

Page 1
Panasonic
Personal Computer
OPERATING INSTRUCTIONS
Model No. CF-E1M
Contents
Getting Started
Read Me First
Names and Functions of Parts
First-time Operation......................................11
Using the Mouse
Operation
Starting Up/Shutting Down............................16
Starting Up
Shutting Down (power off your computer)
Starting Up Your Computer Quickly...........................18
Conserving Power.........................................20
Setting the Sound Volume
DVD-ROM Drive............................................24
Modem
VisuaiBright
Using USB Devices (e.g., FDD. Printer)
Using PC Cards............................................31
Using Audio Devices
Adding Memory
DV Capture
Using Image Files
Setup Utility
..........................................................
.................................................
.......................
...........................................
.................................................................
.................
............................
...................................................
.......
.....................................
.............................................
...................................................
.........................................
...................................................
3
8
15
16
17
22
26
27
28
32
33
36
43
49
Troubleshooting
List of Error Codes........................................51
Dealing With Problems
Troubleshooting Suggestions........................53
Reinstalling Software
Appendix
LIMITED USE LICENSE AGREEMENT........59
For assistance, please calf: 1 -800-211 -PANA (7262)
or send e-mail to :
or visit us at vvww.panasonic.com (U.S.A.)
Please read these instructions carefully before using this product and save this manual for future use.
consumerproducts@panasonic.com * ^
Installing Windows 98 Related Files
Specifications................................................61
LIMITED WARRANTY
.................................
....................................
..................................
.............
52
57
60
62
Page 2

Customer's Record
1
Model No.’'
Serial No.
or
Code No.
Product Key Code’^
Date of Purchase
*' For the Model No., insert the 5 digit number (for example, CF-EIM) located on the right
'' side of the computer.
For Product Key Code, write down the alphanumeric Product Key Code, shown on the
“Certificate of Authenticity” located on the right side of the computer.
Dealer's Name
Dealer's Address
Introduction
Thank you for purchasing the Panasonic computer. Read the operating instructions thoroughly for proper operation of your new
computer.
Illustrations in this Manual
NOTE:
CAUTION:
WARNING:
[Start]-[Shut Down]:
( Enter 1 :
CBrD + CBB :
Some of the illustrations in this manual may differ slightly in shape from the actual items in order to make the explana
tion easier to understand.
NOTE provides a useful fact or helpful information.
CAUTION indicates a condition that may result in minor or moderate injury.
WARNING indicates a hazard that may result in moderate or serious injury.
This illustration means to click [Start], then to click [Shut Down].
(For some applications, you may need to double-cHck.)
This illustration means to press the [Enter] key.
This illustration means to press and hold the [Ctrl] key, then press the [ESC] key.
Where to go for referred infonnation.
Copyright
This manual is copyrighted by Matsushita Electric Industrial Co., Ltd. with all rights reserved. No part of this manual may be
reproduced in any form without the prior written permission of Matsushita Electrie Industrial Co., Ltd.
No patent liability is assumed with respect to the use of the information contained herein.
© 2000 Matsushita Electric Indu.strial Co., Ltd. All Rights Reserved.
Disclaimer
Computer specifications and manuals are subject to change without notice. Matsushita Electric Industrial Co., Ltd. assumes no
liability for damage incurred directly or indirectly from errors, omissions or discrepancies between the computer and the manuals.
Trademarks
Microsoft, MS-DOS and Windows are registered trademarks of Microsoft Corporation of the United States and/or other countries.
Celeron™ is a trademark of Intel Corporation.
Adobe Acrobat and Adobe Premiere are registered trademarks of Adobe Systems Incorporated.
Dolby is a trademark of Dolby Laboratories.
WinDVD^™2000 is a trademark of InterVideo, Inc.
Panasonic is a registered trademark of Matsushita Electric Industrial Co., Ltd.
Page 3

Read Me First
For U.S.A.
Federal Communications Commission Radio Frequency Interference Statement
Note: This equipment has been tested and found to comply with
the limits for a Class B digital device, pursuant to Part 15 of the
FCC Rules. These limits are designed to provide reasonable
protection against harmful interference in a residential
installation. This equipment generates, uses and can radiate radio
frequency energy and, if not installed and used in accordance
with the instructions may cause harmful interference to radio
eommunications. However, there is no guarantee that
interference will not occur in a particular installation. If this
equipment does cause harmful interference to radio or television
reception, which can be determined by turning the equipment
off and on, the user is encouraged to try to correct the interference
by one or more of the following measures:
• Reorient or relocate the receiving antenna.
• Increase the separation between the equipment and receiver.
• Connect the equipment into an outlet on a circuit different
from that to which the receiver is connected.
• Consult the Panasonic Service Center or an experienced radio/TV technician for help.
Warning
To assure continued compliance, use only shielded interface
cables when connecting to a computer or peripheral. Also, any
changes or modifications not expressly approved by the party
responsible for compliance could void the user’s authority to
operate this equipment.
This device complies with Part 15 of the FCC Rules. Operation
is subject to the following two conditions:
(1) This device may not cause harmful interference, and
(2) This device must accept any interference received, including
interference that may cause undesired operation.
Responsible Party:
Panasonic Consumer Electronics Company
Division of Matsushita Electric Corporation of America
One Panasonic Way
Secaucus, NJ 07094
Tel No: 1-800-272-7033
FCC Regulation Notice for modem
1. This equipment complies with Part 68 of the FCC mlcs. On the
computer is a label that contains, among other information, the
FCC registration number and ringer equivalence number
(REN)for this equipment. If required, this information must be
provided to the telephone company.
2. An FCC compliant telephone cord and modular plug is provided
with this equipment This equipment is designed to be connected
to the telephone network or premises wiring using a compatible
modular jack which is Part 68 compliant. See Installation Instmetions for details.
3. The REN is used to determine the quantity of devices which may
be connected to the telephone line. Excessive RENs on the tele
phone line may result in the devices not ringing in response to an
incoming call. In most, but not all area, the sum of RENs should
not exceed five (5.0). To be certain of the number of devices that
may be connected to a line, as determined by the total RENs, con
tact the local telephone company.
4. If your telephone equipment cause harm to the telephone network,
the telephone company will notify you in advice that temporary
discontinuance of service may be required. But if advice notice isn’t
practical, the telephone company will notify the customer as soon as
possible. Also, you will be advised of your right to file a complaint
with the FCC if you believe it is necessary.
5. The telephone company may take changes in it’s facilities, equip
ment, operations or procedures that could affect the operation of
the equipment. If this happens the telephone company will pro
vide advance notice in order for you to make necessary modifi
cations to maintain uninterrupted service.
6. If trouble is experienced with this equipment, for repair or war
ranty information, please contact Matsushita Electric
Corporation of America, toll fixx: at 1-800-272-7033. Ifthe equip
ment is causing harm to the telephone network, the telephone
company may request that you disconnect the equipment until
the problem is resolved.
7. There arc no user serviceable parts contained in this equipment
8. This equipment may not be used on coin service provided by the
telephone eompany. Connection to party lines is subject to state
tariffs.
9. The Telephone Consumer Protection Act of 1991 makes it unlaw'ful
for any person to use a computer or other electronic device to send
any mess^e via a telephone fax machine unless sueh message clearly
contains in a margin at the top or bottom of each transmitted page or
on the first page of the transmission, the date and time it is sent and an
identification of the business or other entry, or other individual send
ing the message and the telephone number of the sending machine
or such business, other entity, or individual. In order to program this
information into your fax software, you should refer to the manual of
the Fax software being used.
10. According to the FCCs electrical safety advisory, we recom
mend that you may install an AC surge arrestor in the AC outlet
to which this equipment is connected. Telephone companies re
port that electrical surges, typically lighming transients, are very
destructive to customer tcnninal equipment connected to AC
power sources and that this is a major nationwide problem.
“Caution : To reduce the risk ot'tlrc, use only No.26 AWG or larger telecommunica
tion line cord."
“ATTENTION : Pour réduire le risque d’incendie, utiliser uniquement de.s conducteurs
de telecommunications 26 AWG ou de .section supérieure."
Page 4
Read Me First
Important Safety Instructions
When using your telephone equipment, basic safety precautions should always be followed
to reduce the risk of fire, electric shock and injury to persons, including the following:
1. Do not use this product near water, for example, near a bath tub, wash bowl, kitchen sink or
laundry tub, in a wet basement or near a swimming pool.
2. Avoid using a telephone (other than a cordless type) during an electrical storm. There may
be a remote risk of eiectrie shock from lightning.
3. Do not use the telephone to report a gas leak in the vicinity of the leak,
4. Use only the power cord and batteries indicated in this manual. Do not dispose of batteries
in a fire. They may explode. Check with local codes for possible special dispose instruc
tions.
SAVE THESE INSTRUCTIONS
Lithium Battery
Lithium Battery!
This computer contains a lithium battery to enable the date, time, and other data to be stored.
The battery should only be exchanged by authorized service personnel.
Warning! A risk of explosion from incorrect installation or misapplication can possibly occur.
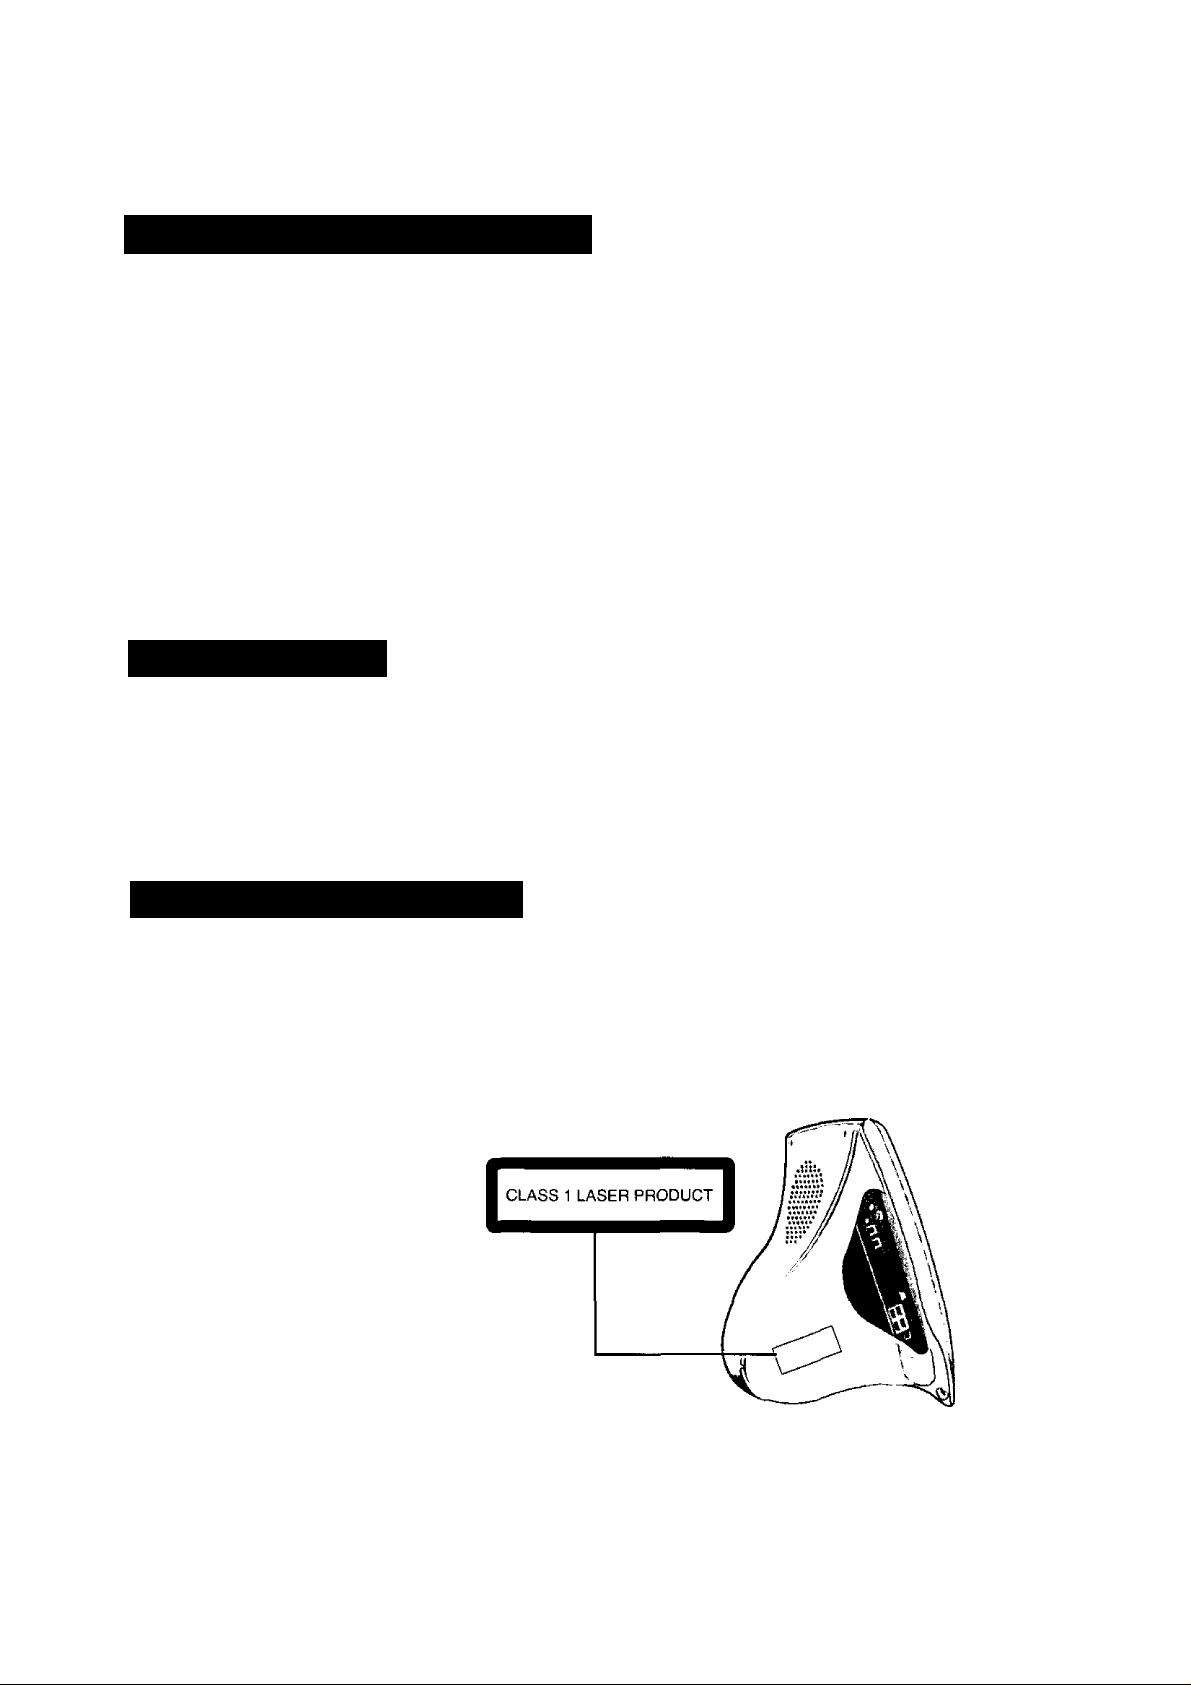
DVD-ROM Drive Caution
CAUTION!
THIS PRODUCT UTILIZES A LASER.
USE OF CONTROLS, ADJUSTMENTS OR PERFORMANCE OF PROCEDURES OTHER THAN
THOSE SPECIFIED HEREIN MAY RESULT IN HAZARDOUS RADIATION EXPOSURE.
DO NOT OPEN COVERS AND DO NOT REPAIR YOURSELF.
REFER SERVICING TO QUALIFIED PERSONNEL
Page 5

Precautions
Usage
Avoid Extreme Heat and Cold
Do not store or use the computer in locations exposed to heat, direct sunlight, or
extreme cold.
Avoid moving the computer between locations with large temperature differences.
Operation: 5 "C to 35 "C {41 “F to 95 "F}
Storage: -20 "C to 60 ”C {-4 °F to 140 "F}
Avoid Direct Sunlight on the LCD Display
The LCD display should not be exposed to direct sunlight or ultraviolet light.
Avoid Humidity, Liquids, and Dust
Do not store or use the computer in locations exposed to high humidity, liquids
(including rain) or dust.
Prevent Shock
Avoid subjecting the computer to severe vibrations or impact. Do not place the
computer inside a car trunk.
Avoid Radio Frequency Interference
Do not place the computer near a television or radio receiver.
Handling
Avoid Magnetic Fields
Keep the computer away from magnets.
Avoid Stacking
Do not place heavy objects on top of the computer.
Keep Small Objects Away
Do not insert paper clips or other small objects into the computer.
About the Display
The display is weak against force or vibration and can easily break, so take the
necessary precautions when setting or moving the display.
When moving the computer
When moving the computer, position yourself in front of the computer and get a
firm grip of the base to move the computer. Do not grab the periphery of the
display or carry the computer by the stand.
Page 6

Read Me First
Saving Data on the Hard Disk
Do not expose your computer to shock.
Use care when handling your computer, shock may damage your hard disk or make your
software applications and data unusable.
Do not power off your computer while software applications are running or HDD
indicator (^) is on.
Properly shut Windows down to avoid problems ([Start] - [Shut Down] ).
Save all valuable data to floppy disks.
Backing up data to floppy disks will limit damage should trouble occur to your computer or
should you inadvertently change or erase data.
Use the security function for all important data. (O’ page 50)
Saving Data on Floppy Disks
Do not pow er off your computer or press the floppy disk drive eject button while the
indicator is on.
Doing so may damage the data on the floppy disk and render the disk useless.
Use care when handling floppy disks.
To protect the data on your floppy disks or to prevent a floppy disk from becoming stuck in
your computer, avoid the following:
• Sliding the shutter on the floppy disk manually.
• Exposing the disk to a magnetic field.
• Storing the disk in locations prone to high temperatures, low pitched noise, dampness, or dust.
• Applying more than one label on the disk.
Confirm the contents of a floppy disk before formatting it.
Confirm that no important data is on the disk, because all data on the disk will be erased.
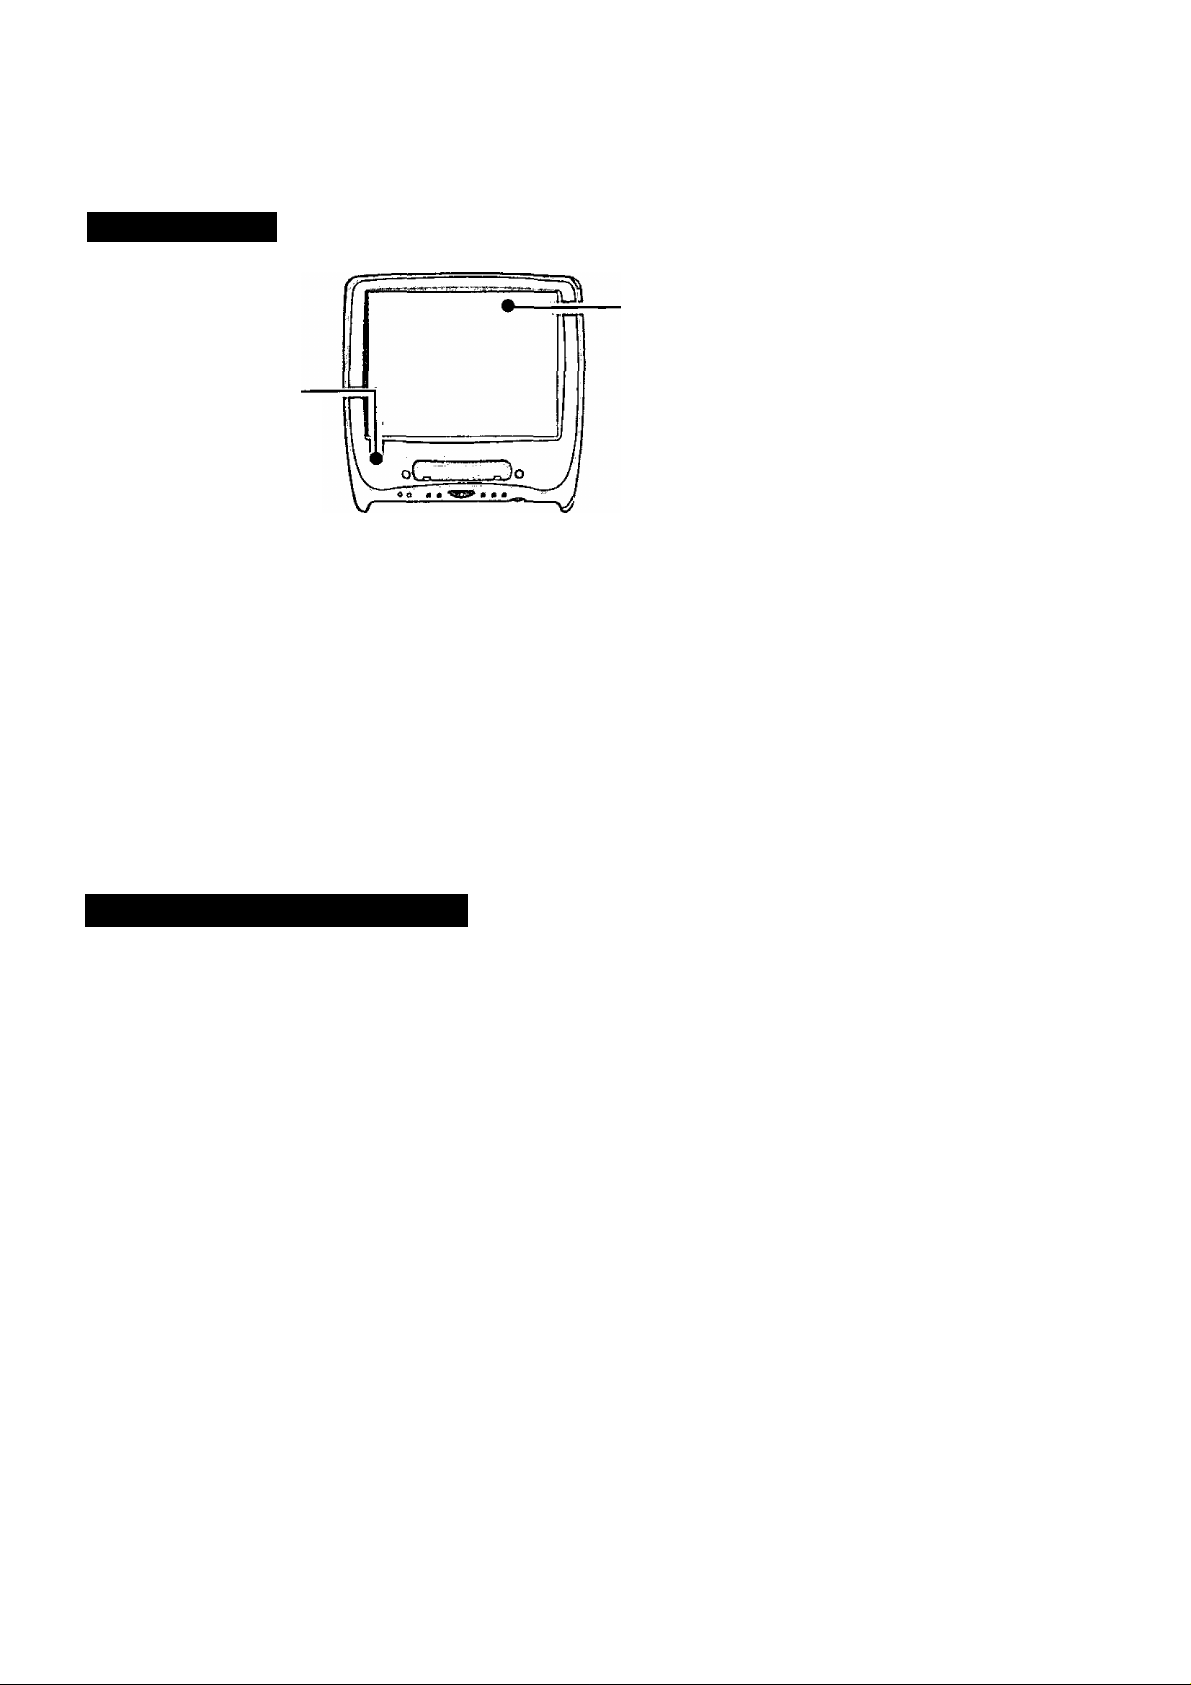
Use the write-protect tab.
This is a must for preserving im
portant data. This prevents your
data from being erased or overwrit
ten.
Write Enable
Write-protect Tab ^
Write Disable
Computer Viruses
• Users are advised to purchase the latest versions of virus protection software and use
them regularly.
We recommend you run the software:
• When booting your computer.
• After receiving data.
We recommend that you check data received on floppy disks or from external sources,
such as data downloaded from the Internet, e-mail, etc, (For compressed files, please
uncompress them before running a check).
Restrictions when starting a program in the MS-DOS mode
The MS-DOS mode has the following restrictions.
• The floppy disk drive cannot be used.
• The system may freeze when a large amount of characters are input from the keyboard at
one time.
Page 7
Maintenance
Areas Excluding the Display
Wipe these areas with a soft
cloth, after applying water
or detergent diluted with
water to the soft cloth and
firmly wringing out excess
water.
LCD Display
Avoid using water when cleaning the panel. Ingredients
included in water may leave residue and reduce readability
of the screen.
<When cleaning dust/dirt>
Avoid rubbing off dust/dirt with a cloth since it may
scratch the screen.
Sweep dust/dirt with fine brush, then wipe it with “dry”
soft cloth used for cleaning glasses.
<When cleaning oily surface>
Apply camera lens cleaner on a soft gauze and clean it
with gentle force. Then, wipe with a dry soft cloth used
for cleaning glasses.
r
Do not use benzene, thinner, or rubbing alcohol. Doing so may adversely affect the
surface, c.g., discoloration. In addition, do not use commcrcially-available cleaners
and cosmetics, as they may contain components hannful to the surface.
Do not directly add or spray water or detergent. If liquid enters the inside of the com
puter, it may cause it to work improperly or be damaged.
About System File Checker
Microsoft Corporation has announced that, with a computer in which Internet Explorer 5.01 is
installed, if the [System File Checker] in [System Information] is executed, the following may
occur.
• The message [System File Checker identified that the following file may be corrupted] may
appear for a normal file.
• In such cases, there is the possibility that the system will become unstable if the file is re
paired with the System File Checker.
In this computer, since Internet Explorer 5.01 is the default browser, we recommend not using
the System File Checker.
Page 8
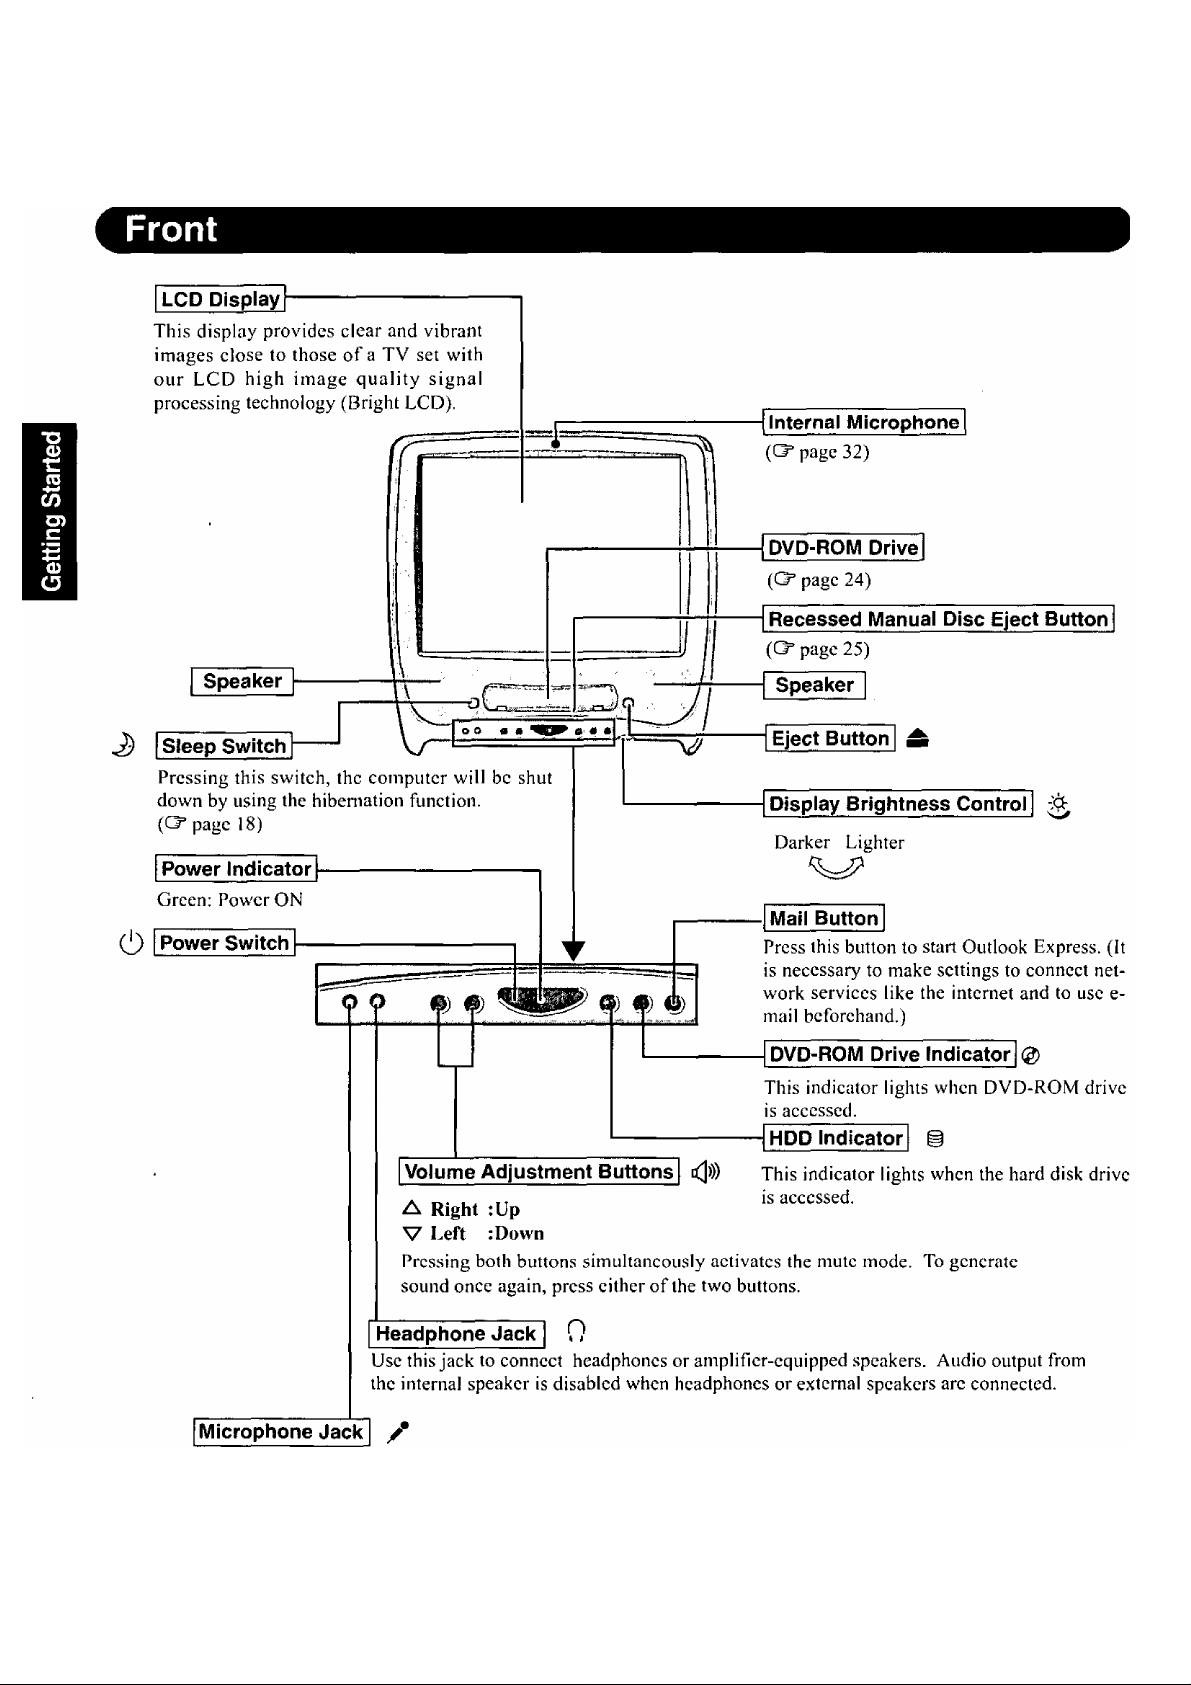
Names and Functions of Parts
Use this jack to connect a monaural condenser microphone (miniature jack).
8
Page 9
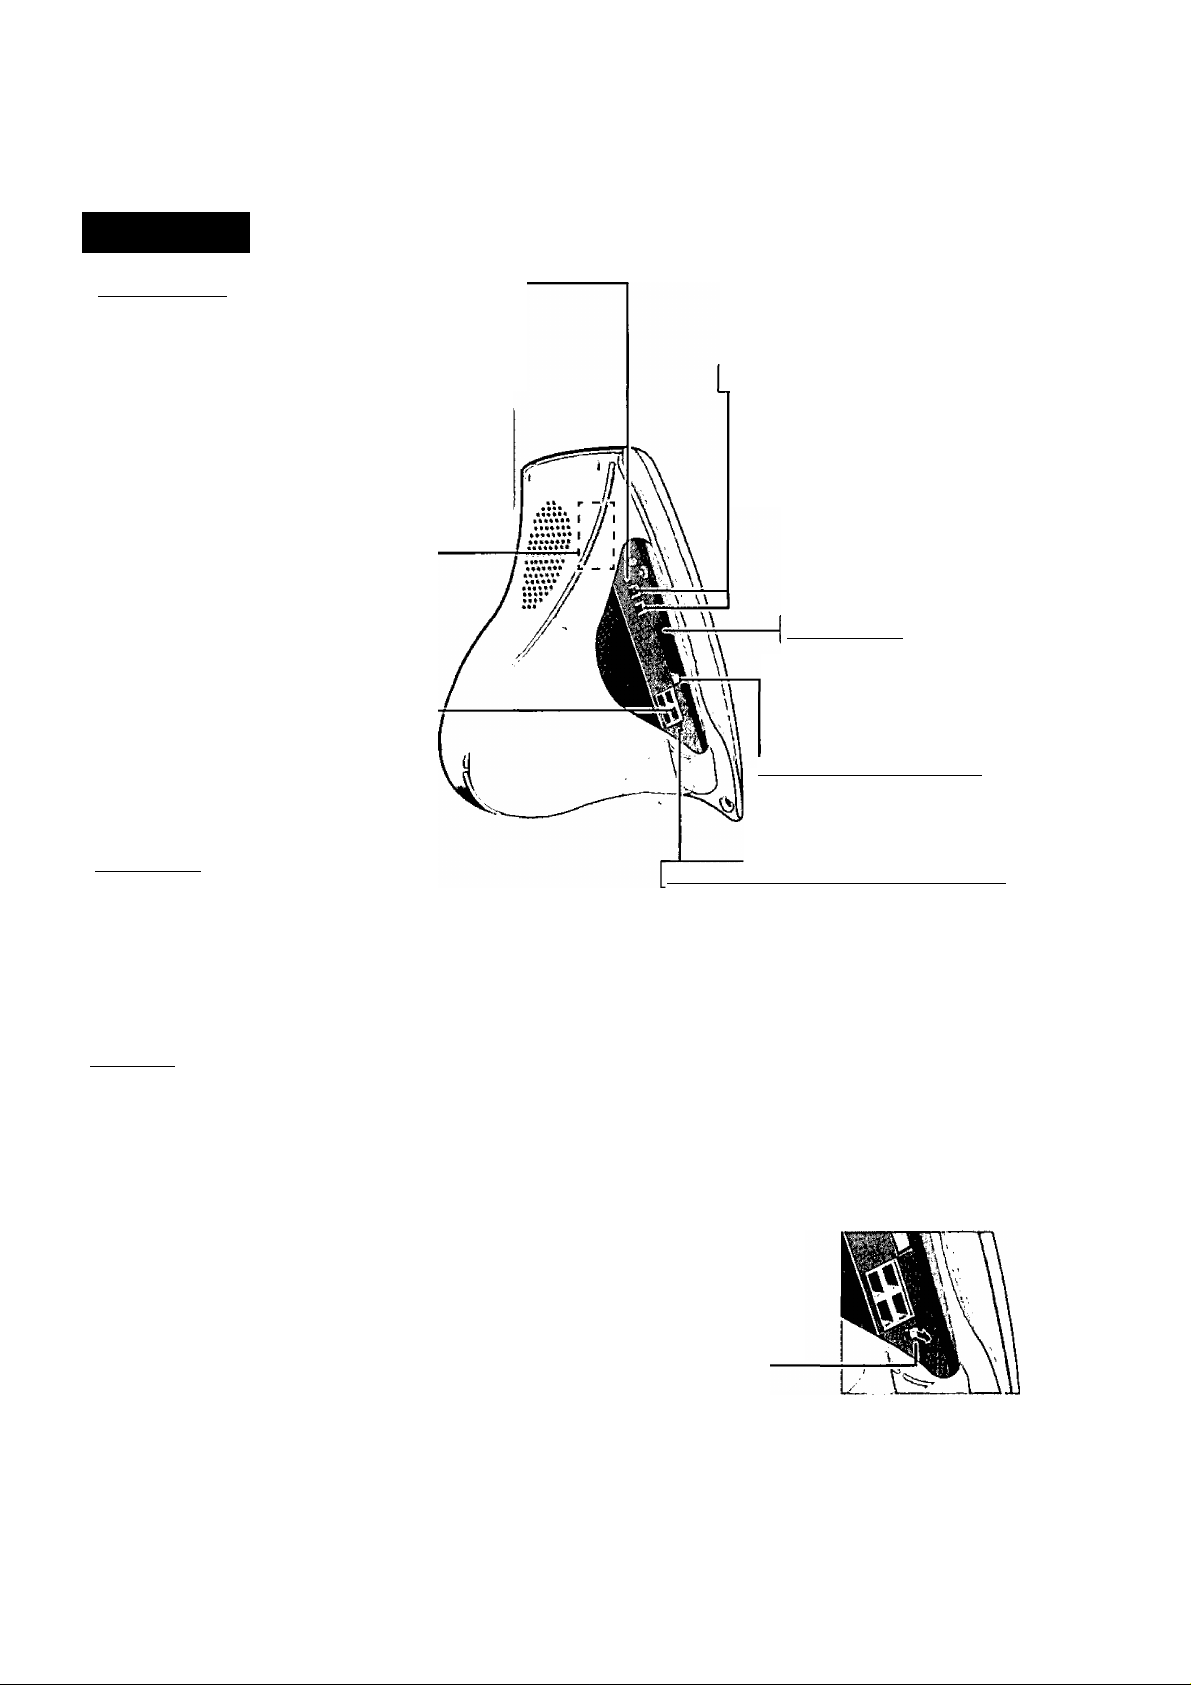
Left Side
Reset Button | ^
When resetting your computer, use a dull pointed ob
ject. Do not use a pencil. Pencil lead can break off
inside and damage the computer.
r
If a problem occurs but your computer does not
lock, we recommend not pressing the reset button.
It will cause you to lose data if an application is
open.
RAM Module Slot
(Cr page 33)
IEEE1394 Interface Connectors
Connect to devices under the IEEE 1394
standards, such as a DV deck or digital video
camcorder.
PC Card Slot
Use the PC Cards that conform
to the PC Card Standard.
(C^ page 31)
*— PC Card Eject Button
(C^ page 31)
\S400
USB Ports I
Connect to various peripheral devices (c.g., printers and a floppy
disk drive) that arc USB compatible even with the computer on
(O’ page 28). It may be necessary to install a driver program for
a USB device; the driver program will be included with the de
vice. Be sure to read the instructions manual provided with the
USB device.
Optical Digital Audio Output Terminal
Outputs to a player such as an MD deck with an opti
cal input terminal, without any noticeable degrada
tion in the digital sound quality of CDs and DVD.
(Cr page 32)
Anote>
Driver programs do not need to be installed for the mouse, keyboard and floppy disk
drive provided with this computer.
note)-
Removing the dust protection cap for the Optical Digital Audio Output Terminal
After removing the dust protection cap, store the removed cap in safe place. When
the terminal is not being used, be sure that the cap is covering the terminal.
Dust Protection Cap
Page 10
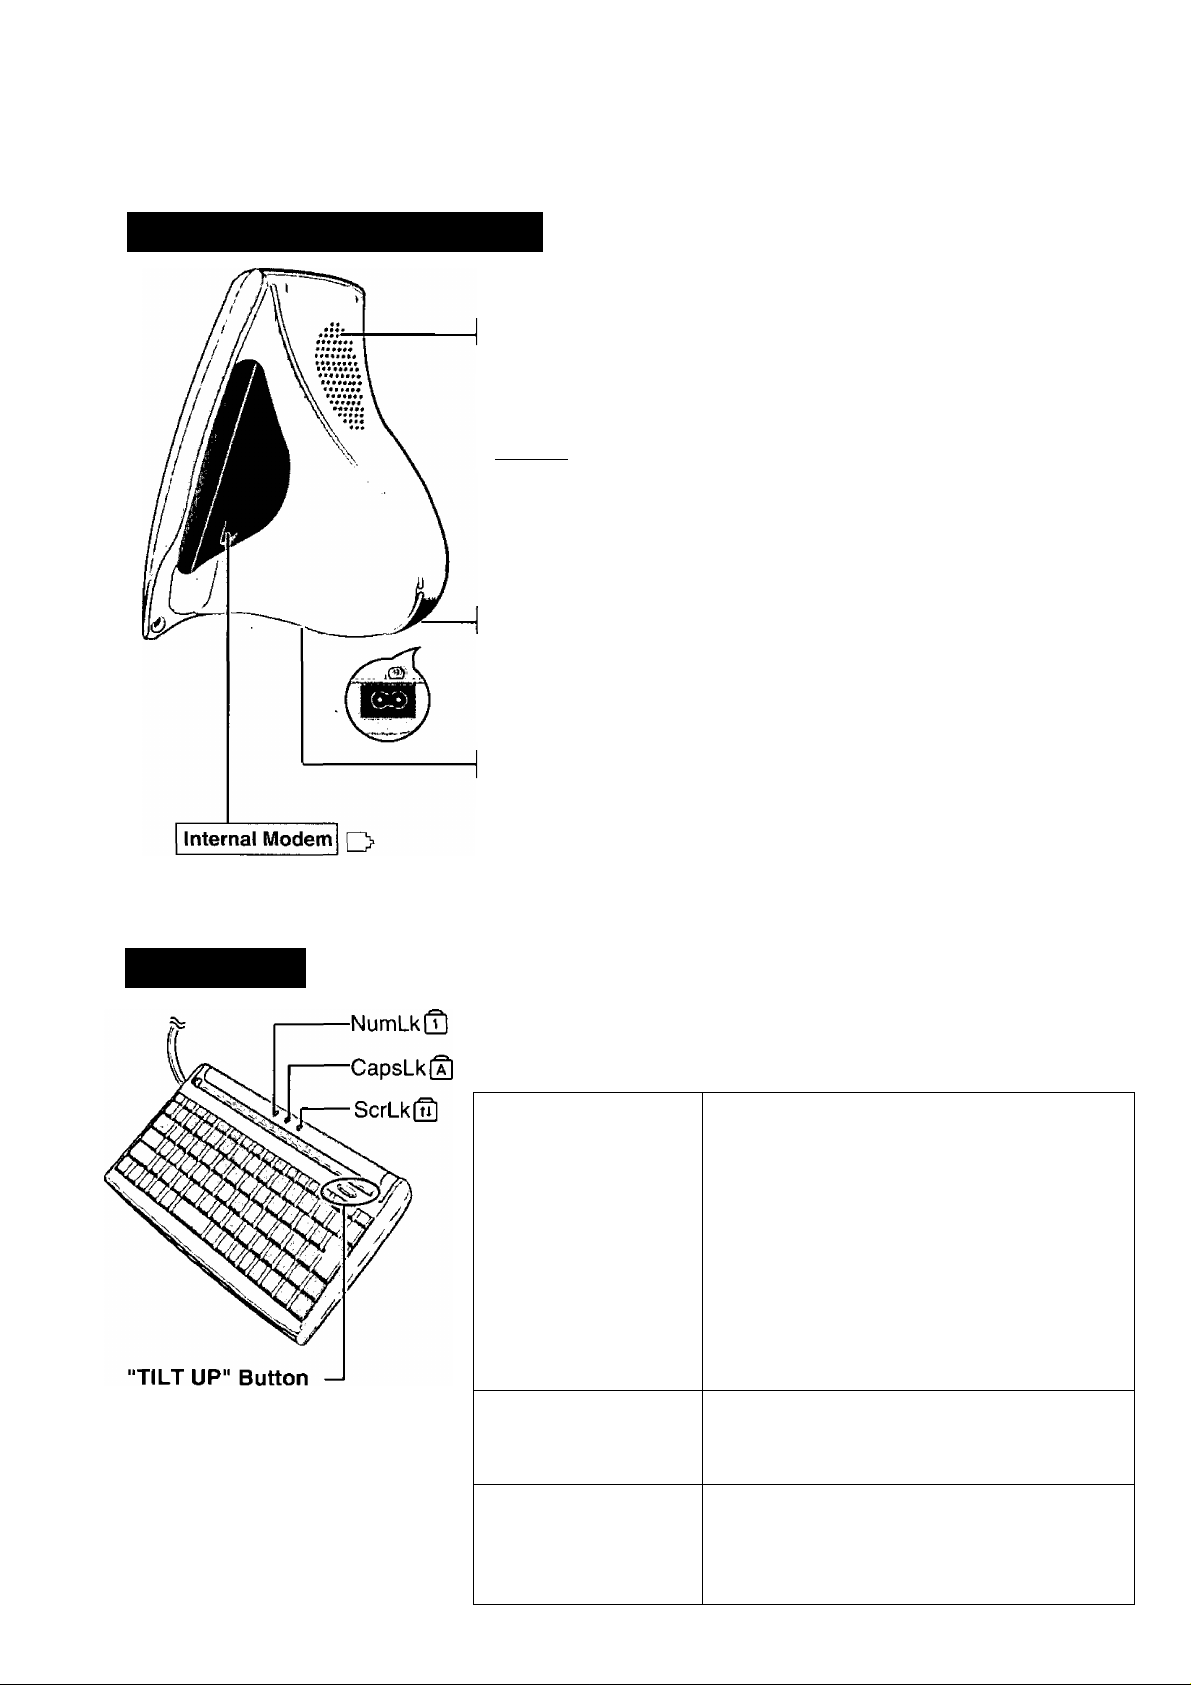
Names and Functions of Parts
Right/Rear/Bottom Side
Ventilation Hole
These holes allow heat to exit.
Do not block or place the computer in a location that may prevent proper
ventilation.
Power Terminal Connector
Connects to the AC cord provided with the computer.
Before using the computer for the first time, carefully read the [LIMITED USE
LICENSE AGREEMENT](C^ page 59). If you agree to the conditions, remove
the seal.
___________________________________________________________________
Connects to a telephone outlet with
the included modem telephone
cable.
Keyboard
Stand (Located at the bottom)
By placing the display on the stand, two types of angle settings can be made.
NumLk (Numeric key)
This indicator liuhts ereen when ( NumLk ) is
pressed. This causes a portion of the keyboard to
function as a numeric keypad. The Numeric key
functions differently depending on the application.
To switch it OFF, Dress( NumLk ) atiain.
HpDloI (NumLk5
iffliran ~]r ETHMIEI)
OOOy
U ny y yy
10
Pressing this button, the stand
can be rotated and the key
board ean be raised.
Caps Lock
SerLk (Scroll lock)
This indicator liehts ereen whent Caos Lock ) is
pressed. Subsequent non-shifted input is capitalized. To switch it OFF, oresst Caos Lock )aeain.
This indicator liehts ereen whcn( ScrLk ) is
pressed. Scroll lock functions differently depend
ing on the application. To switch it OFF, press
( ScrLk )aeain.
Page 11
First-time Operation
Read the steps below to help you Icam what parts are included, and to gain an understand
ing of some basic computer-related operations.
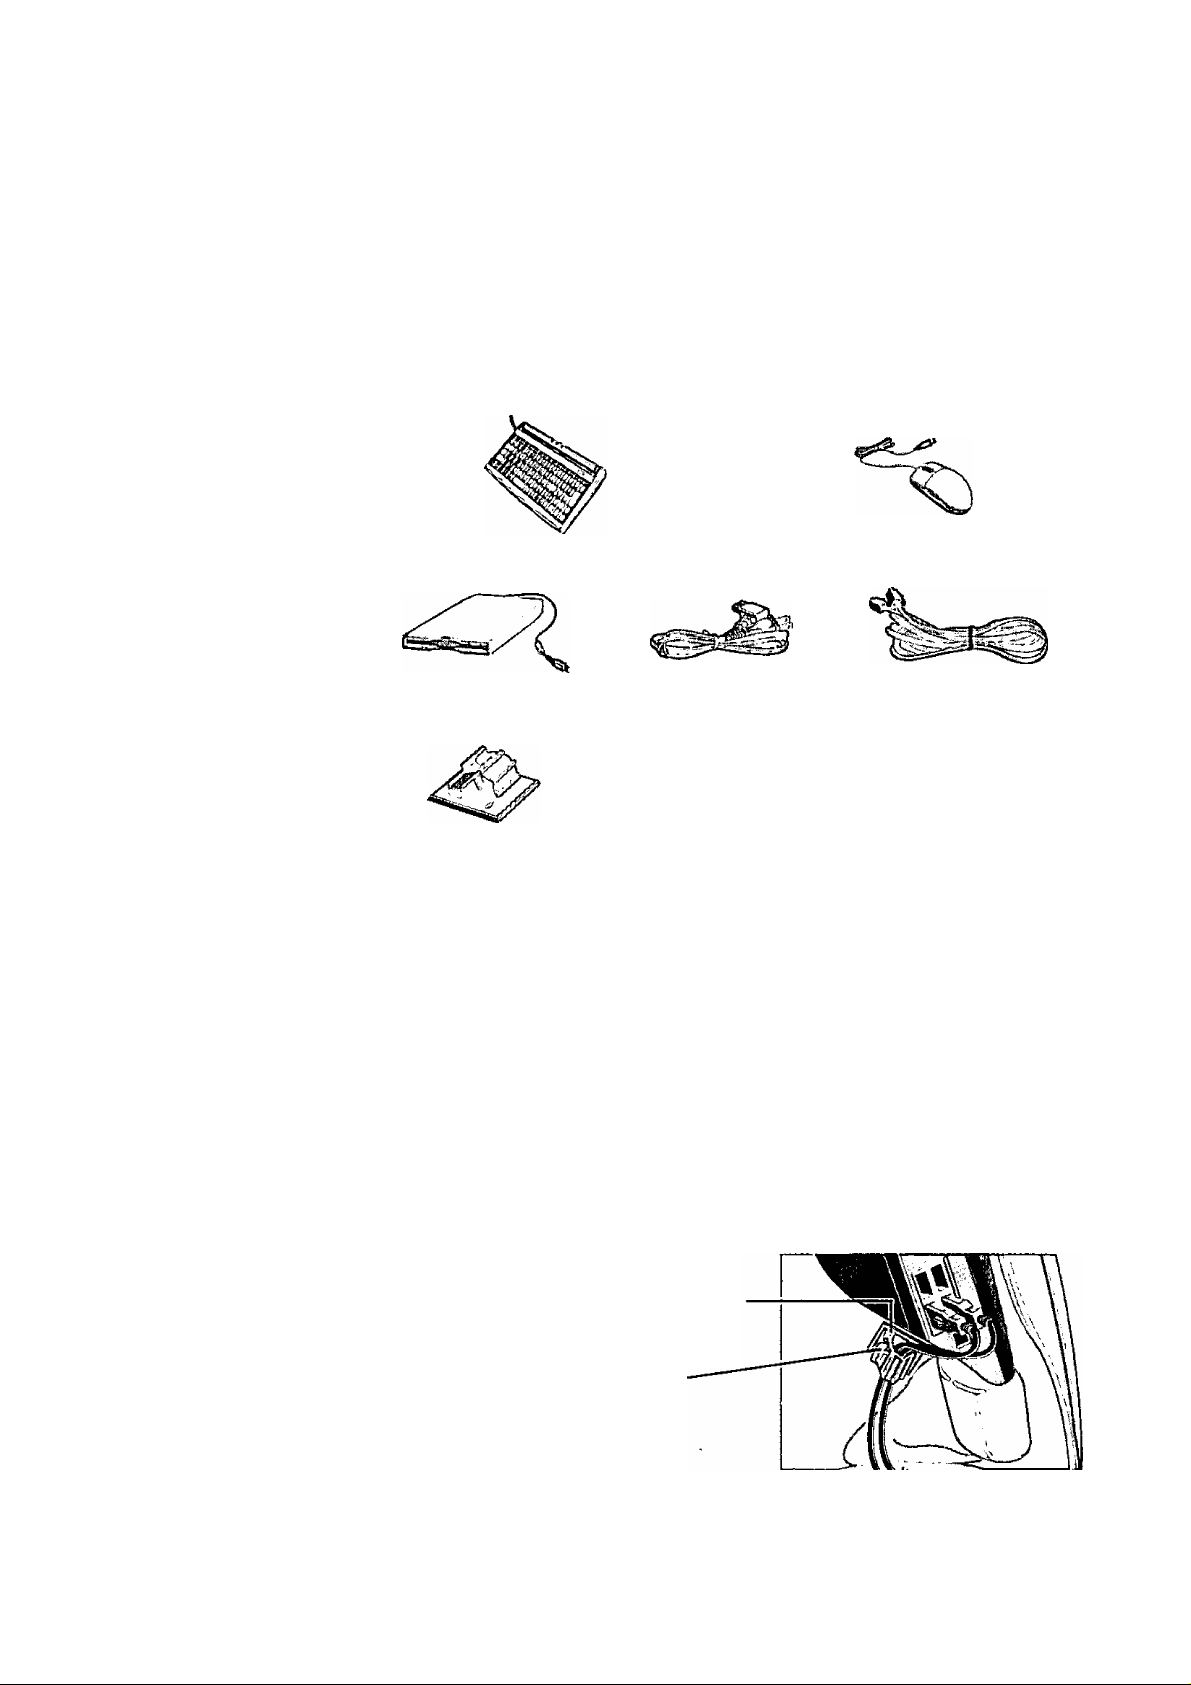
1 Confirm the inclusion of all parts
Make sure the parts shown in the figure have been supplied. If any of these items are
missing or is not working properly, contact Panasonic at I-800-272-7033.
r
Keyboard
Floppy Disk Drive .... 1
Clamper
Product Recovery CD-ROM
1
AC Cord
Eject Pin
Mouse 1
......................
O
.........
1 Windows® Book
Modem Telephone CaUe.. 1
1
Operating
Instructions
.................
1
WinDVD™2000 CD-ROM Sheet ForWinDVD™2000
How to use the clamper
You can choose to bundle the connection cables.
(T) Set the clamper at the position shown in
the figure and put the cables in the
clamper.
@ Mount this part into the groove.
Use care in maintaining the items included with your computer
Handle the Product Recovery CD-ROM with care. You may need to use this
CD-ROM if reinstallation becomes necessary.
11
Page 12
First-time Operation
Write Down the Product Key Code
The Product Key Code is necessary to perform the setup procedure for Win
dows (C? page 14) after reinstallation (O’ page 57). Write down the alpha
numeric Product Key Code shown on the “Certificate of Authenticity” lo
cated on the right side of the computer in the “Customer’s Record” section
(CO page 2),
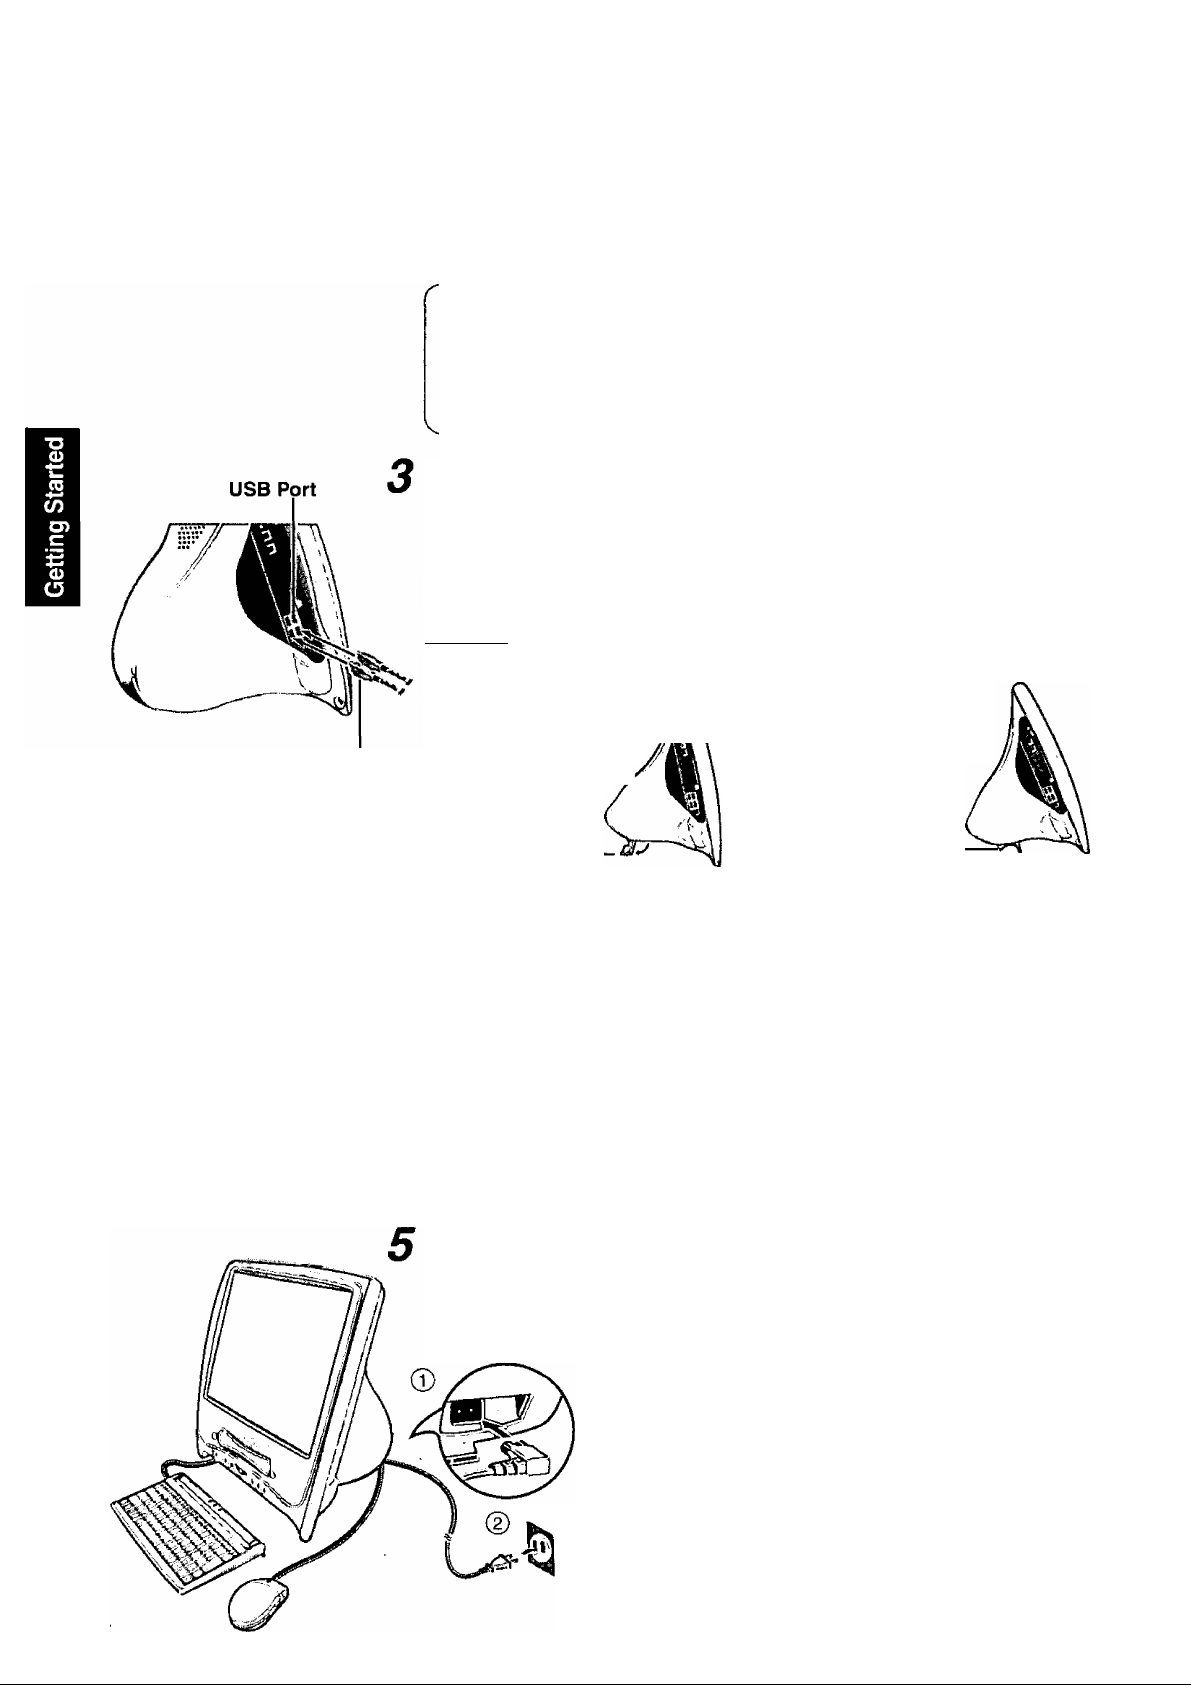
Connect the keyboard and mouse to the USB ports.
The keyboard and mouse can each be connected to any one of the four ports.
USB compliant devices such as a floppy disk drive and printer can be connected to the
remaining two ports (CO page 28).
Xnote>
Two Ways of Positioning the Computer (Display)
• When using the stand A \ # When not using the stand
Completely set in place /A \ display is slightly tilted
Be sure the mark is facing to
wards the back of the computer.
(open)
Completely set in place
(closed)
Set the stand after powering OFF. Do not use the computer if the stand has not
been set in place completely.
--------------------------------------------------------------------
When connecting peripherals other than the keyboard and mouse, connect them
after completing the setup procedure on page 14.
Read the LIMITED USE LICENSE AGREEMENT (o- page 59)
Before removing the seal covering the power terminal connector, read the LIMITED
USE LICENSE AGREEMENT, Removal of this seal indicates agreement to the terms
specified.
Connect the AC cord
Power Terminal Connector
^
12
AC120 V
Page 13
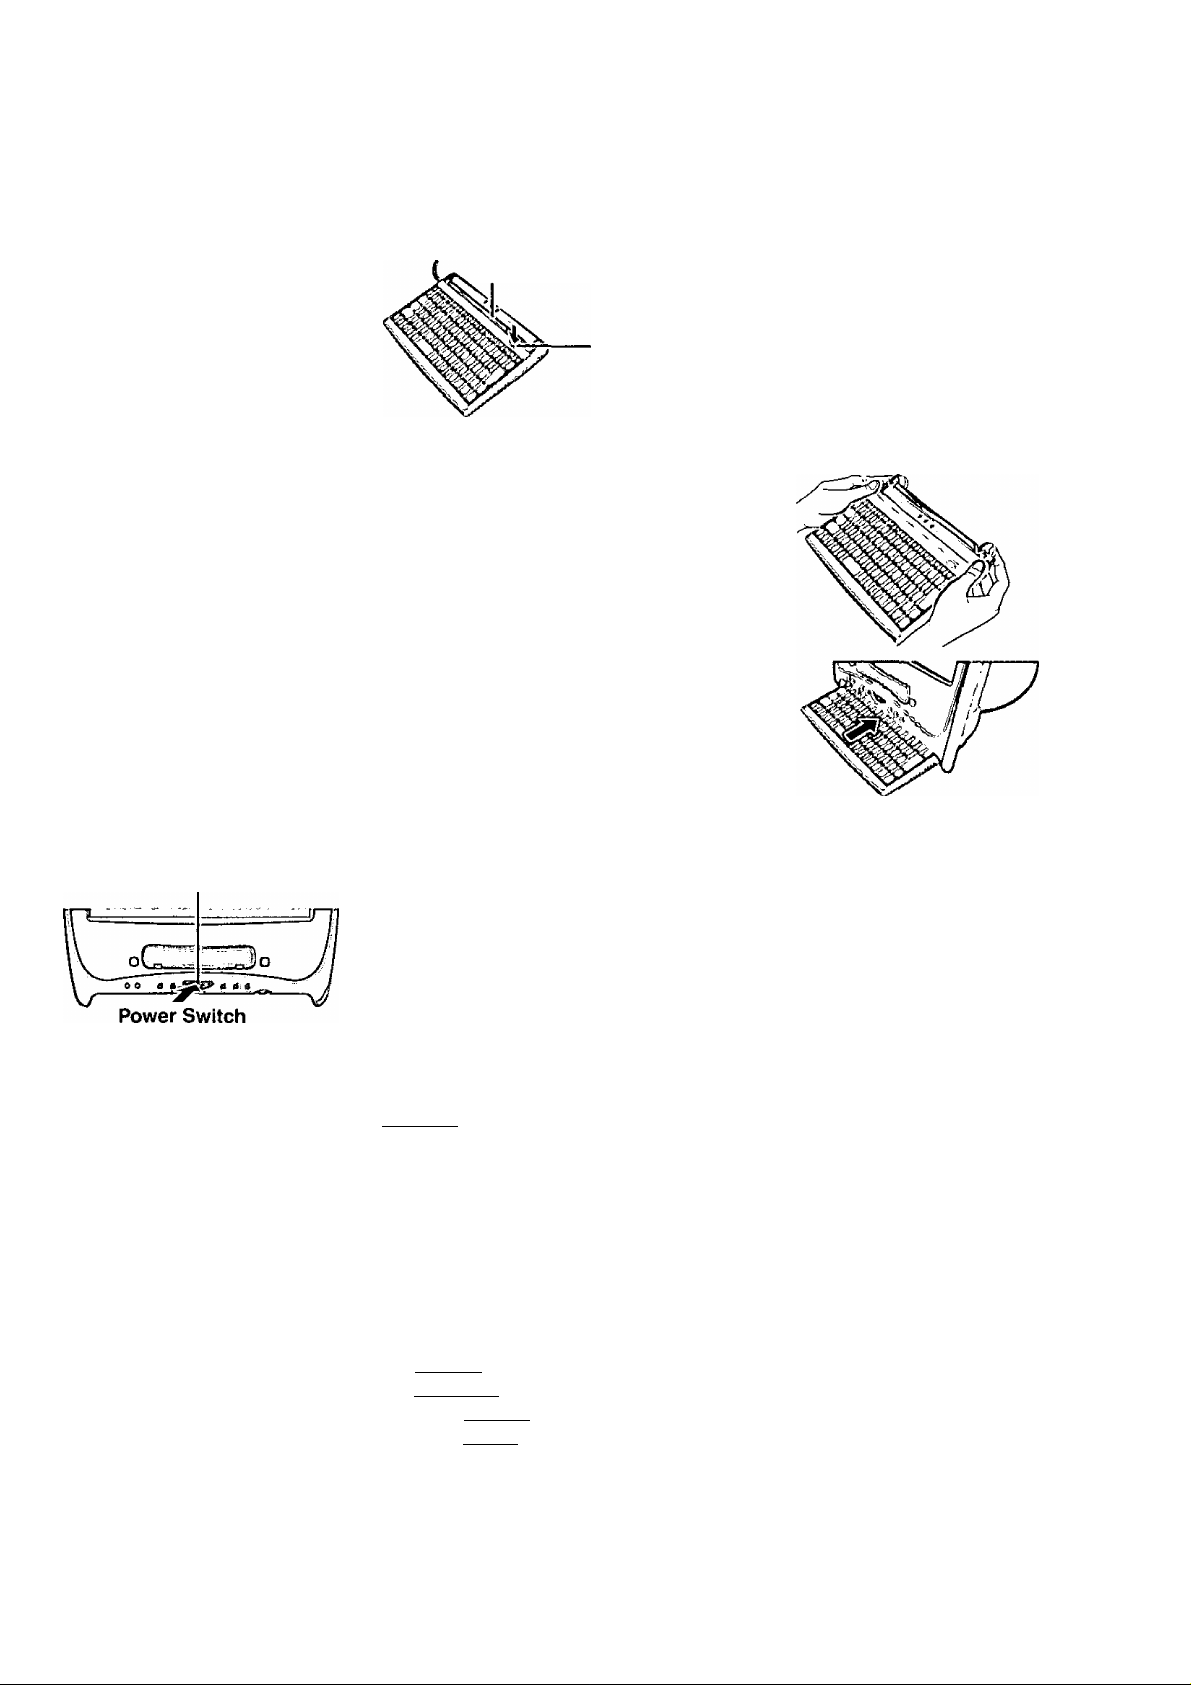
Set the stand for the keyboard
Stand
When the ‘TILT UP” button is pressed, the stand can be
rotated and the keyboard can be raised.
^NOTE>
When the keyboard is not in use
(T) Hold both ends of the keyboard and ro
tate the stand to its original position.
@ Slide the keyboard under the computer.
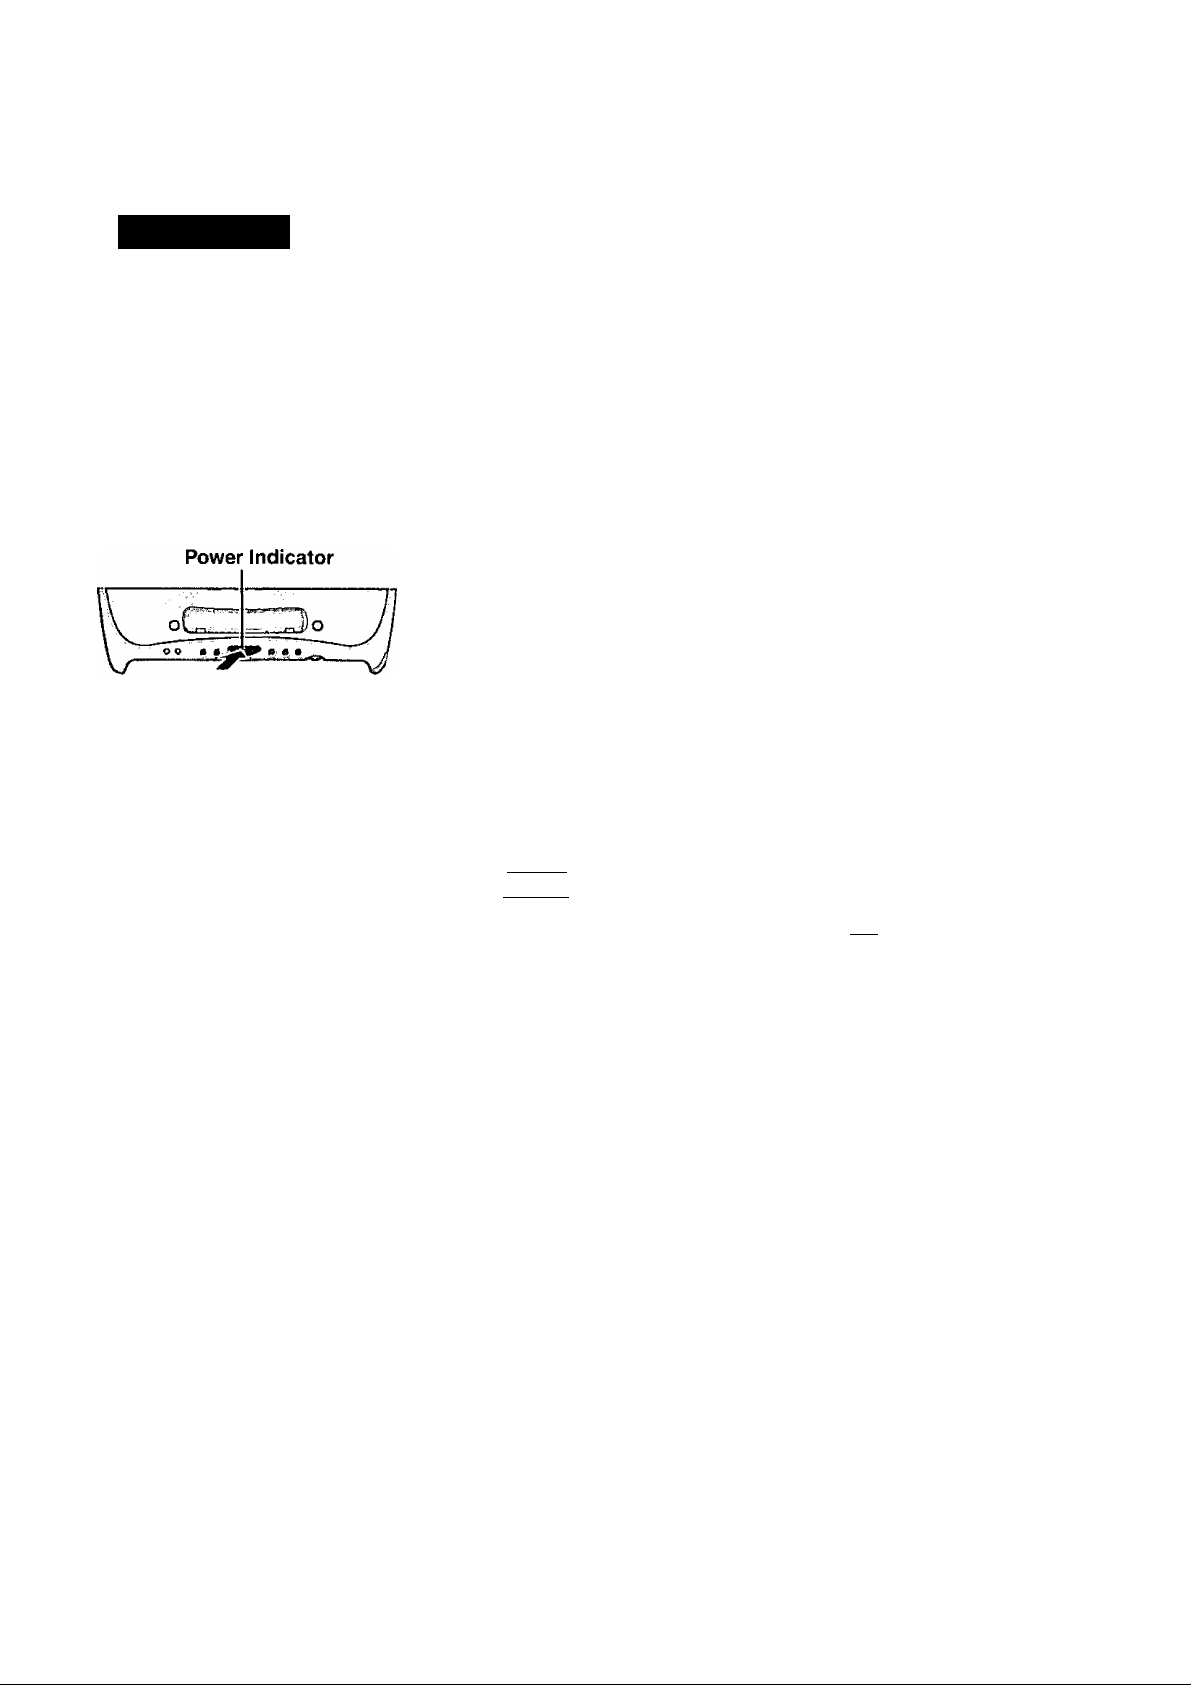
Power Indicator
Turn your computer on
Press the power switch and hold it for approximately one second until the power indicator
(O) turns on before releasing it.
r
After confirming that the power indicator has turned on, do not touch the power switch
until Windows setup has started.
-J
Tnote)-
When the display becomes black (i.e., goes OFF) during operation
The power management function is set at the factory, and therefore, if the computer
is not used for about 15 minutes, it automatically darkens the display of the screen
and controls the consumption of power. If either a key is pressed or the mouse is
moved, the original screen will reappear. Do not leave your computer during the
setup procedure to prevent accidents such as another person pulling out the AC
cord.
If you leave the computer, the power to the LCD may be turned off while Windows
is setting up or even when an application software is being installed. In this case,
because it is conceivable that a selection dialog box will be shown, do not press the
( Enter ] key to attempt to resume from this condition as doing so may trigger a
selection, but instead, press a key unrelated to the direct triggering of a selection,
like theC Ctrl )kev.
13
Page 14

First-time Operation
8 Setup Windows 98
(T) Select settings for your region and your keyboard layout, then press [Next],
(for U.S.A.: United States 101)
^note>
Moving the cursor (i^) or clicking buttons can be performed with the mouse.
(G=page 15)
If you accidentally click [Next| and continue on to the next screen
Simply set the arrow on [Return] and click on the mouse. You will return to the
previous screen.
@ Enter your name, then press [Next].
Select [Skip] at the [Using Your Modem to Connect].
(4) Select [Yes] at the [Cancel Dialing], then press [Next].
The License Agreement will be displayed.
(5) After reading the agreement, select [1 accept this agreement] or [1 do not accept the
agreement], then press [Next].
If [1 do not accept the agreement] is selected, the Windows setup will be aborted.
<During the setup procedure for reinstalling onIy>
After accepting the agreement, the [Windows Product Key Code] is displayed.
Input the Product Key Code written down in the "Customer's Record" section, then
press [Next]. (Q^page 12 step 2)
(§) Press [Finish].
® Input the correct date, time and time zone and press [Close].
You can also complete these settings at a later time.
Q Computer power off
Please refer to page 17 for powering off the computer.
14
Page 15

Using the Mouse
Use the mouse to move the cursor on the display and perform normal computer operations.
Basic Operation
Function
Moving the Cursor
When you lightly grasp the mouse and move (i.e., slide)
it, the arrow on the screen will move together with the
movement of the mouse. If there is no longer any space
for moving the mouse, lift the
mouse and set it at a suitable lo
cation, and then continue mov
ing the mouse.
Clicking
To select an item, etc.
Double-Clicking
To execute an item, etc.
Dragging
To move item.
To draw lines with a Paint, etc.
Hold down on
the left button
while moving
the mouse on a
surface
How to advance (scroll button) ^
Operation
When reading a large document like a home page, it is possible for you to read hidden parts
out of the screen (i.e., scroll), and magnify or reduce the display.
Xnote>
The scroll function may not work depending on the software application.
The scroll function works when the scroll bar is displayed.
Function
Scroll
Scroll a document up and
down.
Auto-scroll
Scroll a document up and
down or left and right.
Zoom
Magnify or reduce the dis
play of a document.
Slide the scroll button forward or Scroll Button
backward.
(Maintaining the sliding enables continuous scrolling.) I
(T) Click the scroll button, and
(2) Move the mouse. \
Scrolling is performed at the
speed of the mouse.
• To cancel the auto scroll function, move the arrow to
a blank area on the screen and click the scroll button.
Slide the scroll button forward (i.e., zoom
in) or backward (i.e., zoom out) while
pressinti down on t Ctrl \ 1.
Operation
15
Page 16
Starting Up/Shutting Down
Starting Up
Here, an explanation is given on how to turn the computer on after completing the setup proce
dure of Windows. If peripherals like a printer arc connected, there is an order to follow to turn
the power on. (Windows setup O’ page 14)
When peripheral devices (e.g., Printer) are connected, turn on the power of each of these devices first
About peripheral devices, be sure to read the instructions manual provided with each of
the peripheral devices.
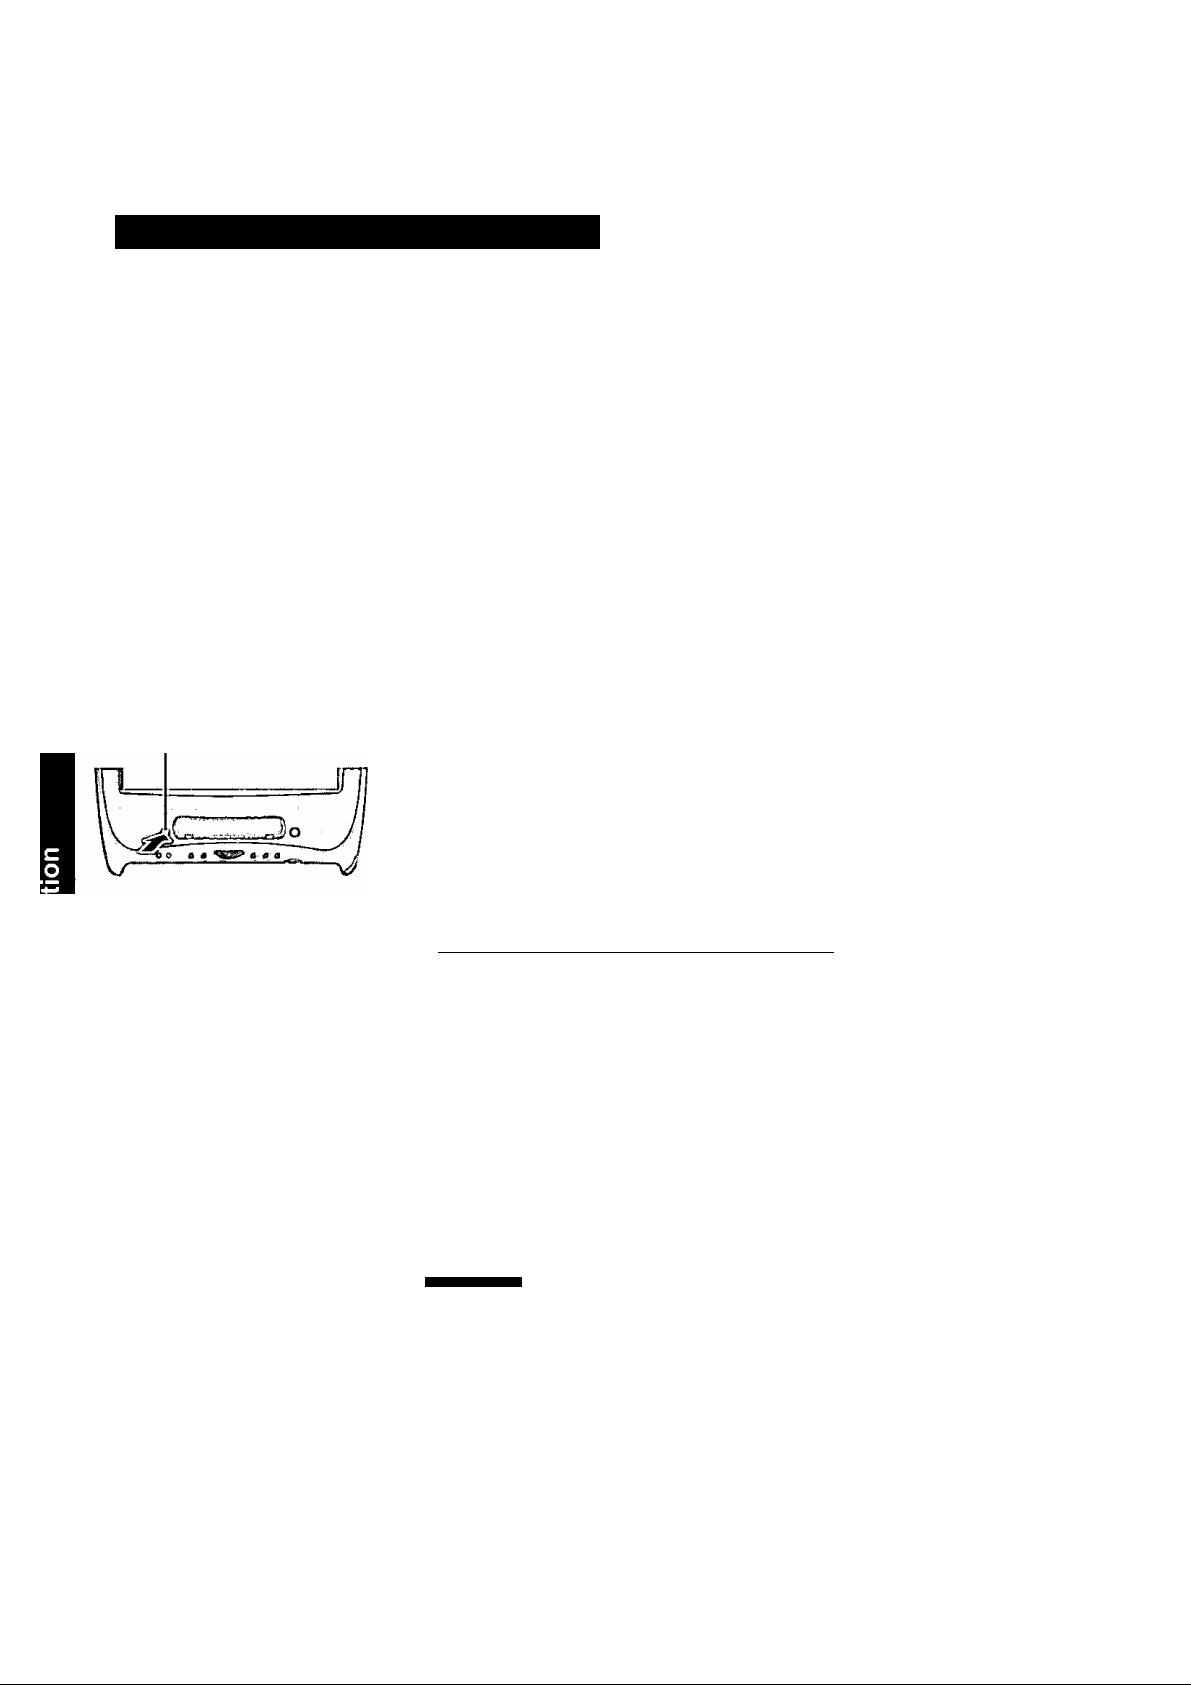
Turn your computer on
Press the power switch and hold it for approximately one second until the power indicator
turns on before releasing it.
r
Power Switch
After confirming that the power indicator has turned on, avoid the following until
Windows has completed loading.
• Touching the power switch.
• Performing any keyboard or mouse operations.
If the message "Enter your Password" is displayed,
you must first enter your password. (O’ page 50)
Upon entering your password
and pressintiC Enter).
Over three incorrect attempts,
If the correct password is input,
-
....
Will start
—r
n?
Will Not Start*
(Power off)
NA
* If you arc starting from the hibernation mode (G*page 18). if you fail to enter correct
password three times, or if no password is entered for about a minute, the computer returns
to the hibernation mode.
When an application or file that was previously displayed appears on your screen,
The computer has been shut down by using the hibernation function, page 18)
note)-
The power saving mode ([Power Schemes] in [Control Panel] - [Power Manage
ment]) is factory set, so if there is no input from a key or a mouse for a certain interval
of time, the power to the LCD and hard disk may be turned off.
The LCD will resume operation when a mouse is used or a key is pressed.
[System devices] in [Start] - [Settings] - [Control Panel] - [System] - [Device Man
ager] may contain a device or devices bearing an exclamation mark or question
mark. This does not indicate a malfunction. Such a mark (exclamation or question
mark) will not be displayed if the operating environment of the device showing the
mark is corrected, by for instance installing the driver of the device.
16
Page 17

Shutting Down (power off your computer)
When the power switch is pressed, the “Power Button Control Program” activates, auto
matically performs the Windows shutdown processing, and powers the computer off. If a
software application is open, power off' the computer after saving the data and closing the
application software.
1
Confirm that 0; is displayed on the taskbar
Turn your computer off
Press the power switch and hold it for approximately one second until the power indi
cator turns olT before releasing it.
Your computer will power off automatically (without using the hibernation function).
(In the OFF state, your eomputcr consumes approximately 1.2 W.)
r
Onec the computer is powered off, you must wait at least ten seconds before pow
ering it on again.
About the Power Button Control Program
On the next occasion, do not press the power switeh (if the power switch is pressed,
this will force the computer to shut down). Perform the “shutdown operation of
Windows” (below),
orp,.
-When 0, is not displayed on the taskbar (the Power Button Control Program is
off)
OFt;
(0 of the Power Button Control Program is displayed when the computer is started up
again.)
-When the display has gone off due to the Power Management Function
OFF,
When 0 is not displayed (shutdow n operation of Windows)
Perform the “Shutdown Windows” operation as follows. If the “Shutdown Win
dows” operation does not proceed correctly, this may be due to a problem in the
computer or the deletion of system data.
(3)Click [Start]-[Shut Down].
(From the keyboard, you may choose to press down on [ ^ ] , then select
[Shut Down] wdth © or ©•) ^
dl) )|«U wM
Qííandkflí
O intiS WJS mode
Cf>. ij' Cencel
©Confirm that is on the left side of “Shut down”, and then click [OK].
If is not on the left side of “Shut down”, click the characters of “Shut
down” or move the arrow over ^ and click the mouse.
17
Page 18
starting Up / Shutting Down
Starting UpYour Computer Quickly
If the computer is powered off while system standby (hereafter, hibernation) function is being
used, the state of the computer is saved to the hard disk and then the power goes off. When the
power is turned back on again, the original state before the computer went off is called up,
allowing you to immediately continue unfinished work.
The following methods are available to enter the hibernation mode.
• Enter the hibernation mode with the sleep switch
• Enter the hibernation mode by selecting [Stand by]
Save your data before using the hibernation function for safety.
• For the purpose of refreshing your computer, periodically (i.c., about one time a week)
perform the "Windows Shutdown" operation and power your computer off without us
ing the hibernation function.
“v
________________________________,__________________________________
Sleep Switch
Enter the Hibernation Mode With the Sleep Switch
1 Press the sleep switch
Confirm that there is a beep sound and take your hand away. If the volume level is set to
low, the sound will be inaudible.
r
Do not press down on the sleep switch for four seconds or more, if the switch is held
dow'n for this period of time, a continuous beeping sound continues, and the computer
is forced to shut down without entering the hibernation mode.
When the screen goes off after a short period of time, the current state of the computer is
saved to the hard disk. While data is being saved, the screen becomes blue and a red
indicator is displayed showing the progress of the process. After that, the power of the
computer goes off. (The power indicator goes oft'.)
Enter the Hibernation Mode By Selecting [Stand by]
7
Select [Start] - [Shut Down]
2
Select [Stand by]
Shut DuwnWindoMt
What do you want the computer to do?
%
----------
■0 Click [Stand by]
_____________________________________
^
18
C^Rortart intis-DOS mode
QK
After the screen goes off after a short period of time, the current state of the computer is
saved to the hard disk. While data is being saved, the screen becomes blue and a red
indicator is displayed showing the progress of the process. After that, the power of the
computer goes oft'. (The power indicator goes off.)
(D Click [OK]
Page 19

Resuming From the Hibernation Mode
Power Indicator power switch and hold it for approximately one second until the power indicator
turns on before releasing it.
The power indicator lamp lights green and the display returns to the state before the power
was cut (i.c., resume).
r
Be sure not to use the keyboard or mouse while data is being read from the hard disk.
If the computer enters hibernation mode and resumes under the condition that an
external drive (such as a hard disk drive or PD drive that uses a PC Card) is con
nected, the number of windows of the connected drive may increase.
Xnote>
Do not enter the hibernation mode for the following cases.
There are cases where the following functions or peripheral devices do not operate
properly.
• While communications software is running
• While audio media is being played or recorded
• While moving images arc being played or captured (i.c., saved).
• While a peripheral device like a PC Card (SCSI or ATA card) is being used.
• While a floppy disk drive or the hard disk drive is being used.
• While a DVD-ROM drive or USB device (excluding the keyboard and mouse
provided with this computer) is being used.
• When a file in an external drive connected to the USB port is used.
What not to do when the computer is entering the hibernation mode or resuming
• When the computer is entering the hibernation mode, do not press the reset
switch. Data that had not been saved will be lost.
• When resuming, do not operate the mouse or keyboard until Windows com
pletely starts up.
Unable to enter the hibernation mode
• With an operating system (OS) other than Windows, the power of the display
may not resume properly or the computer may be unable to enter the hiberna
tion mode.
• The computer may be unable to enter the hibernation mode when there is soft
ware residing in memory.
Terminology
Resume:
To return to the original state when the computer is turned on again from the hiber
nation mode.
Resident software (resident programs):
Software that works while nonnally maintained in memory (or, is able to work at any
time).
19
Page 20

Conserving Power
When your computer is left alone for a while, you can set it to automatically enter the system
standby (hereafter, hibernation mode) or cut the power of the display.
Setting Power Management
1 Select [Start]-[Settings]-[Control Panel]-[Power Management]
2 Select [Power Schemes]
Ponfof Ménageaient Piopeities
[\ Pt»™ Schsmoî j Advanced j
SeieeJ. the pov«r schem the most approptiete settings for
this computer Note that change the below vv4 mipdtfy
the selected scheme.
p Pflwef schemes ^■1'
__________
_____
i3f
BSfl
■0 Click |F| and select the setting
rs
i- pSettiiffi lor Horre/Oilicc Desk pow scheme-
p| I System | Never
Tianc^ffflOfKor.
Tun off herd disks:
I After 15 r
[Aitet 30 r
~3-
and set the time for each
(D Click [OK]
Xnote>
Power schemes
Select one from among:
[Home/Officc Desk]
[Portablc/Laptop]
[Always On]
System standby
This function allows your computer to enter the hibernation mode (O’ page 18), if
it is not being used, after the amount of time set has elapsed.
Turn off monitor
This function cuts the power of the display, if the computer is not being used, after
the amount of time set has elapsed. (The power indicator lamp remains lit.)
Turn off hard disks
This function cuts the power of the hard disk, if the computer is not being used,
after the amount of time set has elapsed.
The initial values for the power source settings following a change to [Portablc/Laptop] or
[Always On] arc given in the table below.
_
20
Item Portablc/Laptop
System standby
Turn ofl'monitor
Turn off hard disks
Always On
After 20 minutes
After 15 minutes After 15 minutes
After 30 minutes After 1 hour
Never
Page 21

Xnote>
When “Turn off monitor” is set,
Do not set the screensaver. When both this function and the screensaver arc set, the
power of the display may not respond properly or the computer may be unable to
properly resume from the hibernation mode.
When the communications function is utilized.
When communications is being performed using a modem, the power saving func
tion activates and the computer may enter the hibernation mode during data com
munications or the communications may not proceed smoothly. When using the
communications function, wc recommend setting [Never] for [System standby] or
setting a sufficiently long period of time in the dialog box.
If the Power Saving Function Activates
If the computer is left alone for the time set on the previous page, the power saving function
will activate.
# If the computer screen turns off
Either press a key or move the mou.se to resume.
At this time, use a key that will have no influence on software in the computer (c.g., @).
since the input of the keyboard or mouse is received by the computer.
When the screen does not return to the original screen even with the above operation
The system standby is activated and the computer has entered the hibernation mode.
Power on the computer by holding the power switch down for approximately one second.
Refer to the page 19 for the details on resuming operation from the hibernation mode.
NOTEf
When the power of the hard disk has been cut
The power of the hard disk is automatically turned back on when an attempt is made to
access the hard disk.
21
Page 22

Setting the Sound Volume
The following settings can be made for the audio output on the computer.
Using the Audio Mixer
Use the Mixer applet to control the overall sound level as well as the volume of the internal and
external sound sources.
Select ^ from the taskbar
The volume control
Drag the slide bar to adjust the level.
Tfflephonir : Wtw« Oik ]i Midi Out
I 1
E^J^l^“Click to close the “DS-XG
3D Wide
Audio Mixer”.
Sounds from an audio CD
Sounds from a modem
MIDI (c.g., Game) ^recs) sounds when speakers
Sounds from a video CD or DVD
The effective sounds of Windows (c.g., sounds at start-up)
— Sets 3D output (about 360 de-
or headphones are connected.
• Volume control
This control adjusts the sound volume regardless of the sound source. The control
corresponds to the sound volume adjustment buttons of the computer ((^ page 8). In
addition, the volume control itself can be displayed by clicking ^ on the taskbar.
• Mute
If a checkmark is added to [Mute], the computer outputs no sound.
Xnote)-
When the input level in the camera mode from a microphone or CD is low
(T) Click [Option] - [Option] in the [Audio mixer] screen.
(2) Select [Recording] in [Adjust volume for], and then select [Microphone] or
[Digital] (for an audio CD) in [Show the following volume controls]. (Confirm
that there is a checkmark.)
(3) After clicking [OK], drag the slide bar to adjust the sound level.
About Microphone Howling (Feedback)
Feedback, a high-pitched whistle or howling, may occur under some circumstances
when the volume of the microphone is set too high, when the microphone is too
close to the speakers, when you arc too close to the microphone, or when you place
you hand over or around the microphone. In such cases, click [Option] - [Option] in
the [Audio mixer] screen, select [Playback] in [Adjust volume for], add a checkmark
to [Microphone] in [Show the following volume controls], click [OK], and mute
the [Microphone].
Or, adjust the volume levels of the microphone and speaker to a suitable degree so
that howling no longer occurs.
22
Page 23

Making Settings In the Control Panel
7
Select [Start] - [Settings] - [Control Panel]
2 Select [YAMAHA DS-XG Audio Config]
Setting of digital output mode
^ Y4MAHA DS-XG Audio CortMg j]
[^Diflilal Outpii I DiiedSourJ |
AhoU^ jj Simthatge) | Echo | Dipiljrintiut
Y«n^DS-XC
Vetsioo
Cot^iohi (c)Yi
Al lights tesefvid
Cor^ig
1Zm,201S
'/JMAHA Colpoiation
I
-Set output from an MS-DOS application.
-Display of digital input
]t^
- Set output from the headphones or speaker,
Set the echo level during microphone input.
Settings of the echo level and tone level during MIDI playback.
NOTE>
Refer to the instructions on the settings by clicking the item after clicking the [i^j
button in the display.
After setting each item, click [OK]
r
About digital output
• You must adjust the sound level on a peripheral device (q* page 32) when con
necting to the optical digital audio output on the computer.
• If a check mark is added to the [Mute All] in [YAMAHA DS-XG Audio Mixer] [Volume Control], the digital audio output will also be muted.
If no sound is audible from the digital audio output even if the check mark is
removed from [Mute All], increase the [Volume Control] level.
(Adjust the sound volume on the peripheral device.)
[Dolby Digitall playback of a DVD video disc
• When a peripheral device is not compatible with [Dolby Digital] output, the disc
will not be played correctly. In addition, there are cases in which large sounds arc
output at the same time as the playback of the sound source. Reduce the sound
volume of the peripheral device.
• When no sound is output from the optical digital audio output terminal, click the
[Digital Output] tab, then confirm that 0 is not on the left side of [OFF] or [ON
(Direct)]. (Confirm the sound level of the peripheral device beforehand.)
• Confirm that the sound setting in the application software is correct.
23
Page 24

DVD-ROM Drive
The DVD-ROM drive is a deviee that can read the data from both CD and DVD discs. When
you place a disc in the drive the computer will determine the type of data that is on the disc and
load the appropriate application to run, play, or view the program material on the disc.
Usage Precaution
• Do not place items other than discs in the tray.
• Do not leave the tray in the open position.
• Under some conditions, dust may build up on the disc, possibly resulting in malfunction.
• Do not apply excessive force to the tray in the open position, doing so could damage the tray.
• Do not open the DVD-ROM drive while the DVD-ROM drive is being accessed. Doing so
could cause it to malfunction. In addition, after running an application involving access to a
disc, do not open the DVD-ROM drive or remove the disc until after the application has been
closed.
• After closing the tray, do not attempt to access a disc until the DVD-ROM drive indicator
(@) disappears.
• Never insert foreign objects such as paper clips into the slot in the DVD-ROM drive.
• Do not use discs that have become deformed (warped, not completely round, etc.).
To avoid damaging discs:
• Do not touch the surface as it can cause the disc to become dirty or scratched.
• Do not allow discs to become dirty or scratched.
• Do not place or store discs in locations exposed to heat, direct sunlight, humidity or dust.
• Do not write on the surface of the disc with a ball-point pen or other writing instrument.
• If the disc is brought from a cold into a wann environment, moisture may form on the disc.
Wipe this moisture off with a soft, dry, lint-free cloth before using the disc.
• Do not drop, bend, or place heavy objects on top of discs.
• Cleaning the disc using a CD cleaner is recommended once every 2 or 3 months.
If the disc gets dirty
After wiping the disc with a moist, soft cloth, wipe it with a dry
cloth. Always wipe from the center toward the edge.
24
Page 25

Using the DVD-ROM Drive
Eject Button
Title side up
1 Confirm the computer is powered on, press the eject button
lightly
Xnote)
Place a disc / Remove a disc
----------------------------
To remove a disc when the computer is powered off or when the tray cannot be pulled
out, insert the eject pin (included with the computer) into the recessed manual disc
eject button and push it completely to the end.
Recessed Manual Disc
O O O; 0 |
’ S; S' 0)
Eject Button
Close the disc tray by pressing the eject button
r ^
• The regional code of the DVD-ROM drive of the computer is set to [ 1]. If the regional
code of the DVD-ROM drive is changed by using a software application for DVD play
back (ex. WinDVD™ 2000), DVD software set for region [1] will no longer be able to
be played.
• The region settings can be changed for up to 4 times. After the fourth change is made, it
will no longer be possible either to change the setting or to return to the original setting.
Vi
____
— ■ ____________
/
25
Page 26

Modem
Connecting to a Telephone Line and Settings
1 Connecting a telephone line to the internal modem
It is not possible to connect the internal modem to any of the following lines.
• Internal home phones
• Intercoms
The internal modem is designed for use with a standard telephone line.
Connecting the modem to a Digital PBX, Intercom, or internal home phones
may cause damage that is not covered under warranty.
Internal Modem
2 Select [Dialing Properties] in [Start] - [Settings] - [Control Panel]
- [Modems]
Input the necessary information (items such as the phone system) and then press [OK].
Dialing Propertiftt
'^i if ■ I jf
I ar> ^ thb Area fiode
I Jriiied StateT of America T j I j IfAissCodeRiiei..
' whandabriQ Iram het«——
i To ^9*» an hriQ:
Foi local calí, dW
For long (Stance cak.. ^
. QTodt^c^ttol'<S fifi
■■ Oiaf using, Q lone dial
: <fatdnce cals, ysa Ihts cafrg card
ia.'sifeaa.-j].
______
--------
______
□
□
liCaing Card,, j
jr Cincel
Be sure to make the [Dial-Up Networking) settings in {My Computer] and |Outlook Ex
press] before conneeting to network services like the Internet or when using e-mail.
T|x{
[■ &V7
26
Do not put a check mark in the redial check box for Dial-Up Networking. Automatic
redialing to any individual number is limited to one time by Part 68 of the FCC rules. If
the number of automatic redials is set to two or more, this may violate the FCC regulations.
Page 27

VisualBright
The VisualBright function works automatically to provide a higher quality picture on your
screen with programs such as Windows Media Player, Panasonic’s DV Capture and Movie
Messenger, and InterVideo WinDVD™2000.
This function is only effective at the actual resolution of the LCD screen, 1024x768 pixels.
note).
VisualBright processes the central 80% of the window image to determine how the
entire image will be enhanced.
Turn this feature off when you are not using applications that benefit from enhanced
picture playback. This will free memory and other system resources for use by those
applications.
When you want to turn this feature off
Select the ^ icon in the taskbar with the [right] mouse button, and select [Close].
VisualBright restarts after you [Shut Down] the computer or use the [Start] - [Shut Down]
-[Restart] process.
VisualBright is not restarted when resuming from the hibernation mode or by running the
program from the shortcut in the [Start Up] window.
Xnote>
The ability of VisualBright to process images in multiple windows may be affected by
the contents and position of those windows.
When you open a text display window that overlaps the display of a processed graphic
window, the enhancements arc removed in favor of the text display.
If the processed graphic window is maximized and you open a text display window, the
enhancements will only be removed if the text mode window overlaps the detection
region in the central 80% of the image.
When you open multiple processed graphic windows, the selected graphic window will
benefit from the enhanced display.
Maximized high image quality display
1
10% of the width of the window
10% of the height
of the window
27
Page 28

Using USB Devices
(e.g., Fioppy Disk Drive, Printer)
USB Root Hub
iV
It is possible to use a variety of USB compatible peripheral devices such as an external floppy
disk drive (included with the computer), printer, and image scanner. (Refer to the instructions
manual provided with each USB compatible peripheral device.)
The computer has four USB ports. Among them, one is the root hub (sec the figure on the left),
and the other ports are USB hubs. Depending on the peripheral device, there arc cases in which
a device not connected to the root hub will be unable to operate.
When Installing a New Device Driver
After installing a device driver, be sure to perform the following procedure, (This
procedure is unnecessary for the keyboard, mouse and external FDD included with
this computer.)
If this procedure is not performed, the [Update wizard for new hardware] may be dis
played when the computer resumes from the hibernation mode and problems may emerge
in the operation thereafter.
0 Click [Start] - [Run],
0 Input the following;
c:\util\usbroot.bat
0 Click [OK], and then follow the on-screen instructions.
(D When [Finished] is displayed, click [j^ in the top right corner,
0 Select [Restart] in [Start] - [Shut Down] and select [OK].
The computer will restart.
• When the above procedure is performed, after the computer restarts, once again install
the driver of the USB device because the [Update wizard for new hardware] will run
again.
Xnote)-
• USB root hub and USB hubs
The USB root hub is a port directly connected to the computer. The USB hubs are
connected to the computer internally through the USB root hub.
(Image of the internal structure.)
Adding USB Hub
A USB hub can be connected to any one of the four USB ports. Follow the instruc
tions manual accompanying the USB hub.
28
Page 29

Using the Floppy Disk Drive
To use floppy disks, connect the included external floppy disk drive.
r
• A bus power type USB hub cannot be used.
• Do not compress or uncompress by drive space 3 in a floppy disk drive.
• Only one external floppy disk drive can be connected to the USB hub or USB ports of
the computer.
• Another floppy disk drive cannot be used at the same time.
1 Connecting a floppy disk drive.
The floppy disk drive can be connected to any one of the four USB ports.
Xnote)-------------------------------------------------------------------------------------------
• It is not necessary to install the driver from the floppy disk provided with the
external floppy disk drive.
• It is not possible to start up the computer from a floppy disk drive.
\__________________________________________________________________________________________________________
Be sure the mark is
facing towards the back
of the computer.
Inserting / Removing the Floppy Disk
_
<lnserting a disk>
Insert the disk properly
until the floppy disk ejec
tion button pops out.
<Removing a disk>
After confirming that the
drive access lamp is not
lit, press the eject button.
r
Do not remove a floppy disk while the drive access lamp is lit. The data on the
floppy disk may become corrupt.
When carrying the floppy disk drive or storing it away, be sure to remove the
floppy disk from the drive first.
Xnote>
Types of floppy disks able to be used and disk capacities
There arc two types of floppy disks: [2HD] and [2DD], The capacity of each is as
follows. ([2HD] has an approximately 2x capacity over [2DD]).
2HD: 1.44 Mbytes
2DD: 720 Kbytes
29
Page 30

Using USB Devices (e.g., Floppy Disk Drive, Printer)
Using the Printer
It is possible to use a USB-compatible printer.
USB Port
Be sure the mark is
facing towards the back
of the computer.
1 Connect the printer to your computer.
NOTE>
Use the cable that is included with the printer.
Turn on the printer, then turn on the computer.
Setting your printer.
Go to [My Computer] - [Printers], Find your printer’s icon, double-click on it, and click
[File] - [Set As Default]. If no icon is available, select [Add Printer] and then follow the
on-screen instructions.
Xnote>
You may need to install a driver for your printer. Follow the on-screen instructions
and refer to the operation manual of the printer on how to install the driver.
30
Page 31

Using PC Cards
Your computer has one PC Card slot. The slot conforms to the PC Card Standard; therefore,
communications or SCSI devices may be utilized.
PC Cards arc classified into three categories depending on the card thickness: Type I (3.3 mm),
Type II (5.0 mm), and Type III (10.5 mm).
For this computer, only a Type I or Type II card can be used.
r
• Check the PC Cards’ specifications. Be sure the operating current does not exceed the
specified limit. Damage may result olherw'ise.
Allowable Current: 3.3 V: 500 mA, 5 V; 400 niA
• Refer to the instructions manual provided with a PC Card for information on how to use
the PC Card.
• Do not install / remove a PC Card while your computer is in the hibernation mode.
When inserting a card
This is the labeled side.
The eject button
will pop out.
Press the ejection button and remove the dummy card (g* below)
The dummy card is inserted at the factory to protect the PC Card slot.
Set the labeled side of the PC Card to the rear of the display and
slide the card firmly into the slot
After inserting the card, the display will freeze temporarily. After confirmation of the
card, the computer will return to its original condition.
When inserting a card, do not force the card in if difficulty is encountered. You may
damage the slot, making it impossible to remove the card.
Removing the PC Card
Follow the steps below to remove a PC Card.
(Perform only step 4 when a dummy card is inserted In the slot.)
c
When removing a CardBus or network card, be sure to remove the card after turning the
computer off.
Select [Start] - [Settings] - [Control Panel] - [PC Card (PCMCIA)]
Select the PC Card slot and select [Stop], then select [OK]
When the message [You may safety remove this device.] is dis
played, click [OK]
(The message may be hidden behind another display.)
Press the button and slide the PC Card out
When the button is pressed, there is a beep sound and the PC Card comes out slightly. At
this time, remove the card.
note)-
When removing a PC Card after turning off the computer, step 1-3 are not needed.
When a PC card is not being used, we recommend inserting the dummy card into
the slot to prevent dust and other objects from entering the slot.
If the computer enters hibernation mode and resumes under the condition that an
external drive (such as a hard disk drive or PD drive that uses a PC Card) is con
nected, the number of windows of the connected drive may increase.
31
Page 32

Using Audio Devices
Microphone / Headphone / Speaker
• ' c;
Headphone Jack
Use this jack to connect headphones or amplifier-equipped speakers.
Audio output from the internal speaker is disabled when headphones
or external speakers are connected.
«> •) p)
Microphone Jack
Use only a monaural condenser microphone (miniature jack).
Using an input source other than a normal dynamic microphone may not allow
audio to be input or may damage the equipment.
When an extcnial microphone is connected to the microphone jack, the internal
microphone cannot be used.
note)-
About adjust the sound volume (C^ page 8, 22).
Optical Digital Audio Output Terminal
j
It is possible to connect a Home Theater System or other Panasonic digital audio device
with an optical input connector to this terminal. (The optical digital cable* is necessary.)
*The cable type may differ depending on the shape of the optical input
connector of the device to connect.
Be sure to read the instructions manual of the device.
Optica) Digital Audio OutputTerminal
To connect a device, perform the following steps:
® Cut the power of the computer and the device to connect.
(1) Remove the cap on the computer (C^ page 9).
(D Connect the optical input terminal of the device with the optical digital audio output
terminal of the device to connect with the above cable.
• Read the instructions manual of the device for information on how to record sound
media.
• When the optical digital audio output terminal is not being used, be sure to attach the
cap to protect the terminal.
Xnote>
32
When no sounds arc being output, double click the [YAMAHA DS-XG Audio Config]
icon of the [Control Panel] and confirm the settings of the [Digital Output] tab (C?*
page 23).
Page 33

Adding Memory
r
Use a RAM module meeting the RAM module specifications below. If a module is used
that does not meet the specifications, there are cases in which data may become unus
able or the computer may not operate properly.
RAM modules are extremely sensitive to static electricity. There are cases where static
electricity generated by the human body has adversely affected such modules. In addi
tion, it is easy to damage the RAM modules or internal components of the computer.
Therefore, when installing or removing a RAM module, handle the module with ex
treme care.
The memory capacity can be confirmed in the [Main] menu of the Setup Utility (O’ page 50).
The memory capacity at the time of purchase is 64 Mbytes. This capacity can be expanded by
installing another separate RAM module. Follow the procedure below to add or remove a
RAM module.
RAM module specifications
144 pins, SO-DIMM, 3.3 V, SDRAM
After completing operations and power off the computer (page 17), remove the AC cord
Also remove all cables connecting peripheral devices, e.g., USB devices.
r
• in the hibernation mode, do not insert or remove a RAM module. The computer
may be damaged or may fail to work properly.
• Be sure to spread a soft cloth so that marks do not appear on the display.
2
Set the computer so that the display is facing downwards
Using a small-sized Philips screwdriver, remove the four screws
3
Back
Soft Cloth
33
Page 34

Adding Memory
4 Remove the four screws of the stand and then remove the cabi-
net
5 Remove the RAM Module Cover
0 Remove the screw.
(D Remove the cover by holding the finger grip and sliding the cover in the
direction of the arrow.
RAM Module Cover
Wc recommend using gloves to prevent the metal from cutting your hands.
(To next page)
34
Page 35

6 Inserting / Removing the RAM module
<When inserting a module>
-0 Insert the RAM module at an angle.
Xnote)------------------------------------------------------------
Be aware of the direction and angle of the RAM module when inserting it. It will be
difficult to insert the module if there is a mistake in the direction and angle between
the RAM module and the slot.
Push down on the RAM module until it locks with the top and bottom
hooks.
Hooks (on both sides)
<When removing a module>
0 Move the hooks on both sides to the outside direction.
The RAM module will rise at an angle (dotted line).
Remove the RAM module at an angle.
Repiace the cover and screws removed in Steps 3to 5
35
Page 36

DV Capture
It is possible to use the DV Capture functions below by connecting a digital video camcorder
(sold separately) to the computer.
• Functions to play recorded images on the computer
• Functions to save a part of the input from recorded images ora digital video camcorder as a
moving image or still image file
• To display or play the contents saved to a file
Connecting a Digital Video Camcorder
Prepare the following items.
• Digital video camcorder (sold separately)
• DV Interface Cable (4-to-4 pin) (sold separately)
• MiniDV tape on which images are recorded (sold separately)
note}-
DV Interface Cable
This is a cable (4-to-4 pin) that connects the DV input/output connector (IEEE 1394 standards) of
a digital video camcorder to the IEEE 1394 interface connector of the computer. The name the
camera is known by differs depending on the product (e.g., ¡.LINK cable).
For questions, contact Panasonic at 1 -800-272-7033.
Turn on the computer and the digital video camcorder (c^ page 13)
Refer to the instnictions manual included with digital video camcorder.
r
• Be sure to connect a DV interface cable after the power is ON.
• When DV capture is being employed, take caution so that the power of the digital video
camcorder connected to the computer is not cut off. When a digital video camcorder in the
camera mode is being used, the power may be cut off automatically when a tape is inserted.
• When capturing recorded contents
Insert a MiniDV tape (recorded by a digital video camcorder) and select the VCR mode.
• When capturing input from a digital video camcorder
Select the camera mode on a digital video camcorder.
After confirming Windows has started up, connect a digital video camcorder to the computer with a DV interface cable
Refer to the instructions manual included with digital video camcorder.
DV Input/Output Connector
^ IEEE 1394 Inter
face Connector
36
Example of a digital video camcorder
• With “DV Capture”, do not simultaneously use the two IEEE 1394 Interface Connectors.
• When connecting a camcorder for the first time, a dialog box may appear to install the device
driver.
• When a digital video camcorder is connected, the sound volume adjustment icon may be
displayed in the taskbar. You can choose to stop the display in the taskbar by double-click
ing the [Multimedia] icon in [Control Panel] and removing the check mark for “Show vol
ume control on the taskbar” in the [Audio] tab.
When Removing the Digital Video Camcorder
© Turn off the computer and remove the cable from the IEEE 1394 Interface connector
of the computer.
(1) Turn off the digital video camcorder and remove the cable .
Page 37

Before Running DV Capture
• Close all moving image application software like games using a capture driver, overlay
function, or Direct Draw and Direct Sound.
• Set either of the following display options and number of colors for the display properties.
800 by 600 pixels :High Color (16-bit), True Color (24-bit), or True Color (32-bit)
1024 by 768 pixels:High Color (16-bit) or True Color (24-bit)
Running DV Capture
1
Confirm that the digital video camcorder is properly connected
(G= page 36)
(D Click [My Computer] with the right button, and then select [Properties] - [Device Man
ager],
iD Confirm that [Microsoft DV Camera and VCR] is displayed at the [Imaging Device],
note)-
Makc the necessary settings for '‘Before Running DV Capture”.
Select [DV Capture] icon on the desktop
When DV Capture is running, do not perform the following operations. The
operation of the computer may become unstable.
• Change the display size or number of colors in [Display properties],
• Power the digital video camcorder ON/OFF.
• Switch between the VCR/camera mode of the digital video camcorder.
• Remove a DV interface cable.
• Perform play/stop/fast-forward/rewind using the buttons of the digital video
camcorder.
3
Perfonn the tape operation.
Rewind Pause Fast-forward
Stop — Play
Pressing (nirn|, the display will change to
^ : Reverse slow*
: Forward slow*
*Thc file play time (Q= page 39) becomes frame by frame.
Run ImageBrowscr (image viewing software).
Exit
Maximum Display
Select the moving image file to play.
Save the captured contents to a still image
file.
Save the captured contents to a moving im
age file.
You can switch between digital video camcorder playback and moving image file captured.
37
Page 38

DV Capture
Movie Capture
Xnote>
Before Capturing Moving Image
• Before performing moving image capture (to prevent frame dropping and to
perform the capturing correctly)
• Close all other applications and resident applications such as virus checkers.
• Do not use any coiniminication function.
• Click the desktop (wallpaper) with the right button, and remove the check mark
next to [View As Web Page] in [Active Desktop],
• Click [Start] - [Programs] - [Accessories] - [System Tools] - [Disk Defragmenter],
and execute “Optimize'’ for the C drive.
# About the possible display sizes
• 360 by 240 pixels display size
• Maximized display size
It is possible to maximize an image display by pressing the "maximize" button (the
image quality will be degraded).
• When DV Capture is running, it is not possible to enter the hibernation mode.
38
It is possible to save scenes as a moving image file from images recorded on tape or inputs from
a digital video camcorder.
1
Running DV Capture (c? page 37)
2
Playing the tape and then perform moving images capture as
follows
® Confirm that "DV" is displayed
When "DV" is not displayed, click [SELECT].
Click n.
To display incomming DV data
Click [MOVIE CAPTURE] to begin
capture
• During moving image capture, do not perform
other operations like moving the mouse.
• During capture, the capture time is displayed.
Click again to end the capture
The capturing ends, but the playback continues.
or, click
• The maximum capture time is about three minutes. One minute is equal to a file size of
about 230 Mbytes.
• Captured images cannot be saved on a compressed drive. In addition, voice over and
wide sound capture are not possible.
• It may not be possible to perform capture properly when capturing the starting or end
ing part of a tape or there are parts on a tape that include unrecorded parts.
• When the contents of a tape arc mixed between the (SP/LP) camera mode, it may not be
possible to correctly capture the boundaries sharing these two modes. Perform capture
in the range of the same camera mode.
• If the remaining capacity of the hard di.sk is below about 300 Mbytes, capturing stops
automatically.
• Special functions of a digital video camcorder (e.g., effects and multi-displays) may not
work properly.
(To next page)
Page 39

About capturing
Moving images that are captured arc automatically saved to the folder (and with the
file names) shown below.
The flic type is an AVI file (*.AV1) of the DV format of 30 frames/second, with a size
of 720X480 pixels.
The date of creation and time are automatically attached to a part of the file name. As
an example, an image captured on August 25, 2000 at 1:08'14 p.m. is given the follow
ing name. ,
^ File Name
C:\Mylmage\CP0825_130814_2000.AVI
Destination folder* August 25 2000
* The destination folder and file name can be changed (q> page 42).
Select '"g": to stop the playback
Playing Captured Movie Files
1
Running DV Capture {or page 37)
11^
I ^
1:08’14 p.m.
©Click lnaiEFi
(D Confirm that the display changes to
[FILE] from [DV]
■ Click
When there arc multiple moving image files,
click [OPEN], select the folder and moving
image file (*.AV1), and then play the file.
A flic that is not an AVI file of the DV for
mat cannot be played.
Playback should begin automatically.
@ Click
The playback of the file finally commences.
AVI flics saved to an external drive (e.g., removable disk drive) may not be played
eorrcctly. Play such files after copying them to the hard disk drive (internal).
Xnote>
Output to a digital video camcorder
• Images of AVI files of the DV format can be output to a digital video camcorder
connected to the IEEE 1394 interface connector during the playback.
• It is possible to add special effects to an AVI file of the DV format with commer
cially available non-linear image editing software applications (e.g., Adobe Pre
miere) and perfonn rewrite recording over tapes. (The recording is done through
operations on the camcorder side.)
39
Page 40

DV Capture
9 When selecting a file to be played from the ImageBrowser
1 Select [IMAGEBROWSER] from the [DV Capture] window
The starting image of each moving image file is displayed.
© Click
Double - click the moving image to be
played
Click here to close the display
Click here to stop the playback
Click
Play back will be started.
The computer may restart even when [Shut down] in [Shut Down] is executed, when
an AVI file or MPEG file is being played using the Windows Media Player.
40
Page 41

still Capture
It is possible to save a scene as a still image file from images recorded on tape or inputs from a
digital video camcorder.
Running DV Capture {a= page 37)
1
Play the tape and then perform still image capture
2
© Confirm that "DV" is displayed
When "DV" is not displayed, click [SELECT],
Click
— (© Click [STILL CAPTURE] for the scene
to capture
One file is saved for each click. In addition,
it is possible to capture a still image in the
[Pause] mode.
• The file formats for captured images arc JPEG and BMP (*.JPG and *.BMP, respec
tively).
• JPEG images of a 320 by 240 pixels size and with about 16 million colors can be
captured under the default conditions; the file size is about 30 Kbytes per image. (The
format and size of an image, and the colors of the image, can be changed through [Still
settings] (Q* next page). The file size will change depending on the settings.)
• The file name and destination of a captured still image arc as follows. The date of
creation and time are automatically attached to a part of the file name.
As an example, an image captured on August 25, 2000 at l:08'l4 p.m. is given the
following name.
File Name*
;C:\Mylmage\CP0825,130814_2000.JPG
Destination folder* August 25 2000
1:08’14 p.m.
• The destination folder and file name can be changed page 42).
• When multiple captures are being pcrfomicd at the same time, numbers are added to the
ends of the file names as follows.
CP0825_ 130814_2000_01 .JPG
CP0825_ 130814_2000_02.J PG
CP0825_ 130814_2000_03 .JPG
(The added numbers go from 01 to 99. Saving is not possible over 99.)
• Special functions of a digital video camcorder (e.g., effects and multi-displays) may not
work properly.
Viewing Still Image Files
It is possible to display a list of files and maximize displays with ImageBrowser (image
viewing software).
41
Page 42

DV Capture
Detailed Settings for Stili Image Capturing
1
Running DV Capture {o= page 37)
2
Select [Settings] and then [Still Settings]
Make the still image settings and click [OK]
3
Select the size.
Select the color option of the image.
Color :About 16 million colors (24-bit)
Monochrome :256-step gray scale
Sepia :256-stcp sepia colors
Select the format to save the image in (i.e., either JPEG or BMP).
Xnote)-------------------------------------------------------------------------------------------
File sizes differ according to the size of the image and color settings.
It is also possible to change the settings by using the pop-up menu displayed when
clicking the right button over the display of Step 2.
Changing the destination folder and file name
It is possible to change the destination folder and file name by running [DV Capture] and
selecting [Folder Settings] from the [File] menu.
It is possible to change the destination folder.
(However, it is not possible to make settings for drives other than the C drive.)
The factory set destination folder is C:\Mylmage.
rFl»<ietto8вy^^
CuntntSebng |ctivmige
i"~ Eftwse.. 'I
10(Д1ПО
ijif^tlTTTwr f___j[ ^
OiJter Customtee
1
J
OK
Auto create
This is the factory set.
[CP] is added at the top of the file name, fol
lowed by the automatic addition of the date of
creation and time (c^ page 39, 41).
-User Customize
It is possible to freely designate
the name (ID Code) attached to
the head of a file name with eight
characters. However, the follow
ing characters cannot be used.
\ /:*?”<> I
(The default name is set to
USER.)
In addition, it is possible to set the
range of the three numerals added
at the end of the name (ID Num
ber 000 to 999). (However, iden
tical files will be ovcrw'rittcn.)
42
Example: USER000.JPG
ID Code
ID Number
Page 43

Using Image Files
The functions below arc available on ImagcBrowscr (image viewing software).
• Functions to view a list of image files like an album.
• Functions to send images from the list as mail. (C^ page 46)
• Functions to compress moving images and send them attached with a player as mail
(Movie Messenger; C? page 47).
NOTE>
r<!
For details, refer to the help file for each function.
Running ImageBrowser
1Select [IMAGEBROWSER] icon on the desktop
With the default settings the contents of the [C:\MyImagc] arc displayed. To change the
folder of images shown in ImageBrowser, click [File] - [Open Folder] in order.
Display of a single image
Shows images of BMP files and
JPEG files in the display image
folder.
J
Activation of Movie Messenger {Or’ page 47)
It is possible to compress a selected moving image file
into a player-equipped executable file. It is also pos
sible to send the compressed moving image file as an
attachment.
I
T
Display of moving images
Displays still images of files in the AVI format and
still images of Movie Messenger in the display im
age folder.
'note)-
About the TMPWORK folder
This is automatically created under the designated display image folder. This folder
is created to store temporary files (*.BMS) that display the first frames of the indi
vidual moving image files (*.AVI). The TMPWORK. folder to be created under the
display image folder can be set for each drive in [Settings Temporary Folder] under
the [File] menu.
Sending mail
It is possible to activate a mail soft
ware application and to send a se-
leetcd image file as an attachment.
43
Page 44

Using Image Files
Displaying Images
If an image is doubic-clicked, an application will open to display a single image or to play
a moving image file.
For a single image (*.BMP)
Microsoft Paint will open and the se
lected image will be displayed.
R13I
^.rrrprrraccrroBG:
¡Fa Tccici onW J
For a moving image (*.AVI)
Windows Media Player will open.
The image will begin playing when
the play ({J[D button is clicked.
ii RdJci A Mueic ^
For a still image (*.JPG)
Imaging will open and the selected im
age will be displayed.
I* V-* e«
IJJ
----------------------
!► » ..ji
Show
5 Aijfiof
."iS
note)-
The computer may restart even when [Shut
down] in [Shut Down] is executed, when an AVI
file or MPEG file is being played using the Win
dows Media Player.
About the menu commands of ImageBrowser
The main commands arc as follows.
[Pile] menu
• Settings Temporary Folder iChanges the folder to display images.
• Register a Related Application :Registcrs applications to display images.
• Select and Execute a Related Application :Selcctively opens applications to display
images.
[Edit] menu
• Copy :Copies a selected image to another folder.
• Delete ;Delctes a selected image file.
[View] menu
• Auto Update
• Size
• Slide
[Scttingsl menu
• E-mail Settings
lAutomatically updates a display to new
conditions.
:Changcs the display size of listed images.
: Automatically scrolls the display of an im
age.
iC? “Mail software settings” (page 45)
44
Page 45

Sending Image Files By Mail
It is possible to open a new mail creation screen with an attached image with one click, through
the use of one of the mail sending functions of the ImageBrowser. This is very convenient as
it is no longer necessary to look for the file name of the image to send.
The following types of mail sending functions are available from ImageBrowser.
• Select a single image or moving image file from the displayed list, and send the file as an
attachment. (O’ next page)
• Compress a moving image file, attach it to an executable player, and send the executable as
an attachment. (“Movie Messenger” O’ page 47)
Xnote>
It is necessary to use a MAPI mail software application.
Depending on the mail software application that is used, an application may have to be
started up beforehand.
Mail software settings
The following settings need to be made beforehand to use the individual mail sending
functions of the ImageBrowser.
1
Running ImageBrowser (co page 43)
2
Click [E-mail Settings] under the [Settings] menu and make the
settings
When a non-MAPI software application is used, select [Others].
0
Select a mail application to
use
(DCIick [OK]
When using a non-MAPI software application
The automatic execution of the mail software applica
tion is not possible even if [E-mail] is clicked in the
ImageBrowser or Movie Messenger. Open the mail soft
ware application beforehand.
If the message on the right is displayed, click [Yes], se
lect the image file to send, and attach it in the mail soft
ware.
Pc voi ¥tar* to cc«n r«tTpoi«v foklc to fl«
rviMlbvE>(dglOM(t?
When using Outlook Express or Outlook 97/98
When a binary file is attached in Outlook Express or Outlook 97/98, the file may be unable
to be read correctly depending on the software used on the receiving side. In such cases, in
the settings for sending mail in Outlook Express or Outlook 97/98, select text style for the
sending style, in addition, set MIME (encoding method) for the binary form for attach
ments. For details on the settings, read the help file or manual of Outlook Express, Outlook
97/98 or of the application you are using.
45
Page 46

Using Image Files
Sending Mail From a List
1 Running ImageBrowser (c^ page 43)
0
Click the still image to send by mail
■(D Click
The mail software is activated.
Xnote>
When the [E-mail Settings] display appears, make the “Mail software settings”
(C? page 45).
Sending a moving image file by mail
The contents of a moving image file is large, and so we do not recommend sending
the flic uncompressed.
Compress a moving image file first with Movie Messenger (Q= page 47) before
sending it.
Write a message and then send the mail
Follow the on-screen instructions.
46
Page 47

Compressing and Mailing Moving Images (Movie Messenger)
It is possible to compress moving image file, attach it to a player (Windows 95/98 only) and
send it by mail.
• The mail software application that can activate from Movie Messenger is only Outlook
Express 5.x.
• Movie Messenger is compatible with AVI files (*,AVI) of the moving image DV format
included in DV Capture.
• Movie Messenger can also be opened by clicking [Movie Messenger] icon on the desk
top,
1 Open Movie Messenger from the ImageBrowser (c^ page 43)
0 Click
Click the still form of a moving image to send by mail
Double Click
Make the compression settings and compress the file
lEfe tleti
MDEOD^tatdvsd. 490, 9set, 301US
fUDiODatcPCM.OJOOOUz. 9se:, Ifibii, 2ch
Statiub'
r^i [~
Coinprestlon Settings r
-Ou3ii(^----------------; OHiuit
1 Qlow
jrgi;e ----------------iH^ClFSiTP U32K2e0)
L QOCIF 51z9(T76» U4)
't
JS
0 Make the compression settings
Click [Compress]
O
Movie M etv eng er '^ ,01
Succetsiu^ Dom e
......
- ~
'note>
About the image file after compression
The size of the original image file will become smaller. In addition, the movements
may no longer move smoothly compared with the original moving image file, be
cause of the reduction in the number of frames per second.
® Click [OK]
47
Page 48

Using Image Files
Run the mail software
|£fe dsip
In«N*m« CU*t^mjnripi fA
VlOEODiU . dv^ct, 770 T 400. 30fp6
IPCM,3200CH2, 9s««;, ihM. 2ch
C№Tipf««»lon S«Cin9S -—- -
i^Cwjdfiti r*S5«
■ QHisn ijeiClfSiit
ii || SI'
i fy L<M i '
■ cpmprpsi jj. v^jsty J lEHl rj
^note>
t:i
.. d
® Click [Play]
A proprietary player application will open.
Confimi the compressed file.
332)(7$a)
(176x144)
Click [E-mail]
When the [E-mail startup settings] display appears, perform the “Mail software set
tings" (Q= page 45).
4 Write a message and then send the mail
Xnote]---------------------------------------------------------
This player will only run if the receiving side is running Windows 95/98. It will not
operate in any other OS environments.
48
Page 49

Setup Utility
An explanation is given below on a utility program (i.e., Setup Utility) for displaying the BIOS
information and for setting the password.
Running the Setup Utility
1 Turn on your computer by pressing the Power Switch or restart
using the [Start]-[Shut Down]
2 When [Press <F2> to enter SETUP] message is displayed, press
Xnote>
• This Setup Utility will not be run if CS) is not pressed soon after the computer is
started. In this case, you need to restart your computer again.
If “Enter your password” is displayed, input your password. (C^ page 50)
Item Menu
PhoenixBIOS Setup Utility
Main
BIOS Version: Vx.xxLxxxxx
System Time:
System Date: [xx/xx/xxxx]
System Memory: xxxxx KB
Primary Master:
Secondary Master: DVD Drive
i^Help f A Select item Change Values
QaaExit
Security
Item Specific Help
[xx:xx:xx]
xxxxMB
Select Menu Select ►Sub-Menu
<Tab>, <Shift Tab> or
<Enter> selects field.
9 Closing the Setup Utility
1 Using [ ^-l and Q , select [Exit] menu and then press [Enter!
Windows will start.
When the password has been set, it will be necessary to input the password before Win
dows can start up.
.(note)------------------------------------------------------------------------------------------
Key Operations ( FI ] :To display the “General help” file.
( Enter ) :To display sub-menu.
:To display [Exit] menu.
0® :To move among the menus.
0© :To move among the items.
:To move among the values.
49
Page 50

Setup Utility
Main Menu
1 Select [Main] menu with [ ^ I [ -» I keys
■ It is possible to confirm the current capacity of the memory and the BIOS ver
sion.
It is possible to confirm the date and time set on the computer. It ¡s
also possible to change the settings.
Changing the system time/datc
(D PressCT) CT] and move the cursor to the item.
(1) Press CM) and match the cursor to each item for [HH:MM:SS]
and [MM:DD:YY], and then pressCF5) (to go back) orCF6) (to
proceed).
--------------------------------
Security Menu
-BIOS Version:
System Time:
System Date: [xx/xx/xxxx] —
■System Memory: xxxxx KB
Primary Master: xxxxMB
Secondary Master: DVD Drive
This protects the start up of the computer and the start up of the setup utility with a password.
Vx.xxLxxx
[xx:xx:xx]
-----------
The left example shows
the default settings (fac
tory condition).
1 Using [ <-1 and i -► 1, select [Security] menu
2 Set the User Password
(T) Enter your password at the [Enter New Password], then press [Enter],
Re-enter your password at the [Confirm New Password], then press [Enter].
3 At the [Setup Notice], press [Enter]
50
r
Your password will not be displayed on the screen.
Do not forget your password. If a password is forgotten, you will be unable to use
your computer. Contact Panasonic at 1-800-272-7033.
Xnote>
Start up when the password is set
The computer asks for the password as shown below for the start up of the com
puter or the start up of the setup utility. Input the password.
The password should be written down somewhere just in case it is forgotten. There
is no method to release a forgotten password.
Enter your password [
After three ineorrect input attempts,
The computer powers off.
The computer returns to the hibernation mode, if it had resumed from the hiberna
tion mode.
Page 51

List of Error Codes
After a hardware (or some other) error has occurred, the “POST Startup Error(s)” screen appears during system startup and an
error code (see below) is displayed.
If a message with an asterisk (*) mark is displayed, run the Setup Utility and try restarting the computer. Then, run the Setup
Utility again and make your desired settings.
If a message without an asterisk (*) mark is displayed, write down the message and contact Panasonic at 1-800-272-7033.
0200 Failure Fixed Disk
Fixed disk in not working or not configured properly. Run the Setup Utility and check that the hard disk capacity is displayed at [Primary Master], If the
[None] is displayed, disk error is occurred,
0210 Stuck key
Stuck key on keyboard. Confirm the keyboard is connected to the computer and that a key is not being held down.
0211 Keyboard error
Keyboard not working. Confirm the keyboard is connected to the computer and that a key is not being held down.
0212 Keyboard Controller Failed
Keyboard controller failed test. May require replacing keyboard controller,
0213 Keyboard locked - Unlock key switch
Unlock the system to proceed. Confirm the keyboard is connected to the computer and that a key is not being held down.
0230 System RAM Failure at offset: n/in/i
System RAM failure at offset imnn of in the 64k block at which the error was detected. If you installed RAM module, remove the RAM module and
reinstall it.
0231 Shadow RAM Failure at offset : twnrt
Shadow RAM failure at offset nnnn of the 64k block at which the error was detected. If you installed RAM module, remove the RAM module and reinstall
it.
0232 Extended RAM Failed at offset: nnnn
Extended memory not working or not configured properly at offset nnnn.
*0251 System CMOS checksum bad - Default configuration used
System CMOS has been corrupted or modified incorrectly, perhaps by an application program that changes data stored in CMOS.
The BIOS installed Default SETUP Values. If you do not want these values, enter Setup and enter your own values, if the error persists,
check the system battery or contact Panasonic.
0260 System timer error
The timer test failed. Requires repair of system board.
0270 Real time clock error
Real-time clock fails BIOS test. May require board repair.
*0280 Previous boot incomplete - Default configuration used
Previous POST did not complete successfully. POST loads default values and offers to run Setup. If the failure was caused by incorrect values and they
are not corrected, the next boot wall likely fail.
02D0 System cache error - Cache disabled
Contact Panasonic at 1-800-272-7033.
02F0: CPU ID:
CPU socket number for Multi-Processor error.
02F4: EISA CMOS not writable
ServerBIOS2 test error: Cannot write to EISA CMOS.
02F5: DMA Test Faijed
ServerBIOS2 test error: Cannot write to extended DM A (Direct Memory Access) registers.
02F6: Software NMl Failed
ServerBIOS2 test error: Cannot generate software NMI (Non-Maskable Interrupt).
02F7: Fail - Safe Timer NMI Failed
ServerB10S2 test error; Fail-Safe Timer takes too long,
device address Conflict
Address conflict for specified device. If yon installed a PC Card, remove the PC Card and reinsert it. Following the procedures for "Stopping” a PC Card.
Invalid System Configuration Data
Problem with NVRAM (CMOS) data. NVRAM means ‘Non-Volatile RAM’.
I/O device IRQ conflict
I/O device IRQ conflict error.
Operating System not found
Operating system cannot be located on drive C:. Enter Setup and see if fixed disk and drive A; are properly identified.
Parity Check 1 nnnn
Parity error found in the system bus. BIOS attempts to locate the address and display it on the screen. If it cannot locate the address, it displays ????,
Parity is a method for checking errors in binary data, A parity error indicates that some data has been corrupted.
Parity Check 2 nnnn
Parity error found in the I/O bus. BIOS attempts to locate the address and display it on the screen. If it cannot locate the address, it displays ????,
51
Page 52

Dealing With Problems
When a problem occurs, refer to this page.
If you still cannot troubleshoot the problem, contact Panasonic at 1-800-272-7033.
# When the display freezes
When the display freezes while an application is running, close the application with the
following procedure. However, the contents of all work that were not saved will be lost.
<When the keyboard and mouse work>
0 Press rctrD + (3D + (BE)
The [Close Program] window is displayed. It may take time before the window is
displayed depending on the application. If there is no display after a period of 30 sec
onds, proceed to Step
(D Click the application for which [No response] is shown from the list of
applications, and then click [End Task}.
(3) When the confirmation message for “Close” appears, click [Close].
The selected application will be forcefully closed. It may take about 20 to 30 seconds
until the application is closed.
0
.
0
If the [Close Program] window is not displayed or the application^
cannot be ciosed after a period of more than 30 seconds, press [ Ctrl ]+
__________
(3D +1 Del) again.
The computer will restart.
If the computer does not restart even after pressing fctrD + caD + fPin two or
three times, press the reset button below), or turn the power oft', and then turn it
back on several seconds later. Please note that you will loose all unsaved data in the
applications that were running at the time of the freeze.
<When the keyboard and/or mouse does not work>
With a dull pointed object, press the reset button.
(Do not use an implement that bends/breaks easily like a
pencil.)
The computer will be forcefully shut down.
After the computer shut down, turn it on again.
Xnote>
To prevent the erroneous execution of an application
Confirm that there is enough free space on the hard disk.
When a lot of applications arc open, close those applications that arc unnecessary.
Be sure to click within the appropriate frame.
If the Microsoft ScanDisk program runs
After an application is forcefully closed or the computer is restarted, there arc cases
where the screen becomes blue and the scandisk program executes. The Microsoft
ScanDisk program functions to check Windows and the state of the hard disk. If an error
is found by the Microsoft ScanDisk program, follow the on-screen message.
______ _________
~N
52
Page 53

Troubleshooting Suggestions
Starting Up
The computer cannot be
started up
The date and time are incor
rect
You forgot the password
[POST Startup Error(s)l is
displayed
i Is the AC cord properly connected to the power terminal of the computer and/or a power
outlet?
i Try restarting the computer after pressing the reset button in the computer OFF state. In
this case, the Microsoft ScanDisk program may automatically run to detect errors on the
hard disk. Follow the on-screen instructions.
► Try removing and then reinserting the AC cord of the computer and restart the computer.
> Confirm that access to the hard disk is possible.
<Confirmation mcthod>
0 Set Product Recovery CD-ROM into the DVD-ROM drive.
(2) Restart the computer.
0 In the lower right of the display, when
Press <F2> to enter Setup
Press <ESC> to enter Boot First Menu
is displayed, press CUE).
0 Select [2. DVD Drive] and then press ( Enter ].
0 Select [4. Close],
® When “A:\>” is displayed, input “c:” and press C Enter ].
■ When “C:V’ is displayed,
there is a possibility that a file necessary to start Windows up is corrupt. It is possible to
, return the hard disk to factory condition by performing reinstallation with the procedure
proposed in this manual. However, please understand that all data, applications or pro
grams will no longer be used and may need to reinstall.
• When ‘'C:\” is not displayed,
consult with the retailer that you purchased the computer from or Panasonic at 1-800272-7033.
You can set the date and time through [Date/Time] in [Start] - [Settings] - [Control Panel].
If you continue to experience problems, the internal battery maintaining the clock may need
to be replaced. Contact Panasonic at 1-800-272-7033.
Contact Panasonic at 1-800-272-7033.
page 51
____
Operations
Computer hangs
The display becomes com
pletely dark
The computer is not output
ting any sound
i\o sound is output from the
optical digital audio output
terminal
MIDI sounds cannot be out
put
A file can no longer be
played using the Windows
Media Player
• Select [Restart] in [Start] - [Shut Down].
• Refer to [When the display freezes] on page 52 and restart the computer.
• After powering down by pressing the power switch for more than four seconds, press the
power switch to power on and open the application again.
If the program no longer works normally, go to [Start] - [Settings] - [Control Panel] - [Add/
Remove Programs] to delete the program. Then, try installing the program once again.
The power of the display may automatically switch OFF with the Pow'er Management func
tion. Refer to page 21 on measures to take.
• Is the sound volume set to the minimum level or has [Mute All] been set for [Volume
Control] in ^ on the taskbar
• Confirm that the sound setting in the application software is correct.
Confirm that is not on the left side of [OFF] or [ON (Direct)] at [Digital Output] of
[YAMAHA DS-XG Audio Config], (0"pagc 23)
When a USB-compatible speaker is used, MIDI sounds will fail to be output when the USB
speaker is removed and then reinstalled (while the computer is ON) or when the computer
resumes from the standby state. In such cases, MIDI sounds can be output by restarting the
computer.
If the sleep button is pressed or the computer is made to forcefully enter the standby state via
the system standby setting in [Power Management] while a file is being played using the
Windows Media Player, the file may no longer be played properly when the computer re
sumes.
53
Page 54

Troubleshooting Suggestions
Operations
The taskbar disappears
# Hibernation Function
Impossible to enter the hi
bernation mode
• Confinn that [Auto hide] setting is off, the taskbar was not resized or the taskbar was not
moved to the side of the display.
• The taskbar can be made to aooear bv switching to the taskbar bv oressine (Alt ] + (Tab ).
• Even though the taskbar is set to [Always on top], a window may be displayed in front of
it.
Close all applications and try the hibernation function again. If you continue to experi
ence problems, restart the computer and try hibernation function again.
Reinstall [Advanced Power Management] with the following procedure.
0Click [Start] - [Settings] - [Control Panel], and then double click [System].
©Click [Device Manager], select [Advanced Power Management Support] in [System
Devices], and then click [Remove].
©When the confirmation message appears, click [OK], and then click [Yes] to restart the
computer.
©Double click [Add New Hardware] in [Control Panel].
©Click [Next] in the [Add New Hardware Wizard] screen and then click [Next] again.
©Select [No, the device isn’t in the list] and then click [Next].
©Select [Yes (Recommended)] and then click [Next].
©Click [Next].
©Click [Details], confirm the display of the [Advanced Power Management Support]
message, and then click [Finish],
©Restart the computer.
Display
The screen has disappeared • The power of the display may switch off with the Power Management function. In such
cases, press any key or move the mouse to return to the original display.
• The computer may enter the hibernation mode with the Power Management function. In
such cases, press the power switch to return to the original display.
An afterimage appears(i,e.,
green, red, and blue dots
remain on the display) or
there are dots not display
ing the correct colors
The motion of the mouse
cursor is not smooth
If an image is displayed for a prolonged period of time, an afterimage may appear. This is
not a malfunction. The afterimage will disappear when a different screen is displayed.
High-precision and advanced technologies are necessary in the production of color liquid
crystal displays (color LCDs). Therefore, if 0.002 % or less of the picture elements cither
fail to light or remain constantly lit (that is, more than 99.998 % of elements are functioning
properly), no defect is considered to exist.
Select [Start] - [Settings] - [Control Panel] - [Mouse] - [Motion] and add the check mark for
[Show pointer trails].
Character Input
Unable to input anything
but numerals
Only capital letters are be
ing input
How to input European
characters (B, it, 0 or sym
bols or Euro Currency Sym
bol is unclear
If NumLk are on, the Numeric Kev Pad is ON. To switch it OFF, cress ( NumLk).
If CaosLock is on. the Cans Lock function is ON. To switch it OFF. oressC Caps Lock ).
Select [Start] - [Programs] - [Accessories] - [System Tools] - [Character Map]. The Charac
ter Map will be displayed. Point to the desired font name and select it.
54
Page 55

Disk Operations
Cannot read/write to a
floppy disk
Unable to read/write to the
hard disk
A CD or DVD cannot be
ejected
• Has the floppy disk drive been correctly connected?
• Has the floppy disk been correctly formatted?
• Your floppy disk content may be corrupted.
• Is the floppy disk write-protected?
• Your drive or file may not have been properly set.
• Check to see if the hard disk is full. If it is full, delete unnecessary files.
• Your hard disk content may be corrupted. Contact Panasonic at 1 -800-272-7033.
Is the computer ON? To eject a disc when the
computer is OFF, insert the eject pin (included)
intO'the recessed manual disc eject button and
pull out the tray.
Recessed Manual Disc Eject Button
DVD-ROM indicator lamp
(@) does not light
A CD or DVD disc cannot
he played or read
A blue background appears
on the screen with the
MPEG image
The vibration of the DVDROM drive is large
The DVD-ROM drive can
not be used in the MS-DOS
mode
Is the disc properly set on the tray?
Is the disc deformed? Or, are there marks or dirt on the disc?
If there is dirt on the disc, clean the disc (q= page 24).
Did you open the DVD-ROM drive or remove the disc while it was operating?
Re-insert the disc and close the DVD-ROM drive. Press C Enter ) .
Are you using a deformed disc or a labeled disc?
When using the DVD-ROM drive in the MS-DOS inode, add the necessary driver with
the following procedure.
1 Select [Start] - [Shut Down],
2 Select [Restart in MS-DOS mode] and click [OK],
3 Open the “CONFIG.SYS” file for editing by issuing the following commands:
cd \ (EnteO
edit config.sys C Enter)
4 Move the cursor to the line containing “OAKCDROM.SYS” and delete the characters
“rem” at the beginning of the line. (Deleting “rem” causes the item to become valid.)
DEVICEHIGH-C:\WINDOWS\COMMAND\OAICCDROM.SYS /D:MSCD000
(If this line is missing, add it.)
_____ __________________
5 Press CHD+CEi , then CE) to save the file. Then press CSD+CD , then CD to exit
the Edit program.
6 Follow the same steps to edit the “AUTOEXEC.BAT” file,
edit autoexec.bat C Enter)
7 Move the cursor to the line containing “MSCDEX.EXE” and delete the characters "rem"
at the beginning of the line. (Deleting “rem” causes the item to become valid.)
LOADHIGH C:\WINDOWS\COMMANDVMSCDEX.EXE /DiMSCDOOO /L:L
(If this line is missing, add it.)
6 Press CM) +CD , then CD to save the file. Then press CM)+Cf) , then CD to exit
the Edit program. ______
9 Restart the computer by pressing CM) + rctrD + fpin.
__________ _________
_____ __________________
Communication
Unable to connect to the
telephone line
# Network
Unable to connect to a net
work
• Confirm that the connection between the modem and the telephone line is correct.
• Confirm that the correct type of telephone line has been set.
• Are the communication settings correct?
• When using the computer as a network computer, additional settings may need to be set
depending on the usage conditions. Ask your system administrator or the person in eharge
of the network.
• The computer must be restarted if hibernation mode is entered.
55
Page 56

Troubleshooting Suggestions
Connecting Peripherals
USB device does not work
An error occurs during a
resume operation from the
hibernation mode when a
device is connected to the
USB root hub.
Unable to print
Mouse does not work Confinn that there is a proper connection with the USB port.
The address map for IRQ,
I/O Port address, etc. is un
clear
A PC Card does not work • Make sure the card is properly inserted.
A PC Card does not work
after resuming from the hi
bernation mode
• Confirm that there is a proper connection with the USB port.
• When connecting a new USB device, be sure to run the USB registry update tool by
following the procedure on page 28.
• For USB devices with a power switch, confirm that the switch has been turned on.
• Make sure a driver is installed.
• Contact the manufacturer of the product.
• Some USB devices can only be connected to the USB root hub (q> page 28).
Be sure to read page 28 when a device is connected to the USB port.
• Confinn that there is a proper connection with the USB port.
• Make sure the printer is on.
• Make sure the printer driver is properly installed.
• Some USB devices can only be connected to the USB root hub (о= page 28).
Check the address map by going to [View Resources] in [Start] - [Settings] - [Control Panel]
- [System] - [Device Manager] - [Computer] - [Properties].
• Confirm that the card conforms to the PC Card Standard.
• Note that after a driver is installed, the computer must be rebooted.
• Read the PC Card’s manual. Or, you may need to call the manufacturer of the PC Card.
• Try removing/reinserting the PC Card by following the proper procedure.
(O' page 31)
When the computer enters the hibernation mode while a PC Card is inserted and then re
sumes from the hibernation mode, the PC Card may fail to work properly thereafter. In such
cases, try removing/reinserting the PC Card by following the proper procedure.
(O page 31)
System File Checker
The message [System File
Checker identified that the
following file may be cor
rupted] appears
Microsoft Corporation has announced that, with a computer in which Internet Explorer 5.01
is installed, if the [System File Checker] from the [Tools] menu in [Start] - [Programs] -
[Accessories] - [System Tools] - [System Information] is executed, the following may
occur,
•The message [System File Checker identified that the following file may be corrupted]
may appear for following normal files:
SETUPX.DLL MSCAT32.DLL MSSIP32.DLL SOFTPUB.DLL
CRYPTUl.DLL CRYPTNET.DLL CRYPTEXT.DLL MSOSS.DLL
MSSIGN32.DLL
• In such cases, there is the possibility that the system will become unstable if the file is
repaired with the System File Checker.
In this computer, since Internet Explorer 5.01 is the default browser, if the above message
[System File Checker identified that the following file may be corrupted] appears for a
normal file, select [Ignore] and then press [OK]. Thereafter, do not use the System File
Checker.
56
Page 57

Reinstalling Software
When the contents on the hard disk have been corrupted, it is possible to return the computer to
close to the conditions at time of purchase.
r
When the hard disk is reinstalled, the application programs and data you installed will be
erased. Be sure to back up all programs and data beforehand._____________________________________________^
Before Reinstallation
'note>
If data on your hard disk is compressed, uncompress the data.
When compressed files cannot be uncompressed because Windows cannot be started up,
select [1. Restore the whole HDD to factory default] in Step 3 of “Reinstallation” (below).
7
Turn the computer on
Reinstallation
2
When [Press <F2> to enter SETUP] message is displayed, press
ni Set the Product Recovery CD-ROM in the DVD-ROM drive
4 Restart the computer by pressing [ Ctrl) + [ Alt] + (Del ]
7
When the [Panasonic] logo is displayed in the center of the screen, press Î Esc]
2 Select [2. DVD Drive] using the m and CE) keys from the
[Startup menu], and then press Î Enter]
3 Make a selection from the menu
• To restore all contents of the hard disk to factory default, including the partition
setting(s):
Select [1. Restore the whole HDD to factory default].
(When changing the partitions from the factory set partitions, be sure that the C drive
partition is set to over 2 GBytes.)
• To restore the hard disk (C drive) to factory default, excluding the partition
setting(s):
Select [2. Restore the drive C to factory default].
• To stop the reinstallation:
Select [3. End].
57
Page 58

Reinstalling Software
At the confirmation message “[Y,N]?” press (Y)
The operations of “format” and “restore” for the hard disk start automatically. (The op
erations take about one hour.)
When the reinstallation completes, the following message will appear on the display.
All data on the whole HDD has been restored to the factory default.
After removing Product Recovery CD-ROM, restart the computer
and set up Windows again.
Remove the Product Recovery CD-ROM, then close the tray
Restart the computer by pressingf Ctrl ] + [Alt] + [ Del 1, and
perform the setup procedure for Windows by following the in
structions on the screen (g* page 14)
58
Page 59

LIMITED USE LICENSE AGREEMENT
THE SOFTWARE PROGRAM(S) {"PROGRAMS") FURNISHED WITH THIS PANASONIC® PRODUCT ("PRODUCT")
ARE LICENSED ONLY TO THE END-USER ("YOU"), AND MAY BE USED BY YOU ONLY IN ACCORDANCE WITH
THE LICENSETERMS DESCRIBED BELOW.YOUR USE OFTHE PROGRAMS SHALL BE CONCLUSIVELY DEEMED
TO CONSTITUTE YOUR ACCEPTANCE OF THE TERMS OF THIS LICENSE.
Matsushita Electric Industrial Co., Ltd. ("MEI") has developed or othenwise obtained the Programs and hereby licenses
their use to you. You assume sole responsibility for the selection of the Product (including the associated Programs) to
achieve your intended results, and for the installation, use and results obtained therefrom.
LICENSE
A. MEI hereby grants you a personal, non-transferable and non-exclusive right and license to use the Programs in
accordance with the terms and conditions stated in this Agreement. You acknowledge that you are receiving only
a LIMITED LICENSE TO USE the Programs and related documentation and that you shall obtain no title,
ownership nor any other rights in or to the Programs and related documentation nor in or to the algorithms,
concepts, designs and ideas represented by or incorporated in the Programs and related documentation, all of
which title, ownership and rights shall remain with MEI or its suppliers.
B. You may use the Programs only on the single Product which was accompanied by the Programs.
C. You and your employees and agents are required to protect the confidentiality of the Programs. You may not
distribute or otherwise make the Programs or related documentation available to any third party, by time-sharing
or otherwise, without the prior written consent of MEI.
D. You may not copy or reproduce, or permit to be copied or reproduced, the Programs or related documentation
for any purpose, except that you may make one (1) copy of the Programs for backup purposes only in support of
your use of the Programs on the single Product which was accompanied by the Programs. You shall not modify,
or attempt to modify, the Programs.
E. You may transfer the Programs and license them to another party only in connection with your transfer of the
single Product which was accompanied by the Programs to such other party. At the tirne of such a transfer, you
must also transfer all copies, whether in printed or machine readable form, of every Program, and the related
documentation, to the same party or destroy any such copies not so transferred.
F. You may not remove any copyright, trademark or other notice or product identification from the Programs and
you must reproduce and include any such notice or product identification on any copy of any Program.
YOU MAY NOT REVERSE ASSEMBLE, REVERSE COMPILE, OR MECHANICALLY OR ELECTRONICALLY TRACE
THE PROGRAMS, OR ANY COPY THEREOF, IN WHOLE OR IN PART.
YOU MAY NOT USE, COPY, MODIFY, ALTER, OR TRANSFER THE PROGRAMS OR ANY COPY THEREOF, IN
WHOLE OR IN PART, EXCEPT AS EXPRESSLY PROVIDED IN THE LICENSE.
IF YOU TRANSFER POSSESSION OF ANY COPY OF ANY PROGRAM TO ANOTHER PARTY, EXCEPT AS PERMIT
TED IN PARAGRAPH E ABOVE, YOUR LICENSE IS AUTOMATICALLY TERMINATED.
TERM
This license is effective only for so long as you own or lease the Product, unless earlier terminated. You may terminate
this license at any time by destroying, at your expense, the Programs and related documentation together with all
copies thereof in any form. This license will also terminate effective immediately upon occurrence of the conditions
therefor set forth elsewhere in this Agreement, or if you fail to comply with any term or condition contained herein. Upon
any such termination, you agree to destroy, at your expense, the Programs and related documentation together with all
copies thereof in any form.
YOU ACKNOWLEDGETHATYOU HAVE READ THIS AGREEMENT, UNDERSTAND IT AND AGREE TO BE BOUND
BY ITS TERMS AND CONDITIONS. YOU FURTHER AGREE THAT IT IS THE COMPLETE AND EXCLUSIVE STATE
MENT OF THE AGREEMENT BETWEEN US, WHICH SUPERSEDES ANY PROPOSAL OR PRIOR AGREEMENT,
ORAL OR WRITTEN, AND ANY OTHER COMMUNICATIONS BETWEEN US, RELATING TO THE SUBJECT MAT
TER OF THIS AGREEMENT.
59
Page 60

Installing Windows 98 Related Files
Follow the steps below if you want to install the files in the following folders (not installed at
the factory).
\add-ons \tools \drivers
A sufficient amount of free space in the C drive of the hard disk is neecssary to install the files.
1 Install the driver to use the DVD-ROM drive in the MS-DOS mode
(G= page 55)
2 Turn the computer on
3 If the [Panasonic] logo disappears, immediately press C Ctrl ] key
(until the menu is displayed)
Xnote)-
I
[f the Wir[f the Windows desktop display appears, reboot the computer.
4
Select [Command prompt only]
J
Set the Product Recovery CD-ROM in the DVD-ROM drive
5
After C:\>, type in the following
6
L:\ENVADDFILE C Enter)
Xnote>
[L:] is the character assigned for the DVD-ROM drive. You may make a change
depending on the usage conditions of the computer.
X
________________________________________________________________
Follow the on-screen instructions
With the above command, the files will be installed in the [C:\util\win98add] folder.
_
60
Page 61

Specifications
Main Specifications
Model No.
CPU
Memory (Expandable to)*'
Video Memory
LCD Type
Displayed Colors*^
Hard Disk Drive (including about 200 mb used
specifically by the system)
*’ Usage limited to a synchronous DRAM or self-refresh module.
A 16 M color display on the LCD is achieved by using the FRC function,
*31 GB = 10® bytes
Other Specifications
Keyboard
Pointing Device
External Floppy Disk Drive
DVD-ROM Drive
Siots
interface
internai Modem
internal Microphone
Speaker
Sound
Software
Power Supply Unit (buiit in)
Power Consumption
Physicai Dimensions (W X H X D)*®
Weight
Operating temperature/
Humidity range
CF-E1M
Intel® Celeron^'^ Processor 400 MHz
L1 Cache Memory: 64 KB L2 (Second) Cache Memory: 128 KB
64 MB (192 MB Max.)
4 MB
15.0 Type (TFT) XGA
262144 colors (1024 X 768 pixels)
6.4 GB*2
USB compatible keyboard 87 keys
USB compatible mouse with a scroll button
720 KB (2DD) / 1.44 MB (2HD)
6X DVD-ROM Drive / 32X CD-ROM Drive max. speed
PC Card Slots Type I or Type II
RAM Module Slot
Microphone Jack*'
Headphone Jack Miniature jack, 3.5 DIA
Optical Digital Audio Output Terminal XI
IEEE 1394 Interface Connector 4 pin male X2 (IEEE 1394 standards)
USB Port
Data:56 kbps (V.90 & K56flex) FAX:14.4 kbps
Monaural Microphone (built in)
Stereo Speaker X 2 (built in)
Operating System | Microsoft® Windows® 98 Second Edition
Input: 120 V AC*3, 60 Hz
Approx. 70 W*“
389 mm X 275 mm X 388 mm {15.3 ” X 10.8 ” X 15.3 ”}
Approx. 8.6 kg {Approx. 18.9 lb.}
5 °C to 35 °C (41 °F to 95 °F} / 30 % to 80 % RH (no condensation)
Allowable current (1 slot) 3.3 V: 500 mA, 5 V: 400 mA
144-pin, SO-DIMM, 3.3 V, SDRAM
Miniature jack, 3.5 DIA
4-pin Universal Serial Bus X 4 (Free: 2 port)
16 bits, 44.1 kHz PCM/FM sound (Windows Sound Systems Compatible)
Application Programs DV Capture, ImageBrowser, Movie Messenger,
1 Adobe® Acrobat 4.0, VisualBright, WinDVD™2000*^
Use only a monaural condenser microphone (miniature jack).
It is necessary to install WinDVD™2000.
AC cord is supplied with a 125 v AC compatible.
Approx. 1.2 W when the computer is OFF
This “height” is when the stand is in use.
61
Page 62

LIMITED WARRANTY
For U.S.A.
PANASONIC AV PLATFORM COMPUTER LIMITED WARRANTY
Panasonic Consumer Electronics Company {referred to as “Panasonic”) will repair this product (other than software, which is covered by a separate
warranty) with new or rebuilt parts, free of charge in the U.S.A. for one (1) year from the date of original purchase in the event of a defect in materials
or workmanship.
This warranty is extended solely to the original purchaser. A purchase receipt or other proof of date of original purchase will be required before
warranty performance is rendered.
This warranty only covers failures due to defects in materials or workmanship which occur during normal use. It does not cover damage which
occurs in shipment or failures which are caused by products not supplied by Panasonic, or failures which result from alteration, accident, misuse,
introduction of liquid or other foreign matter into the unit, abuse, neglect, installation, maladjustment of consumer controls, improper maintenance,
modification or service by anyone other than an authorized Panasonic Service Center, or damage that is attributable to acts of God.
Limits and Exclusions:
There are no other express warranties except as listed below.
PANASONIC SHALL NOT BE LIABLE FOR LOSS OF DATA OR ANY INCIDENTAL OR CONSEQUENTIAL DAMAGES RESULTING FROM THE
USE OF THIS PRODUCT, OR ARISING OUT OF ANY BREACH OF THIS WARRANTY. ALL EXPRESS AND IMPLIED WARRANTIES, INCLUD
ING THE WARRANTIES OF MERCHANTABILITY AND FITNESS FOR A PARTICULAR PURPOSE ARE LIMITED TO THE APPLICABLE WAR
RANTY PERIOD SET FORTH ABOVE. Some states do not allow the exclusion or limitation of incidental or consequential damages, or limitations
on how long an implied warranty lasts, so the above limitations or exclusions may not apply to you.
This limited warranty gives you specific legal rights, and you may also have other rights which vary from state to state. If a problem with your product
develops during the warranty period, you may contact our representatives at 1-800-272-7033. If the problem is not handled to your satisfaction,
then write to the Consumer Affairs Division at the address indicated below.
SOFTWARE LIMITED WARRANTY
Panasonic Consumer Electronics Company (referred to as “Panasonic”) warrants to you only that the disk(s) or other media on which the Programs
are furnished will be free from defects in materials and workmanship under normal use for a period of sixty (60) days from the date of delivery
thereof to you, as evidenced by your purchase receipt.
This is the only warranty Panasonic makes to you. Panasonic does not warrant that the functions contained in the Programs will meet your
requirement or that the operation of the Programs will be uninterrupted or error free.
Panasonic’s entire liability, and your exclusive remedy under this warranty shall be limited to the replacement, in the United States, of any defective
disk or other media which is returned to Panasonic’s Authorized Service Center, together with a copy of the purchase receipt, within the aforesaid
warranty period.
Anything in the foregoing to the contrary notwithstanding, Panasonic shall have no obligation for any defects in the disk(s) or other media on which
the Programs are furnished resulting from your storage thereof, or for defects that have been caused by operation of the disk(s) or other media
otherwise than on the Product or in environmental conditions other than those specified by Panasonic by alteration, accident, misuse, abuse,
neglect, mishandling, misapplication, installation, maladjustment of consumer controls, improper maintenance, modification of damage that is
attributable to acts of God. In addition, Panasonic shall have no obligation for any defects in the disk(s) or other media if you have modified, or
attempted to modify any Program.
DURATION OF IMPLIED WARRANTIES, IF ANY, IS LIMITEDTO SIXTY (60) DAYS.
PANASONIC ASSUMES NO RISK OF AND SHALL NOT IN ANY CASE BE LIABLE FOR ANY DAMAGES, INCLUDING, WITHOUT LIMITATION,
ANY SPECIAL, INCIDENTAL, CONSEQUENTIAL, OR PUNITIVE DAMAGES ARISING FROM BREACH OF WARRANTY OR CONTRACT, NEG
LIGENCE OR ANY OTHER LEGAL THEORY, INCLUDING, WITHOUT LIMITATION LOSS OF GOODWILL, PROFITS OR REVENUE, LOSS OF
USE OF THE PROGRAMS OR PRODUCTS OR ANY ASSOCIATED EQUIPMENT, COST OF CAPITAL, COST OF ANY SUBSTITUTE EQUIP
MENT, FACILITIES, SERVICES, DOWNTIME COSTS, OR CLAIMS OF ANY PARTY DEALING WITH YOU FOR SUCH DAMAGES.
Some states do not allow the exclusion or limitation of incidental or consequential damages, or limitations on how long an implied warranty lasts,
so the above limitations or exclusions may not apply to you.
This limited warranty gives you specific legal rights, and you may also have other rights which vary from state to state.
This Limited Warranty will be governed by the laws the State of New York, without regard to its conflict-oMaws rules.
* * *
To obtain service or technical assistance during the warranty period within the continental U.S.A. and Alaska;
DIAL TOLL FREE: 1-800-272-7033
To obtain support or service following the warranty period within the continental U.S.A. and Alaska:
DIAL: 1-900-555-PANA (1-900-555-7262) for fee based technical support
Correspondence requesting product information should be sent
to: Panasonic Consumer Electronics Company,
One Panasonic Way, Panazip 1D-1, Secaucus, NJ 07094
62
Page 63

63
Page 64

As an Energy star® partner, Matsushita Electric Industrial Co., Ltd. has
determined that this product meets the ENERGY STAR® guidelines for energy
efficiency.
Outline of the International ENERGY STAR® Office Equipment Program
The international ENERGY STAR® Office Equipment Program is an international program
that promotes energy saving through the use of computers and other office equipment.
The program backs the development and dissemination of products with functions that
effectively reduce energy consumption. It is an open system in which business proprietors
can participate voluntarily. The targeted products are office equipment such as computers,
displays, printers, facsimiles, and copiers. Their standards and logos are uniform among
participating nations.
Panasonic Consumer Electronics Company,
Division ot Matsushita Electric Corporation of America
One Panasonic Way
Secaucus, New Jersey 07094
©2000 Matsushita Electric Industrial Co., LTD. All Rights Reserved.
Printed in Japan
FJ0600-0
DFQX2927ZA
 Loading...