

Page 1

OPERATING INSTRUCTIONS
Basic Guide
Personal Computer
Model No. CF-D1N series
Contents
Getting Started
Introduction ................................................................. 2
Description of Parts .................................................... 4
First-time Operation .................................................... 7
Turning On / Turning Off...........................................11
Useful Information
Handling and Maintenance .......................................12
Installing Software ....................................................14
Getting StartedUseful InformationTroubleshootingAppendix
Troubleshooting
Troubleshooting (Basic)............................................18
Appendix
LIMITED USE LICENSE AGREEMENT ...................22
Specifications ...........................................................24
Please read these instructions carefully before using this product, and save this manual for future use.
Page 2
Introduction
Thank you for purchasing this Panasonic product. For optimum performance and safety, please read these instructions
carefully.
In these instructions, the names are referred as follows.
indicates Windows 10 Operating System.
indicates Windows 7 Operating System.
Terms and illustrations in these instructions
n
CAUTION
NOTE
- [All Apps] : Touch (Start) and then touch [All Apps].
(Start) - [All Programs] : Touch (Start), and then touch [All Programs]. You may need to double-touch in
: Page in these Operating Instructions or in the Reference Manual.
è
Enter
Getting Started
Ctrl
• The display of the key may be different from this manual according to the keyboard used. (e.g. “Delete” instead
of “Del”)
Some illustrations are simplified to help your understanding and may look different from the actual unit.
l
If you do not log on as an administrator, you cannot use some functions or cannot display some screens.
l
Refer for the latest information about optional products to the catalogs, etc.
l
In these instructions, the names and terms are referred as follows.
l
• “Windows 10 Pro 64-bit” as “Windows” or “Windows 10”
• “Windows
dows” or “Windows 7”
• Circular media including DVD-ROM and CD-ROM as “discs”
• DVD MULTI drive as “DVD drive”
• “Multilingual User Interface” as “MUI”
l
Screen messages are explained in [English (United States)].
(Depending on the language preference, some screen messages in these instructions are different from the actual
screen messages. For example, [Flight mode] may be displayed instead of [Airplane mode] in some language preference.)
: Conditions that may result in minor or moderate injury.
: Useful and helpful information.
some cases.
: Reference to the on-screen manuals.
: Press [Enter] key.
+ C : Press and hold [Ctrl] key, and then press [C] key.
®
7 Professional 32-bit Service Pack 1” and “Windows® 7 Professional 64-bit Service Pack 1” as “Win-
Disclaimer
n
Computer specifications and manuals are subject to change without notice. Panasonic Corporation assumes no liability for damage incurred directly or indirectly from errors, omissions or discrepancies between the computer and the
manuals.
Trademarks
n
Microsoft
and/or other countries.
®
, Windows® and the Windows logo are registered trademarks of Microsoft Corporation of the United States
2
Page 3

Intel, Core, Centrino and PROSet are either registered trademarks or trademarks of Intel Corporation.
SDXC Logo is a trademark of SD-3C, LLC.
Adobe, the Adobe logo and Adobe Reader are either registered trademarks or trademarks of Adobe Systems Incorporated in the United States and/or other countries.
Bluetooth® is a registered trademark owned by Bluetooth SIG, Inc., U.S.A. and licensed to Panasonic Corporation.
Names of products, brands, etc., appearing in this manual are trademarks or registered trademarks of their respective
own companies.
On-screen Manual
n
For further information about the computer, you can refer to the on-screen manual.
Operating Instructions - Reference Manual
l
The Reference Manual contains the practical information to help you fully enjoy the computer’s performance. Update it to the latest version for reference.
Important Battery Tips
l
The Important Battery Tips will provide you with the battery information so that you can use the battery in the optimum condition to obtain longer operation time.
Update the on-screen manuals
l
This describes the procedures to update the on-screen manual.
Operating Instructions - Connect to a network
l
This describes the connection procedures using the network devices mounted on this unit.
To access the on-screen manuals, follow the steps below.
Double-touch [Manual Selector] on the desktop, and select the on-screen manual.
Getting Started
1. Double-touch the [Panasonic PC Settings Utility] on the desktop screen, and then touch [Support] - [Manual] -
[Launch Manual Selector].
2. Select the on-screen manual.
NOTE
[Contents] tab or [Search] tab of the on-screen manuals is displayed on the left side of the window. Select tab and
l
display the desired item.
3
Page 4
I
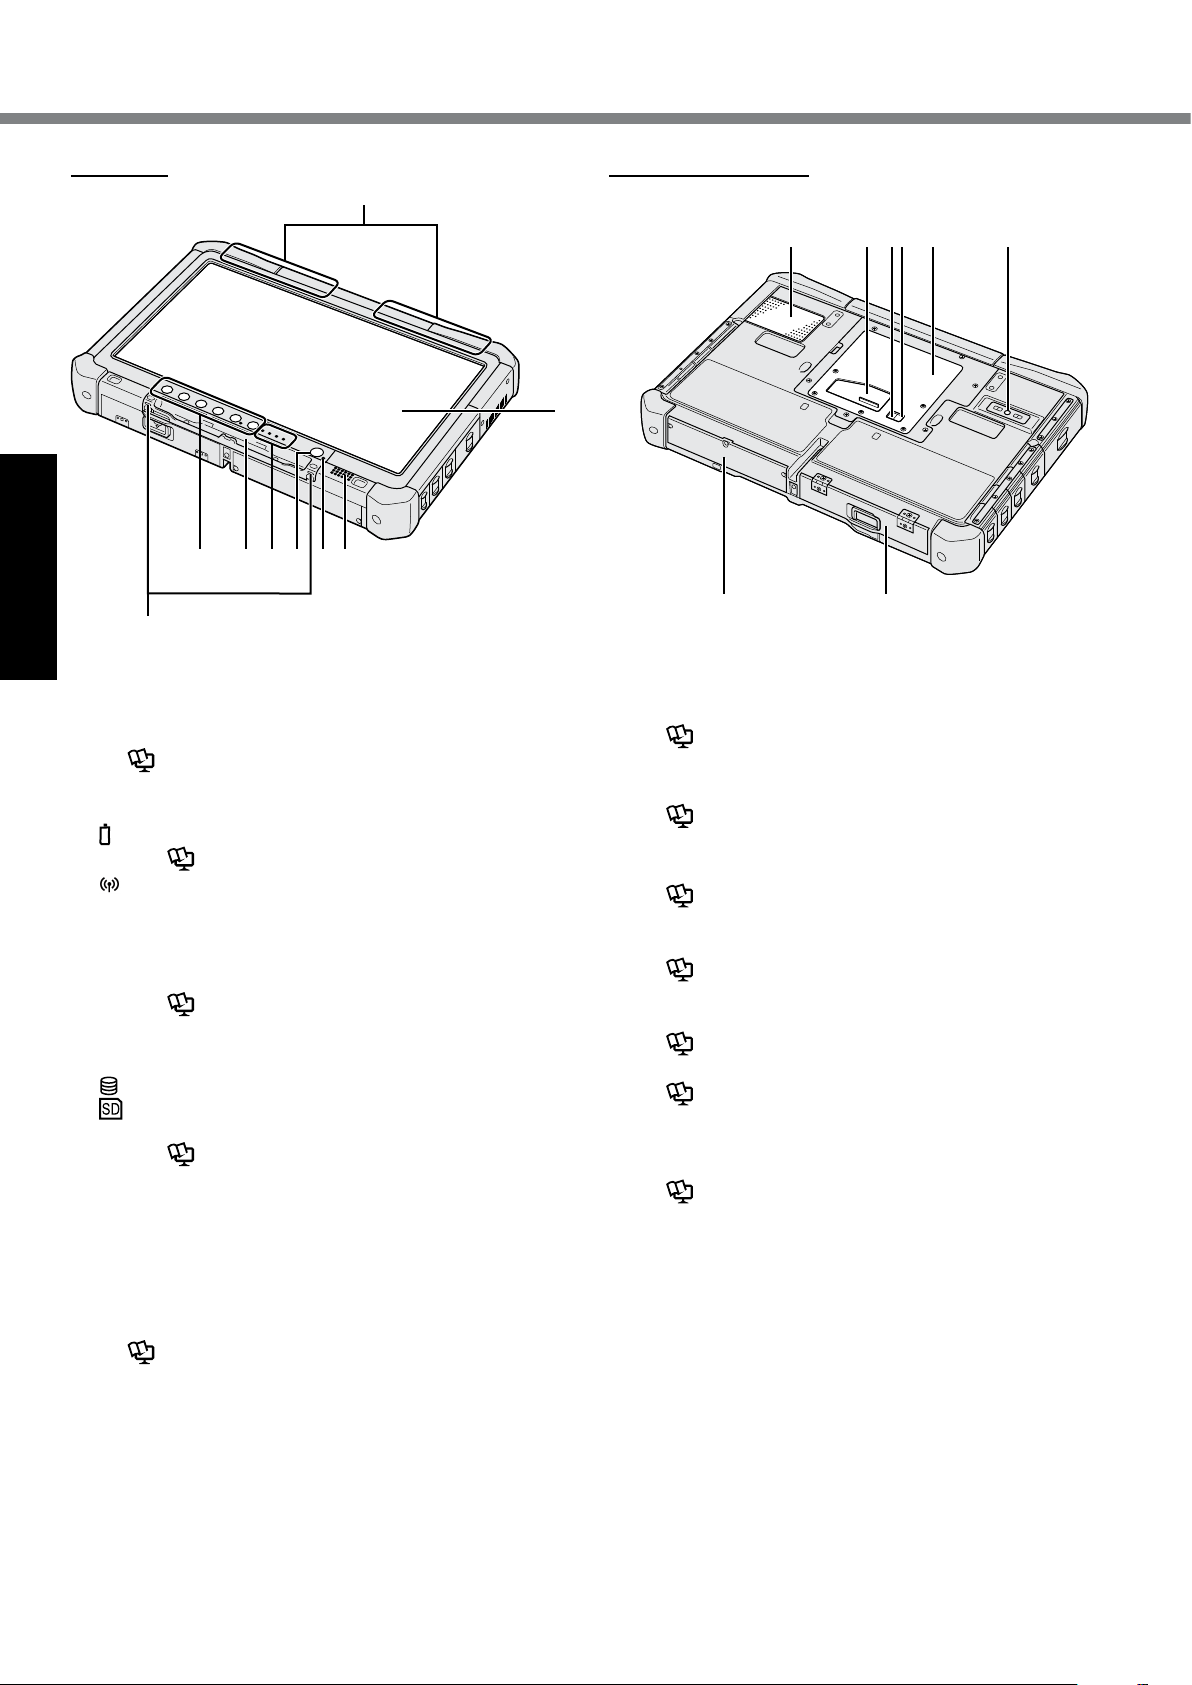
Description of Parts
Q
P O M LN
BAC D E F G
Getting Started
Bottom and rear sideFront side
H
J K
A: Tether Hooks
The tether hooks are not provided for some models.
B: Tablet Buttons
Reference Manual “Tablet Buttons”
è
C: Pen Holder
D: LED Indicator
: Battery status
Reference Manual “Battery Power”
è
: Wireless ready
This indicator lights when wireless LAN, Bluetooth, and/or Wireless WAN are connected and
ready. It does not necessarily indicate the On/Off
condition of the wireless connection.
Connect to a network “Wireless LAN”,
è
“Bluetooth”, “Wireless WAN”, “Disabling/
Enabling Wireless Communication”
: Drive status
: SD Memory Card Indicator
(Blinking: During access)
Reference Manual “SD Memory Card”
è
E: Power Switch
F: Power Status
(Off: Power off/Hibernation, Green: Power on, Blinking
green: Sleep, Blinking green rapidly: Cannot power on
or resume due to low temperature.)
G: Speaker
H: LCD
Reference Manual “Screen Input Operation”
è
I: Bluetooth Antenna
<Only for model with Bluetooth>
Connect to a network “Bluetooth”
è
Wireless WAN Antenna
<Only for model with wireless WAN>
Connect to a network “Wireless WAN”
è
Wireless LAN Antenna
<Only for model with wireless LAN>
Connect to a network “Wireless LAN”
è
J: Hard Disk Drive
K: Battery Pack
Reference Manual “Battery Power”
è
L: Rear Camera
<Only for model with rear camera>
Reference Manual “Camera”
è
M: RAM Module Slot
Reference Manual “RAM Module”
è
N: External Antenna Connector (CH1)
O: External Antenna Connector (CH2)
P: Expansion Bus Connector
Reference Manual “Cradle”
è
Q: Ventilation Hole (Intake)
4
Page 5

Right side
Parts (F) illustrated below are all optional.
Left side
N
SC
*6
M
L
K
3
*
FF
*4*
F
5
E D
A B
1
*
C C
A: DC-IN Jack
B: LAN Port
Reference Manual “LAN”
è
C: Serial Port
*1
<Only for model with serial port>
*2
<Only for model with VGA port>
è
*1
/ VGA Port
*2
Reference Manual “External Display”
D: Security Lock
A Kensington cable can be connected.
For further information, read the manual that comes
with the cable.
E: Ventilation Hole (Exhaust)
F: 4th USB Port (USB2.0)
USB2.0 Port
*3
<Only for model with 4th USB port (USB2.0)>
Reference Manual “USB Devices”
è
*4
<Only for model with 2nd LAN port>
Reference Manual “LAN”
è
*5
<Only for model with rugged USB2.0 port>
Reference Manual “USB Devices”
è
*5
*3
/ 2nd LAN Port*4 / Rugged
G: Wireless Switch
Connect to a network “Disabling / Enabling
è
Wireless Communication”
H: SD Memory Card Slot
Keep SD Memory Cards away from infants and small
children.
Reference Manual “SD Memory Card”
è
2
*
H JI
OFF ON
G
To set the wireless switch to ON,
slide and align it to the mark.
I: USB3.0 Port
Reference Manual “USB Devices”
è
J: USB2.0 Ports
Reference Manual “USB Devices”
è
K: Microphone Jack
A condenser microphone can be used. If other types
of microphones are used, audio input may not be possible, or malfunctions may occur as a result.
L: Headphone Jack
You can connect headphones or amplified speakers.
When they are connected, audio from the internal
speakers is not heard.
M: SIM Card Slot
<Only for model with wireless WAN>
Insert the SIM card into the SIM card slot with the
contact side facing downward and with the cut corner
oriented forward.
Connect to a network “Wireless WAN”
è
CAUTION
The slot accepts SIM Cards (15 mm x 25 mm).
l
Getting Started
N: Smart Card Slot
*6
<Only for model with Smart Card slot>
Reference Manual “Smart Card”
è
*6
5
Page 6
Description of Parts
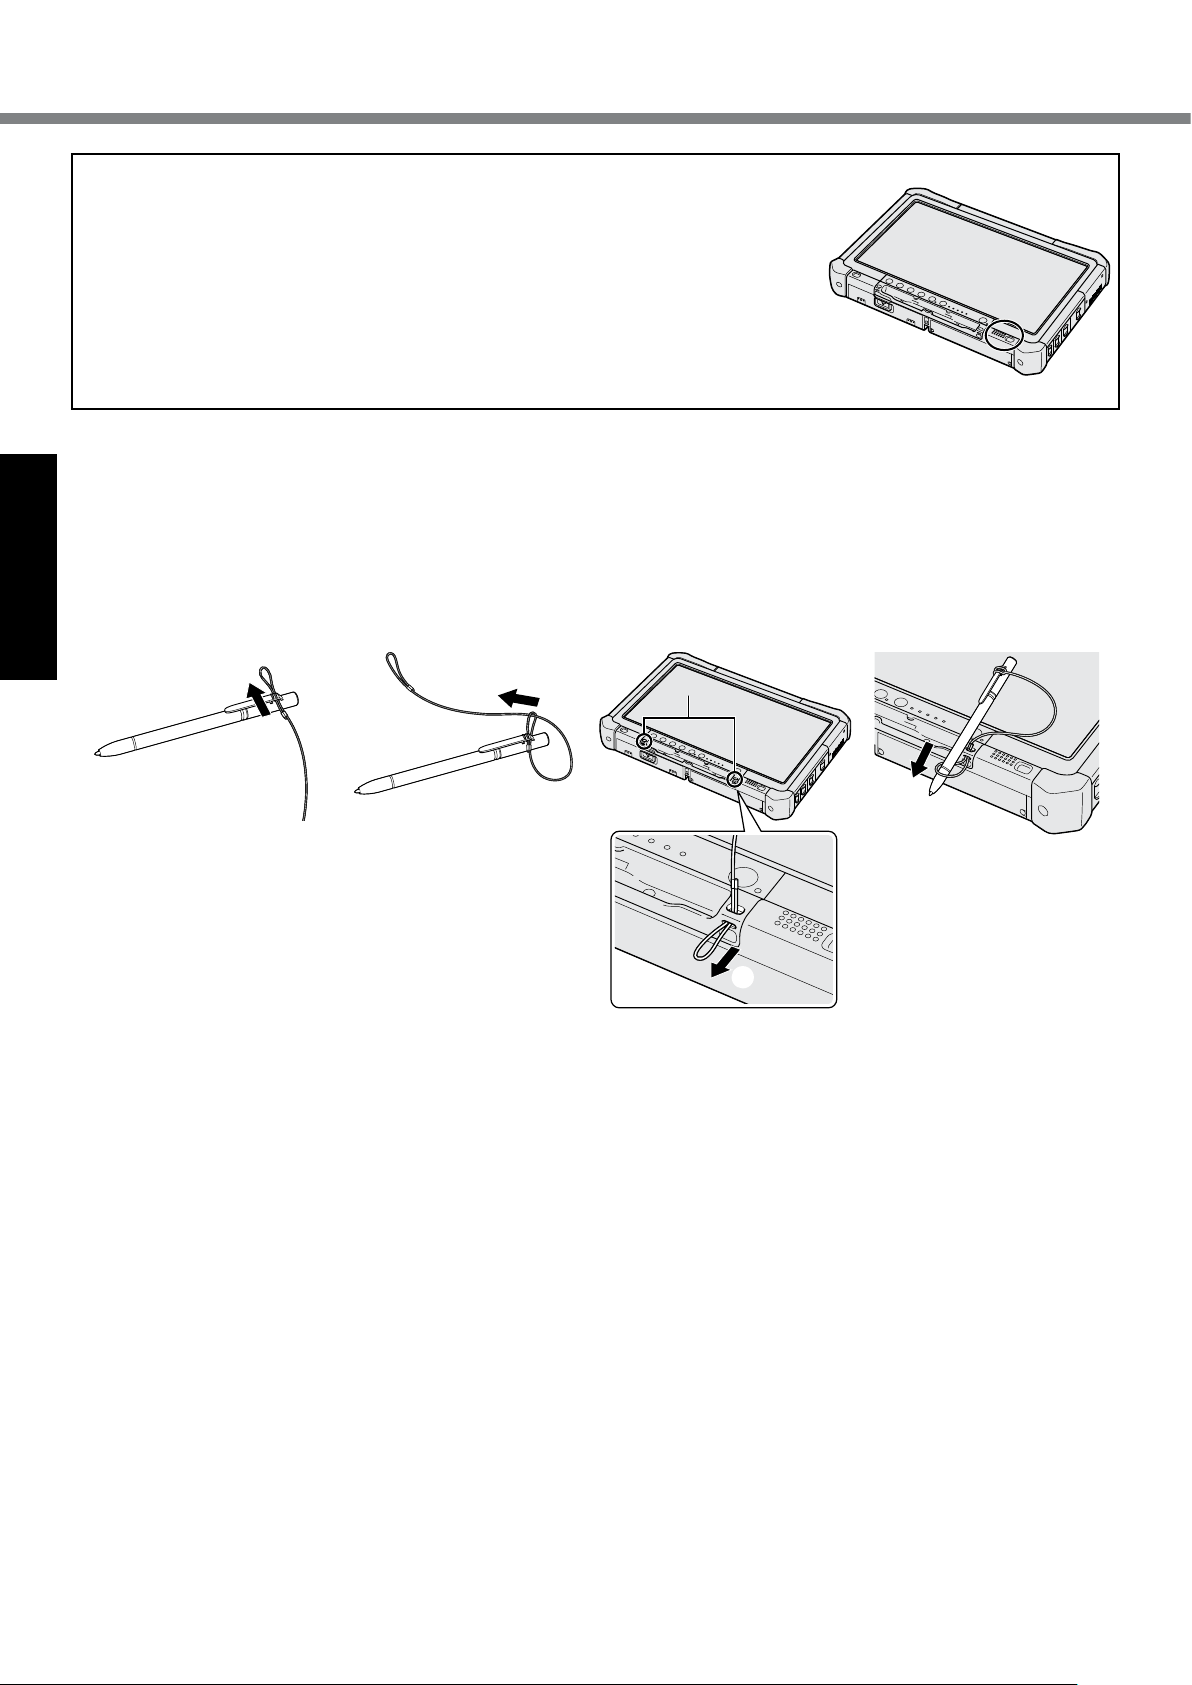
This computer contains a magnet and magnetic products at the location cir-
l
cled in the illustration at right. Avoid leaving metallic object or magnetic media
in contact with this area.
Attaching the stylus to the computer <Only for model with tether>
n
The tether prevents the stylus (included) from falling accidentally.
Use the tether to attach the stylus to the computer so you will not lose it.
There are holes (A) to attach it.
Pass one of the loops through the hole.
A
Pass the second loop on the tether through the first one.
B
Thread the second loop through the hole (A).
C
Pass the stylus through the second loop.
D
Getting Started
①
②
A
③
④
6
Page 7
First-time Operation
Preparation
n
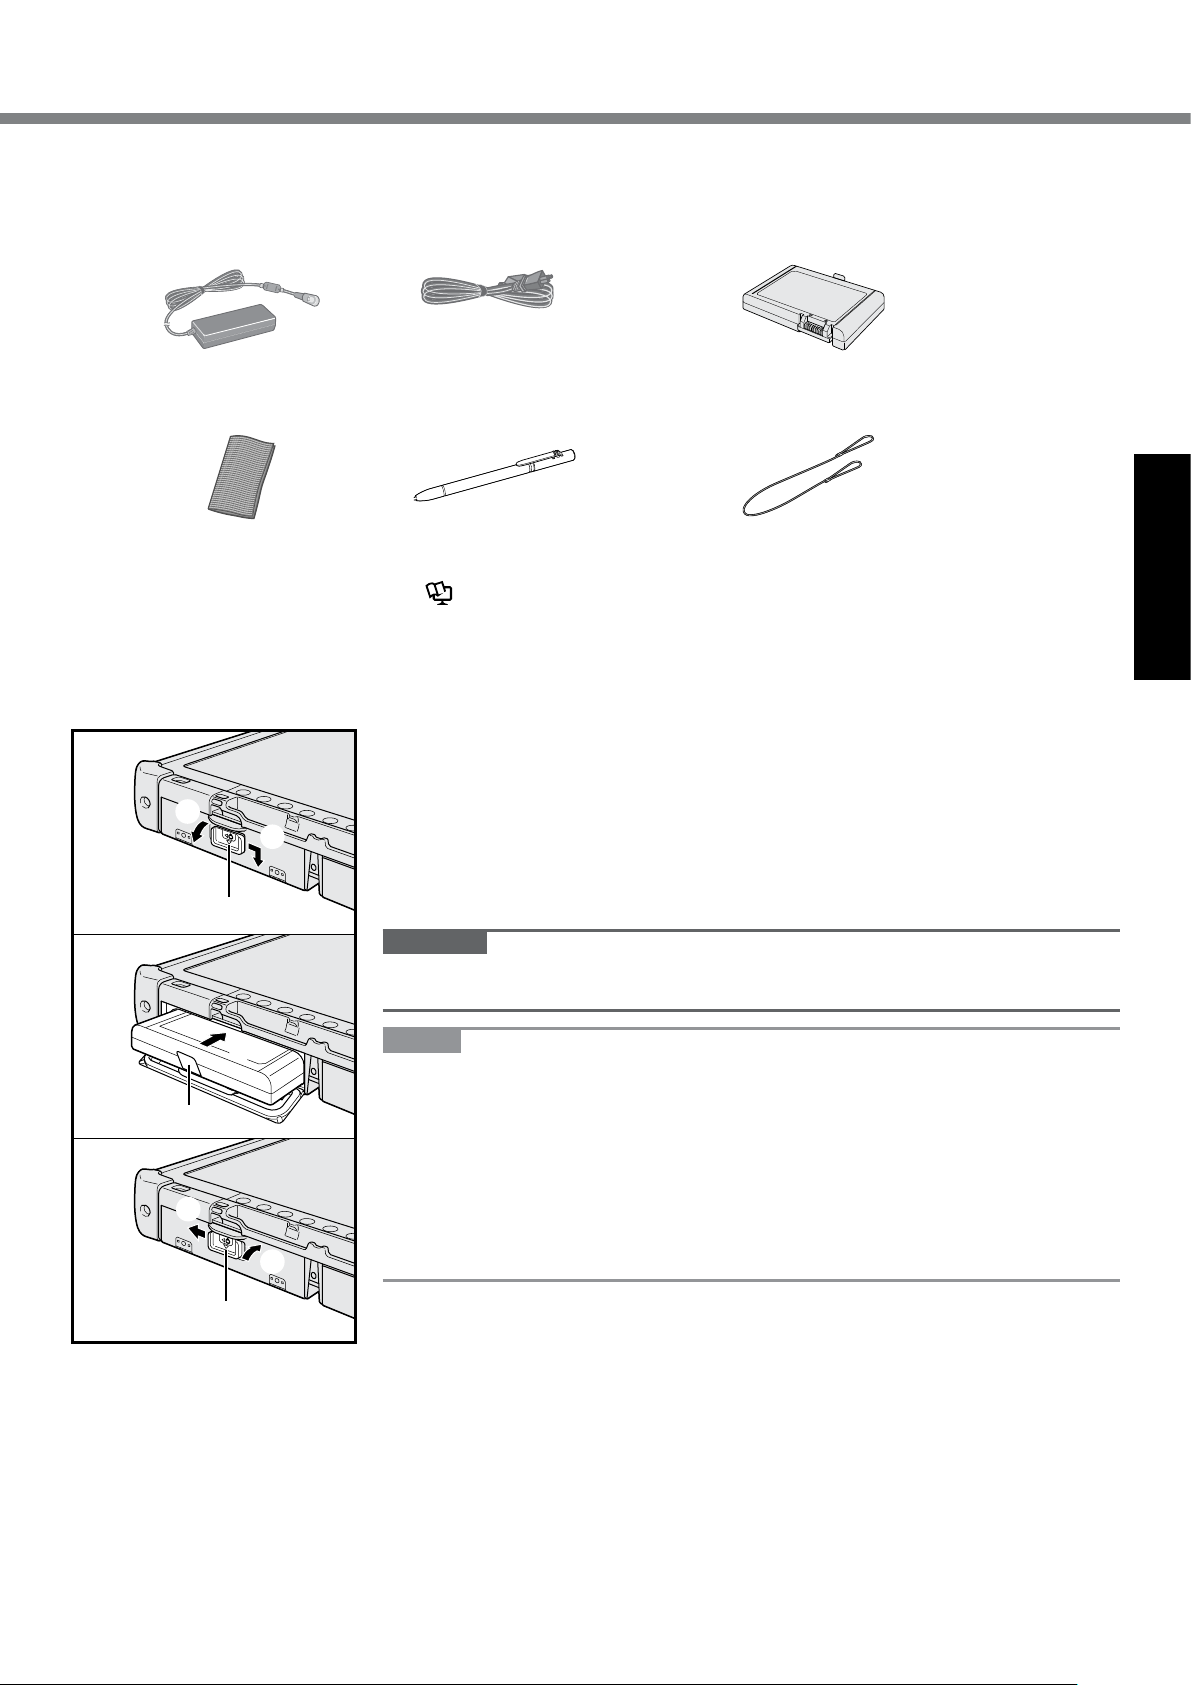
Check and identify the supplied accessories.
A
If you do not find the described accessories, contact Panasonic Technical Support.
AC Adaptor . . . . . 1
y
AC Cord . . . . . . . . . . . . . . . . .1
y
Battery Pack . . . . . . . . . . . . . . . . . . . . . . 1
y
Model No: CF-AA5713A
Soft Cloth . . . . . . . 1
y
Safety Precautions / Regulatory Information . . . . . . . . . . . . . . . . . . . . . . . . . . . . . . . . . . . . . . . . . . . . . . . . 1
y
Inserting the Battery Pack
n
②
①
A
Model No: CF-VZSU73U / CF-VZSU73SP
Stylus . . . . . . . . . . . . . . . . . . .1
y
Some models may be supplied with
a stylus different from the above.
(è
A
B
C
D
E
n
In step C above, pull the tab (B) of the battery pack.
CAUTION
l
Reference Manual “Screen Input Operation”
Slide the latch (A) in the direction of the arrow.
Open the cover.
Insert the battery pack until it securely fits the connector.
Close the cover until it clicks.
Slide the latch (A) in the direction of the arrow.
To remove the battery pack
Make sure the latch is securely locked. Otherwise the battery pack may fall
when you carry the computer.
Tether . . . . . . . . . . . . . . . . . . . . . . . . . . . .1
y
Some models may not be supplied with a tether, or
supplied with a tether different from the above.
)
Getting Started
B
⑤
③
④
NOTE
Note that the computer consumes electricity even when the computer power is
l
off. If the battery pack is fully charged, the battery will fully discharge in the following period of time:
• When power is off: Approx. 9 weeks
• In sleep: Approx. 4 days
• In hibernation: Approx. 8 days
When the DC plug is not connected to the computer, disconnect the AC cord
l
from your AC wall outlet. Power is consumed simply by having the AC adaptor
plugged into an electrical outlet.
A
7
Page 8

First-time Operation
1 Inserting the Battery Pack (è page 7)
l
l
2 Attaching the stylus to the computer (è page 6)
Do not touch the terminals of the battery pack and the computer. Doing so can
make the terminals dirty or damaged, and may cause malfunction of the battery
pack and the computer.
Be sure to attach the cover for use.
3
①
Getting Started
4
②
③
3 Connect your computer to a power outlet.
Slide the latch in the direction of the arrow.
A
Open the cover.
B
Connect the AC adaptor.
C
The battery charging starts automatically.
Slide the latch of one of the three USB ports in the direction of the arrow.
D
CAUTION
Do not disconnect the AC adaptor and do not switch the wireless switch to on
l
until the first-time operation procedure is completed.
When using the computer for the first time, do not connect any peripheral device
l
(including wired LAN cable) except the battery pack, AC adaptor, external keyboard and mouse.
Handling the AC adaptor
l
• Problems such as sudden voltage drops may arise during periods of thunder
and lightning. Since this could adversely affect your computer, an uninterruptible power source (UPS) is highly recommended unless running from the
battery pack alone.
4 Turn on the computer
Confirm the wireless switch (è page 5) is OFF.
A
Press and hold the power switch
B
CAUTION
Do not press the power switch repeatedly.
l
The computer will forcibly be turned off if you press and hold the power switch
l
for 4 seconds or longer.
Any changes from the default setting of the Setup Utility must not be made until
l
the First-time Operation is completed.
until the power indicator (A) lights.
A
5 Select language and OS (32 bit or 64 bit).
CAUTION
Carefully choose your language because you cannot change it later. If you set a
l
wrong language, you need to reinstall Windows.
NOTE
You can operate with the Tablet Buttons. Follow the instructions displayed on
l
the screen.
Select language and OS (32bit or 64bit) “Select OS” screen and select [OK].
A
The language setting will start by selecting [OK] on the confirmation screen.
The language and OS setting will be completed in about 15 minutes.
When termination screen is displayed, select [OK] to turn off the computer.
B
6 Setup Windows.
Select language and touch [Next].
8
Page 9

Turn on the computer.
Follow the on-screen instructions.
The computer restarts several times. Do not touch the touchscreen, external key-
l
board or external mouse, and wait until the drive indicator
After the computer is turned on, the screen remains black or unchanged for
l
a while. This is not a malfunction. Wait for a moment until the Windows setup
screen appears.
During setup of Windows, use the touchscreen, external mouse, external key-
l
board and clicking to move the cursor and to click an item.
Go to the next step, confirming each message on the display.
l
You can set the Wireless Network after the setup of Windows is complete.
l
If “Let’s get connected” is displayed, select [Skip this step].
“Join a wireless network” screen may not appear.
CAUTION
Wait until the drive indicator
l
You can change the user name, password, image and security setting after
l
setup of Windows.
Use standard characters as a computer name: numbers 0 through 9, uppercase
l
and lowercase letters from A to Z, and the hyphen (-) character. If the error message “The computer name is not valid” appears, check if characters other than
the above are not entered. If the error message still remains on the display, set
the key entry mode to English (“EN”) and enter characters.
Do not use the following words for user name: CON, PRN, AUX, CLOCK$, NUL,
l
COM1 to COM9, LPT1 to LPT9, LPT, &, space, @.
l
In particular, if you create a user name (account name) that includes the “@”
mark, a password will be requested at the screen, even if no password has
been set. If you try to log on without entering a password, “The user name or
password is incorrect.” may be displayed and you will not be able to log on to
Windows (è page 20).
The wallpaper for the first logon user has already been set on “6 Setup Windows.”.
l
When using this computer under the Sun, the screen becomes easily viewable
by changing the wallpaper to the white wallpaper.
Long-touch on the desktop, and touch [Personalize] - [Desktop Background].
A
Select [Solid Colors] at [Picture Location].
B
Select the white wallpaper and touch [Save changes].
C
l
When “Enable sensors” is displayed, touch [Enable this sensor].
A
When the [User Account Control] screen is displayed, touch [Yes].
B
At the [Display Rotation Tool] confirmation screen, touch [Yes].
C
The computer restarts automatically, and the setting is enabled.
Follow the steps below.
has turned off.
has turned off.
Getting Started
7
Touch
A
T
B
l
ouch
A portion of the Panasonic PC Settings Utility functions will be enabled after
the computer restarts.
Restart the computer
(Start)
(Power) - [Restart].
.
8 Update the on-screen manual
Connect to the internet.
A
dows as an administrator.
For further information, refer to OPERATING INSTRUCTIONS - Connect
to a network.
Update the on-screen manual.
B
Double-touch [Manual Selector] on the desktop.
Double-touch the [Panasonic PC Settings Utility] on the desktop screen, and then touch [Support] - [Manual] - [Launch Manual Selector].
Follow the on-screen instructions.
Sign in / Log on to Win-
9
Page 10

First-time Operation
NOTE
l
You can check the status of the computer, and change the settings. Double-touch [Panasonic PC Settings Utility] on the
desktop to start the utility. (è
PC Information Viewer
l
This computer periodically records the management information of the hard disk, etc. The maximum data volume for each
record is 1024 bytes. This information is only used for estimating the cause in the case when the hard disk goes down by
any possibility. They are never sent to outside via network nor used for any other purpose except for the purpose described the above.
To disable the function, add the check mark for [Disable the automatic save function for management information history]
in [Hard Disk Status] of PC Information Viewer, and touch [OK]. Then follow the on-screen instructions.
Reference Manual “Checking the Computer’s Usage Status”)
(
l
Getting Started
In the default settings, a shortcut icon for Korean language is on the Desktop screen. You may delete the icon if not
necessary.
l
If the recovery partition is deleted, you cannot create Recovery Disc(s).
è
Panasonic PC Settings Utility
9 Create a recovery disc
A recovery disc allows you to install OS and restore its factory default condition,
in case, the recovery partition of the HDD is damaged. We recommend creating a
recovery disc before you begin using the computer.
Refer to è
the disc.
Reference Manual “Panasonic PC Settings Utility”)
Reference Manual
“Recovery Disc Creation Utility” about creating
Before using wireless function
n
Slide the wireless switch to ON.
A
Touch
B
Set [Airplane mode] to [Off], and then;
set [Wi-Fi] to [On] (for wireless LAN).
set [Cellular] to [On] (for wireless WAN).
set [GPS] to [On] (for wireless WAN).
set [Bluetooth] to [On] (for Bluetooth).
set [GPS\GNSS] to [On] (for GPS).
About the partition structure
n
You can shrink a part of an existing partition to create unallocated disk space, from which you can create a new partition. In the default setting, you can use a single partition.
CAUTION
l
adjacent to each other in Windows 10.
Touch
A
l
Touch [Disk Management].
B
Long-touch the partition for Windows (“c” drive in the default setting), and touch [Shrink Volume].
C
l
Input the size in [Enter the amount of space to shrink in MB] and touch [Shrink].
D
l
l
Long-touch [Unallocated] (the shrunk space in the step D) and touch [New Simple Volume].
E
Follow the on-screen instructions to make the settings, and touch [Finish].
F
Wait until formatting is completed.
(Notication)atthetasktray,andthentouch (All settings) - [Network & Internet] - [Airplane mode].
Do not add or delete partitions in Windows 10, as the Windows area and recovery partition must be
To Change the partition structure
(Start) and long touch [Computer], then touch [Manage].
A standard user needs to enter an administrator password.
The partition size depends on the computer specifications.
You cannot input a larger number than the displayed size.
To select [Reinstall to the OS related partitions.] in reinstalling OS (è page 15), 70 GB or more is necessary
for [Total size after shrink in MB].
NOTE
You can create an additional partition using remaining unallocated space or newly creating unallocated space.
l
To delete a partition, long-touch the partition and touch [Delete Volume] in step C.
l
10
Page 11

Turning On / Turning Off
Turning On
Press and hold the power switch (è page 4) until the power indicator
NOTE
Do not press the power switch repeatedly.
l
The computer will forcibly be turned off if you press and hold the power switch for four seconds or longer.
l
Once you turn off the computer, wait for ten seconds or more before you turn on the computer again.
l
Do not perform the following operation until the drive indicator turns off.
l
• Connecting or disconnecting the AC adaptor
• Pressing the power switch
• Touching the tablet buttons, screen or external mouse
• Turn on/off the wireless switch
(è page 4) lights.
Turning Off
Touch
A
Touch
B
Touch
A
NOTE
l
To turn off the computer completely, proceed as follows.
Touch (Start) at the lower left, and the touch (Settings) - [Update & security] - [Recovery].
A
Touch [Restart now] under “Advanced startup”.
B
Touch [Turn off your PC].
C
(Start) at the lower left.
(Power) - [Shutdown].
(Start) - [Shutdown].
Getting Started
Precaution against Starting Up/Shutting Down
Do not do the following
l
• Connecting or disconnecting the AC adaptor
• Pressing the power switch
• Touching the tablet buttons, screen or external mouse
• Turn on/off the wireless switch
NOTE
To conserve power, the following power saving methods are set at the time of purchase.
l
• The screen automatically turns off after :
10 minutes (when AC adaptor is connected) of inactivity
5 minutes (when operating on battery power) of inactivity
• The computer automatically enters sleep*1 after :
20 minutes (when AC adaptor is connected) of inactivity
15 minutes (when operating on battery power) of inactivity
*1
Refer to Reference Manual “Sleep or Hibernation Functions” about resuming from sleep.
11
Page 12

Handling and Maintenance
Operation environment
Place the computer on a flat stable surface not subject to shock, vibration, and danger of dropping. Do not place
l
the computer upright or turn it over. If the computer is exposed to an extremely strong impact, it may become damaged.
Temperature: Operation : -10 °C to 50 °C {14 °F to 122 °F} (IEC60068-2-1, 2)
l
Storage : -20 °C to 60 °C {-4 °F to 140 °F}
Humidity: Operation : 30 % to 80 % RH (No condensation)
Storage : 30 % to 90 % RH (No condensation)
Even within the above temperature/humidity ranges, operation for a long time in an extreme environments, smoking
nearby, or operation in places where oil is used or where there is a lot of dust will result in the product deterioration
and will shorten the product life.
*1
Do not expose the skin to this product when using the product in a hot or cold environment. (è “Safety Precautions / Regulatory
Information”)
If the computer is wet in temperatures of 0 °C {32 °F} or below, freeze damage may occur. Make sure to dry off the computer in
such temperatures.
Do not place the computer in the following areas, otherwise the computer may be damaged.
l
• Near electronic equipment. Image distortion or noise may occur.
• In extremely high or low temperature.
As the computer can become hot during operation, keep it away from items that are sensitive to heat.
l
*1
Handling cautions
This computer is designed to minimize shock to parts such as the LCD and the hard disk drive, but no warranty is provided against any trouble caused by shock. Be extremely careful when handling the computer.
When carrying the computer:
l
• Turn off the computer.
• Remove all external devices, cables, and other protruding objects.
• Do not drop or hit the computer against solid objects.
• Do not grip the display part.
When you board an airplane, take the computer with you and never put it in your checked luggage. When using the
l
Useful Information
computer on airplane, follow the airline’s instructions.
When carrying a spare battery, put it in a plastic bag to protect its terminals.
l
Use only the included stylus to touch the touchscreen. Do not place any object on its surface and do not press
l
down strongly with sharp-pointed or hard objects that may leave marks (e.g., nails, pencils and ball point pens).
Do not use the touchscreen when dust or dirt (e.g., oil) is on the screen. Otherwise foreign particles on the screen/
l
stylus can scratch the screen surface or obstruct the stylus operation.
Use the stylus only for touching the screen. Using it for any other purpose may damage the stylus and result in
l
scratches on the screen.
When using peripheral devices
n
Follow these instructions and the Operating Instructions - Reference Manual to avoid any damage to the devices.
Carefully read the instruction manuals of the peripheral devices.
Use the peripheral devices conforming to the computer’s specifications.
l
Connect to the connectors in the correct direction.
l
If it is hard to insert, do not try forcibly but check the connector’s shape, direction, alignment of pins, etc.
l
If screws are included, fasten them securely.
l
Remove the cables when you carry the computer. Do not pull the cables forcibly.
l
Preventing your computer from unauthorized use via wireless LAN/Bluetooth/wireless WAN
n
<Only for model with wireless LAN/Bluetooth/wireless WAN>
Before using wireless LAN/Bluetooth/wireless WAN, make the appropriate security settings such as data encryp-
l
tion.
Battery Recalibration
n
The battery recalibration may take a long time due to the large battery capacity. This is not a malfunction.
l
<When performing “Battery Recalibration” after shutting down Windows>
• Full charge: Approximately 2.0 hours
• Complete discharge: Approximately 4.0 hours
When performing “Battery Recalibration” without shutting down Windows, it may take more time to charge / discharge.
12
Page 13

PC-Diagnostic Utility
n
When you start the PC-Diagnostic Utility without connecting an external keyboard and an external mouse, shut down
the computer by pressing and holding the power switch. Then, connect an external keyboard and an external mouse to
the computer and restart the PC-Diagnostic Utility.
Maintenance
To clean the LCD panel
Use the soft cloth included with the computer. (For further information, refer to “Suggestions About Cleaning the LCD
Surface”. è
To clean areas other than the LCD panel
Wipe with a soft dry cloth such as gauze. When using detergent, dip a soft cloth in water-diluted detergent and wring it
thoroughly.
CAUTION
Do not use benzene, thinner, or rubbing alcohol since it may adversely affect the surface causing discoloration, etc.
l
Do not use commercially-available household cleaners and cosmetics, as they may contain components harmful to
the surface.
Do not apply water or detergent directly to the computer, since liquid may enter inside of the computer and cause
l
malfunction or damage.
Use a soft, dry cloth to wipe droplets of water from the surface of the unit. Do not use a microwave to dry the unit.
l
Doing so will result in malfunction or damage.
Reference Manual “Screen Input Operation”)
Useful Information
13
Page 14

Installing Software
Installing software will return the computer to the default condition. When you install the software, the hard disk data
will be erased.
Back up important data to other media or an external hard disk before installation.
CAUTION
Do not delete the Recovery Partition on the hard disk. If it has been deleted, the Recovery Disc could not be cre-
l
ated.
To check the Recovery Partition, perform the following methods.
A
Touch and hold
T
(Start) and l
ouch
A standard user needs to enter an administrator password.
l
Touch [Disk Management].
B
(Start) at the bottom left corner of the Desktop screen.
ong-touch
[Computer], then
touch
[Manage].
n
Preparation
If the computer does not operate normally, or becomes unstable, you can reset Windows to solve the problem.
Remove all peripherals and SD memory card, etc.
l
Connect the AC adaptor and do not remove it until installation is complete.
l
Reset Windows
1 Perform “Reset Windows”.
Touch
A
Touch [Get Started] under “Reset Windows”.
B
Select the option.
C
• [Keep my files]
Windows reinstallation can be completed in a short time (Approximately 30 minutes).
Applications and other items that do not come with this computer will be removed.
• [Remove everything]
Useful Information
By fully cleaning, the deleted files can not be recovered easily and the security level will be increased. The
processing time will be longer (Approximately 50 minutes).
Follow the on-screen instructions.
After the reinstallation, the computer will restart.
Do not interrupt installation, for example by turning off the computer or performing other operation.
l
Otherwise installation may become unavailable as Windows may not start up or the data may be corrupted.
(Start) - [Settings] - [Update & security] - [Recovery].
[Just remove my files] (Approximately 30 minutes)
l
[Remove files and clean the drive]
l
2 Perform the “Setup Windows” (è page 8).
NOTE
The date and time, and the time zone may not be correct. Be sure to set them correctly.
l
3 Perform Windows Update.
4
Touch and hold
A
Press
B
Touch [Clear TPM…] under “Actions” on the right of the “TPM Manager on Local Computer” screen.
C
Touch [Restart] of the “Manage the TPM security hardware” screen.
D
The computer will restart.
When “TPM configuration change was requested to ...” is displayed, press
E
Touch the Desktop tile, and when “TPM is ready” appears, touch [Close].
F
<Only for model with TPM> Clear TPM.
(Start), touch [Run].
(A2) button to display Input Keyboard, then input [tpm.msc] and touch [OK].
14
F12
.
Page 15

Disk recovery
n
You can reinstall the OS that was pre-installed at the time of purchase (Windows 10 or Windows 7).
CAUTION
If the recovery partition is deleted, you cannot perform hard disk (flash memory) recovery.
l
Preparation
Remove all peripherals and SD memory card, etc.
l
Connect the AC adaptor and do not remove it until installation is complete.
l
If reinstallation using the method described in “Reset Windows” above is not successful, follow the steps below.
1 Start the Setup Utility.
Touch
A
Touch [Restart now] under “Advanced startup”.
B
Touch [Troubleshoot] - [Advanced options] - [UEFI Firmware Settings] - [Restart].
C
Turn on the computer, and touch [Click here for Setup] that appears at the top left corner of the screen while
[Panasonic] boot screen is displayed.
If the [Panasonic] boot screen is not displayed, as soon as the computer starts up, press several times
l
until the Setup Utility screen appears.
If the password is requested, enter the Supervisor Password.
l
2
Write down all of the contents of the Setup Utility and double-touch [Load Default Values].
At the confirmation message, select [Yes] and press
(Start) - [Settings] - [Update & security] - [Recovery].
Enter
.
3 Check the [UEFI Boot] setting of the Setup Utility.
[UEFI Boot] should be set to as follows.
When Windows 10 is used : [Enabled]
When Windows 7 is used : [Disabled]
4 Touch [Exit] and double-touch [Save Values and Reboot].
At the confirmation message, select [Yes] and press
Computer will restart.
Enter
.
5 Press several times while [Panasonic] boot screen is displayed.
The Setup Utility starts up.
If the password is requested, enter the Supervisor Password.
l
6 Touch [Exit] and double-touch [Recovery Partition].
7
Touch [Recovery].
Touch [CANCEL] to abort the operation.
Select [Reinstall Windows] and select [Next]. Use the Tablet Buttons to operate.
8
At the License Agreement screen, select [Yes, I agree to the provisions above and
wish to continue!] and select [Next].
9
10
If the option is displayed, select the setting and touch [Next].
[Initialize and reinstall Windows to the whole Disk]
l
Select this option when you want to install Windows to the factory default. After installation, you can create a
new partition. For how to create a new partition, refer to “To change the partition structure” (è page 10).
[Reinstall Windows to the OS related partitions.]
l
Select this option when the hard disk has already been divided into several partitions and you want to keep
the partition structure. For how to create a new partition, refer to “To change the partition structure” (è page 10).
*1
This does not appear if Windows cannot be installed to the recovery partition and the area usable by Windows.
Touch [Disk 0].
Select [Next].
*1
11 At the conrmation message, select [YES].
12
Select language and system type (32bit or 64bit) and select [OK].
At the confirmation message, select [OK].
To cancel the recovery procedure, select [CANCEL], and click the
ner of the screen.
mark that appears at the top right cor-
Useful Information
15
Page 16

Installing Software
13 Touch [Recovery ALL Partitions.].
14
Installation starts according to the instructions on the screen.
Do not interrupt installation, for example by turning off the computer or performing other operation.
l
Otherwise installation may become unavailable as Windows may not start up or the data may be corrupted.
15 When Ending process screen is displayed, touch [Shutdown]
select [OK] to turn off the computer.
16 Turn on the computer.
If the password is requested, enter the Supervisor Password.
l
17 Perform the “Setup Windows” (è page 8).
18 Start the Setup Utility and change the settings as necessary.
19 Perform Windows Update.
20
Using Recovery Disc
n
Use the Recovery Disc in the following conditions.
• You have forgotten the administrator password.
• Installation is not complete. The recovery partition in the hard disk (flash memory drive) may be broken.
• The recovery partition is deleted.
•
To change OS from Windows 7 to Windows 10, or vice versa.
At the conrmation message, select [YES].
<Only for model with TPM> Clear TPM (è page 14).
<Only for Windows 7 downgrade model>
NOTE
l
OS. Therefore, the recovery partition must still exist on the hard disk in order to perform this operation.
Preparation
l
Useful Information
l
l
To change the OS from 32 bit to 64 bit or vice versa, the recovery partition must be used to install the
Prepare the following items:
• Recovery Disc (è Reference Manual “Recovery Disc Creation Utility”)
• USB DVD drive (optional) (refer to recent catalogs and other sources for information about the products
available)
Remove all peripherals and SD memory card, etc.(except for the USB DVD drive).
Connect the AC adaptor and do not remove it until installation is complete.
1 Connect the DVD drive to the USB port.
2 Start the Setup Utility.
Touch
A
Touch [Restart now] under “Advanced startup”.
B
Touch [Troubleshoot] - [Advanced options] - [UEFI Firmware Settings] - [Restart].
C
Turn on the computer, and touch [Click here for Setup] that appears at the top left corner of the screen while
[Panasonic] boot screen is displayed.
If the [Panasonic] boot screen is not displayed, as soon as the computer starts up, press several times
l
until the Setup Utility screen appears.
If the password is requested, enter the Supervisor Password.
l
(Start) - [Settings] - [Update & security] - [Recovery].
3 Write down all of the contents of the Setup Utility and touch [Exit] and double-touch
[Load Default Values].
At the confirmation message, select [Yes] and press
Enter
.
4 Check the [UEFI Boot] setting of the Setup Utility.
[UEFI Boot] should be set to as follows.
When the recovery disc for Windows 10 is used: [Enabled]
When the recovery disc for Windows 7 is used: [Disabled]
5 Set the Recovery Disc into the DVD drive.
6 Touch [Exit] and double-touch [Save Values and Reboot].
At the confirmation message, select [Yes] and press
Computer will restart.
Enter
.
16
Page 17

7 Press several times while [Panasonic] boot screen is displayed.
The Setup Utility starts up.
If the password is requested, enter the Supervisor Password.
l
8 Touch [Exit] and double-touch your DVD drive in [Boot Override].
The computer will restart.
9 Touch [Recovery] and touch [Next].
10
Select [Reinstall Windows] and select [Next]. Use the Tablet Buttons to operate.
11 At the conrmation message, touch [YES].
12
At the License Agreement screen, select [Yes, I agree to the provisions
above and wish to continue!] and select [Next].
13
Touch [Disk 0].
14
Select [Next].
If the option is displayed, select the setting and select [Next].
[Reinstall with HDD recovery partition.]
l
Standard recovery method.
You can use recovery from Recovery Partition.
[Reinstall without HDD recovery partition.]
l
Increase usable disk size.
You can NOT use recovery from Recovery Partition.
When this option is selected, you can no longer create Recovery Disc(s) after the recovery operation.
CAUTION
Carefully choose above item because you cannot change it later.
l
15 Select [Next].
If the option is displayed, select the setting and select [Next].
[Initialize and reinstall Windows to the whole Disk]
l
Select this option when you want to install Windows to the factory default. After installation, you can create a
new partition. For how to create a new partition, refer to “To change the partition structure” (è page 10).
[Reinstall Windows to the OS related partitions.]
l
Select this option when the hard disk has already been divided into several partitions. For how to create a
new partition, refer to “To change the partition structure” (è page 10).
You can keep the partition structure.
*2
This does not appear when [Reinstall with HDD recovery partition.] is selected, or if Windows cannot be installed to
the recovery partition and the area usable by Windows.
*2
16 Touch [Recovery ALL Partitions.].
17
18
At the conrmation message, select [YES].
Select language and system type (32bit or 64bit) and select [OK].
At the confirmation message, select [OK].
To cancel the recovery procedure, select [CANCEL], or click the mark that appears at the top right corner
of the screen.
Installation starts according to the instructions on the screen.
Do not interrupt installation, for example by turning off the computer.
l
Otherwise installation may become unavailable as Windows may not start up or the data may be corrupted.
19 When Ending process screen is displayed, remove the Recovery Disc and DVD Drive
and then
Follow the on-screen instructions.
touch [Reboot] select [OK].
Useful Information
20 Perform the “Setup Windows” (è page 8).
21 On the “Finish Recovery Process.” screen, touch [Shutdown.].
22 Start the Setup Utility and change the settings as necessary.
23 Perform Windows Update.
24
<Only for model with TPM> Clear TPM (è page 14).
17
Page 18

Troubleshooting (Basic)
Follow the instructions below when a problem has occurred. There is also an advanced troubleshooting guide in the
“Reference Manual”. For a software problem, refer to the software’s instruction manual. If the problem persists, contact
Panasonic Technical Support. You can also check the computer’s status in the PC Information Viewer (è Refer-
ence Manual “Checking the Computer’s Usage Status”).
Starting Up
n
Connect the AC adaptor.
Cannot start up.
The power indicator or battery indicator is not lit.
The power is turned on but
“Warming up the system”
appears.
Cannot turn on the computer. The computer does not
resume from sleep.
(The power indicator blinks
quickly in green.)
l
Insert a fully charged battery.
l
Remove the battery pack and the AC adaptor, then connect them again.
l
Even if the AC adaptor and battery pack are correctly connected, if the battery indicator
l
is not lit, the AC adaptor protection function may be operating. Disconnect the AC cord,
wait three minutes or more, and reconnect the AC cord.
If a device is connected to the USB port, disconnect the device, or set [USB Port] or
l
[Legacy USB Support] to [Disabled] in the [Advanced] menu of the Setup Utility.
Check the [UEFI Boot] setting of the Setup Utility.[UEFI Boot] should be set to
l
[Enabled] / [Disabled].
The computer is warming up before start up. Wait for the computer to start up (takes
l
up to 30 minutes). If, “Cannot warm up the system” is displayed, the computer failed to
warm up and does not start. In this case, turn off the computer, leave it in an environment of 5 °C or higher temperature for about an hour, and then turn on the power again.
Leave it in an environment of 5 °C or higher temperature for about an hour, then turn on
l
the power again.
After adding or changing
the RAM module, the power
is turned on but nothing is
displayed on the screen.
It takes time for the power
indicator to light up.
You have forgotten the password.
Troubleshooting
“Remove disks or other
media. Press any key to
restart” or a similar message
appears.
Windows startup and operation is slow.
Turn off the computer and remove the RAM module, then confirm whether the RAM
l
module has conformed to specification. When the RAM module has conformed to specification, install it again.
If the power switch is pressed immediately after the battery pack has been mounted on
l
the computer, and while the AC adaptor is not connected, it may take about five seconds before the power indicator lights up and the computer turns on. This is because
the computer is checking the remaining battery charge; it is not a malfunction.
Supervisor Password or User Password: Contact Panasonic Technical Support.
l
Administrator password:
l
• If you have a password reset disk, you can reset the administrator password. Set the
disk and enter any wrong password, then follow the on-screen instructions and set a
new password.
• If you do not have a password reset disk, reinstall (è page 14) and set up Windows,
and then set a new password.
A floppy disk in the drive or USB memory is connected, and it does not contain system
l
startup information. Remove the floppy disk and USB memory, connect an external keyboard and then press any key.
If a device is connected to the USB port, disconnect the device, or set [USB Port] or
l
[Legacy USB Support] to [Disabled] in the [Advanced] menu of the Setup Utility.
Start the Setup Utility (è
l
ity settings (excluding the passwords) to the default values. Start the Setup Utility and
make the settings again. (Note that the processing speed depends on the application
software, so this procedure may not make Windows faster.)
If you installed a resident software after purchase, turn off the residence.
l
Reference Manual “Setup Utility”) to return the Setup Util-
18
Page 19

Starting Up
n
The date and time are incorrect
[Executing Battery Recalibration] screen appears.
[Enter Password] does not
appear when resuming from
sleep/hibernation.
Make the correct settings.
l
A
Touch and hold (Start) at the bottom left corner, and then touch [Control Panel].
Touch
Touch [Clock, Language, and Region] - [Date and Time].
B
If the problem persists, the internal clock battery may need to be replaced. Contact
l
Panasonic Technical Support.
When the computer is connected to LAN, check the date and time of the server.
l
The 2100 A.D. or later year will not be correctly recognized on this computer.
l
The Battery Recalibration was canceled before Windows was shut down last time.
l
To start up Windows, turn off the computer by the power switch, and then turn on.
Select [Enabled] in [Password On Resume] in the [Security] menu of the Setup Utility (è
l
Reference Manual “Setup Utility”).
The Windows password can be used instead of the password set in the Setup Utility.
l
Add a password.
A
1. Touch (Start) - [Settings] - [Accounts].
2. Touch [Sign-in options], and touch [Add] under “Password”.
1. Touch (Start) - [Control Panel].
2. Touch [User Accounts and Family Safety] - [Add or remove user accounts].
Set up the following.
B
(Start) - [Control Panel].
Cannot resume.
Other startup problems.
1. Open the Control Panel, touch [System and Security] - [Power Options] - [Require
a password on wakeup].
2. Add a check mark for [Require a password].
1. Touch [Control Panel] - [System and Security] - [Power Option] - [Require a password when the computer wakes] and add a check mark for [Require a password].
An error may occur when the computer automatically enters the sleep or hibernation
l
mode while the screen saver is active. In this case, turn off the screen saver or change
the pattern of the screen saver.
Start the Setup Utility (è
l
ity settings (excluding the passwords) to the default values. Start the Setup Utility and
make the settings again.
Remove all peripheral devices.
l
Check to see if there was a disk error.
l
Remove all peripheral devices including an external display.
A
B
Touch and hold (Start) at the bottom left corner, and then touch [File Explorer].
Touch (Start) - [Computer].
C
Touch and hold [Windows (C:)], and touch [Properties].
Long-touch [Local Disk (C:)], and touch [Properties].
D
Touch [Tools] - [Check].
Reference Manual “Setup Utility”) to return the Setup Util-
Troubleshooting
Touch [Tools] - [Check Now...].
• A standard user needs to enter an administrator password.
Follow the on-screen instructions.
E
19
Page 20

Troubleshooting (Basic)
Entering Password
n
The user name (account name) includes an “@” mark.
l
Cannot log on to Windows.
(“The user name or password is incorrect.” is displayed.)
Shutting down
n
Windows does not shut
down.
Display
n
No display.
- If another user account name exists:
Log on to Windows using another user account name and delete the account name
that includes “@”. Then create a new account name.
- If no other account name exists:
You need to reinstall Windows (è page 14).
Remove the USB device.
l
Wait one or two minutes. It is not a malfunction.
l
<Only for model with VGA port>
l
The external display is selected. Change the display output destination.
<Only for model with VGA port>
l
When using an external display,
• Check the cable connection.
• Turn on the display.
• Check the settings of external display.
The display is turned off by the power-saving function. To resume, touch the screen.
l
The computer entered sleep or hibernation by the power-saving function. To resume,
l
press the power switch.
The screen is dark.
The screen is disordered.
<Only for model with VGA
port> <When connecting the
cradle>
During Simultaneous display, one of the screens
becomes disordered.
Troubleshooting
<Only for model with VGA
port> <When connecting the
cradle>
The external display does
not work normally.
The screen might be darker when the AC adaptor is not connected. Adjust the bright-
l
ness by using
for Panasonic PC. As you increase the brightness, battery consumption increases.
You can separately set the brightness for when the AC adaptor is connected and when
not connected.
Changing the number of display colors and resolution may affect the screen. Restart the
l
computer.
Connecting/disconnecting an external display may affect the screen. Restart the com-
l
puter.
Resuming from sleep or hibernation may affect the screen of the external display. Re-
l
start the computer.
When using the Extended Desktop, use the same display colors for the external display
l
as those used by the LCD.
If you continue to experience problems, try changing the display.
Long-touch on the desktop, and touch [Graphics Properties].
A
Simultaneous display cannot be used until Windows startup is complete (during Setup
l
Utility, etc.).
If the external display does not support the power saving function, it may not work nor-
l
mally when the computer enters the power saving mode. Turn off the external display.
Panasonic PC Settings Utility / Dashboard
Touchscreen
n
The cursor does not work.
Cannot point the correct
position using the included
stylus.
20
When using the external mouse, connect it correctly.
l
Restart the computer using the external keyboard.
l
If the computer does not respond to the external keyboard commands, read “No re-
l
sponse” (è page 21).
Perform the touchscreen calibration. (è
l
tion”)
Reference Manual “Screen Input Opera-
Page 21

On-screen Document
n
The document of PDF format is not displayed.
Others
n
No response.
Install Adobe Reader.
l
Log on to Windows as an administrator.
A
Press
B
Input Keyboard screen appears.
Touch
C
files], then press
Update Adobe Reader to its latest version.
D
If your computer is connected to the internet, start up Adobe Reader and touch [Help]
- [Check for Updates...].
Press
l
responding.
An input screen (e.g., password input screen at startup) may be hidden behind another
l
window. Press
on the Input Keyboard to check.
Press the power switch for 4 seconds or longer to shut down the computer, and then
l
press the power switch to turn it on. If the application program does not work normally,
uninstall and reinstall the program. To uninstall,
Open the Control Panel.
A
Touch and hold (Start) at the bottom left corner, and then touch [Control Panel].
Touch (Start) - [Control Panel].
Touch [Programs] - [Uninstall a program].
B
(A2) button.
(Start) and input “c:\util\reader\en\pinstall.bat” in [Search programs and
Enter
button to open Task Manager and close the software application that is not
(A2) button to display Input Keyboard screen. And touch
.
Alt+Tab
Troubleshooting
21
Page 22

LIMITED USE LICENSE AGREEMENT
THE SOFTWARE PROGRAM(S) (“PROGRAMS”) FURNISHED WITH THIS PANASONIC PRODUCT (“PRODUCT”)
ARE LICENSED ONLY TO THE END-USER (“YOU”), AND MAY BE USED BY YOU ONLY IN ACCORDANCE WITH
THE LICENSE TERMS DESCRIBED BELOW. YOUR USE OF THE PROGRAMS SHALL BE CONCLUSIVELY
DEEMED TO CONSTITUTE YOUR ACCEPTANCE OF THE TERMS OF THIS LICENSE.
Panasonic Corporation has developed or otherwise obtained the Programs and hereby licenses their use to you. You
assume sole responsibility for the selection of the Product (including the associated Programs) to achieve your intended results, and for the installation, use and results obtained therefrom.
LICENSE
A. Panasonic Corporation hereby grants you a personal, non-transferable and non-exclusive right and license to use
the Programs in accordance with the terms and conditions stated in this Agreement. You acknowledge that you are
receiving only a LIMITED LICENSE TO USE the Programs and related documentation and that you shall obtain
no title, ownership nor any other rights in or to the Programs and related documentation nor in or to the algorithms,
concepts, designs and ideas represented by or incorporated in the Programs and related documentation, all of
which title, ownership and rights shall remain with Panasonic Corporation or its suppliers.
B. You may use the Programs only on the single Product which was accompanied by the Programs.
C. You and your employees and agents are required to protect the confidentiality of the Programs. You may not dis-
tribute or otherwise make the Programs or related documentation available to any third party, by time-sharing or
otherwise, without the prior written consent of Panasonic Corporation.
D. You may not copy or reproduce, or permit to be copied or reproduced, the Programs or related documentation for
any purpose, except that you may make one (1) copy of the Programs for backup purposes only in support of your
use of the Programs on the single Product which was accompanied by the Programs. You shall not modify, or attempt to modify, the Programs.
E. You may transfer the Programs and license them to another party only in connection with your transfer of the single
Product which was accompanied by the Programs to such other party. At the time of such a transfer, you must also
transfer all copies, whether in printed or machine readable form, of every Program, and the related documentation,
to the same party or destroy any such copies not so transferred.
F. You may not remove any copyright, trademark or other notice or product identification from the Programs and you
must reproduce and include any such notice or product identification on any copy of any Program.
YOU MAY NOT REVERSE ASSEMBLE, REVERSE COMPILE, OR MECHANICALLY OR ELECTRONICALLY TRACE
THE PROGRAMS, OR ANY COPY THEREOF, IN WHOLE OR IN PART.
YOU MAY NOT USE, COPY, MODIFY, ALTER, OR TRANSFER THE PROGRAMS OR ANY COPY THEREOF, IN
WHOLE OR IN PART, EXCEPT AS EXPRESSLY PROVIDED IN THE LICENSE.
IF YOU TRANSFER POSSESSION OF ANY COPY OF ANY PROGRAM TO ANOTHER PARTY, EXCEPT AS PERMITTED IN PARAGRAPH E ABOVE, YOUR LICENSE IS AUTOMATICALLY TERMINATED.
TERM
This license is effective only for so long as you own or lease the Product, unless earlier terminated. You may terminate
this license at any time by destroying, at your expense, the Programs and related documentation together with all copies thereof in any form. This license will also terminate effective immediately upon occurrence of the conditions thereof
set forth elsewhere in this Agreement, or if you fail to comply with any term or condition contained herein. Upon any
such termination, you agree to destroy, at your expense, the Programs and related documentation together with all
copies thereof in any form.
YOU ACKNOWLEDGE THAT YOU HAVE READ THIS AGREEMENT, UNDERSTAND IT AND AGREE TO BE
Appendix
BOUND BY ITS TERMS AND CONDITIONS. YOU FURTHER AGREE THAT IT IS THE COMPLETE AND EXCLUSIVE STATEMENT OF THE AGREEMENT BETWEEN US, WHICH SUPERSEDES ANY PROPOSAL OR PRIOR
AGREEMENT, ORAL OR WRITTEN, AND ANY OTHER COMMUNICATIONS BETWEEN US, RELATING TO THE
SUBJECT MATTER OF THIS AGREEMENT.
22
Page 23

This product incorporates the following software:
(1) the software developed independently by or for Panasonic Corporation,
(2) the software owned by third party and licensed to Panasonic Corporation,
(3) the software licensed under the GNU General Public License Version 2.0 (GPL V2.0),
(4) the software licensed under the GNU LESSER General Public License, Version 2.1 (LGPL
V2.1), and/or
(5) open source software other than the software licensed under the GPL V2.0 and/or LGPL V2.1.
The software categorized as (3) - (5) are distributed in the hope that it will be useful, but WITHOUT
ANY WARRANTY, without even the implied warranty of MERCHANTABILITY or FITNESS
FOR A PARTICULAR PURPOSE. Please refer to the detailed terms and conditions thereof
shown in the “Reference Manual”.
At least three (3) years from delivery of this product, Panasonic will give to any third party who
contacts us at the contact information provided below, for a charge no more than our cost of
physically performing source code distribution, a complete machine-readable copy of the corresponding
source code covered under GPL V2.0, LGPL V2.1 or the other licenses with the obligation
to do so, as well as the respective copyright notice thereof.
Contact Information: oss-cd-request@gg.jp.panasonic.com
The source code and the copyright notice are also available for free in our website below.
http://panasonic.net/avc/oss/index.html
23
Appendix
Page 24

Specications
This page provides the specifications for the basic model. The model number is different according to the unit configuration.
To check the model number:
l
Check the bottom of the computer or the box the computer came in at the time of purchase.
To check CPU speed, memory size and the hard disk drive (HDD) size:
l
Run the Setup Utility (è
[Processor Speed]: CPU speed, [Memory Size]: Memory size, [Hard Disk]: Hard disk drive size
Main Specications
n
CPU Intel® Core™ i5-6300U Processor (3
Chip Set Built-in CPU
Video controller Intel
Main Memory
Storage Hard Disk Drive: 500
Display Method 13.3 type with Touchscreen (IPS) (1366 × 768 dots) (16:9)
Internal LCD 65,536/16,777,216 colors
External Display
LCD Filter Circular Polarizer
Wireless LAN Intel
Bluetooth
Wireless WAN
LAN IEEE 802.3 10Base-T / IEEE 802.3u 100BASE-TX / IEEE 802.3ab 1000BASE-T
Sound WAVE and MIDI playback, Intel
Security Chip
SD Memory Card Slot
RAM Module Slot × 2, DDR3L SDRAM, 204-pin, 1.35 V, SO-DIMM, PC3L-10600 Compliant
Interface USB2.0 Ports
Pointing Device Touchscreen (Resistive)
Button Security, Application × 3, Function, A0
Power Supply AC adaptor or Battery pack
AC Adaptor
Battery Pack Li-ion 10.8 V, Minimum 5800
Appendix
Operating Time
Charging Time
Power Consumption
Physical Dimensions (W × D × H)
(excluding projecting parts)
Weight Approx. 2.2 kg {Approx. 4.85
*2
*5
*6
*7
*8
*9
*11
*12
*13
*14
Reference Manual “Setup Utility”) and select [Information] menu.
*1
MB
cache, up to 3.00
nology)
®
HD Graphics 520 (Built-in CPU)
*1
GB
4
, DDR3L-1600 (16
*3
Approx. 15
tion.)
Approx. 740
Approx. 45
Approx. 300
GB
is used as a partition with HDD recovery tools. (Users cannot use this parti-
*3
MB
is used as a partition with system tools. (Users cannot use this partition.)
*3
GB
is used as a partition with recovery tools. (Users cannot use this partition.)
*3
MB
is used as a partition with system tools. (Users cannot use this partition.)
(800 × 600 dots (
1360 × 768 dots / 1366 × 768 dots)
GB
*3
GB
(Serial ATA)
*1
Max.)
) / 1024 × 768 dots / 1280 × 720 dots / 1280 × 768 dots /
*4
65,536 / 16,777,216 colors (800 × 600 dots ( ) / 1024 × 768 dots /
1280 × 768 dots / 1366 × 768 dots / 1600 × 1200 dots / 1920 × 1080 dots / 1920 × 1200 dots)
®
Dual Band Wireless - AC 8260 (è page 25)
page 25
è
Equipped
®
High Definition Audio subsystem support
TPM (TCG V1.2 compliant)
× 1
*10
× 2 / USB3.0 Port × 1 / LAN Port (RJ-45) × 1 / Microphone Jack (Miniature
jack, 3.5 DIA) / Headphone Jack (Miniature jack, 3.5 DIA, Impedance 32 Ω, Output Power
4 mW × 2, Stereo) / Expansion Bus Connector (Dedicated 100-pin female)
Input: 100 V to 240 V AC, 50 Hz/60 Hz, Output: 15.6 V DC, 7.05
mAh
Approx. 12.0 hours
Approx. 2.0 hours (in the OFF state)
Approx. 2.0 hours (in the ON state)
*15
Approx. 35
W
/ Approx. 90 W (maximum when recharging in the ON state)
Approx. 349 mm × 244 mm × 46 mm {Approx. 13.7 “ × 9.6 “ × 1.8 “}
lb.
}
GHz
with Intel® Turbo Boost Tech-
A
24
Page 25

Main Specications
n
Operating
Storage Temperature -20 °C to 60
Environment
Software
n
Temperature -10 °C to 50 °C {14 °F to 122 °F} (IEC60068-2-1, 2)
Humidity 30 % to 80 % RH (No condensation)
°C
{-4 °F to 140 °F}
Humidity 30 % to 90 % RH (No condensation)
Base OS Windows 10 Pro 64-bit
Installed OS
*17
Windows 10 Pro 64-bit
*16
Pre-installed Software
Windows 7 Professional 32-bit Service Pack 1 (downgraded to Windows 7)
fessional 64-bit Service Pack 1 (downgraded to Windows 7)
*18
PC Information Viewer, Intel® PROSet/Wireless Software, Intel® Wireless Bluetooth
era Utility
Microsoft Office Trial
Panasonic PC Settings Utility
Adobe Acrobat Reader DC, Battery Recalibration Utility, Infineon TPM Professional Package
*19
, Manual Selector, GPS Viewer
*8*22
, Wireless Switch Utility, Wireless Connection Disable Utility
*20
, Hand Writing Utility
*21
, Wireless Toolbox, Calibration Utility
*19
, Recovery Disc Creation Utility, Intel® WiDi,
*18
*22
*22
, Calibration Utility, Dashboard for Panasonic PC, Display Rotation Tool, Tablet Button Manager, Software Keyboard,
Power Plan Extension Utility
Aptio Setup Utility, Hard Disk Data Erase Utility
Wireless LAN
n
Data Transfer Rates IEEE802.11a : 54
IEEE802.11b : 11
IEEE802.11g : 54
IEEE802.11n
*25
HT40 = 300
IEEE802.11ac : VHT80 : 866.7
VHT40 : 400
VHT20 : 173.3
*24
Mbps
*24
Mbps
*24
Mbps
: HT20 = 150
Mbps
Mbps
Mbps
Mbps
Mbps
*23
, PC Diagnostic Utility
Standards Supported IEEE802.11a / IEEE802.11b / IEEE802.11g / IEEE802.11n / IEEE802.11ac
Transmission method OFDM system, DS-SS system
*18
/ Windows 7 Pro-
®*19
, Cam-
Bluetooth
n
Bluetooth Version 4.1 / 4.0
Classic mode / Low Energy mode
Transmission method FHSS system
Wireless Channels Used Channels 1 to 79 / Channels 0 to 39
RF Frequency Band 2.402
Optional Devices
n
GHz
- 2.480
Storage SSD: 128 GB / 256 GB / 512
GHz
GB
GPS Chip: u-blox NEO-M8N
GPS/GLONASS/SBAS Support
Wireless WAN LTE compatible
SIM Card Slot × 1
USB 2.0 Port
*10
Rugged USB 2.0 Port
*10
× 1
× 1
Smart Card Slot × 1
2nd LAN Port IEEE 802.3 10BASE-T, IEEE 802.3u 100BASE-TX
Serial Port × 1, Dsub 9-pin male
Appendix
25
Page 26

Specications
VGA Port × 1
Rear Camera
*26
LCD Filter No Circular Polarizer
*1
1 MB = 1,048,576 bytes /1 GB = 1,073,741,824 bytes
*2
Memory size of the factory default depends on the model.
You can physically expand the memory up to 8 GB, but the total amount of usable memory available will be less depending on
the actual system configuration.
*3
1 MB = 1,000,000 bytes / 1 GB = 1,000,000,000 bytes. Your operating system or some application software will report as fewer
GB
.
*4
A 16,777,216 color display is achieved by using the dithering function.
*5
Display may be impossible using some connected external displays.
*6
Does not guarantee operation of all Bluetooth peripherals.
*7
Only for model with wireless WAN. The specification may differ depending on models.
*8
<Only for model with TPM> For information on TPM, Double-touch [Manual Selector] on the desktop, and select
“Installation Manual for Trusted Platform Module (TPM)”.
*9
Operation has been tested and confirmed using Panasonic SD/SDHC/SDXC Memory Cards with a capacity of up to 64 GB.
Operation on other SD equipment is not guaranteed.
*10
Does not guarantee operation of all USB-compatible peripherals.
*11
<Only for North America>
The AC adaptor is compatible with power sources up to 240 V AC adaptor. This computer is supplied with a 125 V AC compatible AC cord.
*12
Measured with LCD brightness : 60
Varies depending on the usage conditions, or when an optional device is attached.
*13
Varies depending on the usage conditions, CPU speed, etc.
*14
Approx. 0.5 W when the battery pack is fully charged (or not being charged) and the computer is off.
Even when the AC adaptor is not connected to the computer, power is consumed (Max. 0.15 W) simply by having the AC adaptor plugged into an AC outlet.
*15
Rated power consumption.
*16
Do not expose the skin to this product when using the product in a hot or cold environment. (è “Safety Precautions / Regulatory
Information”)
When using in hot or cold environment, some peripherals and battery pack may fail to work properly. Check the operation environment of the peripherals.
Using this product continuously in a hot environment will shorten the product life. Avoid use in these types of environments.
When using in low temperature environment, startup may become slow or battery operation time may become short.
The computer consumes power when the hard disk is warming up during startup. Therefore, if you are using battery power and
the remaining power is low, the computer may not start up.
*17
Operations of this computer are not guaranteed except for the pre-installed OS and the OS which is installed by using the hard
disk recovery and the recovery disc.
*18
This system is preinstalled with Windows 7 Professional software and also comes with a license for Windows 10 Pro software.
You may only use one version of the Windows software at a time. Switching between versions will require you to uninstall one
version and install the other version.
*19
Depending on the models, this application software is not installed.
*20
To continue using this software after the end of the trial, purchase a license by following the on-screen instructions.
*21
Panasonic PC Settings Utility includes the following functions: Battery Charge Speed / Battery Recalibration / Power Saving Settings / etc. (è
*22
Must be installed before use.
*23
Perform on the recovery disc. Alternatively perform on the Hard disk recovery.
*24
These are speeds specified in IEEE802.11a+b+g+n+ac standards. Actual speeds may differ.
*25
Available when set to “WPA-PSK”, “WPA2-PSK” or “none”.
Only available when HT40 enabled by the computer and access point which associated supports HT40.
*26
Appendix
Depending on the specification of application software, the following cases may occur. In these cases, select a smaller resolution.
Reference Manual “Panasonic PC Settings Utility”)
• Cannot select a large resolution.
• When selecting a large resolution, an error occurs.
1280 x 720 dots, 30fps / 2048 x 1536 dots, 15fps (Video) / max. 2592 x 1944 dots (Still), with
Camera light
2
cd/m
23-E-1
20-M-1
26
Page 27

570-0021
Panasonic Corporation
Osaka, Japan
Panasonic System Communications Company of North America
Two Riverfront Plaza, Newark NJ 07102
Panasonic Canada Inc.
5770 Ambler Drive Mississauga, Ontario L4W 2T3
Importer’s name & address pursuant to the EU legislation
Panasonic System Communications Company Europe, Panasonic Marketing Europe GmbH
Hagenauer Straße 43
65203 Wiesbaden
Germany
Web Site : http://panasonic.net/avc/pc
パナソニック株式会社 IT プロダクツ事業部
〒
© Panasonic Corporation 2016
大阪府守口市八雲東町一丁目10番12号
55-E-1
PS0416-0
20160081ZAD
 Loading...