

Page 1

Panasonic Broadcast
BT-LT80W
Menu Information
Page 2
How to Use the On Screen Menu
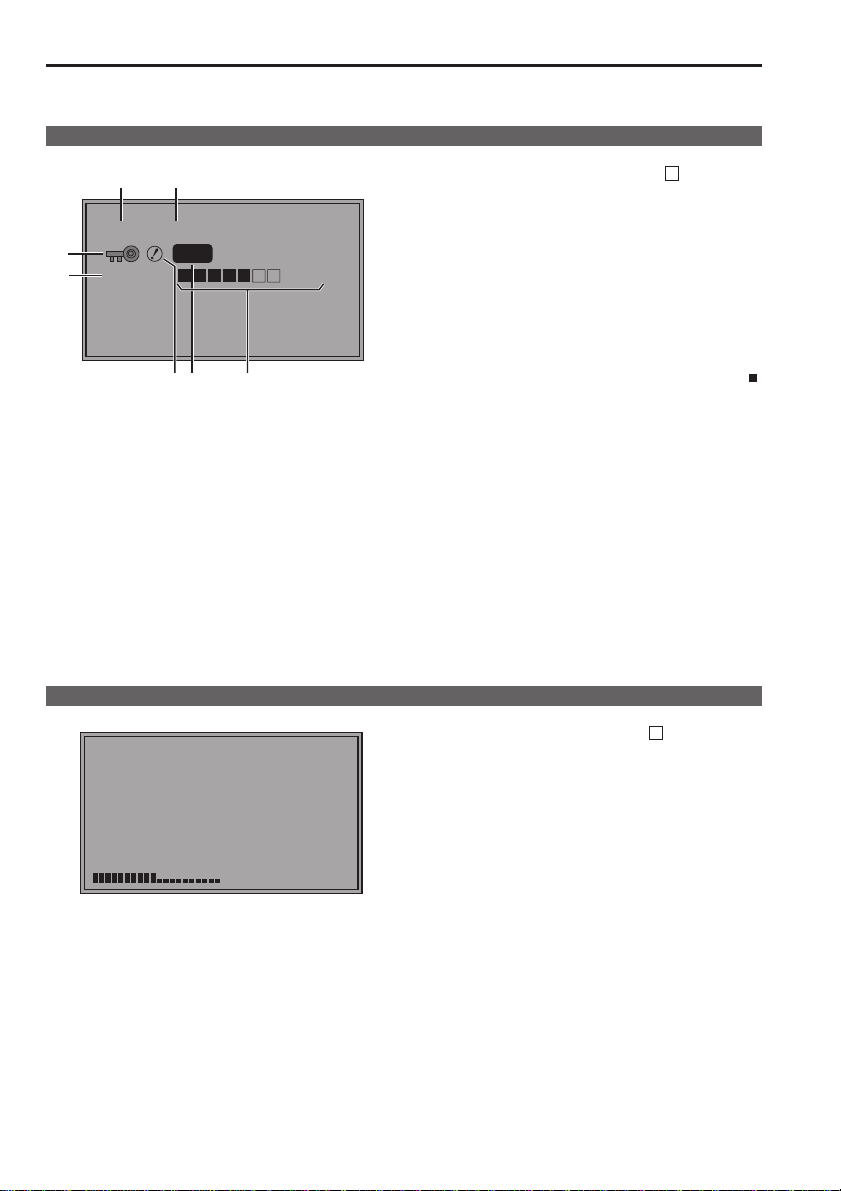
Six types of information are displayed on the screen: the operating status display, picture adjusting knob status,
sharpness display, function display, DC power supply voltage display, battery level display and menu display.
Operating status display
1 2
BPR 1080/60I
YP
7
6
DC14.0V
P-P
4 35
Picture adjusting knob status
[PHASE] 32
50%
1. The selected input line (→ page 7, 2)
BPR, VF-YPBPR/VF-VIDEO, VIDEO, SDI
• YP
2. Signal format
• The display status can be set in “STATUS DISPLAY”
in the “SYSTEM CONFIG” menu (→ page 21).
•
If “UNSUPPORT SIGNAL” is displayed, then either
the current input signal is not supported or the “INPUT
SELECT” menu setting needs to be changed.
• When “NO SIGNAL” is displayed, there is no input
signal.
3. Battery level display
• When an Anton/Bauer type digital battery is used,
battery level is displayed using a block count ( )
and percentage.
4. Various displays (PIXEL TO PIXEL mode)
• Displayed when the picture display is PIXEL TO
PIXEL.
5. Various displays (warning of improper operation
status for the camera settings)
• Displayed when there is an improper operation
status relative to the camera settings.
6. DC power supply voltage display
• DC power supply voltage is displayed.
7. Various displays (lock setting)
• Displayed when front operations are locked
(→ page 30).
<Note>
“UNSUPPORT SIGNAL” and “NO SIGNAL” may not be
displayed correctly.
Picture adjusting knob (→ page 7, 4)
• This knob can be rotated and pushed.
• The status display appears when the knob is pushed.
The display disappears when the knob is pushed
again, or if the knob is not operated for 10 seconds.
• The settings can be adjusted while this display is
shown, but the settings cannot be adjusted after the
display disappears.
Status display:
PEAKING or PHASE
CHROMA or FOCUS-IN-RED
BRIGHT
CONTRAST or BACKLIGHT
12
Page 3
How to Use the On Screen Menu (continued)
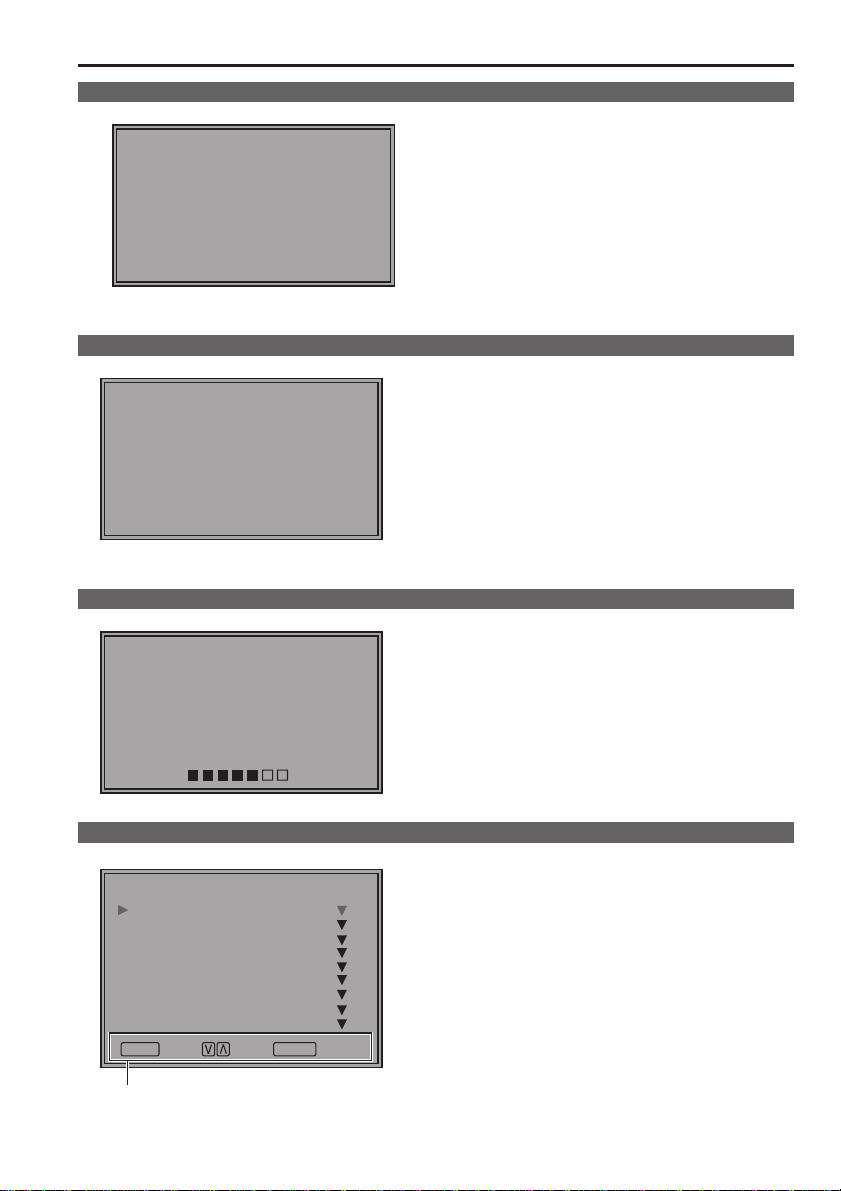
Sharpness display
• SHARPNESS H/V is displayed when it is set.
• The display disappears if remains idle for 2 minutes.
SHARPNESS H 30
Function display
• You can set FUNCTION display in the menu.
• When “FUNCTION DISPLAY” (→ page 23) is ON1
or ON2 and one of the buttons from [FUNCTION1] to
[FUNCTION3] is pressed, the unit displays the status
of the FUNCTION item that is set.
F1:MARKER
F2:WFM
F3:PIXEL TO PIXEL
XXXXX
DC power supply voltage and battery level display
• The display disappears if remains idle for 2 seconds.
• The operational status is displayed in “XXXXX” (→ page
24 “Operation status displayed when a FUNCTION
button is used”).
DC14.0V 50%
Menu display
[MAIN MENU]
MARKER
VIDEO CONFIG
SYSTEM CONFIG
VF CONFIG
FUNCTION
GPI
INPUT SELECT
CONTROL
HOURMETER
MENU
EXIT
Displays the operation explanation for the menu
button.
SEL.
ENTER
ENTER
• DC power supply voltage is displayed.
• Battery level is displayed when using an Anton/Bauer
type digital battery.
• Displayed when the operating status display is not
displayed.
• This is displayed when the menu is used.
• The display disappears if remains idle for 2 minutes.
13
Page 4

How to Use the On Screen Menu (continued)
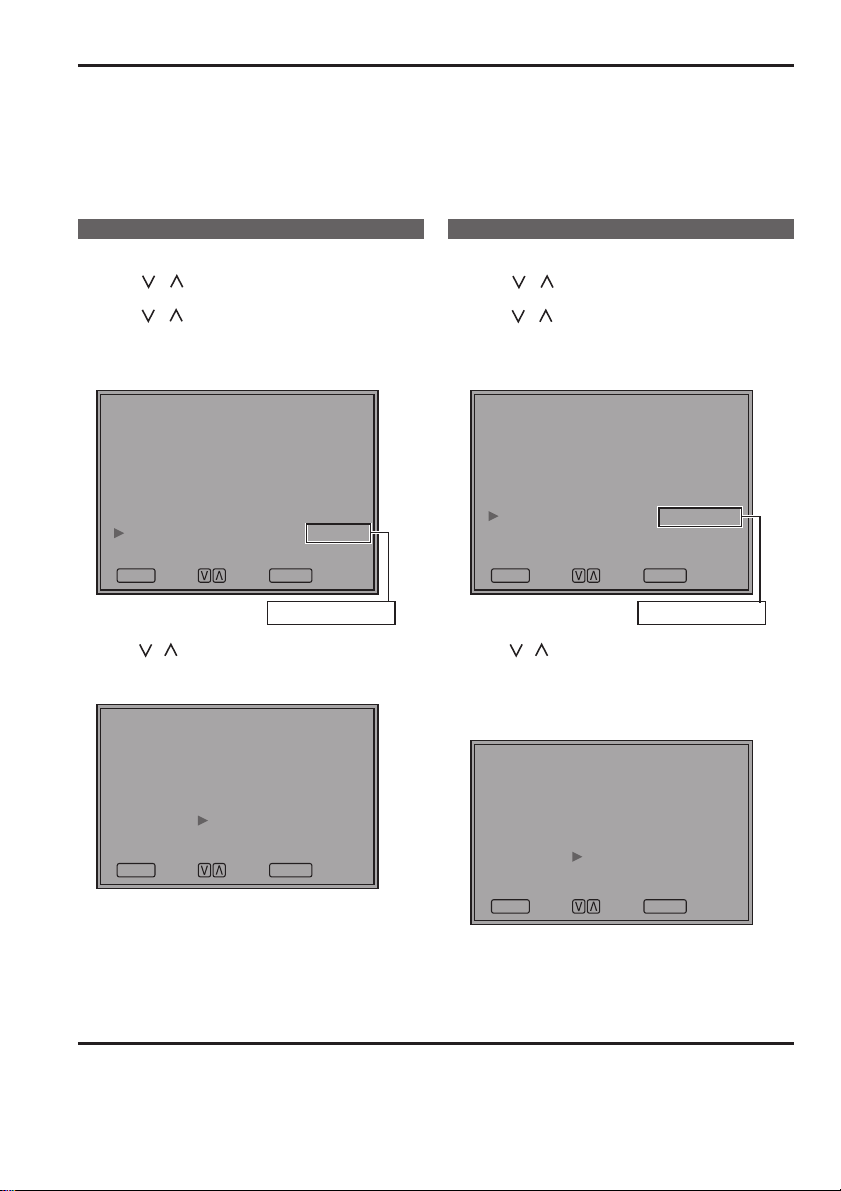
Menu operations
1. Push [MENU] to display the MAIN menu.
FUNCTION
12
MENU
INPUT ENTER
2. Push [
, ] to select the menu, then push
[ENTER].
[MAIN MENU]
MARKER
VIDEO CONFIG
SYSTEM CONFIG
VF CONFIG
FUNCTION
GPI
INPUT SELECT
CONTROL
HOURMETER
MENU
EXIT
SEL.
ENTER
ENTER
To return to the previous screen
Push [MENU].
3. Push [
, ] to select the sub menu, then push
[ENTER].
The setting values in the sub menu change to
green.
4. Push [
[MARKER]
MARKER
16:9
4:3
BACK
CENTER
GPI PRESET1
GPI PRESET2
MENU
EXIT
SEL.
ENTER
OFF
OFF
OFF
NORMAL
OFF
4:3
4:3
SET
, ] to select the setting values, then
3
push [ENTER].
Push [MENU] to cancel.
[MARKER]
MARKER
16:9
4:3
BACK
MARKER
GPI PRESET1
GPI PRESET2
MENU
EXIT
SEL.
ENTER
ON
OFF
OFF
NORMAL
OFF
4:3
4:3
SET
14
Page 5
User Data
You can change the menu setting values and picture adjusting knob settings, then save and load up to 5 combinations
of screen adjustment values as user data. You can also return the setting values and adjustment values to the
factory preset settings.
The following settings are included in user data.
• Menu settings except for “SETUP LOAD/SAVE” and “REMOTE of CONTROL” (including the button function
settings on the front of the monitor)
• Screen adjustment values changed in picture adjusting knob
Saving user data Loading user data
1. Push [MENU] to display the MAIN menu.
2. Push [
menu and push [ENTER].
3. Push [ , ] to select the “SETUP SAVE” sub
menu and push [ENTER].
The setting values in the sub menu change to
green.
4. Push [ , ] to select the file you wish to save to
from “USER1” – “USER5”, then push [ENTER].
The following screen appears.
, ] to select the “SYSTEM CONFIG”
[SYSTEM CONFIG]
CONT./BACK.
BACKLIGHT
PEAKING/PHASE
STATUS DISPLAY
BATTERY REMAIN
SETUP LOAD
SETUP SAVE
PWR ON SETUP
MENU
EXIT
[
SETUP SAVE
MENU
]
USER1
YES
NO
EXIT
BACKLIGHT
PEAKING
3SEC OFF
FACTOR Y
USER1
LAST
ENTER
SEL.
SEL.
ENTER
Changes to green Changes to green
ENTER
SET
--
OFF
1. Push [MENU] to display the MAIN menu.
2. Push [ , ] to select the “SYSTEM CONFIG”
menu and push [ENTER].
3. Push [ , ] to select the “SETUP LOAD” sub
menu and push [ENTER].
The setting values in the sub menu change to
green.
[SYSTEM CONFIG]
CONT./BACK.
BACKLIGHT
PEAKING/PHASE
STATUS DISPLAY
BATTERY REMAIN
SETUP LOAD
SETUP SAVE
PWR ON SETUP
MENU
EXIT
4. Push [
The following screen appears.
To return to the factory preset setting values, select
, ] to select the file you wish to load to
from “USER1” – “USER5”, then push [ENTER].
“FACTORY”.
[
SETUP LOAD
]
USER1
YES
NO
SEL.
BACKLIGHT
PEAKING
3SEC OFF
FACTOR Y
USER1
ENTER
ENTER
--
OFF
LAST
5. Select “YES”, and push [ENTER].
The user data is saved.
To return to the previous screen
Push [MENU].
MENU
EXIT
5. Select “YES”, and push [ENTER].
The user data is loaded.
SEL.
ENTER
SET
15
Page 6
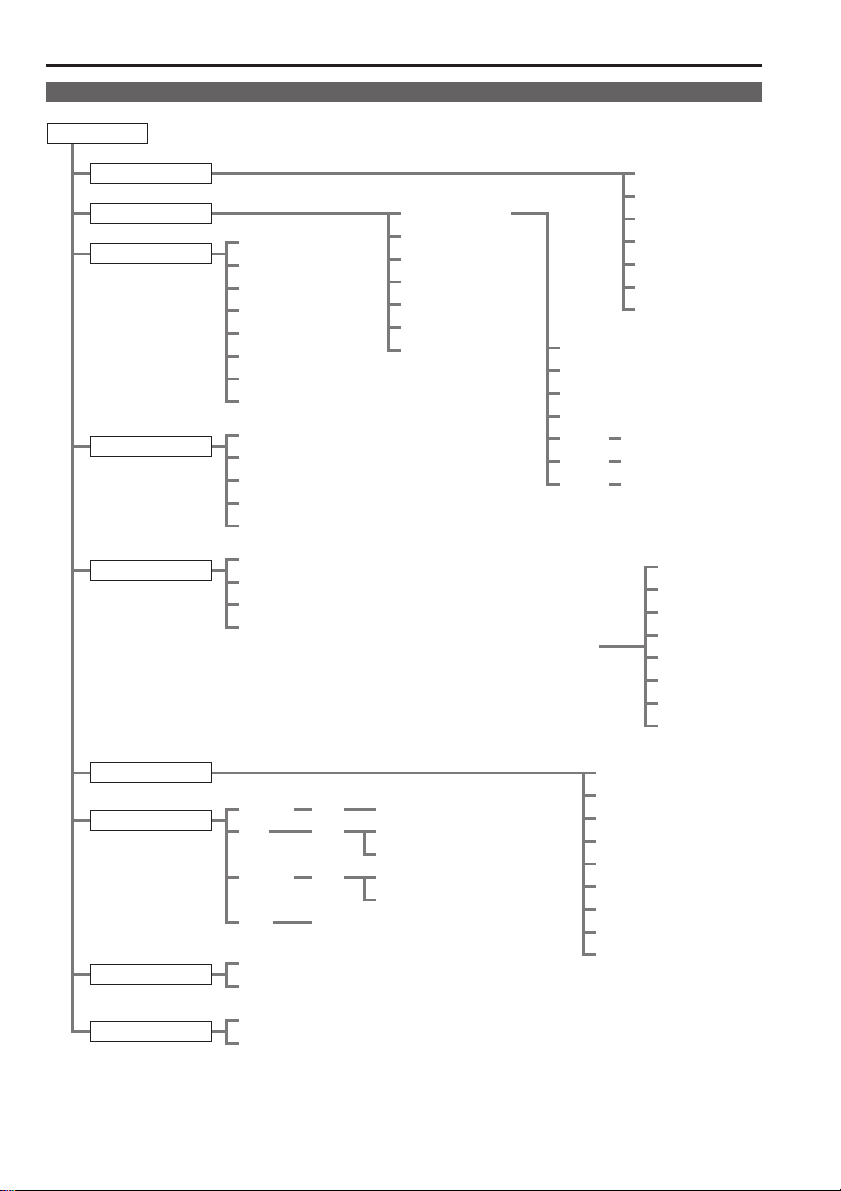
Main Menu
Menu configuration
MAIN MENU
MARKER
VIDEO CONFIG
SYSTEM CONFIG
VF CONFIG
FUNCTION
CONT./BACK.
BACKLIGHT
PEAKING/PHASE
STATUS DISPLAY
BATTERY REMAIN
SETUP LOAD
SETUP SAVE
PWR ON SETUP
VF CONTROL
CROSS HATCH
REAR TALLY
ZEBRA
RETURN CH
FUNCTION1
FUNCTION2
FUNCTION3
FUNCTION DISPLAY
COLOR TEMP.
SHARPNESS MODE
SHARPNESS H
SHARPNESS V
I-P MODE
MONO
SD ASPECT
*[WHITE BALANCE VAR1-3]
USER 63
D93
D65
D56
VAR 1
VAR 2
VAR 3
MARKER
16:9
4:3
BACK
CENTER
GPI PRESET1
GPI PRESET2
[WHITE BALANCE VAR1]*
[WHITE BALANCE VAR2]*
[WHITE BALANCE VAR3]*
COLOR TEMP.
GAIN RED
GAIN GREEN
GAIN BLUE
BIAS RED
BIAS GREEN
BIAS BLUE
RESET
16
GPI
INPUT SELECT
CONTROL
HOURMETER
YPBPR
VF
VIDEO
SDI
CONTROL
LOCAL ENABLE
OPERATION
LCD
ON
ON
ON
ON
COMPONENT LEVEL
VIDEO/YPBPR
SIGNAL TYPE
FORMAT
NTSC SETUP
GPI CONTROL
GPI1
GPI2
GPI3
GPI4
GPI5
GPI6
GPI7
GPI8
Page 7

Main Menu (continued)
MARKER
Sub menu Settings Explanation
MARKER
2∗3
∗
16:9
2
∗
4:3
2
∗
BACK
2
∗
CENTER
4
GPI PRESET1
GPI PRESET2
∗
4
∗
1
∗
OFF
ON
OFF
4:3
13:9
14:9
CNSCO
VISTA
95%
93%
90%
88%
80%
OFF
95%
93%
90%
88%
80%
NORMAL
HALF
BLACK
OFF
ON
4:3
13:9
14:9
CNSCO
VISTA
95% (16:9)
93% (16:9)
90% (16:9)
88% (16:9)
80% (16:9)
95% (4:3)
93% (4:3)
90% (4:3)
88% (4:3)
80% (4:3)
Used to make MARKER settings effective.
Used to select/display the type of marker when the aspect ratio setting
is 16:9.
<OFF> Marker not displayed.
<4:3> 4:3 marker <13:9> 13:9 marker
<14:9> 14:9 marker <CNSCO> CNSCO marker
<VISTA> VISTA marker <95%> 95% Area marker
<93%> 93% Area marker <90%> 90% Area marker
<88%> 88% Area marker <80%> 80% Area marker
Used to select/display the type of 4:3 marker.
<OFF> Marker not displayed.
<95%> 95% Area marker <93%> 93% Area marker
<90%> 90% Area marker <88%> 88% Area marker
<80%> 80% Area marker
Used to select the background brightness excluding the marker.
<NORMAL> Normal background
<HALF> Background brightness 50%
<BLACK> Background brightness 0% (Black)
Used to display the center marker.
<OFF> Not displayed
<ON> Displayed
GPI PRESET1: Used to select the marker to be displayed using the
GPI terminal “MARKER1 ON/OFF” operation (→ page 31).
GPI PRESET2: Used to select the marker to be displayed using the
GPI terminal “MARKER2 ON/OFF” operation (→ page 31).
<4:3> 4:3 marker
<13:9> 13:9 marker
<14:9> 14:9 marker
<CNSCO> CNSCO marker
<VISTA> VISTA marker
<95% (16:9)> 95% Area marker when the aspect ratio is 16:9.
<93% (16:9)> 93% Area marker when the aspect ratio is 16:9.
<90% (16:9)> 90% Area marker when the aspect ratio is 16:9.
<88% (16:9)> 88% Area marker when the aspect ratio is 16:9.
<80% (16:9)> 80% Area marker when the aspect ratio is 16:9.
<95% (4:3)> 95% Area marker when the aspect ratio is 4:3.
<93% (4:3)> 93% Area marker when the aspect ratio is 4:3.
<90% (4:3)> 90% Area marker when the aspect ratio is 4:3.
<88% (4:3)> 88% Area marker when the aspect ratio is 4:3.
<80% (4:3)> 80% Area marker when the aspect ratio is 4:3.
The underlined values are factory preset setting values.
• The marker is not displayed during VF line operation.
• The marker display size is the display size of a camera-recorder, and so is smaller than the previous model (BTLH900A).
∗
1 The setting becomes “ON” when the unit receives marker-related control during REMOTE operation. (Priority
goes to GPI when GPI settings exist.)
∗
2 When controlling the marker settings using the GPI function (→ page 31), these settings become disabled.
∗
3 These are only enabled when the HD signal and SD signal aspect ratio settings are 16:9.
∗
4 When the HD signal and SD signal aspect ratio setting is 16:9, a 4:3 marker is displayed in the center 4:3
area.
17
Page 8

Main Menu (continued)
Types of MARKER
16:9 marker
(Displayed when using HD, or when using SD
with a 16:9 aspect ratio)
The marker is only displayed as a vertical bar. In
addition, the
BACK” item.
4:3 marker 13:9 marker
14:9 marker
VISTA marker, CNSCO marker
A horizontal dotted line is displayed as the marker.
VISTA marker CNSCO marker
Area marker
A dotted line is displayed as the marker.
section becomes the “MARKER
4:3 marker
(Displayed when using SD with a 4:3 aspect ratio)
A dotted line is displayed as the marker.
95% Area marker 93% Area marker
90% Area marker 88% Area marker
80% Area marker
(Displayed when using HD, or when using SD
with a 16:9 aspect ratio)
A dotted line is displayed as the marker.
95% Area marker 93% Area marker
95% Area marker 93% Area marker
90% Area marker 88% Area marker
80% Area marker
18
90% Area marker 88% Area marker
80% Area marker
∗
You can display 4:3 marker at the same time as
16:9 marker.
Simultaneously display example
The section becomes the “MARKER BACK” item. The
background selected with the 16:9 marker is controlled.
80% Area marker
95% Area marker
Center marker
16:9 marker:
95% Area marker
4:3 marker:
80% Area marker
Center marker
The marker is displayed in
the center of the picture.
Page 9

Main Menu (continued)
VIDEO CONFIG
The underlined values are factory preset setting values.
Sub menu Settings Explanation
COLOR TEMP.
USER 63
D93
D65
D56
VAR 1
VAR 2
VAR 3
SHARPNESS
MODE
SHARPNESS H
SHARPNESS V
HIGH
LOW
0 - 30
0 - 30
I-P MODE MODE2
MODE1
4
MONO
∗
OFF
ON
SD ASPECT
∗
4:3
4
16:9
∗
1 When selecting USER 0 - 63
1) Push [ENTER] (USER changes to blue). 2) Select 0 - 63 with [
∗
2 When “VAR1”, “VAR2” or “VAR3” is selected, the monitor switches to WB adjustment mode (→ page 20).
∗
3 The following sharpness values can each be set,
1) VIDEO system input line (VIDEO)(Factory settings are SHARPNESS MODE: LOW, SHARPNESS H/V: 0)
2) any other input line’s HD (Factory settings are SHARPNESS MODE: HIGH, SHARPNESS H/V: 0)
3) any other input line’s SD (Factory settings are SHARPNESS MODE: LOW, SHARPNESS H/V: 0)
and the setting values for the selected input signal from within this group is displayed. The adjustment status is
displayed in the bottom right when selected.
∗
4 During GPI control, the setting items are displayed in gray and the display changes in accordance with the GPI
control.
1
∗
Used to select the color temperature.
<USER 0 - 63> Adjustable settings 0 - 63
(color temperature around 3000K - 9300K)
<D93> Color temperature around 9300K
<D65> Color temperature around 6500K
<D56> Color temperature around 5600K
<VAR1> WB adjustment mode
<VAR2> WB adjustment mode
<VAR3> WB adjustment mode
3
∗
Used to select the width of the sharpness edge.
2
∗
2
∗
2
∗
<HIGH> Thin edge <LOW> Thick edge
3
∗
Used to set the sharpness in the horizontal direction.
When adjusting, the item display moves to the lower part of the
screen.
3
∗
Used to set the sharpness in the vertical direction.
When adjusting, the item display moves to the lower part of the
screen.
Used to select IP conversion mode. (→ page 20 “About IP Mode”)
<MODE2> Field Interpolation <MODE1> Frame Interpolation
Used to switch between color and monochrome (MONO).
<OFF> Color <ON> Monochrome
∗
When this is ON, the picture adjusting knob [CHROMA] setting is
fixed at 0.
Used for setting the aspect ratio settings when using SD signal
input.
<4:3> 4:3 display <16:9> 16:9 display
, ], and push [ENTER].
19
Page 10

Main Menu (continued)
About IP Mode
By selecting “MODE1”, you can convert IP through Frame Interpolation.
This unit has reduced the Frame Interpolation delay to 1 field or less, compared to our old models having caused
1 frame delay or more.
Factory preset setting value is “MODE1” recommended for normal use. Depending on images, in very rare
cases, noise may occur on the screen. In such a case, “MODE 2” is recommended.
By selecting “MODE2”, you can convert IP through Field Interpolation.
Since MODE2 interpolates only within each Field, it is suitable to confirm interlace condition.
Depending on still images, etc., flickers may occur on the screen. In such a case, “MODE1” is recommended.
WB adjustment mode
You can adjust “WHITE BALANCE VAR1” - “WHITE BALANCE VAR3” (WB) by selecting “VAR1” - “VAR3” in
“COLOR TEMP.” in the “VIDEO CONFIG” menu.
The underlined values are factory preset setting values.
Sub menu Settings Explanation
COLOR TEMP.
GAIN RED 0 - 511
GAIN GREEN
GAIN BLUE
BIAS RED –512 - 511
BIAS GREEN
BIAS BLUE
RESET “GAIN RED” - “BIAS BLUE” values are reset to color temperatures
∗
1 When “COLOR TEMP.” is selected and [ENTER] is pressed following item change, the display changes to the
confirmation screen. Selecting “YES” and pressing [ENTER] on this screen return GAIN and BIAS values to the
selected color temperature values.
∗
2 When adjusting, the item display moves to the lower part of the screen.
1
∗
USER 0 - 63
D93
D65
D56
(Factory presets
are values for color
temperature <D65>.)
∗
The presets are
values adjusted
before shipment from
factories.
(Factory preset settings:
0)
Used to select the color temperature that will become the
basis for adjustments.
<USER 0 - 63> Adjustable settings 0 - 63
(color temperature around 3000K - 9300K)
<D93> Color temperature around 9300K
<D65> Color temperature around 6500K
<D56> Color temperature around 5600K
2
GAIN elements for RED are adjusted.
GAIN elements for GREEN are adjusted.
GAIN elements for BLUE are adjusted.
BIAS elements for RED are adjusted.
BIAS elements for GREEN are adjusted.
BIAS elements for BLUE are adjusted.
∗
2
∗
2
∗
2
∗
2
∗
2
∗
values selected in “COLOR TEMP.”.
20
Page 11

Main Menu (continued)
SYSTEM CONFIG
The underlined values are factory preset setting values.
Sub menu Settings Explanation
CONT. /BACK. BACKLIGHT
BACKLIGHT 0 - 60 Used to adjust the LCD backlight level.
PEAKING/PHASE PEAKING
STATUS DISPLAY CONTINUE
BATTERY REMAIN OFF
SETUP LOAD FACTORY
SETUP SAVE USER1
PWR ON SETUP LAST
∗
1 Functions as CONTINUE when
or when the
∗
2 USER saving is not possible when CONTROL is set to REMOTE.
CONTRAST
PHASE
3SEC OFF
OFF
ON
USER1
USER2
USER3
USER4
USER5
USER2
USER3
USER4
USER5
FACTORY
USER1
USER2
USER3
USER4
USER5
(PIXEL TO PIXEL) status is displayed.
P-P
Used to select the function to be assigned to CONT/B.LIGHT (a knob
on the front panel).
<BACKLIGHT> Used to adjust BACKLIGHT.
<CONTRAST> Used to adjust CONTRAST.
<Note>
CONT./BACK displays “-” while BACKLIGHT settings are performed.
Used to select the function to be assigned to PEAK/PHASE (a knob
on the front panel).
<PEAKING> Assigns to the PEAKING function.
<PHASE> Assigns to the PHASE function.
Used to set the display time for the status display.
1
∗
<CONTINUE> Always displayed.
<3SEC OFF> Displayed for 3 seconds.
<OFF> Not displayed.
Used to select whether or not to display the battery level.
<OFF> Not displayed.
<ON> Displayed.
Used to load the saved factory preset setting values (FACTORY) or
user data (USER 1 - USER 5).
<FACTORY> The factory preset settings.
<USER1 - 5> The saved USER data
When the unit is shipped from the factory, the USER 1 to 5 data items
are the same as the factory preset values.
Used to save user data.
Up to 5 sets of user data can be saved, which include the current
setting values for the menu and picture adjusting knobs.
Used to select the settings for when the power supply is switched
ON.
<LAST> Starts up with same settings as the last time the power
<FACTORY> Starts up with the FACTORY settings.
<USER1 - 5> Starts up with the settings that are saved in a USER
(warning of improper operation status for the camera settings) is displayed
supply was switched OFF.
item.
2
∗
.
21
Page 12

Main Menu (continued)
VF CONFIG
The underlined values are factory preset setting values.
Sub menu Settings Explanation
VF CONTROL VF-CH
CROSS HATCH HIGH
REAR TALLY ON
ZEBRA ON
RETURN CH
• The priority sequence for GPI control and RS-232C is as follows: GPI > VF CONFIG > RS-232C.
∗
1 RETURN CH operates when VF CONTROL is set to ALL-CH. It is not affected by the various line ON/OFF
settings in the INPUT SELECT menu (→ page 29). (Input lines that are set with RETURN CH are enabled even
if they are set to OFF in INPUT SELECT.)
∗
2 A function to be used with future Panasonic camera-recorders.
ALL-CH
LOW
OFF
OFF
OFF
∗1∗
2
YPBPR
VF
VIDEO
SDI
Used to select the input line for the VF function of the monitor.
(VF function: tally lamp lit, zebra displayed,
<VF-CH> Only enabled when the VF line is selected.
<ALL-CH> Enabled with all input lines.
Used to set whether to display a cross hatch and select its density
level.
<HIGH> 70/256 (displays with a dense cross hatch)
<LOW> 20/256 (displays with a light cross hatch)
<OFF> Not displayed.
Used to allow control of the tally lamp on the rear of the monitor.
<ON> Lamp lights when TALLY control from a GPI/camera is ON.
<OFF> Lamp does not light.
Used to set ZEBRA information in the camera.
<ON> Sets the information to ON.
<OFF> Sets the information to OFF.
Used to select the signal input line by operating the RETURN (RET)
button of the camera lens.
<Note>
When there is no SDI input unit (option), the SDI item is displayed in
gray and cannot be set.
displayed)
22
Page 13

Main Menu (continued)
FUNCTION
Sub menu Settings Explanation
FUNCTION1 - 3 BLUE ONLY
SD ASPECT
WFM
MARKER
∗1∗
PIXEL TO PIXEL
PIXEL POS.+
PIXEL POS.–
FOCUS-IN-RED
ZEBRA
REAR TALLY
CROSS HATCH
1
∗
MONO
UNDEF
(Factory preset
setting→
FUNCTION1:
WFM
FUNCTION2:
PIXEL TO PIXEL
FUNCTION3:
FOCUS-IN-RED)
FUNCTION
DISPLAY
8
∗
ON1
ON2
9
∗
OFF
Used to select the functions to be assigned to individual buttons
1∗2
∗
[FUNCTION1] to [FUNCTION3] (front-panel buttons).
<BLUE ONLY>
3
Used to cut the red and green signals. You can check the hue (PHASE)
4
∗
and depth of color (CHROMA). This is switched between ON/OFF by
5
∗
pushing the button.
5
∗
<SD ASPECT>
Used to switch between “16:9” and “4:3”.
7
∗4∗
<WFM>
Used to display the waveform display screen.
6
∗
<MARKER>
Used to display the marker.
<PIXEL TO PIXEL>
Used to switch the screen display between input size and display
size.
<PIXEL POS.+>
During PIXEL TO PIXEL display, used to move the signal display
position clockwise and display it.
<PIXEL POS.–>
During PIXEL TO PIXEL display, used to move the signal display
position counterclockwise and display it.
<FOCUS-IN-RED>
Used to highlight in red the section of the image that is being
focused.
<ZEBRA>
Used to set the zebra display ON or OFF for the camera.
<REAR TALLY>
Used to set the rear tally ON or OFF.
<CROSS HATCH>
Used to display a cross hatch.
<MONO>
Used to switch the display between color and black-and-white.
<UNDEF>
Undefined.
Used to display the functions assigned from [FUNCTION1] to
[FUNCTION3] (buttons on the front panel). The button action can also
be selected (1-touch, 2-touch, OFF).
<ON1>
Function display and function operation can be performed with one
touch.
<ON2>
Function display and function operation can be performed with two
touches.
<OFF>
Function not displayed.
The underlined values are factory preset setting values.
• If a FUNCTION button is pushed during the picture adjusting knobs display, the picture adjusting knobs display will
be cancelled and the FUNCTION operation cannot be executed.
∗
1 The control settings do not operate during GPI operation.
∗
2 If these settings are changed, the menu settings will also change.
∗
3 Not displayed when 16:9, 4:3, BACK and CENTER are all OFF in the MARKER menu settings.
∗
4 SD ASPECT cannot be switched when PIXEL TO PIXEL is ON during SD display.
∗
5 PIXEL POSITION is not backed up. It is always CENTER when the power supply is switched ON.
∗
6 Only enabled when TALLY control from the camera is ON.
∗
7 During FOCUS-IN-RED operation, the detection sensitivity can be changed with the FOCUS-R knob.
The setting range is from 0 to 30, with 30 the most sensitive detection.
∗
8 The operating status is displayed regardless of the ON/OFF setting.
∗
9 The function displayed with the ON2 setting can be operated with a button only during the time that it is
displayed.
23
Page 14

Main Menu (continued)
Restrictions on various FUNCTION settings
Under the following conditions, various settings are disabled.
Setting Disabling condition
SD ASPECT Does not operate while GPI items are being set. Does not operate during PIXEL TO PIXEL
WFM Does not operate during PIXEL TO PIXEL or FOCUS-IN-RED mode.
MARKER Does not operate while GPI items are being set.
PIXEL TO PIXEL Does not operate while WFM is ON or GPI items are being set.
FOCUS-IN-RED Does not operate while WFM is ON or GPI items are being set.
MONO Does not operate while GPI items are being set.
Operation status displayed when a FUNCTION button is used
When one of the buttons from [FUNCTION1] to [FUNCTION3] is pushed, one of the following displays is shown
depending on the operation assigned to the button.
• MARKER
MARKER OFF, 4:3 MARKER, 13:9 MARKER, 14:9 MARKER, VISTA MARKER, CNSCO MARKER,
95% MARKER, 93% MARKER, 90% MARKER, 88% MARKER, 80% MARKER
operation.
Does not operate during HD display.
If operated during the conditions described above, “INVALID FUNCTION” is displayed.
If operated during the conditions described above, “INVALID FUNCTION” is displayed.
Does not operate when the VF line is selected for the input.
Does not operate during PIXEL TO PIXEL or FOCUS-IN-RED mode.
If operated during the conditions described above, “INVALID FUNCTION” is displayed.
If operated during the conditions described above, “INVALID FUNCTION” is displayed.
If operated during the conditions described above, “INVALID FUNCTION” is displayed.
If operated during the conditions described above, “INVALID FUNCTION” is displayed.
• PIXEL TO PIXEL / PIXEL POSITION
CENTER, LEFT TOP, LEFT MID, LEFT BOTTOM, MID TOP, MID BOTTOM, RIGHT TOP, RIGHT MID, RIGHT
BOTTOM
• FOCUS-IN-RED
FOCUS-IN-RED OFF, FOCUS-IN-RED ON
• ZEBRA
ZEBRA OFF, ZEBRA ON
• REAR TALLY
REAR TALLY OFF, REAR TALLY ON
24
Page 15

Main Menu (continued)
About WFM
You can display the wave form monitor using the “WFM” function.
The display changes each time you press one of the buttons, [FUNCTION1] to [FUNCTION3] (→ page 23),
assigned with the [WFM] function (To use the “WFM” function, you must assign it to one of the [FUNCTION1] to
[FUNCTION3] buttons).
Press the FUNCTION button assigned
with the WFM function once.
Normal window WFM display
Restrictions on WFM
WFM is not displayed while using the PIXEL TO PIXEL or FOCUS-IN-RED function.
About PIXEL TO PIXEL and PIXEL POS. +/–
Using the “PIXEL TO PIXEL” function, you can confirm a picture with the actual pixel count (only when the input
is an HD signal).
First, press one of the buttons, [FUNCTION1] to [FUNCTION3] (→ page 23), assigned with the “PIXEL TO PIXEL”
function to turn it “ON”. With the function on, press another one of the buttons, [FUNCTION1] to [FUNCTION3]
(→ page 23), assigned with “PIXEL POS. +” or “PIXEL POS. –”. Each time the button assigned with “PIXEL POS.
+/–” is pressed, the signal display position switches.
Sub menu Settings Explanation
PIXEL TO PIXEL OFF
1
PIXEL POS.+
PIXEL POS.–
∗
1
∗
ON
CENTER
LEFT TOP
LEFT MID
LEFT BOTTOM
MID TOP
MID BOTTOM
RIGHT TOP
RIGHT MID
RIGHT BOTTOM
Press the
same button
again.
WFM (Wave Form Monitor)
The window is displayed in 16:9 aspect.
The underlined values are factory preset setting values.
Used to set the display of the screen size to the input signal
size.
Used to set the signal display position when PIXEL TO PIXEL
is on.
HD signal 1080i
<CENTER> center
<LEFT TOP> top left
<LEFT MID> Screen left center*
<LEFT BOTTOM> bottom left
<MID TOP> Screen top center*
<MID BOTTOM> Screen bottom center*
<RIGHT TOP> top right
<RIGHT MID> Screen right center*
2
2
2
2
<RIGHT BOTTOM> bottom right
∗
1 PIXEL POS. + and – operate as follows.
∗
2 Refer to the next page.
HD signal 720P
<CENTER> center
<LEFT TOP> top left
<RIGHT TOP> top right
<RIGHT BOTTOM> bottom right
<LEFT BOTTOM> bottom left
SD signal
<CENTER> center
25
Page 16

Main Menu (continued)
Display position sequence during an HD signal 1080i input
PIXEL POS.+: 1)→2)→3)→4)→5)→6)→7)→8)→9)→1) · · · · ·
PIXEL POS.–: 1)→9)→8)→7)→6)→5)→4)→3)→2)→1) · · · · ·
1) CENTER 2) LEFT TOP 3) MID TOP
4) RIGHT TOP 5) RIGHT MID 6) RIGHT BOTTOM
7) MID BOTTOM 8) LEFT BOTTOM 9) LEFT MID
Display position sequence during an HD signal 720P input
PIXEL POS.+: 1)→2)→3)→4)→5)→1) · · · · ·
PIXEL POS.–: 1)→5)→4)→3)→2)→1) · · · · ·
1) CENTER 2) LEFT TOP 3) RIGHT TOP
4) RIGHT BOTTOM 5) LEFT BOTTOM
Display position sequence during an SD signal input
The input signal is displayed in the same size but POSITION selections are not possible.
Displayed in the same size even when the aspect is 16:9.
∗
2 The following display positions are used after the input signal format is switched from 1080i to 720P.
9) LEFT MID → 2) LEFT TOP
3) MID TOP → 1) CENTER
7) MID BOTTOM → 1) CENTER
5) RIGHT MID → 3) RIGHT TOP
∗
3 Displayed in the same size in the horizontal direction. The vertical direction is resized by taking into account the
vertical and horizontal balance of the displayed image.
3
∗
26
Page 17

Main Menu (continued)
About FOCUS-IN-RED
When the FOCUS-IN-RED function is used, the section that is being focused is displayed in an easy-to-understand
red, making camera focus adjustments easy.
Each time the button from [FUNCTION1] to [FUNCTION3] to which the FOCUS-IN-RED function is assigned
is pushed, the display is switched (the FOCUS-IN-RED function must be assigned to one of the buttons from
[FUNCTION1] to [FUNCTION3] in order to be able to use the FOCUS-IN-RED function).
When the FOCUS-IN-RED function is displayed, the detection sensitivity level (0 - 30) can be changed with the
FOCUS-R knob. 30 is the most sensitive detection.
Push once the FUNCTION button to
which the FOCUS-IN-RED function is
Normal screen FOCUS-IN-RED display
About CROSS HATCH
When the CROSS HATCH function is used, markers are displayed at constant vertical and horizontal intervals
in order to make it easier to decide the picture composition. The marker values are fixed at 1 dot or 1 line for the
line width and 50 dots or 50 lines for the interval.
Each time the button from [FUNCTION1] to [FUNCTION3] to which the CROSS HATCH function is assigned is
pushed, the display is switched.
Each time the FUNCTION button to which the CROSS HATCH function
is assigned is pushed, the display is switched as follows
assigned.
Push the
same button
once more
Displays in red the section of the
image that is being focused
The aspect of 16:9 in the screen example.
With HD/SD (16:9) images
With SD (4:3) images
Push
once
Push
twice
Displays a light cross
hatch
Push 3 times (returns to cross hatch display off)
Displays a dense cross
hatch
27
Page 18

Main Menu (continued)
GPI
The “GPI CONTROL” item is used to set enable/disable of all GPI functions, and assigns functions to each of the
GPI terminal pins (→ page 31).
Sub menu Settings Explanation
GPI CONTROL DISABLE
ENABLE
GPI1 - GPI8 UNDEF
MARKER1 ON/OFF
MARKER2 ON/OFF
MARKER BACK HALF
MARKER BACK BLACK
CENTER MARKER
INPUT SEL. YPBPR
INPUT SEL. VF
INPUT SEL. VIDEO
INPUT SEL. SDI
SD ASPECT
RED TALLY
GREEN TALLY
MONO
PIXEL TO PIXEL
FOCUS IN RED
The underlined values are factory preset setting values.
GPI functions enable/disable settings
<DISABLE> Deactivate
<ENABLE> Activate
Used to set the GPI control terminal pin assign.
You can set the same items for each terminal
(→ page 31).
28
Page 19

Main Menu (continued)
INPUT SELECT
The underlined values are factory preset setting values.
Sub menu Settings Explanation
YP
BPR ON
Used to set the YP
BPR line to the INPUT SELECT button.
OFF
COMPONENT
LEVEL
SMPTE
B75
B00
Used to select the input level for the YPBPR (component) signal.
<SMPTE> When the signal level specified in SMPTE is Chroma 100
IRE, PB, PR=0.7Vp-p
<B75> Select this when connecting a betacam or similar devices
with a 7.5 IRE setup level.
<B00> Select this when connecting a betacam or similar devices
with a 0 IRE setup level.
VF ON
Used to set the VF line to the INPUT SELECT button.
OFF
VIDEO/YPBPR VIDEO
YPBPR
Used to select the VF input mode.
<VIDEO> Selects the VIDEO signal.
<YPBPR> Selects the YPBPR (component) signal.
SIGNAL TYPE HD
SD
Used to select the signal output from the camera.
<HD> Selects the HD signal.
<SD> Selects the SD signal.
VIDEO ON
Used to set the VIDEO line to the INPUT SELECT button.
OFF
2
FORMAT AUTO
NTSC
PAL
Used to select the format for VIDEO input.
<AUTO> NTSC or PAL is selected automatically.
<NTSC> NTSC
∗
<PAL> PAL
NTSC SETUP 00
75
Used to set the setup level for NTSC.
<75> Select this when the signal is at a 7.5 IRE setup level.
<00> Select this when the signal is at a 0 IRE setup level.
SDI ON
Used to set the SDI line to the INPUT SELECT button.
OFF
∗
1 When an SDI input unit (option) is installed, it is not possible to switch OFF all the 4 input lines. An OFF setting
cannot be made for the 4th input line.
When there is no SDI input unit (option), it is not possible to switch OFF all the following 3 input lines: YPBPR,
VIDEO or VF. An OFF setting cannot be made for the 3rd input line.
∗
2 Although the factory preset setting is AUTO, we recommend specifying a format because there is a risk of the
input signal being affected by external noise.
∗
3 When there is no SDI input unit (option), the SDI item is displayed in gray and cannot be set.
1
∗
1
∗
1
∗
1∗3
∗
29
Page 20

Main Menu (continued)
CONTROL
The underlined values are factory preset setting values.
Sub menu Settings Explanation
CONTROL LOCAL
LOCAL
ENABLE
∗
1 The menu can be displayed when the lock is engaged.
The only menu setting that can be changed when the lock is engaged is the “CONTROL/LOCAL ENABLE”
item.
When the lock is engaged, the picture adjusting knob is disabled.
Operations when the lock is engaged follow the settings in “LOCAL ENABLE”.
When the lock is engaged, the key mark is displayed on the screen.
[MAIN MENU]
MARKER
REMOTE
DISABLE
INPUT
Used to select the operation. (Combined control lock)
<LOCAL> Front operation enabled
<REMOTE> Remote operation enabled
(The front controls become locked)
When “REMOTE” is selected in “CONTROL”, this selects whether
front controls are enabled/disabled.
<DISABLE> All front operations are disabled.
<INPUT> Operations other than those with the [INPUT SELECT]
button are disabled.
Key mark
1
∗
HOURMETER
The underlined values are factory preset setting values.
Sub menu Settings Explanation
OPERATION
LCD
∗
1 Time is displayed in “XXXXXX”.
“XXXXXX”: 0 to 262,800 hours (about 30 years), “OVER” is displayed when the time exceeds 262,800 hours.
XXXXXXH
XXXXXXH
1
∗
1
∗
Used to display the power distribution time.
Used to display the backlight activation time.
30
 Loading...