

m
<o
55*
3-
5 S’
s f
O il)
o O
3 T>
6 CD
S' Si
il 5
C lO
II
l-S
<5 c
<D -5
ii
■o
2
5g
<D
0)
a
5
(D
VI
(1>
3
w
c
o
§
(A
n
0
3
■o
<v
><
0)
3
01
;*•
CD
(D
n
s
n
<A
n>
o
■a
(0
3
(3
a
*
z
o
Tl
00
CD
O
CD
CD
O
O
■o
0
0
3
(Q
o
2 O
O f-^
</> »
"n
0)
o
C/)
l§ I
>£. C/5 (D
7
8
3
HI
o
Appendix
Problem Solving Printout Journals
and Lists
Network Features
Advanced
Features
Basic Operations
Programming
Your Machine
Installing Your
Machine
iachine
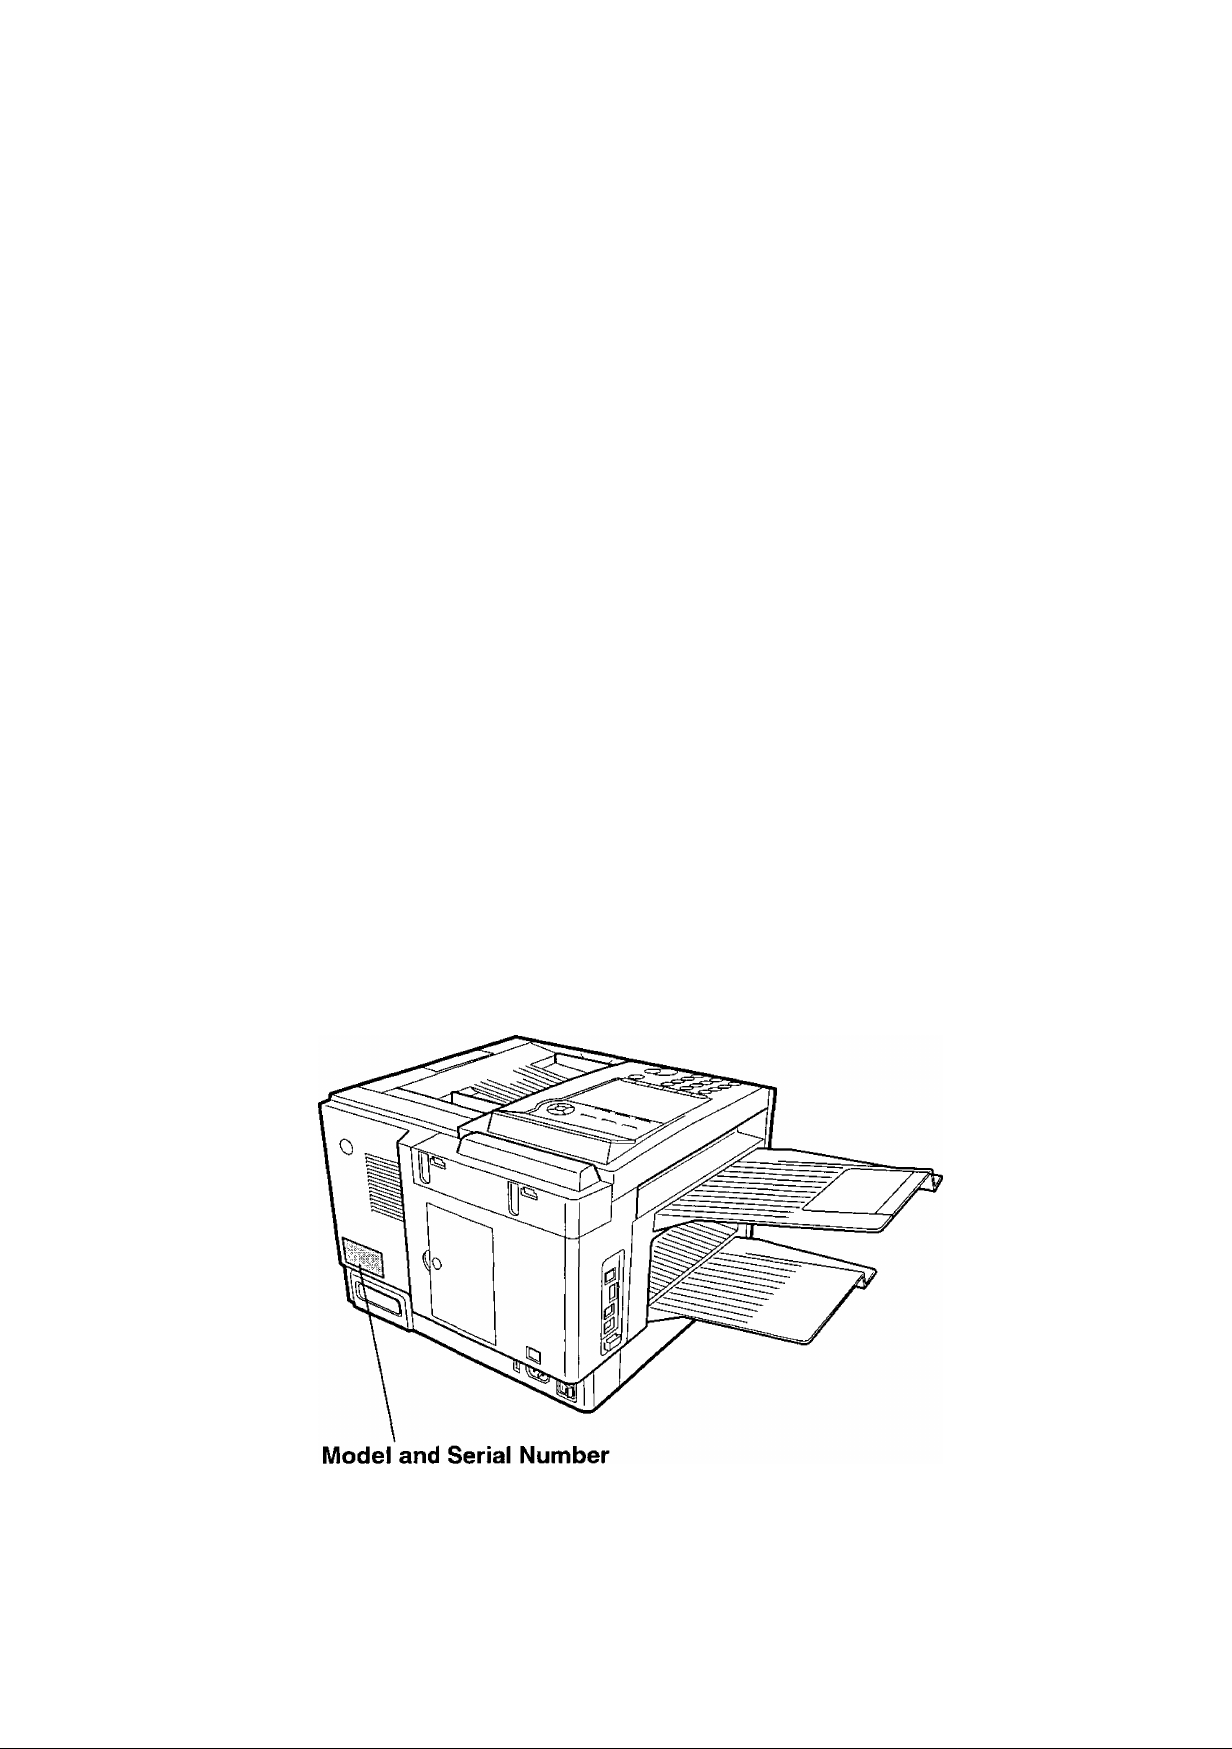
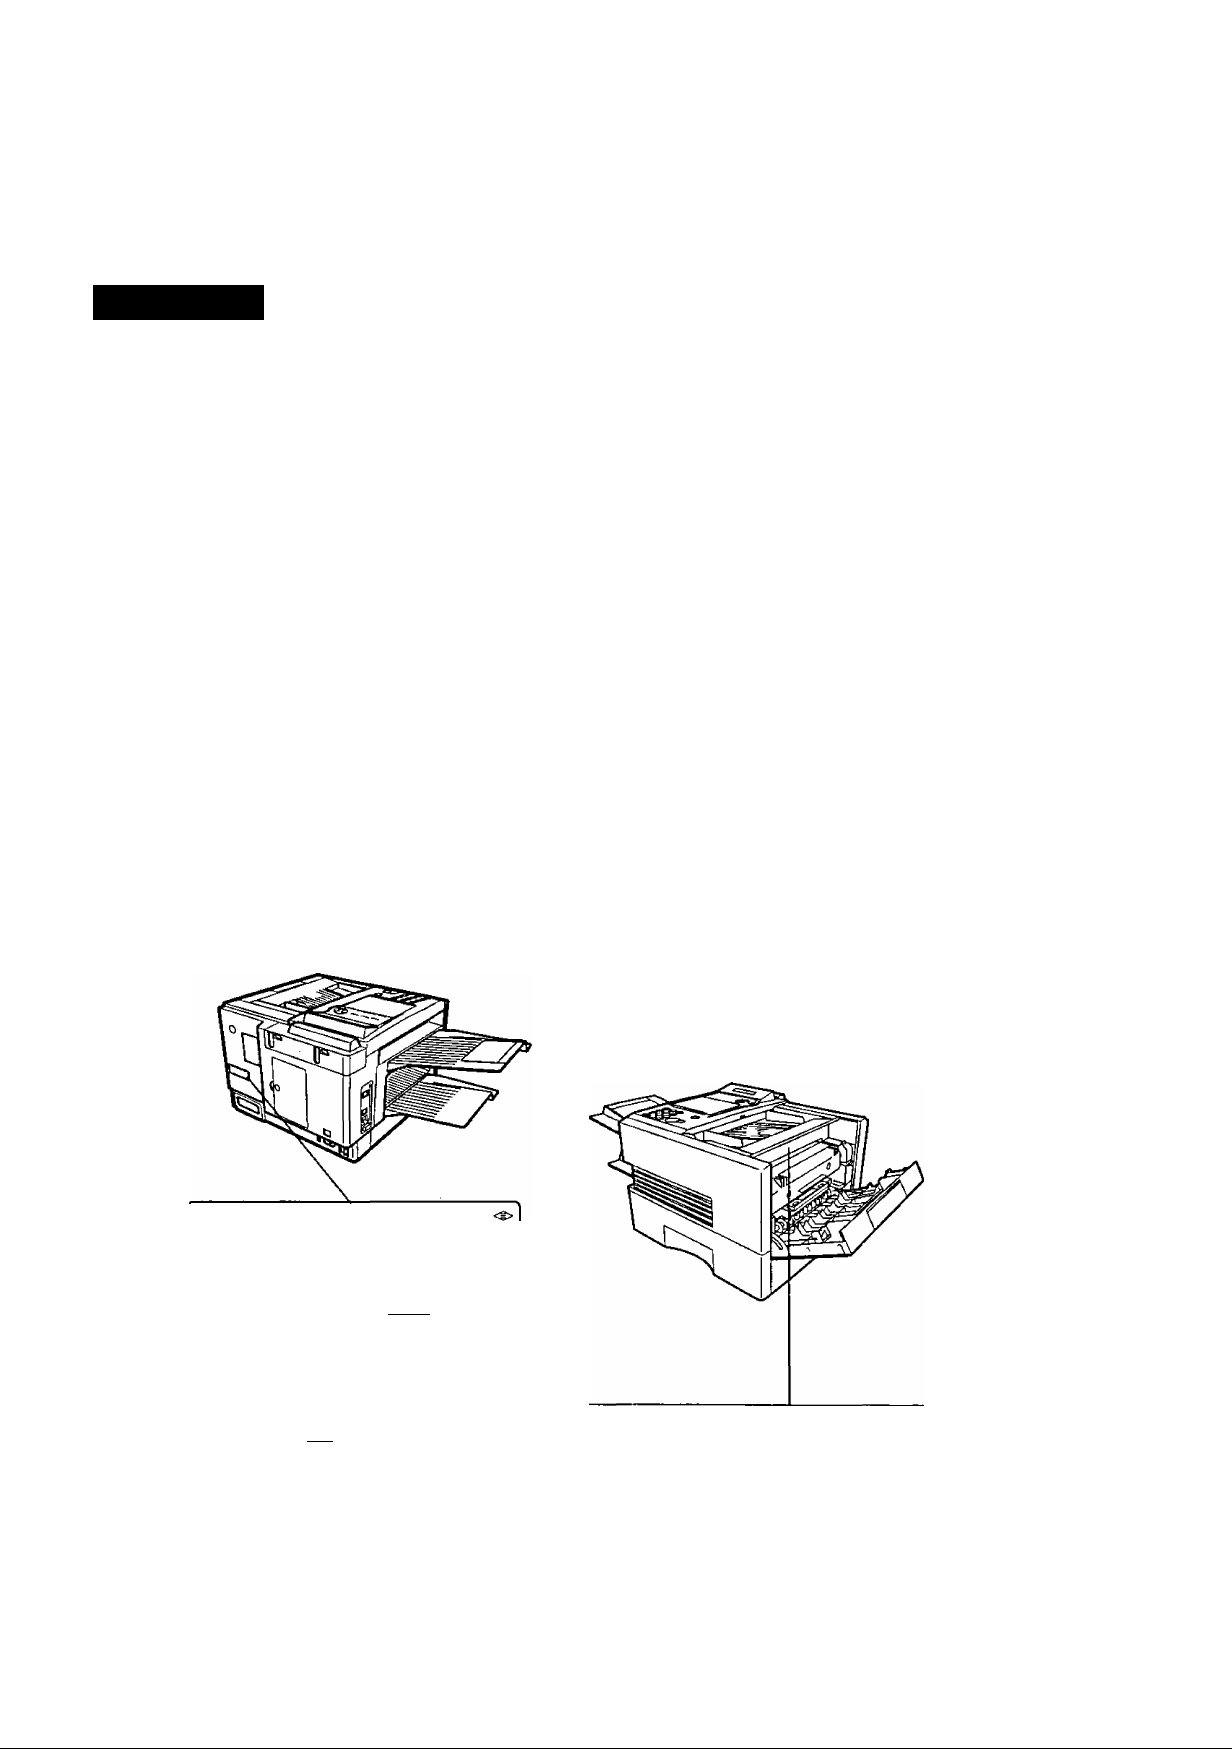
^ IMPORTANT INFORMATION ---------------------------------------------------------------------------------------------
When requesting information, supplies or service always refer to the model and serial number of your
machine. The model and serial number plate (Main Name Plate) is located on the machine as shown below.
For your convenience, space is provided below to record information you may need in the future.
Model No.
Serial No.
Date of Purchase
Dealer
Address
Telephone Number
( )
Supplies Telephone Number
( )
Service Telephone Number
( )
Copyright © 2001-2002 by Matsushita Graphic Communication Systems, Inc.
All rights reserved. Unauthorized copying and distribution is a violation of law. Printed in Japan.
The contents of these Operating instructions are subject to change without notice.

TsibDe of C©ote[ralts
©@(aa]Dg] 0® CSiP^
Safety Information
Precaution................
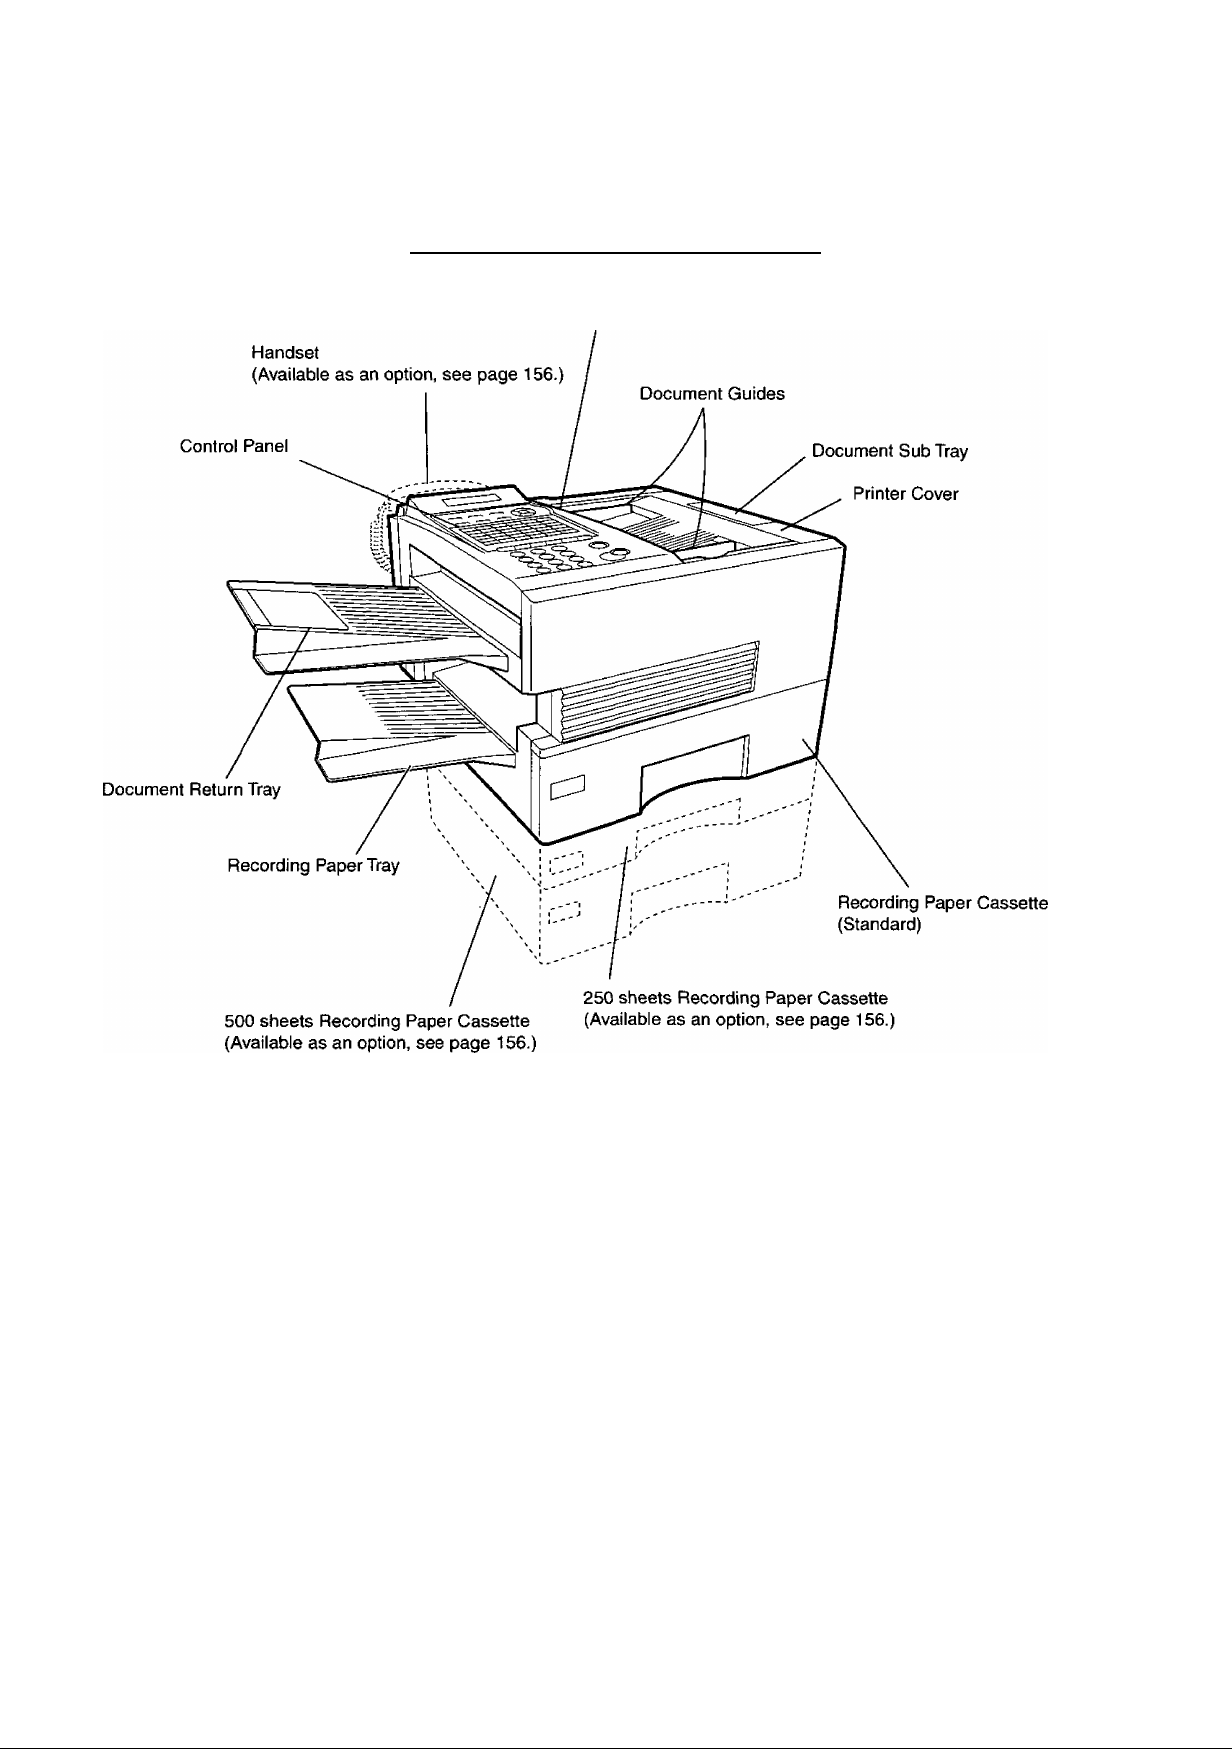
Function Key
External View
Control Panel
DDg(^00oi](s] SteQpte
Main Unit and Accessories
Installing the Accessories
...........
...........
...........
........................................................
.........................................................
Installing the Toner Cartridge....................................................
Loading the Recording Paper....................................................
□ Paper Specifications
........................................
Connecting the Telephone Line Cable and Power Cord.
Setting the Dialing Method (Tone or Pulse)
.............................
Adjusting the Volume.................................................................
O Setting the Monitor Volume
............................
D Setting the Ringer Volume..............................
User Parameters
D Genera! Description.........................................................
D Setting the Date and Time...............................................
D Setting Your LOGO
□ Setting Your Character ID................................................
n Setting Your ID Number (Fax Telephone Number),
.........................................................
9
11
12
13
14
16
17
18
20
20
22
24
25
25
25
26
26
26
27
28
29
One-Touch/Abbreviated Dialing Numbers
.............................................
D Entering One-Touch/Abbreviated Dialing Numbers
□ Editing One-Touch/Abbreviated Dialing Numbers...
□ Printing Out a Directory Sheet......................................
Customizing Your Machine.....................................................................
D General Description.........................................................
□ Setting the Fax Parameters...........................................
D Fax Parameter Table........................................................
30
30
32
34
35
35
35
36

Table of Conieots
Loading Documents....................................................................................................................
n Documents You Can Send
n Documents You Cannot Send...........................................................
□ How to Load Documents...................................................................
................................................................
Basic Transmission Settings..................................................................................................
D General Description..........................................................................
n Contrast...............................................................................................
D Resolution..........................................................................................
n Halftone...............................................................................................
D Verification Stamp
□ Communication Journal (COMM. JOURNAL)
........................................................ ....................
..................................
Sending Documents....................................................................................................................
□ General Description...........................................................................
Q Memory Transmission.......................................................................
□ Direct Transmission...........................................................................
D Voice Mode Transmission................................................................
D Transmission Reservation...............................................................
□ Redialing.............................................................................................
Receiving Documents.................................................................................................................
□ General Description...........................................................................
D Automatic Reception
O Manual Reception..............................................................................
C Print Reduction..................................................................................
n Selecting the Print Reduction Mode.................................................
........................................................................
D Receiving Oversize Documents.......................................................
□ Substitute Memory Reception...........................................................
Making Copies
□ Print Collation Mode
........
..........................................................................
........................
.......................
........................ 40
.......................
........................
.......................
.......................
.......................
.......................
........................ 43
.......................
......................... 45
.......................
.......................
.......................
.......................
.......................
.......................
........................
.......................
........................ 61
........................ 61
........................ 62
........................ 62
........................ 63
.......................
.......................
....................
40
40
41
42
42
42
42
43
44
45
45
52
55
57
60
61
61
64
64
65
[^sgfl3ai©©
Batch Transmission...................................................................
□ General Description......................................
□ Real-time Batch Transmission
□ Delayed Batch Transmission
Timer Controlled Communications
□ General Description......................................
D Deferred Transmission
O Deferred Polling
..........................................
...................................
..............................................
Polling.........................................................................................
n General Description
□ Setting the Polling Password
□ Preparing to be Polled..................................
n To Poll Documents from Another Station.
........................................
....................
.......................
......................
66
66
66
66
67
67
67
68
69
69
69
70
71

Table of Confenis
Program Keys............................................................................................................................... 72
□ General Description.................................................................................................... 72
□ Setting for Group Dialing............................................................................................ 72
D Setting for Deferred Transmission.............................................................................. 73
□ Setting for Deferred Polling........................................................................................ 74
D Setting for Normal Polling............................................................................................ 75
□ Setting for One-Touch Key......................................................................................... 76
□ Changing or Erasing the Program Key Settings
Edit File Mode............................................................................................................................... 78
D General Description...................................................................................................... 78
D Printing a File List......................................................................................................... 78
n Viewing the Contents of a File List............................................................................. 79
□ Changing the Start Time or the Station of a File
□ Deleting a File.............................................................................................................. 82
□ Printing Out a File....................................................................................................... 83
D Adding Documents into a File..................................................................................... 84
D Retry an Incomplete File............................................................................................ 85
Access Code.............................................................................................................................. 86
D General Description...................................................................................................... 86
□ Setting the Access Code............................................................................................ 86
D Operating Your Machine with the Access Code (Restrict all operations)
Cli Operating Your Machine with the Access Code
(Restrict access of Fax Parameters and Journal)................................................. 87
Receive To Memory..................................................................................................................... 88
D General Description...................................................................................................... 88
□ Setting the RCV To Memory Password..................................................................... 88
D Setting RCV To Memory............................................................................................... 88
D Printing Out Documents.............................................................................................. 89
Distinctive Ring Detector (DRD)................................................................................................. 90
CU General Description.................................................................................................... 90
Fax Cover Sheet.......................................................................................................................... 91
□ General Description.................................................................................................... 91
D To use the Fax Cover Sheet....................................................................................... 91
PIN Code Access..................................................................................................................... 93
□ General Description.................................................................................................... 93
G Selecting the Access Method (Prefix or Suffix)......................................................... 93
G Dialing with a PIN Code............................................................................................... 94
Fax Forward................................................................................................................................. 95
G Setting Fax Forward.................................................................................................... 95
File Transmission.................................................................................................................... 96
Q General Description...................................................................................................... 96
G Storing the Document(s)
Q Sending the Stored Document(s)
G Deleting the Stored Document(s)
.............................................................................................
................................................................................
...............................................................................
G Printing the Stored Document(s)................................................................................ 98
....................................................
....................................................
.............
77
80
87
96
97
98

Table of Contente
Department Code
D General Description.............................................................................................
□ Setting the Department Code...........................................................................
□ Changing or Erasing the Department Code.....................................................
CD Sending Document with Department Code....................................................
n Sending Document with Department Code (Voice Mode Transmission)
n Printing a Department Code List.........................................................................
n Printing a Department Code Journal...................................................................
Multiple LOGO
□ General Description.....................................
□ Setting the Multiple LOGO
n Changing or Erasing the Multiple LOGO
□ Sending Document with Multiple LOGO.
D Printing a Multiple Logo List
..........................
.........................
Selective Reception...........................................................................................................
n General Description..........................................................................................
C Setting the Selective Reception......................................................................
Password Communications..............................................................................................
CD General Description......................................................................................
D Compatibility with Other Machines................................................................
CD Setting Password Transmission
□ Setting Password Reception.........................................................................
D Using Password Transmission.......................................................................
□ Using Password Reception...........................................................................
Confidential Mailbox..........................................................................................................
□ General Description.......................................................................................
D Confidential Mailbox
□ Sending a Confidential Document to a Remote Station’s Mailbox............
□ Polling a Confidential Document from a Remote Station's Mailbox
D Receiving a Confidential Document to Your Machine's Mailbox
D Storing a Confidential Document in Your Machine's Mailbox
□ Printing Out a Confidential Document from Your Machine's Mailbox ..
D Deleting a Confidential Document Stored in Your Machine's Mailbox,
Sub-Addressing.................................................................................................................
□ General Description.......................................................................................
n To set the Sub-address into a One-Touch/ABBR. Dialing Numbers...
D To send a Document with Sub-address
.......................................................................................
.................................................................
.........
................
....................
........................................................
99
99
100
101
103
104
105
106
108
108
108
109
110
111
112
112
112
113
113
113
114
115
116
117
118
118
118
119
120
121
122
123
124
125
125
126
127

MdS cMiS cDcmcdo^ LMfe
Table of Contents
Journals and Lists.
[p[K§)IMI@ra ©©(teloDgi
Troubleshooting....
................
U General Description...................................................................................
□ Transaction Journal...................................................................................
D Individual Transmission Journal (IND. XMT JOURNAL)
□ Communication Journal (COMM. JOURNAL)..........................................
□ One-Touch/Abbreviated and Directory Search List
Q Program List
□ FAX Parameter List.................................................................................... ................. 138
..............................................................................................
.......................
................................
D Information Codes....................................................................................
□ Clearing a Recording Paper Jam..............................................................
D Clearing a Document Jam........................................................................
□ Cleaning the Document Scanning Area...................................................
D Cleaning the Printer Roller.......................................................................
□ Adjusting the Automatic Document Feeder (ADF)..................................
D Verification Stamp.....................................................................................
D Replacing the Lithium Battery
D Checking the Telephone Line
.................................................................
..................................................................
................. 128
................. 128
................. 129
................. 132
................. 134
................. 137
................
................. 141
................. 144
................. 145
................. 146
................. 147
................. 148
................. 149
................. 150
................. 151
128
139
Z^^{o)||)©00[o!fe
Specifications......................................................................................................................
Recording Paper Specifications
.......................................................................................
Options and Supplies.........................................................................................................
D Installing the Memory Card (Flash Memory Card and/or DRAM Card).
FCC Notice for User in USA...............................................................................................
Notice to User in Canada...................................................................................................
Glossary...............................................................................................................................
ITU-T Image No. 1...............................................................................................................
Index.....................................................................................................................................
152
155
156
158
159
161
163
166
167

8
ОШ0Ш
iaf©íy llof©rmaíii©ini
Awarning
denotes a potential hazard that could result in serious injury or death.
• TO PREVENT FIRE OR SHOCK. DO NOT EXPOSE THIS PRODUCT TO RAIN OR ANY TYPE OF
MOISTURE.
• TO MINIMIZE THE POSSIBILITY OF SHOCK OR DAMAGE TO THE MACHINE, IT MUST BE PROPERLY
GROUNDED.
• THIS PRODUCT UTILIZES A LASER. ONLY QUALIFIED SERVICE PERSONNEL SHOULD ATTEMPT TO
SERVICE THIS DEVICE DUE TO POSSIBLE EYE INJURY.
CAUTION-USE OF CONTROLS OR ADJUSTMENTS OR PERFORMANCE OF PROCEDURES OTHER
THAN THOSE SPECIFIED HEREIN MAY RESULT IN HAZARDOUS RADIATION EXPOSURE.
LASER CLASS 1
LASER KLASSE 1
LASER CLASSE 1
CLASS 1 LASER PRODUCT
LUOKAN 1 LASERLAITE
KLASS 1 LASER APPARAT
i
7.11'—
THE MAIN PLUG ON THIS EQUIPMENT MUST BE USED TO DISCONNECT THE MAIN POWER.
PLEASE ENSURE THAT THE SOCKET OUTLET IS INSTALLED NEAR THE EQUIPMENT AND SHALL
BE EASILY ACCESSIBLE.
MAKE SURE THAT THE MACHINE IS INSTALLED IN A SPACIOUS OR WELL VENTILATED ROOM SO
AS NOT TO INCREASE THE AMOUNT OF OZONE IN THE AIR. SINCE OZONE IS HEAVIER THAN AIR,
IT IS RECOMMENDED THAT AIR AT FLOOR LEVEL BE VENTILATED.
Product complies with DHHS Rules 21
CFR Subchapter J in effect at date
of manufacture.
I
----
^
Manufacturer's name and address Factory ID
' DANGER ; tnvUtbte lasarratfiatlon when Open and Intirtock defeated. AVOID DIRECT EXPOSURE TO BEAM.
’ CAUTION : InvialMe end hazardoue laser radiation whan Intertocks defeated. AVOID EXPOSURE TO BEAM.
' ATTENTION : Rayonnetnem laser Irrvisible darroereux lorsque la sécurité ast nautraUséa. EXPOSmON DANGEREUSE AU FAISCEAU.
' VORSICHT : Unsichtbara Lasarstrahhmg, wenn Sjcharhartsverriegalung OberbrOckL NIGHT pEM 5TRAHL AUSSETZEN.
' PELIGRO : Cuando «a Invalida el bloquao.ae producen radiaciones InvMlNes de léser. EVITESE LA EXPOSICION
' VARO I : NékymáiOnté la vaaraUlsta lasersAtallya tuo^ldtus ohitatteaasa. VéttAsuoraa altistumlsta sétaella.
• ADVARSEL : USYNUQ LtóERSTRAUNG MAR SIKKEHHEI----------------------------------------------------------
■ ADVARSEL : USYNUG LASERSTRAUNG NAR SIKKERHEL ______________
> VARNINQ : OSYNUG LASERSTRAlNINQ nAR SPArrar.AR URKOPPLADE. STRAlEN AR FARUQ
AitSitJKAn№. âsa*tn№. tSiiaBSiteT.
> ^ us qeis ^ fISS qo|xf »Afijoi 3J0| sffl ü
I DIRECTA ATALES RAYOS.
SrKKËFWEDSAF-BRŸDEREyR UDÊÂ^^ UDSETTELSE FOR STHAUNQ.
-lAS BRYTES.UNNtU EKSPONERJNQ FOR STRALEN.
________

Safety Informatioin
A
CAUTION
• TO REDUCE THE RISK OF SHOCK OR FIRE, USE ONLY NO. 26 AWG OR LARGER TELEPHONE LINE
CABLE.
• DISCONNECT ALL POWER TO THE MACHINE BEFORE COVER(S) ARE REMOVED. REPLACE THE
COVER(S) BEFORE THE UNIT IS RE-ENERGIZED.
• THIS PRODUCT CONTAINS A LITHIUM BATTERY. DANGER OF EXPLOSION IF BATTERY IS
INCORRECTLY REPLACED.
REPLACE ONLY WITH THE SAME OR EQUIVALENT TYPE. DISPOSE OF USED BATTERIES
ACCORDING TO THE INSTRUCTIONS OF YOUR LOCAL SOLID WASTE OFFICIALS.
A
IMPORTANT SAFETY INSTRUCTIONS
When using your telephone equipment, basic safety precautions should always be followed to reduce the risk
of fire, electric shock and injury to persons, including the following:
• DO NOT USE THIS PRODUCT NEAR WATER, FOR EXAMPLE, NEAR A BATH TUB, WASH BOWL.
KITCHEN SINK OR LAUNDRY TUB, IN A WET BASEMENT OR NEAR A SWIMMING POOL.
• AVOID USING A TELEPHONE (OTHER THAN A CORDLESS TYPE) DURING AN ELECTRICAL STORM.
THERE MAY BE A REMOTE RISK OF ELECTRIC SHOCK FROM LIGHTNING
• DO NOT USE THE TELEPHONE TO REPORT A GAS LEAK IN THE VICINITY OF THE LEAK.
denotes hazards that could result in minor injury or damage to the machine.
• USE ONLY THE POWER CORD INDICATED IN THIS MANUAL.
10
©CaOÏDODI
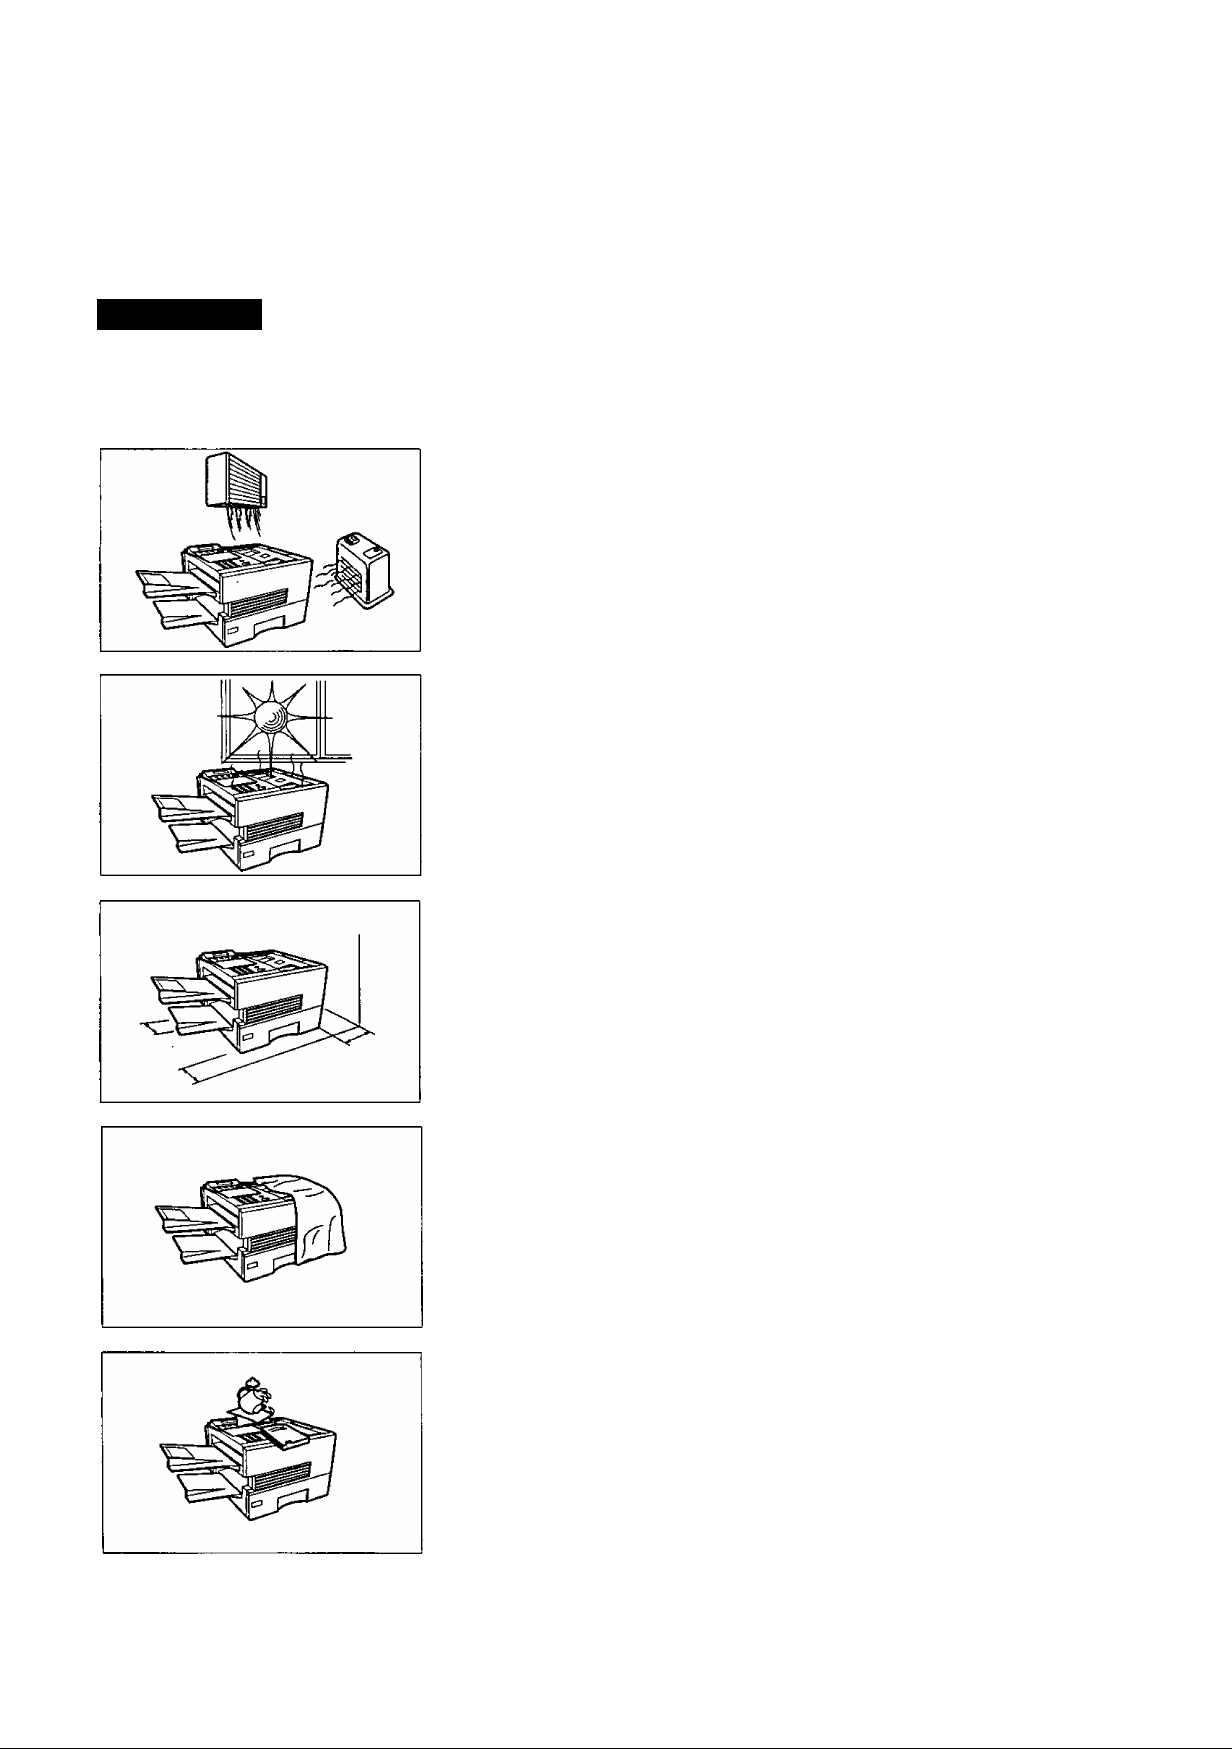
A CAUTION
denotes hazards that could result in minor injury or damage to the machine.
Do not install the machine near heating or an air conditioning unit.
Avoid exposure to direct sunlight.
Install the machine on a flat surface, leave at least 4 inches (10 cm) of space
between the machine and other objects.
Do not block the ventilation openings.
Do not place heavy objects or spill liquids on the machine.
11

Foociooei ICey
Any function can be started by first pressing FUNCTION and then enter the function number, or by
pressing [▼] or [£ scroll key repeatedly until the desired function appears on the display.
Deferred Communication
XMT
2 = Polling
Advanced Communication
1 - Not Used
2 = Confidential Communication
3 = File Transmission
FUNCTION
&
—(^1=1
--
Polling
- Polling
^o _ 1
2 = Polled
Printout
1 = Journal (PrintA/iew)
2 = One-Touch/Abbreviated/
Directory Search List
3 = Program List
4 = Fax Parameter List
5 = Not used
6 = Individual XMT Journal
7 = Directory Sheet
Set Mode
1 = User Parameters
• Date & Time
• Logo
• Character ID
• ID Number (Fax Telephone Number)
2 =: One-Touch/Abbreviated Numbers
3 = Program Keys
4 = Fax Parameters
5 = Not Used
6 = Cleaning Printer Roller
Select Mode
= Communication Journal = OFF/ON/INC
^ 2 = Not Used
3 = Cover Sheet = OFF/ON
4 = Password-XMT = OFF/ON (See Note 1)
5 - RCV to Memory = OFF/ON/PRINT
12
( NOTE )
Edit File Mode
L-0
1. If Fax Parameter is not preset to the Valid position, which enables you to use the function, the
display will not show the function.
1 = File List (Print/View)
2 = Change Time/Station
3 = Delete File
4 = Print File
5 = Add Document
6 = Retry Incomplete File
:'■^^i^^y^:fe4•:^^:^ :i^f;% -■
ADF Door
■ v;;'; ■
13
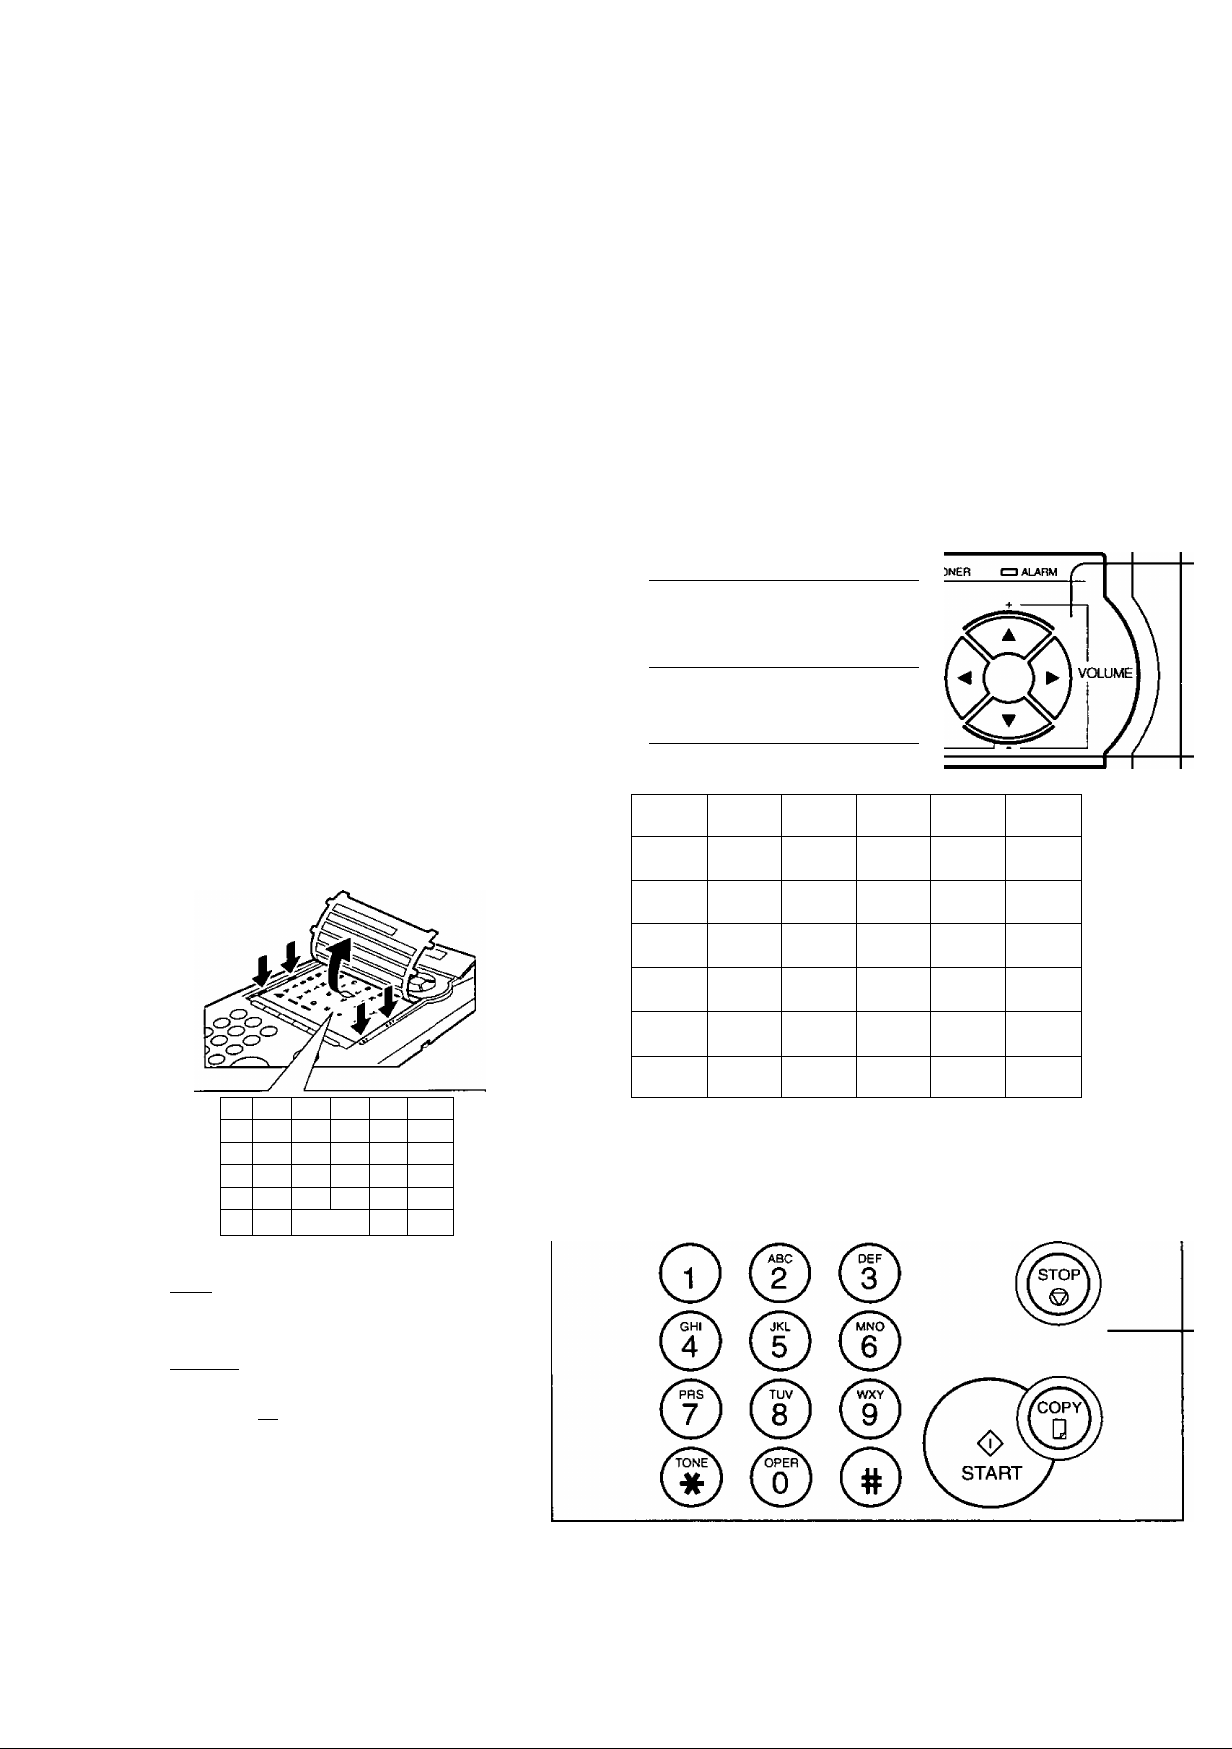
Cooirol PaoeD
LCD Display
Indicates date and time, or the current
operation.
I ON LINE
I TONER
I ALARM
Blinks when the machine is
transmitting a document or
receiving.
Blinks when the remaining toner
is getting low and lights wnen
the toner is running out.
(See page 18)
Lights when trouble occurs.
(See page 139)
Panasonic
a
One-Touch Keys (01-32)
Used for One-Touch Dialing.
(See page 48 and 53)
Program Keys (P1-P8)
Used to record long dialing procedures or
Group Dialing Number keys.
(See page 72 to 77)
Character Keys
The One-Touch Keys and Program Keys
also serve as character and symbol input
keys which are used to record your
LOGO, character ID and station name.
The character key template is printed on
the panel under the directory sheet cover.
" A B
G H
” M
' s T I" u
“ Y z
■' A A ro
r c r D
r I
N
I" 0
r E
r F
r' j
r K I" L
I" Q
r* p
r V rw px
r Ù
P
r Ò P é
R
DCWHKEH DSflNE DFAST
DUGHTER DFWE DQLWJTY
COWTRAST RESOLLmON HALFTONE
a
MEMORY STAMP SEARCH
01 A 02 B 03 C 04 D 05 E 06 F
07 G 08 H 09 1 10 J 11 K
13 M
19 S
25 Y 26 Z
31 A
£S
_______
PAUSE SUB-ADDR
REDIAL ABBR FLASH FUNCTION CLEAR SET
ra
14 N
20 T
32 A PI 6
1 SPACE ) P7 ISYKeCLSI
DIRECTORY
12 L
15 O 16 P 17 Q 18 R
21 U 22 V 23 W
27
28 29 30
P2 Ù
P8| CAPS 1
P3 P4
LINE
SELECT
24 X
MONrrOR
14
[ SPACE
[SYMBOLSi
[ CAPS
Used to insert a space white
entering LOGO, character ID
and station name.
Used to enter a ^mbol (,' & (
):: -K -. /) for LOGO, character
ID and station name. Usep^or
(XI to select the symbols.
Used to switch between upper
and lower character set.
Control Panel
[
CONTTRAST
RESOLUTION
HALFTONE
MEMORY
■
_________
PAUSE
REDIAL
Used to set Normal, Lighter, or Darker.
(See page 42)
Used to set Standard, Fine, Super-Fine.
(See page 42)
Provides OFF, QUALITY or FAST settings
for halftone documents. (See page 43)
Used to select either memory or direct
communication.
(See page 45 to 51)
Used to enter a pause when recording or
dialing a telephone number, or to redial
the last dialed number. (See page 60)
STAMP
DIRECTORY
SEARCH
I I
CLEAR
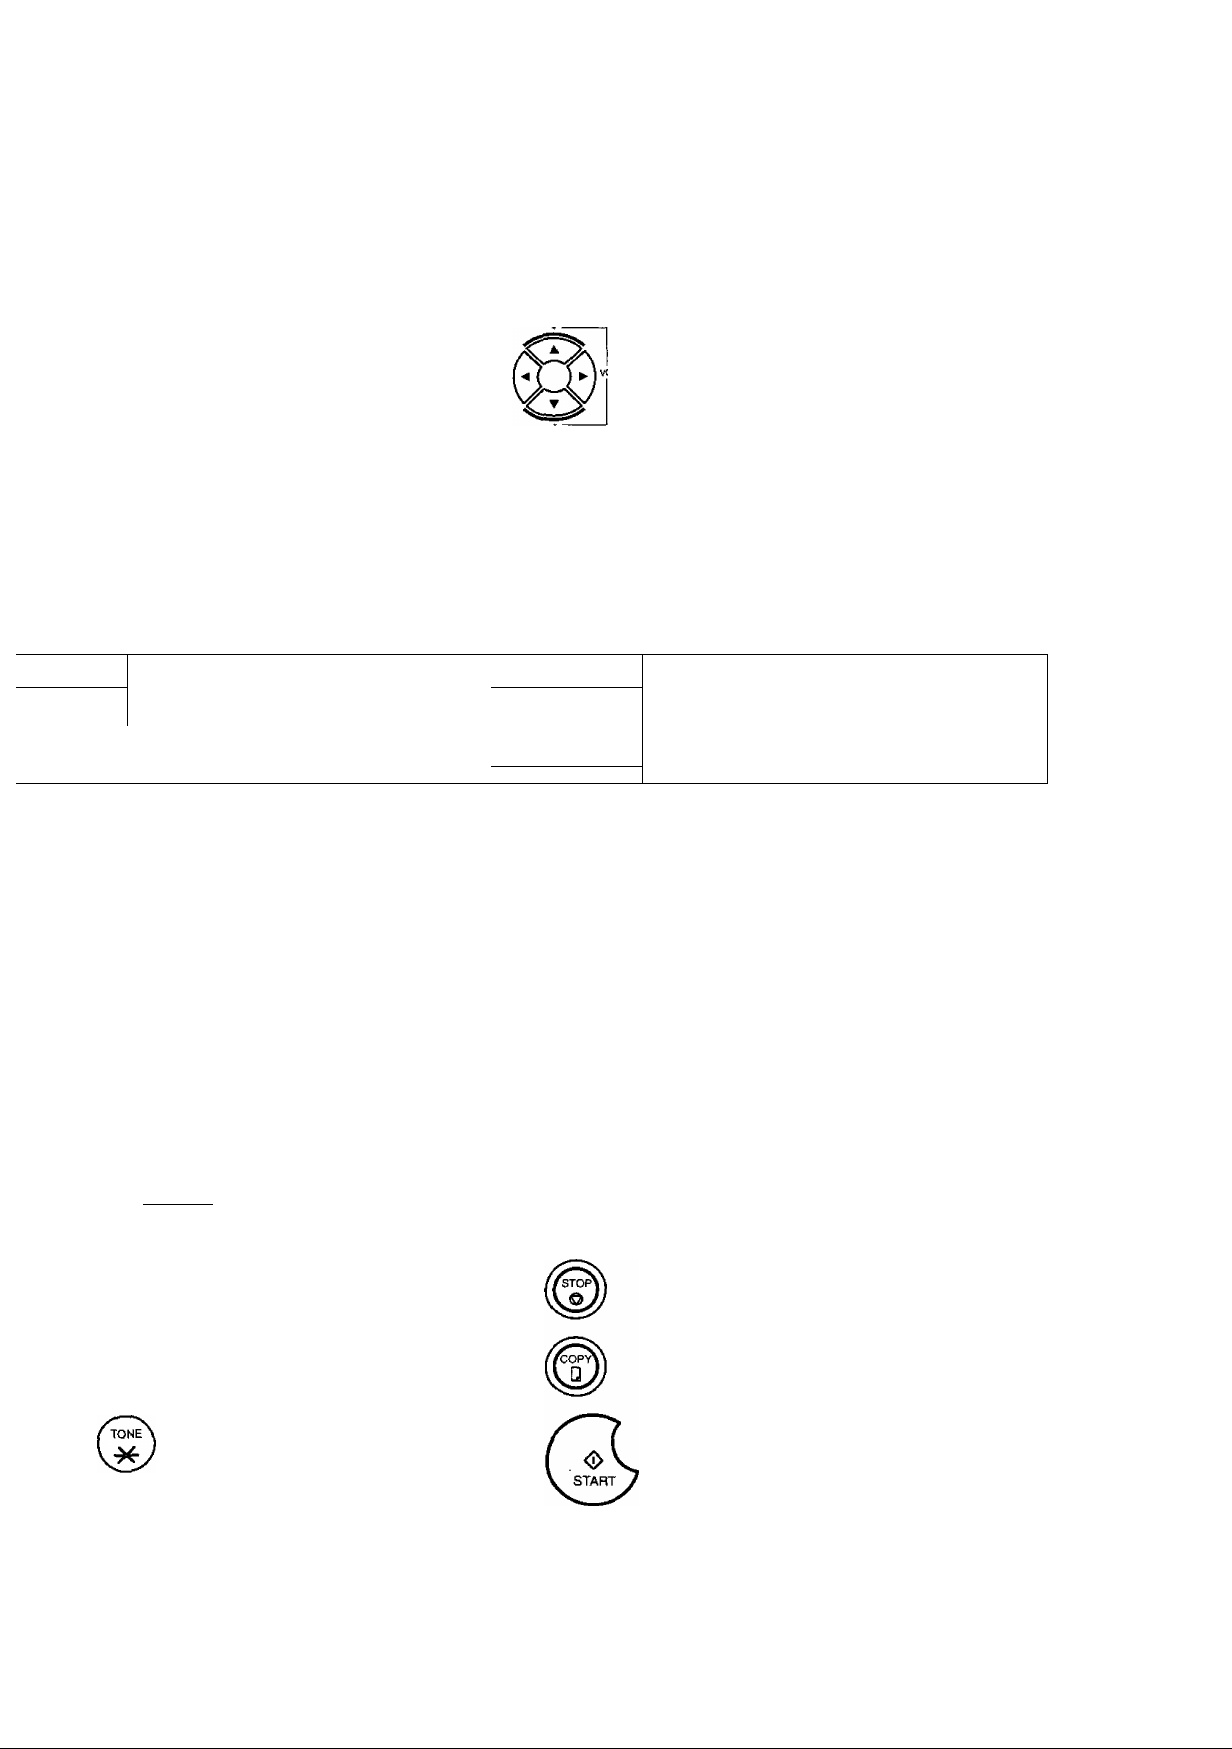
Used for the following:
• Adjust the monitor and ringer volume.
(See page 25)
• Move the cursor while entering numbers and
characters.
• Search the station name for Directory Search
Dialing.
• Confirm the entered station for multi-station
communication.
• Select functions.
• Confirm the current communication modes
(e.g. Page number, ID, Dialed Telephone
number. File number) when the unit is ON
LINE.
Used to turn the verification stamp ON or
OFF. (See page 43)
Used to search for a station name.
(See page 50 and 54)
Used to erase the previously entered input.
ABBR
SUB-ADDR
FLASH
FUNCTION
Used to start Abbreviated Dialing.
(See page 49 and 53)
Used to separate the Sub-address from
the telephone number when dialing, or to
access some features of your PBX.
Used to start or select the function and
sub-functions.
These functions are explained in detail on
page 12.
© ® (D
® © ®
© ® ®
® ® ®
_________________________
Used for manual number dialing,
recording phone numbers, and numerical
entries.
Used to temporarily change the Dialing
Mode to Tone when Pulse mode is set.
SET
LINE
SELECT
MONITOR
Used to set operations.
Used to select the communication port.
Available for UF-990 only if the Optional G3
Communication Port Kit has been installed.
(See page 156)
Used to start On-Hook Dialing. (See page 56)
Used to cancel operations. When it is pressed,
the machine will return to standby.
Used to make copies.
(See page 65)
Used to start operations.
15
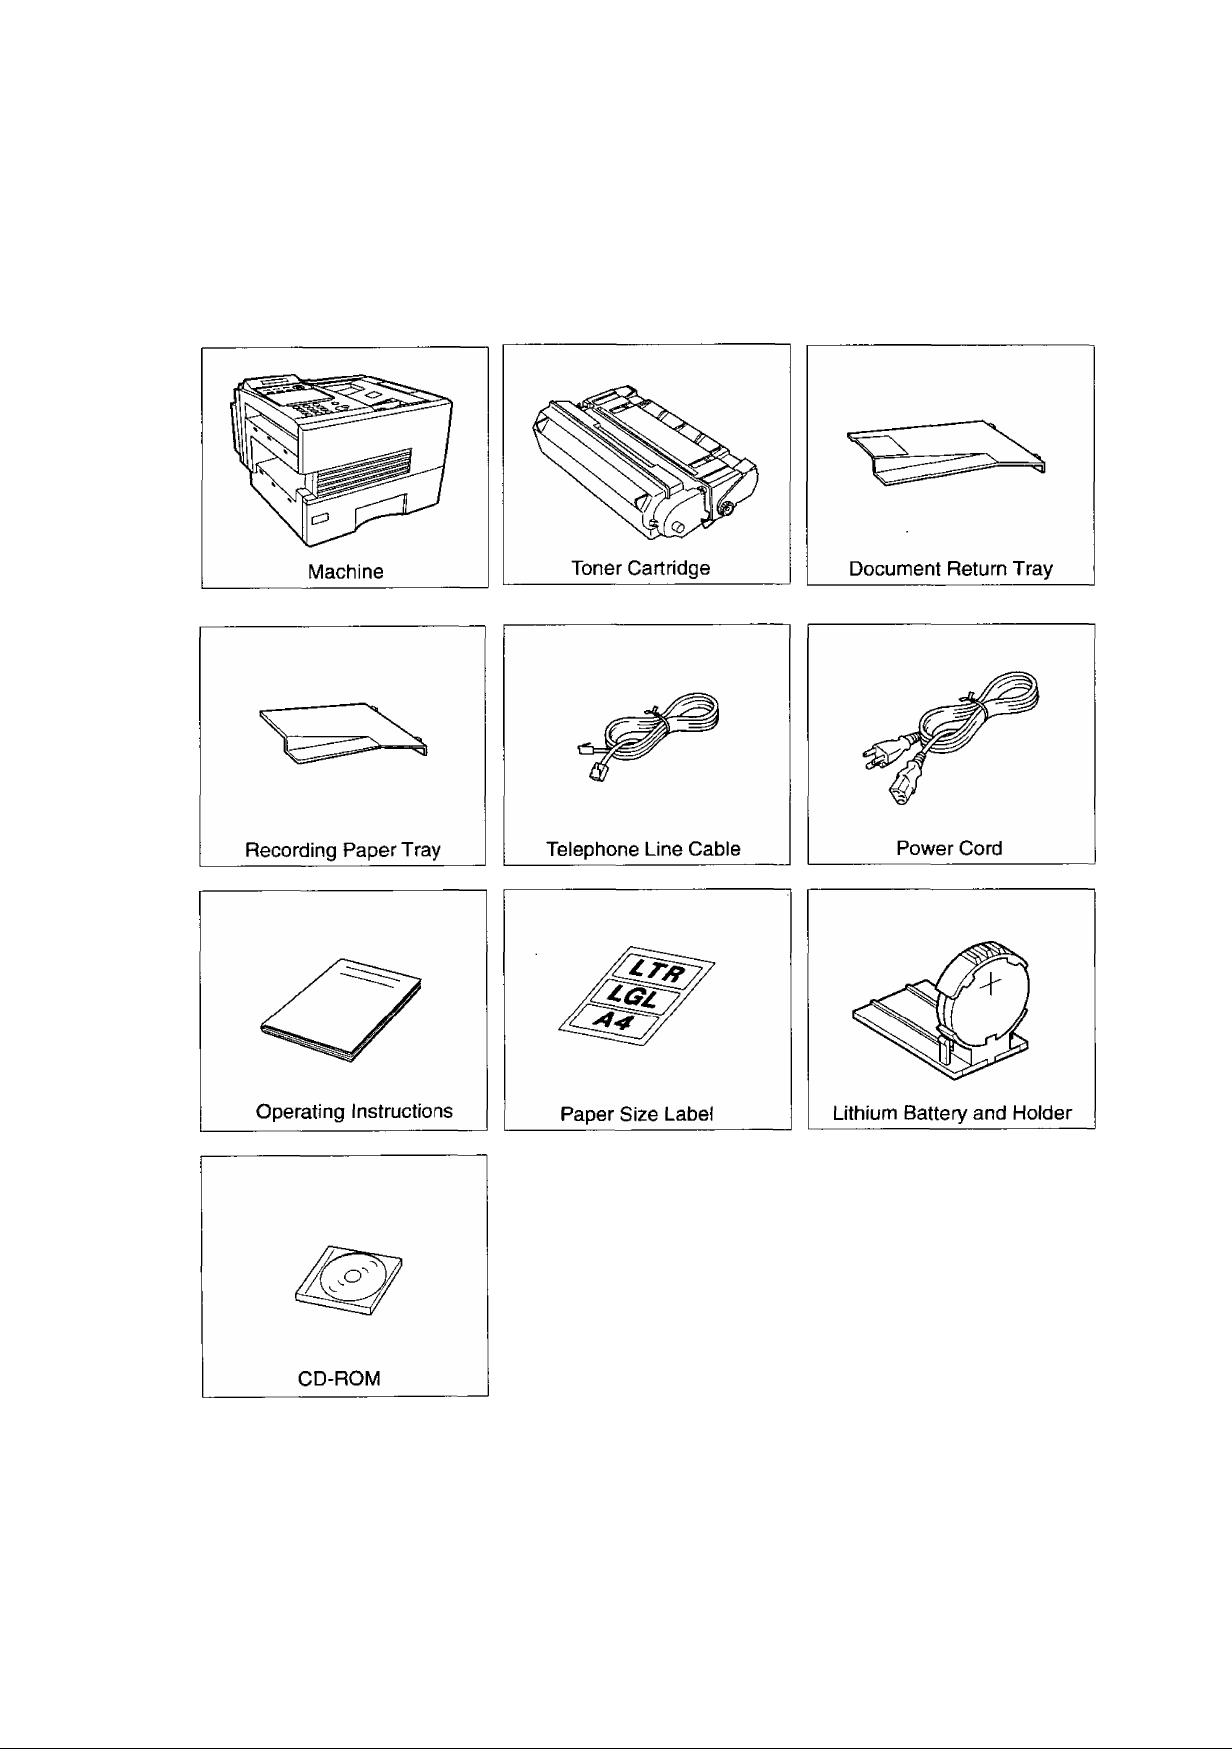
Main Unit and Accessories
Unpack the carton and check that you have all the accessories illustrated.
16
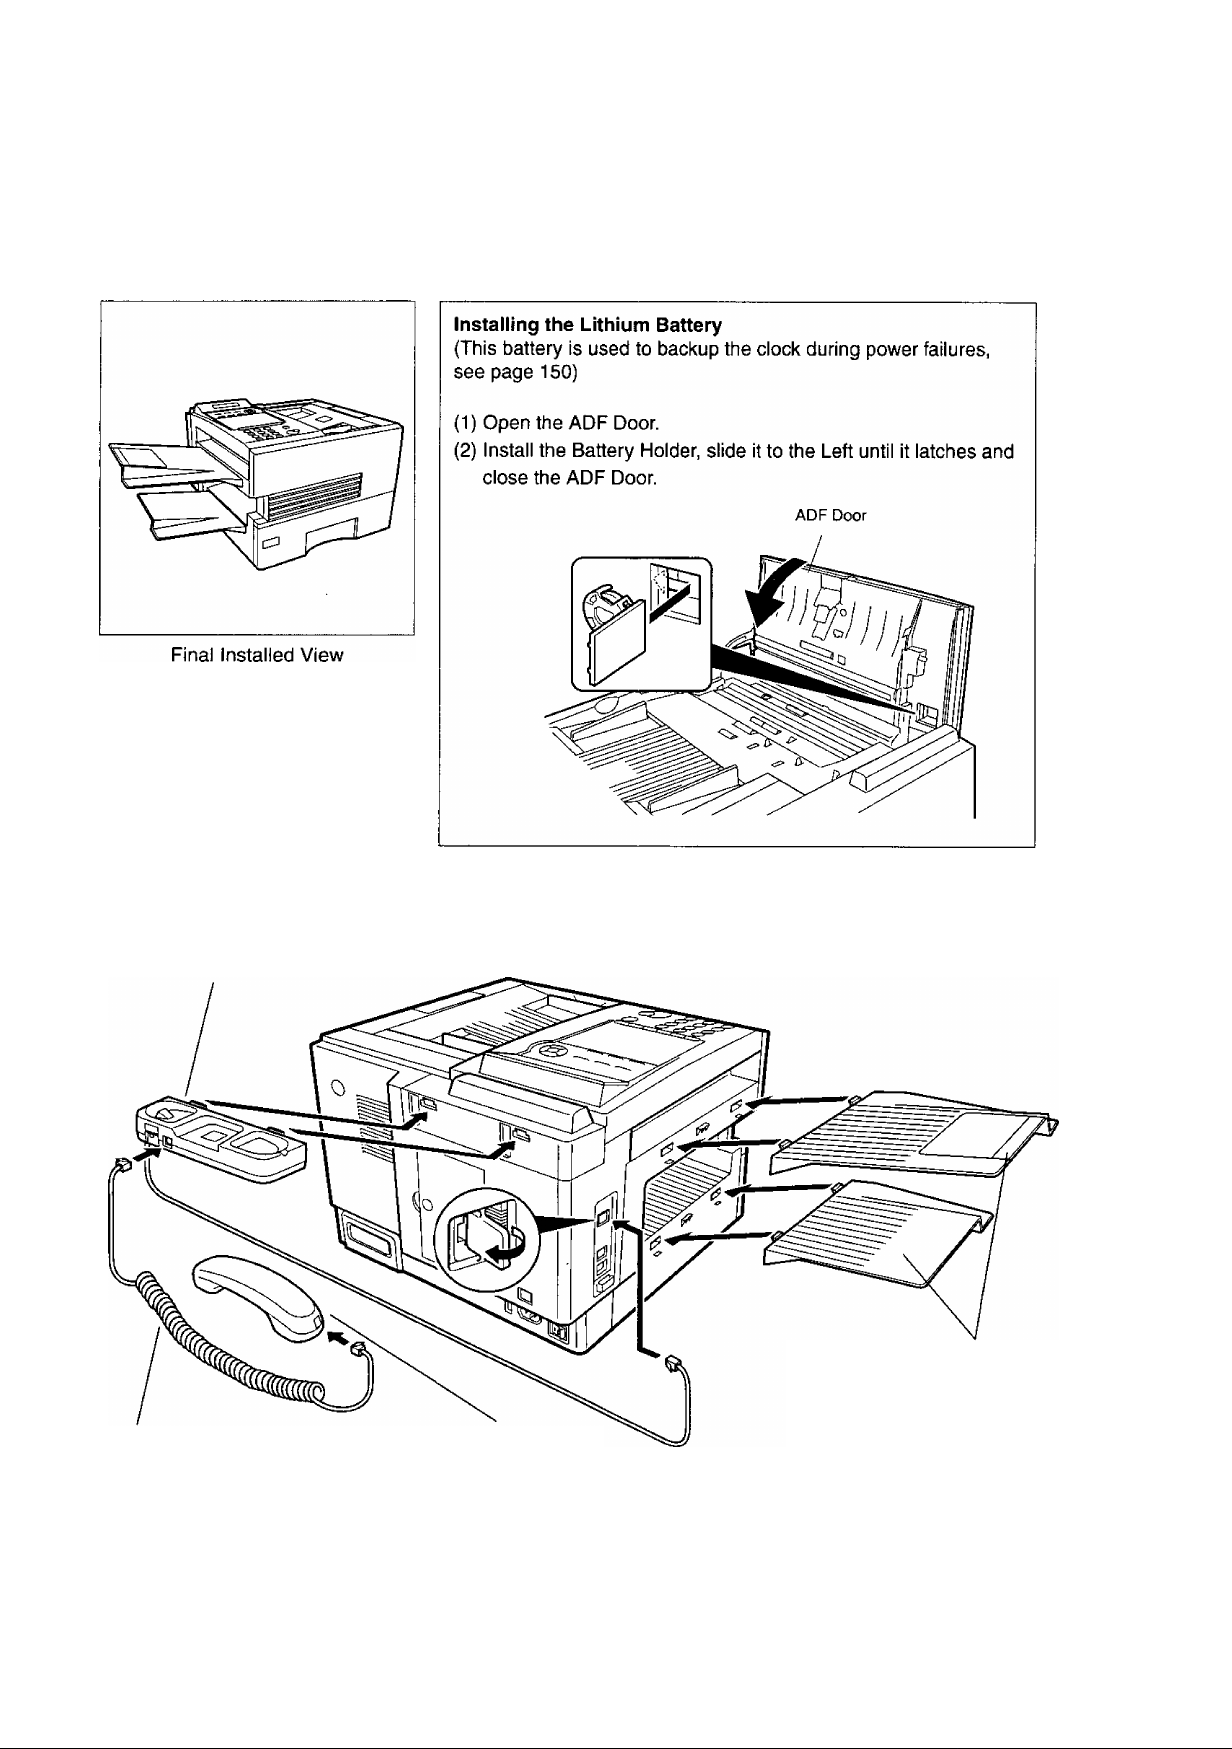
Installing the Accessories
Handset Cradle {Available as an Option]
Hook the projections into the square holes
on the machine.
Connect the cable into the HANDSET jack
on the machine.
Handset Cord
[Available as an Option]
Handset
[Available as an Option]
Document Return and
Recording Paper Trays
Hook the projections into the
square holes on the machine.
17
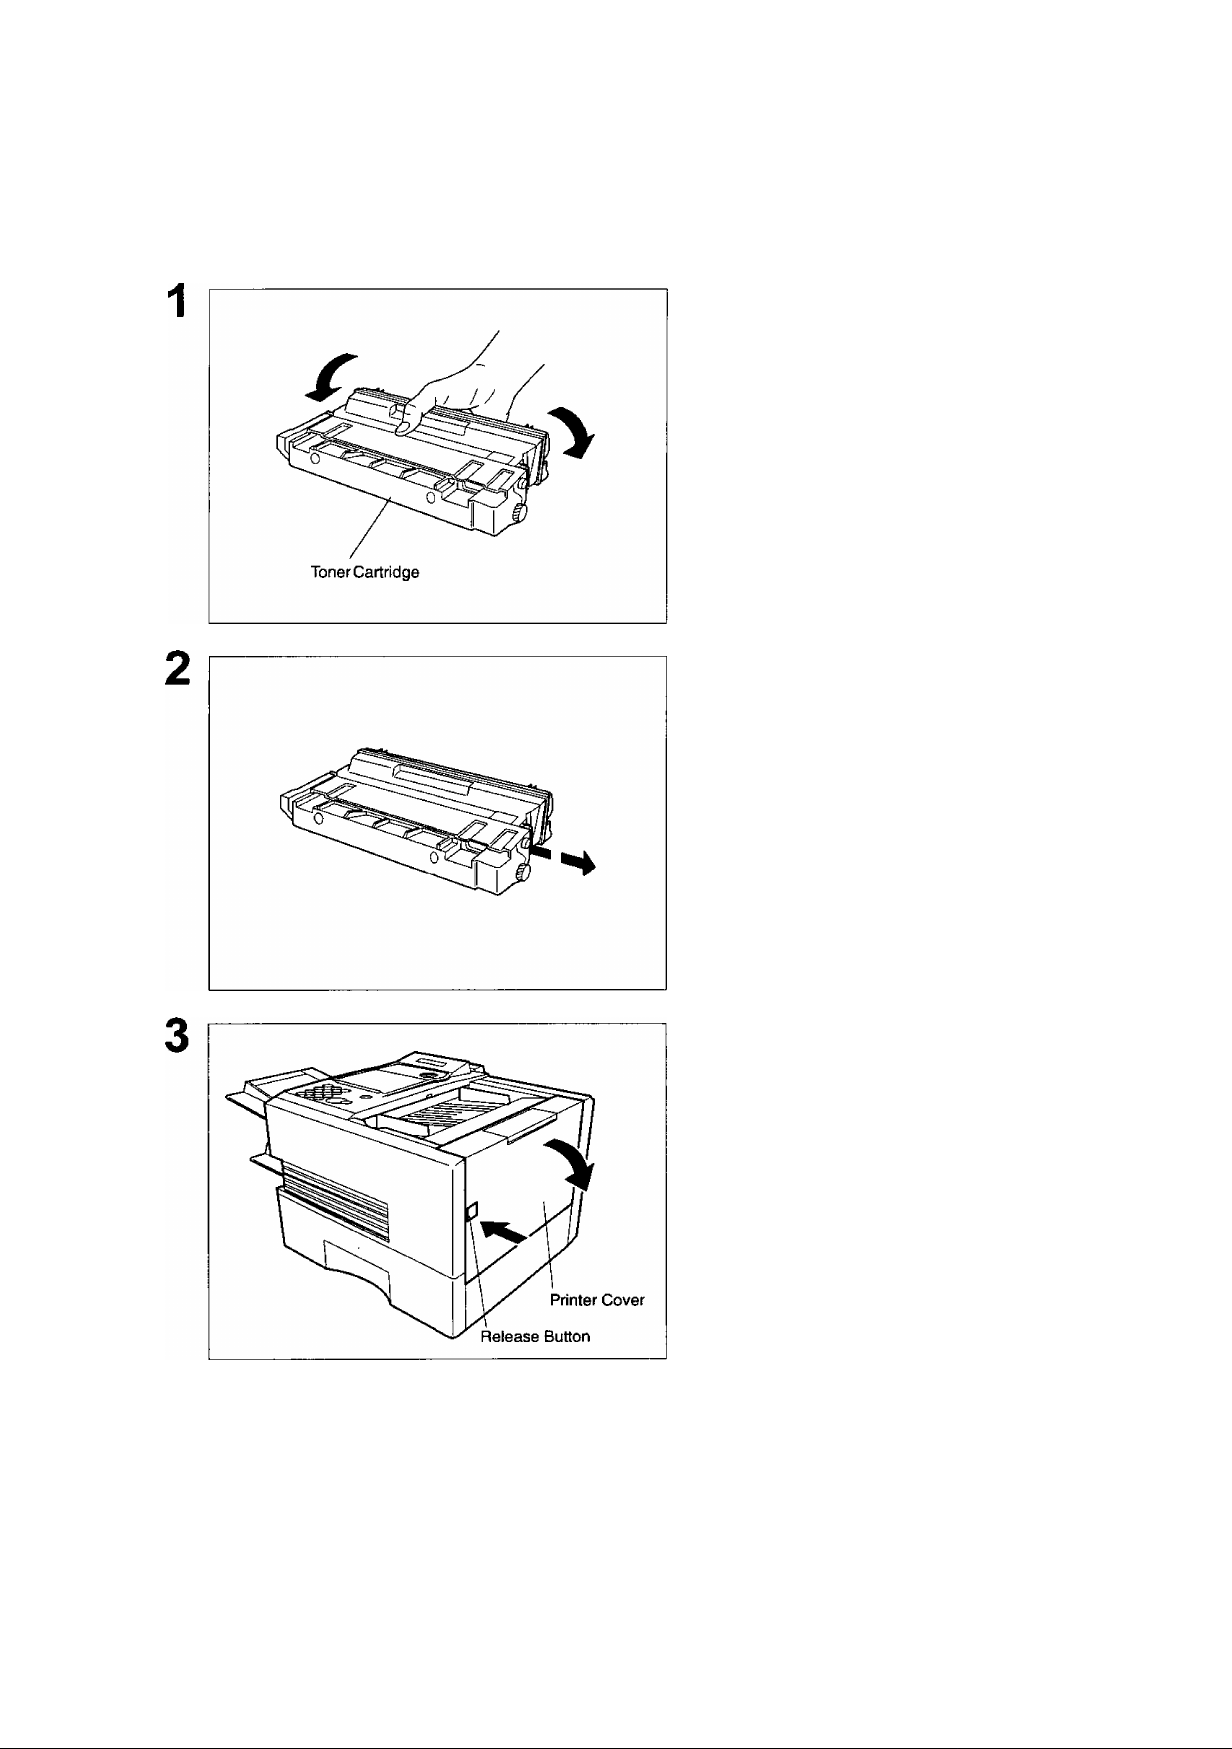
nstalling the Toner Cartridge
Unpack the Toner Cartridge and rock it back
and forth as shown for 5 or 6 times to even the
toner inside.
Remove the protective seal.
Note: Pull on the seal slowly and straight
out.
Push the Release Button to open the Printer
Cover.
18
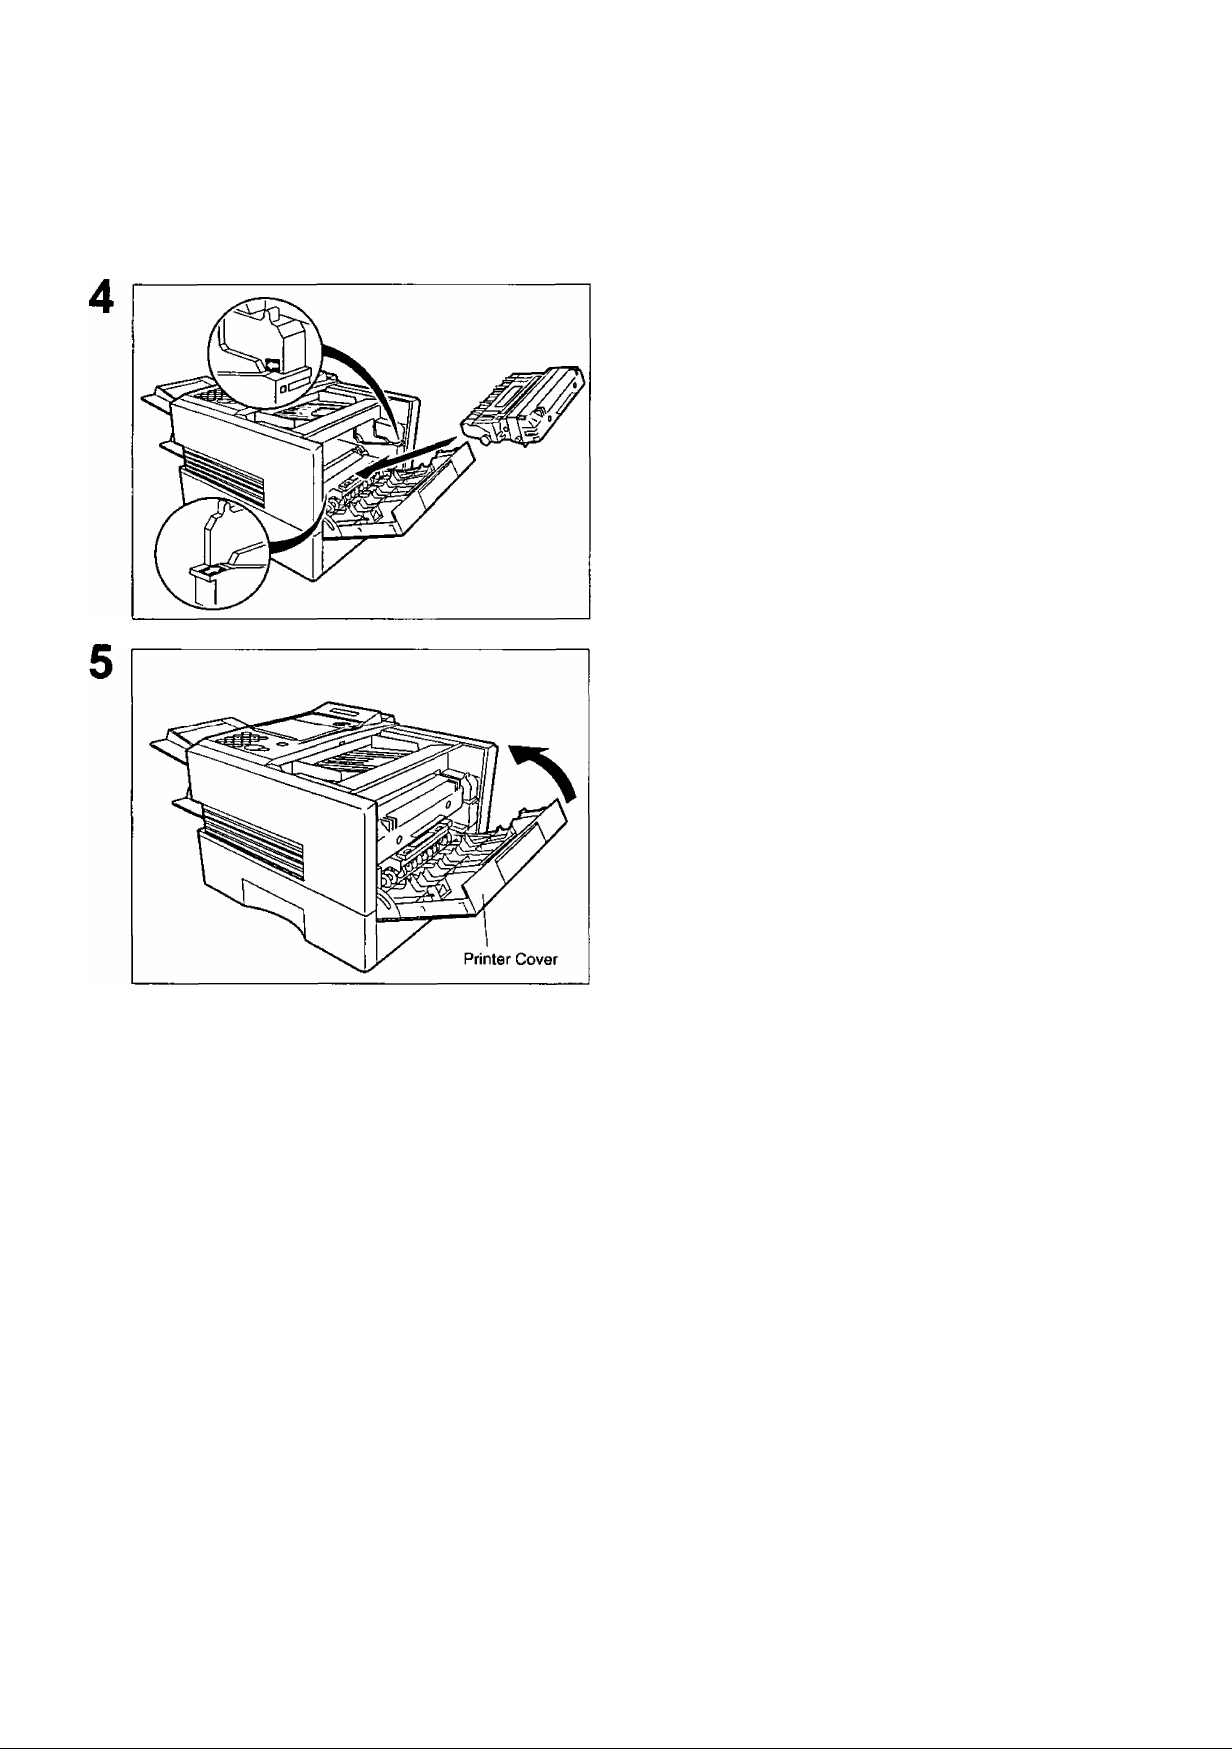
Dnsteiiting the Toner Cartridge
Align the arrow and the projection on both
sides as shown and insert the Toner Cartridge
into the machine.
Close the Printer Cover firmly.
If you are replacing the Toner Cartridge, it is recommended
to clean the Printer Roller to maintain good printing quality.
To clean the Printer Roller, follow the procedure on page
147.
19
Loadiog the Recordiinig Paper
In general, most bond papers will produce excellent results. Most photocopy papers will also work very well.
There are many "name" and "generic" brands of paper available. We recommend that you test various
papers until you obtain the results you are looking for. For detailed recommended paper specifications, see
page 155.
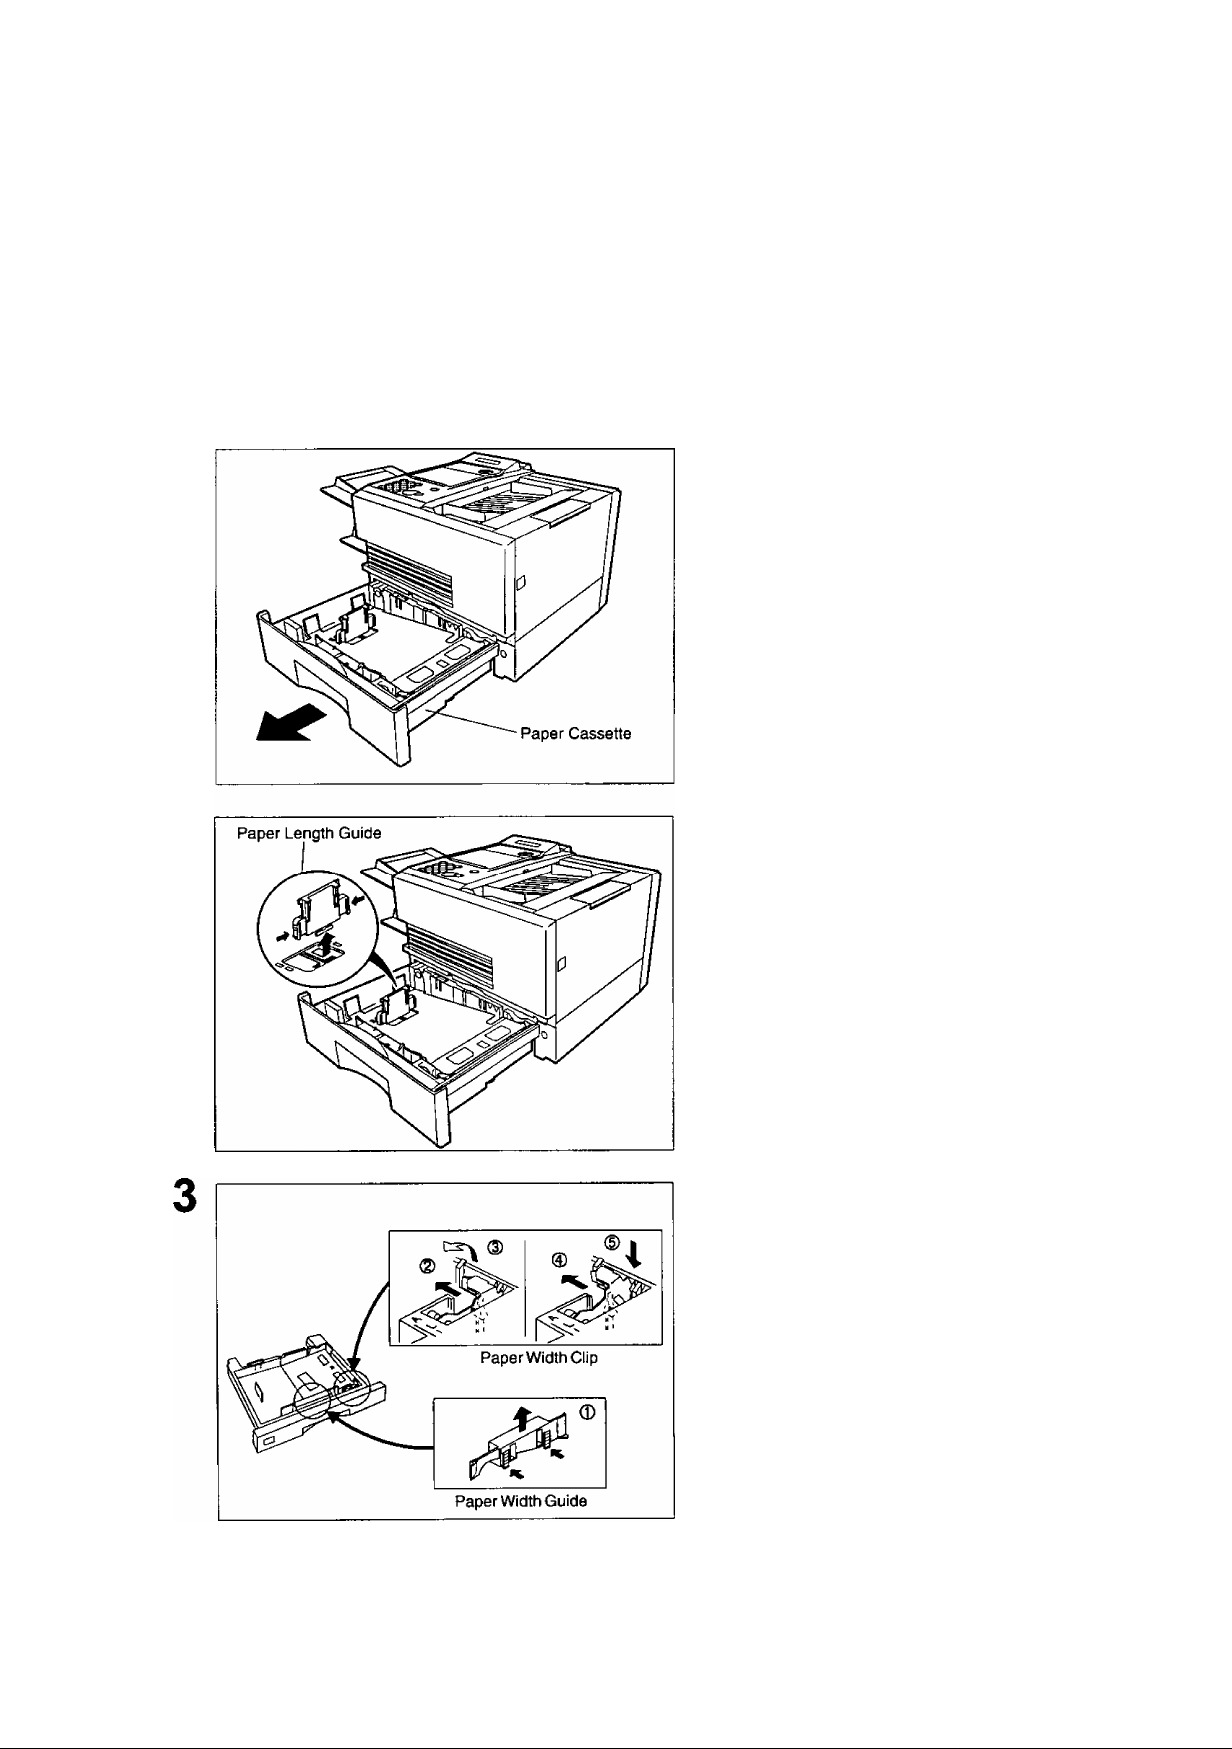
How to Load the Recording Paper
1
Slide out the Paper Cassette from the machine.
Adjust the Paper Length Guide to the proper paper
size (A4, LTR, or LGL).
For LGL size paper, remove the Paper Length
Guide and store it in the provided slot in the front
left side of the Paper Cassette.
If reloading the same size of paper, skip the step 2
and 3.
20
Adjust the Paper Width Guide and Clip to the
proper paper (A4, or LTR/LGL).
The factory default for the Paper Width Guide and
Clip are on LTR/LGL position. For A4 paper size,
adjust by following the steps below.
1. Replace the Paper Width Guide into the
proper slot (A4 or LTR/LGL).
2. Release the Paper Width Clip latch.
3. Pull upwards to remove the Paper Width Clip.
4. Replace the Paper Width Clip into the A(A4)
or L(LTR/LGL) slot.
5. Push down on the Paper Width Clip to latch it
in place.
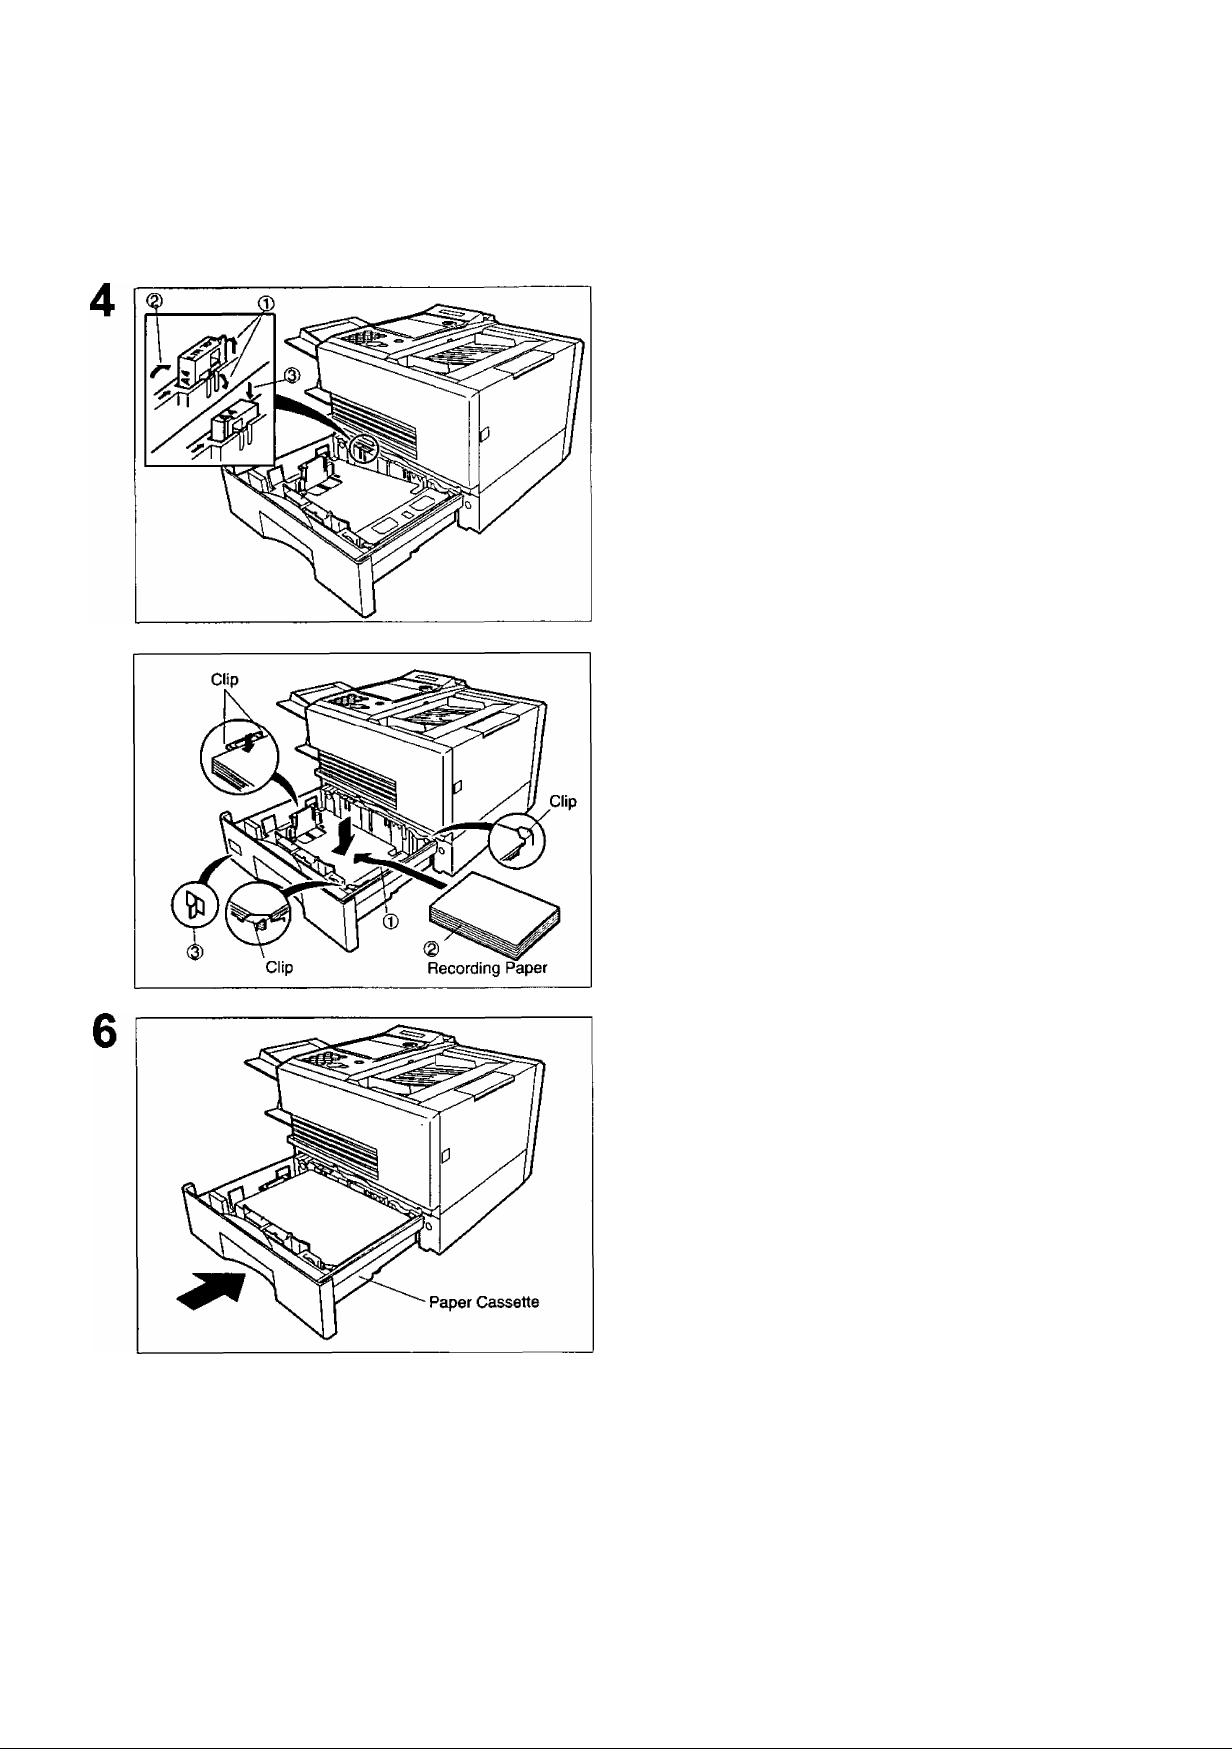
Loading the Recording Paper
1. Release the hook and remove the Paper Size
Selector.
2. Rotate the Paper Size Selector until the
appropriate setting marked on the Selector is
facing upward and the wording is upright.
3. Reinstall the Paper Size Selector.
1. Push the Pressure Plate until it is locked
down.
2. Load the paper into the Paper Cassette.
Caution:Make sure that the paper is set
under the clips of the Paper
Cassette. You can load about 500
sheets with standard weight paper
(20 lb. weight). For paper
specification see page 155.
3. Set the proper paper size label.
C
NOTE )
Slide the Paper Cassette into the machine.
1. Your machine will properly print on A4, Letter and Legal size paper only. If other size of paper
(B4, B5, A5) is used, your machine may not print properly.
21

Connecting the Telephone Line Cable and Power Cord
I Power Cord
Plug one end of the power cord into an ordinary 3 prong AC outlet and the other end into the receptacle on
the rear of the machine.
Warning: This apparatus must be properly grounded through an ordinary 3 prong AC outlet.
Do not break off the earth (ground) prong to fit a 2 prong outlet
Power Cord (Included)
I Telephone Line Cable
Plug one end of the telephone line cable into the "RJ-11C" telephone jack supplied by the telephone
company and the other end into the LINE jack on the left side of the machine.
RJ-11C Telephone Jack
Telephone Line Cable (Included)
22
NOTE 3 ^ machine uses little power and you should keep i\
it ON at ali times.
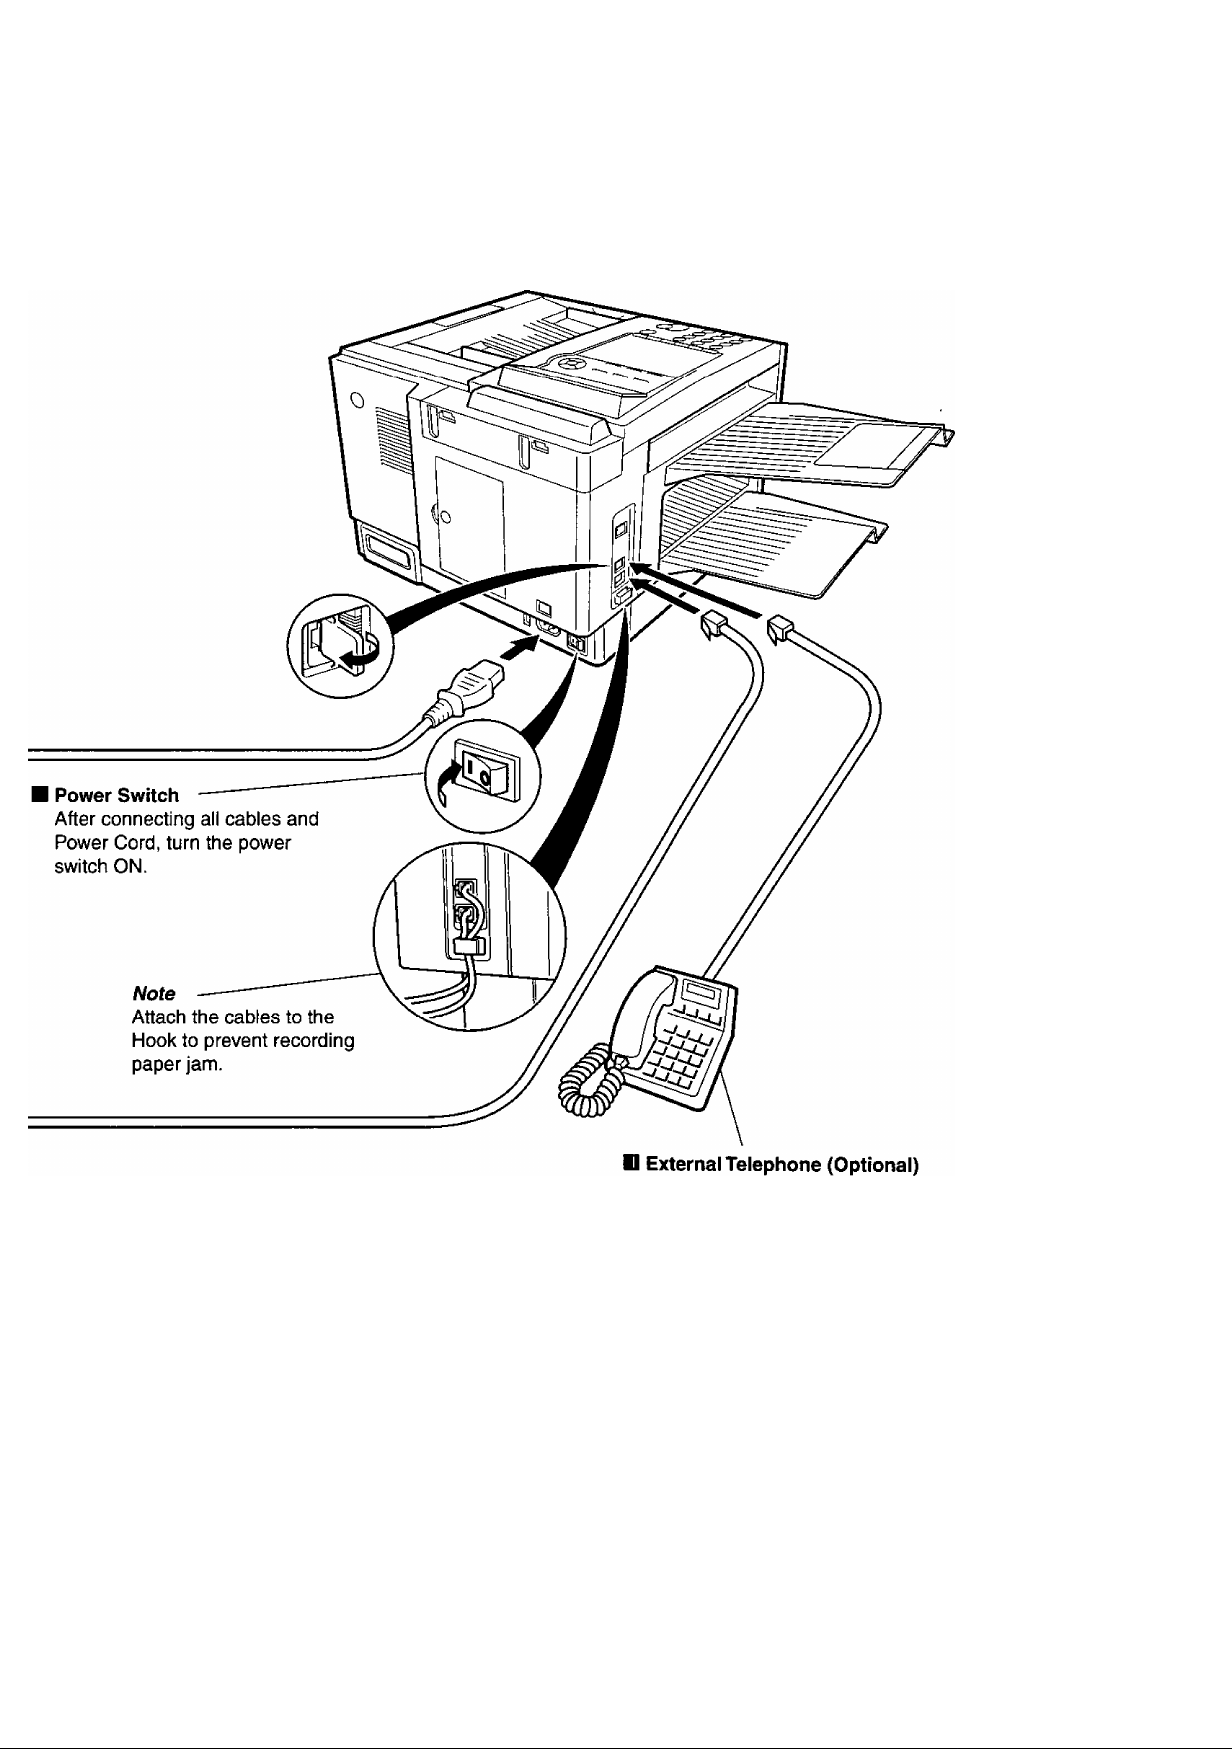
Connecting the Telephone Line Cable and Power Cord
You can connect an additional standard single
line telephone to the machine.
To connect the telephone, break off the
protective tab on the TEL jack.
23
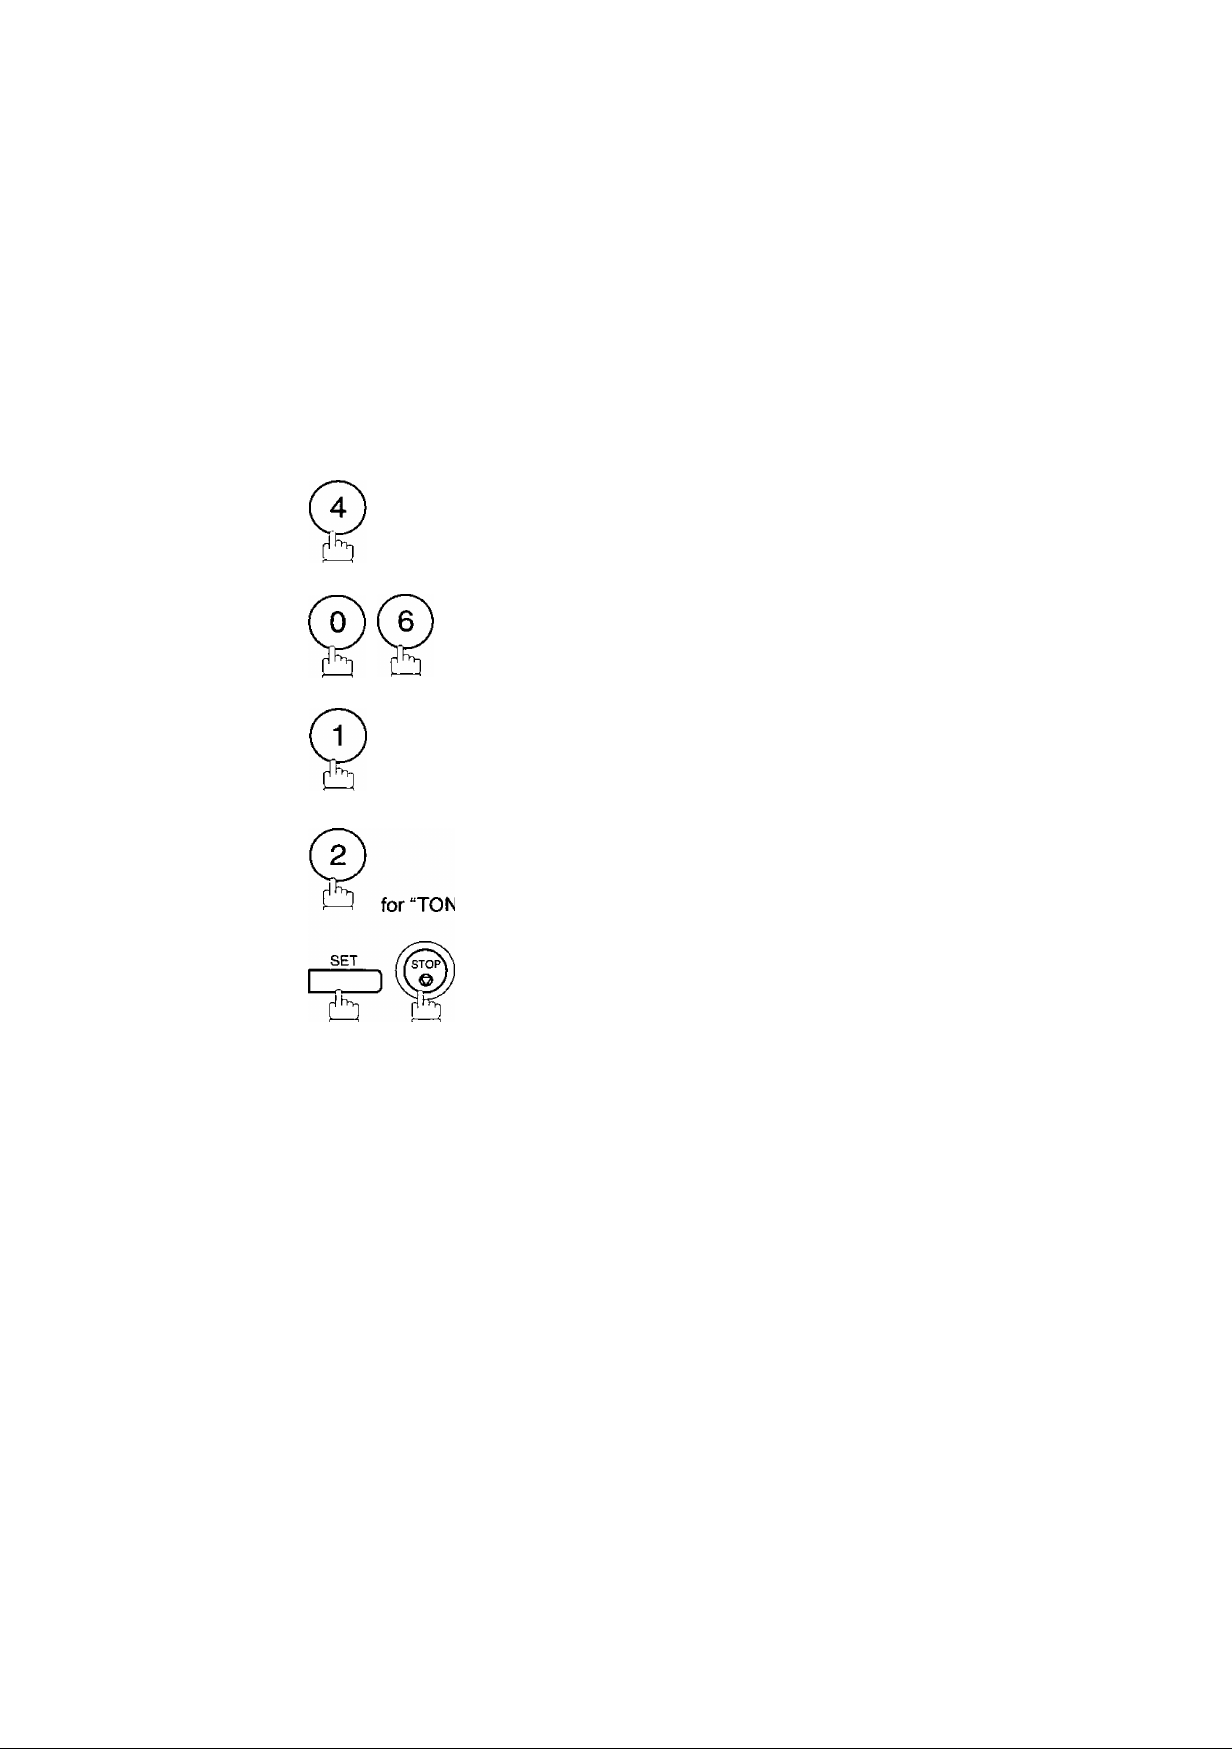
6
DI8I
Your machine can operate with either of two dialing methods (Tone or Pulse), depending on the type of
telephone line you are connected to. If you need to change the dialing method to Tone or Pulse, follow the
procedure below.
SET MODE (1-6)
^ FUNCTION ©
ENTER NO. OR V Л
© Й
or
SET
'H'
SET
'H
for “PULSE".
FAX PARAMETER (01-99)
NO.M
06 DIALING METHOD
2:TONE
06 DIALING METHOD
1:PULSE
or
06 DIALING METHOD
2:TONE
24
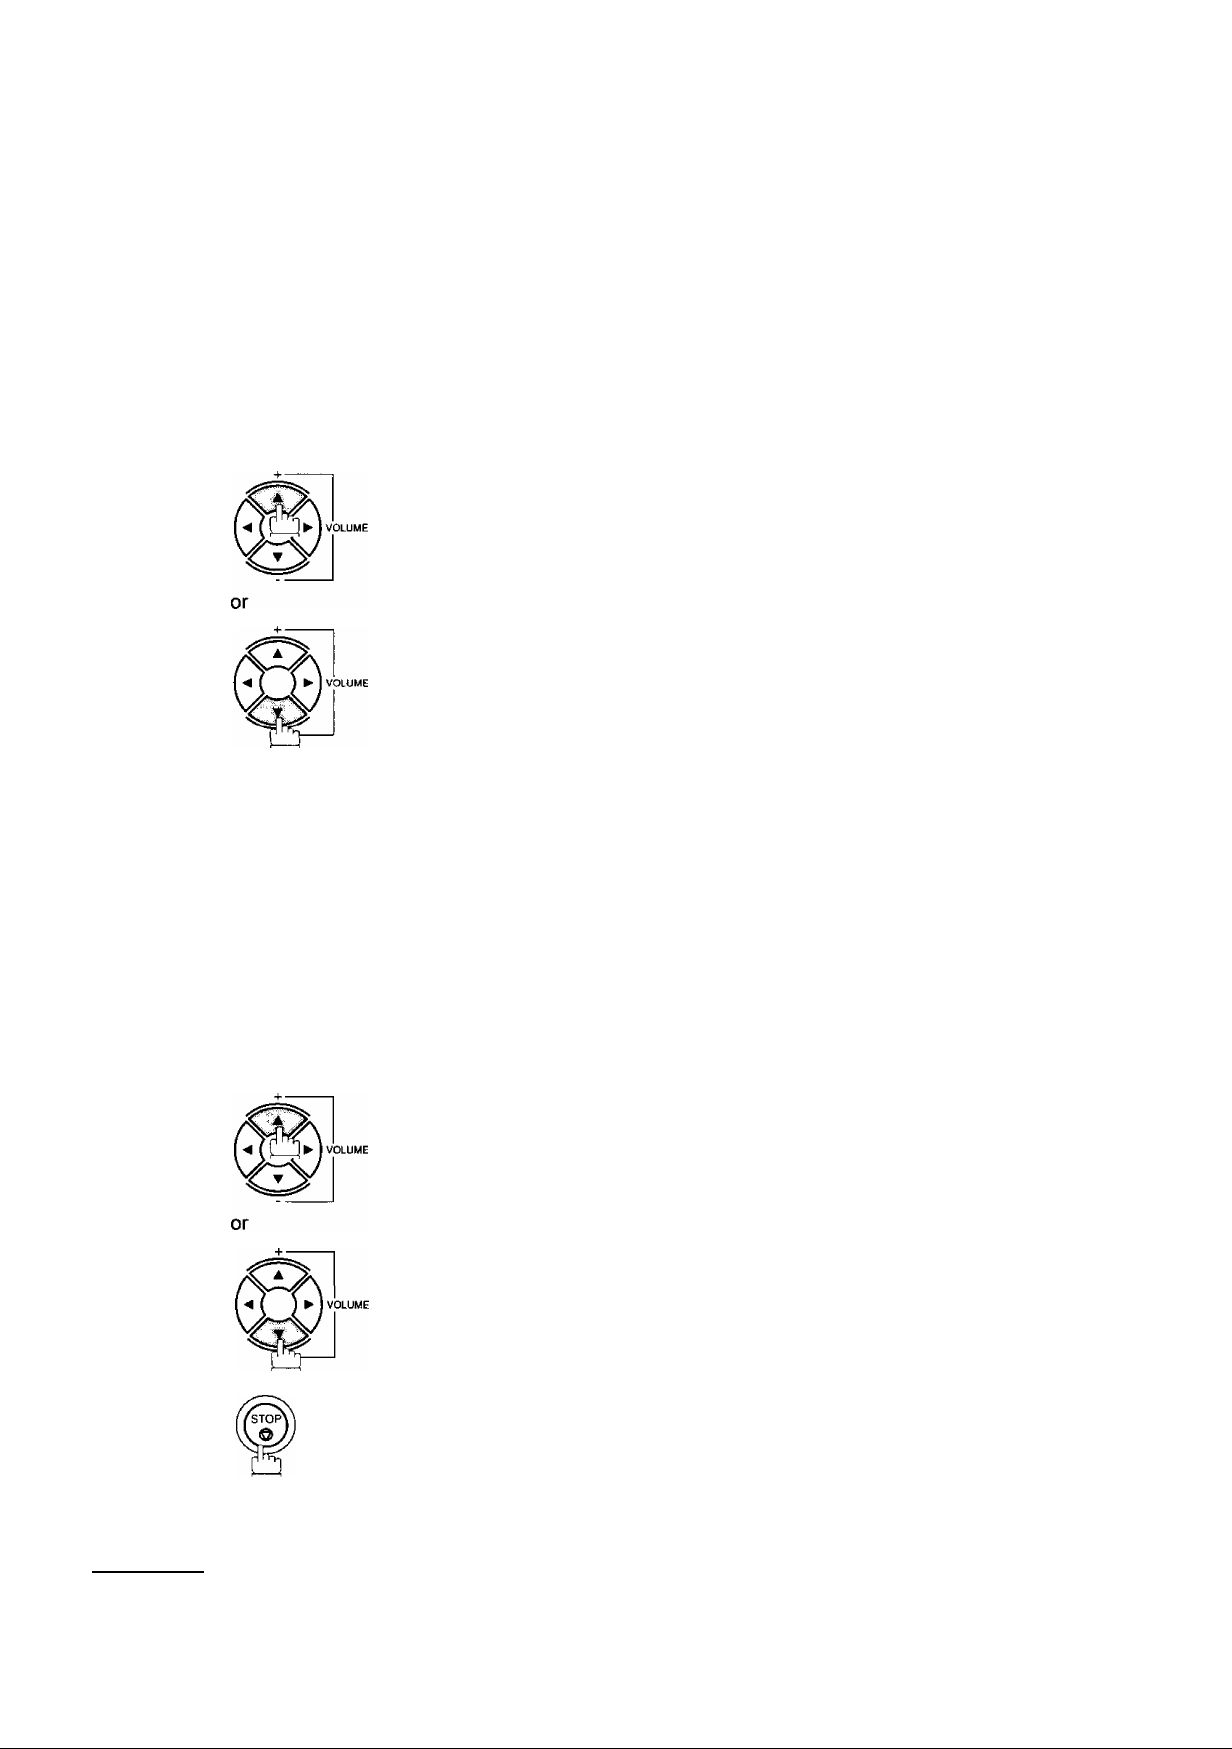
You can adjust the nnonitor and ringer volume on your machine. The built-in speaker enables you to hear the
dial tone, dialing signals, and busy tone. The ringer sounds when your machine receives a call.
1
MONITOR
MONITOR *
You will hear the dial tone through the speaker.
MONITOR VOLUME
LOW [lll■ll■l] HIGH
repeatedly to raise the volume.
MONITOR VOLUME
LOW [ ] HIGH
repeatedly to lower the volume.
MONITOR
tb
1
2
( NOTE )
Standby
repeatedly to raise the volume.
repeatedly to lower the volume.
1. You can also adjust the volume of the key touch tone and the volume of the buzzer in the Fax
Parameter No. 10 (KEY/BUZZER VOLUME). (See page 36)
MAR-12-2002 15:00
RINGER VOLUME
( ( ( ( ) ) ) )
RINGER VOLUME
00%
□
25

User Parameters
Your facsimile machine has several basic settings (User Parameters) to help you keep records of the
documents you send or receive. For example, the built-in clock keeps the current date and time, and your
LOGO and ID Number help to identify you when you send or receive documents.
At standby the display will show the date and time. Once the standby display is set, it will automatically be
updated.
SET MODE (1-6)
1
FUNCTION
ENTER NO. OR V A
1:USER PARAMETERS?
PRESS SET TO SELECT
SET
'Ï5'
Enter the new date and time.
Ex: ©CD Month: March
©@ Date: 12th
@®@@ Year: 2002
®®®@ Time: 3:00 PM
If you make a mistake, use or [g to move the cursor
over the incorrect number, then overwrite it with a correct
one.
DATE & TIME
■ 1-01-2001 00:00
DATE & TIME
03-12-2002 15:00
26
IS
( NOTE )
1. The clock of your machine is equipped with D,S.T.(DayHght Saving Time) system. So, your
clock will automatically set the time fonA/ard from 2:00 AM to 3:00 AM on the ffrsf Sunday of
April and set the time back from 2:00 AM to 1:00 AM on the last Sunday of October.
If your state does not use the D.S.T. system, change the Fax Parameter A/o. 35 (DAYLIGHT
TIME) to "Invalid^
2. The current Date & Time must be set because it is required by the Telephone Consumer Act of
1991. (For details, see FCC NOTICE at the end of this Operating Instructions)

User Parameters
When you send a document, your LOGO appears on the top of the copy printed out at the other station.
The LOGO helps to identify you to someone who receives your document.
SET MODE (1-6}
1
FUNCTION
©
ENTER NO* OR V A
1:USER PARAMETERS?
PRESS SET TO SELECT
©
&
3
4
SET
:
repeatedly until display shows;
Enter your LOGO (max. 25 characters and digits) by using
the Character keys.
Ex: |£][Â][N][Â][I]1S[N][I][C]
If you make a mistake, use SI B move the cursor
one space beyond the incorrect character, press I CLEAR I
then re-enter the new character.
If more than 19 characters are entered, the left side
characters will scroll off the display.
LOGO
LOGO
PANASONICl
( NOTE )
1. Your Company Name or your name must be set as your LOGO because it is required by the
Telephone Consumer Act of 1991. (For details, see FCC NOTICE at the end of this Operating
Instructions)
27

User Parameters
goafeDg] "№)QiE
If the remote machine has a Character ID capabilities, when you are sending or receiving, your Character ID
will appear on the remote machine's display and the remote machine's Character ID will appear on your
display.
SET MODE (1-6)
1
FUNCTION
C
©
ENTER NO. OR V A
1:USER PARAMETERS?
PRESS SET TO SELECT
3
4
SET
CZD
^ repeatedly until display shows;
Enter your Character ID (max. 16 characters and digits)
by using the Character keys.
If you make a mistake, use or [g to move the cursor
beyond the incorrect character, press I CLEAR I then re
enter the new character.
CHARACTER ID
CHARACTER ID
HEAD office!
28
NOTE ') special characters of A, A, 0, 0, /E, P and d cannot be used for Character ID.

§(g3LaiD(s] OE)
If the remote machine does not have a Character ID but it has an ID Number, when sending or receiving,
your ID Number will appear on the remote machine's display and their ID Number will appear on your
display.
We suggest you use your facsimile telephone number as your ID number, {max. 20 digits)
SET MODE (1-6)
1
FUNCTION
L
to
to
©
ENTER NO. OR V A
1:USER PARAMETERS?
PRESS SET TO SELECT
3
4
SET
D
repeatedly until display shows;
Enter your ID (max. 20 digits) by using the keypad and
I SPACE I key to enter a space between numbers.
Ex: (2) (Ô) (T) I SPACE I (5) (5) (5)1 SPACE I (T) (2) (T) (2)
If you make a mistake, use or [g to move the cursor
one space beyond the incorrect number, press I CLEAR I
then re-enter the new number.
ID NO.
ID NO.
201 555 12121
C NOTE )
1. You may use (•) to enter a "+*' character at the beginning of the ID number to indicate the
following digit(s) for your country code.
Ex :+1 201 555 1212 +1 forU.S.A. country code.
+81 3 111 2345 +81 for Japan country code.
2. Your Fax Telephone Number must be set as your ID Number because it is required by the
Telephone Consumer Act of 1991. (For details, see FCC NOTICE at the end of this Operating
Instnjctions)
29

0[m©=Toydhi/Abbrevia1t©dl Doalliinig IMymb©rs
One-Touch and Abbreviated Dialing are two fast ways of dialing full telephone numbers. To use these
dialing methods, you must first store the telephone number using the following procedure.
To enter a One-Touch key, follow the steps below
SET MODE (1-6)
1
FUNCTION
©
[lb o
ENTER NO. OR V A
SET
Ex:
Enter the telephone number
(up to 36 digits including pauses and spaces).
Ex:
Enter the station name using character keys
(up to 15 characters).
Ex: [S][A]Emil] I SPACE I [D][I][P][X]
SET
PAUSE
I (D (D I SPACE I © (D (3) 0
1:ONE-TOUCH
2:ABBR NO.
ONE-TOUCH< >
PRESS ONE-TCH OR V a
<01>
ENTER TEL. NO.
<01>
9-555 12341
<01> ENTER NAME
9-555 1234
<01> SALES DEPT
9-555 1234
]
n
30
8
SET
J
n
To record another number, repeat step 4 to 8.
To return to standby, press I STOP I .
ONE-TOUCH< >
PRESS ONE-TCH OR V a

Ooe-Toych/Abbreviialted Dialing Numbeirs
M
To set an Abbreviated Dialing Number, follow the steps below
1
2 ©
4
5
FUNCTION ( 7
SET
Ex: @ (2) (2) {001 to 160)
Enter the telephone number
(up to 36 digits including pauses and spaces).
Ex: (9) 1 PAUSE I (§) ® ® I SPACE I ®@®
SET
1
'B'
SET MODE
ENTER NO.
1;ONE-TOUCH
2:ABBR N0-
ABBR.[I ]
ENTER NO. OR V A
[022]
ENTER TEL- NO.
[022}
9-555 23451
[022] ENTER Ni\ME
9-555 2345
(1-6) 1
OR V A 1
8
( NOTE )
Enter the station name using character keys
(up to 15 characters).
[0221ACCOUNTINGI
9-555 2345
Ex: f^[Cl[C][OliU1fNlfTimiNlfGl
SET
D
o
To record another number, repeat step 4 to 8.
To return to standby, press I STOP
1. If you require a special access number to get an outside line, enter it first and then press
I PAUSE I. A hyphen ”-"is displayed for pause.
2. Use I SPACE I or MONITOR fo enfera space between fbe numbers to make if eas/erfo
read.
3. If you are using Pulse dialing and you wish to change to Tone dialing in the middle of dialing,
press I TONE I (represented by a T). The dialing method will be changed from Pulse to
Tone after dialing the digit 7".
Ex : 9 PAUSE TONE 5551234
4. You can search for an unused One-Touch key or ABBR. number by pressing ® or in
step 3 or 4.
ABBR.[I ]
ENTER NO. OR V A
31

One-Touch/Abbreviated Dialing Numbers
EMBoOg) teraiMs©
If you have to change or erase any of the One-Touch/Abbreviated dialing numbers, follow the steps below.
To change the settings of a One-Touch/ABBR dialing number
1
3
4
FUNCTION
I ■ --J
0©
__
SET
_______
dlia (3
Select (T) for One-Touch Dialing number
Select (2) for ABBR. Dialing Number
Ex;©
Enter the station you wish to change.
Ex:
CLEAR
then enter a new telephone number. (See Note 1)
Ex: (9) ! PAUSE
SET
CLEAR
I
® ® (§) \ SPACE
I
@ @ (s) (6)
1:ONE-TOUCH
2:ABBR NO.
ONE-TOUCH< >
PRESS ONE-TCH OR V a
<01> SALES DEPT
9-555 1234
<01> SALES DEPT
ENTER TEL. NO.
<01> SALES DEPT
9-555 34561
<01> SALES DEPT
9-555 3456
<01> ENTER NAME
9-555 3456
then enter a new station name. (See Note 1)
Ex: EllAlEIElEiAlEl
SET
j
To return to standby, press I STOP
I .
<01> PANAFAXi
9-555 3456
ONE-TOUCH< >
PRESS ONE-TCH OR V A
NOTE 3 make a mistake, use or [g to move the cursor beyond the incorrect number,
press
I
CLEAR I then re-enter the new number.
2. If the One-Touch/Abbreviated dialing number has been used fora communication reservation,
the settings cannot be changed or erased until the commun/cai/on has finished.
To change or erase the settings, cancel the communication first by Edit File Mode. (See Page
78)
32

One-Touch/Abbreviated Dialing Numbers
[ol (0
To erase the settings of One-Touch/ABBR Dialing number
1
3
4
‘FUNCTION
Select (T) for One-Touch Dialing number
Select (2) for ABBR. Dialing Number
Ex:®
Enter the station you wish to erase.
Ex:
cz:
To return to standby, press I STOP I .
CLEAR
SET
&
3
0 ¿5 05
0©
rn
SET
1:ONE-TOUCH
2:ABBR NO.
ONE-TOUCH< >
PRESS ONE-TCH OR V a
<01> SALES DEPT
9-555 1234
<01> SALES DEPT
ENTER TEL. NO.
ONE-TOUCH< >
PRESS ONE-TCH OR V a
( NOTE ) ^ If the One-Touch/Abbreviated dialing number has been used fora communication reservation,
^--------------------------^ the settings cannot be changed or erased until the communication has finished.
To change or erase the settings, cancel the communication first by Edit Fite Mode. (See Page
78)
33

One-Touch/Abbreviated Dialing Numbers
———^ .......................................................................................................... >1
After programming a one-touch dialing number, you can print out the directory sheet which includes the first
12 characters of each station name. Cut along the dotted line and place it over the One-Touch keys under
the Directory Sheet Cover. To print out a directory sheet, follow the steps below.
PRINT OUT (1-7)
I FUNCTION i 6 )
I I \Zy
& n
ENTER NO. OR V A
Your machine prints out the directory sheet.
T'r*********'*-**-**'*--*'*-*-
r
01
1
1
SALES DEPT
1
07
1
1
13
1
1
1
19
1
1
25 25
1
1
31 32 PI P2 P3 P4
1
1
P5
1
1
L
it -k -k -k- -k -k -k
■kkkkifkkiek'kk'kk
SET
H
-DIRECTORY
02
ENG. DEPT
08 09 10 11 12
14 15 16 17
20 21 22 23 24
P6
^^Hdotted
SHEET— ■ *■ + ** + * + *
03
ACCT. DEPT EXPORT DEPT R &
27
P7
line
*■ ** + **’*■ **'+ DATE
04
28 29 30
P8
-HEAD OFFICE
MAR-12-2002 ****
05 06
D DEPT MARKET DEPT
-
”
PANASONIC
****** - 201
* PRINTING *
DIRECTORY SHEET
* TIME 15:00 *****
18
555 1212- *******
n
1
1
1
1
1
1
1
1
1
1
1
1
1
1
J
-
34

Cystomiziinq Your ¡\lilacihiiinie
©amrgiD
Your facsimile machine has a variety of adjustable Fax Parameters. These parameters, listed in the
Parameter Table, are preset for you and do not need to be changed. If you do want to make a change, read
the table carefully. Some parameters, such as the Resolution and Contrast parameters, can be temporarily
changed by simple key operation just before a transmission is made. When the transmission ends,
however, these parameters return to their preset values {Home position). Other parameters can only be
changed by the procedure described below.
1
FUNCTION
c
2 ©
Enter Fax Parameter number from the Parameter Table.
3
4
5
6
Ex: (0) 0 for CONTRAST
Enter the new setting value.
Ex: (2) for LIGHTER
, i©
CZZD
SET
J
IS
SET
SET
SET MODE
ENTER NO. OR V A 1
FAX PARAMETER(01-99)
NO.=i
FAX PARAMETER (01 - 9 9)
NO.=01
01 CONTRAST
1:NORMAL
01 CONTRAST
2:LIGHTER
02 RESOLUTION
1:STANDARD
(1-6} 1
To set another parameter, press I CLEAR I to return to step
3 or press I STOP I to return to standby.
NOTE ^ To scroll the Fax Parameters in step 2 or 4, press [tI or
2. To print out a Fax Parameter List, see page 138.
35

Customizong Your Machine
(^. ftoiDOSifeO’1MM1©
No.
01
02
04
05
06
07
08
09
Parameter
CONTRAST
RESOLUTION
STAMP
MEMORY
DIALING METHOD
HEADER PRINT
HEADER FORMAT
RCVD TIME PRINT
Setting
Number
*1 Normal
2 Lighter
3
*1
2
3
*1 Off
2 On
1 Off
*2
1 Pulse Selecting the dialing method.
*2 Tone
*1 Inside Selecting the printing position of the header.
2
3 No print
*1 Logo, ID No. Selecting the header format.
2
*1
2
Setting Comments
Setting the home position of the CONTRAST key.
Darker
Standard
Fine
S-Fine
On
Outside
From To
Invalid Selecting whether the machine prints the received date &
Valid
Setting the home position of the RESOLUTION key.
Setting the home position of the STAMP key.
To select the stamp function when document is stored in
memory, see Fax Parameter No. 28.
Setting the home position of the MEMORY key.
Inside : Inside TX copy area.
Outside ; Outside TX copy area.
No print : Header is not printed.
time, remote ID, percentage of reduction and page number
on the bottom of each received page.
10
12
13
14
17
22
KEY/BU2ZER
VOLUME
COMM. JOURNAL
AUTO JOURNAL
PRINT
FILE ACCEPTANCE
REPORT
RECEIVE MODE
SUBSTITUTE RCV
1 Off
*2 Soft
3
1 Off
2
*3
1
*2
*1 Invalid
2
1
*2
1
*2
Loud
Always
Inc. only
Invalid Selecting whether the machine prints the journal
Valid
Valid
Manual
Auto
Invalid
Valid
Selecting the volume of the Key/Buzzer tone.
Selecting the home position of printout mode for COMM.
Journal Off/Always/INC.
Off ; Does not print
Always : Always prints
Inc. only : Prints only when communication has failed.
automatically after every 100 transactions.
Selecting whether the machine prints the file acceptance
journal.
If you set this parameter to valid, a journal will print out
after any memory communication.
Setting the reception mode to automatic or manual.
Selecting whether the machine receives to memory when
recording paper runs out, toner runs out or recording paper
is jammed.
36

(Fas [Mf®iMX3te(7
Customizing Your Machine
No.
24
25
26 POLLING PASSWORD
27 POLLED FILE SAVE
28
31 INCOMPLETE FILE
32
33
34 ENERGY SAVER
Parameter
PRINT REDUCTION
REDUCTION RATIO 70
STAMP AT MEM. XMT
SAVE
COPY REDUCTION 1 Manual Selecting whether the machine performs the copy
XMT REDUCTION 1 invalid
MODE
Setting
Number
1 Fixed Selecting print reduction mode.
*2 Auto
—
100 100%
*1 Invalid Selecting whether the machine retains the polled
2 Valid
1
*2
*1 Invalid
2 Valid
*2 Auto
*2 Valid
1
2
*3 Sleep
Setting
70%
—
(--)
Invalid
Valid
Off
Energy-
Saver
Comments
Fixed : Reduce received document according to setting
of Parameter No. 25.
Auto : Reduce received document according to the
length of received documents.
Selecting fixed print reduction ratio from 70% to 100%.
This parameter functions only when fixed print reduction is
selected on Fax Parameter No. 24.
Setting a 4-digit password for secured polling. (See page
69)
document in memory even after the document is polled
once.
Selecting whether the machine stamps the original
documents when storing the documents into memory,
(Depending on the Stamp setting on the Control Panel)
Selecting whether the machine retains the document in
memory if the document is not successfully transmitted.
reduction ratio automatically or manually.
Manual ; The machine will prompt you for the Zoom ratio
(100% to 70%) when making copies.
Auto : The machine will automatically determine the
reduction ratio according to the length of the
original document.
Selecting whether the machine performs reduction when
the transmitting document is wider than the recording
paper used at the receiving machine.
To reduce the power consumption in standby, select either
Energy-Saver or Sleep mode and specify the Delay Time
(1 to 120 minutes) for the machine to enter into the
selected mode.
The Delay Timer setting is only available in the EnergySaver or Sleep Modes.
Off ; The unit will remain in standby
mode and consume more energy
than when in Energy-Saver or
Sleep modes.
Energy-Saver Mode; Saves energy by consuming less
power than when in standby mode
by turning off the fuser unit after the
specified time.
Sleep Mode : This is the lowest power state that
the machine enters after the
specified time without actually
turning off.
Continued on the next page...
37

Customizing Your Maclhine
(Fsss
No. Parameter
35 DAYLIGHT TIME 1 Invalid
36 RING
PATTERNDETECT
(DRD) (See Note 2)
37 RCV TO MEMORY
38 ACCESS CODE
PIN CODE ACCESS
39
42 CONF. POLLED FILE
SAVE
43 PASSWORD-XMT
Setting
Number
*2 Valid
*1
2 Valid
*1
2 Suffix
3 Prefix
*1
2 Valid
*1
2 On
Setting
Invalid
{---)
(--)
None
Invalid
Off
Comments
Selecting \whether the clock adjusts for Daylight Saving
Time automatically. The built-in clock will advance 1 hour
at 2:00 am on the first Sunday in April and fallback 1 hour
at 2:00 am on the last Sunday in October
All ring patterns.
Select a ring pattern for automatic answering.
1: A Standard ring pattern.
2: B Double ring pattern.
3: C Triple ring pattern (Short-Short-Long).
4: D All other triple ring patterns, except the
type C described above.
Enter a 4-digit password used to print out the received
document in memory by using F8-5 (RCV TO MEMORY).
When F8-5 is set to On, this parameter will not be shown
on the LCD display. (See page 88)
Enter a 4-digit Access Code to secure the machine from
unauthorized use. (See page 86)
Selecting the access method (Prefix or Suffix) to dial a
number with PIN Code. (See page 93)
Selecting whether the machine saves the confidential
polled file even after the file is polled once.
Setting a 4-digit XMT-Password and selecting whether the
machine performs and checks the XMT-Password of the
receiving station when transmitting. (See page 114)
44 PASSWORD-RCV *1
2 On
46 SELECT RCV *1 Invalid
2 Valid
52 DIAGNOSTIC
PASSWORD
53 SUB-ADDRESS
PASSWORD
54 FAX FORWARD
56 COVER SHEET
58 LANGUAGE
60
OPTION PAGE
MEMORY
(D-RAM Card)
*1
2 Valid
*1
2 On
*1 A-English
2 C-French
*1
2 2MB
3
4 8MB
Off Setting a 4-digit RCV-Password and selecting whether the
{—)
(—)
Invalid
Off
Spanish
0MB
4MB
machine performs and checks the RCV-Password of the
transmitting station when receiving. (See page 115)
Selecting whether the machine performs selective
reception. (See page 112)
Setting the password for Remote Diagnostic Mode.
Please ask your Panasonic Authorized Dealer for details.
Setting a 20-digit password for secured sub-address
communication.
Selecting whether the machine performs Fax Forwarding
to the specified destination. (See page 95)
Setting the home position of the Cover Sheet parameter in
the Select Mode. (See page 91)
Selecting the language to be shown on the display and
reports.
Set the size of the page memory to match the optional
Expansion D-RAM Card installed in the machine. (See
page 156)
38

Customizing Your Machine
No.
65
77
82 QUICK MEMORY XMT 1
88
99 MEMORY SIZE
Parameter
PRINT COLLATION 1
LOGO/DEPT. CODE
LINE SELECTION
[See Note 3]
(Flash Memory)
Setting
Number
Setting
Invalid
*2
‘1
2
3
Valid
Invalid
Multi-LOGO
Dept.Code
Invalid
Selecting whether the machine prints out documents in
sequence. (See page 64)
Selecting whether the machine performs the Multiple Logo
or Department Code operation. (See page 99 and 108)
Selecting whether the machine performs Quick Memory
Transmission. (See page 47 to 50)
Comments
Invalid ; Stores all documents into memory first before
*2
Valid
dialing the telephone number.
Valid : Starts dialing the telephone number immediately
after storing the first page.
*1
2
3
Auto
Line 1
Line 2
Setting the home position of the Telephone Line selection.
Auto ; Selects the available telephone line for transmission
automatically.
Line1:Selects this as the default telephone line, unless
manually selecting an alternate phone line.
Line2;Selects this as the default telephone line, unless
manually selecting an alternate phone line.
Displays the amount of base and optional memory
installed.
(Base Memory + Optional Memory)
( NOTE )
Setting number marked with an asterisk (*) indicates the factory standard setting.
This parameter supports an optional telephone service "Distinctive Ring Sen/ice" provided by
your local telephone company. It allows up to 4 different telephone numbers to be assigned on
a single telephone line with a distinctive ring for each telephone number. By selecting the
appropriate ring pattern associated with the telephone number assigned for your fax machine.
It can differentiate and answer the incoming call on the fax number. All other calls on the other
telephone numbers will not be answered. This optional service from your local phone company
is also called Custom Ringing, Distinctive Ringing, Ident-a-call, Ident-a-ring, Personalized
Ringing, RingMaster, RingMate, Selective Ringing, Smart Ring or something similar. Check
with your local telephone company on the availability of this service in your area.
3.
This parameter is available only when the G3 Communication Port Option is installed.
39

Loading Documents
In general, your machine will send any document printed on A4, Letter or Legal size paper.
Document Size
Maximum Size Minimum Size
5.8 in (148 mm^
5.0 in {128 mm)
Direction
Direction
You must never try to send documents that are:
Wet
Document Thickness
Covered with wet ink or paste
¿7
Too thin (e.g., onionskin, airmail
paper, pages from some
magazines, etc.)
Coated (e.g., glossy paper, etc.)
' ~7
To transmit these kinds of documents, make a photocopy first and then transmit the copy instead.
Wrinkled, curled or folded
Chemically processed (e.g.,
pressure-sensitive paper, carboncoated paper, etc.) or made of cloth
or metal
40

Loading Documents
IT
Lru
1. Be sure the document{s) is free of staples, paper clips and is not torn, greasy or covered by foreign
objects.
2. Place the document(s) FACE DOWN on the Automatic Document Feeder (ADF) until the leading edge
placed into the machine stops.
If you are sending multiple pages, make sure that the bottom sheet enters first. You can also stack up
to 70 PAGES on the ADF at one time by setting the documents as stairs shape as the figure below
If you have more than 70 pages, wait until transmission or storing in memory starts as pages feed
through, place any remaining pages on top of the last page in the feeder.
3. Adjust the Document Guides to center the document on the ADF.
Document Guides
CORRECT INCORRECT
When you set a document on the ADF, the display message will change from date and time (standby) to
the following message. You can now change basic transmission settings, or begin the dialing procedure.
ENTER STATIONS)
THEN PRESS START 00%
^ NOTE 3 ^ document limitation to send multiple pages is as follows.
Document Size
Up to 50 pages Up to 10.1 X 14.3 in (257X 364 mm)
Up to 70 pages*
* Please note that although the size and thickness meets the specifications, you might not be
able to set 70 pages with some types of papers.
2. Transmitting documents longer than 14 in (356 mm) requires user's assistance.
3. When transmitting documents longer than Letter size (8.5 x 11 in), please extend the sub-tray
as shown below.
A4 or Letter size
Document Thickness
0.0024 - 0.0048 in
0.0024 - 0.0039 in
41

'asic Traosmissioo Settomigs
un
Oil 0
You can temporarily change the transmission settings either before or after you place the document on the
ADR
These settings are as follows
• Contrast
• Resolution
• Halftone
• Stamp
• Communication Journal
After your document(s) have been sent, your machine will automatically return to the preset settings.
Your machine is preset to Normal contrast. If you wish to send a document with lighter contrast, change the
setting to Lighter. If you wish to send a document with darker contrast, change the setting to Darker.
Press I contrast! to:
DARKER
a UGHTER
CONTTRAST
1=1 DARKER
-Jcza^GKTER
cbhiTRAST
-C3H1ARKER
CD UGI-TTER
CONTRAST
CONTRAST = Normal
CONTRAST = Ughter
CONTRAST = Darker
(SsgisMiteOD
Your machine is preset to Standard resolution, which is suitable for most documents.
Use Fine or Super Fine for detailed documents.
Press RESOLUTION to:
a S-RNE
RESOLUTION
RESOLUTION = Rne
-D-S-BNE
^ m RNE
RESOLUTION
RESOLUTION = Super Rne
( NOTE )
a S'FINE
CZJ FINE
RESOLLmON
► ■ .....................*
RESOLimON = Standard
1. To change the preset Contrast position, change the setting of Fax Parameter No. 01. (See
page 36)
2. To change the preset Resolution position, change the setting of Fax Parameter No. 02. (See
page 36)
3. If you send a photographic document with Halftone set to Fast or Quality and the Resolution
set to Super Fine (406 pelsTinch x 391 lines^nch), the reproduction of the received document
will be detemiined by the capability of the remofe sfa//on.
42

Basic Transmission Settings
nil
InJ
The Halftone setting is useful when sending photographs or illustrations with gray tones. Your machine is
preset to HALFTONE = Off. You can select either Fast or Quality mode.
Press I HALFTONE~l to:
□□ FAST
□□ QUALITY
HALFTONE
HALFTONE = Off
FAST
^^^UALTY
H^FTONE
HALFTONE = Quality
-^S-FAST
CZ3 QUALITY
HALFTONE
HALFTONE = Fast
The Verification Stamp helps you to confirm successful transmissions by stamping the bottom of each
successfully transmitted page with a small (g) mark.
Press STAMP to;
STAMP
STAMP = Off
" STAMP
STAMP = On
NOTE ^ select HALFTONE, FAST or QUALITY, your machine wilt automatically select Fine
^
-------------------------
^ Resolution.
2. When you store a document in memory, the Verification Stamp will stamp on the document if it
is successfully stored in memory. In this case the Verification Stamp is not a confirmation that
the document was successfully transmitted. If you wish to disable the use of the Verification
Stamp when storing document in memory, change the setting of Fax Parameter No. 28. (See
page 37)
3. To change the preset Verification Stamp position, change the setting of Fax Parameter No. 04.
(See page 36)
□
43

Basic Transmission Settings
A Communication Journal lets you verify if the transmission was successful. You can select the condition to
print out the Communication Journal as follows.
When you set COMM. JOURNAL = OFF
When you set COMM. JOURNAL = ON
When you set COMM. JOURNAL = INC.
1
for "OFF”.
for “ON" (Always print out).
a Communication Journal will not be printed out.
a Communication Journal is printed out automatically after every
communication.
a Communication Journal is printed out automatically only if the
communication has failed.
SELECT MODE (1-5)
ENTER NO. OR V A
COMM. JOURNAL^INC
l:OFF 2:ON 3:INC
COMM. JOURNAL=OFF
l:OFF 2:ON 3:INC
or
COMM. JOURNAL=ON
l:OFF 2:ON 3:INC
or
COMM. JOURNAL=INC
l:OFF 2:ON 3:INC
44
for “INCOMPLETE” only.
SET
H
m
NOTE 3 ^ change the preset Comm. Journal condition, change the setting of Fax Parameter No. 12.
(See page 36}

'eimdloinio Docymemitts
©©ojxsoaD [p)g6(g[f^
You can choose either Memory or Direct Transmission.
Use Memory Transmission if:
• You want to send the document to multiple stations.
• You have to retrieve the document immediately.
• You want to take advantage of Dual Operation design.
Use Direct Transmission if:
• The memory is full.
• You want to send the document immediately.
Use Voice Mode Transmission if;
• You want to send the document after talking with the other party.
• You want to send the document after listening to a voice prompting.
Your machine quickly stores the document into the machine's memory.
Then, starts to dial the telephone number.
If the transmission fails, your machine will re-transmit the remaining unsuccessful page(s) automatically.
®
__ _ _ _ _ _ _ _ _ _
Store document
in memory
d)
__ _ _ _ _ _ _ _ _ _ _ _ _ _ _ _ _ _ _ _ _ _ _ _
@
Receive
-----
►
45

Sending Documents
( NOTE )
1. The File Number of the document being stored is shown at the upper right comer of the display
while storing the document It is also printed on the Communication Journal (COMM.
JOURNAL), Transaction Journal and File List The percentage of memory used is shown on
the lower right comer of the display after each page is stored.
STORE * N0.003
PAGES=002 10%
* STORE * COMPLETED
TOTAL PAGES=005 30%
2. If memory overflow occurs while storing documents, the remaining documents on the ADF will
be ejected. The machine prompts you whether to transmit the successfully stored documents
or to cancel the transmission. Press (T) to cancel or press to transmit.
MEMORY OVERFLOW
INFO. CODE=870
See the Specifications on page 153 for the image memory capacity.
If no action is taken within 10 seconds, the machine will start transmitting the stored
documents.
15 PAGES COMPLETED
DELETE? 1:YES 2:NO
3. An Information Code will be displayed if the transmission has failed or no answer at the
receiving side after the last automatic redial.
The document stored for this transmission will be erased from the memory automatically and the
information code Is printed for the transmission on the Communication Journal (COMM. JOURNAL).
If you need to retain the incomplete documents even after the last redial, change Fax
Parameter No. 31 (INC. FILE SAVE) to "Valid" in advance. (See page 37) To retry the
incomplete documents, refer to page 85.
INCOMPLETE
INFO. CODE=XXX
4. To stop the transmission, press
The display shows:
CŒylMUNICATION STOP?
1:YES 2;NO
Press (T) to stop the transmission. The document you stored will be erased automatically.
If you do not want to erase the documents, change the setting of Fax Parameter No. 31 (INC.
FILE SAVE) to "Valid" in advance. (See page 37)
Then the following display will appear and you can select whether to save the file as an
incomplete file for editing and retry, or delete the file manually.
SAVE AS INCOMP.FILE?
1:YES 2;NO
5. If you would like to print a Communication Journal (COMM. JOURNAL) after stopping a
transmission, press (T) when the display shows:
PRINT COMM. JOURNAL?
1:YES 2:NO
6. If the file memory capacity reaches 30 files and you try to store another file, the following
display appears and the machine will not accept additional files until a file is completed and
becomes available.
FILE STORAGE IS FULL
PLEASE WAIT!
STOP
46

îfflSOùiXâOJ^
Manual Number Dialing
To dial the telephone number manually, follow the steps below.
1 ^
Set document{s) face down.
^ I ^
EMORY
Make sure that the MEMORY lamp is on.
If not, press “On", i MEMORY to set “On
ending Documente
ENTER STATION(S)
THEN PRESS START 00%
Enter a telephone number from the keypad.
Ex: (D (D ® © (D (D ©
The document is stored into memory with a file number.
Then starts dialing the telephone number immediately
after storing the first page. (See Note 3)
The remaining page(s) continue to store into memory.
TEL. NO.
55512341
STORE * N0.002
PAGES=00i 05%
* DIALING * N0.002
5551234
NOTE ^ 1- If you need a special access number to get an outside line, dial it first then press I PAUSE I fo
enter a pause (represented by a before dialing the full number.
Ex: 9 PAUSE 5551234
2. If you are using Pulse dialing and you wish to change to Tone dialing in the middle of dialing,
press ( TONE I (represented by a V).
The dialing mode will be changed from Pulse to Tone after dialing the digit
Ex: 9 PAUSE TONE 5551234
3. This feature is called “Quick Memory Transmission”. If you wish to store all the document(s)
into memory first before transmitting, change the Fax Paramefer No. 82 (QUICK MEMORY
XMT) to “ Invalid". (See page 39)
47

Sending Documents
One-Touch Dialing
One-Touch Dialing allows you to dial a full telephone number by pressing a single key. To set up the OneTouch keys, see page 30.
ENTER STATION(S)
1 ^
Set document{s) face down.
^ I ^
""Memory
Make sure that the MEMORY lamp is on.
If not, press “On”. MEMORY to set “On".
THEN PRESS START 00%
Press a One-Touch key.
Ex: “
The document is stored into memory with a file number.
Then starts dialing the telephone number immediately
after storing the first page. (See Note 1)
The remaining page(s) continue to store into memory.
<01>(Station name)
5551234
STORE * N0.002
PAGES=001 05%
* DIALING * N0.002
(Station name)
48
( NOTE )
3
1 This feature is called “Quick Memory Transmission". If you wish to store all the document(s)
into memory first before transmitting, change the Fax Parameter No. 82 (QUICK MEMORY
XMT) to “ Invalid’’. (See page 39)

Sending Documents
Abbreviated Dialing
Abbreviated dialing is a speedy way to dial a frequently dialed telephone number by preprogramming the
telephone number into the built-in auto-dialer with a 3-digit abbreviated code. To program an abbreviated
dialing number, see page 31.
ENTER STATION(S)
1 ^
Set document(s) face down.
lOlEMORY
Make sure that the MEMORY lamp is on.
If not, press “On”. I MEMORVI to set “On”
THEN PRESS START OOi
Press I ABBR I then enter a 3-digit code.
ASBR
Ex;
The document is stored into memory with a file number.
Then starts dialing the telephone number immediately
after storing the first page. (See Note 1)
The remaining page(s) continue to store into memory.
®©®
[010](Station name)
5553456
STORE * N0.002
PAGES=001 05%
* DIALING * N0.002
(Station name)
NOTE ^ fea/ure is called “Quick Memory Transmission”. If you wish to store all the document(s)
^^ into memory first before transmitting, change the Fax Parameter No. 82 (QUICK MEMORY
XMT) to " Invalid". (See page 39)
49

Sending Documents
Directory Search Dialing
Directory Search dialing allows you to dial a full telephone number by searching the station name entered in
One-Touch keys or Abbreviated dialing numbers.
ENTER STATION(S)
1 ^
Set document{s) face down.
-S=*-
MEMORY
Make sure that the MEMORY lamp is on.
If not, press "On". MEMORY I to set “On”.
THEN PRESS START 00%
4
5
DIRECTORY
SEARCH
&
Enter the full station name or part of a station name by
using the Character keys. {See page 14)
Ex:[Era[N][A] for searching PANASONIC
repeatedly until the display shows the station name you
want to send to.
The document is stored into memory with a file number.
Then starts dialing the telephone number immediately
after storing the first page. (See Note 1)
The remaining page(s) continue to store into memory.
ENTER LETTER(S)
ENTER LETTER(S)
PANAI
[010] PANASONIC
5553456
STORE * N0.002
PAGES=001 05%
* DIALING *
PANASONIC
N0.002
50
C NOTE )
1. This feature is called "Quick Memory Transmission ”. If you wish to store all the document(s)
into memory first before transmitting, change the Fax Parameter No. 62 (QUICK MEMORY
XMT) to “ Invalid”. (See page 39)

Sending Documents
Multi-Station Transmission (Broadcasting)
If you have to send the same document{s) to multiple stations, you can save time in feeding the
document(s) by using memory transmission. That is, you can store the document(s) into memory and then
send it to the station(s) automatically.
ENTER STATION(S)
THEN PRESS START 00%
Set document{s) face down.
''Memory
Make sure that the MEMORY lamp is on.
If not, press “On". I MEMORY I to set “On".
Dial by any combination of the following methods:
• One-Touch Dialing
•Abbreviated Dialing
• Manual Number Dialing, press | SET I after each
station is entered
{UF-990: Up to 70 stations, UF-890: Up to 32 stations)
• Directory Search Dialing, press | SET I after each
station is entered
(For details, see page 47 to 50.)
Ex;
<01>(Station name)
5551234
[010](Station name)
5553456
ABBR
®o®
If you want to confirm the number of stations you have
entered, press | SET I •
The document is stored into memory with a file number.
Then starts dialing the telephone numbers in sequence.
note ^ review the stations you entered in step 3 before storing your document into memory
by pressing or [g . Press [CLEAR I to clear an entered station or group shown on the
display if needed.
2. The “Quick Memory Transmission” is disabled if multiple stations are set.
2 STN(S) ARE SET
ADD MORE OR START
STORE * N0.001
* STORE * COMPLETED
TOTAL PAGE=005 25%
* DIALING * N0.001
(Station name)
PAGES=001 01%
51

Sending Documents
-4
If your machine's memory is full or you wish to send the document immediately, use Direct Transmission.
@00
Manual Number Dialing (Direct Transmission)
To dial the telephone number manually, follow the steps below.
ENTER STATION(S)
1 ^
3
4
Set document(s) face down.
MEMORY
Make sure that the lamp goes off.
Enter a telephone number from the keypad.
Ex; (D (D ® © @ (D ®
THEN PRESS START 00%
ENTER STATION
PRESS START TO DIAL
55512341
* DIALING *
5551234
00%
]
Your machine starts to dial the telephone number.
NOTE 3 1- If you need a special access number to get an outside line, dial it first then press i PAUSE I fo
enter a pause (represented by a before dialing the full number.
Ex: 9 PAUSE 5551234
2. If you are using Pulse dialing and you wish to change to Tone dialing in the middle of dialing,
press I TONE I (represented by a
The dialing mode will be changed from Pulse to Tone after dialing the digit 7".
Ex: 9 PAUSE TONE 5551234
3. To stop the transmission, press I STOP I.
The display shows:
52
COMMUNICATION STOP?
I:YES 2:NO
Press (T) fo stop the transmission. The Communication Journal will not print out regardless of
the printout mode setting of the Communication Journal.
1

iending DocomeniliB
One-Touch Dialing (Direct Transmission)
One-Touch Dialing allows you to dial a full telephone number by pressing a single key. To set up the OneTouch keys, see page 30.
ENTER STATION(S)
1 ^
Set document(s) face down.
THEN PRESS START 00%
MEMORY
c
Press a One-Touch key.
Make sure that the lamp goes off.
Ex:
The display will show the One-Touch number and station
name. The full number (e.g. 5551234) will then be dialed.
ENTER STATION
00%
<01>(Station name)
5551234
* DIALING *
(Station name)
Abbreviated Dialing (Direct Transmission)
Abbreviated dialing is a speedy way to dial a frequently dialed telephone number by preprogramming the
telephone number into the built-in auto-dialer with a 3-digit abbreviated code. To program an abbreviated
dialing number, see page 31.
ENTER STATION(S)
1 ^
Set document(s) face down.
MEMORY
Make sure that the lamp goes off.
THEN PRESS START 00%
ENTER STATION
00%
Press I ABBR I and a 3-digit code.
The display will show the ABBR number and station
name.
The full number (e.g. 5553456) will then be dialed.
[010] (Station name)
5553456
* DIALING *
(Station name)
53

Sending Documents
Directory Search Dialing (Direct Transmission)
Directory Search dialing allows you to dial a full telephone number by searching the station name entered in
One-Touch keys or Abbreviated dialing numbers.
ENTER STATION(S)
1 ^
Set document(s) face down.
THEN PRESS START 00%
4
5
MEMORY
Make sure that the lamp goes off.
DIRECTORY
SEARCH
&
Enter the full station name or part of a station name by
using the Character keys. (See page 14)
Ex: [p][S[N][A] fc searching PANASONIC
O
repeatedly until the display shows the station name you
want to send to.
ENTER STATION
00%
ENTER LETTER(S)
ENTER LETTER(S)
pana!
[010] PANASONIC
5553456
* DIALING *
PANASONIC
54
&
The full number (e.g. 5553456) will be dialed.

iending Documents
If you wish to send the document after talking with other party, use Voice Mode Transmission, Your machine
requires an optional fax handset or an external telephone.
Off-Hook Dialing
For Off-Hook Dialing, follow the steps below.
ENTER STATION(S)
1
Set document(s) face down.
THEN PRESS START 00%
Lift the fax handset or the external telephone and dial the
telephone number from the keypad.
Ex: (D (5) (D © (D (D 0
When you hear the voice of the other party, tell the other
party to prepare to receive a document.
Then, when you hear a beep,
and hang up the handset.
* PHONE OFF HOOK *
* DIALING *
55512341
ON LINE * XMT *
( NOTE ) 1. To stop the transmission, press |~STOP
The display shows:
COMMUNICATION STOP?
1:YES 2:NO
Press (T) to stop the transmission. The Communication Journal will not print out regardless of
the printout mode setting of the Communication Journal.
55

Sending Documents
On-Hook Dialing
For On-Hook Dialing, follow the steps below.
1 ^
Set document(s) face down.
ENTER STATION(S)
THEN PRESS START 00%
3
4
MONITOR
Q
You will hear dial tone through the monitor speaker
Dial the telephone number from the keypad.
Ex; (D (D (D © @ (D @
When you hear a beep,
^ MONITOR *
* DIALING
5551234I
ON LINE * XMT *
56
NOTE 3 1- If you need a special access number to get an outside line, dial it first then press I PAUS^ fo
enfera pause (represented by a before dialing the full number.
Ex: 9 PAUSE 5551234
2. If you are using Pulse dialing and you wish to change to Tone dialing in the middle of dialing,
press/"). I TONEH (represented by a T).
The dialing mode will be changed from Pulse to Tone after dialing the digit"/".
Ex: 9 PAUSE TONE 5551234

Sending Documents
You can do the following while sending a document from memory or receiving a document.
• Reserve the next transmission into memory for up to 70* different files (*UF-890: 30 different files).
• Reserve a priority transmission.
Memory Transmission Reservation (Multi-tasking)
If your machine is on-line busy transmitting from memory, receiving or printing received documents, you can
reserve a transmission by the following procedure.
1
2 ^
Your machine is on-line, the ON LINE lamp is blinking or
printing received documents.
ON LINE * PC MODE * | ON LINE * RCV * 1
ON LINE * PRT MODE * 1
* PRINTING PC DATA * |
Set document{s) face down.
'memory
I I
Make sure that the MEMORY lamp is on.
If not, press "On". MEMORY to set "On".
Dial by any combination of the following methods:
• One-Touch Dialing
• Abbreviated Dialing
• Manual Number Dialing, press { SET I after each
station is entered
(UF-990: Up to 70 stations, UF-890: Up to 32 stations)
• Directory Search Dialing, press I SET I after each
station is entered
(For details, see page 47 to 50.)
01
Ex:
ON LINE * MEM.XMT *
ID:(Identification)
ID:(Identification) 1
* PRINTING * 1
MEMORY RCV'D DOC |
* PRINTING * 1
PC DATA 1
ENTER STATION(S)
THEN PRESS START 001
<01>(Station name)
5551234
Your machine will store the document(s) into memory.
^ ^ t. To cancel the memory transmission resen/ation, see page 82
^
------------------------
^ 2. If the same station has been reserved with different files, the files will be executed in a single
transmission (Batch Transmission). (See page 66)
STORE * N0.005
PAGE3=001 01%
* STORE * COMPLETED
TOTAL PAGE=005 25%
57

Sending Documents
TJ!®j®ooo0@©0®od ®3g©[R7a(^
Direct Transmission Reservation (Priority Transmission Reservation)
If you are in a rush to send an urgent document, however there are many files in the memory, use Direct
Transmission Reservation to send the urgent document. The urgent document will be sent immediately
after the current communication is finished.
Note that you cannot send documents to multiple stations.
To reserve your machine for sending the urgent documents
1
2 ^
Your machine is on-line, the ON LINE lamp is blinking or
printing received documents.
ON LINE * PC MODE * |
ON LINE * PRT MODE * |
PRINTING PC DATA * | * PRINTING * 1
Set document(s) face down.
MEMORY
^ Make sure that the lamp goes off.
Dial by using any one of the following methods:
* One-Touch Dialing
•Abbreviated Dialing
Manual Number Dialing and press I START
Directory Search Dialing and press I START
{For details, see pages 52 to 54.)
01
Ex:
You can reserve sending an urgent document to a
single station only.
A message “DIRECT XMT RESERVED” will be
shown on the display.
ON LINE * MEM.XMT *
ID:(Identification)
ON LINE RCV * 1
ID:{Identification) I
* PRINTING * 1
MEMORY RCV'D DOC |
PC DATA 1
ENTER STATION(S)
THEN PRESS START 00%
ENTER STATION
<01>{Station name)
5551234
]
00%
58

To cancel the direct transmission reservation
Sending Documents
^ Make sure the document is on the ADR
and then remove the document from ADR
DIRECT XMT RESERVED
<01>(Station name)
CANCEL XMT RESERVE ?
1:YES 2:NO
1
59

Sendinig Documents
^ailOQOOODg]
Automatic Redialing
If a busy line is detected, the machine will redial the number up to 5 times
at 3 minutes interval. However, if a busy line is not detected, the machine
will redial only one time. During that time, a message will appear as shown
to the right.
A file number is shown in the upper right hand corner of the display if it is a memory
transmission file.
Manual Redialing
You can also redial the last dialed number manually by pressing | REDIAL 1 key.
To redial the last dialed number through memory
1
Set document(s) face down.
Make sure that the MEMORY lamp is on.
PAUSE
REDIAL
3
WAIT TO DIAL N0.001
<01>(Station name)
ENTER STATION(S)
THEN PRESS START 00%
TEL. NO.
555123^
* STORE * N0.002
PAGES=*001 01%
The document is stored into memory with a file number.
Then dials the last dialed number.
To redial the last dialed number through ADF
1
Set document(s) face down.
IZ=I
?
3
MEMORY
I
-------------
Your machine starts to dial the last dialed number.
PAUSE I
REDIAL
1
Make sure that the tamp goes off.
* DIALING * N0.002
5551234
ENTER STATION(S)
THEN PRESS START 00%
ENTER STATION
00%
PRESS START TO DIAL
5551234
* DIALING *
5551234
60
( NOTE ) 1. While the unit is displaying 1/VAIT TO DIAL", you can press \ REDIALI to start redialing
immediately.

c©SvDinia Docymmenfe
Your machine is provided with both automatic and manual reception modes. The selection of either
reception mode is made with Fax Parameter No. 17 {RCV MODE).
Your machine will receive documents automatically if the Fax Parameter No. 17 (RECEIVE MODE) is set to
“Auto".
(MaGDOOSP
You may wish to receive documents manually if you use the telephone line in your office primarily as a
personal telephone and occasionally for your facsimile machine.
To receive documents manually, change the Fax Parameter No. 17 (RECEIVE MODE) to “Manual" and the
following message will be shown on the display.
MAR-12-2002 15:00
MANUAL RCV 00%
When the telephone rings, lift the handset. (See Note 1)
1
If you hear a beep, the sound tells you that someone
wants to send a document.
Remove any documents from the ADR
2
3
Your machine starts receiving the document.
Hang up the telephone.
i fsJOTE ^ n^achine requires an optional fax handset or an external telephone connected to the TEL
^^ jack on the left side of the machine.
2. If you receive a document with Super Fine resolution (406 pelsAnch x 391 Hnes/inch), it might
be divided into multiple pages with no reduction.
61

Receiving Documents
;2S^'
This machine can use Letter, Legal or A4 size plain paper for recording. Sometimes, oversized documents
sent to you by the other parties cannot be printed within a single page. When this occurs, the document will
be divided into separate pages.
This machine is equipped with a Print Reduction function to solve this problem. You may select the most
appropriate setting from the selections described below.
1. Automatic Reduction
Each page of a received document is first stored in memory. Based on the document length, your
machine will automatically calculate the suitable reduction ratio (70% to 100%) to print the entire
document on a single page. If the received document is extremely long (over 39% longer than the
recording paper), the document will be divided into separate pages and print without reduction.
2. Fixed Reduction
You can pre-determine the reduction ratio from 70% to 100% in 1% steps. The document(s) you receive
will be reduced to the fixed ratio regardless of size.
Set Fax Parameters as shown below.
1. To set Automatic Reduction mode.
1) No. 24 Print Reduction set to “Auto”.
2. To set Fixed Reduction mode.
1) No. 24 Print Reduction set to “Fixed”.
2) No. 25 Reduction Ratio set to any number between 70% through 100%. (See Note 1)
Ex: A4 to A4 - 96%
A4 to Letter - 90%
Letter to Letter - 96%
Legal to Letter - 75%
62
^ |\|OTE ^ sending side is set to print the header on the outside of the copy area, more reduction
—
--------
' гя;
ratio will be required.

Receiviog Docyments
If the received document is extremely long (over 39% longer than the recording paper), the document will be
divided into separate pages. When printing on separate pages, the bottom 0.4 in (10 mm) of first page will
be overlapped on top of the next page.
Transmitted Document
Received Document
Overlap print.
0.4 in (10 mm)
The receiving document is divided
into two sheets with overlap printing.
C NOTE )
1. If the reduction method is set to the Automatic Reduction mode, the document is printed out
with no reduction when printing out separate pages. If the reduction method is set to Fixed
Reduction mode, the document is printed out by the ratio you set in Fax Parameter No. 25.
63

Receiving Documents
If the recording paper runs out or jams or if the toner runs out during reception, the machine automatically
starts receiving documents into its image data memory. Stored documents are printed automatically after
replacing the recording paper or the toner cartridge. {See Note 1 and 2)
When the machine finishes the memory reception and
1
The printing mechanism of your machine is a Reverse Order Stacking construction. Your machine has a
Print Collation Mode that stacks received documents in the correct order. When the Print Collation Mode is
enabled, all received documents are stored into memory first, then printed out in Correct Order Stacking.
The requirements for the Print Collation Mode to be active are; 1) Fax Parameter No. 65 PRINT
COLLATION set to “Valid”, and 2) enough remaining memory.
The unit will print in Reverse Order Stacking (Non-Collation Mode) whenever one of the above requirements
is not met.
there is no recording paper or toner, an Information Code
appears on the display.
Install the recording paper (See page 20) or replace the
toner cartridge (See page 18).
The machine will automatically start printing the document
stored in the memory.
NO RECORDING PAPER
INFO. CODE=010
OUT OF TONER
INFO. CODE=041
* PRINTING *
MEMORY RCV'D DOC
To use this function, we recommend installing an Optional Flash Memory Card. See page 156 (Options and
Supplies).
C NOTE )
1. If the memory overflows, the machine will stop receiving and release the communication line.
The document(s) stored in the memory up to that moment will be printed out
2. If you wish to turn off the substitute reception function, change the setting of Fax Parameter
No. 22 to "Invalid". (See page 36}
m
64

akimg Copies
Your machine has a copy function which can make single or multiple copies. When copying, your machine
will automatically select Fine resolution.
ENTER STATION(S)
1 ^
Set document(s) face down.
THEN PFLESS START 00%
COPY
NO. OF COPY=l
3
4
Enter the number of copies.
Ex:© ©
The machine stores the document, then prints the copies.
COPY
NO. OF COPY=10
STORE * N0.005
PAGES=001 01%
* COPY *
NO. OF COPY=01/10
i ^ f. The copy will be reduced automatically depending on the length of the original document If
^-------------------------^ you wish to be prompted for the reduction ratio when making copies, change the setting of Fax
Parameter No. 32 (COPY REDUCTION) to "Manual".
If Copy Reduction is set to Manual, press % steps. (100% to 70%) [▼] and to set the
zoom ratio in 1% steps. (100% to 70%)
2.
If you make a copy with Super Fine resolution, it will be reduced slightly even if the reduction
ratio is set to 100% in order to fit the data on one page.
Standard Resolution is not available in Copy Mode.
3.
4. An optional D-RAM Card is required when copying a Legal size document with the settings on
Super Fine resolution and the reduction ratio at 100%. If no optional D-RAM Card Is installed,
the bottom portion of the document will be cut off.
65

latch TraosmissDOini
@©OD@O©0 D)S©(§iff
To reduce transmission time and cost, this feature allows your machine to accumulate different documents
for the same destination(s) to be transmitted in a single phone call.
M®oo
During memory transmission, your machine searches its memory for reserved files (up to 5 files) to transmit
to the same destination, automatically batching and transmitting them in a single phone call.
The following is an example to show Real-time Batch Transmission. (See Note 1)
Time
Transmit
Wto NY Transmit
London
D)gtegp(s] [j)gflgOD
Assign a time for batch transmission to a Program Key in advance. All transmission(s) using the Program
Key are batched and transmitted at the reserved time.
The following is an example to show Delayed Batch Transmission.
66
^ ^ 1. The machine cannot Batch to a file(s) that is/are Waiting to Rediai orcurrenf/y being sent, but it
\
----------21-------------
^ wii¡
will Batch to files that are pending to dial.

Timer CoBDltrollied CommumiDcattioinis
©cmxMjaQ ^@pfl[o)iSom
You can send a document to one or multiple stations at any preset time within the next 24 hours. Up to 70*
built-in timers can be set for deferred transmission and deferred polling. (* UF-890: 30 built-in timers)
ENTER STATION(S)
1 ^
Set document(s) face down.
FUNCTION
I I
dS
THEN PRESS START 00%
DEFERRED COMM. (1-2)
lENTER NO. OR V A
3 ©
Enter the start time from the keypad.
(Use a 4-digit, 24-hour clock)
Ex: (D d) (3) (0) (11:30 p.m.) and [~SET I
Dial by any combination of the following methods;
Ex:
SET
• One-Touch Dialing
• Abbreviated Dialing
• Manual Number Dialing, press I SET I after each
station is entered
{UF-990: Up to 70 stations, UF-890: Up to 32 stations)
Directory Search Dialing, press I SET I after each
station is entered
(For details, see page 47 to 50.)
to store documents into the memory.
DEFERRED XMT
START TIME
ENTER STATION(S)
THEN PRESS START
<01>(Station name)
5551234
STORE * N0.002
PAGES=001 05%
* STORE * COMPLETED
TOTAL PAGES=005 30%
]
( NOTE ) 1. If you enter a wrong number in Step 4, press I CLEAR 1 then re-enter the right number.
2. To change or cancel the Deferred Communication settings, see page 80 and 82.
3. \/Vhen you reserve a deferred transmission without storing a document into memory, the
following message will be shown on the display after pressing I START I in the last step.
DEF DIRECT XMT RSV'D
<01>(Station name)
67

Timer Controlled Communications
1
FUNCTION
DEFERRED COMM. (1-2
ENTER NO. OR V A
DEFERRED POLLING
START TIME
O
]
4
5
Enter the start time from the keypad.
(Use a 4-digit, 24-hour clock)
Ex: (0) (D @ (0) {3:30 a.m.) and I SET
Enter a 4-digit polling password.
Ex: (9) (D (7) (D and
Dial by any combination of the following methods:
• One-Touch Dialing
• Abbreviated Dialing
• Manual Number Dialing, press I SET I after each
station is entered
(UF-990: Up to 70 stations, UF-890: Up to 32 stations)
• Directory Search Dialing, press I SET I after each
station is entered
(For details, see page 47 to 50.)
Ex: “
SET
DEFERRED POLLING
PASSWORD=r
ENTER STATIONS)
THEN PRESS START
<0l> (Station name)
5551234
STORE
NO.001
]
68
C NOTE ) 1. If you enter a wrong number in Step 3, press I CLEAR I, then re-enter the light number.
2. To change or cancel the Deferred Communication settings, see page 80 and 82.

P©il5o
©QOixgiMI
Polling means calling other station{s) to retrieve a document. The other station must know in advance that
you will call and must have a document set on the ADF or stored in the memory. You may need to set a
polling password, shared by the other station, to ensure security.
If the polling password does not match with the polled station, your polling request will be refused
automatically.
To set the polling password, follow the steps below.
SET MODE (1-6)
1
FUNCTION
r
ENTER NO. OR V A
4
5
©I±D
0©cb
©
Enter a 4-digit polling password.
Ex: © (D (D ©
SET /Y&w
FAX PARAMETER
26 POLLING PASSWORDORD I
26 POLLING PASSWORD
ER(01-99) I
NO.=l
:=!
________
■Ol I
1234
I
]
c
^ ^ 1. Polling might not function with alt fax machines. We suggest you attempt a trial polling before
^^ you actually poll important documents.
2. If a password is not set in the polled station, you may poll the other station even though your
machine has a password.
69

Polling
In order to let other stations poll your machine, you must prepare your machine with a document stored in
memory. Be sure to set the polling password before storing the document into memory. After being polled,
the documents stored in the memory will be erased automatically. To retain the documents in memory so
that they can be polled repeatedly change Fax Parameter No. 27 (POLLED FILE SAVE) to "Valid".
ENTER STATION(S)
1 ^
Set document(s) face down.
FUNCTION
THEN PRESS START 00%
POLLING N0.=
1:POLLING 2:POLLED
POLLED
PASSWORD=1234
4
5
Enter a 4-digit polling password. (See Note 3)
Ex: © (3) @ ®
The document(s) will be stored into memory.
POLLED
PASSWORD=4321
STORE * N0.015
PAGES=001 01%
* STORE * COMPLETED
TOTAL PAGES=005 24%
70
( NOTE )
1. You can still send or receive documents even when set to be polled.
2. Only 1 polled file can be stored In memory. If you need to add document(s) into the same
polled file, see page 84.
3. If you have set the polling password in Fax Parameter No. 26, the password will appear on the
display. You can still change the password temporarily by overwriting it with a new one.

¥® (FM) ©coxgQDOuOg^
The following procedure lets you poll a document from one or multiple stations. Be sure to set the polling
password before polling. (See page 69)
POLLING N0.=
1
FUNCTION
I ,
-------
1
1:POLLING 2:POLLED
3
POLLING
PASSW0RD=1234
3
4
Enter a 4-digit polling password. (See Note 2)
Ex: © 0 © ©
SET
D
Dial by any combination of the following methods:
• One-Touch Dialing
• Abbreviated Dialing
• Manual Number Dialing, press I SET I after each
station is entered
(UF-990: Up to 70 stations, UF-890: Up to 32 stations)
Directory Search Dialing, press I SET I after each
station is entered
(For details, see page 47 to 50.)
01
Ex:
POLLING
PASSWORD=llll
ENTER STATION(S)
THEN PRESS START
<01>(Station name)
5551234
* STORE *
N0.001
]
C NOTE )
1. You can review the entered stations in step 5 by pressing [T| or [g key, press I CLEAR I
fo erase the displayed sfaiion or group as needed.
2. if you have set the polling password in Fax Parameter A/o. 26, the password will appear on the
display
You can still change the password temporarily by overwriting it with a new one.
71

Your fax machine has special Program Keys. These keys are useful if you frequently need to send or poll
the same group of stations. You can use these keys to store a One-Touch group key, a sequence of stations
to be polled, a deferred transmission or polling sequence or an additional One-Touch key.
To set a Program Key for Group Dialing
1
3
4
FUNCTION
□
0®
SET
D
0 0J [0 T5
Enter the station name (up to 15 characters) by using the
Character keys. (See page 14)
Ex: PROGA and I SET I
Enter the station numbers by using One-Touch Key or
ABBR I and 3-digit code.
Ex:
You may use the [t] or keys to review the entered
station(s) before going to next step. If you find an error,
press I CLEAWI to erase the displayed station.
and
ABBR
@©®
PROGRAM (1-4)
ENTER NO. OR V A
PROGRAM[P ]
PRESS PROGRAM KEY
PROGRAM[PI]
ENTER NAME
ENTER STATION(S)
THEN PRESS START
<01> (Station name)
5551234
[010] (Station name)
5553456
NAME
]
72
You can now set other Program Keys by repeating the
procedures from Step 3, or return to standby by pressing
I
STOP I .
PROGRAM[P ]
PRESS PROGRAM KEY

To set a Program Key for deferred transmission
1
FUNCTION ( 7
Program Keys
PROGRAM (1-4)
ENTER NO. OR V A
2 ©
3
4
6
Ex:
Enter the station name {up to 15 characters) by using the
Character keys. (See page 14)
Ex: PROGA and I SET I
FUNCTION
Enter the starting time using 4 digits.
Ex: (2) (3) @ (0) (11:30 p.m.) and I SET
Enter the station by any combination of the following
methods:
SET
© c5
pi
• One-Touch Dialing
• Abbreviated Dialing
• Directory Search Dialing, press I SET \ after each
station is entered
(For details, see page 47 to 50.)
PROGRAM[P ]
PRESS PROGRAM KEY
PROGRAM[PI] NAME
ENTER NAME
PROGRAM[PI]
PRESS FUNCTION KEY
DEFERRED XMT
START TIME
ENTER STATION(S)
THEN PRESS START
<01> (Station name)
5551234
8
Ex:
PROGRAM[P ]
PRESS PROGRAM KEY
You can now set other Program Keys by repeating the
procedures from Step 3. or return to standby by pressing
I STOP I .
73

Program Keys
§©l5O0odsi ikff ©sfeoueca f\DOO0oog)
..
....................
■■■ ■ ■ ■ ■ ■
.......................................................................mu
To set a Program Key for deferred polling
....
1
2 ©
3
4
6
Ex:
Enter the station name (up to 15 characters) by using the
Character keys. (See page 14)
Ex: PROGAand SET
FUNCTION { 1
I I ^
Enter the starting time.
Ex: (D (D ® ® ('*0:00 P-n^ ) and
FUNCTION
[0 o o f©
(0 !0
PI
&
0©
SET
SET
D
I
SET
PROGRAM (1-4)
ENTER NO. OR V A
PROGRAM[P ]
PRESS PROGRAM KEY
PROGRAM[PI]
ENTER NAME
PROGRAM[PI]
PRESS FUNCTION KEY
DEFERRED POLLING
START TIME I
DEFERRED POLLING
PASSWORD=l
NAME
]
7
8
Enter a 4-digit polling password.
Ex: © © © ® and I _SET_ I
The polling password appears if it has been previously
set.
Enter the station by any combination of the following
methods:
• One-Touch Dialing
•Abbreviated Dialing
• Directory Search Dialing, press I SET I after each
station is entered
(For details, see page 47 to 50.)
01
Ex:
You can now set other Program Keys by repeating the
procedures from Step 3, or return to standby by pressing
I
STOP
1 .
ENTER STATION(S)
THEN PRESS START
<01> (Station name)
5551234
PROGRAM[P ]
PRESS PROGRAM KEY
74

To set a Program Key for norma) polling
1
FUNCTION f 7 W Ì .—,
&
2 ©□
Program Keys
PROGRAM (1-4)
ENTER NO. OR V A
PROGRAM[P ]
PRESS PROGRAM KEY
Ex:
Enter the station name (up to 15 characters) by using the
Character keys. (See page 14)
Ex: PROG.A and I SET
FUNCTION
(
-------
~l
to
Enter a 4-digit polling password.
Ex: 0 0 @ @ and I SET I
The polling password appears if it has been previously
set.
Enter the station by any combination of the following
methods;
• One-Touch Dialing
•Abbreviated Dialing
• Directory Search Dialing, press I SET I after each
station is entered
(For details, see page 47 to 50.)
PROGRAM[PI]
ENTER NAME
PROGRAM[PI]
PRESS FUNCTION KEY
POLLING
PASSWORD=l
ENTER STATION(S)
THEN PRESS START
<01> (Station name)
5551234
NAME
]
8
Ex:
PROGRAM[P ]
PRESS PROGRAM KEY
You can now set other Program Keys by repeating the
procedures from Step 3, or return to standby by pressing
I STOP I .
75

Program Keys
olitfWiO
To set a Program Key for One-Touch Key
1
2 ®
3
Enter the station name (up to 15 characters) by using the
4
Character keys. (See page 14)
Ex: PROGAand I SET I
Enter a telephone number (up to 36 digits including
pauses and spaces).
Ex: (9) I PAUSE I (D CD (D I SPACE I ® @ @ @
FUNCTION
C
[0 n Q [0
0) [0
Pi
Ex:
0©
SET
SET
PROGRAM
ENTER NO. OR V A 1
J
PROGRAM[P ]
PRESS PROGRAM KEY 1
PROGRAM[PI] NAME 1
ENTER NAME
[PI] PROG.A
ENTER TEL. NO.
[PI] PROG.A
9-555 12341
PROGRAM[P ]
PRESS PROGRAM KEY
(1-4) 1
You can now set other Program Keys by repeating the
procedures from Step 3, or return to standby by pressing
I STOP 1 ,
76

Program Keys
(MpaODglOODg] iljg^QODg] iiji©
To change the settings in a Program Key, follow the procedure on setting a Program Key on pages 72 to 76.
• Start time or station(s) for deferred transmission
• Station(s) for norma! polling
• Start time or station(s) for deferred polling
• Station(s) for group dialing
• Telephone number and station name for One-Touch key
To erase the settings in a Program Key
1
FUNCTION
1 I
2 ©
Press the Program key you want to erase.
3
4
5
Ex:
©
You can now erase other Program Keys by repeating the
procedures from Step 3, or return to standby by pressing
I STOP I .
fo [0 0 [0
[0 [0
0©
CZD
SET
SET
PROGRAM (1-4)
ENTER NO. OR V A
D
PROGRAM[P ]
PRESS PROGRAM KEY
PROGRAM[PI]
DELETE? 1:YES 2:NO
DELETING *
PROGRAM[PI]
PROGRAM[P ]
PRESS PROGRAM KEY
77

!dot File Mode
©шхшаО [^©об[°Ш°)0Р
Your machine has a document image memory which enables you to reserve memory transmission, memory
deferred transmission, memory polling and so on.
After reserving the communications in memory, you may need to change the settings of the
communication(s) while it is still in memory. This section describes how to use the file editing features.
МдШооа aMte [LfeS
The contents of the communication settings may have to be modified or deleted. To verify the contents,
follow the steps below to print out a file list.
EDIT FILE MODE (1-6)
1
FUNCTION
ENTER NO. OR V Л
FILE LIST?
PRESS SET TO SELECT
SET
to
Sample File List
^ -k it it ‘фе it
(1 )
FILE
No.
001
002
(2 )
COMM. TYPE
DEFERRED XMT
MEM. DEF. XMT
^ ★ —FIIjE
Explanation of Contents
irifieiritit’kitiiititirieieirieirit ★ ★ * * *
LIST-
(3 )
CREATED TIME
NOV-12 13:20 20:30 [001]
NOV-12 13:20
*****••*
(4 )
START TIME
22:30 003 [011] [012] [013]
** -HEAD OFFICE
DATE HAR-12-2002 *
(5 )
PAGES
(€}
DESTINATION(S)
-PANASONIC
FILE LIST
1:PRINT 2:VIEW
* PRINTING *
FILE LIST
TIME 15*00 *’**’***’*♦’*
[016] [017]
-
201 555 1212- *********
78
(1) File number
(2) Communication type
(3) Stored datertime
(4) Executing time
(5) Number of stored page(s)
(6) Destination
If the file is now being executed, a is indicated on the left of the file number.
Date/time that these files were stored.
If the file is a Timer Controlled Communication, the start time is printed in this
column.
If the file is an incomplete file, "INCOMP" is printed in this column.
ABBR. No./One-Touch No./Manual Dialing No.

Edit File Mode
lite ®ff a №
To view the contents of a file list on the display without printing it. follow the steps below.
EDIT FILE MODE (1-6)
1
FUNCTION
ENTER NO. OR V A
FILE LIST?
PRESS SET TO SELECT
FILE LIST
1:PRINT 2:VIEW
USE THE V A KEYS TO
SCROLL EACH FILE
shows a file you want to edit.
Sample display
repeatedly until the display
79

Edit File Mode
©ftMiDElQOQg iijD© [FED©
To change the start time and/or stations in a communication file, follow the steps below.
EDIT FILE MODE (1-6)
1
FUNCTION
I -
_____
&
I
©
ENTER NO. OR V A
2 ©
Enter the file number or use ® ® select the file
that you want to change.
Ex: © ® ©
4
5
6
n—)
Enter a new start time.
Ex:® (6) (g)
{If you do not have to change the time, skip to step 6.)
To delete the station(s), press ® or key uhtil the
station you want to delete appears. Then press I CLEAR I
or
Enter the station(s) you want to add.
Ex:
[© ©
SET
SET
G
SET
(See Note 2)
Co)
(6:00a.m.)
SET
ENTER FILE NO.OR V a
FILE NO.=l
ENTER FILE NO. OR V A
FILE NO.=001
DEFERRED XMT
START TIME 22:30
DEFERRED XMT
START TIME 06:00
<01>{Station name)
5551234
ENTER STATION(S)
THEN PRESS START
1 STN(S) ARE SET
J
ADD MORE OR START
]
80
STORE
8

Edit File Mode
©OOOOì^-iIO^ iijD© Trioi© ©CPdiD© (§{? ©
( NOTE )
1. Your machine cannot change the start time and/or stations in the file white it is being sent or
waiting to redial.
2. If the file is not a Deferred Communication File, the following message is shown on the display.
SET DEFERRED COMM.?
1:YES 2:NO
Press (T) to change the type of the file for deferred communication file.
3. If you edit the file that is saved as an incomplete file, after pressing \ START I in step 8, your
machine will prompt you whether to execute the file immediately.
The display shows:
RETRY INCOMP. FILE?
1:YES 2:NO
Press (T) to execute the file immediately.
81

Edit File Mode
2ia
To delete the file in memory, follow the steps below.
1
FUNCTION ( 9
EDIT FILE MODE (1-6)
ENTER NO. OR V A
2 ©
Enter the file number or use [▼] or to select the file
that you want to delete.
Ex; (o) (o) © (See Note 2)
Enter the next file number you want to delete or press
I STOP I to return to standby.
SET
CI3)
j
SET
&
ENTER FILE NO. OR V a
FILE NO.=iM
ENTER FILE NO. OR v a
FILE NO.=001
DELETE FILE N0.001?
1:YES 2:NO
* DELETING *
FILE NO.=001
ENTER FILE NO.OR V A
FILE NO.=iO
82
NOTE ^ nischine cannot delete the file while it is being sent.
2. Enter © © © as the file number and press \ SET 1 to delete all ^les (except the file in
progress).
The following message is shown on the display.
DELETE ALL FILES?
1:YES 2:NO
Press © to delete all files.

^ ®qdS a PBte
To print the contents of the communication file, follow the steps bellow.
1
FUNCTION ( Q
c
------------ ^
&
Edit File Mode
EDIT FILE MODE (1-6)
ENTER NO. OR V A
2 ©
Enter the file number or use ® or [g to select the file
that you want to print.
Ex: ® ®
Your machine will print the file. The document{s) will
remain in memory even after printing the file.
L3J
SET
&
ENTER FILE NO.OR v a
FILE NO.=l
ENTER FILE NO.OR V a
FILE NO.=001
* PRINTING *
PAGE=001/003
^ NOTE 3 ^ machine cannot print the file while it is being sent
83

Edit File Mode
/MaBPDg] ll)®(gQaa^^
To add documents into the file, follow the steps bellow.
1 ^
Set document(s) face down.
FUNCTION ( 9
I , I
ENTER STATION(S)
THEN PRESS START 05%
EDIT FILE MODE (1-6)
ENTER NO. OR V A
C A SET
^ 'C=D
15'
Enter the file number or use [t] or to select the file
that you want to add.
Ex; ® ® ®
Your machine will start storing the document(s) into a file.
ENTER FILE NO.OR V a
FILE NO.=l
ENTER FILE NO.OR V a
FILE NO.=001
* STORE * N0.001
PAGES=002 10%
84
NOTE 3 rnach/ne cannot add the document into the ff/e while it is being sent or waiting to redial.

Edit File Mode
am OoDS®oui]^^
If a memory communication has been unsuccessful due to a busy line or no answer, the document you
stored is automatically erased from memory after the last redial.
If you need to retain the document even if the communication failed, change the setting of Fax Parameter
No. 31 {INC. FILE SAVE) to Valid in advance.
To retry the incomplete file, print a File List first to verify the file number (See page 78)
Then, follow the steps below.
EDIT FILE MODE (1-6)
1
FUNCTION
[!b
ENTER NO. OR V A
2 ©
Enter the file number or use [▼] or to select the file
that you want to retry.
Ex: ® ® ©
Your machine will retry the file and start dialing
immediately.
SET
ENTER FILE NO.OR V a
FILE NO.=l
D
ENTER FILE NO.OR V a
FILE NO.=001
^ STORE * NO.001
<01>(Station name)
]
* DIALING * N0.001
<01> (Station name)
^
---------------------------
^ 1. To confiim or change the enfered telephone number for the file, see page 78 and 80.
^ 2. If you set Fax Parameter No. 31 to Valid, all incomplete files will remain in the memory. To
avoid memory overflow, please check the memory content frequently. We recommend that
optional flash memory card is installed when this function is used. (See page 156)
85

Access Code
SET
0)[ [0.
SET MODE (1-6)
ENTER NO. OR V A
FAX PARAMETER
38 ACCESS CODE
N0.=
UOl-99) I
■ I
m
The Access Code prevents an unauthorized user from operating the machine. Once a 4-digit Access Code
is registered, no one can operate the machine without entering the correct access code.
Automatic Receiving, however, is always available. After you complete any operation, such as mode setting
or transmission, and the display returns to standby, you have to re-enter the access code in order to use the
machine again. Registering the Access Code does not affect the use of the machine in any other way.
1
FUNCTION
I -I
„ ©
2 ©
¿1:5
4
5
Enter a 4-digit Access Code.
Ex: © (D (D @
SET
&
Select Restriction Level.
(T) for All operations
or
for Setting and Printing the Fax Parameters only.
Ex:
38 ACCESS CODE
1234
38 ACCESS CODE
1:ALL 1234
38 ACCESS CODE
2 .-PARAMETERS 1234
86
( NOTE ) 1. To erase the Access Code, enter the Access Code and
_______________________
procedure above to step 3, then press I CLEAR I I SET I and I STOP I .
, _____ ____________________
press I SET I and follow the

%)©i]gíara® V®(n? EDacgO^
Access Code
Enter the Access Code.
1
Ex: © @ (D 0
SET
CZD
Now you can operate the machine normally.
The machine can restrict the operation of setting/printing the Fax Parameters and printing the Transaction
Journal when the Department Code feature is enabled.
Ex: When setting the Fax Parameter
1
MAR-12-2002 15:00
ACCESS CODE=i
]
mar-12-2002 15:00
ACCESS CODE=****
mar-12-2002 15:00
00%
SET MODE (1-6;
ENTER NO. OR V A
3
4
Enter a 4-digit Access Code.
Ex: ® @ @ 0
SET
Now you can operate the machine normally.
INPUT ACCESS CODE
INPUT ACCESS CODE
FAX PARAMETER(01-99)
NO.=i
87

:©c©i¥e To Mlenmory
a Dlfi
This feature is used to secure all received documents by storing them into the memory. To print out the
document from memory, the authorized operator must enter the correct password.
Enter a 4-digit RCV to Memory Password.
4
Ex: © @ (3) ©
0)1 ro
37 RCV TO MEMORY
37 RCV TO MEMORY
1234
5
gOiMiDg] T©
1
SET
¿3]
SET
SELECT MODE (1-5)
ENTER NO. OR V A
RCV TO MEMORY=OFF
l:OFF 2:ON 3:PRINT
RCV TO MEMORY=ON
l:OFF 2:ON 3:PRINT
MAR-12-2002 15:00
< RCV TO MEMORY >
88
C
^ |SJQ"P^ ^ I4^en the memory overflows, the machine will stop receiving and release the line. The
---------——--------
^ machine will not answer the next incoming call until there is space available in the memory.
2. We recommend that optional flasfl memory card is installed when this function is used. See
page 153 on Image Memory Capacity.

Receive To R/iemoty
After receiving a document with the Receive To Memory feature, the following message will appear on the
display.
MESSAGE IN MEMORY
< RCV TO MEMORY >
To print the document, follow the steps below.
SELECT MODE (1-5)
1
FUNCTION
C
©
ENTER NO. OR V A
RCV TO MEMORY=ON
l:OFF 2:ON 3:PRINT
RCV TO MEMORY=PRINT
l:OFF 2:ON 3;PRINT
SET
'H'
Enter the password to print the documents.
{See Note 1)
Ex: © @ d) ®
SET
&
Machine will start to print the documents.
INPUT PASSWORD
INPUT PASSWORD
1234
* PRINTING *
MEMORY RCV'D DOC
^ NOTE 3 password has not been set, your machine will not prompt you to enter the password.
2. The documents will be printed immediately after pressing \ SET I in step 4.
3. Once the RCV TO MEMORY feature is set to "On", the password cannof 5e changed (Fax
Parameter No. 37 will not be shown on the LCD display). If you wish to change the password,
set RCV TO MEMORY feature to “OIP first. Then change the password. (See page 88)
89

Distinctive Ring Detector (DRD)
aemmmmMm
Your machine has a special feature in conjunction with an optional service provided by many local
telephone companies. It can distinguish up to 4 telephone numbers with a corresponding ring pattern
identifying each number. "DRD" lets you provide multiple phone numbers, one for your fax, business or
personal use with only one single phone line.
Please check with your local telephone company on the availability of this service in your area.
Your machine can be programmed to respond to only 1 of the 4 distinctive ring patterns. To select the
corresponding ring pattern for your fax number, refer to the Fax Parameter Table on page 36.
The following table shows a typical example with 4 telephone numbers on a single phone line
Telephone No. Usage
Riiing
555-1111 Business
555-2222 Fax
555-3333
555-4444
The following illustration shows a typical set up, with your machine set to detect Type B (double ring) ring
pattern.
Personal
Teenager Ring...Riiing...Ring
..................................
Ring...Ring
Ring...Ring... Riiing
Distinctive Ring Sound Ring Pattern
Riiing
..........................
.............
..............
....................................
Ring... Ring
Ring... Ring... Riiing
Ring...Riiing...Ring
...........................
..............
................
Type A, Standard Ring
Type B, Double Ring
Type C,Triple Ring
(Short-Short-Long)
Type D,Triple Ring
(All other than type C)
90
( NOTE )
. "Riiing" means a long ringing sound and "Ring" means a short ringing sound.

ax Cover Sheet
D
A Fax Cover Sheet can be automatically attached to your transmit document{s) that shows the recipient’s
name, originator's name and the number of pages attached.
Transmitted as: Received as;
01 i 10
Fax
Cover
Sheet
Header P,01
Page 1
Header P.02
Page 2
Total P.02
IT© №© (&© fes ©I
To attach a Fax Cover Sheet to a transmission, follow the procedure below.
ENTER STATION(S)
1 ^//
Set document(s) face down.
FUNCTION
I - I
THEN PRESS START 00%
SELECT MODE (1-5)
ENTER NO. OR V A
for “OFF” (Cover Sheet is not attached)
or
for “ON” (Cover Sheet is attached)
SET
'H'
Dial the station(s) you wish to send the documents to.
Ex:
START I
X
COVER SHEET=OFF
l:OFF 2:ON
COVER SHEET=OFF
liOFF 2:ON
or
COVER SHEET=ON
l:OFF 2:ON
ENTER STATION(S)
THEN PRESS START 00%
f ^ To change the preset Fax Cover Sheet Setting, change the setting of Fax Parameter No. 56,
^^ see page 38.
2. This function is available for memory or direct transmission modes.
3. The Fax Cover Sheet is not counted in the number of pages column of the journals.
4. l/Wten the Fax Cover Sheet setting is set to On, the Quick Memory XMT feature is disabled.
91

Fax Cover Sheet
Fax Cover Sheet Sample
i_ — — — — — — — — — — — — — — — — _i
I SALES DEPT. I
I I
L
FACSIMILE COVER SHEET **-»^**
(1)
MAR-12-2002 15:00
(2)
Message To:
____ ___ ___ ___ ___ ___ ___ ___ ___ ___ ___ ___ ___ ___ ___ ___
(3)
Message From:
J
PANASONIC
' 201 555 1212 '
I I
L — — —
__________
Explanation of Contents
(1) Starting time of communication.
(2) Recorded name in the One-Touch, ABBR. No. or dialed telephone number.
(3) Your LOGO (up to 25 characters) and ID Number. (Up to 20 digits)
(4) The number of pages to follow. This information is not shown when transmitting by Direct Transmission Mode.
— — — — —
______________
— — — —
(4)
02
Page(s)
Following This Cover Page
____________
— J
92

PUN Code Access
L^J ill ; . “j If N i ^ ^ r' ' ' ■
If your PBX requires a PIN (Personal Identification Number) code to get an outside line, your machine can
be set to prompt the user to enter a PIN code before any dialing.
39 PIN CODE ACCESS
3 ) ( 9
1:NONE
or
SET f/^TO^
15
39 PIN CODE ACCESS
2;SUFFIX
for suffix code.
or
39 PIN CODE ACCESS
3:PREFIX
for prefix code.
93

1 ^
Set document(s) face down.
Dial by any combination of the following methods:
• One-Touch Dialing
• Abbreviated Dialing
• Manual Number Dialing, press I SET I after each
station is entered
(UF-990: Up to 70 stations, UF-890: Up to 32 stations)
• Directory Search Dialing, press I SET I after each
station is entered
(For details, see page 47 to 50.)
Ex:
ABBR
If you want to confirm the number of stations you have
entered, press I SET I .
0
ENTER STATION(S)
THEN PRESS START 00%
<01>(Station name)
5551234
[010] (Station name)
5553456
2 STN(S) ARE SET
ADD MORE OR START
ENTER PIN CODE
(?)
Ex: ® (J) © (Up to 36 digits)
4
5
Your machine stores the document and starts dialing the
PIN code and telephone number as you specified.
( NOTE ) 1. The PIN code is shown as " I " on the display when dialing the number.
2. This feature is not available when dialing a number by using Off-Hook or On-Hook Direct
Dialing mode.
ENTER PIN CODE
98761
STORE N0.002
PAGES=001 05%
* DIALING * N0.002
{Station name)
94

This feature allows all incoming faxes to be fonwarded to the station registered in the one-touch or
abbreviated dialing number. Once the faxes are received in the memory, the machine will forward the
received document(s) to the telephone number registered in the one-touch or abbreviated dialing number
This function is convenient when you would like to receive faxes in another place (i. e. your home) at night
or during a holiday.
SET MODE (1-6)
1
ENTER NO. OR V A
FAX PARAMETER (01-99)
NO.=i
SET
'E'
to
SET
CZD
to
Enter the station to forward the received faxes to, by
assigning a one-touch key or an abbreviated dialing
number.
Ex;
54 FAX FORWARD
1:INVALID
54 FAX FORWARD
2:VALID
54 FAX FORWARD
ENTER STATION
<01>(Station name)
5551234
Z' ^ T W'hen the Fax Forward feature is set, the one-touch or the abbreviated dialing number is
^^ restricted from editing. Please change this function to “Invalid" when you would like to edit the
telephone number.
2. If the communication to transfer a received document(s) fails, the received document will print
out and then is erased from memory even if the Fax Paramefer No. 31 (INC. FILE SA VE) is set
to “Valid".
If you wish to save the document into memory in case of communication failure, set your
machine to Receive To Memory. (See page 86)
3. It is not possible to receive a document If the memory of your machine overflows or is about
95% used.
95

File Transmission
—.-------------------------^
____________
This feature allows your machine to store the document(s) into the File Transmission in order to send to a
single or to multiple locations when desired. The document(s) in the File Transmission will be kept until it is
manualiy deleted.
Ili№6cumen
To store the document(s), follow the steps below.
■ ■mill*»'»!
_:^^£^.^,..a,.^...^
ENTER STATION(S)
THEN PRESS START 00%
_______
................
1 ^
Set document(s) face down.
FILE XMT MODE (1-4)
FUNCTION { P 1 { Pi 1—^—.
W \L/1
O Q ¿5 &
------------------------
1
ENTER NO. OR V A
1:STORE FILE?
PRESS SET TO SELECT
SET
Your machine will start storing the document{s) into the
memory.
STORE * N0.001
PAGES=002 10%
96
...
C NOTE ) ^
, Only 1 file can be stored for File Transmission.

offiao DVo
To send the stored document(s), follow the steps below.
File Transmission
1
FUNCTION
r~ 3
2 ©
Dial by any combination of the following methods:
Ex:
SET
©©
¿h to
SET
D
^ ¿5"
• One-Touch Dialing
‘Abbreviated Dialing
• Manual Number Dialing, press I SET I after each
station is entered
(UF-990: Up to 70 stations, UF-890: Up to 32 stations)
• Directory Search Dialing, press I SET I after each
station is entered
{For details, see page 47 to 50.)
ABBR
©©©
If you want to confirm the number of stations you have
entered, press I SET I .
FILE XMT MODE (1-4)
ENTER NO. OR V A
ENTER STATION(S)
THEN PRESS START
<01> (Station name)
5551234
[010](Station name)
5553456
2 STN(S) ARE SET
ADD MORE OR START
Your machine starts dialing the telephone numbers in
sequence.
STORE * N0.001
PAGES=001 01%
97

File Transmission
To delete the stored document(s), follow the steps below.
1
FUNCTION
I ' ~l
SET
&
©©
SET
¡MjpaBDDg^ illD©
To print the stored document{s), follow the steps below.
1
FUNCTION f P
I - I'J ^
n
O ^ SET
3 )[-----
5
FILE XMT MODE (1-4)
ENTER NO. OR V A
3:DELETE FILE?
PRESS SET TO SELECT
* DELETING *
FILE XMT MODE (1-4)
ENTER NO. OR V A
[b
SET
1
"E"
Your machine will print the file. The document(s) will
remain in the memory even after printing the file.
4¡PRINT FILE?
PRESS SET TO SELECT
* PRINTING *
FILE XMT DOC
98

Depaotmeoi C©dli
This operation requires the user to input a preset 4-digit Department Code before transmission. The
Department Name of the selected Department Code is printed on the Header of each page sent, Cover
Sheet, COMM
Journal and Individual Transmission Journal. When the Department Code is set, the Transaction Journal
will be sorted by the Department Code number {01 - 24) when it is printed.
If you wish to prevent unauthorized persons from setting, changing or erasing the Department Code
settings, you should set the Access Code to restrict these settings. (See page 86)
99

Department Code
100
( NOTE )
To record another Department Code, repeat step 6 to 10.
To return to standby, press I STOP I .
1. Use ICOPY I to copy the default LOGO which is set in the User Parameters. Ybu can add
the department name following the default LOGO.
2. l/W?en enabling the Dept. Code feature for the first time, it is important to Print the Journal by
pressing \ FUNCTION |, (6) , (?) , I SET I and (T) in order to erase the previous
journal confenis.
 Loading...