

Wireless Proprietary Telephone
7
3
6
2
4
8
9
5
0
1
Operating Instructions
Model No. KX-TD7896
H
O
LD
X
F
E
R
CLR
RCL
FLASH
Thank you for purchasing the Panasonic KX-TD7896 Wireless PT (Wireless
Proprietary Telephone). Please read this manual carefully before using this product
and save this manual for future use.
This manual is designed to be used with the KX-TD7896 Wireless PT and a Panasonic
KX-TA/KX-TAW/KX-TD/KX-TDA series PBXs (Business Telephone Systems).
This product is compatible with (Setting the PBX Type
• KX-TA624/KX-TA824/KX-TAW848/KX-TDA series (KX-TDA50/KX-TDA100/KX-TDA200) - PBX Type 1
• KX-TA308/KX-TA1232/KX-TD series (KX-TD308/KX-TD500/KX-TD816/KX-TD1232) - PBX Type 2
→
See page 38.):
Please use only Panasonic battery and charge the battery for about 7
hours before initial use.
Selecting the Display Language → See page 11.
Please read “Important Information” on page 40 before use. Read and
understand all instructions.
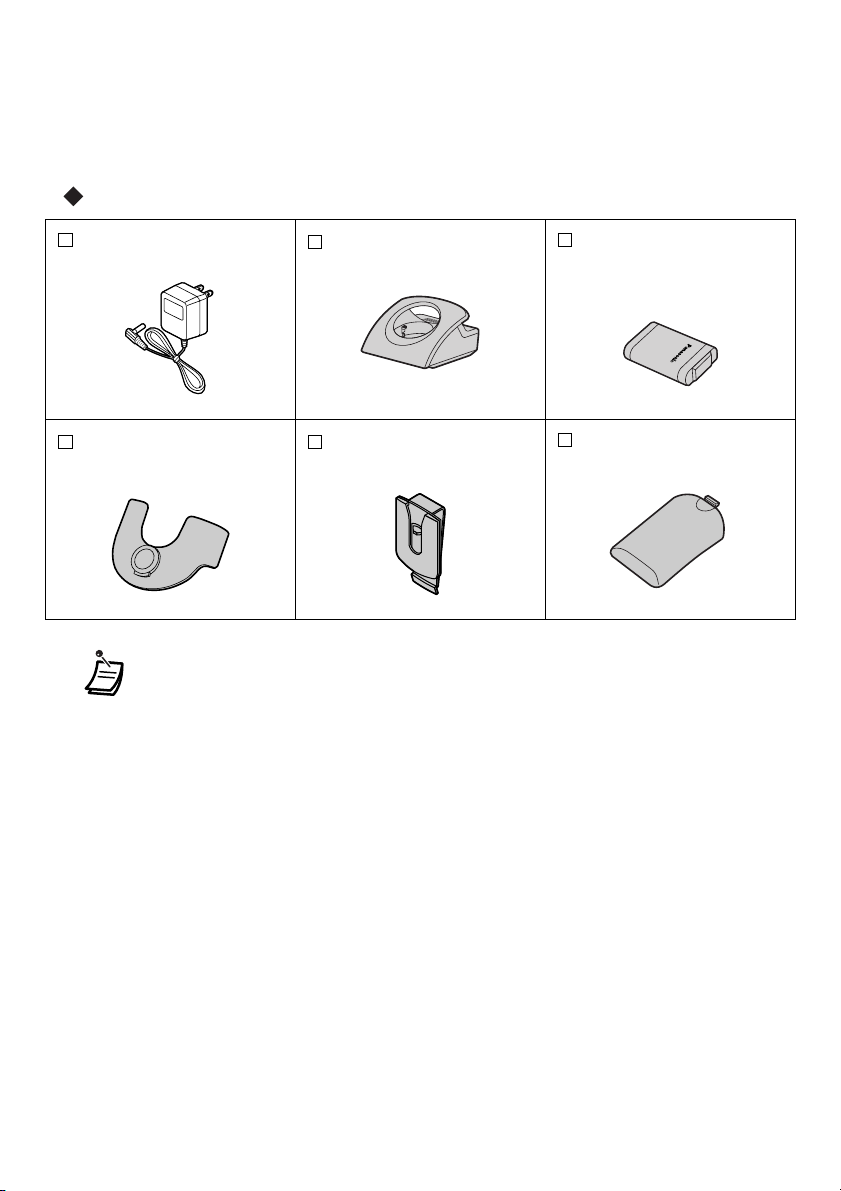
Accessories
AC adaptor
(PQLV19)
Handset Clip*
• In this manual, the suffix of each model number is omitted.
• To order accessories, call toll free 1-800-332-5368.
*1 Charger:
2
*
Handset Clip:
3
*
Belt Holder:
Charger*
1
Battery
(N4HHGMB00005 or
HHR-P103)
Tw o
2
Belt Holder*
3
One
One
Battery Cover
One
For KX-TD7896 (Black Model) users: Part no. PSLP1321ZA
For KX-TD7896-W (White Model) users: Part no. PSLP1321ZA-W
For KX-TD7896 (Black Model) users: Part no. PSKE1084ZA4-H270
For KX-TD7896-W (White Model) users: Part no. PSKE1084ZA3-W140
For KX-TD7896 (Black Model) users: Part no. PSKE1040ZA
For KX-TD7896-W (White Model) users: Part no. PSKE1040ZA2-W140
One
One
2

Table of Contents
For Best Performance.................................................................................... 4
Before Operating the Handset ...................................................................... 5
Location of Controls .................................................................................... 5
Connection .................................................................................................. 7
Battery Installation....................................................................................... 7
Battery Charge ............................................................................................ 8
Handset Clip and Belt Holder...................................................................... 8
Wall Mounting ............................................................................................. 9
Power On/Off ............................................................................................ 11
Selecting the Display Language................................................................ 11
Display Icons............................................................................................. 12
Operation Outline ...................................................................................... 13
Function Menu Display.............................................................................. 14
PBX Feature Keys..................................................................................... 15
PBX Flexible Key Display.......................................................................... 16
Soft Key Display........................................................................................ 17
Ringer Volume Adjustment ....................................................................... 18
Receiver/Speaker/Headset Volume Adjustment ....................................... 18
While Receiving Calls .................................................................................. 19
Ringer Volume Adjustment ....................................................................... 19
Using the Phonebook .................................................................................. 20
Handset Phonebook.................................................................................. 20
Storing an item in the Handset Phonebook............................................... 22
Using Hot Key Dial .................................................................................... 22
Entering Characters .................................................................................. 23
Feature List .................................................................................................. 25
Programming................................................................................................ 32
Changing the Initial Settings ..................................................................... 32
Setting Base Unit ...................................................................................... 39
Important Information .................................................................................. 40
3
For Best Performance
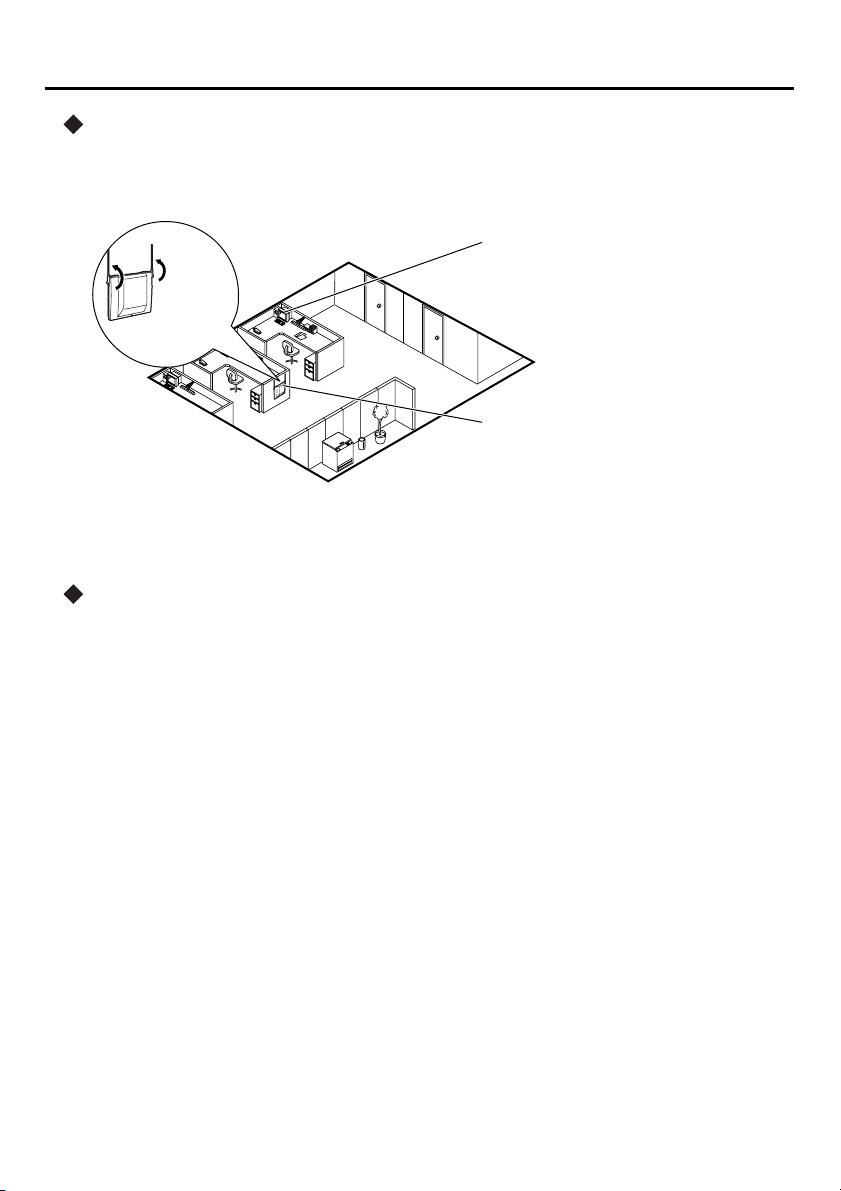
For Best Performance
Noise
Calls are transmitted between the base unit and the handset using radio waves. For
maximum distance and noise free operation, the recommended base unit location is:
Away from electrical appliances
such as a fax, radio, personal
Raise the
antennas.
• The 2.4 GHz wireless telephone cannot be used together.
• If you are out of range, an alarm tone sounds continuously.
Operating Distance
When using more than 2 base units, the distance between one unit and the others must
be at least 3 m (10 ft), or else proper radio transmission cannot be obtained.
computer, or microwave.
In a HIGH location, with no
obstructions or interference
from electrical appliances.
4

Before Operating the Hand set
Location of Controls
Handset
Ringing/Charge Indicator
Headset Jack
– The headset is an option.
Please use only the
Panasonic KX-TCA86/KXTCA88HA/KX-TCA91/KXTCA92 headset.
Open the
cover.
TALK/SP-PHONE
(Speakerphone)
HOLD
Before Operating the Handset
Receiver
Display
Left Soft Key
Right Soft Key
CANCEL/POWER
TRANSFER/CLEAR
3
2
1
4
7
6
5
9
8
0
Joystick
INTERCOM
Charge Contact
RECALL/FLASH
Charge Contact
Microphone
Back View
Speaker
5

Before Operating the Handset
TALK/SP-PHONE Key:
Used to make or receive calls, or
toggle between the two
conversation modes (Handsfree*/Receiver) during a
conversation.
* You can talk with the calling
party alternately through the
speaker without holding the
handset.
Joystick:
Used to adjust the ringer/receiver
volume, select the Function mode
and the function displayed
directly above, and move the
cursor to select a desired item.
HOLD Key:
Used to place a call on Hold.
RCL
RECALL/FLASH Key:
FLASH
Used to disconnect the current
call and make another call
without hanging up, or answer
Call Waiting from the telephone
company.
INTERCOM Key:
Used to make or receive intercom
calls.
CLEAR/TRANSFER Key:
CLR
Used to clear digits or characters,
or transfer a call to another party.
CANCEL/POWER Key:
Used to end calls, exit the
Phonebook or Function mode, or
turn on/off the handset.
Soft Key:
Used to select the function
displayed directly above each
key. Functions displayed depend
on the state of use.
Meeting Mode:
Used to turn on or off Meeting
Mode when in standby mode.
Combination Keys
To use combination keys, refer to “PBX Feature Keys” on page 15.
PBX Program Key:
0
Used to enter the PBX
programming mode.
Message Key:
3
Used to leave a message waiting
indication or call back the party
who left the message indication.
Auto Dial Key:
1
Used to make a call by PBX
system dialing.
Auto Answer Key:
4
Used to answer an incoming call
automatically.
Fwd/DND Key:
2
Used to display or set the Call
Forwarding or Do Not Disturb
(DND) features.
Conference Key:
5
Used to establish a multi-party
conversation.
6
Before Operating the Handset
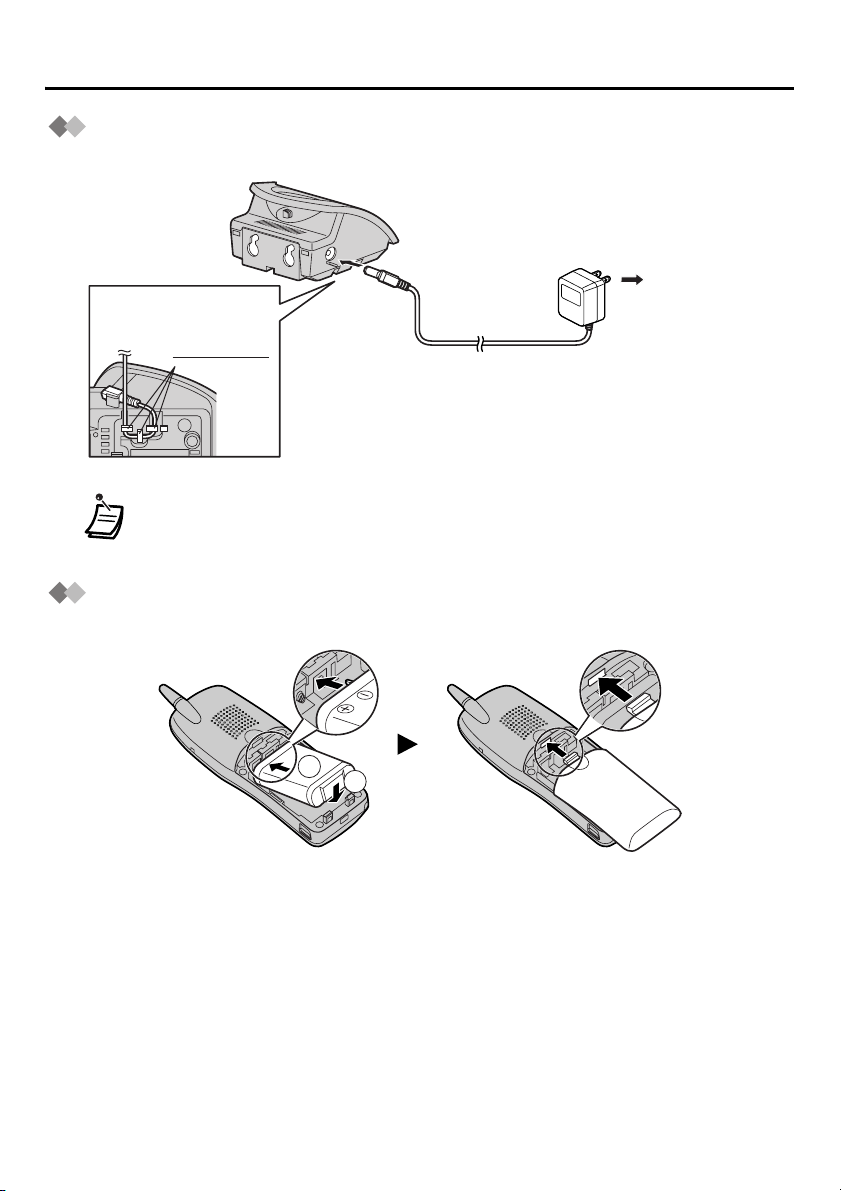
Connection
Connect the AC adaptor to the charger.
To AC Outlet
Fasten the AC
adaptor cord to
the cord holder.
• The AC adaptor should be connected to a vertically oriented or floor-mounted
AC outlet. Do not connect the AC adaptor to a ceiling-mounted AC outlet, as the
weight of the adaptor may cause it to become disconnected.
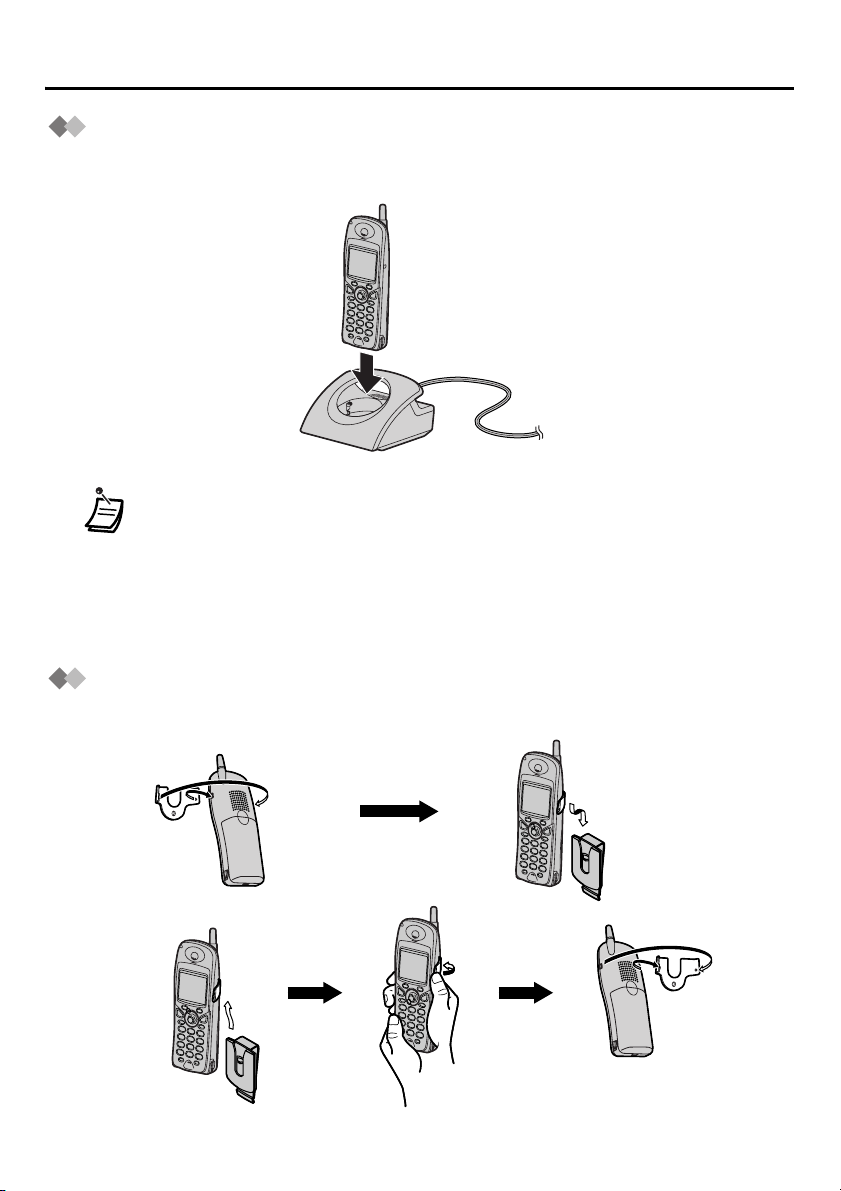
Battery Installation
Insert the battery as shown. Close the cover as indicated by the arrow.
AC adaptor
1
2
7
Before Operating the Handset
Battery Charge
At the time of shipment, the battery is not charged. Please charge the battery for about
7 hours before initial use.
• When the battery has been completely charged, the charge indicator will
change from red to green. Refer to “Battery Information” on page 40.
• It is normal for the handset and charger to feel warm while the battery is
charging.
• If more than 3 units are in use at one time within close range, you may
experience muting, interference or loss of communication.
• While the battery is charging, the handset cannot be turned on or off.
Handset Clip and Belt Holder
You can hang the handset on your belt.
<To attach>
<To remove>
8
Slide the clip and holder
together until you hear a
clicking noise.
Remove the
handset clip.
Before Operating the Handset
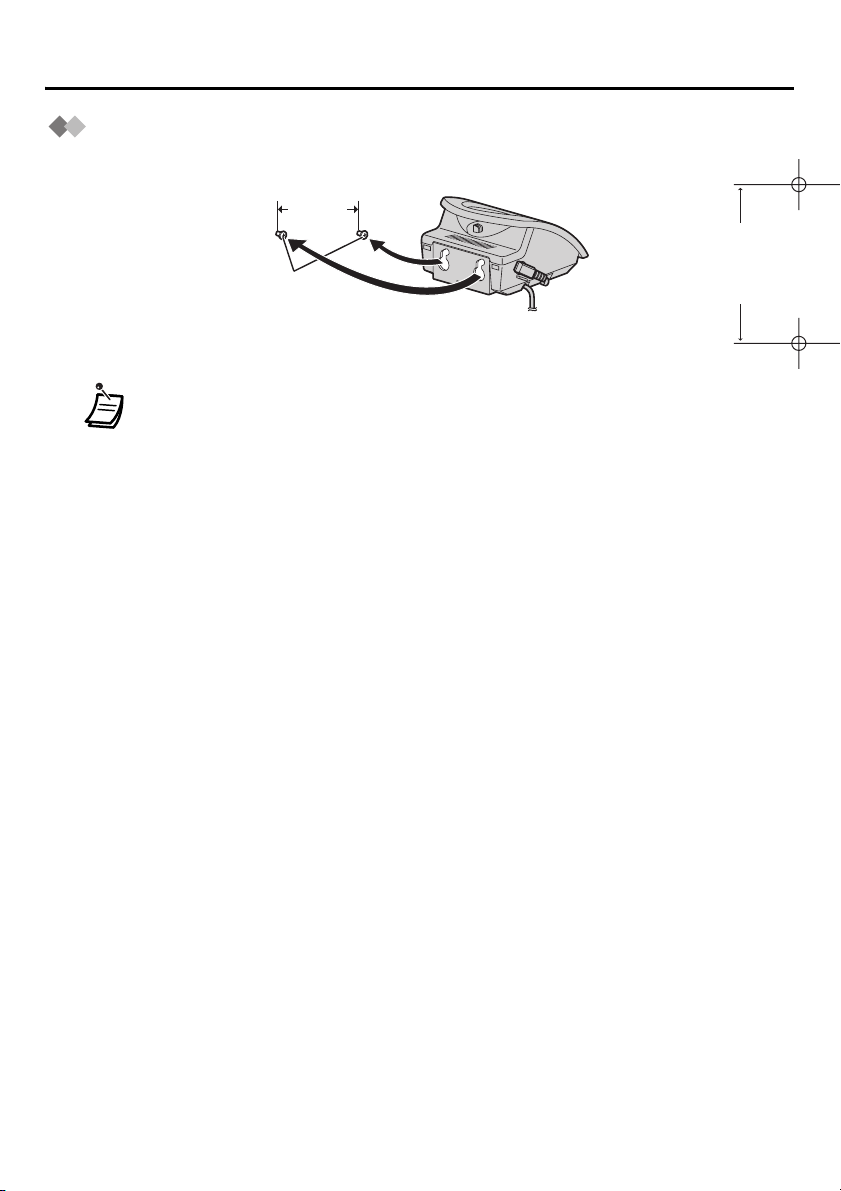
Wall Mounting
1 Drive the screws into the wall using the wall template below.
28 mm
(1-1/8 in)
Screws
2 Mount the charger securely on the screws.
• If the dimension of the paper output still deviates slightly from the measurement
indicated here, use the measurement indicated here.
28 mm
(1-1/8 in)
for charger
9
Before Operating the Handset
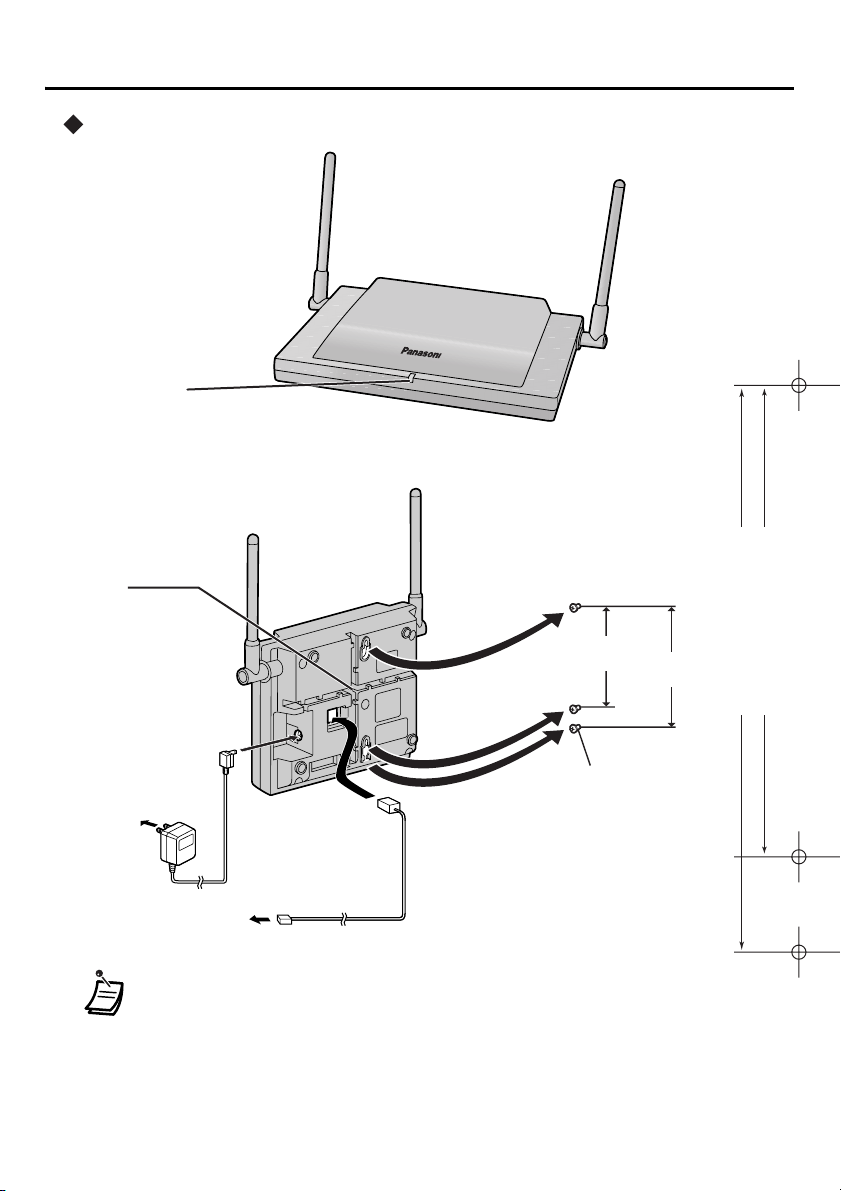
Base Unit
Run Indicator
Indicator Status as follows:
• Green On (Solid)—Base unit is connected to PBX
• Green Flash—Base unit is on, but not connected to PBX
Grooves
Ensure the cords
are inserted in the
grooves to prevent
damage to the
connectors.
83 mm
(3-1/4 in)
100 mm
(3-15/16 in)
for base unit
83 mm (3-1/4 in)
100 mm (3-15/16 in)
To AC Outlet
10
Screw
To PBX
• USE ONLY the Panasonic AC ADAPTOR PQLV19.
• This unit cannot be connected in parallel with a single line telephone.
• The AC adaptor should be connected to a vertically oriented or floor-mounted
AC outlet. Do not connect the AC adaptor to a ceiling-mounted AC outlet, as the
weight of the adaptor may cause it to become disconnected.
• If the dimension of the paper output still deviates slightly from the measurement
indicated here, use the measurement indicated here.
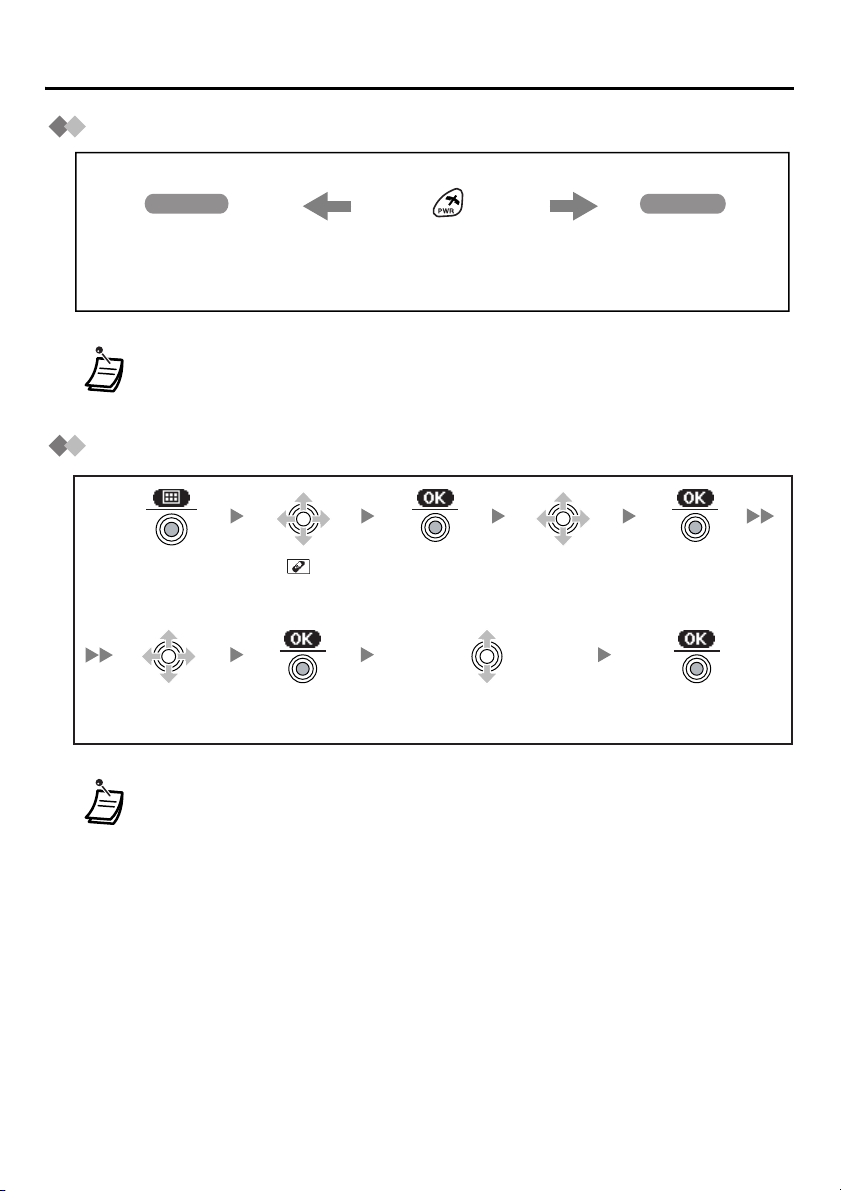
Power On/Off
Before Operating the Handset
Power On
The display will be
in standby mode.
• When the handset is turned on, it will be in standby mode. Standby mode is the
state of the handset when it is not performing any operations and is awaiting
calls.
Press POWER for
more than 2 seconds.
Power Off
The display will
go blank.
Selecting the Display Language
Press the
Joystick.
Select
“Language”.
• The display language of both the handset and PBX can be selected, and both
should be set to the same language. For more information, refer to the user
documentation for the PBX.
Select “ Setting
Handset”.
Press the
Joystick.
Press the
Joystick.
Select the desired language.
(English/Español/FRANÇAIS)
Select “Display
Option”.
Press the
Joystick.
Press the
Joystick.
11
Before Operating the Handset
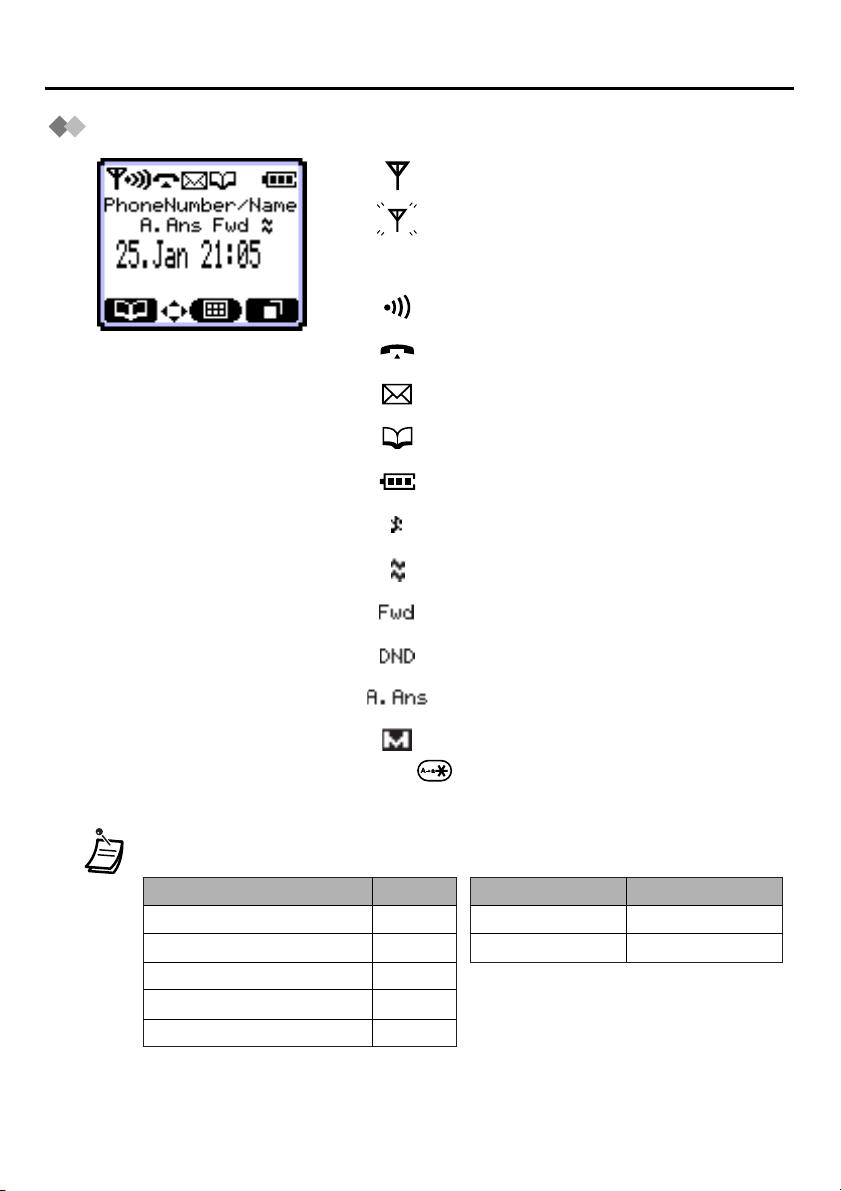
Display Icons
Within range of a base unit
Out of range
If this icon flashes, move closer to the base unit and
dial again.
Intercom Indicator
Off-hook Status
Message Waiting
Handset Phonebook
Battery Indicator
Ringer Volume OFF
Vibrate
Call Forwarding
12
• During the Meeting Mode,
functions are:
Function Status
Microphone volume
Low battery alarm
Key tone
Ringer/Voice Call/Paging/LCS
Vibrate
Do Not Disturb
Auto Answer
Meeting Mode
Press for more than 2 seconds to Meeting Mode
on/off.
• During the Meeting Mode,
while handset is on charger:
Function Status
Up
Off
Off
Off
On
Vibrate*
Ringer
* Please note that, if you set the handset on
the charger while receiving an incoming
call, vibration will stop. Once the vibration
stops, the handset will not vibrate again for
that call, even if the handset is picked up
again. If Quick Answer is set, picking up
the handset will answer the call.
Off
User Setting
Before Operating the Handset
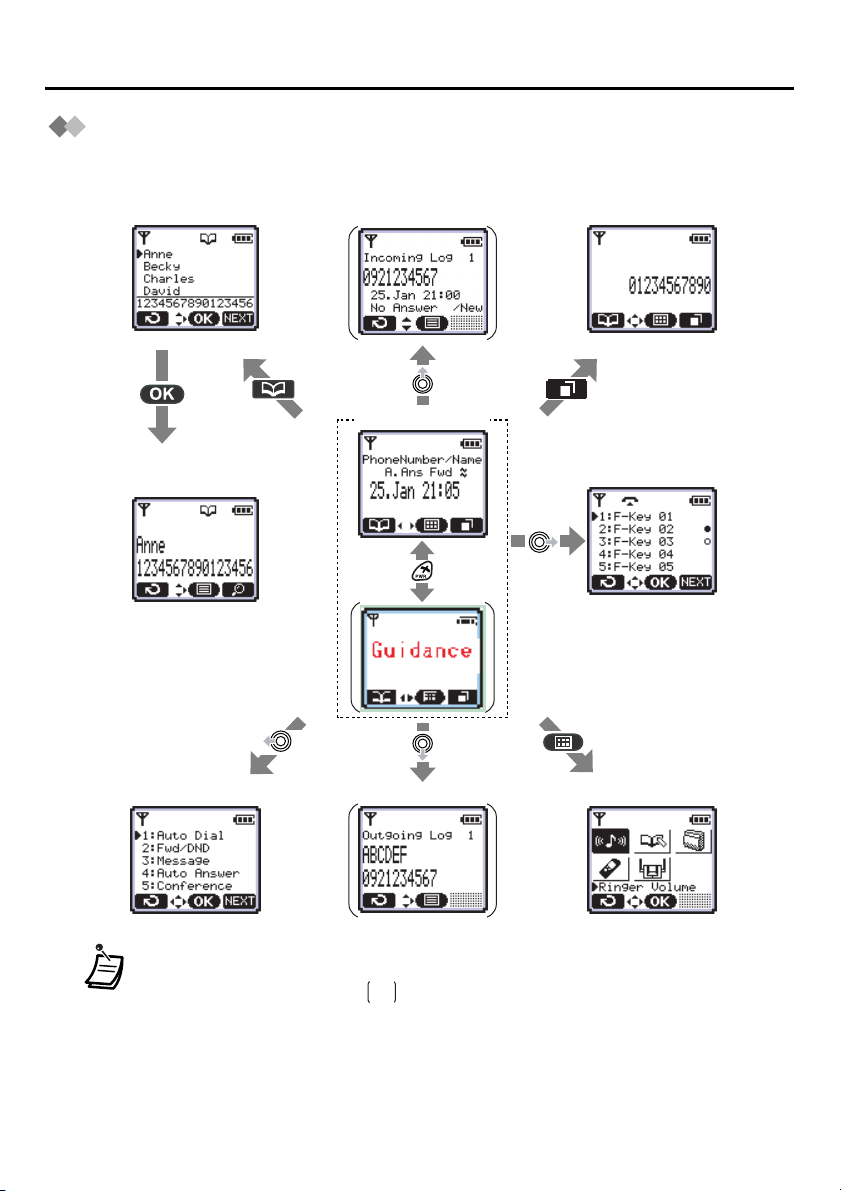
Operation Outline
Functions of the handset are accessed through the display menu, and selected with the
joystick and soft keys. The guidance display is shown in standby mode for easy operation
<Incoming call log><Handset Phonebook>
<In standby mode>
1
*
2
*
<PBX Redial>
<PBX Flexible key><Phonebook detail>
.
<PBX Feature key>
<Outgoing call log>
3
*
<Main menu>
• You cannot toggle the displays while in key lock mode or while the handset is on
a charger.
• The displays marked with are only shown when the following values have
been set:
1
*
Setting Base Unit → PBX Type: Type 2 (See page 38.)
*2 Setting Handset → Display Option → Guidance: On (See page 36.)
*3 Setting Handset → Other Option → Outgoing Log: On (See page 36.)
13
Before Operating the Handset
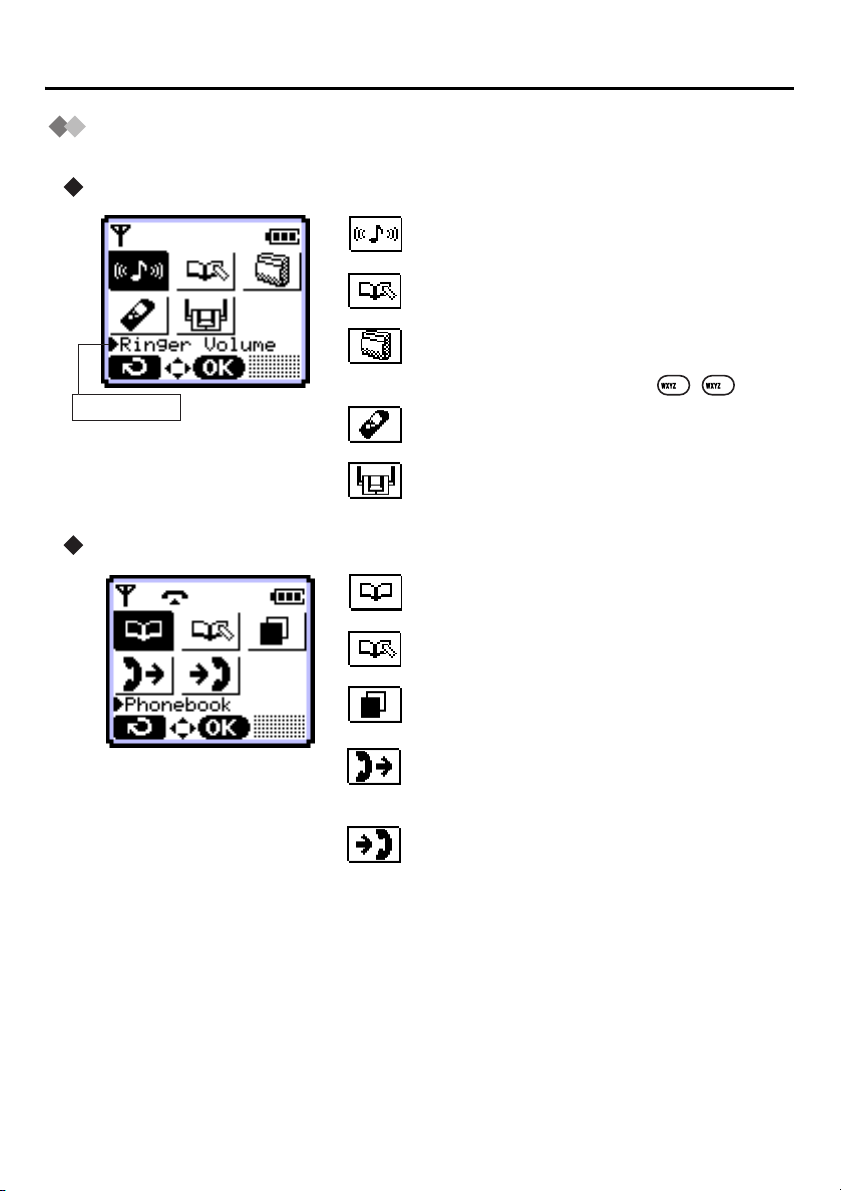
Function Menu Display
Press the joystick to display the function menu.
Main menu – while in standby mode
Ringer Volume:
Accesses to the “Ringer Volume”.
New Phonebook:
Stores a new item in the Handset Phonebook.
PBX Program:
Enters the PBX programming mode.
Only for KX-TD series: Press .
Icon description
Sub menu – while in off-hook/during a conversation
Setting Handset:
Accesses to the “Setting Handset”.
Setting Base:
Accesses to the “Setting Base Unit”.
Phone book:
Opens the Handset Phonebook.
New Phonebook:
Stores a new item in the Handset Phonebook.
PBX Redial:
Makes a PBX Redial. (While in off-hook)
*
Outgoing Call Log:
Enters the Outgoing Call Log. (See page 22,
22)
*
Incoming Call Information:
Enters the Incoming Call Information.
9
9
14
* The arrow in the icon may not be displayed,
depending on your PBX.

Before Operating the Handset
PBX Feature Keys
Functions of the handset can be activated through the display key list.
Move the joystick left to display the key list.
1:Auto Dial:
Makes a call by PBX system dialing.
2:Fwd/DND:
Displays or sets Call Forwarding or Do Not Disturb.
Only for KX-TA824: Displays the current setting.
3:Message:
Used to leave a message waiting indication or call back
the party who left you a message waiting indication.
4:Auto Answer:
Answers an incoming call automatically.
5:Conference:
Establishes a multiple-party conversation.
1
6:Pause*
Inserts a dialing pause.
0:PBX Program*
Enters the PBX programming mode.
Only for KX-TD series: Press .
:
2
:
9
9
•*1 Displayed only during a conversation or PBX Programming mode.
•*2 Displayed only while in standby mode.
15

Before Operating the Handset
PBX Flexible Key Display
A flexible key can be used either to seize a line in order to make or receive an outside call
(F-Key), or used as a function key. Move the Joystick right to display the flexible key list.
Here you can access the 12 flexible keys. The icon shown beside each F-Key indicates
line status similarly to the LED indicators on a Proprietary Telephone: is the same as
a green LED; is the same as a red LED.
Example:
key number
Understanding the Icons for the F-Key
(on): You are currently using this line.
(flashing rapidly): You have an incoming call on this line.
(flashing slowly): You have a call on hold on this line.
(on): This line is in use by someone else.
(flashing rapidly):
(flashing slowly): Someone has a call on hold on this line.
(no icon): This line is idle.
Someone has an incoming call on this line.
Only for KX-TA824: You have an outside
call on this line.
• * The meanings of these icons vary depending on the status of the CO line.
• For further information, refer to “LED Indication” in the feature documentation for
the KX-TA series PBXs.
• To select a key, press its key number, or move the Joystick to select the
desired key then press .
• To go to the next or previous display, move the Joystick .
• To go to the next display, press key.
*
16

Before Operating the Handset
Soft Key Display
Icons and information shown on the display will vary depending on the state of use. To
select an item shown on the display, press the corresponding soft keys.
Opens the Handset Phonebook.
Opens the main menu.
Displays the PBX Redial.
Returns to the previous display.
Opens the list menu (edit/delete
in the Handset Phonebook, etc.).
Inserts a dialing pause.
Used to confirm the entry.
Displayed when in Alphabetic
character entry mode. Switches
to Numeric character entry mode
by pressing.
Displayed when in Numeric
character entry mode. Switches
to Special character entry mode
by pressing.
Displayed when in Special
character entry mode. Switches
to Alphabetic character entry
mode by pressing.
Displayed when in Key Lock
mode. Unlocks keys by pressing
and holding.
Turns the microphone mute on/
off during a conversation.
While Mic Mute is on, the icon
flashes.
Establishes a multiple-party
conversation.
Turns the ringer off.
Displays the next screen.
Clears digits or characters.
Displayed when in Handset
Phonebook Lock.
Unlocks the Handset Phonebook
temporarily by pressing.
Unlocks the Handset Phonebook
by pressing and holding.
Used to search for an item in the
Phonebook alphabetically.
Stores a new item in the Handset
Phonebook.
Used to select an item when in
setting mode.
Used to set the time for 12 h of
Date&Time in Setting Base Unit.
17

Before Operating the Handset
Ringer Volume Adjustment
Press the
Joystick.
Press the
Joystick.
• You can select whether the handset will vibrate while receiving a call.
• You can receive an intercom call by voice of caller instead of rings (Voice Call).
For further information, refer to “Alternate Receiving—Ring/Voice” in the user
documentation for the KX-TA/KX-TAW/KX-TD/KX-TDA series PBXs.
Select “ Ringer
Volume”.
Press the
Joystick.
Select
“Vibrate”.
Select “
Setting Handset”.
Press the
Joystick.
Press the
Joystick.
Select “Incoming
Option”.
Select the
desired setting
(On/Vib. Ring/Off).
Select the desired
setting (Step Up/
Step Down/6 Levels/Off).
Press the
Joystick.
Press the
Joystick.
Receiver/Speaker/Headset Volume Adjustment
During a conversation
Move the Joystick UP or DOWN to adjust the volume.
(Receiver Volume-4 levels, Speaker Volume-6 levels, Headset Volume-4 levels)
18

While Receiving Calls
Ringer Volume Adjustment
While Receiving Calls
OR OR
Move the Joystick UP or DOWN
to adjust the volume.*
Press the Joystick to
turn the ringer off.
Press
CANCEL.
• * The adjusted volume will also be used for subsequent calls.
• If you attach the headset while receiving an incoming call, the ring from the
handset does not switch to the headset. If you attach the headset before
receiving an incoming call, and Headset Tone is set to on, a tone will be heard
from the headset. If Vibrate is set to on, the handset will vibrate whether a
headset is attached or not.
• If you press and hold while receiving a call, the ringer will be turned off, but
the call will not be disconnected.
19

Using the Phonebook
Using the Phonebook
Handset Phonebook
You can store up to 200 items with names, phone numbers and category numbers in the
handset for easy access. All directory items are stored in alphabetical order.
Incoming Call Identification
You can organize entries in the Handset Phonebook into one of 9 categories. A call from
someone stored in one of these categories will be indicated by the ringer type, light (LED)
color pattern assigned to the category.
Item Setting
Ringer pattern 6 ringer tones, 9 melodies (See page 34.)
LED pattern 4 patterns (See page 34.)
Vibrate pattern 7 patterns (See page 34.)
Storing a new item and editing a stored item
<To store>
20
Press the
Joystick.
<To edit>
Press the
Left Soft Key.
Select the
desired item.
Name
Phone
Number
Private
Category
Select “ New
Phonebook”.
Press the
Joystick.
name
Enter or edit the name
(max. 16 characters).
phone no.
Enter or edit the
phone number*
(max. 32 digits).
Select the desired
category number or Off.
Press the
Joystick.
Press the
Joystick.
Select
“Edit”.
Press the
Joystick.
Press the
Joystick.
Press the
Joystick.
Press the
Joystick.
Press the
Joystick.

Using the Phonebook
• To enter characters, see page 23.
• * The valid digits are “0” through “9”, “ ”, “#”, “P ( )” and “F ( )”.
• * Although up to 200 Phonebook items can be stored, each phone number
stored in the Phonebook that contains over 24 digits counts as two Phonebook
items.
• * If there is only one Phonebook memory location available, you cannot store a
phone number that is over 24 digits long.
• To change a character or digit, move the joystick to highlight it, press
to delete it, then enter the new character or digit.
CLR
• To clear an entire line, press and hold .
CLR
• To move the cursor to the left or right, move the joystick or ,
respectively.
• To lock or unlock the Phonebook, press or for more than 2 seconds
while in standby mode. When unlocking the Phonebook, “Unlock Phonebook
Enter Password ----” will be displayed. Enter your password. Note that if
you press for less than 2 seconds, “Enter Password ----” will be
displayed but the Phonebook will not be unlocked even enter the correct
password.
Deleting
Press the
Left Soft Key.
Select the
desired item.
Press the
Joystick.
Press the
Joystick.
RCL
FLASH
Select “Delete” or
“Delete All”.
Press the
Joystick.
Select “Yes”.
Press the
Joystick.
• If you delete the Phonebook item that you also stored as hot key, the Hot Key
Dial is also deleted. (See page 22.)
21

Using the Phonebook
Storing an item in the Handset Phonebook
Using the Outgoing Call Log
Select the
desired item.
Enter a name, phone number, and
select the category number or Off.
Press the
Joystick.
name
phone no.
category no.
Select “Save
Phonebook”.
Press the
Joystick.
Press the
Joystick.
Using Hot Key Dial
The phone numbers stored in the Handset Phonebook can be assigned as hot key.
Press the Left
Soft Key.
Press the
Joystick.
• A “ ” will be displayed next to hot key numbers that have a Phonebook item
registered to them.
Select the
desired item.
Select a blank
hot key number (0-9).
Press the
Joystick.
Press the
Joystick.
Press the
Joystick.
Select “Regist.
Hot Key”.
Press the
Joystick.
22

Using the Phonebook
Entering Characters
You can enter characters and digits using the dialing keys.
You can select one of 3 character modes by pressing the Right Soft
Key while entering a name. The function icon above the soft key
displays the current character mode.
See “Character Mode Table” (page 24) for available characters.
To change the character mode while editing a name in the Phonebook, press
the Right Soft Key.
Alphabet Numeric
Example: To enter “Anne” in Alphabet Mode.
Extended 1
A, a
B, b
C, c
2
2
• To switch between uppercase and lowercase, press .
• To enter a character located on the same dialing key as the previous character,
move the cursor by moving the Joystick , then enter the desired character.
• If you enter a different character by mistake, move the Joystick to highlight
the character, press to delete it, then enter the correct character.
• To clear an entire line, press and hold .
• To move the cursor, move the Joystick .
6 6
CLR
CLR
6
6
3
3
23

Using the Phonebook
Character Mode Table
y
K
• Press to change between uppercase and lowercase.
• For example, to enter the letter “C”, press three times.
2
24

Feature List
Feature List
This feature list applies only when your Wireless PT is connected to a KX-TA series PBX. For
further information, refer to the user documentation for the KX-TA series PBXs or consult your
dealer. Please note that this feature list does not apply to KX-TA1232. Please refer to the User
Manual of the KX-TA1232 for operation.
Desired Function
Calling
Making Calls
To an extension
extension no.
To use F-keys
outside phone no.
To use Hot Key Dial
To use the Outgoing Call Log
To use the Handset Phonebook
<Direct Search>
<Name Search>
Press and hold the dialing key
–
X
more than 1 second.
–
X
X
idle F-Key (0-9, , #)
OR
idle F-Key
Talk on the
speaker phone.
Enter the first letter of the
desired name (0-9).
Operation
name
To an external party
9
OR
CO line
8
group no.
phone no.
idle F-Key
outside phone no.
• When calling a number in the Outgoing Call
Log, the receiver's information is displayed.
• Press the corresponding dial key, then press
the key repeatedly to select the desired
character.
• You can confirm a number was dialed correctly before calling (Predialing) by
entering the number, then pressing .
• To clear an entire number while predialing, press and hold .
CLR
• The numbers you dial will be stored in the Outgoing Call Log. However, in some
cases, such as when the caller hangs up shortly after completing dialing, the
number cannot be stored. Note that, Outgoing Log setting of your handset must
be set to on for this feature to operate.
• When completing a call, if you make another call by pressing and dialing a
RCL
FLASH
new number, only the first number you dialed will be stored in the Outgoing Call Log.
• Password or Account Code you enter will also be stored in the Outgoing Call
Log. Therefore, please delete as necessary for security.
25

Feature List
Desired Function
Redial*
One-touch
Dialing
Calling an
operator
Speed Dialing
(Personal)
To program
To dial
To store
To dial
Making Calls
X
idle F-Key (0-9, , #)
OR
idle F-Key
0
2
personal speed
#
Operation
X
idle F-Key (0-9, , #)
OR
idle F-Key
assigned as a One-touch
–
dialing key
personal speed
dial no.
dial no.
phone no.
2
desired no.
10
#
Speed Dialing
(System)
To dial
1
system speed dial no.
* You can use the last number stored in the PBX to make calls (Last Number Redial).
However, in this case the number will not be stored as a new entry in the Outgoing Call Log.
To display the last number you dialed, press . Note that, depending on your PBX,
pressing this key may switch to SP-PHONE and start dialing the displayed number
automatically.
26

Feature List
Desired Function
Receiving
Picking up
a call
Operation
Receiving Calls
An Intercom Call/An Outside Call to answer a call when the handset is ringing
An Intercom Call to answer a call on the hands-free mode
Talk on the
speaker phone.
An Outside Call to answer a call on a specific line
0
X
OR
OR
extension no.
Talk on the
speaker phone.
rapidly flashing F-Key (0-9, , #)
rapidly flashing F-Key
Select a rapidly
flashing F-Key
Directed
4
Group
4
Automatic
Callback Busy
Message
Waiting
When the Dialed Extension is Busy/No Answer
To set
While hearing a busy tone
6
To leave a notification
When the receiver's extension is busy or does not answer
Sender
Receiver
To cancel a notification
To call back
To clear all notifications
To answer
If you hear callback ringing
3
receiver's
extension no.
7
0 0
3
#
3
3
27

Feature List
Desired Function
Call Waiting
Operation
When the Dialed Extension is Busy/No Answer
While hearing a busy tone
Sender
1
To talk to the new party
Terminating a current status
Wait for an answer.
For outside calls
3
7
7
For intercom calls/doorphone calls
7
7
1 1
3
1
2
3
2
3
(While hearing the Call Waiting tone)
#
0
#
1
#
0
#
Receiver
To hold and then talk to the new party
lit F-Key (0-9, , #)
OR
lit F-Key
OR
Set
Cancel
Set
Cancel
X
Transferring
a call
28
CLR
Disregard this step if both parties are extensions.
During a Conversation
extension no.
phone no.
to an extension
to an external party
Announce.

Desired Function Operation
During a Conversation
Holding To retrieve a call at the holding extension
OR
Holding a call
To retrieve an outside call from another extension
OR
X
flashing F-Key (0-9, , #)
OR
flashing F-Key
Holding
To retrieve a call on exclusive hold
Holding a call
exclusively
You can hold a call exclusively so that
other people cannot retrieve the call.
Useful Features
To page
Paging
To answer an announced page
Through a telephone speaker
All extensions
3
3
0
Group
3
4
3
group no.
3
All external speakers
3
All extensions & external speakers
3
Feature List
X
flashing F-Key (0-9, , #)
flashing F-Key
flashing F-Key (0-9, , #)
OR
flashing F-Key
OR
Announce.
X
OR
3
4
• The method used to hold a call depends on the Call Hold mode (General Call/
Exclusive Call Hold). Ask your manager what the current mode is.
• When you hold several outside line calls, you need to assign the F-Keys
(Specified CO/Group CO/Idle CO) to a flexible key as necessary, beforehand.
• While making a paging announcement, the draining of the battery is as same as
a conversation.
29

Feature List
Desired Function
Three-party
conference
Setting Absent
Message
Clearing the
setting
Log-in/Log-out
Do Not Disturb
(DND)
Forwarding
a call
Useful Features
During a conversation
5 5
third party's no.
message
5
7
7
3
7
3
7
All calls
Busy/No answer
To an outside line
To Voice Processing System (VPS)
All calls
1
2
3
1
extension no.
extension no.
line access
phone no.
extension no.
no.
9
#
6 0 #
6 1 #
2
2
code
VPS
Operation
parameter
(if required)
For Log-in
For Log-out
ICD Group: Incoming Call Distribution Group
*
4
Set
Cancel
0
Follow Me
Follow Me Cancel
Cancel
your extension no.
5
your extension no.
8
0
Busy/No answer
2
#
ICD Group
extension no.
#
VPS
extension no.
*
Specified
All
#
Locking your
extension
30
77
77
Lock code is 4 digits.
*
lock code*lock code
lock code
#
*
Lock
#
*
Unlock

Feature List
Desired Function
Listening to
a message
Leaving a
message
To Make Use of Voice Mail Service
From your
own
extension
password
If you have no password, you can
skip the last step.
From
someone
else's
extension
VPS extension no.
From your own extension
password
From someone else's extension
#
1
mailbox no.
password
If you have no password, you can
If you have no password, you can
skip the last step.
skip the last step.
#
6#
Enter the first 3 or 4 letters
1
of the desired name
2
Operation
KX-TVA series
VPS extension no.
#
VPS extension no.
6
#
#
mailbox no.
If you have no password, you can skip the last step.
To send the message immediately
2
1
2
To set the delivery time
1
❑
❑
Follow the guidance
1
❑
❑
password
KX-TVA series
KX-TVS series
Listen to Message
1
Deliver Message
2
Mailbox Management
3
Automated Attendant
4
Message Notification
5
Other Features
6
Hang UP
KX-TVS series
Listen to Message
1
Deliver Message
2
Check Mailbox
3
Distribution
Automated Attendant
4
Mailbox Management
5
Other Features
6
Hang Up
#
1 1
Leave
a message
2
0
During
playback
•
Consult your dealer for more details about the feature access numbers.
Some feature access numbers may be different in each market.
•
Repeat Voice Guidance
Exit Menu
Please consult your local dealer for the details.
31

Programming
Programming
Changing the Initial Settings
You can customize the handset by editing the settings found under “Setting Handset”
in the menu list, as follows:
Press the
Joystick.
Select the
desired
sub item.
• To return to the previous menu, press .
• To cancel, press at any time.
• The unit will beep to indicate that the new settings have been saved.
Select
“ Setting
Handset”.
Press the
Joystick.
Press the
Joystick.
setting
Follow the
setting.
Select the
desired
main item.
Press the
Joystick.
Press the
Joystick.
32

Handset setting menu layout
Programming
Setting Handset
Incoming Option
Talk Option Speaker Volume
Answer Option
Tone Option
Display Option
Other Option
Ringer Volume
Headset Tone
Vibrate
Vib. On Charger
Single Tone
Double Tone
Triple Tone
Camp-On Tone
Hold Recall 1
Hold Recall 2
Timed Reminder
Private Ring
Category 1-9
Receiver Volume
Headset Volume
Any Key Answer
Quick Answer
Key Tone
Range Alarm
Language
Backlight
LCD Contrast
Standby Display
Category Name
F-Key Name
Guidance
Date&Time Form
(
For “PBX Type-Type 2” only
Change Password
Outgoing Log
Reset Handset
)
33

Programming
Main Item Sub Item Description Setting Default
Incoming Option
Ringer Volume
Headset Tone
Vibrate
Vib. On Charger
Single Tone
Double Tone
Triple Tone
Camp-On Tone
Hold Recall 1
Hold Recall 2
Timed Reminder
Private Ring
Category 1-9
Adjusts the
ringer volume.
Selects whether
a tone is heard
from the
attached
headset while
receiving a call.
Selects whether
the handset
vibrates while
receiving a call.
Selects the
ringing mode
(Ringer or OFF)
in vibrate mode
while a handset
is on a charger.
Selects the
ringer pattern for
each type of call.
Selects the LED
pattern for each
type of call.*
1
Selects the
vibrate pattern
for each type of
2
call.*
Step Up/Step
Down/6 levels/
Off
On/Off
On/Vib.
→ Ring
/Off
Ringer/Off
6 Rings/9
Melodies/Off
Red/Green/
Orange/
R
→ G→ O/Off
Single/Double/
Triple/
Short Double/
Short Triple/
Short Term/
Continuous/Off
Level 3
Off
Off
Ringer
Bell 1
Red:
Single Tone
Green:
Double Tone
Private Ring
Orange:
Triple Tone
→ G→ O:
R
Camp–On Tone
Hold Recall 1
Hold Recall 2
Timed Reminder
Single
34

Programming
Main Item Sub Item Description Setting Default
Talk Option Speaker Volume
Receiver Volume
Headset Volume
Answer Option Any Key Answer
Quick Answer
Tone Option Key Tone
Range Alarm
Adjusts the rear
speaker volume
during a
conversation.
Adjusts the
receiver volume
during a
conversation.
Adjusts the
headset volume
during a
conversation.
Answers a call
by pressing any
dial key.
Answers a call
while charging
by just lifting up
a handset from
the charger.
Turns the key
tone off or on.
Selects whether
range alarm tone
rings or not.
6 levels
4 levels
4 levels
On/Off
On/Off
On/Off
Talk/Idle/Talk &
Idle/Off
Level 3
Level 2
Level 2
Off
Off
On
Ta lk
Display Option
Language
Backlight
LCD Contrast
Standby Display
Selects the
display
language.
Turns on
backlight of LCD
and keypad.
Adjusts the LCD
contrast.
Edits its own
name displayed
on LCD while in
standby mode.
English/
Español/
FRANÇAIS
On/On &
Receiving/
Off
5 levels
16 characters
English
On
Level 3
Not stored
35

Programming
Main Item Sub Item Description Setting Default
Display Option Category Name
F-Key Name
Guidance
Date&Time Form
For “
PBX Type-
(
Type 2
” only
)
Other Option
Change Password
Outgoing Log
Edits the
category name.
Edits the name
of flexible keys.
(max. 12
characters)
Selects whether
the guidance
display is shown
or not in standby
mode.
Selects the
format for the
date shown on
the display in
standby mode.
Changes the
handset
password.
(4 digits)
Selects whether
to save an
outgoing log or
not.
Select a
Category. (1-9)
12 characters
12 Flexible key
On/Off
DD-MM 12H
DD-MM 24H
MM-DD 12H
MM-DD 24H
Enter Old
Password.+/
Enter New
Password.+/
Verify New
Password.
Enter
Password. +
Select On/Off
Not stored
×
Not stored
On
DD-MM 12H
1234
Off
Reset Handset
Returns the
handset settings
(except
Registration) to
the default
Enter
Password.+/
Select
menu(s).+/
Press “OK”.
settings.
*1 The LED pattern does not change when a call is being monitored with the Call Monitor
feature.
2
*
For KX-TDA series PBXs, if the Timed Reminder tone is specified at the PBX side, any
Timed Reminder tone set at your telephone will be ignored.
36

Flexible key name edit
Programming
Press the
Joystick.
Press the
Joystick.
* To edit the name, see page 23.
Select
“ Setting
Handset”.
Select the
desired
flexible key.
Press the
Joystick.
Press the
Joystick.
Standby display name edit
You can name the handset to identify.
Press the
Joystick.
Select “Standby
Display”.
Select “
Setting Handset”.
Press the
Joystick.
Select
“Display
Option”.
name
Edit the name*
(max. 12 characters).
Press the
Joystick.
Enter a name
(max. 16 characters).
Select “Display
Option”.
name
Press the
Joystick.
Press the
Joystick.
Select
“F-Key
Name”.
Press the
Joystick.
Press the
Joystick.
37

Programming
Base unit setting menu layout
Setting Base
Common Settings
Main Item Description Setting Default
PBX Type
Fwd/DND Display
Caller ID Line
(For
“
PBX Type-Type 1” only)
Date&Time
“
PBX Type-Type 2” only)
(For
Caller ID Line
(For “PBX Type-Type 2” only)
PBX Type
Fwd/DND Display
1
*
After you set the PBX type, disconnect and reconnect the telephone cord.
2
*
For KX-TDA series, default may vary by country/area.
Selects the type of PBX that
the base unit is connected
1
to.*
Type 1/Type 2
Mode 1/Mode 2
Ty p e 1
Mode 1*
The following settings vary depending on the PBX type.
For “PBX Type-Type 1” only [KX-TA624/KX-TA824/KX-TAW848/KX-TDA series]
Main Item Description Setting Default
Caller ID Line
Selects which line of the
display Caller ID is shown
from.
1st Line/
2nd Line/
3rd Line
1st Line
2
38

Programming
For “PBX Type-Type 2” only [KX-TA308/KX-TA1232/KX-TD series]
Main Item Description Setting Default
Date&Time
Incoming Log
• * When a check mark is displayed beside a tone type, incoming call information
for that tone type will be logged.
• These settings are only applied to your telephone, not the PBX itself.
• Set the current date and time to the base unit. If you do not do so, the date and
time of incoming and outgoing calls will not be displayed correctly.
Sets the date and time for
the base unit.
Sets each type of Incoming
Log either on or off.*
Date
Time
Single Tone
On/Off
Double Tone
On/Off
Triple Tone
On/Off
01-01-05(D-M-Y)
12:00 AM(H:M)
Single Tone: Off
Double Tone: Off
Triple Tone: Off
Setting Base Unit
Press the
Joystick.
Select “ Setting
Base”.
Press the
Joystick.
Select the
desired setting.
Press the
Joystick.
setting
Follow the
setting.
Press the
Joystick.
39

Important Information
Important Information
BATTERY INFORMATION
After your Panasonic battery is fully charged [at 25 °C (77 °F)]:
Operation
While in use (Talk)
While not in use (Stand-by)
• Operating time may be shortened depending on usage conditions and ambient
temperature.
• The battery will drain slowly even while the unit is turned off.
• The handset can receive calls while charging.
• Battery consumption increases when the handset is used out of range. If “ ” flashes,
power off the handset.
Operating Time
Up to about 7 h
Up to about 168 h
Low Battery Warning
The battery needs to be charged in the following situations:
• “ ” flashes or the alarm sounds every 5 seconds.*
•“Charge Battery” is displayed. In this situation, the handset cannot be operated.
* If the low battery warning occurs during a conversation, the call will be disconnected
automatically one minute later.
Replacing the Battery
If “ ” flashes after using the phone for a short time, even when the battery has been
fully charged, the battery should be replaced.
Before replacing the battery, make sure the low battery warning is displayed, then turn off
the power to prevent memory loss. Replace the battery, and charge the new battery for at
least 7 hours.
If you replace the battery before the low battery warning appears, the battery strength
icon may display an incorrect reading. In this case, use the handset as normal with the
new battery installed. When the low battery warning is displayed, charge the battery for
about 7 hours. The battery strength icon will then display the correct reading.
• Please use Panasonic battery with service part number N4HHGMB00005 or HHRP103.
40
A nickel metal hydride battery that is recyclable powers the product
you have purchased.
Please call 1-800-8-BATTERY for information on how to recycle this
battery.
There is a danger of explosion if the battery is incorrectly replaced.

Important Information
IMPORTANT SAFETY INSTRUCTIONS
When using your telephone equipment, basic safety precautions should always be
followed to reduce the risk of fire, electric shock and injury to persons, including the
following:
1. Read and understand all instructions.
2. Follow all warnings and instructions marked on this unit.
3. Unplug the charger from the AC outlet before cleaning. Do not use liquid or aerosol
cleaners. Clean with a damp cloth.
4. Do not use the unit near water, for example, near a bathtub, kitchen sink, or laundry
tub, in a wet basement, or near a swimming pool.
5. Place the charger on a stable surface.
6. The unit should never be placed near or over a radiator or other heat source.
7. The charger should only be connected to the type of electric power supply specified
on the charger label. If you are not sure of the type of power supply to your home,
consult your dealer or local power company.
8. Do not allow anything to rest on the power cord. Do not locate the charger where the
power cord may be stepped on or tripped on.
9. To reduce the risk of fire or electric shock, do not overload AC outlets and extension
cords.
10. Do not insert objects of any kind into this unit through openings, as they may touch
dangerous voltage points or short out parts that could result in a risk of fire or electric
shock. Never spill liquid of any kind on or in the unit.
11. To reduce the risk of electric shock, do not disassemble this unit. Only qualified
personnel should service this unit. Opening or removing covers may expose you to
dangerous voltages or other risks. Incorrect reassembly can cause electric shock.
12. Unplug the charger from the AC outlet and have the unit serviced by qualified service
personnel in the following cases:
A. When the power supply cord or plug is damaged or frayed.
B. If liquid has been spilled into the unit.
C. If the unit has been exposed to rain or water.
D. If the unit does not work normally by following the operating instructions. Adjust
only controls covered by the operating instructions. Improper adjustment may
require work by an authorized servicenter.
E. If the unit has been dropped or damaged.
F. If the unit performance deteriorates.
13. Avoid using a wired telephone during an electrical storm. There is a remote risk of
electric shock from lightning.
14. Do not use the telephone in the vicinity of a gas leak to report the leak.
15. When you operate this unit, the AC outlets should be near the unit and easily
accessible.
41

Important Information
W
CAUTION:
To reduce the risk of fire or injury to persons, read and follow these instructions.
1. Use only the power cord and batteries indicated in this manual.
2. Do not dispose of batteries in a fire. They may explode. Check with local authorities
for special disposal instructions.
3. Do not open or mutilate the battery. Released electrolyte is corrosive and may cause
burns or injury to the eyes or skin. The electrolyte is toxic if swallowed.
4. Exercise care in handling batteries in order not to short the battery to conductive
materials such as rings, bracelets, and keys. The battery and/or conductor may
overheat and cause burns.
5. Charge the battery provided with or identified for use with this product only in
accordance with the instructions and limitations specified in this manual.
6. There is a danger of explosion if the battery is incorrectly replaced.
Any changes or modifications not expressly approved by the party responsible for compliance
could void the user’s authority to operate this device.
ARNING:
TO PREVENT POSSIBLE FIRE OR ELECTRIC SHOCK, DO NOT EXPOSE THIS PRODUCT
TO RAIN OR MOISTURE.
Unplug this unit from AC outlets if it emits smoke, an abnormal smell or makes unusual noise.
These conditions can cause fire or electric shock. Confirm that smoke has stopped and contact
an authorized servicenter.
FCC INFORMATION
Privacy of communications cannot be ensured when using this phone.
This product complies with FCC radiation exposure limits set forth for an uncontrolled
environment. To comply with FCC RF exposure requirements, it must be installed and operated
in accordance with provided instructions. The base unit requires minimum 20 cm (8 in) spacing
must be provided between antennas and all person’s body (excluding extremities of hands,
wrist and feet) during wireless modes of operation. For handset body-worn operation, this
handset must be used with the provided plastic belt holder, which assures no metal parts and
minimum of 1.5 cm (9/16 in) spacing from the user’s body. This transmitter must not be colocated or operated in conjunction with any other antenna or transmitter.
When programming emergency numbers and/or making test calls to emergency numbers:
1. Remain on the line and briefly explain to the dispatcher the reason for the call before
hanging up.
2. Perform such activities in the off-peak hours, such as early morning hours or late evenings.
42

Important Information
NOTE:
This equipment has been tested and found to comply with the limits for a Class B digital device,
pursuant to Part 15 of the FCC Rules. These limits are designed to provide reasonable
protection against harmful interference in a residential installation. This equipment generates,
uses, and can radiate radio frequency energy and, if not installed and used in accordance with
the instructions, may cause harmful interference to radio communications. However, there is no
guarantee that interference will not occur in a particular installation. If this equipment does
cause harmful interference to radio or television reception, which can be determined by turning
the equipment off and on, the user is encouraged to try to correct the interference by one or
more of the following measures:
—Reorient or relocate the receiving antenna.
—Increase the separation between the equipment and receiver.
—Connect the equipment to an outlet on a circuit different from that to which the receiver is
connected.
—Consult the dealer or an experienced radio/TV technician for help.
Using this telephone near 2.4 GHz electrical appliances may cause interference to one or both
devices. Move away from the electrical appliances.
Hearing Aid Compatibility
This telephone provides magnetic coupling for hearing aids as defined by the FCC in 47 CFR
Section 68.316.
When you hold the phone to your ear, noise might be heard in your Hearing Aid. Some Hearing
Aids are not adequately shielded from external RF (radio frequency) energy. If noise occurs,
use an optional headset accessory or the speakerphone option (if applicable) when using this
phone. Consult your audiologist or Hearing Aid manufacturer about the availability of Hearing
Aids which provide adequate shielding to RF energy commonly emitted by digital devices.
OTHER IMPORTANT INFORMATION
Environment—do not place the unit in rooms where the temperature is less than 5 °C (41 °F)
or greater than 40 °C (104 °F). Allow 10 cm (3-15/16 in) clearance around the unit for proper
ventilation.
Avoid excessive smoke, dust, mechanical vibration, shock, or direct sunlight.
Medical—consult the manufacturer of any personal medical devices, such as pacemakers, to
determine if they are adequately shielded from external RF (radio frequency) energy. (The unit
operates in the frequency range of 2,401 MHz to 2,480 MHz and emits 0.40 watts of RF [radio
frequency] power.) Do not use the unit in health care facilities if any regulations posted in the
area instruct you not to do so. Hospitals or health care facilities may be using devices sensitive
to external RF (radio frequency) energy.
If you are having problems making calls disconnect the unit from the telephone line and
connect a known working phone. If the known working phone operates properly, have your unit
43

Important Information
repaired by an authorized Panasonic Factory Servicenter. If the known working phone does not
operate properly, consult your telephone company.
Routine Care—wipe the unit with a soft cloth. Do not clean the unit with abrasive powder or
with chemical agents such as benzene or thinner. Clean the terminal of the charger
periodically. When you leave the unit unused for a long period of time, unplug the AC adaptor
from the outlet.
For Product Service
• Panasonic Servicenters are listed in the servicenter directory.
• Call 1-800-211-PANA (7262) for the location of an authorized servicenter.
• Panasonic’s e-mail address for customer inquiries:
consumerproducts@panasonic.com
for customers in the USA or Puerto Rico ONLY
To return a product for repair
Carefully pack and send it prepaid, adequately insured and preferably in the original carton.
Attach a postage-paid letter, detailing the symptom, to the outside of the carton. DO NOT send
the product to the Executive or Regional Sales offices, as they are not equipped to make
repairs.
Product Service
Panasonic Factory Servicenters for this product are listed in the servicenter directory. Consult
your certified Panasonic dealer for detailed instructions.
44
SAVE THESE INSTRUCTIONS

Important Information
45

For your future reference
SERIAL NO.
(found inside the battery compartment)
DATE OF PURCHASE
NAME OF DEALER
DEALER’S ADDRESS
DEALER’S TEL. NO.
Panasonic Consumer Electronics Company
Division of Panasonic Corporation of North America
One Panasonic Way
Secaucus, NJ 07094
Panasonic Puerto Rico, Inc.
Ave. 65 de Infantería, Km.9.5
San Gabriel Industrial Park
Carolina, Puerto Rico 00985
http://www.panasonic.com/csd
Copyright:
This material is copyrighted by Panasonic Communications Co., Ltd., and may be reproduced
for internal use only. All other reproduction, in whole or in part, is prohibited without the written
consent of Panasonic Communications Co., Ltd.
© 2005 Panasonic Communications Co., Ltd. All Rights Reserved.
PSQX3589ZA KK0405MA0
 Loading...