

Panasonic 96NKX-MB2061 User Manual
Operating Instructions
Multi-Function Printer
The pictured model is KX-MB2061.
KX-MB2061
Model No. KX-MB2060
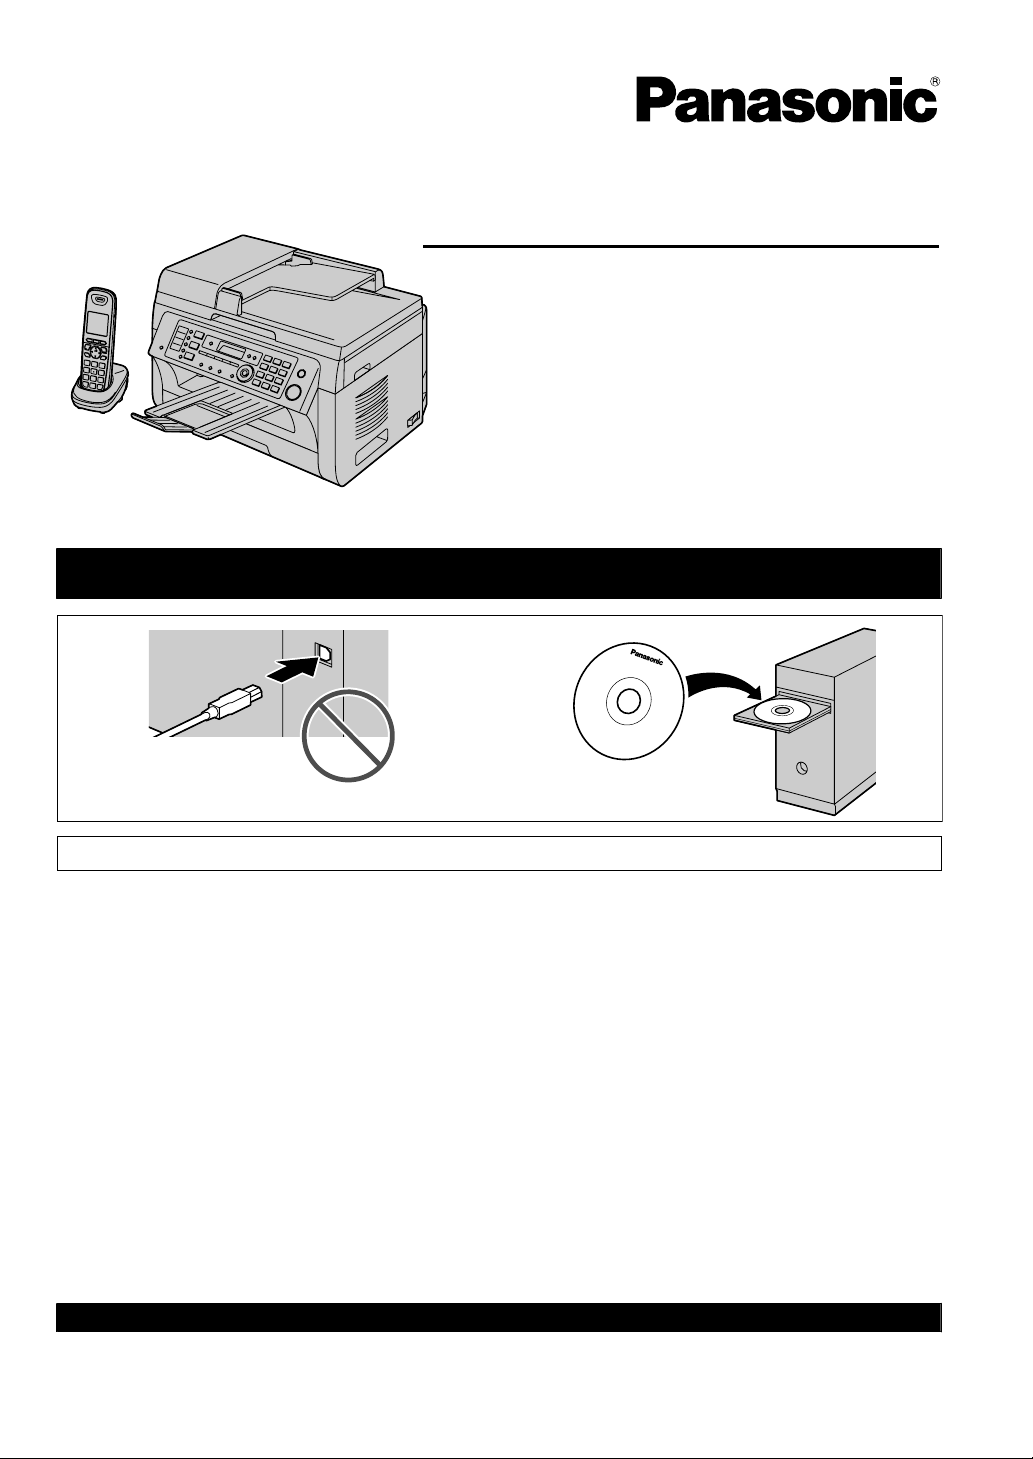
Do NOT connect the unit to a computer with the USB cable until prompted to do so during the setup
12
For hearing or speech impaired TTY users, TTY: 1-877-833-8855
of Multi-Function Station (CD-ROM).
Charge the battery for about 7 hours before initial use.
R This unit is compatible with Caller ID. Subscription to the appropriate service through your service
provider/telephone company is required.

Thank you for purchasing a Panasonic product.
You can select a desired language.
R Base unit: The voice guidance, display and reports
will be in the selected language. The default setting
is English. If you want to change the setting, see
feature #110 on page 78 and feature #112 on
page 88.
R Cordless handset: The display will be in the
selected language. The default setting is English. If
you want to change the setting, see page 102.
Caution:
R Do not rub or use an eraser on the printed side of
the recording paper, as the print may smear.
Notice for product disposal, transfer, or return:
R This product can store your private/confidential
information. To protect your privacy/confidentiality,
we recommend that you erase the information from
the memory before you dispose of, transfer or return
the product.
Environment:
R Panasonic’s strategic direction incorporates concern
for the environment into all aspects of the product life
cycle, from product development to energy saving
designs; from greater product reusability to
waste-conscious packaging practices.
For U.S.A. only: Please visit
www.panasonic.com/environmental for more
information.
Trademarks:
R Microsoft, Windows, Windows Vista, Internet
Explorer and PowerPoint are either registered
trademarks or trademarks of Microsoft Corporation in
the United States and/or other countries.
R Pentium is a trademark of Intel Corporation in the
U.S. and other countries.
R Screen shots reprinted with permission from
Microsoft Corporation.
R Adobe and Reader are either registered trademarks
or trademarks of Adobe Systems Incorporated in the
United States and/or other countries.
R Avery is a registered trademark of Avery Dennison
Corporation.
R XEROX is a registered trademark of Xerox
Corporation in the U.S. and/or other countries.
R All other trademarks identified herein are the property
of their respective owners.
Copyright:
R This material is copyrighted by Panasonic System
Networks Co., Ltd., and may be reproduced for
internal use only. All other reproduction, in whole or
in part, is prohibited without the written consent of
Panasonic System Networks Co., Ltd.
© Panasonic System Networks Co., Ltd. 2010
2
For your safety
B
A
A
A
Laser radiation
R The printer of this unit utilizes a laser. Use of controls
or adjustments or performance of procedures other
than those specified herein may result in hazardous
radiation exposure.
Fuser unit
R During or immediately after printing, the fuser unit
(A) gets hot. This is normal. Do not touch the fuser
unit.
Note:
R The area near the output tray (B) may also get warm.
This is normal.
For best performance
Toner cartridge and drum cartridge
R When replacing the toner cartridge or drum cartridge,
do not allow dust, water, or liquids to come in contact
with the drum. This may affect print quality.
R For optimal performance, genuine Panasonic toner
cartridges and drum cartridges are recommended.
We cannot be responsible for problems that may be
caused by a non-Panasonic toner cartridge or drum
cartridge:
– Damage to the unit
– Poor print quality
– Improper operation
Toner cartridge
R Do not leave the toner cartridge out of the protective
bag for a long time. It will decrease the toner life.
Drum cartridge
R Read the instructions on page 12 before you begin
installation of the drum cartridge. After you have read
them, open the drum cartridge protective bag. The
Important Information
drum cartridge contains a photosensitive drum.
Exposing it to light may damage the drum. Once you
have opened the protective bag:
– Do not expose the drum cartridge to light for more
than 5 minutes.
– Do not touch or scratch the black drum surface.
– Do not place the drum cartridge near dust or dirt,
or in a high humidity area.
– Do not expose the drum cartridge to direct
sunlight.
R To extend the life of the drum cartridge, the power
switch should never be turned OFF immediately after
printing. Leave the power turned ON for a minimum
of 30 minutes after printing.
Location
R To avoid malfunction, do not position the unit near
appliances such as TVs or speakers which generate
an intense magnetic field.
Static electricity
R To prevent static electricity damage to the interface
connectors or other electrical components inside the
unit, touch a grounded metal surface before touching
the components.
Environment
R Keep the unit away from electrical noise generating
devices, such as fluorescent lamps and motors.
R The unit should be kept free from dust, high
temperature and vibration.
R The unit should not be exposed to direct sunlight.
R Do not place heavy objects on top of the unit. When
you leave the unit unused for a long period of time,
unplug this unit from the power outlet.
R The unit should be kept away from heat sources such
as heaters, kitchen stoves, etc. Damp basements
should also be avoided.
R Do not cover slots or openings on the base unit.
Inspect the air circulation vents regularly and remove
any dust build-up with a vacuum cleaner (A).
Routine care
R Wipe the outer surface of the unit with a soft cloth. Do
not use benzine, thinner, or any abrasive powder.
For assistance, please visit http://www.panasonic.com/help
3
A
A
Important Information
Cordless handset communication
R The base unit and other compatible Panasonic units
use radio waves to communicate with each other.
For maximum coverage and noise-free
communications, place your base unit:
– at a convenient, high, and central location with no
obstructions between the cordless handset and
base unit in an indoor environment.
– away from electronic appliances such as TVs,
radios, personal computers, wireless devices, or
other phones.
– facing away from radio frequency transmitters,
such as external antennas of mobile phone cell
stations. (Avoid putting the base unit on a bay
window or near a window.)
R Coverage and voice quality depends on the local
environmental conditions.
R If the reception for a base unit location is not
satisfactory, move the base unit to another location
for better reception.
R The maximum calling distance may be shortened
when the unit is used in the following places: Near
obstacles such as hills, tunnels, underground, near
metal objects such as wire fences, etc.
R Operating the product near electrical appliances may
cause interference. Move away from the electrical
appliances.
Copying certain documents may be illegal in your
country. Penalties of fines and/or imprisonment may
be imposed on those found guilty. The following are
examples of items that may be illegal to copy in your
country.
– Currency
– Bank notes and checks
– Bank and government bonds and securities
– Passports and identification cards
– Copyright material or trademarks without the
consent of the owner
– Postage stamps and other negotiable
instruments
This list is not inclusive and no liability is
assumed for either its completeness or accuracy.
In case of doubt, contact your legal counsel.
Notice:
R Install your machine near a supervised area to
prevent illegal copies from being made.
Moving the base unit
When moving the base unit, hold by the grips (A) on both
sides.
Illegal copies
R It is unlawful to make copies of certain
documents.
4
For assistance, please visit http://www.panasonic.com/help

Table of Contents
1. Introduction and Installation
Accessories
1.1 Supplied accessories ....................................7
1.2 Accessory information ...................................7
Finding the Controls
1.3 Button descriptions of the base unit ..............8
1.4 Button descriptions of the cordless
handset .........................................................9
1.5 Display descriptions of the cordless
handset .......................................................10
1.6 Overview .....................................................10
Installation
1.7 Toner cartridge and drum cartridge .............12
1.8 Output tray ..................................................15
1.9 Recording paper ..........................................16
Telephone
1.10 Handset unit ................................................18
1.11 Battery installation / replacement ................19
2. Preparation
Connections and Setup
2.1 Connections ................................................21
2.2 Battery charge .............................................22
2.3 Intelligent eco mode ....................................23
2.4 Turning the power ON .................................23
2.5 Dialing mode (for the base unit and cordless
handset) ......................................................24
2.6 Selecting the operation mode (Scan/Copy/
Fax) .............................................................24
Document Requirements
2.7 Setting the original ......................................25
Help
2.8 Help function ...............................................26
Volume
2.9 Adjusting the volume ...................................27
Initial Programming
2.10 Date and time ..............................................28
2.11 Your logo .....................................................29
2.12 Your fax number ..........................................29
2.13 Configuring the unit to access the
LAN .............................................................30
2.14 Installing Multi-Function Station ..................31
2.15 Starting Multi-Function Station ....................33
3. Printer
Printer
3.1 Printing from Windows applications ............35
3.2 Easy Print Utility ..........................................36
4. Scanner
Scanner
4.1 Scanning from the base unit (Push
Scan) ...........................................................37
4.2 Scanning from a computer (Pull
Scan) ...........................................................40
5. Copier
Copy
5.1 Making a copy .............................................42
5.2 More copying features .................................43
6. Telephone
Making and Answering Calls
6.1 Making phone calls .....................................49
6.2 Answering phone calls ................................50
Automatic Dialing
6.3 Base unit: One-touch dial feature and
phonebook ..................................................50
6.4 Cordless handset: Shared
phonebook ..................................................51
6.5 Chain dial (Cordless handset only) .............52
7. Caller ID
Caller ID
7.1 Caller ID ......................................................53
7.2 Viewing and calling back using caller
information ..................................................54
7.3 Editing a caller’s telephone number before
calling back/storing ......................................54
7.4 Erasing caller information ............................55
7.5 Storing caller information ............................55
8. Fax
Sending Faxes
8.1 Sending a fax manually ...............................57
8.2 Sending a fax using one-touch dial feature and
phonebook ..................................................58
8.3 Broadcast transmission ...............................59
8.4 Sending an electronic document as a fax
message from your computer .....................61
Receiving Faxes
8.5 Selecting the way to use your unit ..............61
8.6 Receiving a fax automatically: Auto answer
ON ...............................................................62
8.7 Receiving a fax manually: Auto answer
OFF .............................................................65
8.8 Junk fax prohibitor (preventing fax reception
from undesired callers) ................................65
8.9 Receiving a fax on your computer ...............66
8.10 Web fax preview (LAN connection
only) ............................................................67
9. Distinctive Ring
Distinctive Ring
9.1 Distinctive Ring service ...............................68
9.2 Using two or more phone numbers on a single
telephone line ..............................................68
9.3 Using three or more phone numbers on a single
telephone line ..............................................68
9.4 Programming the ring pattern assigned for
fax ...............................................................68
5

Table of Contents
10. Answering Machine
Recording
10.1 Recording your greeting message ..............69
10.2 Leaving a voice message for others or yourself
(Memo recording) ........................................69
10.3 Recording a telephone conversation ...........69
Listening
10.4 Listening to voice messages .......................70
Voice Transfer
10.5 Transferring a specific voice message to email
address (voice to email address) (LAN
connection only) ..........................................71
10.6 Transferring a specific voice message to a
computer (voice to PC) ...............................71
Remote Operation
10.7 Receiving all incoming voice messages on your
computer .....................................................72
10.8 Listening to voice messages via a web browser
(web voice playback) (LAN connection
only) ............................................................73
10.9 Operating from a remote location ................73
10.10 Using the answering machine with the cordless
handset .......................................................74
11. Programmable Features
Features Summary
11.1 Base unit programming ...............................77
11.2 Cordless handset programming ..................99
16. Cleaning
Cleaning
16.1 Cleaning the white plates and glass ..........134
16.2 Cleaning the document feeder
rollers ........................................................137
17. General Information
Printed Reports
17.1 Reference lists and reports (Base unit
only) ..........................................................138
Specifications
17.2 Specifications ............................................138
Copyrights
17.3 Information of copyrights and
licenses .....................................................142
18. Index
18.1 Index..........................................................154
12. Multi-unit Operation
Additional Units
12.1 Operating additional units .........................104
12.2 Registering a cordless handset to a base
unit ............................................................104
Other Features
12.3 Intercom ....................................................104
12.4 Transferring a call/conference ...................105
12.5 Copying phonebook items .........................105
13. Useful Information
Useful Information
13.1 Character entry .........................................107
13.2 Status of the base unit ..............................108
13.3 Canceling the operations ..........................109
14. Help
Reports and Displays
14.1 Report messages ......................................110
14.2 Display messages .....................................111
Troubleshooting
14.3 When a function does not work .................115
15. Paper Jams
Jams
15.1 Recording paper jam .................................127
15.2 Document jams (Automatic document
feeder) .......................................................132
6
1. Introduction and Installation
1.1 Supplied accessories
1. . Introduction and Installation
A Toner cartridge
(starter)
*1
C CD-ROM
(PNJKMB2060Z)
E Quick installation
guide
(PNQW2309Z)
*2
*2
B Drum cartridge
(KX-FAD462)
D Important
information guide
(English–
PNQW2407Z)
(Spanish–
PNQW2408Z)
F Output tray
(PNZEMB2030EB)
K Handset cradle
(xxxxxx)
*2
*2
M Rechargeable
batteries
(xxxxxx)
*2
*2
O Charger
(xxxxxx)
*2*3
*2*3
L
Cordless handset
N AC adaptor
(PQLV219Y)
*3
*2*3
*1 Prints about 500 pages at ISO/IEC 19752 standard
page.
*2 Part numbers are subject to change without notice.
*3 KX-MB2061 only
*2
Note:
R Save the original carton and packing materials for
future shipping and transportation of the unit.
R After unpacking the product, take care of the packing
materials and/or power plug cap appropriately.
G Power cord
(PNJA1022Z)
I Handset
(xxxxxx)
*2
1.2 Accessory information
*2
(PFJA02B002Y)
*2
J Handset cord
H Telephone line cord
(xxxxxx)
*2
For assistance, please visit http://www.panasonic.com/help
Accessories for this unit can be ordered online, by fax,
or by telephone.
Please note that headset orders can be accepted via the
internet.
To ensure that the unit operates properly, we
recommend the use of Panasonic toner and drum
cartridges.
n Replacement accessory
– Toner cartridge
R Model No. (Part No.): KX-FAT461
R Prints about 2,000 pages at ISO/IEC 19752
standard page.
– Drum cartridge
R Model No. (Part No.): KX-FAD462
– Rechargeable batteries
R Model No. (Part No.): HHR-4DPA
R 2 rechargeable nickel metal hydride (Ni-MH)
batteries, AAA (R03) size
R Replacement batteries may have a different
capacity from that of the supplied batteries.
n Optional accessory
– Additional digital cordless handset
7
To place an order online (for customers in the
U.S.A. or Puerto Rico)
Visit our web site:
http://www.panasonic.com/mfpsupplies
R For questions regarding online orders:
Email:
customerservice@shop.us.panasonic.com
Telephone: (800) 405-0652
To place an order by fax
Fax: (800) 237-9080
Include:
–
your name, shipping address and telephone
number
–
credit card type, number, expiration date and your
signature
–
part number and quantity
To place an order by telephone
Telephone: (800) 332-5368
(Monday - Friday 9 am to 9 pm, EST.)
DEFGHIJK L MAC
N PQRS T U VWXY ZO
B
1. Introduction and Installation
R Model No. (Part No.): KX-TGA651
– Headset
R Model No. (Part No.): KX-TCA60, KX-TCA93,
KX-TCA94, KX-TCA400, KX-TCA430
Note:
R ISO/IEC 19752 standard is as follows:
– Environment: 23 ± 2 °C (73 ± 3 °F) / 50 ± 10% RH
– Print mode: Continuous printing
8
For assistance, please visit http://www.panasonic.com/help
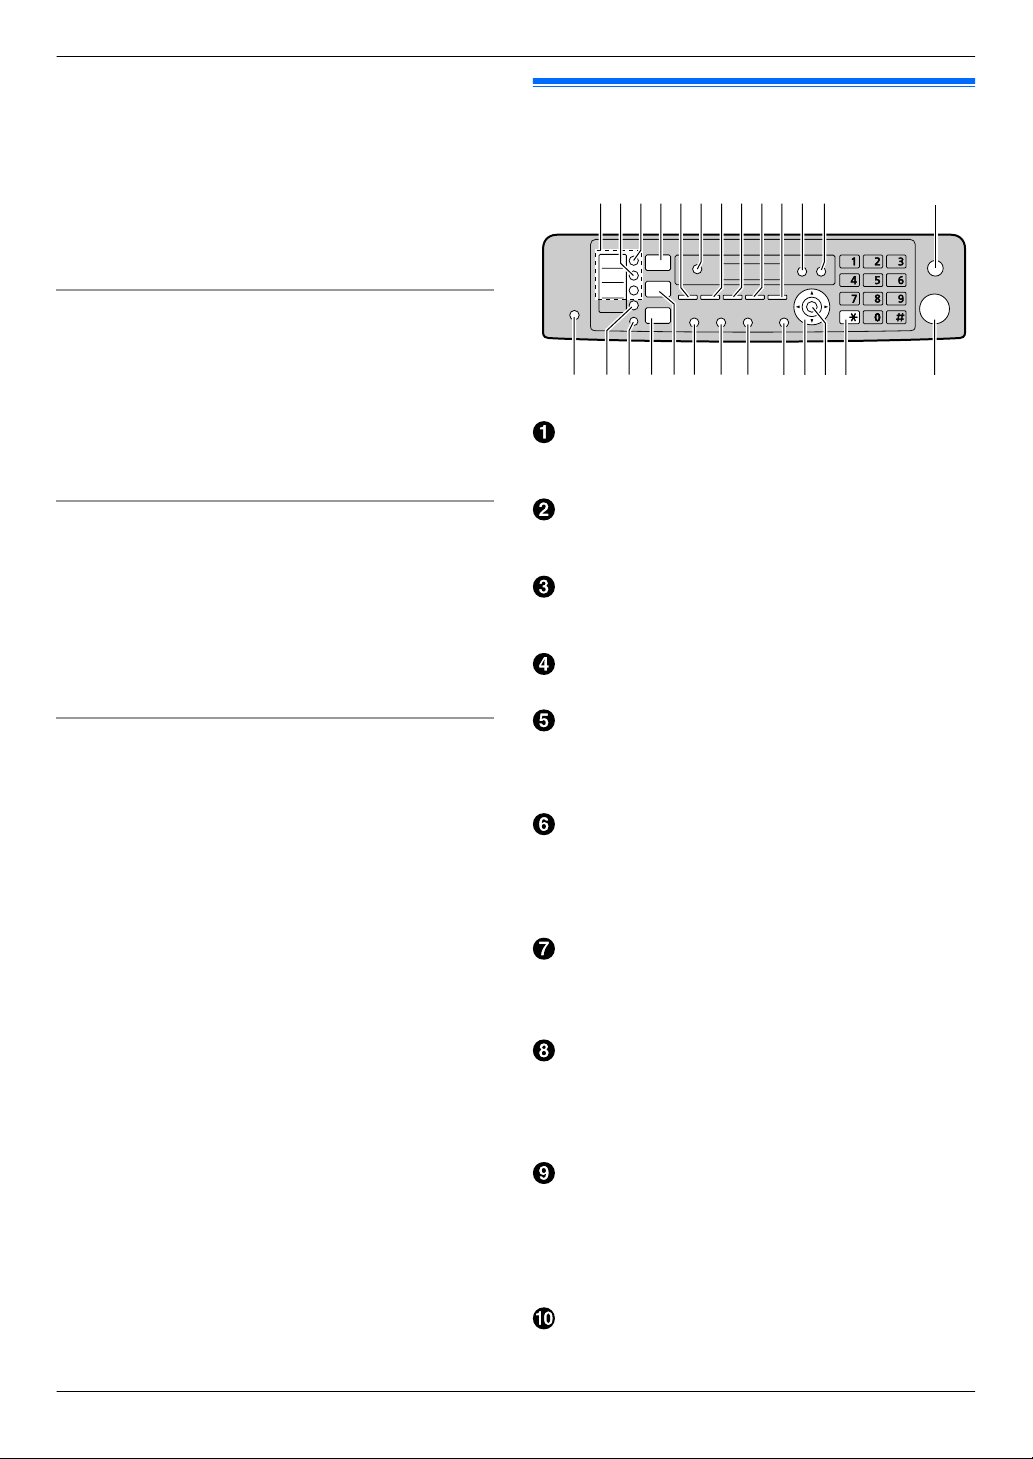
1.3 Button descriptions of the base unit
Station keys
R To use the one-touch dial feature (page 50,
58).
MManual BroadN
R To send a document to multiple parties by using
the dial keypad (page 59).
MBroadcastN
R To send a document to multiple parties
(page 59).
MScanN
R To switch to the scan mode (page 24, 37).
MCopy SizeN
R To select the copy size (page 42).
MPhonebookN
R To initiate the phonebook (page 51, 60).
MPlaybackN
R To play messages (page 70).
MVoice to PCN
R To transfer a voice message to an email address
(page 71), or a computer (page 71).
MContrastN
R To select the contrast when copying (page 42).
R To select the contrast when sending a fax
(page 57).
MResolutionN
R To select the resolution when copying
(page 42).
R To select the resolution when sending a fax
(page 57).
MZoomN
R To enlarge or reduce a document when copying
(page 43).
MQuick ScanN
R To store a scanned document into memory, and
then send it (page 58).
MPage LayoutN
R To make copies using various page layouts
(page 44).

A
B
C
E
D
F
G
1. Introduction and Installation
MCaller IDN
R To use Caller ID features (page 53).
MEraseN
R To erase messages (page 69, 70).
MRecordN
R To record a greeting message, conversation or
memo message (page 69).
MStopN
R To stop an operation or programming session.
R To erase a character/number.
MAuto AnswerN
R To turn the auto answer setting ON/OFF
(page 62).
MLowerN
R To select station 4-6 for the one-touch dial feature
(page 50, 58).
MLocatorN/MIntercomN
R To make/answer intercom calls (page 104).
R To page or locate a cordless handset
(page 104).
MFaxN
R To switch to the fax mode (page 24, 57).
MCopyN
R To switch to the copy mode (page 24, 42).
MRedialNMPauseN
R To redial the last number dialed. If the line is busy
when you send a fax, the unit will automatically
redial the number 1 time.
R To insert a pause during dialing.
MFlashN
R To access special telephone services such as call
waiting (page 53) or for transferring extension
calls.
MMonitorN
R To initiate dialing.
When you press MMonitorN while receiving a call,
you will be able to hear the other party, but the
other party will not be able to hear you.
MMenuN
R To start or exit programming.
Navigator key
R To select desired settings.
R To adjust the volume (page 27).
R To search for a stored item (page 58).
MSetN
R To store a setting during programming.
MToneN
R To change from pulse to tone temporarily during
dialing when your line has rotary/pulse service.
MStartN
R To copy a document (page 42).
R To scan a document (push scan) (page 37).
R To send a fax (page 57).
1.4 Button descriptions of the cordless handset
Soft keys
R To select the features or operations displayed
directly above each key (page 10).
M N (Talk)
R To make/answer calls (page 49, 50).
M N (Speakerphone)
R For speakerphone operation.
MGN (Tone)
R To change from pulse to tone temporarily during
dialing when your line has rotary pulse service.
MOFFN
R To hang up (page 49, 50).
R To stop an operation or programming.
Navigator
R To adjust the receiver or speaker volume (up or
down) while talking (page 27).
R To scroll through various lists or items
(page 52).
R MCIDFN (Caller ID): To move the cursor (left) to
view the caller list.
R MEREDIALN: To move the cursor (right) to view
the redial list.
MFLASHNMCALL WAITN
R To access special telephone services or for
transferring extension calls.
R The flash time can be changed (feature #121 on
page 78).
R To set the alarm feature (page 102).
R To access special telephone services such as call
waiting (page 53) or for transferring extension
calls.
For assistance, please visit http://www.panasonic.com/help
9
K
L
AB DC
HGIJF
E
1. Introduction and Installation
1.5 Display descriptions of the cordless handset
Display items
Display
item
“In use” Answering machine is being used by
“Line in
use”
Soft keys
The cordless handset features 3 soft keys. By pressing
a soft key, you can select the feature shown directly
above it on the display.
Symbols used in these operating instructions
Symbol Meaning
“ ” Select the words in quotations shown
Meaning
Within base unit range
Out of base unit range
The line is in use.
R When flashing:
The call is put on hold.
R When flashing rapidly:
An incoming call is now being
received.
Eco mode is ON. (page 23)
Speakerphone is ON. (page 49)
Ringer volume is OFF. (page 27)
Silent mode is ON. (page 102)
Alarm is ON. (page 102)
Handset number
Battery level
Blocked call (page 102)
Clarity booster is ON. (page 49)
another cordless handset or the base
unit.
Someone is using the line.
on the display (e.g., “Time
Settings”) by pressing MCN or MDN.
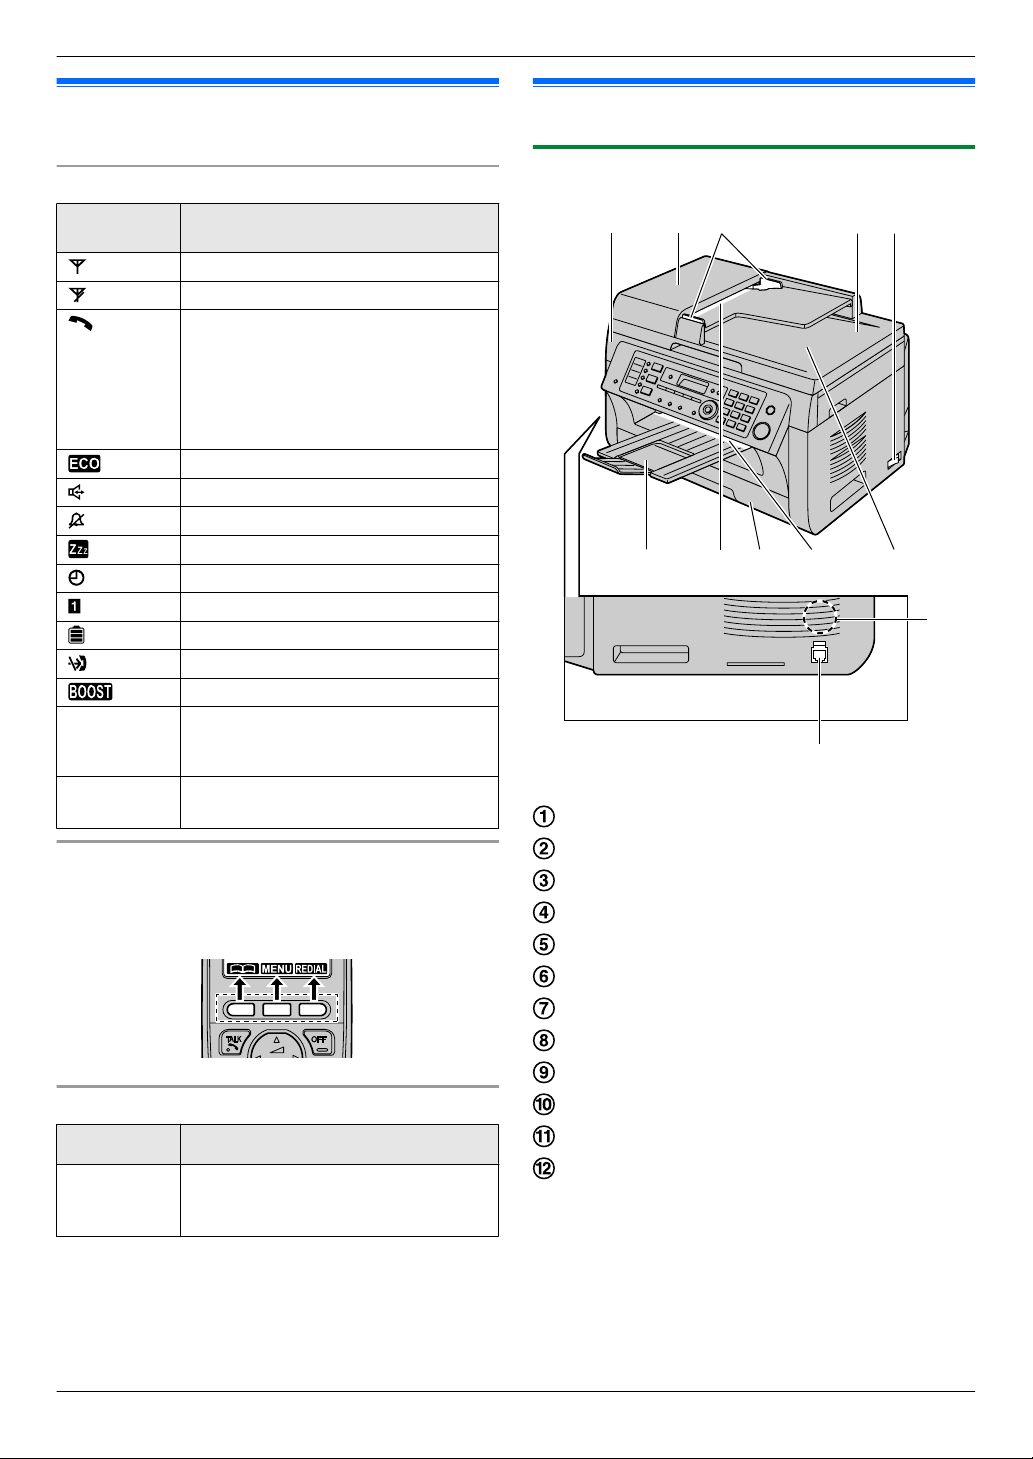
1.6 Overview
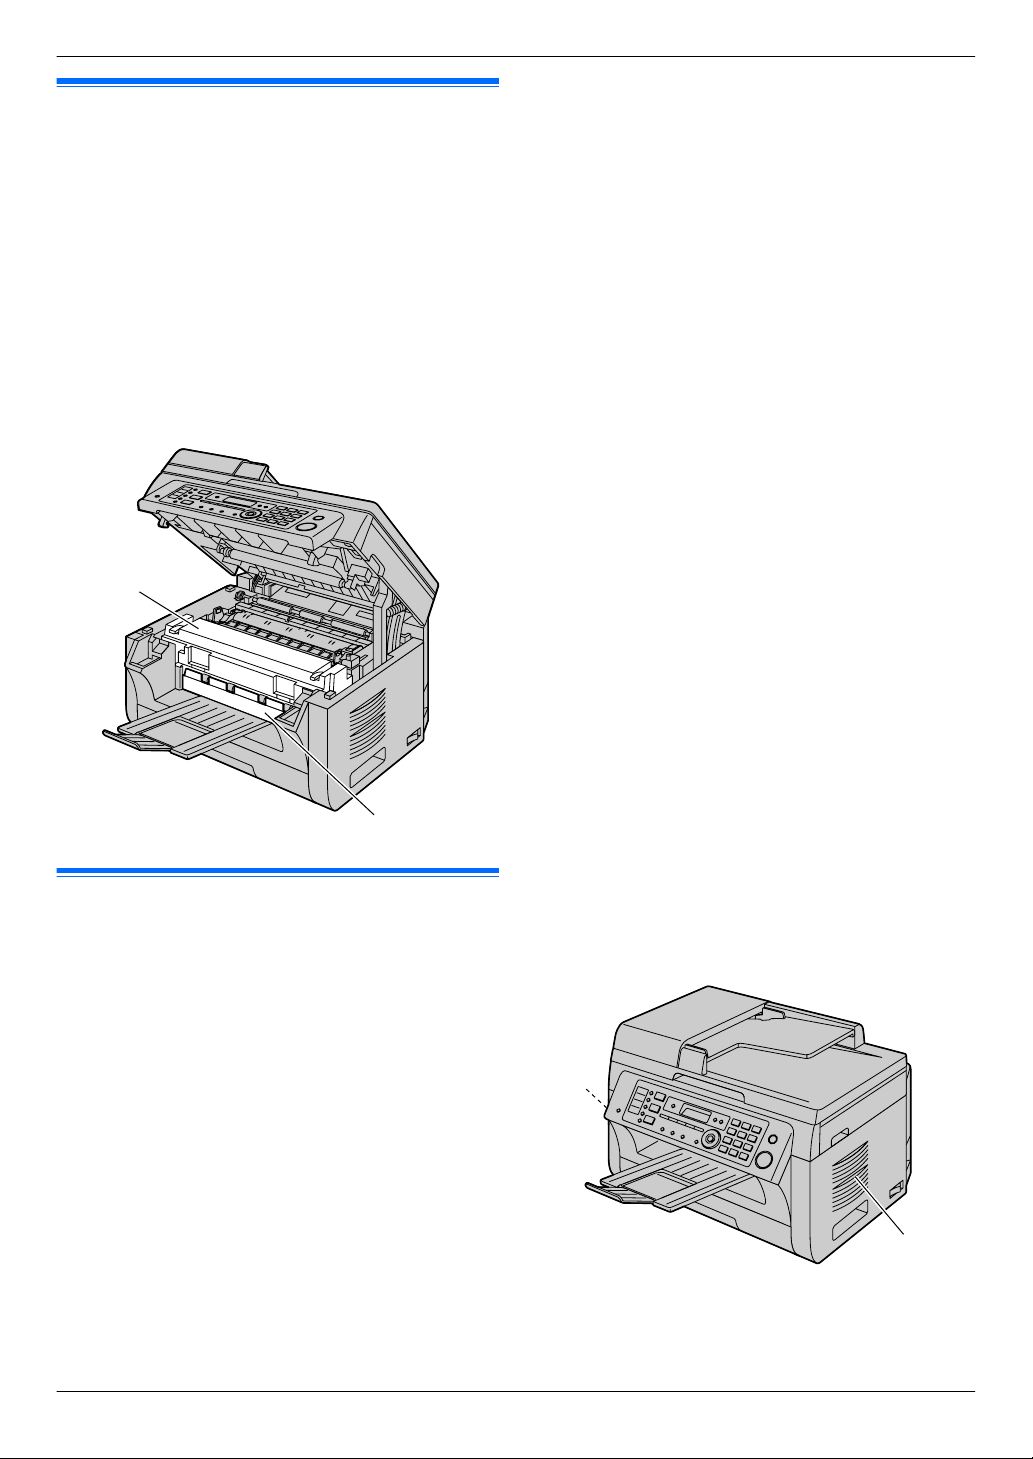
1.6.1 Base unit front view
Top cover
ADF (Automatic Document Feeder) cover
Document guides
Document cover
Power switch
Output tray
Document entrance
Paper input tray
Recording paper exit
Document exit
Speaker
Handset unit connection jack
10
For assistance, please visit http://www.panasonic.com/help
B
A
E FD G
C
A
D
CB
E
F
G
1. Introduction and Installation
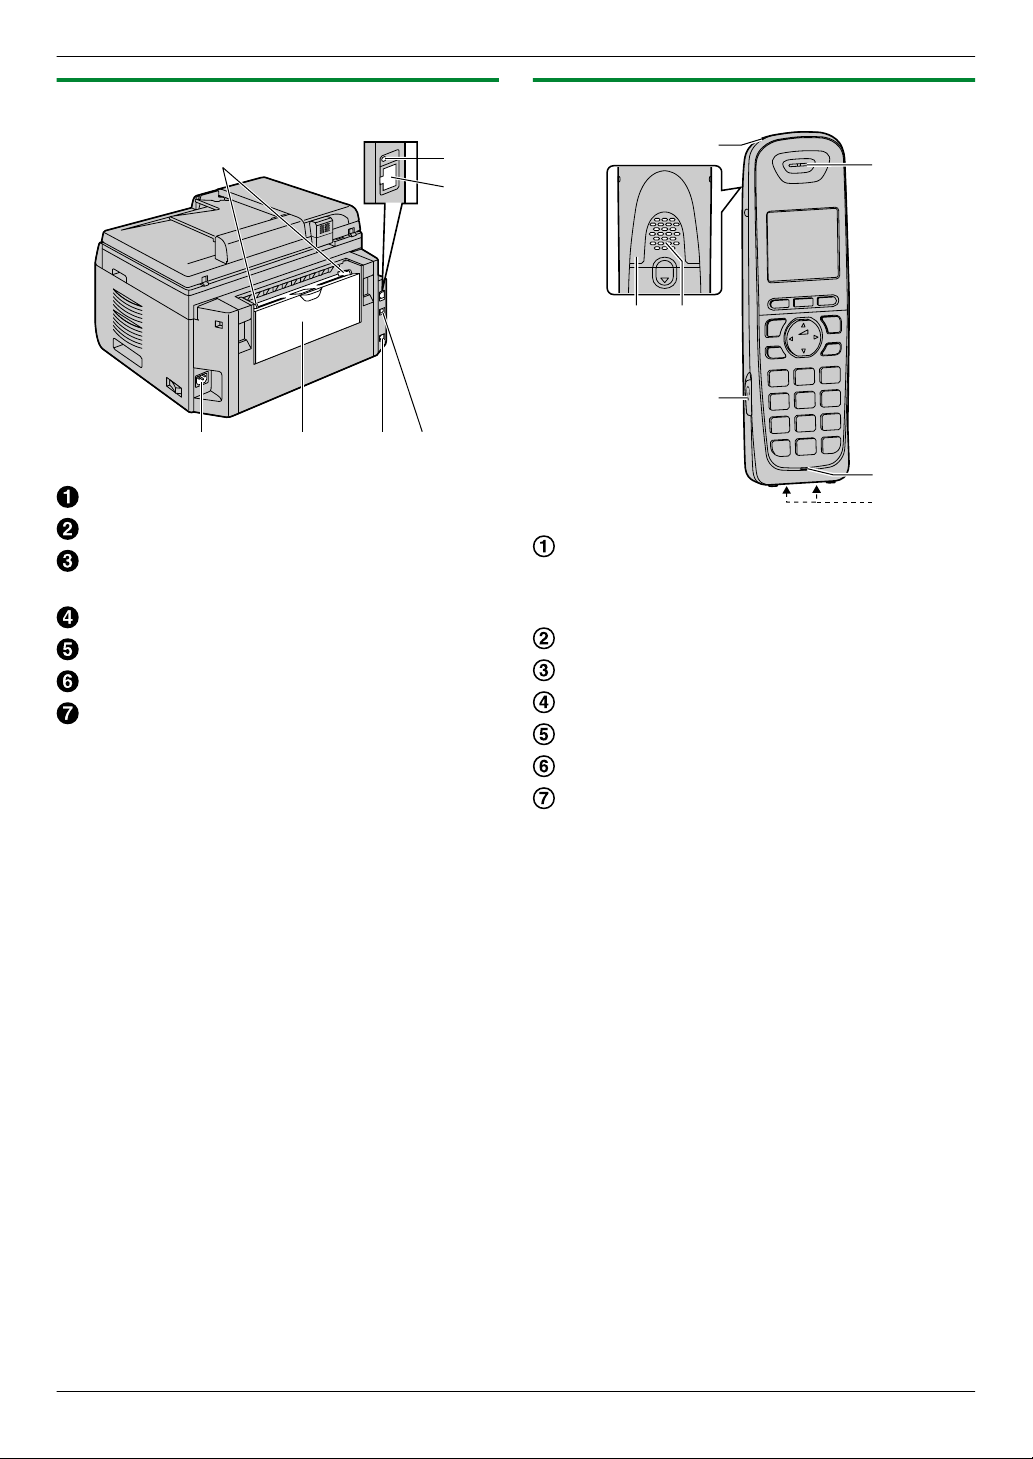
1.6.2 Base unit rear view
Recording paper guides
LED
LAN interface connector
R 10Base-T/100Base-TX
Power inlet
Manual input tray (Rear cover)
Telephone line jack
USB interface connector
1.6.3 Cordless handset
Charge indicator
Ringer indicator
Message indicator
Nonslip pad
Speaker
Headset jack
Receiver
Microphone
Charge contacts
For assistance, please visit http://www.panasonic.com/help
11
B
A
C
D
E
E
F
F
G
1. Introduction and Installation
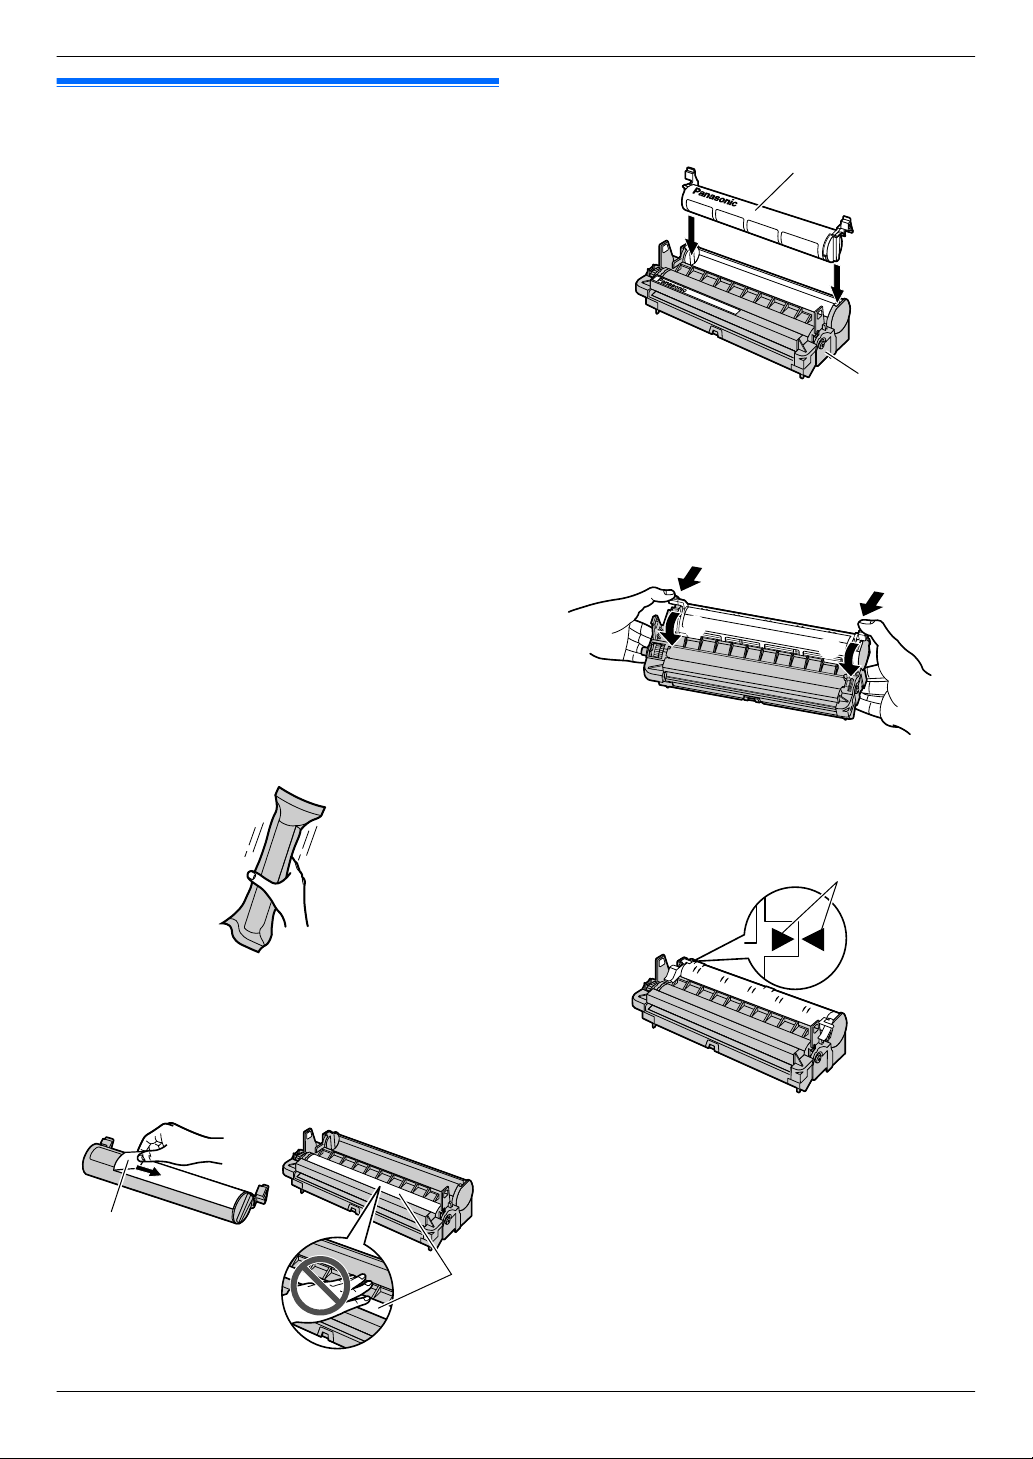
1.7 Toner cartridge and drum cartridge
The supplied toner cartridge is a starter toner cartridge.
Caution:
R Read the following instructions before you begin
installation. After you have read them, open the
drum cartridge protective bag. The drum
cartridge contains a photosensitive drum.
Exposing it to light may damage the drum. Once
you have opened the protective bag:
– Do not expose the drum cartridge to light for
more than 5 minutes.
– Do not touch or scratch the black drum
surface inside of the drum cartridge.
– Do not place the drum cartridge near dust or
dirt, or in a high humidity area.
– Do not expose the drum cartridge to direct
sunlight.
R Do not leave the toner cartridge out of the
protective bag for a long time. It will decrease the
toner life.
R We cannot be responsible for any damage to the
unit or degradation of print quality which may
occur from the use of a non-Panasonic toner and
drum cartridges.
R Do not add toner to the toner cartridge.
1 Before opening the protective bag of the new toner
cartridge, shake it vertically more than 5 times.
3 Place the toner cartridge (C) into the drum cartridge
(D) vertically.
4 Press down the toner cartridge firmly (E). Keep
pressing while turning the green lever on each side
of the toner cartridge towards you (F).
2 Remove the toner cartridge and drum cartridge from
the protection bags. Peel off the seal (A) from the
toner cartridge.
R Do not touch or scratch the black drum surface
(B).
12
For assistance, please visit http://www.panasonic.com/help
5 Make sure that the arrows (G) match, to install the
toner cartridge correctly.
H
J
I
I
K
L
M
1. Introduction and Installation
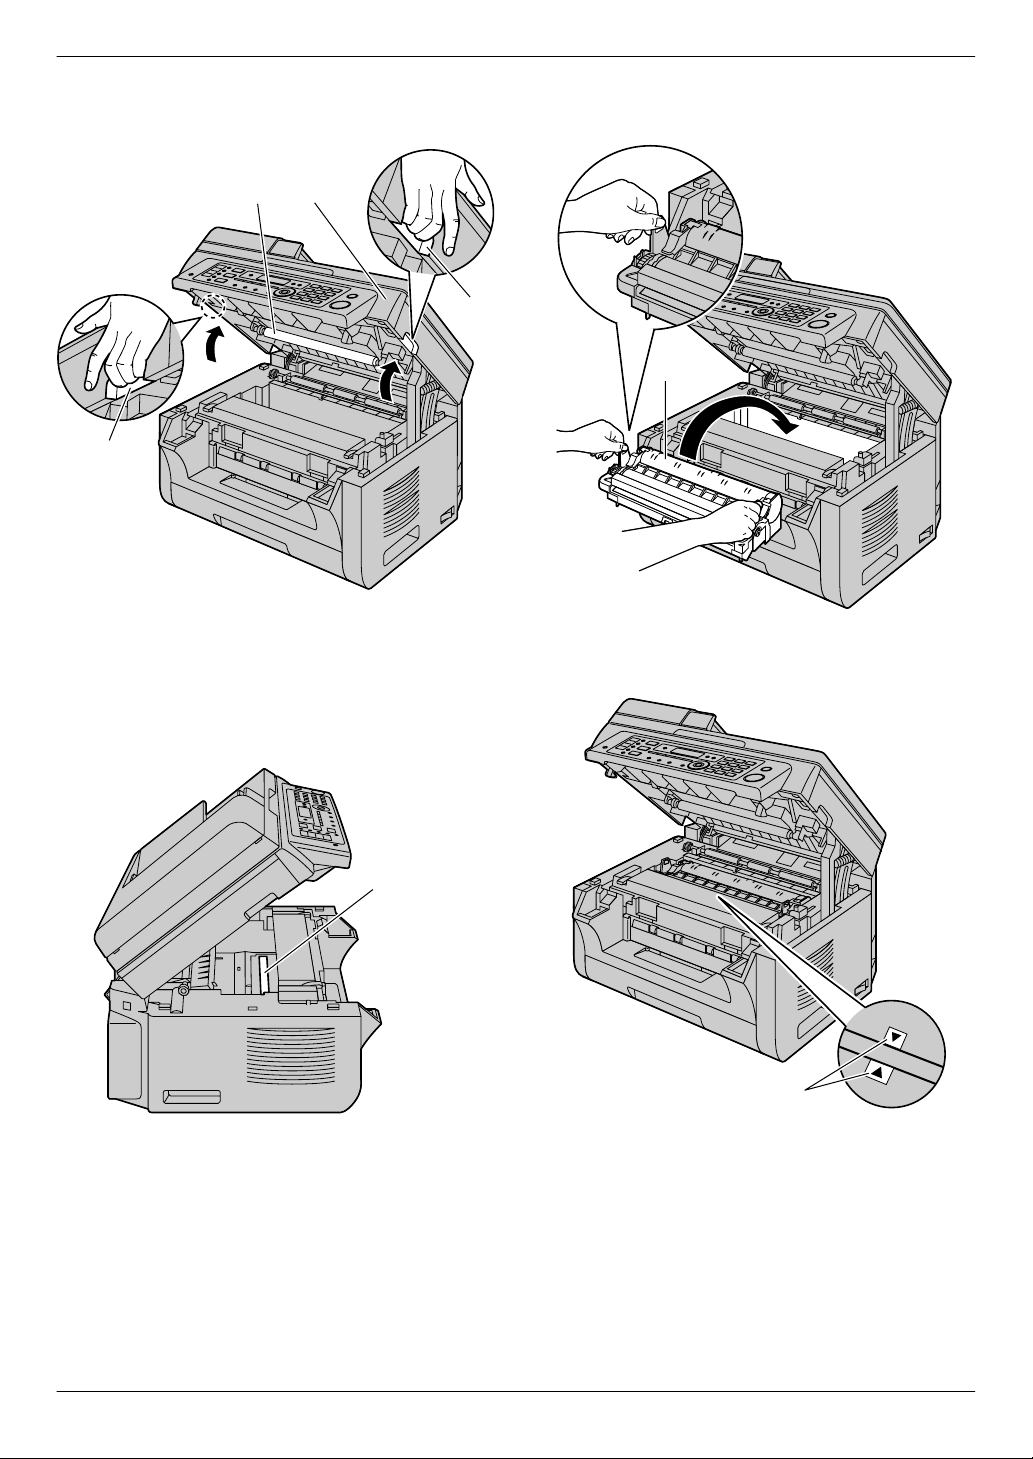
6 Open the top cover (H) by holding the indentations
(I) on both sides of the base unit.
Note:
R Do not touch the transfer roller (J).
R If the lower glass (K) is dirty, clean it with a soft
and dry cloth.
7 Install the drum and toner cartridge (L) by holding
the tabs.
R Make sure that the arrows (M) match, to install
the drum and toner cartridge correctly.
For assistance, please visit http://www.panasonic.com/help
13
1. Introduction and Installation
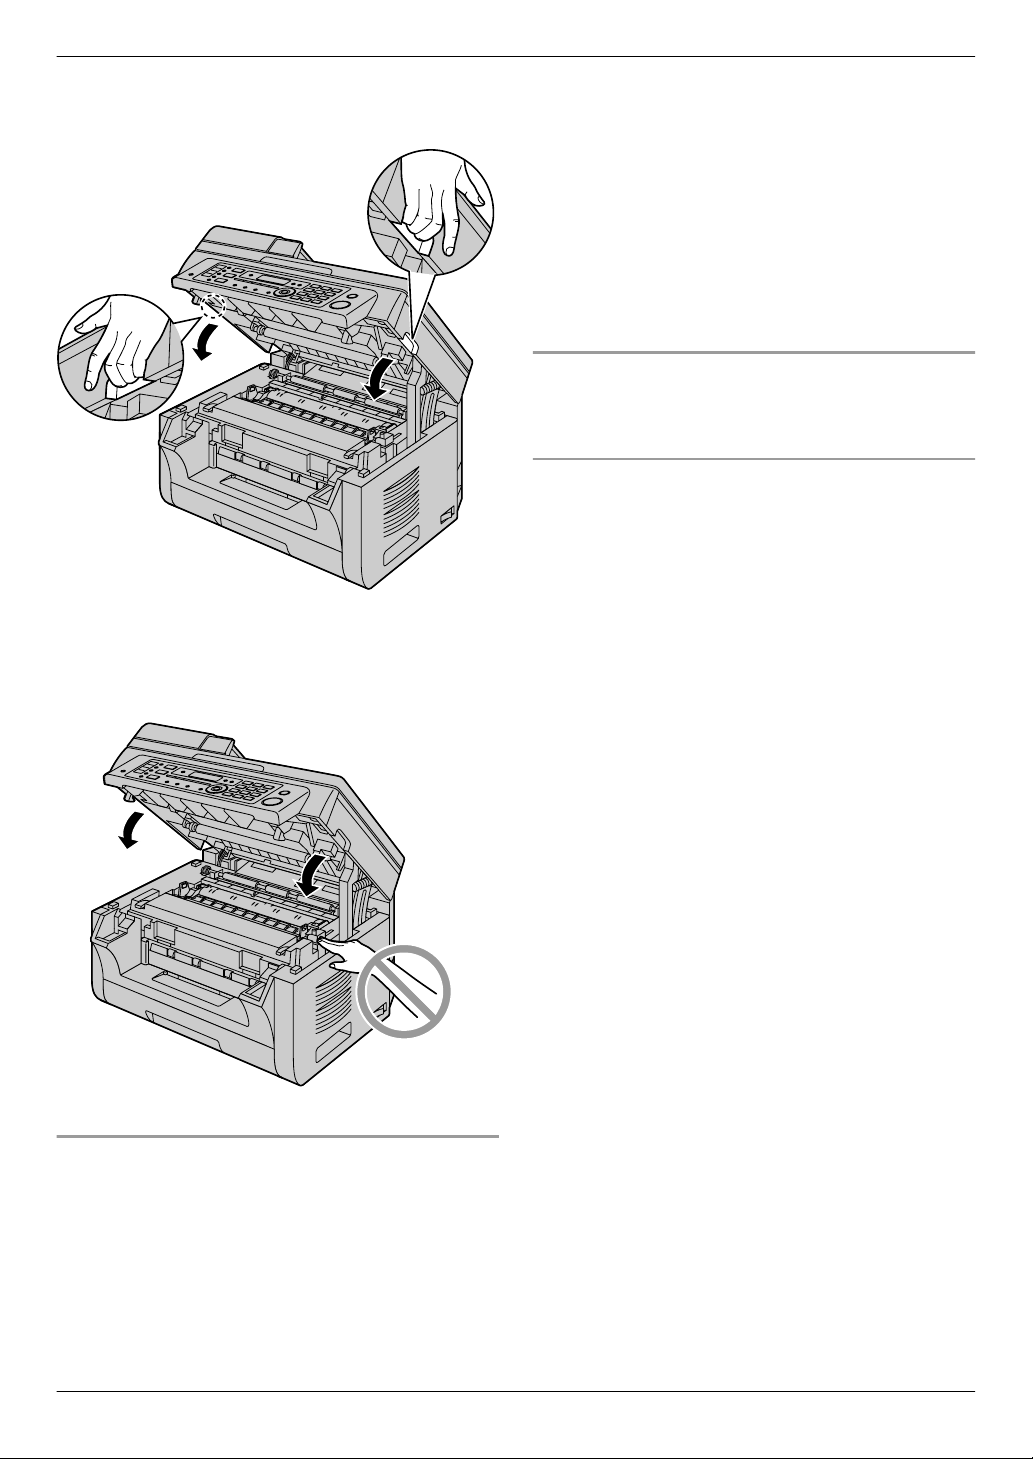
8 Close the top cover by holding the indentations on
both sides of the base unit, until locked.
Caution:
R To prevent injuries, be careful not to put your
hands under the top cover.
poor or
replace the toner cartridge and drum cartridge.
R To ensure that the unit operates properly, we
recommend the use of Panasonic toner and drum
cartridges. See page 7 for accessory information.
R To maintain print quality and machine life, we
recommend you to clean slots and openings
(page 3) and the inside of the base unit (page 134,
137) when replacing the toner cartridge and/or drum
cartridge.
R See page 140 for information on toner life and drum
life.
Waste disposal method
Waste material should be disposed of under conditions
which meet all national and local environmental
regulations.
Toner save feature
If you want to reduce toner consumption, set the toner
save setting to ON (feature #482 on page 81). The
toner cartridge will last approximately 20 % longer. This
feature may lower the print quality.
“REPLACE DRUM” appears on the display,
When to replace the toner and drum cartridges
When the display shows the following, replace the toner
cartridge.
– “TONER LOW”
– “TONER EMPTY”
Note:
R To check the drum life and quality, please print the
printer test list (page 138) and refer to page 141 for
information on the drum life. If printing quality is still
14
For assistance, please visit http://www.panasonic.com/help

B
A
B
A
D
C
1. Introduction and Installation
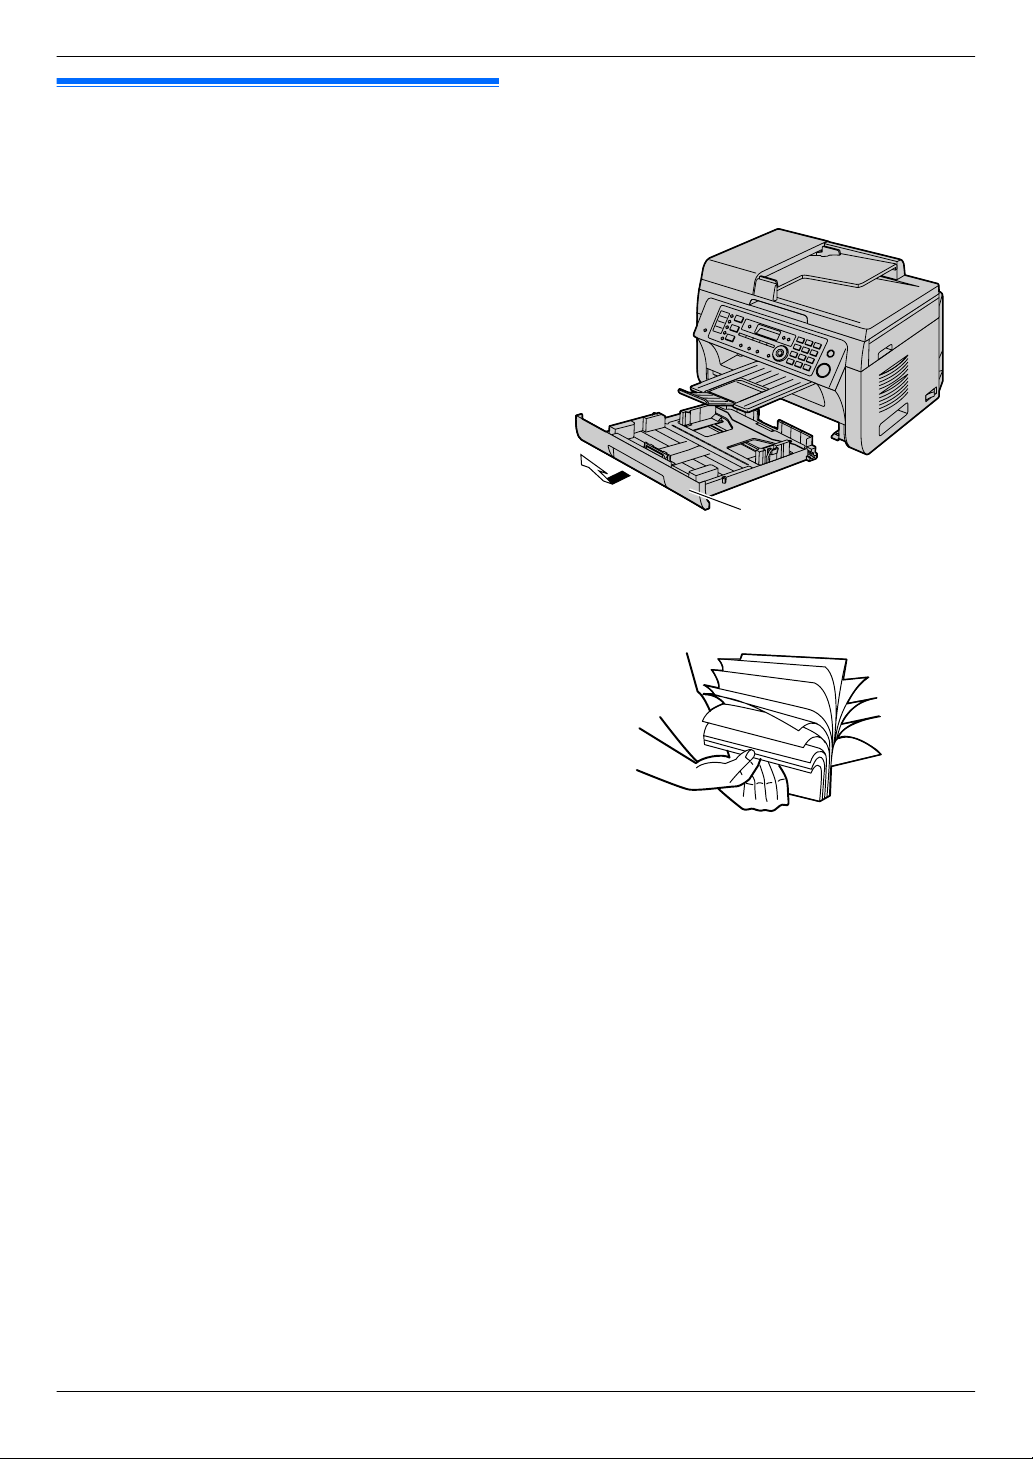
1.8 Output tray
Insert the output tray (A) until it clicks into place, and
then press the center part (B) of the extender to open it.
If the top part of the extender is detached
1. With the top part of the extender in the open position,
insert the tab (A) into the left hole (B) of the
extender.
Note:
R Do not place the base unit in an area where the output
tray may be easily bumped into.
R The output tray can hold up to approximately 100
sheets of printed paper (the number of sheets may
vary depending on the usage environment). Remove
the printed paper before the output tray becomes full.
For assistance, please visit http://www.panasonic.com/help
Slide the other tab (C) into the right hole (D) of the
2.
extender from below until it clicks into place.
15
A
1. Introduction and Installation
1.9 Recording paper
The paper input tray unit can hold:
– Up to 250 sheets of 64 g/m2 to 75 g/m2 (17 lb to
20 lb) paper.
– Up to 230 sheets of 80 g/m2 (21 lb) paper.
– Up to 200 sheets of 90 g/m2 (24 lb) paper.
R A4, letter, B5 and 16K-size paper can be used. B5
and 16K-size paper can only be used when using the
unit for printing or copying.
R Please refer to page 139 for information on recording
paper.
R The unit is set for printing letter-size plain paper
by default.
– To use other paper sizes, change the
recording paper size setting (feature #380 on
page 80).
– To use thin paper, change the recording paper
type setting (feature #383 on page 81).
Note for recording paper:
R We recommend that you test paper (especially
special sizes and types of paper) on the unit before
purchasing large quantities.
R Do not use the following types of paper:
– Paper with cotton and/or fiber content that is over
20 %, such as letterhead paper or paper used for
resumes
– Extremely smooth or shiny paper, or paper that is
highly textured
– Coated, damaged or wrinkled paper
– Paper with foreign objects attached, such as tabs
or staples
– Paper that has dust, lint or oil stains
– Paper that will melt, vaporize, discolor, scorch or
emit dangerous fumes near 200 °C (392 °F), such
as vellum paper. These materials may transfer
onto the fusing roller and cause damage.
– Moist paper
– Inkjet paper
R Some paper is designed to be printed on only one
side. Try printing on the other side of the paper if you
are not happy with the print quality, or if misfeeding
occurs.
R For proper paper feeding and best print quality, we
recommend using long-grained paper.
R Do not use paper of different types or thicknesses at
the same time. This may cause paper jams.
R Avoid double-sided printing.
R Do not use paper printed from this unit for
double-sided printing with other copiers or printers.
This may cause paper jams.
R To avoid curling, do not open paper packs until you
are ready to use the paper. Store unused paper in the
original packaging, in a cool and dry location.
R For customers who live in high humidity areas:
Please be sure to store paper in an air-conditioned
room at all times. If you print using moist paper, it may
cause paper jam.
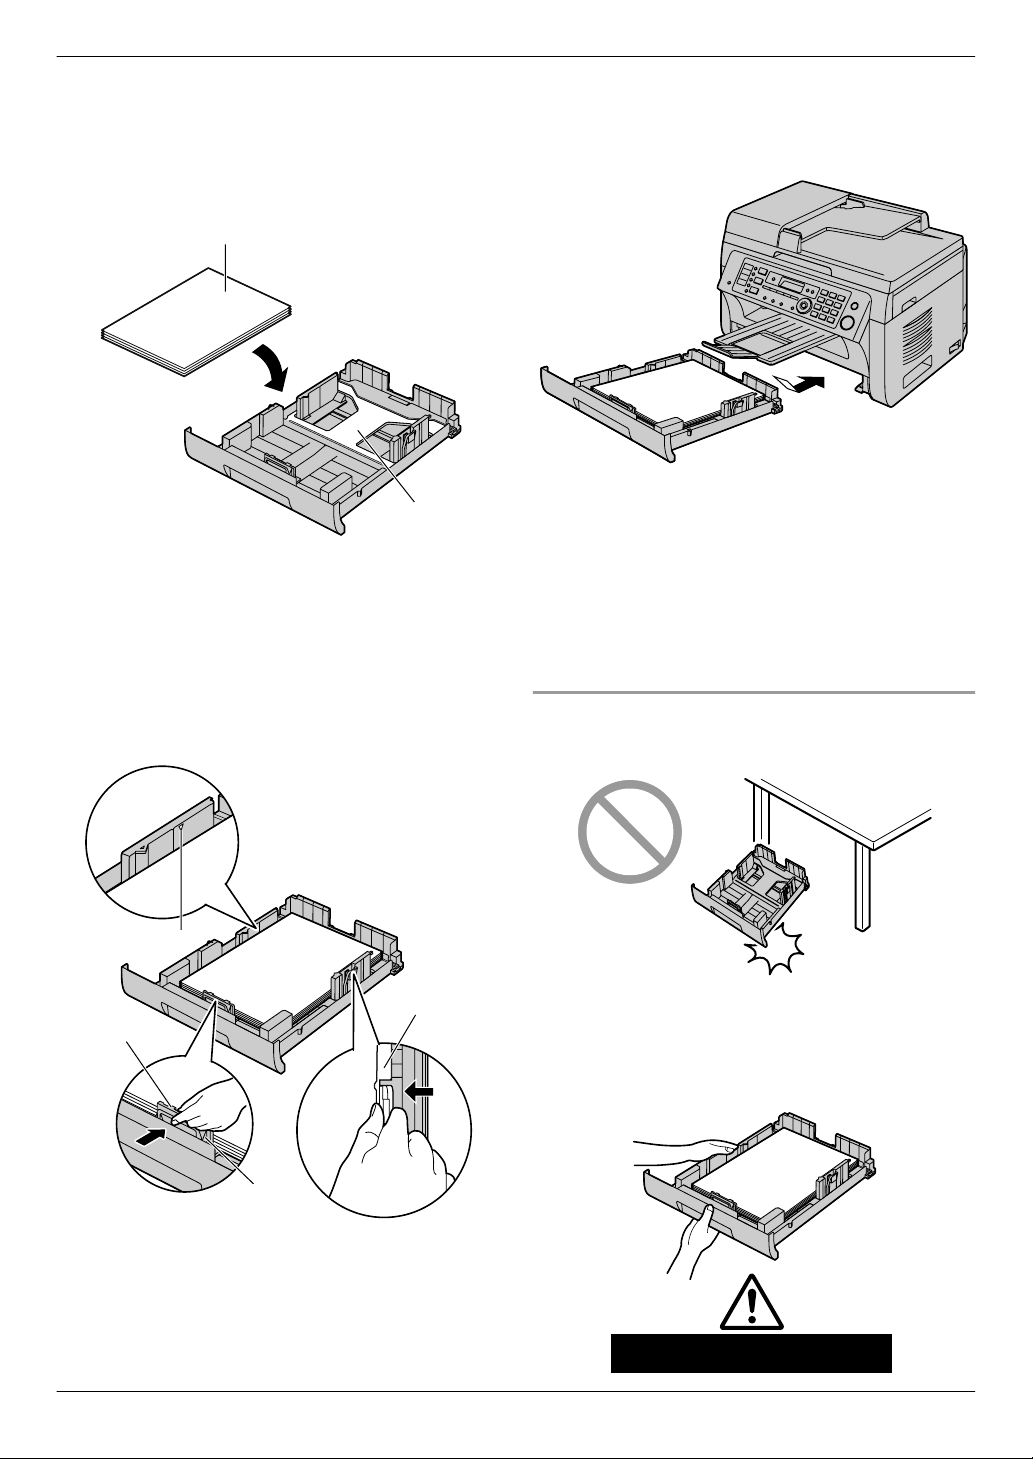
1 Pull the paper input tray (A) until it clicks into place,
then pull it completely out, lifting the front part of the
tray.
Before loading a stack of paper, fan the paper to
2
prevent paper jams.
16
For assistance, please visit http://www.panasonic.com/help
B
C
G
D
E
F
Approx. 2 kg (4.4 lb)
1. Introduction and Installation
3 Load the paper, print-side up (B).
Important:
R Push down to lock the plate (C) in the paper
input tray, if necessary.
4 Adjust the recording paper guides. Pinch the front
side of the recording paper guide (D), then slide it to
match the paper size mark. Pinch the right side of the
recording paper guide (E), then slide it to adjust the
width to the size of the recording paper.
R Make sure that the recording paper is under the
paper limit mark (F), and the paper should not
be loaded over the snubbers (G).
5 Insert the paper input tray into the base unit, lifting
the front part of the tray. Then push it completely into
the base unit.
Note:
R If the paper is not loaded correctly, re-adjust the
paper guides, or the paper may jam.
R If the paper input tray does not close, the plate in the
paper input tray may not be in the locked position.
Push the paper down and make sure that the paper
is laying flat in the paper input tray.
Caution for the paper input tray
R Do not drop the paper input tray.
For assistance, please visit http://www.panasonic.com/help
R Hold the paper input tray with both hands when
removing or installing. The paper input tray
weighs approximately 2 kg (4.4 lb) when fully
loaded with recording paper.
17
A
B
A
B
1. Introduction and Installation
1.9.1 Manual input tray
You can use the manual input tray for printing with the
computer and for copying. It can hold one page at a time.
When printing or copying multiple pages, add a next
page after the first page has been fed into the base unit.
R Please refer to page 139 for information on recording
paper.
R The unit is set for printing letter-size plain paper
by default.
– To use other paper sizes, change the
recording paper size setting (feature #381 on
page 80).
– To use thin paper, change the recording paper
type setting (feature #384 on page 81).
1 Adjust the width of the guides (A) to the size of the
recording paper.
2 Insert the paper, print-side down (B) until the base
unit grasps the paper and a single beep is heard.
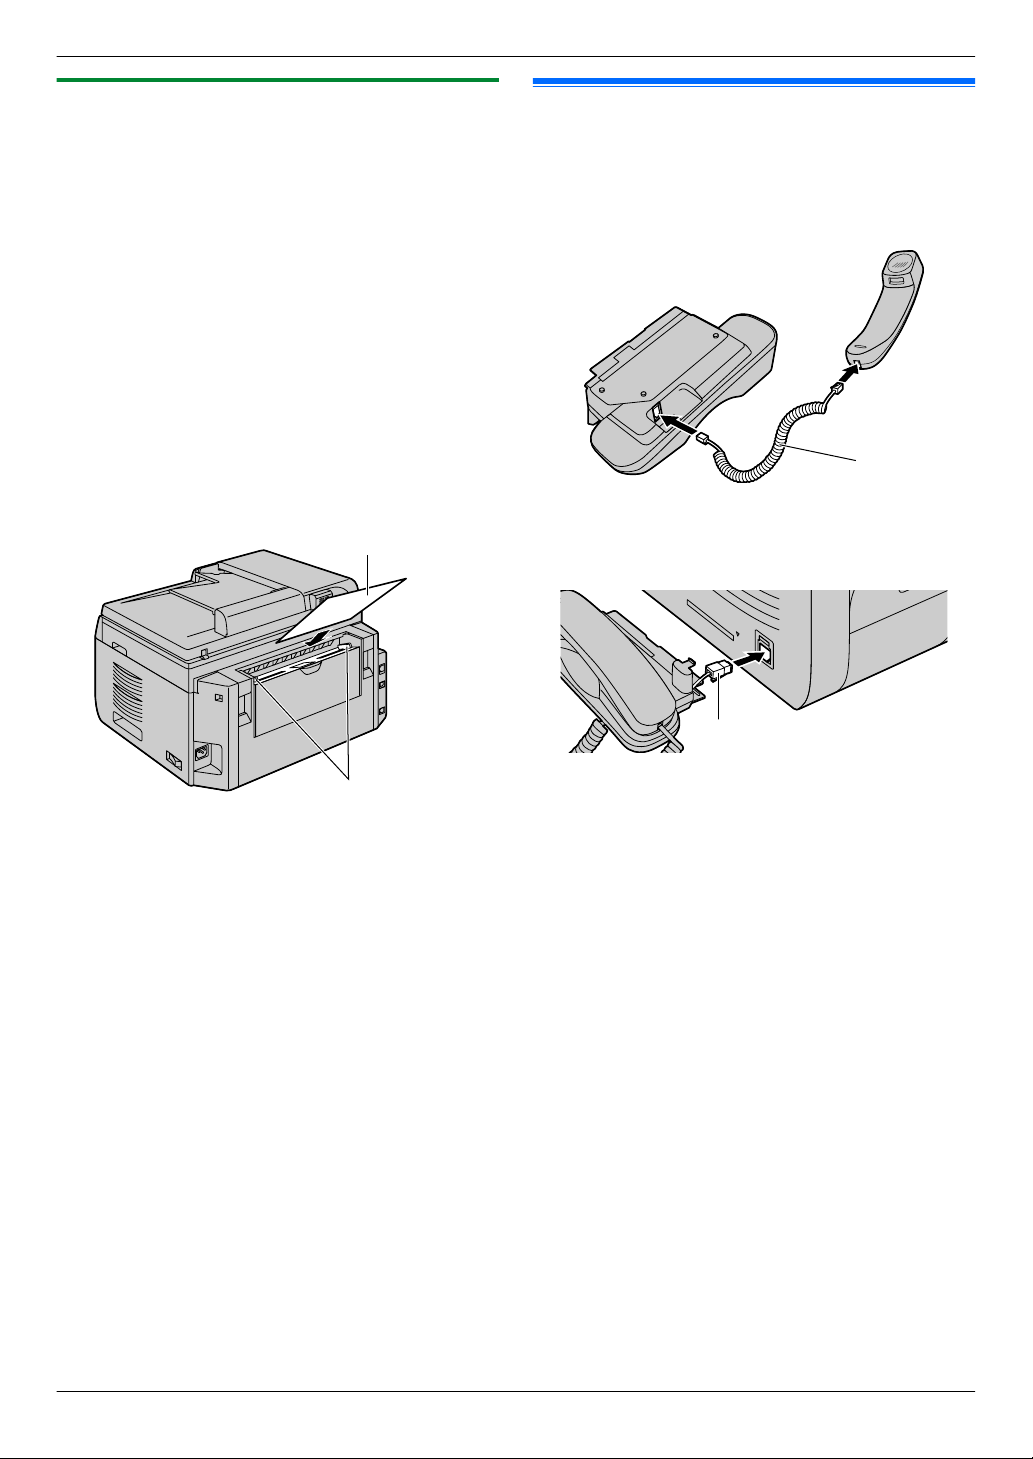
1.10 Handset unit
Important:
R Before installing or removing the handset unit, be
sure to turn the power switch OFF.
1 Connect the handset cord (A).
Connect the handset connector (B).
2
R Remove the seal from the handset unit
connection jack if attached.
Note:
R To print from the manual input tray;
– when printing with the computer, select #2 for the
printer properties.
– when making a copy, set the copy input tray
setting to “#2” beforehand (feature #460 on
page 90).
If these settings are not changed, when printing or
copying multiple pages, the 1st page will be printed
from the manual input tray, but the rest of the pages
will be printed from the paper input tray.
R If the paper is not inserted correctly, re-adjust the
paper, or the paper may jam.
18
For assistance, please visit http://www.panasonic.com/help
C
D
A
B
C
D
1. Introduction and Installation
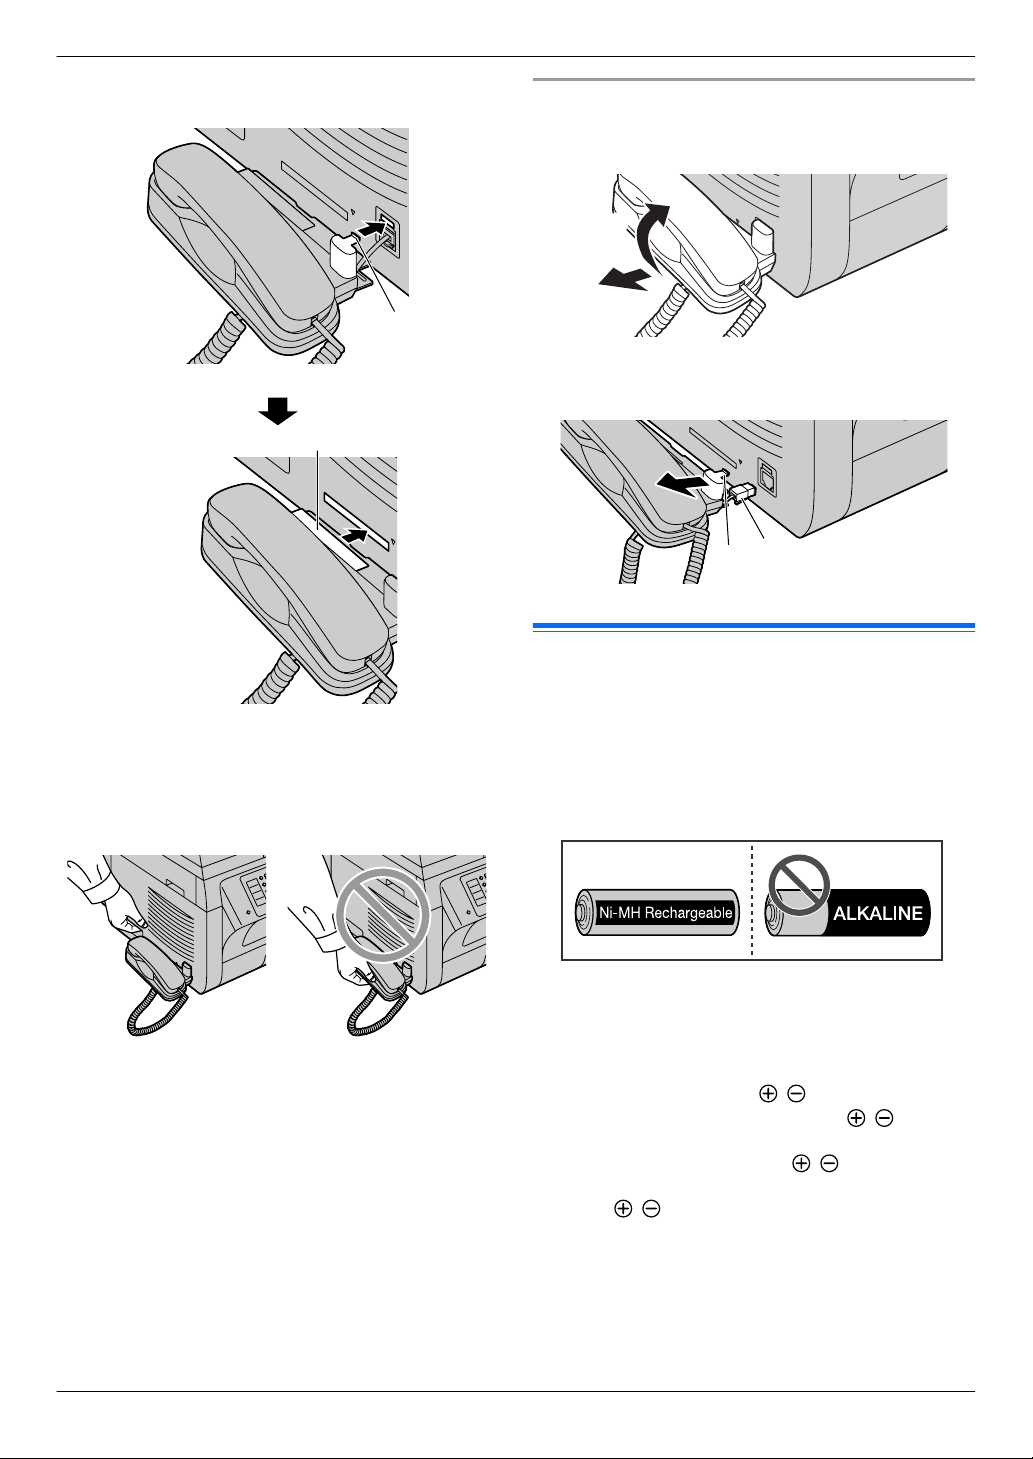
3 Insert the tab (C) and rib (D).
To remove the handset unit
1. Pull the handset unit slightly forward (A), then lift it
in the direction of the arrow (B) to remove the rib.
2. Remove the tab (C), then disconnect the handset
connector (D).
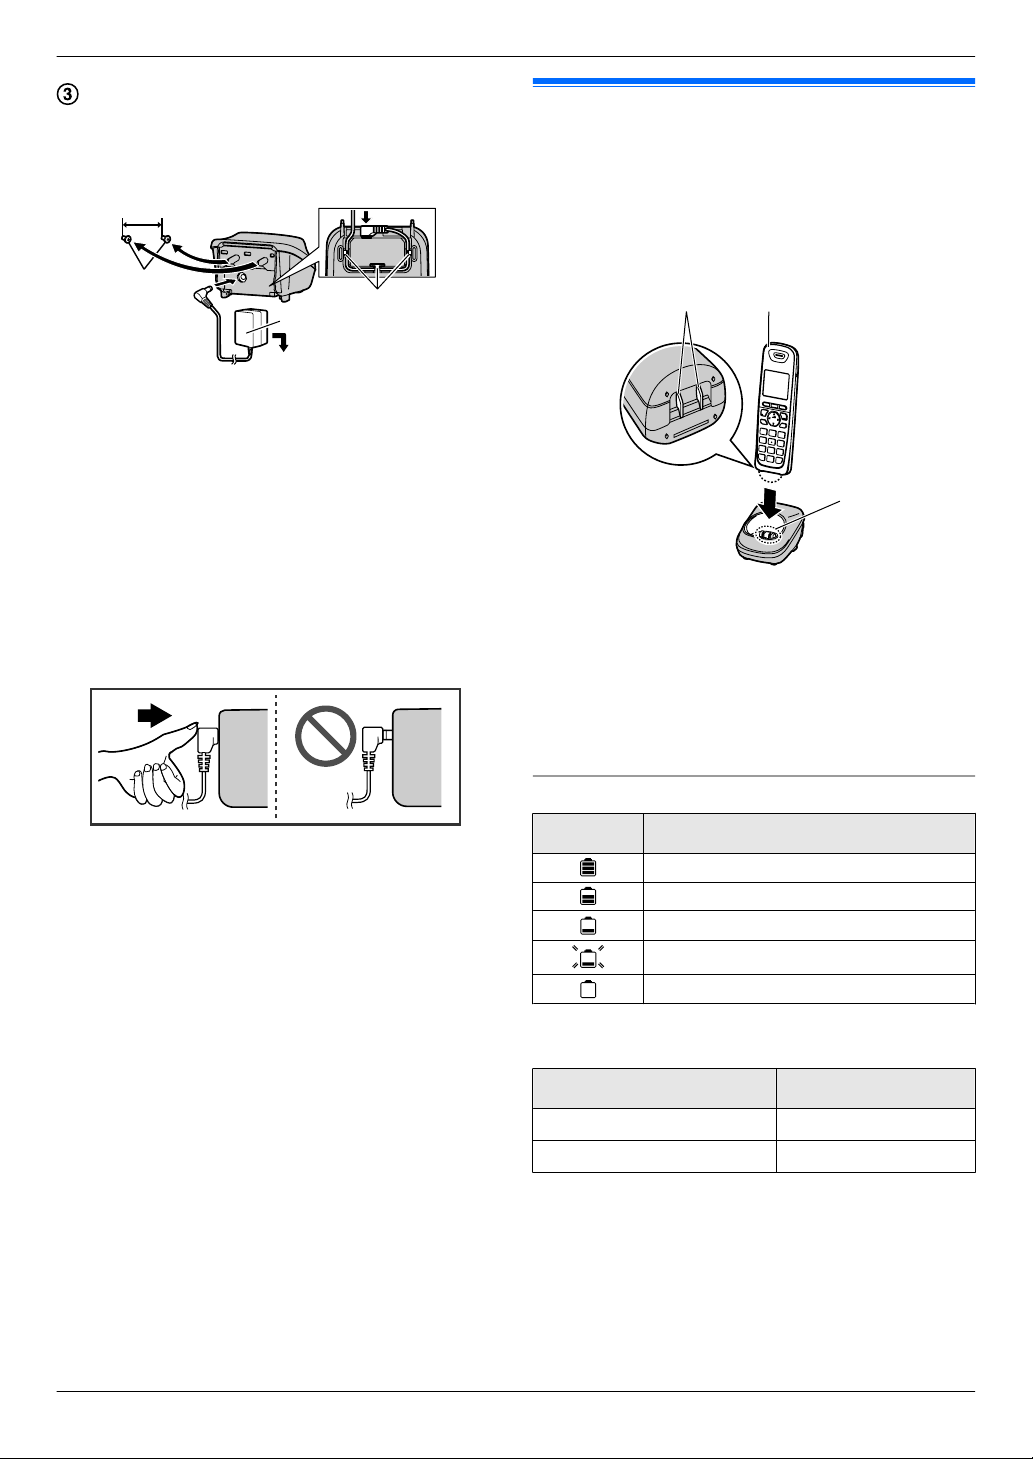
1.11 Battery installation /
replacement
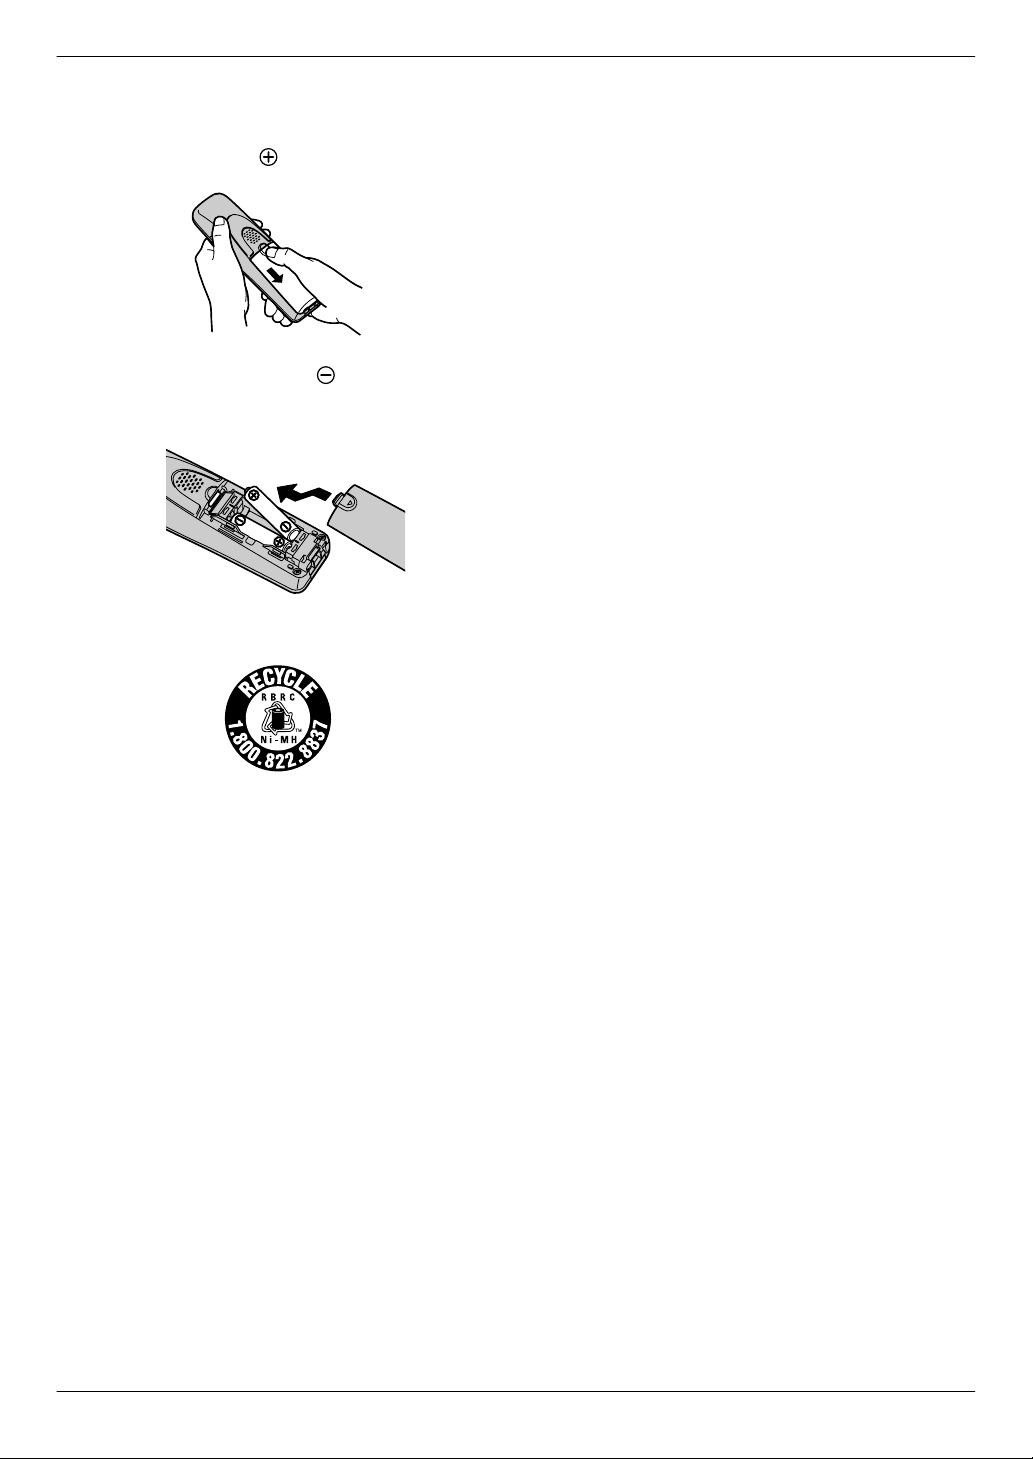
Caution:
R When moving the base unit, be sure to hold by
the grip. Do not hold by the handset unit.
Correct
Note:
R While talking to the other party, you can send a fax
using the scanner glass by pressing MStartN, and
then M1N (To receive a fax, press M2N).
Incorrect
Important:
R USE ONLY Ni-MH batteries AAA (R03) size.
Do NOT use alkaline/Manganese/Ni-Cd batteries
etc.
R Use the supplied rechargeable batteries. For
replacement, we recommend using the
Panasonic rechargeable batteries noted on
page 7.
R Wipe the battery ends (
R Avoid touching the battery ends ( , ) or the
unit contacts.
R Confirm correct polarities (
R Install the batteries without touching the battery
ends (
, ) or the unit contacts.
, ) with a dry cloth.
, ).
For assistance, please visit http://www.panasonic.com/help
19
1. Introduction and Installation
1 Press the notch on the cordless handset cover firmly,
and slide the cover.
R When replacing batteries, remove the old
batteries positive (
) terminal first.
2 Insert the batteries negative ( ) terminal first. Close
the cordless handset cover.
Attention:
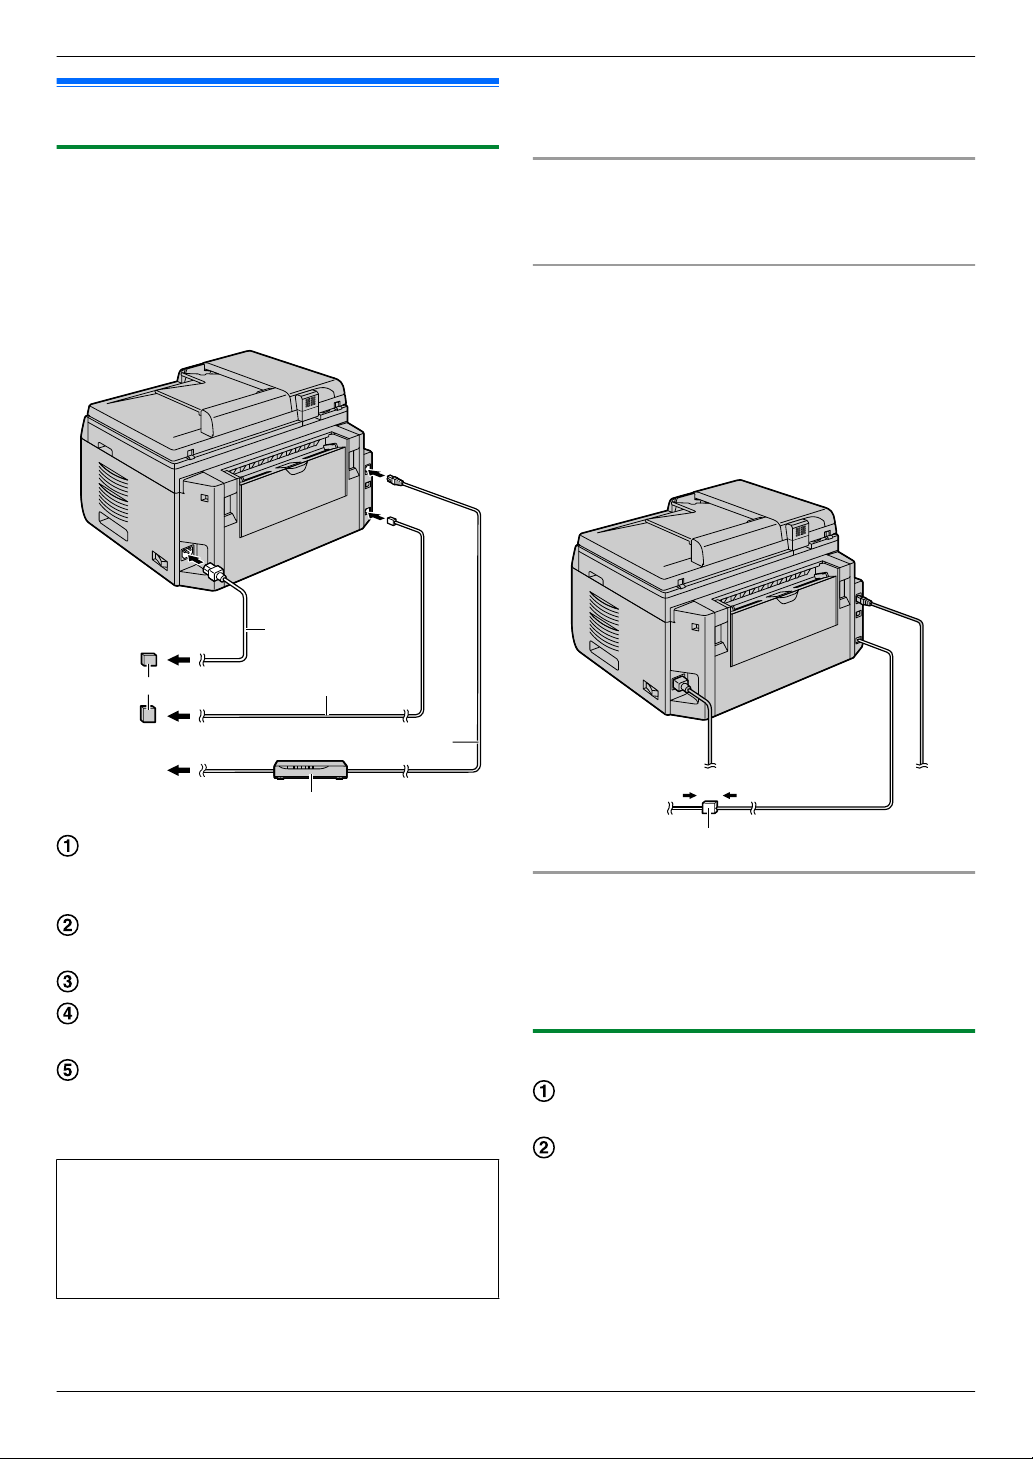
A nickel metal hydride battery that is recyclable powers
the product you have purchased.
Please call 1-800-8-BATTERY (1-800-822-8837) for
information on how to recycle this battery.
20
For assistance, please visit http://www.panasonic.com/help
2.1 Connections
C
D
B
A
E
F
G
2. . Preparation
2.1.1 Base unit
Caution:
R When you operate this product, the power outlet
should be near the product and easily accessible.
Important:
R See page 18 to connect the handset unit.
2. Preparation
If any other device is connected to the same
R
telephone line, this unit may disturb the network
condition of the device.
Using surge protectors
R The warranty does not cover damage due to power
line surges or lightning. For additional protection, we
recommend using a surge protector (F).
If the unit shares a single telephone line with a DSL
service
Fax transmission/reception may be disturbed, noise
interference may be heard during telephone
conversations, or Caller ID (page 53) may not function
properly. Please attach a DSL filter (G) to the telephone
line cord of the unit to prevent this. A DSL filter may be
provided by your DSL service provider.
Power cord
R Connect to a power outlet
(120 V, 60 Hz).
Telephone line cord
R Connect to a single telephone line jack (RJ11C).
To the Internet
Network router/Network hub (not supplied)
R Also connect networked computers.
LAN cable (not supplied)
R To assure continued emission limit compliance,
use only shielded LAN cable (Category 5 (Cat-5)
Ethernet cable).
IMPORTANT NOTICE FOR THE USB
CONNECTION
R DO NOT CONNECT THE UNIT TO A
COMPUTER WITH THE USB CABLE UNTIL
PROMPTED TO DO SO DURING THE SETUP
OF MULTI-FUNCTION STATION (page 31).
Note:
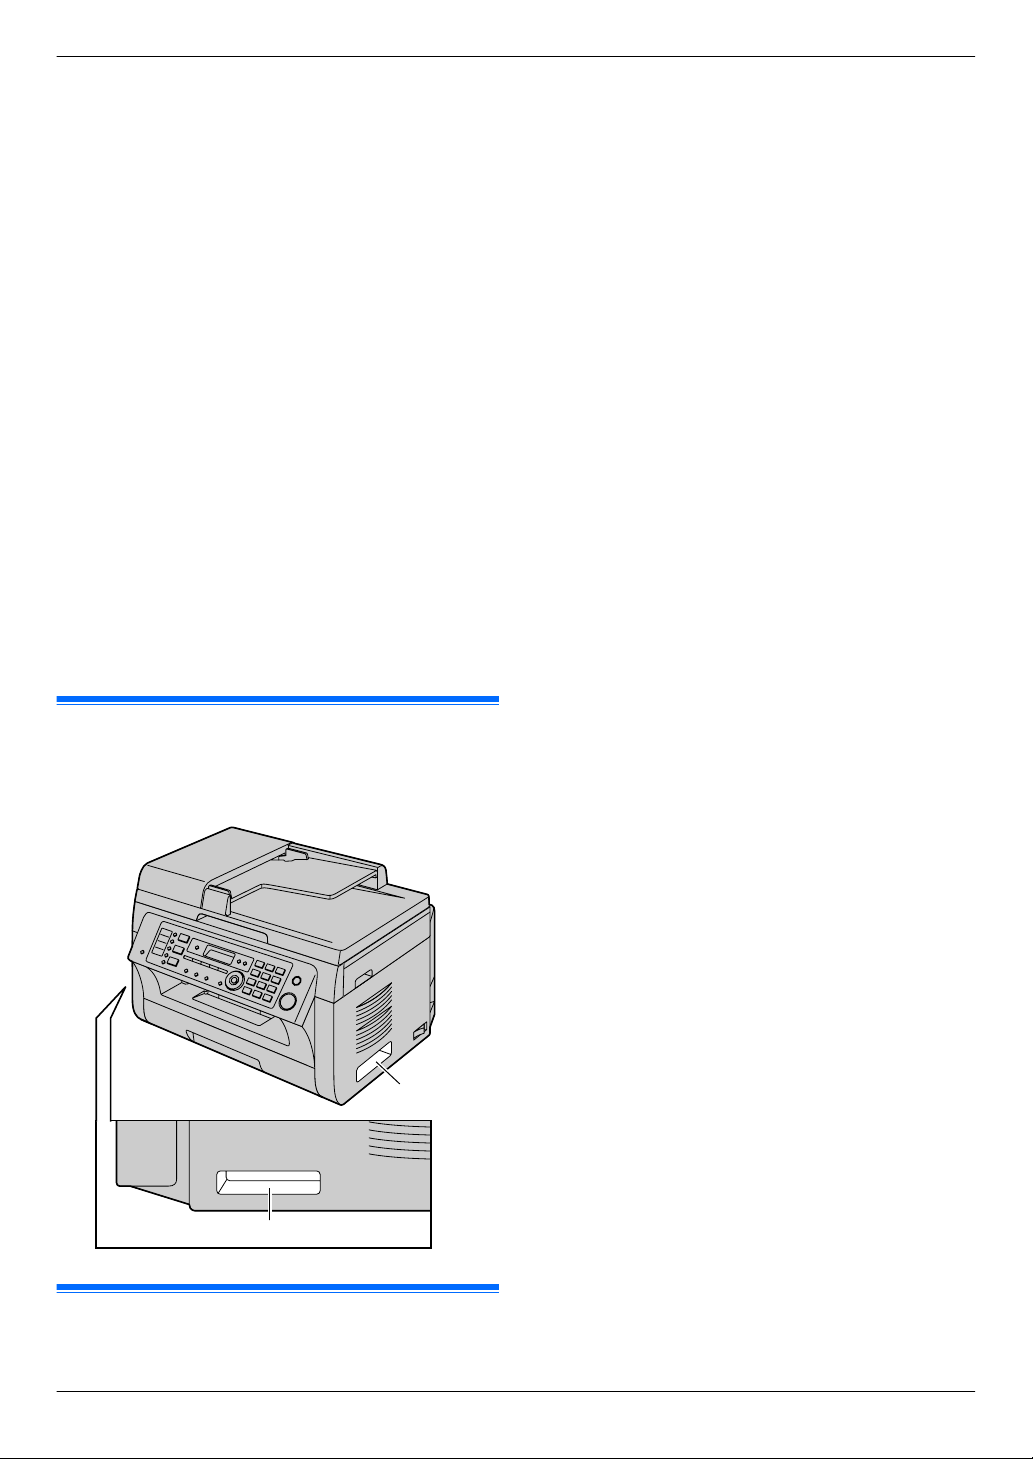
R Do not place any objects within 10 cm (4 inches) of
the right, left and back sides of the base unit.
For assistance, please visit http://www.panasonic.com/help
Using network router/network hub
R We recommend using network routers/network hubs
(D) under secure network environments. Consult
your network administrator for firewall settings, etc.
R The warranty does not cover damage due to security
problems or any inconveniences relating to it.
2.1.2 Charger unit
AC adaptor
R Connect to a power outlet (120 V, 60 Hz).
Hooks
R Fasten the AC adaptor cord to prevent it from
being disconnected.
21
25.4 mm
(1 inch)
C
A
B
A
C
B
2. Preparation
Screws (not supplied)
R The charger can be mounted on the wall, if
required.
Caution:
R USE ONLY WITH the supplied Panasonic AC
adaptor.
R The AC adaptor must remain connected at all
times. (It is normal for the adaptor to feel warm
during use.)
R The AC adaptor should be connected to a
vertically oriented or floor-mounted AC outlet. Do
not connect the AC adaptor to a ceiling-mounted
AC outlet, as the weight of the adaptor may cause
it to become disconnected.
R Press the AC adaptor plug firmly.
2.2 Battery charge
Place the cordless handset on the charger for about 7
hours before initial use. Confirm “Charging” is
displayed.
When the batteries are fully charged, the charge
indicator (A) goes OFF and “Fully charged” is
displayed.
Note:
R It is normal for the cordless handset to feel warm
during charging.
R Clean the charge contacts of the cordless handset
(B) and charger (C) with a soft and dry cloth once
a month. Clean more often if the unit is exposed to
grease, dust, or high humidity.
22
Battery level
Icon Battery level
High
Medium
Low
Needs charging.
Empty
Panasonic Ni-MH battery performance (supplied
batteries)
Operation Operating time
In continuous use
Not in use (standby)
*1 If Eco mode is on.
Note:
R Actual battery performance depends on usage and
ambient environment.
R Even after the cordless handset is fully charged, the
cordless handset can be left on the charger without
any ill effect on the batteries.
For assistance, please visit http://www.panasonic.com/help
13 hours max.
11 days max.
*1
*1
R The battery level may not be displayed correctly after
A
you replace the batteries. In this case, place the
cordless handset on the charger and let it charge for
at least 7 hours.
2.3 Intelligent eco mode
This feature automatically reduces cordless handset
power consumption by suppressing cordless handset
transmission power when the cordless handset is close
to the base unit.
R When this feature is activated,
R Eco mode is turned OFF when the clarity booster is
activated (page 49).
is displayed.
2. Preparation
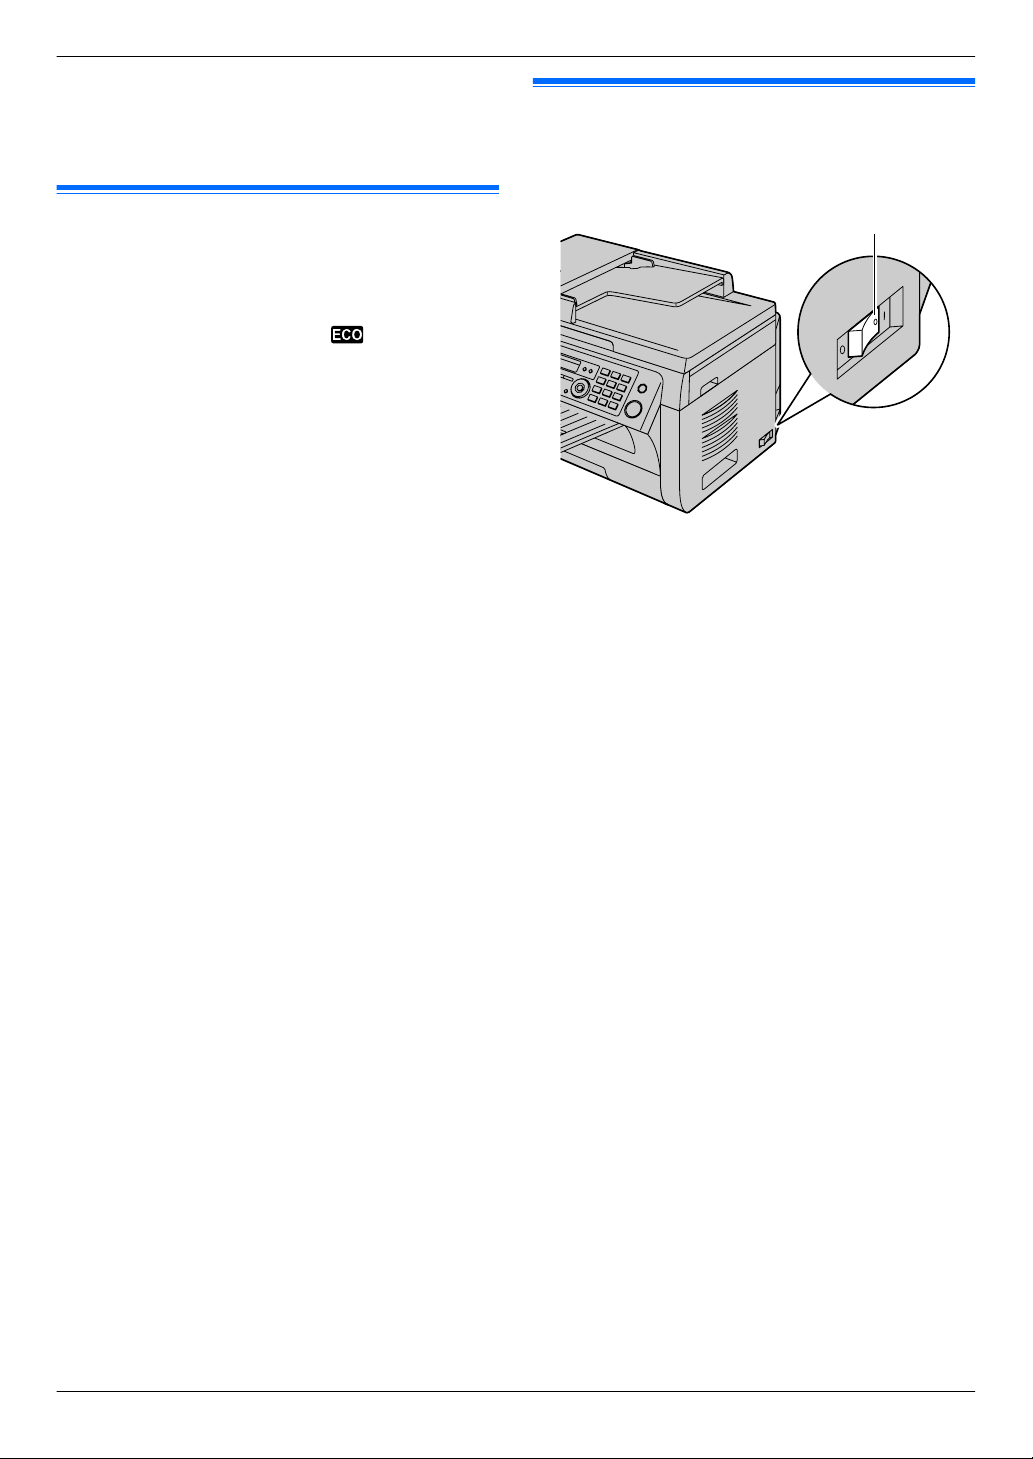
2.4 Turning the power ON
Turn the power switch to the ON position (A).
For assistance, please visit http://www.panasonic.com/help
23
MSetN
MMenuN
2. Preparation
2.5 Dialing mode (for the base unit and cordless handset)
If you cannot dial (page 49, 57), change this setting
according to your telephone line service.
1 MMenuN
2 Press MBNM1NM2NM0N to display “DIALING MODE”.
3 Press M1N or M2N to select the desired setting.
M1N “PULSE”: For rotary/pulse dial service.
M2N “TONE” (default): For tone dial service.
4 MSetN
5 Press MMenuN to exit.
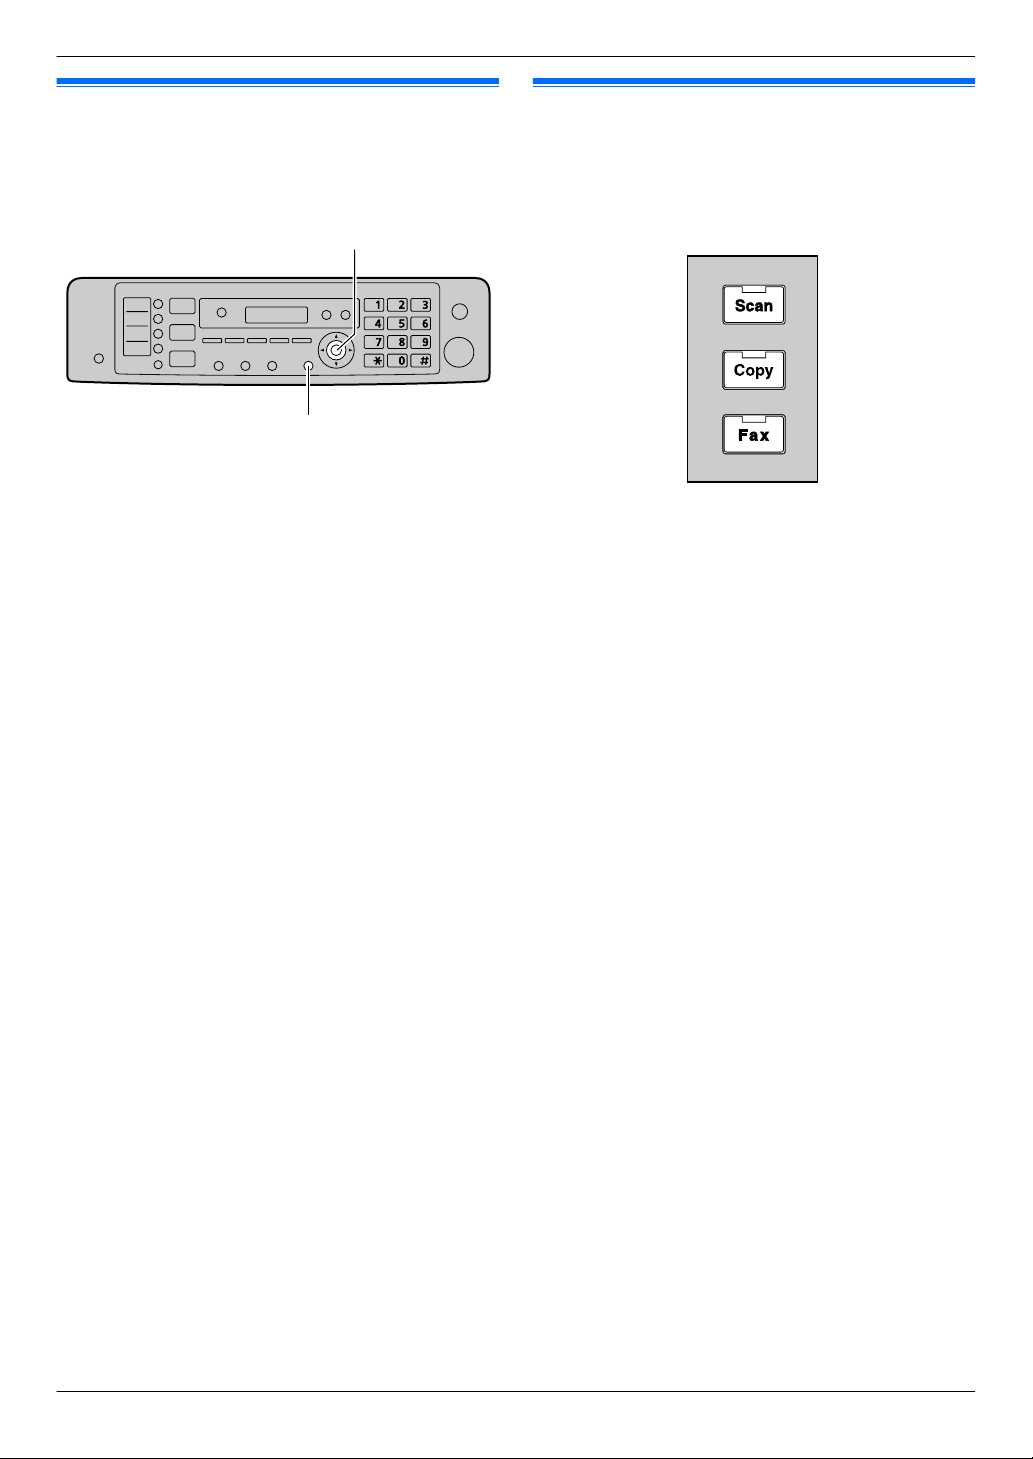
2.6 Selecting the operation mode (Scan/Copy/Fax)
You can select the desired mode by pressing one of the
following buttons.
– MScanN: Select this mode when using the unit as a
scanner (page 37).
– MCopyN: Select this mode when using the unit as a
copier (page 42).
– MFaxN: Select this mode when using the unit as a fax
machine (page 57).
Note:
R The default operation mode is the copy mode.
R You can change the default operation mode (feature
#463 on page 81) and the timer before returning to
the default operation mode (feature #464 on
page 81).
24
For assistance, please visit http://www.panasonic.com/help

A
B
208 mm
(8
3
/16")
289
mm
(11 3/8")
4 mm
(
5
/32")
4 mm
(
5
/32")
4 mm
(
5
/32")
4 mm
(
5
/32")
A
2. Preparation
2.7 Setting the original
2.7.1 Using the scanner glass
1 Open the document cover (A).
2 Place the document FACE DOWN on the scanner
glass (B), aligning the top left of the document with
the corner where the mark is positioned.
3 Close the document cover.
Note:
R Confirm that there are no documents in the automatic
document feeder.
R Place the original onto the scanner glass gently. To
avoid malfunction, do not press down too firmly.
R If the original is a thick book, do not close the
document cover.
R Confirm that any ink, paste or correction fluid has
dried completely.
R Effective scanning area is shown by the shaded area:
Effective scanning area
2.7.2 Using the automatic document feeder
1 Insert the document (up to 20 pages) FACE UP into
the feeder until a single beep is heard.
2 Adjust the width of the document guides (A) to fit the
actual size of the document.
Note:
R Confirm that there are no documents on the scanner
glass.
R Confirm that any ink, paste or correction fluid has
dried completely.
R Remove clips, staples or other fasteners.
R Do not insert the following types of documents (Make
a copy of the document using the scanner glass and
set the copy instead.):
– Chemically treated paper such as carbon or
carbonless duplicating paper
– Electrostatically charged paper
– Badly curled, creased or torn paper
– Paper with a coated surface
– Paper with printing on the opposite side that can
be seen through the other side, such as newsprint
R The total height of the documents when laid flat, must
be less than 4 mm (5/32"). If the documents exceed
the capacity of the automatic document feeder, they
may fall or cause a jam in the feeder.
R To set a document with a width of less than 210 mm
(8 1/4"), we recommend using the scanner glass to
copy the original document onto A4 or letter-size
paper, then setting the copied document for better
results.
R Do not set documents that do not satisfy the
requirements of size and weight. Make a copy of the
document using the scanner glass and set the copy.
R Available document size, document weight and
effective scanning area are as follows:
For assistance, please visit http://www.panasonic.com/help
25
128 mm
(5")
128 mm
(5")
600 mm
(23
5
/8")
216 mm
(8
1
/2")
216 mm (8
1
/2")
208 mm (8
3
/16")
4 mm
(
5
/32")
4 mm
(
5
/32")
4 mm
(
5
/32")
4 mm
(
5
/32")
MSetN
MMenuN
MFNMEN
2. Preparation
Minimum document size
Maximum document size
Effective scanning area
2.8 Help function
The unit contains helpful information, which can be
printed for reference.
– “BASIC SETTINGS”
– “FEATURE LIST”
– “PHONEBOOK”
– “TAM OPERATION”
– “FAX SND/RCV”
– “COPIER”
– “Q and A”
– “ERRORS”
– “REPORTS”
– “CALLER ID”
R Shaded area will be scanned.
R When using the unit as a scanner (page 37,
40), the effective scanning length depends on
the selected paper size.
Document weight
R Single sheet:
60 g/m2 to 75 g/m2 (16 lb to 20 lb)
R Multiple sheets:
60 g/m2 to 75 g/m2 (16 lb to 20 lb)
1 Press MMenuN repeatedly to display “HELP”. 2 Press MFN or MEN repeatedly to display the desired
item. A MSetN
3 Press MMenuN to exit.
26
For assistance, please visit http://www.panasonic.com/help
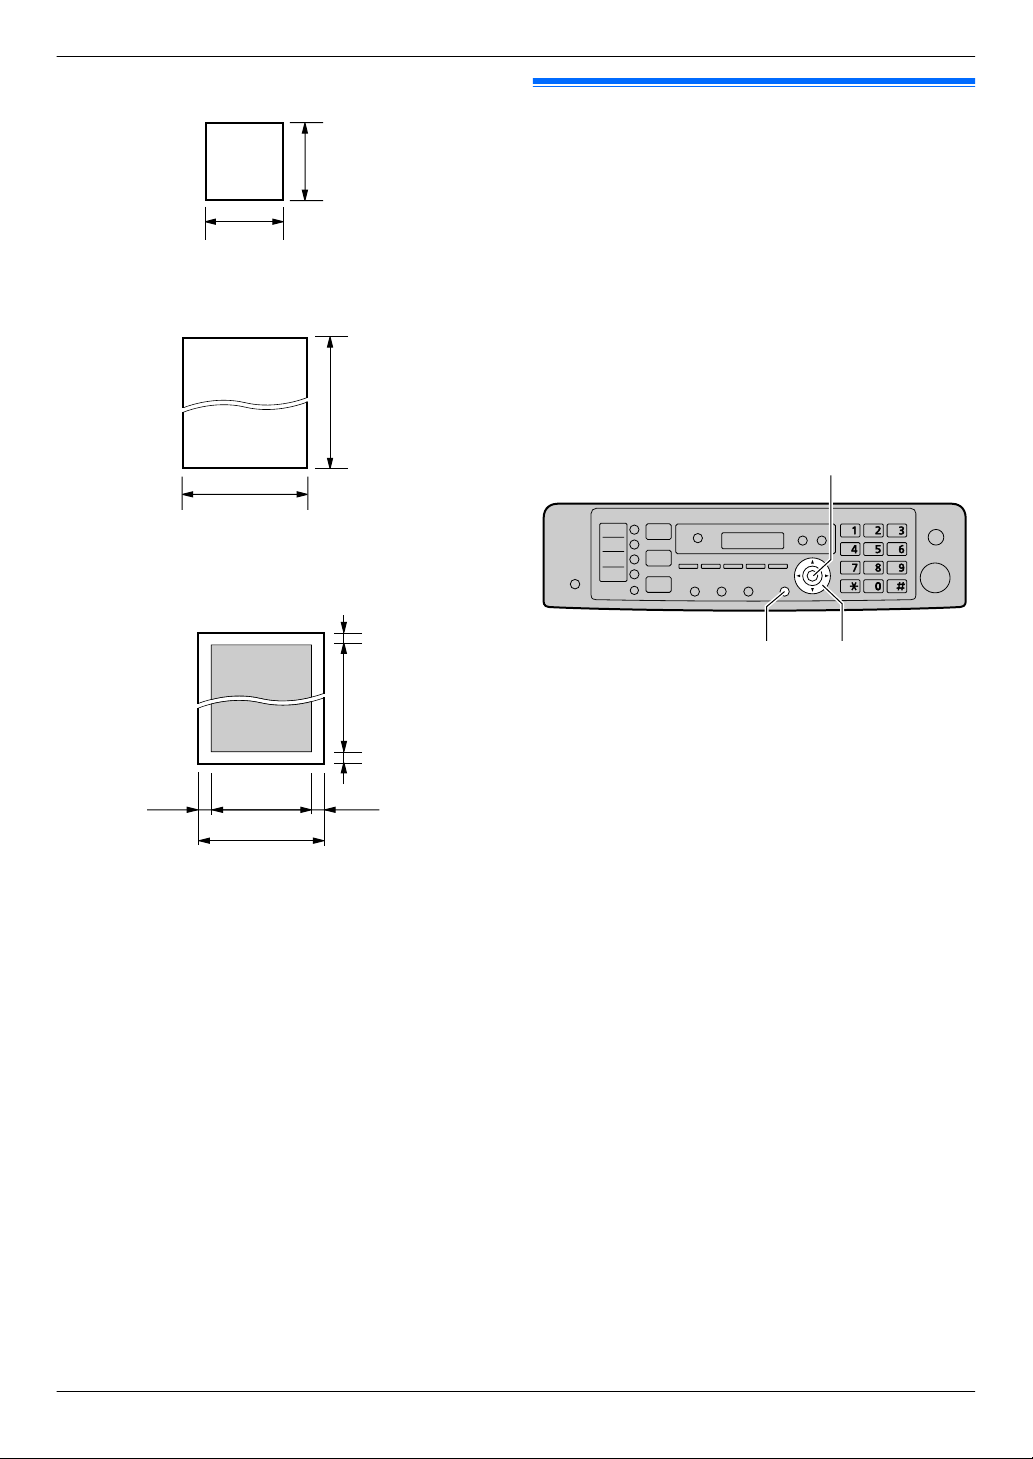
2.9 Adjusting the volume
MSetN
MCNMDN
MFaxN
MCNMDN
MOFFN
2.9.1 Base unit
Important:
R Before adjusting the volume, set the operation
mode to fax mode. If the MFaxN light is OFF, turn
it ON by pressing MFaxN.
Ringer volume
While the unit is idle, press MCN or MDN.
To turn the ringer OFF
Press MCN repeatedly to display “RINGER OFF= OK?”.
A MSetN
R The base unit will not ring for outside calls.
The base unit will ring at the low level for intercom
calls.
R To turn the ringer back ON, press MDN.
2. Preparation
Press MCN or MDN to select “Ringer volume”. A
4.
MSELECTN
5. Press MCN or MDN to select the desired volume. A
MSAVEN A MOFFN
Note:
R When receiving a call, you can adjust the ringer
volume by pressing MCN or MDN.
R When the ringer volume is turned OFF,
displayed and the cordless handset does not ring for
outside calls.
However even when the ringer volume is set to OFF,
the cordless handset rings:
– at the low level for alarm (page 102) and intercom
calls (page 104)
– at the high level for paging (page 104)
Cordless handset receiver volume
While using the receiver, press MCN or MDN.
Speaker volume
While using the speakerphone, press MCN or MDN.
is
Handset receiver volume
While using the receiver, press MCN or MDN.
Monitor volume
While using the monitor, press MCN or MDN.
2.9.2 Cordless handset
Ringer volume
1. MMENUN
2. Press MCN or MDN to select “Initial setting”.
A MSELECTN
3. Press MCN or MDN to select “Ringer setting”.
A MSELECTN
For assistance, please visit http://www.panasonic.com/help
27
MSetN
MMenuN
MFNMEN
MFaxN
MCNMDN
MOFFN
2. Preparation
2.10 Date and time
We recommend you to set the date and time. The other
party will receive your unit’s date and time as the header
information.
2.10.1 With the base unit
1 MMenuN A MBNM1NM0NM1N A MSetN
2 Enter the current month/date/year by selecting 2
digits for each.
Example: August 3, 2010
M0NM8N M0NM3N M1NM0N
3 Enter the current hour/minute by selecting 2 digits for
each.
Example: 10:15 PM (12 hour clock format)
1. M1NM0N M1NM5N
2. Press MGN repeatedly to select “PM”.
4 MSetN
5 Press MMenuN to exit.
Note:
R To check the current date and time setting, press
MFaxN to temporarily change the unit to the fax mode.
R Your unit’s date and time will be used as the header
information for the following:
– When sending as an attached file to an email
destination directly from this unit (Scan to email
address) (page 38).
– When sending faxes (page 57).
R If the date and time is not set correctly, the other party
will receive an incorrect date and time as their
header. This may confuse the other party.
2.10.2 With the cordless handset
1 MMENUN A M#NM1NM0NM1N
2 Enter the current month/date/year by selecting 2
digits for each.
Example: August 3, 2010
M0NM8N M0NM3N M1NM0N
3 MOKN
4 Enter the current hour/minute by selecting 2 digits for
each.
Example: 10:15 PM (12 hour clock format)
M1NM0N M1NM5N
5 Press MAM/PMN repeatedly to select “PM”.
6 MSAVEN
7 Press MOFFN to exit.
Note:
R When English is selected as the display language, 12
hour clock format is used. When Spanish is selected,
24 hour clock format is used.
To correct a mistake
Press MFN or MEN to move the cursor to the incorrect
number, and make the correction.
To correct a mistake
Press MFN or MEN to move the cursor to the incorrect
number, and make the correction.
If you have subscribed to a Caller ID service
The date and time will be automatically set according to
the received caller information.
R If the time has not previously been set, Caller ID will
not adjust the clock.
R You can turn this feature OFF (feature #226 on
page 80).
28
For assistance, please visit http://www.panasonic.com/help

MSetN
MMenuN
MFNMEN
MStopN
MSetN
MMenuN
MFNMEN
MFlashN
MStopN
2. Preparation
2.11 Your logo
You can program your logo (name, company name, etc.)
so that it appears on the top of each page sent.
1 MMenuN A MBNM1NM0NM2N A MSetN
2 Enter your logo, up to 30 characters (see page 107
for character entry). A MSetN
3 Press MMenuN to exit.
To correct a mistake
Press MFN or MEN to move the cursor to the incorrect
character, and make the correction.
R To erase all characters, press and hold MStopN.
2.12 Your fax number
You can program your fax number so that it appears on
the top of each page sent.
1 MMenuN A MBNM1NM0NM3N A MSetN
2 Enter your fax number, up to 20 digits.
R To enter a “+”, press MGN.
R To enter a space, press MBN.
R To enter a hyphen, press MFlashN.
R To erase a number, press MStopN.
3 MSetN
4 Press MMenuN to exit.
To correct a mistake
Press MFN or MEN to move the cursor to the incorrect
number, and make the correction.
R To erase all numbers, press and hold MStopN.
For assistance, please visit http://www.panasonic.com/help
29

2. Preparation
2.13 Configuring the unit to
access the LAN
You can use printer, scanner, fax, telephone answering
machine features using a computer connected to the
LAN. To enable these features, you need to set the IP
address, subnet mask, and default gateway in the unit.
Important:
R Consult your network administrator when setting
the IP address, subnet mask, and default
gateway.
2.13.1 Setting up automatically with a DHCP
server
Your situation:
– When only one unit is connected to the LAN.
If your network administrator manages the network with
a DHCP (Dynamic Host Configuration Protocol) server,
it will automatically assign an IP (Internet Protocol)
address, subnet mask, and default gateway to the unit.
1 After connecting the LAN cable to the unit and the
computer, turn the power switch ON.
R The IP address, subnet mask, and default
gateway will be set automatically.
2 Install Multi-Function Station on the computer that
you want to use it with. See page 31 for details.
Note:
R You can connect two or more units and assign IP
addresses automatically with a DHCP server, but we
recommend assigning static IP addresses manually
for each unit to avoid network access and
configuration troubles.
2.13.2 Setting up manually
Your situation:
– When your network administrator does not manage
the network with a DHCP server.
– When two or more units are connected to the LAN.
You need to assign an IP address, subnet mask, and
default gateway manually.
1 MMenuN
2 Press MBNM5NM0NM0N to display “DHCP”.
3 Press M0N to select “DISABLED”. A MSetN
4 Set each item.
For the IP address:
1. Press M5NM0NM1N to display “IP ADDRESS”. A
MSetN
2. Enter the IP address of the unit. A MSetN
For the subnet mask:
1. Press M5NM0NM2N to display “SUBNET MASK”.
A MSetN
2. Enter the subnet mask of the network. A MSetN
For the default gateway:
1. Press M5NM0NM3N to display “DEFAULT
GATEWAY”. A MSetN
2. Enter the default gateway of the network. A
MSetN
5 Press MMenuN to exit.
6 Install Multi-Function Station on the computer that
you want to use it with. See page 31 for details.
To correct a mistake in the IP address, subnet mask,
or default gateway
Press MFN or MEN to move the cursor to the incorrect
number, and make the correction.
2.13.3 Setting the computer for PC fax reception
You need to select the computer that will be used for
receiving faxes.
Important:
R Make sure the PC fax setting is set to “ALWAYS”
or “CONNECTED” beforehand (feature #442 on
page 86).
R Make sure the fax preview mode is turned OFF
beforehand (feature #448 on page 67).
1 MMenuN A MBNM4NM4NM3N A MSetN
2 Press MCN or MDN repeatedly to select the desired
computer.
R You can display IP address of the selected
computer by pressing MEN.
3 MSetN
4 Press MMenuN to exit.
Note:
R If the unit is not connected to the LAN, the computer
connected to the unit by USB is assigned as the
default computer for PC fax reception.
R To select the desired computer easily, change the PC
name beforehand (page 34).
2.13.4 Setting the computer for PC TAM reception
You need to select the computer that will be used for
receiving voice messages.
Important:
R Make sure the PC TAM setting is set to
“ALWAYS” beforehand (feature #365 on
page 88).
1 MMenuN A MBNM3NM6NM6N A MSetN
2 Press MCN or MDN repeatedly to select the desired
computer.
R You can display IP address of the selected
computer by pressing MEN.
30
For assistance, please visit http://www.panasonic.com/help
 Loading...