


User Guide
BlackBerry Connect™ for the
Palm® Treo™ 680 Smart Device
Intellectual property notices
© 2006 Palm, Inc. All rights reser ved.
Palm, Treo, VersaMail, and the Palm and Treo logos are among the
trademarks or registered trademarks owned by or licensed to Palm,
Inc. All other brand and product names are o r may be trademarks of,
and are used to identify products or ser vices of, their respective
owners.
The RIM and BlackBerry families of related marks, images, and
symbols are the exclusive properties and trademarks of Research In
Motion Limited—used by permission. BlackBerry, the BlackBerry
logo, the “envelope-in-motion” symbol, and “Always On, Always
Connected” are registered with the U.S. Patent and Trademark Office
and may be pending or registered in other countries .
Disclaimer and limitation of liability
Palm, Inc. assumes no responsibility for any damage or loss resulting
from the use of this guide.
Palm, Inc. assumes no responsibility for any loss or claims by third
parties which may arise through the use of this software. Palm, Inc.
assumes no responsibility for any damag e or loss caused by deletion
of data as a result of malfunction, dead battery, or repairs. Be sure to
make backup copies of all important data on other media to protect
against data loss.
IMPORTANT Please read the End User Software License
Agreement with this product before using the accompanying
software program(s). Using any part of the software indicates that
you accept the terms of the End User Software License Agreement.
v. 1.0
Contents
Chapter 1: Using Your Account . . . . . . . . . . . . . . . . . . . . . . . . . . . . . . . . . . . . . . . . . . 1
Accessing your BlackBerry Connect account . . . . . . . . . . . . . . . . . . . . . . . . . . . . . . 3
Your Inbox . . . . . . . . . . . . . . . . . . . . . . . . . . . . . . . . . . . . . . . . . . . . . . . . . . . . . . . . 3
Sending email messages . . . . . . . . . . . . . . . . . . . . . . . . . . . . . . . . . . . . . . . . . . . . . 6
Managing messages and folders . . . . . . . . . . . . . . . . . . . . . . . . . . . . . . . . . . . . . . . 8
Working with attachments . . . . . . . . . . . . . . . . . . . . . . . . . . . . . . . . . . . . . . . . . . . . 8
Working with meeting invitations . . . . . . . . . . . . . . . . . . . . . . . . . . . . . . . . . . . . . . . 11
Viewing and using the Reminders screen . . . . . . . . . . . . . . . . . . . . . . . . . . . . . . . . 13
BlackBerry Connect preferences . . . . . . . . . . . . . . . . . . . . . . . . . . . . . . . . . . . . . . . 14
BlackBerry desktop application settings . . . . . . . . . . . . . . . . . . . . . . . . . . . . . . . . . . 16
Chapter 2: Using Calendar . . . . . . . . . . . . . . . . . . . . . . . . . . . . . . . . . . . . . . . . . . . . . . 21
Creating an event . . . . . . . . . . . . . . . . . . . . . . . . . . . . . . . . . . . . . . . . . . . . . . . . . . . 23
Working with Calendar events . . . . . . . . . . . . . . . . . . . . . . . . . . . . . . . . . . . . . . . . . 23
Changing Calendar sync settings when you delete
a BlackBerry Connect account . . . . . . . . . . . . . . . . . . . . . . . . . . . . . . . . . . . . . . . 25
Chapter 3: Synchronizing Contacts . . . . . . . . . . . . . . . . . . . . . . . . . . . . . . . . . . . . . . . 27
Setting up synchronization with Outlook . . . . . . . . . . . . . . . . . . . . . . . . . . . . . . . . . 29
How to synchronize . . . . . . . . . . . . . . . . . . . . . . . . . . . . . . . . . . . . . . . . . . . . . . . . . 30
Chapter 4: Common Questions . . . . . . . . . . . . . . . . . . . . . . . . . . . . . . . . . . . . . . . . . . 31
Using BlackBerry Connect . . . . . . . . . . . . . . . . . . . . . . . . . . . . . . . . . . . . . . . . . . . . 32
Account Deletion . . . . . . . . . . . . . . . . . . . . . . . . . . . . . . . . . . . . . . . . . . . . . . . . . . . 35
Contacts . . . . . . . . . . . . . . . . . . . . . . . . . . . . . . . . . . . . . . . . . . . . . . . . . . . . . . . . . . 36
CONTENTS
iii
iv
CONTENTS

Using Your Account
BlackBerry Connect™ for the Palm®Tr eo™ 680 smart device
provides specific features for working with email messages
and Calendar events. This chapter discusses those features in
detail.
For additional information on working with email messages in
the VersaMail
which is available in PDF format from the same website from
which you downloaded the BlackBerry software. For more
information on working with Calendar, see your Treo 680 User
Guide.
NOTE When email info appears both in this guide and in the VersaMail User
Guide—for example, info about sending messages—follow the instructions in
this guide.
®
application, see the VersaMail User Guide,
CHAPTER
1
In this chapter
Accessing your BlackBerry Connect account. . . . . . . . . . . . . . . . . . 3
Your Inbox . . . . . . . . . . . . . . . . . . . . . . . . . . . . . . . . . . . . . . . . . . . . 3
Sending email messages . . . . . . . . . . . . . . . . . . . . . . . . . . . . . . . . . 6
Managing messages and folders . . . . . . . . . . . . . . . . . . . . . . . . . . . 8
Working with attachments . . . . . . . . . . . . . . . . . . . . . . . . . . . . . . . . 8
Working with meeting invitations . . . . . . . . . . . . . . . . . . . . . . . . . . 11
Viewing and using the Reminders screen . . . . . . . . . . . . . . . . . . . . 13
BlackBerry Connect preferences . . . . . . . . . . . . . . . . . . . . . . . . . . . 14
BlackBerry desktop application settings. . . . . . . . . . . . . . . . . . . . . . 16
USING YOUR ACCOUNT
1
Accessing your BlackBerry Connect account
To perform any of the procedures in this
chapter, you need to be in your BlackBerry
Connect email account.
1 Press Messaging .
2 If “BBC” does not appear in the
upper-left corner of the screen, open the
menus , select Accounts, and then
select BBC.
DID YOU KNOW
button to open a different application, you can
open VersaMail by going to Applications and
selecting Email.
?
If you reassign the Messaging
Your Inbox
The Inbox of your BlackBerry Connect
account includes the following features:
Push email Once you set up a BlackBerry
Connect account, the server pushes email
messages and Calendar events to your
Treo 680 as they are received. Likewise,
when you send an email message or
create a Calendar event, it is pushed to the
server.
DID YOU KNOW
service begins automatically when you turn
the phone on your Treo 680 on and you are in
a coverage area. You can set a preference
you want to manually start the BlackBerry
service.
IMPORTANT Push email does not work in
?
By default, the BlackBerry
if
either of the following situations:
• Less than 1MB of memory is available
on your Treo 680. Delete some
messages to free up at least 1.2MB of
memory, and see if new messages
appear.
TIP
To check for available space on your Treo
680, go to Applications and select Info on
the App menu. At the bottom of the screen,
select Size. The first number on the Free
Space line tells you how much space is
available on your Treo 680.
CHAPTER
ACCESSING YOUR BLACKBERRY CONNECT ACCOUNT
3
USING YOUR ACCOUNT
1
CHAPTER
• The total number of messages in all
VersaMail accounts exceeds 2,200.
Delete some messages so that you
have fewer than 2,000 total messages
in all of your VersaMail accounts.
Reconciliation Periodically, the server
checks for updated information in the
BlackBerry Connect account on your Treo
DID YOU KNOW
receive a special type of message in your
BlackBerry Connect Inbox called an All Points
Bulletin (APB). APBs are messages that an
administrator in your company’s IT
department may send you. These APB
messages do not synchronize with the server,
and you cannot reply to these messages.
?
From time to time, you may
680 and wirelessly reconciles the info with
(updates the info on) the server. Any
changes you make to the Inbox on your
Treo 680—deleting messages, for
example—are made on the server as well.
NOTE You can manually reconcile your
Inbox with the mail server as well.
Message removal Email messages in
your Treo 680 Inbox that fall outside the
time interval set on the Treo 680 (the
default is seven days) are deleted from
your Inbox. For example, if the time interval
Viewing large messages
Use the Get More icon to view the large
messages that are not fully downloaded
from the server.
1 Press Messaging .
2 In the Inbox, select the message you
want to read.
3 Select the More button in the
lower-right corner of the screen to
retrieve and view the rest of the
message.
is set at seven days, any email messages
that are eight days old are removed from
your Treo 680. The messages are not
removed from the Exchange or Domino
server. You can select a preference
to
change the time interval.
4
YOUR INBOX
USING YOUR ACCOUNT
1
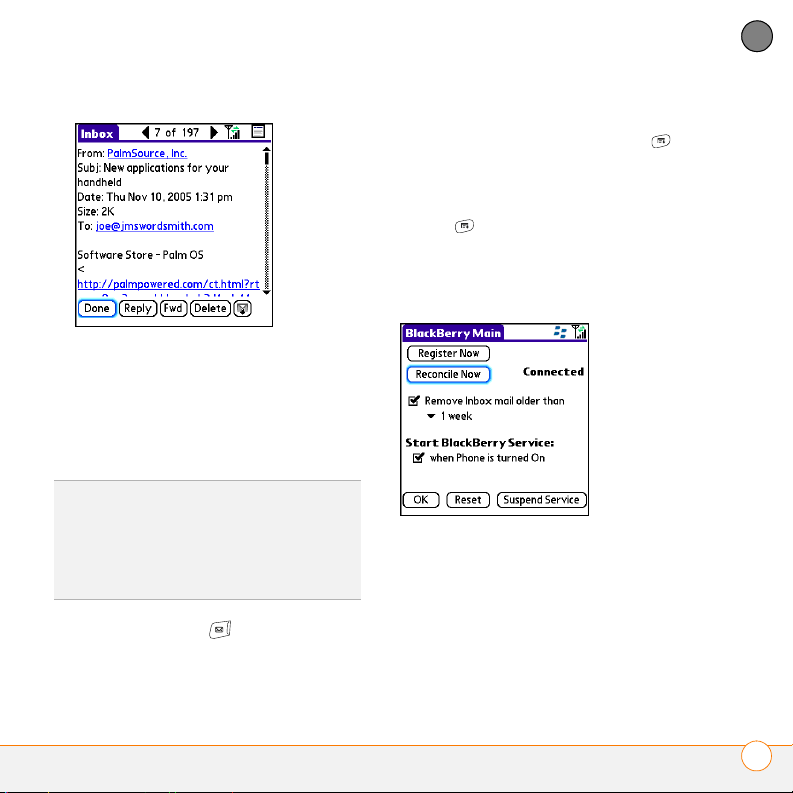
Manually reconciling your Inbox with the mail server
You can force an update of read, unread,
and deleted messages from your Treo 680
to the server at any time.
DID YOU KNOW
automatically checks for new information in
the BlackBerry Connect account on your Treo
680 and reconciles this information with the
server, so manual reconciliation is not
required.
?
Periodically, the server
1 Press Messaging .
2 If you are not in your BlackBerry
Connect account, open the menus ,
select Accounts, and then select BBC.
3 From the Inbox or another folder in your
BlackBerry Connect account, open the
menus .
4 Select Options, select Preferences,
and then select Main.
5 Select Reconcile Now.
6 Select OK, and then select OK again.
CHAPTER
YOUR INBOX
5
USING YOUR ACCOUNT
1
CHAPTER
Sending email messages
1 Press Messaging .
2 From the Inbox, select New.
3 Enter the recipient’s email address, use
Smart Addressing, or use Remote
Address Lookup to find and select
addresses on your corporate server.
4 In the Subject field, enter the subject of
your email. In the area below the
Subject field, enter your message text.
5 Select Send. The message is placed in
the Outbox and is pushed to the server.
DID YOU KNOW
message, including any attachments, cannot
exceed the maximum message size
supported by BlackBerry Enterprise Server
usually 32KB. If you attempt to send a
message whose total size exceeds the
maximum message size, an error message
appears.
TIP
If an error message appears that a
message was not sent successfully, you can
go to the Outbox to manually resend the
message.
TIP
You can attach one or more files to
outgoing messages.
?
The total size of the outgoing
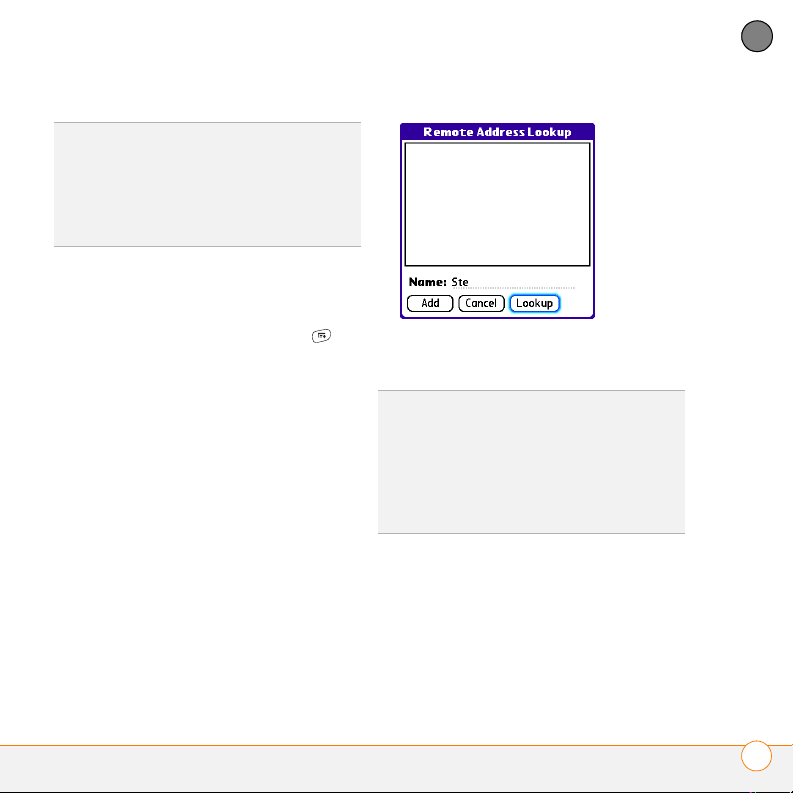
Remote Address Lookup
BlackBerry Connect accounts, like all
®
,
VersaMail accounts, use the Smart
Addressing feature: When you begin to
enter an email address in the To or cc: field
of a new message, a list of matches from
your contacts list appears that corresponds
to the characters you have entered so far.
In addition, BlackBerry Connect accounts
offer Remote Address Lookup, which
enables you to search for matching names
and addresses that exist on your corporate
server.
SENDING EMAIL MESSAGES
6
USING YOUR ACCOUNT
1
DID YOU KNOW
Addressing can be either names or email
addresses.
TIP
and you must be in a coverage area to use
Remote Address Lookup.
?
The matches in Smart
The phone on your Treo 680 must be on
1 On the new message screen, begin
addressing the message. If the name
you want does not appear on the Smart
Addressing list, open the menus ,
select Options, and then select
Remote Lookup.
2 Enter text you want to find on the
server. For example, type “Ste” to send
mail to a person at your company
named Steve.
3 Select Lookup. Any names or
addresses on the server that match the
characters you entered are displayed.
4 When the name you want appears,
select it, and then select Add.
TIP
If Remote Address Lookup retrieves no
new matches, an alert message appears.
DID YOU KNOW
the list and send a message using that name
or address, the match is added to your Smart
Addressing list and you do not need to use
Lookup to retrieve it in the future.
?
Once you select a match from
CHAPTER
SENDING EMAIL MESSAGES
7
USING YOUR ACCOUNT
1
CHAPTER
Managing messages and folders
A BlackBerry Connect account includes the
following features for managing email
messages and folders:
Moving messages Only the Inbox folder
synchronizes with BlackBerry Enterprise
Server. If you create another folder and
move a message there from the Inbox, the
message no longer synchronizes with the
server—even if you move the message
back into the Inbox.
NOTE If you move messages from a
server folder to a personal folder in Outlook
on your desktop computer, that message is
not removed from the Inbox on your Treo
680 unless your company is using
BlackBerry Enterprise Server version 4.1 or
later.
Read/unread status Messages marked
as read or unread on your Treo 680 or on
the server are synchronized so that each
message has the same status in both
locations. In the event of a discrepancy, the
message status on your Treo 680 overrides
the status on the server. You can manually
reconcile message status between your
Treo 680 and the server.
Replying to and forwarding messages
By default, when you forward or reply to a
message, the text is sent from the server
copy of the message, not from the copy on
your Treo 680. This is faster and may save
on data charges, and it allows you to send
replies/forwards that exceed the maximum
message size allowed for sending
messages from your Treo 680. If a server
copy does not exist, the reply or forward is
sent from your Treo 680, as long as the
maximum message size is not exceeded.
Working with attachments
Viewing attachments
BlackBerry Connect accounts let you view
a list of all attachments to a message, with
approximate file size, so you can decide
which ones you want to download. The list
appears dimmed at the bottom of the
MANAGING MESSAGES AND FOLDERS
8
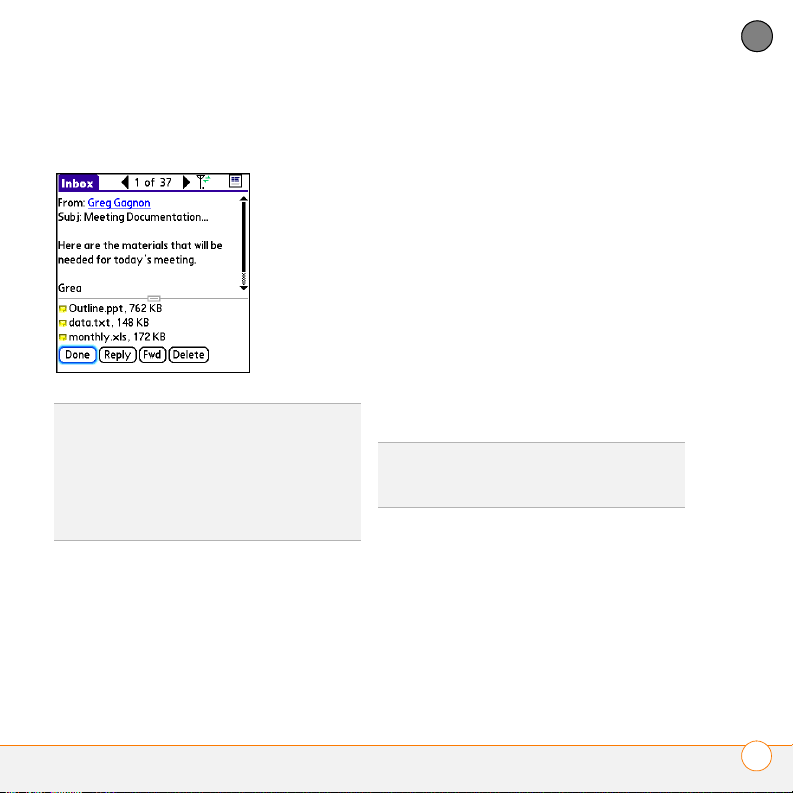
USING YOUR ACCOUNT
1
message screen. Select an attachment
from the list to download it.
TIP
You can tap the yellow icon to the left of
the attachment name to open a menu of
options for working with an attachment. You
can use the Select Viewer or Save to Card
options only for messages under the
maximum message size that have an
application for viewing on your Treo 680.
If your company uses BlackBerry
Enterprise Server version 4.1 or later,
attachment viewing takes place as follows:
Message under the maximum message
size supported by the server (usually
30KB to 50KB) The message opens in the
native application on your Treo 680. For
example, Microsoft Word, Excel, and
PowerPoint files are displayed in the
Documents application if it is installed on
your Treo 680; HTML files are displayed in
the web browser. If there is no application
on your Treo 680 to open the attachment,
an error message appears.
Message over the maximum message
size supported by the server (usually
30KB to 50KB) The message opens in the
BlackBerry
TIP
obtain the maximum message size supported
by the server.
®
Attachment Viewer.
Check with your system administrator to
If your company is using a version of
BlackBerry Enterprise Server earlier than
version 4.1, all attachments are opened in
the BlackBerry Attachment Viewer on your
Treo 680.
CHAPTER
WORKING WITH ATTACHMENTS
9

USING YOUR ACCOUNT
1
CHAPTER
NOTE The BlackBerry Attachment Viewer
supports the following file types:
• DOC
(Word 1997–
• WPD (Corel
WordPerfect 6–2000)
2003)
• XLS
• TXT (ASCII Text)
(Excel 1997–
2003)
• PPT
• HTML
(PowerPoint
1997–2003)
• PDF (1.1–1.4) • ZIP
4 Select the file that you want to attach,
and then select Add or Attach. The
selected file appears in the Attachments
box.
DID YOU KNOW
not supported, an error message appears.
Sending attachments
1 Press Messaging .
2 On the New Message screen, tap the
red paper clip
corner.
3 Select the Ty p e pick list, and then select
the file type. The VersaMail application
displays all file types on your Treo 680
?
If the attachment file type is
icon in the upper-right
DID YOU KNOW
example, addresses or memos—the files that
you can choose from appear in the box at the
top of the Attachments screen. For others—
for example, Word or Excel files—a new
screen appears from which you can select the
file to attach.
?
For some file types—for
5 Repeat steps 2 and 3 for each
attachment you want to add, and then
select Done.
that you can attach to an email
message.
WORKING WITH ATTACHMENTS
10

USING YOUR ACCOUNT
1
DID YOU KNOW
the total size of the outgoing message,
including any attachments, exceeds the
maximum message size supported by the
server (usually 30KB to 50KB).
?
An error message appears if
Working with meeting invitations
When a meeting invitation appears on the
server, it is pushed to your Treo 680 in the
same way as email messages and
Calendar appointments.
NOTE You cannot create meeting
invitations on your Treo 680. You can,
however, receive, reply to, and forward
meeting invitations that have been sent to
you.
Here are the key features of meeting
invitations:
• Meeting invitations appear on your Treo
680 in the VersaMail application, not in
the Calendar application.
• From within the VersaMail application,
you can accept, decline, or tentatively
accept a meeting invitation. Your
response is automatically synchronized
to the server.
• If you accept an invitation, the meeting
shows up as an appointment in the
Calendar application.
• If you change or delete a meeting
invitation in Calendar, the change is
synchronized to the server.
NOTE When you change or delete a
meeting invitation, the change is not sent
to the originator or to other meeting
invitation recipients.
DID YOU KNOW
invitations in the same way you forward email
messages. The recipient receives the
message as a meeting invitation.
?
You can forward meeting
1 Press Messaging . Any new
meeting invitations are pushed from the
server to your Treo 680.
2 Select a meeting invitation to open it.
Meeting invitations are displayed with a
unique icon .
CHAPTER
WORKING WITH MEETING INVITATIONS
11

USING YOUR ACCOUNT
1
CHAPTER
Respond without comments Sends
an immediate email response to the
meeting organizer by means of
BlackBerry Enterprise Server.
Respond without reply Updates the
server with your reply, but does not
send a response to the meeting
organizer.
3 After reading the invitation, select
Accept , Decline , or Te n t a t i v e
(tentatively accept).
DID YOU KNOW
response, the server is updated with the new
meeting event and synchronizes the event to
the Calendar application on your Treo 680.
TIP
If you receive an updated meeting
invitation, you can again choose to accept,
decline, or tentatively accept. If you receive a
meeting cancellation, you don’t need to do
anything.
DID YOU KNOW
automatically moved to the Trash folder.
?
When you send your
?
If you decline an invitation, it is
4 Select the response option you want
from the dialog box:
WORKING WITH MEETING INVITATIONS
12

USING YOUR ACCOUNT
1
Viewing and using the Reminders screen
The Reminders screen on your Treo 680
shows info about new email messages,
Calendar events, and meeting invitations.
The Reminders screen also notifies you if
your BlackBerry service connection is lost,
and if the connection is re-established.
To view the Reminders screen, select the
blinking bell when it appears in the
upper-left corner of any screen.
You can do any of the following:
• Check the box to clear a reminder from
the list.
• Select the reminder (either the mail icon
or the text description) to open the
VersaMail application to view the
message, invitation, or event.
• Select Done to close the Reminders
screen and return to whatever you were
doing on your Treo 680 before the
Reminders screen appeared. The bell
continues to blink in the upper-left
corner of the screen.
• Select Clear All to delete all reminders
from the Reminders screen.
Once you open the Inbox or the Calendar
application, any new messages, events, or
invitations are removed from the
Reminders screen, even if you don’t open
them. The Reminders screen counter is
reset to 1.
TIP
If the Reminders screen shows an error
message, select the message to view more
detailed information about the error.
Changing the alert volume
You can change the volume for Reminders
screen alerts. The volume you set applies
to all system sounds on your Treo 680.
1 Go to Applications and select
Sounds .
2 Select the System Volume pick list,
and then select a number (1 is the
quietest). Select Off to mute all system
sounds.
CHAPTER
VIEWING AND USING THE REMINDERS SCREEN
13

USING YOUR ACCOUNT
1
CHAPTER
3 Select Done.
TIP
You can also mute system sounds by
switching the Ringer switch to Sound Off.
4 Select Options, select Preferences,
and then select Main.
5 On the Main Preferences screen, you
can do any of the following:
BlackBerry Connect preferences
1 Press Messaging .
2 If you are not in your BlackBerry
Connect account, open the menus ,
select Accounts, and then select BBC.
3 From the Inbox or another folder in your
BlackBerry Connect account, open the
menus .
Register Now Select this button to
force your Treo 680 to connect to the
BlackBerry network. Occasionally, the
BLACKBERRY CONNECT PREFERENCES
14

USING YOUR ACCOUNT
1
connection from your Treo 680 to the
data network may be lost; selecting this
button forces a connection if the data
network is available.
DID YOU KNOW
simply a means of manually connecting to the
BlackBerry network; you do not have to go
through any registration process if you select
it.
?
The Register Now button is
Reconcile Now Select this button to
force an update of read, unread, and
deleted messages from your Treo 680
to the server.
Remove Inbox mail older
than Check the box to delete
messages in your Treo 680 Inbox that
are older than the specified time
interval. Select the time inter val from
the pick list (default is 1 week).
NOTE Messages are not deleted on the
server; they are only removed from your
Treo 680.
Start BlackBerry Service Check the
when Phone is turned On box to
automatically start the BlackBerry
service when your Treo 680 is turned on
(this box is checked by default). Uncheck
the box if you want to manually start the
BlackBerry service.
Reset Select the button to reset your
connection (disconnect and then
reconnect) to the network.
DID YOU KNOW
appears in the upper-right corner when the
BlackBerry service is connected.
?
The word “Connected”
6 When finished setting preferences,
select OK, and then select OK again.
CHAPTER
BLACKBERRY CONNECT PREFERENCES
15

USING YOUR ACCOUNT
1
CHAPTER
DID YOU KNOW
screen, you can also select and view the
following informational screens:
Information The Info Preferences screen
displays your BlackBerry Connect account
personal information number (PIN), the
version number of the BlackBerry stack on
your Treo 680, and more.
Service Books The Services Preferences
screen displays technical statistics for the
BlackBerry Connect account, including name,
Service ID, UID, CID/Type, and more.
About This screen displays legal information
about the BlackBerry service.
?
From the BBC Preferences
TIP
If you do not have a BlackBerry Desktop
icon, go to Start, select Programs, navigate
to the Palm program group, and then select
BlackBerry Desktop.
2 The General tab displays your account
password (PIN). You can enter the
following preferences:
Redirect incoming mail to your
handset Leave this box checked so
that incoming messages are sent to
your Treo 680.
Automatically include your signature
on outgoing messages Enter text,
such as your name and company, that
BlackBerry desktop
you want to appear at the bottom of all
outgoing messages.
application settings
Setting general preferences
1 On your computer desktop, double-
click the BlackBerry Desktop icon.
BLACKBERRY DESKTOP APPLICATION SETTINGS
16

USING YOUR ACCOUNT
1
3 Click Apply, and then click Exit.
DID YOU KNOW
BlackBerry desktop application, they are
transferred to your Treo 680 during the next
wireless reconciliation.
?
After you enter settings in the
Using filters
Filters determine which email messages
are sent to your Treo 680. Filters you create
in the BlackBerry Desktop application apply
to your BlackBerry Connect account only.
DID YOU KNOW
Treo 680 for other email accounts, those
filters continue to work with those accounts.
?
If you set up filters on your
1 On your computer desktop, double-click
the BlackBerry Desktop icon.
2 Click the Filters tab, and then click
New.
3 Set the filter criteria:
Filter Name Enter a name for the
filter.
Conditions Enter the filter criteria. For
example:
• To filter all messages from
ctang@example.com, check the From
box and enter “ctang@example.com”
in the field. Click Import to enter an
address directly from the Contacts
application on your computer.
CHAPTER
BLACKBERRY DESKTOP APPLICATION SETTINGS
17

USING YOUR ACCOUNT
1
CHAPTER
• To filter by your status as recipient,
check the Recipient Types box and
check the box indicating whether the
message is sent directly to you or
your address as recipient appears in
the CC or BCC field of the message.
• Check boxes to filter messages by
importance and sensitivity level.
Forwarding options Select the
Forward message to the handset
option to have messages that meet the
filter criteria sent to your Treo 680.
Check the box if you want to have only
message headers sent. Select the
Don’t forward messages to the
handset option if you do not want
messages that meet the filter criteria
sent to your Treo 680.
4 Click OK on the Add Filters screen.
5 On the Filters tab, select the option for
whether messages that do not meet
the filter criteria should or should not be
sent to your Treo 680 (handset).
BLACKBERRY DESKTOP APPLICATION SETTINGS
18

6 Click Save. Click Apply, and then click
Exit.
USING YOUR ACCOUNT
1
CHAPTER
BLACKBERRY DESKTOP APPLICATION SETTINGS
19

USING YOUR ACCOUNT
1
CHAPTER
BLACKBERRY DESKTOP APPLICATION SETTINGS
20

Using Calendar
The Calendar application lets you view your schedule by day,
week, or month, or as an agenda list that combines your list of
tasks and email notifications with your appointments. Schedule
repeating meetings or block out a vacation by creating one
event set to repeat at an interval you specify. Color-code your
appointments by category and add notes with helpful
information.
NOTE For more information on working with Calendar, see the Treo 680 User
Guide.
CHAPTER
2

In this chapter
Creating an event . . . . . . . . . . . . . . . . . . . . . . . . . . . . . . . . . . . . . . . 23
Working with Calendar events . . . . . . . . . . . . . . . . . . . . . . . . . . . . . 23
Changing Calendar sync settings when you delete a
BlackBerry Connect account . . . . . . . . . . . . . . . . . . . . . . . . . . . . 25

USING CALENDAR
2
Creating an event
1 Press Calendar on your Treo 680
until you are in Day View.
2 Press Left or Right on the 5-way
navigator to select the desired day.
Selected
day
TIP
If you are creating an event more than a
few days in advance, select Go To at the
bottom of the screen to enter the event
information.
3 Using the keyboard, enter a starting
time for the event. (For example, enter
530 for 5:30.)
4 Select the End Time box, and then
enter the ending time for the event.
TIP
When entering start and end times,
remember to press Option before entering
numbers.
5 (Optional) Select the Time Zone pick
list and select a time zone.
6 Select OK, and then enter a description
of the event.
Working with Calendar events
When you set up a BlackBerry Connect
account in the VersaMail
server pushes both email messages and
Calendar events to your Treo 680.
IMPORTANT You cannot choose to
synchronize Calendar events with
Palm Desktop or Outlook once you set up a
BlackBerry Connect account. If you want to
synchronize Calendar events with a
desktop software application, you must
delete the BlackBerry Connect account
®
application, the
.
CHAPTER
CREATING AN EVENT
23

USING CALENDAR
2
CHAPTER
DID YOU KNOW
information is pushed from the server. Other
information on your Treo 680, such as
contacts, tasks, and memos, continues to
synchronize with information in your desktop
software application—either Palm
software or Outlook.
?
Only Calendar and VersaMail
®
Desktop
or Domino server. When events are
reconciled with the server, all of the
following take place:
• Any events you create on your Treo 680
are updated to the server.
NOTE You cannot create meeting
invitations on your Treo 680. You can only
Here are the key features of working with
Calendar events in a BlackBerry Connect
account:
Initial deletion and push When you set
up BlackBerry Connect on your Treo 680,
all existing Calendar events are deleted on
your Treo 680, and all events on the server
are sent to your Treo 680—so you do not
end up with duplicate events.
Push Calendar events Once the
BlackBerry Connect account is set up, the
server pushes Calendar events to your Treo
680 as they are received. Push Calendar
events applies to BlackBerry Connect
accounts only.
Reconciliation When you enter or update
an event in the Calendar application on
your Treo 680, the information is wirelessly
receive and respond to meeting invitations
sent to you.
• Any events you create or change in
Outlook on your computer that are on
the server are sent to your Treo 680.
• Any meeting invitations are displayed in
the Inbox of your BlackBerry Connect
account in the VersaMail application.
When you respond to an invitation, the
response is updated to the server and
then sent from the server to Calendar
on your Treo 680.
Time zones: events sent from server
Calendar events, both meetings and
appointments, received from the server
retain their time zone information when
sent to the Calendar application on your
Treo 680. If you change the time zone on
reconciled with (updated to) the Exchange
WORKING WITH CALENDAR EVENTS
24

USING CALENDAR
2
your Treo 680, these events are displayed
at the correct time in the new time zone.
Time zones: events created on the Treo
680 All appointments created on your Treo
680 are assigned a time zone. You can
manually assign a time zone to an
appointment; if you do not, the
appointment is given the time zone set in
Date & Time preferences on your Treo 680.
When you synchronize, the time zone
information is retained in the appointment
on the server.
Changing Calendar sync settings when you delete a BlackBerry Connect account
If you want to stop synchronizing Calendar
events with the server, you must delete
the BlackBerry Connect account.
IMPORTANT The following steps ensure
that you do not end up with duplicate
events on your Treo 680 or your computer.
Complete these steps only if you are sure
that the Calendar info on your Treo 680 is
up-to-date; otherwise, you will lose any
info on your desktop that is not on your
Treo 680. If you are not sure that your Treo
680 info is up-to-date, skip steps 4 through
7. Your desktop info will not be deleted in
this case, though you may end up with
duplicate events.
TIP
If you skip steps 4 through 7 of “Changing
Calendar sync settings when you delete a
BlackBerry Connect account,” you can
manually delete any duplicate events after
you’ve completed the procedure.
DID YOU KNOW
Connect account, all Calendar events remain
on your Treo 680. Then, when you synchronize
Calendar with your desktop software
application—Palm Desktop or Outlook—the
events synchronize to the selected desktop
software application.
1 Click the HotSync manager icon in
the task bar in the lower-right corner of
your computer screen.
?
When you delete a BlackBerry
CHAPTER
CHANGING CALENDAR SYNC SETTINGS WHEN YOU DELETE A BLACKBERRY CONNECT
25

USING CALENDAR
2
CHAPTER
2 Select Custom.
3 Select Calendar from the conduit list,
and then select Change. If you are
synchronizing with Outlook, select the
conduit that has both “Calendar” and
“Outlook” in its name.
4 Select Handheld overwrites desktop
and click OK.
5 Click Done.
6 Synchronize your device and your
computer.
DID YOU KNOW
6, any new or changed events on your Treo
680 only are updated on your computer.
?
When you synchronize in step
7 Repeat steps 1 through 3 to reopen the
Change HotSync Action dialog box for
Calendar.
8 Select Synchronize the files, check the
Set as default box, and then click OK.
9 Click Done. Your events now
synchronize with your desktop
software.
CHANGING CALENDAR SYNC SETTINGS WHEN YOU DELETE A BLACKBERRY CONNECT
26

Synchronizing Contacts
Unlike your email messages and Calendar events, new
contacts on the server are not pushed to your Treo 680, and
new contacts on your Treo 680 are not reconciled with the
server. Instead, you synchronize contacts with Microsoft
Outlook or Lotus Notes on your computer.
When you synchronize, any contacts you enter or update on
your Treo 680 are updated in Outlook or Notes on your
computer, and any contacts you enter or update in Outlook or
Notes are updated on your Treo 680, so you do not need to
enter the info twice.
CHAPTER
3

In this chapter
Setting up synchronization with Outlook . . . . . . . . . . . . . . . . . . . . . 29
How to synchronize . . . . . . . . . . . . . . . . . . . . . . . . . . . . . . . . . . . . . 30

SYNCHRONIZING CONTACTS
3
Setting up synchronization with Outlook
To synchronize your contacts with Outlook,
you must install the desktop software from
the Software Installation CD included with
your Treo 680.
• If you have not yet installed the
software, insert the CD into your
computer’s CD drive and follow the
onscreen instructions. When prompted,
select the option to synchronize with
Outlook. You can now synchronize.
• If you have already installed the
software and selected the option to
synchronize with Outlook, you can now
synchronize.
• If you have already installed the
software but did not select the option to
synchronize with Outlook, see I need to
change my synchronization method to
Outlook.
NOTE If you want to synchronize Contacts
with Lotus Notes on your computer, you
must purchase third-party synchronization
software, sometimes called a conduit.
Follow the instructions included with the
software to set up synchronization with
Notes.
CHAPTER
SETTING UP SYNCHRONIZATION WITH OUTLOOK
29

SYNCHRONIZING CONTACTS
3
CHAPTER
How to synchronize
1 Connect your Treo 680 to your
computer using the USB sync cable
included with your Treo 680.
2 Press the sync button on the sync
cable.
Sync button
3 Messages on your Treo 680 and on your
computer indicate that synchronization
is in progress.
4 When you receive a message on your
Treo 680 indicating that the process is
complete, disconnect the sync cable.
HOW TO SYNCHRONIZE
30

Common Questions
Although we can’t anticipate all the questions you might have,
this chapter provides answers to some of the most commonly
asked questions.
CHAPTER
4

COMMON QUESTIONS
4
CHAPTER
Using BlackBerry Connect
I am having problems sending and receiving email.
If you have problems sending or receiving
mail for an extended period of time, do the
following:
• Check with your BlackBerry Enterprise
• Check your Treo 680:
®
Server
administrator to verify that the
service is working properly.
• Make sure that the phone on your
Treo 680 is turned on and that you
the BlackBerry service running while
roaming.
• Reset the BlackBerry service.
• If you have not already done so,
register
your Treo 680 with the
BlackBerry service.
• Check with Cingular to verify that your
account is active and in good standing.
• If you still cannot access your account,
you may need to reinstall BlackBerry
Connect. Select Start on your computer
desktop, navigate to Programs, and
then select Set up BlackBerry
Connect. Repeat the installation steps
and then try accessing your account
again.
have a good connection to your data
network.
Push email and Calendar events was working, but then stopped.
TIP
Look at the signal- strength bars in the
connection icon in the title bar of any screen in
the VersaMail
good data connection. More bars means a
stronger connection.
• If you are roaming, make sure that
you have set the preference
®
application to see if you have a
to keep
If server push of email and Calendar events
is occurring and you turn your Treo 680 off
or the connection to your server is
disconnected, push fails.
• Make sure that the phone on your Treo
680 is turned on and that you have a
good connection to your data network.
USING BLACKBERRY CONNECT
32

COMMON QUESTIONS
4
• Check with your BlackBerry Enterprise
®
Server
administrator to verify that the
service is working properly.
I am not getting any new messages.
If less than 1MB of memory is available on
your Treo 680, new messages cannot be
sent from the server using your BlackBerry
Connect account. Delete some messages
to free up at least 1.2MB of memory, and
see if new messages appear.
TIP
To check for available space on your Treo
680, go to Applications and select Info on
the App menu. At the bottom of the screen,
select Size. The first number on the Free
Space line tells you how much space is
available on your Treo 680.
Also, if the total number of messages in all
accounts exceeds 2,200, new messages
cannot be sent from the server using your
BlackBerry Connect account. If you have
several accounts in the VersaMail
application for personal email, the number
of messages in these accounts is included
in the maximum 2,200 message limit.
Delete some messages in any of your
accounts so that you have fewer than
2,000 total messages across all accounts,
and see if new messages appear.
Some messages have disappeared from my Inbox.
Email messages in your Inbox that fall
outside the time interval set on the Treo
680 (the default is seven days) are deleted
from your Inbox. For example, if the time
interval is set at seven days, any email
messages that are eight days old are
removed from your Treo 680. The
messages are not removed from the
Exchange or Domino server. You can select
a preference to change the time interval.
I have read and/or deleted messages in my Treo 680 Inbox, but they are not displayed correctly.
If read, unread, or deleted messages are
not showing the correct status in your Treo
680 Inbox (for example, deleted messages
continue to appear in the Inbox instead of
in the Trash folder), you need to manually
reconcile the Inbox with your server.
Messages that have been deleted on your
Treo 680 are deleted on the server when
the trash on your Treo 680 is emptied. By
CHAPTER
USING BLACKBERRY CONNECT
33

COMMON QUESTIONS
4
CHAPTER
default, the trash is emptied automatically
once a week—so messages that have
been deleted on your Treo 680 may take a
few days to be deleted on the server. You
can increase the frequency for
automatically emptying the trash on your
Treo 680; see the Treo 680 User Guide for
instructions.
I have another email account that I want to use on my Treo 680.
If you have set up a BlackBerry Connect
account, you can set up other email
accounts, such as a Yahoo! account, in the
Ver saMail
application on your Treo 680. You
can set up a total of eight accounts.
NOTE You cannot have both a Microsoft
Exchange ActiveSync
®
account and a
BlackBerry Connect account on your Treo
680. Also, you can set up only one
BlackBerry Connect account.
To set up an account on your Treo 680,
follow these steps:
1 Press Messaging .
2 From the Inbox or another folder, open
the menus .
3 Select Accounts, and then select
Account Setup.
4 Select New.
5 In the Account Name field, enter a
descriptive name.
6 Select the Mail Service pick list, and
then select your email provider. Select
Other if your provider is not listed. If
you chose Other, select the Protocol
pick list, and then select POP or IMAP.
TIP
If your provider appeared in the list, the
protocol is automatically selected and the
Protocol pick list does not appear.
7 Enter the username you use to access
your email.
8 Select the Password box, enter your
email account password, and then
select OK.
9 Select Next. If you chose a provider
from the Mail Service pick list on the
Account Setup screen, the mail server
screen is already filled in. If you chose
Other, enter your email address and the
names of the incoming and outgoing
mail servers.
USING BLACKBERRY CONNECT
34

COMMON QUESTIONS
4
TIP
Check with your email service provider to
find the protocol for your email account as
well as the names of the mail servers.
10 Select Next, and then select Done.
Account Deletion
I no longer want to synchronize email or other info with my corporate server and want to delete my BlackBerry Connect account.
You need to delete the BlackBerry Connect
software from both your computer and
your Treo 680.
On your computer, use Add/Remove
Programs in the Control Panel to delete
BlackBerry Connect.
On your Treo 680, do the following:
1 Press Messaging .
2 Open the menus .
3 Select Accounts, and then select
Account Setup.
4 Select BBC, and then select Delete.
5 Select OK to confirm the deletion.
I am giving my Treo 680 to someone else and want to delete all BlackBerry Connect information on the Treo 680 entirely.
To completely remove BlackBerry Connect
and all associated information from your
Treo 680, you need to perform a hard reset.
1 Remove the battery from your Treo 680,
and then reinsert it.
2 When the Palm logo appears, press and
hold Power/End until the black
status bar at the bottom of the screen
fills and disappears, and then release
Power/End .
3 When the Erase all data? prompt
appears, press Up to confirm the
hard reset.
NOTE See the Treo 680 User Guide for
complete instructions on performing a hard
reset.
If the new user of the Treo 680 wants to
use BlackBerry Connect, he or she must
reinstall the software. See the BlackBerry
Connect Setup Guide for instructions.
CHAPTER
ACCOUNT DELETION
35

COMMON QUESTIONS
4
CHAPTER
Contacts
I need to change my synchronization method to Outlook.
1 Insert the Palm Software Installation CD
into your computer.
2 Select Change your synchronization
method.
3 Follow the onscreen instructions. When
prompted, select to synchronize with
Outlook.
NOTE If you want to synchronize Contacts
with Lotus Notes on your computer, you
must purchase third-party synchronization
software, sometimes called a conduit.
Follow the instructions included with the
software to set up synchronization with
Notes.
36
CONTACTS

Index
A
account
accessing 3
creating additional 34
deleting 35
alerts 13
All Points Bulletins 4
attachments
sending 10
supported tile types 10
viewing 8
B
blinking asterisk 13
C
Calendar events
bulk load 24
creating 23
reconciliation 24
server push 24
Change your synchronization
method option 36
CID/Type 16
connecting to BlackBerry
network 14
contacts, synchronizing 27–
30
D
desktop application 16–19
E
email
alerts 13
attachments 8
forwarding messages 8
message removal 4
moving messages 8
preferences 14–15
Remote Address Lookup
6
replying to messages 8
sending messages 6
updating message status
8
viewing large messages 4
events
alerts
13
bulk load 24
creating 23
reconciliation 24
server push 24
synchronizing with
desktop software 25
time zone information 24
Exchange ActiveSync 34
F
FAQs 31
filters 17
forcing connection 14
forwarding messages 8
frequently asked questions
31
L
liability ii
lost connection 14
M
meeting invitations
alerts 13
creating, limitation on 24
working with 11
messages
adding signature 16
addressing 6
alerts 13
forwarding 8
maximum number 4
maximum size (outgoing)
6
moving 8
replying 8
INDEX
37

updating status 8
using filters 17
viewing large 4
N
network, reset connection 15
O
opening Reminders screen
13
P
personal information number
(PIN) 16
preferences
desktop 16–19
Treo 680 14–15
push
of Calendar events 24
of email events 3
R
reconciliation
of Calendar events 24
of email messages 4
registering on (connecting to)
network 14
Reminders screen 13
Remote Address Lookup 6
replying to messages 8
restoring lost connection 14
S
sending email messages
how to send 6
Remote Address Lookup
6
server push
of Calendar events 24
of email events 3
service
selecting network 15
starting automatically 15
starting manually 14
Service ID 16
signature on outgoing
messages 16
Smart Addressing 6
T
troubleshooting 31
turning on/off BlackBerry
service
3, 15
U
UID 16
V
version number, BlackBerry
stack 16
INDEX
38
 Loading...