

Page 1

User Guide
Your Palm® Treo™ 500v Smartphone
Page 2
Intellectual property notices
© 2007 Palm Inc. All rights reserved. Trademark, copyright, patent,
and other intellectual property notices are se t forth on page ii within
Introducing Your Palm
in your smartphone package.
®
Treo™ 500v Smartphone, which can be found
Disclaimer and limitation of liability
Palm Inc. and its suppliers assume no responsib ility for any damage
or loss resulting from the use of this gui de. Palm Inc. and its suppliers
assume no responsibilit y for any loss or claims by third parti es that
may arise through the use of this software. Palm Inc. and its suppliers
assume no responsibility for any damage or loss caused by deletion
of data as a result of malfun ction, dead battery, or repairs. Be sure to
make backup copies of all important data on other media t o protect
against data loss.
Palm Take Back and Recycling Program
This symbol indicates that Palm products should be
recycled and not be disposed of in unsorted municipa l
waste. Palm products should be sent to a facility t hat
properly recycles electrical and electronic equipmen t.
For information on environmental programs visit:
palm.com
/environment
As part of Palm’s corporate commitment to be a good steward of the
environment, we strive to use environmentally friendly material s,
reduce waste, and develop the highest standards in elect ronics
recycling. Our recycling program keeps Palm handheld devices,
smartphones, and mobile companions out of landfill s through
evaluation and disposition for reuse and recycling.
Palm customers may participate in the recycling program free of
charge. Visit palm.com
about how you can help reduce electronic waste.
PN: 406-11180-01
v 1.1
/recycle for additional details and information
Page 3

Contents
Chapter 1: Welcome . . . . . . . . . . . . . . . . . . . . . . . . . . . . . . . . . . . . . . . . . . . . . . . . . . 7
Your new smartphone . . . . . . . . . . . . . . . . . . . . . . . . . . . . . . . . . . . . . . . . . . . . . . . 9
What’s in the box? . . . . . . . . . . . . . . . . . . . . . . . . . . . . . . . . . . . . . . . . . . . . . . . . . . 9
What do I need to get started? . . . . . . . . . . . . . . . . . . . . . . . . . . . . . . . . . . . . . . . . 10
Where to learn more . . . . . . . . . . . . . . . . . . . . . . . . . . . . . . . . . . . . . . . . . . . . . . . . 10
Chapter 2: Setting up . . . . . . . . . . . . . . . . . . . . . . . . . . . . . . . . . . . . . . . . . . . . . . . . . . 13
Palm Treo 500v smartphone overview . . . . . . . . . . . . . . . . . . . . . . . . . . . . . . . . . . . 15
Inserting the SIM card and battery . . . . . . . . . . . . . . . . . . . . . . . . . . . . . . . . . . . . . . 17
Charging the battery . . . . . . . . . . . . . . . . . . . . . . . . . . . . . . . . . . . . . . . . . . . . . . . . . 19
Making your first call . . . . . . . . . . . . . . . . . . . . . . . . . . . . . . . . . . . . . . . . . . . . . . . . 22
Setting up synchronisation . . . . . . . . . . . . . . . . . . . . . . . . . . . . . . . . . . . . . . . . . . . . 23
Chapter 3: Moving around on your Palm
Navigating around the screen . . . . . . . . . . . . . . . . . . . . . . . . . . . . . . . . . . . . . . . . . . 27
Using the keyboard . . . . . . . . . . . . . . . . . . . . . . . . . . . . . . . . . . . . . . . . . . . . . . . . . 33
Opening and closing applications . . . . . . . . . . . . . . . . . . . . . . . . . . . . . . . . . . . . . . . 36
Using your Home screen . . . . . . . . . . . . . . . . . . . . . . . . . . . . . . . . . . . . . . . . . . . . . 39
Chapter 4: Your phone . . . . . . . . . . . . . . . . . . . . . . . . . . . . . . . . . . . . . . . . . . . . . . . . . 41
Turning your Palm
®
Treo™ 500v smartphone on/off . . . . . . . . . . . . . . . . . . . . . . . . . 43
Making calls from the Home screen . . . . . . . . . . . . . . . . . . . . . . . . . . . . . . . . . . . .45
Other ways of making calls . . . . . . . . . . . . . . . . . . . . . . . . . . . . . . . . . . . . . . . . . . . 48
Receiving calls . . . . . . . . . . . . . . . . . . . . . . . . . . . . . . . . . . . . . . . . . . . . . . . . . . . . . 49
Using voicemail . . . . . . . . . . . . . . . . . . . . . . . . . . . . . . . . . . . . . . . . . . . . . . . . . . . . 50
What can I do during a call? . . . . . . . . . . . . . . . . . . . . . . . . . . . . . . . . . . . . . . . . . . . 51
Working with called numbers . . . . . . . . . . . . . . . . . . . . . . . . . . . . . . . . . . . . . . . . . . 56
Creating speed dials . . . . . . . . . . . . . . . . . . . . . . . . . . . . . . . . . . . . . . . . . . . . . . . . . 58
®
Treo™ 500v smartphone . . . . . . . . . . . . . . . 25
CONTENTS
iii
Page 4

Using a phone headset . . . . . . . . . . . . . . . . . . . . . . . . . . . . . . . . . . . . . . . . . . . . . . 60
Customising phone settings . . . . . . . . . . . . . . . . . . . . . . . . . . . . . . . . . . . . . . . . . . 63
Using the SIM toolkit . . . . . . . . . . . . . . . . . . . . . . . . . . . . . . . . . . . . . . . . . . . . . . . . 71
What are all those icons? . . . . . . . . . . . . . . . . . . . . . . . . . . . . . . . . . . . . . . . . . . . . . 72
Chapter 5: Synchronising information . . . . . . . . . . . . . . . . . . . . . . . . . . . . . . . . . . . . . 75
Synchronisation overview . . . . . . . . . . . . . . . . . . . . . . . . . . . . . . . . . . . . . . . . . . . . 77
How do I synchronise? . . . . . . . . . . . . . . . . . . . . . . . . . . . . . . . . . . . . . . . . . . . . . . . 77
What can I synchronise? . . . . . . . . . . . . . . . . . . . . . . . . . . . . . . . . . . . . . . . . . . . . . 78
Setting up wireless synchronisation . . . . . . . . . . . . . . . . . . . . . . . . . . . . . . . . . . . . 81
Setting up your computer for synchronisation . . . . . . . . . . . . . . . . . . . . . . . . . . . . . 86
Synchronising using the sync cable . . . . . . . . . . . . . . . . . . . . . . . . . . . . . . . . . . . . . 92
Other ways to synchronise . . . . . . . . . . . . . . . . . . . . . . . . . . . . . . . . . . . . . . . . . . . 92
Setting synchronisation options . . . . . . . . . . . . . . . . . . . . . . . . . . . . . . . . . . . . . . . . 94
Chapter 6: Your email . . . . . . . . . . . . . . . . . . . . . . . . . . . . . . . . . . . . . . . . . . . . . . . . . 97
Setting up email . . . . . . . . . . . . . . . . . . . . . . . . . . . . . . . . . . . . . . . . . . . . . . . . . . . . 99
Sending and receiving messages . . . . . . . . . . . . . . . . . . . . . . . . . . . . . . . . . . . . . . . 108
Working with email messages . . . . . . . . . . . . . . . . . . . . . . . . . . . . . . . . . . . . . . . . . 112
Working with meeting invitations . . . . . . . . . . . . . . . . . . . . . . . . . . . . . . . . . . . . . . 120
Sending email messages from within another application . . . . . . . . . . . . . . . . . . . . 121
Chapter 7: Your text and multimedia messages . . . . . . . . . . . . . . . . . . . . . . . . . . . . . 123
Sending and receiving messages . . . . . . . . . . . . . . . . . . . . . . . . . . . . . . . . . . . . . . . 125
Customising your message settings . . . . . . . . . . . . . . . . . . . . . . . . . . . . . . . . . . . . 132
Using Windows Live . . . . . . . . . . . . . . . . . . . . . . . . . . . . . . . . . . . . . . . . . . . . . . . . 136
Chapter 8: Your connections to the web and wireless devices . . . . . . . . . . . . . . . . . 141
Browsing the web . . . . . . . . . . . . . . . . . . . . . . . . . . . . . . . . . . . . . . . . . . . . . . . . . . 143
Connecting to devices with Bluetooth
®
wireless technology . . . . . . . . . . . . . . . . . . 149
Using your device as a wireless modem . . . . . . . . . . . . . . . . . . . . . . . . . . . . . . . . . 154
iv
CONTENTS
Page 5

Chapter 9: Your photos, videos, and music . . . . . . . . . . . . . . . . . . . . . . . . . . . . . . . . . 157
Synchronising your media files . . . . . . . . . . . . . . . . . . . . . . . . . . . . . . . . . . . . . . . . . 159
Camera . . . . . . . . . . . . . . . . . . . . . . . . . . . . . . . . . . . . . . . . . . . . . . . . . . . . . . . . . . . 160
Pictures & Videos . . . . . . . . . . . . . . . . . . . . . . . . . . . . . . . . . . . . . . . . . . . . . . . . . . . 165
Windows Media Player Mobile . . . . . . . . . . . . . . . . . . . . . . . . . . . . . . . . . . . . . . . . 169
Mobile TV . . . . . . . . . . . . . . . . . . . . . . . . . . . . . . . . . . . . . . . . . . . . . . . . . . . . . . . . . 177
Chapter 10: Your personal information organiser . . . . . . . . . . . . . . . . . . . . . . . . . . . . 179
Contacts . . . . . . . . . . . . . . . . . . . . . . . . . . . . . . . . . . . . . . . . . . . . . . . . . . . . . . . . . . 181
Calendar . . . . . . . . . . . . . . . . . . . . . . . . . . . . . . . . . . . . . . . . . . . . . . . . . . . . . . . . . . 186
Tasks . . . . . . . . . . . . . . . . . . . . . . . . . . . . . . . . . . . . . . . . . . . . . . . . . . . . . . . . . . . . 191
Voice Notes . . . . . . . . . . . . . . . . . . . . . . . . . . . . . . . . . . . . . . . . . . . . . . . . . . . . . . . 194
Chapter 11: Your Microsoft Office and other document tools . . . . . . . . . . . . . . . . . . 195
Synchronising your Microsoft Office files . . . . . . . . . . . . . . . . . . . . . . . . . . . . . . . .197
Word Mobile . . . . . . . . . . . . . . . . . . . . . . . . . . . . . . . . . . . . . . . . . . . . . . . . . . . . . . . 199
PowerPoint Mobile . . . . . . . . . . . . . . . . . . . . . . . . . . . . . . . . . . . . . . . . . . . . . . . . . . 202
Excel Mobile . . . . . . . . . . . . . . . . . . . . . . . . . . . . . . . . . . . . . . . . . . . . . . . . . . . . . . . 205
PDF Viewer . . . . . . . . . . . . . . . . . . . . . . . . . . . . . . . . . . . . . . . . . . . . . . . . . . . . . . . 212
Chapter 12: Your application and info management tools . . . . . . . . . . . . . . . . . . . . . . 215
Finding information . . . . . . . . . . . . . . . . . . . . . . . . . . . . . . . . . . . . . . . . . . . . . . . . . . 217
Installing applications . . . . . . . . . . . . . . . . . . . . . . . . . . . . . . . . . . . . . . . . . . . . . . . . 218
Removing applications . . . . . . . . . . . . . . . . . . . . . . . . . . . . . . . . . . . . . . . . . . . . . . . 221
Sharing information . . . . . . . . . . . . . . . . . . . . . . . . . . . . . . . . . . . . . . . . . . . . . . . . . 222
Beaming information . . . . . . . . . . . . . . . . . . . . . . . . . . . . . . . . . . . . . . . . . . . . . . . . 222
Using expansion cards . . . . . . . . . . . . . . . . . . . . . . . . . . . . . . . . . . . . . . . . . . . . . . . 224
Calculator . . . . . . . . . . . . . . . . . . . . . . . . . . . . . . . . . . . . . . . . . . . . . . . . . . . . . . . . . 229
Chapter 13: Your personal settings . . . . . . . . . . . . . . . . . . . . . . . . . . . . . . . . . . . . . . .231
Home screen settings . . . . . . . . . . . . . . . . . . . . . . . . . . . . . . . . . . . . . . . . . . . . . . . 233
CONTENTS
v
Page 6

System sound settings . . . . . . . . . . . . . . . . . . . . . . . . . . . . . . . . . . . . . . . . . . . . . . 234
Display and appearance settings . . . . . . . . . . . . . . . . . . . . . . . . . . . . . . . . . . . . . . . 237
Application settings . . . . . . . . . . . . . . . . . . . . . . . . . . . . . . . . . . . . . . . . . . . . . . . . . 239
Locking your smartphone and info . . . . . . . . . . . . . . . . . . . . . . . . . . . . . . . . . . . . . . 241
System settings . . . . . . . . . . . . . . . . . . . . . . . . . . . . . . . . . . . . . . . . . . . . . . . . . . . . 245
Connection settings . . . . . . . . . . . . . . . . . . . . . . . . . . . . . . . . . . . . . . . . . . . . . . . . . 250
Chapter 14: Troubleshooting . . . . . . . . . . . . . . . . . . . . . . . . . . . . . . . . . . . . . . . . . . . . 257
Transferring info from another device . . . . . . . . . . . . . . . . . . . . . . . . . . . . . . . . . . . 259
Reinstalling the desktop software . . . . . . . . . . . . . . . . . . . . . . . . . . . . . . . . . . . . . . 259
Resetting your smartphone . . . . . . . . . . . . . . . . . . . . . . . . . . . . . . . . . . . . . . . . . . . 260
Performance . . . . . . . . . . . . . . . . . . . . . . . . . . . . . . . . . . . . . . . . . . . . . . . . . . . . . . . 263
Screen . . . . . . . . . . . . . . . . . . . . . . . . . . . . . . . . . . . . . . . . . . . . . . . . . . . . . . . . . . . 264
Network connection . . . . . . . . . . . . . . . . . . . . . . . . . . . . . . . . . . . . . . . . . . . . . . . . . 265
Synchronisation: Overview . . . . . . . . . . . . . . . . . . . . . . . . . . . . . . . . . . . . . . . . . . . 268
Synchronisation: Desktop sync software . . . . . . . . . . . . . . . . . . . . . . . . . . . . . . . . . 269
Synchronisation: Exchange ActiveSync (wireless synchronisation) . . . . . . . . . . . . . 274
Email . . . . . . . . . . . . . . . . . . . . . . . . . . . . . . . . . . . . . . . . . . . . . . . . . . . . . . . . . . . . 275
Bluetooth wireless technology . . . . . . . . . . . . . . . . . . . . . . . . . . . . . . . . . . . . . . . . . 278
Web . . . . . . . . . . . . . . . . . . . . . . . . . . . . . . . . . . . . . . . . . . . . . . . . . . . . . . . . . . . . . 278
Camera . . . . . . . . . . . . . . . . . . . . . . . . . . . . . . . . . . . . . . . . . . . . . . . . . . . . . . . . . . . 279
Third-party applications . . . . . . . . . . . . . . . . . . . . . . . . . . . . . . . . . . . . . . . . . . . . . . 280
Making room on your smartphone . . . . . . . . . . . . . . . . . . . . . . . . . . . . . . . . . . . . . . 281
Voice quality . . . . . . . . . . . . . . . . . . . . . . . . . . . . . . . . . . . . . . . . . . . . . . . . . . . . . . . 282
Terms . . . . . . . . . . . . . . . . . . . . . . . . . . . . . . . . . . . . . . . . . . . . . . . . . . . . . . . . . . . . . . 285
Important safety and legal information . . . . . . . . . . . . . . . . . . . . . . . . . . . . . . . . . . . . 291
Specifications . . . . . . . . . . . . . . . . . . . . . . . . . . . . . . . . . . . . . . . . . . . . . . . . . . . . . . . . 301
Index . . . . . . . . . . . . . . . . . . . . . . . . . . . . . . . . . . . . . . . . . . . . . . . . . . . . . . . . . . . . . . 303
vi
CONTENTS
Page 7

CHAPTER
Welcome
Congratulations on the purchase of your Palm® Tr e o™ 500v
smartphone!
Benefits
• Make and receive phone calls
• Manage your contacts, calendar,
and task list
• Receive and send corporate and
personal email messages
• Browse the web
• Use a Bluetooth
separately) for hands-free
operation
®
headset (sold
1
7
Page 8

In this chapter
Your new smartphone . . . . . . . . . . . . . . . . . . . . . . . . . . . . . . . . . . . 9
What’s in the box? . . . . . . . . . . . . . . . . . . . . . . . . . . . . . . . . . . . . . . 9
What do I need to get started? . . . . . . . . . . . . . . . . . . . . . . . . . . . . 10
Where to learn more . . . . . . . . . . . . . . . . . . . . . . . . . . . . . . . . . . . . 10
Page 9
WELCOME
1
Your new smartphone
In one compact and indispensable device—
your new Palm
you now have all of the following:
• An advanced wireless smartphone
• A Windows Mobile
portable expansion capability (microSD)
• High-speed data with GPRS and UMTS
(3G) support
• A 2-megapixel digital camera
• Support for numerous mobile email
solutions
• Text and multimedia messaging
• Windows Media
• Microsoft
This guide will help you set up your
smartphone and quickly learn to use it.
NOTE If you want to use your phone and
send and receive text messages, you need
a service contract with your network
operator. If you also want to browse the
web and send and receive email, you need
®
Tr e o™ 500v smartphone—
®
organiser with
®
Player Mobile
®
Office Viewer applications
not only a service contract but also a data
service plan from your network operator.
You may also need a specific data service
plan to send and receive multimedia
messages. Data speeds vary based on
network availability and capacity.
TIP
LOOK HERE: Don’t miss the helpful tips
and cross-references given in these boxes.
What’s in the box?
All of the following items should be in the
smartphone box:
Hardware
• Treo 500v smartphone
• Rechargeable battery (1200 mAh)
• AC charger with international adapters
• USB sync cable
• Stereo headset
Documentation and software
• Quick Start Guide
CHAPTER
YOUR NEW SMARTPHONE
9
Page 10

1
WELCOME
CHAPTER
• Introducing Your Palm
Smartphone
• Windows Mobile Getting Started CD,
which includes links to the following:
• Desktop synchronisation software
download (ActiveSync
software for Windows XP, Windows
Mobile Device Center for Windows
Vista)
• Microsoft Office Outlook
®
Treo™ 500v
®
desktop
®
software
• You must have an activated wireless
account (using a SIM card from your
network operator) with data services.
• If you plan to synchronise personal
information between your smartphone
and a computer, you need access to
that computer during setup.
• You must also have your smartphone
within range of your network operator’s
cellular coverage.
download
• User Guide (this guide)
• Palm warranty
• End User Licence Agreement
Where to learn more
Webs ites
Support from Palm and online forums:
What do I need to get started?
go.palm.com/treo500v/
Registration
.
To obtain discounts on software and
As you work through the instructions in this
guide, you need all the items that came in
the smartphone box (see What’s in the
accessories, faster technical support,
updates, and special promotions:
palm.com/register
. Registration is free.
box?), as well as the following:
WHAT DO I NEED TO GET STARTED?
10
Page 11

WELCOME
1
Customer service from your network operator
For questions about your mobile account or
features.
Corporate network support/your IT administrator
If you are having problems synchronising
information on a corporate network
CHAPTER
WHERE TO LEARN MORE
11
Page 12

1
CHAPTER
WELCOME
WHERE TO LEARN MORE
12
Page 13

CHAPTER
Setting up
You’re about to discover the many things about your
smartphone that will help you better manage your life and have
fun, too.
As you become more familiar with your smartphone, you’ll
want to personalise the settings and add applications to make
it uniquely yours. But first, follow these few easy steps to set
up your smartphone and get it running.
Benefits
Benefits
• Know where your smartphone
• Know where your smartphone
controls are located
controls are located
• Start using your smartphone right
• Start using your smartphone right
away
away
2
13
Page 14

In this chapter
Palm Treo 500v smartphone overview. . . . . . . . . . . . . . . . . . . . . . . 15
Inserting the SIM card and battery. . . . . . . . . . . . . . . . . . . . . . . . . . 17
Charging the battery. . . . . . . . . . . . . . . . . . . . . . . . . . . . . . . . . . . . . 19
Making your first call . . . . . . . . . . . . . . . . . . . . . . . . . . . . . . . . . . . . 22
Setting up synchronisation . . . . . . . . . . . . . . . . . . . . . . . . . . . . . . . . 23
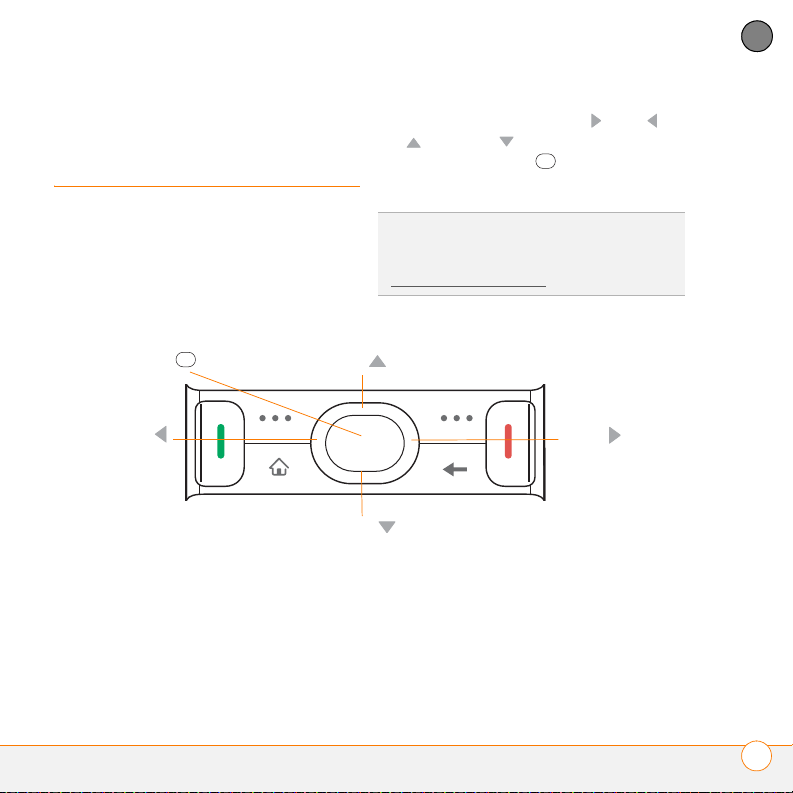
Page 15

SETTING UP
Indicator light (visible
when smartphone is
chargin g)
Earpiece
Lanyard
connector
5-way navigator
with Centre button
End
Sync and charge
connector
Headset jack
Home
Phone/Send
Side button
Back
Vol ume
Left
softkey
Right softkey
Microphone
2
Palm Treo 500v smartphone overview
Front view
CHAPTER
PALM TREO 500V SMARTPHONE OVERVIEW
15
Page 16
2
Battery door
Camera lens Speaker
Expansion card
tray (located
inside battery
compartment,
beneath battery)
SIM card slot
(located inside
battery
compartment,
beneath battery)
Smartphone
contacts (located
on side of battery
compartment)
Battery
Battery contacts
SETTING UP
CHAPTER
TIP
Be careful not to scratch or crush your
smartphone screen. Do not store it in a place
where other items might damage it.
Back view
DID YOU KNOW
button opens Internet Explorer Mobile (see
B
rowsing the web).
TIP
To connect a lanyard (sold separately),
remove the batter y door, connect the lanyard,
and then replace the battery door.
?
Pressing and holding the Side
PALM TREO 500V SMARTPHONE OVERVIEW
16
Page 17

SETTING UP
Powe r
2
IMPORTANT The smartphone speaker
includes a large magnet, so be sure not to
store your smartphone near credit cards or
other items that could be demagnetised.
Top view
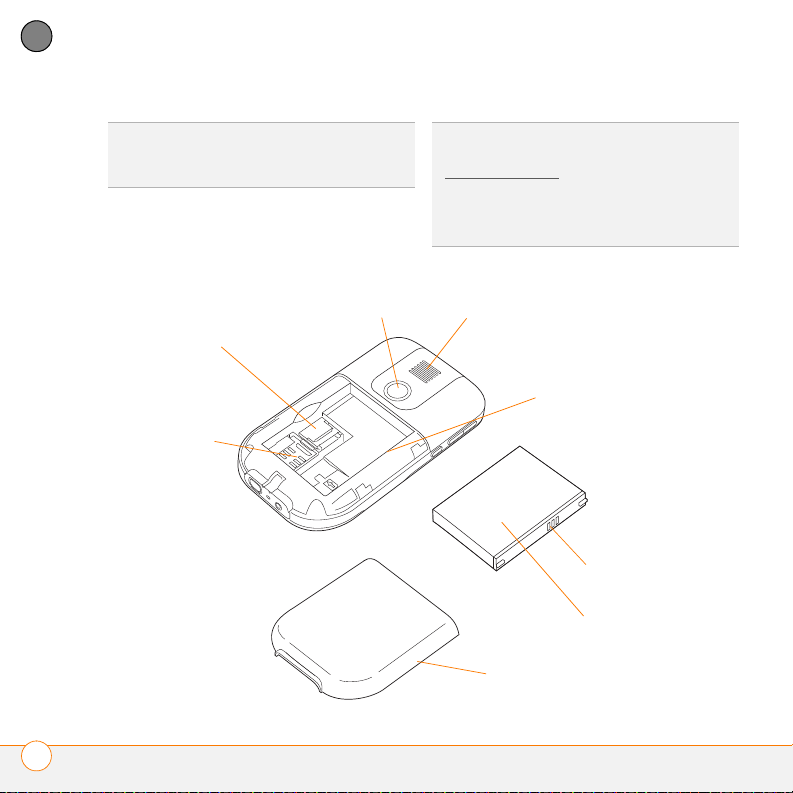
Inserting the SIM card and battery
Your SIM card contains account
information such as your phone number
and voicemail access number. To use your
smartphone’s phone, email, or web
features, you need to insert a SIM card. If a
SIM card is not included in your
smartphone box, your network operator
will provide you with one.
To take advantage of the high-speed data
connection available on your smartphone,
you need to have a 3G SIM card. A 3G SIM
card has “3G” on it.
TIP
If you don’t have a SIM card, contact your
network operator.
1 Holding your smartphone screen side
down, use two or more fingers to press
firmly against the battery door while
pulling downward to release it, and then
slide the door off the back of your
smartphone.
CHAPTER
INSERTING THE SIM CARD AND BATTERY
17
Page 18
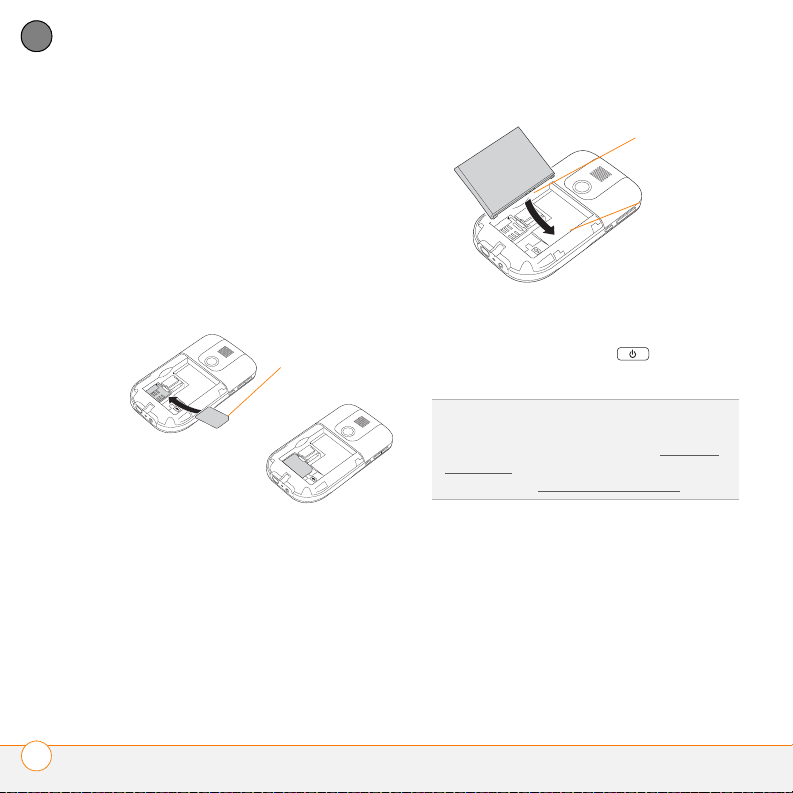
2
Notch
Battery
contacts
Smartphone
contacts
SETTING UP
CHAPTER
2 If the battery is installed, remove it.
Slide your finger under the left side of
the battery and lift up to remove it.
3 With the metal contacts facing the
battery compartment, slide the SIM
card into the cutout in the lower-left
corner of the compartment until you
feel the card click into place. Align the
notches to make sure you have the card
oriented correctly.
5 Slide the battery door back into place.
6 Press and hold Power until the
®
Palm
logo appears.
TIP
If your smartphone does not turn on after
you insert the batter y, you need to connect it
4 Align the metal contacts on the battery
with the contacts inside the battery
compartment, insert the battery into the
compartment at a 45-degree angle, and
then press it into place.
to the AC charger to charge it (see C
the battery). If it still doesn’t start, perform a
soft reset (see P
erforming a soft reset).
7 Follow the onscreen instructions to
finish the installation.
8 If your SIM card is not already activated,
follow the activation steps provided by
your network operator, or contact your
network operator directly for
assistance. If you plan to use email and
web browsing, you need a data service
harging
INSERTING THE SIM CARD AND BATTERY
18
Page 19
SETTING UP
Indicator light
2
plan from your network operator in
addition to your service contract. You
may also need a data service plan to
send and receive multimedia
messages.
TIP
You can buy an extra battery as a spare for
long airplane trips or periods of heavy data
use. To ensure proper functioning and avoid
nullifying the warranty, be sure to use
batteries from Palm only. Visit palm.com
.
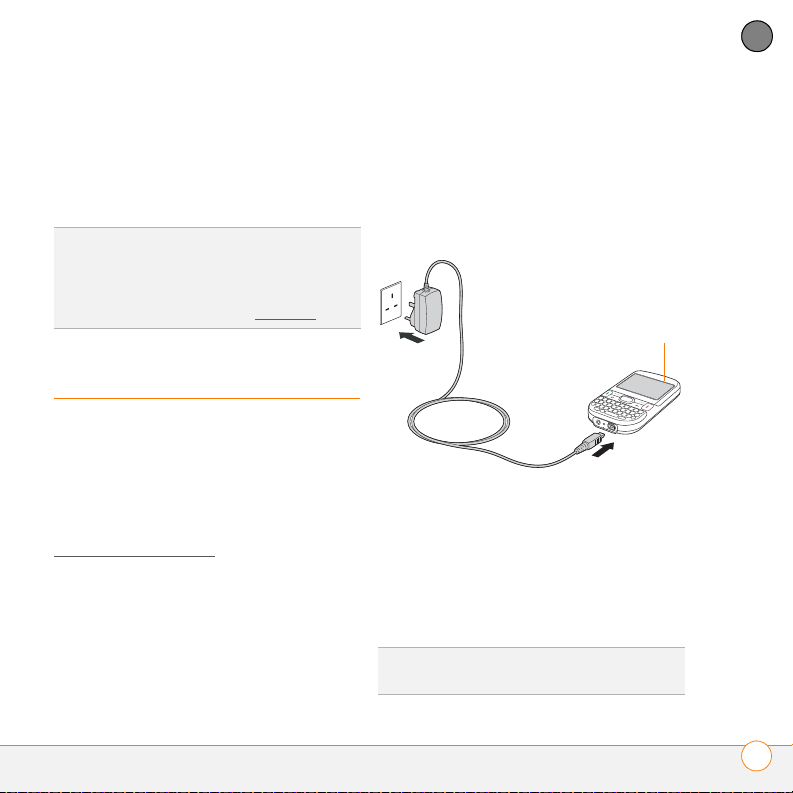
Charging the battery
Although the battery may come with a
sufficient charge to complete the setup
process, we recommend that after setup
you charge your smartphone for three
hours (or until the indicator light is solid
green) to give it a full charge. See
Maximisi
your battery’s power last longer.
BEFORE YOU BEGIN Make sure the
battery is inserted in your smartphone
before you charge. If you connect your
smartphone to a power source without the
battery inserted, nothing happens.
ng battery life for tips on making
1 Prepare the AC charger by inserting the
adapter that fits the wall outlet you’re
going to use.
2 Plug the AC charger into a wall outlet.
3 Connect the charger cable to the
bottom of your smartphone.
4 Check the indicator light to confirm that
your smartphone is charging.
• Solid red indicates that your
smartphone is charging.
• Solid green indicates that your
smartphone is fully charged.
DID YOU KNOW
indicator light flashes red.
?
If the battery is low, the
CHAPTER
CHARGING THE BATTERY
19
Page 20
2
Battery
icon
SETTING UP
CHAPTER
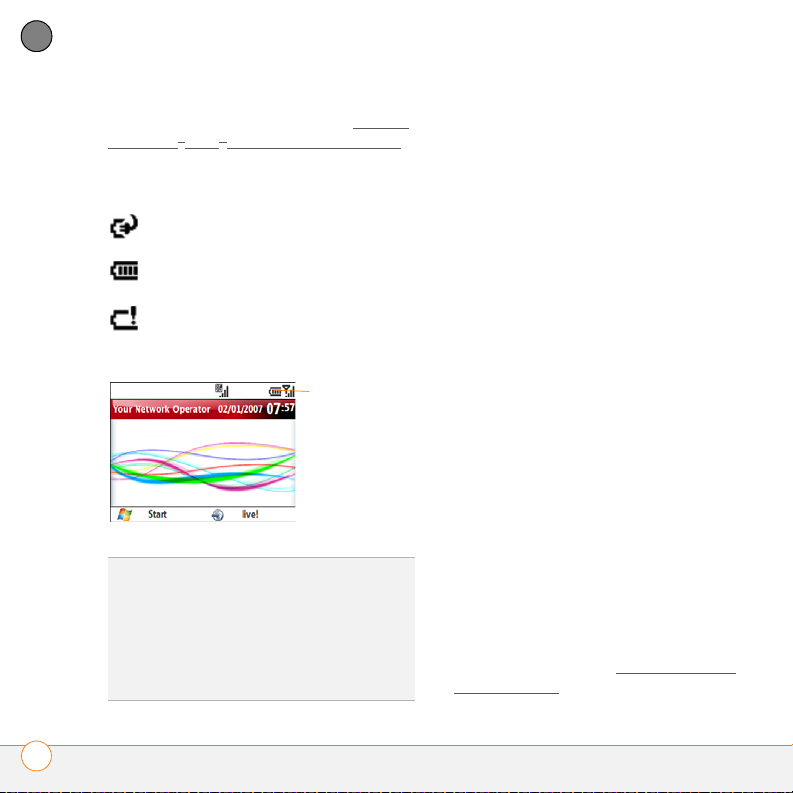
When your smartphone is on (see Turning
your Palm® Tr e o™ 500v smartphone on/off),
the onscreen battery icon displays the
charging status:
This icon indicates that the battery
is being charged.
This icon indicates that the battery
is fully charged.
This icon indicates that the battery
needs to be charged immediately.
Maximising battery life
Battery life depends on how you use your
smartphone. You can maximise the life of
your battery by following a few easy
guidelines:
• Charge your smartphone whenever
you’re at your desk, or charge
it overnight each day. The battery in
your smartphone has a much longer
useful life if you charge it frequently
instead of waiting until it’s fully drained.
• If you spend a lot of time using the
camera, games, media players
(including listening to music with
wireless headphones using the built-in
Bluetooth
®
wireless technology), or
other applications, keep an eye on the
battery icon and charge when
necessary.
• The wireless features (phone, email,
messaging, instant messaging, and
DID YOU KNOW
fully drained, your info remains safely stored
on your smartphone. Recharge the battery to
access your info.
TIP
You can also charge your smartphone
from your computer by connecting them with
the sync cable.
?
If your battery ever becomes
web) on your smartphone generally
consume more power than the
organiser features. If you don’t plan to
use the wireless features on your
smartphone for a while, turn off your
wireless services (see T
urning wireless
services on/off). You can forward calls
CHARGING THE BATTERY
20
Page 21
SETTING UP
2
to a different number or let all calls be
picked up by voicemail (see Forwarding
calls). To see if your wireless services
are on, press Power and select
Wireless Manager.
• If you are synchronising email and other
information directly with your corporate
Exchange server using Microsoft
Exchange ActiveSync
®
, set the
synchronisation interval to a maximum
of every 15 minutes during peak times
and every hour (or turned off
completely) during non-peak times (see
Setting the synchronisation schedule
• Turn off the Bluetooth feature when
).
you do not need to make a Bluetooth
connection (see Entering basic
Bluetooth settings).
• As with any mobile phone, if you are in
an area with no wireless coverage, your
smartphone searches for a signal,
which consumes power. If you cannot
move to an area of better coverage,
temporarily turn off your phone (see
Turning your phone off
).
TIP
When your phone is on, press Power to
display a list of options from which you can
quickly turn off the phone (see Turning your
phone off), silence the ringer (see Selecting a
sound profile), and more.
• Turn down the screen brightness (see
Adjusting the brightness
• Set your screen to turn off automatically
).
after a shorter period of inactivity (see
O
ptimising power settings).
• Turn off the option to receive beamed
information using Bluetooth technology
(see B
eaming an entry or file).
• If you use Internet Connection Sharing
to connect to the Internet, make a
connection to your computer using the
USB sync cable instead of wirelessly
using Bluetooth technology (see Using
your device as a wireless modem).
• Keep your battery away from direct
sunlight and other sources of heat.
Temperatures over 50 degrees Celsius
can permanently reduce the capacity
and life span of any lithium-ion battery.
CHAPTER
CHARGING THE BATTERY
21
Page 22

2
Vol ume
SETTING UP
CHAPTER
• Charge your battery at a comfortable
room temperature. Charging your
battery in cold temperatures results in
lower usable charge capacity.
Making your first call
1 Press Home to display your Home
screen.
TIP
You can also press End to display your
Home screen, unless you are on a call. If you
are on a call, pressing End hangs up the call.
2 Using the numbered keys (and the +, *,
and # keys, if necessary) on the
keyboard, enter a phone number.
3 Press Phone/Send to dial.
4 When your call is complete, press
End to end the call.
Adjusting call volume
While a call is in progress, press the
Vo lu me button on the side of your
smartphone to adjust the call volume.
22
MAKING YOUR FIRST CALL
Page 23
SETTING UP
Look here
for your
phone
number
2
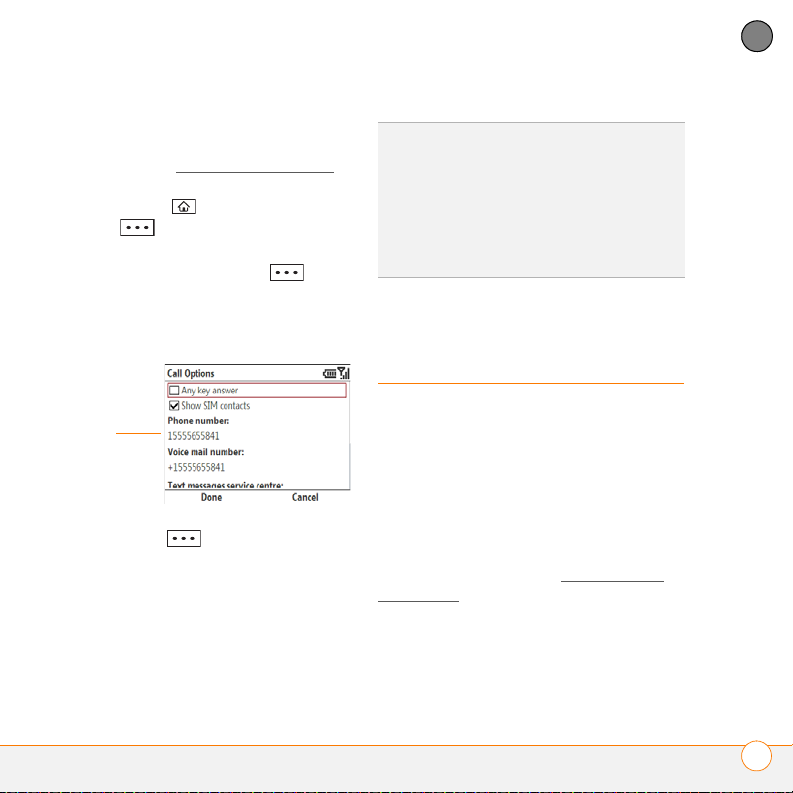
What’s my number?
BEFORE YOU BEGIN Make sure your
phone is on (see Turning your phone on
1 Press Home , and then press
Start (left softkey).
2 Navigate to the My Settings content
list and press All Settings (right
softkey).
3 Select Phone, and then select Call
Options.
4 Press Done (left softkey).
TIP
If your phone number doesn’t appear on
the Call Options screen, your network has not
).
yet sent the number to the SIM card (this
does not affect SIM card functionality). Turn
your phone off, wait a few hours, and then
turn on your phone and repeat these steps. If
your phone number still does not appear,
contact your network operator for assistance.
Setting up synchronisation
After you’ve finished setting up your
smartphone, we recommend that you set
up a synchronisation method to get the
most out of your smartphone.
Synchronising means that information that
has been entered or updated in one
place—your smartphone, your computer,
or your corporate server—is automatically
updated in the other (see Synchronisi
information).
CHAPTER
ng
SETTING UP SYNCHRONISATION
23
Page 24

2
CHAPTER
SETTING UP
SETTING UP SYNCHRONISATION
24
Page 25

CHAPTER
Moving around on your Palm®Treo™ 500v smartphone
Have you ever been to a new city and felt a bit lost until you
figured out the streets? Learning to move around on your
®
Palm
Tr e o™ 500v smartphone is similar. Most applications that
work on your smartphone use the same set of controls. So
once you learn how to use these controls, you’ll be driving all
over town and you won’t even need a map.
Benefits
• Quickly move around and
complete tasks in applications
using one thumb on the 5-way
navigator
• Access extra features with menus
• Find and open applications quickly
3
25
Page 26

In this chapter
Navigating around the screen . . . . . . . . . . . . . . . . . . . . . . . . . . . . . 27
Using the keyboard . . . . . . . . . . . . . . . . . . . . . . . . . . . . . . . . . . . . . 33
Opening and closing applications . . . . . . . . . . . . . . . . . . . . . . . . . . . 36
Using your Home screen . . . . . . . . . . . . . . . . . . . . . . . . . . . . . . . . . 39
Page 27
MOVING AROUND ON YOUR PALM®TREO™ 500V SMARTPHONE
Up
Down
Left
Right
Centre
3
Navigating around the screen
To navigate around the smartphone
screen, you use the 5-way navigator. As
you become familiar with your
smartphone, you’ll find your own favourite
way to scroll, highlight, and select items.
Using the 5-way, press Right , Left ,
Up , or Down to move around the
screen. Press Centre to highlight and
select items.
TIP
The arrow icons that indicate directions on
the 5-way are different from the onscreen
arrows that indicate that a list is available (see
S
electing options in a list).
CHAPTER
NAVIGATING AROUND THE SCREEN
27
Page 28
MOVING AROUND ON YOUR PALM®TREO™ 500V SMARTPHONE
Scroll bar
3
CHAPTER
Scrolling through screens
As on a computer, on your smartphone you
scroll to move from field to field or page to
page, or in some cases to highlight an item
or option in a list. There are several
methods of scrolling:
• Use the 5-way on the front of your
smartphone. Press Right , Left , Up
, or Down to move to the next
field, button, or action in that direction.
TIP
If a scroll bar appears on the right side of a
screen, this indicates that more options are
available than what is shown on the screen.
Press Up or Down on the 5-way to display
additional options.
• When inside a text field, press Right
or Left to move to the next character,
and press Up or Down to move
between lines.
• When inside a list, press and hold
Up or Down to rapidly scroll
through the list.
Closing screens
• To accept the information you entered
on a screen and to return to the
previous screen—or to return to the
previous screen without making any
changes—press Back
Highlighting and selecting items
On most screens, one item—an icon, a list
entry, or a check box—is highlighted by
default. The highlight identifies which item
is affected by your next action. Use the
5-way to move the highlight from one item
to another before opening or selecting it.
TIP
The best way to learn to use the 5-way is
to experiment. Press the 5-way buttons, and
as you do, follow the movement of the border
around the screen. The behaviour of the
5-way varies slightly in each application.
NAVIGATING AROUND THE SCREEN
28
Page 29

MOVING AROUND ON YOUR PALM®TREO™ 500V SMARTPHONE
3
The highlight can take one of two forms,
depending on what is highlighted:
• Border: This rectangular border
highlights items such as a text-entry
field, a check box, an option, or a web
link.
• Light text on a dark background: This
highlights items such as a phone
number, an email address, or an item in
a menu or a list.
After highlighting an item with the 5-way,
select or activate it by pressing Centre .
CHAPTER
NAVIGATING AROUND THE SCREEN
29
Page 30

MOVING AROUND ON YOUR PALM®TREO™ 500V SMARTPHONE
Left softkey
Right softkey
Left so ftkey
activates this
command
Right softkey
activates this
command
3
CHAPTER
Using the softkeys
The left and right softkeys give you quick
access to tasks that you can do on the
current screen, so the softkey items vary
from application to application and from
screen to screen. Look on the screen
directly above the softkey to see the action
that it takes in the current context. In some
contexts, these keys may do nothing at all.
In most cases the right softkey
opens the menu, and the left softkey
activates a specific command, such as
New or Done. Remember that softkey
functions vary from screen to screen, so
be sure to check the onscreen label before
pressing the softkeys.
Selecting menu items
In many applications, a menu provides
access to additional features. The menu is
hidden until you press Menu (right
softkey). To get the most out of your
smartphone, it’s a good idea to familiarise
yourself with the additional features
available through the menu in various
applications.
1 Press Menu (right softkey) to
display an application’s menu.
NAVIGATING AROUND THE SCREEN
30
Page 31

MOVING AROUND ON YOUR PALM®TREO™ 500V SMARTPHONE
3
CHAPTER
2 Press Up or Down to highlight a
menu item.
3 If an arrow appears at the top or bottom
of the displayed menu items, press
Up or Down to view additional
items.
4 If an arrow appears next to a menu
item, press Centre or Right to
display additional options for that item,
and then press Up or Down to
highlight a menu item. To return to the
original menu without making a
selection, press Left .
5 Press Centre to select the menu
item, or press Left or Menu
(right softkey) to close the menu and
cancel your selection.
DID YOU KNOW
items by pressing a key on the keyboard. To
quickly access a menu item, press Menu
(right softkey) followed by the underlined
letter in the menu item’s name.
?
You can select most menu
Selecting options in a list
If a rectangle appears around a field and
the field contains both a right- and a
left-pointing arrow, a list is available. On
most screens, the rectangle does not
appear until you navigate to the field using
the 5-way.
NAVIGATING AROUND THE SCREEN
31
Page 32

MOVING AROUND ON YOUR PALM®TREO™ 500V SMARTPHONE
Arrows
indicate a
list
Press
Centre to
display list
3
CHAPTER
To select from a list, do any of the
following:
• Use the 5-way to highlight the field, and
then press Centre to display the
items in the list. Press Up or
Down to highlight the item you want,
and then press Centre to make your
selection.
TIP
Fields that display a right arrow only do not
contain list items. These are either text-entry
fields (see Using text-entry fields
selection fields (for example, the Attendees
field in Calendar or the Categories field in
Contacts or Tasks). In a selection field, press
Centre or Right to view additional options.
NOTE A list is available for the Subject
), or
field in Calendar and Tasks, even though
this field does not display arrows.
Lists are different from the menus
described earlier in this section.
NAVIGATING AROUND THE SCREEN
32
Page 33

MOVING AROUND ON YOUR PALM®TREO™ 500V SMARTPHONE
Left
softkey
Right
softkey
Phone/Send
Home
End
Back
Backspace
Option
Shift
Space
Return
Alt
3
• With the field highlighted, press
Right or Left to scroll through the
options until the one you want appears.
This works with all list fields except the
Subject field in Calendar and Tasks. In
that field, you can press Centre to
display list items.
Using the keyboard
CHAPTER
USING THE KEYBOARD
33
Page 34

MOVING AROUND ON YOUR PALM®TREO™ 500V SMARTPHONE
3
CHAPTER
Use the keyboard to enter text and other
symbols in many applications on your
smartphone, as well as to dial phone
numbers (see Using your Home screen
NOTE Depending on your region, your
).
keyboard layout may be different from the
one shown above.
Understanding the keyboard backlight
Your smartphone includes a keyboard
backlight for low light conditions. The
keyboard backlight activates automatically
when the screen turns on. The backlight
turns off automatically when the screen
turns off or when you are on a call or
playing music in the background for longer
than the time specified in Backlight
Settings. You can set different time
intervals depending on whether the
smartphone is operating on battery power
or is connected to an external power
source. The backlight also turns off when
an application’s power-saving features turn
it off.
TIP
You can change the backlight shut-off
interval. Press Home, press Start (left
softkey), navigate to the My Settings content
list, and then press All Settings (right
softkey). Select More, and then select Power
Management. Use the two Backlight time
out on... lists to specify how long the
backlight stays on.
Using text-entry fields
In applications such as Contacts, Calendar,
and Tasks, text-entry fields are designated
by a rectangle around the field. On most
screens, the rectangle does not appear
until you navigate to the field using the
5-way. To enter text in a field, highlight the
field and use the keyboard to enter text.
Some text-entry fields—for example, the
Street field in Contacts or the Notes field in
Contacts, Calendar, or Tasks—display a
right-pointing arrow. In these fields, press
Centre or Right to open a text-entry
screen that allows you to enter more than
one line of text.
USING THE KEYBOARD
34
Page 35

MOVING AROUND ON YOUR PALM®TREO™ 500V SMARTPHONE
3
The address and subject lines in an email,
text, or multimedia message you compose,
as well as the message body, are also
text-entry fields.
TIP
Some fields that display a right arrow—for
example, the Attendees field in Calendar or
the Categories field in Contacts or Tasks—are
selection fields, not text-entry fields. In a
selection field, press Centre or Right to view
additional options.
TIP
If a field displays both a right and a left
arrow, it is not a text-entry field. Instead, it is a
field for which a list is available (see S
options in a list).
electing
Entering lowercase and uppercase letters
By default, the first letter of each sentence
or field is capitalised and the remaining text
you enter is lowercase. In some cases, the
initial capital letter does not appear until
after you finish typing the first word and
press Space or Enter .
To enter other uppercase letters, do one of
the following:
• Press Shift and enter a letter. You
don’t need to press and hold Shift while
entering a letter.
• Press Shift twice to turn on Caps
Lock, and then enter a series of letters.
When Caps Lock is on, this symbol
appears at the bottom of the screen:
. To turn off Caps Lock, press Shift
again.
Entering numbers, punctuation, and symbols
Numbers, punctuation, and symbols
appear above the letters on the keys. To
enter these characters, do one of the
following:
• Press Option , and then press the
key of the desired character. You don’t
need to hold Option while pressing the
key.
• Press Option twice to turn on
Option Lock, and then press the desired
keys to enter a series of characters.
When Option Lock is on, this symbol
appears at the bottom of the screen:
. To turn off Option Lock, press
Option again.
CHAPTER
USING THE KEYBOARD
35
Page 36

MOVING AROUND ON YOUR PALM®TREO™ 500V SMARTPHONE
3
CHAPTER
Entering other symbols and accented characters
You can enter symbols and accented
characters that don't appear on the keys by
using the alternative character list.
1 Press Alt to display the alternative
character list.
2 Press Prev (left softkey) or
Next (right softkey) to scroll
through the alternative character
screens.
3 When the character you want appears
on the screen, use the 5-way to
highlight the character.
4 Press Centre to insert the character.
TIP
To quickly view the most commonly used
accented characters, press Alt and then press
Prev (left softkey).
Entering passwords
You can’t see your password as you enter
it, so be careful. Be sure Caps Lock and
Option Lock are not on unless you need
them. For info on how to enter characters,
see Entering lowercase and uppercase
letters and Entering numbers, punctuation,
and symbols.
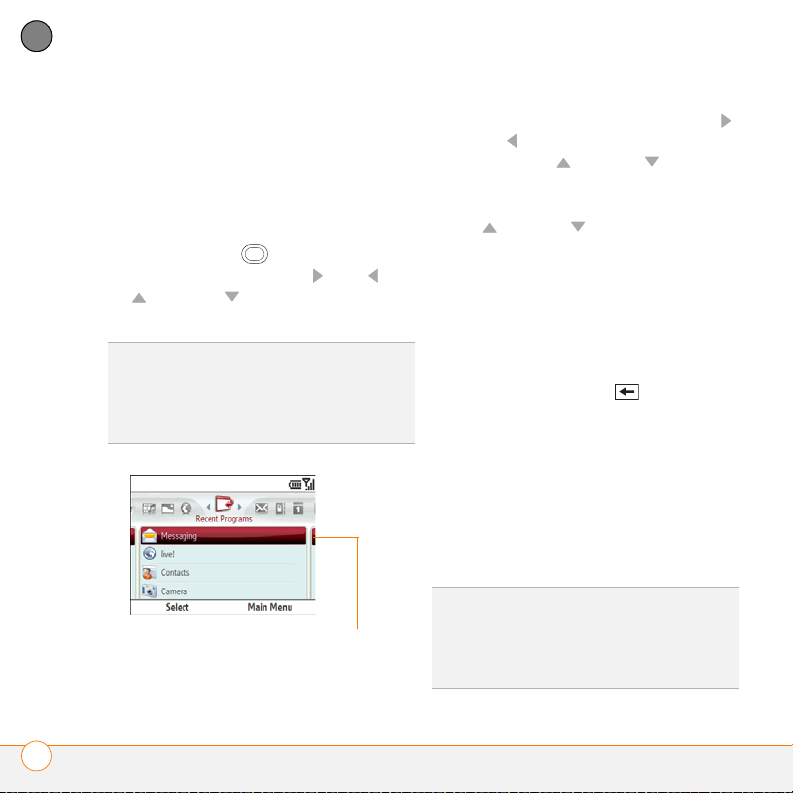
Opening and closing applications
You can open applications in one of the
following ways:
Recent Programs content list: Contains
the ten programs you used most recently.
Other content lists: Contain groups of
related items to give you fast access to
frequently used applications.
Keyboard shortcuts: Open applications
with just two key presses.
Main Menu: Gives you full access to all
applications and files on your smartphone.
OPENING AND CLOSING APPLICATIONS
36
Page 37

MOVING AROUND ON YOUR PALM®TREO™ 500V SMARTPHONE
3
Your smartphone can run multiple apps at
the same time, so when you finish using
one, just open the next one you want to
use.
Using the Recent Programs content list
1 Press Home , and then press
Start (left softkey). The Recent
Programs content list is displayed.
2 Press Up or Down to highlight
the desired application.
3 Press Centre to open the app.
Using other content lists
Other content lists contain a mix of
applications, files, and features. If you
select a file or feature from a content list, it
opens in the related application on your
smartphone. For example, selecting a
picture opens the Pictures & Videos app,
while selecting the “Add a Favourite”
feature opens Contacts.
NOTE The content list icons and entries
may vary according to your network
operator.
1 Press Home , and then press
Start (left softkey).
2 Press Right or Left to navigate to
the content list containing the
application, file, or feature you want.
3 Press Up or Down to highlight
the desired item.
4 Press Centre to open the item in
the appropriate application.
CHAPTER
OPENING AND CLOSING APPLICATIONS
37
Page 38

MOVING AROUND ON YOUR PALM®TREO™ 500V SMARTPHONE
3
CHAPTER
Using keyboard shortcuts
Home + Right : Opens the
Message Centre content list.
Home + Left : Opens the live!
content list.
TIP
You can create additional keyboard
shortcuts to quickly open apps (see Creating
keyboard shortcuts).
Using the Main Menu
DID YOU KNOW
or multimedia message alert, pressing Home
+ Centre opens the message. If you have a
new voicemail message alert, pressing Home
+ Centre dials your voicemail number.
TIP
To view all available applications, select
Applications.
TIP
When you open a category from the Main
Menu, items appear in a list with a letter to
the left of each item. To open an item, either
select it with the 5-way or press the letter on
the keyboard.
?
If you have a new email, text,
1 Press Home , and then press
Centre .
Closing applications
You can have several applications open at
once, so you don’t need to exit an
application to open another one. In most
cases, applications close automatically
when available memory is low, but you can
also close applications manually.
NOTE If you press Back to leave an
2 Navigate to the category or item you
want and press Centre . You may
need to navigate through one or more
levels of folders to get to the item you
application, the current application
continues to run in the background.
Manually closing applications helps free up
memory.
want.
OPENING AND CLOSING APPLICATIONS
38
Page 39

MOVING AROUND ON YOUR PALM®TREO™ 500V SMARTPHONE
Call and connection
status icons
3
1 Press Home , and then press
Centre .
2 Select Applications , and then
select Organiser & Tools .
3 Press More (left softkey) and
select Ta s k M a na g er .
4 Do one of the following:
Close a single application: Highlight
the application you want and press
Close (left softkey).
Close all open applications: Press
Menu (right softkey) and select
Close All.
Using your Home screen
From your Home screen you can quickly
see your call and connection status and
access all of your applications.
To access your Home screen, press
Home .
TIP
You can also open the Home screen by
pressing End, unless you are on a call. If you
are on a call, pressing End hangs up the call.
• Title bar and status icons: See What
are all those icons? to learn about the
icons that appear in this area.
CHAPTER
USING YOUR HOME SCREEN
39
Page 40

MOVING AROUND ON YOUR PALM®TREO™ 500V SMARTPHONE
3
CHAPTER
• Start (left softkey): Press this
key to open the content lists (see Using
the Recent Programs content list and
Using other content lists
• live! (right softkey): Press this
).
TIP
You can select a picture for your Home
screen background and select which items
appear in the Home screen. See Home s
settings for details.
creen
key to open your smartphone’s web
browser to the Vodafone live! website.
USING YOUR HOME SCREEN
40
Page 41

CHAPTER
Your phone
The phone is your home base for making and receiving calls.
You can creatively manage multiple calls, such as swapping between
calls and creating conference calls. You can also access voicemail or
talk using a wired or wireless headset.
Benefits
• Stay in touch—you choose how
• Work in other applications when
on a call
• Add contact numbers to your
Favourite Contacts content list for
quick access
4
41
Page 42

In this chapter
Turning your Palm® Tre o™ 500v smartphone on/off . . . . . . . . . . . . . 43
Making calls from the Home screen . . . . . . . . . . . . . . . . . . . . . . . . 45
Other ways of making calls . . . . . . . . . . . . . . . . . . . . . . . . . . . . . . . 48
Receiving calls . . . . . . . . . . . . . . . . . . . . . . . . . . . . . . . . . . . . . . . . . 49
Using voicemail . . . . . . . . . . . . . . . . . . . . . . . . . . . . . . . . . . . . . . . . 50
What can I do during a call? . . . . . . . . . . . . . . . . . . . . . . . . . . . . . . . 51
Working with called numbers . . . . . . . . . . . . . . . . . . . . . . . . . . . . . 56
Creating speed dials. . . . . . . . . . . . . . . . . . . . . . . . . . . . . . . . . . . . . 58
Using a phone headset . . . . . . . . . . . . . . . . . . . . . . . . . . . . . . . . . . 60
Customising phone settings . . . . . . . . . . . . . . . . . . . . . . . . . . . . . . 63
Using the SIM toolkit . . . . . . . . . . . . . . . . . . . . . . . . . . . . . . . . . . . . 71
What are all those icons? . . . . . . . . . . . . . . . . . . . . . . . . . . . . . . . . . 72
Page 43

YOUR PHONE
4
Turning your Palm®
Tr e o
™
500v
smartphone on/off
The term smartphone refers to the device
and its physical aspects. The term phone
refers to the wireless feature of your Palm
™
Tr eo
500v smartphone that enables you
to connect to your network operator’s
network so that you can make and receive
calls and send and receive data.
The phone and your smartphone can be
turned off and on separately. This means
you can turn on your smartphone to use
just the organiser features without turning
on the phone.
Turning your phone off
When you turn the phone off, you can still
use the Microsoft Office apps and all the
organiser features of your smartphone.
1 Press Power and select Wireless
Manager.
®
2 Select Phone.
3 Press Done (left softkey).
When your phone is off, the phone-off
icon appears at the top of the screen and
Phone Off appears in the upper-left of the
screen. Your phone is not connected to
any mobile network. Although you can no
longer use the phone, you can still use
Microsoft Office apps and all the organiser
features of your smartphone.
CHAPTER
TURNING YOUR PALM
®
TREO™ 500V SMARTPHONE ON/OFF
43
Page 44

YOUR PHONE
4
CHAPTER
TIP
When you travel by plane, you need to
turn off all radios on your smartphone, which
include the phone and the Bluetooth
technology feature. This is sometimes
referred to as flight mode. To turn off all
radios, press Power, select Wireless
Manager, and then select All.
TIP
You can also press Power and select
Silent to quickly silence the ringer on your
phone.
®
wireless
Turning your phone on
When you turn on your phone, it connects
to a mobile network so that you can make
When your smartphone locates a signal,
your network operator’s name appears in
the upper-left of the screen and the
signal-strength icon appears at the top
of the screen.
When you are inside a coverage area, the
signal-strength icon has bars in it. If
you’re outside a coverage area, the
indicator light flashes red and no bars
appear in the signal-strength icon.
Turning your smartphone on
• Press and hold Power until the
®
Palm
logo appears.
and receive phone calls and use other
wireless services (if supported by the local
network).
NOTE The first time you turn your
smartphone on (see Turning your
smartphone on), the phone is on by
default.
1 Press Power and select Wireless
Manager.
2 Select Phone.
3 Press Done (left softkey).
TIP
If battery power is extremely low, the
screen does not turn on when you press and
hold Power. If this happens, you need to
charge the battery.
Turning your smartphone off
• Press and hold Power . When your
smartphone is off, the screen turns off.
You cannot make phone calls or use any
of the Microsoft Office apps or the
organiser features on your smartphone.
TURNING YOUR PALM
44
®
TREO™ 500V SMARTPHONE ON/OFF
Page 45

YOUR PHONE
4
TIP
You can also turn your smartphone off by
pressing Power and selecting Power off.
Waking up the screen
After a designated period of inactivity, your
smartphone screen turns off, even though
your smartphone is still powered on. If the
screen turns off, wake up the screen by
pressing any key. If you press End , you
automatically go to the Home screen after
you wake up the screen. If you press any
other key, the last screen you were using
is displayed.
TIP
You can change the time interval for the
period of inactivity that takes place before the
screen turns off. Press Home, press Start
(left softkey), navigate to the My Settings
content list, and then press All Settings (right
softkey). Select More, and then select Power
Management. Select the Display time out
list and specify how many minutes the screen
stays on during a period of inactivity.
Making calls from the Home screen
Your smartphone offers several ways to
make phone calls from the Home screen.
Dialling from the Home screen
BEFORE YOU BEGIN Make sure your
phone is on and that you’re inside a
coverage area (see Turning your phone on
1 Press Home .
2 Using the numbered keys (and the +,*,
and # keys, if needed) on the keyboard,
enter a phone number.
CHAPTER
).
MAKING CALLS FROM THE HOME SCREEN
45
Page 46

YOUR PHONE
4
CHAPTER
DID YOU KNOW
enter +, *, or # without first pressing Option.
You can also press P to pause. This makes it
easy to respond to further dialling instructions.
?
When you're on a call, you can
3 Press Phone/Send to dial.
NOTE You do not need to press Option to
access the numbers on the keyboard.
However, when dialling short numbers, the
number may conflict with a contact name.
If this occurs, press Option to avoid
starting a contact lookup. For emergencies,
you can dial your national emergency
number (such as 999 or 112) without
pressing Option first.
Dialling by contact name
You can look up contacts quickly by
entering just a few letters of a contact’s
name directly from your Home screen.
BEFORE YOU BEGIN
• Before you can dial a number by contact
name, you must create some contacts
(see A
dding a contact,) or import them
by synchronising (see Synchronisi
ng
information).
• Make sure your phone is on and that
you’re inside a coverage area (see
Turning your phone on
).
1 Press Home .
2 Using the keyboard, begin entering one
of the following for the contact you
TIP
If you lock your smartphone and select
Simple PIN as the password type, you can dial
an emergency number by entering the
number in the password field and pressing
Phone/Send. You do not need to press
Option before entering the number. However,
if you select Strong alphanumeric as the
password type, you must first press Option
twice before entering the number in the
password field. See Locking your smartphone
want to call:
.
• First name (JOH for John)
MAKING CALLS FROM THE HOME SCREEN
46
Page 47

YOUR PHONE
Phone
number
codes
4
• Last name (SMI for Smith)
• First initial, a space, and then last
initial (J S for John Smith)
• A few letters of the first name, a
space, and then a few letters of the
last name (JOH SMI for John Smith)
For example, entering SM finds both
Smilla Anderson and John Smith.
Entering SM AN finds only Smilla
Anderson.
TIP
You can type letters from the last name
first; for example, typing “S J” or “Smi Joh”
also finds “John Smith.”
DID YOU KNOW
several features that make it easy to find the
contact you want, even if you are not sure of
the exact name: 1) Search results include
name variations, such as “David” for “Dave.”
2) The search function inserts a space before
the last letter typed if it cannot find a match.
So if entering “Davidm” returns no results,
the search function automatically tries to
search for “David M.” 3) Search results
include soundalike entries, so entering
“Dwayne” also returns results for “Duane.”
?
The search function offers
To delete letters when correcting a
misspelled name, press Backspace .
3 Each matching contact is displayed with
a code for the type of number you last
entered for that contact: “w” for work,
“m” for mobile, and so on.
DID YOU KNOW
example, “E”—that corresponds to a number
key, both the number and any matching
contact names appear on the screen. The
onscreen numbers do not affect the process
for dialling by contact name.
?
If you enter a letter—for
If the name you want is displayed with
the correct phone number code,
highlight the name and press
Phone/Send to dial the number.
If you want to dial a different number
for a displayed contact, select the
contact name, select the number to
dial, and then press Phone/Send .
MAKING CALLS FROM THE HOME SCREEN
CHAPTER
47
Page 48

YOUR PHONE
4
CHAPTER
Dialling with a speed dial
BEFORE YOU BEGIN
• Create some speed dials. See Creating
contact name you want to call, and then
press Phone/Send to dial.
speed dials.
• Make sure your phone is on and that
you’re inside a coverage area (see
Turning your phone on
).
You can make a call using a speed dial you
have assigned to a contact’s phone
number.
1 Press Home .
2 Press and hold the key or keys that you
assigned as a speed dial to the contact
TIP
You can manage information about a
recently called number in several ways (see
Working with called numbers
).
number you want to call. If you have
assigned a two-digit speed dial to this
number, press the first key and then
press and hold the second key.
Redialling a recently called number
To dial the last number you called: Press
Home , and then press Phone/Send
twice.
To select from your most recently
Other ways of making calls
Your smartphone offers several ways to
make phone calls other than from the
Home screen. Try them all and you’ll
discover which methods you prefer.
dialled numbers: Press Home ,press
Phone/Send , highlight the number or
OTHER WAYS OF MAKING CALLS
48
Page 49

YOUR PHONE
4
Dialling by company name
BEFORE YOU BEGIN Make sure your
phone is on and that you’re inside a
coverage area (see Turning your phone on
1 Press Home , and then press Start
(left softkey)
2 Navigate to the Favourite Contacts
content list and press All Contacts
(right softkey).
3 Press Menu (right softkey) and
select View By > Company.
4 Press Phone/Send to go to your
Home screen.
5 Using the keyboard, begin entering the
first few letters of the company name.
6 Select the number you want to dial.
7 Press Phone/Send to dial.
Dialling from a message
Your smartphone recognises most phone
numbers that appear in text, email, or
multimedia messages.
1 Use the 5-way to highlight the phone
number you want to dial in the
message.
2 Press Phone/Send to dial.
TIP
If the message includes the name of a
contact whose contact entry contains a phone
).
number, you can also highlight the contact
name and press Phone/Send to dial the
associated number.
TIP
Highlight a name or phone number in a
message and press Centre to create a new
contact containing the highlighted information
or edit an existing contact to include the
highlighted information.
Receiving calls
To answer calls, your phone must be on.
This is different from having only your
smartphone turned on (see Turning your
phone on). When your phone is off, your
calls go to voicemail.
TIP
See a picture of the person calling you!
Learn how to assign a caller ID picture in
A
dding a contact.
If music is playing when a call arrives, the
smartphone rings softly. You can answer
CHAPTER
RECEIVING CALLS
49
Page 50

YOUR PHONE
Voicemail icon
4
CHAPTER
the phone as you normally would. The
audio pauses during your call.
To answer a call, do one of the following:
• Press Phone/Send .
• Press Answer (left softkey).
• If a headset is attached, press the
To ignore a call and send it to voicemail,
select Ignore (right softkey) or press
End .
Using voicemail
Setting up voicemail
1 Press Home
2 Press and hold 1 on the keyboard to dial
3 Follow the voice prompts to set up your
headset button.
your network operator’s voicemail
system.
voicemail.
Retrieving voicemail messages from the Home screen
When you have unretrieved voicemail
messages, a Voicemail icon appears at
the top of your screen.
1 Press Home
2 Press and hold 1 on the keyboard to dial
your network operator’s voicemail
system.
3 Enter your voicemail password using
the keyboard.
4 Follow the voice prompts to listen to
your messages.
USING VOICEMAIL
50
Page 51

YOUR PHONE
Caller’s name
and/or number
4
What can I do during a call?
Your smartphone offers many advanced
telephone features, including call waiting,
six-way conferencing, and call forwarding.
These features depend on your service
plan. Contact your network operator for
more information.
When you make or receive a call, the call
info appears on your Home screen.
During a call, you can do any of the
following:
Navigate around the Home screen: Use
Up and Down to move around or
highlight items.
Put the call on hold: Press Menu
(right softkey) and select Hold. To take the
call off hold, press Unhold (left
softkey).
Mute the microphone so you can’t be
heard: Press Mute (left softkey). To
turn the microphone back on, press
Unmute (left softkey).
DID YOU KNOW
(shown above) must be displayed if you want
to place a call on hold or mute a call. If the
“Connected” screen is not displayed, press
Back until it appears.
?
The “Connected” screen
Use the built-in speakerphone: Press
Menu (right softkey) and select
Speakerphone On. To turn the
speakerphone off, press Menu (right
softkey) and select Speakerphone Off.
DID YOU KNOW
screen dims to conserve battery power. Press
any key except End to light up the screen.
DID YOU KNOW
messages during a call. This is a great way to
stay connected with colleagues during a long
call.
?
When you are on a call, the
?
You can send and receive text
CHAPTER
WHAT CAN I DO DURING A CALL?
51
Page 52

YOUR PHONE
4
CHAPTER
Ending a call
Do one of the following:
• Press End .
• Press the headset button (if a headset is
attached and has a button on it). Some
headsets do not have a button.
Switching applications during an active call
You can use many other applications on
your smartphone, including the organiser
and text message features, while holding a
phone conversation. You cannot, however,
make some data connections during an
active call while connected to a GPRS
network. If you’re connected to a GPRS
network, you cannot browse the web or
send and receive email or multimedia
messages while on a voice call. If you’re
From any application, press Home to
return to your Home screen.
Saving phone numbers
After you hang up a call, you can add the
number of the person you were talking
with to Contacts if it's not already in your
list. If an incoming call uses caller ID
blocking, you cannot save the number.
1 After you hang up the call, press
Save (left softkey).
2 Do one of the following:
Create a new contact: Select <New
Contact>.
Add this number to an existing
contact: Select the contact name.
Decline adding the number: Press
Cancel (right softkey).
connected to a UMTS (3G) network, you
can perform simultaneous voice and data
functions. How can you tell which kind of
network you’re connected to? See W
hat
are all those icons?
To open an application, see Opening and
closing applications.
TIP
You can also save contact info from email
messages.
If you don’t add a number right away,
follow these steps to add it later:
1 Press Home ,and then press
Phone/Send .
WHAT CAN I DO DURING A CALL?
52
Page 53

YOUR PHONE
4
2 Highlight the number you want to save.
3 Press Save (left softkey).
4 Do one of the following:
Create a new contact: Select <New
Contact>.
Add this number to an existing
contact: Select the contact name.
Decline adding the number: Press
Cancel (right softkey).
Making a second call
You can make a second call while your first
call is still active:
1 Place your first call on hold by pressing
Menu (right softkey) and
selecting Hold.
2 Dial a second number using any of the
methods described in Making calls from
the Home screen.
When two calls are active, your Home
screen includes two call status sections,
each representing one of the calls.
Answering a second call (call waiting)
When you’re on a call and you receive a
second call, the call waiting notification
appears if you have chosen to be notified
(see Setting call waiting notification
). You
can do any of the following:
Send the new call to voicemail: Press
Ignore (right softkey).
Place the current call on hold and
answer the new call: Press Answer
(left softkey) or Phone/Send . After you
answer the call:
CHAPTER
WHAT CAN I DO DURING A CALL?
53
Page 54

YOUR PHONE
4
CHAPTER
IMPORTANT You can join up to 5 calls into
a 6-way conference call. The number of
calls you can join in conference depends
on your service plan. Additional charges
may apply, and minutes in your mobile
account may be deducted for each call.
Please contact your network operator for
more information.
• Press Swap (left softkey) to
move between callers by placing the
current active call on hold and talking on
the other line.
• Make the calls a conference call. See
Making a conference call
.
Making a conference call
BEFORE YOU BEGIN Not all service plans
1 Answer a second call (see Answering a
second call (call waiting)), or put the first
call on hold and make a second call (see
M
aking a second call).
2 Press Menu (right softkey) and
select Conference. This joins the two
calls with you in a conference.
support the conference call feature. Even if
your home network supports conference
calling, the feature may not be supported if
you are roaming. If you experience
problems, check with your network
operator to confirm that your service plan
includes conference calling. If you are
roaming, try a test call to see if conference
calling is supported.
3 (Optional) Do one or more of the
following:
• Make or answer more calls and join
them into the conference call. The
WHAT CAN I DO DURING A CALL?
54
Page 55

YOUR PHONE
4
number of calls you can join in
conference depends on your service
plan.
• Extract a caller from the conference
call to talk with them privately by
pressing Menu (right softkey),
selecting Private, and then selecting
the phone number. The extracted call
becomes the active call. To return
that call to the conference, press
Menu (right softkey) and select
Conference.
• Swap between the conference call
and the private call by pressing
Swap (left softkey).
4 When you’re done, do one of the
following:
• If you have extracted a call, press
End twice to hang up all calls or
press End once to hang up just the
active call.
• If you have not extracted a call, press
End once to hang up all calls.
Forwarding calls
You can forward calls to another phone
number. Please check with your network
operator about availability and pricing of
forwarded calls; additional charges may
apply.
When all calls are forwarded, the call
forwarding icon appears in the title bar.
BEFORE YOU BEGIN Make sure your
phone is on and that you’re inside a
coverage area (see Turning your phone on
1 Press Home , and then press
Start (left softkey).
2 Navigate to the My Settings content
list and press All Settings (right
softkey).
3 Select Phone, and then select Call
Forwarding.
4 Select when you want calls to be
forwarded. Select Unconditional if you
want all calls to be forwarded. Some of
CHAPTER
).
WHAT CAN I DO DURING A CALL?
55
Page 56

YOUR PHONE
4
CHAPTER
the settings may already be set by your
network operator to send your calls to
voicemail.
Working with recently called numbers
1 Press Home , and then press
Phone/Send .
5 Press Done (left softkey).
TIP
To turn off call forwarding, press Menu
(right softkey) and select Disable All.
Working with called numbers
You can redial a number you’ve recently
called (see R
number). You can also view call details,
send a text message to a number, save the
number to your contact list, and more.
edialling a recently called
DID YOU KNOW
outgoing calls are designated by a
right-pointing green arrow, and incoming calls
are designated by a left-pointing yellow arrow.
Missed calls are designated by a red
exclamation point.
TIP
To filter the calls shown on the recent call
list, press Menu (right softkey), select View,
and then select the option you want.
2 Highlight the number you want and do
one or more of the following:
Save the phone number to a contact:
See Saving phone numbers
Send a text message to the number:
?
On the recent calls list,
.
Press Menu (right softkey) and
WORKING WITH CALLED NUMBERS
56
Page 57

YOUR PHONE
4
select Send Text Message. Enter the
message text and press Send
(left softkey).
View more details about the number:
Press Menu (right softkey) and
select Open Call. The first entry shows
the length of your last call with this
number. Use the other entries to call
the number or send a text message.
3 With the call open, do either of the
following:
View all calls with this number: Press
Menu (right softkey) and select
View All Calls. All calls with this
number are shown, including their
duration.
Delete the call from the recent calls
list: Press Menu (right softkey)
and select Delete Call. Press Ye s
(left softkey) to confirm the deletion.
Viewing all of your calls
Your Call History list contains the numbers
for all incoming and outgoing calls.
1 Press Home , and then press
Centre .
2 Select Calls .
DID YOU KNOW
outgoing calls are designated by a
right-pointing green arrow, and incoming calls
are designated by a left-pointing yellow arrow.
Missed calls are designated by a red
exclamation point.
?
On the Call History list,
3 Highlight a number and do one or more
of the following:
CHAPTER
WORKING WITH CALLED NUMBERS
57
Page 58

YOUR PHONE
4
CHAPTER
Save the phone number to a contact:
Press Save (left softkey) and refer
to Saving phone numbers
.
Open the contact associated with the
phone number: Press Menu
(right softkey) and select Find Contact.
Send a text message to the number:
Press Menu (right softkey) and
select Send Text Message. Enter the
message text and press Send
(left softkey).
Delete the number from the list:
Press Menu (right softkey) and
select Delete. Press Ye s (left
softkey) to confirm the deletion.
Delete the entire Call History list:
Press Menu (right softkey) and
select Delete List. Press Ye s (left
softkey) to confirm the deletion.
TIP
To filter the calls shown on the Call History
list, press Menu (right softkey), select Filter,
and then the type of calls you want to view.
Send an email message to the
contact associated with the number:
Press Menu (right softkey) and
select Email. Enter the message text
Creating speed dials
and press Send (left softkey).
View timers for the most recent call,
all calls, and more with this number:
Press Menu (right softkey) and
select View Timers.
You can assign a speed dial to any contact
phone number. You can create up to 99
speed dials.
BEFORE YOU BEGIN Before you can
assign a speed dial to a contact phone
TIP
To reset call timers to zero for this
number, press Menu (right softkey) and
select Reset Timers. Press Yes (left softkey)
to confirm that you want to reset all timers.
number, you must create some contacts
(see A
dding a contact) or import them by
synchronizing (see Synchronisi
ng
information).
CREATING SPEED DIALS
58
Page 59

YOUR PHONE
4
1 Press Home , and then press Start
(left softkey).
2 Navigate to the Favourite Contacts
content list and press All Contacts
(right softkey).
3 Select the contact to whom you want to
assign a speed dial.
4 Highlight the phone number to which
you want to assign a speed dial.
5 Press Menu (right softkey) and
select Add to Speed Dial.
6 If you want to change the name for this
speed dial, select the Name list and
enter a new name.
7 Select the Keypad assignment list, and
then select the speed dial you want to
assign to this phone number.
DID YOU KNOW
already assigned as a speed dial to a different
phone number, you receive an alert asking if
you want to replace the existing assignment
with the new one.
DID YOU KNOW
entering the + symbol in a phone number, and
the number 1 is reserved for dialing your
voicemail system. You cannot assign either of
these numbers as a speed dial.
TIP
You can also create speed dials to quickly
open applications (see Creating keyboard
shortcuts).
?
If you select a number that is
?
The number 0 is reserved for
CHAPTER
CREATING SPEED DIALS
59
Page 60

YOUR PHONE
Microphone
Speakers
Headset button
4
CHAPTER
Using a phone headset
You can connect a phone headset for
hands-free operation. You can use either
the headset that came with your
smartphone or a compatible third-party
headset.
Using a wired headset
IMPORTANT If driving while using a
smartphone is permitted where you are
and you need to make a call, we
recommend using a phone headset or a
hands-free car kit (sold separately). If you
must use the wired headset while driving,
place a speaker in only one ear. Leave the
other ear free to hear outside noises. Make
such a call only if it is legal to do so and you
can do so safely.
USING A PHONE HEADSET
60
Page 61

YOUR PHONE
4
The headset button is context-sensitive,
and it performs various actions based on
the situation. You can press the headset
button to perform tasks such as the
following:
• Answer an incoming call
• Respond to call waiting
• Hang up a single active call or all calls on
a conference call if there is no extracted
call
• Swap between calls if there is one
active call and one call on hold
NOTE Your smartphone works with
headsets that have a 2.5mm, 3-pin
connector (look for three dark bands on the
plug). When in doubt, ask the third-party
headset manufacturer if the product is
compatible with your smartphone. If you
hear a headset buzz or poor microphone
performance, your headset may be
incompatible with your smartphone.
Connecting to a Bluetooth
®
hands-free
device
Your smartphone is also compatible with
many headsets and car kits (sold
separately) enabled with Bluetooth
®
wireless technology version 2.0 or earlier.
For a list of compatible hands-free devices
with Bluetooth wireless technology, go to
go.palm.com/treo500v/
.
After you set up a connection with a
Bluetooth headset or hands-free car kit,
you can communicate with that device
whenever it is within range and the
Bluetooth feature on your smartphone is
turned on. The range varies greatly,
depending on environmental factors. The
maximum is about 9 metres.
DID YOU KNOW
Bluetooth headset and a car kit, the one you
connected to your smartphone last becomes
the active device.
?
If you have both a compatible
1 If necessary, prepare the other device,
such as a headset, to accept a new
connection. Check the device’s
documentation for details. Be sure to
find out if the device has a predefined
passkey that you need to enter on your
smartphone in step 9.
2 Press Home , and then press
Start (left softkey).
CHAPTER
USING A PHONE HEADSET
61
Page 62

YOUR PHONE
4
CHAPTER
3 Navigate to the My Settings content
list, highlight Bluetooth, and then press
Tu r n On (left softkey).
4 Select Bluetooth, and then select Add
new device.
softkey). You do not need to press
Option before entering digits
IMPORTANT Some hands-free devices
have a predefined passkey. If your
hands-free device has a predefined
passkey, you can find it in the
documentation for that device. Other
devices provide a screen where you enter
a passkey that you make up. In either case,
you must use the same passkey on both
your smartphone and your hands-free
device. We recommend that you use a
passkey of 16 digits, where possible, to
5 Wait for your smartphone to search for
devices and to display the device list.
improve the security of your smartphone.
The longer the passkey, the more difficult
it is for the passkey to be deciphered.
DID YOU KNOW
Home screen indicates the status of the
Bluetooth feature. See T
icon for details.
?
The Bluetooth icon on your
he Bluetooth status
8 If the passkey is not predefined, enter
6 Select the device you want to connect
to and press Next (left softkey).
7 Enter a passkey between 1 and 16
the same passkey on the other
Bluetooth device.
9 Press OK (left softkey).
digits long and press Next (left
USING A PHONE HEADSET
62
Page 63

YOUR PHONE
4
You can now communicate with this
device whenever it is within range and the
Bluetooth feature on your smartphone is
turned on. The range varies greatly,
depending on environmental factors. The
maximum is about 9 metres.
Using a Bluetooth hands-free device
To learn how to set up and connect to
Bluetooth devices, see Connecting to a
Bluetooth® hands-free device.
Here are tips for working with a Bluetooth
hands-free device:
• To transfer a call from the handset to a
Bluetooth hands-free device during a
call, press Menu (right softkey)
and select Connect Bluetooth. To
transfer the call back to the headset,
press Menu (right softkey) and
select Cancel Bluetooth.
• To transfer a call from a wired headset
to a Bluetooth headset or car kit that is
within range and with which you’ve
previously set up a partnership
(Bluetooth headset or car kit required,
sold separately), unplug the wired
headset and press the button on the
Bluetooth headset or car kit.
DID YOU KNOW
hands-free device and it is within range, your
smartphone routes all calls to the hands-free
device instead of to the earpiece on your
smartphone. Bluetooth range is up to 9
metres in optimum environmental conditions.
TIP
To find out how to transfer your contacts
from your smartphone to your car kit, go to
go.palm.com/treo500v/
?
If you’re using a Bluetooth
.
Customising phone settings
Selecting ringtones and alert sounds
You can set tones for incoming phone
calls, notifications, and voicemail
messages. You can download MP3, MIDI,
AMR, WAV, and WMA ringtones directly to
your smartphone (see D
and images from a web page). You can also
download ringtones to your computer and
then email them to your phone.
ownloading files
CHAPTER
CUSTOMISING PHONE SETTINGS
63
Page 64

YOUR PHONE
Volu me
4
CHAPTER
BEFORE YOU BEGIN If you want to use a
downloaded or emailed ring tone, make
sure it has been saved or copied to the My
Ringtones folder on your smartphone (see
Finding informatio
n).
1 Press Home , and then press
Start (left softkey).
2 Navigate to the My Settings content
list and press All Settings (right
softkey).
3 Select Sounds.
TIP
Select Vibrate to have your smartphone
vibrate when a call arrives (see S
sound profile).
electing a
New voice message: Sets the sound
when you receive a new voicemail
message.
5 (Optional) To preview the selected
sound, press Menu (right softkey)
and select Play.
6 Press Done (left softkey).
TIP
You can also set sounds for messaging
notifications, calendar reminders, and other
events (see S
electing Sounds & Notifications).
Adjusting call and ringer volume
4 Select one or more of the following
lists, and then press Right or Left
to make your selection:
Ring tone: Sets the ring sound for
incoming calls.
64
CUSTOMISING PHONE SETTINGS
Page 65

YOUR PHONE
4
When the phone is ringing, press Vo lu me
(on the side of your smartphone) to adjust
the ring volume.
While a call is in progress, press Vol um e
to adjust the call volume.
Assigning a caller ID ringtone
1 Press Home , and then press Start
(left softkey).
2 Navigate to the Favourite Contacts
content list and press All Contacts
(right softkey).
3 Highlight the contact’s name.
4 Press Menu (right softkey) and
select Edit.
5 Select the Custom ring tone list, and
then select a tone for this contact entry.
6 Press Done (left softkey).
Automatically answering calls
You can set your smartphone to
automatically answer calls when you are
using a hands-free device.
NOTE Automatic answering is not
available when the sound profile is set to
Silent (see S
electing a sound profile).
1 Press Home , and then press
Start (left softkey).
2 Navigate to the My Settings content
list and press All Settings (right
softkey).
3 Select Phone, and then select Auto
Answer.
4 Select an option for how quickly calls
are automatically answered when using
a hands-free device.
5 Press Done (left softkey).
Blocking calls
You can block (bar) incoming or outgoing
calls.
BEFORE YOU BEGIN You need to do the
following:
• Make sure that call barring is supported
by your service plan. Check with your
network operator for more information.
• Get a call barring password from your
network operator.
• Make sure your phone is on and that
you’re inside a coverage area (see
Turning your phone on
).
CHAPTER
CUSTOMISING PHONE SETTINGS
65
Page 66

YOUR PHONE
4
CHAPTER
1 Press Home , and then press
Start (left softkey).
2 Navigate to the My Settings content
list and press All Settings (right
softkey).
3 Select Phone, and then select Call
Barring.
Int’l except to home: All outgoing
international calls are blocked except to
the country where the phone is based.
Int’l calls: All outgoing international
calls are blocked.
All calls: All outgoing calls are blocked.
6 Press Done (left softkey).
7 Enter a call barring password and press
Done (left softkey).
Setting call waiting notification
You can choose to be notified when you
receive a call while you are on a call. If you
set up call waiting, you can choose to
4 Select the Block incoming calls list,
and then select one of the options:
Off: No incoming calls are blocked.
When roaming: All incoming calls are
blocked when roaming.
All calls: All incoming calls are blocked.
5 Select the Block outgoing calls list and
then select one of the options:
Off: No outgoing calls are blocked.
accept the call or not. See Answering a
second call (call waiting).
BEFORE YOU BEGIN Make sure your
phone is on and that you’re inside a
coverage area (see Turning your phone on
1 Press Home , and then press
Start (left softkey).
2 Navigate to the My Settings content
list and press All Settings (right
softkey).
).
CUSTOMISING PHONE SETTINGS
66
Page 67

YOUR PHONE
4
3 Select Phone, and then select Call
Waiting.
4 Check the box if you want to receive
call waiting notifications.
5 Press Done (left softkey).
Setting caller ID
You can set the option for who can see
your number when you call them.
BEFORE YOU BEGIN Make sure your
phone is on and that you’re inside a
coverage area (see Turning your phone on
1 Press Home , and then press
Start (left softkey).
2 Navigate to the My Settings content
list and press All Settings (right
softkey).
3 Select Phone, and then select Caller
ID.
4 Select the appropriate option to provide
your caller ID to Everyone, No one, or
Only my contacts.
5 Press Done (left softkey).
Enabling fixed dialling
Fixed dialling allows you to restrict your
outgoing calls and messages to selected
phone numbers included in your fixed
).
dialling list. After the service is activated,
you can call and send messages only to the
phone numbers from the list.
The list is protected by a PIN2 code. If you
enter an incorrect PIN2 more times than
allowed by your network operator, the SIM
card locks. After the SIM card locks, you
need the PUK2 (pin unblocking key) to
CHAPTER
CUSTOMISING PHONE SETTINGS
67
Page 68

YOUR PHONE
4
CHAPTER
unlock the SIM card. Contact your network
operator for more information and your
PIN2 and PUK2.
BEFORE YOU BEGIN
• Make sure your phone is on and that
you’re inside a coverage area (see
Turning your phone on
• Get your PIN2 from your network
).
operator.
1 Press Home , and then press
Start (left softkey).
5 Check the Enable fixed dialling box
and press Done (left softkey).
6 Enter your PIN2 and press Done
(left softkey).
7 Press Menu (right softkey) to add,
delete, or edit the phone numbers in the
list. The options to add or delete
numbers appear only when fixed dialling
has been enabled.
TIP
You can add or edit numbers only in the
fixed dialling list. You cannot edit the names
that appear.
2 Navigate to the My Settings content
list and press All Settings (right
softkey).
3 Select Phone.
4 Select More, and then select Fixed
Dialling.
8 Press Done (left softkey).
TIP
If your network operator provides you with
a new PIN2, you can easily change it on your
smartphone. Press Home, press Start, and
navigate to the My Settings content list.
Press All Settings (right softkey), select
More, and then select Security. Select
Change PIN2 and enter your new PIN2.
Manually selecting your wireless band
IMPORTANT The wireless band setting is
preset for optimum performance. Do not
change this setting unless instructed to do
CUSTOMISING PHONE SETTINGS
68
Page 69

YOUR PHONE
4
so by a representative from your network
operator.
BEFORE YOU BEGIN Make sure your
phone is on and that you’re inside a
coverage area (see Turning your phone on
1 Press Home , and then press
Start (left softkey).
2 Navigate to the My Settings content
list and press All Settings (right
softkey).
3 Select Phone.
4 Select More, and then select GSM/3G
Networks.
5 Select the Network list, and then select
one of the following:
Automa ti c: Automatically selects a
network.
GSM: Connects only to GSM networks.
6 Press Done (left softkey).
7 If prompted, turn off your smartphone
(see Turning your smartphone off
).
Manually selecting your network settings
IMPORTANT The network settings are
preset for optimum performance. Do not
change these settings unless instructed to
do so by a representative from your
network operator. The network settings
options vary according to your wireless
service provider.
BEFORE YOU BEGIN Make sure your
phone is on and that you’re inside a
coverage area (see Turning your phone on
1 Press Home , and then press
Start (left softkey).
2 Navigate to the My Settings content
list and press All Settings (right
softkey).
3 Select Phone.
4 Select More, and then select
Networks.
CHAPTER
).
).
CUSTOMISING PHONE SETTINGS
69
Page 70

YOUR PHONE
4
CHAPTER
Manual: Network connections are
manually made. If you are manually
selecting a network, select a network
from the list of available networks.
9 Press Done (left softkey).
Setting other call options
You can change your voicemail number,
5 To search for other available networks,
press Menu (right softkey), select
Find a New Network, and then select
an available network.
6 To switch to another network, press
Menu (right softkey), select
Select a Network, and then select an
available network.
7 To change your preferred network,
enter a country or dialling code, and more.
1 Press Home , and then press
Start (left softkey).
2 Navigate to the My Settings content
list and press All Settings (right
softkey).
3 Select Phone, and then select Call
Options.
select Preferred Networks, check the
box next to the networks you want, and
then select your order of preference.
8 From the Network selection list, select
an option:
Automa ti c: The network connection is
automatically made.
CUSTOMISING PHONE SETTINGS
70
Page 71

YOUR PHONE
4
4 Select one or more of the following
options:
Any key answer: Check the box if you
want to answer incoming calls by
pressing any key.
Show SIM contacts: Check the box if
you want contacts on your SIM card
displayed when you do a contact
lookup.
Voice mail number: Your network
operator’s voicemail number is entered
by default. Enter a new number only if
your network operator changes its
voicemail number.
Text messages service centre: The
number for your network operator’s text
message service centre is entered by
default. Enter a new number only if your
network operator changes its text
message service centre number.
Country code: Enter a country code
that you want to be dialled automatically
when you enter a phone number. All
numbers you dial are preceded by this
code.
Dialling code: Enter any other dialling
code, such as a “1,” that you want to
be dialled automatically when you enter
a phone number. All numbers you dial
are preceded by this code.
5 Press Done (left softkey).
Using the SIM toolkit
The SIM toolkit is a set of small
applications that are stored on your SIM
card and enable you to do certain tasks. For
example, using the SIM toolkit, you might
be able to check your prepaid balance or
call customer service.
IMPORTANT Not all network operators
offer the SIM toolkit on their SIM cards.
For those network operators that do
support the SIM toolkit, features vary by
network operator. If your network operator
does not support the SIM toolkit, you
cannot open this application on your
smartphone.
CHAPTER
USING THE SIM TOOLKIT
71
Page 72

YOUR PHONE
4
CHAPTER
BEFORE YOU BEGIN The name of the
SIM toolkit application varies depending on
your network operator. Contact your
network operator for the SIM toolkit
application name.
1 Press Home , and then press
Centre .
2 Select Applications ., and then
select More.
3 Select the SIM toolkit application.
What are all those icons?
You can monitor the status of several
items using icons at the top of your Home
screen:
You missed an incoming call.
You have a voicemail message.
You have a new text,
multimedia, or email message.
You have a new text message.
You have a new instant
message.
No SIM card is inserted.
There is a problem reading the
SIM card.
The ringer on your phone is off.
Your phone is on. The bars
display the signal strength.
The stronger the signal, the
more bars that appear.
Your phone is on but there is no
signal.
Your phone is on but you are in
an area where there is no
service, or the SIM card is locked
and you have exceeded the
number of tries permitted to
unlock the SIM card (see L
the SIM card).
Your phone is off.
ocking
WHAT ARE ALL THOSE ICONS?
72
Page 73

YOUR PHONE
4
The SIM card is locked. You
need to enter a PIN or a PUK to
unlock the SIM card (see L
ocking
the SIM card).
A voice call is in progress.
A voice call is on hold.
All calls are being forwarded.
A data call is in progress.
The speakerphone is turned on.
You are in a roaming coverage
area. Additional fees may apply
for calls or data transmission.
Your phone is connected to a 3G
UMTS network, but you are not
actively transmitting data. You
can still make or receive calls.
Your phone is on and a 3G UMTS
data connection is active. You
can make and receive calls and
transmit data simultaneously.
You are in a roaming coverage
area and your phone is
connected to a 3G UMTS
network, but you are not actively
transmitting data. Additional fees
may apply for calls or data
transmission.
Your phone is connected to a
GPRS network, but you are not
actively transmitting data. You
can still make or receive calls.
Your phone is on and a GPRS
data connection is active. You
can still make or receive calls,
but the data transmission is
automatically interrupted.
You are in a roaming coverage
area and your phone is
connected to a GPRS network,
but you are not actively
transmitting data. Additional fees
may apply for calls or data
transmission.
No battery is inserted into your
smartphone.
Your smartphone’s battery is
low.
CHAPTER
WHAT ARE ALL THOSE ICONS?
73
Page 74

YOUR PHONE
4
CHAPTER
Your smartphone’s battery is
being charged.
Your smartphone’s battery is
fully charged.
Network
operator
name
Your phone is on. When you turn
off your phone, Phone Off
appears instead.
A synchronisation error occurred.
The vibrate profile is enabled.
The Bluetooth
®
wireless
Music files are playing from your
smartphone through a
connected Bluetooth headset.
Lowercase text entry is enabled.
Shift is enabled.
Caps Lock is enabled.
Option is enabled.
Option Lock is enabled.
You have an alert from
Microsoft.
technology feature is turned on.
A call is in progress and your
smartphone is connected to a
Bluetooth headset or car kit.
WHAT ARE ALL THOSE ICONS?
74
Page 75

CHAPTER
Synchronising information
5
Synchronising means that information that has been entered or
updated in one place—your Palm
®
Tre o™ 500v smartphone, your
computer, or your corporate server—is automatically updated in
the other. There’s no need to enter information twice. Some
types of synchronisation can happen on an automated schedule,
so you don’t even have to think about it.
After you get into the habit of synchronising regularly, you’ll
know what a powerful tool synchronisation is for transferring,
updating, and backing up large amounts of information on your
smartphone.
Benefits
• Quickly update information on your
computer, your corporate server,
and your smartphone
• Protect your information
• Send photos and videos to your
smartphone from your desktop
computer
75
Page 76

In this chapter
Synchronisation overview . . . . . . . . . . . . . . . . . . . . . . . . . . . . . . . . 77
How do I synchronise?. . . . . . . . . . . . . . . . . . . . . . . . . . . . . . . . . . . 77
What can I synchronise? . . . . . . . . . . . . . . . . . . . . . . . . . . . . . . . . . 78
Setting up wireless synchronisation. . . . . . . . . . . . . . . . . . . . . . . . . 81
Setting up your computer for synchronisation . . . . . . . . . . . . . . . . . 86
Synchronising using the sync cable . . . . . . . . . . . . . . . . . . . . . . . . . 92
Other ways to synchronise . . . . . . . . . . . . . . . . . . . . . . . . . . . . . . . 92
Setting synchronisation options . . . . . . . . . . . . . . . . . . . . . . . . . . . . 94
Page 77

SYNCHRONISING INFORMATION
5
Synchronisation overview
This chapter discusses using desktop sync
software and other methods to
synchronise your smartphone and your
computer.
When you synchronise, info you enter on
your smartphone, your computer, or your
corporate server is automatically updated
in the other location. There’s no need to
enter the info twice. This is true whether
you sync wirelessly with your company’s
Exchange server using Microsoft Exchange
ActiveSync (see Setting up wireless
synchronisation) or with your computer
using desktop synchronisation software
(see S
etting up your computer for
synchronisation).
How do I synchronise?
There are a number of ways to make
synchronisation occur. You may be able to
synchronise wirelessly with an Exchange
server, or you can install desktop sync
software on your computer to synchronise
in one of several ways. You can also
maximise your sync options and sync with
both an Exchange server and desktop sync
software.
Synchronising wirelessly with the server
You can set up your smartphone to
synchronise email and other information
wirelessly with Microsoft Exchange Server
2003 or Exchange Server 2007 using
Microsoft Exchange ActiveSync (see
Setting up wireless synchronisation
choose this method, synchronisation takes
place automatically after setup. You do not
need to install the software from the
Windows Mobile Getting Started CD.
NOTE We recommend that you install the
desktop sync software from the CD even if
). If you
CHAPTER
SYNCHRONISATION OVERVIEW
77
Page 78

SYNCHRONISING INFORMATION
5
CHAPTER
you synchronise wirelessly with the server.
You need the desktop sync software to
synchronise pictures, videos, music files,
and other info directly with your computer.
Synchronising with desktop sync software
BEFORE YOU BEGIN Install the software
from the Windows Mobile Getting Started
If you have a Windows XP computer:
The desktop sync software is called
ActiveSync
®
desktop software.
If you have a Windows Vista computer:
The desktop sync software is called
Windows Mobile Device Center. The sync
application on your smartphone is called
ActiveSync.
CD, which came with your smartphone.
You must install this software even if you
have already installed a previous version of
desktop sync software. See Installing
ActiveSync desktop software: Windows XP
or Installing
Windows Mobile Device
Center: Windows Vista for instructions.
What can I synchronise?
If you have Microsoft Office Outlook® 2003
or later installed on your computer, by
After you install desktop sync software,
you can synchronise in either of the
following ways:
• By connecting your smartphone to your
computer using the sync cable (see
Synchronisi
• By connecting your smartphone to your
computer using Bluetooth
technology (see Synchronisi
ng using the sync cable)
®
wireless
ng over a
Bluetooth connection)
default, the following information is
synchronised when you synchronise using
either desktop sync software or Microsoft
Exchange ActiveSync:
You can, however, customise sync
settings to suit your needs and sync only
some of these applications.
WHAT CAN I SYNCHRONISE?
78
Page 79

SYNCHRONISING INFORMATION
5
TIP
If you don’t already have Outlook 2003 or
later installed on your computer, you can
install a trial version of Outlook 2007 from the
Windows Mobile Getting Started CD. Insert
the CD into your computer’s CD drive, select
Add Programs (Windows XP) or Bonus
Software (Windows Vista), and then select
the link to download a trial version of
Outlook 2007.
If you set up synchronisation with your
computer using the desktop sync
software, information in the Favourites
application is synchronised by default as
well. Synchronising Favourites gives you
an easy way to get web favourites from
become available on your smartphone as
well. Backup copies of any favourites that
you add on the smartphone browser are
also stored in the Mobile Favourites folder.
You can also change settings to
synchronise Word, Excel, PowerPoint, and
PDF files, as well as pictures, music,
videos, and other types of files (see
C
hanging which applications sync).
TIP
If you want to synchronise with a personal
information manager (PIM) other than
Microsoft Office Outlook, you must install a
third-party solution. Contact the PIM’s vendor
to learn if software is available for your
smartphone.
the web browser on your computer into
the web browser on your smartphone. Just
add them to the folder called Mobile
Favourites, which shows up in your
computer's browser. When you sync, they
The following table lists the types of info
you can synchronise and the methods
to use.
Info type Method Where to learn more
Outlook Contacts,
Calendar, Tasks
Desktop sync software
(sync with computer) or
Exchange ActiveSync
(direct sync with server)
S
etting up your computer for
synchronisation or
Setting up wireless synchronisation
CHAPTER
WHAT CAN I SYNCHRONISE?
79
Page 80

SYNCHRONISING INFORMATION
5
CHAPTER
Info type Method Where to learn more
Outlook Email Desktop sync software or
Exchange ActiveSync
Setting up your computer for
synchronisation or
Setting up wireless synchronisation
Word , Exce l,
PowerPoint, PDF
files
Desktop sync software S
etting up your computer for
synchronisation
Synchronising your Microsoft Office
files
Changing which applications sync
Music and video
files
Desktop sync software
and Windows Media
Player
S
etting up your computer for
synchronisation
Changing which applications sync
Transferring media files to your
smartphone
Pictures Windows XP: Desktop
sync software
Windows Vista: Desktop
sync software and
Windows Media Player
Outlook Notes Desktop sync software S
S
etting up your computer for
synchronisation
Changing which applications sync
Transferring media files to your
smartphone (Windows Vista)
etting up your computer for
synchronisation
Changing which applications sync
WHAT CAN I SYNCHRONISE?
80
Page 81

SYNCHRONISING INFORMATION
5
Info type Method Where to learn more
Files to be
transferred to an
expansion card
TIP
If you want to synchronise music and
videos, you need to have Windows Media
Player 10 or later installed on your computer.
If you don’t already have Windows Media
Player on your computer, you can download it
from m
icrosoft.com.
Desktop sync software S
If you are using Exchange Server 2007 or
Exchange Server 2003 that has been
upgraded to Service Pack 2, you may be
able to take advantage of the additional
features of Microsoft Direct Push.
Microsoft Direct Push is a two-way
wireless delivery method that keeps your
etting up your computer for
synchronisation
Changing which applications sync
Outlook information always up-to-date and
Setting up wireless synchronisation
provides more efficient communication
between the server and your smartphone.
It includes features like Global Address
List; Tasks Over The Air (OTA); and
IP-based push updating of Calendar,
Does your company use Microsoft Outlook
Messaging, and Inbox (email).
as its email solution? Does your company
also use Microsoft Exchange Server 2003
or 2007 as its email server? If so, you may
be able to wirelessly synchronise the email
and other Outlook info on your smartphone
and the same info stored on the Exchange
server using Microsoft Exchange
ActiveSync.
CHAPTER
SETTING UP WIRELESS SYNCHRONISATION
81
Page 82

SYNCHRONISING INFORMATION
5
CHAPTER
DID YOU KNOW
?
Because your desktop copy of
Outlook also syncs with the server, whatever
is synchronised to the server from your
smartphone also shows up in Outlook; and
whatever you enter or change in Outlook on
your computer syncs to the server and then
shows up on your smartphone.
DID YOU KNOW
?
You cannot synchronise email
distribution lists wirelessly with the Exchange
Server. However, you can search for a Global
Address List in Contacts (see F
inding a
contact in an online address book) and add it
as a single entry in your contact list. This
contact entry can then synchronise with the
server.
TIP
If you are using Microsoft Exchange
ActiveSync and you lose your smartphone,
contact your IT department as soon as
possible to have them deactivate access to
the Exchange server from your smartphone.
BEFORE YOU BEGIN To synchronise
wirelessly, you need to set up an Exchange
Server account. Work with your system
administrator to gather the following info,
and then follow the steps in this section to
set up an account:
• Mail server address and domain name.
DID YOU KNOW
?
If you use Outlook Web
Access (OWA) services, the mail server
address is usually the same as your OWA
address.
TIP
If you use hosted Exchange services,
contact the host company to get the domain
name.
• The username and password you use to
access your corporate mail server.
• Security connection: Does your server
use an encrypted (SSL) connection?
NOTE Even if you sync with an Exchange
server, we recommend that you install the
desktop sync software as well, to take full
advantage of your smartphone’s
capabilities.
• Whether it is OK to store your corporate
email password on your smartphone. To
maintain security, the administrator may
require you not to store the password
on your smartphone.
SETTING UP WIRELESS SYNCHRONISATION
82
Page 83

SYNCHRONISING INFORMATION
5
TIP
If you installed ActiveSync desktop
software on a Windows XP computer, you
may have already set up your smartphone to
synchronise wirelessly with the server. To
check, press Home, press Centre on the
5-way, and then select Applications. Select
Organiser & Tools, and then select
ActiveSync. Press Menu (right softkey). If
Configure Server appears instead of Add
Server Source, wireless sync is already set
up, and you can skip this procedure.
1 Press Home , and then press
Centre .
2 Select Applications , and then
select ActiveSync .
3 Press Menu (right softkey) and
select Add Server Source.
4 Enter the server address.
5 Check the This server requires an
encrypted (SSL) connection box if
your server uses an encrypted
connection. In most cases, this box
should be checked.
6 Press Next (right softkey).
7 Enter the username and password you
use to access your corporate mail
server, and enter the Exchange server
domain.
NOTE You can’t see your password as you
enter it, so be careful. Be sure Caps Lock
and Option Lock are not on unless you
need them. For info on how to enter
characters, see Entering lowercase and
uppercase letters and Entering numbers,
punctuation, and symbols.
CHAPTER
SETTING UP WIRELESS SYNCHRONISATION
83
Page 84

SYNCHRONISING INFORMATION
5
CHAPTER
TIP
The Exchange server settings are casesensitive. Be sure to enter uppercase and
lowercase letters properly.
8 Check the Save password box.
TIP
If you found out from your system
administrator that it is not OK to store your
password, don’t check the Save password
box; you must synchronise manually (see
Initiating a wireless sync manually
TIP
If you check this box and later change your
Exchange password, you need to repeat the
steps in this procedure and enter the new
password. You cannot synchronise wirelessly
until you update the password.
).
9 Press Next (right softkey) and
check the boxes for the types of
information you want to synchronise
with the Exchange server.
10 (Optional) Highlight an item, press
Menu (right softkey), and then
select Settings to change the
synchronisation settings for that type
of information. Settings are not
available for all items.
TIP
To automatically download more of an
incoming email message than the default
setting, select E-mail in step 10 and select a
higher number from the Download size limit
list. If you don’t increase this setting, you can
manually download the rest of the message at
your convenience.
11 Press Finish (left softkey).
Synchronisation with your Exchange
server begins automatically. A status
bar appears onscreen indicating sync
progress.
You can set a schedule for synchronisation
to take place anytime info is updated on
either your smartphone or the server or at
certain intervals (see Setting the
synchronisation schedule), or allow
synchronisation to take place only when
you initiate it manually (see Initiating a
wireless sync manually).
SETTING UP WIRELESS SYNCHRONISATION
84
Page 85

SYNCHRONISING INFORMATION
5
Setting the synchronisation schedule
You can set a synchronisation schedule in
either of the following situations:
If you use Microsoft Exchange Server
2007 or Microsoft Exchange Server 2003
with Service Pack 2: By default, wireless
sync takes place anytime info is updated
on either your smartphone or the server
using Microsoft Direct Push. To save
battery life, however, you can set
synchronisation to take place at intervals
that you specify.
If you use Microsoft Exchange Server
2003 that is not upgraded to Service
Pack 2: By default, wireless sync does not
take place automatically. Set a
synchronisation schedule to have sync
take place either anytime info is updated
on your smartphone or the server, or at
certain intervals.
1 Press Home , and then press
Centre .
2 Select Applications , and then
select ActiveSync .
3 Press Menu (right softkey) and
select Schedule.
4 Set any of the following options:
Peak ti mes: Sets the frequency for
high-traffic time periods such as when
you are at work or when email volume
is high.
Off-peak times: Sets the frequency for
low-traffic time periods such as late at
night.
Use above settings when roaming:
Sets the frequency while you are
roaming outside your network
operator’s network. You should keep
this box checked to ensure that
wireless sync works properly.
CHAPTER
SETTING UP WIRELESS SYNCHRONISATION
85
Page 86

SYNCHRONISING INFORMATION
5
CHAPTER
Send/receive when I click Send:
Specifies whether items are sent as
soon as you select Send in the email
application, or whether they are held
until the next synchronisation.
5 Press Done (left softkey).
Initiating a wireless sync manually
If you want to control exactly when a
wireless sync takes place, or if it is not OK
to store your corporate email password on
your smartphone, you can initiate
synchronisation manually.
1 To set up manual sync, follow the
preceding procedure, Setting the
synchronisation schedule. In the Peak
times and Off-peak times lists, select
Manual.
2 To initiate a manual sync, press
Home , and then press Centre .
3 Select Applications , and then
select ActiveSync .
4 Press Sync (left softkey).
Setting up your computer for synchronisation
Even if you are synchronising email,
contacts, calendar events, and tasks
directly with Exchange Server 2003 or
2007, we recommend that you install the
desktop sync software (accessible from a
link on the Windows Mobile Getting
Started CD) so that you can sync your
smartphone directly with your computer.
Why? Using the desktop sync software
enables you to synchronise additional info
such as pictures, videos, music files,
Microsoft Office files, and notes. So you
can create and work on files on your
smartphone and then sync changes to your
computer, where you then have a
backed-up and up-to-date copy of
important info.
Before you can synchronise, you need to
install your desktop sync software and
connect the USB sync cable to your
computer. Even if you already have
desktop sync software installed on your
SETTING UP YOUR COMPUTER FOR SYNCHRONISATION
86
Page 87

SYNCHRONISING INFORMATION
5
computer, you must install the software
that you can download from the link on the
Windows Mobile Getting Started CD that
came with your smartphone.
System requirements
Your computer must meet the following
minimum system requirements:
• Windows XP Service Pack 2 or
Windows Vista (later versions may also
be supported)
• 32MB of available memory (RAM)
• 170MB of free hard disk space
• CD drive
• Available USB port
• USB sync cable (included with your
smartphone)
• Adobe Flash Player (required to run the
installation program)
TIP
If you do not have Adobe Flash Player on
your computer, you can download it for free
from a
dobe.com.
Installing ActiveSync desktop software: Windows XP
If you have a Windows XP computer, the
desktop sync software is called ActiveSync
desktop software. The Windows Mobile
Getting Started CD recognises that you
have a Windows XP computer and
automatically directs you to install
ActiveSync desktop software. On your
smartphone, the sync application is also
called ActiveSync.
BEFORE YOU BEGIN
• If you are installing the software on a
computer at work, make sure your
company allows you to install new
software. Contact your company’s
IT department for help.
• Make sure your computer is connected
to the Internet so that you can
download the software.
• Turn off any firewall settings on your
computer that can interfere with the
synchronisation process. Contact your
company’s IT department for help.
1 Close any applications that are currently
running on your computer, including
those running in the background. Your
CHAPTER
SETTING UP YOUR COMPUTER FOR SYNCHRONISATION
87
Page 88

SYNCHRONISING INFORMATION
5
CHAPTER
computer must have all its resources
available to install the software.
2 Insert the Windows Mobile Getting
Started CD into the CD drive on your
computer.
3 Follow the installation instructions that
appear on both your computer and your
smartphone.
During installation, you connect your
smartphone to your computer and sync
for the first time. Be sure to watch
what’s happening on both your
computer and your smartphone. For
more info, see C
onnecting your
smartphone to your computer and
Synchronisa
tion: Overview.
Installing Windows Mobile Device Center: Windows Vista
If you have a Windows Vista computer, the
desktop sync software is called Windows
Mobile Device Center. The Windows
Mobile Getting Started CD recognises that
you have a Windows Vista computer and
automatically directs you to install
Windows Mobile Device Center. On your
smartphone, the sync application is called
ActiveSync.
BEFORE YOU BEGIN
• If you are installing the software on a
computer at work, make sure your
company allows you to install new
software. Contact your company’s
IT department for help.
TIP
During software installation, you can
select an option to synchronise email,
contacts, calendar events, and tasks directly
with Microsoft Exchange Server 2003 or
2007. If you choose this option, you are
prompted to enter your mail server address
and domain name and your Exchange Server
account username and password.
• Make sure your computer is connected
to the Internet so that you can
download the software.
• Turn off any firewall settings on your
computer that can interfere with the
synchronisation process. Contact your
company’s IT department for help.
1 Close any applications that are currently
running on your computer, including
those running in the background. Your
SETTING UP YOUR COMPUTER FOR SYNCHRONISATION
88
Page 89

SYNCHRONISING INFORMATION
5
computer must have all its resources
available to install the software.
2 Insert the Windows Mobile Getting
Started CD into the CD drive on your
computer.
3 If prompted, click RunStart.exe.
4 Click Continue.
5 Select your language and click Next.
6 Select Setup and Installation.
7 Make sure the Windows Mobile
Device Center box is checked, and click
Install.
8 Follow the installation instructions that
appear on both your computer and your
smartphone.
During installation, you connect your
smartphone to your computer and sync
for the first time. Be sure to watch
what’s happening on both your
computer and your smartphone. For
more info, see C
onnecting your
smartphone to your computer and
Synchronisa
tion: Overview.
Using the desktop sync software
After you install the desktop sync
software, synchronisation happens
automatically anytime you connect your
smartphone to your computer, as
described in the next section. You can also
open the desktop sync software window
on your computer to perform the following
tasks:
• Install applications from your computer
to your smartphone (see Installing
applications from your computer) or to
an expansion card inserted into the
expansion card slot on your smartphone
(see Installing applications onto an
expansion card).
• Change which applications synchronise.
• In ActiveSync desktop software on a
Windows XP computer, enter settings
to synchronise wirelessly with
Microsoft Exchange Server 2003 or
2007.
DID YOU KNOW
applications synchronise (see C
applications sync) and enter settings to
synchronise wirelessly (see Setting up
wireless synchronisation) in the ActiveSync
app on your smartphone. Whether you enter
changes on your smartphone or on your
computer, the changes are transferred to the
other location the next time you synchronise.
?
You can also change which
hanging which
CHAPTER
SETTING UP YOUR COMPUTER FOR SYNCHRONISATION
89
Page 90

SYNCHRONISING INFORMATION
5
CHAPTER
To open the desktop sync software, do
one of the following:
Windows XP: To open the ActiveSync
desktop software window, double-click the
ActiveSync icon in the taskbar in the
lower-right corner of your computer
screen.
TIP
If the ActiveSync icon does not appear in
the taskbar, go to Start, navigate to
Programs, and then select Microsoft
ActiveSync to open the ActiveSync window.
TIP
You can enter a setting to have the
ActiveSync window open automatically when
you connect your computer and your
smartphone. In the ActiveSync window,
select File > Connection Settings, and then
check th e Open ActiveSync when my
device connects box.
XP) or Computer (Windows Vista) displays
an icon representing your smartphone.
Double-clicking this icon displays folders
containing items you synchronised, such
as music files, pictures, and videos.
Connecting your smartphone to your computer
1 Plug the USB sync cable into an
available USB port or into a powered
USB hub on your computer.
TIP
For best performance, plug the sync cable
directly into a USB port on your computer. If
your computer has USB ports on both the
front and back, we suggest using the back
port. If you use a USB hub, make sure it’s a
powered hub.
2 Connect the sync cable to your
Windows Vista: To open Windows Mobile
Device Center, click Start > All Programs
> Windows Mobile Device Center.
smartphone by inserting it into the
connector on the bottom of the
smartphone.
Desktop software installation also creates
a folder for your smartphone on your
computer. When your smartphone is
connected to your computer, opening My
Computer or Windows Explorer (Windows
SETTING UP YOUR COMPUTER FOR SYNCHRONISATION
90
Page 91

SYNCHRONISING INFORMATION
USB sync cable
5
TIP
To charge your smartphone, connect the
AC charger to the connector on the bottom of
the smartphone. Your smartphone also
charges when it is connected to your
computer using the sync cable.
DID YOU KNOW
?
When your smartphone is
connected to your computer, it uses your
computer’s Internet connection (if one is
active) to access the Internet.
NOTE If you’re transferring info from a
previous Windows Mobile
a Palm OS
®
by ACCESS device, you can
®
device or from
learn more about how to move content,
such as pictures, music, and files, to your
smartphone by going to go.palm.com/
treo500v/.
CHAPTER
SETTING UP YOUR COMPUTER FOR SYNCHRONISATION
91
Page 92

SYNCHRONISING INFORMATION
5
CHAPTER
Synchronising using the sync cable
Every time you connect your smartphone
to your computer, the desktop sync
software automatically turns on and
checks whether changes you made on the
computer or on the smartphone need to be
synchronised.
• Connect your smartphone to your
computer (see C
smartphone to your computer).
onnecting your
If you have any problems synchronising,
see Synchronisa
troubleshooting suggestions.
tion: Overview for
Other ways to synchronise
Synchronising over a Bluetooth connection
You can synchronise your computer and
smartphone using Bluetooth wireless
technology.
BEFORE YOU BEGIN Make sure your
computer is equipped with Bluetooth
wireless technology.
1 Do one of the following:
Windows XP: On your computer,
right-click the ActiveSync icon in
the taskbar in the lower-right corner of
the screen, and select Connection
Settings.
Windows Vista: Click Start > All
Programs > Windows Mobile Device
Center. Select Connect without
SYNCHRONISING USING THE SYNC CABLE
92
Page 93

SYNCHRONISING INFORMATION
5
setting up your device, and then
select Connection settings.
2 Check the Allow connections for one
of the following box, and then select
Bluetooth.
3 On your smartphone, press Home ,
and then press Start (left
softkey).
4 Navigate to the My Settings content
list, highlight Bluetooth, and then press
Tu r n On (left softkey).
5 Press Home , and then press
Centre .
6 Select Applications , and then
select ActiveSync .
7 Press Menu (right softkey) and
select Connect via Bluetooth.
8 If this is the first time you’re making a
Bluetooth connection to this computer,
follow the onscreen prompts to set up a
Bluetooth partnership with this
computer. See C
onnecting to devices
with Bluetooth® wireless technology for
more information on partnerships.
9 Select Sync.
10 When synchronisation has finished,
press Menu (right softkey) and
select Disconnect Bluetooth.
Synchronising with multiple computers
You can set up your smartphone to
synchronise with up to two computers as
well as with Exchange Server 2003 or
2007. When synchronising with multiple
computers, the items that you synchronise
appear on all the computers.
For example, if you set up to sync your
smartphone with two computers named
C1 and C2, when you sync Contacts and
Calendar on your smartphone with both
computers, you get the following results:
• The contacts and calendar
appointments that were on C1 are now
also on C2.
• The contacts and calendar
appointments that were on C2 are now
also on C1.
• The contacts and calendar
appointments from both computers are
on your smartphone.
NOTE Microsoft
®
Office Outlook® E-mail
can synchronise with only one computer.
CHAPTER
OTHER WAYS TO SYNCHRONISE
93
Page 94

SYNCHRONISING INFORMATION
5
CHAPTER
Setting
synchronisation
4 Do any of the following:
• Check the box next to any items you
want to synchronise. If you cannot
check a box, you might have to
options
uncheck a box for the same
information type elsewhere in the list.
Changing which applications sync
You must select sync options if you want
to synchronise notes, pictures, and other
types of files.
1 Press Home , and then press
Centre .
2 Select Applications , and then
select ActiveSync .
3 Press Menu (right softkey) and
select Options.
• Uncheck the box next to any items
you want to stop synchronising.
TIP
To end the sync relationship between your
smartphone and a computer so that items are
no longer synchronised with that computer,
highlight the computer name on the Options
screen, press Menu (right softkey), and then
select Delete.
• Highlight an item and then select
Settings to customise the
settings for that item. Settings are not
available for all items.
TIP
For detailed information on synchronising
Word documents, Excel spreadsheets, and
PowerPoint presentations, see Synchronisi
your Microsoft Office files. For detailed
information on synchronising pictures, videos,
and music files, see Synchronisi
files.
ng your media
ng
SETTING SYNCHRONISATION OPTIONS
94
Page 95

SYNCHRONISING INFORMATION
5
Stopping synchronisation
If you ever need to manually stop
synchronisation, follow these steps:
1 Press Home , and then press
Centre .
2 Select Applications , and then
select ActiveSync .
3 Press Stop (left softkey).
CHAPTER
SETTING SYNCHRONISATION OPTIONS
95
Page 96

SYNCHRONISING INFORMATION
5
CHAPTER
SETTING SYNCHRONISATION OPTIONS
96
Page 97

CHAPTER
Your email
6
You already know how efficient email is for staying in touch.
Now your Palm
®
Tre o™ 500v smartphone brings you a new
level of convenience: email on the go. Enjoy the ease and
speed of communicating with friends, family, and colleagues
anywhere you can access your network operator’s data
network.
You can send photos to your friends and family, or create
Microsoft Word or Excel files and send them to your
colleagues. You can also receive attachments to view at your
convenience.
Benefits
• Receive photos, sound files, Word
and Excel files, and more
• Attach and send files of almost any
type
• Save messages from your
computer to view at a convenient
time
97
Page 98

In this chapter
Setting up email . . . . . . . . . . . . . . . . . . . . . . . . . . . . . . . . . . . . . . . . 99
Sending and receiving messages . . . . . . . . . . . . . . . . . . . . . . . . . . 108
Working with email messages. . . . . . . . . . . . . . . . . . . . . . . . . . . . . 112
Working with meeting invitations . . . . . . . . . . . . . . . . . . . . . . . . . . 120
Sending email messages from within another application. . . . . . . . 121
Page 99

YOUR EMAIL
6
Setting up email
personal email service, which you can use
to access one or more email accounts,
already installed. You can also use other
BEFORE YOU BEGIN
• Before you use your smartphone to
send or receive messages, consult your
network operator for pricing and
availability of email services and data
rate plans.
• Make sure your phone is on and you’re
inside a coverage area before you send
or receive messages.
applications on your smartphone to access
the many kinds of email you may use:
corporate, ISP, and web-based (like Gmail
and Yahoo! Mail). Before you can send and
receive email on your smartphone, you
need to decide which type of email
account you want to access. The setup
process is different for each email account
type, so it is very important that you select
the correct type.
Entering settings for an email account
Depending on your network operator, your
smartphone may come with the MyMail
Email account type Type of email you can access How to set up
POP/IMAP You can obtain email from an
ISP or Internet email account
such as EarthLink, or from a
small business or corporate
Internet email account.
See Setting up a personal
email account using the
MyMail service, Setting up a
POP/IMAP account: Common
email providers, or Setting up a
POP/IMAP account: Other
email providers.
CHAPTER
SETTING UP EMAIL
99
Page 100

6
YOUR EMAIL
CHAPTER
Email account type Type of email you can access How to set up
Microsoft Exchange
server
You can retrieve corporate
email using a Microsoft
Exchange server. You can
access email wirelessly if your
company is using Microsoft
Exchange ActiveSync
®
.
See Setting up wireless
synchronisation.
You may need to check with
your IT organisation to ensure
that Exchange ActiveSync
supported and to obtain the
®
is
configuration settings.
Hotmail You can use Windows Live to
See Using Windows Live
access mail from your
web-based Hotmail account.
Free web-based
email
You can access mail from
Yahoo! and other free
web-based systems.
TIP
Some web-based email providers such as
Yahoo! and Gmail allow you to configure your
email account so that you can access it from
the email application on your smartphone
instead of from the web browser. Check the
provider’s website for information.
provides secure, remote access to
messages from a personal email account
directly from your smartphone.
BEFORE YOU BEGIN Not all network
operators support the MyMail service.
Check with your network operator for
Access the email website
directly using your
smartphone’s web browser.
information.
Setting up a personal email account using the MyMail service
If your network operator supports the
MyMail service, your MyMail account
1 Press Home , and then press Right
to open the Message Centre content
list.
SETTING UP EMAIL
100
 Loading...