

Page 1

Palm.Net Discontinued: The Palm.Net service is
discontinued as of August 31, 2004. Any information in
this manual pertaining to Palm.Net, PQAs (web
clipping applications), MyPalm and the WAP Browser
is not applicable after that date. For wireless email and
web browsing, we recommend you migrate to a
palmOne smartphone.
We can help you do this: Click here to learn how to
upgrade to a new solution.
Handbook for
Palm
™
i700 Series
Handhelds
Page 2

Copyright
Copyright © 1998-2001 Palm, Inc. All rights reserved. Graffiti, HotSync, MultiMail, PalmModem, Palm.Net,
and Palm OS are registered trademarks, and the HotSync logo, MyPalm, Palm, Palm Powered, and the Palm
logo are trademarks of Palm, Inc. Other product and brand names may be trademarks or registered
trademarks of their respective owners. Bluetooth is a trademark of Telefonaktiebolaget L M Ericsson,
Sweden and licensed to Palm, Inc.
Disclaimer and Limitation of Liability
Palm, Inc. assumes no responsibility for any damage or loss resulting from the use of this handbook.
Palm assumes no responsibility for any loss or claims by third parties which may arise through the use of
this software. Palm, Inc. assumes no responsibility for any damage or loss caused by deletion of data as a
result of malfunction, dead battery, or repairs. Be sure to make backup copies of all important data on other
media to protect against data loss.
IMPORTANT Please read the End User Software License Agreement with this product before using the
accompanying software program(s). Using any part of the software indicates that you accept the terms of the
End User Software License Agreement.
Software Download Available
Palm™ Desktop software is supplied on a CD-ROM disc. If you do not have access to a CD-ROM drive for
your computer, you can download the Palm Desktop software from www.palm.com.
PN: 406-2771-01
Page 3

Contents
About This Book . . . . . . . . . . . . . . . . . . . . . . . . . . . . . . . . . . . . . . . . . . . . . . . . 1
Chapter 1: Setting Up . . . . . . . . . . . . . . . . . . . . . . . . . . . . . . . . . . . . . . . . . . . 3
System requirements . . . . . . . . . . . . . . . . . . . . . . . . . . . . . . . . . . . . . . . . . . . . . . . . 3
Minimum requirements: Windows . . . . . . . . . . . . . . . . . . . . . . . . . . . . . . . . . . 3
Minimum requirements: Mac computers . . . . . . . . . . . . . . . . . . . . . . . . . . . . . 4
Internet Access . . . . . . . . . . . . . . . . . . . . . . . . . . . . . . . . . . . . . . . . . . . . . . . . . . . 4
®
If you are upgrading from another Palm OS
Step 1: Connect the HotSync cradle . . . . . . . . . . . . . . . . . . . . . . . . . . . . . . . . . . . . 5
Step 2: Charge your handheld . . . . . . . . . . . . . . . . . . . . . . . . . . . . . . . . . . . . . . . . . 5
Step 3: Set up your handheld . . . . . . . . . . . . . . . . . . . . . . . . . . . . . . . . . . . . . . . . . . 5
Step 4: Install software . . . . . . . . . . . . . . . . . . . . . . . . . . . . . . . . . . . . . . . . . . . . . . . 6
Step 5: Perform a HotSync operation . . . . . . . . . . . . . . . . . . . . . . . . . . . . . . . . . . . 6
Step 6: Establish wireless service . . . . . . . . . . . . . . . . . . . . . . . . . . . . . . . . . . . . . . 6
Step 7: Activate your handheld . . . . . . . . . . . . . . . . . . . . . . . . . . . . . . . . . . . . . . . . 7
Step 8: Complete installation . . . . . . . . . . . . . . . . . . . . . . . . . . . . . . . . . . . . . . . . . . 7
Updating the mobile portal . . . . . . . . . . . . . . . . . . . . . . . . . . . . . . . . . . . . . . . . 8
Palm MultiMail Desktop Link . . . . . . . . . . . . . . . . . . . . . . . . . . . . . . . . . . . . . . 8
Congratulations! . . . . . . . . . . . . . . . . . . . . . . . . . . . . . . . . . . . . . . . . . . . . . . . . . . . . 8
handheld . . . . . . . . . . . . . . . . 4
Chapter 2: Exploring Your Handheld . . . . . . . . . . . . . . . . . . . . . . . . . . . . . . . 9
Handheld components . . . . . . . . . . . . . . . . . . . . . . . . . . . . . . . . . . . . . . . . . . . . . . 10
Locating front panel controls . . . . . . . . . . . . . . . . . . . . . . . . . . . . . . . . . . . . . . 10
Using the backlight . . . . . . . . . . . . . . . . . . . . . . . . . . . . . . . . . . . . . . . . . . . . . . 11
Locating back panel components . . . . . . . . . . . . . . . . . . . . . . . . . . . . . . . . . . 12
Adding an expansion card . . . . . . . . . . . . . . . . . . . . . . . . . . . . . . . . . . . . . . . . . . . 12
Tapping and typing . . . . . . . . . . . . . . . . . . . . . . . . . . . . . . . . . . . . . . . . . . . . . . . . 13
Elements of the handheld interface . . . . . . . . . . . . . . . . . . . . . . . . . . . . . . . . . 14
Chapter 3: Entering Data in Your Handheld . . . . . . . . . . . . . . . . . . . . . . . . . 17
Using the onscreen keyboard . . . . . . . . . . . . . . . . . . . . . . . . . . . . . . . . . . . . . . . . 17
Using Graffiti writing to enter data . . . . . . . . . . . . . . . . . . . . . . . . . . . . . . . . . . . 18
Writing Graffiti characters . . . . . . . . . . . . . . . . . . . . . . . . . . . . . . . . . . . . . . . . 18
Graffiti tips . . . . . . . . . . . . . . . . . . . . . . . . . . . . . . . . . . . . . . . . . . . . . . . . . . . . . 20
i
Page 4

Contents
The Graffiti alphabet . . . . . . . . . . . . . . . . . . . . . . . . . . . . . . . . . . . . . . . . . . . . . 20
Writing capital letters . . . . . . . . . . . . . . . . . . . . . . . . . . . . . . . . . . . . . . . . . . . . 21
Writing numbers . . . . . . . . . . . . . . . . . . . . . . . . . . . . . . . . . . . . . . . . . . . . . . . . 22
Graffiti numbers . . . . . . . . . . . . . . . . . . . . . . . . . . . . . . . . . . . . . . . . . . . . . . . . . 22
Writing punctuation marks . . . . . . . . . . . . . . . . . . . . . . . . . . . . . . . . . . . . . . . 22
Additional Graffiti punctuation . . . . . . . . . . . . . . . . . . . . . . . . . . . . . . . . . . . . 23
Writing symbols and extended characters . . . . . . . . . . . . . . . . . . . . . . . . . . . 23
Writing accented characters . . . . . . . . . . . . . . . . . . . . . . . . . . . . . . . . . . . . . . . 24
Accent strokes . . . . . . . . . . . . . . . . . . . . . . . . . . . . . . . . . . . . . . . . . . . . . . . . . . . 24
Additional non-English characters . . . . . . . . . . . . . . . . . . . . . . . . . . . . . . . . . 24
Navigation strokes . . . . . . . . . . . . . . . . . . . . . . . . . . . . . . . . . . . . . . . . . . . . . . . 25
Graffiti ShortCuts . . . . . . . . . . . . . . . . . . . . . . . . . . . . . . . . . . . . . . . . . . . . . . . . 25
Beaming data . . . . . . . . . . . . . . . . . . . . . . . . . . . . . . . . . . . . . . . . . . . . . . . . . . . . . . 26
Using your computer keyboard . . . . . . . . . . . . . . . . . . . . . . . . . . . . . . . . . . . . . . 28
Importing data . . . . . . . . . . . . . . . . . . . . . . . . . . . . . . . . . . . . . . . . . . . . . . . . . . . . . 28
Importing data from a Windows computer . . . . . . . . . . . . . . . . . . . . . . . . . . 28
Importing data from a Mac computer . . . . . . . . . . . . . . . . . . . . . . . . . . . . . . 30
Using Note Pad . . . . . . . . . . . . . . . . . . . . . . . . . . . . . . . . . . . . . . . . . . . . . . . . . . . . 31
Using a portable keyboard . . . . . . . . . . . . . . . . . . . . . . . . . . . . . . . . . . . . . . . . . . . 31
Chapter 4: Using Wireless Features . . . . . . . . . . . . . . . . . . . . . . . . . . . . . . . 33
Using the Wireless button . . . . . . . . . . . . . . . . . . . . . . . . . . . . . . . . . . . . . . . . . . . 33
Turning on the radio . . . . . . . . . . . . . . . . . . . . . . . . . . . . . . . . . . . . . . . . . . . . . . . . 34
Monitoring the transmission signal . . . . . . . . . . . . . . . . . . . . . . . . . . . . . . . . . . . 35
Using the indicator light . . . . . . . . . . . . . . . . . . . . . . . . . . . . . . . . . . . . . . . . . . . . . 36
What is Web Clipping? . . . . . . . . . . . . . . . . . . . . . . . . . . . . . . . . . . . . . . . . . . . . . . 36
Web Clipping, not web browsing . . . . . . . . . . . . . . . . . . . . . . . . . . . . . . . . . . 37
Using the MyPalm mobile portal . . . . . . . . . . . . . . . . . . . . . . . . . . . . . . . . . . . . . 38
Using mobile portal web clipping applications . . . . . . . . . . . . . . . . . . . . . . . 38
Browsing or searching the Internet . . . . . . . . . . . . . . . . . . . . . . . . . . . . . . . . . 39
Adding web clipping applications . . . . . . . . . . . . . . . . . . . . . . . . . . . . . . . . . 39
Working with web clipping applications . . . . . . . . . . . . . . . . . . . . . . . . . . . . . . 40
Using installed web clipping applications . . . . . . . . . . . . . . . . . . . . . . . . . . . 41
Example of web clipping . . . . . . . . . . . . . . . . . . . . . . . . . . . . . . . . . . . . . . . . . 42
Reviewing current queries and clippings . . . . . . . . . . . . . . . . . . . . . . . . . . . . 43
Reviewing stored clippings: History list . . . . . . . . . . . . . . . . . . . . . . . . . . . . 43
Saving information from a web clipping application . . . . . . . . . . . . . . . . . . 44
Sending e-mail from a page . . . . . . . . . . . . . . . . . . . . . . . . . . . . . . . . . . . . . . . 45
Web Clipping Preferences . . . . . . . . . . . . . . . . . . . . . . . . . . . . . . . . . . . . . . . . . . . 45
ii
Page 5

Contents
Protection of your wireless transactions . . . . . . . . . . . . . . . . . . . . . . . . . . . . . . . 46
Chapter 5: Using MultiMail
®
Deluxe . . . . . . . . . . . . . . . . . . . . . . . . . . . . . . . 49
Receiving e-mail . . . . . . . . . . . . . . . . . . . . . . . . . . . . . . . . . . . . . . . . . . . . . . . . . . . 50
Reading e-mail . . . . . . . . . . . . . . . . . . . . . . . . . . . . . . . . . . . . . . . . . . . . . . . . . . 51
Viewing other folders . . . . . . . . . . . . . . . . . . . . . . . . . . . . . . . . . . . . . . . . . . . . 51
Moving e-mail between folders . . . . . . . . . . . . . . . . . . . . . . . . . . . . . . . . . . . . 52
Sending e-mail . . . . . . . . . . . . . . . . . . . . . . . . . . . . . . . . . . . . . . . . . . . . . . . . . . 53
Adding attachments . . . . . . . . . . . . . . . . . . . . . . . . . . . . . . . . . . . . . . . . . . . . . 54
Completing drafts . . . . . . . . . . . . . . . . . . . . . . . . . . . . . . . . . . . . . . . . . . . . . . . 55
Replying to or forwarding e-mail . . . . . . . . . . . . . . . . . . . . . . . . . . . . . . . . . . 55
Deleting e-mail . . . . . . . . . . . . . . . . . . . . . . . . . . . . . . . . . . . . . . . . . . . . . . . . . . 56
Emptying trash . . . . . . . . . . . . . . . . . . . . . . . . . . . . . . . . . . . . . . . . . . . . . . . . . . 57
Using the Message menu . . . . . . . . . . . . . . . . . . . . . . . . . . . . . . . . . . . . . . . . . 57
Configuring MultiMail Deluxe . . . . . . . . . . . . . . . . . . . . . . . . . . . . . . . . . . . . . . . 58
Before you begin . . . . . . . . . . . . . . . . . . . . . . . . . . . . . . . . . . . . . . . . . . . . . . . . . 58
Using Account Setup . . . . . . . . . . . . . . . . . . . . . . . . . . . . . . . . . . . . . . . . . . . . . 58
Editing e-mail accounts . . . . . . . . . . . . . . . . . . . . . . . . . . . . . . . . . . . . . . . . . . . 63
Deleting an account . . . . . . . . . . . . . . . . . . . . . . . . . . . . . . . . . . . . . . . . . . . . . . 65
Setting IMAP Options . . . . . . . . . . . . . . . . . . . . . . . . . . . . . . . . . . . . . . . . . . . . 66
Setting notification options . . . . . . . . . . . . . . . . . . . . . . . . . . . . . . . . . . . . . . . . . . 66
Using notification filters . . . . . . . . . . . . . . . . . . . . . . . . . . . . . . . . . . . . . . . . . . 67
Creating filters . . . . . . . . . . . . . . . . . . . . . . . . . . . . . . . . . . . . . . . . . . . . . . . . . . . . . 68
Setting MultiMail Deluxe Preferences . . . . . . . . . . . . . . . . . . . . . . . . . . . . . . . . . 70
Chapter 6: Working with Applications . . . . . . . . . . . . . . . . . . . . . . . . . . . . . 73
Opening applications . . . . . . . . . . . . . . . . . . . . . . . . . . . . . . . . . . . . . . . . . . . . . . . 73
Opening expansion card applications . . . . . . . . . . . . . . . . . . . . . . . . . . . . . . . 74
Switching between applications . . . . . . . . . . . . . . . . . . . . . . . . . . . . . . . . . . . . . . 74
Categorizing applications . . . . . . . . . . . . . . . . . . . . . . . . . . . . . . . . . . . . . . . . . . . 75
Changing the Applications Launcher display . . . . . . . . . . . . . . . . . . . . . . . . . . 76
Copying applications to an expansion card . . . . . . . . . . . . . . . . . . . . . . . . . . . . 76
Using menus . . . . . . . . . . . . . . . . . . . . . . . . . . . . . . . . . . . . . . . . . . . . . . . . . . . . . . 77
Choosing application preferences . . . . . . . . . . . . . . . . . . . . . . . . . . . . . . . . . . . . . 79
Common tasks . . . . . . . . . . . . . . . . . . . . . . . . . . . . . . . . . . . . . . . . . . . . . . . . . . . . . 79
Creating records . . . . . . . . . . . . . . . . . . . . . . . . . . . . . . . . . . . . . . . . . . . . . . . . . 80
Editing records . . . . . . . . . . . . . . . . . . . . . . . . . . . . . . . . . . . . . . . . . . . . . . . . . . 80
Deleting records . . . . . . . . . . . . . . . . . . . . . . . . . . . . . . . . . . . . . . . . . . . . . . . . . 81
Purging records . . . . . . . . . . . . . . . . . . . . . . . . . . . . . . . . . . . . . . . . . . . . . . . . . 82
iii
Page 6

Contents
Categorizing records . . . . . . . . . . . . . . . . . . . . . . . . . . . . . . . . . . . . . . . . . . . . . 83
Finding information . . . . . . . . . . . . . . . . . . . . . . . . . . . . . . . . . . . . . . . . . . . . . . 86
Sorting lists of records . . . . . . . . . . . . . . . . . . . . . . . . . . . . . . . . . . . . . . . . . . . . 89
Attaching notes . . . . . . . . . . . . . . . . . . . . . . . . . . . . . . . . . . . . . . . . . . . . . . . . . . 90
Choosing fonts . . . . . . . . . . . . . . . . . . . . . . . . . . . . . . . . . . . . . . . . . . . . . . . . . . 91
Reviewing alerts . . . . . . . . . . . . . . . . . . . . . . . . . . . . . . . . . . . . . . . . . . . . . . . . . 92
Hiding or masking private records . . . . . . . . . . . . . . . . . . . . . . . . . . . . . . . . . 93
Installing and removing applications . . . . . . . . . . . . . . . . . . . . . . . . . . . . . . . . . . 93
Installing add-on applications . . . . . . . . . . . . . . . . . . . . . . . . . . . . . . . . . . . . . 93
Removing applications . . . . . . . . . . . . . . . . . . . . . . . . . . . . . . . . . . . . . . . . . . . 97
Removing Palm Desktop software . . . . . . . . . . . . . . . . . . . . . . . . . . . . . . . . . 97
Chapter 7: Using Address Book . . . . . . . . . . . . . . . . . . . . . . . . . . . . . . . . . . 99
Creating an Address Book entry . . . . . . . . . . . . . . . . . . . . . . . . . . . . . . . . . . . . . 100
Selecting types of phone numbers . . . . . . . . . . . . . . . . . . . . . . . . . . . . . . . . . 101
Changing Address Entry details . . . . . . . . . . . . . . . . . . . . . . . . . . . . . . . . . . 102
Address Book menus . . . . . . . . . . . . . . . . . . . . . . . . . . . . . . . . . . . . . . . . . . . . 102
Chapter 8: Using Calculator . . . . . . . . . . . . . . . . . . . . . . . . . . . . . . . . . . . . . 105
Performing calculations . . . . . . . . . . . . . . . . . . . . . . . . . . . . . . . . . . . . . . . . . . . . 105
Recent Calculations . . . . . . . . . . . . . . . . . . . . . . . . . . . . . . . . . . . . . . . . . . . . . . . . 106
Calculator menus . . . . . . . . . . . . . . . . . . . . . . . . . . . . . . . . . . . . . . . . . . . . . . . . . . 106
Chapter 9: Using Card Info . . . . . . . . . . . . . . . . . . . . . . . . . . . . . . . . . . . . . 109
Reviewing Card Information . . . . . . . . . . . . . . . . . . . . . . . . . . . . . . . . . . . . . . . . 109
Renaming a card . . . . . . . . . . . . . . . . . . . . . . . . . . . . . . . . . . . . . . . . . . . . . . . . . . 109
Formatting a card . . . . . . . . . . . . . . . . . . . . . . . . . . . . . . . . . . . . . . . . . . . . . . . . . 110
Card Info menus . . . . . . . . . . . . . . . . . . . . . . . . . . . . . . . . . . . . . . . . . . . . . . . . . . 110
Card menus . . . . . . . . . . . . . . . . . . . . . . . . . . . . . . . . . . . . . . . . . . . . . . . . . . . . 110
Chapter 10: Using Clock . . . . . . . . . . . . . . . . . . . . . . . . . . . . . . . . . . . . . . . . 111
Viewing the time . . . . . . . . . . . . . . . . . . . . . . . . . . . . . . . . . . . . . . . . . . . . . . . . . . 111
Setting an alarm . . . . . . . . . . . . . . . . . . . . . . . . . . . . . . . . . . . . . . . . . . . . . . . . . . . 112
Clock menus . . . . . . . . . . . . . . . . . . . . . . . . . . . . . . . . . . . . . . . . . . . . . . . . . . . . . . 112
Chapter 11: Using Date Book . . . . . . . . . . . . . . . . . . . . . . . . . . . . . . . . . . . 115
Scheduling an event . . . . . . . . . . . . . . . . . . . . . . . . . . . . . . . . . . . . . . . . . . . . . . . 116
Rescheduling an event . . . . . . . . . . . . . . . . . . . . . . . . . . . . . . . . . . . . . . . . . . . . . 119
Setting an alarm for an event . . . . . . . . . . . . . . . . . . . . . . . . . . . . . . . . . . . . . . . . 119
Scheduling repeating or continuous events . . . . . . . . . . . . . . . . . . . . . . . . . . . 120
Changing the Date Book view . . . . . . . . . . . . . . . . . . . . . . . . . . . . . . . . . . . . . . . 122
iv
Page 7

Contents
Working in Week View . . . . . . . . . . . . . . . . . . . . . . . . . . . . . . . . . . . . . . . . . . 123
Spotting event conflicts . . . . . . . . . . . . . . . . . . . . . . . . . . . . . . . . . . . . . . . . . . 124
Working in Month View . . . . . . . . . . . . . . . . . . . . . . . . . . . . . . . . . . . . . . . . . 124
Working in Agenda View . . . . . . . . . . . . . . . . . . . . . . . . . . . . . . . . . . . . . . . . 125
Date Book menus, preferences, and display options . . . . . . . . . . . . . . . . . . . . 126
Record menu . . . . . . . . . . . . . . . . . . . . . . . . . . . . . . . . . . . . . . . . . . . . . . . . . . . 126
Options menu . . . . . . . . . . . . . . . . . . . . . . . . . . . . . . . . . . . . . . . . . . . . . . . . . . 126
Chapter 12: Using Memo Pad . . . . . . . . . . . . . . . . . . . . . . . . . . . . . . . . . . . 129
Creating memos . . . . . . . . . . . . . . . . . . . . . . . . . . . . . . . . . . . . . . . . . . . . . . . . . . . 129
Reviewing memos . . . . . . . . . . . . . . . . . . . . . . . . . . . . . . . . . . . . . . . . . . . . . . . . . 130
Memo Pad menus . . . . . . . . . . . . . . . . . . . . . . . . . . . . . . . . . . . . . . . . . . . . . . . . . 130
Record menus . . . . . . . . . . . . . . . . . . . . . . . . . . . . . . . . . . . . . . . . . . . . . . . . . . 131
Options menus . . . . . . . . . . . . . . . . . . . . . . . . . . . . . . . . . . . . . . . . . . . . . . . . . 131
Chapter 13: Using Note Pad . . . . . . . . . . . . . . . . . . . . . . . . . . . . . . . . . . . . 133
Creating a note . . . . . . . . . . . . . . . . . . . . . . . . . . . . . . . . . . . . . . . . . . . . . . . . . . . . 133
Reviewing notes . . . . . . . . . . . . . . . . . . . . . . . . . . . . . . . . . . . . . . . . . . . . . . . . . . 134
Setting an alarm for a note . . . . . . . . . . . . . . . . . . . . . . . . . . . . . . . . . . . . . . . . . . 134
Note Pad menus . . . . . . . . . . . . . . . . . . . . . . . . . . . . . . . . . . . . . . . . . . . . . . . . . . 135
Record menus . . . . . . . . . . . . . . . . . . . . . . . . . . . . . . . . . . . . . . . . . . . . . . . . . . 136
Options menus . . . . . . . . . . . . . . . . . . . . . . . . . . . . . . . . . . . . . . . . . . . . . . . . . 136
Chapter 14: Using Security . . . . . . . . . . . . . . . . . . . . . . . . . . . . . . . . . . . . . 137
Assigning a password . . . . . . . . . . . . . . . . . . . . . . . . . . . . . . . . . . . . . . . . . . . . . . 137
Locking your handheld . . . . . . . . . . . . . . . . . . . . . . . . . . . . . . . . . . . . . . . . . . 139
Recovering from a forgotten password . . . . . . . . . . . . . . . . . . . . . . . . . . . . 141
Making records private . . . . . . . . . . . . . . . . . . . . . . . . . . . . . . . . . . . . . . . . . . 141
Chapter 15: Using To Do List . . . . . . . . . . . . . . . . . . . . . . . . . . . . . . . . . . . . 145
Creating list items . . . . . . . . . . . . . . . . . . . . . . . . . . . . . . . . . . . . . . . . . . . . . . . . . 145
Setting priority . . . . . . . . . . . . . . . . . . . . . . . . . . . . . . . . . . . . . . . . . . . . . . . . . . . . 146
Checking off a To Do List item . . . . . . . . . . . . . . . . . . . . . . . . . . . . . . . . . . . . . . 146
Changing To Do List item details . . . . . . . . . . . . . . . . . . . . . . . . . . . . . . . . . . . . 147
Setting a due date . . . . . . . . . . . . . . . . . . . . . . . . . . . . . . . . . . . . . . . . . . . . . . . 147
To Do Show Options . . . . . . . . . . . . . . . . . . . . . . . . . . . . . . . . . . . . . . . . . . . . 148
To Do List menus . . . . . . . . . . . . . . . . . . . . . . . . . . . . . . . . . . . . . . . . . . . . . . . 149
®
Chapter 16: Performing HotSync
Operations . . . . . . . . . . . . . . . . . . . . . 151
Selecting HotSync setup options . . . . . . . . . . . . . . . . . . . . . . . . . . . . . . . . . . . . . 151
Customizing HotSync application settings . . . . . . . . . . . . . . . . . . . . . . . . . . . . 155
v
Page 8

Contents
Performing cradle HotSync operations . . . . . . . . . . . . . . . . . . . . . . . . . . . . . . . 158
Performing a cradle HotSync operation: Windows . . . . . . . . . . . . . . . . . . 158
Performing a direct HotSync operation: Mac computers . . . . . . . . . . . . . 159
IR HotSync operations . . . . . . . . . . . . . . . . . . . . . . . . . . . . . . . . . . . . . . . . . . . . . 162
Preparing your computer for infrared communication . . . . . . . . . . . . . . . 162
Performing an IR HotSync operation . . . . . . . . . . . . . . . . . . . . . . . . . . . . . . 164
Returning to cradle HotSync operations . . . . . . . . . . . . . . . . . . . . . . . . . . . 164
Conducting a HotSync operation via modem . . . . . . . . . . . . . . . . . . . . . . . . . 165
Preparing your computer . . . . . . . . . . . . . . . . . . . . . . . . . . . . . . . . . . . . . . . . 166
Preparing your handheld . . . . . . . . . . . . . . . . . . . . . . . . . . . . . . . . . . . . . . . . 168
Selecting the conduits for a modem HotSync operation . . . . . . . . . . . . . . 169
Performing a HotSync operation via a modem . . . . . . . . . . . . . . . . . . . . . . 169
Creating a user profile . . . . . . . . . . . . . . . . . . . . . . . . . . . . . . . . . . . . . . . . . . . . . 170
Chapter 17: Setting Preferences for Your Handheld . . . . . . . . . . . . . . . . . 173
Viewing Preferences . . . . . . . . . . . . . . . . . . . . . . . . . . . . . . . . . . . . . . . . . . . . . . . 173
Buttons preferences . . . . . . . . . . . . . . . . . . . . . . . . . . . . . . . . . . . . . . . . . . . . . 174
Pen preferences . . . . . . . . . . . . . . . . . . . . . . . . . . . . . . . . . . . . . . . . . . . . . . . . . 174
HotSync buttons preferences . . . . . . . . . . . . . . . . . . . . . . . . . . . . . . . . . . . . . 175
Digitizer preferences . . . . . . . . . . . . . . . . . . . . . . . . . . . . . . . . . . . . . . . . . . . . 176
Formats preferences . . . . . . . . . . . . . . . . . . . . . . . . . . . . . . . . . . . . . . . . . . . . . 176
General preferences . . . . . . . . . . . . . . . . . . . . . . . . . . . . . . . . . . . . . . . . . . . . . 177
Date and Time preferences . . . . . . . . . . . . . . . . . . . . . . . . . . . . . . . . . . . . . . . 178
Connection preferences . . . . . . . . . . . . . . . . . . . . . . . . . . . . . . . . . . . . . . . . . . 180
Network preferences and TCP/IP software . . . . . . . . . . . . . . . . . . . . . . . . 181
Owner preferences . . . . . . . . . . . . . . . . . . . . . . . . . . . . . . . . . . . . . . . . . . . . . . 193
ShortCuts preferences . . . . . . . . . . . . . . . . . . . . . . . . . . . . . . . . . . . . . . . . . . . 194
Appendix A: Maintaining Your Handheld . . . . . . . . . . . . . . . . . . . . . . . . . 197
Caring for your handheld . . . . . . . . . . . . . . . . . . . . . . . . . . . . . . . . . . . . . . . . . . 197
Battery considerations . . . . . . . . . . . . . . . . . . . . . . . . . . . . . . . . . . . . . . . . . . . . . 197
Resetting your handheld . . . . . . . . . . . . . . . . . . . . . . . . . . . . . . . . . . . . . . . . . . . 198
Performing a soft reset . . . . . . . . . . . . . . . . . . . . . . . . . . . . . . . . . . . . . . . . . . 198
Performing a hard reset . . . . . . . . . . . . . . . . . . . . . . . . . . . . . . . . . . . . . . . . . . 199
Appendix B: Frequently Asked Questions . . . . . . . . . . . . . . . . . . . . . . . . . 203
Software installation problems . . . . . . . . . . . . . . . . . . . . . . . . . . . . . . . . . . . . . . 204
Operating problems . . . . . . . . . . . . . . . . . . . . . . . . . . . . . . . . . . . . . . . . . . . . . . . 205
Tapping and writing problems . . . . . . . . . . . . . . . . . . . . . . . . . . . . . . . . . . . . . . 206
Wireless problems . . . . . . . . . . . . . . . . . . . . . . . . . . . . . . . . . . . . . . . . . . . . . . . . . 207
vi
Page 9

Contents
Application problems . . . . . . . . . . . . . . . . . . . . . . . . . . . . . . . . . . . . . . . . . . . . . . 208
HotSync problems . . . . . . . . . . . . . . . . . . . . . . . . . . . . . . . . . . . . . . . . . . . . . . . . . 209
Beaming problems . . . . . . . . . . . . . . . . . . . . . . . . . . . . . . . . . . . . . . . . . . . . . . . . . 213
Recharging problems . . . . . . . . . . . . . . . . . . . . . . . . . . . . . . . . . . . . . . . . . . . . . . 214
Password problems . . . . . . . . . . . . . . . . . . . . . . . . . . . . . . . . . . . . . . . . . . . . . . . . 214
Technical support . . . . . . . . . . . . . . . . . . . . . . . . . . . . . . . . . . . . . . . . . . . . . . . . . 215
Product Regulatory Information . . . . . . . . . . . . . . . . . . . . . . . . . . . . . . . . . 217
Index . . . . . . . . . . . . . . . . . . . . . . . . . . . . . . . . . . . . . . . . . . . . . . . . . . . . . . . . 219
vii
Page 10

Contents
viii
Page 11

About This Book
Welcome to the Palm™ i700 Series handheld. This handbook is designed to help
you get up and running quickly on your handheld. It describes all you need to
know about how to use your handheld and the applications that come with it. It
walks you through:
■ Enabling wireless features
■ Sending and receiving personal and business e-mail wirelessly
■ Locating all the parts of your handheld
■ Viewing and entering data
■ Working with expansion cards
■ Using your handheld with your computer
■ Personalizing your handheld with your own preference settings
After you become familiar with the basic functionality of your handheld, you can
use the rest of this handbook as a reference for less common tasks, for maintaining
your handheld, and also as a source of information if you have problems operating
it.
1
Page 12

About This Book
2
Page 13

CHAPTER 1
Setting Up
Your new Palm™ i700 Series handheld is wirelessly enabled so that you can use it
to transmit and receive information over the airwaves. Use your handheld to do
the following:
■ Receive secure business e-mail wherever you are, and rely on your handheld’s
blinking indicator light, vibrator, or alarm to notify you of its arrival.
■ Set filters and notification preferences so that you determine what e-mail is
forwarded from your desktop.
■ Read, compose, and send e-mail on the go.
■ Access the Internet and view content formatted for viewing on your handheld,
or browse or search the Internet.
■ Stay organized and on time by keeping your appointments, contact
information, and to do items in one place
■ Quickly jot notes or memos on the fly
Before you can use these features, you must set up your handheld, install software
on your desktop computer, activate your wireless account, and activate your
handheld.
System requirements
To install and operate Palm™ Desktop software, your computer system must meet
the following requirements:
Minimum requirements: Windows
■ IBM-compatible Pentium-class computer
■ Windows 98/ME/2000 (Windows 95/NT operating systems require a serial
cradle/cable, sold separately)
■ 16 MB RAM (64 MB recommended with Windows 2000)
■ 30 MB available hard disk space
■ VGA monitor or better (the Quick Tour requires 256-color video display; for best
results, use High Color: 16 bit)
3
Page 14

Chapter 1 Setting Up
■ CD-Rom drive (you can also download Palm Desktop software from
www.palm.com).
■ Mouse
■ One USB port or available serial port (serial cradle/cable sold separately)
Minimum requirements: Mac computers
■ Apple Mac computer or compatible with a Power PC processor
■ Mac OS 8.6 to 9.1 (9 or 9.1 required to receive updates to the MyPalm™ mobile
portal)
■ One USB port or available serial port (serial cradle/cable sold separately)
■ 25 MB available hard disk space
■ 6 MB free RAM
Internet Access
For easiest activation of your wireless account, and to install Palm™ MultiMail®
Deluxe Desktop Link, and receive updates to the MyPalm mobile portal, your
desktop computer must have the following:
■ A modem or LAN connection
■ An account with an Internet service provider, or Internet service provided by
your company
■ A web browser
If you are upgrading from another Palm OS® handheld:
If you already own a Palm OS® handheld, you must install the version of Palm
Desktop software that comes with your new Palm i700 Series handheld. Before you
install new software, perform a HotSync
cradle. This ensures all data on your handheld is on your desktop computer.
®
operation using your old handheld and
4
Page 15

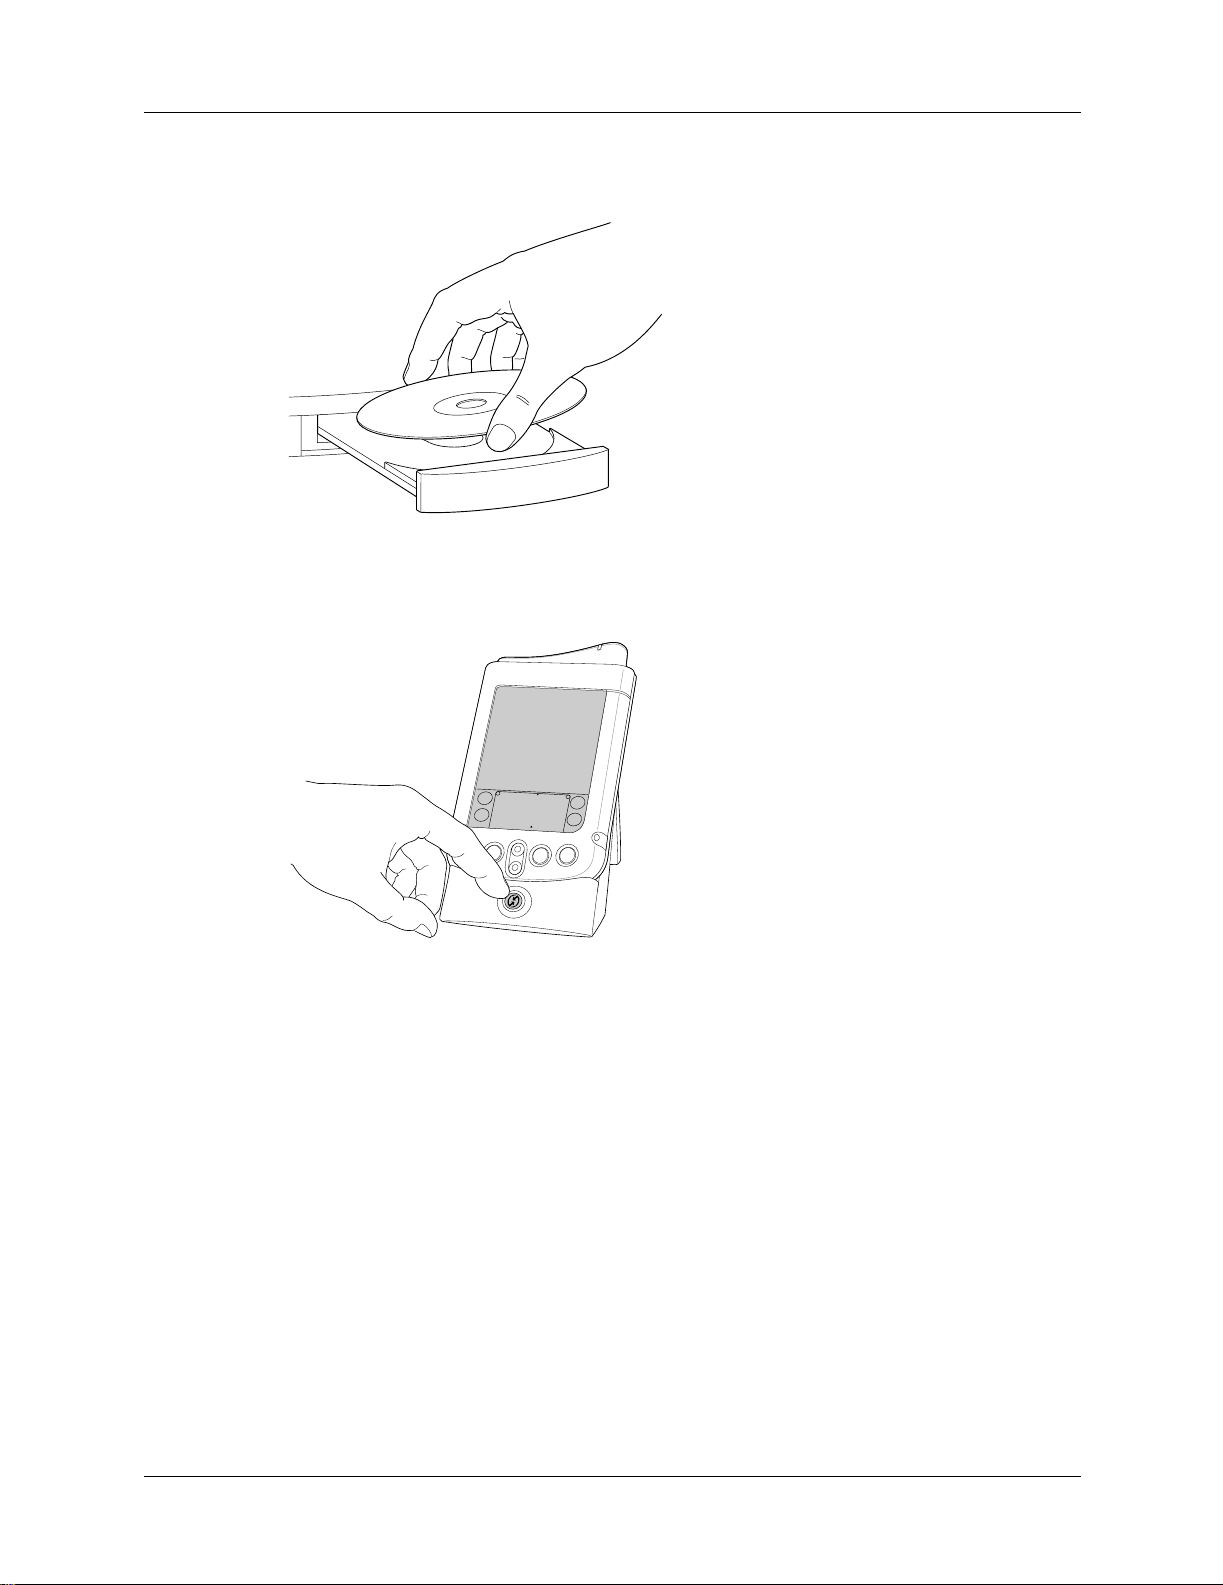
Step 1: Connect the HotSync cradle
Step 2: Charge your handheld
Just place your handheld on the cradle for one hour for an initial charge. Once your
handheld is set up and in daily use, place it on the cradle for a few minutes each
day to recharge it to full capacity. Your handheld’s indicator light displays solid
green when it is recharging.
Step 1: Connect the HotSync cradle
Shut down and turn off your computer.
Plug the USB connector into a USB port on your
computer.
Connect the power cord that attaches to the back of
the cradle’s USB port connector to the AC adapter
cord.
Plug the AC adapter into any AC current outlet.
Step 3: Set up your handheld
The Setup screen appears when you press the power
button. Just follow the onscreen directions.
When you finish Setup, take a few minutes to review the
Basic Skills and Graffiti
®
writing tutorials.
5
Page 16
Chapter 1 Setting Up
I
Wh
Step 4: Install software
Step 5: Perform a HotSync operation
nsert the Palm Installation CD into your
computer’s CD-ROM drive and follow the
onscreen instructions.
You will be guided through the process of
installing Palm Desktop software,
registering for a wireless account,
selecting a service plan, and downloading
and installing MultiMail Deluxe Desktop
Link
en prompted, just place your handheld
on the cradle and press the HotSync
button.
Step 6: Establish wireless service
As the first HotSync operation completes, the installer launches a web browser on
your desktop and opens the Palm i700 Series Activation URL where you will
establish your wireless account, select a service plan, provide billing information,
and set up your Palm wireless e-mail account.
New users: Click Sign up and Register.
Palm VII/VIIx users: Log in using your existing Palm.Net
You must also check the box beneath the password that identifies you as a Palm
VII/VIIx user.
MyPalm portal members: Log in using your MyPalm portal username and
password.
When a HotSync operation completes,
remove the handheld from the cradle by
gently rocking it forward and then lifting it
from the cradle.
®
username and password.
NOTE If you do not have Internet access, call Customer Care to set up your wireless
account. You will need to provide your handheld’s hardware serial number, which is
printed on the back panel of the handheld.
6
Page 17
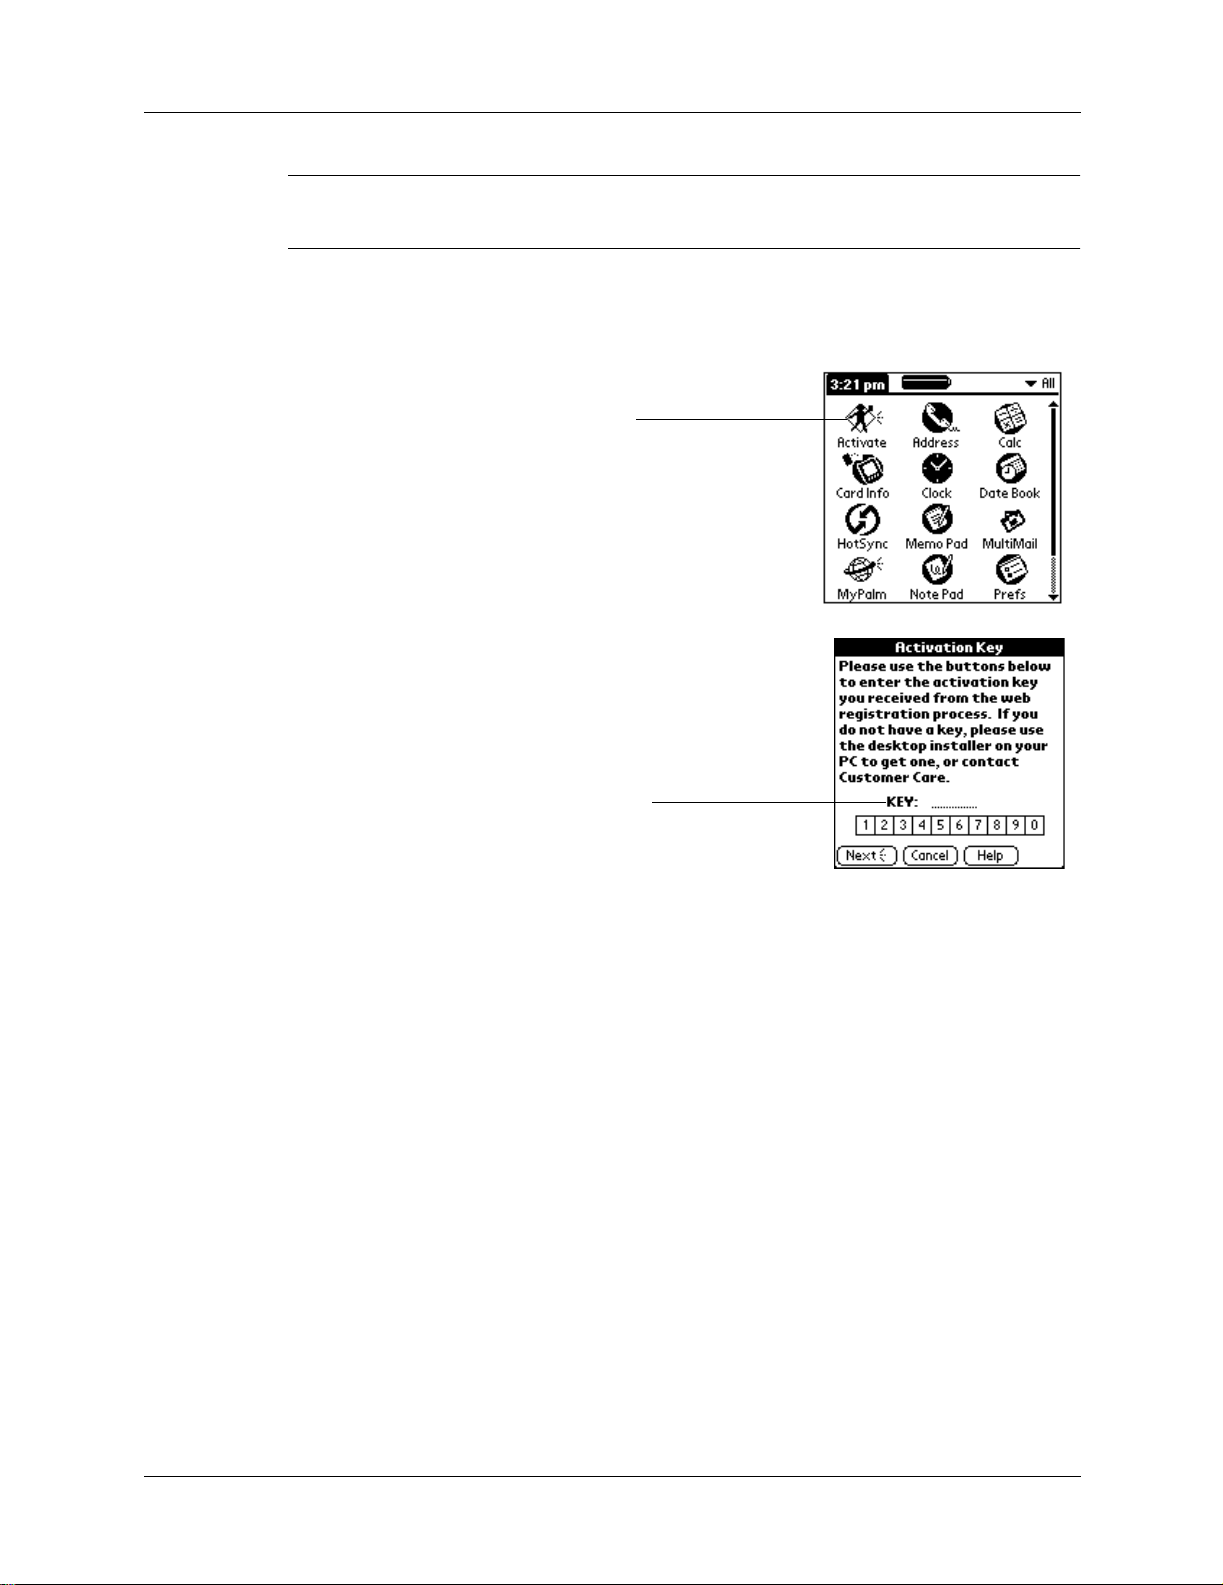
IMPORTANT When you complete registration, you receive a five digit activation key
A
that you need to activate wireless service on your handheld.
Step 7: Activate your handheld
Tap Activate and follow the instructions.
Step 7: Activate your handheld
Enter the Activation Key you received
when you activated your wireless account.
Activation will also configure MultiMail Deluxe to work with your Palm wireless account and
your business e-mail account.
t the Activation Successful screen, write down your user name and login information.
Perform a HotSync operation when prompted to complete activation.
Step 8: Complete installation
As the HotSync operation completes, you will be able to do the following:
■ Choose an option that updates the features of the mobile portal application.
■ Install Palm MultiMail Deluxe Desktop Link, which wirelessly links your
desktop business e-mail account to the business e-mail account on your
handheld.
Onscreen directions guide you through the processes.
7
Page 18

Chapter 1 Setting Up
Updating the mobile portal
The MyPalm mobile portal on your handheld is much like a portal site on the
Internet. It allows you to quickly and wirelessly access Internet content by channel,
and it specially formats content for viewing on a handheld. When you elect to
receive updates to the mobile portal, the update process initiates an Internet
connection each time you perform a HotSync operation. If a newer version of the
MyPalm mobile portal is found, it replaces the current version on your handheld
during the HotSync operation.
For information about changing conduit settings, see “Customizing HotSync
application settings” in Chapter 16.
Palm MultiMail Deluxe Desktop Link
Palm MultiMail Deluxe Desktop Link securely forwards e-mail from your
Windows 2000 Microsoft Outlook business e-mail account to your handheld. Your
handheld notifies you of arriving e-mail by blinking its red indicator light at paired
intervals, vibrating, or sounding an alarm.
For information about selecting notification methods, see “General preferences” in
Chapter 17.
NOTE You must install Palm MultiMail Deluxe Desktop Link to the same computer
that you use to access your business e-mail.
Congratulations!
You’ve set up your handheld, installed Palm Desktop software, activated your
wireless account, activated your handheld, and installed additional wireless
components. For comprehensive information about using your handheld,
continue reading this electronic Handbook.
For more information about using Palm Desktop Software, see the following:
■ The Windows tutorial for Palm Desktop software, Quick Tour. To access this
tutorial, go to the Help menu in Palm Desktop software and choose Quick Tour.
■ The electronic Palm Desktop Software for the Macintosh User’s Guide. To access this
guide, open the Palm folder, and then open the Documentation folder. Doubleclick the file Palm Desktop.pdf.
■ The online help for Palm Desktop software. To access the online help, go to the
Help menu in Palm Desktop software.
NOTE If you have upgraded, your new handheld and your old handheld have the
same user name after completing the upgrade process. We strongly recommend that
you perform a hard reset on your old handheld to erase all data from it and assign it
a new user name during the next HotSync operation. See “Performing a hard reset”
in Appendix A for details.
8
Page 19

CHAPTER 2
Exploring Your Handheld
Your Palm ™ i700 Series handheld is wirelessly enabled. It will help you stay in
touch with important e-mail and information, and to stay organized, on time, and
up to date with daily tasks while you are away from your desk. Use your new
handheld to do the following:
■ Compose and securely send and receive business or personal e-mail wirelessly.
■ Receive alerts when new e-mail arrives. Rely on any or all of the following alert
modes: the indicator light, vibrator, or alarm sound.
■ Access internet information with the MyPalm™ mobile portal.
■ Browse or search the internet.
■ Download and use web clipping applications that help you find Internet
information quickly.
■ Enter your schedule in Date Book.
■ Keep all your contact names, addresses, and phone numbers in Address Book.
■ Prioritize and assign your tasks a due date in To Do List.
■ Jot quick notes directly on the screen in Note Pad.
■ Set alarms from Clock, Date Book, and Note Pad, to keep yourself on schedule
and remind yourself of appointments and notes.
■ Set preferences for how you receive alarms: hearing a sound, seeing a blinking
indicator light, or feeling your handheld vibrate. Chose any combination.
■ Synchronize your data with Palm™ Desktop software on your Windows or Mac
computer so you always have a copy.
■ Insert Secure Digital (SD) or MultiMediaCards to add additional software or
memory, or to back up your data.
■ Beam information to another Palm OS
®
handheld that is close by and has an IR
(infrared) port.
■ Update, and receive new applications, via the MyPalm mobile portal.
9
Page 20
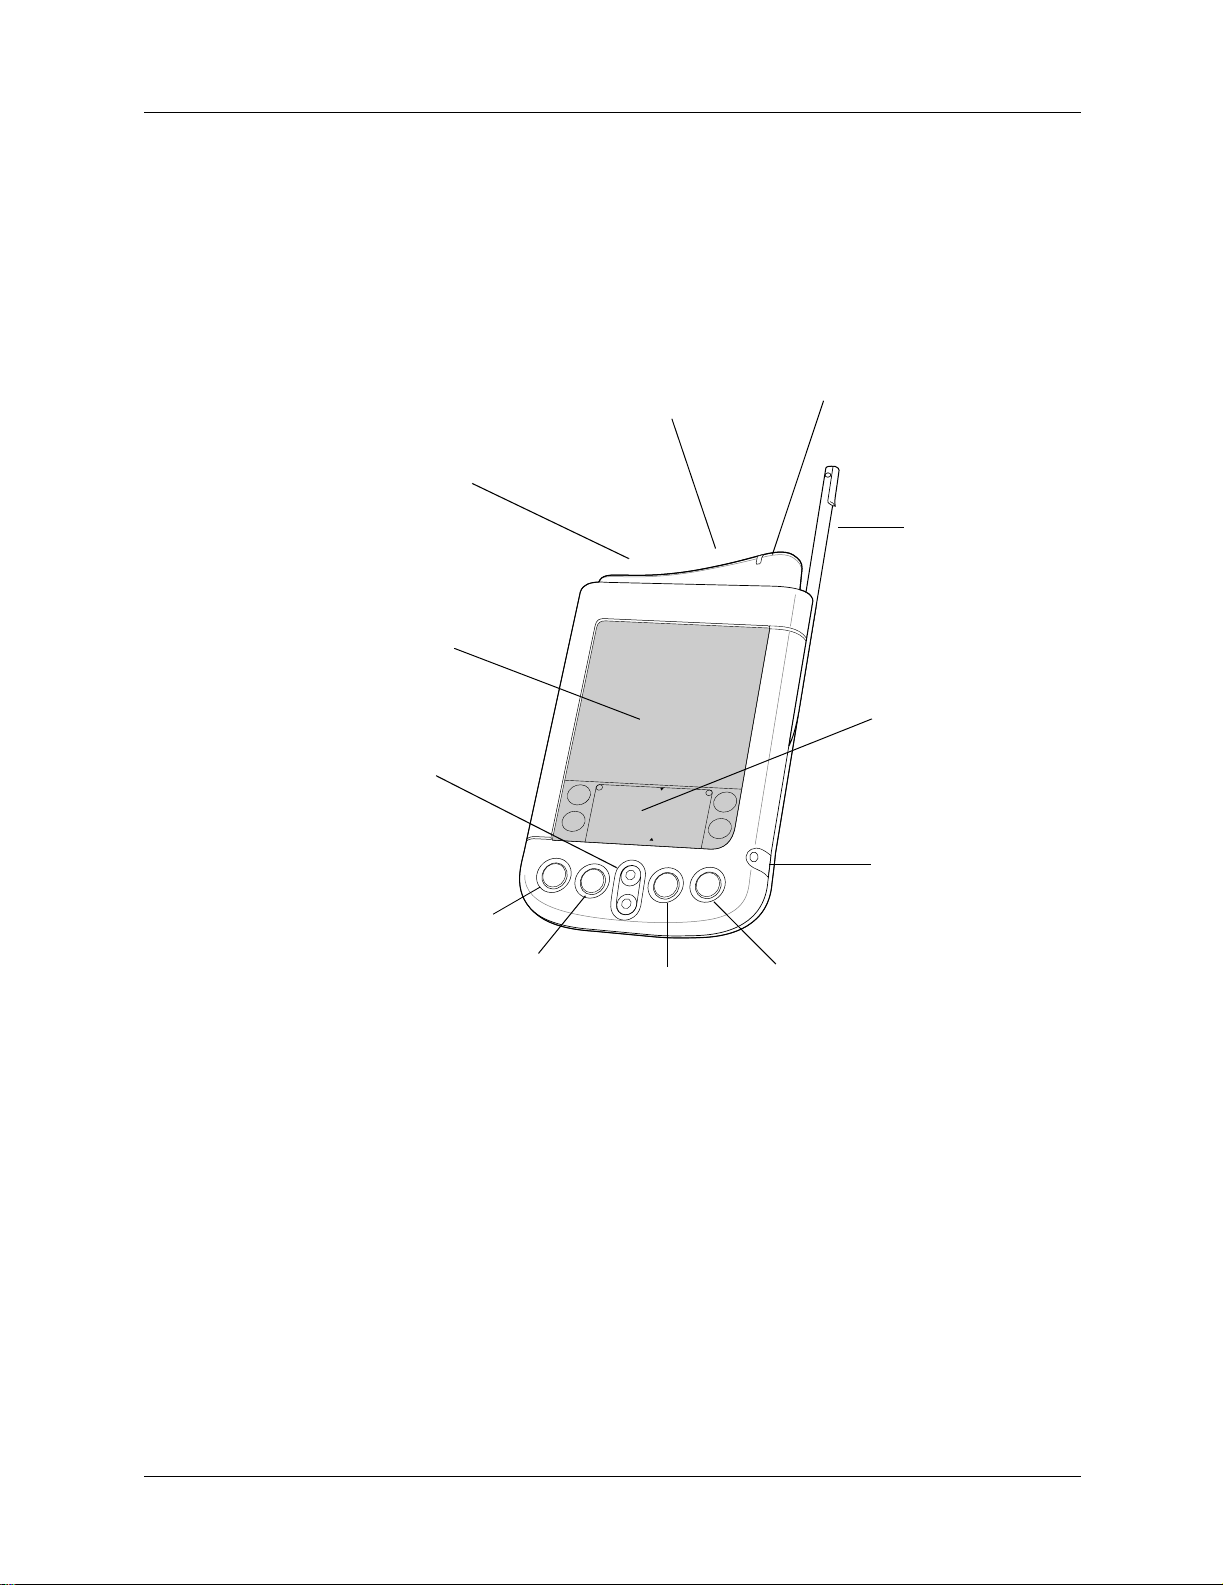
Chapter 2 Exploring Your Handheld
Handheld components
Take a few moments to locate the front and back panel components of your
handheld.
Locating front panel controls
Antenna cap
Screen
Red and green indicator light
IR port
Stylus
Scroll
buttons
IR port
Red and green
indicator light
Date
Book
®
writing
Address
Book
Wireless
Application buttons
MultiMail
Deluxe
Graffiti
area
Power button/
Backlight control
®
Uses infrared technology to transmit data to and receive data
from other Palm OS handhelds, and to perform HotSync
operations. See “Beaming data” in Chapter 3 and see “IR
HotSync operations” in Chapter 16 or more information.
Indicates when you are within or out of range for wireless
transmission. It also notifies you of incoming e-mail, or Date
Book/Clock/Note Pad alarms.
10
Stylus
Slides in and out of the slot in the side channel of the
handheld. To use the stylus, remove it from the slot and hold
it as you would a pen or pencil. Unscrew the top of the stylus
to access the reset tool.
Page 21

Handheld components
Graffiti writing area
Power button/
Backlight control
Application buttons
Scroll buttons
Screen
The area where you write letters and numbers using the
Graffiti alphabet. See “Using Graffiti writing to enter data” in
Chapter 3 to learn how to write Graffiti characters.
Turns your handheld on or off and controls the backlight
feature. If your handheld is turned off, pressing the power
button turns the handheld on and returns you to the last
screen you viewed.
If your handheld is turned on, pressing the power button turns
the unit off. Pressing the power button for about two seconds
turns the backlight on or off.
Activates the individual handheld applications that
correspond to the icons on the buttons: Date Book, Address
Book, Wireless, and MultiMail Deluxe. See “Buttons
preferences” in Chapter 17 for details on reassigning these
buttons to activate any application on your handheld.
Displays text and other information that extends beyond the
area of the handheld screen. Pressing the lower scroll button
scrolls down to view information below the viewing area, and
pressing the upper scroll button scrolls up to view the
information above the viewing area.
Displays the applications and information stored in your
handheld. It is touch-sensitive and responds to the stylus.
Using the backlight
If lighting conditions make it difficult for you to see the information on your
handheld, you can use the backlight to illuminate your screen.
To activate the backlight:
■ Press the power button and hold it down for about two seconds. Release the
button when the backlight turns on.
TIP In addition, you can assign the full-screen pen stroke to activate the
backlight. See “Pen preferences” in Chapter 17 for details.
To turn off the backlight:
■ Press and hold the power button for about two seconds. The backlight also
turns off automatically (after a period of inactivity) with the Auto-off feature.
See “General preferences” in Chapter 17 for more information.
11
Page 22
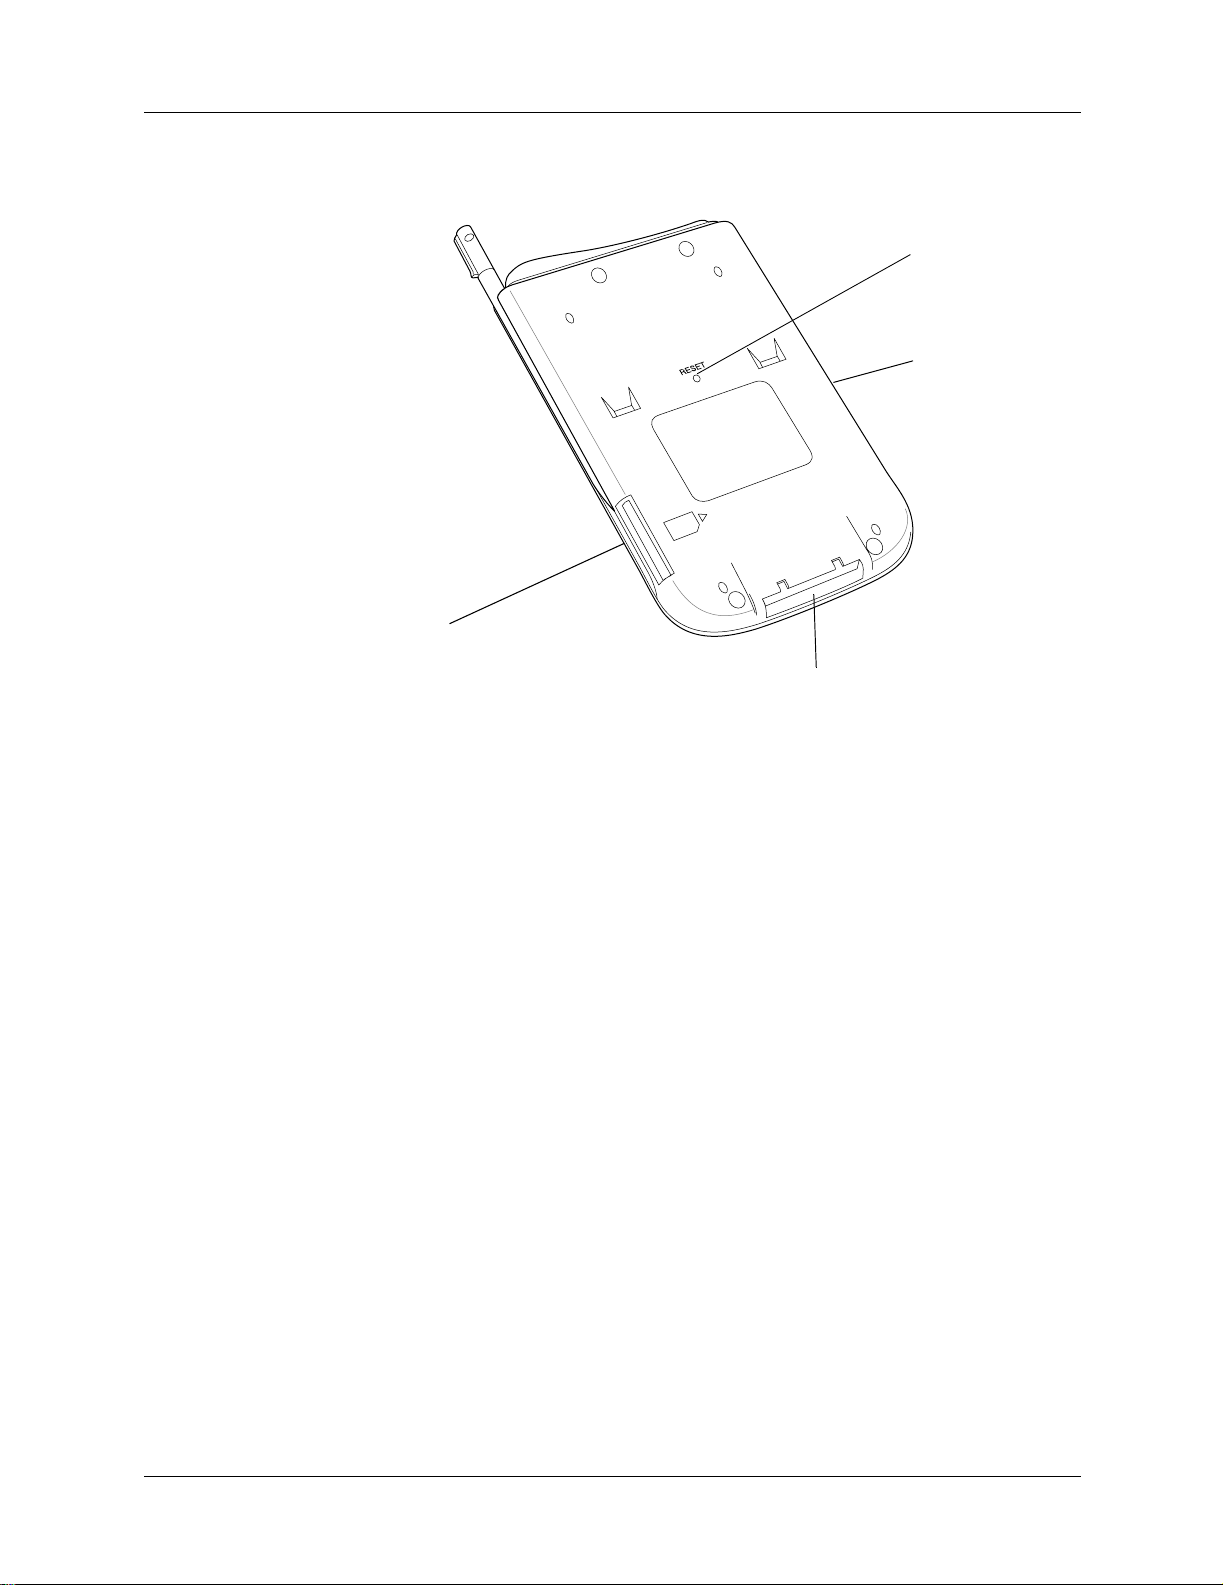
Chapter 2 Exploring Your Handheld
Locating back panel components
Expansion
card slot
Reset
button
Side
channel for
cover
Universal
connector
Reset button
Side channel
Universal connector
Expansion card slot
Adding an expansion card
A tiny expansion card (sold separately) increases the variety of tasks you can do
and the amount of space you have to store software and data on your handheld.
Under normal use, you should not have to use the reset
button. See “Resetting your handheld” in Appendix A for
information about when and how to use the reset button.
The left side channel holds the front cover, which slides in and
out.
Connects your handheld to the cradle, which in turn connects
to the back of your computer and through the AC adapter to
the wall current. This allows you to recharge your handheld as
well as update the information between your handheld and
computer using HotSync
The universal connector also connects peripheral hardware
devices to your handheld.
Accepts Secure Digital (SD) or MultiMediaCard expansion
cards, enabling you to add more memory, applications, or
Bluetooth™ functionality. You can also back up data to an
expansion card.
®
technology.
12
Page 23
Tapping and typing
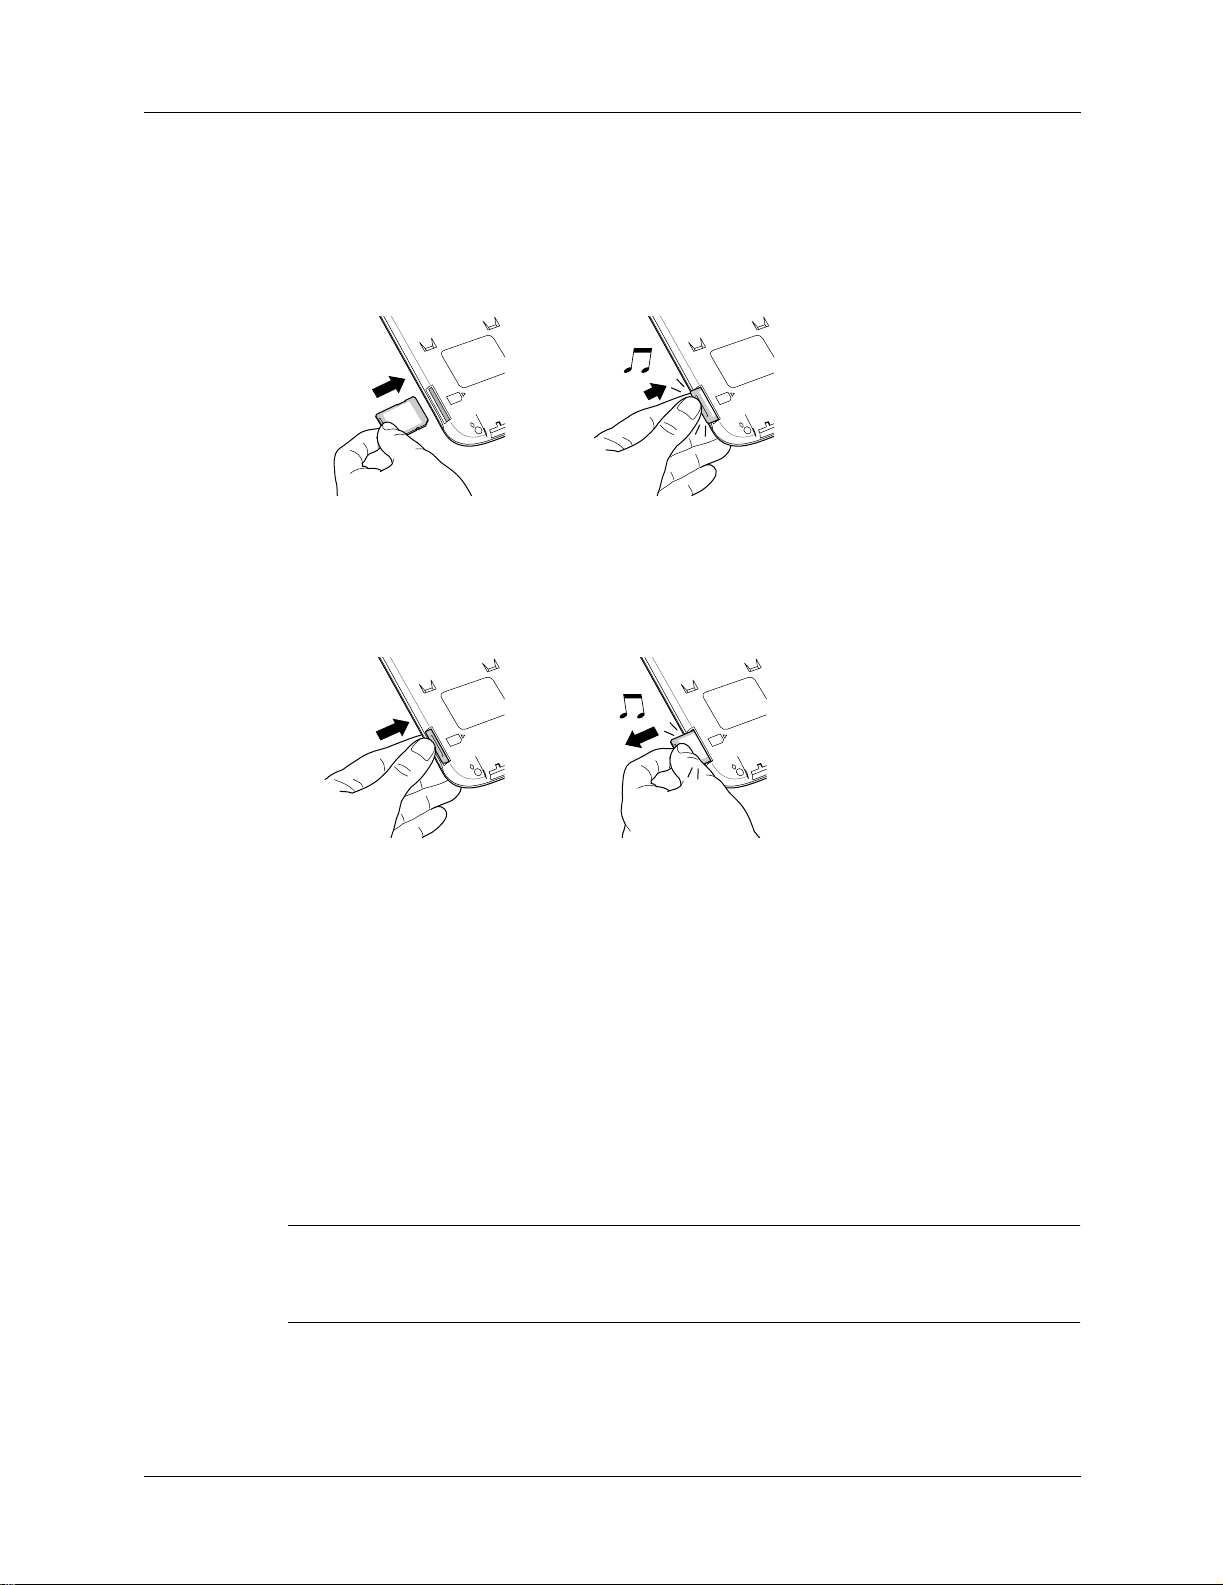
To insert a card:
1. Insert the card in the direction shown by the icon.
2. Push the card in with your thumb. You feel the card lock and hear the system
sound.
To remove a card:
1. Push lightly against the card with your thumb.
2. When the card is released, you hear the system sound.
For complete information about working with expansion cards, see Chapter 9.
Tapping and typing
Like using a mouse to click elements on a computer screen, using the stylus to tap
elements on your handheld screen is the basic action that gets things done on your
handheld.
The first time you start your handheld, setup instructions appear on the screen.
These instructions include a calibration screen. Calibration aligns the internal
circuitry of your handheld with its touch-sensitive screen so that when you tap an
element on the screen, the handheld can detect exactly which task you want to
perform.
IMPORTANT Always use the point of the stylus for tapping or making strokes on the
handheld screen. Never use an actual pen, pencil, or other sharp object to write on
the handheld screen.
With your handheld turned on, you can tap the handheld screen to do many
operations, such as the following:
13
Page 24
Chapter 2 Exploring Your Handheld
■ Open applications
■ Choose menu commands
■ Initiate a Find operation to search through applications installed on your
handheld for specific text (Find operations do not search through applications
on expansion cards)
■ Select options in dialog boxes
■ Open the onscreen keyboards
Just as you can drag the mouse to select text or move objects on your computer, you
can also drag the stylus to select text. You can also use the stylus to drag the slider
of any scroll bar.
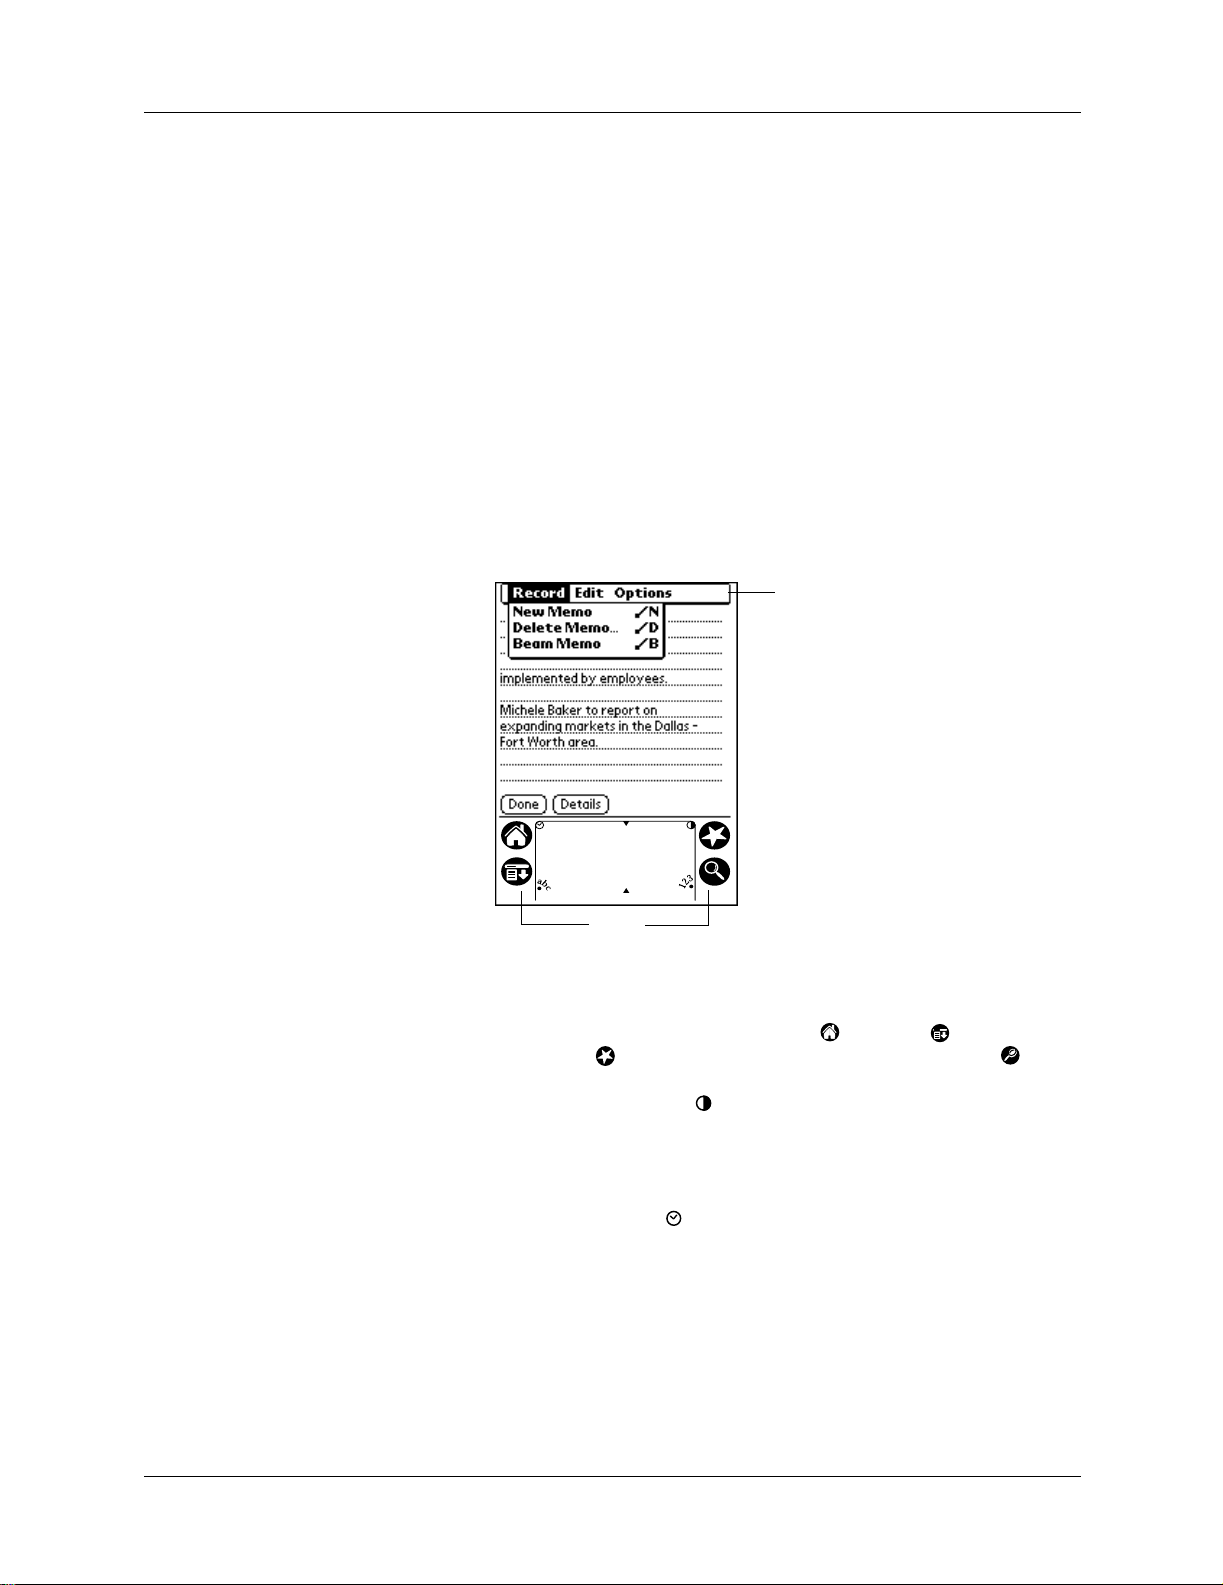
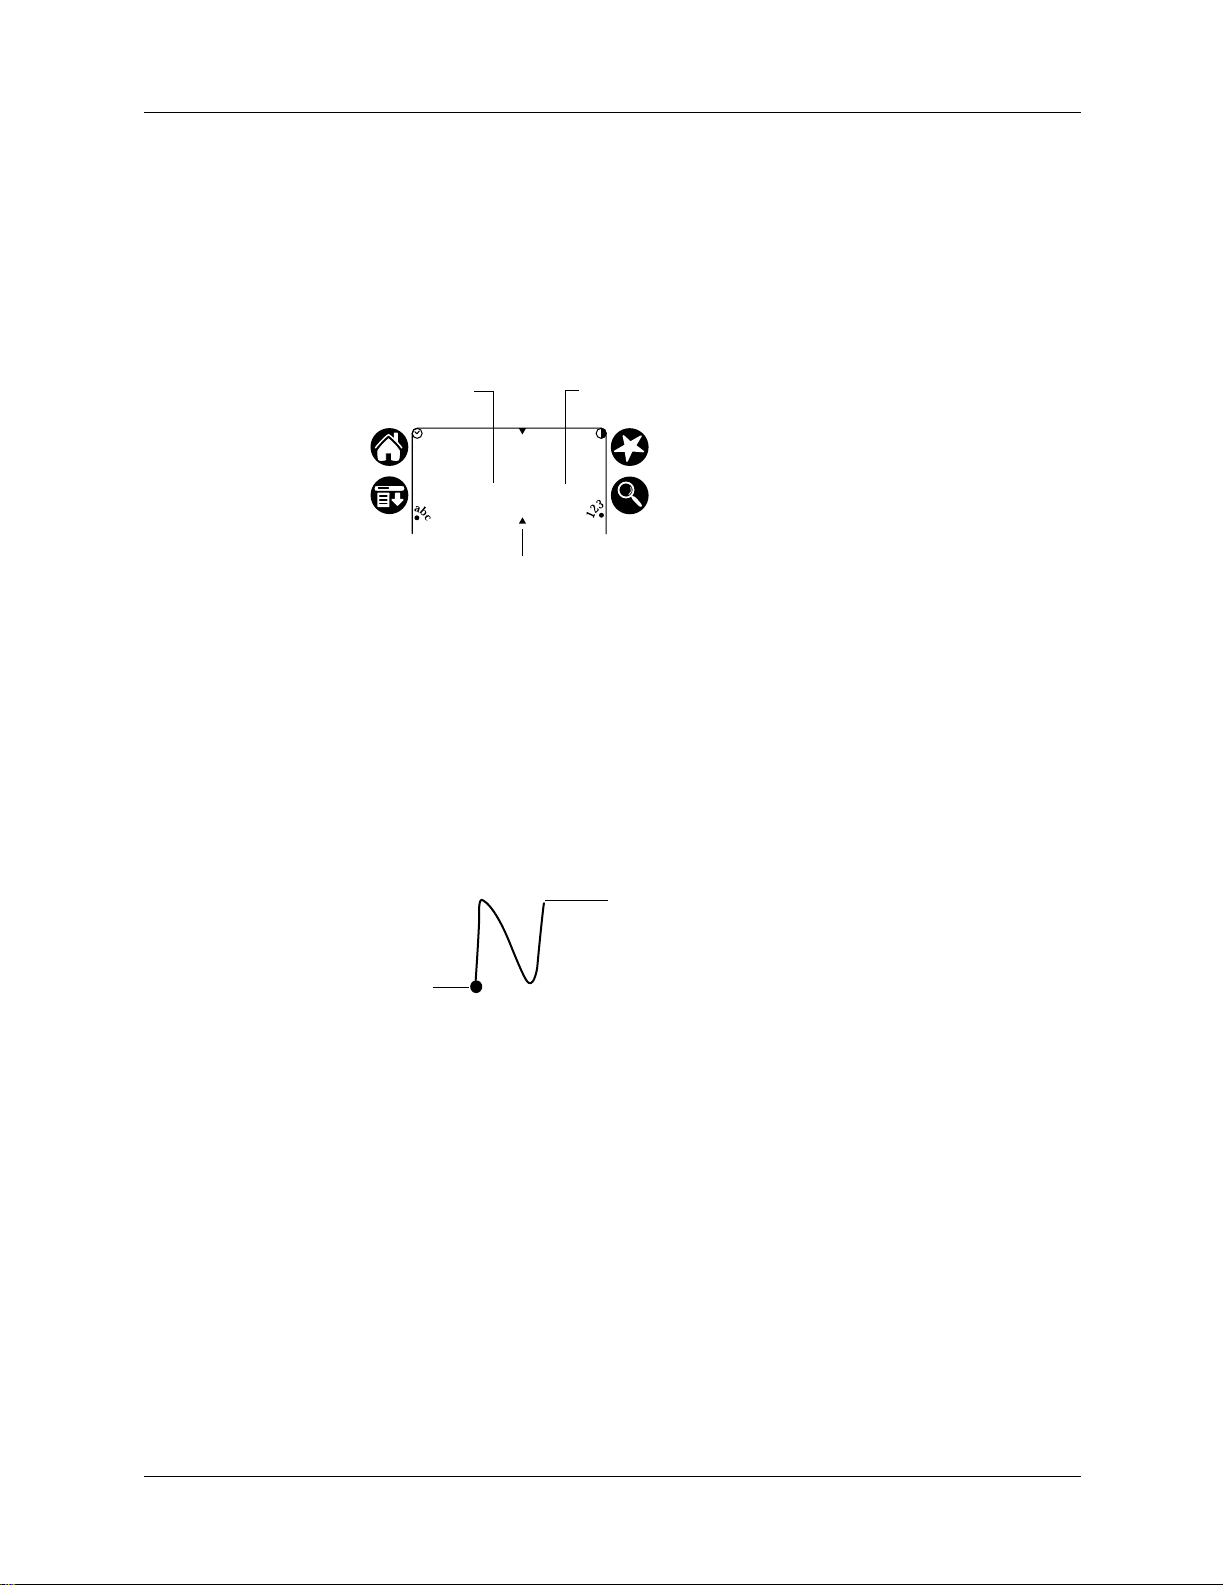
Elements of the handheld interface
Menu
bar
14
Menu bar
Icons
Contrast control
Clock
abc
123
Icons
A set of commands that are specific to the application. Not all
applications have a menu bar.
Tap the icons to open applications , menus , a favorite
application , and to find text anywhere in your data .
Tap the Contrast icon to open the Adjust Contrast dialog
box. Tap to the left or right of the slider to adjust the contrast
in small increments or drag the slider to change the contrast in
large increments.
Tap the Clock icon to display the time and date.
With the cursor in an input field, tap the dot to activate the
alphabetic keyboard.
With the cursor in an input field, tap the dot to activate the
numeric keyboard.
Page 25
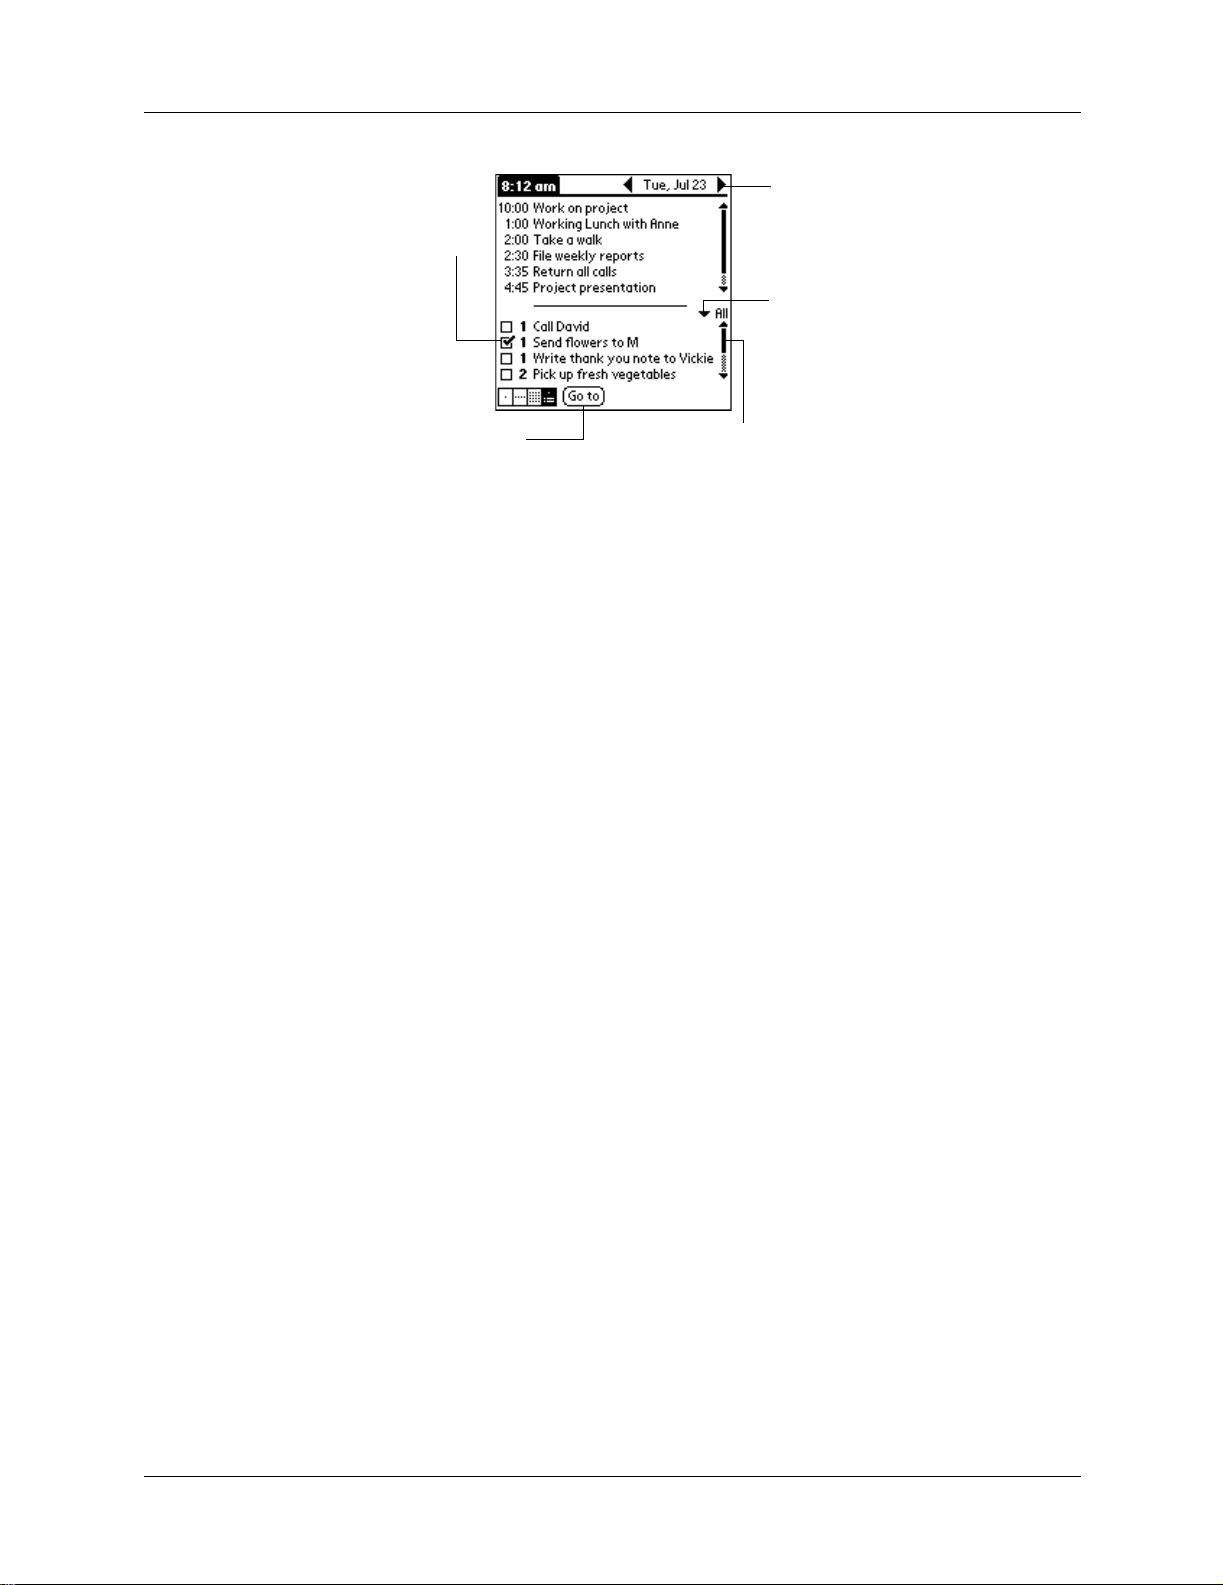
Check
box
Tapping and typing
Previous/next arrows
Pick list
Command
button
Check box
Command buttons
Next/previous
arrows
Pick list
Scroll bar
Scroll
bar
When a check mark appears in a check box, the corresponding
option is active. If a check box is empty, tapping it inserts a
check mark. If a check box is checked, tapping it removes the
check mark.
Tap a button to perform a command. Command buttons
appear in dialog boxes and at the bottom of application
screens.
Tap the left and right arrows to display the previous and next
record; tap the up and down arrows to display the previous
and next page of information.
Tap the arrow to display a list of choices, and then tap an item
in the list to select it.
Drag the slider, or tap the top or bottom arrow, to scroll the
display one line at a time. To scroll to the previous page, tap
the scroll bar just above the slider. To scroll to the next page,
tap the scroll bar just below the slider.
You can also scroll to the previous and next pages by pressing
the upper and lower scroll buttons on the front panel of your
handheld.
15
Page 26

Chapter 2 Exploring Your Handheld
Displaying online tips
Many of the dialog boxes that appear on your handheld contain an online Tips icon
in the upper-right corner. Online tips anticipate questions you have in a dialog box,
provide shortcuts for using the dialog box, or give you other useful information.
To display an online tip:
1. Tap the Tips icon .
2. After you review the tip, tap Done.
16
Page 27

CHAPTER 3
Entering Data in Your Handheld
This chapter explains how to enter data into your handheld. There are several
ways to enter data into your handheld:
■ Using the onscreen keyboard
■ Using Graffiti
■ Beaming data from another Palm OS
®
writing
infrared port.
■ Entering or importing data in Palm™ Desktop software and then synchronizing
with your handheld
■ Using Note Pad
■ Using a portable keyboard accessory, sold separately, and attached to the
universal connector
Using the onscreen keyboard
You can open the onscreen keyboard anytime you need to enter text or numbers on
your handheld. You can also use Graffiti writing when the keyboard is open, which
makes it easy to switch between these two methods of entering data.
To use the onscreen keyboard:
1. Open any application (such as Memo Pad).
2. Tap any record, or tap New.
3. Tap “abc” to open the alphabetic keyboard, or tap “123” to open the numeric
keyboard.
®
handheld that is close by and has an
Tap here for
alphabetic keyboard
4. Tap the characters to enter text and numbers.
Tap here for
numeric keyboard
17
Page 28

Chapter 3 Entering Data in Your Handheld
When a keyboard is open, you can tap to open any of the other keyboards,
including the international keyboard.
Ta b
Alpha
Backspace
Caps lock
Caps shift
Tap here to display
Numeric
Tap here to display
numeric keyboard
alphabetic keyboard
After you finish, tap Done to close the onscreen keyboard and place the text in the
record.
Using Graffiti writing to enter data
In this section, you learn the procedures for creating letters, numbers, punctuation,
and symbols, as well as some Graffiti tips and tricks.
Writing Graffiti characters
Carriage return
International
Tap here to display
international keyboard
18
Most people find they can enter text quickly and accurately with only minutes of
practice. Graffiti writing includes any character you can type on a standard
keyboard. The Graffiti strokes closely resemble the uppercase letters of the regular
alphabet, which makes Graffiti writing easy to learn.
There are four basic concepts for success with Graffiti writing:
■ If you draw the character shape exactly as shown in the tables later in this
chapter (like the shapes shown in the following diagram), you achieve 100%
accuracy.
■ The heavy dot on each shape shows where to begin the stroke. Certain
characters have similar shapes, but different beginning and end points. Always
begin the stroke at the heavy dot (you should not create the heavy dot; it is only
there to show you where to begin the stroke).
Page 29
Using Graffiti writing to enter data
■ Most characters require only a single stroke. When you lift the stylus from the
Graffiti writing area, your handheld recognizes and displays the text character
immediately. To accomplish single strokes, some Graffiti strokes are portions of
the regular alphabet equivalents.
■ The Graffiti writing area is divided into two parts: one for writing the letters of
the alphabet and one for writing numbers. The small marks at the top and
bottom of the Graffiti writing area indicate the two areas.
Write letters here Write numbers here
Division marks
To write Graffiti letters:
1. Tap the screen where you want your text to go.
You need to tap above the Graffiti writing area, and must see a blinking cursor
before you write the text.
2. Use the tables on the following pages to find the stroke shape for the letter you
want to create. For example, the stroke shown below creates the letter “n.”
There are two different stroke shapes available for some letters. For these letters,
choose the one that’s easiest for you.
Lift stylus
here
Start stroke
at heavy dot
As you’ll see later, you use the same shape to create both the uppercase and
lowercase version of a letter.
3. Position the stylus in the left-hand side of the Graffiti writing area.
4. Start your stroke at the heavy dot and draw the stroke shape as it appears in the
tables.
5. Lift the stylus from the screen at the end of the stroke shape.
That’s all there is to it! When you lift the stylus from the screen, your handheld
recognizes your stroke immediately and prints the letter at the insertion point on
the screen.
As soon as you lift the stylus from the screen, you can begin the stroke for the next
character you want to write.
19
Page 30
Chapter 3 Entering Data in Your Handheld
NOTE You must begin the character strokes in the Graffiti writing area. If you do not
make Graffiti strokes in the Graffiti writing area, your handheld does not recognize
them as text characters.
Graffiti tips
When using Graffiti writing, keep these tips in mind:
■ Accuracy improves when you write large characters. You should draw strokes
that nearly fill the Graffiti writing area.
■ To delete characters, simply set the insertion point to the right of the character
you want to delete and make the backspace stroke (a line from right to left) in
the Graffiti writing area.
■ Write at natural speed. Writing too slowly can generate recognition errors.
■ Do not write on a slant. Vertical strokes should be parallel to the sides of the
Graffiti writing area.
■ Press firmly.
The Graffiti alphabet
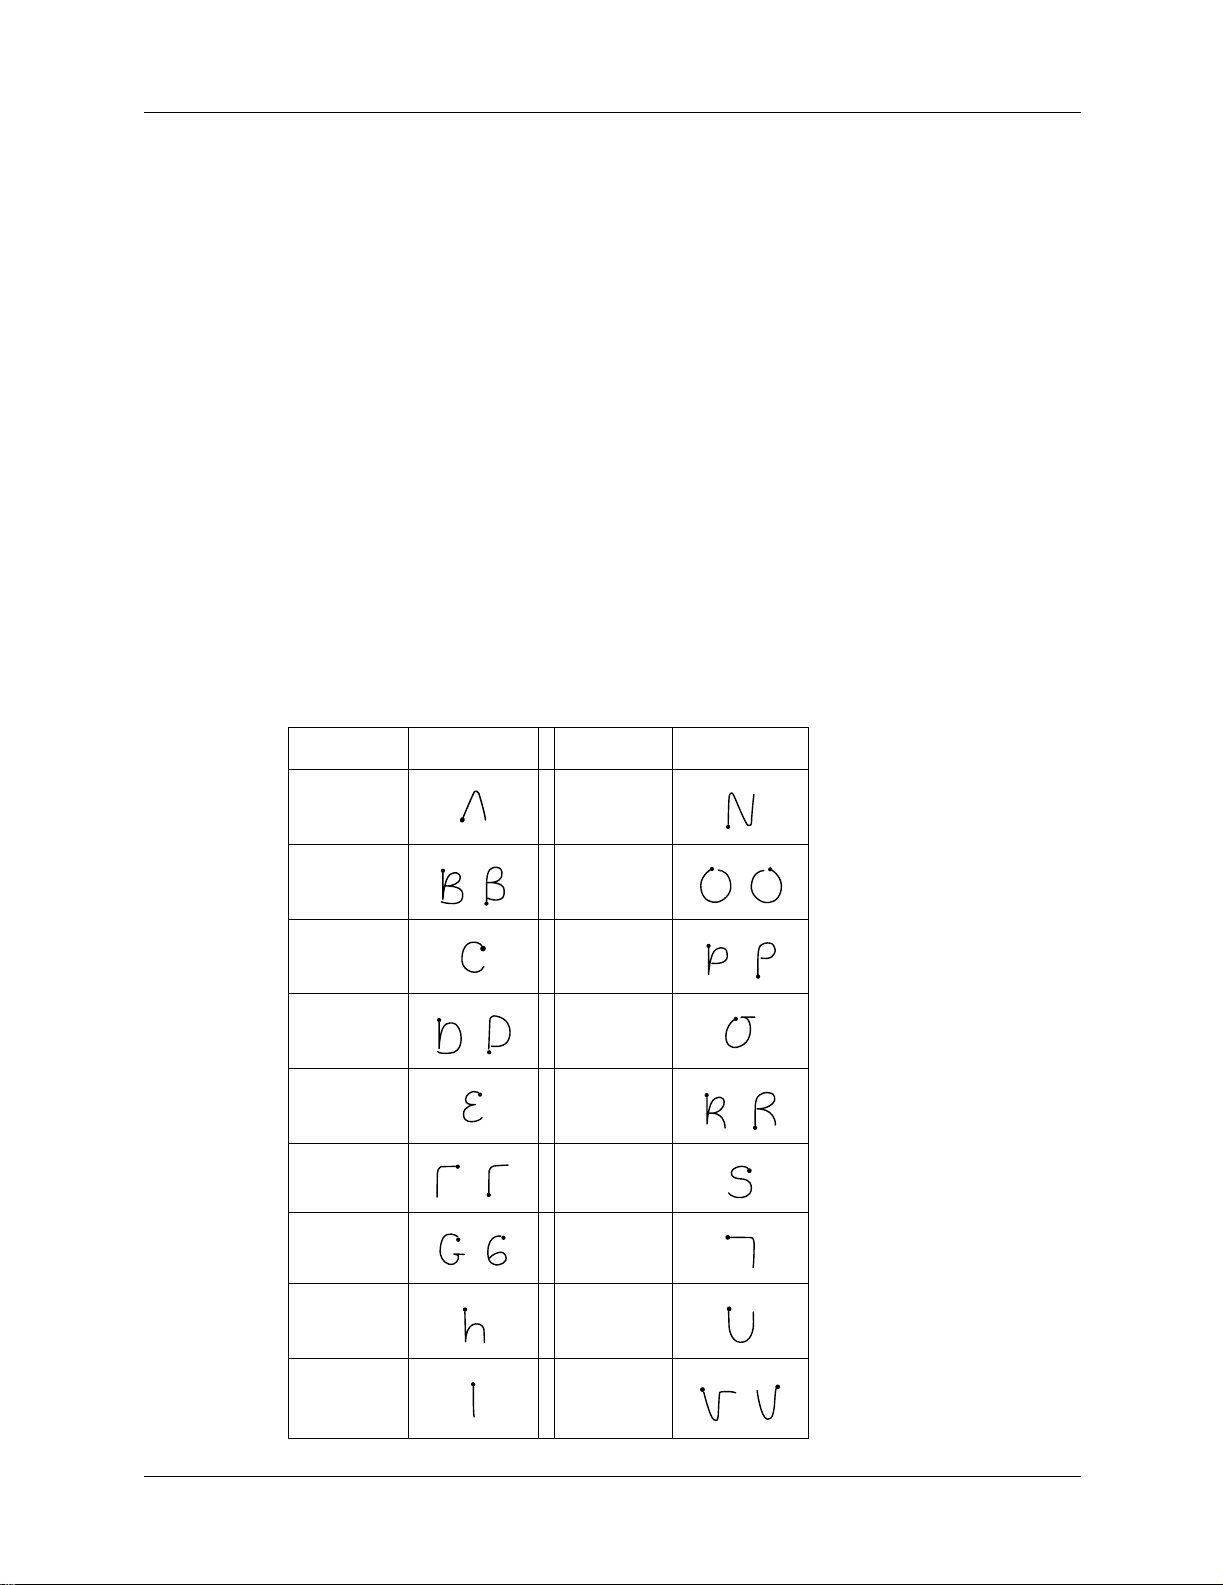
Letter Strokes Letter Strokes
AN
B
O
CP
D
Q
ER
F
G
S
T
20
HU
IV
Page 31

Using Graffiti writing to enter data
JW
KX
LY
M
Space Back Space
Carriage
Return
TIP A fullscreen pen stroke brings up Graffiti help on your handheld. See “Pen
preferences”
Writing capital letters
You make capital letters with the same stroke shapes as the basic alphabet
characters. To make capital letters, you must first “shift” to caps — just as you press
the Shift key on a keyboard — and then write the character strokes.
Z
Period
in Chapter 17 for details.
tap twice
Graffiti writing includes a feature that automatically capitalizes the first letter
when you create a new sentence or a new record (by tapping New or a blank line).
To draw the first letter of a word as a capital letter:
■ Use the Caps Shift stroke:
Caps
Shift
TIP When Caps Shift is active, an “up arrow” symbol appears in the lower-
right corner of the handheld screen. If you accidentally activate Caps Shift,
backspace will cancel it.
Caps Shift
21
Page 32

Chapter 3 Entering Data in Your Handheld
To enter only capital letters (Caps Lock):
■ Use the Caps Lock stroke:
Writing numbers
Writing numbers with Graffiti writing is similar to writing letters of the alphabet,
except that you make the character strokes on the right-hand side (numbers side)
of the Graffiti writing area.
Graffiti numbers
Caps
Lock
TIP When Caps Lock is active, an underlined “up arrow” symbol appears in
the lower-right corner of the handheld screen. To return to lowercase, make the
Caps Shift stroke.
Caps Lock
Number Strokes Number Strokes
0
5
1
27
38
4
Writing punctuation marks
Graffiti writing can create any punctuation symbol that you can enter from a
standard keyboard. All punctuation marks begin with a single tap on the Graffiti
writing area. When you make this tap, you activate Punctuation Shift and a dot
6
9
22
Page 33

Using Graffiti writing to enter data
appears to show it is active. The next stroke you make with the stylus creates a
punctuation mark.
Punctuation shift
When Punctuation Shift is active, you can make a symbol stroke anywhere in the
Graffiti writing area (the letters or numbers side).
Symbol Stroke Symbol Stroke
Period
.
Comma
,
Apostrophe
'
Question
?
Dash
—
Left Paren
(
Right Paren
)
Slash
/
Exclamation
!
Additional Graffiti punctuation
@ # % ^ & * < > + = |
\ { } [ ] ~ ` ; : " tab
Writing symbols and extended characters
All symbols and extended characters begin with the stroke in the Graffiti writing
area of your handheld:
Symbol
Shift
Dollar
$
—
When the Symbol Shift is active, a slanted shift symbol appears in the lower-right
corner of the screen. The next stroke that you make creates the symbol or extended
character.
Symbol Shift
23
Page 34

Chapter 3 Entering Data in Your Handheld
•
,
,
,°,
,
,
+
Writing accented characters
To create accented characters, draw the stroke normally used to create the letter,
followed by an accent stroke. Graffiti writing then adds the accent to the letter.
For example, the following diagram shows the strokes required to draw an
accented “e.”
= e
Accent strokes
a a a a a a
—
==c
:
X
!
ƒ
Y
∅
?
Using these accent strokes, you can write the following accented letters:
à á â ã ä å è é ê ë ì í î ï ò ó ô õ ö ù ú û ü ÿ ý ñ
Additional non-English characters
You can write the following characters without any special punctuation or shifting:
c
a
e
You must write these non-English characters in the left side of the Graffiti writing
area.
24
Page 35

Navigation strokes
In addition to character symbols, Graffiti writing includes special strokes that you
can use to navigate within text or fields in your applications.
Using Graffiti writing to enter data
Command
Move cursor right
Move cursor left
Previous field
(Address Book only)
Next Field
(Address Book only)
Open Address Record
(Address Book only)
Graffiti ShortCuts
Graffiti ShortCuts make entering commonly used words or phrases quick and
easy. ShortCuts are similar to the Glossary or Autotext features of some word
processors.
Graffiti writing comes with several predefined ShortCuts, and you can also create
your own. Each ShortCut can represent up to 45 characters. For example, you
might create a ShortCut for your name, or for the header of a memo. See
“ShortCuts preferences” in Chapter 17 to learn about creating your own ShortCuts.
Stroke
To use a ShortCut, draw the ShortCut stroke followed by the ShortCut characters.
When you draw the ShortCut stroke, the ShortCut symbol appears at the insertion
point to show that you are in ShortCut mode.
ShortCut
Your handheld includes the following predefined Graffiti ShortCuts:
Entry Shortcut
Date Stamp ds
Time stamp ts
Date / time stamp ds
Meeting me
25
Page 36

Chapter 3 Entering Data in Your Handheld
Entry Shortcut
Breakfast br
Lunch lu
Dinner di
Beaming data
Your handheld is equipped with an IR (infrared) port that you can use to beam
information to another Palm OS handheld that’s close by and also has an IR port.
The IR port is located at the top of the handheld, behind the small dark shield.
You can beam the following information between Palm OS handhelds:
■ The record currently displayed in Date Book, Address Book, To Do List, Note
Pad, or Memo Pad
■ All records of the category currently displayed in Address Book, To Do List,
Note Pad, or Memo Pad
■ A special Address Book record that you designate as your business card,
containing information you want to exchange with business contacts
■ An application installed in RAM memory
■ An application installed on an expansion card that is seated in the card slot
TIP You can also perform HotSync operations using the IR port. See “IR
HotSync operations” in Chapter 16 for more details.
To select a business card:
1. Create an Address Book record that contains the information you want on your
business card.
2. Tap the Menu icon .
3. Tap Record, and then tap Select Business Card.
4. Tap Yes.
To beam a record, business card, or category of records:
1. Locate the record, business card, or category you want to beam.
2. Tap the Menu icon .
3. Tap one of the following on the Record menu:
26
– The Beam command for an individual record
– In Address Book only: Beam Business Card
– Beam Category
Page 37

Beaming data
4. When the Beam Status dialog box appears, point the IR port directly at the IR
port of the receiving handheld.
For best results, handhelds should be between 10 centimeters (approximately 4
inches) and 1 meter (approximately 39 inches) apart, and the path between the
two handhelds must be clear of obstacles. Beaming distance to other Palm OS
handhelds may be different.
5. Wait for the Beam Status dialog box to indicate that the transfer is complete
before you continue working on your handheld.
To beam an application:
1. Open the Applications Launcher.
2. Tap the Menu icon .
3. Tap App, and then tap Beam.
4. Select either Handheld or Card from the Beam From pick list.
5. Tap the application you want to transfer.
Some applications are copy-protected and cannot be beamed. These are listed
with a lock icon next to them.
6. Tap Beam.
7. When the Beam Status dialog box appears, point the IR port directly at the IR
port of the receiving handheld.
8. Wait for the Beam Status dialog box to indicate that the transfer is complete
before you continue working on your handheld.
To receive beamed information:
1. Turn on your handheld.
2. Point the IR port directly at the IR port of the transmitting handheld to open the
Beam dialog box.
3. Select a category for the incoming information, create a new category, or leave
the information unfiled.
27
Page 38

Chapter 3 Entering Data in Your Handheld
4. Tap Yes.
Tips on beaming information
■ You can set the full-screen pen stroke to beam the current entry. See “Pen
preferences” in Chapter 17 for more information.
■ You can draw the Graffiti Command stroke to activate the Command toolbar,
and then tap the beam icon.
■ You can use the Graffiti Command stroke “/ B” to beam the current entry.
Using your computer keyboard
If you have a lot of data to enter, or prefer to use the computer keyboard, you can
use Palm Desktop software or any supported PIM to enter information. You can
then perform a HotSync
computer with the information on your handheld. Many of the applications that
came with your handheld are also available in Palm Desktop software and in most
PIMs, so you don’t need to learn different applications. For more information on
entering data on your computer, refer to the online Help in Palm Desktop software,
the Quick Tour in Palm Desktop software (for Windows users), and the Palm
Desktop Software for the Macintosh User’s Guide on the Palm Desktop software CDROM.
®
operation to synchronize the information on your
Importing data
If you have data stored in computer applications such as spreadsheets and
databases, or if you want to import data from another handheld, you can transfer
the data to your handheld without having to key it in manually. Save the data in
one of the file formats listed below, import it into Palm Desktop software, and then
perform a HotSync operation to transfer the data to your handheld.
Importing data from a Windows computer
Palm Desktop software can import data in the following file formats:
■ Comma delimited (.csv, .txt): Address Book and Memo Pad only
■ Tab delimited (.tab, .tsv, .txt): Address Book and Memo Pad only
■ CSV (Lotus Organizer 2.x/97 Mapping): Address Book only
■ vCal (.vcs): Date Book only
■ v Card (.vcf): Address Book only
■ Date Book archive (.dba)
■ Address Book archive (.aba)
■ To Do List archive (.tda)
28
■ Memo Pad archive (.mpa)
Page 39

Importing data
Archive formats can only be used with Palm Desktop software. Use the archive file
formats to share information with other people who use a Palm OS
®
handheld or
to create a copy of your important Palm Desktop information.
To import data from a Windows computer:
1. Open Palm Desktop software.
2. Click the application into which you want to import data.
3. If you are importing records that contain a field with category names, do the
following:
Select All in the Category box.
Be sure that the same categories that appear in the imported file also exist in the
application. If the categories do not exist, create them now; otherwise, the
records are imported into the Unfiled category.
4. From the File menu, choose Import.
5. Select the file you want to import.
6. Click Open.
If you are importing a vCal or vCard file, skip to step 10. You do not have to
specify which fields correspond to the imported data.
7. To import data into the correct Palm Desktop fields, drag fields in the left-hand
column so that they are opposite the corresponding imported field on the right.
8. If you do not want to import a field, deselect the check box for that field.
9. Click OK.
The imported data is highlighted in the application.
10. To add the imported data to your handheld, perform a HotSync operation.
See Palm Desktop online Help for more information on importing and exporting
data.
Using File Link
The File Link feature enables you to import Address Book and Memo Pad
information to your handheld from a separate external file on your Windows
computer, such as a company phone list. You can configure the File Link feature to
check for changes to the external file when you perform a HotSync operation.
HotSync Manager stores the data in a separate category in Palm Desktop software
and on your handheld.
With File Link, you can import data stored in any of the following formats:
■ Comma-separated (*.csv)
■ Memo Pad archive (*.mpa)
■ Address Book archive (*.aba)
29
Page 40

Chapter 3 Entering Data in Your Handheld
■ Text (*.txt)
For information on how to set up a file link, see the Palm Desktop online Help.
Importing data from a Mac computer
Palm Desktop software can import data from any of the following applications
when you export the data in the appropriate file format:
■ Address Book Plus (text file)
■ Claris Organizer (Palm Desktop software can open these files directly)
■ ClarisWorks (save under new name as ASCII text file)
■ DateBook Pro (text file)
■ DayMaker (text file)
■ Dynodex (text file)
■ FileMaker Pro (tab separated text file)
■ Meeting Maker (text file)
■ Newton running OS 1.0 with Newton Connection Kit:
Names; Date Book Calendar; and Notepad (text file)
■ Now Contact (text file)
■ Now Up-to-Date (text file)
■ QuickDex (text file)
■ TouchBase Pro (text file)
To import data from a Mac computer:
1. Open Palm Desktop software.
2. From the File menu, choose Import.
3. Select the file you want to import.
4. Click Open.
5. If you want to change the order of the fields you’re importing, point to a field,
wait for the cursor to change to a double arrow, and then drag the field to a new
location.
6. If you do not want to import a field, click the arrow between the field names.
7. From the Fields pop-up menu, choose the appropriate field.
30
8. From the Delimiters pop-up menu, choose the appropriate delimiter.
9. Click OK.
10. To add the imported data to your handheld, perform a HotSync operation.
Page 41

See Palm Desktop online Help for more information on importing and exporting
data.
Using Note Pad
In addition to using Graffiti characters and the onscreen keyboard, you can enter
data on your handheld using the Note Pad application. When you use Note Pad,
you write quick notes directly on the handheld screen in your own handwriting.
See Chapter 13 for more information and instructions.
Using a portable keyboard
You can connect a portable keyboard accessory to the universal connector on your
handheld so you can type data directly into your handheld. Portable keyboards are
very helpful when you need to enter large amounts of data quickly and accurately
while you are away from your computer. For additional information about this
optional accessory, go to the web site:
Using Note Pad
http://www.palm.com.
31
Page 42

Chapter 3 Entering Data in Your Handheld
32
Page 43

CHAPTER 4
Using Wireless Features
Your handheld is wirelessly enabled so that you can use it to transmit and receive
information over the airwaves.
To use the wireless features, you must first establish a wireless account and activate
your handheld. See “Setting Up” in Chapter 1 or Getting Started with Palm™ i700
Series Handhelds for details.
After activatation, you can use your wireless account to securely send and receive
business and personal e-mail. See Chapter 5 for details. You can also use it to
™
quickly access Internet information from the MyPalm
additional web clipping applications.
IMPORTANT Whenever you use the wireless features of your handheld, please
observe the guidelines or prohibitions on the use of wireless devices in your current
location. For example, when you are on an airplane, do not turn on your radio at
times when government or airline regulations prohibit the use of cellular phones.
You can, of course, use all other applications of your handheld in accordance with
airline regulations for electronic devices.
mobile portal and
Using the Wireless button
■ Press the Wireless button to open the MyPalm mobile portal where you can
easily access Internet information.
Wireless button
■ Press and hold the Wireless button for one second to access the Wireless
Preferences screen where you can turn the radio on or off.
33
Page 44

Chapter 4 Using Wireless Features
Turning on the radio
To send and receive wireless information and receive wireless notifications, the
internal radio needs to be turned on. Use the Wireless Preferences screen to turn
the radio on or off, or to schedule radio operation.
You can open the Wireless Preferences screen in multiple ways:
■ Press and hold down the Wireless button for one second.
■ Tap the Applications icon , tap the Prefs icon , tap the pick list in the upper-
right corner, and then tap Wireless.
Tap the Wireless Radio pick list and select one of the following options:
Always Off
Always On
Scheduled
Radio remains off until you turn it on.
Radio remains on until you turn it off.
Radio automatically turns on and off at the
hours you select.
TIP Scheduling radio operation helps conserve battery power.
To schedule radio coverage:
1. Tap the Wireless Radio pick list and select Scheduled.
Tap Scheduled
Tap for Start
and End Time
2. Tap the Start Time box.
34
3. Tap the up or down arrows to adjust the hour.
4. Tap the minutes box, and then tap the arrows to adjust the minutes.
5. Tap AM or PM.
6. Tap OK.
7. Tap the End Time box, and then repeat steps 3 through 6.
The radio turns off in multiple ways:
■ Turn off the radio from the Wireless Preferences screen by tapping Always Off.
■ The radio turns off automatically at a preset time when scheduling is used.
■ The radio turns off automatically if the battery is very low.
Page 45

IMPORTANT Turning off the handheld does not turn off the radio. When the
handheld is turned off, the radio can remain on to receive notification of e-mail.
The indicator light shows radio and notification status.
Monitoring the transmission signal
When the radio is turned on, a signal strength bar graph and text message appear
on the Wireless Preferences screen.
Monitoring the transmission signal
Both the bar graph and the number represent the signal strength:
■ The graph represents signal strength as a series of bars. The more bars
displayed, the stronger the signal.
■ The number represents signal strength as a percentage. The higher the number,
the stronger the signal.
If you experience poor reception, often you can improve it simply by moving five
or ten feet in any direction away from the spot where reception is poor. As you
move around to improve reception, you can monitor the increase or decrease in
signal strength.
35
Page 46

Chapter 4 Using Wireless Features
Using the indicator light
The indicator light at the top of the handheld blinks to indicate the following status
levels:
No light
Green light
flashes every
5 seconds
Red light
flashes every
5 seconds
Red light
flashes at
paired
intervals
What is Web Clipping?
Web clipping is a fast and simple way to submit information to, and retrieve
information from, the Internet.
Just as your web browser gives you access to many different web sites, your
handheld gives you access to many different “sites” for web clipping — either
through the MyPalm mobile portal, or downloaded and installed directly on your
handheld.
Radio is off.
Radio is on and transmitter is within range.
Radio is on, but transmitter is out of range. You
need to move to another area to bring the
transmitter within range.
A notification that:
E-mail or other content has been received
Date Book/Note Pad/Clock event alert occurred
A dialog box appears describing the reason for
notification. Acknowledging the notification
turns off the indicator light.
36
These “sites” are called web clipping applications. You access and work with them
just as you would with a handheld application like Address Book.
Web clipping applications give you access to a wide variety of practical Internet
information. Each web clipping application is designed to let you query the
Internet for a specific kind of information.
For example, there are web clipping applications that give you access to traffic and
weather conditions; airline, hotel, and restaurant information; locations of
Page 47

automatic teller machines; driving directions; stock market data; movie listings;
availability of tickets to local events; business and general news; definitions,
spelling, and synonyms of words; and business and residential phone numbers,
addresses, and e-mail addresses.
Web Clipping, not web browsing
It can be impractical to browse the Internet from a small handheld computer and
look at elaborate, animated, graphics-laden web pages on a small screen. As a way
to access Internet information, web clipping offers you the following advantages:
■ Convenience: You can be sitting on a park bench or in the back of a taxi while
accessing information from the Internet.
■ Focus: Web clipping applications focus on retrieving specific, up-to-date
information for the quickest, most efficient experience.
So when you’re near a desktop computer and have some time, you can take
advantage of the elaborate graphics, variety, and many choices offered by a web
site.
What is Web Clipping?
But when you’re in a taxi or a hotel lobby and need information fast, a web clipping
application makes it easy to find the specific information you need.
37
Page 48

Chapter 4 Using Wireless Features
Using the MyPalm mobile portal
The MyPalm application is a mobile portal. Like portals on the Internet that
aggregate other web sites into content channels, the MyPalm mobile portal
aggregates web clipping applications into content channels. Web clipping
applications allow you to access a wide array of Internet information, and view
that information in a format that is easy to read on your handheld screen and
reduces the cost of transmission.
This application is also dynamic. If you selected the option to receive updates to
the MyPalm mobile portal when you installed Palm™ Desktop software, you
automatically receive newer versions of the application when you perform a
HotSync
application you see on your handheld may differ slightly from the images of it
shown in this chapter.
NOTE In the event of a hard reset, the original MyPalm mobile portal will be
restored. The next HotSync operation will replace it with a current version.
To access the MyPalm mobile portal application:
Do one of the following:
®
operation with an active Internet connection. Because of this, the
■ Press the Wireless button on your handheld.
■ Tap the Applications icon and then tap the MyPalm icon .
If the radio is not on, the Radio dialog box appears. Turn on the radio.
Tap to view
Internet content
by channel
Tap to search the Internet
Using mobile portal web clipping applications
The content channels of the MyPalm mobile portal host web clipping applications,
grouped together by categories. These channels provide a convenient way to
access information quickly, even without downloading and installing web clipping
applications on your handheld.
Tap to v ie w
Internet content
by channel
Tap to download
web clipping
applications
38
Page 49

To access Internet content by channel:
1. Tap a content channel, such as Finance.
2. Tap an icon to view the content.
If you want to access more web clipping applications, tap More or More Content
at the bottom of the screen.
Browsing or searching the Internet
Browsing or searching Internet sites directly using a URL is available from the
MyPalm mobile portal. Keep in mind, however, that downloading information
directly from an Internet site has certain limitations: downloading is slow, the
presentation is not optimized for display on the handheld, and the amount of data
transferred is higher, and therefore, more costly. We recommend that you access a
web site using web clipping applications that are modified for use with your
handheld. See “What is Web Clipping?” earlier in this chapter for more
information.
To browse or search the Internet:
1. Tap the search icon on the command bar.
Using the MyPalm mobile portal
2. Enter an URL to browse, or a search term, and then tap Go.
Enter a URL
Enter search
terms
Adding web clipping applications
In addition to the web clipping applications available through the mobile portal,
you can also download and install web clipping applications directly on your
handheld.
You can add web clipping applications to your handheld Applications Launcher in
two ways:
■ Download an application directly using the mobile portal.
Tap to browse
a URL
Tap t o s ea rch
■ Download the application onto your computer desktop and perform a HotSync
operation. This is the same procedure you would use for any other application.
See “Installing add-on applications” in Chapter 6 for details.
39
Page 50

Chapter 4 Using Wireless Features
To add web clipping applications using the MyPalm mobile portal:
1. Tap the web clipping applications icon on the command bar.
2. Tap Download.
3. Do one of the following:
– Enter search terms, and then tap Search.
– Tap New This Week.
– Tap Top 10 Downloa ds.
Your handheld initiates a wireless transaction, and returns results.
4. Tap a web clipping application to see more information about it.
5. Tap Download.
6. Tap Start Download.
7. Tap OK.
Working with web clipping applications
Web clipping applications are designed so that you can use them as you use most
handheld applications. Skills you learn in other applications can also be used to
work in web clipping applications. For example:
■ Tap to select an item or perform an action.
■ Use Graffiti
■ In edit lines, select, cut, copy, and paste text as you do in other applications on
your handheld.
®
writing or the onscreen keyboard to enter text.
Tap a web clipping application
for more information
40
Page 51

■ Elements of the interface that look familiar—edit lines, pick lists, check boxes,
scroll arrows, buttons, menus, etc.—behave in web clipping applications just as
they behave in basic applications like Address Book.
When you install a web clipping application on your handheld, it appears by
default in the Palm.Net
®
category of the Applications Launcher. Most web clipping
application icons are easy to recognize because they usually include the over-theair icon: three short lines radiating from the right side of the application icon. Often
the application icons also have a dark diamond shape as their background:
Common identifiers used in many icons of web clipping applications
After you establish a wireless connection, tapping a command button or other
object that displays the over-the-air icon initiates a wireless transaction.
Examples of the over-the-air icon
Using installed web clipping applications
Working with web clipping applications
Web clipping applications installed on your handheld appear in a list accessible
from the MyPalm mobile portal. They also appear by default in the Palm.Net
category of the Applications Launcher.
To open a web clipping application from the Applications Launcher:
1. Tap the Applications icon .
2. Tap the pick list in the upper-right corner of the screen.
3. Tap Palm.Net.
4. Tap the icon of the web clipping application you want to open.
To open a web clipping application from the MyPalm mobile portal:
1. Tap the web clipping icon from the command bar.
2. Tap a web clipping application in the list.
Once the web clipping application opens, you can query the Internet for
information.
To query the Internet for information:
1. Follow the onscreen directions to specify the information you want from the
Internet.
2. Tap the button or other object that displays the over-the-air icon to submit your
query to the Internet.
The response — your clipping — typically appears within seconds.
41
Page 52

Chapter 4 Using Wireless Features
To stop a wireless transaction:
■ Tap the Stop icon.
Any data that is downloaded to your handheld before you tap the Stop icon
appears onscreen.
Example of web clipping
Stop icon
This example takes you through the process of finding driving directions using the
MapQuest web clipping application.
Example: To find driving directions:
1. Tap the MapQuest icon.
2. Under From, tap the Address field and enter the street address of the place you
are leaving from.
You can use Graffiti writing or the onscreen keyboard to enter data.
3. Complete the From address by entering the city and state.
4. Under To, tap the Address field and enter the street address of the place you
want to go to.
5. Complete the To address by entering the city and state.
6. Tap Get Directions.
Note the over-the-air icon following the word “Directions.” That’s your clue
that the button initiates a wireless transaction.
42
Page 53

Within seconds, your clipping appears. In this example, the clipping needs
more than one screen to display all the directions. Use the scroll bar to see the
rest of the clipping.
Reviewing current queries and clippings
Your handheld stores the queries and clippings of your current session so that you
can review them. Use the Back arrow to review the pages you displayed since you
opened the web clipping application.
Working with web clipping applications
To go back to a previously viewed page:
■ Tap the Back arrow in the web clipping application.
Reviewing stored clippings: History list
You can see a list of stored clippings in the History list and then select the one you
want to review. You can see clippings that pertain only to the web clipping
application that is open. When you open another web clipping application, the
History list changes to display only clippings that you received in that web
clipping application.
To review the History list:
1. Open the web clipping application that has clippings you want to review.
Back arrow
2. Tap the History pick list.
43
Page 54

Chapter 4 Using Wireless Features
3. Select the clipping you want to review.
Saving information from a web clipping application
You can copy the text of a clipping or a page of a web clipping application and
paste it into another application. For example, you can copy driving directions and
paste them into Memo Pad.
To save the text of a clipping or page:
1. Make sure the clipping or page you want to copy is onscreen.
History pick list
You can use the Back arrow or the History list to display the clipping or page
you want.
2. Tap the Menu icon .
3. Tap Edit, and then tap Copy Page.
4. Open one of the handheld applications, such as Memo Pad.
5. Create a new record.
6. Tap the Menu icon.
7. Tap Edit, and then tap Paste.
For example, here are the directions found in the sample procedure above, pasted
into Memo Pad:
44
Keep the following points in mind about the Copy Page command:
■ Copying always starts at the top of the current clipping or page, regardless of
what is displayed onscreen.
Page 55

■ The Copy Page command copies only the first 4,096 bytes (4KB) of data. If the
clipping or page you copy contains more than 4KB of data, your handheld
appends the word “truncated” to the end of the pasted text.
TIP Use the Info command in the Options menu to find out how large a
clipping is.
The Copy Page command does not copy images or icons; table structures; or text
formatting such as bold, italics, and so on.
Sending e-mail from a page
If a web clipping application or clipping gives you the opportunity to reply to an
e-mail address, you can do so.
To send e-mail from a page:
1. Tap the address displayed in the page.
MultiMail
2. Enter the text of your message.
Web Clipping Preferences
®
Deluxe opens. The To: field contains the address to reply to.
3. Do one of the following:
Tap Put in Outbox to file the message in the Outbox. Your message is sent the
next time you open the e-mail application and tap Get & Send.
Tap Cancel, and then tap Yes to save the message in the MultiMail Draft folder.
Tap No to delete the message.
Web Clipping Preferences
The Web Clipping Preferences screen allows you to change the proxy server your
handheld uses to communicate and allows you to prevent the transmission of your
handheld’s ID to Internet content providers.
IMPORTANT If you are working within a corporate environment, do not change these
settings unless your corporate system administrator instructs you to do so.
To view or change Web Clipping Preferences:
1. Tap the Applications icon .
2. Tap the Prefs icon .
3. Tap the pick list in the upper-right corner of the screen.
4. Select Web Clipping.
45
Page 56

Chapter 4 Using Wireless Features
5. Access any of the following options:
Connection
User ID
Server
Warn when
sending personal
information
Displays the name of the current connection, either the Palm
Wireless Service or a network dialup connection. Changes you
make in the Network preferences panel update this field.
Displays your User ID.
Displays the name of the proxy server.
Displays a warning when you submit a query that transmits your
personal information, such as your unique handheld ID. The
warning gives you a choice; you can continue the transaction or
cancel it before any information is sent. If you want to be warned,
select this check box.
To change the proxy server:
1. From the Web Clipping Preferences screen, tap Server.
2. Enter your new Proxy server name or IP address.
3. Tap OK.
Tap here
To restore the initial proxy server setting, tap Default.
Protection of your wireless transactions
Your handheld uses next generation encryption technology. This encryption
technology secures the transmission of sensitive information such as passwords
that are sent over the network. Data is protected both when sent from your
handheld over the network and when coming in from the Internet to your
handheld.
When a wireless transaction is secured, the command button that initiates the
transaction is marked not only by the over-the-air icon, but also by the security
icon.
The security icon indicates that your
transmission is encrypted
46
Page 57

Protection of your wireless transactions
Encryption makes your data unreadable by anyone but the intended recipient.
Encryption is done using a technology used in a wide variety of consumer
handheld devices and enterprise applications.
It’s not unusual to experience a delay of several seconds when a wireless
transaction is being encrypted.
In addition to the protection provided by the encryption technology, individual
web clipping applications may add another layer of protection to their
transactions. For example, a web clipping application may require you to create
and use a password to access sensitive information (for example, your checking
account).
47
Page 58

Chapter 4 Using Wireless Features
48
Page 59

CHAPTER 5
Using MultiMail® Deluxe
MultiMail® Deluxe allows you to securely send and receive business and personal
e-mail directly from your handheld. MultiMail Deluxe provides the following
features:
■ Send and receive e-mail using your Palm™ wireless account.
■ Receive Microsoft Outlook business e-mail forwarded from your desktop, and
reply to it.
■ Wireless notification of new e-mail messages from your Palm wireless account
or your business e-mail account.
■ Filtering capabilities for wireless e-mail notification, and for sorting and
organizing your e-mail based on rules you create.
■ Support for SMTP, POP3, and IMAP4 protocols.
■ Support for up to six e-mail accounts, in addition to your Palm wireless account
and desktop account.
When you registered for your wireless account and activated your handheld, a
mailbox was configured to work with your Palm wireless account. If you installed
®
Palm™ MultiMail
Deluxe Desktop Link, a second mailbox is configured on your
handheld to receive your forwarded business e-mail. You can create mailboxes to
access up to six additional e-mail services. See “Configuring MultiMail Deluxe”
later in this chapter for details.
To open MultiMail Deluxe:
■ Press the MultiMail Deluxe application button on the front panel of your
handheld.
MultiMail Deluxe button
49
Page 60

Chapter 5 Using MultiMail® Deluxe
TIP Holding down the button for two seconds initiates wireless message
retrieval.
Receiving e-mail
1. Tap Get Mail.
If you have e-mail stored in your Outbox, you will see Get and Send.
2. In the Get Mail dialog box, select choices for downloading subjects only or
messages.
3. Tap Details and select choices for retrieving unread mail, attachments, using
filters (explained later in this chapter), and maximum download size.
Tap Details
Tap OK .
4. Tap OK.
The Getting Messages dialog box appears and keeps you updated on
connection status as your e-mail is downloaded.
When the Getting Messages dialog box disappears, another dialog box appears
that tells you the number of new e-mail messages.
5. Tap OK.
50
Page 61

Reading e-mail
Receiving e-mail
A list of your e-mail appears in the Inbox.
Shows unread/total
messages
Icons indicate
whether a message
or subject has been
downloaded, or has
attachments
To read e-mail, tap the item in the Inbox or another folder. The e-mail appears on
the screen.
Tap to move
message into a
different folder
Viewing other folders
When you receive e-mail, it appears in the Inbox folder. You can easily switch to
any other folder to view its contents.
Tap to view shortened
header
View complete header
51
Page 62

Chapter 5 Using MultiMail® Deluxe
1. Tap the folders pick list in the upper-right corner of the screen.
2. Tap the folder you want to view.
Moving e-mail between folders
You can move one or multiple e-mail messages between folders.
To move one e-mail:
1. Tap the folder that contains the e-mail message you want to move.
2. Tap the icon to the left of the message, and then tap Move To.
3. The folders pick list appears.
4. Tap the folder that you want to move the e-mail to.
To move multiple e-mail messages:
1. Tap the folder that contains the e-mail messages you want to move.
2. Select the messages to move by tapping to the left of each message icon.
A check mark appears next to selected messages.
3. Do one of the following:
Tap the account name, and then tap Move To on the Message menu.
Tap the Menu icon , and then tap Move To on the Message menu.
Tap a message icon next to a selected message, and then tap Move To on the pick
list.
The Folders pick list appears.
4. Tap the Folders pick list, and select a destination folder.
5. Tap OK.
52
Page 63

Sending e-mail
Receiving e-mail
To start a new e-mail:
1. Tap New.
Tap N e w
2. Tap the Subject field and enter the subject of your e-mail.
Address your e-mail by entering the address until recognized or looking it up
in the Address Book.
To enter the address:
1. Tap the To field and enter the address.
If you want to edit an e-mail address that is longer than the line provided in the
®
New Message screen, you need to use the Graffiti
navigation strokes for
moving the cursor left and right.
If you add addresses to the same field, separate them with a comma and a space.
2. To send copies, tap cc: or bcc: and enter the address.
Copies (cc:) allow recipients see the addresses of the other recipients, but
addresses in the blind copies (bcc:) field are hidden from all other recipients.
TIP Smart Addressing will complete an address for you. Just type in the first
few characters of a name in Address Book with an associated e-mail address.
When the e-mail address appears, use a comma to accept it or use the scroll
buttons to see the previous or next e-mail address match.
To add an address from Address Book:
1. Tap the word To.
2. On the Recipient List screen, tap Lookup.
53
Page 64

Chapter 5 Using MultiMail® Deluxe
3. On the E-mail Lookup screen, tap the address you want, and then tap Add.
4. Repeat steps 2 and 3 to add more addresses.
5. Tap Done.
6. To enter an address in the cc: or the bcc: field, tap the field name, and follow the
steps given for the To field.
To compose and send an e-mail:
1. Tap the area below the Subject line and enter the text of your e-mail.
To access the editing features available on the Edit menu, tap the Menu icon .
2. Tap one of the following to send the e-mail:
Outbox
Send
Adding attachments
You can attach and send files from your Palm wireless e-mail account. Attached
files can be no larger than 3KB. The following files are supported as attachments:
■ v Card (.vcf)
■ vCal (.vcs)
■ text (.txt)
■ PQA (.pqa)
■ PRC (.prc)
Stores e-mail in the Outbox. This allows you to compose
e-mail offline and then send all e-mail during one connection
with the server. To send your e-mail later, go to the Outbox
and tap Get & Send. MultiMail Deluxe initiates the connection
to the mail server and delivers all of the e-mail in the Outbox.
Sends the e-mail immediately.
54
■ PDB (.pdb)
Page 65

To attach a file to a message:
1. Tap the Menu icon .
2. Tap Options, and then tap Add Attachments.
3. Tap the attachments pick list, and select the file type.
All files of the selected type appear in the Select box.
4. Tap the file to attach, and then tap Add.
The selected file appears in the Attachments box.
Receiving e-mail
5. Tap Done.
Completing drafts
If you are composing an e-mail and exit MultiMail Deluxe before tapping Outbox,
Send, or Cancel, the draft e-mail is automatically moved to the Drafts folder. To
finish editing the e-mail, tap the folders pick list and select Drafts. Select the e-mail
you wish to complete or edit, and tap Edit. You can also delete the e-mail.
Replying to or forwarding e-mail
1. Tap the folders pick list and select the folder that contains the e-mail.
2. Tap the item in the list of e-mail.
3. In the View window, tap Reply.
4. In the Reply Options dialog box, select choices for replying to the sender, all e-
mail recipients, forwarding to new recipients, and including original message
text.
5. Tap OK.
6. The e-mail is addressed and you can enter your message.
55
Page 66

Chapter 5 Using MultiMail® Deluxe
7. Enter a reply.
8. Tap Outbox or Send to send the message.
Deleting e-mail
You can delete one or more e-mail messages at a time.
To delete one e-mail:
1. Tap the folders pick list and select the folder that contains the e-mail.
2. Tap the icon next to the message you want to delete.
3. Tap Delete.
4. (Optional) Select the check box to delete the message on the server.
5. Tap OK.
IMPORTANT If you delete a message on the server, you cannot retrieve it and view
it again later.
To delete selected e-mail:
1. Tap the folders pick list and select the folder that contains the e-mail.
2. Select the e-mail that you want to delete.
3. Do one of the following
Tap the account name, and then tap Delete.
56
Tap the icon next to a selected e-mail message, and then tap Delete on the pick
list.
Page 67

Emptying trash
Receiving e-mail
Tap the Menu icon , and then tap Delete.
4. (Optional) Select the check box to delete the message on the server.
5. Tap OK.
IMPORTANT If you delete a message on the server, you cannot retrieve it and view
it again later.
Deleted e-mail accumulates in the Trash folder and takes up space on your
handheld. To increase memory, do the following:
1. Tap the Menu icon .
2. Tap Message, and then tap Empty Trash.
Using the Message menu
You can use the Message menu to further manipulate your e-mail, and you can
select from the following options:
Select All
Deselect All
Selects all e-mail in the current mail folder.
Deselects all e-mail in the current mail folder.
Get Message
Move To
Connects to the mail server if needed, and downloads all bodies for
selected e-mail that need to be downloaded.
Moves selected e-mail to the folder you specify. See “Moving e-mail
between folders” earlier in this chapter for details.
57
Page 68

Chapter 5 Using MultiMail® Deluxe
Mark Read
Mark Unread
Delete
Empty Trash
Marks all selected e-mail as read. Read messages appear in plain
text.
Marks all selected e-mail as unread. Unread messages appear in
bold text.
Deletes all selected e-mail in the current folder.
Deletes all e-mail from the trash.
Configuring MultiMail Deluxe
If you have activated your handheld and established a Palm wireless account, a
Palm wireless e-mail account is already configured in MultiMail Deluxe. If you
installed Palm MultiMail Deluxe Desktop Link, a business e-mail account is
configured to receive your forwarded business e-mail.
You can configure up to six additional e-mail accounts. Each account can use one
of the following connection methods:
Palm Wireless
Synchronize Only
E-mail is sent and received using Palm wireless service.
E-mail is exchanged between your handheld and desktop
computer when you perform a HotSync operation.
Modem/Dialup
Before you begin
If you are setting up an e-mail account to use with a well known Internet service
provider, MultiMail Deluxe will automatically set many of the required settings
after you select your mail service. For other e-mail accounts, it will be helpful to
have the following information, which is available from your mail server
administrator:
■ The protocol used for incoming mail
■ The name of the incoming mail server
■ The name of the outgoing mail (SMTP) server
■ Your e-mail address
■ The login script (if any) you need for connecting to your ISP or mail server
Using Account Setup
Account Setup guides you through the process of adding a mailbox.
E-mail is sent and received using a modem accessory.
58
Page 69

To open account setup:
1. Tap the Menu icon .
2. Tap Accounts.
3. Tap Account Setup.
4. Tap the Account pick list, and then tap New Account.
To add a mailbox:
1. Tap Next.
2. Enter a name for the mailbox you are creating.
Configuring MultiMail Deluxe
3. Tap Next.
4. Tap the Mail Service pick list and select the service to which you are connecting.
Select Other if your ISP is not listed.
TIP When you select an ISP from the Mail Service pick list, MultiMail Deluxe
automatically completes many of the required settings.
5. Tap the Protocol pick list and select the protocol used by this mail service, either
POP or IMAP.
59
Page 70

Chapter 5 Using MultiMail® Deluxe
6. Tap Next.
7. Tap the Connection pick list and select one of the following connection
methods:
Synchronize Only
E-mail is exchanged between your handheld and desktop
computer when you perform a HotSync operation.
Modem/Dialup
Palm Wireless
E-mail is sent and received using a modem accessory.
E-mail is sent and received using Palm wireless service.
The next screens in the setup process will differ based on the selected connection
method.
To complete setup for a Modem/Dialup connection:
1. Tap Next.
2. Tap Network Prefs to adjust network settings. See “Network preferences and
TCP/IP software” in Chapter 17 for details about configuring network settings.
60
3. Tap Modem/Phone Prefs to adjust these settings. See “Connection preferences”
in Chapter 17 for details about configuring modem or phone settings.
When you finish adjusting these settings, tap Done to return to the Account
setup process where you will enter mail server settings.
Page 71

Configuring MultiMail Deluxe
To enter mail server settings:
1. Tap Next.
2. Enter the name of your outgoing mail server, and then enter your name and
your full e-mail address.
3. (Optional) Tap Next and enter a signature to attach to your outgoing mail.
4. (Optional) Tap More to set options for receiving replies at a different e-mail
address and sending blind (bcc:) copies to other recipients.
5. Tap OK.
6. Tap Next.
7. Tap OK.
8. Enter the name of your incoming mail server and your username (not your
entire e-mail address).
9. Tap the Mail Server Password box and enter a password.
10. Tap OK.
The next screen in the account set up process differs based on the protocol used
by the mail service.
NOTE If you are creating a POP account that connects to your desktop using
Synchronize only, you will see the same screen used for IMAP accounts.
61
Page 72

Chapter 5 Using MultiMail® Deluxe
To set mail retrieval server options for a POP account:
1. Tap Next.
2. If you want to view incoming mail later on your desktop, tap Leave mail on
server.
3. If you want only unread mail to be downloaded to your handheld, tap Get
unread mail ONLY.
4. Tap More.
5. If you want to limit the maximum size of an incoming e-mail message, tap the
maximum size field and enter the size in kilobytes.
6. Tap the check box to delete messages on the server when they are deleted in
MultiMail Deluxe.
7. Tap OK.
8. Tap Finish.
9. Tap Done.
To set mail retrieval server options for an IMAP account:
1. Tap Next.
2. If you want only unread mail to be downloaded to your handheld, make sure
Get unread mail ONLY is selected.
62
3. Tap More.
4. If you want to limit the maximum size of an incoming e-mail message, tap the
maximum size field and enter the size in kilobytes.
Page 73

5. Tap the check box to delete messages on the server when they are deleted in
MultiMail Deluxe.
6. Tap OK.
7. Tap Finish.
8. Tap Done.
Editing e-mail accounts
From time to time, you may need to alter information about an e-mail account.
To select an account to edit:
1. Tap the menu icon .
2. Tap Options.
3. Tap Servers.
4. Tap the Account pick list, and then tap Edit Accounts.
All configured e-mail accounts appear in a list.
Configuring MultiMail Deluxe
5. Tap the name of the account you want to change, and then tap OK.
To change the connection type:
1. Tap the Connection pick list and select Synchronize Only, Modem/Dialup, or
Palm Wireless.
To change your username or password:
1. Tap the username field and enter a new username.
Your username is typically the first part of your e-mail, which appears before
the @ symbol.
2. Tap the Password box and enter your password.
3. Tap OK.
63
Page 74

Chapter 5 Using MultiMail® Deluxe
To change incoming mail server settings:
1. Tap Server.
2. Tap Incoming Mail.
3. In the Server field, enter the name of your incoming mail (POP or IMAP) server.
4. Tap the appropriate protocol for this server: POP or IMAP.
5. Tap OK.
To set additional incoming mail options:
1. Tap More.
2. Set options for getting leaving mail on the server, retrieving unread mail only,
and maximum message size.
3. Tap OK.
To set outgoing mail server settings:
1. Tap Outgoing Mail in the Server Settings dialog box.
2. In the Server field, enter the name of your outgoing (STMP) mail server.
3. Enter your e-mail address.
4. Enter your name.
64
Page 75

Configuring MultiMail Deluxe
To set additional outgoing mail options:
1. Tap More and set additional options for outgoing mail.
2. Set additional options for outgoing mail:
Reply To Address
BCC
Port Number
Use ESTMP
3. Tap OK.
Deleting an account
1. Tap the menu icon .
2. Tap Options.
3. Tap Servers.
4. Tap the Account pick list, and then tap Edit Accounts.
All configured e-mail accounts appear in a list.
If you want replies sent to a different e-mail address, tap the
check box and enter an alternative address.
Tap the check box and enter an e-mail address to which a blind
carbon copy will be sent.
If your SMTP server uses a port number other than 25, change
the Port number.
Select this option only when your System Administrator
advises you to do so.
5. Tap the name of the account you want to delete, and then tap Delete.
6. Tap Yes in the Delete Confirmation dialog box to delete the account and all
associated e-mail messages.
7. Tap OK.
®
After you perform the next HotSync
operation, the memory associated with an
account and its messages will be released.
65
Page 76

Chapter 5 Using MultiMail® Deluxe
Setting IMAP Options
If you have created an IMAP e-mail account that connects to a server by a modem/
dialup connection, you can set additional options.
To set options for an IMAP modem/dialup account:
1. Tap the menu icon .
2. Tap Options.
3. Set the following options:
Folder Sync
Create Mailbox
Rename Mailbox
Delete Mailbox
Disconnect
Setting notification options
Turn notification on or off, or set filters for your Palm wireless e-mail account so
that you control the e-mail messages that are delivered to and trigger an alert from
your handheld.
To set notification options:
1. Tap the menu icon .
2. Tap Options.
The IMAP protocol allows you to perform certain operations
while disconnected from your server, then update the server
with changes at a later time. Choose Folder Sync to update the
server with changes on your handheld, and to have your
handheld updated with changes from the server.
Creates a new mailbox on the server.
Renames the mailbox on the server.
Deletes the mailbox on the server.
Disconnects from the server.
66
3. Tap Notification.
Page 77

4. Select one of the following options:
Setting notification options
On
Off
Filter
5. Tap the Notification Sound pick list and select either the System sound or None.
With the sound turned off, you can still receive alerts from the indicator light
and the vibrator.
Using notification filters
For your Palm wireless e-mail account only, use notification filters to limit the email messages that are delivered to and trigger an alert from your handheld.
For example, when you travel, you may want to receive and be alerted only to email regarding a particular project. You can create a filter that permits delivery and
notification only when e-mail meets these conditions.
To create a notification filter:
1. Tap Filter.
You are notified of all new mail whenever wireless coverage is
enabled.
You receive no notifications.
Allows you to set conditions that e-mail must meet in order to
trigger an alert.
2. Tap Edit.
3. Use the If the pick lists to create criteria for the notification filter.
The two pick lists and the edit line combine to create a statement that identifies
the type of e-mail that triggers notification. For example, a filter might read, “If
the [From] [Contains] mweston@example.com, Then Notify Me.”
You can also use the And button to create a more complex statement, such as “If
the [From] [Contains] mweston@example.com, And if the [Subject] [Starts with]
Apollo Project, Then Notify Me.”
When you use this notification filter, only e-mail matching these conditions
prompts a notification alert on your handheld.
To pick list
Select the header field with the information contained in the
edit line: To, From, Subject.
67
Page 78

Chapter 5 Using MultiMail® Deluxe
Creating filters
Filters provide efficient ways to manage e-mail retrieval and storage. Filters may
be used differently based on the e-mail account to which you attach a filter.
Palm wireless e-mail account: When you initiate a Get Mail or a Get and Send
transaction, filters can be used to define which e-mail is downloaded to your
handheld.
Any POP or IMAP e-mail account: When you initiate a Get Mail or a Get and Send
transaction, filters can be used to define which e-mail is downloaded to your
handheld.
Business e-mail account: Filters can be used to determine which e-mail is
forwarded from your desktop to your handheld.
Contains pick
list
Edit line
ADD button
Select a filter action: Contains, Starts with, Does NOT Contain.
Enter the text that must be found in the header field. For
example, if you want to be notified of only e-mail whose
Subject is the Apollo Project, enter “Apollo Project.”
Use to further refine the notification criteria by linking two
conditions together.
For any e-mail account, filters allow you to sort incoming e-mail into a folder or
mailbox you identify, to make reading faster and easier.
For example, you may want to file e-mail about sales meetings into a specific
folder. You can create a filter that automates this action, so that whenever you
receive an e-mail about sales meetings, it is immediately sent to the sales folder.
To create a filter:
1. Tap the Menu icon .
2. Tap Options, and then tap Filters.
3. Tap New.
4. Tap the Filter name field and enter a short description of the filter.
68
5. Use the If the pick lists to create criteria for the filter.
Page 79

Creating filters
The three pick lists and the edit line combine to create a statement that identifies
the type of e-mail and what you want to do with the e-mail. For example, a filter
might read, “If the [Subject] [Contains] sales meeting, Then retrieve and move
to [Sales].” When you use this filter to sort incoming e-mail, any e-mail
containing sales in the subject line is filed in the Sales folder.
To pick list
Contains pick
list
Edit line
Inbox pick list
6. Tap OK.
Select the header field with the information contained in the
edit line: To, From, Subject, cc, Date, Size.
Select a filter action: Contains, Starts with, Does NOT Contain.
Enter the text that must be found in the header field. For
example, if you want to sort e-mail whose Subject is Sales,
enter “Sales.” If you enter more than one address, separate
them with a comma.
Select the folder or mailbox into which you want your filtered
e-mail to go.
The filter appears in the Filters list.
7. Tap OK.
By default, a filter is selected for use and affects all subsequent downloads of email until you deselect it. More than one filter can be in effect at once. Before you
download e-mail, be sure the filters you want are turned on and the ones you don’t
want are turned off.
To turn a filter on or off:
1. Tap the Menu icon .
2. Tap Options, and then tap Filters.
The Filters dialog box appears, listing the filters you created.
3. Tap the pick list in the upper-left, and select Connected or Synchronize.
The Connected setting applies a filter to a wireless or modem transaction.
The Synchronize setting applies a filter to a HotSync operation.
69
Page 80

Chapter 5 Using MultiMail® Deluxe
4. Tap the filter check boxes to select those filters you want to work for a
subsequent e-mail transaction.
A check mark next to a filter means that it is selected. To remove a check mark,
tap the check box. To add a check mark, tap an empty check box.
5. Tap OK.
To edit or delete a filter:
1. Tap the Menu icon .
2. Tap Options, and then tap Filters.
The Filters dialog box appears, listing the filters you created.
3. Tap the name of the filter.
The Filter Editor dialog box appears.
4. Do one of the following:
To edit the filter, revise your selections in the pick lists and revise the text in the
edit line. Tap OK.
To delete the filter, tap Delete, and then tap Yes to confirm deletion.
5. Tap OK.
Setting MultiMail Deluxe Preferences
Preferences allow you to set preferences for how MultiMail Deluxe handles your
e-mail.
To set General preferences:
1. Tap the Menu icon .
2. Tap Options.
3. Tap Preferences.
70
4. Select preferences:
Get
Select either Subjects Only or Entire Message.
Page 81

Setting MultiMail Deluxe Preferences
Ask Every Time
Select if you want to choose subjects only or entire messages
each time you retrieve e-mail.
Confirm
Deletions
Delete Msgs on
Server
Download
Attachments
Signature
Displays a confirmation dialog before executing e-mail
deletions.
Deletes messages on the server that you have deleted on your
handheld.
Enables files attached to e-mail to be downloaded to your
handheld.
Allows you to attach a default signature to all your outgoing
messages. Tap Signature, and then enter information in the
signature dialog box.
To set Advanced Preferences:
1. Tap Advanced.
2. Select preferences:
Enable Smart
Addressing
Allows MultiMail Deluxe to type ahead and complete an e-mail
address when recognized.
The rest of the settings only appear for accounts that use a modem/dialup
connection:
Timeout
AutoDisconnect
Disconnect on
Exit
Sets the number of seconds that MultiMail Deluxe tries to
connect before timing out. If you are using a wireless modem
or an adapter with a cellular phone, this value should be
greater than 45 seconds.
To change, tap the Timeout field and enter a new value.
Automatically disconnects your remote connections after each
command. This feature is especially useful for wireless
modems.
Disconnects from the modem only after you leave MultiMail
Deluxe. This feature is an alternative to AutoDisconnect.
71
Page 82

Chapter 5 Using MultiMail® Deluxe
Modem Wait
To set System Preferences:
1. Tap System.
2. Select a preference:
Backup ALL
Databases
If you have a wireless modem and want to give the modem a
few seconds to initialize itself, tap and enter a number of
seconds for the wait. The typical setting for a wireless modem
is 3, and the typical setting for most normal modems is 0.
Enables backing up the e-mail database. Deselecting this
option allows you to increase the speed of HotSync operations
by not backing up the mail database. Because in most cases
your mail is on your server, you do not need to back up your
e-mail database from your handheld.
3. Tap OK.
72
Page 83

This chapter explains how to open and switch between applications on your
handheld, how to change application settings so they are personalized to your
work methods, and how to categorize applications so you view them in related
groups.
Opening applications
You can use the Applications Launcher to open any application installed on your
handheld or an expansion card. You can also open Date Book, Address Book, the
MyPalm™ mobile portal, and MultiMail
the front panel of your handheld.
Applications
Launcher
CHAPTER 6
Working with Applications
®
Deluxe with the application buttons on
Date Book
Address Book
In addition to providing a way for you to open applications, the Applications
Launcher displays the current time, battery level, and application category.
MultiMail
Deluxe
Wireless
To open an application on your handheld:
1. Tap the Applications icon .
2. Tap the icon of the application that you want to open. If you have many
applications installed on your handheld, tap the scroll bar to see all of your
applications.
73
Page 84

Chapter 6 Working with Applications
TIP To find an application quickly, you can write the Graffiti
first letter of its name. The Applications Launcher scrolls to the first application
with a name that begins with that letter.
Opening expansion card applications
When an expansion card is properly seated in the expansion card slot, the
Applications Launcher switches to the card and displays its contents. The pick list
in the upper-right corner of the screen displays the name of the card.
To open an application on an expansion card:
■ Tap the icon of the application that you want to open.
®
character for the
Switching between applications
When working with any application, tap the Applications icon or press an
application button on the front panel of your handheld to switch to another
application. Your handheld automatically saves your work in the current
application and displays it when you return to that application.
When you use an expansion card, your handheld creates and displays a new
category that matches the name of the expansion card. You can easily switch
between applications installed on your handheld and on the expansion card.
To switch to an expansion card:
1. Tap the pick list in the upper-right corner.
2. Tap the category item that matches the name of the expansion card.
74
Page 85

Categorizing applications
The category feature enables you to manage the number of application icons that
appear onscreen in the Applications Launcher. You can assign an application to a
category and then display a single category or all your applications.
To categorize an application:
1. Tap the Applications icon .
Categorizing applications
2. Tap the Menu icon .
3. Tap Category on the App menu.
4. Tap the pick list next to each application to select a category.
TIP To create a new category, tap Edit Categories from the pick list. Tap New,
enter the category name, and then tap OK to add the category. Tap OK.
5. Tap Done.
To display applications by category:
1. Tap the Applications icon .
2. Do one of the following:
– Tap the Applications icon repeatedly to cycle through all your categories.
– Tap the pick list in the upper-right corner of the screen and select the
category you want to display.
75
Page 86

Chapter 6 Working with Applications
Changing the Applications Launcher display
By default, the Applications Launcher displays each application as an icon. As an
alternative, you can choose to show a list of applications. You can also choose to
view the same category of applications each time you open the Applications
Launcher.
To change the Applications Launcher display:
1. Tap the Applications icon .
2. Tap the Menu icon .
3. Tap Options, and then tap Preferences.
4. Tap the View By pick list and select List.
5. Tap OK.
To open the Applications Launcher to the last opened category:
1. Tap the Applications icon .
2. Tap the Menu icon .
3. Tap Options, and then tap Preferences.
4. Tap the Remember Last Category check box to select it.
5. Tap OK.
Copying applications to an expansion card
You can copy applications from your handheld to an expansion card, or from an
expansion card to your handheld.
To copy an application to an expansion card:
1. Tap the Applications icon .
2. Tap the Menu icon .
76
Page 87

Using menus
3. Tap Copy on the App menu.
4. Select the card name from the Copy To pick list.
5. Select Handheld from the From pick list.
6. Tap an application to copy.
7. Tap Copy.
8. Tap Done.
You can install applications to a card that is seated in the expansion card slot
®
during a HotSync
operation; see “Installing add-on applications” later in this
chapter for details.
Using menus
NOTE If you copy applications between your handheld and multiple
expansion cards, and then attach a card with a copied application to a Card
Reader/Writer, you may notice that the copied application’s filename has been
changed to the name of a database file it contains. You will only see this if you
use your cards with a Card Reader/Writer.
Menus on your handheld are easy to use. Once you have mastered them in one
application, you can use them the same way in all other applications.
The menus of each application are illustrated in the chapter on that application.
To open the menu bar:
1. Open an application (such as Memo Pad).
2. Do one of the following:
– Tap the Menu icon .
77
Page 88

Chapter 6 Working with Applications
– Tap on the inverted title area at the top of the screen.
Tap the title area
Tap the Menu icon
In this example, three menus are available: Record, Edit, and Options. The Record
menu is selected and contains the commands New Memo, Delete Memo, and Beam
Memo.
Choosing a menu
After you open the menu bar for an application, tap the menu that contains the
command you want to use.
The menus and menu commands that are available depend on the application that
is currently open. Also, the menus and menu commands vary depending on which
part of the application you’re currently using. For example, in Memo Pad, the
menus are different for the Memo list screen and the Memo screen.
Graffiti menu commands
Most menu commands have an equivalent Graffiti Command stroke, which is
similar to the keyboard shortcuts used to execute commands on computers. The
command letters appear to the right of the command names.
Menu commands
Command letters
Draw the Command stroke anywhere in the Graffiti area. When you draw the
Command stroke, the Command toolbar appears just above the Graffiti writing
area to indicate that you are in Command mode.
Command
78
Page 89

Choosing application preferences
CutUndo Copy Paste Beam Delete
The command toolbar displays context sensitive menu commands for the current
screen. For example, if text is selected the menu icons displayed may be undo, cut,
copy, and paste. Tap on an icon to select the command, or immediately write the
corresponding command letter for an appropriate command in the Graffiti writing
area.
For example, to choose Select All in the Edit menu, draw the Command stroke,
followed by the letter “s.”
Command mode is only active for a short time, so you must tap an icon or write
the command letter immediately to choose the menu command.
Choosing application preferences
You can set options that affect an entire application in the application’s Preferences
dialog box.
To change preferences for an application:
1. Open an application.
2. Tap the Menu icon .
3. Tap Options, and then tap Preferences.
NOTE Not all applications have a Preferences command.
4. Make changes to the settings.
5. Tap OK.
Common tasks
The tasks described in this section use the term “records” to refer to an individual
item in any of the applications: a single Date Book event, Address Book entry, To
Do List item, Note Pad note, or Memo Pad memo.
79
Page 90

Chapter 6 Working with Applications
Creating records
You can use the following procedure to create a new record in Date Book, Address
Book, To Do List, Note Pad, and Memo Pad.
To create a record:
1. Select the application in which you want to create a record.
2. Tap New.
3. In Date Book only: Select start and end times for your appointment and tap OK.
4. Enter text for the record.
5. (Optional) Tap Details to select attributes for the record. (Not available in Note
Pad.)
6. In Address Book, Note Pad, and Memo Pad only: Tap Done.
There’s no need to save the record because your handheld saves it automatically.
Editing records
After you create a record, you can change, delete, or enter new text at any time.
Two screen features tell you when your handheld is in editing mode:
■ A blinking cursor
■ One or more dotted edit lines
Blinking cursor
Edit line
NOTE In Note Pad you can write anywhere on the screen. So, you will not see
an edit line or blinking cursor.
Entering text
For information on how to enter text using Graffiti writing, the onscreen keyboard,
or the keyboard attached to your computer, see Chapter 3. For information on
entering text in Note Pad, see Chapter 13.
80
Edit menu
The Edit menu is available with any screen where you enter or edit text. In general,
commands available in the Edit menu apply to text that you select in an application.
Page 91

Common tasks
To select text in an application:
1. Tap the beginning of the text that you want to select.
2. Drag the stylus over the text to highlight it (in black).
NOTE You can also double tap to select a word, or triple tap to select a line of
text. You can also drag across the text to select additional words, or drag down
to select a group of lines.
The following commands may appear in an Edit menu:
Undo
Cut
Copy
Paste
Select All
Keyboard
Graffiti Help
Reverses the action of the last edit command. For example, if you
used Cut to remove text, Undo restores the text you removed.
Undo also reverses deletions done by using backspace.
Removes the selected text and stores it temporarily in the memory
of your handheld. You can paste the text you cut into another area
of the current application or into a different application.
Copies the selected text and stores it temporarily in the memory of
your handheld. You can paste the text that you copy into another
area of the current application or into a different application.
Inserts the text that you cut or copied at the selected point in a
record. The text you paste replaces any selected text. If you did not
previously cut or copy text, Paste does nothing.
Selects all of the text in the current record or screen. This enables
you to cut or copy all of the text and paste it elsewhere.
Opens the onscreen keyboard. When you finish with the onscreen
keyboard, tap Done.
Opens screens that show all the Graffiti character strokes. Use this
command anytime you forget a stroke for a character.
NOTE In Note Pad, the Edit menu appears only when the title of a note is selected.
To edit a note in Note Pad, use the eraser tool to remove lines, and the pen tool to add
lines.
Deleting records
To delete a record:
1. Select the record you want to delete.
2. Tap the Menu icon .
3. Tap Record, and then tap the Delete command:
Date Book: Delete Event
Address Book: Delete Address
81
Page 92

Chapter 6 Working with Applications
To Do List: Delete Item
Note Pad: Delete Note
Memo Pad: Delete Memo
A confirmation dialog box appears. If you want to save a copy of the deleted
item to an archive file in Palm™ Desktop software, be sure that the check box is
checked. If you don’t want to save a copy, tap the check box to remove the check.
(The archive check box does not appear in Note Pad because you can’t archive
Note Pad notes.)
4. Tap OK.
If you choose to save a copy of the selected item, your handheld transfers it to the
archive file on your desktop the next time you perform a HotSync operation.
Other ways to delete records
You can also delete records in the following ways:
■ In Date Book, Address Book, To Do List, and Memo Pad, open the Details dialog
box for the record, tap Delete, and then tap OK.
Purging records
■ In Note Pad, open the note you want to delete, and then tap Delete.
■ Delete the text of the record.
NOTE In Date Book, you can choose to delete the text of the current repeating
event, current and future events, or all instances of that event.
Over time, as you use Date Book and To Do List, you’ll accumulate records in these
applications that have outlived their usefulness. For example, events that occurred
months ago remain in the Date Book, and To Do List items that you marked as
completed remain in the list.
All these outdated records take up memory on your handheld, so it’s a good idea
to remove them by using Purge. If you think Date Book or To Do List records might
prove useful later, you can purge them from your handheld and save them in an
archive file on your computer.
Purging is not available in Address Book, Note Pad, or Memo Pad; you must delete
outdated records manually from these applications.
To purge records:
1. Open the application.
82
2. Tap the Menu icon .
3. Tap Record, and then tap Purge.
A confirmation dialog box appears.
Page 93

Date Book: Tap the pick list and select how old a record must be to be purged.
Purge deletes repeating events if the last of the series ends before the date that
you purge records.
Date Book, To Do List: If you want to save a copy of the purged records to an
archive file on your desktop, be sure that the check box is checked. If you don’t
want to save a copy, tap the check box to remove the check box.
4. Tap OK.
If you chose to save a copy of the purged records, your handheld transfers them to
an archive file on your desktop the next time you perform a HotSync operation.
NOTE Purging does not happen automatically. You must tap the command to make
it happen.
Categorizing records
Categorize records in the Address Book, To Do List, Note Pad, and Memo Pad
applications so that they are grouped logically and are easy to review.
When you create a record, your handheld automatically places it in the category
that is currently displayed. If the category is All, your handheld assigns it to the
Unfiled category. You can leave an entry as Unfiled or assign it to a category at any
time.
Common tasks
System-defined and user-defined categories
By default, your handheld includes system-defined categories, such as All and
Unfiled, and user-defined categories, such as Business and Personal.
You cannot modify the system-defined categories, but you can rename and delete
the user-defined categories. In addition, you can create your own user-defined
categories. You can have a maximum of 15 user-defined categories in each
application.
When you have an expansion card properly seated in the expansion card slot, the
last item in the category pick list will be the name of the expansion card. You
cannot otherwise categorize applications that reside on an expansion card.
Address Book contains the QuickList user-defined category, in which you can store
the names, addresses, and phone numbers you might need in emergencies (doctor,
fire department, lawyer, etc.).
The illustrations in this section come from Address Book, but you can use these
procedures in all the applications in which categories are available.
To move a record into a category:
1. Select the record you want to categorize.
2. In Address Book only: Tap Edit.
3. Tap Details.
4. Tap the Category pick list to display the list of available categories.
83
Page 94

Chapter 6 Working with Applications
5. Select the category for the record.
6. Tap OK.
NOTE In Address Book, Note Pad, and Memo Pad you can tap the category
name in the upper-right corner of the screen and select a new category for the
item.
To display a category of records:
1. Tap the category pick list in the upper-right corner of the list screen.
Tap here
84
NOTE In the Date Book Agenda view, the pick list is in the upper right of the To
Do list.
2. Select the category you want to view.
The list screen now displays only the records assigned to that category.
TIP Pressing an application button on the front panel of the handheld toggles
through all the categories of that application.
Page 95

Common tasks
To define a new category:
1. Tap the category pick list in the upper-right corner of the screen or list.
Tap he r e
2. Tap Edit Categories.
3. Tap New.
4. Enter the name of the new category, and then tap OK.
5. Tap OK.
You can assign any of your records to the new category.
To rename a category:
1. Tap the category pick list in the upper-right corner of the screen or list.
2. Tap Edit Categories.
3. Select the category that you want to rename, and then tap Rename.
85
Page 96

Chapter 6 Working with Applications
4. Enter the new name for the category, and then tap OK.
5. Tap OK.
TIP You can group the records in two or more categories into one category by
giving the categories the same name. For example, if you change the name of
the Personal category to Business, all records formerly in the Personal category
appear in the Business category.
Finding information
Your handheld offers several ways to find information quickly:
■ All applications that reside on your handheld: Find locates any text that you
specify, always starting with the current application. However, Find does not
search through applications on expansion cards.
■ Date Book, To Do List, Memo Pad: Phone Lookup displays the Address list
screen and lets you add the information that appears in this list to a record.
■ Address Book: The Look Up line lets you enter the first letters of a name to scroll
immediately to that name.
Looking up Address Book records
When working with Address Book, the scroll button on the front panel of the
handheld makes it easy to navigate among your address entries.
■ In the Address list screen, the scroll button moves up or down an entire screen
of records. If you hold down the scroll button, you accelerate the scrolling and
display every third screen.
■ In the Address view screen, the scroll button moves to the previous or next
address record.
You can also use the Address list Look Up feature to quickly scroll to any of your
Address Book entries.
86
Page 97

Common tasks
To look up an Address Book record:
1. Display the Address list screen.
2. Enter the first letter of the name you want to find.
Look Up line
The list scrolls to the first entry that begins with that letter. If you write another
letter, the list scrolls to the first entry that starts with those two letters. For
example, writing an “s” scrolls to “Sands,” and writing “sm” scrolls further to
“Smith.” If you sort the list by company name, the Look Up feature scrolls to the
first letter of the company name.
3. Tap the record to view its contents.
Using Find
You can use Find to locate any text that you specify, in any application that resides
on your handheld. Find does not search applications that reside on an expansion
card.
To use Find:
1. Tap the Find icon .
TIP If you select text in an application before you tap Find, the selected text
automatically appears in the Find dialog box.
2. Enter the text that you want to find.
Find is not case-sensitive. For example, searching for the name “davidson” also
finds “Davidson.”
Find locates any words that begin with the text you enter. For example,
searching for “plane” finds “planet,” but not “airplane.”
3. Tap OK.
Find searches for the text in all records and all notes.
87
Page 98

Chapter 6 Working with Applications
As your handheld searches for the text, you can tap Stop at any time. You may
want to do this if the entry you want appears before your handheld finishes the
search. To continue the search after you tap Stop, tap Find More.
4. Tap the text that you want to review.
Using Phone Lookup
Phone Lookup displays the Address list screen and lets you add the information
that appears in this list to a record.
To use Phone Lookup:
1. Display the record in which you want to insert a phone number. The record can
be in Date Book, To Do List, Memo Pad, or Mail.
2. Tap the Menu icon .
3. Tap Options, and then tap Phone Lookup.
4. Begin to spell the last name of the name you want to find.
The list scrolls to the first record in the list that starts with the first letter you
enter. Continue to spell the name you’re looking for, or when you see the name,
tap it.
5. Tap Add.
88
The name you selected, along with the other information associated with it, is
pasted into the record you selected in step 1.
Page 99

Phone Lookup tips
Write the Graffiti Command stroke “/L” to activate the Phone Lookup feature. You
can also activate it in the following circumstances:
■ While entering text: For example, to insert the full name and phone number for
someone with the last name “Williams,” write the Graffiti characters for “Wi”
and then the Phone Lookup Command stroke “/L.”
Assuming you have only one Address Book record that begins with “Wi,” your
handheld inserts the full name “Fred Williams” (and its associated
information). If you have more than one name that begins with “Wi,” the Phone
Lookup screen appears and highlights the first record that begins with “Wi.”
■ For selected text: Drag to highlight the text, and then write the Phone Lookup
Command stroke “/L.” Your handheld replaces the selected text and adds the
name and its associated information.
Sorting lists of records
You can sort lists of records in various ways, depending on the application. Sorting
is available in applications that have list screens: Address Book, To Do List, and
Memo Pad.
Common tasks
NOTE You can also assign records to categories. See “Categorizing records” earlier
in this chapter.
To sort records in To Do List:
1. Open the application to display the list screen.
2. Tap Show.
3. Tap the Sort by pick list and select an option.
4. Tap OK.
To sort records in Address Book, Note Pad, and Memo Pad:
1. Open the application to display the list screen.
2. Tap the Menu icon .
89
Page 100

Chapter 6 Working with Applications
3. Tap Options, and then tap Preferences.
Address Book
Note Pad
Memo Pad
4. Do one of the following:
Address Book: Tap the setting you want.
Note Pad: Tap the Sort by pick list and select Alphabetic, Date, or Manual.
Memo Pad: Tap the Sort by pick list and select Alphabetic or Manual.
5. Tap OK.
To sort the Note Pad or Memo list manually, tap and drag a memo or note to a
new location in the list.
To make the list of your memos appear in Palm Desktop software as you
manually sorted it on your handheld, open Memo Pad in Palm Desktop
software and click List by. Then select Order on handheld.
Attaching notes
90
In applications except Memo Pad and Note Pad, you can attach a note to a record.
A note can be up to several thousand characters long. For example, for an
appointment in Date Book, you can attach a note with directions to the location.
 Loading...