


VisorPhone™ Module User Guide

Copyright
Copyright © 2000 - 2001 Handspring, Inc. All rights reserved. Handspring, Springboard,
Visor, VisorPhone, the Handspring logo, and the Springboard logo are trademarks of Handspring, Inc., and may be registered in some jurisdictions. Graffiti, HotSync, and Palm OS are
registered trademarks of Palm, Inc. or its subsidiaries. All other trademarks are the property of
their respective owners.
Disclaimer and limitation of liability
Handspring, Inc. and its suppliers assume no responsibility for any damage or loss resulting
from the use of this guide.
Handspring, Inc. and its suppliers assume no responsibility for any loss or claims by third parties
which may arise through the use of this software and hardware. Handspring, Inc. and its suppliers assume no responsibility for any damage or loss caused by deletion of data as a result of malfunction, dead battery, or repairs. Be sure to make backup copies of all important data on other
media to protect against data loss.
Important: Please read the Handspring End User Software License Agreement in the back of
this guide before using the accompanying software program(s). Using any part of the software
indicates that you accept the terms of the Handspring End User Software License Agreement.
Part #: 50-0227-01
ii

Contents
Getting Started................................................................................. 1
Step 1: Set up your handheld computer.............................................2
Step 2: Insert your SIM card into your VisorPhone .........................3
Step 3: Insert your battery into your VisorPhone .............................4
Step 4: Get to know your phone........................................................5
Step 5: Connect the phone to your handheld....................................7
Step 6: Charge the battery..................................................................8
Step 7: Turn on your phone...............................................................9
Step 8: Activate your account...........................................................10
Congratulations................................................................................11
Making Voice Calls ........................................................................13
Calling a speed dial number.............................................................14
Dialing a number with the Dialpad .................................................15
Redialing the last number ................................................................16
Redialing previous numbers.............................................................16
Calling a number in your Address Book..........................................17
Dialing a number from other applications.......................................18
Returning a missed call.....................................................................19
Calling an emergency number.........................................................20
Receiving Calls............................................................................... 21
Answering the phone........................................................................22
Responding to call waiting...............................................................23
Forwarding calls ...............................................................................24
Contents iii

Handling Multiple Calls...................................................................25
Placing a call on hold .......................................................................26
Dialing another number while a call is on hold ..............................27
Switching between two calls ............................................................28
Using 3-way calling..........................................................................29
Checking Messages ........................................................................31
Reviewing missed calls .....................................................................32
Checking voicemail..........................................................................33
Checking text messages....................................................................34
Displaying call history......................................................................35
Purging call history ..........................................................................36
Managing Your Speed Dial List .......................................................37
Defining speed dial buttons .............................................................38
Adding an Address Book entry to your speed dial list.....................39
Changing a speed dial entry.............................................................40
Deleting speed dial entries...............................................................41
Arranging the speed dial list.............................................................42
Using Your SIM Phonebook ............................................................43
Copying entries from your speed dial list to your SIM card...........44
Copying entries from your SIM card to your speed dial list...........45
Deleting entries from your SIM card ..............................................46
Dialing entries on your SIM card....................................................47
iv Contents

Working With SMS Text Messages..................................................49
Enabling SMS and SMS Email........................................................50
Viewing messages.............................................................................51
Replying to messages........................................................................52
Creating messages ............................................................................53
Creating message greetings and signatures .....................................56
Saving incoming messages................................................................57
Copying incoming messages ............................................................57
Forwarding incoming messages .......................................................58
Modifying messages..........................................................................58
Sorting messages...............................................................................59
Deleting messages ............................................................................60
Using VisorPhone as a Wireless Modem..........................................61
Setting up VisorPhone as a wireless modem...................................62
Using third-party data applications with VisorPhone.....................63
Preparing for a direct wireless HotSync operation .........................64
Preparing for a network wireless HotSync operation .....................65
Performing a wireless HotSync operation.......................................66
Customizing Your Phone.................................................................67
Setting dialing prefixes for use in North America...........................68
Assigning dialing applications ..........................................................69
Changing the phone display.............................................................70
Selecting the ringer settings.............................................................71
Preventing unauthorized use of your phone....................................72
Unlocking your phone......................................................................73
Contents v

Disabling call waiting.......................................................................74
Blocking your phone number for outgoing calls.............................75
Selecting a service provider network ...............................................76
Connecting a headset.......................................................................77
Using the Menus.............................................................................79
Phone application Edit menus.........................................................79
Phone application Record menu......................................................79
Phone application Options menus...................................................80
SIM Phonebook application Edit menu..........................................81
SIM Phonebook application Options menu....................................81
SMS Message Manager application Message menus ......................82
SMS Message Manager application Edit menu...............................83
SMS Message Manager application Options menu ........................84
Troubleshooting and Maintenance...................................................85
Caring for your VisorPhone module...............................................91
Caring for the battery ......................................................................92
How do I dispose of the battery?.....................................................93
Warranty and Other Product Information ........................................95
Index ...........................................................................................115
vi Contents

Getting Started
Congratulations on the purchase of your new VisorPhone™ module. Your
VisorPhone module integrates the power of a state-of-the-art digital mobile
phone with the simplicity of your Handspring handheld computer.
To use your VisorPhone, you must first activate your account with your
mobile phone service provider.
Your account information is located on your SIM (Subscriber Identity
Module) card. If a SIM card did not come with your VisorPhone, your
service provider will provide one when you subscribe to their service. Your
SIM card must be inserted into your VisorPhone before you can use it.
Just follow the eight easy steps in this chapter to get up and running quickly.
Getting Started 1

Step 1: Set up your handheld computer
1. If you haven’t already set up your handheld, follow the steps that came
with your handheld to set it up.
2. (Recommended) Synchronize your handheld with your computer.
Place your handheld
in the cradle and
press the HotSync
button
Tip:
If you need additional information about synchronizing, refer to the
Quick Reference Guide and Visor Handheld User Guide that came with
your handheld.
2 Getting Started
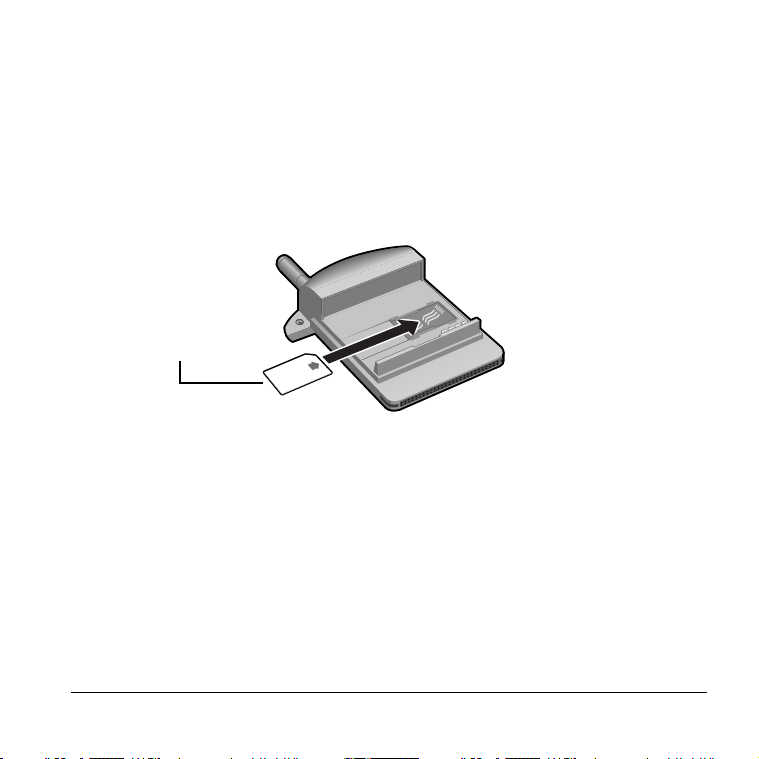
Step 2: Insert your SIM card into your VisorPhone
The SIM (Subscriber Identity Module) card is a small rectangular plastic
piece. The SIM card is included with your service provider’s documentation
and is often referred to as a “smartcard.”
Note: If your SIM card is already inserted in your phone, skip to Step 3.
■ Insert the SIM card into the slot.
Slide the SIM
card into the slot
Tip: Since calls are billed to your telephone number, you can move your
SIM card to any mobile phone that uses a SIM card, and the calls
will be billed to your account.
Getting Started 3
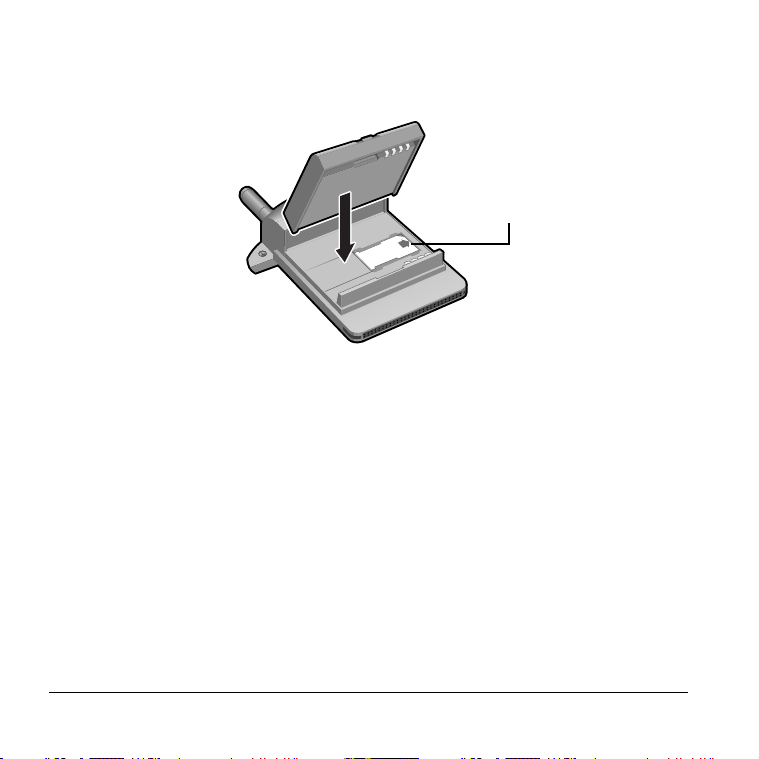
Step 3: Insert your battery into your VisorPhone
■ Insert the battery into your VisorPhone and secure the latch.
SIM card
4 Getting Started
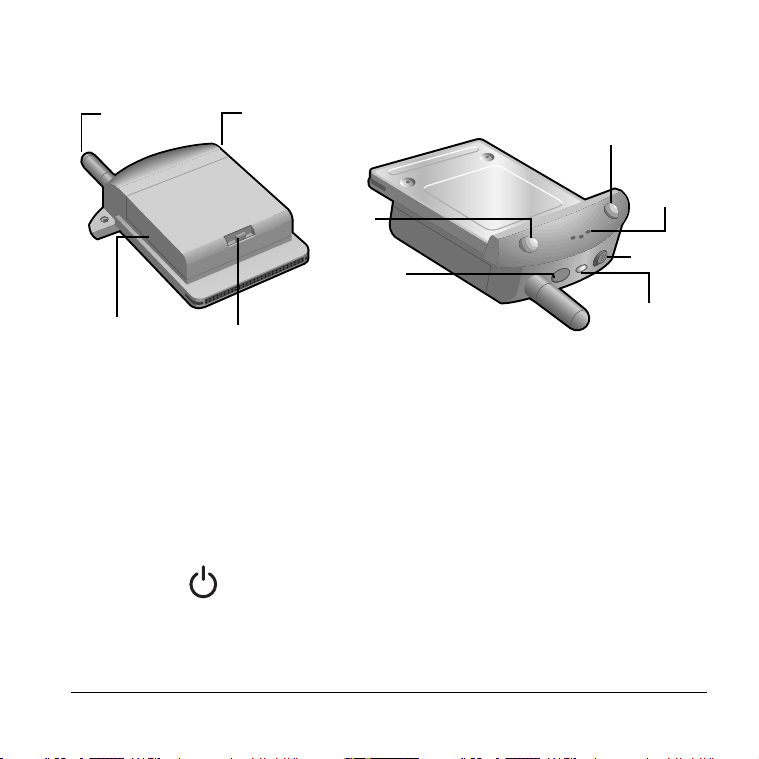
Step 4: Get to know your phone
k
Antenna Headset jac
Battery
Battery latch
Phone
button
Power
button
SMS Message
Manager button
Speaker
Slider
LED
Antenna Receives and sends signals on your VisorPhone. The
antenna does not telescope out of the phone.
Headset jack Enables you to connect a headset so you can view your
handheld screen while talking on the phone.
Battery Powers your VisorPhone.
Battery latch Secures the battery to your VisorPhone.
Power
button
Turns on your VisorPhone and activates the signal.
Your phone stays on until you remove it from your
handheld or press the power button to turn it off.
Getting Started 5

Speaker Functions as the earpiece on your VisorPhone.
Tip: To adjust the volume during a call, press the
scroll buttons on the front of your handheld.
Phone
button
Turns on your handheld and starts the Phone
application. If another application is running, press this
button to switch to the Phone application. If the phone
is ringing, press this button to answer calls.
SMS
Message
Manager button
Turns on your handheld and starts the SMS Message
Manager application so you can view, send, and receive
text messages.
Slider Controls the ringer setting. See “Selecting the ringer
settings” on page 71 for details on changing the settings.
LED Provides status information for your VisorPhone. The
color of the light and the blink state indicate the status
as follows:
No light = Phone off
Red/solid = Charger on; battery charging
Green/solid = Charger on; battery fully charged
Red/slow blink = Phone on; no network service
Green/slow blink = Phone on; in service
Red/fast blink = Battery low
Green/fast blink = Data call active
6 Getting Started

Step 5: Connect the phone to your handheld
1. Remove the slot protector from your handheld.
2. Insert your VisorPhone module into the Springboard™ expansion slot.
Slide the module into
Slide the slot
protector away
from your
handheld
Tip: To remove your VisorPhone from your handheld, simply slide it
out from the Springboard expansion slot.
the Springboard
expansion slot
Getting Started 7
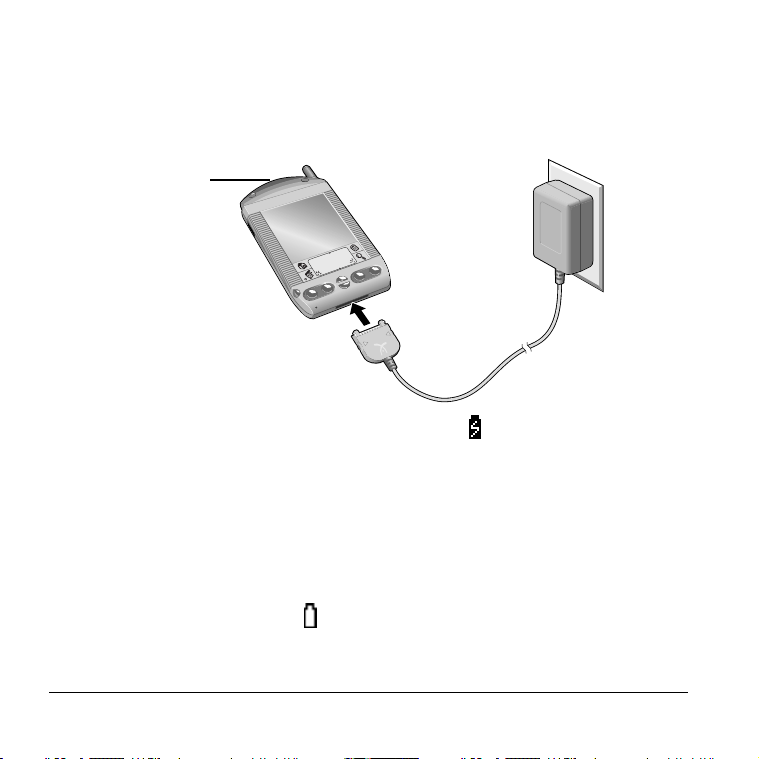
Step 6: Charge the battery
1. Plug the travel charger into a wall outlet.
2. Insert the travel charger cable into the connector on your handheld.
LED turns solid red
when charging
and solid green
when charged
Tip: When your phone is on, the charge icon appears in the Phone
application while your VisorPhone charges. Note that your
VisorPhone must be in your handheld while charging, and that it
takes about 1.5 hours to fully charge the battery. It’s time to recharge
the battery when you observe one of the following:
■ the LED turns red and blinks quickly
■ the LED does not turn on when you turn on your phone
■ the battery gauge in the top-right corner of the Phone
application appears empty when your VisorPhone is on and the
Phone application is on the screen
8 Getting Started
Step 7: Turn on your phone
After the battery is charged, you can begin using your phone.
1. Press the Power button on your VisorPhone for two seconds until you
hear a beep.
Note: If the Unlock Phone dialog appears, see “Unlocking your
phone” on page 73 for instructions.
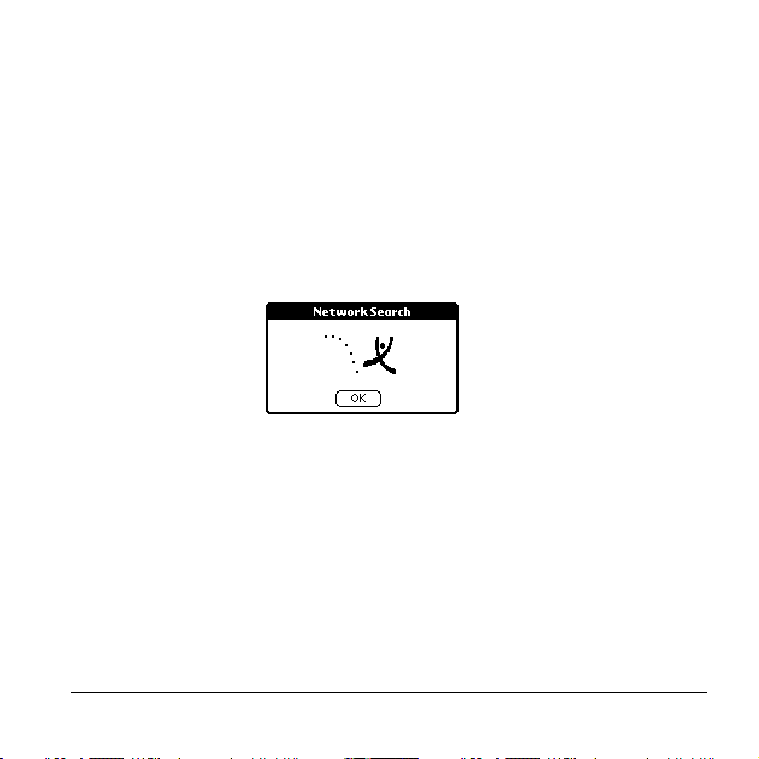
2. Wait up to two minutes for your VisorPhone to locate your service
provider’s network. Do not tap OK.
Tip: When your VisorPhone locates the network, the Network Search
dialog displays a Welcome message and your service provider’s
name appears in the upper-left corner of the Phone application. If
you are in an area without coverage, the Network Search dialog
displays an “Unable to register to the network” message and “No
Service” appears in the upper-left corner of the Phone application.
Getting Started 9
Step 8: Activate your account
If you received a new SIM card with your phone, you need to call your
service provider to activate your account (unless it was activated upon
purchase at a retail location). Your service provider’s phone number is
located on the materials that came with your VisorPhone module.
Once you receive your phone number, it may take a few hours to become
fully active. Some service providers send a special message with your phone
number. Follow these steps to check the phone number:
1. Make sure your phone is on for at least 30 seconds.
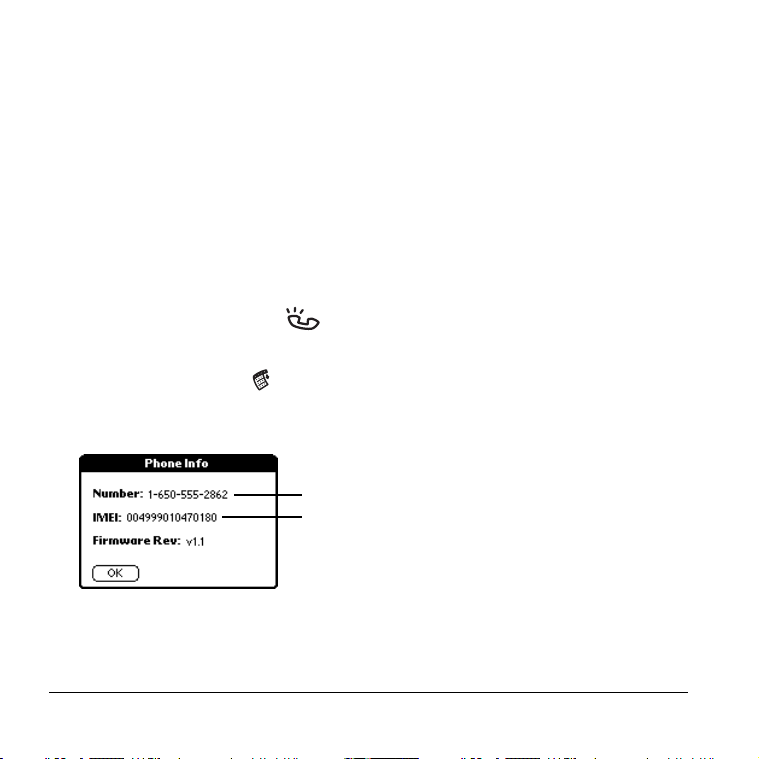
2. Press the Phone button on your VisorPhone to access the Phone
application.
3. Tap the Menu icon .
4. Under Options, tap Phone Info.
Your VisorPhone number (if available)
Your equipment ID number
5. Tap OK.
10 Getting Started

Congratulations
You’re ready to use your VisorPhone module. Keep these things in mind as
you use your new phone:
■ If you travel outside a coverage area, your phone remains on but you
can’t make or receive calls. If this occurs, the LED blinks red slowly and
the phone periodically tries to register to the network. When you return
to a coverage area, the LED blinks green.
■ Although VisorPhone supports many calling features, such as call
waiting, call hold, call forwarding, 3-way calling, voicemail, SMS, and
SMS Email, check with your service provider to confirm that these
services are available and active on your mobile calling plan.
■ If you travel outside a coverage area, you can’t receive SMS text
messages. However, the messages are stored by the network and you
will receive them when you return to a coverage area.
■ Your account includes a voicemail feature so people can always leave
you a message even when your phone is off.
■ Always use care when operating a mobile phone. If you plan to use your
VisorPhone module while driving a car, we recommend that you
become familiar with local laws concerning use of a mobile phone while
driving, and that you use a headset for hands-free operation. See
“Connecting a headset” on page 77 to learn how to connect a headset to
your VisorPhone.
Getting Started 11

12 Getting Started
Making Voice Calls
There are several ways to make voice calls with your VisorPhone. This
chapter describes how to dial a number by:
■ Selecting it from your speed dial list
■ Entering it on the Dialpad
■ Selecting it from your Call History list
■ Selecting it from your Address Book
■ Dialing from another application
■ Returning a missed call
■ Dialing an emergency number
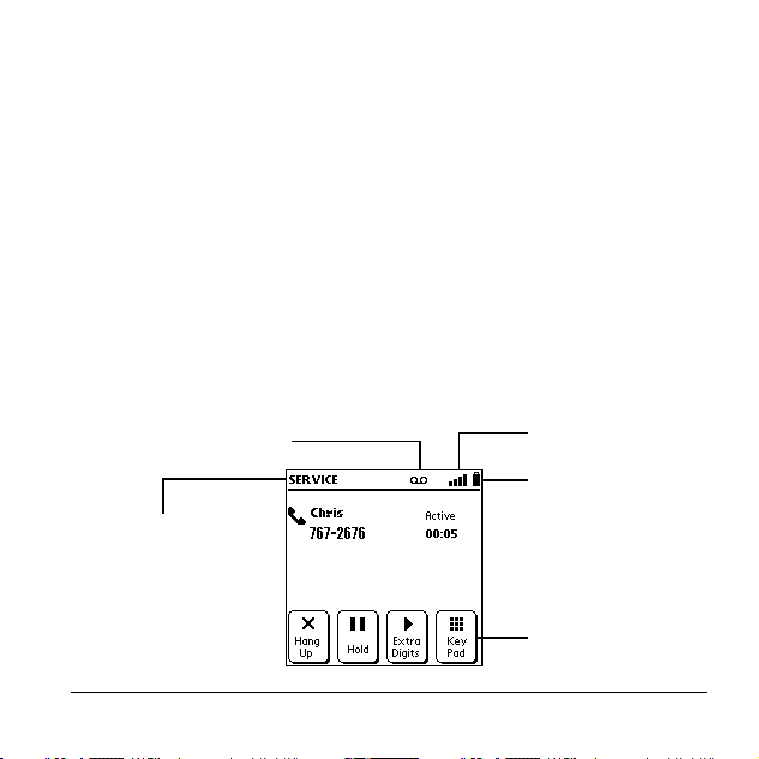
After you dial and establish a connection, the Active Call screen appears:
Voicemail notification icon
(not used by all networks)
Signal strength icon
Battery gauge
Network name
Tap Key Pad to enter
extra numbers such
as a PIN code or an
extension
Making Voice Calls 13
Calling a speed dial number
Speed dialing enables you to quickly place a call without entering the
number. This is particularly useful for numbers you call often, such as your
home or office.
Note: This section assumes you’ve already created a speed dial list. To
learn how to add numbers to your speed dial list see “Defining speed
dial buttons” on page 38.
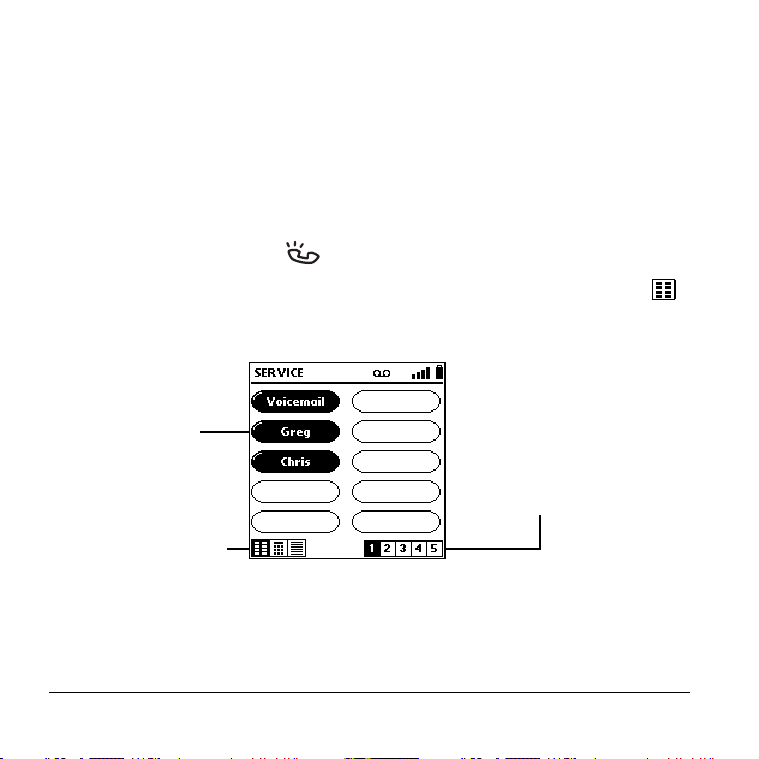
1. Press the Phone button on your VisorPhone.
Tip: If the screen below doesn’t appear, tap the Speed Dial icon .
2. Select the number you want to call.
Tap a button to
dial a number
Tap a Page icon
to view other
speed dial pages
Speed Dial, Dialpad,
and Call History icons
Tip: After you make the connection the Active Call screen appears.
If prompted to enter a menu selection, tap Key Pad. If you
defined any Extra Digits, such as an extension, tap Extra Digits.
3. Tap Hang Up to end the call.
14 Making Voice Calls

Dialing a number with the Dialpad
1. Press the Phone button on your VisorPhone.
Tip: You can also tap the Phone icon in the Applications
Launcher to start the Phone application.
2. Tap the Dialpad icon .
3. Dial the number. If you are dialing an international number, tap the +
key before entering the number to automatically insert the international
access code upon dialing.
Tip: To display the last ten numbers dialed, press the scroll buttons
on the front of your handheld.
Dial box
Tap Backspace to
erase the last digit
Tap a digit to enter
it in the dial box
Tip: To edit the phone number, tap the Dial box and then use the
®
keypad, Graffiti
writing, or the onscreen keyboard.
Tap CLR to delete
the entire entry
Tap Send to dial the
number in the dial box
4. Tap Hang Up to end the call.
Making Voice Calls 15

Redialing the last number
■ Hold down the Phone button for two seconds to redial the last number
you called.
Redialing previous numbers
1. Press the Phone button on your VisorPhone.
2. Tap the Call History icon to view a list of previous incoming and
outgoing calls.
3. Select the number you want to call.
Tap the entry you
want to dial
Tap Dial to call
selected number
4. Tap Dial.
Tip: To add a number to your Address Book or Speed Dial list, tap
Details, tap Copy Phone #, then in Address Book or Speed Dial Edit
view, tap the line where you want to add the number, and select
Paste from the Edit menu to insert the number.
Tap here to select
the call category:
All, Incoming, Outgoing, or Missed
Tap Details to view
call information
16 Making Voice Calls
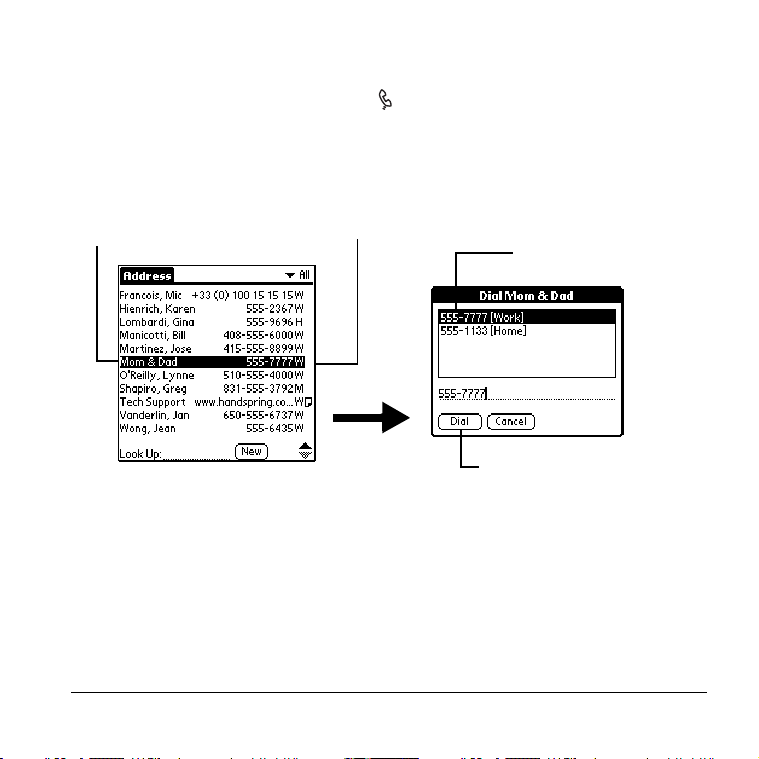
Calling a number in your Address Book
T
1. Press the Address Book button on the front of your handheld.
2. Select the number you want to call.
ap a name
to view or
edit contact
information
Tap a number
to select a
number to dial
Tap a number
to select it
Tap Dial to call the number
Tip: If you install a third-party email or SMS application, the Dial
button changes to an Email button when you select an email
address, or to an SMS button when you select a mobile phone
number. See “Assigning dialing applications” on page 69 for
details on assigning compatible third-party SMS and Email
applications to these buttons.
3. Tap Hang Up to end the call.
Making Voice Calls 17
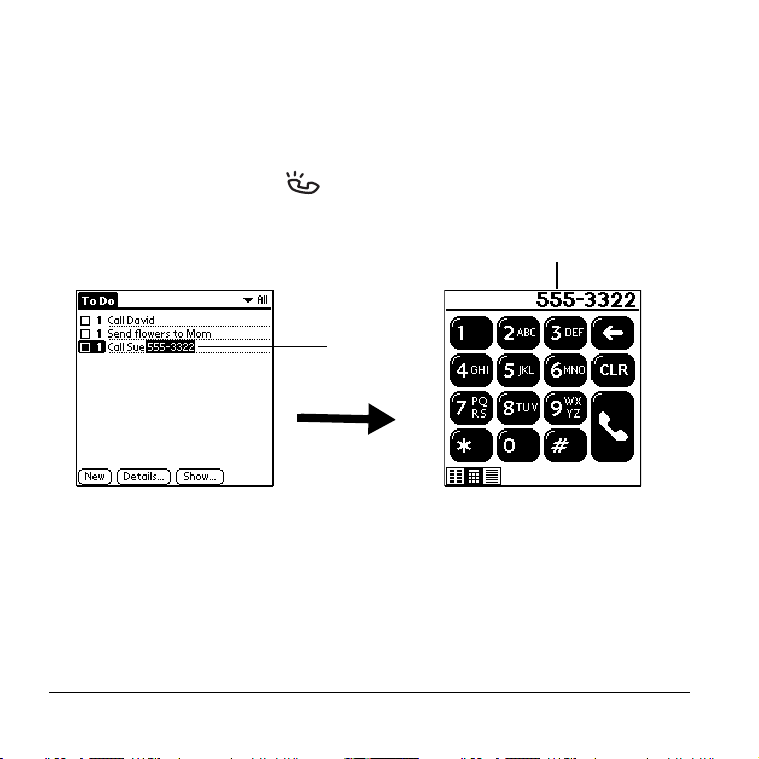
Dialing a number from other applications
You can also dial numbers from other applications such as Memo Pad or To
Do List.
1. Highlight the number you want to dial.
2. Press the Phone button on your VisorPhone.
Tap here to add an a rea code
or change the number
Select a
number
to dial
Tip: The number automatically appears in the Dial box on the Dialpad
screen so you can edit the number if needed.
18 Making Voice Calls
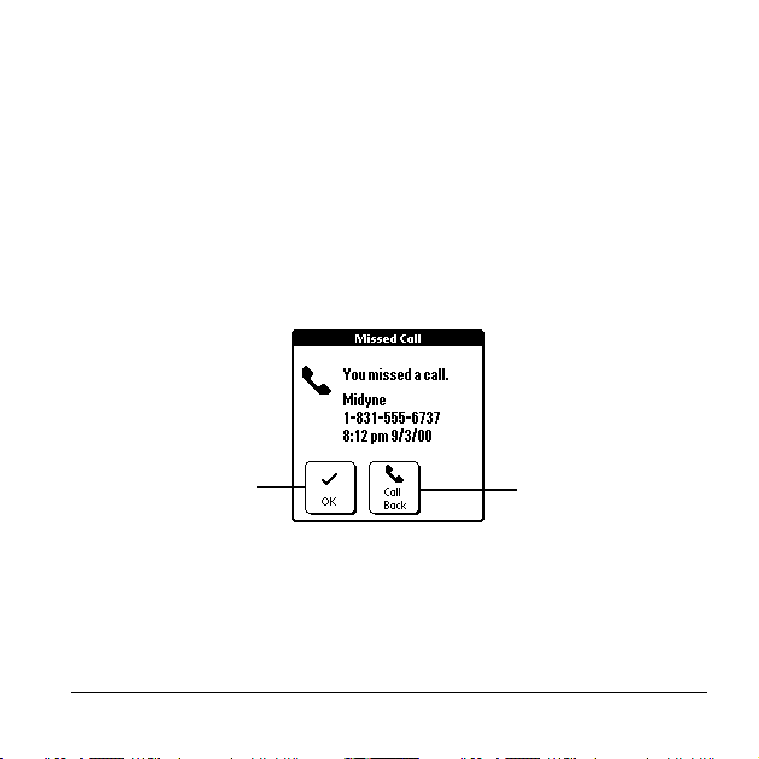
Returning a missed call
When your VisorPhone is on and you remain in a coverage area, any calls
you miss appear in the Call History list and you receive a missed call alert
message. When your phone is off or you travel outside a coverage area, your
calls are forwarded to voicemail and they do not appear in the Call History
list.
■ If you miss multiple calls, a message appears indicating the number of
calls you missed. Follow the steps in “Reviewing missed calls" on page
32 to return the calls.
■ If you miss a single call, the following screen appears:
Tap OK to dismiss
the call without
calling back
Tap Call Back to
dial the number
Tip: If the caller’s phone number is not available, the Call Back button
does not appear on the Missed Call screen.
Making Voice Calls 19
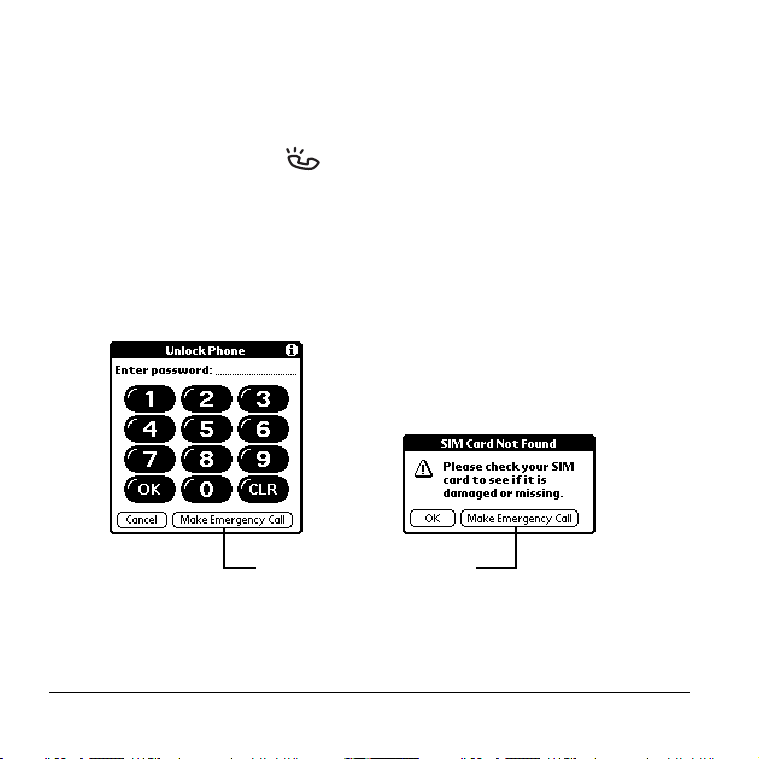
Calling an emergency number
Your VisorPhone provides easy access to emergency numbers such as
112 or 911.
1. Press the Phone button on your VisorPhone.
2. Do one of the following:
■ If your phone is unlocked, dial 112 or 911 from the Dialpad screen.
■ If your phone is locked or your SIM card is missing, tap Make
Emergency Call from the Unlock Phone or SIM Card Not Found
screen.
Tap Make Emergency Call
Tip: You don’t need to unlock your phone or even have the SIM card
installed to call an emergency number.
20 Making Voice Calls

Receiving Calls
Whenever your phone is on and you are within a coverage area, you can
receive incoming calls. In addition to answering calls, you can also choose
several incoming call options. This chapter describes how to:
■ Answer the phone (or reject a call)
■ Respond to a call waiting prompt
■ Forward your calls
Receiving Calls 21

Answering the phone
An incoming call turns on your handheld if it is off.
Caller’s name and
phone number if
available
Tap Answer to
accept the call
Tap Ignore to
send the call
to voicemail
Tip: You can also answer a call by pressing the Phone button while
your VisorPhone is ringing.
22 Receiving Calls
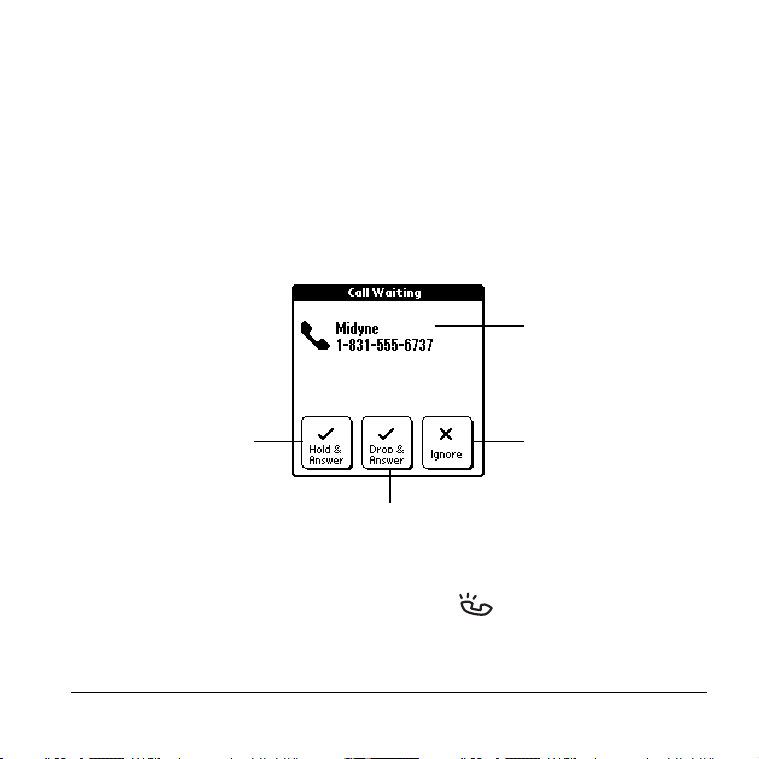
Responding to call waiting
When you are on the phone and receive a second call, the Phone application
updates the Active call screen and emits a Call Waiting “beep” tone.
Tip: Make sure the Disable Call Waiting option on the Call Preferences
screen is off. When this option is off the Disable Call Waiting check
box is empty. For more information on enabling and disabling call
waiting, see “Disabling call waiting” on page 74.
■ When the Call Waiting dialog appears, tap the appropriate button.
Caller’s name and
phone number if
available
Tap Hold & Answer
to place 1st call on
hold and answer
incoming call
Tap Ignore to
send the call
to voicemail
Tap Drop & Answer
to end1st call and
answer incoming call
Tip: You can also press the Phone button to place the first call on
hold and answer the incoming call.
Receiving Calls 23
Forwarding calls
If you need to turn off your phone or know you will be traveling outside a
coverage area, you can forward your calls to another number. Keep in mind
that your service provider will still charge you for your forwarded calls.
Note: Because call forwarding information is stored by the network, it’s a
good idea to check the current network settings both before and
after you change the call forwarding option.
1. Tap the Menu icon .
2. Under Options, tap Call Preferences.
3. Select the call forwarding option you want to use.
Tap here to forward
all calls to the selected
number
Tap here to display
current network settings
Tip: You can define multiple forwarding numbers. Select Edit numbers
from the list to add, change, or delete a number.
4. Tap OK.
24 Receiving Calls

Handling Multiple Calls
You can use the Hold button in the Phone application to handle a variety of
situations that involve multiple calls. During an active call, you can receive
or place another call, switch between two active calls, and create a 3-way
conference call. For example, when you’re talking to a friend, you can put
them on hold, call a restaurant to make dinner reservations, and return to
your friend to confirm the time and place. These features also enable you to
receive an important incoming call while you’re already on the phone, and
to facilitate conference calls when you’re on the go.
This chapter describes how to:
■ Place a call on hold
■ Dial another number while a call is on hold
■ Switch between two calls
■ Use 3-way calling
Handling Multiple Calls 25

Placing a call on hold
1. Place or answer a call.
Call status
indicator
Tap Hold to put the
call on hold
Tap Off Hold to return
to the call
2. Tap Hang Up to end the call.
26 Handling Multiple Calls

Dialing another number while a call is on hold
1. Place or answer a call.
2. Put the call on hold.
Tap Hold to put the
call on hold
Tap 2nd Call to access
dial functions
3. Tap 2nd Call.
4. Dial the number.
Tip: You can tap the Applications Launcher icon to open
another application that has the number you want to dial.
Handling Multiple Calls 27

Switching between two calls
1. Answer or place two calls. See “Dialing another number while a call is on
hold” on page 27.
2. Tap Swap, or tap the call status line to switch between calls.
1st call status
2nd call status
Tap KeyPad to access a
voice prompt system
Tap Swap to
change calls
Tip: If you called an automated phone system that prompts you to
enter a menu selection or phone extension, tap KeyPad to
respond to the voice prompts.
3. Tap Hang Up to end the active call.
28 Handling Multiple Calls

Using 3-way calling
1. Answer or place two calls.
2. Join the two calls.
1st call status
Tap 3-way Call to
speak with both calls
at the same time
Tap Hold to place
both calls on hold
Tap Hang Up to
end both calls
Handling Multiple Calls 29
2nd call status
Tap Cancel 3-way to
return to the previous
active call and to
place the other call
on hold

30 Handling Multiple Calls

Checking Messages
Your VisorPhone is capable of receiving voicemail and text messages and
generating missed call messages.
If you miss a call when your VisorPhone is on and you remain in a coverage
area, your missed calls appear in the Call History list and you receive a
missed call alert message. When your phone is off or you travel outside a
coverage area, your missed calls are forwarded to voicemail and they do not
appear in the Call History list. Similarly, when your phone is off or you
travel outside a coverage area, your service provider stores your text
messages until you turn on your phone or return to a coverage area.
Note: You may need to contact your service provider to add the text
messaging feature to your rate plan. This feature is sometimes
referred to as SMS, or Short Message Service.
This chapter describes how to:
■ Review missed calls
■ Check voicemail
■ Check text messages
■ Display call history
■ Purge call history
Checking Messages 31

Reviewing missed calls
When you don’t answer an incoming call, it appears under Missed calls in
your Call History list.
1. Tap the Call History icon .
2. Tap Missed in the pick list in the upper-right corner.
Tap caller’s name
or phone number
Tap Dial to return the call
32 Checking Messages

Checking voicemail
When your phone is off, you travel outside a service area, or you miss or
choose to ignore a call, the caller may leave a voicemail message. When you
connect to the network, the phone application notifies you that you received
voicemail messages.
1. Dial your voicemail service using one of these methods:
■ Tap the Voicemail button in the Speed Dial view.
■ Tap Listen in the Voicemail alert dialog.
■ Tap the Voicemail icon in the upper-right part of the Speed Dial
view or the Dialpad view.
Tip: Some service providers do not support the Listen button and
the Voicemail icon .
2. Tap Key Pad on the Active Call screen.
Tap buttons to dial
access codes and
review messages
3. Tap Done.
Checking Messages 33

Checking text messages
b
When your phone is off or you travel outside a service area, other people can
still send you text messages. Your service provider stores the messages for
you until you turn on your phone or return to a service area. When you
connect to the network, the SMS Message Manager displays the first
message in a screen similar to the following:
Num
er of new messages
Caller’s name and
phone number if
available
Tap OK to review
messages later
Tap Call Back to
dial the sender
Tap Delete to delete
the message
34 Checking Messages

Displaying call history
l
The Call History view provides quick access to the previous 1,000 incoming
and outgoing calls.
■ Tap the Call History icon .
Tap arrow to se
the call category: All,
Incoming, Outgoing,
Missed call
or Missed
Incoming call
Outgoing call
Tap Details to
view time and
duration
Tap Dial to call the
selected number
Tip: To temporarily store a number in your handheld’s memory,
tap Details, tap Copy Phone #, and then tap Done. You can
now Paste this number into any application on your handheld.
ect
Checking Messages 35

Purging call history
Your VisorPhone continues accumulating call history information for up to
1,000 calls until you purge the call history list. To conserve storage space, we
recommend that you purge this list periodically.
Note: Using the Purge function permanently removes the calls from your
handheld. You cannot undo this process to restore the information.
1. From the Call History view, tap the Menu icon .
2. Under Record, tap Purge.
Tip: To delete a specific item, select the item from the Call History
view and tap Delete Item instead of Purge.
3. Select the purge option you want to use.
Tap the pick list to
choose which calls
to purge
4. Tap OK.
36 Checking Messages

Managing Your Speed Dial List
You can store up to 50 phone numbers in the speed dial list. There are five
pages of numbers that hold ten numbers per page.
Tip: Keep your speed dial list organized by storing different types of
numbers on different pages. For example, create separate pages for
family, business, friends, and emergency numbers.
This chapter describes how to:
■ Assign phone numbers to speed dial buttons
■ Add Address Book entries to your speed dial list
■ Change speed dial entries
■ Delete speed dial entries
■ Arrange the speed dial list
Managing Your Speed Dial List 37

Defining speed dial buttons
1. Tap the Speed Dial icon .
2. Tap a blank speed dial button.
Note: The first slot on the first Speed Dial page is reserved for your
service provider’s voicemail service number.
3. In the Edit Entry dialog, enter the Name, Number, and any Extra digits.
Enter a
name for
the button
Enter the phone
number
Enter digits to dial
after placing the call
(such as an extension
or access code)
Tap Lookup to find
a number in your
Address Book
Tip: To insert a pause between Extra digits when dialing, enter a
comma (,). Each comma represents a one second pause.
4. Tap OK.
38 Managing Your Speed Dial List

Adding an Address Book entry to your speed dial list
1. Tap the Speed Dial icon .
2. Tap a blank speed dial button.
3. Tap Lookup.
4. In the Phone Number Lookup dialog, use the scroll arrows or begin
writing the person’s last name to find the number you want.
Tap a number to select it
Tap Add to insert
the number in the
speed dial entry
5. Tap Add.
Tip: You can edit the number or name by tapping it in the Edit
Entry dialog.
6. From the Edit Entry dialog, tap OK.
Managing Your Speed Dial List 39

Changing a speed dial entry
1. Tap the Speed Dial icon .
2. Tap the Menu icon .
3. Under Edit, tap Edit Speed Dial.
4. Select the entry you want to change.
Tap an entry
to select it
Tap pages to view
more entries
5. In the Edit Entry dialog, enter the new information.
6. Tap OK to save the new information.
7. Tap Done.
40 Managing Your Speed Dial List

Deleting speed dial entries
1. Tap the Speed Dial icon .
2. Tap the Menu icon .
3. Under Edit, tap Edit Speed Dial.
4. Select the entry you want to delete.
Tap an entry
to select it
5. In the Edit Entry dialog, tap Delete.
6. Tap OK to confirm deletion.
7. Tap Done.
Tap pages to view
more entries
Managing Your Speed Dial List 41

Arranging the speed dial list
1. Tap the Speed Dial icon .
2. Tap the Menu icon .
3. Under Edit, tap Edit Speed Dial.
Drag an entry
to another slot
or page
Tip: If the new slot is full, the other entries move over one slot as the
rows fill from top to bottom. If you drag an entry to a page icon,
the entry moves to the first available slot on that page.
4. Tap Done.
42 Managing Your Speed Dial List

Using Your SIM Phonebook
In addition to storing your phone number and billing information, your
SIM card also contains a phone list that is separate from your Address Book
and speed dial list. Most SIM cards enable you to store more than 50 names
and numbers. By storing a phone list on your SIM card, you have immediate
access to your phone list when you move your SIM card to another phone.
The SIM Phonebook application is a utility that enables you to view and
manage the phone list on your SIM card.
This chapter describes how to:
■ Copy entries from your speed dial list to your SIM card
■ Copy entries from your SIM card to your speed dial list
■ Delete entries from your SIM card
■ Dial entries on your SIM card
Using Your SIM Phonebook 43

Copying entries from your speed dial list to your SIM card
1. Tap the Applications Launcher icon on the front of your handheld.
2. Tap the SIM Phonebook icon .
3. Tap Speed Dial in the pick list in the upper-right corner.
4. Tap the entry you want to copy.
Tip: To copy all the numbers in your speed dial list, select Copy All
from the Edit menu.
Tap Speed Dial
Tap a name or number to select it
Tap Copy to add the entry
to your SIM card
Tip: A check mark indicates that the entry is already on both your
speed dial list and your SIM list.
5. Tap Copy.
44 Using Your SIM Phonebook

Copying entries from your SIM card to your speed dial list
M
1. Tap the Applications Launcher icon on the front of your handheld.
2. Tap the SIM Phonebook icon .
3. Tap SIM in the pick list in the upper-right corner.
4. Tap the entry you want to copy.
Tip: To copy all the numbers in your speed dial list, select Copy All
from the Edit menu.
Tap SI
Tap a name or number to select it
Tap Copy to add the entry
to your speed dial list
Tip: A check mark indicates that the entry is already on both your
speed dial list and your SIM list.
5. Tap Copy.
Using Your SIM Phonebook 45

Deleting entries from your SIM card
1. Tap the Applications Launcher icon on the front of your handheld.
2. Tap the SIM Phonebook icon .
3. Tap SIM in the pick list in the upper-right corner.
Tip: To delete entries from your speed dial list, tap Speed Dial
instead.
4. Select the entry you want to delete.
Tap to select SIM or Speed Dial
Tap a name or number to select it
Tap Delete to remove
the entry
5. Tap Delete.
6. Tap OK to confirm deletion.
46 Using Your SIM Phonebook

Dialing entries on your SIM card
1. Tap the Applications Launcher icon on the front of your handheld.
2. Tap the SIM Phonebook icon .
3. Tap SIM in the pick list in the upper-right corner.
Tip: You can also dial entries from your speed dial list by tapping
Speed Dial instead.
4. Select the entry you want to dial.
Tip: You can also send a text message to an SMS-enabled mobile
phone by tapping a mobile phone number and then tapping
SMS instead of Dial.
Tap to select SIM or Speed Dial
Tap a name or number to select it
Tap Dial to call the number
Tap SMS to send a text message
5. Tap Dial.
Using Your SIM Phonebook 47

48 Using Your SIM Phonebook

Working With SMS Text Messages
In addition to dialing and receiving calls, you can use your VisorPhone to
send and receive short text messages. These text messages, also called SMS
(Short Message Service) messages, are similar to email messages that you
send and receive from your computer, but are limited to a few sentences in
length. The person receiving your message must also have a GSM mobile
phone and a service provider that supports text messages. Some service
providers also allow you to use your mobile phone to send text messages to
an email address and to receive text messages from a computer. Talk to your
service provider for details about their SMS and SMS Email features. This
chapter describes how to:
■ Enable SMS and SMS Email
■ View messages
■ Reply to messages
■ Create messages
■ Create message greetings and signatures
■ Set message options
■ Save messages
■ Forward messages
■ Copy message text to the clipboard
■ Modify outgoing messages
■ Sort messages
■ Delete messages
Working With SMS Text Messages 49

Enabling SMS and SMS Email
To send and reply to SMS messages, you must subscribe to your service
provider’s SMS service. If you subscribe to this service, your service provider
supplies an SMS Message Center number which appears in the SMS
Preferences dialog.
To use SMS Email, you must subscribe to your service provider’s SMS
Email service and enter their SMS Email Center number in the SMS
Preferences dialog. The SMS Email Center forwards the SMS messages to
the recipient’s email address. Contact your service provider to obtain their
SMS Email Center number.
1. Press the SMS Message Manager button on your VisorPhone.
2. From any SMS Message Manager list view, tap the Menu icon .
3. Under Options, tap Preferences.
Confirm SMS Message Center number
Enter SMS Email Center number
4. Tap OK.
50 Working With SMS Text Messages

Viewing messages
You can view SMS messages even if you don’t subscribe to your service
provider’s SMS service.
1. Press the SMS Message Manager button on your VisorPhone to
open the SMS Message Manager Inbox.
Tap arrow to select
the message category:
Inbox , Saved, Pending,
Message read
Tap New to create
a message
Tip: When viewing Saved messages, the arrows indicate whether a
message was incoming or outgoing.
2. Tap the message you want to view.
3. Press the scroll buttons on your handheld to scroll through a message.
At the start or end of a message, it displays the next message.
4. Tap Done.
or Sent
Working With SMS Text Messages 51

Replying to messages
To reply to SMS messages, you must subscribe to your service provider’s
SMS service. See “Enabling SMS and SMS Email” on page 50 to determine
if you subscribed to your service provider’s SMS service.
1. Tap the incoming message to which you want to reply.
Tap Reply to respond to the message
2. Tap Reply.
3. Enter the message text.
Tip: When you reply to an SMS message, the SMS Message
Manager fills in the To field for you. When you reply to an
email message, you must enter the email address on the first
line of the message. See “Creating an SMS Email message” on
page 55 for more information.
4. Tap Send.
52 Working With SMS Text Messages

Creating messages
SMS Message Manager enables you to create short text messages and send
them to a GSM mobile phone number or an email address. If a message
exceeds 160 characters, SMS Message Manager divides the text into
multiple messages. As you create a message, the status bar indicates how
many messages will be sent and the total number of characters in all the
messages.
To save time while creating messages, you can insert predefined text from
a template. Some templates ask you to enter information such as a meeting
time or place. Using a template is similar to filling in the blanks on a form
letter instead of writing a letter from scratch. Fortunately, in SMS Message
Manager you can easily combine the template text with your own text to
personalize your message.
You can create a message at any time, but if you send a message when you
are outside a coverage area, your VisorPhone places the message in the
Pending category and sends it automatically when you return to a coverage
area. While a message is in the Pending category, you cannot edit it, but you
can delete it before it is sent.
Working With SMS Text Messages 53

Creating an SMS text message
1. From any SMS Message Manager list view, tap New.
2. Address the message to a mobile phone number.
Tap To to select a number
Tap Text to insert text
from a template
3. Enter text using Graffiti, the onscreen keyboard, or the Text and
Greetings pick lists.
4. Tap Send. (The message goes into the Pending category until your
phone transmits the message.)
Tip: To store a draft message and send it later, tap Save instead.
After your message transmits, your VisorPhone places a copy in the Sent
category. If an error occurs while sending the message, an exclamation point
(!) appears next to the message in the Sent category.
Note: Some service providers may restrict you from sending SMS
messages to recipients outside your service network.
54 Working With SMS Text Messages

Creating an SMS Email message
To send a message to an email address, you must first enter your service
provider’s SMS Email Center number. See “Enabling SMS and SMS
Email” on page 50.
1. From any SMS Message Manager list view, tap New.
2. Tap the To pick list and select SMS Email Center.
Tap To to select
SMS Email Center
Enter email address
followed by a space
and # symbol
3. On the first Text line, enter the recipient’s email address followed by a
space and a # symbol.
4. Enter the remaining text.
5. Tap Send. (The message goes in the Pending category until it
transmits.)
Tip: To store a draft message and send it later, tap Save instead.
Working With SMS Text Messages 55

Creating message greetings and signatures
h
When you create a message you can use the greetings pick lists to insert a
greeting and signature in your message. You can also add items to these lists
or modify the existing items.
1. From any SMS Message Manager list view, tap the Menu icon .
2. Under Options, tap Greetings.
Tap
ere to hide the
greetings pick lists
Tap Add entry to
create a new greeting
Tap Add entry to
create a new signature
3. Tap Done.
56 Working With SMS Text Messages

Saving incoming messages
1. Open the message you want to save.
2. Tap the Menu icon .
3. Under Message, tap Save.
Tip: Saving an incoming message moves the message from your
Inbox to the Saved category.
Copying incoming messages
1. Open the message you want to copy.
2. Tap the Menu icon .
3. Under Message, tap Put Into Clipboard.
Tip: To create a memo with the text, tap Copy to Memo Pad
instead.
4. Open the message or application where you want to insert the message.
5. Tap the Menu icon .
6. Under Edit, tap Paste.
Working With SMS Text Messages 57

Forwarding incoming messages
1. From the Inbox or Saved category, open the incoming message you want
to forward.
2. Tap the Menu icon .
3. Under Message, tap Forward.
Tip: You can edit the forwarded message before sending it.
4. Enter the recipient’s mobile phone number.
Note: The recipient’s phone must be SMS enabled.
5. Tap Send.
Modifying messages
You can modify any outgoing messages in your Saved or Sent categories.
Tip: You can create your own message template by modifying and
resending a Sent message.
1. Open the message you want to change.
2. Tap the message text, or tap Edit.
3. Edit the message.
4. Tap Send.
Tip: When modifying a message, you can keep the revised message
without sending it by tapping Save instead of Send.
58 Working With SMS Text Messages

Sorting messages
1. In the SMS Message Manager, tap Show.
2. Select the sort method you want to use.
Tap arrow to select
sort method
3. Tap OK.
Tip: If you sort the list by name, messages from senders that are not in
your Address Book appear at the bottom of the list in numerical
order by phone number.
Working With SMS Text Messages 59

Deleting messages
1. In the SMS Message Manager, tap the pick list in the upper-right corner
to select the category containing the messages you want to delete.
2. Tap the Menu icon .
3. Under Message, tap Purge.
4. Select the deletion method you want to use.
Tap arrow to select
deletion method
5. Tap OK.
6. If prompted, tap Yes to confirm deletion.
Tip: To delete a single message, open it and tap the Delete button.
60 Working With SMS Text Messages

Using VisorPhone as a Wireless Modem
In addition to using your VisorPhone as a phone, you can also use it as a
modem that operates at 14.4Kbps or 9.6Kbps, depending on the speed of
your service provider network. You can use your VisorPhone’s modem
capabilities with third-party communication software that you download
from the Internet, such as web browsers or email applications, and to
perform wireless HotSync operations when your cradle is not available.
This chapter describes how to:
■ Set up your VisorPhone as a wireless modem
■ Use third-party data applications with VisorPhone
■ Prepare for a direct wireless HotSync operation
■ Prepare for a network wireless HotSync operation
■ Perform a wireless HotSync operation
Using VisorPhone as a Wireless Modem 61

Setting up VisorPhone as a wireless modem
To use your VisorPhone as a modem, you must subscribe to the data services
feature from your service provider and establish an ISP account or corporate
dial-up account.
1. Tap the Applications Launcher icon on the front of your handheld.
2. Tap the Prefs icon .
3. Tap Network in the pick list in the upper-right corner.
4. Enter the configuration information for your ISP.
Select your ISP
from the Service
pick list
Tap here to enter
advanced DNS and
IP Address settings
Note: If your ISP is not on the Service pick list, tap the Menu icon ,
tap New on the Service menu, and enter the service name.
5. Check your settings by tapping Connect. When your settings work
properly, the Connect button changes to a Disconnect button.
Enter your User Name,
Password, and your
ISP’s phone number
To learn more about using your handheld with your ISP, see “Network
Preferences and TCP/IP Software” in the Visor Handheld User Guide.
62 Using VisorPhone as a Wireless Modem

Using third-party data applications with VisorPhone
Before using a third-party communication application, verify with the
developer that the application you installed is compatible with VisorPhone.
1. Install the third-party application on your handheld. See “Installing
third-party applications” in the Visor Handheld User Guide for details.
2. Start the third-party application you installed.
Note: Most third-party applications automatically connect you to
your ISP when you start the application. If the application
doesn’t connect you to your ISP, follow these steps to establish
a connection:
a.Tap the Applications Launcher icon on the front of your
handheld.
b.Tap the Prefs icon .
c.Tap Network in the pick list in the upper-right corner.
d.Tap Connect and wait for a connection to establish.
3. Disconnect after you finish using the third-party application.
Using VisorPhone as a Wireless Modem 63

Preparing for a direct wireless HotSync operation
A direct wireless HotSync operation is when you dial a modem attached to
your desktop computer to perform a remote HotSync operation.
1. Tap the Applications Launcher icon on the front of your handheld.
2. Tap the HotSync icon .
3. Tap Enter Phone #.
4. Enter your computer modem number, and then tap OK.
Enter the number
used to call your
computer modem
5. Tap the Menu icon .
6. Under Options, tap Modem Sync Prefs.
7. Tap Direct to modem, and then tap OK.
8. On a Windows computer, click the HotSync icon and check Modem
on the HotSync Manager menu. On a Macintosh, open HotSync
Manager and select Modem Setup on the Serial Port Settings tab.
64 Using VisorPhone as a Wireless Modem

Preparing for a network wireless HotSync operation
A network wireless HotSync operation is when you dial a modem attached
to a network, such as a server on a corporate LAN, to perform a remote
HotSync operation.
Note: This feature is not available for the Macintosh.
1. Tap the Applications Launcher icon on the front of your handheld.
2. Tap the HotSync icon .
3. Tap the Menu icon .
4. Under Options, tap Modem Sync Prefs.
5. Tap Network, and then tap OK.
6. Tap Select Service and configure the Network Preferences panel.
Note: For information on the Network HotSync feature and
configuring the Network Preferences panel, see the Visor
Handheld User Guide.
7. On your desktop computer, click the HotSync icon and check
Network on the HotSync Manager menu.
8. Click the HotSync icon again, select Setup, click the Network tab,
and then select your user name.
9. Perform a HotSync operation.
Using VisorPhone as a Wireless Modem 65

Performing a wireless HotSync operation
Since your VisorPhone operates as a modem at 14.4Kbps or 9.6Kbps, a
wireless HotSync operation takes significantly longer than performing a
HotSync operation with your cradle. Therefore, we recommend performing
a wireless HotSync operation only when your cradle is not available.
Tip: To increase the speed of a wireless HotSync operation, select
Conduit Setup under Options and reduce the number of
applications with which you synchronize.
1. Tap the Applications Launcher icon on the front of your handheld.
2. Tap the HotSync icon .
3. Tap the Modem Sync icon .
4. Wait for your VisorPhone to connect with the modem on the other end
and for the HotSync operation to finish.
Tip: If necessary, you can cancel the procedure at any time by tapping the
Cancel button.
66 Using VisorPhone as a Wireless Modem

Customizing Your Phone
The Phone application Preference screens enable you to customize many of
the VisorPhone features to meet your individual needs. For example, you
can choose which view appears when you start the Phone application, and
set security options to prevent unauthorized use.
This chapter describes how to:
■ Set dialing prefixes
■ Reassign the buttons in your Address Book
■ Change the phone display
■ Select the ringer setting
■ Prevent unauthorized use of your phone
■ Unlock your phone
■ Disable call waiting
■ Block your phone number for outgoing calls
■ Select a different service provider network
■ Connect a headset to your VisorPhone
Customizing Your Phone 67

Setting dialing prefixes for use in North America
Some North American service providers require 11-digit dialing. If you
already have 7-digit or 10-digit numbers in your Address Book, you can set
your VisorPhone to automatically use 11-digit dialing by using a default area
code. Using this feature does not change the numbers in your Address Book.
1. Press the Address Book button on the front of your handheld.
2. Tap the Menu icon .
3. Under Options, tap Dial Preferences.
Tap check box to insert an
area code in front of 7-digit
numbers before dialing
Enter default
area code here
Tap check box to insert a 1
in front of 10-digit numbers
before dialing
4. Tap OK.
Note: You may be prompted to enter a default area code the first time you
dial a number from your Address Book.
68 Customizing Your Phone

Assigning dialing applications
When you select a phone number or email address in Address Book, you can
tap the Dial, SMS, or Email buttons to direct the selected information to a
specific application. The default applications for these buttons are the
Phone application and the SMS Message Manager. However, if you have
third-party SMS or Email applications installed on your handheld, you can
assign these buttons to any application that is compatible with the dialingenabled version of Address Book.
1. Press the Address Book button on the front of your handheld.
2. Tap the Menu icon .
3. Under Options, tap Dial Preferences.
Tap pick lists to
assign an application
to that button
Tip: If no other applications appear in the pick lists, then you don’t
have compatible SMS or Email applications on your handheld.
4. Tap OK.
Customizing Your Phone 69

Changing the phone display
1. Press the Phone button on your VisorPhone.
2. Tap the Menu icon .
3. Under Options, tap Phone Preferences.
4. Select the display options you want to use.
Tap the view you want
to see when you open
the Phone application
5. Tap OK.
Tap an icon to skip
that view when
pressing the Phon e
button repeatedly
70 Customizing Your Phone

Selecting the ringer settings
1. Tap the Menu icon .
2. Under Options, tap Ringer Preferences.
Tip: The slider on your phone has two positions and . The
two Ringer Preferences columns control the behavior of the
corresponding slider position.
3. Select the ringer settings you want to use.
Tap Ring pick lists to
select ring style
Tap Volume pick lists to
select volume level
Tap Vibrate pick lists to turn
vibrate mode on or off
Tip: You can use both a ring tone and vibrate alert or use them
separately. For example, you can set one position to ring softly
and vibrate, and the other position to vibrate only. To preview
a new sound, select Play ring when changed.
4. Tap OK.
Customizing Your Phone 71

Preventing unauthorized use of your phone
You can protect your phone number from unauthorized use by locking your
SIM card.
1. Turn on your phone.
2. Press the Phone button on your VisorPhone.
3. Tap the Menu icon .
4. Under Options, tap Phone Preferences.
5. Select the Phone Locked check box to lock your SIM card.
Tap here to lock
and unlock the
SIM card
6. Enter your password (PIN) and tap OK.
Note: If you haven’t set a password yet, check your service provider’s
documentation for the default password. In North America,
this is usually 1234 or 1111.
7. Tap OK.
Tap here to define a
new password (PIN)
72 Customizing Your Phone

Unlocking your phone
1. Turn on your phone.
2. Press the Phone button on your VisorPhone.
3. Enter your password (PIN).
Note: If you haven’t set your own password, enter the password listed
in your service provider documentation. In North America,
this is usually 1234 or 1111.
If you are using a SIM card from an established account, enter
your existing password.
Tap numbers to
enter password
Tap OK to unlock
your phone
Tap CLR to erase
the entire entry
4. Tap OK.
Tip: See “Preventing unauthorized use of your phone” on the previous
page to learn about setting your own password.
Customizing Your Phone 73

Disabling call waiting
If you receive a call while you are talking on the phone, the Phone
application notifies you about the second call. If you don’t want to be
interrupted by other calls, you can disable call waiting.
Note: Because call waiting information is stored by the network, it’s a good
idea to check the current network settings both before and after you
change the call waiting option.
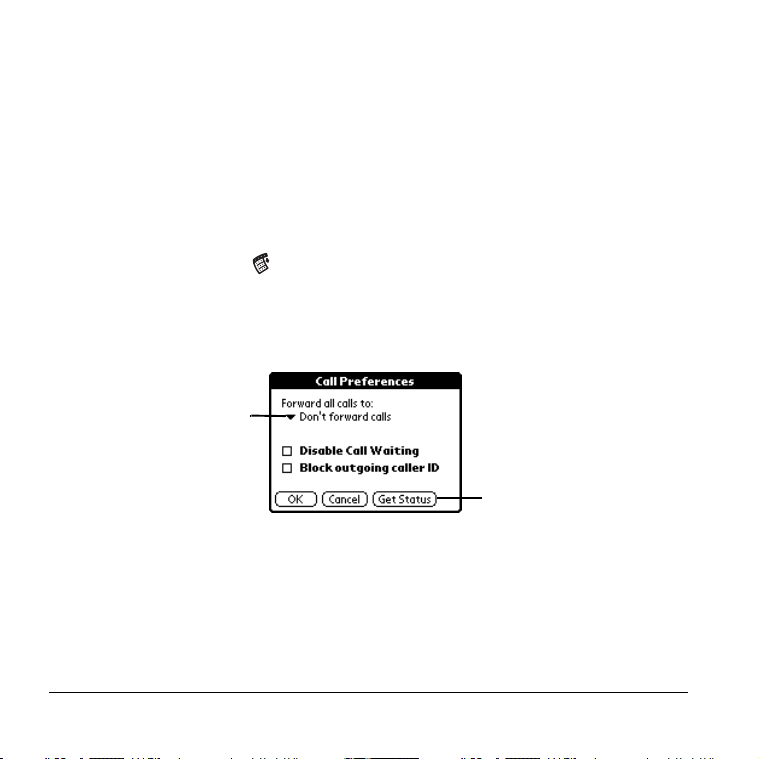
1. Tap the Menu icon .
2. Under Options, tap Call Preferences.
3. Disable the call waiting option.
Tap here to disable
call waiting
Tap here to display current
network settings
4. Tap OK.
Tip: To reactivate Call Waiting, remove the check from the Disable Call
Waiting check box.
74 Customizing Your Phone

Blocking your phone number for outgoing calls
When you place a call from your VisorPhone, the Phone application reveals
your phone number to the person you’re calling. If your service provider
supports caller ID blocking, you can prevent revealing your phone number
to people you call.
Note: Because caller ID blocking information is stored by the network,
it’s a good idea to check the current network settings both before
and after you change the Block outgoing caller ID option.
1. Press the Phone button on your VisorPhone.
2. Tap the Menu icon .
3. Under Options, tap Call Preferences.
4. Enable the Block outgoing caller ID option.
Tap here to place
anonymous calls
5. Tap OK.
Customizing Your Phone 75

Selecting a service provider network
If you roam to an area where multiple service providers offer coverage, your
VisorPhone automatically selects the provider with the strongest signal.
However, if you prefer, you can manually select a service provider network.
Note: When you manually select a network, your VisorPhone finds only
that network until you either choose another network, or return to
Automatic Mode.
1. Press the Phone button on your VisorPhone.
2. Tap the Menu icon .
3. Under Options, tap Select Network.
4. Select a network.
Tap a network
to enter manual
mode
Tap Automatic Mode
to return to automatic
search mode
5. Tap OK.
Note: Selecting a new network may take 30 seconds or more.
76 Customizing Your Phone

Connecting a headset
Use the built-in speaker and microphone or connect an optional headset for
hands-free operation. For best results, use only headsets from Handspring.
Headset
jack
Customizing Your Phone 77

78 Customizing Your Phone

Using the Menus
This section provides an overview of the menu options available in the
Phone, SIM Phonebook, and SMS Message Manager applications. Some of
the menu options vary based on which screen is active.
Phone application Edit menus
Speed Dial view
Edit Speed Dial: Opens a dialog where you can define, change, and delete
speed dial buttons. For details, see “Changing a speed dial entry” on page
40.
Paste: Inserts a phone number from the clipboard into the dial box.
Dialpad view
Phone application Record menu
Call History view
Purge: Opens a dialog where you can remove selected records from the Call
History list. For details, see “Purging call history” on page 36.
Delete Item: Removes the selected record from the Call History list.
Using the Menus 79

Phone application Options menus
Speed Dial
and Dialpad
views
Phone Preferences: Opens a dialog where you can change your phone display
Call History
view
and lock the phone. For details, see “Changing the phone display” on page
70 and see “Preventing unauthorized use of your phone” on page 72.
Ringer Preferences: Opens a dialog where you can choose the ringer settings.
For details, see “Selecting the ringer settings” on page 71.
Call Preferences: Opens a dialog where you can choose call waiting, call
blocking, and call forwarding settings. For details, see “Disabling call
waiting” on page 74, “Blocking your phone number for outgoing calls” on
page 75, and “Forwarding calls” on page 24.
Select Network: Opens a dialog where you can search for and use networks
other than your default network. For details, see “Selecting a service
provider network” on page 76.
Phone Info: Opens a dialog where you can view information about your phone
such as the phone number and the IMEI number that uniquely identifies
your phone to the network.
Font Preference: Opens a dialog where you can choose the font you want.
About Phone: Opens a dialog where you can view version and copyright
information for the Phone application.
80 Using the Menus

SIM Phonebook application Edit menu
Speed Dial and SIM views
Copy All: Copies all entries that exist in one phone list to the other phone
list. If you are viewing the speed dial list, it copies all new entries to your
SIM card. If you are viewing the SIM card list, it copies all new entries to
the speed dial list.
SIM Phonebook application Options menu
Speed Dial and SIM views
Help: Opens a dialog where you can view tips about using the SIM
Phonebook application.
About: Opens a dialog where you can view version and copyright
information for the SIM Phonebook application.
Using the Menus 81

SMS Message Manager application Message menus
Inbox view
Message view
Purge: Opens a dialog where you can choose which messages you want to
remove from the Inbox. For details, see “Deleting messages” on page 60.
Put Into Clipboard: Copies the selected message to the clipboard so you can
paste it into another message or application. For details, see “Copying
incoming messages” on page 57.
Copy to Memo Pad: Copies the selected message to a new Memo Pad memo.
For details, see “Copying incoming messages” on page 57.
Save: Stores the selected message in the Saved category.
Forward: Creates a copy of the selected message so you can send it to
someone else. For details, see “Forwarding incoming messages” on page 58.
Call Sender: Dials the person who sent the message.
82 Using the Menus

SMS Message Manager application Edit menu
Undo: Clears the last action.
Cut: Removes the selected text and places it on the clipboard.
Copy: Copies the selected text and places it on the clipboard.
Paste: Inserts text stored on the clipboard at the current cursor position.
Select All: Selects all text in the current field.
Keyboard: Opens the onscreen keyboard.
Graffiti Help: Opens screens that show you how to form Graffiti characters.
Using the Menus 83

SMS Message Manager application Options menu
Font: Opens a dialog where you can choose the font you want to use.
Greetings: Opens a dialog where you can enter predefined opening and
closing phrases to use in your messages. For details, see “Creating message
greetings and signatures” on page 56.
Preferences: Opens a dialog where you can view the SMS Service Center
number (if this field is blank, contact your service provider for this
information), choose deletion confirmation, and enter your service
provider’s SMS Email Center number. For details, see “Enabling SMS and
SMS Email” on page 50.
About SMS: Opens a dialog where you can view version and copyright
information for the SMS Message Manager application.
84 Using the Menus

Troubleshooting and Maintenance
If you encounter a problem with your VisorPhone module, check this
section to see if your problem is listed. If your problem isn't listed here, or
the suggestions don't resolve your problem, visit us at www.handspring.com
for technical support contact information.
My VisorPhone
won't turn on
■ Make sure your VisorPhone is inserted firmly in the
Springboard expansion slot.
■ Make sure your VisorPhone battery isn't drained.
■ When you turn on your VisorPhone, hold down the
power button for at least two seconds, until you hear
a beep.
■ Turn on your handheld to make sure that the
handheld batteries aren't drained. Low batteries will
prevent your VisorPhone from turning on.
I get a message
that my SIM
card is missing
when I turn on
my VisorPhone
■ Make sure your SIM card is properly inserted. The
metal contacts must face down (away from the
battery), and the side with the corner cut must slide
into the SIM slot first. For details, see “Step 2: Insert
your SIM card into your VisorPhone” on page 3.
■ Your SIM card may be damaged. Contact your
service provider for a new card.
Troubleshooting and Maintenance 85

My VisorPhone
requires an
unlocking code
(PIN), but I
didn't set one
■ Your service provider may have set the locking code
before you received your VisorPhone. Enter the
default unlocking code (PIN) and then tap OK. In
North America, the default unlocking code is usually
1234 or 1111. If this doesn't work, contact your
service provider.
Note: It is actually your SIM card that is locked, not
your VisorPhone.
■ If you see the Unblock Phone screen instead of the
Unlock Phone screen, you entered the unlock code
(PIN) incorrectly three times, and your VisorPhone
is now blocked. Contact your service provider to
obtain the unblock code. If you enter the unblock code
(PUK) incorrectly ten times, your SIM is
permanently disabled.
I called my
service provider
to enable my
phone service,
Some service providers require 24 hours or more to
activate your phone service. If it has been longer than
your service provider’s activation period, report the
problem to your service provider.
but it still
doesn’t work
86 Troubleshooting and Maintenance

My phone
number isn't on
the Phone Info
screen
Your service provider may need to install your phone
number onto your SIM card. Contact your service
provider to see if they can send a message to your
VisorPhone that writes your phone number onto your
SIM card.
My VisorPhone
won't register to
the network
■ You are probably outside a network coverage area.
Try using another GSM phone to verify whether
coverage is available in your current location.
■ If coverage is available in your location, try your SIM
card in another GSM phone. If it still doesn’t, work,
your SIM card may be malfunctioning. Contact your
service provider for another SIM card.
■ Tu rn off y our VisorPhone , and then tur n it on aga in.
If a dialog appears asking if you want to search for a
network, tap Yes.
I tried dialing a
phone number,
but my
VisorPhone just
beeps at me
■ Make sure you dialed the correct number.
■ Wait a few minutes and try again. If the network is
very busy, calls cannot connect.
■ Verify that you are in a network coverage area and
then move a few yards away and try the call again. If
you are in a weak coverage area (1 bar of signal
strength or less), you may not be able to complete
calls even though you are registered to the network.
Troubleshooting and Maintenance 87

I can't dial
international
numbers
For security purposes, most service providers require you
to enable international calling on your account. Call your
service provider to enable international calling.
Call waiting
doesn’t work
Call forwarding
doesn't work
Enable call waiting in the Call Preferences dialog. For
details, see “Disabling call waiting” on page 74.
For security purposes, most service providers require you
to enable this feature on your account even though there
is usually no extra charge. Call your service provider to
enable call forwarding.
Caller ID
blocking for my
outgoing calls
Some service providers require you to enable this feature
on your account. Call your service provider to enable
blocking your Caller ID.
doesn't work
Some incoming
caller’s names
don’t appear in
Call History
The SIM
Phonebook
■ Find out if a caller has blocked their Caller ID.
■ Call History does not show names for records you
marked hidden in your Address Book.
Make sure your SIM card is inserted in your VisorPhone
and that your phone has been on for at least 30 seconds.
application
won't open
88 Troubleshooting and Maintenance

My SIM
Phonebook
doesn’t display
the full name
and number
When a name or number is longer than will fit in the SIM
Phonebook display, three dots appear to indicate that the
entry contains additional information. SIM Phonebook
does not truncate the actual entry, it just does not appear
on the screen.
Some phone
numbers don’t
appear in the
SMS Lookup
I can’t send SMS
Messages
Make sure the number you want is identified as a mobile
number in your Address Book. Only mobile phone
numbers appear when you use the SMS Message Manager
Lookup button.
■ Make sure SMS services are enabled on your account
by checking the SMS Preferences dialog to see if the
SMS Message Center number is on this screen. If the
number is missing, contact your service provider for
the SMS Message Center number and enter it in the
SMS Preferences dialog.
Note: Receiving SMS messages does not indicate
that you have a subscription to your service
provider’s SMS service. You must subscribe
to this service to send or reply to messages.
■ Verify that you are in a GSM coverage area.
■ Make sure the destination number is correct. Some
service providers require 11-digit phone numbers for
SMS messages.
Troubleshooting and Maintenance 89

I get an error
message when I
send an SMS
message to an
email address
Make sure you have subscribed to and enabled the SMS
email feature. You need to get the SMS Email Center
number from your service provider and enter it in the
SMS Preferences dialog. This number is different from
the SMS Message Center number you use to send
messages to other mobile phone numbers. For more
information, see “Enabling SMS and SMS Email” on
page 50.
The applicat ions
I assigned to the
Dial, Email, and
SMS buttons in
the Dialing
Address Book
don’t launch
■ Check the Dial Preferences dialog in the Address
Book to confirm the application is assigned to the
Dial, Email, or SMS button. For details, see
“Assigning dialing applications” on page 69.
■ Contact the software developer for the application
you want to use when you tap the button, and verify
that the software is compatible with the new Dialing
Address Book and the version of Palm OS your
VisorPhone uses. To take advantage of these buttons,
an application must contain special code that
registers its capabilities to the Dialing Address Book.
I get a “No
Carrier” error
■ Verify that data calls are enabled on your account.
■ Verify that you are in a coverage area.
when making
data calls
90 Troubleshooting and Maintenance

I can't
synchronize
when my
VisorPhone is
Make sure that there are no active calls on your
VisorPhone before you begin a HotSync operation. You
cannot synchronize while you have an active call, and you
cannot make or receive calls during a HotSync operation.
connected to my
handheld
Caring for your VisorPhone module
■ Keep your VisorPhone and its accessories out of the reach of small
children.
■ Keep your VisorPhone dry.
■ Use your VisorPhone at normal temperatures between -20 degrees and
54.4 degrees Celsius (-4 degrees and 130 degrees Fahrenheit).
Temperatures outside of this range may cause damage to your
VisorPhone.
■ Keep your VisorPhone away from dusty or dirty areas.
■ Do not disassemble your VisorPhone.
■ Do not use harsh detergents to clean your VisorPhone.
■ Use only genuine Handspring accessories. Third party accessories are
not guaranteed to function properly with your VisorPhone.
■ Do not let the Springboard contacts on your VisorPhone come in direct
contact with conductive or electronic objects.
■ Do not short any contacts on your VisorPhone module or the
Springboard connectors.
Troubleshooting and Maintenance 91

Caring for the battery
Your VisorPhone uses a 680mAh Lithium Ion battery. A fully-charged
battery provides approximately 3 hours of talk time and more than 70 hours
of standby time. Follow these guidelines to get the most from your battery:
■ Do not disassemble the battery pack.
■ If you are not using your VisorPhone for an extended period of time,
disconnect the battery pack from the phone and store it in a cool, dry
place; charge the battery at least once every six months when not in use.
■ Never throw the battery pack into fire or expose it to extreme heat.
■ If the battery pack ever becomes hot or smells odd, stop using it.
■ If the battery pack becomes damaged and leaks liquid, stop using it and
avoid skin contact with the leaking liquid.
■ Use only a genuine Handspring battery pack. Third party battery packs
are not guaranteed to function properly with your VisorPhone.
■ Always replace the battery pack with the same type of pack. Using
another type of battery pack may cause an explosion.
■ Do not short any battery contacts or let the contacts come in direct
contact with conductive or electronic objects.
■ Be sure to properly dispose of the battery. For more information, see
“How do I dispose of the battery?” on page 93.
92 Troubleshooting and Maintenance

How do I dispose of the battery?
When your battery fails to hold a charge, you need to replace it.
Caution: It is illegal in many areas to dispose of Lithium Ion batteries in
household or business trash. Call your local recycling center for
instructions on battery recycling, or contact Handspring for safe
disposal options. Do not handle a damaged or leaking battery.
Troubleshooting and Maintenance 93

94 Troubleshooting and Maintenance
 Loading...