

Page 1

Handbook
for the
Palm HotSync
®
Mail Application
Page 2

Copyright
Copyright © 2000 Palm, Inc. or its subsidiaries. All rights reserved. Graffiti, HotSync,
and Palm OS are registered trademarks of Palm, Inc. or its subsidiaries. The HotSync
logo, Palm, and the Palm logo are trademarks of Palm, Inc. or its subsidiaries. Other
product and brand names may be trademarks or registered trademarks of their respective owners.
Disclaimer and Limitation of Liability
Palm, Inc. and its subsidiaries assume no responsibility for any damage or loss resulting
from the use of this handbook.
Palm, Inc. and its subsidiaries assume no responsibility for any loss or claims by third
parties which may arise through the use of this software. Palm, Inc. and it subsidiaries
assume no responsibility for any damage or loss caused by deletion of data as a result
of malfunction, dead battery, or repairs. Be sure to make backup copies of all important
data on other media to protect against data loss.
Important: Please read the End User Software License Agreement with this product before using the accompanying software program(s). Using any part of the software indicates that you accept the terms of the End User Software License Agreement.
P/N: 406-2782-01
Page ii Handbook for the Palm HotSync Mail Application
Page 3

Contents
Chapter 1: Introduction
Managing desktop E-Mail away from your desk .............................1
Installing Mail ........................................................................................2
Chapter 2: Using the Mail Application
Opening Mail .........................................................................................4
Viewing e-mail items ............................................................................4
Displaying full header information ................................................5
Creating e-mail items............................................................................5
Looking up an address .........................................................................7
Adding details to e-mail items ............................................................9
Setting a priority ................................................................................9
Sending a blind carbon copy .........................................................10
Adding a signature to your e-mail item ......................................10
Requesting confirmations ..............................................................11
Storing e-mail to be sent later ............................................................12
Editing unsent e-mail ..........................................................................12
Draft e-mail ..........................................................................................13
Filing e-mail .........................................................................................14
Deleting e-mail.....................................................................................15
Removing e-mail from the Deleted folder ...................................15
Purging deleted e-mail ...................................................................15
Message list options ............................................................................16
Folders ..............................................................................................16
Date column .....................................................................................16
Sorting the Message list ..................................................................17
HotSync options ..................................................................................18
Creating special filters ........................................................................19
Ignoring or receiving e-mail ..........................................................20
Defining filter strings ......................................................................21
High-priority e-mail ........................................................................23
Truncating e-mail items......................................................................23
Mail menus ...........................................................................................24
Message menus ...............................................................................24
Options menus ................................................................................25
......................................................................................................... 26
Index
Contents Page iii
Page 4
Chapter 1
Introduction
Welcome to Palm HotSync® Mail. You can use the Mail application on
your handheld to read, reply to, compose, and delete e-mail from your
desktop E-Mail application while you’re away from your desk.
This handbook guides you through setting up and using the Mail
application. For information on how to use the other applications on
your handheld, see the handbook that came with your handheld.
Managing desktop E-Mail away from your desk
Mail lets you manage the e-mail that you send and receive
through the E-Mail application on your desktop computer. You
can read, reply to, compose, and delete e-mail on your
handheld; but to send or receive e-mail, you must perform a
HotSync® operation either directly or indirectly. Direct methods
include placing your handheld in the cradle attached to your
computer, or using infrared communications. Indirect methods
include using an add-on modem.
The key to Mail is that it truly synchronizes the mail in the Inbox of
your desktop E-Mail application with the mail on your handheld. For
example, if you delete e-mail items from Mail, your next HotSync
operation also deletes the e-mail items from your desktop E-Mail
application, so you never have to delete e-mail items twice. Similarly,
if you read an e-mail item on your handheld and leave it in your
Inbox, your next HotSync operation marks it as read in your desktop
E-Mail application.
Page 1 Introduction
Page 5

In Mail, you can do the following:
■
View, delete, file, and reply to incoming mail.
■
Create outgoing e-mail items and drafts of e-mail items.
■
Create simple or complex filters, which allow you to decide the
type of e-mail that your handheld retrieves from your desktop
E-mail application.
■
Use your handheld to send and retrieve e-mail items from your
desktop E-Mail application via the cradle or infrared
communications.
Installing Mail
Your handheld supports a number of desktop E-Mail applications for
Microsoft Windows, such as:
■
Microsoft Exchange (version 5.0 or higher)
■
QUALCOMM Eudora (version 3.0.1 or higher)
■
Lotus cc:Mail (6.0 or higher)
■
Microsoft Outlook 97 (or higher)
■
Microsoft Outlook Express
■
Netscape Communicator (version 4.5 or higher)
You can see the full list of supported applications when you install
and set up Mail. If your desktop E-Mail application does not appear
on the list, you may still be able to manage your desktop E-Mail
application from your handheld by means of special connection
software, called a conduit, that lets you synchronize your desktop
E-Mail application and your handheld. Contact the vendor of your
E-Mail application or visit the web site
information.
Note:
The following instructions assume you already installed Palm
Desktop software on your computer. If you have not installed
the Palm Desktop software, you must install it now. See the
Getting Started
guide that came with your handheld for
instructions.
http://www.palm.com
for more
Chapter 1 Page 2
Page 6

To install Mail on a Windows computer:
1. Insert the Palm Desktop software CD-ROM into the computer’s
CD-ROM drive.
2. When the menu appears, click Bonus Software.
3. When the Bonus Software list appears, click Palm HotSync Mail.
4. When the description of the Mail application appears, click Install.
5. Follow the instructions onscreen to set up your handheld for use
with your desktop E-Mail application.
6. Perform a HotSync operation to install the Mail application on
your handheld.
Page 3 Introduction
Page 7
Chapter 2
Using the Mail Application
Opening Mail
To open Mail:
1. Tap the Applications icon .
2. Tap the Mail icon .
Viewing e-mail items
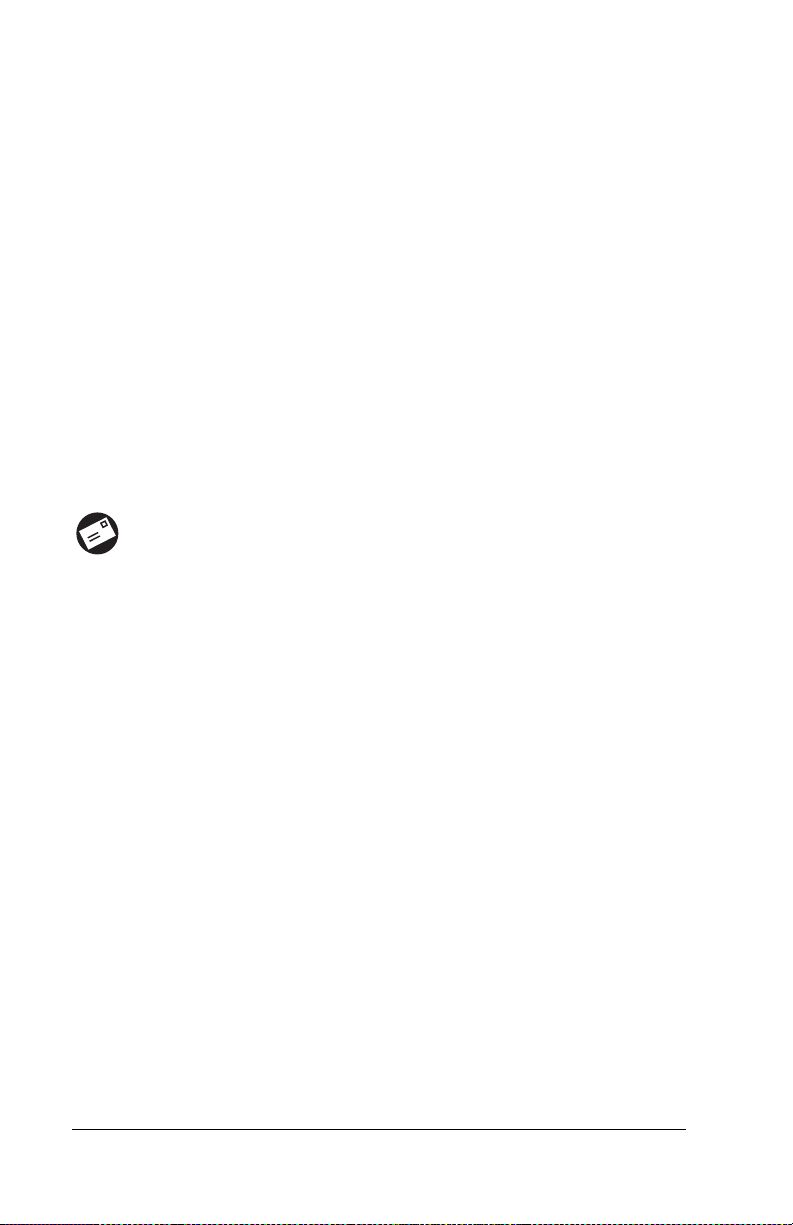
The Message list displays a list of your incoming e-mail items, who
sent them, and the date they were received. E-mail items you’ve read
have a check next to them. High-priority e-mail items appear with an
exclamation point (!) next to them.
Previously
read
To open an e-mail item:
■
Tap an e-mail item to open it.
Recipient
Subject
Chapter 2 Page 4
Header mode icons
Sender
Time and date sent
E-mail body
Page 8

To close an e-mail item:
■
Tap Done to close the e-mail item.
Displaying full header information
By default, Mail displays abbreviated header information, which
comprises only the From: and Subj: fields. The full header provides
complete information about the sender, receiver, and copied
recipients, in addition to the subject and date the e-mail item was
created. Mail uses the header type you select for all your e-mail items.
To display full header information:
1. Open an e-mail item.
2. Tap the Complete Header icon.
Tip:
To redisplay the abbreviated header, tap the Abbreviated
Header icon.
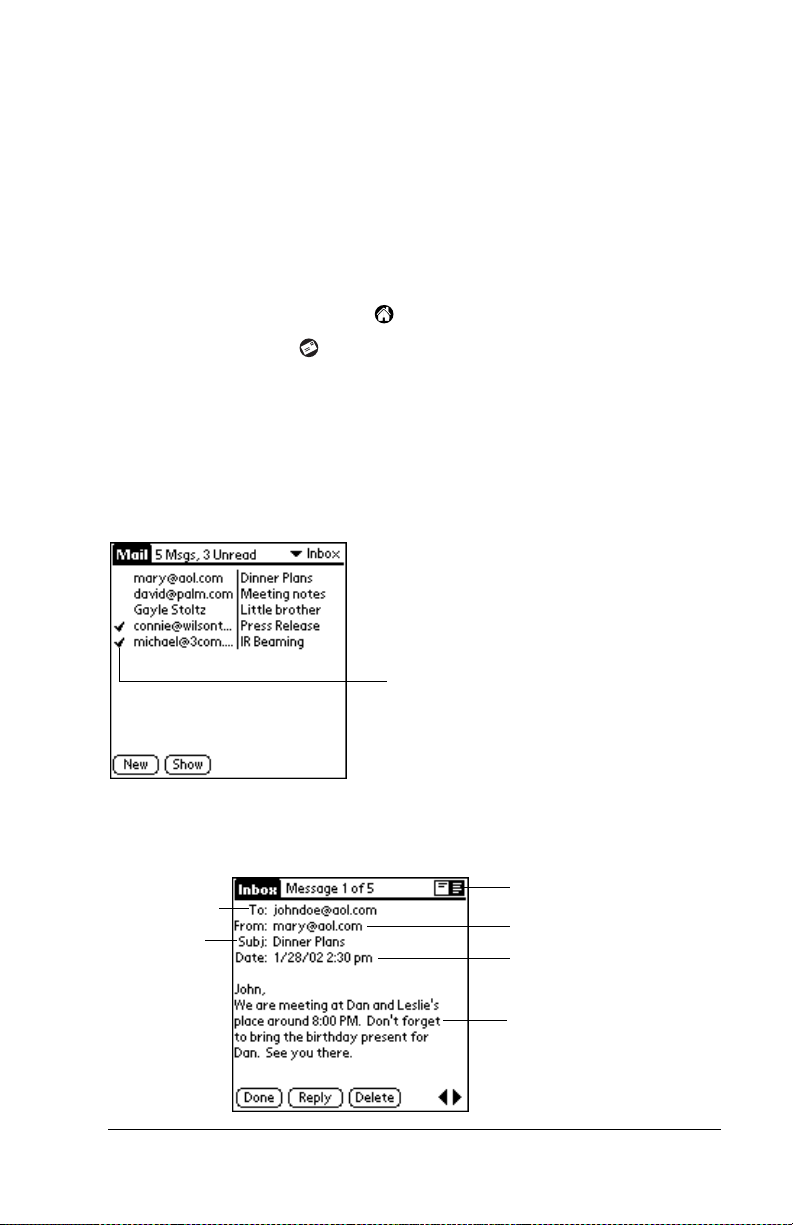
Creating e-mail items
You create e-mail items with your handheld the same way you create
e-mail with your desktop E-mail application: you identify the
recipient(s) of the e-mail item, define a subject, and create the body of
the e-mail item.
You create original e-mail items and replies in the New Message
screen. All e-mail items must, at the very least, contain information in
the To: and Subj: fields.
To create an e-mail item:
1. Tap New.
Tap
New
Tip:
You can also create an e-mail item by tapping New from
the Message menu.
Page 5 Using the Mail Application
Page 9
2. Enter the e-mail address of the recipient.
Note:
Enter the address as if you were entering it from your
desktop E-Mail application. For example, network users
sending an e-mail item to a user on the same network do
not need to add Internet information, such as
@mycorp.com.
3. To send a copy of this e-mail item to additional recipients, tap the
CC: field, and then enter the e-mail addresses of the additional
recipients, separating the addresses with a comma followed by a
space.
4. Tap the Subj: field and enter a subject for your e-mail item.
5. Tap the Body: field and enter the text of your e-mail item.
Tip:
If the address, CC, subject, or body exceeds the capacity
of the screen display, tap the name of the field (for
example, tap “To:”) to expand that field. Tap the Done
button to return to the New Message screen.
Tap the name of the field to open
Tap to return to New Message screen
Chapter 2 Page 6
Page 10

To reply to an e-mail item:
1. Tap an e-mail item in the Message list to display it onscreen.
2. Tap Reply.
3. Select whom you want to receive the reply: Sender only, All
recipients, or someone who didn’t see the original e-mail item
(Forward).
4. Select whether you want to include original text or comment
original text.
5. Tap OK.
6. Enter the text of your reply.
Tip:
7. Tap Send to place your reply in the Outbox.
You have several options including setting the priority.
See “Adding details to e-mail items” later in this chapter.
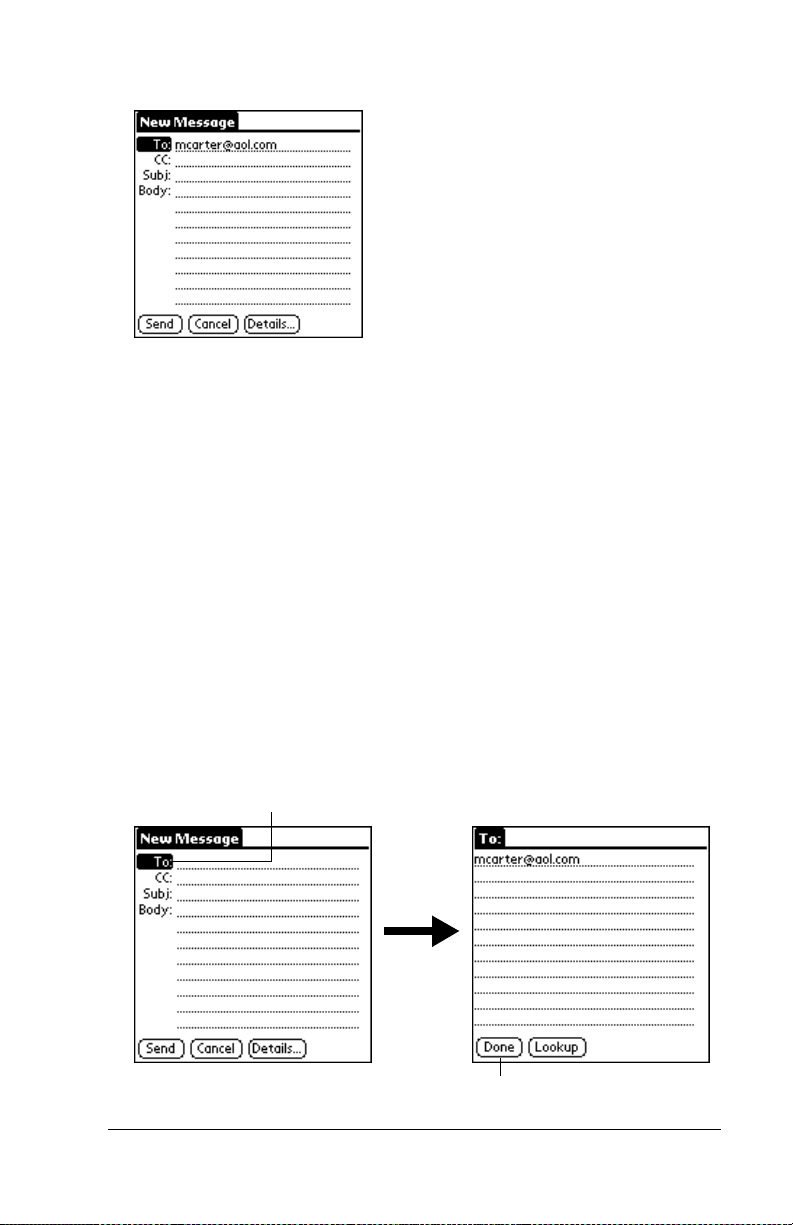
Looking up an address
To identify the recipient of an e-mail item, you need to enter that
person’s e-mail address. You can do this either by entering the data
directly into the field or by using the Look Up command to access the
information in your Address Book.
To look up an e-mail address:
1. Tap either the To: or CC: field name to expand it.
2. Enter the first few letters of the last name of the person whose
address you want to find.
3. Tap Lookup.
4. If the letters you enter identify a unique listing from your Address
Book, your handheld completes the address for you. If not, the
Lookup dialog box appears and lists all records that contain
information in an E-mail field.
Page 7 Using the Mail Application
Page 11

Tip:
You can also open the Look Up dialog box in the New
Message screen by tapping Lookup from the Options
menu or by using the Graffiti
Tap Lookup
®
Command stroke /L.
5. Enter the first letter of the entry you want to find to scroll to the
first entry that begins with that letter. If you write an additional
letter, the list scrolls to the first entry that starts with those two
letters. For example, writing an “s” scrolls to “Sanders,” and
writing “sm” scrolls to “Smith.”
6. Tap an address to select it.
7. Tap Add.
Tap to select
Tap here to enter address in field
Chapter 2 Page 8
Page 12

Adding details to e-mail items
Before you send your e-mail item, you can attach additional attributes
to it, such as a signature or a priority level. These features are
dependent on the desktop E-mail application you use. If your
application does not support the attribute you select, your handheld
cannot attach that attribute to the e-mail item.
The following details are available:
Priority
Flags an e-mail item as High, Normal, or Low
priority.
BCC
Creates a blind carbon copy field in the New
Message screen.
Signature
Attaches previously defined text as the closing of an
e-mail item. See “Adding a signature to your e-mail
item” later in this chapter.
Confirm
Read
Confirm
Delivery
Requests a confirmation telling you when the
e-mail item was read.
Requests a confirmation telling you when the
e-mail item was delivered.
The Priority and BCC settings are valid only for the current e-mail
item and must be set for each item you create.
Setting a priority
To set a priority for your e-mail item:
1. In the New Message screen, tap Details.
Tap here
2. Tap the Priority pick list and select the priority you want.
Page 9 Using the Mail Application
Page 13

Tap
here
3. Tap OK.
Tip:
Your handheld can flag e-mail items with a specific priority
only if your desktop E-Mail application supports this feature.
Sending a blind carbon copy
To add a BCC field to your e-mail item:
1. In the New Message screen, tap Details.
2. Tap the BCC check box to select it.
3. Tap OK.
BCC field
Tap to select priority
4. Tap the BCC: field and enter an address.
Adding a signature to your e-mail item
A signature consists of information about yourself that is appended to
your e-mail item as its closing. For example, a signature can contain
your name, address, phone and fax numbers, and any other text you
want to include. By defining such information as a signature, you save
yourself the trouble of having to enter it every time you create an
e-mail item.
Adding a signature to your message is a two-part process. First, you
create your signature. Then you select the Signature option.
Chapter 2 Page 10
Page 14

To create a signature:
1. Tap the Menu icon .
2. Tap Options, and then tap Preferences.
3. Tap the Signature text field and enter the text of your signature.
Add signature
text here
4. Tap OK.
To add a signature to your e-mail item:
1. In the New Message screen, tap Details.
2. Tap the Signature check box to select it and add your signature to
the e-mail item.
Note:
The check box stays selected, so all subsequent e-mail
items you create will also contain your signature until you
deselect the Signature option.
3. Tap OK.
Note:
The signature does not display in your e-mail item; only your
recipient sees the signature.
Requesting confirmations
To receive a confirmation when your e-mail item is read:
1. In the New Message screen, tap Details.
2. Tap the Confirm Read check box to select it.
3. Tap OK.
To receive a confirmation when your e-mail item is delivered:
1. In the New Message screen, tap Details.
2. Select the Confirm Delivery check box to select it.
3. Tap OK.
Page 11 Using the Mail Application
Page 15

Storing e-mail to be sent later
When you send e-mail from your handheld, it actually stores the
e-mail in the Outbox folder until the next time you synchronize your
handheld with your computer. During synchronization, all e-mail
stored in the Outbox folder is transferred to the Outbox folder in your
desktop E-Mail application. E-mail created on your handheld is sent
out the next time you send mail from your desktop E-Mail application.
To send e-mail:
■
After you create an e-mail item, tap Send.
Editing unsent e-mail
You can make changes to an e-mail that has not yet been sent, as long
as you have not yet performed a HotSync operation. When you edit an
e-mail item, your handheld removes the item from the Outbox folder
and takes you back to the New Message screen, where you can edit the
item and resend it, save it as a draft, or delete it.
To retrieve an e-mail item:
1. In the Message list, tap Outbox from the pick list in the upper-right
corner.
Tap here to display folder list
2. Tap the e-mail item you want to retrieve.
Chapter 2 Page 12
Page 16

Tap
here to
select
item
Tap to
edit
item
3. Tap Edit.
Draft e-mail
Sometimes you may not want to send an e-mail item immediately; for
example, you may want to add additional information before sending
it. Your handheld stores such e-mail items in the Draft folder until you
are ready to edit them again.
Note:
To save an e-mail item as a draft:
1. Create an e-mail item.
When you’re creating or editing an e-mail item, you can also
save the item as a draft by canceling it. When you cancel an
item, your handheld opens a dialog asking if you want to save
the e-mail item. If you tap Yes, your handheld saves the item
in the Draft folder.
2. Tap the Menu icon .
3. Tap Message, and then tap Save Draft.
To edit an e-mail item saved as a draft:
1. In the Message list, tap Draft from the pick list in the upper-right
corner.
2. Tap the draft you want to display.
Page 13 Using the Mail Application
Page 17

Tap here
to select
item
Tap to
edit
item
3. Tap Edit.
4. Enter your changes; then either save the e-mail item again as a
draft, or tap Send to move the item to your Outbox folder.
Filing e-mail
Your handheld can store e-mail you receive or create in the Filed
folder. The contents of this folder do not automatically synchronize
with your desktop E-Mail application during a HotSync operation.
Your handheld, however, stores a backup copy of the Filed folder on
your computer hard disk.
To file e-mail:
1. Open an e-mail item.
2. Tap the Menu icon .
3. Tap Message, and then tap File.
4. Tap No to save the e-mail item and move it to the Filed folder, or
tap Yes to file the item and keep a copy in the Inbox.
To remove e-mail from the Filed folder:
1. In the Message list, tap Filed from the pick list in the upper-right
corner.
2. Tap the e-mail item you want to restore.
3. Tap Edit to display and modify the item.
Tip:
After you display and modify the e-mail item, you can send it,
save it as a draft, or return it to the Filed folder.
Chapter 2 Page 14
Page 18

Deleting e-mail
Your handheld stores deleted e-mail in the Deleted folder until you
perform the next HotSync operation. If you delete an e-mail item from
the handheld, it is also deleted from your desktop E-Mail application
when you perform the next HotSync operation.
To delete e-mail:
1. Open the e-mail item you want to delete.
2. Tap Delete.
3. If you selected the Preferences option to confirm deletion, tap Yes.
Removing e-mail from the Deleted folder
You can reverse the deletion of an e-mail item (by removing it from the
Deleted folder) as long as you have not performed a HotSync
operation or purged the contents of the Deleted folder.
To remove an e-mail item you received from the Deleted folder:
1. In the Message list, tap Deleted from the pick list in the upper-right
corner.
2. Tap the e-mail item you want to restore.
3. Tap Undelete to move the selected item to the Inbox and mark it as
read.
To remove an e-mail item you created from the Deleted folder:
1. In the Message list, tap Deleted from the pick list in the upper-right
corner.
2. Tap the e-mail item you want to restore.
3. Tap Edit to display and modify the item.
Note:
After you display and modify the e-mail item, you can send it
or save it as a draft.
Purging deleted e-mail
Because your handheld stores deleted e-mail in the Deleted folder
until you perform a HotSync operation, deleted e-mail can
monopolize storage space. To avoid or correct this problem, purge the
contents of your Deleted folder. E-mail that you purge is still deleted
from your desktop E-Mail application when you perform the next
HotSync operation.
Page 15 Using the Mail Application
Page 19

To purge the contents of the Deleted folder:
1. Tap the Menu icon .
2. Tap Message, and then tap Purge Deleted.
3. Tap Yes.
Note:
You cannot restore e-mail items after you purge them.
Message list options
Message list options enable you to manage the way the Message list
displays information.
Folders
Your handheld provides folders for categorizing your mail. The
Message list displays the e-mail items in the folder you select.
To select a folder:
1. Tap the pick list in the upper-right corner to open the list of folders:
Inbox
Outbox
Deleted
Filed
Draft
2. Select the folder you want to display in the Message list screen.
Contains the e-mail from your desktop E-Mail
application Inbox, minus any that you have excluded
using filtering options. See “Creating special filters”
later in this chapter.
Contains the e-mail you created and sent on the
handheld since the last HotSync operation.
Contains the e-mail you deleted since the last HotSync
operation.
Contains the e-mail you want to store on the handheld.
Contains the e-mail you created using the handheld
but are not yet ready to send.
Date column
The Date column is optional in the Message list. By default, the Date
column is hidden to increase the available screen space.
Chapter 2 Page 16
Page 20

To show the Date column:
1. In the Message list, tap Show.
Tap
Show
2. Tap the Show Date check box to select it.
3. Tap OK.
Sorting the Message list
You can sort e-mail items by the date sent, by sender, or by subject.
Note:
To sort the Message list:
1. In the Message list, tap Show.
2. Tap the Sort by pick list and select one of the following options:
High-priority e-mail items always appear first, no matter how
you sort the list.
Date
Sorts e-mail by date and displays the most recent
e-mail item at the top of the screen.
Sender
Sorts e-mail by the sender’s user name and
displays items in ascending alphabetical order,
based on the first word of the From: field.
Subject
Sorts e-mail by the subject and displays items in
ascending alphabetical order, based on the first
word of the Subj: field.
3. Tap OK.
Page 17 Using the Mail Application
Page 21

HotSync options
HotSync options enable you to manage your e-mail more effectively
by selecting which e-mail items download when you synchronize
your computer and your handheld. You can define different settings
for local and remote synchronization. For example, you may want to
download all of your e-mail during local synchronization and only
urgent e-mail during remote synchronization. Once defined, your
handheld determines if synchronization is occurring locally or
remotely and uses the appropriate settings for the HotSync operation.
To open the HotSync Options dialog box:
1. Tap the Menu icon .
2. Tap Options, and then tap HotSync Options.
3. Tap the Settings for pick list and select Local HotSync or Remote
HotSync.
Tap here
to display
HotSync
options
Note:
For more information about Local and Remote HotSync
operations, see the handbook that came with your
handheld.
4. Tap the filtering option you want to apply:
All
During synchronization, all e-mail items in your
desktop E-Mail Inbox synchronize with your
handheld, and all e-mail items in your handheld
Outbox are sent to your desktop E-Mail
application.
Chapter 2 Page 18
Page 22

Send Only
During synchronization, only the e-mail items in
your handheld Outbox are sent to your desktop
E-Mail application; from there, they are sent to
their destinations.
Filter
Unread
The All setting does not mean that all information included in each
e-mail item downloads to your handheld. Truncation settings
(explained in a following section) for long e-mail items still apply.
Also, Mail never downloads any attachments to your handheld.
The e-mail item and any text information appear, but the
attachment is left in your desktop E-Mail application.
5. If you selected All, Send only, or Unread, tap OK. If you selected
Filter, continue to the next section.
During synchronization, all e-mail items in your
handheld Outbox are sent to your desktop E-Mail
application, and items in your desktop E-Mail
Inbox that meet specific criteria download to your
handheld. When you select the Filter setting, the
HotSync Options dialog box opens and displays
additional filter settings. See “Creating special
filters” later in this chapter.
During synchronization, only unread e-mail
items download to your handheld from your
desktop E-Mail Inbox, and all items in your
handheld Outbox are sent to your desktop E-Mail
application.
Creating special filters
You can create special filters to control the type of e-mail items that
download to your handheld during synchronization. Special filters
work on the premise of ignoring or retrieving items that contain
specific information in their header fields.
To create a special filter, you must decide whether you want to ignore
or retrieve certain e-mail items. Then, based on that decision, you
must tell your handheld what it needs to look for in the To:, From:, and
Subj: fields to single out those e-mail items.
Page 19 Using the Mail Application
Page 23

To access the special filter settings:
■
Tap the Filter box in the HotSync Options dialog box.
Tap here
to display
Filter
options
Ignoring or receiving e-mail
The first step in establishing a special filter is to determine whether
you want to ignore or retrieve e-mail that matches the information you
specify.
To define whether to ignore or receive e-mail:
■
Tap the pick list in the center of the HotSync Options dialog box
and select one of the following settings:
Tap here
Select Filter option
Ignore
Messages
Containing
Tells your handheld to
that meet the criteria you define and download
all other e-mail items
exclude
the e-mail items
during synchronization. In
general, this filter downloads more e-mail
during synchronization because it blocks only
one defined subset of e-mail.
Chapter 2 Page 20
Page 24

Retrieve Only
Msgs
Containing
Tells your handheld to
items that meet the criteria you define and to
ignore all other e-mail items during
include
only the e-mail
synchronization. This filter has the potential to
block more e-mail during synchronization
because it downloads only one subset of e-mail.
Defining filter strings
E-mail items are filtered based on the information contained in their
To:, From:, and Subj: fields. The information that defines what your
handheld is looking for is called a
by listing the words you want your handheld to find and separating
them with either a comma or a space. Each word in the filter string is
joined by an implicit OR, so you do not need to enter logical
connectors like AND or OR.
To create a more complex filter, you can define filter strings for the To:,
From:, and Subj: fields simultaneously. Your handheld joins the filter
strings for these fields using an implicit AND; once again, you do not
need to add the logical connector. Your handheld does that for you.
For example, suppose you want to receive only e-mail items from John
Smith (jsmith@aol.com) or Jack Jones (jjones@aol.com) concerning the
Apollo Project. You would create the following filter strings:
filter string
. You create a filter string
In the To: field:
In the Subj: field:
jsmith@aol.com, jjones@aol.com
Apollo Project
Your handheld interprets this as, “Accept e-mail items about the
Apollo Project from John Smith or Jack Jones. Do not accept e-mail
items from other people. Do not accept e-mail items from John or Jack
about any other subject.”
When you define a string, note that your handheld searches for any
instance of that
sequence
of characters. For example, if you create a
filter that retrieves only e-mail items containing the string “info,” your
handheld considers “
info
,” “ra
info
rest” and “k
info
lk” appropriate
matches.
Page 21 Using the Mail Application
Page 25

To define a filter string:
1. Tap a header field in the HotSync Options dialog box.
Tap here
to insert
cursor
2. Enter your filter string, using commas or spaces to separate the
words. Do not add connectors, such as AND or OR, between
words in a string.
3. If your string exceeds the length of the field, tap the name of the
field to display the Notes screen for that header field. For more
information about header field Notes screens, see “Creating e-mail
items” earlier in this chapter.
Enter
filter
data
Tap here
Tap Done
to return to
HotSync
Options
4. Tap Done to return to the HotSync Options dialog box.
5. Tap OK.
Chapter 2 Page 22
Page 26

High-priority e-mail
The Retrieve All High Priority setting lets you retrieve e-mail items
marked high-priority, even if those items would have been blocked by
a defined filter.
To retrieve high-priority e-mail items:
1. Tap the Filter box in the HotSync Options dialog box.
2. Tap the Retrieve All High Priority check box to select it.
Tap
check
box
3. Tap OK.
Note:
This setting is applicable only if your E-Mail application has
the capacity to flag high-priority e-mail items.
Truncating e-mail items
The Truncate feature lets you set a point at which long e-mail items
truncate when downloading to your handheld. By default, this
Truncate value is 4,000 characters. By truncating long messages, you
reduce the time it takes to synchronize your desktop E-Mail and Mail,
as well as the amount of storage space e-mail uses on your handheld.
Note:
Truncation is separate and independent from filtering.
Page 23 Using the Mail Application
Page 27

To truncate e-mail items:
1. Tap Truncate in the HotSync Options dialog box.
Tap to
select
maximum
length
Tap
Truncate
2. Tap to select the truncation setting you want.
Tip:
If you select the maximum setting, messages can be 8,000
characters; longer messages are truncated. If you select a
lower value, you’ll have more room for e-mail items.
3. Tap OK.
Mail menus
Mail menus are shown here for your reference, and Mail features that
are not explained elsewhere in this book are described here.
See "Using Menus" in the handbook that came wtih your handheld for
information about choosing menu commands.
Message menus
The Message menu varies depending on whether you are viewing an
e-mail item, creating an e-mail item, or viewing the Message list.
Message list
New Message
View Message
Chapter 2 Page 24
Page 28

Options menus
The Options menu varies depending on whether you are creating or
editing an e-mail item.
Message list
About Mail
New Message
Shows version information for Mail.
Page 25 Using the Mail Application
Page 29

Index
Finding
e-mail addresses 7–9
Folders for e-mail 16
B
BCC (blind carbon copy) 10
C
Categories
folders for e-mail 16
cc:Mail 2
Confirming e-mail 11
Creating
e-mail 5–7
D
Dates
showing in Mail list 16
Deleted
e-mail, recovering 15
Deleting
e-mail 15
Delivering e-mail 9, 11
Desktop E-Mail application
applications supported 2
managing 1–25
support of Mail features 9
Draft e-mail 13
E
Editing
unsent e-mail 12
E-mail addresses
looking up 7–9
E-mail items.
Eudora 2
Exchange 2
See
Mail
F
Filing e-mail 14
Filters for e-mail 19–23
H
Header information (e-mail) 5, 6
High Priority e-mail filter 23
HotSync
options for filtering e-mail 18–23
I
Ignoring e-mail.
Inbox 16
See
Filters for e-mail
L
Looking up Address Book data
to add to e-mail addresses 7–9
Lotus
cc:Mail 2
M
Mail
address lookup 7–9
attachments 19
BCC (blind carbon copy) 9, 10
closing 5
confirm delivery 9, 11
confirm read 9, 11
creating 5–7
deleting e-mail 15
draft e-mail 13
editing unsent e-mail 12
filing e-mail 14
filtering options 18–23
folders 16
menus 24
opening 4
overview 1–2
priority of delivery 9
purging deleted e-mail 15–16
recovering deleted 15
replying to e-mail 7
sending 12
Index Page 26
Page 30

showing dates 16
signature 9, 10–11
sorting 17
truncating 23
viewing e-mail 4
Menus
Mail 24
Microsoft
Exchange 2
O
Opening
Mail 4
Outbox 12, 16
P
Priority of delivery (e-mail) 9
Purging
deleted e-mail 15–16
R
Reading e-mail on handheld 4
Recovering
deleted e-mail 15
filed mail 14
Replying to e-mail 7
Retrieving e-mail.
e-mail
See
Filters for
S
Saving
draft e-mail 13
Selecting
e-mail to be synchronized.
Filters for e-mail 19
Sending
e-mail 5–7, 12
Showing dates in Mail list 16
Signature for e-mail 10–11
Sorting
e-mail items 17
Storing e-mail 14
T
Truncating e-mail 23
U
Unsent e-mail, editing 12
See
Page 27 Index
 Loading...