

Page 1

PACKARD BELL COMPASSEO 600
NAVFDRIVE
USER MANUAL
Version 2.0
Page 1 of 18
Page 2

FDRIVE
NAV
MOBILE NAVIGATION
USER MANUAL CONTENTS
STARTING UP COMPASSEO 600 PACKARD BELL .................................................................................................. 1
GETTING YOUR SOFTWARE REGISTERED................................................................................................................ 1
CONFIGURING YOUR SYSTEM............................................................................................................................... 1
Navigating to your Preference ............................................................................................................................ 2
Night Mode Advance Settings............................................................................................................................. 2
Audio Pleasure....................................................................................................................................................... 3
Basic Audio Settings................................................................................................................................................ 3
Safety Speed Settings............................................................................................................................................. 3
Distance Prompt Settings ...................................................................................................................................... 4
Language Selection............................................................................................................................................... 4
Change Your Map................................................................................................................................................. 4
Returning to Default............................................................................................................................................... 4
CHECKING OUT YOUR STATUS............................................................................................................................... 4
FDRIVE
NAV
NAV
Setting Your Points................................................................................................................................................... 5
Proceed to Route .................................................................................................................................................. 6
SEARCH – SEARCHING FOR THAT LOCATION………………………………………………………………………….. 6
Searching in Layers................................................................................................................................................ 7
Using Your Search Results ..................................................................................................................................... 7
Viewing Location in Map View............................................................................................................................. 8
Searching for Amenities Nearby........................................................................................................................... 8
N NAV
Adding a New Favourite Point ............................................................................................................................. 9
Deleting your Favourite Point ............................................................................................................................... 9
Viewing your Favourite Point................................................................................................................................. 9
Searching for Nearby Amenities........................................................................................................................... 9
Editing Your Favourite Point.................................................................................................................................. 10
NAV
On the description screen…................................................................................................................................ 11
NAV
Knowing Your Navigation Map .......................................................................................................................... 12
Pop-Up Menu ....................................................................................................................................................... 12
Recognizing your Navi Map Modes................................................................................................................... 13
Working with Your Navigation Map .................................................................................................................. 14
Zooming In and Zooming Out on the Map....................................................................................................... 14
Panning of the Map ............................................................................................................................................ 14
Switching Between the Navi Mode and Map Mode ..................................................................................... 14
Switching Between the Night Mode and Day Mode...................................................................................... 14
Switching Between the 2D and 3D Mode ........................................................................................................14
Switching Between the Head-Up and North-Up Mode.................................................................................... 15
Playing Your Route Simulation............................................................................................................................. 15
Adding a Favourite .............................................................................................................................................. 15
Search for Amenities Nearby............................................................................................................................... 15
APPENDIX A: DEFAULT SETTINGS VALUE ..............................................................................................................(i)
– YOUR NAVIGATION COMPANION ................................................................................................... 5
FDRIVE
PLANNER – PLANNING YOUR JOURNEY .............................................................................................. 5
FDRIVE
FAVOURITE MANAGER – SAVING THAT INTERESTING PLACE ......................................................... 9
FDRIVE
DIRECTORY – ADDRESSES IN YOUR PALM.......................................................................................... 10
FDRIVE
NAVIGATION MAP – WHERE IT ALL HAPPENS.................................................................................... 11
Page 2 of 18
Page 3

FDRIVE
NAV
MOBILE NAVIGATION
USER MANUAL
STARTING UP COMPASSEO 600 PACKARD BELL
On turning on your COMPASSEO 600, a Welcome Menu would be displayed. The menu presents access
buttons to the main NAV
• Tab on one of the following buttons to access your desired application.
Access main NAV
Access NAV
Access Compasseo MP3 player
Access Compasseo JPG viewer
View the current GPS status
Displays device information and technical support details
GETTING YOUR SOFTWARE REGISTERED
Visit www.iwsgis.com for more information.
CONFIGURING YOUR SYSTEM
Before jumping into your application, it is best to get your system configured to a setting that suits you.
• To access the Settings Menu, tap on the ‘SETTINGS’ button on the Welcome Menu.
You will find that the system settings have been grouped into 3 simple categories as seen from the 3 main
buttons – NAVIGATION, AUDIO and CHANGE MAP.
NAVFDRIVE Nav NAV
Page 3 of 18
FDRIVE
application and other functions available in your mobile navigation device.
FDRIVE
application
FDRIVE
Settings Menu
FDRIVE
Navigation
Settings
FDRIVE
NAV
Audio Settings
Changing maps to other
installed maps
Re-set to Default Settings
Page 4
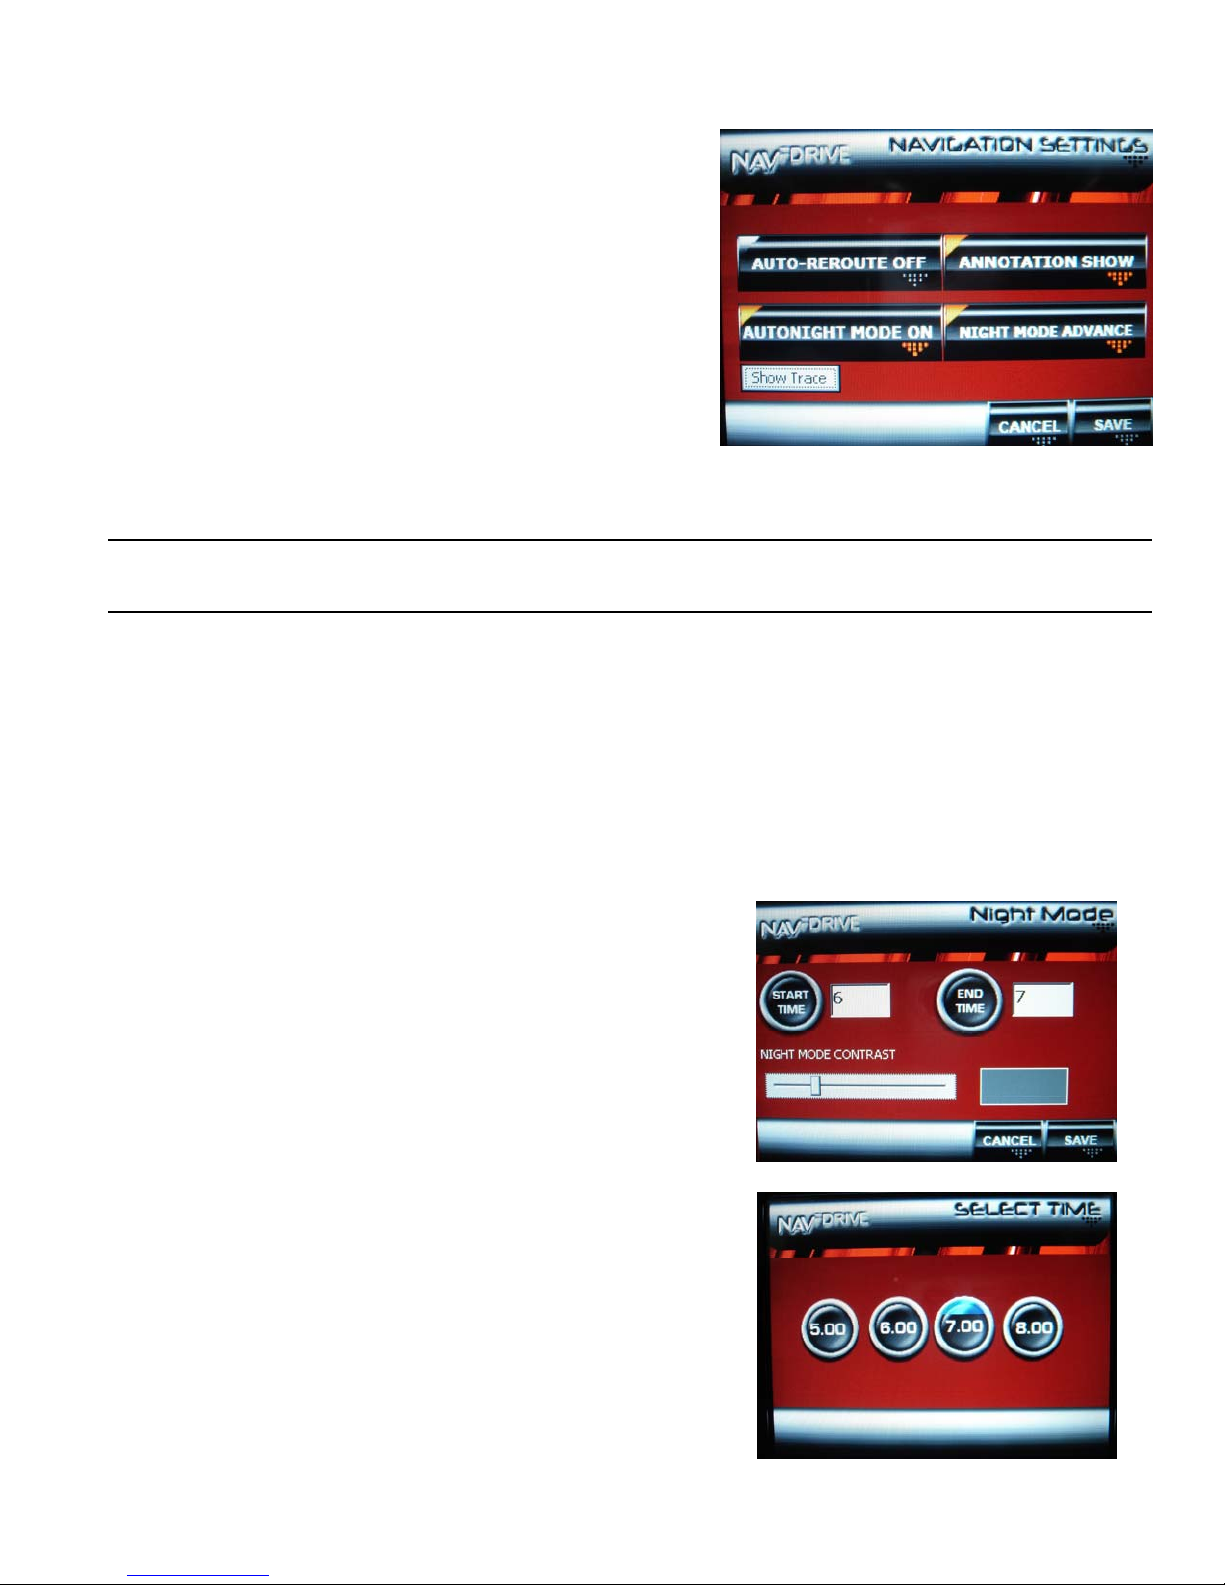
Navigating to your Preference
Navigation Settings allow you to configure settings for your
navigation according to your preferences. To avoid confusion
from a long list of settings, the Navigation Settings panel
presents 3 features that you need to set once before you
begin your navigation. These are features that are least likely
to be changed while you are navigating.
The 3 features are – Auto-Reroute, Annotation and Auto Night
Mode.
Auto-Reroute: Enables the system to automatically re-plan your route in the event you miss a turn during
your journey. This saves you the need to stop your vehicle to re-plan your route.
Annotation: Name labels on the buildings and landmarks can be displayed or hidden, based on your
preference.
Auto Night Mode: The system would automatically switch to the night mode, based on the system GPS
timing. You can further set your night mode viewing. (See Night Mode Advance Settings).
These features could be turn ON/OFF by tapping on the respective buttons.
Night Mode Advance Settings
You can also further configure settings for your night mode.
• Tap on the Night Mode Advance button to display the advance settings panel for the night mode.
To set the Start/End time for the auto night mode:
• Set the Start/End Time for the Auto Night Mode by
tapping on the respective buttons.
• Select the desired time from the subsequent selection
panel.
To set the Colour Contrast for the night mode:
• Set your desired Night Mode colour contrast by sliding the
slide bar indicator.
• Slide to the right for a lighter contrast and to the left for a
darker contrast – based on your preferences.
Page 4 of 18
Page 5
Audio Pleasure
Your navigation device is loaded with various audio prompts. This audio assistance allows you to continue
getting guided instructions without having to continually look at the screen. You also have to choice to select
the kinds of prompt that would want to enable/disable.
• Tap on the ‘AUDIO’ button to access the Audio Settings panel.
The Audio Settings are on two panels. Tap on the ‘NEXT’ button to turn to the next panel and tap
on the ‘BACK’ button to return to the previous panel.
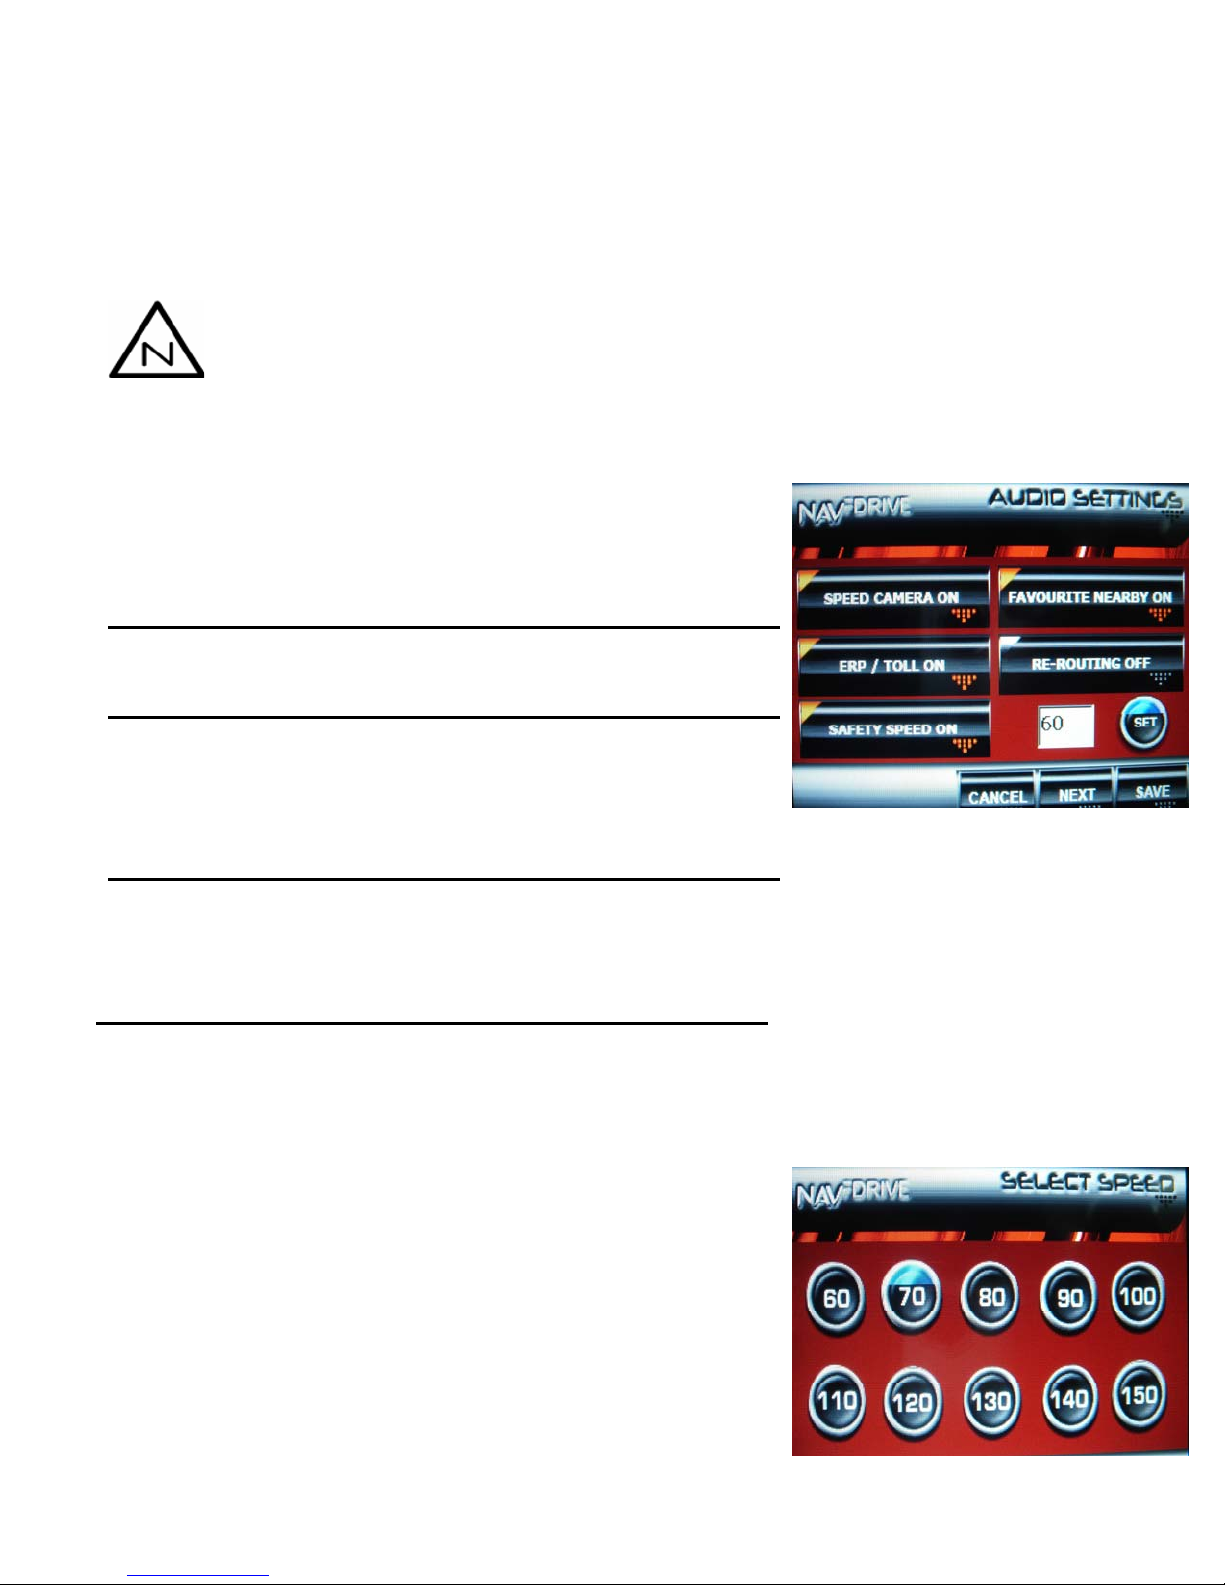
Basic Audio Settings
Your basic audio settings enable you to turn ON/OFF basic audio prompts.
Warns you of speed camera nearby.
Speed Camera That would provide you with ample
warning to slow your vehicle to the
legal speed limit. (Not applicable to Sri
Lankan Market)
Alerts you if one of your favourite
Favourite Nearby locations is nearby.
Informs you of ERP/Toll gates that you
are approaching. It is advisable to get
ERP / Toll your payment modes ready i.e. cash
card, cash etc. (Not applicable to Sri
Lankan Market)
Re-Routing Indicates that your system is rerouting.
This also indicates that you have missed
a turn on your original route. Don’t
worry; your system will lead you back to
the correct route.
Alerts you if you have exceeded your
speed limit. Subsequently, set your
Safety Speed speed limit. It is best to be aware of the
legal speed limits within your travelling
vicinity.
• Tap on the respective buttons to turn ON/OFF the basic audio
prompts. On turning ON each prompt, a corresponding audio
prompt would be played.
Safety Speed Settings
On turning ON your Safety Speed prompt, the corresponding
‘SET’ button would be enabled (indicated by a blue top).
• Tap on the ‘SET’ button to select the desired speed limit
from the subsequent selection panel.
Page 5 of 18
Page 6
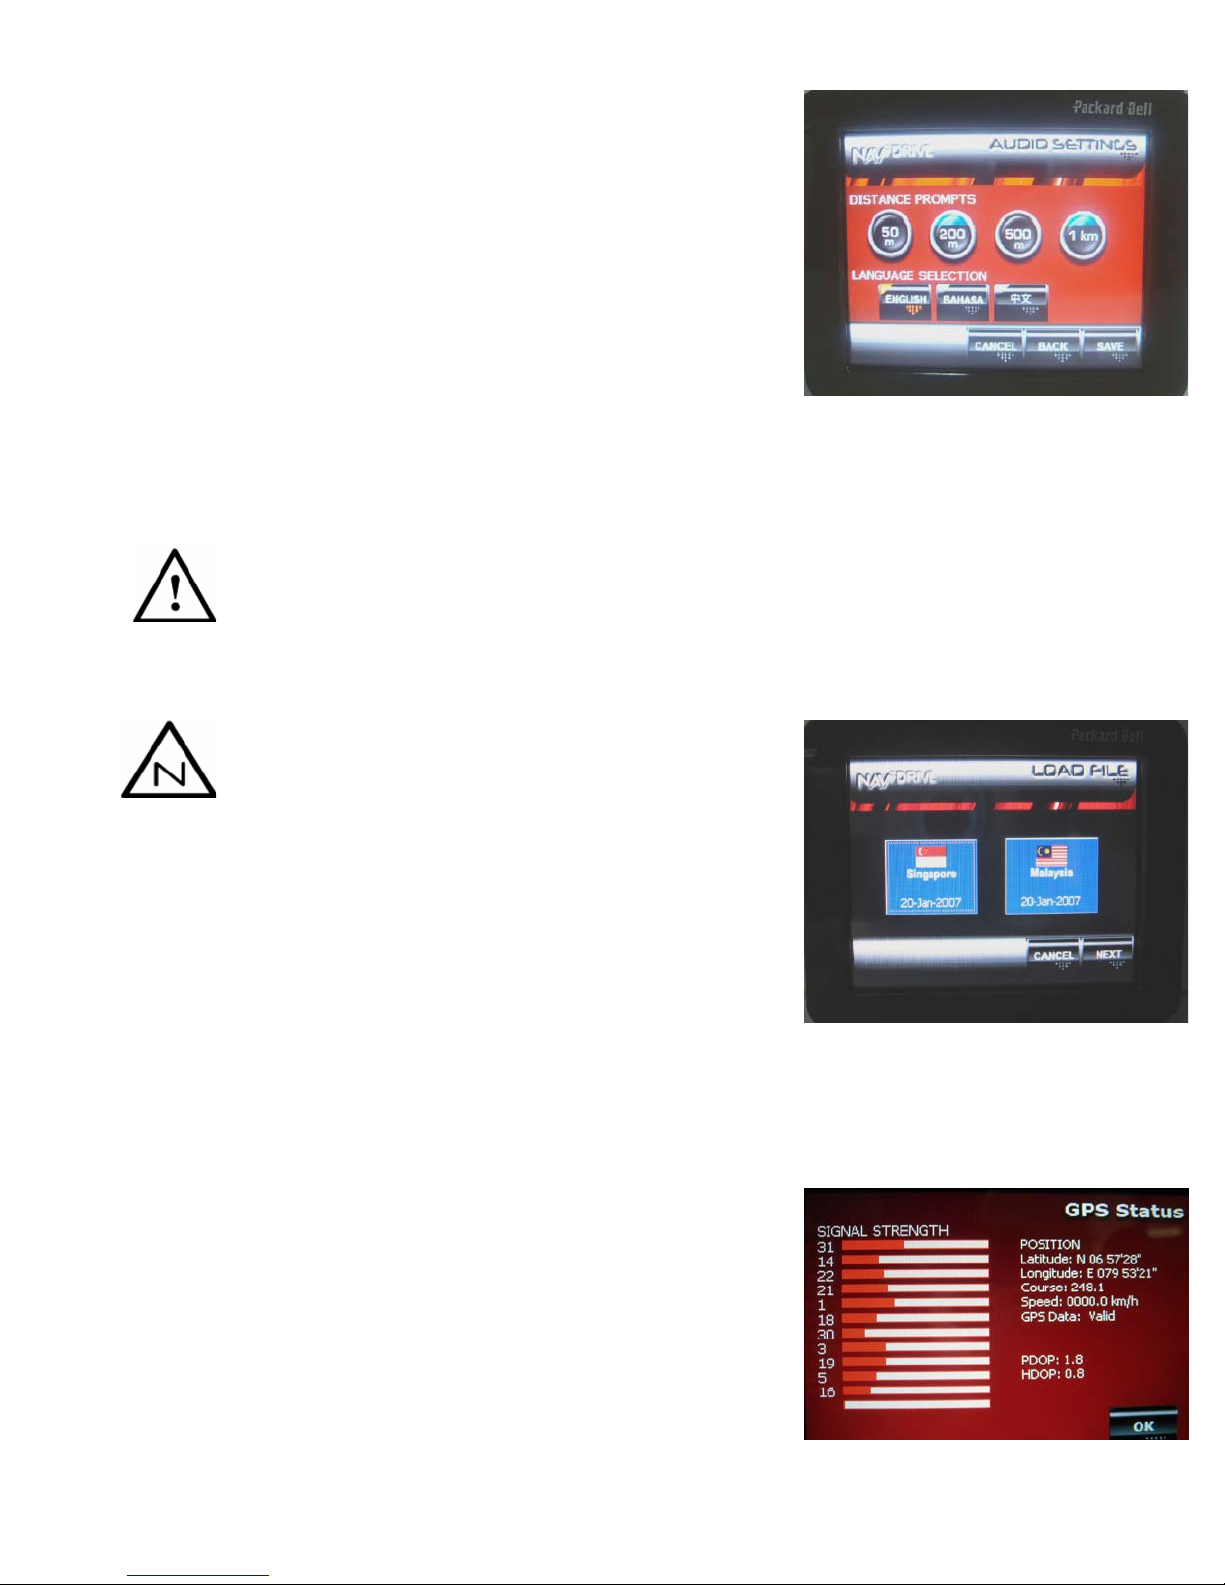
Distance Prompt Settings
You can also opt to have audio prompts at pre-determined
distances – 50m, 200m, 500m and 1km from the next turn.
Alternatively, you can opt to turn these off – one, two, three
or all of them!
• Tap on the respective distance prompt buttons to turn
ON/OFF the prompts. Enabled buttons are indicated by
the blue top.
Language Selection
The current version includes English as well as Mandarin voice prompts.
• You may select your preferred language of instruction by tapping on the respective language buttons.
Tap on the ‘SAVE’ button to Save your changed settings or tap on the ‘CANCEL’ button
to cancel the changed settings.
Change Your Map
Travelling to another country and need to change your map?
Your NAVFDRIVE application is pre-loaded with map of
Sri Lanka (please check with your vendor on versions).
Singapore and Malaysia maps are available and will
have to be purchased separately. Should you purchase
more than 1 country map on your SD Card,
please refer below.
• Tap on the ‘CHANGE MAP’ button to load your desired
map.
• Tap on the ‘NEXT’ button to view more available maps.
• Select your desired map by tapping on the respective
button. Your map would be automatically loaded!
• Tap on the ‘CANCEL’ button to exit.
Returning to Default
• In the event you wish to re-set all your settings to default settings, tap on the ‘BACK TO DEFAULT’ button.
Refer to Appendix A for a list of default settings. Alternatively, refer to your vendor.
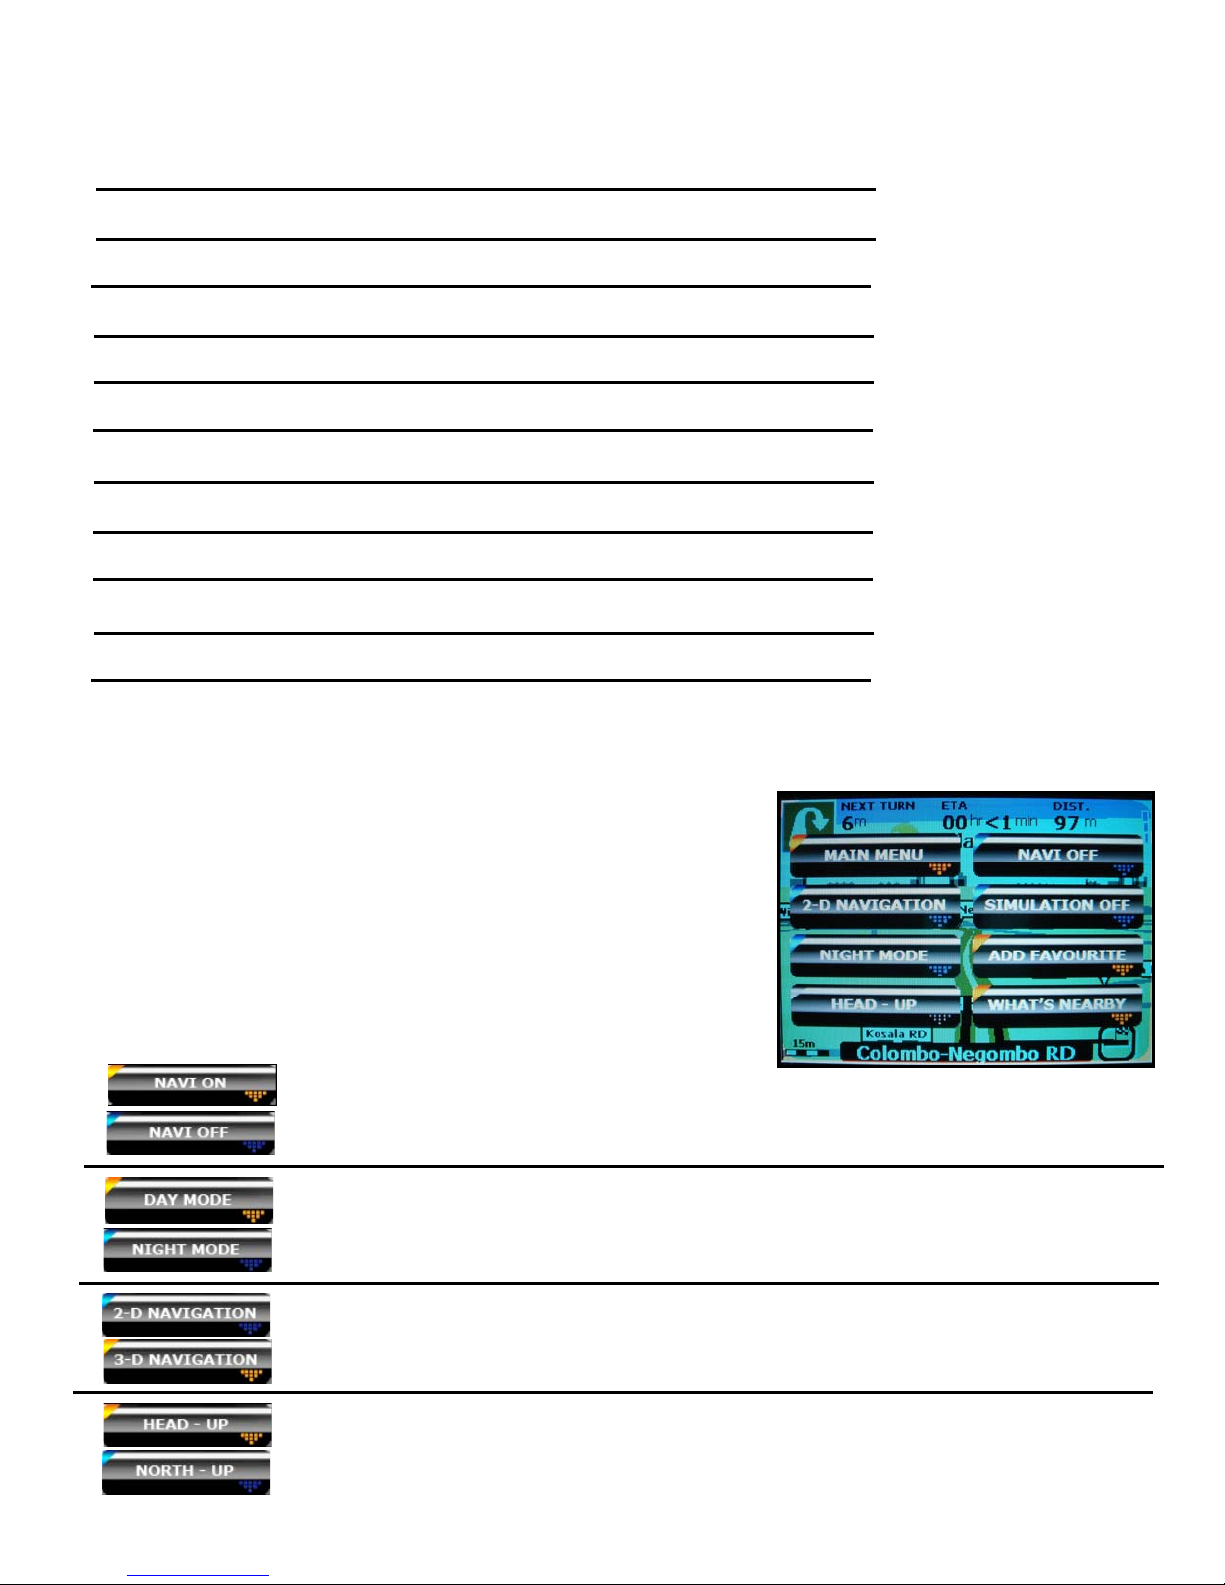
CHECKING OUT YOUR STATUS
In any case that you wish to check if your device is
connected to the GPS, tap on the ‘GPS STATUS’ button on
the Welcome Menu. The GPS Status display would show
GPS signal strength and your GPS location.
Page 6 of 18
Page 7

FDRIVE
NAV
FDRIVE
NAV
destination as well as store and manage your favourite locations in just a few finger taps.
Navigating has never been easier!
• To access the application, tap on the ‘NAVIGATION’ button on the Welcome Menu.
The Main Menu will be displayed. You will find buttons linking to the various tools that will help you in your
navigation.
Launches the NAV
Launches the Launches the NAV
Launches the Launches the NAV
Displays the Main Menu Help screen
Launches the Launches the NAV
Map
FDRIVE
NAV
NAVFDRIVE Planner allows you to plan your journey to your desired location with great ease. In this Wizard-like
interface, planning is a breeze!
• Tap on the ‘PLANNER’ button to launch the Planner
tool.
Setting Your Points
• Tap on the Set Start button to set your start point.
Similarly, tap on the Set End button to set your end
point.
A subsequent panel displayed would allow you to set your
points by three methods.
• Tap on the ‘BY GPS’ button to set your Start Point
based on your current location.
This is applicable only for your Start Point and very useful if you wish to plan a route
from where you are.
• Tap on the ‘SEARCH’ button to set your points by a
location/address search. (See: WHERE IS THIS PLACE?)
• Otherwise, you can select any of your favourite points
as your start/end point! Tap on the desired favourite
point to select.
By tapping the ‘REVERSE’ button, you can
easily interchange your Start and End
Point.
– YOUR NAVIGATION COMPANION
provides you with easy-to-use tools to search and view locations, plan a route to your desired
FDRIVE
Search tool
FDRIVE
Planner
Fdrive
Favourite Manager
Displays the NAV
FDRIVE
FDRIVE
Directory
Navigation
PLANNER – PLANNING YOUR JOURNEY
Page 7 of 18
Page 8

Selecting Your Preferred Routing Method
The Planner tool allows you to determine how you want your route to be planned.
You may choose to route: Via Shortest Time or Via Shortest Distance
• Tap on the route option button. The route option button displays the current
routing method that is selected i.e. ‘VIA SHORTEST TIME’ or ‘VIA SHORTEST DIST’.
• The button would toggle to display the corresponding selected route method.
Proceed to Route.
• Tap on the ‘ROUTE’ button to start your routing. Otherwise, tap on ‘CLEAR’ to clear your existing route.
• Upon successful routing, the system would lead you to the navigation map and you are on way to your
destination.
See: “
navigation map!
FDRIVE
NAV
SEARCH – SEARCHING FOR THAT LOCATION
With the NAVFDRIVE Search tool, you can search for a location.
• Tap on the ‘SEARCH’ button to launch the Search tool.
A NAVFDRIVE generic keyboard would be launch for you
to enter a keyword to search. You may enter a location
name (e.g. road name, building name) or a specific
address (e.g. Alfred House Gardens).
• Enter your desired keyword by pressing the alphabet
keys (E.g. Hilton).
• To switch to the numeric keyboard, tap on the ‘123’
button to access it and tap on the ‘ABC’ button to
return to the alpha keyboard.
• Tap on the ‘ENTER’ button to proceed with your
search. The search tool shall start the search process
and display the results in the Search Results panel.
The search tool would search for the
location in a specific layer, if you had
selected a specific layer. (See – Searching
-In Layers).
As the Search Results would display a maximum of 200 matched locations, it is advisable to
enter a more specific keyword rather than a generic keyword.
NAV
FDRIVE
NAVIGATION MAP – WHERE IT ALL HAPPENS” to see what you can do in the
Page 8 of 18
Page 9

Searching in Layers
You can choose to search for the desired location in all the available layers or in specific layers (e.g. Address,
Road, Building, etc).
• Tap on the ‘LAYER’ button to access the select layer
panel.
• From the displayed list, select your desired layer.
• Otherwise, tap on the ‘SELECT ALL’ button to set the
search tool to search all layers.
Using Your Search Results
On successful search, the results would be displayed in the Search Results panel. With the results you may
carry out a number of actions.
• Tap on the desired location to select.
• Tap the buttons listed below to carry out the corresponding tasks.
NEARBY: To search to amenities within a 1km radius of
VIEW: To view the selected location in the Map view
START: To set the location as your start point
END: To set the location as your end point
FAV: To save the location as your favourite
BACK: To do another search
EXIT: To exit the Search Results panel and return to
the location
point
the Main Menu
Page 9 of 18
Page 10

Viewing Location in Map View
A location displayed on a list, for example in Search Results, could be viewed in the Map View screen.
• Upon tapping on the ‘VIEW’ button, the location will be displayed as shown.
• The selected location is positioned in the centre of the map and indicated by the ‘+’ sign.
• To zoom in on the location, tap the ‘+’ button.
• To zoom out, tap the ‘-‘ button.
• To exit from the screen, tap the ‘EXIT’ button.
Searching for Amenities Nearby
You may want to search for nearby amenities. Amenities found within a 1km radius of a selected location
would be displayed in the results screen.
• Tap on the ‘NEARBY’ button after selecting the
location e.g. in the Search Results.
• Select the desired amenity from the list of amenities.
You can use tap on the checkbox or tap on the
‘SELECT’ button.
• Tap ‘SEARCH’ to proceed.
• If any of the amenities you selected are found within a
1km radius, it would be displayed.
From the results list, you can select any of the location and carry out any of the actions below.
VIEW: To view the selected location in the Map view
START: To set the location as your start point
END: To set the location as your end point
FAV: To save the location as your favourite point
BACK: To do another nearby search
EXIT: To exit the Search Results panel and return to
the Main Menu
Page 10 of 18
Page 11

FDRIVE
NAV
NAV
have just visited or passed by.
• Tap on the ‘FAVOURITES’ button to launch the
Favourite Manager
Your favourite points would be listed in the display.
Adding a New Favourite Point
• Tap the ‘ADD’ button to add a new favourite point.
• You will launch the Search tool to search for your
desired location and save the desired location as your
favourite point. (See: Using Your Search Results).
• There will be a prompt informing you that the selected
location has been saved as a favourite point.
You will find alternative ways to add a favourite point. You can add a selected location as a favourite
point by tapping on the ‘FAV’ button in any screen.
Deleting your Favourite Point
• To delete an unwanted favourite point, select the point and tap the ‘DELETE’ button to delete the
respective point.
• You will be prompted to confirm if you want to delete the point.
A deleted point cannot be recovered!
Viewing your Favourite Point
• To view your favourite point in map view, select the desired point and tap the ‘VIEW’ button.
Searching for Nearby Amenities
• To search for amenities near your favourite point, tab to select your desired point and tap the ‘NEAR’
button.
FAVOURITE MANAGER – SAVING THAT INTERESTING PLACE
FDRIVE
Favourite Manager helps you to save that frequently visited location or an interesting place you’ve
Page 11 of 18
Page 12

Editing Your Favourite Point
• Select your desired point from the displayed list and tap the ‘EDIT’ button.
The NAVFDRIVE generic keyboard would be launch displaying the selected favourite point in the edit box.
• Rename your favourite point to your preferred name.
• Tap on the ‘ENTER’ button to apply the change.
FDRIVE
NAV
The NAV
and many others.
Contents of the directory are dependent on the manufacturer specifications.
Please refer to your manufacturer for more details.
• Tap on the ‘DIRECTORY’ button to launch the Load File panel.
• Select on the corresponding button of the desired country.
You may load directory data for e.g.: Malaysia, even if
you are using a Singapore map
(depending on the map contents of your SD Card).
• Tap on the ‘NEXT’ button to view more countries (if any).
Directory data of the selected country would be loaded and displayed.
• Tap on the respective links to search for the desired address.
• Tap on the ‘PREV’ / ‘NEXT’ button to see more entries (if any).
• Tap on the ‘DONE’ button if you are done using the directory.
DIRECTORY – ADDRESSES IN YOUR PALM
FDRIVE
Directory is just like your mini Yellow Pages storing a directory of businesses, places of interest
Page 12 of 18
Page 13

Tap on the desired address to see details of the location.
On the description screen:
MAP: To view the location in map view
END: To set the location as your end point
point
FAV: To save the location as your favourite
BACK: To do another search
FDRIVE
NAV
The
With an easy access pop-up menu integrated in the Navigation Map, you can have the ease of changing
settings on the go or carry out simple tasks.
• Tap on the ‘NAVI MAP’ button in the Main Menu to access the Navigation Map. Alternatively, you will
launch the Navigation Map upon pressing the ROUTE button in the
Turn Signal
Next Turn Road
North Compass
Zoom Scale
NAVIGATION MAP – WHERE IT ALL HAPPENS
FDRIVE
NAV
Page 13 of 18
Navigation Map (Navi Map) is where everything happens!
Distance to
Next Turn
Current Road
Navigation Arrow
ETA
FDRIVE
NAV
Distance to
Destination
Route Line
Planner.
GPS Signal
Zoom Button
Page 14
Knowing Your Navigation Map
Turn Signal: Shows the next turn that you are to make.
Distance to Next Turn: Distance to the next turn that you are going to make.
ETA: Estimated time of arrival at the destination.
Distance to Destination: Estimated distance remaining to destination.
GPS Signal: Colour indicates if GPS signal is present or absent.
Zoom Button: Tap to zoom in or out.
Route Line: The route that you are going to travel.
Navigation Arrow: Points to the direction of travel.
Current Road: Name of road you currently travelling on.
Zoom Scale: Indicates the scale at which the map is displayed.
North Compass: The North compass pointing towards the north direction.
Next Turn Road: Name of road at next turn.
Pop-Up Menu
The pop-up menu includes the most commonly used tools as well as settings that you may want to change
on-the-go.
• To open the pop-up menu, tap anywhere on the
Navigation Map.
• To close the pop-up menu, tap on any ‘empty’ space.
• Tap on the following buttons to carry out the
respective actions.
Toggles between the Navi Mode (navigation mode) and Map Mode (map
view/street directory mode)
Toggles the Map between day and night modes. Thos enables you to view the
map in your preferred way.
Enables the user to switch between the two modes. You can then navigate in
3-Dimension or 2-Dimension, based on your preference.
Enables the user to switch between viewing the Navigation Map in Heading-Up
mode or North-Up mode.
Page 14 of 18
Page 15

Leads you back to the NAVFDRIVE Main Menu. From the Main Menu, you can
access the other tools.
An alternative method of saving a location on the map as your favourite point.
The location saved depends on the mode you are in i.e. map view mode or
navigation mode and also if there is a GPS signal available.
Allow you to search for nearby amenities based on a location on the map. The
location depends on the mode you are in i.e. map view mode or navigation
mode and also if there is a GPS signal available.
Turns on and off a simulation.
Recognizing your Navi Map Modes
Map Mode Map Mode
in day in Night
Mode Mode
Navi Mode Navi Mode
in Day in Night
Mode and Mode and
2-D 2-D
Navi Mode Navi Mode
In Day in Night
Mode and Mode and
3-D 3-D
Page 15 of 18
Page 16

Working with Your Navigation Map
Zooming In and Zooming Out on the Map
• Tap on the Zoom In / Zoom Out button on the right side of the screen. Each tap will increase / decrease
the scale. To check the current scale, check the Zoom Scale at the bottom left corner of the map.
Panning of the Map
• Sometimes, you may want to move the map to view a location which is outside the viewable screen. To
do this, you need to pan the map.
• Tap AND hold on the map screen and drag towards the desired direction i.e. to the left or right etc.
You can only pan in the Map Mode.
Switching Between the Navi Mode and Map Mode
• The Navi Mode is a dynamic map which you display your route as you navigate towards your destination.
Simulation is also carried out in this mode.
• The Map Mode is simply a street directory where you can view a stationary map.
• To switch between these two modes, tap anywhere on the map to open the pop-up menu.
• Tap on the ‘NAVI ON’ / ‘NAVI OFF’ button.
The button would display the next state that you are toggling to. For example, if you are in Navi Mode, the
button would display ‘NAVI OFF’ which allows you to switch off Navi Mode and switch to Map Mode.
Switching Between the Night Mode and Day Mode
• You can choose to view the map in Night / Day mode.
• Tap anywhere on the map to open the pop-up menu.
• Tap on the ‘DAY MODE’ / ‘NIGHT MODE’ button. The button would display
The button would display the next state that you are switching to.
Switching Between the 2D and 3D Mode
• You can view the Navigation Mode in 2D or 3D.
3-Dimension is only available in Navigation Mode (NAVI ON). In Map Mode (NAVI OFF) you can only view in 2Dimension.
• Tap anywhere on the map to open the pop-up menu
• Tap on the ‘2-DIMENSION’ / ‘3-DIMENSION’ button to switch to the next mode.
The button would display the next state that you are switching to.
Page 16 of 18
Page 17

Switching Between the Head-Up and North-Up Mode
• The Navigation Mode can be viewed in either Head-Up or North-Up mode.
• In the Head-Up mode, the direction of travel (indicated by the Navigation arrow) is always upwards, while
the North direction changes, indicated by the direction of the North compass.
• In the North-Up mode, the direction of travel changes while the North direction is kept fixed and pointing
upwards.
• To switch, tap anywhere on the map to open the pop-up menu.
• Tap on the ‘NORTH-UP’ / ‘HEAD-UP’ button to switch to the next mode.
The button would display the next state that you are switching to.
The Map Mode can be viewed only in North-Up mode.
Playing Your Route Simulation
• If you have a route present, you can simulate the route to preview the journey you’ll be taking.
• Tap anywhere on the map to open the pop-up menu.
• Tap on the ‘SIMULATION ON’ button to start simulation.
• To end the simulation, open the pop-up menu and tap on the ‘SIMUATION OFF’ button.
Adding a Favourite
• You can add a favourite directly from the map.
• Tap anywhere on the map to open the pop-up menu.
• Tap on the ‘ADD FAVOURITE’ button to add the location to your favourite list.
• The location saved depends on the mode you are in i.e. Navi Mode / Map Mode and if there is a GPS
signal present. Refer to the table below.
STATE LOCATION BASED
Map Mode (NAVI OFF) Location in centre point of the map
Navi Mode (NAVI ON) with GPS Location based on GPS position
Navi Mode (NAVI ON) without GPS Location in centre point of the map
Search for Amenities Nearby
• You can search for nearby amenities based on the location on the map.
• Tap anywhere on the map to open the pop-up menu.
• Tap on the ‘WHAT’S NEARBY’ button to search for amenities within 1km radius of the location on the map.
• The location of reference depends on the mode you are in i.e. Navi Mode / Map Mode and if there is a
GPS signal present. Refer to the table above.
Page 17 of 18
Page 18

APPENDIX A: DEFAULT SETTINGS VALUE
Setting Default Value
Auto-Reroute
Annotation Disabled
Auto Night Mode Enabled
Night Mode Start Time 7pm
Night Mode End Time 7am
Night Mode Colour Contrast
Setting Default Value
Speed Cam Prompt Enabled
Favourite Nearby Prompt Enabled
ERP/Toll Prompt Enabled
Re-Routing Prompt Enabled
Safety Speed Prompt Enabled
Safety Speed 90 KPH
Distance Prompt
o 50m
o 200m
o 500m
o 1km
Language English
Appendix
NAVIGATION SETTINGS
Enabled
RGB (120,120,120)
AUDIO SETTINGS
Enabled
Enabled
Enabled
Enabled
Page 18 of 18
 Loading...