


|
SWI-RC |
06-18-10 |
|
|
|
Universal Steering Wheel Control Interface |
|
|
For Alpine, JVC, Clarion, Kenwood, |
Installation Instructions |
|
Dual, Visteon, Advent & Blaupunkt |
||
Pioneer, Sony, Valor, OEM, Boyo, |
|
|
Pacific Accessory Corporation Steering Remote Ready Radios
Before You Start
A.Is this product compatible with the vehicle?
•Please visit http://www.pac-audio.com/swixprogramming/swixprogramming.asp for the most current list of
compatible vehicles.
B. Prepare for the installation.
• If possible, install the SWI-RC while you are installing the new head unit. Keep in mind you may need to plug in the factory stereo to locate certain wires; therefore do not complete the head unit installation until the SWI-RC is working properly.
•Plan a general installation location for both the SWI-RC plug and the control body. Keep in mind that the supplied wire harness is two feet long, and the 1/8" plug harness is three feet long.
•Use a multimeter or approved measuring device for checking vehicle circuits.
SEEK |
VOLUME |
AM FM |
PLAY MUTE |
Steering wheel
 audio control wire
Power
 Jack for the SWI-RC
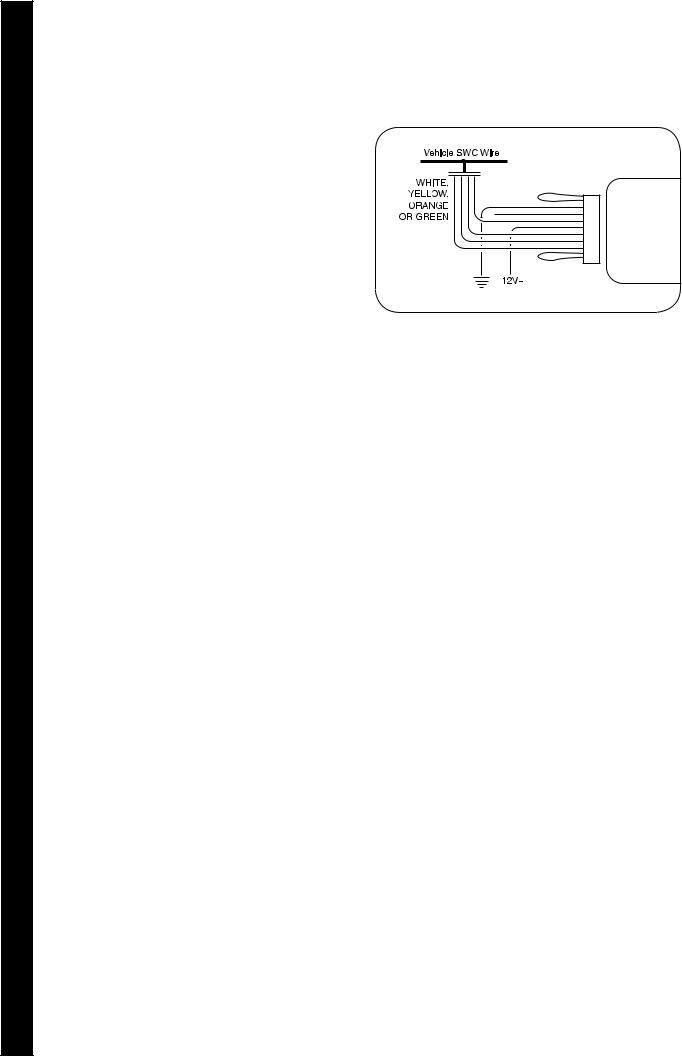
Please Note: The SWC input may be located on a seperate harness instead of the radio chassis. Please refer to the radio's installation manual before plugging in the SWI-RC to be certain you are using the correct input to prevent damage.
To Kenwood, OEM or Blaupunkt
remote control input
For Alpine, Clarion, JVC, Pioneer, Sony or Valor radios, connect the SWI-RC 1/8" plug into the radio's Steering Wheel input jack on back of radio or wire harness. For Kenwood or OEM radios, connect the blue/yel wire to the remote Input wire (blue/yel or yel/blu for Kenwood, gray for OEM) of radio.
Blaupunkt radios with optional wireless remote inputs are supported by the SWI-RC, however we do not supply
any connectors or support for Blaupunkt. It is up to the consumer or installer to supply this connector. Use vehicle |
|
Connector Chart and use VW connector as reference. Connect the SWI-RC's blue/yel wire to pin #11 of VW connector. |
|
The connector you obtain may come with two of three pieces, however the connector (usually green) should show pin |
|
#11 on it. |
1 |
|
Step 1 - Wiring
Note: Only 3 wires from the SWI-RC will be used during installation. GM vehicles programmed for version #4, will use 4 wires.
Step A. |
|
Connect the BLACK wire to ground (-). |
|
Verification: Wire or location registers a constant |
|
(-) when probed. |
SWI-RC |
Step B.
Connect the RED wire to switched +12V.
Verification: Wire registers +12V when the ignition key is turned to the ACC or ON positions.
Step C.
Connect the appropriate interface control input wire (WHITE, YELLOW, ORANGE or
GREEN) to vehicle. please refer to the included chart or visit:
www.pac-audio.com/swixprogramming/swixprogramming.asp
Step D.
If indicated, cut the necessary loop and add the proper resistor as indicated in the connection chart or on the website.
NOTE: Using T-Taps is NOT recommended. It is VERY important that ALL connections be solid & secure. Soldering or crimp connects are best and will provide reliable operation.
2
06-18-10
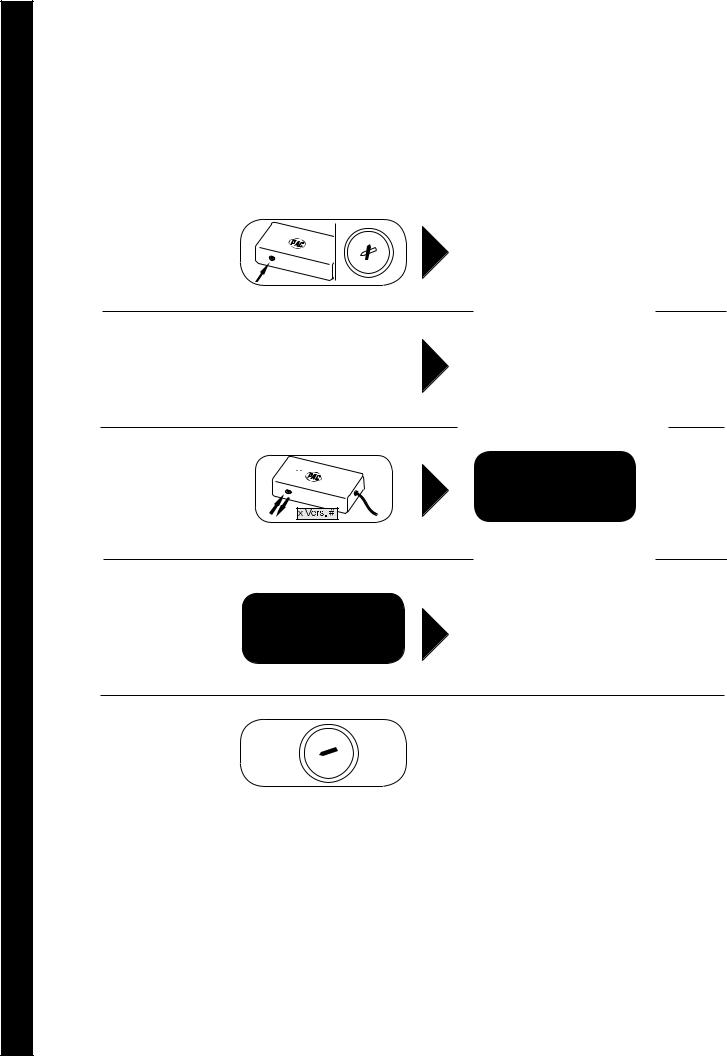
Step 2 - Programming the Version #
Step A.
Refer to The Vehicle Application Guide or www.pac-audio.com/swixprogramming/swixprogramming.asp for the proper version number. Refer to the programming chart on page 4 for the proper radio select switch setting. Fill in the information below for quick reference. Please note that it is very important to set the radio select switch before turning on the ignition
beginning programming. |
|
2 |
3 |
|
|
Radio Select Switch |
|||
|
|
1 |
4 |
||||||
|
|
|
|
|
|
5 |
located on the side of |
||
Vehicle Version Number: ____________ Radio Select Switch: ____________ |
0 |
|
|
|
|
6 |
|||
9 |
8 |
7 |
SWI-RC interface |
||||||
|
|
|
|||||||
|
|
|
|
|
|
|
|
|
|
Step B.
Press and hold programming/ mode button on SWI-RC. Turn the vehicle ignition to the ON position while still holding the button in.
 SWI-RC
IGN
ACC
STRT
OFF
 SWI-RC
The LED on the  SWI-RC will light.
Step C.
Release the programming/ mode button.
Step D.
Press and release the programming/mode button the same number of times as the desired version number.
 SWI-RC
 SWI-RC
SWI- |
RC |
The LED will turn off, |
indicating memory is |
||
|
|
cleared. |
SWI |
The LED will flash |
|
each time the button is |
||
-RC |
||
|
pressed and released. |
Step E.
WAIT 3 seconds, the LED will flash the same amount of times as set version number.
Step F.
Turn vehicle ignition to OFF position. Vehicle programming sequence is complete.
 SWI-RC
IGN
ACC
STRT
OFF
3
 Loading...