

Output Solutions CP-1002, CP-1001 Owner's Manual
Output Solutions Card Printer
CP-1001/1002 SERIES
Owner's Manual

CE Compliance (for EU only)
This product complies with the requirements of EMC and Low Voltage Directives including their
amendments.
A
TTENTION:
· Acoustic noise: below 70dB (A) according to ISO 7779
· The outlet to be used should be located close to the printer and easily accessible.
NOTE:
This document describes the handling of the CP-1001 series and CP-1002 series card printers.
The major difference between these two models is that the CP-1001 series includes one print head
mechanism for uni-colour printing while the CP-1002 series includes two print head mechanisms for
two-colour printing. There is not great difference in operations.
Please note that most of the illustrations used in this document are those of CP-1002 series.
Safety Summary
Personal safety in handling or maintaining the equipment is extremely important. Warnings and Cautions
necessary for safe handling are included in this manual. All warnings and cautions contained in this manual
should be read and understood before handling or maintaining the equipment.
Do not attempt to effect repairs or modifications to this equipment. If a fault occurs that cannot be rectified
using the procedures described in this manual, turn off the power, unplug the machine, then contact your
authorised Output Solutions representative for assistance.
Meanings of Each Symbol
This symbol indicates warning items (including cautions).
Specific warning contents are drawn inside the symbol.
(The symbol on the left indicates a general caution.)
This symbol indicates prohibited actions (prohibited items).
Specific prohibited contents are drawn inside or near the
symbol.
(The symbol on the left indicates “no disassembling”.)
This symbol indicates actions which must be performed.
Specific instructions are drawn inside or near the
l symbol.
(The symbol on the left indicates “disconnect the power cord plug from the outlet”.)
This indicates that there is the risk of death or serious injury if the
machines are improperly handled contrary to this indication.
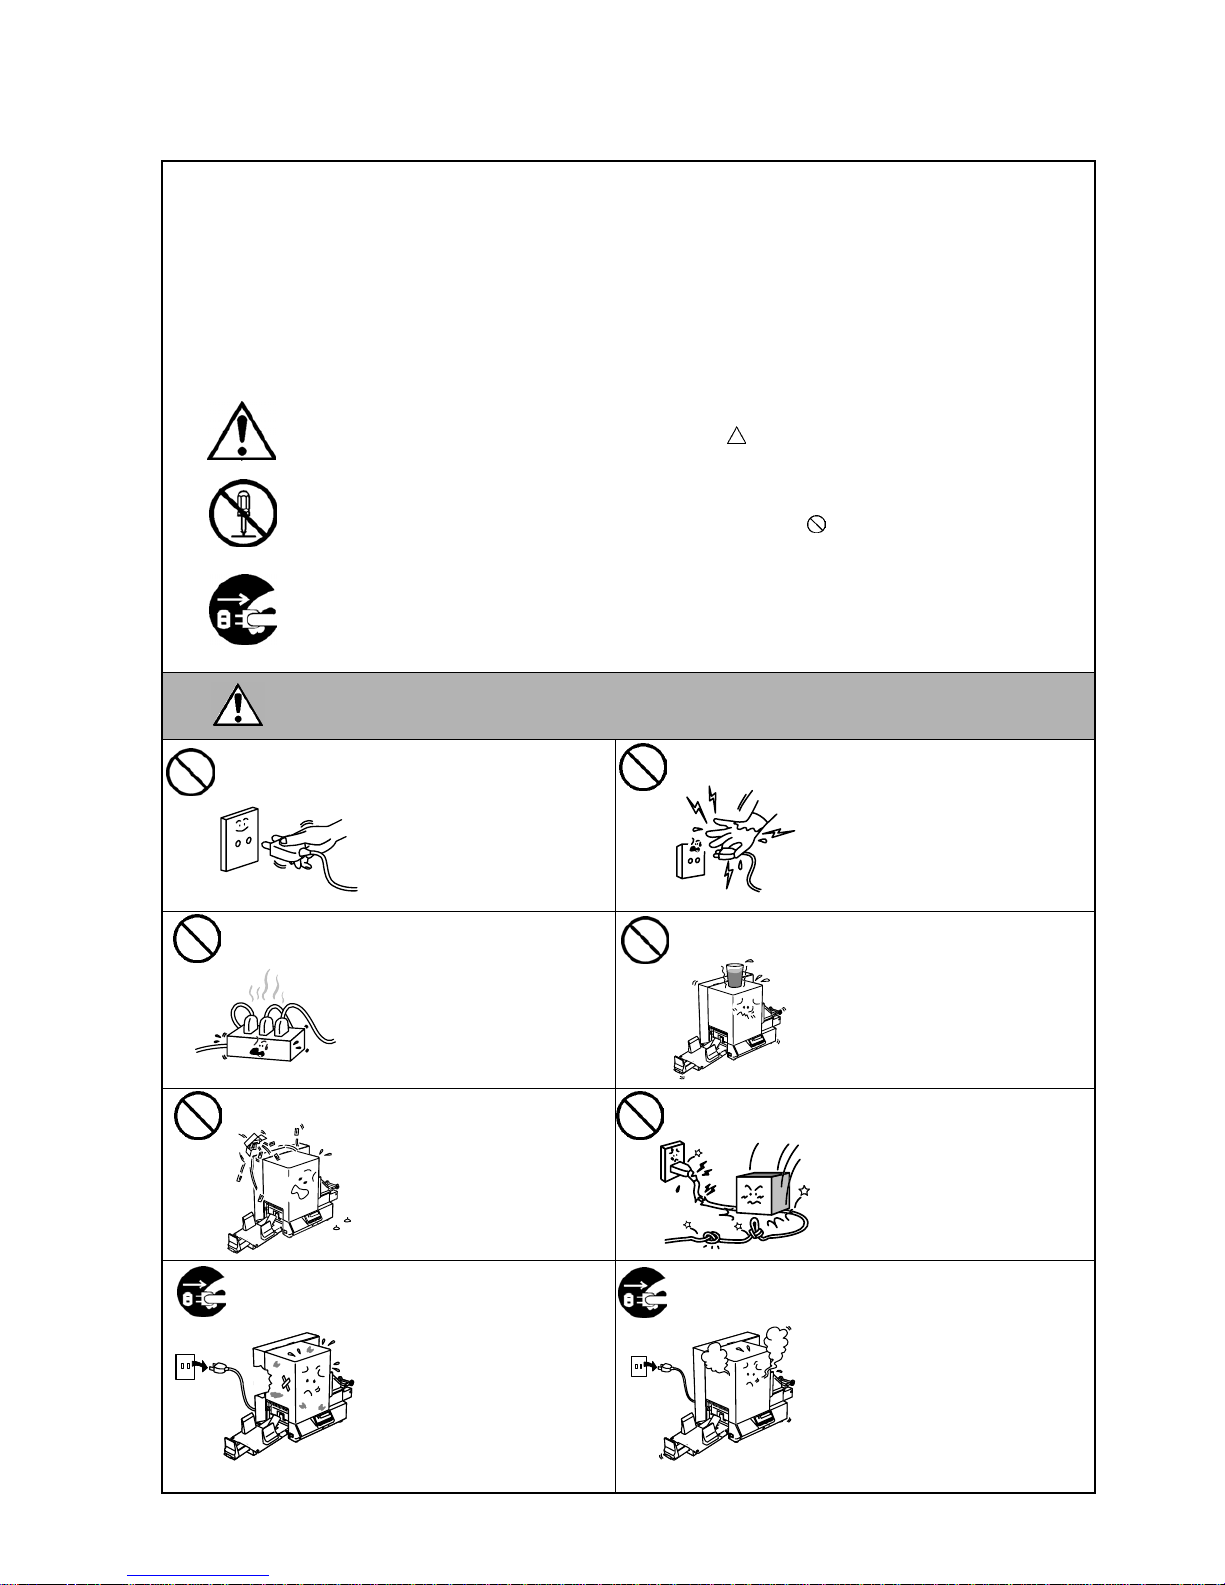
Do not use voltages other than
the voltage (AC) specified on the
rating plate, as this may cause
fire or electric shock.
Do not plug in or unplug the power
cord plug with wet hands as this
may cause electric shock.
If the machines share the same
outlet with any other electrical
appliances that consume large
amounts of power, the voltage
will fluctuate widely each time
these appliances operate. Be sure
to provide an exclusive outlet for
the machine as this may cause
fire or electric shock.
Do not place metal objects or
water-filled containers such as
flower vases, flower pots or mugs,
etc. on top of the machines. If
metal objects or spilled liquid enter
the machines, this may cause fire
or electric shock.
Do not insert or drop metal,
flammable or other foreign
objects into the machines through
the ventilation slits, as this may
cause fire or electric shock.
Do not scratch, damage or modify
the power cords. Also, do not
place heavy objects on, pull on, or
excessively bend the cords, as this
may cause fire or electrical shock.
If the machines are dropped or
their cabinets damaged, first turn
off the power switches and
disconnect the power cord plugs
from the outlet, and then contact
your authorised Output Solutions
representative for assistance.
Continued use of the machine in
that condition may cause fire or
electric shock.
Continued use of the machines in
an abnormal condition such as
when the machines are producing
smoke or strange smells may cause
fire or electric shock. In these
cases, immediately turn off the
power switches and disconnect the
power cord plugs from the outlet.
Then, contact your authorised
Output Solutions representative for
assistance.
W
ARNING
Prohibited
Any other than the
specified AC voltage
is prohibited.
Prohibited
Prohibited
Prohibited
Prohibited
Disconnect
the plug.
Disconnect
the plug.
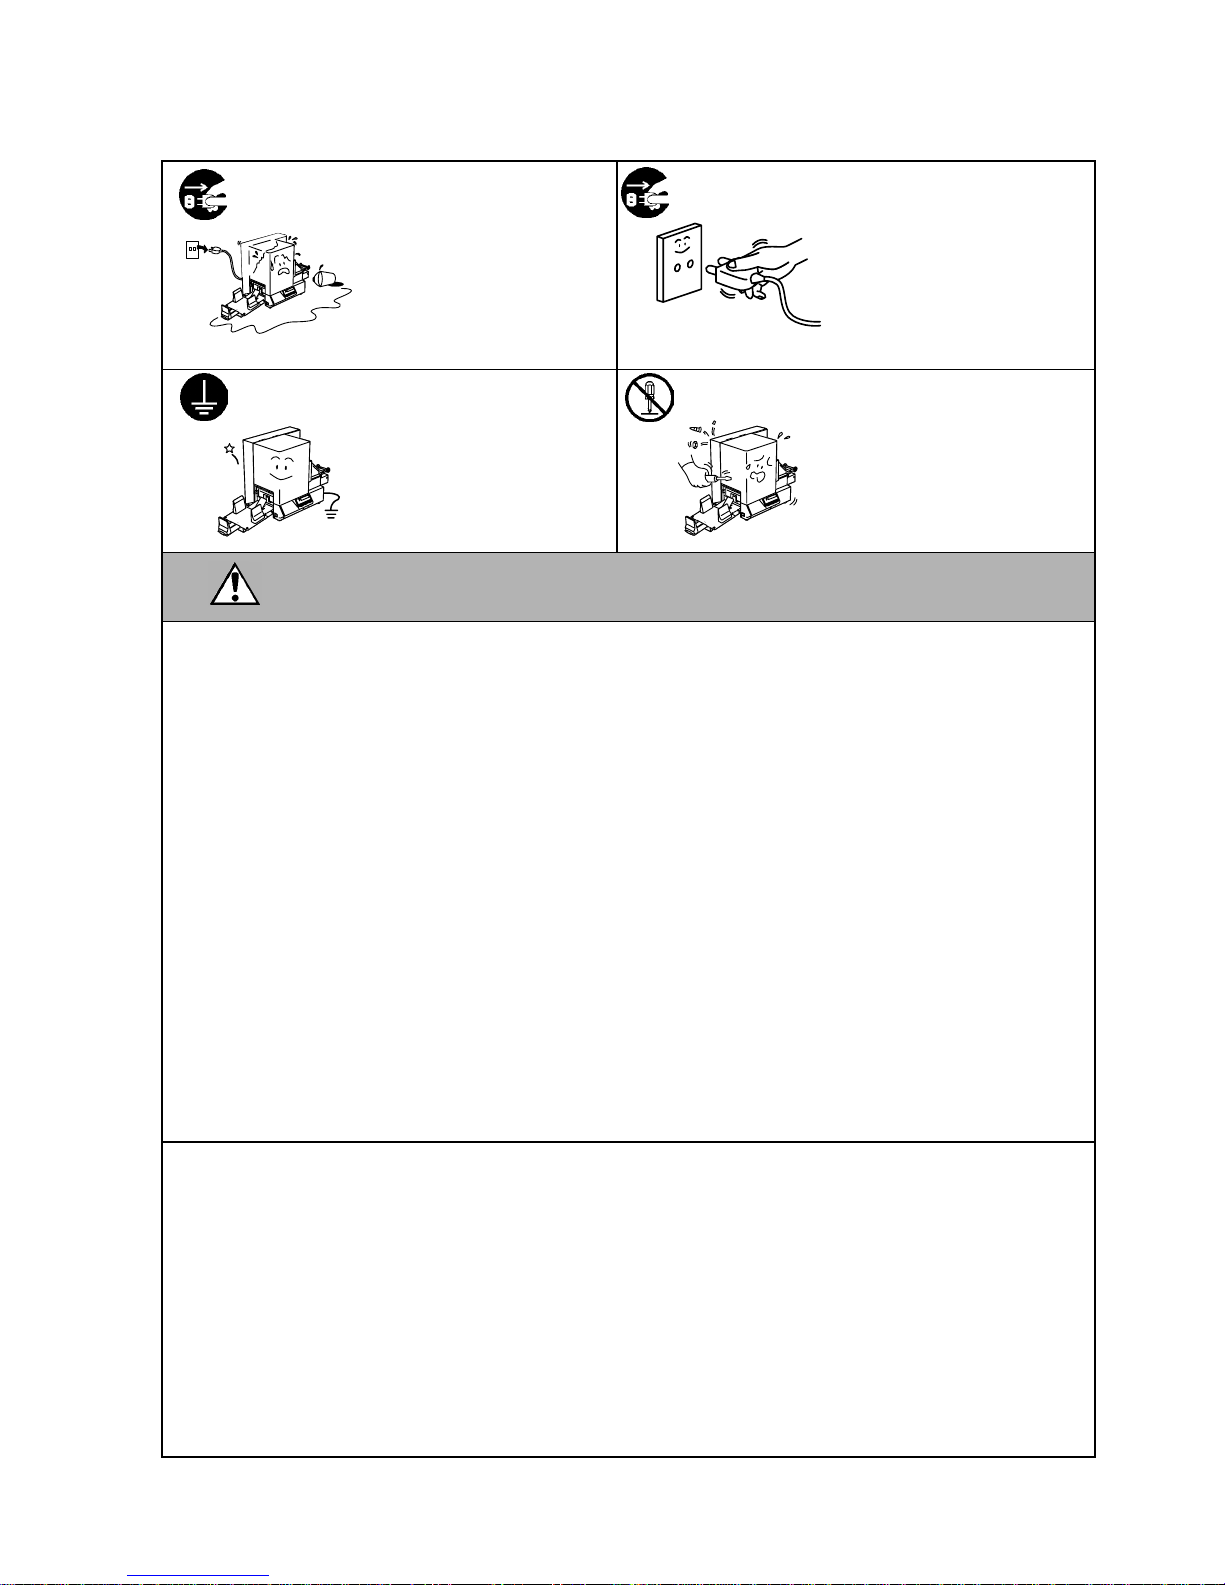
If foreign objects (metal
fragments, water, liquids) enter
the machines, first turn off the
power switches and disconnect
the power cord plugs from the
outlet, and then contact your
authorised Output Solutions
representative for assistance.
Continued use of the machine in
that condition may cause fire or
electric shock.
When unplugging the power cords,
be sure to hold and pull on the plug
portion. Pulling on the cord portion
may cut or expose the internal wires
and cause fire or electric shock.
Ensure that the equipment is
properly grounded. Extension
cables should also be grounded.
Fire or electric shock could
occur on improperly grounded
equipment.
Do not remove covers, repair or
modify the machine by yourself.
You may be injured by high
voltage, very hot parts or sharp
edges inside the machine.
This indicates that there is the risk of personal Injury or damage to
objects if the machines are improperly handled contrary to this indication.
Precautions
The following precautions will help to ensure that this machine will continue to function correctly.
· Try to avoid locations that have the following adverse conditions:
* Temperatures out of the specification * Direct sunlight * High humidity
* Shared power source * Excessive vibration * Dust/Gas
· The cover should be cleaned by wiping with a dry cloth or a cloth slightly dampened with a mild
detergent solution. NEVER USE THINNER OR ANY OTHER VOLATILE SOLVENT on the plastic
covers.
· USE ONLY Output Solutions SPECIFIED paper and ribbons.
· DO NOT STORE the paper or ribbons where they might be exposed to direct sunlight, high
temperatures, high humidity, dust, or gas.
· Ensure the printer is operated on a stable and level surface.
· Any data stored in the memory of the printer could be lost during a printer fault.
· Try to avoid using this equipment on the same power supply as high voltage equipment or equipment
likely to cause mains interference.
· Unplug the machine whenever you are working inside it or cleaning it.
· Keep your work environment static free.
· Do not place heavy objects on top of the machines, as these items may become unbalanced and fall
causing injury.
· Do not block the ventilation slits of the machines, as this will cause heat to build up inside the
machines and may cause fire.
· Do not lean against the machine. It may fall on you and could cause injury.
· Care must be taken not to injure yourself with the printer paper cutter.
· Unplug the machine when it is not used for a long period of time.
Request Regarding Maintenance
· Utilize our maintenance services.
After purchasing the machine, contact your authorised Output Solutions representative for assistance
once a year to have the inside of the machine cleaned. Otherwise, dust will build up inside the
machines and may cause a fire or a malfunction. Cleaning is particularly effective before humid rainy
seasons.
· Our preventive maintenance service performs the periodic checks and other work required to maintain
the quality and performance of the machines, preventing accidents beforehand.
For details, please consult your authorised Output Solutions representative for assistance.
· Using insecticides and other chemicals
Do not expose the machines to insecticides or other volatile solvents. This will cause the cabinet or
other parts to deteriorate or cause the paint to peel.
CAUTION
Disconnect
the plug.
Connect a
grounding wire.
Disconnect
the plug.
No
disassembling.

5
TABLE OF CONTENTS
1. PRODUCT OVERVIEW-----------------------------------------------------------------------------------------1- 1
1.1 Introduction-------------------------------------------------------------------------------------------------1- 1
1.2 Features-----------------------------------------------------------------------------------------------------1- 1
1.3 Unpacking --------------------------------------------------------------------------------------------------1- 1
1.4 Accessories-------------------------------------------------------------------------------------------------1- 2
1.5 Appearance-------------------------------------------------------------------------------------------------1- 3
1.5.1 Dimensions ---------------------------------------------------------------------------------------1- 3
1.5.2 Front View-----------------------------------------------------------------------------------------1- 3
1.5.3 Rear View -----------------------------------------------------------------------------------------1- 4
1.5.4 Interior----------------------------------------------------------------------------------------------1- 4
1.5.5 Operation Panel----------------------------------------------------------------------------------1- 5
1.5.6 Power Switch-------------------------------------------------------------------------------------1- 7
2. PRINTER SETUP ------------------------------------------------------------------------------------------------2- 1
2.1 Precautions-------------------------------------------------------------------------------------------------2- 1
2.2 Procedure before Operation----------------------------------------------------------------------------2- 2
2.3 Fitting the Fan Filter --------------------------------------------------------------------------------------2- 3
2.4 Attaching the Media Guide Unit------------------------------------------------------------------------2- 3
2.5 Attaching the Stacker ------------------------------------------------------------------------------------2- 4
2.6 Connecting the Printer to Your PC--------------------------------------------------------------------2- 6
2.7 Connecting the Power Cord ----------------------------------------------------------------------------2- 7
2.8 Loading the Ribbon---------------------------------------------------------------------------------------2- 8
2.8.1 Ribbon Loading Procedure--------------------------------------------------------------------2- 8
2.8.2 Removing the Ribbon Module with the Ribbon Loaded -------------------------------2-11
2.8.3 When the Ribbon Has been Used Up -----------------------------------------------------2-12
2.9 Loading the Media ---------------------------------------------------------------------------------------2-13
2.9.1 Loading the Business Card and Post Card-----------------------------------------------2-13
2.9.2 When Removing the Printed Media from the Stacker----------------------------------2-15
3. INSTALLING THE PRINTER DRIVERS--------------------------------------------------------------------3- 1
3.1 System Requirements -----------------------------------------------------------------------------------3- 1
3.2 Driver Download-------------------------------------------------------------------------------------------3- 2
3.3 Uninstalling the Printer Driver ------------------------------------------------------------------------- 3-17

6
4. MAINTENANCE --------------------------------------------------------------------------------------------------4- 1
4.1 Cleaning-----------------------------------------------------------------------------------------------------4- 1
4.1.1 Print Head-----------------------------------------------------------------------------------------4- 1
4.1.2 Platen, Pinch Roller, and Feed Rollers-----------------------------------------------------4- 2
4.1.3 Auto Media Feeder------------------------------------------------------------------------------4- 3
4.1.4 Top Cover -----------------------------------------------------------------------------------------4- 3
5. TROUBLESHOOTING------------------------------------------------------------------------------------------5- 1
5.1 Error Messages--------------------------------------------------------------------------------------------5- 1
5.2 Possible Problems----------------------------------------------------------------------------------------5- 2
5.3 Removing the Jammed Media -------------------------------------------------------------------------5- 5
5.4 When the Ribbon Has Broken -------------------------------------------------------------------------5- 6
5.5 When the Ribbon Roll Has Become Loose or Untidy --------------------------------------------5- 7
5.6 Correcting the Skew Print-------------------------------------------------------------------------------5- 8
5.7 Fitting the Media Weight in case of Feed Failure--------------------------------------------------5- 9
APPENDIX SPECIFICATIONS --------------------------------------------------------------------------------- A1- 1
A1.1 Printer -----------------------------------------------------------------------------------------------------A1- 1
A1.2 Media ------------------------------------------------------------------------------------------------------A1- 2
A1.2.1 Media Size --------------------------------------------------------------------------------------A1- 2
A1.2.2 Effective Print Area----------------------------------------------------------------------------A1- 2
A1.3 Ribbon -----------------------------------------------------------------------------------------------------A1- 3
CAUTION!
1. This manual may not be copied in whole or in part without prior written permission of Output Solutions.
2. The contents of this manual may be changed without notification.
3. Please refer to your local authorised service representative with regard to any queries you may
have in this manual.
This is a Class A product. In a domestic environment this product may cause radio interference in
which case the user ma
y
be required to take adequate measures.
WARNING!

7
1. PRODUCT OVERVIEW
1.1 Introduction
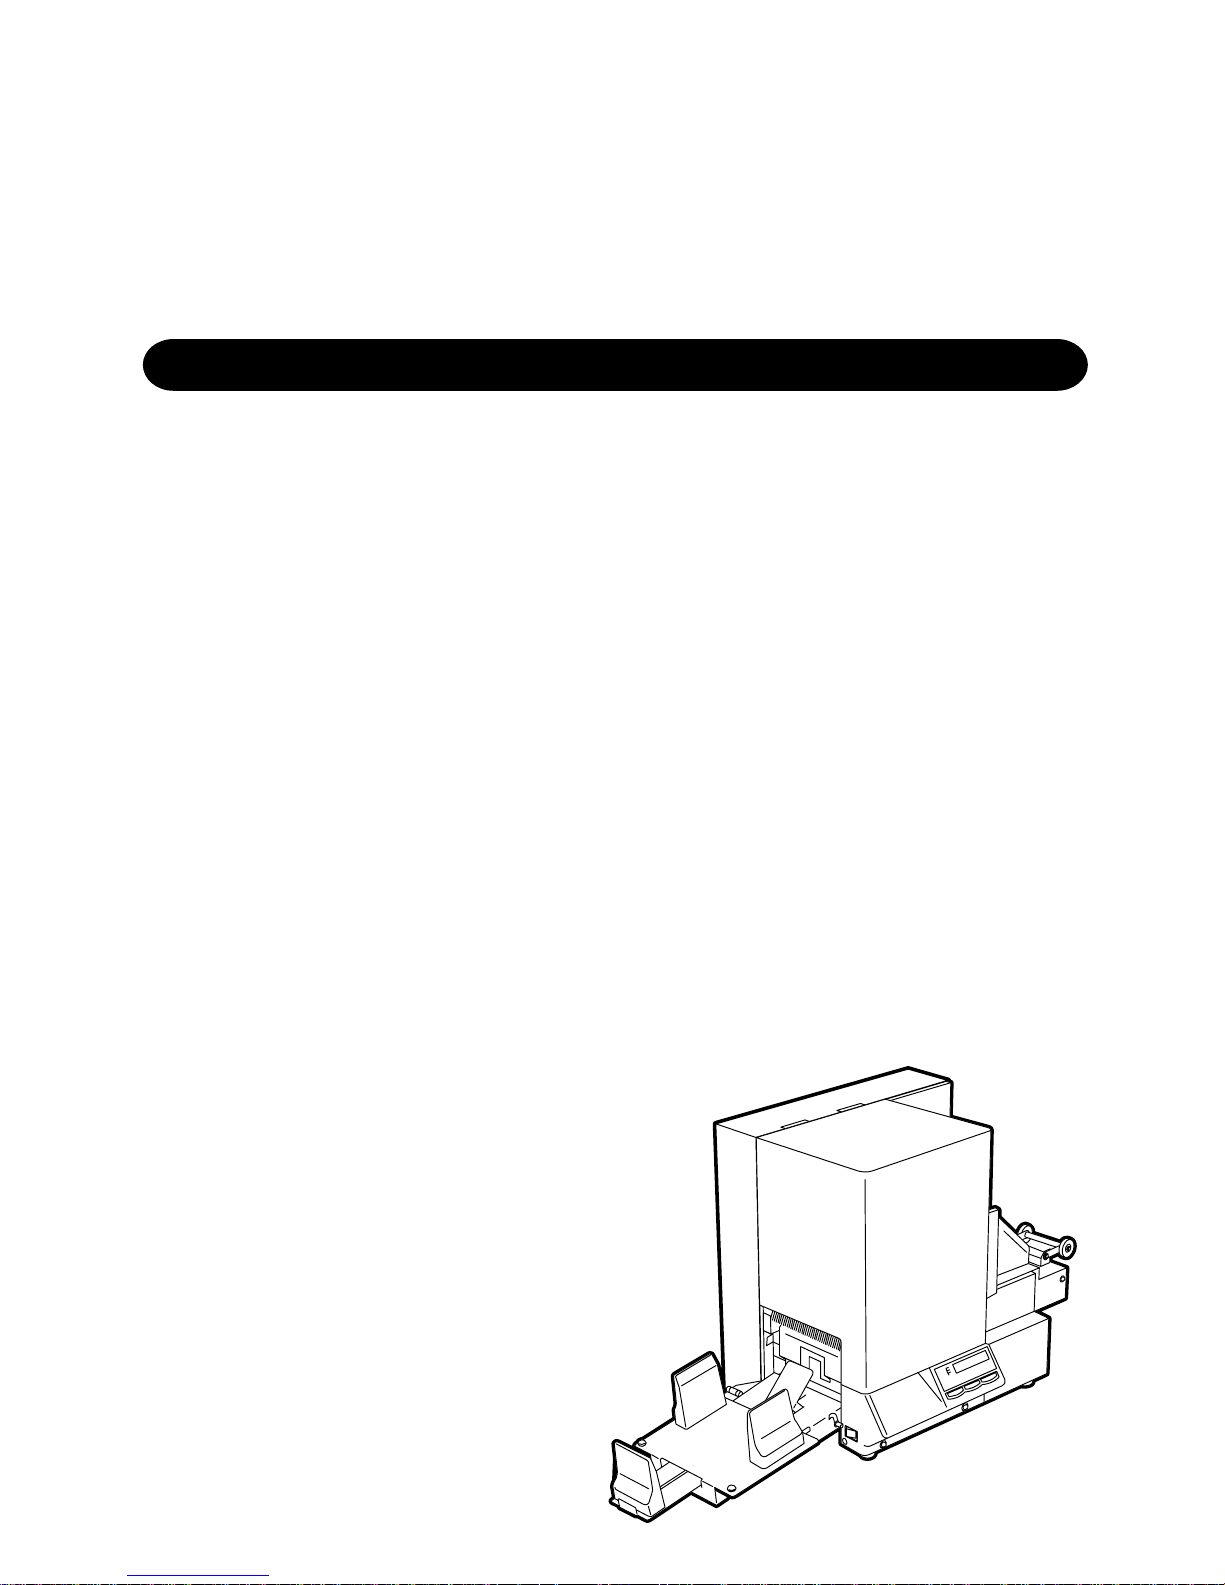
Thank you for choosing the CP-1001/1002 series card printer. This Owner’s Manual contains general
set-up, and should be read carefully to help gain maximum performance and life from your printer. For
most queries please refer to this manual and keep it safe for future reference. Please contact the
nearest Output Solutions representative for further information concerning this manual.
1.2 Features
This printer has the following features:
· Superior hardware, including the specially developed corner edge 600 dots/inch thermal print head
realizes very clear print quality at a print speed of either 2.2 inches/sec. or 3 inches/sec.
· Media loading method is very simple: Just put the media stack on the Auto Media Feeder.
· Not only business cards, but also post cards, etc. can be printed.
· Since this printer can be used as a network printer, there is no need of an exclusive PC or
operator.
You can print desired pieces of media from your PC on demand.
· The CP-1002 model is provided with the two print heads, which enables two-colour printing at
the same time.
· The ribbon saving function included as part of the standard specification saves ribbon. (For
details, please contact the nearest Output Solutions representative.)
1.3 Unpacking
Unpack the printer as per the Unpacking Instruction supplied with the printer.
NOTES:
1. Check for damage or scratches on the printer. However, please note that Output Solutions shall
have no liability for any damage of any kind sustained during transportation of the product.
2. Keep the cartons and pads for future transportation of the printer.
8
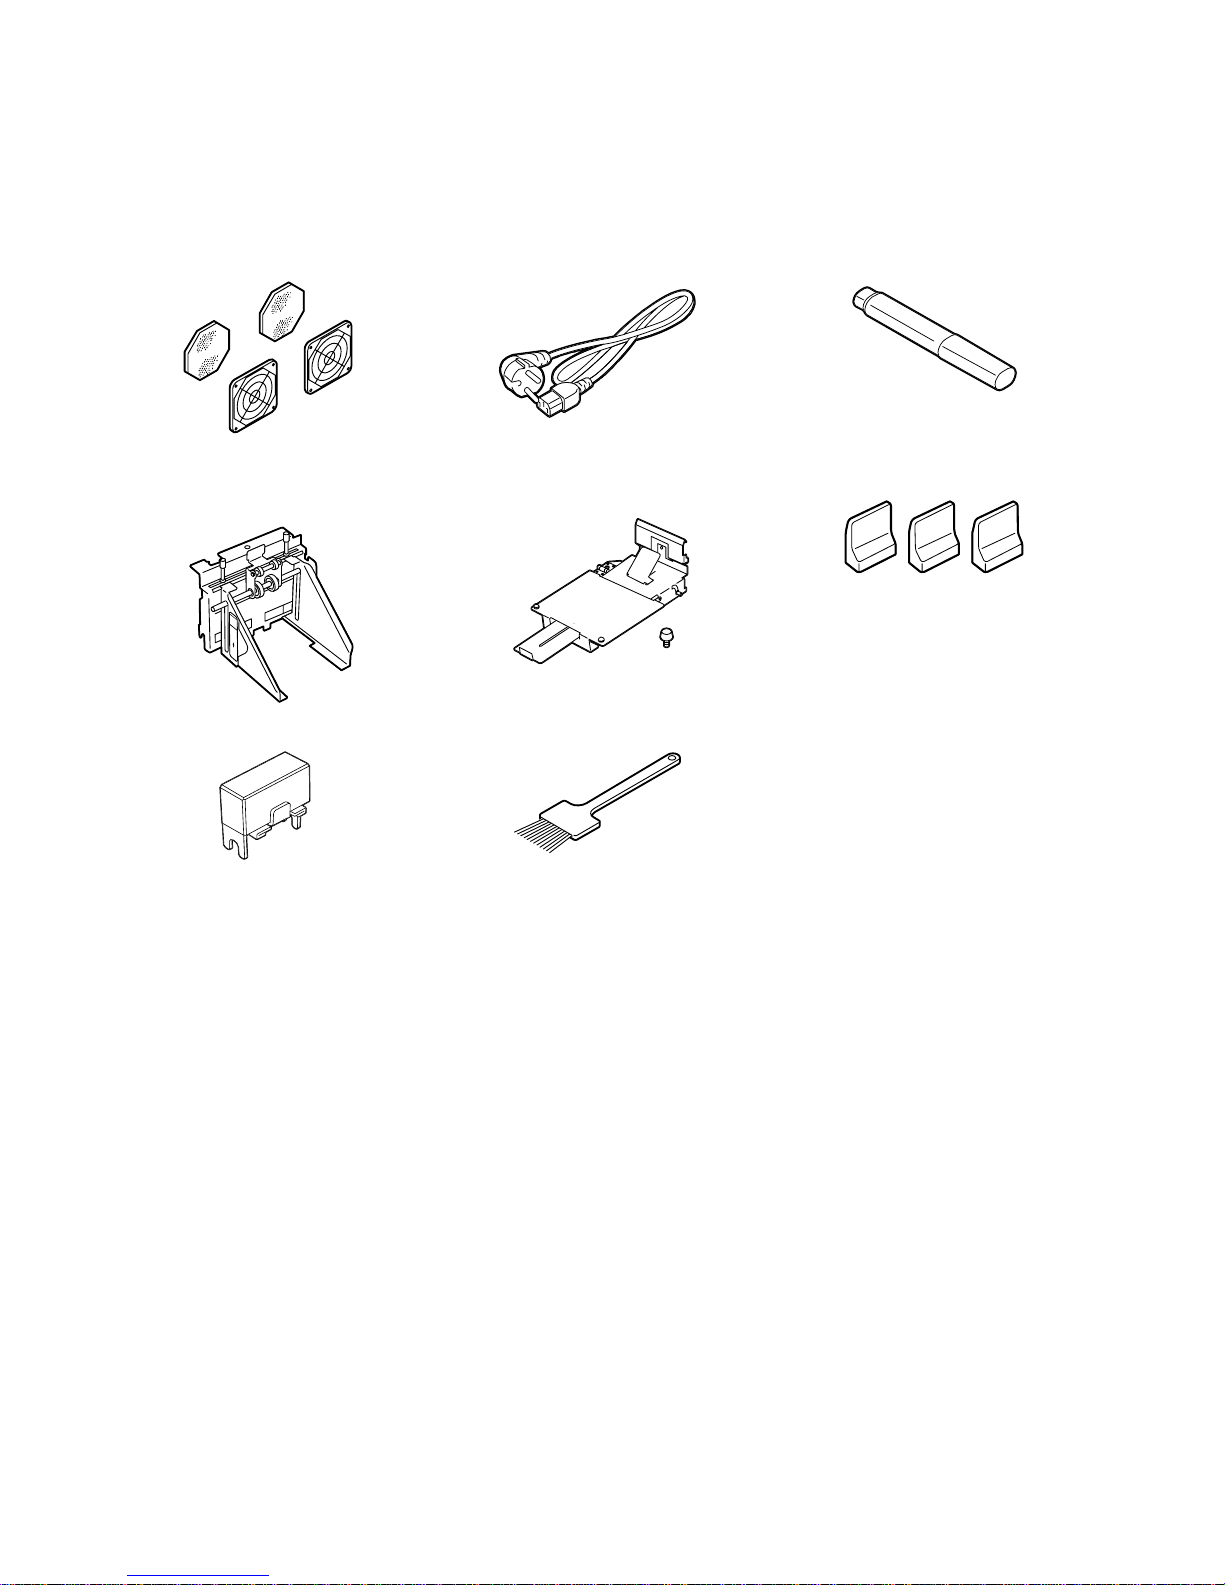
1.4 Accessories
When unpacking the printer, please make sure all accessories are supplied with the printer.
Fan Filter (2 sets) Power Cord (1 pc.) Print Head Cleaner (1 pc.)
Media Guide Unit (1 pc.) Stacker (1 pc.) Media Stopper (3 pcs.)
Fixing Screw (1 pc.)
Media Weight (1 pc.) Dust Brush (1 pc.) 1 Quick Guide
1 CD-ROM
9
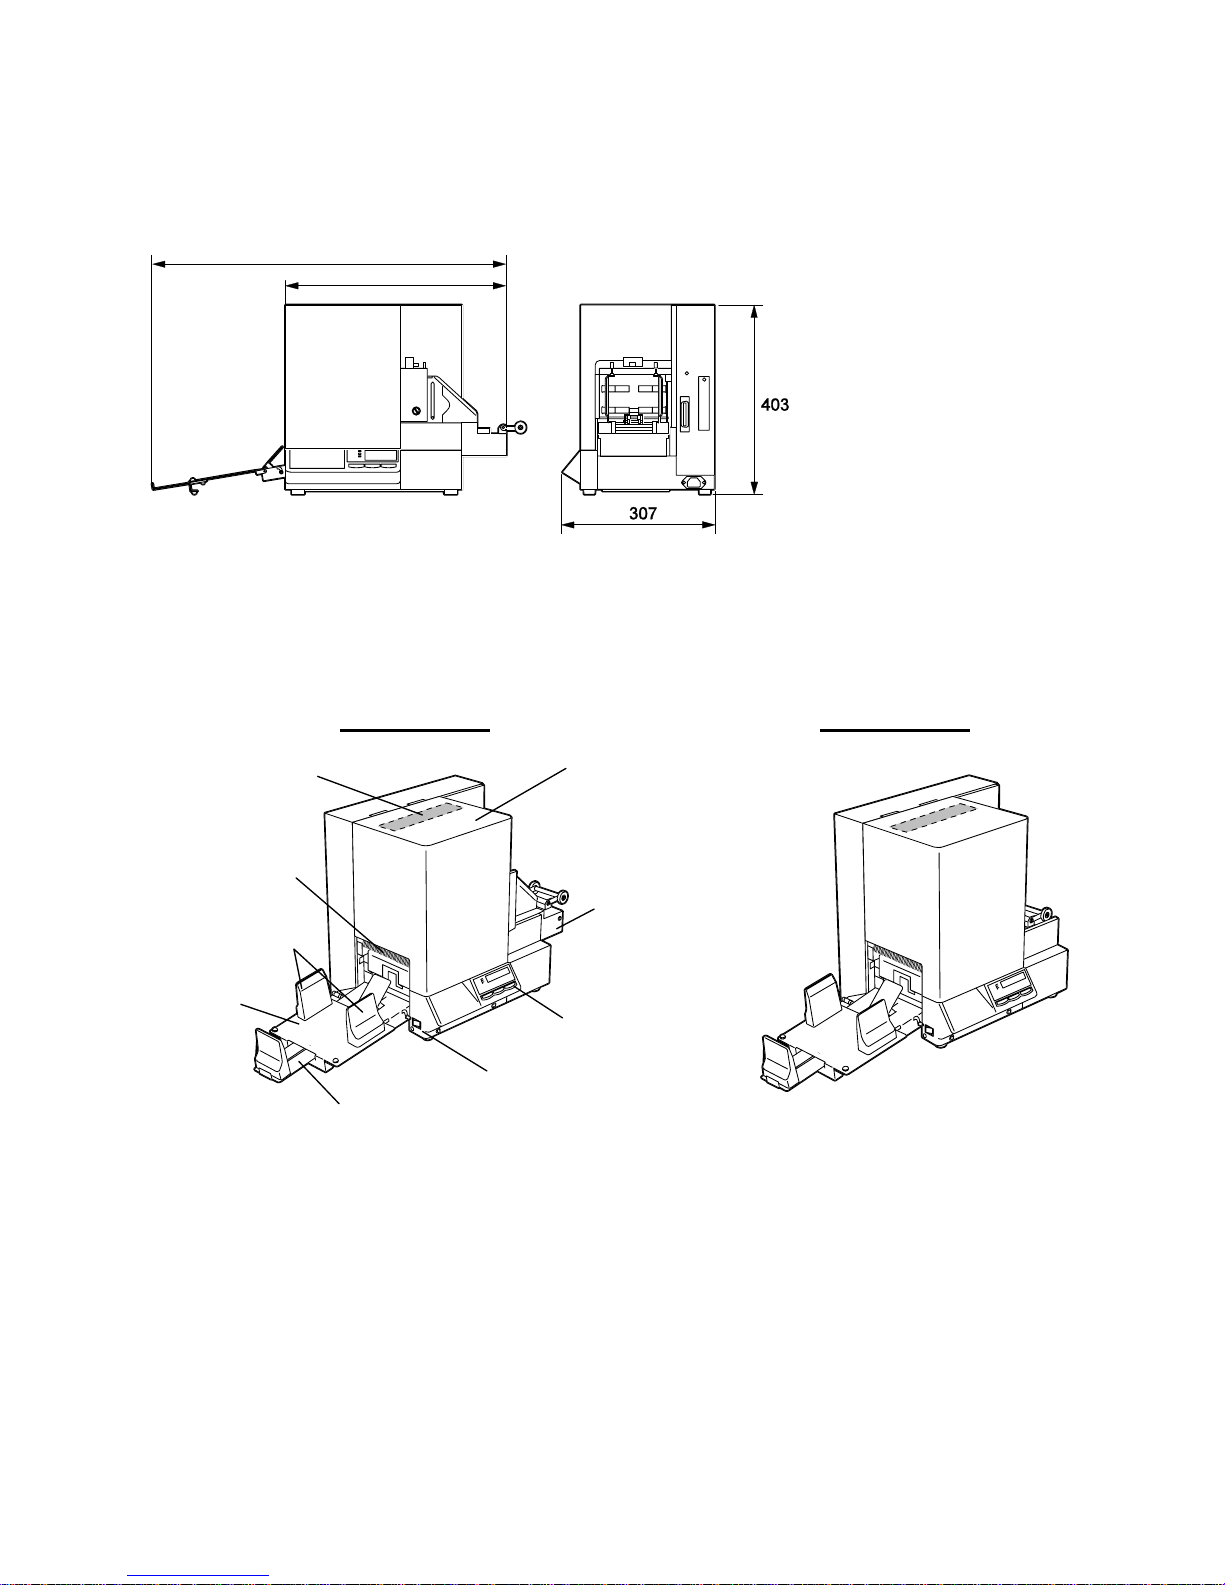
1.5 Appearance
1.5.1 Dimensions
Unit: mm
NOTES:
1. CP-1001: 661 mm, CP-1002: 754 mm
2. CP-1001: 356 mm, CP-1002: 449 mm
1.5.2 Front View
CP-1001 Series
CP-1002 Series
NOTE: Since the CP-1002 series is provided with the two print head mechanisms, its auto media feeder is
protruding from the printer’s enclosure, causing the larger machine width than the CP-1001 series.
Top Cover
Operation Panel
Power Switch
Stacker
Media Outlet
Media Stopper
Media Tray
CAUTION Label
Auto Media Feeder
See Note 2
See Note 1

10
1.5.3 Rear View
1.5.4 Interior
CP-1001 Series CP-1002 Series
Media Guide Unit
Roller Arm
Parallel Interface Port
Power Inlet
Fan Filter
A
uto Media Feeder
Print Head
Pinch Roller
Platen
Print Head
Mechanism
Ribbon
Drive Block
Print Head
Mechanism No.1
Print Head
Mechanism
No.2
Ribbon Drive
Block No.1
Ribbon Drive
Block No.2
Platen
Print Head
11
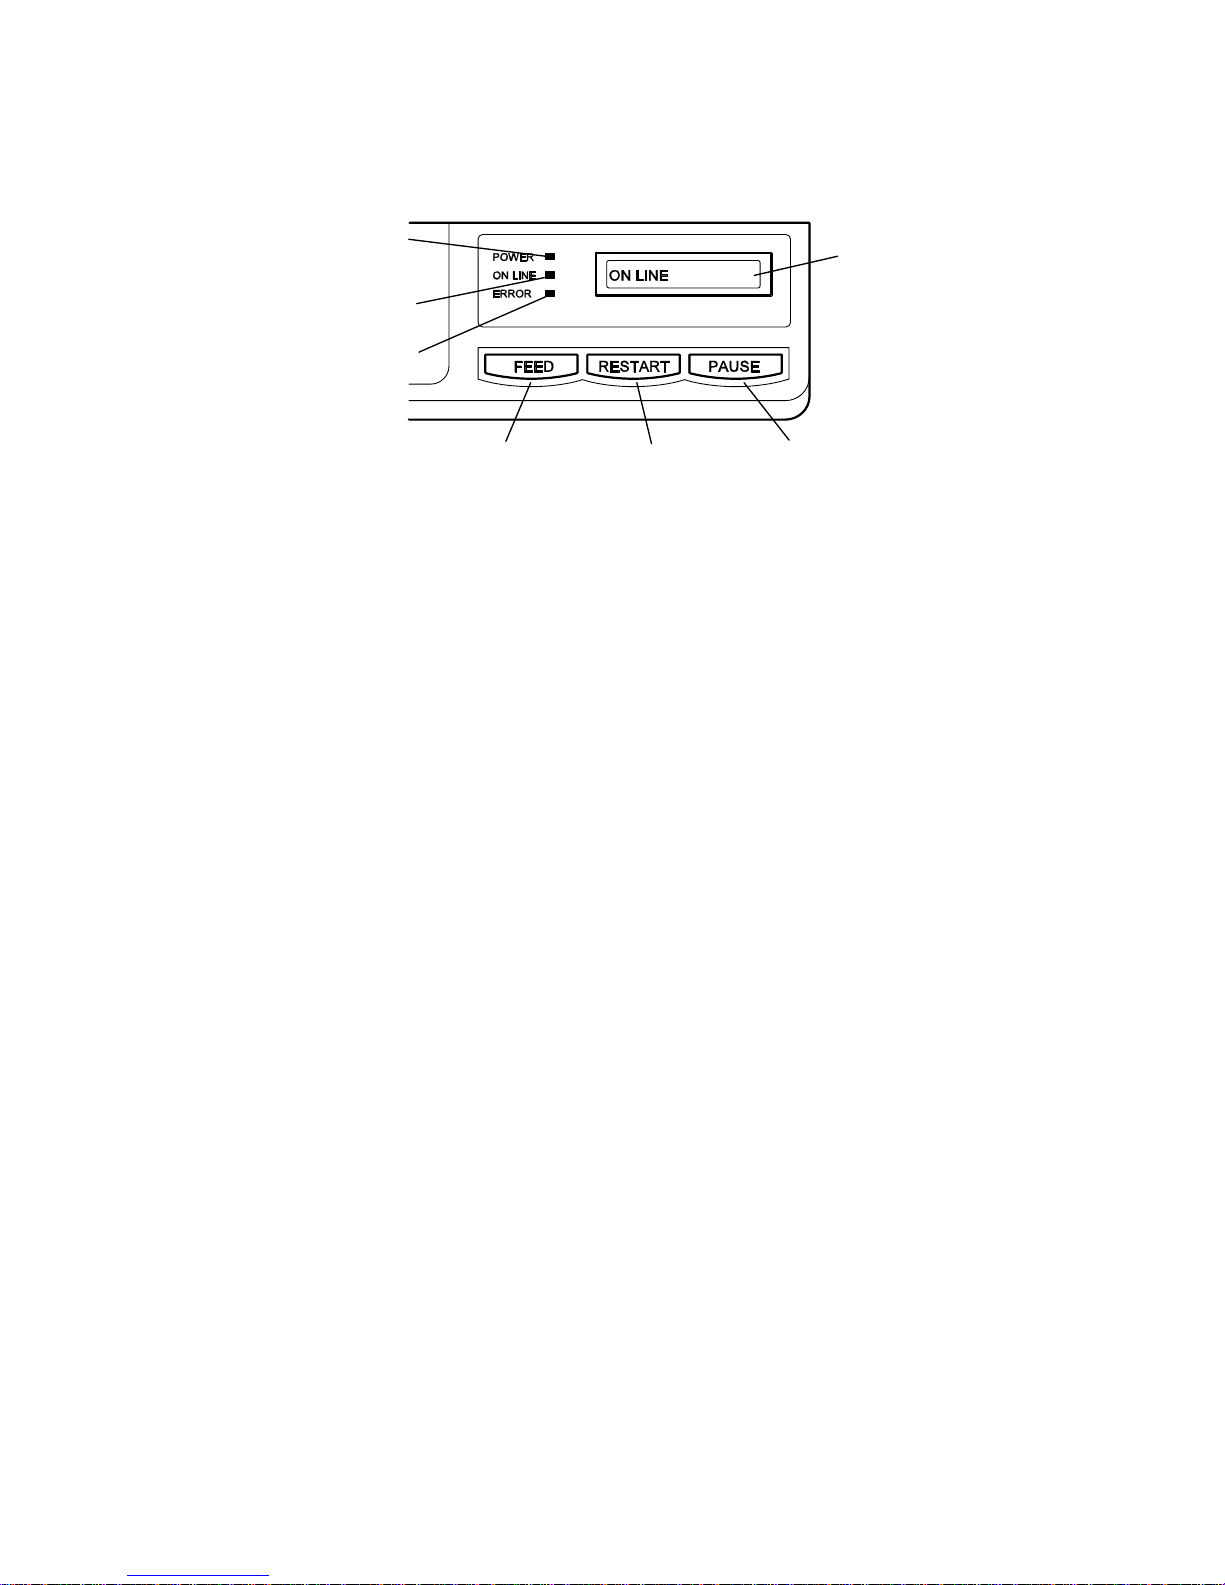
1.5.5 Operation Panel
LCD MESSAGE DISPLAY (Max. 16 digits x 1 line)
- Displays the machine status with an alphanumeric and symbols.
POWER LED (Green)
- Turns on while the power is on.
ON LINE LED (Green)
- Turns on when ready is communication with a host machine.
- Blinks in-service of communication.
ERROR LED (Red)
- Turns on while the machine detects something wrong.
[FEED] key (Paper Feed Key)
- Used to feed a piece of media or discharge the media when an error occurred.
- Used to make positioning of media.
[RESTART] key (Reissue Key)
- Used to exit from the pause mode to restart issuing the media.
- Used to exit from the error mode to restart issuing the media.
Note that some errors cannot be released even by depressing the [RESTART] key.
(See Section 5.1, Error Messages.)
[PAUSE] key
- Used to temporarily stop issuing the media.
- Used to initialise the machine after a reset operation.
LCD Message Display
PAUSE Key
RESTART Key
FEED Key
POWER LED
ON LINE LED
ERROR LED
12
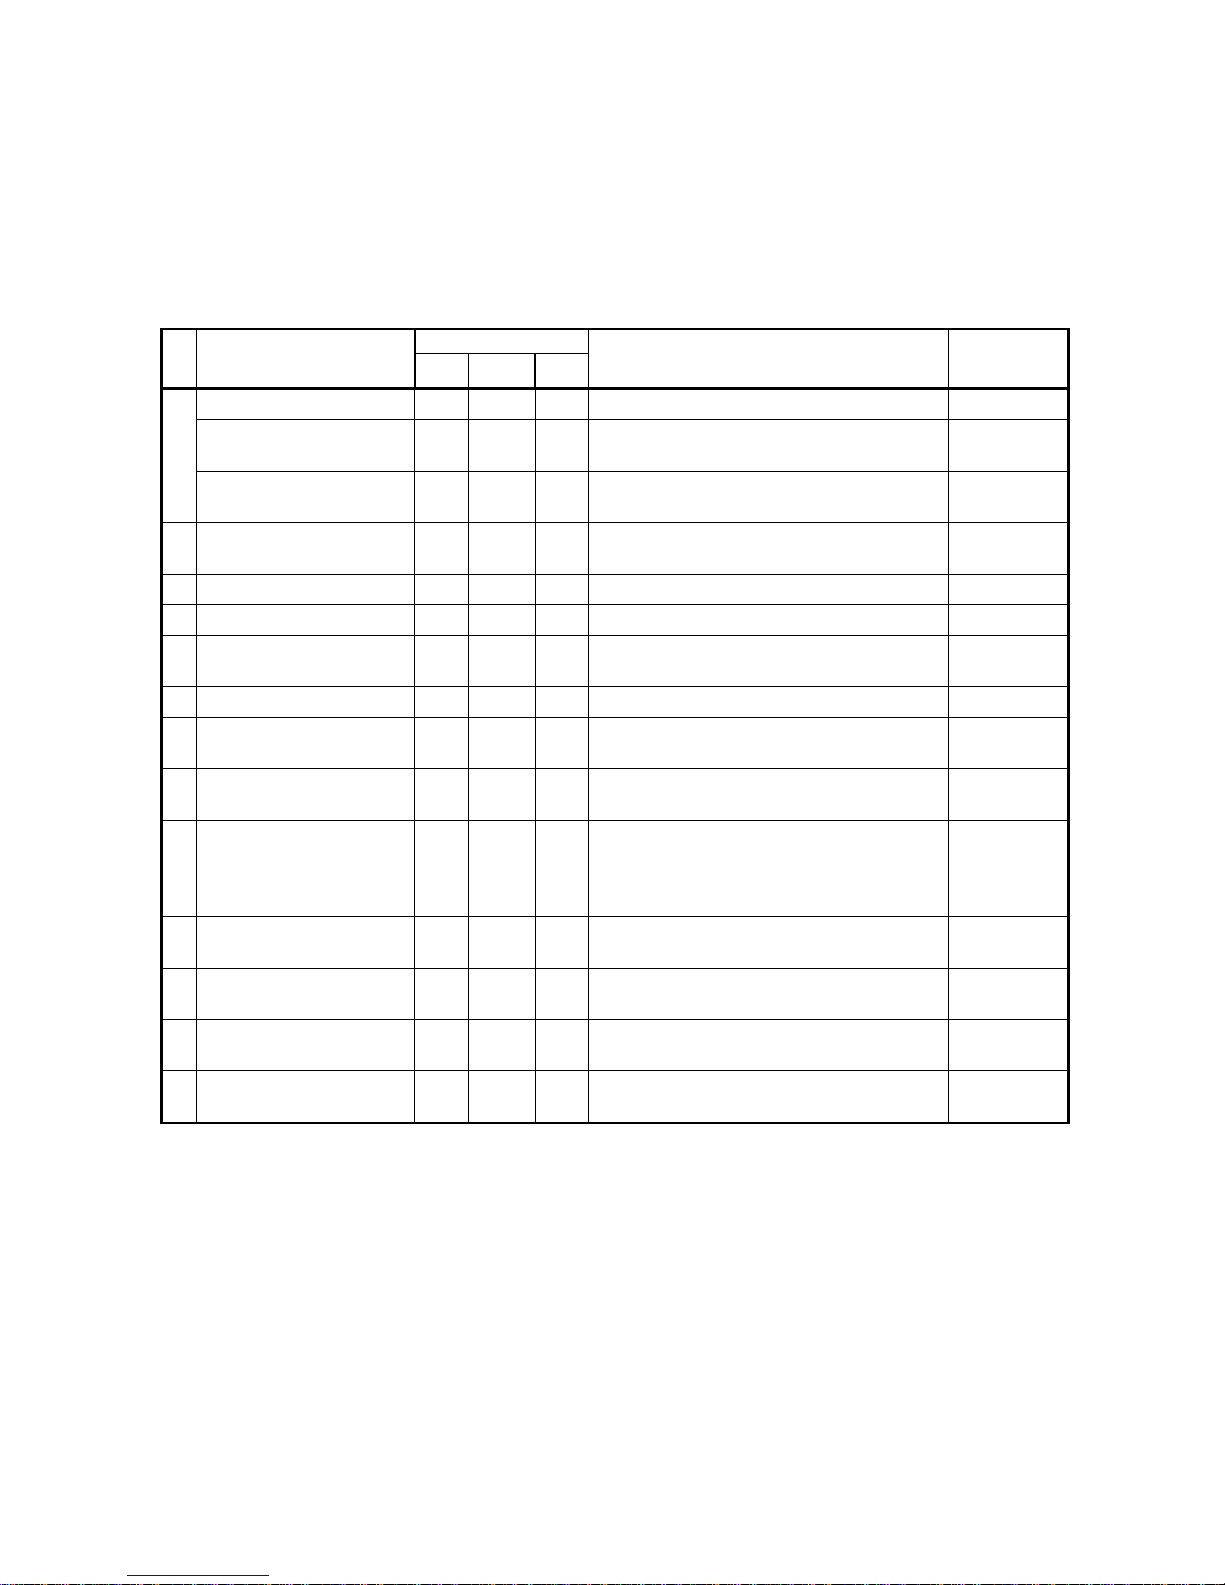
n Messages and LEDs
Symbols in the message
1. m: The LED is illuminated. ¤: The LED is flashing. l: The LED is unlit.
2. ####: the number of unprinted media. Up to 9999 (in pieces)
3. *: Print Head Mechanism No. “1”: Print Head Mechanism No. 1 “2”: Print Head Mechanism No.2
LED Indication
No. LCD Message
POWER ONLINE ERROR
Printer Status
Restoration by
RESTART key
Yes/No
ON LINE
m m l
On line mode -----
ON LINE
m ¤ l
On line mode (The printer is in
communication)
-----
1
ON LINE ####
m m/¤ l
On line mode (The number of unprinted
media is displayed.)
-----
2
HEAD OPEN *
m l l
The print head mechanism is opened in
online mode.
-----
3
PAUSE ####
m l l
The printer is paused. Yes
4
PAPER JAM
m l m
The media is jammed during paper feed. Yes
5
NO PAPER ####
m l m
The media has run out, or the media is
not loaded properly.
Yes
6
NO RIBBON *
m l m
The ribbon has run out. Yes
7
HEAD OPEN *
m l m
Feed or printing was attempted with the
print head mechanism open.
Yes
8
EXCESS HEAD TEMP
m l m
The print head is overheated. No
(See NOTE.)
9
RIBBON ERROR *
m l m
The ribbon has run out or broken. A
problem has occurred with the sensor
that determines the torque for the ribbon
motor.
Yes
1
0
COVER OPEN
m l l
The Top Cover is opened in online
mode.
Yes
1
1
COVER OPEN ERROR
m l m
Feed or printing was attempted with the
Top Cover open.
Yes
1
2
POWER FAILURE
m l m
A power failure has occurred. No
(See NOTE.)
1
3
EEPROM ERROR
m l m
Back up EEPROM cannot be
read/written correctly.
No
(See NOTE.)
NOTE: Regarding how to recover from the error, please refer to Section 5, TROUBLESHOOTING.

13
1.5.6 Power Switch
When the printer is connected to your PC it is good practice to turn the printer ON before turning on
your PC and turn OFF your PC before turning off the printer
n Turning ON/OFF the Printer
1. To turn ON the printer power, press the Power Switch as shown in the diagram below. Note that
( | ) is the power ON side of the switch.
NOTE: Be sure to turn on the printer before turning on the PC. Turning on the printer after sending a
print command from the PC may cause a print failure.
2. Check that the ON LINE message appears in the LCD Message Display and that the ON LINE
LED and POWER LED are illuminated.
3. Before turning off the printer Power Switch verify that the ON LINE message appears in the LCD
Message Display and that the ON LINE LED is on and is not flashing.
4. To turn OFF the printer power, press the Power Switch as shown in the diagram below. Note that
(¡) is the power OFF side of the switch.
CAUTION!
1. Use the power switch to turn the printer on/off. Plugging or unplugging the Power Cord to turn
the printer on/off may cause fire, an electric shock, or damage to the printer.
2. Do not turn off the printer power while the media is being printed as this may cause a paper jam
or damage to the printer.
3. Do not turn off the printer power while the ON LINE LED is flashing as this may cause damage to
your PC.
Power Switch
Power Switch

14
2. PRINTER SETUP
This section outlines the procedures to setup your printer prior to its operation. The section includes
precautions, connecting cables, assembling accessories, and loading media and ribbon.
2.1 Precautions
To insure the best operating environment, and to assure the safety of the operator and the equipment,
please observed the following precautions.
· Operate the printer on a stable, level, operating surface in a location free from excessive humidity,
high temperature, dust, vibration, direct sunlight, or rapid change of temperature.
· Keep your work environment static free. Static discharge can cause damage to delicate internal
components.
· Make sure that the printer is connected to a clean source of AC Power and that no other high
voltage devices that may cause line noise interference are connected to the same mains.
· Assure that the printer is connected to the AC mains with a three-prong power cable that has the
proper ground (earth) connection.
· Do not operate the printer with the cover open. Be careful not to allow fingers or articles of clothing
to get caught into any of the moving parts of the printer.
· Make sure to turn off the printer power and to remove the power cord from the printer whenever
working on the inside of the printer such as changing the ribbon or removing jammed media, or
when cleaning the printer.
· For best results, and longer printer life, use only Output Solutions recommended media and
ribbons.
· Store the media and ribbons in accordance with their specifications.
· This printer mechanism contains high voltage components; therefore you should never remove any
of the covers of the machine as you may receive an electrical shock. Additionally, the printer
contains many delicate components that may be damaged if accessed by unauthorised personnel.
· Clean the outside of the printer with a clean dry cloth or a clean cloth slightly dampened with a mild
detergent solution.
· Use caution when cleaning the thermal print head as it may become very hot while printing. Wait
until it has had time to cool before cleaning. Use only the Output Solutions recommended print
head cleaner to clean the print head.
· Do not turn off the printer power or remove the power plug while the printer is printing or while the
ON LINE LED is blinking.
15
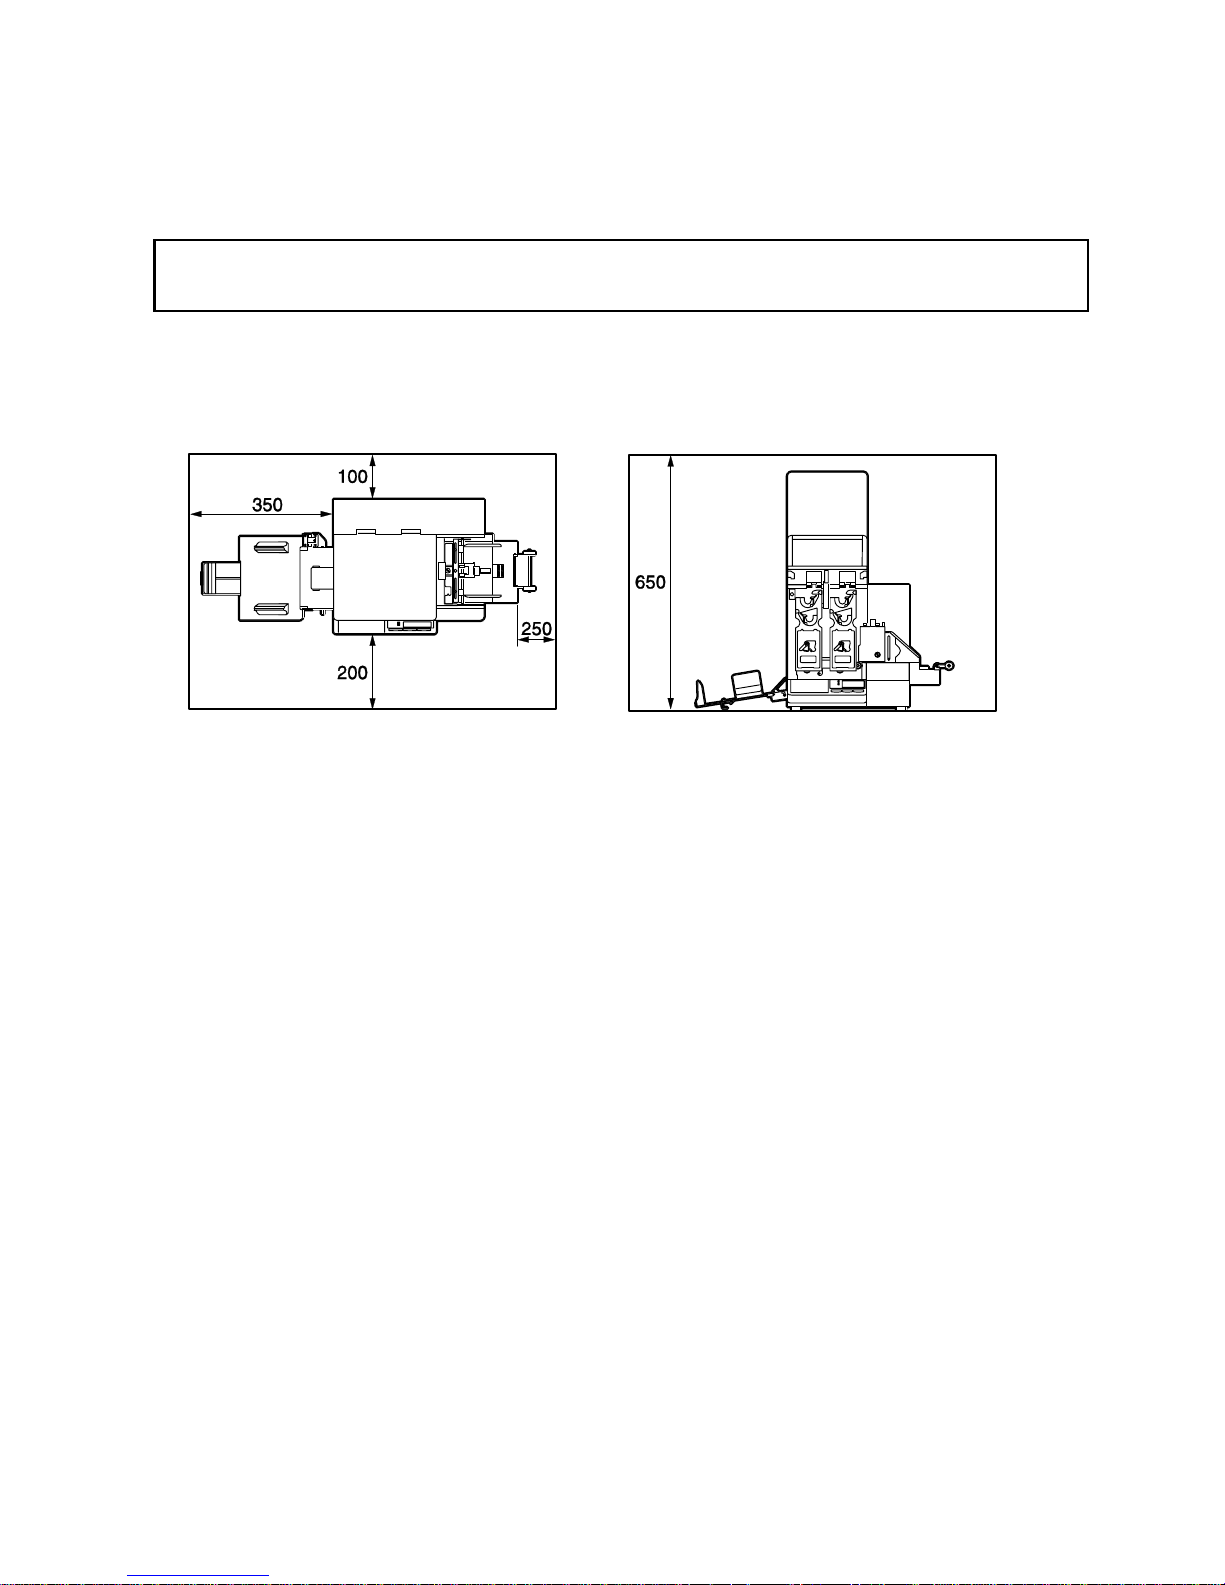
2.2 Procedure before Operation
This section describes the outline of the printer set up.
1. Unpack the accessories and printer from the box.
2. Refer to Safety Precautions in this manual and set up the printer at a proper location.
NOTE: Secure the space around the printer as follows: (unit: mm)
3. Fit the Fan Filter to the printer. (Refer to Section 2.3, Fitting the Fan Filter.)
4. Attach the Media Guide Unit. (Refer to Section 2.4, Attaching the Media Guide Unit.)
5. Attach the Stacker to the printer. (Refer to Section 2.5, Attaching the Stacker.)
6. Connect the printer to a PC with a Centronics Interface Cable. (Section 2.6, Connecting the
Printer to Your PC.)
7. Insert the Power Cord Plug into an AC outlet. (Refer to Section 2.7, Connecting the Power Cord.)
8. Load the Ribbon. (Refer to 2.8, Loading the Ribbon.)
9. Load the Media. (Refer to Section 2.9, Loading the Media.)
10. Install the Printer Drivers. (Refer to Section 3, INSTALLING THE PRINTER DRIVERS.)
CAUTION!
When moving the printer, be sure to hold the bottom. Do not hold the operation panel.

16
2.3 Fitting the Fan Filter
When installing the printer, it is important to ensure that the Fan Filters are attached before using the
printer.
A Fan Filter consists of 2 parts:
(1) Filter Pad
(2) Filter Retainer
1. Put the Filter Pad inside the Filter Retainer.
2. Press into place as shown in the diagram below, ensuring connecting pins are aligned with the
connecting holes.
2.4 Attaching the Media Guide Unit
1. Loosen the two Media Guide Fixing Screws and spread the Media Guides.
2. Lift the Media Holder and put it on top of the Media Holder Unit by fitting its stud into the hole.
NOTES:
1. Do not spread the Media Guides by force, as this may cause deformation of the Media Guide or
machine failure.
2. When moving the Media Guides, be sure to hold the position where the “Press” sign label is
attached.
Media Guide
Media Holder
Media Guide Fixing Screw
Media Guide Fixing Screw
Media Guide Unit
“Press” Sign
Filter Pad
Filter Retainer
Filter Pad
Filter Retainer
WARNING!
Turn OFF the power and disconnect the power cord before attaching the Media Guide Unit. Failure
to do this may cause electric shock.
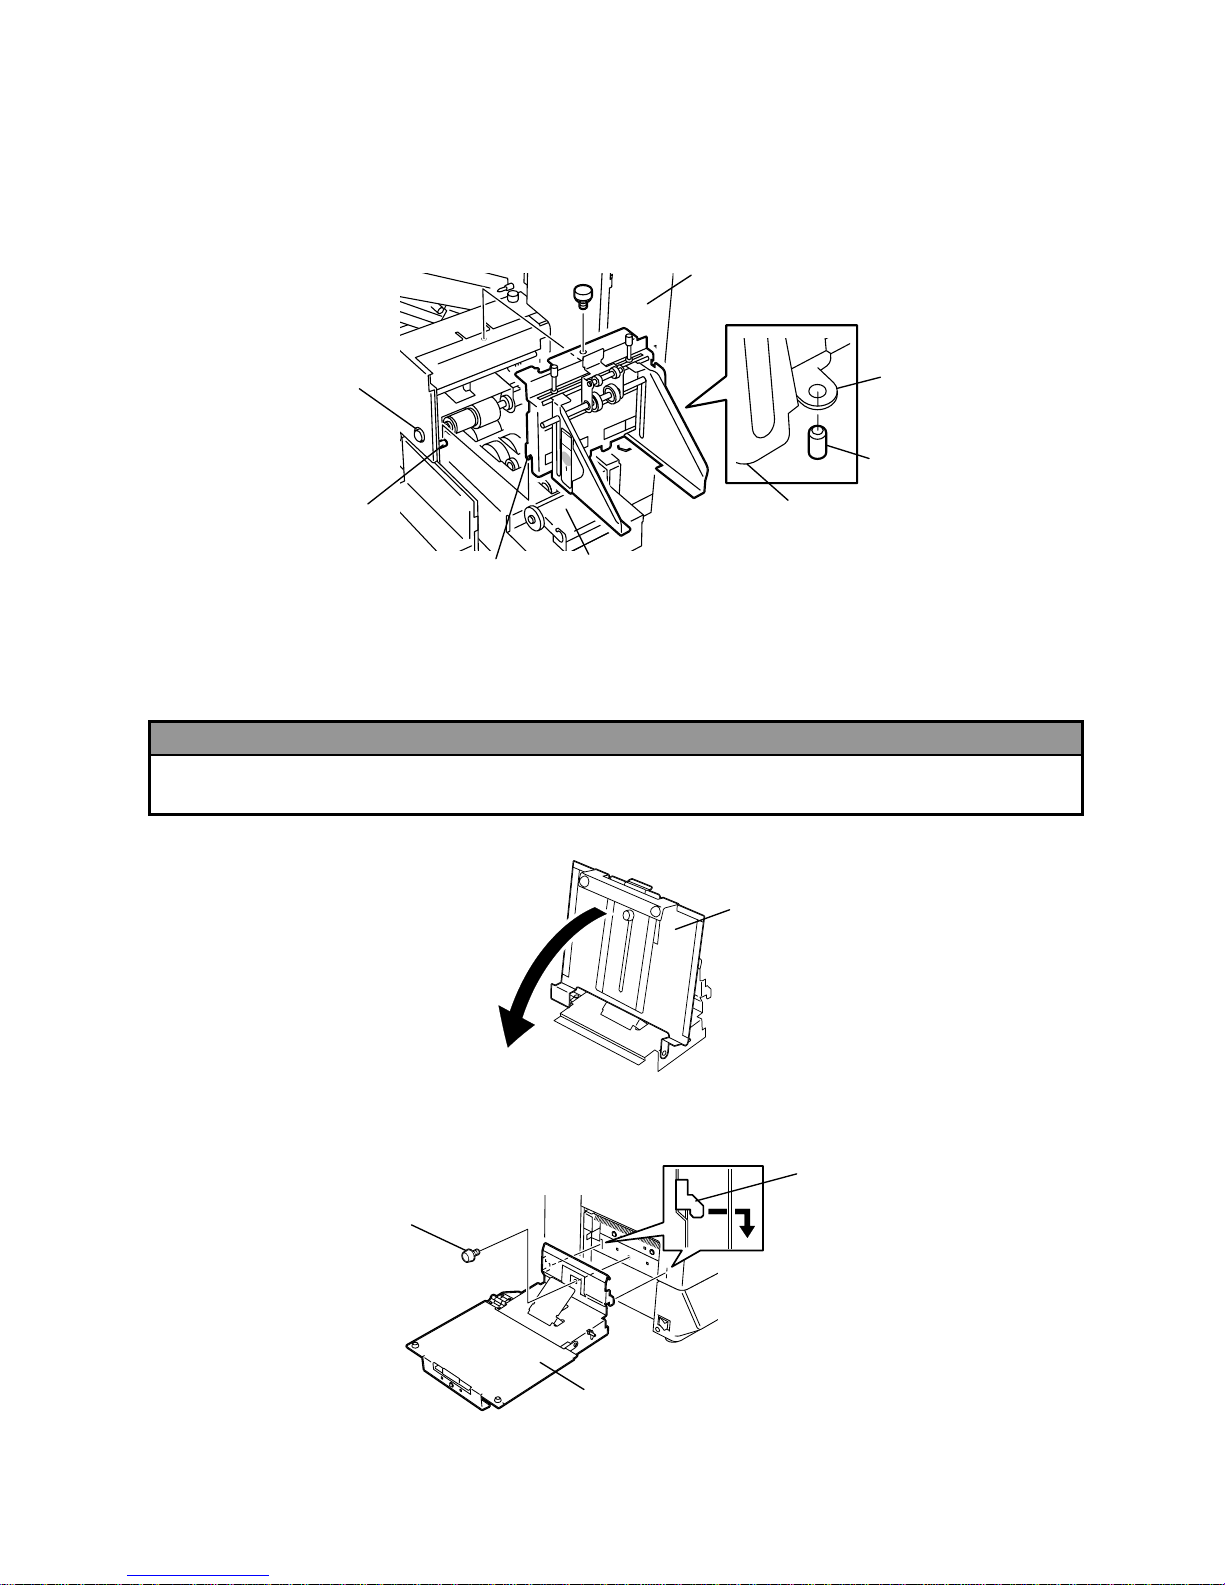
17
3. Fit the slit and hole of the Media Guide Unit onto the Shaft and positioning pin of the Auto Media
Feeder, respectively.
4. Secure the Media Guide Unit to the printer wit the Media Guide Unit Fixing Screw.
NOTE: Do not loosen the Media Guide Angle Adjustment Screw, or else a re-adjustment will be
necessary. (Refer to Section 5.6, Correcting the Skew Print.)
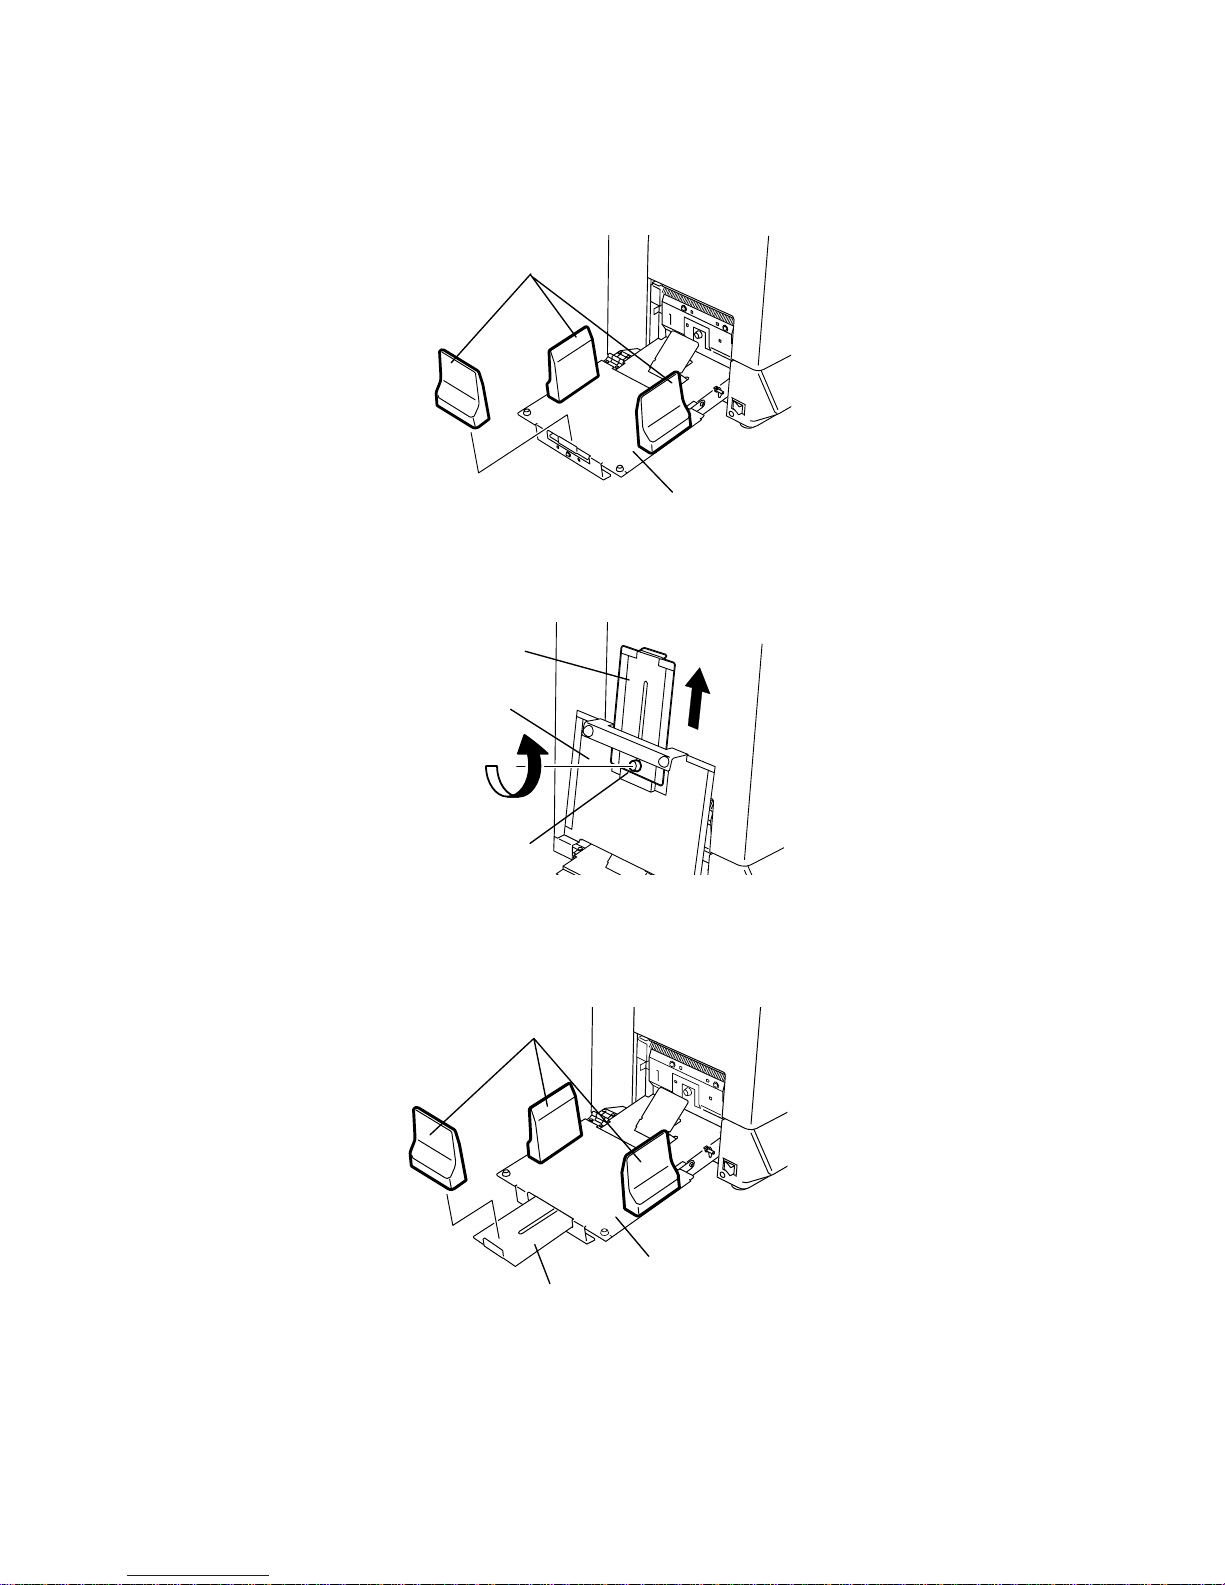
2.5 Attaching the Stacker
1. Open the Stacker Table.
2. Attach the Stacker in front of the Media Outlet by inserting the hooks of the Stacker into the slots in
the printer front, and then secure the Stacker with the enclosed Fixing Screw.
WARNING!
Turn OFF the power and disconnect the power cord before attaching the Stacker. Failure to do this
may cause electric shock.
Stacker Table
Hook
Fixing Screw
Stacker
Media Guide Unit Fixing Screw
Media Guide Unit
Positioning Pin
Hole
Shaft
DO NOT LOOSEN the
Media Guide Angle
Adjustment Screw
Slit
Auto Media Feeder
18
3. Place the Media Stoppers (magnet contained) on the Stacker Table according to the media size.
(When printing business card or post card)
4. When printing long media, fold the Stacker Table, loosen the Fixing Screw, and then pull up the
Media Tray.
5. After securing the Media Tray with the Fixing Screw, open the Stacker Table. Place the Media
Stoppers (magnet contained) according to the media size.
Media Stopper
Stacker Table
Media Tray
Fixing Screw
Stacker Table
Media Stopper
Stacker Table
Media Tray
19
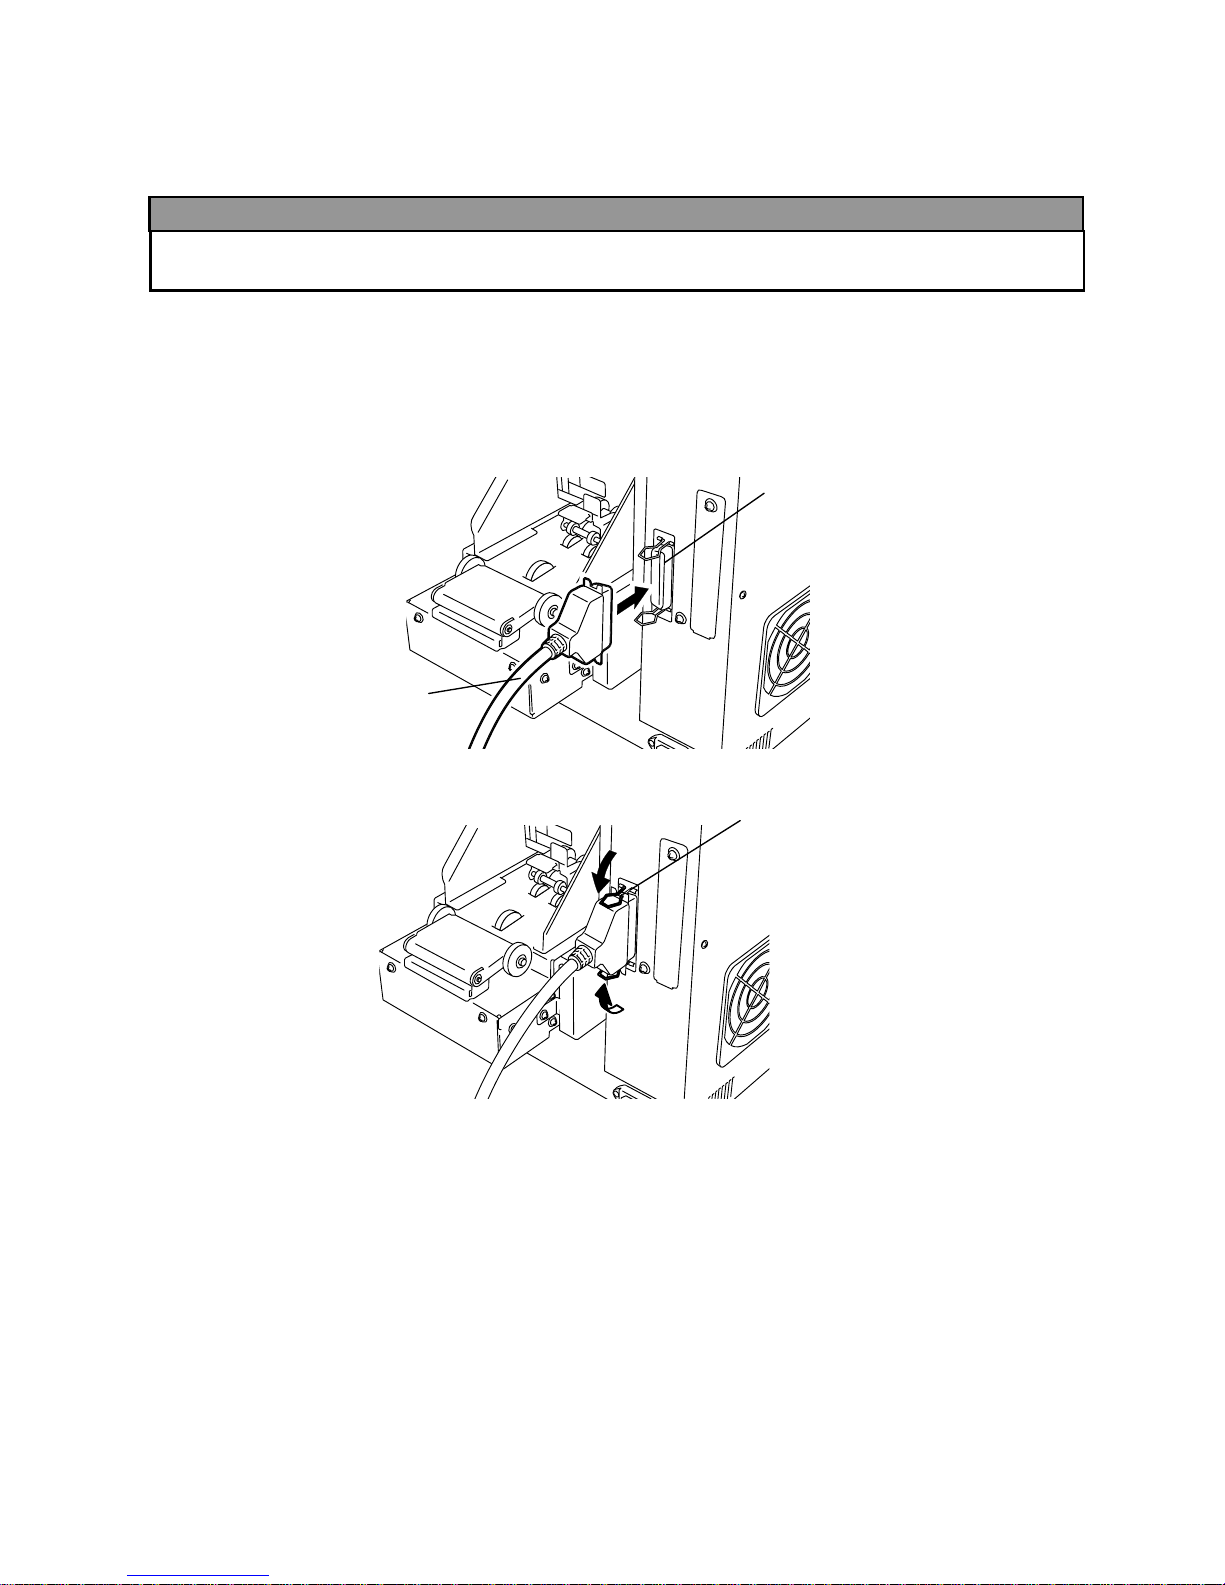
2.6 Connecting the Printer to Your PC
The following paragraphs outline how to connect the Centronics Interface Cable between the printer
and your PC.
1. Make sure that both printer and PC are turned off.
2. Connect the Centronics Interface Cable to the parallel port on the right side of the printer.
3. Fix the connector with the clampers.
4. Connect the other side of the Centronics Interface Cable to the parallel port of your PC.
WARNING!
Turn OFF the printer and PC and disconnect the power cord before connecting the printer to the PC.
Failure to do this may cause electric shock or short-circuit.
Centronics Interface Cable
Parallel Port
Clamper
 Loading...