

Page 1
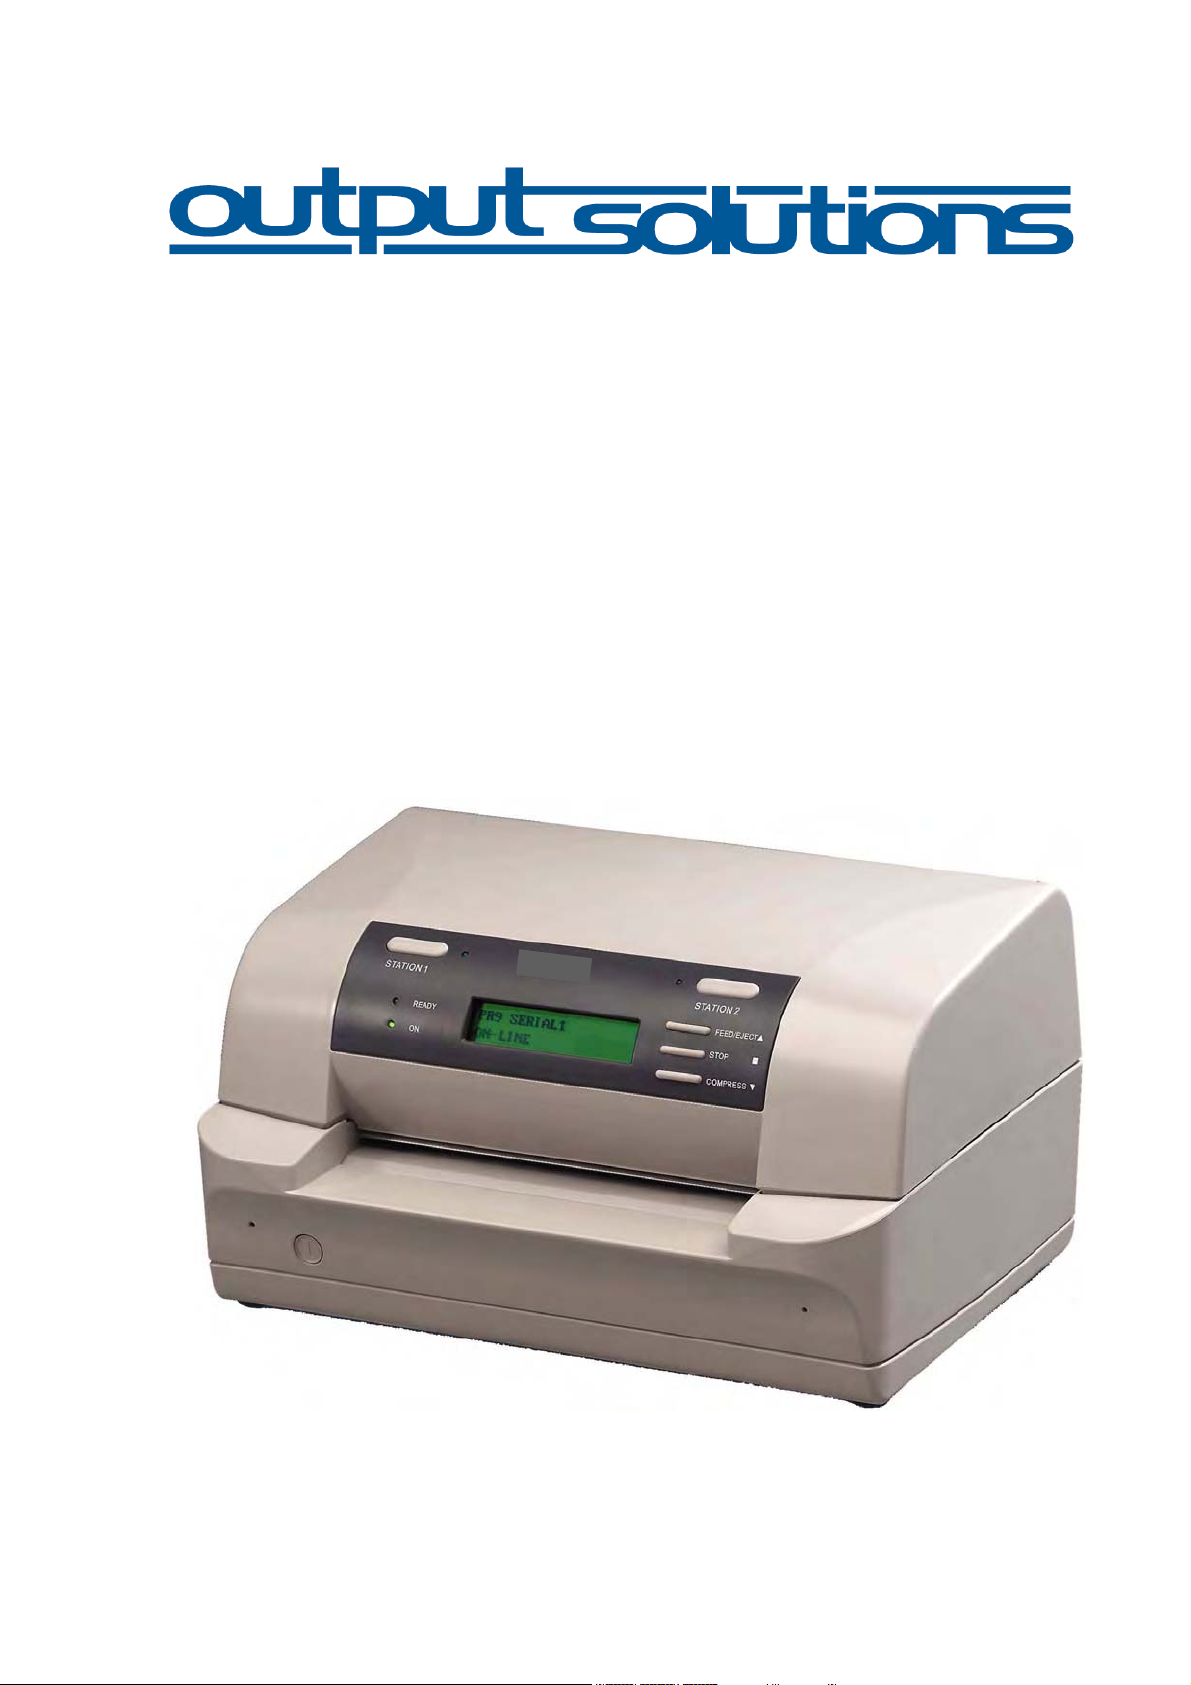
User's Manual
C-650 Plus
Page 2

p
p
A
Acknowledgements
EPSON is a Trademark of Seiko Epson Corporation.
IBM is a Trademark of International Business Machines Cor
ProPrinter is a Trademark of International Business Machines Cor
oration.
oration.
Publication of
Output Solutions GmbH
Talstraße 25
D 51399 Burscheid
Federal Republic of Germany
Pub. No. 602 650
Great care has been taken to ensure that the information in this publication is accurate and
complete. However, should any errors or omissions be discovered or should any user
wish to make suggestions for improving this manual, please feel encouraged to send us the
relevant details.
The contents of this manual are subject to change without notice.
Copyright © by Output Solutions GmbH.
All rights strictly reserved. Reproduction or
permitted without written authorization from the publisher.
February 2006
issue to third parties in any form is not
Page 3

Safety Regulations
The printer C-650 Plus
computer systems.
fulfill the safety regulations according to DIN EN 60950-1 for
The mains cable must be connected to a ground protected wall-socket. The selected
voltage of the printer needs to fit to the local voltage.
The power plug must be easily accessible at any time so that it can be disconnected
immediately in case of danger or for maintenance purposes.
Comme le câble de secteur sert de dipositif d'arrêt-urgence, sa connexion à l'imprimante
doit être tout le temps accessible.
Before installing the printer, check the surrounding conditions in which the printer will be
placed (see next page, Operating Environment).
During a thunderstorm you should never attempt to connect or disconnect any data
transfer cables.
The power supply should only be opened and checked by authorized personnel. Repairs
and maintenance may only be attempted by authorized personnel as well. Repairs done
inappropriately may cause damage and severe danger for the user.
General Installation Precautions
To ensure optimum printer functionality and to avoid making service calls for problems
that are not directly caused by the product itself, bear in mind the information provided in
the following sections.
Electrical Power Supply
Make sure that the electrical wall outlet to which the printer is connected has a valid
ground and that it is able to supply the power needed by the machine. A wall outlet
without ground can cause functional problems and can be a safety hazard.
Do not plug the printer to electrical wall outlets that are already being used by equipment
that could cause electrical noise and excessive voltage fluctuations (fans and air
conditioners, large photocopiers, lift motors, TV radio transmitters and signal generators,
high frequency safety devices, and so on).
Common office equipment (calculating machines, typewriters, small photocopiers,
terminals and personal computers) can share the same outlet as long as they do not
cause excessive electrical noise.
Environmental Conditions
The environmental conditions in which the product can work properly referring to a normal
air-conditioned office environment (environmental temperature of 15 up to 35 °C, relative
humidity of between 15 and 85%).
During machine storage and operation, make sure that condensation does not form as the
result of extreme environmental variations.
Dust, dirt and smoke can cause the parts in
motion to wear excessively, short circuits (in the presence of a high degree of humidity).
High temperatures and low humidity can cause problems due to static electricity.
I
Page 4

Safety Regulations
Locating the Machine
-
The printer must be installed on a flat, vibration free surface.
-
Do not position the machine near air conditioning systems, heat sources or in direct
sunlight.
-
Do not obstruct the printer's ventilation slots.
-
If the printer is installed in a cabinet, make sure that it has good ventilation so as to
avoid overheating.
-
Install the printer in a position so that paper jams can be cleared easily.
Work Environment
An environment that is too cold, hot or humid could be the cause of certain malfunctions.
The machine must not be positioned near air conditioning system vents or exposed to
direct sun light. Make sure that the machine's internal ventilation slots are not blocked,
especially if the printer is installed in furniture.
Printer Operating Condition
Check that the internal parts of the machine have no dirt deposited or residue of paper or
ink that could interfere with the performance of the printer's different components. Make
sure there is no internal damage caused by the insertion of documents with metal clips,
staples, pins or similar. Ensure that the parts specified are correctly lubricated.
II
Page 5

TABLE OF CONTENTS
Preface ............................................................................................................................. VII
About this manual ............................................................................................................. VII
1. Getting Started ............................................................................................................1-1
1.1 Unpacking ..................................................................................................................1-1
1.1.1 Delivery contents Printer C-650 PLus .......................................................1-1
1.2 Requirements to the Location of the Printer...............................................................1-2
1.3 A first Look at the Printer............................................................................................1-3
1.3.1Front View ...................................................................................................1-3
1.3.2Rear View....................................................................................................1-3
1.4 Remove Transport Lock.............................................................................................1-4
1.5 Ribbon Installation......................................................................................................1-5
1.6 Mains Connection and Power On ..............................................................................1-7
1.7 Print Test....................................................................................................................1-9
1.7.1 Selftest ....................................................................................................1-9
1.7.1 Selftest Printing Contents......................................................................1-10
1.7.3 Dr. Grauert (print a letter) ......................................................................1-11
1.8 Connection to the System........................................................................................1-12
1.8.1 Parallel / Serial Interface .......................................................................1-12
1.9 Installing the Printer Drivers .....................................................................................1-12
2. Printer Operation........................................................................................................2-1
2.1 Operator Panel...........................................................................................................2-1
2.2 Function Keys ............................................................................................................2-2
2.3 Liquid Crystal Display (LCD) ......................................................................................2-4
2.4 Load Print Medium.....................................................................................................2-5
2.5 Menu Mode ................................................................................................................2-5
2.5.1 To Confirm a Macro Selection and Save the Settings.............................2-6
2.6 The Use of C-650 Plus Emulation .............................................................................2-6
3. Configuring the Printer..............................................................................................3-1
Main Functions and Entry Points into the Menu................................................................3-1
3.1 What is Configuration..............................................................................................3-2
3.2 Standard Configuration ...........................................................................................3-3
3.2.1 Explanation of the Printout on the Previous Page...................................3-4
3.3 Menu Structure.........................................................................................................3-4
3.3.1 How to use the Key in the Menu Mode ...................................................3-5
3.3.2 The Emulations of C-650 PLus...............................................................3-5
3.4 Menu Setup Description ..........................................................................................3-5
3.4.1 Select Current Macro ..............................................................................3-6
3.4.2 Select User to Setup ...............................................................................3-6
3.4.3 Configure.................................................................................................3-6
Page 6

3.4.4 IBM Configure .......................................................................................3-10
3.4.5 LQ Configure.........................................................................................3-13
3.4.6 Save Parameters...................................................................................3-16
3.5 Print Test ................................................................................................................3-17
3.5.1 Users Guide ...................................................................................... 3-17
3.5.2 ASCII Character Set............................................................................. 3-17
3.5.3 Character Attributes ............................................................................. 3-17
3.5.4 Dr. Grauert (print a letter) ..................................................................... 3-17
3.6 Adjustment ............................................................................................................. 3-18
3.6.1 Photo Sensor Value .............................................................................. 3-18
3.6.2 Left Margin ............................................................................................ 3-19
3.6.3 Top Margin ............................................................................................ 3-20
3.6.4 Run-in Test............................................................................................ 3-20
3.6.5 Bidirectional Alignment Adjustment....................................................... 3-21
3.6.6 Print Photo Values................................................................................. 3-22
3.6.7 Inquire Photo Values ............................................................................. 3-23
3.6.8 Resume Hardware Parameters............................................................. 3-24
3.7 Debug / Test ........................................................................................................... 3-24
3.7.1 Data Backup Mode................................................................................ 3-25
3.7.2 Printing Saved Data .............................................................................. 3-25
3.7.3 Printing Last Data.................................................................................. 3-26
3.7.4 Printing Flash Data................................................................................ 3-26
3.7.5 Directly Dump........................................................................................ 3-27
3.8 Info Inquiring .......................................................................................................... 3-28
3.8.1 FW Version............................................................................................ 3-28
3.8.2 HW Configuration .................................................................................. 3-28
3.8.3 Printer ID ............................................................................................... 3-28
4. Maintenance ............................................................................................................... 4-1
4.1 Cleaning Surrounding Areas...................................................................................... 4-1
4.1.1 Remove the Ribbon................................................................................. 4-2
4.1.2 Remove the Alignment Unit..................................................................... 4-3
4.1.3 Cleaning Procedure................................................................................. 4-4
4.1.4 Install the Alignment Unit ........................................................................ 4-4
4.1.5 Install the Ribbon Cassette ..................................................................... 4-4
5. Options........................................................................................................................ 5-1
5.1 Optional Devices........................................................................................................ 5-1
IV
Page 7

6. Technical Data............................................................................................................ 6-1
6.1 Technical Specification ............................................................................................ 6-1
6.2 Document Specification and Technical Instructions ................................................ 6-3
7. Interface Description ................................................................................................. 7-1
7.1 Serial Interface......................................................................................................... 7-1
7.2 Parallel Interface...................................................................................................... 7-2
7.3 USB Interface .......................................................................................................... 7-2
8. Firmware Update........................................................................................................ 8-1
9. Troubleshooting......................................................................................................... 9-1
How to Use This Section................................................................................................... 9-1
9.1 Power-related Problems............................................................................................. 9-1
9.2 Uncompleted Power On............................................................................................. 9-1
9.3 Ribbon or Carriage-related Problems ........................................................................ 9-2
9.4 Paper-related Problems ............................................................................................. 9-2
9.5 Print-related Problems ............................................................................................... 9-3
9.6 No Printout ................................................................................................................. 9-4
V
Page 8

Table of Contents
3
Appendix A Code Pages .............................................................................................. A-1
A.1 PC Character Sets ................................................................................................... A-2
A.2 ISO Character Sets ................................................................................................. A-25
A.3 OCR-A Character Sets............................................................................................ A-34
A.4 OCR-B Character Sets............................................................................................ A-36
Appendix B IBM ProPrinter X24 and IBM ProPrinter II Emulation ........................... B-1
B.1 Command Index .................................................................................................... B-2
B.2 Command Description........................................................................................... B-4
B.2.1 Basic Operations............................................................................ B-4
B.2.2 Margins ............................................................................... B-6
B.2.3 Line Feed ............................................................................... B-8
B.2.4 Print Pitches ............................................................................. B-11
B.2.5 Print Attributes ............................................................................. B-13
B.2.6 Tabulation ............................................................................. B-19
B.2.7 Graphics ............................................................................. B-21
B.2.7.1 The IBM Graphic Commands .......................................... B-22
B.2.7.2 Alternate Graphic Mode (AGM) .......................................... B-24
B.2.8 Downloading Customized Characters (DLL)................................ B-26
B.2.9 Other Functions ........................................................................... B-31
B.
Hex - Decimal Conversion Table............................................................................. B-34
Appendix C Epson LQ Emulation................................................................................. C-1
C.1 Command Index .................................................................................................... C-2
C.2 Command Description............................................................................................... C-6
C.2.1 Basic Operations............................................................................C-6
C.2.2 Margins ...............................................................................C-8
C.2.3 Line Feed ............................................................................. C-10
C.2.4 Print Position ............................................................................. C-12
C.2.5 Print Pitches ............................................................................. C-14
C.2.6 Print Attributes .............................................................................C-16
C.2.7 Tabulation .............................................................................C-23
C.2.8 Graphics .............................................................................C-25
C.2.9 Other Functions ...........................................................................C-27
C.2.10 Ignored Commands ..................................................................... C-29
C.3 Hex - Decimal Conversion Table ............................................................................C-33
VI
Page 9

p
p
A
Preface
About this Manual
This manual covers the printer in combination with an interface module.
The interface is an integral part of the printer, and the type of interface used significantly
influences the behaviour or o
The structure of this manual is such that the operator is led step-by-step through the
various procedures. It starts with the unpacking and setting-up, moves on to detailed
instructions for o
The manual is divided into the following chapters:
1. Getting Started
This chapter covers the unpacking and setting-up of the printer and the installation of the
ribbon cassette. By the end of this chapter the printer should be fully functional and
tested in its primary form. It is not yet connected to the host computer system and no
options are mounted.
eration of the printer.
erating the printer and ends with the mounting of options.
2. Operating the Printer
This chapter discusses in great detail the operation of the operator panel, all menu
functions, and the general operation of the menu.
3. Configuring the Printer
This chapter explains how to configure the printer so that it can communicate with the
corresponding system environment. Then this chapter thoroughly describes the
printer's operating controls. In the last part you will find tables with the possible values
of the menu items.
In this chapter you will also find a detail explanations of individual menu items.
4. Maintenance
This chapter shows how to clean the printer and how to remove the Alignment Unit.
5. Options
This is a description of the available options, the Tractor Unit and the USB Port.
6. Technical Data
ll technical details or data about the printer can be found here.
7. Interface Description
This chapter gives hints about possibilities to connect the printer to the various
computer systems and explains particularities depending on the version of the
operating system. Additionally, cable connection is illustrated.
8. Firmware Update
Output Solutions will advise users to update the printer’s firmware irregularly to
strengthen C-650 PLUS’s functions.
VII
Page 10
Preface
A
9. Trouble Shooting and Diagnostics
Suggests how to identify and correct simple problems.
Appendix
A. Character Set Table
ll printer supported character sets are listed in this chapter.
B. IBM ProPrinter Emulation Commands
Quick reference for IBM ProPrinter X24 and IBM ProPrinter II
C. EPSON LQ Emulation Commands
Quick reference for EPSOM LQ Emulation.
Conventions Used in this Guide
The following conventions are used:
Bold
Note:
Caution:
[STOP ]
Headlines and important information.
Contains special advice to facilitate handling.
Contains important information to prevent damage of the
equipment.
Key functions are always depicted in brackets.
Abbreviations and Acronyms
DRAFT
HSD
LCD
LED
LQ
MACRO
NLQ
PH
VIII
Draft
High S
Liquid C
Light E
Letter Q
User defined group (1 up to 3) of stored parameter
Near L
Print H
Quality
peed D
rystal D
mitting D
uality
etter Q
ead
raft
isplay
iode
uality
Page 11
r
y
1.
Getting Started
1.1 Unpacking
Check each item against the check list detailed below. Contact your supplier immediately if
any item is missing or damaged.
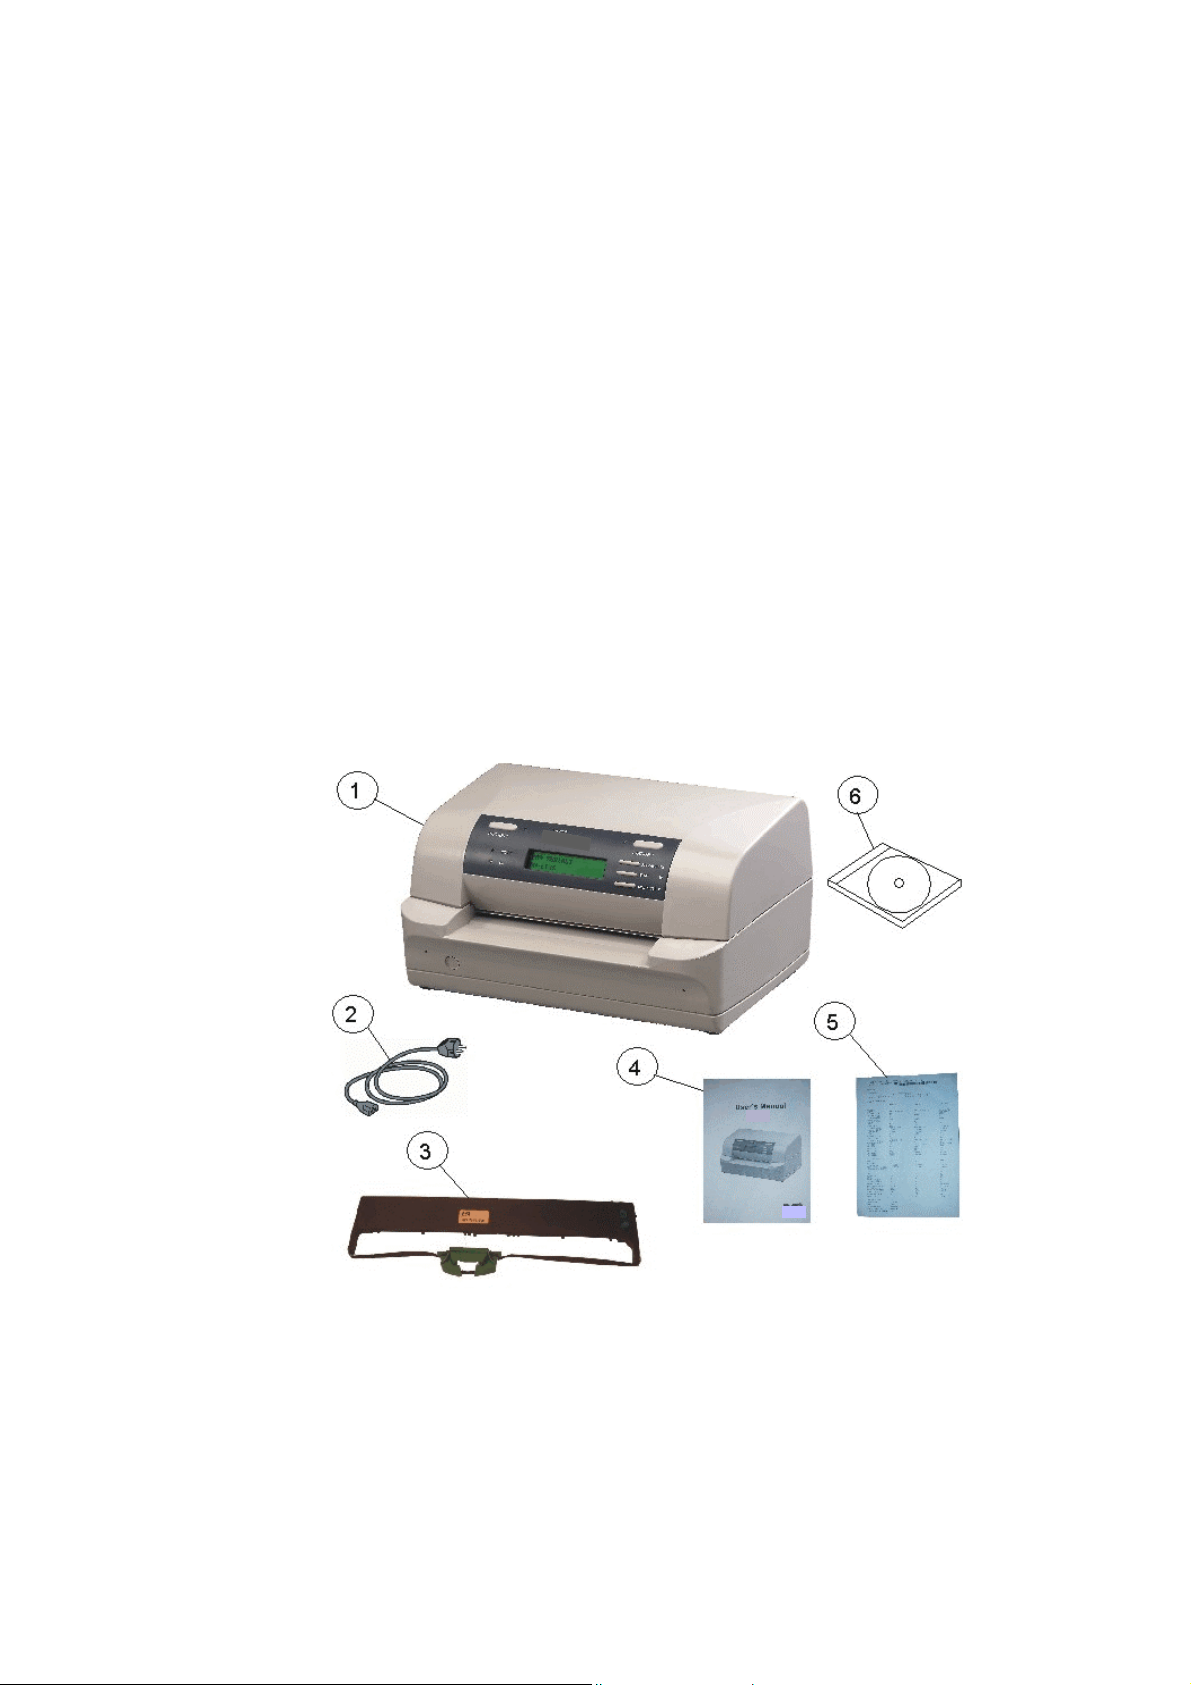
1.1.1 Delive
Check each item against the check list detailed below. Contact your supplier immediately if
any item is missing or damaged.
•
Printer
•
Power Cord (2)
•
C-650 PLUS Cartridge (Ribbon Cassette) (3)
•
Printout of the User's Manual (4)
Printout of the default menu configuration (5)
•
•
CD-ROM with a PDF format of the User's Manual and additional information (6)
Contents Printer C-650 Plus
C-650 Plus (1)
1-1
Page 12

Getting Started
r
y
1.2
Requirements to the Location of the Printe
Environmental Conditions
This printer is designed to be installed in a typical office environment. We claim that
customer must follow these operation explanation as below for printer’s well working
status and safet
Install the printer in an area away from any heat source, air conditioner, or strong
•
airflow.
Avoid installing the printer where it is exposed to moisture or heat (eg. direct sunlight).
•
•
Avoid installing the printer in a dusty or humid environment.
•
Do not put printer to the high temperature, shake or wet environment. And no exposure
to direct sunlight. For example boiler, humidifier or fridge.
of operator:
•
Preconditions for Installation
•
Place the printer on the stand or a table.
•
When processing fanfold paper always place the printer with its front edge slightly off
the edge of the table.
Power Requirements
•
No special wiring is required. A typical office wall outlet is sufficient. Make sure that the
electrical wall outlet to which the printer is connected has a valid ground and that it is
able to supply the power needed by the machine.
•
Do not plug into the same wall outlet other equipment besides the printer such as
1-2
Page 13
r
1.3
A First Look at the Printe
1.3.1 Front View
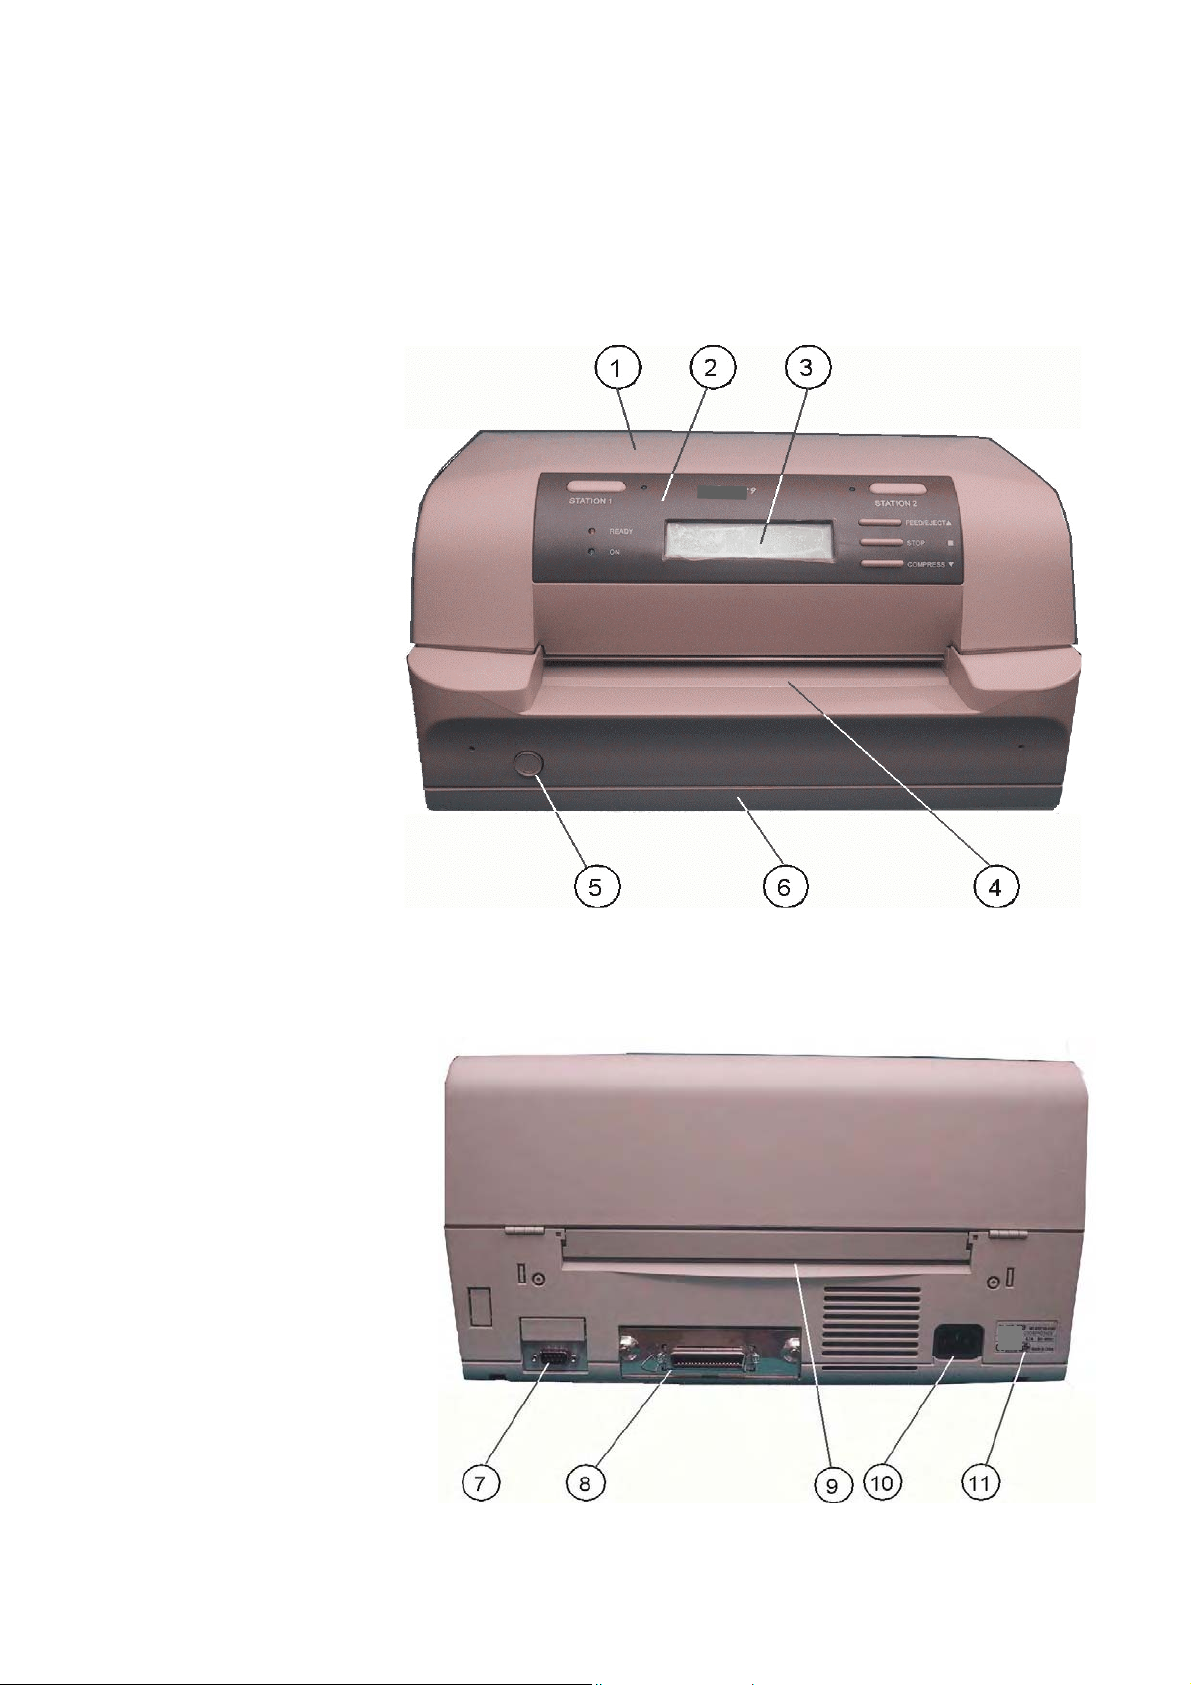
•
Top Cover (1)
•
Operator Panel (2)
•
Display (3)
•
Front Paper Feeding Platform (4)
•
Power Switch (5)
•
Bottom Frame (6)
Getting Started
1.3.2
Rear View
•
Serial Interface Connector (7)
•
Option Interface Board Slot (8) for detail see chapter 5
•
Rear Paper Feeding Path (9)
•
Power Cord Socket (10)
•
Electrical Label (11)
Options
1-3
Page 14
Getting Started
p
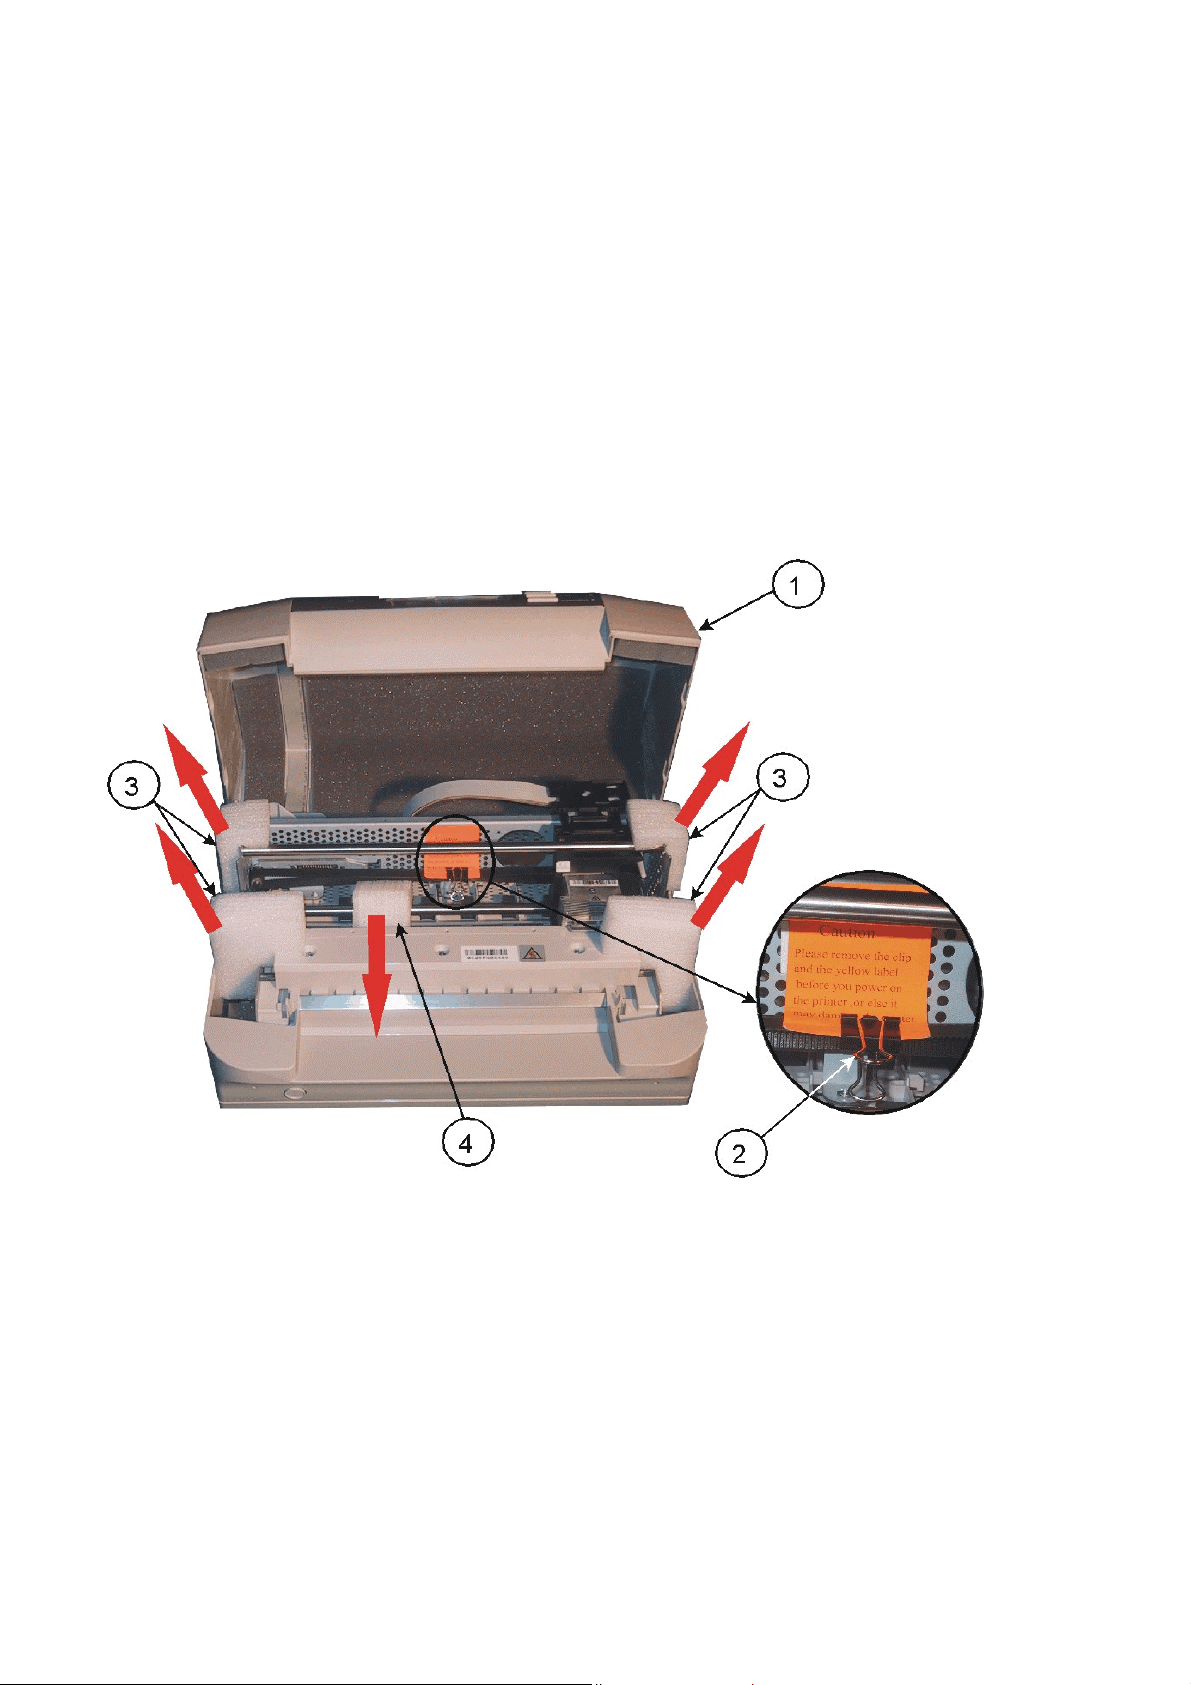
1.4 Remove Transport Lock
Note:
Please do not connect the printer's power cord at this moment, otherwise the
printer may be damaged permanently.
Open the top cover (1) first.
•
•
Remove the black iron clip (2) and yellow label, from the print head carriage.
•
Take out the four foam-rubber cushions (3) which on the both sides of carriage.
•
Remove the foam-rubber cushions (4) to the front by lifting up.
Remove all trans
ort
Re-packing Information
To ensure maximum protection when transporting the printer, always:
•
Remove the mains cable.
•
Remove the ribbon cassette.
•
Reposition the transport lock.
•
Pack the printer in its original packing material and ship in its original package.
1-4
Page 15
1.5
Ribbon Installation
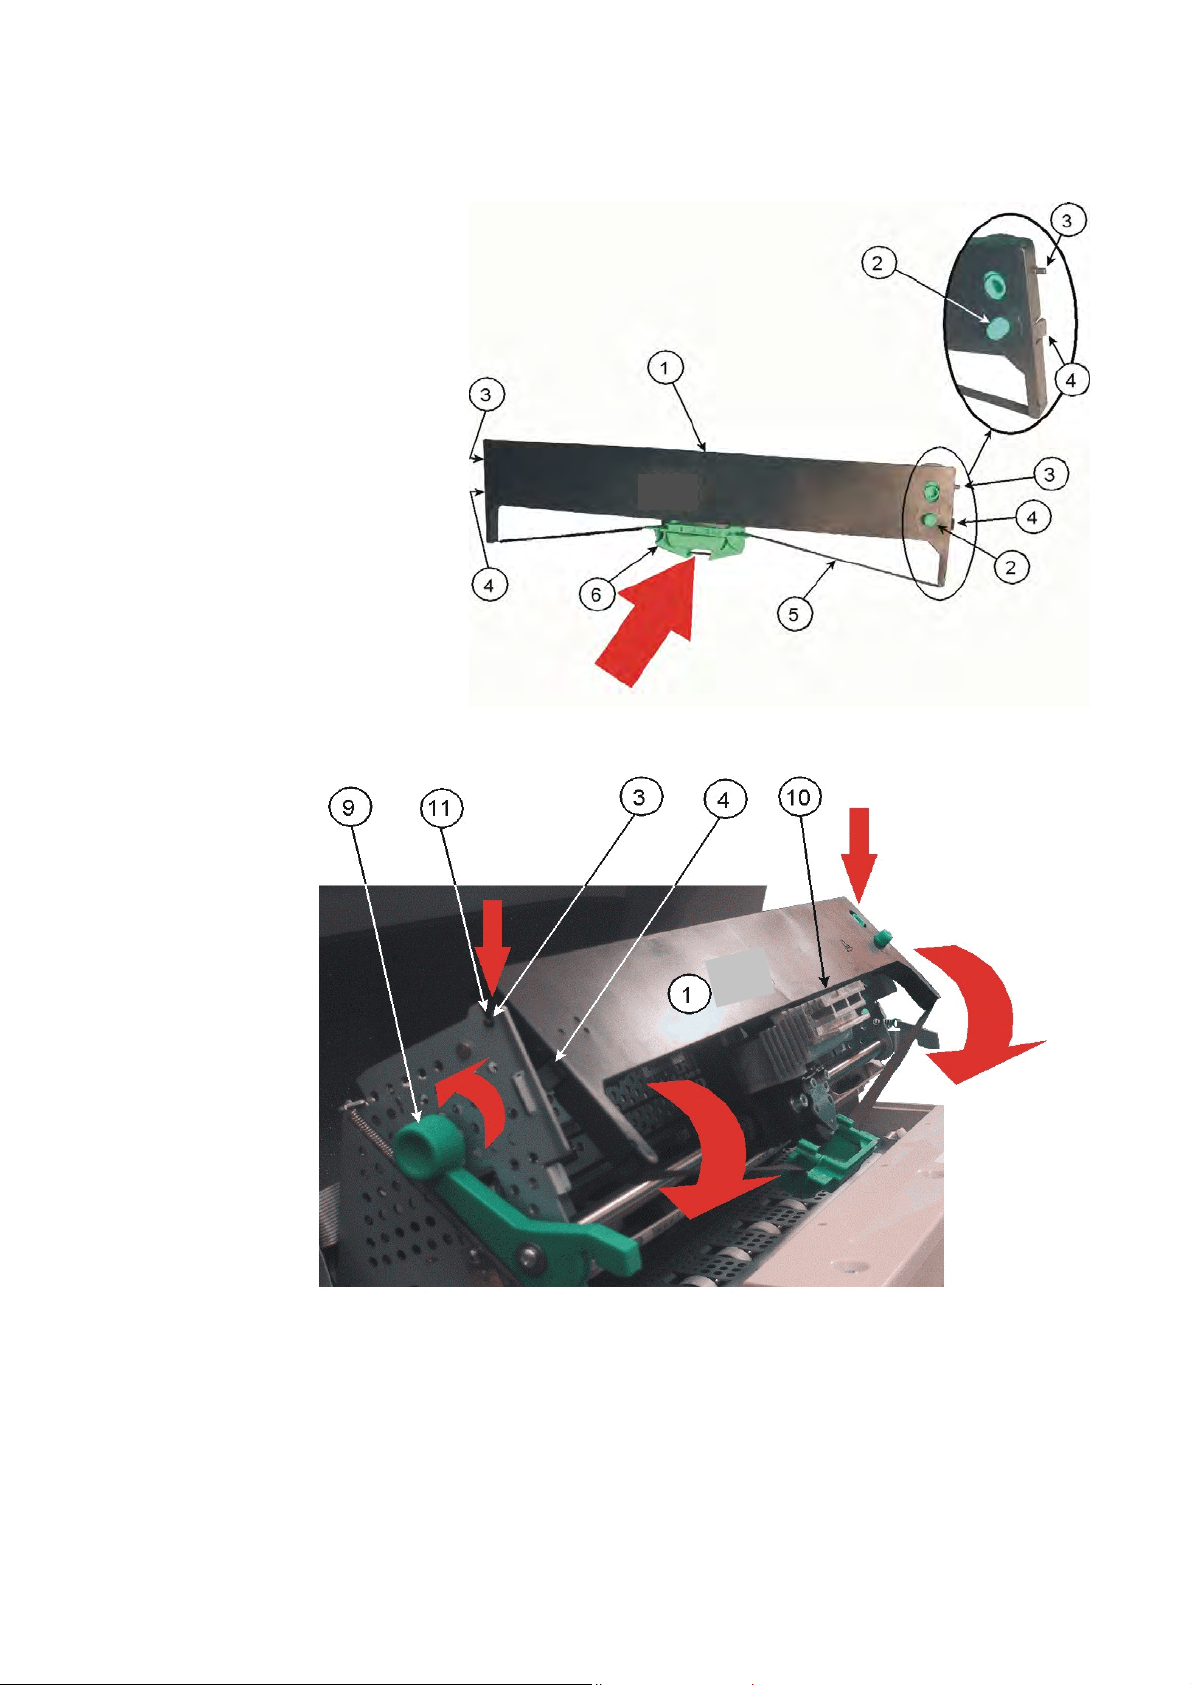
•
Take out the Ribbon Cassette (1) from plastic wrapping
Details of the Ribbon Cassette (1):
•
Active Wheel (2)
•
Fixation Pin (3)
•
Fixation Block (4)
•
Ribbon (5)
•
Ribbon Guide (6)
Getting Started
Installing:
Power the printer on.
•
•
Remove the Ribbon Guide (6) by sliding down from the Ribbon Cassette (1).
•
Open top cover.
•
Swivel the green print unit lift handle (9) backwards to lift the print unit entirely.
•
Move print head (10) to the centre.
•
Insert the fixation pins (3) at the both ends of ribbon cassette (1) into the slots (11) at
both ends of print unit frame.
•
Try to push ribbon cassette (1) by rotation as shown in the picture above.
Press the ribbon cassette fixation block (4) into both ends slot of print unit until you
•
hear a “
CLICK”.
1-5
Page 16
Getting Started
•
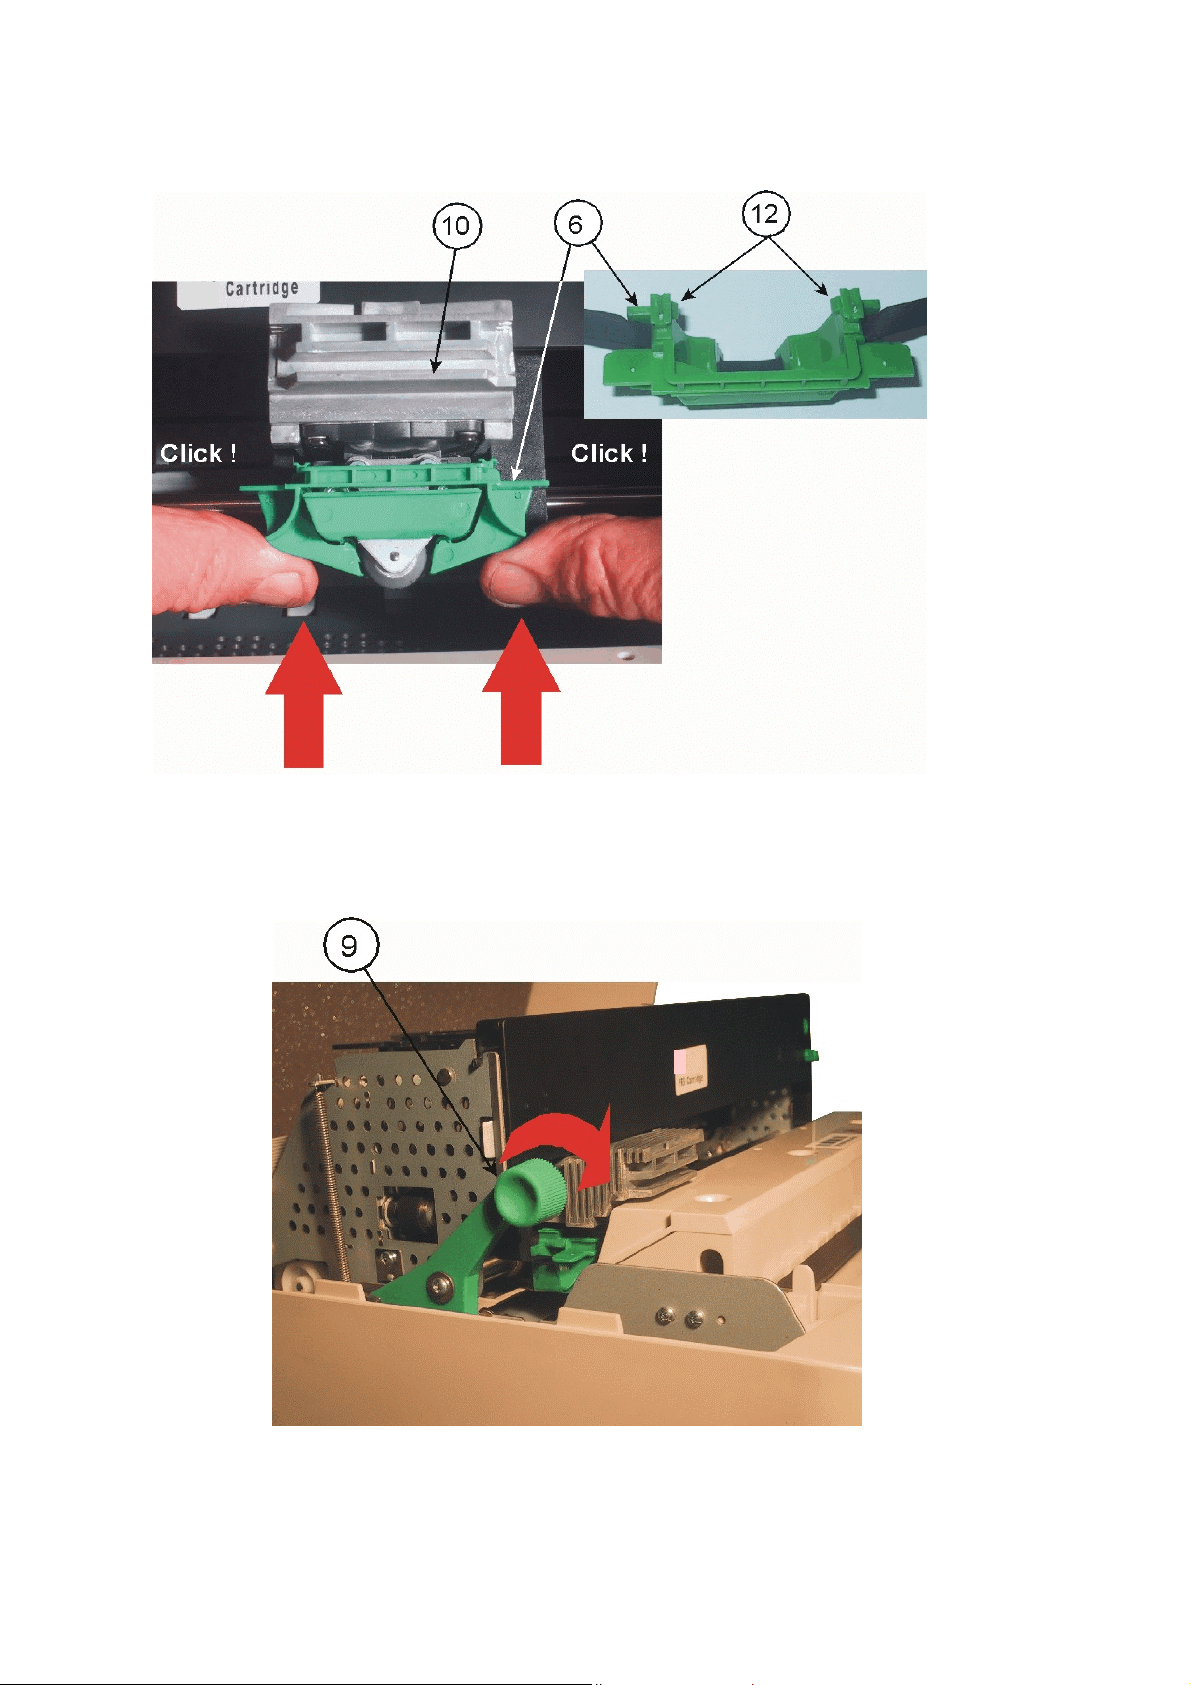
Insert ribbon guide (6) into print head (10) and press it up to make sure that the two
taps (12) on the ribbon guide (6) have been fixed.
•
Move the print head (10) to the right and left side until the ribbon is tight.
Swivel the green print unit lift handle (9) to let print unit back to its normal Position.
•
•
Close top cover.
1-6
Page 17
p
1.6
Mains Connection and Power On
Getting Started
WARNING:
Before plug the power cord into the electrical wall outlet and power on the
printer, voltage rating indicated on the electrical data plate must be checked to
corres
Note:
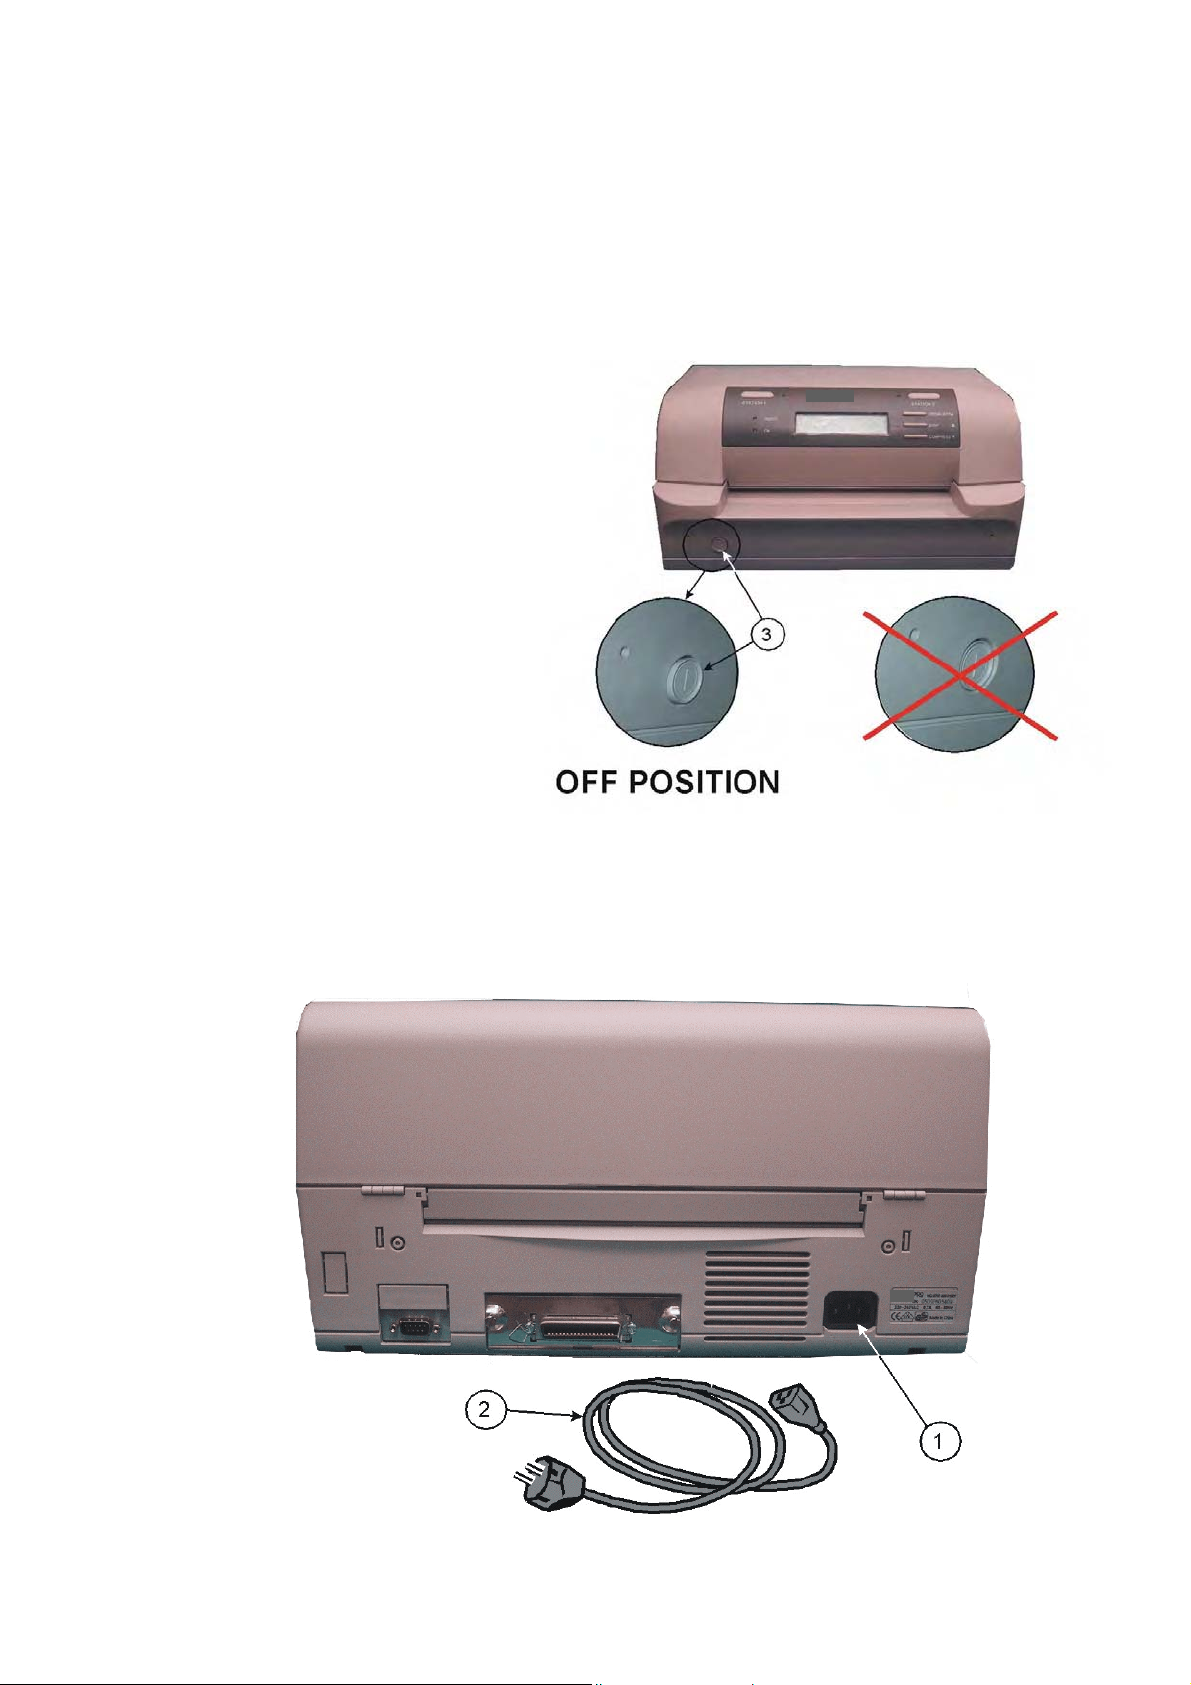
Power switch (3) must be in off position.
•
Connect the printer to the mains using the power cord (2).
•
First connect the cable to the power cord socket (1) and then to the mains.
•
Do not plug into the same wall outlet other equipment besides the printer such as
coffee machines, copy machines, or air conditioners.
ond to the local mains.
1-7
Page 18
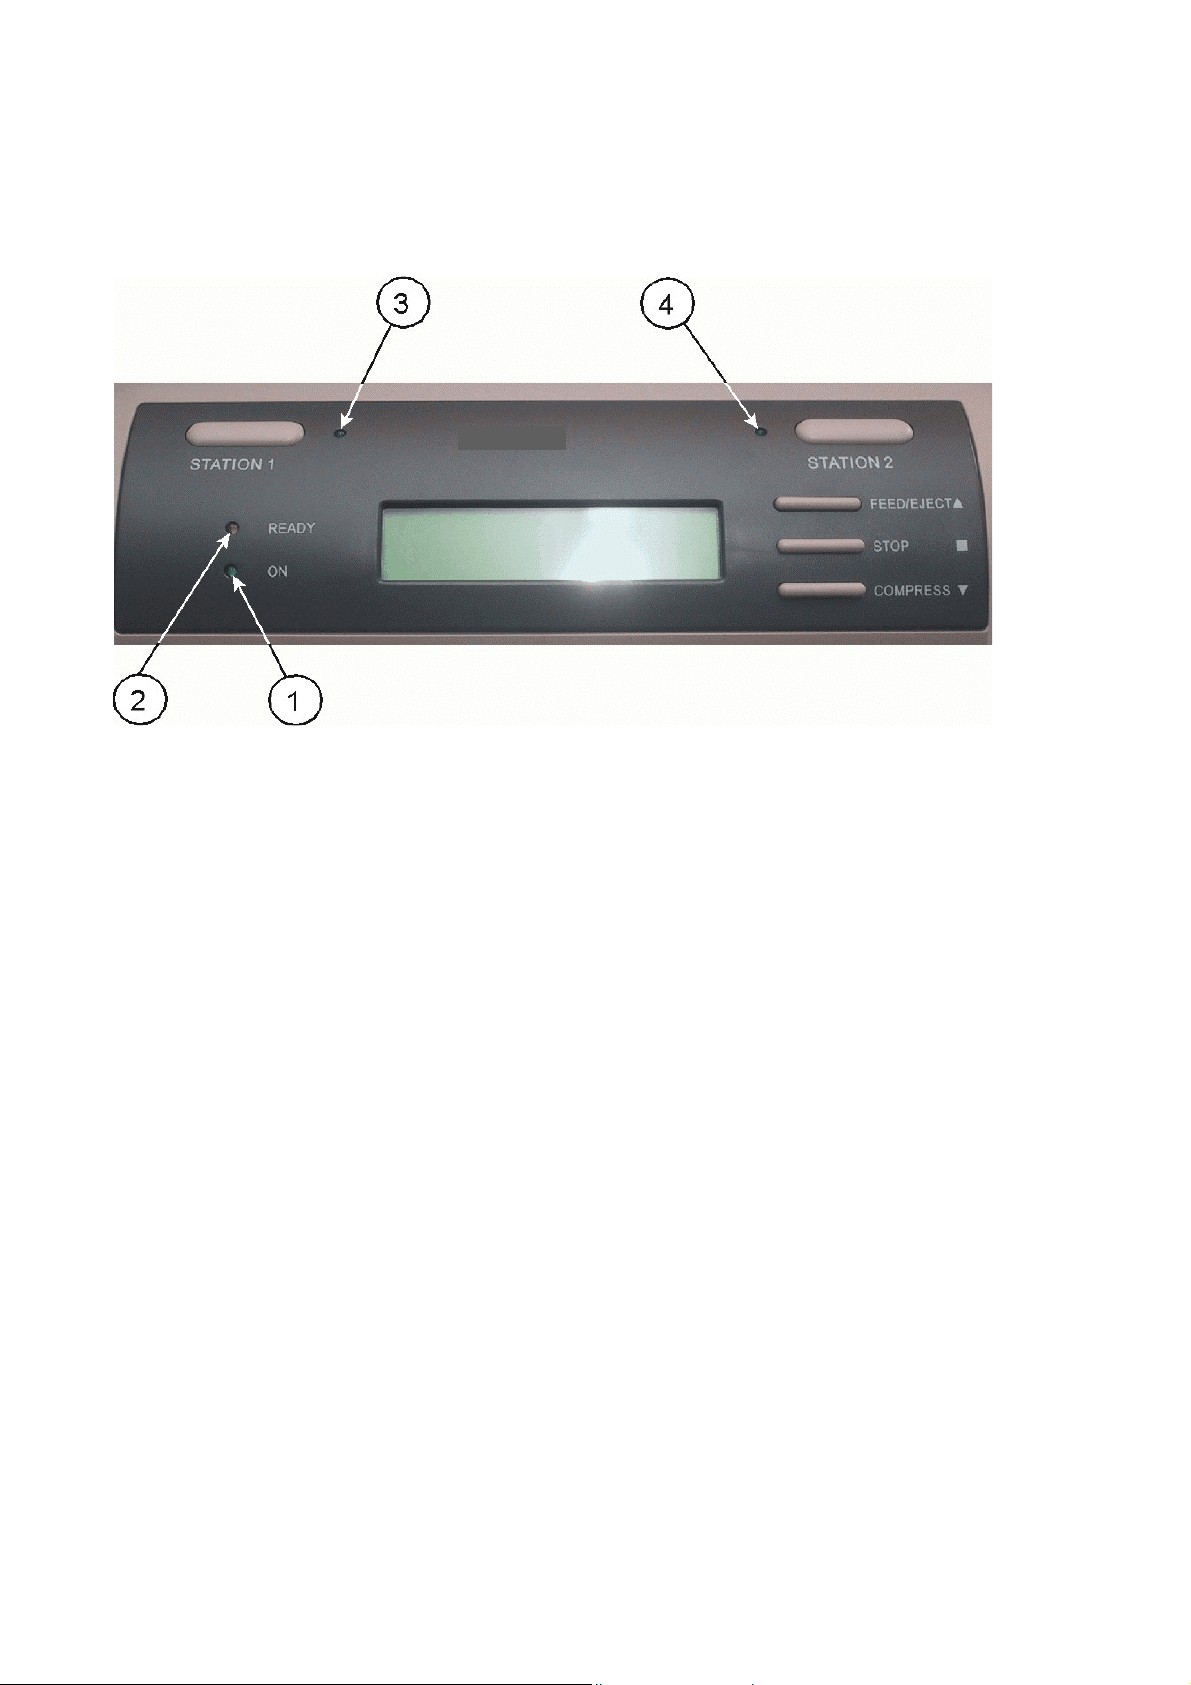
Getting Started
A
Any p
The operator can press down front power switch (3 in figure before) to power on printer
now.
fter power on:
The ON
•
•
After a short delay the READY
be all lighted.
•
Several seconds later the print head start initialization action. You hear a sound of the
movement.
•
Only ON indicator will be light after initialization has been finished.
Note:
The display shows the message:
(1) indicator will be light up
(2), STATION 1
(3), and STATION 2
rinting medium in the printer paper path will be ejected.
CX LQ
(4) indicator will
ON-LINE
The informations shown by the LCD are either factory default or related to the selected
micro.
1-8
Page 19

;
(sy
A
1.7
Print Test
1.7.1
Selftest
The following steps show which keys to use to start a test printout.
KEY
/ or action
DISPLAY
[STATION 2] and [COMPRESS –]
(synchronously)
OFF-LINE MODE
MENU SETUP
[COMPRESS –]
OFF-LINE MODE
MENU PRINTING
Getting Started
[STOP #]
After feeding an A4 paper the printer will start
process automatically if the operator put the
print medium into the paper feeding path.
MENU PRINTING
MENU PRINTING
PRINTING; WAITING...
The user needn’t align the print medium with
the left or right border of the printer.
The printer itself will look after the alignment.
If printing finished, printer will eject paper.
PRINTING
[STATION 2]
[STATION 2]
MENU PRINTING
WAITING...
MENU PRINTING
FINISH; PRESS STAT2
OFF-LINE MODE
MENU PRINTING
[STATION 2] and [COMPRESS –]
nchronously)
CX LQ1600K
ON-LINE
Note:
sample of the Menu Printing you will find on the next page.
1-9
Page 20
Getting Started
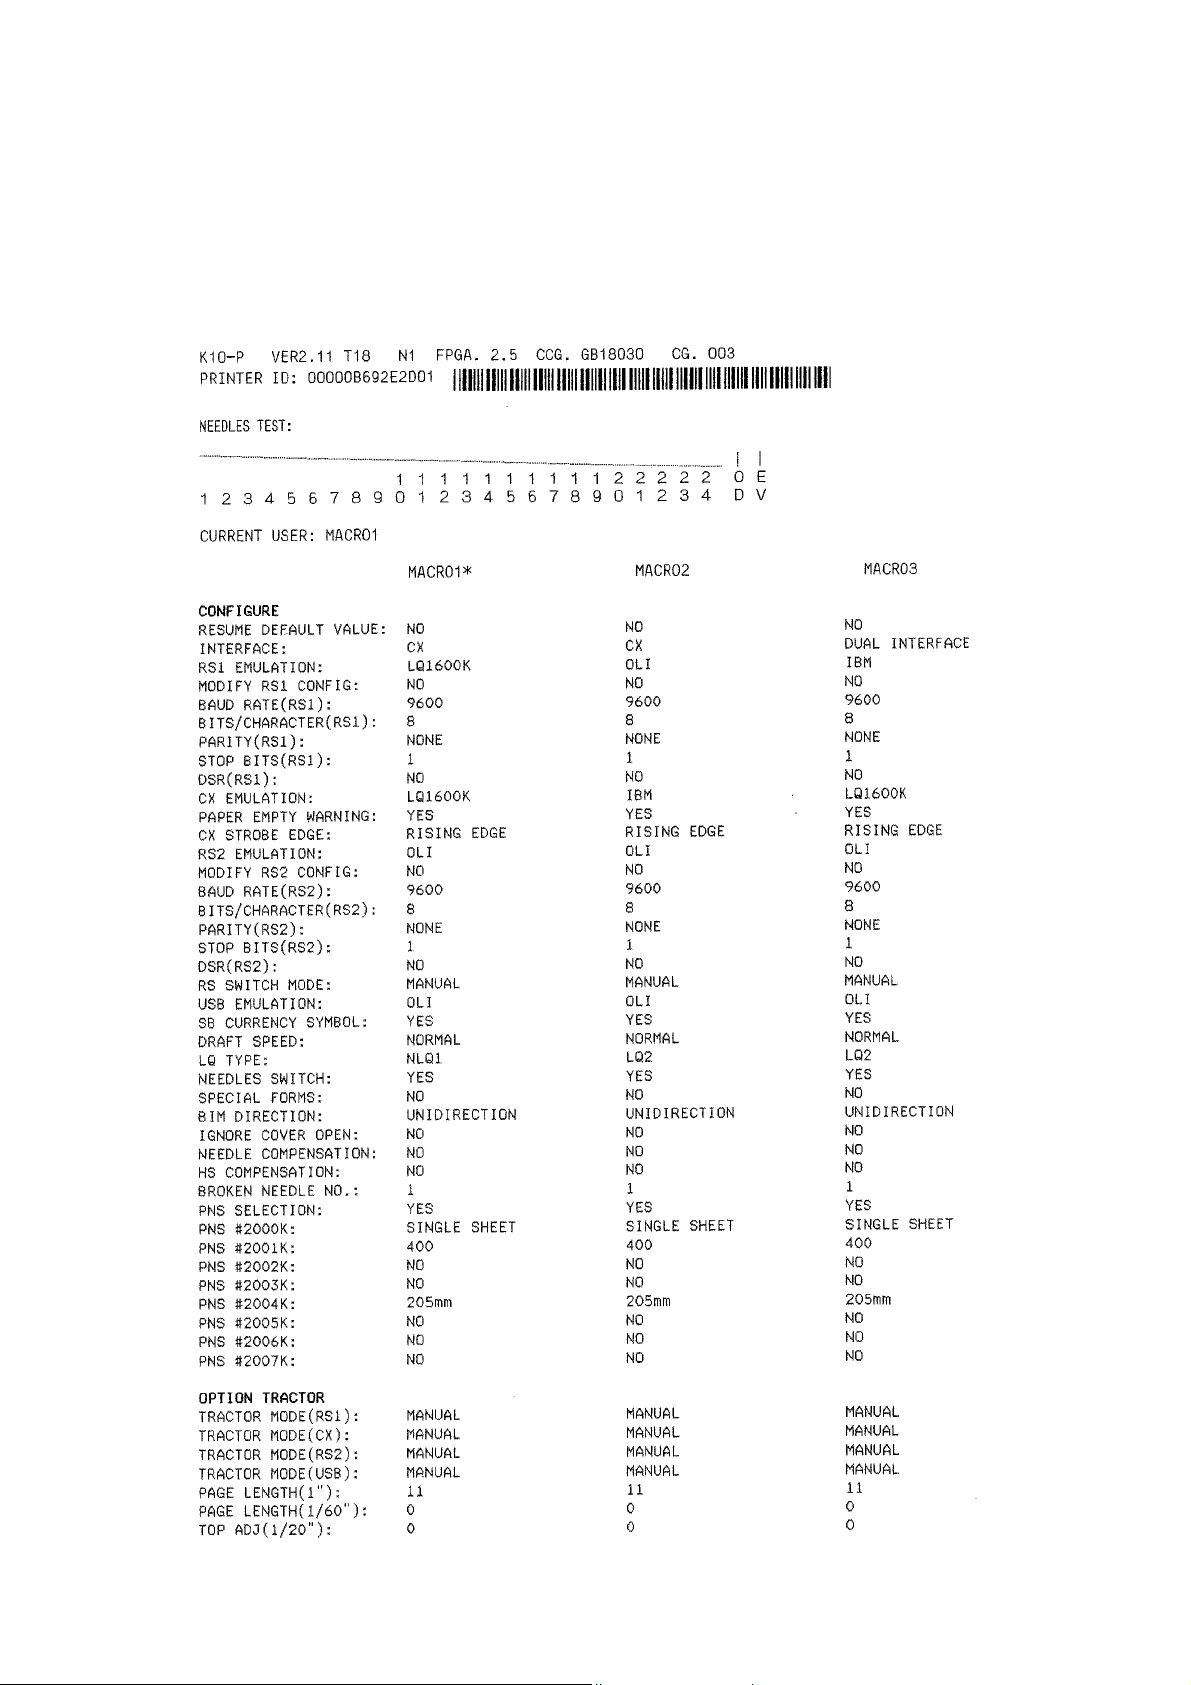
1.7.2 Selftest Printing Contents
For different menu setup configuration, there will be different printed out selftest printing
contents. Concerning your printer’s menu configuration please refer to printer packing
enclosed sheet.
1-10
Page 21

V
V
V
N
M
N
A
Getting Started
1.7.3 Dr. Grauert
The following steps show which keys to use to start a test printout.
(print a letter)
KEY
/ or action
[STATION 2] and [COMPRESS –]
(synchronously)
[COMPRESS –]
[COMPRESS –]
[STOP #]
[COMPRESS –]
up to the message Y
[STOP #]
DISPLAY
OFF-LINE MODE
MENU SETUP
OFF-LINE MODE
MENU PRINTING
OFF-LINE MODE
PRINTING TEST
PRINTING TEST
USER'S GUIDE
PRINTING TEST
Dr. Grauert
Dr. Grauert
INSERT A4 SHEET
After feeding an A4 paper the printer
processes the printing.
If printing finished, printer will eject paper.
PRINTING TEST
PRINTING; WAITING...
PRINTING TEST
FINISH, PRESS STAT2
[STATION 2]
PRINTING TEST
Dr. Grauert
[STATION 2] and [COMPRESS –]
(synchronously)
Eilzustellung Norddeutsche
Farbwerke KG Herrn Dr.
Grauert
Große Elbstraße 64
2000 Hamburg 4
Org. III 5/37
17.04.75
ordruckgestaltung für den allgemeinen Schrift-
verkehr, für das Bestell- und Rechnungswesen
Sehr geehrter Herr Dr. Grauert,
Sie können das Schreiben der Briefe, Bestellungen, Rechnungen usw.
sowie das Bearbeiten des Schriftguts rationalisieren, wenn die
ordrucke Ihres Unternehmens den folgenden Normen entsprechen:
DIN 676 Geschäftsbrief; Vordrucke A4
DIN 677 -; Vordruck A5
DIN 679 Geschäftspostkarte; Vordrucke A6
DIN 4991 Vordrucke im Lieferantenverkehr; Rechnung
DIN 4992 -; Bestellung (Auftrag)
DIN 4993 -; Bestellungsannahme (Auftragsbestätigung)
DIN 4994 -; Lieferschein/Lieferanzeige
DIN 4998 Entwurfsblätter für Vordrucke
Diese Normen enthalten alle Einzelheiten für den sinnvollen und
zweckmäßigen Aufdruck. Wenn dazu bei der Beschriftung genormter
ordrucke DIN 5008 'Regel für Maschinenschreiben' beachtet wird,
entstehen übersichtliche und werbewirksame Schriftstücke.
Die beifgefügten 6 Mustervordrucke zeigen, daß das Beachten der
ormen die künstlerische und werbewirksame Gestaltung der Vor-
drucke nicht ausschließt.
Da wir uns auf die Herstellung genormter Vordrucke spezialisiert
haben, können wir besonders billig liefern. Eine Probestellung
wird Sie und Ihre Geschäftsfreunde von den Vorteilen überzeugen.
it bester Empfehlung
ORAG
Druckerei und Verlagshaus KG
Herrmann
nlagen
6 Mustervordrucke
H-A
Volkmann
4 34
22.04.75
E i l t
ON-LINE
CX LQ1600K
1-11
Page 22
Getting Started
g
A
y
1.8
Connection to the System
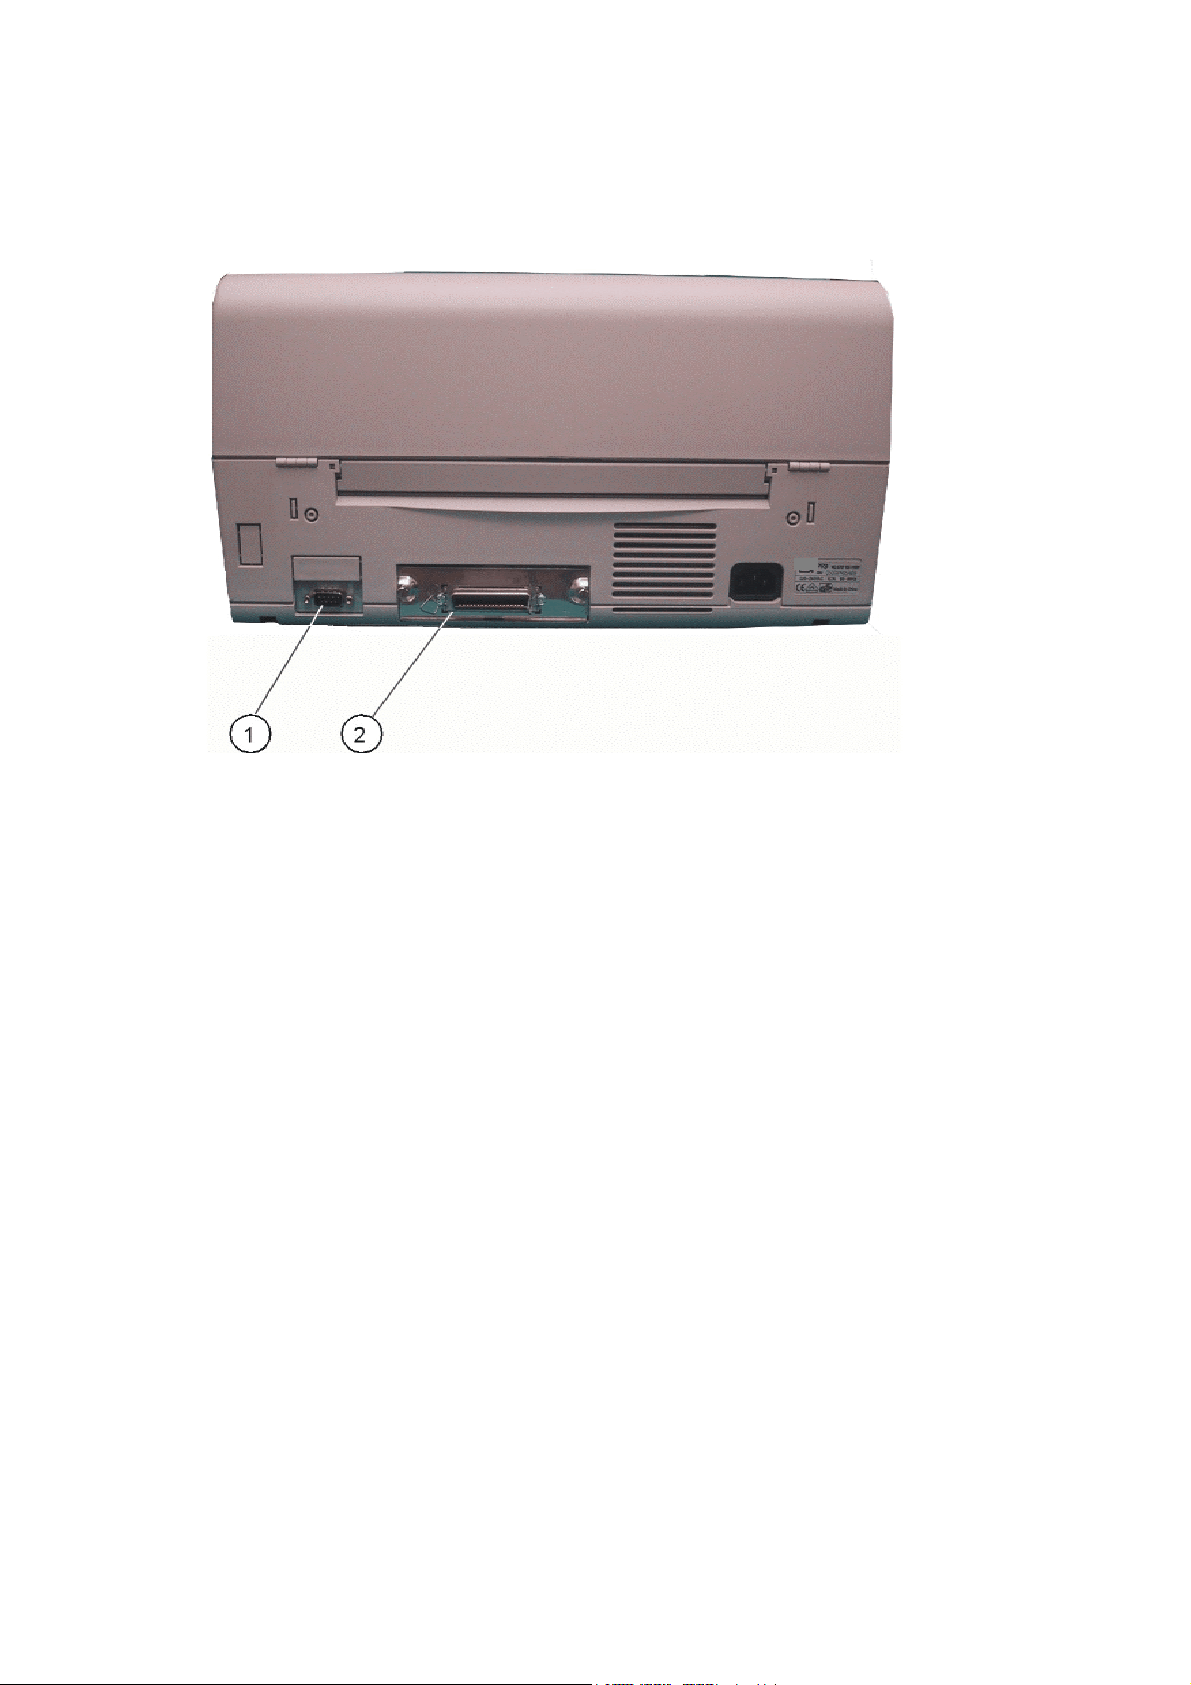
1.8.1 Serial/Parallel Interface
Switch the printer and the computer OFF.
•
Connect the interface cable coming from the computer to the printer's standard
•
RS232 C serial (1) port or to the optional Centronics Parallel (2) port.
•
The followin
•
Interface
•
Baud-Rate (RS1)
•
Bits/Characters (RS1)
•
Parity (RS1)
•
Stop Bits (RS1)
•
DSR (RS1)
values are default settings, see chapter1.7.2 Selftest Printing Contents.
1
Dual Interface
9600 BPS
8 bit
None
No
fter powering the printer ON both interfaces, serial and parallel, are available for data
transfer due to the shared mode. The port to which data is sent becomes active
.
automaticall
For detail information to the ports see Chapter7 Interface Description
1.9
Installing the Printer Drivers
You will find the printer drivers on the CD-ROM.
•
.
1-12
Page 23
g
y
(2)
2.
Printer Operation
2.1
Operator Panel
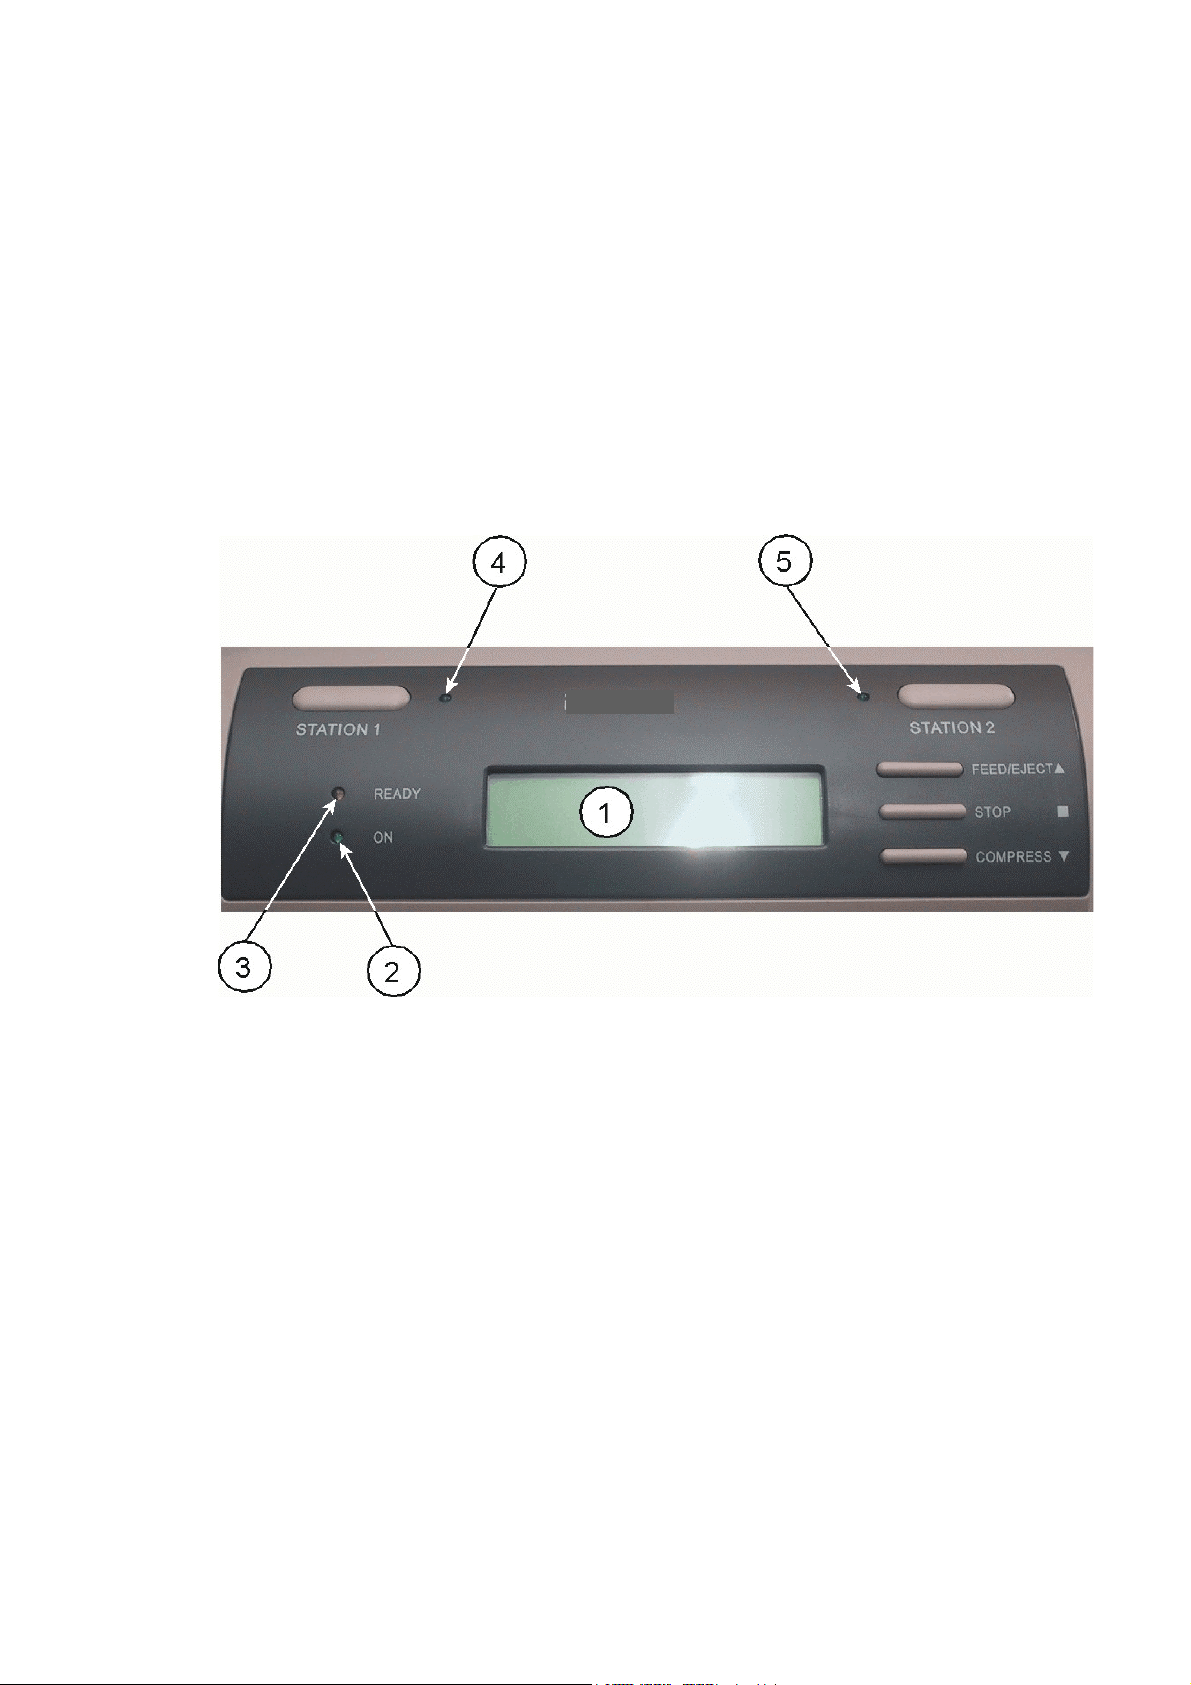
The Operator Panel
•
controls the setup for communication with the host computer;
•
controls various parameter settings;
•
allows manual control of the paper handling;
•
ives information about the printer's status.
Two lines L
1
The LCD Display (1) indicates the current status of the Printer. If any error occurs (e.g.
PLEASE CLOSE COVER
LED
L
ight E
lights only if the Printer is powered on and in the
mitting D
2
Online LED
3
Ready LED
4
Station 1 LED
5
Station 2 LED
iquid C
iode (LED)
rystal D
(flashing if receiving data)
(user 1 active; only lighting up if a second serial Interface is
installed and a special software is working)
(user 2 active; only lighting up if a second serial Interface is
installed and a special software is working)
isplay (LCD) Displa
) the corresponding error message will be displayed. The green
On-line Mode.
2-1
Page 24
Printer Operation
g
g
•
p
•
•
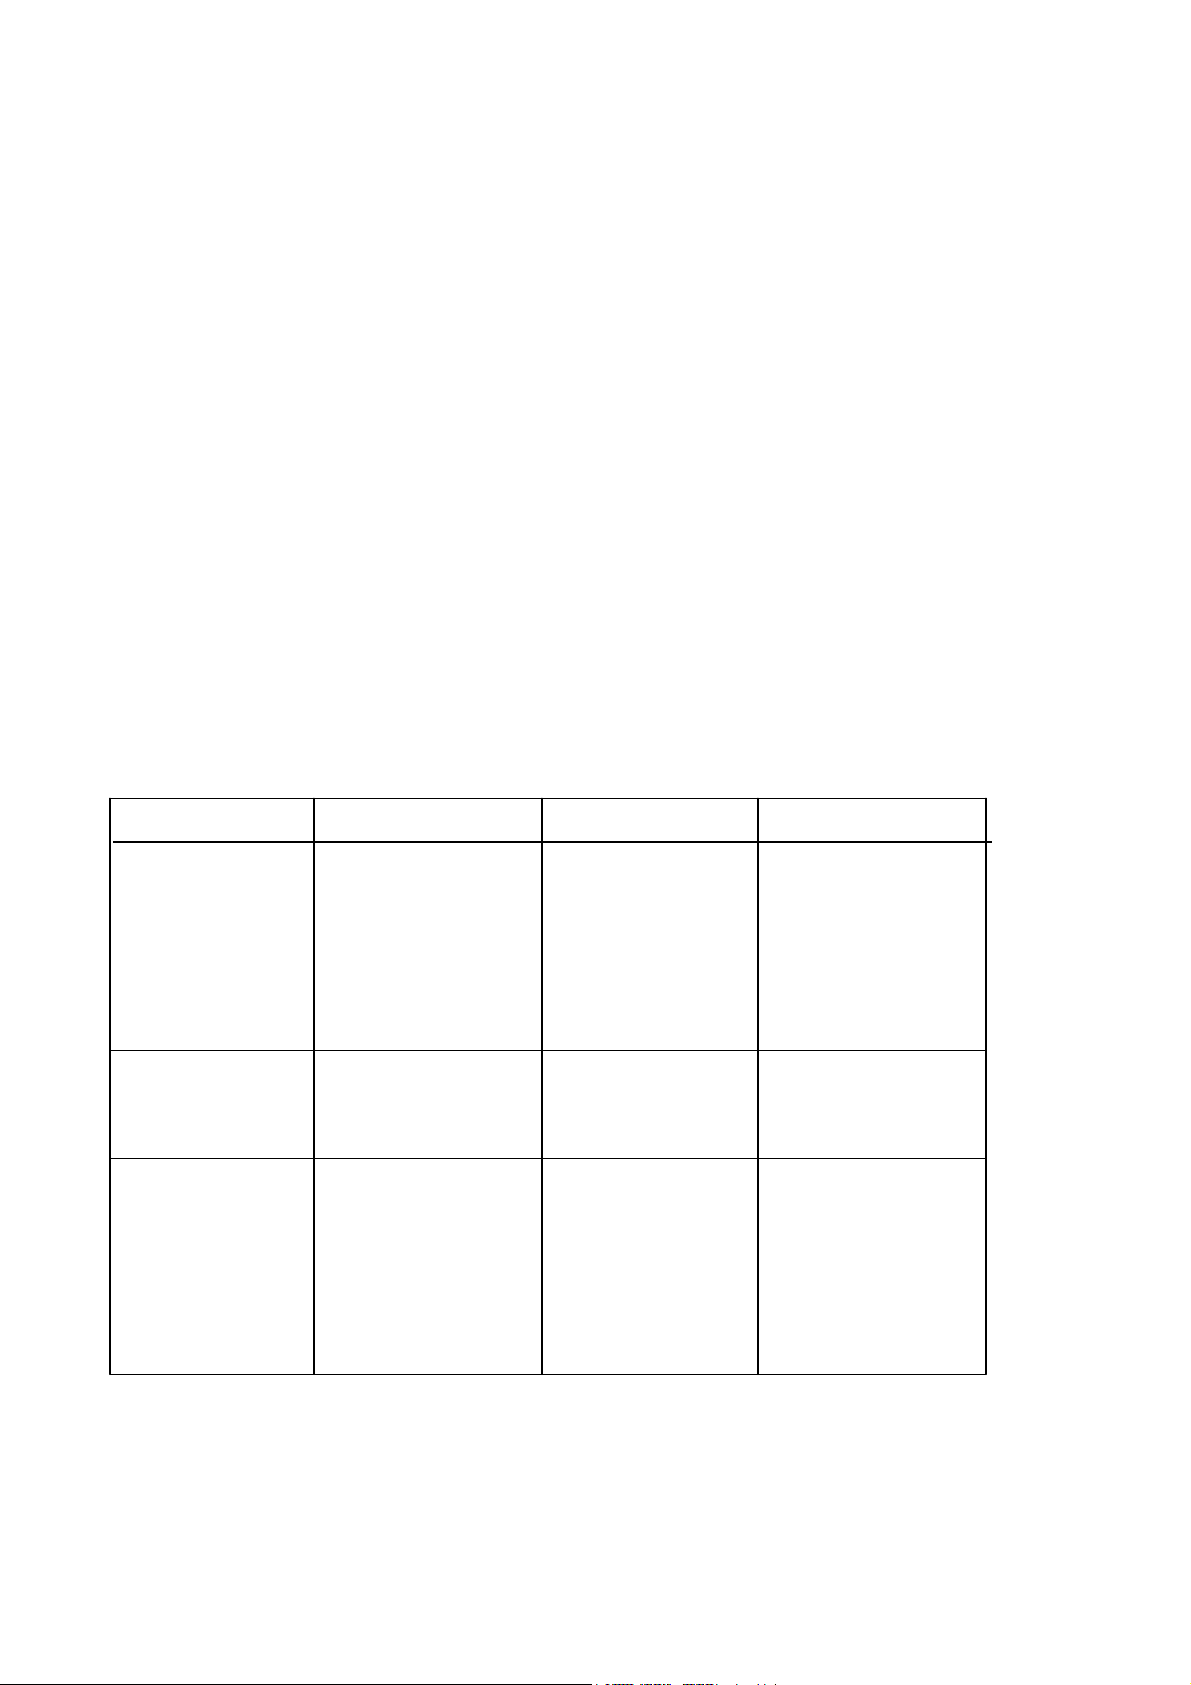
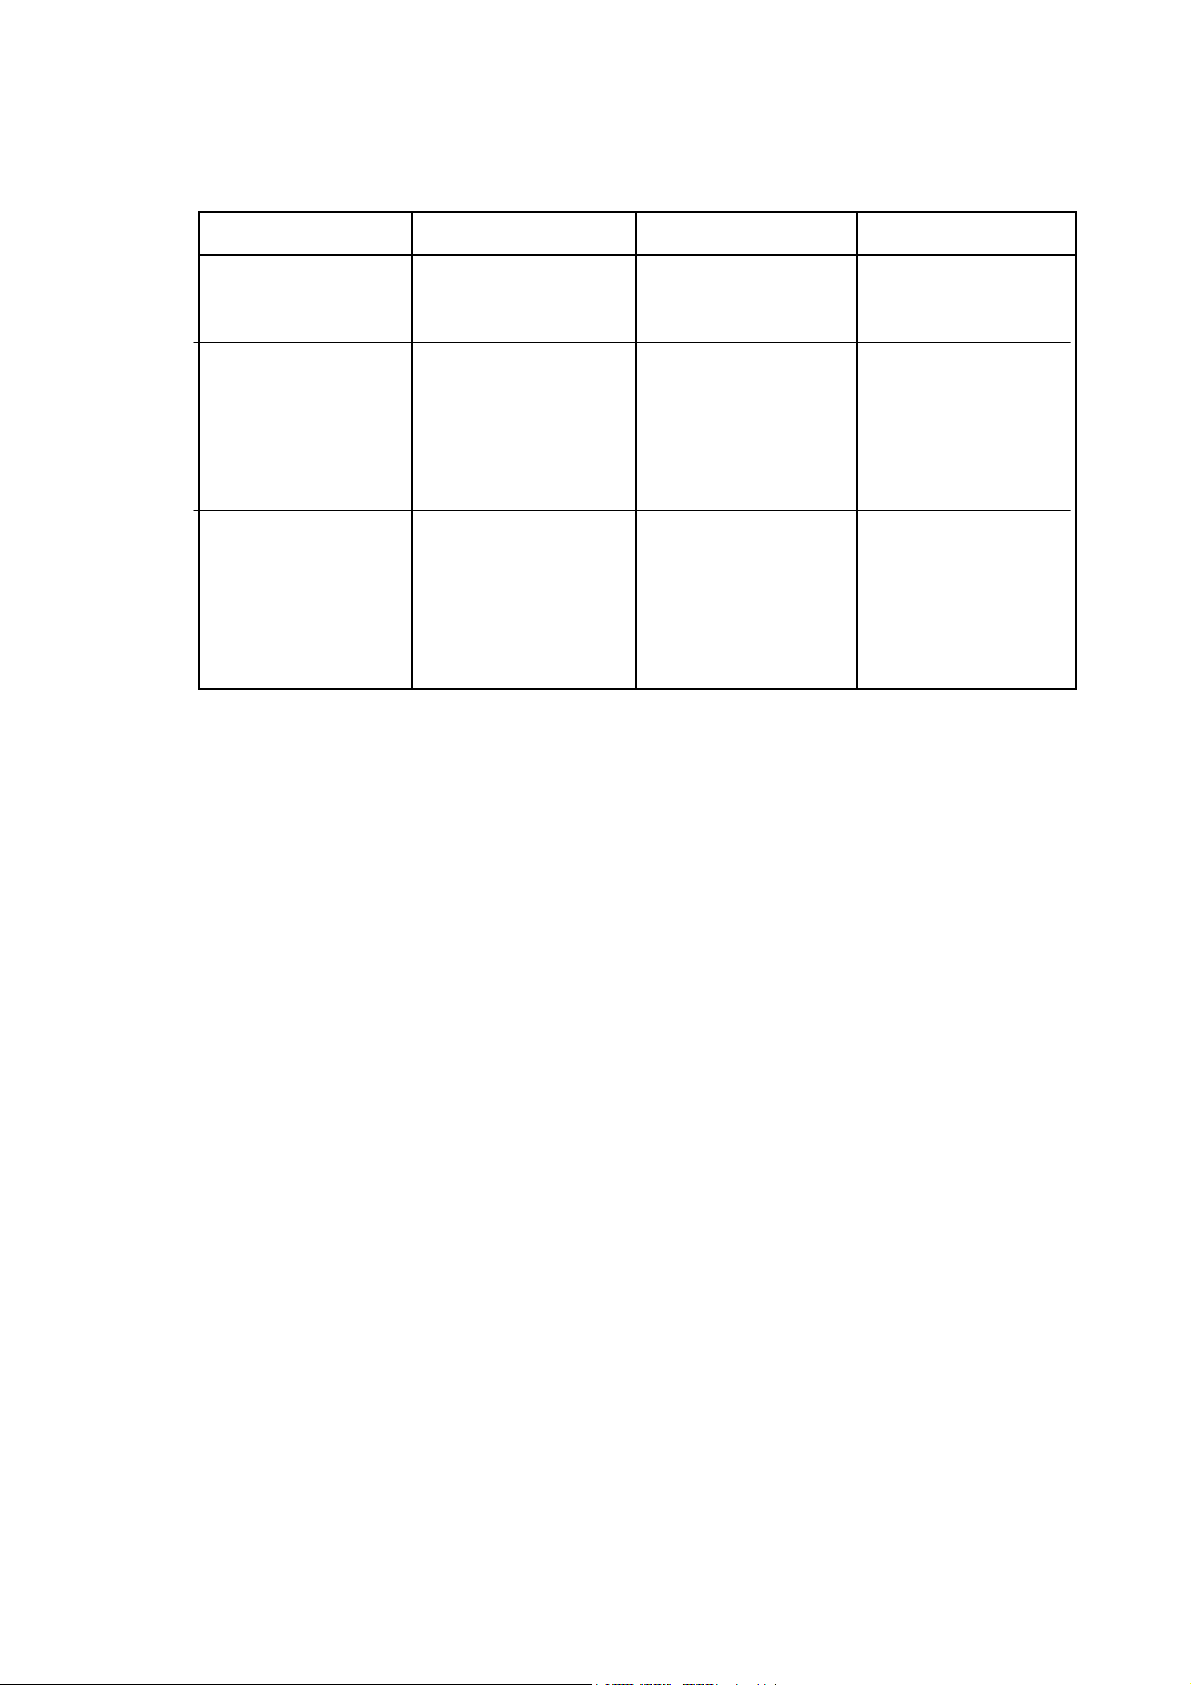
2.2
Function Keys
The five function keys operate differently in the on line or off line mode. Please refer to the
followin
table for details when pressing the function keys.
If the Printer is powered on, the display shows in line two
lights. The Printer is in the
On-line Mode / Off-line Mode
On-line Mode
and ready to receive and print data.
ON-LINE
and the green LED (2)
In this mode only the [STOP ] key is active and the green LED (2) lights. By pressing the
key the Printer changes into the
Menu-Mode
To set the Printer into the Menu-Mode
Off-line Mode
, press the [STATION 2] and [COMPRESS –
or back into the On-line Mode .
]
together. Depending on the state of the Printer the four right hand keys have multiple
functions. For further information see paragraph
Function Key
[FEED/EJECT •
Menu-Mode = UP
or LEFT
depending
On-line
•
]
Feed or eject
paper depending
on the printin
on the actual menu
level
2.5 Menu-Mode
Off-line
.
Menu- Mode the
previous item in the
highest menu level
•
item in a selected
Menu-Mode
select in the
go up to the next
[STOP ]
Menu-Mode =
ACCEPT
[COMPRESS
–]
Menu-Mode =
DOWN
or RIGHT
depending on the
actual menu level
2-2
•
stop printing and
change to Offline Mode
•
activates or
cancels
compression
rinting
change to On-line
Mode and
continue printing
O.k. or confirm
the actual item
•
select the
following item in
the highest menu
level
•
go down to the
next item in a
selected group
Page 25
Printer Operation
Function Key
•
[STATION 2]
together with
[COMPRESS –]
[STATION 2]
together with
[STOP ]
[FEED/EJECT •]
together with
[COMPRESS –]
change into the
Menu- Mode
•
in “Data backup”
mode of HEX
PRINTING, the
Printer will save the
8K data which it
received lately in
flash memory
•
in “Data backup”
mode of HEX
PRINTING, the
Printer will clear all
received data
which it backs up.
On-line
Off-line
•
On-line Mode
Menu-Mode
go back into the
2-3
Page 26
Printer Operation
r
y
g
p
y
2.3
Liquid C
stal Display (LCD)
The LCD indicator gives information about the status of the printer. In general it can be
distin
uished between:
ONLINE messages
•
•
OFFLINE messages
Menu Information
•
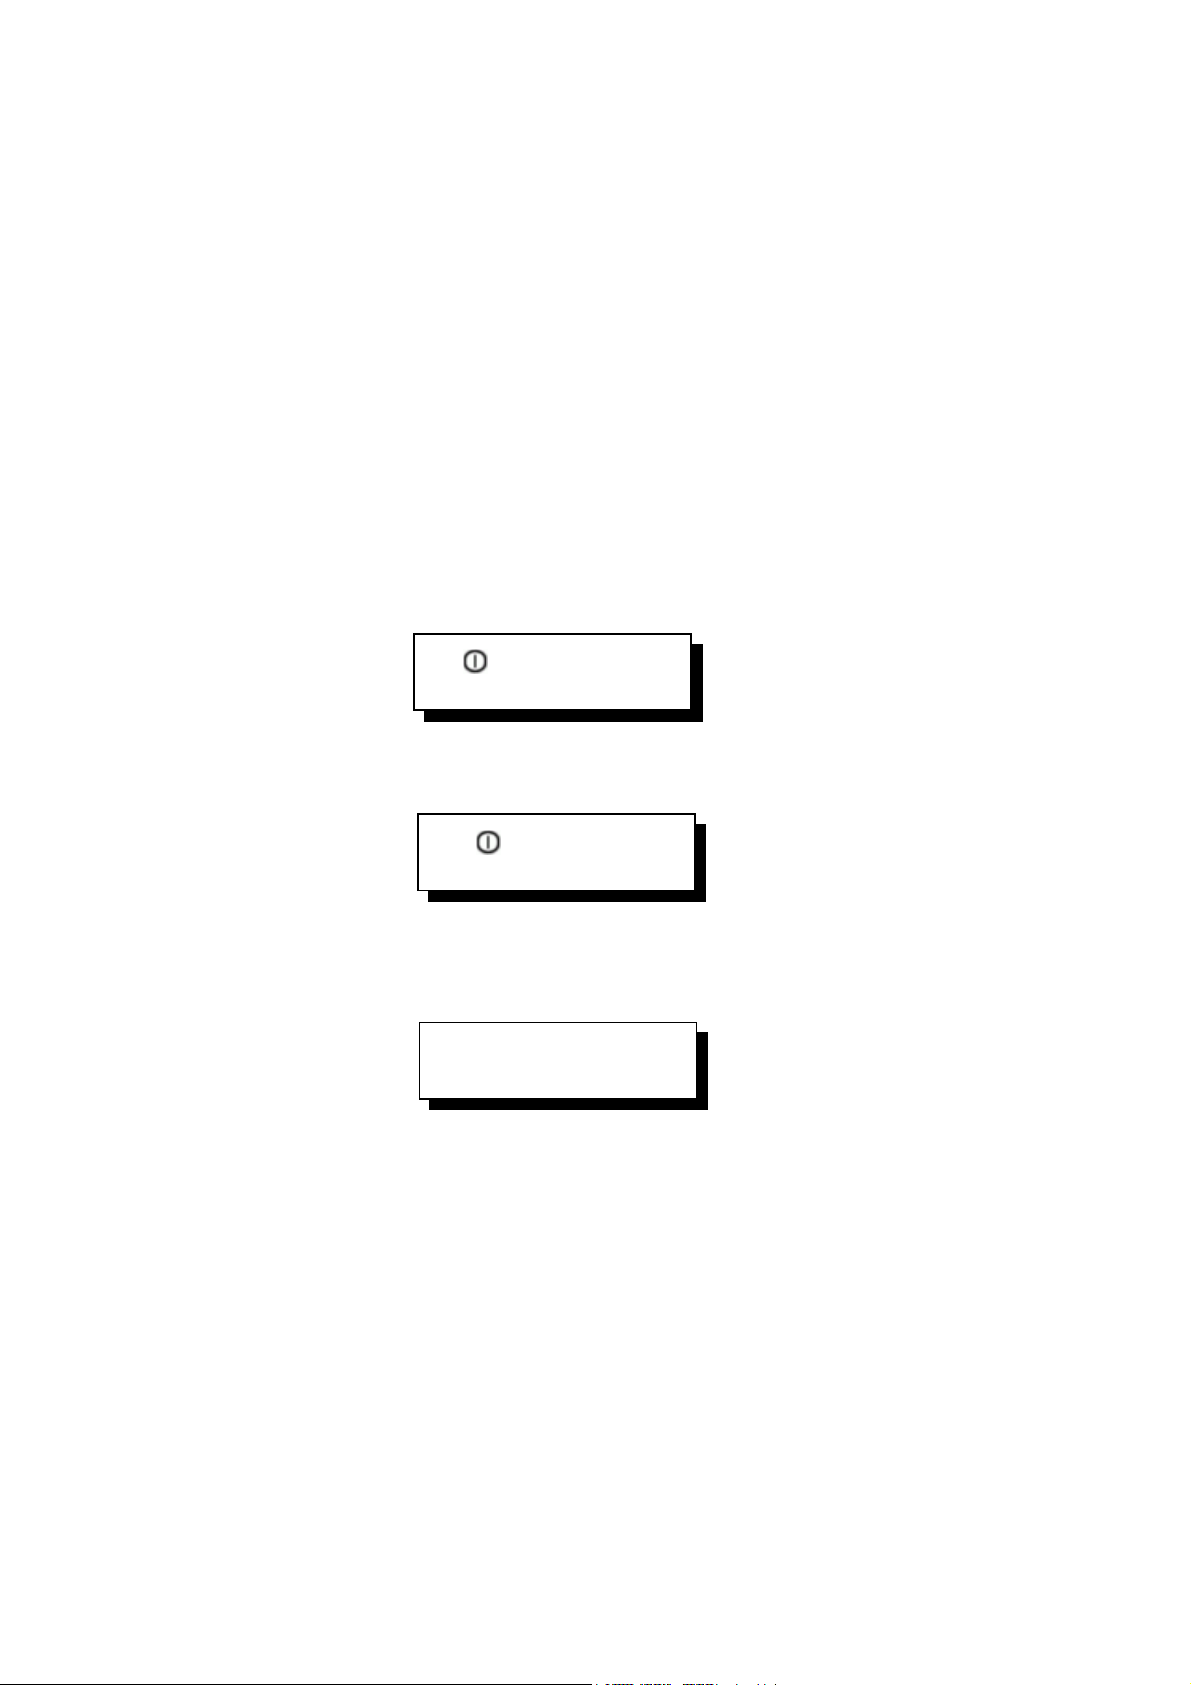
The LCD has two lines with 20 characters per line. After power on the display shows for
le:
exam
•
emulation
•
in the upper line:
in the second line:
the head line with the printer name, the actual interface, and the
the status.
CX LQ1600K
-
After pressing the [STOP ] key you get the OFF-LINE
message.
CX LQ1600K
-
After entering the MENU MODE
together the printer displays:
by pressing the [STATION 2] and [COMPRESS –] keys
OFF-LINE MODE
MENU SETUP
You can enter the Menu Mode from the
On-line
orOff-line Mode
.
In this state it is possible to use all four keys at the right hand side of the Operator Panel
in the wa
as described in the table in paragraph
2.2 Function Keys
.
2-4
Page 27

g
A
r
2.4
Load Print Medium
Printer Operation
The Printer can deal with single sheet, cheque,multi copy carbon paper and carton. The
printer will start inserting the sheet automatically when the operator puts the print medium
into paper feeding path. Users needn’t bother aligning the print medium with the left or
ri
ht border of the printer. The printer itself aligns automatically.
Note:
As soon as the auto alignment process starts after you put in a medium, please
release the medium.
2.5
Menu Mode
ll selectable features are accessible via the operator panel and combined in the Printe
MENU.
This feature provides:
•
•
•
easy configuration (language, etc.)
quick parameter changes
activation of test functions
There are six entry points in the highest level:
•
MENU SETUP
Set up the Menu parameters for various modules (common
configuration and different emulation) and the important save
function is included.
•
MENU PRINTING
Printout of the Menu which is in use.
•
PRINTING TEST
character attributes is possible.
ADJUSTMENT
•
setting up the photoelectric sensor and printing the new settings,
setting up the left margin, setting up the top margin, alignment
adjusting for bi-direction print, and run-in printing etc.
•
DEBUG TEST
magnetic stripe.
•
INFO INQUIRY
including the version (version number, nonstandard issue tag,
special simulation etc.), a hardware configuration (characters
generators, optional interface connections, a scanner, the sprocket),
A printout of the user's guide, the ASCII character sets and
Include printing the current settings of the photoelectric sensor, re-
A Hexdump-function is available and a soft test for reading a
Inquire current parameters settings of both software and hardware,
2-5
Page 28

2.5.1 To Confirm a Macro Selection and Save the Settings
,
•
Press [STOP ] key; the confirmed value will now be shown in the head line.
MENU SETUP
SELECT CURRENT MACRO
•
Press [STOP ] key again.
SELECT CURRENT MACRO
MACRO1
•
Now it is possible to scroll up or down with the [FEED/EJECT •] or [COMPRESS –]
key.
•
Save the selected item immediately by pressing the [STOP ] key again.
•
SELECT CURRENT MACRO
SAVING
PLEASE WAIT
• After the saving procedure the printer changed to the On-line Mode.
2.6 The C-650 Plus Emulations
The printer
•
EPSON LQ1600K Emulation
IBM ProPrinter X24 Emulation
•
C-650 Plus
will be delivered with two different
Note:
Depending on the selected emulation you must also select the corresponding
Printer Driver.
2-6
Page 29

r
r
y
3.
Configuring the Printe
Main Functions and Ent
The following Main Functions are available:
•
Menu Setup
With this function you are able to modify the parameters of the printer configuration.
For a detail information look at
Menu Printing
•
Printout of the Printer ID, a Needle Test and the parameter setting of the three Macros.
For a detail information look at
•
Printing Test
The printing of User’s Guide, ASCII character set, character attributes, Dr. Grauert
(print a letter). For a detail information look at
Adjustment
•
Printing current photosensor parameters, reset photosensor parameters and printing;
adjust left margin, top margin and bi-direction printing, run-in printing, inquire
photosensor value, reset hardware parameters. For a detail information look at
paragraph
•
Debug / Test
Hex printing (include: data backup, printing backup data, directly dump), magnetic stripe
operation (include read and write). For a detail information look at
3.6.
Points into the Menu
paragraph 3.4.
paragraph 3.2.
paragraph 3.5.
paragraph 3.7.
Info Inquiring
•
Inquiry the current setting parameters of software or hardware, including a version
(version number, special version tag, special emulation, FPGA Version, etc.), hardware
configuration (character’s generators, optional interface, scanner, sprockets), printer
ID. For a detail information look at paragraph 3.8.
3-1
Page 30

Configuring the Printer
;
3.1
What is Configuration?
This chapter describes how to use the operator panel and menu settings to set up or
configure your printer, so that the printer and your computer system can communicate
correctly with each other.
Communication between the two requires that both, the computer operating system and
the printer have the same communication settings or features. The most important of
those are:
•
•
•
•
•
bit/character
baud rate
parity
stop bits
DSR
You may also need to change some of the printer's other features depending on your
hardware and application requirements, for example:
•
special forms
•
paper handling
The MENU MODE allows you to access the configuration memory. All settings of the
printer are stored in this memory and can be printed. The possible settings are described
in detail on the following pages. A detail description of all Menu settings you will find in
paragraph
The standard parameter setting can be printed by using the function PRINT MENU
following steps show which keys to use to start this printout.
3.4 Menu Setup Description.
. The
KEY
/ or action
[STATION 2] and [COMPRESS –]
(synchronously)
2 Line DISPLAY
OFF-LINE MODE
MENU SETUP
[COMPRESS –]
MENU PRINTING
[STOP #]
Insert the paper
PRINTING
[STATION 2]
[STATION 2]
MENU PRINTING
[STATION 2] and [COMPRESS –]
(synchronously)
OFF-LINE MODE
MENU PRINTING
MENU PRINTING
WAITING...
MENU PRINTING
FINISH; PRESS STAT2
OFF-LINE MODE
C-650P SERIAL1 Epson
ON-LINE
3-2
Page 31
r
Configuringthe Printe
3.2
Standard Configuration
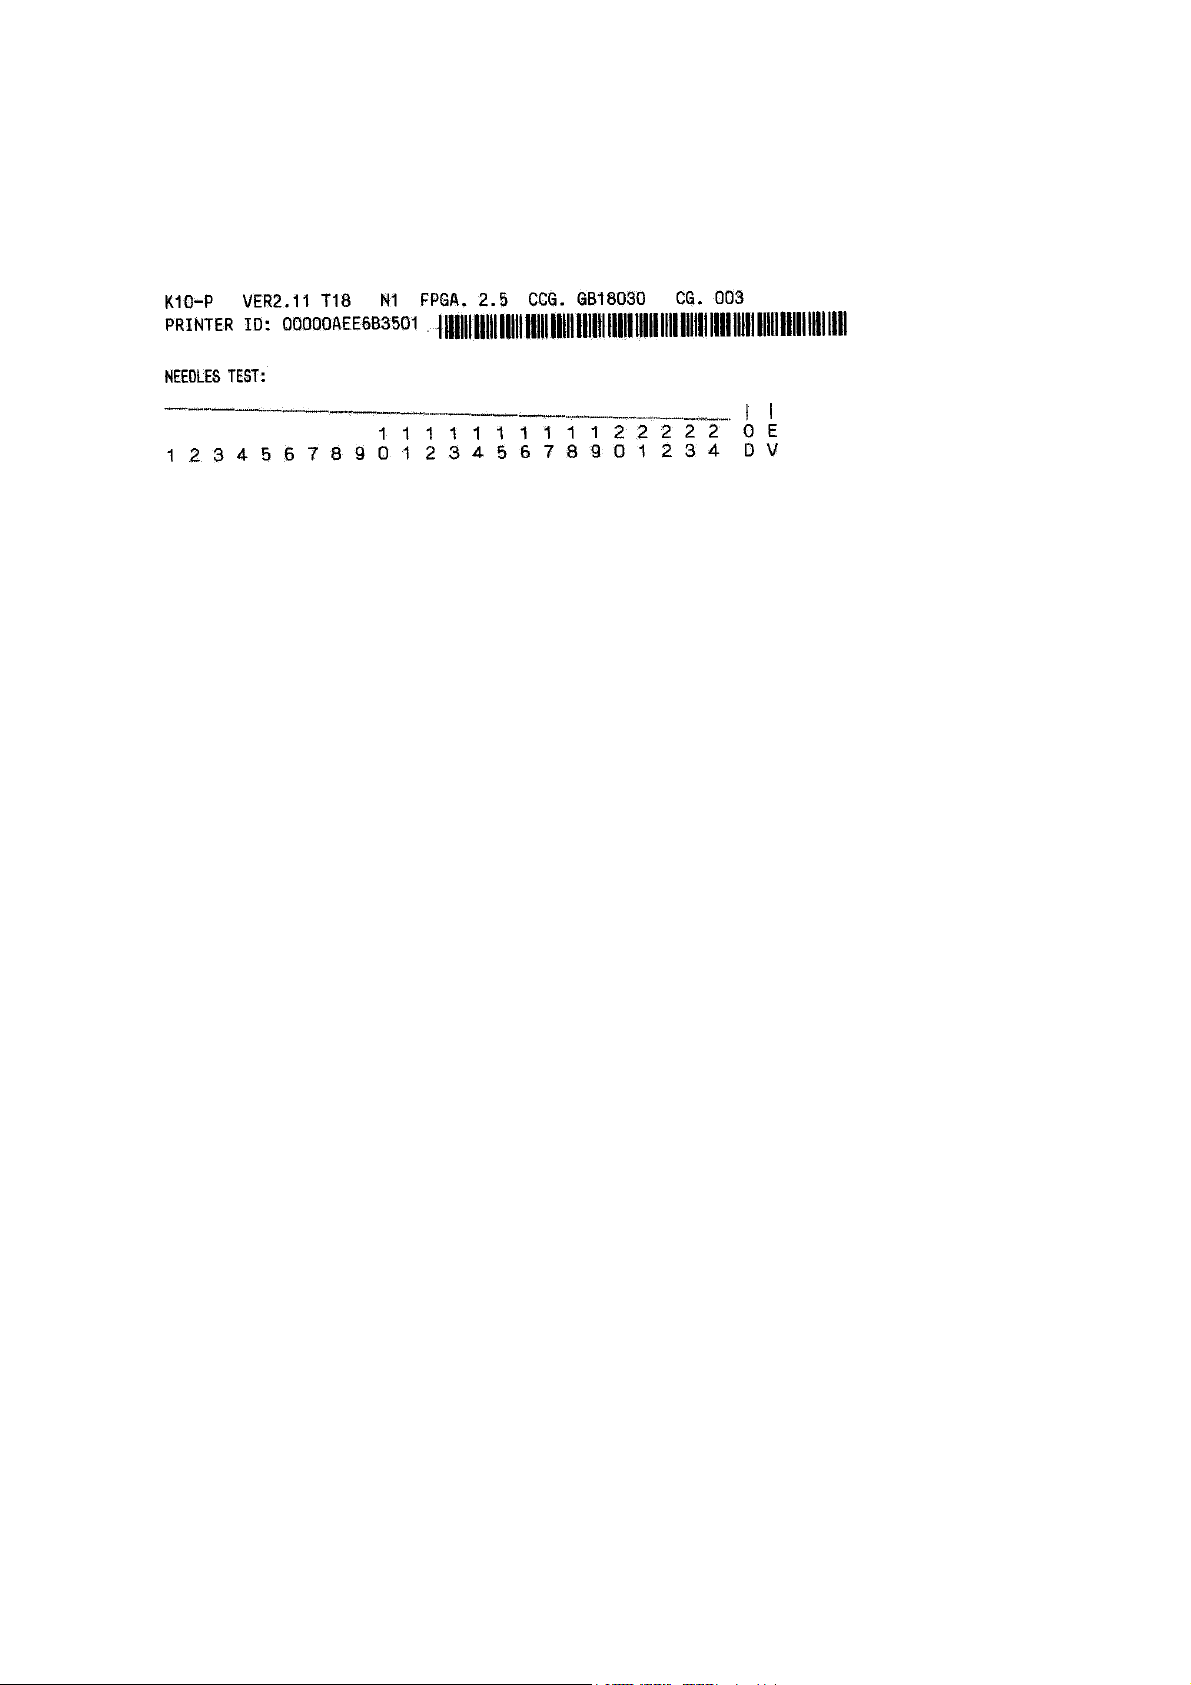
The standard configuration (factory setting) is reflected in the following printout.
CURRENT USER: MACRO1
MACRO1* MACRO2 MACRO3
CONFIGURE
INTERFACE: CX CX DUAL INTERFACE
RS1 EMULATION: --- --- IBM
BAUD RATE (RS1): --- --- 9600
BIT/CHARACTER(RS1): --- --- 8
PARITY (RS1): --- --- NONE
STOP BITS (RS1): --- --- 1
DSR (RS1): --- --- NO
CX EMULATION: LQ1600K IBM LQ1600K
CX STROBE EDGE: RISING EDGE RISING EDGE RISING EDGE
DRAFT SPEED: NORMAL NORMAL NORMAL
LQ TYPE: LQ2 LQ2 LQ2
NEEDLES SWITCH: YES YES YES
SPECIAL FORMS: NO NO NO
BIM DIRECTION: UNIDIRECTION UNIDIRECTION UNIDIRECTION
NEEDLE COMPENSATION: NO NO NO
PMS #2000K: SINGLE SHEET SINGLE SHEET SINGLE SHEET
PMS #2001K: 400 400 400
PMS #2002K: NO NO NO
PMS #2003K: NO NO NO
PMS #2004K: 205mm 205mm 205mm
PMS #2005K: NO NO NO
PMS #2006K: NO NO NO
PMS #2007K: NO NO NO
LQ CONFIGURE
AUTO COMRESSION: NO NO
LINE LENGTH COMPRESS: NO NO
COMPRESS PROPORTION: 108/LINE(80%) 108/LINE(80%)
FAN FOLD LEFT MARGIN: 0 0
PRINTING MODE: LATIN LATIN
HIGH SPEED PRINTING: NO NO
LPI: 6 6
CPI OF CJK FONT: 6.7 6.7
CPI OF WEST FONT: 10 10
XPI LOCKED: NO NO
CHARACTER SET: PC PC
PC CHARACTER SET: 1252 (PC-WIN LATIN1) 1252 (PC-WIN LATIN1)
CHARACTER DEFINITION: LQ LQ
LF+CR YES YES
CR+LF NO NO
LEFT MARG.(1/6): 0 0
LEFT MARG.(1/60): 0 0
TOP MARG.(1/6): 0 0
TOP MARG.(1/60): 0 0
ZERO SLASH: NO NO
LINE LENGTH: 94 94
RESET WHEN EJECT: NO NO
Note: An asterisk (* behind MACRO indicates the active macro.
3-3
Page 32
Configuring the Printer
g
g
g
p
q
g
A
3.2.1 Explanation of the Printout on the Previous Pages
In the headline behind the term VER2
found.
the revision level of the printer's firmware can be
Then following the Printer Identification and in the next line a needle test.
The next part of the printout is a list of the
In this case
macro.
Note:
MACRO 1
is marked with an asterisk (*) which identifies it as the active
A “Macro“ is a summary of application specific parameter settings for a user. It is
MACRO
settings.
possible to have a total of three macros, each with a different summary of VALUE
settin
s for different applications.
Whenever you make modifications in the active macro without saving them you will find
the new settings under the heading
CURRENT USER
. Unless they are saved, the
modifications will stay active only until the printer is switched off. When the printer is
switched on a
Note:
The CURRENT USER will be selected by MACRO 1, MACRO 2, or MACRO 3.
3.3
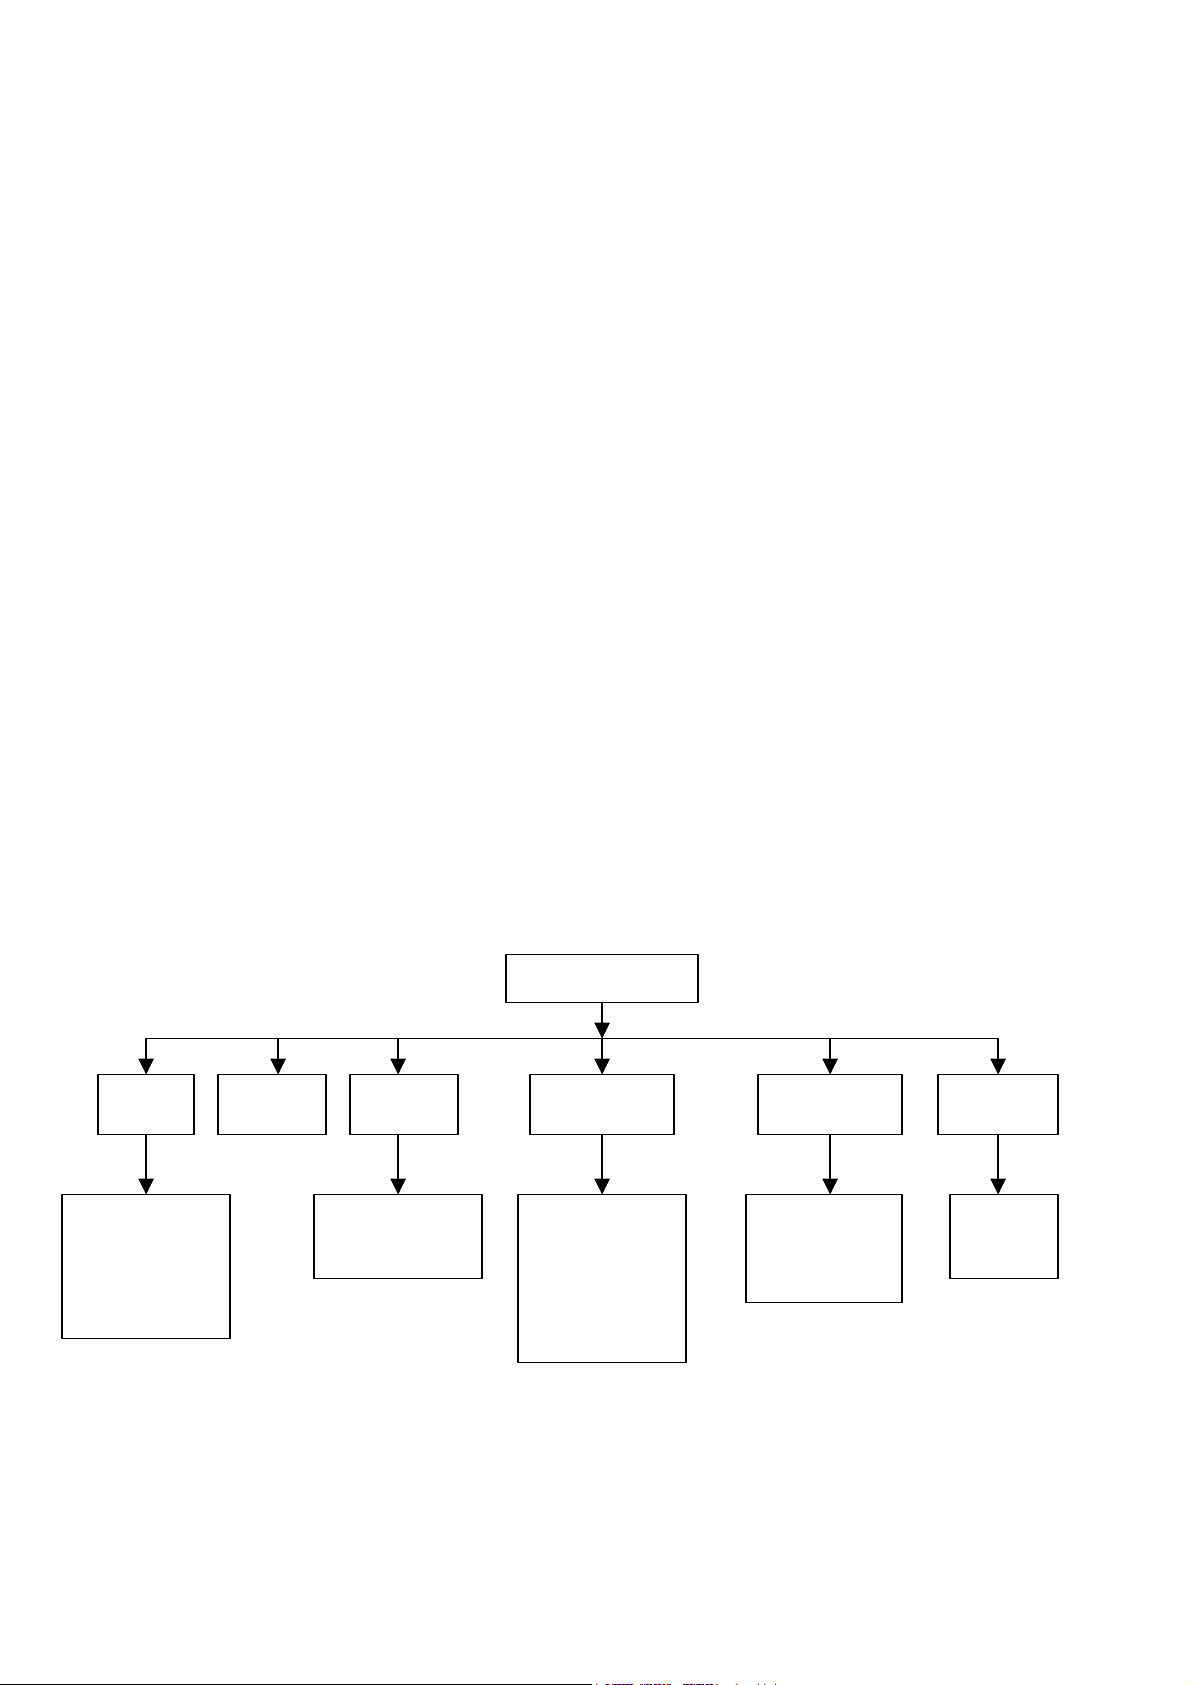
Menu Structure
ain the macro settings marked with the asterisk will be reactivated.
Press [STATION 2] and [COMPRESS –
operation.
The Menu Mode starts with MENU SETUP
] together to start the Menu-Mode in Off-line
in level 1.
Menu
Setu
Select Current Macro
Select User to Setup
Configure
IBM Configure
LQ Configure
Save Parameters
Menu
Printin
Test
User’s Guide
SCII Character Set
Character Attributes
Dr. Grauert
OFF-LINE MODE
Printing
Photo Sensor Value
Left Margin
Top Margin
Run In Test
Bidirectional Aligment
Print Photo Values
Inquire Photo Values
Resume Hardware
Parameters
Debug/Test Info
In
Data Backup Mode
Printing Saved Data
Printing Last Data
Printing Flash Data
Directly Dump
FW Version
HW Version
Printer ID
Level 1
uirin
Level 2
3-4
Page 33

r
[
g
Configuringthe Printe
3.3.1 How to use the Key in the Menu Mode
If you want to enter a menu setup, you should press down [STATION 2]
and
[COMPRESS –] key simultaneously in on-line mode, entering the off-line mode and then
selecting
MENU SETUP
(see also Paragraph 2.2 Function Keys).
During the Menu Mode the key’s definition is as following:
•
[FEED/EJECT •]
•
[COMPRESS –]
•
[STOP ]
•
STATION 2] go back to the previous menu level or back to the top level.
upwards; it may cycle to the previous item from the first one.
downwards; it may cycle to the following item from the last one.
accept the selected item or value
The LCD display shows on the first line the current level, and on the second line the next
level.
3.3.2 The Emulations of C-650 Plus
The C-650 Plus printer offers the following emulations:
•
IBM
•
LQ
You can modify the emulation you need by entering the corresponding menu setup.
3.4
Menu Setup Description
MENU SETUP was classified into 6
•
SELECT CURRENT MACRO
•
SELECT USER TO SETUP
•
CONFIGURE
•
IBM CONFIGURE
LQ CONFIGURE
•
•
SAVE PARAMETERS
modules
(see paragraph 3.4)
(see paragraph 3.4)
(see paragraph 3.4.3)
(see paragraph 3.4.4)
(see paragraph 3.4.5)
(see paragraph 3.4.6)
To modify various modules’ parameters you should enter a corresponding module. Before
modifying printer parameters, please select the desired macro first. The current macro is
the one to be chan
ed.
3-5
Page 34
Configuring the Printer
g
p
x
p
A
w
A
t
your
3.4.1 SELECT CURRENT MACRO
The printer stores up to three user settings in MACRO 1 up to MACRO 3.
Use the [STOP #] key to activate this function. The active macro is displayed first. Press
the
[COMPRESS –] key until you find the macro for your application and selected it with
the
[STOP #] key. The printer will save the selected macro immediately. After the
procedure the printer changes into the ON-LINE mode and will now work with the new
settin
3.4.2 SELECT USER TO SETUP
With the module SELECT USER TO SET UP
MACRO 2, and MACRO 3. Select the macro witch should be changed.
s.
you have the choice between MACRO 1,
Note:
If you have selected all new items and have these confirmed with the [STOP ]
'
t forget to activate the module SAVE PARAMETERS.
don
3.4.3 CONFIGURE
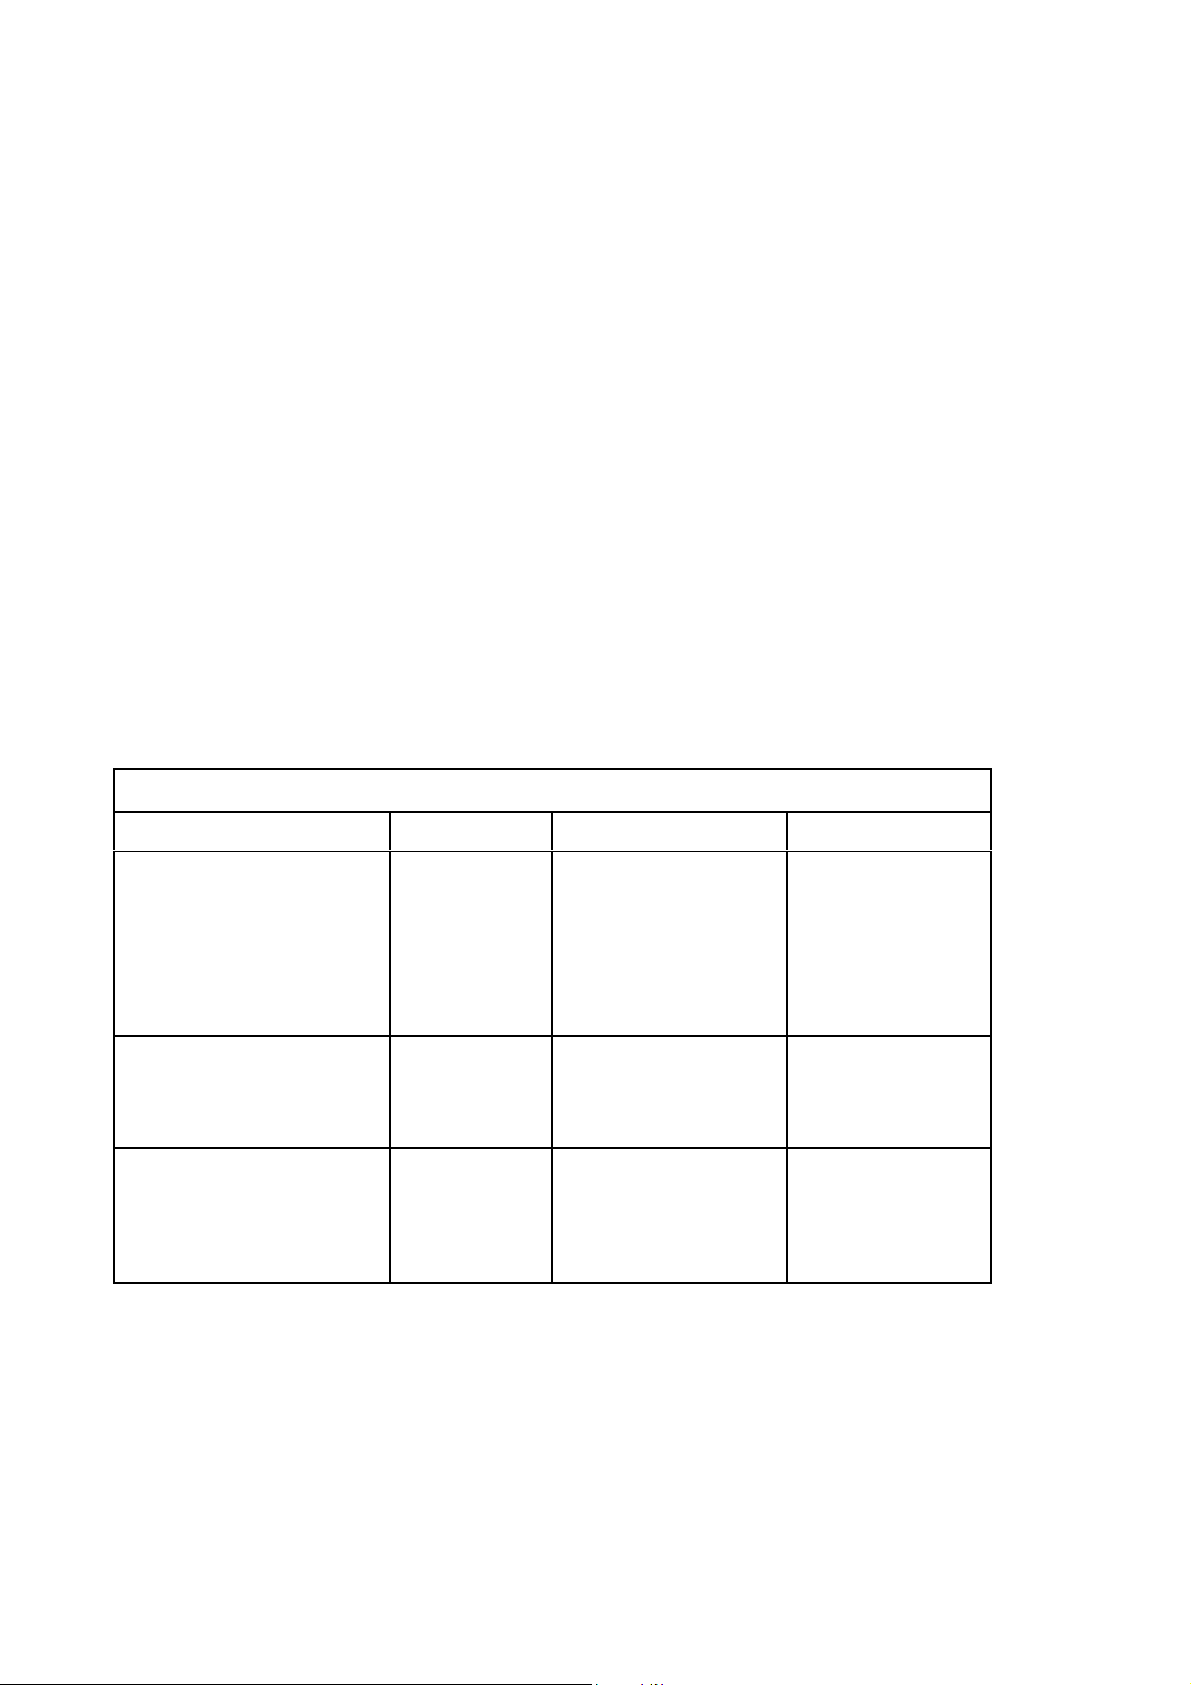
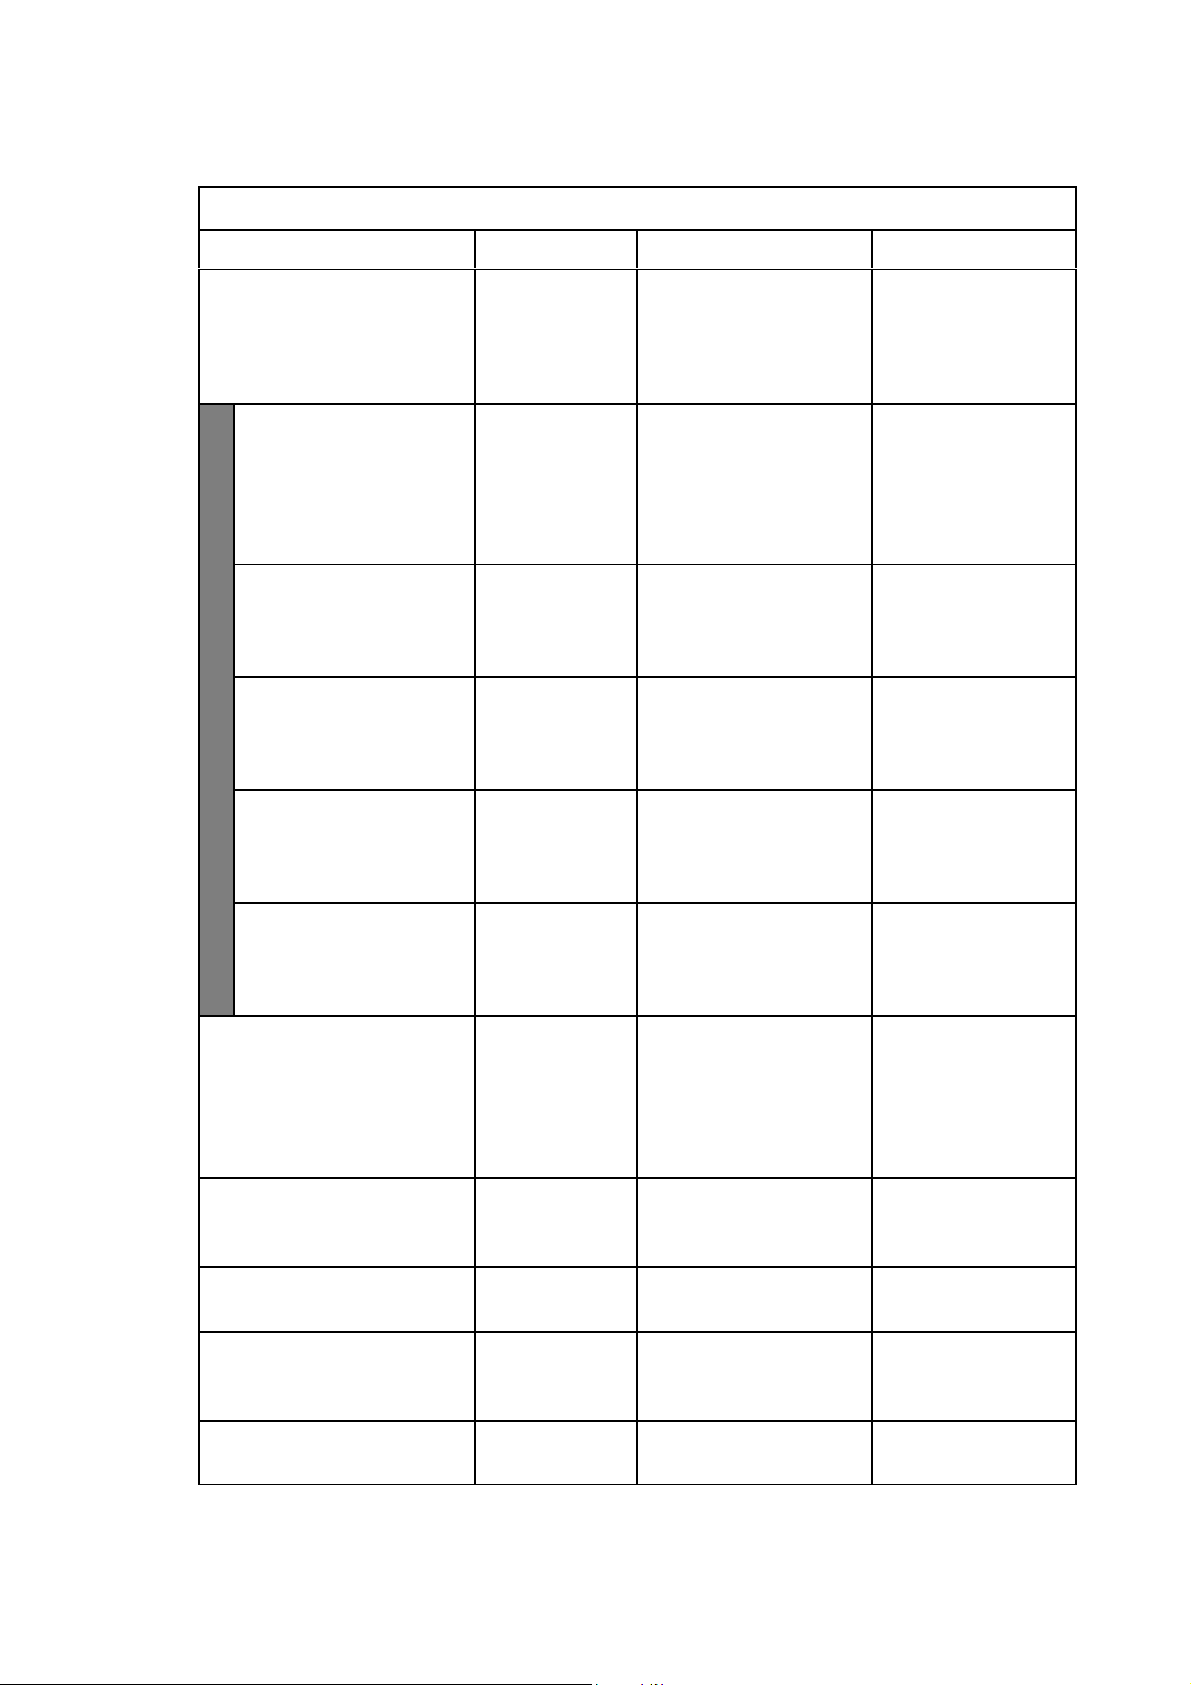
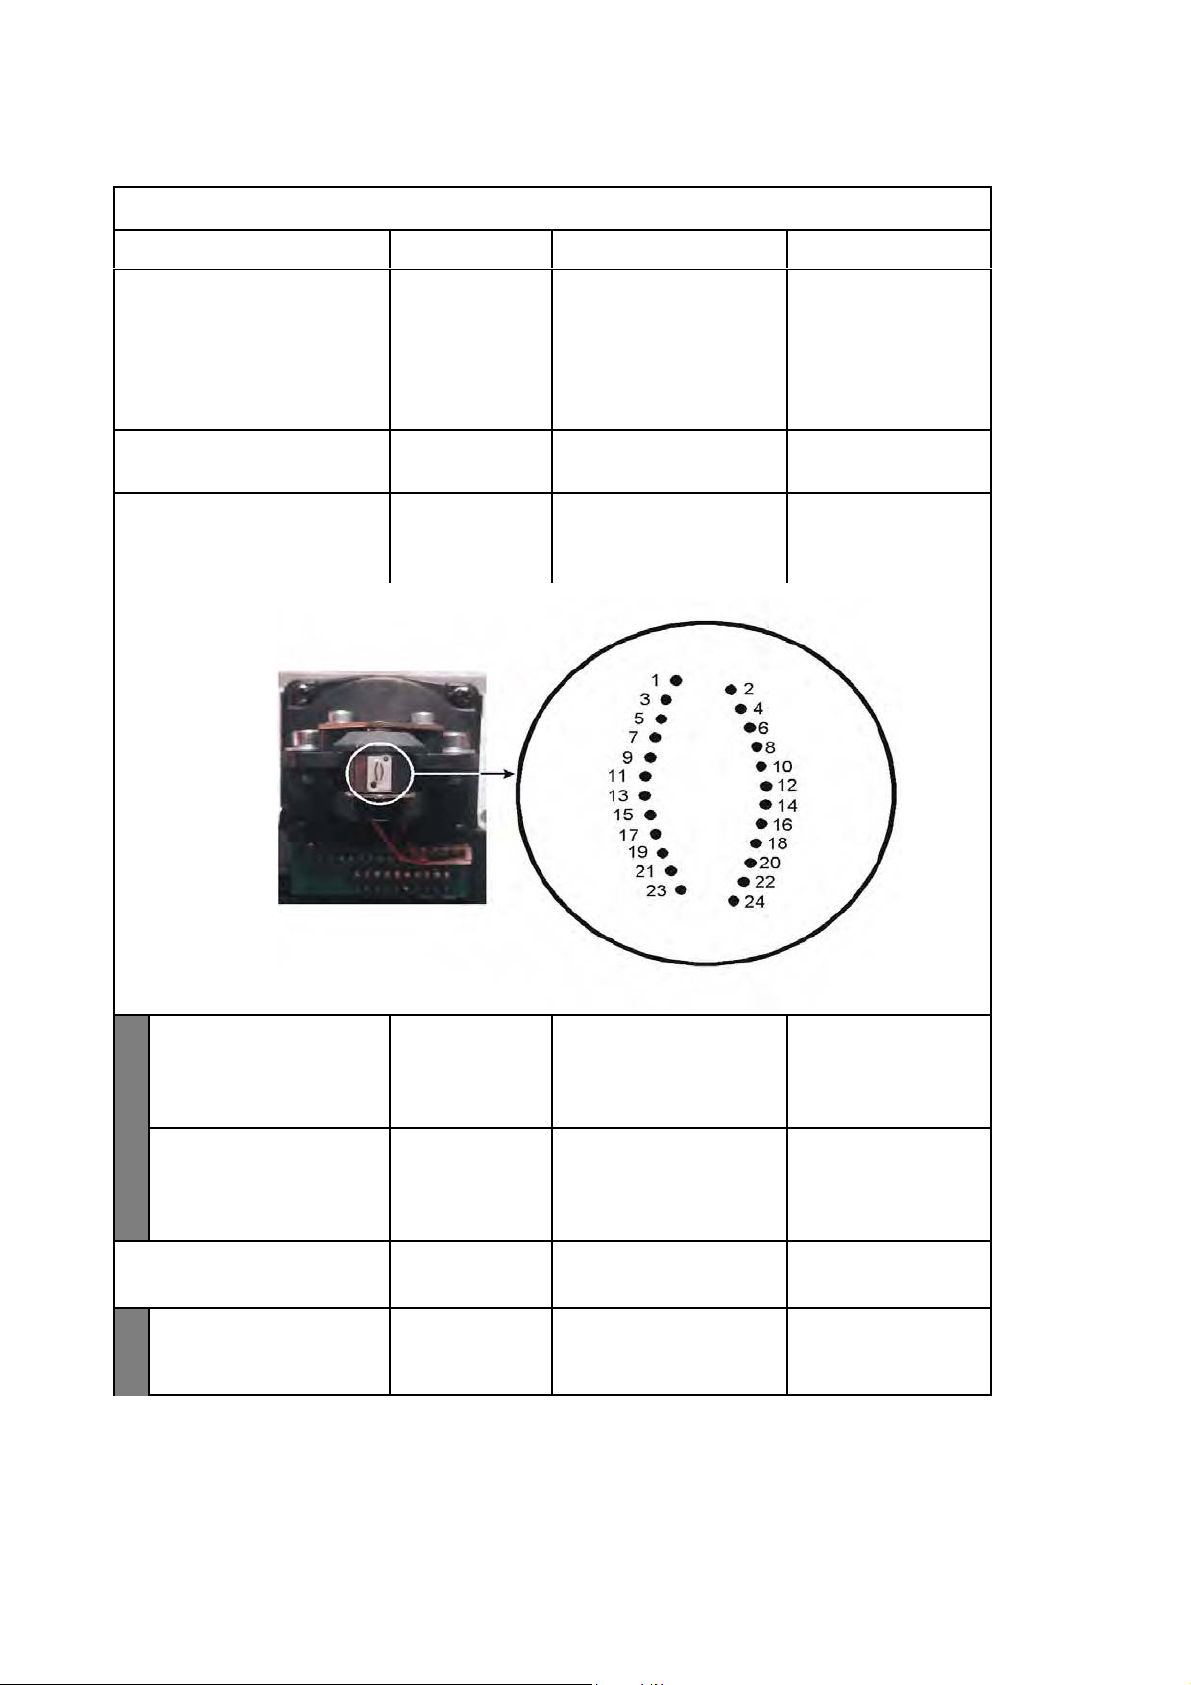
The following items can be modified according to the
Note:
In the different emulations the items shown are not equal. The option’s which are
rinted in bold
C-650 Plus
indicate the actual setting.
key,
CONFIGURE
Parameter Option E
RESUME DEFAULT VALUE NO
YES
INTERF
RS1 EMUL
CE DUAL
INTERFACE
SERIAL1
CX
TION IBM
LQ1600K
lanation Note
Select resume default
value or not,
If select YES, jump to
SAVE PARAMETERS the
parameters will be resumed
the default value if pressing
[STOP
Select the interface you
ant to use.
Selec
] to confirm.
RS1 emulation
This option is mainly
used to resume the
default value when the
menu parameters
have been changed in
disorder.
DUAL or CX will be
selected only if an
optional interface card
is installed.
3-6
Page 35
r
x
p
y
A
ARA
A
y
R
A
A
g
Configuringthe Printe
CONFIGURE
Parameter Option E
MODIFY RS1 CONFIG NO
YES
UD RATE (RS1) 2400
B
4800
9600
19200
BITS/CH
RITY (RS1) NONE
P
STOP BITS (RS1) 12 Number of stop bits which
CTER (RS1) 87 Number of bits that
EVEN
ODD
lanation Note
If YES configure also baud
rate, bits/character, parit
and stop bit.
NO not used with
CX EMULATION .
Controls the speed of the
data transfer.
The baud rate for the
printer should be
corresponding to the
settings of the computer.
represent a character.
The data transfer will be
checked by an even or odd
parity bit.
are in use.
Only displayed if
MODIFY RS1
CONFIG
is set to YES
Only displayed if
MODIFY RS1
CONFIG
is set to YES
Only displayed if
MODIFY RS1
CONFIG
is set to YES
displayed if
Onl
MODIFY RS1
CONFIG
is set to YES
(RS1) NO
DS
YES
CX EMUL
CX STROBE EDGE RISING EDGE
DR
LQ TYPE
NLQ1
NEEDLES SWITCH YES
TION IBM
LQ 1600K
FALLING EDGE
FT SPEED NORMAL
HIGH SPEED
NLQ2
NO
SERIAL 1 handle the DSR
signal ornot.
The emulation determines
the set of commands
available for the printer:
Select the trig mode of the
printer strobe signal (CX
present.
Select printer speed in draft
mode.
Selectthe printertype in
LQ mode.
YES = activated
No = i
nored
Only displayed if
MODIFY RS1
CONFIG
is set to YES
3-7
Page 36
Configuring the Printer
x
p
Y
A
A
Y
CONFIGURE
Parameter Option E
SPECIAL FORMS NO
YES
BIM DIRECTION
UNIDIRECTION
NEEDLE COMPENS
Needle Position
TION NO
YES
lanation Note
ES reduce the speed of
paper handling, and add
some special management
to support special forms,
e.g. thin paper, paper with
different thickness.
Select printing direction for
graphics.
Select needle
compensation or not when
the needle is broken.
HS COMPENS
BROKEN NEEDLE NO. 1
PNS SELECTION
ES
PNS #2000K SINGLE SHEET
3-8
TION NO
YES
up to
24
205 mm
220 mm
Select heigh speed
compensation or not
Choose the one needle
from needle 1 up to needle
24 for compensation.
Whetherthe following PNS
items are valid ornot.
The selection will influence
the ejection of the paper.
Single Sheet means A4
Only displayed if
NEEDLE
COMPENSATION
is set to YES
Only displayed if
NEEDLE
COMPENSATION
is set to YES
Only displayed if PNS
SELECTION
is set to YES
Page 37
r
x
p
Y
Configuringthe Printe
Parameter Option E
CONFIGURE
lanation Note
PNS #2001K 400
selectable: 200
up to 1000 in
steps of 100
Digital filter (CX STB) Only displayed if PNS
SELECTION
is set to YES
PNS #2002K NO
Yes
PNS #2003K NO
Yes
PNS #2004K 205 mm
YES
NO
145 mm
PNS #2005K ERROR
SPACE
CHAR1
CHAR2
IGNORE
reserved Only displayed if PNS
SELECTION
is set to YES
reserved Only displayed if PNS
SELECTION
is set to YES
Printhead moves out of
paper with vertical
movement or not .
NO, the print head never
moves out of paper edge.
145 mm / 205 mm, the
print head moves out of the
paper if the paper width is
less than 145 or 205 mm.
ES the print head always
moves out of the paper.
Only displayed if PNS
SELECTION
is set to YES
Only displayed if PNS
SELECTION
is set to YES
.
3-9
Page 38
r
p
r
x
p
A
A
Y
A
Y
ARA
Y
R
Y
A
A
p
3.4.4
IBM CONFIGURE
The following items can be modified according to the IBM parameters.
Note:
In the different emulations the items shown are not equal. The option’s which are
rinted in
bold
indicate the actual setting.
IBM CONFIGURE
Configuringthe Printe
ameter Option E
Pa
EMUL
HIGH SPEED PRINTING YES
CPI 10
TION IBM X24
IBM PPII
GM NO
YES
NO
A4 SHEET
FANFOLD PAPER
12
15
17.1
20
lanation Note
Select your printer
emulation
NO = ignore AGM graphic
printing
ES = AGM graphic
printing is active
Selecting high speed
printing mode.
NO = no draft mode.
A4 SHEET = always draft
mode when the paper is A4
Sheet.
FANFOLD PAPER =
always draft mode when the
paper is fanfold paper.
ES: = the print mode
always is draft.
Defines the number of
characters printed per inch.
GM is only for IBM
X24 printers valid.
LPI
CH
LF+CR NO
CR+LF NO
LEFT MARG. (1/60") 0
TOP M
CTER DEFINITION DRAFT
RG. (1/60") 0
5
6
LQ
YES
YES
-6 up to +6
-6 upto +6
Defines the number of lines
printed per inch.
Selecting the printing
quality.
ES: LF = LF + C
NO: LF = LF
NO: CR = CR
ES:CR=CR+LF
To adjust the left margin
more to left or right in units
of 1/60" inch (about 4 mm).
djust the top margin in
units of 1/60 inch (about
4 mm).
TOF = To
Of Form
3-10
Page 39
Configuring the Printer
r
x
p
ARA
r
ARA
ARA
t
r
A
r
Y
Y
Pa
ameter Option E
IBM CONFIGURE
lanation Note
IBM CH
PC CH
CTER SET PC
ISO
CTER SET 437(INT)
210(GR)
220(E)
850(LATIN 1)
851(GREEK)
852(LATIN 2)
855(CYRILLIC)
857(LATIN 5)
858(LATIN EURO)
860(P)
862(IL)
863(CAN. FR.)
864(ARABIC)
865(NORDIC)
866(CYRILLIC)
DK/N
DK
1252(PC-WIN LATIN1)
1250(PC-WIN LATIN2)
CHINA
CHN2
990(PC-866-BG
991(PC-GER)
Select PC characterseto
ISO characterset.
Selectthe code page of the
PC characterset.
PC continued with PC
CHARACTER SET;
ISO continued with ISO
CHARACTER SET.
Only displayed if IBM
CHARACTER SET
is set to PC.
ISO CH
PC T
BOF IBM-PP LIKE NO
TOP IBM PP LIKE NO
CTER SET CPOLUNIX
8859/15
8859/1
8859/2
8859/5
8859/6
8859/7
8859/8
8859/9
BLE TABLE 1
TABLE
YES
YES
the code page of the
Selec
ISO characte
Selectthe PC Table 1 o
Table 2
Setting the bottom margin
NO = 2.3 mm
ES = 10 mm
Setting the top margin.
NO the physical top margin
(adjustable)
ES = 7.4 mm
set.
Only displayed if IBM
CHARACTER SET
is set to ISO.
BOF = Bottom Of Form
TOF = Top Of Form
3-11
Page 40
r
r
x
p
A
Y
w
A
t
Y
r
IBM CONFIGURE
Pa
ameter Option E
lanation Note
Configuringthe Printe
ZERO SL
LINE LENGTH
80
INSERT MODE DIRECT
GE LENGTH 11
P
RESET WHEN EJECT NO
SH NO
YES
90
PR2 LIKE
12
YES
Selectthe printoutof 0
(0x30 = zero)
ES = the 0 will be printed
ith a slash on it (e.g. 0/ ).
Setting the line length in
unit of character of 10 CPI.
Selecting the paper insert
mode.
DIRECT = PR9 insert paper
directly when paper
alignment.
PR2 LIKE = PR9 insert
paper when printing data is
received, it is same
procedure as PR2.
Setting the page length in
the units of an inch.
NO = no rese
ES = the printer will be
reset when eject a form.
COMPRESS 16.6
17.1
PNS SELECTION NO
YES
PNS #2080K NO
YES
Setting CPI which
command SI set.
16.6 = 16.6 CPI
17.1 = 17.1 CPI
Whethe
item is valid ornot.
NO = Double height printing
and bold printing are
permissible in any print
pitch.
the following PNS
Only displayed if PNS
SELECTION
is set to YES.
Relative to the
PNS4001K of PR2E.
3-12
Page 41
Configuring the Printer
p
A
w
w
(
)
A
APER
Y
Y
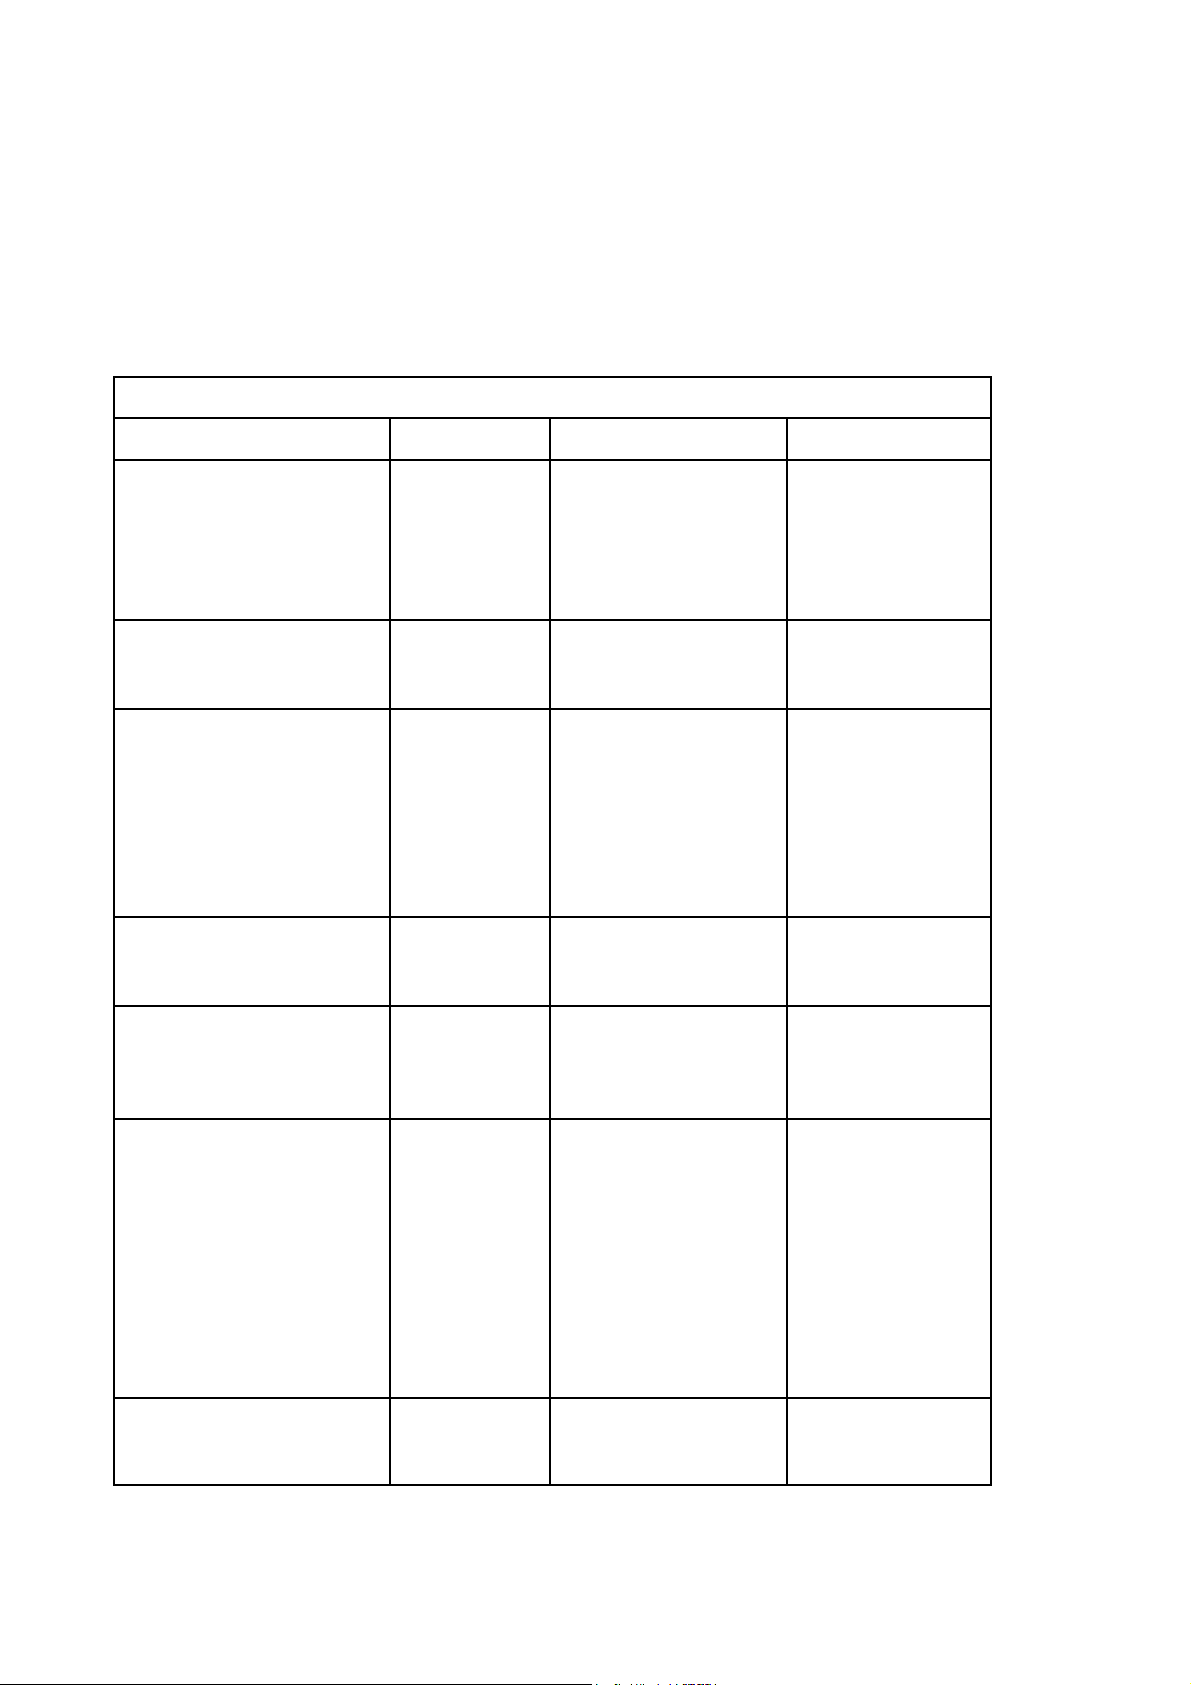
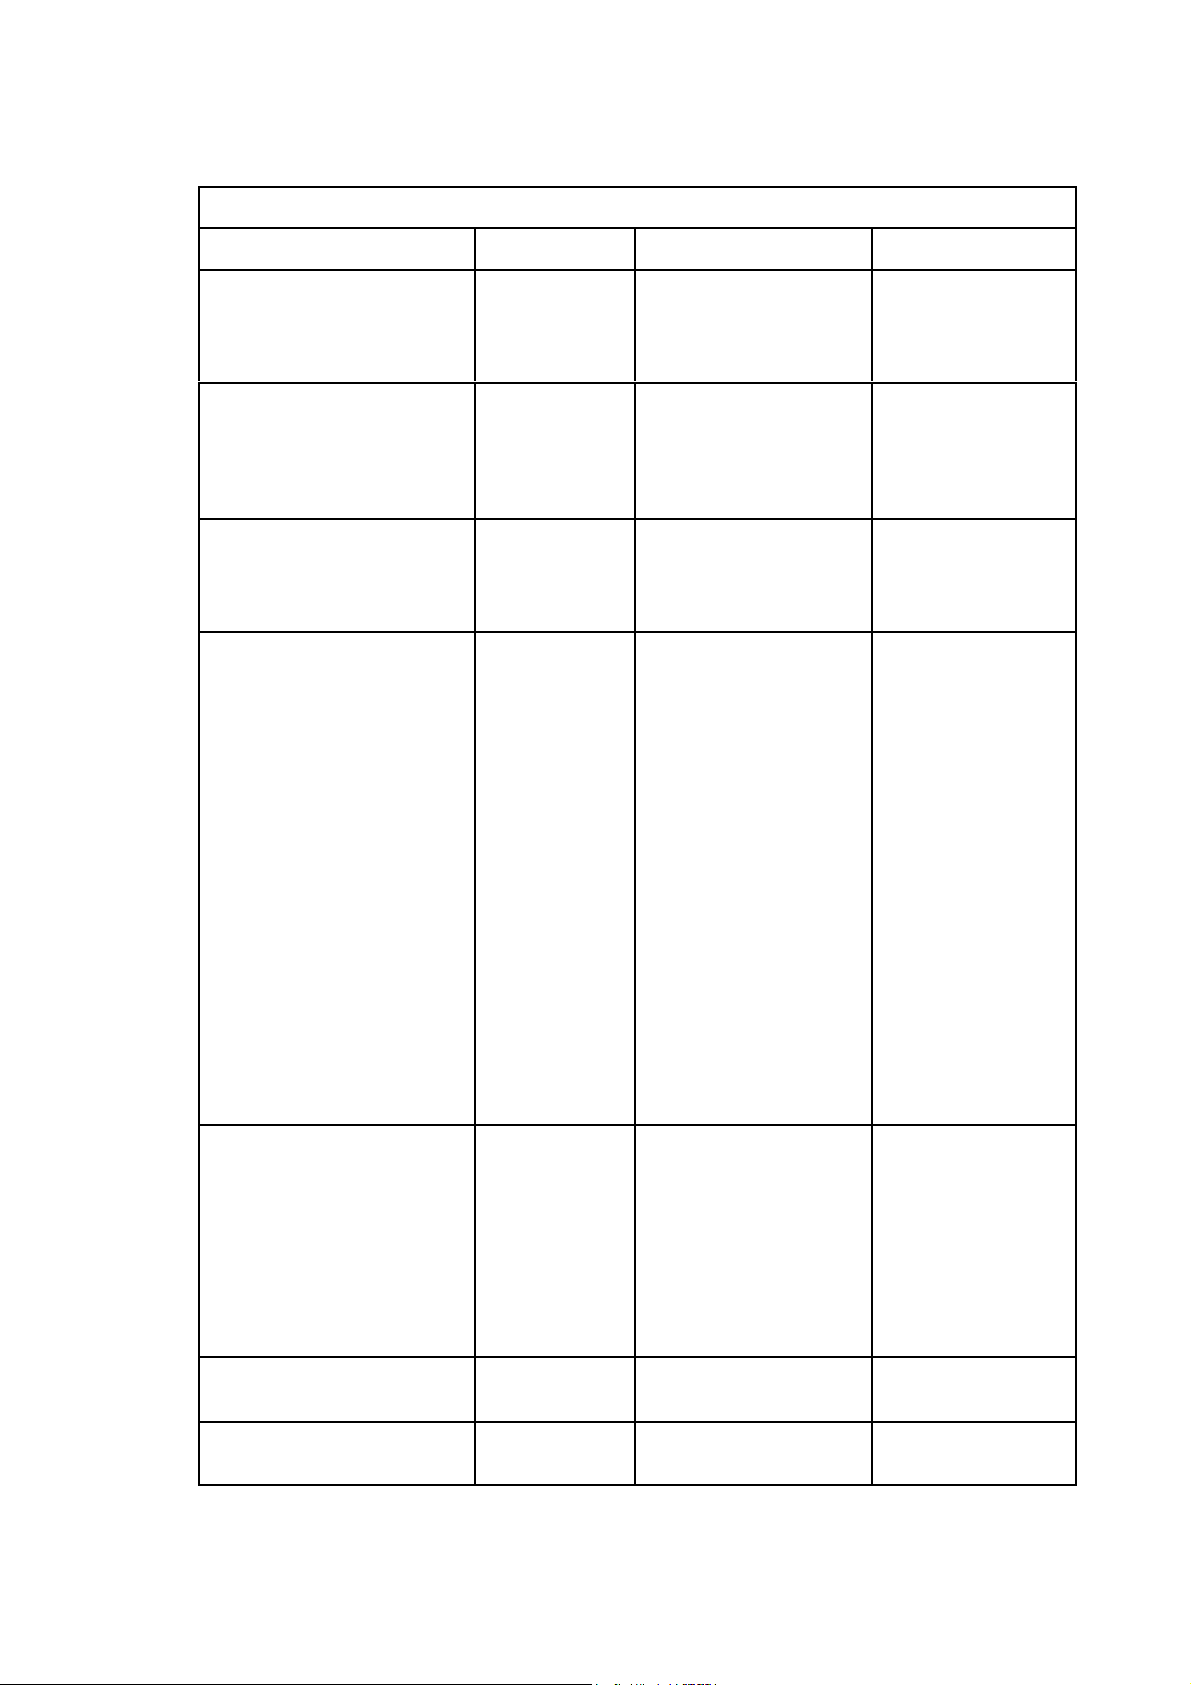
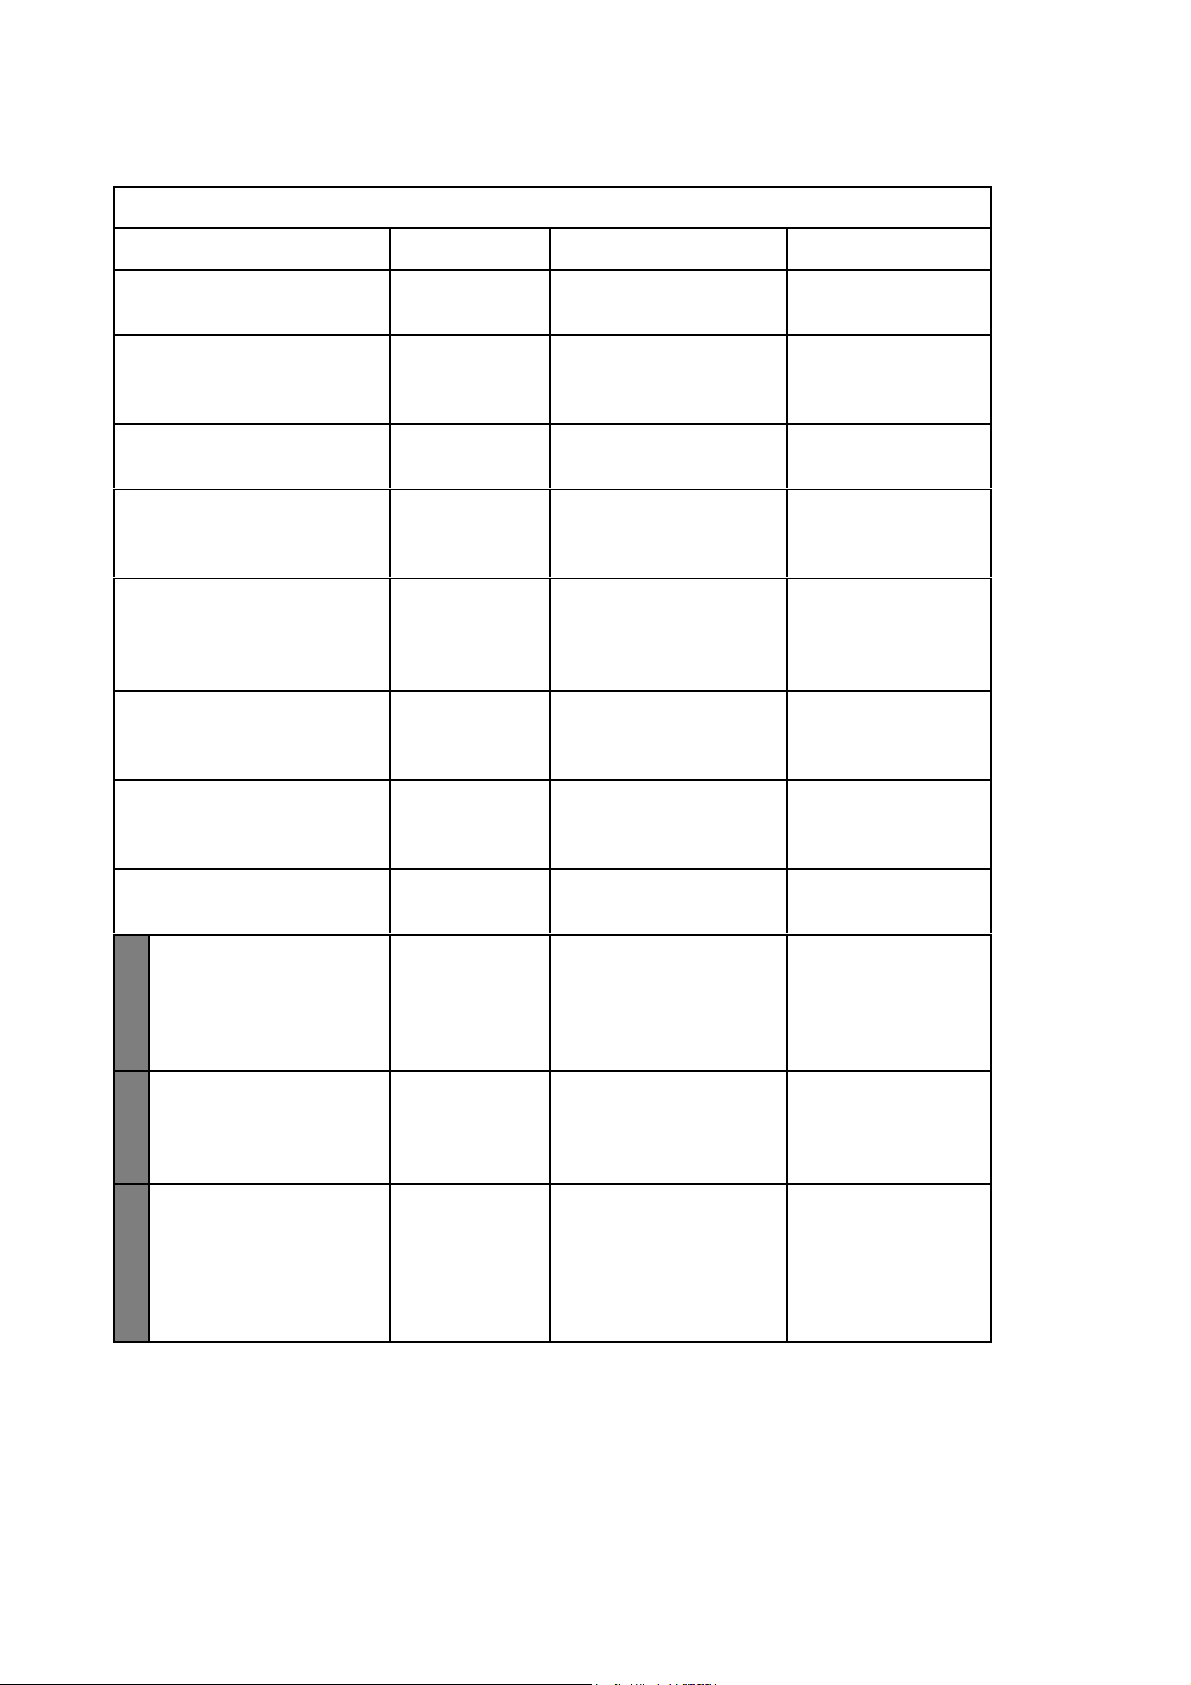
3.4.5
LQ CONFIGURE
The following items can be modified according to the LQ parameters.
Note:
In the different emulations the items shown are not equal. The option’s which are
rinted in bold
Parameter Option Explanation Note
indicate the actual setting.
LQ CONFIGURE
UTO COMPRESSION NO
YES
LINE LENGTH COMPRESS NO
YES
COMPRESS PROPORTION 101/LINE (85%)
108/ LINE (80%)
115/ LINE (75%)
123/ LINE (70%)
133/ LINE (65%)
144/ LINE (60%)
157/ LINE (55%)
170/ LINE
NFOLD LEFT MARG. 0
F
P
EMPTY WARNING NO
0 up to +7
50%
YES
Determine whether
automatically condense
current line for printing,
hen current line length
exceeds the allowed line
length.
Determine whether the line
idth to compress or is
fixed by the menu setting.
Select the proportion of the
automatic line
condensation.
Select the left margin for
the 80 columns fan fold
paper in steps of 1/10 inch.
NO = blocking of the parallel
port, when there is no paper
in the C-650 PLUS.
ES = no blocking
HIGH SPEED PRINTING YES
NO
A4 SHEET
FANFOLD PAPER
LPI
5
6
3-13
Selecting high speed
printing mode.
NO = no draft mode.
A4 SHEET = always draft
mode when the paper is A4
Sheet.
FANFOLD PAPER =
always draft mode when the
paper is fan fold paper.
ES: = the print mode
always is draft.
Defines the number of lines
printed per inch.
Page 42
r
r
x
p
ARA
ARA
t
ARA
t
ARA
Y
R
Configuringthe Printe
LQ CONFIGURE
Pa
ameter Option E
lanation Note
CPI OF WEST FONT 10
12
15
17
20
CH
CTER SET PC
ISO
PC CH
CTERSET 437(INT)
210(GR)
220(E)
850(LATIN 1)
851(GREEK)
852(LATIN 2)
855(CYRILLIC)
857(LATIN 5)
858(LATIN EURO)
860(P)
862(IL)
863(CAN. FR.)
DK/N
DK
1252(PC-WIN LATIN1)
1250(PC-WIN LATIN2)
CHINA
CHN2
990(PC-866-BG
991(PC-GER)
Select CPI of ASCII
character.
Select PC charactersetor
ISO characterset.
Selec
the code page of the
PC characterset.
PC continued with PC
CHARACTER SET;
ISO continued with ISO
CHARACTER SET.
Only displayed if IBM
CHARACTER SET
is set to PC.
ISO CH
CTERSET CPOLUNIX
8859/15
8859/1
the code page of the
Selec
ISO characterset.
Only displayed if IBM
CHARACTER SET
is set to ISO.
8859/2
8859/5
8859/6
8859/7
8859/8
8859/9
CH
LF+CR NO
CTER DEFINITION DRAFT
LQ
YES
Selecting the printing
quality.
ES: LF = LF + C
NO: LF = LF
3-14
Page 43
Configuring the Printer
r
x
p
Y
A
A
A
p
A
A
p
A
Y
w
t
Y
Y
Y
Y
t
Y
Y
Y
Pa
ameter Option E
LQ CONFIGURE
lanation Note
CR+LF NO
YES
LEFT M
TOP M
TOP M
ZERO SL
LINE LENGTH 80
RESET WHEN EJECT NO
RG. (1/60") 0
-6 up to +6
RG. (1/6") 0
-1 up to +6
RG. (1/60") 0
-5 up to +5
SH NO
YES
90
94
YES
ES: CR = LF + CR
NO: CR = CR
To adjust the left margin
more to left or right in units
of 1/60" inch (about 4 mm).
djust the top margin in
units of 1/6 inch.
djust the top margin in
units of 1/60 inch (about
4 mm).
Selectthe printoutof 0
(0x30 = zero)
ES = the 0 will be printed
ith a slash on it (e.g. 0/ ).
Setting the line length in
unit of character of 10 CPI.
NO = no rese
ES = the printer will be
reset when eject a form.
TOF = To
TOF = To
Of Form
Of Form
PNS SELECTION NO
YES
PNS #2100K NO
YES
PNS #2101K NO
YES
PNS #2102K NO
YES
Whetherthe following PNS
item is valid ornot.
ES = Reset automatically
line condensation when
Form Feed command
executed.
NO = no reset
NO = ignore 0x20 at the
end of a line.
ES = don't ignores 0x20
the end of a line.
a
ES = Process of the
horizontal and vertical
movement command:
ESC $; ESC \; ESC (v)
NO = ignore the command
Only displayed if PNS
SELECTION is set to
ES.
Only displayed if PNS
SELECTION is set to
ES.
Only displayed if PNS
SELECTION is set to
ES.
This PNS is only active
on ver. 1.08 or higher.
3-15
Page 44

r
g
Configuringthe Printe
3.4.6 SAVE PARAMETERS
Any desired changes to the default settings can be saved here. After power on the new
settin
s are activated.
While this function is operating the display shows the message
•
SAVING, PLEASE WAIT
SAVED, RESTART C-650 Plus.
•
Now the printer changed into the
and then
ON -LINE
mode.
3-16
Page 45

Configuring the Printer
A
3.5
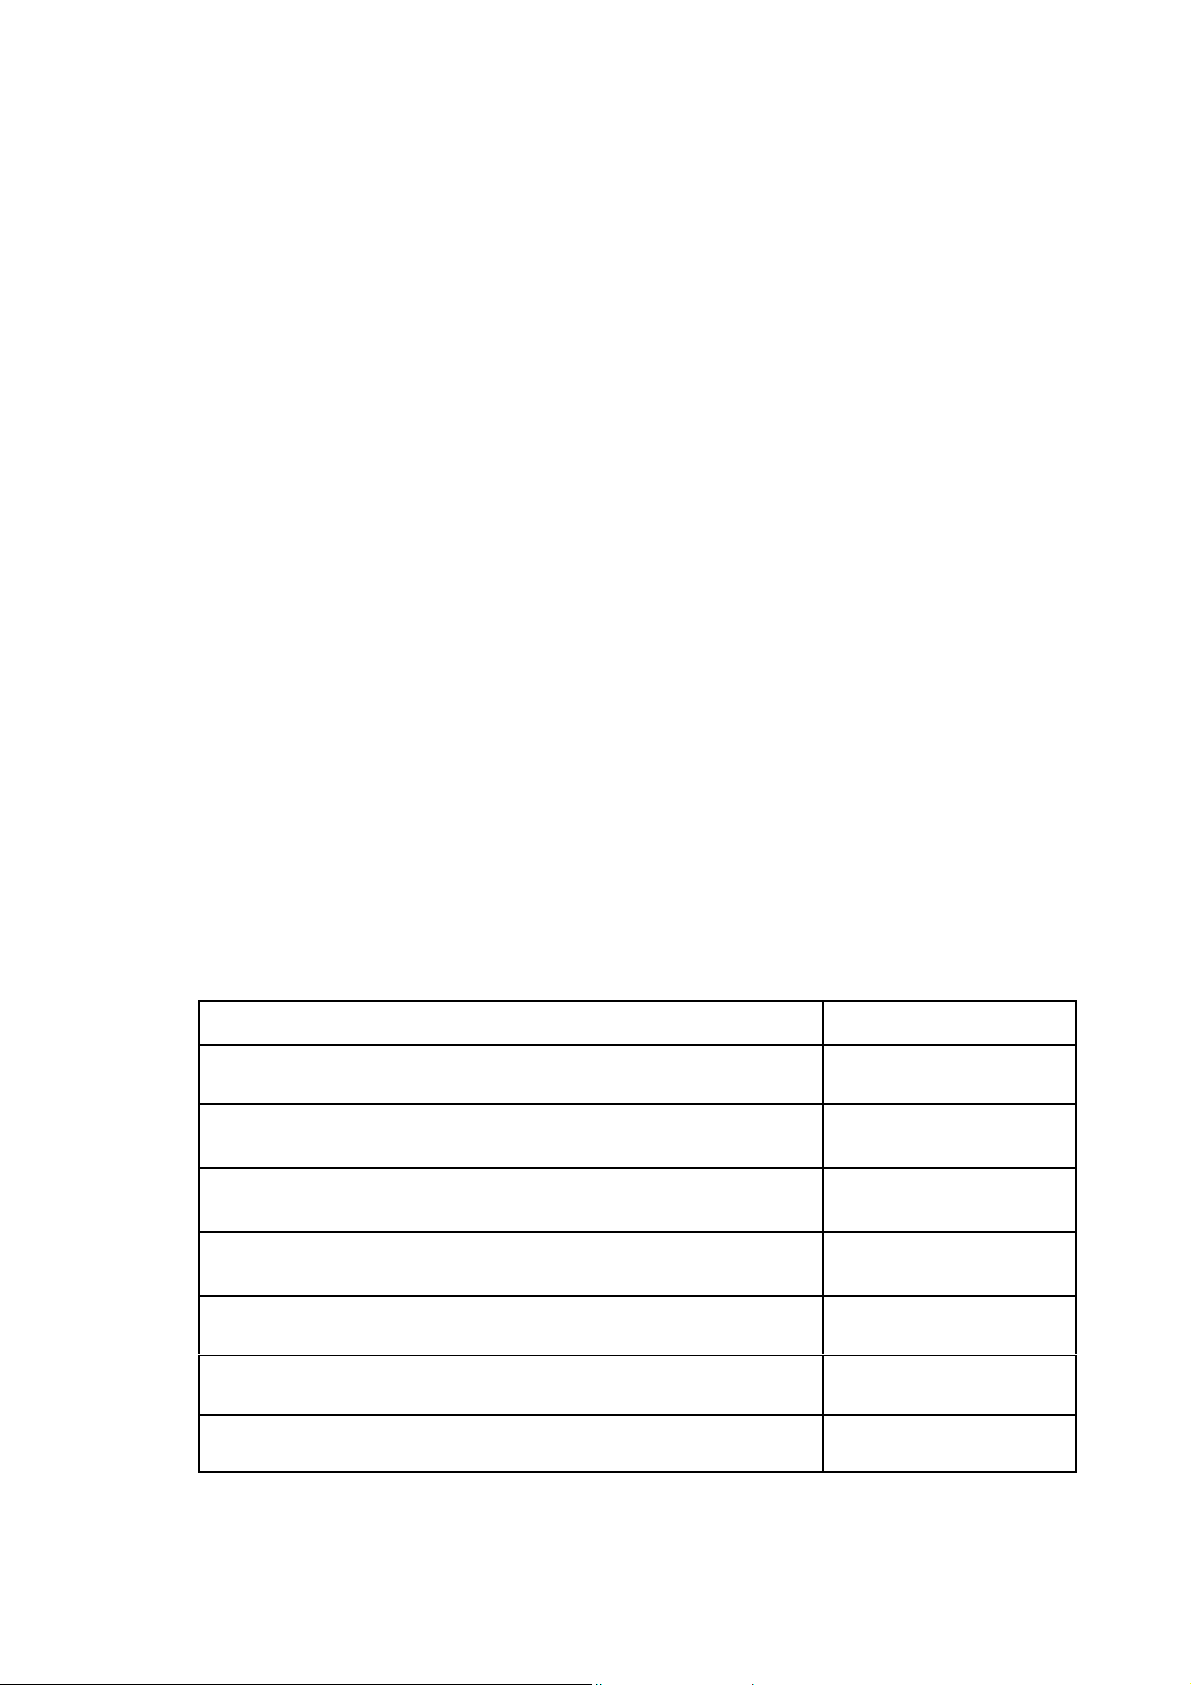
PRINTING TEST
There are five test printouts available:
•
User's Guide
•
Ascii Character Set
Character Attributes
•
•
Dr. Grauert (print a letter)
3.5.1 USER'S GUIDE
In the User's Guide you will find detail information. So it is possible to print out the User's
Guide by yourself. If this function is selected the printer asks for A4 sheets. After inserting
an A4 sheet the printer starts the print-out.
With the
[STATION 2] key it is possible to skip the selection.
3.5.2 ASCII CHARACTER SET
The stored ASCII character sets are:
•
GB
•
ROMAN
•
INT 437
•
CANADIAN FRENCH
•
OCR A
OCR B
•
3.5.3 CHARACTER ATTRIBUTES
ll included character attributes are printed here.
3.5.4 Dr. GRAUERT
This test printout produces a standard letter (ECMA-132) which can be used for
measuring the printer's throughput.
3-17
Page 46
r
p
r
g
)
A
#
#
[
#
]
R
#
per eject
t
r p
r
w
t
;
3.6
ADJUSTMENT
Adjustment can be used to adjust and check some built-in parameters of the printer. It may
enhance the print performance. Sometimes, it’s possible to improve the rationality of the
page layout according to the practical environment. The printer has been adjusted
corresponding to factory standard before it is delivered.
Warning:
User usually should not change the settings. If the printer has to be adapted, the use
should have already well understood the involved parameters. Or else the printer may
miss normal function. The followin
These parameters below allow manipulation on operator panel:
•
•
•
•
•
•
•
•
3.6.1 PHOTOSENSOR VALUE
All the photo sensor value has been adjusted to correct values in the factory, but after
using it for many days, some unexpected change may happen for some reason, such as
using unacceptable paper. In order to make the printer work correctly, please adjust the
photo sensor value again.
fter entering adjustment, you have to do the following steps:
The user who wants to adjust these parameters of the printer should be a
rofessional engineer or be guided bya professional engineer.
Photosensor Value (see paragraph 3.6.1
Left Margin
Top Margin
Run In Test
Alignment Adjustment for Bidirectional Printing (see paragraph 3.6.5)
Printing Photosensor Value
Inquire Photosensor Values
Resume HW Parameters
There is a noise of the rollers and thegreen lamp of Station 2 lightup
The printer insert the paper and start the setup of the photo sensor.
(see paragraph 3.6.2
(see paragraph 3.6.3
(see paragraph 3.6.4)
Key or action
Select Adjustment ADJUSTMENT
PHOTOSENSOR VALUE
insert paperand press
Pa
afte
rint the values thepape
introduce the adjustable parameters.
)
)
)
(see paragraph 3.6.6)
(see paragraph 3.6.7)
(see paragraph
3.6.8
[STOP
STOP
[STOP
Inser
[STATION 2]
]
afteradjustment.
#
]
paper;
ill be ejec
Two line display
PHOTOSENSOR VALUE
INSERT SHEET; PRESS
PHOTOSENSOR VALUE
INSE
PHOTOSENSOR VALUE
END. PRESS
PHOTOSENSOR VALUE
INSERT A4 SHEET
PHOTOSENSOR VALUE
FINISH
PHOTOSENSOR VALUE
Configuringthe Printe
T SHEET; PRESS
#
TO PRINT
PRESS STAT 2
3-18
Page 47
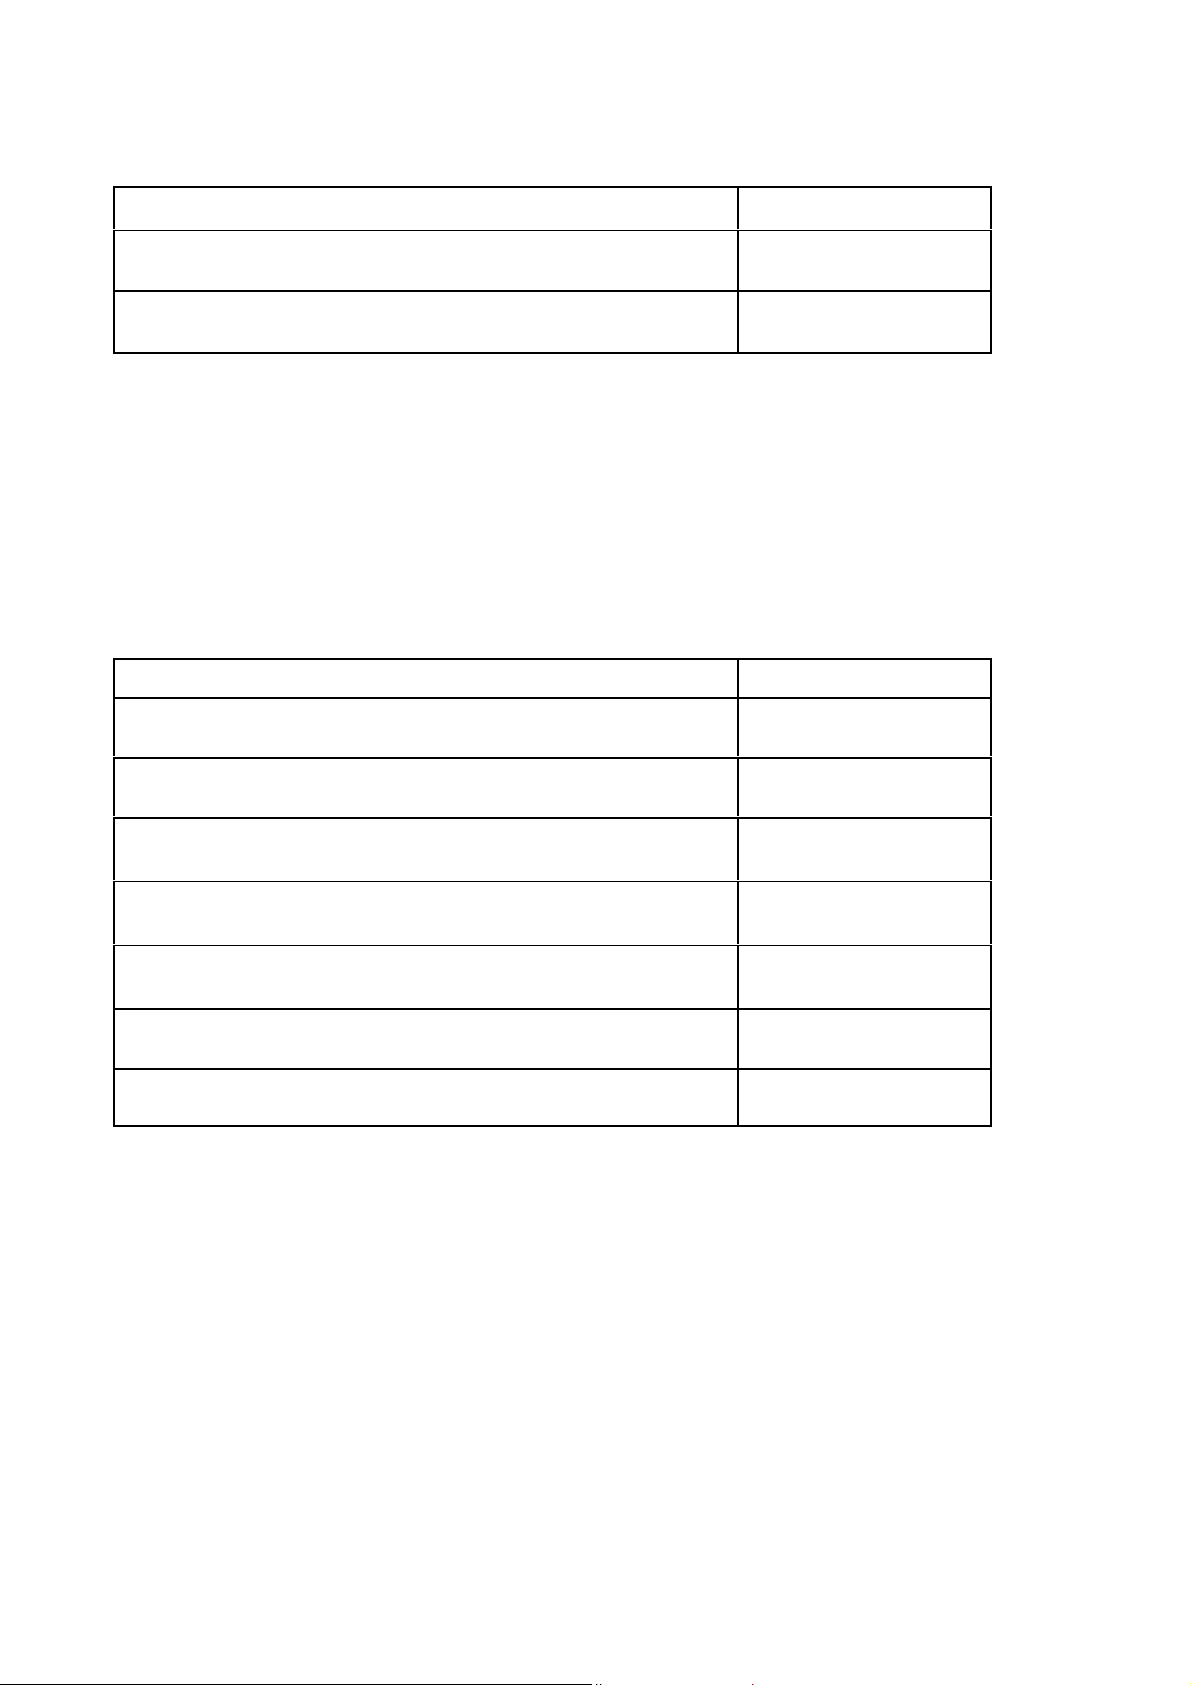
Configuring the Printer
A
#
g
A
A
t
t
y
, p
Key or action
[STATION 2]
Note: The adjustment is only active during power on.
[STATION 2] and [COMPRESS
to leave the off-line mode
–
] together
Two line display
OFF-LINE MODE
DJUSTMENT
SAVE PARAMETERS
ACCEPT ST2 = IGNORE
The new values of adjustment to be default settings can be saved now or ignore the new
values. After savin
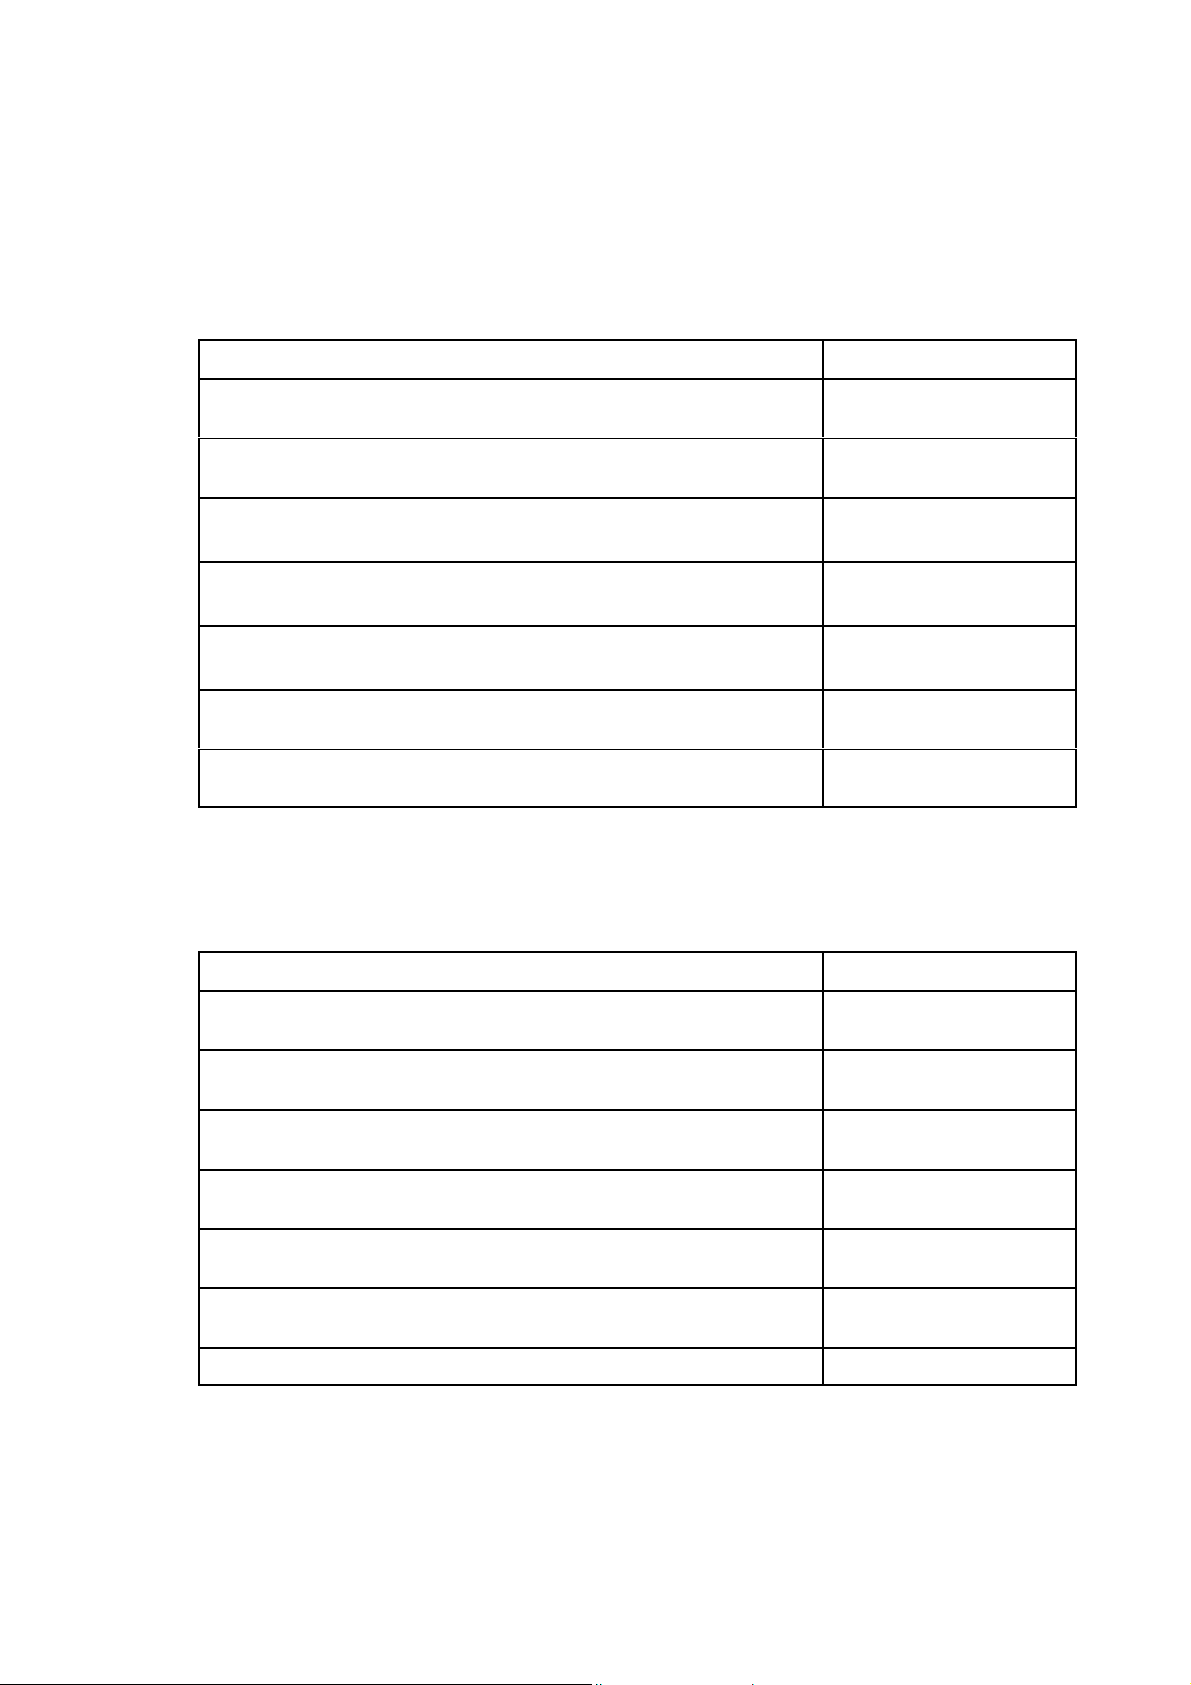
3.6.2 LEFT MARGIN
and power OFF and ON the new adjustment is still activated.
The [FEED/EJECT •] key reduce the current value (left margin is moving to the left side)
and the [COMPRESS –] key increases the current value (moving to the right side).
fter entering adjustment, you have to do the following steps:
Key or action Two line display
Select Adjustment ADJUSTMENT
PHOTOSENSOR VALUE
[COMPRESS –]
until LCD shows
DJUSTMENT
LEFT MARGIN
Press [FEED/EJECT •] or [COMPRESS –] to find the new left margin.
an A4 sheet to control the setting. The printer will insert the paper
Inser
automaticall
[STOP
The range is from zero up to 133.
rint the current margin and ejectthepaper.
[STOP #] to accept
Display after saving ADJUST M E N T
#
] to selec
LEFT MARGIN 17
•
= LEFT – = RIGHT
LEFT MARGIN 20
•
= LEFT – = RIGHT
LEFT MARGIN (20)
•
= LEFT – = RIGHT
LEFT MARGIN
SAVE PARAMETERS
LEFT MARGIN
3-19
Page 48
ADJUSTMENT
r
A
w
A
t
t
y
, p
A
w
A
t
R
r
p
w it
p
A
PHOTOSENSOR VALUE
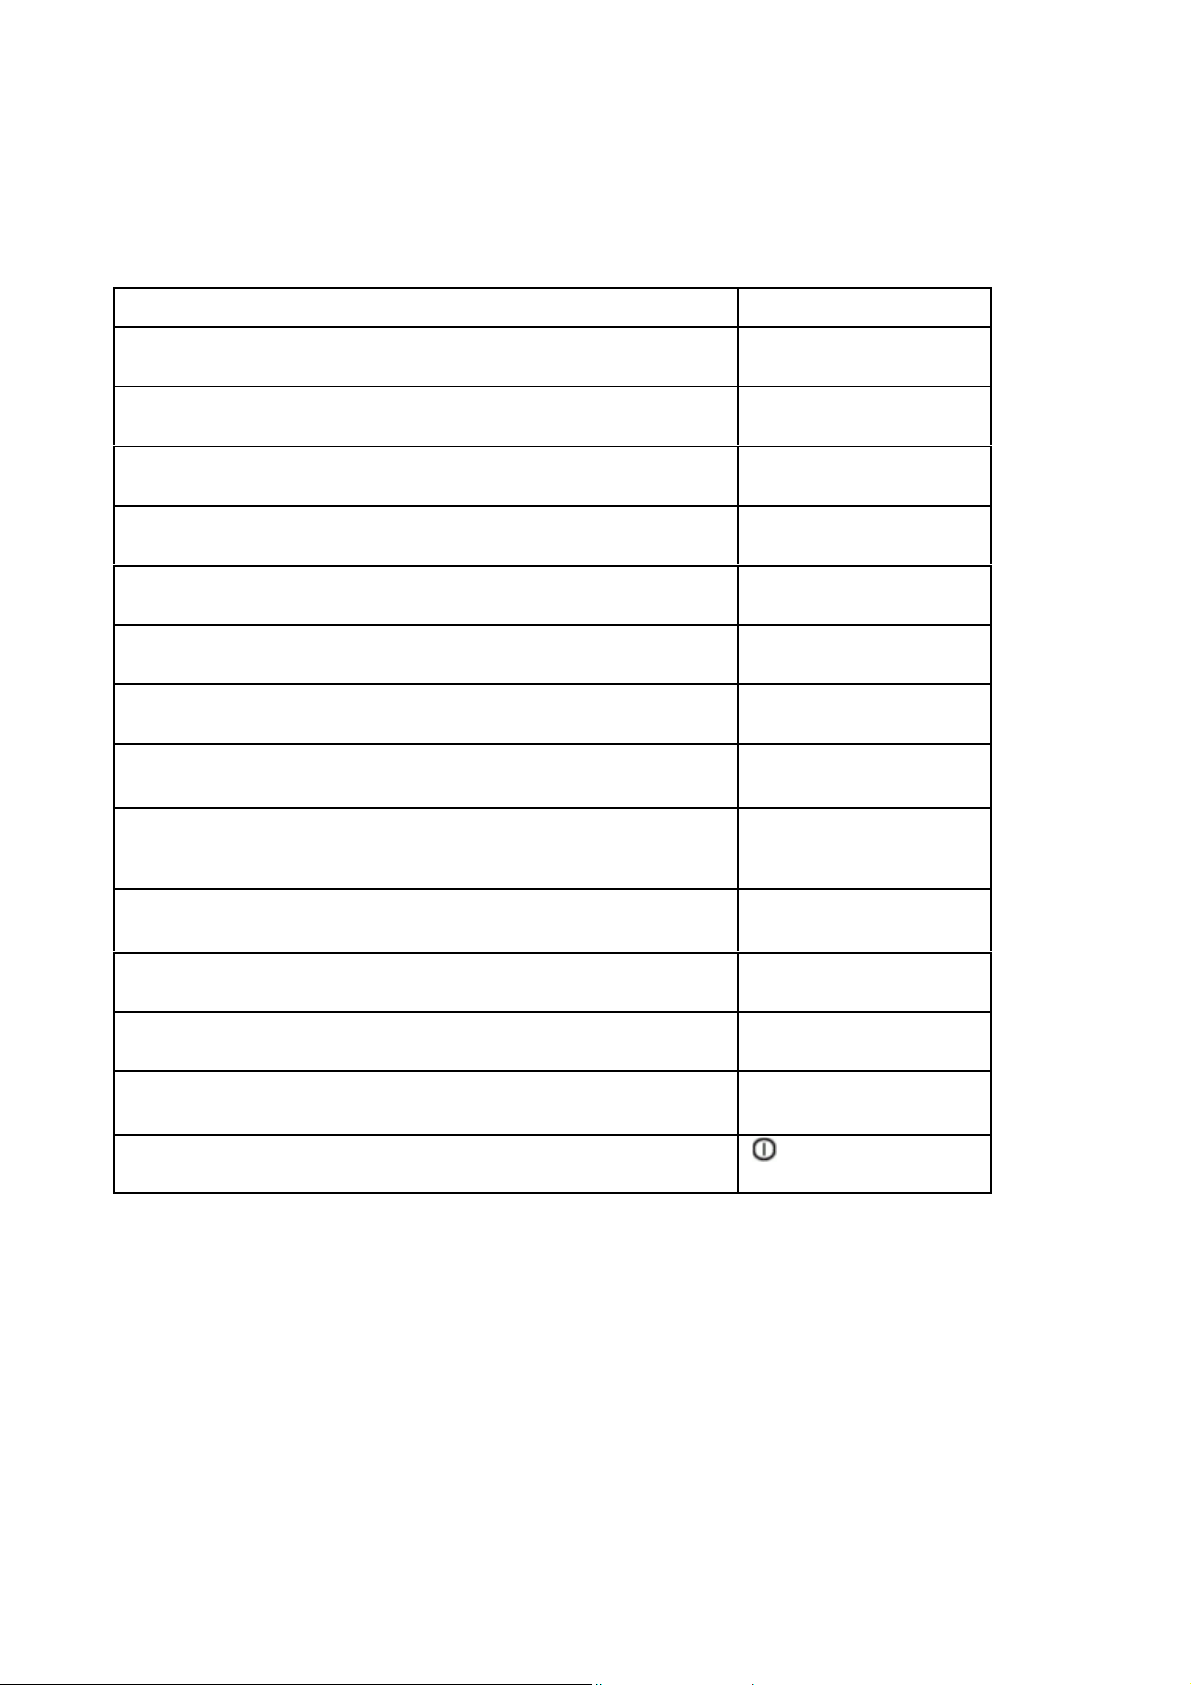
3.6.3 TOP MARGIN
Configuringthe Printe
The [FEED/EJECT •] key reduce the current value (top margin is moving upwards) and
[COMPRESS –] key enlarge the current value (moving downwards).
the
fter entering adjustment, you have to do the following steps:
Key oraction Two line display
Select Adjustment ADJUSTMENT
PHOTOSENSOR VALUE
–
[COMPRESS
until LCD sho
]
s
DJUSTMENT
TOP MARGIN
Press [FEED/EJECT •] or [COMPRESS –] to find the new top margin.
an A4 sheet to control the setting. The printer will insert the paper
Inser
automaticall
3.6.4 RUN IN TEST
[STOP #] to selec
The range is from zero up to 214.
rint the currentmargin and ejectthepaper.
#
[STOP
Display after saving ADJUSTMENT
] to accept
TOP MARGIN 030
•
= UP – = DOWN
TOP MARGIN 042
•
= UP – = DOWN
TOP MARGIN (042)
•
= UP – = DOWN
TOP MARGIN
SAVE PARAMETERS
TOP MARGIN
fter selecting the Run in Test the printer will insert a sheet and start nonstop printing.
Key oraction Two line display
Select Adjustment
[COMPRESS
until LCD sho
–
s
]
DJUSTMENT
PHOTOSENSOR VALUE
DJUSTMENT
RUN IN TEST
[STOP #] to selec
The yellow Readylamp lights up.
The printe
No
starts printing horizontal lines afterinserting a paper. RUN IN TEST NO: 00
is possible to stop printing bypressing the [STOP #] key. RUN IN TEST NO: 00
RUN IN TEST
PLEASE INSE
rinting, finish: 00
printing, finish: 00
T SHEET
[STOP #] continued printing
Power off the printer to leave the continued printing.
Note:
Use Bidirectional Alignment Adjust to correct an offset in the vertical lines (see
aragraph
3.6.5).
RUN IN TEST NO: 00
printing, finish: 00
3-20
Page 49
Configuring the Printer
A
t
A
t
y
#
3.6.5 BIDIRECTIONAL ALIGNMENT ADJUSTMENT
After selecting the Bidirectional Alignment it is possible to align the printing of vertical
lines.
Key or action Two line display
Select Adjustment ADJUSTMENT
PHOTOSENSOR VALUE
–
[COMPRESS
until the LCD shows:
#
[STOP
The yellow Readyand green Station 2 lamp lights up.
Press the [STOP
INSERT A4 SHEET
The printer starts printing vertical lines after inserting a paper. BIDIRECTION ALIGN
•
Now press [FEED/EJECT
font and CPI which you want to align (e.g. DRAFT 12 CPI).
] or [COMPRESS –] until you can select the
] to selec
TION 2] BIDIRECTION ALIGN
[ST
]
#
] key BIDIRECTION ALIGN
BIDIRECTION ALIGN
DJUSTMENT
BIDIRECTION ALIGN
BIDIRECTION ALIGN
RESULT OF ALL SPEED
FINISH; PRESS STAT2
RESULT OF ALL SPEED
BIDIRECTION ALIGN
DRAFT 12CPI
Press the [STOP #] key to acceptthe selection. BIDIRECTION ALIGN 000
•
= LEFT – = RIGHT
•
Use the [FEED/EJECT
5 times). If you are going to the right the numeric value will be indicated by
an A4 sheet and the printer starts a controlprintofyourselection.
Inser
Press the [STOP #] key to accept and save your selection.
Now you can select an other font for alignment or leave the function. BIDIRECTION ALIGN
ou want to leave the off-line mode press [STATION 2] and
If
Because the parameters are saved, press [STATION 2] to ignore.
] or [COMPRESS –] key for alignment (e.g. left
an minus sign (e.g. -005).
[COMPRESS
–
] together.
BIDIRECTION ALIGN 005
•
= LEFT – = RIGHT
BIDIRECTION ALIGN 005
•
= LEFT – = RIGHT
DRAFT 12CPI
SAVE PARAMETERS
DRAFT 12CPI
SAVE PARAMETERS
ACCEPT ST2 = IGNORE
CX LQ1600K
ON-LINE
*)
The displayed line is depending on the selected emulation.
3-21
Page 50
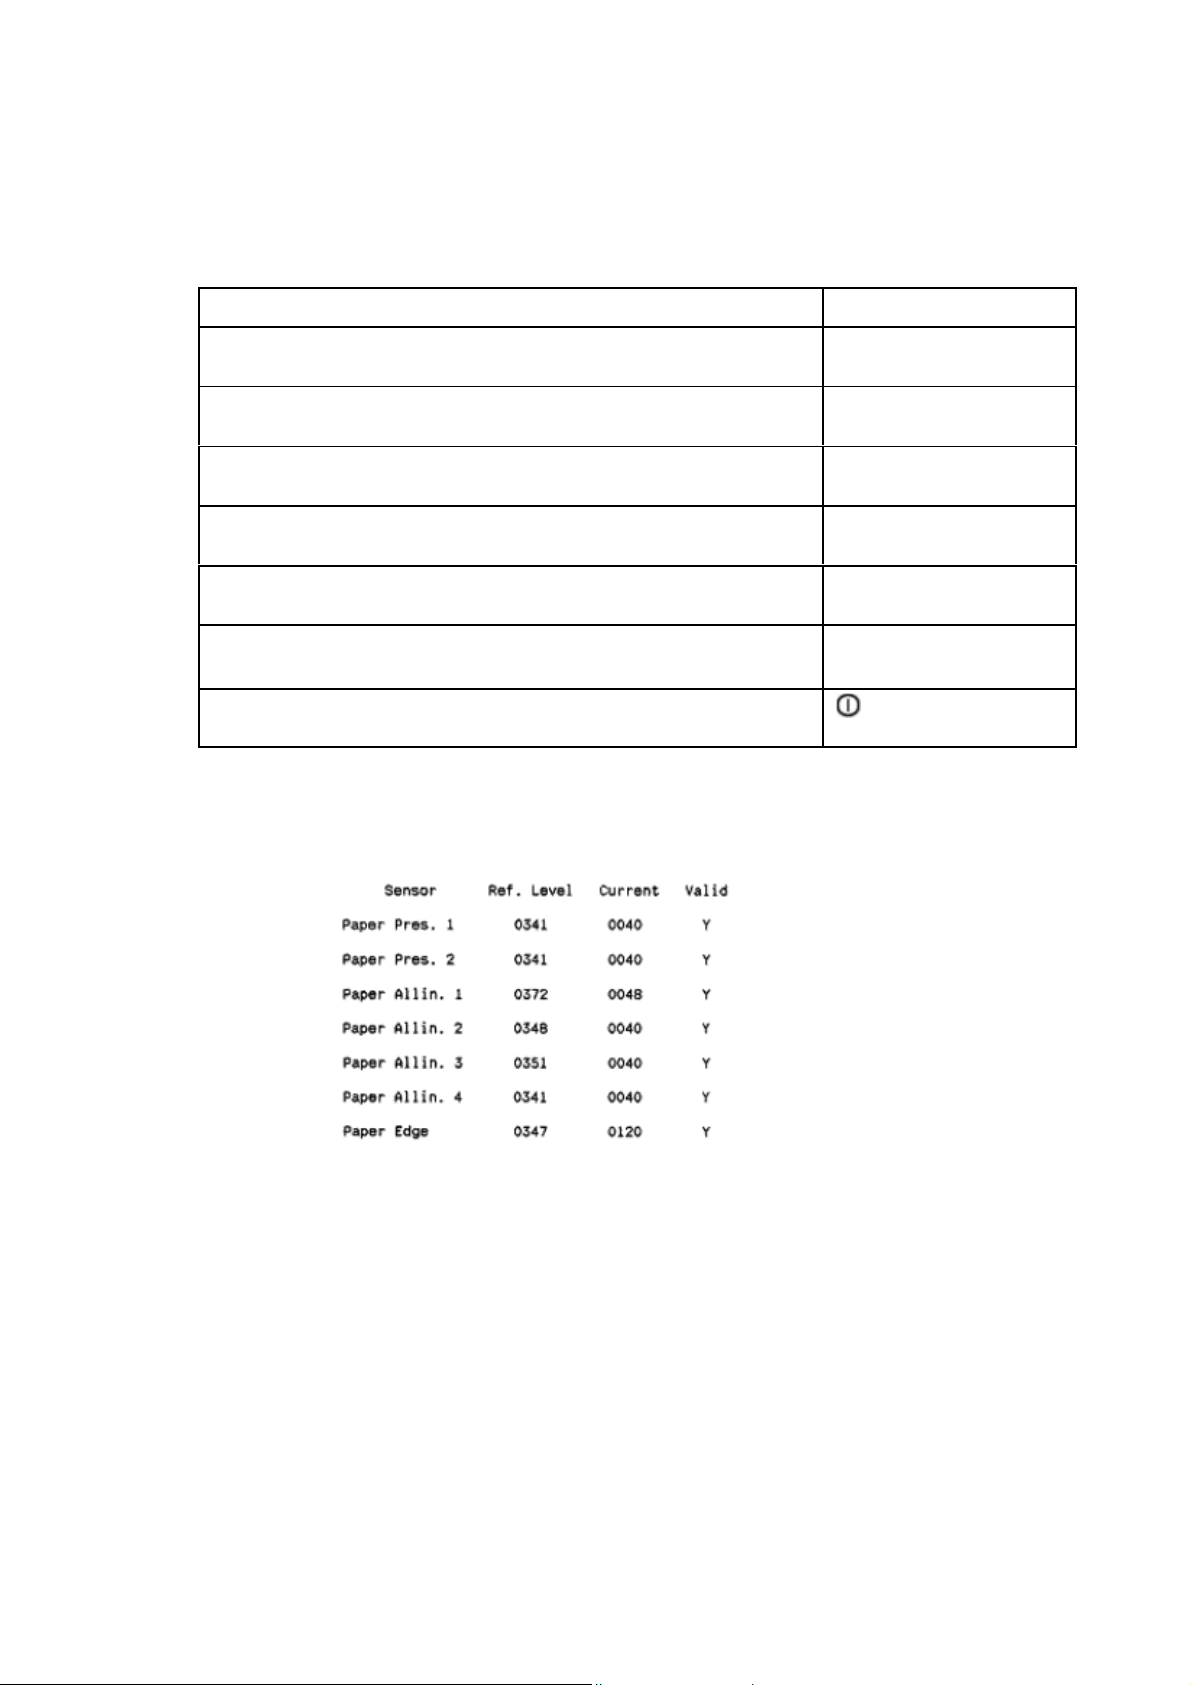
r
A
t
R
y
#
p
y
A
Configuringthe Printe
3.6.6 PRINT PHOTO VALUES
With the selecting of Print Photo Values you can start a print out photo sensor values.
oraction Two line display
Ke
Select Adjustment ADJUSTMENT
PHOTOSENSOR VALUE
[COMPRESS –]
until the LCD shows:
[STOP #] to selec
The yellow Ready and green Station 1 lamp lights up.
The printer starts printing the values after inserting a paper.
[STATION 2]
ou want to leave the off-line mode press [STATION 2] and
If
[COMPRESS
Press [STATION 2] to ignore.
–
] together.
DJUSTMENT
PRINT PHOTO VALUES
PRINT PHOTO VALUES
T A4 SHEET
INSE
PRINT PHOTO VALUES
FINISH, PRESS STAT2
DJUSTMENT
PRINT PHOTO VALUES
SAVE PARAMETERS
ACCEPT ST2 = IGNORE
CX LQ1600K
ON-LINE
*)
The displayed line is depending on the selected emulation.
le of the Print Photo Values:
Sam
3-22
Page 51
Configuring the Printer
A
r
A
3.6.7 INQUIRE PHOTO VALUES
The inquiry of the photosensor can be classified into
•
Photo Value-set and
•
Photo Value-actual.
For both selections you can inquire 7 class photosensor values
•
Paper Intro1
•
Paper Intro2
•
Paper Alline 1
•
Paper Alline 2
•
Paper Alline 3
•
Paper Alline 4
•
Paper Edge
You can check each photosensor value by pressing [COMPRESS –] (means move
downwards) or
[FEED/EJECT •] (means upwards).
Key or action Two line display
Select Adjustment ADJUSTMENT
PHOTOSENSOR VALUE
[COMPRESS –] or [FEED/EJECT •]
until the LCD shows:
DJUSTMENT
INQUIRE PHOTO VALUES
[STOP
#
] to select INQUIRE PHOTO VALUES
inquire press [STOP #]
Fo
continue with
–
[COMPRESS
to check various values
] or [FEED/EJECT •]
Press [ST
TION 2]
to exit
Now you can select other operations you want.
PHOTO VALUE SET
INTRO CUR
VOL. 0260
INQUIRE PHOTO VALUES
PHOTO VALUE SET
3-23
Page 52
r
w
A
t
#
y
#
p
A
A
3.6.8 RESUME HARDWARE PARAMETERS
All standard default settings of the firmware will be restored. The contents of the page
counter will not be changed, but all other settings are reset.
The yellow Ready and green Station 1 and Station 2 lamp lights up.
Key oraction Two line display
Select Adjustment ADJUSTMENT
PHOTOSENSOR VALUE
[COMPRESS –]
until the LCD sho
[STOP #] to selec
Press[STOP #] to accept
or [STATION 2] to ignore.
s:
DJUSTMENT
RESUME HW PARAMETERS
RESUME HW PARAMETERS
ACCEPT ST2 = IGNORE
DJUSTMENT
RESUME HW PARAMETERS
OFF-LINE MODE
DJUSTMENT
Configuringthe Printe
If
ou want to leave the off-line mode press [STATION 2] and
[COMPRESS
Press [STATION 2] to ignore.
*)
The displayed line is depending on the selected emulation.
3.7
DEBUG / TEST
–
] together.
SAVE PARAMETERS
ACCEPT ST2 = IGNORE
CX LQ1600K
ON-LINE
The Debug / Test parameter defines the execution of control sequences when Hexprinting has been activated. The incoming or stored data from the host are printed in hex
mode. This is an excellent hel
for the programmer.
The Debug/ Test mode is arrange into two groups:
•
Hex Printing
Magnetic Test
•
In the Hex Printing mode we will find five groups:
•
Data Backup Mode
•
Printing Saved Data
•
Printing Last Data
•
Printing Flash Data
•
Directly Dump
The HEX print is divided into three groups:
•
1. the transmission code first with five bytes
•
2. values of the data in HEX
•
3. ASCII code of the printed data
1.
2. 3.
Sample:
00000 00 0C 07 0D 07 0D 07 0D 07 0D 07 0D 0 &
C * C * C * C * C *
3-24
Page 53
Configuring the Printer
r
Y
y
#
g
p
t
R
y
3.7.1 DATA BACKUP MODE
The Data Backup Mode is using the buffer of the printer. All receiving data from the host
are saved first. To get data printed select after saving the data the function Printing Saved
Data (see paragraph
Note:
The new to be saved data will overwrite the saved data before.
The receiving data from the host will be stored in the buffer of the printer. HEX PRINTING
ou want to leave the off-line mode press [STATION 2] and
If
3.7.2).
Key or action Two line display
Select Debug / Test DEBUG/TEST
HEX PRINTING
[COMPRESS –]
[STOP #] to select
You hea
[STOP #] to stop hex printing HEX PRINTING
[COMPRESS
Press [STATION 2] to ignore.
a short beep.
–
] together.
HEX PRINTING
DATA BACK UP MODE
HEX PRINTING
WAITING FOR DATA ...
OPERATE NATURALLY
OPERATE NATURALL
SAVE PARAMETERS
ACCEPT ST2 = IGNORE
CX LQ1600K
ON-LINE
*)
The displayed line is depending on the selected emulation.
3.7.2 PRINTING SAVED DATA
All before in the buffer of the printer saved data can be printed in HEX format with this
function.
Note:
The saved data are printed with two bytes first
indicates the len
Sam
le:
00000 00 0C 07 0D 07 0D 07 0D 07 0D 07 0D 0 &
The green Station 2 lamp is flashing.
The printer starts printing vertical lines after inserting a paper. HEX PRINTING
After printing and eject the page the LCD shows: HEX PRINTING
POWER OFF OR OTHERS
th of the saved data.
Ke
or action Two line display
Select Debug / Test DEBUG/TEST
HEX PRINTING
[COMPRESS –]
until the LCD shows:
[STOP
#
] to accep
(in the sample in bold), which
C * C * C * C * C *
HEX PRINTING
PRINTING SAVED DATA
HEX PRINTING
T A4 SHEET
INSE
PRINTING, WAITING...
3-25
Page 54
r
w
t
R
A
w
t
R
y
Configuringthe Printe
3.7.3 PRINTING LAST DATA
All last used and in the buffer of the printer saved data can be printed in HEX format with
this function.
The printer starts printing vertical lines after inserting a paper. HEX PRINTING
Key oraction Two line display
Select Debug / Test DEBUG/TEST
HEX PRINTING
[COMPRESS –]
until the LCD sho
#
[STOP
The green Station2lampisflashing.
PRINTING, WAITING...
After printing and eject the page the LCD shows: HEX PRINTING
POWER OFF OR OTHERS
] to accep
s:
HEX PRINTING
PRINTING LAST DATA
HEX PRINTING
T A4 SHEET
INSE
3.7.4 PRINTING FLASH DATA
ll in the flash saved data can be printed in HEXformat with this function.
Ke
oraction Two line display
Select Debug / Test DEBUG/TEST
HEX PRINTING
[COMPRESS –]
until the LCD sho
[STOP
The green Station2lampisflashing.
The printer starts printing vertical lines after inserting a paper. HEX PRINTING PRINTING,
After printing and eject the page the LCD shows: HEX PRINTING
POWER OFF OR OTHERS
#
] to accep
s:
HEX PRINTING
PRINTING FLASH DATA
HEX PRINTING
INSE
T A4 SHEET
WAITING...
3-26
Page 55
Configuring the Printer
g
p
w
t
R
pap
p
3.7.5 DIRECTLY DUMP
The receiving data from the host will not stored first in the buffer of the printer. They will be
printed directly after being received by the printer.
Note:
The directly printed data are printed without the two bytes first
indication of the len
le:
Sam
The printer starts printing vertical lines after inserting a paper. HEX PRINTING
PRINTING, WAITING...
00000 07 0D 07 0D 07 0D 07 0D 07 0D 07 0D
The green Station 2 lamp is flashing.
After printing and eject the page the LCD shows: HEX PRINTING
POWER OFF OR OTHERS
th of the printed data.
Key or action Two line display
Select Debug / Test DEBUG/TEST
HEX PRINTING
[COMPRESS –]
until the LCD sho
[STOP
#
] to accep
s:
. So there is no
C * C * C * C * C * C *
HEX PRINTING
DIRECTLYDUMP
HEX PRINTING
T A4 SHEET
INSE
Note:
During the Directly Dump process, if the printer ejects paper automatically, it
indicate that the printing has been finished, but if the printer does not eject
Caution:
er automatically, press
The performance in the two different modes is different. In the Data Backup
[FEED/EJECT
•]key to eject the paper.
Mode, the printer doesn’t only print HEX, but also execute the programmer
correctly (the bell will sound six times). But in the Directly Dump, the printer just
rints in HEX.
3-27
Page 56
r
p
g
A
3.8
INFO INQUIRING
Configuringthe Printe
You get information of the current setting parameters of software or hardware. This
information is im
ortant for the system engineer and service staff.
You can select the following parameters:
•
FW VERSION
•
HW CONFIGURATION
•
PRINTER ID
3.8.1 FW Version
The parameter firmware version shows:
•
version number
•
special version tag
e.g.:
FW VERSION
VER2.09 T7FPGA:2.4
Note:
In this sample indicates VER2.09
special version tag.
3.8.2 HW Configuration
the version number (firmware release), and T7
The parameter hardware configuration gives information over:
•
characters generators
optional interface
•
•
scanner (only with MagneticTest)
e.g.:
HW CONFIGURATION
GB18030 CX
3.8.3 Printer ID
The display shows the identification of the printer:
the
.:
e.
PRINTER ID
00000
EE6B3501
3-28
Page 57

q
4.
Maintenance
Preferred Material
The following materials and cleaning lubricants are recommended when maintaining the
printer:
•
•
4.1
Lint-free soft cloth
Light vacuum cleaner.
Cleaning Surrounding Areas
The user should clean the printer every six months. If you experience paper feed problems
or if the print head carriage movement is hampered, cleaning should be carried out more
often.
Maintenance work of
do is:
•
remove the ribbon and
•
remove the Alignment
Note:
Before doing the cleaning, please switch off the printer and unplug the power cord
first.
C-650 Plus
printer is very simple, all you need to
Don't use alcohol, liquor or brushes with hard hair to clean the printer. Be careful not
to let water and other li
uid flow into the inner of printer.
4-1
Page 58
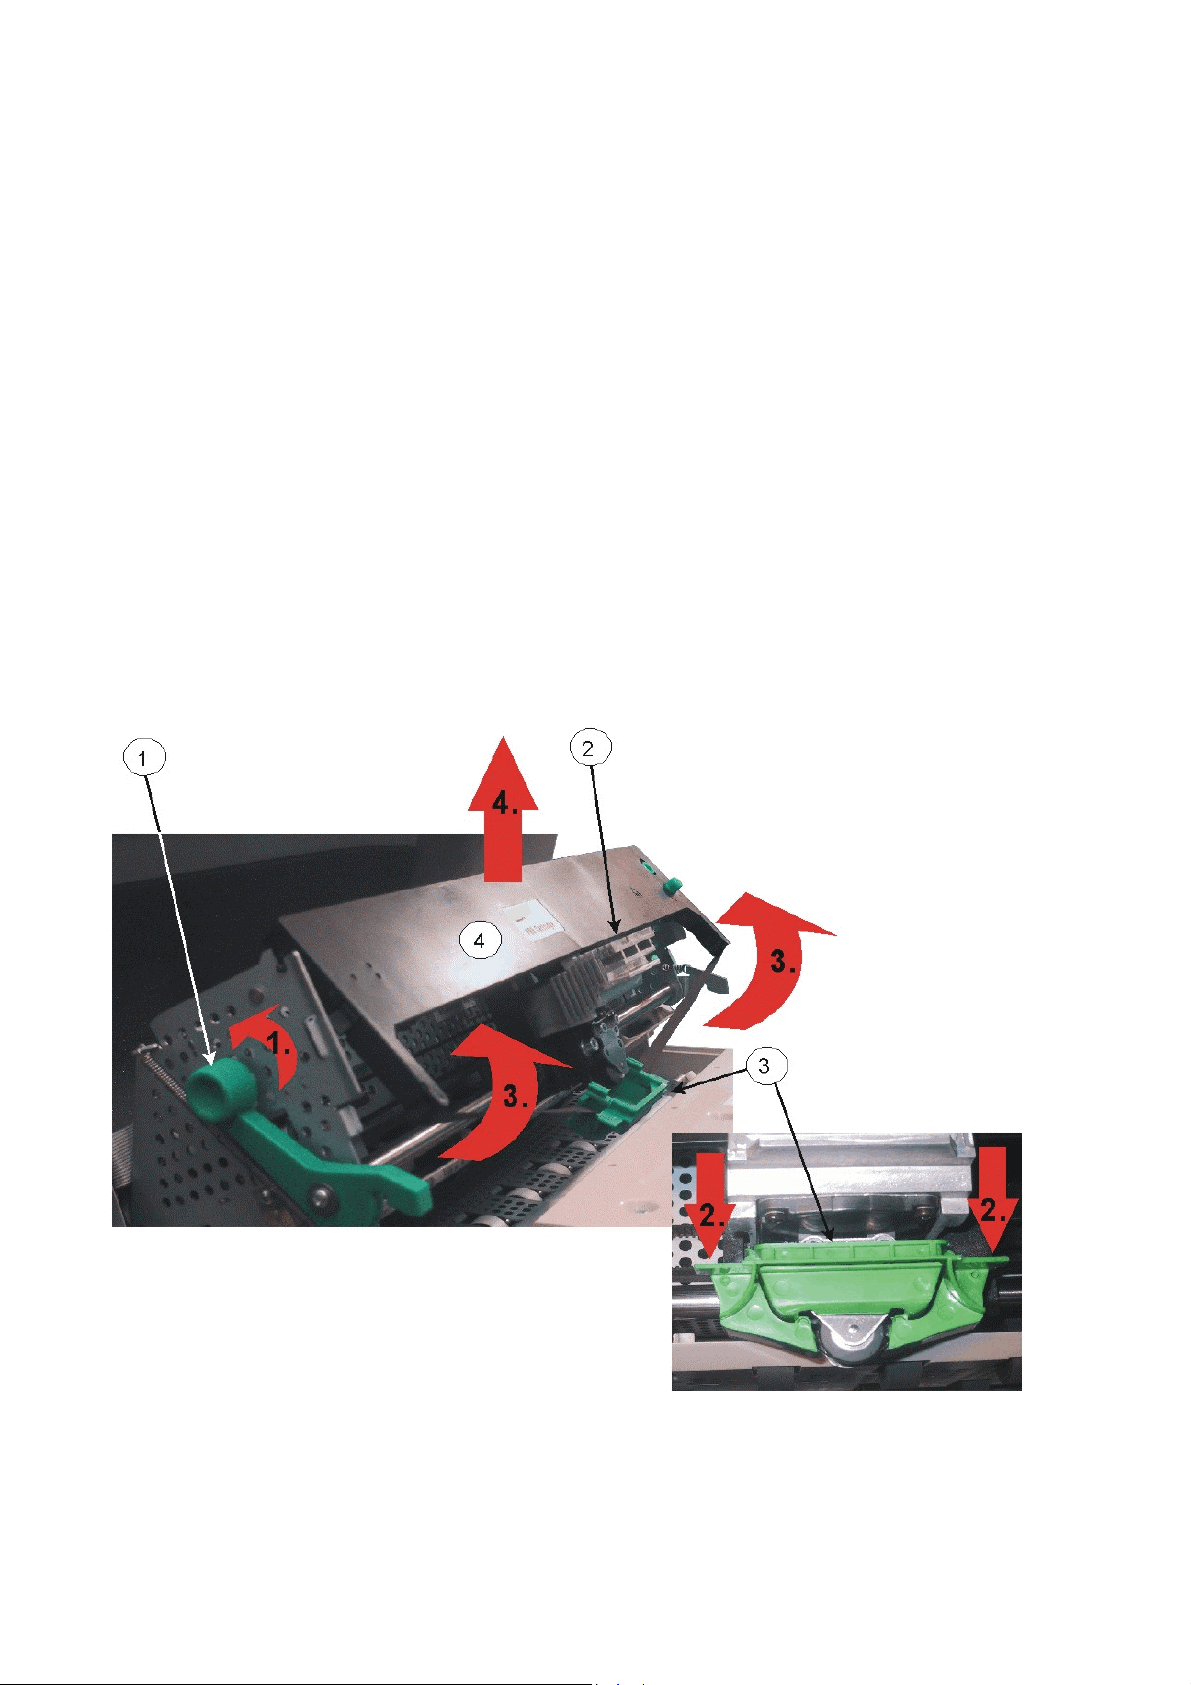
Maintenance
4.1.1
•
Power the printer on.
•
Open the top cover; the print head (2) is moving to the centre.
•
Step 1:
•
Step 2:
•
Step 3:
•
Step 4:
•
Power the printer off.
Remove the Ribbon
swivel the green print unit lift handle (1) backwards to lift the print unit entirely.
loosen the green ribbon guide (3) by pressing downwards.
lift the ribbon cassette (4) by rotation as shown in the picture below.
take the ribbon cassette (4) out of the printer.
Caution:
The print head may by very hot immediately after printing.
4-2
Page 59
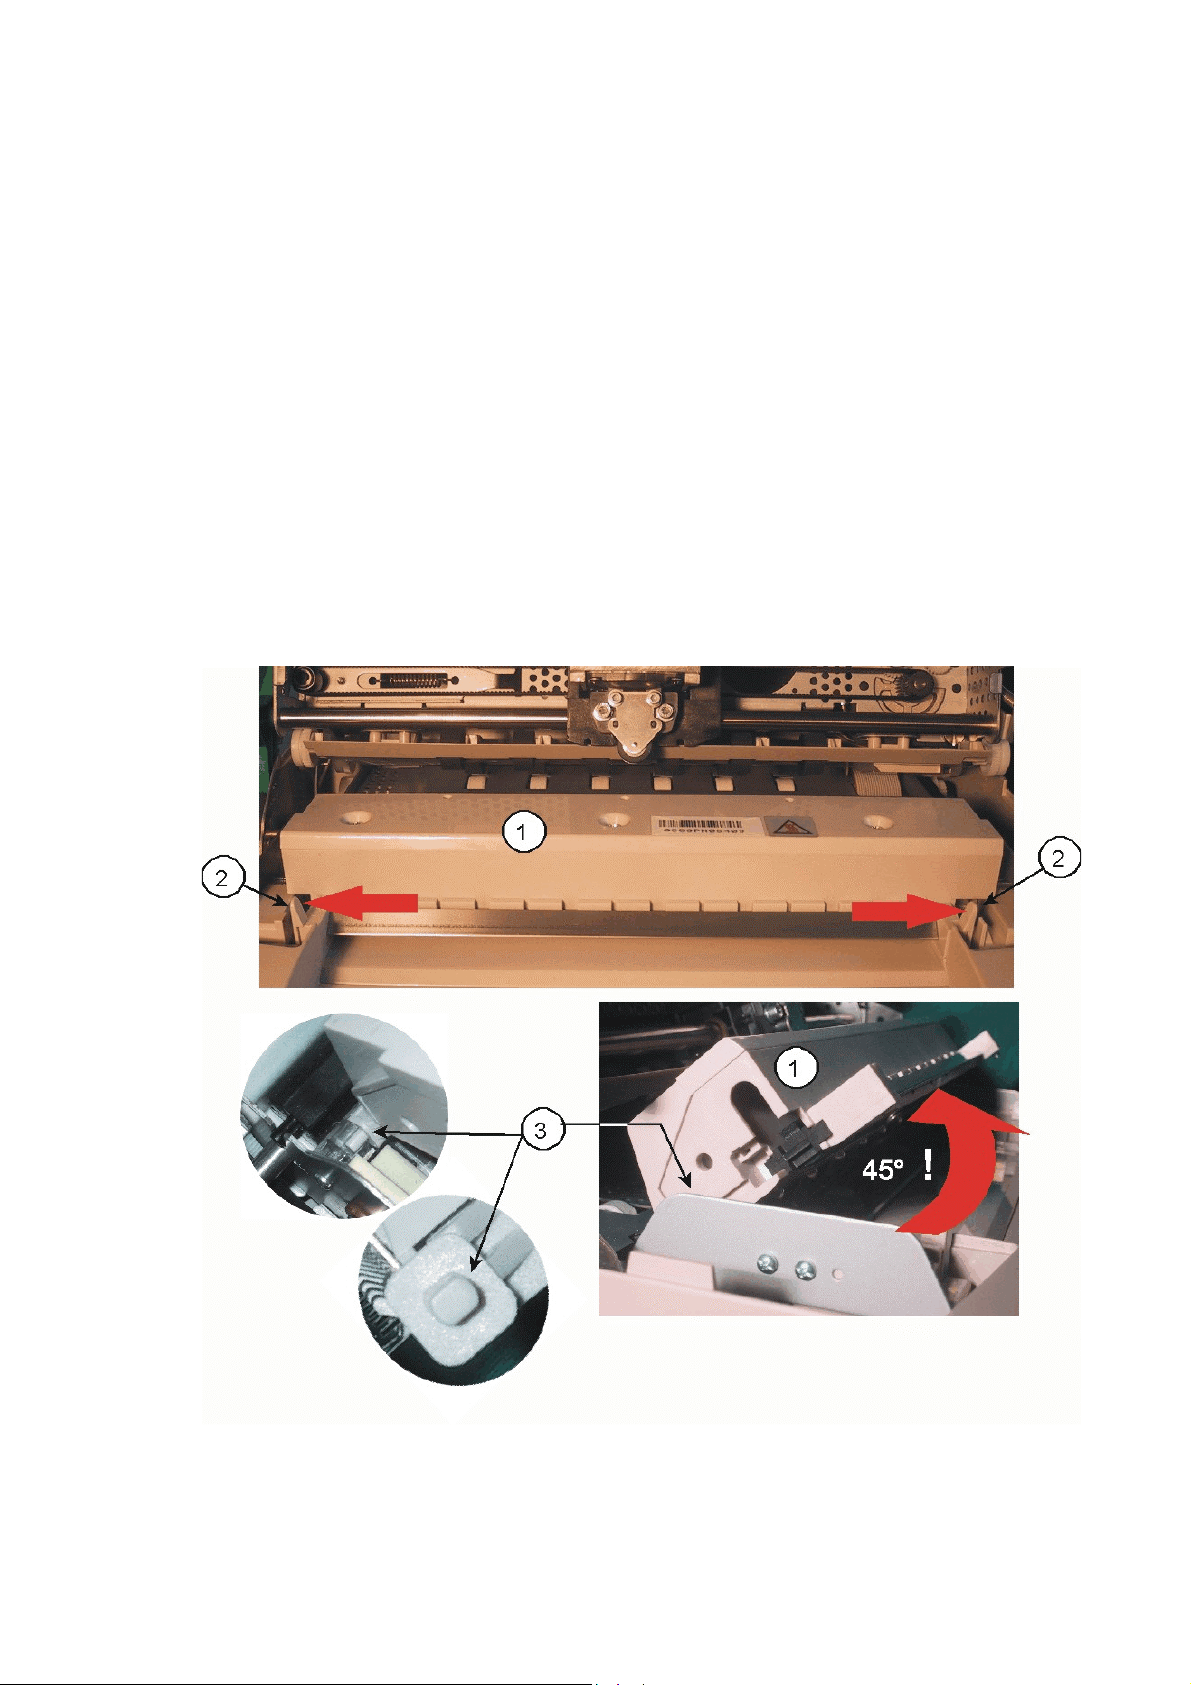
g
Maintenance
4.1.2
Remove the Alignment Unit
•
Power the printer off
•
Open the Top Cover
Swivel the green print unit lift handle (see the photo on the page before) backwards to lift
•
the print unit entirely.
Press both Levers (2) to the outside of the printer
•
Swivel the Alignment Unit up to about 45°
•
•
Alignment Unit (1) are in the correct position.
•
Lift the Alignment Unit (1) out of the printer.
Note:
Both pins (3) are flatten and so it is only possible to take out the Alignment Unit in
an an
le of
45°!
. Now the Pins (3) on both sides of the
4-3
Page 60
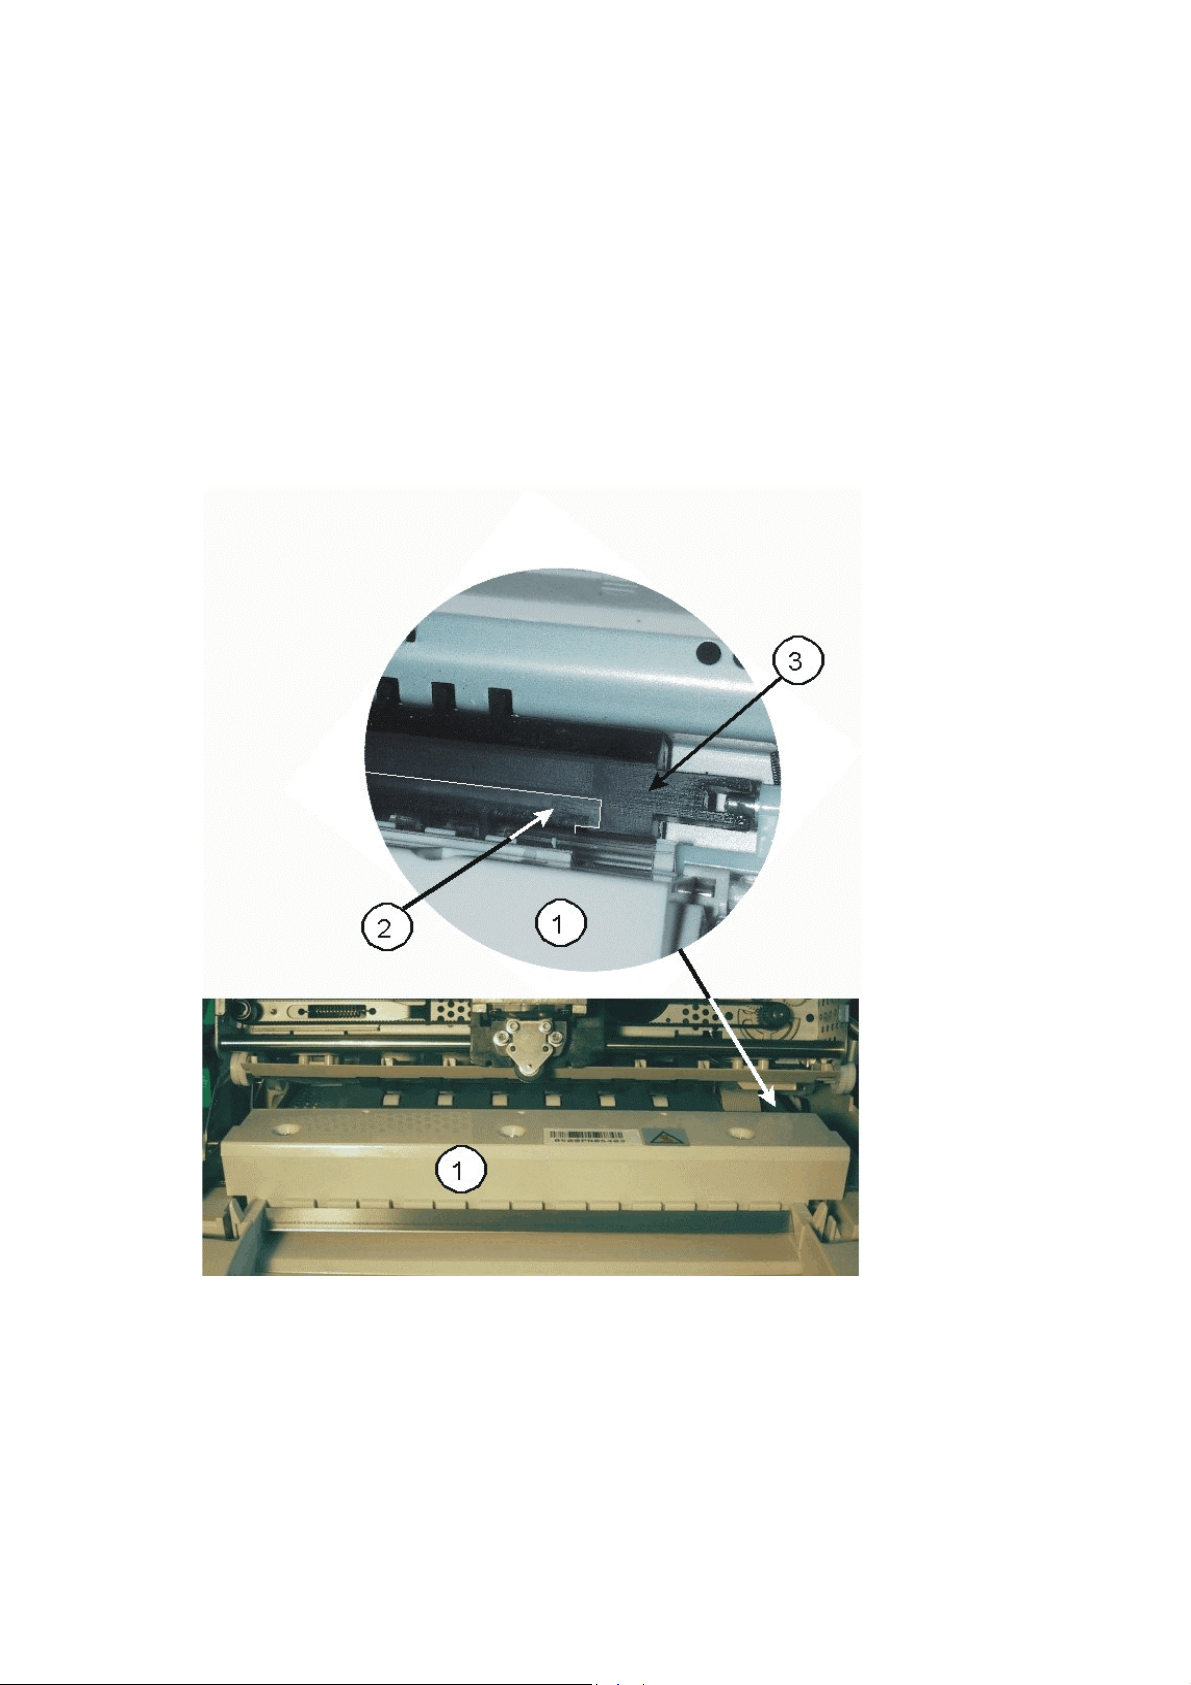
Maintenance
A
g
4.1.3 Cleaning Procedure
Thoroughly brush and vacuum all accessible areas to any paper flock and dust.
•
•
Clean the black platen’s surface, the transport rollers.
Clean also the rollers on the lower side of the Alignment Unit.
•
Clean the covers and operator panel with damp, lint-free cloth. Do not use some
•
cleaning solvents or excessive amount of water.
4.1.4 Install the Alignment
•
Mount the Alignment Unit. Execute the removing procedure in reverse sequence.
ttention:
Take care that the foil (2) at the rear side of the Alignment Unit (1) will not be
dama
ed and is flat over the Print Bar (3)!
4.1.5 Install the Ribbon Cassette
•
Insert the Ribbon Cassette.
•
Swivel down the Print Unit with the green print unit lift handle to its normal position.
•
Close the Top Cover.
Connect the Power Cord.
•
4-4
(see paragraph 1.5)
Page 61

)
,
5.
Options
5.1
Optional Devices
Following optional devices can be provided:
•
Serial interface port 2
USB interface (in preparation
•
Add the second interface port
Printer has basic configuration of one standard serial and parallel communication
interface. At the rear of printer there is a second interface installation slot, this slot is be
used in the standard Version by the parallel interface. A special version of
can be provide without the parallel interface port.
C-650 Plus
This slot can be used than for option boards and cards as below:
•
Second serial interface board and USB interface board
Second serial interface board or
•
USB interface board
•
Note:
When printer equipped with second or more other data communication interface
boards
interface working mode can be selected by menu setup configuration.
Options
•
Working with single communication port
•
Printer can only work according to the interface mode and emulation selected
by menu configuration, even if the printer has been equipped with more
interface boards.
•
Working with dual-port
If the printer has been equipped with option interface board, the operator can set
•
up printer working mode to be dual-port mode through the operator panel to meet
different usage requirements.
•
If the printer has been installed second serial port board and USB interface board,
there are only two serial ports( first serial port and second serial port) can work
synchronously. Under this configuration, printer can check which port is active.
Any one of these two ports, if its data has been received, printer will be under the
control of this port, and be kept in this state till this port task is end. Two ports are
independent. And two ports have the same configuration except emulation mode.
Emulation mode can be shifted by commands.
If printer has been installed with second parallel interface board and configured as
•
dual-port activity, it will check which port buffer has data. If any one of these two
ports detect data has been received, printer will be under the control of the port
and it will be kept in this state till port task is end. Dual-port functionality and
corresponding parameters can be selected though operator panel. Under the
especial circumstance, each port can have its own emulation mode, and using
commands can shift emulation mode.
•
If printer hardware configuration has two interface and the setup item interface in
the menu is UAL then it can print out two interface corresponding emulation
configuration in self-test sheet. Printer can set which port to be active and
emulation mode according to host communication port
.
5-1
Page 62
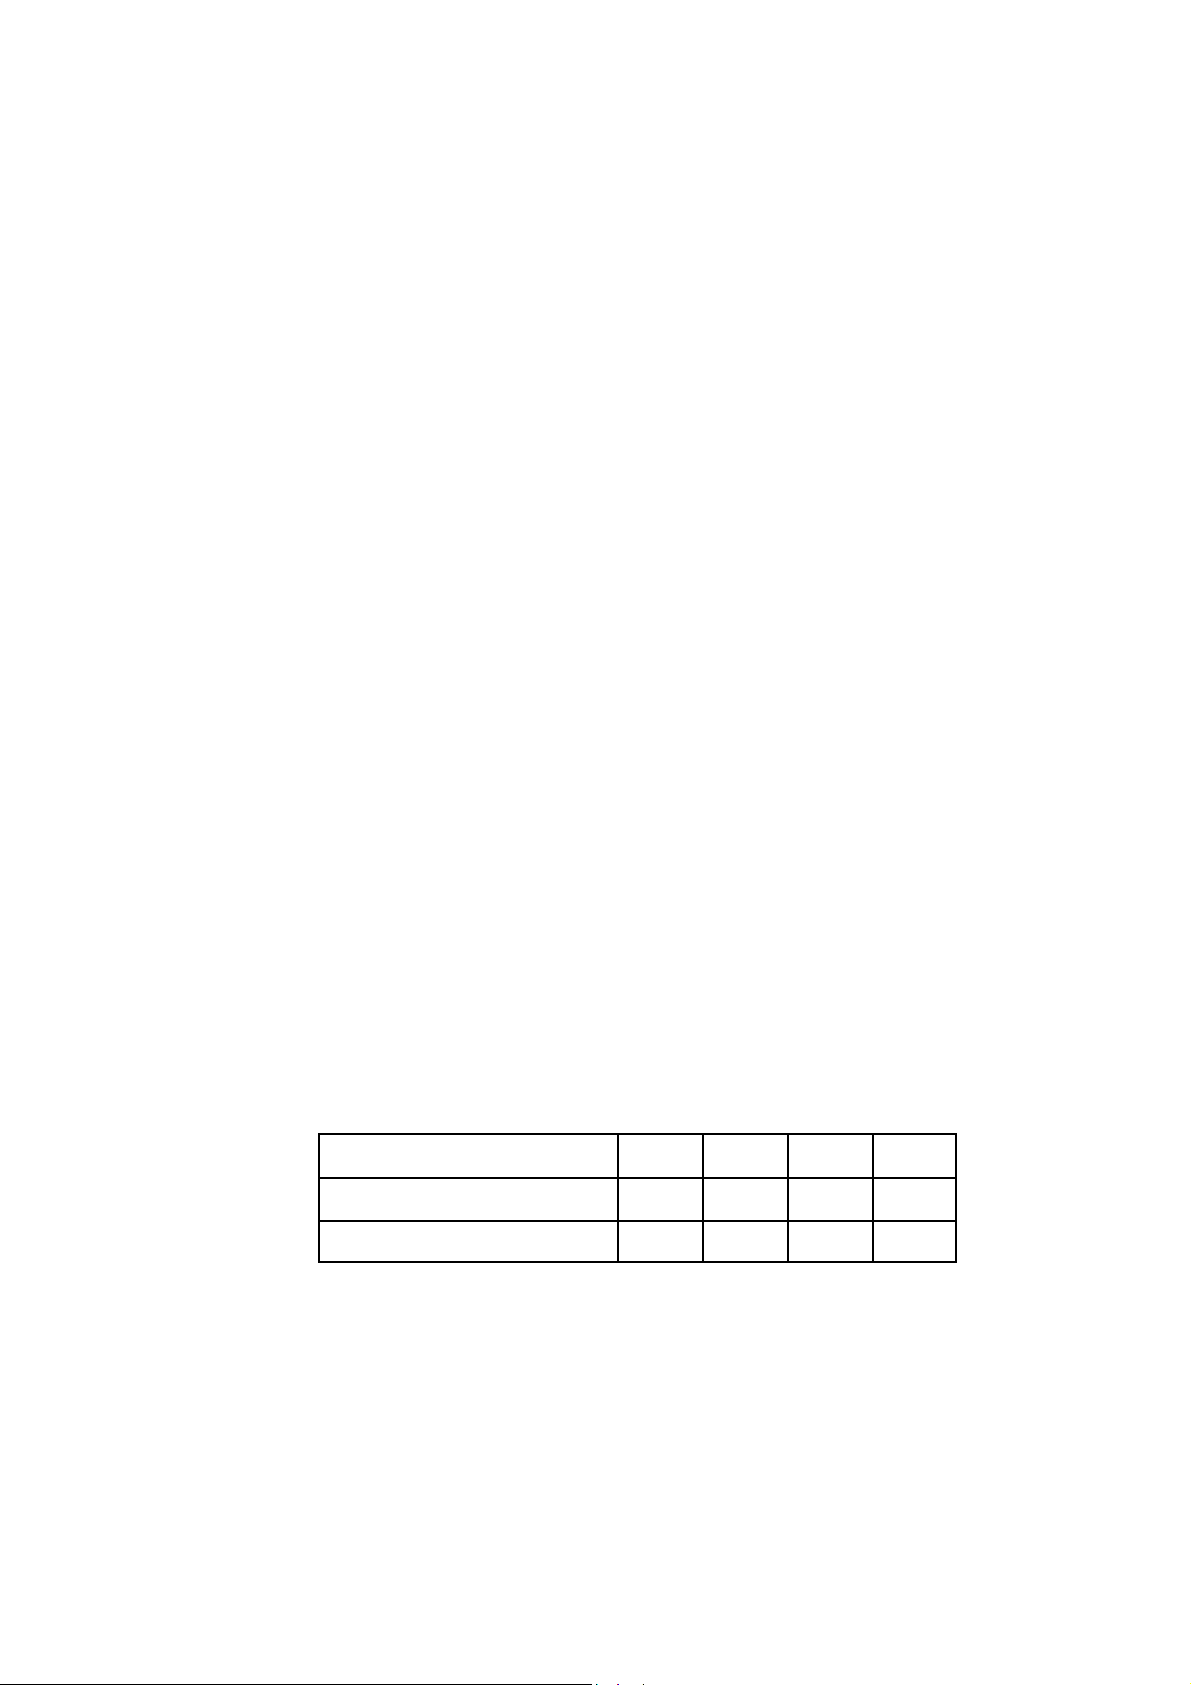
6.
Technical Data
6.1
Technical Specification
Printhead:
•
Number of needles:
•
Needle Diameter:
•
Needle Material:
•
Needle alignment:
•
Matrix form:
•
Multi-copy print:
•
Thermal protection:
•
Life of print head:
Font:
•
Latin character: HSD, Draft, Roman, Sans Serif, Italic, OCR-A, OCR-B, E13B.
•
UNICODE and BIG-5 traditional Chinese character.
Character Set:
ASCII character: 54 codepages
•
CPI:
•
ASCII character:
10CPI, 12CPI, 13.8CPI, 15CPI, 16.6CPI, 17.1CPI, 18CPI, 20CPI
24
0.25 mm
tungsten carbide
staggered two lines, 12+12
diamond-shaped
1+6
PTC
>600 million dots/needle
LPI:
1/5”, 1/6”, 1/8”, n/72”, n/180”, n/216”, n/240”, n/360”
Printing Speed:
ASCII Character (CPS)
Form Feed Speed:
Alignment Speed:
Bar Code Printing:
32 cm/s
<0.3 s
EAN 8, EAN 13, UPC-A, UPC-E, Code 39, Code 128, Codabar,
2 of 5 industrial, 2 of 5 interleaved
HSD
400
Draft
300
NLQ
150
LQ
100
6-1
Page 63

Technical Data
)
)
y
Graphics Dot Matrix Density:
•
9 needles:
•
24 needles:
Machine ID:
Diagnose:
•
Self-diagnose,
•
Hex print,
•
Remote interrupt by interface,
•
Remote intelligence service by interface,
•
Self-test when power on.
Ribbon Cassette:
Ribbon:
•
•
Ribbon Length:
•
Ribbon Width:
•
Useful ribbon Life:
Machine Character:
•
Dimensions:
•
Weight:
60 DPI, 72 DPI,
60 DPI, 120 DPI,
each machine has an unique ID Number.
80 DPI,
180 DPI,
96 DPI,
240 DPI,
black fabric
18 m
7 mm
120 DPI,
360 DPI
240 DPI
5 million characters (HSD
398 x 296 x 215 mm (W x D x H)
9.0 kg (Basic Model
Electric Character:
•
Rated Voltage:
•
Frequency:
•
Power Consumption: operating approx. 170 W (max), 15 W Standb
Environment:
•
Temperature:
Humidity:
•
Noise level:
•
220 VAC ± 10%
50 HZ / 60 HZ
5 - 35° C
15 - 85% (no frost)
< 54 dBA acc. to ISO 7799
Quality Characteristics:
•
MTBF:
EMC and radio interference character:
•
>=10,000 hours
acc. to CCC.
6-2
Page 64

y
)
6.2
Document Specification and Technical Instruction
Technical Data
Disposable Form:
•
Single sheet or multi-copy paper
•
Bill (card)
Caution:
If the print media does not accord to the above character, you have
to discriminate it carefull
Printing Media Character:
Input media
•
•
Margin align
•
Max thickness
•
Max width
•
Max length per line 10 CPI
•
Standard of top of page of document (measured
from the character’s bottom):
•
C-650 Plus
•
IBM PP II = 4.3 mm
The min distance from the last basic printing line to the page bottom margin:
•
•
5 mm (0.2 inch)
handwork
automatically
2.2 mm
245 mm
emulation = 4.3 mm
before you use it.
(238 mm
Min value of document rear (measured from the character bottom):
•
•
C-650 Plus
•
IBM PP II = 10 mm
Left and right margin value of document LH/RH:
•
•
min
Min distance between last basic line character above the cord and horizontal cord:
•
•
5 mm
•
Min distance between last basic line character below the cord and horizontal cord:
•
8 mm
•
Distance between character Axial wire and vertical cord
emulation = 3.1 mm
3.1 mm ± 0.3 mm
• 5.08 mm
6-3
Page 65

Technical Data
Document
Single and multi-copy Sheet:
•
•
•
•
•
•
Max width
Min width
Suggested max length
Permitted max length
Single sheet weight:
245 mm
80 mm
297 mm
450 mm
45 g - 160 g/m² (when you set the
SPECIAL FORM to
YES
, it can print
thin paper with above 35 g/m²)
•
•
Weight of original and duplicated document
•
Weight of carbon
•
Max number of duplicated document
document value)
Thickness of single sheet
•
Recommended weight
last copy
•
Multicopy gluing
•
Max paper weight of multicopy forms
•
Printing quality (with multicopy forms)
original
0.06 mm - 0.28 mm
40 - 60 g/m²
20 - 34 g/m²
1+ 4 (paper weight equal average
50 g/m²
60 g/m²
At the top or on the side
380 g/m²
LQ or NLQ
•
Document
•
•
Single/multi copy
Min length 70 mm
6-4
Page 66
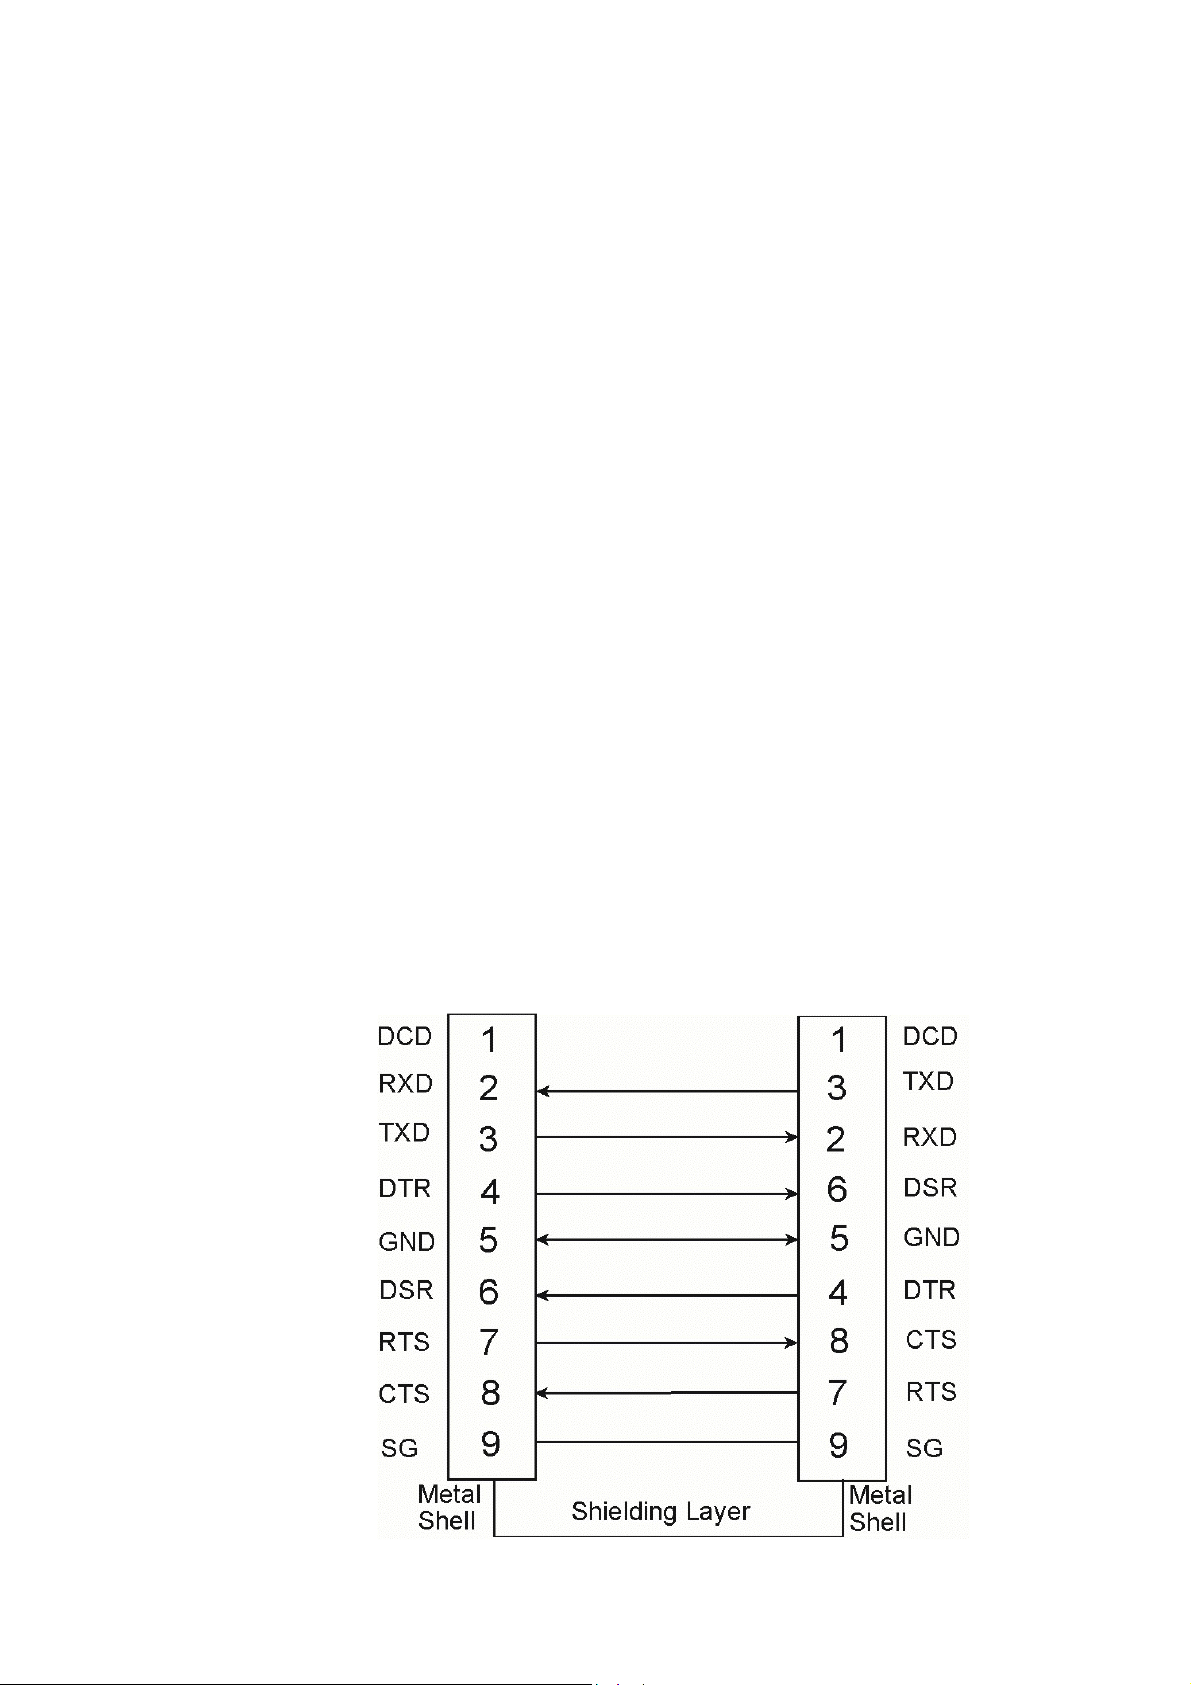
)
r
7.
Interface Description
7.1
Serial Interface
Standard C-650 Plus
cores connected to the host.
has one asynchronous V24 RS232C serial interface with 9
Technical Character:
The following parameters can be modified in SETUP:
•
BAUD RATE:
•
BITS/CHARACTER:
•
STOP BITS:
•
PARITY:
•
DSR:
Communication Cable:
•
HOST: 9 PINS (DB-9S)
•
PRINTER: 9 PINS (DB-9S
This protocol uses the following signal lines
•
Receive Data (RXD)
•
Transmit Data (TXD)
•
Data Terminal Ready (DTR)
•
Projective Ground (GND)
•
Data Set Ready (DSR)
•
Clear To Send (CTS)
•
Ready to send (RTS)
•
Signal Ground (SG)
2400, 4800, 9600, 19200 (bit/s)
7 or 8 bits
1 or 2 bits
none, even or odd.
YES orNO
:
Host System
Printe
7-1
Page 67
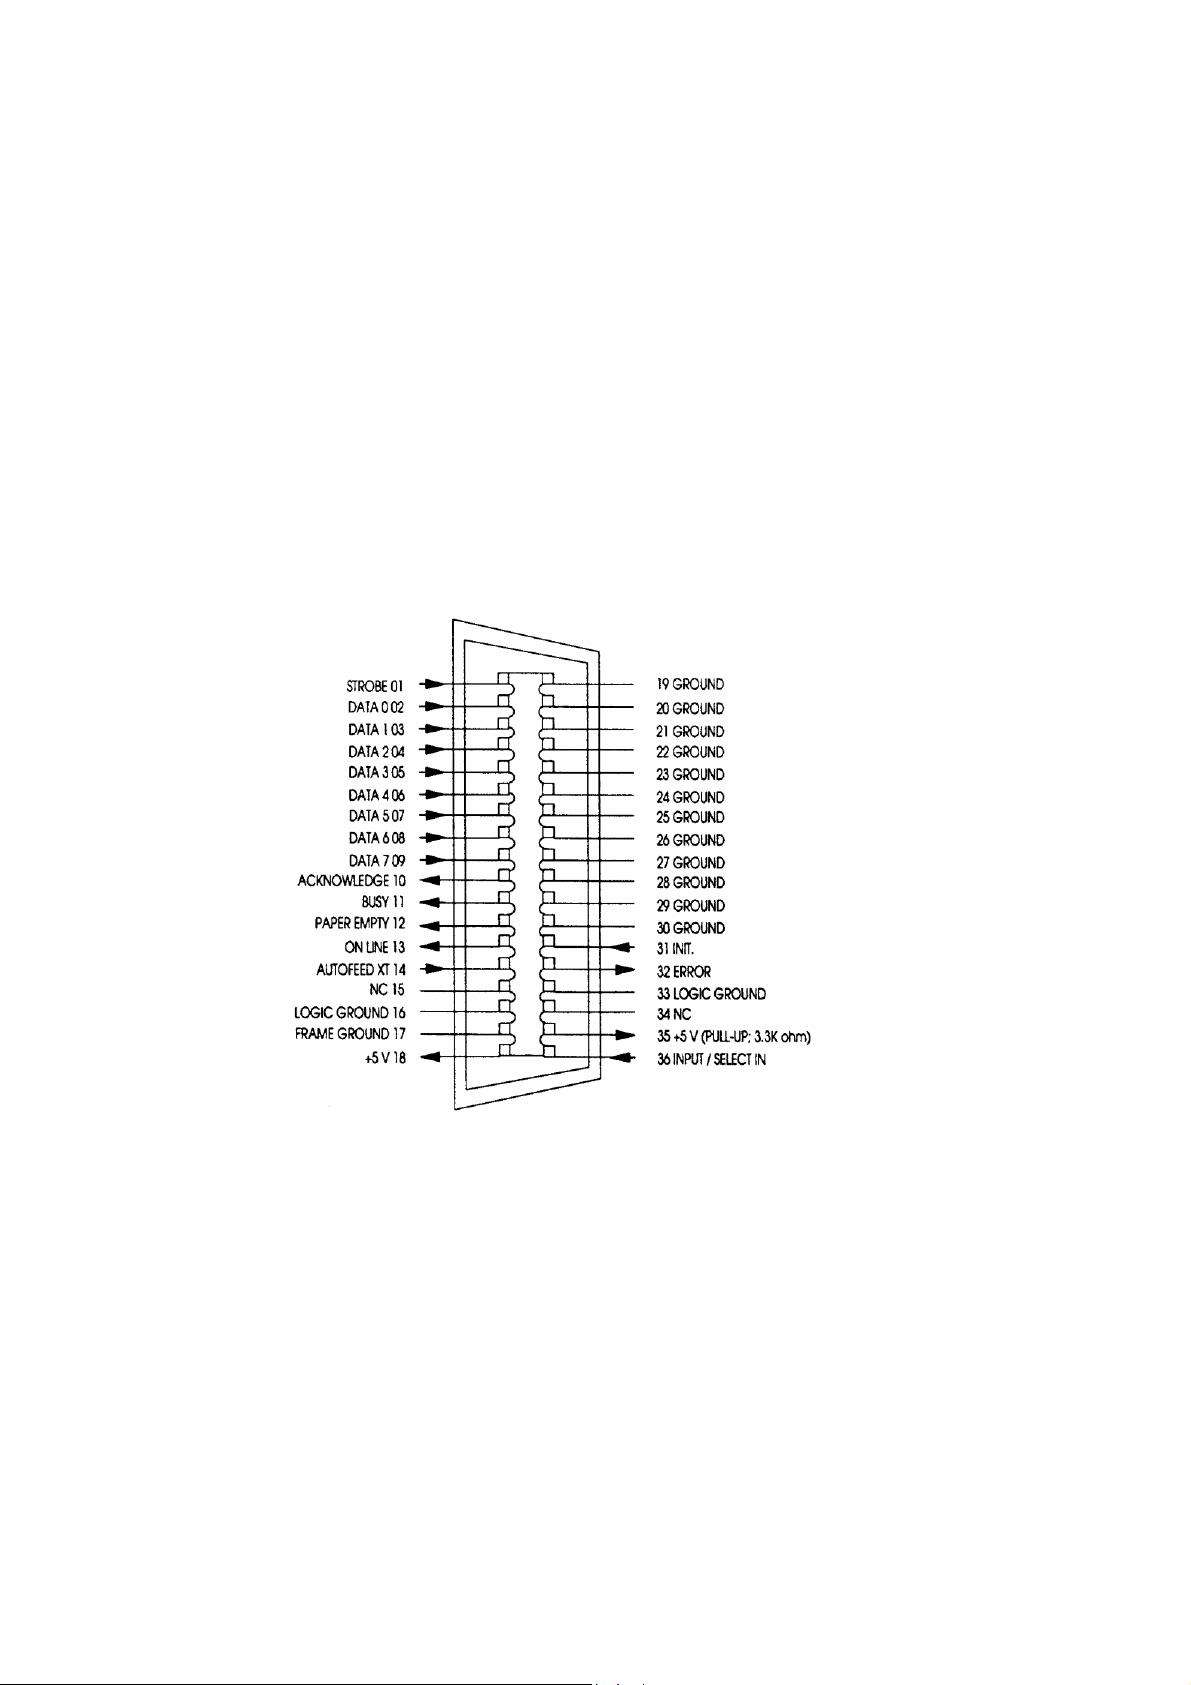
Interface Description
A
7.2
Parallel Interface
The C-650 Plus parallel interface according to IEEE 1284-1994 standard, support SPP,
nibble, byte protocol.
Instruction of parallel interface as follows:
Technical Character:
•
Compatibility:
•
Logic circuit:
•
Data format:
•
Logic level:
•
Connector:
CENTRONICS
TTL
7 or 8 bits
0 - 5 V
36 pins
ll the input and output signal was connected to a 5V voltage by a 2.2k ohm resistance
Interface signal:
7.3 USB Interface
USB characters
•
Type:
•
•
•
7-2
Reference standard:
Transmission speed:
(in preparation)
terminal
Universal Serial Bus
$ 200 kbps
Page 68
8.
Firmware Update
Output Solutions will advise users to update the printer’s firmware irregularly to
strengthen C-650 Plus’ functions and will offer the necessary firmware file to users
(usually the firmware file is named
To update C-650 Plus’ firmware please follow the steps below:
•
Copy the firmware file flash.mot
•
Connect C-650 Plus to one of the PC’s parallel ports (usually LTP1 port), and power on
•
the PC.
Connect a 220-V power line to the
•
•
Press the [STOP ]
•
Plus.
Do not release the [STOP ]
•
printer’s LCD.
flash.mot).
to a Personal Computer.
C-650 Plus
key and push the power button
key until the current firmware’s edition is displayed on the
VER211-T18
printer.
together to power on the C-650
•
Hold on to press the [STOP ]
•
After LCD’s displaying become stable, you can release the [STOP ]
will display “PROGRAM UPDATE”.
•
Copy the firmware file flash.mot
the
C-650 Plus
this:
. Usually we suggest the user to use the command under MS-DOS like
key until LCD shows as:
RELEASE STOP KEY
PROGRAM UPDATE
binary to the PC’s parallel port, which is connected to
c:\>copy flash.mot lpt1 /b
key and the LCD
8-1
Page 69

Firmware Update
p
y
,
p
•
Now the downloading process will begin.
UPDATE BUSY
•
During the downloading process
rinter has received.
C-650 Plus’
LCD will display how many bytes the
PROGRAMMING 13BB0
•
The whole downloading process will last about three minutes. After updating is finished
successfull
LCD shows:
UPDATE O.K.
•
Now the
•
Firmware upgrading finished after
C-650 Plus
Warning:
C-650 Plus
will automatically reset after downloading process
can be used normally.
Power off during the process of firmware upgrading is forbidden, otherwise the
rinter will be destroyed.
C-650 Plus’
automatically resetting finish and
8-2
Page 70

g
pp
A
9.
Troubleshooting
How to Use This Section
There are some examples which will help you to solve the printer troubles that may occur
durin
use.
Warning:
1.
2. Find the symptom description that most closely matches the printer symptom.
3. Try the first suggestion under that heading.
4. If the suggestion does not cure the problem, try the next suggestion.
5. If none of the suggestions enable you to continue printing, or if the fault is not listed,
If there are mechanical or electrical troubles, don’t repair by yourself. Ask
your service centre for help.
If you cannot find the troubles in the following pages, please contact your local
service office for technical su
Find the category in which your problem occurs. The problem categories are:
Power-related Problems
•
Uncompleted Power On
•
•
Ribbon or Carriage related Problems
Paper-related Problems
•
•
Print-related Problems
•
No Printout
contact your service office.
ort.
9.1
Power-related Problems
•
The power indicator does not come on when power is switched on.
Check that the power cord and plug are securely fitted to the printer and to an electrical
•
outlet.
Ask for the power connector connections to be verified.
•
•
sk for the building electrical supply to be verified.
9.2
Uncompleted Power On
After you powered on the printer, the printhead does not return to the left edge, which
means the printer did not finish the internal self test.
Check whether the component used to protect the printhead and the sponge have
•
been removed or not.
•
Check if there is any object which is blocking the motor.
Check whether the top cover is closed or not.
•
•
Restart the printer to try again.
•
Check whether the printhead moves smoothly or not.
Check whether the ribbon box is settled correctlyor not.
•
9-1
Page 71

Troubleshooting
p
y)
9.3
Ribbon or Carriage-related Problems
•
Ribbon Problems
• Make sure that the ribbon is:
Stretched correctly;
•
•
Not worn thin or dry;
•
Not torn or damaged in any other way;
Not jammed
•
• If the ribbon box is damaged, replace it with a new one.
•
Carriage does not move smoothly
•
Examine the paper pathway. Remove any obstructions. Check that all
packing material is removed.
Examine the carriage area for obstructions. Remove where necessary.
•
9.4
Paper-related Problems
The printer does not accept the sheet
•
•
Check whether the document is within specifications or not.
•
Check whether the document is inserted and aligned correctly or not.
•
Fanfold Paper is not positioned at perforation for tear-off feature
•
Select the correct form length using the Setup feature.
Reset top of form by performing a parking function.
•
•
Paper tears or jams
•
Examine the paper path; remove any
Note:
To clean the paper path remove the Alignment Unit as described in
aragraph 4.1.2.
Paper is ropy, such as crimp.
•
Multi-carbon does not bond well together.
•
•
Too thick, too thin or too many sheets of paper.
There is residue of paper or fibre on the printing media.
•
•
Paper with clip or pin (which would damage the printer seriousl
Note:
See
paragraph 6.2 Document Specification
•
Paper jam with printer including the optional Tractor Unit
•
Is the fanfold paper too loose or too taut between the tractors?
•
If the holes in the paper are deformed at their outer edges, the paper is too taut.
•
If the paper rises between the tractors, it is too loose.
Readjust the tractor spacing so that the paper lies smoothly but without any tension.
•
•
Ensure that the paper is horizontally aligned on the pins.
.
9-2
Page 72

g
p
g
9.5
Print-related Problems
Note:
The
C-650 Plus
printer has the function of overheating protection. If overheating
Troubleshootin
protection will be active the printer may slow down printing speed or even stop
printing after a long time printing (until printhead’s temperature returns normal). This
function can
•
Print faint or of poor quality.
•
Have you used the correct paper? See Chapter 6
revent print head from being destroyed if print head is over heated.
Technical Data
which contains a full
specification of the paper you can use. Replace the paper if it does not match the
specification.
Make sure that the ribbon is stretched correctly.
•
•
Does the ribbon need changing? Replace it with a new ribbon if necessary.
•
Is the ribbon cartridge properly installed? Adjust as necessary.
Characters do not print evenlyor are not uniform in pitch
•
•
Examine the paper pathway for dirt or other obstruction that may cause the gap
between print head and platen to vary. Remove the obstruction.
Incorrect installation of ribbon box or the ribbon tied.
•
•
Part of printed text is missing (loss of data)
•
If you are using serial communication check the buffer control setting in Setup.
•
Check the data flow control setting on the host computer.
•
Dot Missing
•
If white lines appear on characters at certain fixed position, there are probably
several needles broken or crooked. When this happens, please contact your printer
supplier to replace the dama
Note:
Please avoid printing on the edge of the paper! It may cause printer needle
broken
.
ed printhead.
9-3
Page 73

Troubleshooting
9.6
No Printout
•
Self-test printout does not start
•
Make sure that you have closed the cover.
Check if paper is loaded in the printer.
•
•
Check if ribbon cassette is installed correctly on
•
Printing does not start
Check if the physics and logic connection between printer and host system are
•
correct and at least one LED should be light.
Check if LCD displays ON LINE and check if the communication interface
•
parameters have been set up correctly.
•
Make sure that the printer is connected to the host computer. (Refer to Paragraph
1.8 Connection to the System
•
both ends.
Make sure that the printer is receiving data from the host computer.
•
Make sure that the correct protocol is enabled.
•
•
Make sure that you have selected the correct port (if the automatic feature has not
been selected).
Make sure that paper is loaded.
•
•
Make sure that the ribbon is installed.
Examine the ribbon path. Does the ribbon pass in front of the whole printhead?
•
Adjust the ribbon if necessary.
9-4
). Make sure that connectors are properly fixed at
Page 74
Appendix A Code Pages
Code page of C-650 Plus
nnn PC Character Set nnn ISO Character Set
“700” PC-437 International “600” ISO 8859/1 Latin 1
“701” PC-220 Spain 2 “602” ISO 8859/9 Latin 5
IBM/PC Character Set
“710” PC-865 North Europe
(Sweden)
“711” PC- DK/N Denmark /
Norway
“712” PC-DK Denmark “617” ISO 8859/15
“720” PC-860 Portugal “620” ISO 8859/6 Arabia
“730” PC-863 Canada
(French)
“740” PC-850 Latin 1 “625” ISO 8859/8 Hebrew
“741” PC-858 Europe “680” OLI-UNIX
“742” PC-857 Latin 5
“750” PC-852 Latin 2
“770” PC-851 Greece
“771” PC-210 Greece *
“780” PC-855 Slavic
“781” PC-862 Israel
“782” PC-864 Arabia
“783” PC-866 Slavic
“640” PC-WIN Latin 1
“605” ISO 8859/2 Latin 2
“615” ISO 8859/5 Slavic
“623” ISO 8859/7 Greece
“645” PC-WIN Latin 2
“910” CHINA
“911” CHN2
“912” PC-866-BG(Bulgaria)
“913” PC-Ger.(Germany)
A-1
Page 75
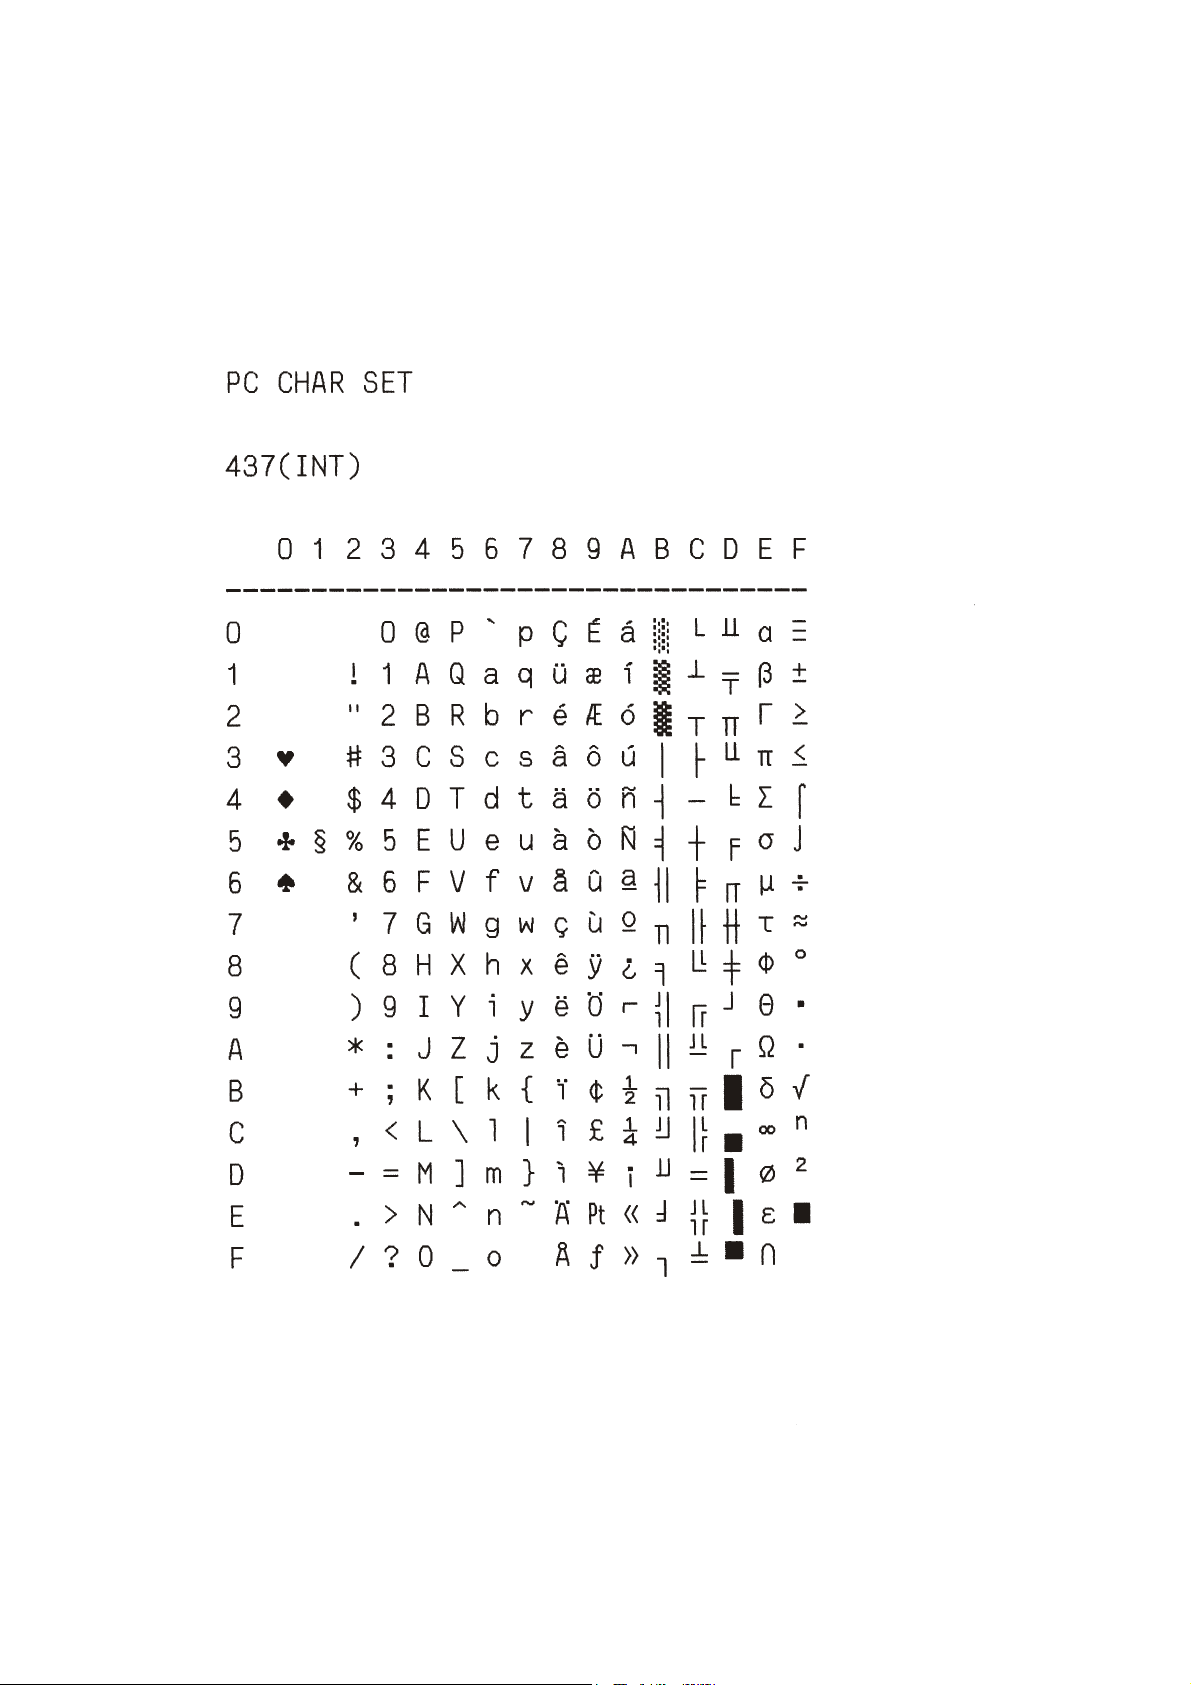
Appendix A Code Pages
A.1 PC Character Sets
A-2
Page 76
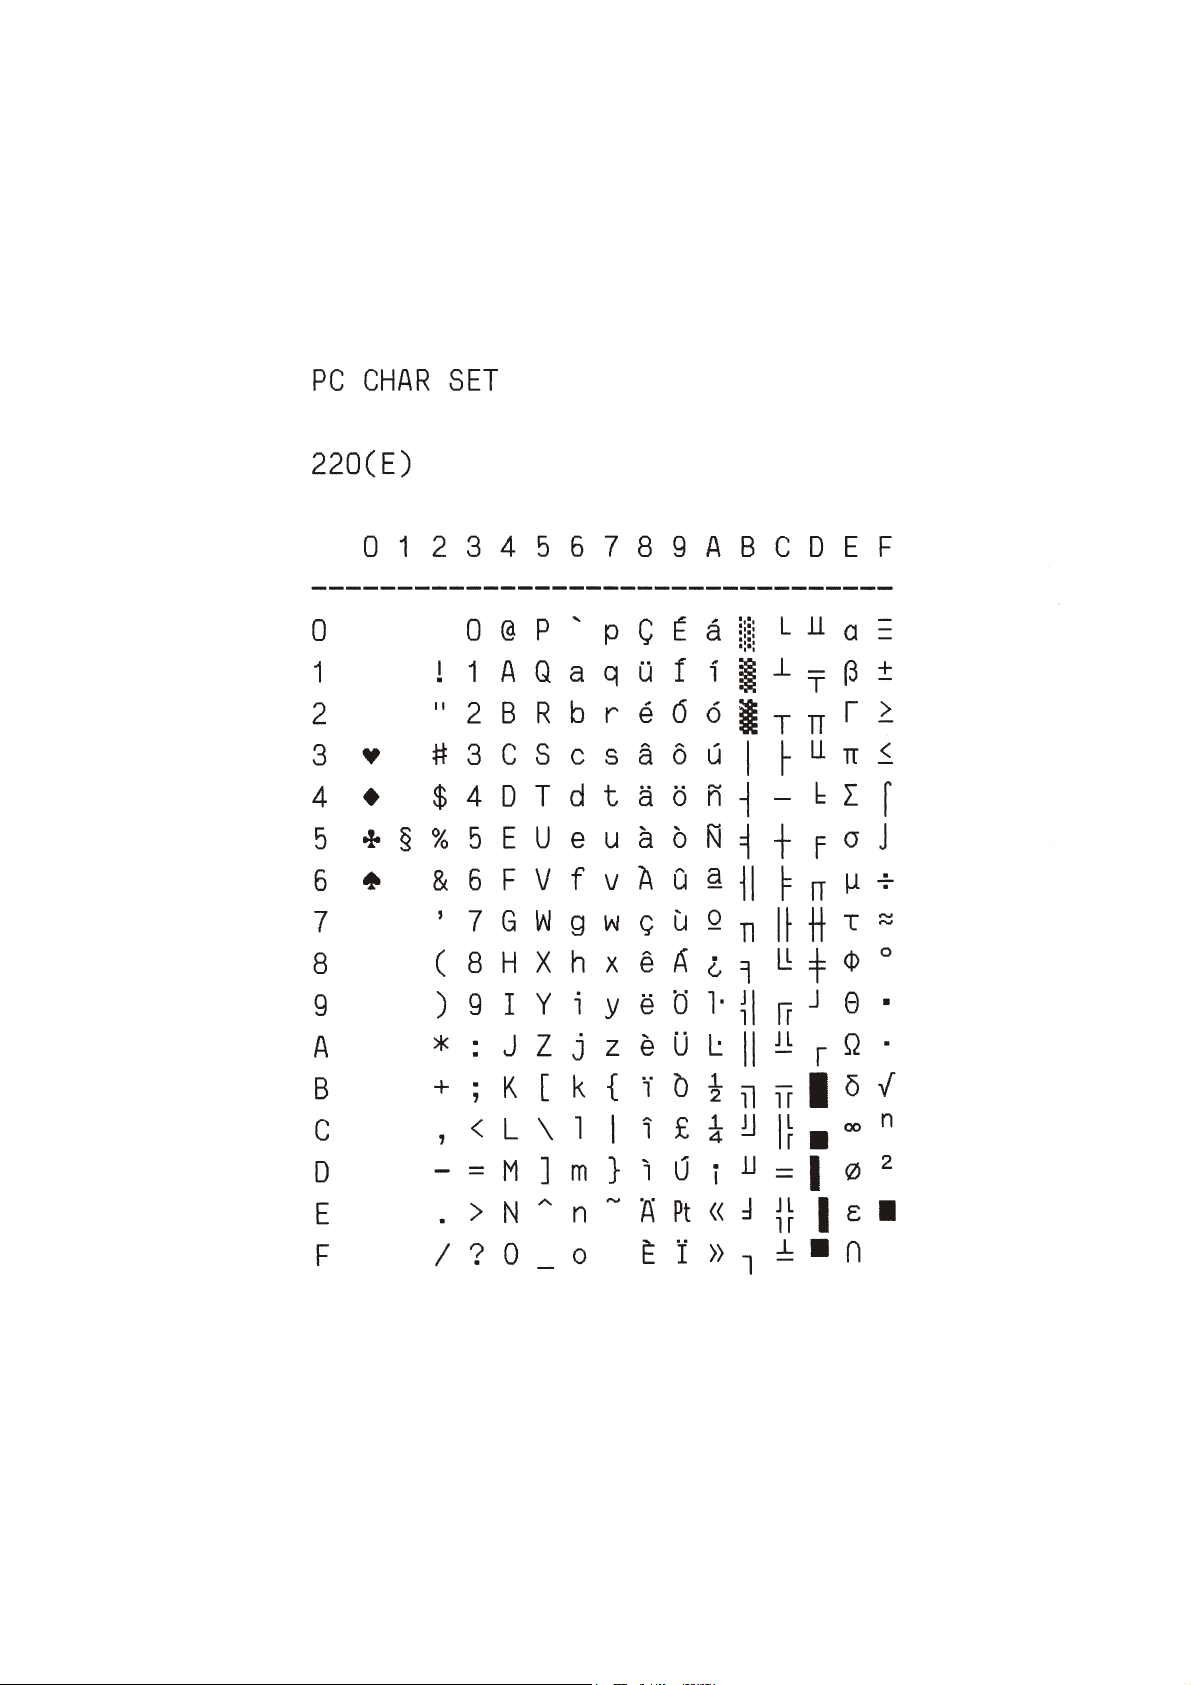
Appendix A Code Pages
A-3
Page 77
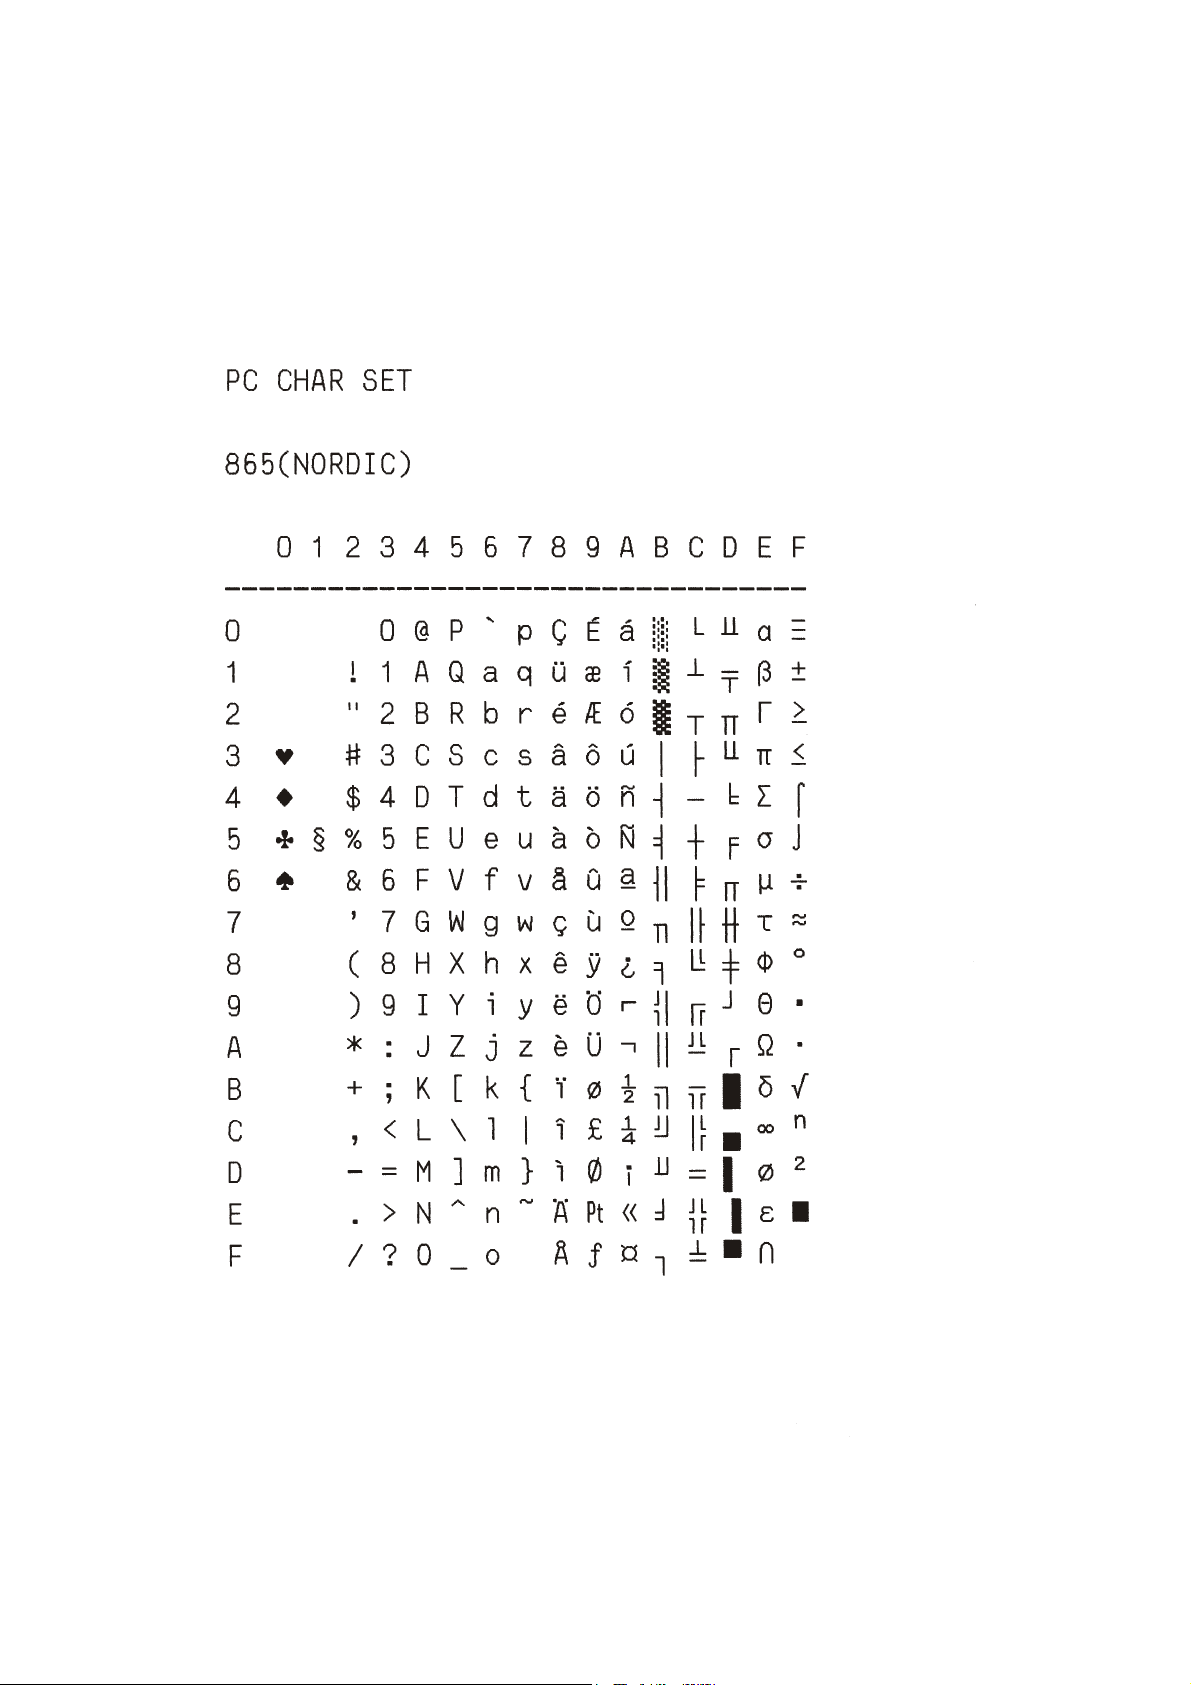
Appendix A Code Pages
A-4
Page 78
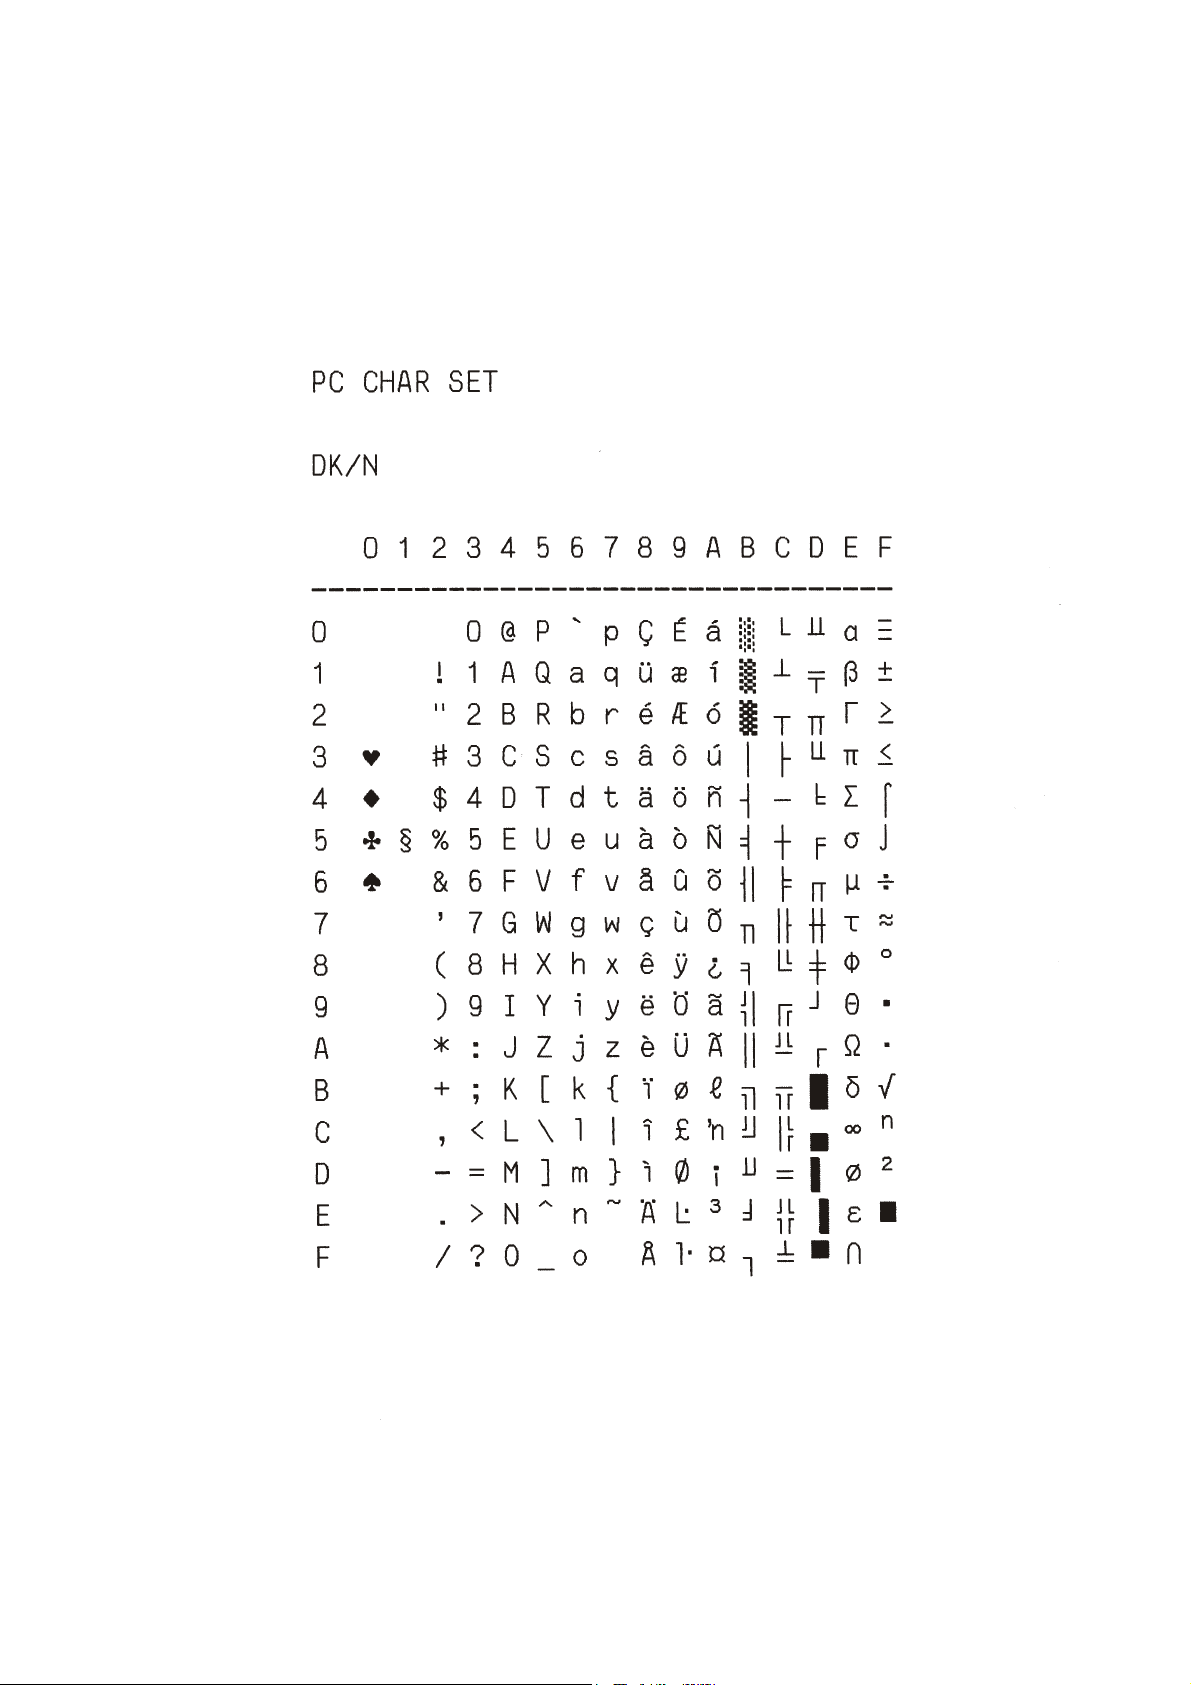
Appendix A Code Pages
A-5
Page 79
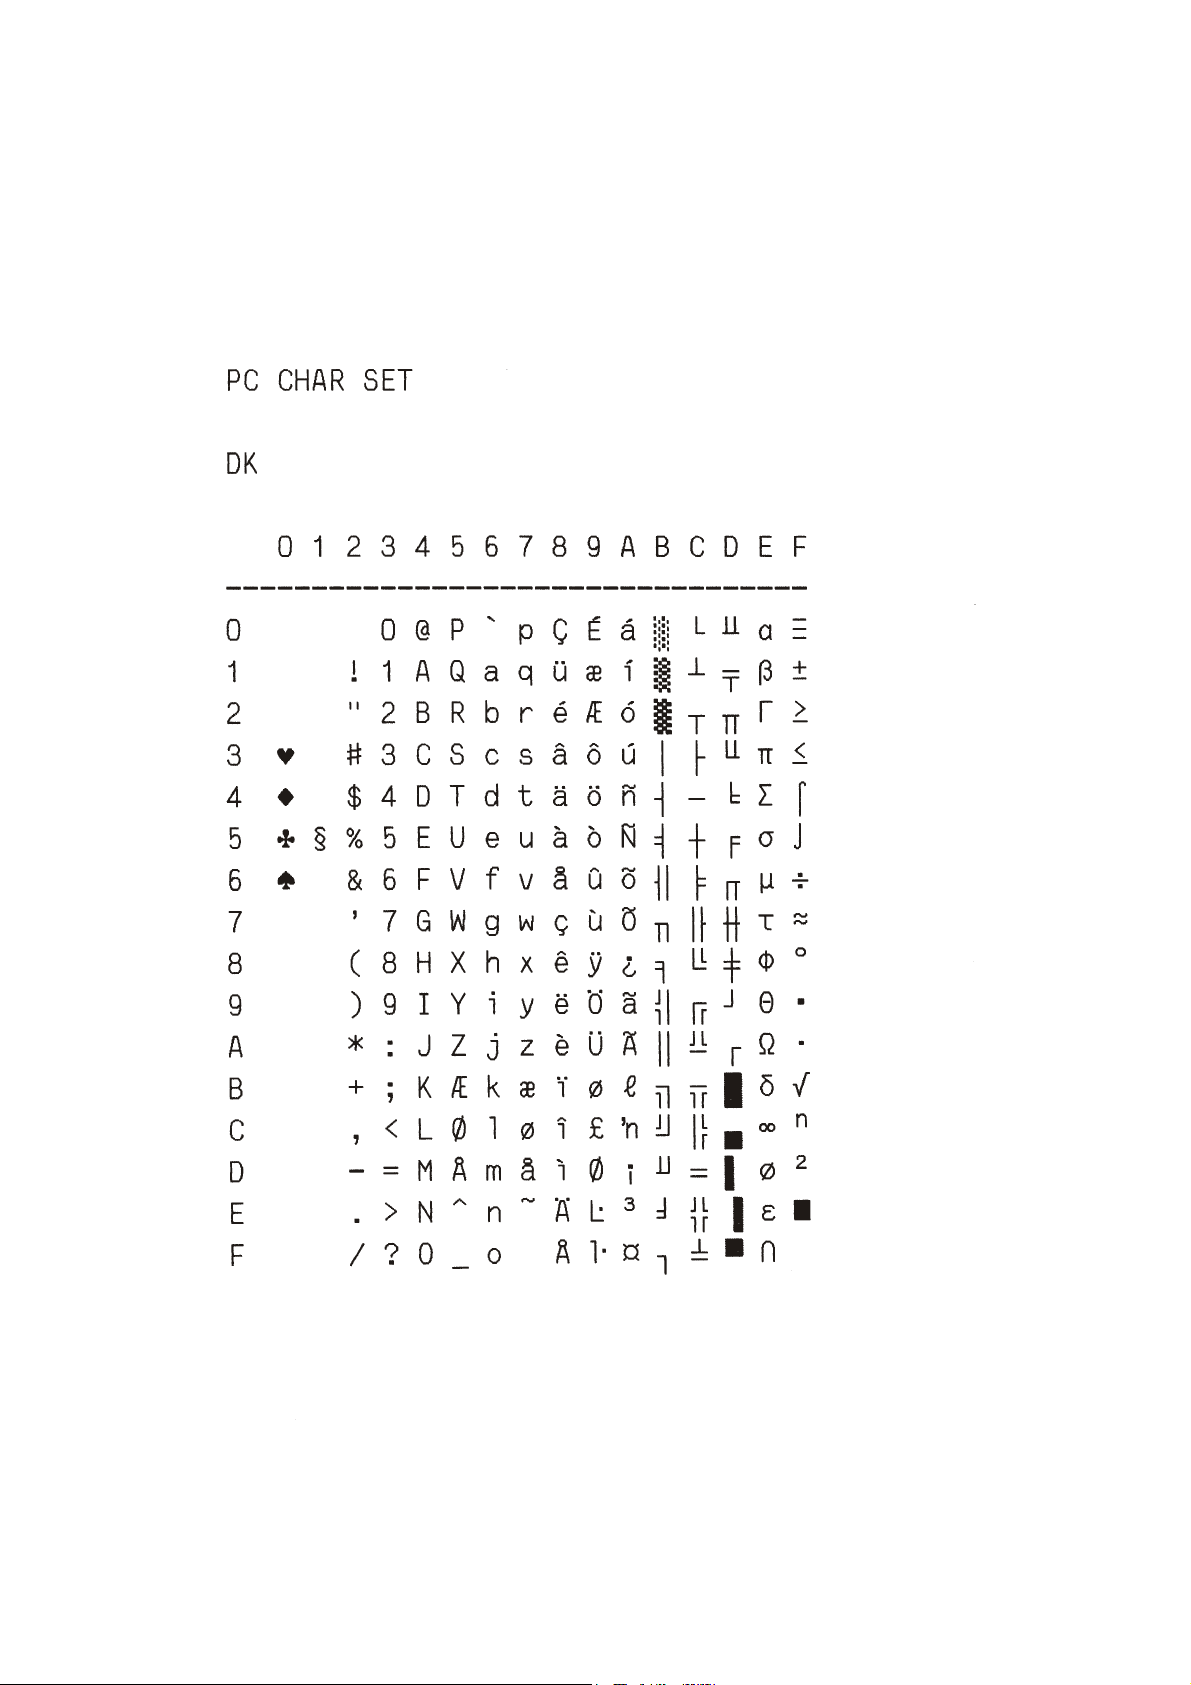
Appendix A Code Pages
A-6
Page 80
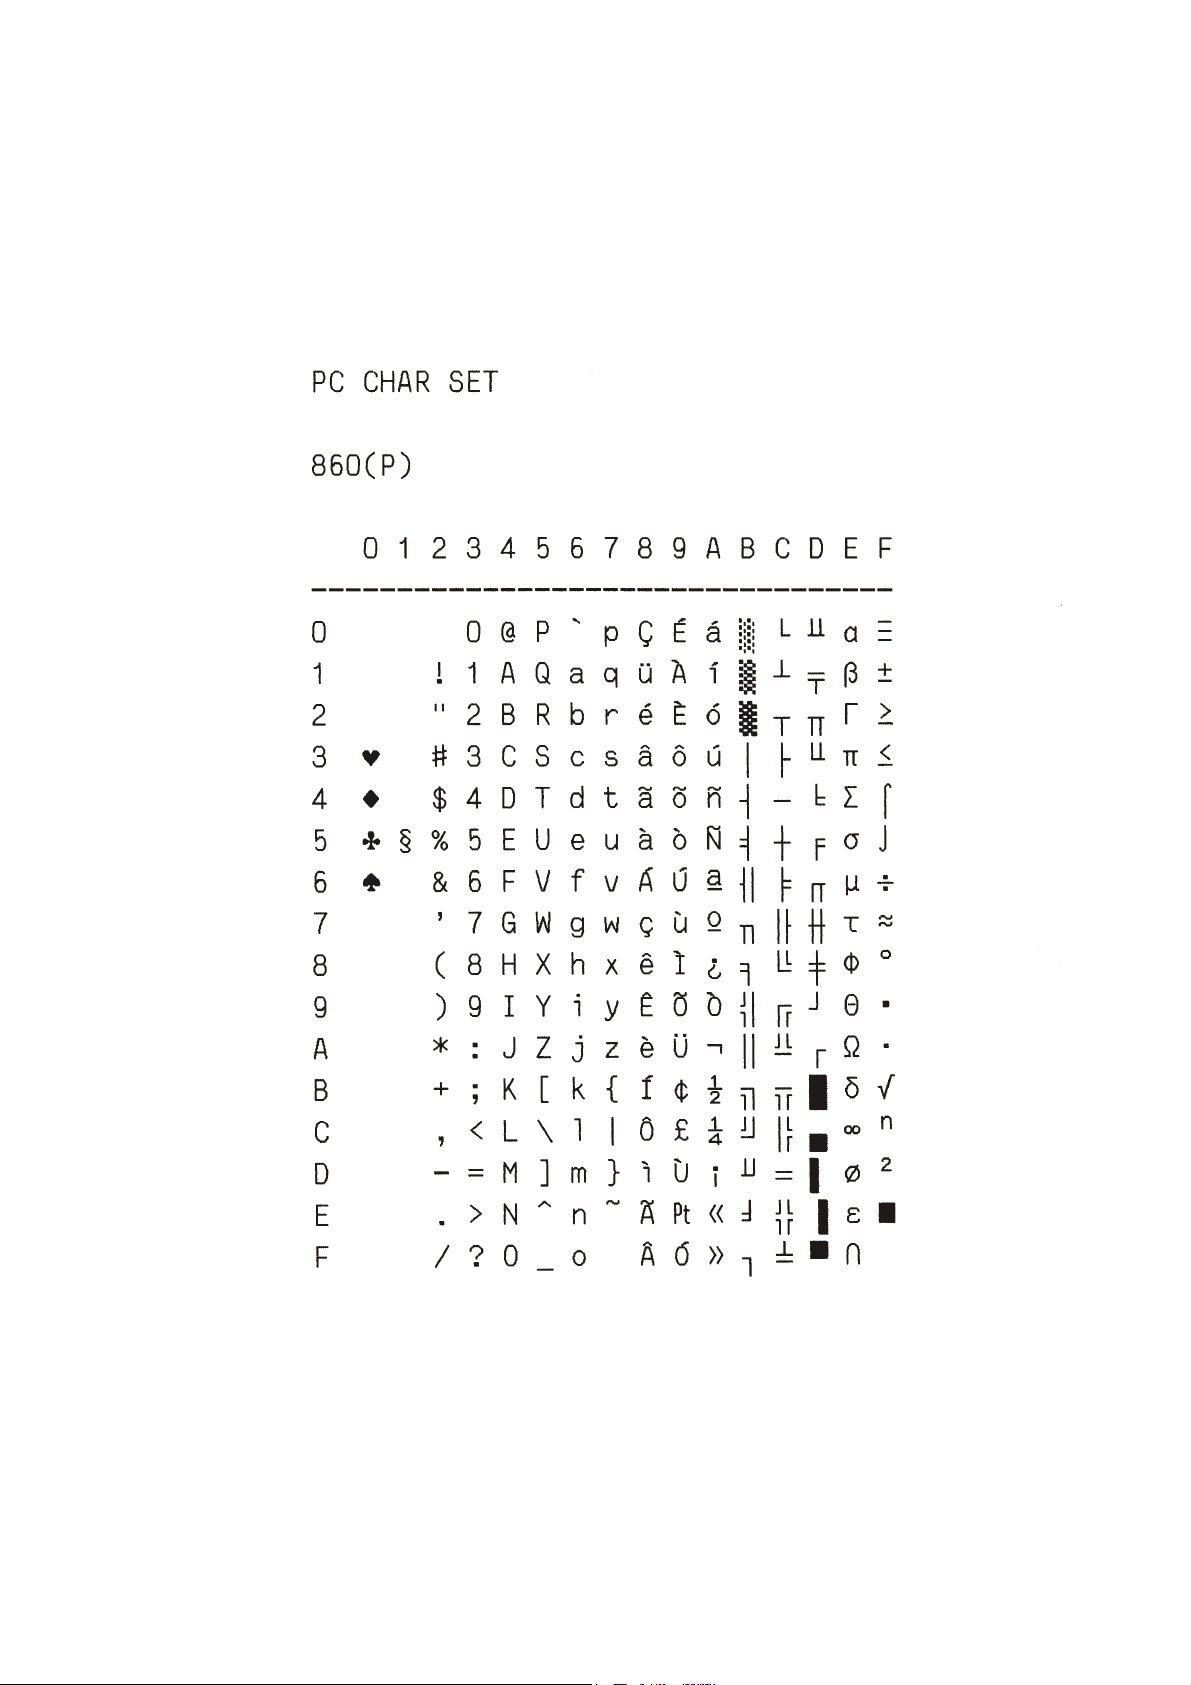
Appendix A Code Pages
A-7
Page 81
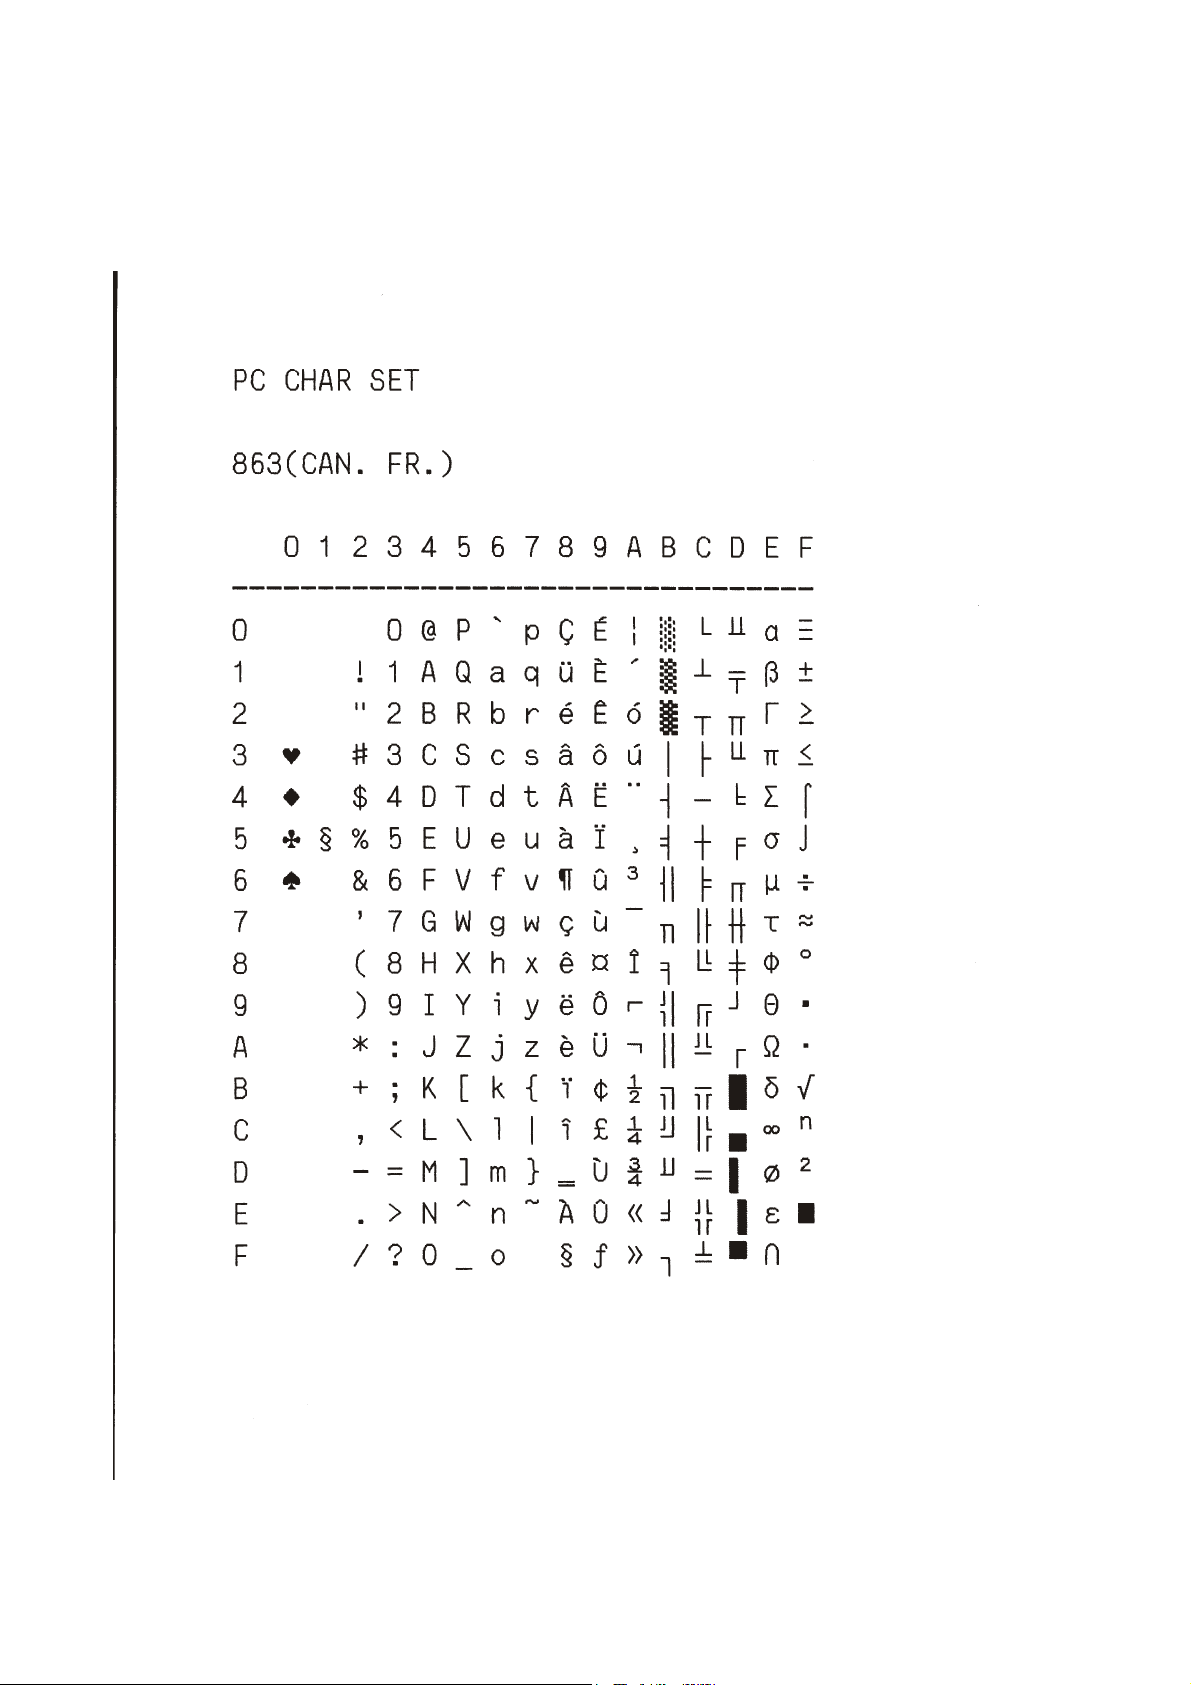
Appendix A Code Pages
A-8
Page 82
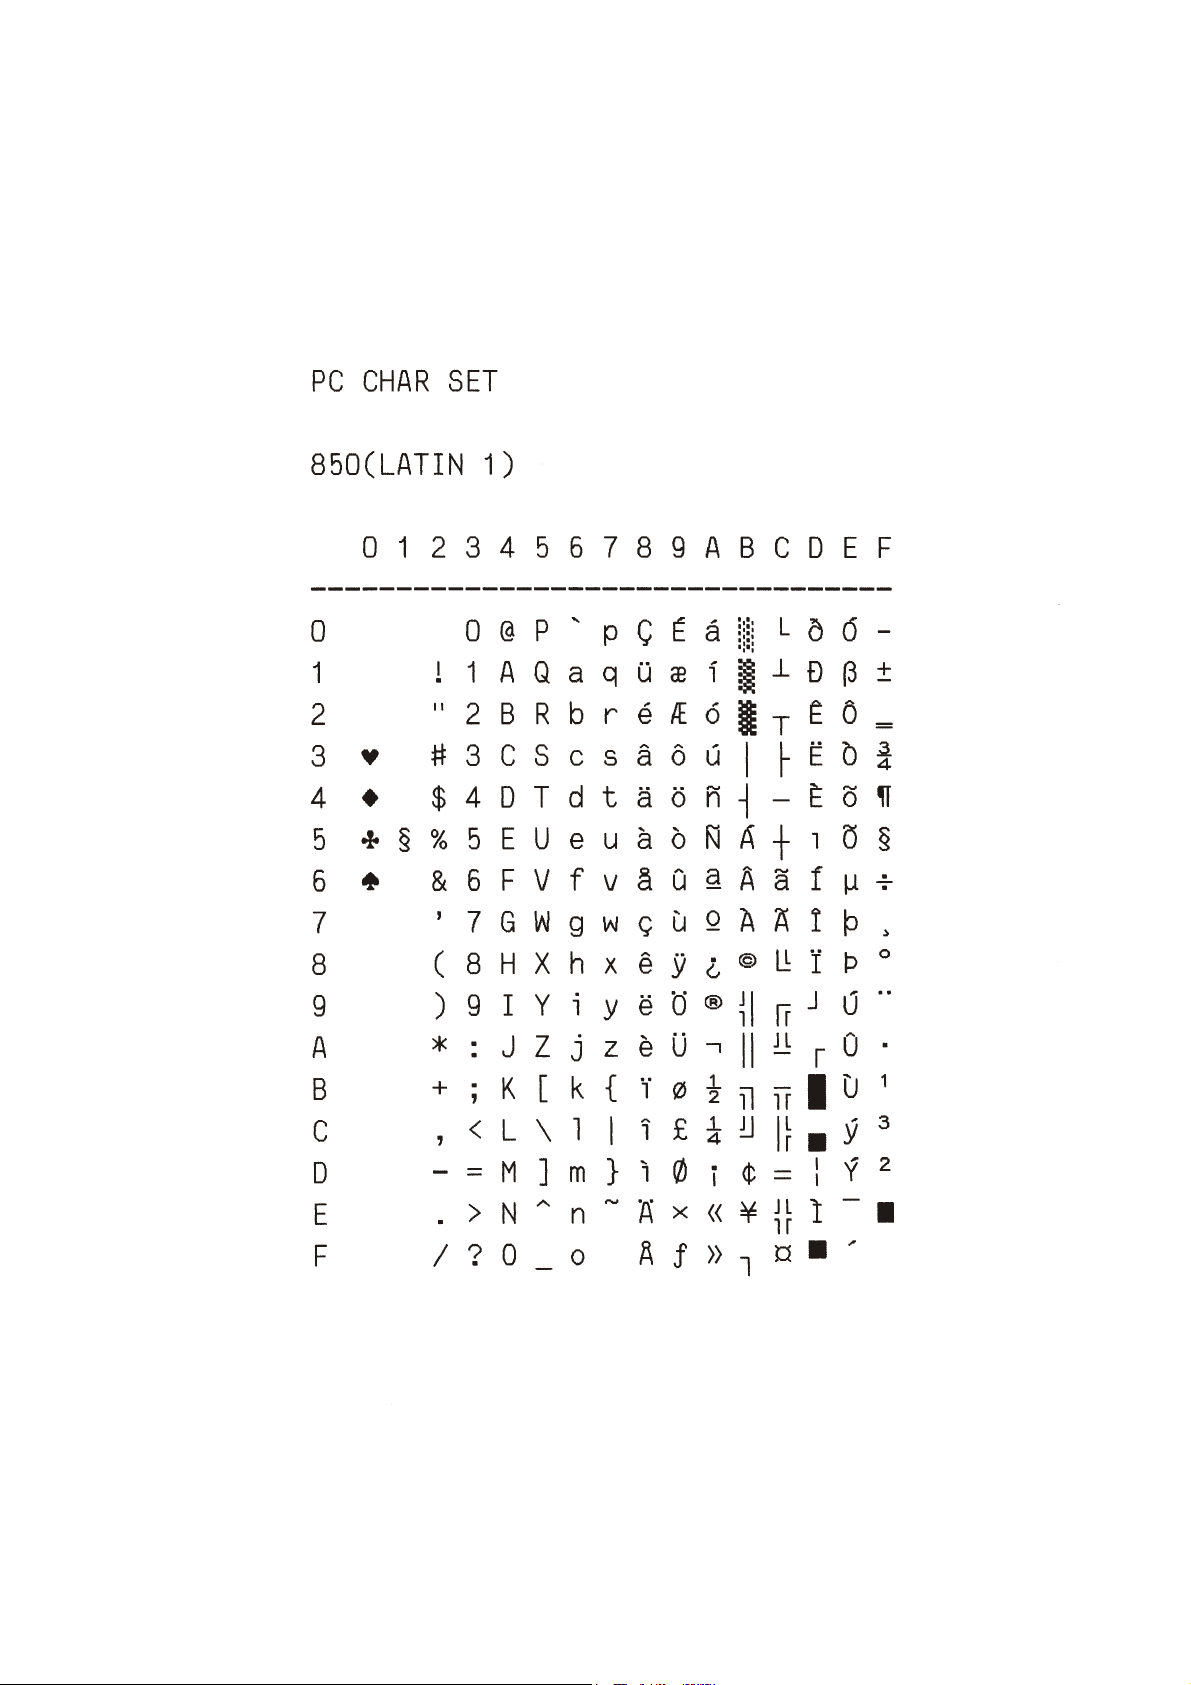
Appendix A Code Pages
A-9
Page 83
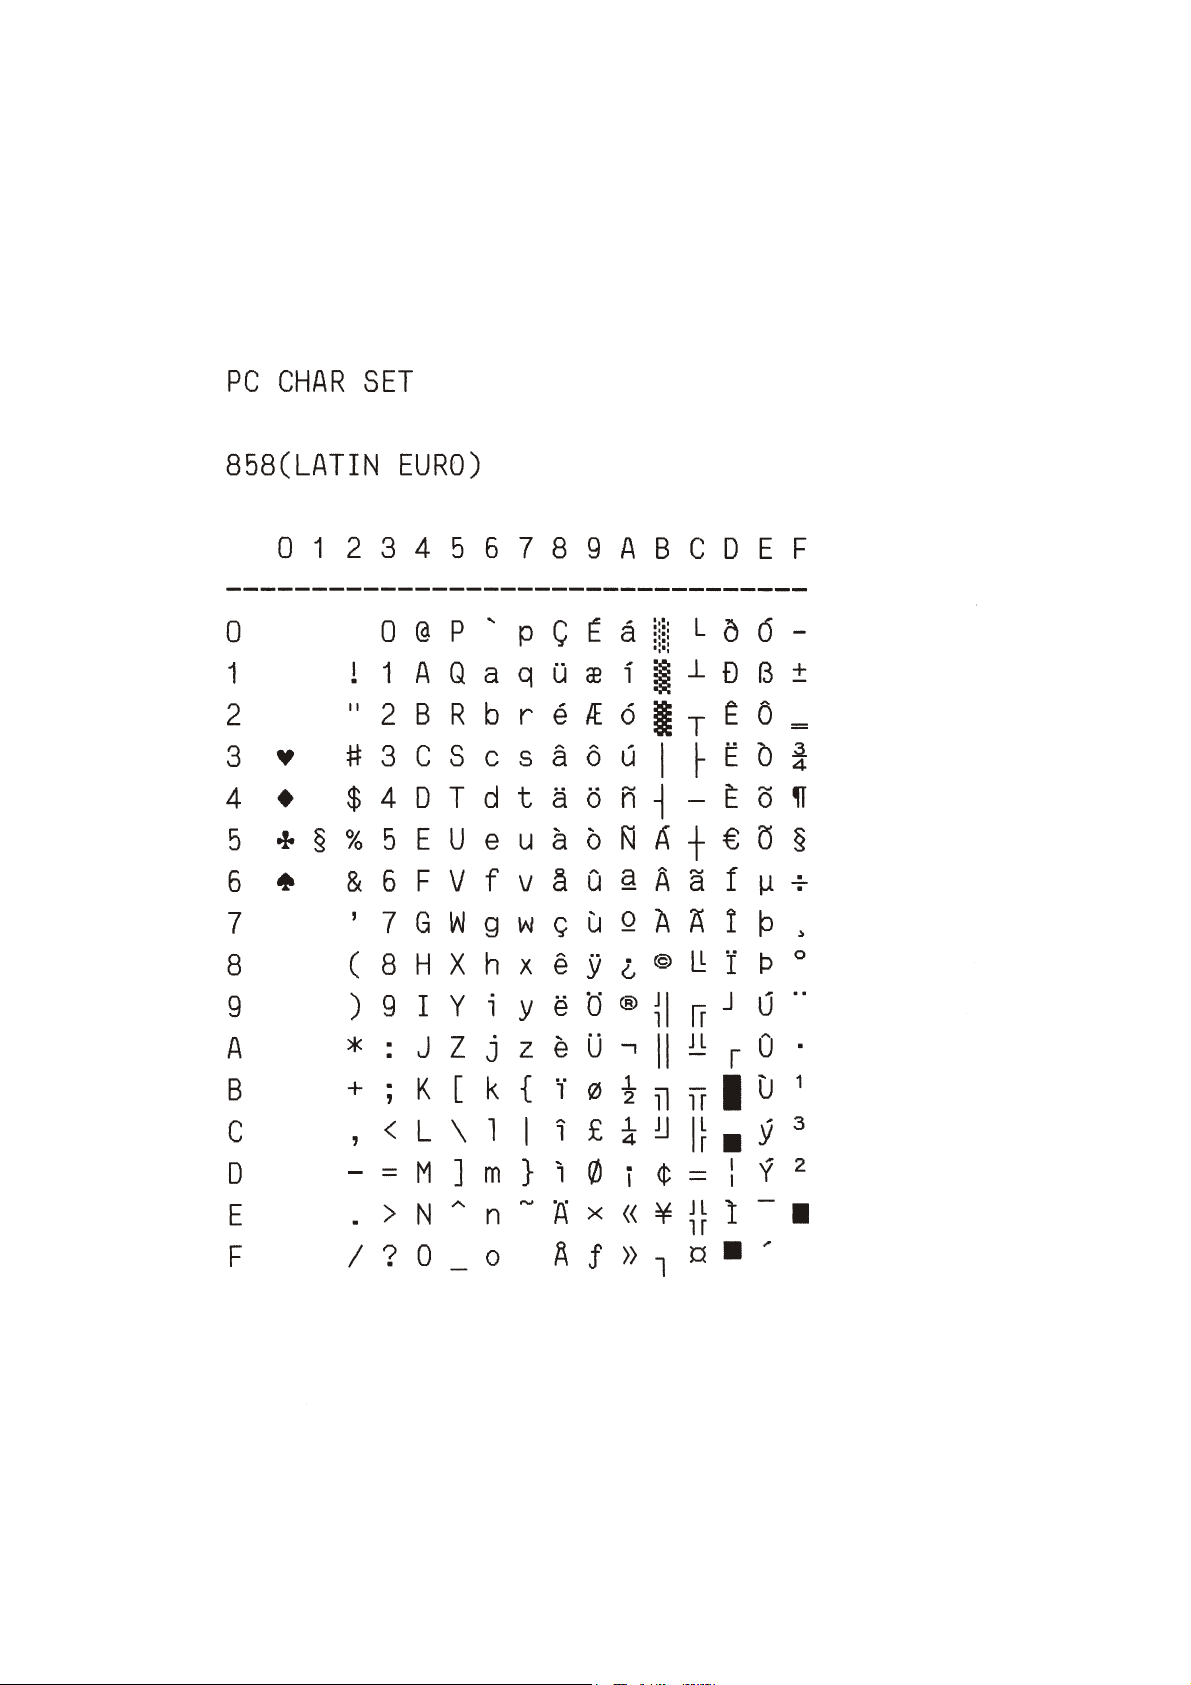
Appendix A Code Pages
A-10
Page 84
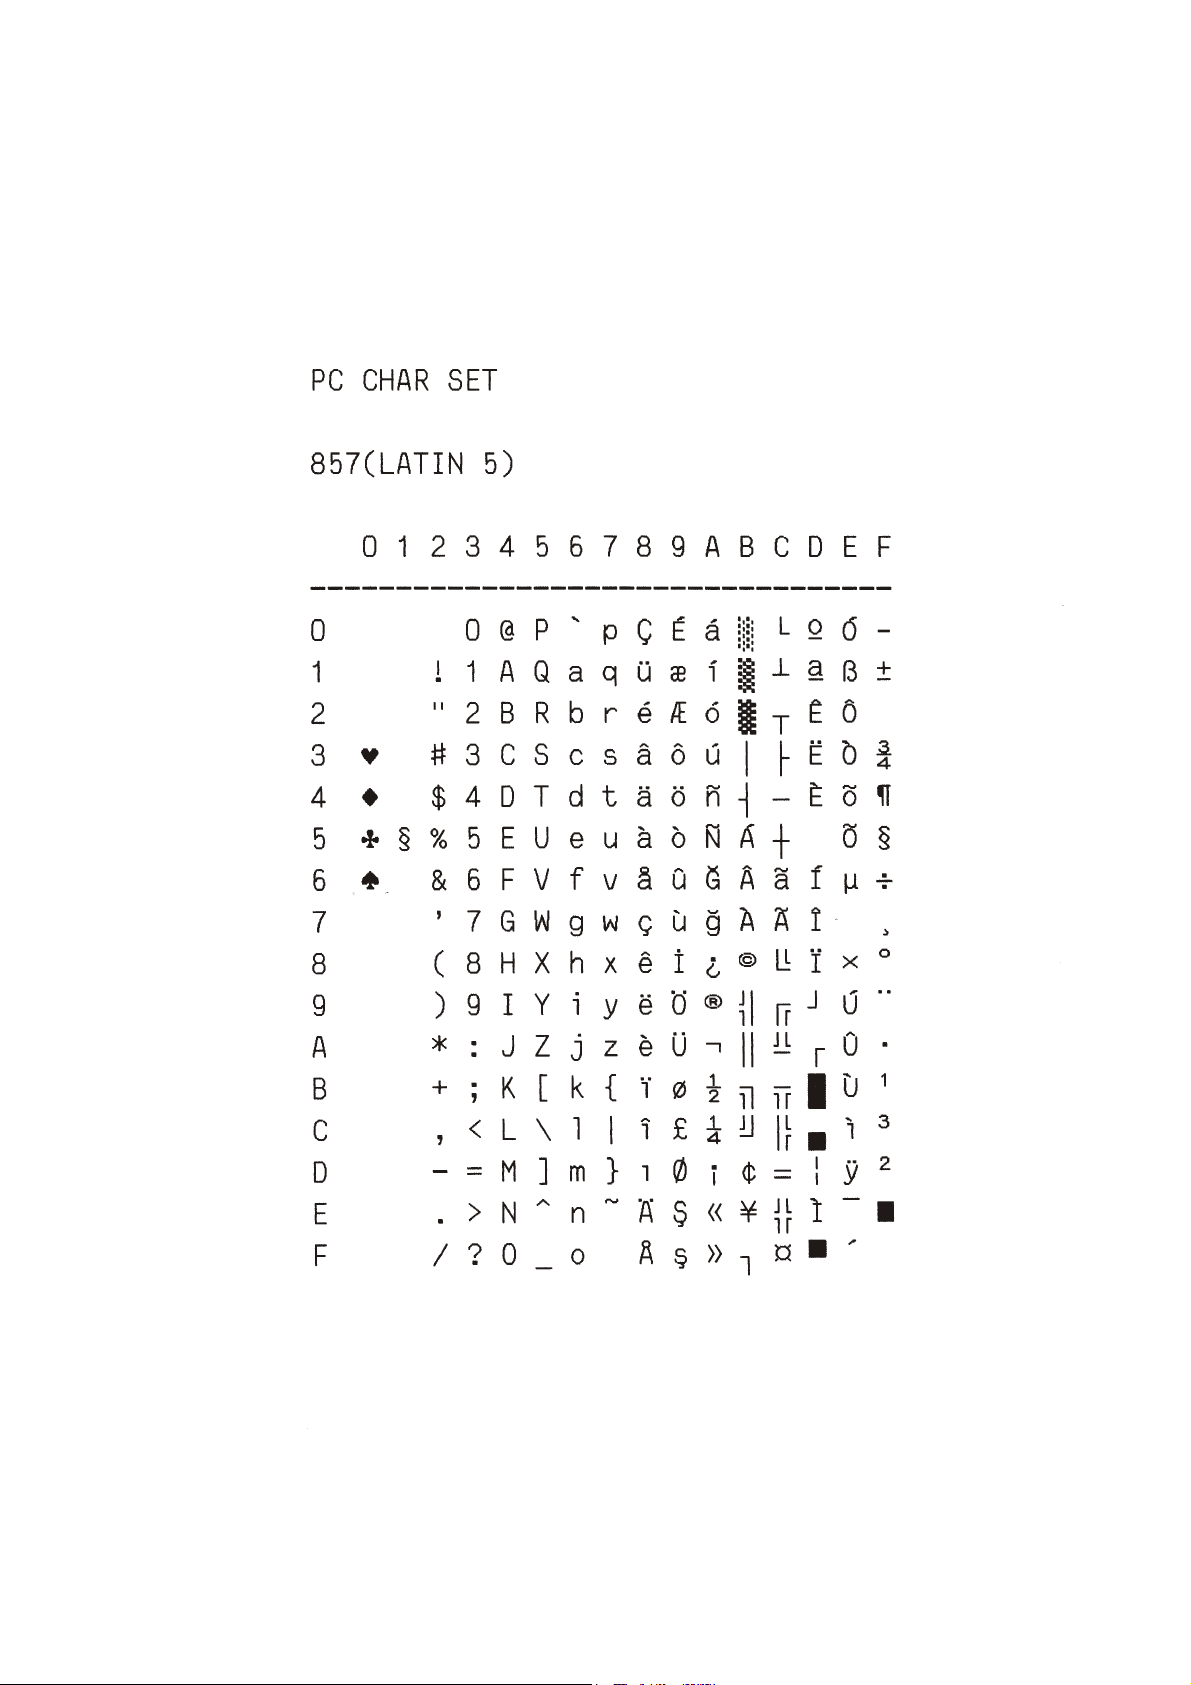
Appendix A Code Pages
A-11
Page 85
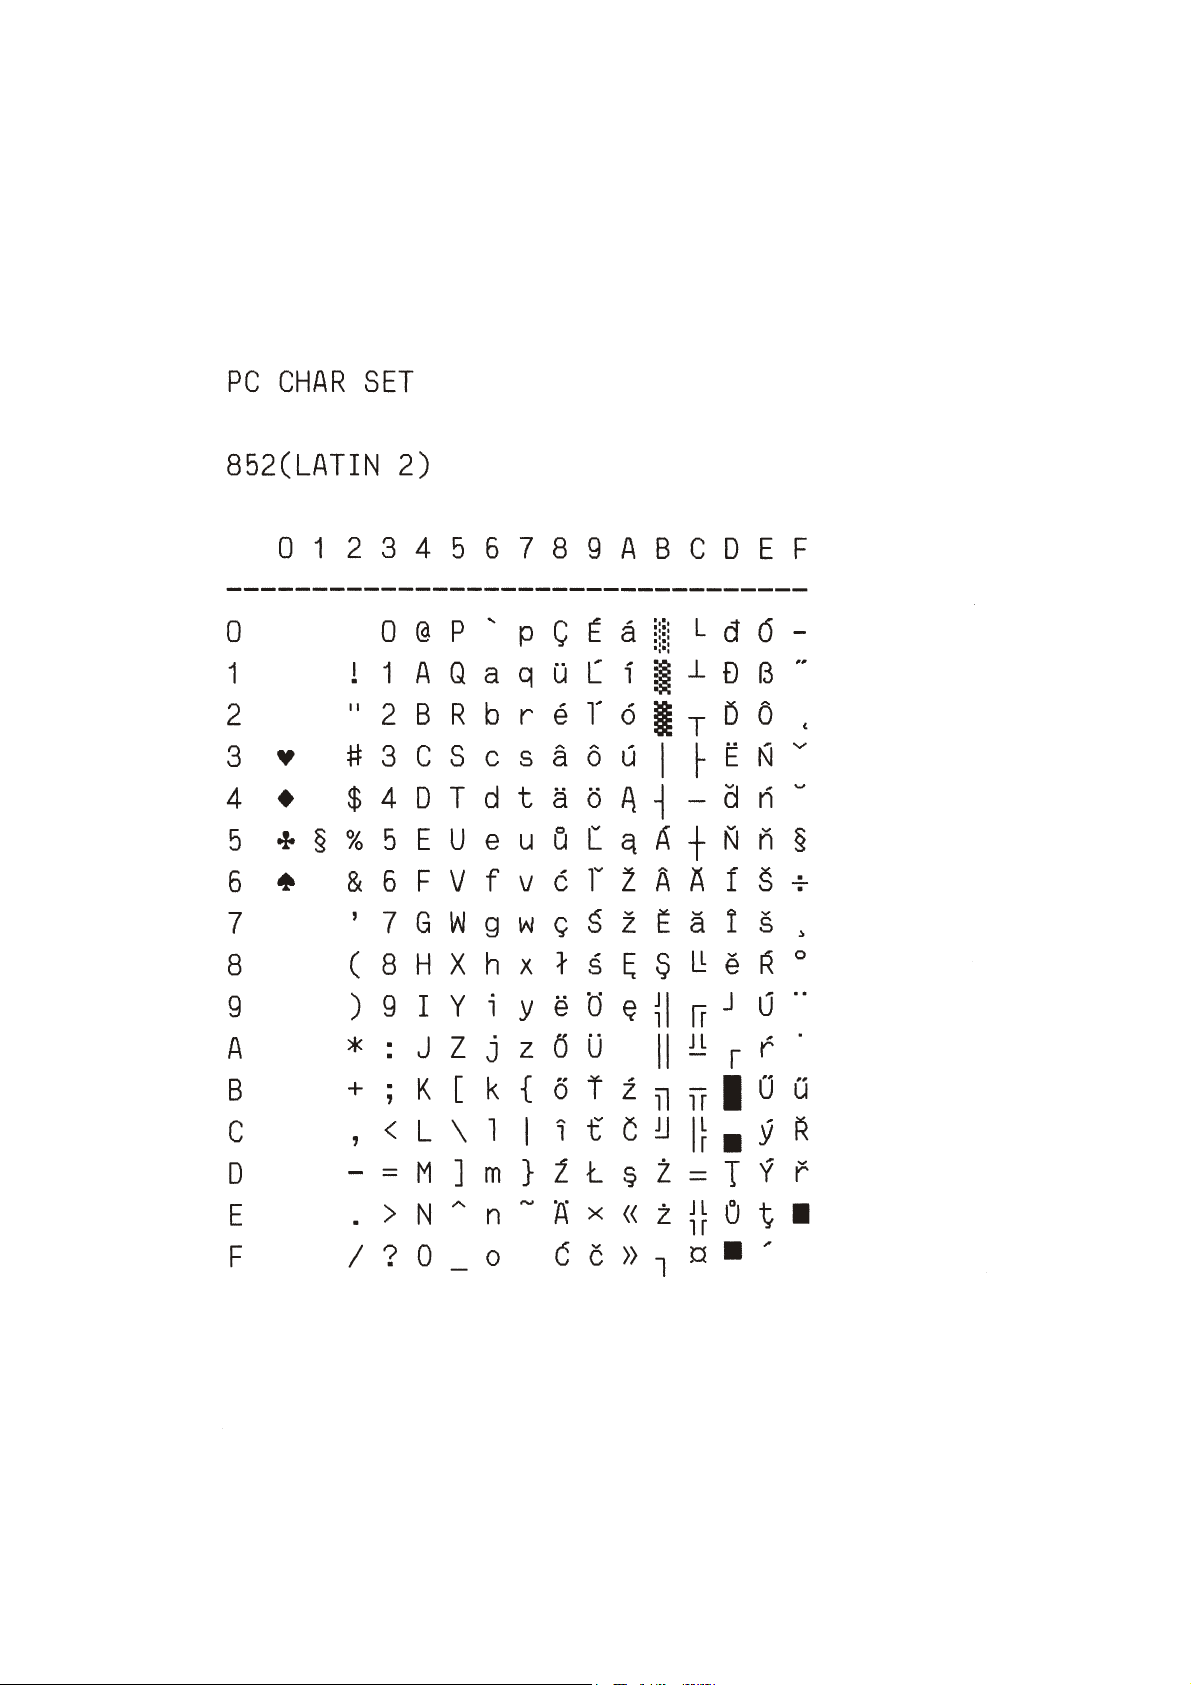
Appendix A Code Pages
A-12
Page 86
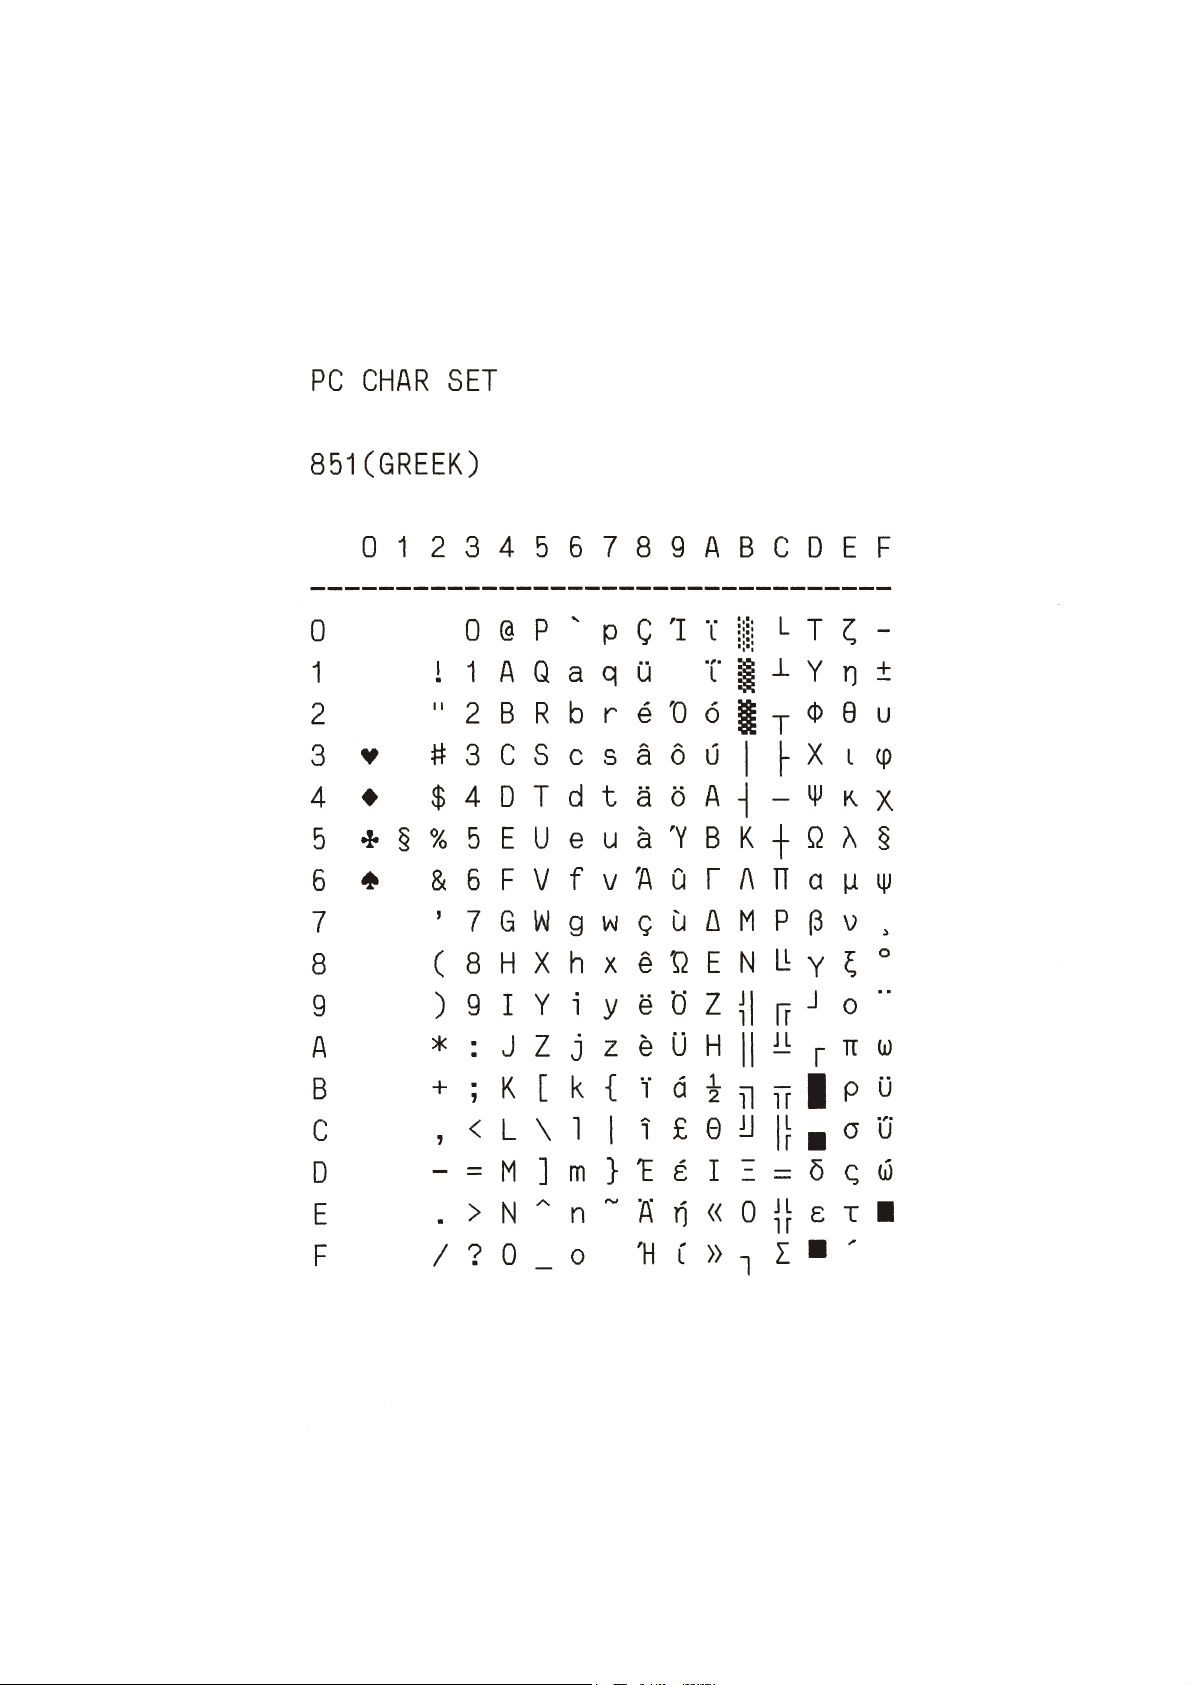
Appendix A Code Pages
A-13
Page 87
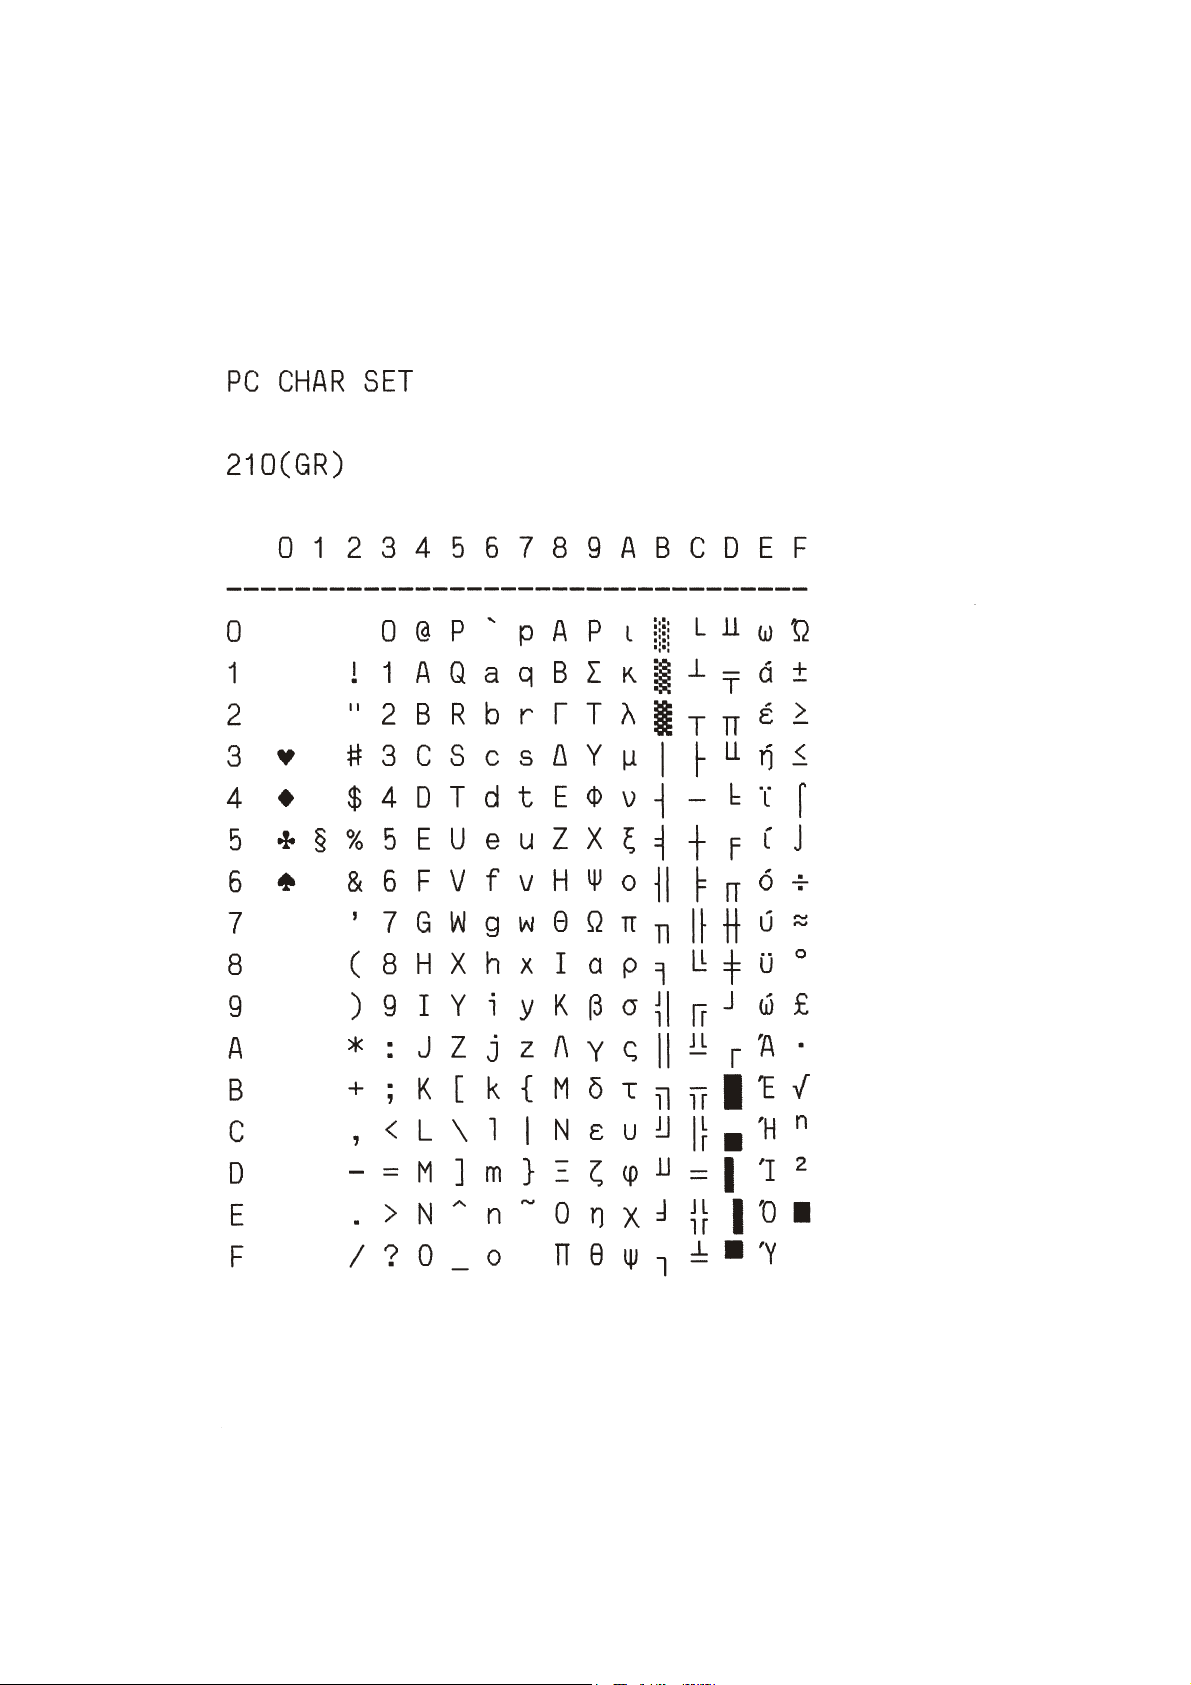
Appendix A Code Pages
A-14
Page 88
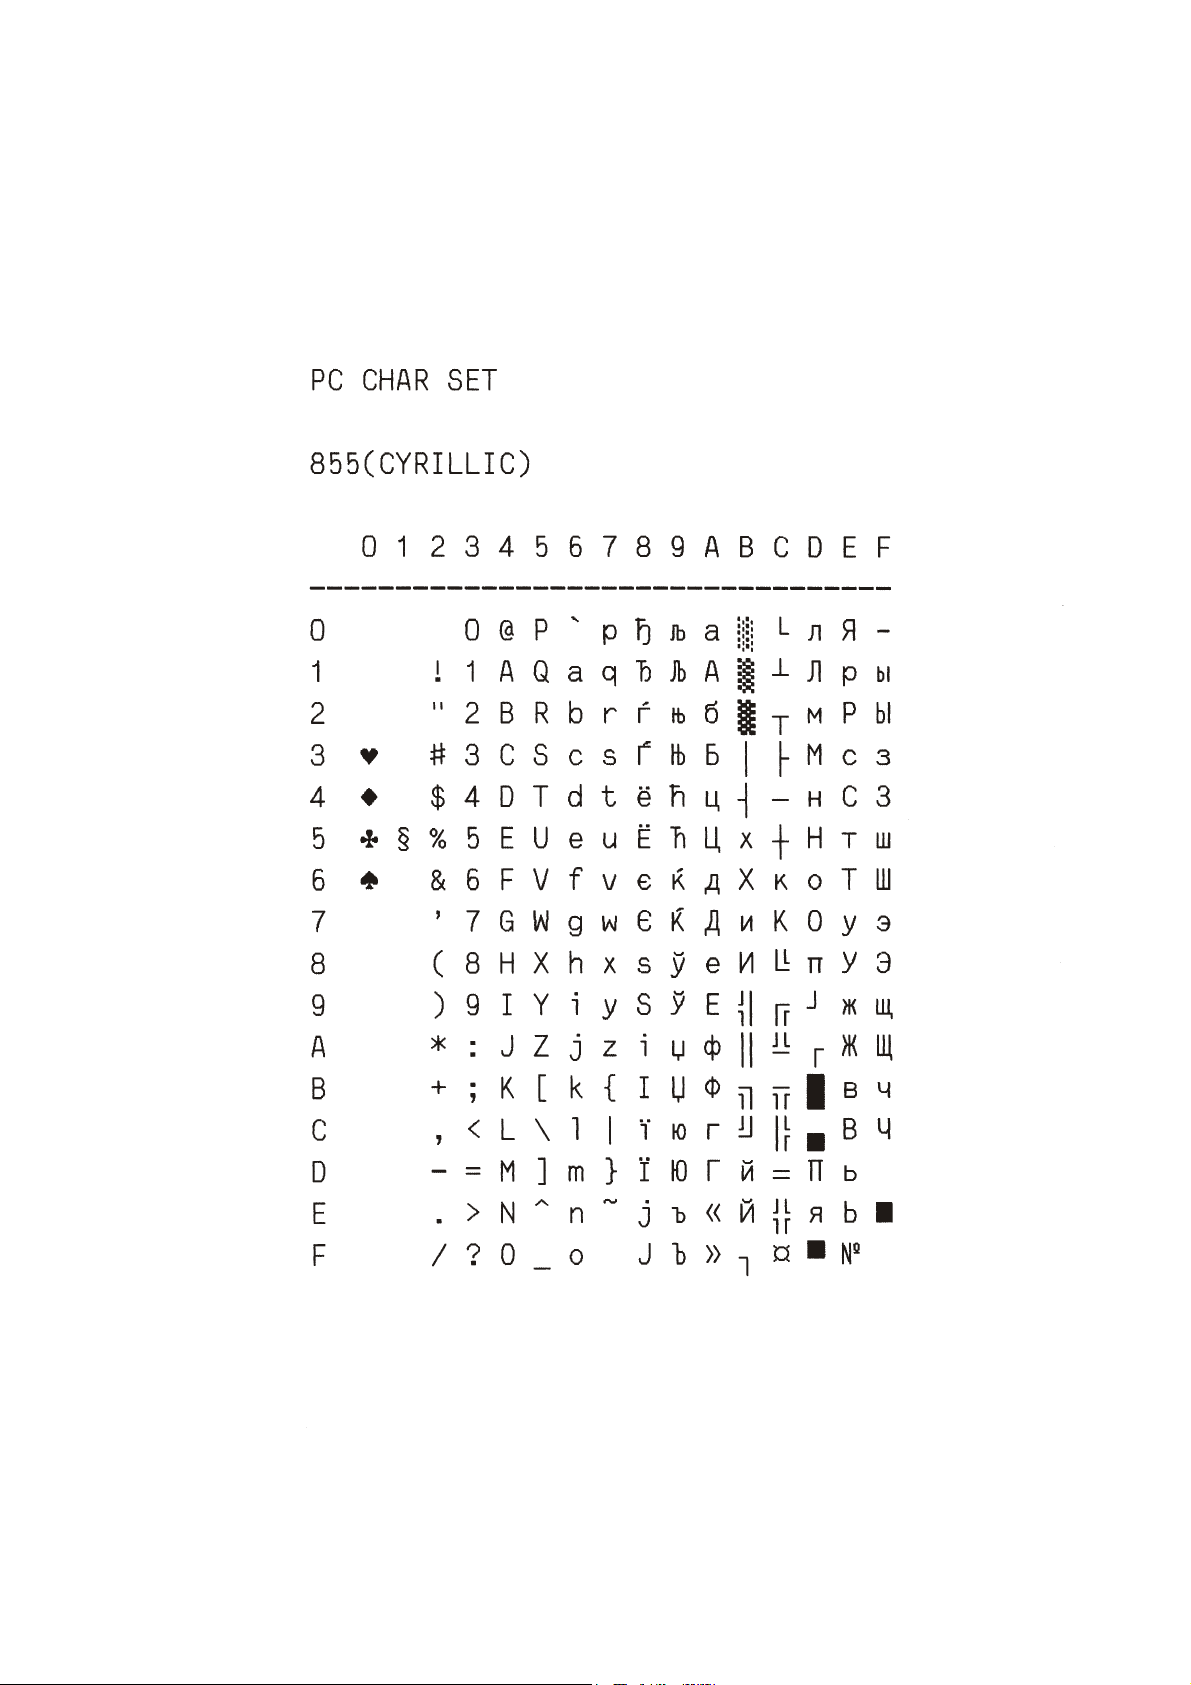
Appendix A Code Pages
A-15
Page 89
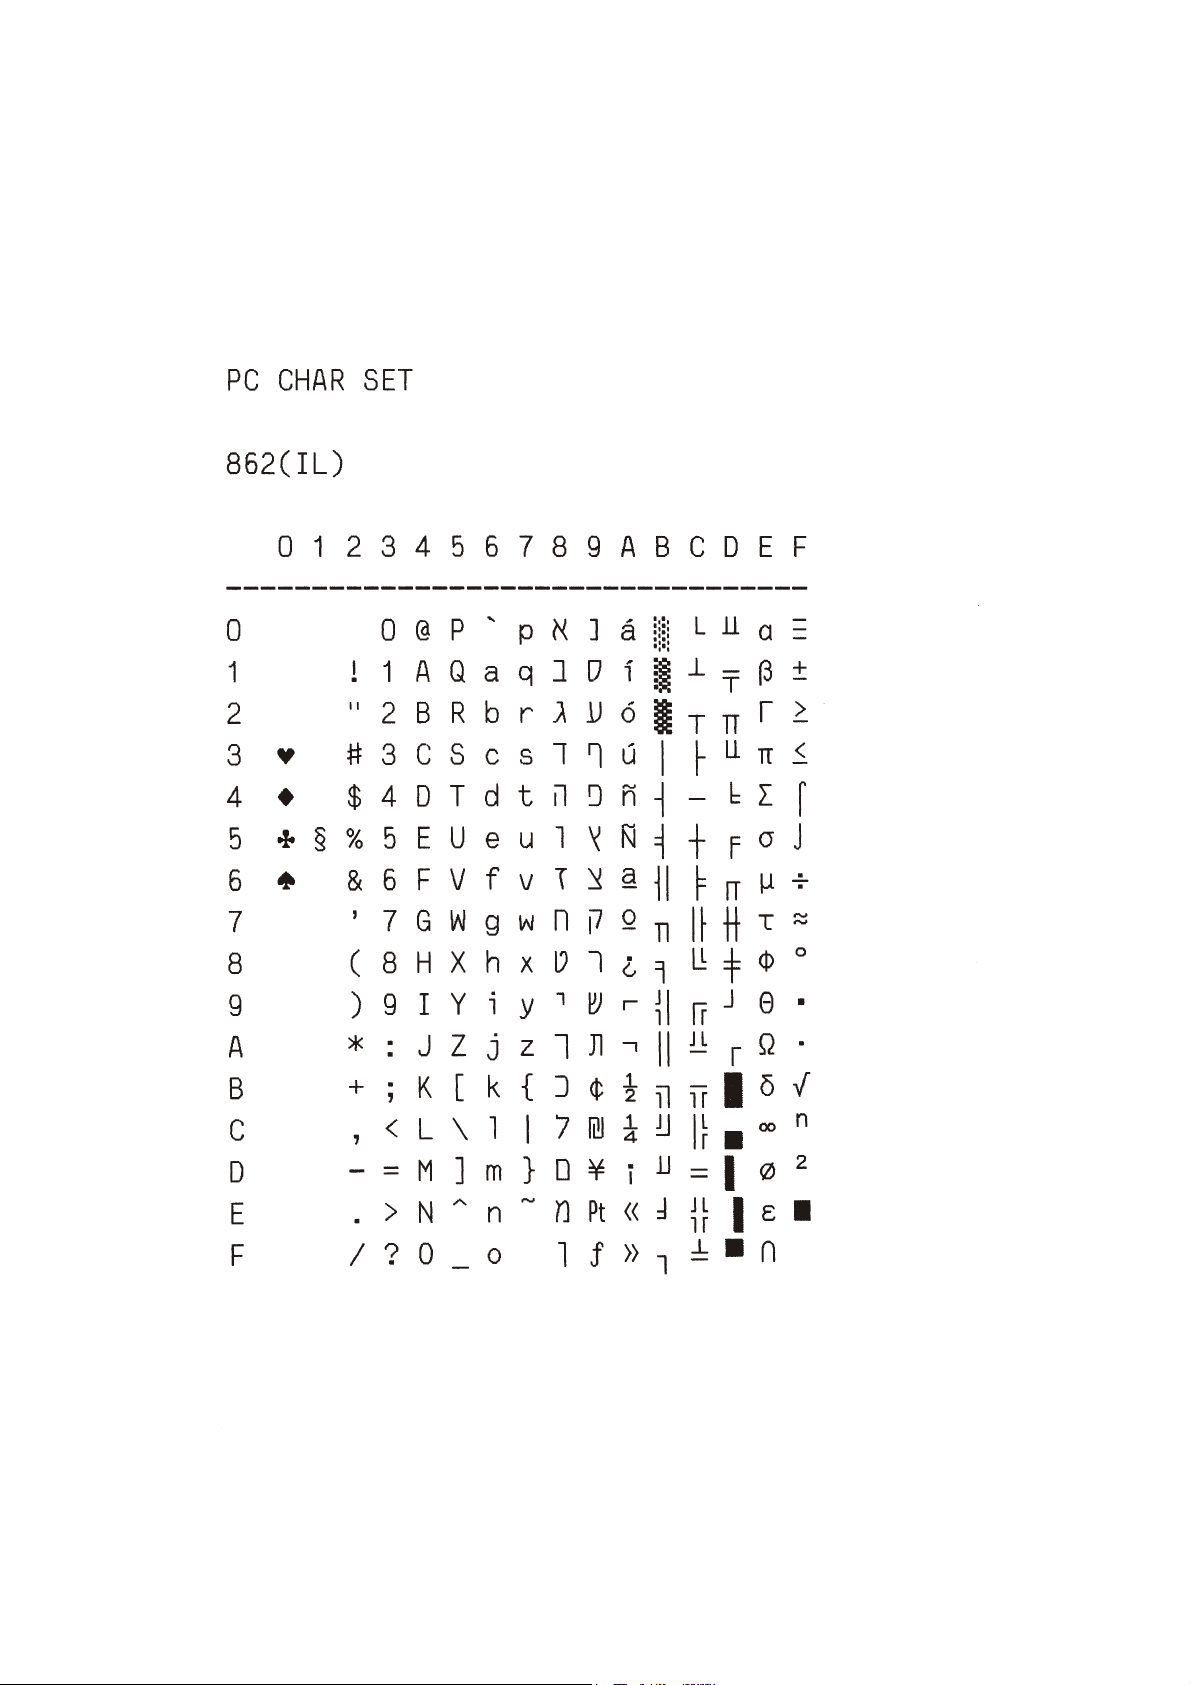
Appendix A Code Pages
A-16
Page 90
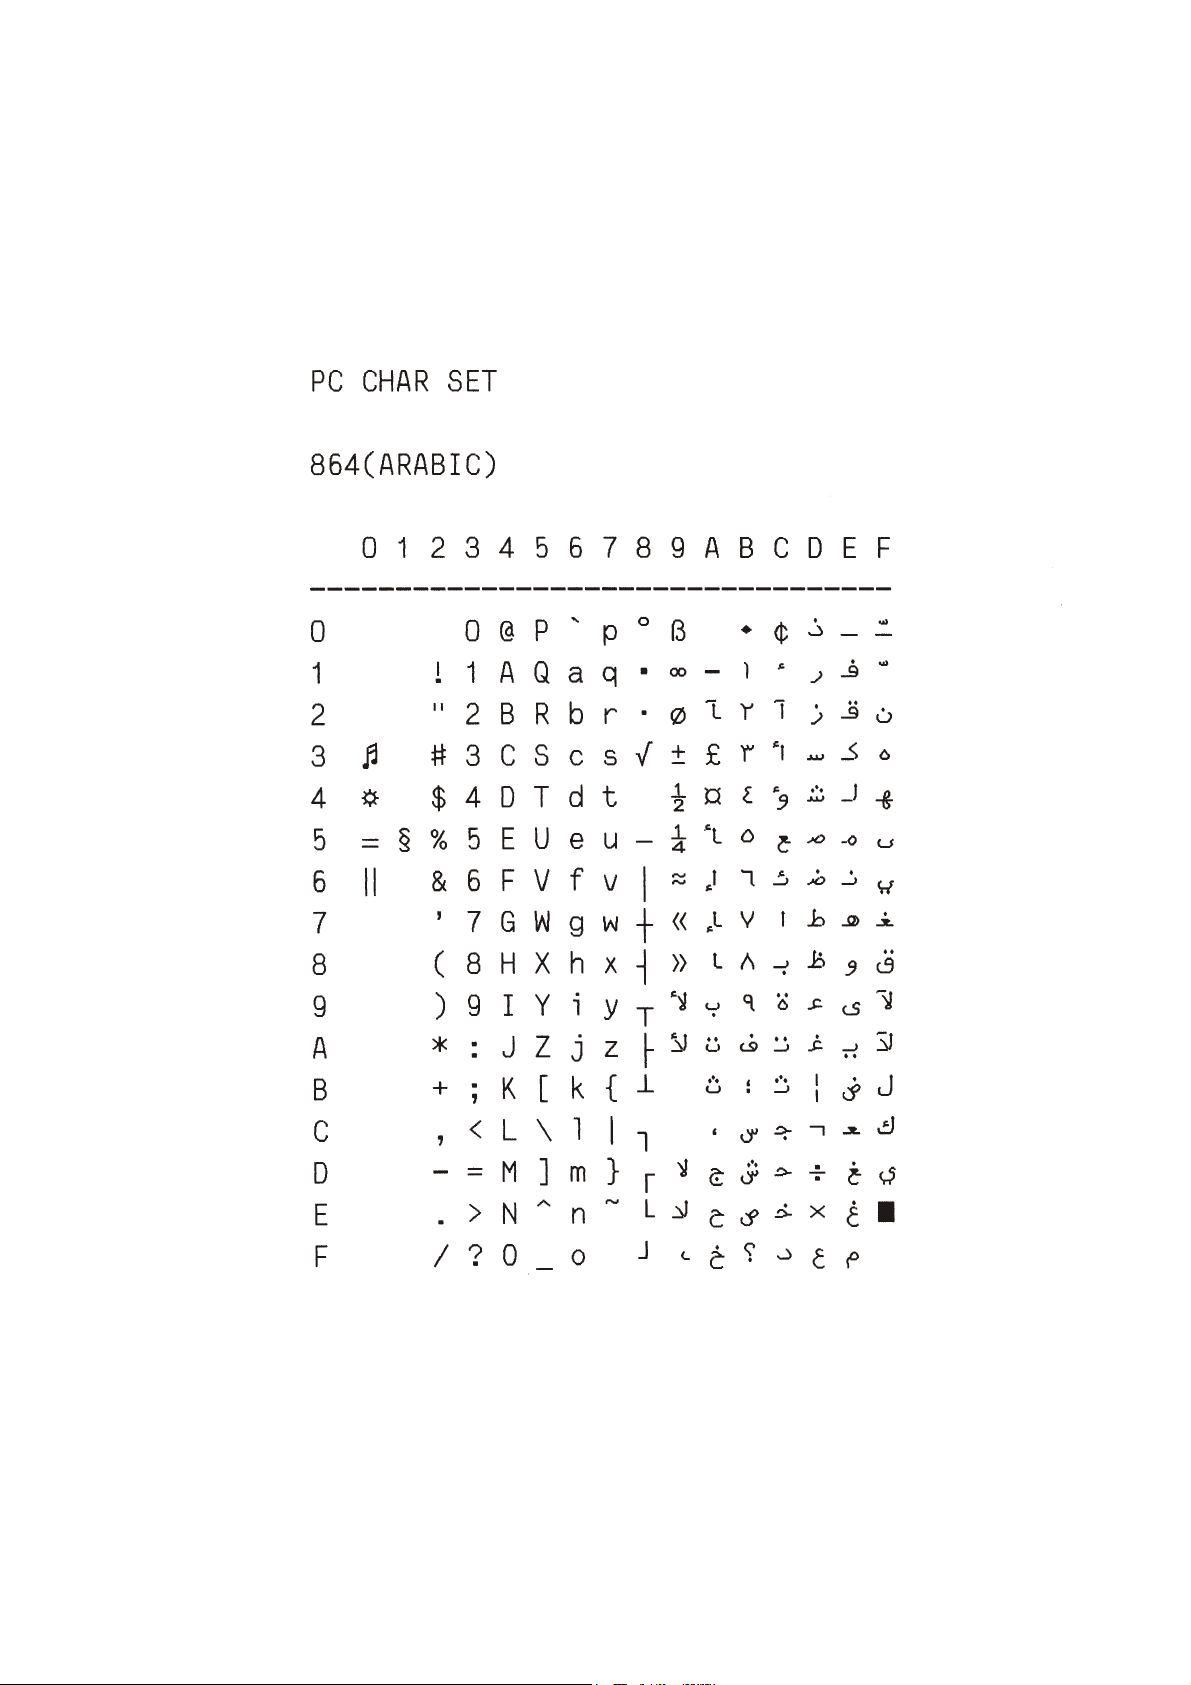
Appendix A Code Pages
A-17
Page 91
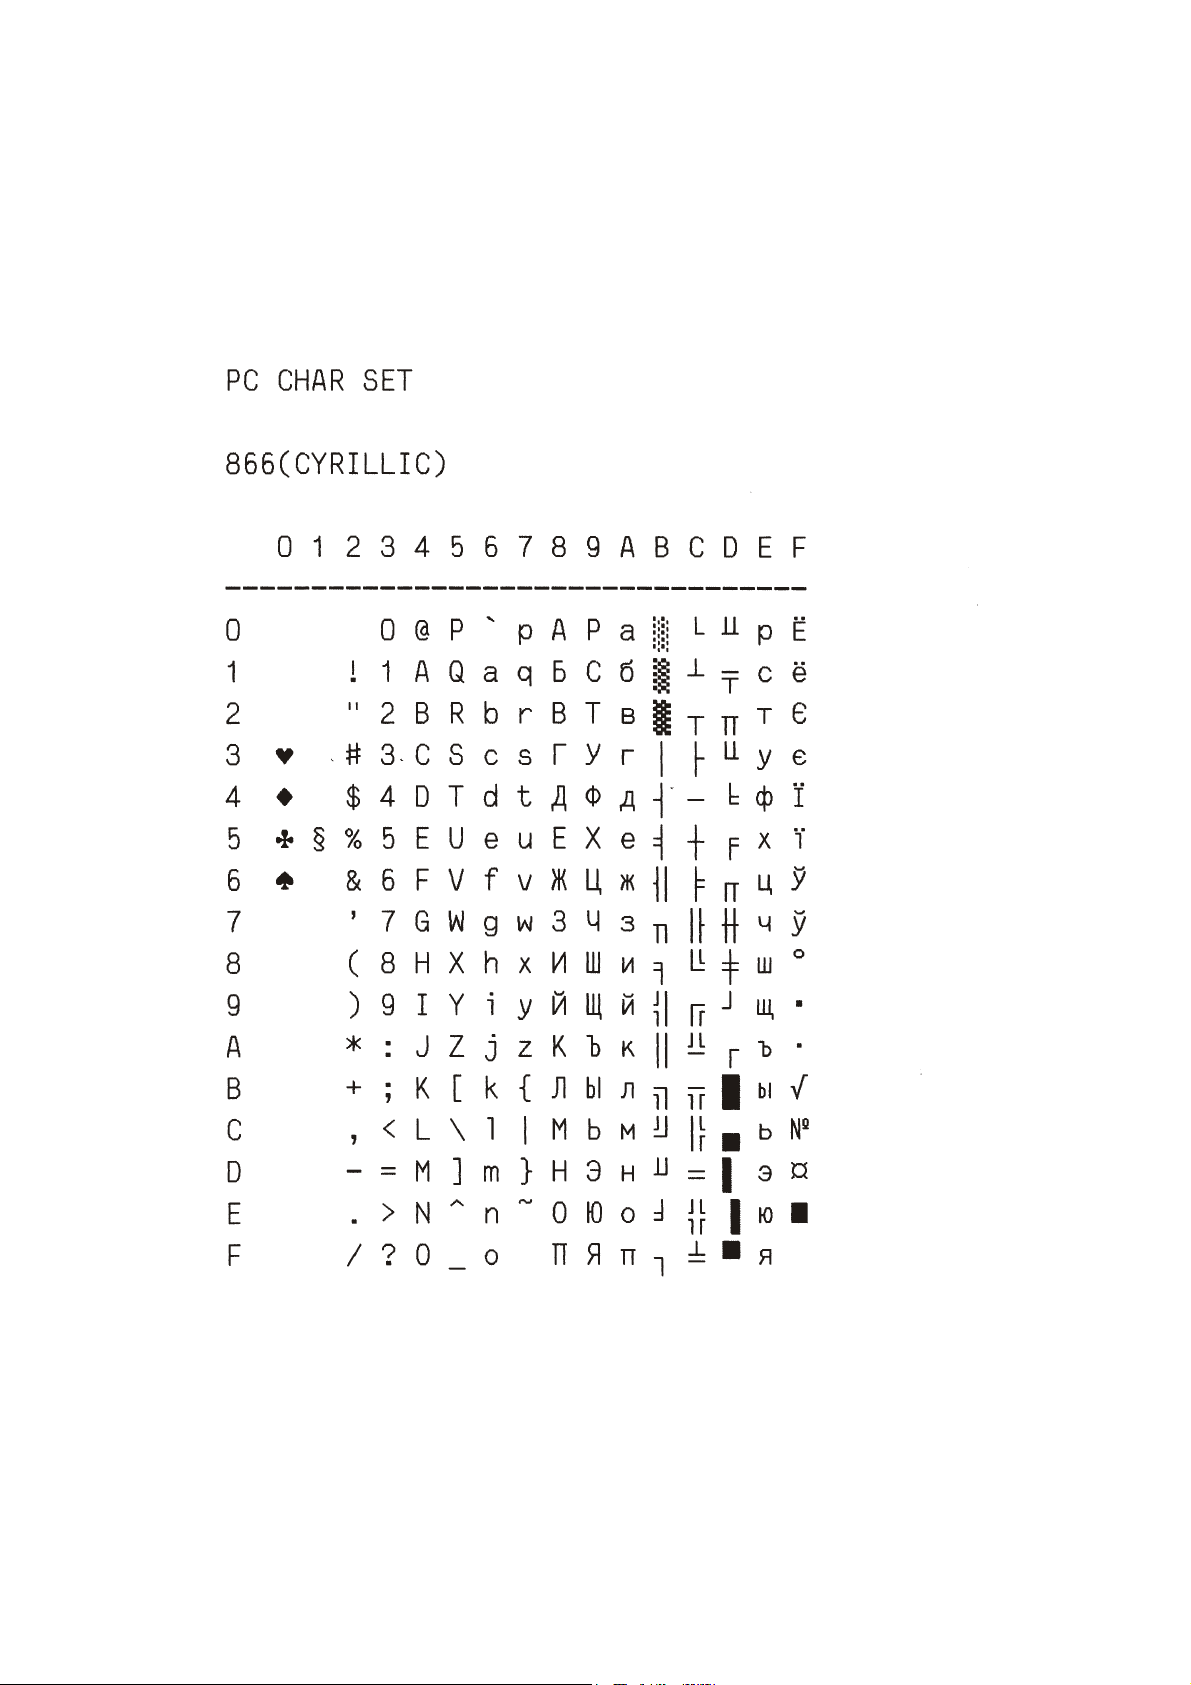
Appendix A Code Pages
A-18
Page 92
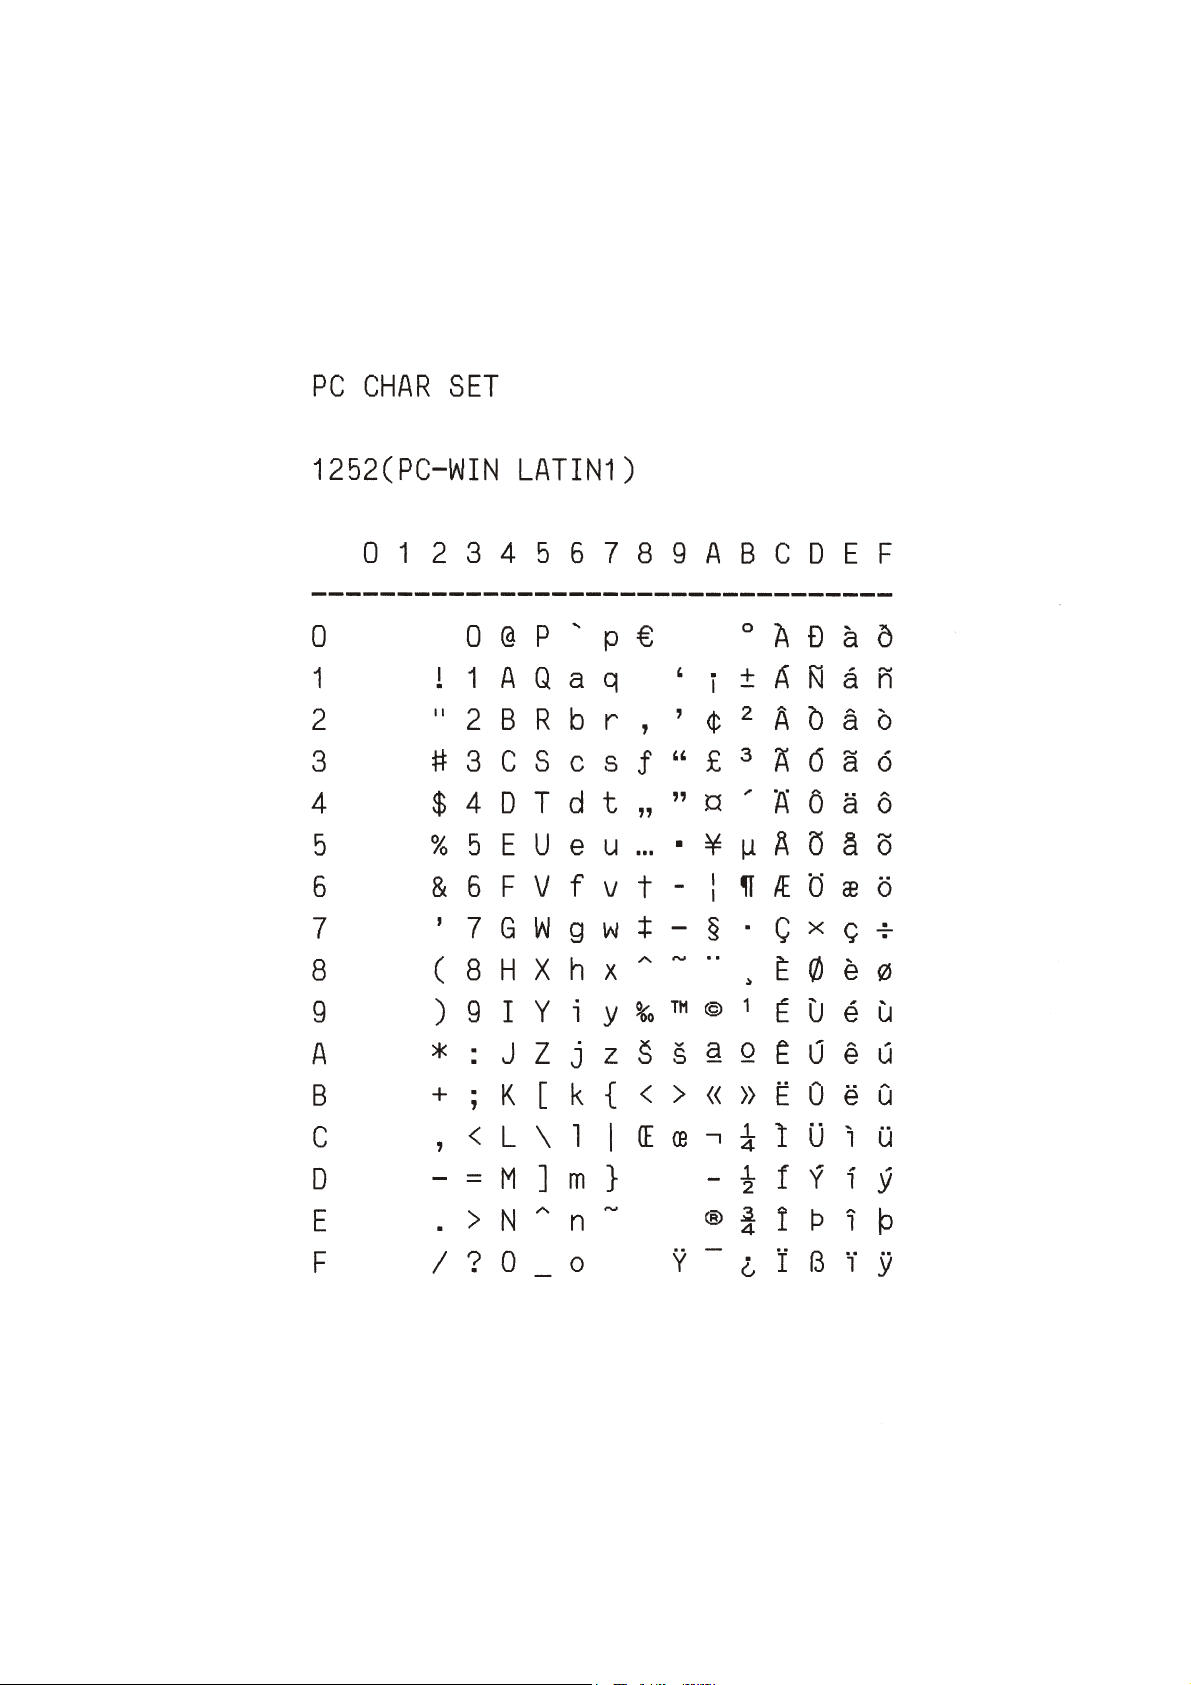
Appendix A Code Pages
A-19
Page 93
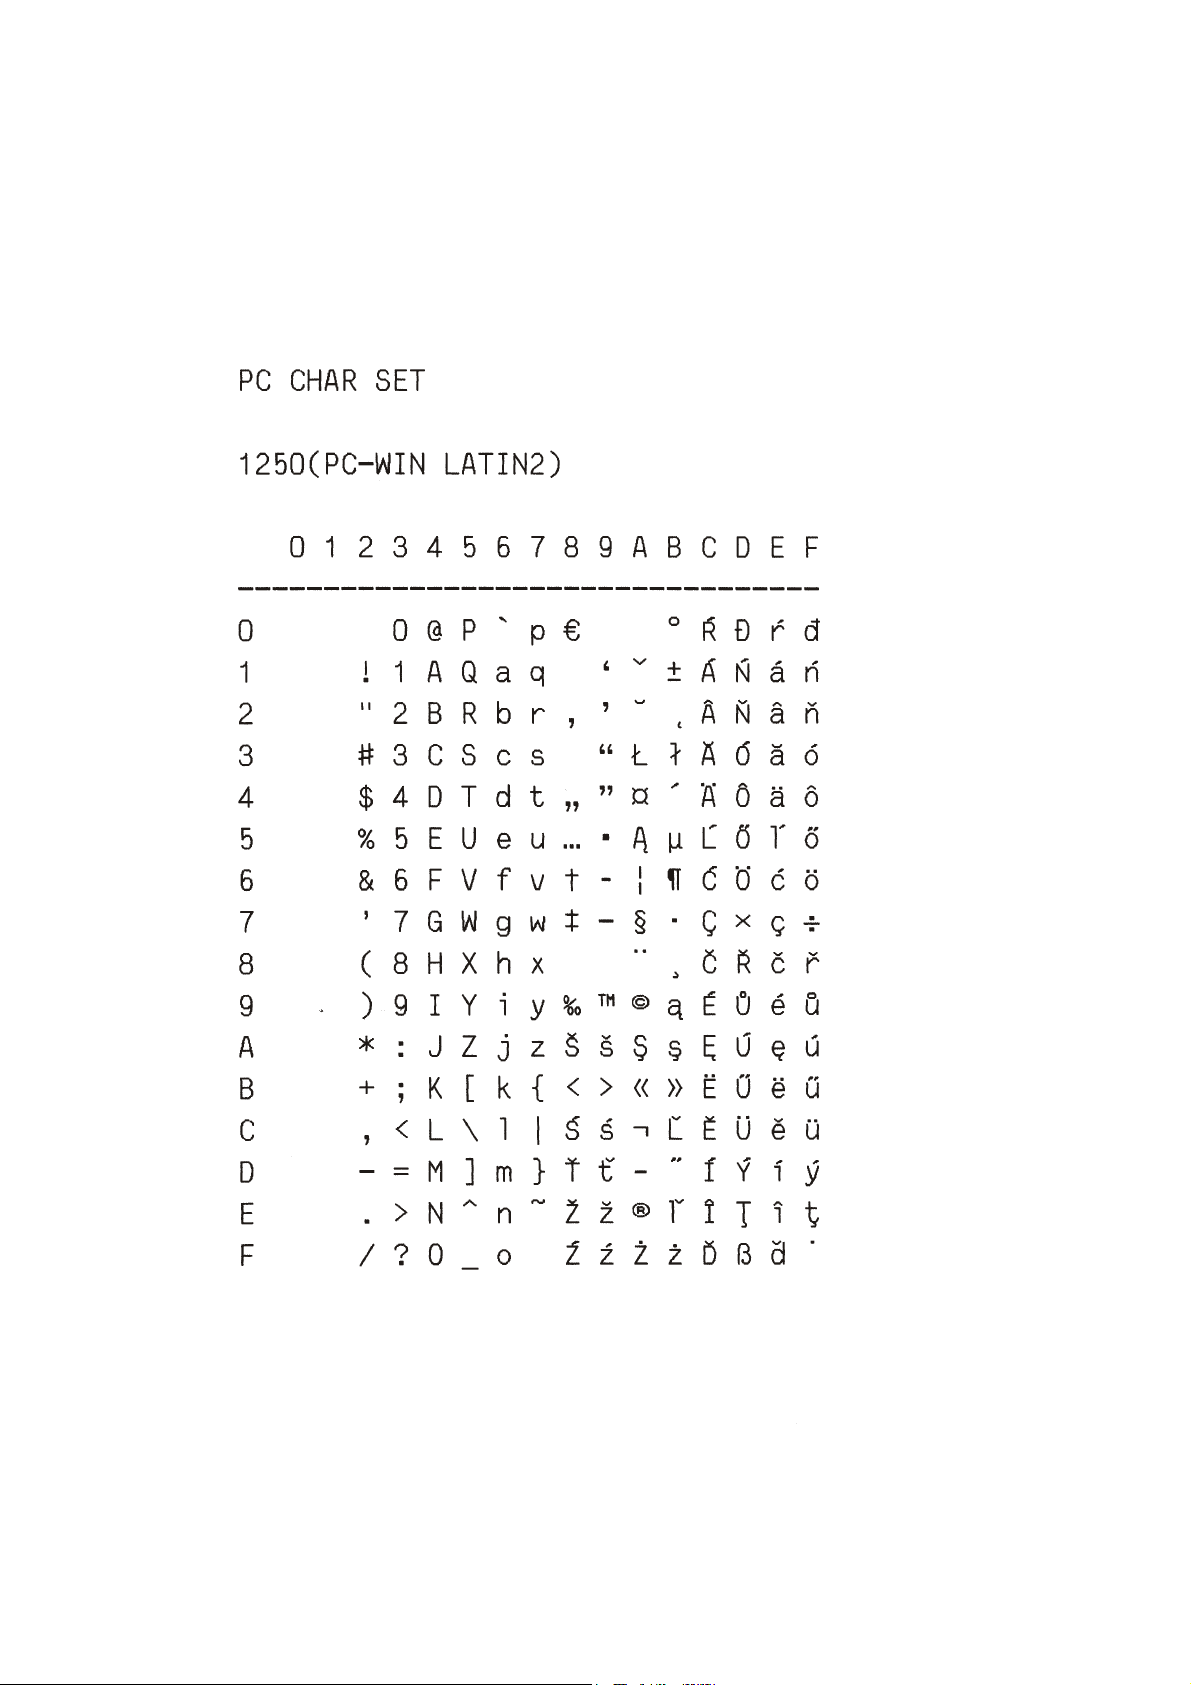
Appendix A Code Pages
A-20
Page 94
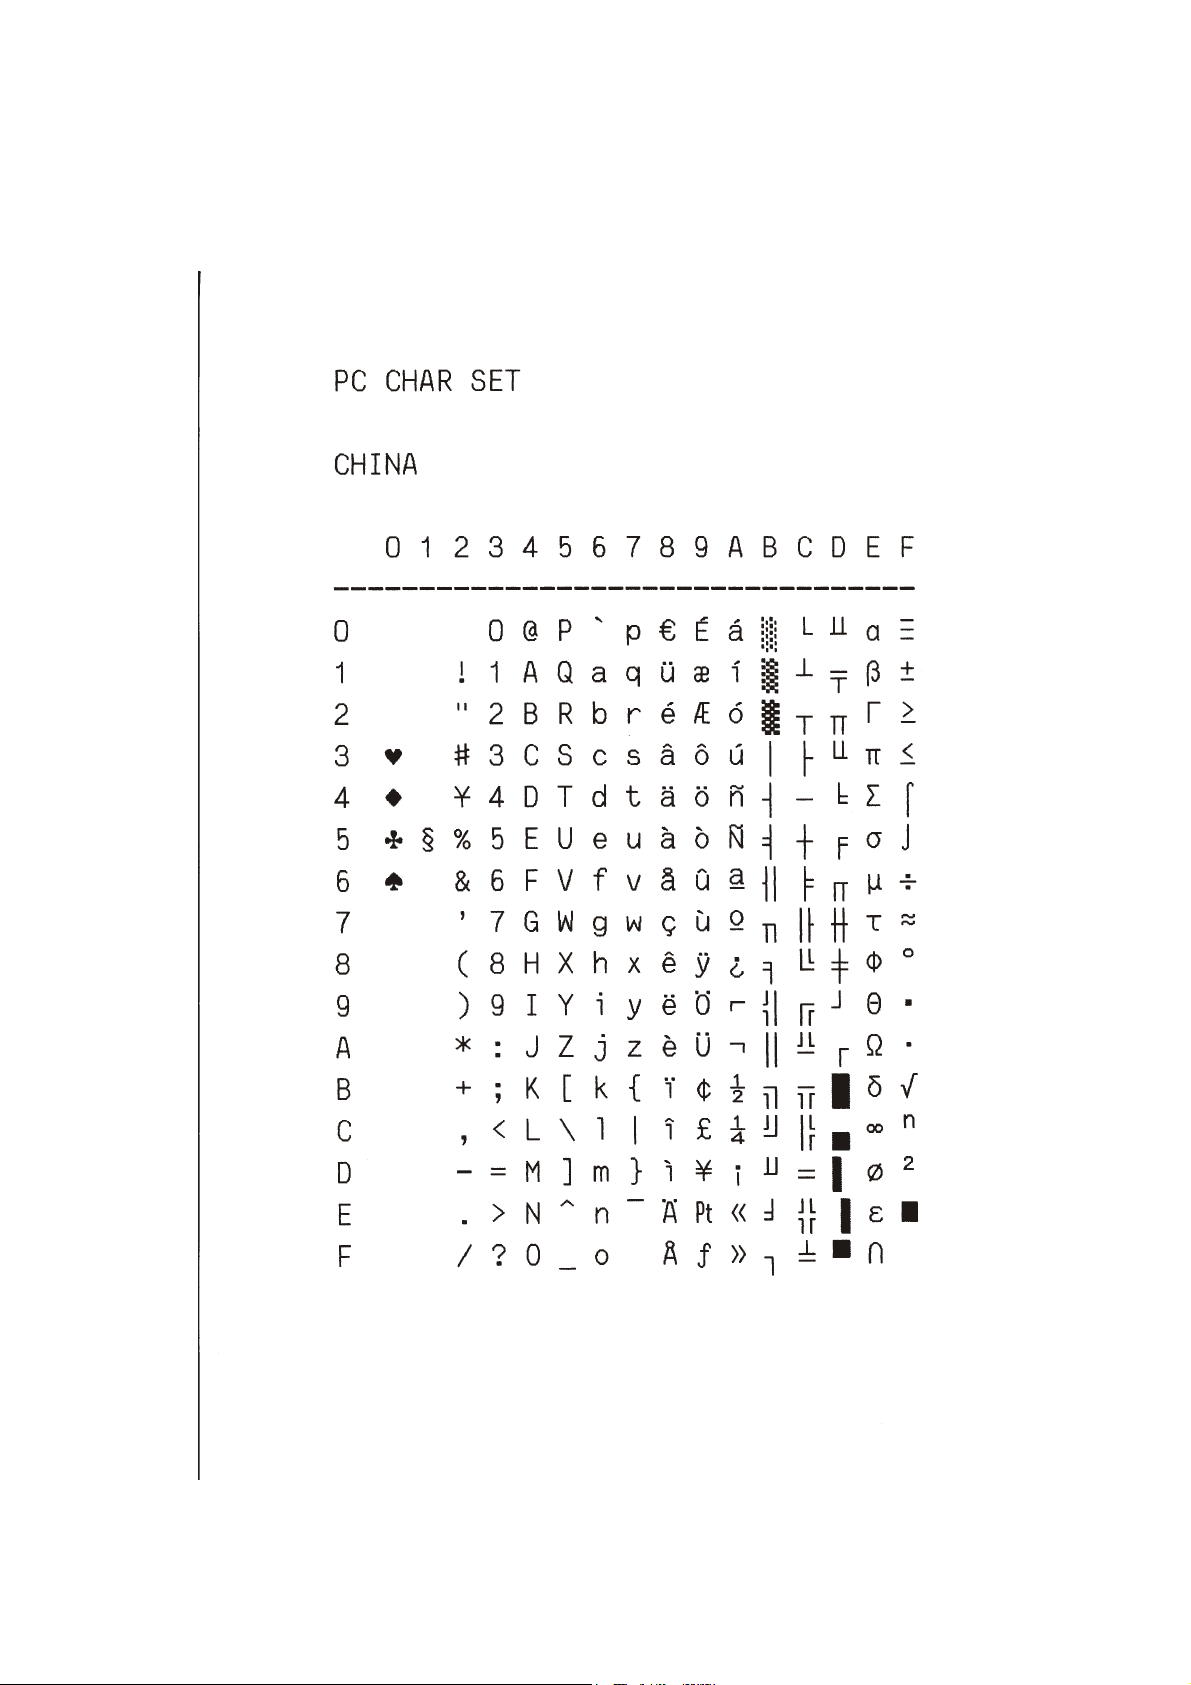
Appendix A Code Pages
A-21
Page 95
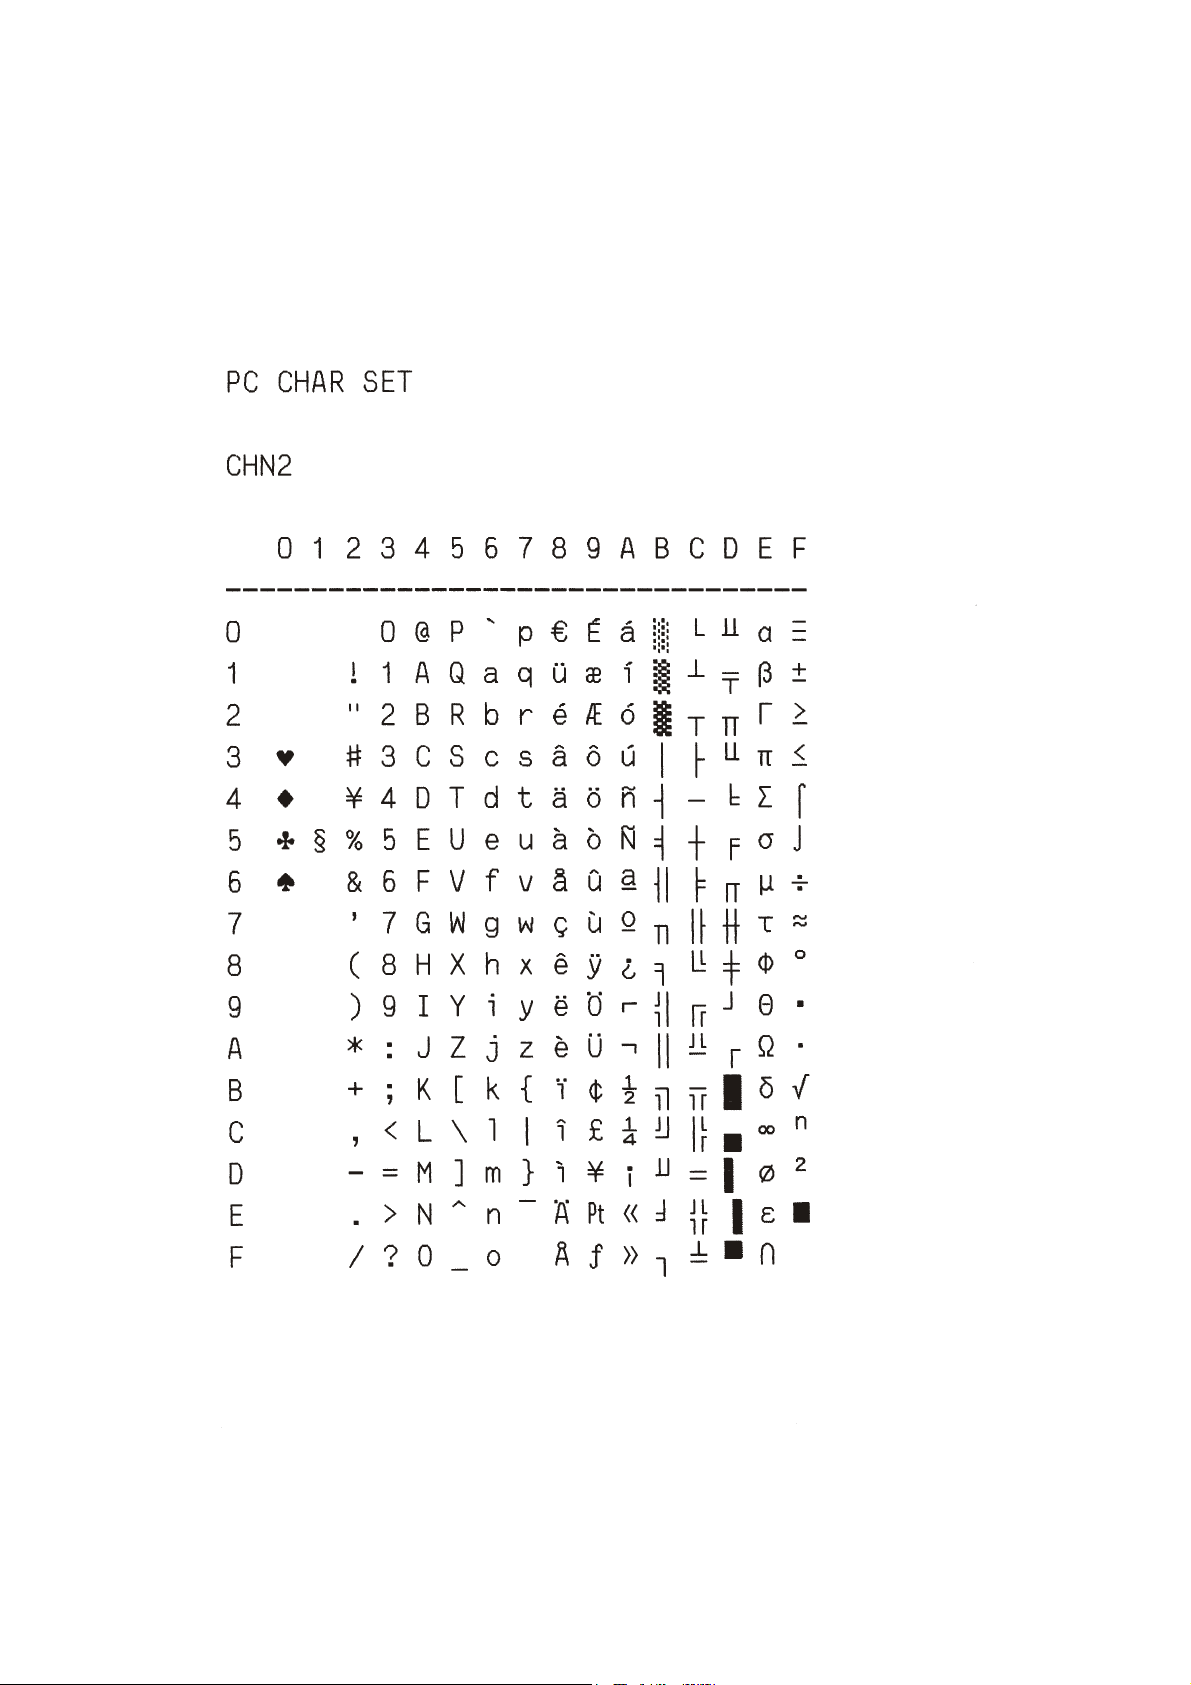
Appendix A Code Pages
A-22
Page 96
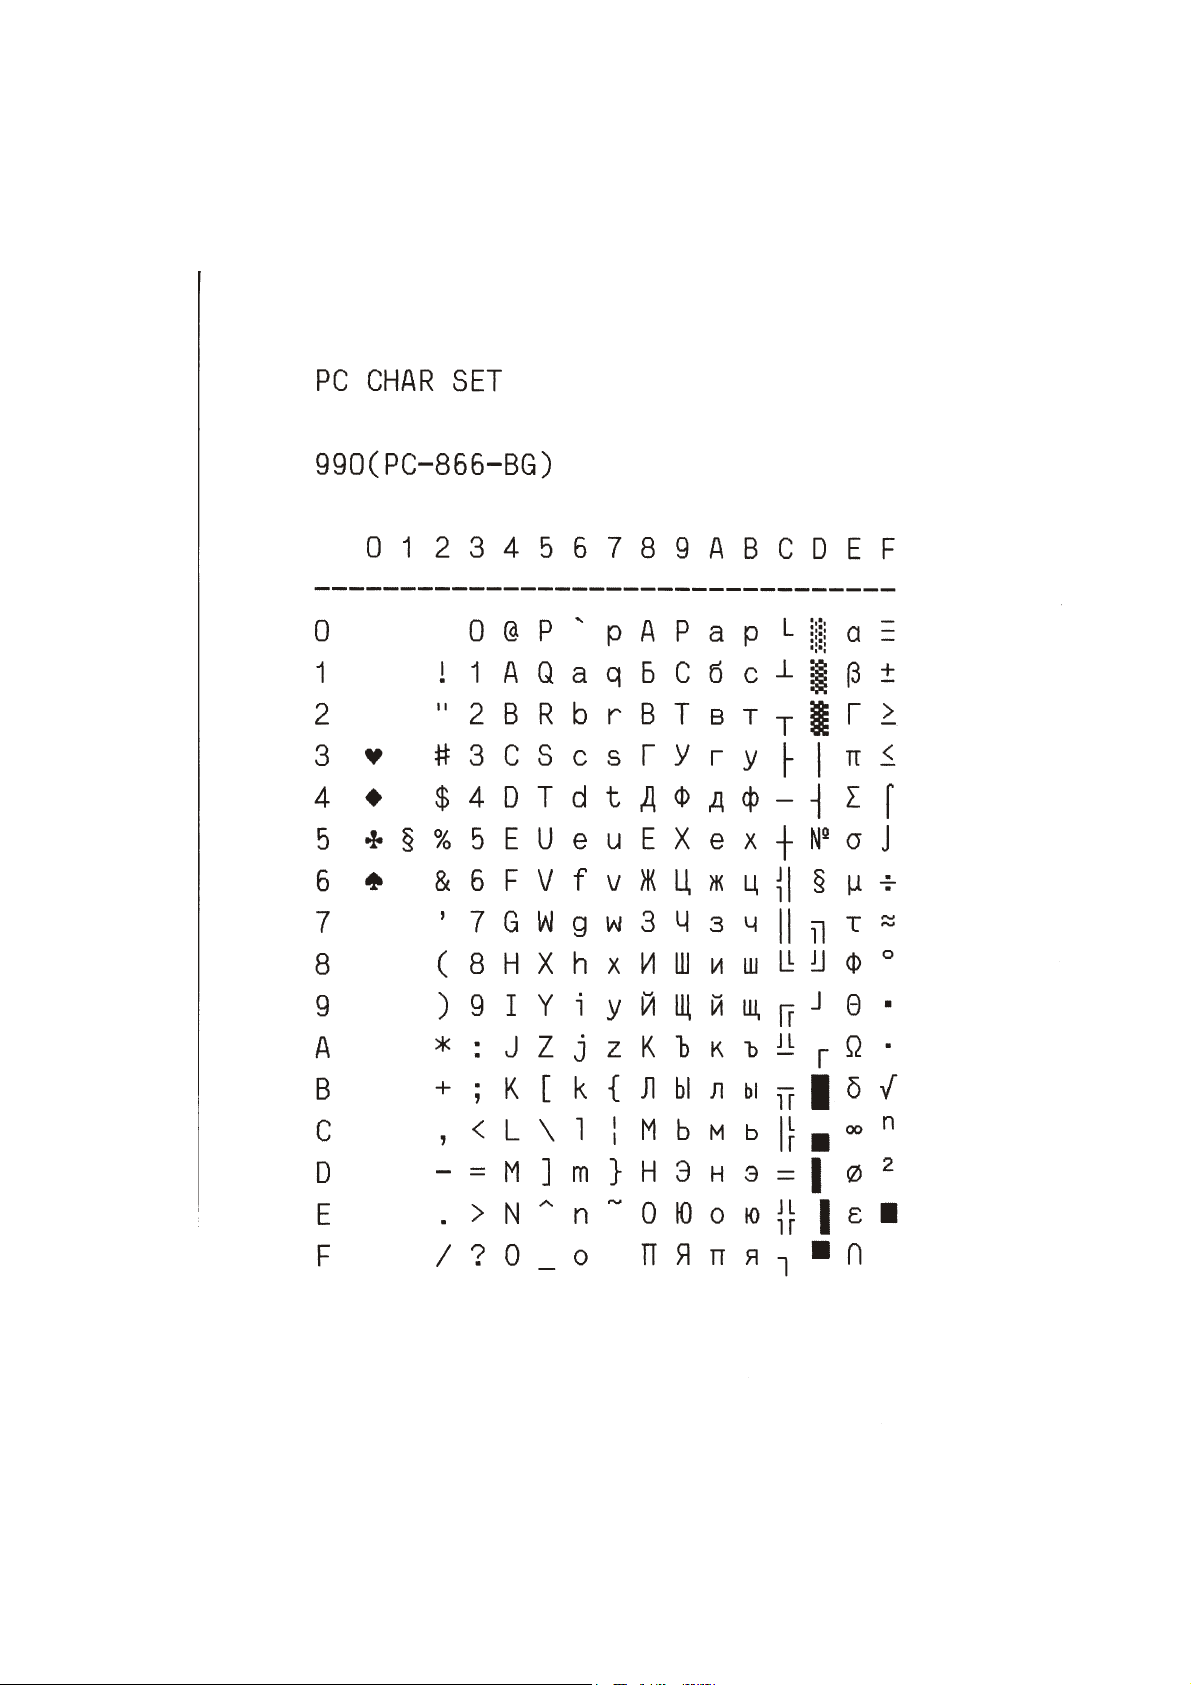
Appendix A Code Pages
A-23
Page 97
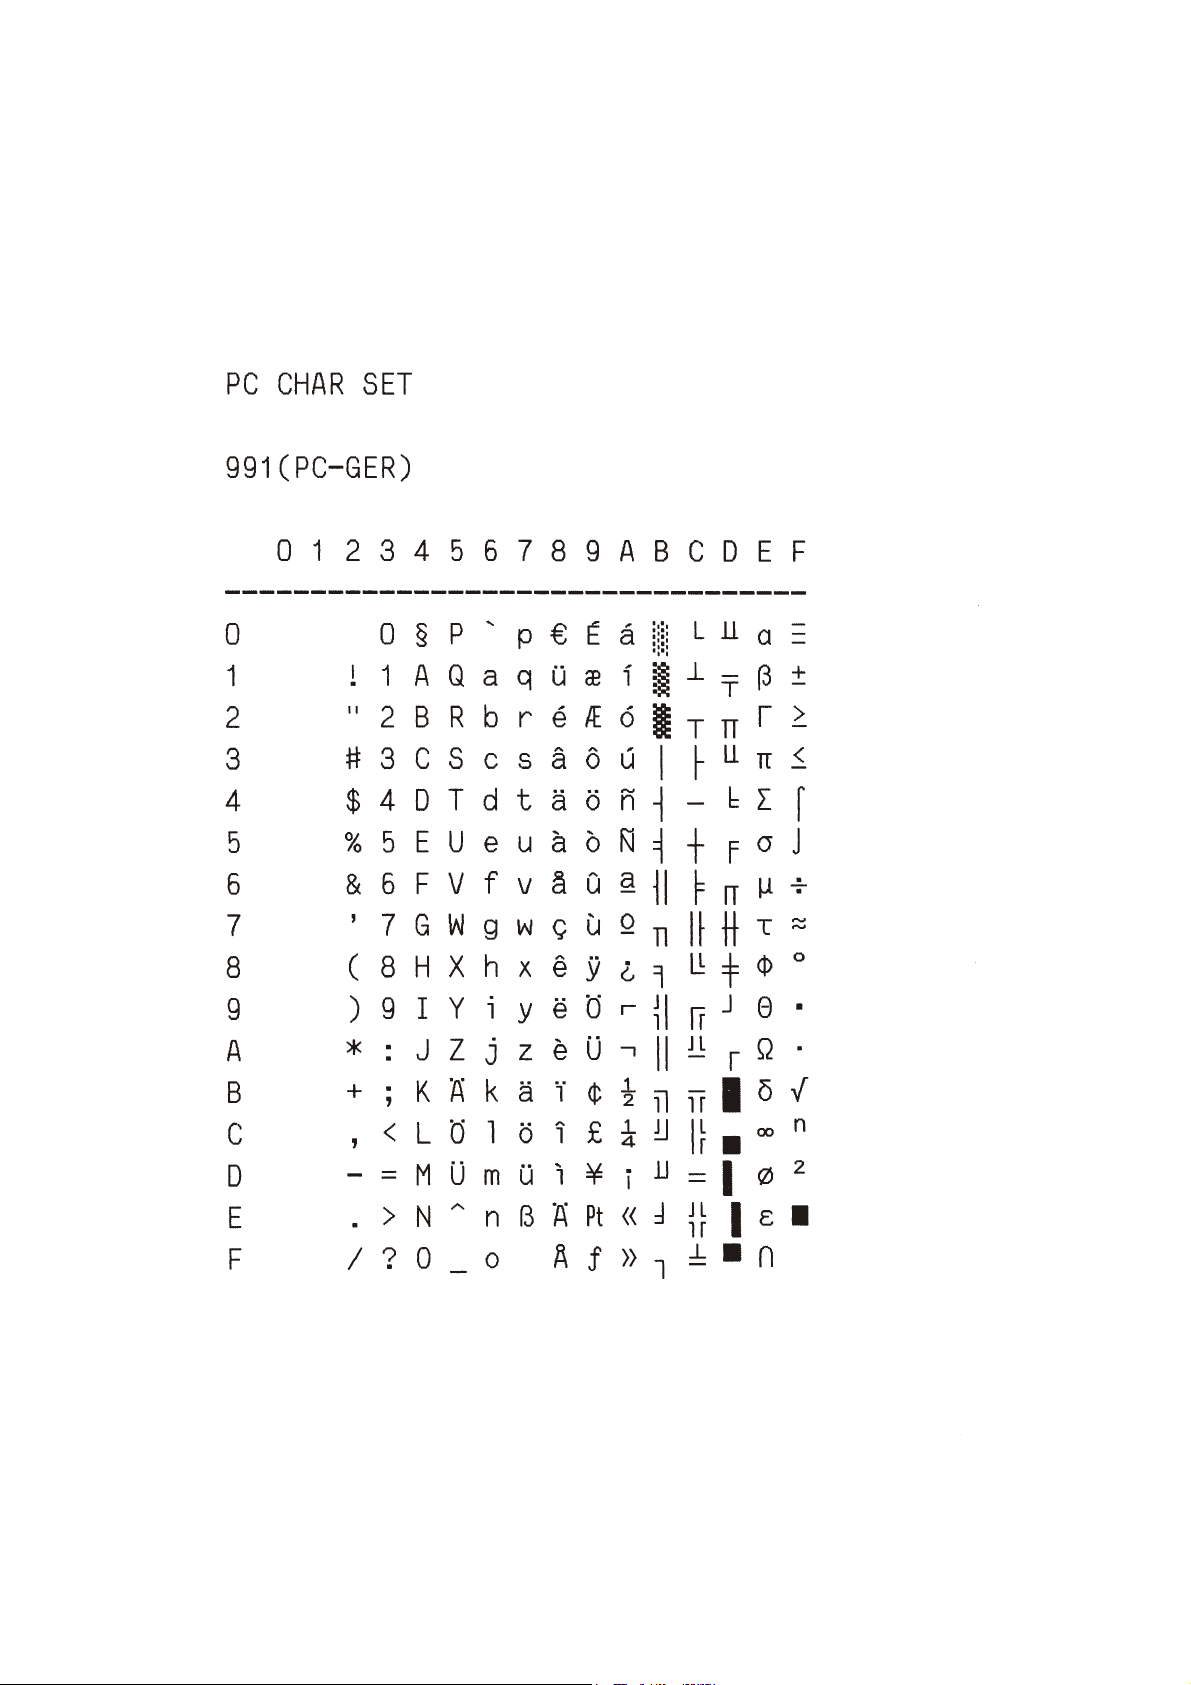
Appendix A Code Pages
A-24
Page 98
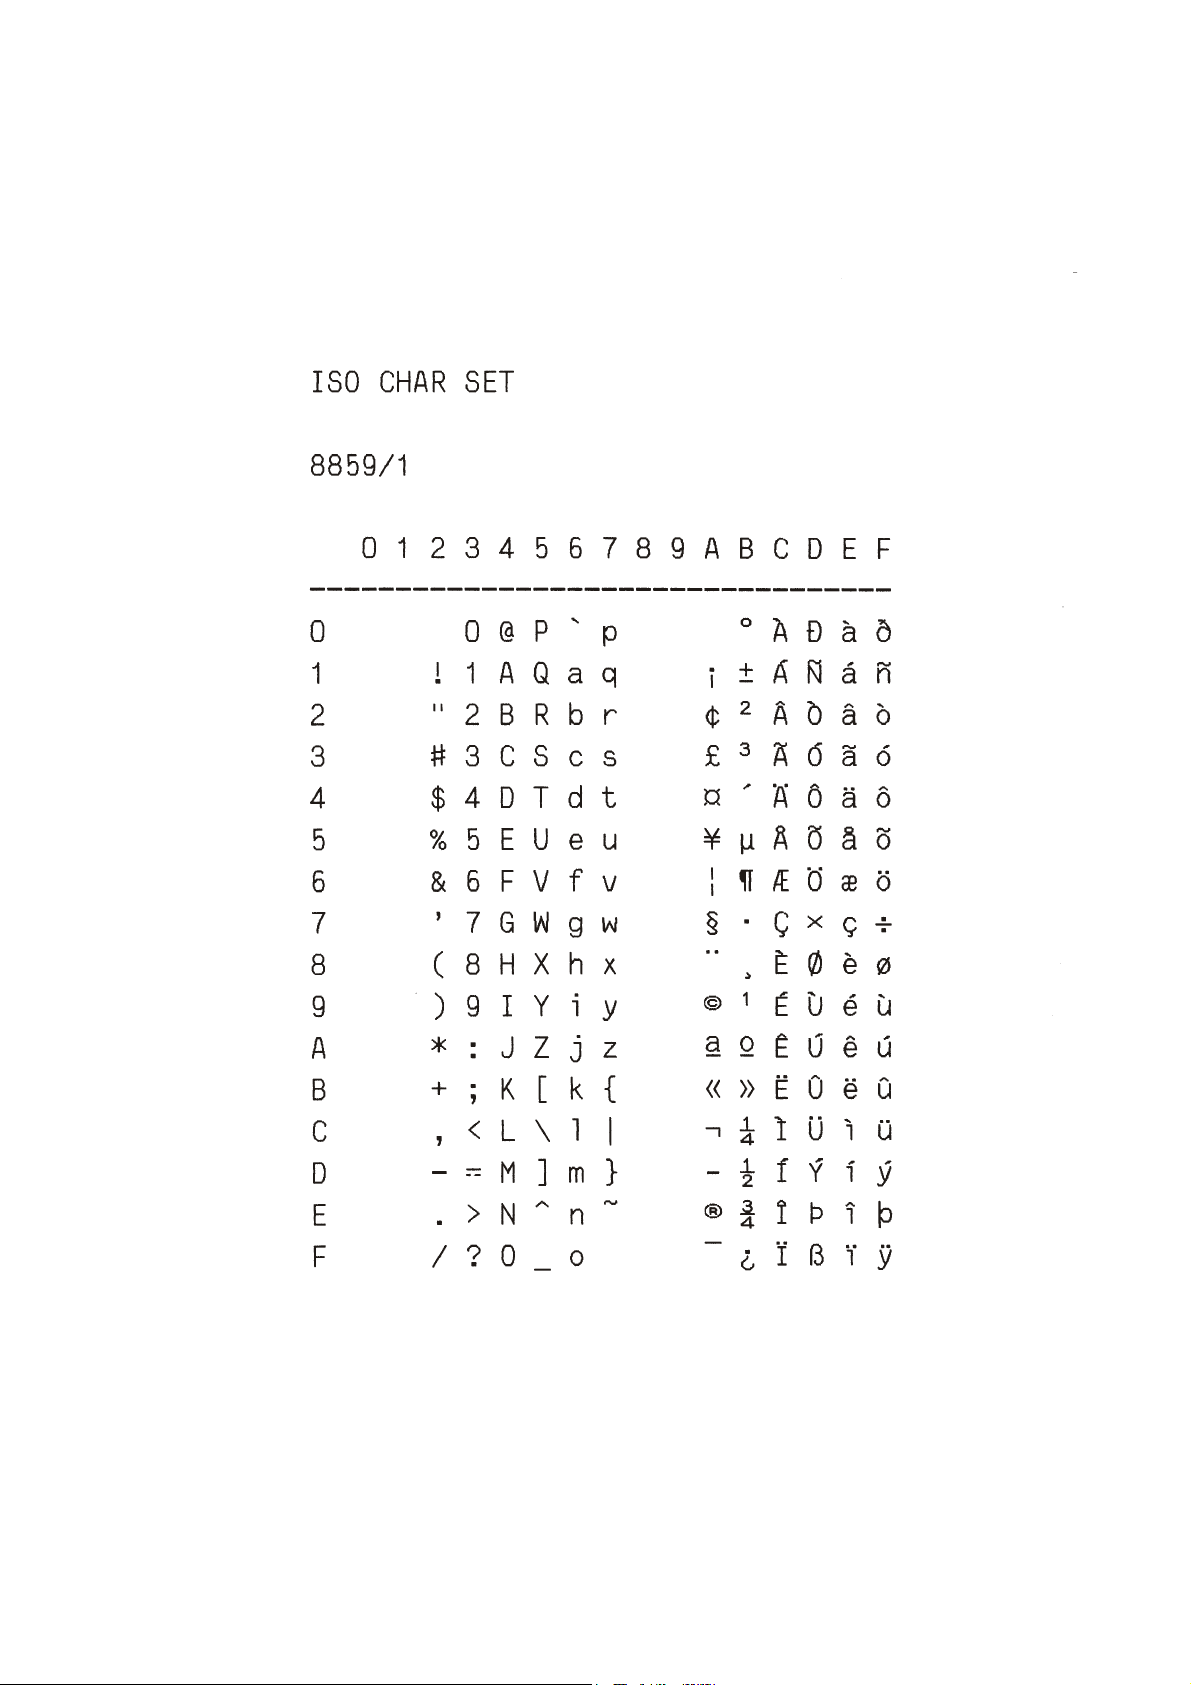
A.2 ISO Character Sets
Appendix A Code Pages
A-25
Page 99
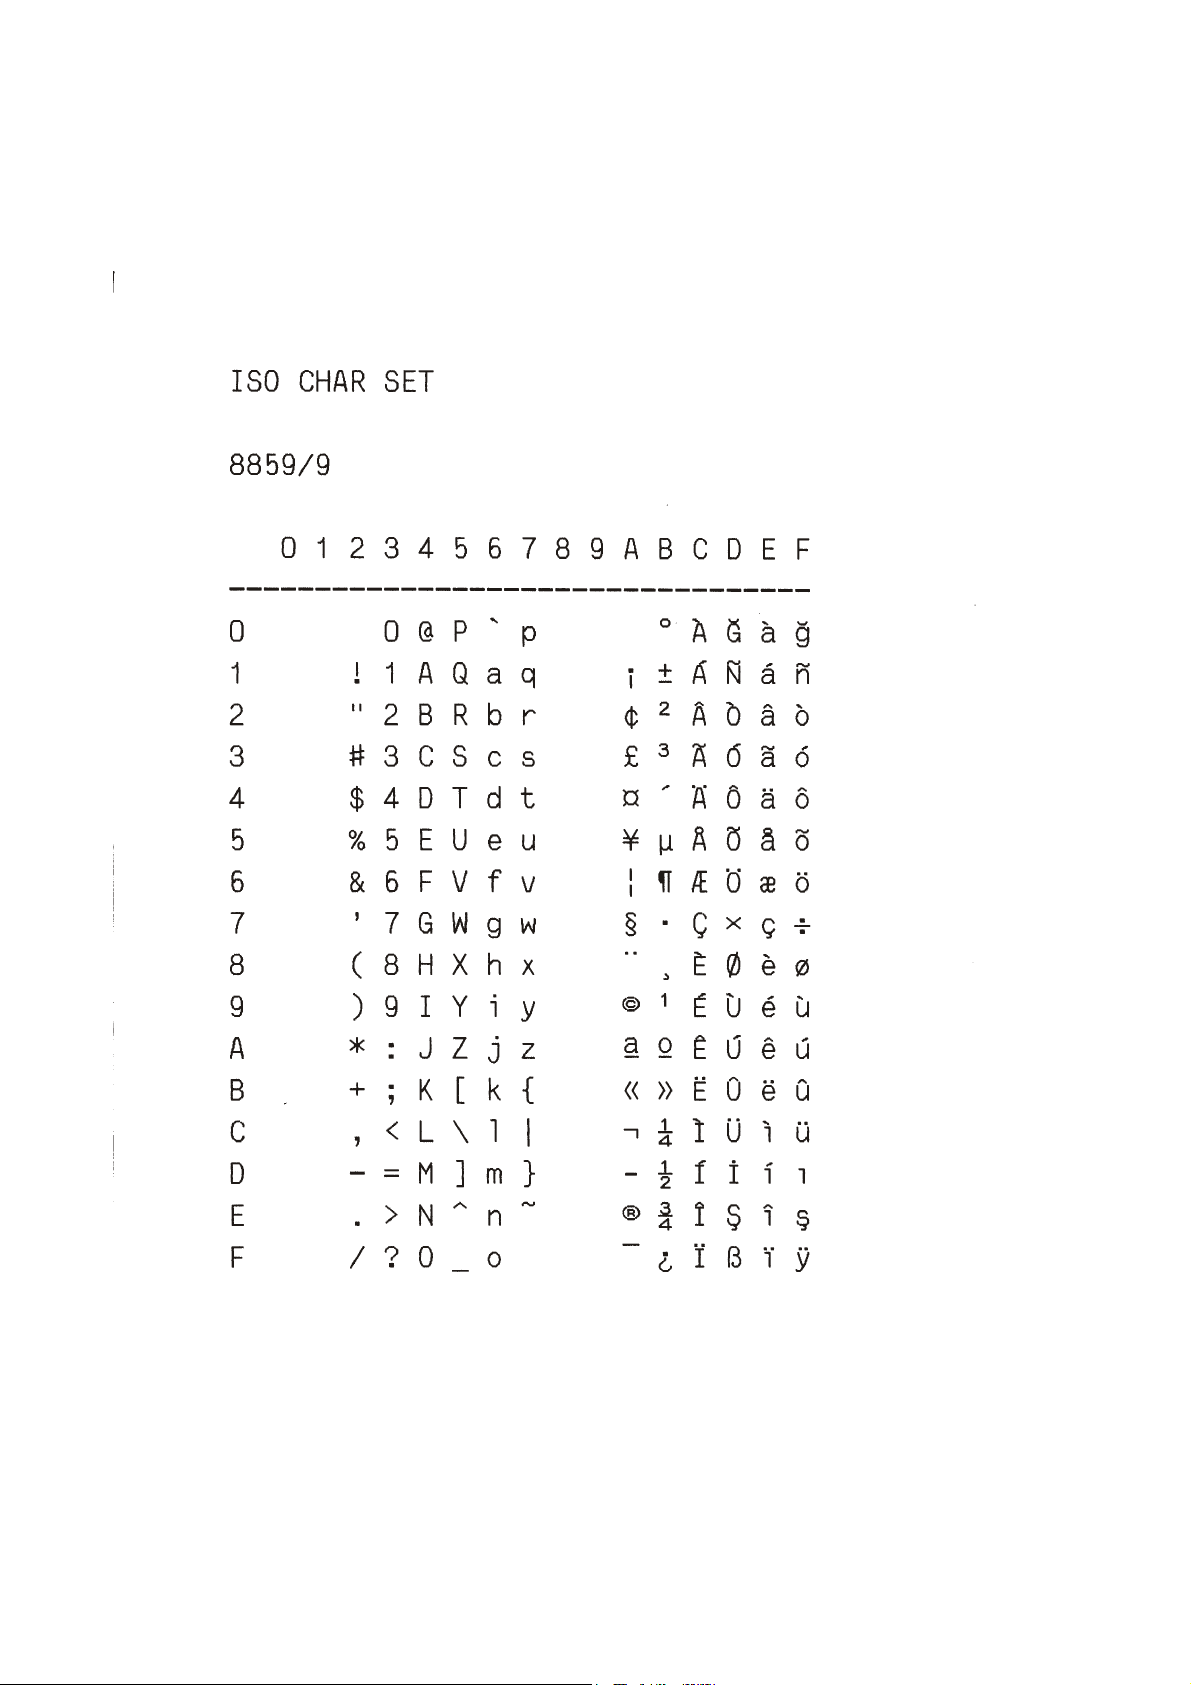
Appendix A Code Pages
A-26
Page 100
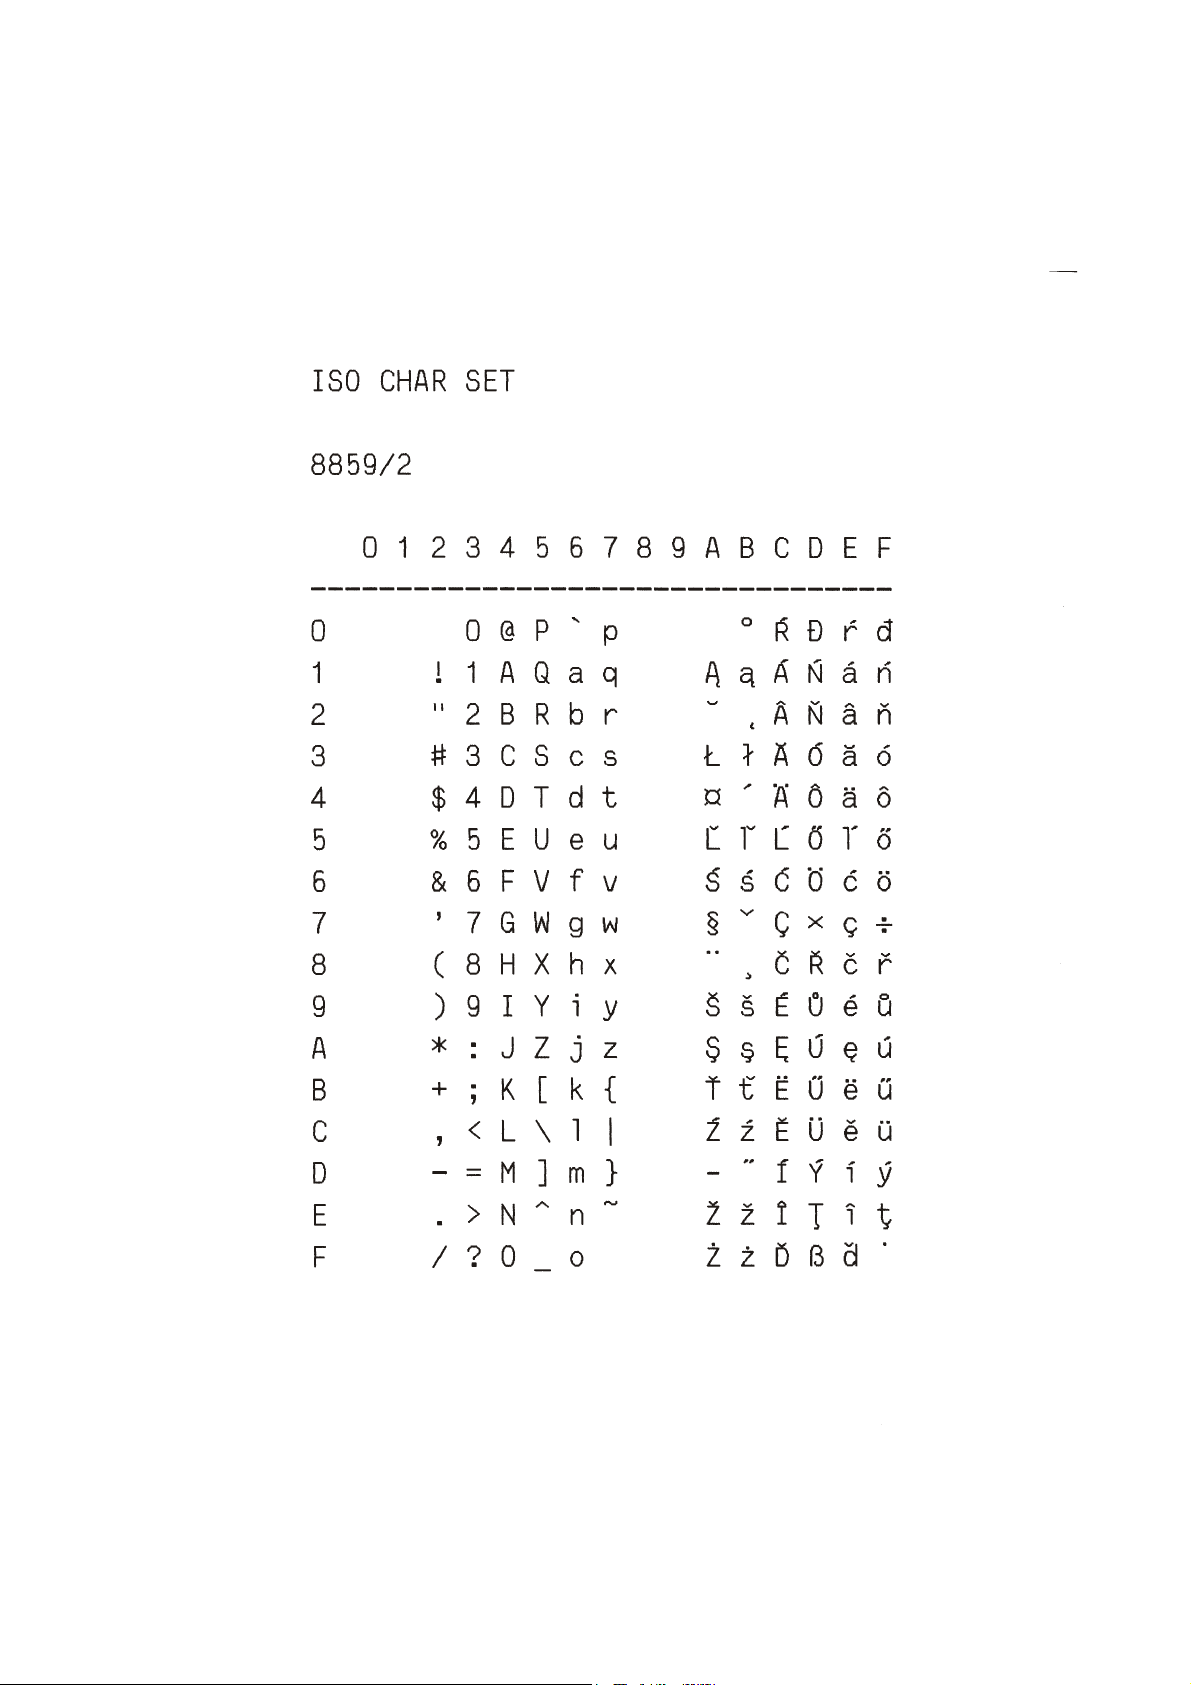
Appendix A Code Pages
A-27
 Loading...