

Oster Stainless Steel Flip Belgian Waffle Maker, CKSTWFBF20 User Manual

FLIP BELGIAN WAFFLE MAKER
WAFLERA BELGA FLIP
User Guide/ Guía del Usuario:
CKSTWFBF20
www.oster.com
For product questions contact:
Sunbeam Consumer Service
USA : 1.800.334.0759
Canada : 1.800.667.8623
www.oster.com
©2010 Sunbeam Products, Inc. doing business as
Jarden Consumer Solutions. All rights reserved.
Distributed by Sunbeam Products, Inc. doing business as
Jarden Consumer Solutions, Boca Raton, Florida 33431.
Para preguntas sobre los productos llame:
Sunbeam Consumer Service
EE.UU.: 1.800.334.0759
www.oster.com
©2010 Sunbeam Products, Inc. operando bajo el nombre de
Jarden Consumer Solutions. Todos los derechos reservados.
Distribuido por Sunbeam Products, Inc. operando bajo el
nombre de Jarden Consumer Solutions, Boca Raton, Florida 33431.
SPR-070710 P.N. 141974
Printed in China
Impreso en China
Safety
Seguridad
How to use
Cómo usar
Cleaning
Cuidado y Limpieza
Recipes
Recetas
Warranty
Garantía

www.oster.com
www.oster.com
IMPORTANT SAFEGUARDS
When using electrical appliances, basic safety precautions should always be followed,
including the following:
Read all instructions before using. 1.
Make sure the voltage in your outlet is the same as the voltage indicated on the 2.
appliance’s rating label.
To protect against risk of electric shock, do not immerse the cord, plug or cooking unit 3.
in water or any other liquid.
Do not touch hot surfaces. Use handles. 4.
This appliance should not be used by children. 5.
Extreme caution must be exercised when any appliance is used near children. 6.
Unplug from wall outlet when not in use and before cleaning. Allow to cool before 7.
cleaning or storing this appliance.
Never yank the cord to disconnect the cooking unit from the outlet. Instead, grasp the 8.
plug and pull to disconnect.
Do not operate any appliance if the cord is damaged. Do not use this appliance if the 9.
unit malfunctions, if it is dropped or has been damaged in any manner.
In order to avoid the risk of an electric shock, never try to repair the Flip Belgian 10.
Wa e Maker yourself. Take it to an authorized service center for examination and
repair. An incorrect reassembly could present a risk of electric shock when the Flip
Belgian Wa e Maker is used.
The use of accessories or attachments not recommended by the manufacturer may 11.
cause re, electrical shock or injury.
Do not use outdoors or for commercial purposes. 12.
Do not use this appliance for purposes other than the one for which it was designed. 13.
Do not let the electrical cord hang over the edge of the table or countertop, or touch 14.
hot surfaces.
Do not place on or near a hot gas or electric burner or heated oven. 15.
Use on a heat-resistant, at level surface only. 16.
Use extreme caution when moving any appliance containing hot food, water, oil or 17.
other liquids.
To disconnect, remove plug from outlet. 18.
Always unplug after use. The appliance will remain on unless unplugged. 19.
CAUTION: This appliance generates heat during use. Proper precautions must be taken 20.
to prevent the risk of burns, re or other damage to persons or property.
When using this appliance, provide adequate ventilation above and on all sides for 21.
air circulation. Do not allow this appliance to touch curtains, wall coverings, clothing,
dish towels or other ammable materials during use.
THIS UNIT IS INTENDED FOR
HOUSEHOLD USE ONLY.
This appliance has a polarized alternating current plug (one blade is wider than the other).
To reduce the risk of electric shock, as a safety feature, this plug will t in a polarized outlet
only one way. If the plug does not insert fully in the outlet, reverse the plug. If it still fails to
t, contact a quali ed electrician.
DO NOT ATTEMPT TO DEFEAT THIS SAFETY FEATURE.
EXTENSION CORD USE
A short power-supply cord is provided to reduce the risk resulting from becoming entangled
in or tripping over a longer cord. An extension cord may be used if care is exercised in its
use. If an extension cord is used, the electrical rating of the cord must be at least as great as
the electrical rating of the appliance. The extension cord should be arranged so that it will
not drape over the countertop or tabletop where it can be pulled on by children or tripped
over unintentionally.
SAVE THESE INSTRUCTIONS
Thank you for purchasing the OSTER® Flip Belgian Waffl e
Maker. Before you use this product for the fi rst time, please take a
few moments to read these instructions and keep it for reference.
Pay particular attention to the Safety Instructions provided. Please
review the product service and warranty statements. Please do not
return to the place of purchase. To learn more about Oster® products,
please visit us at www.oster.com or call us at 1-800-334-0759.
2
3
www.oster.com
www.oster.com
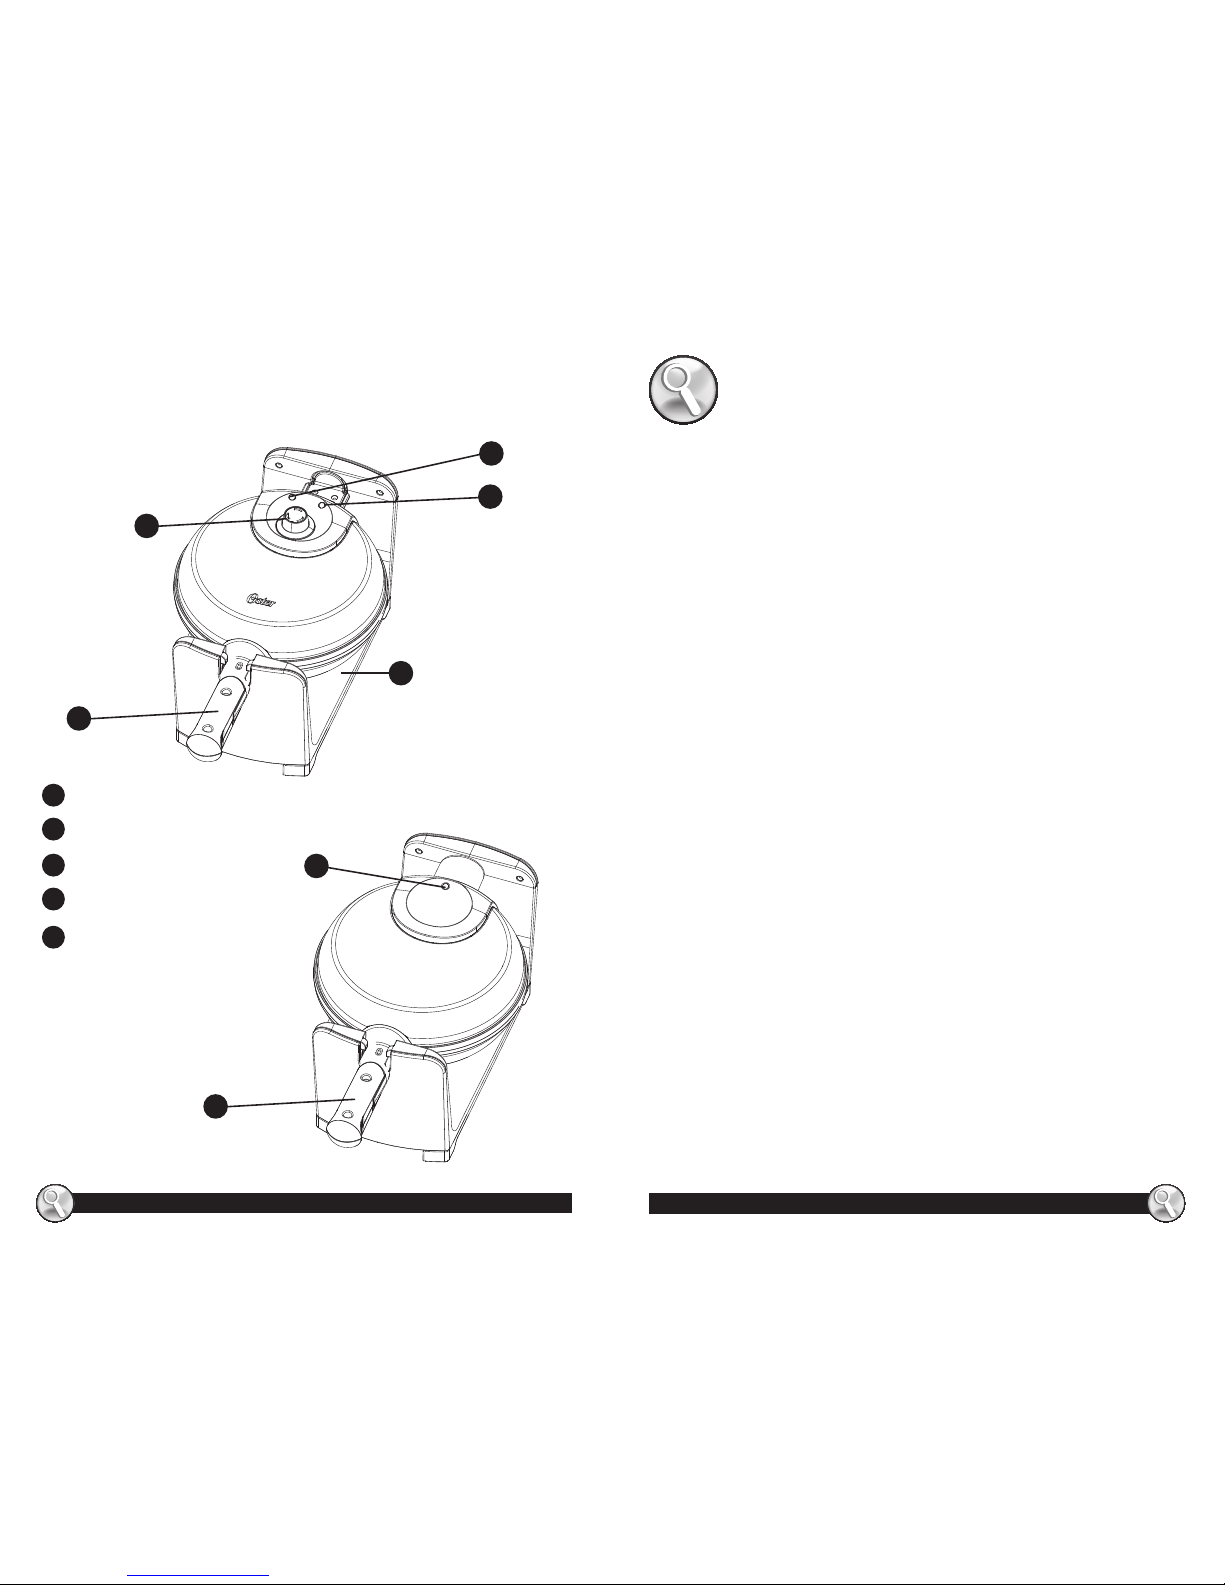
LEARNING ABOUT YOUR
FLIP BELGIAN WAFFLE MAKER
4
5
a
Red Power Light
Green Ready Light
Temp. Control Knob
Removable Drip Tray
Folding Handle
b
c
d
e
HOW TO:
USING YOUR OSTER® FLIP BELGIAN WAFFLE MAKER
For best results, follow these simple instructions.
When your waffl e maker is heated for the fi rst time, it may
emit slight smoke or odor. This is normal with many heating
appliances. This does not aff ect the safety of your appliance.
However, it may aff ect the fl avor of the fi rst set of waffl es
prepared in your waffl e maker, and it is recommended that
you discard these.
Preparing Your Flip Belgian Waffl e Maker
1 Close the waffl e maker and plug it into the wall outlet, you
will notice that the red power light will turn on. Turn the
temperature control knob to the desired setting. It will take
approximately 5 to 8 minutes to reach baking temperature.
When the Green Ready Light goes on, the waffl e maker is
ready for use.
2 Before baking the fi rst waffl es of the day, use a pastry brush
to lightly coat the top and bottom waffl e grids with
vegetable oil. A light coating of non-stick cooking spray
also works well.
Baking
1 When the proper baking temperature is reached, the green
light will go on. Once heated up, cycle times will be faster.
2 Pour batter onto bottom grid of waffl e maker. Ladle just
enough batter to fi ll lower grid so that the peak area of the
grid is covered. If necessary, use a spatula to spread the
batter in to the corners of the grid. At this point the green
light will go off as the baking cycle begins.
Top View of
Waffl e Maker
c
a
b
d
Bottom View of Waffl e Maker
Rotated 180 Degrees
e
e
b

www.oster.com
www.oster.com
6
7
3 Close waffl e maker and rotate unit 180º to the right
(clockwise). Do not open for at least 1
1
⁄2 minutes. Opening
the lid too soon will cause under-baked waffl es to split,
making them diffi cult to remove.
4 When the green light goes on again, rotate waffl e maker 180º
to the left (counterclockwise). Your waffl es should be done
according to the Waffl e Temperature Control setting that
you’ve chosen. If you want them darker, close the lid and
continue baking until the desired color is achieved.
5 Remove waffl es from the grid using non-metallic utensils.
6 If additional baking is to be done, close waffl e maker to
retain heat. Always be sure the green light goes on again
before making more waffl es.
7 If you need to take a short break, close waffl e maker to
maintain heat. When you return to baking, you will notice
that the fi rst waffl es will bake faster because extra heat has
been allowed to build up.
8 Close supervision is necessary when any appliance is being
used by or near children.
9 When baking is complete, simply unplug the power cord
from wall outlet. Leave waffl e maker open to cool. Do not
clean until unit has cooled.
Waffl e Baking Tips
1 Set the Waffl e Temperature Control to your desired setting.
At fi rst, try a setting in the middle. You may later adjust it
lower or higher according to your preference. A lower setting
produces a lighter colored waffl e, while waffl es made at a
higher setting are darker and crisper. Diff erent waffl e batters
will also cook up diff erently. Over time, you will fi nd your
perfect setting for the batter you use.
2 When preparing waffl e batter, do not over mix or waffl es will
be tough. Stir batter only until large lumps of dry ingredients
disappear.
3 The optimal amount of batter to produce a full-shaped
waffl e, without overfl owing, will vary with diff erent waffl e
batters. Pouring batter from a measuring cup will help you
gauge how much batter to use each time. Fill bottom grid
of waffl e maker with enough batter to cover peak areas of
the grid.
4 For more evenly shaped waffl es, spread thick batters to
outer edge of grid, using a heat proof rubber spatula or
other non-metallic utensil before closing lid.
5 Cake-based waffl es, such as the Chocolate Waffl es are more
tender than regular waffl es, and may require more care
when removing from waffl e maker. You may want to break
these waffl es into halves or quarters before removing. Use
a spatula to support waffl es when removing from the
waffl e maker.
6 To retain crispness, move baked waffl es to a wire cooling
rack to prevent steam from accumulating underneath.
7 When serving several waffl es at one time, keep waffl es
hot and crisp by placing on a rack in a preheated 200°F
oven until ready to serve.
8 Already cooled waffl es can be re-warmed and re-crisped,
individually, by returning to hot waffl e maker. Set Waffl e
Temperature Control to low. Place waffl e on grid so grooves
match up; close lid and heat for 1 to 2 minutes, watching
carefully to prevent burning.
9 Baked waffl es freeze well. Cool completely on wire rack.
Store in plastic freezer bag or in covered container,
separating waffl es with wax paper. Reheat frozen waffl es
in toaster oven, oven or toaster until hot and crisp.

www.oster.com
www.oster.com
CARE & CLEANING
Here are a few easy steps to keep your wa e maker
looking and working like new:
1 Always unplug the waffl e maker and allow it to cool before
cleaning. There is no need to disassemble the waffl e maker
for cleaning. Never immerse the waffl e maker in water or
place in dishwasher.
2 Brush away any loose crumbs from the grooves. Wipe grids
clean with a paper towel, absorbing any oil or butter that
might be down in the grooves of the grid. You can also wipe
grids with a damp cloth. Do not use anything abrasive that
can scratch or damage the non-stick coating.
3 Wipe the outside of the waffl e maker with a damp cloth only.
Do not clean the outside with any abrasive scouring pad or
steel wool, as this will damage the fi nish. A little metal polish
suitable for stainless steel may be used occasionally on the
top housing. Do not immerse in water or any other liquid.
Do not place in the dishwasher.
4 Should any batter become baked onto the grids, pour a little
cooking oil onto the hardened batter. Let sit 5 minutes to
soften batter, then wipe off with a paper towel or soft cloth.
5 Do not use metal utensils to remove your waffl es, they can
damage the non-stick surface.
8
9
RECIPES
Classic Waffl es
1 1⁄2 cups all-purpose fl our 3 large eggs, separated
1
⁄2 cup cornstarch 2 tbsp. granulated sugar
2 tbsp. cornmeal (optional) 1 3⁄4 cups milk
1 tbsp. baking powder
1
⁄2 tsp. pure vanilla extract
1 tsp. salt
1
⁄2 cup (1 stick) unsalted butter,
melted
In large bowl, sift or whisk together fl our, cornstarch, cornmeal,
baking powder and salt to blend thoroughly; set aside. In mixer
bowl, beat egg whites until soft peaks form. Add sugar; continue
beating just until stiff peaks form; set aside. Whisk together egg
yolks, milk and vanilla. Using rubber spatula, stir milk mixture
into fl our mixture, blending just until dry ingredients are
moistened. (There should still be small lumps; do not over mix).
Stir in melted butter. Fold in beaten egg whites until combined.
Pour batter onto hot, greased waffl e maker and bake.
Makes about 5
1
⁄2 cups batter
Waffl e Tip: Cornstarch makes the waffl es crisper. If you don’t
have cornstarch, you could still make great waffl es by omitting
cornstarch and increasing fl our to 2 cups. Bake as directed.
Toasted Pecan & Cranberry Waffl es
Sprinkle chopped pecans onto bottom grid of hot, greased
waffl e maker. Pour batter over pecans. Sprinkle dried cranberries
over batter. Close waffl e maker and bake as directed.
 Loading...