

User Manual
Hinged Lid
Electric Skillet
For product questions contact:
Jarden Consumer Service
USA: 1.800.334.0759
Canada: 1.800.667.8623
www.oster.com
©2011 Sunbeam Products, Inc. doing business as Jarden Consumer Solutions. All rights
reserved. Distributed by Sunbeam Products, Inc. doing business as Jarden Consumer
Solutions, Boca Raton, Florida 33431.
Para preguntas sobre los productos llame:
Jarden Consumer Service
EE.UU.: 1.800.334.0759
Canadá: 1.800.667.8623
www.oster.com
©2011 Sunbeam Products, Inc. operando bajo el nombre de Jarden Consumer Solutions.
Todos los derechos reservados. Distribuido por Sunbeam Products, Inc. operando bajo el
nombre de Jarden Consumer Solutions, Boca Raton, Florida 33431.
Manual de Instrucciones
Sartén Eléctrica
Tapa con Bisagras
Printed in China SPR-030411-197 Impreso en China
Visit us at www.oster.com
P.N. 149170

IMPORTANT SAFEGUARDS
When using your electric skillet, basic safety precautions should always be
followed, including the following:
READ ALL INSTRUCTIONS
• Be sure that lid handles are assembled and fastened properly.
• Do not touch hot surfaces, use handles.
• To protect against electric shock, do not immerse the temperature controller,
cord or plug in water or other liquids.
• Close supervision is necessary when any appliance is used by or near children.
• Unplug the appliance from the outlet when not in use and before cleaning.
Allow appliance to cool before putting on or taking off parts and before
cleaning appliance.
• Do not operate any appliance with a damaged cord or plug, or after
the appliance malfunctions, or has been damaged in any manner. Return
to an Authorized Service Station for examination, repair or electrical or
mechanical adjustment. You can locate the nearest service center by
calling 1.800.334.0759.
• The use of accessory attachments not recommended by the appliance
manufacturer may cause injuries.
• Do not use outdoors.
• Do not let cord hang over edge of table or counter or touch hot surfaces.
• Do not place on or near a hot gas or electric burner or in a heated oven.
• Use extreme caution when moving the appliance if it contains hot oil or any
other hot liquid.
• Always attach the temperature controller to the appliance first, then plug
into the wall outlet. To disconnect, switch off, remove plug from the wall
outlet, then remove the temperature controller from the appliance.
• Only use the appliance with the OSTER™ Temperature Controller.
• Do not use appliance for anything other than its intended use.
• It is recommended that you do not cook with the Electric Skillet standing on
temperature sensitive surfaces.
• To prevent the risk of burns, never fill oil in the Skillet Pan more than
½ inch (12.7 mm) high.
SAVE THESE INSTRUCTIONS
To reduce the risk of electrical shock, this appliance has a polarized plug (one
blade is wider than the other). This plug fits a polarized outlet only one way;
if the plug does not fit fully into the outlet, reverse the plug. If it still does not
fit, contact a qualified electrician.
DO NOT ATTEMPT TO DEFEAT THIS SAFETY FEATURE.
DO NOT CHANGE THE PLUG IN ANY WAY.
We l c o m e
Congratulations on your purchase of an OSTER® Hinged Lid Electric Skillet!
To learn more about OSTER® products, please visit us at www.oster.com.
Hi n g e d lid el e c t r i c Sk i l l e t Fe a t u r e S
li d li F t i n g
Ha n d l e
Hi n g e
Th i s Un i T is Fo r
o U s e h o l d Us e on l y
h
ex T e n s i o n Co r d Us e
A short power-supply cord is provided to reduce the risk resulting from becoming
entangled in or tripping over a longer cord. Do not use an extension cord.
re m o v a b l e
gl a S S li d
te m p e r a t u r e
co n t r o l pr o b e
co o l -to u c H
Wi d e Ha n d l e S
in t r o d u c t i o n
co n d i t i o n i n g o F t H e no n -St i c k co a t e d pa n
Before using your new appliance, wash the inside of the pan with warm, sudsy
water and dry. When washing the skillet, make sure the temperature controller
is removed. Rub a film of cooking or salad oil all over the non-stick coating on
the inside of the pan. Remove any excess oil with a cloth or paper towel.
The OSTER® Electric Skillet is now ready for use and it is unnecessary to
condition it again.
uS i n g t H e Hi n g e d lid el e c t r i c Sk i l l e t
1. Push the temperature controller firmly into its socket found at the side of
the appliance. Plug into a standard 120 Volt AC outlet.
2. Set the temperature you want by turning the knob on the temperature
controller. The indicator light will come on. Set the temperature of your
choice opposite the indicator light. When the light goes off, the chosen
cooking temperature has been reached. During cooking, the light will cycle
on and off indicating the temperature is being maintained. Guidance in the
choice of temperatures is supplied later in this book.
3. It is recommended that you do not cook with the Hinged Lid Electric Skillet
standing on temperature sensitive surfaces.
4. For simmering, set the temperature control knob to 300°F/150°C or
SIMMER and wait until the liquid boils. Turn the knob toward the WARM
setting. Set the dial to this point each time SIMMER is specified in a recipe.
5. Do not use metal utensils in your Hinged Lid Electric Skillet as they may
damage the non-stick coating. Wood or plastic coated spatulas are best. If
you use plastic tools, make sure they are suitable for use on hot surfaces.
6. To remove the temperature controller, first unplug from the wall outlet
and pull out.
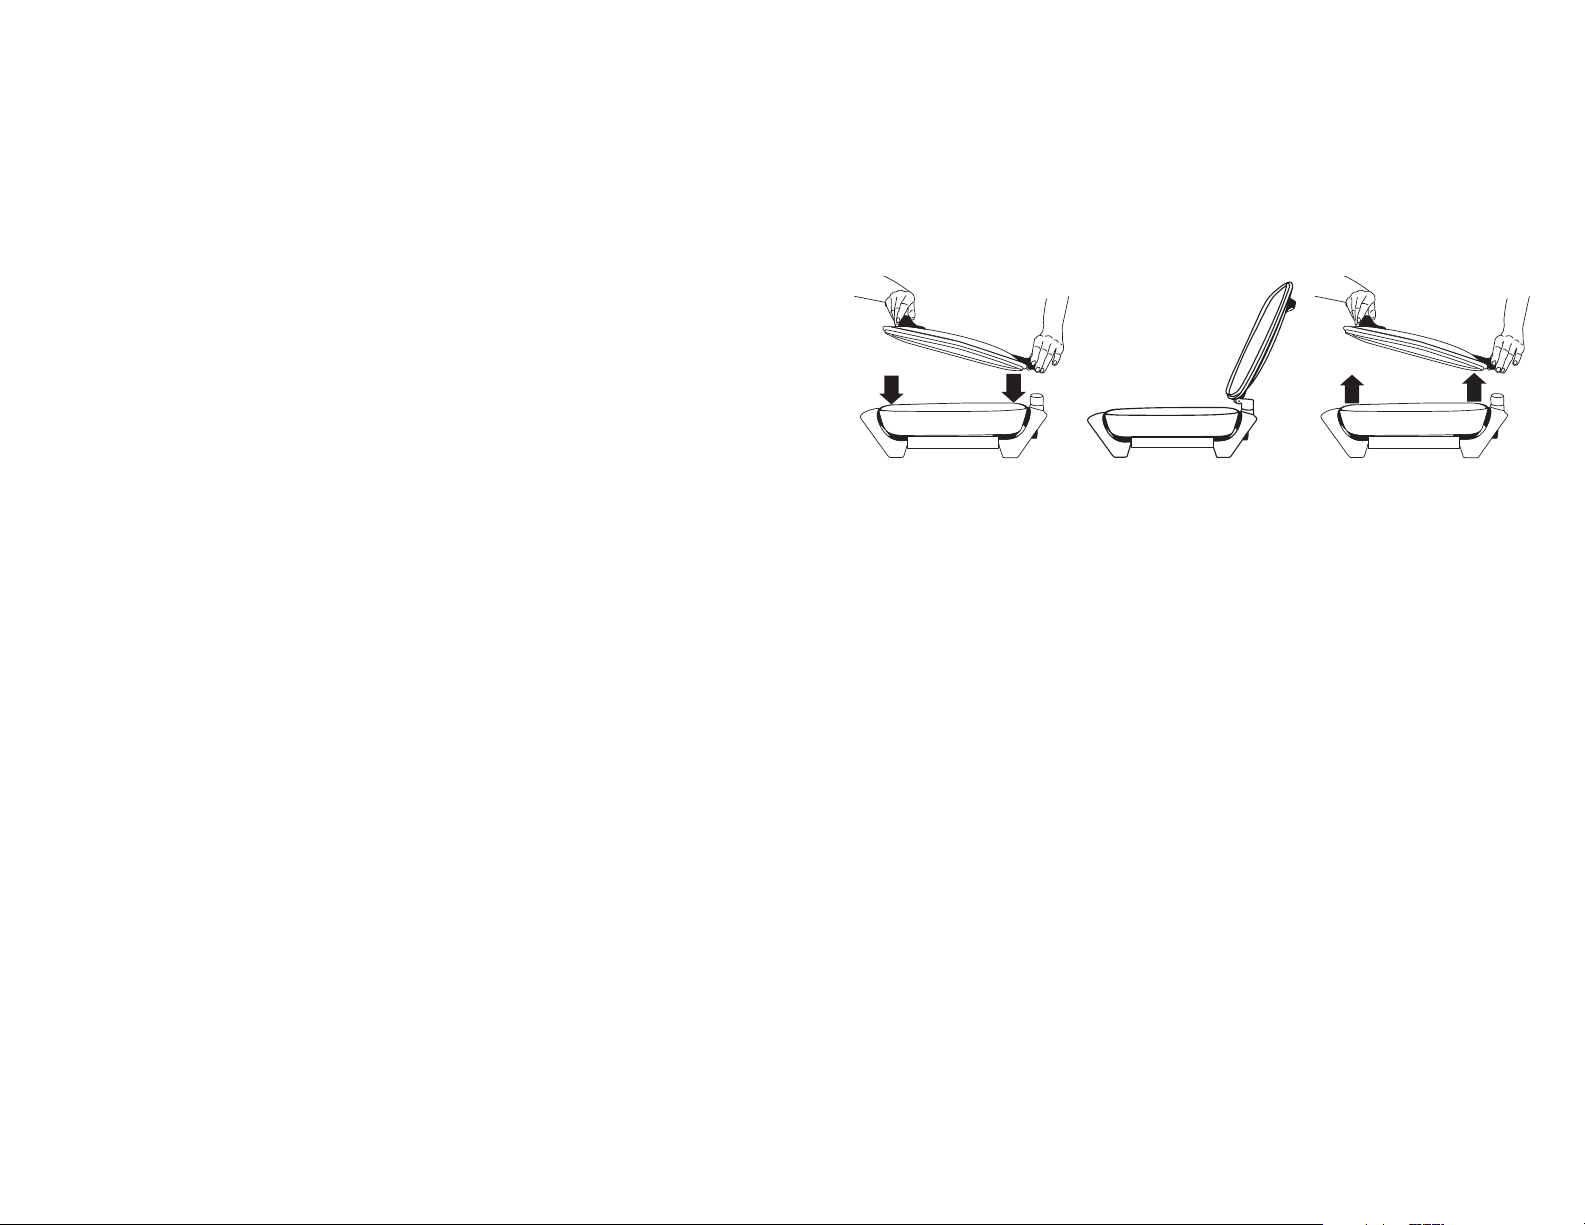
The hinged lid was specially designed to make preparing and
serving food easier.
• To attach the lid, be sure to align the lid hinge so that it slides down onto the
matching heating base hinge. (see Fig. 1).
• When raising and lowering the lid, always use the lid lifting handle (see Fig. 2).
Note: Lid opens away from the steam.
• To remove the lid, use both hands to gently lift up and remove. (see Fig. 3).
Fig. 1 Fig. 2 Fig. 3
cl e a n i n g t H e ap p l i a n c e
Switch off, remove plug from wall outlet and remove the temperature control
probe. Allow the appliance to cool. Wash the pan and lid with hot sudsy
water. You can totally immerse the pan or place in the dishwasher. The lid
is also dishwasher-safe providing it is placed in the TOP RACK ONLY. DO
NOT PLACE LID UPSIDE DOWN IN BOTTOM DISHWASHER RACK.
To remove stubborn food residues, use a nylon scourer. NEVER use abrasive
powder cleaners or metal scouring pads because these will damage the non-
stick coating. After washing, dry the pan thoroughly, while paying particular
attention to the electrical socket and pins. DO NOT USE METAL PADS
TO CLEAN ELECTRICAL PINS. Wipe controller with damp cloth. Do not
immerse cord or controller in water.
St o r a g e a n d ma i n t e n a n c e
Unplug cord and remove temperature control probe. Allow appliance to cool
before storing. Store your Hinged Lid Electric Skillet in a dry location, such as
on a tabletop or countertop, or on a cupboard shelf. Wind the electrical cord
into a loose coil and secure with a plastic twist fastener. For convenience, the
temperature control probe and cord can then be stored inside the skillet.
Other than recommended cleaning, no further user maintenance should
be necessary.

FOOD CHART
Fo o d
Ba c o n
Eg g s ( Fried)
Eg g s ( Scrambled)
Pa n c a k E s
Ha m B u r g E r
(1/2-inch Thick)
H
a m
(1/2-inch – 1/4 -inch Slices)
Po t a t o E s
(Country Fried)
(Crispy Brown)
sa u s a g E
Fi s H
Po r k cH o P s
(Breaded)
(Brown)
cu B E o r mi n u t E st E a k
Li v E r
(Calf’s, Lamb or
Tender Beef)
Fr E n c H to a s t
cr u s t y cH i c k E n
(Use 4 Tbsp. Oil)
Do Not add wate
r
tE m P E r a t u r E
350º F / 175º C
300º F / 150º C
325º F / 162º C
375º F / 190º C
375º F / 190º C
325º F / 162º C
325º F / 162º C
350º F / 175º C
340º F / 170º C
375º F / 190º C
375º F / 190º C
225º F / 110º C
400º F / 205º C
350º F / 175º C
325º F / 162º C
400º F / 200º C
300º F / 150º C
aP P r o x i m a t E
ti m E
5 – 8 Minutes
3 – 5 Minutes
2 – 3 Minutes
1 – 3 Minutes
Rare
4 – 8 Minutes
Well Done
9 – 12 Minutes
10 – 20 Minutes
10 – 12 Minutes
10 – 12 Minutes
12 – 15 Minutes
5 – 8 Minutes
10 – 15 Minutes
30 – 40 Minutes
2 – 4 Minutes
5 – 10 Minutes
4 – 6 Minutes
12 – 18 Minutes
10 – 15 Minutes
One-Year Limited Lifetime Warranty
Sunbeam Products, Inc. doing business as Jarden Consumer Solutions or if in Canada, Sunbeam
Corporation (Canada) Limited doing business as Jarden Consumer Solutions (collectively “JCS”)
warrants that for a period of one year from the date of purchase, this product will be free from defects
in material and workmanship. JCS, at its option, will repair or replace this product or any component of
the product found to be defective during the warranty period. Replacement will be made with a new or
remanufactured product or component. If the product is no longer available, replacement may be made
with a similar product of equal or greater value. This is your exclusive warranty. Do NOT attempt to
repair or adjust any electrical or mechanical functions on this product. Doing so will void this warranty.
This warranty is valid for the original retail purchaser from the date of initial retail purchase and is
not transferable. Keep the original sales receipt. Proof of purchase is required to obtain warranty
performance. JCS dealers, service centers, or retail stores selling JCS products do not have the right to
alter, modify or any way change the terms and conditions of this warranty.
This warranty does not cover normal wear of parts or damage resulting from any of the following:
negligent use or misuse of the product, use on improper voltage or current, use contrary to the
operating instructions, disassembly, repair or alteration by anyone other than JCS or an authorized JCS
service center. Further, the warranty does not cover: Acts of God, such as fire, flood, hurricanes and
tornadoes.
What are the limits on JCS’s Liability?
JCS shall not be liable for any incidental or consequential damages caused by the breach of any
express, implied or statutory warranty or condition.
Except to the extent prohibited by applicable law, any implied warranty or condition of merchantability
or fitness for a particular purpose is limited in duration to the duration of the above warranty.
JCS disclaims all other warranties, conditions or representations, express, implied, statutory or
otherwise.
JCS shall not be liable for any damages of any kind resulting from the purchase, use or misuse of,
or inability to use the product including incidental, special, consequential or similar damages or loss
of profits, or for any breach of contract, fundamental or otherwise, or for any claim brought against
purchaser by any other party.
Some provinces, states or jurisdictions do not allow the exclusion or limitation of incidental or
consequential damages or limitations on how long an implied warranty lasts, so the above limitations
or exclusion may not apply to you.
This warranty gives you specific legal rights, and you may also have other rights that vary from
province to province, state to state or jurisdiction to jurisdiction.
How To Obtain Warranty Service
In the U.S.A.
If you have any question regarding this warranty or would like to obtain warranty service,
please call 1-800-334-0759 and a convenient service center address will be provided to you.
In Canada
If you have any question regarding this warranty or would like to obtain warranty service,
please call 1-800-667-8623 and a convenient service center address will be provided to you.
In the U.S.A., this warranty is offered by Sunbeam Products, Inc. doing business as Jarden Consumer
Solutions located in Boca Raton, Florida 33431. In Canada, this warranty is offered by Sunbeam
Corporation (Canada) Limited doing business as Jarden Consumer Solutions, located at 20 B Hereford
Street, Brampton, Ontario L6Y 0M1. If you have any other problem or claim in connection with this
product, please write our Consumer Service Department.
PLEASE DO NOT RETURN THIS PRODUCT TO ANY OF THESE
ADDRESSES OR TO THE PLACE OF PURCHASE.

RECIPES
RECIPES
APPLE NUT PANCAKES
2 tablespoons butter or margarine
1
/2 cup plus 2 tablespoons
all-purpose flour 1 egg
11/2 teaspoons sugar Vegetable oil
2 teaspoons baking powder
2 tablespoons chopped pecans chopped apple
or walnuts
Dash nutmeg
Melt butter. Set aside to cool slightly. Combine flour, sugar, baking
powder and spices in a small bowl. Combine melted butter and milk in
mixing bowl. Add egg and beat lightly to combine. Blend in flour mixture,
stirring just until combined. Fold in apple and nuts. Preheat skillet to
325°F. Brush lightly with oil. Pour about 1⁄4 cup batter for each pancake.
Cook until bubbles come to the surface and the bottom is golden brown,
about 2 minutes. Serve 3 warm with maple syrup for breakfast or brunch
or top with ice cream, additional nuts and caramel syrup for dessert.
2
/3 cup milk
1
/2 teaspoon vanilla
1
/2 cup peeled and finely
1
/4 teaspoon cinnamon
CLASSIC FRENCH TOAST
1 egg, slightly beaten 1 tablespoon butter or margarine
1
/3 cup milk 2 slices French bread,
1
/4 teaspoon vanilla extract sliced 1-inch thick
Confectioner’s sugar Dash nutmeg or cinnamon
1
/2 teaspoon vanilla Maple syrup
Combine egg, milk, spices and sugar in shallow pan. Preheat skillet to
325°F. Add butter to skillet. Dip both sides of bread quickly into egg
mixture then place in skillet. Cook 2 to 3 minutes per side or until bread
is golden brown. Dust each piece lightly with confectioner’s sugar and
serve with maple syrup.
DENVER OMELET
1
/2 cup diced, cooked ham 3 eggs
1
/4 cup chopped green bell pepper 2 tablespoons water
1
/4 cup sliced fresh mushrooms
1 green onion, sliced Dash cayenne pepper
1 tablespoon butter or margarine
shredded
Set skillet temperature to 325°F. Add ham, green bell pepper, mushrooms,
onions and butter. Sauté 2 minutes stirring frequently. Arrange vegetables in
an even layer. Lightly beat eggs with water, salt and cayenne pepper; pour egg
mixture over ham and vegetables. Cover and cook 4 minutes or until eggs are
set. Sprinkle with cheese, cover and cook additional 2 minutes. To serve, slice
omelet in half then gently fold each part in half. Lift oldest from skillet with a
spatula.
1
/2 teaspoon salt
1
/2 cup (1-ounce) cheddar cheese,
CHEESE AND BACON POTATOES
6 slices bacon
4 large potatoes, thinly sliced 11/2 cups (6-ounces)
with skins on cheddar cheese, shredded
1 can (4 ounces) chopped
green chilies
Place bacon in cold skillet. Set skillet temperature to 325°F.
Fry bacon until crisp, remove and drain. Carefully remove grease,
reserving 2 tablespoons bacon grease in skillet. Add potatoes to skillet;
cover and cook 10 minutes. Turn potatoes and cook an additional
5 minutes. Crumble bacon and combine with green chiles and onion.
Sprinkle over potatoes. Top with cheese; cover and cook 5 more minutes.
1
/4 cup onion, finely chopped

RECIPES
RECIPES
PASTA WITH PEPPERS AND CHICKEN
1 clove garlic, minced Pinch ground red pepper
1 tablespoon olive oil Salt and ground black pepper
1 whole boneless, skinless to taste
chicken breast, cut into 11/2 teaspoons cornstarch
1/2-inch x 2-inch strips
1 cup sliced red, green or yellow 4 ounces linguine or fettuccine,
cooled and drained bell pepper
(or combination)
1
/2 teaspoon basil
Set skillet temperature to 325°F. Add garlic and oil and sauté
2 minutes. Add chicken; cook and stir for 5 minutes. Stir in bell peppers
and allow to cook additional 2minutes or until vegetables are crisp tender
and chicken is done. Reduce temperature to 250º F / 120º C. Blend
seasonings and cornstarch into chicken broth, stirring until well blended.
Pour broth mixture into skillet. Heat, stirring gently, 1 minute or until
mixture is hot and thickened. Serve over pasta. Makes 2 servings.
3
/4 cup chicken broth
PORK CHOPS WITH SPANISH RICE
2 to 4 center cut pork chops,
about 1/2 - inch thick
1
/3 cup chopped onion 1 can (14
1
/4 cup chopped green bell pepper whole tomatoes
1
/3 cup raw long grain rice
1
/2 teaspoon chili powder
1
/2-ounces)
EASY BEEF FAJITAS
Juice of 2 limes
2 tablespoon olive oil 4 flour tortillas
1
/2 teaspoons ground cumin
1
/4 teaspoon salt cheddar cheese, shredded
1 clove garlic minced Guacamole optional
1
/2 teaspoon red pepper flakes Salsa optional
Freshly ground black pepper Sour cream optional
to taste Chopped tomatoes optional
1
/3 -lb. top round steak,
thinly sliced
1 small onion, thinly sliced
Combine lime juice, 1 tablespoon olive oil, cumin, salt, garlic, red pepper and
black pepper in a bowl. Add beef and allow to stand, at room temperature,
for 30 minutes. Set skillet temperature to 325°F. Add remaining 1
tablespoon olive oil, onion and pepper and stir gently. Cover and cook 1
to 2 minutes or until vegetables are tender. Remove vegetables and keep
warm. Drain meat, discard marinade and place meat in skillet, sauté meat
7 to 9 minutes or until done. Meanwhile wrap tortillas in aluminum foil and
heat in oven for 5 minutes. To assemble, spoon about 1/4 of meat and
vegetables into center of each warmed tortilla. Sprinkle with 2 tablespoons
cheese. Roll tortilla and place on serving plate. Garnish, as desired, with
guacamole, salsa, sour cream and/or chopped tomatoes.
1
/2 green or red bell pepper, thinly sliced
1
/2 cup (2-ounces) monterey jack or
Set skillet temperature to 325°F. Add chops and cook on first side 5
minutes. Turn chops; add onion and green bell pepper. Cook, stirring
vegetables occasionally, 2 minutes. Reduce temperature to “WARM”.
Add rice, chili powder and tomatoes and stir to blend into vegetables.
Cover and cook 25 to 30 minutes, stirring occasionally.

NOTES
PRECAUCIONES IMPORTANTES
Obedezca siempre las precauciones elementales de seguridad cuando vaya
a hacer uso de su tostadora, incluyendo las siguientes:
LEA TODAS LAS INSTRUCCIONES
ANTES DE USAR
• Asegúrese que los mangos de la sartén estén montados y ajustados
adecuadamente.
• No toque superficies calientes, utilice agarraderas.
• Como protección contra choques eléctricos, no sumerja el controlador de la
temperatura, el cable o el enchufe en agua u otros líquidos.
• Nunca deje la unidad sin supervisión si la utilizan los niños o si la misma se
utiliza cerca de ellos.
• Desenchufe el electrodoméstico del tomacorriente cuando no esté en uso y
antes de limpiar. Deje que la unidad se enfríe antes de quitar o agregar piezas y
antes de limpiarla.
• No opere ningún electrodoméstico que tenga el cable o enchufe dañado, si la
unidad no funciona correctamente o se ha dañado de alguna manera. Envíelo a
un Centro de Servicio autorizado para que lo revisen, reparen o para un ajuste
eléctrico o mecánico. Para ubicar el centro de servicio más cercano, llame al
1.800.334.0759.
• El uso de accesorios no recomendados por el fabricante del electrodoméstico
puede causar heridas.
• No lo use al aire libre.
• No permita que el cable cuelgue por sobre el mostrador o la mesa ni toque
superficies calientes.
• No lo coloque cerca o sobre una estufa a gas o eléctrica o en el horno caliente.
• Use suma precaución al desplazar el electrodoméstico si contiene aceite caliente
o cualquier otro líquido caliente.
• Siempre coloque el controlador de temperatura en el electrodoméstico primero,
luego enchúfelo al tomacorriente de la pared. Para desconectar, páguelo, quite
el enchufe del tomacorriente de la pared y quite el controlador de temperatura
del electrodoméstico.
• Sólo use el electrodoméstico con el Controlador de Temperatura OSTER™.
• No use el electrodoméstico para un propósito distinto para el cual fue
diseñado.
• Es recomendable no cocinar con la Sartén Eléctrica colocada sobre superficies
sensibles al calor.
• Para prevenir riesgo de quemaduras, nunca llene la Sartén Eléctrica con aceite
por mas de ½ pulgada (12.7 mm) de altura.
es T a Un i d a d e s só l o Pa r a
U s o do m é T i C o

Có m o Us a r U n Ca b l e el é C T r i C o Co r T o
Se provee un cordón eléctrico corto para reducir el riesgo de enredos o tropiezos
que pudiese ocasionar un cordón largo. No use una extensión de cordón.
GUARDE ESTAS INSTRUCCIONES
PARA PRODUCTOS COMPRADOS EN ESTADOS UNIDOS Y
CANADÁ ÚNICAMENTE
Para reducir el riesgo de descargas eléctricas, este aparato cuenta con una clavija
polarizada (una cuchilla es más ancha que otra). Como medida de seguridad,
esta clavija entra sólo de una manera en un enchufe polarizado. Si la clavija no
encaja en el enchufe simplemente colóquela al revés. Si aun así no encaja llame a
un electricista calificado.
DE NINGUNA MANERA INTENTE MODIFICAR ESTA MEDIDA DE
SEGURIDAD. NO MODIFIQUE EL ENCHUFE EN NINGUNA FORMA.
bi e n v e n i d o S
¡Felicitaciones en su compra de una Sartén Eléctrica OSTER®. Para aprender
más sobre productos OSTER®, por favor visítenos en www.oster.com!
pi e z a S d e l a Sa r t é n el é c t r i c a
ma n g o d e
t a p a
bi S a g r a
in t r o d u c c i ó n
co n d i c i o n a m i e n t o d e l a Sa r t é n c o n re c u b r i m i e n t o an t i a d H e r e n t e
Antes de usar el electrodoméstico nuevo, lave el interior de la sartén con
agua y jabón tibia y seque. Antes de lavar la sartén, debe quitar el controlador.
Frote una película de aceite de cocina o para ensalada sobre el recubrimiento
antiadherente dentro de la sartén. Quite el exceso de aceite con un paño o
toalla de papel.
La Sartén Eléctrica OSTER® está ahora lista para usar y no es necesario
acondicionarla nuevamente.
có m o uS a r l a Sa r t é n el é c t r i c a
1. Introduzca el controlador de temperatura firmemente en su enchufe en la
parte lateral del electrodoméstico. Enchufe en un tomacorriente de 120
Voltios de CA.
2. Para fijar la temperatura deseada gire la perilla del controlador de
temperatura. Se encenderá la luz indicadora. Fije la temperatura de su
preferencia en el lado opuesto a la luz indicadora. Se apagará la luz cuando
se ha alcanzado la temperatura deseada. Durante la cocción, la luz irá
en un ciclo de encendida a apagada indicando que la temperatura se está
manteniendo. Este libro ofrece una guía para la elección de la temperatura.
3. No se recomienda usar la Sartén Eléctrica Tapa con Bisagras sobre
superficies sensibles a la temperatura.
4. Para cocinar a fuego lento, coloque la perilla de control de la temperatura
en 300°F/150°C o FUEGO LENTO (SIMMER) y espere que el líquido
hierva. Gire la perilla hacia el selector TIBIO (WARM). Coloque la perilla
en este punto cada vez que la receta indique FUEGO LENTO.
5. No use utensilios de metal en su Sartén Eléctrica Tapa con Bisagras, ya que
pueden dañar el recubrimiento antiadherente. Se recomienda usar espátulas
de madera o plástico. Si usa utensilios de plástico, verifique que sean aptos
para superficies calientes.
6. Para retirar el control de la temperatura, primero desenchufe del
tomacorriente de pared y luego jale.
ta p a d e vi d r i o
re m o v i b l e
ma n g o S an c H o S
Fr í o S a l ta c t o
me d i d o r pa r a co n t r o l a r
l a te m p e r a t u r a

La tapa con bisagras fue diseñada especialmente para preparar y servir
la comida con mayor facilidad
• Para colocar la tapa, asegúrese de alinear la bisagra de la tapa de forma que
pueda deslizarse hacia abajo encajando dentro de la bisagra de la base que
calienta. (ver Fig.1).
• Cuando levante y baje la tapa, utilice siempre la perilla que eleva la tapa
(ver Fig. 2)
Nota: La tapa abre fuera del alcance del vapor.
• Para sacar la tapa, utilice ambas manos para levantarla suavemente y sacarla.
(ver Fig. 3).
CARTA DE COMIDA
ti P o d E aL i m E n t o
to c i n o
Hu E v o s ( Fritos)
Hu E v o s ( Revueltos)
tE m P E r a t u r a
350ºF / 175ºC
300ºF / 150ºC
325ºF / 162ºC
ti E m P o
aP r o x i m a d o
5 – 8 Minutos
3 – 5 Minutos
2 – 3 Minutos
Fig. 1 Fig. 2 Fig. 3
limpiando el aparato
de S e n c H u F e e l ca b l e y re m u e v a e l me d i d o r p a r a co n t r o l a r
l a te m p e r a t u r a
Apague. Retire el enchufe del tomacorriente de pared y retire el medidor del
control de temperatura. Permita que el aparato se enfríe. Lave la olla y la tapa
con agua caliente jabonosa. Puede sumergir la olla por completo o meterla
en el lavaplatos. La tapa también se puede lavar en el lavaplatos pero debe
colocarla SOLAMENTE EN LA REJILLA SUPERIOR. NO COLOQUE LA
TAPA HACIA ABAJO EN LA REJILLA INFERIOR DEL LAVAPLATOS. Para
limpiar residuos de comida muy difíciles, use una esponja de nylon. NUNCA use
limpiadores abrasivos en polvo o esponjas de metal dado que estos dañarán el
acabado antiadherente. Luego de lavar, seque la olla minuciosamente, teniendo
cuidado con los postes y el enchufe eléctrico. NO USE ESPONJAS DE METAL
PARA LIMPIAR LOS POSTES ELÉCTRICOS. Limpie el control con una tela
húmeda. No sumerja el cordón o el control en agua.
al m a c e n a m i e n t o y ma n t e n i m i e n t o
Desenchufe el cordón y retire el medidor del control de temperatura. Permita
que el aparato se enfríe antes de almacenar. Guarde su Sartén Eléctrica y Tapa
con Bisagra en un lugar seco, como el tablero de cocina, o sobre una repisa.
Enrolle el cordón eléctrico en un ovillo suelto y asegúrelo con un seguro de
plástico. Para mayor conveniencia, el medidor del control de temperatura y el
cordón pueden guardarse dentro de la sartén.
Salvo por la limpieza recomendada, no se requiere ningún mantenimiento especial.
Pa n q u E q u E s
Ha m B u r g u E s a s
(1/2-Pulgada de Grosor)
J
a m ó n
(1/2-pulg. a
1
/4 -pulg. en Fetas)
Pa P a s
(papas fritas en cubos
estilo desayuno)
(Doradas y Crocantes)
sa L c H i c H a
PE s c a d o
cH u L E t a s d E cE r d o
(empanizadas)
(doradas)
Bi s t E c E n cu B o s o
Bi s t E c dE L g a d o
Hí g a d o
(Bife de Ternero,
Cordero o Tierno)
to a s t a d a Fr a n c E s a
Po L L o cr o c a n t E
(Use 4 Cu. de Aceite)
No Agregue Aguar
375ºF / 190ºC
375ºF / 190ºC
325ºF / 162ºC
325ºF / 162ºC
350ºF / 175ºC
340ºF / 170ºC
375ºF / 190ºC
375ºF / 190ºC
225ºF / 110ºC
400ºF / 205ºC
350ºF / 175ºC
325ºF / 162ºC
400ºF / 200ºC
300ºF / 150ºC
1 – 3 Minutos
Poco Cocida
4 – 8 Minutos
Bien Cocida
9 – 12 Minutos
10 – 20 Minutos
10 – 12 Minutos
10 – 12 Minutos
12 – 15 Minutos
5 – 8 Minutos
10 – 15 Minutos
30 – 40 Minutos
2 – 4 Minutos
5 – 10 Minutos
4 – 6 Minutos
12 – 18 Minutos
10 – 15 Minutos

Garantía Limitada de 1 Año
Sunbeam Products, Inc. operando bajo el nombre de Jarden Consumer Solutions, o en Canadá, Sunbeam
Corporation (Canada) Limited operando bajo el nombre de Jarden Consumer Solutions, (en forma conjunta,
“JCS”), garantiza que por un período de un año a partir de la fecha de compra, este producto estará libre
de defectos de materiales y mano de obra. JCS, a su elección, reparará o reemplazará este producto o
cualquier componente del mismo que presente defectos durante el período de garantía. El reemplazo
se realizará por un producto o componente nuevo o reparado. Si el producto ya no estuviera disponible,
se lo reemplazará por un producto similar de valor igual o superior. Ésta es su garantía exclusiva. No
intente reparar o ajustar ninguna función eléctrica o mecánica de este producto. Al hacerlo elimínará ésta
garantía.
La garantía es válida para el comprador minorista original a partir de la fecha de compra inicial y la misma
no es transferible. Conserve el recibo de compra original. Para solicitar servicio en garantía se requiere
presentar un recibo de compra. Los agentes y centros de servicio de JCS o las tiendas minoristas que
venden productos de JCS no tienen derecho a alterar, modificar ni cambiar de ningún otro modo los
términos y las condiciones de esta garantía.
Esta garantía no cubre el desgaste normal de las piezas ni los daños que se produzcan como resultado
de uso negligente o mal uso del producto, uso de voltaje incorrecto o corriente inapropiada, uso contrario
a las instrucciones operativas, y desarme, reparación o alteración por parte de un tercero ajeno a JCS
o a un Centro de Servicio autorizado por JCS. Asimismo, la garantía no cubre actos fortuitos tales como
incendios, inundaciones, huracanes y tornados.
¿Cuál es el límite de responsabilidad de JCS?
JCS no será responsable de daños incidentales o emergentes causados por el incumplimiento de
alguna garantía o condición expresa, implícita o legal.
Excepto en la medida en que lo prohíba la ley aplicable, cualquier garantía o condición implícita de
comerciabilidad o aptitud para un fin determinado se limita, en cuanto a su duración, al plazo de la
garantía antes mencionada.
JCS queda exenta de toda otra garantías, condiciones o manifestaciones, expresa, implícita, legal o de
cualquier otra naturaleza.
JCS no será responsable de ningún tipo de daño que resulte de la compra, uso o mal uso del producto,
o por la imposibilidad de usar el producto, incluidos los daños incidentales, especiales, emergentes o
similares, o la pérdida de ganancias, ni de ningún incumplimiento contractual, sea de una obligación
esencial o de otra naturaleza, ni de ningún reclamo iniciado contra el comprador por un tercero.
Algunas provincias, estados o jurisdicciones no permiten la exclusión o limitación de los daños
incidentales o emergentes ni las limitaciones a la duración de las garantías implícitas, de modo que es
posible que la exclusión o las limitaciones antes mencionadas no se apliquen en su caso.
Esta garantía le otorga derechos legales específicos y es posible que usted tenga otros derechos que
varían de un estado, provincia o jurisdicción a otro.
Cómo solicitar el servicio en garantía
En los Estados Unidos
Si tiene alguna pregunta sobre esta garantía o desea recibir servicio de garantía, llame al
1-800-334-0759 y podrá obtener la dirección del centro de servicio que le resulte más conveniente
En Canadá
Si tiene alguna pregunta sobre esta garantía o desea recibir servicio de garantía, llame al
1-800-667-8623 y podrá obtener la dirección del centro de servicio que le resulte más conveniente
En los Estados Unidos, esta garantía es ofrecida por Sunbeam Products, Inc. operando bajo el nombre
de Jarden Consumer Solutions, Boca Ratón, Florida 33431. En Canadá, esta garantía es ofrecida por
Sunbeam Corporation (Canada) Limited operando bajo el nombre de Jarden Consumer Solutions, 20 B
Hereford Street, Brampton, Ontario L6Y 0M1. Si usted tiene otro problema o reclamo en conexión con
este producto, por favor escriba al Departamento de Servicio al Consumidor.
POR FAVOR NO DEVUELVA ESTE PRODUCTO A NINGUNA DE ESTAS
DIRECCIONES NI AL LUGAR DE COMPRA
RECETAS
PANCAKES DE MANZANA Y NUECES
2 cucharadas de mantequilla o margarina 2/3 taza de leche
1
/2 taza más 2 cucharadas
de harina para todo propósito 1 huevo
11/2 cucharadita de azúcar Aceite vegetal
2 cucharaditas de polvo de hornear
2 cucharadas de nueces pecán finamente picada
o nueces del nogal picadas
Una pizca de nuez moscada
Derrita la mantequilla. Deje a un lado para que se enfríe ligeramente.
Combine la harina, el azúcar, el polvo de hornear y las especias en
un tazón pequeño. Combine la mantequilla derretida y la leche en un
tazón de mezclar. Agregue los huevos y bata ligeramente para mezclar.
Agregue en la mezcla de harina, revolviendo hasta que esté combinada.
Incorpore las manzanas y las nueces. Precaliente el sartén a 350°F. Unte
ligeramente con aceite. Vierta cerca de 1⁄4 taza de mezcla para cada
pancake. Cocine hasta que se formen burbujas en la superficie y la parte
de abajo esté dorada, unos 2 minutos. Sirva 3 pancakes, calientes con
sirope de arce para desayuno o brunch o cubra con helado, más nueces
y sirope de caramelo como postre.
TOSTADA A LA FRANCESA CLÁSICA
1 huevo, ligeramente batido 1 cucharada de mantequilla o
1
/3 taza de leche margarina
1
/4 cucharadita de extracto de vainilla 2 rebanadas de pan francés,
Azúcar pulverizada en rodajas de 1 pulgada
1
/2 cucharadita de vainilla Una pizca de nuez moscada
Sirope de arce o canela
Combine el huevo, la leche, las especias y el azúcar en un recipiente
poco profundo. Precaliente el sartén a 350°F. Agregue la mantequilla al
sartén. Sumerja rápidamente ambos lados del pan dentro de la mezcla
de huevo, y luego coloque en el sartén. Cocine por 2 a 3 minutos por
lado o hasta que el pan esté dorado. Espolvoree cada pieza ligeramente
con azúcar pulverizada y sirva con sirope de arce.
1
/2 cucharadita de vainilla
1
/2 taza de manzana pelada y
1
/4 cucharadita de canela

RECETASRECETAS
TORTILLA DENVER
1
/2 taza de jamón cocido en cuadritos 3 huevos
1
/4 taza de pimiento verde picado 2 cdas. de agua
1
/4 taza de champiñones
1
/2 cdita. sal
frescos rebanados 1 cebollín en rueditas
una pizca de pimienta de cayena 1 cda. de mantequilla o margarina
1
/2 taza (1 oz.) de queso cheddar,
rallado
Ajuste la temperatura de la sartén a 325ºF. Agregue el jamón, pimientos,
champiñones, cebollas y la mantequilla. Sofría 2 minutos revolviendo
frecuentemente. Arregle los vegetales en una capa uniforme. Bata
ligeramente los huevos con el agua, sal, y la pimienta de cayena; vierta la
mezcla de huevo sobre el jamón y los vegetales. Tape y cocine 4 minutos
o hasta que los huevos estén listos. Espolvoree con queso, tape y cocine
2 minutos adicionales. Para servir, corte la tortilla por la mitad y luego
doble suavemente cada parte sobre su otra mitad. Utilice una espátula
para levantarlas de la sartén.
PAPAS CON QUESO Y TOCINO
6 rebanadas de tocino
4 papas grandes, rebanadas 11/2 tazas (6 oz.) queso cheddar
delgadas con piel rallado
1 lata (4 oz.) de chiles
verdes picados
Coloque las rebanadas de tocino en la sartén fría. Ajuste la temperatura
de la Sartén a 325ºF. Fría el tocino hasta que esté crocante, remueva y
cuele. Cuidadosamente remueva la grasa, reservando 2 cucharadas de la
grasa dentro de la sartén. Agregue las papas a la sartén; cubra y cocine
por 10 minutos. Voltee las papas y cocine otros 5 minutos. Desmenuce
el tocino y mézclelo con los chiles y la cebolla. Espolvoréelos sobre las
papas. Cubra con el queso; tape y cocine 5 minutos más.
1
/4 taza de cebolla picada muy fino
PASTA CON PIMIENTOS Y POLLO
1 diente de ajo, machacado Una pizca de pimienta roja molida
1 cda. de aceite de oliva Sal y pimienta negra molida al gusto
1 pechuga de pollo entera, sin piel, 11/2 cdita de maicena
sin huesos, cortadas en tiras de
1
/2 x 2 pulgadas 4 de linguine o fettucccine
3
/4 taza de caldo de pollo
1 taza de pimientos rojos, verdes enfriados y escurridos
o amarillos (o combinados)
1
/2 cdita. de albahaca
Ajuste la temperatura de la sartén a 325ºF. Añada el ajo y el aceite y
sofría 2 minutos. Agregue el pollo; cocine y revuelva por 2 minutos.
Incorpore los pimientos revolviendo y cocine 2 minutos más o hasta que
los vegetales estén tiernos y crocantes y el pollo cocido. Reduzca la
temperatura a 250 º F/ 120 ºC. Aparte mezcle los aderezos y la maicena
dentro del caldo de pollo, revolviendo hasta que estén bien disueltos.
Vierta la mezcla del caldo dentro de la sartén. Caliente, revuelva
suavemente por 1 minuto o hasta que la mezcla esté caliente y espesa.
Sirva sobre pasta. Alcanza para 2 porciones.
CHULETAS DE PUERCO CON ARROZ ESPA—OL
2 a 4 centros de chuletas de puerco, 1/4 tazas de arroz crudo de granos
grandes alrededor de
1/2 - pulg. de espesor
1
/3 taza de cebolla picada 1 lata de tomates enteros
1
/4 de pimientos verdes picados (14 1/2 oz.)
Ajuste la temperatura de la Sartén a 325ºF. Agregue el aceite. Arregle las
presas de pollo, con la piel para abajo en la sartén. Cocine el pollo hasta
que esté dorado de un lado, alrededor de 5 minutos. Voltee el pollo.
Agregue la cebolla y el ajo alrededor del pollo. Cocine 3 minutos, o hasta
que las cebollas estén cocidas pero no doradas. Reduzca la temperatura
a “WARM”. Agregue los ingredientes restantes, excepto el spaghetti.
Tape y cocine de 30 a 40 minutos, o hasta que el pollo esté cocido.
Revuelva la salsa y bañe el pollo ocasionalmente con la misma. Sirva el
pollo con su salsa sobre spaghetti u otra pasta.
1
/2 cdita. de chile en polvo

FAJITAS DE CARNE FÁCILES
NOTASRECETAS
Jugo de 2 limones fino
2 cdas. de aceite de oliva 4 tortillas de harina
1
/2 cdita. de comino molido
1
/4 cdita. de sal o cheddar, rallado
1 diente de ajo Guacamole (opcional)
1
/2 cdita de pimienta roja Salsa (opcional)
desmenuzada Crema agria (opcional)
Pimienta negra fresca molida Tomates en cuadritos (opcional)
al gusto
1 cebolla pequeña, rebanada fino lonjas finas
Mezcle el jugo de limón, 1 cda. de aceite de oliva, comino, sal, ajo, pimienta
roja y pimienta negra en un recipiente. Añada la carne y déjela reposar a
temperatura ambiente, por 30 minutos. Ajuste la temperatura de la sartén
a 325ºF. Agregue la cucharada de aceite de oliva restante, la cebolla,
pimientos y revuelva suavemente. Tape y cocine 1 a 2 minutos o hasta que
los vegetales estén tiernos. Remueva los vegetales y manténgalo caliente.
Escurra la carne, desechando los ingredientes que la marinaron y colóquela
en la sartén, sofría la carne 7 a 9 minutos o hasta que esté listo, mientras
tanto envuelva las tortillas en papel de aluminio y caliéntelas en el horno
por 5 minutos. Para su preparación, ponga cucharadas de ¼ de carne y
vegetales en el centro de cada tortilla caliente. Espolvoree con 2 cdas. de
queso. Enrolle la tortilla y colóquela en un plato de servir. Adorne, si desea,
con guacamole, salsa, crema agria y/o tomate en cuadritos.
1
/2 pimiento verde o rojo, rebanado
1
/2 taza (2 oz.) de queso monterey jack
1
/3 de libra de carne cortada en
 Loading...