

Page 1
2700
2700
Instruction Manual
PLEASE READ ALL INSTRUCTIONS BEFORE USING THIS APPLIANCE
LIRE TOUTES LES INSTRUCTIONS AVANT D'UTILISER CET APPAREIL
BATIDORA DE PEDESTAL MIXMASTER®
LEA TODAS LAS INSTRUCCIONES ANTES DE USAR ESTE APARATO
BATEDEIRA DE PEDESTAL MIXMASTER®
LEIA TODAS AS INSTRUÇÕES ANTES DE USAR ESTE APARELHO
MIXMASTER® STAND MIXER
Manuel d'Instructions
BATTEUR SUR PIED MIXMASTER®
Manual de Instrucciones
Manual de Instruções
Page 2

IMPORTANT SAFEGUARDS
When using electrical appliances, basic safety precautions should always be followed to
reduce the risk of fire, electric shock and/or injury to persons, including the following:
READ ALL INSTRUCTIONS BEFORE USING YOUR STAND MIXER.
• To protect against risk of electrical shock DO NOT immerse power cord or motor base
in water or any other liquid
• Close supervision is required when any appliance is used by or near children
• Unplug your appliance from the outlet when not in use, before putting on or taking off
parts, and before cleaning
• Avoid contacting moving parts
• DO NOT operate any appliance with a damaged cord or plug or after the appliance
malfunctions, or is dropped or damaged in any manner. Return appliance to the nearest
Oster® Authorized Service Center for examination, repair, or electrical/mechanical
adjustment
• The use of attachments not recommended or sold by the manufacturer may cause fire,
electric shock, or injury
• DO NOT use outdoors
• DO NOT let cord hang over edge of table or counter
• Never leave an appliance unattended while in use
• Keep hands and utensils away from the beaters or any other attachment that is in use.
To reduce the risk of personal injury or damage to the mixer, a rubber spatula can be
used only when the mixer is off
• Always use the Stand Mixer on a dry, level surface
• DO NOT place this appliance on or near a hot gas or electric burner, or where it could
touch a heated oven
• DO NOT operate Stand Mixer continuously for more than 10 minutes when mixing
regular batter. When using extremely heavy loads such as dough, the appliance should
not be operated for more than 5 minutes
• Keep hands, hair, clothing, as well as spatulas and other utensils away from beaters
during operation to reduce the risk of injury to persons, and/or damage to the mixer
1
Page 3

• Remove beaters from Stand Mixer before washing. NEVER eject beaters or dough
hooks when appliance is in operation
• Ensure fingers are kept well away from moving beaters and dough hooks
• Use only the supplied mixing bowl. DO NOT remove mixing bowl from the base while
Stand Mixer is in use
THIS APPLIANCE IS FOR HOUSEHOLD USE ONLY.
SAVE THESE INSTRUCTIONS
(For 120 & 127 Volts Only)
To reduce the risk of electrical shock, this appliance has a polarized plug (one blade is
wider than the other). This plug fits a polarized outlet only one way. This is a safety
feature intended to help reduce the risk of electrical shock. If the plug does not fit fully
into the outlet, reverse the plug. If it still does not fit, contact a qualified electrician. Do
not attempt to defeat this safety feature.
If a longer detachable power-supply cord or extension cord is used, the marked
electrical rating of the extension cord should be the same as that of your mixer. The
extension cord should be arranged so that it will not drape over the countertop or
tabletop where it can be pulled on by children or tripped over unintentionally.
2
Page 4

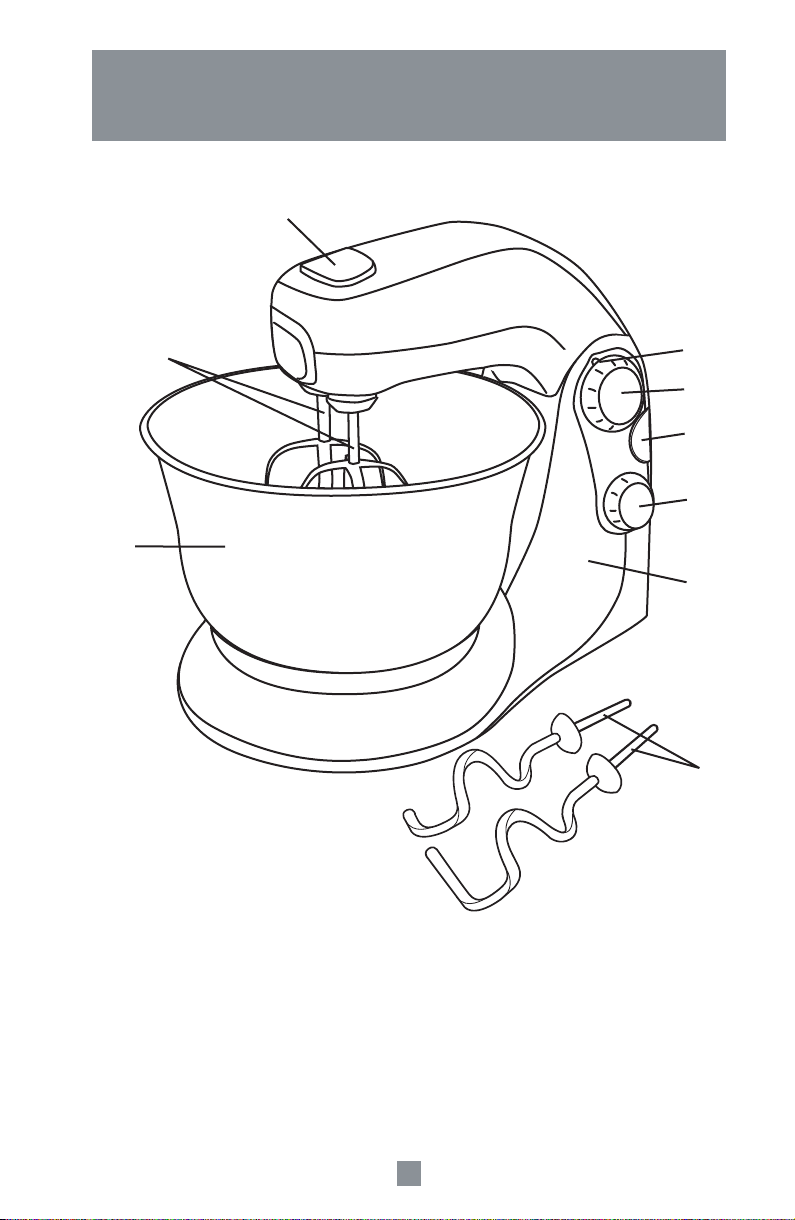
DESCRIPTION OF THE APPLIANCE
9
2
4
1. Stand/Motor Base
2. Beaters
3. Dough Hooks
4. 4-liter Stainless Steel Mixing Bowl
5. 12-speed Rotary Control Dial
6. Power Indicator Light
7. Bowl Speed Control Dial
8. Tilt Button
9. Eject Button
6
5
8
7
1
3
3
Page 5
INSTRUCTIONS FOR USE
BEFORE USING YOUR OSTER® MIXMASTER® STAND MIXER
Before assembling your Oster® Mixmaster® Stand Mixer, be sure the power cord is
unplugged from the power outlet and the speed control dial is in the “O” position.
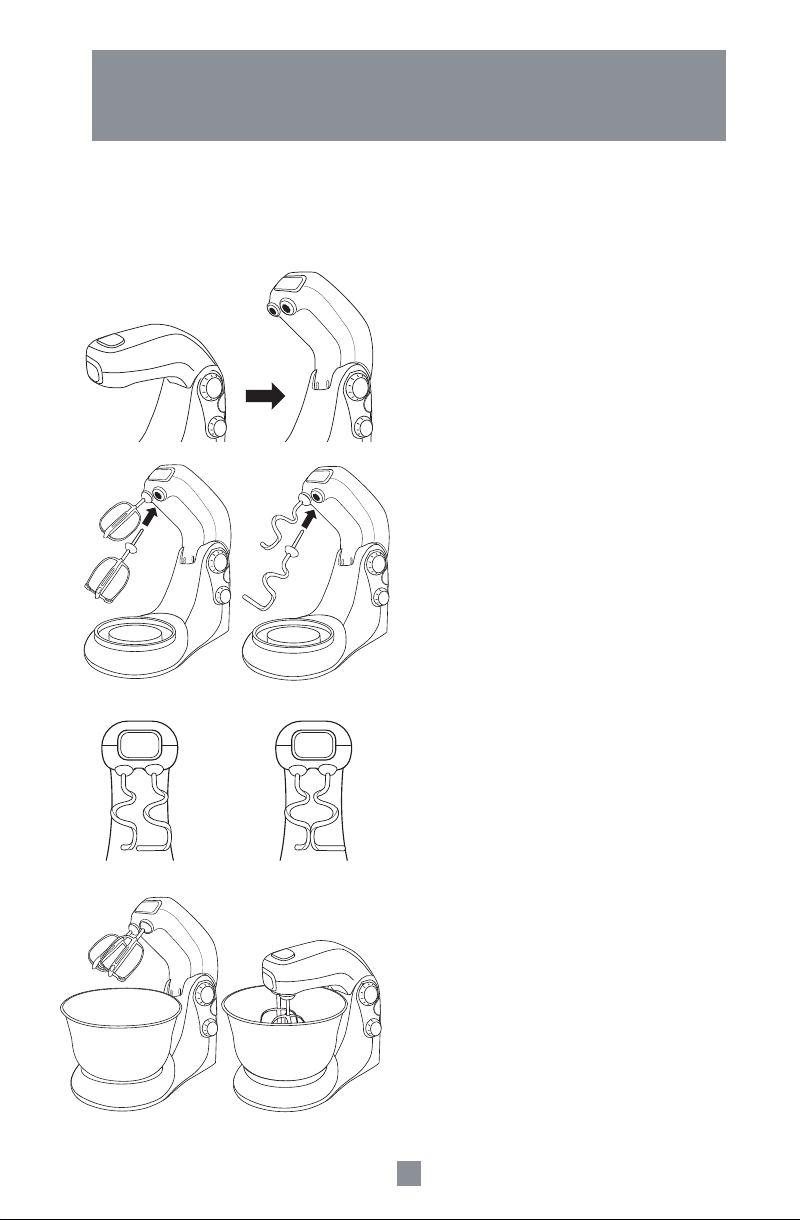
1. Press the tilt button located on the stand
and swing the mixer head up. The mixer
head will lock into this tilt position so you
can insert the beaters or dough hooks and
Figure 1
Figure 2 Figure 3
Figure 4
CORRECT INCORRECT
the bowl
2. Insert the beater with the round/oval shape
into the back socket and the beater with
the flat bottom shape and plastic pieces
into the front socket (the socket located on
same side as the speed controls in the
mixer) (Figure 2). To insert the dough hooks,
place the one with the shorter hook into
the back socket and the one with the
longer hook into the front socket (the
socket located on same side as the speed
controls in the mixer) (Figure 3).
Important: Please review Figure 4. The
illustration on the left is how the dough
hooks should look when correctly inserted.
However, should the dough hooks once
inserted to be touching, as they do in the
illustration on the right, then they have
been inserted incorrectly.
Note: Be sure both beaters or dough
hooks click firmly in place, you may need
to twist the attachments slightly to engage
them in position prior to pushing them into
place.
(Figure 1).
Figure 5 Figure 6
3. Place the mixing bowl onto the plate
located on the stand and lock it by turning
it clockwise (Figure 5).
4. Press tilt button to lower the head with the
attachments already in place and into the
bowl. Ensure mixer head locks into place
(Figure 6).
4
Page 6
USING YOUR OSTER® MIXMASTER® STAND MIXER
The OSTER® Mixmaster® Stand Mixer has a DUAL MOTOR DESIGN where one
motor located in the head of the mixer drives the beaters while an independent motor
located in the neck of the mixer rotates the bowl for more powerful and optimum
mixing. Please follow the instructions below to use your Oster® Mixmaster® Stand
Mixer:
1. Turn the rotary speed control dial to the “O” position; plug the power cord into the
power outlet.
NOTE: The power indicator light on the speed control dial should now be on.
2. Use the rotary speed dial to turn the mixer on and off and to control the mixing
speeds.
Please refer to the “SPEED GUIDE FOR STAND MIXER” section of this manual for
mixing instructions for several types of mixtures,
Tip: Start mixing at slow speeds and increase speed gradually to prevent
ingredients from splashing out of the mixing bowl. When adding dry ingredients
such as flour, chocolate powders and others, lower the speed temporarily until
ingredients are combined.
Tip: For better results when kneading yeast dough, use speed 1.
SELECTING THE MIXING BOWL SPEED
1. The mixing bowl automatically turns on when one of the 12 speeds is selected in
the speed control dial. For majority of mixing tasks the bowl speed should be set on
the low speed setting “1”. For light mixes requiring maximum mixing performance
such as cakes and meringue, set the bowl speed to the high setting “2” to ensure
the whole mixture goes through the beaters many times. For thick mixes and large
volumes the bowl speed should be set at the low position “1”.
2. When mixing is complete, turn the speed control dial to the “O” position and unplug
the cord from the power outlet.
Note: The indicator light will stay on until power is disconnected from the mixer.
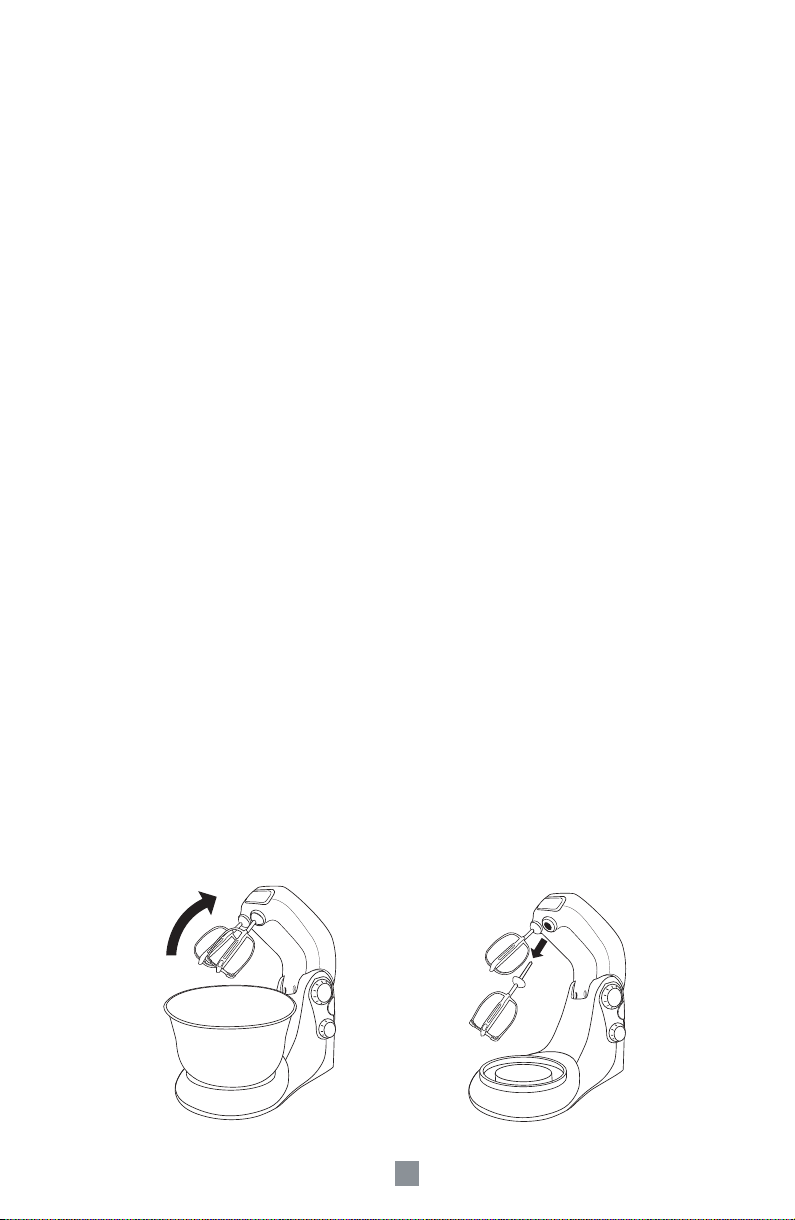
3. Push down the tilt button and move mixer head back until it is locked into position
(Figure 7).
4. To remove the attachments (either beaters or dough hooks), place fingers loosely
around the attachments and hold down the “beater eject” button (Figure 8).
Figure 7
Figure 8
5
Page 7

SPEED GUIDE FOR STAND MIXER
Please keep in mind that the various mixing tasks and related speeds listed in the table
below may vary slightly from recipe to recipe.
SPEED SETTING MIXING TASK
FOLDING & BLENDING
1 Scones/Pastry
2 Biscuit dough
3 Tea Cakes
LIGHT MIXING
4 Sauces & Puddings
5 Custard/Icing
6 Packet Mixes
CREAMING & BEATING
7 Butter & Sugar
8 Cream Cheese
9 Heavy Batters
WHIPPING & AERATING
10 Cream
11 Egg whites & meringue
12 Marshmallow
CARE AND CLEANING
• Before cleaning your mixer, ensure the power is turned off and then remove the plug
• Wipe over the outside area of the stand with a damp cloth and polish with a soft dry
cloth
• Wipe any excess food particles from the power cord
• Wash the mixing bowl, beaters, and dough hooks in warm soapy water and wipe
dry. The stainless steel mixing bowl, beaters and dough hooks can also be placed in
the dishwasher (top rack only)
6
Page 8

RECIPES
Fruit Cake
Ingredients
400 grams (14 oz.) butter or margarine (room temperature)
200 grams (7 oz.) brown sugar
200 grams (7 oz.) sugar
6 eggs
1 teaspoon vanilla essence
5 tablespoons rum
½ kilogram (1 lb) all-purpose flour
½ teaspoon baking soda
1 pinch ground clove
1 pinch nutmeg
1 pinch cinnamon powder
¼ teaspoon baking powder
150 grams (5 oz.) raisins
150 grams (5 oz.) golden raisins
1 tablespoon grated orange peel
150 grams (5 oz.) dried seedless prunes
100 grams (3.5 oz.) cherries maraschinos
100 grams (3.5 oz.) chopped dried apricots
Powder sugar to decorate
Directions
In the Oster® Mixmaster® Stand Mixer, mix the butter or margarine with the
sugar. Add eggs, one by one. Add vanilla and rum. Mix the dry ingredients
separately, setting aside 5 tablespoons to powder the dried fruit. Add the dried
ingredients to the mixture and mix in a folding motion. Chop the fruits and
powder them with the flour you set aside and add them to the previous mixture.
Pour the mixture into a greased pan lined with baking paper. Bake for 45
minutes at 180º C (350º F). Remove from pan and let cool. Decorate with
powdered sugar.
7
Page 9

Coconut Caramel Custard
Ingredients
5 eggs
1 ½ cups condensed milk
1 cup fresh milk
1 teaspoon vanilla
50 grams (2oz) grated coconut
Caramelized mold
Sauce
½ cup fresh milk
100 grams (3.5oz) milk caramel
Directions
In the Oster® Mixmaster® Stand Mixer, mix the eggs with the fresh milk, the
condensed milk and the vanilla. Add the grated coconut and keep mixing. Pour
the mixture over a caramelized mold. Set mold over a broiling pan filled with
water and let it cook for 20 minutes. Remove from pan and decorate with
grated coconut and serve with sauce.
Sauce
Mix milk with milk caramel to obtain a consistent sauce.
8
Page 10

Apricot Sponge Cake
Ingredients
1 cup white wine
200 grams (7oz) dried apricot
200 grams (7oz) brown sugar
150 grams (5oz) butter or margarine
3 egg yolks
3 egg whites
80 grams (3oz) toasted almonds
250 grams (9oz) all-purpose flour
2 teaspoons baking powder
To decorate
Apricot marmalade
Dried apricots
Almonds
Directions
Heat the wine, add the apricots and let them soak. Grind the apricots with an
Oster® Blender until the mix becomes a puree. In your Oster® Mixmaster®
Stand Mixer, mix the egg whites until light and fluffy, add the sugar and keep
mixing. Add the apricot puree and mix with folding strokes. Melt the butter or
margarine, allowing it to cool before adding the previously made mixture. Add
the egg yolks one by one; add the chopped almonds in the Oster® Food
Processor. Lastly, add the all-purpose flour mixed with the baking powder.
Pour the batter into a greased bundt cake pan. Bake it for 35 minutes at 180º
C (350º F). Let it cool and remove it from pan. Add a layer of apricot
marmalade to the top of the cake and decorate with dried apricots and
almonds.
9
Page 11

Banana Bread
Ingredients
2 cups flour
3/4 cup sugar
1 teaspoon baking soda
1/2 teaspoon salt
1 cup mashed ripe banana
2/3 cup mayonnaise
1/4 cup water
1 1/2 teaspoons vanilla
1/2 cup each chopped nuts and chocolate chips, optional
Directions
In Oster® Mixmaster® Stand Mixer, stir together dry ingredients at a medium
speed. Put in the remaining ingredients, adding chocolate chips and nuts last.
Bake on 180 ºC (350 ºF) in 23 x 13 cm (9x5") pan or in a 12-cupcake tin for 30
to 40 minutes. Less time is needed for cupcakes. Cake is done when a
toothpick poked into the center of the bread comes out clean. Mayonnaise is
substituted for the egg and butter in this recipe so fat free mayonnaise will not
be appropriate.
10
Page 12

Scones
Ingredients
3 cups all purpose flour
1 tablespoon baking powder
1 cup butter or margarine
1 cup buttermilk
1 tablespoon lemon zest
Your choice of raisins; dried cranberries; or butterscotch, cinnamon, or
chocolate chips
Cinnamon Spread
1 teaspoon cinnamon, 2 tablespoons sugar, 1/2 pound (230 grams) soft butter
or margarine
Directions
Cut softened margarine or butter into the mixture of flour and baking powder
(you may use the Oster® Mixmaster® Stand Mixer if you desire). When the
mixture resembles coarse meal, add buttermilk and zest and mix until the
dough is combined. On a lightly floured counter or board, mix in your choice of
raisins, dried cranberries, or those wonderful commercial butterscotch,
cinnamon, or chocolate chips. Divide batter into 2 balls and pat into a circle
until it is about 1.27cm to 1.90cm (1/2 to 3/4 inch thick. Cut into triangles and
bake on a non-stick cookie sheet at 205 ºC (400 ºF) degrees for about 35 to 40
minutes until golden brown. You may sprinkle the tops with about 2
tablespoons of sugar if desired before baking. Serve warm or at room
temperature accompanied by cinnamon spread.
Cinnamon Spread
Mix 1 teaspoon cinnamon and 2 tablespoons sugar with ½ pound (230 grams)
soft butter or margarine. Label and use as a topping for toast, muffins, or
scones. Also great on pancakes and waffles. More cinnamon and a ¼
teaspoon of nutmeg may be added.
11
Page 13

Honey-almond Biscotti
Ingredients
3½ cups all-purpose flour
2 tsp. anise seeds
2 tsp. ground cinnamon
2 tsp. baking powder
½ tsp. baking soda
½ tsp. salt
1 cup dried cranberries
3/4 cup slivered almonds
½ cup (1 stick) butter or margarine
¾ cup honey
2 large eggs
1 tsp. vanilla
Directions
Preheat oven to 180 ºC (350° F). Spray a large baking sheet with nonstick
cooking spray; set aside. In the Oster® Mixmaster® Stand Mixer, stir together
flour, anise seeds, cinnamon, baking powder, baking soda and salt; Stir in
cranberries and almonds; set aside. Separately, at medium speed, beat butter
until creamy. Beat in honey until smooth and light, and then beat in eggs one at
a time. At low speed, stir in flour mixture until just mixed, then stir in vanilla. On
prepared baking sheet, shape dough into two 25.4x33x2.54cm (10x13x1 inch)
logs. Bake at 180 ºC (350°F) for 20 minutes or until light golden brown.
Remove from oven to wire rack; cool 5 minutes. Reduce oven to 150 ºC
(300°F). Using 2 metal spatulas in tandem, transfer logs to a cutting board. Cut
each log into 1.27cm (1/2 inch) strips; arrange strips on baking sheet. Bake 20
minutes or until crisp. Remove from baking sheet to wire racks to cool
completely.
12
Page 14

Chocolate Crumb Bars
Ingredients
1 cup butter or margarine, softened
2 cups all-purpose flour
¼ tsp. salt
½ cup firmly packed brown sugar
1 pkg. 340 grams (12 oz.) semisweet chocolate pieces, divided
1 can sweetened condensed milk
1/3 cup seedless raspberry jam
½ cup chopped nuts, optional
Directions
Preheat oven to 180 ºC (350° F). Spray 33x23cm (13x9-inch) baking pan with
nonstick cooking spray. In large bowl of your stand mixer, beat butter or
margarine on medium speed until creamy. At low speed, beat in flour, sugar
and salt until crumbly. Remove 1 cup. In a 2 liter (2-quart) microwave-safe
bowl, place 1 cup chocolate morsels and the condensed milk. Cook on
Medium (50% power) 3-5 minutes. Remove and stir until smooth. Spread over
hot crust. Stir nuts into remaining crumb mixture. Sprinkle crumbs over
chocolate filling. Drop teaspoonfuls of raspberry jam over crumb mixture.
Sprinkle with remaining chocolate pieces. Bake 25-30 minutes or until center is
set. Cool in pan on wire rack. Cut into squares when completely cool.
13
Page 15

Lemon Pound Cake
Ingredients
1 lemon
3 cups all-purpose flour
1-1/2 tsp. baking powder
1 tsp. baking soda
1/4 tsp. salt
1 cup (2 sticks) unsalted butter
1-1/2 cups granulated sugar
4 large eggs
1 cup dairy sour cream
1/2 tsp. vanilla
Confectioners' sugar for decoration, optional
Directions
Preheat oven to 160 ºC (325°F). Butter and lightly flour a 25.4cm (10-inch)
tube pan. Grate zest from lemon and squeeze juice; set both aside. On a piece
of waxed paper, sift together flour, baking powder, salt and baking soda. Set
aside. In the Oster® Mixmaster® Stand Mixer, at medium speeds, beat butter
until smooth. Add sugar and beat until light and fluffy. Add eggs one at a time,
beating well after each addition. Add vanilla. Using low speed, beat in flour
mixture alternately. Pour into prepared pan. Bake about 1 hour or until wooden
pick inserted near center of cake comes out clean. Cool cake in pan on wire
rack 20 minutes, then remove from pan to wire rack to cool completely. Just
before serving, sprinkle, if desired, with confectioners' sugar.
14
Page 16

Pineapple Upside Down Cake
Ingredients
1¼ cups flour
2 teaspoons baking powder
¼ teaspoon salt
1 cup sugar
3/4 cup milk
1 teaspoon vanilla
1 egg
4 pineapple slices or 1 cup crushed pineapple
½ cup margarine or butter
¼ cup brown sugar
Directions
Melt ¼ cup margarine or butter in a 23 x 23 cm (9x9-inch) pan. Sprinkle brown
sugar evenly over melted margarine. Drain 4 pineapple slices or 1 cup of
crushed pineapple and arrange in pan. Mix flour, baking powder, and salt into a
mixing bowl. Stir in sugar. Add ¼ cup margarine or butter and milk. Beat for 2
minutes at medium speed in a mixer, scraping sides of bowl frequently. Add
vanilla and egg. Beat at medium speed for another minute and pour carefully
over pineapple in pan. Bake for 50 to 60 minutes or until cake springs back
when top is lightly touched with a finger. Remove from oven; turn upside down
all at once. Leave pan in place for 1 to 2 minutes so topping will not stick to
pan; remove pan. Serve warm or cold. Peaches may be substituted for
pineapple.
15
Page 17

1 – YEAR LIMITED WARRANTY
Sunbeam Products, Inc. ("Sunbeam") doing business as Jarden Consumer Solutions
warrants that for a period of ONE year from the date of purchase, this product will be
free from defects in material and workmanship. Sunbeam, at its option, will repair or
replace this product or any component of the product found to be defective during the
warranty period. Replacement will be made with a new or remanufactured product or
component. If the product is no longer available, replacement may be made with a
similar product of equal or greater value. This is your exclusive warranty.
This warranty is valid for the original retail purchaser from the date of initial retail
purchase and is not transferable. Keep the original sales receipt. Proof of purchase is
required to obtain warranty performance. OSTER® dealers, service centers, or retail
stores selling OSTER® products do not have the right to alter, modify, or any way
change the terms and conditions of this warranty.
This warranty does not cover normal wear of parts or damage resulting from any of the
following: negligent use or misuse of the product, use on improper voltage or current,
use contrary to the operating instructions, disassembly, repair or alteration by anyone
other than an Oster® Authorized Service Center. Further, the warranty does not cover:
Acts of God, such as fire, flood, hurricanes and tornadoes.
Sunbeam shall not be liable for any incidental or consequential damages caused by the
breach of any express, implied or statutory warranty or condition. Except to the extent
prohibited by applicable law, any implied warranty or condition of merchantability or
fitness for a particular purpose is limited in duration to the duration of the above
warranty.
How To Obtain Warranty Service:
Please see the country specific warranty insert or contact your local authorized
distributor.
PLEASE DO NOT RETURN THIS PRODUCT TO THE PLACE OF PURCHASE.
16
Page 18

IMPORTANTES MESURES DE SECURITE
L’utilisation d’appareils électriques nécessite certaines précautions élémentaires
d’emploi afin de réduire les risques d’incendie, de choc électrique ou autres blessures,
et notamment les suivantes :
LIRE SOIGNEUSEMENT TOUTES LES INSTRUCTIONS AVANT D’UTILISER LE
MIXEUR
• Pour éviter tout risque d’électrocution, NE PAS plonger le cordon ou le socle-moteur
dans l’eau ou tout autre liquide
• Ne pas laisser un enfant se servir ou s’approcher sans surveillance de l’appareil
• Débrancher après usage, avant de retirer ou d’ajouter des éléments et avant de
nettoyer
• Eviter tout contact avec les éléments en mouvement
• Ne pas utiliser un appareil lorsque le cordon ou la fiche électrique est endommagé, ni
lorsque cet appareil ne fonctionne pas normalement, qu’il est tombé ou qu’il a subi
quelque dommage que ce soit. En cas de réparation, vérification ou mise au point,
veuillez retourner l’appareil au centre de service agréé Oster® le plus proche de chez
vous.
• L’usage d’accessoires non recommandés ou vendus par le fabricant présente des
risques d’incendie, d’électrocution ou de blessure
• Ne pas utiliser à l’extérieur
• Ne pas laisser le cordon électrique pendre sur le bord d’une table ou d’un plan de
travail.
• Pendant l’usage, ne jamais laisser l’appareil sans surveillance
• Garder les mains et les ustensiles de cuisine à l’écart des fouets ou de tout autre
accessoire durant le fonctionnement afin de réduire les risques de blessure corporelle
ou de dommage sur l’appareil. Une spatule en caoutchouc peut être utilisée
uniquement lorsque l’appareil n’est pas en marche.
• Toujours utiliser le mixeur sur une surface sèche et plane.
• NE PAS mettre l’appareil au contact de surfaces chaudes, en particulier, cuisinière et
four.
• Débrancher l’appareil après usage, avant de retirer ou d’ajouter des éléments et
avant de le nettoyer
• Ne pas faire fonctionner le Mixeur de manière continue pendant plus de 10 minutes
dans le cas d’une mixture standard. Ne pas faire fonctionner l’appareil pendant plus
de 5 minutes dans le cas de mixtures très lourdes comme les pâtes à gâteaux.
• Garder les mains, cheveux ou vêtements, ainsi que toute spatule ou autre ustensile
de cuisine à l’écart des fouets durant le fonctionnement afin de réduire les risque de
blessure corporelle ou de dommage sur le Mixeur.
17
Page 19

• Détacher les fouets du Mixeur avant de les laver. Ne jamais éjecter les fouets ou les
crochets pétrisseurs pendant que l’appareil est en marche
• Maintenir les doigts bien à l’écart des fouets et des crochets pétrisseurs
• Utiliser uniquement le bol mélangeur pourvu avec l’appareil. NE PAS retirer le bol
mélangeur de la base pendant l’usage
CET APPAREIL EST PREVU POUR USAGE MENAGER UNIQUEMENT
CONSERVER CES INSTRUCTIONS
(Uniquement pour 120 &127 volts)
Pour réduire le risque de choc électrique, cet appareil est muni d’une fiche électrique
polarisée (l’une des broches est plus large que l’autre) Il n’y qu’une seule façon
d’insérer cette fiche dans une prise de courant polarisée. C’est un dispositif de
sécurité qui vise à réduire le risque de choc électrique. Si la fiche ne rentre pas
parfaitement dans la prise, tournez-la dans l’autre sens. Si elle ne rentre toujours pas,
faites appel à un électricien professionnel. Ne pas tenter de contourner ce dispositif de
sécurité.
Si vous utiliser un câble d’alimentation détachable ou une rallonge, (1) le cordon doit
avoir une puissance équivalente à celle du Mixeur. Ne pas laisser pendre le cordon sur
le bord d’un plan de travail ou d’une table, un enfant pourrait tirer dessus ou s’y
accrocher involontairement.
18
Page 20
DESCRIPTION DE L’APPAREIL
9
2
4
1. Socle-moteur
2. Fouets
3. Crochets pétrisseurs
4. Bol mélangeur en acier inoxydable de 4 litres
5. Commande de vitesse de rotation (12 vitesses )
6. Indicateur lumineux de marche/arrêt
7. Commande de vitesse du bol mélangeur
8. Bouton de dégagement
9. Bouton d’éjection
6
5
8
7
1
3
19
Page 21

MODE D’EMPLOI
AVANT D’UTILISER VOTRE MIXEUR OSTER® MIXMASTER®
Avant d’assembler votre mixeur Oster® Mixmaster, s’assurer que le cordon est bien
débranché de la prise de courant et que la commande de vitesse est sur position « o »
1. Appuyer sur le bouton de dégagement
situé sur le socle et lever le batteur. Le
batteur restera bien ajusté en place de
façon à pouvoir insérer les fouets ou les
schéma 1
schéma 2 schéma 3
schéma 4
CORRECT INCORRECT
crochets pétrisseurs (schéma No 1)
2. Placer les crochets de forme ronde/ovale
dans l’ouverture du fond et les crochets en
plastique à fond plat dans l’ouverture du
devant (du même côté que la commande
de vitesse sur le mixeur) (schéma No 2)
Pour insérer les crochets pétrisseurs,
placer le plus court dans l’ouverture du
fond et le plus long dans l’ouverture du
devant (du même côté que la commande
de vitesse sur le mixeur) (schéma No 3)
Important: Veuillez regarder attentivement
le schéma No 4. L’illustration de la gauche
montre les crochets correctement insérés.
Cependant, si une fois en place, les
crochets se touchent - comme le montre
l’illustration de la droite- c’est qu’ils n’ont
pas été insérés correctement.
Note: Assurez-vous que les fouets et les
crochets sont bien en place, il est possible
que vous ayez à tordre légèrement les
accessoires pour les introduire avant de
les glisser dans l’ouverture
schéma 5 schéma 6
3. Placer le bol mélangeur sur le plateau
situé sur le socle et le verrouiller en
position en tournant dans le sens des
aiguilles d’une montre (schéma No 5).
4. Appuyer sur le bouton de dégagement
pour remettre le batteur avec ses acces
soires en position droite à l’intérieur du bol
(schéma No 6)
20
Page 22

COMMENT UTILISER VOTRE MIXEUR OSTER® MIXMASTER
Le Mixeur OSTER® Mixmaster a deux moteurs, le premier moteur qui se trouve dans
la partie supérieure du mixeur entraîne les fouets pendant que le second moteur qui se
trouve dans la partie centrale, fait tourner le bol, pour un mélange optimum et sans
effort. Veuillez lire les instructions ci-dessous avant d’utiliser votre mixeur Oster®
Mixmaster:
1. Tourner le bouton de contrôle de vitesse sur la position “o” et brancher le cordon
dans la prise de courant
Note: l’indicateur lumineux de marche devrait maintenant être allumé
2. Utiliser la commande de vitesse pour mettre en marche et arrêter le mixeur et aussi
pour contrôler la vitesse de mélange
Veuillez vous rapporter au paragraphe intitulé “ guide de réglage des vitesses du
mixeur” de ce manuel pour les instructions concernant la vitesse à utiliser pour chaque
type de mixture
Conseil: commencer lentement et augmenter la vitesse progressivement pour
éviter que les ingrédients ne projettent à l’extérieur du bol. Lorsque vous
ajoutez des ingrédients secs comme la farine, la poudre de chocolat et
autres, ralentissez la vitesse jusqu'à ce qu’ils soient bien intégrés
Conseil: Pour pétrir une pâte, vous obtiendrez de meilleurs résultats si vous utiliser
la vitesse #1
CHOISIR LA VITESSE DU BOL MELANGEUR
1. Le bol mélangeur se met en marche automatiquement quand, avec la commande de
vitesse, vous sélectionnez l’une des 12 vitesses de rotation. Pour la grande majorité
des mixtures, la vitesse du bol devrait être réglée sur la position lente ”1”. Pour les
mixtures légères qui ont besoin d’être très bien mélangées comme par exemple les
pâtes à gâteaux et les meringues, régler la vitesse du bol sur la position ”2 ” pour
s’assurer que la mixture passe ainsi plusieurs fois entre les fouets. Pour des
mixtures plus épaisses et plus volumineuses, la vitesse du bol devrait être réglée
sur la position la plus lente ” 1”.
2. Quand la mixture est prête, tourner la commande de vitesse sur la position »o » et
débrancher le cordon de la prise de courant
Note: l’indicateur lumineux de marche restera allumé jusqu'à ce que le mixeur soit
débranché
3. Appuyer sur le bouton de dégagement et soulever le batteur vers l’arrière jusqu’à ce
qu’il se bloque dans sa position (schéma No 7)
4. Pour retirer les accessoires (fouets ou crochets), les soutenir légèrement tout en
appuyant sur le bouton d’éjection (schéma No 8)
schéma 7
schéma 8
21
Page 23

GUIDE DE RÉGLAGE DES VITESSES DU MIXEUR
Rappelez-vous que les différentes mixtures et leur vitesse respective –voir ci-dessouspeuvent varier légèrement d’une recette à l’autre
VITESSE MIXTURE
POUR BRASSER & MÉLANGER
1 Galettes/pâtisserie
2 Gâteaux
3 Biscuits
POUR MÉLANGER LÉGER
4 Sauces & Puddings
5 Entremets/glaçage
6 Préparations en sachet
DES CRÈMES
7 Beurre & Sucre
8 Fromage blanc
9 Pâtes lourdes
POUR MÉLANGER AÉRÉ
10 Crème
11 Blanc d’oeuf et meringue
12 Guimauve
POUR FOUETTER ET PRÉPARER
ENTRETIEN ET NETTOYAGE
• Avant de nettoyer votre mixeur, placer l’appareil en position d’arrêt et le débrancher
• Essuyer l’extérieur du socle avec un chiffon humide et sécher
• Essuyer le cordon électrique pour y enlever toute trace d’aliments
• Laver le bol mélangeur, les fouets et les crochets pétrisseurs à l’eau chaude
savonneuse et sécher. Le bol en acier inoxydable, les fouets et les crochets peuvent
aller au lave-vaisselle
22
Page 24

RECETTES
Gâteau aux fruits
Ingrédients
400 grammes (14 onces) de beurre ou de margarine (à température ambiante)
200 grammes (7 onces)de sucre brun
200 grammes (7 onces) de sucre en poudre
6 oeufs
1 cuillère à café d’extrait de vanille
5 cuillères à soupe de rhum
½ kg (1livre) de farine
½ cuillère de bicarbonate de soude
1 pincée de clous de girofle
1 pincée de noix de muscade
1 pincée de noix de cannelle en poudre
¼ de cuillère à soupe de levure
150 grammes (5 onces) de raisins secs
150 grammes (5 onces) de raisins blonds
1 cuillère à soupe de zeste d’orange
150 grammes (5 onces) de prunes dénoyautées
100 grammes (3.5 onces) de cerises confites
100 grammes (3.5 onces)d’abricots secs en morceaux
Sucre en poudre pour garniture
Préparation
Avec le mixeur Oster® Mixmaster®, mélanger le beurre ou la margarine avec
le sucre. Ajouter les oeufs un par un. Puis ajouter la vanille et le rhum.
Mélanger les ingrédients secs à part, et séparer 5 cuillères que vous utiliserez
pour saupoudrer les fruits secs postérieurement. Ajouter les ingrédients secs à
la mixture et mélanger délicatement. Couper les fruits en dés et saupoudrer
avec la farine que vous avez séparée puis ajouter à la mixture. Verser la
mixture dans un moule préalablement graissé et tapissé de papier à cuisiner.
Faire cuire à four chaud 180º C (350º F) pendant 45 minutes. Démouler et
laisser refroidir. Garnir de sucre en poudre.
23
Page 25

Tarte à la noix de coco et au caramel
Ingrédients
5 oeufs
1 tasse ½ de lait condensé
1 tasse de lait frais
1 cuillère à soupe de vanille
50 grammes (2 onces) de noix de coco
Un moule caramélisé
Crème
½ tasse de lait frais
100 grammes (3.5 onces) de caramel
Préparation
Dans le bol du mixeur Oster® Mixmaster®, battre les oeufs avec le lait frais, le
lait condensé et la vanille. Ajouter la poudre de noix de coco et continuer de
mélanger. Verser la mixture dans le moule caramélisé. Faire cuire au
bain-marie pendant 20 minutes. Démouler et garnir avec la poudre de noix de
coco et servir avec la crème.
Crème
Mélanger le lait avec le caramel jusqu'à obtenir la consistance d’une crème.
24
Page 26

Gâteau à l’abricot
Ingrédients
1 tasse de vin blanc
200 grammes(7onces) d’abricots secs
200 grammes (7onces) de sucre brun
150 grammes (5 onces) de beurre ou margarine
3 jaunes d’oeufs
3 blancs d’oeufs
80 grammes (3 onces) d’amandes grillées
250 grammes (9 onces) de farine
2 cuillères à café de levure
Garniture
Confiture d’abricot
Abricots secs
Amandes
Préparation
Faire chauffer le vin, y ajouter les abricots et laisser mariner. Ecraser les
abricots avec le mixeur Oster® jusqu'à obtenir la consistance d’une purée.
Avec votre batteur sur pied Oster®Mixmaster®, battre les blancs en neige,
ajouter le sucre et continuer de mélanger. Ajouter la purée d’abricot et
incorporer avec délicatesse. Faire fondre le beurre ou la margarine, laisser
refroidir avant de l’ajouter à la mixture. Ajouter ensuite les jaunes d’oeufs un
par un, ajouter les amandes que vous avez broyées avec votre robot Oster®.
Et enfin, mélanger la farine avec la levure. Verser la pâte dans un moule à
brioche préalablement graissé. Faire cuire pendant 35 minutes à 180º C (350º
F). Laisser refroidir et démouler. Ajouter une couche de confiture d’abricot sur
le dessus du gâteau et décorer avec les abricots secs et les amandes.
25
Page 27

Gâteau à La Banane
Ingrédients
2 tasses de farine
¾ de tasse de sucre
1 cuillère à café de bicarbonate de soude
½ cuillère à café de sel
1 tasse de bananes écrasées
Deux-tiers de tasse de mayonnaise
¼ tasse d’eau
1 cuillère à café et demie de vanille
½ tasse de noix et chocolat en morceaux (au choix)
Préparation
Dans le mixeur Oster® Mixmaster®, mélanger tous les ingrédients secs à
vitesse moyenne. Ajouter le reste des ingrédients, les morceaux de chocolat et
les noix en tout dernier. Faire cuire à 350 degrés dans un moule de 23x13cm
(9x5 pouces) ou dans 12 moules individuels, pendant 30 à 40 minutes. Moins
si vous utilisez des moules individuels. Piquer un couteau dans le gâteau pour
vérifier qu’il est bien cuit. Si le couteau est propre, le gâteau est prêt. La
mayonnaise est un substitut des oeufs et du beurre dans cette recette, la
mayonnaise sans matière grasse ne conviendrait donc pas.
Faire chauffer le vin et ajouter les abricots à mariner. Ensuite, les mélanger
dans le robot ou le mixeur Oster jusqu'à obtenir la consistance d’une purée.
Avec les accessoires du mixeur Oster, faire monter les oeufs en neige jusqu'à
obtenir la consistance d’une meringue, ajouter le sucre et continuer de
mélanger. Ajouter les abricots en purée et continuer de mélanger. Faire fondre
le beurre ou la margarine, laisser refroidir jusqu'à pouvoir l’ajouter à la mixture.
Ajouter les jaunes d’oeufs, un par un. Ajouter les amandes pilées et enfin
ajouter la farine avec la levure. Verser la mixture dans un moule à savarin,
préalablement beurré.
26
Page 28

Galettes au Lait
Ingrédients
3 tasses de farine
1 cuillère à soupe de levure
1 tasse de beurre ou margarine
1 tasse de babeurre
1 cuillère à soupe de citron
Au choix: raisins secs, groseilles séchées, caramel, cannelle ou morceaux de
chocolat
Coulis de cannelle
1 cuillère à soupe de cannelle, 2 cuillères à soupe de sucre, une demi-livre
(230 grammes) de beurre ou margarine
Préparation
Couper la margarine ou le beurre en petits morceaux et ajouter à la mixture de
farine et levure (vous pouvez utiliser le mixeur Oster® Mixmaster® si vous le
désirez) Mélanger grossièrement puis ajouter le beurre et le citron, et
mélanger jusqu'à obtention d’une pâte homogène. Sur un plan de travail ou
planche à découper, placer un peu de farine et mélanger les raisins secs avec,
au choix, des groseilles séchées, des délicieux caramels, de la cannelle ou
des morceaux de chocolat. Diviser la pâte en 2 boules et l’aplatir pour obtenir
une forme ronde d’une épaisseur d’environ 1.27cm à 1.90cm (½ à ¾ de
pouces). Couper en triangle et faire cuire à 205ºC (400ºF) sur un plateau non
adhérant pendant environ 35 à 40 minutes, jusqu'à obtenir une couleur marron
dorée. Si vous le désirez, vous pouvez aussi recouvrir le dessus du gâteau
avec 2 cuillères à soupe de sucre avant de le faire cuire. Servir chaud ou à
température ambiante, accompagné du coulis de cannelle.
Coulis de cannelle
Mélanger 1 cuillère à café de cannelle et 2 cuillères à soupe de sucre avec
une demi-livre (230 grammes) de beurre ou margarine. Conserver et utiliser
sur du pain grillé, des petits gâteaux ou galettes. C’est aussi excellent sur des
crêpes ou des gaufres. Vous pouvez y ajouter un peu plus de cannelle et ¼ de
cuillère à café de noix de muscade.
27
Page 29

Biscotte au Miel et aux Amandes
Ingrédients
3 tasses et demie de farine
2 cuillères à café de graines d’anis
2 cuillères à café de cannelle en poudre
2 cuillères à café de levure
½ cuillère à café de bicarbonate de soude
½ cuillère à café de sel
1 tasse de groseilles séchées
¾ tasse d’éclats d’amandes
½ tasse (1 barre) de beurre ou margarine
¾ tasse de miel
2 gros oeufs
1 cuillère à café de vanille
Préparation
Préchauffer le four à 180ºC (350ºF) . Graisser un large plateau avec un spray
anti-adhérant, laisser reposer. Dans le petit bol du mixeur Oster® Mixmaster®,
mélanger la farine, les graines d’anis, la cannelle, la levure, le bicarbonate de
soude et le sel. Ajouter les groseilles et les amandes, laisser reposer. A part, à
vitesse moyenne, mélanger le beurre jusqu'à obtention
d’un mélange crémeux. Battre le miel jusqu'à obtention d’un mélange
homogène et léger puis battre les oeufs et les ajouter un par un. A vitesse
lente, bien mélanger la mixture contenant la farine, puis ajouter la vanille. Sur
le plateau graissé, diviser la pâte en deux bûches de 24.4x33x2.54cm
(10x13x1 pouces). Faire cuire à 180ºC (350ºF) pendant 20 minutes ou jusqu'à
obtention d’une couleur dorée. Retirer du four et laisser refroidir pendant 5
minutes.
Réduire la température du four à 150ºC (300ºF). Avec 2 spatules en métal,
saisir les bûches et les déposer sur une planche à découper. Couper chaque
bûche en bandes de 1.27cm (½ pouce), les placer sur le plateau à enfourner.
Faire cuire pendant 20 minutes ou jusqu'à ce qu’ils deviennent croustillants.
Puis laisser refroidir complètement.
28
Page 30

Barres au Chocolat
Ingrédients
1 tasse de beurre ou margarine, ramolli
2 tasses de farine
¼ cuillère à café de sel
½ tasse de sucre brun bien tassé
1 sachet de 340 grammes (12 onces) de chocolat noir semi-amer, en
morceaux
1 boîte de lait condensé sucré
Un tiers de tasse de confiture de framboise
½ tasse de noix en morceaux, au choix
Préparation
Préchauffer le four à 180ºC (350ºF). Graisser un plateau de 33x23cm (13x9
pouces) avec un spray anti-adhérant. Dans le grand bol du mixeur, à vitesse
moyenne, mélanger le beurre ou la margarine jusqu'à obtention d’un mélange
crémeux. A vitesse lente, battre la farine, le sucre et le sel jusqu'à obtention
d’un mélange friable. En retirer la mesure d’une tasse. Dans un bol à
micro-ondes d’une capacité de 2 litres(2 quarts de gallon), placer les morceaux
de chocolat et le lait condensé. Faire fondre à puissance moyenne (50%)
pendant 3 à 5 minutes. Retirer du four et mélanger jusqu'à obtenir un mélange
homogène. Etaler sur une croûte chaude. Mélanger les noix avec le reste de la
mixture friable. Saupoudrer le mélange friable sur le chocolat. Ajouter des
cuillères à café de confiture de framboise à la mixture. Saupoudrer avec le
chocolat restant. Faire cuire pendant 25 à 30 minutes ou jusqu'à ce que le
centre soit cuit. Laisser refroidir. Couper en carré une fois complètement
refroidi.
29
Page 31

Gâteau au Citron
Ingrédients
1 citron
3 tasses de farine
1 cuillère à café et demie de levure
1 cuillère à café de bicarbonate de soude
Un quart de cuillère à café de sel
1 tasse (2 barres) de beurre non-salé
1 tasse et demie de sucre cristallisé
4 gros oeufs
1 tasse de crème fraîche
1 cuillère à café et demie de vanille
Sucre pour garniture, au choix
Préparation
Préchauffer le four à 160ºC (325ºF). Beurrer un moule de 25.4cm (10 pouces)
et saupoudrer de farine. Gratter la peau du citron et le presser. Laisser
reposer. Sur un morceau de papier ciré, tamiser la farine, la levure, le sel et le
bicarbonate de soude. Laisser reposer. Dans le grand bol du mixeur Oster®
Mixmaster®, à vitesse moyenne, battre le beurre jusqu'à obtention d’un
mélange crémeux. Ajouter le sucre et battre jusqu'à obtention d’un mélange
léger. Ajouter les oeufs un par un, bien battre après chaque oeuf. Ajouter la
vanille. A vitesse lente, incorporer la farine avec la mixture du beurre. Verser
dans le moule. Faire cuire pendant environ 1 heure, enfoncer le couteau pour
vérifier que le gâteau est bien cuit. S’il ressort propre, c’est que votre gâteau
est prêt. Laisser refroidir sur le plateau pendant environ 20 minutes, puis le
retirer du plateau et laisser refroidir complètement. Juste avant de servir, si
vous le désirez, saupoudrer de sucre en poudre pour la décoration.
30
Page 32

Gâteau Renversé à L’ananas
Ingrédients
1 ¼ tasse de farine
2 cuillères à café de levure
Un quart de cuillère à café de sel
1 tasse de sucre
Trois-quarts de tasse de lait
1 cuillère à café de vanille
1 oeuf
4 rondelles d’ananas ou 1 tasse de morceaux d’ananas
½ tasse de margarine ou beurre
¼ tasse de sucre brun
Préparation
Faire fondre ¼ tasse de margarine ou beurre dans un plateau de 23x23cm
(9x9 pouces). Saupoudrer le sucre brun sur la margarine fondue de manière
uniforme. Egoutter 4 tranches d’ananas ou une tasse de morceaux d’ananas
et les placer sur le plateau. Mélanger la farine, la levure et le sel dans le bol
mélangeur. Ajouter le sucre. Ajouter ¼ tasse de margarine ou beurre et du lait.
Battre la mixture pendant 2 minutes à vitesse moyenne dans le mixeur, en
grattant souvent les bords du bol. Ajouter la vanille et l’oeuf. Battre à vitesse
moyenne pendant encore une minute puis verser avec soin dans le moule sur
les ananas. Faire cuire pendant 50 à 60 minutes ou jusqu'à ce que la
superficie du gâteau rebondisse lorsque vous la touchez du doigt. Retirer du
four et retourner le gâteau. Laisser le plateau attaché au gâteau pendant 1 ou
2 minutes pour éviter qu’il n’attache. Retirer le plateau. Servir chaud ou froid.
Vous pouvez remplacer l’ananas par des pêches.
31
Page 33

1 AN DE GARANTIE LIMITEE
©2006 Sunbeam Products, Inc.(“Sunbeam”), faisant affaires sous le nom de Jarden
Consumer Solutions garantit que pour une période de (1) an, à partir de la date d’achat,
ce produit ne présentera aucun vice matériel ou de fabrication. Sunbeam fera le choix
de réparer ou de remplacer ce produit ou tout autre élément défectueux pendant la
période de garantie. Le remplacement consistera en un produit -ou élément- nouveau
ou re-manufacturé. Si le produit n’est plus disponible, il sera remplacé par un produit
similaire d‘une valeur comparable ou supérieure. Cela constitue votre garantie
exclusive.
Cette garantie est valable pour l’acheteur original à partir de la date d’achat initiale et
ne peut être transférée. Conservez le reçu d ‘achat original. Une preuve d’achat est
requise pour que la garantie puisse appliquer. Les revendeurs, centres de service ou
magasins Oster® n’ont pas le droit de transformer, modifier ou de changer, de quelque
façon que ce soit, les termes et conditions de cette garantie.
Cette garantie ne couvre ni l’usure normale des pièces ni les dommages encourus lors
des situations suivantes: utilisation inappropriée ou négligente du produit, utilisation
sous un voltage ou courant inadéquat, utilisation contraire au mode d’emploi,
démontage, réparation ou modification par toute entité autre que le service après-vente
agréé par Oster®. De plus, la garantie ne couvre pas les dommages encourus lors
d’évènements provoqués par la Nature tels que: incendie, inondation, ouragans et
tornades.
Sunbeam ne sera pas tenu responsable de tout dommage encouru de manière
accidentelle ou conséquente découlant du manquement des conditions de garantie
implicites ou statutaires. A moins que ce ne soit interdit par la loi en vigueur, toute
garantie, condition marchande ou définition d’usage est limitée à la durée de la garantie
mentionnée
ci-dessus.
Comment obtenir un service après-vente sous garantie: Veuillez consulter l’insert
correspondant à votre pays ou veuillez contacter votre distributeur local agréé.
NE PAS RETOURNER CE PRODUIT A L’ENDROIT OU VOUS AVEZ EFFECTUE VOTRE ACHAT.
32
Page 34

PRECAUCIONES IMPORTANTES
Cuando se utiliza cualquier artefacto eléctrico siempre se deben seguir precauciones
básicas de seguridad para evitar el riesgo de incendio, descarga eléctrica y/o lesiones,
incluyendo las siguientes:
LEA TODAS LAS INSTRUCCIONES ANTES DE UTILIZAR SU BATIDORA DE
PEDESTAL.
• Para protegerse contra el riesgo de una descarga eléctrica, NO sumerja el cable, el
enchufe o el artefacto en agua u otros líquidos
• Se requiere supervisión cercana cuando cualquier artefacto está siendo utilizado por
niños o cerca de ellos
• Desenchufe el cable eléctrico del tomacorriente cuando no esté utilizando su batidora
o antes de limpiarla
• Evite el contacto con partes en movimiento
• NO opere ningún artefacto con un cordón o enchufe dañado, después de que el
artefacto haya fallado o si se cae al suelo o se daña de cualquier otra manera.
Regrese el artefacto al Centro de Servicio Oster® Autorizado más cercano para
examinarlo, repararlo o para ajustarlo mecánica o eléctricamente
• El uso de accesorios no recomendados o vendidos por el fabricante del artefacto
puede causar riesgos de daños corporales a las personas
• NO la utilice al aire libre
• NO permita que el cable cuelgue del borde de la mesa o mostrador
• Nunca deje ningún artefacto eléctrico desatendido cuando esté operando
• Mantenga las manos y los utensilios alejados de los batidores o de cualquier otra
parte de la batidora que esté en funcionamiento. Para reducir el riesgo de lesiones
personales severas y/o daños a la unidad se puede utilizar una espátula de goma,
pero únicamente cuando la batidora no esté funcionando
• Siempre opere su batidora de pedestal en una superficie seca y plana
• NO coloque este artefacto sobre o cerca de quemadores de estufas de gas o
eléctricas, ni dentro de un horno caliente
• NO opere su batidora de pedestal por más de 10 minutos consecutivos cuando bata
una mezcla regular. Cuando preparando mezclas extremadamente pesadas como
masas, no deberá operar el artefacto por más de 5 minutos consecutivos
33
Page 35

• Mantenga alejadas las manos, el cabello y la ropa, así como las espátulas y otros
utensilios de los batidores cuando éstos estén en movimiento para reducir el riesgo
de daños corporales y/o al artefacto
• Remueva los batidores de su batidora antes de lavarlos. NUNCA retire los batidores
o los ganchos amasadores cuando el artefacto se encuentre funcionando
• Proteja sus dedos manteniéndolos bien alejados de los batidores y ganchos
amasadores cuando éstos estén en movimiento
• Sólo utilice el tazón de mezclar que viene con su batidora. NO detenga el tazón de
mezclar mientras éste se encuentre dando vueltas
ESTA UNIDAD ESTA DISEÑADA SOLO PARA USO DOMESTICO.
CONSERVE ESTAS INSTRUCCIONES
(Para 120 y 127 Voltios Unicamente)
Para reducir el riesgo de una descarga eléctrica, este artefacto cuenta con un enchufe
polarizado (una clavija es más ancha que la otra). Este enchufe entra sólo de una
manera en un tomacorriente polarizado. Si el enchufe no entra correctamente en el
tomacorriente, simplemente colóquelo al revés. Si todavía no entra, comuníquese con
un electricista competente. De ninguna manera intente modificar o forzar la conexión
diseñada como medida de seguridad.
INSTRUCCIONES ESPECIALES DEL CABLE ELECTRICO
Si se utiliza un cable de extensión la capacidad nominal eléctrica del cable de
extensión debe ser el mismo del producto. El cable de extensión deberá colocarse de
manera que no cuelgue del borde del mostrador o mesa donde pueda tirarlo un niño o
pueda tropezar con él accidentalmente.
34
Page 36

DESCRIPCION DEL ARTEFACTO
9
2
4
1. Motor/base de pedestal
2. Batidores
3. Ganchos amasadores
4. Tazón de mezclar de acero inoxidable
Con 4 litros de capacidad
5. Control de rotación de 12 velocidades
6. Luz indicadora de encendido
7. Control de velocidad dual para el tazón
8. Botón para reclinar el cabezal
9. Botón para expulsar los batidores
6
5
8
7
1
3
35
Page 37

INSTRUCCIONES DE OPERACION
ANTES DE UTILIZAR SU BATIDORA DE PEDESTAL OSTER® MIXMASTER®
Antes de utilizar su batidora de pedestal Oster® Mixmaster®, asegúrese de que el
cable eléctrico no esté conectado en el enchufe y el control de velocidad se encuentre
en la posición de apagado “O”.
Figura 1
Figura 2 Figura 3
Figura 4
CORRECTO INCORRECTO
Figura 5 Figura 6
1. Presione el botón inclinador, localizado en el
cuello de su batidora y levante el cabezal. El
cabezal de la batidora quedará afianzado en
esta posición para que usted pueda insertar
los batidores o ganchos amasadores.
2. Inserte el batidor que tiene forma ovalada
en la abertura posterior y el batidor con la
base lisa y los nódulos de plástico en la
abertura frontal (la abertura localizada en el
mismo lado de los controles de velocidad de
su batidora)
ganchos amasadores, coloque el que tiene el
gancho más pequeño del lado posterior y el
gancho más largo en la parte frontal (la
abertura localizada en el mismo lado de los
controles de velocidad de su batidora)
Importante: Por favor refiérase a la Figura 4.
La ilustración del lado izquierdo muestra
como deben de lucir los ganchos
amasadores cuando están insertados
correctamente. Si los ganchos amasadores
una vez que se inserten llegasen a tener
contacto, tal y como se muestra en la
ilustración de la derecha, significa que están
colocados de manera incorrecta.
Nota: Asegúrese de que ambos batidores o
ganchos amasadores estén enganchados
firmemente en su lugar. Quizás usted
necesite torcerlos ligeramente para que
entren correctamente en su posición antes
de que los empuje para que queden en su
lugar.
3. Coloque el tazón de mezclar en el plato
localizado en la base y ajústelo en su lugar
girándolo en dirección de las manillas del
reloj.
4. Presione el botón inclinador del cabezal para
bajarlo hacia el tazón una vez que los
accesorios y el tazón se encuentren en su
lugar. Asegúrese de que el cabezal de su
batidora está firmemente afianzado en su
lugar
5. Vuelva a conectar el cable eléctrico al
enchufe, asegurándose que el control de
velocidad siga en la posición de apagado “O”.
36
(Figura 2). Para insertar los
(Figura 5).
(Figura 6).
(Figura 1)
(Figura 3)
Page 38

UTILIZANDO SU BATIDORA DE PEDESTAL OSTER® MIXMASTER®
La Batidora de Pedestal Oster® Mixmaster® cuenta con un DISEÑO DE MOTOR DUAL, lo
que permite que un motor localizado en el cabezal de la batidora impulse los batidores
mientras que un motor independiente localizado en el cuello de la batidora rote el tazón,
para un mayor poder y una mezcla más óptima. Por favor siga las siguientes instrucciones
para utilizar su Batidora de Pedestal Oster® Mixmaster®:
1. Con el control de rotación de velocidades en la posición de apagado “O”, enchufe el
cable en el tomacorriente.
NOTA: La luz indicadora de encendido que se encuentra localizada en el control de
rotación de velocidades se iluminará al momento que usted enchufe el artefacto.
2. Utilice el control de rotación de velocidades para encender y controlar las velocidades
de mezclado de su batidora (de 1 a 12) y para apagarla “O”.
Por favor refiérase a la sección GUIA DE AJUSTE DE VELOCIDAD de este manual para
instrucciones sobre cómo preparar una gran variedad de mezclas.
Consejo: Comience a mezclar en velocidad baja e incremente la velocidad
gradualmente para prevenir que los ingredientes salpiquen hacia fuera
del tazón. Cuando agregue ingredientes secos, tales como harina y
chocolate en polvo, baje la velocidad temporalmente hasta que los
ingredientes estén mezclados.
Consejo: Cuando amase masas que contengan levadura, utilice la velocidad 1 para
obtener mejores resultados.
SELECCIONANDO LA VELOCIDAD DEL TAZON DE MEZCLAR
1. El tazón de mezclar girará automáticamente una vez que el control de rotación de
velocidad sea colocado en las velocidades, desde 1 a 12. Para la mayoría de las
mezclas el tazón debe estar colocado en velocidad baja “1”. Para mezclas más ligeras
que requieren el máximo de mezclado, tales como pasteles o merengues, utilice la
velocidad del tazón alta “2”, ya que la mezcla pasará por los batidores muchas veces.
Para mezclas gruesas y abundantes cantidades, utilice la velocidad del tazón baja “1”.
2. Una vez que los ingredientes estén bien mezclados, coloque el control de rotación de
velocidad en la posición de apagado “O”, y desenchufe el cable del tomacorriente.
NOTA: La luz indicadora de encendido no se va a apagar hasta que usted haya
desenchufado el artefacto del tomacorriente.
3. Presione el botón inclinador y lleve el cabezal de la batidora hacia atrás hasta que el
mismo quede bien ajustado en esta posición
4. Para retirar los accesorios (ya sean los batidores o ganchos amasadores), coloque los
dedos alrededor del accesorio y presione el botón expulsor (Figura 8).
Figura 7
(Figura 7).
Figura 8
37
Page 39

GUIA DE AJUSTE DE VELOCIDAD
Por favor tome en cuenta los diferentes tipos de mezclas y las velocidades relativas
listadas en la tabla que aparece a continuación, como podrá observar varía
ligeramente de receta en receta.
TIPO DE MEZCLA
1 Bollo/Pastel
2 Panecillo
3 Pasteles para acompañar el té
4 Salsas y pudines
5 Natillas/glaseados de azúcar
6 Mezclas de Paquete
CREMANDO Y ESPONJANDO
7 Mantequilla y azúcar
8 Queso crema
9 Tartas pesadas
Y MERENGUES
10 Crema
11 Claras de huevo y merengues
12 Marshmallow
RANGO DE AJUSTE
DE VELOCIDAD
ENVOLVIENDO Y MEZCLANDO
BATIENDO MEZCLAS LIGERAS
PREPARANDO CREMA CHANTILLY
LIMPIEZA Y CUIDADO
• Antes de limpiar su batidora de pedestal, asegúrese de que está apagada y
desenchufada
• Limpie el área exterior de su batidora y la base con un paño húmedo y púlala con
un paño seco suave
• Limpie cualquier partícula de alimento que pueda haber quedado en el cable
eléctrico
• Lave el tazón de mezclar, los batidores y los ganchos amasadores con agua
jabonosa tibia, enjuáguelos y séquelos. El tazón de mezclar de acero inoxidable, los
batidores y los ganchos amasadores puede lavarlos en el lavaplatos automático en
la parte superior solamente.
38
Page 40

RECETAS
Torta De Frutas
Ingredientes
400 gramos (14 onzas) de mantequilla o margarina a temperatura ambiente
200 gramos (7 onzas) de azúcar morena
200 gramos (7 onzas) de azúcar blanca
6 huevos
1 cucharadita de esencia de vainilla
5 cucharadas de ron (aguardiente)
½ kg. (1 libra) de harina preparada
½ cucharadita de bicarbonato de sodio
1 pizca de clavo de olor molido
1 pizca de nuez moscado
1 pizca de canela molida
¼ cucharadita de polvo de hornear
150 gramos (5 onzas) de uvas pasas negras
150 gramos (5 onzas) de uvas pasas rubias
1 cucharada de ralladura de naranja
150 gramos (5 onzas) de ciruelas pasas sin semilla
100 gramos (3.5 onzas) de cerezas marrasquinos
100 gramos (3.5 onzas) de albaricoques picados
Azúcar pulverizada para decorar
Preparación
En el tazón de su Batidora de Pedestal Oster® Mixmaster®, bata la
mantequilla o margarina con el azúcar. Agregue los huevos uno por uno,
incorpore la vainilla y el ron. Cierna los ingredientes secos y agréguelos,
reservando unas 5 cucharadas para espolvorear las frutas secas. Mezcle con
movimientos envolventes. Pique las frutas y páselas por la harina que reservó,
agréguelas a la preparación anterior. Coloque esta mezcla en un molde
previamente engrasado y forrado con papel encerado. Hornee a 180ºC
(350ºF) por 45 minutos aproximadamente. Desmolde, deje enfriar y
espolvoree con el azúcar pulverizada.
39
Page 41

Flan de Coco
Ingredientes
5 huevos
1 ½ taza de leche condensada
1 taza de leche fresca
1 cucharadita de vainilla
50 gramos (2 onzas) de coco rallado
Molde con una capa de caramelo o miel de caña
Salsa
½ taza de leche fresca
100 gramos (3.5 onzas) de manjar blanco (dulce de leche)
Preparación
En el tazón de su Batidora de Pedestal Oster® Mixmaster®, bata los huevos
con la leche condensada, la leche fresca y la vainilla. Agregue el coco rallado
y siga mezclando. Coloque esta mezcla sobre el molde con caramelo y cocine
a baño de Maria por 20 minutos. Desmolde y decore con coco rallado y sirva
con la salsa.
Salsa
Mezcle la leche con el manjar blanco para obtener una mezcla consistente.
40
Page 42

Bizcocho de Albaricoques
Ingredientes
1 taza de vino blanco
200 gramos(7 onzas) de albaricoques deshidratados (o cualquier fruta
deshidratada de su preferencia)
3 claras de huevo
200 gramos (7onzas) de azúcar morena
150 gramos (2 onzas) de mantequilla o margarina
3 yemas de huevo
80 gramos (3 onzas) de almendras tostadas
250 gramos (9 onzas) de harina preparada
2 cucharaditas de polvo de hornear
Para decorar
Mermelada de albaricoque (cantidad necesaria)
Albaricoques (o fruta deshidratada)
Almendras
Preparación
Caliente el vino y deje remojar los albaricoques. Luego muélalos en su
procesador de alimentos o en su licuadora Oster® hasta hacerlos puré. Con la
ayuda de su Batidora de Pedestal Oster® Mixmaster®, bata las claras a punto
de merengue, incorpore el azúcar y siga batiendo. Añada el puré de
albaricoques y mezcle con movimientos envolventes. Derrita la mantequilla o
margarina, déjela enfriar para luego agregar a la preparación anterior. Añada
las yemas una a una, incorpore las almendras picadas en el procesador de
alimentos y por último la harina mezclada con el polvo de hornear. Vierta la
preparación en un molde tipo “savarin" previamente engrasado. Hornee a
180ºC (350ºF) durante 35 minutos. Deje enfriar, desmolde, pincele la
superficie con mermelada y decore con las almendras y trocitos de
albaricoque.
41
Page 43

Pan de Banana
Ingredientes
2 tazas de harina
¾ taza de azúcar
1 cucharadita de polvo de hornear
½ cucharadita de sal
1 taza de bananas maduras trituradas
2/3 taza de mayonesa
¼ taza de agua
1 ½ cucharadita de vainilla
½ taza de trocitos de nueces y chispas de chocolate (opcional)
Preparación
Con su Batidora de Pedestal Oster® Mixmaster® revuelva todos los
ingredientes secos. Luego, coloque el resto de los alimentos agregando los
trocitos de nueces y las chispas de chocolate al final. Hornee a 180ºC (350ºF)
en un molde de 23x13cm (9x5pol) por 30 ó 40 minutos, o hasta que al insertar
un palillo de dientes en el centro del pan salga limpio. La mayonesa es
utilizada para sustituir huevos y mantequilla en la mezcla, por lo tanto no se
recomienda mayonesa baja en grasas para esta receta.
42
Page 44

Biscocho
Ingredientes
3 tazas de harina
1 cucharada de polvo de hornear
1 taza de mantequilla o margarina
1 taza de suero de leche
1 cucharada de ralladura de limón
Seleccione entre pasas, arándanos, o sirope de caramelo, canela o chispas de
chocolate.
Baño de Canela
1 cucharadita de canela
2 cucharadas de azúcar
230 gramos (½ libra) de mantequilla o margarina suavizada
Preparación
Bata en su batidora de pedestal Oster® Mixmaster® la mantequilla o
margarina suavizada con la harina y el polvo de hornear. Cuando la mezcla
tenga una consistencia gruesa, añádale el suero de leche y la ralladura de
limón y bata hasta que todos los ingredientes estén bien mezclados. En una
mesa o mostrador coloque una pequeña cantidad de harina y espolvoréelo,
para luego colocar su selección de pasas, arándanos, canela, chispas de
chocolate o sirope de caramelo. Divida la mezcla en dos bolas y haga dos
círculos de aproximadamente 1.27cm a 1.90cm (½ a ¾pol) de espesor.
Córtelos en triángulos y hornéelos en una bandeja para hacer galletas
antiadherente a 205ºC (400ºF) grados por 35 a 40 minutos, hasta que estén
dorados. Si lo desea, espolvoréelos por encima antes de hornearlos con dos
cucharadas de azúcar. Sírvalos tibios o a temperatura ambiente acompañados
con el baño de canela.
Baño de Canela
Mezcle 1 cucharadita de canela y 2 cucharadas de azúcar con 230 gramos
(½ libra) de margarina o mantequilla suavizada. Colóquelo en un envase y
utilícelo para acompañar con pastelitos, pan, bollos. También es excelente en
panqueques y waffles. Si lo desea, agregue más canela y ¼ cucharadita de
nuez moscada.
43
Page 45

Biscochos de Miel y Almendras
Ingredientes
3 ½ tazas de harina
2 cucharaditas de semillas de anís
2 cucharaditas de canela en polvo
2 cucharaditas de polvo de hornear
2 cucharaditas de bicarbonato de soda
½ cucharadita de sal
1 taza de durazno secos
¾ taza de rodajas de almendras
½ taza ( 1 barra) de mantequilla o margarina
¾ taza de miel
1 cucharadita de vainilla
Preparación
Caliente previamente el horno a 180ºC (350º F). Utilice una bandeja para
hornear previamente engrasada y póngala a un lado. En el tazón de su
Batidora de Pedestal Oster® Mixmaster®, mezcle la harina, las semillas de
anís, la canela, el polvo de hornear, el bicarbonato de soda y la sal, colóquelo
en un recipiente; aparte, una los durazno con las almendras y póngalas a un
lado. Vuelva a tomar el tazón de la batidora y a velocidad media bata la
mantequilla hasta que esté cremosa. Añada a esta mezcla la miel hasta que
esté suave, luego agregue los huevos uno a uno. A velocidad baja, agregue a
esta última mezcla la primera mezcla de harina y bata hasta que ambas estén
bien unidas. Luego agregue la vainilla. En la bandeja que tiene lista, coloque
la masa cortada en forma de troncos de 25.4x33x2.54cm (10x13x1pol).
Hornee a 180ºC (350ºF) por 20 minutos o hasta que los biscochos se doren.
Remuévalos de la bandeja y déjelos enfriar por 5 minutos. Reduzca la
temperatura del horno a 150ºC (300º F). Utilizando 2 espátulas de metal, lleve
los biscochos a una tabla de cortar. Corte cada tronco en tiras de 1.27cm
(½pol); coloque estas tiras en la bandeja de hornear. Hornee por 20 minutos o
hasta que estén crujientes. Remuévalos de la bandeja una vez que se enfríen.
44
Page 46

Barras de Migas de Chocolate
Ingredientes
1 taza de mantequilla o margarina suavizada
2 tazas de harina
¼ cucharadita de sal
½ taza de azúcar morena
1 paquete (12 onzas) de chocolate semi-dulce dividido en trozos
1 lata (14 onzas) de leche condensada
1/3 taza de mermelada de frambuesa sin semillas
½ taza de nueces picadas, opcional
Preparación
Caliente previamente el horno a 180ºC (350º F). Utilice una bandeja para
hornear previamente engrasada y póngala a un lado. En el tazón de su
Batidora de Pedestal Oster® Mixmaster®, mezcle a velocidad media la
mantequilla o margarina hasta que esté cremosa. Cambie a velocidad baja y
agregue la harina, el azúcar y la sal, bata hasta que la mezcla tenga la
consistencia adequada. Tome 1 taza de esta mezcla y haga una corteza
colocándola en la bandeja. En un tazón que se puede llevar al horno
microondas, coloque una taza del chocolate y únalo con la leche condensada.
Cocínelo en el microondas a temperatura media (50% del poder) por 3-5
minutos. Revuelva esta mezcla hasta que esté suave. Colóquela caliente
sobre la corteza. Revuelva las nueces con la mezcla que quedó y rocíe las
migas de chocolate sobre esta mezcla. Por último, coloque la mermelada de
frambuesa y rocíe con los trozos de chocolate restantes. Hornee 25-30
minutos o hasta que el centro esté listo. Deje enfriar. Cuando esté
completamente frío corte en cuadros.
45
Page 47

Pastel de Limón
Ingredientes
1 limón
3 tazas de harina
1½ cucharita de polvo para hornear
1 cucharadita de bicarbonato de soda
¼ cucharita de sal
1 taza (2 barras) mantequilla sin sal
1½ azúcar granulada
4 huevos grandes
1 taza de crema agria
½ cucharita de vainilla
Azúcar pulverizada para adornar (opcional)
Preparación
Precaliente el horno a 160ºC (325º F). Tenga a mano un molde previamente
engrasado. Exprima y ralle la corteza de un limón y déjelo a un lado. En un
papel encerado, mezcle la harina, el polvo para hornear y la sal. En el tazón
de mezclar de su Batidora de Pedestal Oster® Mixmaster®, bata a velocidad
mediana la mantequilla hasta alcanzar una consistencia suave. Agregué
azúcar y mezcle hasta alcanzar una consistencia espesa. Agregue los huevos
uno a uno y mezcle bien a medida que va colocando cada huevo. Agregue la
vainilla mientras que alterna la velocidad entre media y baja. Coloque la
mezcla dentro del molde. Hornee por alrededor de una hora. Otra manera de
saber si su pastel está listo es introduciendo un palillo de dientes en el centro
del molde, si éste sale seco, el pastel está listo. Deje que el molde y el pastel
se enfríen por 20 minutos, después remueva el pastel del molde y permita que
se enfríe por completo. Si desea antes de servir, agréguele por encima el
azúcar pulverizada.
46
Page 48

Pastel de Piña
Ingredientes
1 ¼ tazas de harina
2 cucharitas de polvo de hornear
¼ cucharita de sal
¾ taza de leche
1 cucharita de vainilla
1 huevo
4 piñas cortadas o una taza de piña triturada
½ taza de mantequilla o margarina
¼ taza de azúcar morena
Preparación
Derrita ¼ taza de margarina o mantequilla, en un molde de dimensiones
23x23cm (9x9pul). Rocíe el azúcar morena sobre la mantequilla. Escurra las 4
piñas cortadas o una taza de piña triturada y añádala a la base del molde.
Mezcle la harina, el polvo de hornear y la sal al tazón de mezclar de su
batidora. Agregué el azúcar, añada ¼ de mantequilla o margarina y leche.
Bata por 2 minutos a velocidad mediana, raspando las paredes del molde
frecuentemente. Añada vainilla y el huevo. Mezcle a velocidad mediana por
otro minuto extra y cuidadosamente coloque la mezcla encima de la piña.
Hornee por 50 a 60 minutos o hasta que sienta la superficie del pastel
esponjosa al tocarla con un dedo. Retire el pastel del horno y coloque boca
abajo el molde. Deje que éste se enfríe por unos minutos para que el pastel se
despegue del molde. Sírvalo caliente o frío. Puede remplazar la piña por
durazno.
47
Page 49

1 AÑO DE GARANTIA LIMITADA
Sunbeam Products, Inc. (“Sunbeam”), operando bajo el nombre de Jarden Consumer
Solutions garantiza que este producto estará libre de defectos en material o mano de
obra por un periodo de un año a partir de la fecha de la compra. Sunbeam, a su
elección, reparará o reemplazará este producto o cualquier componente del producto
que se encuentre defectuoso durante el período de garantía. El reemplazo será
efectuado por un producto o componente nuevo o remanufacturado. Si el producto ya
no está disponible, el reemplazo podrá ser efectuado por un producto similar de igual o
mayor valor. Esta es su garantía exclusiva.
Esta garantía es válida para el comprador original al detalle desde la fecha de compra
original al detalle y no es transferible. Guarde el recibo de venta original. Se requiere
prueba de compra para obtener la garantía. Los concesionarios OSTER®, Centros de
Servicio OSTER® Autorizado, o almacenes de ventas al detalle de productos
OSTER® no tienen el derecho de alterar, modificar o cambiar, de manera alguna, los
Términos y condiciones de esta garantía.
Esta garantía no cubre el desgaste normal de las piezas o daños causados por: uso
Negligente o mal uso del producto, uso en voltaje o corriente inapropiada, uso
contrario A las instrucciones de operación, desarme, reparación o alteración por
cualquier Persona que no sea de un Centro de Servicio OSTER® Autorizado. Además,
esta Garantía no cubre: Actos de la naturaleza, tales como incendios, inundaciones,
Huracanes o tornados.
Sunbeam no será responsable por ningún daño incidental o consecuente causado por
El incumplimiento de la garantía o condición expresa, implícita o reglamentaria.
Excepto hasta donde lo prohíben las leyes aplicables, cualquier garantía implícita o
Condición de comerciabilidad o aptitud para un propósito particular, está limitada en
Base a la duración de la garantía descrita arriba.
Cómo obtener Servicio de Garantía:
Por favor consulte el inserto de la garantía correspondiente al país o póngase en
contacto con su distribuidor autorizado local.
NO REGRESE ESTE PRODUCTO AL LUGAR DE COMPRA.
48
Page 50

PRECAUÇÕES IMPORTANTES
Ao usar eletrodomésticos, as precauções de segurança básicas devem sempre ser
observadas para evitar o risco de fogo, descarga elétrica ou ferimentos, incluindo as
seguintes:
LEIA TODAS AS INSTRUÇÕES ANTES DE USAR SUA BATEDEIRA DE PEDESTAL.
• A fim de proteger-se de contra o risco de descarga elétrica, NÃO se deve submergir o
fio, o plugue ou o base do motor na água ou em outros líquidos
• CertifIque-se de que o aparelho não seja usado por crianças ou próximo a elas
• Desconecte o fio da tomada quando a batedeira não estiver sendo utilizada ou antes
de limpá-la
• Evite o contato com peças em movimento
• NÃO opere nenhum eletrodoméstico com o fio ou o plugue danificado, caso o
eletrodoméstico tenha apresentado falhas, tenha caído no chão ou tenha se danificado
de alguma outra maneira. Leve o eletrodoméstico ao Centro de Serviço Autorizado
Oster® mais próximo para ser examinado e reparado
• O uso dos acessórios não recomendados ou vendidos pelo fabricante do aparelho
podem causar riscos de incendio, choque elétrico ou danos corporais as pessoas
• NÃO usar ao ar livre
• Certifique-se de que o fio não se encontra pendurado sobre a borda da mesa ou do
balcão
• Nunca deixe nenhum aparelho elétrico sem a presença de um adulto quando estiver
sendo usado
• Mantenha as mãos e os utensílios longe dos batedores ou de qualquer outra peça da
batedeira quando a mesma estiver sendo usada. Para reduzir o risco de ferimentos
pessoais severos ou de danos a unidade use uma espátula de borracha, mas somente
quando a Batedeira não estiver ligada
• Opere sempre sua Batedeira em uma superfície seca e plana
• NÃO coloque o eletrodoméstico próximo a fogões elétricos ou a gás, nem próximo de
um forno quente
• Quando estiver batendo massas regulares NÃO usar a Batedeira por mais que 10
minutos consecutivos. Caso esteja batendo misturas pesadas tipo massa para pão,
NÃO utilizar a batedeira por mais que 5 minutos consecutivos
49
Page 51

• Mantenha afastado da Batedeira, mãos, cabelo e a roupa, assim como espátulas e
outros utensílios quando a mesma estiver sendo usada para evitar o risco de danos
corporais ou ao eletrodoméstico
• Retire os batedores de sua batedeira antes de lavá-los. Nunca retire os batedores ou
os ganchos quando a batedeira estiver sendo usada
• Mantenha seus dedos afastados dos batedores e dos ganchos quando os mesmos
estiverem em movimento
• Use somente o recipiente para misturar que veio com sua batedeira. Não segure
tentando fazer parar o recipiente enquanto o mesmo estiver em movimento
ESTE APARELHO FOI DESENVOLVIDO SOMENTE PARA USO DOMÉSTICO.
GUARDE ESTAS INSTRUÇÕES
(Somente para 120 E 127 Volts)
A fim reduzir o risco de uma descarga elétrica, este dispositivo conta com um plugue
polarizado (uma ponta é mais larga do que a outra). Este plugue encaixa somente de
uma maneira em uma tomada polarizada. Se o plugue não encaixar na tomada
corretamente, simplesmente coloque-o de maneira inversa. Se ainda não entrar,
comunique-se com um eletricista competente. De nenhuma maneira tente modificar ou
forçar a conexão projetada como a medida de segurança.
Caso for necessário o uso de um fio de extensão a capacidade elétrica nominal do fio
de extensão deve ser a mesma do produto. O fio de extensão deve ser colocado de
maneira que não fique pendurado na da mesa, que não possa ser puxado por uma
criança ou de maneira que alguém possa tropeçar acidentalmente nele.
50
Page 52

DESCRIÇÃO DO APARELHO
9
2
4
1. Motor/base de pedestal
2. Batedores
3. Ganchos amassadores
4. Recipiente em aço inoxidável com 4 litros de capacidade
5. Botão giratório para controle das 12 velocidades
6. Luz indicadora de ligado
7. Botão de controle das duas velocidades do recipiente
8. Botão para levantar e abaixar o cabeçote
9. Botão para soltar os batedores
6
5
8
7
1
3
51
Page 53

INSTRUÇÕES DE USO
ANTES DE UTILIZAR SUA BATEDEIRA DE PEDESTAL OSTER® MIXMASTER®
Antes de usar sua Batedeira, certifIque-se de que o fio não esteja ligado na tomada e
que o controle da velocidade esteja na posição desligado “O”.
1. Pressione o botão localizado na haste da
batedeira para levantar ou abaixar o
cabeçote de modo que você possa colocar
ou retirar os batedores ou os ganchos
amassadores (Figura 1)
2. Insira o batedor com formato oval no
Figura 1
orifício localizado na parte traseira do
cabeçote e o batedor com a base plana e
nódulos plásticos no orifício frontal do
cabeçote (o orifício frontal é aquele mais
próximo ao lado onde estão localizados os
controles de velocidade de sua batedeira)
(Figura 2)
amassadores, coloque o que tem o gancho
menor no orifício localizado na parte de trás
do cabeçote e o gancho o mais longo no
orifício localizado na parte frontal (o orifício
frontal é aquele mais próximo ao lado onde
estão localizados os controles de velocidade
de sua batedeira)
. Para inserir os ganchos
(Figura 3)
.
Figura 2 Figura 3
Figura 4
CORRECTO INCORRECTO
Figura 5 Figura 6
Importante: Conforme indicado na
a ilustração do lado esquerdo mostra como
devem estar os ganchos amassadores
quando forem introduzidos corretamente. Se
os ganchos amassadores estiverem
encostados, conforme mostra a ilustração da
direita, significa que foram colocados da
maneira incorreta.
Nota: Certifique-se de que ambos os
batedores amassadores estejam encaixados
firmemente em seus devidos lugares. Talvez
seja necessário girar os ganchos um pouco
para coloca-los na posição correta antes de
travá-los.
3. Coloque o recipiente para misturar na placa
situada na base e ajuste em seu lugar
girando no sentido horário.
4. Pressione o botão para levantar ou abaixar o
recipiente quando os acessórios e o
recipiente estiverem em seus devidos
lugares. Certifique-se de que os batedores
ou os ganchos para amassar pão de sua
batedeira estejam firmemente travados em
seu devido lugares
52
(Figura 6).
figura 4,
(Figura 5).
Page 54

UTILIZANDO SUA BATEDEIRA DE PEDESTAL OSTER® MIXMASTER®
A Batedeira de Pedestal Oster® Mixmaster® conta com TECNOLOGIA DE MOTOR
DUPLO o que permite o motor posicionado na parte superior da batedeira impulsione os
batedores enquanto o outro motor gire o recipiente, resultando em maior potência e
melhores resultados. Por favor siga as seguintes instruções para usar sua Batedeira de
Pedestal Oster® Mixmaster®:
1. Gire o botão de controle de velocidades colocando-o na posição de desligado “O” e
ligue o fio na tomada.
OBSERVAÇÃO: A luz que se encontra no controle da rotação das velocidades deverá
estar acessa.
2. Use o botão de controle de velocidades para ligar ou desligar sua batedeira e para
controlar as velocidades de batimento.
Use a informação incluída na seção “GUIA DE AJUSTE DE VELOCIDADE” deste manual
para maiores detalhes de como usar as velocidades de sua Batedeira.
DICA: Comece a misturar em velocidade baixa e aumente a velocidade
gradativamente para que os ingredientes não salpiquem para fora do recipiente.
Ao adicionar ingredientes secos, como a farinha ou chocolate em pó, abaixe a
velocidade temporariamente até que os ingredientes estejam misturados.
DICA: Quando bater massas que contenham levedura, use a velocidade 1 para obter
melhores resultados.
SELECIONANDO A VELOCIDADE DO RECIPIENTE
1. O recipiente da Batedeira girará automaticamente uma vez que o botão de controle da
velocidade for colocado nas velocidades de 1 a 12. Para a maioria das misturas, o botão
de controle da velocidade do recipiente deverá ser colocado na velocidade baixa “1”.
Para misturas leves mas que exigem misturar bem, como bolos ou claras ao ponto de
neve, use a velocidade alta “2”, pois isso fará com que a mistura passem através dos
batedores com maior freqüência. Para misturas pesadas e em grandes quantidades, a
velocidade do recipiente terá que ser colocada em baixa “1”.
2. Uma vez que os ingredientes estejam bem misturados, coloque o controle da rotação da
velocidade na posição desligado “O”, e desconecte o fio da tomada.
OBSERVAÇÃO: A luz indicadora não se apagará até que o aparelho seja
desconectado da tomada.
3. Pressione o botão na haste e levante o cabeçote para traz até que o mesmo trave
(Figura 7).
4. Para retirar os acessórios (como batedores ou os ganchos amassadores), coloque os
dedos em baixo do acessório e pressione o botão para expulsar os acessórios (Figura 8).
Figura 7
Figura 8
53
Page 55

GUIA DE AJUSTE DE VELOCIDADE
Vale a pena mencionar que os tipos diferentes de misturas e as respectivas
velocidades incluídas na tabela que segue poderão variar de uma receita para outra.
TIPO DE MISTURA
1 Massa de torta
2 Massa para pão
3 Massa para bolo
4 Molhos e Pudins
5 Recheios/Claras em neve
6 Misturas prontas
CREMES E BATER
7 Manteiga e açúcar
8 Creme de queijo
9 Massas para bolos pesados
10 Cremes
11 Claras em ponto de neve e
merengues
12 Marshmallow
CONTROLE DA
VELOCIDADE
MISTURANDO
MISTURAS LEVES
CHANTILLY E MERENGUES
LIMPEZA E CUIDADOS
• Antes de limpar sua batedeira, certifique-se de que a mesma esteja desligada e
desconectada da tomada
• Limpe a área exterior de sua batedeira e a base com um pano úmido e seque com
um pano seco macio
• Limpe todo resíduo de alimento que puder ter ficado no fio elétrico
• Lave o recipiente, os batedores e os ganchos amassadores com água morna e
ensaboada e seque bem após lavar. Esses acessórios também podem ser lavados
na prateleira superior da lava louças
54
Page 56

RECEITAS
Bolo de frutas
Ingredientes
400 gramas (14 onças) do manteiga ou margarina à temperatura ambiente
200 gramas (7 onças) de açúcar mascavo
200 gramas (7 onças) de açúcar refinado
6 ovos
1 colher de chá de essência do baunilha
5 colheres de rum (conhaque)
½ quilo (1 libra) de farinha de trigo
½ colher de chá de bicarbonato de sódio
1 pitada de cravo moído
1 pitada de noz-moscada
1 pitada de canela em pó
¼ colher de chá de fermento em pó
150 gramas (5 onças) de uva passa preta
150 gramas (5 onças) de uva passa vermelha
1 colher de raspa de casaca de laranja
150 gramas (5 onças) de ameixa sem semente
100 gramas (3.5 onças) de cereja ao marasquino
100 gramas (3.5 onças) de abricó picado
Açúcar de confeiteiro para pulverizar
Preparação:
Coloque na Batedeira de Pedestal Oster® Mixmaster®, manteiga ou margarina com o
açúcar. Adicione os ovos um por um, adicione a baunilha e o rum. Adicione os
ingredientes secos, reservando 5 colheres de farinha para espalhar nas frutas secas.
Misture levemente. Pique as frutas e passe pela farinha que reservou, adicione à
preparação anterior. Coloque esta mistura em uma forma untada forrada com papel
manteiga e leve ao forno a uma temperatura de 180ºC (350ºF) por 45 minutos. Tire,
deixe esfriar e pulverize com o açúcar de confeiteiro.
55
Page 57

Pudim de coco
Ingredientes
5 ovos
1 ½ lata de leite condensado
1 copo de leite fresco
1 colher de chá de Baunilha
50 (2 onças) gramas de coco ralado
Unte com uma calda de caramelo
Molho
½ Copo de leite fresco
100 Gramas (3.5 onças) de manjar branco (doce de leite)
Preparação
No recipiente da Batedeira de Pedestal Oster® Mixmaster®, bata os ovos com
o leite condensado, o leite fresco e a baunilha. Junte o coco ralado e continue
batendo. Coloque a mistura na forma já untada com a cobertura de caramelo
e leve ao banho Maria por 20 minutos. Tire da forma e decore com o coco
ralado e sirva com a calda.
Calda
Misture o leite com o manjar branco para obter uma calda consistente.
56
Page 58

Biscoito de Abricó
Ingredientes
1 taça de vinho branco
200 gramas (7 onças) de abricó desidratado (ou qualquer fruta desidratada de
sua preferência)
3 claras de ovos
200 gramas (7 onças) de açucar mascado
150 (5 onças) Gramas de Manteiga ou Margarina
3 gemas de ovo
80 (3 onças) Gramas de amêndoas torradas
250 gramas (9 onças) de farinha de trigo
2 colheres de chá de fermento em pó
Decoração
Creme de abricó (quantidade razoável)
Abricó (ou fruta desidratada)
Amêndoas
Preparação
Aqueça o vinho e deixe o abricó ficar de molho. Moa no seu processador de
alimentos ou em seu Liquidificador Oster® até formar um purê. Com a ajuda
de sua Batedeira de Pedestal Oster® Mixmaster®, bata as claras ao ponto de
neve, adicione o açúcar e continue batendo. Adicione o purê de abricó e mexa
em movimentos circulares. Derreta a manteiga ou margarina e deixe esfriar
antes de adicioná-la. Adicione as gemas uma por uma, adicione também as
amêndoas picadas e por último a farinha de trigo junto com o fermento em pó.
Despeje a mistura em uma forma previamente untada e leve ao forno
aquecido a 180ºC (350ºF) durante 35 minutos. Quando terminar deixe esfriar,
tire da forma, pincele com o creme de abricó e decore com as amêndoas e
pedaços de abricó.
57
Page 59

Pão de Banana
Ingredientes
2 xícara de farinha
¾ xícara de açúcar
1 colher de chá de fermento em pó
½ colher de chá de sal
1 xícara de bananas maduras moídas
2/3 xícara de maionese
¼ xícara de água
1 ½ colher de chá de baunilha
½ xícara de nozes picadas e raspas de chocolate (opcional)
Preparação
Triture todos os ingredientes secos na Batedeira de Pedestal Oster®
Mixmaster®. Adicione as nozes picadas junto com as raspas de chocolate ao
final. Leve em uma forma de 23x13cm (9x5pol.) ao forno aquecido a uma
temperatura de 180ºC (350ºF) por aproximadamente 30 a 40 minutos, ou
espete um palito de dente até que saia seco. A maionese é utilizada para
substituir os ovos ou a manteiga na mistura, portanto não é recomendado
maionese sem o teor de gordura para esta mistura.
58
Page 60

Scones (Bolinhos)
Ingredientes
3 xícaras de farinha de trigo
1 colher da sopa de fermento em pó
1 xícara de manteiga ou margarina
1 xícara de creme de leite
1 colher de sopa de raspas de limão
Escolha entre passas, essência de baunilha, canela ou raspas de chocolate.
Calda de canela
1 colher de sopa de canela
2 colheres de sopa de açúcar
230 gramas (½ libra) de manteiga ou margarina
Preparação
Bata em sua Batedeira de Pedestal Oster® Mixmaster®, a manteiga ou
margarina junto a farinha de trigo e o fermento em pó. Quando a mistura
atingir uma consistência cremosa, adicione o creme de leite e as raspas de
limão e bata até que os ingredientes estejam misturados de forma uniforme.
Despeje as passas, essência de baunilha, canela ou raspas de chocolate em
uma mesa previamente untada com farinha de trigo. Divida a massa em duas
partes iguais e faça dois círculos de aproximadamente 1,27cm a 1,90 cm (½ a
¾pol.). Corte em triângulos, coloque em uma forma com revestimento
anti-aderente. Leve ao forno pré-aquecido a uma temperatura de 205ºC
(400ºF) por 35 a 40 minutos, até que estejam dourados, se desejar, polvilhe
com açúcar de confeiteiro. Deixe esfriar e sirva com uma calda de canela.
Calda de canela
Misture 1 colher de sopa de canela com duas colheres de sopa de açúcar e
230 gramas de manteiga derretida, se desejar, adicione um pouco de
noz-moscada picada. Ideal para acompanhar os biscoitos, pães ou bolos.
59
Page 61

Biscoitos de mel e amêndoas
Ingredientes
3 ½ xícara de farinha de trigo
2 colheres de chá de sementes de anis
2 colheres de chá de canela em pó
2 colheres de chá de fermento em pó
2 colheres de chá de bicarbonato de sódio
½ colher de chá de sal
1 xícara de uva passa
¾ xícara de amêndoas fatiadas
½ xícara (1 barra) de manteiga ou margarina
¾ xícara de mel
1 colher de chá de baunilha
Preparação
Aqueça o forno a uma temperatura de 180ºC (350ºF) . Use uma forma
untada. No recipiente da Batedeira de Pedestal Oster® Mixmaster®, misture
a farinha de trigo, as sementes de anis, a canela, o fermento em pó, o
bicarbonato de sódio e o sal, coloque em um recipiente a parte, continue
batendo a mistura em velocidade média com a manteiga até atingir uma
consistência cremosa. Adicione o mel, e em seguida adicione os ovos um a
um. Na velocidade baixa, adicione a primeira massa e continue batendo até
atingir uma mistura uniforme. Logo após, adicione a baunilha. Coloque a
massa na forma já untada em forma de troncos de 25,4x33x2,54cm
(10x13x1pol.). Leve ao forno pré-aquecido a uma temperatura de 180ºC
(350ºF) por 20 minutos ou até que os biscoitos estejam dourados. Retira a
forma e deixe esfriar por 5 minutos. Reduza a temperatura do forno para
150ºC (300ºF). Utilizando uma espátula de metal, leve os biscoitos para uma
tábua de cortar. Corte cada tronco em tiras de 1,27cm (½ pol.), coloque as
tiras na forma e leve novamente ao forno até ficarem crocantes. Retire a
bandeja, deixe esfriar e já pode servir.
60
Page 62

Barras de gotas de chocolate
Ingredientes
1 xícara de manteiga ou margarina
2 xícaras de farinha de trigo
¼ colher de chá de sal
½ xícara de açúcar mascavo
1 pacote de chocolate meio amargo picado
1 lata de leite condensado
1/3 xícara de geléia de framboesa sem sementes
½ xícara de nozes picadas (opcional)
Preparação
Aqueça o forno a uma temperatura de 180ºC (350ºF). Use uma forma untada.
No recipiente da Batedeira de Pedestal Oster® Mixmaster®, misture a
manteiga ou margarina até atingir uma consistência cremosa. Em velocidade
baixa adicione a farinha de trigo, o açúcar e o sal, bata até que os
ingredientes se soltem facilmente. Separe uma xícara desta mistura e forme
uma crosta, colocando em uma forma para ser levada ao microondas,
adicione o chocolate junto ao leite condensado. Cozinhe no microondas em
potência média de 3 a 5 minutos, retire a mistura ainda quente e coloque
sobre uma tábua de cortar, misture as nozes com a massa.
Finalmente, coloque a geléia de framboesa juntamente com os pedaços de
chocolate. Leve ao forno por 25 a 30 minutos até que o centro da massa
esteja pronto. Deixe esfriar. Quando estiver completamente frio corte em
quadrados e sirva.
61
Page 63

Bolo de limão
Ingredientes
1 limão
3 xícaras de farinha de trigo
1 ½ colher de chá de fermento em pó
1 colher de chá de bicarbonato de sódio
¼ colher de chá de sal
1 xícara de manteiga sem sal
1 ½ açúcar
4 ovos grandes
1 xícara de creme de leite com uma colher de sopa de limão
½ colher de chá de baunilha
Açúcar de confeiteiro para polvilhar
Preparação
Pré-aqueça o forno a uma temperatura de160ºC (325ºF). Use uma forma
untada. Rale uma casca de um limão. Em uma folha de papel manteiga,
misture a farinha de trigo, o fermento em pó e o sal. No recipiente da
batedeira, bata a velocidade média a manteiga até atingir uma consistência
leve. Adicione o açúcar e bata até atingir uma consistência espessa. Adicione
os ovos um a um batendo bem. Adicione a baunilha e alterne a velocidade
entre média e baixa. Coloque a mistura em uma forma untada. Leve ao forno
por aproximadamente uma hora. Outra maneira de você saber se o bolo está
pronto é introduzindo um palito de dente no meio da massa, e se sair seco é
um sinal de que já está pronto. Deixe esfriar por 20 minutos, retira da forma e
certifique-se de que está completamente frio. Se desejar, polvilhe com o
açúcar de confeiteiro.
62
Page 64

Bolo de Abacaxi
Ingredientes
1 ¼ xícara de farinha de trigo
2 colheres de chá de fermento em pó
¼ colher de chá de sal
¾ xícara de leite
1 colher de chá de baunilha
1 ovo
4 abacaxi cortado em fatias e uma xícara de abacaxi picado
½ xícara de manteiga ou margarina
¼ xícara de açúcar mascavo
Preparação
Derreta ¼ xícara de manteiga ou margarina em uma forma de 23x23cm
(9x9pol.). Polvilhe o fundo da forma com o açúcar mascavo sobre a manteiga.
Forre com as fatias de abacaxi o fundo da forma. Misture a farinha de trigo, o
fermento em pó e o sal no recipiente da batedeira. Adicione o açúcar, ¼ de
manteiga ou margarina e o leite. Bata por 2 minutos sem velocidade média,
raspando as laterais do recipiente frequentemente. Adicione a baunilha e o
ovo, bata por mais 1 minuto. Coloque a mistura na forma por cima do abacaxi
com cuidado. Leve ao forno por aproximadamente 50 a 60 minutos, ou até
sentir que a superfície esteja esponjosa, tocando-a com a ponta do dedo.
Retire do forno e tire da forma de cabeça para baixo. Deixe esfriar por alguns
minutos até ter a certeza de que não ira grudar no fundo da forma e sirva. O
abacaxi picado poderá ser substituído por pêssegos.
63
Page 65

GARANTIA LIMITADA DE 1 ANO
Sunbeam Products, Inc. (“Sunbeam”), operando sob o nome de Jarden Consumer
Solutions garante que, por um período de UM ano a partir da data de compra, este
produto ficará livre de defeitos materiais e de mão-de-obra. A seu critério, a Sunbeam
reparará ou substituirá este produto ou qualquer componente do produto que possa
apresentar defeitos durante o período de garantia. A substituição será feita com um
produto ou componente novo ou recondicionado. Se o produto não estiver mais
disponível, a substituição poderá ser feita com um produto semelhante de igual ou
maior valor. Esta é a sua garantia exclusiva.
Esta garantia é válida para o comprador original em varejo a partir da data de compra
inicial no varejo, e não poderá ser transferida. Guarde o recibo original de venda. Para
obter serviços de garantia, é necessário ter um comprovante de compra. Os
distribuidores, centros de assistência técnica ou lojas de varejo da Sunbeam que
vendem os produtos da Sunbeam não têm o direito de alterar, modificar ou mudar de
qualquer maneira os termos e condições desta garantia.
Esta garantia não cobre o desgaste normal de peças ou danos resultantes de qualquer
dos seguintes casos: uso negligente ou errôneo do produto, o uso de tensão ou
corrente inadequadas, uso contrário às instruções operacionais, desmonte, conserto
ou alterações efetuadas por outrem que não a Sunbeam ou Centro de Serviço
Oster® Autorizado. Além disso, a garantia não cobre casos de força maior, tais
como incêndios, enchentes, furacões e tornados.
Sunbeam não se responsabilizará por quaisquer danos emergentes ou indiretos
causados pela violação de qualquer garantia expressa ou implícita. Exceto na medida
proibida pelas leis aplicáveis, quaisquer garantias implícitas na comercialização ou
adequação a um fim específico limitam-se à duração expressa pela garantia acima.
Como Obter Serviço Autorizado na Garantia: Consulte as condições da garantia
específica do país ou entre em contato com o seu representante local.
NÃO DEVOLVA ESTE PRODUTO AO LOCAL ONDE ELE FOI COMPRADO.
64
Page 66

PARA MÉXICO SÓLAMENTE -FOR MEXICO ONLY
BATIDORA DE PEDESTAL OSTER® MIXMASTER
IMPORTADOR: SUNBEAM MEXICANA, S.A. DE C.V.
AV. JUÁREZ No. 40-201,
EX–HACIENDA DE SANTA MÓNICA,
TLALNEPANTLA, ESTADO DE MÉXICO,
C.P. 54050, R.F.C. SME570928G90, TEL. 53660800
PAÍS DE ORIGEN: CHINA
PAÍS DE PROCEDENCIA: CHINA, E.U.A.
LEA EL INSTRUCTIVO ANTES DE USAR EL APARATO
MODELO CARACTERÍSTICA ELÉCTRICAS
2700, 2700-13 60 Hz 120 V~ 480 W
CONTENIDO: 1 PIEZA
®
©2006 Sunbeam Products, Inc., doing business as Jarden Consumer Solutions. All rights
reserved. Distributed by Sunbeam Products, Inc., doing business as Jarden Consumer
©2006 Sunbeam Products, Inc., faisant affaires sous le nom de Jarden Consumer Solutions.
Tout droit réservé. Distribué par Sunbeam Products, Inc., faisant affaires sous le nom de
Une année de garantie limitée – veuillez lire à l'intérieur pour plus de détails.
©2006 Sunbeam Products, Inc., operando bajo el nombre de Jarden Consumer Solutions.
Todos los derechos reservados. Distribuido por Sunbeam Products Inc., operando bajo el
Garantía limitada de un año – por favor consulte los detalles en el interior.
©2006 Sunbeam Products, Inc., operando sob o nome de Jarden Consumer Solutions.
Todos os direitos reservados. Distribuído pela Sunbeam Products, Inc., operando sob o
Garantia limitada de um ano – para maiores detalhes, consulte no interior.
Solutions, Boca Raton, Florida 33431.
One year limited warranty – please see inside for details.
Patent pending.
Jarden Consumer Solutions, Boca Raton, Florida 33431.
Brevets en cours.
nombre de Jarden Consumer Solutions, Boca Raton, Florida 33431.
Patentes pendientes.
nome de Jarden Consumer Solutions, Boca Raton, Florida 33431.
Patentes em adamento.
Printed in China Imprimè en Chine Impreso en China Impresso na China
P.N. 120531
 Loading...