

Page 1
Blending Hints & Tips
NOTE: For safety information, read the Important Safeguards in the user manual.
* This Guide is not a substitute for the Owner’s Manual. Refer to this guide only after you have read the
Owner’s Manual thoroughly.
Visit www.osterversa.com to find your blender's owner's manual.
OSTER®
VERSA® PERFORMANCE
BLENDER
The Power to Blend Everything
Congratulations on the purchase of your new Oster® Versa® Performance Blender! Here are a few quick tips to get you started,
but please read all the instructions in the Instruction Manual to ensure proper use and performance.
If you have any comments, questions or inquiries about this revolutionary product, please call 1-800-334-0759.
Getting Started
Before you get started, separate the tamper, lid, filler cap, and jar. Wash in warm, soapy water. Rinse and dry well.
Unit will not operate unless the jar is fully seated on base. Please follow assembly instructions listed below.
Note – Do not put the jar in the dishwasher.
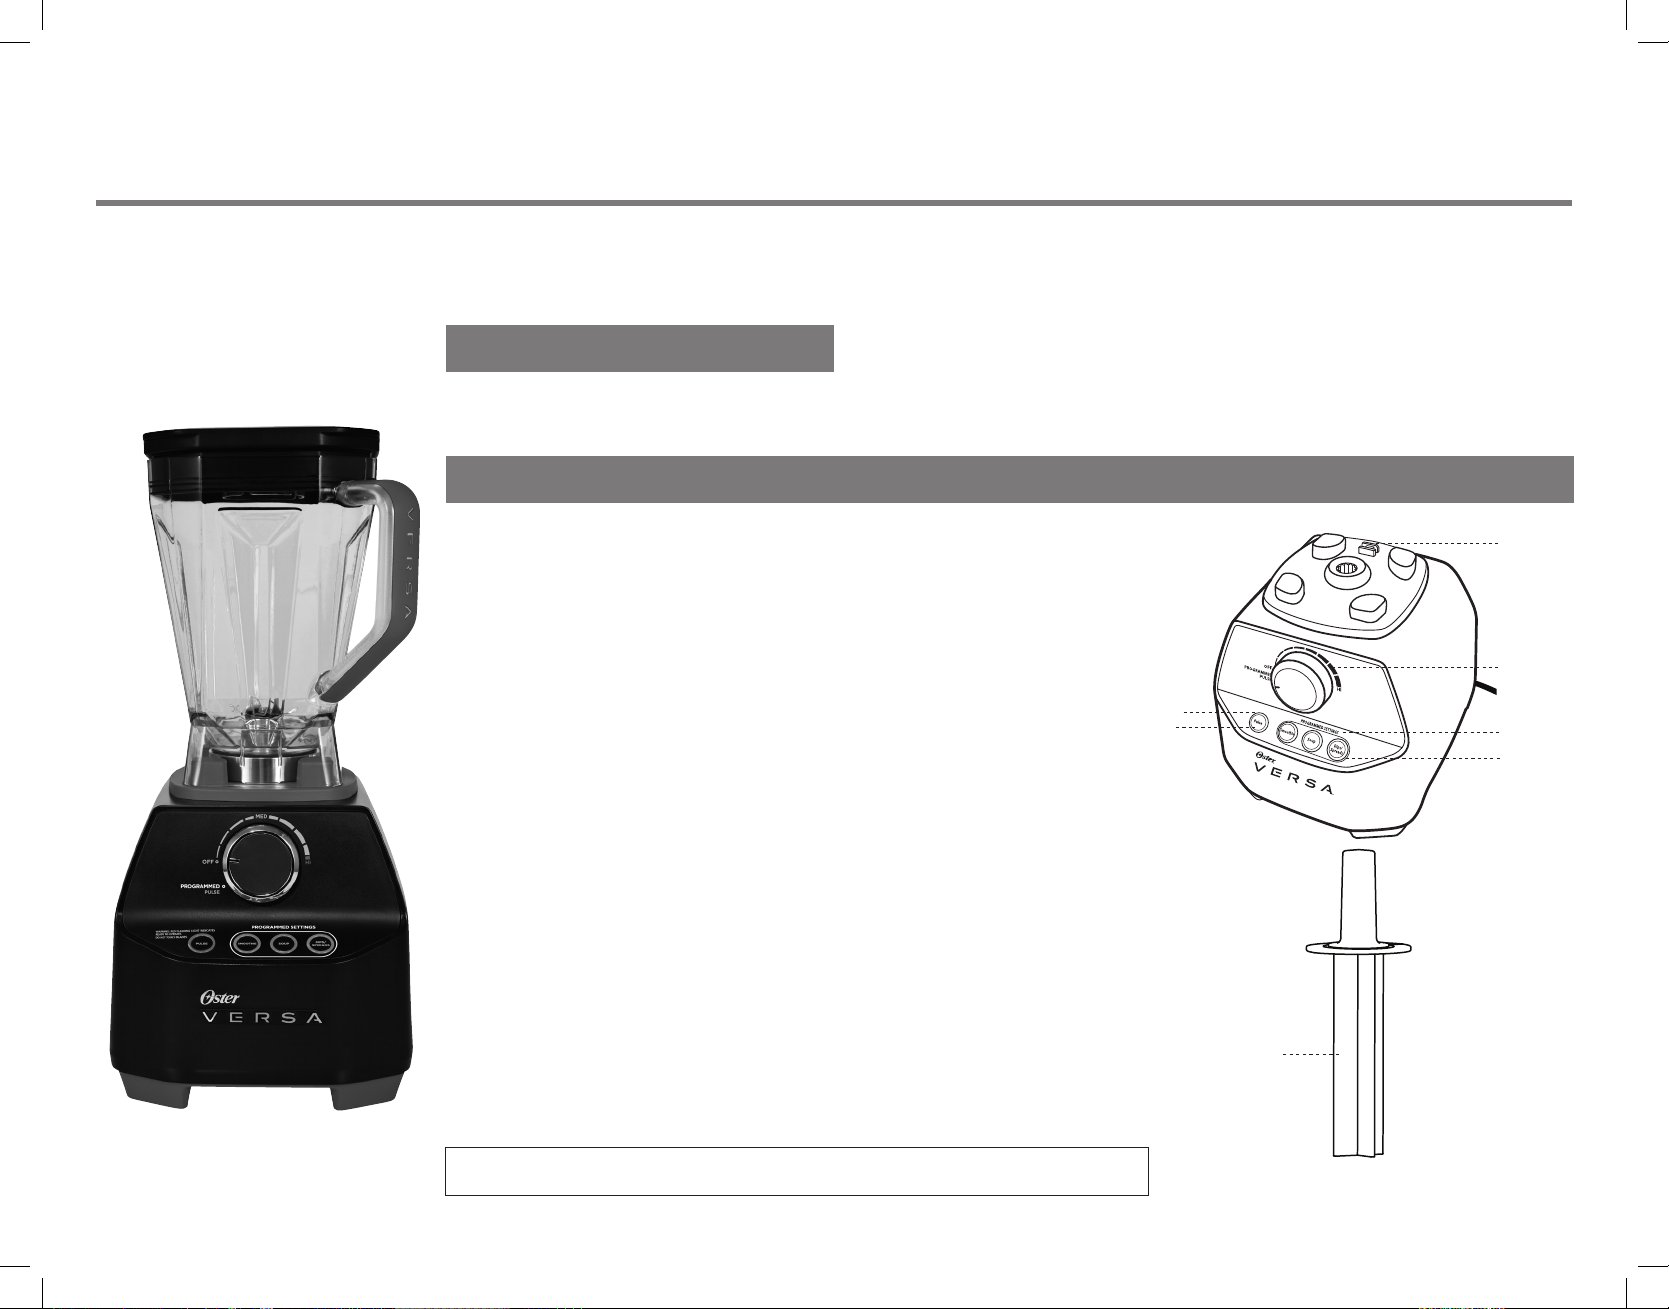
Your Product Features and Assembly
Jar Sensor
The unit is supplied with a jar sensor. This will prevent the motor from starting if the jar
is not properly placed on the base. The control knob must be in the ‘Off’ position when
the jar is placed on the base.
For your safety, if the jar is removed from the base during blending, the motor will
shut off. This also applies even if slightly lifted unintentionally.
Control Panel
The control panel includes a speed dial, plus 3 programmed settings and pulse. To use
the speed dial, simply turn it clockwise to choose from manual settings from ‘Low’ to
‘High.’ To use the programmed settings, you must first activate by turning the speed dial
counter-clockwise to the ‘Programmed/Pulse’ setting. Then select which programmed
setting you would like to use.
These settings have been optimized by time and speed to best blend most Smoothies,
Soups, and Dips/Spreads. It will stop once the cycle is complete.
When the speed dial is turned to the ‘Programmed/Pulse’ setting, the red light around the
pulse button will flash to indicate the unit is ready to operate. Avoid contact with blades or
moveable parts. Never operate the unit without the lid in place.
Flashing
Lights
Pulse
Jar Sensor
Speed Dial
Programmed
Settings
LED Lights
Tamper
The unit comes equipped with a tamper. This allows you to accelerate the process of very
thick and/or frozen mixtures. If food is not circulating, remove the filler cap and use the
tamper to press ingredients down into the blades.
Fuse/Overload Protection
If the unit stops working, the fuse/overload protection has kicked in. First turn speed dial
to ‘Off’ and unplug from the electrical outlet. Then, remove the jar from the base and free
the blade of any food obstructions. Wait 30-45 minutes for the unit to cool and then it
will be ready to use again. Next, press the external resettable fuse on the bottom on the
base.
Note – Due to the power of the machine, it is normal for it to be fairly loud during operation.
© 2013 Sunbeam Products, Inc. doing business as Jarden Consumer Solutions Boca Raton, Florida 33431.
All rights reserved. P.N. 166825 GCDS-OST29332-JC
BLSTVB-RV0-000_13ESQSG1.indd 1 5/21/13 8:45 AM
Tam per
Page 2

Consejos y Recomendaciones
para Licuado
NOTA: Para la información de la seguridad, lea las reglas de seguridad importantes en el manual de usuario.
Esta guía, no es un sustituto del Manual del Usuario. Haga referencia a esta guía solamente cuando haya
leído el Manual del Usuario minuciosamente.
Visite www.osterversa.com para encontrar el Manual del Usuario de su licuadora.
LICUADORA DE
ALTO RENDIMIENTO
OSTER® VERSA
La potencia para licuar todo
®
¡Felicitaciones por la compra de su nueva Licuadora de Rendimiento Oster® Versa®! Aquí mostramos algunos consejos para comenzar, pero es
necesario que lea todas las instrucciones en el Manual de Instrucción para asegurarse un uso y rendimiento adecuados.
Si tiene algún comentario, pregunta o duda acerca de este producto revolucionario, por favor llame al 1-800-334-0759.
Comenzando
Antes de comenzar, separe el accesorio para forzar, la tapa, la tapa de llenado y el vaso. Lave en agua tibia jabonosa. Enjuague y seque bien.
La unidad sólo funciona cuando el vaso está montado sobre la base firmemente. Favor de seguir las instrucciones de ensamblaje que aparecen a
continuación.
Nota – No coloque el vaso en el lavaplatos.
Características y ensamblaje de su producto
Sensor del Vaso
La unidad tiene un sensor de vaso sobre la base. Esto impedirá que el motor se inicie si el
vaso no esté colocado adecuadamente sobre la base. El control de perilla debe estar en la
posición de “OFF” cuando el vaso sea colocado sobre la base.
Para su seguridad, si el vaso se retira de la base durante el licuado, el motor se apagará.
Esto también se aplica a aun así se levante ligeramente de manera involuntaria.
Panel de Control
El panel de control incluye una perilla de velocidad, más 3 posiciones programadas
e impulso. Para usar la perilla de velocidades, simple gírela en dirección del reloj para
escoger las posiciones manuales de “bajo” a “alto”. Para usar las posiciones
programadas, debe primero activar girando la perilla en dirección contraria al reloj hacia la
posición “programado/pulso”. Luego seleccione qué posición programada le gustaría usar.
Estas posiciones han sido optimizadas en tiempo y velocidad para licuar de la mejor manera
batidos, sopas y cremas para untar. Se detendrá una vez que el ciclo se haya completado.
Cuando la perilla de velocidades se fije en la posición “programado/pulso”, la luz roja alrededor
del botón del pulso parpadeará para indicar que la unidad está lista para operar. Evite el contacto
con las cuchillas y partes móviles. Nunca opere la unidad sin la tapa en su lugar.
Luces
parpadeantes
Pulso
Sensor del
Vaso
Perilla de
Velocidades
Posiciones
Programadas
Luces LED
Accesorio para forzar
La unidad viene equipada con un accesorio para forzar. Esto le permite acelerar el proceso de
mezclas muy espesas o congeladas. Si el alimento está circulando, retire la tapa del llenado y
use el accesorio para forzar para presionar los ingredientes hacia las cuchillas.
Fusible/Protector de Sobrecarga
Si la unidad deja de funcionar, el fusible/protector de sobrecarga se ha activado. Primero gire la
perilla de velocidad hacia “OFF” y desenchufe del tomacorriente eléctrico. Luego, retire el vaso
de la base y libere la cuchilla de cualquier obstrucción de alimentos. Espere de 30-45 minutos
para que la unidad se enfríe y luego estará lista para ser usada nuevamente. Luego,
presione el fusible externo en la parte inferior de la base para volver a encender.
Nota – Debido a la potencia de la máquina es normal que sea bastante ruidosa durante la operación.
© 2013 Sunbeam Products, Inc. operando bajo el nombre de Jarden Consumer Solutions Boca Raton, Florida 33431.
Todos los derechos reservados. P.N. 166825 GCDS-OST29332-JC
BLSTVB-RV0-000_13ESQSG1.indd 2 5/21/13 8:45 AM
Accesorio
para Forzar
 Loading...