

Page 1
–– –FO LD– ––
English-1
IMPORTANT SAFEGUARDS
When usingyour toaster,basic safetyprecautions shouldalways befollowed,
including thefollowing:
READ ALL INSTRUCTIONS BEFORE USE
• Unplugtoaster fromoutlet whennot inuse andbefore cleaning.Allow tocool beforeputting on
ortaking offparts.
• Donot touchhot surfaces.Metal partscan becomehot. Usehandles orknobs.
• Toprevent electricshock, unplugbeforecleaning.
• Toprotect againstelectrical hazards,donot immersecord, plugor toasterin wateror otherliquids.
• Donot letcord hangover edgeof tableor counteror touchhot surfaces.
• Neverleave applianceunattended whenin use.
• Youngchildren orincapacitated personsshould notusethis appliance.Super viseolderchildren closely.
• Donot operateor placethe toaster:
–On non-heat-resistantor flammablesurfaces.
–On ornear ahot gasor electricburner.
–In aheated ovenor microwaveoven.
• Toreduce therisk offireor electricshock, donot insert:
–Utensils orfoil-covered oroversized foodsinto thetoaster.
–Fingers ormetallic utensilsinto slotswhen toasteris pluggedin.
• Donot attemptto dislodgefood whentoaster isplugged in.
• Donot usefoods thatwill dripcoatings orfillings whenheated. Suchaccumulations insidethe toastercreate
unsanitaryconditions andthe possibilityof fireor toastermalfunction. Cleanout accumulatedcrumbs
frequentlyto avoidrisk offire ortoaster malfunction.Do notoperate thetoaster withoutthe crumbtray being
replacedin itscorrect position.
• Donot operateany appliancewith adamaged cordor plugor afterthe appliancehas malfunctionedorhas
beendamaged inany manner.Return thetoaster tothe nearestAuthorized SunbeamAppliance Service
Centerfor examination,repair orelectrical ormechanical adjustment.
• Donot usethe toasteroutdoors orfor commercialpurposes; thisappliance isfor householduse only.
• Usethis applianceonly forits intendeduse asdescribed inthis manual.Do notuse attachmentsthatare
notrecommended bythe manufacturer;they maycause injury.
• Afire mayoccur iftoasters arecovered ortouching flammablematerial, includingcurtains, draperies,walls
andthe likewhen inoperation.
• Toconnect ordisconnect appliance,presscancel button.Toast liftlever mustbe inthe normalup position
beforeattaching ordisconnecting theplug fromthe walloutlet.
SAVE THESE INSTRUCTIONS
Power CordInstructions
Please follow the instructions below toens urethe safe use ofthe power cord.
• Thisto asterhas a powercord area thatall owsyou toa djustthe length ofthe cord sothat it isthe
appropriate length foryou rsituation .Try topositi onthe toaster nearthe power source toreduce the
hazards associated withpo wercords (such asbeco mingentangl edor tripping overa long powercor d).
• Fortoa sterspurcha sedin theU .S.and Canada: Thisapp liancehas a polarized plug(one blade is
wider thanthe other). Toredu cethe risk ofelectric shock, this plugwill fit intoa polarized plug inonly
one way.If youc annotcomple telyinsert the powerp luginto the poweroutle t,reverse the direction of
the plug.If it stilldoes not fit,co ntacta qualified electrician. Dono tmodify the plugin any way.
• Dono tpull, twist or otherwise abuse thepowe rcord.
• Dono toperate any electrical applianc ewith a damaged cordor plug ora fterthe applianc e
malfunctio nsor has beendr oppedor damaged in anym anner.
• Unplug thetoa sterwhe nit is notin use andbe foreclea ning.
• Dono twrap the power cordarou ndthe main body ofthe toaster during or afterus e.
THIS UNIT IS FOR HOUSEHOLD USE ONLY
Short PowerSupply CordInstructions
Ashort power-supplycord isprovided toreduce therisk resultingfrom becomingentangled inor trippingover
alonger cord.An extensioncord maybe usedif careis exercisedin itsuse.If anextension cordis used,the
electricalrating ofthe cordmust beat leastas greatas theelectricalrating ofthe appliance.The extensioncord
shouldbe arrangedso thatit willnot drapeover thecountertop ortabletop whereit canbe pulledon bychildren
ortripped overunintentionally.
English-5
English-4
Using theFood SelectFeature (Bagel, Waffle,Pastry)
YourOSTER®Toasterwill adjustthe light/darkrange basedupon thetype offood
youare toasting.You mustselect whichtype offood you aretoasting sothat the
toastercan adjustaccordingly.
Toselect thefood type:
Choose betweenthe Bagel,Waffle orPastry mode.
• Toastis thedefault settingif nofood orfunction selectbuttons arechosen.
• Pressthe Bagel buttonif you aregoing totoast a bagel.The Bagelindicator will
light. Thisoption willallow the toasterto adjustthe time neededto toastbagels
according tothe shadelevel selected.
•
Press theWaffle buttonif youare going totoast awaffle. The Waffleindicator will
light.
This optionwill allowthe toaster toadjust thetime needed totoast waffles
according tothe shadelevel selected.
•
Press thePastry buttonif you aregoing totoast a pastry.The Pastryindicator will
light. Thisoption willallow the toasterto adjustthe time neededto toastpastries
according tothe shadelevel selected.
Using theFrozen FoodFunction
Yourtoaster can defrostyour frozenfood and thentoast it.Now you cantake a frozen
bagel outof thefreezer and defrostand toastit – allin yourtoaster – allin one easystep.
Todefrost andtoast your food:
1.Place foodinto the BreadCarriage.
2.Press theFrozen button ifthe food isfrozen, thenselect your foodtype bypressing
the appropriatebutton. Ifno food isselected thetoaster will operatein Toastmode.
3.Select thedesired darkness settingby turning theLighter/Darker knob.
4.Press theBread Carriage Lever.
Using theWarm Function
Will yourtoasted foodbe ready beforeyou areready to eatit? Thisfeature will
allow you
to reheatyour toastedfood.
Toreheat yourfood:
1.Press theWarmbutton.If desired,pressfood select.If nofoodis selectedthe toaster
willoperate inToastmode.TheWarm indicator willlightand thetoasterwill reheat
yourfood.
2.Press theBreadCarriage Lever.
Using theCancel Function
Tocancel thetoast process:
Press theCancel button.The toaster willstop toastingimmediately and thefood
will popup automatically.
Cleaning YourToaster
1.Unplug and allowthe toasterto cool.
2.Once cool, wipethe outsideof your toasterwith adamp cloth.
English-6
Español-1 Español-3 Español-4
PRECAUCIONESIMPORTANTES
Obedezca siemprelas precaucioneselementales deseguridad cuandovaya ahacer
uso desu tostadora,incluyendo lassiguientes:
LEA TODAS LASINS TRUCCIONES ANTESDEL USO
• Desenchufe latostado radel tomacorrientes cuando nose encuentre en servicioy antes
de limpiarla. Antesde poner oquitar alguna pieza, esperaha staque lat ostadorase enfríe.
• Notoque las superficies calientes. Laspiez asde metal puedenvolve rsecaliente s.
Utilice lasa sideraso las perillas.
• Paraevit ardescarga eléctrica, desenchufe la tostadora antesde limpiarla.
• Paraevit ardescargas eléctricas ,no sumerja elcable, e lenchufe o latostador aen agua
u otroslíqui dos.
• Nopermit aque elcor dóncuelgue sobre elbor dede lames ao delmost rador,ni quee ntre
en contactoc onlas superficies calientes.
•
Jamás permita quelos enseres queden desatendidos duranteel uso.
• Losniños y lasperso nasincapaci tadasno adeben haceru sode estos enseres.
S
upervise cuidadosamente a losniños de mayoreda d.
• Noopere ni coloquel atostadora:
– Sobre superficies queno sean termorresistentes ni inflamables.
– Eno cerca deun ahornalla eléctrica oa gas caliente.
– Dentro deun horno calentado omicroond as.
• Pararedu cirel riesgo delos incendios olos choques eléctricos, no inserte:
– Utensilios nial imentoscub iertosen papel aluminio, nide grandes dimensiones, enla
tostadora.
– Los dedosni utensilios dem etalen lat ostadoracua ndoel aparato seencue ntreenchufa do.
• Nointent edesalojar alimentos cuando latos tadoraesté enchufada.
• Noutilic ealimentos cuyas cubiertas orelle nospuedan gotear acons ecuenciadel calentamie nto.
Tales acumulaciones dentrod ela tostadora creancon dicionespoc osanitaria sasí comol a
p
osibilidad de incendioso malfunciona mientosde la tostadora. Elimineco nfrecuenci alas
migas acumuladas paraevi tarel riesgo deincendi oso elmalf uncionamiento deltosta dora.
No operela tostadora sin haberantes devuelto la bandejapar amigas asu posición correcta.
• Noopere ningún aparato quetenga un cordóno enchufe dañado, odespu ésde quese haya
producido un malfuncionamiento enel aparato oqu ehaya sido dañadoen cualquier forma.
Devuelva lat ostadoraal centro dese rvicioauto rizadode Sunbeam paras uinspecció n,ajuste,
reparación o cualquieraj usteelectro mecánico.
• Noutilic ela tostadora ala intemperie opar ausos comerciales: esta tostadora espara elu so
d
oméstico exclusivamente.
• Sóloutil iceeste aparato parasu uso original conforme alo descrito eneste manual; nouti lice
aditamentos que nohayan sido recomendados porel fabricante ,ya quepue denproducir
lesionamiento s.
• Puedepro ducirseun incendio sis ecubre lat ostadorao si entraen contacto con material
inflamable, incluyendo cortinas, tapicería, paredes yafines mientras que seencuen tre
funcionando.
• Paraconectar odesconectar elaparato, aprieteel botón“cancel”. Elmando elevador detos tadas
debe estaren la posición elevadaant esde conectar odescone ctarel enchufe dela pared.
GUARDE ESTAS INSTRUCCIONES
I
nstrucciones parael Cordónde Potencia
Obedezca las siguientesi nstrucciones paraasegu rarel usoc orrectodel cordón depo tencia.
• Estatost adoracuenta con unazon ade cordón depotencia que leperm iteajustarl oa lalongi tud
correcta para susituació n.Trate decol ocarla tostadora cerca deltomacorr ientesapro piadopara
disminuir los riesgosaso ciadoscon los cordones depotencia (tales como enredarsec onun
c
ordón depote nciade longitud excesiva otropezar sesobre él).
• Siresult anecesario, se puedeha ceruso deu naextensió neléctrica, pero asegúrese desegui r
estas direcciones:
– Lan otacióneléc tricade la extensióne léctricadeb eser deun mínimo de12 0/127voltio s,
60 Hz.
– Lae xtensiónelé ctricadebe estar colocada detal manera queno se envuelva sobreel
mostrador ol asuperficie de lamesa, ni quetamp ocoquede al alcancede los niños,n ique
t
ampoco pueda tropezarses obreella.
• Paralos tostadoraes cuya compra seefectúa en EE.UU.y el Canadá:e steaparato cuenta conu n
e
nchufe polarizado (unaho jaes másan chaque lao tra).Para disminuir el riesgode los choques
eléctricos, dicho enchufe seadaptará a untomaco rrientespo larizadode una maneras olamente.
Si nopuede insertar ele nchufeen el tomacorrientes completamente, invierta ladire cción
del enchufe. Siaún noca be,comuníqu esecon une lectricista experto.No modifique el enchufe.
• Notire, tuerza niab useel cordón depotenci a.
• Noopere ningúnaparato eléctricoque tengaun cordóno enchufedañado,ni despuésde quese haya
producidoel malfuncionamientode launidad, nique sehaya caídoo dañadoen cualquiermanera.
• Desenchufe latostado racuando ésta nose encuentre enu soy antesd elimpiarla.
ESTA UNIDAD ES SÓLO PARA
USO DOMÉSTICO
Uso deun CableEléctrico Corto
Se incluyeun cable dete nsióncorto para evitar quese enrede oque cause tropiezos. Uncable
de extensión puedeusarse con cuidado. Sise usa unacable de extensión, lapotencia eléctrica
marcada enel cable deex tensióndebe ser porlo menos igual omayor ala potencia eléctrica del
aparato. Elc ablede extensión debec olocarsede manera quen ocuelgue del mostrador ode la
mesa, dondep uedacausar tropiezos accidentalmen te.
Español-2
Conociendo SuTostadora
Si nose seleccionaningún botón defunción oalimento, el ajustepredeterminado
es “Toast” (Tostar).
1.Botón deAnulación –Presiónelo para hacersaltar los alimentos
de latostadora ycancelar el procesode tostado.
2.Botón de“Frozen” (Congelados)con Luz Indicadora– Presioneeste botónsi sus
alimentos
están congelados.Utilice estebotón conjuntamente conlos botones
de“Bagel”,
“Waffle”,
“Toast”y “Pastry”. La tostadoradescongelará
automáticamente susalimentos
y luegolos tostaráfácilmente en unsolo paso.
El botónse encenderáal presionarlo.
3.
Botón “Warm”(Calentar) conLuz Indicadora–Presione estebotón paracalentar
su alimentotostado. Useeste botón encombinación conlos botones de
“Bagel”, “Waffle”, “Toast”y “Pastry”.El indicador seiluminará para
confirmar queel botón“Warm” seha seleccionado.
4.
Selector yPiloto deTostadora –Gire laperilla para seleccionarel gradoal cual
le gustaríatostar susalimentos: el númeroes elmás ligero, yel númera siete
e
s elmás oscuro.
5.
Botón “Toast” (Toast)con LuzIndicadora –Presione este botónsi deseatostar
a
rtículosde pastelería.El indicador“Pastry” se encenderá.Esta opciónle
permitirá ala tostadoraajustar el tiemponecesario paratostar pastelería de
acuerdo conel nivelde dorado seleccionado.-
6
.Botón de“Bagel” (Rosca)con Luz Indicadora
–
P
resione estebotón siusted
desea tostarun bagel.Se encenderá elindicador paraconfirmar que seha
seleccionado “Bagel”.
7.
Botón de“Waffle” (Waffle)con LuzIndicadora–Presione estebotón siusted desea
tostar unwaffle. Seencenderá el indicadorpara confirmarque se haseleccionado
“Waffle”.
8.Ranuras ExtraAnchas –Las ranuras anchas(1.3 pulgadas)le permiten tostar
“bagels”, pan caseroy bollitos.
9.Guías paraRebanadas Dobles,Autonivelantes, Hechas deAcero Inoxidable–
Se ajustanautomáticamente algrosor del pan.
10.
Mando deResistencias delPan –Presiónelo paraempezar a tostarsus alimentos.
11.Elevador deTostadas–Presione elmando deresistencias del panpara hacer
saltar losalimentos fuerade la tostadora.
12.Bandeja paramigas, totalmente extraíble–Para unalimpieza conveniente
y fácil.
13.Area paraguardar el cordónretractable –Le permiteguardar el cordónextra
en latostadora paraque no estorbe.
14.Cordón dePotencia
English-3
6. Withoutinserting anyfood intothe breadslots, pushthe BreadLever allthe way
down
untilit locks.(The carriage willnot lock ifthe toasteris not pluggedinto a
powersource.)
Thefirst toastingprocess willpreheat thenew elementsand burnoff
anydust whichmay haveaccumulated duringstorage ormanufacturing. Itis normal
forthis burnoff to createan odor. Your OSTER
®
Toasteris nowready foruse.
Adjusting thePower Cordlength
Yourtoaster’s RetractableCord Storage areaallows you toadjust thelength of the
Power Cordso thatit is theexact lengthyou desire whencontrols areoff and unitis
unplugged andcool.
1. Whenretracting thecord, hold theplug withone hand andpull thecord away
from thetoaster toretract. Once pulledhold theplug and allowcord toretract.
2. Thecord reelis compact formulti-layer retractingof the cord.In casecord is not
fully rewound,pull outthe cord andsteer cordevenly on thereel.
3. Incase thecord is notpulled outeasily, pullcord firmly.
4. Donot allowchildren to useretractable cordfeature as thecord maycause injury.
Using YourToaster
Inserting thefood intothe breadslots andtoasting:
Now youare readyto insert yourfood intothe bread slots.Keep thefollowing tips
in mindwhen insertingyour food:
• Mosttypes of breadsand pastries canbe toasted,such as bagels,tea cakes,thickly
sliced breads,English muffins,etc. Slices shouldnot, however,be sothick as tojam
the breadslots.
• Whentoasting two slicesat a time,the slicesshould be ofequal sizeand freshness
to ensureeven toasting.
• Whentoasting two slicesof bread, placeone slicein the centerof eachbread slot.
• Whentoasting one sliceof bread, placethe slicein the centerof eitherbread slot.
After youinsert thefood intothe breadslots:
1.Choose betweenthe Food SelectFeatures orother Functions. Ifno food or
function ischosen, Toastis thedefault setting.
2.Select thedesired darkness settingby turningthe Lighter/Darker knob.
3.Press theBread Carriage Leverdown untilit locks.
The Auto-AdjustingBread Guideswill automatically centerthe foodfor even
browning.
Tip:Your toaster has been designed for optimum toast balance. Some elements
on the inside of the toaster may glow more brightly than others when in use.
This is part of normal toaster operation.
After thedesired levelof darkness hasbeen reached,the food willpop up
automatically
. TheBread CarriageLever will returnto itsoriginal position andthe
indicator lightswill turnoff.
4.Carefully removethe toasted foodfrom thebread slots.
WARNING:Toasted foodcan be veryhot. Handlewith care.
Tip:To remove food jammed in the bread slots, unplug the toaster and remove
the food once the toaster has cooled down.
WARNING:Never insert yourfingers ormetallic utensilsinto thebread slots.
Learning AboutYour Toaster
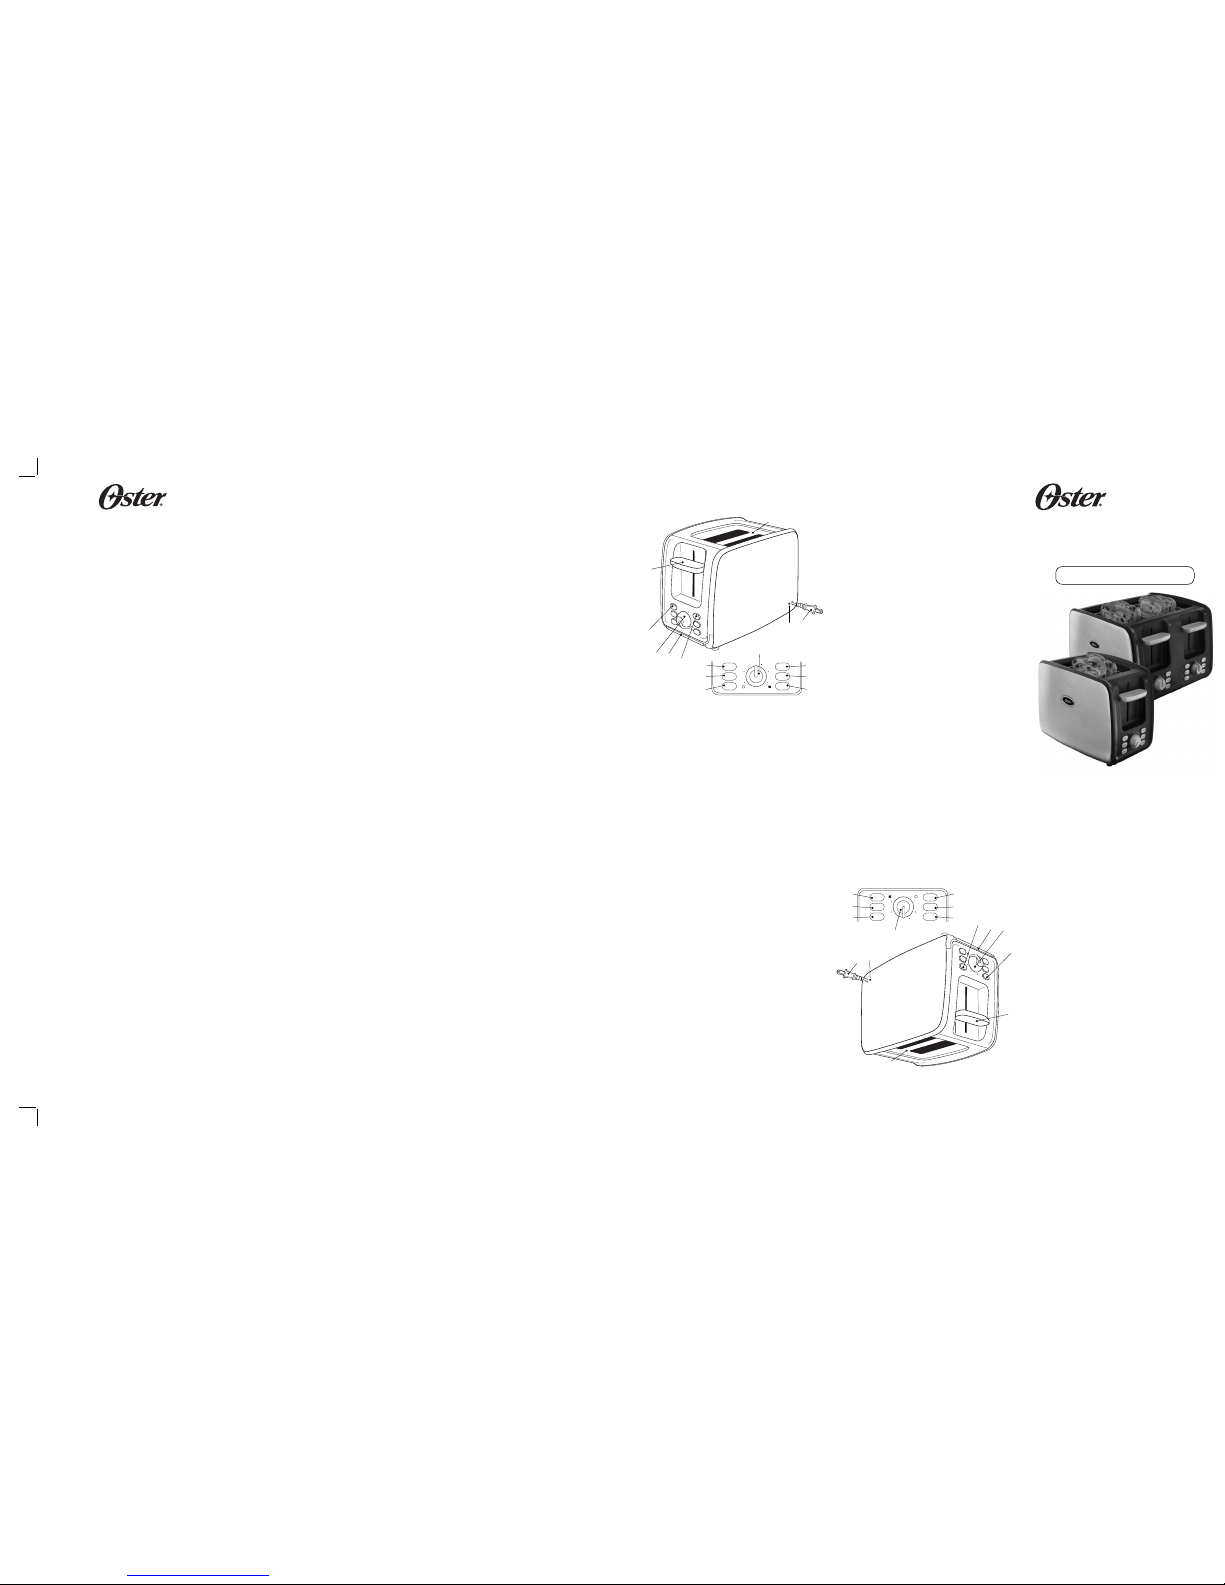
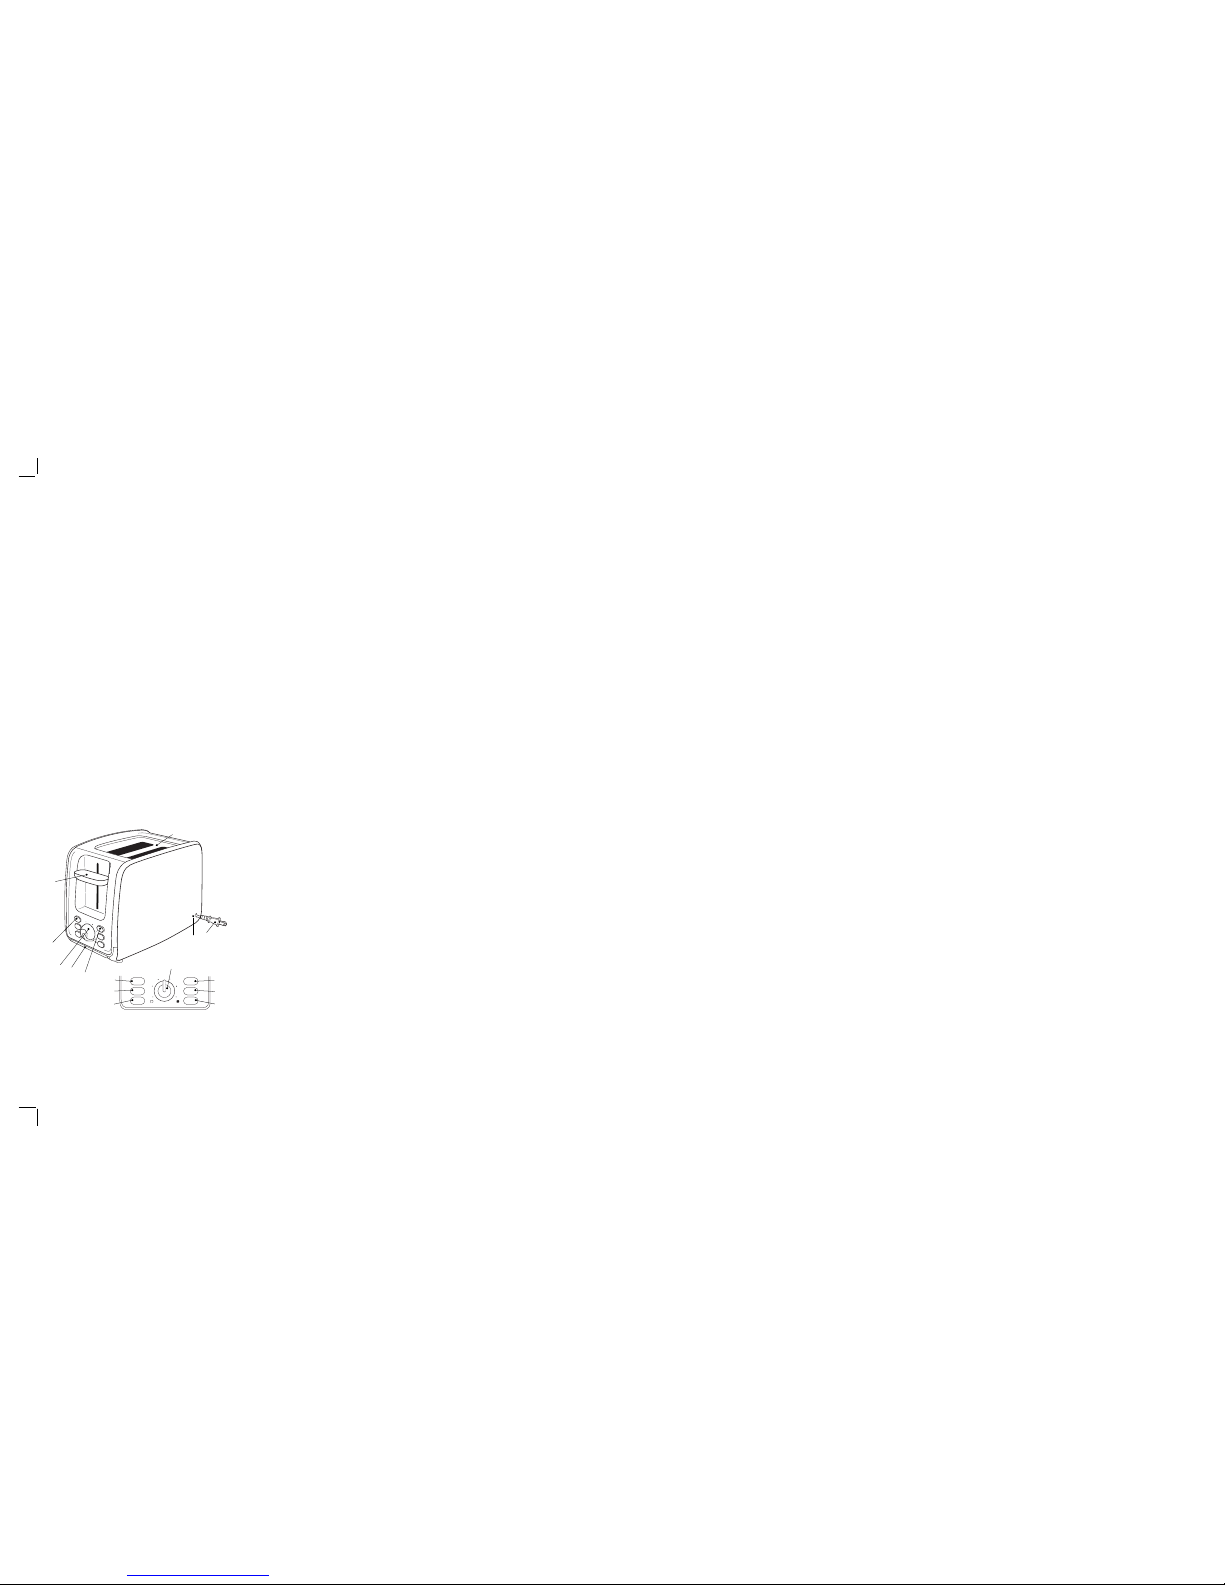
Toastis the defaultsetting ifno food orfunction selectbuttons are chosen.
1. CancelButton –Press the cancelbutton topop the foodout ofthe bread slotsand
stop thetoasting process.
2. FrozenButton withIndicator Light– Press thisbutton ifyour food isfrozen. Use
this buttonin combinationwith the Bagel,Waffle, Toastand Pastrybuttons.
The toasterwill automaticallydefrost your foodand thentoast it inone easy
step. Thebutton willlight up whenpressed.
3. WarmButton withIndicator Light – Pressthis buttonto warm yourtoasted food.
Use thisbutton incombination with theBagel, Waffle,Toast andPastry buttons.
The indicatorwill lightto confirm that“Warm” isselected.
4. Lighter/DarkerKnob –Turn theknob to selecthow darkyou would likeyour food
toasted; 1is lightest,7 is darkest.
5. ToastButton withIndicator Light –Press this buttonif you wantto toasta pastry.
The indicatorwill lightto confirm “Pastry”is selected
.
6. BagelButton withIndicator Light –Press thisbutton if youwant totoast a bagel.
The indicatorwill lightto confirm that“Bagel” isselected.
7. WaffleButton withIndicator Light– Press thisbutton ifyou want totoast a waffle.
The indicatorwill lightto confirm that“Waffle” isselected.
8. Extra-WideBread Slots– Wideslots (1.3 inches)allow you totoast bagels,
thickly-sliced homemadebread andEnglish muffins.
9. Dual,Auto-Adjusting, StainlessSteel BreadGuides – Automaticallyadjust tobread
thickness foreven toasting.
10.Bread Carriage Lever– Pressto begintoasting your food.
11.Toast Lift– Press upon thebread carriage leverto liftfood out ofthe breadslots.
Convenient andsafe wayof retrieving thesmallest oftoasted items.
12.Fully Removable CrumbTray– For convenientand easycleanup.
13.Retractable Cord Storage– Allowsyou tostore extra cordin the toasterand out
of theway.
14.Power Cord
Preparing ToUse YourToaster forthe FirstTime
If youare usingyour toaster forthe firsttime, please besure to:
1. Removeany stickers fromthe surfaceof the toasterand wipe theoutside ofyour
toaster witha dampcloth.
2. Insertthe Removable CrumbTray intothe crumb trayslot.
3. Makecertain that theBread CarriageLever is inthe uppermost positionbefore
plugging inthe toaster’spower cord.
4. Selecta location forthe toaster.The locationshould be:
• Aflat, heat-resistant, non-flammablesurface.
• Atleast three inchesaway from wallsor theback of countertops.
• Atleast one footaway from anycabinet orshelving that maybe abovethe
toaster.
• Awayfrom flammable materials,such ascurtains and wallfabric.
• Awayfrom a gasstove flameor electric element.
5. Plugthe Power Cordinto 120Volt, 60 HzAC outlet.
English-2
–– –FO LD– ––
–– –F
OLD –– –
–– –F
OLD –– –
–– –F
OLD –– ––– –FO LD– ––
–– –F
OLD –– –
–– –F
OLD –– –
–– –F
OLD –– –
–– –F
OLD –– –
–– –FO LD– ––
For productquestions contact:
Sunbeam ConsumerService
USA: 1.800.334.0759
Canada: 1.800.667.8623
w
ww.oster.com
©2009 SunbeamProducts, Inc.doing business asJarden ConsumerSolutions.
All rightsreserved. Distributedby Sunbeam Products,Inc. doingbusiness as
Jarden ConsumerSolutions, BocaRaton, Florida 33431.
Pour lesquestions deproduit:
Sunbeam ConsumerService
États-Unis: 1.800.334.0759
Canada: 1.800.667.8623
www.oster.com
©
2009Sunbeam Products,Inc. faisant affairessous lenom deJarden ConsumerSolutions.
Tousdroits reservés. DistribuéSunbeam Products,Inc. faisant affairessous lenom de
Jarden ConsumerSolutions, BocaRaton, Florida 33431.
Para preguntassobre losproductos llame:
Sunbeam ConsumerService
EE.UU.: 1.800.334.0759
Canadá: 1.800.667.8623
www.oster.com
©2009 SunbeamProducts, Inc.operando bajo elnombre deJarden Consumer Solutions.
T
odos losderechos reservados.Distribuido por SunbeamProducts, Inc.operando bajo el
nombre deJarden ConsumerSolutions, Boca Raton,Florida 33431.
SPR-020909
Printed inChina Imprimé enChine Impreso enChina
B
ienvenido
¡
Felicitaciones por haber efectuado lacompra de unaTostado raOSTER
®
!
Para
aprender mássobre los productosde OSTER
®
, visítenospor favor enwww.oster.com.
1 Year Limited Warranty
Sunbeam Products,Inc. doingbusiness as JardenConsumer Solutionsor if inCanada, Sunbeam
Corporation (Canada)Limited doingbusiness as JardenConsumer Solutions(collectively “JCS”)
warrants thatfor aperiod of oneyear fromthe date ofpurchase, thisproduct will befree from
defectsin material andworkmanship. JCS, at itsoption, willrepair or replacethis product or
any componentof theproduct found tobe defectiveduring the warrantyperiod. Replacement
will bemade witha new orremanufactured productor component. If theproduct is nolonger
available, replacementmay bemade with asimilar productof equal orgreater value. This is
your exclusivewarranty. Do NOTattempt to repairor adjustany electrical ormechanical
functionson this product. Doing sowill voidthis warranty.
This warrantyis validfor the originalretail purchaserfrom the dateof initialretail purchase
and isnot transferable. Keep theoriginal salesreceipt. Proof of purchaseis required toobtain
warranty performance.JCS dealers,service centers, orretail storesselling JCS productsdo not
have theright toalter, modifyor any waychange theterms and conditionsof thiswarranty.
This warrantydoes notcover normal wearof partsor damage resultingfrom anyof the
following:negligent use ormisuse of theproduct, useon improper voltageor current,use
contrary tothe operatinginstructions, disassembly,repair or alterationby anyoneother than
JCS oran authorizedJCS service center. Further,the warrantydoes notcover: Acts ofGod,
such asfire, flood,hurricanes and tornadoes.
What arethe limits onJCS’s Liability?
JCS shallnot beliable for anyincidental orconsequential damages causedby thebreach of any
express, impliedor statutorywarranty or condition.
Except tothe extentprohibited by applicablelaw, anyimplied warrantyor condition of
merchantabilityor fitness fora particular purposeis limitedin duration tothe durationof the
above warranty.
JCS disclaimsall otherwarranties, conditions orrepresentations, express,implied, statutory or
otherwise.
JCS shallnot beliable for anydamages ofany kind resultingfrom thepurchase, use ormisuse
of, orinability touse the productincluding incidental,special, consequential orsimilar damages
or lossof profits,or for anybreach ofcontract, fundamental orotherwise, orfor any claim
brought againstpurchaser byany other party.
Some provinces,states orjurisdictions do notallow theexclusion or limitationof incidentalor
consequentialdamages or limitationson how longan impliedwarranty lasts, sothe above
limitationsor exclusion maynot apply toyou.
This warrantygives youspecific legal rights,and youmay also haveother rightsthat vary from
province toprovince, stateto state orjurisdiction tojurisdiction.
How toObtain WarrantyService
In theU.S.A.
If youhave anyquestion regarding thiswarranty orwould like toobtain warrantyservice,
please call1-800-334-0759 and a convenientservice centeraddress will beprovided toyou.
In Canada
If youhave anyquestion regarding thiswarranty orwould like toobtain warrantyservice,
please call1 8001-800-667-8623 and a convenientservice centeraddress will beprovided to
you.
In theU.S.A., thiswarranty is offeredby SunbeamProducts, Inc. doingbusiness asJarden
Consumer Solutionslocated inBoca Raton, Florida33431. InCanada, this warrantyis offered
by SunbeamCorporation (Canada)Limited doing businessas JardenConsumer Solutions,
located at20B HerefordStreet, Brampton, OntarioL6Y 0M1. If youhave anyother problem
or claimin connectionwith this product,please writeto Consumer ServiceDepartment.
PLEASE DONOT RET
U
RN THISPRODUCT TO ANYOF THESE
ADDRESSES ORTO THE PLACEOF PURCHASE
Welcome
Congratulations onyour purchase ofan OSTER®Toaster!
Tolearn more aboutOSTER®products,
please visitus at www.oster.com.
User Manua l
Toaster
M
anual de Inst rucciones
Tostadora
Manuel d’I nstructions
Grille-pain
P.N. 122453 REV1
Visi t us at www.o ster.co m
6340, 6341
MODELS/MODÈLES
M
ODELOS
1. Botónde Cancel(Anulación)
2
. Botónde“Frozen”(Congelados)con Luz
Indicadora
3
. Botónde“Warm”(Calentar)con Luz
Indicadora
4
. Selector yPilotode Tostadora
5. Botón “Toast”(Toast) conLuzIndicadora
6. Botón deRosca“Bagel”con LuzIndicadora
7. Botón de“Waffle”(Waffle)conLuz Indicadora
8. Ranuras Extra Anchas
9
. Guíaspara Rebanadas,
Hechasde AceroInoxidable
1
0. Mandode Resistenciasdel Pan
11. Elevadorde Tostadas
12. Bandejapara migas,totalmente extraíble
13. Areapara guarderel cordónretractable
14. Cordónde Potencia
1. CancelButton
2. FrozenButton withIndicator Light
3. WarmButton withIndicator Light
4. Lighter/DarkerKnob
5. Toast Buttonwith IndicatorLight
6. BagelButton withIndicator Light
7. WaffleButton withIndicator Light
8. Extra-WideBread Slots
9. StainlessSteel BreadGuides
10. BreadCarriage Lever
11. ToastLift
12. RemovableCrumb Tray
13. RetractableCord Storage
14. PowerCord
6
5
4
3
1
C
a
n
c
e
l
F
r
o
z
e
n
W
a
r
m
T
o
a
s
t
B
a
g
e
l
W
a
e
13
8/9
4
10/11
14
5
1
1
2
3
4
5
6
7
Cancel
Frozen
Warm Wae
Bagel
Toast
4
3
2
1
7
6
5
12
6
5
4
3
1
C
a
n
c
e
l
F
r
o
z
e
n
W
a
r
m
T
o
a
s
t
B
a
g
e
l
W
a
e
13
8/9
4
10/11
14
5
1
1
2
3
4
5
6
7
Cancel
Frozen
Warm Wae
Bagel
Toast
4
3
2
1
7
6
5
12
Page 2
Français-4 Français-5 Français-6 Français-7 Français-8
Español-6Español-5 Español-8
Français-1
Français-2
Uso dela Funciónpara “Frozen” (AlimentoCongelado)
S
u tostadorapuede deshelarsus alimentos congeladosy tostarlosdespués.
Ahora puedetomar unbagel congelado delcongelador, deshelarloy tostarlo–
t
odo estoen sutostadora en unsolo pasofácil.
Para deshelary tostarsus alimentos:
1. Ponga los alimentosen lasguías del pan.
2. Presione el botónde Congelado“Frozen” si lacomida estácongelada, luego
s
eleccione sutipo decomida presionando elbotón apropiado.Si no se
selecciona untipo dealimento, la tostadorafuncionará enmodo de tostado.
3. Seleccione el gradode tostadodeseado girando laperilla Lighter/Darker
(Más Claro/MásOscuro).
4. Presione la palancade lasGuías del Pan.
Uso dela Funciónpara “Warm” (Calentar)
¿Su comidatostada estarálista antes deque ustedesté listo paracomerla?
Esta característicale permitirárecalentar su comidatostada.
Para recalentarsu comida:
1.
Presione elbotón deCalentar “Warm”.Si no seselecciona un tipode
a
limento,la tostadorafuncionará enmodo de tostado.Si lodesea, presione
l
a selecciónde comida.El indicador decalentar seencenderá y latostadora
recalentará sucomida.
2. Presione la palancade lasGuías del Pan.
Cancelando elProceso deTostadora
Para cancelarel procesode tostadora:
Presione elbotón decancelación “Cancel”. Latostadora repicará.La tostadora
dejará detostar inmediatamentey los alimentossaltarán demanera automática.
Cómo limpiarsu tostadora
1. Desenchúfela y déjelaenfriar.
2. Una vez queesté fría,limpie el exteriorde latostadora con unpaño
húmedo.
• Cuando vaya atostar dosrebanadas de pan,coloque una rebanada
en elcentro decada ranura.
•
Cuando vayaa tostaruna sola rebanadade pan,coloque la ranura
en elcentro decualquiera de lasranuras.
Después deinsertar losalimentos enlas ranuras:
1. Elija entre lasopciones deselección de comidasu otrasfunciones. Si nose
selecciona ningunaopción decomida o función,el modode tostado esel
ajuste predeterminado.
2. Para seleccionar elnivel deoscuridad que desee,gire laperilla Lighter
(Más claro)/Darker(Más oscuro).
3. Presione el mandode resistenciasdel pan hastaengranarlo.
La guíaautoajustable parapan centrará automáticamenteel alimentopara
obtener untostado parejo.
Consejo: Su tostadora ha sido diseñado para un equilibro óptimo de
tostadora. Algunos de los elementos dentro de la tostadora pueden brillar
con más intensidad que los otros cuando estén en uso. Esto es parte del
funcionamiento normal de la tostadora.
Después deque elnivel deseado dela oscuridadse haya alcanzado,el
alimento
hará estallarpara arribaautomáticamente. El mandode resistencias
del pan
volverá asu posiciónoriginal y lasluces deindicador darán vueltaapagado.
4. Quite los alimentostostados cuidadosamentede las ranuras.
ADVERTENCIA:Los alimentos tostadospueden estarsumamente calientes.
Manéjelos concuidado.
Consejo: Para extraer los alimentos atascados en las ranuras, desenchufe
la tostadora y quite los alimentos una vez que la tostadora se haya enfriado.
A
DVERTENCIA:Jamás inserte losdedos niutensilios demetal enlas ranuras.
Usando laCaracterística deSeleccionar
d
e Alimento
(Bage ls, Waffles, Pa stelería )
Su Tostadora OSTER®ajustará elgrado declaridad/ oscuridad desus tostadasco
n
base enla clasede alimento quevaya atostar. Debeseleccionar primero laclase
de alimentoa tostarpara que latostadora puedarealizar el ajustecorrespondiente.
Para seleccionarel tipode alimento:
E
lija entrelas opcionesde modos Bagel(bagel), Waffle(waffle)yPastry
(pastelería).
• Si nose selecciona ningúnbotón defuncióno alimento, elajustepredeterminado
e
sToast (Tostar).
• Presione el botónde “Bagel” siva atostar un bagel.El indicadorde “Bagel”
se encenderá.Esta opciónpermitirá que latostadora seajuste al tiempo
necesario paratostar losbagels según elnivel dedorado seleccionado.
• Presione el botónde “Waffle”si va atostar unwaffle. El indicadorde
“Waffle”se encenderá. Estaopción permitiráque la tostadorase ajuste al
tiempo necesariopara tostarlos waffle segúnel nivelde dorado
s
eleccionado.
•
P
resioneel botón“Pastry” siva atostarun artículode pastelería.El indicador
“Pastry”se encenderá.Estaopción permitiráque latostadoraregule eltiempo
necesariopara tostarpastelería,de acuerdocon elnivel dedoradoseleccionado.
Español-7
PRÉCAUTIONS IMPORTANTES
L
’utili sation d’un Grille-pa inex igec ertaines précauti onsf ondamentale s,y
compri sles suiv antes:
LISEZ TOUTES LES INSTRUCTIONS AVANT D’UTILISER
L’APPAREIL
• Débran chezl’appa reils’il ne sertpas et avantde le nettoyer.Laiss ezrefroidi ravant dem ettreou
d'enlever des pièces.
• Ne touchez pasaux surfaces chaudes. Lesp iècesen métal deviennent brûlantes.
Employez poignées oubout ons.
• Débran chezla prise avantnet toyagepour éviter unch océlectriqu e.
• Pour éviter toutr isqueélect rique,n'imm ergezpas le cordon,la prise oule toaster dans del'eau
ou dansd'aut resliquides .
• Ne laissez paspen drele cordon aubord de latable ou duplan de travail;
veillez àce qu’il netou chepas àune surface chaude.
•
Ne lelaissez jamais sans surveillance quandil fonctionne.
• Jeunes enfants et personnesi nvalidesne devraient pas utiliserl ’appareil; redoublezde vigilance
d
ans lecas des enfantspl usâgés.
• Ne faites pasfonc tionnerle Grille-pain et nele posez pas:
– S urune surface nonrésis tanteà lac haleurou inflammable.
– S urou àprox imitéd'un brûleur àgaz ou d'unepl aqueélectr iqueen marche.
– D ansun four chaudou dans unfour à micro-ondes.
• Pour réduire lesr isquesd’in cendieou de chocsélect riques:
– N emettez pas d’ustensiles oubien d’aliments enveloppés de feuilled’a luminium
ou surdimensionnés dansl eGrille-pai n.
– N ’introduisez nivos doigts nides ustensiles en métaldans les fentesq uandle Grille-pain
est branché.
• Ne tentez pasde déloger unal imentsi l’appareil est branché.
• N’y placez pasd’a limentsgla césou dotés d’unegarni turerisquan tde couler unefois chaude.
N
on hygiéniques, lesdégou tturespeuve ntcauser un incendieo uun mauvais fonctionnement.
Enlevez souvent lesmiett esqui s’accumulent dans leramasse -miettespou rprévenir incendies
et pannes.N’ employezjam aisle Grille-pain sans quele ramasse-miettes ne soiten place.
• N’util isezpas un appareiléq uipéd’un cordon oud’un efiche abîmé, quia mal fonctionné ou
a étéendomma géde quelque façon.Ret ournez-leau centre des erviceSunb eamagréé le plus
proche pourl uifaire subir lescontr ôles,répara tionsou réglages électriques oumé caniques
nécessaires.
• Conçu pour l’usag edomestiqu e,le Grille-pain nedoi têtre utilisé nià l’air libreni à desfins
c
ommerciales.
• N’empl oyezle Grille-pain qu’aux finsaux quellesil est destiné, telque décrit danscet tenotice.
Ne vousserve zpas d’accessoires qui nesont pas formellement conseillés parle fabricant,
ils pourraient êtresourc ede blessures.
• Un incendie peuts edéclarer si leGrille- painest couvert outou cheà desma tières
inflammables – rideaux,m urs,et autres, parexem ple– pendant sonfonct ionnement.
• Pour mettreen marcheou arrêterl’appareil, poussezsur latouche “cancel”.Assure z-vousque la
manette soit enposition haute avant debrancher ou dedébran cherle Grille-pain.
CONSERVEZ CES INSTRUCTIONS
Instructions SpécialesQuant auCordon
Veuillez observer cesins tructionspa rmesure de sécurité.
• Ce Grille-pain est équipéd’u ncordon del ongueurrég lable,adapt ableselon vos besoins
particuliers. Placez dep référencele Grille-pai nprès dela prise deco urant(afin que lecordo n
ne risquepas de fairetr ébucher,comme le feraitun cordon long).
•
Vous pouvez,s inécessaire ,employer une rallonge, àconditio ntoutefois :
– Q ueses caractéristiques électriques soient aum oinsde 120/127 voltse t60 Hz;
– D ela disposer detelle façon qu’elle nepende pas d’unplat eaude table oud’un plan de
travail, que lesenfants ne risquent pasde lati reret qu’elle nepuisse pas fairet rébucher.
• Grille -painachet ésaux États-Unis etau Canada :Cet appareil est équipéd’u nefiche polarisée
(ayant unela meplus large quel’autr e).Pour réduire lesris quesde chocs électriques, lafiche
ne rentredan sles prises qued’une façon. Sila fiche neren trepas entièrement dans laprise,
inversez-la. Si ellene rentre toujours pasentiè rement,con tactezun électricien qualifié.
Ne modifiezl afiche d’aucune façon.
• Ne tirez passur le cordon,ne le tordezp aset nelui faites pas subirde mauvais traitements.
• N’util isezpas un appareilél ectriqueéqu ipéd’un cordon oud’une fiche abîmé, quia mal
f
onctionné ou biena étéé chappéou endommagé deq uelquefaçon .
• Débran chezle Grille-pain s’il nesert pas etavant de lenettoye r.
• N’enro ulezpas le cordonauto urdu corpsd uGrille-pa inpendant ou aprèsl’ut ilisation.
CET APPAREIL EST DESTINÉ À UN
USAGE MÉNAGER UNIQUE MENT
Utilisation deCorde deProlongation
L’appareilest livréavec uncordon d’alimentationcourt pourréduire lesrisques d’enchevêtrementou de
trébuchementaccidentel. Uncordon d’extensionpeut êtreacheté etutilisé àcondition deprendre des
précautions.Si unerallonge électriqueest utilisée,le calibreélectrique indiquésur larallonge devrait
êtreau moinssoit aussigrande quel’estimation électriquede lappareil.La rallongedevrait êtreplacée de
sortequelle netombe pasdu compteurou dudessus detable làoù desenfants pourraientl’attraper ou
s
’accrocheraccidentellement danscelle-ci.
Familiarisez-Vous Avec VotreGri lle-pain
Toast estle réglage par défaut siaucun bouton d’aliment ou defonction
n’est choisi.
1. Bouton d’Annulation– Vous lepres sezpour faire éjecter lesal iments
et interrompre lecyc lede grillage
2.Bo uton« Frozen »(Congelé) avec Voyant – Appuyez surce bouton si
l’aliment est surgelé. Utilisezc ebouton en combinaison avec lebouton
« Bagel» (Baguel), « Waffle »(Gaufre), « Toast» (Pain grillé) ou «
Pastry » (Pâtisserie). Décongélation etgrill agese font automatiquement
en unese uleopératio n.Le voyant s’allumera enap puyantsur le bouton.
3.Bo uton« Warm» (Garde auc haud)avec voyant – Appuyez sur cebouton
pour réchauffer lesa limentsgril lés.Utilise zce bouton enc ombinaison
avec les boutons« Bagel » (Baguel), « Waffle» (Gaufre),
« Toast» (Pain grillé) ou« Pastry » (Pâtisserie). Levoyan ts’allume pour
confirmer que «Warm » (Réchauffer) aété sélectionné.
4. Bouton Clair/ Foncé –Vous le tournezselo nle degré decui ssonpréfér é;
1 estle réglage le plusc lairet 7 leplus foncé.
5.Bo uton« Toast» (Toast) avecvoyan t– Appuyez surce bouton pour faire
griller une pâtisserie. Levoyant s’allume pour confirmer la sélection«
Pastry » (Pâtisserie).
6.Bo uton« Bagel »(Baguel) avec voyant –Appuyez sur ce boutonpour
griller un baguel.Le voyant s’allume pour confirmer que« Bagel »
(Baguel) a étésélect ionné.
7.Bo uton« Waffle »(Gaufre) avec voyant – Appuyez surce bouton pour
griller une gaufre.L evoyant s’allume pour confirmer que« Waffle »
(Gaufre) a étésélect ionné.
8.Fe ntes– Ont 3,3cm (1,3 po) delargeur : acceptent baguels, tranches de
pain épaisses etpain smoufflets.
9.De uxGuide-Pain Autoréglables – S’ajustent automatiquement selon
l’épaisseur des tranches.
10. Manette duChario t– Legr illagedébut equand vous l’abaissez.
11. Lève-Rôties –Vous mettez la manetted uchariot en position extra-haute
pour sortir lesalime ntsdes fentes.
12.Ramasse -miettesamovib le– Pour lenettoyag ecommode et facile.
13. Espacede rangement ducordon rétractable– Ilvous permet deranger une
partie ducordon dansle grille-pain.
14. Cordon
Préparatif spour la Toute Première Utilisation
Si vousutilisez leGrille-pain pour latoute premièrefois :
1. Retirez les étiquettesqui adhèrentau Grille-pain etessuyez le corpsavec unlinge
humide.
2. Faites glisser leramasse-miettes amovible enplace.
3. Assurez-vous que lamanette du chariotest danssa position laplus élevéeavant
de brancherle Grille-pain.
4. Décidez où placerle Grille-pain. Choisissezun endroit–
• plat, résistant àla chaleur etininflammable ;
• à au moins8 cm (3po) desmurs ou dudosseret duplan de travail;
• au moins unpied loinde toutcoffret ouétagère quipeuventêtre au-dessusdu
grille-pain;
• éloigné des matériauxinflammables, rideaux etmurs tapissésde tissu,
par exemple;
• éloigné des foyersde cuisson àgaz ouélectriques.
5.
Branchez lecordon surune prise decourant alternatifde 120 volts,60 Hz.
6. Sans mettre quoique cesoit dans lesfentes, abaissez lamanette duchariot
jusqu’à cequ’elle sebloque.
(Elle nese bloquera que si leGrille-pain est branché).
Ce toutpremier grillageà vide réchauffeles élémentset brûle lapoussière ayant
pu s’accumulerau coursde l’entreposage. L’odeur quise dégage esttout àfait
normale.
VotreGrille-pain OSTER
®
est prêtà l’emploi.
Modification dela longueurdu cordon :
L’espacede rangement devotre grille-painvous permet d’ajusterla longueurdu
cordon électriqueafin qu’ilsoit à lalongueur désiréelorsqu'il est éteint,l'unité
refroidie étantdébranchée.
1. Lorsque vous rétractezle cordon,tenez la prised'une main ettirez lecordon à
l'opposé dugrille-pain afinde le rétracter. Unefois le cordontiré, retenezla fiche
et laissezle cordonse rétracter.
2. La bobine ducordon estcompacte afin quele cordon serétracte surplusieurs
niveaux. Sile cordonne s’est pasentièrement enroulé,tirez le cordonet dirigezle demanière uniformesur la bobine.
3. Au cas oùle cordon auraitdes difficultésà se dérouler, tirezfermement sur
le cordon.
4. Ne permettez pasaux enfantsde manipuler lecordon afin d’évitertoutes
blessures
Utilisation duGrille-Pain
Pose desaliments dansles fenteset grillage:
Vousêtes maintenant prêtà placerles tranches dansles fentes.Tenez compte
des conseilspratiques suivants:
• La plupart despains et despâtisseries peuventêtre grillés, ycompris lesbaguels,
les briochesplates, lestranches de painépaisses, lespains moufflets, lesgaufres,
et autres.Les tranchesne doivent cependantpas êtresi épaisses qu’elles
se coincentdans lesfentes. N’oubliez pasque legrillage ordinaire estle réglage
par défaut.
• Deux tranches depain qui grillentsimultanément doiventêtre de mêmes
épaisseur etfraîcheur pourcuire uniformément.
•
Pour fairegriller deuxtranches de paind’un coup,placez une trancheau milieu
de chaquefente.
• Dans le casd’une seule tranche,placez-la aucentre de l’uneou del’autre
des fentes.
Une foisles tranchesposées dansles fentes:
1. Choisissez entre lesdiverses optionsd’aliments ou d’autresfonctions. Si
aucun alimentou fonctionn’est choisi, grille-painest leréglage par défaut.
2. Sélectionnez le degréde brunissementsouhaité en tournantle bouton
Clair/Foncé.
3. Abaissez la manettedu chariot jusqu’àce qu’ellese bloque.
Les guide-painauto-réglables vontcentrer automatiquement lesaliments
pour unbrunissement uniforme.
Truc: OSTER®a conçu ce Grille-pain pour qu’il fournisse le grillage optimal.
Il est possible – et normal – que certaines parties des éléments rougeoient
plus vivement que d’autres au cours du fonctionnement.
Après quele niveaudésiré de l’obscuritéait étéatteint, la nourrituresautera
vers lehaut automatiquement.Le levier dechariot depain reviendra àson
position originaleet lesvoyants de signalisations’éteindront.
4. Retirez prudemment lestranches des fentes.
AVERTISSEMENT :Les aliments juste grillésson ttrès chauds. Agissezavec prudence.
Truc: Si un aliment se coince dans une fente, débranchez et laissez refroidir
le Grille-pain avant de retirer l’aliment.
AVERTISSEMENT: Nemettez jamais vosdoigts oudes ustensilesmétalliques
dans lesfentes.
Utilisation dela fonctionAliments
(Bagel, Waffle,Pastry. [Baguel,Gaufre, Pâtisserie])
Le grille-painOSTER®Toasterajustera le réglageClair/Foncé selonle type d’aliment
que vousgrillez. Vousdevez sélectionnerle type d’alimentque vousvoulez griller
afin legrille-pain puissese régler enconséquence.
Pour sélectionnerle typed’aliment :
Choisissez lemode Bagel,Waffle ouPastry (Baguel, Gaufre,Pâtisserie).
• Toast est leréglage pardéfaut si aucunbouton d’alimentou de fonctionn’est
choisi.
• Appuyez sur lebouton « Bagel» (Baguel)si vous allezgriller unbaguel.
Le voyant« Bagel» (Baguel) s’allume.Cette optionétant réglée, legrille-pain
ajustera ladurée grillagedes baguels selonle degréde brunissement que
vous avezchoisi.
•
Appuyez surle bouton« Waffle» pour grillerune gaufre.Le voyant «Waffle »
(Gaufre) s’allume.Cette optionpermet au grille-painde réglerle temps nécessaire
au
grillage desgaufres selonle degré debrunissement sélectionné.
•
Appuyez surle bouton« Pastry »(Pâtisserie) sivous allez grillerune pâtisserie.Le
voyant «Pastry »(Pâtisserie) s’allume. Cetteoption permetau grille-pain
de réglerle tempsnécessaire au grillagedes pâtisseriesselon le degréde
brunissement sélectionné.
Utilisati onde la fonction “Frozen” (Aliments congelés)
Le Grille-painest capablede décongeler lesaliments surgeléspuis de lesgriller. Vous
pouvez doncdésormais sortirun baguel surgelédu congélateuret le grillerdans
votre Grille-painen uneseule opération.
Pour décongeleret grillerdu pain:
1. Placez le paindans le chariot
2. Appuyez sur lebouton «Frozen » (Congelé)si l’aliment estcongelé puis
sélectionnez letype d’alimenten appuyant surle boutoncorrespondant.
Si aucunaliment n’estsélectionné, le grille-painfonctionnera enmode « Toast»
(Pain grillé).
3. Sélectionnez le degréde brunissementsouhaité en tournantle bouton
Clair/Foncé.
4. Appuyez sur lamanette du chariotdu grille-pain.
Utilisation dela Fonction“Warm” (Réchauffer)
L’alimentgrillé sera-t-il prêtavant depasser à table? Cettefonction permet
de réchaufferun alimentgrillé/cuit.
Pour réchaufferun aliment:
1. Appuyez sur lebouton «Warm » (Réchauffer).Si aucunaliment n’est
sélectionné, legrille-pain fonctionneraen mode «Toast »(Pain grillé).
Le caséchéant, appuyezsur Food Select(Aliments). Levoyant « Warm»
(Réchauffer) s’allumeet legrille-pain réchauffe l’aliment.
2. Appuyez sur lamanette du chariotdu grille-pain.
Interruption duGrillage
Pour interromprele cyclede grillage:
Appuyez surle boutond’annulation « Cancel». Legrillage cessera immédiatement
et lestranches serontautomatiquement éjectées.
Nettoyage devotre grille-pain
1. Débranchez et laissezrefroidir le grille-pain.
2. Après refroidissement, essuyezl’extérieur devotre grille-pain àl'aide d'un
chiffon humide.
–– –FO LD– ––
–– –FO LD– ––
–– –F
OLD –– –
–– –F
OLD –– –
–– –F
OLD –– ––– –FO LD– ––
–– –F
OLD –– –
–– –F
OLD –– –
–– –F
OLD –– –
–– –F
OLD –– –
Preparándose paraUsar SuTostadora porPrimera Vez
Si vaa utilizarsu tostadora porprimera vez,asegúrese de losiguiente:
1. Quite cualquier pegatinade lasuperficie de latostadora ylimpie la carcasa
de sutostadora conun paño húmedo.
2. Inserte la bandejapara migasdesmontable en laranura dela bandeja para
m
igas.
3
. Asegúrese de queel mandode resistencias delpan estéen la posición
superior antesde enchufarel cordón depotencia dela tostadora.
4. Elija una ubicaciónpara latostadora. Dicha ubicación:
• Debe ser unasuperficie plana,termorresistente y antiinflamable.
• Debe estar aun mínimode 3 pulgadasde las paredeso dela parte
posterior delos mostradores.
• Por lo menosde unpie de distanciade cualquier gabinete
o estanteque puedenestar sobre dela tostadora.
• Debe estar alejadade losmateriales inflamables talescomo las cortinas
o lostapizados.
• Debe estar alejadade lasestufas de gaso de elementoseléctricos.
5. Enchufe el cordónde potenciaen un tomacorrientesde 120voltios,
6
0 HzCA.
6
. Sin insertar alimentoalguno enlas ranuras, empujeel mandode pan
completamente haciaabajo hastaengranarlo (las resistenciasno quedarán
engranadas sila tostadora no está enchufadaa una fuente depotencia).
El primerproceso detostado precalentará losnuevos elementosy quemará
c
ualquier polvoque sehaya acumulado duranteel almacenamientoo
fabricación. Esperfectamente normalque dicho quemadoproduzca unolor.
Su Tostadora OSTER
®
ya seencuentra listapara el uso.
A
juste dela longituddel cordón depotencia
El áreapara guarduarel cordón retractablede sutostadora le permiteajustar la
longitud delcordón depotencia de talmanera quetenga la longitudexacta que
usted desee,cuando loscontroles están apagadosy launidad está desenchufada
y
fría.
1. Al retractar elcordón, sujeteel enchufe conuna manoy hale elcordón lejos
de latostadora pararetractarlo. Una vezque loesté halando, sujeteel
enchufe ypermita queel cordón seretracte.
2. El carrete delcordón escompacto y permitemúltiples capaspara retractar
e
l cordón.En casode que elcordón noesté totalmente enrollado,hale el
cordón yencarrilelo enuna manera uniformeen elcarrete.
3. En caso deque elcordón no sepueda halarfácilmente, hálelo confirmeza.
4. No permita quelos niñosutilicen el cordónretractable yaque el cordón
puede causaralguna lesión.
U
so dela Tostadora
Insertando alimentosen lasranuras yla operaciónde tostadora
Yaestá listo parainsertar alimentosen las ranurasde pan. Tenga lossiguientes
consejos enmente durantela inserción desus alimentos.
•
La mayoríade lospanes y artículosde pasteleríapueden tostarse, tales
como bagels,bizcochos, rebanadasgruesas de pan,bollitos, waffles,etc.
Sin embargo,las rebanadasno deben sertan gruesasque queden atascadas
en lasranuras.
• Cuando vaya atostar dosrebanadas a lamisma vez, lasrebanadas deben
s
er delmismo tamañoy frescura paraasegurar unatostadora uniforme.
Garantía Limitada de 1 Año
Sunbeam Products,Inc. operandobajo el nombrede JardenConsumer Solutions, oen Canadá,
Sunbeam Corporation(Canada) Limitedoperando bajo elnombre deJarden Consumer Solution(en
f
orma conjunta,“JCS”), garantizaque por unperíodo deun año apartir dela fecha decompra, este
producto estarálibre dedefectos de materialesy manode obra. JCS,a suelección, reparará o
reemplazaráeste producto ocualquier componente delmismo quepresente defectos duranteel
período degarantía. Elreemplazo se realizarápor unproducto o componentenuevo oreparado. Si el
producto yano estuvieradisponible, se loreemplazará porun producto similarde valorigual o
superior.Ésta essu garantía exclusiva. NO tratede repararo ajustar ningunade funcionesmecánicas
o eléctricasde esteproducto. El hacerloanulará estagarantía.
La garantíaes válidapara el compradorminorista originala partir dela fechade compra inicialy la
misma noes transferible.Conserve el recibode compraoriginal. Para solicitarservicio engarantía se
requiere presentarun recibode compra. Losagentes ycentros de serviciode JCSo las tiendas
minoristasque venden productosJCS no tienenderecho aalterar, modificarni cambiar deningún
otro modolos términosy las condicionesde estagarantía.
Esta garantíano cubreel desgaste normalde laspiezas ni losdaños quese produzcan comoresultado
de usonegligente omal uso delproducto, usode voltaje incorrectoo corrienteinapropiada, uso
contrario alas instruccionesoperativas, y desarme,reparación oalteración por partede untercero
a
jeno aJCS oa un Centrode ServicioSunbeam autorizado. Asimismo,la garantíano cubre actos
fortuitostales como incendios,inundaciones, huracanes ytornados.
¿Cuál esel límite deresponsabilidad de JCS?
JCS noserá responsablede daños incidentaleso emergentescausados por elincumplimiento de
alguna garantíao condiciónexpresa, implícita olegal.
Excepto enla medidaen que loprohíba laley aplicable, cualquiergarantía ocondición implícita de
comerciabilidado aptitud paraun fin determinadose limita,en cuanto asu duración,al plazo dela
garantía antesmencionada.
JCS quedaexenta detoda otra garantía,condición omanifestación, expresa, implícita,legal ode
cualquier otranaturaleza.
JCS noserá responsablede ningún tipode dañoemergente de lacompra, usoo mal usodel producto,
ad deusar elproducto, incluidos losdaños incidentales,especiales, emergentes osimilares, ola
pérdida deganancias, nide ningún incumplimientocontractual, seade una obligaciónesencial ode
otra naturaleza,ni deningún reclamo iniciadocontra elcomprador por untercero.
Algunas provincias,estados ojurisdicciones no permitenla exclusióno limitación delos daños
incidentaleso emergentes nilas limitaciones ala duraciónde las garantíasimplícitas, demodo que es
posible quela exclusióno las limitacionesantes mencionadasno se apliquenen sucaso.
Esta garantíale otorgaderechos legales específicosy esposible que ustedtenga otrosderechos que
varían deun estado,provincia o jurisdiccióna otro.
Cómo solicitarel servicio engarantía
En losEstados Unidos –
Si tienealguna preguntasobre esta garantíao desearecibir servicio degarantía, llameal
1-800-334-0759
y podráobtener ladirección del centrode servicioque le resultemás conveniente.
En Canadá–
Si tienealguna preguntasobre esta garantíao desearecibir servicio degarantía, llameal
1-800-667-8623y podrá obtenerla dirección delcentro deservicio que leresulte másconveniente.
En losEstados Unidos,esta garantía esofrecida porSunbeam Products, Inc.operando bajoel nombre
de JardenConsumer SolutionsBoca Ratón, Florida33431.En Canadá,esta garantía esofrecida por
Sunbeam Corporation(Canada) Limited,operando bajo elnombre deJarden Consumer Solutions20
B HerefordStreet, Brampton,Ontario L6Y 0M1.Si tienealgún otro problemao reclamorelacionado
con esteproducto, porfavor escriba alDepartamento deservicio al consumidor.
POR FAVOR NODEVUELVAESTE PRODUCTO A NINGUNA
DE ESTASDIRECCIONES NI ALLUGAR DE COMPRA.
Garantie limitée de un an
SunbeamProducts, Inc.faisantaffaire sousle nomde JardenConsumerSolutions, ouau Canada,
SunbeamCorporation(Canada) Limited,faisantaffaire sousle nomde JardenConsumerSolutions
(collectivement« JCS»)garantit quependant unepérioded’un anà compterde ladate d’achatce
produitsera exemptde défautsdematériaux oude maind’uvre. JCS,selonson choix,réparera ou
remplacerace produitoutout composantdu produits’avérantdéfectueux pendantquela garantie
seraen vigueur.Leremplacement seraréaliséau moyend’un produitou composantneufou
reconstruit.Si leproduitn’est plusdisponible,un produitd’une valeursimilaireou supérieurefera
lieude remplacement.Ceciest votregarantie exclusive.N’essayezPAS deréparerou d’ajusterles
fonctionnalitésélectriquesou mécaniquesdece produit.Si telest lecas, votregarantiesera annulée.
Cettegarantie estaccordéeà l’acheteurau détailinitialet entreen vigueurà compterde ladate
d’achatau détailinitial.Elle n’estpas transférable.Gardezvotre preuved’achatd’origine, carelle
serarequise pourobtenirun serviceau titrede lagarantie. Lesmarchands,les centresde réparation
oules magasinsau détailJCS vendantdesproduits JCSn’ont pasle droitdemodifier lesmodalités
etconditions généralesdecette garantie.
Cettegarantie necouvrepas l’usurenormale despièces niles dégâtsoccasionnéspar unedes causes
suivantes: mauvaiseutilisationou utilisationnégligentede ceproduit, branchement surun courant
ouune tensionautre queceux spécifiés, utilisationcontraireaux instructions defonctionnement,
démontage,réparationou modificationpar quiconque autreque JCSou unCentrede réparation
agrééJCS. Deplus, lagarantiene couvrepas lescas deforces majeures,telsque lesincendies, les
inondations,les ouragansetles tornades.
Quellessont leslimites deresponsabilitéde JCS?
JCSne serapas responsablede dégâtssecondairesou conséquents causéspar larupturede toutes
garantiesou conditionsexpresses,tacites oulégales.
Dansla mesuredes loisapplicables,toute garantietaciteou conditionde commercialitéou
d’adaptationà unbut particulier estlimitée enduréeà cellestipulée dansla présentegarantie.
JCSrejette touteautre garantie, conditionoureprésentation express,tacites,légales ouautre.
JCSne serapas responsabledesdégâts, quelsqu’ils soient,résultantde l’achat,de l’utilisation, de
l’abusd’utilisationdu produitou del’incapacitéde l’utiliser,ycompris lesdégâts directs,spéciaux,
indirectsou identiques;nides pertesde revenus,de touterupturede contrat,fondamentaleou autre,
nide touteplainte déposéecontrel’acheteur parune autrepartie.
Certainsterritoires,provinces, étatsou juridictions nepermettentpas l’exclusionou lalimitationdes
dégâtsdirects ouindirects,ni leslimitations dela duréedegarantie tacite.Il sepeut doncque les
limitationset exclusionsstipuléesdans lesprésentesne s’appliquentpasà votrecas.
Cettegarantie vousdonnedes droitsjuridiques précisetil sepeut quevous enayez d’autresqui
peuventvarier d’unterritoire,d’une province,d’unétat oud’une juridictionà l’autre.
Pourobtenir unservice autitre dela garantie
AuxÉtats-Unis –
Pourtoute questionconcernantcette garantieou pourobtenirune réparationsousgarantie, appelez
au1-800-334-0759.L’adressedu centrede réparationle plusprochede chezvous voussera fournie.
AuCanada –
Pourtoute questionconcernantcette garantieou pourobtenirune réparationsousgarantie, appelez
au1-800-667-8623.L’adressedu centrede réparationle plusprochede chezvous voussera fournie.
AuxÉtats-Unis, cettegarantieest offertepar SunbeamProducts,Inc. faisantaffairesous lenom de
JardenConsumer Solutions, situéà BocaRaton,Florida 33431.Au Canada,elleest offertepar
SunbeamCorporation(Canada) Limitedfaisantaffaire sousle nomde JardenConsumerSolutions,
situéeau 20B HerefordStreet,Brampton, OntarioL6Y 0M1.Si vousaveztoute autrequestion ou
réclamationconcernantce produit,veuillezécrire ànotre serviceà laclientèle.
NE RENVOYEZ PAS CE PRODUIT À UNEDE CES
ADRESSESNI OÙVOUS L’AVEZACHETÉ
Français-3
Bienvenue
Nous vous félicitons d’avoir choisi un Grille-pain OSTER®!
Pour ensavoir plus
sur lesproduits OSTER®, veuillez visiternotre site webà www.oster.com.
1. Boutond’Annulation
2. Bouton« Frozen» (Congelé)avec voyant
3. Bouton« Warm» (Garde-au-chaud)
avecvoyant
4. BoutonClair /Foncé
5. Bouton« Toast »(Toast)avec voyant
6. Bouton« Bagel» (Baguel)avec voyant
7. Bouton« Waffle» (Gaufre)avec voyant
8. Fentes
9. DeuxGuide-Pain Autoréglables
10. Manettedu Chariot
11. Lève-Rôties
12. Ramasse-miettes amovible(s)
13. Espacede rangementdu cordonrétractable
14. Cordon
6
5
4
3
1
C
a
n
c
e
l
F
r
o
z
e
n
W
a
r
m
T
o
a
s
t
B
a
g
e
l
W
a
e
13
8/9
1
10/11
14
3
7
12
1
2
3
4
5
6
7
Cancel
Frozen
Warm Wae
Bagel
Toast
4
3
2
1
7
6
5
 Loading...