

Page 1

Instruction Manual & Recipe Booklet
OSTER® MEAT/FOOD GRINDER
Manuel d’Instructions et Livre de Recettes
HACHOIR À VIANDE ET À NOURRITURE OSTER®
MODEL
4726
MODEL
4726
Page 2

2
When using electrical appliances, basic safety precautions should always be followed
including the following:
• READ ALL INSTRUCTIONS.
• To protect against risk of electric shock, do not put appliance in water or other liquid.
• Close supervision is necessary when Food Grinder is used by or near children.
• Unplug from outlet when not in use, before putting on or taking off parts,
and before cleaning.
• Avoid contacting moving parts. Never feed food by hand. Always use Food Pusher.
• Do not use fingers to scrape food away from discharge disc while appliance
is operating. Injury may result.
• Do not operate any appliance with a damaged cord or plug or after the appliance
malfunctions or has been dropped or damaged in any manner. Return appliance
to the nearest authorized service facility for examination and repair or adjustment.
• The use of attachments not recommended or sold by the manufacturer may cause fire,
electric shock, or injury.
• Do not use outdoors.
• Do not let the cord hang over edge of a table or countertop. Do not rest cord
against hot surfaces.
• Never leave Food Grinder unattended while it is operating.
• If motor stalls turn off immediately and unplug Power Unit. To avoid injury,
first detach Food Grinder Head then disassemble and remove clogged pieces.
FOR PRODUCTS PURCHASED IN THE U.S. AND CANADA ONLY
This appliance has a polarized plug – one blade is wider than the other. To reduce the risk
of electric shock, this plug will fit into a polarized outlet only one way. If the plug does not
fit fully into the outlet, reverse it. If it still does not fit, contact a qualified electrician.
Do not attempt to defeat this safety feature by modifying the plug in any way.
“The maximum rating as marked on the Food Grinder is based on the attachment that draws
the greatest load. Other recommended attachments may draw significantly less power.”
T
HISUNITISDESIGNED FORHOUSEHOLD
USEO
NLY
IMPORTANT SAFEGUARDS
SAVE THESE INSTRUCTIONS
Page 3
3
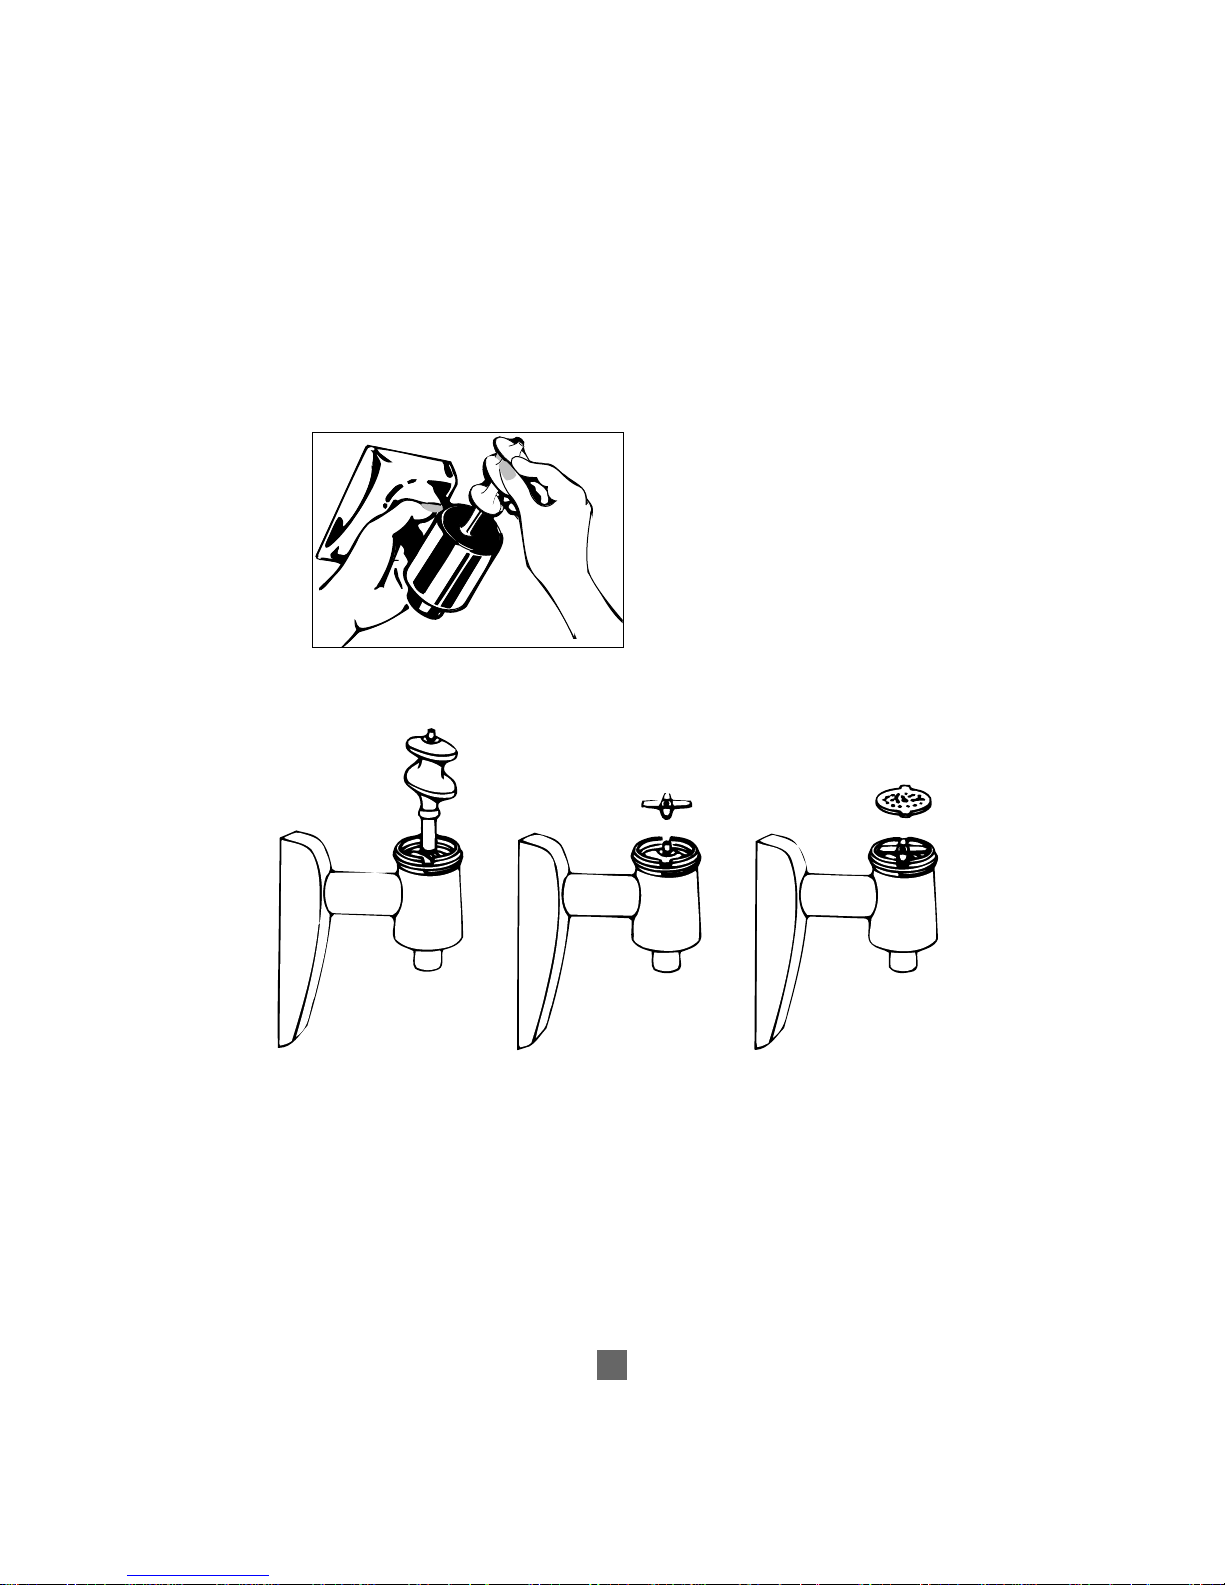
ASSEMBLING INSTRUCTIONS
HOW TO ASSEMBLE GRINDER HEAD
Before assembling, lubricate shaft of Feed Screw with vegetable oil (very sparingly,
to prevent excess oil from entering Grinder Body).
N
OTE:
Always hold Grinder as shown
so the parts will drop into place
and be properly seated for
trouble-free operation.
1. Drop the Feed Screw into the Grinder Body.
2. Fit the four-fingered Cutting Blade over the end of the Feed Screw.
The Cutting Blade has a center hole with one side round and the other side square.
Attach Cutting Blade so that the square hole faces the Feed Screw.
3. Slide the Grinding Disc on next – either the coarse or the fine disc, whichever you need.
Turn the Disc until the square “ears” on the edge fit down into the two notches on the
rim of the Grinder Disc. N
OTE: The Grinding Disc will protrude slightly over the rim
of the Grinder Body until the Retaining Ring is screwed tightly in place.
Feed
Screw
Cutting
Blade
Grinding
Disc
Grinder
Body
Page 4
4
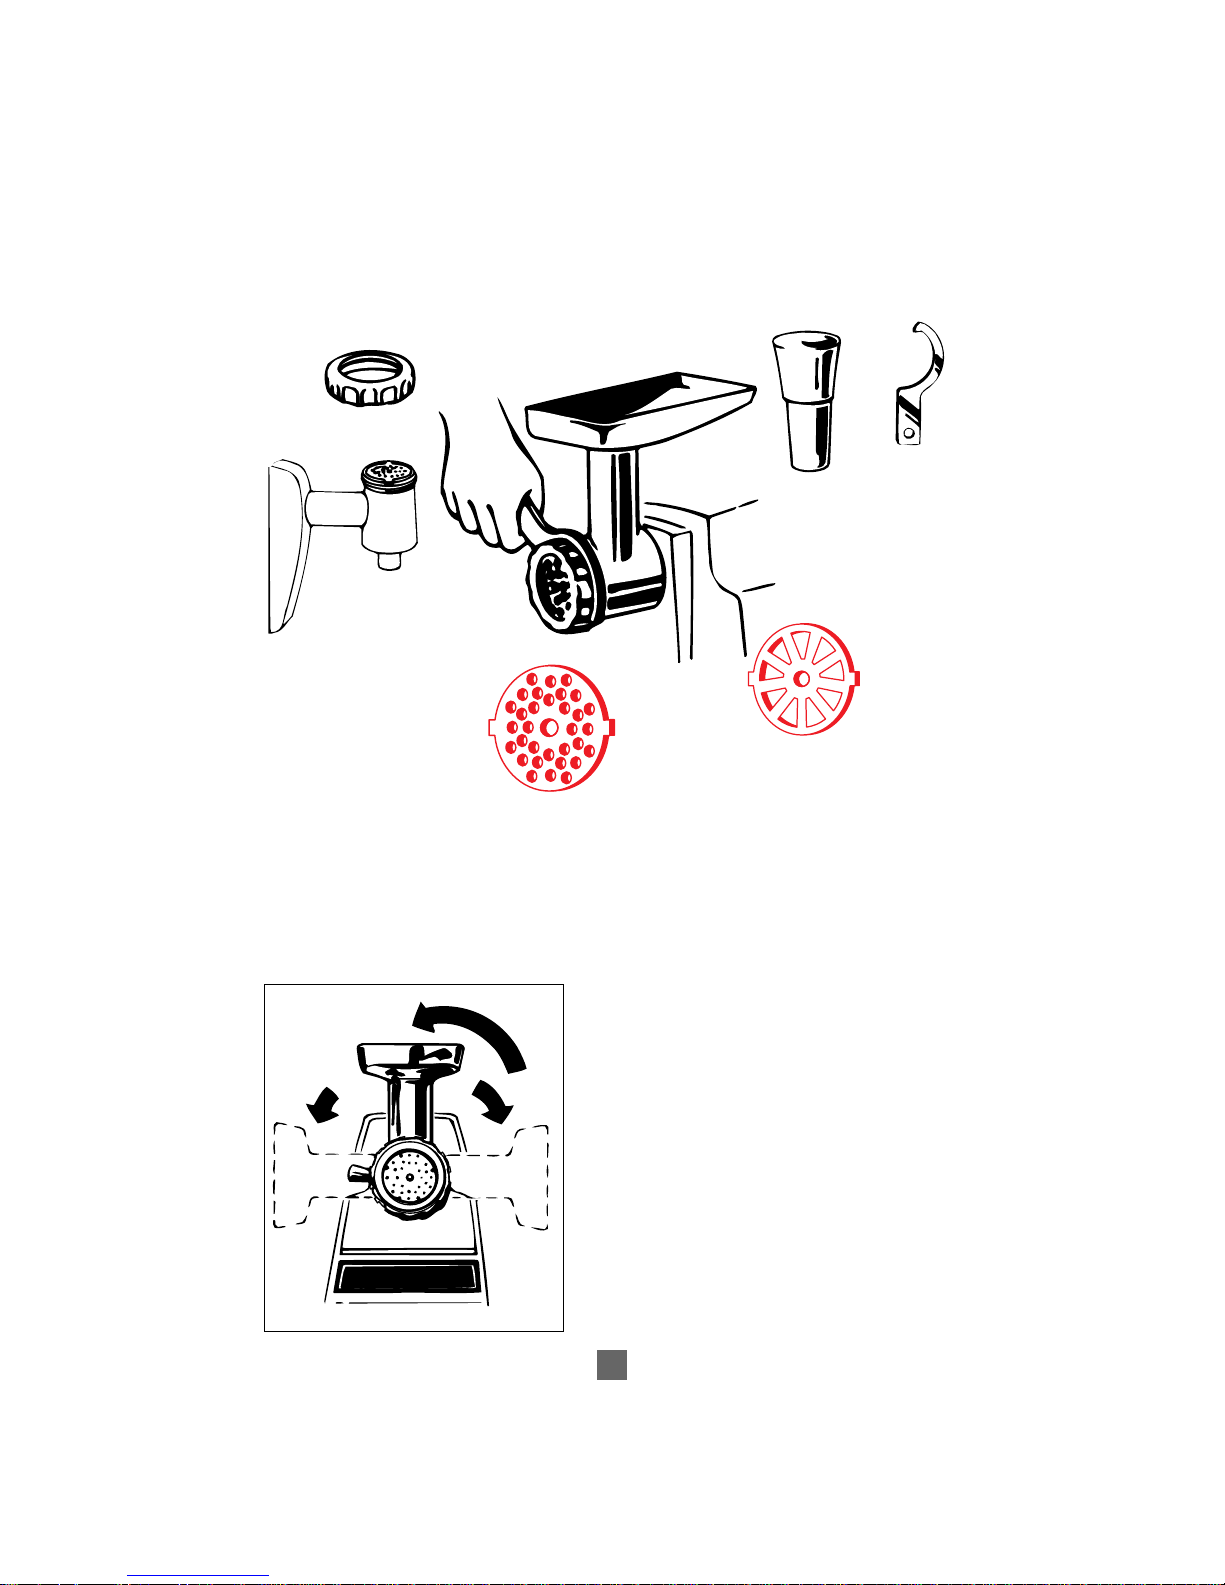
4. Screw on the threaded Retaining Ring. It must be tightened so no meat fibers can lodge
between Cutting Blade and Disc to hinder grinding.
5. A handy wrench is included for loosening tight retaining rings. Simply attach wrench
to retaining ring and turn counterclockwise.
HOW TO ATTACH GRINDER HEAD
1. Disconnect electric cord.
2. Loosen knob on side of Power Unit and insert
Grinder Head in opening. Maintain a light force
to hold Grinder Head in place. Rotate Grinder
Head (1) to the left to approximate position
shown, then (2) to the right to the approximate
position shown, and then (3) back to the center.
This procedure insures that the Food Grinder
Head snaps into the correct position.
3. Tighten knob securely.
4. Turn unit ON and feed food into Food Hopper.
Use Food Pusher to guide food down into screw.
➀
➁
➂
Retaining
Ring
Food Pusher
Wrench
Fine Grinding
Disc
Coarse
Grinding
Disc
➔
ASSEMBLING INSTRUCTIONS
Page 5

5
C
LEANING
All parts must be clean so they will fit together snugly and give proper cutting action.
The Grinder Head can be completely disassembled for thorough cleaning by reversing
Steps 2, 3, and 4 of “How To Attach Grinder Head” section on Pages 3 and 4. A wrench
is included for loosening a tight Retaining Ring. To loosen, attach Wrench to Ring
and turn counterclockwise.
Wash grinder parts in hot, soapy water, rinse and dry thoroughly. Do not wash any
parts in an automatic dishwasher.Use a brush to remove food from hard-to-reach
areas in the grinding discs and food hopper.
IMPORTANT: With a clean cloth, thoroughly dry Cutting Blade and Grinding Discs
after washing. Allow to stand overnight to dry. Wrap in airtight wrap, such as plastic
or foil, to protect disc from moisture. Wipe the Power Unit with a damp cloth.
Do not immerse in water.
LUBRICATION
No oiling of internal parts is necessary. Any other servicing required should be done
by an authorized service facility.
TIPS FOR PROPERLY GRINDING FOOD
• All Grinder parts must be assembled tightly.If any parts are loose, food fibers
will lodge between them and clog up the Grinder. Should this occur, it will be necessary
to unplug unit, remove the Grinder Head, take it apart, clean out all food fibers, and
reassemble properly. Be sure to follow Step 4 of “How To Assemble Grinder Head”
section on Page 3.
• Before grinding, be sure food is free of bone fragments, nutshells and other hard objects.
• Always turn unit ON before inserting food.
• Cut foods into strips or pieces just slightly smaller than opening in grinder.
Most foods will feed into the Grinder without being forced. If any pressure is necessary,
use only the Food Pusher supplied; never push food by hand.
• Feed foods into Grinder slowly and evenly. Nut Meats should be fed 6 to 8 at a time.
Break bread into 6 or 8 pieces and drop into opening. Do not use food pusher on
bread crumbs or nut meats. They will feed themselves.
• Use coarse disc only on bread crumbs, unless recipe specifies fine disc.
• It is normal for a small portion of unground food to remain in the Grinder Head
when grinding is finished. To remove this food, break a piece of bread into eight pieces
and drop slowly into Grinder Head. As soon as bread appears at cutting surface,
turn unit OFF.
Page 6
6
SAUSAGE MAKER
REDISCOVER HOMEMADE SAUSAGE WITH THE
HOME SAUSAGE MAKER
This Home Sausage Maker is designed for household use only.
Now you can enjoy the goodness of freshly made sausage, prepared right at home quickly
and easily. Fresh pork, beef, veal, or venison, fresh herbs and spices are all you need
to create and reproduce the OLD WORLD flavors of homemade country sausage.
Making your own sausage enables you to serve a high-quality product, free from any
additives or preservatives.
Before Beginning . . . REMEMBER:
1. Always use fresh meat for maximum quality, flavor and wholesomeness.
2. Be sure all bowls, utensils, and equipment that come in contact with the meat
are clean and sanitary.
3. NEVER allow meat to reach room temperature. Work in small amounts and refrigerate
remainder of meat until ready to use to avoid bacterial growth.
4. For maximum flavor and moistness in sausage, always have approximately 25% fat
to 75% meat in your sausage mixture.
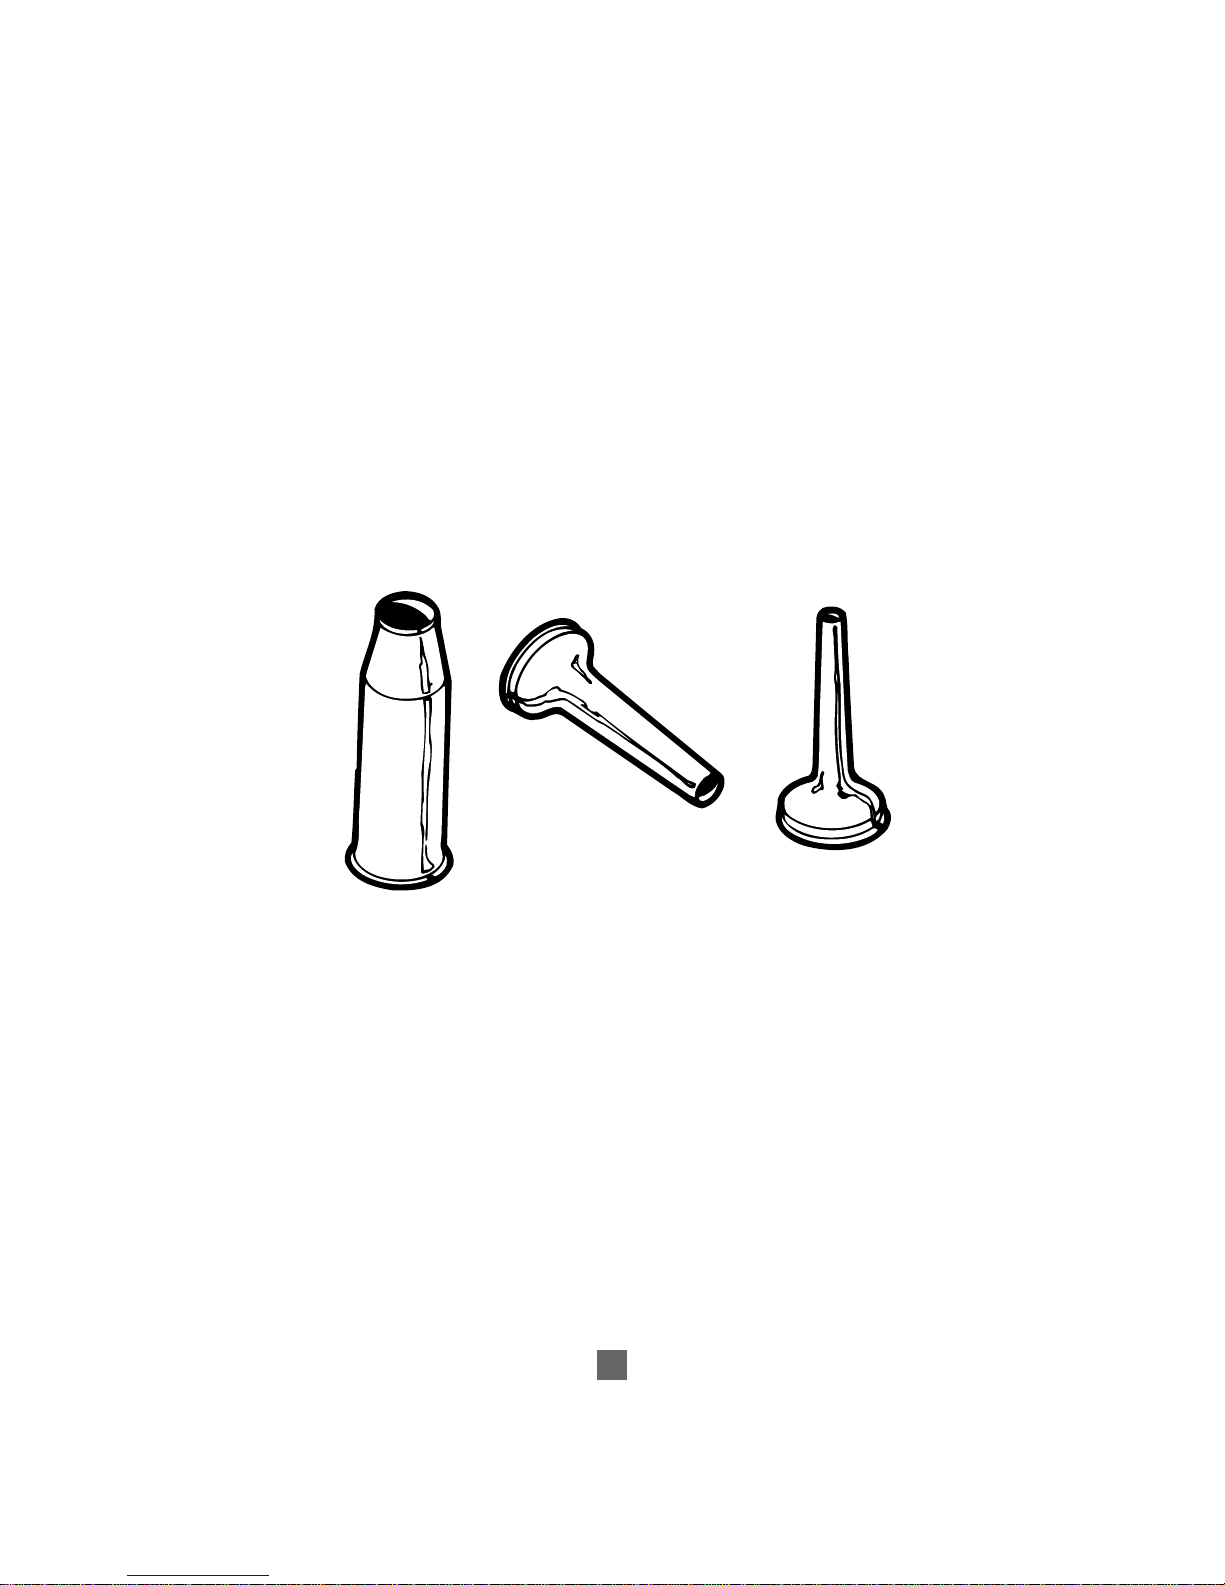
PREPARING NATURAL CASINGS FOR STUFFING
Natural casings can be purchased from your local butcher. In many areas they must be
ordered in advance, so plan ahead. The casings are packed in salt and must be soaked
about 1 hour before stuffing. Cut casings in 4-foot lengths for easy handling and stuffing.
Before stuffing, flush casing through with cold tap water.
(After making sausage, if any casings are left over, resalt.)
Medium
Stuffing
Tube
Small
Stuffing
Tube
Large
Stuffing
Tube
Page 7

7
STUFFING TUBE USES
SMALL Stuffing Tube – Used to make pork or beef breakfast sausage, and SouthernStyle sausage. Use with natural sheep casings (about .5 to 1 inch or 21-25 mm in size).
MEDIUM Stuffing Tube – Used to make Country-Style sausage, such as Polish, Italian,
Bratwurst, Venison, Chorizo, etc., as well as skinless sausages.* Use with natural hog
casings (about 1 to 1.25 inches or 25 – 30 mm in size).
LARGE
Stuffing Tube – Used to make larger skinless sausages* or to stuff larger casings.
Stuffed Sausage Yield:
Sheep Casings – 4-foot (1.2 m) length casings equal approximately 1-1/2 pounds (675 g)
stuffed sausage.
Hog Casings – 4-foot
(1.2 m) l
ength casings equal approximately 2-1/2 pounds (1 Kg)
stuffed sausage.
LINK SAUSAGES WITHOUT CASINGS
If desired, link sausage may be prepared without casings. Assemble Food Grinder Hopper
for 1- or 2-step method (see Page 8), using Fine or Coarse Grinding Disc only. Putmeat
through Food Hopper, using the food pusher as a guide. Pinch sausage off into desired
lengths. (N
OTE: For easier handling, stop motor when sausage reaches 6-inch lengths
and pinch in half.) Brown on all sides and serve. Uncooked links may be frozen on a
cookie sheet until firm, then wrapped in freezer paper or freezer bags. When ready to use,
brown frozen sausage and serve.
HOW TO ASSEMBLE SAUSAGE MAKER
1. For proper assembly, always hold Grinder Hopper as shown. Drop Feed Screw
into Grinder Hopper.
2. Fit Cutting Blade onto end of Feed Screw. N
OTE: If Cutting Blade has a center hole
with one side round and the other square, attach Cutting Blade so that the square hole
faces Feed Screw. Cutting Blades with square center hole on both sides can be attached
with either side toward Feed Screw.
3. Place desired Grinding Disc on top of Cutting Blade. Grinding Disc fits snugly
when square ears of Disc fit into notches on rim of Grinder Body.
4. Select Stuffing Tube required for sausage making operation and place wide end
over Grinding Disc. Slide Retaining Ring over assembly and screw on Ring
until firmly attached.
5.
Attach completed Sausage Making Assembly to unit, following Instructions (on Pages4&5)
.
To disassemble for cleaning or changing Tubes, reverse Steps 1 through 5.
Page 8

8
BASIC SAUSAGE STUFFING PROCEDURES
1-STEP METHOD: For sausages with casings – grind and stuff meat in one easy step .
1. Cut meat into 1-1/2 to 2-inch (3-cm – 5-cm) pieces to fit in Food Grinder Hopper.
2. Place meat in large bowl or on a clean flat surface. Sprinkle meat with required amount
of your favorite blend of seasonings. Add water if directed.
3.
Toss the meat pieces gently with seasonings to coat evenly, using plastic or metal spoons.
4. Assemble Hopper as shown, using desired Stuffing Tube and Grinding Disc.
5. Generously coat Stuffing Tube with vegetable oil and slip casings onto Tube.
6. Ease 1 inch of casing off Tube before stuffing. Tie end with heavy string.
7. Start motor and feed the seasoned meat cubes into the Hopper opening with a gentle,
even pressure on the Food Pusher.
8. As the sausage is forced into the casings, loosely hold the casing end and ease it
off gradually as it fills.
9. Fill in one continuous rope. Do not fill too tightly. If link sausage is desired,
leave room enough to twist or tie between each link.
2-STEP METHOD: For sausages with casings – Grind meat entirely, then stuff in casings.
This provides a good distribution of fat, lean, and spices.
1. Follow steps 1 through 3 of 1-Step Method.
2. Assemble Food Grinder Hopper
(see Assembly Instructions on Pages 3 & 4).
Omit Stuffing Tube. Grind directly into a bowl. Disassemble Food Hopper.
3. Start motor and feed the seasoned meat cubes into the Hopper opening with a gentle,
even pressure on the pusher. When all meat is ground . . .
4. Reassemble the Hopper with the Feed Screw, desired Grinding Disc and desired
Stuffing Tube. Assemble per instructions for 1-Step Method above.
5. Generously coat Stuffing Tube with vegetable oil and slip casings onto Tube.
6. Ease 1 inch of casing off of Tube before stuffing. Tie end with heavy string.
7. Start motor and feed the seasoned ground meat into the Hopper opening with a gentle,
even pressure on the Food Pusher.
8. As the sausage is forced into the casings, loosely hold the casing end and ease it off
gradually as it fills.
9. Fill in one continuous rope. Do not fill too tightly. If link sausage is desired, leave room
enough to twist or tie between each link.
Page 9

9
STORING FRESH SAUSAGE
Fresh sausage must be refrigerated immediately after stuffing. If sausage is to be stored
longer than 2 or 3 days in the refrigerator, it must be frozen in proper freezer bags,
freezer paper or containers. Freeze portions that will be used at one setting.
Mark each portion with a waterproof marking pen as to the date and kind of sausage.
Always consult your favorite freezer book for recommended freezer storage times.
COOKING YOUR SAUSAGE
Par-Boil Method– Arrange sausage fresh or frozen in a cold skillet, add 2 to 4 Tbsp.
(30 ml – 60 ml) water per pound. Cover and simmer 8 to 10 minutes over a medium-low heat.
Uncover. Let water evaporate and brown evenly. COOK UNTIL WELL DONE.
Pan-Broil or Griddle Method – Arrange fresh sausage on cold griddle or skillet.
Cook on low heat, turning often. COOK UNTIL WELL DONE,
APPROXIMATELY 20 MINUTES.
Page 10

10
APPETIZERS
The following recipes are but a few of the many you can create, using your Food Grinder
and Sausage Maker. You’ll find many recipes in your current cookbooks that contain
ground foods. It’s fun to experiment with your own recipes, too. Happy grinding!
SWEDISH MEATBALLS
1 medium onion, quartered 4 tsp. (20 ml) salt
2 Tbsp. (30 ml) butter dash of pepper
1 pound (450 g) beef chuck or shoulder, 1/2 tsp. (2 ml) nutmeg
cubed 6 Tbsp. (90 ml) butter
1 pound (450 g) pork shoulder, cubed 2 Tbsp. (30 ml) flour
3 slices dry bread 1 cup (250 ml) cream
1 cup (250 ml) chicken broth 3 cups (750 ml) milk
1/2 tsp. (2 ml) dried dill weed 4 eggs
Blender chop onion and cook in butter until soft. Put meat and bread alternately through
Grinder using Fine Disc. Mix meat, cooked onions, milk, eggs, salt, pepper and nutmeg
in a large bowl. Beat very well, at least 10 minutes, with an electric mixer. Chill well for
two hours. Form into small balls and brown in remaining butter. Remove to hot serving
dish. Mix cream, chicken broth, and flour and add to pan mixing well. Heat until
thickened. Add dill and stir well and pour over meat balls.
YIELD: 6-8 SERVINGS
CHOPPED LIVER
1 medium onion, quartered 1 tsp. (5 ml) salt
4 Tbsp. (60 ml) melted 1/2 tsp. (2 ml) pepper
chicken fat 1 Tbsp. (15 ml) red wine
1/2 pound (225 g) chicken livers 2 hard-boiled eggs
Sauté onions and chicken livers in chicken fat until livers are tender.
Put livers, onions and egg whites through Grinder using Fine Disc. Add seasonings
and wine and mix well to form a smooth paste. Chop egg yolks and use for garnish.
Y
IELD
: 1-1/2 C
UPS
(375 ML)
LIVER AND BACON PATE
1 pound (450 g) bacon, cooked 1/4 tsp. (1 ml) pepper
1/2 pound (225 g) liver, cooked dash of cayenne
1/2 tsp. (2 ml) salt 1/2 cup (125 ml) cream
Grind the bacon and liver in Grinder using Fine Disc. Add remaining ingredients
and mix well.
Y
IELD
: 2 C
UPS
(500 ML)
Page 11

11
SANDWICH SPREADS
GOLDEN EGG SANDWICHES
6 hard-boiled eggs, shelled 2 Tbsp. (30 ml) mayonnaise
1 small onion 1 tsp. (5 ml) vinegar
1 can (7 oz. or 200 g) 1 tsp. (5 ml) Worcestershire Sauce
canned luncheon meat, dash garlic salt
cut into chunks Hamburger buns, split
1/2 pound (225 ml) processed cheese,
cut in chunks
Put eggs, onion, meat, and cheese through Grinder, alternating ingredients, using the
Coarse Disc. Stir in all remaining ingredients. Spread 2-4 Tbsp. (30-60 ml) of mixture
on hamburger bun halves. Broil 4 inches (10 cm) from the heat until golden and bubbly.
Garnish with a slice of stuffed olive.
Y
IELD
: 3 C
UPS
(750 ML) S
PREAD
SLOPPY JOES
1 pound (450 g) boneless beef chuck 1 can (10-1/2 ounces or 300 g)
or stew meat chicken gumbo soup, undiluted
1 small onion, cubed 1/2tsp. (2 ml) salt
4 Tbsp. (60 ml) catsup 1/2 tsp. (2 ml) pepper
1 Tbsp. (15 ml) prepared mustard
Put meat through Grinder using the Fine Disc. Brown in a skillet. Using the Coarse Disc,
grind the onion. Add meat together with all remaining ingredients. Cook for 30 minutes
on medium heat. Serve on hamburger rolls.
Y
IELD
: 3 C
UPS
HAM SALAD
2 cups (500 ml) cooked ham 1/3 cup (75 ml) mayonnaise
2 sweet or dill pickles 1 tsp. (5 ml) prepared mustard
1/4 medium onion
Put ham, pickles, and onion through Grinder using Fine Disc. Mix well with
remaining ingredients.
Y
IELD
: 2-1/2 C
UPS
(675 ML)
Page 12

12
MAIN DISHES
SALISBURY STEAK
2 pounds (1 Kg) boneless 1 tsp. (5 ml) salt
chuck roast, cubed 1/2 tsp. (2 ml) pepper
1 medium onion 1/2 tsp. (2 ml) garlic
1 stalk celery 1 can (15 ounces or 425 g)
1/2 large green pepper tomato sauce with celery
1 tsp. (5 ml) dry mustard and green pepper pieces
Using Fine Grinding Disc of Grinder, grind meat, onion, celery, and green pepper.
Add seasoning and mix thoroughly. Form into 8 patties and sear over high heat to
brown. Reduce heat and cook 10 minutes. Pour over tomato sauce, cover and simmer
20 minutes. Remove cover and simmer 10 minutes longer to thicken sauce.
Serve with rice, if desired.
Y
IELD
: 8 S
ERVINGS
MEAT LOAF
6 slices bread 1 large carrot, cut in 1-inch
1 medium onion (2-cm) pieces
2 pounds (1 Kg) beef chuck 1 Tbsp. (15 ml) salt
2 pounds (1 Kg) pork shoulder 1cup (250 ml) milk
1/2 tsp. (2 ml) pepper 1 egg
Heat oven to 350°F (180°C). Grease 9" x 5" x 4" (23 x 13 x 11 cm) loaf pan.
Put bread and onion through Grinder using Coarse Disc. Put beef, pork, and carrot
through food grinder using Fine Disc. Add milk, egg, salt, and pepper and mix
thoroughly. Pack lightly into prepared pan. Bake for one hour. Serve either hot or cold.
Y
IELD
: 8 S
ERVINGS
Page 13

13
STUFFED MEAT LOAF
Meat Mixture:
5 slices fresh bread 1-1/2 tsp. (7 ml) salt
1 large onion, cut in eighths 1 tsp. (5 ml) nutmeg
2 pounds (1 Kg) boneless 1/2 tsp. (2 ml) pepper
beef chuck, cubed 1/2 cup (125 ml) milk
1 egg
Filling Mixture:
3 slices fresh bread 1/2 cup (125 ml) butter or margarine
3/4 cup (175 ml) celery pieces 1/2 cup (125 ml) crumbled blue cheese
2 large onions, cut in eighths 1 cup (250 ml) parsley sprigs
1 can (4 ounces or 110 ml)
mushroom pieces and stems,
drained
Heat oven to 425°F (220°C). Slightly grease a 9" x 13" (23 cm x 33 cm)
baking pan.
Put bread and onion through Grinder using Coarse Disc. Put meat through
food grinder
using Fine Disc. Lightly mix egg and milk and add to meat and crumb
mixture along with seasonings. Mix thoroughly. Grease a large sheet of heavy foil,
place the meat
mixture on it and pat it into an 8" x 12" (20 cm x 30 cm) rectangle.
Refrigerate while
preparing filling. Wash and dry grinder head thoroughly, then put
bread through meat
grinder using Coarse Disc. Set aside. Put celery, onions,
parsley, and mushrooms,
through food grinder using Coarse Disc. Melt butter in a
skillet and sauté vegetables
until golden. Add to bread crumbs. Add blue cheese and
mix well. Cool about 10 minutes.
Spread filling over meat and roll up jelly roll fashion.
Wrap loaf completely in foil and set in baking pan. Bake about 40 minutes then turn back
foil and bake about 20 minutes longer until nicely browned. Remove from foil with
two wide spatulas.
Y
IELD
: 6-8 S
ERVINGS
Page 14

14
CABBAGE ROLLS
(An Old Favorite)
8 cabbage leaves 1 onion
1 pound (454 g) beef 1 tsp. (5 ml) salt
1/2 pound (227 g) pork 1/2 tsp. (2 ml) pepper
6 saltines 1 egg
SAUCE:
1 can (1 pound or 450 g) tomatoes 1/2 tsp. (2 ml) salt
1/2 cup (125 ml) water dash powdered sage
1/2 tsp. (2 ml) sugar 1/2 bayleaf
Cook cabbage leaves in boiling, salted water for 2 minutes. Drain. Grind beef,
pork, saltines, and onion in Grinder using Fine Disc. Stir in egg and seasoning.
Place 3 Tbsp. (45 ml) of meat mixture on each leaf and roll. Fasten with toothpick.
Put in
large skillet and cover with tomato sauce. Cover skillet and simmer about one hour.
VARIATIONS: Scald 4 to 5 medium green peppers. Drain and stuff with meat mixture.
Stand upright in pan. Add sauce and proceed as above.
Y
IELD
: 8 S
ERVINGS
TURKISH MEAT BALLS
1 slice dry bread 2 eggs
1 medium onion 1 Tbsp. (15 ml) dried mint leaves
1 cup (250 ml) parsley sprigs 1-1/2 tsp. (7 ml) salt
1 pound (454 g) lamb shoulder, cubed 1/2 tsp. (1 ml) pepper
1 pound (454 g) lean beef chuck, cubed olive oil
Put bread, onion, and parsley through Grinder using Coarse Disc. Put lamb and beef
through Food Grinder using Fine Disc. Add remaining ingredients except olive oil and
mix well. Form into 30 meatballs about the size of golf balls. Place on broiler rack and
brush with olive oil. Broil about 4 inches (10 cm) from the heat until meat is desired
doneness, turning to brown all sides. Serve on a bed of cooked, cracked wheat with
yogurt or sour cream.
Y
IELD
: 6 S
ERVINGS
Page 15

15
CONFETTI CASSEROLE
(A Convenient Do-Ahead Dish)
4 Tbsp. (60 ml) 2 Tbsp. (30 ml) oil
buttered toast crumbs 1/2tsp. (2 ml) salt
1-1/2 pounds (680 g) beef stew meat dash pepper
1 medium diced onion 1 egg, beaten
1 cup (250 ml) cream style corn 1/2 cup (125 ml) green pepper, diced
2 tomatoes, sliced
Butter 2 slices of toast. Put through Grinder using Fine Disc. Set aside to be used later.
Grind the meat and onions using the Fine Disc. Brown the meat, onions, and pepper
with the oil in a skillet. Remove from heat. Add seasonings and egg and mix well.
Put half the corn in a greased 1-1/2 quart (1-1/2 liter) casserole. Add half the meat,
mixture, then a layer of sliced tomatoes. Add the remaining corn, meat, and tomatoes.
Top with the buttered crumbs. Bake 35 to 40 minutes at 350°F (180°C).
Y
IELD
: 4 S
ERVINGS
NOTE: Casserole may be prepared ahead, such as the day before,
and baked the next day.
SPANISH RICE
(A 1-Hour Casserole from Start to Finish)
1/2 pound (225 g) beef stew meat, 1 can (28 ounces or 800 g)
cut into cubes whole tomatoes, drain and
1 medium onion, quartered reserve liquid
1 medium green pepper, 1-1/2 tsp. (7 ml) salt
cut into strips 1/2 tsp. (2 ml) garlic salt
1 cup (250 ml) cheddar cheese cubes 1/2 tsp. (2 ml) oregano
(about 6 ounces or 170 g) 1/4 tsp. (1 ml) pepper
1-1/2 cups (375 ml) quick-cooking rice
Put meat through Grinder using the Fine Disc. In a skillet brown well.
Using the Coarse Disc, grind onion, green pepper, cheese, and drained tomatoes.
In a 3-quart (3 liter) oven-proof casserole combine all ingredients including
tomato juice. Cover and bake in a preheated 350°F (180°C) oven 45 minutes.
Uncover and bake an additional 15 minutes.
Y
IELD
: 4-6 S
ERVINGS
Page 16

16
MAIN DISHES
HASH
2 cups (500 ml) cooked potatoes 1/4 tsp. (1 ml) pepper
2 cups (500 ml) cooked beef 4 Tbsp. (60 ml) butter
1 small onion 1 cup (250 ml) brown gravy, or
1 tsp. (5 ml) salt 1 cup (250 ml) light cream
Put the beef, potatoes, and onion through Grinder using the Coarse Disc.
Add seasonings and gravy or cream. Mix well. Melt butter in large skillet and
cook hash over low heat about 20 minutes.
V
ARIATION
: REDF
LANNELHASH
Grind 1 to 2 cups (250-500 ml) cooked beets or carrots along with potatoes and beef.
About 5 minutes before removing from heat, make 6 depressions in hash with
large spoon. Fill each depression with 1 egg. Cover pan and continue cooking
about 4 to 5 minutes or until eggs are cooked.
Y
IELD
: 4-6 S
ERVINGS
HOMEMADE SAUSAGE
COUNTRY PORK SAUSAGE
1/2-1 tsp. (2-5 ml) red pepper 2 tsp. (10 ml) dried sage
(cayenne) 8 pounds (4 Kg) boneless pork butt
3 Tbsp. (45 ml) salt or pork shoulder, cut into 1-1/2-inch
2 tsp. (10 ml) black pepper (4-cm) cubes
Sprinkle combined seasonings over meat cubes in a large bowl. Toss until well coated.
Grind with desired grinding disc and stuff into casings or shape into patties.
Freeze in meal-size portions.
OLD-WORLD ITALIAN SAUSAGE
2 tsp. (10 ml) salt 1 tsp. (5 ml) red pepper (cayenne)
1 tsp. (5 ml) black pepper
(optional)
4 tsp. (20 ml) fennel seeds 8pounds (4 Kg) boneless pork butt
4 tsp. (20 ml) oregano or pork shoulder, cut into
1 tsp. (5 ml) garlic powder 1-1/2-inch (4-cm) cubes
Sprinkle combined seasonings over meat cubes in a large bowl. Toss until well coated.
Grind with desired grinding disc. Shape into patties. Freeze in meal-size portions.
Page 17

17
HUNTER’S VENISON SAUSAGE PATTIES
2 Tbsp. (30 ml) salt 4pounds (Kg) boneless venison or beef,
2 tsp. (10 ml) coarsely cut into 1-1/2-inch (4-cm) cubes
ground black pepper 4 pounds (Kg) boneless pork butt
3/4 tsp. (7 ml) mace or pork shoulder, cut into 1-1/2-inch
1/4 tsp. (1 ml) nutmeg (4-cm) cubes
1/4 tsp. (1 ml) cloves 1/2 tsp. (2 ml) garlic powder
1/2 tsp. (2 ml) allspice
Sprinkle combined seasonings over meat cubes in a large bowl. Toss until well coated.
Grind with desired grinding disc. Shape into patties. Or, grind with desired grinding disc
and stuff into casings. Freeze in meal-size portions.
GARLIC SAUSAGE
1 small onion, quartered 1tsp. (5 ml) black pepper
2 pounds (1 Kg) boneless 1 tsp. (5 ml) sage
pork shoulder, cut into 1/2 tsp. (2 ml) thyme
1-1/2-inch (4 cm) cubes 1/4tsp. (1 ml) ground nutmeg
1/4 pound (100 g) pork fat, 1/4 tsp. (1 ml) ground ginger
cut into 1-1/2-inch (4-cm) cubes 4cloves garlic, minced
2 tsp. (10 ml) salt 1/8 tsp. (.5 ml) ground allspice
Grind onion with Coarse Disc into large bowl. Add meat, fat, and seasonings.
Toss until well coated. Grind with Coarse Disc and stuff into casings or shape
into patties. Cook or freeze in meal-size portions.
Y
IELD
: 2-1/2 P
OUNDS
(1.25 KG)
INDIANA FARM SAUSAGE
2 small onions, cut into 2 Tbsp. (30 ml) sage
1-1/2-inch (4-cm) cubes 1 Tbsp. (15 ml) cayenne pepper
1 Tbsp. (15 ml) butter or margarine 2 Tbsp. (10 ml) salt
3 pounds (1.5 Kg) lean 1-1/2 tsp. (7 ml) chili powder
boneless pork butt, cut 1-1/2 tsp. (7 ml) marjoram
into 1-1/2-inch (4-cm) cubes 1-1/2 tsp. (7 ml) thyme
1 pound (450 g) pork fat, 1/2tsp. (2 ml) garlic powder
cut into 1-1/2-inch (4-cm) cubes
Grind onions with Coarse Disc and sauté in pan with butter. Combine onions, meat, fat
and seasonings in large bowl. Toss until well coated. Grind with Coarse Disc and stuff
into casings or shape into patties. Cook or freeze in meal-size portions.
Y
IELD
: 4 P
OUNDS(KG
)
Page 18

18
ITALIAN PARMESAN SAUSAGE
4 pounds (Kg) boneless 2 tsp. (10 ml) cayenne pepper
pork butt or shoulder, cut 1-1/2 tsp. (7 ml) salt
into 1-1/2 inch (4 cm) cubes 1 tsp. (5 ml) black pepper
1-1/2 cups (375 ml) grated 1Tbsp. (15 ml) water
Parmesan cheese 1/4 cup (50 ml) finely chopped parsley
Combine all ingredients, except water, into large bowl. Toss with water to coat meat.
Grind with Coarse Disc and stuff into casings or shape into patties. Cook or freeze in
meal-size portions.
Y
IELD
: 4 P
OUNDS(KG
)
BRATWURST
8-1/2 tsp. salt 1 tsp. garlic salt
5 tsp. black pepper 1 tsp. mustard seed
2-1/2 tsp. grated nutmeg 2-1/2 tsp. mace
8-1/2 pounds veal and pork
(We suggest about 6 pounds
pork to 2-1/2 pounds veal)
Sprinkle combined seasonings over meat cubes in a large bowl. Toss until well coated.
Grind with desired grinding disc and stuff into casings.
RELISHES
ONION RELISH
14 medium-sized onions 4 cups (1 liter) white vinegar
6 green peppers, seeded 3 cups (750 ml) sugar
6 fresh or 3 dried hot peppers 2 Tbsp. (30 ml) salt
Grind onions and peppers in Grinder using Coarse Disc. Cover with boiling water
and let stand for 5 minutes. Drain well. Heat vinegar, sugar, and salt in large
saucepan until sugar is dissolved, stirring occasionally. Add vegetables.
Bring to boil and simmer 15 minutes. Pour into hot canning jars and seal.
Process 15 minutes in a boiling water bath.
Y
IELD
: 3 P
INTS
(1-1/2 L
ITERS
)
RAW CRANBERRY RELISH
4 cups (1 liter) cranberries 2 cups (500 ml) sugar
1 large orange, cut in eighths
Put cranberries and orange through Grinder using Coarse Disc. Add sugar and stir well.
Cover and allow to stand at room temperature about one hour before serving.
Y
IELD
: 4 C
UPS
(1 L
ITER
)
Page 19

19
FALL RELISH
8 cups (2 liters) peeled ripe tomatoes 3 tsp. (45 ml) salt
1/2 cup (125 ml) brown sugar 2 cups (500 ml) sliced onion
1/2 cup (125 ml) white sugar 1 cup (250 ml) green pepper
1-1/2 cups (375 ml) cider vinegar 1/2 cup (125 ml) sweet red pepper
1 tsp. (5 ml) celery seed 2 cups (500 ml) unpeeled apples
1 tsp. (5 ml) mustard seed 1 tsp. (5 ml) whole cloves
2 cinnamon sticks
Put the tomatoes, onion, and peppers through Grinder using the Coarse Disc.
Cook together until thick. Use the Coarse Disc to grind the apples. Add to the cooked mixture.
Tie the cinnamon and cloves in a cloth bag and add. Cook the combined mixture again
until thick. Add the remaining ingredients and continue cooking until thick. Pack in hot
canning jars. Process 15 minutes in a boiling water bath.
Y
IELD
: A
BOUT
8 P
INTS
(4 L
ITERS
)
MISCELLANEOUS RECIPES
LIVER DUMPLINGS
6 cups (1-1/2 liters) water 1 egg
6 beef bouillon cubes 3 Tbsp. (45 ml) all-purpose flour
5 slices bread 1-1/2 tsp. (7 ml) salt
1 pound (454 g) liver, 1/4 tsp. (1 ml) pepper
membrane removed 1/2 tsp. (2 ml) nutmeg
1 medium onion 1/2 tsp. (2 ml) marjoram
1 cup (250 ml) parsley sprigs
In 3-quart (3 liter) saucepan heat water and bouillon cubes. Using Fine Grinding Disc,
grind bread, liver, onion, and parsley. Add egg, flour, and seasonings. Mix well.
Drop from tablespoon into boiling beef broth. Simmer about 10 minutes.
Y
IELD
: 4-6 S
ERVINGS
STRAWBERRY-RHUBARB JAM
2 thick stalks rhubarb, about 1/4 tsp. (1 ml) salt
18 inches or 450 cm long 1 package (1-3/4 ounce or 48 g)
1 quart (1 liter) strawberries, powdered fruit pectin
hulled and washed 5-1/2 cups (1.35 liters) sugar
2 Tbsp. (30 ml) lemon juice
Place large saucepan under Grinder head. Using Coarse Disc, grind rhubarb and
strawberries. Add lemon juice, salt, and pectin. Cook and stir until boiling. Add sugar.
Stirring constantly boil 1 minute. Turn off heat source. Stir and skim 5 minutes.
Ladle into hot canning jars, leaving 1/2 inch (1.2 cm) headspace.
Seal and process in simmering water bath 10 minutes.
YIELD: 6 PINTS (3 LITERS)
Page 20

20
POTATO KUGEL
4 cups (1 liter) raw potatoes 1-1/2 tsp. (7 ml) salt
(about 4 medium potatoes) 1/4 tsp. (1 ml) pepper
6 sprigs parsley, stems removed 4Tbsp. (60 ml) melted butter
1 large onion, quartered 1/3 cup (75 ml) flour
3 eggs
Put potatoes, parsley, and onion through Grinder using Fine Disc. Rinse in colander
to remove excess potato starch. Drain well. Beat eggs, add seasonings, flour, and
melted butter. Beat until smooth. Mix batter thoroughly with well-drained potatoes
and turn into greased 1-1/2-quart (1-1/2 liters) casserole. Bake at 350°F (180°C)
for 1 hour or until brown. Serve hot.
Y
IELD
: 6-8 S
ERVINGS
.
NOTE: If a more coarse texture is desired, use Coarse Disc.
YOU CAN REFER TO THE DIAGRAM BELOW TO
BETTER HELP YOU USE YOUR FOOD GRINDER
Food Grinder Body
Clamp Ring
Clamp Ring
Feed Screw
2 Washers
I
n order to enhance and improve the performance of your Oster
®
Meat/Food Grinder,
we have provided you with flat washers. You only need to apply two to the drive-end shaft
on your feed screw. The extra two washers are provided in the event any are misplaced.
Please refer to the above diagram for proper usage.
Page 21

21
1-YEAR LIMITED WARRANTY
Sunbeam Products Inc. warrants to the original purchaser, subject to the limitations and exclusions
set forth below, that this product shall be free, in all material respects, of mechanical and electrical
defects in material and workmanship from the date of purchase for one year. This warranty does not
cover normal wear of parts or damage resulting from any of the following: negligent use or misuse
of the product, use on improper voltage or current, use contrary to operating instructions or
disassembly, repair or alteration by any person other than an authorized service center.
Our obligation hereunder is limited to repair or replacement, at manufacturer’s option, of the
product during the warranty period, provided that the product, along with the model number and
original dated proof of purchase, is sent postage prepaid, directly to the following address:
For products purchased in the United States:
SUNBEAM APPLIANCE SERVICE STATION
Attention: Service Department
117 Central Industrial Row
Purvis, MS 39475
For products purchased in Canada:
SUNBEAM APPLIANCE SERVICE STATION (KND)
Attention: Service Department
Please call 1-800-667-8623
consumeraffairs@consumer.sunbeam.com
Do not return this product to the place of purchase or to the manufacturer; doing so may delay the
processing of your warranty claim.
Answers to questions regarding this warranty or for your nearest authorized service location may be
obtained by calling toll-free 1-800-597-5978 or by writing to Sunbeam – Consumer Affairs, at P.O.
Box 948389, Maitland, FL 32794-8389. Answers to questions regarding this warranty or for your
nearest Canadian authorized service location may be obtained by calling toll-free in Canada
1-800-667-8623. For warranty information or for an authorized service location outside of the
United States and Canada, please see the warranty service card inserted in the product packaging.
DISCLAIMER
Product repair or replacement as provided under this warranty is your exclusive remedy.
SUNBEAM PRODUCTS, INC. SHALL NOT BE LIABLE FOR ANY INCIDENTAL OR
CONSEQUENTIAL DAMAGES FOR BREACH OF ANY EXPRESS OR IMPLIED
WARRANTY ON THIS PRODUCT OR ANY PART THEREOF. EXCEPT TO THE EXTENT
PROHIBITED BY APPLICABLE LAW, SUNBEAM PRODUCTS, INC. DISCLAIMS ANY
IMPLIED WARRANTY OF MERCHANTABILITY OR FITNESS FOR A PARTICULAR
PURPOSE OF THIS PRODUCT OR ANY PART THEREOF. Some states and provinces
do not allow the exclusion or limitation of incidental or consequential damages, or allow
limitations on how long an implied warranty lasts, so the above limitations or exclusions
may not apply to you. This warranty gives you specific legal rights, and you may also have
other rights, which vary from State to State or Province to Province.
Page 22

22
IIl est important d’observer un certain nombre de règles de sécurité élémentaires pendant
l’utilisation de tout appareil électrique:
• LISEZ TOUTES LES DIRECTIVES.
• Pour vous protéger des risques d’électrocution, ne plongez jamais l’appareil dans l’eau
ou tout autre liquide.
• Faites particulièrement attention lorsque l’appareil est utilisé par, ou en présence
d’enfants.
• Débrancher l’appareil lorsqu’il n’est pas utilisé, avant d’y placer ou y retirer des pièces
et avant de le nettoyer.
• Éviter de toucher les parties amovibles. Ne jamais ajouter de nourriture avec les mains.
Toujours utiliser le poussoir.
• Ne pas se servir des doigts pour écarter la nourriture du disque de recharge d’aliments
lorsque lappareil fonctionne. Des blessures comme des coupures peuvent se produire.
• Ne pas faire fonctionner l’appareil dont le fil ou la fiche est endommagé ou après que
qu’il ait mal fonctionné, qu’il ait été échappé ou endommagé d’une façon quelconque.
Retourner l’appareil au Centre de Service Autorisé le plus près aux fins d’inspection,
de réparation, de réglage électrique ou mécanique.
• L’utilisation d’accessoires non conseillés ou vendus par le fabricant présente des
risques d’incendie, d’électrocution ou de blessure.
• Ne pas utiliser à l’extérieur
• Ne pas laisser le cordon pendre du rebord de la table ou du plan de travail ni entrer
au contact de surfaces chaudes.
• Ne jamais laisser le hachoir à viande et à nourriture en marche sans surveillance.
• Si le moteur cale, l’arrêter immédiatement et débrancher l’appareil. Pour éviter des
blessures, ôter d’abord la tête du broyeur puis démonter et enlever les pièces entravées.
PRODUITS ACHETÉS AUX ÉTATS-UNIS ET AU CANADA UNIQUEMENT
Pour réduire le risque de choc électrique, cet appareil est doté d’une fiche polarisée
(une broche est plus large que l’autre). Cette fiche ne va que dans un sens seulement
sur
une prise de courant polarisée. Si la fiche ne s’enfonce pas complètement dans la prise,
la retourne et essayer de nouveau. Si elle ne s’adapte toujours pas à fond, consulter
un électricien qualifié. Veillez à respecter les mesures de securité de la prise polarisée.
“Le taux maximum indiqué sur le hachoir daliments est fonction de l’accessoire
qui supporte la plus grande charge. Les autres accessoires recommandés
peuvent supporter une puissance nettement inférieure.”
CET APPAREIL EST PRÉVU POUR USAGE MÉNAGER UNIQUEMENT
PRÉCAUTIONS IMPORTANTES
CONSERVER CES INSTRUCTIONS
Page 23

23
INSTRUCTIONS D’ASSEMBLAGE
COMMENT ASSEMBLER LA TÊTE DU HACHOIR
Avant l’assemblage, lubriquer l’axe de la vis d’avance avec de l’huile végétale
(légèrement, afin d’éviter qu’un excès d’huile ne pénètre dans l’intérieur du broyeur).
R
EMARQUE:
Toujours maintenir le hachoir comme
indiqué, afin que les éléments se mettent
correctement en place pour pouvoir
fonctionner sans problème.
1. Placer la vis d’avance dans le corps du hachoir.
2. Placer la lame tranchante à quatre doigts à l’extrémité de la vis d’avance. La lame
tranchante dispose d’un trou central avec un coté rond et un coté carré. Positionner
la lame tranchante de façon à ce que le trou carré soit en face de la vis d’avance.
3. Glisser ensuite le disque pour hacher – pour hachage épais ou fin selon le besoin.
Tourner le disque jusqu’à ce que les “oreilles” carrées sur le côté se positionnent dans
les deux coches sur le rebord du disque de broyage.
R
EMARQUE
:
Le disque dépassera
légèrement sur le coté du corps du hachoir, jusqu’à ce que l’anneau de retenue soit
fermement vissé.
Lame
Tranchante
Disque pour
Hacher
Corps du
Hachoir
Vis
d’Avance
Page 24

24
Anneau de
Retenue
Poussoir à
Nourriture
Clé
Disque pour
Hacher Finement
Disque pour
Hacher
Grossièrement
➔
INSTRUCTIONS D’ASSEMBLAGE
4. Visser l’anneau de retenue enfilé. Il devra être extrêmement serré de façon à ce qu’aucune
parcelle de viande ne se loge entre la lame et le disque pour entraver le broyage.
5. Une clé est incluse pour libérer les anneaux de retenue trop serrés. Simplement
positionner la clé sur l’anneau de retenue et tourner à l’inverse des aiguilles d’une montre.
COMMENT METTRE EN PLACE LA TÊTE DU HACHOIR
1. Débrancher le cordon électrique.
2. Libérer la poignée sur le Coté de l’Appareil et
insérer la tête du hachoir dans l’ouverture.
Maintenir une légère pression pour que la Tête du
Hachoir reste en place. Tourner la tête du hachoir
(1) vers la gauche jusqu’à la position présentée,
puis vers la droite (2) jusqu’à la position
présentée et enfin revenez vers le centre (3).
Cette procédure permet au Hachoir de se
positionner correctement avec un claquement.
3. Bien resserrer la poignée.
4. Mettre l’appareil sur ON (Marche) et placer
la Nourriture dans le réservoir à nourriture.
Utiliser le poussoir à nourriture pour Guider
la Nourriture dans la vis.
➀
➁
➂
Page 25

25
NETTOYAGE
Tous les éléments doivent être nettoyés de façon à ce qu’ils se positionnent bien ensemble
et puissent couper efficacement.
La tête du hachoir peut être complètement désassemblée pour être nettoyée en
inversant les étapes 2, 3, et 4 de la section “Comment attacher la tête du hachoir” sur
les pages 23 et 24. Une clé est fournie pour libérer un anneau de retenue trop serré.
Pour cela, relier la clé à l’anneau et tourner à l’inverse des aiguilles d’une montre.
Laver les parties du hachoir dans de l’eau chaude et savonneuse, rincer et soigneusement
sécher. Ne mettre aucun des éléments dans le lave-vaisselle. Utiliser une brosse
pour ôter la nourriture des recoins des disques pour hacher et le réservoir à aliments.
IMPORTANT:
Après nettoyage, bien sécher la lame tranchante et les disques pour hacher
avec un chiffon propre. Laisser sécher une nuit entière. Emballer hermétiquement dans un
plastique ou du papier aluminium pour protéger le disque de l’humidité. Nettoyer l’appareil
avec un chiffon humide. Ne pas immerger.
LUBRIFICATION
Il n’est pas nécessaire de lubrifier les parties internes. Tout autre service devra être pris
en charge par un service agréé.
CONSEILS POUR BIEN HACHER LA NOURRITURE
• Toutes les parties du Hachoir devront être bien serrées. Si elles sont mal
assemblées, des morceaux de nourriture se logeront entre les éléments et entravereront
le fonctionnement du hachoir. Si cela se produit, il sera nécessaire de débrancher
l’appareil, d’ôter la tête du Hachoir, de la mettre de côté, de nettoyer tous les morceaux
de nourriture et d’effectuer un réassemblage. Soyez sûrs de suivre l’étape 4 de la section
“Comment Assembler la Tête du Hachoir,” Page 24.
• Avant de hacher, vérifier que la nourriture ne contient ni fragments d’os,
ni coquilles de noix et autres objets durs.
• Toujours mettre EN MARCHE l’appareil avant d’insérer la nourriture.
• Couper la nourriture en petites lamelles ou morceaux un peu plus petits que l’ouverture
située dans le hachoir. La plupart des aliments entreront aisément dans le hachoir.
Dans le cas où il est nécessaire de pousser, n’utiliser que le poussoir fourni.
Ne jamais pousser la nourriture avec les mains.
•
Remplir le hachoir lentement en répartissant bien. Les viandes noix devront être
incorporées 6 à 8 à la fois. Séparer le pain en 6 ou 8 morceaux et le mettre dans l’ouverture.
Ne pas utiliser le poussoir avec la chapelure ou les viandes n
oix.
Elles se positionneront par elles-mêmes.
• Pour la chapelure, n’utiliser le disque pour un hachage grossier, à moins que la recette
ne précise disque fin.
• C’est normal qu’une petite quantité d’aliments reste dans la tête du hachoir,
après l’opération de hachage. Pour ôter cette nourriture, couper un pain en huit
morceaux et les faire tomber lentement dans la tête du hachoir. Dès que le pain
apparait au niveau de la surface de coupe, éteindre l’appareil.
Page 26

26
FABRICATION DE SAUCISSE
REDÉCOUVRIR LES SAUCISSES FAIT MAISON AVEC
LA
MACHINE À FAIRE LES SAUCISSES
Cet appareil est destiné à une utilisation domestique uniquement.
Vous pouvez maintenant profiter de la fraîcheur de bonnes saucisses faites maison,
préparées chez vous, rapidement et facilement. Il vous suffit d’utiliser de la viande fraîche
de porc, bœuf, veau ou de gibier, des herbes fraîches et des épices pour reproduire les
SAVEURS ANCIENNES des saucisses campagnardes faites à la maison.
Fabriquer vos propres saucisses vous permet de servir un produit de haute qualité,
sans colorants ou agents de conservations.
Avant de commencer . . . RAPPELEZ-VOUS DE:
1. Toujours utiliser de la viande fraîche pour une meilleure qualité, saveur et comestibilité
2. Vérifier bien que tous les bols, ustensiles et équipement en contact avec la viande sont
propres et hygiéniques.
3. NE JAMAIS laisser la viande atteindre la température de la pièce. Travailler avec
de petites quantités et réfrigérer le restant de la viande jusqu’à utilisation,
afin d’éviter le développement de bactéries.
4. Pour une excellente saveur et une saucisse mœlleuse, toujours mettre dans votre
préparation environ 25% de gras pour 75% de viande.
PRÉPARATION DES BOYAUX NATURELS POUR LES FARCIR
Les boyaux naturels peuvent être achetés chez votre boucher. Dans de nombreux endroits,
ils devront être commandés d’avance et il vous faut donc planifier. Les boyaux sont
conservés dans le sel et doivent être trempés pendant environ une heure avant d’être farcis.
Couper les boyaux en une longueur de 4 pieds (1.5 m) pour manipulation et remplissage
aisés. Avant de mettre la farce, passer l’intérieur des boyaux à l’eau froide. Une fois la
saucisse faite et s’il reste des boyaux, saler à nouveau.
Tube à
Farce
Moyen
Petit
Tube
à Farce
Tube à
Farce
Large
Page 27

27
UTILISATION DU TUBE DE REMPLISSAGE
PETIT
tube à farce – Sert dans la fabrication des saucisses de porc ou de bœuf pour
le petit déjeuner et la saucisse de style méridional. Faites avec des boyaux naturels
demouton (taille d’environ 5 à 10 pouces ou 21 à 25 mm).
Tube à farce
MOYEN
– Utilisé pour la saucisse fermière, telle que polonaise, italienne,
bratwurst, de gibier, chorizo, etc., ainsi que des sausages sans peau.* Utiliser avec
des boyaux naturels de porc (d’une taille d’environ 1 à 1,25 pouces ou 25 à 30 mm).
LARGE
tube à farce – Utilisé pour faire de grandes saucisses sans peau* ou pour remplir
des boyaux plus larges.
Rendement pour Saucisse Farcie:
Boyaux de Mouton – des boyaux de 4 pieds (1,2 m) de long donnent environ 1-1/2 livres
(675 g) de saucisse farcie.
Boyaux de porc - des boyaux de 4 pieds de long (1,2 m) donnent environ 2-1/2 livres
(1 Kg) de saucisse farcie.
SAUCISSES EN CHAPELET SANS BOYAUX
Si souhaité, il est possible de préparer des saucisses en chapelet sans boyaux.
Préparer le réservoir de nourriture du hachoir selon les étapes 1 ou 2 (voir Page 28),
à l’aide uniquement du disque pour hacher grossièrement ou finement. Placer la viande
dans le réservoir, avec le poussoir comme guide. Pincer les saucisses aux longueurs
voulues. Remarque : Pour une manipulation plus facile, arrêter le moteur lorsque la
saucisse atteint une longueur de 6 pouces et la pincer en deux parties. Faire revenir
des deux cotés et servir. Des chapelets non cuits peuvent être congelés sur une plaque
à biscuits jusqu’à durcissement et enveloppés dans des sachets pour congélation.
Lorsqu’ils sont prêts à être utilisés, les faire revenir saucisses congelés et servir.
COMMENT ASSEMBLER L’APPAREIL À FAIRE DES SAUCISSES
1. Pour un bon assemblage, toujours maintenir le réservoir de hachage tel que présenté.
Placer la vis d’avance dans le réservoir.
2. Placer la lame tranchante à l’extrémité de la vis d’avance. R
EMARQUE
: si la lame
tranchante possède un trou central avec un coté rond et un autre carré, placer la lame
de façon à ce que le trou carré soit en face de la vis d’avance. Les lames tranchantes
avec un trou central carré de chaque côté peuvent être reliées à l’un ou l’autre des côtés
de la vis d’avance.
3. Placer le disque souhaité au-dessus de la lame tranchante. Le disque est bien mis
en place lorsque les ‘’oreilles’’ carrées sont positionnées dans les coches sur le rebord
du corps du hachoir.
4. Sélectionner le tube à farce requis pour l’opération de fabrication de saucisses et placer
l’extrémité large sur le disque pour hacher. Glisser l’anneau de retenue sur l’ensemble
et visser l’anneau jusqu’à ce qu’il soit complètement serré.
5. Relier l’assemblage terminé à l’appareil en suivant les instruction Pages 24 et 25. Pour
démonter en but de nettoyer ou de changer les tubes, inverser les étapes jusqu’à 5.
Page 28

28
PROCÉDURES DE BASE DE REMPLISSAGE DE LA SAUCISSE
MÉTHODE EN 1 ETAPE:Pour les saucisses avec boyaux – hacher et effectuer
le remplissage aisément en une étape.
1. Couper la viande en morceaux de 1-1/2 à 2 pouces (3 cm - 5 cm) pour qu’elle puisse
tenir dans le compartiment du hachoir.
2. Placer la viande dans un large bol ou une surface plane propre. Saupoudrer sur la viande
votre assaisonnement préféré. Ajouter de l’eau si indiqué.
3. Mélanger délicatement les morceaux de viande avec l’assaisonnement.
Utiliser des cullères en plastique ou en métal pour bien répartir.
4. Assembler le compartiment comme présenté, avec le tube à farce et le disque
pour hacher choisis.
5.
Protéger l’intérieur du tube à farce avec de l’huile végétale et glisser les boyaux dans le tube.
6.
Enlever une pouce de boyaux du tube avant de remplir. Serrer le bout avec une corde solide.
7. Mettre le moteur en marche et remplir le compartiment avec les morceaux de viande
assaisonnés avec une légère pression du poussoir.
8. Alors que la saucisse pénètre dans les boyaux, maintenir légèrement l’extrémité du boyau
et relâcher pour laisser défiler.
9. Remplir en continu, mais pas trop. Si vous souhaitez fabriquer des saucisses chapelet,
laisser assez de place pour tourner ou ligaturer entre chaque lien.
MÉTHODE EN 2 ÉTAPES: Pour les saucisses avec boyaux – Hacher complètement
la viande, puis en farcir les boyaux. Cela permet une bonne répartition du gras,
du maigre et des épices.
1. Suivre les étapes 1 à 3 de la méthode en 1 étape.
2.
Assembler le compartiment à aliments (voir les Instructions d’Assemblage Pages 23 et 24).
Ne plus tenir compte du tube à farce. Hacher directement dans un bol.
Désassembler le compartiment à nourriture.
3. Lancer le moteur et remplir l’ouverture du compartiment avec de la viande coupées en dés
en effectuant une légère pression sur le poussoir. Lorsque toute la viande est hachée . . .
4.
Réassembler le compartiment avec la vis d’avance, le disque pour hacher et le tube à farce
souhaités. Assembler en suivant les instructions pour la méthode en 1 étape ci-dessus.
5.
Protéger l’intérieur du tube à farce avec de l’huile végétale et glisser les boyaux dans le tube.
6. Ôter 1 pouce de boyaux du tube avant de remplir. Serrer le bout avec une corde solide.
7. Mettre le moteur en route et remplir le compartiment avec les morceaux de viande
assaisonnés avec une légère pression du poussoir.
8. Alors que la saucisse pénètre dans les boyaux, maintenir légèrement l’extrémité
du boyau et relâcher pour laisser défiler.
9. Remplir en continu mais pas trop. Si vous souhaitez des saucisses chapelet,
laisser assez de place pour tourner ou ligaturer entre chaque lien.
Page 29

29
CONSERVATION DES SAUCISSES FRAÎCHES
Les saucisses fraîches doivent être réfrigérées immédiatement après avoir été farcies.
Si les saucisses doivent être conservées plus de 2 ou 3 jours dans le réfrigérateur,
elle devront être congelées et mises dans des sachets de congélation appropriés.
Les portions congelées seront utilisées en une fois. Indiquer sur chaque portion
et avec un marqueur indélébile la date et le type de saucisse. Toujours consulter votre
livre de recettes de congélation favori pour les temps de conservation recommandés.
CUIRE VOTRE SAUCISSE
Méthode de cCuisson Vapeur – Mettre la saucisse fraîche ou congelée dans
une casserole, ajouter 2 à 4 Cu. à soupe (30 ml - 60 ml) d’eau par livre. Couvrir et laisser
frémir 8 à 10 minutes à feu moyen ou doux. Enlever le couvercle. Laisser l’eau s’évaporer
et la saucisse brunir de façon uniforme. LAISSER DANS L’EAU JUSQU’À CE QUE
BIEN CUIT.
Méthode de Cuisson Gril ou Friture – Placer la saucisse fraîche sur une grille
ou une poêle. Cuire à feu doux, retourner souvent. BIEN FAIRE CUIRE
APPROXIMATIVEMENT 20 MINUTES.
Page 30

30
HORS D’OEUVRES
Les recettes suivantes ne représentent qu’un échantillon de ce que vous pouvez créer à l’aide
du compartiment à nourriture et de l’appareil à fabriquer des saucisses. Vous trouverez
de nombreuses recettes dans vos livres de recettes qui concernent les aliments hachés.
Il est également amusant d’expérimenter avec vos propres recettes. Joyeuses recettes!
BOULETTES DE VIANDE SUÉDOISES
1 oignon moyen coupé en quart 4 cu. à thé (20 ml) de sel
2 cu. à table (30 ml) de beurre une pincée de poivre
1 livre (450 g) d’épaule de bœuf 1/2 cu. à thé (2 ml) de noix muscade
de en morceaux 6 Cu. à soupe (90 ml) de beurre
1 livre (450 g) d’épaule de porc, en dés 2 Cu. à soupe (30 ml) de farine
3 morceaux de pain sec 1 tasse (250 ml) de crème
1 tasse (250 ml)de bouillon de poulet 3 tasses (750 ml) de lait
1/2 cu. à thé (2 ml) d’aneth 4 œufs
Mélanger l’oignon en morceaux et le faire cuire dans le beurre ramolli. Mettre en alternance
la viande et le pain dans le hachoir avec le disque pour hacher finement. Mélanger la viande,
les oignons cuits, le lait, les œufs, le sel, le poivre et la noix de muscade dans un large bol.
Mélanger très bien au moins 10 minutes avec un batteur électrique. Laisser refroidir pendant deux
heures. Façonner en petites boulettes et faire revenir dans le beurre restant. Placer sur un plat à
service chaud. Mélanger la crème, le bouillon de poulet et la farine et ajouter à la casserole en
mélangeant bien. Faire chauffer jusqu’à épaississement. Ajouter l’aneth, bien mélanger et verser
sur les boulettes de viande.
F
AIT DE6 À
8 P
ORTIONS
FOIE COUPÉ EN MORCEAUX
1 oignon moyen coupé en quart 1 cu. à thé (5 ml) de sel
4 Cu. à soupe (60 ml) de gras 1/2 cu. à thé (2 ml) de poivre
de poulet fondu 1 Cu. à soupe (15 ml) de vin rouge
1/2 livre (225 g) de foie de poulet 2 œufs durs
Faire sauter les oignons et les foies de poulet dans le gras de poulet jusqu’à ce que les foies
soient tendres. Mettre les foies, les oignons et les blancs d’œufs dans le hachoir avec le disque
pour hacher finement. Ajouter l’assaisonnement et le vin et bien mélanger pour former une pâte
lisse. Émietter les jaunes d’œufs et utiliser pour la décoration.
F
AIT
1-1/2 T
ASSE
(375 ML)
PÂTÉ DE FOIE ET BACON
1 livre (450 g) de bacon, cuit 1/4 cu. à thé (1 ml) de poivre
1/2 livre (225 g) de foie, cuit une pincée de cayenne
1/2 cu. à thé (2 ml) de sel 1/2 tasse (125 ml) de crème
Hacher le bacon et foie dans le hachoir à l’aide du disque pour hacher fin.
Ajouter les ingrédients restants et bien mélanger.
F
AIT
2 T
ASSES
(500 ML)
Page 31

31
TARTINADES POUR SANDWICH
SANDWICHES GOLDEN EGG
6 œufs durs, épluchés 2 Cu. à soupe (30 ml) de mayonnaise
1 petit oignon 1 cu. à thé (5 ml) de vinaigre
1 boîte (7 onces ou 200 g) 1 cu. à thé (5 ml) de sauce Worcestershire
de viande froide, une pincée de sel d’ail
coupée en morceaux Pains à hamburger, ouverts en deux
1/2 livre (225 ml) de fromage,
coupée en morceaux
Mettre les œufs, l’oignon, la viande et le fromage dans le hachoir, en alternant les ingrédients,
avec le disque pour hacher grossièrement. Mélanger tous les ingrédients restants.
Tartiner2à4 cu. à table (30 - 60 ml) de mélange sur les moitiés de hamburgers.
Griller 4 pouces (10 cm) sur le feu jusqu’à ce que les hamburgers soient dorés
et que leur dessus fasse des bulles. Garnir avec une tranche d’olive farcie.
F
AIT
3 T
ASSES
(750 ML) DEP
ÂTE ÀTARTINER
“SLOPPY JOES”
1 livre (450 g) de viande de bœuf désossée 1 boîte de soupe au poulet gombo,
de bloc d’épaule ou de ragoûtnon diluée (10-1/2 onces ou 300 g)
1 petit oignon, coupé en morceaux 1/2 cu. à thé (2 ml) de sel
4 Cu. à soupe (60 ml) de ketchup 1/2 cu. à thé (2 ml) de poivre préparée
1 Cu. à soupe (15 ml) de moutarde
Hacher la viande en utilisant le disque pour hacher finement. Faire revenir dans une poêle.
À l’aide du disque pour hacher grossièrement, hacher l’oignon. Ajouter la viande en même
temps que tous les ingrédients restants. Cuire à chaleur moyenne pendant 30 minutes.
Servir sur des pains hamburgers.
F
AIT
3 T
ASSES
SALADE DE JAMBON
2 tasses (500 ml) de jambon cuit 1/3 tasse (75 ml) de mayonnaise
2 cornichons doux ou à l’aneth 1 cu. à thé (5 ml) de moutarde préparée
1/4 oignon moyen
Hacher le jambon, les cornichons et l’oignon avec le disque à hacher finement.
Bien mélanger avec les ingrédients qui restent.
F
AIT
2-1/2 T
ASSES
(675 ML)
Page 32

32
PLATS PRINCIPAUX
STEAK SALISBURY
2 livres (1 Kg) de rôti 1 cu. à thé (5 ml) de sel
coupé en dés 1/2 cu. à thé (2 ml) de poivre
1 oignon moyen 1/2 cu. à thé (2 ml) d’ail.
1 branche de céleri 1boîte (15 onces ou 425 g)
1/2 gros poivron vert de sauce tomate avec morceaux
1 cu. à thé (5 ml) de moutarde sèche de céleri et de poivron vert
À l’aide du disque pour hacher finement, hacher la viande, l’oignon, le céleri et le poivron vert.
Ajouter l’assaisonnement et bien mélanger. Façonner en 8 galettes et faire revenir à forte chaleur.
Réduire la chaleur et cuire 10 minutes. Verser dessus la sauce tomate, couvrir et laisser
mijoter 20 minutes. Ôter le couvercle et laisser cuire 10 minutes de plus pour épaissir
la sauce. Si souhaité, servir avec du riz.
F
AIT
8 P
ORTIONS
PAIN DE VIANDE
6 tranches de pain 1 grosse carotte, coupée en morceaux
1 oignon moyen de 1 pouce (2 cm)
2 livres (1 Kg) de bloc d’épaule de bœuf 1 Cu. à soupe (15 ml) de sel
2 livres (1 Kg) d’épaule de porc 1 tasse (250 ml) de lait
1/2 cu. à thé (2 ml) de poivre 1 œuf
Préchauffer le four à 350°F (180°C). Graisser un moule à cake de 9" x 5" x 4"
(23 x 13 x 11 cm). Hacher le pain et l’oignon à l’aide du disque pour hacher
grossièrement. Hacher le bœuf, le porc et la carotte avec le disque pour hacher finement.
Ajouter le lait, l’œuf, le sel et le poivre et bien mélanger. Répartir dans le moule préparé.
Cuire pendant une heure. Servir chaud ou froid.
F
AIT
8 P
ORTIONS
Page 33

33
PAIN DE VIANDE FARCI
Mélange à Viande:
5 tranches de pain frais 1-1/2 cu. à thé (7 ml) de sel
1 oignon large, coupé en huit 1 cu. à thé (5 ml) de noix de muscade
2 livres (1 Kg) de bloc d’épaule de bœuf 1/2 cu. à thé (2 ml) de poivre
désossée, coupé en dés 1/2 tasse (125 ml) de lait
1 œuf
Pour la Farce:
3 tranches de pain frais 1/2 tasse (125 ml) de beurre ou de margarine
3/4 tasse (175 ml) de morceaux de céleri 1/2 tasse (125 ml) de fromage bleu émietté
2 oignons large, coupé en huit 1 tasse (250 ml) de persil en branches
1 boîte (4 onces ou 110 ml) de morceaux
et de pieds de champignons égouttés
Graisser légèrement un moule à cuisson de 9" x 13" (23 cm x 33 cm). Hacher la viande
à l’aide du disque pour hacher finement. Mélanger légèrement l’œuf et le lait et les
ajouter à la farce de viande et de chapelure assaisonnée. Mélanger soigneusement.
Graisser une large plaque en métal résistant, y mettre le mélange de viande et en
fabriquer une galette de 8" x 12" (20 cm x 30 cm) de rectangle. La réfrigérer durant
la préparation de la farce. Nettoyer et sécher soigneusement la tête du hachoir,
puis hacher le pain avec le disque à hacher grossièrement. Mettre de coté.
Hacher céleri, oignons, persil et champignons avec le disque pour hacher
grossièrement. Faire fondre le beurre dans une poêle et faire sauter les légumes
jusqu’à ce qu’ils soit dorés. Ajouter la chapelure. Ajouter le fromage bleu et bien mélanger.
Laisser refroidir pendant environ 10 minutes. Répartir la farce sur la viande et rouler
à la façon d’un roulé à la confiture. Envelopper complètement le pain de viande dans
l’aluminium et le mettre dans le moule. Faire cuire environ 40 minutes puis retourner
le papier aluminium. Faire cuire environ 20 minutes de plus jusqu’à ce que le pain
de viande soit bien doré. Ôter le papier aluminium à l’aide de deux larges spatules.
F
AIT DE6 À
8 P
ORTIONS
Page 34

34
CHOUX FARCIS
(Recette à l’Ancienne)
8 feuilles de choux 1 oignon
1 livre (454 g) de bœuf 1 cu. à thé (5 ml) de sel
1/2 livre (227 g) de porc 1/2 cu. à thé (2 ml) de poivre
6 biscuits salés 1 œuf
SAUCE:
1 boîte (1 livre ou 450 g) de tomates 1/2 cu. à thé (2 ml) de sel
1/2 tasse (125 ml) d’eau une pincée de sauge en poudre
1/2 cu. à thé (2 ml) de sucre 1/2 feuille de laurier
Cuire les feuilles de choux dans de l’eau bouillante salée pendant 2 minutes. Égoutter.
Hacher le bœuf, le porc, les biscuits salés et l’oignon à l’aide du disque pour hacher
finement. Mélanger l’œuf et l’assaisonnement. Placer 3 Cu. à soupe (45 ml) du mélange
sur chacune des feuilles et rouler. Maintenir avec un cure-dent. Mettre dans une grande
poêle et recouvrir de sauce. Couvrir la poêle et faire mijoter environ 1 heure.
VARIANTE: Faire griller 4 à 5 poivrons verts moyens. Les vider et les farcir avec le mélange
à viande. Positionner à la verticale dans le moule. Ajouter la sauce et suivre les
instructions ci-dessus.
F
AIT
8 P
ORTIONS
BOULETTES DE VIANDE À LA TURQUE
1 tranche de pain sec 2 œufs
1 oignon moyen 1 c. à soupe (15 ml) de feuilles
1 tasse (250 ml) de persil en branches de menthe séchées
1 livre (454 g) d’épaule de mouton, 1-1/2 cu. à thé (7 ml) de sel
coupée en dés 1/2 cu. à thé (2 ml) de poivre
1 livre (454 g) de bloc d’épaule de bœuf, huile d’olive
coupé en dés
Hacher le pain, l’oignon et le persil avec le disque pour hacher grossièrement. Hacher le
mouton et le bœuf avec le disque pour hacher finement. Ajouter les ingrédients restants sauf
l’huile d’olive et bien mélanger. Fabriquer 30 boulettes de viande de la taille d’une balle de golf.
Placer sur une plaque à gril et badigeonner avec l’huile d’olive. Griller à environ 4 pouces
(10 cm) de la source de chaleur jusqu’à ce que la viande soit cuite comme souhaité,
la retourner pour cuire chacun des cotés. Servir sur un lit de gruaux de blé cuits
avec du yogourt ou de la crème sure.
F
AIT
6 P
ORTIONS
Page 35

35
CASSEROLE CONFETTI
(Plat Pouvant se Préparer à l’Avance)
4 Cu. à soupe (60 ml) 2 Cu. à soupe d’huile
de morceaux de toast beurrés 1/2 cu. à thé (2 ml) de sel
1-1/2 livres (680 g) de ragoût de bœuf pincée de poivre
1 oignon moyen émincé 1 œuf battu
1 tasse (250 ml) de maïs crème 1/2 tasse (125 ml) de poivron vert, émincé
2 tomates en tranches
Beurrer 2 toasts. Les hacher avec le disque pour hacher finement. Mettre de coté pour
utilisation ultérieure. Hacher la viande et les oignons avec le disque à hacher finement.
Faire revenir la viande, les oignons et le poivron avec l’huile dans une poêle. Ôter du feu.
Ajouter l’assaisonnement, puis l’œuf et bien mélanger. Mettre la moitié du maïs dans une
cocotte huilée de 1-1/2 litre. Ajouter la moitié du mélange de viande, puis une couche de
tomates en tranches. Ajouter le maïs restant, la viande et les tomates. Saupoudrer de la
chapelure faite à partir des toasts. Cuire de 35 à 40 minutes à 350°F (180°C).
N
OTE: Cette recette à la cocotte peut être préparée à l’avance, par exemple la veille et cuite
le jour suivant.
F
AIT
4 P
ORTIONS
RIZÀL’ESPAGNOLE
(Temps de Préparation et de Cuisson: 1 Heure)
1/2 livre (225 g) de bœuf à ragoût, 1 boîte (28 onces ou 800 g)
1 oignon moyen, coupé en quart coupé en dés de tomates entières,
1 poivron vert moyen, égouttées coupé en lamelles
et dont le jus est mis de coté 1-1/2 cu. à thé (7 ml) de sel
1 tasse (250 ml) de fromage cheddar 1/2 cu. à thé (2 ml) de sel d’ail
(environ 6 en dés onces ou 170 g) 1/2 cu. à thé (2 ml) d’origan
1-1/2 tasse (375 ml) de riz cuisson rapide 1/4 cu. à thé (1 ml) de poivre
Hacher la viande à l’aide du disque pour hacher finement. Faire bien revenir dans une poêle.
Avec le disque pour hacher grossièrement, hacher l’oignon, le poivron vert, le fromage
et les tomates égouttées. Dans un plat de 3 pintes (3 litres) allant au four, combiner tous
les ingrédients y compris le jus de tomate. Couvrir et faire cuire dans un four préchauffé
à 350°F (180°C) pendant 45 minutes.
Découvrir et faire cuire 15 minutes de plus.
F
AIT DE4 À
6 P
ORTIONS
Page 36

36
PLATS PRINCIPAUX
FRICASSÉE
2 tasses (500 ml) de pommes de terre cuites 1/4 cu. à thé (1 ml) de poivre
2 tasses (500 ml) de bœuf cuit 4 Cu. à soupe (60 ml) de beurre
1 petit oignon 1 tasse (250 ml) de fond
1 cu. à thé (5 ml) de sel 1 tasse (250 ml) de crème légère
Hacher le bœuf, les pommes de terre et l’oignon avec le disque pour hacher grossièrement.
Ajouter l’assaisonnement et le fond ou la crème. Bien mélanger. Faire fondre le beurre dans
une large poêle et cuire la fricassée à feu doux pendant 20 minutes.
VARIANTE:Fricassée “Red Flannel”
Hacher 1 à 2 tasses (250 - 500 ml) de betteraves cuites ou de carottes en plus des pommes
de terre et du bœuf. Environ 5 minutes avant d’ôter du feu, créer 6 cratères dans la fricassée
avec une large cullière. Remplir chaque cratère avec 1 œuf. Couvrir la casserole et laisser cuire
de 4 à 5 minutes ou jusqu’à ce que les œufs soient cuits.
F
AIT DE4 À
6 P
ORTIONS
SAUCISSE FAITE MAISON
SAUCISSE DE PORC FERMIÈRE
1/2 – 1 cu. à thé (2 - 5 ml) de poivre 2 cu. à thé (10 ml) de sauge séchée
rouge (cayenne) 8 livres (4 Kg) de soc de porc
3 Cu. à soupe (45 ml) de sel ou d’épaule de porc coupée
2 cu. à thé (10 ml) de poivre noir en dés de 1-1/2 pouce (4 cm)
Dans un grand bol, saupoudrez les épices sur la viande coupée en dés. Bien mélanger.
Hacher avec le disque à hacher désiré et farcir les boyaux ou façonner des galettes.
Congeler en portions repas.
SAUCISSE ITALIENNE À L’ANCIENNE
2 cu. à thé (10 ml) de sel 1 cu. à thé (5 ml) (cayenne) [optionnel]
1 cu. à thé (5 ml) de poivre noir 8 livres (4 Kg) de soc de porc
4 cu. à thé (20 ml) de graines de fenouil ou d’épaule de porc coupée
4 cu. à thé (20 ml) d’origan en dés de 1-1/2 pouce (4 cm)
1 cu. à thé (5 ml) de poudre d’ail
Dans un grand bol, saupoudrer la viande en dés avec l’assaisonnement. Bien mélanger.
Hacher avec le disque souhaité. Façonner en galettes. Congeler en portions repas.
Page 37

37
GALETTES DE SAUCISSES “FAÇON CHASSEUR”
2 Cu. à soupe (30 ml) de sel 4 livres (2 Kg) de gibier ou de bœuf,
2 cu. à thé (10 ml) de poivre coupés en dés de 1-1/2 pouces (4 cm)
noir moulu 4 livres (4 Kg) de soc de porc
3/4 cu. à thé (7 ml) de macis ou d’épaule de porc coupée
1/4 cu. à thé (1 ml) de noix de muscade en dés de 1-1/2 pouces (4 cm)
1/4 cu. à thé (1 ml) de clous de girofles 1/2 cu. à thé (2 ml) de poudre d’ail
1/2 cu. à thé (2 ml) de piment de Jamaïque
Dans un grand bol, saupoudrer la viande en dés avec l’assaisonnement. Bien mélanger.
Hacher avec le disque souhaité. Façonner en galettes. Moudre avec le disque désiré
et en farcir les boyaux. Congeler en portions repas.
SAUCISSE À L’AIL
1 petit oignon, coupé en quart 1 cu. à thé (5 ml) de poivre
2 livres (1 Kg) d’épaule de porc 1 cu. à thé (5 ml) de sauge
désossé, coupé en 1/2 cu. à thé (2 ml) de thym
dés de 1-1/2 pouces (4 cm) 1/4 cu. à thé (1 ml) de noix de muscade moulue
1/4 livre (100 g) de gras de porc, 1/4 cu. à thé (1 ml) de gingembre moulu
coupé en dés de 1-1/2 pouces (4 cm) 4 gousses d’ail, émincées
2 cu. à thé (10 ml) de sel 1/8 cu. à thé (0,5 ml) de piment de jamaïque moulu
Dans un bol, hacher l’oignon avec le disque pour hacher grossièrement. Ajouter la viande,
le gras et l’assaisonnement. Mélanger jusqu’à ce que bien recouvert. Hacher avec le disque
pour hacher grossièrement et farcir les boyaux ou façonner en galettes. Cuire ou congeler
en portions repas.
F
AIT
: 2-1/2 L
IVRES
(1,25 KG)
SAUCISSE FERMIÈRE INDIANA
2 petits oignons, coupés en 2 Cu. à soupe (30 ml) de sauge
de 1-1/2 dés pouce (4 cm) 1 Cu. à soupe (15 ml) de poivre cayenne
1 Cu. à soupe (15 ml) de beurre 2 Cu. à soupe (30 ml) de sel
ou de margarine 1-1/2 cu. à thé (7 ml) de poudre de chili
3 livres (1,5 Kg) de soc de porc 1-1/2 cu. à thé (7 ml) de marjolaine
désossé, coupé en dés 1-1/2 cu. à thé (7 ml) de thym
de 1-1/2 pouces (4 cm) 1/2 cu. à thé (2 ml) de poudre d’ail
1/4 livre (100 g) de gras de porc,
coupé en dés de 1-1/2 pouces (4 cm)
Hacher les oignons avec le disque pour hacher grossièrement et les faire revenir dans la poêle
avec le beurre. Combiner oignons, viande, gras et assaisonnements dans un large bol.
Mélanger jusqu’à ce que bien recouvert. Hacher avec le disque pour hacher grossièrement
et farcir les boyaux ou façonner en galettes. Cuire ou congeler en portions repas.
F
AIT
: 4 L
IVRES
(2 KG)
Page 38

38
SAUCISSE ITALIENNE AU PARMESAN
4 livres (2 Kg) de soc de porc 2 cu. à thé (10 ml) de poivre cayenne
désossé, coupé en dés 1-1/2 cu. à thé (7 ml) de sel
de 1-1/2 pouces (4 cm) 1 cu. à thé (5 ml) de poivre noir
1-1/2 tasses (375 ml) de fromage 1 Cu. à soupe (15 ml) d’eau
Parmesan râpé 1/4 tasse (50 ml) de persil finement haché
Combiner tous les ingrédients, sauf l’eau dans un large bol. Mélanger avec l’eau jusqu’à ce
que bien recouvert. Hacher avec le disque pour hacher grossièrement et farcir les boyaux
ou façonner en galettes. Cuire ou congeler en portions repas.
F
AIT
: 4 L
IVRES
(2 KG)
BRATWURST
8 – 12 cu. à thé de sel 1 cu. à thé de sel d’ail
5 cu. à thé de poivre noir 1 cu. à thé de graine de moutarde
2-1/2 cu. à thé de noix de muscade 2-1/2 cu. à thé de macis
8-1/2 livres (3,8 g) de veau et de porc
(Nous vous conseillons d’employer environ 6 livres de porc et 2-1/2 livres [3,8 g] de veau).
Dans un grand bol, saupoudrer l’assaisonnement sur la viande en dés. Mélanger jusqu’à
ce que bien recouvert. Hacher avec le disque souhaité et farcir les boyaux.
CONDIMENTS
CONDIMENT À L’OIGNON
14 oignons de taille moyenne 4 tasses (1 litre) de vinaigre blanc
6 poivrons verts, épépinés 3 tasses (750 ml) de sucre
6 piments forts frais ou 3 piments forts séchés 2 Cu. à soupe (30 ml) de sel
Hacher les oignons et les piments à l’aide du disque pour hacher grossièrement.
Couvrir avec de l’eau bouillante et laisser reposer 5 minutes. Bien égoutter. Réchauffer
le vinaigre, le sucre et le sel dans une large casserole jusqu’à ce que le sucre soit fondu,
en remuant de temps en temps. Ajouter les légumes. Faire bouillir et mijoter 15 minutes.
Verserdans des bocaux de conserve chauds et sceller. Mettre 15 minutes au bain-marie.
D
ONNE
3 C
HOPINES
(1-1/2 L
ITRES
)
CONDIMENTS AUX CANNEBERGES CRUES
4 tasses (1 litre) de canneberges 2 tasses (500 ml) de sucre
1 grosse orange, en huit quarts
Hacher les canneberges et l’orange avec le disque pour hacher grossièrement.
Ajouter le sucre et bien mélanger. Couvrir et laisser reposer à la température
ambiante environ une heure avant de servir.
D
ONNE
4 T
ASSES
(1 L
ITRE
)
Page 39

39
CONDIMENT AUTOMNAL
8 tasses (2 litres) de tomates mures 3 cu. à thé (45 ml) de sel
1/2 tasse (125 ml) de sucre brun 2 tasses (500 ml) d’oignon en tranches
1/2 tasse (125 ml) de sucre blanc 1 tasse (250 ml) de poivron vert
1-1/2 tasses (375 ml) de vinaigre de cidre 1/2 tasse (125 ml) de poivron rouge doux
1 cu. à thé (5 ml) de graine de céleri 2 tasses (500 ml) de pommes non pelées
1 cu. à thé (5 ml) de graine de moutarde 1 cu. à thé (5 ml) de clous de girofle entiers
2 tiges de cannelle
Hacher les tomates, l’oignon et les poivrons à l’aide du disque pour hacher grossièrement.
Cuire ensemble jusqu’à épaississement. Hacher les pommes avec le disque pour hacher
grossièrement. Ajouter au mélange cuit. Mettre la cannelle et les clous de girofles dans un sac
en tissu et ajouter à la cuisson. Continuer à cuire jusqu’à épaississement. Ajouter le restant des
ingrédients et continuer à cuire jusqu’à épaississement. Mettre dans des bocaux de conserve
chauds. Placer 15 minutes au bain-marie.
D
ONNEENVIRON
8 C
HOPINES
(4 L
ITRES
)
RECETTES VARIÉES
BOULETTES VAPEUR AU FOIE
6 tasses (1-1/2 litres) d’eau 1 œuf
6 bouillon cubes de bœuf 3 Cu. à soupe (45 ml) de farine tout usage
5 tranches de pain 1-1/2 cu. à thé (7 ml) de sel
1 livre (454 g) de foie, 1/4 cu. à thé (1 ml) de poivron
dont la membrane est retirée 1/2 cu. à thé (2 ml) de noix de muscade
1 oignon de taille moyenne 1/2 cu. à thé (2 ml) de marjolaine
1 tasse (250 ml) de persil en branches
Dans une casserole de 3 pintes (3 litres), chauffer l’eau et les bouillon cubes. Utiliser le disque
pour hacher finement et hacher le pain, le foie, l’oignon et le persil. Ajouter œuf, farine et
assaisonnement. Bien mélanger. Avec une Cu. à soupe, jeter la pâte dans le bouillon de bœuf
en ébullition. Faire mijoter environ 10 minutes.
F
AIT DE4 À
6 P
ORTIONS
CONFITURE FRAISE-RHUBARBE
2 tiges épaisses de rhubarbe, d’environ 1/4 cu. à thé (1 ml) de sel
18 pouces ou 450 cm de long 1 paquet (1-3/4 onces ou 48 g)
1 pinte (1 litre) de fraises, de pectine de fruit en poudre
équeutées et lavées 5-1/2 tasses (1,35 L) de sucre
2 Cu. à soupe (30 ml) de jus de citron
Placer dans une grande casserole sous la tête du hachoir. Hacher la rhubarbe et les fraises avec
le disque pour hacher grossièrement. Ajouter le jus du citron, le sel et la pectine. Cuire et
mélanger jusqu’à ébullition. Ajouter le sucre. Remuer constamment et laisser bouillir une
minute. Éteindre le feu. Mélanger et écumer 5 minutes. Utiliser une louche et verser dans des
bocaux de conserve chauds, laisser 1/2 pouce (1,2 cm)
d’espace libre. Sceller et mettre au
bain-marie pendant 10 minutes.
D
ONNE
6 C
HOPINES
(3 L
ITRES
)
Page 40

40
POMMES DE TERRE KUGEL
4 tasses (1 litre) de pommes de terre crues 1-1/2 cu. à thé (7 ml) de sel
(environ 4 pommes de terre moyennes) 1/4 cu. à thé (1 ml) de poivron
6 branches de persil, sans tiges 4 Cu. à soupe (60 ml) de beurre fondu
1 oignon large, coupé en huit 1/3 tasse (75 ml) de farine
3 œufs
Hacher les pommes de terre, le persil et l’oignon avec le disque pour hacher finement.
Rincer dans la passoire pour ôter la fécule de pomme de terre en excès. Bien égoutter.
Battre les œufs, ajouter l’assaisonnement, la farine et le beurre fondu. Battre jusqu’à
l’obtention d’une mixture lisse. Mélanger la mixture avec les pommes de terre bien égouttées
et placer dans une cocotte graissée d’1-1/2 pintes (1-1/2 litres). Cuire à 350°F (180°C)
pendant 1 heure ou jusqu’à ce que cela soit doré. Servir chaud. Fait de 6 à 8 portions.
NOTE: Si vous souhaitez une texture plus épaisse, utiliser le disque pour hacher grossièrement.
VEUILLEZ-VOUS REPORTER AU DIAGRAMME CI-DESSUS
POUR
BIEN UTILISER L’APPAREIL.
Afin d’augmenter et d’améliorer la performance de votre Hachoir à Viande/Nourriture Oster,
®
nous vous fournissons des rondelles plates. Il vous faut simplement en placer deux à
l’extrémité de l’arbre de rotation sur la vis d’avance. Les deux autres rondelles
supplémentaires sont fournies en cas de perte.
Corps du Hachoir
Anneau de
Support
Anneau de Support
Vis d’Avance
2 Rondelles
Page 41

41
GARANTIE LIMITÉE 1 AN
Sunbeam Products Inc. garantit à l’acheteur initial, sous couvert des limitations et exclusions stipulées
ci-après, que ce produit est exempt, sous tous les aspects matériels, de tout défaut mécanique et électrique
de matériel ou de fabrication pendant un an à compter de la date d’achat. Cette garantit ne couvre pas l’usure
normale des pièces ni les dommages résultant des situations suivantes: usage négligent ou abusif du produit,
courant ou tension d’alimentation inadaptés, utilisation en contradiction avec le mode d’emploi ou démontage,
réparation ou modification par toute personne autre que le personnel d’un centre de réparation agréé.
Nos obligations dans le cadre de cette garantie se limitent à la réparation et au remplacement, au choix du
fabricant, du produit pendant la durée de la garantie, à condition que le produit soit renvoyé en port payé,
accompagné de son numéro de modèle et de l’original du justificatif d’achat daté, à l’adresse suivante:
Produits achetés aux États-Unis:
SUNBEAM APPLIANCE SERVICE STATION
Attention: Service Department
117 Central Industrial Row
Purvis, MS 39475
Produits achetés au Canada:
SUNBEAM APPLIANCE SERVICE STATION (KND)
Attention: Service Department
Please call 1-800-667-8623
consumeraffairs@consumer.sunbeam. com
Ne pas renvoyer l’appareil au revendeur ou au fabricant; ceci aurait pour effet de retarder le traitement de la
demande de garantie.
Pour toute question relative à cette garantie ou pour obtenir l’adresse du centre de réparation agréé le plus
proche, appeler sans frais le 1-800-597-5978 ou écrire à Sunbeam – Consumer Affairs, P.O. Box 948389,
Maitland, FL 32794-8389.
Au Canada, pour toute question relative à cette garantie ou pour obtenir l’adresse du centre de réparation agréé
canadien le plus proche, appeler sans frais le 1-800-667-8623. Pour toutes questions relatives à cette garantie
ou
pour obtenir l’adresse du centre de réparation agréé le plus proche en-dehors des États-Unis
et du Canada,
consulter la carte de service de la garantie jointe à l’emballage du produit.
AVERTISSEMENT
La réparation ou le remplacement du produit suivant les termes de cette garantie constituent votre unique
recours.
SUNBEAM PRODUCTS, INC. NE POURRA ÊTRE TENUE RESPONSABLE DE DOMMAGES
ACCESSOIRES OU INDIRECTS POUR RUPTURE D’UNE QUELCONQUE GARANTIE EXPRESSE OU
IMPLICITE CONCERNANT CE PRODUIT OU UNE PARTIE DE CE PRODUIT. DANS LES LIMITES DE
LA RÉGLEMENTATION EN VIGUEUR, SUNBEAM PRODUCTS, INC. N’OFFRE AUCUNE GARANTIE
I
MPLICITE QUANT À L’ADÉQUATION DE CE PRODUIT OU D’UNE PARTIE DE CE PRODUIT À UN
USAGE PARTICULIER OU À LA COMMERCIALISATION. Certains états ou provinces n’autorisant pas
l’exclusion ou la limitation des dommages accessoires ou indirects ou autorisant uniquement des limitations
sur la durée de validité d’une garantie implicite, les limitations et exclusions ci-dessus peuvent ne pas
s’appliquer à votre situation. Cette garantie vous accorde des droits juridiques particuliers et il est possible que
vous ayez d’autres droits, différents d’un état ou d’une province à l’autre.
Page 42

42
NOTES
Page 43

43
NOTES
Page 44

©1998 Sunbeam Corporation or its affiliated companies. All rights reserved.
Oster®is a registered trademark of Sunbeam Corporation or its affiliated companies.
Distributed by Sunbeam Products Inc., Delray Beach, Florida 33445, or an affiliated company.
©1998 Sunbeam Corporation ou ses sociétés affiliées. Tous droits réservés.
Oster®est une marque déposée de Sunbeam Corporation ou de ses sociétés affiliées.
Distribué par Sunbeam Products Inc., Delray Beach, Florida 33445, ou une société affiliée.
P.N. 27747-098
 Loading...