

Page 1

INSTRUCTION MANUAL
Orion® VersaGo E-Series Altazimuth Mount
#52587
Congratulations on your purchase of a quality Orion
product. The VersaGo E-Series Altazimuth Mount
is a sturdy and versatile single-arm mount designed
for use with spotting scopes, small telescopes and
binoculars. Its simple, lightweight design makes setting up and using the mount quick and easy. Whether
you’re exploring scenic daytime vistas or scanning the
night skies, you will nd yourself observing more and
fussing with equipment less when using the VersaGo
E-Series mount.
These instructions will help you set-up, properly use, and care for
your mount. Please read them over carefully before getting started.
Included Parts
Unpack all of the parts and lay them out in your workspace. Make
sure all the parts list below and shown in Figure 2 are present.
Save the shipping box and packaging material. In the unlikely
event that you need to return the mount, you must use the original
packaging. Initial assembly of the mount is easy and should take
only about 15 minutes.
Parts List
Open the backpack (A) and remove and identify all parts, using
the list below and Figure 1 for reference.
Included Parts
A – Tripod
B – Altazimuth arm
C –Accessory tray and leg brace
D – Micro-motion cables (short and long)
Assembly
1. Stand the tripod (A) upright and spread the legs apart a little.
Keep the tripod legs at their shortest (fully retracted) length for
now; you can extend them to a more desirable length later, after
the mount is fully assembled.
2. To attach the accessory tray (C), place a hooked tab on one of
the three corners of the tray over the screw in the leg collar, as
shown in Figure 3A. Connect the tray to the other two legs in
the same manner (3B), then tighten all three of the tray lock
knobs (3C) to secure the tray in place.
Providing Exceptional Consumer Optical Products Since 1975
Copyright © 2017 Orion Telescopes & Binoculars
All Rights Reserved. No part of this product instruction or any of its contents may be reproduced, copied,
modied or adapted, without the prior written consent of Orion Telescopes & Binoculars.
Figure 1. The fully assembled VersaGo E-Series Altazimuth Mount
3. Now you’ll install the altazimuth arm (B) onto the tripod. Remove
the azimuth tension knob and washer from the center shaft on
the bottom of the arm. Then place the base of the arm on the tripod’s mounting platform, inserting the center shaft into the hole
WARNING: Never look directly at the Sun through your
telescope—even for an instant—without a professionally
made solar lter that completely covers the front of
the instrument, or permanent eye damage could result.
Young children should use this telescope only with
adult supervision.
®
Customer Support:
www.OrionTelescopes.com/contactus
Corporate Offices:
89 Hangar Way, Watsonville CA 95076 – USA
IN 592 10/17
Page 2
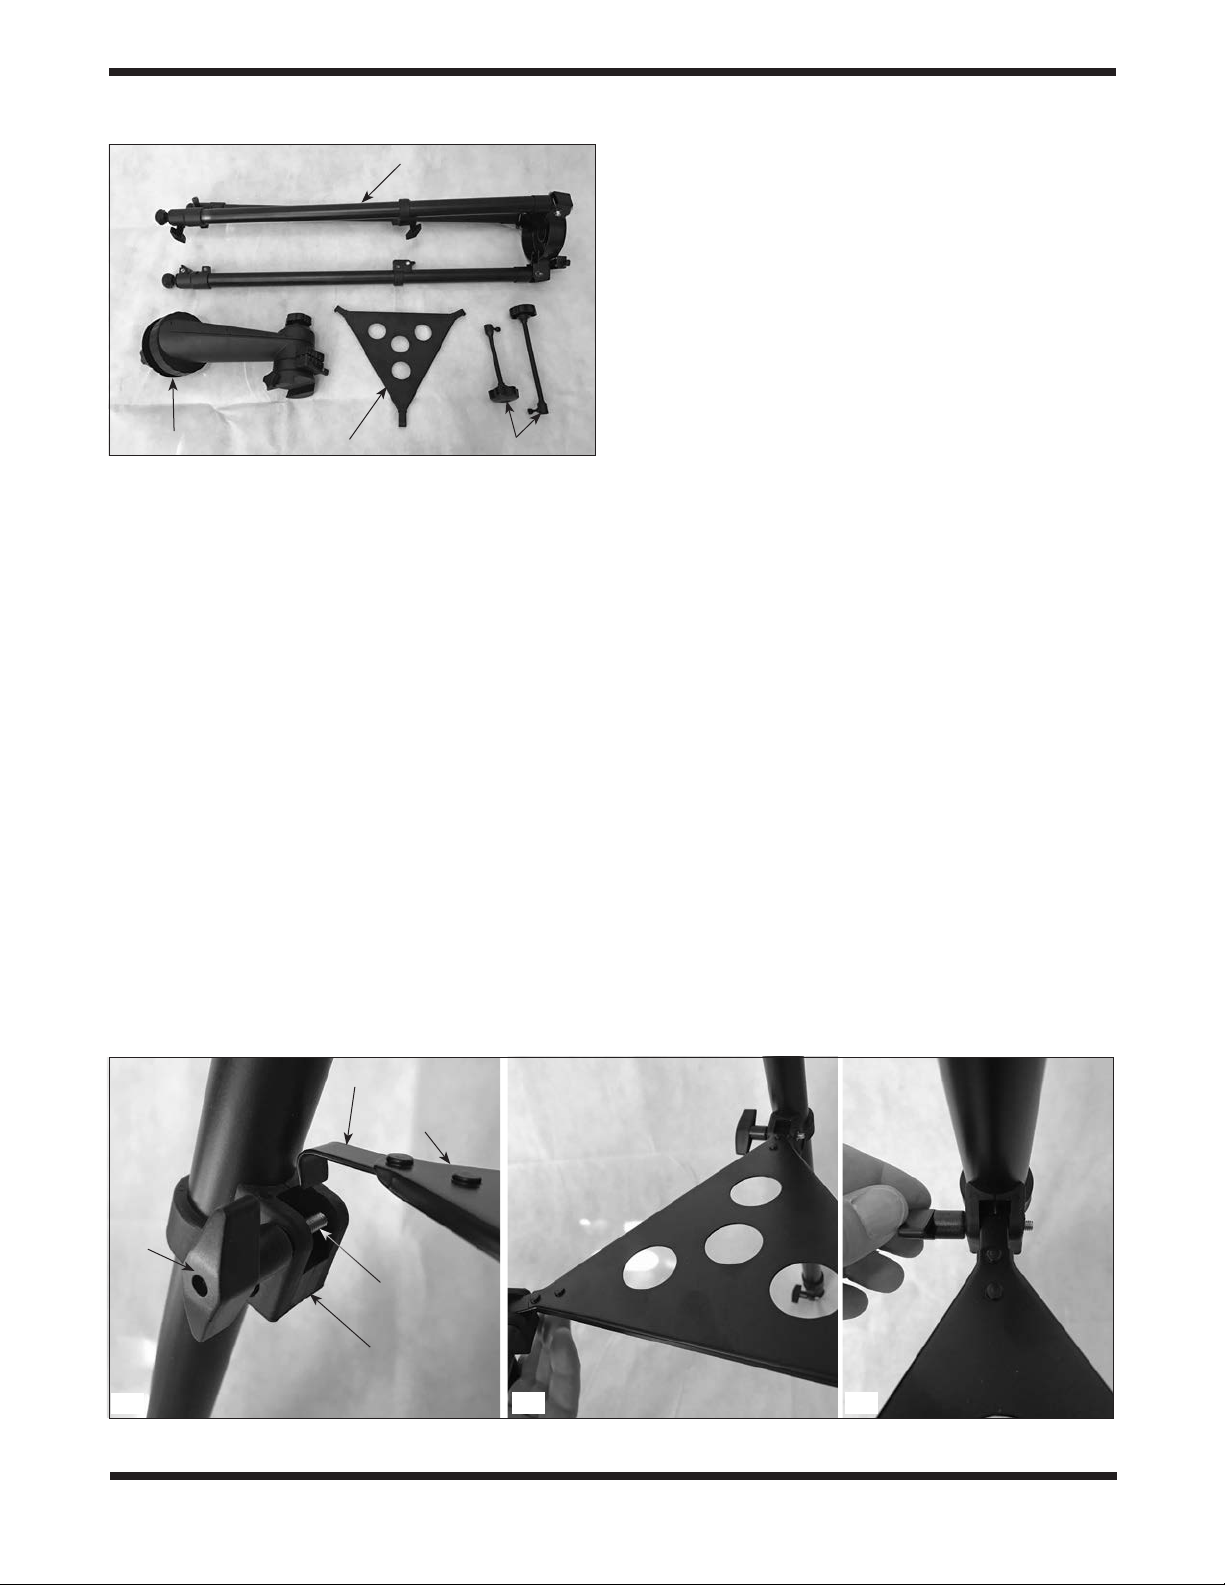
A
B
C
D
Figure 2. Included parts of the VersaGo E-Series Mount.
in the tripod’s mounting platform. Then replace the washer and azimuth tension knob to secure the arm in place
(Figure 4).
4. Attach the two micro-motion cables (D). The shorter of the
two is usually preferred for the altitude axis and the longer
one for the azimuth axis. Loosen the thumbscrew at the
end of the cable, then line up the cable end so that the
thumbscrew is over the at side of the axle on each axis
(Figure 5). Press the cable end over the axle, then tighten
the thumbscrew to secure the cable in place. The thumbscrew should protrude down into the dimple in the axle, to
insure that the cable will not slip off the axle.
The mount is now fully assembled and should look like Figure 1.
Attaching an Instrument to the VersaGo E-Series
Mount
The E-Series Altazimuth Mount features a dovetail mounting
saddle (Figure 6) that accommodates Vixen-style mounting
bars. Slide the dovetail bar attached to your instrument into
the saddle, then secure it in place by tightening the saddle
lock knob. Since the saddle is perpendicular to the ground,
some instruments may require that you purchase an optional L-bracket such as the Orion #5052 Dovetail L-Bracket for
VersaGo Telescope Mount to allow a more convenient upright
orientation of the instrument.
Using the VersaGo E-Series Mount
The VersaGo E-Series mount allows motion in two axes: altitude
(up and down) and azimuth (left and right). Hence, the VersaGo
E-Series is an “altazimuth” mount. To make coarse movements
of your instrument, loosen the azimuth tension knob and/or the
altitude tension knob (Figure 7) to slew the instrument to your
target. Then lightly retighten the knob(s). When set to the proper
tension – not too tight and not too loose -- you should be able to
move the instrument without having to adjust the tension knobs
each time. The friction will be sufficient to allow the instrument
to move but also to stay put when you let go of it to observe.
To make ner directional adjustments to the instrument, turn the
hand knobs on the micro-motion cables.
The azimuth axis is rotatable 360 degrees and the altitude axis
has 180 degrees of motion.
Tripod Height Adjustment
There is a leg extension segment on each tripod leg to allow
quick height adjustment. Simply loosen the winged leg lock
knobs half a turn or so, extend the leg to the desired length,
then retighten the winged knobs.
Tripod Feet
Note that at the bottom of each tripod leg is a rubber foot. If
desired, the foot can be retracted by rotating it clockwise to
expose a metal spike, when needed for extra grip on slippery
surfaces (Figure 8). If the spikes are not needed, rotate the
rubber foot counterclockwise until the spike is recessed in the
foot and no longer protruding.
Accessory Tray
The triangular accessory tray acts as a tripod leg brace as
well as a storage rack for 1.25" telescope eyepieces or accessories. The four holes in the tray accommodate the barrels of
1.25" accessories.
Care and Maintenance
If you give your VersaGo E-Series mount reasonable care, it
will last a lifetime. Store it in a clean, dry, dust-free place. Do
Hooked tab
Accessory
tray
Lock
knob
Screw
Leg
collar
A
B C
Figure 3. A) Hook the tray corner over the screw in the leg collar, B) Repeat for the other two legs, then C) Tighten all three tray lock knobs
2
Page 3

Altitude tension
knob
Washer
Azimuth
tension knob
Figure 4. Secure the altazimuth arm to the tripod with the washer
and azimuth tension knob.
Axle
Thumbscrew
Dimple
Altitude micromotion cable
Azimuth micromotion cable
Azimuth
tension knob
Figure 7. The mount has two large tension knobs and two
micro-motion cables to allow precise movement of your instrument.
Rubber foot
Micro-motion
cable
Figure 5. When attaching the micro-motion cables, make sure the
thumbscrew is directly over the dimple on the at side of the axle.
Saddle
Figure 6. The dovetail saddle allows secure attachment of your
instrument, or of an optional L-bracket.
Metal spike
Figure 8. Rotate the rubber feet to expose or hide metal spikes
for grip on slippery surfaces.
not store the mount outdoors, although keeping it in a garage
or shed is OK.
Specifications
Mount: Alt-azimuth
Azimuth range: 360 degrees
Altitude range: 180 degrees
Saddle: Vixen-style dovetail
Maximum load capacity: 11 lbs.
Height, legs extended: 57-1/4"
Height, legs retracted: 36"
3
Page 4

Dimensions collapsed: 37.5" x 9"
Assembled weight: 8 lbs. 5 oz.
One-Year Limited Warranty
This Orion product is warranted against defects in materials or workmanship for a period of one year from the date
of purchase. This warranty is for the benet of the original retail purchaser only. During this warranty period Orion
Telescopes & Binoculars will repair or replace, at Orion’s option, any warranted instrument that proves to be defective, provided it is returned postage paid. Proof of purchase (such as a copy of the original receipt) is required. This
This warranty does not apply if, in Orion’s judgment, the instrument has been abused, mishandled, or modied, nor
does it apply to normal wear and tear. This warranty gives you specic legal rights. It is not intended to remove or
restrict your other legal rights under applicable local consumer law; your state or national statutory consumer rights
For further warranty information, please visit www.OrionTelescopes.com/warranty.
Corporate Offices: 89 Hangar Way, Watsonville CA 95076 - USA
Customer Support: www.OrionTelescopes.com/contactus
All Rights Reserved. No part of this product instruction or any of its contents may be reproduced, copied, modified or adapted, without the prior
4
warranty is only valid in the country of purchase.
governing the sale of consumer goods remain fully applicable.
Orion® Telescopes & Binoculars
Copyright © 2017 Orion Telescopes & Binoculars
written consent of Orion Telescopes & Binoculars.
 Loading...