

Orion RC-5030, BuckEye Cam RC-5030 Owner's Manual

BuckEye Cam
TM
ORION
Wireless Scouting Camera System
Model RC-5030
Owner's Manual
Revision 3.6

WARRANTY REGISTRATION
ATSI warrants Products (BuckEye CamTM ) sold by it and guarantees to correct, by
repair or replacement at our option, any defects of material and workmanship which develop
under normal and proper use within six (6) months from the date of the original purchase
when inspection proves the fault to be of manufacturing. Circuit board components only
receive a twelve (12) month warranty. All such Products must be returned to our service
center, transportation charges prepaid. This warranty does not apply to any of our Products
which have been repaired or altered by unauthorized persons or service centers in any way so
as, in our judgment, to injure their stability or reliability, or which have been subject to
misuse, negligence, or accident or which have had their serial number altered, effaced or
removed.
We will not assume any expense or liability for repairs made by other parties without our
written consent. ATSI is not responsible for damage to any associated equipment or
apparatus, nor shall we be held liable for loss of profit or other special damages. There is no
other guarantee or warranty except as herein stated.
The Buyer, his employees, or others assumes all risks and liabilities for the operation, the use
and the misuse of the product described herein and agree to defend and to save the seller
harmless from any and all claims arising from any cause whatsoever, including seller’s
negligence for personal injury incurred in connection with the use of the said product.
ATSI reserves the right to discontinue models at any time or change specifications, price or
design without notice and without incurring any obligation.
The express warranties are in lieu of all other warranties, guarantees, promises, affirmations,
or representations, express or implied which would be deemed applicable to the goods sold
hereunder. No express warranties and no implied warranties, whether of merchantability,
fitness for any particular use or purpose, against infringement, or otherwise (except as to title)
other than those expressly set forth herein, shall apply.
FOR REPAIR, CONTACT US AT:
ATSI
8157 US Hwy 50 • Athens, OH 45701
(866) 325-8172 • (740) 592-2874
Fax (740) 594-2875
buckeyecam@buckeyecam.com
www.buckeyecam.com

1
Table of contents
1. Warnings...................................................................................................3
2. ORION Camera System Specifications....................................................4
3. User Manual Reference Chart...................................................................5
4. ORION Camera System Overview...........................................................6
4.1. Camera Controls...............................................................................9
5. Portable System Setup ...........................................................................12
5.1. Configuring Camera Unit as a Portable Base................................12
5.2. Registering Cameras to a Portable Base........................................13
5.3. Unregistering Camera from a Portable Base..................................14
5.4. Unregistering a Camera at the Camera..........................................15
5.5. Changing Time and Date...............................................................16
5.6. Changing Settings on the Camera..................................................16
5.7. Testing Signal Strength..................................................................24
5.8. Checking Battery Level..................................................................24
5.9. Taking a Test Picture.....................................................................25
5.10. Receiving Pictures from the Camera............................................26
6. PCBase System Setup.............................................................................27
6.1. Installing the PCBase Modem Driver............................................27
6.2. Installing the PCBase Software......................................................27
6.3. Launching the PCBase Software....................................................28
6.4. Adding a Camera............................................................................29
6.5. Controlling Camera from PCBase.................................................30
6.6. Changing Camera Settings.............................................................33
6.7. Changing PCBase Settings.............................................................33
6.8. Setting up PCBase to Email Pictures.............................................36
6.9. Setting up LiveCam........................................................................38
7. Stand-Alone Camera Setup.....................................................................40
7.1. Configuring Unit as a Stand-Alone Camera..................................40
7.2. Changing Settings on Stand-Alone Camera...................................40
7.3. Changing Time and Date...............................................................41
7.4. Switching Stand-Alone Camera to Wireless..................................41
7.5. Checking Battery Level..................................................................42
8. Repeater Function Description...............................................................43
8.1. Description.....................................................................................43
8.2. Setting and Changing Routing Path...............................................43
8.3. Communication Delay in Repeater Network.................................45
8.4. Viewing the Routing Structure on PCBase....................................46
8.5. Unregistering a Camera..................................................................46
9. Camera Operation and Maintenance.......................................................48
9.1. Saving Pictures to Memory Card at the Camera............................48
9.2. Replacing the Battery on the Camera.............................................49
9.3. Charging the Battery......................................................................50
ORION - Owner's Manual, Rev. 3.6

2
9.4. Capturing License Plate.................................................................50
9.5. Using the Optional Solar Charger..................................................51
9.6. Reading Firmware Version and Serial Number.............................51
9.7. Checking for Updates and Messages.............................................52
10. Troubleshooting....................................................................................54
11. Replacement Parts and Accessories......................................................56
12. How to Contact BuckEye Cam.............................................................57
Appendix A. Camera Display Character Set..............................................57
ORION - Owner's Manual, Rev. 3.6
1. Warnings 3
1. Warnings
WARNING: This equipment is approved only for mobile and
base station transmitting devices. Antenna(s) used for this
transmitter must be installed to provide a separation distance
of at least 30 cm from all persons and must not be co-located
or operating in conjunction with any other antenna or
transmitter.
Contains FCC ID: OUR-9XTEND
The enclosed device complies with Part 15 of the FCC Rules. Operation is
subject to the following two conditions: (i.) this device may not cause
harmful interference and (ii.) this device must accept any interference
received, including interference that may cause undesired operation.
If the camera is used with any antenna other than the portable
antenna supplied with the ORION Camera Unit or PCBase
Unit, the system may not comply with the FCC regulation Part
15.247, Operation within the license-free band 902 – 928
MHz. Contact manufacturer regarding use of optional highgain antennas with the ORION wireless camera system.
Contact information is listed in section 12 on page 56 of this
manual.
ORION - Owner's Manual, Rev. 3.6

4 2. ORION Camera System Specifications
2. ORION Camera System Specifications
Still picture resolution options 3.1 Mpixel (2048x1536)
1.3 Mpixel (1360x1016)
0.8 Mpixel (1024x768)
0.3 Mpixel (640x480)
Video resolution options VGA (640x480) 1 frame/second
QVGA (320x240) 3 frames/second
Video clip length 5 seconds to 60 seconds
Reaction speed
2
0.2 seconds
Stamps on the picture Date, Time, Temperature
Moon Phase, 4 custom text fields
Minimum delay between pictures
or video clips
1 sec. (0.3Mp)
5 sec. (0.8Mp)
10 sec. (1.3Mp)
15 sec. (3Mp)
Time lapse photography Yes
Camera scheduling Yes (for each day of week)
Additional settings Adjustable image compression
Reverse order file transfer
Burst mode
License Plate Mode
RF transmission range
3
+2 miles L.O.S.
Maximum number of cameras on
one base
30 (for Portable Base)
30 (for PCBase)
Transmission speed
4
Up to 3KB/sec
Transmission power 1W
Maximum allowed gain of the
antenna (including loss in cable)
5
6dBi
Memory Card SD-compatible card, 2GB max. Not
compatible with SDHC.
1
Specifications listed here are subject to change. New features may be
added. For firmware updates and instructions visit www.buckeyecam.com.
2
Time from the moment the motion is recognized by the sensor till the
moment the picture is captured
3
Transmission range will depend on the type of antenna used, elevation of
the antenna, and surrounding terrain. It can be reduced by trees, hills, and
other obstacles. On flat terrain without obstacles can exceed 5 miles.
4
Transmission speed will depend on the signal strength and amount of
interference at the receiver.
5
According to FCC Part 15.247 (1 watt intentional radiator employing 50
hopping channels).
ORION - Owner's Manual, Rev. 3.6
1
3. User Manual Reference Chart 5
3. User Manual Reference Chart
For information on how to configure and setup a ...
Portable System:
Refer to section 5 on
page 12:
“Portable System Setup”
PCBase system:
Refer to section 6 on
page 27:
“PCBase System Setup”
Stand-Alone Camera:
Refer to section 7 on page 40:
“Stand-Alone Camera Setup”
ORION - Owner's Manual, Rev. 3.6
Remote
Camera 1
Remote
Camera 2
Portable
Base
Pi
ct
u
re
s
P
i
c
t
u
r
e
s
Remote
Camera 1
Remote
Camera 2
P
i
c
t
u
r
e
s
P
i
c
t
u
r
e
s
PCBase
Stand-Alone
camera
Does no t t ran smit
pict ures!

6 4. ORION Camera System Overview
4. ORION Camera System Overview
The BuckEye Cam ORION camera system is the second generation of
BuckEye Cam wireless camera systems. Unlike most other
scouting/hunting cameras, the ORION system gives you the freedom of
retrieving pictures without visiting the camera site. The system includes
two types of units, the remote camera and the base unit. The remote
camera takes a picture immediately after it detects motion in front of it.
The pictures from remote cameras are transmitted to the base, where they
can be retrieved by the user. This way the user does not have to visit and
disturb the camera site.
The ORION camera system also offers customers the ability to change the
system configuration. Thus, one system with multiple cameras transmitting
to one base can be split by the customer into two systems with two bases.
A camera unit can be set up to operate in one of four modes:
• Stand-alone camera
In this mode, pictures are saved to the memory card at the camera. This mode
provides the longest battery life. Camera settings are changed though the
memory card.
• Wireless remote camera
In this mode, pictures are transmitted to a Portable Base or PCBase (computer
connected to a PCBase modem). Camera settings are changed from the base.
Camera must be registered to the base unit before it can transmit pictures.
• Portable Base (camera at the base is disabled)
In this mode the unit will receive pictures from multiple remote cameras. The
pictures are saved to the memory card at the base. Settings can be changed for
each individual camera through the memory card at the base. Up to 30 cameras
can be controlled from the base unit. The base is not taking pictures.
• Portable Base with Camera
This mode is the same as the one above except the base can also take pictures.
The settings for the base as well as settings for remote cameras can be changed
through the memory card. Up to 30 remote cameras can be registered to one
Portable Base.
The user can choose two types of bases:
• Portable Base (see above)
As was mentioned above, a camera unit can be set to receive pictures from other
remote cameras. Pictures are saved to the memory card in the Portable Base.
Camera settings are changed through the memory card from the base.
• PCBase
Pictures are transmitted directly to a computer. Pictures can be automatically
emailed to the user, or uploaded to a web site. Up to 30 cameras can be
registered to a PCBase.
A Portable Base is a camera unit configured to receive pictures from other
cameras. This configuration is done through the button interface on the
ORION - Owner's Manual, Rev. 3.6
4. ORION Camera System Overview 7
unit. At the Portable Base, the user can check the status of a battery on a
remote camera, tell the camera to take a picture, update camera settings on
any of the remote cameras.
A PCBase is software that is running on a computer and communicating
with remote cameras through a PCBase modem. Unlike a Portable Base, a
PCBase gives the user an easy access to all the camera controls and
settings. With one click of a button the user can check the battery level on
a remote camera and can quickly change settings without going outside.
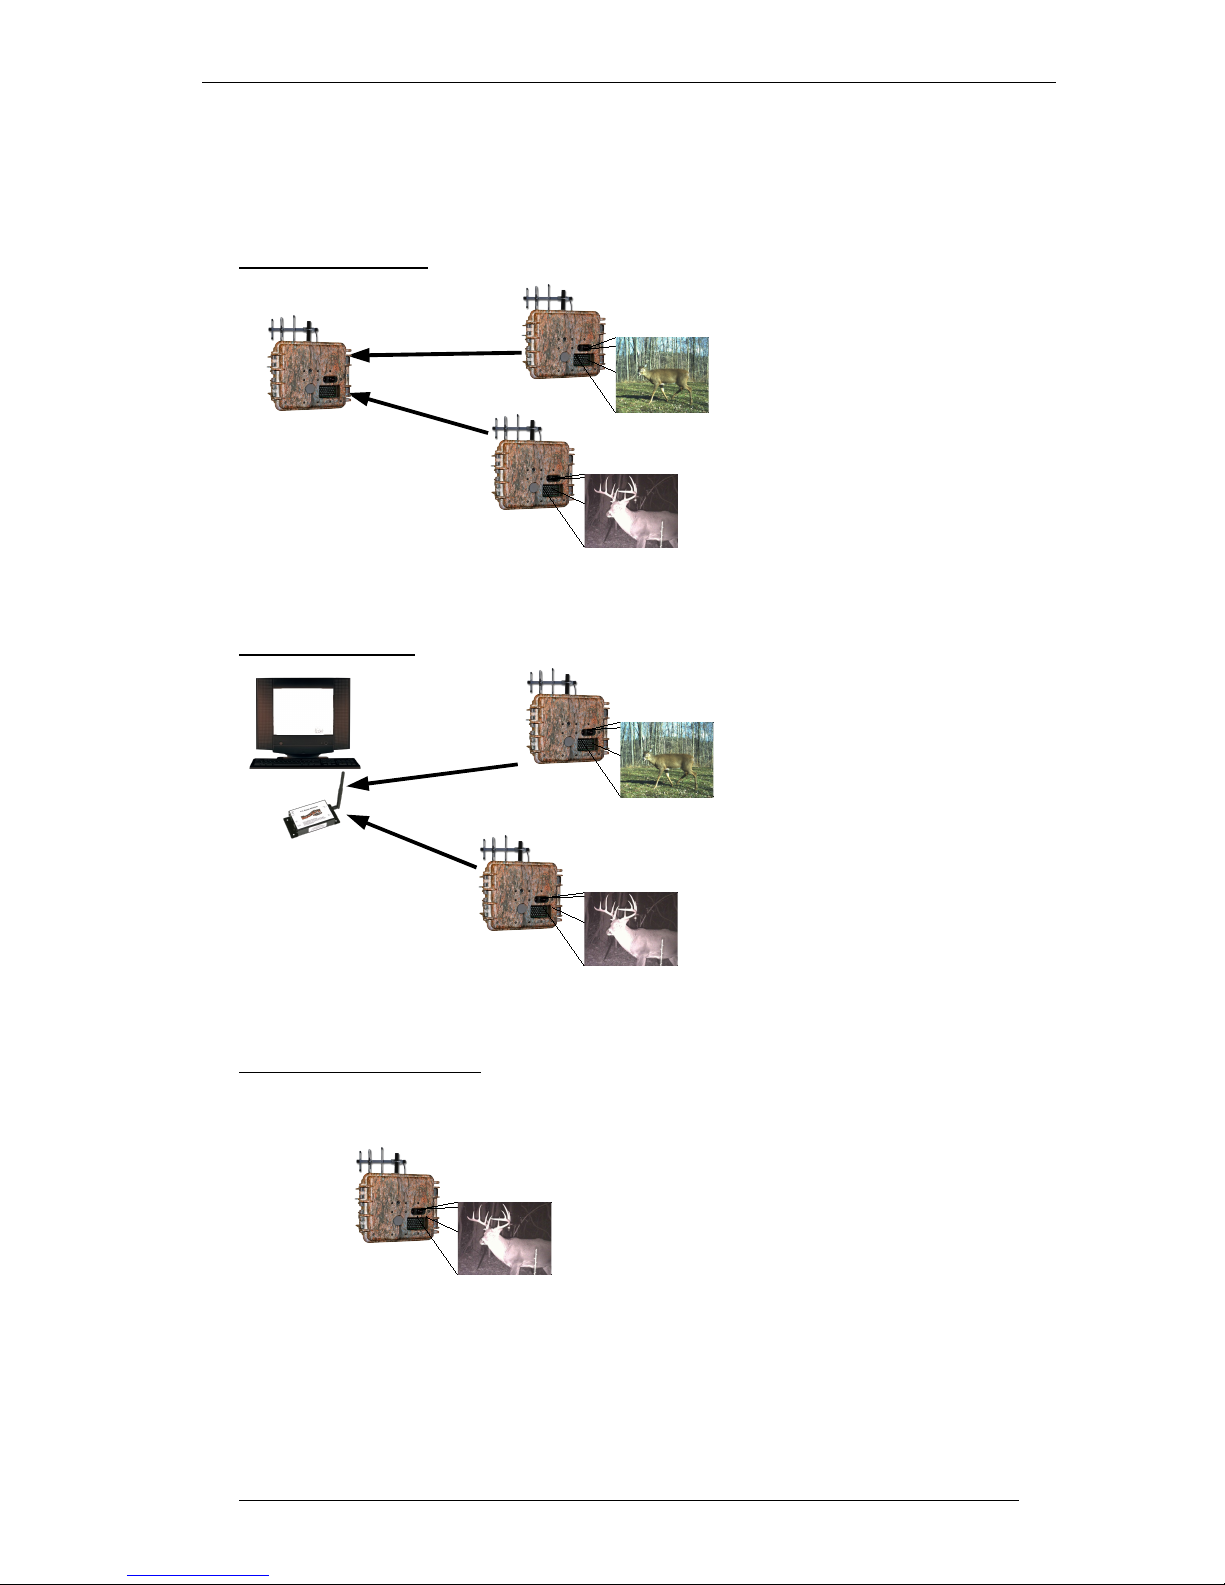
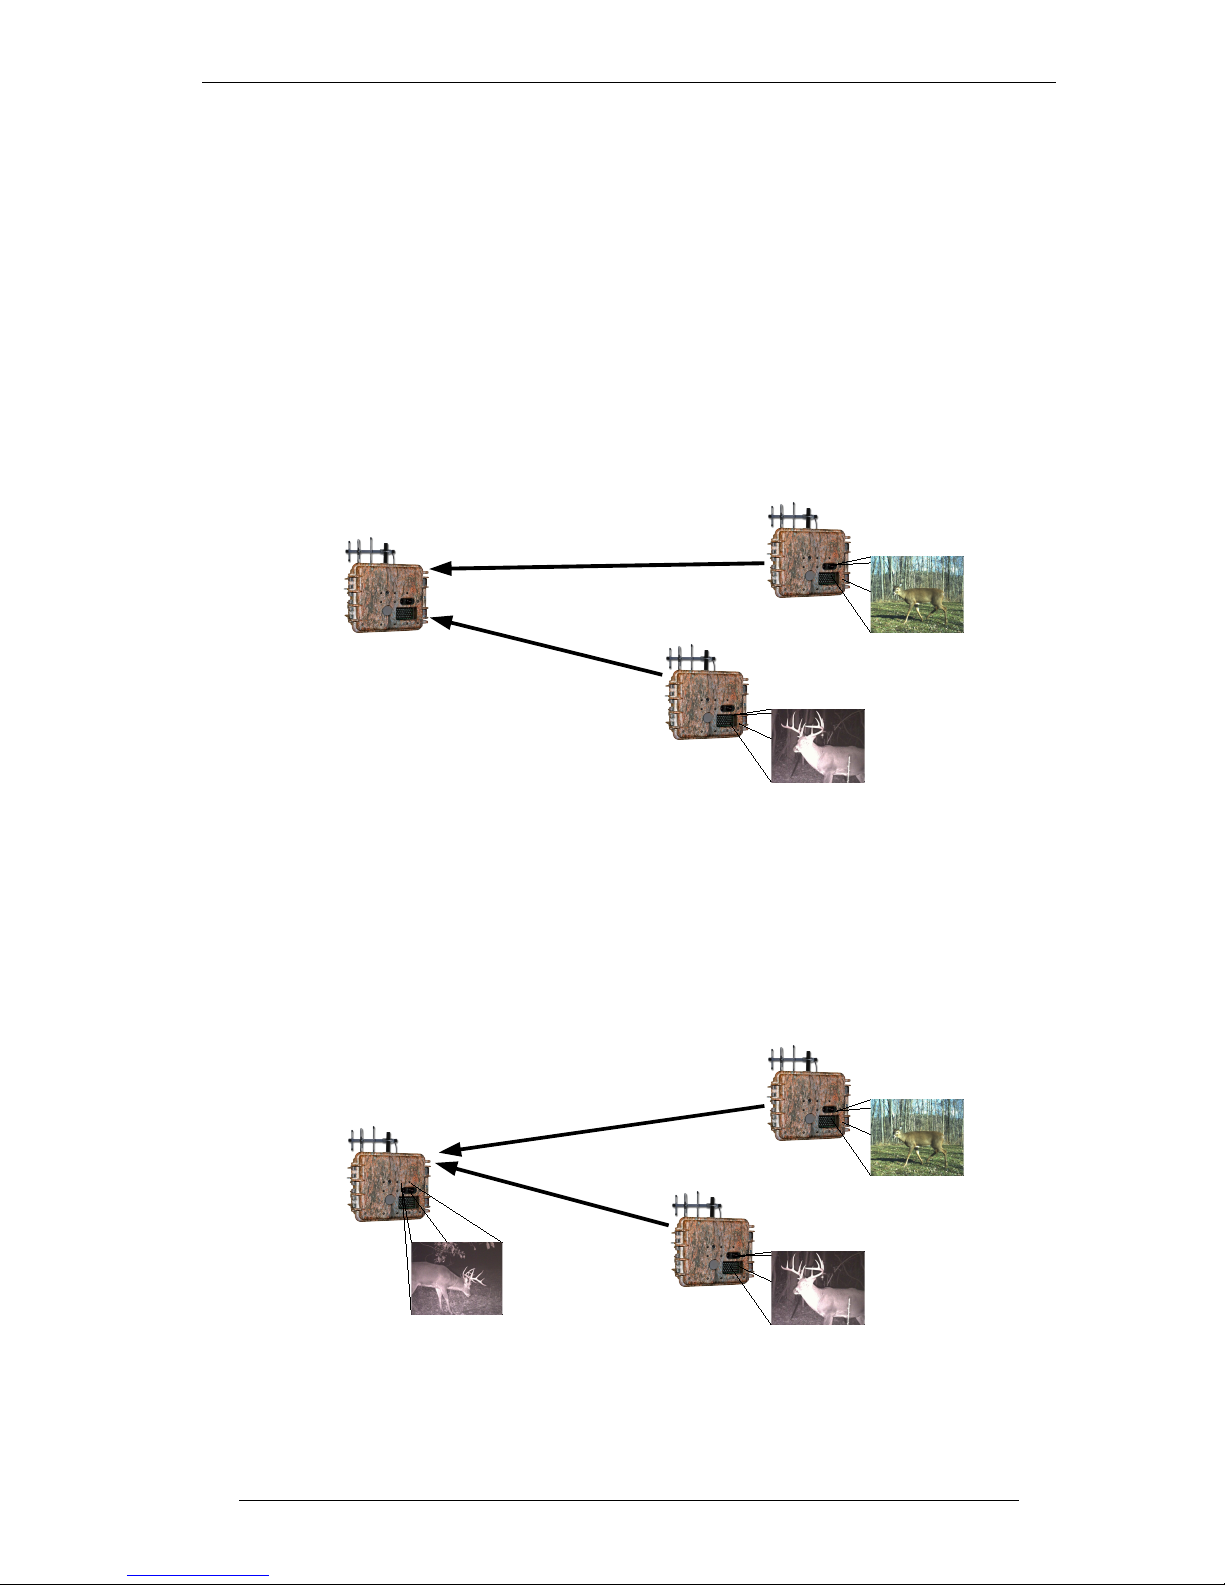
Figure 1 illustrates an example of a system with three units, two cameras
taking pictures and transmitting to the base unit.
Figure 2 illustrates a system similar to the one in Figure 1 except the base
unit is operating in a base-camera mode and will also be taking pictures
just like the remote cameras. System in Figure 1 can be turned into system
illustrated in Figure 2 by simply changing the operating mode of the base
unit.
ORION - Owner's Manual, Rev. 3.6
Camera unit
configured as
portable base
Remote
Camera 1
Remote
Camera 2
Figure 1
Portable
Base
Pi
ct
u
re
s
P
i
c
t
u
r
e
s
Camera unit
configured as
base and camera
Remote
Camera 1
Remote
Camera 2
Figure 2
Portable
Base
Pi
ct
u
re
s
P
i
c
t
u
r
e
s
8 4. ORION Camera System Overview
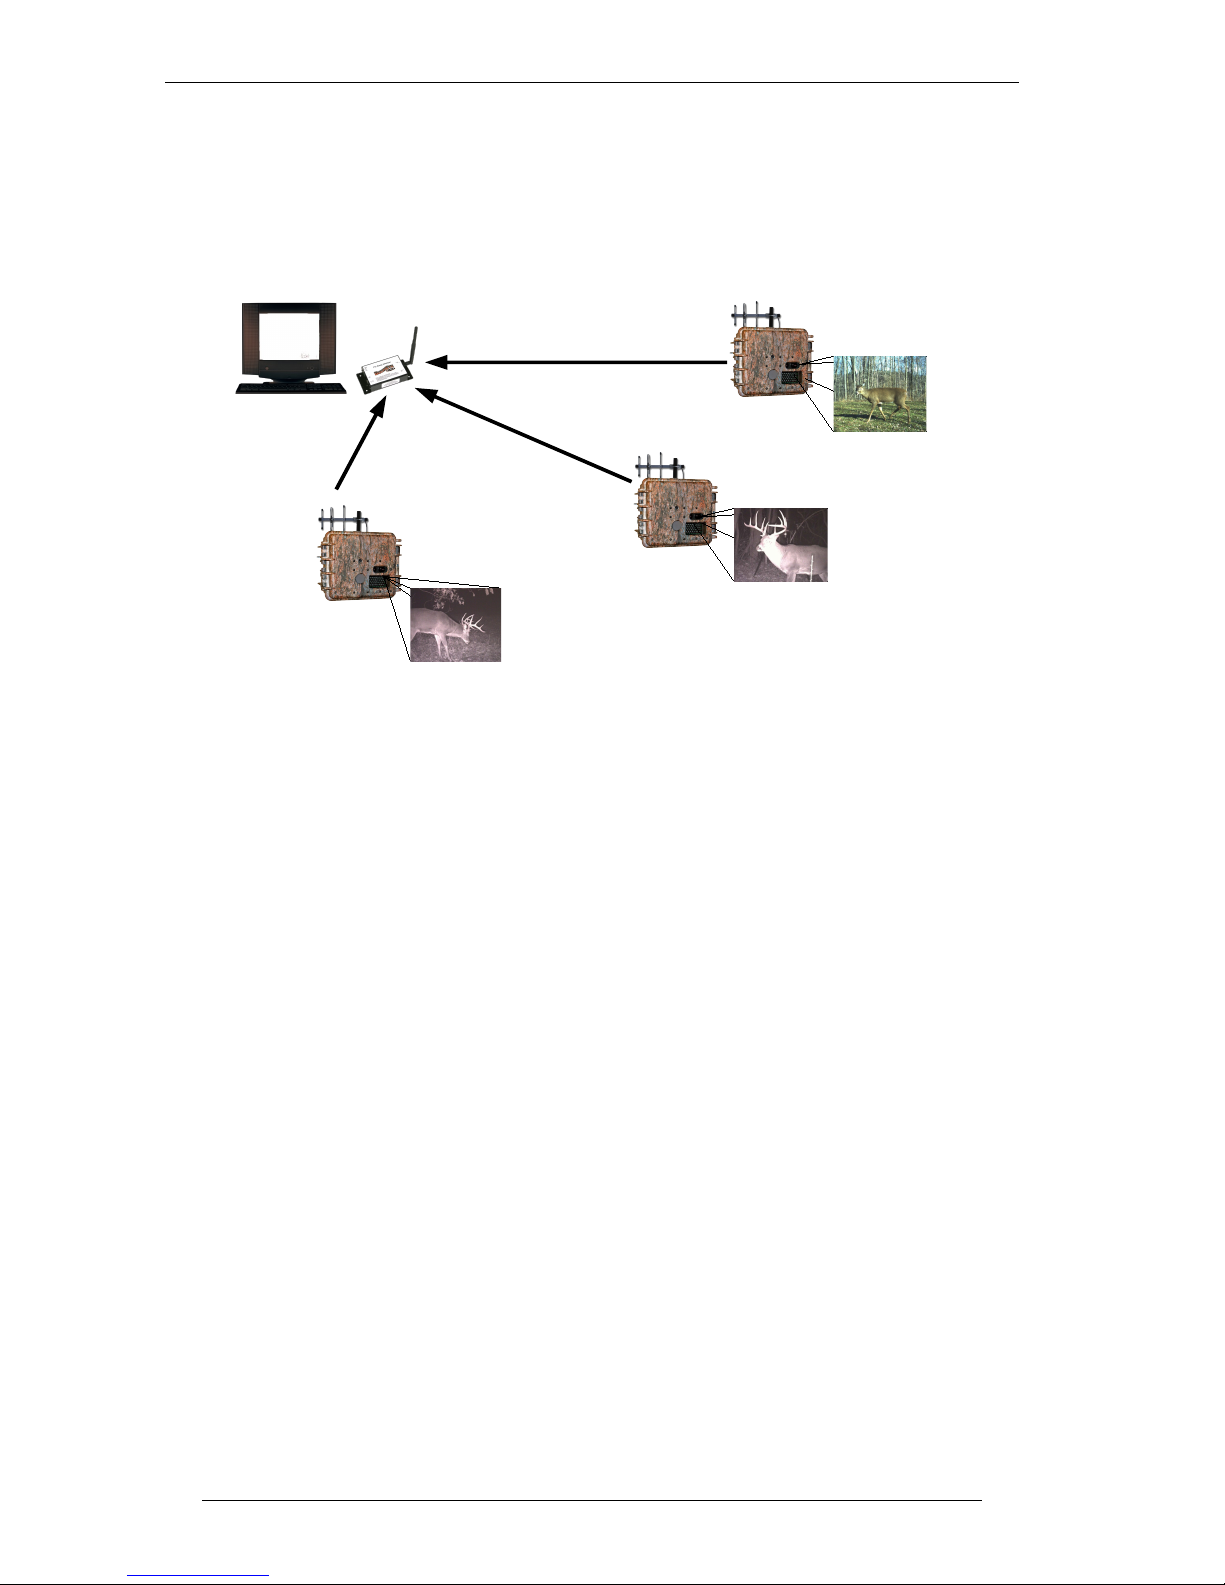
Figure 3 illustrates a system with three cameras registered to one PCBase.
Pictures in this system are transmitted directly to the computer. PCBase
software can also be setup to email pictures to multiple email addresses or
to upload pictures to the LiveCam website.
Before a camera can transmit pictures to a base it needs to be registered to
that base. During the registration process the base tells a remote camera the
unique identification of the base that should be receiving pictures.
Registration permits several camera systems to be located in close
proximity and still be transmitting pictures to the appropriate bases. Thus
your neighbor will not be able to receive pictures from your cameras.
Once a camera is registered to a base, it can only be controlled from the
base and unregistered from the base. It means that the camera must be
unregistered before it can be setup as a Portable Base or a stand-alone
camera. Unregistration can easily be executed from the base. However,
unregistration of the camera at that camera will require a password, which
is provided along with the camera documentation and can be found on the
last two pages of the manual. The user should keep it in a safe place. The
password may also be required to reset the camera registration in the case
of computer crash, when a camera was registered to a PCBase.
The registration process also provides a security feature and makes the
camera unusable if it is stolen, since a thief would not be able to retrieve
pictures or change settings without knowing the password. If a user loses
or forgets the password, he or she can request it from the manufacturer. In
this case the user will have to provide the contact information and the
serial number of the camera. The information will be compared against the
product registration information submitted by the user and a password will
be sent to the user.
ORION - Owner's Manual, Rev. 3.6
Remote
Camera 1
Remote
Camera 2
Figure 3
Remote
Camera 3
Pi
ct
u
re
s
P
i
c
t
u
r
e
s
PCBase
P
i
c
t
u
r
e
s
4. ORION Camera System Overview 9
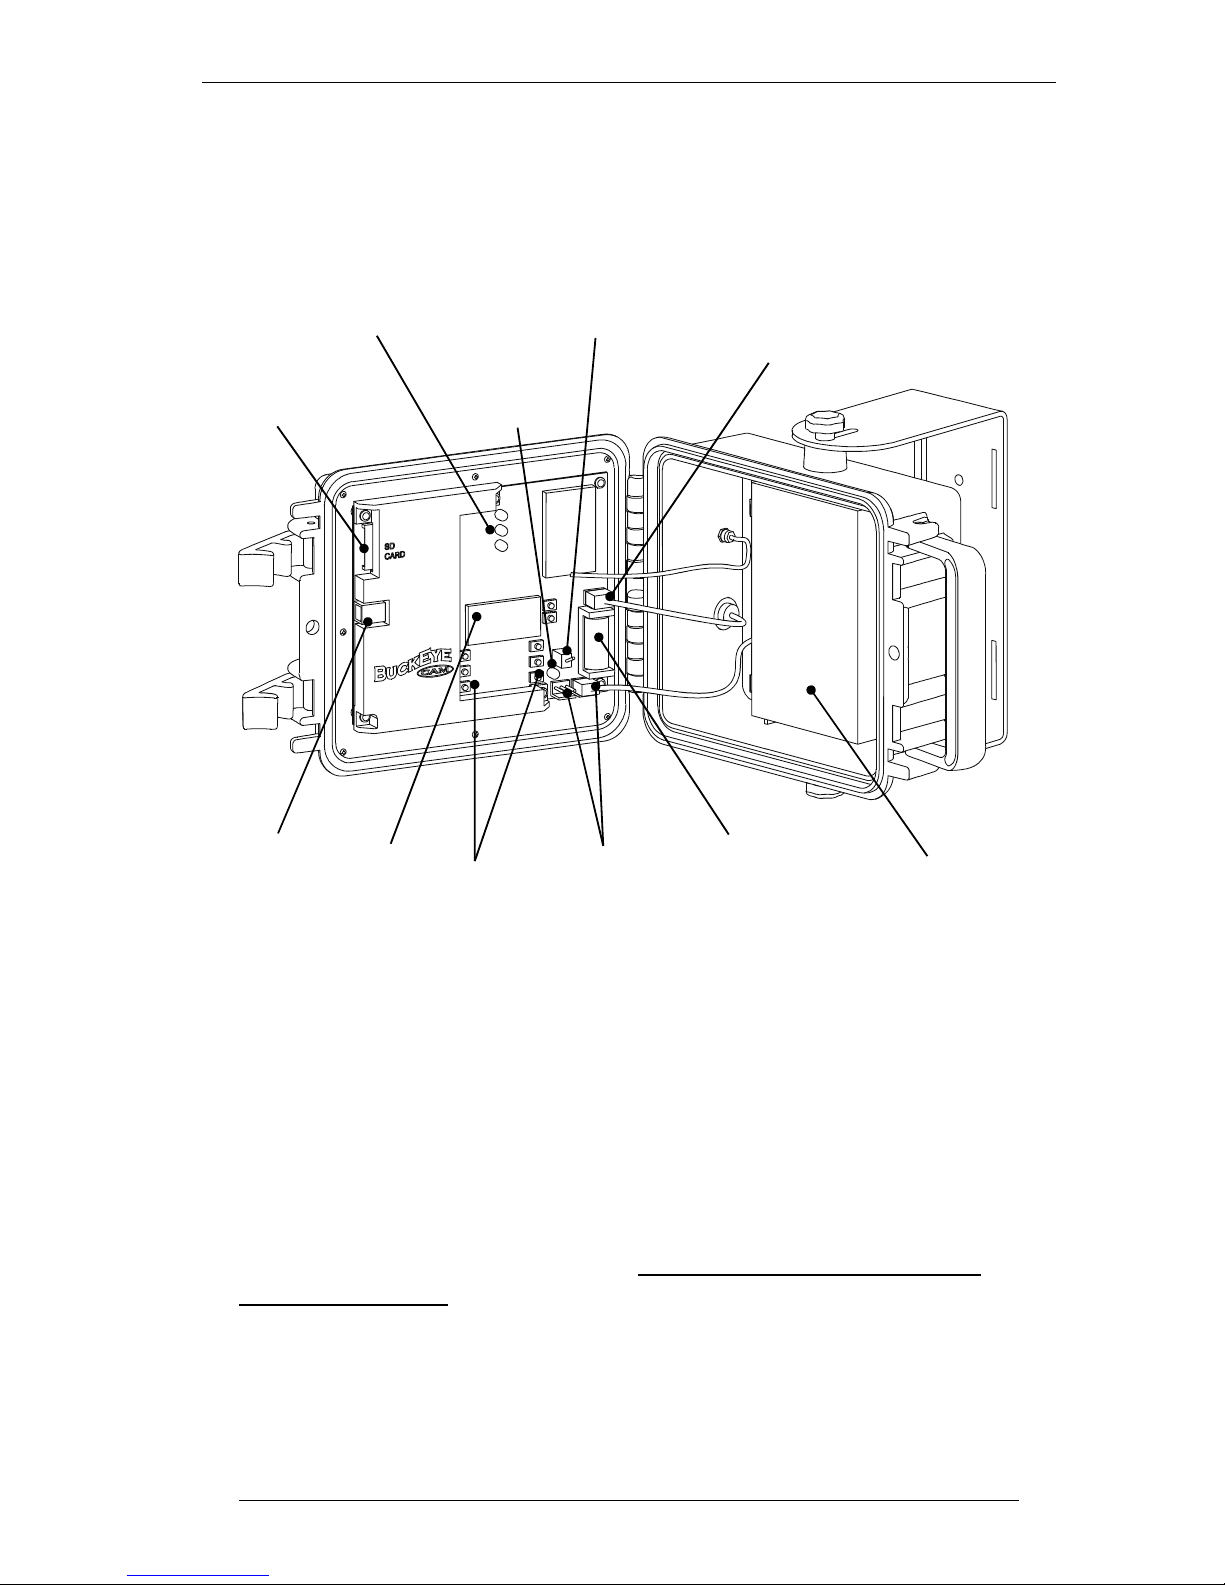
4.1. Camera Controls
The following figure describes the inside detail of the camera.
Battery Connectors - Two battery connectors are available on the camera.
These connectors can be used to “hot-swap” the battery without powering
down the camera.
READY Indicator – After you press the SAVE PICS TO CARD button,
this light will turn on to notify you that it is safe to remove the memory
card.
WAIT Indicator – This light will turn on when you first turn on the power
and when accessing the memory card. Do not remove the memory card
when this light is on.
ERROR Indicator – This light will turn on when there is an error writing to
the memory card. If this light turns on consistently, try a different memory
card.
ORION - Owner's Manual, Rev. 3.6
Display
Control
Buttons
Battery
Connectors
Main
Battery
Clock
Battery
Memory
Card Slot
READY, WAIT, and
ERROR indicators
Reverse Battery
Indicator
Power
Switch
External
Power
Connector
USB
Connector

10 4. ORION Camera System Overview
Reverse Battery Indicator – This light will turn on if you plug the battery
cable in backwards. If this happens, simply unplug and reverse the cable.
Power Switch – This switch turns power on and off to the camera.
Control Buttons – used to setup and configure the camera or to send
commands to remote cameras from a Portable Base.
Clock Battery – The clock battery powers the internal clock while the
camera is turned off.
Main Battery – 6V lead acid battery powers the camera. It provides a
significant amount of charge and operates well in low temperatures.
Display – This displays all messages and menus.
External Power Connector – This connector is used to supply external
power. Do not disconnect this connector. Do NOT plug the battery into
this connector.
Memory Card Slot – SD-compatible Memory Card connector. Maximum
card size is 2GB (2 gigabytes). The camera is NOT compatible with SD
High-Capacity memory cards.
USB Connector – DO NOT USE. For factory use only.
ORION - Owner's Manual, Rev. 3.6
4. ORION Camera System Overview 11
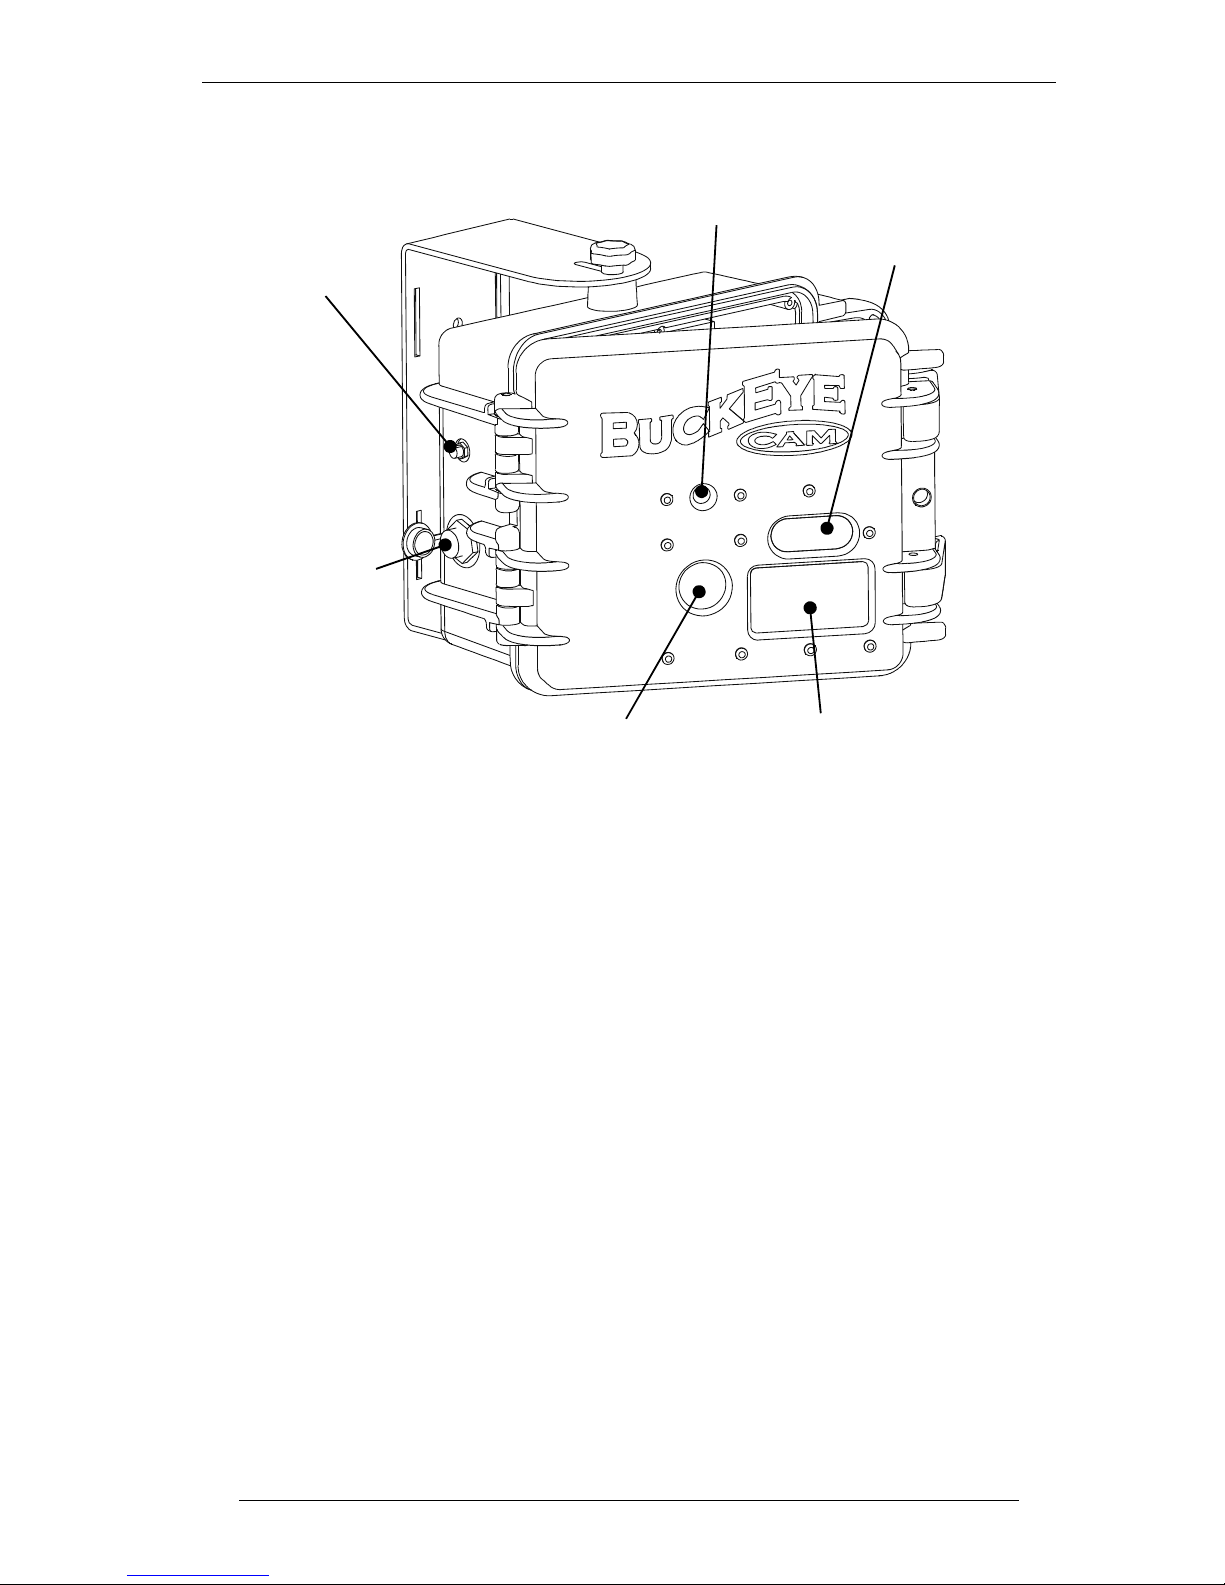
The following figure illustrates the exterior of the camera.
Antenna Connector – Connect a supplied antenna to this connector. You
can purchase a high-gain antenna to increase the transmission distance.
Visit www.buckeyecam.com or contact BuckEye Cam for the list of
available high-gain antennae.
Connector for Solar panel or Battery Pack – Connect an external battery
pack or a solar panel to increase the battery life of the camera.
Light Sensor – Camera uses the light sensor to determine the amount of
light and exposure when it is capturing a picture.
Motion Sensor – Passive Infrared sensor is used to detect motion of
animals and people.
IR Illuminator – Infrared illuminator is used to capture pictures at night
without being detected.
ORION - Owner's Manual, Rev. 3.6
Antenna
Connector
Connector for
Solar Panel or
Battery Pack
Motion Sensor
IR Illuminators
Camera Lenses
Light Sensor

12 5. Portable System Setup
5. Portable System Setup
5.1. Configuring Camera Unit as a Portable Base
Choose a camera unit that you want to be receiving pictures from other
cameras, this will be your Portable Base. Turn the camera on. If the camera
is unregistered, it should say
CAMERA
C---
indicating that camera is
unregistered. Wait until
REGCam
C---
is shown on the display. If the camera
is in stand-alone mode, it will say
CAMERA
CA
. In this case wait until P-
0000 is shown on the display. If the camera is registered to another base
refer to section 5.4 Unregistering Camera from the Camera located on page
15.
To setup the camera unit as a Portable Base:
1. Press MENU button
2. Using UP/DOWN buttons scroll until you see MODE on the
display
3. Press SELECT button
4. Using UP/DOWN buttons select:
a. BASE if you do not want the base to be taking pictures
b. CamBAS if you want the base to be taking pictures
5. Press SELECT button. The camera should reboot and switch to a
Portable Base mode. Please note that if the camera feature is
activated, the camera will be immediately ready to take pictures.
After the camera is set to operate as a Portable Base, you can start
registering remote cameras.
NOTE: If you are changing the operating mode from stand-alone to
Portable Base, from Portable Base to Portable Base with camera, or
from Portable Base with camera to Portable Base, make sure you save
pictures to the card first. After the mode is changed the unit will reboot
and any pictures that were not saved to the card will be lost.
NOTE: Maximum card size is 2GB (2 gigabytes). The camera is NOT
compatible with SD High-Capacity (SDHC) memory cards.
It is recommended to leave a memory card inserted into the card slot on the
Portable Base. If a memory card is not inserted, the base will temporarily
store pictures to its internal memory. Up to 200 pictures of 0.3Mpixel
resolution or up to 60 picture of 3Mpixel resolution can be buffered in the
internal memory. After the internal memory is filled up, the base will stop
receiving pictures from remote cameras. If the the base looses power,
ORION - Owner's Manual, Rev. 3.6

5. Portable System Setup 13
pictures that were stored in the internal memory will be lost.
To copy pictures from internal memory to the card, insert the card into the
card slot and press SAVE PICS TO CARD button.
5.2. Registering Cameras to a Portable Base
During registration the base tells the camera what channel, address, and
camera number it should use. Also the base adds the unit to the list of
active cameras. Up to 30 cameras can be registered to one Portable Base.
NOTE: Only add one camera at a time to avoid possible communication
errors. Turn on the Portable Base unit before completing the following
steps.
To register cameras to a Portable Base, the camera should be unregistered.
Turn the camera on and wait until
REGCam
C---
is shown on the display. If
the display shows P-00000, the camera must be unregistered first. Refer
to section 5.4 Unregistering Camera from the Camera located on page 15.
To ensure a reliable registration and initialization, it is recommended to
register the cameras before placing them in the field.
To register a camera to a base:
1. Turn on the power to the camera you wish to add to the Portable
Base. If you are wanting to add more camera, only turn on one at
this time.
• Make sure the camera powers up and display shows
REGCam
C---
with a scrolling bar at the upper left hand corner.
If this message does not appear, the camera is either already
registered to a base, setup as a Portable Base, or is in standalone mode.
• Make sure the remote unit and Portable Base unit both have
antennas connected and batteries are charged to 50% or more.
2. Press MENU button on your Portable Base unit.
3. Using UP/DOWN buttons scroll until you see AddCAM on the
display
4. Once you see AddCAM on your display press the SELECT
button.
5. The Portable Base will detect the camera and the camera will be
automatically registered to the system.
After successful registration, the camera will reboot automatically. The
Portable Base will display
REG OK
C-01
, with camera number in the upper
right hand corner as C-01 for camera #1, C-02 for camera #2, etc.
ORION - Owner's Manual, Rev. 3.6

14 5. Portable System Setup
If the base cannot find a camera it will show
NO CAM
rEG
on the display.
If that happens make sure the camera is turned on and antennae are
connected to both base and remote camera. Repeat steps 1 through 5.
5.3. Unregistering Camera from a Portable Base
To properly unregister a camera from a Portable Base, the CAMERA
MUST BE TURNED ON and located in close proximity to ensure reliable
unregistration. Do not turn off the camera or Portable Base until the
following process is complete.
To unregister the camera from the Portable Base:
1. Make sure the camera you want to unregister is turned on and
located near the Portable Base.
2. Press MENU button on your Portable Base.
3. Using UP/DOWN buttons scroll through the menu until you see
DelCAM on the display.
4. Press SELECT button
5. Using UP/DOWN buttons choose the appropriate camera number
you want to unregister. The camera number will be shown in the
upper right corner of the display. Example: C-01 corresponds to
camera #1, C-02 corresponds to camera #2, etc.
6. Once you have chosen the correct camera number press SELECT
button
7. Using UP/DOWN buttons select YES on the display to confirm
your intention to unregister the selected camera.
8. Press SELECT button to initiate unregistration. The camera will
be automatically unregistered from the Portable Base.
Upon successful unregistration, the Portable Base will display
UnREGD
C-01
with the camera number in the upper right hand corner. At
the same time, the camera will reboot into an unregistered state. At that
point the camera can be registered to another base, switched to a standalone camera, or switched to a Portable Base.
If the Portable Base cannot communicate with a camera, it will say
FAILED
UrEG
. If that happens, make sure the camera is turned on, antennas
are properly connected, and repeat the process from step 1.
NOTE: In some cases the user may need to unregister the camera the
user no longer has. For that case, the user can force unregistration of
the camera from the base.
ORION - Owner's Manual, Rev. 3.6

5. Portable System Setup 15
To force unregistration at the Portable Base follow steps 1-8 as mentioned
above, then:
9. When message
FAILED
UrEG
is displayed, using UP/DOWN
buttons, select
PROCED
UrEG
10. Press SELECT button to ignore the communication failure and
proceed with unregistration. This will remove the camera
registration from the Portable Base.
NOTE: If the user forces unregistration, the remote camera will
maintain its registration information, and on the first attempt to
communicate it will automatically register itself back to the base.
5.4. Unregistering a Camera at the Camera
This operation requires entering a password. Each camera has a unique
password which is assigned by the manufacturer and cannot be changed.
The password for each camera is supplied along with the camera. For
convenience, each camera comes with two password stickers. One sticker
can be attached at the end of the manual in the Password Codes section.
NOTE: Camera unregistration from the camera should normally be
executed only when a user does not have the base to which the camera is
registered, and he/she needs to set the camera to a different mode, or
register the camera to another base.
To unregister the remote camera from the camera:
1. Turn on the camera if it is not turned on and wait until P-0000 is
shown on the display.
2. Press MENU button.
3. Using UP/DOWN buttons scroll until you see
UnREG
-CA-
on the
display.
4. Press SELECT button. You will be prompted to enter the
password.
5. Using UP/DOWN buttons, select scroll until the character
matches the first character of the password.
6. Press SELECT button.
7. Repeat steps 5 and 6 for the other 5 characters of the password.
8. After the last character is entered, the camera will start the
unregistration sequence.
After completing the unregistration sequence the camera will reboot into
an unregistered wireless camera mode, and
REGCam
C---
will be shown on
ORION - Owner's Manual, Rev. 3.6

16 5. Portable System Setup
the display. At this point, the user can register the camera to another base
or switch it to another mode such as Portable Base or stand-alone camera.
5.5. Changing Time and Date
NOTE: The BuckEye Cam ORION uses Military settings when
displaying the time. The time and date is maintained with a 3V Lithium
battery located next to the On/Off switch.
You only need to set the Time and Date on the Portable Base. The Remote
Camera(s) will be updated automatically when it communicates with the
base.
To change the on the Portable Base:
1. Press and hold the SET CLOCK button for two seconds until
HOURS appears on the display. Release the SET CLOCK button.
2. Press the UP or DOWN buttons to set the Hour.
3. Press the SET CLOCK button to display MINUTE.
4. Press the UP or DOWN button to set the Minute.
5. Repeat steps 3 and 4 to update SECOND, DAY, MONTH, and
YEAR. Note, when updating seconds, pressing UP/DOWN button
will reset the seconds to 00.
After the time is changed, the Portable Base will automatically notify the
cameras about the new time and date, and the clock the the Remote
Cameras will be synchronized to the clock on the Portable Base.
5.6. Changing Settings on the Camera
Settings for a remote cameras can be changed at the Portable Base through
a memory card using a special program located on the memory card. Any
time a card is inserted into the Portable Base, the base verifies and make
sure the software to change settings and the settings file are present on the
card. If the software or settings file is not present, or the file is corrupted,
the base copies the files to the card. This is done automatically and no user
intervention is required.
To copy the setup software to the memory card:
1. If the memory card was not inserted, insert the memory card into
the card slot on the Portable Base. For stand-alone camera, insert
the card into the card slot on the camera.
2. The WAIT light will flash once. If the light stays on for longer
than 1 second it means that the program is copied to the memory
card.
ORION - Owner's Manual, Rev. 3.6
5. Portable System Setup 17
3. Press SAVE PICS TO CARD button. This will indicate that you
are about to remove the memory card and the Portable Base will
not attempt to access the card giving you time to remove the card.
4. Wait till the READY light turns on, indicating that the operation
was completed successfully.
5. Remove the card from the card slot by lightly pushing the card
into the card slot and releasing it. The card will be ejected from
the card slot.
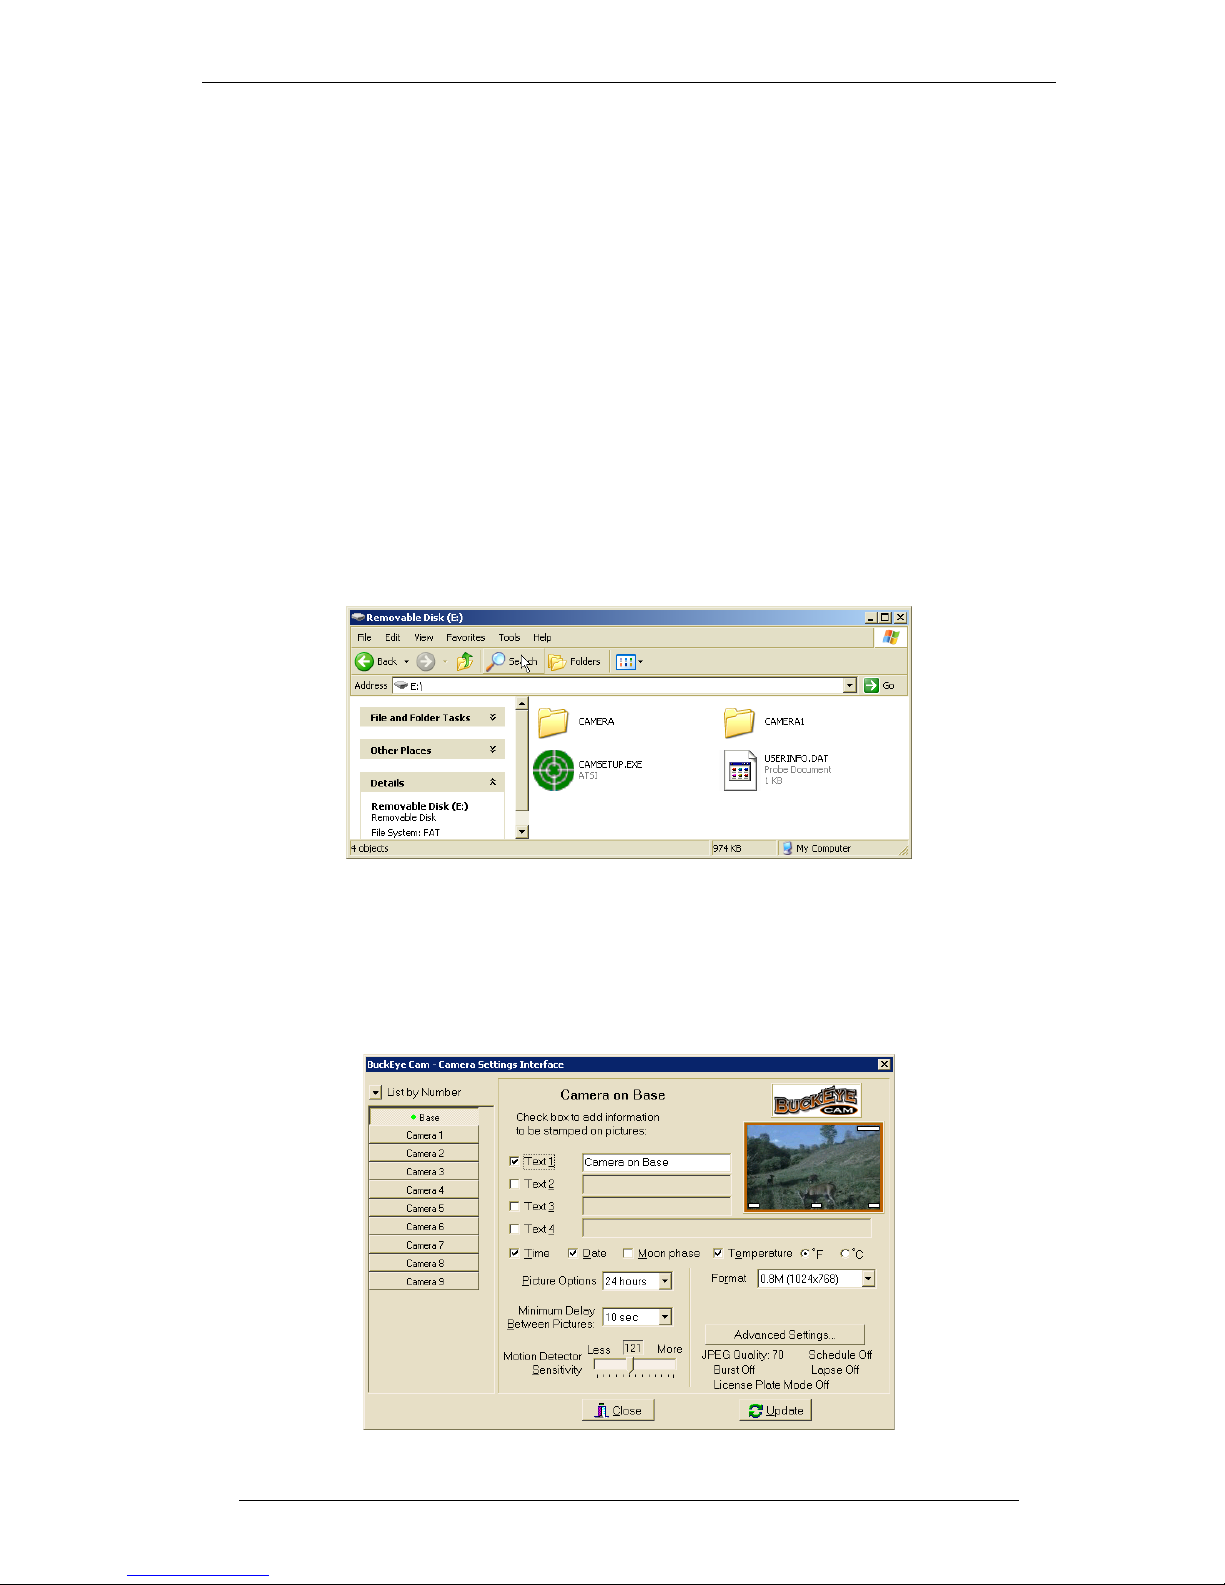
After you connect the card reader to your computer and insert the memory
card, a window will pop up displaying the contents of the memory card. If
the window does not appear automatically, click the Start button on the
task bar and select My Computer. In the opened window double-click onto
the removable disk icon that corresponds to the memory card.
Example of the content of the memory card is shown in below.
In the open window, click on the camsetup.exe file to open the UserOptions software as shown below.
NOTE: Do not worry if you only see camsetup and not camsetup.exe.
Your computer is probably set up to hide the three letter extension and
there are no problems with the files.
ORION - Owner's Manual, Rev. 3.6
 Loading...