

Page 1
IN 116 Rev.A 0499
Providing Exceptional Consumer Optical Products Since 1975
Customer Support (800) 676-1343
E-mail: support@telescope.com
Corporate Offices (831) 763-7000
P.O. Box 1815, Santa Cruz, CA 95061
INSTRUCTION MANUAL
Orion
®
AZ-3 Altazimuth Mount
#9018
Page 2
2
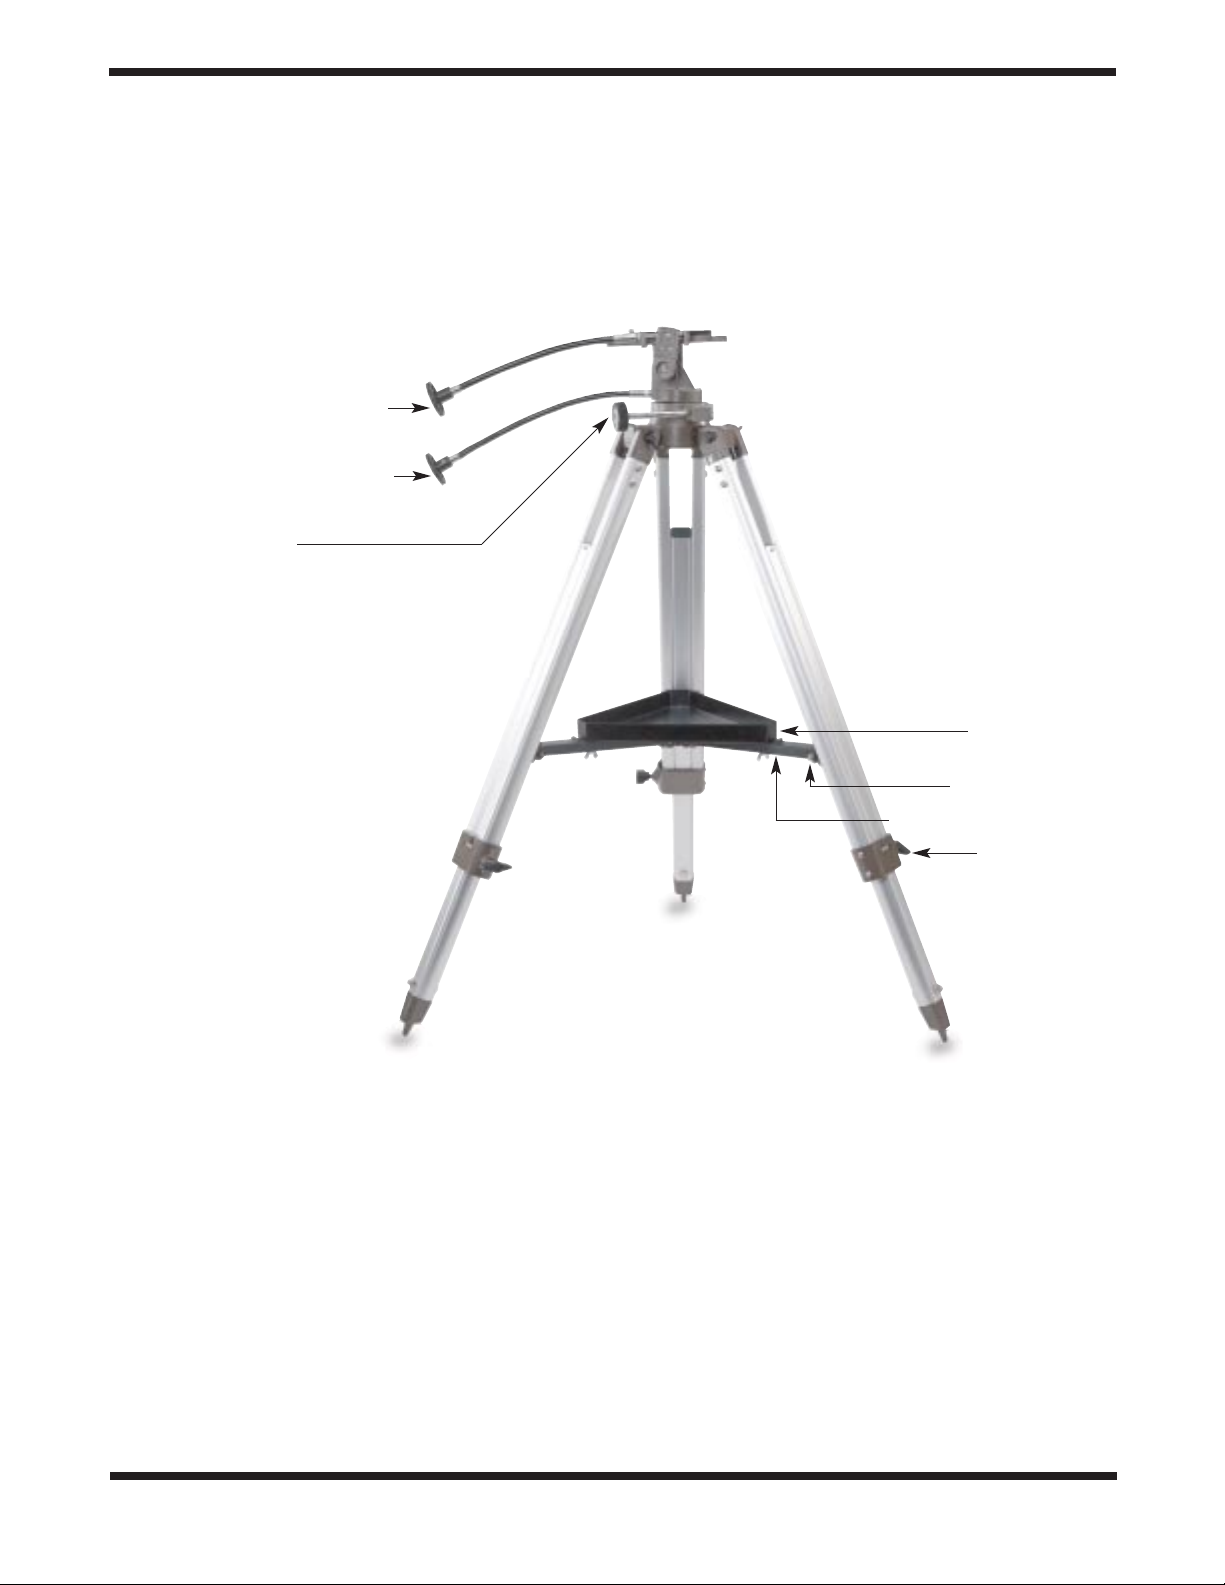
AZ-3 Altazimuth Mount Parts Diagram
Altitude slow-motion control
Azimuth slow-motion control
Azimuth lock knob
Accessory tray
Accessory tray bracket
attachment point
Accessory tray bracket
Leg lock knob
Page 3

3
1. Parts List
Qty. Description
1 Altazimuth mount
3 Tripod legs w/attachment bolts
1 Accessory tray w/mounting hardware
1 Accessory tray bracket
2 Slow-motion control cables
2 Assembly tools (wrench, Phillips-head screwdriver)
2. Assembly
Carefully open all of the boxes in the shipping container. Make
sure all the parts listed in Section 1 are present.Save the bo x es
and packaging material. In the unlikely event that you need to
return the mount, you must use the original packaging.
Assembling the mount should take only about 10-15 minutes.
All bolts should be tightened securely to eliminate flexing and
wobbling, but be careful not to over-tighten or threads may
strip. No tools, other than the ones provided, are needed.
Refer to the figure on page 2 during assembly.
1. Lay the altazimuth mount on its side. Attach the tripod
legs, one at a time, to the mount with the long bolts
installed in the tops of the tripod legs. First remove the
bolts, then line up the top of each tripod leg with the holes
in the base of the mount and reinstall the bolt.Tighten the
wingnuts finger-tight, for now.Note that the accessory tray
bracket attachment point on each leg should face inward.
2. Tighten the leg lock knobs at the base of the tripod legs.
For now, keep the legs at their shortest (fully retracted)
length; you can extend them to a more desirable length
later, after the mount is completely assembled.
3. With the tripod legs now attached to the altazimuth mount,
stand the tripod upright (be careful!) and spread the legs
apart enough to connect each end of the accessory tray
bracket to the attachment point on each leg.Use the screw
that comes installed in each attachment point to do this.
First remove the screw using the supplied screwdriver,
then line up one of the ends of the bracket with the attachment point and reinstall the screw. Make sure that the
smooth side of the accessory tray bracket faces upward.
4. Now, with the accessory tray brack et attached, spread the tripod legs apart as far as they will go, until the bracket is taut.
Attach the accessory tray to the accessory tray bracket with
the three wingnut-head bolts already installed in the tray.
Push the bolts up through the holes in the accessory tray
bracket, and thread them into the holes in the accessory tray.
5. Next, tighten the bolts at the tops of the tripod legs, so the
legs are securely fastened to the altazimuth mount. Use
the larger wrench and your fingers to do this.
6. Now attach the two slow-motion cables to the altitude and
azimuth worm gear shafts of the mount by positioning the
setscrew on the end of each cable over the indented slot
on the worm gear shaft and then tightening the setscrew.
3. Attaching A Telescope
The AZ-3 is designed to hold small to mid-size telescopes weighing up to about 10 lbs. For heavier telescopes, the mount may
not provide sufficient stability for steady imaging.Any type of telescope can be used on the AZ-3, including refractors, reflectors,
catadioptrics, and spotting scopes, as well as telephoto lenses
and giant binoculars, provided a proper coupling adapter or pair
of tube rings is available to couple the instrument to the mount.
Orion carries a variety of differently sized tube rings and a
1/4"-20 mounting adapter designed exclusively for the AZ-3.
One of these items probably fits the telescope you wish to
use. See the list of Suggested Accessories at the end of
these instructions, or check the Orion print or online catalogs
for currently available mounting accessories.
4. Using the Mount
To acquire an object in the telescope you’ve mounted on the
AZ-3, first loosen the azimuth lock knob.Point the telescope
at the object you wish to observe by simply pushing the back
end of the telescope in the vertical (altitude) and horizontal
(azimuth) directions. Accurately center the object within the
telescope’s field of view by using the altitude and azimuth
slow-motion controls.The azimuth slo w-motion control will not
engage until the azimuth lock knob is retightened.
The slow-motion controls are also useful for keeping moving
subjects in the field of view.
The AZ-3 is an excellent mount for astronomcial use too.
There is no need for “polar alignment,” and it is very easy to
point the telescope at what you wish to see.When employing
the AZ-3 for astronomical observing, use both slow-motion
controls to keep objects centered in the telescope’s e y epiece ,
since the rotation of the Earth will cause them to gradually
move out of the field of view.With a little practice, you’ll have
no problem manually “tracking” the night sky. Keep in mind
that increasing magnification makes objects appear to move
faster. This is because the field of view becomes narrower.
C
ongratulations on your purchase of a quality Orion product
.Your new AZ-3 Altazimuth Mount is designed to provide stable support and smooth operation of many different types of telescopes, spotting scopes, giant binoculars,
and telephoto lenses.It is an excellent mount for terrestrial applications as well as astronomical viewing.Whether your
target is a ship on the ocean horizon, a bird perched in a distant tree, or a planet looming in the night sky, the AZ-3
mount makes it easy to acquire the view and hold it steady.
These instructions will help you set up and properly use your mount.Please read them over thoroughly before getting started.
Page 4

And remember to aim well clear of the Sun, unless the front
of the telescope is fitted with a professionally made solar filter and the finder scope is covered with foil or some other
completely opaque material. Looking at the Sun directly
through any magnifying instrument, even for an instant, could
cause permanent retinal damage or blindness.
Note About the Slow-Motion Controls
The slow-motion control cables can move the telescope a
maximum of only 30° in any direction. This is because the
worm gears that the cables attach to have a limited range of
mechanical “trav el.” If you can no longer rotate one of the control cables in a desired direction, you hav e reached the end of
worm gear travel, and the worm gear should be reset.This is
done by first rotating the control cable several turns in the
opposite direction from which it was originally being turned.
Then, manually move the telescope closer to the object you
wish to observe (remember to first loosen the azimuth lock
knob, if repositioning in azimuth).You should now be able to
use the slow-motion control again to fine-adjust the telescope’s position.
5. Specifications
Mount: altazimuth
Tripod: aluminum, adjustable height
Weight: 9 lbs., 9 oz.
Height: 32" to 52.5"
Slow-Motion Controls: altitude and azimuth
Maximum Loading Weight: about 10 lbs.
6. Suggested Accessories
1/4"-20 Adapter (#10100)
This adapter bolts to the top of the altazimuth mount and provides a threaded post on which to attach any instrument that
utilizes a standard 1/4"-20 thread.
Tube Mounting Rings
These quality metal rings are custom-made for use with the
AZ-3 Mount. They are hinged for easy installation of a telescope tube and are lined with felt to prev ent scr atching.Check
the outer diameter of your telescope; if it matches the inner
diameter (I.D.) of the rings, then the rings will fit. If the outer
diameter of your telescope is a little smaller than the I.D .of the
rings, that is also acceptable; you can “shim” the inside of the
rings with extra felt.Two rings are included in each set.
I.D.3.0" (#7369)
I.D.3.5" (#7370)
I.D.3.9" (#7371)
I.D.4.6" (#7372)
I.D.5.5" (#7373)
ShortTube 80 Refractor (#9086)
This portable yet versatile telescope is an excellent match for
the AZ-3; a great choice for daytime spotting or astronomical
adventuring.Take it with you camping, or lea ve it set up in the
living room. No matter what you want to see, the ShortTube
80 will bring you closer.Also works well as a 400mm f/5 telephoto lens. Requires the 1/4"-20 Adapter above.
One-Year Limited Warranty
This Orion AZ-3 Altazimuth Mount is warranted against defects in materials or workmanship for a period of one year
from the date of purchase.This warranty is f or the benefit of the original retail purchaser only. During this warranty period Orion Telescopes & Binoculars will repair or replace, at Orion’s option, any warranted instrument that proves to be
defective, pro vided it is returned postage paid to:Orion Warranty Repair, 89 Hangar Way, W atsonville, CA 95076.If the
product is not registered, proof of purchase (such as a copy of the original invoice) is required.
This warranty does not apply if, in Orion’s judgment, the instrument has been abused, mishandled, or modified, nor
does it apply to normal wear and tear.This warranty gives you specific legal rights, and you may also have other rights,
which vary from state to state. For further warranty service information, contact: Customer Ser vice Department, Orion
Telescopes & Binoculars, P. O.Box 1815, Santa Cruz, CA 95061; (800) 676-1343.
Orion Telescopes & Binoculars
Post Office Box 1815, Santa Cruz, CA 95061
Customer Support Help Line (800) 676-1343 • Day or Evening
 Loading...