

Page 1
INSTRUCTION MANUAL
Orion®
Aristocrat™ 60mm
#9800 Brass Altazimuth Refractor Telescope
Providing Exceptional Consumer Optical Products Since 1975
Customer Support (800) 676-1343
E-mail: support@telescope.com
Corporate Offices (831) 763-7000
89 Hangar Way, Watsonville, CA 95076
IN 198 Rev. B 4/04
Page 2
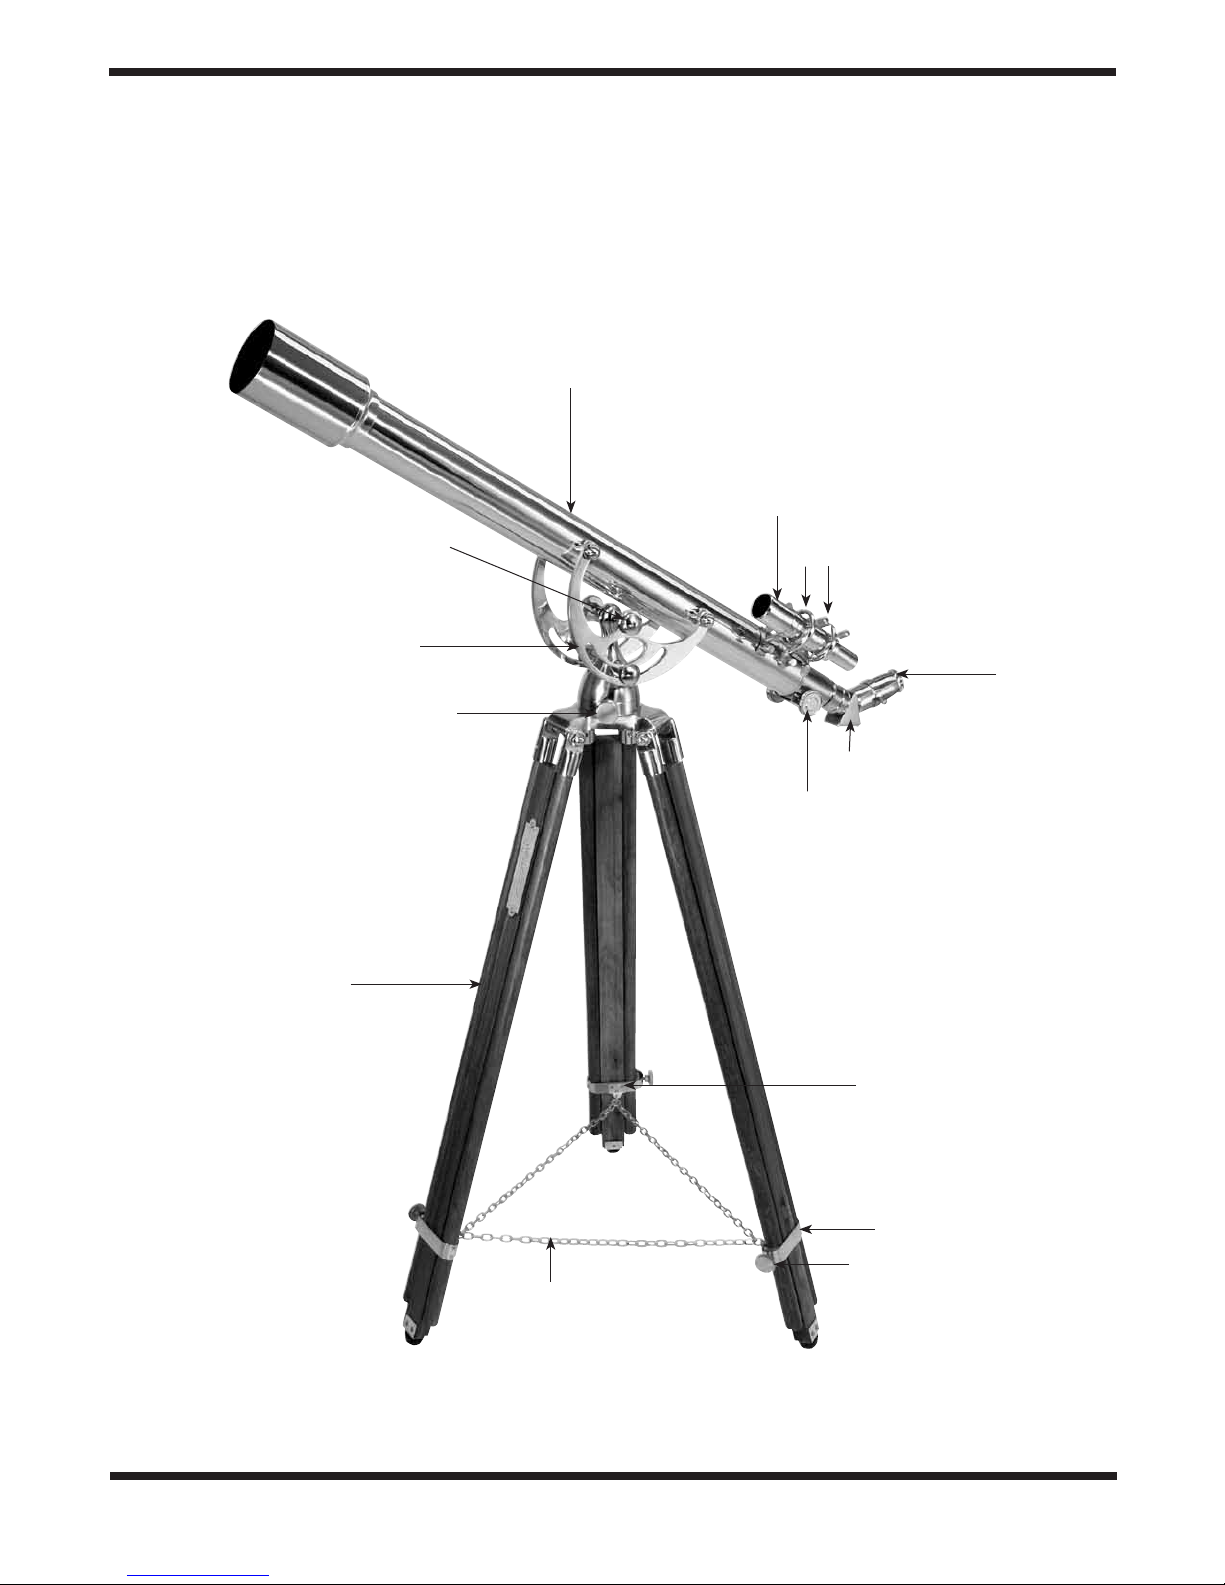
Optical tube
Finder scope
Altitude tension
discs (2)
Altitude lock lever
(opposite side)
Azimuth lock knob
Tripod leg
Finder scope brackets
Eyepiece
Correct image diagonal
Focus wheel
Leg chain plate
22
Tripod leg lock
Tripod leg lock knob
Leg chain
Figure 1.
Aristocrat 60mm Brass Refractor
Page 3

Congratulations on your purchase of an Orion Aristocrat 60mm. Your Aristocrat 60mm was hand crafted
out of brass and African mahogany. It is a sophisticated instrument that not only looks great, but also
performs well with its quality optics. The Aristocrat is great for a bay window, or any place you need that
“touch of class” and wish to get majestic views of the land, sea or sky. With proper care, the Aristocrat
60mm will last a lifetime, and probably longer. These instructions will help you assemble and use your
Aristocrat 60mm. Please read them thoroughly.
Table of Contents
1. Unpacking........................ 3
2. Parts List......................... 3
3. Assembly ........................ 3
4. Getting Started .................... 4
5. Terrestrial Viewing.................. 6
6. Astronomical Viewing ............... 6
7. Care and Maintenance .............. 7
8. Specifications ..................... 8
1. Unpacking
The entire telescope will arrive in one box. Be careful unpacking the box since some of the contents are small and easy to
overlook. We recommend keeping the box and all original
packaging. In the event that you need to ship the telescope to
another location, or return it to Orion for warranty repair,
having the proper packaging will help ensure that your telescope will survive the journey intact.
Make certain all the parts in the parts list are present.
Familiarize yourself with the features and compare them to
the callouts on Figure 1. If anything appears to be missing
or broken, immediately call Orion Customer Support
(1-800-676-1343) for assistance.
Warning: Never look directly at the Sun through
your telescope or its finder scope—even for an
instant—without a professionally made solar
filter that completely covers the front of the
instrument, or permanent eye damage could
result. Young children should use this telescope
only with adult supervision.
2. Parts List
1 Optical tube with cradle and altazimuth mount
1 45° Correct-image diagonal
1 25mm Plössl eyepiece
1 6x30 correct-image finder scope
4 Brass thumbscrews
2 Finder scope brackets
3 Leg attachment shafts
6 Acorn nuts
12 Brass washers
3 Mahogany wood tripod legs.
1 Brass leg chain with three leg plates
9 Brass leg plate screws
3. Assembly
Assembly should take no more than 30 minutes. Refer to
Figure 1 during assembly. You will need a small phillips-head
screwdriver and a 5/8" or 16mm crescent wrench. An adjustable wrench can also be used. When assembling, be careful
not to scratch any of the brass parts.
1. Gently lay the optical tube and mount on its side. Attach
the tripod legs, one at a time to the base of the mount by
first lining the holes on the top of the tripod with the holes
on the base of the mount. Make certain that the chain
holes on the brass leg locks are facing inside so that you
can attach the leg chain later on. Slide a leg attachment
shaft through the top of a leg and through the holes in the
base of the mount. Place a brass washer on either end of
the leg attachment shaft. Then thread an acorn nut on both
sides of the threaded shaft. Secure the nuts finger tight for
now. Figure 2 shows detail of this attachment.
2. Stand the tripod and telescope up and spread the legs
slightly (be careful). Attach the brass plates on the leg
chain to each tripod leg lock with three phillips head
screws. Once attached, spread the tripod legs as far as
they will go (Figure 3).
3
Page 4
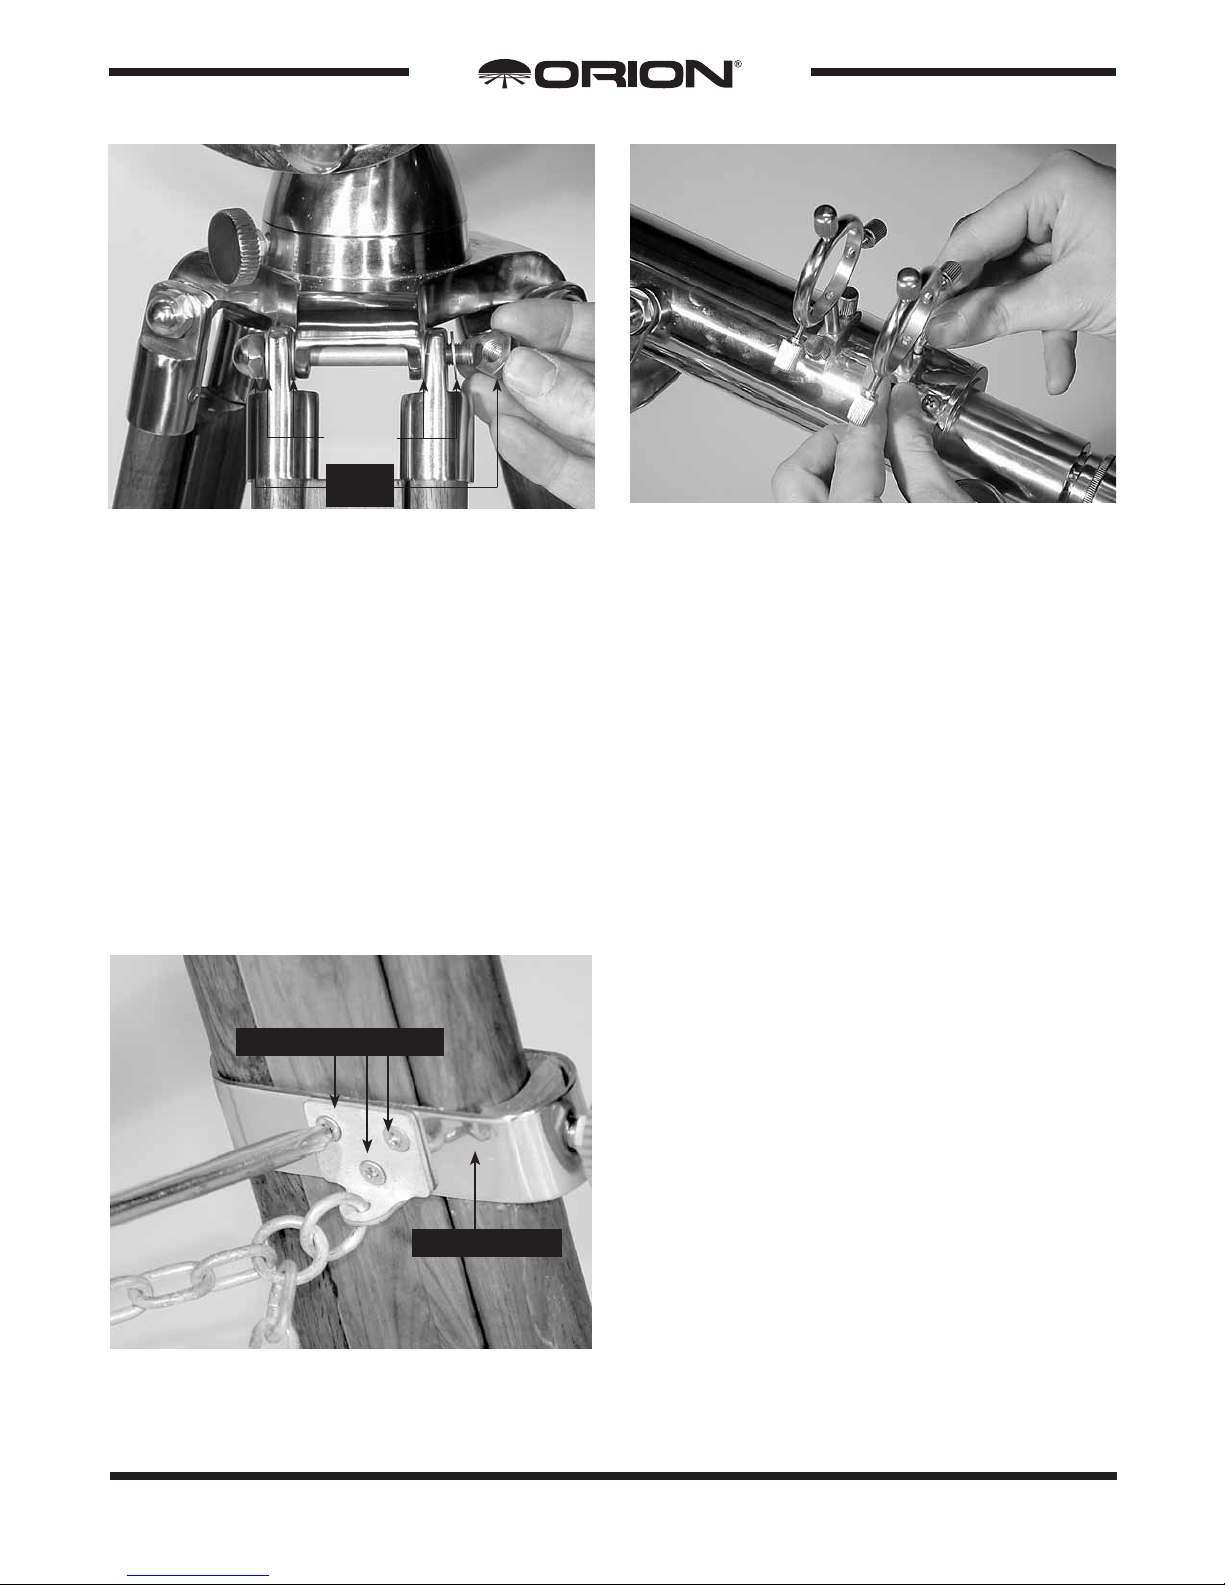
Washers
Acorn
nuts
Figure 2. Attaching the tripod legs to the mount.
3. Tighten the acorn nuts with the wrench. Be very careful
when doing this so as not to scrape or strip the nuts. Do
not overtighten the nuts.
4. Attach the finder scope brackets to the optical tube with
the brass thumbscrews (Figure 4).
5. Unthread the six thumbscrews on the finder scope brackets until they are flush with the inside of the bracket. Then
insert the brass finder scope into the brackets so the large
end (objective lens) is facing the front of the telescope, as
shown in Figure 1. The grooves on the body of the finder
scope should line up with the thumbscrews on the brackets. Thread the six finder scope bracket thumbscrews
equally until the finder scope is secure in the brackets.
6. Remove the brass cover on the end of the focuser drawtube. Insert the chrome barrel of the correct-image diago-
Phillips head screws
Tripod leg lock
Figure 3. Use a phillips-head screwdriver to attach the brass
chain plates to the tripod leg locks.
Figure 4. Attaching the finder scope brackets to the optical tube.
nal into the focuser of the telescope and tighten it with the
thumbscrew.
7. Insert the chrome barrel of the 25mm eyepiece into the
open end of the correct image diagonal and secure it with
the thumbscrew.
Your telescope is now fully assembled and should resemble
Figure 1. Leave the dust cover on the front of the telescope
when it is not in use.
4. Getting Started
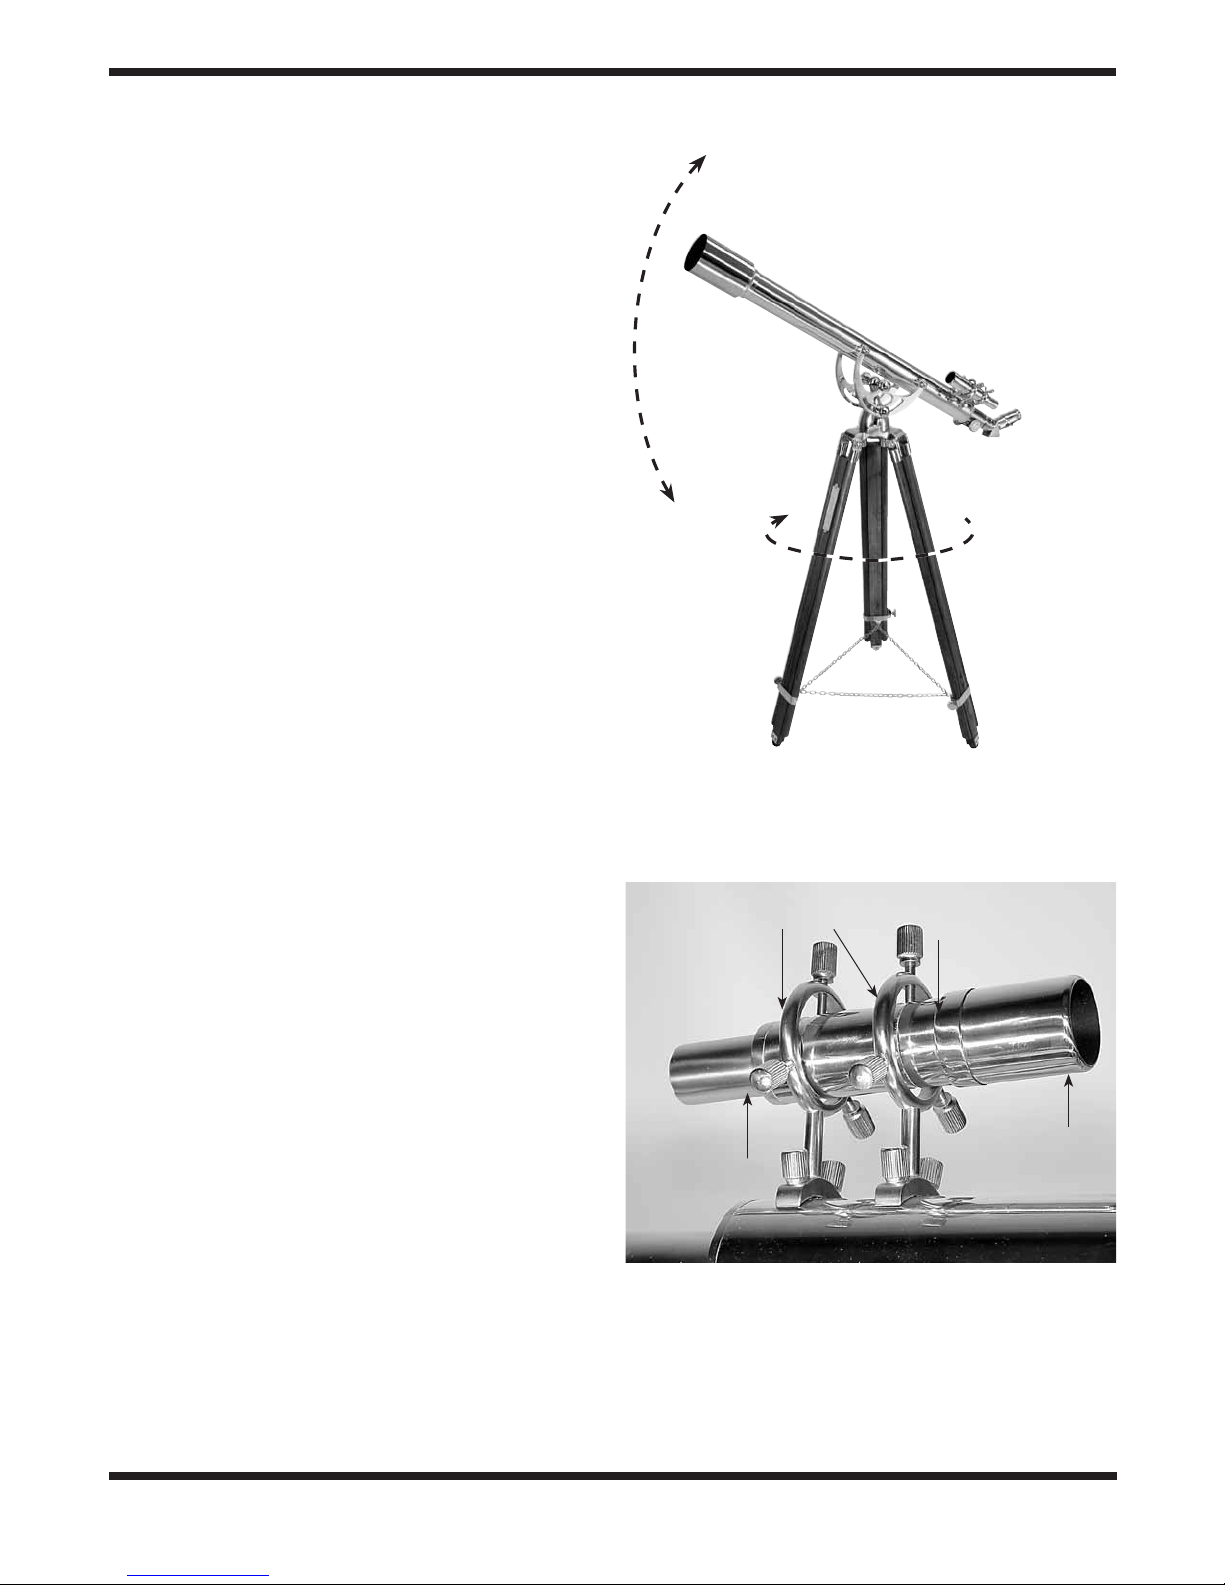
Aiming the Telescope
The Aristocrat 60mm mount permits movement along two
axes: altitude (up/down) and azimuth (left/right). See Figure 5.
Moving the telescope up/down and left/right is the “natural”
way people aim objects and this makes pointing the telescope
intuitive and easy.
Aiming in Azimuth (Left/Right)
To move the telescope in azimuth, loosen the azimuth lock
knob, take hold of the telescope and gently rotate the telescope to the desired position. Then re-tighten the azimuth
lock knob.
Aiming in Altitude (Up/Down)
With your hand firmly supporting the focuser end of the telescope, loosen the altitude lock lever and lift or lower the telescope close to the desired position. As you get close to where
you want the telescope to be aimed, tighten the lock lever
slightly to increase the tension and make slower, more stable
movements. When you are in the desired position, completely
tighten the lock lever.
If the altitude movement seems too loose or too tight when
the altitude lock lever is completely loosened, you will want to
increase the tension on the altitude cradle. Turn the altitude
tension discs clockwise or counter clockwise to increase or
decrease altitude tension on the mount, using the discs on
both sides of the mount. Adjust until the altitude motion feels
comfortable for you. Once set, this adjustment will rarely need
to be made again.
4
Page 5
Focusing the Telescope
With the 25mm eyepiece securely inserted into the correctimage diagonal, aim the optical tube so the front (open) end is
pointing in the general direction of an object at least 1/4 mile
away. With your fingers, slowly rotate the focus wheel until the
object comes into sharp focus. Go a little bit beyond sharp
focus until the image starts to blur again, then reverse the
rotation of the knob, just to make sure you’ve hit the exact
focus point.
Aligning the Finder Scope
The finder scope is used to aid in aiming the telescope. It is a
small, lower-powered telescope that sits on top of the main
telescope. Without it, it would be very difficult to aim your
Aristocrat 60mm.
The finder scope (Figure 6) must be aligned accurately with
the telescope for proper use. To align it, first aim the main telescope in the general direction of an object at least 1/4 mile
away–the top of a telephone pole, tree, etc. Position that
object in the center of the telescope’s eyepiece.
Now, look in the finder scope. Is the object visible? Ideally, it
should be somewhere in the field of view. If it is not, some
coarse adjustments of the six finder scope alignment thumbscrews will be needed to get the finder scope roughly parallel
to the main tube.
With the image in the finder scope’s field of view, you will now
use the six alignment thumbscrews to center the object on the
intersection of the crosshairs.
By loosening one alignment thumbscrew and tightening
another, you change the line-of-sight of the finder scope.
Continue making adjustments to the various alignment thumbscrews until the image in the eyepiece is exactly centered in
both the finder scope and telescope’s eyepiece.
Check the alignment by moving the telescope to another
object and fixing the finder scope’s crosshairs on the exact
point you want to view. Then look through the telescope’s eyepiece to see if that point is centered in the field of view. If it is,
the job is done. If not, make necessary adjustments until the
two images match.
Once aligned, the finder scope should not need realignment
unless the telescope is roughly handled or jostled.
Altitude
Azimuth
Figure 5.
Eyepieces and Magnification
The Aristocrat has two axes of motion: Altitude (up/down) and
Azimuth (left/right).
Finder scope bracket
Focus lock ring
Focusing the Finder Scope
If, when looking through the finder scope, the images appear
somewhat out of focus, you will need to refocus the finder
scope for your own eyes. Loosen the lock ring located behind
the objective lens cell on the body of the finder scope (Figure
6). Back the lock ring off a few turns, for now. Refocus the
finder scope on a distant object by threading the objective lens
cell in or out on the finder scope body. Once the image appears
sharp, lock the ring behind the objective lens cell. The finder
scope’s focus should not need to be adjusted again.
Alignment
thumbscrews (6)
Figure 6. The 6x30 correct-image finder scope.
Objective lens
55
Page 6

Your Aristocrat 60mm comes with a 25mm focal length Plössl
eyepiece that provides 36x magnification. The Aristocrat can
accept any 1.25" eyepiece (the most common eyepiece barrell diameter). Orion also makes several brass eyepieces that
will provide different magnifications for your Aristocrat 60mm.
To calculate magnification, or power, of a telescope-eyepiece
combination, simply divide the focal length of the telescope by
the focal length of the eyepiece:
Telescope Focal Length (mm)
Eyepiece Focal Length (mm)
For example, the Aristocrat 60mm, which has a focal length of
900mm, used in combination with the 25mm eyepiece, yields
a magnification of
900mm
25mm
Whatever you choose to view, always start by inserting your
lowest power (longest focal length) eyepiece to locate and
center the object. Low magnification yields a wide field of
view, which shows a much larger area in the eyepiece. This
makes finding and centering an object much easier. Trying to
find and center objects with higher power (narrow field of
view) is like trying to find a needle in a haystack!
= Magnification
= 36x
5. Terrestrial Viewing
Your Aristocrat 60mm excels in terrestrial daytime viewing. It
employs a correct-image finder scope and a correct-image
diagonal to provide views that are right-side up. This will allow
you to comfortably view nature, vistas, boats, etc. Do not view
through a closed window or bug screen as they will cause
distortions to your images. Stick with magnifications below
100x, since at higher powers images rapidly lose sharpness
and quality due to “heat waves” caused by sun-heated air.
Remember to aim well clear of the Sun, as the unfiltered
rays of the sun through the telescope can cause permanent
eye damage.
6. Astronomical Viewing
The Aristocrat 60mm was designed primarily for terrestrial
daytime viewing, but it can be used for astronomy. We recommend using an optional 90° star diagonal when viewing the
night sky.
What to Expect
So what will you see with your telescope? You should be able
to see bands on Jupiter, the rings of Saturn, craters on the
Moon, the waxing and waning of Venus, and several bright
deep-sky objects. Do not expect to see color as you do in
NASA photos, since those are taken with long-exposure cameras and have “false color” added. Our eyes are not sensitive
enough to see color in deep-sky objects except in a few of the
brightest ones.
What about tracking?
As you view objects in the night sky, you will notice that they
slowly move out of the telescope’s field of view. This is due to
the rotation of the earth. To keep an object in the telescope’s
field of view (to “track” it), you will need to make small adjustments to the altitude and azimuth position of the telescope. To
move the telescope in azimuth (left/right), unlock the azimuth
lock knob and turn the telescope a very slight amount. To
move the telescope in altitude (up/down) loosen the altitude
lock lever and make the needed adjustment.
Remember that you are seeing these objects using your own
telescope with your own eyes! The object you see in your eyepiece is in real-time, and not some conveniently provided
image from an expensive space probe. Each session with
your telescope will be a learning experience. Each time you
work with your telescope it will get easier to use, and stellar
objects will become easier to find. Take it from us, there is big
difference between looking at a well-made full-color NASA
image of a deep-sky object in a lit room during the daytime,
and seeing that same object in your telescope at night. One
can merely be a pretty image someone gave to you. The other
is an experience you will never forget!
Objects to Observe
Now that you are all set up and ready to go, one critical decision must be made: what to look at?
A. The Moon
With its rocky surface, the Moon is one of the easiest and
most interesting targets to view with your telescope. Lunar
craters, marias, and even mountain ranges can all be clearly
seen from a distance of 238,000 miles away! With its everchanging phases, you’ll get a new view of the Moon every
night. The best time to observe our one and only natural satellite is during a partial phase, that is, when the Moon is NOT
full. During partial phases, shadows are cast on the surface,
which reveal more detail, especially right along the border
between the dark and light portions of the disk (called the
“terminator”). A full Moon is too bright and devoid of surface
shadows to yield a pleasing view. Make sure to observe the
Moon when it is well above the horizon to get the sharpest
images.
Use an optional Moon filter to dim the Moon when it is very
bright. It simply threads onto the bottom of the eyepieces
(you must first remove the eyepiece from the focuser to attach
a filter). You’ll find that the Moon filter improves viewing comfort,
and also helps to bring out subtle features on the lunar surface.
6
Page 7

B. The Planets
The planets don’t stay put like the stars, so to find them you
should refer to Sky Calendar at our website (telescope.com),
or to charts published monthly in Astronomy, Sky & Telescope,
or other astronomy magazines. Venus, Mars, Jupiter, and
Saturn are the brightest objects in the sky after the Sun and
the Moon. Your Aristocrat 60mm is capable of showing you
these planets in some detail. Other planets may be visible but
will likely appear star-like. Because planets are quite small in
apparent size, optional higher-power eyepieces are recommended and often needed for detailed observations. Not all
the planets are generally visible at any one time.
JUPITER: The largest planet, Jupiter, is a great subject for
observation. You can see the disk of the giant planet and
watch the ever-changing positions of its four largest moons Io, Callisto, Europa, and Ganymede.
SATURN: The ringed planet is a breathtaking sight when it is
well positioned. The tilt angle of the rings varies over a period
of many years; sometimes they are seen edge-on, while at
other times they are broadside and look like giant “ears” on
each side of Saturn’s disk. A steady atmosphere (good seeing) is necessary for a good view. You will probably see a
bright “star” close by, which is Saturn’s brightest moon, Titan.
VENUS: At its brightest, Venus is the most luminous object in
the sky, excluding the Sun and the Moon. It is so bright that
sometimes it is visible to the naked eye during full daylight!
Ironically, Venus appears as a thin crescent, not a full disk,
when at its peak brightness. Because it is so close to the Sun,
it never wanders too far from the morning or evening horizon.
No surface markings can be seen on Venus, which is always
shrouded in dense clouds.
MARS: The Red Planet makes its closest approach to Earth
every two years. During close approaches you’ll see a red
disk, and may be able to see the polar ice cap.
C. The Stars
Stars will appear like twinkling points of light. Even powerful
telescopes cannot magnify stars to appear as more than a
point of light. You can, however, enjoy the different colors of the
stars and locate many pretty double and multiple stars. The
famous “Double-Double” in the constellation Lyra and the gorgeous two-color double star Albireo in Cygnus are favorites.
Defocusing a star slightly can help bring out its color.
D. Deep Sky Objects
Under dark skies, there are many deep sky objects that are
bright enough to be viewed with your Aristocrat 60mm, including galaxies, nebulas, and star clusters. Most deep-sky objects
are faint, so it is important that you allow plenty of time for
your eyes to adjust to the darkness. Do not expect these to
look like the photographs you see in books and magazines.
To find deep sky objects in the sky, it is best to consult a star
chart and planisphere. These guides will help you locate the
brightest and best deep sky objects for viewing with your
Aristocrat 60mm.
7. Care and Maintenance.
If you give your telescope reasonable care, it will last a lifetime. Do not store the telescope outdoors. Small components
like eyepieces and other accessories should be kept in a protective box or storage case. Keep the dust covers on the front
and rear of the telescope and finder scope when not in use.
The Aristocrat’s legs are made of Mahogany wood that has
been lacquered for protection. As long as they are kept from
excess moisture, they will not warp or bend. Should they be
exposed to moisture, dry them with a towel as soon as possible.
All the brass parts of the telescope have been treated to prevent tarnishing and discoloring. You will not need to polish the
brass. Fingerprints and other marks should be wiped off with
a soft cloth. The coating will also cause moisture that comes
in contact with the brass to “bead” on the surface. Moisture
on the brass parts should be wiped up immediately with a soft
cloth.
Cleaning Lenses
Any quality optical lens cleaning tissue and optical lens cleaning fluid specifically designed for multi-coated optics can be
used to clean the Aristocrat 60mm’s objective lens or the
exposed lenses of your eyepieces and finder scope. Never
use regular glass cleaner or cleaning fluid designed for eyeglasses
Before cleaning with fluid and tissue, blow any loose particles
off the lens with a blower bulb or compressed air. Then apply
some cleaning fluid to a tissue, never directly on the optics.
Wipe the lens gently in a circular motion, then remove any
excess fluid with a fresh lens tissue. Oily fingerprints and
smudges may be removed using this method. Use caution rubbing too hard may scratch the lens. For the larger surface
of the objective lens, clean only a small area at a time, using
a fresh lens tissue on each area. Never reuse tissues.
7
Page 8

8. Specifications
Mount: Brass, altazimuth
Optical tube: Brass, coated to prevent rust and tarnish
Objective lens diameter: 60mm
Objective lens: Achromatic, fully coated
Focal length: 900mm
Focal ratio: f/15
Focuser: Brass rack-and-pinion, accepts 1.25" eyepieces and accessories
Eyepiece: Brass with chrome barrel, 25mm Plössl
Magnification with supplied eyepiece: 36x
Diagonal: Brass with chrome barrel, 1.25", correct-image, 45°
Finder scope: 6x30 correct-image, achromatic
Tripod: Mahogany wood, lacquered
Weight: 22lbs. 13oz.
One-Year Limited Warranty
This Orion Aristocrat 60mm is warranted against defects in materials or workmanship for a period of
one year from the date of purchase. This warranty is for the benefit of the original retail purchaser
only. During this warranty period Orion Telescopes & Binoculars will repair or replace, at Orion’s
option, any warranted instrument that proves to be defective, provided it is returned postage paid to:
Orion Warranty Repair, 89 Hangar Way, Watsonville, CA 95076. If the product is not registered,
proof of purchase (such as a copy of the original invoice) is required.
This warranty does not apply if, in Orion’s judgment, the instrument has been abused, mishandled,
or modified, nor does it apply to normal wear and tear. This warranty gives you specific legal rights,
and you may also have other rights, which vary from state to state. For further warranty service information, contact: Customer Service Department, Orion Telescopes & Binoculars, 89 Hangar Way,
Watsonville, CA 95076; (800) 676-1343.
Orion Telescopes & Binoculars
89 Hangar Way, Watsonville, CA 95076
Customer Support Help Line (800) 676-1343 • Day or Evening
8
 Loading...