

Page 1

EN
Advanced Weather Station
with Thermo-hydro Sensor
26
Model: WMR100TH
USER MANUAL
Page 2

Advanced Weather Station
with Thermo-hydro sensor
Model: WMR100TH
USER MANUAL
CONTENTS
Introduction .................................................................2
Packing Contents ....................................................... 2
Thermo-Hydro Sensor (THGR810) .......................... 2
Accessories - Sensors ............................................. 2
Overview ......................................................................3
LCD Display ............................................................. 5
Getting Started ............................................................7
Set up Base Station .................................................7
Set up Sensor ............................................................8
Batteries ................................................................... 9
Set Channel ..........................................................10
Base Station .............................................................. 10
Change Display / Setting ........................................ 10
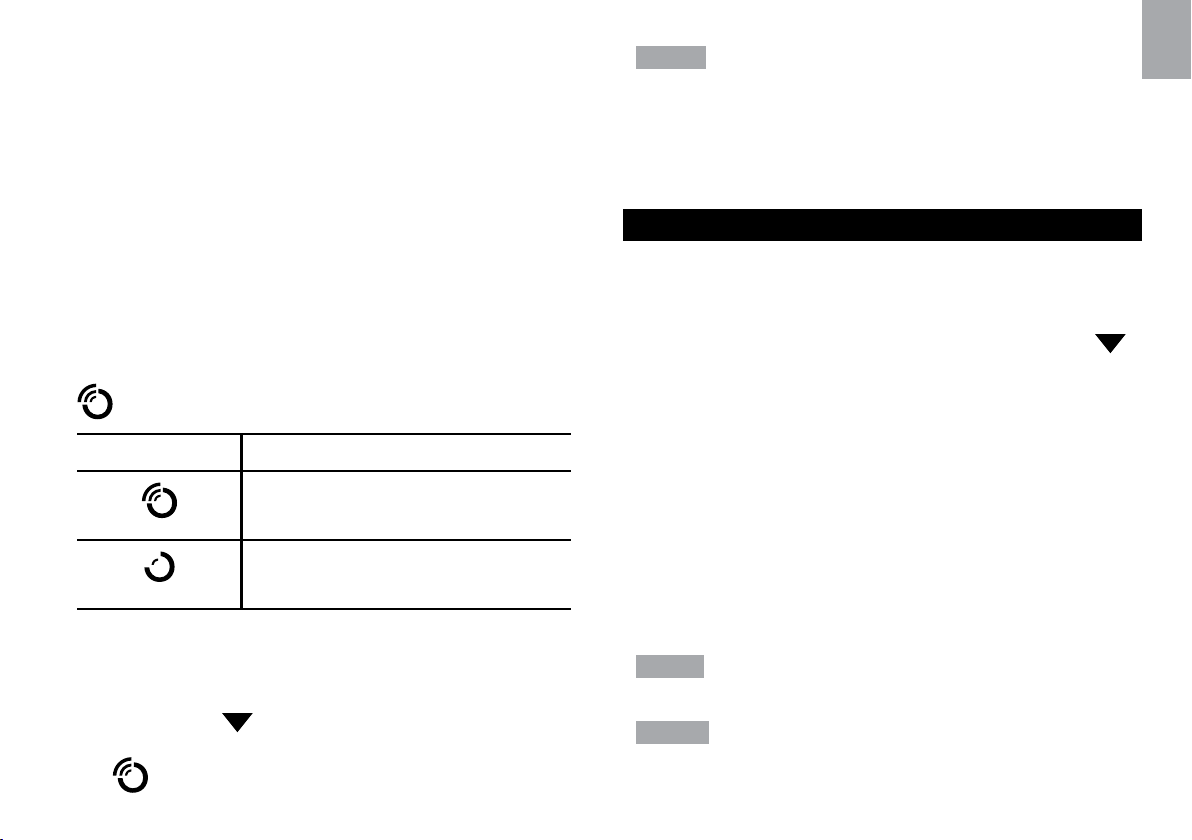
Clock Reception ......................................................10
Clock / Calendar ....................................................... 11
Clock Alarm .............................................................12
Moon Phase ..............................................................12
Auto Scanning Function ......................................... 13
Weather Forecast .................................................... 13
Temperature and Humidity ..................................... 13
Temperature and Humidity Trend ......................... 15
Comfort Level ........................................................ 15
Wind Direction / Speed ............................................ 16
UVI / Barometer / Rainfall ........................................ 17
UV Index ................................................................ 18
Barometer .............................................................. 18
Rainfall .................................................................... 19
Weather Alarms ........................................................ 19
Connection to PC ..................................................... 20
Backlight ................................................................... 20
Reset ......................................................................... 20
Troubleshooting ....................................................... 20
Precautions .............................................................. 21
Specifications ........................................................... 22
About Oregon Scientific .......................................... 24
EU-Declaration of Conformity ................................. 24
FCC Statement ......................................................... 24
Declaration of Conformity ...................................... 25
1
EN
Page 3
EN
INTRODUCTION
Thank you for selecting the Oregon ScientificTM Weather
Station (WMR100TH).
The base station is compatible with other sensors. To
purchase additional sensors, please contact your local
retailer.
The “Virtual Weather Station” software and manual are
available for download at this address:
http://www2.oregonscientific.com/assets/software/
wmr100.exe
THERMO-HYDRO SENSOR (THGR810)
Sensors with this logo
NOTE Please keep this manual handy as you use
your new product. It contains practical step-by-step
instructions, as well as technical specifications and
warnings you should know about.
are compatible with this unit.
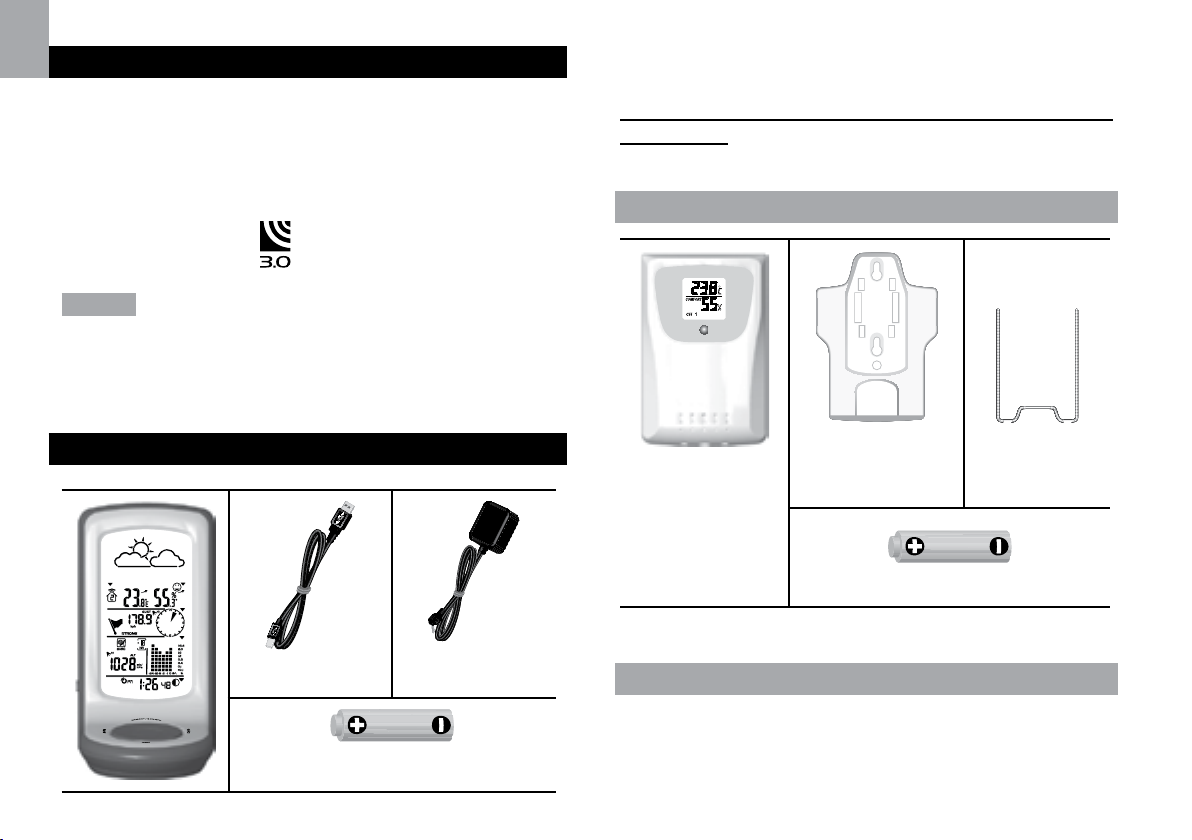
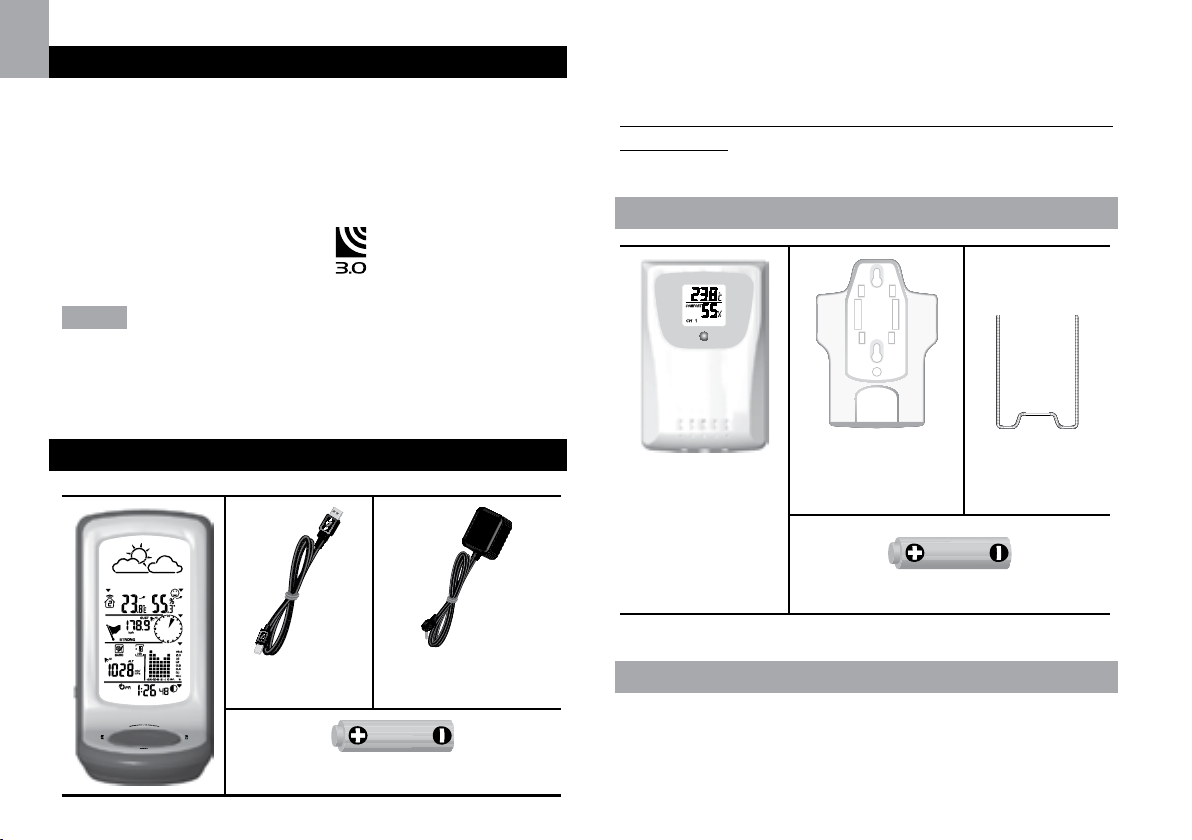
PACKAGING CONTENTS
1 x USB Cable
4 x UM-3 / AA
1 x 6V Adapter
1 x Wall mount
bracket
2 x UM-4 / AAA
1 x Table
stand
ACCESSORIES – SENSORS
This product can work with up to 10 sensors at any one
time to capture outdoor temperature, relative humidity
or UV readings in various locations. Optional wireless
2
Page 4
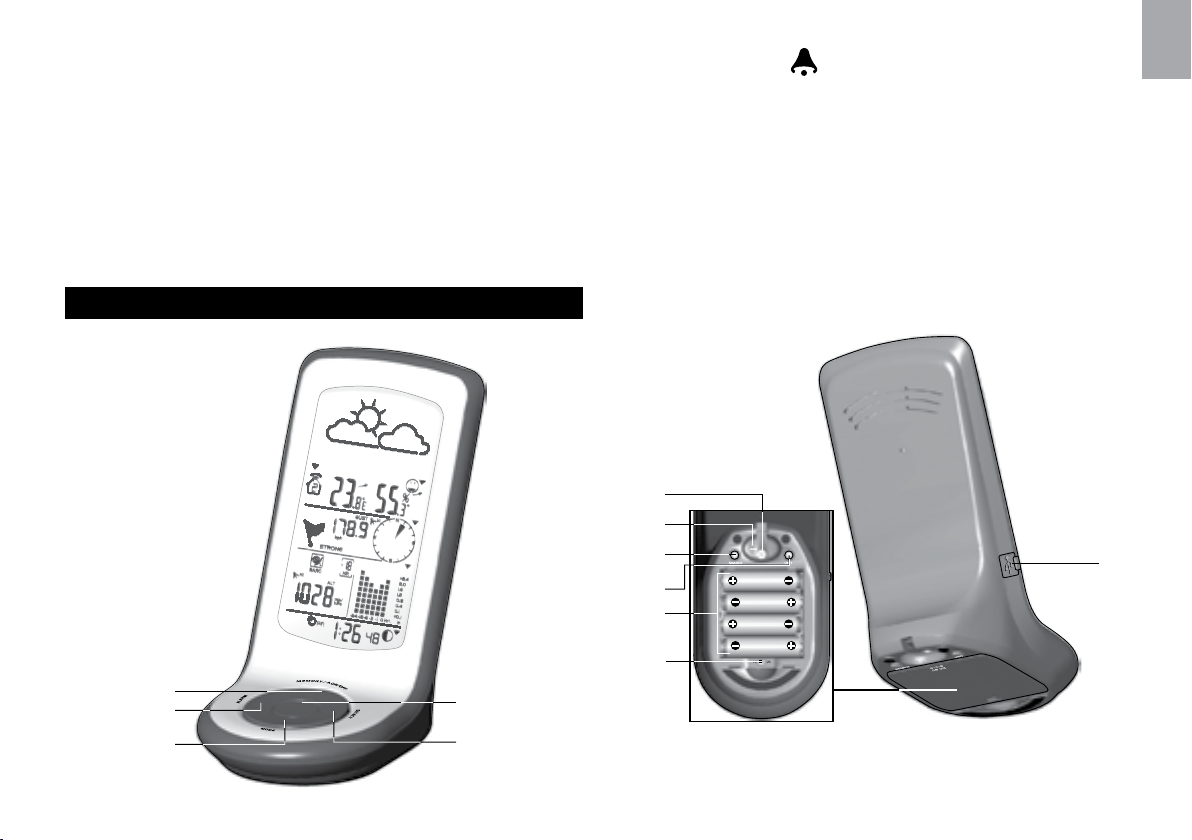
remote sensors such as those listed below can be
purchased separately. For more information, please
contact your local retailer.
• Thermo-hygro THGR800 (3-Ch)
• UV UVN800
• Rain Gauge PCR800
• Wind sensor WTGR800
OVERVIEW
1. MEMORY / ON/OFF: Read the max / min
memory record; activate / deactivate alarms
2. ALARM: View and set alarms for barometer,
temperature, humidity, rainfall and wind speed
3. MODE: Switch between the different display modes
/ settings
4. Rotating dial: Rotate left or right to increase or
decrease the values of the selected reading
5. SELECT: Switch between the different areas
1
2
3
4
5
7
EN
6
1
2
3
4
5
1. AC adapter socket
2. RESET: Returns unit to default settings
3
Page 5
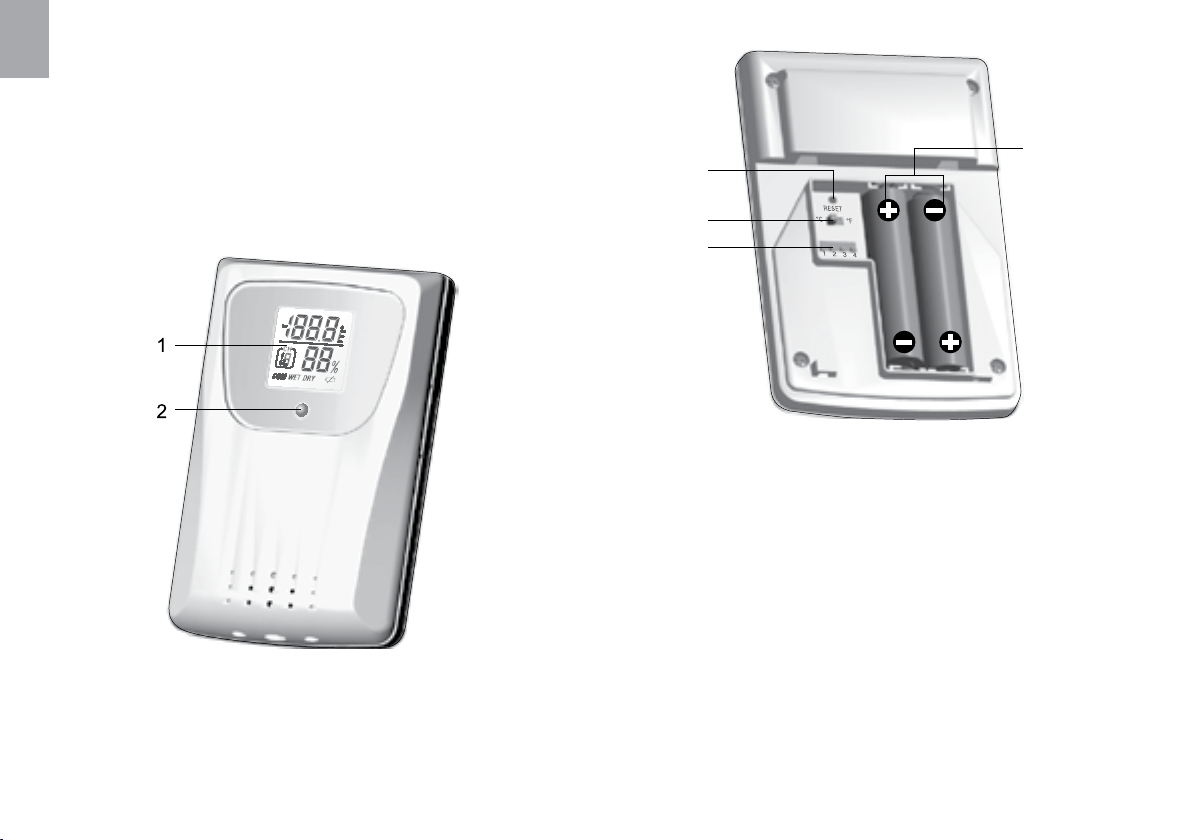
EN
3. SEARCH: Searches for sensors or for the radio-
controlled clock signal
4. UNIT: Selects unit of measurement
5. Battery compartment
6. WMR100 only – EU / UK radio signal
7. USB connector
4
1
2
3
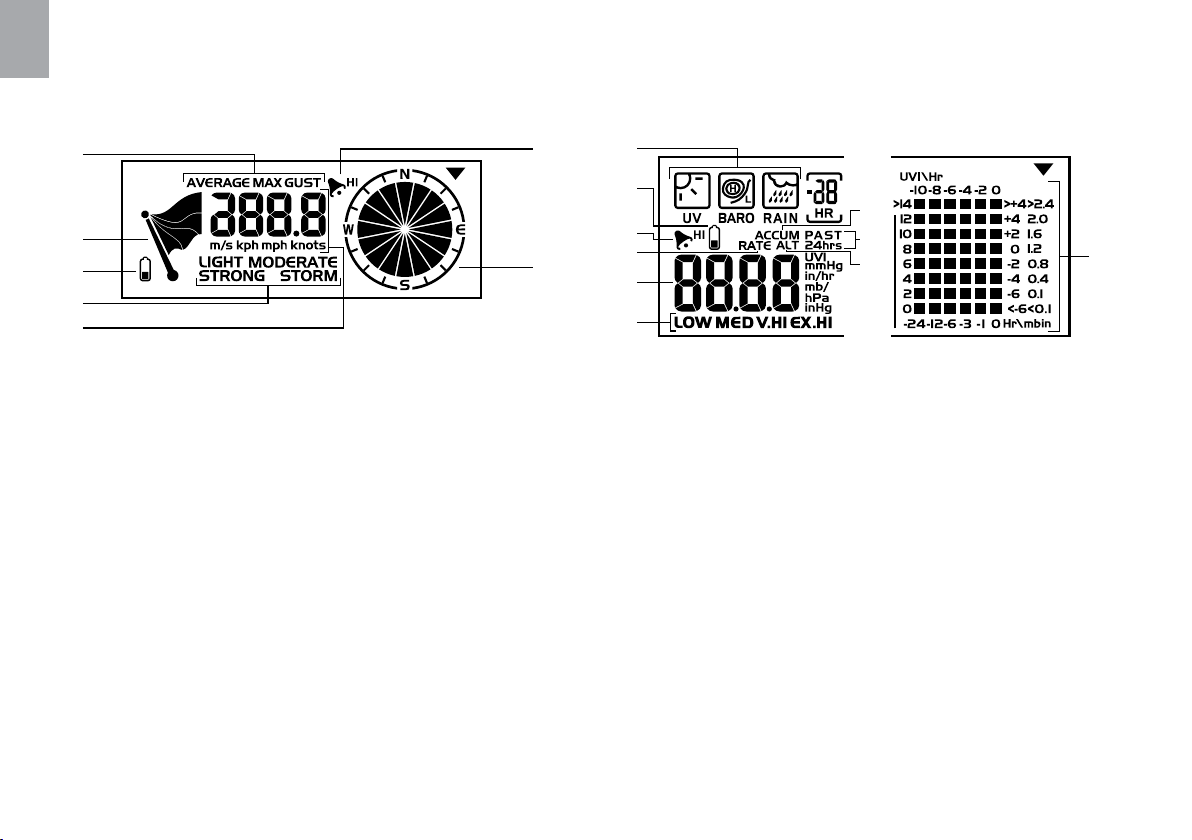
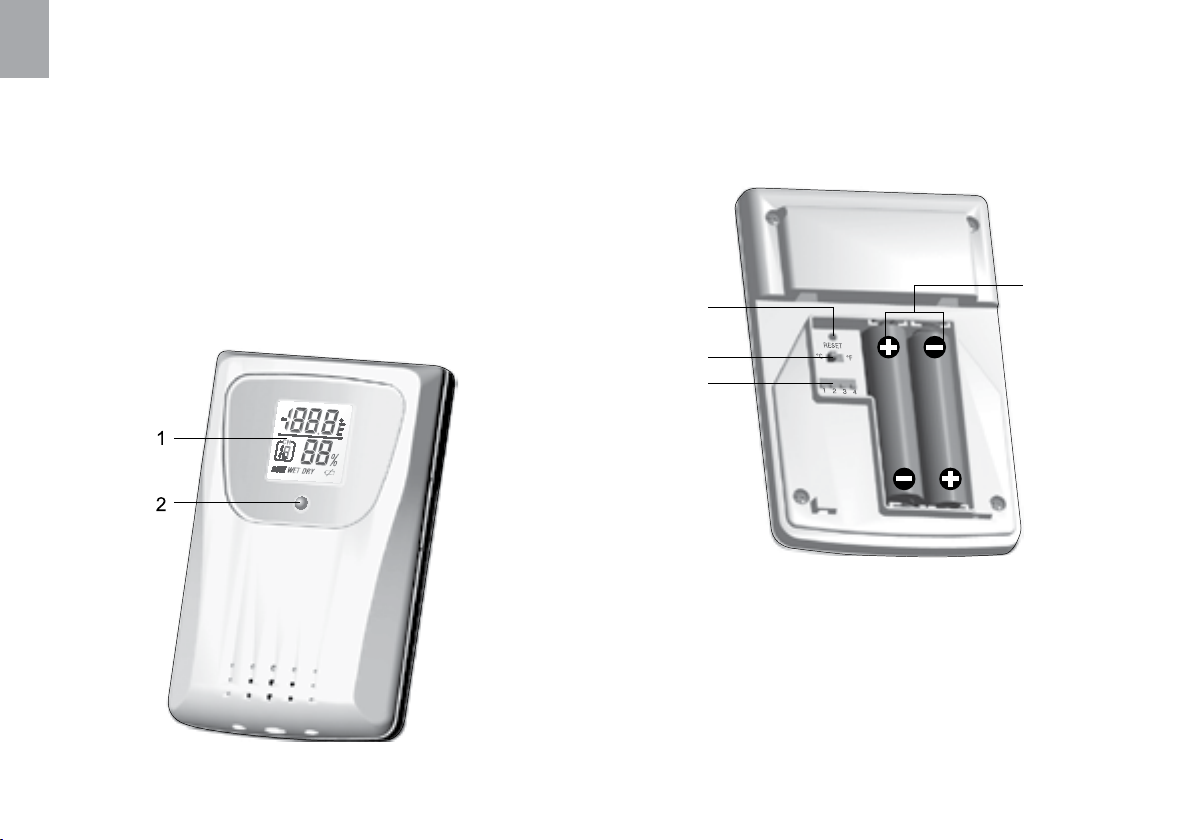
1. RESET hole
2. °C / °F switch (THGN810 does not have this switch)
3. CODE switch
4. Battery compartment
1. LCD display (the THGN810 does not have an LCD
screen): Shows the channel number, temperature
and humidity readings, and comfort level
2. LED status indicator
4
Page 6

LCD DISPLAY
1
7. Low battery icon for base station
8. Humidity / Dew Point Area
EN
6
7
1
Temperature / Heat Index / Wind Chill Area
2
3
4
2
8
5
6
3
7
8
9
4
1. Temperature trend
2. Wind Chill level - temperature is showing
5
1. Weather Forecast Area
2. Temperature / Heat Index / Wind Chill Area
3. Wind Speed / Wind Direction Area
4. UVI / Barometer / Rainfall Area
5. Clock / Alarm / Calendar / Moon Phase Area
6. AC adapter icon - displays when unplugged
3. Heat Index level - temperature is showing
4. HI / LO temperature, HI Heat Index and LO Wind
Chill alarms are set
5. Selected area icon
6. Indoor / Outdoor channel temperature and humidity
is displayed
7. MAX / MIN temperature
8. Outdoor sensor battery is low
9. Temperature (°C / °F)
5
Page 7
EN
6
1
Wind Speed / Wind Direction Area
(Wind sensor optional)
1
2
3
4
5
UVI / Barometer / Rainfall Area
(Rain sensor and UV sensor optional)
2
7
3
7
4
8
9
10
5
6
1. Wind speed levels: AVERAGE / MAX / GUST
2. Wind speed level indicator
3. Outdoor wind sensor battery is low
4. Wind speed level description
5. Gust wind or wind speed reading (m / s, kph, mph or
knots)
6. HI gust wind alarm is set
7. Wind direction display
1. UVI / barometer / rainfall readings is showing
2. Outdoor UV / rain sensor battery is low
3. UV / barometer / rainfall alarm is set
4. Rain rate is showing
5. UVI / barometric pressure (mmHg, inHg or mb / hPa)
/ rainfall readings (in / hr or mm / hr)
6. UVI level indicator
7. Accumulated rainfall is showing
8. Past 24hrs rainfall is showing
9. Altitude is showing
10. UVI / barometric pressure / rainfall historical bar
chart display
6
Page 8
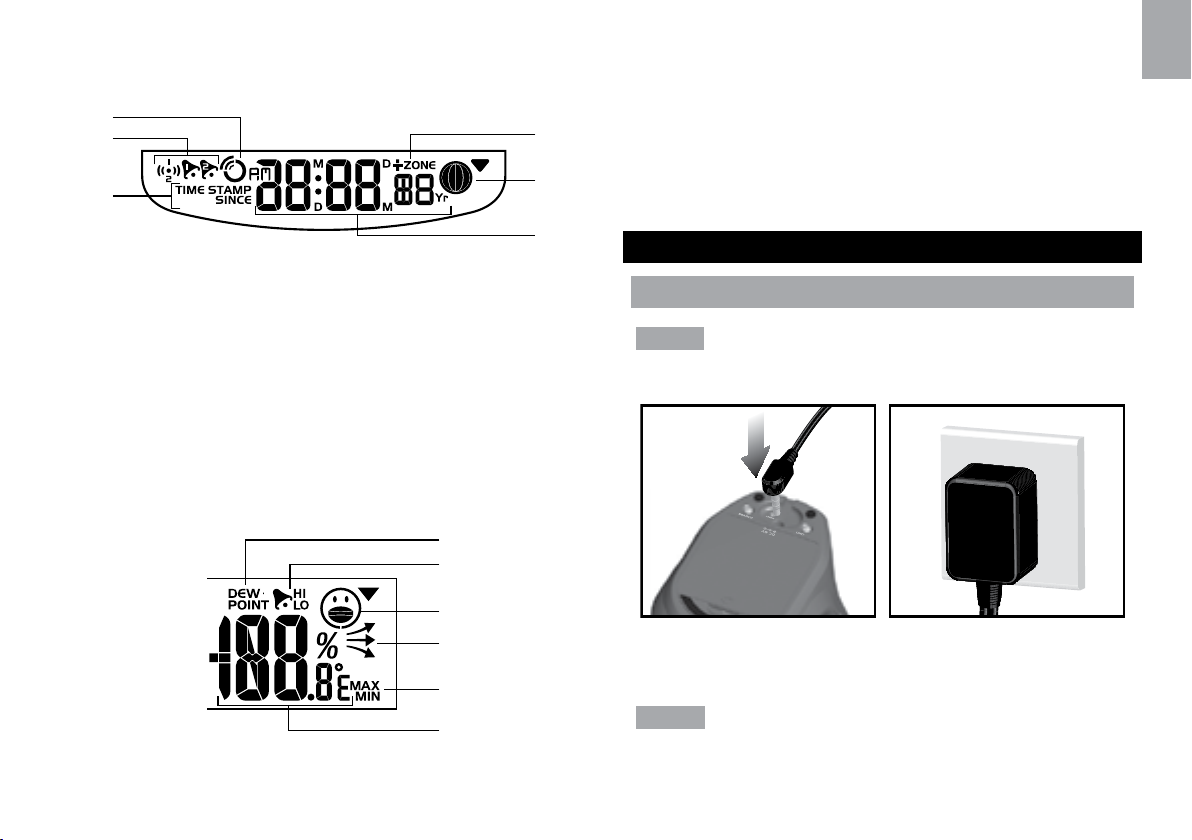
Clock / Alarm / Calendar / Moon Phase Area
1
1
2
3
2. HI / LO humidity and Dew Point alarms are set
3. Comfort levels
4
5
4. Humidity trend
5. MAX / MIN humidity
6. Humidity reading
EN
6
1. Clock radio reception
2. Alarm 1 and 2 are displayed and set
3. Timestamp is displayed
4. Offset time zone
5. Moon phase
6. Time / date / calendar
Humidity / Dew Point Area
GETTING STARTED
SET UP BASE STATION
NOTE Install batteries in the remote sensor before the
base station matching the polarities (+ and -).
2
3
1. Dew point level - Temperature is showing
4
5
6
For continuous use, please install the AC adapter. The
batteries are for back-up use only.
NOTE Please make sure the socket-outlet is installed
near the equipment and is easily accessible.
7
Page 9
EN
Wind Speed /
Wind Direction
Area
Battery in the wind sensor is low.
Install the base station batteries (4 x UM-3 / AA)
matching the polarity + and -. Press RESET after each
battery change.
NOTE Do not use rechargeable batteries. It is
recommended that you use alkaline batteries with this
product for longer performance.
The battery icon indicator
following areas:
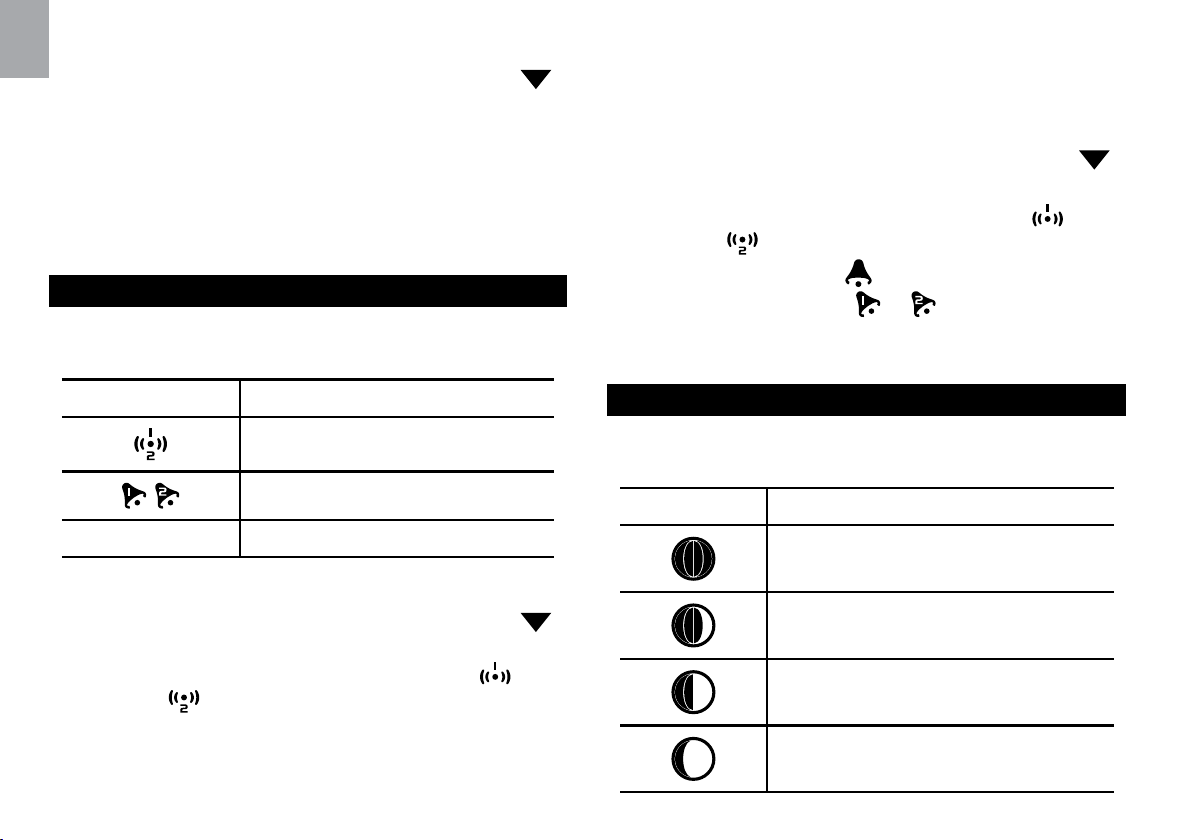
AREA MEANING
Weather
Forecast Area
Temperature
/ Heat Index /
Wind Chill Area
Battery in the base station is low.
disconnected.
The displayed channel indicates
the outdoor sensor for which
battery is low.
may appear in the
will show when AC adapter is
UVI / Barometer
/ Rainfall Area
Battery in the UV / Rain sensor
is low.
SET UP SENSOR
To set up sensor:
1. Slide battery door open.
2. Insert the batteries, matching the polarity (+ and -).
3. Use CODE to select the channel.
4. THGR810 only - Set the temperature unit.
5. Place the sensor near the main unit. Press RESET
on the sensor. Then, press the approriate main unit
8
Page 10
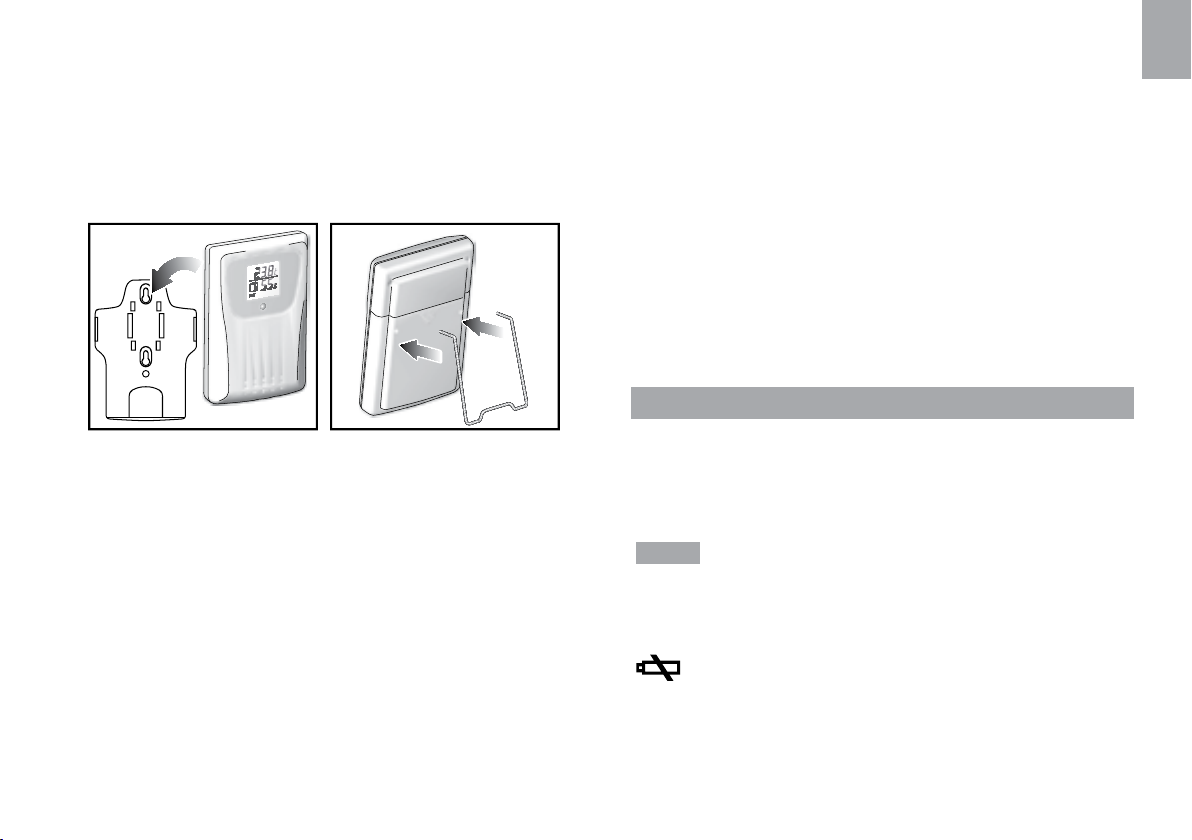
button (as specified in the main unit manual) to
initiate signal sending between the sensor and the
main unit.
6. Close the sensor battery compartment.
7. Secure the sensor in the desired location using the
wall mount or table stand.
For best results:
• Place the sensor out of direct sunlight and moisture.
• Do not place the sensor more than 100 m (30 ft)
from the main (indoor) unit.
• Position the sensor so that it faces the main (indoor)
unit, minimizing obstructions such as doors, walls,
and furniture.
• Place the sensor in a location with a clear view to the
sky, away from metallic or electronic objects.
• Position the sensor close to the main unit during cold
winter months as below-freezing temperatures may
affect battery performance and signal transmission.
The transmission range may vary depending on many
factors. You may need to experiment with various
locations to get the best results.
Wireless ranges can be impacted by a variety of factors
such as extremely cold temperatures. Extreme cold
may temporarily reduce the effective range between the
sensor and the base station. If the unit’s performance
fails due to low temperature, the unit will resume proper
functioning as the temperature rises to within the normal
temperature range (i.e. no permanent damage will occur
to the unit due to low temperatures).
BATTERIES
Insert batteries before first use, matching the polarity (+
and -) as shown in the battery compartment. For best
results, install batteries in the remote sensor before the
main unit. Press RESET after each battery change.
NOTE It is recommended that you use alkaline batteries
with this product for longer performance and lithium
batteries in below freezing temperatures (0°C / 32°F).
Do not use rechargeable batteries.
shows on the THGR810 when the batteries are
low.
EN
9
Page 11
EN
SET CHANNEL
Set the channel by adjusting the CODE switch to one of
the following settings.
CHANNEL NUMBER SWITCH SETTING
1
2
3
4
5
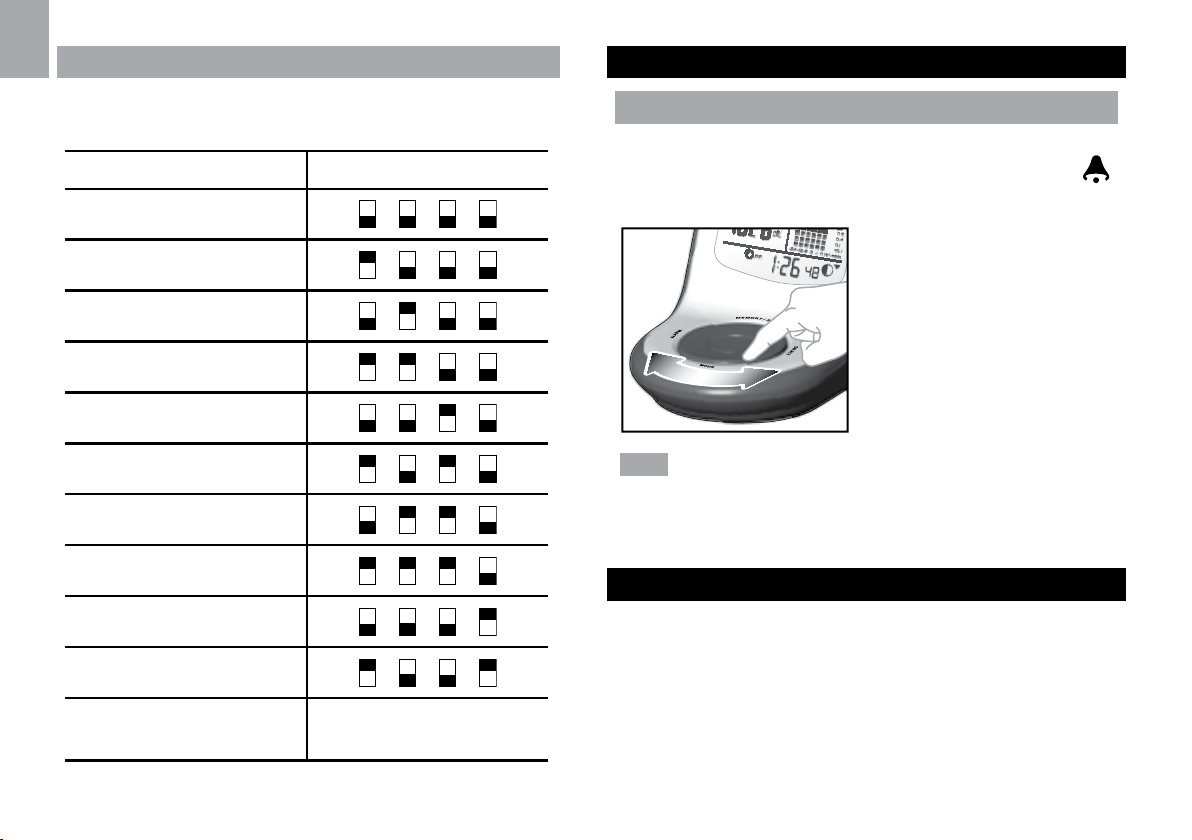
BASE STATION
CHANGE DISPLAY / SETTING
To change the display and settings, use the following
buttons on the rotating dial: SELECT, MEMORY /
ON/OFF, MODE and ALARM.
In addition, the UNIT
and SEARCH buttons
located at the bottom of
the base station allows
pre-setting of the remote
sensor channels and the
measurement units for
display.
6
7
8
9
10
10 Other switch settings
(Not recommend)
TIP To exit from the setting mode, push any button.
Alternatively, the base station will automatically exit after
30 seconds.
CLOCK RECEPTION
This product is designed to synchronize its calendar
clock automatically once it is brought within range of a
radio signal:
WMR100:
• DCF-77 generated from Frankfurt, Germany for
Central Europe
• MSF-60 generated from Anthorn, England
10
Page 12
The radio signal range is 1500 km (932 miles).
WMR100A:
• WWVB-60 generated from the atomic clock in Fort
Collins, Colorado
The radio signal range is 3219 km (2000 miles).
WMR100 only - slide the EU / UK switch to the appropriate
setting based on your location. Press RESET whenever
you change the selected setting.
The reception icon will blink when it is searching for a
signal. If the radio signal is weak it can take up to 24
hours to get a valid signal reception.
indicates the status of the clock reception signal.
ICON MEANING
Time is synchronized.
Receiving signal is strong
Time is not synchronized.
Receiving signal is weak
To enable (and force a signal search) / disable the clock
radio reception (clock synchronization):
1. Press SELECT to navigate to the Clock / Calendar /
Alarm Area.
will show next to the Area.
2. Press and hold SEARCH.
appears when it is enabled.
NOTE For best reception, the base station should be
placed on a flat, non-metallic surface near a window
in an upper floor of your home. The antenna should
be placed away from electrical appliances and not be
moved around when searching for a signal.
CLOCK / CALENDAR
To manually set the clock:
(You only need to set the clock and calendar if you have
disabled the clock radio reception.)
1. Press SELECT to navigate to the Clock Area.
will show next to the Area.
2. Press and hold MODE to change the clock setting.
The setting will blink.
3. Rotate the dial left or right to decrease or increase
the setting value.
4. Press MODE to confirm.
5. Repeat steps 1 to 5 to set the time zone offset hour
(+ / -23 hours), 12 / 24 hour format, hour, minute,
year, date / month format, month, date and weekday
language.
NOTE If you enter +1 in the time zone setting, this will
give you your regional time plus 1 hour.
NOTE The weekday is available in English, French,
German, Italian or Spanish.
11
EN
Page 13
EN
To change the clock display:
1. Press SELECT to navigate to the Clock Area.
will show next to the Area.
2. Press MODE to toggle between:
• Clock with Seconds
• Clock with Weekday
• Calendar
CLOCK ALARM
The clock has 2 alarms that can be set to sound with
a beep.
4. Rotate the dial left or right to change the setting.
5. Press ALARM to confirm.
To activate / deactivate an alarm:
1. Press SELECT to navigate to the Clock Area.
will show next to the Area.
2. Press ALARM to toggle between alarm 1
alarm 2
3. Press MEMORY /
deactivate the alarm.
alarm is activated.
.
ON/OFF to activate or
or appears when the
and
ICON MEANING
Alarm 1 or 2 is displayed
Alarm 1 or 2 is activated
No icons No alarm is set
To set an alarm:
1. Press SELECT to navigate to the Clock Area.
will show next to the Area.
2. Press ALARM to toggle between alarm 1
alarm 2
3. When you’ve selected the alarm you wish to
change, press and hold ALARM. The alarm setting
will blink.
display.
and
MOON PHASE
The Calendar must be set for this feature to work (see
Clock / Calendar section).
ICON DESCRIPTION
New moon
12
Waxing crescent
First quarter
Waxing gibbous
Page 14
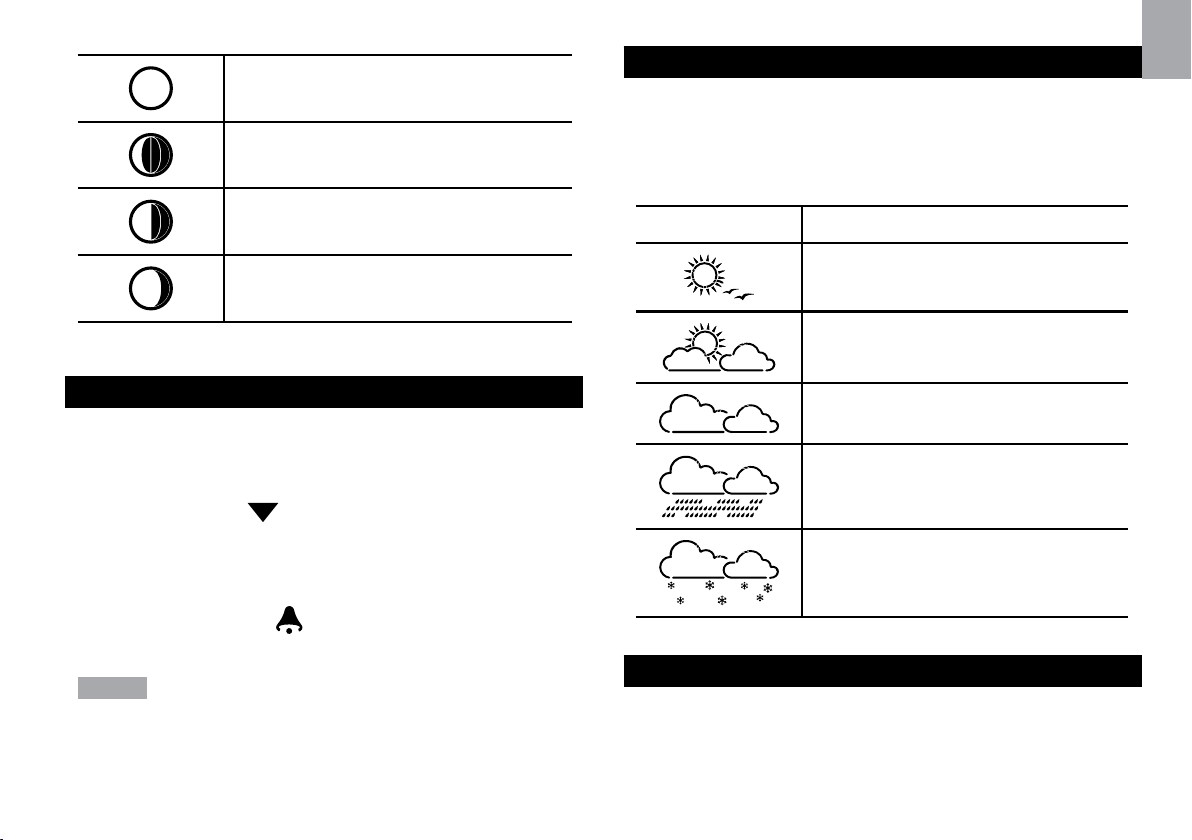
Full moon
Waning gibbous
WEATHER FORECAST
EN
The weather display in the top part of the screen shows
the current weather and the weather forecast for the next
12-24 hours within a 30-50 km (19-31 mile) radius.
Weather Forecast Area
Third quarter
Waning crescent
AUTO SCANNING FUNCTION
To activate the outdoor temperature and humidity
auto-scan function:
1. Press SELECT to navigate to the Temperature or
Humidity Area.
2. Press and hold MODE to activate auto-scan. The
temperature and humidity display will scroll from
indoor to ch1 through to ch10.
3. Press MEMORY /
to stop the auto-scan.
NOTE Channel 1 is used for the outdoor temperature
and humidity sensor in the remote wind sensor.
Additional temperature and humidity sensors can use
other channels.
will show next to the Area.
ON/OFF or MODE or ALARM
ICON DESCRIPTION
Sunny
Partly cloudy
Cloudy
Rainy
Snowy
TEMPERATURE AND HUMIDITY
The weather station displays indoor and outdoor
readings for:
1. Current, minimum and maximum temperatures and
relative humidity.
13
Page 15
EN
2. Comfort level indicator and trend line.
3. Heat index, wind chill and dew point level.
The weather station can connect up to 10 remote
sensors.
shows which remote sensor’s data you are viewing.
appears when indoor data is displayed.
The timestamp records the date and time when storing
the temperature and humidity readings in memory.
To select the temperature measurement unit:
Press UNIT (at the bottom of the base station) to select
°C / °F.
NOTE The unit of all temperature related displays will
be changed simultaneously.
To view readings from indoor / outdoor sensors
(1-10) for temperature and humidity:
1. Press SELECT to navigate select the Temperature
or Humidity Area.
2. Rotate the dial left or right to select the channel.
will show next to the Area.
To view minimum and maximum temperature or
humidity:
1. In the Temperature or Humidity Area, press MODE
repeatedly to cycle through the readings for:
• Current Temperature
• Heat Index
• Wind Chill
• Dew Point
• Humidity
2. For each of the above readings, press MEMORY
ON/OFF repeatedly to toggle respectively
/
between:
• Current / MAX / MIN temperature
• Current / MAX heat index
• Current / MIN wind chill
• Current / MAX / MIN dew point
• Current / MAX / MIN humidity
The timestamp is displayed accordingly in the Clock
Area.
To clear the memories and timestamp for the
temperature, heat index, wind chill, humidity and
dew point readings:
In the Temperature or Humidity Area, press and hold
MEMORY /
ON/OFF to clear the readings.
14
Page 16
To change the high / low temperature, heat index,
wind chill, humidity and dew point alarms:
1. In the Temperature or Humidity Area, press ALARM
repeatedly to toggle between high / low alarms for
temperature, heat index, wind chill, humidity and
dew point readings.
2. Press and hold ALARM to enter the alarm setting.
3. Rotate the dial left or right to set the desired values.
4. Press ALARM to confirm the setting.
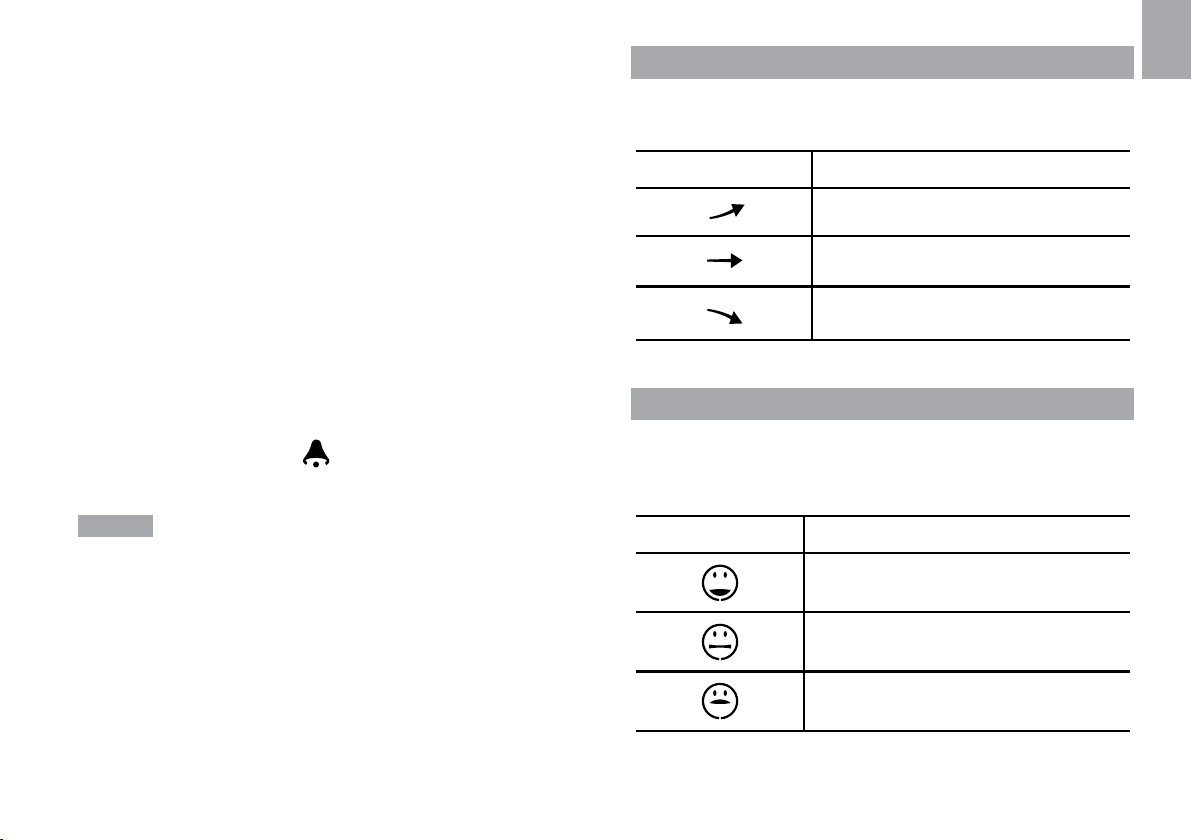
TEMPERATURE AND HUMIDITY TREND
EN
The trend lines are shown next to the temperature and
humidity readings. The trend is shown as follows:
TREND ICON DESCRIPTION
Rising
Steady
To activate / deactivate the high / low temperature,
heat index, wind chill, humidity and dew point
alarms:
1. In the Temperature or Humidity Area, press ALARM
repeatedly to select the desired alarm.
2. Press MEMORY /
deactivate the alarm.
NOTE The dew point advises at what temperature
condensation will form. The wind chill factor is based on
the combined effects of temperature and wind speed.
ON/OFF to activate or
Falling
COMFORT LEVEL
The Comfort Zone icon indicates how comfortable the
climate is based on current temperature and humidity
measurements:
ICON DESCRIPTION
Comfortable
Neutral
Uncomfortable
15
Page 17
EN
WIND DIRECTION / SPEED
The base station provides
wind speed and wind
direction information.
To read the wind direction
find the compass point the
is pointing to.
Moderate 9-25 mph (~14-41 km/h)
Strong 26-54 mph (~42-87 km/h)
Storm >55 mph (>88 km/h)
The timestamp records the date and time when storing
the wind speed readings.
NOTE Wind sensor optional.
To select the wind speed unit:
Press UNIT (at the bottom of the base station) to switch
between:
• Metres per second (m / s)
• Kilometers per hour (kph)
• Miles per hour (mph)
• Knots (knots)
The wind level is shown by a series of icons:
ICON LEVEL DESCRIPTION
N/A <2 mph (<4km/h)
Light 2-8 mph (3~13 km/h)
To display the AVERAGE and GUST wind:
1. Press SELECT to navigate to the Wind Speed and
Wind Direction Area.
2. Press MODE to toggle between AVERAGE and
GUST wind readings.
To display the maximum speed and direction for
gust wind:
In the Wind Speed and Wind Direction Area, press
MEMORY /
/ MAX GUST wind readings. The timestamp is displayed
accordingly in the Clock Area.
To clear the memories and timestamp for the wind
readings:
In the Wind Speed and Wind Direction Area, press and
hold MEMORY /
To change the high gust wind speed alarm:
1. In the Wind Speed and Wind Direction Area, press
16
ON/OFF to toggle between wind speed
ON/OFF to clear the readings.
will show next to the Area.
Page 18
and hold ALARM to enter the high gust wind alarm
setting.
2. Rotate the dial left or right to set the desired values.
3. Press ALARM to confirm the settings.
To activate / deactivate the high gust wind speed
alarm:
1. In the Wind Speed and Wind Direction Area, press
ALARM repeatedly to select the desired alarm.
2. Press MEMORY /
deactivate the alarm.
ON/OFF to activate or
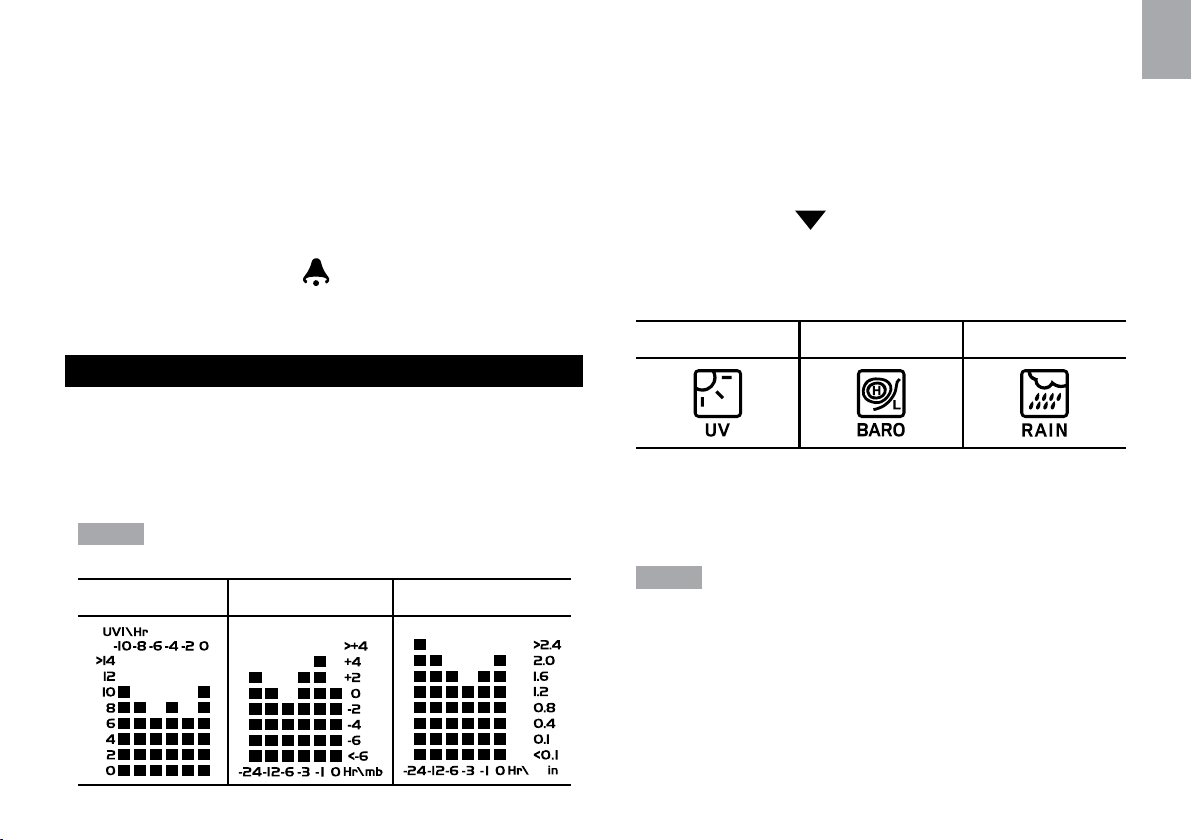
UVI / BAROMETER / RAINFALL
The weather station works with one UV sensor and
one rain gauge. The station is capable of storing and
displaying the hourly history data for the last 10 hours
of UV index, and 24 hours of rainfall and barometric
pressure readings.
NOTE Rain sensor and UV sensor optional.
The bar chart display shows the current and historical
data for the UV index, barometric pressure and rainfall
readings.
To view the UV / Barometer / Rainfall readings:
1. Press SELECT to navigate to the UV / Barometer /
Rainfall Area.
2. Press MODE to toggle between UVI / Barometer
/ Rainfall readings. The corresponding icon will
appear:
UVI BAROMETER RAINFALL
3. Rotate the dial left or right to view the historical data
for the selected area. The corresponding historical
readings are showing.
will show next to the Area.
EN
UVI BAROMETER RAINFALL
NOTE The number shown in the HR icon indicates how
long ago each measurement was taken (e.g. 2 hours
ago, 3 hours ago, etc.).
To select the measurement unit for the barometer or
rainfall readings:
In the UV / Barometer / Rainfall Area, press UNIT (at the
bottom of the base station) to switch between:
17
Page 19

EN
• For barometer: Millimeters of mercury (mmHg),
inches of mercury (inHg), millibars per hectopascal
(mb / hpa).
• For rainfall: Millimeters (mm), inches (in), inches per
hour (in / hr) or millimeters per hour (mm / hr).
To activate / deactivate the high UV alarm:
1. In the UV / Barometer / Rainfall Area and UVI
reading display, press ALARM repeatedly to select
the desired alarm.
2. Press MEMORY /
deactivate the alarm.
ON/OFF to activate or
UV INDEX
The UV index levels are as follows:
UV INDEX DANGER
LEVEL
0-2 Low
3-5 Moderate
6-7 High
8-10 Very high
11 and above Extremely high
To change the high UV alarm:
1. In the UV / Barometer / Rainfall Area and UVI
reading display. Press and hold ALARM to enter the
high UV alarm setting.
2. Rotate the dial left or right to set the desired values.
3. Press ALARM to confirm the settings.
ICON
BAROMETER
To change the barometer alarm:
1. In the UV / Barometer / Rainfall Area and Barometer
reading display. press and hold ALARM to enter the
Barometer alarm setting.
2. Rotate the dial left or right to set the desired values.
3. Press ALARM to confirm the settings.
To activate / deactivate the barometer alarm:
1. In the UV / Barometer / Rainfall Area and Barometer
reading display, press ALARM repeatedly to select
the desired alarm.
2. Press MEMORY /
deactivate the alarm.
To set the altitude level compensation for the
Barometer readings:
1. In the UV / Barometer / Rainfall Area and Barometer
reading display. Press and hold MODE to enter the
altitude setting.
2. Rotate the dial left or right to set the desired values.
3. Press MODE to confirm the setting.
18
ON/OFF to activate or
Page 20
RAINFALL
To view the current hour, accumulated or last 24
hours rainfall history:
In the UV / Barometer / Rainfall Area and Rainfall reading
display, press MEMORY /
toggle between current, past 24 hours or accumulated
rainfall. The clock line will change to display the start
time when the accumulated rainfall is displayed. The
icon
To toggle between rainfall & rain rate display:
In the UV / Barometer / Rainfall Area and Rainfall reading
display, press and hold MODE.
To reset the accumulated rainfall and timestamp:
In the UV / Barometer / Rainfall Area and Rainfall reading
display. Press and hold MEMORY /
the accumulated rainfall to ‘0’ and to set the timestamp
to current date and time.
To change the HI rainfall rate alarm:
1. In the UV / Barometer / Rainfall Area and Rainfall
reading display, press and hold ALARM to enter the
Rainfall alarm setting.
2. Rotate the dial left or right to set the desired values.
3. Press ALARM to confirm the settings.
appears and the start date is showing.
ON/OFF repeatedly to
ON/OFF to reset
To activate / deactivate the HI rainfall rate alarm:
1. In the UV / Barometer / Rainfall Area and Rainfall
reading display, press ALARM repeatedly to select
the desired alarm.
2. Press MEMORY /
deactivate the alarm.
ON/OFF to activate or
WEATHER ALARMS
Weather alarms are used to alert you of certain weather
conditions. Once activated, the alarm will go off when a
certain criterion is met.
Alarms can be set for:
• Indoor and outdoor high/low temperatures, dew point
and high/low humidity
• High Heat Index
• High Gust Wind
• Low wind chill
• High UV
• Pressure drop
• High rain rate
See the relevant section for how to set the alarm.
To silence any alarm: Press any button or rotate the
dial.
EN
19
Page 21
EN
CONNECTION TO PC
The weather station is capable of connecting to a PC
computer using the USB connection. The “Virtual
Weather Station” software can read the latest weather
data collected from the base station. Please download
the software from the following website:
http://www2.oregonscientific.com/assets/software/
wmr100.exe
For full details see the “Virtual Weather Station” software
instructions.
PC System requirements
The minimum system requirements for use of the “Virtual
Weather Station” software is:
• Operating system: Microsoft Windows 98 or above
• Processor: Pentium II 166Mhz or above
• RAM: Min. 64Mb
• Hard disk free space: Min. 30Mb
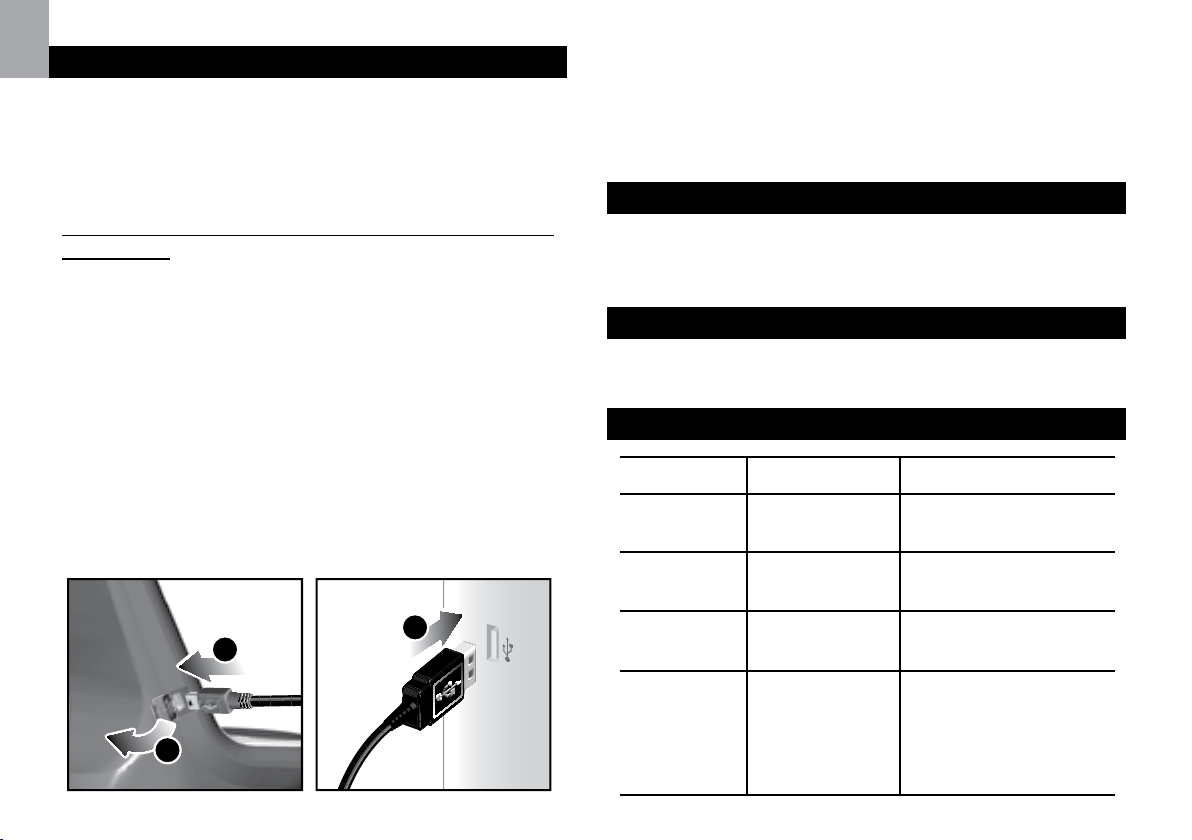
To connect the base station to the computer:
1. Uncover the USB point on the side of the base
station.
2. Plug in the USB cable.
3. Plug in the other end of the cable in the computer.
BACKLIGHT
Press any button or rotate the dial to activate the
backlight.
RESET
Press RESET to return to the default settings.
TROUBLESHOOTING
PROBLEM SYMPTOM REMEDY
Barometer Strange
readings
Calendar Strange date /
month
Set unit
Change language
3
2
1
Clock Cannot adjust
clock
Cannot autosynch
20
Disable radiocontrolled clock
1. Adjust batteries
2. Press RESET
3. Manually activate
radio-controlled
clock
Page 22
Do not immerse the unit in water. If you spill liquid
Temp Shows “LLL”
or “HHH”
Remote
sensor
Cannot locate
remote sensor
Cannot
change
channel
Data does not
match main
unit
Temperature is outof-range
Check batteries
check location
Check sensors. Only
one sensor is working
Initiate a manual
sensor search
PRECAUTIONS
This unit is engineered to give you years of
satisfactory service if you handle it carefully. Here are
a few precautions:
Placement of this product on wood surfaces with
•
certain types of finishes, such as clear varnish, may
result in damage to the finish. Consult the furniture
manufacturer’s care instructions for direction as to
the types of objects that may safely be placed on
the wood surface. Oregon Scientific shall not be
responsible for any damage to wood surfaces from
contact with this product.
Do not cover the ventilation holes. Make sure
•
items that are nearby such as newspapers,
tablecloths, curtains etc cannot accidentally cover
the ventilation holes.
•
over it, dry it immediately with a soft, lint-free cloth.
Do not clean the unit with abrasive or corrosive
•
materials. This may scratch the plastic parts and
corrode the electronic circuit.
Do not subject the unit to excessive force, shock,
•
dust, temperature or humidity, which may result in
malfunction, shorter electronic life span, damaged
battery and distorted parts.
This product may malfunction if electrostatic
•
discharge or radio interference appears in the
environment and / or affects the ac power line. The
unit will revert to normal operation when interference
stops.
Do not tamper with the unit’s internal components.
•
Doing so will invalidate the warranty on the unit and
may cause unnecessary damage. The unit contains
no user-serviceable parts.
Only use fresh batteries as specified in the user’s
•
instructions. Do not mix new and old batteries as the
old ones may leak.
Do not dispose this product as unsorted municipal
•
waste. Collection of such waste separately for special
treatment is necessary.
Due to printing limitations, the displays shown in this
•
manual may differ from the actual display.
The contents of this manual may not be reproduced
•
without the permission of the manufacturer.
21
EN
Page 23

EN
NOTE The technical specifications for this product and
the contents of the user manual are subject to change
without notice.
SPECIFICATIONS
BASE STATION
Dimensions 143 x 89 x 165 mm
(L x W x H) (5.6 x 3.5 x 6.5 inches)
Weight 300g (0.66 lbs) without battery
INDOOR BAROMETER
Barometer unit mb/hPa, inHg and mmHg
Measuring range 700 – 1050mb/hPa
Accuracy +/- 10 mb/hPa
Resolution 1mb (0.0 inHg)
Altitude setting Sea level
User setting for compensation
Weather display Sunny, Partly Cloudy, Cloudy,
Rainy and Snowy
Memory Historical data and bar chart for
last 24hrs
INDOOR TEMPERATURE
Temp. unit °C / °F
Displayed range. 0°C to 50°C (32°F to 122°F)
Operating range. -30°C to 60°C (-4°F to 140°F)
Accuracy 0°C - 40°C: +/- 1°C (+/- 2.0°F)
40°C - 50°C: +/- 2°C (+/- 4.0°F)
Comfort 20°C to 25°C (68°F to 77°F)
Memory Current, min and max temp.
Dew Point w/ min and max
Alarm Hi / Lo
INDOOR RELATIVE HUMIDITY
Displayed range 2% to 98%
Operating range 25% to 90%
Resolution 1%
Accuracy 25% - 40%: +/- 7%
40% - 80%: +/- 5%
80% - 90%: +/- 7%
Comfort 40% to 70%
Memory Current, min and max
Alarm Hi / Lo
RADIO-CONTROLLED / ATOMIC CLOCK
Synchronization Auto or disabled
Clock display HH:MM:SS
Hour format 12hr AM/PM or24hr
Calendar DD/MM or MM/DD
Weekday in 5 (E, G, F, I, S)
languages
22
Page 24

Battery 4 x UM-3 (AA) 1.5V batteries
AC adapter 6V
THERMO-HYDRO SENSOR
Dimensions 92 x 60 x 20 mm
(L x W x H) (3.6 x 2.4 x 0.79 inches)
Weight 62 g (2.22 oz)
Humidity range 5% to 95%
Humidity resolution 1%
Temp. unit °C / °F
Temp. outdoor range 30°C to 60°C (22°F to 140°F)
Temp. resolution 0.1°C (0.2°F)
RF frequency 433 MHz
Range 100 meters (330 feet)
Transmission Every 60 seconds
Channel No. 1-10
Batteries 2 x UM-4 (AAA) 1.5V
OUTDOOR TEMPERATURE
Temp. unit °C / °F
Displayed range. -50°C to 70°C (-58°F to 158°F)
Operating range. -30°C to 60°C (-4°F to 140°F)
Accuracy -20°C – 0°C: +/- 2°C (+/- 4.0°F)
0°C - 40°C: +/- 1°C (+/- 2.0°F)
40°C - 50°C: +/- 2°C (+/- 4.0°F)
50°C - 60°C: +/- 3°C (+/- 6.0°F)
Comfort 20°C to 25°C (68°F to 77°F)
Memory Current, min and max temp.
Dew Point w/ max and min
Wind chill temp. and min
RELATIVE HUMIDITY
Displayed range. 2% to 98%
Operating range. 25% to 90%
Resolution 1%
Accuracy 25% - 40%: +/- 7%
40% - 80%: +/- 5%
80% - 90%: +/- 7%
Comfort 40% to 70%
Memory Current, min and max
RF TRANSMISSION
RF frequency 433MHz
Range Up to 100 meters (328 feet) with
no obstructions
Transmission Approx. every 60 seconds
No. of Channel 1 for Wind/ Rain/ UV and 10 for
Temp. / Humidity
Battery 4 x UM-3 (AA) 1.5V
EN
23
Page 25

EN
ABOUT OREGON SCIENTIFIC
EU-DECLARATION OF CONFORMITY
Visit our website (www.oregonscientific.com) to learn
more about Oregon Scientific products such as digital
cameras; MP3 players; children’s electronic learning
products and games; projection clocks; health and
fitness gear; weather stations; and digital and conference
phones. The website also includes contact information
for our Customer Care department in case you need
to reach us, as well as frequently asked questions and
customer downloads.
We hope you will find all the information you need on our
website, however if you’re in the US and would like to
contact the Oregon Scientific Customer Care department
directly, please visit:
www2.oregonscientific.com/service/default.asp
OR
Call 1-800-853-8883.
For international inquiries, please visit:
www2.oregonscientific.com/about/international.asp
Hereby, Oregon Scientific, declares that this
Advanced Weather Station with Thermo-hydro sensor
model WMR100TH is in compliance with the essential
requirements and other relevant provisions of Directive
1999/5/EC. A copy of the signed and dated Declaration
of Conformity is available on request via our Oregon
Scientific Customer Service.
COUNTRIES RTTE APPROVAL COMPLIED
All EU countries, Switzerland
and Norway
CH
N
FCC STATEMENT
This device complies with Part 15 of the FCC Rules.
Operation is subject to the following two conditions: (1)
This device may not cause harmful interference, and
(2) This device must accept any interference received,
including interference that may cause undesired
operation.
WARNING Changes or modifications not expressly
approved by the party responsible for compliance could
void the user’s authority to operate the equipment.
24
Page 26

NOTE This equipment has been tested and found
to comply with the limits for a Class B digital device,
pursuant to Part 15 of the FCC Rules. These limits
are designed to provide reasonable protection against
harmful interference in a residential installation.
This equipment generates, uses and can radiate radio
frequency energy and, if not installed and used in
accordance with the instructions, may cause harmful
interference to radio communications. However, there is
no guarantee that interference will not occur in a particular
installation. If this equipment does cause harmful
interference to radio or television reception, which can
be determined by turning the equipment off and on, the
user is encouraged to try to correct the interference by
one or more of the following measures:
• Reorient or relocate the receiving antenna.
• Increase the separation between the equipment and
receiver.
• Connect the equipment into an outlet on a circuit
different from that to which the receiver is connected.
• Consult the dealer or an experienced radio / TV
technician for help.
inquiries instead.
We
Name: Oregon Scientific, Inc.
Address: 19861 SW 95th Ave., Tualatin,
Oregon 97062 USA
Telephone No.: 1-800-853-8883
declare that the product
Product No.: WMR100TH
Product Name: Professional Weather Station
Manufacturer: IDT Technology Limited
Address: Block C, 9/F, Kaiser Estate,
Phase 1,41 Man Yue St.,
Hung Hom, Kowloon,
Hong Kong
is in conformity with Part 15 of the FCC Rules. Operation
is subject to the following two conditions:
1. This device may not cause harmful interference.
2. This device must accept any interference
received, including interference that may cause
undesired operation.
EN
DECLARATION OF CONFORMITY
The following information is not to be used as contact
for support or sales. Please call our customer service
number (listed on our website at www.oregonscientific.
com), or on the warranty card for this product) for all
25
Page 27

Estación meteorológica avanzada
con sensor inalámbrico y kit de
montaje
Modelo: WMR100TH
MANUAL DE USUARIO
CONTENIDO
Introducción ................................................................ 2
Contenidos del embalaje ........................................... 2
Sensor Termohigráfico (THGR810) ......................... 2
Accesorios - Sensores ............................................. 2
Resumen .....................................................................3
Pantalla LCD ............................................................ 5
Para Empezar .............................................................. 7
Montaje de la estación base .................................... 7
Instalación del sensor ............................................... 8
Pilas .........................................................................9
Seleccionar canal .................................................. 10
Unidad Principal ....................................................... 10
Cambiar pantalla / configuración ............................ 10
Recepción del reloj ...................................................10
Reloj / Calendario ..................................................... 11
Alarma del reloj .........................................................12
Fase de la luna .......................................................... 12
Función de búsqueda automática ..........................13
Previsión meteorológica .......................................... 13
Temperatura y humedad .......................................... 13
Tendencia de temperatura y humedad ................... 15
Nivel de confort ...................................................... 15
Dirección / Velocidad del viento .............................. 16
UV / Barómetro / Precipitación ................................ 17
Índice de UV ...........................................................18
Barómetro ..............................................................18
Precipitación ...........................................................19
Alarmas Meteorológicas .......................................... 19
Conexión Al PC ......................................................... 20
Iluminación de la pantalla ........................................ 20
Reinicio ......................................................................20
Solución de problemas ............................................ 21
Precaución ................................................................21
Ficha Técnica ............................................................ 22
Sobre Oregon Scientific ...........................................24
EU - Declaración de conformidad ........................... 25
ES
1
Page 28
ES
INTRODUCCIÓN
Gracias por elegir Estación Meteorológica de Oregon
Scientific
La unidad base es compatible con otros sensores.
Para comprar un sensor adicional, sírvase ponerse en
contacto con su proveedor local.
TM
(WMR100TH).
El software y el manual “Virtual Weather Station” se
pueden descargar en esta dirección:
http://www2.oregonscientific.com/assets/software/
wmr100.exe
SENSOR TERMOHIGRÁFICO (THGR810)
Los sensores con este logotipo
esta unidad.
NOTA Tenga este manual a mano cuando use el nuevo
producto. Contiene prácticas instrucciones explicadas
paso a paso, así como especificaciones técnicas y
advertencias que debe conocer.
son compatibles con
CONTENIDOS DEL EMBALAJE
1 x Cable USB
1 adaptador de 6V
4 x UM-3 / AA
1 x Soporte para
montaje en pared
2 x UM-4 / AAA
1 x Soporte
de mesa
ACCESORIOS - SENSORES
Este producto puede funcionar hasta con 10 sensores
en cualquier momento para medir temperatura exterior,
humedad relativa o índices de rayos UV en distintos
lugares. Se pueden comprar por separado sensores
2
Page 29

remotos como los que aparecen a continuación: Sírvase
ponerse en contacto con su distribuidor local si desea
más información.
• Termo-Higro THGR800 (3-Ch)
• Rayos UV UVN800
• Medidor de lluvia PCR800
• Sensor de viento WTGR800
RESUMEN
1
2
3
4
5
1. MEMORIA / ACTIVADA/DESACTIVADA:
Lectura de registros máx / mín; activar / desactivar
alarmas
2. ALARMA: Consultar y configurar alarmas de
barómetro, temperatura, humedad, precipitación y
velocidad del viento
3. MODO: Alterna entre los distintos modos de pantalla
/ ajustes
4. Dial rotatorio: Gire a izquierda o derecha para
incrementar o reducir los valores de la lectura
seleccionada
5. SELECCIÓN: Alterna entre las distintas áreas.
1
2
3
4
5
6
7
ES
3
Page 30
ES
1. Toma del adaptador de CA
2. REINICIO: La unidad vuelve a los ajustes
predeterminados
3. BUSCAR: Busca sensores o la señal
radiocontrolada
4. UNIDAD: Selecciona la unidad de medición
5. Compartimento para las pilas
6. Sólo WMR100 – señal de radio EU / UK
7. Conector USB
1. Pantalla LCD (el THGN810 no tiene pantalla LCD) :
Muestra el número de canal y las lecturas de
temperatura y humedad, y el nivel de confort
2. Indicador LED de estado
4
1
2
3
1. Orificio de REINICIO
2. Interruptor °C / °F (el THGN810 no tiene este
interruptor)
3. Interruptor de CÓDIGO
4. Compartimento para las pilas
4
Page 31

PANTALLA LCD
1
7. Icono de pila gastada para la estación base
8. Área de humedad / Punto de condensación
ES
6
7
1
Temperatura / Índice de calor / Área de sensación
térmica por viento
2
3
2
3
8
4
5
6
7
8
9
4
1. Tendencia de la temperatura
2. Sensación térmica por el viento – muestra la
5
1. Área de previsión meteorológica
2. Temperatura / Índice de calor / Área de sensación
térmica por viento
3. Velocidad / Dirección del viento
4. UV / Área del barómetro / Precipitación
5. Reloj / Alarma / Calendario / Fase de la luna
6. Icono del adaptador de CA – se muestra cuando no
está enchufada
5
temperatura
3. Nivel de índice de calor – muestra la temperatura
4. Temperatura alta / baja, Alarmas alta de Índice de
calor y baja de temepratura de frío activadas
5. Icono de área seleccionada
6. Se muestran la humedad y temperatura interior y
exterior
7. Temperatura MÁX / MíN
8. La pila del sensor exterior está casi gastada
9. Temperatura (°C / °F)
Page 32

ES
6
1
Velocidad / Dirección del viento
(Sensor de viento opcional)
1
2
3
4
5
UV / Área del barómetro / Precipitación
(Pluviómetro y sensor de rayos UV opcional)
2
7
3
7
4
8
9
10
5
6
1. Niveles de velocidad del viento: MEDIA / MÁX /
RÁFAGA
2. Indicador de nivel de velocidad del viento
3. La pila del anemómetro está casi gastada
4. Descripción del nivel de velocidad del viento
5. Lectura de ráfaga o velocidad del viento (m / s, kph,
mph o nudos)
6. Alarma de ráfaga de viento configurada
7. Muestra la dirección del viento
1. Se muestran lecturas de UV / barómetro /
precipitación
2. La pila del sensor exterior de rayos UV / lluvia está
casi gastada
3. Alarma de rayos UV / barómetro / precipitación
activada
4. Muestra el índice de lluvia
5. Lectura de rayos UV / presión barométrica (mmHg,
inHg o mb / hPa) / precipitación (en / hr o mm / hr)
6. Indicador de nivel de rayos UV
7. Muestra la precipitación acumulada
8. Muestra la precipitación de las últimas 24 horas
9. Muestra la altura
10. Pantalla de gráficos de rayos UV / presión
barométrica / barra histórica de precipitaciones
6
Page 33

Reloj / Alarma / Calendario / Fase de la luna
1
1
2
3
2. Las alarmas de humedad alta / baja y punto de
condensación están configuradas
3. Niveles de confort
4
5
4. Tendencia de la humedad
5. Humedad MÁX / MíN
6. Lectura de humedad
ES
6
1. Recepción de reloj/radio
2. Muestra la alarma 1 y 2, ambas están activadas
3. Muestra la codificación de tiempo
4. Configuración de usos horarios
5. Fase de la luna
6. Tiempo / fecha / calendario
Área de humedad / Punto de condensación
PARA EMPEZAR
MONTAJE DE LA ESTACIÓN BASE
NOTA Coloque las pilas del sensor remoto antes que
las de la unidad principal, asegurándose de que la
polaridad coincida (+ y -)
2
3
4
5
1. Nivel de punto de condesnación – Muestra la
temperatura
6
Si desea utilizarlo continuamente, deberá usar el
adaptador de CA. Las baterías deben usarse únicamente
en caso de necesidad.
NOTA Asegúrese de que el enchufe está cerca del
equipo y es de fácil acceso.
7
Page 34

ES
Velocidad /
Dirección del
viento
La pila del anemómetro está casi
gastada.
Introduzca las pilas (4 x UM-3 / AA), asegurándose de
que la polaridad (+ / -) coincida. Pulse REINICIO cada
vez que cambie las pilas.
NOTA No use pilas recargables. Recomendamos
utilizar pilas alcalinas con este producto para que
funcione durante más tiempo.
El icono del estado de la pila
siguientes áreas:
ÁREA SIGNIFICADO
Área de
previsión
meteorológica
Temperatura /
Índice de calor
/ Área de sensación
térmica por viento
La pila de la estación base está casi
gastada. Se mostrará
desconecte el adaptador de CA.
El canal que se muestra indica el
sensor exterior cuya batería está
casi gastada.
puede aparecer en las
cuando se
UV / Área del
barómetro /
Precipitación
La pila del sensor de rayos UV /
Lluvia está casi gastada.
INSTALACIÓN DEL SENSOR
Para instalación del sensor:
1. Abra la tapa del compartimento para pilas.
2. Introduzca las pilas hacienda coincidir la polaridad
(+ y -).
3. Use CÓDIGO para seleccionar el canal.
4. Sólo THGR810 – selección de unidad de
temperatura.
5. Coloque el sensor cerca de la unidad principal.
Pulse REINICIO en el sensor. Pulse el botón de
8
Page 35

la unidad principal correspondiente (tal y como se
especifica en el manual de la unidad principal) para
empezar a buscar una señal entre el sensor y la
unidad principal.
6. Cierre el compartimento para pilas del sensor.
7. Coloque el sensor en el lugar deseado usando el
montaje de pared o el soporte para mesa.
Cómo conseguir los mejores resultados:
• Coloque el sensor en un lugar en el cual no esté
expuesto a la luz directa del sol ni a la humedad.
• No coloque el sensor a más de 100 metros (330
pies) de la unidad principal (interior).
• Coloque el sensor de tal modo que quede de
cara a la unidad principal (interior), minimizando
obstrucciones como puertas, paredes y muebles.
• Coloque el sensor en un lugar al descubierto debajo
del cielo, alejado de objetos metálicos o electrónicos.
• Coloque el sensor cerca de la unida central durante
los fríos meses del invierno, ya que las temperaturas
bajo cero podrían afectar el rendimiento de las pilas
y la transmisión de la señal.
El alcance de transmisión puede variar debido a muchos
factores. Es posible que tenga que probar varias
ubicaciones para obtener los mejores resultados.
Las coberturas inalámbricas pueden recibir el impacto
de una serie de factores, como las temperaturas
extremadamente bajas. El frío extremo podría reducir
temporalmente la cobertura efectiva entre la estación
base y el sensor. Si el rendimiento de la unidad se
interrumpe debido a las bajas temperaturas, la unidad
volverá a empezar a funcionar cuando la temperatura
vuelva a la normalidad (es decir, las bajas temperaturas
no provocan daños permanentes a la unidad).
PILAS
Antes de utilizar el dispositivo por primera vez,
introduzca las pilas haciendo coincidir la polaridad
(+ y -) de las mismas con las indicaciones que hay
en el compartimento de pilas. Para obtener mejores
resultados, coloque primero las pilas del sensor remoto
y luego las de la unidad principal Pulsar REINICIO cada
vez que cambie las pilas.
NOTA Recomendamos utilizar pilas alcalinas con este
producto para que funcione durante más tiempo, y el uso
de pilas de litio en temperaturas bajo cero (0°C/32°F).
No use pilas recargables.
aparece en el THGR810 cuando las pilas están
casi gastadas.
9
ES
Page 36

ES
SELECCIONAR CANAL
UNIDAD PRINCIPAL
Seleccione el canal ajustando el interruptor de CÓDIGO
a uno de los ajustes siguientes.
NÚMERO DE
CANAL
1
2
3
4
5
6
7
8
9
AJUSTE DEL
INTERRUPTOR
CAMBIAR PANTALLA / CONFIGURACIÓN
Para modificar la pantalla y la configuración, use los
siguientes botones del dial rotatorio: SELECT, MEMORY
ON/OFF, MODE and ALARM.
/
Además, los botones UNIT y
SEARCH situados en la parte
baja de la unidad principal
permiten preconfigurar los
canales del sensor remoto y
las unidades de medición que
se muestran.
CONSEJO Pulse cualquier botón para salir del modo
de configuración. Si no lo hace, la unidad principal saldrá
automáticamente al cabo de 30 segundos.
RECEPCIÓN DEL RELOJ
Este producto está diseñado para sincronizar su calendario
y reloj automáticamente en cuanto está en el área de
cobertura de una señal de radio:
10
10 Otros ajustes del interruptor
(No recomendado)
WMR100:
• la DCF-77 de Frankfurt, Alemania, para Europa central
• la MSF-60 de Anthorn, Inglaterra
La cobertura de la señal de radio es de 1.500 km (932 millas).
10
Page 37

WMR100A:
• la WWVB-60 de Fort Collins, Colorado (Estados
Unidos)
La cobertura de la señal de radio es de 3.219 km (200
millas).
NOTA Para obtener la mejor recepción, debería colocar
la base en una superficie plana y no metálica cerca de
una ventana en el piso superior de su casa. La antena
debería colocarse alejada de dispositivos eléctricos y no
moverse mientras busca una señal.
ES
Sólo WMR100– deslice el conmutador entre EU / UK
para que encaje con su localización. Pulse RESET para
modificar la configuración seleccionada.
El icono de recepción parpadeará mientras busque una
señal. Si la señal de radio es débil, puede tardarse hasta
24 horas en conseguir una señal válida.
Indica el estado de recepción de la señal del reloj.
ICONO SIGNIFICADO
La hora está sincronizada.
La señal que se recibe es fuerte
La hora no está sincronizada.
La señal que se recibe es débil
Para activar / desactivar la recepción de la señal
radiocontrolada (y forzar una búsqueda de la señal)
que haya seleccionado:
1. Pulse SELECT para acceder al área de Reloj /
Calendario / Alarma . Se mostrará
2. Pulse SEARCH y manténgalo pulsado.
aparece si está activada.
al lado del Área.
RELOJ / CALENDARIO
Para configurar el reloj manualmente:
(Sólo tiene que configurar el reloj y el calendario si ha
desactivado la recepción de la señal radiocontrolada.)
1. Pulse SELECT y acceda al área de Reloj. Se
mostrará
2. Pulse MODE para modificar la configuración del
reloj. El ajuste parpadeará.
3. Haga girar el dial a la izquierda o a la derecha para
incrementar o disminuir el valor del ajuste.
4. Pulse MODO para confirmar.
5. Repita los pasos del 1 al 5 para seleccionar el uso
horario (+ / - 23 horas), formato de 12 o 24 horas,
hora, minuto, año, formato fecha / mes, mes, fecha
e idioma del día de la semana.
NOTA Si introduce +1 en el ajuste de uso horario, le
indicará su hora regional más una hora.
NOTA El día de la semana está disponible en inglés,
francés, alemán, italiano o español.
11
al lado del Área.
Page 38

ES
Cómo cambiar la pantalla del reloj:
1. Pulse SELECT y acceda al área de Reloj. Se
mostrará
2. Pulse MODE para pasar de uno de estas funciones
a otra:
• Reloj con segundos
• Reloj con día de la semana
• Calendario
al lado del Área.
ALARMA DEL RELOJ
El reloj tiene 2 alarmas que se pueden configurar para
que emitan un pitido.
ICONO SIGNIFICADO
Muestra las alrmas 1 ó 2
Alarma 1 ó 2 está activada
Ningún icono No se ha configurado ninguna alarma
Para configurar la alarma:
1. Pulse SELECT y acceda al área de Reloj. Se
mostrará
2. Pulse ALARM para alternar entre alarma 1
alarma 2
3. En cuanto haya seleccionado la alarma que desee
cambiar, pulse ALARM y manténgalo pulsado. El
ajuste de la alarma parpadeará.
al lado del Área.
.
y
4. Haga girar el dial a la izquierda o a la derecha para
modificar el ajuste.
5. Pulse ALARM para confirmar.
Para activar o desactivar la alarma:
1. Pulse SELECT y acceda al área de Reloj. Se
mostrará
2. Pulse ALARM para alternar entre alarma 1
alarma 2
3. Pulse MEMORY /
para activar o desactivar la alarma.
cuando la alarma está activada.
al lado del Área.
.
ACTIVADA/DESACTIVADA
o aparece
FASE DE LA LUNA
El Calendario debe estar configurado para que
esta función esté activa (consulte la sección Reloj /
Calendario)
ICONO DESCRIPCIÓN
Luna nueva
Creciente
Cuarto creciente
12
y
Page 39

Casi llena
Luna llena
PREVISIÓN METEOROLÓGICA
ES
La pantalla de meteorología de la parte superior de la
pantalla muestra el clima actual y la previsión para las
próximas 12-24 horas en un radio de 30-50 km (19-31
millas).
Inicio de menguante
Cuarto menguante
Menguante
FUNCIÓN DE BÚSQUEDA AUTOMÁTICA
Para activar la función de escaneado automático de
temperatura y humedad:
1. Pulse SELECT y acceda al área de temperatura o
humedad. Se mostrará
2. Pulse MODE y manténgalo pulsado para activar la
búsqueda automática. La pantalla de temperatura y
humedad alternará del canal interior hasta el canal 10.
3. Pulse MEMORY /
MODE o ALARM para detener la búsqueda automática.
NOTA El canal 1 sirve para la temperatura exterior y
el sensor de humedad del sensor de viento remoto. Los
sensores de temperatura y humedad adicionales pueden
usar los demás canales.
al lado del Área.
ACTIVADA / DESACTIVADA,
Área de predicción meteorológica
ICONO DESCRIPCIÓN
Soleado
Parcialmente nublado
Nublado
Lluvia
Nieve
TEMPERATURA Y HUMEDAD
La estación meteorológica muestra lecturas
interiores y exteriores de:
13
Page 40

ES
1. Temperaturas actuales, mínimas y máximas y
porcentajes de humedad relativa.
2. Indicador de nivel de confort y tendencia.
3. Índice de calor, sensación de frío y punto de
condensación.
La estación meteorológica es compatible hasta con 10
sensores.
muestra a qué sensor pertenecen los datos que está
viendo.
aparece cuando se muestran datos interiores.
La codificación de tiempo graba la fecha y hora en que
se almacenan las lecturas de temperatura y humedad
en la memoria.
Para seleccionar la unidad de temperatura:
Pulse UNIT (en la parte inferior de la base) para
seleccionar °C / °F.
Ver lecturas de temperatura y humedad máximas y
mínimas:
1. En el Área de temperatura o humedad, pulse MODE
repetidamente para alternar entre las lecturas de:
• Temperatura actual
• Índice de calor
• Sensación térmica por el viento
• Punto de condensación
• Humedad
2. Para cada una de las lecturas anteriores, pulse
MEMORY /
repetidamente para alternar entre:
• Temperatura MÁX / MíN / actual
• Índice de calor MÁX / actual
• Sensación de temperatura MíN / actual
• Punto de condensación MÁX / MíN / actual
• Humedad MÁX / MíN / actual
La codificación de tiempo depende del Área de Reloj.
ACTIVADA / DESACTIVADA
NOTA La unidad de todas las pantallas con temperatura
se modificará al mismo tiempo.
Para ver lecturas de los sensores interior / exterior
(1-10) de temperatura y humedad:
1. Pulse SELECT y acceda al área de temperatura o
humedad. Se mostrará
2. Haga girar el dial a la izquierda o a la derecha para
seleccionar el canal.
al lado del Área.
Para borrar las memorias y la codificación de
tiempo para las lecturas de temperatura, índice
de calor, sensación de frío, humedad y punto de
condensación:
En el Área de temperatura o humedad, pulse MEMORY /
ACTIVADA / DESACTIVADA para borrar las lecturas.
14
Page 41

Para modificar las alarmas de temperatura alta/baja,
índice de calor, sensación de frío, humedad y punto
de condensación:
1. En el Área de temperatura o humedad, pulse
ALARM repetidamente para alternar entre alarmas
de temperatura alta/baja, índice de calor, sensación
de frío, humedad y punto de condensación.
2. Pulse ALARM y manténgalo pulsado para acceder
al ajuste de la alarma.
3. Haga girar el dial a la izquierda o a la derecha para
seleccionar los valores deseados.
4. Pulse ALARM para confirmar el ajuste.
Para activar / desactivar las alarmas de temperatura
alta/baja, índice de calor, sensación de frío, humedad
y punto de condensación:
1. En el Área de temperatura o humedad, pulse
ALARM repetidamente para seleccionar la alarma
deseada.
2. Pulse MEMORY /
para activar o desactivar la alarma.
ACTIVADA / DESACTIVADA
TENDENCIA DE TEMPERATURA Y HUMEDAD
ES
Las líneas de tendencia se muestran al lado de las
lecturas de temperatura y humedad. La tendencia se
muestra de la manera siguiente:
ICONO DE TENDENCIA DESCRIPCIÓN
Subiendo
Estable
Bajando
NIVEL DE CONFORT
El icono de Zona de Confort indica lo agradable que
es un clima, basándose en la temperatura actual y las
mediciones de humedad.
ICONO DESCRIPCIÓN
NOTA El punto de condensación indica a qué
temperatura se producirá condensación de aire. El factor
de sensación de frío se basa en los efectos combinados
de temperatura y velocidad del viento.
Confortable
Neutral
Desagradable
15
Page 42

ES
DIRECCIÓN / VELOCIDAD DEL VIENTO
La unidad principal proporciona
información sobre la velocidad
y la dirección del viento.
Para leer la dirección del viento,
mire a donde enfoca el símbolo
.
Moderado 9-25 mph (~14-41 km/h)
Fuerte 26-54 mph (~42-87 km/h)
Tormenta >55 mph (>88 km/h)
La codificación de tiempo graba la fecha y hora en que
se almacenan las lecturas de velocidad del viento.
NOTA Sensor de viento opcional.
Para seleccionar la unidad de velocidad del viento:
Pulse UNIT (en la parte inferior de la base) para alternar
entre:
• Metros por segundo (m / s)
• Kilómetros por hora (kph)
• Millas por hora (mph)
• Nudos (knots)
El nivel del viento se representa con una serie de iconos:
ICONO NIVEL DESCRIPCIÓN
N/A <2 mph (<4km/h)
Suave 2-8 mph (3~13 km/h)
Para mostrar el viento MEDIO y las RÁFAGAS:
1. Pulse SELECT y acceda al área de velocidad y
dirección del viento. Se mostrará
2. Pulse MODO para pasar de la lectura de MEDIA de
velocidad a la velocidad de RÁFAGA.
Para mostrar la velocidad máxima y la dirección de
una ráfaga de viento:
En el Área de velocidad y dirección del viento, pulse
MEMORY /
alternar entre las lecturas de velocidad del viento /
RÁFAGA MÁX. La codificación de tiempo depende del.
Para borrar las memorias y la codificación de tiempo
de las lecturas de viento:
En el Área de velocidad y dirección del viento, pulse
MEMORY /
borrar las lecturas.
Para cambiar la alarma de velocidad de ráfaga de viento:
1. En el Área de velocidad y dirección del viento, pulse
16
ACTIVADA / DESACTIVADA para
ACTIVADA / DESACTIVADA para
al lado del Área.
Page 43

ALARM para acceder a la configuración de ráfaga
de viento.
2. Haga girar el dial a la izquierda o a la derecha para
seleccionar los valores deseados.
3. Pulse ALARM para confirmar el ajuste.
Para activar / desactivar la alarma de velocidad de
ráfaga de viento:
1. En el Área de velocidad y dirección del viento, pulse
ALARM repetidamente para seleccionar la alarma
deseada.
2. Pulse MEMORY /
para activar o desactivar la alarma.
ACTIVADA/DESACTIVADA
UV / BARÓMETRO / PRECIPITACIÓN
La estación meteorológica funciona con un sensor UV y
un pluviómetro. La estación puede almacenar y mostrar
el historial de datos hora a hora de las últimas 10 horas
de índice UV, y 24 horas de lecturas de precipitación y
presión barométrica.
NOTA Pluviómetro y sensor de rayos UV opcional.
UVI BAROMETRO PRECIPITAZIONI
Los gráficos muestran los datos actuales e históricos
del índice de rayos UV, la presión barométrica y la precipitación.
Para ver las lecturas de rayos UV / Barómetro /
Precipitación:
1. Pulse SELECT para acceder al área de UV / Barómetro
/ Precipitación. Se mostrará
2. Pulse MODO para pasar de la lectura de rayos
UVA / Barómetro / Precipitación. Aparecerá el icono
correspondiente.
UVA BARÓMETRO PRECIPITACIÓN
3. Haga girar el dial a la izquierda o a la derecha para
ver los datos históricos del área seleccionada. Se
muestran las lecturas históricas correspondientes.
NOTA El número que muestra la casilla de HR indica
cuánto tiempo hace que se tomó cada medición (por
ejemplo, hace 2 años, hace 3 años, etc).
al lado del Área.
ES
Para seleccionar la unidad de medición de las
lecturas de barómetro y precipitación:
En el Área de Rayos UV / Barómetro / Precipitación, pulse
UNIT (en la parte inferior de la base) para alternar entre:
17
Page 44

ES
• Para el barómetro: milímetros de mercurio (mmHg),
pulgadas de mercurio (inHg), milibares por
hectopascal (mb / hpa).
• Para la precipitación: Milímetros (mm), pulgadas
(in), pulgadas por hora (in / hr) o milímetros por
hora (mm / hr).
ÍNDICE DE UV
Los niveles del índice UV son los siguientes:
ÍNDICE DE UV NIVEL DE PELIGRO ICONO
0-2 Bajo
3-5 Moderado
6-7 Alto
Para activar o desactivar la alarma de índice de
rayos UV:
1. En el Área de Rayos UV / Barómetro / Precipitación,
pulse ALARM repetidamente para seleccionar la
alarma deseada.
2. Pulse MEMORY /
para activar o desactivar la alarma.
ACTIVADA / DESACTIVADA
BARÓMETRO
Para cambiar la alarma del barómetro:
1. En la pantalla de Rayos UV / Barómetro / Precipitación
y la pantalla de barómetro, pulse ALARM y manténgalo
pulsado para acceder al ajuste de la alarma del
barómetro.
2. Haga girar el dial a la izquierda o a la derecha para
seleccionar los valores deseados.
3. Pulse ALARM para confirmar el ajuste.
8-10 Muy alto
11 y superior Estremadamente alto
Para cambiar la alarma de nivel de UV alto:
1. En el Área Rayos UV / Barómetro / Precipitación y la
pantalla de lectura UV. Pulse ALARM y manténgalo
pulsado para acceder al ajuste de la alarma de
índice de rayos UV.
2. Haga girar el dial a la izquierda o a la derecha para
seleccionar los valores deseados.
3. Pulse ALARM para confirmar el ajuste.
Para activar o desactivar la alarma del barómetro:
1. En el Área de Rayos UV / Barómetro / Precipitación y
pantalla del barómetro, pulse ALARM repetidamente
para seleccionar la alarma deseada.
2. Pulse MEMORY /
para activar o desactivar la alarma.
Para configurar la compensación del nivel de altura
para las lecturas del barómetro:
1. En el Área Rayos UV / Barómetro / Precipitación y
la pantalla de lectura de barómetro. Pulse MODE
18
ACTIVADA/DESACTIVADA
Page 45

y manténgalo pulsado para acceder al ajuste de
altura.
2. Haga girar el dial a la izquierda o a la derecha para
seleccionar los valores deseados.
3. Pulse MODE para confirmar el ajuste.
PRECIPITACIÓN
Para consultar el historial de precipitación de la hora
actual, el acumulado o el de las últimas 24 horas:
En el Área de Rayos UV / Barómetro / Precipitación y
la pantalla de lectura de precipitación, pulse MEMORY
/
ACTIVADA / DESACTIVADA repetidamente para
alternar entre precipitación actual, últimas 24 horas o
acumulada. La línea del reloj cambiará para mostrar la
hora de inicio desde la cual se muestra la precipitación
acumulada. Aparece el icono
fecha de inicio.
Para alternar entre las pantallas de precipitación e
índice de lluvia:
En la pantalla de lectura de rayos UV / Barómetro /
Precipitación y precipitación, pulse MODE y manténgalo
pulsado.
Para reiniciar la precipitación acumulada y la
codificación de tiempo:
En el Área Rayos UV / Barómetro / Precipitación y la
pantalla de lectura de precipitación. Pulse MEMORY /
ACTIVADA / DESACTIVADA y manténgalo pulsado
y se muestra la
para reiniciar la precipitación acumulada volviendo a
situarla a ‘0’ y ajustando la codificación de tiempo a la
fecha y hora actuales.
Para modificar la alarma de precipitación alta:
1. En la pantalla de Rayos UV / Barómetro /
Precipitación y la pantalla de precipitación, pulse
ALARM y manténgalo pulsado para acceder al
ajuste de la alarma de precipitación.
2. Haga girar el dial a la izquierda o a la derecha para
seleccionar los valores deseados.
3. Pulse ALARM para confirmar el ajuste.
Para activar / desactivar la alarma de precipitación
alta:
1. En el Área de Rayos UV / Barómetro / Precipitación
y pantalla de lectura de precipitación, pulse ALARM
repetidamente para seleccionar la alarma deseada.
2. Pulse MEMORY /
para activar o desactivar la alarma.
ACTIVADA / DESACTIVADA
ALARMAS METEOROLÓGICAS
Se pueden utilizar las alarmas meteorológicas para
avisar de ciertas condiciones meteorológicas. Una vez
activada, la alarma se disparará cuando se cumplan
ciertos criterios.
Se pueden configurar alarmas de:
• Temperaturas altas/bajas interiores y exteriores,
punto de condensación y humedad alta/baja
19
ES
Page 46

ES
• Alto índice de calor
• Fuerte ráfaga de viento
• Sensación de frío por viento
• Índice de rayos UV elevado
• Caída de presión
• Índice de precipitación alto
Consulte la sección correspondiente para saber cómo
configurar la alarma.
Para silenciar la alarma: Pulse cualquier botón o haga
girar el dial.
• Procesador: Pentium II 166MHz o superior
• RAM: Mín. 64Mb
• Espacio libre en el disco duro: Mín. 30Mb
Para conectar la unidad base al ordenador:
3
2
CONEXIÓN AL PC
La estación meteorológica se puede conectar a un PC
mediante conexión USB. El software “Virtual Weather
Station” puede leer los últimos datos meteorológicos
recopilados por la unidad principal. Sírvase descargar el
software de la siguiente página web:
http://www2.oregonscientific.com/assets/software/
wmr100.exe
Para obtener más información, consulte las instrucciones
del software “Virtual Weather Station”.
Requisitos del sistema del PC
Los requisitos mínimos que debe cumplir su sistema
para poder utilizar el software “Virtual Weather Station”
son:
• Sistema operativo: Microsoft Windows 98 o superior
1
1. Destape la toma USB que hay en el lateral de la
unidad principal.
2. Conecte el cable de conexión USB.
3. Conecte el otro extremo del cable al ordenador.
ILUMINACIÓN DE LA PANTALLA
Pulse cualquier botón o haga girar el dial para activar la
retroiluminación.
REINICIO
Pulse RESET para volver a la configuración
predeterminada.
20
Page 47

SOLUCIÓN DE PROBLEMAS
PROBLEMA SÍNTOMA SOLUCIÓN
Sensor
remoto
No se puede
localizar el
sensor
ES
Compruebe la
localización
Barómetro Lecturas
extrañas
Calendario Fecha / mes
extraño
Reloj No se puede
ajustar el reloj
No puede
sincronizar
automáticamente
Temp Se muestra
“LLL” o “HHH”
Configure la
unidad
Cambie el idioma
Desactive el reloj
controlado por
radio
1. Ajuste de las
pilas
2. Pulse
REINICIO
3. Active
manualmente el
reloj controlado
por radio
La temperatura
está fuera de los
límites.
No se puede
cambiar de
canal
Los datos no
coinciden con la
unidad principal
Compruebe los
sensores. Sólo
funciona un sensor
Inicie una
búsqueda de
sensor manual
PRECAUCIÓN
No exponga el producto a fuerza extrema,
•
descargas, polvo, fluctuaciones de temperatura o
humedad.
No cubra los orificios de ventilación con objetos
•
como periódicos, cortinas, etc.
No sumerja el dispositivo en agua. Si se vertiera
•
líquido en la unidad, límpiela con un paño suave y
sin electricidad estática.
No limpie la unidad con materiales abrasivos o
•
corrosivos.
No manipule los componentes internos. De hacerlo
•
se invalidaría la garantía.
Use siempre pilas nuevas. No mezcle pilas viejas
•
con pilas nuevas.
21
Page 48

ES
Las imágenes de esta guía para el usuario puede
•
ser distintas al producto en sí.
Cuando elimine este producto, asegúrese de que no
•
vaya a parar a la basura general, sino separadamente
para recibir un tratamiento especial.
La colocación de este producto encima de ciertos tipos
•
de madera puede provocar daños a sus acabados.
Oregon Scientific no se responsabilizará de dichos
daños. Consulte las instrucciones de cuidado del
fabricante para obtener más información.
Los contenidos de este manual no pueden
•
reproducirse sin permiso del fabricante.
No elimine las pilas gastadas con la basura normal.
•
Es necesario desecharlo separadamente para
poder tratarlo.
Tenga en cuenta que algunas unidades disponen de
•
una cinta de seguridad para las pilas. Retire la cinta de
compartimiento para pilas antes de usarlo por primera
vez.
NOTA La ficha técnica de este producto y los contenidos
de este manual de usuario pueden cambiarse sin aviso.
FICHA TÉCNICA
UNIDAD PRINCIPAL
Dimensiones 143 x 89 x 165 mm
(L x A x A) (5,6 x 3,5 x 6,5 pulgadas)
Peso 300g (0,66 lbs) sin pila
BARÓMETRO INTERIOR
Unidad del barómetro mb/hPa, inHg y mmHg
Alcance de medición 700 – 1050mb/hPa
Precisión +/- 10 mb/hPa
Resolución 1mb (0,0 inHg)
Ajuste de altura Nivel de mar
Ajuste del usuario para
compensación
Pantalla del tiempo Soleado, Parcialmente nublado,
Nublado, Lluvia y Nieve.
Memoria Datos históricos y gráfico de
las últimas 24 horas
TEMPERATURA INTERIOR
Unidad de temperatura °C / °F
Gama mostrada 0°C a 50°C (32°F a 122°F)
Alcance funcional -30°C a 60°C (-4°C a 140°C)
Precisión 0°C - 40°C: +/- 1°C (+/- 2,0°F)
40°C -50°C: +/-2°C (+/-4,0°C)
Confort 20°C a 25°C (68°F a 77°F)
22
Page 49

Memoria Temp. actual, mín y máx
Punto de condensación con
mín y máx
Alarma Alta / Baja
HUMEDAD RELATIVA INTERIOR
Alcance mostrado 2% a 98%
Alcance funcional 25% a 90%
Resolución 1%
Precisión 25% - 40%: +/- 7%
40% - 80%: +/- 5%
80% - 90%: +/- 7%
Confort 40% a 70%
Memoria Actual, mín y máx
Alarma Alta / Baja
RELOJ RADIOCONTROLADO
Sincronización Automática o desactivada
Pantalla de reloj HH:MM:SS
Formato de la hora 12hr AM/PM ó 24 horas
Calendario DD/MM o MM/DD
Día de la semana (E, G, F, I, S)
en 5 idiomas
Batería 4 pilas UM-3 (AA) de 1,5V
Adaptador CA 6V
SENSOR TERMOHIGRÁFICO
ES
Dimensiones 92 x 60 x 20 mm
(A x A x P) (3,6 x 2,4 x 0,79 pulgadas)
Peso 62 g (2,22 oz)
Rango de humedad 5% a 95%
Resolución de la 1%
humedad
Unidad de temperatura °C / °F
Rango de temperatura 30°C a 60°C (22°F a 140°F)
exterior
Resolución de 0.1°C (0.2°F)
temperatura
Frecuencia RF 433 MHz
Alcance transmisión 100 metros (330 pies)
Frecuencia transmisión Cada 60 segundos
Núm. de canales 1 - 10
Pilas 2 pilas UM-4 (AAA) 1,5V
TEMPERATURA EXTERIOR
Unidad de temperatura °C/°F
Gama mostrada -50°C a 70°C (-58°F a 158°F)
Alcance funcional -30°C a 60°C (-4°C a 140°C)
Precisión -20°C – 0°C: +/- 2°C (+/- 4.0°F)
0°C - 40°C: +/- 1°C (+/- 2.0°F)
40°C - 50°C: +/- 2°C (+/- 4.0°F)
50°C - 60°C: +/- 3°C (+/- 6.0°F)
23
Page 50

ES
Confort 20°C a 25°C (68°C a 77°C)
Memoria Temp. actual, mín y máx
Punto de condensación con
mín y máx
Temperatura y mín de
sensación de frío
HUMEDAD RELATIVA
Alcance mostrado 2% a 98%
Alcance funcional 25% a 90%
Resolución 1%
Precisión 25% - 40%: +/- 7%
40% - 80%: +/- 5%
80% - 90%: +/- 7%
Confort 40% a 70%
Memoria Actual, mín y máx
TRANSMISIÓN RF
Frecuencia RF 433MHz
Alcance Hasta 100 metros (358 pies)
sin obstrucciones
Transmisión Aprox. cada 60 segundos
Nº de canal 1 para Viento / Precipitación /
UVA y 10 para temperatura /
humedad
Batería 4 pilas UM-3 (AA) 1,5V
SOBRE OREGON SCIENTIFIC
Visite nuestra página web (www.oregonscientific.com)
para conocer más sobre los productos de Oregon
Scientific tales como: Reproductores MP3, juegos y
productos de aprendizaje electrónico para niños, relojes
de proyección, productos para la salud y el deporte,
estaciones meteorológicas y teléfonos digitales y de
conferencia. La página web también incluye información
de contacto de nuestro departamento de Atención al
Cliente, en caso de que necesite contactar con nosotros,
a la vez que Preguntas Frecuentes y Descargas de los
programas y controladores necesarios para nuestros
productos.
Esperamos que encuentre toda la información
que necesite en nuestra página web. En cualquier
caso, si necesita contactar con el departamento de
Atención al Cliente directamente, por favor visite www.
oregonscientific.es la sección “Contáctenos” o llame al
902 338 368. Los residentes en EEUU pueden visitar
www2.oregonscientific.com/service/support o llamar al
1-800-853-8883.
24
Page 51

EU - DECLARACIÓN DE CONFORMIDAD
Por medio de la presente Oregon Scientific declara
que el Estación meteorológica avanzada con sensor
inalámbrico y kit de montaje Modelo: WMR100TH
cumple con los requisitos esenciales y cualesquiera
otras disposiciones aplicables o exigibles de la Directiva
1999/5/CE. Tiene a su disposición una copia firmada
y sellada de la Declaración de Conformidad, solicítela
al Departamento de Atención al Cliente de Oregon
Scientific.
PAÍSES BAJO LA DIRECTIVA RTTE
ES
Todos los países de la UE, Suiza
y Noruega
CH
N
25
Page 52

Wettermess-System
mit kabellosem Sensorsatz und
Montagepaket
Modell: WMR100TH
BEDIENUNGSANLEITUNG
INHALT
Einleitung .................................................................... 2
Inhalt der Verpackung ................................................ 2
Thermo-Hydro-Sensor (THGR810) .......................... 2
Zubehör – Sensoren ................................................ 2
Übersicht ..................................................................... 3
LCD-Anzeige ............................................................ 5
Erste Schritte .............................................................. 7
Basisstation einrichten ............................................. 7
Sensor einrichten ...................................................... 8
Batterien ................................................................. 10
Kanal einstellen ..................................................... 10
Basisstation .............................................................. 11
Anzeige / Einstellungen ändern ............................. 11
Zeitsignalempfang .................................................... 11
Uhr / Kalender ........................................................... 12
Uhralarm .................................................................... 12
Uhralarm ................................................................... 12
Mondphase ................................................................ 13
Automatische Abfrage (Auto-Scan-Funktion)........ 13
Wettervorhersage ..................................................... 14
Temperatur und Luftfeuchtigkeit ............................ 14
Temperatur- und Luftfeuchtigkeitstrend ................. 16
Komfortstufe ........................................................... 16
Windrichtung / Windgeschwindigkeit .................... 16
UVI / Barometer / Regenfall ................................... 18
UV-Index ................................................................. 19
Barometer ............................................................... 19
Regenfall ................................................................. 20
Wetteralarme ............................................................ 21
Anschluss an einen PC ......................................... 21
Hintergrundbeleuchtung ........................................ 22
Reset ......................................................................... 22
Fehlersuche und Abhilfe ........................................ 22
Vorsichtsmassnahmen ............................................ 23
Technische Daten .................................................... 24
Über Oregon Scientific .......................................... 26
EG-Konformitätserklärung .................................... 26
DE
1
Page 53

DE
EINLEITUNG
Wir danken Ihnen, dass Sie sich für das WettermessSystem von Oregon Scientific™ (WMR100TH)
entschieden haben.
Die Basisstation ist mit weiteren Sensoren kompatibel.
Um zusätzliche Sensoren zu erwerben, wenden Sie sich
bitte an Ihren Händler vor Ort.
Die Software “Virtual Weather Station” und die Anleitung
sind zum Download unter dieser Adresse erhältlich:
http://www2.oregonscientific.com/assets/software/
wmr100.exe
THERMO-HYDRO-SENSOR (THGR810)
Sensoren mit diesem Logo
kompatibel.
HINWEIS Halten Sie bitte diese Anleitung bereit,
wenn Sie Ihr neues Produkt in Betrieb nehmen. Sie
enthält praktische Schritt-für-Schritt-Anweisungen sowie
technische Daten und für Sie wichtige Warnhinweise.
sind mit diesem Gerät
INHALT DER VERPACKUNG
1 x USB Kabel
4 x UM-3 / AA
1 x Netzteil 6V
1 x Halterung für
Wandmontage
2 x UM-4 / AAA
Tischaufsteller
ZUBEHÖR – SENSOREN
Dieses Produkt kann mit bis zu 10 Sensoren betrieben
werden, um jeweils Messwerte für Außentemperatur,
relative Luftfeuchtigkeit oder UVI an verschiedenen
Standorten zu erfassen. Optionale, kabellose Sensoren,
2
1 x
Page 54

wie die nachstehend angeführten, können gesondert
erworben werden. Weitere Informationen erhalten Sie
von Ihrem Händler vor Ort.
• Thermo-Hygro THGR800 (3-Kanal)
• UV UVN800
• Regenmesser PCR800
• Windmesser WTGR800
ÜBERSICHT
1
2
3
4
5
1. MEMORY / ON/OFF: die gespeicherten max.
/ min. Datensätze abrufen; Alarme aktivieren /
deaktivieren
2. ALARM: Alarme für Barometer, Temperatur,
Luftfeuchtigkeit, Regenfall und Windgeschwindigkeit
anzeigen und einstellen
3. MODE: Zwischen verschiedenen Anzeigemodi /
Einstellungen umschalten
4. Steuerungsrad: Nach links oder rechts drehen,
um die gewählten Messwerte zu erhöhen oder zu
verringern
5. SELECT: Zwischen verschiedenen Bereichen
wechseln
1
2
3
4
5
6
7
DE
3
Page 55

DE
1. Buchse für Netzadapter
2. RESET: Gerät auf Standardeinstellungen
zurücksetzen
3. SEARCH: Nach Sensoren oder funkgesteuertem
Zeitsignal suchen
4. UNIT: Maßeinheit auswählen
5. Batteriefach
6. Nur bei WMR100 – EU- / UK-Funksignal
7. USB-Anschluss
1. LCD-Anzeige (der THGN810 verfügt über keine
LCD-Anzeige) : Zeigt Kanalnummer, Messwerte für
Temperatur und Luftfeuchtigkeit, sowie Komfortstufe
an
2. LED-Statusindikator
4
1
2
3
1. RESET-Öffnung
2. °C- / °F-Schalter (Bei THGN810 ist dieser Schalter
nicht vorhanden)
3. CODE-Schalter
4. Batteriefach
4
Page 56

LCD-ANZEIGE
1
7. Symbol für schwache Batterie bei Basisstation
8. Bereich für Luftfeuchtigkeit / Taupunkt
DE
6
7
1
Bereich für Temperatur / Hitzeindex / Windkühlung
2
3
4
2
8
5
6
3
7
8
9
4
5
1. Bereich für Wettervorhersage
2. Bereich für Temperatur / Hitzeindex / gefühlte
Temperatur
3. Bereich für Windgeschwindigkeit / Windrichtung
4. Bereich für UVI / Barometer / Regenfall
5. Bereich für Uhr / Alarm / Kalender / Mondphase
6. Symbol für Netzteil – wird angezeigt, wenn dieses
vom Gerät getrennt wird
1. Temperaturtrend
2. Windkühlfaktor – Temperatur wird angezeigt
3. Stufe des Hitzeindex – Temperatur wird angezeigt
4. Alarme für hohe / niedrige Temperatur (HI / LO),
hohen Hitzeindex (HI) und niedrige Windkühlung
(LO) sind eingestellt
5. Gewähltes Bereichssymbol
6. Temperatur und Luftfeuchtigkeit für Innen- /
Außenkanal wird angezeigt
7. MAX. / MIN.Temperatur
8. Schwache Batterie bei Außensensor
9. Temperatur (°C / °F)
5
Page 57

DE
6
1
Bereich für Windgeschwindigkeit / Windrichtung
(Windmesser optional)
1
2
3
4
5
Bereich für UVI / Barometer / Niederschlag
(Regenmesser und UV-Sensor optional)
2
7
3
4
7
5
8
9
10
6
1. Höhe der Windgeschwindigkeit: AVERAGE / MAX /
GUST (DURCHSCHN. / MAX. / BÖE)
2. Indikator für Höhe der Windgeschwindigkeit
3. Schwache Batterie bei Windmesser (außen)
4. Beschreibung der Höhe der Windgeschwindigkeit
5. Messwert der Windböe oder Windgeschwindigkeit
(m/s, k/h, mph oder Knoten)
6. Alarm für hohe Windböe (HI) ist eingestellt
7. Anzeige der Windrichtung
1. Messwerte für UVI / Barometer / Niederschlag
werden angezeigt
2. Schwache Batterie bei UV- / Regenmesser (außen)
3. Alarm für UV / Barometer / Niederschlag ist eingestellt
4. Niederschlagsrate wird angezeigt
5. Messwerte für UVI / Luftdruck (mmHg, inHg oder mb
/ hPa) / Niederschlag (in / hr oder mm / hr)
6. Indikator für UVI-Wert
7. Kumulativer Regenfall wird angezeigt
8. Regenfall der vergangenen 24 Std. wird angezeigt
9. Höhenlage wird angezeigt
10. Anzeige von Balkendiagramm für historischen UVI /
Luftdruck / Niederschlag
6
Page 58

Bereich für Uhr / Alarm / Kalender / Mondphase
1
1
2
3
2. Alarme für hohe / niedrige Luftfeuchtigkeit (HI / LO)
und Taupunkt sind eingestellt
3. Komfortstufen
4
5
4. Luftfeuchtigkeitstrend
5. MAX. / MIN. Luftfeuchtigkeit
6. Messwert der Luftfeuchtigkeit
DE
6
1. Empfang des Funkzeitsignals
2. Alarm 1 und 2 werden angezeigt und sind eingestellt
3. Zeitmarke wird angezeigt
4. Zeitzonenausgleich
5. Mondphase
6. Uhrzeit / Datum / Kalender
Bereich für Luftfeuchtigkeit / Taupunkt
ERSTE SCHRITTE
BASISSTATION EINRICHTEN
HINWEIS Installieren Sie die Batterien zuerst im
externen Sensor und anschließend in der Basisstation;
achten Sie dabei auf die Übereinstimmung der
Polaritäten (+ und -).
2
3
4
5
1. Stufe des Taupunkts (Dew Point) – Temperatur wird
angezeigt
6
Für den Dauerbetrieb installieren Sie bitte das Netzteil.
Die Batterien dienen lediglich als Sicherung.
HINWEIS Stellen Sie bitte sicher, dass sich die
Steckdose in der Nähe des Geräts befindet und leicht
zugänglich ist.
7
Page 59

DE
Bereich für
Temperatur
/ Hitzeindex
/ gefühlte
Temperatur
Der angezeigte Kanal gibt den
Außensensor an, dessen
Batterie schwach ist.
Installieren Sie die Batterien (4 x UM-3 / AA) der
Basisstation und achten Sie auf die Übereinstimmung
der Polarität + und -. Nach jedem Batteriewechsel auf
RESET drücken.
HINWEIS Verwenden Sie keine wiederaufladbaren
Batterien. Es wird empfohlen, dass Sie für dieses
Produkt Alkaline-Batterien verwenden, um eine längere
Betriebsleistung zu gewährleisten.
Das Batterieladeanzeige
erscheinen:
BEREICH BEDEUTUNG
Bereich
für Wettervorhersage
kann in folgenden Bereichen
Batterie in der Basisstation ist
schwach.
das Netzteil vom Gerät getrennt
wird.
wird angezeigt, wenn
Bereich f. Windgeschwindigkeit
/ Windrichtung
Bereich für UVI
/ Barometer /
Niederschlag
Batterie im Windmesser ist
schwach.
Batterie im UV- / Regenmesser
ist schwach.
SENSOR EINRICHTEN
Um sensor einrichten:
1. Öffnen Sie den Batteriedeckel.
2. Legen Sie die Batterien ein und achten Sie auf die
Übereinstimmung der Polarität (+ und -).
8
Page 60

3. Verwenden Sie CODE, um den Kanal auszuwählen.
4. Nur bei THGR810 - Stellen Sie die Temperatureinheit
ein.
5. Platzieren Sie den Sensor in der Nähe der
Basiseinheit. Drücken Sie am Sensor auf RESET.
Drücken Sie anschließend die entsprechende
Taste der Basiseinheit (wie in der Anleitung der
Basiseinheit angegeben), um die Signalübertragung
zwischen Sensor und Basisgerät zu veranlassen.
6. Schließen Sie das Batteriefach des Sensors.
7. Befestigen Sie den Sensor mit der Wandaufhängung
oder dem Tischaufsteller an der gewünschten
Stelle.
Für optimale Ergebnisse:
• Platzieren Sie die Funksendeeinheit so, dass sie
vor direkter Sonnenbestrahlung und Feuchtigkeit
geschützt ist.
• Platzieren Sie die Funksendeeinheit nicht weiter
als 100 Meter von der Basiseinheit (330 im Haus)
entfernt.
• Positionieren Sie die Funksendeeinheit so, dass sie
auf die Basiseinheit (im Haus) ausgerichtet ist, und
vermeiden Sie Hindernisse wie Türen, Wände und
Möbel.
• Platzieren Sie die Funksendeeinheit an einem
Standort mit freier Sicht auf den Himmel und
stellen Sie ihn nicht in die Nähe von metallischen
Gegenständen oder elektronischen Geräten.
• Positionieren Sie die Funksendeinheit während der
kalten Wintermonate in der Nähe der Basiseinheit,
da Temperaturen unter der Frostgrenze die
Batterieleistung und die Signalübertragung
beeinträchtigen können.
Die Übertragungsreichweite kann von mehreren
Faktoren abhängen. Sie müssen eventuell mehrere
Standorte testen, um optimale Ergebnisse zu erzielen.
Die Übertragungsreichweite von Funksignalen kann
von verschiedenen Faktoren, wie extrem niedrige
Temperaturen, beeinflusst werden. Extreme Kälte
kann die effektive Übertragungsreichweite zwischen
Funksendeeinheit und Basisstation vorübergehend
verringern. Sollten Funktionsstörungen am Gerät
aufgrund niedriger Temperaturen auftreten, so wird das
Gerät wieder ordnungsgemäß funktionieren, sobald sich
die Temperaturwerte wieder innerhalb des normalen
Bereichs befinden (d.h. niedrige Temperaturen
können keine dauerhaften Schäden an Ihrem Gerät
verursachen).
9
DE
Page 61

DE
BATTERIEN
KANAL EINSTELLEN
Legen Sie die Batterien vor der ersten Inbetriebnahme
ein und achten Sie auf die Übereinstimmung der Polarität
(+ und -), wie im Batteriefach angegeben. Um optimale
Ergebnisse zu erzielen, installieren Sie die Batterien
zuerst im externen Sensor und anschließend in der
Basiseinheit. Drücken Sie nach jedem Batteriewechsel
auf RESET.
HINWEIS Es wird empfohlen, dass Sie bei diesem
Produkt Alkaline-Batterien für eine längere Betriebsdauer
und Lithium-Batterien für Temperaturen unter dem
Gefrierpunkt verwenden (0°C / 32°F). Verwenden Sie
keine wiederaufladbaren Batterien.
wird auf dem THGR810 angezeigt, wenn die
Ladung der Batterien zu niedrig ist.
Stellen Sie den Kanal ein, indem Sie eine der folgenden
Einstellungen mit dem CODE-Schalter vornehmen:
Kanal-Nummer Schalterstellung
1
2
3
4
5
6
7
8
9
10
10
10 Andere Schalterstellungen
(Nicht empfohlen)
Page 62

BASISSTATION
ANZEIGE / EINSTELLUNGEN ÄNDERN
Um die Anzeige und Einstellungen zu ändern, verwenden
Sie bitte folgende Tasten auf dem Steuerungsrad:
SELECT, MEMORY /
ON/OFF, MODE und ALARM.
Weiter ermöglichen die Tasten
UNIT und SEARCH auf der
Unterseite der Basisstation
die Voreinstellung der Kanäle
der externen Sensoren
sowie die Maßeinheit für die
Anzeige.
Die Reichweite des Funksignals beträgt 1500 km (932
Meilen).
WMR100A:
• WWVB-60 wird von der Atomuhr in Fort Collins,
Colorado, erzeugt
Die Reichweite des Funksignals beträgt 3219 km (2000
Meilen).
Nur bei WMR100 – schieben Sie den EU- / UK-Schalter
auf die Ihrem Standort entsprechende Stellung. Drücken
Sie jedes Mal auf RESET, wenn Sie die gewählte
Einstellung ändern.
Das Empfangssymbol blinkt, wenn eine Signalsuche erfolgt.
Wenn das Funksignal schwach ist, kann es bis zu 24
Stunden dauern, bis ein gültiges Signal empfangen wird.
DE
TIPP Um den Einstellungsmodus zu verlassen, drücken
Sie eine beliebige Taste. Andernfalls wird dieser von der
Basisstation automatisch nach 30 Sekunden beendet.
ZEITSIGNALEMPFANG
Dieses Produkt synchronisiert automatisch seine
Kalenderuhr, sobald es sich im Empfangsbereich der
folgenden Funksignale befindet:
WMR100:
• DCF-77 wird in Frankfurt, Deutschland, für
Mitteleuropa erzeugt
• MSF-60 wird in Anthorn, England, erzeugt
gibt den Status des Zeitsignalempfangs an.
SYMBOL BEDEUTUNG
Uhrzeit wird synchronisiert.
Das empfangene Signal ist stark.
Uhrzeit wird nicht synchronisiert.
Das empfangene Signal ist schwach.
So aktivieren (und veranlassen Sie eine Signalsuche)
/ deaktivieren Sie den Empfang des Funkzeitsignals
(Synchronisierung der Uhr):
1. Drücken Sie auf SELECT, um zum Bereich für Uhr /
11
Page 63

DE
Kalendar / Alarm zu navigieren. wird neben dem
Bereich angezeigt.
2. Halten Sie SEARCH gedrückt.
HINWEIS Um einen optimalen Empfang zu
gewährleisten, sollte die Basisstation auf einer ebenen,
nicht-metallischen Oberfläche, in der Nähe eines
Fensters und im oberen Stockwerk Ihres Hauses platziert
werden. Die Antenne sollte entfernt von elektrischen
Geräten platziert und während der Signalsuche nicht
bewegt werden.
erscheint, wenn dieser aktiviert ist.
UHR / KALENDER
So stellen Sie die Uhr manuell ein:
(Sie müssen Uhrzeit und Kalender nur einstellen, wenn Sie
den Empfang des Funkzeitsignals deaktiviert haben.)
1. Drücken Sie auf SELECT, um zum Uhr-Bereich zu
navigieren.
2. Halten Sie MODE gedrückt, um die Uhreinstellung
zu ändern. Die Einstellung beginnt zu blinken.
3. Drehen Sie die Scheibe nach links oder rechts, um den
Einstellungswert zu verringern oder zu erhöhen.
4. Drücken Sie zur Bestätigung auf MODE.
5. Wiederholen Sie die Schritte 1 bis 5, um die Stunde
für den Zeitzonenausgleich (+ / -23 Stunden), das
12- / 24-Stundenformat, Stunde, Minute, Jahr,
Datums-/Monatsformat, Monat, Datum und Sprache
für den Wochentag einzustellen.
wird neben dem Bereich angezeigt.
HINWEIS Wenn Sie +1 in der Einstellung für die Zeitzone
eingeben, ergibt dies Ihre Ortszeit plus 1 Stunde.
HINWEIS Der Wochentag ist in Englisch, Französisch,
Deutsch, Italienisch oder Spanisch verfügbar.
So ändern Sie die Anzeige der Uhr:
1. Drücken Sie auf SELECT, um in den Uhr-Bereich zu
navigieren.
2. Drücken Sie auf MODE, um zwischen folgenden
Anzeigearten zu wechseln:
• Uhrzeit mit Sekunden
• Uhrzeit mit Wochentag
• Kalender
wird neben dem Bereich angezeigt.
UHRALARM
Die Uhr verfügt über 2 Alarme, die so eingestellt werden
können, dass bei jedem Alarm ein Signalton erfolgt.
SYMBOL BEDEUTUNG
Alarm 1 oder 2 wird angezeigt
Alarm 1 oder 2 ist aktiviert
Keine Symbole Es ist kein Alarm eingestellt
So stellen Sie einen Alarm ein:
1. Drücken Sie auf SELECT, um zum Uhr-Bereich zu
navigieren.
wird neben dem Bereich angezeigt.
12
Page 64

2. Drücken Sie auf ALARM, um zwischen der Anzeige
für Alarm 1
3. Wenn Sie den Alarm gewählt haben, den Sie
ändern möchten, halten Sie ALARM gedrückt. Die
Alarmeinstellung beginnt zu blinken.
4. Drehen Sie die Scheibe nach links oder rechts, um
die Einstellung zu ändern.
5. Drücken Sie zur Bestätigung auf ALARM.
und Alarm 2 umzuschalten.
DE
Erstes Viertel (zunehmender
Halbmond)
Zunehmender ¾-Mond
Vollmond
So aktivieren / deaktivieren Sie einen Alarm:
1. Drücken Sie auf SELECT, um zum Uhr-Bereich zu
navigieren.
2. Drücken Sie auf ALARM, um zwischen Alarm 1
und Alarm 2
3. Drücken Sie auf MEMORY /
Alarm zu aktivieren oder zu deaktivieren.
erscheint bei aktiviertem Alarm.
wird neben dem Bereich angezeigt.
umzuschalten.
ON/OFF, um den
oder
MONDPHASE
Der Kalender muss eingestellt sein, damit diese Funktion
ausgeführt werden kann (siehe Abschnitt Uhr / Kalender).
SYMBOL BESCHREIBUNG
Neumond
Zunehmende Sichel
Abnehmender ¾-Mond
Letztes Viertel (abnehmender
Halbmond)
Abnehmende Sichel
AUTOMATISCHE ABFRAGE (AUTO-SCANFUNKTION)
So aktivieren Sie die Auto-Scan-Funktion der
Außentemperatur und Außenluftfeuchtigkeit:
1. Drücken Sie auf SELECT, um zum Bereich
Temperatur oder Luftfeuchtigkeit zu navigieren.
wird neben dem Bereich angezeigt.
2. Halten Sie MODE gedrückt, um die automatische
Abfrage zu aktivieren. Die Temperatur und
Luftfeuchtigkeit läuft als Laufschrift vom Innenbereich
zum Kanal 1 (Ch1) bis zum Kanal 10 (Ch10) durch
die Anzeige.
13
Page 65

DE
3. Drücken Sie auf MEMORY / ON/OFF oder MODE
oder ALARM, um die automatische Abfrage zu
beenden.
Verschneit
HINWEIS Kanal 1 wird für den Sensor für die
Außentemperatur und Außenluftfeuchtigkeit im externen
Windmesser verwendet. Zusätzliche Temperatur- und
Luftfeuchtigkeitssensoren können andere Kanäle
verwenden.
WETTERVORHERSAGE
Die Wetteranzeige im oberen Teil des Bildschirms zeigt
das aktuelle Wetter und die Wettervorhersage für die
folgenden 12 – 24 Stunden innerhalb eines Radius von
30 - 50 km (19 - 31 Meilen) an.
Bereich für Wettervorhersage
SYMBOL BESCHREIBUNG
Sonnig
Leicht bewölkt
Bewölkt
Regnerisch
TEMPERATUR UND LUFTFEUCHTIGKEIT
Die Wetterstation zeigt folgende Messwerte für den
Innen- und Außenbereich an:
1. Aktuelle, minimale und maximale Temperatur und
relative Luftfeuchtigkeit.
2. Komfortstufen-Indikator und Trendanzeige.
3. Hitzeindex, Faktor für gefühlte Temperatur und Stufe
des Taupunkts.
Die Wetterstation kann mit bis zu 10 externen Sensoren
verbunden werden.
gibt an, vom welchem externen Sensor die Daten
angezeigt werden.
erscheint, wenn die Daten für den Innenbereich
angezeigt werden.
Die Zeitmarke zeichnet Datum und Uhrzeit der
Speicherung der Messwerte für Temperatur und
Luftfeuchtigkeit auf.
14
Page 66

So wählen Sie die Maßeinheit für die Temperatur
aus:
Drücken Sie auf UNIT (auf der Unterseite der
Basisstation), um °C / °F auszuwählen.
HINWEIS Die Maßeinheit für alle temperaturbezogenen
Anzeigen wird gleichzeitig geändert.
• Aktueller / MAX. Hitzeindex
• Aktuelle / MIN. gefühlte Temperatur
• Aktueller / MAX. / MIN. Taupunkt
• Aktuelle / MAX. / MIN. Luftfeuchtigkeit
Die Zeitmarke wird dementsprechend im Uhr-Bereich
angezeigt.
DE
So zeigen Sie die Messwerte der Innen- / Außensensoren
(1-10) für Temperatur und Luftfeuchtigkeit an:
1. Drücken Sie auf SELECT, um zum Bereich für
Temperatur oder Luftfeuchtigkeit zu navigieren.
wird neben dem Bereich angezeigt.
2. Drehen Sie die Scheibe nach links oder rechts, um
den Kanal auszuwählen.
So zeigen Sie die minimale und maximale Temperatur
oder Luftfeuchtigkeit an:
1. Drücken Sie im Bereich für Temperatur oder
Luftfeuchtigkeit wiederholt auf MODE, um durch
folgende Messwerte zu blättern:
• Aktuelle Temperatur
• Hitzeindex
• Windkühlung
• Taupunkt
• Luftfeuchtigkeit
2. Drücken Sie für jeden der obigen Messwerte
wiederholt auf MEMORY /
zwischen folgenden Werten zu wechseln:
• Aktuelle / MAX. / MIN. Temperatur
ON/OFF, um jeweils
So löschen Sie die gespeicherten Messwerte und
Zeitmarken für Temperatur, Hitzeindex, gefühlte
Temperatur, Luftfeuchtigkeit und Taupunkt:
Halten Sie im Bereich für Temperatur oder Luftfeuchtigkeit
MEMORY /
löschen.
So ändern Sie die Alarme für hohe / niedrige Temperatur,
Hitzeindex, gefühlte Temperatur, Luftfeuchtigkeit und
Taupunkt:
1. Drücken Sie im Bereich für Temperatur oder
Luftfeuchtigkeit wiederholt auf ALARM, um zwischen
den Alarmen für hohe / niedrige Messwerte bei
Temperatur, Hitzeindex, gefühlte Temperatur,
Luftfeuchtigkeit und Taupunkt zu wechseln.
2. Halten Sie ALARM gedrückt, um die Alarmeinstellung
aufzurufen.
3. Drehen Sie die Scheibe nach links oder rechts, um
die gewünschten Werte einzustellen.
4. Drücken Sie auf ALARM, um die Einstellung zu
bestätigen.
15
ON/OFF gedrückt, um die Werte zu
Page 67

DE
So aktivieren / deaktivieren Sie die Alarme für
hohe / niedrige Temperatur, Hitzeindex, gefühlte
Temperatur, Luftfeuchtigkeit und Taupunkt:
1. Drücken Sie im Bereich für Temperatur oder
Luftfeuchtigkeit wiederholt auf ALARM, um den
gewünschten Alarm auszuwählen.
2. Drücken Sie auf MEMORY /
Alarm zu aktivieren oder zu deaktivieren.
HINWEIS Der Taupunkt gibt an, ab welcher Temperatur
es zur Kondensation kommt. Die gefühlte Temperatur
basiert auf den gemeinsamen Auswirkungen von
Temperatur und Windgeschwindigkeit.
ON/OFF um den
TEMPERATUR- UND
LUFTFEUCHTIGKEITSTREND
Die Trendanzeigen werden neben den Messwerten für
Temperatur und Luftfeuchtigkeit angezeigt. Der Trend
wird wie folgt dargestellt:
TRENDSYMBOL BESCHREIBNG
Steigend
Konstant
Fallend
KOMFORTSTUFE
Das Symbol für die Komfortzone gibt an, wie angenehm
das Klima auf der Grundlage der aktuellen Messungen
der Temperatur und Luftfeuchtigkeit ist:
SYMBOL BESCHREIBUNG
Angenehm
Neutral
Unangenehm
WINDRICHTUNG / WINDGESCHWINDIGKEIT
Die Basisstation liefert Daten
über Windgeschwindigkeit
und Windrichtung.
Um die Windrichtung
abzurufen, eruieren Sie den
Punkt auf dem Kompass, auf
den das
Die Zeitmarke zeichnet Datum und Uhrzeit der
Speicherung der Messwerte der Windgeschwindigkeit
auf.
HINWEIS Windmesser optional.
16
gerichtet ist.
Page 68

So wählen Sie die Maßeinheit für die
Windgeschwindigkeit aus:
Drücken Sie auf UNIT (auf der Unterseite der
Basisstation), um diese wie folgt zu wechseln:
• Meter pro Sekunde (m / s)
• Kilometer pro Stunde (kph)
• Meilen pro Stunde (mph)
• Knoten (knots)
Die Höhe der Windgeschwindigkeit wird durch eine
Reihe von Symbolen dargestellt:
SYMBOL HÖHE BESCHREIBUNG
1. Drücken Sie auf SELECT, um zum Bereich
für Windgeschwindigkeit und Windrichtung zu
navigieren.
2. Drücken Sie auf MODE, um zwischen den
Messwerten AVERAGE und GUST zu wechseln.
So zeigen Sie die maximale Geschwindigkeit und
Windrichtung für die Windböe an:
Drücken Sie im Bereich für Windgeschwindigkeit und
Windrichtung auf MEMORY /
den Messwerten der Windgeschwindigkeit MAX / GUST
zu wechseln. Die Zeitmarke wird dementsprechend im
Uhr-Bereich angezeigt.
wird neben dem Bereich angezeigt.
ON/OFF, um zwischen
DE
N/V <2 mph (<4km/h)
Gering 2-8 mph (3~13 km/h)
Mäßig 9-25 mph (~14-41 km/h)
Stark 26-54 mph (~42-87 km/h)
Sturm >55 mph (>88 km/h)
So zeigen Sie den durchschnittlichen Wind
(AVERAGE) und die Windböe (GUST) an:
So löschen Sie die gespeicherten Werte und
Zeitmarken für die Windmessung:
Halten Sie im Bereich für Windgeschwindigkeit und
Windrichtung MEMORY /
Werte zu löschen.
So ändern Sie den Alarm für die Windgeschwindigkeit
hohe Windböe (HI gust wind):
1. Halten Sie im Bereich für Windgeschwindigkeit
und Windrichtung ALARM gedrückt, um die
Alarmeinstellung für hohe Windböe aufzurufen.
2. Drehen Sie die Scheibe nach links oder rechts, um
die gewünschten Werte einzustellen.
3. Drücken Sie auf ALARM, um die Einstellungen zu
bestätigen.
17
ON/OFF gedrückt, um die
Page 69

DE
So aktivieren / deaktivieren Sie den Alarm für die
Windgeschwindigkeit hohe Windböe:
1. Drücken Sie im Bereich für Windgeschwindigkeit
und Windrichtung wiederholt auf ALARM, um den
gewünschten Alarm auszuwählen.
2. Drücken Sie auf MEMORY /
Alarm zu aktivieren oder zu deaktivieren.
ON/OFF, um den
So zeigen Sie die Messwerte für UVI / Barometer /
Regenfall an:
1. Drücken Sie auf SELECT, um zum Bereich für UVI
/ Barometer / Regenfall zu navigieren.
neben dem Bereich angezeigt.
2. Drücken Sie auf MODE, um zwischen den
Messwerten für UVI / Barometer / Regenfall zu
wechseln. Das entsprechende Symbol erscheint:
wird
UVI / BAROMETER / REGENFALL
Die Wetterstation kann mit einem UV-Sensor und einem
Regenmesser betrieben werden. Die Station kann die
stündlichen Verlaufsdaten der vergangenen 10 Stunden
für den UV-Index sowie die Messwerte für Regenfall und
Luftdruck der vergangenen 24 Stunden anzeigen und
speichern.
HINWEIS Regenmesser und UV-Sensor optional.
UVI BAROMETER REGENFALL
Das Balkendiagramm zeigt die aktuellen und historischen
Messdaten für UV-Index, Luftdruck und Regenfall an.
UVI BAROMETER REGENFALL
3. Drehen Sie die Scheibe nach links oder rechts, um
die historischen Daten für den gewählten Bereich
anzuzeigen. Die entsprechenden historischen
Messwerte werden dargestellt.
HINWEIS Die Zahl über dem Symbol HR gibt an, wann
jede einzelne Messung erfolgt ist (z.B. vor 2 Stunden,
vor 3 Stunden, usw.)
So wählen Sie die Maßeinheit für die Messwerte des
Barometers oder Regenfalls aus:
Drücken Sie im Bereich für UVI / Barometer / Niederschlag
auf UNIT (auf der Unterseite der Basisstation) um diese
wie folgt zu wechseln:
18
Page 70

• Für Barometer: Millimeter Quecksilbersäule
(mmHg), Zoll Quecksilbersäule (inHg), Millibar /
Hekto-Pascal (mb / hpa).
• Für Regenfall: Millimeter (mm), Zoll (in), Zoll pro
Stunde (in / hr) oder Millimeter pro Stunde (mm / hr).
UV-INDEX
Die Werte des UV-Index lauten wie folgt:
So aktivieren / deaktivieren Sie den Alarm für hohen
UVI:
1. Drücken Sie im Bereich für UVI / Barometer
/ Niederschlag und in der Anzeige des UVIMesswertes wiederholt auf ALARM, um den
gewünschten Alarm auszuwählen.
2. Drücken Sie auf MEMORY /
Alarm zu aktivieren oder zu deaktivieren.
ON/OFF, um den
DE
UV-INDEX GEFAHRENSTUFE SYMBOL
0-2 Niedrig
3-5 Medium
6-7 Hoch
8-10 Sehr hoch
11 und darüber Extrem hoch
So ändern Sie den Alarm für hohen UVI:
1. Halten Sie im Bereich für UVI / Barometer / Regenfall
und in der Anzeige des UVI-Messwertes ALARM
gedrückt, um die Alarmeinstellung für hohen UVI
aufzurufen.
2. Drehen Sie die Scheibe nach links oder rechts, um
die gewünschten Werte einzustellen.
3. Drücken Sie auf ALARM, um die Einstellungen zu
bestätigen.
BAROMETER
So ändern Sie den Barometer-Alarm:
1. Halten Sie im Bereich für UVI / Barometer / Regenfall
und in der Anzeige des Barometer-Messwertes
ALARM gedrückt, um die Alarmeinstellung für das
Barometer aufzurufen.
2. Drehen Sie die Scheibe nach links oder rechts, um
die gewünschten Werte einzustellen.
3. Drücken Sie auf ALARM, um die Einstellungen zu
bestätigen.
So aktivieren / deaktivieren Sie den BarometerAlarm:
1. Drücken Sie im Bereich für UVI / Barometer /
Regenfall und in der Anzeige des BarometerMesswertes wiederholt auf ALARM, um den
gewünschten Alarm auszuwählen.
2. Drücken Sie auf MEMORY /
Alarm zu aktivieren oder zu deaktivieren.
19
ON/OFF, um den
Page 71

DE
So stellen Sie den Ausgleich der Höhenlage für die
Barometer-Messwerte ein:
1. Halten Sie im Bereich für UVI / Barometer / Regenfall
und in der Anzeige des Barometer-Messwertes
MODE gedrückt, um die Einstellung der Höhenlage
aufzurufen.
2. Drehen Sie die Scheibe nach links oder rechts, um
die gewünschten Werte einzustellen.
3. Drücken Sie auf MODE, um die Einstellung zu
bestätigen.
REGENFALL
So zeigen Sie den aktuellen, kumulativen Regenfall
oder den Verlauf der vergangenen 24 Stunden an:
Drücken Sie im Bereich für UV / Barometer / Regenfall
und in der Anzeige des Regenfall-Messwertes wiederholt
auf MEMORY /
Regenfall, dem Regenfall der vergangenen 24 Stunden
oder dem kumulativen Regenfall zu wechseln. Die Zeile
für die Uhrzeit ändert sich daraufhin und blendet die
Startzeit für die Anzeige des kumulativen Regenfalls ein.
Das Symbol
angezeigt.
So wechseln Sie zwischen der Anzeige des
Regenfalls und der Regenfallrate:
Halten Sie im Bereich für UVI / Barometer / Regenfall
und in der Anzeige des Regenfall-Messwertes MODE
gedrückt.
ON/OFF, um zwischen dem aktuellen
erscheint und das Startdatum wird
So setzen Sie den kumulativen Regenfall und die
Zeitmarke zurück:
Halten Sie im Bereich für UVI / Barometer / Regenfall
und in der Anzeige des Regenfall-Messwertes MEMORY
/
ON/OFF gedrückt, um den kumulativen Regenfall
auf ‘0’ und die Zeitmarke auf das aktuelle Datum und die
aktuelle Uhrzeit zu setzen.
So ändern Sie den Alarm für die hohe Regenfallrate
(HI):
1. Halten Sie im Bereich für UVI / Barometer /
Regenfall und in der Anzeige des RegenfallMesswertes ALARM gedrückt, um die Einstellung
des Regenfallalarms aufzurufen.
2. Drehen Sie die Scheibe nach links oder rechts, um
die gewünschten Werte einzustellen.
3. Drücken Sie auf ALARM, um die Einstellungen zu
bestätigen.
So aktivieren / deaktivieren Sie den Alarm für die
hohe Regenfallrate (HI):
1. Drücken Sie im Bereich für UVI / Barometer /
Regenfall und in der Anzeige des RegenfallMesswertes wiederholt auf ALARM, um den
gewünschten Alarm auszuwählen.
2. Drücken Sie auf MEMORY /
Alarm zu aktivieren oder zu deaktivieren.
20
ON/OFF , um den
Page 72

WETTERALARME
Wetteralarme werden verwendet, um Sie auf bestimmte
Wetterbedingungen aufmerksam zu machen. Sobald
diese aktiviert sind, wird der Alarm ausgelöst, wenn ein
bestimmtes Kriterium erfüllt ist.
Alarme können für folgende Werte eingestellt
werden:
• Hohe/niedrige Innen- und Außentemperatur,
Taupunkt und hohe/niedrige Luftfeuchtigkeit
• Hoher Hitzeindex
• Hohe Windböen
• Niedrige gefühlte Temperatur
• Hoher UVI
• Druckabfall
• Hohe Regenfallrate
Die Einstellung des jeweiligen Alarms finden Sie im
entsprechenden Abschnitt.
So schalten Sie einen beliebigen Alarm stumm:
Drücken Sie eine beliebige Taste oder drehen Sie an der
Scheibe.
Sie können diese Software unter folgender Adresse
herunterladen:
http://www2.oregonscientific.com/assets/software/
wmr100.exe
Die genauen Angaben finden Sie in der Anleitung der
Software “Virtual Weather Station”.
PC-Systemvoraussetzungen:
Die minimalen Systemvoraussetzungen für die
Verwendung der Software “Virtual Weather Station”
sind:
• Betriebssystem: Microsoft Windows 98 oder höher
• Prozessor: Pentium II 166Mhz oder höher
• RAM: Min. 64Mb
• Freier Speicherplatz auf Festplatte: Min. 30 Mb
So schließen Sie die Basisstation an den Computer an:
3
2
DE
ANSCHLUSS AN EINEN PC
Die Wetterstation kann über den USB-Anschluss mit
einem Computer verbunden werden. Die Software
“Virtual Weather Station” kann die aktuellen Wetterdaten
abrufen, die von der Basisstation erfasst werden.
1
1. Öffnen Sie die Abdeckung des USB-Anschlusses an
der Seite der Basisstation.
21
Page 73

DE
2. Stecken Sie das USB-Kabel hinein.
3. Schließen Sie das andere Ende des Kabels an den
Computer an.
HINTERGRUNDBELEUCHTUNG
Drücken Sie eine beliebige Taste oder drehen Sie an
dem Steuerungsrad, um die Hintergrundbeleuchtung zu
aktivieren.
RESET
Drücken Sie auf RESET, um das Gerät auf die
Standardeinstellungen zurückzusetzen.
FEHLERSUCHE UND ABHILFE
PROBLEM MERKMAL ABHILFE
Barometer Seltsame
Messwerte
Kalender Seltsames
Datum / Monat
Uhr Kann Uhrzeit
nicht verstellen
Gerät einstellen
Sprache ändern
Funkgesteuerte
Uhr deaktivieren
Kann keine
autom.
Synchronisierung
durchführen
Temperatur Zeigt “LLL” oder
“HHH” an
Externer
Sensor
Kann externen
Sensor nicht
finden
Kann Kanal
nicht ändern
Daten
entsprechen
nicht der
Basiseinheit
1. Batterien
austauschen
2. RESET
drücken
3. Funkgesteuerte
Uhr manuell
aktivieren
Temperatur
ist außerhalb
des zulässigen
Bereichs
Batterien
überprüfen
Standort
überprüfen
Sensoren
überprüfen.
Nur ein Sensor
funktioniert
Manuelle
Sensorsuche
veranlassen
22
Page 74

VORSICHTSMASSNAHMEN
Setzen Sie das Gerät keiner extremen
•
Gewalteinwirkung und keinen Stößen aus, und
halten Sie es von übermäßigem Staub, Hitze oder
Feuchtigkeit fern.
Sie dürfen die Belüftungsöffnungen nicht mit
•
Gegenständen abdecken, wie z.B. Zeitungen,
Vorhänge, usw.
Tauchen Sie das Gerät niemals in Wasser. Falls
•
Sie eine Flüssigkeit über das Gerät verschütten,
trocknen Sie es sofort mit einem weichen, faserfreien
Tuch.
Reinigen Sie das Gerät keinesfalls mit scheuernden
•
oder ätzenden Mitteln.
Machen Sie sich nicht an den internen Komponenten
•
des Geräts zu schaffen, da dies zu einem Verlust
der Garantie führen kann.
Verwenden Sie nur neue Batterien. Verwenden Sie
•
keinesfalls neue und alte Batterien gemeinsam.
Die in dieser Anleitung dargestellten Abbildungen
•
können sich vom Original unterscheiden.
Entsprechende Hinweise entnehmen Sie bitte der
Pflegeanleitung Ihres Möbelherstellers.
Der Inhalt dieser Anleitung darf ohne Genehmigung
•
des Herstellers nicht vervielfältigt werden
Verbrauchte Batterien gehören nicht in den
•
Hausmüll. Bitte geben Sie sie bei einer Sammelstelle
für Altbatterien bzw. Sondermüll ab.
Bitte beachten Sie, dass manche Geräte mit einem
•
Batterieunterbrechungsstreifen bestückt sind. Vor dem
ersten Gebrauch müssen Sie den Streifen aus dem
Batteriefach ziehen.
HINWEIS Die technischen Daten für dieses Produkt
und der Inhalt der Bedienungsanleitung können ohne
Benachrichtigung geändert werden.
DE
Entsorgen Sie das Gerät ausschließlich in den dafür
•
vorgesehenen, kommunalen Sammelstellen, die Sie
bei Ihrer Gemeinde erfragen können.
Wenn dieses Produkt auf bestimmte Holzflächen gestellt
•
wird, kann die Oberfläche beschädigt werden. Oregon
Scientific ist nicht haftbar für solche Beschädigungen.
23
Page 75

DE
TECHNISCHE DATEN
BASISSTATION
Abmessungen 143 x 89 x 165 mm
(L x B x H)
Gewicht 300 g (ohne Batterie)
Genauigkeit 0°C - 40°C: +/- 1°C (+/- 2,0°F)
40°C - 50°C: +/- 2°C (+/- 4,0°F)
Komfort 20°C bis 25°C (68°F bis 77°F)
Speicher Aktuelle, min. und max Temp.
Taupunkt mit Min. und Max.
Alarm Hoch / niedrig (Hi / Lo)
INNENBAROMETER
Einheit für Barometer mb/hPa, inHg und mmHg
Messbereich 700 – 1050 mb/hPa
Genauigkeit +/- 10 mb/hPa
Auflösung 1 mb (0,0 inHg)
Einstellung der Meereshöhe
Höhenlage Benutzereinstellung
für Ausgleich
Wetteranzeige Sonnig, Leicht bewölkt, Bewölkt,
Regnerisch und Verschneit
Speicher Historische Daten und
Balkendiagramm der
vergangenen 24 Std.
INNENTEMPERATUR
Temperatureinheit °C / °F
Anzeigebereich 0°C bis 50°C (32°F bis 122°F)
Betriebsbereich -30°C bis 60°C (-4°F bis 140°F)
RELATIVE LUFTFEUCHTIGKEIT (INNEN)
Anzeigebereich 2 % bis 98 %
Betriebsbereich 25 % bis 90 %
Auflösung 1 %
Genauigkeit 25 % - 40 %: +/- 7 %
40 % - 80 %: +/- 5 %
80 % - 90 %: +/- 7 %
Komfort 40 % bis 70 %
Speicher Aktuell, min. und max.
Alarm Hoch / niedrig (Hi / Lo)
FUNKUHR / ATOMUHR
Synchronisierung Autom. oder deaktiviert
Uhranzeige HH:MM:SS
Stundenformat 12Std. AM/PM oder 24Std.
Kalender DD/MM oder MM/DD
Wochentag in 5 (E, D, F, I, S)
Sprachen
24
Page 76

Batterie 4 x UM-3 (AA) 1,5 V
Netzteil 6 V
THERMO-HYDRO-SENSOR
Abmessungen 92 x 60 x 20 mm
(L x B x H)
Gewicht 62 g
Luftfeuchtigkeitsbereich 5% bis 95%
Luftfeuchtigkeitsauflösung 1%
Temperatureinheit °C (°F)
Außentemperaturbereich 30°C (22°F) bis 60°C (140°F)
Temperaturauflösung 0.1°C (0.2°F)
Funkfrequenz 433 MHz
Reichweite 100 Meter
Übertragung Alle 60 Sekunden
Kanal-Nr. 1 - 10
Batterien 2 x UM-4 (AAA)1,5V
AUSSENTEMPERATUR
Temperatureinheit °C / °F
Anzeigebereich -50°C bis 70°C (-58°F bis 158°F)
Betriebsbereich -30°C bis 60°C (-4°F bis 140°F)
Genauigkeit -20°C – 0°C: +/- 2°C (+/- 4,0°F)
0°C - 40°C: +/- 1°C (+/- 2,0°F)
40°C - 50°C: +/- 2°C (+/- 4,0°F)
50°C - 60°C: +/- 3°C (+/- 6,0°F)
DE
Komfort 20°C bis 25°C (68°F bis 77°F)
Speicher Aktuelle, min. und max. Temp.
Taupunkt mit Max. und Min.
gefühlte Temperatur und Min.
RELATIVE LUFTFEUCHTIGKEIT
Anzeigebereich 2 % bis 98 %
Betriebsbereich 25 % bis 90 %
Auflösung 1 %
Genauigkeit 25 % - 40 %: +/- 7 %
40 % - 80 %: +/- 5 %
80 % - 90 %: +/- 7 %
Komfort 40 % bis 70 %
Speicher Aktuell, min. und max.
FUNKÜBERTRAGUNG
Funkfrequenz 433 MHz
Reichweite Bis 100 m (ohne Hindernisse)
Übertragung Etwa alle 60 Sek.
Kanal-Nr. 1 für Wind/ Niederschlag / UV
und 10 für Temp. /
Luftfeuchtigkeit
Batterie 4 x UM-3 (AA) 1,5 V
25
Page 77

DE
ÜBER OREGON SCIENTIFIC
EG-KONFORMITÄTSERKLÄRUNG
Besuchen Sie unsere Website (www.oregonscientific.de)
und erfahren Sie mehr über unsere Oregon ScientificProdukte wie zum Beispiel Wetterstationen, ProjektionsFunkuhren, Produkte für Gesundheit und Fitness,
Digitalkameras, MP3-Player, DECT-/Konferenztelefone
und elektronische Lernprodukte für Kinder. Auf der Website
finden Sie auch Informationen, wie Sie im Bedarfsfall
unseren Kundendienst erreichen und Daten herunterladen
können.
Wir hoffen, dass Sie alle wichtigen Informationen auf
unserer Website finden. Für internationale Anfragen
besuchen Sie bitte unsere Website:
www2.oregonscientific.com
Hiermit erklärt Oregon Scientific, dass das WettermessSystem mit kabellosem Sensorsatz und Montagepaket
(WMR100TH) mit den grundlegenden Anforderungen und
anderen relevanten Vorschriften der Richtlinie 1999/5/EG
übereinstimmt. Eine Kopie der unterschriebenen und mit
Datum versehenen Konformitätserklärung erhalten Sie auf
Anfrage über unseren Oregon Scientific Kundendienst.
KONFORM IN FOLGENDEN LÄNDERN
Alle EG Staaten, die Schweiz
und Norwegen
CH
N
26
Page 78

Station Météorologique Pro
avec Thermo Hygromètre
Modèle: WMR100TH
MANUEL DE L’UTILISATEUR
TABLE DES MATIERES
Introduction ................................................................ 2
Contenu de l’emballage.............................................. 2
Thermo Hygrometre (THGR810) ............................. 2
Accessoires - Capteurs ................................................ 2
Vue d’ensemble ......................................................... 3
Affichage LCD ......................................................... 5
Au Commencement ................................................... 7
Installation de la station de base ............................ 7
Reglage du capteur .................................................. 8
Piles ......................................................................... 9
Reglage du canal ....................................................10
Station de base ........................................................ 10
Changer l'affichage / les réglages ........................ 10
Réception de l'horloge ........................................... 10
Horloge / calendrier ................................................. 11
Alarme de l'horloge ................................................ 12
Cycle lunaire ............................................................ 12
Fonction auto balayage ......................................... 13
Prévisions météorologiques .................................. 13
Température et Humidité ..................................... 13
Variation de température et d’humidité................... 15
Niveau de confort .................................................. 15
Vitesse et direction du vent ..................................... 16
Précipitation / baromètre / indice uv ........................ 17
Indice UV ................................................................ 18
Barometre .............................................................. 18
Précipitations .......................................................... 19
Alarmes de prévisions météo .................................. 19
Connexion à votre pc .............................................. 20
Rétro éclairage ......................................................... 20
Reinitialisation ......................................................... 20
Dépannage ............................................................... 21
Précautions .............................................................. 21
Caractéristiques ....................................................... 22
Á Propos d'Oregon Scientific ................................. 24
Europe - déclaration de conformité .......................... 24
FR
1
Page 79

FR
INTRODUCTION
Merci d’avoir choisi cette Station Météorologique (modèle
WMR100TH) Oregon Scientific
Cette station est compatible avec d’autres capteurs. Si
vous désirez acheter des capteurs supplémentaires,
veuillez contacter votre revendeur local.
TM
.
THERMO HYGROMETRE (THGR810)
Les capteurs au logo suivant
sont compatibles avec
cet appareil.
REMARQUE Veuillez conserver ce manuel pour toutes
références ultérieures. Il contient toutes les instructions
pratiques, les caractéristiques techniques et les
avertissements à prendre en compte.
CONTENU DE L’EMBALLAGE
1 x câble USB
4 x piles UM-3 (AA)
1 x 6V adaptateur
1 x Montage
Mural
1 x Support
de Table
2 x UM-4 / AAA
ACCESSOIRES – CAPTEURS
La station peut supporter jusqu’à 10 capteurs maximum
relevant les informations de divers endroits : température,
humidité ou indice UV. Des capteurs optionnels
comme ceux indiqués ci-dessous peuvent être achetés
séparément. Pour plus d’informations, contacter votre
revendeur local:
• Thermo hygromètre THGR800 (3 canaux)
• UV UVN800
• Pluviomètre PCR800
• Anémomètre WTGR800
2
Page 80

VUE D'ENSEMBLE
5. SELECT: Permet de sélectionner entre les différentes
zones.
1
2
3
4
5
7
FR
1
2
3
4
5
1. MEMORY / ON/OFF: Affiche les relevés
maximum et minimum enregistrés en mémoire,
active / désactive l’alarme.
2. ALARM: Visualise et règle l’alarme relative au
baromètre, à la température, l’humidité, aux
précipitations et à la vitesse du vent.
3. MODE: Permet d’alterner entre les différents modes
d’affichages / réglages.
4. Bouton rotatif: Tournez à gauche ou à droite pour
augmenter ou diminuer les valeurs de la lecture
sélectionnée.
6
1. Prise adaptateur secteur
2. RESET: Réinitialise l’appareil aux réglages par
défaut
3. SEARCH: Initie une recherche des capteurs ou du
signal radio piloté.
4. UNIT: Permet de sélectionner l’unité de mesure
5. Compartiment des piles
6. Modèle WMR100 uniquement - signal radio - EU /
UK (Europe / Royaume Uni)
7. Prise USB
3
Page 81

FR
4
1
2
3
1. Ecran LCD (le THGN810 n’a pas d’écran LCD):
indique le numéro du canal, les relevés de
température et d’humidité et le niveau de confort.
2. Indicateur LED
1. Fente RESET
2. Interrupteur °C / °F (THGN810 ne possède pas cet
interrupteur)
3. Interrupteur CODE
4. Compartiment des piles
4
Page 82

AFFICHAGE LCD
1
8. Zone Humidité / Point de rosée
FR
6
7
1
froid dûe au vent
2
3
4
5
Zone Température / indice de chaleur / sensation de
2
8
6
7
3
8
9
1. Variation de température
4
5
1. Zone de Prévision Météorologique
2. Zone Température/ indice de chaleur / sensation de
froid dûe au vent (windchill)
3. Zone Vitesse du vent / direction du vent
4. Zone Indice UV / Baromètre / Précipitation
5. Zone Horloge / Alarme / Calendrier / Cycle lunaire
6. Icône adaptateur s’affiche une fois débranché.
7. Icône de faiblesse des piles pour la station de base
2. Niveau de sensation de froid – indication de
température
3. Niveau indice de chaleur – indication de
température
4. Alarmes de température inférieure / supérieure,
d’indice de chaleur supérieur, et de refroidissement
éolien réglées
5. Icône de zone sélectionnée
6. Températures et Humidités des différents canaux
7. Température MAX / MIN
8. La pile du capteur intérieur est faible
9. Température (°C / °F)
5
Page 83

FR
6
1
Zone Vitesse du vent / direction du vent
(Anémomètre en option)
1
2
3
4
5
Zone Indice UV / Baromètre / Précipitation
(Pluviomètre et capteur d’UV en option)
2
7
3
7
4
8
9
10
5
6
1. Niveaux de vitesse du vent : MOYEN / MAX /
RAFALE
2. Indicateur du niveau de la vitesse du vent
3. La pile du capteur de vent extérieur est faible.
4. Description du niveau de la vitesse du vent
5. Relevés de vitesse du vent en rafale ou régulier (m/s,
Km/h, Miles/h, ou noeuds)
6. Alarme relative au niveau supérieur de rafale de vent
réglée.
7. Affichage de la direction du vent
1. Affichage des relevés de l’indice UV / baromètre/
précipitations
2. La pile du capteur de précipitation / UV extérieur est
faible
3. Alarme relative aux UV / baromètre / précipitations
réglée
4. Affichage du taux de précipitation
5. Relevés des Indices UV / pression barométrique
(mm/Hg, pouces /Hg ou mb/hPa) / précipitations (en
pouces/h ou mm/h)
6. Indicateur du niveau de l’indice UV
7. Affichage des précipitations accumulées
8. Affichage des précipitations des dernières 24 h
9. Affichage de l’altitude
10. Affichage de l’histogramme de l’indice UV / pression
barométrique/ précipitations
6
Page 84

Zone Horloge / Alarme / Calendrier / Cycle lunaire
1
1
2
3
2. Alarmes relatives à l’Humidité Inférieure et Supérieure
et au Point de Rosée réglées
3. Niveaux de confort
4
5
4. Variation d’humidité
5. Humidité MAX / MIN
6. Relevés d’humidité
FR
6
1. Réception radio de l’horloge
2. L’alarme 1 et 2 sont affichées et réglées
3. Affichage de l’heure d’un relevé
4. Décalage horaire
5. Cycle lunaire
6. Heure / date / calendrier
Zone Humidité / Point de rosée
AU COMMENCEMENT
INSTALLATION DE LA STATION DE BASE
REMARQUE Installez les piles dans le capteur à
distance avant d’installer celles de la station de base,
veillez à respecter les polarités (+ / -).
2
3
4
5
1. Niveau de point de rosée – indication de la
température
6
Pour une utilisation continue, branchez l’adaptateur
secteur. Utilisez les piles comme alimentation de secours
uniquement.
REMARQUE Assurez-vous que la prise est installée à
proximité de l’appareil et qu’elle soit accessible.
7
Page 85

FR
Zone Vitesse du
vent / direction
du vent
Les piles situées dans
l’anémomètre sont faibles.
Installez les piles de la station de base (4 piles UM3 / AA) en respectant les polarités. Appuyez sur
REINITIALISER (RESET) après chaque changement
de piles.
REMARQUE Nous vous recommandons d’utiliser des
piles alcalines pour une meilleure performance.
L’icône des piles
ZONE SIGNIFICATION
Zone de
Prévision
Météorologique
Zone
Température/
indice de chaleur
/ sensation de
froid dûe au vent
apparaîtra dans les zones suivantes:
Les piles situées dans la station
de base sont faibles.
si l’adaptateur secteur n’est pas
branché.
Le canal affiché indique le capteur
extérieur dans lequel les piles
sont faibles.
s’affichera
Zone Indice UV
/ Baromètre /
Précipitation
Les piles situées dans le capteur
de précipitations / UV sont
faibles.
REGLAGE DU CAPTEUR
Pour reglage du capteur:
1. Retirer le couvercle du compartiment des piles en le
faisant glisser.
2. Insérer les piles, en respectant la polarité (+ et -).
3. Utiliser l’interrupteur CODE pour choisir le canal.
4. THGR810 uniquement – Régler l’unité de
température.
5. Placer le capteur près de l’appareil principal. Appuyer
sur RESET sur le capteur. Appuyer ensuite sur le bouton
approprié de l’appareil principal (comme il est indiqué
8
Page 86

dans le manuel de l’appareil principal) pour initier l’envoi
des signaux entre le capteur et l’appareil principal.
6. Refermer le compartiment des piles du capteur.
7. Fixer le capteur à l’endroit désiré en utilisant le
montage mural ou le support de table.
La distance de transmission peut varier en fonction de
plusieurs facteurs. Vous pouvez expérimenter plusieurs
emplacements afin d’obtenir les meilleurs résultats
possibles.
Les ondes radios peuvent être endommagées par divers
facteurs comme les températures extrêmement froides.
En effet, le froid intense peut temporairement réduire
le champ radio entre le capteur et la station de base.
Si un disfonctionnement de l’appareil est remarqué à
cause de températures froides, l’appareil reviendra en
mode de fonctionnement normal dès que la température
repassera dans une gamme acceptable (ainsi aucun
dommage permanent ne sera remarqué).
FR
Pour de meilleurs résultats :
• Ne placez pas le capteur directement face aux rayons
du soleil ou en contact avec de la moisissure.
• Ne placez pas le capteur à plus de 100 mètres (330
pieds) de l’appareil principal (intérieur).
• Positionnez le capteur de manière à ce qu’il soit
face à l’appareil principal (intérieur), minimisant
ainsi les obstructions comme les portes, murs ou les
meubles.
• Placez le capteur directement vers le ciel, éloigné
des objets métalliques et électroniques.
• Positionnez le capteur à proximité de l’appareil
principal pendant les mois d’hiver puisque le gel
peut endommager le fonctionnement des piles et la
transmission du signal.
PILES
Insérer les piles avant la première utilisation, en
respectant les signes de polarité (+ et -) comme indiqué
dans le compartiment des piles. Pour de meilleurs
résultats, insérez les piles du capteur à distance avant
celles de l’appareil principal. Appuyer sur RESET après
chaque changement de piles.
REMARQUE Il est conseillé d’utiliser des piles alcalines
avec ce produit pour une plus longue durée de vie et des
piles en lithium pour des températures inférieures à 0°C.
Ne pas utiliser de piles rechargeables.
apparaît sur le THGR810 lorsque le niveau des
piles est faible.
9
Page 87

FR
REGLAGE DU CANAL
Régler le canal en positionnant l’interrupteur CODE sur
l’une de ces positions.
NUMÉRO DU CANAL POSITIONS DE
L’INTERRUPTEUR
1
2
3
4
STATION DE BASE
CHANGER L'AFFICHAGE / LES REGLAGES
Pour changer l’affichage et modifier les réglages, utilisez
les boutons suivants situés sur l’écran rotatif : SELECT,
MEMORY /
ON/OFF, MODE and ALARM.
Les boutons UNIT et
SEARCH situées au bas
de la station de base
permettent en outre le
préréglage des canaux du
capteur et des unités de
mesure pour l’affichage.
5
6
7
8
9
10
10 Autres positions
(Non conseillé)
ASTUCE Pour sortir du mode réglage, appuyez sur
n’importe quelle touche. De même, le mode réglage
sera automatiquement désactivé après 30 secondes.
RÉCEPTION DE L'HORLOGE
Ce produit est conçu de manière à synchroniser
automatiquement l’horloge une fois placée dans le champ
d’un signal radio.
WMR100:
• DCF-77 généré depuis Frankfort, Allemagne pour
l’Europe centrale
• MSF-60 généré depuis Anthorn, Angleterre
L’étendue du signal radio est de 1500 Km (932 miles).
10
Page 88

WMR100A:
• WWVB-60 généré depuis l’horloge atomique de Fort
Collins, Colorado
L’étendue du signal radio est de 3219 Km (2000 miles).
Modèle WMR100 uniquement – placez le bouton EU
/ UK selon votre zone géographique. Appuyez sur
RESET (REINITIALISER) dès lors que vous changez le
réglage sélectionné.
L’icône de réception clignotera quand il recherchera un
signal. Si le signal radio est faible, 24 heures peuvent
être nécessaires pour obtenir un signal valide.
indique l’état du signal de réception de l’horloge.
ICONE SIGNIFICATION
L’heure est synchronisée
Le signal de réception est fort
L’heure n’est pas synchronisée
Le signal de réception est faible
Initier (et forcer une recherche de signal) / désactiver
la réception radio de l’horloge (synchronisation de
l’horloge):
1. Appuyez sur SELECT pour naviguer dans la zone
Horloge / Calendrier et Alarme.
de la zone.
2. Appuyez et maintenez enfoncée la touche SEARCH
(RECHERCHE).
s’affiche une fois activé.
s’affichera à côté
REMARQUE Pour obtenir une meilleure réception,
placez la station de base sur une surface plane et non
métallique à proximité d’une fenêtre à l’étage de votre
habitation. Eloignez l’antenne des appareils électriques
et ne la déplacez pas lors de la recherche d’un signal.
HORLOGE / CALENDRIER
Pour régler manuellement l’horloge:
(Vous ne devez régler l’horloge et le calendrier que si
vous avez désactivé la réception radio de l’horloge.)
1. Appuyez sur SELECT pour naviguer dans la zone
Horloge.
2. Appuyez et maintenez enfoncée la touche MODE
pour modifier les réglages de l’horloge. Le réglage
clignotera.
3. Tournez le cadran sur la droite ou sur la gauche pour
diminuer ou augmenter les valeurs de réglages.
4. Appuyez sur MODE pour confirmer.
5. Répétez les étapes 1 à 5 pour régler le fuseau
horaire (+ /- 23 heures), le format 12 / 24 h, l’heure,
les minutes, l’année, la format date / mois, le mois, la
date et l’année et la langues d’affichage des jours de
la semaine.
REMARQUE Si vous entrez +1 dans le réglage du fuseau horaire, vous obtiendrez votre heure locale plus une
heure.
REMARQUE Les jours de la semaine sont disponibles
en anglais, français, allemand ou espagnol.
11
s’affichera à côté de la zone.
FR
Page 89

FR
Modification de l’affichage de l’alarme:
1. Appuyez sur SELECT pour naviguer dans la zone
Horloge.
2. Appuyez sur MODE pour alterner entre:
• L’horloge avec les secondes
• L’horloge avec les jours de la semaine
• Le calendrier
s’affichera à côté de la zone.
ALARME DE L'HORLOGE
L’horloge est composée de deux alarmes pouvant se
régler sur son avec un bip.
ICONE SIGNIFICATION
L’alarme 1 ou l’alarme 2 est affichée
Activer / désactiver l’alarme:
1. Appuyez sur SELECT pour naviguer dans la zone
Horloge.
2. Appuyez sur ALARM pour alterner entre l’alarme 1
et l’alarme 2 .
3. Appuyez sur MEMORY /
désactiver l’alarme.
est activée.
s’affichera à côté de la zone.
ON/OFF pour activer ou
ou apparaîtront si l’alarme
CYCLE LUNAIRE
Réglez le calendrier si vous désirez que cette fonction
soit correctement activée. (Voir section Horloge /
Calendrier).
ICONE DESCRIPTION
L’alarme 1 ou l’alarme 2 est activée
Aucune icône Aucune alarme n’est sélectionnée
Pour régler une alarme:
1. Appuyez sur SELECT pour naviguer dans la zone
Horloge.
2. Appuyez sur ALARM pour alterner entre l’affichage
de l’alarme 1
3. Une fois que vous avez sélectionné l’alarme à
modifier, appuyez et maintenez enfoncée la touche
ALARM Les réglages de l’alarme clignoteront.
4. Tournez le cadran vers la gauche ou la droite pour
modifier les réglages.
5. Appuyez sur ALARM pour confirmer.
s’affichera à côté de la zone.
et de l’alarme 2 .
Nouvelle lune
Premier croissant
Premier quartier
Lune gibbeuse croissante
Pleine lune
12
Page 90

Lune gibbeuse décroissante
Troisième quartier
PRÉVISIONS MÉTÉOROLOGIQUES
FR
L’affichage météorologique situé dans la partie
supérieure de l’écran vous indique le temps actuel et
les prévisions météo pour les 12-24 h à venir dans un
périmètre de 30 à 50 Km (19 -21 miles).
Dernier croissant
FONCTION AUTO BALAYAGE
Activer la fonction auto balayage de l’humidité et de
la température extérieure.
1. Appuyez sur SELECT pour naviguer dans la zone
Température ou Humidité.
la zone.
2. Appuyez et maintenez enfoncée la touche MODE
pour activer l’auto balayage. L’écran relatif à la
température et à l’humidité défilera de l’intérieur vers
le canal 1 et le canal 2.
3. Appuyez sur MEMORY /
ALARM pour arrêter l’auto balayage.
REMARQUE Le canal 1, situé dans l’anémomètre
est utilisé pour la température extérieure et le capteur
d’humidité. Les capteurs de température et d’humidité
supplémentaires peuvent utiliser les autres canaux.
s’affichera à côté de
ON/OFF, MODE ou
Zone de Prévisions Météorologiques
ICONE DESCRIPTION
Ensoleillé
Partiellement nuageux
Nuageux
Pluvieux
Neigeux
TEMPERATURE ET HUMIDITE
La station météo affiche les relevés intérieurs et
extérieurs de:
13
Page 91

FR
1. L’humidité relative et des températures actuelles,
maximum et minimum.
2. L’indicateur de niveau de confort et de la ligne de
variation.
3. Indice de chaleur, de la sensation de froid dûe au
vent et du point de rosée.
La station météo peut se connecter à 10 capteurs à
distance maximum.
vous indique quelles données de capteur à distance
vous visualisez.
apparaît lors de l’affichage des données intérieures.
Le point temps enregistre la date et l’heure lors
de l’enregistrement des relevés de température et
d’humidité.
Sélectionner l’unité de mesure de la température:
Appuyez sur UNIT (situé en bas de la station de base)
pour sélectionner °C / °F.
REMARQUE Les unités de tous les écrans relatifs à la
température s’afficheront simultanément.
Visualisation des relevés de température et
d’humidité des capteurs intérieurs / extérieurs:
1. Appuyez sur SELECT pour naviguer dans la zone
Température et Humidité.
2. Tournez le cadran vers la gauche ou la droite pour
sélectionner le canal.
s’affichera à la zone.
Visualisation de la température minimum et
maximum ou de l’humidité:
1. Dans la zone Température ou Humidité, appuyez
plusieurs fois sur la touche MODE pour faire défiler
les relevés suivants:
• Température actuelle
• Indice de chaleur
• Indice de sensation de froid
• Point de rosée
• Humidité
2. Pour chacune des lectures ci-dessous, appuyez
plusieurs fois sur MEMORY /
alterner entre:
• La température actuelle / MAX / MIN
• L’indice de chaleur actuel / MAX
• L’indice de sensation de froid actuel / MIN
• Le point de rosée actuel / MAX / MIN
• L’humidité actuelle / MAX / MIN
L’heure de relevé s’affiche donc dans la Zone Horloge.
Effacer les mémoires et les heures de relevés
afférents aux relevés de température, indice de
chaleur, indice de sensation froid, humidité et point
de rosée.
Pour effacer les relevés, dans la Zone Température ou
Humidité, appuyez et maintenez enfoncée la touche
MEMORY /
14
ON/OFF.
ON/OFF pour
Page 92

Modification des alarmes relatives à la température
inférieure / supérieure, à l’indice de chaleur, à l’indice
de sensation de froid et au point de rosée:
1. Dans la zone Température ou Humidité, appuyez
plusieurs fois sur ALARM pour alterner entre les
alarmes supérieures / inférieures relatives au relevés
de température, indice de chaleur, à l’indice de
sensation de froid et point de rosée.
2. Appuyez et maintenez enfoncée la touche ALARM
pour entrer dans le réglage de l’alarme.
3. Tournez le cadran vers la gauche ou la droite pour
sélectionner la valeur désirée.
4. Appuyez sur ALARM pour confirmer le réglage.
Activer / désactiver les alarmes relatives à la
température inférieure / supérieure, à l’indice de
chaleur, à l’indice de sensation de froid et au point
de rosée:
1. Dans la zone de Température et d’Humidité, appuyez
plusieurs fois sur ALARM pour sélectionner l’alarme
désirée.
2. Appuyez sur MEMORY /
désactiver l’alarme.
REMARQUE Le point de rosée vous indique à quelle
température, se formera la condensation. Le facteur de
sensation de froid est basé sur les effets combinés de
température et de vitesse du vent.
ON/OFF pour activer ou
VARIATION DE TEMPÉRATURE ET
FR
D’HUMIDITÉ
Les lignes de variation apparaissent à proximité des
relevés de température et d’humidité. La variation est
indiquée comme suit:
ICONE DE VARIATION DESCRIPTION
Augmentation
Stable
Diminution
NIVEAU DE CONFORT
A partir des mesures de température actuelle et
d’humidité, l’icône du Niveau de Confort vous indique si
le climat est convenable:
ICONE DESCRIPTION
Convenable
Neutre
15
Non convenable
Page 93

FR
VITESSE ET DIRECTION DU VENT
La station de base vous fournit
les informations relatives à la
direction et à la vitesse du vent.
Modéré 9-25 miles/h (~14-41 km/h)
Fort 26-54 miles/h (~42-87 km/h)
Pour lire la direction du vent,
localisez la direction du
point de compas.
Le point temps relève la date et l’heure lors de
l’enregistrement des lectures de la vitesse du vent.
REMARQUE Anémomètre en option.
Sélection de l’unité de vitesse du vent:
Appuyez sur UNIT (situé en bas de la station de base)
pour alterner entre:
• Les mètres par seconde (m / s)
• Les kilomètres par heure (Km/h)
• Les Miles par heure (Miles/h)
• Les nœuds (nœuds)
Le niveau de vent est indiqué par une série d’icônes:
ICONE NIVEAU DESCRIPTION
Indisponible
Léger 2-8 miles/h (3~13 km/h)
du
<2 miles/h (<4km/h)
Tempête > 55 miles/h (>88 km/h)
Pour afficher le vent MOYEN et le vent en RAFALE:
1. Appuyez sur SELECT pour naviguer dans la zone
Vitesse et Direction du Vent.
de la zone.
2. Appuyez sur MODE pour alterner entre les relevés
relatifs au vent MOYEN et au vent en RAFALE.
Pour afficher la vitesse maximum et la direction du
vent en rafale:
Dans la Zone de Vitesse et de Direction du Vent,
appuyez sur MEMORY /
les relevés de vitesse du vent et de vent MAX en rafale.
L’heure de relevé s’affiche donc dans la Zone Horloge.
Effacer les mémoires et les heures des relevés du vent:
Dans la Zone Vitesse et Direction du Vent, appuyez et
maintenez enfoncée la touche MEMORY /
pour effacer les relevés.
Modification de l’alarme supérieure de vitesse du
vent en rafale:
1. Dans la zone de Vitesse et Direction du vent, appuyez
et maintenez enfoncée la touche ALARM pour entrer
16
ON/OFF pour alterner entre
s’affichera à côté
ON/OFF
Page 94

dans le réglage de l’alarme supérieure de vent en
rafale.
2. Tournez le cadran vers la gauche ou la droite pour
sélectionner la valeur désirée.
3. Appuyez sur ALARM pour confirmer le réglage.
Activer / désactiver l’alarme supérieure de vitesse
du vent en rafale:
1. Dans la zone de Vitesse et Direction du Vent,
appuyez plusieurs fois sur ALARM pour sélectionner
l’alarme désirée.
2. Appuyez sur MEMORY /
désactiver l’alarme.
ON/OFF pour activer ou
PRECIPITATION / BAROMETRE / INDICE UV
La station météo fonctionne avec un capteur d’ UV et
un pluviomètre. La station peut enregistrer et afficher
l’historique des 10 dernières heures d’indice UV et les
dernières 24 heures de précipitations et de pression
barométrique.
REMARQUE Pluviomètre et capteur d’UV en option.
INDICE UV BAROMETRE PRECIPITATIONS
Le diagramme ci-dessus vous indique les données
actuelles et l’historique de l’indice UV, des pressions
barométriques et des précipitations.
Visualisation des relevés d’UV / Baromètre /
Précipitations:
1. Appuyez sur SELECT pour naviguer dans la zone
Baromètre / Précipitations.
la zone.
2. Appuyez sur MODE pour alterner entre les relevés
d’Indice UV / Baromètre et Précipitations. L’icône
correspondant apparaîtra :
INDICE UV BAROMETRE PRECIPITATIONS
3. Tournez le cadran vers la gauche ou la droite
pour visualiser les données de zone sélectionnée.
L’historique correspondant s’affiche.
REMARQUE Le chiffre dans l’icône HR vous indique le
temps écoulé depuis la dernière mesure (par exemple, il
y a 2 heures, il y a 3 heures, etc.…)
s’affichera à côté de
FR
Sélectionner l’unité de mesure afférente aux relevés
du baromètre ou de précipitations:
Dans la zone UV / Baromètre / Précipitations, appuyez
sur UNIT (situé en bas de la station de base) pour
alterner entre:
17
Page 95

FR
• Pour le baromètre : Les millimètres de mercure (mm/
Hg), les pouces de mercure (in/Hg) ou les millibars
par hectopascal (mb/hPa).
• Pour les précipitations: Les millimètres (mm), les
pouces (in), les pouces par heures (in/h) ou les
millimètres par heure (mm/h).
INDICE UV
Les niveaux d’indice UV sont les suivants:
INDICE UV NIVEAU DE DANGER ICONE
0-2 Faible
3-5 Modéré
6-7 Elevé
8-10 Très élevé
11 et plus
Modification de l’alarme supérieure d’UV
1. Dans l’affichage de la zone d’UV / Baromètre /
Précipitations et des lectures d’Indice UV. Appuyez
et maintenez enfoncée la touche ALARM pour entrer
dans le réglage de l’alarme supérieure des UV.
2. Tournez le cadran vers la gauche ou la droite pour
sélectionner la valeur désirée.
3. Appuyez sur ALARM pour confirmer le réglage.
Extrêmement élevé
Activer / désactiver l’alarme supérieure des UV:
1. Dans l’affichage de la zone UV / Baromètre /
Précipitations et des lectures d’indice UV, appuyez
plusieurs fois sur ALARM pour sélectionnée l’alarme
désirée.
2. Appuyez sur MEMORY /
désactiver l’alarme.
ON/OFF pour activer ou
BAROMETRE
Modification de l’alarme du baromètre:
1. Dans l’affichage de la zone d’UV / Baromètre /
Précipitations et des lectures du Baromètre, appuyez
et maintenez enfoncée la touche ALARM pour entrer
dans les réglages de l’alarme du Baromètre.
2. Tournez le cadran vers la gauche ou la droite pour
sélectionner la valeur désirée.
3. Appuyez sur ALARM pour confirmer le réglage.
Activer / désactiver l’alarme du baromètre:
1. Dans l’affichage de la zone UV / Baromètre /
Précipitations et des lectures du baromètre, appuyez
plusieurs fois sur ALARM pour sélectionnée l’alarme
désirée.
2. Appuyez sur MEMORY /
désactiver l’alarme.
Régler la compensation du niveau d’altitude pour les
relevés barométriques:
1. Dans l’affichage de la zone d’UV / Baromètre /
Précipitations et des lectures du baromètre. Appuyez
18
ON/OFF pour activer ou
Page 96

et maintenez enfoncée la touche MODE pour entrer
dans les réglages de l’altitude.
2. Tournez le cadran vers la gauche ou la droite pour
régler la valeur désirée.
3. Appuyez sur MODE pour confirmer le réglage.
PRECIPITATIONS
Visualisation de l’historique des précipitations de
l’heure actuelle, des dernières 24 heures ou des
précipitations accumulées:
Dans l’affichage de zone d’UV / Baromètre /
Précipitations et des lectures de précipitations, appuyez
plusieurs MEMORY /
précipitations accumulées, actuelles ou des dernières
24 heures. La ligne de l’horloge affichera l’heure où
les précipitations accumulées ont commencé. L’icône
(DEPUIS) apparaît, la date de début
s’affiche.
Alterner entre l’affichage des précipitations & le taux
de précipitations:
Dans l’affichage de la zone UV/ Baromètre/ Précipitations
et des lectures de précipitations, appuyez et maintenez
enfoncée la touche MODE.
Réinitialisation des précipitations accumulées et de
l’heure du relevé:
Dans l’affichage de la zone d’UV / Baromètre /
Précipitations et des lectures de précipitations. Appuyez
et maintenez enfoncée la touche MEMORY /
ON/OFF pour alterner entre les
ON/OFF
pour réinitialiser les précipitations accumulées à ‘0’ et
pour régler le point temps à la date et l’heure actuelle.
Modification de l’alarme du taux supérieur de
précipitations:
1. Dans l’affichage de la zone d’UV / Baromètre /
Précipitations et des lectures de Précipitations,
appuyez et maintenez enfoncée la touche ALARM
pour entrer dans les réglages de l’alarme des
précipitations.
2. Tournez le cadran vers la gauche ou la droite pour
sélectionner la valeur désirée.
3. Appuyez sur ALARM pour confirmer le réglage.
Activer / Désactiver l’alarme du taux supérieur de
précipitations:
1. Dans l’affichage de la zone UV / Baromètre /
Précipitations et des lectures des précipitations,
appuyez plusieurs fois sur ALARM pour sélectionnée
l’alarme désirée.
2. Appuyez sur MEMORY /
désactiver l’alarme.
ON/OFF pour activer ou
ALARMES DE PREVISIONS METEO
Les alarmes de prévisions météo vous permettent
de prendre connaissance de certaines conditions
météorologiques. Une fois activée, l’alarme retentira si
certaines conditions apparaissent.
19
FR
Page 97

FR
Les alarmes sont réglables pour:
• Les températures inférieures/supérieures extérieures
et intérieures, le point de rosée et l’humidité inférieure/
supérieure
• L’indice de chaleur supérieur
• Le taux supérieur de vent en rafale
• Le taux inférieur de sensation de froid dûe au vent
• Le taux supérieur d’UV
• Les chutes de pression
• Le taux supérieur de précipitations
Veuillez vous reporter aux différentes sections du
réglage de l’alarme.
Pour couper le son de l’alarme: Appuyez sur n’importe
quel bouton ou tournez le cadran.
CONNEXION A VOTRE PC
La station météorologique peut être connectée à
un ordinateur à l’aide d’une connexion USB. Lit les
dernières données collectées depuis la station de base.
Spécifications requises
La spécification minimum requise pour l’utilisation du
logiciel est:
• Système d’exploitation : Microsoft Windows 98 ou
version supérieure
• Processeur: Pentium II 166 Mhz ou version
supérieure
• RAM: 64 Mb au minimum
• Espace libre sur le disque dur : 30 Mb au minimum
Connexion de la station de base à l’ordinateur:
3
2
1
1. Ouvrez la prise USB située sur le côté de la station
de base.
2. Branchez le câble USB.
3. Branchez l’autre bout du câble à la prise USB de
l’ordinateur.
RETRO ECLAIRAGE
Appuyez sur n’importe quelle touche ou tournez le
cadran pour activer le rétro éclairage.
REINITIALISATION
Appuyez sur RESET pour que l’appareil revienne aux
réglages par défaut.
20
Page 98

DEPANNAGE
PROBLEME SYMPTOME SOLUTION
Baromètre Relevés
bizarres
Calendrier Date / mois
non conforme
Horloge Réglage
impossible
Auto
synchronisation impossible
Temp Indique “LLL”
ou “HHH”
Régler l’appareil
Changer la langue
Désactiver l’horloge
radio pilotée
1. Ajustez les piles
2. Appuyer sur
RESET
3. Activer
manuellement
l’horloge radio
pilotée
La température est
hors de portée
Capteur à
distance
Impossible
de localiser
le capteur à
distance
Impossible de
changer de
canal
Les
données ne
correspondent
pas à l’appareil
principal.
Vérifier l’état des
piles
Vérifier
l’emplacement
Vérifier les capteurs.
Un seul capteur
fonctionne
Lancer une
recherche manuelle
PRÉCAUTIONS
Ne pas soumettre le produit à une force excessive,
•
au choc, à la poussière, aux changements de
température ou à l’humidité.
Ne pas couvrir les trous de ventilation avec des
•
journaux, rideaux etc...
Ne pas immerger le produit dans l’eau. Si vous
•
renversez du liquide sur l’appareil, séchez-le
immédiatement avec un tissu doux.
FR
Ne pas nettoyer l’appareil avec des matériaux
•
corrosifs ou abrasifs.
Ne pas trafiquer les composants internes. Cela
•
invalidera votre garantie.
21
Page 99

FR
N’utilisez que des piles neuves. Ne pas mélanger
•
des piles neuves et usagées.
Les images de ce manuel peuvent différer de l’aspect
•
réel du produit.
Lorsque vous désirez vous débarrasser de ce
•
produit, assurez-vous qu’il soit collecté séparément
pour un traitement adapté.
Le poser sur certaines surfaces en bois peut
•
endommager la finition du meuble, et Oregon
Scientific ne peut en être tenu responsable. Consultez
les mises en garde du fabricant du meuble pour de
plus amples informations.
Le contenu du présent manuel ne peut être reproduit
•
sans la permission du fabriquant.
Ne pas jeter les piles usagées dans les containers
•
municipaux non adaptés Veuillez effectuer le
tri de ces ordures pour un traitement adapté si
nécessaire.
Veuillez remarquer que certains appareils sont
•
équipés d’une bande de sécurité. Retirez la bande du
compartiment des piles avant la première utilisation.
REMARQUE Les caractéristiques techniques de ce
produit et le contenu de ce manuel peuvent être soumis
à modifications sans préavis.
CARACTERISTIQUES
STATION DE BASE
Dimensions 143 x 89 x 165 mm
(L X E X H) (5,6 x 3,5 x 6,5 pouces)
Poids 300g (0,66 Livres) sans piles
BAROMÈTRE INTÉRIEUR
Unité de mesure mb/hPa, inHg ou mm/Hg
Plage de mesure 700 – 1050 mb/hPa
Précision +/- 10 mb/hPa
Résolution 1mb (0,0 inHg)
Réglage de l'altitude Niveau de la mer Compenstion
réglable par l'utilisateur
Prévision météo Ensoleillé, partiellement
nuageux, nuageux, pluvieux,
neigeux
Mémoire Historique et diagramme
des dernières 24 heures
TEMPÉRATURE INTÉRIEURE
Unité de la °C/°F
température
Plage affichée 0°C à 50°C (32°F à 122°F)
Plage de -30°C à 60°C (-4°C à 140°C)
fonctionnement
Précision 0°C - 40°C: +/- 1°C (+/- 2,0°F)
40°C -50°C: +/-2°C (+/-4,0°C)
Confort 20°C à 25°C (68°F à 77°F)
22
Page 100

Mémoire Température actuelle, mini, max.
Point de rosée avec mini et maxt
Alarme Sup / Inf
HUMIDITÉ RELATIVE INTÉRIEURE
Plage affichée 2% à 98%
Plage de 25% à 90%
fonctionnement
Résolution 1%
Précision 25% - 40%: +/- 7%
40% - 80%: +/- 5%
80% - 90%: +/- 7%
Confort 40% à 70%
Mémoire Actuelle, mini, maxi.
Alarme Sup / Inf
HORLOGE ATOMIQUE / RADIO PILOTÉE
Synchronisation Automatique ou désactivée
Affichage de l'horloge HH:MM:SS
Format de l'heure 12 h AM/PM ou 24 h
Calendrier JJ/MM ou MM/JJ
Jour de la semaine (Anglais, allemand,
en 5 langues français, italien, et espagnol)
Pile 4 x UM-3 (AA) 1,5V
Adaptateur secteur 6V
CARACTERISTIQUES
Dimensions 92 x 60 x 20 mm
(L x E x D) (3.6 x 2.4 x 0.79 inches)
Poids 62 g (2.22 oz)
Gamme de l’humidité 5% to 95%
Résolution de l’humidité 1%
Unité de température °C / °F
Niveau de température 30°C to 60°C
en extérieur (22°F to 140°F)
Résolution de 0.1°C (0.2°F)
température
Fréquence 433 MHz
Distance 100 mètres (330 pieds)
Transmission Toutes les 60 secondes
Nombre de canaux 1-10
Piles 2 x UM-4 (AAA) 1.5V
TEMPÉRATURE EXTÉRIEURE
Unité de la température °C/°F
Plage affichée -50°C à 70°C (-58°F à 158°F)
Plage de -30°C à 60°C (-4°C à 140°C)
fonctionnement
Précision -20°C - 0°C: +/- 2°C (+/- 4.0°F)
0°C - 40°C: +/- 1°C (+/- 2.0°F)
40°C - 50°C: +/- 2°C (+/- 4.0°F)
50°C - 60°C: +/- 3°C (+/- 6.0°F)
Confort 20°C à 25°C (68°C à 77°C)
Mémoire Température actuelle, mini, maxi.
Point de rosée avec mini et
maxi
Sensation de froid dûe au vent
23
FR
 Loading...