

Page 1

EN
1
Tap On Sport
Heart Rate Monitor
Model: SE102N
USER MANUAL
CONTENTS
Introduction .....................................................................2
Key features .................................................................... 2
Front view ..................................................................... 2
LCD............................................................................... 2
Getting started ................................................................. 3
Turning on the watch (1st time use only) ......................3
Switch operation modes ...............................................3
Clock / Alarm / Keypad tone / Tap On Lens .................. 3
Alarm ............................................................................4
Keypad tone.................................................................. 4
Tap On Lens ................................................................. 4
Heart rate limits / Alert .................................................... 5
Target activity ...............................................................5
Maximum / lower / upper heart rate .............................. 6
Heart rate alert ..............................................................6
User data .......................................................................... 6
Activity level .................................................................. 7
Fitness Index ................................................................7
Wearing the chest belt ................................................... 8
Transmission signal ......................................................
8
Stopwatch ...................................................................... 10
View data and current heart rate while stopwatch
is running .................................................................... 10
Percentage heart rate reading .................................... 10
Backlight / keypad lock .................................................10
Batteries ......................................................................... 11
Training information ..................................................... 11
How the heart rate monitor helps you ......................... 11
Training tips ................................................................ 12
Use in the water ............................................................ 12
Specications ................................................................ 13
Precautions .................................................................... 13
About Oregon Scientic ............................................... 14
EU-Declaration of conformity .......................................14
Page 2
EN
2
INTRODUCTION
Thank you for selecting the Oregon ScienticTM Tap On
Sport Heart Rate Monitor (SE102N).
This heart rate monitor uses analog coded cordless
transmission.
IMPORTANT This watch is for sport purposes only and is
not meant to replace any medical device.
NOTE Please keep this manual handy as you use your
new product. It contains practical step-by-step instructions,
as well as technical specications and warnings you should
know about.
KEY FEATURES
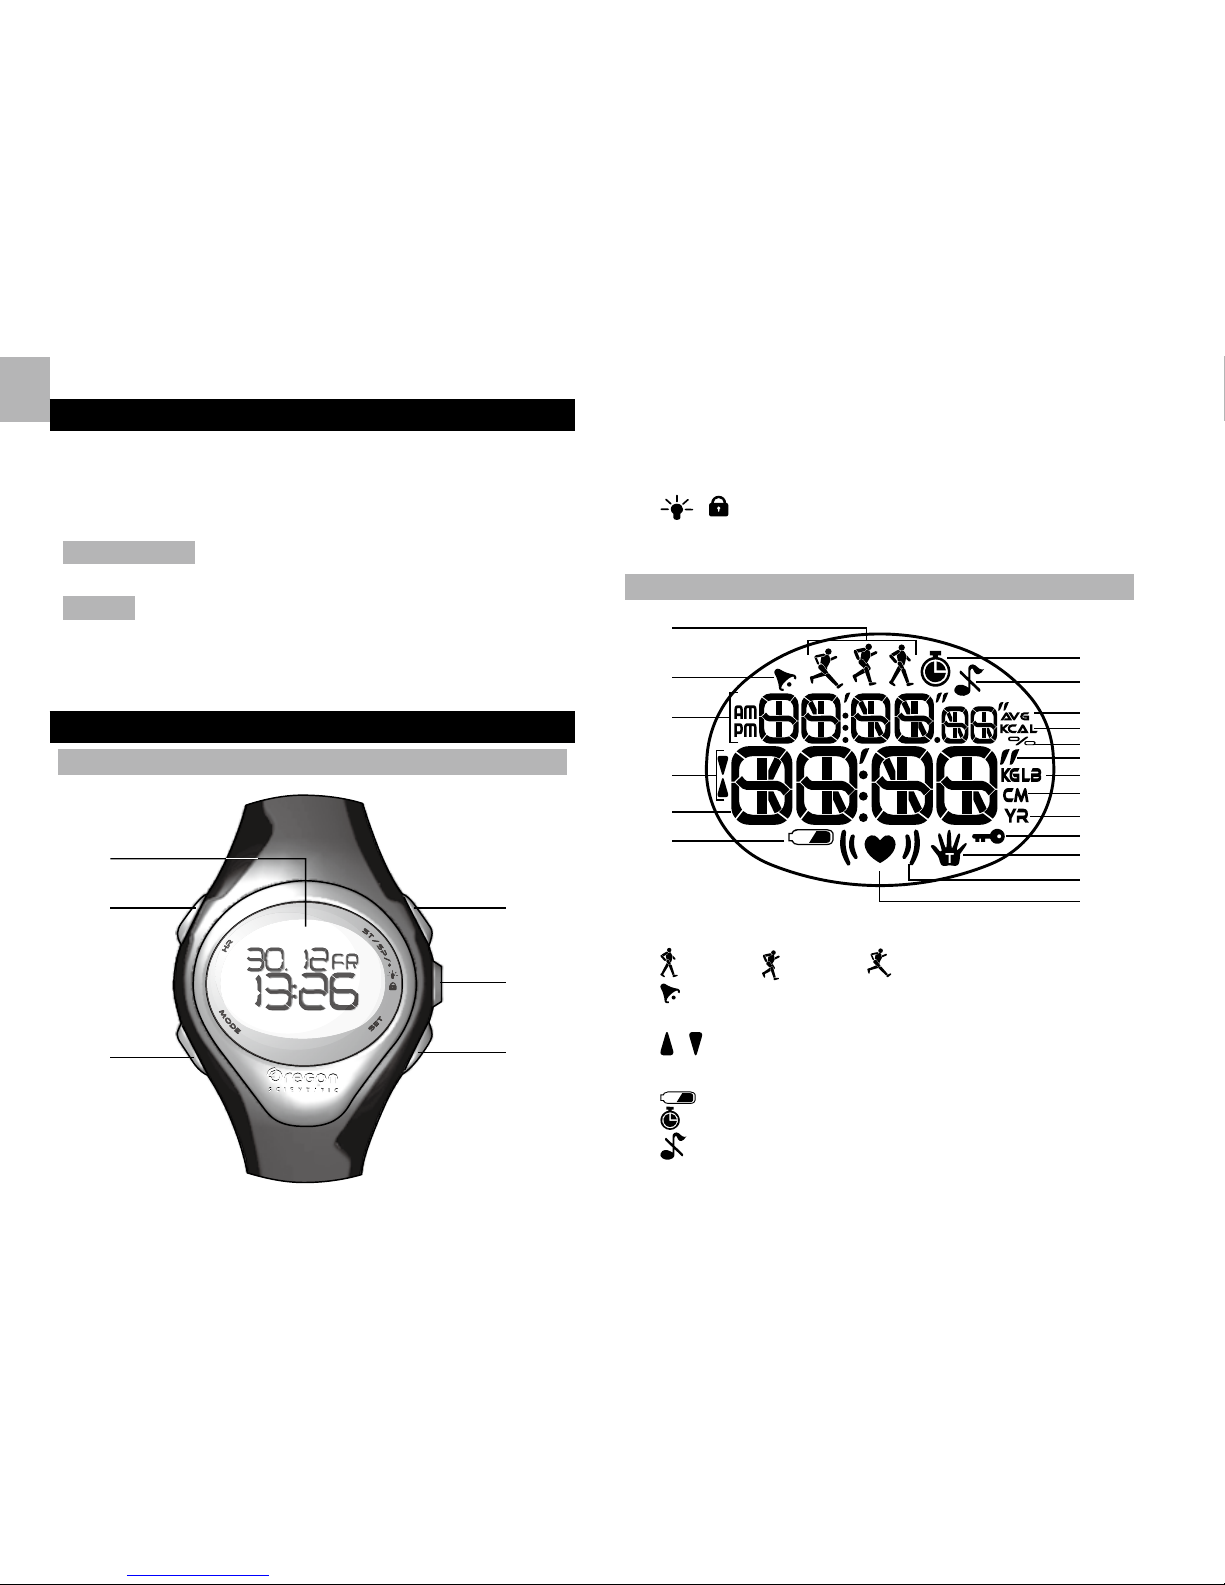
FRONT VIEW
2
1
3
4
5
6
1. Tap on lens screen: Tap on it to view a display mode
2.
HR: Enter HR mode; toggle heart rate displays
3.
MODE: Switch to another display mode
4.
ST / SP / +: Start / stop stopwatch; change setting
5.
/ : Turn on backlight; lock / unlock keypad
6.
SET: Enter setting mode; clock setting displays
LCD
1
7
8
13
12
14
15
16
17
19
18
9
10
11
2
3
4
6
5
1. walking / jogging / running activity level
2.
: Alarm is set; ashes when alarm is active
3.
AM / PM: 12-hour clock
4.
/ : Upper / lower heart rate limit
5. Time / heart rate
6. : Indicates battery power is low
7. : Stopwatch is shown or running
8.
: Keypad tone is turned off
9.
AVG: Average heart rate reading
Page 3
EN
3
10. KCAL: Calorie unit
11.
% : Percentage heart rate reading
12.
/ : Imperial height units (feet and inches)
13.
KGLB: Body weight unit
14.
CM: Metric height unit (centimeters)
15.
YR: Year of user’s birth
16.
: Keypad lock is turned on
17.
: Tap on lens function is active
18.
: Heart rate has exceeded the set limit
19.
: Flashes when receiving heart rate signal
GETTING STARTED
IMPORTANT To effectively use the watch when exercising
i.e. to calculate your calories burned and tness index, you
MUST set the heart rate limits and user data as shown in
the relevant sections.
TURNING ON THE WATCH (1ST TIME USE ONLY)
Press any key for 2 seconds to activate the LCD screen.
SWITCH OPERATION MODES
Press MODE to switch between the 4 operation modes.
Each main mode displays a banner screen telling you which
mode you are entering. After 1 second the banner screen is
automatically replaced by the main mode screen.
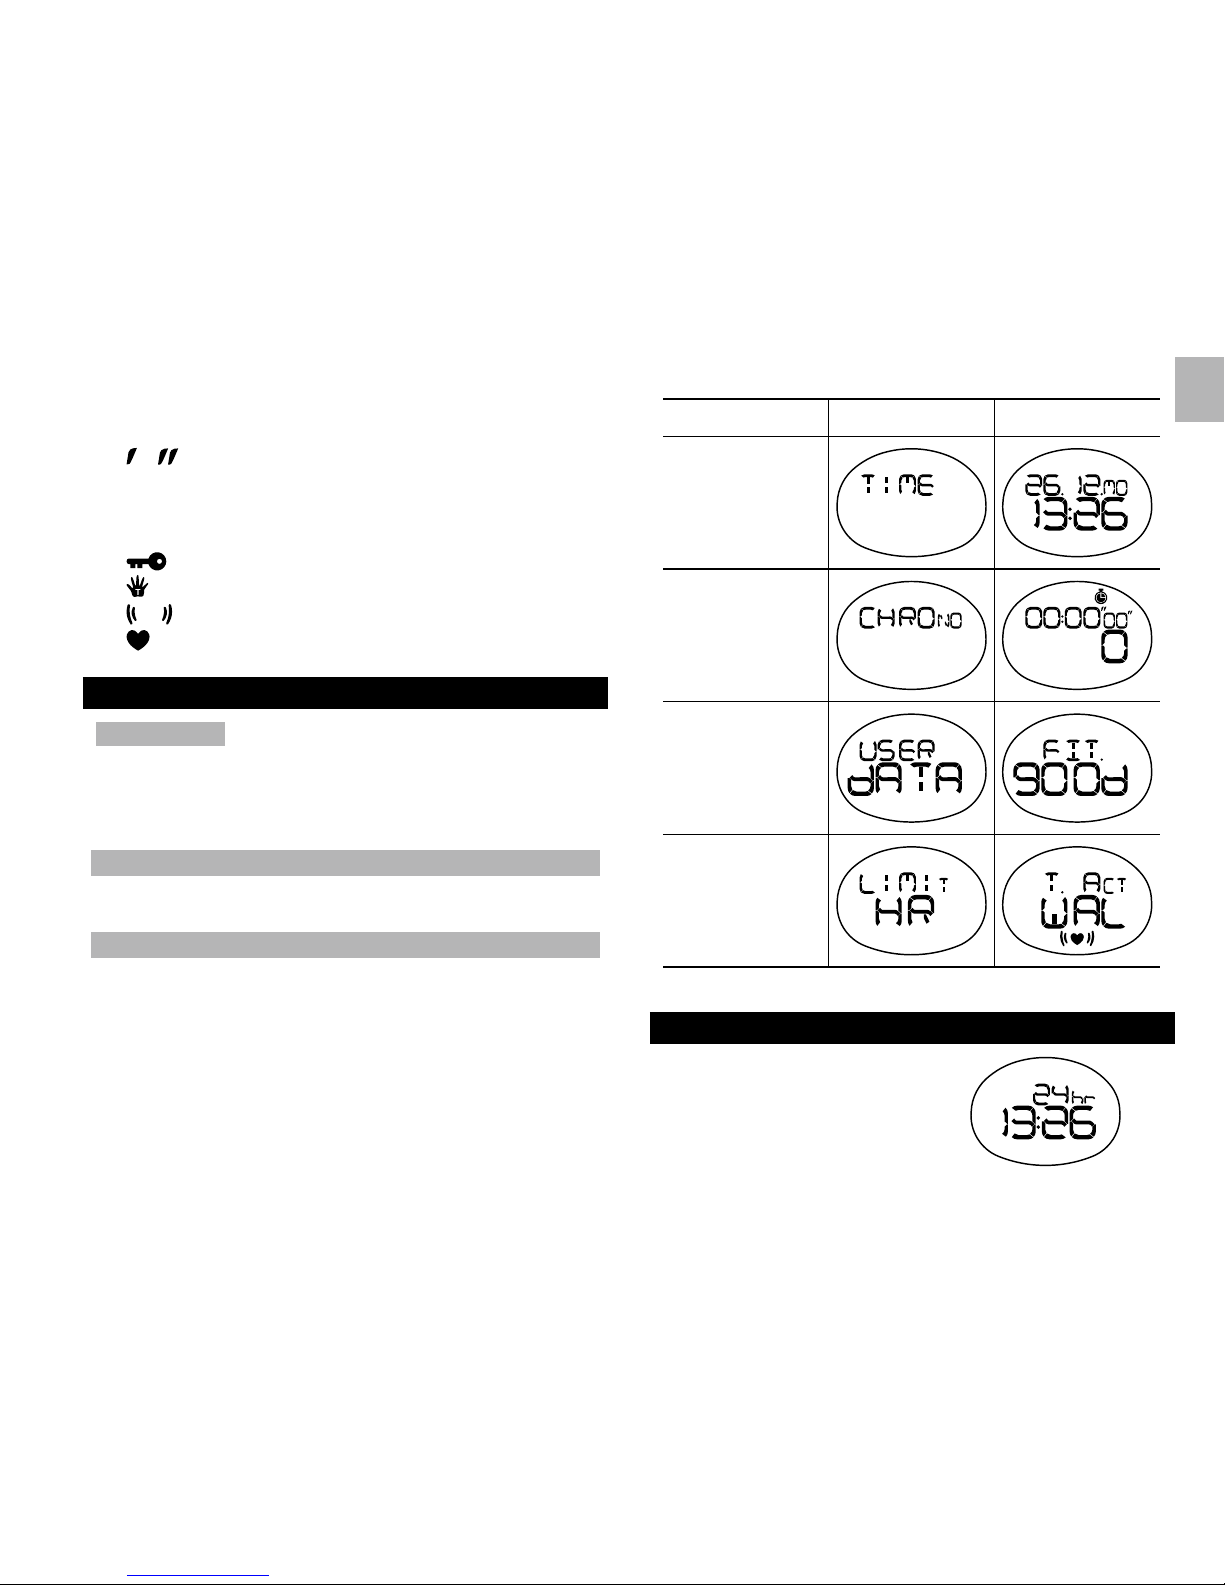
MODE BANNER MAIN MODE
CLOCK
STOPWATCH
USER
PROFILE
HEART RATE
LIMIT
CLOCK / ALARM / KEYPAD TONE / TAP ON LENS
To set the clock:
1. Press
MODE to switch to
clock mode.
2. Press and hold
SET until the
rst setting ashes.
Page 4

EN
4
3. Press + to change the setting. Hold to speed through the
options.
4. Press
SET to conrm and move onto the next setting.
The setting sequence is: 12/24-hour format, hour,
minute, year, day-month format, month and day.
To toggle between the 4 different clock displays:
1. Press
MODE to navigate to clock mode.
2. Press
SET to scroll through the different screens.
ALARM
To set the daily alarm:
1. Press
MODE to navigate to
clock mode.
2. Press
SET until you reach
the alarm display.
3. Press and hold
SET until the rst setting ashes.
4. Press
+ to change the setting. Hold to speed through the
options.
5. Press SET to conrm and move onto the next setting.
The setting sequence is hours and minutes.
To turn the alarm sound OFF and reset it for the next
day:
Press any key.
To activate / deactivate the alarm:
1. Press
MODE to navigate to clock mode.
2. Press
SET until you reach the alarm display.
3. Press
+ to toggle between alarm on or off. appears
when the alarm is activated.
KEYPAD TONE
To turn the keypad tone ON or OFF:
1. Press MODE to navigate to
the clock mode.
2. Press
SET until you reach
the keypad tone display.
3. Press
+ to change the
setting.
4. Press
SET to conrm.
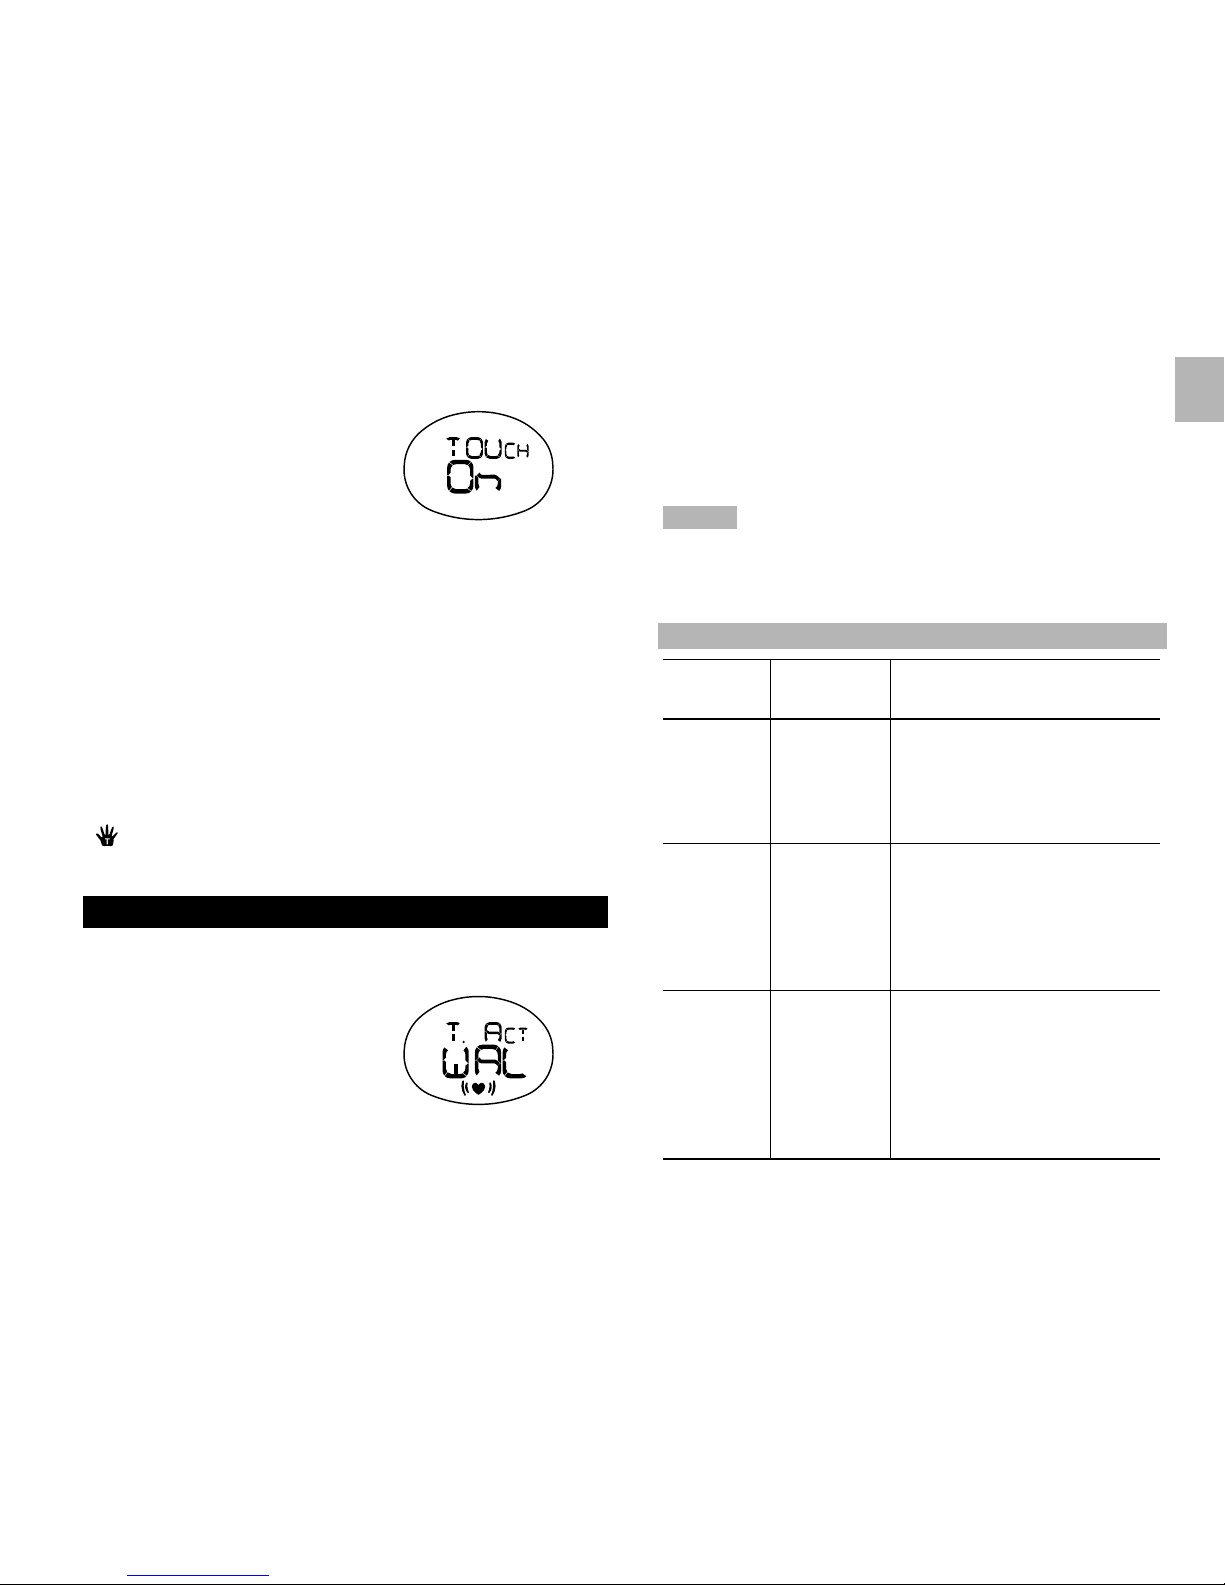
TAP ON LENS
The tap on lens feature gives you easy access to 1 of 6
preset modes.
To set the tap on lens preset mode:
1. Press
MODE to navigate to the clock mode.
2. Press
SET until you reach the tap on lens display and
use + to select TOUCH ON.
Page 5
EN
5
3. Press and hold SET.
4. Press
+ to select 1 of the
6 modes and SET twice to
conrm.
• Clock (TIME)
• Instant percentage
heart rate, i.e., how hard the heart is working
(%HR)
• Stopwatch and current heart rate (STW HR)
• Average heart rate (Avg HR)
• Calories burned (kCAL)
• Stopwatch (CHRONO)
To use the tap on lens:
Simply tap on the lens and your preset mode will display for
10 seconds before returning to the previous screen.
appears when the tap on lens feature is activated and
ashes when the preset display is shown.
HEART RATE LIMITS / ALERT
To set lower and upper heart rate limits / alert:
1. Press MODE to switch to
heart rate mode.
2. Press and hold
SET until the
rst setting ashes.
3. Press
+ to change the
setting. Hold to speed
through the options.
4. Press
SET to conrm and move onto the next setting.
5. The setting sequence is: Target activity (Walk, Jog or
Run), lower heart rate limit, upper heart rate limit, alert
ON / OFF.
NOTE You need to set the target activity for automatic
calculation of the lower and upper heart rate limit. If you
change the target activity level or age, your upper / lower
heart rate will automatically be updated.
TARGET ACTIVITY
TARGET
ACTIVITY
MHR % DESCRIPTION
WALK 65 - 78%
Health Maintenance:
Low intensity training
level. Good for those who
want to strengthen their
cardiovascular systems
JOG 65 - 85%
Aerobic Exercise: Increases
strength and endurance.
Works within body’s oxygen
intake capability, burns more
calories, can be maintained
for a long period of time
RUN 78 - 90%
Anaerobic: Generates
speed and power. Works
at or above body’s oxygen
intake capability, builds
muscle, and cannot be
maintained for a long period
of time
Page 6

EN
6
MAXIMUM / LOWER / UPPER HEART RATE
Before you begin any exercise program and to achieve
maximum health benets from your workout, it is important
to know your:
• Maximum heart rate (MHR)
• Lower heart rate limit
• Upper heart rate limit
To manually calculate your own heart rate limits:
MHR MHR = 220-age
LOWER LIMIT
MHR x lower target activity %.
E.g. Target activity is WALK:
Lower limit = MHR x 65%
UPPER LIMIT
MHR x upper target activity %.
E.g. Target activity is WALK:
Upper limit = MHR x 78%
HEART RATE ALERT
You can set the heart rate alert in the heart rate mode to the
following settings:
ICON DESCRIPTION
*
Heart rate sound and vibration
alert are OFF
Heart rate sound alert is ON
• 1 beep = you have gone below
your lower zone limit
• 2 beeps = you have gone above
your upper zone limit
or ash when you have surpassed your heart rate limit.
NOTE If the watch is kept idle without receiving a heart
rate signal for 5 minutes, the heart rate mode will quit and
return to clock mode.
USER DATA
To access the full benets of this product, set up your user
data before you exercise. This will automatically generate a
tness index, and enable the watch to calculate the level of
calories burned when exercising. This information helps you
track your progress over time.
To set the user data:
1. Press
MODE to navigate to
the user data mode.
2. Press and hold
SET until the
rst setting ashes.
3. Press
+ to change the
setting. Hold to speed
through the options.
4. Press
SET to conrm and move onto the next setting.
The setting sequence is: Activity level (ATH / HOB / LIT),
gender (M / F), year of birth, month of birth, day of birth,
height unit (feet or meters), height, weight unit (lbs or kg)
and weight. Once data has been completed the tness
index will display as FAIR, NORMAL or GOOD.
NOTE You must enter your user data to enable the calorie
count and fat burn features.
To view your tness index:
Press MODE until you reach the user data display.
Page 7

EN
7
ACTIVITY LEVEL
The activity level is based on your own self-assessment of
the amount of exercise you regularly perform.
ACTIVITY
LEVEL
DESCRIPTION
LITTLE
Low - You do not usually participate in
programmed recreation sports or exercise.
HOBBY
Medium - You are engaged in modest
physical activity (such as golng,
horseback riding, table tennis,
calisthenics, bowling, weight lifting or
gymnastics) 2-3 times a week, totaling 1
hour per week.
ATHLETE
High - You actively and regularly
participate in heavy physical exercise
(such as running, jogging, swimming,
cycling, or skipping rope) or engage in
vigorous aerobic exercise (such as tennis,
basketball or handball).
NOTE You must enter the activity level to calculate the
calories burned and tness index.
FITNESS INDEX
The watch will generate a tness index based on your aerobic
tness. This index is dependent and limited by the body’s
ability to deliver oxygen to the working muscles in training. It
is often measured by maximum oxygen uptake (VO2 Max),
which is dened as the highest amount of oxygen that can
be utilized when exercising at an increasingly demanding
level. The lungs, heart, blood, circulatory system, and
working muscles are all factors in determined VO2 Max. The
unit of VO2 Max is ml/kg min.
See the tables below for a rough guide to what your tness
index means:
FITNESS INDEX FOR MEN
Age
FA
IR
NORMAL
GOOD
Fitness index
FITNESS INDEX FOR WOMEN
Age
FA
IR
NORMAL
GOOD
Fitness index
Page 8

EN
8
WEARING THE CHEST BELT
Chest belt
The chest belt counts your heartbeat and transmits this data
to the watch.
1. Wet the conductive
pads on the underside
of the chest belt with
a few drops of water
or conductive gel to
ensure solid contact.
2. Strap the heart rate
chest belt across your
chest. To ensure an
accurate heart rate
signal, adjust the strap
until the belt sits snugly below your pectoral muscles.
TIPS
• The position of the chest belt affects its performance.
Move the chest belt along the strap so that it falls above
your heart.
• Avoid areas with dense chest hair.
• In dry, cold climates, it may take several minutes for the
chest belt to function steadily. This is normal and should
improve with several minutes of exercise.
NOTE To maintain the best performance of your chest belt,
please handle it with care according to the following:
• Do not wrap the chest belt in a wet towel nor with other
wet materials.
• Do not store the chest belt in a hot (about 50°C) and
humid (about 90%) environment.
• Do not place or wash the chest belt under running water,
instead clean it with a wet cloth.
• Do not place the conductive rubber face down on a
metal table or surface.
• Properly dry the chest belt immediately after use.
NOTE If the watch is kept idle without receiving a heart
rate signal for 5 minutes, the heart rate mode will quit and
return to clock mode.
TRANSMISSION SIGNAL
The heart rate chest belt and watch have a maximum
transmission range of about 62.5 centimetres (25 inches).
They are equipped with the latest digital coding system to
reduce signal interference from the environment, as well
as analog technology. This heart rate monitor uses analog
coded cordless transmission.
NOTE
Whenever the watch is searching for the chest
belt signal (manual or automatic search), make sure that
the chest belt is no further than 10 cm (4 inches) from the
watch.
Your watch will advise you which system it is using and the
signal status by displaying the following icons:
ICON DESCRIPTION
Outside heart is
ashing
Searching for a signal
Inside heart is
ashing
A signal has been found
and the digital system is
being used
Page 9

EN
9
Heart is ashing
A signal has been found
and the analog system is
being used
/
No signal has been found
NOTE To switch from digital to analog or analog to digital
system, press the chest belt button for more than 4 seconds
and then force a signal search.
The signal search will take approximately 10 seconds. If
after 10 seconds the heart icon is not ashing, then your
signal search has been unsuccessful and you need to force
another signal search.
IMPORTANT If the heart icon does not appear on the
display or is not ashing because no signal has been found,
press HR then press and hold MODE to force a signal
search.
In the event that you experience a weak signal or your signal
is disrupted by interference in the environment, follow the
instructions below to identify and resolve the situation.
1. The signal is weak or heart rate is unreasonably high the watch heart rate monitor will only show “0” or a false
reading:
• Shorten the distance between the heart rate chest
belt and watch.
• Re-adjust the position of the heart rate chest
belt.
• Check the conductive pads are moist enough to
ensure solid contact.
• Check the batteries. If they are low or exhausted, the
transmission range may be shortened.
• Chest belt is in digital system. Press and hold the
chest belt button for more than 4 seconds to change
from digital to analog. Press HR then press and hold
MODE to force a signal search.
2. The gym equipment does not seem to work with your
chest belt and the digital icon is displayed:
• Most gym
equipment is
compatible with
the analog system.
Press and hold
the chest belt
button for more
than 4 seconds to
change from digital
to analog. Press HR then press and hold MODE to
force a signal search.
3. Interference from another person’s heart rate monitor their heart rate readings appear on your watch, or the
heart rate monitor shows “0”:
• Press the chest belt button to get the watch to
receive your chest belt signal. Do not press and
hold the chest belt button, as it will change the
transmission signal from analog to digital.
4. The signal is jammed - the heart rate reading on your
watch is ashing:
• There is too much interference in the environment for
your heart rate monitor to function. Move to an area
where the heart rate reading stops ashing.
WARNING Signal interference in the environment can be
caused by electromagnetic disturbances. These may occur
near high voltage power lines, trafc lights, overhead lines
Page 10

EN
10
of electric railways, electric bus lines or trams, televisions,
car motors, bike computers, some motor driven exercise
equipment, cellular phones or when you walk through
electric security gates. Under interference, the heart rate
reading may become unstable and inaccurate.
STOPWATCH
To use the stopwatch:
1. Press
MODE to navigate to
stopwatch mode.
2. To start / stop / resume the
stopwatch, press ST / SP.
3. To reset the stopwatch,
press and hold SET.
If the watch heart rate function is activated and the user
data has been entered, the calorie consumption will start
counting when the stopwatch is running.
appears when the stopwatch is running. You can run the
stopwatch while you access other modes. ashes until
you switch back to stopwatch mode.
VIEW DATA AND CURRENT HEART RATE
WHILE STOPWATCH IS RUNNING
Press HR to scroll through the following screen displays
while the stopwatch is in use:
Percentage heart rate and
current heart rate
Stopwatch and
current heart rate
Average heart rate and
current heart rate
Calories burned and
current heart rate
PERCENTAGE HEART RATE READING
The percentage heart rate reading is calculated from your
current heart rate and MHR:
The higher the percentage, the harder the heart is working.
For example, when you reach 80-90% you should consider
slowing down to a more comfortable exercise level.
BACKLIGHT / KEYPAD LOCK
To turn the backlight on for 3 seconds:
Press . (Press again within the 3 seconds to extend
the light for 3 more seconds.)
Page 11
EN
11
To turn the keypad lock ON or OFF:
Press and hold .
appears when the keypad lock is ON.
NOTE The backlight does not work when the low battery
icon is shown and will return to normal once the batteries
are replaced.
BATTERIES
The product uses 2 x CR2032 batteries, one for the watch
and another for the chest belt. Both are already installed.
The battery warnings are:
DESCRIPTION
Continuous ashing The watch battery is low
Intermittent ashing
The watch battery is too low to
run the backlight
*
The batteries typically last one year.
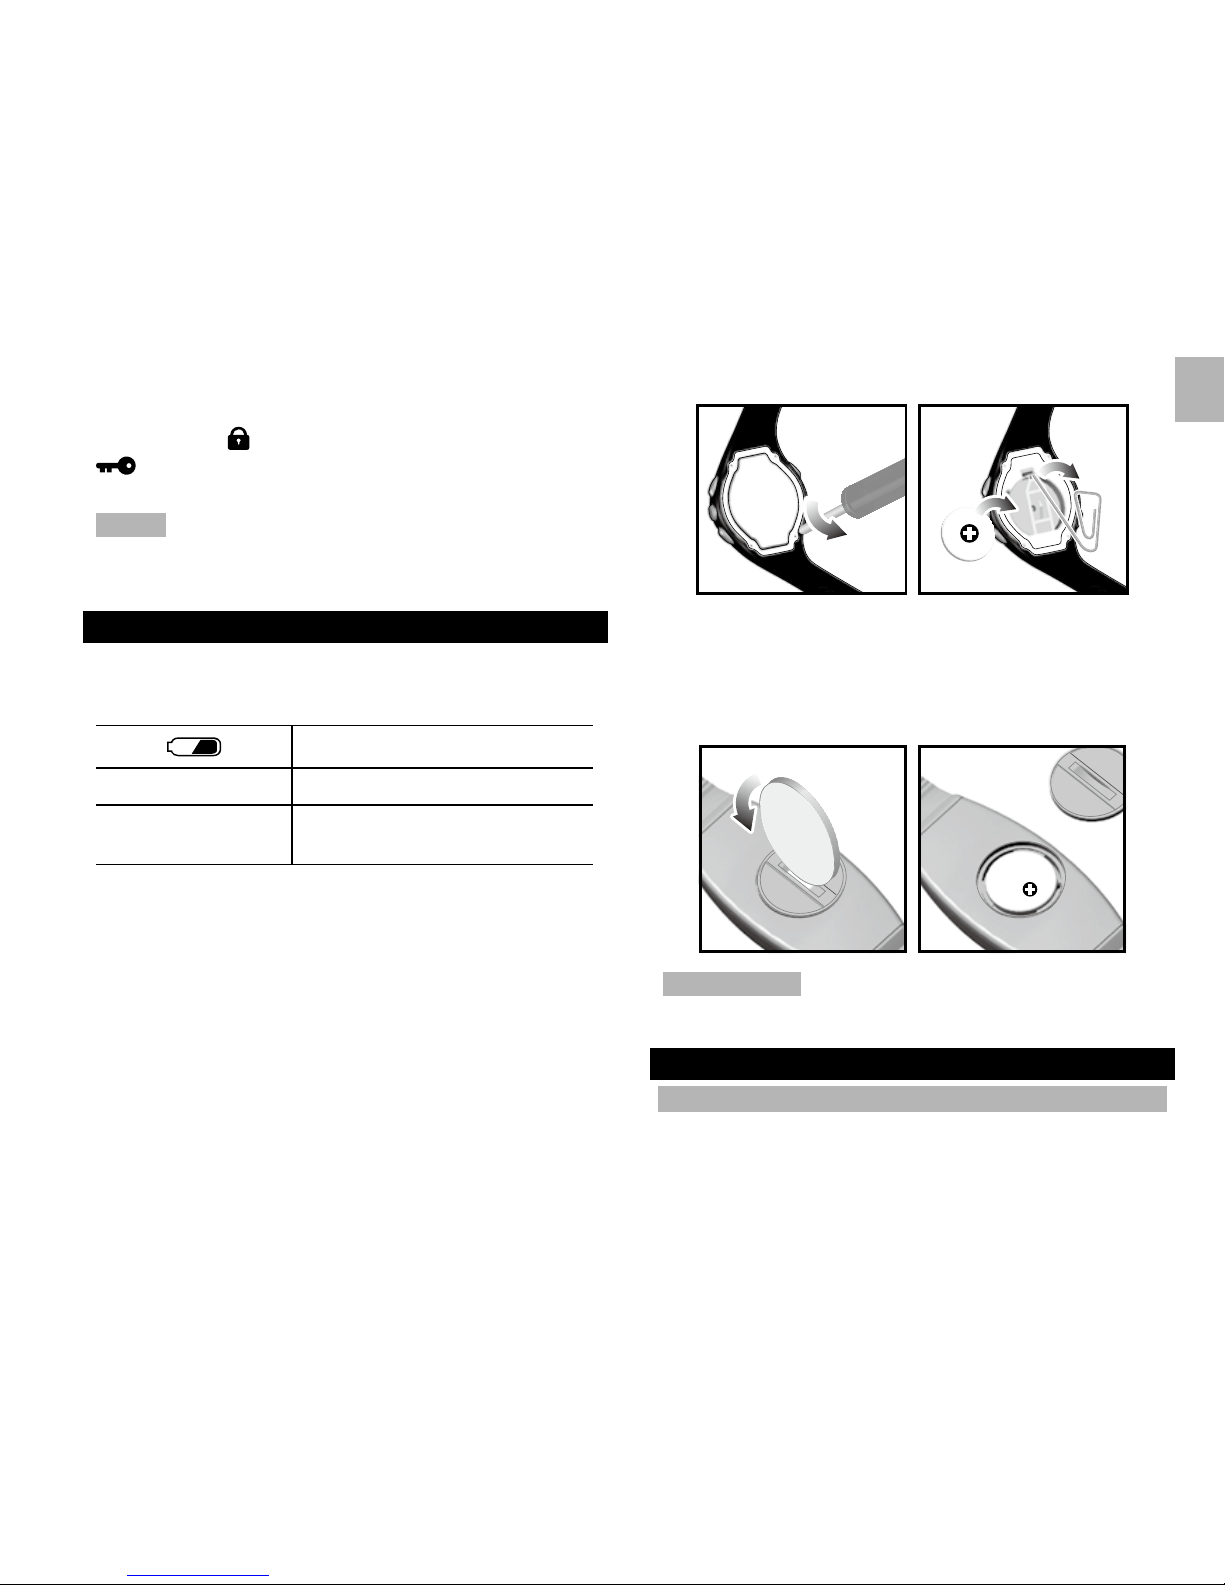
To replace the watch battery:
1. Undo the screws and remove the back plate.
2. Using a thin blunt instrument, hook the release catch
and lift the clip.
3. Replace the old battery and then the battery clip.
4. Replace the back plate and screws.
To replace the chest belt battery:
1. Using a coin, twist the battery door counter-clockwise
until it clicks out of place.
2. Replace the old battery and close the battery door by
twisting it clockwise until it is rmly in place.
IMPORTANT Remember to set the proles after every
battery replacement or reset.
TRAINING INFORMATION
HOW THE HEART RATE MONITOR HELPS YOU
A heart rate monitor is the most important tool in
cardiovascular health and an ideal training partner. It enables
you to see and monitor results. This helps you assess your
Page 12

EN
12
past performance, maximize your work out and adapt your
future exercise program to achieve your desired goals in a
safer and more effective way.
When you exercise, the chest belt picks up your heartbeat
and sends it to the watch. Now you can view your heart rate
and start monitoring your performance based on your heart
rate readings. As you get tter, your heart will need to do
less work and the speed of your heart rate will decrease.
The reason for this is as follows:
• Your heart pumps blood to your lungs to obtain oxygen.
Then, the oxygen rich blood will travel to your muscles.
The oxygen is used as fuel and the blood leaves the
muscles and returns to the lungs to begin the process
again.
As you get t, your heart is able to pump more blood with
every beat.As a result, your heart doesn’t have to beat
as often to get the necessary oxygen to your muscles.
TRAINING TIPS
To gain the maximum benet from your training program,
and to ensure that you exercise safely, please observe the
following guidelines:
• Start with a well-dened training goal, such as to lose
weight, keep t, improve health or compete in a sporting
event.
• Select a training activity you enjoy, and vary your training
activities to exercise different muscle groups.
• Start slowly, and then gradually step up your work out
as you become tter. Exercise regularly. To maintain a
healthy cardiovascular system, 20-30 minutes three
times a week is recommended.
• Always allow at least ve minutes before and after
exercising for warm-up and cool-down.
• Measure your pulse after training. Then repeat the
procedure again after three minutes. If it does not
return to its normal resting rate, you may have trained
too hard.
• Always check with your doctor before starting a vigorous
training program.
USE IN THE WATER
The watch is water-resistant up to 50 meters. The chest
belt is splash proof, but should not be worn for underwater
activities, as the heart rate transmission cannot occur under
water. Refer to the table for proper use guidelines.
RAIN
SPLASHES
ETC
SHOWERING
(WARM/
COOL
WATER
ONLY)
LIGHT
SWIMMING
/ SHALLOW
WATER
SHALLOW
DIVING/
SURFING/
WATER
SPORTS
SNORKELING
/ DEEP
WATER
DIVING
Watch
50M/164
Feet
OK OK OK NO NO
Chest Belt
OK NO NO NO NO
IMPORTANT
•
Ensure the buttons and battery compartment are secured
and intact before exposing the watch to excessive
water.
Page 13

EN
13
• Avoid pressing the buttons while in the water or during
heavy rainstorms, as this may cause water to enter the
watch, leading to malfunction.
SPECIFICATIONS
TYPE DESCRIPTION
Clock
Time format 12 hr / 24 hr
Date format DD / MM or MM / DD
Year 2005-2054 (auto-calendar)
Alarm Daily
Stopwatch
Count-up timer
From 00:00:00 (Min:
Sec:100th sec) to 99:59:59
(Hr:Min:Sec)
Performance tracking
Heart rate (HR) alarm Sound / visual
HR measuring range
30-240 bpm (beats per
minute)
Lower HR settable
range
30-240 bpm (beats per
minute)
Upper HR settable
range
80-240 bpm (beats per
minute)
Calories calculation 0-9,999kcal
Transmission
Range
62.5 cm (25 inches) – may
decrease with low battery
Water resistant
Watch
50 meters (163 feet) not
actuating keys
Chest belt Splash proof
Operating environment
Operation temperature 5°C to 40°C (41°F to 104°F)
Storage temperature
-20°C to 70°C (-4°F to
158°F)
PRECAUTIONS
To ensure you use your product correctly and safely, read
these warnings and the entire user manual before using the
product:
• Use a soft, slightly moistened cloth. Do not use abrasive
or corrosive cleaning agents, as these may cause
damage. Use luke warm water and mild soap to clean
the watch and chest belt thoroughly after each training
session. Never use the products in hot water or store
them when wet.
• Do not bend or stretch the transmitter part of the chest
belt.
• Do not subject the product to excessive force, shock,
dust, temperature changes, or humidity. Never expose
the product to direct sunlight for extended periods. Such
treatment may result in malfunction.
• Do not tamper with the internal components. Doing
so will terminate the product warranty and may cause
damage. The main unit contains no user-serviceable
parts.
• Do not scratch hard objects against the LCD display as
this may cause damage.
Page 14

EN
14
• Take precautions when handling all battery types.
• Remove the batteries whenever you are planning to
store the product for a long period of time.
• When replacing batteries, use new batteries as specied
in this user manual.
• The product is a precision instrument. Never attempt
to take this device apart. Contact the retailer or our
customer service department if the product requires
servicing.
• Do not touch the exposed electronic circuitry, as there is
a danger of electric shock.
• Check all major functions if the device has not been
used for a long time. Maintain regular internal testing
and cleaning of your device. Have your watch serviced
by an approved service center annually.
• When disposing of this product, ensure it is collected
separately for special treatment and not as normal
household waste.
• Due to printing limitations, the displays shown in this
manual may differ from the actual display.
• The contents of this manual may not be reproduced
without the permission of the manufacturer.
NOTE The technical specications for this product and the
contents of the user manual are subject to change without
notice.
NOTE Features and accessories will not be available in all
countries. For more information, please contact your local
retailer.
ABOUT OREGON SCIENTIFIC
Visit our website (www.oregonscientic.com) to learn more
about Oregon Scientic products. If you’re in the US and
would like to contact our Customer Care department directly,
please visit:
www2.oregonscientic.com/service/support.asp
For international inquiries, please visit:
www2.oregonscientic.com/about/international.asp
EU-DECLARATION OF CONFORMITY
Hereby, Oregon Scientic, declares that this Tap On Sport
Heart Rate Monitor (Model: SE102N) is in compliance with
EMC directive 2004/108/EC. A copy of the signed and dated
Declaration of Conformity is available on request via our
Oregon Scientic Customer Service.
 Loading...