

Page 1

1
EN
Ssmart Watch
Model: SE900/RA900
USER MANUAL
CONTENTS
Introduction
.............
.................................
.............
............
......
....
......
...
....
...
......
.............
.................................
.............
............
......
....
....................
.................................
............
2
Packaging
Items
.............
.................................
.............
............
......
....
......
...
....
...
......
.............
.................................
.............
............
......
....
....................
.................................
............
2
Control Buttons
.............
.................................
.............
............
......
....
......
...
....
...
......
.............
.................................
.............
............
......
....
....................
.................................
............
2
Screen Display
Start Your Watch (First Time)
Set Up Your Watch
Exit to
Default
Time Screen
Set Time Profi le
..
.................................
.............
............
......
....
......
...
....
...
......
.............
.................................
.............
............
......
....
....................
....................................
............
2
Set User Profi le
..
.................................
.............
............
......
....
......
...
....
...
......
.............
.................................
.............
............
......
....
....................
....................................
............
3
Oregon Scientifi c Application
..
.................................
....
......
....
......
...
....
...
......
.............
.................................
.............
............
......
....
....................
....................................
............
4
Purchase a Profi le
.........................................
........................................
........................................
........................................
...............
..............
..........
...
...
...................
...
......
4
Set Exercise Profi les
..
.................................
.............
............
......
....
......
...
....
...
......
.............
.................................
.............
............
......
....
....................
....................................
.....
4
Conne
ct
to Phone
Download Profi les onto Watch
Upload Data onto Mobile Device
5
Update System
5
Sensor Setup
..
.................................
.............
............
......
....
......
...
....
...
......
.............
.................................
.............
............
......
....
....................
.................................
...................
5
Add a Sensor Device
.........................................
........................................
........................................
........................................
...............
..............
.........................................
5
Remove a Sensor Device
.........................................
........................................
........................................
........................................
...............
..............
.........................................
6
Start Exercising
..
.................................
.............
............
......
....
......
...
....
...
......
.............
.................................
.............
............
......
....
....................
.................................
...................
6
Running Profi le
..
.................................
.............
............
......
....
......
...
....
...
......
.............
.................................
.............
............
......
....
....................
.................................
...................
7
Setup
Useful Reference
8
View Exercise Record During Running
8
View Exercise Record After Running
9
View Exercise Record In Application
..............................................
........................................
........................................
........................................
...............
..............
............
9
Cycling
Profi le
..
.................................
.............
............
......
....
......
...
....
...
......
.............
.................................
.............
............
......
....
....................
.................................
...................
1
1
Setup
.........................................
........................................
........................................
........................................
...............
..............
................................................................
1
1
Useful Reference
.........................................
........................................
........................................
........................................
...............
..............
.............................................
1
1
View Exercise Record During
Cy
cling
.........................................
........................................
........................................
........................................
...............
..............
............11
View Exercise Record After
Cy
cling
View Exercise Record In Application
3
Swimming
Profi le
Setup
View Exercise Record During
Swimming
.........................................
........................................
........................................
........................................
...............
..............
............14
View Exercise Record After
Swimming
...............................................
........................................
........................................
........................................
...............
..............
............
1
5
View Exercise Record In Application
..............................................
........................................
........................................
........................................
...............
..............
............
1
5
Workout
Profi le
..
.................................
.............
...........
......
....
......
...
....
...
......
.............
.................................
.............
............
......
....
....................
.................................
...................
1
7
Setup
.........................................
........................................
........................................
........................................
...............
..............
................................................................
1
7
Useful Reference
View Exercise Record During
Workout
8
View Exercise Record In Application
19
Activity
Profi le
0
Useful Reference
.........................................
........................................
........................................
........................................
...............
..............
.............................................
2
0
View Record After
Acitivy
.................................................................
........................................
........................................
........................................
...............
..............
............
2
0
View Activity Record In Application
.................................................
........................................
........................................
........................................
...............
..............
............21
Weather Profi le
..
.................................
.............
............
......
....
......
...
....
...
......
.............
.................................
.............
............
......
....
....................
.................................
...................
22
Setup
.........................................
........................................
........................................
........................................
...............
..............
................................................................
22
View Temperature And Weather
View Weather In Application
Hiking Profi le
23
Setup
23
View Record During Hiking
............................................................
........................................
........................................
........................................
...............
..............
............
2
3
View Record After Hiking
..............................................................
........................................
........................................
........................................
...............
..............
............
2
3
View Hiking Record In Application
.................................................
........................................
........................................
........................................
...............
..............
............
2
3
Fishing Profi le
..
.................................
.............
............
......
....
......
...
....
...
......
.............
.................................
.............
............
......
....
....................
.................................
...................
2
5
Setup
.........................................
........................................
........................................
........................................
...............
..............
................................................................
2
5
View Status During Fishing
5
View Fishing Record In Application
6
Water Resistance
6
Backlight
6
Replace Battery
..
..............................
.............
............
......
....
......
...
....
...
......
.............
.................................
.............
............
......
....
....................
.................................
...................
2
6
Specifi cations
.
...................................
.............
............
......
....
......
...
....
...
......
.............
.................................
.............
............
......
....
....................
.................................
...................
2
6
Precautions
........................................
.............
............
......
....
......
...
....
...
......
.............
.................................
.............
............
......
....
....................
.................................
...................
2
7
About Or
egon Scientifi c
...................
.............
............
......
....
......
...
....
...
......
.............
.................................
.............
............
......
....
....................
.................................
...................
2
8
EU-Declaration of Conf
ormity
...........
.............
............
......
....
......
...
....
...
......
.............
.................................
.............
............
......
....
....................
.................................
...................
2
8
CC / IC Statement
8
Declaration of Conformity
8
Page 2

2
EN
INTRODUCTION
Thank you for selecting the Oregon Scientifi c
TM
Ssmart Watch as your sport mate that can be a great motivational tool compatible with downloaded application from your
mobile device, such as Smartphone or tablet PC. This multi-functional watch can help you systematically achieve and maintain your optimum exercise. Share your exercise
benefi ts with your friends and family!
The watch is currently compatible with iPhone 4S / iPhone 5 / iPad 3 that is with logo
to achieve reliable transmission linkage. Please get the latest compatibility
details from our website
http://ssmart.oregonscientifi c.com
.
You can purchase our accessories separately, such as Bluetooth Smart Fabric Chest Belt (SZ999) and Bluetooth Smart Bike Pod (AD262) to maximize the performance of
your watch.
IMPORT
This watch is for sport purposes only and is not meant to replace any medical device.
Patent Notice
: This product is applying US & European patent.
PACKAGING ITEMS
The package should include the following items:
1 x SE900 or RA900 watch
1 x CR2032 3V lithium battery (already installed in watch)
1 x Oregon Scientifi c
warranty card
1 x Quick Start Guide
CONTROL BUTTONS
1. Top (
) button: Start / stop stopwatch; increase value of the setting; enter profi le settings
2. Middle (
2
) button: Toggle between profi les / displays; toggle through data; confi rm setting
3. Bottom (
3
) button: Decrease value of the setting; enter memory to view records; enter set-up; record a lap while
stopwatch is running; exit current display and return to previous screen
4. Tap on lens to activate backlight
SCREEN DISPLAY
1.
: Indicates battery status is low or nearly empty
: Indicates beep tone is off
3.
: Indicates exercise timer is activated; fl ashes when counting
4.
: Indicates alarm is on
START YOUR WATCH (FIRST TIME)
After removing the watch from the package box, press and hold top (
) button to activate it until the screen has
time display.
Press top (
1
) button to switch the displays between default time (
Time 1
) and
Time 2
. Press middle (
2
) button to
continue set time profi le.
SET UP YOUR WATCH
IMPORTANT
To ensure accurate calculations with your exercise, you are strongly recommended to set the watch and user profi les before exercising.
Remember to set the profi les after every battery replacement or reset.
EXIT TO DEFAULT TIME SCREEN
You could press and hold middle (2) button to exit from any display and directly go back to the default time screen displays at any time.
SET TIME PROFILE
After starting the watch for the fi rst time, you can enter
TIME setup
mode by pressing middle (
) button.
1. Press bottom (
3
) button to start setting in order.
2. Toggle middle (
) button to select the option to set, they are
Time 1
,
Date, Time 2
,
Alarm
,
Beep
and measurement
Unit
After select an option, press the following buttons to edit settings:
1. Press top (
) button to start a particular setting display.
2. Press top (
) button to increase value or select option; press bottom (
3
) button to decrease value or select option.
3. Press middle (
2
) button to save setting and automatically move to another setting display (if applicable).
2
Page 3

3
EN
NOTE
If you want to get back to the real-time display, return to the TIME setup mode and then press top (1) button.
NOTE
If the alarm is turned on, displays on the screen until you set the alarm setting to be off.
NOTE
You can independently set daily / weekday / weekend alarm.
NOTE
If your watch is low battery, the beep is automatically turned off without displays.
SET USER PROFILE
You can choose to set user profile or downloading exercise profiles after setting the time profile, but we highly
suggest that you could set up the user profile before exercising.
You can set the user profile through application on your mobile device, and update the profile to the watch.
In USER setup mode, press top (1) button and continue to set your user profile according to the following
order: Gender, Birthday, Weight (and measurement unit), Height (and measurement unit), Stride (and
measurement unit), Toggle and Power Save, by pressing the following buttons:
1. Press top (
1) button to increase value or select option; press bottom (3) button to decrease value or select option.
2. Press middle (2) button to save setting and automatically move to another setting display.
TIP
Stride length is a distance between the tip of toe of your leading foot and the tip of toe of your back foot while you walk a
pace, or also can be measured by the heel of your feet as reference. For correctly measuring individual stride length, you can
walk a distance at your normal pace, and then being divided by the paces, the average value can be used for inputting into the
watch as a stride length.
For example, the total paces of your walking are 10, and the distance is 230 inches (584.2 cm). Therefore, the average stride value is 23 inches (59cm).
Total distance ÷ Steps taken = Average stride-length
230 ÷ 10 = 23 inches
There is a formula to calculate your stride as well , please see below:
584.2cm
STARTEND
(230 inches)
Stride length
heel to heel
Stride length
toe to toe
Females: Your Height x 0.413 = Your Stride Length
Males: Your Height x 0.415 = Your Stride Length
Page 4

4
EN
NOTE
During exercise, if you want the watch to automatically toggle the exercise data, turn on Toggle setting.
NOTE
If the Power Save is set to on, the watch will go to sleep mode in 30 minutes without any button being pressed during 11pm to 6am. Tap the lens to display the
screen again. You can set desired time duration in POWER SAVE SETTING in the application.
NOTE
You can also change the time and measurement unit setting through application.
IMPORTANT
Reset the user profile if the watch will be used by another person.
OREGON SCIENTIFIC APPLICATION
Download the Oregon Scientific application from your mobile device. It is available in Apple App Store (iOS version) or Google Play Store (android version, coming soon).
Different exercise profiles can be downloaded for free or purchased directly from the application.
TIP
For fast searching the application, type ‘Ssmart Watch’ as the keyword in the search engine.
PURCHASE A PROFILE
In SHOP mode, profiles are listed on the screen. If any profile has been installed onto your
watch, is labeled besides that profile icon.
If you want to purchase a profile, tap on the price icon
and then displays.
To confirm the purchase, tap again. You will see the profile details and continue
your payment procedure.
SET EXERCISE PROFILES
There are different exercise profiles in Oregon Scientific application for downloading as shown below,
• Running
• Cycling
• Swimming
• Workout
• Activity
• Fishing
Except the above profiles, RA900 model can be exclusively installed with below profiles.
• Hiking
• Weather
CONNECT TO PHONE
DOWNLOAD PROFILES ONTO WATCH
You can download desired exercise profiles from the application onto your watch. Select up to 3 profiles and be changed at any time.
1. In
mode, tap and select desired exercised profiles on the mobile device and then tap .
2. Press and toggle middle (
2) button on the watch to enter CONNECT mode. Press top (1) button to enter.
3. Tap CONNECT WITH WATCH on the mobile device to initiate synchronization while pressing top (1) button again on the watch. Done displays on the watch until
successfully connect and download.
Icon Meaning
The mobile device is searching for the watch for connection.
After connecting successfully, the downloading starts.
NOTE
If your battery is low, pls change batt.for update displays and you cannot continue entering other screens.
Page 5

5
EN
UPLOAD DATA ONTO MOBILE DEVICE
You could upload data from the watch onto the application.
1. In
CONNECT mode, press top (1) button to enter and toggle middle (2) button to enter upload memory display.
2. Press top (1) button to enter for selecting an exercise profile, toggle middle (2) button to select your desired profile, then press top (1) button to start uploading.
3. Tap CONNECT WITH WATCH on the mobile device to initiate synchronization while pressing top (1) button again on the watch. Done displays on the watch until
successfully connect and upload.
NOTE
If the connection is failed, the watch automatically attempts to synchronize again.
SCREEN MESSAGE
Synchronization in progress
Synchronization successful
Synchronization failed. Watch attempts to synchronize again.
no memory
There is no data in the watch.
pls change
batt.for
update
The watch battery is low and needs to be replaced
UPDATE SYSTEM
You could update the watch to an advanced system that Oregon Scientific offers in the future through the application, if applicable.
In the application, you can be noticed in INFO page by a message popped up, or browsing NEW VERSION AVAILABLE! at the
below of the page.
1. In CONNECT mode, press top (1) button to enter and toggle middle (2) button to enter update system display.
2. Toggle top (1) button to enter below screens in order. The current watch system will be erased after your confirmation.
NOTE
If the system updating fails, Failed displays, and the screen goes back to start system update for your next trial.
NOTE
In INFO page, you can browse the WATCH ID, VERSION and LAST SYNC TIME.
SOLUTION
Without the phone application “Ssmart”, once you accidentally press the wrong button while updating
SYNC
Searching for watch
the system on the watch, please follow the steps below to resume the updates.
1. Remove the battery from the compartment and wait for at least 15 seconds before re-installation.
2. Return the battery to the compartment. Make sure the battery should have enough energy;
otherwise please insert a new battery instead of the original one.
3. Secure the lid by using the coin to make the lid back into the place.
start system update displays
on the screen.
4. Start your phone with the application “Ssmart”.
5. Tap on
to enter SYNC page.
6. Tap on CONNECT WITH WATCH, and then press the top (1) button on the watch. system update
and please wait display on the screen.
7. The watch and the application begin to synchronize and the system starts updating. Once the watch
completes updating, the screen turns off for about 1 minute, then goes back to the idle time mode.
SENSOR SETUP
With different sensor devices paired with the watch, the watch can be maximized to the highest performance for your exercise target, including chest belt and bike pod
(purchased separately). You can add a sensor before or after downloading exercise profiles.
Page 6

6
EN
IMPORTANT
To ensure high accurate calculations with your exercise, we highly recommend you to pair the watch with Oregon Scientific Bluetooth Smart Fabric Chest
Belt (model SZ999). To order an accessory, visit our website www.oregonscientific.com or contact your local.
ADD A SENSOR DEVICE
Please prepare your sensor without packaging and locate it close to the watch.
For the first time use, there is no sensor added, following the steps below.
1. In
SENSOR setup mode, press top (1) button to enter, add sensor displays on the screen.
2. Press top (
1) button again to start pairing sensor. flash during pairing and only the icon of the paired sensor displays on the screen once the pairing is complete.
3. After 3 seconds, add sensor displays again on the watch.
If the watch has added chest belt sensor, following the steps below.
1. In
SENSOR setup mode, press top (1) button to enter, paired sensor icon displays on the screen.
2. After 3 seconds, add sensor displays on the screen.
3. Press top (
1) button again to start pairing sensor. flash during pairing and only the icon of the paired sensor displays on the screen once the pairing is complete.
4. After 3 seconds, add sensor displays again on the watch.
If the watch has added bike pod sensor, following the steps below.
1. In
SENSOR setup mode, press top (1) button to enter, paired sensor icon displays on the screen.
2. After 3 seconds, add sensor displays on the screen.
3. Press top (
1) button again to start pairing sensor. flash during pairing and only the icon of the paired sensor displays on the screen once the pairing is complete.
4. After 3 seconds, add sensor displays again on the watch.
NOTE
You can pair all sensors with the watch at a time.
REMOVE A SENSOR DEVICE
You can remove the sensor from the watch. Remove one sensor at a time.
1. In SENSOR setup mode, press top (1) button to enter. Paired sensor(s) display and then toggle middle (2) button till remove sensor displays.
2. Press top (1) button to enter.
3. Toggle middle (2) button to select the sensor you want to remove. Sensor ID also displays under the sensor icon.
4. Press top (1) button again to confirm the deletion and Done displays on the screen.
5. After 3 seconds, the screen automatically displays other paired sensor icon.
6. Follow step 3 in this section, or press bottom (3) button to exit.
NOTE
Sensor ID range is from 00000 to FFFFF and each sensor has an individual sensor ID
START EXERCISING
With your desired profile downloaded onto the watch, you can start exercising and review exercise data records on the watch or uploading them to the application, which
can systematically manage and analyze your records.
IMPORTANT
You need to pair sensor with the watch if necessary before starting exercising, such as paring a bike pod for cycling. If without pairing, the exercise profile
does not work to collect data.
Page 7

7
EN
RUNNING PROFILE
SETUP
You can do running setup on the watch. In RUNNING mode, press top (1) button to enter, and the paired sensor icons display on the screen. Press bottom (3) button to
skip and then press middle (2) button to enter setup mode. The setup mainly includes the following parts:
• Lap
• Interval
• Rest
• HR Zone
NOTE
If there is no sensor being paired, no sensor displays on
the screen.
NOTE
You need to measure stride length before running, see
USER SETUP section.
NOTE
Before you start exercise, allow the watch a few seconds to
search for sensor(s) first. This is to ensure you can receive
comprehensive calculations (such as your lap, calorie, heart rate
and speed) during exercise. But if you start exercise without sensor(s) search, you will only receive heart rate readings.
If you find that the sensor icons are flashing, please wait until the icons stop flashing and display on the screen.
Lap setup
1. After entering
setup screen, press middle (2) button to enter Lap setup.
2. Press top (1) button. If you want to setup for Auto Lap, press top (1) button again, or press middle (2) button to turn on Manual Lap.
3. Press middle (2) button to count by distance or press bottom (3) button to count by time. To adjust the distance or time by pressing the following buttons:
• Top (1) button to increase value
• Bottom (3) button to decrease value
NOTE
Long press to fast increase or decrease the value.
4. Press middle (
2) button to confirm selection.
Interval setup
1. After entering
setup screen, press bottom (3) button to enter Interval setup.
2. If you want to setup for Interv.by distance (counted by distance), press middle (
2) button, or press bottom (3) button for Interv.by time (counted by time).
3. Press middle (
2) button to count by distance or press bottom (3) button to count by time. To adjust the distance or time by pressing the following buttons:
• Top (1) button to increase value
• Bottom (3) button to decrease value
NOTE
Long press to fast increase or decrease the value.
4. Press middle (2) button to confirm selection and enter to Rest by distance/time screen.
5. Press middle (
2) button to count by distance or press bottom (3) button to count by time. To adjust the distance or time by pressing the following buttons:
• Top (1) button to increase value
• Bottom (3) button to decrease value
6. Press middle (2) button to confirm selection.
Page 8

8
EN
HR Zone setup
1. After entering
setup screen, toggle middle (2) button to enter HR Zone setup.
2. Press top (
1) button to turn on HR Zone.
3. Press top (
1) button or press bottom (3) button to select from Fat burn 61-70%, Aerobic 71-80% or Anaerobic 81-90%.
4. Press middle (
2) button to confirm selection.
Anaerobic
81-90%
Aerobic
71-80
%
USEFUL REFERENCE
Target Zone
To help achieve maximum health benefits from your workout program, it is important to know your health index as shown below:
• Maximum Heart Rate (MHR)
• Upper heart rate limit
• Lower heart rate limit
MHR is expressed in beats per minute. You can get your MHR from an MHR test, or you can estimate it by using the following formula:
220-age=MHR
The watch is pre-programmed with three target zone options, each with its lower and upper heart rate limit, as listed in the table below.
ZONE NAME LOWER LIMIT UPPER LIMIT
Fat burn
61% x MHR 70% x MHR
Aerobic
71% x MHR 80% x MHR
Anaerobic
81% x MHR 80% x MHR
The zone range from 61% to 80% of your maximum heart rate is where you achieve cardiovascular benefits, burn fat and become fitter.
There are three categories of training as described in the table below.
TRAINING CATEGORY MHR% DESCRIPTION
Fat burn 61-70%
This is the lowest training intensity level. It is good for beginners and those who want to strengthen their cardiovascular
systems and burn some fat.
Aerobic
71-80%
Increases strength and endurance. It works within the body’s oxygen intake capability, burns more calories and can
be maintained for a long period of time.
Anaerobic 81-90%
Generates speed and power. It works at or above the body’s oxygen intake capability, builds muscle and cannot be
maintained for a long period of time.
The upper and lower heart rate limits are calculated by multiplying your MHR by the percentages of the selected training category.
For example:
A 40-year-old training for fat burn purpose:
His upper heart rate limit [220-40(age)] x 70%
His lower heart rate limit [220-40(age)] x 61%
NOTE
Always warm up before exercise and select the training category that best suits your physique. Exercise regularly, 20 to 30 minutes per session, three to four times
a week for a healthier cardiovascular system.
WARNING
Determining your individual training category is a critical step in the process towards an efficient and safe training program. Please consult your doctor or health
professional to help you determine exercise frequency and duration appropriate for your age, condition and specific goals.
VIEW EXERCISE RECORD DURING RUNNING
You could start running by following the below steps, and if you set up the interval, the distance or timer will count down.
NOTE
Make sure the watch has enough memory, otherwise no memory displays when you press button after RUNNING mode.
To view running records:
1. In
RUNNING mode, press top (1) button to enter the sensor searching mode, or press bottom (3) button to skip the mode if you know the sensor is paired.
2. Press top (
1) button to enter start mode. Counting starts while flashes. Heart rate reading with icon ( ) and exercise time counting (00’00’00) display.
3. Toggle middle (2) button. Total distance (km)/speed (km/h), calories counting (Cal)/current exercise time (00’00’00), and time screen display.
• If Auto lap is set, the lap and time counting data automatically display on the screen when they reach the setting.
OR
• If Manual lap is set, press bottom (3) button to manually set for a lap.
OR
While viewing this screen and pressing top (
1) button to pause the counting, stops flashing, then press top (1) button to select continue or press bottom (3) button to
select stop running. If you press bottom (3) button to stop counting, the RUNNING mode displays on the screen.
Page 9

9
EN
NOTE
If you set the watch to automatically toggle screens, the last four screens automatically toggle to display every 5 seconds. Please
see SET USER PROFILE for turning on the toggle feature.
NOTE
If you turn on HR zone, the watch displays Above Zone for 3 seconds when your particular heart rate is above the zone; or displays
Below Zone for 3 seconds when your particular heart rate is below the zone.
NOTE
If the total number of laps and records reaches the 100th or the total hours of the exercise reaches 80 hours, memory full displays on
the screen with a long beep. You need to clear the memory for further exercise purpose.
NOTE
HR belt low batt displays on the screen if the watch evaluates the chest belt is low battery.
VIEW EXERCISE RECORD DURING RUNNING
You could view records after running on the watch by following the below steps.
To view exercise records:
1. In
RUNNING mode, press bottom (3) button to enter running memory (mem). The screen displays the latest exercise date and time. Toggle middle (2) button to select
the desired one, then press top (1) button to enter.
NOTE
If you want to clear all the memory, toggle middle (2) button until Clear all displays. Press top (1) button to enter, then press top (1) button again to select yes
to confirm deletion of the memory; or press bottom (3) button to select no to go back to the record screen.
2. Press top (
1) button to enter View Summary screen. Press top (1) button again to start viewing, then toggle middle (2) button to view the records.
OR
Press bottom (
3) button to exit.
3. Press middle (
2) button to enter View Lap screen. Press top (1) button to start viewing or toggle middle (2) button to view your desired lap.
4. Press top (
1) button again to start viewing, then toggle middle (2) button to view the records.
OR
Press bottom (3) button to exit.
Other
dat
a
Lap No.
VIEW EXERCISE RECORD IN APPLICATION
You could upload the memory to your application and view the running records on the mobile device.
1. Enter the profiles page in your application. Tap
RUNNING profile icon.
2. Running records are listed by date and time. Please follow the below steps.
• Tap the desired one you want to view or tap to transmit the data by email.
• Swipe the screen to left or right to view other set of records.
Page 10

EN
3. Tap
OVERALL RESULT
to enter. Then you can tap
WEEK
and
ANNUAL
to view each overall result chart.
4. Tap
on the screen to exit.
Page 11

11
EN
CYCLING PROFILE
SETUP
Except wheel size setting, you could set up all for cycling profile following by the SETUP section in RUNNING PROFILE.
NOTE
Make sure bike pod sensor is paired with the watch before cycling.
The setup mainly includes the following parts:
• Lap
• Interval
• Rest
• HR Zone
• Wheel size
Wheel size setup
1. In
CYCLING mode, press top (1) button to enter, and
the paired sensor icons display on the screen. Press
bottom (3) button to skip if the sensor is added.
2. Press middle (
2) button to enter setup mode.
3. Toggle middle (
2) button until adjust Wheel size displays.
4. Press top (
1) button to enter.
5. Press top (
1) button again to increase the value or press bottom (3) button to decrease the value.
6. Press middle (
2) button to confirm selection.
USEFUL REFERENCE
About Bike Wheel Size
Match the ETRTO or wheel size diameter printed on the wheel with the wheel size setting at the right hand column of the table below. Input the relevant wheel size setting
number after bike pod is paired.
ETRTO Wheel size diameter (inches) Wheel size setting (mm)
25-559 26 x 1.0 1884
23-571 650 x 23C 1909
35-559 26 x 1.50 1947
37-622 700 x 35C 1958
47-559 26 x 1.95 2022
20-622 700 x 20C 2051
52-559 26 x 2.0 2054
23-622 700 x 23C 2070
25-622 700 x 25C 2080
28-622 700 x 28 2101
32-622 700 x 32C 2126
42-622 700 x 40C 2189
47-622 700 x 47C 2220
NOTE
Wheel sizes on the above table are for reference only as wheel size depends on the wheel type and air pressure.
VIEW EXERCISE RECORD DURING CYCLING
You could start cycling by following the steps below, and if you set up the Interval, the distance or timer will count down.
NOTE
Make sure the watch has enough memory, otherwise no memory displays when you press button after CYCLING mode.
To view cycling records:
1. In CYCLING mode, press top (
1) button to enter, and the paired sensor icons display on the screen. Press bottom (3) button to skip the searching mode if the sensor is added.
Page 12

12
EN
2. Press top (1) button to enter start mode. Counting starts while flashes. Heart rate reading with icon ( ) and exercise time counting (00’00’00) display.
3. Press middle (2) button. You can see total distance (km) /speed (km/h), cadence counting (rpm), calories counting (Cal) and time screen display.
• If Auto lap is set, the lap and time counting data automatically display on the screen when they reach the setting.
OR
• If Manual lap is set, press bottom (3) button to manually set for a lap.
OR
While viewing the screen and pressing top (
1) button to pause the counting, stops flashing, then press top (1) button to select continue counting or press bottom (3) button
to stop counting. If you press bottom (3) button to stop counting, the CYCLING mode screen displays.
NOTE
If you set the watch to automatically toggle screens, the last five screens automatically toggle to display every 5 seconds. Please see
SET USER PROFILE for turning on the toggle feature.
NOTE
If you turn on HR zone, the watch displays Above Zone for 3 seconds when your particular heart rate is above the zone;
or displays Below Zone for 3 seconds when your particular heart rate is below the zone.
NOTE
If the total number of laps and records reaches the 100th or the total hours of the exercise reaches 80 hours, memory full displays on
the screen with a long beep. You need to clear the memory for further exercise purpose.
NOTE
Bike pod low batt. displays on the screen if the watch estimates the bike pod is low battery.
VIEW EXERCISE RECORD AFTER CYCLING
You could view record after cycling on the watch by following the below steps.
To view exercise records:
1. In
CYCLING mode, press bottom (3) button to enter cycling memory (mem). The screen displays the latest exercise date and time. Toggle middle (2) button to select
the desired one, then press top (1) button to enter.
NOTE
If you want to clear all the memory, toggle middle (2) button until Clear all displays. Press top (1) button to enter, then press top (1) button again to select yes
to confirm deletion of the memory; or press bottom (3) button to select no to go back to the record screen.
2. Press top (1) button to enter View Summary screen. Press top (1) button again to start viewing, then toggle middle (2) button to view the records.
OR
Press bottom (3) button to exit.
3. Press middle (2) button to enter View Lap screen. Press top (1) button to view Lap 1.
4. Press top (1) button again to start viewing, then toggle middle (2) button to view the records.
5. Toggle middle (2) button to view your desired lap. Follow the above step 4.
OR
Press bottom (3) button to exit.
Page 13

EN
VIEW EXERCISE RECORD DURING CYCLING
You could upload the memory to your application and view the cycling records on the mobile device.
CYCLING
profi le icon.
2. Cycling records are listed by date and time. Please follow the below steps.
Tap the desired one you want to view or tap
to transmit the data by email.
Swipe the screen to left or right to view other set of records.
3. Tap
OVERALL RESULT
to enter. Then you can tap
and
ANNUAL
to view each overall result chart. Swipe the screen to left or right to view chart by
each time unit. Tap each bar of the chart, the particular data pops up, tap again to make it disappeared.
4. Tap
on the screen to exit.
Page 14

14
EN
SWIMMING PROFILE
SETUP
You can do swimming setup on the watch. In SWIMMING mode, press top (1) button to enter setup mode. The setup mainly includes the following parts:
• Swim type
• Pool size
• Calibration
NOTE
Avoid pressing any buttons while in the water whatever you do settings or
swimming, as this may cause water to enter the watch, leading to malfunction.
Swim type setup
1. In
SWIMMING mode, press top (1) button to enter setup mode.
2. Press middle (
2) button to enter swim type mode, then press top (1) button or
press bottom (3) button to select from ft.crawl (front crawl), backstr (backstroke),
breastsr (breaststroke) and butterfly.
3. Press middle (
2) button again to confirm selection.
Pool size setup
1. In
SWIMMING mode, press top (1) button to enter setup mode.
2. Toggle middle (
2) button to enter pool size mode, then press top (1) button or press bottom (3) button to select from 50m (meters) and 25m (meters).
3. Press middle (
2) button again to confirm selection.
Calibration
1. In
SWIMMING mode, press top (1) button to enter setup mode.
2. Toggle middle (
2) button until start cali. displays.
3. Press top (
1) button to start calibration.
OR
Press bottom (3) button to exit.
4. Lap counting data displays. You need to swim for 2 laps and manually press t (
1) button to stop above the water surface. Once you successfully complete the calibration,
cali.done displays then after 2 seconds the screen goes back to setup screen.
OR
If you want to stop the calibration, press top (
1) button then cali.failed displays.
VIEW EXERCISE RECORD DURING SWIMMING
You could start swimming by following the below steps.
NOTE
Make sure the watch has enough memory, otherwise no memory displays when you press button after SWIMMING mode.
To view swimming records:
1. In
SWIMMING mode, press top (1) button to enter start mode.
2. Toggle middle (
2) button to select swim type and pool size (see above sections).
3. The watch starts counting. Only Auto lap is available during swimming, the stroke (
stk), time (00’00’00) and calories (Cal) counting data automatically display on the
screen. Lap counting data displays when it reaches the setting.
OR
While viewing the screen and pressing top (1) button to pause the counting, stops flashing, then select continue or stop. If you press bottom (3) button to stop counting,
the SWIMMING mode screen displays. Go directly to above step 1 for counting again.
NOTE
If you set the watch to automatically toggle screens, the last three screens automatically toggle to display every 5 seconds. Please see SET USER PROFILE for
turning on the toggle feature.
NOTE
If the lap counting reaches the 100th or the total hours of the exercise reaches 80 hours, memory full displays on the screen with a long beep. You need to clear
the memory for further exercise purpose.
Page 15

15
EN
VIEW EXERCISE RECORD AFTER SWIMMING
You could view records after swimming on the watch by following the below steps.
To view exercise records:
1. In
SWIMMING mode, press bottom (3) button to enter. The screen displays the latest exercise date and time. Toggle middle (2) button to select the desired one, then
press top (1) button to enter.
NOTE
If you want to clear all the memory, toggle middle (2) button until Clear all displays. Press top (1) button to enter, then press top (1) button again to select yes to
confirm deletion of the memory; or press bottom (3) button to select no to go back to the record screen.
2. Press top (
1) button to enter View Summary screen. Press top (1) button again to start viewing, then toggle middle (2) button to view the records.
OR
Press bottom (3) button to exit.
3. Press middle (
2) button to enter View Lap screen. Press top (1) button to view Lap 1.
4. Press top (
1) button again to start viewing, then toggle middle (2) button to view the records.
5. Toggle middle (
2) button to view your desired lap. Follow the above step 4.
OR
Press bottom (3) button to exit.
Other
data
Lap No.
VIEW EXERCISE RECORD IN APPLICATION
You could upload the memory to your application and view the swimming records on the mobile device.
1. Enter the profiles page in your application. Tap
SWIMMING profile icon.
2. Swimming records are listed by date and time. Please follow the below steps.
• Tap the desired one you want to view or tap to transmit the data by email.
• Swipe the screen to left or right to view other set of records.
3. Tap OVERALL RESULT to enter. Then you can tap
WEEK, MONTH and ANNUAL to view each overall result chart. Swipe the screen to left or right to view chart by
each time unit. Tap each bar of the chart, the particular data pops up, tap again to make it disappeared.
4. Tap
on the screen to exit.
Page 16

EN
Page 17
EN
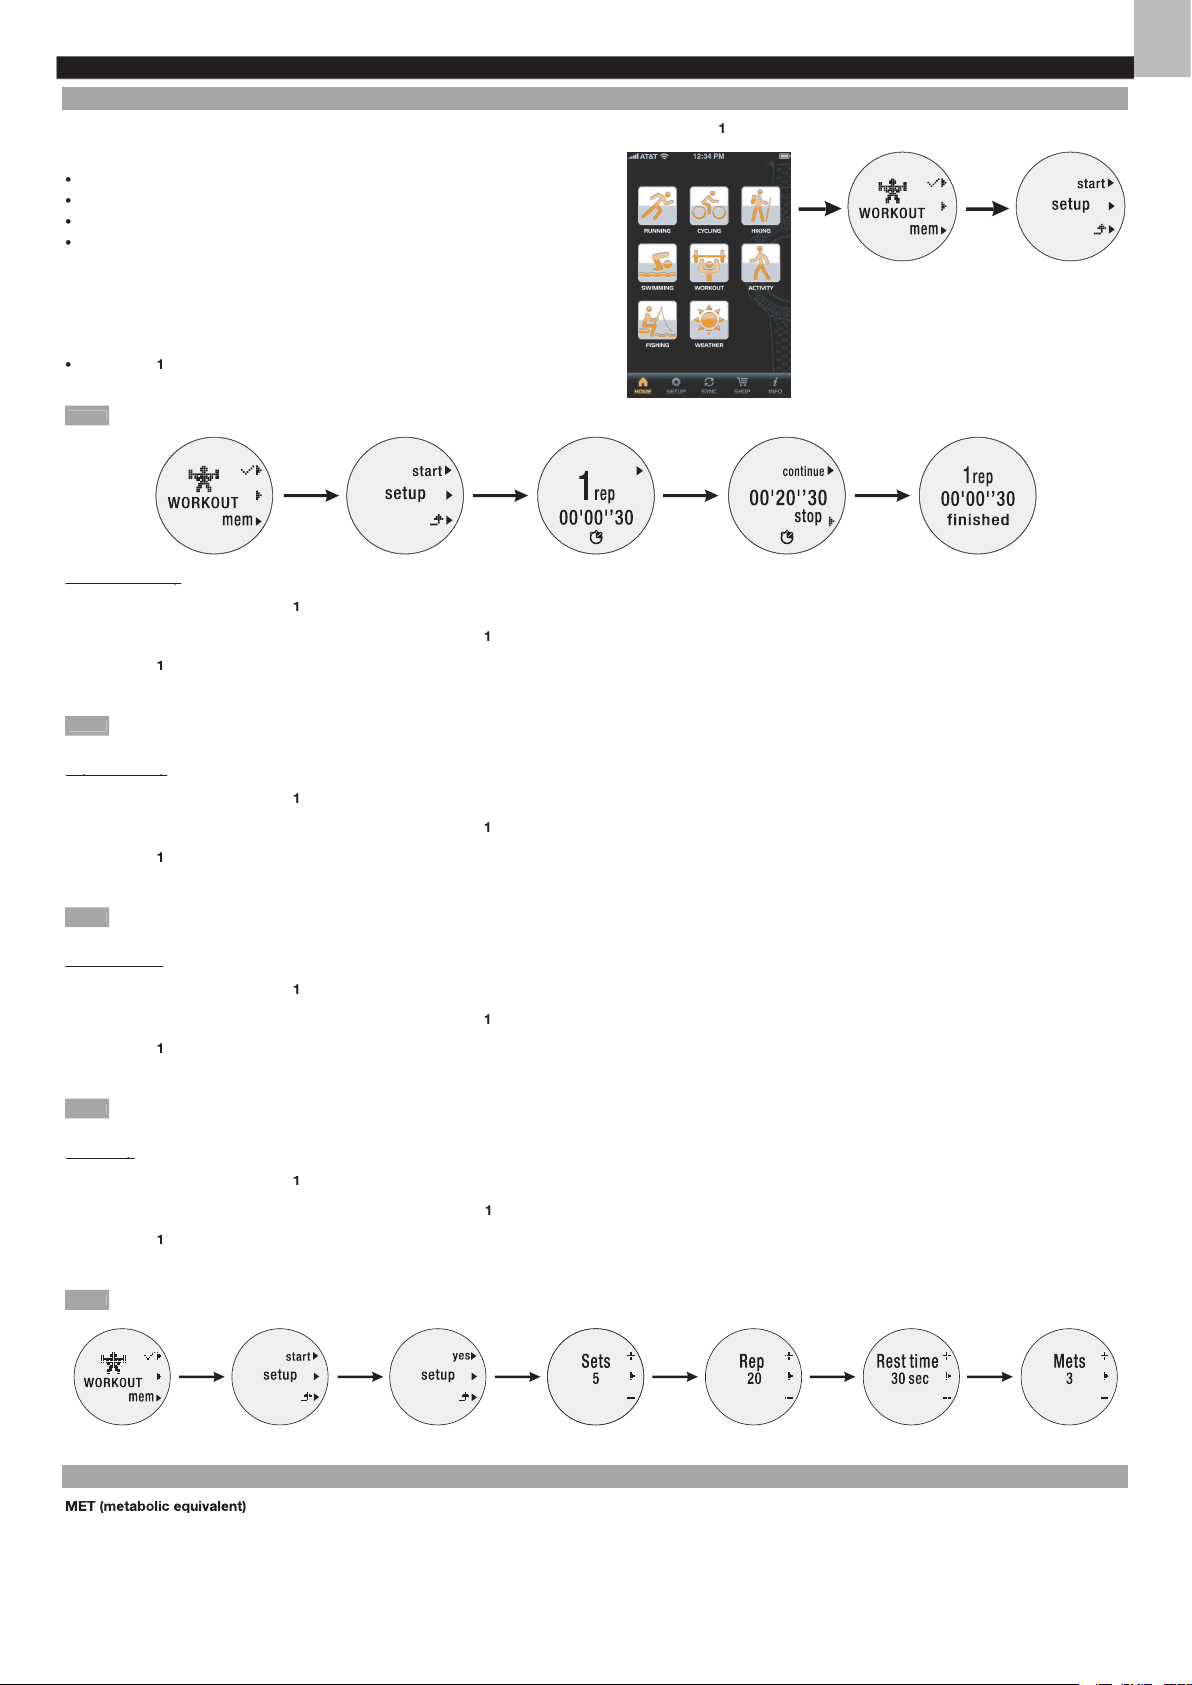
WORKOUT PROFILE
SETUP
WORKOUT
mode, press top (
) button to enter
setup
mode. The setup mainly includes the
following parts:
Sets
Repetitions
Rest time
Met
Or, you can
skip
setup by pressing
skip
setup
mode; the watch automatically
counts the sets (default value=3 sets), repetitions (default value=12 repetitions),
Press top (
) button to pause, then press again to continue, or press bottom (
3
)
button to stop. Workout result displays on the screen.
The time counting will be reset to zero at 12am every midnight.
WORKOUT
mode, press top (
) button to enter
setup
mode.
2. Press middle (
) button to enter
yes
setup
mode. Press top (
) button to enter
Sets
mode.
3. Press top (
) button to increase the value or press bottom (
3
) button to decrease the value.
4. Press middle (
) button to confi rm selection.
Exercise set setup range is 1-9 set(s).
WORKOUT
mode, press top (
) button to enter
setup
mode.
2. Press middle (
2
) button to enter
yes
in
setup
mode. Press top (
) button and then press middle (
2
) button to enter
mode.
3. Press top (
) button to increase the value or press bottom (
3
) button to decrease the value.
4. Press middle (
2
) button to confi rm selection.
Repetition setup range is 1-99 repetition(s).
WORKOUT
mode, press top (
) button to enter setup mode.
2. Press middle (
2
) button to enter
yes
in
setup
mode. Press top (
) button and then toggle middle (
2
) button until Rest time mode displays.
3. Press top (
) button to increase the value or press bottom (
3
) button to decrease the value.
4. Press middle (
2
) button to confi rm selection.
Rest time setup range is 15-30 seconds. The rest time counts down after start.
WORKOUT
mode, press top (
) button to enter setup mode.
2. Press middle (
) button to enter
yes in setup
mode. Press top (
) button and then toggle middle (
) button until
mode displays.
3. Press top (
) button to increase the value or press bottom (
3
) button to decrease the value.
4. Press middle (
) button to confi rm selection. The counting automatically starts.
Mets setup range is 3-13.
USEFUL REFERENCE
ties will vary with the intensity and type of exercise.
One of the easiest methods for recording of the intensity of a physical activity is the Metabolic Equivalent Task (MET) method. The energy cost of many activities has been
determined, usually by monitoring the oxygen consumption during the activity, to determine an average oxygen uptake per unit of time. This value is then compared to the
Page 18

EN
MET values for each activity are approximations; there may be considerable individual variation.
WORKOUT TYPE
Stretching or yoga
2.5
Weight lifting (light or moderate effort, light workout, general)
3.0
Water aerobics, water calisthenics
4.0
General health club exercise
5.5
Weight lifting (power lifting or body building, vigorous), jazzerciser
6.0
Ski machine
7.0
Stair-treadmill ergometer
9.0
VIEW EXERCISE RECORD DURING WORKOUT
After setup for the
value on the watch, you can start the workout. The watch counts automatically. You can see the repetition and time counting, and the rest time
counts down on the screen to remind you.
You can press top (
) button to pause. If you decide to stop the workout, press bottom (
3
) button. Total calorie output and time display on the screen. The display goes
WORKOUT
mode after 3 seconds.
The repetition starts to be displayed when it counts to the 4
one.
The watch reminds you before or fi nish taking each rest time, there is a short beep in the last-fi ve second and a long beep to start or fi nish rest time while the screen
View exercise record after workout
You could view records after workout on the watch by following the below steps.
To view exercise records:
WORKOUT
mode, press bottom (
3
) button to enter into the memory (
mem
).
2. The latest record displays fi rst. Toggle middle (
) button to view other records by date and time. Press top (
) button to enter the specifi c record.
If the record you view is the one with setup, toggle middle (
) button to view calories, time, sets and repetitions in total.
OR
If the record you view is the one without setup, you can only view the repetitions and time in total.
OR
) button until
Clear all
displays. Press top (
) button to select
yes
to do deletion, then
displays on the screen, or
3
) button to select
no
to cancel the deletion.
No memory displays when you attempt to view the record but there is no memory.
Page 19

EN
VIEW EXERCISE RECORD IN APPLICATION
You could upload the memory to your application and view the workout records on the mobile device.
WORKOUT
profi le icon.
2. Workout records are listed by date and time.
Tap the desired one you want to view or tap
to transmit the data by email.
•
Swipe the screen to left or right to view other set of records.
3. Tap
OVERALL RESULT
to enter. Then you can tap
and
ANNUAL
to view each overall result chart. Swipe the screen to left or right to view chart by
each time unit. Tap each bar of the chart, the particular data pops up, tap again to make it disappeared.
4. Tap
on the screen to exit.
Page 20

20
EN
ACTIVITY PROFILE
ACITIVITY MONITOR
profi le
from your mobile device. This profi le is suitable for monitoring moderate intensity physical activity.
This profi le sets the daily activity volume to be 30 minutes and weekly activity volume to be 150 minutes.
ACTIVITY
mode, press top (
) button.
The screen displays
be active
and animation plays.
If you meet the target,
target done
If you want to exit, press bottom (
3
) button.
Excepting the battery replacement, the watch automatically monitor and count your activity, even though you exit the profi le.
USEFUL REFERENCE
WHO-European Commission
WHO-European Commission
or more days a week that works a major muscle groups (legs, hips, back, abdomen, chest, should and arms).”
Activity Intensity
Steps/Min
<60
<60
2
60-96
60-107
3
96-124
4
5
Very hard (>=9.0 METs)
>153
>162
VIEW RECORD AFTER ACTIVITY
To view today’s data:
To view today’s data:
ACTIVITY
mode, press bottom (
3
) button to enter.
Today Data
screen displays.
2. Press top (
) button , then toggle middle (
) button to view different records, such as rest time volume (
), activity time volume (
), steps and distance.
To view weekly data:
To view weekly data:
ACTIVITY
mode, press bottom (
3
) button to enter. Toggle middle (
2
) button until Week Data screen displays.
2. Press top (
) button to enter. Then toggle middle (
) button to view the record of
This Week
or
) button to enter.
3. Toggle middle (
2
) button to view different activity records, such as rest time volume (
), activity time volume (
), steps and distance. If you view the recrod of this
week, the increased and decreased percentage of your activity achieved compared with the record of last week also displays.
This Week
means from this Sunday to today; Last Week means last Sunday to last Saturday.
Page 21

21
EN
VIEW ACTIVITY RECORD IN APPLICATION
You could upload the memory to your application and view the activity records on the mobile device.
ACTIVITY
profi le icon.
2. Activity records are listed by date and time. Please follow the below steps.
•
Tap the desired one you want to view or tap
to transmit the data by email.
Swipe the screen to left or right to view other set of records.
3. Tap
OVERALL RESULT
to enter. Then you can tap
and
ANNUAL
to view each overall result chart. Swipe the screen to left or right to view chart by
each time unit. Tap each bar of the chart, the particular data pops up, tap again to make it disappeared.
4. Tap
on the screen to exit.
Page 22

22
EN
WEATHER PROFILE
You can view the current temperature and the weather forecast for the next 12-24 hours on the watch.
The weather icons are shown below.
Weather Icons
Sunny
Cloudy
SETUP
You can setup the temperature unit before viewing.
mode, press top (
) button to enter.
2. Press middle (
) button to enter setup mode.
3. Press top (
) button or bottom (
3
) button to select
°C
or
°F
4. Press middle (
) button to confi rm selection.
VIEW TEMPERATURE AND WEATHER
You can view the temperature and forecasted weather on the watch.
mode, press top (
) button to enter.
2. Press middle (
) button to enter
start
mode. Current time,
temperature and forecasted weather icon display.
3. Press bottom (
3
) button to exit.
VIEW WEATHER IN APPLICATION
You can only view the temperature and forecasted weather on the watch.
Page 23

23
EN
HIKING PROFILE
You can use hiking profi le to setup and monitor different values, such as distance, altitude and sea level pressure, etc. The setup mainly includes the following parts:
Altitude
Sea level
SETUP
You need to input the value of altitude and sea level before starting hiking. You could browse your local weather station website for details of your living area or particular city.
Altitude and sea level setup:
Altitude and sea level setup:
mode, press top (
) button to enter
setup
mode.
2. Toggle middle (
) button to set for altitude and its measurement unit (
or
ft
) and sea level and its measurement unit (
inHg
or
hPa
).
3. Press top (
) button to increase value or select option; press bottom (
3
) button to decrease value or select option.
VIEW RECORD DURING HIKING
You could view different monitored values, such as current altitude, altitude difference, local pressure, sea level pressure and so on. Maximum 10 time logs can be recorded.
Altitude and sea level setup:
mode, press top (
) button to enter
setup
mode.
2. Press top (
) button again while starting your hiking. Altitude of your location and time log display. Press top (
) button again to stop the time counting.
OR
Press and hold top (
) button to reset the time to be
0:00’00
3. Toggle middle (
) button to view several other screens and data.
•
Altitude of your current standing location and altitude difference
Local pressure and sea level pressure
Local pressure and current time
4. Press bottom (
3
) button to exit.
VIEW RECORD AFTER HIKING
You could view the records after hiking. The record in log form is ordered by date and time.
To view log:
To view log:
mode, press bottom (
3
) button to enter memory mode.You will see the total number of free time logs, date and time.
2. Toggle middle (
2
) button to select the desired record.
3. Press top (
) button to enter.
4. Toggle middle (
2
) button to view accumulated time of hiking, a chart representing your altitude display, ascended altitude, descended altitude display and the maximum
5. Press bottom (
3
) button to exit.
VIEW HIKING RECORD IN APPLICATION
You could upload the memory to your application and view the hiking records on the mobile device.
profi le icon.
2.
records are listed by date and time. Please follow the below steps.
•
Tap the desired one you want to view or tap
to transmit the data by email.
•
Swipe the screen to left or right to view other set of records.
3. Tap
OVERALL RESULT
to enter. Then you can tap
WEEK
and
ANNUAL
to view each overall result chart. Swipe the screen to left or right to view chart by
each time unit. Tap each bar of the chart, the particular data pops up, tap again to make it disappeared.
Page 24

24
EN
4. Tap
on the screen to exit.
Page 25

25
EN
FISHING PROFILE
You can use
profi le to forecast the best harvest time range for fi shing at your location in next 14 days. You need to setup before use.
The setup mainly includes the following parts:
Latitude
Longitude
SETUP
mode, press top (
) button to enter setup mode.
2. Toggle middle (
) button to enter latitude and longitude mode. You can press top (
) button or bottom (
3
) button to select the measurement unit (
orth, South,
ast, and
est).
3. Press middle (
) button to confi rm selection.
4. You can set the value. Press top (
) button to increase value or press bottom (
3
) button to decrease value.
5. Press middle (
) button to confi rm setting.
VIEW STATUS DURING FISHING
You can view the forecasted trend of fi sh volume in the next 10 hours from today to the next 14 days. The starting time point of the trend chart is the current time.
To view today:
To view today:
mode, press top (
) button to enter
start
mode.
Today
displays and fi sh forecast chart appears after 3 seconds. The below charts are for your reference to recognize the status.
3. Press bottom (
3
) button to exit.
To view other days:
To view other days:
mode, press top (
) button to enter
start
mode.
2. Press top (
) button to enter into
screen, the related forecast chart appears after 3 seconds. Toggle top (
) button to select your desired day.
OR
Press middle (
) button to enter into
screen, the related forecast chart appears after 3 seconds. Toggle middle (
) button to select your desired day in reverse order.
3. Press bottom (
3
) button to exit.
Page 26

26
EN
VIEW FISHING RECORD IN APPLICATION
You could upload the memory to your application and view the forecasted fi shing harvest location on the map.
profi le icon.
2. On the map, there is a purple pin on the forecasted location with the latitude and longitude, or tap
to display your current location.
3. Tap
on the screen to exit.
WATER RESISTANCE
The Ssmart watch is water-resistant up to 5ATM (50 meters or 164 feet). This means you can use the watch for swimming or other water sport activities (such as surfi ng)
Ensure the buttons and battery compartment are secured and intact before exposing the watch to excessive water.
Avoid pressing the buttons while in the water or during heavy rainstorms, as this may cause water to enter the watch, leading to malfunction.
Even the watch is water-resistant, as radio signals do not carry in water, signal transmission between the watch and accessories, such as chest belt, will still be impos-
sible in water.
BACKLIGHT
Tap twice to activate backlight. For longer backlight, tap on lens three times consecutively.
REPLACE BATTERY
displays on the screen; If there is low battery in
CONNECT
mode,
pls change batt. for update
displays.
To obtain a replacement battery, you can purchase from your local electronics or call our customer service for details.
To replace watch battery:
2. Remove the old battery and insert a new CR2032, 3V lithium battery.
3. Secure the lid by using the coin to make the lid back into place.
SPECIFICATIONS
CLOCK
Time format
Year range
2012 - 2061
Alarm
Alarm with daily, weekday or weekend settings
Only available for time 1
TRAINING
00:00:00 to 99:59:00
00:00:00 to 99:59:00
Page 27

27
EN
Target heart rate zone Fat burn, aerobic, anaerobic
Heart rate range 0, 30-240 bpm
Distance measurement range
0-599.9 unit (km or mile)
Step measurement range
0 to 99999
Step timer range 00:00:00 to 99:59:00
Maximum lap count 99
Cadence measurement range
0 to 9999.99 unit (unit is km or mile)
Step measurement range
0 to 99999
Cadence measurement range
1 to 199 rpm
Number of interval training 2 to 5
Calorie range 0 to 9999 kcal
Fat burn percentage range
0 to 100%
Calibration distance range 0.4-2.0 km
Exercise repetition range
0-999
Wheel size range 800-3000mm
Pool size range 25 meters / 50 meters
MET value range 3-13 METS
Workout set range
1-9 sets
Workout repetition range 1-99 reps
USER
Birth year range 1913-2012
Weight range
20-225 kg (44-496 lbs)
Height range 69-231cm (2’3-7’7 inches)
Stride range 22-152 cm (11-60 inches)
POWER
Watch
1 x CR2032 3V lithium battery
OPERATING ENVIRONMENT
Operating temperature
For watch 0°C to 40°C (32°F to 104°F)
Storage temperature
For watch -20°C to 60°C (-4°F to 140°F)
PRECAUTIONS
To ensure you use your product correctly and safely, read these warnings and the entire user manual before using the product:
• Use a soft, slightly moistened cloth. Do not use abrasive or corrosive cleaning agents, as these may cause damage. Use lukewarm water and mild soap to clean the
watch thoroughly after each training session. Never use the product in hot water or store it when wet.
• Do not subject the product to excessive force, shock, dust, temperature changes, or humidity. Never expose the product to direct sunlight for extended periods. Such
treatment may result in malfunction.
• Do not bend or stretch the transmitter part of the chest belt.
• Do not tamper with the internal components. Doing so will terminate the product warranty and may cause damage. The main unit contains no user-serviceable parts.
• Do not scratch hard objects against the LCD display as this may cause damage.
• Take precautions when handling all battery types.
• Remove the batteries whenever you are planning to store the product for a long period of time.
• When replacing batteries, use new batteries as specified in this user manual.
• The product is a precision instrument. Never attempt to take this device apart. Contact the retailer or our customer service department if the product requires servicing.
• Do not touch the exposed electronic circuitry, as there is a danger of electric shock.
• Check all major functions if the device has not been used for a long time. Maintain regular internal testing and cleaning of your device. Have your watch serviced by an
approved service center annually.
• When disposing of this product, ensure it is collected separately for special treatment and not as normal household waste.
• Due to printing limitations, the displays shown in this manual may differ from the actual display.
• The contents of this manual may not be reproduced without the permission of the manufacturer.
NOTE
The technical specifications for this product and the contents of the user manual are subject to change without notice.
NOTE
Features and accessories will not be available in all countries. For more information, please contact your local retailer.
ABOUT OREGON SCIENTIFIC
Visit our website www.oregonscientific.com to learn more about Oregon Scientific products.
For any enquiry, please contact our Customer Services at info@oregonscientific.com.
Page 28

28
EN
EU-DECLARATION OF CONFORMITY
COUNTRIES RTTE APPROVED COMPLIED
All EU countries, Switzerland
CH
CH
and Norway
FCC / IC STATEMENT
This device complies with Part 15 of the FCC Rules. Operation is subject to the following two conditions: (1) This device may not cause harmful interference, and (2) This
device must accept any interference received, including interference that may cause undesired operation.
WARNING
Changes or modifi cations not expressly approved by the party responsible
for complia
This equipment has been tested and found to comply with the limits for a Class B digital device, pursuant to Part 15 of the FCC Rules. These limits are designed to
This equipment generates, uses and can radiate radio frequency energy and, if not installed and used in accordance with the instructions, may cause harmful interference
to radio communications. However, there is no guarantee that interference will not occur in a particular installation. If this equipment does cause harmful interference to
following measures:
Connect the equipment into an outlet on a circuit different from that to which the receiver is connected.
Consult the dealer or an experienced radio / TV technician for help.
DECLARATION OF CONFORMITY
The following information is not to be used as contact for support or sales. Please call our customer service number (listed on our website at
www.oregonscientifi c.com
www.oregonscientifi c.com
),
),
or on the warranty card for this product for all inquiries instead.
We
Oregon Scientifi c, Inc.
Address: 19861 SW 95th Ave.Tualatin,
Oregon 97062 USA
Telephone No.: 1-800-853-8883
declare that the product
Ssmart Watch
Address: Block C, 9/F, Kaiser Estate,
Phase 1, 41 Man Yue St.,
Hung Hom, Kowloon,
Hong Kong
accept any interference received, including interference that may cause undesired operation.
Page 29

29
EN
Ssmart Watch
Page 30

30
EN
© 2013 Oregon Scientific. All rights reserved.
P/N: 300103378-00001-10
Page 31

DE
INHALT
...
...............
......
....
...
....
......
.............
..........................
............
2
Setup Ihrer Uhr
..
..........................
.....
.............
....
.............
.....
2
..
.....
.............
............
......
...
..................
2
..
......
...
3
Anschluss An Mobiltelefon
4
5
Aktualisierung Des Systems
5
Setup Des Sensors
......
................................
.............
............
......
6
6
6
8
Setup
8
9
Trainingsdatensätze Während Des Laufens Anzeigen
Trainingsdatensätze Nach Dem Laufen Anzeigen
Trainingsdatensatz In Der Anwendung Anzeigen
.............
....
...
.................
....
......
.....
..........................
2
Setup
Trainingsdatensatz Während Des Radfahrens Anzeigen
Trainingsdatensätze Nach Dem Radfahren Anzeigen
3
Trainingsdatensatz In Der Anwendung Anzeigen
4
Schwimmprofi l
............
......
....
....................
.................................
5
Setup
5
Trainingsdatensätze Während Des Schwimmens Anzeigen
5
Trainingsdatensätze Nach Dem Schwimmen Anzeigen
6
Trainingsdatensätze In Der Anwendung Anzeigen
6
Workout-profi l
8
Setup
8
9
Trainingsdatensätze Während Des Workouts Anzeigen
9
Trainingsdatensätze Nach Dem Workout Anzeigen ..
Trainingsdatensätze In Der Anwendung Anzeigen
....
20
Activitätsprofi l
..........................
............
......
...
.................
.....
2
21
Trainingsdatensätze Nach Der Aktivität Anzeigen
Aktivitätsdatensätze In Der Anwendung Anzeigen
Wetterprofi l
3
Setup
3
Temperatur Und Wetter Anzeigen
2
3
Wetter In Der Anwendung Anzeigen
2
3
Wanderprofi l
..........
....
....
....
.............
.....
..........................
.............
...2
4
Setup
2
4
2
4
5
Anglerprofi l
6
Setup
6
2
6
2
7
Wasserdichtigkeit
..
.............
............
.............
.....
..........................
........................
2
7
.....
...................................
......
.............
.............
.27
Technische Daten
Vorsichtsmassnahmen
8
egon Scientifi c
8
8
Page 32

DE
EINLEITUNG
Wir danken Ihnen, dass Sie sich für die Ssmart Watch von Oregon Scientifi c
TM
als Sportpartner Ihrer Wahl entschieden haben. Sie kann Ihnen als besondere Motivationshilfe
dienen und ist mit herunterladbaren Anwendungen von Ihrem Mobilgerät, wie Smartphone oder Tablet-PC, kompatibel. Mit dieser Multifunktionsuhr können Sie Ihr optimales
Training systematisch umsetzen und beibehalten. Lassen Sie Ihre Freunde und Famile an den Vorteilen Ihres Trainings teilhaben!
zur Gewährleistung einer zuverlässigen Übertragungsverbindung
tragen. Die neuesten Details zur Kompatibilität fi nden Sie außerdem auf unserer Webseite
http://ssmart.oregonscientifi c.com
Sie können unsere Zubehörteile, wie den Bluetooth Smart-Textil-Brustgurt (SZ999) und den Bluetooth Smart-Fahrradsensor (AD262), separat erwerben, um die Leistungs-
fähigkeit Ihrer Uhr zu maximieren.
WICHTIG
Diese Uhr ist nur für sportliche Einsatzzwecke vorgesehen und nicht dafür geeignet, medizinische Geräte zu ersetzen.
INHALT DER VERPACKUNG
TM
BEDIENTASTEN
Obere (
) Taste: Stoppuhr starten /
beenden; Einstellungswert erhöhen; Profi leinstellungen aufrufen
2.
2
) Taste: Zwischen Profi len /
Anzeigearten wechseln; durch Daten blättern; Einstellung bestätigen
3.
3
) Taste: Einstellungswert verringern; Speicher aufrufen, um Datensätze anzuzeigen; Setup aufrufen; bei
laufender Stoppuhr eine Runde aufzeichnen
4.
Auf Sensorglas tippen, um Hintergrundbeleuchtung zu
aktivieren
BILDSCHIRMANZEIGE
: Gibt an, dass die Ladung der Batterie niedrig oder nahezu erschöpft ist
2.
: Gibt an, dass der Signalton deaktiviert ist
3.
: Gibt an, dass der Trainingstimer aktiviert ist; Anzeige blinkt während des Zählvorgangs
: Gibt an, dass der Alarm aktiviert ist
INBETRIEBNAHME IHRER UHR (ERSTMALIG)
(
) zur Aktivierung der Uhr
gedrückt, bis auf dem Bildschirm die Uhrzeit angezeigt wird.
) Taste, um die Anzeigearten zwischen der Standardzeit (
Time 1
) und
Time 2
) Taste, um mit der Einstellung der Uhrzeitprofi ls fortzufahren.
SETUP IHRER UHR
WICHTIG
Um präzise Berechnungen bei Ihrem Training zu gewährleisten, wird dringed empfohlen, die Uhr und Benutzerprofi le vor dem Training einzurichten.
Denken Sie daran, die Profi le nach jedem Batteriewechsel und jeder Zurücksetzung der Uhr einzurichten.
RÜCKKEHR ZUM STANDARDMÄSSIGEN BILDSCHIRM MIT UHRZEIT
Sie können die mittlere (
) Taste gedrückt halten, um eine beliebige Anzeige zu verlassen und jederzeit direkt zur standardmäßigen
Bildschirmanzeige
der Uhrzeit zurückzukehren.
EINSTELLUNG DES UHRZEITPROFILS
TIME setup
(UHRZEIT einrichten)
aufrufen, indem Sie die mittlere
(
) Taste drücken.
3
) Taste, um die Einrichtung der Reihe nach vorzunehmen.
) Taste können Sie die einzurichtende Option auswählen:
Time 2
(Uhrzeit 2)
(Datum)
Time 2
(Uhrzeit 2)
Alarm
(Alarm)
(Signalton)
(Maßeinheit)
) Taste, um mit der Anzeige einer bestimmten Einstellung zu beginnen.
2
4
Page 33

3
DE
2. Drücken Sie auf die obere (
) Taste, um den Wert zu erhöhen oder eine Option auszuwählen; drücken Sie auf die untere (
3
) Taste, um den Wert zu verringern und eine
Option auszuwählen.
3. Drücken Sie auf die mittlere (
2
) Taste, um die Einstellung zu speichern und automatisch zur Anzeige einer weiteren Einstellung überzugehen (falls gewünscht).
Wenn Sie zur Anzeige der Echtzeit zurückkehren möchten, rufen Sie den Modus
TIME setup
(UHRZEIT einrichten)
wieder auf und drücken Sie auf die obere (
) Taste.
Bei aktiviertem Alarm wird
auf dem Bildschirm angezeigt, bis Sie den Alarm in der entsprechenden Einstellung deaktivieren.
Sie können Alarme mit den Einstellungen
daily
(täglich)
/
weekday
(Wochentag)
/
weekend
(Wochenende)
unabhängig voneinander .
Wenn die Batterieladung der Uhr niedrig ist, wird der Signalton automatisch deaktiviert und
angezeigt.
EINRICHTUNG DES BENUTZERPROFILS
Sie können nach Einstellung des Uhrzeitprofi ls wahlweise Ihr Benutzerprofi l einrichten oder Trainingsprofi le
Sie können das Benutzerprofi l über die Anwendung auf Ihrem Mobilgerät einrichten und das Profi l auf Ihrer
(BENUTZER einrichten)
auf die obere (1) Taste und fahren Sie damit fort,
Gender
(Geschlecht)
(Geburtstag)
Weight
(Gewicht)
(und Maßeinheit),
(Größe)
(und Maßeinheit),
Stride
(Schritt)
(und Maßeinheit),
Toggle
(Wechseln)
(Energiesparen)
) Taste, um den Wert zu erhöhen oder eine Option auszuwählen; drücken Sie auf die untere (
3
)
Taste, um den Wert zu verringern oder eine Option auszuwählen.
) Taste, um die Einstellung zu speichern und automatisch zur Anzeige einer weiteren
Einstellung überzugehen.
TIPP
Die Schrittlänge bezeichnet den Abstand zwischen der Zehenspitze Ihres vorderen Fußes und der Zehenspitze Ihres hinteren
Gesamte Strecke ÷ Zurückgelegte Schritte = Durchschnittl. Schrittlänge
584,2 ÷ 10 = 59 cm
Page 34

6
DE
SETUP DES SENSORS
Trainingsziele maximieren. Sie können einen Sensor hinzufügen, bevor oder nachdem Sie Ihre Trainingsprofi le herunterladen.
WICHTIG
Scientifi c (Modell SZ999) zu koppeln. Um Zubehörteile zu erwerben, besuchen Sie bitte unsere Webseite www.oregonscientifi c.com oder kontaktieren Sie Ihren Händler
vor Ort.
EIN SENSORGERÄT HINZUFÜGEN
SENSOR setup
auf die obere Taste (
), um diese Funktion aufzurufen;
add sensor
(Sensor hinzufügen)
wird auf dem Bildschirm angezeigt.
), um die Kopplung des Sensors zu starten.
blinkt während des Kopplungsvorgangs; es wird nur mehr das Symbol des
gekoppelten Sensors auf dem Bildschirm angezeigt, sobald die Kopplung abgeschlossen wurde.
3.
add sensor
(Sensor hinzufügen)
erneut auf der Uhr angezeigt.
Wenn die Uhr bereits den Brustgurt-Sensor hinzugefügt hat, befolgen Sie bitte die nachstehenden Schritte.
Wenn die Uhr bereits den Brustgurt-Sensor hinzugefügt hat, befolgen Sie bitte die nachstehenden Schritte.
SENSOR setup
auf die obere (
) Taste, um diese Funktion aufzurufen; das Symbol des gekoppelten Sensors
wird auf dem Bildschirm angezeigt.
2.
add sensor
(Sensor hinzufügen
)
auf dem Bildschirm angezeigt.
3.
) Taste, um die Kopplung des Sensors zu starten.
blinkt während des Kopplungsvorgangs; es wird nur mehr das Symbol des
gekoppelten Sensors auf dem Bildschirm angezeigt, sobald die Kopplung abgeschlossen wurde.
4.
Wenn die Uhr bereits den Fahrradsensor hinzugefügt hat, befolgen Sie bitte die nachstehenden Schritte.
Wenn die Uhr bereits den Fahrradsensor hinzugefügt hat, befolgen Sie bitte die nachstehenden Schritte.
SENSOR setup
auf die obere (
) Taste, um diese Funktion aufzurufen; das Symbol des gekoppelten Sensors
wird auf dem Bildschirm angezeigt.
2. Nach 3 Sekunden wird add sensor (Sensor hinzufügen) auf dem Bildschirm angezeigt.
3. Drücken Sie erneut auf die obere (
) Taste, um die Kopplung des Sensors zu starten.
blinkt während des Kopplungsvorgangs; es wird nur mehr das Symbol des
gekoppelten Sensors auf dem Bildschirm angezeigt, sobald die Kopplung abgeschlossen wurde.
4. Nach 3 Sekunden wird
add sensor
(Sensor hinzufügen)
erneut auf der Uhr angezeigt.
Sie können alle Sensoren gleichzeitig mit der Uhr koppeln.
EIN SENSORGERÄT LÖSCHEN
Sie können den Sensor in der Uhr wieder löschen. Es ist nur möglich, einen Sensor auf einmal zu löschen.
SENSOR setup
auf die obere (
) Taste, um diese Funktion aufzurufen; die gekoppelten Sensoren werden angezeigt; drücken Sie mehrmals auf
die mittlere (
) Taste, bis
remove sensor
(Sensor löschen)
angezeigt wird.
2. Drücken Sie auf die obere Taste (
), um die Funktion zu öffnen.
3. Mit der mittleren (
2
) Taste können Sie den Sensor auswählen, den Sie löschen möchten. Die Sensor-ID wird außerdem unter dem Sensorsymbol angezeigt.
4. Drücken Sie erneut auf die obere (
) Taste, um den Löschvorgang zu bestätigen; anschließend wird
(Fertig)
auf dem Bildschirm angezeigt.
5. Nach 3 Sekunden zeigt der Bildschirm automatisch die Symbole von weiteren gekoppelten Sensoren an.
6. Befolgen Sie Schritt 3 in diesem Abschnitt oder drücken Sie auf die untere (
3
) Taste, um den Modus zu beenden.
Page 35

5
DE
Symbol
Wenn Ihre Batterie schwach ist, wird pls change batt.for update (Batterie für Update wechseln) angezeigt; Sie können daher keine
anderen Bildschirme aufrufen.
DATEN AUF DAS MOBILGERÄT HOCHLADEN
Sie können auch Daten von der Uhr auf die Anwendung hochladen.
CONNECT
(VERBINDEN)
auf die obere (
) Taste, um diese Funktion aufzurufen, und anschließend auf die mittlere (
) Taste, um die Anzeige
upload memory
(Speicher hochladen)
zu öffnen.
2. Drücken Sie auf die obere (
) Taste, um die auswählbaren Trainingsprofi le aufzurufen; mit der mittleren (
2
) Taste können Sie Ihr gewünschtes Profi l auswählen; drücken
Sie anschließend auf die obere (
) Taste, um den Upload-Vorgang zu starten.
3. Tippen Sie auf dem Mobilgerät auf
CONNECT WITH WATCH
(MIT UHR VERBINDEN)
obere (
) Taste drücken.
(Fertig)
wird auf der Uhr angezeigt, wenn die Verbindung erfolgreich hergestellt und die Daten hochgeladen wurden.
Wenn die Verbindung fehlgeschlagen ist, versucht die Uhr automatisch eine neue Synchronisierung vorzunehmen.
Synchronisierung wird ausgeführt
Synchronisierung erfolgreich
Synchronisierung ist fehlgeschlagen. Die Uhr versucht eine erneute Synchronisierung
vorzunehmen.
no memory
pls change
batt.for
update
AKTUALISIERUNG DES SYSTEMS
Sie können Ihre Uhr auf Wunsch auf ein fortschrittlicheres System aktualisieren, das von Oregon Scientifi c zukünftig über die
Anwendung
verfügbar sein wird. In der Anwendung selbst können Sie sich über die Seite
INFO
durch eine Pop-Up-Meldung
am unteren Seitenbereich nachsehen.
CONNECT
(VERBINDEN)
auf die obere (
) Taste, um diese Funktion aufzurufen und drücken Sie auf die
mittlere (
2
) Taste, um die Anzeige
update system
(System aktualisieren)
zu öffnen.
2. Mit der oberen (
) Taste können Sie die nachstehenden Bildschirme der Reihe nach aufrufen. Das aktuelle System der Uhr wird
nach Ihrer Bestätigung gelöscht.
Wenn die Aktualisierung des Systems fehlschlägt, wird
(Fehlgeschlagen)
angezeigt, und der Bildschirm kehrt zum
start system update
(Systemaktualisierung starten)
zurück, um einen erneuten Versuch starten zu können.
Auf der Seite
können Sie die
WATCH ID
(ID DER UHR)
VERSION
sowie die
(LETZTE SYCHRONISIERUNG)
anzeigen lassen.
Page 36

6
DE
SETUP DES SENSORS
Trainingsziele maximieren. Sie können einen Sensor hinzufügen, bevor oder nachdem Sie Ihre Trainingsprofi le herunterladen.
WICHTIG
Scientifi c (Modell SZ999) zu koppeln. Um Zubehörteile zu erwerben, besuchen Sie bitte unsere Webseite www.de.oregonscientifi c.com oder kontaktieren Sie Ihren Händler
vor Ort.
EIN SENSORGERÄT HINZUFÜGEN
SENSOR setup
auf die obere Taste (
), um diese Funktion aufzurufen;
add sensor
(Sensor hinzufügen)
wird auf dem Bildschirm angezeigt.
), um die Kopplung des Sensors zu starten.
blinkt während des Kopplungsvorgangs; es wird nur mehr das Symbol des
gekoppelten Sensors auf dem Bildschirm angezeigt, sobald die Kopplung abgeschlossen wurde.
3.
add sensor
(Sensor hinzufügen)
erneut auf der Uhr angezeigt.
Wenn die Uhr bereits den Brustgurt-Sensor hinzugefügt hat, befolgen Sie bitte die nachstehenden Schritte.
Wenn die Uhr bereits den Brustgurt-Sensor hinzugefügt hat, befolgen Sie bitte die nachstehenden Schritte.
SENSOR setup
auf die obere (
) Taste, um diese Funktion aufzurufen; das Symbol des gekoppelten Sensors
wird auf dem Bildschirm angezeigt.
2.
add sensor
(Sensor hinzufügen
)
auf dem Bildschirm angezeigt.
3.
) Taste, um die Kopplung des Sensors zu starten.
blinkt während des Kopplungsvorgangs; es wird nur mehr das Symbol des
gekoppelten Sensors auf dem Bildschirm angezeigt, sobald die Kopplung abgeschlossen wurde.
4.
Wenn die Uhr bereits den Fahrradsensor hinzugefügt hat, befolgen Sie bitte die nachstehenden Schritte.
Wenn die Uhr bereits den Fahrradsensor hinzugefügt hat, befolgen Sie bitte die nachstehenden Schritte.
SENSOR setup
auf die obere (
) Taste, um diese Funktion aufzurufen; das Symbol des gekoppelten Sensors
wird auf dem Bildschirm angezeigt.
2. Nach 3 Sekunden wird add sensor (Sensor hinzufügen) auf dem Bildschirm angezeigt.
3. Drücken Sie erneut auf die obere (
) Taste, um die Kopplung des Sensors zu starten.
blinkt während des Kopplungsvorgangs; es wird nur mehr das Symbol des
gekoppelten Sensors auf dem Bildschirm angezeigt, sobald die Kopplung abgeschlossen wurde.
4. Nach 3 Sekunden wird
add sensor
(Sensor hinzufügen)
erneut auf der Uhr angezeigt.
Sie können alle Sensoren gleichzeitig mit der Uhr koppeln.
EIN SENSORGERÄT LÖSCHEN
Sie können den Sensor in der Uhr wieder löschen. Es ist nur möglich, einen Sensor auf einmal zu löschen.
SENSOR setup
auf die obere (
) Taste, um diese Funktion aufzurufen; die gekoppelten Sensoren werden angezeigt; drücken Sie mehrmals auf
die mittlere (
) Taste, bis
remove sensor
(Sensor löschen)
angezeigt wird.
2. Drücken Sie auf die obere Taste (
), um die Funktion zu öffnen.
3. Mit der mittleren (
2
) Taste können Sie den Sensor auswählen, den Sie löschen möchten. Die Sensor-ID wird außerdem unter dem Sensorsymbol angezeigt.
4. Drücken Sie erneut auf die obere (
) Taste, um den Löschvorgang zu bestätigen; anschließend wird
(Fertig)
auf dem Bildschirm angezeigt.
5. Nach 3 Sekunden zeigt der Bildschirm automatisch die Symbole von weiteren gekoppelten Sensoren an.
6. Befolgen Sie Schritt 3 in diesem Abschnitt oder drücken Sie auf die untere (
3
) Taste, um den Modus zu beenden.
Page 37

DE
00000
bis
MIT DEM TRAINING BEGINNEN
Wenn Sie Ihr gewünschtes Profi l auf die Uhr heruntergeladen haben, können Sie mit dem Training beginnen; Sie können jetzt die Trainingsdatensätze auf der Uhr überprüfen
oder sie auf die Anwendung hochladen, damit diese Ihre Datensätze systematisch verwalten und analysieren kann.
WICHTIG
Sie müssen vor dem Training ggf. einen Sensor mit der Uhr koppeln, wie z.B. einen Fahrradsensor für das Radfahren. Wenn kein Sensor gekoppelt wurde, kann
das Trainingsprofi l keine Daten erfassen.
Page 38

8
DE
LAUFPROFIL
SETUP
Sie können ein Laufprofil auf der Uhr einrichten. Drücken Sie im Modus RUNNING (LAUFEN) auf die obere (1) Taste, um diese Funktion aufzurufen; das Symbol des
gekopelten Sensors wird auf dem Bildschirm angezeigt. Drücken Sie auf die untere (3) Taste, um den Vorgang zu überspringen, und anschließend auf die mittlere (2) Taste,
um den Modus Setup aufzurufen. Das Setup enthält im Wesentlichen die nachfolgenden Bereiche:
• Runde
• Intervall
• Ruhepause
• HF-Zone
HINWEIS
Wenn kein Sensor gekoppelt wurde, wird no sensor
(kein Sensor) auf dem Bildschirm angezeigt.
HINWEIS
Sie müssen Ihre Schrittlänge vor dem Laufen messen
(siehe Abschnitt USER SETUP (BENUTZER EINRICHTEN)).
HINWEIS
Lassen Sie die Uhr vor dem Training zunächst einige
Sekunden lang nach dem(n) Sensor(en) suchen. Damit wird
gewährleistet, dass Sie umfassende Berechnungen (wie Ihre
Runde, Kalorienverbrauch, Herzfrequenz und Geschwindigkeit) während des Traininigs erhalten. Wenn Sie Ihr Training ohne Sensorsuche beginnen, erhalten Sie nur die
Messwerte der Herzfrequenz.
Wenn Sie feststel den.
Setup der Runde
1. Nachdem der Bildschirm
setup aufgerufen wurde, drücken Sie auf die mittlere (2) Taste, um Lap Setup (Runde einrichten) aufzurufen.
2. Drücken Sie auf die obere (1) Taste. Wenn Sie das Setup mit Auto Lap (Autom. Runde) durchführen möchten, drücken Sie erneut auf die obere (1) Taste; oder drücken
Sie auf die mittlere (2) Taste, um Manual Lap (Manuelle Runde) zu aktivieren.
3. Drücken Sie auf die mittlere (2) Taste, um den Zählvorgang nach Distanz zu aktivieren, oder auf die untere (3) Taste, um ihn nach Zeit zu aktivieren. Drücken Sie die
nachfolgenden Tasten, um die Distanz oder die Zeit einzustellen:
• Obere (1) Taste, um den Wert zu erhöhen
• Untere (3) Taste, um den Wert zu verringern
HINWEIS
Durch langes Drücken der Taste können Sie den Wert rascher erhöhen oder verringern.
4. Drücken Sie auf die mittlere (2) Taste, um Ihre Auswahl zu bestätigen.
Setup des Intervalls
1. Nachdem der Bildschirm
setup aufgerufen wurde, drücken Sie auf die untere (3) Taste, um Interval setup aufzurufen.
2. Wenn Sie das Setup mit Interv.by distance (Zählvorgang nach Distanz) durchführen möchten, drücken Sie auf die mittlere (2) Taste; oder drücken Sie auf die untere (3)
Taste, um Interv.by time (Zählvorgang nach Zeit) auszuwählen.
3. Drücken Sie auf die mittlere (2) Taste, um den Zählvorgang nach Distanz zu aktivieren, oder auf die untere (3) Taste, um ihn nach Zeit zu aktivieren. Drücken Sie die
nachfolgenden Tasten, um die Distanz oder die Zeit einzustellen:
• Obere (1) Taste, um den Wert zu erhöhen
• Untere (3) Taste, um den Wert zu verringern
HINWEIS
Durch langes Drücken der Taste können Sie den Wert rascher erhöhen oder verringern.
4. Drücken Sie auf die mittlere (2) Taste, um Ihre Auswahl zu bestätigen und den Bildschirm Rest by distance/time (Ruhepause nach Distanz/Zeit) aufzurufen.
5. 5. Drücken Sie auf die mittlere (2) Taste, um den Zählvorgang nach Distanz zu aktivieren, oder auf die untere (3) Taste, um ihn nach Zeit zu aktivieren. Drücken Sie die
nachfolgenden Tasten, um die Distanz oder die Zeit einzustellen:
• Obere (1) Taste, um den Wert zu erhöhen
• Untere (3) Taste, um den Wert zu verringern
Page 39

9
DE
6.
2
) Taste, um Ihre Auswahl zu bestätigen.
Setup der HF-Zone
Setup der HF-Zone
setup
aufgerufen wurde, wählen Sie mit der mittleren (
2
) Taste
setup aus.
2. Drücken Sie auf die obere (
) Taste, um
(HF-Zone)
zu aktivieren.
3. Drücken Sie auf die obere (
) Taste oder die untere (
3
) Taste, um eine Auswahl aus
(Fettverbrennung 61-70%)
Aerobic 71-80%
(Aerobe Zone 71-80%)
oder
Anaerobic 81-90%
(Anaerobe Zone 81-90%)
zu treffen.
4. Drücken Sie auf die mittlere (
2
) Taste, um Ihre Auswahl zu bestätigen.
Anaerobic
81-90%
Aerobi
c
71-80
%
ÜTZLICHE HINWEISE
Zielzone
Maximale Herzfrequenz (MHR)
Obere Herzfrequenzgrenze
Untere Herzfrequenzgrenze
220-Alter=MHR
OBERE GRENZE
61% x MHR
70% x MHR
Aerobe Zone
71% x MHR
80% x MHR
Anaerobe Zone
81% x MHR
80% x MHR
TRAININGS- KATEGORIE
61-70%
System stärken und Fett verbrennen möchten.
Aerobe Zone
71-80%
Steigert Kraft und Ausdauer. Wirkt innerhalb der Fähigkeit der Sauerstoffaufnahme des Körpers, verbrennt mehr
Anaerobe Zone
81-90%
Steigert Kraft und Ausdauer. Wirkt innerhalb der Fähigkeit der Sauerstoffaufnahme des Körpers, verbrennt mehr
Training eines 40-jährigen für den Zweck der Fettverbrennung:
Seine obere Herzfrequenzgrenze [220-40(Alter)] x 70 %
Seine untere Herzfrequenzgrenze [220-40(Alter)] x 61 %
Wärmen Sie sich vor dem Training stets auf und wählen Sie die Trainingskategorie, die Ihrer Konstitution am besten entspricht. Trainieren Sie regelmäßig, ca. 20
ACHTUNG
Die Ermittlung Ihrer persönlichen Trainingskategorie ist ein wichtiger Schritt auf dem Weg zu einem wirkungsvollen und sicheren Trainingsprogramm. Ziehen
Sie bitte Ihren Hausarzt oder einen medizinischen Fachmann zu Rate, um die Häufi gkeit und Dauer des Trainings zu bestimmen, das Ihrem Alter, Ihrer Kondition und Ihren
spezifi schen Zielen entspricht.
Page 40

10
DE
TRAININGSDATENSÄTZE WÄHREND DES LAUFENS ANZEIGEN
Sie können mit dem Laufen beginnen, indem Sie die nachstehenden Schritte befolgen; wenn Sie das Intervall einrichten, startet der Zählvorgang (Count-Down) der Distanz
oder Zeit.
HINWEIS
Vergewissern Sie sich, dass die Uhr über ausreichend Speicher vefügt; ansonsten wird no memory (kein Speicher) angezeigt, wenn Sie nach Aktivierung des
Modus RUNNING (LAUFEN) eine Taste drücken.
So zeigen Sie die Datensätze des Lauftrainings an:
1. Drücken Sie im Modus RUNNING (LAUFEN) auf die obere (1) Taste, um den Modus der Sensorsuche zu aktivieren; oder drücken Sie auf die untere (3) Taste, um den
Modus zu überspringen, falls Sie sicher sind, dass der Sensor bereits gekoppelt wurde.
2. Drücken Sie auf die obere (1) Taste, um den Modus start aufzurufen. Der Zählvorgang beginnt, während blinkt. Der Messwert der Herzfrequenz mit dem Symbol
( ) und der Zähler der Trainingszeit (00’00’00) werden angezeigt.
3. Mit der mittleren (2) Taste können Sie zwischen folgenden Bereichen wechseln: Gesamte Distanz (km)/Geschwindigkeit (km/h), Kalorienzählung (Cal)/aktuelle Trainingszeit
(00’00’00) und Anzeige der Uhrzeit.
• Wenn Auto lap (autom. Runde) eingestellt ist, werden die Daten der Runden- und Zeitzählung automatisch auf dem Bildschirm angezeigt,
wenn die jeweilige Einstellung erreicht wird.
ODER
• Wenn Manual lap (man. Runde) eingestellt ist, drücken Sie auf die untere (3) Taste, um eine Runde manuell einzustellen.
ODER
Während dieser Bildschirm angezeigt wird und Sie die obere (
1) Taste drücken, um den Zählvorgang zu unterbrechen, hört auf zu blinken; drücken Sie anschließend auf
die obere (1) Taste, um continue (fortsetzen) auszuwählen, oder die untere (3) Taste, um stop running (Laufen beenden) auszuwählen. Wenn Sie die untere (3) Taste drücken,
um den Zählvorgang zu beenden, wird der Modus RUNNING (LAUFEN) auf dem Bildschirm angezeigt.
HINWEIS
Wenn Sie die Uhr für einen autom. Wechsel der Bildschirme einstellen, werden die letzten vier Bildschirme automatisch alle
5 Sekunden abwechselnd angezeigt. Die genauen Hinweise zur Aktivierung der Wechselfunktion finden Sie im Abschnitt
EINRICHTUNG DES BENUTZERPROFILS.
HINWEIS
Wenn Sie HR zone (HF-Zone) aktivieren, zeigt die Uhr 3 Sekunden lang Above Zone (Über Zone) an, wenn sich ihre jeweilige
Herzfrequenz oberhalb der Zone befindet; oder es wird 3 Sekunden lang Below Zone (Unter Zone) angezeigt, wenn sich Ihre jeweilige
Herzfrequenz unterhalb der Zone befindet.
HINWEIS
Wenn die Gesamtanzahl der Runden und Datensätze die Zahl 100 erreicht oder die Gesamtzeit des Trainings 80 Stunden erreichen,
wird memory full (Speicher voll) in Verbindung mit einem langen Signalton auf dem Bildschirm angezeigt. Sie müssen in diesem Fall den
Speicher löschen, um ein weiteres Training durchführen zu können.
HINWEIS
HR belt low batt. (schw. Batt. HF-Gurt) wird auf dem Bildschirm angezeigt, wenn die Uhr feststellt, dass die Batterie des Brustgurts schwach ist.
TRAININGSDATENSÄTZE NACH DEM LAUFEN ANZEIGEN
Sie können die Datensätze nach dem Laufen auf der Uhr anzeigen, indem Sie die nachstehenden Schritte befolgen.
So zeigen Sie die Trainingsdatensätze an:
1. Drücken Sie im Modus
RUNNING (LAUFEN) auf die untere (3) Taste, um den Laufspeicher (mem) aufzurufen. Auf dem Bildschirm wird das Datum und die Uhrzeit des
letzten Trainings angezeigt. Mit der mittleren (2) Taste können Sie die den gewünschten Datensatz auswählen und anschließend auf die obere (1) Taste drücken, um
diesen aufzurufen.
HINWEIS
Wenn Sie den gesamten Speicher löschen möchten, drücken Sie mehrmals auf die mittlere (2) Taste, bis Clear all (Alles löschen) angezeigt wird. Drücken
Sie auf die obere (1) Taste, um diese Funktion zu öffnen, und anschließend erneut auf die obere (1) Taste, um yes (Ja) auszuwählen und die Löschung des Speichers zu
bestätigen; oder drücken Sie auf die untere (3) Taste, um no (Nein) auszuwählen und zum Bildschirm des Datensatzes zurückzukehren.
2. Drücken Sie auf die obere (1) Taste, um den Bildschirm View Summary (Übersicht anzeigen) aufzurufen. Drücken Sie erneut auf die obere (1) Taste, um die Anzeige zu
starten; anschließend können Sie die Datensätze mit der mittleren (2) Taste anzeigen.
ODER
Drücken Sie auf die untere (3) Taste, um den Modus zu beenden.
3. Drücken Sie auf die mittlere (2) Taste, um den Bildschirm View Lap (Runde anzeigen) aufzurufen. Drücken Sie auf die obere (1) Taste, um die Anzeige zu starten; oder
zeigen Sie Ihre gewünschte Runde mit der mittleren (2) Taste an.
4. Drücken Sie erneut auf die obere (1) Taste, um die Anzeige zu starten; anschließend können Sie die Datensätze mit der mittleren (2) Taste anzeigen.
ODER
Drücken Sie auf die untere (3) Taste, um den Modus zu beenden.
Page 41

DE
Other
data
Lap No.
INGSDATENSATZ IN DER ANWENDUNG ANZEIGEN
Sie können den Speicher auf Ihre Anwendung hochladen und die Datensätze des Lauftrainings auf Ihrem Mobilgerät anzeigen.
(LAUFEN)
2. Die Datensätze des Lauftrainings werden nach Datum und Uhrzeit aufgelistet. Befolgen Sie die bitte die nachstehenden Schritte.
•
Tippen Sie auf den gewünschten Datensatz, den Sie anzeigen möchten, oder tippen Sie auf
, um die Daten per E-Mail zu übertragen.
•
Wischen Sie auf dem Bildschirm mit den Fingern nach links oder rechts, um weitere Datensätze anzuzeigen.
3.
Tippen Sie auf
OVERALL RESULT
(GESAMTERGEBNIS)
WEEK
(WOCHE)
(MONAT)
und
ANNUAL
(JAHR)
tippen, um das jeweilige Diagramm des Gesamtergebnisses anzuzeigen. Wischen Sie auf dem Bildschirm nach links oder rechts, um das Diagramm
erneut darauf, um das Fenster zu schließen.
4. Tippen Sie auf dem Bildschirm auf
, um den Modus zu beenden.
Page 42

12
DE
RADFAHRPROFIL
SETUP
Mit Ausnahme der Einstellung der Reifengröße können Sie sämtliche Einstellungen im Radfahrprofil vornehmen, das dem Abschnitt SETUP unter RUNNING PROFILE
(LAUFPROFIL) folgt.
HINWEIS
Vergewissern Sie sich, dass der Fahrradsensor mit der Uhr gekoppelt ist, bevor Sie mit dem Radfahren beginnen.
Das Setup enthält im Wesentlichen die folgenden Bereiche:
• Runde
• Intervall
• Ruhepause
• HF-Zone
• Reifengröße
Einrichtung der Reifengröße
1. Drücken Sie im Modus
CYCLING (RADFAHREN) auf
die obere (1) Taste, um diese Funktion zu öffnen; das
Symbol des gekoppelten Sensors wird auf dem
Bildschirm angezeigt. Drücken Sie auf die untere (3)
Taste, um diesen Vorgang zu überspringen, wenn der
Sensor bereits hinzugefügt wurde.
2. Drücken Sie auf die mittlere (
2) Taste, um den Modus setup aufzurufen.
3. Drücken Sie mehrmals auf die mittlere (
2) Taste, bis adjust Wheel size (Reifengröße anpassen) angezeigt wird.
4. Drücken Sie auf die obere (
1) Taste, um diese Funktion zu öffnen.
5. Drücken Sie erneut auf die obere (
1) Taste, um den Wert zu erhöhen, oder auf die untere (3) Taste, um den Wert zu verringern.
6. Drücken Sie auf die mittlere (
2) Taste, um Ihre Auswahl zu bestätigen.
ÜTZLICHE HINWEISE
Über die Reifengröße
Passen Sie die auf dem Fahrradreifen aufgedruckte ETRTO-Norm oder den Reifendurchmesser an die Einstellung der Reifengröße in der rechten Spalte der nachstehenden
Tabelle an. Geben Sie den entsprechenden Einstellungswert der Reifengröße ein, nachdem der Fahrradsensor gekoppelt wurde.
ETRTO Reifendurchmesser (Zoll) Einstellung der Reifengröße (mm)
25-559 26 x 1.0 1884
23-571 650 x 23C 1909
35-559 26 x 1.50 1947
37-622 700 x 35C 1958
47-559 26 x 1.95 2022
20-622 700 x 20C 2051
52-559 26 x 2.0 2054
23-622 700 x 23C 2070
25-622 700 x 25C 2080
28-622 700 x 28 2101
32-622 700 x 32C 2126
42-622 700 x 40C 2189
47-622 700 x 47C 2220
HINWEIS
Die Reifengrößen in der obigen Tabelle sind lediglich als Richtwert zu verstehen, da die Reifengröße vom Reifentyp und dem Reifendruck abhängt.
TRAININGSDATENSATZ WÄHREND DES RADFAHRENS ANZEIGEN
Sie können mit dem Radfahren beginnen, indem Sie die nachstehenden Schritte befolgen; wenn Sie das Intervall einrichten, startet der Zählvorgang (Count-Down) der
Distanz oder Zeit.
Page 43

13
DE
HINWEIS
Vergewissern Sie sich, dass die Uhr über ausreichend Speicher verfügt, ansonsten wird no memory (kein Speicher) angezeigt, wenn Sie nach Aktivierung des
Modus CYCLING (RADFAHREN) eine Taste drücken.
So zeigen Sie die Datensätze für das Radfahren an:
1. Drücken Sie im Modus CYCLING (RADFAHREN) auf die obere (1) Taste, um diese Funktion zu öffnen; das Symbol des gekoppelten Sensors wird auf dem Bildschirm
angezeigt. Drücken Sie auf die untere (3) Taste, um den Suchmodus zu überspringen, wenn der Sensor bereits hinzugefügt wurde.
2. Drücken Sie auf die obere (1) Taste, um den Modus start aufzurufen. Der Zählvorgang beginnt, während blinkt. Der Messwert der Herzfrequenz mit dem Symbol
(
) und der Zähler der Trainingszeit (00’00’00) werden angezeigt.
3. Drücken Sie auf die mittlere (2) Taste. Damit können Sie die gesamte Distanz (km) /Geschwindigkeit (km/h), Zählung der Trittfrequenz (rpm), Zählung der Kalorien
(Cal) und Uhrzeit anzeigen.
• Wenn Auto lap (autom. Runde) eingestellt ist, werden die Daten der Runden- und Zeitzählung automatisch auf dem Bildschirm angezeigt,
wenn die jeweilige Einstellung erreicht wird.
ODER
• Wenn Manual lap (man. Runde) eingestellt ist, drücken Sie auf die untere (3) Taste, um eine Runde manuell einzustellen.
ODER
Während dieser Bildschirm angezeigt wird und Sie die obere (
1) Taste drücken, um den Zählvorgang zu unterbrechen, hört auf zu blinken; drücken Sie anschließend auf die
obere (1) Taste, um continue counting (Zählvorgang fortsetzen) auszuwählen, oder die untere (3) Taste, um stop counting (Zählvorgang beenden) auszuwählen. Wenn Sie die untere
(3) Taste drücken, um den Zählvorgang zu beenden, wird der Modus CYCLING (LAUFEN) angezeigt.
HINWEIS
Wenn Sie die Uhr für einen autom. Wechsel der Bildschirme einstellen, werden die letzten fünf Bildschirme automatisch alle 5 Sekunden
abwechselnd angezeigt. Die genauen Hinweise zur Aktivierung der Wechselfunktion finden Sie im Abschnitt
EINRICHTUNG DES BENUTZERPROFILS.
HINWEIS
Wenn Sie die HF-Zone aktivieren, zeigt die Uhr 3 Sekunden lang Above Zone (Über Zone) an, wenn sich ihre jeweilige Herzfrequenz
oberhalb der Zone befindet; oder es wird 3 Sekunden lang Below Zone (Unter Zone) angezeigt, wenn sich Ihre jeweilige Herzfrequenz unterhalb
der Zone befindet.
HINWEIS
Wenn die Gesamtanzahl der Runden und Datensätze die Zahl 100 erreicht oder die Gesamtzeit des Trainings 80 Stunden erreichen,
wird memory full (Speicher voll) in Verbindung mit einem langen Signalton auf dem Bildschirm angezeigt. Sie müssen in diesem Fall den
Speicher löschen, um weitere Trainingseinheiten durchführen zu können.
HINWEIS
Bike pod low batt. (schw. Batt. Fahrradsensor) wird auf dem Bildschirm angezeigt, wenn die Uhr feststellt, dass die Batterie des
Fahrradsensors schwach ist.
TRAININGSDATENSÄTZE NACH DEM RADFAHREN ANZEIGEN
Sie können die Datensätze nach dem Radfahren auf der Uhr anzeigen, indem Sie die die nachstehenden Schritte befolgen.
So zeigen Sie die Trainingsdatensätze an:
1. Drücken Sie im Modus CYCLING (RADFAHREN) auf die untere (3) Taste, um den Radfahrspeicher (mem) aufzurufen. Auf dem Bildschirm wird das Datum und die Uhrzeit
des letzten Trainings angezeigt. Mit der mittleren (
2) Taste können Sie den gewünschten Datensatz auswählen und anschließend auf die obere (1) Taste drücken, um
diesen aufzurufen.
HINWEIS
Wenn Sie den gesamten Speicher löschen möchten, drücken Sie mehrmals auf die mittlere (2) Taste, bis Clear all (Alles löschen) angezeigt wird. Drücken
Sie auf die obere (1) Taste, um diese Funktion zu öffnen, und anschließend erneut auf die obere (1) Taste, um yes (Ja) auszuwählen und die Löschung des Speichers zu
bestätigen; oder drücken Sie auf die untere (3) Taste, um no (Nein) auszuwählen und zum Bildschirm des Datensatzes zurückzukehren.
2. Drücken Sie auf die obere (1) Taste, um den Bildschirm View Summary (Übersicht anzeigen) aufzurufen. Drücken Sie erneut auf die obere (1) Taste, um die Anzeige zu
starten; anschließend können Sie die Datensätze mit der mittleren (2) Taste anzeigen.
ODER
Drücken Sie auf die untere (3) Taste, um den Modus zu beenden.
3. Drücken Sie auf die mittlere (2) Taste, um den Bildschirm View Lap (Runde anzeigen) aufzurufen. Drücken Sie auf die obere (1) Taste, um Lap 1 (Runde 1) anzuzeigen.
4. Drücken Sie erneut auf die obere (1) Taste, um die Anzeige zu starten; anschließend können Sie die Datensätze mit der mittleren (2) Taste anzeigen.
5. Mit der mittleren (2) Taste können Sie Ihre gewünschte Runde anzeigen. Befolgen Sie den obigen Schritt 4.
ODER
Drücken Sie auf die untere (3) Taste, um den Modus zu beenden.
Page 44

DE
TRAININGSDATENSATZ IN DER ANWENDUNG ANZEIGEN
Sie können den Speicher auf Ihre Anwendung hochladen und die Datensätze des Radfahrtrainings auf Ihrem Mobilgerät anzeigen.
CYCLING
(RADFAHREN)
2. Die Datensätze des Radfahrtrainings werden nach Datum und Uhrzeit aufgelistet. Befolgen Sie bitte die nachstehenden Schritte.
Tippen Sie auf den gewünschten Datensatz, den Sie anzeigen möchten, oder tippen Sie auf
, um die Daten per E-Mail zu übertragen.
Wischen Sie auf dem Bildschirm mit den Fingern nach links oder rechts, um weitere Datensätze anzuzeigen.
com zu teilen.
3.
Tippen Sie auf
OVERALL RESULT
(GESAMTERGEBNIS)
WEEK
(WOCHE)
(MONAT)
und
ANNUAL
(JAHR)
tippen, um das jeweilige Diagramm des Gesamtergebnisses anzuzeigen. Wischen Sie nach links oder rechts, um das Diagramm pro Zeiteinheit anzuzeigen.
Tippen Sie auf den jeweiligen Balken des Diagramms, damit die entsprechenden Daten als Pop-Up-Fenster angezeigt werden; tippen Sie erneut darauf, um das Fenster
zu schließen.
4. Tippen Sie auf dem Bildschirm auf
, um den Modus zu beenden.
Page 45

DE
SCHWIMMPROFIL
SETUP
Sie können ein Schwimmprofi l auf der Uhr einrichten. Drücken Sie im Modus
SWIMMING
(SCHWIMMEN) auf die obere (
) Taste, um den Modus
setup
aufzurufen. Das
Setup enthält im Wesentlichen die nachfolgenden Bereiche:
Schwimmstil
Beckengröße
Kalibrierung
Vermeiden Sie es, die Tasten im Wasser zu drücken, um Einstellungen
vorzunehmen; es könnte sonst Wasser in die Uhr eindringen und diese beschädigen.
Setup des Schwimmstils
Setup des Schwimmstils
SWIMMING
(SCHWIMMEN) auf die obere (
) Taste,
um den Modus
setup
aufzurufen.
2. Drücken Sie auf die mittlere (
) Taste, um den Modus
swim type
(Schwimmstil)
aufzurufen; und anschließend auf die obere (
) oder untere (
3
) Taste, um eine
Auswahl aus den Optionen
ft.crawl
(Kraulschwimmen),
backstr
(Rückenschwimmen),
breastsr
(Brustschwimmen) und
butterfl y
(Schmetterling) zu treffen.
3. Drücken Sie erneut auf die mittlere (
2
) Taste, um Ihre Auswahl zu bestätigen.
Setup der Beckengröße
Setup der Beckengröße
SWIMMING
(SCHWIMMEN) auf die obere (
) Taste, um den Modus
setup
aufzurufen.
2. Mit der mittleren (
2
) Taste können Sie den Modus der Beckengröße aufrufen und anschließend auf die obere (
) oder untere (
3
) Taste drücken, um eine Auswahl aus den
Optionen
50m
(Meter) und
25m
(Meter) zu treffen.
3. Drücken Sie erneut auf die mittlere (
2
) Taste, um Ihre Auswahl zu bestätigen.
SWIMMING
(SCHWIMMEN) auf die obere (
) Taste, um den Modus
setup
aufzurufen.
2. Drücken Sie mehrmals auf die mittlere (
2
) Taste, bis
start cali.
(Kal. starten) angezeigt wird.
3. Drücken Sie auf die obere (
) Taste, um die Kalibrierung zu starten.
ODER
Drücken Sie auf die untere (
3
) Taste, um den Modus zu beenden.
4. Die Daten der Bahnenzählung werden angezeigt. Sie müssen nun 2 Bahnen schwimmen und manuell auf die obere (
) Taste drücken, um oberhalb der Wasserfl äche zu
stoppen. Wenn Sie die Kalibrierung erfolgreich abgeschlossen haben, wird
cali.done
(Kal. fertig) angezeigt; nach 2 Sekunden kehrt der Bildschirm zum Modus
setup
zurück.
ODER
Wenn Sie die Kalibrierung beenden möchten, drücken Sie auf die obere (
) Taste, sodass
cali.failed
(Kal. fehlgeschl.) angezeigt wird.
TRAININGSDATENSÄTZE WÄHREND DES SCHWIMMENS ANZEIGEN
Sie können mit dem Schwimmen beginnen, indem Sie die nachstehenden Schritte befolgen.
Vergewissern Sie sich, dass die Uhr über ausreichend Speicher verfügt; ansonsten wird
no memory
(kein Speicher) angezeigt,
wenn Sie nach Aktivierung des Modus
SWIMMING
(SCHWIMMEN) eine Taste drücken.
So zeigen Sie die Datensätze des Schwimmtrainings an:
So zeigen Sie die Datensätze des Schwimmtrainings an:
SWIMMING
(SCHWIMMEN) auf die obere (
) Taste, um den Modus
start
aufzurufen.
2. Drücken Sie mehrmals auf die mittlere (
2
) Taste, um eine Auswahl aus den Optionen
swim type
(Schwimmstil) und
pool size
(Beckengröße) zu treffen (siehe obige Abschnitte).
3. Die Uhr startet den Zählvorgang. Während des Schwimmens ist nur die Option
Auto lap
(Autom. Bahn) verfügbar; die Zähldaten der Schläge (
stk
), Zeit (
00’00’00
) und
Cal
) werden automatisch auf dem Bildschirm angezeigt. Die Daten der Bahnenzählung werden angezeigt, wenn die entsprechende Einstellung erreicht wird.
ODER
Während dieser Bildschirm angezeigt wird und Sie die obere (
) Taste drücken, um den Zählvorgang zu unterbrechen, hört
auf zu blinken; wählen Sie anschließend
continue
(fortsetzen) oder
stop
(beenden) aus. Wenn Sie die untere (
3
) Taste drücken, um den Zählvorgang zu beenden, wird der Modus
SWIMMING
(SCHWIMMEN) auf
dem Bildschirm angezeigt. Gehen Sie direkt zum obigen Schritt 1 über, um den Zählvorgang erneut zu starten.
Wenn Sie die Uhr für einen autom. Wechsel der Bildschirme einstellen, werden die letzten drei Bildschirme automatisch alle 5 Sekunden abwechselnd angezeigt.
Page 46

DE
HINWEIS
Wenn die Gesamtanzahl der Bahnen die Zahl 100 oder die Gesamtzeit des Trainings 80 Stunden erreicht, wird
memory full
(Speicher voll) in Verbindung mit einem
TRAININGSDATENSÄTZE NACH DEM SCHWIMMEN ANZEIGEN
Sie können die Datensätze nach dem Schwimmen auf der Uhr anzeigen, indem Sie die nachstehenden Schritte befolgen.
So zeigen Sie die Trainingsdatensätze an:
So zeigen Sie die Trainingsdatensätze an:
SWIMMING
(SCHWIMMEN) auf die untere (
3
) Taste, um diese Funktion zu öffnen. Auf dem Bildschirm wird das Datum und die Uhrzeit des letzten
Trainings angezeigt. Mit der mittleren (
2
) Taste können Sie den gewünschten Datensatz auswählen und anschließend auf die obere (
) Taste drücken, um diesen aufzurufen.
Wenn Sie den gesamten Speicher löschen möchten, drücken Sie mehrmals auf die mittlere (
) Taste, bis
Clear all
(Alles löschen) angezeigt wird. Drücken
Sie auf die obere (
) Taste, um diese Funktion zu öffnen, und anschließend erneut auf die obere (
) Taste, um
yes
(Ja) auszuwählen und die Löschung des Speichers zu
3
) Taste, um
no
(Nein) auszuwählen und zum Bildschirm des Datensatzes zurückzukehren.
2.
) Taste, um den Bildschirm
View Summary
(Übersicht anzeigen) aufzurufen. Drücken Sie erneut auf die obere (
) Taste, um die Anzeige zu
starten; anschließend können Sie die Datensätze mit der mittleren (
) Taste anzeigen.
ODER
Drücken Sie auf die untere (
3
) Taste, um den Modus zu beenden.
3. Drücken Sie auf die mittlere (
2
) Taste, um den Bildschirm
View Lap
(Bahn anzeigen) aufzurufen. Drücken Sie auf die obere (
) Taste, um
(Bahn 1) anzuzeigen.
4. Drücken Sie erneut auf die obere (
) Taste, um die Anzeige zu starten; anschließend können Sie die Datensätze mit der mittleren (
2
) Taste anzeigen.
5. Drücken Sie mehrmals auf die mittlere (
2
) Taste, um Ihre gewünschte Bahn anzuzeigen. Befolgen Sie den obigen Schritt 4.
ODER
Drücken Sie auf die untere (
3
) Taste, um den Modus zu beenden.
Other
data
Lap No
TRAININGSDATENSÄTZE IN DER ANWENDUNG ANZEIGEN
Sie können den Speicher auf Ihre Anwendung hochladen und die Datensätze des Schwimmtrainings auf Ihrem Mobilgerät anzeigen.
SWIMMING
(SCHWIMMEN).
2. Die Datensätze des Schwimmtrainings werden nach Datum und Uhrzeit aufgelistet. Befolgen Sie bitte die nachstehenden Schritte.
Tippen Sie auf den gewünschten Datensatz, den Sie anzeigen möchten, oder tippen Sie auf
, um die Daten per E-Mail zu übertragen.
Wischen Sie auf dem Bildschirm mit den Fingern nach links oder rechts, um weitere Datensätze anzuzeigen.
Page 47

DE
3.
Tippen Sie auf
OVERALL RESULT
(GESAMTERGEBNIS), um diese Anzeige aufzurufen. Anschließend können Sie auf
WEEK
(WOCHE),
(MONAT) und
ANNUAL
(JAHR) tippen, um das jeweilige Diagramm des Gesamtergebnisses anzuzeigen. Wischen Sie auf dem Bildschirm nach links oder rechts, um das Diagramm
erneut darauf, um das Fenster zu schließen.
4. Tippen Sie auf dem Bildschirm auf
, um den Modus zu beenden.
Page 48

DE
WORKOUT-PROFIL
SETUP
Vor der Durchführung eines Krafttrainings können Sie Ihr Workout auf der Uhr einrichten. Drücken Sie im Modus
WORKOUT
auf die obere (
) Taste, um den Modus
setup
aufzurufen. Das Setup enthält im Wesentlich die folgenden Bereiche:
Sätze
Wiederholungen
Ruhepause
Oder Sie können das Setup überspringen, indem Sie im Modus
setup
auf
skip
(Überspringen)
drücken; die Uhr zählt automatisch die Sätze (Standardwert = 3 Sätze),
Wiederholungen (Standardwert = 12 Wiederholungen), Ruhepause
(Standardwert = 15 Sekunden) und den MET-Wert (Standardwert = 3).
Wir empfehlen Ihnen jedoch dringend, ein Setup für das Krafttraining vorzunehmen.
Drücken Sie auf die obere (
) Taste, um den Vorgang zu unterbrechen; drücken Sie
erneut auf die Taste, um fortzufahren; oder drücken Sie auf die untere (
3
) Taste,
um den Vorgang zu beenden. Das Ergebnis des Workouts wird auf dem Bildschirm angezeigt.
Die Zeitzählung wird jede Nacht um 00.00 Uhr auf den Wert Null zurückgesetzt.
Setup der Trainingssätze
Setup der Trainingssätze
WORKOUT
auf die obere (
) Taste, um den Modus setup aufzurufen.
2. Drücken Sie auf die mittlere (
2
) Taste, um
yes
(Ja)
in Modus
setup
auszuwählen. Drücken Sie auf die obere (
) Taste, um den Modus
Sets
(Sätze)
aufzurufen.
3. Drücken Sie auf die obere (
) Taste, um den Wert zu erhöhen, oder auf die untere (
3
) Taste, um den Wert zu verringern.
4. Drücken Sie auf die mittlere (
2
) Taste, um Ihre Auswahl zu bestätigen.
Der Setupbereich der Trainingssätze umfasst 1-9 Sätze.
Setup der Wiederholungen
Setup der Wiederholungen
WORKOUT
auf die obere (
) Taste, um den Modus
setup
aufzurufen.
2. Drücken Sie auf die mittlere (
2
) Taste, um
yes
(Ja)
im Modus
setup
auszuwählen. Drücken Sie auf die obere (
) Taste und anschließend auf die mittlere (
2
) Taste, um den
(Wdhg)
aufzurufen.
3. Drücken Sie auf die obere (
) Taste, um den Wert zu erhöhen, oder auf die untere (
3
) Taste, um den Wert zu verringern.
4. Drücken Sie auf die mittlere (
2
) Taste, um Ihre Auswahl zu bestätigen.
Der Setupbereich der Wiederholungen umfasst 1-99 Wiederholungen.
Setup der Ruhepause
Setup der Ruhepause
WORKOUT
auf die obere (
) Taste, um den Modus setup aufzurufen.
2. Drücken Sie auf die mittlere (
2
) Taste, um
yes
(Ja)
im Modus
setup
auszuwählen. Drücken Sie auf die obere (
) Taste und anschließend auf die mittlere (
2
) Taste, bis der
(Ruhepause)
angezeigt wird.
3. Drücken Sie auf die obere (
) Taste, um den Wert zu erhöhen, oder auf die untere (
3
) Taste, um den Wert zu verringern.
4. Drücken Sie auf die mittlere (
2
) Taste, um Ihre Auswahl zu bestätigen.
Der Setupbereich der Ruhepause umfasst 15-30 Sekunden. Die Ruhepause wird nach dem Start heruntergezählt.
Setup des MET-Wertes
Setup des MET-Wertes
WORKOUT
auf die obere (
) Taste, um den Modus
setup
aufzurufen.
2. Drücken Sie auf die mittlere (
2
) Taste, um
yes
(Ja)
im Modus
setup
auszuwählen. Drücken Sie auf die obere (
) Taste und anschließend auf die mittlere (
2
) Taste, bis der
(MET-Wert)
angezeigt wird.
3. Drücken Sie auf die obere (
) Taste, um den Wert zu erhöhen, oder auf die untere (
3
) Taste, um den Wert zu verringern.
4. Drücken Sie auf die mittlere (
2
) Taste, um Ihre Auswahl zu bestätigen. Der Zählvorgang startet automatisch.
Der Setupbereich des MET-Werts umfasst die Werte 3-13.
Page 49

DE
ÜTZLICHE HINWEISE
Sauerstoffaufnahme pro Zeiteinheit festzustellen. Dieser Wert wird anschließend mit der Sauerstoffaufnahme in absoluter Ruhe verglichen.
MET-Werte für bestimmte Aktivitäten sind Näherungswerte; daher kann es im Einzelfall zu deutlichen Abweichungen kommen.
ART DES WORKOUTS
Stretching oder Joga
2,5
Gewichtheben (geringe oder mäßige Anstrengung, leichtes Workout, allgemeines Training)
3,0
Wasseraerobic oder -gymnastik
4,0
Allgemeines Training im Fitnesscenter
5,5
Gewichtheben (Kraftdreikampf oder Bodybuilding, starke Anstrengung), Jazzercise
6,0
Ski-Simulator
7,0
Stufen-/Laufband-Ergometer
9,0
TRAININGSDATENSÄTZE WÄHREND DES WORKOUTS ANZEIGEN
-Wert auf Ihrer Uhr eingerichtet haben, können Sie mit dem Workout beginnen. Die Uhr startet dabei den Zählvorgang automatisch. Sie können die
Wiederholungen und die Zeitzählung verfolgen, während der Zähler der Ruhepause auf dem Bildschirm nach unten zählt, um Sie an die Einhaltung der Pause zu erinnern.
Sie können das Workout unterbrechen, indem Sie auf die obere (
) Taste drücken. Wenn Sie das Workout beenden möchten, drücken Sie auf die untere (
3
) Taste. Der gesamte
WORKOUT
zurück.
Die Wiederholungen werden angezeigt, wenn der Zähler bei der 4. Wiederholung angelangt ist.
Die Uhr erinnert Sie daran, die jeweilige Ruhepause zu beginnen bzw. zu beenden; es erfolgt ein kurzer Signalton in den letzten 5 Sekunden und ein langer
Signalton, der darauf hinweist, die Ruhepause zu beginnen oder zu beenden; gleichzeitig blinkt der Bildschirm.
TRAININGSDATENSÄTZE NACH DEM WORKOUT ANZEIGEN
Sie können die Datensätze nach dem Workout auf der Uhr anzeigen, indem Sie die nachstehenden Schritte befolgen.
So zeigen Sie die Trainingsdatensätze an:
So zeigen Sie die Trainingsdatensätze an:
WORKOUT
auf die untere (
3
) Taste, um den Speicher (
mem
) aufzurufen.
2. Der letzte Datensatz wird zuerst angezeigt. Mit der mittleren (
) Taste können Sie weitere Datensätze nach Datum und Uhrzeit anzeigen. Drücken Sie auf die obere (
)
Taste, um einen bestimmten Datensatz aufzurufen.
Wenn der angezeigte Datensatz im Setup enthalten ist, können Sie mit der mittleren (
) Taste die Gesamtzahl der Kalorien, Zeit, Sätze und Wiederholungen anzeigen.
ODER
Wenn der angezeigte Datenssatz nicht im Setup enthalten ist, können Sie nur die Gesamtzahl der Wiederholungen und Zeit anzeigen.
ODER
Wenn Sie den gesamten Speicher löschen möchten, drücken Sie mehrmals auf die mittlere (
2
) Taste, bis
Clear all
(Alles löschen)
angezeigt wird. Drücken Sie auf die obere
(
) Taste, um
yes (Ja
)
auszuwählen und den Speicher zu löschen; anschließend wird
(Fertig)
auf dem Bildschirm angezeigt; oder drücken Sie auf die untere (
3
) Taste,
no
(Nein)
auszuwählen und den Löschvorgang abzubrechen.
(Kein Speicher)
wird angezeigt, wenn Sie einen Datensatz anzeigen möchten, aber kein Speicher verfügbar ist.
Page 50

20
DE
TRAININGSDATENSÄTZE IN DER ANWENDUNG ANZEIGEN
Sie können den Speicher auf Ihre Anwendung hochladen und die Datensätze des Workouts auf Ihrem Mobilgerät anzeigen.
WORKOUT
2. Die Datensätze des Workouts werden nach Datum und Uhrzeit aufgelistet.
•
Tippen Sie auf den gewünschten Datensatz, den Sie anzeigen möchten, oder tippen Sie auf
, um die Daten per E-Mail zu übertragen.
•
Wischen Sie auf dem Bildschirm mit den Fingern nach links oder rechts, um weitere Datensätze anzuzeigen.
3.
Tippen Sie auf
OVERALL RESULT
(GESAMTERGEBNIS), um diese Funktion zu öffnen. Anschließend können Sie auf
WEEK
(WOCHE),
(MONAT) und
ANNUAL
(JAHR) tippen, um das jeweilige Diagramm des Gesamtergebnisses anzuzeigen. Wischen Sie auf dem Bildschirm nach links oder rechts, um das Diagramm
erneut darauf, um das Fenster zu schließen.
4. Tippen Sie auf dem Bildschirm auf
, um den Modus zu beenden.
Page 51

DE
ACTIVITÄTSPROFIL
ACITIVITY MONITOR
(AKTIVITÄTSÜBERWACHUNG) von Ihrem Mobilgerät herunterladen. Dieses Profi l eignet sich zur Überwachung der mäßigen Intensität Ihrer
Vom dem auf Ihre Uhr heruntergeladenen Profi l wird Ihre Aktivät automatisch überwacht und zahlenmäßig erfasst. Drücken Sie im Modus
ACTIVITY
(AKTIVITÄT) auf die
obere (
) Taste.
be active
(sei aktiv) an, und eine Animation wird abgespielt.
Wenn Sie das Ziel erreichen, wird
target done!
(Ziel abgeschlossen) angezeigt.
Wenn Sie den Modus beenden möchten, drücken Sie auf die untere (
3
) Taste.
Die Uhr überwacht und zählt Ihre Aktivität, auch wenn Sie das Profi l verlassen (mit Ausnahme bei einem Batteriewechsel).
ÜTZLICHE HINWEISE
Gesundheitliche Richtlinien
WHO-Europäische Kommission
WHO-Europäische Kommission
Tagen pro Woche hinzukommen.”
Stärkung der Muskeln an 2 oder mehr Tagen pro Woche, die eine Hauptmuskelgruppe bearbeiten (Beine, Hüften, Rücken, Bauch, Brust, Schultern und Arme).”
Stufe
Schritte/Min.
<60
<60
60-96
60-107
3
96-124
4
Schwer (6,0-8,99 METs)
5
Sehr schwer (>=9,0 METs)
>153
>162
TRAININGSDATENSÄTZE NACH DER AKTIVITÄT ANZEIGEN
So zeigen Sie die heutigen Daten an:
So zeigen Sie die heutigen Daten an:
ACTIVITY
(AKTIVITÄT) auf die untere (
3
) Taste, um diese Funktion zu öffnen.
Today Data
(Daten von Heute) wird am Bildschirm angezeigt.
2.
) Taste; mit der mittleren (
2
) Taste können Sie anschließend die verschiedenen Datensätze anzeigen, wie Volumen der Ruhephase
(
),
Volumen der Aktivitätsphase (
), Schritte und Distanz.
So zeigen Sie die wöchentlichen Daten an:
So zeigen Sie die wöchentlichen Daten an:
ACTIVITY
(AKTIVITÄT) auf die untere (
3
) Taste, um diese Funktion zu öffnen. Drücken Sie mehrmals auf die mittlere (
2
) Taste, bis der Bildschirm
der Wochendaten angezeigt wird.
2. Drücken Sie auf die obere (
) Taste, um diese Funktion zu öffnen. Mit der mittleren (
) Taste können Sie anschließend die Datensätze von
This Week
(dieser Woche)
oder
(letzter Woche) anzeigen. Drücken Sie auf die obere (
) Taste, um die Anzeige zu öffnen.
3.
2
) Taste können Sie die Datensätze der verschiedenen Aktivitäten anzeigen, wie Volumen der Ruhephase
(
), Volumen der Aktivitätsphase (
),
Schritte und Distanz. Wenn Sie den Datensatz der aktuellen Woche anzeigen, wird außerdem der höhere oder niedrigere Prozentsatz Ihrer erreichten Aktiviät im Vergleich
zum Datensatz der letzten Woche angezeigt.
This Week
bedeutet von Sonntag bis zum heutigen Tag;
bedeutet vom letzten Sonntag bis zum letzten Samstag.
Page 52

DE
AKTIVITÄTSDATENSÄTZE IN DER ANWENDUNG ANZEIGEN
Sie können den Speicher auf Ihre Anwendung hochladen und die Datensätze der Aktivität auf Ihrem Mobilgerät anzeigen.
ACTIVITY
(AKTIVITÄT).
2. Die Datensätze der Aktivität werden nach Datum und Uhrzeit aufgelistet. Befolgen Sie bitte die nachstehenden Schritte.
•
Tippen Sie auf den gewünschten Datensatz, den Sie anzeigen möchten, oder tippen Sie auf
um die Daten per E-Mail zu übertragen.
Wischen Sie auf dem Bildschirm mit den Fingern nach links oder rechts, um weitere Datensätze anzuzeigen.
3.
Tippen Sie auf
OVERALL RESULT
(GESAMTERGEBNIS), um diese Anzeige aufzurufen. Anschließend können Sie auf
(WOCHE),
(MONAT) und
ANNUAL
(JAHR) tippen, um das jeweilige Diagramm des Gesamtergebnisses anzuzeigen. Wischen Sie auf dem Bildschirm nach links oder rechts, um das Diagramm
erneut darauf, um das Fenster zu schließen.
4. Tap
on the screen to exit.
Page 53

23
DE
WETTERPROFIL
Sie können die aktuelle Temmperatur und die Wettervorhersage für die nächsten 12-24 Stunden auf der Uhr anzeigen.
Wettersymbole
Wettersymbole
Sonnig
SETUP
Sie können die Temperatureinheit vor der Anzeige einrichten.
(
WETTER)
auf die obere Taste (
), um diese
Funktion zu öffnen.
2. Drücken Sie auf die mittlere (
) Taste, um den Setup-Modus aufzurufen.
3. Drücken Sie auf die obere (
) Taste oder untere (
3
) Taste,
um
°C
oder °F auszuwählen.
4. Drücken Sie auf die mittlere (
) Taste, um Ihre Auswahl zu bestätigen.
TEMPERATUR UND WETTER ANZEIGEN
Sie können die Temperatur und das vorhergesagte Wetter auf der Uhr anzeigen.
(WETTER)
auf die obere (
) Taste, um diese
Funktion zu öffnen.
2. Drücken Sie auf die mittlere (
2
) Taste, um den Modus
start
aufzurufen. Die aktuelle
Uhrzeit, die Temperatur und das Symbol der Wettervorhersage werden angezeigt.
3. Drücken Sie auf die untere (
3
) Taste, um diesen Modus zu beenden.
WETTER IN DER ANWENDUNG ANZEIGEN
Sie können lediglich die Temperatur und das vorhersagte Wetter auf der Uhr anzeigen.
Page 54

DE
WANDERPROFIL
Wesentlichen die folgenden Bereiche:
Höhenlage
Luftdruck auf Meereshöhe
SETUP
Sie müssen die Werte der Höhenlage und des Luftdrucks auf Meereshöhe eingeben, bevor Sie mit der Wanderung beginnen. Sie können die Daten Ihrer Wohngegend oder
jeweiligen Stadt auf der Webseite Ihrer lokalen Wetterstation fi nden.
Setup der Höhenlage und des Luftdrucks auf Meereshöhe:
Setup der Höhenlage und des Luftdrucks auf Meereshöhe:
(WANDERN)
auf die obere (
) Taste, um den Modus
setup
aufzurufen.
2. Mit der mittleren (
2
) Taste können Sie die Höhenlage und zugehörige Maßeinheit (
m
oder
ft
) sowie den Luftdruck auf Meereshöhe und die zugehörige Maßeinheit (
inHg
oder
hP
a
) einstellen.
3. Drücken Sie auf die obere (
) Taste, um den Wert zu erhöhen oder eine Option auszuwählen; oder drücken Sie auf die untere (
3
) Taste, um den Wert zu verringern oder
eine Option auszuwählen.
DATENSÄTZE WÄHREND DER WANDERUNG ANZEIGEN
Sie können verschiedene überwachte Werte anzeigen, wie aktuelle Höhenlage, Differenz der Höhenlage, lokaler Luftdruck, Luftdruck auf Meereshöhe, usw. Es können max.
Setup der Höhenlage und des Luftdrucks auf Meereshöhe:
Setup der Höhenlage und des Luftdrucks auf Meereshöhe:
(WANDERN)
auf die obere (
) Taste, um den Modus
setup
aufzurufen.
2. Drücken Sie erneut auf die obere (
) Taste, während Sie Ihre Wanderung beginnen. Die Höhenlage Ihres Standorts und das Zeitprotokoll werden angezeigt. Drücken Sie
erneut auf die obere (
) Taste, um den Zählvorgang zu beenden.
ODER
) Taste gedrückt, um die Zeit auf
0:00’00
zurückzusetzen.
3. Mit der mittleren (
) Taste können Sie weitere Bildschirme und Daten anzeigen.
Höhenlage Ihres aktuellen Standorts und die Differenz der Höhenlage
Lokaler Luftdruck und Luftdruck auf Meereshöhe
•
Lokaler Luftruck und aktuelle Uhrzeit
4. Drücken Sie auf die untere (
3
) Taste, um diesen Modus zu beenden.
DATENSÄTZE NACH DER WANDERUNG ANZEIGEN
Sie können die Datensätze nach der Wanderung anzeigen. Der Datensatz in Protokollform ist nach Datum und Uhrzeit angeordnet.
So zeigen Sie das Protokoll an:
So zeigen Sie das Protokoll an:
(WANDERN)
auf die untere (
3
) Taste, um den Speichermodus aufzurufen. Sie sehen die Gesamtzahl der freien Zeitprotokolle, das Datum
2. Mit der mittleren (
) Taste können Sie den gewünschten Datensatz auswählen.
3. Drücken Sie auf die obere (
) Taste, um diese Funktion zu öffnen.
4. Mit der mittleren (
) Taste können Sie die kumulierte Wanderzeit anzeigen; es wird ein Diagramm angezeigt, dass Ihre Höhenlage darstellt, außerdem werden die
gesteigerte Höhenlage, die gesenkte Höhenlage sowie die maximale Höhe beim Wandern angezeigt.
5. Drücken Sie auf die untere (
3
) Taste, um diesen Modus zu beenden.
Page 55

25
DE
DATENSATZ DER WANDERUNG IN DER ANWENDUNG ANZEIGEN
Sie können den Speicher auf Ihre Anwendung hochladen und die Datensätze der Wanderung auf Ihrem Mobilgerät anzeigen.
(WANDERN)
2. Die Datzensätze der Wanderung werden nach Datum und Uhrzeit aufgelistet. Befolgen Sie bitte die nachstehenden Schritte.
Tippen Sie auf den gewünschten Datensatz, den Sie anzeigen möchten, oder tippen Sie auf
, um die Daten per E-Mail zu übertragen.
•
Wischen Sie auf dem Bildschirm mit den Fingern nach links oder rechts, um weitere Datensätze anzuzeigen.
3.
Tippen Sie auf
OVERALL RESULT
(GESAMTERGEBNIS)
(WOCHE)
(MONAT)
ANNUAL
(JAHR)
tippen, um das jeweilige Diagramm des Gesamtergebnisses anzuzeigen. Wischen Sie auf dem Bildschirm nach links oder rechts, um das Diagramm
erneut darauf, um das Fenster zu schließen.
4. Tippen Sie auf dem Bildschirm auf
, um den Modus zu beenden.
Page 56

26
DE
ANGLERPROFIL
Sie können das Profi l
(ANGELN)
vorherzusagen.
Sie müssen vor der Verwendung zuerst das Setup vornehmen. Das Setup enthält im Wesentlichen die folgenden Bereiche:
Breitengrad
Längengrad
SETUP
Setup des Breiten- und Längengrads:
Setup des Breiten- und Längengrads:
(ANGELN)
auf die obere (
) Taste, um den Modus
setup
aufzurufen.
2. Mit der mittleren (
) Taste können Sie den Modus für den Breiten- und Längengrad aufrufen. Drücken Sie die obere (
) oder die untere (
3
) Taste, um die Maßeinheit
auszuwählen (
orth (Norden),
S
outh (Süden),
ast (Osten) und
est (Westen)).
3. Drücken Sie auf die mittlere (
2
) Taste, um Ihre Auswahl zu bestätigen.
4. So können Sie den Wert einstellen: Drücken Sie auf die obere (
) Taste, um den Wert zu erhöhen, oder auf die untere (
3
) Taste, um den Wert zu verringern.
5. Drücken Sie auf die mittlere (
2
) Taste, um Ihre Auswahl zu bestätigen.
DEN STATUS WÄHREND DES ANGELNS ANZEIGEN
Sie können den vorhergesagten Trend des Fischvolumens der nächsten 10 Stunden, von heute bis zu den nächsten 14 Tagen, anzeigen. Der Startzeitpunkt des
Trenddiagramms entspricht der aktuellen Uhrzeit.
So zeigen Sie den heutigen Status an:
So zeigen Sie den heutigen Status an:
(ANGELN)
auf die obere (
) Taste, um den Modus
start
aufzurufen.
Today
(Heute)
wird angezeigt und das Fisch-Vorhersagediagramm wird nach 3 Sekunden eingeblendet. Die nachstehenden Diagramme können Ihnen als Richtwert
dienen, um den Status zu verstehen.
3. Drücken Sie auf die untere (
3
) Taste, um diesen Modus zu beenden.
So zeigen Sie den Status von anderen Tagen an:
So zeigen Sie den Status von anderen Tagen an:
(ANGELN)
auf die obere (
) Taste, um den Modus
start
aufzurufen.
2. Drücken Sie auf die obere (
) Taste, um den Bildschirm
(Nächster Tag)
aufzurufen; das zugehörige Vorhersagediagramm wird nach 3 Sekunden eingeblendet.
) Taste können Sie Ihren gewünschten Tag auswählen.
ODER
Drücken Sie auf die mittlere (
) Taste, um den Bildschirm
(Nächste 14 Tage)
aufzurufen; das zugehörige Vorhersagediagramm wird nach 3 Sekunden
eingeblendet. Mit der mittleren (
) Taste können Sie Ihren gewünschten Tag in umgekehrter Reihenfolge auswählen.
3. Drücken Sie auf die untere (
3
) Taste, um diesen Modus zu beenden.
Page 57

27
DE
DIE DATENSÄTZE DES ANGELNS IN DER ANWENDUNG ANZEIGEN
Sie können den Speicher auf Ihre Anwendung hochladen und den vorhergesagten Fangort für das Angeln auf der Landkarte anzeigen.
1. Rufen Sie die Profilseite in Ihrer Anwendung auf. Tippen Sie auf das Symbol des Profils
FISHING (ANGELN).
2. Auf der Landkarte ist der vorhergesagte Standort mit einer violetten Nadel sowie dem Breiten- und Längengrad gekennzeichnet; oder tippen Sie auf
, um Ihren
aktuellen Standort anzuzeigen.
3. Tippen Sie auf dem Bildschirm auf
, um diesen Modus zu beenden.
WASSERDICHTIGKEIT
Die Ssmart Watch ist bis zu einem Druck von 5 ATM (50 m) wasserdicht. Sie können die Uhr daher beim Schwimmen und anderen Wassersportarten (wie Windsurfen)
benutzen; sie darf jedoch nicht beim Schnorcheln oder Tauchen im tiefen Wasser getragen werden.
HINWEIS
• Vergewissern Sie sich, dass die Tasten und das Batteriefach fest verschlossen und intakt sind, bevor Sie das Gerät in feuchten Umgebungen benutzen.
• Vermeiden Sie es, die Tasten im Wasser oder bei heftigem Regen zu drücken; es könnte sonst Wasser in die Uhr eindringen und diese beschädigen.
• Obwohl die Uhr wasserfest ist, können im Wasser keine Funksignale übertragen werden; eine Signalübertragung zwischen Uhr und Zubehörteilen, wie Brustgurt, ist im
Wasser daher nicht möglich.
HINTERGRUNDBELEUCHTUNG
Tippen Sie zweimal auf das Sensorglas, um die Hintergrundbeleuchtung zu aktivieren. Um diese für längere Zeit aktiviert zu lassen, tippen Sie dreimal hintereinander.
BATTERIEWECHSEL
Wenn die Ladung der Batterie Ihrer Uhr niedrig ist, wird auf dem Bildschirm angezeigt; wenn eine schwache Batterie im Modus
CONNECT (VERBINDEN) vorhanden ist, wird pls change batt. for update (Batterie für Update wechseln) angezeigt. Um eine optimale
Leistung zu ermöglichen, müssen Sie die Batterie der Uhr ersetzen, wie nachstehend erläutert:
HINWEIS
Ersatzbatterien können Sie in Ihrem lokalen Elekronikhandel oder über unseren Kundendienst erwerben.
So wechseln Sie die Batterie der Uhr:
1. Öffnen Sie den Deckel des Batteriefachs mit einer Münze.
2. Entnehmen Sie die alte Batterie und legen Sie eine neue Lithium-Batterie des Typs CR2032, 3V, ein.
3. Befestigen Sie den Deckel mit der Münze wieder an der Uhr.
TECHNISCHE DATEN
UHR
Uhrzeitformat 12-/24-Stundenformat mit Stunde / Minute / Sekunde
Datumsformat TT / MM oder MM / TT
Jahresbereich 2012 - 2061
Alarm
Alarm mit Einstellungen für täglich, Wochentag oder Wochenende
Nur für Uhrzeit 1 verfügbar
TRAINING
Bereich der Trainingszeit 00:00:00 bis 99:59:00
Bereich der Ruhepause 00:00:00 bis 99:59:00
Zielzone der Herzfrequenz Fettverbrennung, aerobe Zone, anaerobe Zone
Page 58

28
DE
0,30 - 240 SpM (bpm)
0 - 599,9 Einheit (km oder Meilen)
0 bis 99999
00:00:00 bis 99:59:00
99
0 bis 9999,99 Einheit (Einheit in km oder Meilen)
0 bis 99999
Anzahl des Intervalltrainings
2 bis 5
0 bis 9999 kcal
0 bis 100%
0,4 – 2,0 km
0-999
800 – 3000 mm
25 m / 50 m
3 - 13 METS
Gewichtsbereich
20-225kg
69-231cm
22-152 cm
STROMVERSORGUNG
VORSICHTSMASSNAHMEN
Tuch (mit warmem Wasser oder einer milden Seife).
Setzen Sie das Gerät keiner übermäßigen Gewalteinwirkung und keinen Stößen aus und halten Sie es von Staub, Temperaturschwankungen und Feuchtigkeit fern. Lassen Sie das Produkt
Zeit bei direkter Sonnenbestrahlung liegen. Ansonsten können Fehlfunktionen auftreten.
beschädigen. Die Basiseinheit enthält keine Teile, die vom Benutzer selbst repariert werden dürfen.
gewartet werden muss.
Aufgrund der technischen Druckeinschränkungen können sich die in dieser Anleitung dargestellten Abbildungen vom Original unterscheiden
technischen Daten für dieses Produkt und der Inhalt der Kurzanleitung können ohne Benachrichtigung geändert werden. Detaillierte Anweisungen zur
Verwendung dieses Produkts fi nden Sie in der Online-Bedienungsanleitung unter
www.oregonscientifi c.com
www.oregonscientifi c.com
Die englische Version der Anleitung enthält die aktuellste
ÜBER OREGON SCIENTIFIC
www.oregonscienti
www.oregonscienti
fi c.com
EU-KONFORMITÄTSERKLÄRUNG
Scientifi c, dass die
(Modell: RA900/SE900) oder mit den grundlegenden Anforderungen und anderen relevanten
Vorschriften der Richtlinie 28999/5/EG übereinstimmt. Eine Kopie der unterschriebenen und mit Datum versehenen Konformitätserklärung erhalten Sie auf Anfrage über
Alle Länder der EU, Schweiz CH
Page 59

ES
eloj Ssmart
CONTENIDO
..
.....
2
Contenido Del Paquete
.............
....
...
......
.................................
............
2
......
...
....
......
2
Cómo Poner En Marcha El Reloj (Por Primera Vez)
Confi guración Del Reloj
..
..........................
......
...
..................
..
..........................
......
....
............
2
Salir A La Pantalla De Hora Predeterminada
2
Confi gurar Perfi l De La Hora
Confi gurar Perfi l De Usuario
3
Aplicación De Oregon Scientifi c
..................
4
Comprar Un Perfi l
4
Confi gurar Perfi les De Ejercicio
Conectar Al Teléfono
Cargar Datos Al Dispositivo Móvil
5
Sistema De Actualización
5
Confi guración Del Sensor
5
Cómo Añadir Un Sensor
6
Cómo Retirar Un Sensor
6
.............
............
....
...
..........................
.............
.
.....
6
..
......
......
....
........................................
7
Confi guración
8
Ver Registro Del Ejercicio Mientras Corre
8
Ver Registro Del Ejercicio Después De Correr
9
Ver Registro Del Ejercicio En La Aplicación
til
Ver Registro Del Ejercicio Mientras Va En Bicicleta
Ver Registro Del Ejercicio Después De Ir En Bicicleta
Ver Registro Del Ejercicio En La Aplicación ........
3
.....
.................
..
............
....
.............
..
4
Confi guración
4
Ver El Registro Del Ejercicio Mientras Nada
Ver Registro Del Ejercicio Después Del Nadar
5
Ver Registro Del Ejercicio En La Aplicación
5
..
...........
.............
............
......
.........
7
Confi guración
Ver Registro Del Ejercicio Durante El Ejercicio
8
Ver Registro Del Ejercicio Después Del Ejercicio
8
Ver Registro Del Ejercicio En La Aplicación
0
20
Visualizar Registro Después De La Actividad
2
0
Ver Registro De La Actividad En La Aplicación
2
Confi guración
Ver Temperatura Y Previsión Meteorológica
Ver La Situación Meteorológica En Aplicación
2
2
..
....
.......
..........................
............
..................................
23
Confi guración
23
Visualizar Registro Durante El Senderismo
3
Visualizar Registro Después De La Excursión
2
3
Ver Registro De La Excursión En La Aplicación
2
3
.............
......
....
...
.....
............
....
......
.....
2
5
Confi guración
5
Ver El Estado Mientras Pesca
5
Ver Registro De La Pesca En La Aplicación
2
6
............
....
......
....
.............
............
....
2
6
la Pantalla
6
Cómo Cambiar Las Pilas
6
......
....
......
...
....
...
......
.............
.................................
2
6
recau
ciones
...................................
......
......
...
.............
............
......
.................................
2
7
Sobre
Or
egon Scientifi c
eclaración de Conformidad
Page 60

2
ES
INTRODUCCIÓN
Gracias por seleccionar el reloj Ssmart de Oregon Scientifi c
TM
Ssmart Watch como su compañero deportivo; se trata de un reloj que puede ser una magnífi ca herramienta
de motivación compatible con aplicaciones descargables desde su dispositivo móvil, como por ejemplo su Smartphone o tableta. Este reloj multifuncional puede ayudarle
a llegar a su nivel de ejercicio óptimo y mantenerlo sistemáticamente. ¡Comparta los benefi cios del ejercicio con sus amigos y parientes!
Actualmente, el reloj es compatible con iPhone 4S / iPhone 5 / iPad, es decir, los que llevan el logotipo
http://ssmart.oregonscientifi c.com
aprovechar al máximo las posibilidades de su reloj.
ANT
El uso de este producto es únicamente deportivo y no está diseñado para reemplazar el consejo médico.
CONTENIDO DEL PAQUETE
BOTONES DE CONTROL
) superior: Iniciar / detener cronómetro;
2.
2
) central: Alternar entre perfi les / pantallas; alternar entre datos; confi rmar ajuste
3
3
) inferior: Reducir valor del ajuste; acceder a la memoria para ver registros; acceder a confi guración; grabar una
vuelta mientras el cronómetro está en marcha
4
Toque la esfera para activar la retroiluminación
PANTALLA
: Indica que la pila se está acabando o se ha agotado
: Indica que el pitido está desactivado
3.
: Indica que el temporizador de ejercicio está activado; parpadea mientras cuenta
4.
: Indica que la alarma está activada
CÓMO PONER EN MARCHA EL RELOJ (POR PRIMERA VEZ)
) y manténgalo pulsado hasta que la hora aparezca
en la pantalla.
) para alternar entre pantalla de la hora predeterminada (
Time 1
) (Hora 1) y
Time 2
(Hora 2).
2
) para continuar confi gurando el perfi l de la hora
CONFIGURACIÓN DEL RELOJ
IMPORTANTE
Para asegurarse de que los cálculos que se realizan durante sus sesiones de ejercicio sean correctos, le recomendamos confi gurar los perfi les del reloj y del usuario
antes de empezar a hacer ejercicio.
Recuerde confi gurar los perfi les cada vez que cambie las pilas o si reinicia el reloj.
SALIR A LA PANTALLA DE HORA PREDETERMINADA
2
) y mantenerlo pulsado para salir de cualquier pantalla y acceder directamente a la pantalla de hora predeterminada
en cualquier momento.
CONFIGURAR PERFIL DE LA HORA
confi guración de la HORA
2).
3
) para iniciar la confi guración en orden.
2.
2
) para seleccionar la opción que quiera confi gurar. Puede elegir entre
Time 1
(Hora 1),
(Fecha),
Time 2
(Hora 2),
Alarm
(Alarma),
(Pitido) y
(unidad de medición).
2
2
4
Page 61

3
ES
) para iniciar la pantalla de un ajuste concreto.
2. Pulse el botón superior (
) para incrementar el valor o seleccionar la opción, o pulse el botón inferior (
3
) para reducir el valor o seleccionar la opción.
3. Pulse el botón central (
) para guardar la confi guración y pasar automáticamente a otra pantalla de ajuste (si es el caso).
Si quiere volver a la pantalla de la hora real, vuelva al modo de
confi guración de la HORA
y a continuación pulse el botón superior (
).
A
Si la alarma está activada, aparecerá
en la pantalla hasta que desactive la alarma.
diaria
/
día laborable
/
fi n de semana
independientemente.
A
Si a su reloj le queda poca pila, el pitido se desactiva automáticamente sin que aparezca
.
CONFIGURAR PERFIL DE USUARIO
de la hora, pero le recomendamos que primero confi gure el perfi l de usuario.
al reloj.
confi guración de USUARIO
) y continúe confi gurando su perfi l
de usuario en el orden siguiente:
Gender
(Sexo),
(Cumpleaños),
Weight
(Peso) (y unidad de medición),
Altura (y unidad de medición),
Stride
(Zancada) (y unidad de medición),
Toggle
(Alternar) y
(Ahorro de energía), pulsando los botones siguientes:
) para incrementar el valor o seleccionar la opción, o pulse el botón inferior (
3
) para reducir el valor
o seleccionar la opción.
2. Pulse el botón central (
) para guardar la confi guración y pasar automáticamente a otra pantalla de ajuste.
CONSEJO
La longitud de zancada es una distancia entre la punta del pie de delante y la punta del pie de detrás cuando camina
a ritmo
230 ÷ 10 = 23 pulgadas
Page 62

4
ES
584,2 cm
(230 pulgadas
)
INICIOFI
N
Longitud de
zancada de
talón a talón
Longitud de
zancada de
punta a punta
A
Si quiere que el reloj alterne automáticamente entre datos de ejercicio durante la sesión de ejercicio, elija el ajuste
Alternar
Si el
(Ahorro de energía) está
activado
) AJUSTE DE AHORRO DE ENERGÍA en la aplicación.
También puede cambiar la unidad de medición y de la hora mediante la aplicación.
Reinicie el perfi l de usuario si otra persona va a utilizar el reloj.
APLICACIÓN DE OREGON SCIENTIFIC
CONSEJO
Para buscar la aplicación rápidamente, introduzca “Ssmart Watch” como palabra clave en el motor de búsqueda.
COMPRAR UN PERFIL
al lado de ese icono de perfi l aparecerá
.
Si quiere adquirir un perfi l, toque el icono de precio
y a continuación aparecerá
de nuevo. Verá los datos del perfi l y continuará
con el procedimiento de pago.
CONFIGURAR PERFILES DE EJERCICIO
Footing
Bicicleta
Natación
Gimnasia
Actividad
Pesca
Aparte de los perfi les anteriores, el model RA900 se puede instalar con los perfi les siguientes.
Senderismo
Situación meteorológica
CONECTAR AL TELÉFONO
DESCARGAR PERFILES AL RELOJ
, toque y seleccione los perfi les de ejercicio deseados en el dispositivo móvil y a continuación toque
) del reloj para acceder al modo
CONNECT
(conectar). Pulse el botón superior (
) para acceder.
3.
Toque
CONNECT WITH WATCH
(conectar con el reloj) en el dispositivo móvil para iniciar la sincronización mientras vuelve a pulsar el botón superior (
) del reloj. En
el reloj aparecerá
(listo) hasta que se haya conectado y descargado con éxito.
Page 63

5
ES
Signifi cado
Si la pila está casi gastada, cámbiela para actualizar las pantallas y poder proceder a otras pantallas.
CARGAR DATOS AL DISPOSITIVO MÓVIL
CONNECT
) para acceder y pulse el botón central (
) para acceder a la pantalla
upload memory
2. Pulse el botón superior (
) para seleccionar un perfi l de ejercicio, o el botón central (
2
) para desplazarse hasta su perfi l deseado, y a continuación pulse el botón superior
(
) para iniciar la transmisión.
3. Toque
CONNECT WITH WATCH
(conectar con el reloj) en el dispositivo móvil para iniciar la sincronización mientras vuelve a pulsar el botón superior (
) del reloj. En
el reloj aparecerá
(listo) hasta que se haya conectado y descargado con éxito.
Si la conexión falla, el reloj intentará automáticamente restablecerla.
Sincronización en marcha
no memory (no hay datos)
cambie la pila para actualizar
SISTEMA DE ACTUALIZACIÓN
se lo
con un mensaje en la página INFO, o verá ¡NUEVA VERSIÓN DISPONIBLE! en el explorador de la parte inferior de la página.
CONNECT
) para acceder y pulse el botón central (
) para acceder a la pantalla
update
system
(actualizar sistema).
2. Pulse el botón (
) para acceder a las pantallas siguientes en orden. El sistema actual del reloj se borrará cuando confi rme.
Si la actualización del sistema no se realiza correctamente, aparecerá
(error) en pantalla, y la pantalla vuelve a
start
system update
(iniciar actualización del sistema) para que vuelva a intentarlo.
puede consultar la
VERSIÓN
y la
CONFIGURACIÓN DEL SENSOR
Scientifi c (modelo SZ999). Para encargar un accesorio, visite nuestro sitio web
www.oregonscientifi c.com
www.oregonscientifi c.com
o póngase en contacto con su vendedor local.
Page 64

6
ES
CÓMO AÑADIR UN SENSOR
confi guración de SENSOR
) para acceder, y en la pantalla aparecerá
add sensor
(añadir sensor).
) de nuevo para empezar a acoplar el sensor.
parpadearán durante el acoplamiento. Una vez el acoplamiento se ha realizado con
éxito, solo aparecerá en pantalla el icono del sensor acoplado.
3.
Transcurridos 3 segundos, en el reloj aparecerá de nuevo
add sensor
(añadir sensor).
Si el reloj ya está conectado al sensor de la cinta para el pecho, siga los pasos siguientes.
Si el reloj ya está conectado al sensor de la cinta para el pecho, siga los pasos siguientes.
confi guración de SENSOR
) para acceder, y en la pantalla aparecerá el icono de sensor acoplado
.
Transcurridos 3 segundos, en el reloj aparecerá add sensor (añadir sensor).
3.
) de nuevo para empezar a acoplar el sensor.
parpadearán durante el acoplamiento. Una vez el acoplamiento se ha realizado con
éxito, solo aparecerá en pantalla el icono del sensor acoplado.
4.
Transcurridos 3 segundos, en el reloj aparecerá de nuevo
add sensor
(añadir sensor).
Si el reloj ya está conectado al sensor para bicicleta, siga los pasos siguientes.
Si el reloj ya está conectado al sensor para bicicleta, siga los pasos siguientes.
confi guración de SENSOR
) para acceder, y en la pantalla aparecerá el icono de sensor acoplado
Transcurridos 3 segundos, en el reloj aparecerá
add sensor
(añadir sensor).
3.
) de nuevo para empezar a acoplar el sensor.
parpadearán durante el acoplamiento. Una vez el acoplamiento se ha realizado con
éxito, solo aparecerá en pantalla el icono del sensor acoplado.
4.
4. Transcurridos 3 segundos, en el reloj aparecerá de nuevo
add sensor
(añadir sensor).
Puede acoplar todos los sensores con el reloj al mismo tiempo.
CÓMO RETIRAR UN SENSOR
confi guración del SENSOR
) para acceder. Aparecerá la pantalla de los sensores acoplados. Pulse el botón central (
) hasta
que aparezca
remove sensor
(retirar sensor).
2. Pulse el botón superior (
) para acceder.
3. Toque el botón central (
2
) hasta llegar al sensor que quiera retirar. El ID del sensor también se muestra debajo del icono del sensor.
4. Pulse el botón superior (
) de nuevo para confi rmar que retira el sensor y a continuación en la pantalla aparecerá
(listo).
5. Al cabo de 3 segundos la pantalla mostrará automáticamente el icono de otro sensor acoplado.
6. Siga el paso 3 de esta sección, o pulse el botón inferior (
3
) para salir.
A
00000
a
INICIO DEL EJERCICIO
aplicación, que puede gestionarlos y analizarlos sistemáticamente.
ANT
Si es necesario, deberá acoplar el sensor con el reloj antes de iniciar el ejercicio; por ejemplo, si quiere acoplar un sensor para bicicleta. Si no lo hace, el
Page 65

7
ES
PERFIL DE FOOTING
CONFIGURACIÓN
Puede aplicar un perfil de footing al reloj. En modo FOOTING, pulse el botón superior (1) para acceder, y en la pantalla aparecerá el icono de sensor acoplado . Pulse el
botón inferior (3) para omitir y a continuación el central (2) para acceder al modo de configuración. Los elementos principales de la configuración son:
• Vuelta
• Intervalo
• Intervalo
• Zona RC
NOTA
Si no se está acoplando ningún sensor, la pantalla
mostrará no sensor (ningún sensor).
NOTA
Debe medir la longitud de zancada antes de correr;
consulte la sección CONFIGURACIÓN DE USUARIO.
NOTA
Antes de empezar a hacer ejercicio espere unos
segundos para que el reloj busque sensores. Así se asegurará
de poder recibir cálculos detallados (como vuelta, calorías, ritmo
cardíaco y velocidad) durante el ejercicio. Si empieza a hacer ejercicio sin hacer la búsqueda de sensores, solamente recibirá lecturas de ritmo cardíaco.
Si los iconos de sensor están parpadeando, espere hasta que los iconos dejen de parpadear y aparezcan en la pantalla.
Configuración de vuelta
1. Después de acceder a la pantalla de
setup (configuración), pulse el botón central (2) para acceder a la configuración de Lap (Vuelta).
2. Botón superior (
1): Si quiere la configuración de Auto Lap (Vuelta automática), pulse el botón (1) de nuevo, o pulse el botón central (2) para activar
Manual Lap (Vuelta manual).
3. Pulse el botón central (
2) para contar según distancia o pulse el botón (3) para contar por tiempo. Para configurar la distancia o el tiempo, pulse los botones siguientes:
• El botón superior (1) para incrementar el valor
• El botón inferior (3) para reducir el valor
NOTA
Manténgalos pulsados para incrementar o reducir el valor rápidamente.
4. Pulse el botón central (2) para confirmar la selección.
Configuración de intervalo
1. Después de acceder a la pantalla de
setup (configuración), pulse el botón inferior (3) para acceder a la configuración de Interval (Intervalo).
2. Si quiere configurar un Interv.by distance (intervalo por distancia, calculado según la distancia), pulse el botón central (
2); de lo contrario, pulse el botón inferior (3) para
acceder a Interv.by time (intervalo por tiempo, calculado según el tiempo).
3. Pulse el botón central (
2) para contar según distancia o pulse el botón (3) para contar por tiempo. Para configurar la distancia o el tiempo, pulse los botones siguientes:
• El botón superior (1) para incrementar el valor
• El botón inferior (3) para reducir el valor
NOTA
Long press to fast increase or decrease the value.
4. Pulse el botón central (
2) para confirmar la selección y acceder a la pantalla Rest by distance/time (resultados por distancia/tiempo).
5. Pulse el botón central (
2) para contar según distancia o pulse el botón (3) para contar por tiempo. Para configurar la distancia o el tiempo, pulse los botones siguientes:
• El botón superior (1) para incrementar el valor
• El botón inferior (3) para reducir el valor
6. Pulse el botón central (2) para confirmar la selección.
Page 66

8
ES
Confi guración de zonas de RC
Confi guración de zonas de RC
setup
(confi guración), pulse el botón central (
2
) para acceder a la
(Zona de ritmo cardiaco).
2. Pulse el botón superior (
) para activar la
(Zona de ritmo cardiaco).
3. Pulse el botón superior (
) o el botón inferior (
3
) para seleccionar entre
(Quemar grasas 61-70%),
Aerobic 71-80%
(Aeróbico 71-80%) o
Anaerobic
81-90%
(Anaeróbico 81-90%).
4. Pulse el botón central (
2
) para confi rmar la selección.
Anaerobic
81-90%
Aerobi
c
71-80
%
REFERENCIA ÚTIL
Zona objetivo
Ritmo cardiaco máximo (MHR)
Límite máximo de ritmo cardiaco
Límite mínimo de ritmo cardiaco
220-edad=
tabla siguiente.
Quemar grasas
61% x
70% x
Aeróbico
71% x
80% x
Anaeróbico
81% x
80% x
CATEGORÍA DE ENTRENAMIENTO
Quemar grasas
61-70%
fortalecer sus sistemas cardiovasculares y quemar algo de grasas.
Aeróbico
71-80%
Anaeróbico
81-90%
Genera velocidad y potencia. Funciona con o por encima de la capacidad de consumo de oxígeno del cuerpo,
construye músculo y no puede mantenerse durante un largo periodo de tiempo.
por los porcentajes de la categoría de entrenamiento seleccionada.
Su límite cardíaco máximo [220 - -40(edad)] x 70%
Su límite cardíaco mínimo [220 - -40(edad)] x 61%
Haga siempre un calentamiento antes de hacer ejercicio y seleccione la zona de entrenamiento que mejor encaje con su físico. Haga ejercicio regularmente, entre
20 y 30 minutos por sesión, tres o cuatro veces a la semana para mejorar su sistema cardiovascular.
ADVERTENCIA
Determinar su categoría de entrenamiento individual es un paso crítico en el avance hacia un programa de entrenamiento efi ciente y seguro. Sírvase
consultar a su médico o profesional de la salud para la frecuencia y duración del ejercicio apropiados para su edad, su forma física y sus objetivos.
VER REGISTRO DEL EJERCICIO MIENTRAS CORRE
A
Asegúrese de que el reloj tenga memoria sufi ciente; de lo contrario en la pantalla aparece
no memory
(no hay datos) cuando pulse el botón después del modo
(Footing).
(Footing), pulse el botón superior (
) para acceder al modo de búsqueda de sensor, o el botón inferior (
3
) para omitir el modo si sabe que el sensor
está acoplado.
2.
) para acceder al modo
start
(inicio). El recuento empieza mientras
parpadea. Lectura de ritmo cardiaco con icono (
) y pantalla que
cuenta la duración del ejercicio (
00’00’00
).
3.
2
). Distancia total (
)/velocidad (
), recuento de calorías (
Cal
)/tiempo de ejercicio actual (
00’00’00
),
y pantalla
del tiempo.
•
Si se ha activado Auto lap (Vuelta automática), los datos de vueltas y tiempo se mostrarán automáticamente en la pantalla cuando lleguen
al ajuste.
Page 67

9
ES
O bien
• Si se ha activado Manual lap (Vuelta automática), pulse el botón inferior (3) para configurar manualmente una vuelta.
O bien
Mientras visualice esta pantalla, si pulsa el botón superior (
1) para interrumpir el recuento, deja de parpadear, pulse el botón superior (1) para seleccionar continue
(continuar) o pulse el botón inferior (3) para seleccionar stop (parar) de correr. Si pulsa el botón inferior (3) para parar de contar, el modo RUNNING (Footing) aparece en pantalla.
NOTA
Si configura el reloj para que alterne pantallas automáticamente, las últimas cuatro pantallas se alternarán automáticamente cada
5 segundos. Consulte SET USER PROFILE (Configurar perfil de usuario) para activar la función de alternancia.
NOTA
Si activa la HR zone (Zona de ritmo cardíaco), el reloj muestra Above Zone (Por encima) durante 3 segundos cuando su ritmo cardíaco
está por encima de la zona, o Below Zone (Por debajo) durante 3 segundos cuando su ritmo cardíaco está por debajo de la zona.
NOTA
Si el total de vueltas y registros llega a 100, o el total de horas de ejercicio llega a 80, se oirá un pitido largo y aparecerá memory full
(memoria llena) en pantalla. Deberá borrar la memoria para poder continuar con el ejercicio.
NOTA
Si el reloj considera que la cinta del pecho se está quedando sin pila, aparecerá HR belt low batt. (cinta RC pila agotada).
VER REGISTRO DEL EJERCICIO DESPUÉS DE CORRER
Después de correr, puede ver en su reloj los registros de su ejercicio siguiendo los pasos que aparecen a continuación.
Cómo consultar registros de ejercicio:
1. En el modo
RUNNING (Footing), pulse el botón inferior (3) para acceder a la memoria de footing (mem). La pantalla muestra la fecha y hora de las últimas sesiones de
ejercicio. Pulse el botón central (2) para seleccionar la sesión que desee y a continuación pulse el botón superior (1) para entrar.
NOTA
Si quiere borrar toda la memoria, pulse el botón central (2) hasta que aparezca Clear all (Borrarlo todo). Pulse el botón (1) para acceder, y a continuación pulse el
botón (1) de nuevo para seleccionar yes (sí) para confirmar que quiere borrar la memoria, o el botón inferior (3) para seleccionar no y volver a la pantalla de registros.
2. Pulse el botón superior (1) para acceder al modo View Summary (Ver resumen). Pulse el botón superior (1) de nuevo para iniciar la visualización, y a continuación el
botón central (2) para ver los registros.
O bien
Pulse el botón superior (3) para acceder.
3. Pulse el botón superior (
2) para acceder al modo View Lap (Ver vuelta). Pulse el botón superior (1) de nuevo para iniciar la visualización, y a continuación el botón central
(2) para ver la vuelta que desee.
4. Pulse el botón superior (
1) de nuevo para iniciar la visualización, y a continuación el botón central (2) para ver los registros.
O bien
Pulse el botón superior (3) para acceder.
Other
dat
a
Lap No.
Page 68

ES
VER REGISTRO DEL EJERCICIO EN LA APLICACIÓN
(Footing).
2. Los registros de footing aparecen en una lista por fecha y hora. Siga los pasos siguientes, por favor.
•
Toque el que desee ver o toque
para transmitir los datos por correo electrónico.
Desplace la pantalla a izquierda o derecha para ver el resto de registros.
3.
Toque
OVERALL RESULT
(RESULTADO GENERAL) para acceder. A continuación puede tocar
(SEMANA),
(MES) y
ANNUAL
(ANUAL) para ver todas las
gráfi cas generales. Desplace la pantalla a izquierda o derecha para ver las gráfi cas por unidad de tiempo. Toque todas las barras de la gráfi ca y aparecerán los datos
correspondientes; vuelva a tocar para que desaparezcan.
4. Toque
en la pantalla para salir.
Page 69

11
ES
PERFIL DE CICLISMO
CONFIGURACIÓN
Puede configurar todo el perfil de ciclismo desde la sección de SETUP (CONFIGURACIÓN) del RUNNING PROFILE (PERFIL DE FOOTING), excepto el ajuste del tamaño
de la rueda.
NOTA
Asegúrese de que el sensor para bicicleta esté acoplado con el reloj antes de empezar a ir en bicicleta.
Los elementos principales de la configuración son:
• Lap
• Vuelta
• Intervalo
• Descanso
• Zona de RC
• Tamaño de la rueda
Configuración del tamaño de la rueda
1. En modo
CYCLING (CICLISMO), pulse el botón
superior (1) para acceder, y en la pantalla aparecerá
el icono de sensor acoplado . Pulse el botón inferior
(3) para omitir este paso si el sensor ya está acoplado.
2. Pulse el botón central (
2) para acceder al modo setup (configuración).
3. Pulse el botón central (
2) hasta que aparezca adjust Wheel size (introduzca tamaño de la rueda).
4. Pulse el botón superior (
1) para acceder.
5. Pulse el botón superior (
1) de nuevo para incrementar el valor, o pulse el botón inferior (3) para reducirlo.
6. Pulse el botón central (
2) para confirmar la selección.
REFERENCIA ÚTIL
Acerca del tamaño de la rueda de la bicicleta
Consulte el ETRTO (diámetro de la rueda) en la rueda y contrástelo con la columna derecha de la tabla siguiente. Una vez conectado el sensor para bicicleta, introduzca
el ajuste de tamaño de rueda correspondiente.
ETRTO Diámetro de la rueda (pulgadas) Ajuste de tamaño de la rueda (mm)
25-559 26 x 1,0 1884
23-571 650 x 23C 1909
35-559 26 x 1,50 1947
37-622 700 x 35C 1958
47-559 26 x 1,95 2022
20-622 700 x 20C 2051
52-559 26 x 2,0 2054
23-622 700 x 23C 2070
25-622 700 x 25C 2080
28-622 700 x 28 2101
32-622 700 x 32C 2126
42-622 700 x 40C 2189
47-622 700 x 47C 2220
NOTA
Los tamaños de la rueda de esta tabla sirven solamente como referencia, ya que el tamaño de la rueda depende del tipo de la rueda y de la presión del aire.
VER REGISTRO DEL EJERCICIO MIENTRAS VA EN BICICLETA
Puede empezar siguiendo los pasos que encontrará a continuación, y si configura un Interval (intervalo), la distancia o el cronómetro iniciarán la cuenta atrás.
NOTA
Asegúrese de que el reloj tenga memoria suficiente; de lo contrario en la pantalla aparece no memory (no hay datos) cuando pulse el botón después del modo
CYCLING (Ciclismo).
Page 70

12
ES
Para visualizar registros de ciclismo:
1. En modo
CYCLING (CICLISMO), pulse el botón superior (1) para acceder, y en la pantalla aparecerá el icono de sensor acoplado . Pulse el botón inferior (3) para omitir
la búsqueda si el sensor ya está acoplado.
2. Pulse el botón superior (1) para acceder al modo start (inicio). El recuento empieza mientras parpadea. Lectura de ritmo cardiaco con icono ( ) y pantalla que
cuenta la duración del ejercicio (00’00’00).
3. Pulse el botón central (2). Puede ver la distancia total (km) /velocidad (km/h), recuento de cadencia (rpm), recuento de calorías (Cal) y pantalla de la hora.
• Si se ha activado Auto lap (Vuelta automática), los datos de vueltas y tiempo se mostrarán automáticamente en la pantalla cuando
lleguen al ajuste.
O bein
• Si se ha activado Manual lap (Vuelta manual), pulse el botón inferior (3) para configurar una vuelta manualmente.
O bein
Mientras visualice esta pantalla, si pulsa el botón superior (
1) para interrumpir el recuento, deja de parpadear, pulse el botón superior (1) para seleccionar continue
(continuar) contando o pulse el botón inferior (3) para seleccionar stop (parar) de contar. Si pulsa el botón inferior (3) para parar de contar, el modo CYCLING (CICLISMO)
aparece en pantalla.
NOTA
Si configura el reloj para que alterne pantallas automáticamente, las últimas cinco pantallas se alternarán automáticamente cada 5 segundos.
Consulte SET USER PROFILE (Configurar perfil de usuario) para activar la función de alternancia.
NOTA
Si activa la HR zone (Zona de ritmo cardíaco), el reloj muestra Above Zone (Por encima) durante 3 segundos cuando su ritmo cardíaco está
por encima de la zona, o Below Zone (Por debajo) durante 3 segundos cuando su ritmo cardíaco está por debajo de la zona.
NOTA
Si el total de vueltas y registros llega a 100, o el total de horas de ejercicio llega a 80, se oirá un pitido largo y aparecerá memory full
(memoria llena) en pantalla. Deberá borrar la memoria para poder continuar con el ejercicio.
NOTA
Si el reloj considera que la cinta del pecho se está quedando sin pila, aparecerá Bike pod low batt. (sensor para bicicleta pila agotada).
VER REGISTRO DEL EJERCICIO DESPUÉS DE IR EN BICICLETA
Después de ir en bicicleta, puede ver en su reloj los registros de su ejercicio siguiendo los pasos que aparecen a continuación.
Cómo consultar registros de ejercicio:
1. En el modo
CYCLING (Ciclismo), pulse el botón inferior (3) para acceder a la memoria de ciclismo (mem). La pantalla muestra la fecha y hora de las últimas sesiones
de ejercicio. Pulse el botón central (2) para seleccionar la sesión que desee y a continuación pulse el botón superior (1) para entrar.
NOTA
Si quiere borrar toda la memoria, pulse el botón central (2) hasta que aparezca Clear all (Borrarlo todo). Pulse el botón (1) para acceder, y a continuación pulse el
botón (1) de nuevo para seleccionar yes (sí) para confirmar que quiere borrar la memoria, o el botón inferior (3) para seleccionar no y volver a la pantalla de registros.
2. Pulse el botón superior (1) para acceder al modo View Summary (Ver resumen). Pulse el botón superior (1) de nuevo para iniciar la visualización, y a continuación el
botón central (2) para ver los registros.
O bien
Pulse el botón superior (3) para acceder.
3. Pulse el botón superior (2) para acceder al modo View Lap (Ver vuelta). Press top (1) button to view Lap 1.
4. Pulse el botón superior (1) de nuevo para iniciar la visualización, y a continuación el botón central (2) para ver los registros.
5. Pulse el botón central (2) para ver la vuelta que desees. Siga el paso 4 que aparece más arriba.
O bien
Pulse el botón superior (3) para acceder.
Page 71

ES
VER REGISTRO DEL EJERCICIO EN LA APLICACIÓN
CYCLING
(Ciclismo).
2. Los registros de ciclismo aparecen en una lista por fecha y hora. Siga los pasos siguientes, por favor.
Toque el que desee ver o toque
para transmitir los datos por correo electrónico.
Desplace la pantalla a izquierda o derecha para ver el resto de registros.
3.
Toque
OVERALL RESULT
(RESULTADO GENERAL) para acceder. A continuación puede tocar
WEEK
(SEMANA),
(MES) y
ANNUAL
(ANUAL) para ver todas las gráfi cas
generales. Desplace la pantalla a izquierda o derecha para ver las gráfi cas por unidad de tiempo. Toque todas las barras de la gráfi ca y aparecerán los datos correspondientes
4. Toque
en la pantalla para salir.
Page 72

ES
PERFIL NATACIÓN
CONFIGURACIÓN
SWIMMING
(NATACIÓN), pulse el botón superior (
) para acceder al modo de
setup
(confi guración). Los elementos
Tipo de natación
Tamaño de la piscina
Calibración
No pulse los botones mientras esté en el agua, ni nadando ni para modifi car
dejara de funcionar correctamente.
Confi guración del tipo de natación
Confi guración del tipo de natación
SWIMMING
(NATACIÓN), pulse el botón superior (
) para acceder
al modo de
setup
(confi guración).
2. Pulse el botón central (
2
) para acceder al modo
swim type
(tipo de natación), y a
continuación pulse el botón superior (
) o el botón inferior (
3
) para elegir entre
ft.crawl
(crol hacia delante),
backstr
(espalda),
breastsr
(braza) y
butterfl y
(mariposa).
3. Pulse el botón central (
) de nuevo para confi rmar la selección.
Confi guración del tamaño de la piscina
Confi guración del tamaño de la piscina
SWIMMING
(NATACIÓN), pulse el botón superior (
) para acceder al modo de
setup
(confi guración).
2. Toque el botón central (
) hasta acceder al modo de tamaño de piscina, y a continuación pulse el botón superior (
) o el botón inferior (
3
) para seleccionar entre
50m
(50 metros) y
25m
(25 metros).
3. Pulse el botón central (
) de nuevo para confi rmar la selección.
Calibración
SWIMMING
(NATACIÓN), pulse el botón superior (
) para acceder al modo de
setup
(confi guración).
2. Toque el botón central (
2
) hasta que aparezca
start cali.
(iniciar calibración).
3. Pulse el botón superior (
) para iniciar la calibración.
O BIEN
Pulse el botón inferior (
3
) para salir.
4. Se mostrarán los datos de recuento de largos. Deberá nadar 2 largos y pulsar manualmente el botón superior (
) sobre la superfi cie del agua para parar el recuento. En
cuanto complete la calibración correctamente, aparecerá
cali.done
(calibración realizada) y al cabo de 2 segundos la pantalla volverá a la pantalla de
setup
(confi guración).
O BIEN
Si quiere interrumpir la calibración, pulse el botón superior (
) y a continuación aparecerá
cali.failed
(calibración no realizada).
VER EL REGISTRO DEL EJERCICIO MIENTRAS NADA
Asegúrese de que el reloj tenga memoria sufi ciente; de lo contrario en la pantalla aparece
no memory
(no hay datos) cuando pulse el
SWIMMING
(NATACIÓN), pulse el botón superior (
) para acceder al modo de
setup
(confi guración).
2. Pulse el botón central (
) para seleccionar
swim type
(tipo de natación) y
pool size
(tamaño de la piscina). Consulte las secciones anteriores.
3. El reloj empieza a contar. Mientras nada solo podrá consultar
Auto lap
(Largo automático); la brazada (
stk
), el tiempo (
00’00’00
) y el recuento de calorías (
Cal
) aparecerán
automáticamente en pantalla. Los datos de recuento de largos se mostrarán cuando lleguen al ajuste.
O BIEN
) para detener el recuento;
dejará de parpadear. A continuación elija
continue
(continuar) o stop (parar). Si pulsa el
3
) para parar de contar, el modo
SWIMMING
(NATACIÓN) aparecerá en pantalla. Vaya directamente al paso 1 para volver a contar.
A
Si confi gura el reloj para que alterne pantallas automáticamente, las últimas cuatro pantallas se alternarán automáticamente cada 5 segundos. Consulte
SET USER
(Confi gurar perfi l de usuario) para activar la función de alternancia
Page 73

ES
NOTA
Si el total de largos llega a 100, o el total de horas de ejercicio llega a 80, se oirá un pitido largo y aparecerá
memory full
(memoria llena) en pantalla. Deberá borrar
VER REGISTRO DEL EJERCICIO DESPUÉS DEL NADAR
Cómo consultar registros de ejercicio:
Cómo consultar registros de ejercicio:
SWIMMING
(NATACIÓN), pulse el botón superior (
3
) para acceder. La pantalla muestra la fecha y hora de las últimas sesiones de ejercicio. Pulse el botón
central (
) para seleccionar la sesión que desee y a continuación pulse el botón superior (
) para entrar.
Si quiere borrar toda la memoria, pulse el botón central (
) hasta que aparezca
Clear all
(Borrarlo todo). Pulse el botón (
) para acceder, y a continuación pulse el
) de nuevo para seleccionar
yes
(sí) para confi rmar que quiere borrar la memoria, o el botón inferior (
3
) para seleccionar
no
y volver a la pantalla de registros.
2. Pulse el botón superior (
) para acceder al modo
View Summary
(Ver resumen). Pulse el botón superior (
) de nuevo para iniciar la visualización, y a continuación el
2
) para ver los registros.
O BIEN
Pulse el botón inferior (
3
) para salir.
3. Pulse el botón superior (
) para acceder al modo
View Lap
(Ver largo). Pulse el botón superior (
) para ver
(Largo 1).
4. Pulse el botón superior (
) de nuevo para iniciar la visualización, y a continuación el botón central (
2
) para ver los registros.
5. Pulse el botón central (
2
) para ver el largo deseado. Siga el paso 4 que aparece más arriba.
O BIEN
Pulse el botón inferior (
3
) para salir.
Other
data
Lap No
VER REGISTRO DEL EJERCICIO EN LA APLICACIÓN
(Footing).
2. Los registros de la sesión de natación aparecen en una lista por fecha y hora. Siga los pasos siguientes, por favor.
Toque el que desee ver o toque
para transmitir los datos por correo electrónico.
Desplace la pantalla a izquierda o derecha para ver el resto de registros.
3.
Toque
OVERALL RESULT
(RESULTADO GENERAL) para acceder. A continuación puede tocar
WEEK
(SEMANA),
(MES) y
ANNUAL
(ANUAL) para ver todas las
gráfi cas generales. Desplace la pantalla a izquierda o derecha para ver las gráfi cas por unidad de tiempo. Toque todas las barras de la gráfi ca y aparecerán los datos
correspondientes; vuelva a tocar para que desaparezcan.
4. Toque
en la pantalla para salir.
Page 74

ES
Page 75

ES
PERFIL DE EJERCICIO
CONFIGURACIÓN
Antes de hacer ejercicios de fuerza, puede confi gurar el ejercicio en el reloj. En el modo de
WORKOUT
(EJERCICIO), pulse el botón superior (
) para acceder al modo
setup
(confi guración). Los elementos principales de la confi guración son:
Sets
Ajustes
Repeticiones
Tiempo de descanso
MET
skip
(omitir) en el modo
setup
(confi guración); en
tal caso el reloj contará automáticamente las series (valor predeterminado = 12
confi guración del ejercicio de fuerza.
) para hacer una pausa, y púlselo de nuevo para
continuar, o pulse el botón inferior (
3
) para parar. Los resultados del ejercicio aparecen en pantalla.
A
El recuento de tiempo se pondrá a cero a las 12 AM de cada medianoche.
Confi guración de serie de ejercicios
Confi guración de serie de ejercicios
WORKOUT
(EJERCICIO), pulse el botón superior (
) para acceder al modo de
setup
(confi guración).
2. Pulse el botón central (
) para introducir
yes
(sí) en el modo
setup
(confi guración). Pulse el botón superior (
) para acceder al modo
Sets
(series).
3. Pulse el botón superior (
) para incrementar el valor, o el botón inferior (
3
) para reducir el valor.
4. Pulse el botón central (
2
) para confi rmar la selección.
El intervalo de series de ejercicio es 1-9.
Ajuste de repeticiones
Ajuste de repeticiones
WORKOUT
(EJERCICIO), pulse el botón superior (
) para acceder al modo de
setup
(confi guración).
2. Pulse el botón central (
2
) para introducir
yes
(sí) en el modo
setup
(confi guración). Pulse el botón inferior (
) para omitir y a continuación el central (
2
) para acceder al
(repetición).
3. Pulse el botón (
) para incrementar el valor, o el botón (
3
) para reducirlo.
4. Pulse el botón central (
) para confi rmar la selección.
A
El intervalo de repeticiones es 1-99.
Confi guración de tiempo de descanso
Confi guración de tiempo de descanso
WORKOUT
(EJERCICIO), pulse el botón superior (
) para acceder al modo de
setup
(confi guración).
2. Pulse el botón central (
) para introducir
yes
(sí) en el modo
setup
(confi guración). Pulse el botón inferior (
) y a continuación el central (
) hasta que aparezca el modo
(Tiempo de descanso).
3. Pulse el botón (
) para incrementar el valor, o el botón (
3
) para reducirlo.
4. Pulse el botón central (
) para confi rmar la selección.
A
El intervalo de tiempo de descanse es de 15-30 segundos. El tiempo de descanso hace una cuenta atrás.
Ajuste de METs
Ajuste de METs
WORKOUT
(EJERCICIO), pulse el botón superior (
) para acceder al modo de
setup
(confi guración).
2. Pulse el botón central (
2
) para introducir
yes
(sí) en el modo setup (confi guración). Pulse el botón inferior (
) y a continuación el central (
2
) hasta que aparezca el modo
(equivalentes metabólicos).
3. Pulse el botón (
) para incrementar el valor, o el botón (
3
) para reducirlo.
4. Pulse el botón central (
2
) para confi rmar la selección. El reloj empieza automáticamente a contar.
El intervalo de confi guración de METs es 3-13.
REFERENCIA ÚTIL
distintas actividades varía según la intensidad y el tipo de ejercicio.
Page 76

ES
energético de muchas actividades, generalmente haciendo un seguimiento del consumo de oxígeno durante la actividad, hasta calcular una inhalación media de oxígeno
A continuación aparecen algunos valores MET relacionados con los distintos tipos de ejercicio, para que tenga una referencia:
A
Los valores MET de cada actividad son aproximaciones; podría haber importantes variaciones individuales.
TIPO DE EJERCICIO
Valor MET
2,5
3,0
Aeróbic acuático, calistenia acuática
4,0
5,5
6,0
7,0
9,0
VER REGISTRO DEL EJERCICIO DURANTE EL EJERCICIO
(MET) en el reloj, puede iniciar el ejercicio. El reloj cuenta automáticamente. Puede ver la repetición y el tiempo, así como la cuenta
atrás para el tiempo de descanso.
) para hacer una pausa. Si decide detener el ejercicio, pulse el botón inferior (
3
). La pantalla muestra el consumo total de calorías y el tiempo. La
WORKOUT
(EJERCICIO) al cabo de 3 segundos.
A
a
El reloj le avisa del tiempo de descanso. Hay un pitido corto en los últimos cinco segundos y un pitido largo en el momento en que se debe iniciar o fi nalizar el
tiempo de descanso mientras la pantalla parpadea.
VER REGISTRO DEL EJERCICIO DESPUÉS DEL EJERCICIO
Cómo consultar registros de ejercicio:
Cómo consultar registros de ejercicio:
WORKOUT
(EJERCICIO), pulse el botón inferior (
3
) para acceder a la memoria de ciclismo (
mem
).
2. El registro más reciente aparece primero. Pulse el botón central (
2
) para ver otros registros por fecha y hora. Pulse el botón superior (
) para acceder a un
Si el registro que visualiza es el que tiene la confi guración, pulse el botón central (
2
) para ver el total de calorías, tiempo, series y repeticiones.
O bien
Si el registro que está visualizando no tiene la confi guración, solo podrá ver el total de repeticiones y tiempo.
O bien
Si quiere borrar toda la memoria, pulse el botón central (
) hasta que aparezca
Clear all
(Borrarlo todo). Pulse el botón superior (
) para seleccionar
yes
(sí) para borrar, y
a continuación aparecerá
(listo) en pantalla, o bien pulse el botón inferior (
3
) para seleccionar
no
y cancelar la operación de borrado.
Aparece
(no hay datos) si se intenta ver el registro pero no hay memoria.
Page 77

ES
VER REGISTRO DEL EJERCICIO EN LA APLICACIÓN
WORKOUT
(EJERCICIO).
2. Los registros de ejercicio aparecen en una lista por fecha y hora.
Toque el que desee ver o toque
para transmitir los datos por correo electrónico.
•
Desplace la pantalla a izquierda o derecha para ver el resto de registros.
3.
Toque
OVERALL RESULT
(RESULTADO GENERAL) para acceder. A continuación puede tocar
(SEMANA),
(MES) y
ANNUAL
(ANUAL) para ver todas las
gráfi cas generales. Desplace la pantalla a izquierda o derecha para ver las gráfi cas por unidad de tiempo. Toque todas las barras de la gráfi ca y aparecerán los datos
correspondientes; vuelva a tocar para que desaparezcan.
4. Toque
en la pantalla para salir.
Page 78

20
ES
PERFIL DE ACTIVIDAD
ACTIVITY
(SEGUIMIENTO DE LA ACTIVIDAD) de su dispositivo móvil. Este perfi l es adecuado para hacer un seguimiento de la actividad física de intensidad moderada.
ACTIVITY
(ACTIVIDAD), pulse el botón superior (
).
La pantalla mostrará
be active
(sea activo) y se reproducirá una animación.
Si cumple con el objetivo, aparece
target done!
(¡objetivo cumplido!).
Si quiere salir, pulse el botón inferior (
3
).
A
Excepto cuando cambie las pilas, el reloj hace un seguimiento y recuento automático de su actividad, incluso si sale del perfi l.
REFERENCIA ÚTIL
OMS - Comisión Europea
OMS - Comisión Europea
semana.” “Debería añadir 2 o 3 días a la semana actividades para incrementar la fuerza y la resistencia de los músculosActivities to increase muscular.”
Centros de control y prevención de enfermedades de los Estados Unidos:
Centros de control y prevención de enfermedades de los Estados Unidos:
estiramientos musculares 2 días más por semana trabajando grupos musculares principales (piernas, caderas, espalda, abdomen, pecho, hombros y brazos).”
<60
<60
60-96
60-107
3
96-124
4
Alta (6,0-8,99 equivalentes metabólicos)
5
>153
>162
VISUALIZAR REGISTRO DESPUÉS DE LA ACTIVIDAD
ACTIVITY
(actividad), pulse el botón superior (
3
) para acceder. Aparecerá en pantalla
Today Data
(Datos de hoy).
2. Pulse el botón superior (
), y a continuación el botón central (
) para ver distintos registros, como el volumen de tiempo restante (
), el volumen de tiempo de la
actividad (
), pasos y distancia.
ACTIVITY
(actividad), pulse el botón superior (
3
) para acceder. Toque el botón central (
2
) hasta que aparezca Week Data (Datos semanales).
2. Pulse el botón superior (
) para entrar. A continuación, pulse el botón central (
2
) para ver el registro de
This Week
(Esta semana) o
(Semana pasada). Pulse
el botón superior (
) para entrar.
3. Pulse el botón central (
) para ver distintos registros, como el volumen de tiempo restante
(
), el volumen de tiempo de la actividad (
), pasos y distancia. Si
consulta el registro de esta semana, también se mostrará el incremento o la reducción del porcentaje de la actividad que ha alcanzado en comparación con el registro
de la semana anterior.
A
This Week
(esta semana) se refi ere desde el domingo hasta la fecha de hoy; Last Week (la semana pasada) signifi ca desde el domingo pasado hasta el sábado anterior.
Page 79

21
ES
VER REGISTRO DE LA ACTIVIDAD EN LA APLICACIÓN
ACTIVITY
(actividad).
2. Los registros de actividad aparecen en una lista por fecha y hora. Siga los pasos siguientes, por favor.
•
Toque el que desee ver o toque
para transmitir los datos por correo electrónico.
Desplace la pantalla a izquierda o derecha para ver el resto de registros.
3.
Toque
OVERALL RESULT
(RESULTADO GENERAL) para acceder. A continuación puede tocar
(SEMANA),
(MES) y
ANNUAL
(ANUAL) para ver todas las
gráfi cas generales. Desplace la pantalla a izquierda o derecha para ver las gráfi cas por unidad de tiempo. Toque todas las barras de la gráfi ca y aparecerán los datos
correspondientes; vuelva a tocar para que desaparezcan.
4. Toque
en la pantalla para salir.
Page 80

22
ES
PERFIL METEOROLÓGICO
A continuación aparecen los iconos meteorológicos:
Signifi cado
Soleado
CONFIGURACIÓN
WEATHER
(SITUACION METEROLOGICA)
)
para entrar.
2. Pulse el botón central (
) para acceder al modo de confi guración.
3. Pulse el botón superior (
) o el inferior (
3
) para seleccionar
ºC
o
ºF
4. Pulse el botón central (
2
) para confi rmar la selección.
VER TEMPERATURA Y PREVISIÓN METEOROLÓGICA
Solo puede ver la temperatura y la previsión meteorológica en el reloj.
WEATHER
(SITUACION METEROLOGICA)
)
para acceder.
2. Pulse el botón central (
2
) para acceder al modo
start
(inicio). Se mostrarán la hora
actual, la temperatura y el icono de la previsión meteorológica.
3. Pulse el botón inferior (
3
) para salir.
VER LA SITUACIÓN METEOROLÓGICA EN APLICACIÓN
Solo puede ver la temperatura y la previsión meteorológica en el reloj.
Page 81

23
ES
PERFIL DE SENDERISMO
confi guración incluye los elementos siguientes:
Altura
Nivel de mar
CONFIGURACIÓN
Confi guración de altitud y nivel del mar
Confi guración de altitud y nivel del mar
confi guración
2. Pulse el botón (
) para confi gurar la altitud y la unidad de medición (
o
ft
), el nivel del mar y su unidad de medición (
inHg
o
hPa
).
3. Pulse el botón superior (
) para incrementar el valor o seleccionar la opción, o pulse el botón inferior (
3
) para reducir el valor o seleccionar la opción.
VISUALIZAR REGISTRO DURANTE EL SENDERISMO
Confi guración de altitud y nivel del agua del mar:
(SENDERISMO), pulse el botón superior para acceder al modo de
confi guración
2. Pulse el botón superior (
) de nuevo cuando empiece a caminar. La pantalla muestra la altitud a la que se encuentra y los registros de tiempo. Pulse el botón superior
(
) de nuevo para detener el recuento de tiempo.
O bien
) y manténgalo pulsado para volver a poner el tiempo a
0:00’00
3.
2
) para ver otras pantallas y datos.
Altitud a la que se encuentra actualmente y diferencia de altitud
Presión local y presión a nivel del mar
Presión local y hora actual
4.
3
) para acceder.
VISUALIZAR REGISTRO DESPUÉS DE LA EXCURSIÓN
Cómo visualizar registros de memoria:
Cómo visualizar registros de memoria:
(SENDERISMO), pulse el botón inferior (
3
) para acceder al modo de memoria.Verá el total de informes de tiempo libre, fecha y hora.
2. Pulse el botón central (
) para seleccionar el registro deseado.
3. Pulse el botón superior (
) para acceder.
4. Pulse el botón central (
2
) para ver tiempo acumulado de una excursión, un gráfi co que representa su pantalla de altitud, pantalla de subida y bajada de altitud y pantalla
de punto más alto.
5. Pulse el botón superior (
3
) para salir.
VER REGISTRO DE LA EXCURSIÓN EN LA APLICACIÓN
(SENDERISMO).
2. Los registros de
(SENDERISMO) están ordenados por fecha y hora. Siga los pasos siguientes, por favor.
Toque el que desee ver o toque
(EXPORTAR) para transmitir los datos por correo electrónico.
•
Desplace la pantalla a izquierda o derecha para ver el resto de registros.
Page 82

24
ES
3.
Toque
OVERALL RESULT
(RESULTADO GENERAL) para acceder. A continuación puede tocar
WEEK
(SEMANA),
(MES) y
ANNUAL
(ANUAL) para ver todas las
gráfi cas generales. Desplace la pantalla a izquierda o derecha para ver las gráfi cas por unidad de tiempo. Toque todas las barras de la gráfi ca y aparecerán los datos
correspondientes; vuelva a tocar para que desaparezcan.
4. Toque
en la pantalla para salir.
Page 83

25
ES
PERFIL DE PESCA
(PESCA) para prever los mejores momentos para pescar en su ubicación los próximos 14 días.
Tiene que confi gurarlo antes de usarlo. Los elementos principales de la confi guración son:
Latitud
Longitud
CONFIGURACIÓN
Siga los pasos siguientes, por favor.
Confi guración de latitud y longitud:
Confi guración de latitud y longitud:
(PESCA), pulse el botón superior (
) para acceder al modo de setup (confi guración).
2. Pulse el botón central (
) para acceder al modo de latitud y longitud. Puede pulsar el botón superior (
) o el botón inferior (
3
) para seleccionar la unidad de medición
(
orth (Norte),
S
outh (Sur),
ast (Este) y
W
est (Oeste))
3. Pulse el botón central (
2
) para confi rmar la selección.
4. Puede confi gurar el valor. Pulse el botón (
) para incrementar el valor, o el botón (
3
) para reducirlo.
5. Pulse el botón central (
2
) para confi rmar el ajuste.
VER EL ESTADO MIENTRAS PESCA
(PESCA), pulse el botón superior (
) para acceder al modo de setup (confi guración).
2. Aparecerá
Today
(hoy) y al cabo de 3 segundos aparecerá la gráfi ca de previsión. Las gráfi cas siguientes son para su referencia y para reconocer el estado.
3. Pulse el botón superior (
3
) para salir.
(PESCA), pulse el botón superior (
) para acceder al modo de setup (confi guración).
2. Pulse el botón superior (
) para acceder a la pantalla
(Próximo día); la gráfi ca relacionada tarda 3 segundos en salir. Pulse el botón superior (
) para
seleccionar el día deseado.
O bien
Pulse el botón central (
2
) para acceder a la pantalla
(Próximos 14 días); la gráfi ca relacionada tarda 3 segundos en salir. Pulse el botón superior (
2
) para
seleccionar el día deseado.
3. Pulse el botón superior (
3
) para salir.
Page 84

26
ES
VER REGISTRO DE LA PESCA EN LA APLICACIÓN
Puede cargar la memoria a su aplicación y ver los registros de la pesca en el dispositivo móvil.
1. Introduzca la página de perfiles en su aplicación. Toque el icono de perfil FISHING (PESCA).
2. En el mapa hay una marca morada con latitud y longitud en la ubicación de la predicción, o
toque para mostrar su ubicación actual.
3. Toque
en la pantalla para salir.
RESISTENCIA AL AGUA
El reloj Ssmart es resistente a hasta 5 ATM (50 m o 164 pies). Esto significa que puede utilizarlo para nadar u otras actividades deportivas acuáticas (como el surf), pero
que no debe utilizarse para hacer submarinismo ni inmersión en aguas profundas.
NOTA
• Asegúrese de que los botones y el compartimiento para pilas estén totalmente seguros e intactos antes de exponer el reloj al exceso de agua.
• Evite pulsar los botones mientras estén sumergidos o durante tormentas intensas, ya que podría provocar la entrada de agua en el reloj, y ello, a su vez, dar lugar a mal
funcionamiento.
• Aunque el reloj es resistente al agua, puesto que las señales de radio no se transmiten por el agua, no podrá haber transmisiones entre el reloj y los accesorios, como
la cinta para el pecho, si el reloj está sumergido.
ILUMINACIÓN DE LA PANTALLA
Toque dos veces para activar la retroiluminación. Si quiere que se mantenga encendida más tiempo, toque la esfera tres veces consecutivamente.
CÓMO CAMBIAR LAS PILAS
Si la pila de su reloj se está agotando, si en el modo CONNECT la batería está baja, aparecerá en pantalla CONNECT, pls change batt.
for update (cambie la pila). Para que el resultado sea óptimo, reemplace la pila tal y como se muestra a continuación.
NOTA
Puede comprar la pila de recambio en su tienda de electrónica habitual o llamar a su asesor del servicio de atención al consumidor.
Cómo cambiar la pila:
1. Con una moneda, abra el compartimiento para pilas.
2. Retire la pila vieja e introduzca una pila de litio CR2032 de 3V nueva.
3. Fije la tapa utilizando la moneda para que quede otra vez en su sitio.
FICHA TÉCNICA
RELOJ
Formato de la hora formato de 12 ó 24 horas / minuto / segundo
Formato de la fecha DD / MM o MM / DD
Años 2012 - 2061
Alarma
Alarma con ajuste diario, días laborables o fin de semana
Solo disponible para el tiempo 1
ENTRENAMIENTO
Gama de tiempo de ejercicio
00:00:00 a 99:59:00
Intervalo de tiempo de descanso 00:00:00 a 99:59:00
Zona de ritmo cardiaco objetivo Quemar grasas, aeróbico, anaeróico
Alcance del ritmo cardíaco
0, 30-240 bpm
Cálculo de distancia 0 a -599,9 (en km o millas)
Alcance del recuento de pasos Entre 0 y 99999
Alcance del temporizador de pasos 00:00:00 a 99:59:00
Page 85

27
ES
99
Gama de medición de cadencia
0 a 9999,99 (en km o millas)
Gama de medición de cadencia
Gama de calorías
87,5 a 9.999 kcal
0 a 100%
Alcance de distancia de calibración
0,4-2,0 km
Alcance de repetición de ejercicio
0-999
Alcance del tamaño de la rueda
800-3.000 mm
Alcance del tamaño del lago
25 m / 50 m
Alcance de valor MET
3-1 3 METS
Alcance de series de ejercicio
Alcance de repeticiones de ejercicio
Gama de peso
20-225 kg (44-496 lbs)
69-231 cm (2’3-7’7 pulgadas)
Alcance de calzada
22-152 cm (11-60 pulgadas)
ALIMENTACIÓN
Temperatura de funcionamiento
Temperatura de almacenamiento
PRECAUCIONES
con agua caliente o un jabón suave.
durante periodos larg
os de tiempo. De hacerlo podría provocar que el producto se estropeara.
atención al cliente.
A
www.oregonscientifi c.com
www.oregonscientifi c.com
actualizada del funcionamiento.
SOBRE OREGON SCIENTIFIC
Visite nuestro sitio web
www.oregon
www.oregon
scientifi c.com
para obtener más información sobre los productos de Oregon Scientifi c.
Si tiene alguna duda, póngase en contacto con nuestros servicios al cliente en info@oregonscientifi c.com.
EU-DECLARACIÓN DE CONFORMIDAD
eloj Ssmart
(Modelo: RA900/SE900) cumple con los requisitos esenciales y cualesquiera otras disposiciones
aplicables o exigibles de la Directiva 1999/5/CE. Tiene a su disposición una copia fi rmada y sellada de la Declaración de Conformidad, solicítela al Departamento de
Atención al Cliente de Oregon Scientifi c.
SES BAJO LA DIRECTIVA RTTE
odos los países de la UE, Suiza CH
y Norue
Page 86

1
FR
Montre Smart
Modèle : SE900/RA900
MODE D’EMPLOI
TABLE DES MATIÈRES
Introduction ......................................................................................................................................................................................................................................................... 2
Contenu De L’emballage
......................................................................................................................................................................................................................................................... 2
Boutons De Controle ......................................................................................................................................................................................................................................................... 2
Screen Display
......................................................................................................................................................................................................................................................... 2
Demarrage De La Montre (Premiere Fois)
............................................................................................................................................................................................................................. 2
Reglage De La Montre
.............................................................................................................................................................................................................................................. 2
Pour Sortir Vers L’aff ichage Horaire Par Defaut
...................... ....................... ..... ....................... ....................... ....................... ..... .................... 2
Reglage Du Profil Horaire
................................................................................................................................................................................................................................................. 2
Reglage Du Profil De L’utilisateur
................................................................................................................................................................................................................................................. 3
Application Oregon Scientific
............................................................................................................................................................................................................................ 4
Achat D’un Profil
.......................................................................................................................................................................................................................................... 4
Reglage Des Profils D’exercice
.......................................................................................................................................................................................................................................... 4
Connexion Au Telephone
.............................................................................................................................................................................................................................................. 4
Telechargement Des Profils Sur La Montre
....................................................................................................................................................................................................................... 4
Telechargement Des Donnees Sur L’appareil Portable
..................................................................................................................................................................................................... 5
Mise A Jour Du Systeme
............................................................................................................................................................................................................................................... 5
Reglage De Capteur
..................................................................................................................................................................................................................................................... 6
Ajout D’un Capteur
....................................................................................................................................................................................................................................... 6
Pour Retirer Un Capteur
....................................................................................................................................................................................................................................... 6
Commencer L’ Exercice
..................................................................................................................................................................................................................................................... 6
Profil Course A Pied..........................................................................................
........................................................................................................................................................... 7
Reglage
.............................................................................................................................................................................................................................................................. 7
Useful Reference
........................................................................................................................................................................................................................................... 8
Comment Voir L’enregistrement D’exercice Tout En Courant........................................................................................................................................................................................
...... 9
Voir L’enregistrement De L’exercice Apres Avoir Couru
.............................................................................................................................................................................................................. 9
Pour Voir Les Enregistrement D’exercice Dans L’application
.............................................................................................................................................................................................. 10
Profil Cyclisme..........................................................................................
........................................................................................................................................................... 11
Reglage
.............................................................................................................................................................................................................................................................. 11
Useful Reference
........................................................................................................................................................................................................................................... 11
Comment Voir L’enregistrement De L’exercice En Faisant Du Velo
........................................................................................................................................................................... 11
Voir Les Enregistrements D’exercice Apres Avoir Fait Du Cyclisme
................................................................................................................................................................................. 12
Pour Voir Les Enregistrement D’exercice Dans L’application
................................................................................................................................................................................... 13
Profil Natation
..................................................................................................................................................................................................................................................... 14
Reglage
.............................................................................................................................................................................................................................................................. 14
Pour Voir Les Enregistrements D’exercice En Nageant
.......................................................................................................................................................................................................... 14
Comment Voir Les Enregistrements D’exerciceapres Avoir Nage
............................................................................................................................................................................................ 15
Pour Voir Les Enregistrements D’exercice Dans L’ Application
................................................................................................................................................................................................ 16
Workout Profil .........................................................................................
........................................................................................................................................................... 17
Reglage
.............................................................................................................................................................................................................................................................. 17
Useful Reference
........................................................................................................................................................................................................................................... 18
Comment Voir L’enregistrement D’exercice En Faisant L’entrainement.......................................................................................................................................................................
...... 18
Voir L’enregistrementr De L’exercice Apres L’entrainement
............................................................................................................................................................................................. 18
Voir L’enregistrement D’exercice Dans L’application
............................................................................................................................................................................................. 19
Profil D’activite
..................................................................................................................................................................................................................................................... 20
Useful Reference
........................................................................................................................................................................................................................................... 20
Pour Voir Les Enregistrements Apres L’ Activite
....................................................................................................................................................................................................................... 20
Pour Voir Les Enregistrements D’activite Dans L’ Application
.................................................................................................................................................................................................. 21
Profil Meteo
..................................................................................................................................................................................................................................................... 22
Reglage
.............................................................................................................................................................................................................................................................. 22
Pour Voir La Temperature Et Le Temps
..................................................................................................................................................................................................................... 22
Pour Voir La Meteo Dans L’application
........................................................................................................................................................................................................................... 22
Profil Randonnee
..................................................................................................................................................................................................................................................... 23
Reglage
.............................................................................................................................................................................................................................................................. 23
Comment Voir Les Enregistrements Pendant La Randonnee
.................................................................................................................................................................................................. 23
Pour Voir Les Enregistrements Apres La Randonnee............................................................................................................................................................................................
...... 23
Pour Voir Les Enregistrements De Randonnee Dans L’application
...................................................................................................................................................................................... 24
Profil Peche
..................................................................................................................................................................................................................................................... 25
Reglage
.............................................................................................................................................................................................................................................................. 25
Pour Voir Le Statut Pendant La Peche
............................................................................................................................................................................................................................. 25
Voir Les Enregistrements De Peche Dans L’application
...................................................................................................................................................................................................... 26
Resistance A L’eau
................................................................................................................................................................................................................................................. 26
Retroeclairage
.............................................................................................................................................................................................................................................................. 26
Remplacement De La Pile.......................................................................................
........................................................................................................................................................... 26
Caracteristiques
...................................................................................................................................................................................................................................................... 27
Precautions
.......................................................................................................................................................................................................................................................... 28
À Propos D’oregon Scientific
..................................................................................................................................................................................................................................... 28
Eu – Déclaration De Conformit
é ............................................................................................................................................................................................................................. 28
Page 87

2
FR
INTRODUCTION
Merci d’avoir choisi la Ssmart Watch d’Oregon Scientific TM comme votre partenaire sportif qui peut être un outil de motivation superbe compatible avec une application
téléchargeable depuis votre appareil portable tel qu’un Smartphone ou une tablette PC. Cette montre multifonctions peut vous aider à atteindre et maintenir systématiquement
votre niveau d’exercice optimum. Partagez les bénéfices de votre exercice avec vos amis et votre famille !
Cette montre est actuellement compatible avec iPhone 4S / iPhone 5 / iPad 3 portant le logo
SMART READY
pour assurer une liaison de transmission fiable. Vous pourrez
trouver les derniers détails de compatibilité sur notre site web http://ssmart.oregonscientific.com.
Vous pouvez acheter nos accessoires séparément, tels que la sangle pectorale Bluetooth Smart Fabric Chest Belt (SZ999) et le module vélo Bluetooth Smart Bike Pod
(AD262) pour maximiser l’utilisation de votre montre.
IMPORTANT
Cette montre est à usage sportif uniquement et n’est pas supposée remplacer un appareil médical de quelque sorte que ce soit.
Remarque de brevet: Ce produit fait l’objet d’une demande de brevet aux États-Unis et en Europe
.
CONTENU DE L’EMBALLAGE
L’emballage devrait inclure les articles suivants:
1 x montre SE900 ou RA900
1 x pile lithium CR2032 3V (déjà installée dans la montre)
1 x carte de garantie Oregon Scientific
TM
1 x Guide de Démarrage Rapide
BOUTONS DE CONTROLE
1. Bouton du haut (1): Démarre / arrête le chronomètre; augmente les valeurs de réglage; entre les réglages du profil
2. Bouton du milieu (2): Alterne entre profils / affichages; navigue dans les données; confirme le réglage
3. Bouton du bas (3): Diminue les valeurs de réglage; entre dans la mémoire pour voir les enregistrements ; entre dans le
mode réglage; enregistre un tour de piste quand le chronomètre est en marche; sort de l’affichage courant et revient
à
l’écran précédent
4. Taper sur la vitre pour activer le rétroéclairage
AFFICHAGE À L’ÉCRAN
1. :Indique le statut de la pile qui est faible ou presque vide
2. :Indique que le bip sonore est éteint
3. :Indique que le minuteur d’exercice est activé ; clignote pendant le décompte
4. :Indique que l’alarme est en marche
DEMARRAGE DE LA MONTRE (PREMIERE FOIS)
Une fois la montre retirée de sa boite d’emballage, appuyer et tenir le bouton du haut (1) pour l’activer jusqu’à
ce que l’écran affiche l’heure.
Appuyer sur le bouton du haut (1) pour faire passer les affichages entre l’heure par défaut (Time 1) et l’autre heure
(Time 2). Appuyer sur le bouton du milieu (2) pour continuer à régler le profil horaire.
REGLAGE DE LA MONTRE
IMPORTANT
• Pour assurer des calculs précis de vos exercices, il vous est fortement recommandé de régler la montre et les profils d’utilisateur avant de faire votre exercice.
• Rappelez-vous de régler les profils après chaque changement de pile ou réinitialisation.
POUR SORTIR VERS L’AFFICHAGE HORAIRE PAR DEFAUT
Vous pouvez appuyer et tenir le bouton du milieu (2) pour sortir de n’importe quel affichage et retourner directement à l’affichage horaire par défaut à tout moment.
REGLAGE DU PROFIL HORAIRE
Après avoir démarré la montre pour la première fois, vous pouvez entrer en mode TIME setup en appuyant sur le bouton du milieu (2).
1. Appuyer sur le bouton du bas (3) pour commencer le réglage dans l’ordre.
2. Basculer le bouton du milieu (2) pour choisir l’option à régler, elles sont Time 1 (Heure 1), Date (Date), Time 2 (Heure 2), Alarm (Alarme),
Beep (Bip sonore) et Unit (unité de mesure).
1
2
3
4
1
3
4
2
Page 88

3
FR
Après avoir choisi une option, appuyer sur les boutons suivants pour changer les réglages :
1. Appuyer sur le bouton du haut (1) pour démarrer un affichage de réglage spécifique.
2. Appuyer sur le bouton du haut (1) pour augmenter les valeurs ou choisir une option ; Appuyer sur le bouton du bas (3) pour diminuer les valeurs ou choisir une option.
3. Appuyer sur le bouton du milieu (2) pour enregistrer le réglage et automatiquement aller vers un autre affichage de réglage (s’il y a lieu).
REMARQUE
Si vous voulez revenir à l’affichage en temps réel, retournez au mode de réglage horaire TIME setup et ensuite appuyez sur le bouton du haut (1).
REMARQUE
Si l’alarme est allumée, s’affiche à l’écran jusqu’à ce que vous ayez mis le réglage de l’alarme en position éteinte.
REMARQUE
Vous pouvez régler l’alarme indépendamment pour daily (quotidien)/ weekday (jours de la semaine)/ weekend (samedi et dimanche).
REMARQUE
Si la pile de votre montre est faible, le bip sonore est automatiquement éteint sans l’affichage .
REGLAGE DU PROFIL DE L’UTILISATEUR
Vous pouvez choisir de régler le profil d’utilisateur ou de télécharger des profils d’exerciceaprès avoir réglé le
profil horaire, mais nous recommandons fortement que vous régliez le profil d’utilisateur avant votre exercice.
Vous pouvez régler le profil d’utilisateur par l’intermédiaire de l’application sur votre appareil portable, et mettre
à jour le profil sur la montre.
En mode réglage d’utilisateur (USER setup), appuyer sur le bouton du haut (1) et continuer à régler votre profil
d’utilisateur dans l’ordre suivant : Gender (Sexe), Birthday (Anniversaire), Weight (poids et unité de mesure),
Height (taille et unité de mesure), Stride (foulée et unité de mesure), Toggle (Basculer) et Power Save (Économiser la pile),
en appuyant sur les boutons suivants :
1. A
ppuyer sur le bouton du haut (1) pour augmenter les valeurs ou choisir une option ; Appuyer sur le bouton du bas
(3) pour diminuer les valeurs ou choisir une option.
2. A
ppuyer sur le bouton milieu (2) pour enregistrer le réglage et automatiquement aller vers un autre affichage de réglage.
TIP
La longueur de foulée est la distance entre la pointe de votre pied avant et la pointe de votre pied arrière quand vous faites
un pas, ou la distance d’un talon à l’autre. Pour mesurer correctement la longueur d’une foulée individuelle, vous pouvez marcher
sur une certaine distance à votre rythme normal, et ensuite diviser par le nombre de pas, la valeur moyenne peut être utilisée pour
entrer dans la montre en tant que longueur de foulée.
Par exemple, le nombre total de pas que vous faites est 10, et la distance parcourue est 230 pouces (584,2 cm). Par conséquent, la valeur moyenne d’une foulée
est 23 pouces (59cm). .
Distance totale ÷ Nombre de pas = Longueur moyenne de foulée
230 ÷ 10 = 23 pouces
Page 89

4
FR
584.2cm
DÉBUTFI
N
(230 pouces)
Longueur de
foulée de talon
Longueur de
foulée de pointe
à pointe
REMARQUE
Pendant votre exercice, si vous voulez que la montre bascule automatiquement les données d’exercice, mettre le réglage Bascule (Toggle) en marche.
REMARQUE
Si le réglage d’économie de pile Power Save est mis sur on (marche), la montre se mettra en veille si aucun bouton n’a été utilisé pendant 30 minutes entre 23h00
et 06h00 (11pm et 6am). Tapoter le verre pour afficher l’écran de nouveau. Vous pouvez régler le temps de mise en veille voulu avec POWER SAVE SETTING dans l’application.
REMARQUE
Vous pouvez aussi changer l’heure et l’unité de mesure par l’intermédiaire de l’application.
IMPORTANT
Réinitialiser le profil d’utilisateur si la montre a été utilisée par une autre personne.
APPLICATION OREGON SCIENTIFIC
Télécharger l’application Oregon Scientific à partir de votre appareil portable. Elle est disponible chez Apple App Store (version iOS) ou Google Play Store (version Android,
prochainement disponible). Différents profils d’exercice peuvent être téléchargés gratuitement ou achetés directement à partir de l’application.
TIP
Pour trouver l’application rapidement, taper ‘Ssmart Watch’ comme mot-clé dans le moteur de recherche.
ACHAT D’UN PROFIL
En mode SHOP, les profils sont listés à l’écran. Tout profil qui a été installé sur votremontre
a la mention affichée à côté de l’icône de ce profil.
Si vous voulez acheter un profil, tapez sur l’icône de prix
et puis s’affiche.
Pour confirmer l’achat, taper de nouveau sur . Vous verrez les détails du profil et
pourrez continuer avec la procédure de payement.
REGLAGE DES PROFILS D’EXERCICE
Il y a différents profils d’exercice à télécharger dans l’application Oregon Scientific comme montré ci-dessous,
• Course
• Cyclisme
• Natation
• Entrainement
• Activité
• Pêche
À l’exception des profils ci-dessus, le modèle RA900 peut exclusivement installer les profils suivants.
• Randonnée
• Météo
CONNEXION AU TELEPHONE
TELECHARGEMENT DES PROFILS SUR LA MONTRE
Vous pouvez télécharger les profils d’exercice à partir de l’application sur votre montre. Choisissez jusqu’à 3 profils qui peuvent être changés n’importe quand.
1. En mode
, taper et choisir les profils d’exercice désirés sur l’appareil portable et ensuite taper .
2. Appuyer et basculer le bouton du milieu (2) sur le montre pour entrer en mode CONNECT (connexion). Appuyer sur le bouton du haut (1) pour entrer.
3. Taper sur CONNECT WITH WATCH (connexion à la montre) sur l’appareil portable pour initialiser la synchronisation tout en appuyant sur le bouton du haut (1) de
nouveau du la montre. Done (Fait) s’affiche sur la montre une fois la connexion et le téléchargement réussis.
Page 90

5
FR
Icone Signification
L’appareil portable cherche à se connecter à la montre.
Une fois la connexion réussie, le téléchargement commence.
REMARQUE
Si votre pile est faible, pls change batt.for update s’affiche et vous ne pouvez pas continuer à entrer dans les autres écrans.
TELECHARGEMENT DES DONNEES SUR L’APPAREIL PORTABLE
Vous pouvez télécharger les données de la montre vers l’application.
1. En mode CONNECT, appuyer sur le bouton du haut (1) pour entrer et basculer le bouton du milieu (2) pour entrer dans l’affichage upload memory (téléchargement de mémoire).
2. Appuyer sur le bouton du haut (1) pour entrer et choisir un profil d’exercice, basculer le bouton du milieu (2) pour choisir le profil voulu, ensuite appuyer sur le bouton
du haut (1) pour commencer à télécharger.
3. Taper sur CONNECT WITH WATCH (connexion à la montre) sur l’appareil portable pour initialiser la synchronisation tout en appuyant sur le bouton du haut (1) sur la
montre de nouveau. Done (Fait) s’affiche sur la montre une fois la connexion et le téléchargement réussis.
REMARQUE
Si la connexion a échoué, la montre va automatiquement essayer de se synchroniser de nouveau.
MESSAGE D’ÉCRAN
Synchronisation en cours
Synchronisation réussie
Échec de synchronisation. La montre essaie encore de synchroniser.
no memory
Il n’y a pas de données dans la montre
pls change
batt.for
update
Le pile de la montre est faible et doit être remplacée
MISE A JOUR DU SYSTEME
Vous pourriez mettre à jour la montre avec un système avancé qu’Oregon Scientific offrira à l’avenir par l’intermédiaire de
l’application, s’il y a lieu. Dans l’application, vous pouvez remarquer dans la page INFO un message qui apparait, ou regarder
NEW VERSION AVAILABLE! (nouvelle version disponible) en bas de la page.
1. En mode CONNECT, appuyer sur le bouton du haut (1) pour entrer et basculer le bouton du milieu (2) pour entrer dans
l’affichage update system (mise à jour du système).
2. Basculer le bouton du haut top (1) pour entrer dans les écrans ci-dessous dans l’ordre. Le système actuel de la montre
sera affacé après votre confirmation.
REMARQUE
Si la mise à jour du système 130choue, Failed s’affiche, et lécran retourne à start system update pour votre prochain essai.
REMARQUE
Dans la page INFO, vous pouvez consulter WATCH ID (identification de la montre), VERSION et LAST SYNC TIME
(dernière synchronisation).
REGLAGE DE CAPTEUR
Avec différents capteurs couplés à la montre, celle-ci peut être maximisée au niveau le plus haut correspondant au but de votre exercice d’entrainement, y inclus une sangle
pectorale et un module vélo (vendus séparément). Vous pouvez ajouter un capteur avant ou après le téléchargement de vos profils d’exercice.
IMPORTANT
Pour assurer une haute précision des calculs avec votre exercice, nous recommandons fortement que vous associiez la montre avec la sangle pectorale
Bluetooth Smart Fabric Chest Belt (modèle SZ999) d’Oregon Scientific. Pour commander un accessoire, visitez notre site web www.oregonscientific.com ou contactez
Page 91

6
FR
votre détaillant local.
AJOUT D’UN CAPTEUR
Sortez le capteur de son emballage et placez-le près de la montre.
Pour la première utilisation, aucun capteur n’est ajouté, suivre les étapes ci-dessous.
1. En mode SENSOR setup, appuyer sur le bouton du haut (1) pour entrer, add sensor s’affiche à l’écran.
2. Appuyer sur le bouton du haut (1) de nouveau pour commencer à coupler le capteur. clignotent pendant le couplage et seul l’icone du capteur couplé s’affiche
à l’écran une fois le couplage complet.
3. Après 3 secondes, add sensor s’affiche de nouveau sur la montre.
Si le capteur sangle pectorale a été ajouté, suivre les étapes suivantes.
1. En
mode SENSOR setup (réglage de capteur), appuyer sur le bouton du haut (1) pour entrer, l’icône de capteur couplé s’affiche à l’écran.
2. Après 3 secondes, add sensor s’affiche à l’écran.
3. A
ppuyer sur le bouton du haut (1) de nouveau pour coupler le capteur. clignotent pendant le couplage et seul l’icone du capteur couplé
s’affiche à l’écran une fois le couplage complet.
4. Après 3 secondes, add sensor s’affiche de nouveau sur la montre.
Si le capteur module vélo a été ajouté, suivre les étapes suivantes.
1. En
mode SENSOR setup (réglage de capteur), appuyer sur le bouton du haut (1) pour entrer, l’icône de capteur couplé s’affiche à l’écran.
2. Après 3 secondes, add sensor s’affiche à l’écran.
3. Appuyer sur le bouton du haut (
1) de nouveau pour commencer à coupler le capteur. clignotent pendant le couplage et seul l’icone du capteur couplé s’affiche
à l’écran une fois le couplage complet.
4. Après 3 secondes, add sensor s’affiche de nouveau sur la montre.
REMARQUE
Vous pouvez coupler tous les capteurs avec la montre à la fois.
POUR RETIRER UN CAPTEUR
Vous pouvez retirer le capteur de la montre. Retirez un capteur à la fois.
1. En
mode SENSOR setup (réglage de capteur), appuyer sur le bouton du haut (1) pour entrer. Quand les(s) capteur(s) couplé(s) s’affiche(nt), basculer le bouton du milieu
(2) jusqu’à ce que remove sensor (retirer le capteur) s’affiche.
2. Appuyer sur le bouton du haut (1) pour entrer.
3. Basculer le bouton du milieu (2) pour choisir le capteur que vous voulez retirer. Le numéro d’identification du capteur s’affiche aussi sous l’icône de capteur.
4. Appuyer sur le bouton du haut (1) de nouveau pour confirmer le retrait et Done (Fait) s’affiche à l’écran.
5. Après 3 secondes, l’écran affiche automatiquement l’icone de l’autre capteur couplé.
6. Suivre l’étape 3 de cette section, ou appuyer sur le bouton du bas (3) pour sortir.
REMARQUE
Le numéro d’identification du capteur va de 00000 à FFFFF et chaque capteur a un numéro d’identification individuel.
COMMENCER L’ EXERCICE
Avec le profil d’exercice voulu téléchargé sur la montre, vous pouvez commencer à vous entrainer et revoir les enregistrements de données d’exercice sur la montre ou les
télécharger vers l’application qui peut systématiquement gérer et analyser vos enregistrements.
IMPORTANT
Vous aurez besoin de coupler un capteur tel qu’un module vélo pour le cyclisme avec la montre si nécessaire avant de commencer. Sans couplage, le profil
d’exercice ne fonctionne pas pour collecter les données.
Page 92

7
FR
PROFIL COURSE A PIED
REGLAGE
Vous pouvez faire un réglage pour la course à pied sur la montre. En mode RUNNING, appuyer sur le bouton du haut (1) pour entrer, et les icones de capteurs couplés
s’affichent à l’écran. Appuyer sur le bouton du bas (3) pour sauter l’étape et ensuite appuyer sur le bouton du milieu (2) pour entrer en mode setup (réglage). Le réglage
comprend principalement les parties suivantes :
• Tour de piste
• Intervalle
• Repos
• Zone de rythme cardiaque
REMARQUE
Si aucun capteur n’est couplé, no sensor s’affiche
à l’écran.
REMARQUE
Vous aurez besoin de mesurer la longueur de foulée
avant de courir, voir la section USER SETUP (Réglage de l’utilisateur).
REMARQUE
Avant de commencer l’exercice, donner d’abord quelques
secondes à la montre pour chercher le(s) capteur(s). Ceci est fait pour s’assurer de recevoir des calculs précis (tels que votre temps
de tour de piste, décompte de calories, rythme cardiaque et vitesse) pendant l’exercice. Mais si vous commencez l’exercice sans chercher le(s) capteur(s), vous ne
ecevrez que les lectures de rythme cardiaque.
Si vous voyez les icones de capteur clignoter, attendez qu’ils arrêtent de clignoter et s’affichent à l’écran
.
Réglage tour de piste
1. Après être entré dans l’écran
setup, appuyer sur le bouton du milieu (2) pour entrer en mode de réglage Lap (tour de piste).
2. Appuyer sur le bouton du haut (1). Si vous voulez un réglage automatique Auto Lap, appuyer sur le bouton du haut (1) de nouveau, ou appuyer sur le bouton du milieu
(2) pour mettre en marche le réglage manuel Manual Lap.
3. Appuyer sur le bouton du milieu (2) pour compter par distance ou appuyer sur le bouton du bas (3) pour compter par le temps. Pour ajuster la distance ou le temps,
appuyer sur les boutons suivants :
• Bouton du haut (1) pour augmenter les valeurs
• Bouton du bas (3) pour diminuer les valeurs
REMARQUE
Appuyer longtemps pour augmenter ou diminuer les valeurs rapidement.
4. ppuyer sur le bouton du milieu (2) pour confirmer la sélection.
Réglage d’intervalle
1. Après être entré dans l’écran
setup, appuyer sur le bouton du bas (3) pour entrer en mode de réglage Interval (intervalle).
2. S
i vous voulez un réglage Interv.by distance (intervalle compté par la distance), appuyer sur le bouton du milieu (2), ou appuyer sur le bouton du bas (3) pour
Interv.by time (intervalle compté par le temps).
3. A
ppuyer sur le bouton du milieu (2) pour compter par distance ou appuyer sur le bouton du bas (3) pour compter par le temps. Ajuster la distance ou le temps
en appuyant sur les boutons suivants :
• Bouton du haut (1) pour augmenter les valeurs
• Bouton du bas (3) pour diminuer les valeurs
REMARQUE
Appuyer longtemps pour augmenter ou diminuer les valeurs rapidement.
4. A
ppuyer sur le bouton du milieu (2) pour confirmer la sélection et entrer dans l’écran Rest by distance/time (Repos par distance/temps).
5. A
ppuyer sur le bouton du milieu (2) pour compter par distance ou appuyer sur le bouton du bas (3) pour compter par le temps. Ajuster la distance ou le temps
en appuyant sur les boutons suivants :
• Bouton du haut (1) pour augmenter les valeurs
• Bouton du bas (3) pour diminuer les valeurs
6. Appuyer sur le bouton du milieu (2) pour confirmer la sélection.
Page 93

8
FR
Réglage de la zone rythme cardiaque
1. Après être entré dans l’écran
setup, basculer le bouton du milieu (2) pour entrer dans le réglage HR Zone (Zone de rythme cardiaque).
2. A
ppuyer sur le bouton du haut (1) pour mettre en marche HR Zone.
3. Appuyer sur le bouton du haut (
1) ou appuyer sur le bouton du bas (3) pour sélectionner Fat burn (brûlage des graisses) 61-70%, Aerobic (aérobic) 71-80% ou Anaerobic
(anaérobique) 81-90%.
4. A
ppuyer sur le bouton du milieu (2) pour confirmer la sélection.
Anaerobic
81-90%
Aerobic
71-80
%
USEFUL REFERENCE
Zone Cible
Pour aider à obtenir le maximum de bienfaits pour la santé de votre programme d’entrainement, il est important de connaitre votre indice de santé comme montré ci-dessous :
• Rythme Cardiaque Maximum (MHR)
• Limite supérieure de rythme cardiaque
• Limite inférieure de rythme cardiaque
MHR (le rythme cardiaque) s’exprime en battements par minute. Vous pouvez obtenir votre MHR à partir d’un test, ou vous pouvez l’estimer en utilisant la formule suivante :
220-âge=MHR
La montre est préprogrammée avec trois options de zone-cible, chacune avec sa limite de rythme cardiaque supérieure et, comme montré dans le tableau ci-dessous.
NOM DE ZONE LIMITE INFÉRIEURE LIMITE SUPÉRIEURE
Brûlage des graisses 61% x MHR 70% x MHR
Aérobic 71% x MHR 80% x MHR
Anaérobique 81% x MHR 90% x MHR
La zone va de 61% à 80% de votre rythme cardiaque maximum et c’est là que vous obtenez des bienfaits cardiovasculaires, que vous brûlez des graisses et devenez en
meilleure forme
.
Il y a trois catégories d’entrainement décrites dans le tableau ci-dessous.
CATÉGORIE
D’ENTRAINEMENT
MHR% DESCRIPTION
Brûlage des graisses 61-70%
C’est le niveau d’entrainement à l’intensité la plus basse. C’est bon pour les débutants et ceux qui veulent renforcer
leur système cardiovasculaire et brûler quelques graisses
.
Aérobic
71-80%
Augmente la force et l’endurance. Fonctionne dans les limites de la capacité de prise d’oxygène du corps, brûle plus
de calories et peut être maintenu sur une longue période
.
Anaérobique
81-90%
Génère vitesse et puissance. Fonctionne à ou au dessus de la capacité de prise d’oxygène du corps, développe les
muscles et ne peut pas être maintenu sur une longue période
.
Les limites supérieures et inférieures de rythme cardiaque sont calculées en multipliant votre MHR par les pourcentages de la catégorie d’entrainement sélectionnée
.
Par exemple :
Un homme de 40 ans qui s’entraine dans le but de brûler des graisses:
Sa limite supérieure de rythme cardiaque [220-40(âge)] x 70%
Sa limite inférieure de rythme cardiaque [220-40(âge)] x 61%
REMARQUE
Toujours s’échauffer avant de faire des exercices et choisir la catégorie d’entrainement qui correspond le mieux à votre physique. Faire de l’exercice
régulièrement, 20 à 30 minutes par session, trois à quatre fois par semaine, pour avoir un système cardiovasculaire en bonne santé.
WARNING
La détermination de votre catégorie d’entrainement individuelle est une étape critique dans le processus menant à un programme d’entrainement sain et
efficace. Veuillez consulter votre médecin ou un professionnel de la santé pour vous aider à déterminer la fréquence et la durée d’exercices appropriées pour votre âge,
votre condition et vos buts spécifiques.
Page 94

9
FR
COMMENT VOIR L’ENREGISTREMENT D’EXERCICE TOUT EN COURANT
Vous pou ebours .
REMARQUE
Bien s’assurer que la montre a assez de mémoire, sinon no memory s’affiche quand vous appuyez sur le bouton après être entré en mode RUNNING.
Pour voir les enregistrements de course
:
1. En
mode RUNNING, appuyer sur le bouton du haut (1) pour entrer dans le mode de recherche de capteur, ou appuyer sur le bouton du bas (3) pour sauter ce mode si
vous savez que la capteur a été couplé.
2. Appuyer sur le bouton du haut (
1) pour entrer en mode start (Départ). Le décompte commence pendant que clignote. La lecture du rythme cardiaque avec l’icone
( ) et le décompte du temps d’exercice (00’00’00) s’affichent.
3. Basculer le bouton du milieu (2). La distance totale (km)/vitesse (km/h), le décompte de calories (Cal)/ le temps d’exercice actuel (00’00’00), et l’heure s’affichent.
• Si Auto lap est activé, les données de tour de piste et de décompte de temps s’affichent automatiquement à l’écran quand ce réglage est atteint.
OU
• Si Manual lap est activé, appuyer sur le bouton du bas (3) pour régler manuellement pour un tour de piste.
OU
Tout en voyant cet écran et appuyant sur le bouton du haut (
1) pour mettre en pause le décompte, s’arrête de clignoter, alors appuyer sur le bouton du haut (1) pour
choisir continue ou appuyer sur le bouton du bas (3) pour choisir stop et arrêter de courir. Si vous appuyez sur le bouton du bas (3) pour arrêter le décompte, le mode
RUNNING s’affiche à l’écran.
REMARQUE
Si vous réglez la montre pour basculer automatiquement les écrans, les derniers quatre écrans alternent automatiquement pour
s’afficher toutes les 5 secondes. Veuillez consulter SET USER PROFILE pour mettre la fonction bascule en marche.
REMARQUE
Si vous activez HR zone, la montre affiche Above Zone (au-dessus de la zone) pendant 3 secondes quand votre rythme cardiaque
personnel est au-dessus de la zone ; ou affiche Below Zone (en-dessous de la zone) pendant 3 secondes quand votre rythme cardiaque
personnel est en dessous de la zone.
REMARQUE
Si le nombre total de tours de piste et d’enregistrements atteint 100 ou si le total d’heures d’exercice atteint 80 heures, memory full
(mémoire pleine) s’affiche à l’écran avec un long bip sonore. Il vous faudra effacer la mémoire pour entrer d’autres données d’exercice.
REMARQUE
HR belt low batt (pile faible sur la sangle pectorale) s’affiche à l’écran si la montre estime que la pile de la sangle pectorale est faible.
VOIR L’ENREGISTREMENT DE L’EXERCICE APRES AVOIR COURU
Après avoir couru, vous pouvez voir les enregistrements sur la montre en suivant les étapes ci-dessous.
TPour voir les enregistrements d’exercice :
1. En
mode RUNNING, appuyer sur le bouton du bas (3) pour entrer dans la mémoire de course (mem). L’écran affiche la date et l’heure des derniers exercices. Basculer
le bouton du milieu (2) pour choisir celui que vous voulez, puis appuyer sur le bouton du haut (1) pour entrer.
REMARQUE
Si vous voulez effacer toute la mémoire, basculer le bouton du milieu jusqu’à ce que Clear all s’affiche. Appuyer sur le bouton du haut (1) pour entrer, puis
appuyer sur le bouton du haut (
1) de nouveau pour choisir yes (oui) pour confirmer l’effacement de la mémoire; ou appuyer sur le bouton du bas (3) pour choisir no pour
revenir à l’écran des enregistrements.
2. Appuyer sur le bouton du haut (
1) pour entrer dans l’écran View Summary (visionnage du sommaire). Appuyer sur le bouton du haut (1) de nouveau pour commencer
à visionner, puis basculer le bouton du milieu (2) pour voir les enregistrements.
OU
A
ppuyer sur le bouton du bas (3) pour sortir.
3. Appuyer sur le bouton du milieu (
2) pour entrer dans l’écran View Lap (visionnage du tour de piste). Appuyer sur le bouton du haut (1) pour commencer à visionner ou
basculer le bouton du milieu (2) pour voir le tour de piste voulu.
4. A
ppuyer sur le bouton du haut (1) de nouveau pour commencer à visionner, puis basculer le bouton du milieu (2) pour voir les enregistrements.
OU
Appuyer sur le bouton du bas (3) pour sortir.
Page 95

10
FR
Other
dat
a
Lap No.
POUR VOIR LES ENREGISTREMENT D’EXERCICE DANS L’APPLICATION
Vous pouvez télécharger la mémoire vers votre application et voir les enregistrements sur l’appareil portable.
1. Entrer la page de profils dans votre application. Taper sur l’icone du profil
RUNNING.
2. Les enregistrements de course sont listés par date et heure. Veuillez suivre les étapes ci-dessous.
• Taper sur celui que vous voulez voir ou taper sur pour transmettre les données par e-mail.
• Passez votre doigt sur l’écran vers la droite ou la gauche pour voir les autres enregistrements.
3. aper sur OVERALL RESULT (résultat général) pour entrer. Alors vous pouvez taper sur WEEK (semaine), MONTH (mois) et ANNUAL (annuel) pour voir chaque graphique
de résultat global. Passez votre doigt sur l’écran vers la droite ou la gauche pour voir le graphique pour chaque unité de temps. Taper sur chaque barre du graphique
et cette donnée spécifique apparait, taper de nouveau pour le faire disparaitre.
4. Taper sur
sur l’écran pour sortir.
Page 96

11
FR
PROFIL CYCLISME
REGLAGE
À part le réglage de la taille de roue, vous pouvez établir tous les autres aspects du profil de cyclisme en suivant les instructions de la section SETUP de RUNNING PROFILE.
REMARQUE
S’assurer que le capteur du module vélo est couplé à la montre avant de faire du cyclisme.
Le réglage inclut principalement les parties suivantes :
• Tour de piste
• Intervalle
• Repos
• Zone de Rythme Cardiaque
• Taille de roue
Réglage de la taille de roue
1. E
n mode CYCLING, appuyer sur le bouton du haut (1)
pour entrer, les icones de capteurs couplés s’affichent
à l’écran. Appuyer sur le bouton du bas (3) pour sauter
si le capteur a été ajouté.
2. A
ppuyer sur le bouton du milieu (2) pour entrer en mode setup (réglage).
3. B
asculer le bouton du milieu (2) jusqu’à ce que adjust Wheel size (réglage de taille de roue) s’affiche.
4. A
ppuyer sur le bouton du haut (1) pour entrer.
5. A
ppuyer sur le bouton du haut (1) de nouveau pour augmenter la valeur ou appuyer sur le bouton du bas (3) pour diminuer la valeur.
6. A
ppuyer sur le bouton du milieu (2) pour confirmer la sélection.
USEFUL REFERENCE
À Propos de la Taille de Roue
Faire correspondre le nombre ETRTO ou la taille de roue gravée sur la jante avec le réglage de taille de roue dans la colonne de droite du tableau ci-dessous. Entrer la
dimension appropriée après que le module vélo a été couplé.
ETRTO Taille du diamètre de roue (pouces) Dimension de la roue (mm)
25-559 26 x 1.0 1884
23-571 650 x 23C 1909
35-559 26 x 1.50 1947
37-622 700 x 35C 1958
47-559 26 x 1.95 2022
20-622 700 x 20C 2051
52-559 26 x 2.0 2054
23-622 700 x 23C 2070
25-622 700 x 25C 2080
28-622 700 x 28 2101
32-622 700 x 32C 2126
42-622 700 x 40C 2189
47-622 700 x 47C 2220
REMARQUE
Les tailles de roue dans le tableau ci-dessus sont pour référence seulement puisque la taille de roue dépend du type de pneu et de la pression.
COMMENT VOIR L’ENREGISTREMENT DE L’EXERCICE EN FAISANT DU VELO
Vous pouvez commencer à rouler en suivant les étapes ci-dessous, et si vous réglez Interval (l’intervalle), la distance ou le temps sera compté à rebours.
REMARQUE
Bien s’assurer que la montre a assez de mémoire, sinon no memory s’affiche quand vous appuyez sur le bouton après être entré en mode CYCLING.
Page 97

12
FR
Pour voir les enregistrements de cyclisme :
1. En mode
CYCLING, appuyer sur le bouton du haut (1) pour entrer, et les icones de capteurs couplés s’affichent à l’écran. Appuyer sur le bouton du bas (3) pour sauter
le mode recherche si le capteur a été ajouté.
2. Appuyer sur le bouton du haut (
1) pour entrer en mode start (départ). Le décompte commence pendant que clignote. La lecture de rythme cardiaque avec l’icone
( ) et le décompte du temps d’exercice (00’00’00) s’affichent.
3. Appuyer sur le bouton du milieu (2). Vous pouvez voir l’affichage de la distance totale (km) / de la vitesse (km/h), de la cadence (rpm) (tr/min), du décompte de calories
(Cal) et l’heure à l’écran.
• Si Auto lap est activé, les données de comptage de tour de piste et de temps s’affichent automatiquement à l’écran
quand ce réglage est atteint.
OU
• Si Manual lap est activé, appuyer sur le bouton du bas (3) pour régler un tour de piste manuellement.
OU
Tout en voyant cet écran et appuyant sur le bouton du haut (
1) pour mettre en pause le décompte, s’arrête de clignoter, alors appuyer sur le bouton du haut (1) pour choisir
continue ou appuyer sur le bouton du bas (3) pour choisir stop et arrêter de courir. Si vous appuyez sur le bouton du bas (3) pour arrêter le décompte, le mode CYCLING
s’affiche à l’écran.
REMARQUE
Si vous réglez la montre pour basculer automatiquement les écrans, les derniers cinq écrans alternent automatiquement pour
s’afficher toutes les 5 secondes. Veuillez consulter SET USER PROFILE pour mettre la fonction bascule en marche.
REMARQUE
Si vous activez HR zone, la montre affiche Above Zone (au-dessus de la zone) pendant 3 secondes quand votre rythme cardiaque
personnel est au-dessus de la zone ; ou affiche Below Zone (en-dessous de la zone) pendant 3 secondes quand votre rythme cardiaque
personnel est en dessous de la zone.
REMARQUE
Si le nombre total de tours de piste et d’enregistrements atteint 100 ou si le total d’heures d’exercice atteint 80 heures, memory full
(mémoire pleine) s’affiche à l’écran avec un long bip sonore. Il vous faudra effacer la mémoire pour entrer d’autres données d’exercice.
REMARQUE
Bike pod low batt. S’affiche à l’écran si la montre estime que la pile du module vélo est faible.
VOIR LES ENREGISTREMENTS D’EXERCICE APRES AVOIR FAIT DU CYCLISME
Après avoir fait du cyclisme, vous pouvez voir les enregistrements sur la montre en suivant les étapes suivantes.
To view exercise records:
1. En mode
CYCLING, appuyer sur le bouton du bas (3) pour entrer dans la mémoire de cyclisme (mem). L’écran affiche la date et l’heure des derniers exercices. Basculer
le bouton du milieu (2) pour choisir celui que vous voulez, puis appuyer sur le bouton du haut (1) pour entrer.
REMARQUE
Si vous voulez effacer toute la mémoire, basculer le bouton du milieu jusqu’à ce que Clear all s’affiche. Appuyer sur le bouton du haut (1) pour entrer, puis
appuyer sur le bouton du haut (1) de nouveau pour choisir yes (oui) pour confirmer l’effacement de la mémoire; ou appuyer sur le bouton du bas (3) pour choisir no pour
revenir à l’écran des enregistrements.
2. Appuyer sur le bouton du haut (
1) pour entrer dans l’écran View Summary (visionnage du sommaire). Appuyer sur le bouton du haut (1) de nouveau pour commencer
à visionner, puis basculer le bouton du milieu (2) pour voir les enregistrements.
OU
Appuyer sur le bouton du bas (3) pour sortir.
3. Appuyer sur le bouton du milieu (2) pour entrer dans l’écran View Lap (visionnage du tour de piste). Appuyer sur le bouton du haut (1) pour commencer à visionner ou
basculer le bouton du milieu (2) pour voir le tour de piste voulu.
4. Appuyer sur le bouton du haut (1) de nouveau pour commencer à visionner, puis basculer le bouton du milieu (2) pour voir les enregistrements.
5. B
asculer le bouton du milieu (2) pour visionner le tour de piste voulu. Suivre l’étape 4 ci-dessus.
OU
A
ppuyer sur le bouton du bas (3) pour sortir.
Page 98

13
FR
POUR VOIR LES ENREGISTREMENT D’EXERCICE DANS L’APPLICATION
Vous pouvez télécharger la mémoire vers votre application et voir les enregistrements de cyclisme sur l’appareil portable.
1. Entrer la page de profils dans votre application. Taper sur l’icone du profil
CYCLING.
2. Les enregistrements de cyclisme sont listés par date et heure. Veuillez suivre les étapes ci-dessous.
• Taper sur celui que vous voulez voir ou taper sur pour transmettre les données par e-mail.
• Passez votre doigt sur l’écran vers la droite ou la gauche pour voir les autres enregistrements.
3. Taper sur OVERALL RESULT (résultat général) pour entrer. Alors vous pouvez taper sur WEEK (semaine), MONTH (mois) et ANNUAL (annuel) pour voir chaque graphique
de résultat global. Passez votre doigt sur l’écran vers la droite ou la gauche pour voir le graphique pour chaque unité de temps. Taper sur chaque barre du graphique
et cette donnée spécifique apparait, taper de nouveau pour le faire disparaitre.
4. Taper sur
sur l’écran pour sortir.
Page 99

14
FR
PROFIL NATATION
REGLAGE
Vous pouvez faire un réglage pour la natation sur la montre. En mode SWIMMING, appuyer sur le bouton du haut (1) pour entrer dans le mode réglage. Le réglage inclut
principalement les parties suivantes :
• Type de nage
• Longueur de piscine
• Calibration
REMARQUE
Éviter d’appuyer sur aucun des boutons quand vous êtes dans l’eau que ce
soit pour des réglages ou en nageant car cela peut faire entrer de l’eau dans la montre
et causer un mauvais fonctionnement.
Réglage du type de nage
1. E
n mode SWIMMING (natation), appuyer sur le bouton du haut (1) pour entrer en
mode réglage.
2. A
ppuyer sur le bouton du milieu (2)pour entrer en mode swim type (type de nage),
puis appuyer sur le bouton du haut (1) appuyer sur le bouton du bas (3) pour choisir
entre ft.crawl (crawl avant), backstr (dos), breastsr (brasse) et butterfly (papillon).
3. A
ppuyer de nouveau sur le bouton du milieu (2) pour confirmer la sélection.
Réglage de la longueur de piscine
1. E
n mode SWIMMING (natation), appuyer sur le bouton du haut (1) pour entrer dans le mode réglage.
2. Basculer le bouton du milieu(
2) pour entrer en mode longueur de piscine, puis appuyer sur le bouton du haut (1) ou appuyer sur le bouton du bas (3) pour choisir entre
50m (mètres) et 25m (mètres).
3. A
ppuyer de nouveau sur le bouton du milieu (2) pour confirmer la sélection.
Calibration
1. E
n mode SWIMMING (natation), appuyer sur le bouton du haut (1) pour entrer en mode réglage.
2. B
asculer le bouton du milieu (2) jusqu’à ce que start cali. (démarrage calibration) s’affiche.
3. A
ppuyer sur le bouton du haut (1) pour commencer la calibration.
OU
Appuyer sur le bouton du bas (3) pour sortir.
4. Les données de décompte des longueurs s’affichent. Vous devez nager 2 longueurs et appuyer sur le bouton du haut (
1) au dessus de la surface de l’eau pour arrêter.
Une fois que vous avez réussi à compléter la calibration, cali.done (calibration faite) s’affiche alors, après 2 secondes l’écran revient à l’affichage du mode réglage.
OU
S
i vous voulez arrêter la calibration, appuyer sur le bouton du haut (1) et cali.failed (échec calibration) s’affiche.
POUR VOIR LES ENREGISTREMENTS D’EXERCICE EN NAGEANT
Vous pouvez commencer à nager en suivant les étapes ci-dessous.
REMARQUE
S’assurer que la montre a assez de mémoire, autrement no memory (pas de mémoire) s’affiche quand vous appuyez sur le bouton après
avoir été en mode SWIMMING (natation).
Pour voir les enregistrements de natation:
1. E
n mode SWIMMING (natation), appuyer sur le bouton du haut (1) pour entrer en mode start (démarrage).
2. B
asculer le bouton du milieu (2) pour choisir swim type (type de nage) et pool size (longueur de piscine, voir les sections ci-dessus).
3. La montre commence à compter. Seulement Auto lap (longueurs automatiques) est disponible pendant que vous nagez, le comptage des données de nage (
stk), de
temps (00’00’00) et des calories (Cal) s’affiche automatiquement à l’écran. Les données de décompte des longueurs s’affichent quand la présélection est atteinte.
OU
Pendant que vous visionnez l’écran et appuyez sur le bouton du haut (1) pour mettre le décompte en pause, s’arrête de clignoter, choisir alors continue (continuer)
ou stop (arrêter). Si vous appuyez sur le bouton du bas (3) pour arrêter le décompte, l’écran de mode SWIMMING s’affiche. Aller directement à l’étape 1 ci-dessus pour
compter de nouveau.
Page 100

15
FR
REMARQUE
Si vous réglez la montre pour alterner automatiquement entre les écrans, les trois derniers écrans alternent automatiquement à l’affichage toutes les 5 secondes.
Veuillez voir SET USER PROFILE (réglage du profil d’utilisateur) pour activer la fonction alterner.
REMARQUE
Si le décompte de longueurs atteint 100 ou si le total de temps d’exercice atteint 80 heures, memory full (mémoire pleine) s’affiche à l’écran avec un long bip.
Il faudra purger la mémoire pour enregistrer plus d’exercices.
COMMENT VOIR LES ENREGISTREMENTS D’EXERCICEAPRES AVOIR NAGE
Vous pouvez voir les enregistrements sur la montre après avoir nagé en suivant les étapes ci-dessous.
Pour voir les enregistrements d’exercice
:
1. En mode
SWIMMING (natation), appuyer sur le bouton du bas (3) pour entrer. L’écran affiche la date et l’heure du dernier exercice fait. Basculer le bouton du milieu (2)
pour choisir l’exercice voulu, puis appuyer sur le bouton du haut (1) pour entrer.
REMARQUE
Si vous voulez purger toute la mémoire, basculer le bouton du milieu (2) jusqu’à ce que Clear all (effacer tout) s’affiche. Appuyer sur le bouton du haut (1)
pour entrer, puis appuyer de nouveau sur le bouton du haut (1) pour choisir yes (oui) pour confirmer la purge de la mémoire ; ou appuyer sur le bouton du bas (3) pour
choisir no (non) pour revenir à l’écran d’enregistrement.
2. Appuyer sur le bouton du haut (
1) pour entrer dans l’écran View Summary (voir sommaire). Appuyer de nouveau sur le bouton du haut (1) pour commencer à visionner,
puis appuyer sur le bouton du milieu (2) pour visionner les enregistrements.
OU
Appuyer sur le bouton du bas (3) pour sortir.
3. A
ppuyer sur le bouton du milieu (2) pour entrer dans l’écran View Lap (voir les longueurs). Appuyer sur le bouton du haut (1) pour voir Lap 1 (longueur 1).
4. A
ppuyer de nouveau sur le bouton du haut (1) pour commencer à visionner, puis basculer le bouton du milieu (2) pour voir les enregistrements.
5. B
asculer le bouton du milieu (2) pour voir la longueur voulue. Suivre l’étape 4 ci-dessus.
OU
Appuyer sur le bouton du bas (3) pour sortir.
Other
data
Lap No.
 Loading...