

Page 1

Heart Rate Monitor with Speed and
Distance plus PC Connection
Model: SE833
USER MANUAL
Page 2

Heart Rate Monitor with Speed and
Distance plus PC Connection
MODEL: SE833
USER MANUAL
CONTENTS
Introduction ................................................................... 2
Package Items ........................................................... 2
Control Buttons ............................................................. 2
Display ........................................................................... 3
Starting Your Watch (First Time) ................................. 3
Setting Up Your Watch ................................................. 3
Set User Profile .......................................................... 4
Set Watch Profile ....................................................... 5
Set Exercise Profile ................................................... 5
Wearing Chest Belt ....................................................... 8
Pairing Device ............................................................... 9
Pair With SZ909 Chest Belt (Or Other
ANT-system Chest Belts) .......................................... 9
Pair With ANT-system Foot Pod / Bike Pod .............. 9
Input Bike Wheel Size (For Bike Pod) ....................... 10
Remove Paired Device .............................................. 10
Calibrating Paired Device ............................................. 11
Calibrate By Running Or Walking .............................. 11
Calibrate By Inputting Parameter ............................... 12
Conducting Exercise .................................................... 12
Available Memory For Exercise ................................. 13
Device Search Before Exercise ................................. 14
Auto Toggle Data View During Exercise .................... 14
Pause And Resume Exercise .................................... 14
Save Exercise Data ................................................... 15
Exceed Heart Rate Limit ............................................ 15
View Exercise Data During Exercise ......................... 15
Viewing Exercise Record ............................................. 17
View Exercise Record In Summary Record Page ..... 17
View Exercise Record In Lap Record Page ............... 18
Delete Memories ........................................................ 19
Knowing Your Fitness Index ........................................ 19
Other Operation And Setting ....................................... 20
Activate Backlight ...................................................... 20
Lock / Unlock Keypad ................................................ 20
Set Alarm On / Off ..................................................... 20
Silence Alarm ............................................................ 20
Set Beep Tone On / Off ............................................. 20
Replace Battery ......................................................... 21
Install Bike Mount ...................................................... 21
Useful Reference ........................................................... 22
Target Zone ............................................................... 22
Bike Wheel Size ......................................................... 23
Connecting With PC Application Software ................. 24
PC Requirements ...................................................... 24
Synchronising SE833 Watch With PC Application
Software ..................................................................... 24
Water Resistance ......................................................... 26
Specifications ................................................................ 26
Precautions ................................................................... 27
About Oregon Scientific ............................................... 28
EU-Declaration Of Conformity ..................................... 28
FCC (US) / IC (Canada) Statement ............................... 28
Declaration Of Conformity ......................................... 29
1
EN
Page 3
EN
INTRODUCTION
Thank you for selecting the Oregon Scientific
Monitor with Speed and Distance plus PC Connection
(SE833). Apart from being an advanced heart rate monitor,
this watch is also designed with PC compatibility to allow
users to store exercise data for analysis and fitness
management. Other functions such as speed and distance
measurement, exercise timer with laps and exercise profiles
are available for users to optimize their workout.
2.4GHz-ANT Sports System is used in this watch to achieve
reliable transmission linkage with other devices such as
chest belt, foot pod or bike pod.
TM
Heart Rate
IMPORTANT This watch is for sport purposes only and is
not meant to replace any medical device.
Patent Notice: This product is protected by US Patent No.
7,237,446 (European Patent pending).
PACKAGE ITEMS
The package should include the following items:
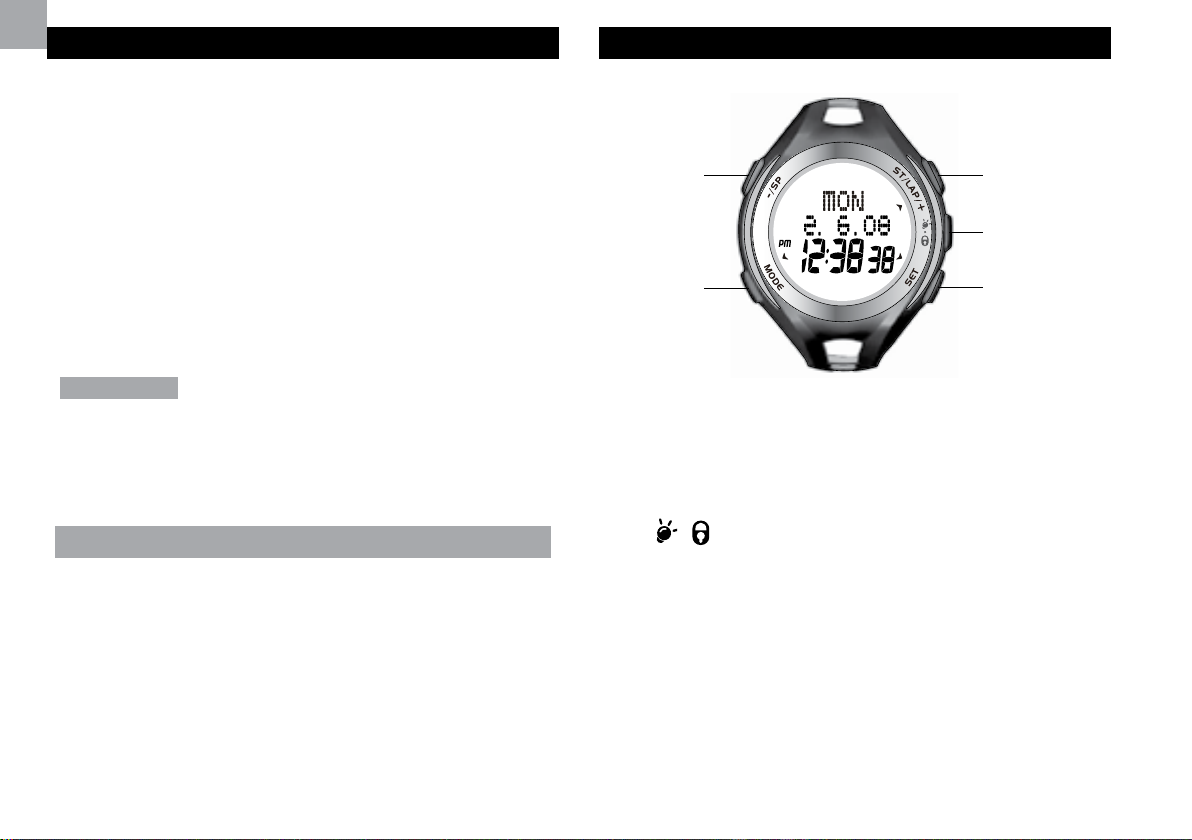
CONTROL BUTTONS
1
5
4
2
1. - / SP : Toggle options; decrease value; pause/stop
during exercise
2. MODE : Toggle modes; return to previous page
3. SET : Confirm settings; set alarm on/off in Time mode
4.
/ : Activate backlight; lock / unlock keypad
5. ST / LAP / + : Toggle options; increase value; mute/unmute in Time mode
3
• 1 x SE833 watch
• 1 x SZ909 chest belt
• 1 x AD112 USB dongle
• 1 x AD108 application software CD
• 1 x bike mount (with 2 nylon cords)
• 2 x CR2032 3V lithium batteries (already installed in
watch and chest belt)
2
Page 4
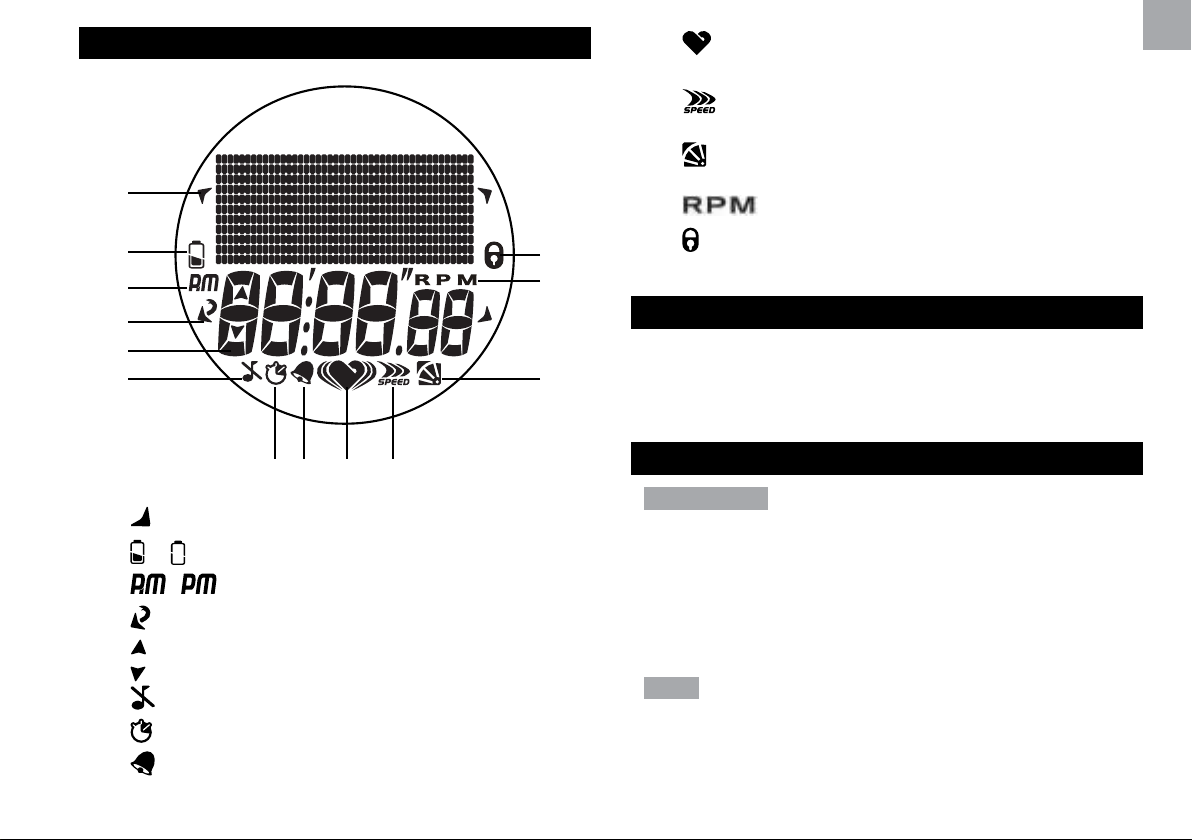
DISPLAY
1
2
3
4
5
6
13
12
11
9. : Indicates heart rate signal is received or heart rate
chest belt is paired
10.
11.
12.
13.
OPERATING MODES
STARTING YOUR WATCH (FIRST TIME)
After removing the watch from the package, activate it by
pressing and holding MODE until the display is shown. The
watch will prompt you to set your user profile.
: Indicates speed and distance signal is received or
foot pod is paired
: Indicates bike and cadence signal is received or
bike pod is paired
: Resolutions per minute (unit of cadence)
: Indicates keypad is locked
EN
78 910
1. : Key to press indicator
or : Indicates battery power is low or empty
2.
3.
4.
5.
6.
7.
8.
/ : 12 hour clock
: Press the key to exit
: Indicates up / down or upper / lower limit
: Indicates beep tone is off
: Indicates exercise timer is activated
: Indicates alarm is on
SETTING UP YOUR WATCH
IMPORTANT
• To ensure accurate calculations with your exercise, you
are strongly required to set the watch and user profiles
before exercising.
• Remember to set the profiles after every battery
replacement or reset.
NOTE When the watch is left idle for 30 seconds during set
up, it will automatically exit.
3
Page 5
EN
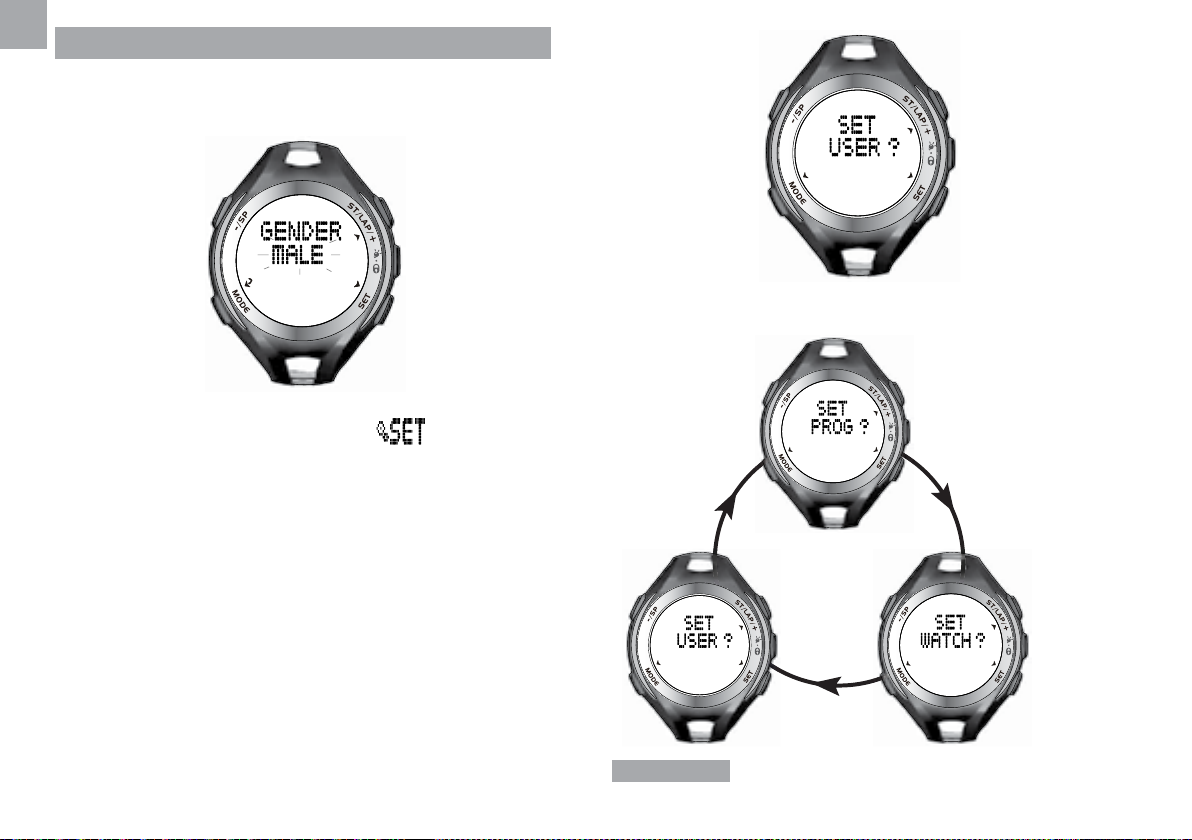
SET USER PROFILE
When prompted to set user profile after starting the watch
the first time, the screen below will be shown. Go directly
to step 4.
For normal setting procedure:
7. You can continue setting other profiles (watch or
exercise profiles) by pressing ST/LAP/+ repeatedly.
1. Press MODE repeatedly to select
.
2. Press ST/LAP/+ repeatedly to select “SET USER”.
3. Press SET to enter user profile setting options.
4. Press ST/LAP/+ to select option, then press SET to
confirm.
5. Continue setting your user profile according to the
following order: year of birth, month of birth, day of
birth, weight unit and weight value, by pressing the
following buttons:
• ST/LAP/+ to increase value or select option
• -/SP to decrease value
• SET to confirm selected option
6. After your user profile is set, the screen below will be
shown.
press
ST/LAP/+
press
ST/LAP/+
press
ST/LAP/+
IMPORTANT Reset the user profile if the watch will be
used by another person.
4
Page 6

SET WATCH PROFILE
1. Press MODE repeatedly to select .
2. Press ST/LAP/+ repeatedly to select “SET WATCH”.
3. Press SET to enter watch profile setting options.
4. Press ST/LAP/+ or -/SP to select the option to set: set
alarm, set time, set date, set unit, set alert*, set view**.
5. Press SET and start setting the selected option by
pressing the following buttons:
• ST/LAP/+ to increase value or select option
• -/SP to decrease value
• SET to confirm selected option
* During exercise, when the heart rate is out of the target
zone, the watch will send out visual and sound alert. You
can select to turn on/off the sound alert in the “SET ALERT”
option. For details of target zone, refer to “TARGET ZONE”
section in this manual.
** During exercise, the watch will toggle display your
exercise information. You can select to turn on/off the toggle
display in the “SET VIEW” option.
SET EXERCISE PROFILE IN WATCH
You can set the 3 default exercise profiles (Cardio, Run,
Cycling) in the watch.
1. Press MODE repeatedly to select
2. In “SET PROG”, press SET to enter exercise options.
3. Press ST/LAP/+ or -/SP to select the exercise to set:
set cardio, set run, set cycling.
4. Press SET to confirm selection, then continue to set
the profile* of the selected exercise by pressing the
following buttons:
• ST/LAP/+ to increase value or select option
• -/SP to decrease value
• SET to confirm selected option
* The profile setting sequence is as follows:
1. Warm up time
to decrease
value
.
to increase
value
EN
SET EXERCISE PROFILE
IMPORTANT
used by another person.
You can select to set the default exercise profiles in the
watch or to upload custom exercise profiles from the PC
application software.
Reset the exercise profile if the watch will be
warm up time
to exit
5
to next page
Page 7
EN
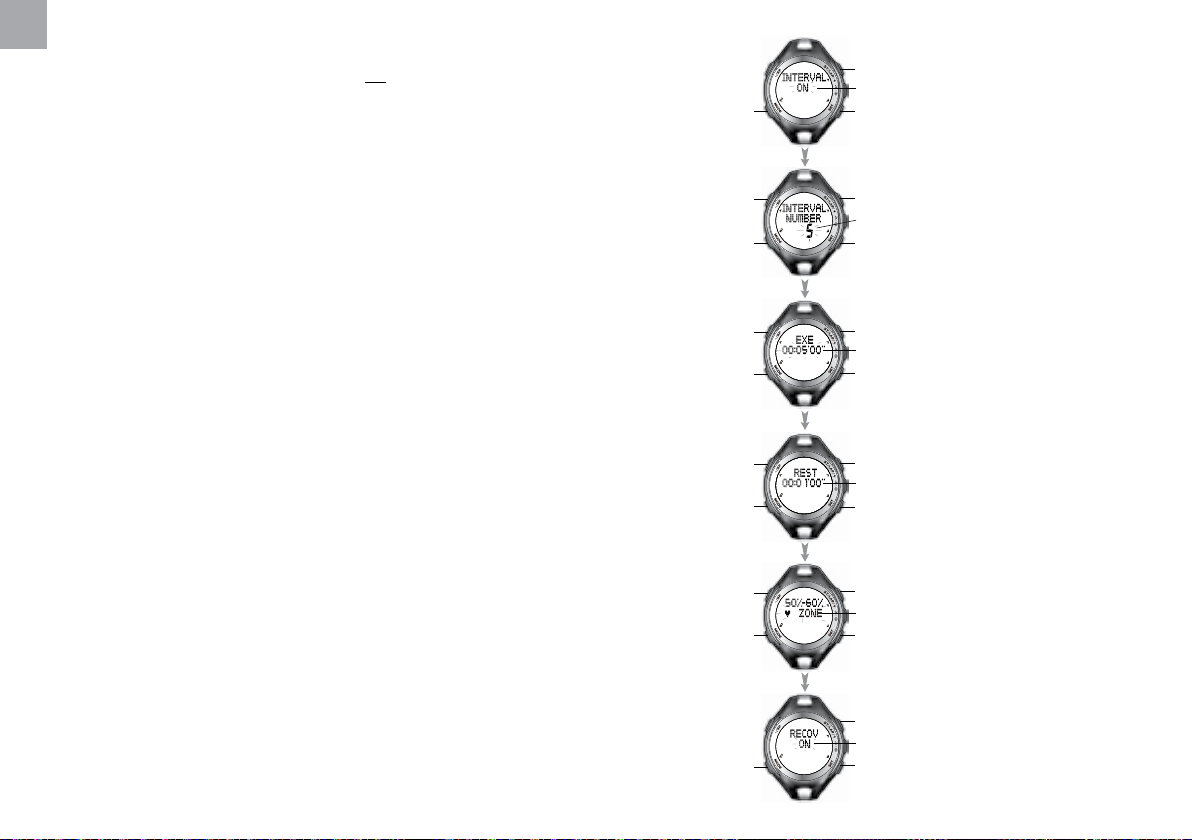
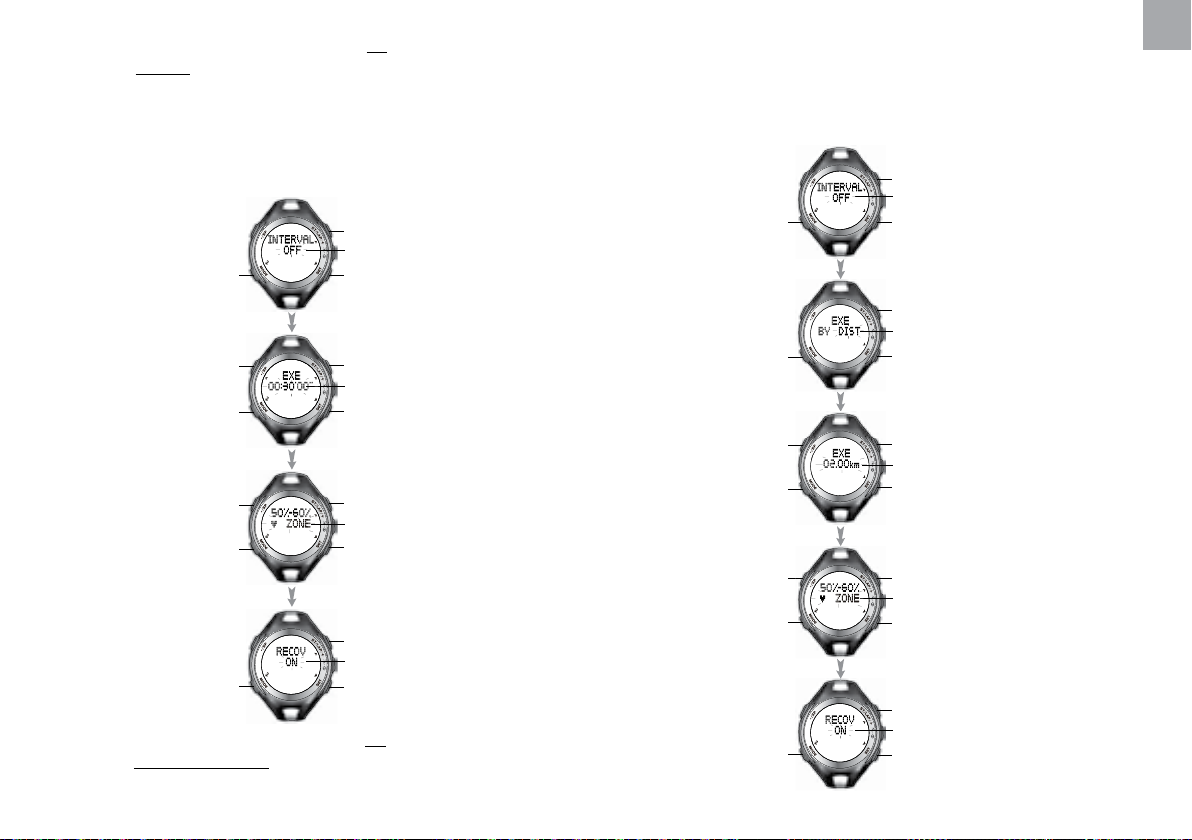
2. Interval training on/off
2a If you set interval training to on, you have to set:
v Number of interval (2-5)
v Interval work time for each interval
v Rest time for each interval
v Target heart rate zone (1-5) [For details, refer to
“TARGET ZONE” section in this manual]
v Recovery timer on/off
to exit
to decrease value
to exit
to toggle on or off
interval training on/off
to next page
press SET
to increase value
number of interval
to next page
press SET
to decrease value
to exit
to decrease value
to exit
to decrease value
to exit
to exit
press SET
press SET
press SET
press SET
to increase value
interval work time for each interval
to confirm setting; to next page
to increase value
rest time for each interval
to confirm setting; to next page
to increase value
target heart rate zone
to next page
to toggle on or off
recovery timer on/off
to next page
6
Page 8
2b If you set interval training to off, you have to set (for
Cardio setting only):
v Exercise time
v Target heart rate zone (1-5) [For details, refer to
“TARGET ZONE” section in this manual]
v Recovery timer on/off
to toggle on or off
interval training on/off
to exit
press SET
to decrease value
to exit
press SET
to decrease value
to exit
press SET
to exit
to next page
to increase value
exercise time
to confirm setting; to next page
to increase value
target heart rate zone
to next page
to toggle on or off
recovery timer on/off
to next page
2c If you set interval training to off, you have to set (for
Run and Cycling setting only):
v Exercise by distance or by time
v Exercise distance or exercise time
EN
v Target heart rate zone (1-5) [For details, refer to
“TARGET ZONE” section in this manual]
v Recovery timer on/off
to toggle on or off
interval training on/off
to exit
press SET
to exit
press SET
to decrease value
to exit
press SET
to decrease value
to exit
press SET
to exit
to next page
to toggle by distance or by time
exercise by distance or by time
to next page
to increase value
exercise distance; exercise time
to confirm setting; to next page
to increase value
target heart rate zone
to next page
to toggle on or off
recovery timer on/off
to next page
7
Page 9
EN
UPLOAD CUSTOM EXERCISE PROFILE FROM PC
APPLICATION SOFTWARE
You can upload up to 3 exercise profiles from the PC
application software to your watch with customised setting.
But you cannot modify the settings of the uploaded exercise
profiles through the watch, you can only modify them
through the software.
For more details about uploading custom exercise profiles
from software to the watch, refer to “SYNCHRONISING
SE833 WATCH WITH PC APPLICATION SOFTWARE” in
this manual.
For more details about modifying the custom exercise
profiles in the software, refer to “CREATE OR MODIFY
USER PROFILE / DEVICE SETTING” in the PC Application
Software User Guide inside the CD-ROM.
NOTE If no custom exercise profile is uploaded from the
software to the watch, the watch will only display its default
exercise profiles.
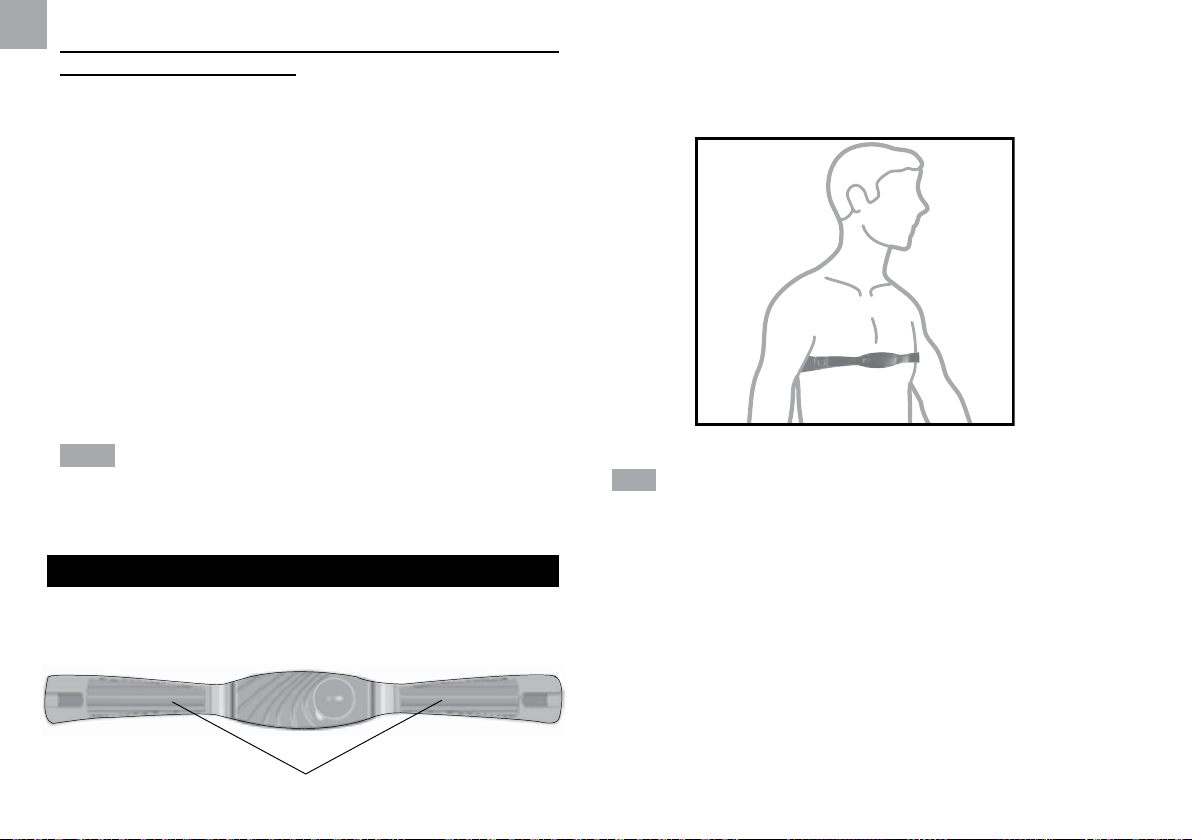
WEARING CHEST BELT
1. Wet the conductive pads on the underside of the chest
belt with a few drops of water or a conductive gel to
ensure solid contact.
conductive pads
2. Strap the chest belt across your chest. To ensure an
accurate heart rate signal, adjust the strap until the belt
sits snugly below your pectoral muscles.
TIPS
• The position of the chest belt affects its performance.
Move the chest belt along the strap so that it falls above
your heart.
• Avoid areas with dense chest hair.
• In dry, cold climates, it may take several minutes for the
chest belt to function steadily. This is normal and should
improve with several minutes of exercise.
• To maintain the best performance of your chest belt,
please handle it with care according to the following:
- Do not wrap the chest belt in a wet towel nor with
other wet materials.
8
- Do not store the chest belt in a hot (about 50°C)
Page 10
and humid (about 90%) environment.
- Do not place or wash the chest belt under running
water, instead clean it with a wet cloth.
- Do not place the conductive rubber face down on a
metal table or surface.
- Properly dry the chest belt immediately after use.
PAIRING DEVICE
IMPORTANT
exercise, you should pair the watch with SZ909 chest belt.
This chest belt allows pairing of both heart rate and foot pod
functions.
The watch can also pair with other chest belts and devices
such as foot pod and bike pod that use the ANT Sports
System. However, other chest belts can only allow pairing
of heart rate function.
1. Press MODE repeatedly to select
will show how many and which devices are paired
(if any). If no device is paired, the watch will show “0
DEVICE PAIRED”.
2. Press SET to enter “PAIR DEVICE”. Press SET to start
pairing.
To ensure accurate calculations with your
. The watch
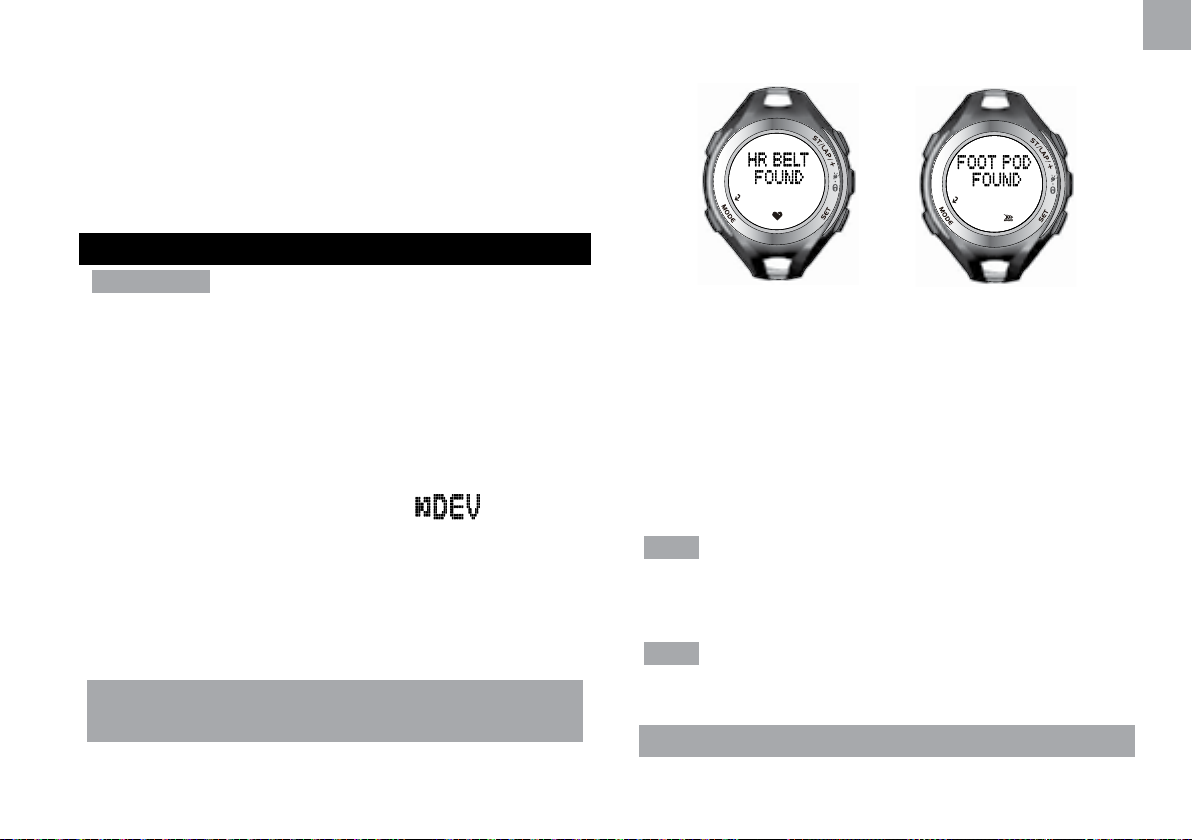
PAIR WITH SZ909 CHEST BELT (OR OTHER
ANT-SYSTEM CHEST BELTS)
You have 2 ways to pair the watch with chest belt.
• One way is to strap the belt across your chest, and wait
until the watch displays
and
(only with SZ909)
• The other way is as follows:
i. Hold the chest belt firmly with your thumbs touching
the conductive pads that normally contact your
chest.
ii. Rub your thumbs back and forth across the
conductive pads a few times until the watch displays
the screens above.
NOTE Only with SZ909 chest belt can you pair both HR belt
and foot pod. If you pair with other ANT-system chest belt,
only HR belt can be found.
NOTE For SZ909 chest belt, pairing is only considered
successful when both HR belt and foot pod are found.
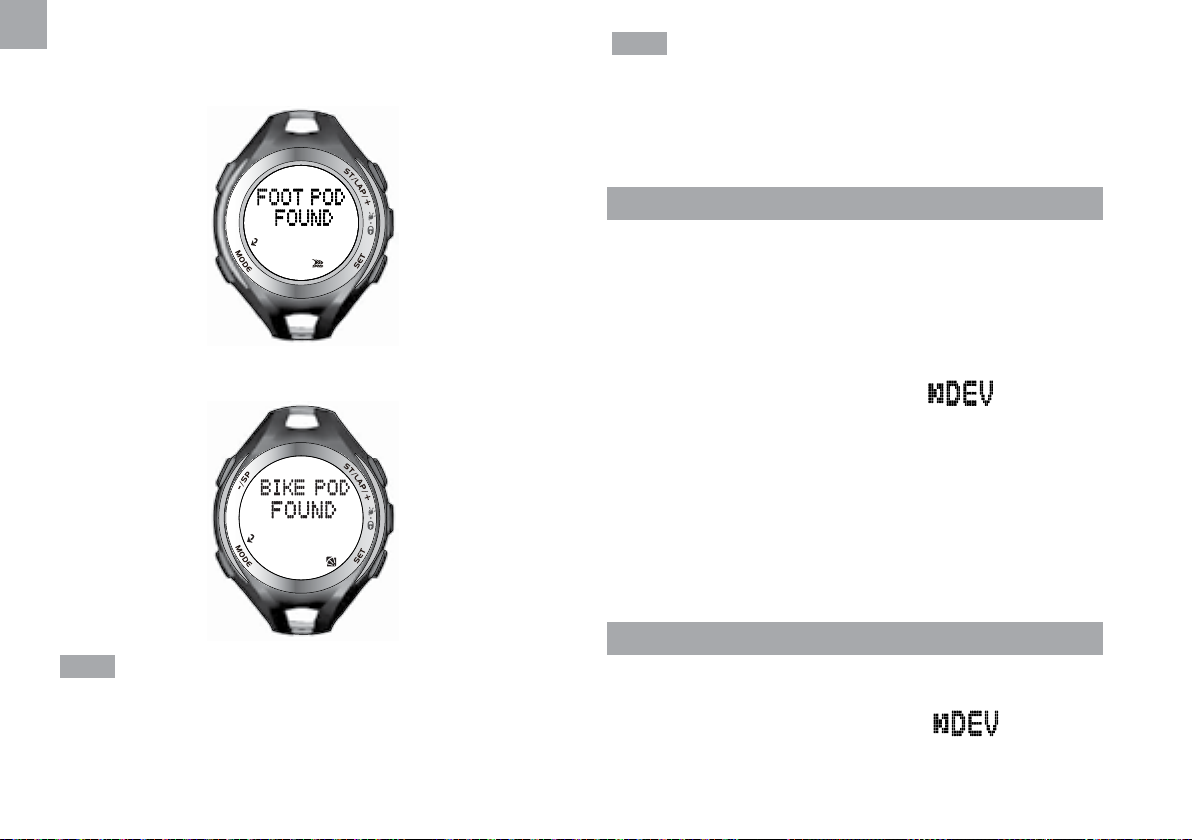
PAIR WITH ANT-SYSTEM FOOT POD / BIKE POD
You can purchase foot pod or bike pod separately to pair
with your watch, as long as they use the ANT system. For
9
EN
Page 11
EN
information on pairing, refer to their User Guides.
• When the foot pod is paired successfully, the watch will
display
• When the bike pod is paired successfully, the watch will
display
NOTE If the watch is already paired with SZ909 chest belt,
and you want to pair with another chest belt, you have to
first delete the SZ909 chest belt before you are able to pair
with another chest belt. This principle also applies to bike
pod and foot pod.
INPUT BIKE WHEEL SIZE (FOR BIKE POD)
The watch will not show “WHEEL SIZE” if no bike pod is
paired. For details of bike wheel size, refer to “BIKE WHEEL
SIZE” section in this manual.
If your watch is paired with bike pod, you will be asked to
input the wheel size values.
1. Press MODE repeatedly to select
2. Press SET.
3. Press ST/LAP/+ repeatedly to select “WHEEL SIZE”.
4. Press SET.
5. Input the bike wheel size by pressing ST/LAP/+ to
increase values or -/SP to decrease values.
6. Press SET to confirm.
.
NOTE If pairing is weak and unstable:
• Shorten the distance between the device and watch.
• Re-adjust the position of the device.
• Check the batteries. Replace them when necessary.
REMOVE PAIRED DEVICE
The watch will not show “DEVICE REMOVE” if no device
is paired.
1. Press MODE repeatedly to select
2. Press SET.
3. Press ST/LAP/+ repeatedly to select “DEVICE
.
10
Page 12
REMOVE”.
4. Press SET.
5. Press ST/LAP/+ to select which device to delete.
6. Press SET to confirm selection.
CALIBRATING PAIRED DEVICE
The watch will not show “CAL DEVICE” if no device is
paired.
You can calibrate by running, walking or inputting parameter.
The parameter is the same value after you have successfully
calibrated by running or walking.
If you want to calibrate the device immediately after pairing,
go directly to step 4. Otherwise, start from the beginning.
CALIBRATE BY RUNNING OR WALKING
1. Press MODE repeatedly to select .
2. Press SET.
3. Press ST/LAP/+ repeatedly to select “CAL DEVICE”.
4. Press SET.
5. Press ST/LAP/+ to select “CAL BY RUN” or “CAL BY
WALK”.
6. Press SET to confirm selection.
7. The watch will conduct a device search first, as
indicated by flashing
flashing, then press SET to start calibration.
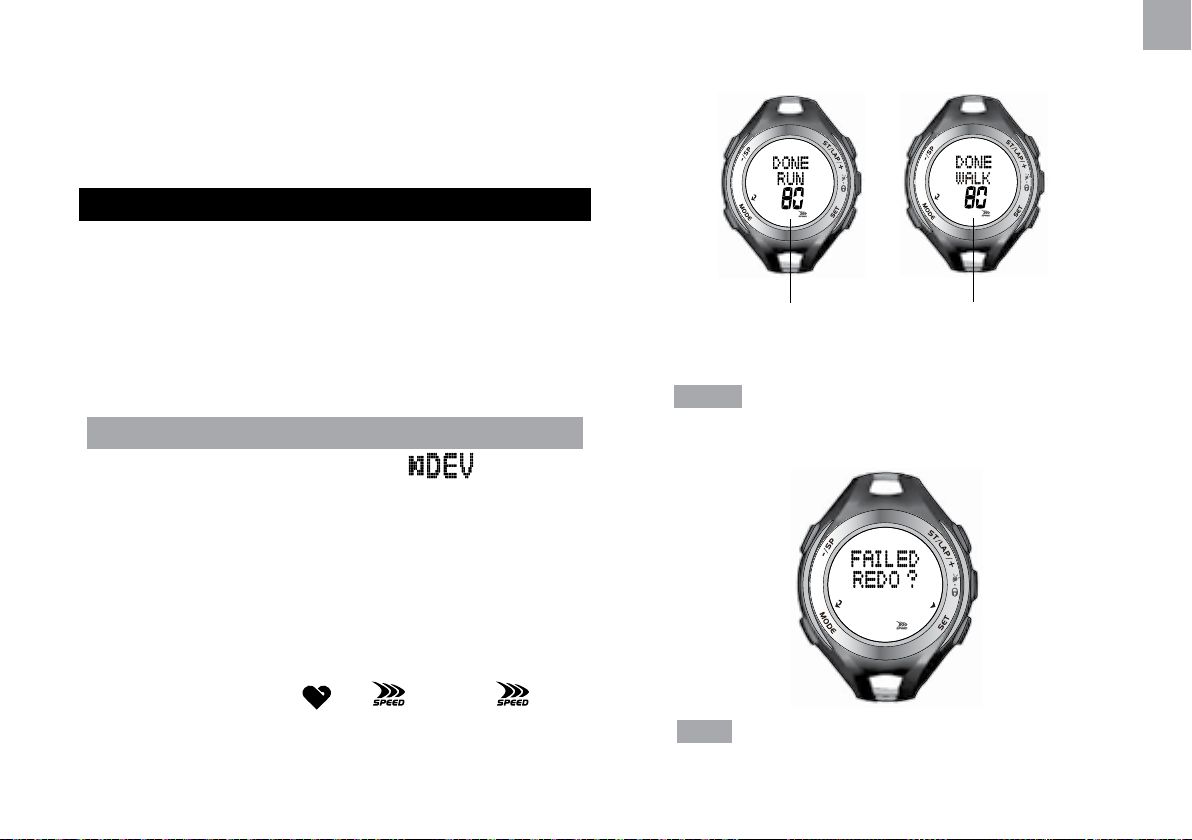
8. Ensure to complete walking or running the selected
and . Wait until stops
distance for calibration.
Ø If calibration is successful, the watch will display
or
Run parameter
Walk parameter
NOTE The Run parameter and Walk parameter is the
value to enter when calibrating by inputting parameter.
Ø If calibration fails, the watch will display
NOTE The SZ909 chest belt should be calibrated both
by running and walking.
EN
11
Page 13
EN
CALIBRATE BY INPUTTING PARAMETER
You can only know your parameter if you have already
successfully calibrated by running or walking beforehand.
This is because the parameter is the same value displayed
after you have successfully calibrated by running or walking.
By inputting parameter, you will be spared the time of
calibrating by running or walking again.
1. Press MODE repeatedly to select
2. Press SET.
3. Press ST/LAP/+ repeatedly to select “CAL DEVICE”.
4. Press SET.
5. Press ST/LAP/+ to select “PARA INPUT”.
6. Press SET to confirm selection.
7. Input parameter for Walk by pressing ST/LAP/+ to
increase values or - / SP to decrease values. The
parameter is the same value after you have successfully
calibrated by walking.
8. Press SET to confirm.
9. Input parameter for Run by pressing ST/LAP/+ to
increase values or - / SP to decrease values. The
parameter is the same value after you have successfully
calibrated by running.
10. Press SET to confirm.
.
CONDUCTING EXERCISE
IMPORTANT
exercise, you should pair the watch with SZ909 chest belt or
other devices such as bike pod. However, if without pairing,
the chest belt will only receive heart rate signal.
To ensure accurate calculations with your
There are 2 options for exercise: AUTO and PROG.
• AUTO refers to conducting exercise without using the
set exercise profile.
• PROG refers to conducting exercise by using the set
exercise profile (refer to “SET EXERCISE PROFILE”
section in this manual).
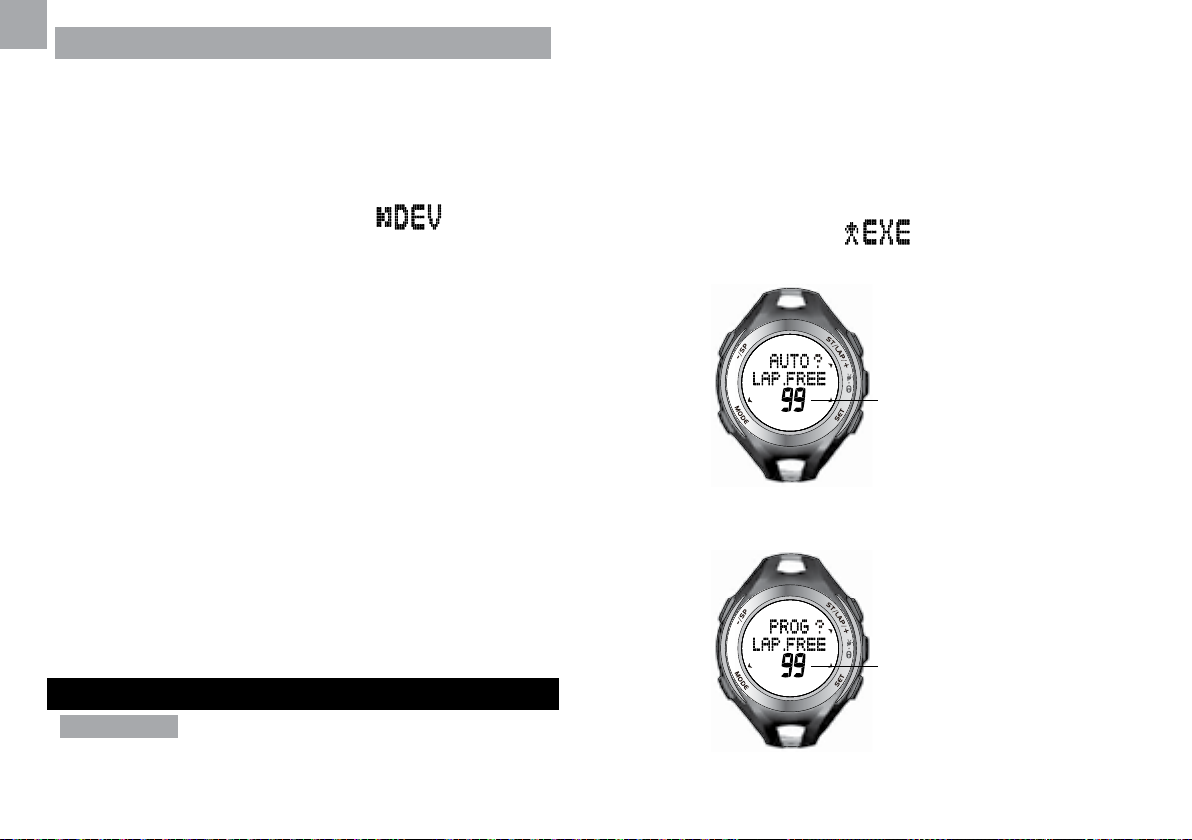
To conduct exercise:
1. Press MODE to select
• To exercise without exercise profile, select
.
available lap
memory
• To exercise with exercise profile, press ST/LAP/+ to
select
available lap
memory
Press SET, then press -/SP or ST/LAP/+ to select
which exercise profile to use.
12
Page 14
NOTE Available lap memory refers to the lap
memory available to do exercise. See “AVAILABLE
MEMORY FOR EXERCISE” for more details.
2. Press SET to confirm selection.
3. Wait for the watch to search for device first before
pressing SET to start exercise. See “DEVICE SEARCH
BEFORE EXERCISE” for more details.
4. During exercise, you can view your exercise data
by manually pressing SET repeatedly or automatic
toggling. See “AUTO TOGGLE DATA VIEW DURING
EXERCISE” for more details. To know what exercise
data are shown, see “VIEW EXERCISE DATA DURING
EXERCISE” for more details.
5. If you need to take a break during exercise, press -/SP.
You can resume exercise by pressing ST/LAP/+. See
“PAUSE AND RESUME EXERCISE” for more details.
6. After you completed your exercise, you can save the
exercise data. See “SAVE EXERCISE DATA” for
more details.
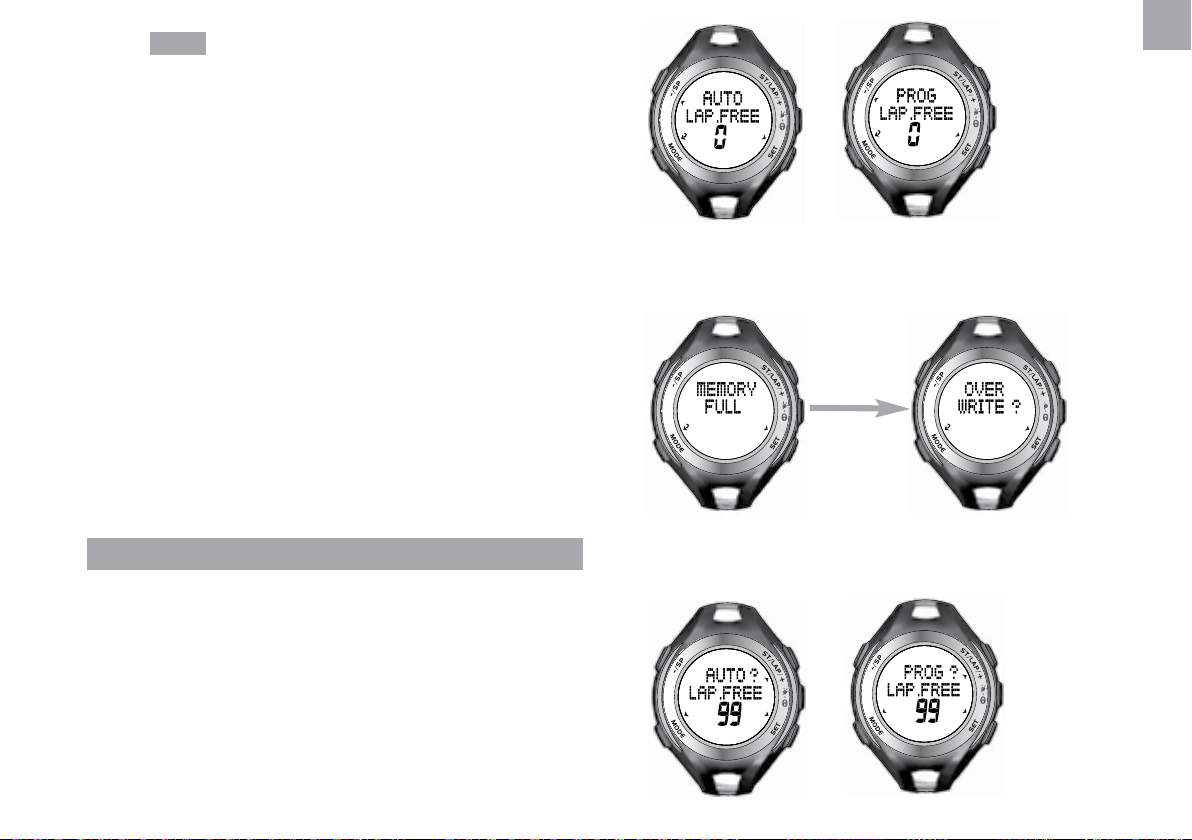
AVAILABLE MEMORY FOR EXERCISE
The watch must have available memory to allow for exercise.
If you want to exercise but there is no available lap memory,
the watch will prompt you to overwrite first before you can
exercise.
When the available lap memory is used up, AUTO and
PROG screens will show
EN
or
and the watch will display the screens below if you press
SET to exercise. You cannot start exercise unless you
overwrite old lap memories.
2SEC
Press SET to overwrite old lap memories. After overwriting,
the available lap memory will resume and the screens will
display
or
13
Page 15

EN
DEVICE SEARCH BEFORE EXERCISE
Before you start exercise, allow the watch a few seconds
to search for device first. This is to ensure you can receive
comprehensive calculations (such as your lap, calorie, heart
rate, distance, step, speed and cadence) during exercise.
But if you start exercise without device search, you will only
receive heart rate readings.
When you are in the screen below, you will find that the
device icons (
no heart rate values. Wait until
and heart rate values appear. Then you can start exercise
by pressing SET.
, , or ) are flashing and there are
or stops flashing
4. Press ST/LAP/+ or -/SP repeatedly to select “SET
VIEW”.
5. Press SET.
6. Press ST/LAP/+ to select “TOGGLE ON”.
7. Press SET to confirm selection.
NOTE If you have not set the above setting, you can
still view your exercise data by manually pressing SET
repeatedly during exercise.
PAUSE AND RESUME EXERCISE
If you need to take a break during exercise, press -/SP. Do
not press MODE, otherwise your exercise data will be lost.
AUTO TOGGLE DATA VIEW DURING EXERCISE
During exercise, if you want the watch to automatically toggle
the exercise data, go to Setting Mode to do the setting.
1. Press MODE repeatedly to select
2. Press ST/LAP/+ repeatedly to select “SET WATCH”.
3. Press SET.
.
During the long pause, the watch will lost connection with
the device. Hence, once you resume exercise, allow the
watch a few seconds to search for device first by pressing
SET. You will find that the device icons (
flashing and there are no heart rate values. Wait until
stops flashing and heart rate values appear. Then you
can resume exercise by pressing ST/LAP/+.
, , or ) are
14
or
Page 16
time
heart rate
lap
exercise
time
heart rate
lap
calorie
exercise
time
step
speed
heart rate
SAVE EXERCISE DATA
1. Press -/SP to stop the watch from counting. Do not
press MODE, otherwise your exercise data will be lost.
2. Press and hold -/SP to save and exit.
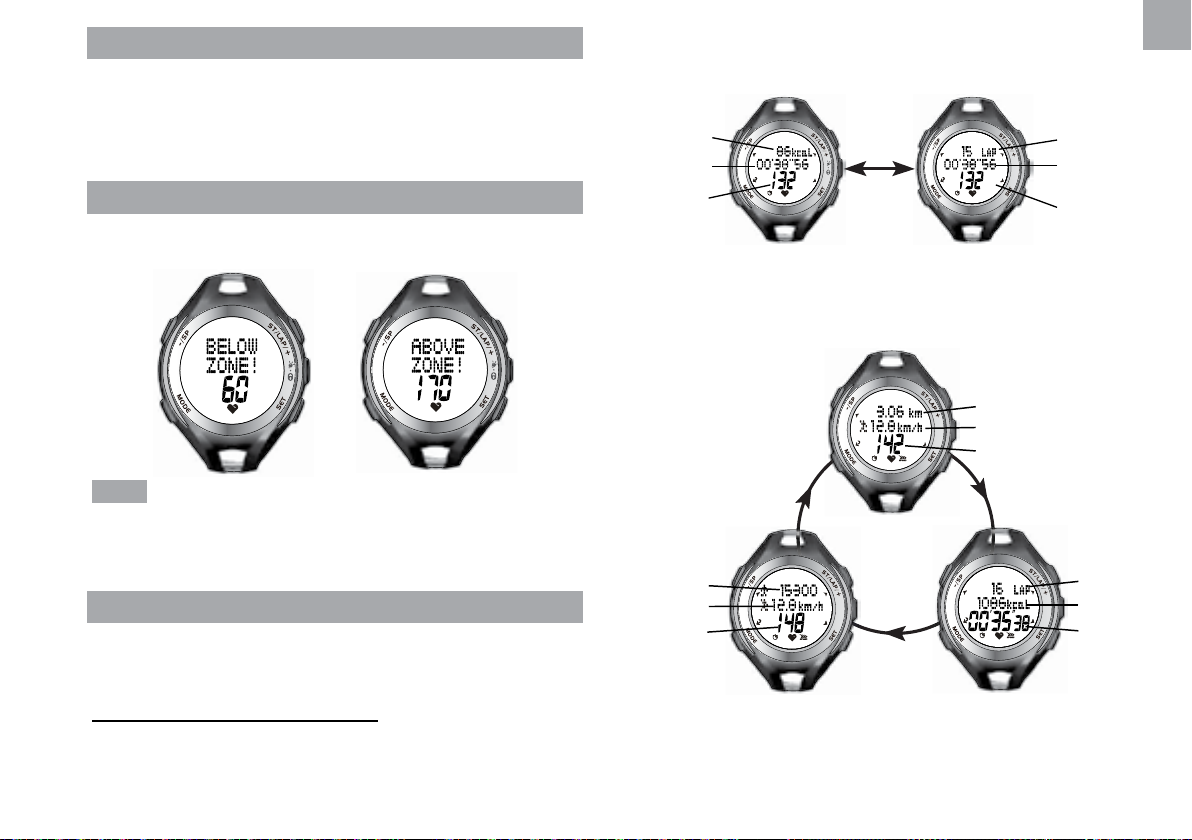
EXCEED HEART RATE LIMIT
During exercise, if the upper or lower heart rate limit is
exceeded, the watch will warn by beeping and displaying
or
NOTE This feature is only available when exercising with
exercise profile. It is not available when exercising in AUTO
sub-mode.
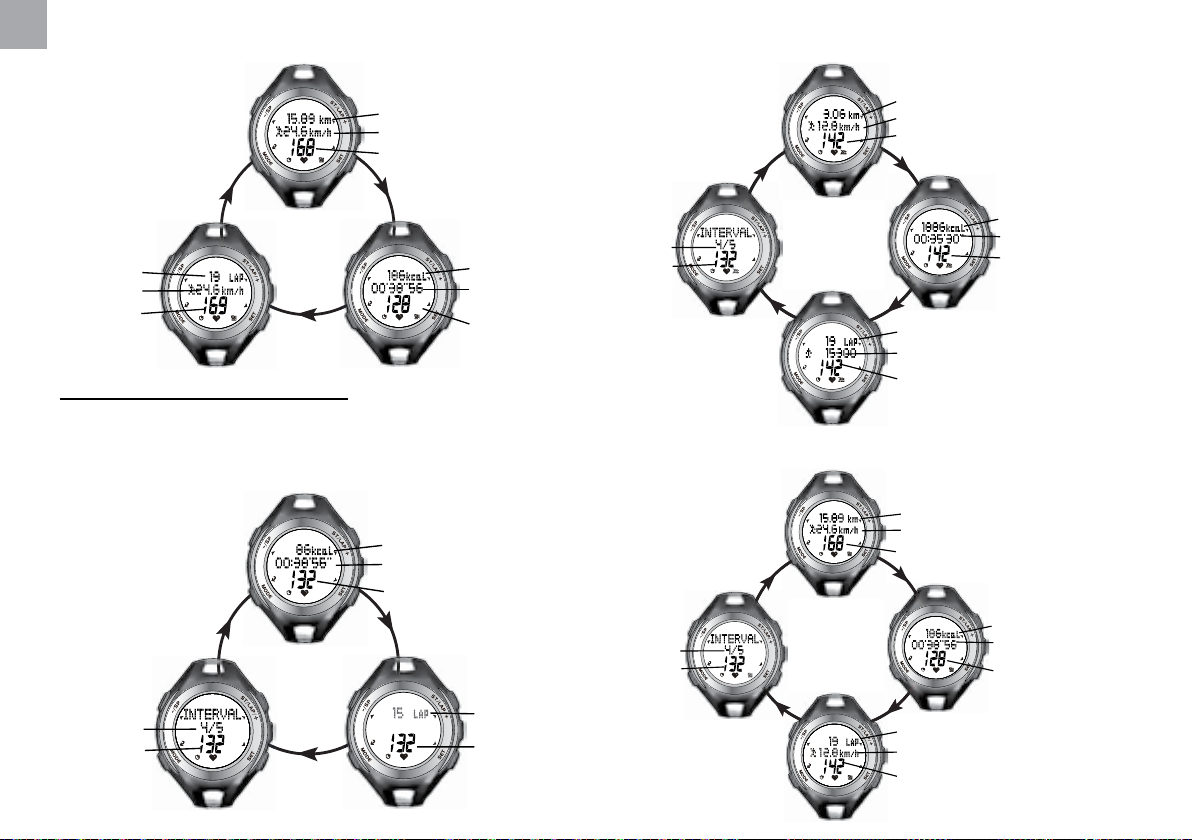
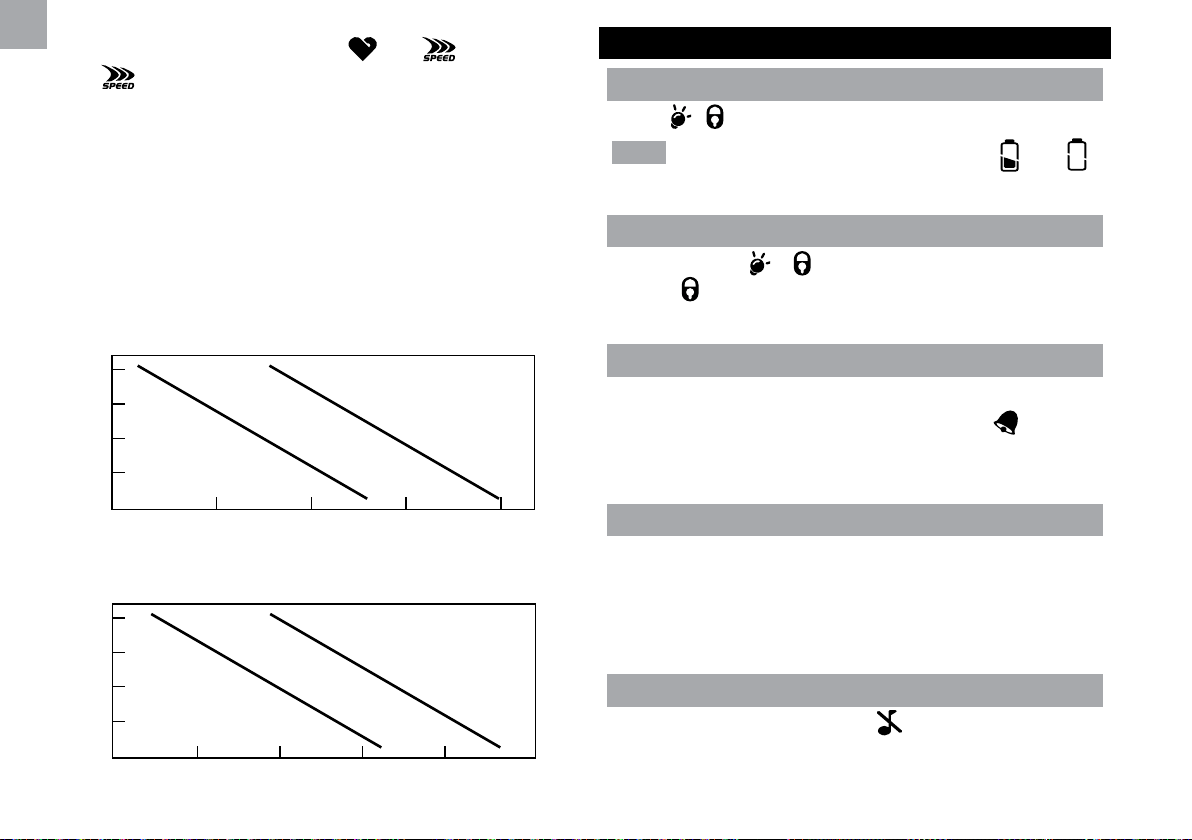
VIEW EXERCISE DATA DURING EXERCISE
During exercise, you can view your exercise data either
by automatic toggling or manually pressing SET to toggle
screens.
Exercise data for AUTO exercise
The diagrams below illustrate what exercise data will show
during exercise when paired with different devices.
• When paired with HR chest belt (except SZ909
chest belt)
calorie
exercise
• When paired with HR chest belt + foot pod (or
paired with SZ909 chest belt only)
distance
speed
heart rate
15
EN
Page 17
EN
distance
speed
heart rate
exercise
time
calorie
cadence
lap
speed
heart rate
RPM
lap
heart rate
remaining time
heart rate
calorie
lap
step
heart rate
interval
heart rate
remaining time
cadence
calorie
lap
speed
heart rate
interval
heart rate
RPM
• When paired with bike pod
Exercise data for PROG exercise
The diagrams below illustrate what exercise data will show
during exercise when using different exercise profiles.
• When using Cardio profile
calorie
remainning time
heart rate
• When using Running profile
• When using Cycling profile
distance
speed
heart rate
distance
speed
heart rate
interval
heart rate
16
Page 18
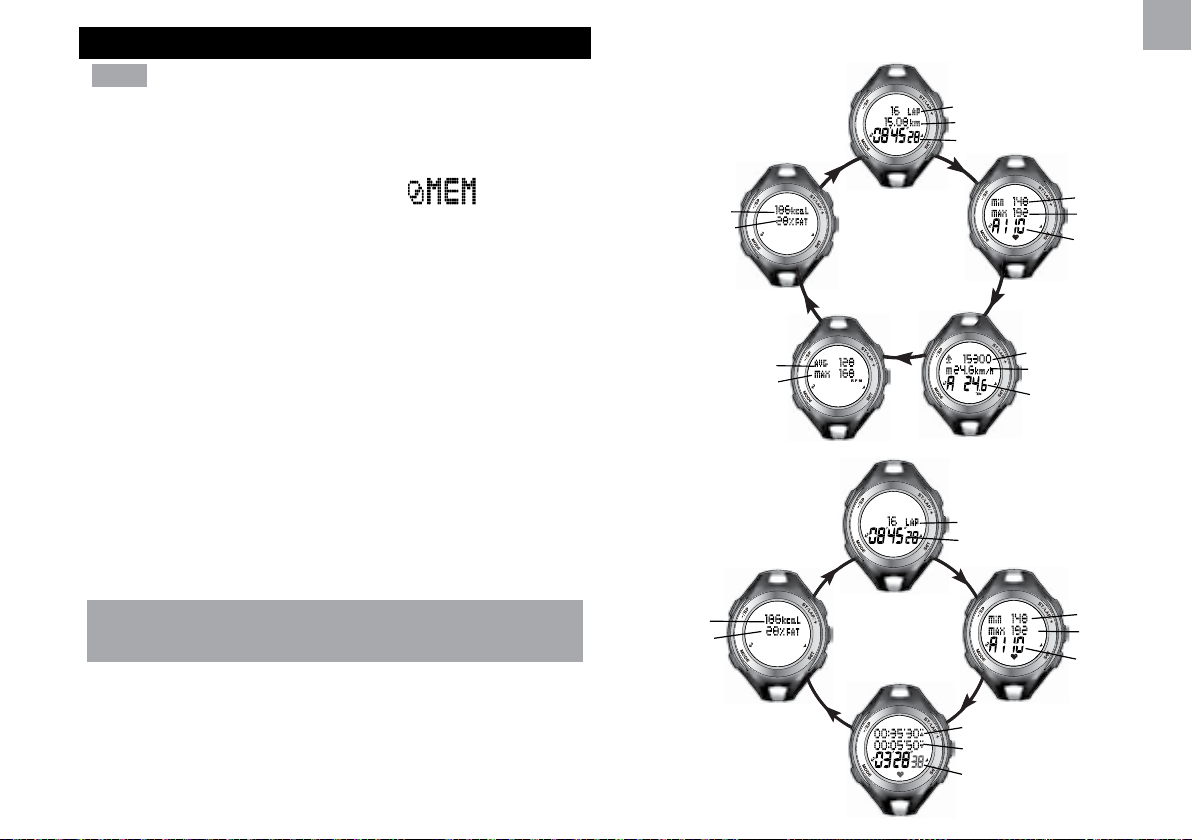
VIEWING EXERCISE RECORD
maximum
heart rate
average
heart rate
minimum
heart rate
total steps
maximum speed
average speed
average cadence
maximum cadence
calorie
%fat burnt
Memory Mode will not display when no exercise
NOTE
record is stored.
To view exercise records:
1. Press MODE repeatedly to select
will display the number of exercise records.
2. Press SET.
3. View your exercise records by pressing the following
buttons:
• ST/LAP/+ to select option
• -/SP to select option
• SET to enter Summary Record page or Lap Record
page and view record details
• MODE to return to previous page
. Your watch
• For Auto
• For Cardio
total laps
total distance
exercise time
EN
In each exercise record, it may either include a Summary
Record page only or a Summary Record page plus a Lap
Record page.
VIEW EXERCISE RECORD IN SUMMARY RECORD
PAGE
The diagrams below illustrate what exercise record details
will show for different exercise profiles. Press SET to toggle
screens.
%fat burnt
17
calorie
total laps
exercise time
minimum
heart rate
maximum
heart rate
average
heart rate
time above HR zone
time below HR zone
time in HR zone
Page 19
EN
maximum
heart rate
average
heart rate
minimum
heart rate
time above HR zone
time below HR zone
time in HR zone
total steps
maximum speed
average speed
calorie
%fat burnt
total laps
total distance
exercise time
maximum
heart rate
average
heart rate
minimum
heart rate
time above HR zone
time below HR zone
time in HR zone
average
cadence
maximum speed
average speed
maximum
cadence
calorie
%fat burnt
heart rate
average
cadence
maximum
speed
average
speed
maximum
cadence
time below HR zone
time in HR zone
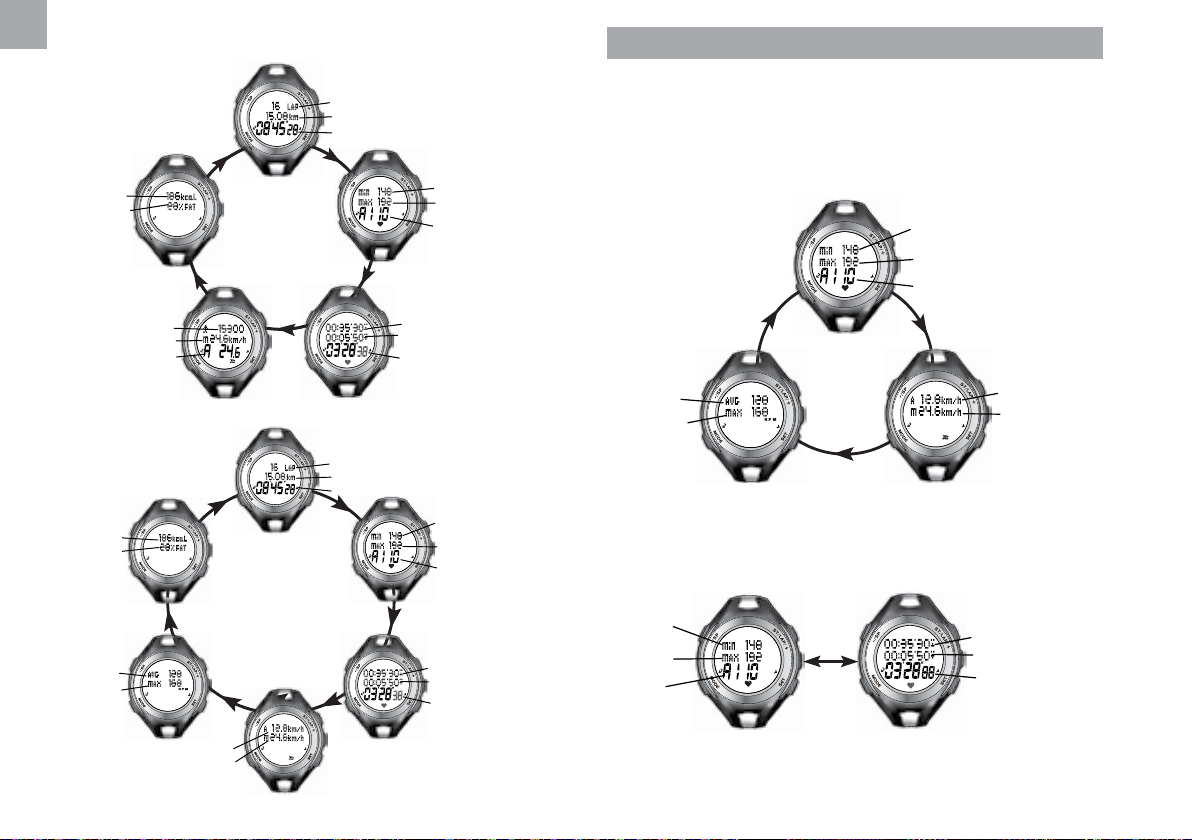
• For Running
• For Cycling
total distance
exercise time
total laps
VIEW EXERCISE RECORD IN LAP RECORD PAGE
The diagrams below illustrate what exercise record details
will show for different exercise profiles. Press SET to toggle
screens.
• For Auto
minimum
maximum
heart rate
average
heart rate
• For Cardio
minimum
heart rate
maximum
heart rate
average
heart rate
time above HR zone
18
Page 20
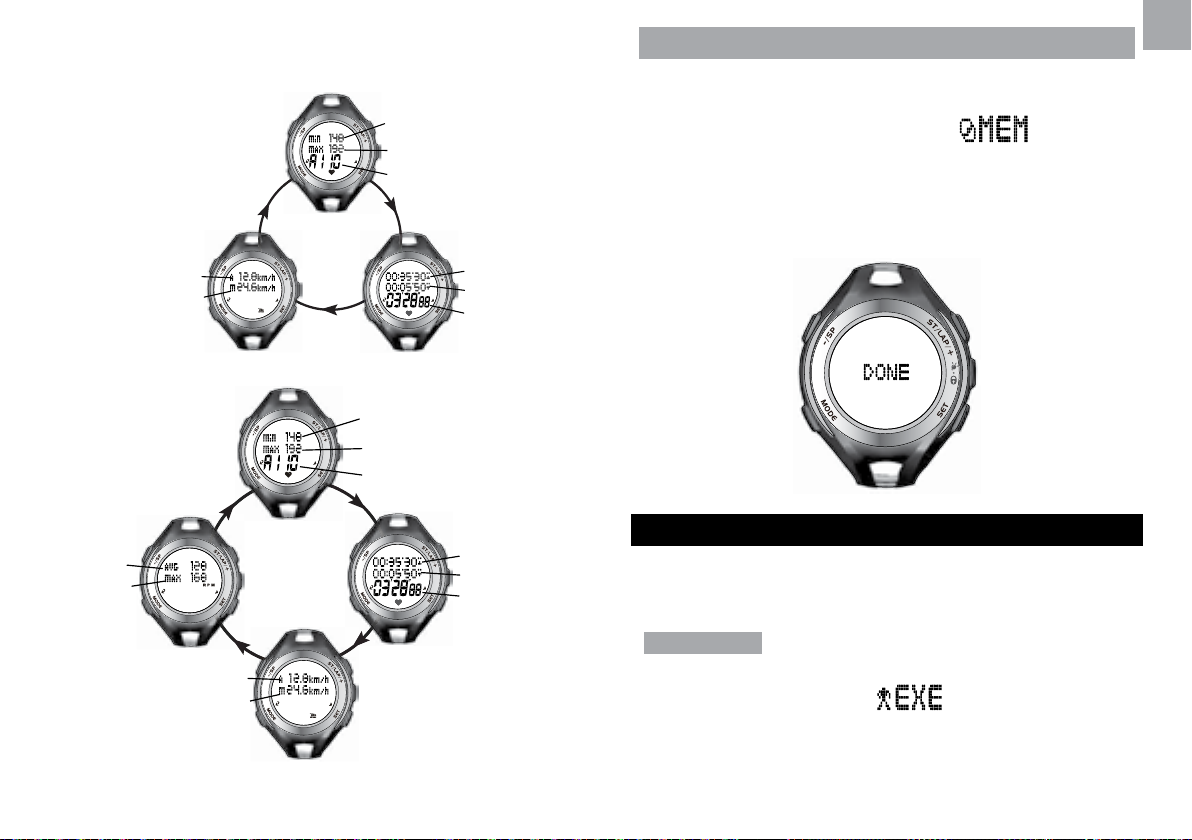
• For Running
maximum
heart rate
average
heart rate
minimum
heart rate
time in HR zone
maximum speed
average speed
heart rate
time above HR zone
time below HR zone
time in HR zone
maximum speed
average speed
average
cadence
maximum
cadence
DELETE MEMORIES
You cannot select memory to delete, but have to delete all
memories.
EN
• For Cycling
minimum
maximum
heart rate
average
heart rate
time above HR zone
time below HR zone
1. Press MODE repeatedly to select
. Your watch
will display the number of exercise records.
2. Press ST/LAP/+. Your watch will ask if you are going to
clear memory.
3. Press and hold SET until the watch displays
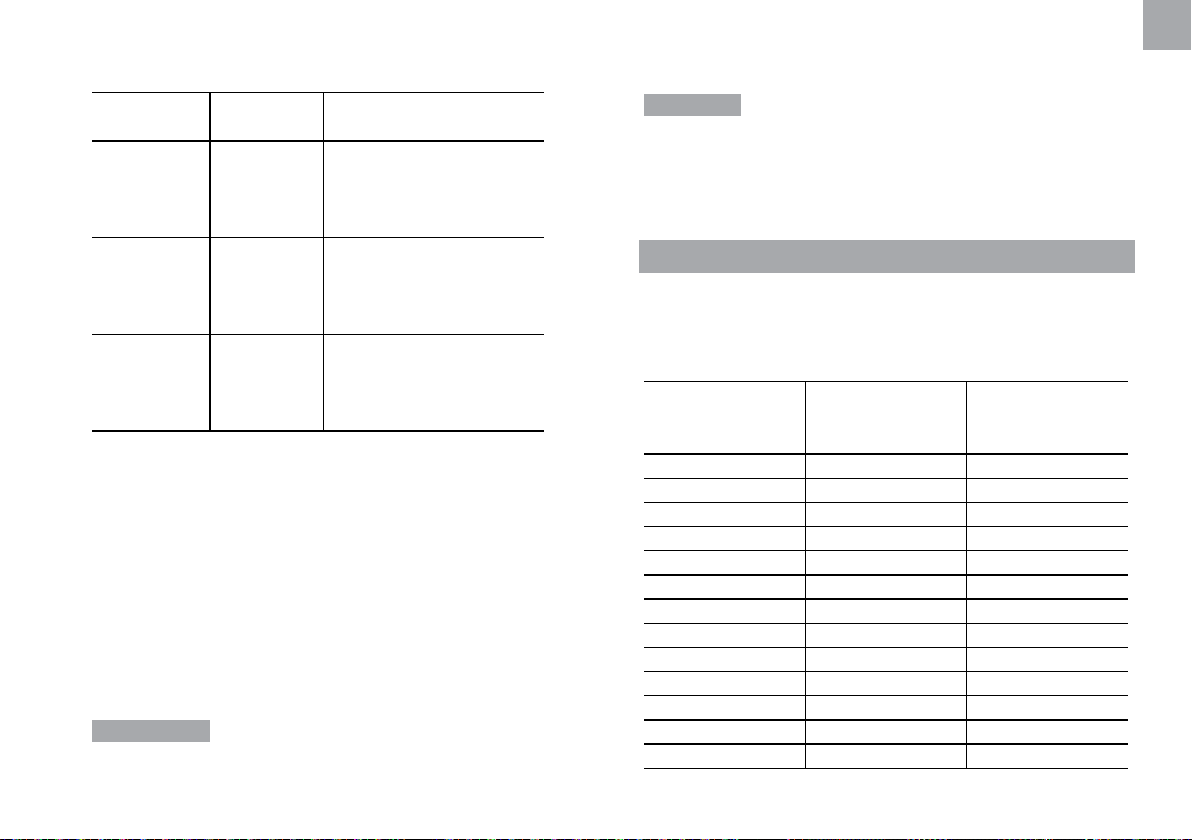
KNOWING YOUR FITNESS INDEX
Your watch will generate a fitness index based on your
aerobic exercise (by running 1 mile or 1.60 km).
IMPORTANT Ensure your watch is already paired with
heart rate chest belt before doing the fitness test.
1. Press MODE to select
.
2. Press ST/LAP/+ repeatedly to select “FITNESS
TEST”.
3. Press SET. The watch will conduct a device search
19
Page 21
EN
FITNESS INDEX FOR MEN
FAIR
GOOD
AVERAGE
Age
60
50
40
30
20
22 27 32 37 42
FITNESS INDEX FOR WOMEN
FAIR
GOOD
AVERAGE
Age
60
50
40
30
20
15 20 25 30 35 40
first, as indicated by flashing and . Wait until
stops flashing. The watch will also prompt you to
run 1 mile.
4. Press SET to start running. Ensure to complete running
1 mile for accurate fitness measurement. While running,
the watch will display the exercise time, distance and
heart rate.
5. After completing the run, your watch will automatically
calculate and show your fitness index. The higher the
index, the fitter you are. The diagrams below provide a
general guide as to what your fitness index means.
OTHER OPERATION AND SETTING
ACTIVATE BACKLIGHT
Press / to turn backlight On for 5 seconds.
NOTE The backlight function will not operate if “ ” or “ ”
is displayed.
LOCK / UNLOCK KEYPAD
Press and hold / for 2 seconds to lock or unlock
keypad.
indicates keypad is locked.
SET ALARM ON / OFF
1. In Time Mode, press SET.
2. Press ST/LAP/+ to turn alarm On or Off.
indicates
the alarm is turned On.
3. Press MODE or SET to exit.
SILENCE ALARM
• Press any button to stop the alarm and it will activate
again 24 hours later.
OR
• Set the alarm to Off.
SET BEEP TONE ON / OFF
In Time Mode, press ST/LAP/+. indicates the beep tone
is turned Off.
20
Page 22
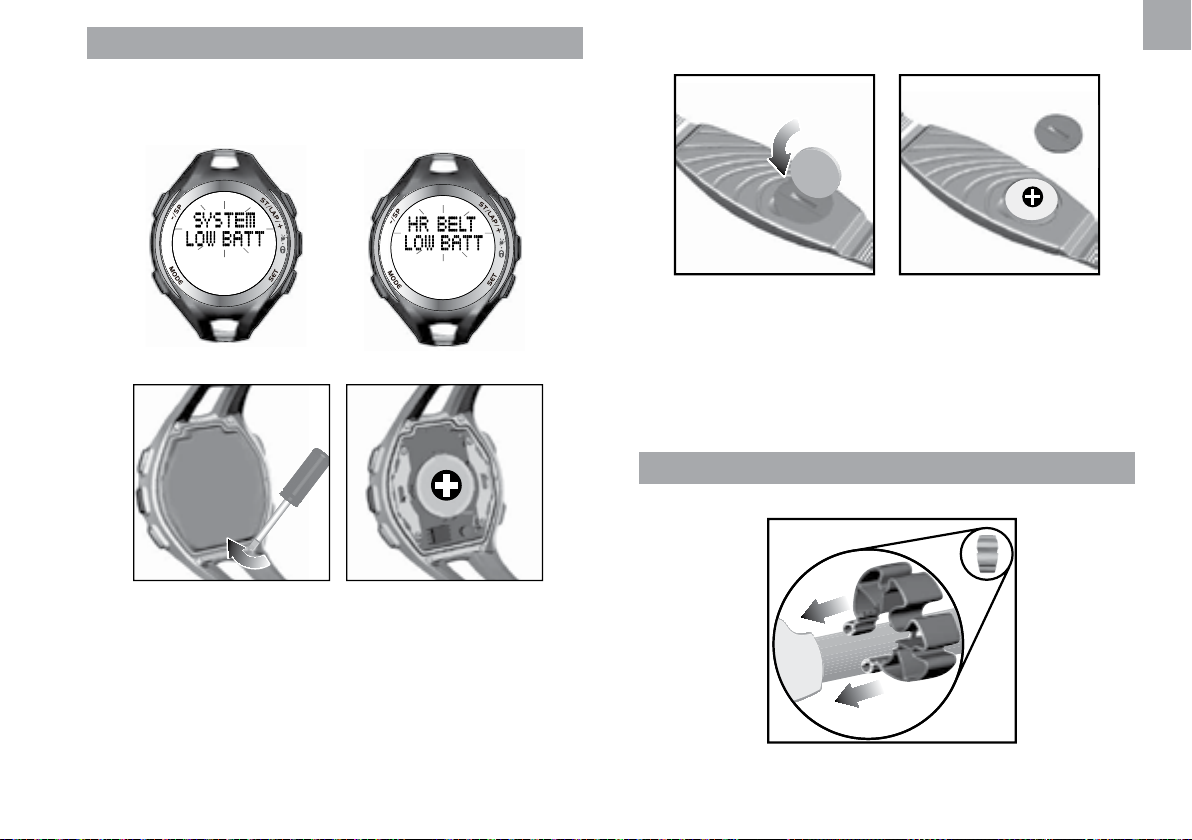
REPLACE BATTERY
If the battery power of your watch or chest belt is low, the
watch will display:
watch low battery chestbelt low battery
or
To replace watch battery:
To replace chest belt battery:
1. Use a coin to open the battery compartment lid by
turning it anticlockwise.
2. Remove the old battery and insert a new CR2032, 3V
lithium battery.
3. Secure the lid by turning the coin clockwise.
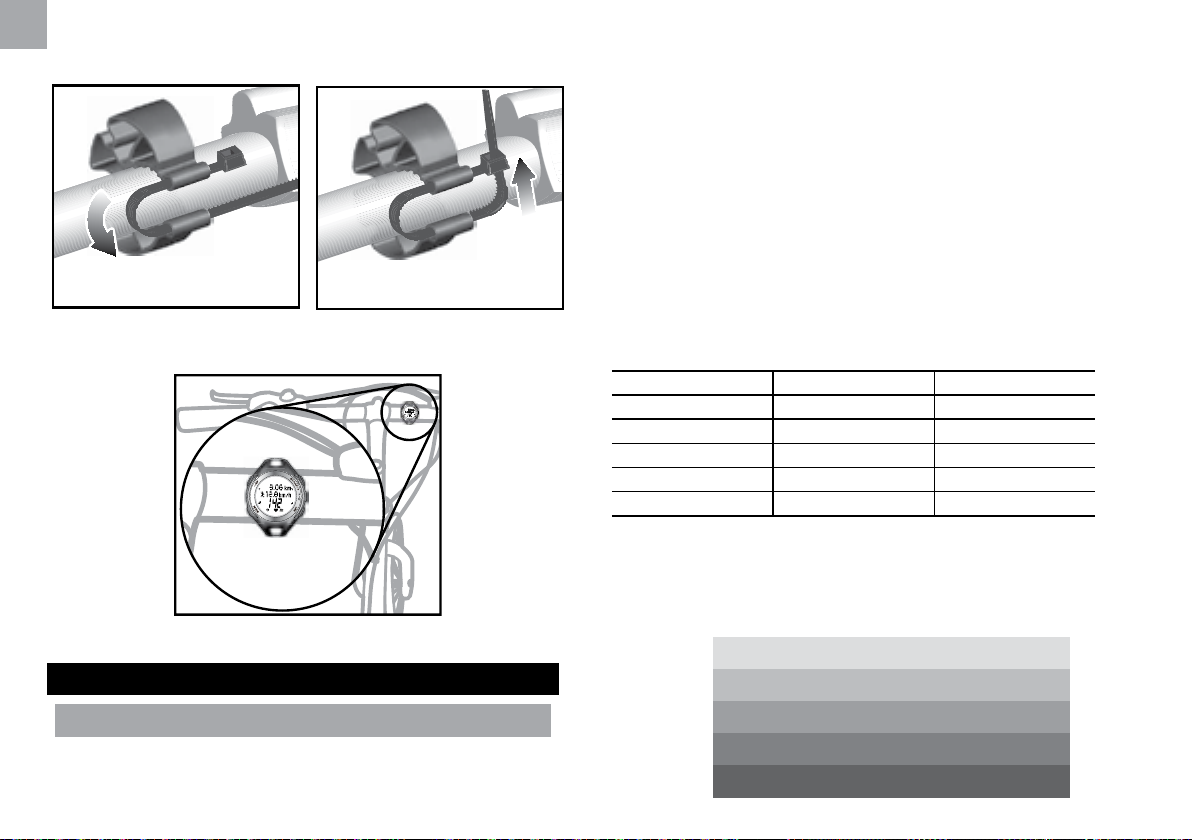
INSTALL BIKE MOUNT
1. Clasp the bike mount onto a bike or exercise machine.
EN
1. Use a small screwdriver to open the battery
compartment lid.
2. Remove the old battery and insert a new CR2032, 3V
lithium battery.
3. Secure the lid by screwing it back into place.
21
Page 23
EN
2. Insert the nylon cord to secure the bike mount according
to the diagrams below.
3. Fix the watch onto the bike mount.
USEFUL REFERENCE
TARGET ZONE
To help achieve maximum health benefits from your workout
programme, it is important to know your:
• Maximum Heart Rate (MHR)
• Upper heart rate limit
• Lower heart rate limit
MHR is expressed in beats per minute. You can get your
MHR from an MHR test, or you can estimate it by using the
following formula:
220 - age = MHR
The watch is pre-programmed with 5 target zone options,
each with its lower and upper heart rate limit, as listed in
the table below.
Lower Limit Upper Limit
Zone 1 50% x MHR 60% x MHR
Zone 2 60% x MHR 70% x MHR
Zone 3 70% x MHR 80% x MHR
Zone 4 80% x MHR 90% x MHR
Zone 5 90% x MHR 100% x MHR
The most popular zone range is from 50% to 80% of
your Maximum Heart Rate. This is where you achieve
cardiovascular benefits, burn fat and become fitter.
22
50%
60%
70%
80%
90%
100%
Moderate Activity
Weight Management
Aerobic Zone
Anaerobic Threshold Zone
Red Line Zone ( maximum capacity )
Page 24
There are three categories of training as described in the
table below.
week for a healthier cardiovascular system.
EN
TRAINING
CATEGORY
Health
Maintenance
Aerobic
Exercise
Anaerobic
Exercise
MHR% DESCRIPTION
This is the lowest training
65-78%
65-85%
78-90%
intensity level. It is good for
beginners and those who want to
strengthen their cardiovascular
systems.
Increases strength and
endurance. It works within the
body’s oxygen intake capability,
burns more calories and can
be maintained for a long period
of time.
Generates speed and power.
It works at or above the body’s
oxygen intake capability,
builds muscle and cannot be
maintained for a long period
of time.
The upper and lower heart rate limits are calculated by
multiplying your MHR by the percentages of the selected
training category.
For example:
A 40-year-old training for basic health maintenance:
• His upper heart rate limit [220 - 40(age)] x 78%
• His lower heart rate limit [220 - 40(age)] x 65%
IMPORTANT Always warm up before exercise and select
the training category that best suits your physique. Exercise
regularly, 20 to 30 minutes per session, three to four times a
WARNING Determining your individual training category is
a critical step in the process towards an efficient and safe
training programme. Please consult your doctor or health
professional to help you determine exercise frequency and
duration appropriate for your age, condition and specific
goals.
BIKE WHEEL SIZE
Match the ETRTO or wheel size diameter printed on the
wheel with the wheel size setting at the right hand column
of the table below. Input the relevant wheel size setting
number after bike pod is paired.
Wheel size
ETRTO
diameter
(inches)
25-559 26 x 1.0 1884
23-571 650 x 23C 1909
35-559 26 x 1.50 1947
37-622 700 x 35C 1958
47-559 26 x 1.95 2022
20-622 700 x 20C 2051
52-559 26 x 2.0 2054
23-622 700 x 23C 2070
25-622 700 x 25C 2080
28-622 700 x 28 2101
32-622 700 x 32C 2126
42-622 700 x 40C 2189
47-622 700 x 47C 2220
Wheel size
setting (mm)
23
Page 25

EN
NOTE Wheel sizes on this table are for reference only as
wheel size depends on the wheel type and air pressure.
CONNECTING WITH PC APPLICATION SOFTWARE
The AD108 PC Application Software is a software designed
for users in order to benefit from all features of their SE833
watch. You can use the software to upload and download
data to/from your SE833 watch, and to organize and view
the downloaded data on your computer. Additionally, you
can also use the software to create or modify the settings
of your watch.
Software features include:
• Up to 50 multi-user accounts
• Up to 3 custom exercise profiles for upload to watch
• Display of exercise records in summaries and graphs
• Creation and modification of user data and settings
PC REQUIREMENTS
Make sure your PC has the following configuration before
installing the software:
• Operating system: Microsoft Windows 2000, XP SP2 or
Vista
• Processor: Intel® Pentium® III 1GHz or faster (minimum);
Pentium 4 2GHZ or faster (recommended)
• RAM: 512MB (minimum); 1GB (recommended)
• Hard disk free space: Min. 512MB
• Screen Display Area: 1024 x 600 pixels
SYNCHRONISING SE833 WATCH WITH PC
APPLICATION SOFTWARE
You can either upload data from the software to the SE833
watch or download data from the SE833 watch to the
software.
Data to upload from software to watch:
• up to 3 customised exercise profiles (the custom exercise
profiles will be added in addition to the default exercise
profiles in the watch)
• new or modified user data or device settings (once
uploaded, the current user data and device settings in
the watch will be overwritten)
Data to download from watch to software:
• all exercise records (exercise records will be saved and
accumulated in the software)
• new or modified user data or device settings (once
downloaded, the current user data and device settings
in the software will be overwritten)
NOTE For more details about the exact data being uploaded
or downloaded, refer to “UPLOAD AND DOWNLOAD
DATA” in the PC Application Software User Guide inside
the CD-ROM.
24
Page 26
To synchronise watch with software:
On the PC
1. Plug in the USB dongle.
2. Start up the software by double-clicking
3. Click
on the software.
On the watch
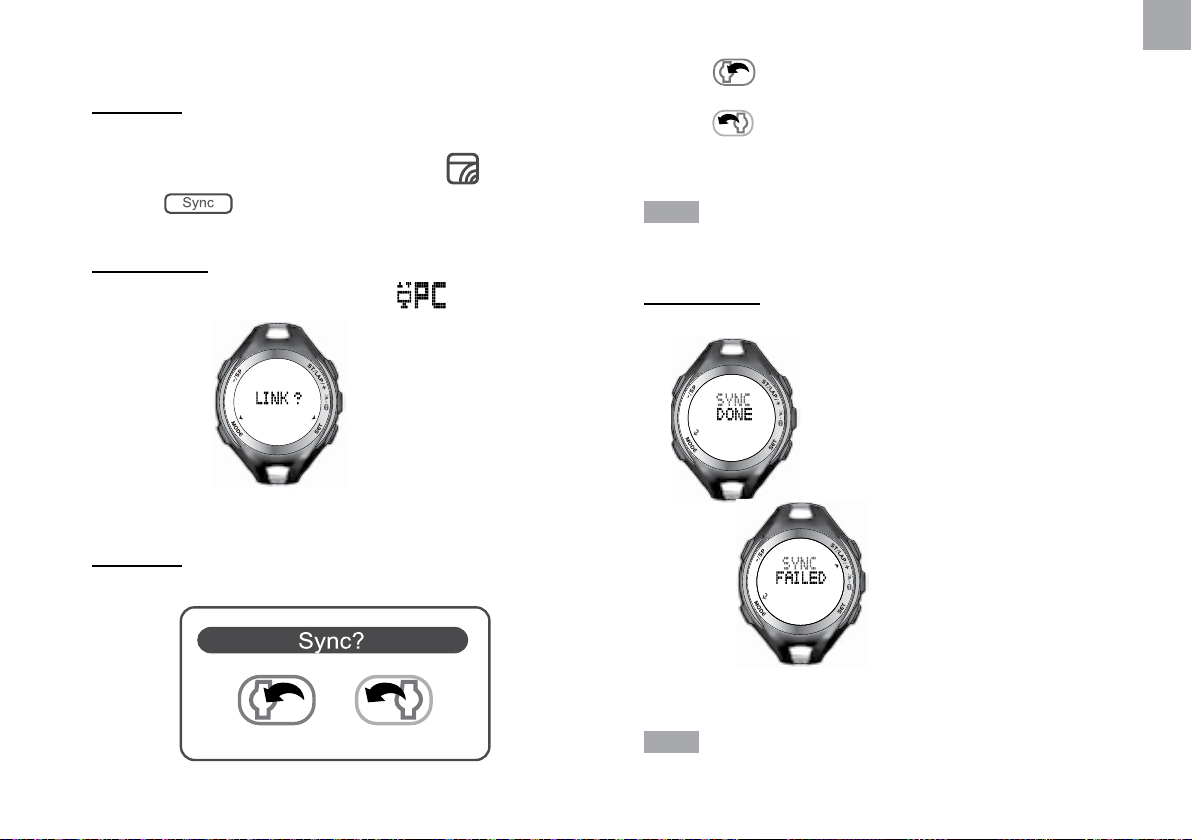
4. Press MODE repeatedly to select
5. The screen
will be displayed. Press SET
.
to start synchronising.
On the PC
6. The message box below will be displayed.
• To upload data from the software to the SE833 watch,
click
.
EN
• To download data from the SE833 watch to the software,
click
.
• To exit, press Esc.
.
NOTE Synchronisation cannot be cancelled while in
progress.
On the watch
7. If synchronisation is successful, the screen will display
. If synchronisation fails, the screen will
UPLOAD
DOWNLOAD
display
. Press ST/LAP/+ then SET to
try again or press MODE to exit.
NOTE For more details of the software interface and
functions, refer to the PC Application Software User
Guide inside the CD-ROM.
25
Page 27
EN
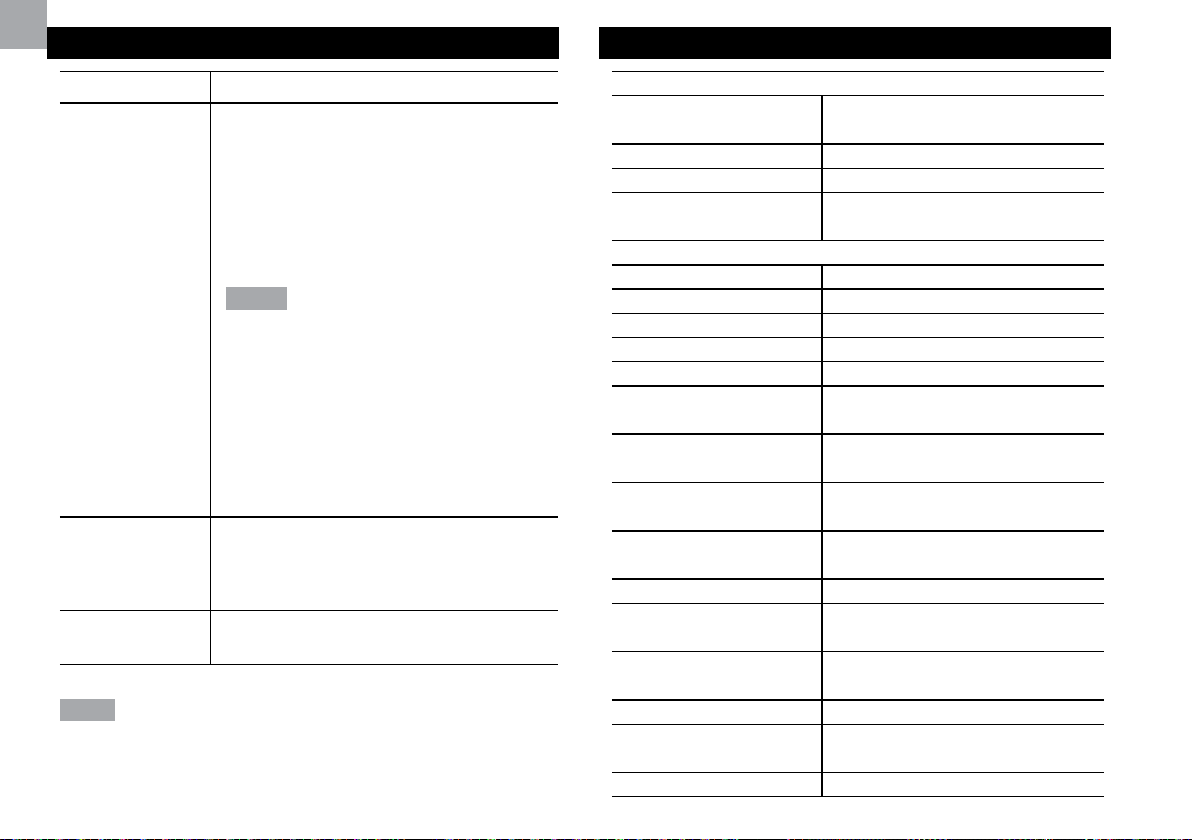
WATER RESISTANCE
SPECIFICATIONS
Item Water resistance
50 metres (164 feet)
This means you can use the watch
for swimming or other water sport
activities (such as surfing) but it must
not be used for snorkeling and deep
water diving.
SE833 watch
NOTE
• Ensure the buttons and battery
compartment are secured and
intact before exposing the watch
to excessive water.
• Avoid pressing the buttons while
in the water or during heavy
rainstorms, as this may cause
water to enter the watch, leading
to malfunction.
SZ909 chest
belt
AD112 USB
dongle
10 metres (32.8 feet)
Not recommended to use for
swimming.
No
NOTE Even if both the SE833 watch and the SZ909 chest
belt are water-resistant, as radio signals do not carry in
water, signal transmission between the watch and chest belt
will still be impossible in water.
CLOCK
Time format
Date format DD / MM or MM / DD
Year range 2009 - 2058
Alarm
TRAINING
Exercise time range 00:00:00 to 99:59:59
Rest time range 00:00:00 to 99:59:59
Warm up time range 00:00:00 to 00:15:00
Recovery timer range 0 or 5 minutes
Target heart rate zone Zone 1 to 5
Lower heart rate limit
range
Upper heart rate limit
range
Distance measurement
range
Step measurement
range
Maximum lap count 99
Cadence measurement
range
Number of interval
training
Calorie range 0 to 9999 kcal
Fat burn percentage
range
Fitness Index range 1 to 99
12/24 hour format with hour /
minute / second
Alarm with daily, weekday or
weekend settings
30 to 220 bpm
80 to 240 bpm
0 to 60.99 unit (unit is km or
mile)
0 to 999999
1 to 1999 rpm
2 to 5
0 to 100%
26
Page 28

POWER
Watch 1 x CR2032 3V lithium battery
SZ909 chest belt 1 x CR2032 3V lithium battery
OPERATING ENVIRONMENT
For watch
0°C to 40°C
Operating temperature
Storage temperature
(32°F to 104°F)
For SZ909 chest belt
5°C to 40°C
(41°F to 104°F)
For watch and SZ909 chest
belt
-20°C to 60°C
(-4°F to 140°F)
PRECAUTIONS
To ensure you use your product correctly and safely, read
these warnings and the entire user manual before using the
product:
• Use a soft, slightly moistened cloth. Do not use
abrasive or corrosive cleaning agents, as these may
cause damage. Use lukewarm water and mild soap to
clean the watch thoroughly after each training session.
Never use the product in hot water or store it when
wet.
• Damage to the product may occur if the keys are
pressed underwater.
• Hot steam may cause damage to the product. Do not
wear it in steaming shower, spa or hot tub.
• The product should be rinsed thoroughly with fresh
water after being in contact with salt water.
• Do not subject the product to excessive force, shock,
dust, temperature changes, or humidity. Never expose
the product to direct sunlight for extended periods.
Such treatment may result in malfunction.
• Do not bend or stretch the transmitter part of the chest
belt.
• Do not tamper with the internal components. Doing
so will terminate the product warranty and may cause
damage. The main unit contains no user-serviceable
parts.
• Do not scratch hard objects against the LCD display as
this may cause damage.
• Take precautions when handling all battery types.
• Remove the batteries whenever you are planning to
store the product for a long period of time.
• When replacing batteries, use new batteries as
specified in this user manual.
• The product is a precision instrument. Never attempt
to take this device apart. Contact the retailer or our
customer service department if the product requires
servicing.
• Do not touch the exposed electronic circuitry, as there
is a danger of electric shock.
• Check all major functions if the device has not been
used for a long time. Maintain regular internal testing
and cleaning of your device. Have your watch serviced
by an approved service center annually.
• When disposing of this product, ensure it is collected
EN
27
Page 29
EN
separately for special treatment and not as normal
household waste.
• Due to printing limitations, the displays shown in this
manual may differ from the actual display.
• The contents of this manual may not be reproduced
without the permission of the manufacturer.
NOTE The technical specifications for this product and the
contents of the user manual are subject to change without
notice.
NOTE Features and accessories will not be available in all
countries. For more information, please contact your local
retailer.
ABOUT OREGON SCIENTIFIC
Visit our website (www.oregonscientific.com) to learn more
about Oregon Scientific products.
If you’re in the US and would like to contact our Customer
Care department directly, please visit:
www2.oregonscientific.com/service/support.asp
EU-DECLARATION OF CONFORMITY
Hereby, Oregon Scientific, declares that this Heart Rate
Monitor with Speed and Distance plus PC Connection (model
SE833) is in compliance with the essential requirements and
other relevant provisions of Directive 1999/5/EC. A copy of
the signed and dated Declaration of Conformity is available
on request via our Oregon Scientific Customer Service.
COUNTRIES RTTE APPROVED COMPLIED
All EU countries, Switzerland CH
and Norway N
FCC (US) / IC (CANADA) STATEMENT
This device complies with Part 15 of the FCC Rules.
Operation is subject to the following two conditions: (1) This
device may not cause harmful interference, and (2) This
device must accept any interference received, including
interference that may cause undesired operation.
WARNING Changes or modifications not expressly
approved by the party responsible for compliance could void
the user’s authority to operate the equipment.
For international inquiries, please visit:
www2.oregonscientific.com/about/international.asp
NOTE This equipment has been tested and found to comply
with the limits for a Class B digital device, pursuant to Part
15 of the FCC Rules. These limits are designed to provide
reasonable protection against harmful interference in a
residential installation.
28
Page 30

This equipment generates, uses and can radiate radio
frequency energy and, if not installed and used in accordance
with the instructions, may cause harmful interference to
radio communications. However, there is no guarantee
that interference will not occur in a particular installation.
If this equipment does cause harmful interference to radio
or television reception, which can be determined by turning
the equipment off and on, the user is encouraged to try
to correct the interference by one or more of the following
measures:
• Reorient or relocate the receiving antenna.
• Increase the separation between the equipment and
receiver.
• Connect the equipment into an outlet on a circuit
different from that to which the receiver is connected.
• Consult the dealer or an experienced radio / TV
technician for help.
This Class B digital apparatus complies with Canadian
ICES-003.
DECLARATION OF CONFORMITY
The following information is not to be used as contact for
support or sales. Please visit our website at
www2.oregonscientific.com/service for all enquiries.
We
Name: Oregon Scientific, Inc.
Address: 19861 SW 95
Oregon 97062 USA
Telephone No.: 1-800-853-8883
th
Ave.,Tualatin,
declare that the product
Product No.: SE833
Product Name: Heart Rate Monitor with Speed and
Distance plus PC Connection
Manufacturer: IDT Technology Limited
Address: Block C, 9/F, Kaiser Estate,
Phase 1,41 Man Yue St., Hung
Hom, Kowloon,
Hong Kong
is in conformity with Part 15 of the FCC Rules. Operation is
subject to the following two conditions: 1) This device may
not cause harmful interference. 2) This device must accept
any interference received, including interference that may
cause undesired operation.
29
EN
Page 31

Monitor del ritmo cardíaco con
velocidad, distancia y conexión a PC
MODELO: SE833
MANUAL DE USUARIO
CONTENIDOS
Introducción .................................................................. 2
Contenido del paquete ............................................... 2
Botones de control ....................................................... 2
Pantalla .......................................................................... 3
Cómo poner en marcha el reloj (por primera vez) ..... 3
Cómo configurar el reloj .............................................. 3
Configurar perfil de usuario ....................................... 4
Configurar perfil del reloj ............................................ 5
Configurar perfil de ejercicio ...................................... 5
Cómo colocarse la cinta ............................................... 8
Conexión a dispositivo ................................................. 9
Conexión con cinta SZ909 (u otra cinta de sistema
ANT) ......................................................................... 10
Conexión con sensor para zapatilla / bicicleta ........... 10
Introducción del tamaño de la rueda de la bicicleta (para
el sensor para bicicleta) ............................................. 11
Retirar dispositivo conectado ..................................... 11
Calibración de dispositivo conectado ........................ 11
Calibración corriendo o caminando ........................... 12
Calibración introduciendo parámetro ......................... 13
Realizar ejercicio ........................................................... 13
Memoria disponible para ejercicio ............................. 14
Búsqueda de memoria antes del ejercicio ................ 15
Activar o desactivar automáticamente la visualización
de datos durante el ejercicio ...................................... 15
Pausar y reanudar ejercicio ....................................... 16
Guardar datos del ejercicio ........................................ 16
Qué ocurre si se superan los límites de ritmo cardiaco
................................................................................... 16
Ver datos durante el ejercicio .................................... 17
Consulta del registro de ejercicio ............................... 18
Ver registro del ejercicio en la página de resumen de
registros ..................................................................... 19
Ver registro del ejercicio en la página de registro de
vueltas ....................................................................... 20
Borrar memorias ........................................................ 21
Cómo calcular su nivel de forma física ...................... 21
Funcionamiento y configuración ................................ 22
Activar retroiluminación ............................................. 22
Bloquear / Desbloquear botones ............................... 22
Activar / desactivar alarma ........................................ 22
Silenciar alarma ......................................................... 23
Activar / desactivar pitido ........................................... 23
Cambio de pilas ......................................................... 23
Instalar soporte para bicicletas .................................. 24
Referencia útil ............................................................... 24
Zona objetivo ............................................................. 24
Tamaño de la rueda de la bicicleta ........................... 26
Conexión con aplicación de software del PC ............ 26
Requisitos de PC ....................................................... 27
Sincronización del reloj SE833 con la aplicación del PC
Software ..................................................................... 27
Resistencia al agua ....................................................... 29
Ficha técnica ................................................................. 29
Precauciones ................................................................. 30
Sobre Oregon Scientific ............................................... 31
EU - Declaración De Conformidad .............................. 31
Aviso De FCC (EE.UU.) / Aviso De IC (Canadá) ......... 31
1
ES
Page 32

ES
INTRODUCCIÓN
Gracias por elegir el Monitor de ritmo cardíaco con
velocidad, distancia y conexión a PC (SE833) de Oregon
Scientific
avanzado, este reloj también ha sido diseñado de modo
que sea compatible con PC para permitir a los usuarios
almacenar datos relativos al ejercicio para analizarlos y
evaluar su ejercicio. Los usuarios tienen a su disposición
otras funciones, como medición de velocidad y distancia,
temporizador de ejercicio con vueltas y perfiles de ejercicio
para maximizar su ejercicio. Este reloj utiliza el 2.4GHzANT Sports System para que la transmisión de información
con otros dispositivos, como la cinta de transporte, el
sensor para zapatilla o el sensor para bicicleta, se realice
correctamente.
TM
. Además de ser un monitor de ritmo cardíaco
• 1 CD con la aplicación de software AD108
• 1 soporte para bicicleta (con 2 cuerdas de nylon)
• 2 pilas de litio CR2032 3V (ya instaladas en el reloj y la
cinta)
BOTONES DE CONTROL
1
5
4
IMPORTANTE El uso de este producto es únicamente
deportivo y no está diseñado para reemplazar el consejo
médico.
Información sobre la patente: Este producto está
protegido mediante la Patente americana Nº 7,237,446
(Patente europea pendiente).
CONTENIDO DEL PAQUETE
El paquete debería incluir los elementos siguientes:
• 1 reloj SE833
• 1 cinta SZ909
• 1 dongle AD112 USB
2
1. - / SP : Alternar entre opciones; reducir valor; pausa/
parada durante el ejercicio
2. MODE: Alternar modos, volver a la página anterior
3. SET : Confirmar configuración; activar/desactivar alarma
en modo Hora
4.
/ : Activar retroiluminación; bloquear/desbloquear
botones
5. ST / LAP / + : Alternar entre opciones; incrementar valor;
activar/desactivar función de silencio en modo Hora
3
2
Page 33

PANTALLA
8. : Indica que la alarma está activada
9.
: Indica que se recibe señal de ritmo cardíaco o que
la cinta de control de ritmo cardíaco está conectada
ES
1
2
3
4
5
6
78 910
1. : Botón para pulsar indicador
2.
o : Indica que la pila se está acabando o se ha
agotado
3.
4.
5.
6.
7.
/ : Reloj de 12 horas
: Pulse el botón para salir
: Indica subir / bajar o límite superior / inferior
: Indica que el pitido está desactivado
: Indica que el temporizador de ejercicio está
activado
13
12
11
10.
11.
12.
13.
CÓMO PONER EN MARCHA EL RELOJ
(POR PRIMERA VEZ)
Después de retirar el reloj del embalaje, actívelo pulsando
MODE y manteniéndolo pulsado hasta que se muestre la
pantalla. El reloj le pedirá que cree su perfil de usuario.
CONFIGURACIÓN DEL RELOJ
IMPORTANTE
• Para asegurarse de que los cálculos que se realizan
• Recuerde configurar los perfiles cada vez que cambie
NOTA Si durante la configuración no toca ningún botón en
3
: Indica que se recibe señal de velocidad y distancia
o que el sensor para zapatilla está conectado
: Indica que se recibe señal de bicicleta y cadencia o
que el sensor para bicicleta está conectado
: Resoluciones por minuto (unidad de
cadencia)
: Indica que los botones están bloqueados
durante sus sesiones de ejercicio sean correctos deberá
configurar los perfiles del reloj y del usuario antes de
empezar a hacer ejercicio.
las pilas o si reinicia el reloj.
Page 34

ES
30 segundos, el reloj saldrá automáticamente del modo de
configuración.
CONFIGURAR PERFIL DE USUARIO
La primera vez que ponga en marcha el reloj aparecerá la
pantalla siguiente para que cree un perfil de usuario. Vaya
directamente al paso 4.
siguientes:
• ST/LAP/+ para incrementar el valor o seleccionar
opción
• -/SP para reducir valor
• SET para confirmar la opción seleccionada
6. Una vez configurado su perfil de usuario se mostrará la
pantalla siguiente.
Procedimiento de configuración normal:
1. Pulse MODE repetidamente para elegir .
2. Pulse ST/LAP/+ repetidamente para elegir “SET
USER”.
3. Pulse SET para introducir las opciones de configuración
de perfil de usuario.
4. Pulse ST/LAP/+ para elegir la opción, y a continuación
SET para confirmar.
5. Siga configurando su perfil de usuario en el siguiente
orden: año de nacimiento, mes de nacimiento, día de
nacimiento, unidad de peso, peso, pulsando los botones
7. Puede continuar configurando otros perfiles (perfiles de
reloj o de ejercicio) pulsando repetidamente ST/LAP/+ .
4
Page 35

press
Pulse
press
ST/LAP/+
ST/LAP/+
Pulse
press
ST/LAP/+
ST/LAP/+
Pulse
ST/LAP/+
ST/LAP/+
IMPORTANTE Reinicie el perfil de usuario si otra persona
va a utilizar el reloj.
CONFIGURAR PERFIL DEL RELOJ
1. Pulse MODE repetidamente para elegir .
2. Pulse ST/LAP/+ repetidamente para seleccionar
“CONFIGURAR RELOJ”.
3. Pulse SET para introducir las opciones de configuración
del reloj.
4. Pulse ST/LAP/+ o -/SP para elegir la opción que quiera
configurar: configurar alarma, configurar hora, configurar
fecha, configurar alerta*, configurar vista**.
5. Pulse SET y empiece a configurar la opción seleccionada
pulsando los botones siguientes:
• ST/LAP/+ para incrementar el valor o seleccionar
opción
• -/SP para reducir el valor
• SET para confirmar la opción seleccionada
* Si durante la sesión de ejercicio el ritmo cardíaco excede
la zona objetivo, el reloj emitirá una alerta visual y auditiva.
Puede elegir activar/desactivar la alerta auditiva en la opción
“CONFIGURAR ALERTA”. Para obtener datos sobre la
zona objetivo, consulte la sección de “ZONA OBJETIVO”
de este manual.
** Durante la sesión de ejercicio, el reloj alternará las
pantallas con información relativa al ejercicio. Puede elegir
activar/desactivar la alternancia de pantallas en la opción
“CONFIGURAR VISTA”.
CONFIGURAR PERFIL DE EJERCICIO
IMPORTANTE
persona va a utilizar el reloj.
Puede decidir configurar los perfiles de ejercicio
predeterminados en el reloj, o cargar perfiles de ejercicio
personalizados de la aplicación de software del PC.
CONFIGURAR PERFIL DE EJERCICIO EN EL RELOJ
Puede configurar 3 perfiles de ejercicio predeterminados
(Cardio, Fúting, Bicicleta) en el reloj.
1. Pulse MODE repetidamente para seleccionar
5
Reinicie el perfil del ejercicio si va otra
ES
.
Page 36

ES
warm up time
to increase
value
to next page
to decrease
value
to exit
2. En “SET PROG”, pulse SET para acceder a las opciones
de ejercicio.
3. Pulse ST/LAP/+ o -/SP para elegir el ejercicio que quiera
configurar: configurar cardio, configurar fúting, configurar
bicicleta.
4. Pulse SET para confirmar su elección, y a continuación
siga configurando el perfil * del ejercicio seleccionado
pulsando los botones siguientes:
• ST/LAP/+ para incrementar el valor o seleccionar
opción
• -/SP para reducir el valor
• SET para confirmar la opción seleccionada
* La secuencia de configuración de perfil es la siguiente:
1. Tiempo de calentamiento
2. Activar/desactivar intervalo de entrenamiento
2a Si activa el intervalo de entrenamiento, deberá
configurar:
v Número de intervalo (2-5)
v Tiempo de trabajo en cada intervalo
v Tiempo de descanso en cada intervalo
v Zona objetivo de ritmo cardíaco (1-5) [Para
obtener más información, consulte la sección
“ZONA OBJETIVO” de este manual]
v Activar/desactivar cronómetro de
recuperación
para reducir
el valor
para salir
para incrementar
el valor
tiempo de
calentamiento
a la página
siguiente
6
Page 37

para salir
para reducir
el valor
para salir
para reducir el
valor
para salir
para reducir el
valor
para salir
para reducir el
valor
para salir
para salir
Pulse SET
Pulse SET
Pulse SET
Pulse SET
press SET
Pulse SET
para activar/
desactivar
activar/desactivar
intervalo de
entrenamiento
a la página
siguiente
para incrementar
el valor
número de intervalo
a la página
siguiente
para incrementar
el valor
tiempo de trabajo en
cada intervalo
para confirmar configuración;
a la página siguiente
para incrementar
el valor
tiempo de descanso
en cada intervalo
para confirmar
configuración; a la página
siguiente
para incrementar
el valor
zona de ritmo
cardíaco objetivo
a la página
siguiente
para activar/
desactivar
activar/desactivar
cronómetro de
recuperación
a la página
siguiente
2b Si desactiva el intervalo de entrenamiento, deberá
ES
configurar (solamente en configuración Cardio):
v Duración del ejercicio
v Zona objetivo de ritmo cardíaco (1-5) [Para
obtener más información, consulte la sección
“ZONA OBJETIVO” de este manual]
v Activar/desactivar cronómetro de recuperación
para activar/
desactivar
activar/desactivar
intervalo de
para salir
para reducir el
valor
para salir
para reducir el
valor
para salir
para salir
Pulse SET
Pulse SET
Pulse SET
entrenamiento
a la página siguiente
para incrementar
el valor
duración del ejercicio
para confirmar
configuración; a la
página siguiente
para incrementar
el valor
zona de ritmo cardíaco
objetivoobjetivo
a la página
siguiente
para activar/
desactivar
activar/desactivar
cronómetro de
recuperación
a la página
siguiente
2c Si desactiva el intervalo de entrenamiento, deberá
configurar (solamente en configuración Fúting y
7
Bicicleta):
Page 38

ES
v Ejercicio por distancia o por tiempo
v Tiempo o distancia de ejercicio
v Zona objetivo de ritmo cardíaco (1-5) [Para
obtener más información, consulte la sección
“ZONA OBJETIVO” de este manual]
v Activar/desactivar cronómetro de recuperación
para activar/desactivar
activar/desactivar
intervalo de
para salir
para salir
para reducir el
valor
para salir
para reducir el
valor
para salir
para salir
Pulse SET
Pulse SET
Pulse SET
Pulse SET
entrenamiento
a la página siguiente
para alternar por
distancia o por tiempo
ejercicio por distancia o
por tiempo
a la página siguiente
para incrementar
el valor
distancia de ejercicio;
tiempo de ejercicio
para confirmar
configuración; a la
página siguiente
para incrementar
el valor
zona de ritmo cardíaco
objetivo
a la página siguiente
para activar/desactivar
activar/desactivar
cronómetro de
recuperación
a la página siguiente
CARGAR PERFIL DE EJERCICIO PERSONALIZADO
DESDE EL PC APLICACIÓN DE SOFTWARE
Puede cargar hasta 3 perfiles de ejercicio con configuración
personalizada desde la aplicación de software de PC a su
reloj. Pero no se pueden modificar la configuración de los
perfiles de ejercicio cargados a través del reloj; solamente
se pueden modificar a través del software.
Para obtener más información acerca de cómo cargar
perfiles de ejercicio personalizados del software al reloj,
consulte “SINCRONIZACIÓN DEL RELOJ SE833 CON LA
APLICACIÓN DE SOFTWARE DEL PC” de este manual.
Para obtener más información acerca de cómo modificar
los perfiles de ejercicio personalizados en el software,
consulte la sección “CREAR O MODIFICAR PERFIL DE
USUARIO / CONFIGURACIÓN DEL DISPOSITIVO” de la
Guía de usuario de la aplicación de software del PC que
encontrará en el CD-ROM.
NOTA Si no se carga ningún perfil de ejercicio personalizado
del software al reloj, el reloj solamente mostrará sus perfiles
de ejercicio predeterminados.
CÓMO PONERSE LA CINTA
1. Moje las almohadillas conductoras de la cara inferior
de la cinta con unas cuantas gotas de agua o un gel
conductivo para garantizar un buen contacto.
8
Page 39

almohadillas conductoras
conductive pads
2. Póngase la cinta diagonalmente colgada del cuello. Para
asegurarse que el ritmo cardiaco se mide correctamente,
ajústese la cinta hasta que quede exactamente por
debajo de sus músculos pectorales.
• Para que la cinta funcione con el mejor rendimiento
tenga en cuenta las instrucciones siguientes:
- No envuelva la cinta en una toalla mojada ni con
otros materiales húmedos.
- No guarde la cinta en lugares con altas temperaturas
(aproximadamente 50 ºC) ni en entornos húmedos
(humedad superior al 90%).
- No moje la cinta ni la lave con agua corriente, límpiela
con un paño húmedo.
- No coloque la cara de goma conductora cara abajo
sobre una mesa o superficie de metal.
- Seque bien la cinta inmediatamente después de
utilizarla.
CONEXIÓN A DISPOSITIVO
IMPORTANTE
ejercicio se calculan correctamente, le recomendamos
conectar el reloj con la cinta SZ909. Esta cinta permite
conectar tanto las funciones de ritmo cardíaco como el
sensor para zapatilla.
Para garantizar que los valores de su
ES
CONSEJOS
• La posición de la cinta afecta al rendimiento del
dispositivo. Mueva la hebilla por la cinta para que quede
encima de su corazón.
• Evite las zonas con vello denso.
• En climas secos y fríos podrían pasar varios minutos
antes de que funcionara correctamente. Esto es normal
y debería mejor al cabo de unos minutos de ejercicio.
El reloj también se puede combinar con otras cintas y
dispositivos, como sensores para zapatilla o bicicleta que
utilicen ANT Sports System. Sin embargo, otras cintas
podrían permitir conectar únicamente la función de ritmo
cardíaco.
1. Pulse MODE repetidamente para elegir
reloj mostrará cuántos dispositivos están conectados
(si hay alguno), y cuáles son. Si no se ha conectado
9
ningún dispositivo, el reloj mostrará “0 DISPOSITIVOS
. El
Page 40

ES
CONECTADOS”.
2. Pulse SET para acceder a “CONECTAR DISPOSITIVO”.
Pulse SET para iniciar la conexión.
ritmo cardíaco como el sensor para zapatilla si se usa la
cinta SZ909. Si conecta el reloj a otra cinta con ANT-system,
solamente se detectará la cinta de ritmo cardíaco.
CONEXIÓN CON CINTA SZ909 (U OTRA CINTA
CON ANT-SYSTEM)
El reloj se puede conectar con la cinta de 2 modos.
• El primero es colocarse la cinta diagonalmente sobre el
pecho y esperar hasta que el reloj muestre
y
(solamente con SZ909)
• El otro modo es el siguiente:
i. Sostenga la cinta firmemente con los pulgares
tocando las almohadillas conductoras que
normalmente están en contacto con el pecho.
ii. Frote los pulgares varias veces en la superficie de las
almohadillas conductoras hasta que el reloj muestre
las pantallas que aparecen sobre estas líneas.
NOTA Solamente se pueden conectar tanto la cinta de
NOTA La cinta SZ909 solamente emitirá la señal de
conexión perfecta si ha detectado tanto la cinta de ritmo
cardíaco como el sensor para zapatilla.
CONEXIÓN CON SENSOR PARA ZAPATILLA /
BICICLETA CON ANT-SYSTEM
Puede adquirir el sensor para zapatilla o bicicleta
separadamente y conectarlo a su reloj, siempre y cuando
disponga de ANT system. Para obtener información sobre
la conexión consulte sus manuales de usuario.
• Si el sensor para zapatilla está conectado correctamente,
el reloj mostrará
• Si el sensor para bicicleta está conectado correctamente,
el reloj mostrará
10
Page 41

1. Pulse MODE repetidamente para elegir .
2. Pulse SET.
3. Pulse ST/LAP/+ repetidamente para elegir “TAMAÑO
DE LA RUEDA”.
4. Pulse SET.
5. Introduzca el tamaño de la rueda pulsando ST/LAP/+
para incrementar los valores o -/SP para reducirlos.
6. Pulse SET para confirmar.
ES
NOTA Si la conexión es débil e inestable:
• Reduzca la distancia entre el dispositivo y el reloj.
• Reajuste la posición del dispositivo.
• Compruebe las pilas. Reemplácelas si es necesario.
NOTA Si el reloj ya está conectado a la cinta SZ909 y
quiere conectarla a otra cinta, en primer lugar deberá borrar
la cinta SZ909. Lo mismo se aplica a los sensores para
bicicleta y zapatilla.
INTRODUCCIÓN DEL TAMAÑO DE LA RUEDA DE
LA BICICLETA (PARA EL SENSOR PARA BICICLETA)
El reloj no mostrará “TAMAÑO DE LA RUEDA” si no se
ha conectado un sensor para bicicleta. Para obtener
información sobre el tamaño de la rueda, consulte la
sección de “TAMAÑO DE LA RUEDA DE LA BICICLETA”
de este manual.
Si su reloj está conectado a un sensor para bicicleta tendrá
que introducir el tamaño de la rueda.
RETIRAR DISPOSITIVO CONECTADO
El reloj no mostrará “RETIRAR DISPOSITIVO” si no se hay
ningún dispositivo conectado.
1. Pulse MODE repetidamente para elegir
2. Pulse SET.
3. Pulse ST/LAP/+ repetidamente para elegir “RETIRAR
DISPOSITIVO”.
4. Pulse SET.
5. Pulse ST/LAP/+ para elegir qué dispositivo retirar.
6. Pulse SET para confirmar la selección.
CALIBRAR DISPOSITIVO CONECTADO
El reloj no mostrará “CALIBRAR DISPOSITIVO” si no se
hay ningún dispositivo conectado.
La calibración se puede hacer a corriendo, caminando o
introduciendo el parámetro. El parámetro seguirá siendo el
11
.
Page 42

ES
mismo valor una vez realizada correctamente la calibración
corriendo o caminando.
Si quiere calibrar el dispositivo inmediatamente después de
conectarlo, vaya directamente al paso 4. De lo contrario,
empiece desde el principio.
CALIBRACIÓN CORRIENDO O CAMINANDO
1. Pulse MODE repetidamente para elegir .
2. Pulse SET.
3. Pulse ST/LAP/+ repetidamente para elegir “CALIBRAR
DISPOSITIVO”.
4. Pulse SET.
5. Pulse ST/LAP/+ para elegir “CALIBRAR CORRIENDO”
o “CALIBRAR CAMINANDO”.
6. Pulse SET para confirmar la selección.
7. El reloj hará una búsqueda de dispositivos, indicada
por los iconos parpadeantes
deje de parpadear y pulse SET para iniciar la
calibración.
8. Asegúrese de recorrer la distancia seleccionada
caminando o corriendo para que la calibración se realice
correctamente.
Ø Si la calibración se ha realizado correctamente, el
reloj mostrará
y . Espere a que
o
Parámetro Fúting
Run parameter
Parámetro Caminar
Walk parameter
NOTA Los parámetros Fúting y Caminar son el valor
que debe introducir al calibrar los dispositivos.
Ø Si la calibración no se ha realizado correctamente,
el reloj mostrará
NOTA La cinta SZ909 debería calibrarse tanto corriendo
como caminando.
12
Page 43

CALIBRACIÓN INTRODUCIENDO PARÁMETRO
available lap
memory
Para conocer su parámetro, primero deberá calibrar el
dispositivo corriendo o caminando, puesto que el parámetro
es el mismo valor una vez realizada correctamente la
calibración corriendo o caminando. Introduciendo el
parámetro podrá ahorrarse el tiempo de calibrar corriendo
o caminando.
REALIZAR EJERCICIO
IMPORTANTE
ejercicio se calculan correctamente, le recomendamos
conectar el reloj con la cinta SZ909 u otros dispositivos como
el sensor para bicicleta. Si no conecta ningún dispositivo, la
cinta solamente recibirá la señal del ritmo cardíaco.
Para garantizar que los valores de su
ES
1. Pulse MODE repetidamente para elegir
2. Pulse SET.
3. Pulse ST/LAP/+ repetidamente para elegir “CALIBRAR
DISPOSITIVO”.
4. Pulse SET.
5. Pulse ST/LAP/+ repetidamente para elegir “INTRODUCIR
PARÁMETRO”.
6. Pulse SET para confirmar la selección.
7. Introduzca el parámetro Caminar pulsando ST/LAP/+
para incrementar los valores o -/SP para reducirlos.
El parámetro seguirá siendo el mismo valor una vez
realizada correctamente la calibración caminando.
8. Pulse SET para confirmar.
9. Introduzca el parámetro Fúting pulsando ST/LAP/+
para incrementar los valores o -/SP para reducirlos.
El parámetro seguirá siendo el mismo valor una vez
realizada correctamente la calibración corriendo.
10. Pulse SET para confirmar.
.
Hay 2 opciones de ejercicio: AUTO y PROG.
• AUTO se refiere a hacer ejercicio sin utilizar el perfil de
ejercicio configurado.
• PROG se refiere a hacer ejercicio utilizando el perfil de
ejercicio configurado (consulte la sección “CONFIGURAR
PERFIL DE EJERCICIO” de este manual).
Ejercicio a realizar:
1. Pulse MODE para seleccionar
• Para hacer ejercicio sin perfil de ejercicio, seleccione
.
memoria de
vuelta disponible
13
Page 44

ES
• Para hacer ejercicio con un perfil, pulse ST/LAP/+
para seleccionar
memoria de
available lap
vuelta disponible
memory
saber qué datos se muestran, consulte la sección
“ACTIVAR O DESACTIVAR AUTOMÁTICAMENTE
LA VISUALIZACIÓN DE DATOS DURANTE EL
EJERCICIO”.
5. Si se toma un descanso durante el ejercicio, pulse -/SP.
Para reanudar el ejercicio, pulse ST/LAP/+. Consulte la
sección “PAUSAR Y REANUDAR EJERCICIO” para
obtener más información.
6. Una vez completado el ejercicio podrá guardar los datos
del ejercicio. Consulte la sección “GUARDAR DATOS
DEL EJERCICIO” para obtener más información.
Pulse SET, y a continuación -/SP o ST/LAP/+ para
seleccionar qué perfil quiere utilizar.
NOTA La memoria de vuelta disponible es la
memoria de vuelta disponible para hacer ejercicio.
Consulte la sección “MEMORIA DISPONIBLE PARA
EJERCICIO” para obtener más información.
2. Pulse SET para confirmar la selección.
3. Espere a que el reloj busque el dispositivo antes
de pulsar SET para iniciar el ejercicio. Consulte la
sección “BÚSQUEDA DE DISPOSITIVO ANTES DEL
EJERCICIO” para obtener más información.
4. Durante la sesión de ejercicio, puede consultar los datos
del ejercicio pulsando manualmente SET varias veces
o alternando automáticamente. Consulte la sección
“ACTIVAR O DESACTIVAR AUTOMÁTICAMENTE
LA VISUALIZACIÓN DE DATOS DURANTE EL
EJERCICIO” para obtener más información. Para
MEMORIA DISPONIBLE PARA EJERCICIO
El reloj debe tener memoria disponible para que el usuario
pueda hacer ejercicio. Si quiere hacer ejercicio pero no
hay memoria de vuelta disponible, el reloj le pedirá que
sobrescriba datos antes de hacer ejercicio.
Cuando la memoria de vuelta disponible esté llena
aparecerán las pantallas AUTO y PROG
o
14
Page 45

y el reloj mostrará las pantallas siguientes si pulsa SET para
hacer ejercicio. No podrá empezar a hacer ejercicio si no
sobrescribe la memoria de vuelta vieja.
2SEG
2SEC
Pulse SET para sobrescribir la memoria de vuelta vieja. A
continuación la memoria de vuelta disponible se reanudará
y las pantallas mostrarán
o
BÚSQUEDA DE MEMORIA ANTES DEL EJERCICIO
Antes de empezar a hacer ejercicio espere unos segundos
para que el reloj busque dispositivos. Así se asegurará de
poder recibir cálculos detallados (como vuelta, calorías,
ritmo cardíaco, distancia, pasos, velocidad y cadencia)
durante el ejercicio. Si empieza a hacer ejercicio sin hacer
la búsqueda de dispositivos, solamente recibirá lecturas de
ritmo cardíaco.
Cuando esté en la pantalla siguiente, verá que los iconos de
dispositivo (
valores de ritmo cardíaco. Espere a que
de parpadear y aparezcan los valores de ritmo cardíaco.
A continuación puede empezar a hacer ejercicio pulsando
SET.
, , o ) están parpadeando y no hay
o dejen
ACTIVAR O DESACTIVAR AUTOMÁTICAMENTE LA
VISUALIZACIÓN DE DATOS DURANTE EL EJERCICIO
Si quiere que el reloj alterne automáticamente entre datos de
ejercicio durante la sesión de ejercicio, deberá configurarlo
en el modo de configuración.
1. Pulse MODE repetidamente para seleccionar
2. Pulse ST/LAP/+ repetidamente para seleccionar
15
ES
.
Page 46

ES
“CONFIGURAR RELOJ”.
3. Pulse SET.
4. Pulse ST/LAP/+ o -/SP repetidamente para seleccionar
“CONFIGURAR VISTA”.
5. Pulse SET.
6. Pulse ST/LAP/+ para seleccionar “ACTIVAR”.
7. Pulse SET para confirmar la selección.
NOTA Si no ha configurado el ajuste anterior, puede
ver los datos de ejercicio pulsando manualmente SET
repetidamente durante el ejercicio.
PAUSAR Y REANUDAR EJERCICIO
Si quiere tomarse un descanso durante el ejercicio, pulse
-/SP. No pulse MODE o perderá los datos de su sesión de
ejercicio.
parpadean y no hay valores de ritmo cardíaco. Espere a que
o dejen de parpadear y aparezcan los valores de
ritmo cardíaco. Para reanudar el ejercicio, pulse ST/LAP/+.
GUARDAR DATOS DEL EJERCICIO
1. Pulse -/SP para que el reloj deje de contar. No pulse
MODE o perderá los datos de su sesión de ejercicio.
2. Pulse -/SP y manténgalo pulsado para guardar y salir.
QUÉ OCURRE SI SE EXCEDEN LOS LÍMITES DE
RITMO CARDÍACO
Si durante el ejercicio se excede el límite de ritmo cardíaco
superior o inferior, el reloj emitirá un aviso con un pitido y
mostrará
o
Durante una pausa larga el reloj se desconectará del
dispositivo; por tanto, cuando reanude el ejercicio pulse
SET y espere unos segundos para que el reloj busque
dispositivos. Los iconos de dispositivo (
, , o )
NOTA Esta función solamente está disponible si se hace
ejercicio con perfil de ejercicio. No está disponible si se
hace ejercicio en el submodo AUTO.
16
Page 47

VER DATOS DURANTE EL EJERCICIO
time
heart rate
lap
exercise
time
heart rate
lap
calorie
exercise
time
step
speed
heart rate
distance
speed
heart rate
exercise
time
calorie
cadence
lap
speed
heart rate
RPM
Durante la sesión de ejercicio, puede consultar los datos
del ejercicio alternando automáticamente o pulsando
manualmente SET para alternar pantallas.
Datos del ejercicio AUTO
Los diagramas que aparecen a continuación muestran qué
datos de ejercicio se mostrarán si el reloj está conectado
con distintos dispositivos.
• Si el reloj está conectado a una cinta de ritmo cardíaco
(que no es la cinta SZ909)
pasos
velocidad
ritmo
cardíaco
distancia
distance
velocidad
speed
ritmo cardíaco
heart rate
vuelta
calorías
duración del
ejercicio
ES
calorías
calorie
duración del
exercise
ejercicio
ritmo cardíaco
• Si el reloj está conectado a una cinta de ritmo cardíaco
+ sensor para zapatilla (o solamente está conectado a la
cinta SZ909)
duración
del
ejercicio
vuelta
ritmo
cardíaco
17
• Si el reloj está conectado al sensor para bicicleta
distancia
velocidad
ritmo cardíaco
vuelta
velocidad
ritmo
cardíaco
Datos del ejercicio PROG
Los diagramas que aparecen a continuación muestran qué
calorías
duración del
ejercicio
cadencia
Page 48

ES
lap
heart rate
remaining time
heart rate
calorie
lap
step
heart rate
interval
heart rate
remaining time
cadence
calorie
lap
speed
heart rate
interval
heart rate
RPM
datos de ejercicio se mostrarán al utilizar distintos perfiles
de ejercicio.
• Si se utiliza el perfil Cardio
calorías
calorie
tiempo restante
remainning time
ritmo cardíaco
heart rate
• Si se utiliza el perfil Bicicleta
intervalo
ritmo
cardíaco
distance
distancia
speed
velocidad
ritmo cardíaco
heart rate
calorías
tiempo
restante
cadencia
interval
intervalo
ritmo cardíaco
• Si se utiliza el perfil Fúting
intervalo
ritmo
cardíaco
vuelta
pasos
ritmo cardíaco
distancia
distance
velocidad
speed
heart rate
ritmo cardíaco
calorías
tiempo restante
ritmo cardíaco
vuelta
ritmo
heart rate
cardíaco
vuelta
velocidad
ritmo cardíaco
CONSULTA DEL REGISTRO DE EJERCICIO
El modo de memoria no se mostrará si no hay
NOTA
registros de ejercicio guardados.
Cómo consultar registros de de ejercicio:
1. Pulse MODE repetidamente para elegir
reloj mostrará el número de registros de ejercicio.
2. Pulse SET.
3. Consulte sus registros de ejercicio pulsando los botones
siguientes:
• ST/LAP/+ para elegir opción
• -/SP para elegir opción
18
. Su
Page 49

• SET para acceder a la página de de resumen
total laps
total distance
exercise time
maximum
heart rate
average
heart rate
minimum
heart rate
total steps
maximum speed
average speed
average cadence
maximum cadence
calorie
%fat burnt
heart rate
minimum
heart rate
time above HR zone
time below HR zone
time in HR zone
total steps
maximum speed
average speed
calorie
%fat burnt
de registros o a la página de registro de vueltas y
consultar los registros
• MODE para volver a la página anterior
Cada registro de ejercicio puede incluir solamente una
página de resumen de registros o, además, una página de
registro de vueltas.
VER REGISTRO DEL EJERCICIO EN LA PÁGINA
DE RESUMEN DE REGISTROS
Los diagramas que aparecen a continuación muestran qué
datos de ejercicio se mostrarán al utilizar distintos perfiles
de ejercicio. Pulse SET para alternar entre pantallas.
• Cardio:
calorie
calorías
% grasas
%fat burnt
quemadas
total de vueltas
total laps
duración del
exercise time
ejercicio
ritmo cardíaco
minimum
mínimo
heart rate
ritmo cardíaco
maximum
máximo
heart rate
ritmo cardíaco
average
medio
heart rate
time above HR zone
tiempo por encima del RC
time below HR zone
tiempo por debajo del RC
time in HR zone
tiempo en zona RC
ES
• Auto:
calorías
% grasas
quemadas
cadencia
media
cadencia
máxima
total de vueltas
distancia total
duración del
ejercicio
total de pasos
velocidad máxima
velocidad media
ritmo cardíaco
mínimo
ritmo cardíaco
máximo
ritmo cardíaco
medio
• Fúting:
calorías
% grasas
quemadas
total de pasos
velocidad máxima
velocidad media
19
total de vueltas
total laps
total distance
distancia total
exercise time
duración del ejercicio
ritmo cardíaco
mínimo
maximum
ritmo cardíaco
heart rate
máximo
average
ritmo cardíaco
medio
tiempo por encima del RC
tiempo por debajo del RC
tiempo en zona RC
Page 50

ES
maximum
heart rate
average
heart rate
minimum
heart rate
time above HR zone
time below HR zone
time in HR zone
average
cadence
maximum speed
average speed
maximum
cadence
calorie
%fat burnt
maximum
heart rate
average
heart rate
minimum
heart rate
average
cadence
maximum
speed
average
speed
maximum
cadence
maximum
heart rate
average
heart rate
minimum
heart rate
time above HR zone
time in HR zone
• Bicicleta:
calorías
% grasas
quemadas
total de vueltas
total laps
total distance
distancia total
exercise time
duración del ejercicio
ritmo cardíaco
mínimo
ritmo cardíaco
máximo
ritmo cardíaco
medio
• Auto:
ritmo cardíaco mínimo
ritmo cardíaco máximo
ritmo cardíaco medio
cadencia media
cadencia
máxima
velocidad media
velocidad máxima
VER REGISTRO DEL EJERCICIO EN LA PÁGINA
DE REGISTRO DE VUELTAS
Los diagramas que aparecen a continuación muestran qué
datos de ejercicio se mostrarán al utilizar distintos perfiles
de ejercicio. Pulse SET para alternar entre pantallas.
tiempo por encima
del RC
tiempo por debajo
del RC
tiempo en zona
RC
20
cadencia
media
cadencia
máxima
• Cardio:
ritmo cardíaco
mínimo
ritmo cardíaco
máximo
ritmo cardíaco
medio
velocidad
media
velocidad
máxima
tiempo por encima
del RC
tiempo por debajo
time below HR zone
del RC
tiempo en zona RC
Page 51

• Fúting:
maximum
heart rate
average
heart rate
minimum
heart rate
time in HR zone
maximum speed
average speed
maximum
heart rate
average
heart rate
minimum
heart rate
time above HR zone
time below HR zone
maximum speed
average speed
average
cadence
maximum
cadence
velocidad máxima
• Bicicleta:
velocidad media
cadencia
media
cadencia
máxima
velocidad media
velocidad máxima
ritmo cardíaco mínimo
ritmo cardíaco máximo
ritmo cardíaco medio
tiempo por
time above HR zone
encima del RC
tiempo por
time below HR zone
debajo del RC
tiempo en zona
RC
ritmo cardíaco mínimo
ritmo cardíaco máximo
ritmo cardíaco medio
tiempo por
encima del RC
tiempo por
debajo del RC
time in HR zone
tiempo en zona
RC
BORRAR MEMORIAS
No puede elegir borrar una memoria, sino que tiene que
borrarlas todas.
1. Pulse MODE repetidamente para elegir
reloj mostrará el número de registros de ejercicio.
2. Pulse ST/LAP/+. El reloj le preguntará si quiere borrar la
memoria.
3. Pulse SET y manténgalo pulsado hasta que el reloj
muestre
CÓMO CALCULAR SU NIVEL DE FORMA FÍSICA
Su reloj genera un índice del nivel de forma física a partir de
su ejercicio aeróbico (deberá correr 1 milla = 1,60 km).
IMPORTANTE Asegúrese de que su reloj ya esté
conectado con la cinta de ritmo cardíaco antes de hacer la
prueba de forma física.
1. Pulse MODE para seleccionar
.
21
ES
. Su
Page 52

ES
FITNESS INDEX FOR MEN
FAIR
GOOD
AVERAGE
Age
60
50
40
30
20
22 27 32 37 42
FITNESS INDEX FOR WOMEN
FAIR
GOOD
AVERAGE
Age
60
50
40
30
20
15 20 25 30 35 40
2. Pulse ST/LAP/+ repetidamente para seleccionar
“PRUEBA DE FORMA FÍSICA”.
3. Pulse SET. El reloj hará una búsqueda de dispositivos ,
indicada por los iconos parpadeantes
hasta que
deje de parpadear. El reloj le pedirá que
y . Espere
corra 1 milla (1,6 km).
4. Pulse SET para empezar a correr. Asegúrese de correr 1
milla entera (1,6 km) para garantizar que las mediciones
sean correctas. Mientras corra el reloj mostrará el tiempo
de ejercicio, la distancia recorrida y el ritmo cardíaco.
5. Una vez recorrida toda la distancia, el reloj calculará
y mostrará automáticamente su nivel de forma física.
Cuanto más alto sea el índice, mejor forma física tiene.
Los diagramas que vienen a continuación son una
guía aproximada de lo que significa su índice de forma
física.
ÍNDICE DE FORMA FÍSICA PARA MUJERES
Buena
Normal
Media
Edad
FUNCIONAMIENTO Y CONFIGURACIÓN
ACTIVAR RETROILUMINACIÓN
Pulse / para encender la retroiluminación durante 5
segundos.
NOTA La función de retroiluminación no se activará si la
ÍNDICE DE FORMA FÍSICA PARA HOMBRES
Normal
Media
Edad
Buena
pantalla muestra “
” o “ ”.
BLOQUEAR / DESBLOQUEAR BOTONES
Pulse / y manténgalo pulsado durante 2 segundos
para bloquear o desbloquear los botones.
indica que los
botones están bloqueados.
ACTIVAR / DESACTIVAR ALARMA
1. En el Modo de hora, pulse SET.
2. Pulse ST/LAP/+ para activar o desactivar la alarma.
indica que la alarma está activada.
3. Pulse MODE o SET para salir.
22
Page 53

INTERRUMPIR ALARMA
• Pulse cualquier botón para silenciar la alarma y que se
active de nuevo pasadas 24 horas.
O bien
• Desactive la alarma.
ACTIVAR / DESACTIVAR PITIDO
En Modo de hora, pulse ST/LAP/+. indica que el pitido
está desactivado.
CAMBIO DE PILAS
Si las pilas del reloj o de la cinta se están agotando, el reloj
mostrará:
La pila del reloj
está casi gastada
La pila de la cinta
está casi gastada
o
Cómo cambiar la pila del reloj:
1. Use un destornillador pequeño para retirar la cubierta
del compartimiento para pila.
2. Retire la pila vieja e introduzca 1 pila de litio CR2032 3V
nueva.
3. Vuelva a colocar la cubierta y ciérrela con los tornillos.
Para reemplazar la pila de la cinta:
ES
1. Use una moneda para retirar la cubierta del
compartimiento para pila.
Haga girar la moneda en la dirección contraria a las
23
agujas del reloj.
Page 54

ES
2. Retire la pila vieja e introduzca 1 pila de litio CR2032 3V
nueva.
3. Vuelva a colocar la cubierta y ciérrela girando la moneda
en la dirección de las agujas del reloj.
INSTALAR SOPORTE PARA BICICLETAS
1. Instale el soporte para bicicletas en la bicicleta o la
máquina de ejercicio.
2. Introduzca el cable de nylon para fijar el soporte
para bicicletas tal y como muestran los siguientes
diagramas.
3. Fije el reloj al soporte para bicicletas.
REFERENCIA ÚTIL
ZONA OBJETIVO
Para conseguir los máximos beneficios de salud de su
ejercicio, es importante que conozca su:
• Ritmo cardíaco máximo (RCM)
• Límite máximo de ritmo cardiaco
• Límite mínimo de ritmo cardiaco
El RCM se expresa en latidos por minuto. Puede obtener tu
RCM con una prueba o calcularlo con la fórmula siguiente:
RCM = 220 - edad
El reloj viene programado de fábrica con 5 opciones de
zona objetivo, cada una de las cuales tiene su límite de
ritmo cardíaco inferior y superior, tal y como muestra la
tabla siguiente.
24
Page 55

Límite inferior Límite superior
Zona 1 50% x RCM 60% x RCM
Zona 2 60% x RCM 70% x RCM
Zona 3 70% x RCM 80% x RCM
Zona 4 80% x RCM 90% x RCM
Zona 5 90% x RCM 100% x RCM
Las más populares se sitúan entre el 50% y el 80% del ritmo
cardíaco máximo: en esta zona se consiguen beneficios
cardiovasculares, se queman grasas y se ejercita el
organismo.
50%
60%
70%
80%
90%
100%
Hay tres categorías de entrenamiento, que se describen a
continuación:
Actividad moderada
Control del peso
Zona aeróbica
Zona umbral anaeróbica
Zona de línea roja (capacidad máxima)
CATEGORÍA DE
ENTRENAMIENTO
Mantenimiento de
la salud
Ejercicio aeróbico 65-85%
Anaeróbico
Ejercicio 78-90%
RCM% DESCRIPCIÓN
65-78%
ES
Este es el nivel de
entrenamiento de
menor intensidad.
Es bueno para
los principiantes
y para quien
desee fortalecer
sus sistemas
cardiovasculares.
Incrementa la fuerza
y la resistencia.
Funciona con
la capacidad de
consumo de oxígeno
del cuerpo, quema
más calorías y
puede mantenerse
durante un largo
periodo de tiempo.
Genera velocidad y
potencia. Funciona
con o por encima
de la capacidad
de consumo
de oxígeno del
cuerpo, construye
músculo y no puede
mantenerse durante
un largo periodo de
tiempo.
Los límites cardíacos superior e inferior se calculan
multiplicando el RCM por los porcentajes de la categoría de
entrenamiento seleccionada.
Por ejemplo:
25
Page 56

ES
Una persona de 40 años que hace ejercicio de
mantenimiento:
• Su límite cardíaco máximo [220 - 40(edad)] x 78%
• Su límite cardíaco mínimo [220 - 40(edad)] x 65%
IMPORTANTE Haga siempre un calentamiento antes de
hacer ejercicio y seleccione la categoría de entrenamiento
que mejor encaje con su físico. Haga ejercicio regularmente,
entre 20 y 30 minutos por sesión, tres o cuatro veces a la
semana para mejorar su sistema cardiovascular.
ADVERTENCIA Determinar su categoría de entrenamiento
individual es un paso crítico en el avance hacia un programa
de entrenamiento eficiente y seguro. Sírvase consultar a
su médico o profesional de la salud para la frecuencia y
duración del ejercicio apropiados para su edad, su forma
física y sus objetivos.
TAMAÑO DE LA RUEDA DE LA BICICLETA
Consulte el ETRTO (diámetro de la rueda) en la rueda y
contrástelo con la columna derecha de la tabla siguiente.
Una vez conectado el sensor para bicicleta, introduzca el
ajuste de tamaño de rueda correspondiente.
ETRTO
25-559 26 x 1,0 1884
23-571 650 x 23C 1909
35-559 26 x 1,50 1947
37-622 700x x 35C 1958
47-559 26 x 1,95 2022
20-622 700 x 20C 2051
52-559 26 x 2,0 2054
23-622 700 x 23C 2070
25-622 700 x 25C 2080
28-622 700 x 28 2101
32-622 700 x 32C 2126
42-622 700 x 40C 2189
47-622 700 x 47C 2220
Diámetro de la
rueda (pulgadas)
Ajuste de tamaño
de la rueda (mm)
NOTA Los tamaños de la rueda de esta tabla sirven
solamente como referencia, ya que el tamaño de la rueda
depende del tipo de la rueda y de la presión del aire.
CONEXIÓN CON APLICACIÓN DE SOFTWARE
DEL PC
La aplicación de software AD108 PC ha sido diseñada
para que los usuarios puedan utilizar todas las funciones
de su reloj SE833. Puede utilizar el software para cargar y
descargar datos de/a su reloj SE833 y organizar y consultar
los datos que ha descargado en su ordenador. Además,
también puede utilizar el software para crear o modificar la
configuración de su reloj.
26
Page 57

Las funciones del software incluyen:
• Hasta 50 cuentas multi usuario
• Hasta 3 perfiles de ejercicio personalizados que se
pueden cargar al reloj
• Muestra registros de ejercicio en resúmenes y gráficos
• Creación y modificación de datos y configuración de
usuario
REQUISITOS DE PC
Antes de instalar el software, asegúrese de que su PC
cumple los requisitos siguientes:
• Sistema operativo: Microsoft Windows 2000, XP SP2 o
Vista
• Procesador: Intel® Pentium® III 1GHz o superior
(mínimo); Pentium 4 2GHZ o superior (recomendado)
• RAM: 512MB (mínimo), recomendamos 1GB RAM
• Espacio libre en el disco duro: Mín. 512MB
• Superficie de pantalla: 1024 x 600 píxeles
SINCRONIZACIÓN DEL PC CON EL RELOJ SE833
APLICACIÓN DE SOFTWARE
Puede cargar datos del software al reloj SE833 o descargar
datos del reloj SE833 al software.
ejercicio predeterminados del reloj)
• los datos de usuario nuevos o modificados o la
configuración del dispositivo (una vez cargados, los
datos y la configuración del usuario actual del reloj se
sobrescribirán)
Datos para descargar de reloj a software:
• todos los registros de ejercicio (los registros de ejercicio
se guardarán y acumularán en el software)
• los datos de usuario nuevos o modificados o la
configuración del dispositivo (una vez descargados, los
datos y la configuración del usuario actual del software
se sobrescribirán)
NOTA Para obtener más información acerca de
exactamente qué datos se cargan o descargan, consulte
“CARGAR Y DESCARGAR DATOS”en la Guía de usuario
de la aplicación que encontrará en el CD-ROM.
Cómo sincronizar el reloj con el software:
En el PC
1. Conecte el dongle USB.
2. Ponga el software en marcha haciendo doble clic en
3. Haga clic en
Sinc
en el software.
.
ES
Datos para cargar de software al reloj:
• hasta 3 perfiles de ejercicio personalizados (los perfiles
de ejercicio personalizados se añadirán a los perfiles de
En el reloj
4. Pulse MODE repetidamente para elegir
27
.
Page 58

ES
7. Si la calibración se ha realizado correctamente, la
5. Se mostrará la pantalla . Pulse SET
para iniciar la sincronización.
En el PC
6. Se mostrará el recuadro que aparece a continuación.
Sinc?
CARGAR
• Para cargar datos del software al reloj SE833, haga clic
en
.
• Para descargar datos del reloj SE833 al software, haga
clic en
.
• Para salir, pulse Esc.
NOTA La sincronización no se puede cancelar una vez ha
empezado.
En el reloj
DESCARGAR
apantalla mostrará
.
Si la sincronización falla, la pantalla mostrará
. Pulse ST/LAP/+ y a continuación
SET para volver a intentarlo, o MODE para salir.
NOTA Para obtener más información de la interfaz y las
funciones del software, consulte la Guía de usuario del
software que encontrará en el CD-ROM.
28
Page 59

RESISTENCIA AL AGUA
FICHA TÉCNICA
ES
Artículo Resistencia al agua
50 metros (164 pies)
Esto significa que puede utilizar
el reloj para nadar o hacer otros
deportes acuáticos (como el surf),
pero no para bucear o hacer
submarinismo.
Reloj SE833
Cinta SZ909
cinta
AD112 USB
dongle
NOTA
• Asegúrese de que los botones y
el compartimiento para pilas estén
cerrados e intactos antes de exponer
el reloj a un exceso de agua.
• No pulse los botones mientras esté
en el agua o si llueve mucho, puesto
que podría provocar que entre agua
en el reloj y que el reloj dejara de
funcionar correctamente.
10 metros (32,8 pies)
No recomendada para nadar
No
NOTA Aunque tanto el reloj SE833 como la cinta SZ909
son resistentes al agua, puesto que el agua no transmite
señales de radio, la transmisión entre el reloj y la cinta no
funcionará bajo el agua.
RELOJ
Formato de la hora
Formato de la fecha DD/MM o MM/DD
Años 2009 – 2058
Alarma
ENTRENAMIENTO
Gama de tiempo de
ejercicio
Reiniciar tiempo de
ejercicio
Tiempo de
calentamiento
Recuperar gama de
tiempo
Zona de ritmo cardíaco
objetivo
Límite mínimo de ritmo
cardíaco
Límite máximo de ritmo
cardíaco
Cálculo de distancia 0 a 60,99 (en km o millas)
Recuento de pasos Entre 0 y 999999
Recuento máximo de
vueltas
Formato de 12 ó 24 horas /
minuto / segundo
Alarma con ajuste diario,
días laborables o fin de
semana
00:00:00 a 99:59:59
00:00:00 a 99:59:59
00:00:00 a 00:15:00
0 o 5 minutos
Zona 1 a 5
30 a 220 bpm
80 a 240 bpm
99
29
Page 60

ES
Gama de medición de
cadencia
Números de intervalo
de entrenamiento
Gama de calorías 0 a 9.999 kcal
Porcentaje de grasas
quemadas
Índice de forma física Entre 1 y 99
ALIMENTACIÓN
Reloj 1 pila de litio CR2032 3V
Cinta SZ909 1 pila de litio CR2032 3V
ENTORNO DE TRABAJO
Temperatura de
funcionamiento
Temperatura de
almacenamiento
Entre 1 y 1999 rpm
Entre 2 y 5
0 a 100%
Reloj
0 °C a 40 °C
(32 °F a 104 °F)
Cinta SZ909
5 ºC a 40 °C
(41 °F a 104 °F)
Reloj y cinta SZ909
cinta
-20 °C a 60 °C
(-4 °F a 140 °F)
PRECAUCIÓN
Pasa asegurarse de que usa su producto correctamente
y sin correr riesgos, lea estos avisos y el manual de
usuario entero antes de utilizar el producto.
• Limpie el producto con un paño suave ligeramente
humedecido. No use detergentes abrasivos ni
corrosivos, porque podrían causar daños a la unidad.
Use agua tibia y un jabón suave para limpiar el reloj
y la cinta detenidamente después de cada sesión. No
sumerja nunca los productos en agua caliente ni los
guarde mojados.
• No doble ni estire el dispositivo transmisor de la cinta.
• No exponga el producto a fuerza extrema, descargas,
polvo, fluctuaciones de temperatura o humedad. En
ningún caso exponga el producto a la luz directa del sol
durante periodos largos de tiempo. De hacerlo podría
provocar que el producto se estropeara.
• No manipule los componentes internos. De hacerlo
anulará la garantía de la unidad y podría causar daños.
La unidad principal contiene componentes que el usuario
no debe manipular.
• No raye la pantalla LCD con objetos duros, porque
podría causar daños.
• Tenga cuidado cuando manipule las pilas de cualquier
tipo.
• Retire las pilas si va a guardar el producto por un largo
periodo de tiempo.
• Al reemplazar las pilas, introduzca pilas nuevas siguiendo
las especificaciones de este manual de usuario.
• Este producto es un instrumento de precisión. Nunca
intente desmontarlo, Si necesita reparación, póngase en
contacto con el proveedor o nuestro departamento de
atención al cliente.
• No toque los circuitos del dispositivo, ya que existe un
peligro de descarga eléctrica.
• No use la cinta en aviones ni hospitales. La utilización
de productos de radiofrecuencia pueden provocar mal
funcionamiento en los dispositivos de control y otros
30
Page 61

equipos.
• Compruebe todas las funciones principales si el
dispositivo no se usa durante un largo periodo de tiempo.
Compruebe y limpie regularmente la parte interior de su
dispositivo. Asegúrese de que su reloj sea revisado cada
año por un centro de servicio autorizado.
• Al desechar este producto, hágalo según las regulaciones
de desecho de residuso locales.
• Debido a limitaciones de imprenta, las pantallas que se
muestran en este manual pueden diferir de las pantallas
reales.
• Los contenidos de este manual no pueden reproducirse
sin permiso del fabricante.
NOTA La ficha técnica de este producto y los contenidos
de este manual de usuario pueden cambiarse sin previo
aviso.
NOTA No todas las funciones y accesorios estarán
disponibles en todos los países.
Sírvase ponerse en contacto con su distribuidor local si
desea más información.
Si está en España y quiere contactar directamente con
nuestro Departamento de Atención al Cliente, por favor
visite www.oregonscientific.es o llame al 902 338 368.
Para consultas internacionales, por favor visite www2.
oregonscientific.com/about/international.asp.
EU - DECLARACIÓN DE CONFORMIDAD
Por medio de la presente Oregon Scientific declara que
el Monitor del ritmo cardíaco con velocidad, distancia
y conexión a PC (Modelo: SE833) cumple con los
requisitos esenciales y cualesquiera otras disposiciones
aplicables o exigibles de la Directiva 1999/5/CE. Tiene a su
disposición una copia firmada y sellada de la Declaración
de Conformidad, solicítela al Departamento de Atención al
Cliente de Oregon Scientific PAÍSES.
PAÍSES BAJO LA DIRECTIVA RTTE
Todos los países de la UE, Suiza CH
y Noruega N
ES
SOBRE OREGON SCIENTIFIC
Visite nuestra página web (www.oregonscientific.com)
para conocer más sobre los productos de Oregon
Scientific.
Si está en EE.UU y quiere contactar directamente con
nuestro Departamento de Atención al Cliente, por favor
visite www2.oregonscientific.com/service/support.asp
AVISO DE FCC (EE.UU.) / AVISO DE IC (CANADÁ)
Este reloj cumple con la Sección 15 de las Reglas de
FCC. El funcionamiento está sujeto a las siguientes dos
condiciones: (1) no provocara interferencias nocivas y
31
Page 62

ES
(2) aceptará todas las interferencias que reciba, incluso
interferencias que podrían provocar un funcionamiento no
deseado.
ADVERTENCIA Los cambios o modificaciones que no
estén expresamente aprobados por la parte responsable
del cumplimiento podrían anular la autoridad que tiene el
usuario para operar este reloj.
NOTA Se han realizado pruebas con este equipo y se
ha determinado que cumple con los límites establecidos
para dispositivos digitales de Clase B, de acuerdo con la
Sección 15 del reglamento de FCC. Estos límites se han
fijado para proporcionar un grado de protección razonable
contra interferencias nocivas en áreas residenciales. Este
equipo genera, usa y emite energía de radiofrecuencia y, si
no se instala y usa según lo indicado en las instrucciones,
podría causar interferencias en las comunicaciones de
radio. Sin embargo, no hay garantía de que no aparecerán
interferencias en una instalación en particular. Si este
equipo causa interferencias perjudiciales en la recepción
de señales de radio o televisión, lo que se determina
encendiendo y apagando el equipo, se recomienda al
usuario que intente corregir la interferencia tomando una o
varias de las siguientes medidas:
radio y TV.
Este aparato digital de Clase [B] cumple con la norma
canadiense ICES-003.
• Reoriente o reubique la antena receptora.
• Aumente la separación entre el equipo y el receptor.
• Conecte el equipo a un enchufe que esté en un circuito
diferente al que está conectado el receptor.
• Consulte al distribuidor o a un técnico experimentado en
32
Page 63

Herzfrequenzmesser mit
Geschwindigkeit und Distanz sowie
PC-Anschluss
MODELL: SE833
BEDIENUNGSANLEITUNG
INHALT
Einleitung ....................................................................... 2
Inhalt der Verpackung ............................................... 2
Bedientasten ................................................................. 2
Anzeige .......................................................................... 3
Inbetriebnahme Ihrer Uhr (erstmalig) .......................... 3
Ihre Uhr einstellen ......................................................... 3
Benutzerprofil einstellen ............................................ 4
Uhrenprofil einstellen ................................................. 5
Trainingsprofil einstellen ............................................ 5
Tragen des Brustgurts ................................................. 8
Gerät koppeln ................................................................ 9
Mit Brustgurt SZ909 koppeln (oder anderen
Brustgurten mit ANT-System) ................................... 10
Mit Lauf- / Fahrradsensor mit ANT-System koppeln .. 10
Reifengröße des Fahrrads eingeben (für
Fahrradsensor) .......................................................... 11
Ein Gekoppeltes Gerät entfernen .............................. 11
Kalibrierung eines gekoppeltes Gerätes durchführen
........................................................................................ 12
Kalibrierung durch Laufen oder Gehen durchführen . 12
Kalibrierung durch Eingabe von Parametern
durchführen ................................................................ 13
Das Training durchführen ........................................... 13
Für das Training verfügbarer Speicher ...................... 14
Gerätesuche vor dem Training .................................. 15
Datenanzeige beim Training automatisch wechseln 16
Training unterbrechen und fortsetzen ........................ 16
Trainingsdaten speichern .......................................... 17
Herzfrequenzgrenze überschreiten ........................... 17
Trainingsdaten beim Training anzeigen ..................... 17
Trainingsdatensätze anzeigen ..................................... 19
Trainingsdatendatz auf der Seite der Übersichtsdaten
anzeigen .................................................................... 19
Trainingsdatensatz auf der Seite der Rundendaten
anzeigen .................................................................... 20
Speicher löschen ....................................................... 21
Ihren Fitnessindex kennen .......................................... 21
Weitere Funktionen und Einstellungen ...................... 22
Hintergrundbeleuchtung aktivieren ............................ 22
Tasten sperren / entsperren ...................................... 22
Alarm ein- / ausschalten ............................................ 22
Alarm stummschalten ................................................ 23
Signalton ein- / ausschalten ....................................... 23
Batterie wechseln ...................................................... 23
Fahrradhalterung montieren ...................................... 24
Nützliche Hinweise ....................................................... 24
Zielzone ..................................................................... 24
Reifengröße des Fahrrads ......................................... 26
Verbindung mit PC-Anwenderprogramm herstellen . 26
PC-Voraussetzungen ................................................. 27
Die Uhr SE833 mit PC-Anwenderprogramm
synchronisieren ......................................................... 27
Wasserfestigkeit .......................................................... 29
Technische Daten ......................................................... 39
Vorsichtsmaßnahmen .................................................. 30
Über Oregon Scientific ................................................. 31
EU-Konformitätserklärung ........................................... 31
1
DE
Page 64

DE
EINLEITUNG
Wir danken Ihnen, dass Sie sich für den Herzfrequenzmesser
mit Geschwindigkeit und Distanz sowie PC-Anschluss
(SE833) von Oregon Scientific
Uhr ist nicht nur ein fortschrittlicher Herzfrequenzmesser,
sondern auch mit einem PC kompatibel, damit der Benutzer
Trainingsdaten zur Analyse und Fitnessverwaltung
speichern kann. Weitere Funktionen, wie Messung der
Geschwindigkeit und Distanz, sowie ein Trainingstimer
mit Runden und Trainingsprofilen, sind für den Benutzer
verfügbar, um sein Fitnessprogramm zu optimieren. Die
2,4GHz-ANT-Sporttechnologie wird in dieser Uhr benutzt,
um eine zuverlässige Übertragungsleitung zu anderen
Geräten, wie Brustgurte, Fuß- oder Fahrradsensoren zu
ermöglichen.
TM
entschieden haben. Diese
WICHTIG Diese Uhr ist ausschließlich für sportliche
Zwecke bestimmt und nicht dafür vorgesehen, medizinische
Geräte zu ersetzen.
Patentvermerk: Dieses Produkt ist durch das US Patent Nr.
7,237,446 geschützt (Europäisches Patent angemeldet).
INHALT DER VERPACKUNG
Diese Packung sollte folgende Teile enthalten:
• 1 x Uhr SE833
• 1 x Brustgurt SZ909
• 1 x USB-Transmitter AD112
• 1 x CD mit Anwenderprogramm AD108
• 1 x Fahrradhalterung (mit 2 Befestigungsbändern)
• 2 x Lithium-Batterien CR2032 3V (bereits in Uhr und
Brustgurt installiert)
BEDIENTASTEN
1
5
4
2
1. - / SP : Zwischen Optionen wechseln; Wert verringern;
beim Training unterbrechen/beenden
2. MODE : Zwischen Modi wechseln; zur vorherigen Seite
zurückkehren
3. SET : Einstellungen bestätigen; Alarm im Uhrzeitmodus
ein-/ausschalten
4.
/ : Hintergrundbeleuchtung aktivieren; Tasten
sperren / entsperren
5. ST / LAP / + : Zwischen Optionen wechseln; Wert erhöhen;
im Uhrzeitmodus stummschalten / Stummschaltung
aufheben
3
2
Page 65

ANZEIGE
DE
9. : Herzfrequenzsignal wird empfangen/ Brustgurt ist
gekoppelt
1
2
3
4
5
6
78 910
1. : Zeigt Tasten mit aktuell möglicher Funktion
2.
or : Batteristandsanzeige
3.
4.
5.
/ : 12-Stundenuhr
: Zurück
: Gibt oben / unten oder oberen / unteren Grenzwert
an
13
12
11
10.
11.
12.
13.
INBETRIEBNAHME IHRER UHR (ERSTMALIG)
Nachdem Sie die Uhr aus der Verpackung entnommen
haben, müssen Sie sie aktivieren, indem Sie die Taste
MODE gedrückt halten, bis die Anzeige aktiviert wird. Die
Uhr fordert Sie sodann auf, Ihr Benutzerprofil einzustellen.
IHRE UHR EINSTELLEN
WICHTIG
• Um präzise Berechnungen bei Ihrem Training zu
• Denken Sie daran, die Profile nach jedem Batteriewechsel
: Signal für Geschwindigkeit / Laufsensor gekoppelt
: Signal für Fahrrad und Trittfrequenz /Fahrradsensor
gekoppelt
: Umdrehungszahl pro Minute (Einheit der
Trittfrequenz)
: Gibt an, dass die Tasten gesperrt sind
gewährleisten, wird dringend empfohlen, die Uhr und
Benutzerprofile vor Trainingsbeginn einzustellen.
und jedem Reset der Uhr einzustellen.
6.
: Signalton aus
7.
: Trainingstimer aktiviert
8.
: Alarm an
HINWEIS Wenn bei Einstellung der Uhr 30 Sekunden lang
keine Eingabe erfolgt, wird dieser Vorgang automatisch
beendet.
3
Page 66

DE
BENUTZERPROFIL EINSTELLEN
Nach erstmaliger Inbetriebnahme und Aufforderung zur
Einstellung des Benutzerprofils wird der nachstehende
Bildschirm angezeigt. Gehen Sie direkt zu Schritt 4.
• -/SP, um den Wert zu verringern
• SET, um die gewählte Option zu bestätigen
6. Nachdem Ihr Benutzerprofil eingestellt wurde, wird der
nachstehende Bildschirm angezeigt.
Normaler Einstellungsvorgang:
1. Drücken Sie wiederholt auf MODE, um
auszuwählen.
2. Drücken Sie wiederholt auf ST/LAP/+, um “SET USER”
auszuwählen.
3. Drücken Sie auf SET, um die Optionen zur Einstellung
des Benutzerprofils aufzurufen.
4. Drücken Sie auf ST/LAP/+, um eine Option auszuwählen,
und anschließend auf SET, um diese zu bestätigen.
5. Fahren Sie mit der Einstellung Ihres Benutzerprofils
gemäß nachstehender Reihenfolge fort: Geburtsjahr,
Geburtsmonat, Geburtstag, Einheit und Wert für
Körpergewicht. Drücken Sie dafür folgende Tasten:
• ST/LAP/+, um den Wert zu erhöhen oder die Option
auszuwählen
7. Sie können weitere Profile einrichten (Uhren- oder
Trainingsprofile), indem Sie wiederholt auf ST/LAP/+
drücken.
4
Page 67

press
Drücken Sie
press
ST/LAP/+
ST/LAP/+
Drücken Sie
press
ST/LAP/+
ST/LAP/+
Drücken Sie
ST/LAP/+
ST/LAP/+
WICHTIG Sie müssen das Benutzerprofil zurücksetzen,
wenn die Uhr von einer anderen Person verwendet wird.
zur Einstellung folgender Punkte auszuwählen: Alarm
einstellen, Uhrzeit einstellen, Datum einstellen, Einheit
einstellen, Warnung* einstellen, Ansicht** einstellen.
5. Drücken Sie auf SET und beginnen Sie mit der
Einstellung der gewählten Option, indem Sie folgende
Tasten drücken:
• ST/LAP/+, um den Wert zu erhöhen oder die Option
auszuwählen
• -/SP, um den Wert zu verringern
• SET, um die gewählte Option zu bestätigen
* Wenn sich die Herzfrequenz während des Trainings
außerhalb der Zielzone befindet, sendet die Uhr ein
visuelles und akustisches Warnsignal aus. Sie können
das akustische Warnsignal in der Option “SET ALERT”
wahlweise ein- oder ausschalten. Die näheren Angaben
zur Zielzone finden Sie im Abschnitt “ZIELZONE” in
diesem Handbuch.
** Während des Trainings wechselt die Uhr die Anzeige
Ihrer Trainingsinformationen. Sie können den Wechsel
der Anzeige in der Option “SET VIEW” wahlweise einoder ausschalten.
DE
UHRENPROFIL EINSTELLEN
1. Drücken Sie wiederholt auf MODE, um
auszuwählen.
2. Drücken Sie wiederholt auf ST/LAP/+, um “SET
WATCH” auszuwählen.
3. Drücken Sie auf SET, um die Optionen zur Einstellung
des Uhrenprofils aufzurufen.
4. Drücken Sie auf ST/LAP/+ oder -/SP, um eine Option
TRAININGSPROFIL EINSTELLEN
WICHTIG
wenn die Uhr von einer anderen Person verwendet wird.
Sie können wahlweise die vorgegebenen Trainingsprofile
der Uhr einstellen oder benutzerspezifische Trainingsprofile
vom PC-Anwenderprogramm hochladen.
Sie müssen das Trainingsprofil zurücksetzen,
5
Page 68

DE
warm up time
to increase
value
to next page
to decrease
value
to exit
TRAININGSPROFIL IN DER UHR EINSTELLEN
Sie können die 3 vorgegebenen Trainingsprofile (Kardio,
Laufen, Radfahren) in der Uhr einstellen.
1. Drücken Sie wiederholt auf MODE, um
auszuwählen.
2. Drücken Sie unter “SET PROG” auf SET, um die
Trainingsoptionen aufzurufen.
3. Drücken Sie auf ST/LAP/+ oder -/SP, um das Training
zur Einstellung auszuwählen: Kardio einstellen, Laufen
einstellen, Radfahren einstellen.
4. Drücken Sie auf SET, um die Auswahl zu bestätigen
und anschließnd das Profil* des gewählten Trainings
einzustellen, indem Sie folgende Tasten drücken:
• ST/LAP/+, um den Wert zu erhöhen oder die Option
auszuwählen
• -/SP, um den Wert zu verringern
• SET, um die gewählte Option zu bestätigen
* Die Einstellungssequenz des Profils lautet wie folgt:
1. Aufwärmzeit
2. Intervalltraining ein-/ausschalten
2a Für das Intervalltraining, müssen Sie Folgendes
einstellen:
v Anzahl der Intervalle (2-5)
v Intervall-Belastungszeit für jedes Intervall
v Pausezeit für jedes Intervall
v Zielzone der Herzfrequenz (1-5) [Nähere
Angaben finden Sie im Abschnitt “ZIELZONE”
in diesem Handbuch]
v Erholungstimer ein-/ausschalten
Um den
Wert zu
verringern
Um zu
beenden
Um den
Wert zu
erhöhen
Aufwärmzeit
Zur
nächsten
Seite
6
Page 69

Um zu
beenden
Um den Wert zu
verringern
Um zu beenden
Um den Wert zu
verringern
Um zu beenden
Um den Wert zu
verringern
Um zu beenden
Um den Wert zu
verringern
Um zu beenden
Um zu beenden
Drücken Sie auf SET
Drücken Sie auf SET
Drücken Sie auf SET
Drücken Sie auf SET
press SET
Drücken Sie auf SET
Um ein- oder
auszuschalten
Intervalltraining
ein-/ausschalten
Zur nächsten
Seite
Um den Wert zu
erhöhen
Anzahl der
Intervalle
Zur nächsten
Seite
Um den Wert zu
erhöhen
Intervall-Belastungszeit
für jeden Intervall
Um Einstellung zu bestätigen;
zur nächsten Seite
Um den Wert zu
erhöhen
Pausezeit für
jeden Intervall
Um Einstellung zu
bestätigen; zur nächsten
Seite
Um den Wert zu
erhöhen
Zielzone der
Herzfrequenz
Zur nächsten
Seite
Um ein- oder
auszuschalten
Erholungstimer
ein-/ausschalten
Zur nächsten
Seite
2b Wenn Sie das Intervalltraining ausschalten,
DE
müssen Sie Folgendes einstellen (Gilt nur für die
Einstellung „Kardio“):
v Trainingszeit
v Zielzone der Herzfrequenz (1-5) [Nähere
Angaben finden Sie im Abschnitt “ZIELZONE”
in diesem Handbuch]
v Erholungstimer ein-/ausschalten
Um ein- oder
auszuschalten
Intervalltraining
Um zu beenden
Um den Wert zu
verringern
Um zu beenden
Um den Wert zu
verringern
Um zu beenden
Um zu beenden
Drücken Sie auf SET
Drücken Sie auf SET
Drücken Sie auf SET
ein-/ausschalten
Zur nächsten Seite
Um den Wert zu
erhöhen
Trainingszeit
Um Einstellung
zu bestätigen; zur
nächsten Seite
Um den Wert zu
erhöhen
Zielzone der
Herzfrequenz
Zur nächsten Seite
Um ein- oder
auszuschalten
Erholungstimer
ein-/ausschalten
Zur nächsten Seite
2c Wenn Sie das Intervalltraining ausschalten,
müssen Sie Folgendes einstellen (Gilt nur für die
7
Einstellung „Laufen“ und „Radfahren“):
Page 70

DE
v Training nach Distanz oder nach Zeit
v Trainingsdistanz oder Trainingszeit
v Zielzone der Herzfrequenz (1-5) [Nähere Angaben
finden Sie im Abschnitt “ZIELZONE” in diesem
Handbuch]
v Erholungstimer ein-/ausschalten
Um ein- oder
auszuschalten
Intervalltraining
Um zu beenden
Um zu beenden
Um den Wert zu
verringern
Um zu beenden
Um den Wert zu
verringern
Um zu beenden
Um zu beenden
Drücken Sie auf SET
Drücken Sie auf SET
Drücken Sie auf SET
Drücken Sie auf SET
ein / ausschalten
Zur nächsten Seite
Um nach Distanz oder
Zeit einzustellen
Training nach Distanz
oder nach Zeit
Zur nächsten Seite
Um den Wert zu
erhöhen
Trainingsdistanz;
Trainingszeit
Um Einstellung
zu bestätigen; zur
nächsten Seite
Um den Wert zu
erhöhen
Zielzone der
Herzfrequenz
Zur nächsten Seite
Um ein-/auszuschalten
Erholungstimer
ein-/ausschalten
Zur nächsten Seite
BENUTZERSPEZIFISCHES TRAININGSPROFIL VOM
PC-ANWENDERPROGRAMM HOCHLADEN
Sie können bis zu 3 Trainingsprofile vom PCAnwenderprogramm auf Ihre Uhr mit persönlichen
Einstellungen hochladen. Sie können die Einstellungen der
hochgeladenen Trainingsprofile jedoch nicht über die Uhr,
sondern nur über die Software ändern.
Nähere Angaben über das Hochladen von
benutzerspezifischen Trainingsprofilen von der Software
auf die Uhr finden Sie im Abschnitt “DIE UHR SE833 MIT
PC-ANWENDERPROGRAMM SYNCHRONISIEREN” in
diesem Handbuch.
Nähere Angaben zur Änderung der benutzerspezifischen
Trainingsprofile in der Software finden Sie im Abschnitt
“BENUTZERPROFIL / GERÄTEINSTELLUNG
ERSTELLEN ODER ÄNDERN” in der Anleitung des PCAnwenderprogramms auf der CD-ROM.
HINWEIS Wenn keine benutzerspezifischen Trainingsprofile
von der Software auf die Uhr hochgeladen wurden, zeigt die
Uhr nur ihre vorgegebenen Trainingsprofile an.
TRAGEN DES BRUSTGURTS
1. Befeuchten Sie die leitfähigen Polster an der Unterseite
des Brustgurts mit einigen Tropfen Wasser oder einem
Leitgel, um einen guten Kontakt zu gewährleisten.
8
Page 71

Leitfähige Polster
conductive pads
2. Schnallen Sie den Brustgurt um Ihre Brust. Verstellen
Sie den Brustgurt für ein präzises Herzfrequenzsignal
so, dass er genau unter Ihren Brustmuskeln sitzt.
TIPPS
• Die Position des Brustgurts beeinflusst seine Leistung.
Ziehen Sie den Brustgurt am Riemen entlang, bis er über
Ihrem Herzen liegt.
• Vermeiden Sie Bereiche mit dichtem Brusthaar.
• In einem trockenen kalten Klima kann es mehrere Minuten
dauern, bis der Brustgurt zuverlässig funktioniert. Dies
ist normal und sollte sich nach einigen Minuten Training
verbessern.
• Um die bestmögliche Funktion Ihres Brustgurts
aufrechtzuerhalten, behandeln Sie ihn mit Sorgfalt und
beachten Sie die nachfolgenden Punkte:
- Wickeln Sie den Brustgurt nicht in feuchte Handtücher
oder in andere feuchte Materialien.
- Bewahren Sie den Brustgurt nicht in einer heißen
(etwa 50 °C) oder feuchten (etwa 90 %) Umgebung
auf.
- Halten oder reinigen Sie den Brustgurt nicht unter
fließendem Wasser, sondern säubern Sie ihn mit
einem feuchten Tuch.
- Legen Sie die leitfähige Gummifläche nicht auf einen
Metalltisch oder eine metallische Oberfläche.
- Trocknen Sie den Brustgurt sofort und gründlich nach
Verwendung.
GERÄT KOPPELN
WICHTIG
gewährleisten, sollten Sie die Uhr mit dem Brustgurt SZ909
koppeln. Dieser Brustgurt unterstützt die Koppelung der
Funktionen von Herzfrequenz und Laufsensor.
Die Uhr kann auch mit anderen Brustgurten und Geräten,
wie Lauf- und Fahrradsensoren, gekoppelt werden,
die die ANT-Sporttechnologie verwenden. Andere
Brustgurte ermöglichen jedoch nur die Koppelung der
Herzfrequenzfunktion.
Um präzise Berechnungen bei Ihrem Training zu
9
DE
Page 72

DE
1. Drücken Sie wiederholt auf MODE, um
auszuwählen. Die Uhr zeigt an, welche und wieviele
Geräte gekoppelt sind (sofern vorhanden). Wenn kein
Gerät gekoppelt ist, zeigt die Uhr “0 DEVICE PAIRED”
an.
2. Drücken Sie auf SET, um “PAIR DEVICE” aufzurufen.
Drücken Sie auf SET, um die Koppelung zu starten.
ii. Reiben Sie Ihren Daumen am leitfähigen Polster
einige Male hin und her, bis die Uhr einen der obigen
Bildschirme anzeigt.
HINWEIS Nur mit dem Brustgurt SZ909 können Sie den
HF-Gurt und den Laufsensor gleichzeitig koppeln. Wenn
Sie die Koppelung mit anderen Brustgurten mit ANT-System
durchführen, wird nur der HF-Gurt gefunden.
MIT BRUSTGURT SZ909 KOPPELN (ODER
ANDEREN BRUSTGURTEN MIT ANT-SYSTEM)
Sie können die Uhr mit dem Brustgurt auf 2 Arten koppeln.
• Eine Möglichkeit besteht darin, den Gurt um Ihre Brust
zu schnallen und zu warten, bis eine Anzeige auf der Uhr
erfolgt
und
(nur mit SZ909)
• Die andere Möglichkeit ist wie folgt:
i. Halten Sie den Brustgurt fest und berühren Sie die
leitfähigen Polster (die normalerweise Ihre Brust
berühren) mit Ihren Daumen.
HINWEIS Die Koppelung mit dem Brustgurt SZ909 ist nur
dann als erfolgreich zu betrachten, wenn der HF-Gurt und
der Laufsensor gefunden werden.
MIT LAUFSENSOR / FAHRRADSENSOR MIT
ANT-SYSTEM KOPPELN
Sie können Lauf- oder Fahrradsensoren separat erwerben,
um sie mit ihrer Uhr zu koppeln, solange diese das ANTSystem nutzen. Nähere Hinweise zum Vorgang des Koppels
finden Sie in den entsprechenden Anleitungen.
• Wenn der Laufsensor erfolgreich gekoppelt wurde,
zeigt die Uhr Folgendes an:
10
Page 73

• Wenn der Fahrradsensor erfolgreich gekoppelt
wurde, zeigt die Uhr Folgendes an:
gekoppelt ist. Nähere Angaben zur Reifengröße des
Fahrrads finden Sie im Abschnitt “REIFENGRÖSSE DES
FAHRRADS” in diesem Handbuch.
Wenn Ihre Uhr mit dem Fahrradsensor gekoppelt ist, werden
Sie aufgefordert, die Werte der Reifengröße einzugeben.
DE
HINWEIS Falls die Koppelung zu schwach und instabil ist:
• Verkürzen Sie den Abstand zwischen Gerät und Uhr.
• Verstellen Sie die Position des Geräts.
• Überprüfen Sie die Batterien. Tauschen Sie die Batterien
ggf. aus.
HINWEIS Wenn die Uhr bereits mit dem Brustgurt SZ909
gekoppelt ist, und Sie sie mit einem anderen Brustgurt
koppeln möchten, müssen Sie zuerst den Brustgurt SZ909
löschen, bevor Sie die Koppelung mit einem anderen
Brustgurt vornehmen können. Dieser Grundsatz gilt auch
für den Fahrrad- und Laufsensor.
REIFENGRÖSSE DES FAHRRADS EINGEBEN
(FÜR FAHRRADSENSOR)
Die Uhr zeigt “WHEEL SIZE” nur an, wenn ein Fahrradsensor
1. Drücken Sie wiederholt auf MODE, um
auszuwählen.
2. Drücken Sie auf SET.
3. Drücken Sie wiederholt auf ST/LAP/+, um “WHEEL
SIZE” auszuwählen.
4. Drücken Sie auf SET.
5. Geben Sie die Reifengröße des Fahrrads ein, indem Sie
auf ST/LAP/+ drücken, um die Werte zu erhöhen, oder
auf -/SP, um diese zu verringern.
6. Drücken Sie zur Bestätigung auf SET.
EIN GEKOPPELTES GERÄT ENTFERNEN
Das Gerät zeigt “DEVICE REMOVE” nur an, wenn ein Gerät
gekoppelt ist.
1. Drücken Sie wiederholt auf MODE, um
auszuwählen.
2. Drücken Sie auf SET.
3. Drücken Sie wiederholt auf ST/LAP/+, um “DEVICE
REMOVE” auszuwählen.
4. Drücken Sie auf SET.
5. Drücken Sie auf ST/LAP/+, um auszuwählen, welches
11
Gerät gelöscht werden soll.
Page 74

DE
6. Drücken Sie auf SET, um Ihre Auswahl zu bestätigen.
KALIBRIERUNG EINES GEKOPPELTEN
GERÄTES DURCHFÜHREN
Die Uhr zeigt “CAL DEVICE” nur an, wenn ein Gerät
gekoppelt ist.
Sie können die Kalibrierung durch Laufen, Gehen oder
durch Eingabe von Parametern durchführen. Der Parameter
entspricht dem Wert, der nach der erfolgreichen Kalibrierung
durch Laufen oder Gehen erzielt wurde.
Wenn Sie das Gerät sofort nach der Koppelung kalibrieren
möchten, gehen Sie direkt zu Schritt 4. Andernfalls beginnen
Sie am Anfang.
7. Die Uhr führt zunächst eine Gerätesuche durch, die
durch ein Blinken von
Warten Sie, bis
anschließend auf SET, um die Kalibrierung zu starten.
8. Achten Sie darauf, dass Sie die gewählte Distanz zur
Kalibrierung vollständig durch Gehen oder Laufen
zurücklegen.
Ø Wenn die Kalibrierung erfolgreich ist, zeigt die Uhr
Folgendes an:
aufhört zu blinken, und drücken Sie
und angezeigt wird.
oder
KALIBRIERUNG DURCH LAUFEN ODER
GEHEN DURCHFÜHREN
1. Drücken Sie wiederholt auf MODE, um
auszuwählen.
2. Drücken Sie auf SET.
3. Drücken Sie wiederholt auf ST/LAP/+, um “CAL
DEVICE” auszuwählen.
4. Drücken Sie auf SET.
5. Drücken Sie auf ST/LAP/+, um “CAL BY RUN” oder
“CAL BY WALK” auszuwählen.
6. Drücken Sie auf SET, um Ihre Auswahl zu bestätigen.
Laufparameter
Run parameter
Gehparameter
Walk parameter
HINWEIS Der Lauf- oder Gehparameter entspricht
dem Wert, der bei der Kalibrierung durch Eingabe von
Parametern einzugeben ist.
Ø Wenn die Kalibrierung fehlgeschlagen ist, zeigt die Uhr
Folgendes an:
12
Page 75

HINWEIS Der Brustgurt SZ909 sollte durch Laufen und
Gehen kalibriert werden.
KALIBRIERUNG DURCH EINGABE VON
PARAMETERN DURCHFÜHREN
Sie werden Ihre Parameter nur kennen, wenn Sie vorher
bereits eine erfolgreiche Kalibrierung durch Laufen oder
Gehen vorgenommen haben. Dies kommt daher, weil der
Parameter dem Wert entspricht, der nach erfolgreicher
Kalibrierung durch Laufen oder Gehen angezeigt wird.
Durch die Eingabe von Parametern können Sie sich die
erforderliche Zeit für eine erneute Kalibrierung durch Laufen
oder Gehen ersparen.
5. Drücken Sie auf ST/LAP/+, um “PARA INPUT”
auszuwählen.
6. Drücken Sie auf SET, um Ihre Auswahl zu bestätigen.
7. Geben Sie den Parameter für Gehen ein, indem Sie auf
ST/LAP/+ drücken, um die Werte zu erhöhen, oder auf
- / SP, um diese zu verringern. Der Parameter entspricht
dem Wert, den Sie nach erfolgreicher Kalibrierung durch
Gehen erzielen.
8. Drücken Sie zur Bestätigung auf SET.
9. Geben Sie die Parameter für Laufen ein, indem Sie auf
ST/LAP/+ drücken, um die Werte zu erhöhen, oder auf
- / SP, um diese zu verringern. Der Parameter entspricht
dem Wert, den Sie nach erfolgreicher Kalibrierung durch
Laufen erzielen.
10. Drücken Sie zur Bestätigung auf SET.
DAS TRAINING DURCHFÜHREN
WICHTIG
zu gewährleisten, sollten Sie die Uhr mit dem Brustgurt
SZ909 oder mit anderen Geräten, wie dem Fahrradsensor,
koppeln. Wenn Sie jedoch keine Koppelung durchführen,
empfängt der Brustgurt nur das Herzfrequenzsignal.
Um präzise Berechnungen bei Ihrem Training
DE
1. Drücken Sie wiederholt auf MODE, um
auszuwählen.
2. Drücken Sie auf SET.
3. Drücken Sie wiederholt auf ST/LAP/+, um “CAL
DEVICE” auszuwählen.
4. Drücken Sie auf SET.
Es sind 2 Optionen für das Training verfügbar: AUTO und
PROG.
• AUTO bezieht sich auf die Durchführung des Trainings
ohne Verwendung des eingestellten Trainingsprofils.
• PROG bezieht sich auf die Durchführung des Trainings
mit Verwendung des eingestellten Trainingsprofils
13
Page 76

DE
available lap
memory
(siehe Abschnitt “TRAININGSPROFIL EINSTELLEN”
in diesem Handbuch).
So führen Sie das Training durch:
1. Drücken Sie auf MODE, um
• Um ohne Trainingsprofil zu trainieren, wählen Sie
verfügbarer
Rundenspeicher
• Um mit Trainingsprofil zu trainieren, drücken Sie auf
ST/LAP/+ und wählen Sie
verfügbarer
available lap
Rundenspeicher
memory
auszuwählen.
HINWEIS Der verfügbare Rundenspeicher verweist
auf den Rundenspeicher, der für die Durchführung des
Trainings verfügbar ist. Siehe “FÜR DAS TRAINING
VERFÜGBARER SPEICHER” für weitere Details.
2. Drücken Sie auf SET, um Ihre Auswahl zu bestätigen.
3. Warten Sie, bis die Uhr nach dem Gerät sucht, bevor
Sie auf SET drücken, um mit dem Training zu beginnen.
Siehe “GERÄTESUCHE VOR DEM TRAINING” für
weitere Details.
4. Während des Trainings können Sie Ihre Trainingsdaten
anzeigen, indem Sie manuell und wiederholt auf SET
drücken oder automatisch wechseln. Siehe “ANZEIGE
DER DATEN BEIM TRAINING AUTOM. WECHSELN” für
weitere Details. Um festzustellen, welche Trainingsdaten
angezeigt werden, siehe “TRAININGSDATEN BEIM
TRAINING ANZEIGEN” für weitere Details.
5. Wenn Sie während des Trainings eine Pause einlegen
müssen, drücken Sie auf -/SP. Sie können das
Trainings wieder fortsetzen, indem Sie auf ST/LAP/+
drücken. Siehe “TRAINING UNTERBRECHEN UND
FORTSETZEN” für weitere Details.
6. Nachdem Sie Ihr Training beendet haben, können Sie die
Trainingsdaten speichern. Siehe “TRAININGSDATEN
SPEICHERN” für weitere Details.
Drücken Sie auf SET und anschließend auf -/SP oder
ST/LAP/+, um auszuwählen, welches Trainingsprofil
Sie verwenden möchten.
FÜR DAS TRAINING VERFÜGBARER SPEICHER
Die Uhr muss über freien Speicher verfügen, um ein
Training zu ermöglichen. Wenn Sie trainieren möchten, aber
kein freier Rundenspeicher vorhanden ist, wird Sie die Uhr
auffordern, die Daten vor dem Training zu überschreiben.
14
Page 77

Wenn der verfügbare Rundenspeicher aufgebraucht ist,
zeigen die Bildschirme AUTO und PROG Folgendes an:
oder
DE
oder
Die Uhr zeigt die nachstehenden Bildschirme an, wenn Sie
auf SET drücken, um zu trainieren. Sie können daher erst mit
dem Training beginnen, wenn Sie die alten Rundenspeicher
überschrieben haben.
2SEC
Drücken Sie auf SET, um die alten Rundenspeicher zu
überschreiben. Nach dem Überschreiben der Daten wird
der verfügbare Rundenspeicher wieder übernommen, und
die nachfolgenden Bildschirme werden angezeigt,
(Überschreiben bedeutet das vollständige löschen des
Rundenspeichers.)
GERÄTESUCHE VOR DEM TRAINING
Bevor Sie mit dem Training beginnen, müssen Sie der
Uhr erlauben, einige Sekunden nach dem Gerät zu
suchen. Damit wird sichergestellt, dass Sie umfassende
Berechnungen (wie Rundenzeit, Kalorien, Herzfrequenz,
Distanz, Schritte, Geschwindigkeit und Trittfrequenz) beim
Training empfangen können. Wenn Sie mit dem Training
jedoch ohne Gerätesuche beginnen, können Sie nur
Messwerte der Herzfrequenz empfangen.
Wenn Sie sich bei nachstehendem Bildschirm befinden,
werden Sie feststellen, dass die Gerätesymbole (
oder
werden. Warten Sie, bis
und die Herzfrequenzwerte erscheinen. Anschließend
können Sie mit dem Training beginnen, indem Sie auf SET
drücken.
) blinken und keine Herzfrequenzwerte angezeigt
oder aufhören zu blinken
15
,
Page 78

DE
DATENANZEIGE BEIM TRAINING AUTOMATISCH
WECHSELN
Wenn Sie möchten, dass die Uhr die Trainingsdaten
beim Training automatisch wechselt, gehen Sie zum
Einstellungsmodus und nehmen diese Einstellung vor.
vorgenommen haben, können Sie Ihre Trainingsdaten
trotzdem anzeigen, indem Sie während des Trainings
manuell und wiederholt auf SET drücken.
TRAINING UNTERBRECHEN UND FORTSETZEN
Wenn Sie während des Trainings eine Pause einlegen
müssen, drücken Sie auf -/SP. Drücken Sie nicht auf MODE,
sonst gehen Ihre Trainingsdaten verloren.
1. Drücken Sie wiederholt auf MODE, um
auszuwählen.
2. Drücken Sie wiederholt auf ST / LAP/ +, um “SET
WATCH” auszuwählen.
3. Drücken Sie auf SET.
4. Drücken Sie wiederholt auf ST/LAP/+ oder -/SP, um
“SET VIEW” auszuwählen.
5. Drücken Sie auf SET.
6. Drücken Sie auf ST/LAP/+, um “TOGGLE ON”
auszuwählen.
7. Drücken Sie auf SET, um Ihre Auswahl zu bestätigen.
HINWEIS Wenn Sie die obige Einstellung nicht
Während einer längeren Pause verliert die Uhr die
Verbindung mit dem Gerät. Daher müssen Sie der Uhr beim
Fortsetzen des Trainings erneut erlauben, einige Sekunden
nach dem Gerät zu suchen, indem Sie auf SET drücken. Sie
werden feststellen, dass die Gerätesymbole (
) blinken und keine Herzfrequenzwerte angezeigt werden.
Warten Sie, bis
Herzfrequenzwerte erscheinen. Anschließend können Sie
das Training fortsetzen, indem Sie auf ST/LAP/+ drücken.
oder aufhören zu blinken, und die
16
, oder
Page 79

TRAININGSDATEN SPEICHERN
time
heart rate
lap
exercise
time
heart rate
lap
calorie
exercise
time
step
speed
heart rate
1. Drücken Sie auf -/SP, um den Zählvorgang der Uhr zu
stoppen. Drücken Sie nicht auf MODE, sonst gehen Ihre
Trainingsdaten verloren.
2. Halten Sie -/SP gedrückt, um zu speichern und zu
beenden.
HERZFREQUENZGRENZE ÜBERSCHREITEN
Wenn die obere oder untere Herzfrequenzgrenze beim
Training überschritten wird, warnt Sie die Uhr durch einen
Signalton und durch Anzeige von
Trainingsdaten für Training AUTO
Auf den nachstehenden Grafiken wird veranschaulicht,
welche Trainingsdaten beim Training angezeigt werden,
wenn die Uhr mit verschiedenen Geräten gekoppelt ist.
• Bei Koppelung mit HF-Brustgurt (außer Brustgurt
SZ909)
Kalorien
calorie
Trainingszeit
exercise
Herzfrequenz
DE
Runde
Trainingszeit
Herzfrequenz
oder
HINWEIS Diese Funktion ist nur verfügbar, wenn Sie mit
Trainingsprofilen trainieren. Sie ist nicht verfügbar, wenn Sie
im Submodus AUTO trainieren.
TRAININGSDATEN BEIM TRAINING ANZEIGEN
Sie können Ihre Trainingsdaten während des Trainings
anzeigen, indem Sie entweder automatisch wechseln oder
manuell auf SET drücken, um die Bildschirme zu wechseln.
• Bei Koppelung mit HF-Brustgurt + Laufsensor (oder
nur Koppelung mit Brustgurt SZ909)
Distanz
distance
Geschwindigkeit
speed
Herzfrequenz
heart rate
Schritte
Geschwindigkeit
Herzfrequenz
17
Runde
Kalorien
Trainingszeit
Page 80

DE
distance
speed
heart rate
exercise
time
calorie
cadence
lap
speed
heart rate
RPM
lap
heart rate
remaining time
heart rate
calorie
lap
step
heart rate
interval
heart rate
remaining time
cadence
calorie
lap
speed
heart rate
interval
heart rate
RPM
• Bei Koppelung mit Fahrradsensor
Distanz
Geschwindigkeit
Herzfrequenz
Runde
Geschwindigkeit
Herzfrequenz
Trainingsdaten für Training PROG
Auf den nachstehenden Grafiken wird veranschaulicht,
welche Trainingsdaten beim Training angezeigt werden,
wenn verschiedene Trainingsprofile verwendet werden.
• Bei Verwendung des Profils “Kardio”
Kalorien
calorie
Restliche Zeit
remainning time
heart rate
Herzfrequenz
Kalorien
Trainingszeit
Trittfrequenz
• Bei Verwendung des Profils “Laufen”
distance
Distanz
Geschwindigkeit
speed
heart rate
Herzfrequenz
Intervall
Herzfrequenz
Runde
Schritte
Herzfrequenz
• Bei Verwendung des Profils “Radfahren”
distance
Distanz
speed
Geschwindigkeit
heart rate
Herzfrequenz
Intervall
Herzfrequenz
Kalorien
Restliche Zeit
Herzfrequenz
Kalorien
Restliche
Zeit
Trittfrequenz
Intervall
interval
Herzfrequenz
Runde
Herzfrequenz
heart rate
Runde
Geschwindigkeit
Herzfrequenz
18
Page 81

TRAININGSDATENSÄTZE ANZEIGEN
maximum
heart rate
average
heart rate
minimum
heart rate
total steps
maximum speed
average speed
average cadence
maximum cadence
calorie
%fat burnt
HINWEIS
kein Trainingsdatensatz gespeichert ist.
So zeigen Sie die Trainingsdatensätze an:
1. Drücken Sie wiederholt auf MODE, um
2. Drücken Sie auf SET.
3. Zeigen Sie Ihre Trainingsdatensätze an, indem Sie
In jedem Trainingsdatensatz kann entweder nur eine Seite
mit Übersichtsdaten oder eine Seite mit Übersichtsdaten
zuzüglich einer Seite mit Rundendaten enthalten sein.
TRAININGSDATENSÄTZE AUF DER SEITE
DER ÜBERSICHTSDATEN ANZEIGEN
Auf den nachstehenden Grafiken wird veranschaulicht,
welche Details der Trainingsdatensätze bei verschiedenen
Trainingsprofilen angezeigt werden. Drücken Sie auf SET,
um zwischen den Bildschirmen zu wechseln.
Der Speichermodus wird nicht angezeigt, wenn
auszuwählen. Ihre Uhr zeigt sodann die Anzahl der
Trainingsdatensätze an.
folgende Tasten drücken:
• ST/LAP/+, um eine Option auszuwählen
• -/SP, um eine Option auszuwählen
• SET, um die Seite der Übersichtsdaten oder der
Rundendaten aufzurufen und die Details des
Datensatzes anzuzeigen
• MODE, um zur vorherigen Seite zurückzukehren
• Für Auto
% Fettverbrennung
• Für Kardio
% Fettverbrennung
19
Kalorien
Durchschnittliche
Trittfrequenz
Maximale
Trittfrequenz
calorie
Kalorien
%fat burnt
Gesamtrunden
total laps
Gesamtdistanz
total distance
exercise time
Trainingszeit
Gesamtschritte
Maximale
Geschwindigkeit
Durchschnittliche
Geschwindigkeit
Gesamtrunden
total laps
exercise time
Trainingszeit
time above HR zone
Zeit über HF-Zone
time below HR zone
Zeit unter HF-Zone
time in HR zone
Zeit in HF-Zone
Minimale
Herzfrequenz
Maximale
Herzfrequenz
Durchschnittliche
Herzfrequenz
minimum
Minimale
heart rate
Herzfrequenz
maximum
Maximale
heart rate
Herzfrequenz
average
Durchschnittliche
Herzfrequenz
heart rate
DE
Page 82

DE
maximum
heart rate
average
heart rate
minimum
heart rate
time above HR zone
time below HR zone
time in HR zone
total steps
maximum speed
average speed
calorie
%fat burnt
maximum
heart rate
average
heart rate
minimum
heart rate
time above HR zone
time below HR zone
time in HR zone
average
cadence
maximum speed
average speed
maximum
cadence
calorie
%fat burnt
maximum
heart rate
average
heart rate
minimum
heart rate
average
cadence
maximum
speed
average
speed
maximum
cadence
maximum
heart rate
average
heart rate
minimum
heart rate
time above HR zone
time in HR zone
• Für Laufen
% Fettverbrennung
Maximale Geschwindigkeit
Kalorien
Gesamtschritte
Durchschnittl.
Geschwindigkeit
Gesamtrunden
total laps
Gesamtdistanz
total distance
exercise time
Trainingszeit
Zeit über HF-Zone
Zeit unter HF-Zone
Zeit in HF-Zone
Minimale
Herzfrequenz
Maximale
Herzfrequenz
Durchschnittliche
Herzfrequenz
TRAININGSDATENSÄTZE AUF DER SEITE
DER RUNDENDATEN ANZEIGEN
Auf den nachstehenden Grafiken wird veranschaulicht,
welche Details der Trainingsdatensätze bei verschiedenen
Trainingsprofilen angezeigt werden. Drücken Sie auf SET,
um zwischen den Bildschirmen zu wechseln.
• Für Auto
Minimale Herzfrequenz
Maximale Herzfrequenz
Durchschnittliche
Herzfrequenz
• Für Radfahren
% Fettverbrennung
Durchschnittliche
Kalorien
Trittfrequenz
Maximale
Trittfrequenz
Durchschnittl.
Geschwindigkeit
Maximale
Geschwindigkeit
Gesamtrunden
total laps
total distance
Gesamtdistanz
exercise time
Trainingszeit
Minimale
Herzfrequenz
Maximale
Herzfrequenz
Durchschnittliche
Herzfrequenz
Zeit über HF-Zone
Zeit unter HF-Zone
Zeit in HF-Zone
20
Durchschnittliche
Trittfrequenz
Maximale
Trittfrequenz
• Für Kardio
Minimale
Herzfrequenz
Maximale
Herzfrequenz
Durchschnittliche
Herzfrequenz
Durchschnittliche
Geschwindigkeit
Maximale
Geschwindigkeit
Zeit über HF-Zone
time below HR zone
Zeit unter HF-Zone
Zeit in HF-Zone
Page 83

maximum
heart rate
average
heart rate
minimum
heart rate
time in HR zone
maximum speed
average speed
maximum
heart rate
average
heart rate
minimum
heart rate
time above HR zone
time below HR zone
maximum speed
average speed
average
cadence
maximum
cadence
• Für Laufen
Maximale
Geschwindigkeit
Maximale
Geschwindigkeit
• Für Radfahren
Durchschnittliche
Trittfrequenz
Maximale
Trittfrequenz
Durchschnittliche
Geschwindigkeit
Geschwindigkeit
Maximale
Minimale
Herzfrequenz
Maximale
Herzfrequenz
Durchschnittliche
Herzfrequenz
Zeit über HF-Zone
time above HR zone
Zeit unter HF-Zone
time below HR zone
Zeit in HF-Zone
Minimale
Herzfrequenz
Maximale
Herzfrequenz
Durchschnittliche
Herzfrequenz
Zeit über HF-Zone
Zeit unter HF-Zone
time in HR zone
Zeit in HF-Zone
SPEICHER LÖSCHEN
Sie können nicht einzelne Speichersätze zur Löschung
auswählen, sondern nur den gesamten Speicher löschen.
1. Drücken Sie wiederholt auf MODE, um
auszuwählen. Ihre Uhr zeigt die Anzahl der
Trainingsdatensätze an.
2. Drücken Sie auf ST/LAP/+. Ihre Uhr fragt Sie, ob Sie den
Speicher löschen möchten.
3. Halten Sie SET gedrückt, bis die Uhr Folgendes
anzeigt:
IHREN FITNESSINDEX KENNEN
Ihre Uhr erzeugt einen Fitnessindex auf der Grundlage Ihres
aeroben Trainings (durch Laufen von 1,6 km oder 1 Meile).
DE
WICHTIG Stellen Sie sicher, dass Ihre Uhr bereits mit
dem HF-Brustgurt gekoppelt ist, bevor Sie den Fitnesstest
durchführen.
21
Page 84

DE
FITNESS INDEX FOR MEN
FAIR
GOOD
AVERAGE
Age
60
50
40
30
20
22 27 32 37 42
FITNESS INDEX FOR WOMEN
FAIR
GOOD
AVERAGE
Age
60
50
40
30
20
15 20 25 30 35 40
1. Drücken Sie auf MODE, um auszuwählen.
2. Drücken Sie wiederholt auf ST/LAP/+, um “FITNESS
TEST” auszuwählen.
3. Drücken Sie auf SET. Die Uhr führt zunächst eine
Gerätesuche durch, die durch ein Blinken von
angezeigt wird. Warten Sie, bis aufhört zu
blinken. Die Uhr fordert Sie dann auch auf, 1,6 km (1
Meile) zu laufen.
4. Drücken Sie auf SET, um mit dem Laufen zu beginnen.
Stellen Sie sicher, dass Sie die gesamte Strecke
von 1,6 km (1 Meile) zurücklegen, um eine präzise
Fitnessmessung zu erhalten. Beim Laufen zeigt die Uhr
die Trainingszeit, die Distanz und die Herzfrequenz an.
5. Nach Beendigung des Laufes berechnet Ihre Uhr
automatisch Ihren Fitnessindex und zeigt diesen an.
Je höher der Index, desto höher ist Ihr Fitnessgrad.
Die nachstehenden Grafiken liefern eine allgemeine
Anleitung zur Bedeutung Ihres Fitnessindex.
und
FITNESSINDEX FÜR FRAUEN
Durchschnittlich
Ausreichend
Gut
Alter
WEITERE FUNKTIONEN UND EINSTELLUNGEN
HINTERGRUNDBELEUCHTUNG AKTIVIEREN
Drücken Sie auf / , um die Hintergrundbeleuchtung 5
Sekunden lang einzuschalten.
HINWEIS Die Hintergrundbeleuchtung funktioniert nicht,
wenn “
” oder “ ” angezeigt wird.
FITNESSINDEX FÜR MÄNNER
Durchschnittlich
Ausreichend
Alter
Gut
TASTEN SPERREN / ENTSPERREN
Halten Sie / 2 Sekunden lang gedrückt, um die
Tasten zu sperren oder zu entsperren.
gibt an, dass die
Tasten gesperrt sind.
ALARM EIN- / AUSSCHALTEN
1. Drücken Sie im Uhrzeitmodus auf SET.
2. Drücken Sie auf ST/LAP/+, um den Alarm ein- oder
22
auszuschalten.
ist.
gibt an, dass der Alarm eingeschaltet
Page 85

3. Drücken Sie auf MODE oder SET, um den Modus zu
beenden.
ALARM STUMMSCHALTEN
• Drücken Sie eine beliebige Taste, um den Alarm zu
beenden und ihn nach 24 Stunden erneut zu aktivieren.
ODER
• Schalten Sie den Alarm aus.
DE
SIGNALTON EIN- / AUSSCHALTEN
Drücken Sie im Uhrzeitmodus auf ST/LAP/+. gibt an,
dass der Signalton ausgeschaltet ist.
BATTERIE WECHSELN
Wenn die Ladung der Batterien in Ihrer Uhr oder Ihrem
Brustgurt niedrig ist, zeigt die Uhr Folgendes an:
Schwache Batterie in Uhr Schwache Batterie in Brustgurt
or
So wechseln Sie die Batterie:
1. Öffnen Sie den Batteriefachdeckel mit einem kleinen
Schraubenzieher.
2. Entnehmen Sie die alte Batterie und legen Sie eine neue
Lithium-Batterie des Typs CR2032, 3V, ein.
3. Schrauben Sie den Deckel wieder auf das Gehäuse.
So wechseln Sie die Batterie des Brustgurts:
1. Öffnen Sie den Batteriefachdeckel mit einer Münze
durch Drehen gegen den Uhrzeigersinn.
2. Entnehmen Sie die alte Batterie und legen Sie eine neue
Lithium-Batterie des Typs CR2032, 3V, ein.
23
Page 86

DE
3. Bringen Sie den Deckel durch Drehen im Uhrzeigersinn
wieder an.
FAHRRADHALTERUNG MONTIEREN
1. Klammern Sie die Fahrradhalterung auf Ihr Fahrrad oder
Trainingsgerät.
2. Führen Sie die Nylonkordel wie in nachstehender
Abbildung durch die Öffnungen, um die Halterung zu
befestigen.
NÜTZLICHE HINWEISE
ZIELZONE
Um einen maximalen gesundheitlichen Nutzen aus Ihrem
Fitnessprogramm zu ziehen, sollten Sie folgende Daten
kennen:
• Maximale Herzfrequenz (MHF)
• Obere Herzfrequenzgrenze
• Untere Herzfrequenzgrenze
Die MHF wird in Schlägen pro Minute (SpM) angegeben.
Sie können Ihre MHF in einem MHF-Test ermitteln oder
anhand der folgenden Formel berechnen:
3. Befestigen Sie die Uhr auf der Fahrradhalterung.
220 - Alter = MHF
Die Uhr ist mit 5 Optionen für Zielzonen vorprogrammiert,
jede Zone mit ihrer unteren und oberen Herzfrequenzgrenze,
wie in nachstehender Tabelle angeführt.
24
Page 87

DE
Untere Grenze Obere Grenze
Zone 1 50 % x MHF 60 % x MHF
Zone 2 60 % x MHF 70 % x MHF
Zone 3 70 % x MHF 80 % x MHF
Zone 4 80 % x MHF 90 % x MHF
Zone 5 90 % x MHF 100 % x MHF
Der am häufigsten verwendete Zonenbereich liegt zwischen
50 % und 80 % Ihrer maximalen Herzfrequenz. Ein Training
innerhalb dieses Bereichs stärkt Ihr Herz-Kreislauf-System,
verbrennt Fett und erhöht Ihren Fitnessgrad.
50%
60%
70%
80%
90%
100%
Es gibt 3 Trainingskategorien, wie in nachstehender Tabelle
erläutert.
Mäßige Anstrengung
Gewichtsregulierung
Aerobe Zone
Anaerobe Grenzzone
Rote Zone (max. Kapazität )
25
TRAININGSKATEGORIE
Erhaltung der
Gesundheit
Aerobes
Training
Anaerobes
Training
MHF % BESCHREIBUNG
Dies ist die
niedrigste Stufe der
65-78
%
65-85
%
78-90
%
Trainingsintensität. Sie
ist gut für Anfänger und
jene geeignet, die Ihr
Herz-Kreislauf-System
stärken wollen.
Verbessert Kraft
und Ausdauer. Wirkt
innerhalb der Fähigkeit
der Sauerstoffaufnahme
des Körpers, verbrennt
mehr Kalorien, und kann
über einen längeren
Zeitraum ausgeübt
werden.
Erzeugt Schnelligkeit
und Kraft. Wirkt an oder
oberhalb der Fähigkeit
der Sauerstoffaufnahme
des Körpers, baut
Muskeln auf, und
kann nicht über einen
längeren Zeit ausgeübt
werden.
Page 88

DE
Die oberen und unteren Herzfrequenzgrenzen werden
durch Multiplikation Ihrer MHF mit den Prozentsätzen der
gewählten Trainingskategorie berechnet.
Beispiel:
Training eines 40-Jährigen zur grundlegenden Erhaltung
der Gesundheit:
• Seine obere Herzfrequenzgrenze [220 - 40(Alter)] x
78%
• Seine untere Herzfrequenzgrenze [220 - 40(Alter)] x
65%
WICHTIG Wärmen Sie sich vor dem Training stets auf und
wählen Sie die Trainingskategorie, die Ihrer Konstitution am
besten entspricht. Trainieren Sie regelmäßig, ca. 20 bis 30
Minuten pro Einheit, 3 – 4 x pro Woche, für ein gesünderes
Herz-Kreislauf-System.
ACHTUNG Die Ermittlung Ihrer persönlichen
Trainingskategorie ist ein wichtiger Schritt auf dem Weg
zu einem wirkungsvollen und sicheren Trainingsprogramm.
Ziehen Sie bitte Ihren Hausarzt oder einen medizinischen
Fachmann zu Rate, um die Häufigkeit und Dauer des
Trainings zu bestimmen, das Ihrem Alter, Ihrer Kondition
und Ihren spezifischen Zielen entspricht.
REIFENGRÖSSE DES FAHRRADS
Passen Sie die auf dem Fahrradreifen aufgedruckte ETRTO-
Norm oder den Reifendurchmesser an die Einstellung der
Reifengröße in der rechten Spalte der nachstehenden
Tabelle an. Geben Sie den entsprechenden Einstellungswert
der Reifengröße ein, nachdem der Fahrradsensor gekoppelt
wurde.
ETRTO
25-559 26 x 1.0 1884
23-571 650 x 23C 1909
35-559 26 x 1.50 1947
37-622 700x x 35C 1958
47-559 26 x 1.95 2022
20-622 700 x 20C 2051
52-559 26 x 2.0 2054
23-622 700 x 23C 2070
25-622 700 x 25C 2080
28-622 700 x 28 2101
32-622 700 x 32C 2126
42-622 700 x 40C 2189
47-622 700 x 47C 2220
Reifendurchmesser
(Zoll)
Einstellung der
Reifengröße
(mm)
HINWEIS Die Reifengrößen in dieser Tabelle sind nur
als Empfehlung zu verstehen, da die Reifengröße vom
Reifentyp sowie dem Reifendruck abhängt.
VERBINDUNG MIT PC-ANWENDERPROGRAMM
HERSTELLEN
Das PC-Anwenderprogramm AD108 ist für Benutzer
vorgesehen, die alle Funktionen der Uhr SE833 nutzen
möchten. Sie können das Programm zum Hochladen
und Herunterladen von Daten auf/von Ihre(r) Uhr SE833
verwenden, sowie zur Verwaltung und Anzeige der
heruntergeladenen Daten auf Ihrem Computer. Darüber
hinaus können Sie das Programm zur Erstellung oder
26
Page 89

Änderung der Einstellungen Ihrer Uhr nutzen.
Zu den Programmfunktionen zählen:
• Bis zu 50 Multi-Benutzer-Konten
• Bis zu 3 benutzerspezifische Trainingsprofile zum
Upload auf die Uhr
• Anzeige von Trainingsdatensätzen in Übersichts- und
Grafikform
• Erstellung und Änderung von Benutzerdaten und
Einstellungen
PC-VORAUSSETZUNGEN
Stellen Sie vor Installation der Software sicher, dass Ihr PC
über die folgende Konfiguration verfügt:
• Betriebssystem: Microsoft Windows 2000, XP SP2 oder
Vista
• Prozessor: Intel® Pentium® III, 1 GHz oder höher
(minimal); Pentium 4, 2 GHZ oder höher (empfohlen)
• RAM: 512 MB (minimal); 1 GB (empfohlen)
• Freier Festplattenspeicher: Min. 512 MB
• Bildschirmauflösung: 1024 x 600 Pixel
DE
Daten zum Upload von Software auf Uhr:
• Bis zu 3 benutzerspezifische Trainingsprofile (die
persönlichen Trainingsprofile werden zusätzlich zu den
vorgegebenen Trainingsprofilen der Uhr hinzugefügt)
• Neue oder geänderte Benutzerdaten oder
Geräteeinstellungen (Nach dem Upload werden die
aktuellen Benutzerdaten und Geräteeinstellungen in der
Uhr überschrieben)
Daten zum Download von Uhr auf Software:
• alle Trainingsdatensätze (Trainingsdaten werden in der
Software gespeichert und gesammelt)
• Neue oder geänderte Benutzerdaten oder
Geräteeinstellungen (Nach dem Download werden die
aktuellen Benutzerdaten und Geräteeinstellungen in der
Software überschrieben)
HINWEIS Nähere Angaben über die genauen Daten
zum Upload oder Download finden Sie unter “DATEN
HOCHLADEN UND HERUNTERLADEN” in der Anleitung
des PC-Anwenderprogramms auf der CD-ROM.
So synchronisieren Sie die Uhr mit der Software:
DIE UHR SE833 MIT PC-ANWENDERPROGRAMM
SYNCHRONISIEREN
Sie können entweder Daten von der Software auf die Uhr
SE833 hochladen oder Daten von der Uhr SE833 auf die
Software herunterladen.
Auf dem PC
1. Schließen Sie den USB-Transmitter an.
2. Starten Sie das Programm, indem Sie auf das Symbol
27
Page 90

DE
doppelklicken.
3. Klicken Sie auf
im Programm.
• Um Daten von der Uhr SE833 auf die Software
herunterzuladen, klicken Sie auf
.
• Um zu beenden, drücken Sie auf Esc.
Auf der Uhr
4. Drücken Sie wiederholt auf MODE, um
auszuwählen.
5. Der Bildschirm
wird angezeigt. Drücken
Sie auf SET, um die Synchronisierung zu starten.
Auf dem PC
6. Das nachstehende Hinweisfenster wird angezeigt.
HOCHLADEN
HERUNTERLADEN
• Um Daten von der Software auf die Uhr SE833
HINWEIS Die Synchronisierung kann während der
Ausführung nicht unterbrochen werden.
Auf der Uhr
7. Wenn die Synchronisierung erfolgreich ist, wird
dieser Bildschirm angezeigt
. Wenn
die Synchronisierung fehlgeschlagen ist, wird dieser
Bildschirm angezeigt
. Drücken Sie
auf ST/LAP/+ und anschließend auf SET, um es erneut
zu versuchen, oder drücken Sie auf MODE, um den
Vorgang zu beenden.
hochzuladen, klicken Sie auf
.
HINWEIS Nähere Angaben über die Benutzeroberfläche
28
Page 91

und Funktionen der Software finden Sie in der Anleitung
des PC-Anwenderprogramms auf der CD-ROM.
wasserfest sind, ist eine Signalübertragung zwischen Uhr
und Brustgurt im Wasser nicht möglich, da Funksignale im
Wasser nicht übertragen werden.
DE
WASSERFESTIGKEIT
Artikel Wasserfestigkeit
50 m (164 Fuß)
Dies bedeutet, dass Sie die Uhr
beim Schwimmen und anderen
Wassersportarten (z.B. Windsurfen)
verwenden können; sie darf jedoch
nicht beim Schnorcheln oder Tauchen
in tiefem Wasser benutzt werden.
Uhr SE833
Brustgurt SZ909
USB-Transmitter
AD112
HINWEIS
• Vergewissern Sie sich, dass die
Tasten und das Batteriefach fest
verankert und intakt sind, bevor
Sie die Uhr im Wasser benutzen.
• Vermeiden Sie es, die Tasten im
Wasser oder bei heftigem Regen
zu drücken, da die Uhr durch
eintretendes Wasser beschädigt
werden kann.
10 m (32,8 Fuß)
Nicht zur Verwendung beim
Schwimmen empfohlen.
Nein
TECHNISCHE DATEN
UHR
Uhrzeitformat
Datumsformat TT / MM oder MM / TT
Jahresbereich 2009 – 2058
Alarm
TRAINING
Bereich für
Trainingszeit
Bereich für ZeitZurücksetzung
Bereich für Aufwärmzeit 00:00:00 bis 00:15:00
Bereich für
Erholungszeit
Zielzone der
Herzfrequenz
Bereich für untere
Herzfrequenzgrenze
Bereich für obere
Herzfrequenzgrenze
12-/24-Stundenformat mit
Stunde / Minute / Sekunde
Alarm mit Einstellung für
täglich, Wochentag oder
Wochenende
00:00:00 bis 99:59:59
00:00:00 bis 99:59:59
0 oder 5 Minuten
Zone 1 bis 5
30 bis 220 Spm
80 bis 240 Spm
HINWEIS Obwohl die Uhr SE833 und der Brustgurt SZ909
29
Page 92

DE
Bereich für
Distanzmessung
Bereich für
Schrittmessung
Maximale Rundenzahl 99
Bereich für
Trittfrequenzmessung
Anzahl des
Intervalltrainings
Kalorienbereich 0 bis 9999 kcal
Prozentbereich der
Fettverbrennung
Bereich für
Fitnessindex
STROMVERSORGUNG
Uhr
Brustgurt SZ909
BETRIEBSUMGEBUNG
Betriebstemperatur
Lagertemperatur
0 bis 60,99 Einheit (Einheit in
km oder Meilen)
0 bis 999999
1 bis 1999 RPM
2 bis 5
0 bis 100 %
1 bis 99
1 Lithium-Batterie CR2032
3V
1 Lithium-Batterie CR2032
3V
Für Uhr
0 °C bis 40 °C
(32 °F bis 104 °F)
Für Brustgurt SZ909
5 °C bis 40 °C
(41 °F bis 104 °F)
Für Uhr und Brustgurt
SZ909
-20 °C bis 60 °C
(-4 °F bis 140 °F)
VORSICHTSMASSNAHMEN
Um sicherzustellen, dass Sie Ihr Produkt richtig und sicher
verwenden, lesen Sie bitte diese Warnhinweise und die
gesamte Bedienungsanleitung vor Inbetriebnahme des
Geräts durch:
• Verwenden Sie ein weiches, leicht feuchtes Tuch.
Nehmen Sie keine scheuernden oder ätzenden
Reinigungsmittel, da diese das Gerät beschädigen
können. Reinigen Sie die Uhr und den Brustgurt nach
jeder Trainingseinheit sorgfältig mit lauwarmen Wasser
und einer milden Seife. Verwenden Sie das Produkt
niemals in heißem Wasser und lagern Sie es nicht in
feuchtem Zustand.
• Sie dürfen den Senderteil des Brustgurts nicht knicken
oder dehnen.
• Setzen Sie das Gerät keiner übermäßigen
Gewalteinwirkung und keinen Stößen aus, und halten
Sie es von Staub, Temperaturschwankungen oder
Feuchtigkeit sowie längerer, direkter Sonnenbestrahlung
fern, da dies zu Funktionsstörungen führen kann.
• Nehmen Sie keine Änderungen an den internen
Komponenten des Geräts vor. Dies kann zu einem
Verlust der Garantie führen und eine Beschädigung
des Geräts verursachen. Das Hauptgerät enthält keine
Teile, die vom Benutzer selbst repariert werden dürfen.
• Kratzen Sie nicht mit harten Gegenständen an der LCD-
Anzeige, da diese beschädigt werden könnte.
• Seien Sie vorsichtig beim Umgang mit allen
Batterietypen.
• Entfernen Sie alle Batterien, wenn Sie das Produkt über
einen längeren Zeitraum lagern möchten.
30
Page 93

• Verwenden Sie beim Batteriewechsel nur neue Batterien,
wie in dieser Bedienungsanleitung angegeben.
• Dieses Produkt ist ein Präzisionsgerät. Versuchen Sie
niemals, das Gerät zu zerlegen. Wenden Sie sich bitte
an Ihren Händler oder unsere Kundendienststelle, falls
das Produkt eine Wartung erfordert.
• Berühren Sie keine ungeschützten, elektronischen
Schaltungen, da sonst die Gefahr eines elektrischen
Schlags besteht.
• Benutzen Sie den Brustgurt nicht in Flugzeugen oder
Krankenhäusern. Die Verwendung von FunkfrequenzProdukten kann Funktionsstörungen in den
Steuergeräten von anderen technischen Einrichtungen
verursachen.
• Überprüfen Sie alle Hauptfunktionen des Geräts, wenn
dieses längere Zeit nicht benutzt wurde. Sorgen Sie für
eine regelmäßige Kontrolle und Reinigung Ihres Geräts.
Lassen Sie Ihre Uhr jährlich bei einer zugelassenen
Service-Zentrale warten.
• Richten Sie sich bei der Entsorgung dieses
Produktes nach den örtlichen Verordnungen der
Abfallbeseitigung.
• Aufgrund der technischen Druckeinschränkungen
können sich die in dieser Anleitung dargestellten
Abbildungen vom Original unterscheiden.
• Der Inhalt dieser Anleitung darf nicht ohne Genehmigung
des Herstellers vervielfältigt werden.
HINWEIS Eigenschaften und Zubehör nicht in allen
Ländern verfügbar. Weitere Informationen erhalten Sie von
Ihrem Fachhändler vor Ort.
ÜBER OREGON SCIENTIFIC
Besuchen Sie unsere Website www.oregonscientific.
de und erfahren Sie mehr über unsere Oregon Scientific-
Produkte. Auf der Website finden Sie auch Informationen,
wie Sie im Bedarfsfall unseren Kundendienst erreichen und
Daten herunterladen können. Für internationale Anfragen
besuchen Sie bitte unsere Website: www2.oregonscientific.
com/about/international.asp
EU-KONFORMITÄTSERKLÄRUNG
Hiermit erklärt Oregon Scientific, dass Herzfrequenzmesser
mit Geschwindigkeit und Distanz sowie PC-Anschluss
(Modell: SE833) mitden grundlegenden Anforderungen und
anderen relevanten Vorschriften der Richtlinie 1999/5/EG
übereinstimmt. Eine Kopie der unterschriebenen und mit
Datum versehenen Konformitätserklärung erhalten Sie auf
Anfrage über unseren Oregon Scientific Kundendienst.
DE
HINWEIS Die technischen Daten für dieses Produkt
und der Inhalt der Bedienungsanleitung können ohne
Benachrichtigung geändert werden.
KONFORM IN FOLGENDEN LÄNDERN
Alle Länder der EU, Schweiz CH
und Norwegen N
31
Page 94

Cardiofréquencemètre avec calcul
de la vitesse et de la distance et
connexion PC
MODELE : SE833
Manuel de l’utilisateur
TABLE DES MATIERES
Introduction ................................................................... 2
Contenu de l’emballage ............................................. 2
Touches de commande ................................................ 2
Affichage ........................................................................ 3
Démarrer votre montre (première utilisation) ............ 3
Paramétrage de la montre ............................................ 3
Réglage du profil personnel ...................................... 4
Réglage du profil de la montre ................................... 5
Réglage du profil d’entraînement ............................... 5
Bracelet pour région pectorale .................................... 8
Pairage de Peripherique ............................................... 9
Pairage avec le bracelet pour région pectorale
SZ909 (ou autres ceintures thoraciques au
système ANT) ............................................................ 9
Pairage avec podomètre Foot pod / Bike pod ........... 10
Saisie du diamètre de la roue (pour Bike Pod) .......... 11
Supprimer un périphérique en pairage ...................... 11
Etalonner un appareil en pairage ................................ 11
Etalonner en courant ou en marchant ....................... 11
Etalonner en saisissant les paramètres ..................... 12
S’entraîner ..................................................................... 13
Mémoire disponible pour l’entraînement .................... 14
Recherche de périphérique avant l’entraînement ...... 15
Alterner automatiquement entre les données pendant
l’entraînement ............................................................ 15
Interrompre ou reprendre l’entraînement ................... 16
Enregistrer les données d’entraînement .................... 16
Dépasser la limite de pulsations cardiaques ............. 16
Afficher les données pendant l’entraînement ............ 16
Afficher le relevé d’entraînement ................................ 18
Afficher le relevé d’entraînement dans la page Relevé
récapitulatif ................................................................ 18
Afficher le relevé d’entraînement dans la page
Relevé des tours ........................................................ 20
Supprimer les relevés en mémoire ............................ 21
Indice d’aptitude physique ........................................... 21
Autre fonctionnement et réglage ................................. 22
Activer le rétro-éclairage ............................................ 22
Verrouillage / déverrouillage des touches .................. 22
Activer / désactiver l’alarme ....................................... 22
Eteindre l’alarme ........................................................ 22
Activer / désactiver le bip ........................................... 22
Remplacer la pile ....................................................... 22
Installer un support pour vélo .................................... 23
Référence utile .............................................................. 24
Zone cible .................................................................. 24
Diamètre de la roue ................................................... 25
Connexion au logiciel d’application pour PC ............. 26
Configuration minimale PC ........................................ 26
Synchronisation de la montre SE833 avec le logiciel
d’application pour PC ................................................. 26
Résistance à l’eau ......................................................... 28
Caractéristiques ............................................................ 29
Précautions ................................................................... 29
À Propos de Oregon Scientific .................................... 30
Europe - Déclaration De Conformité ........................... 31
Avis FCC (Etats-Unis) / Avis IC (Canada) ................... 31
1
FR
Page 95

FR
INTRODUCTION
Nous vous remercions d’avoir choisi le cardiofréquencemètre
de Oregon Scientific
distance et connexion PC (SE833). Bien plus qu’un
cardiofréquencemètre avancé, cette montre est également
compatible avec un PC, permettant aux utilisateurs
d’enregistrer les données de l’entraînement pour effectuer
une analyse et une gestion de la condition physique. Des
fonctions supplémentaires sont également disponibles
comme le calcul de la vitesse et de la distance, le compteur
d’entraînement avec tours et les profils pour un entraînement
optimal. Cette montre est équipée du système ANT Sports
à 2,4 GHz pour une transmission idéale avec les autres
périphériques comme le bracelet pectoral, le foot pod et le
bike pod.
TM
avec calcul de la vitesse, de la
IMPORTANT Cette montre est uniquement conçue à des
fins sportives et ne doit pas remplacer un appareil médical.
• 2 piles au lithium CR2032 3 V (préalablement installées
dans la montre et le bracelet pectoral)
TOUCHES DE COMMANDE
1
5
4
2
3
Brevet : Ce produit est breveté, N° de brevet américain
7,237,446 (Brevet européen en instance).
CONTENU DE L’EMBALLAGE
L’emballage contient les éléments suivants :
• 1 montre SE833
• 1 bracelet pour région pectorale SZ909
• 1 clé USB AD112
• 1 CD du logiciel d’application AD108
• 1 support vélo (avec 2 cordons de nylon)
1. - / SP : vous permet d’alterner entre les différentes
options ; de diminuer les valeurs ; d’interrompre ou
d’arrêter l’entraînement
2. MODE : vous permet d’alterner entre les modes ; de
revenir à la page précédente
3. SET : vous permet de confirmer les réglages, d’activer/
désactiver l’alarme dans le mode Heure
4.
/ : active le rétro-éclairage, verrouillage /
déverrouillage des touches
5. ST / LAP / + : vous permet d’alterner entre les options ;
augmenter les valeurs ; fonction muet du mode Heure
2
Page 96

AFFICHAGE
cardiaques ou le pairage de la ceinture thoracique
FR
1
2
3
4
5
6
78 910
1. : Indicateur des touches
2.
ou : Indique que la pile est faible ou vide
3.
4.
5.
6.
/ : Horloge format 12 heures
: Appuyez sur cette touche pour sortir
: Indique la limite maximale / inférieure /supérieure
: Indique que le bip est désactivé
13
12
11
10.
11.
12.
13.
DÉMARRER VOTRE MONTRE
(PREMIÈRE UTILISATION)
Après avoir déballé la montre, activez-la en maintenant la
touche MODE jusqu’à ce que l’écran s’allume. La montre
vous demandera automatiquement de paramétrer votre
profil utilisateur.
PARAMÉTRAGE DE LA MONTRE
IMPORTANT
• Pour garantir l’exactitude des calculs pendant
• Rappelez-vous de régler les profils après avoir remplacé
: Indique la réception du signal de la vitesse et de la
distance ou le pairage du foot pod
: Indique la réception du signal de la cadence et du
vélo ou le pairage du bike pod
: Résolutions par minute (unité de cadence)
: Indique que les touches sont verrouillées
l’entraînement, nous vous recommandons de régler la
montre et les profils personnels avant de commencer
l’entraînement.
la pile ou réinitialisé l’appareil.
7.
: Indique que le compteur d’entraînement est activé
8.
: Indique que l’alarme est activée
9.
: Indique la réception du signal des fréquences
REMARQUE Si pendant le réglage, la montre n’est pas
utilisée pendant 30 secondes, elle sortira automatiquement
du mode en question.
3
Page 97

FR
RÉGLAGE DU PROFIL PERSONNEL
Suite à la première activation, la montre vous invitera à
régler votre profil personnel, l’écran suivant s’affichera.
Rendez-vous directement à l’étape 4.
Pour une procédure de réglage normale :
1. Appuyez plusieurs fois sur MODE pour sélectionner
.
2. Appuyez plusieurs fois sur ST/LAP/+ pour sélectionner
“SET USER” (REGLER L’UTILISATEUR).
3. Appuyez sur SET pour entrer dans les options du profil
personnel.
4. Appuyez sur ST/LAP/+ pour sélectionner l’option, et
appuyez sur SET pour confirmer.
5. Continuez de paramétrer votre profil personnel dans
l’ordre suivant : année de naissance, mois de naissance,
jour de naissance, unité de poids et poids en appuyant
sur les divers boutons :
• ST/LAP/+ pour augmenter la valeur ou sélectionner
l’option
• -/SP pour diminuer la valeur
• SET pour confirmer l’option sélectionnée
6. Après avoir paramétré le profil personnel, l’écran cidessous s’affichera.
7. Vous pouvez paramétrer d’autres profils (montre ou
profils d’entraînement) en appuyant plusieurs fois sur
ST/LAP/+.
press
Appuyez sur
ST/LAP/+
ST/LAP/+
Appuyez sur
press
ST/LAP/+
ST/LAP/+
press
ST/LAP/+
Appuyez sur
ST/LAP/+
4
Page 98

IMPORTANT Réinitialisez le profil personnel si un autre
utilisateur utilise la montre.
REGLAGE DU PROFIL DE LA MONTRE
1. Appuyez plusieurs fois sur MODE pour sélectionner
.
2. Appuyez plusieurs fois sur ST/LAP/+ pour sélectionner
“SET WATCH”.(RÉGLAGE DE LA MONTRE)
3. Appuyez sur SET pour entrer dans les options de
paramétrage du profil.
4. Appuyez plusieurs fois sur ST/LAP/+ ou -/SP pour
sélectionner l’option à paramétrer : régler l’alarme, régler
l’heure, régler la date, régler l’alerte* et régler la vue**.
5. Appuyez sur SET et commencez à paramétrer l’option
sélectionnée à l’aide des boutons suivants :
• ST/LAP/+ pour augmenter la valeur ou sélectionner
l’option
• -/SP pour diminuer la valeur
• SET pour confirmer l’option sélectionnée
* Pendant l’entraînement, si la fréquence cardiaque est
hors de la zone cible, la montre émettra une alerte
visuelle et sonore. Vous avez le choix d’activer ou de
désactiver l’alerte sonore dans l’option “SET ALERT”
(REGLER L’ALERTE). Pour de plus amples détails sur
la zone cible, veuillez vous reporter à la section « ZONE
CIBLE » de ce manuel.
** Pendant l’entraînement, la montre affichera par
alternance les informations en relation. Vous avez le
choix d’activer/désactiver l’affichage par alternance dans
l’option “SET VIEW” (REGLER LA VUE).
REGLAGE DU PROFIL D’ENTRAINEMENT
IMPORTANT
autre utilisateur utilise la montre.
Vous avez le choix de régler les profils d’entraînement
par défaut dans la montre ou de charger les profils
d’entraînement personnalisés depuis le logiciel d’application
PC.
REGLER LE PROFIL D’ENTRAINEMENT DE LA
MONTRE
Vous pouvez paramétrer 3 profils d’entraînement par défaut
(Cardio, course et cyclisme) dans la montre.
1. Appuyez plusieurs fois sur MODE pour sélectionner
2. Dans “SET PROG”, appuyez sur SET pour accéder aux
options d’entraînement.
3. Appuyez sur ST/LAP/+ ou -/SP pour sélectionner
l’entraînement à paramétrer : cardio, course ou
cyclisme.
4. Appuyez sur SET pour confirmer la sélection, puis
poursuivez par le profil* de l’entraînement sélectionné
en appuyant sur les boutons suivants :
• ST/LAP/+ pour augmenter la valeur ou sélectionner
l’option
• -/SP pour diminuer la valeur
• SET pour confirmer l’option sélectionnée
Réinitialisez le profil d’entraînement si un
.
5
FR
Page 99

FR
warm up time
to increase
value
to next page
to decrease
value
to exit
* Les réglages du profil se présentent dans l’ordre
suivant :
1. Temps d’échauffement
Quitter
Appuyez sur SET
Activer/désactiver l’alternance
Activation / désactivation de
l’entraînement par intervalle
Aller à la page suivante
Diminuer les
valeurs
Augmenter les
valeurs
Temps
d’échauffement
Quitter
Aller à la page
suivante
2. Activation / désactivation de l’entraînement par
intervalle
2a Si vous activez un entraînement par intervalle, vous
devez régler :
v le nombre d’intervalle (2-5)
v le temps d’entraînement pour chaque intervalle
v le temps de repos pour chaque intervalle
v la zone de pulsations cardiaques cible (1-5), [Pour de
plus amples informations, reportez-vous à la section
« ZONE CIBLE » de ce manuel]
v Activation / désactivation du compteur de
récupération
Diminuer les valeurs
Quitter
Diminuer les valeurs
Quitter
Diminuer les valeurs
Quitter
Diminuer les valeurs
Quitter
Quitter
Appuyez sur SET
Appuyez sur SET
Appuyez sur SET
press SET
Appuyez sur SET
Augmenter les valeurs
Nombre d’intervalles
Aller à la page suivante
Augmenter les valeurs
Temps d’entraînement pour
chaque intervalle
Confirmer les réglages ; aller à
la page suivante
Augmenter les valeurs
Temps de repos pour
chaque intervalle
Confirmer les réglages ; aller à
la page suivante
Augmenter les valeurs
Zone de pulsations cardiaques
cible
Aller à la page suivante
Activer/désactiver l’alternance
Activation / désactivation du
compteur de récupération
Aller à la page suivante
6
Page 100

2b Si vous désactivez un entraînement par intervalle, vous
devez régler (pour les paramètres cardio uniquement) :
v le temps d’entraînement
v la zone de pulsations cardiaques cible (1-5), [Pour
de plus amples informations, reportez-vous à la
section « ZONE CIBLE » de ce manuel]
v Activation / désactivation du compteur de
récupération
Activer/désactiver l’alternance
Activation / désactivation de
l’entraînement par intervalle
Quitter
Appuyez sur SET
Diminuer les valeurs
Quitter
Appuyez sur SET
Diminuer les valeurs
Quitter
Appuyez sur SET
Quitter
Aller à la page suivante
Augmenter les valeurs
Temps d’entraînement
Confirmer les réglages ; aller à
la page suivante
Augmenter les valeurs
Zone de pulsations cardiaques cible
Aller à la page
suivante
Activer/désactiver
l’alternance
Activation / désactivation du
compteur de récupération
Aller à la page suivante
2c Si vous désactivez un entraînement par intervalle, vous
devez régler (pour les paramètres course et cyclisme
uniquement) :
v Entraînement par distance ou par temps
v Temps et distance d’entraînement
v Zone de pulsations cardiaques cible (1-5), [Pour de plus
amples informations, reportez-vous à la section « ZONE
CIBLE » de ce manuel]
v Activation / désactivation du compteur de récupération
Activer/désactiver l’alternance
Activation / désactivation de
l’entraînement par intervalle
Quitter
Appuyez sur SET
Quitter
Appuyez sur SET
Diminuer les valeurs
Quitter
Appuyez sur SET
Diminuer les valeurs
Quitter
Appuyez sur SET
Quitter
Aller à la page suivante
Alterner entre la distance et
le temps
Entraînement par distance
ou par temps
Aller à la page suivante
Augmenter les valeurs
Distance d’entraînement,
temps d’entraînement
Confirmer les réglages ; aller à
la page suivante
Augmenter les valeurs
Zone de pulsations cardiaques cible
Aller à la page suivante
Activer/désactiver l’alternance
Activation / désactivation du
compteur de récupération
Aller à la page suivante
7
FR
 Loading...