

Page 1

PCS 3840
Operating Instructions Read operating instructions before use!
Manuel d’utilisation Lire attentivement le mode d‘emploi avant chaquemise en service !
EN
73701540
FR
Page 2
1
EN
1. For Safe Operation
Dear Customer,
Firstly, we wish to thank you for having chosen our products and hope that the use of this machine will
be extremely satisfying for you and fully meet your expectations. This manual has been drawn up to
allow your to get to know your machine well and use it in safe and efficient conditions; please do not
forget that it is an integral part of the machine and keep it to hand to be consulted at all times and consign it with the machine if you should sell or lend it to others.
Your new machine has been designed and manufactured to current standards and is safe and reliable
if used in full respect of the instructions contained in this manual (forecast use); any other use or failure to comply with the instructions for safe use, maintenance and repair shall be considered as
“improper use”, cause the warranty to become null and void and relieve the Manufacturer from all
responsibility, with the user becoming responsible for charges for damages or personal or third party
injury.
If any slight differences are found between the description herein and the machine you own, please
bear in mind that due to continual product improvement, the information contained in this manual is
subject to modification without prior notice or obligatory updating, although the essential features for
the purposes of safety and operation remain unchanged. In the event of doubt, please contact your
dealer. Enjoy your work!
EXPLANATION OF SYMBOLS AND SAFETY
WARNINGS
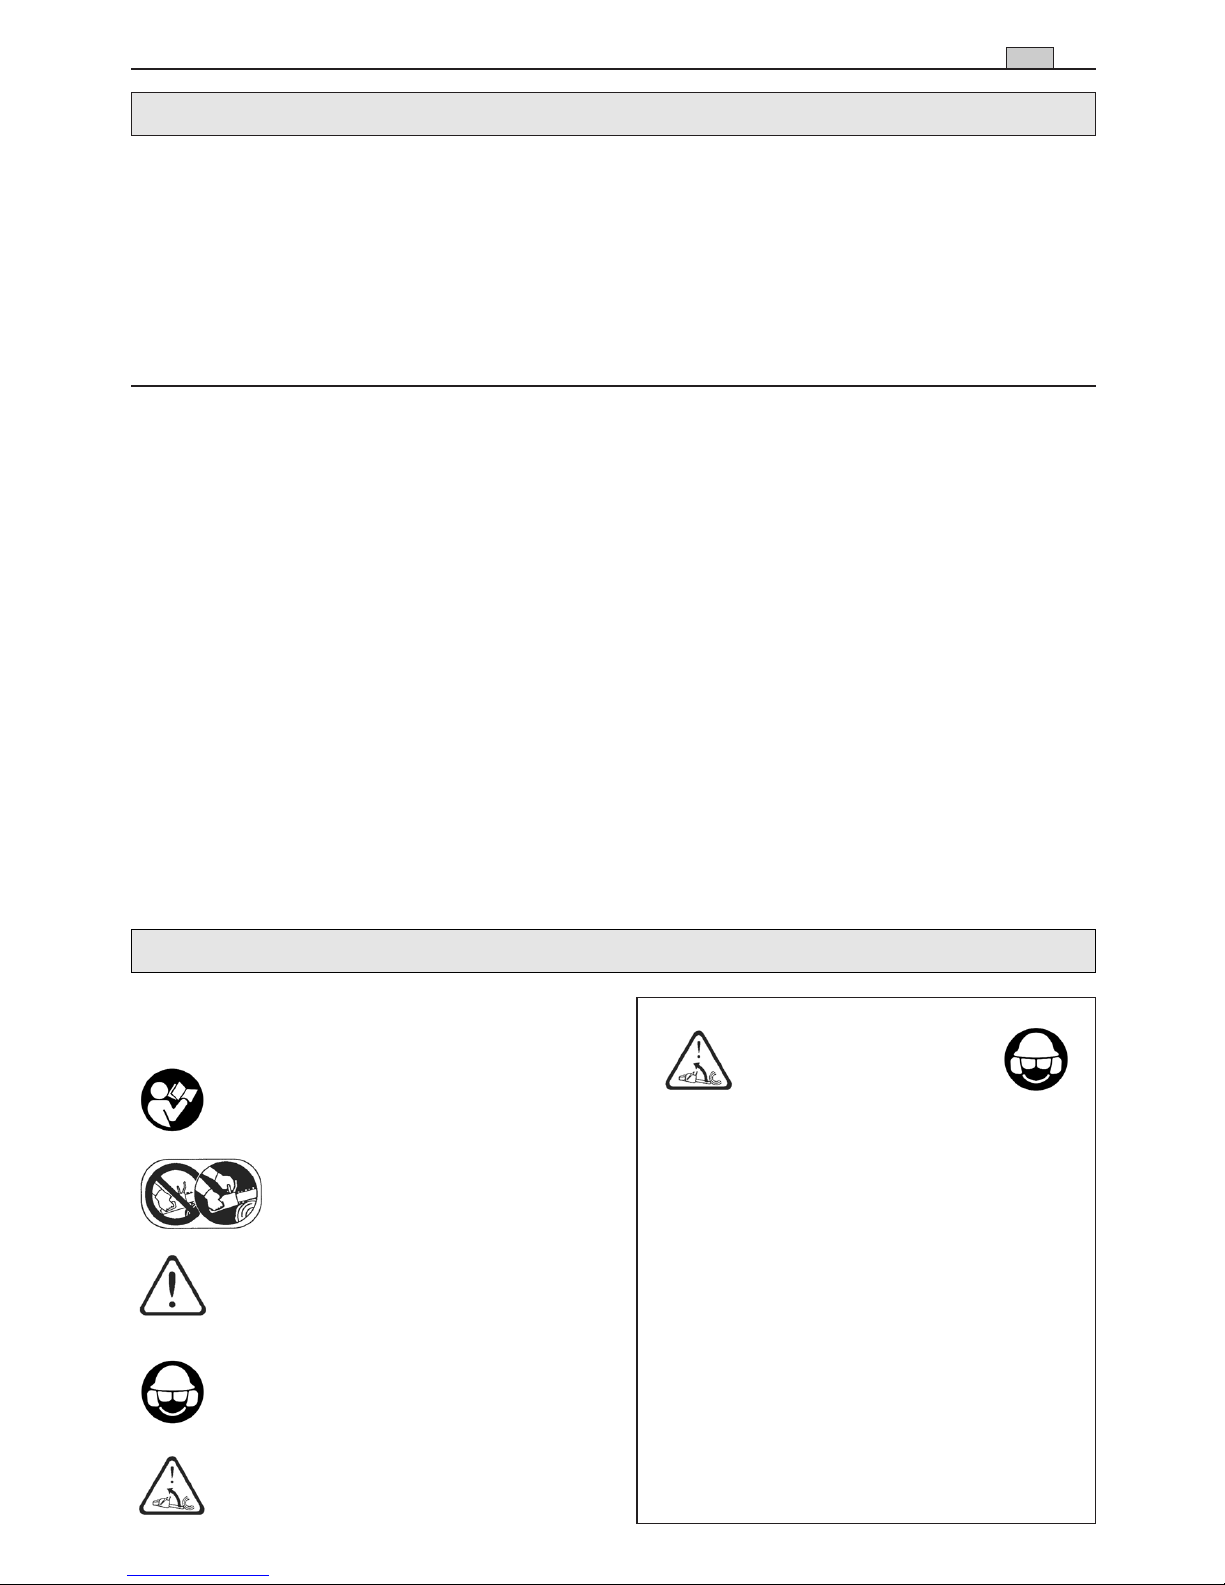
Read operator's instruction
book before operating this
machine.
Use the chain saw with two
hands.
Read, understand and follow all
warnings.
Wear head, eye and ear protection.
Warning! Danger of kickback.
WARNING!!!
RISK OF DAMAGING HEARING
IN NORMAL CONDITIONS OF USE,
THIS MACHINE MAY INVOLVE A DAILY
LEVEL OF PERSONAL EXPOSURE TO
NOISE FOR THE OPERATOR EQUAL
TO OR GREATER THAN
85 dB(A)
1. For Safe Operation ...................................................................... 1
2. Explanation of Symbols on the Machine ................................... 4
3. Installing Guide Bar and Saw Chain .......................................... 5
4. Fuel and Chain Oil ...................................................................... 6
5. Operating the Engine .................................................................. 8
6. Sawing ....................................................................................... 11
7. Maintenance .............................................................................. 13
8. Maintenance of Saw Chain and Guide Bar .............................. 15
9. Troubleshooting Guide ............................................................. 16
Contents
1. For Safe Operation
Page 3

2MM2
EN
1. For Safe Operation
1. Never operate a chain saw
when you are fatigued, ill, or
upset, or under the influence of
medication that may make you
drowsy, or if you are under the
influence of alcohol or drugs.
2. Use safety footwear, snug fitting clothing and eye, hearing and
head protection devices.
Use the vibration-proof glove.
3. Keep the saw chain sharp and
the saw, including the AV system,
well maintained. A dull chain will
increase cutting time, and pressing a dull chain through wood will
increase the vibrations transmitted to your hands. A saw with
loose components or with damaged or worn AV buffers will also
tend to have higher vibration levels.
4. All the above mentioned precautions do not guarantee that
you will not sustain whitefinger
diseaseor carpal tunnel syndrome.
Therefore, continual and regular
users should monitor closely the
condition of their hands and fingers. If any of the above symptoms appear, seek medical advice
immediately.
5. Always use caution when handling fuel. Wipe up all spills and
then move the chain saw at least 3
m from the fueling point before
starting the engine.
6. Eliminate all sources of sparks
or flame (i.e. smoking, open
flames, or work that can cause
sparks) in the areas where fuel is
mixed, poured, or stored.
7. Do not smoke while handling
fuel or while operating the chain
saw.
8. Do not allow other persons to
be near the chain saw when starting or cutting. Keep bystanders
and animals out of the work area.
Children, pets and bystanders
should be a minimum of 10 m
away when you start or operate
the chain saw.
9. Never start cutting until you
have a clear work area, secure
footing, and a planned retreat
path from the falling tree.
10. Always hold the chain saw
firmly with both hands when the
engine is running. Use a firm grip
with thumb and fingers encircling
the chain saw handles.
11. Keep all parts of your body
away from the saw chain when the
engine is running.
12. Before you start the engine,
make sure the saw chain is not
contacting anything.
13. Always carry the chain saw
with the engine stopped, the
guide bar and saw chain to the
rear, and the muffler away from
your body.
14. Always carry the chain saw
with the engine stopped, the
guide bar and saw chain to the
rear, and the muffler away from
your body.
15. All chain saw service, other
than the items listed in the
Owner’s Manual, should be performed by competent chain saw
service personnel. (E.g., if improper tools are used to remove the
flywheel, or if an improper tool is
used to hold the flywheel in order
to remove the clutch, structural
1. For Safe Operation
Page 4

3
EN
1. For Safe Operation
damage to the flywheel could
occur which could subsequently
cause the flywheel to disintegrate.)
16. Always shut off the engine
before setting it down.
17. Use extreme caution when
cutting small size brush and
saplings because slender material
may catch the saw chain and be
whipped toward you or pull you
off balance.
18. When cutting a limb that is
under tension, be alert for springback so that you will not be struck
when the tension in the wood
fibers is released.
19. Never cut in high wind, bad
weather, when visibility is poor or
in very high or low temperatures.
Always check the tree for dead
branches which could fall during
the felling operation.
20. Keep the handles dry, clean
and free of oil or fuel mixture.
21. Operate the chain saw only in
well ventilated areas. Never start
or run the engine inside a closed
room or building. Exhaust fumes
contain dangerous carbon
monoxide.
22. Do not operate the chain saw
in a tree unless specially trained to
do so.
23. Guard against kickback.
Kickback is the upward motion of
the guide bar which occurs when
the saw chain at the nose of the
guide bar contacts an object.
Kickback can lead to dangerous
loss of control of the chain saw.
24. When transporting your chain
saw, make sure the appropriate
guide bar scabbard is in place.
KICKBACK SAFETY PRECAUTIONS FOR
CHAIN SAW USERS
Kickback may occur when
the nose or tip of the guide bar touches an
object, or when the wood closes in and
pinches the saw chain in the cut. Tip contact
in some cases may cause a lightning fast
reverse reaction, kicking the guide bar up
and back towards the
operator.
Pinching the saw
chain along the top of
the guide bar may
push the guide bar
rapidly back towards the operator. Either of
these reactions may cause you to lose control
of the saw, which could result in serious personal injury.
• Do not rely exclusively on the safety devices
built into your saw. As a chain saw user you
should take several steps to keep cutting
jobs free from accident or injury.
1. With a basic understanding of kickback you
can reduce or eliminate the element of surprise.
Sudden surprise contributes to accidents.
2. Keep a good grip on the saw
with both hands, the right hand on
the rear handle, and the left hand
on the front handle, when the
engine is running. Use a firm grip
with thumbs and fingers encircling
the chain saw handles. A firm grip
will help you reduce kickback and
maintain control of the saw.
3. Make certain that the area in
which you are cutting is free from
obstructions. Do not let the nose
of the guide bar contact a log,
branch, or any other obstruction
which could be hit while you are
operating the saw.
4. Cut at high engine speeds.
5. Do not overreach or cut above
shoulder height.
6. Follow the manufacturer’s
sharpening and maintenance
instructions for the saw chain.
7. Only use replacement bars and
chains specified by the manufacturer or the equivalent.
!
WARNING!
Page 5
4MM4
EN
2. Explanation of Symbols on the Machine
For safe operation and
maintenance, symbols are carved in relief on
the machine.
According to these indications, please be
careful not to make any mistake.
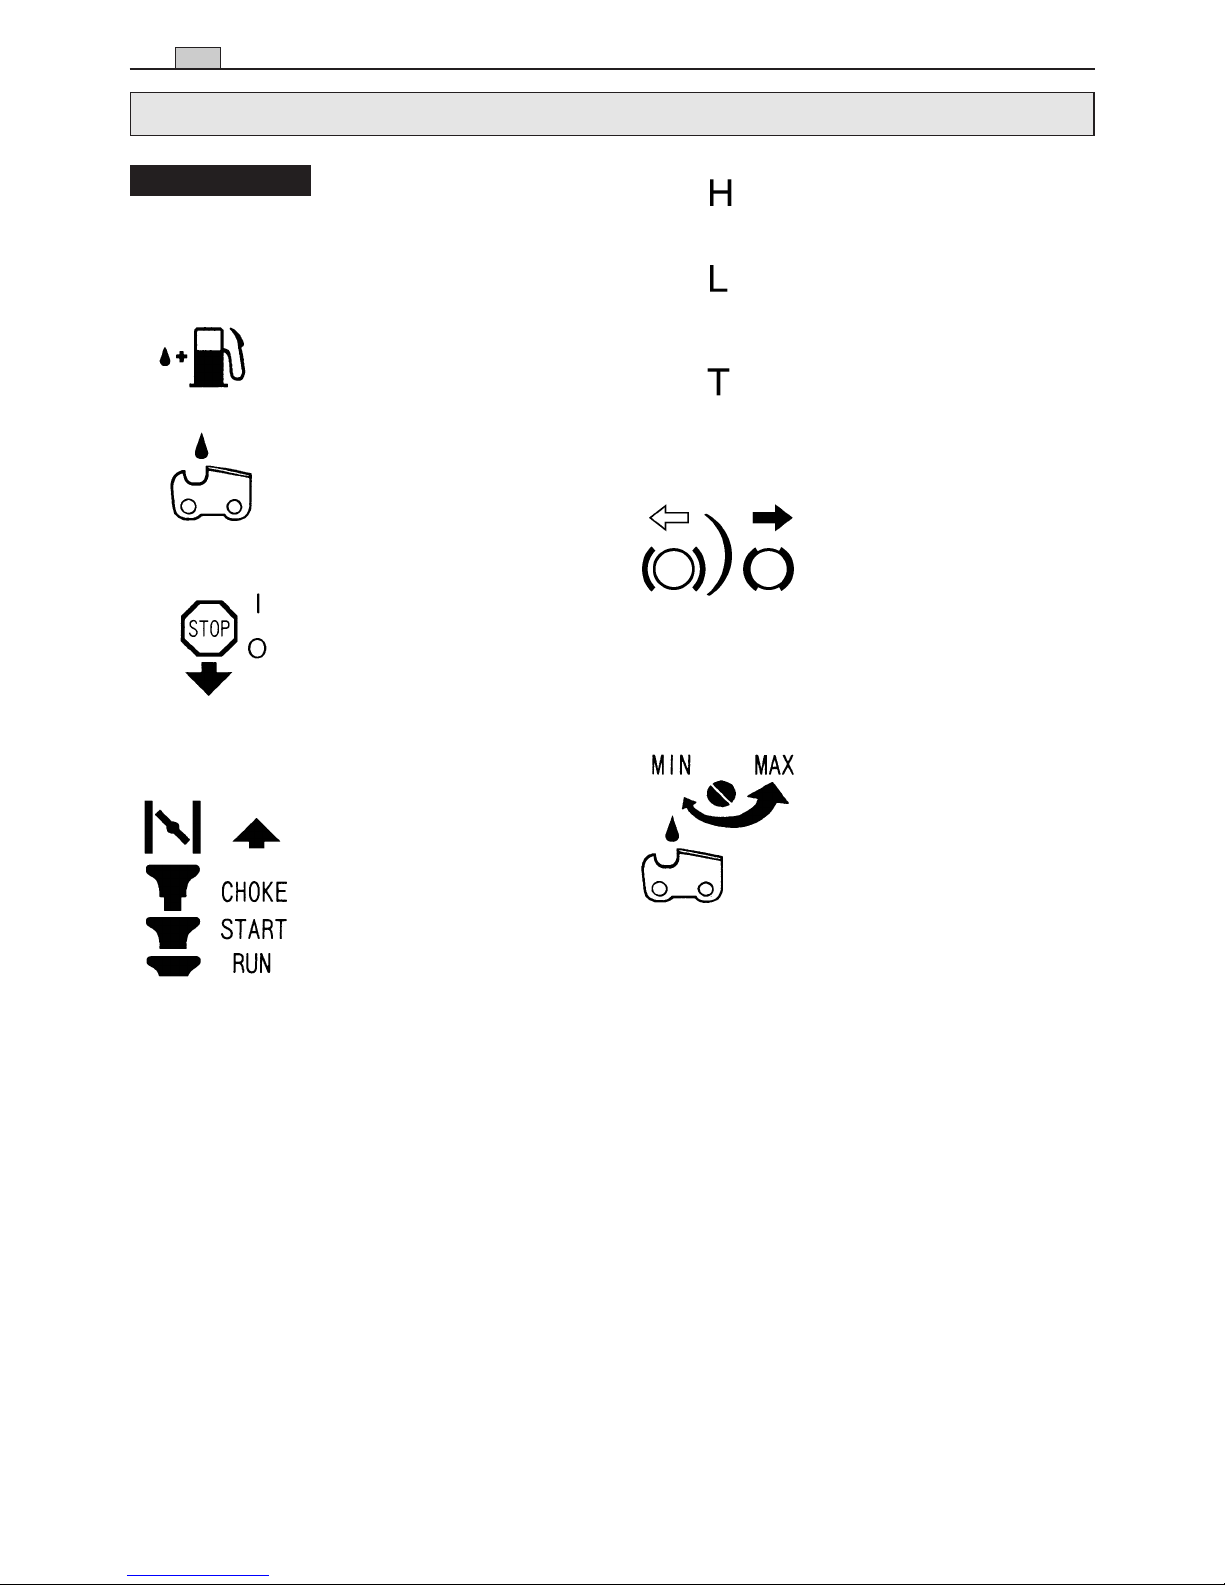
The port to refuel “MIX GASOLINE”
Position: Fuel cap
The port to top up chain oil
Position: Oil cap
Setting the switch to the “I”
position, the engine starts.
Setting the switch to the “O”
position, the engine stops
immediately.
Position: Front at the top of
the rear handle
Starting the engine. If you pull
out the choke knob (at the
back-right of the rear handle)
to the point of the arrow, you
can set the starting mode as
follows:
• First-stage position – starting mode when the engine is
warm.
• Second-stage position –
starting mode when the
engine is cold.
Position: Upper-right of the
aircleaner cover
!
WARNING!
The screw under the “H”
stamp is The High-speed
adjustment screw.
The screw under the “L” stamp
is The Slow-speed adjustment
screw.
The screw at the left of the “T”
stamp is the Idle adjustment
screw.
Position: Left side of the rear
handle
Shows the directions that the
chain brake is released (white
arrow) and activated (black
arrow).
Position: Front of the chain
cover
If you turn the rod by screwdriver follow the arrow to the
"MAX" position, the chain oil
flow more, and if you turn to
the "MIN" position, less.
Position: Bottom of the
power unit
2. Explanation of Symbols on the Machine
Page 6
5
EN
3. Installing Guide Bar and Saw Chain
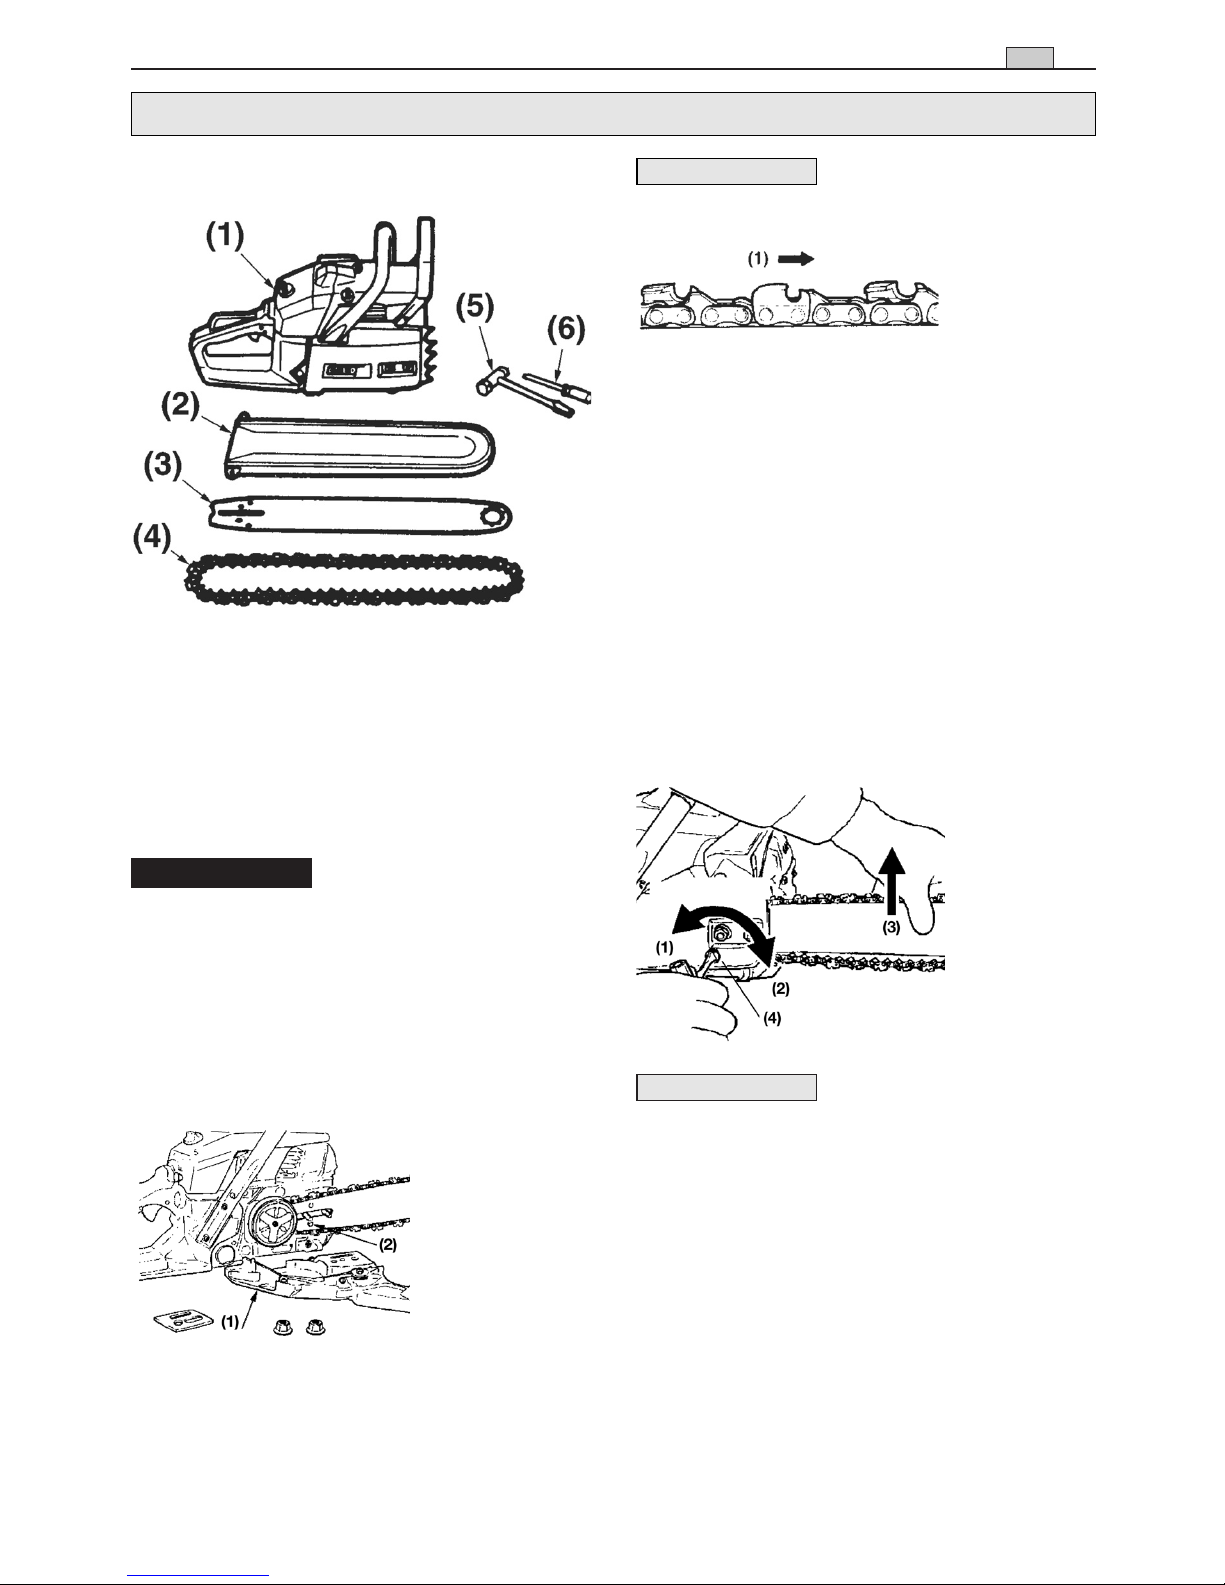
A standard saw unit package contains the items
as illustrated.
Open the box and install the guide bar and the
saw chain on the power unit as follows:
The saw chain has very
sharp edges. Use thick protective gloves for
safety.
1. Pull the guard towards the front handle to
check that the chain brake is not engaged.
2. Loosen the nuts and remove the chain cover.
3. Gear the chain to the sprocket and, while fit-
ting the saw chain around the guide bar,
mount the guide bar to the power unit. Adjust
the position of chain tensioner nut.
!
WARNING!
Pay attention to the correct
direction of the saw chain.
4. Fit the chain cover to the power unit and fasten the nuts to finger tightness.
5. While holding up the tip of the bar, adjust the
chain tension by turning the tensioner screw
until the tie straps just touch the bottom side
of the bar rail.
6. Tighten the nuts securely with the bar tip held
up (12 ~ 15 Nm). Then check the chain for
smooth rotation and proper tension while
moving it by hand. If necessary, readjust with
the chain cover loose.
7. Tighten the tensioner screw.
A new chain will expand its
length in the beginning of use. Check and readjust the tension frequently as a loose chain can
easily derail or cause rapid wear of itself and the
guide bar.
NOTE
NOTE
3. Installing Guide Bar and Saw Chain
(1) Chain cover
(2) Chain Tensioner
nut
(1) Moving
direction
(1) Loosen
(2) Tighten
(3) Lift up
(4) Tensioner
screw
(1) Power unit
(2) Bar protector
(3) Guide bar
(4) Saw chain
(5) Plug wrench
(6) Screwdriver for carburetor adjustment
Page 7
6MM6
EN
4. Fuel and Chain Oil
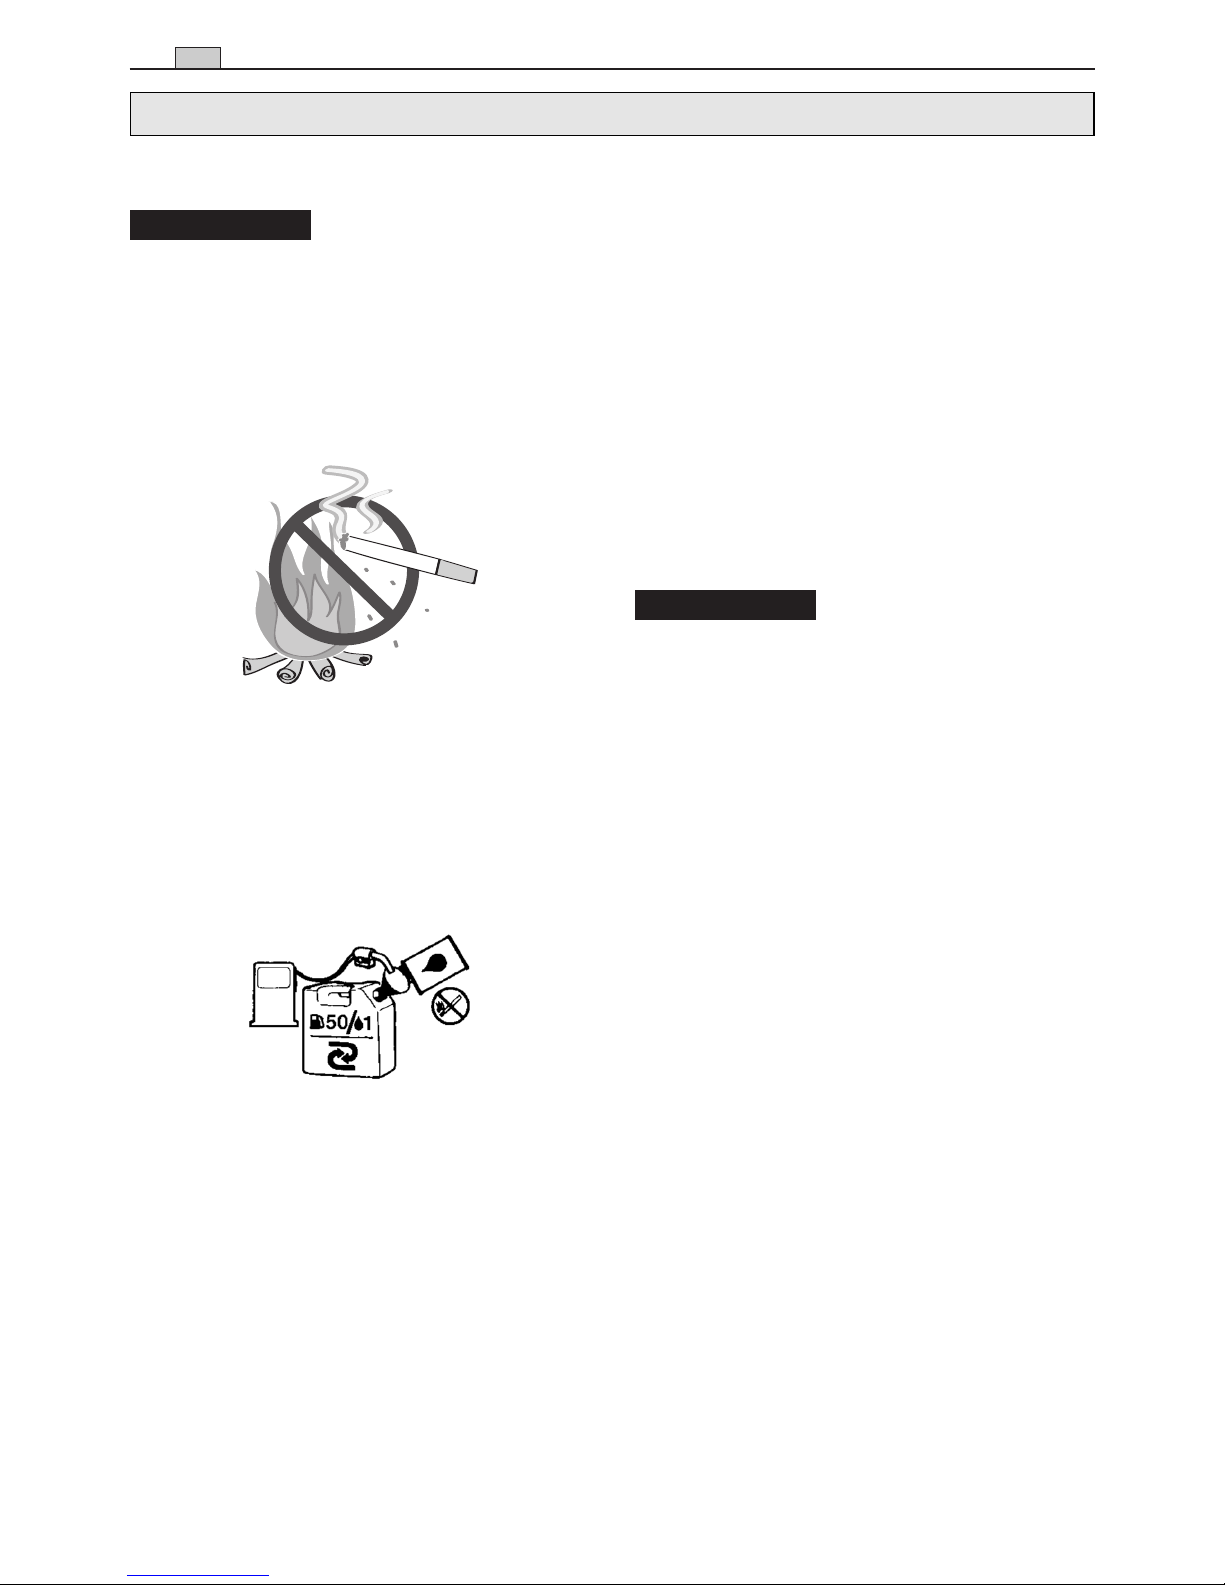
• FUEL
Gasoline is very flammable. Avoid smoking or bringing any flame or
sparks near fuel.
Make sure to stop the engine and allow it cool
before refueling the unit.
Select outdoor bare ground for fueling and
move at least 3 m (10 ft) away from the fueling point before starting the engine.
• The engines are lubricated by oil specially for-
mulated for air-cooled 2-cycle gasoline engine
use. Use an anti-oxidant added quality oil
expressly labeled for air-cooled 2-cycle engine
use (JASO FC GRADE OIL or ISO EGC
GRADE).
• Do not use BIA or TCW (2-stroke water-cool-
ing type) mixed oil.
• RECOMMENDED MIXING RATIO GASO-
LINE 50: OIL 1
• Exhaust emission are controlled by the funda-
mental engine parameters and components
(eq., carburation, ignition timing and port timing) without addition of any major hardware or
the introduction of an inert material during
combustion.
• These engines are certified to operate on
unleaded gasoline.
• Make sure to use gasoline with a minimum
octane number of 89RON (USA/Canada:
87AL).
• If you use a gasoline of a lower octane value
!
WARNING!
than prescribed, there is a danger that the
engine temperature may rise and an engine
problem such as piston seizing may consequently occur.
• Unleaded gasoline is recommended to reduce
the contamination of the air for the sake of
your health and the environment.
• Poor quality gasolines or oils may damage
sealing rings, fuel lines or fuel tank of the
engine.
• HOW TO MIX FUEL
Pay attention to agitation.
1. Measure out the quantities of gasoline and oil
to be mixed.
2. Put some of the gasoline into a clean,
approved fuel container.
3. Pour in all of the oil and agitate well.
4. Pour in the rest of gasoline and agitate again
for at least one minute. As some oils may be
difficult to agitate depending on oil ingredients, sufficient agitation is necessary for the
engine to last long. Be careful that, if the agitation is insufficient, there is an increased
danger of early piston seizing due to abnormally lean mixture.
5. Put a clear indication on the outside of the
container to avoid mixing up with gasoline or
other containers.
6. Indicate the contents on outside of container
for easy identification.
• FUELING THE UNIT
1. Untwist and remove the fuel cap. Rest the
cap on a dustless place..
2. Put fuel into the fuel tank to 80% of the full
capacity.
3. Fasten the fuel cap securely and wipe up any
fuel spillage around the unit.
!
WARNING!
4. Fuel and Chain Oil
Page 8

7
EN
4. Fuel and Chain Oil
1. Select flat and bare ground for fueling.
2. Move at least 10 feet (3 meters) away from
the fueling point before starting the
engine.
3. Stop the engine before refueling the unit.
At that time, be sure to sufficiently agitate
the mixed gasoline in the container.
• FOR YOUR ENGINE LIFE, AVOID:
1. FUEL WITH NO OIL (RAW GASOLINE) – It will
cause severe damage to the internal engine
parts very quickly.
2. GASOHOL – It can cause deterioration of
rubber and/or plastic parts and disruption of
engine lubrication.
3. OIL FOR 4-CYCLE ENGINE USE – It can
cause spark plug fouling, exhaust port blocking, or piston ring sticking.
4.
Mixed fuels which have been left unused
for a period of one month or more may clog
the carburetor and result in the engine failing
to operate properly.
5. In the case of storing the product for a long
period of time, clean the fuel tank after rendering it empty. Next, activate the engine and
empty the carburetor of the composite fuel.
6. In the case of scrapping the used mixed oil
container, scrap it only at an authorized
repository site.
Moreover, normal wear and
change in product with no functional influence
are not covered by the warranty. Also, be careful
that, if the usage in the instruction manual is not
observed as to the mixed gasoline, etc.
described therein, it may not be covered by the
warranty.
• CHAIN OIL
Use motor oil SAE #10W-30 all year round or
SAE 30 ~ #40 in summer and SAE #20 in winter.
Do not use wasted or regenerated oil that can cause damage to the oil
pump.
NOTE
NOTE
!
WARNING!
Page 9
8MM8
EN
5. Operating the Engine
It is very dangerous to run
a chainsaw that mounts broken parts or lacks
any parts. Before starting engine, make sure
that all the parts including bar and chain are
installed properly.
•STARTING THE ENGINE
1. Fill fuel and chain oil tanks respectively, and
tighten the caps securely.
2. Set the switch to “I” position.
3. While holding the throttle lever together with
the trigger safety, push in the side latch and
release the throttle lever to leave it at the
starting position.
!
WARNING!
When restarting immediately
after stopping the engine, set the Choke knob in
the first-stage position (choke open and throttle
lever in the starting position).
Once the choke knob has
been pulled out, it will not return to the operating
position even if you press down on it with your
finger. When you wish to return the choke knob
to the operating position, pull out the throttle
lever instead.
4. While holding the saw unit securely on the
ground, pull the starter rope vigorously.
Do not start the engine
while the chain saw hangs in one hand. The
saw chain may touch your body. This in very
dangerous.
5. When engine has ignited, first push in the
choke knob to the first-stage position and
then pull the starter again to start the engine.
6. Allow the engine to warm up with the throttle
lever pulled slightly.
Keep clear of the saw
chain as it will start rotating upon starting of
engine.
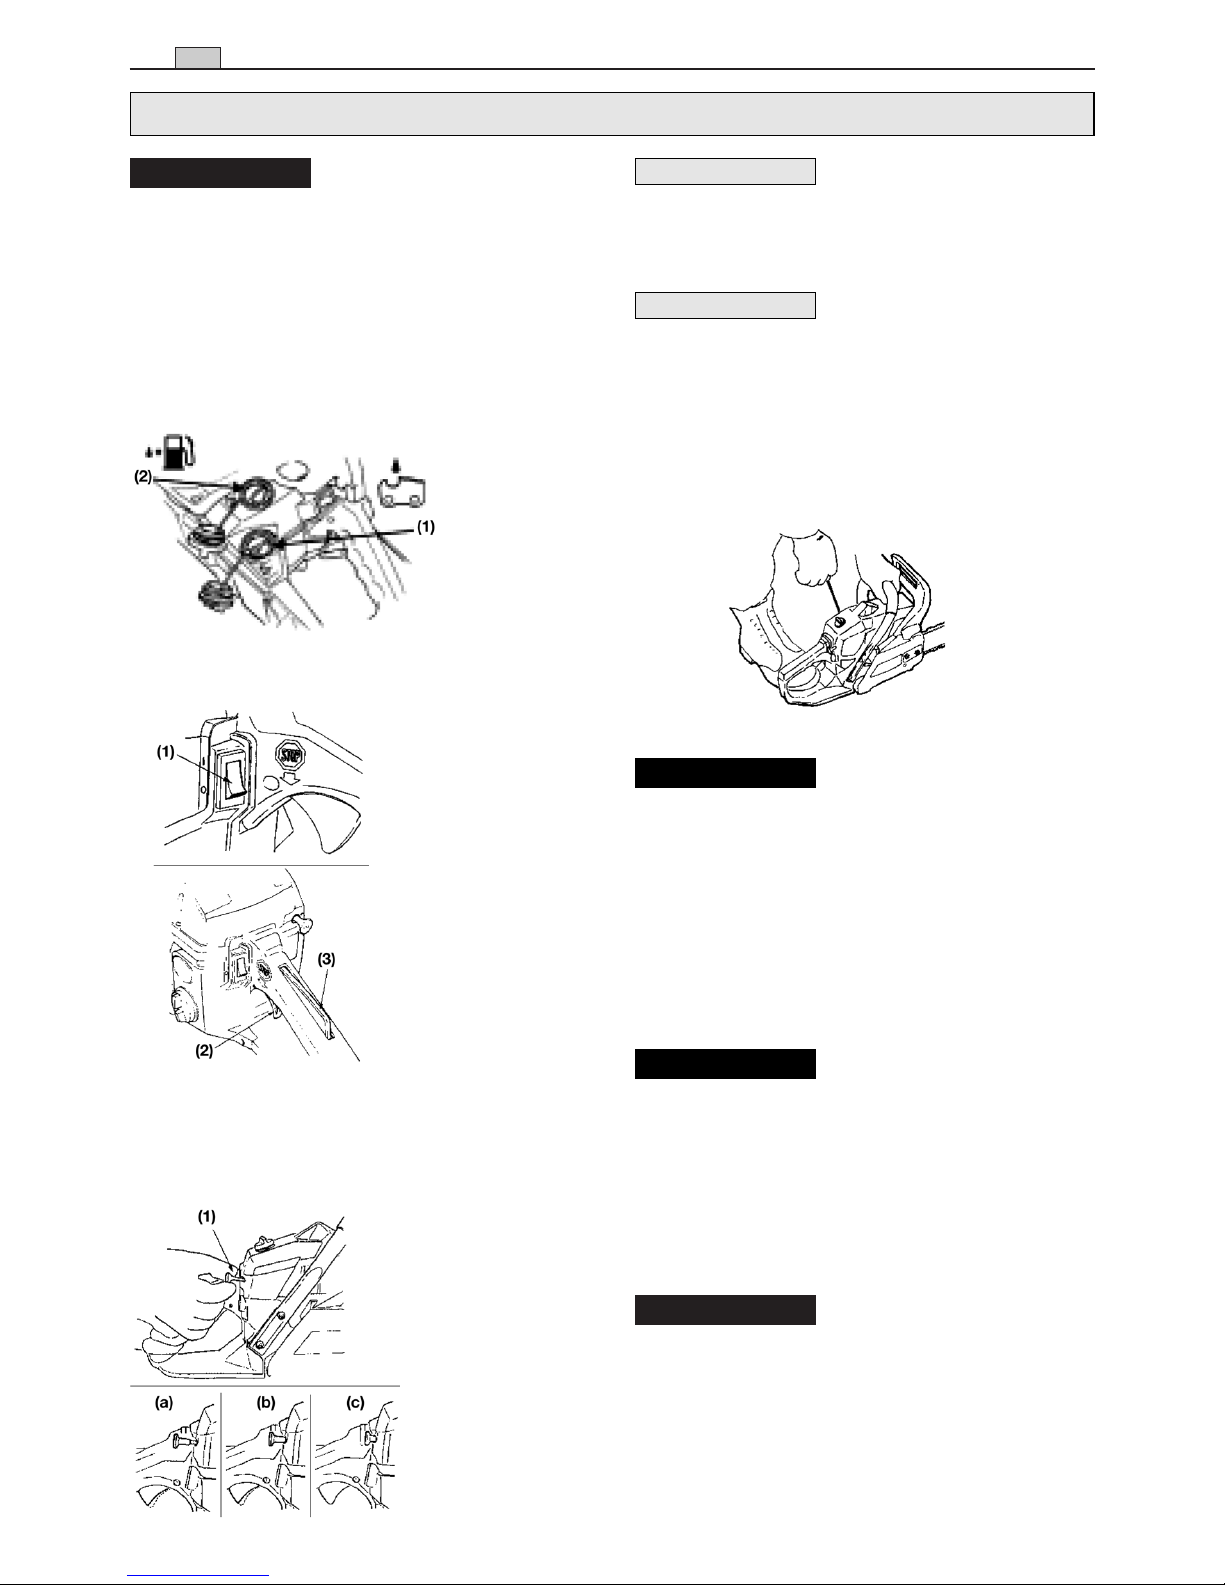
• CHECKING THE OIL SUPPLY
Make sure to set up the bar
and the chain when checking the oil supply.
If not, the rotating parts may be exposed. It is
very dangerous.
After starting the engine, run the chain at medium speed and see if chain oil is scattered off as
shown in the figure.
!
WARNING!
!
WARNING!
!
WARNING!
NOTE
NOTE
5. Operating the Engine
(1) Chain oil
(2) Fuel
(1) Switch
(2) Throttle lever
(3) Throttle interlock
(1) Choke knob:
(a) When the engine
is cool
(b) When the engine
is warm up
(c) After the engine
starts
Page 10
9
EN
5. Operating the Engine
The chain oil flow can be changed by inserting a
screwdriver in the hole on bottom of the clutch
side. Adjust according to your work conditions.
The oil tank should become
nearly empty by the time fuel is used up. Be sure
to refill the oil tank every time when refueling the
saw.
• ADJUSTING THE CARBURETOR
The carburetor has been adjusted at the factory.
Should your unit need readjustment due to the
changes in altitude or operating conditions,
please let your skillful dealer make the adjustment.
A wrong adjustment may cause damage to your
unit.
If you have to make the adjustment yourself,
please follow the procedure below carefully.
Before adjusting the carburetor, make sure that
the provided air/fuel filters are clean and fresh
and the fuel properly mixed.
NOTE
When adjusting, take the following steps:
Be sure to adjust the carbu-
retor with the bar chain attached.
1. “H” and “L” needles are restricted within the
number of turn as shown below.
“H” needle: -1/4
“L” needle: -1/4
2. Start the engine and allow it to warm up in
low speed for a few minutes.
3. Turn the idle adjusting screw (T) counterclockwise so that the saw chain does not
turn. If the idling speed is too slow, turn the
screw clockwise.
4. Make a test cut and adjust the “H” needle for
best cutting power, not for maximum speed.
Over revolution of “H” needle
causes a lack of power or a poor acceleration. In
such a case please turn the “H” needle a little
counterclockwise.
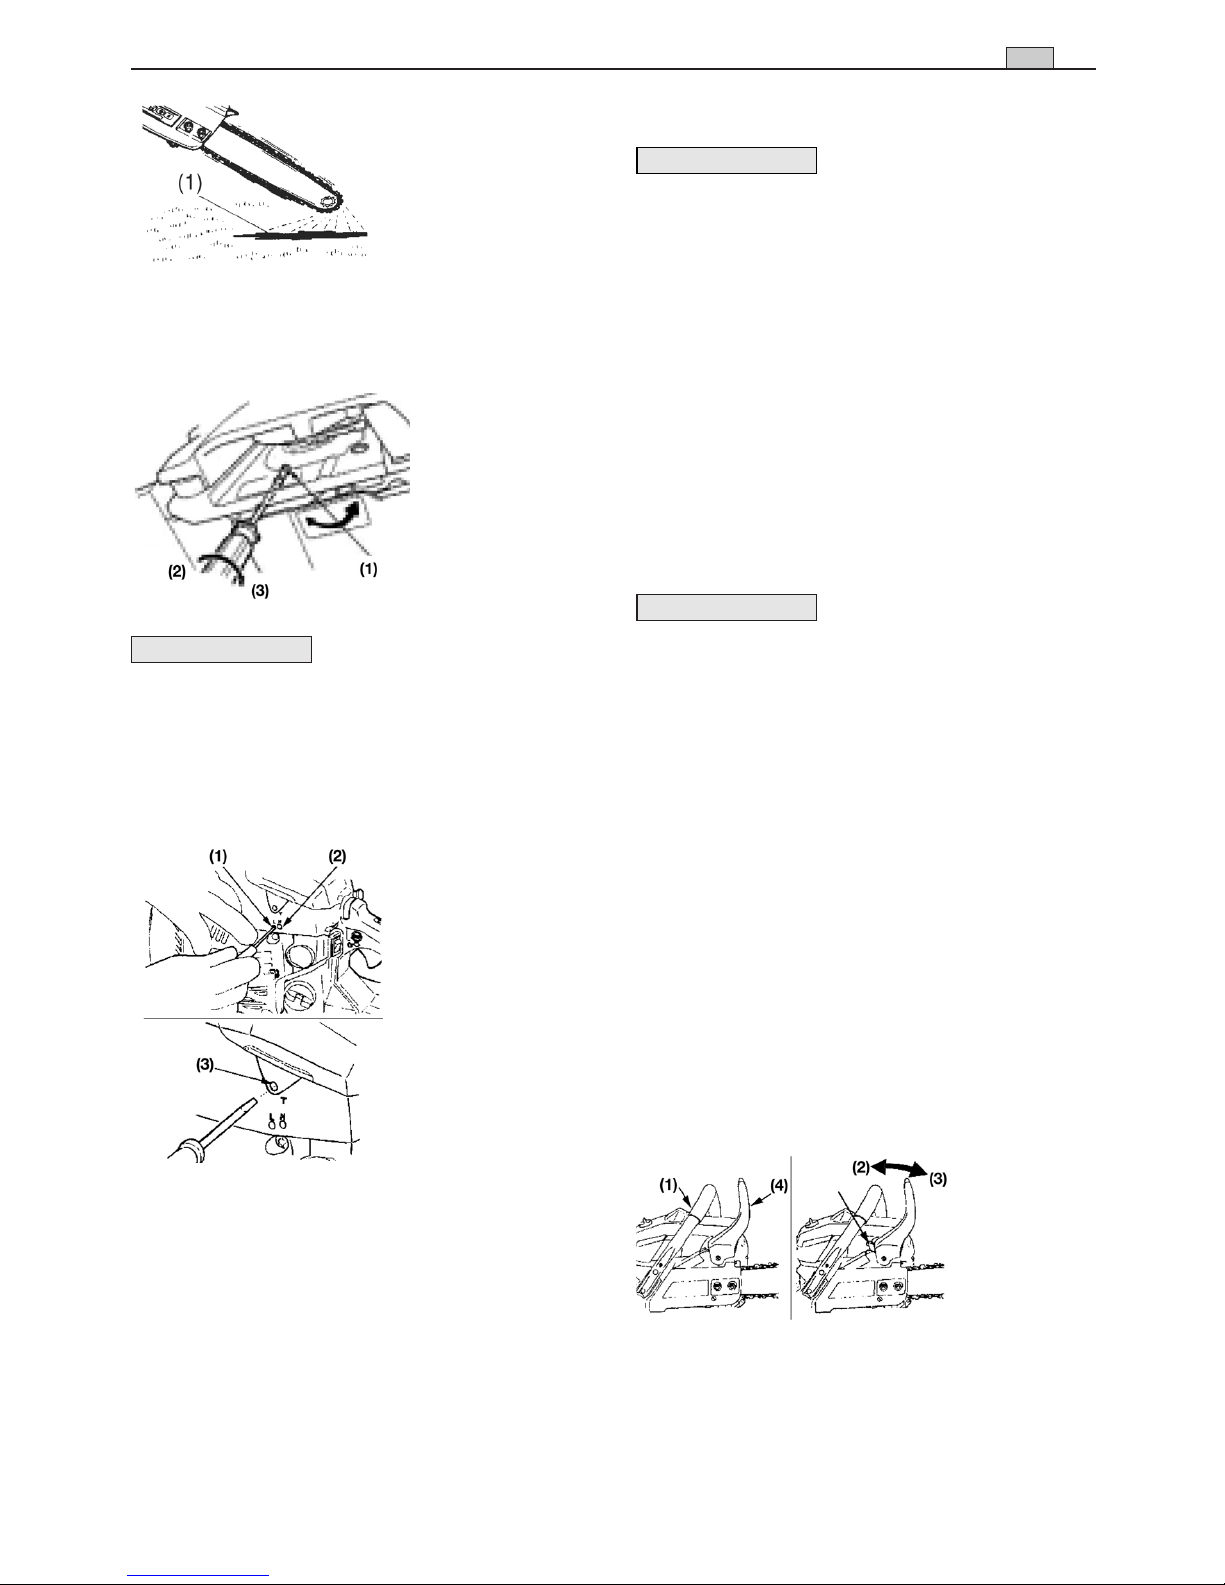
• CHAIN BRAKE
This machine is equipped with an automatic
brake tostop saw chain rotation upon occurrence of kickback during saw cutting.
The brake is automatically operated by inertial
force, which acts on the weight fitted inside the
front guard.
This brake can also be operated manually with
the front guard turned down to the guide bar.
To release the brake, pull up the front guard
toward the front handle till a “click” sound is
heard.
Caution
Be sure to confirm brake operation during daily
inspection.
How to confirm:
1. Turn off the engine.
NOTE
NOTE
(1) Front handle
(2) Released
(3) Braking
(4) Brake lever
(1) “L” needle
(2) “H” needle
(3) Idle adjusting
screw
(1) Chain oil
(1) Chain oil flow
adjusting shaft
(2) Rich
(3) Lean
Page 11

10MM10
EN
5. Operating the Engine
2. Holding the chain saw horizontally, release
your hand from the front handle, hit the tip of
the guide bar to a stump or a piece of wood,
and confirm brake operation. Operating level
varies by bar size.
In case the brake is not effective, ask our dealer
for inspection and repairs.
If the engine keeps rotating at high speed with
the brake engaged, the clutch will overheat
causing trouble.
When the brake engages during operation,
immediately release the throttle lever to stop the
engine.
• CARBURETOR ANTI-FREEZE MECHANISM
Operating chain saws in temperatures of 0 – 5°C
at times of high humidity may result in ice forming within the carburetor, and this in turn may
cause the output power of the engine to be
reduced or for the engine to fail to operate
smoothly.
This product has accordingly been designed
with a ventilation hatch on the right side of the
surface of the cylinder cover to allow warm air to
be supplied to the engine and to thereby prevent
icing from occurring.
Under normal circumstances the product should
be used in the normal operating mode, i.e., in the
mode which it is set at the time of shipment.
However when the possibility exists that icing
may occur, the unit should be set to operate in
the anti-freeze mode before use
Continuing to use the product in the anti-freeze mode even when temperatures have risen and returned to normal, may
result in the engine failing to start properly or in
the engine failing to operate at its normal speed,
and for this reason you should always be sure to
return the unit to the normal operating mode if
there is no danger of icing occurring.
HOW TO SWITCH BETWEEN OPERATING
MODES
1. Flip the engine switch to turn off the engine.
2. Remove the cover to the air filter, remove the
air filter, and then remove the choke knob from
the cylinder cover.
3. Loosen the screws holding the cylinder cover
in place (i.e., the three screws on the inside
and the one screw on the outside of the
cover), and then remove the cylinder cover.
4. Press with your finger down on the icing cap
located on the right-hand side of the cylinder
cover to remove the icing cap.
5. Adjust the icing cap so that the “snow” mark
faces upwards and then return it to its original
position in the cylinder cover.
6. Fix the cylinder cover back into its original
position, and then fix all other parts back into
their proper positions.
• STOPPING THE ENGINE
1. Release the throttle lever to allow the engine
to idle for a few minutes
2. Set the switch to the “O” (STOP) position.
NOTE
(1) Switch
(1) Cylinder cover
(2) “Sunshine” mark
(3) “Snow” mark
(a) Normal operating mode
(b) Anti-freeze mode
(1) Cylinder
cover
(2) Choke knob
(3) Icing cap
Page 12

11
EN
6. Sawing
• Before proceeding to
your job, read the section “For Safe Operation”. It is recommended to first practice sawing easy logs. This also
helps you get accustomed to your unit.
•Always follow the safety
regulations. The chain
saw must only be used
for cutting wood. It is
forbidden to cut other
types of material.
Vibrations and kickback
vary with different materials and the requirements of the safety regulations would not be
respected. Do not use
the chain saw as a lever
for lifting, moving or
splitting objects. Do not
lock it over fixed stands.
It is forbidden to hitch
tools or applications to
the PTO other than
those specified by the
manufacturer.
•
It is not necessary to force the saw into the
cut. Apply only light pressure while running the
engine at full throttle.
• When the saw chain is caught in the cut, do
not attempt to pull it out by force, but use a
wedge or a lever to open the way.
• GUARD AGAINST KICKBACK
!
WARNING!
•
This saw is equipped with
a chain brake that will
stop the chain in the
event of kickback if operating properly. You must
check the chain brake
operation before each
usage by running the saw
at full the throttle for 1-2
seconds and pushing the
front hand guard forward.
The chain should stop
immediately with the
engine at full speed. If the
chain is slow to stop or
does not stop, replace the
brake band and clutch
drum before use.
• It is extremely important
that the chain brake be
checked for proper operation before each use and
that the chain be sharp in
order to maintain the kickback safety level of this
saw. Removal of the safety devices, inadequate
maintenance, or incorrect
replacement of the bar or
chain may increase the
risk to serious personal
injury due to kickback.
• FELLING A TREE
1. Decide the felling direction considering the
wind, lean of the tree, location of heavy
branches, ease of completing the task after
felling and other factors.
2. While clearing the area around the tree,
arrange a good foothold and retreat path.
(1) Notch cut
(2) Felling cut
(3) Felling direction
6. Sawing
Page 13

12MM12
EN
6. Sawing
3. Make a notch cut one-third of the way into
the tree on the felling side.
4. Make a felling cut from the opposite side of
the notch and at a level slightly higher than
the bottom of the notch.
When you fell a tree, be
sure to warn neighboring workers of the danger.
Bucking and Limbing
•Always ensure your foothold. Do not stand
on the log.
• Be alert to the rolling over of a cut log.
Especially when working on a slope, stand
on the uphill side of the log.
• Follow the instructions in “For Safe
Operation” to avoid kickback of the saw.
Before starting work, check the direction of
bending force inside the log to be cut. Always
finish cutting from the opposite side of the bending direction to prevent the guide bar from being
caught in the cut.
A log lying on the ground
Saw down halfway, then roll the log over and cut
from the opposite side.
A log hanging off the ground
In area “A”, saw up from the bottom one-third
and finish by sawing down from the top. In area
“B”, saw down from the top one-third and finish
by sawing up from the bottom.
!
WARNING!
!
WARNING!
Cutting the limbs of Fallen Tree
First check to which side the limb is bent. Then
make the initial cut from the bent side and finish
by sawing from the opposite side.
Be alert to the springing
back of a cut limb.
Pruning of Standing Tree
Cut up from the bottom, finish down from the
top.
•Do not work standing on unstable bases or
rung ladders.
• Do not overreach.
• Do not cut above shoulder height.
• Always use both your hands to hold the
saw.
!
WARNING!
!
WARNING!
Page 14

13
EN
7. Maintenance
Before cleaning, the
inspecting or repairing the unit, make sure
that engine has stopped and is cool.
Disconnect the spark plug to prevent accidental starting.
• MAINTENANCE AFTER EACH USE
1. Air filter
Loosen the knob and remove the air cleaner
cover.
Take off the filter element and brush off attached
sawdust. When the filter is clogged with dust,
separate it in halves and shake-wash with gasoline.
When using compressed air, blow from the
inside.
To assemble the cleaner halves, press the rim
until it clicks.
When installing the main filter, make sure that the
grooves on the filter edge are correctly fit with
the projections on the cylinder cover.
2. Oiling port
Dismount the guide bar and check the oiling port
for clogging.
NOTE
!
WARNING!
3. Guide bar
When the guide bar is dismounted, remove sawdust in the bar groove and the oiling port.
Grease the nose sprocket from the feeding port
on the tip of the bar.
4. Others
Check for fuel leakage and loose fastenings and
damage to major parts, especially handle joints
and guide bar mounting.
If any defects are found, make sure to have them
repaired before operating the saw again.
• PERIODICAL SERVICE POINTS
1. Cylinder fins
Dust clogging between the cylinder fins will
cause overheating of the engine.
Periodically check and clean the cylinder fins
after removing the air cleaner and the cylinder
cover.
When installing the cylinder cover, make sure
that switch wires and grommets are positioned
correctly in place.
Be sure to block the air intake hole.
NOTE
7. Maintenance
(1) Oiling port
(2) Grease port
(3) Sprocket
(1) Oiling port
Page 15

14MM14
EN
7. Maintenance
2. Fuel filter
1. Using a wire hook, take out the filter from the
filler port.
2. Disassemble the filter and wash with gasoline, or replace with a new one if needed.
• After removing the filter, use a pinch to hold
the end of the suction pipe.
• When assembling the filter, take care not to
allow filter fibers or dust inside the suction
pipe.
3. Spark plug
Clean the electrodes with a wire brush and reset
the gap to 0.65 mm as necessary.
4. Sprocket
Check for cracks and for excessive wear interfering with the chain drive. If the wear is considerable, replace it with new one. Never fit a new
chain on a worn sprocket, or a worn chain on a
new sprocket.
NOTE
5. Front and Rear dampers
Replace if adhered part is peeled or crack is
observed on the rubber part. Replace if the
inside of the rear damper metal has been beaten
by the stopper bolt and the clearance of the
metal increased.
(1) Fuel filter
Page 16

15
EN
8. Maintenance of Saw Chain and Guide Bar
1. Saw Chain
It is very important for
smooth and safe operation to always keep
the cutters sharp.
The cutters need to be sharpened when:
• Sawdust becomes powder-like.
•You need extra force to saw in.
• The cut path does not go straight.
•Vibration increases.
• Fuel consumption increases.
Cutter setting standards
Be sure to wear safety
gloves.
Before filing:
• Make sure the saw chain is held securely.
• Make sure the engine is stopped.
• Use a round file of proper size for the chain
(see “Chain maintenance table”).
Place the file on the cutter and push straight forward.
Keep the file position as illustrated.
After each cutter has been filed, check the depth
gauge and file it to the proper level as illustrated.
Be sure to round off the
front edge to reduce the chance of kickback
or tie-strap breakage.
!
WARNING!
!
WARNING!
!
WARNING!
Make sure every cutter has the same length and
edge angles as illustrated.
2. Guide Bar
• Reverse the bar occasionally to prevent partial
wear.
• The bar rail should always be square.
Check for wear of the bar rail. Apply a ruler to the
bar and the outside of a cutter. If a gap is
observed between them, the rail is normal.
Otherwise, the bar rail is worn. Such a bar needs
to be corrected or replaced.
(1) Appropriate
gauge checker
(2) Depth gauge
standard
(3) Make the shoul-
der round: (see
“Chain maintenance table”)
(A) Cutter length
(30°) Filing angle
(85°) Side plate angle
(60°) Top plate cutting
angle
(1) Ruler
(2) Gap
(3) No gap
(4) Chain tilts
8. Maintenance of Saw Chain and Guide Bar
Page 17

16MM16
EN
8. Maintenance of Saw Chain and Guide Bar / 9. Troubleshooting Guide
9. Troubleshooting Guide
PROBLEME CAUSE REMEDY
1) Starting failure
WARNING
Make sure the
icing prevention
system is not
working.
2) Lack of
power/Poor acceleration/Rough
idling
3) Oil does not
come out
– Check fuel for water or substandard
mixture.
– Check for engine flooding.
– Check spark ignition.
– Check fuel for water or substandard
mixture.
– Check air filter and fuel filter for
clogging.
– Check carburetor for inadequate
adjustment.
– Check oil for substandard quality.
– Check oil passage and ports for
clogging.
– Replace with proper fuel.
– Remove and dry the spark plug.
– Then pull the starter again with no
choke.
– Replace with a new plug.
– Replace with proper fuel.
– Clean.
– Readjust speed needles.
– Replace.
– Clean.
If the unit seems to need further service, please consult with an authorized
service shop in your area.
3. Chain maintenance table
The characteristic data of the chain and bar homologated for this machine
are shown in the “EC Conformity Statement” that accompanies same machine. Do not use other
types of chain or bar for safety reasons.
The table gives the sharpening data for different types of chain, without this giving the possibility of using chains other than the homologated one.
!
WARNING!
Chain stroke Limiter tooth level (a) File diameter (d)
Inches mm Inches mm Inches mm
3/8 Mini 9,32 0,018 0,45 5/32 4,0
0,325 8,25 0,026 0,65 3/16 4,8
3/8 9,32 0,026 0,65 13/64 5,2
0,404 10,26 0,031 0,80 7/32 5,6
a
d
Page 18

1
FR
1. Pour la sécurité
Cher Client,
Nous désirons avant tout vous remercier de la préférence que vous avez accordée à nos produits et nous espérons que l’utilisation de cette machine vous réservera de grandes satisfactions et répondra pleinement à votre
attente. Ce manuel a été rédigé pour vous permettre de bien connaître votre machine et de l’utiliser dans les
meilleures conditions de sécurité et d’efficacité; n’oubliez pas qu’il est partie intégrante de la machine, gardez-le
à portée de la main pour pouvoir le consulter à tout moment et remettez-le avec la machine si vous deviez la céder
ou la prêter à d’autres personnes.
Votre nouvelle machine a été projetée et construite conformément aux normes en vigueur, elle résulte sûre et fiable si elle est utilisée dans le plein respect des indications contenues dans ce manuel (utilisation prévue); toute
autre utilisation ou le non-respect des normes de sécurité pour l’emploi, l’entretien et la réparation indiquées sont
considérés comme une “utilisation impropre” et entraîne la perte de la garantie et le déclin de toute responsabilité du Constructeur, en reversant sur l’utilisateur les frais dérivant de dommages ou lésions personnelles ou à
autrui.
Si vous deviez trouver de légères différences entre la description donnée et la machine en votre possession, tenez
compte du fait que, dans le cadre de l’amélioration continuelle du produit, les informations contenues dans ce
manuel sont sujettes à des modifications sans préavis ou obligation de mise à jour, sans remettre en cause toutefois les caractéristiques essentielles aux fins de la sécurité et du fonctionnement. En cas de doute, contactez
votre revendeur. Bon travail!
EXPLICATION DES SYMBOLES ET REGLES DE
SECURITE
Lire le manuel avant d’utiliser cette
machine.
Utiliser la tronçonneuse en se servant des deux mains.
Lisez, cherchez à comprendre et
suivez toutes les instructions.
Porter casque, lunettes de protection et protège-oreilles.
Avertissement! Phénomène de
rebond dangereux.
ATTENTION
!!!
DANGER D’ATTEINTE A L’OUIE
L’OPERATEUR UTILISANT NORMALE-
MENT CETTE MACHINE PEUT S’EXPOSER
QUOTIDIENNEMENT A UN BRUIT EGAL
OU DEPASSANT
85 dB(A)
1. Pour la sécurité ....................................................................................... 1
2. Explication des symboles figurant sur la machine ................................. 4
3. Montage du guide-chaîne et de la chaîne .............................................. 5
4. Carburant et huile de chaîne ................................................................... 6
5. Moteur ...................................................................................................... 8
6. Travail à la tronçonneuse ...................................................................... 11
7. Entretien ................................................................................................ 13
8. Entretien de la chaîne et du guide-chaîne ............................................ 15
9. Guide de dépannage ............................................................................ 16
Sommaire
1. Pour la sécurité
Page 19

2MM2
FR
1. Ne jamais utiliser une tronçonneuse
lorsqu’on est fatigué, malade, énervé,
sous l’influence de médicaments
entraînant vertige ou somnolence, ou
encore sous l’influence de l’alcool ou
de drogues.
2. Porter des chaussures de sécurité,
des vêtements moulants, des lunettes
de protection, un casque de sécurité
et un casque anti-bruit. Utiliser les
gants anti-vibrations.
3. Maintenir la chaîne de scie bien
tendue et la scie, y compris le système AV, bien entretenue. Une chaîne
lâche augmente le temps de coupe
ainsi que les vibrations dans les mains
lorsque la chaîne est appuyée contre
le bois. Le niveau de vibration augmente également sur les scies dont
les pièces sont desserrées, ou dont
les tampons AV sont endommagés ou
usés.
4. Toutes les précautions indiquées
cidessus ne constituent pas une
garantie de protection contre la maladie des mains blanches ou le syndrome du canal carpien. Les personnes qui utilisent régulièrement lascie
devront surveiller attentivement l’état
de leurs mains et de leurs doigts.
Dès que l’un de ces symptômes
apparaît, veuillez consulter votre
médecin.
5. Observer les précautions d’usage
avec le carburant. Essuyer immédiatement l’essence répandue et éloigner
le bidon d’essence d’au moins 3 mètres avant de mettre le moteur de la
tronçonneuse en marche.
6. Ne tolérer aucun flamme ou source
d’étincelles à proximité de l’endroit où
est entreposée l’essence et pendant
la préparation du mélange ou le remplissage du réservoir. (S’abstenir de
fumer, de faire du feu ou d’utiliser un
outil produisant des étincelles.)
7. Ne jamais fumer en manipulant l’essence ou en utilisant la tronçonneuse.
8. Ne pas mettre la tronçonneuse en
marche à proximité d’autres personnes. Ne pas tolérer la présence d’enfants ou d’animaux sur le lieu de travail. Faire éloigner toute personne ou
animal d’au moins 10 mètres avant de
mettre en marche et d’utiliser la tronçonneuse.
9. Avant de commencer à tronçonner,
dégager le lieu de travail, prévoir une
voie de retraite pour le moment où
l’arbre va choir et bien se caler les
pieds pour assurer sa posture.
10. Lorsque le moteur est en marche,
tenir fermement la tronçonneuse à
deux mains. Saisir la poignée et le
guidon à pleine main.
11. Ne jamais approcher la main ou
toute autre partie du corps de la chaîne lorsque le moteur est en marche.
12. Avant de mettre le moteur en marche, vérifier que rien ne touche la
chaîne.
13. Lorsqu’on se déplace avec la
tronçonneuse, le moteur doit être
arrêté. Porter la tronçonneuse par le
guidon avec la chaîne vers l’arrière.
Veiller à ne pas se brûler contre le pot
d’échappement.
14. Avant de se servir de la tronçonneuse, contrôler l’état de la chaîne
(usure, tension, etc.). Ne jamais utiliser une tronçonneuse endommagée,
mal réglée, mal remontée ou dépourvue de ses carters. Vérifier que la
chaîne s’immobilise lorsque qu’on
relâche la gâchette d’accélérateur.
15. Toute intervention d’entretien non
décrite dans le présent mode d’emploi doit être confiée à un personnel
d’entretien qualifié.
1. Pour la sécurité
1. Pour la sécurité
Page 20

3
FR
(En particulier, toute tentative de
démontage du volant ou de l’embrayage sans disposer des outils
appropriés risque de fissurer le volant
qui pourrait ensuite se désintégrer en
marche).
16. Toujours arrêter le moteur avant
de poser la tronçonneuse.
17. Observer la plus grande prudence
en coupant les broussailles. Une liane
ou un arbrisseau se prenant dans la
chaîne risquent de faire perdre l’équilibre ou de cingler le visage.
18. Lorsqu’on coupe une branche en
flexion, prendre garde à la détente au
moment où les fibres porteuses sont
sectionnées.
19. Ne coupez jamais si le temps est
mauvais, si la visibilité est insuffisante
ou si la température est trop basse ou
trop élevée. Assurez-vous qu’il n’y a
pas de branches sèches qui puissent
tomber pendant la coupe.
20. Maintenir la poignée et le guidon
toujours propres et secs; essuyer
immédiatement toute trace d’huile, de
graisse ou de carburant.
21. La tronçonneuse ne doit être utilisée qu’en plein air ou dans un local
bien ventilé. Ne jamais mettre en marche ou laisser tourner le moteur dans
un local fermé.
Les gaz d’échappement sont dangereux car ils contiennent du monoxyde
de carbone.
22. Sans entraînement spécial, s’abstenir d’utiliser la tronçonneuse juché
sur un arbre.
23. Prendre garde au rebond, particulièrement dangereux car la tronçonneuse risque d’échapper des mains.
On appelle rebond le brusque saut de
la tronçonneuse lorsque la chaîne à
l’extrémité du guide-chaîne bute
contre quelque chose.
24. Pour transporter la tronçonneuse,
recouvrir la chaîne de son fourreau.
PRECAUTIONS A OBSERVER POUR EVITER LE
REBOND DE LA TRONÇONNEUSE
Le phénomène de rebond de
la tronçonneuse se produit lorsque l’extrémité du
guide-chaÎne heurte quelque chose ou lorsque la
coupe se resserre et coince la chaîne. Si le guidechaîne bute contre un objet, il arrive que la tron-
çonneuse saute en l’air
et se retourne contre l’opérateur. Si la chaîne
coince dans la coupe se
resserrant vers le haut, la
tronçonneuse est brusquement refoulée en
arrière vers l’opérateur.
Dans les deux cas, la perte de contrôle de l’outil
peut résulter en un très grave accident corporel.
• Les dispositifs de sécurité dont est équipée la
tronçonneuse ne dispensent pas d’observer la
plus grande prudence. Pour éviter tout accident ou
blessure, observer scrupuleusement les consignes
de sécurité ci-après lors de l’emploi de la tronçonneuse.
1. Une bonne compréhension du phénomène de
rebond de la tronçonneuse permet de prévoir les
situations où il risque de se produire et d’éviter d’être
pris par surprise.
Cet effet de surprise peut favoriser les accidents.
2. Tenir fermement la tronçonneuse à
deux mains, main droite sur la poignée arrière et main gauche sur le guidon avant avec le pouce à l’opposé
des autres doigts pour affermir la
prise lorsque le moteur est en marche.
Une bonne prise aide à maîtriser la
tronçonneuse en cas de rebond.
3. Avant de commencer à couper,
vérifier que la zone à couper est dégagée, Eliminer au préalable toute branche ou tout obstacle sur lequel la
chaîne risquerait de buter.
4. Faire tourner le moteur à vitesse
élevée pendant la coupe.
5. Ne pas travailler en tenant la tronçonneuse à bout de bras ou plus haut
que les épaules.
6. Observer les recommandations du
fabricant en matière d’entretien ou
d’affûtage de la chaîne.
7. Comme rechange, n’utiliser que
des chaînes et guide-chaînes d’origine ou recommandés par le fabricant.
!
ATTENTION!
1. Pour la sécurité
Page 21

4MM4
FR
2. Explication des symboles figurant sur la machine
Pour une utilisation et un
entretien sûrs, les symboles sont gravés en relief
sur la machine.
Selon ces indications, faire attention de ne pas
commettre d’erreur.
Orifice de remplissage de
“MELANGE DEUX TEMPS”
Emplacement: Près du bouchon
de carburant
Orifice de remplissage d’huile de
chaîne
Emplacement: Près du bouchon
d’huile
Régler le commutateur sur la
position “O”, et le moteur s’arrête
immédiatement.
Emplacement: Partie avant audessus de la poignée arrière
Au démarrage du moteur, si on tire
le bouton du starter (à droite à
l’arrière du levier arrière) dans le
sens de la flèche, le mode de
démarrage peut être réglé comme
suit:
•Premier cran – mode démarrage à chaud.
• Second cran – mode démarrage à froid.
Emplacement: Partie supérieure
droite du cache de filtre à air
!
ATTENTION!
La vis sous la marque “H” est la
vis de réglage Grande vitesse.
La vis sous la marque “L” est la
vis de réglage Petite vitesse.
La vis à gauche de la marque “T”
est la vis de réglage Vitesse neutre.
Emplacement: Côté gauche de la
poignée arrière
Indique le sens dans lequel le
frein de chaîne est lâché (flèche
blanche) et engagé (flèche noire).
Emplacement: Partie avant du
cache de chaîne
Si on fait tourner la tige à l’aide
d’un tournevis, suivre la flèche
jusque la position “MAX” pour
faire arriver plus d’huile sur la
chaîne, et faire tourner la tige
vers la position “MIN” pour qu’il
en arrive moins.
Emplacement: Partie inférieure
de l’ensemble moteur
2. Explication des symboles figurant sur la machine
Page 22

5
FR
Contenu de l’emballage de la tronçonneuse.
Déballer et mettre en place le guide-chaîne et la chaîne sur le groupe moteur en procédant comme suite:
Travailler avec des gants
épais pour ne pas risquer de se blesser sur les
dents de la chaîne.
1. Tirez la protection en direction de la poignée avant
pour vérifier que le frein de chaîne n’est pas
enclenché.
2. Desserrer les écrous et déposer le carter de chaî-
ne.
3. Engager la chaîne autour de la roue dentée du
moteur et mettre en place la guide-chaîne en passant la chaîne tout autour. Amener l’écrou de tendeur de chaîne.
!
ATTENTION!
Respecter le sens de montage
de la chaîne.
4. Remettre le carter de chaîne contre le groupe
moteur en serrant les écrous à la main.
5. Tout en soulevant le guide-chaîne par le bout, tourner la vis du tendeur pour donner à la chaîne la tension correcte. A la partie inférieure du guide-chaîne, les patins des maillons de chaîne doivent juste
toucher la glissière.
6. Toujours en tenant le guide-chaîne soulevé, bloquer les écrous du carter (12 ~ 15 Nm). Tourner la
chaîne à la main pour vérifier qu’elle tourne sans
résistance excessive et qu’elle est convenablement tendue. Si nécessaire, redesserrer les écrous
du carter de chaîne et refaire le réglage de tension.
7. Serrer la vis du tendeur.
Lorsqu’elle est neuve, la chaîne
a tendance à s’allonger. Contrôler et régler fréquemment la tension de la chaîne. Si la chaîne est trop peu
tendue, elle risque de sauter et s’use rapidement,
ainsi que le guide-chaîne.
REMARQUE
REMARQUE
3. Montage du guide-chaîne et de la chaîne
3. Montage du guide-chaîne et de la chaîne
(1) Couvercle de
chaînette
(2) Ecrou de mise
sous tension de
chaînette
(1) Sens de
rotation
(1) Desserrer
(2) Serrer
(3) Soulever
(4) Vis du tendeur
(1) Groupe moteur
(2) Protège-chaîne
(3) Guide-chaîne
(4) Chaîne
(5) Clé pour obturateurs
(6) Tournevis de réglage du carburateur
Page 23

6MM6
FR
• CARBURANT
L’essence est un produit hautement inflammable. S’abstenir de fumer et ne
tolérer aucun flamme ou source d’étincelles à proximité de l’endroit où est entreposée l’essence.
Arrêter le moteur puis le laisser refroidir un peu
avant de remplir le réservoir.
Remplir le réservoir à l’extérieur sur une surface
nue et éloigner le bidon d’essence d’au moins 3
mètres avant de mettre le moteur de la tronçonneuse en marche.
• Les moteurs sont lubrifiés à l’aide d’une huile spé-
cialement conçue pour les moteurs 2 temps à
refroidissement par air. Utilisez une huile antioxydante de haute qualité spécialement destinée aux
moteurs 2 temps à refroidissement par air (HUILE
DE TYPE JASO FC ou DE TYPE ISO EGC).
• Ne jamais utiliser des huiles mélangées BIA ou TCW
(pour les moteurs 2 temps à refroidissement par
eau).
• RAPPORT DE MELANGE RECOMMANDE
ESSENCE 50: HUILE 1
• La composition des gaz d’échappement est contrô-
lée par les principaux paramètres et composants du
moteur (comme par ex., la carburation, le calage de
l’allumage et le calage du port) sans avoir besoin
d’effectuer des changements de matériel ou à introduire un matériel inerte durant la combustion.
• Ces moteurs sont certifiés pour fonctionner avec de
l’essence sans plomb.
•Utiliser toujours une essence à indice d’octane
minimal de 89RON (USA/Canada: 87AL).
• Si une essence à indice d’octane inférieur est utili-
!
ATTENTION!
sée, il y a un risque important d’augmentation dangereuse de la température du moteur, entraînant
des problèmes de moteur au niveau des cylindres
par exemple.
• Il est préférable d’utiliser de l’essence sans plomb
afin de réduire la pollution de l’atmosphère et de
participer ainsi à la protection de l’environnement et
de votre santé.
• De l’essence ou de l’huile de basse qualité risque
d’endommager les joints, les conduites d’essence
ou le réservoir d’essence du moteur.
• COMMENT OBTENIR UN BON MELANGE
Faire attention à ne pas trop
remuer le carburant.
1. Mesurez les volumes d’essence et d’huile à mélan-
ger.
2. Verser un peu d’essence dans un récipient à car-
burant propre.
3. Verser ensuite toute l’huile, puis bien remuer le
tout.
4. Verser enfin le reste de l’essence, puis bien mélan-
ger l’ensemble pendant une minute environ. Etant
donné que certains types d’huiles sont plus fluides
que d’autres en fonction de leur composition, un
brassage énergique est nécessaire afin de garantir
une bonne marche du moteur pendant longtemps.
En effet, en cas de mélange insuffisant, un risque
majeur de problèmes au niveau des cylindres peut
apparaître en raison d’un mélange hétérogène.
5. Placer une étiquette assez grande sur le récipient
afin d’éviter de le confondre avec de l’essence ou
avec d’autres récipients.
6. Indiquer les composants sur cette étiquette afin
d’en faciliter l’identification.
• REMPLISSAGE DU RESERVOIR
1. Dévisser puis retirer le bouchon de carburant.
Déposer ce bouchon sur une surface non poussiéreuse.
2. Remplir le réservoir de carburant à 80% de sa
capacité totale.
3. Visser fermement le bouchon du réservoir et
essuyer toute éventuelle éclaboussure d’essence
sur l’appareil.
!
ATTENTION!
4. Carburant et huile de chaîne
4. Carburant et huile de chaîne
Page 24

7
FR
1. Choisir une surface plane et nue pour effectuer
le remplissage.
2. S’éloigner d’au moins 3 mètres du point de remplissage avant de démarrer le moteur.
3. Arrêter le moteur avant de démarrer l’appareil.
Bien remuer à cet instant le mélange d’essence
dans le réservoir.
•A EVITER POUR PROLONGER LA DUREE DE VIE
DU MOTEUR:
1. ESSENCE SANS HUILE (ESSENCE PURE) –
L’essence pure est capable d’endommager très
rapidement les pièces du moteur.
2. ESSENCE-ALCOOL – Ce mélange risque de très
rapidement détruire les pièces en caoutchouc
et/ou en plastique et d’empêcher la lubrification du
moteur.
3. HUILE POUR MOTEURS 4 TEMPS – Elles risquent
d’encrasser les bougies, de bloquer l’échappement ou d’endommager les segments des pistons.
4.
Les mélanges d’huile et de carburants laissés
au repos pendant une période d’un mois ou
plus
risquent sérieusement d’encrasser le carburateur et d’entraîner par conséquent une défaillance
du moteur.
5. Dans l’éventualité d’une longue période d’inactivité, nettoyer le réservoir de carburant après l’avoir
vidangé. Allumer ensuite le moteur et vider le
mélange d’essence du carburateur.
6. En cas de mise au rebut du récipient contenant le
mélange d’huile, en disposer toujours dans une
décharge autorisée.
Il est également important de
rappeler que l’usure et les dégradations normales de
l’appareil ne sont en aucun cas couvertes par cette
garantie.
De plus, le non-respect des instructions relatives aux
proportions des mélanges d’essence, etc. décrites
dans ce mode d’emploi risque d’entraîner un refus de
couverture par la garantie.
REMARQUE
!
ATTENTION!
• HUILE POUR CHAÎNE
Utilisez une huile moteur SAE #10W-30 tout au long
de l’année ou de l’huile SAE #30 ~ #40 en été et SAE
#20 en hiver.
N’utilisez pas de l’huile usagée
ou recyclée, elle pourrait endommager la pompe à
huile.
REMARQUE
4. Carburant et huile de chaîne
Page 25

8MM8
FR
En cas de redémarrage immé-
diatement après l’arrêt du moteur. Bouton de starter
en première position (starter ouvert et levier de commande des gaz en position de démarrage).
Après avoir sorti le bouton de
starter, il ne retourne pas à la position de service,
même si vous l’enfoncez avec le doigt. Lorsque vous
voulez ramener le bouton de starter à la position d’ouverture, appuyer sur le levier de commande des gaz.
4Tenir la tronçonneuse plaquée au sol et tirer la cor-
delette du lanceur avec force.
Ne pas mettre le moteur en
marche en portant la tronçonneuse d’une main.
Cela est très dangereux car on risque de se blesser avec la chaîne.
5. Si le moteur démarre et cale, repousser le bouton
de starter à la première position et tirer à nouveau
la corde du lanceur pour remettre le moteur en
marche.
6. Laisser le moteur se réchauffer en accélérant légèrement.
Ne pas s’approcher de la
chaîne qui se met à tourner dès que le moteur
démarre.
• CONTRÔLE DU GRAISSAGE DE LA CHAÎNE
Avant de vérifier l’huile, s’assurer que la barre et la chaîne sont bien en place.
Si elles ne le sont pas les pièces rotatives exposées constituent un véritable danger.
Une fois que le moteur a démarré, le faire tourner à
régime moyen et vérifier que l’huile de chaîne est projetée et forme une trace sur le sol.
!
ATTENTION!
!
ATTENTION!
!
ATTENTION!
REMARQUE
REMARQUE
Il est dangereux d’utiliser une
scie avec des pièces cassées ou manquantes.
Avant de mettre le moteur en marche, toujours
vérifier que toutes les pièces sont posées correctement, notamment la barre et la chaîne.
• DÉMARRAGE DU MOTEUR
1. Remplir le réservoir de carburant et le réservoir
d’huile de chaîne et bien refermer les bouchons.
2. Mettre l’interrupteur en position “I”.
3. Tirer le bouton de starter à la seconde position. Le
starter se ferme et le levier de commande des gaz
est alors placé en position de démarrage.
!
ATTENTION!
5. Moteur
(1) Huile de
chaîne
(2) Carburant
(1) Interrupteur
(2) Levier accéléra-
teur
(3) Blocage accélé-
rateur
5. Moteur
(1) Bouton de star-
ter:
(a) lorsque le moteur
est froid
(s) lorsque le moteur
est chaud
(c) lorsque le moteur
est mis en marche
Page 26

Le débit d’huile peut varier en tournant le bouton de
réglage placé au sommet du couvercle du cylindre.
Effectuer les réglages nécessaires selon les circonstances des travaux.
Le réservoir d’huile doit être
presque vide quand le carburant est épuisé.
Veiller à remplir le réservoir d’huile à l’occasion du
plein en carburant de la tronçonneuse.
• RÉGLAGE DU CARBURATEUR
Le carburateur a été ajuste à la fabrique. Au cas où
cette machine nécessite un adjustage ultérieur à
cause de changement d’altitude ou de conditions de
service, prière de se mettre en contact avec ie distributeur qualifié.
Un ajustage erroné risque d’endommager cette
machine.
Au cas où l’on désire effectuer soi-même l’ajustage, il
est recommandé de procéder de la manière suivante.
Avant de refaire le réglage du carburateur, vérifier que
le filtre à air et le filtre à essence sont propres et que
la composition du carburant utilisé est correcte.
REMARQUE
Méthode de réglage:
Le réglage du carburateur doit
se faire avec le guide-chaîne et la chaîne en place.
1. Le nombre de tour des pointeaux “H” et “L “ est
limité de la manière suivante.
Pointeau “H”: -1/4
Pointeau “L”: -1/4
2. ettre le moteur en marche et le laisser se réchauffer à régime faible pendant quelques minutes.
3. Tourner la vis de réglage de ralenti (T) dans le sens
contraire des aiguilles d’une montre jusqu’à ce que
la chaîne ne tourne plus. À l’inverse, si le régime de
ralenti est trop bas, tourner la vis dans le sens des
aiguilles d’une montre.
4. Faire un essai de coupe et régler le pointeau “H”
pour obtenir le régime optimal de coupe qui n’est
pas nécessairement le régime maximum.
Une rotation excessive de l’aiguille “H” causera une perte de puissance ou une
mauvaise accélération. Dans ce cas il sera nécessaire
de tourner l’aiguille “H” légèrement dans le sens des
aiguilles d’une montre.
• FREIN DE LA CHAÎNE
La présente machine est munie d’un frein automatique qui arrête le mouvement de la chaîne de scie en
appliquant le frein automatiquement par l’action d’inertie qui sollicite au poids se trouvant dans l’intérieur
de la garde avant lorsqu’un recul s’est produit pendant le sciage.
Ce frein peut être appliqué manuellement aussi en faisant incliner la garde avant vers la barre de guidage à
la main. Pour dégager le frein, relever la garde avant
vers la manette jusqu’à ce que celle-ci fasse un clic.
Attention
Lors de l’inspection quotidienne, vérifier le bon fonctionnement du frein.
Méthode de vérification:
1. Arrêter le moteur.
REMARQUE
REMARQUE
5. Moteur 9
FR
(1) Huile de chaîne
(1) Levier avant
(2) Relâché
(3) Freinage
(4) Levier freina-
ge
(1) Pointeau “L”
(2) Pointeau “H”
(3) Vis de réglage de
ralenti
(1) Arbre de réglage
de l’arrivée d’huile de chaîne
2) Riche
3) Pauvre
Page 27

2. En maintenant la tronçonneuse horizontalement
avec les deux mains, enlever la main de la manette avant et appliquer l’extrémité de la barre de guidage à une souche pour vérifier le bon fonctionnement du frein. La hauteur d’opération sera différente selon la taille du guide de chaîne.
Lorsque le frein fonctionne mal, adressez-vous à votre
concessionnaire pour le faire réparer.
Si l’on laisse tourner le moteur à grande vitesse en
appliquant le frein, l’embrayage sera chauffé et cela
entraîne des causes de pannes.
Lorsque le frein s’applique accidentellement pendant
le fonctionnement, dégager le doigt du papillon immédiatement pour arrêter le moteur.
• MÉCANISME ANTIGEL DE CARBURATEUR
L’utilisation des tronçonneuses à des températures de
0 – 5 °C et avec une humidité élevée peut entraîner la
formation de glace dans le carburateur, et ceci à son
tour peut entraîner une réduction de la puissance du
moteur ou une opération non régulière du moteur.
Ce produit a en conséquence été conçu avec un volet
d’aération sur le côté droit de la surface du cache-culbuteurs pour laisser l’air chaud être fourni vers le
moteur et empêcher de la sorte la formation de glace.
Dans des circonstances normales, le produit doit être
utilisé en mode d’utilisation normale, c.-à-d., dans le
mode auquel il est réglé lors de l’expédition.
Cependant, lorsque la possibilité existe de formation
de glace, l’appareil doit être réglé pour agir en mode
antigel avant utilisation.
Le fait de continuer à utiliser le
produit en mode antigel, même lorsque les températures ont augmenté et sont revenues à la normale,
peut entraîner un démarrage incorrect du moteur ou
son impossibilité à fonctionner à sa vitesse normale,
et pour cette raison, vous devez toujours ramener
l’appareil au mode d’utilisation normale s’il n’y a pas
de risque de formation de glace.
COMMENT CHANGER ENTRE LES MODES D’UTILISATION
1. Désenclencher le commutateur de moteur pour
couper le moteur.
2. Déposer le capot au filtre à air, déposer le filtre à air,
puis déposer le bouton de starter du cache-culbuteurs.
3. Desserrer les vis en maintenant le cache-culbuteurs
en position (c.-à-d., les trois vis à l’intérieur et une
vis à l’extérieur du capot), puis déposer le cacheculbuteurs.
4. Appuyer avec le doigt sur le capuchon de gel situé
sur le côté droit du cache-culbuteurs pour le déposer.
5. Ajuster le capuchon de gel pour que la marque
“neige” soit dirigée vers le haut, puis le ramener à
sa position d’origine dans le cache-culbuteurs.
6. Refixer le cache-culbuteurs à sa position d’origine,
puis refixer toutes les autres pièces à leurs positions correctes.
• ARRET DU MOTEUR
1. Relâcher la gâchette d’accélérateur et laisser le
moteur tourner au ralenti pendant quelques minutes.
2. Régler l’interrupteur en position “O” (ARRET).
REMARQUE
5. Moteur10MM10
FR
(1) Interrupteur
(1) Couvercle du cylindre
(2) Marque “soleil”
(3) Marque “neige”
(a) Mode d’opération normal
(b) Mode antigel
(1) Cache-culbu-
teurs
(2) Bouton de
starter
(3) Capuchon de
gel
Page 28

•Avant de commencer à travailler, lire attentivement le
chapitre “Pour la sécurité”
au début de cette notice.
Commencer à se familiariser avec le fonctionnement
de la tronçonneuse en
sciant quelques bûches
dans de bonnes conditions
de travail à titre d’exercice
• Suivre les règles de sécurité. La tronçonneuse ne doit
être utilisée que pour scier
du bois. Il est interdit de
couper d’autres matériaux.
Les vibrations et le rebond
sont en effet différents et
les mesures de sécurité ne
seraient pas respectées.
N’utilisez pas la tronçonneuse comme levier pour
lever, déplacer ou casser
quoi que ce soit. Il est
interdit de brancher sur la
prise de force de la tronçonneuse des outils ou des
applications autres que
ceux que le constructeur a
indiqués.
•
Il n’est pas nécessaire d’appuyer dans la coupe. Si
le moteur tourne suffisamment vite, une légère
pression suffit.
• Si la chaîne reste coincée dans la coupe, ne pas for-
cer pour l’extraire. Ecarter la coupe en introduisant
un coin ou en faisant levier avec un pied-de-biche.
• MESURES DE PROTECTION CONTRE LES
REBONDS
!
ATTENTION!
• Cette tronçonneuse est équi-
pée d’un frein de chaîne qui,
si la machine est en bon état,
immobilise immédiatement la
chaîne en cas de rebond.
Avant chaque séance de travail, contrôler le fonctionnement du frein de chaîne en
accélérant à fond et en poussant le protège-main avant
vers l’avant au bout de 1 ou 2
secondes. La chaîne doit
s’immobiliser immédiatement même avec le moteur
tournant à plein régime. Si la
chaîne ne s’arrête pas ou ne
s’arrête que trop lentement,
remplacer immédiatement la
bande de frein et le tambour
d’embrayage.
• Pour la sécurité, il est extrê-
mement important de vérifier
avant d’utiliser la tronçonneuse que le frein de chaîne
fonctionne bien et que la
chaîne est bien affûtée, ce
qui limite le risque de rebond.
Un entretien négligé et l’utilisation de la tronçonneuse
sans ses dispositifs de sécurité, ou avec un guide-chaîne
en mauvais état et une chaîne mal affûtée, augmentent
le risque de rebond et de
grave accident corporel.
•ABATTAGE D’UN ARBRE
1. Déterminer le sens dans lequel l’arbre doit choir,
compte tenu du vent, de l’inclinaison du tronc, de
la disposition des branches les plus lourdes, de la
commodité des travaux après abattage, etc.
2. Nettoyer la zone de travail autour de l’arbre.
Prévoir une voie de retraite pour le moment où l’arbre va choir et bien se caler les pieds pour assurer
sa posture.
6. Travail à la tronçonneuse 11
FR
(1) Coupe
(2) Entaille d’abattage
(3) Sens d’abattage
6. Travail à la tronçonneuse
Page 29

3. Du côté où l’arbre doit choir, pratiquer une entaille
d’abattage d’une profondeur du tiers du diamètre
de l’arbre.
4. Faire ensuite une coupe horizontale de l’autre côté,
légèrement plus haut que le fond de l’entaille d’abattage.
Avant d’abattre un arbre, faire
évacuer toutes les personnes présentes et surveiller la zone de travail.
Débitage et ébranchage
•Toujours bien se caler les pieds. Ne pas monter
sur le tronc.
•Prendre garde au fait que le tronc risque de se
retourner ou de rouler. Si le terrain est en pente,
toujours se tenir plus haut que le tronc sur la
pente.
• Pour éviter le rebond de la tronçonneuse,
respecter les consignes du chapitre “Pour la
sécurité”.
Avant de couper une branche ou un tronc en flexion,
observer le sens de la flexion et finir la coupe à l’opposé du côté en flexion pour éviter que le guide-chaîne ne soit coincé dans la coupe.
Tronc reposant sur le sol
Couper à moitié, retourner le tronc et finir la coupe par
l’autre côté.
Tronc en surélévation
Commencer par couper au tiers par en dessous dans
la “A”et finir la coupe par-dessus. Dans la zone “B”,
couper au par-dessus et finir la coupe par en dessous.
!
ATTENTION!
!
ATTENTION!
Ebranchage d’un arbre abattu
Observer d’abord le sens de flexion de la branche.
Faire une première entaille du côté en flexion et finir la
coupe du côté opposé.
Attention au saut de la bran-
che au moment où elle se détache du tronc.
Elagage d’un arbre
Commencer par entailler par en dessous et finir la
coupe pardessus.
• Ne jamais travailler sur un échafaudage ou une
échelle instable.
• Ne pas travailler à bout de bras trop loin de soi.
•Ne pas couper plus haut que le niveau des épaules.
•Toujours tenir la tronçonneuse à deux mains.
!
ATTENTION!
!
ATTENTION!
6. Travail à la tronçonneuse
12MM12
FR
Page 30

Avant toute intervention de
nettoyage, d’inspection ou de démontage, arrêter
le moteur et attendre qu’il refroidisse.
Débrancher le fil de la bougie pour éviter que le
moteur ne démarre accidentellement.
• ENTRETIEN APRES CHAQUE UTILISATION
1. Filtre à air
Desserrer le bouton et déposer le couvercle du filtre à
air.
Retirer l’élément de filtre et enlever la sciure qui s’est
adhérée. Si le filtre est bouché, le séparer en deux
moités et le laver en secouant, avec de l’essence.
Si on utilise de l’air comprimé, souffler par l’intérieur.
Pour remonter le filtre, appuyer sur les bordures jusqu’à encliquetage.
En remettant le filtre principal, introduire les languettes
du bord du filtre dans les renfoncements du cache
culbuteur.
2. Orifice de sortie d’huile
Déposer le guide-chaîne et vérifier que l’orifice de sortie d’huile n’est pas obstrué.
REMARQUE
!
ATTENTION!
3. Guide-chaîne
Après la dépose du guide-chaîne, éliminer la sciure
dans la rainure et l’orifice de sortie d’huile.
Injecter de la graisse dans l’orifice de graissage de la
roue dentée à l’extrémité du guide-chaîne.
4. Divers
Vérifier que le carburant ne fuit pas et que la boulonnerie est bien serrée. En particulier, contrôler l’état et
le serrage de la poignée, du guidon et du guide-chaîne. En cas d’anomalie, ne pas réutiliser la tronçonneuse avant de l’avoir réparée.
• ENTRETIEN PERIODIQUE
1. Ailettes de refroidissement du cylindre
Si de la poussière reste entre les ailettes du cylindre,
le moteur va chauffer. Vérifier périodiquement les
ailettes du cylindre et les nettoyer en déposant le filtre à air et le couvre cylindre.
Lors de la remise en place du couvre-cylindre, s’assurer que les fils de la gâchettes et les passe-fils sont
bien positionnés.
Couvrir au préalable l’ouverture d’admission d’air.
REMARQUE
7. Entretien 13
FR
(1) Orifice de sortie d’huile
(2) Orifice de graissage
(3) Roue dentée
(1) Orifice de sortie
d’huile
7. Entretien
Page 31

2. Filtre à essence
1. A l’aide d’un fil de fer recourbé, sortir le filtre à
essence de l’orifice de remplissage.
2. Démonter le filtre et le laver avec de l’essence, ou
remplacer le filtre par un neuf si nécessaire.
• Après dépose du filtre, immobiliser le tuyau d’aspi-
ration à l’aide d’une pince.
• Au remontage, veiller à ne pas introduire de la
poussière ou des impuretés dans le tuyau d’aspiration.
3. Bougie
Nettoyer les électrodes et, si nécessaire, régler l’écartement à 0,65 mm.
4. Roue dentée
Vérifier que la roue dentée n’est pas ébréchée et que
la denture n’est pas usée au point de patiner sur la
chaîne. Remplacer la roue dentée si elle est endommagée ou très usée.
Ne pas utiliser une chaîne neuve avec une roue dentée usée ou bien une chaîne usée avec une roue dentée neuve.
REMARQUE
5. Silent-blocs avant et arrière
Remplacer si des parties d’adhèsion sont enlevées ou
si des fêlures sont observées sur les pièces en caoutchouc.
Remplacer si l’intérieur de la pièce métallique d’amortisseur arrière a été cogné par le boulon de la pièce
d’arrêt et si le jeu de la pièce métallique a augmenté.
7. Entretien14MM14
FR
(1) Filtre à essence
Page 32

1. Chaîne
Pour la sécurité et le rendement dans le travail, les dents de la chaîne doivent
toujours être bien affûtées.
Les dents de chaîne doivent être affûtées lorsque:
• La sciure produite est poudreuse.
• Il faut appuyer excessivement pour faire mordre la
chaîne dans le bois.
• La coupe n’est pas droite.
• La tronçonneuse vibre fortement.
• La consommation de carburant augmente.
Méthode et critères d’affûtage
Porter des gants de sécurité.
Avant l’affûtage:
•Immobiliser fermement la chaîne.
•Arrêter le moteur.
• Se procurer une lime ronde de taille appropriée
(voir le “Tableau d’entretien de la chaîne”)
Poser la lime sur la dent et pousser bien droit.
Maintenir l’orientation de la lime indiquée ci-contre.
Après affûtage de toutes les dents, vérifier la chaîne à
l’aide d’un gabarit d’affûtage en limant à la cote indiquée ci-dessous.
Arrondir le bord d’attaque des
dents pour réduire le risque de rebond ou de rupture des maillons.
!
ATTENTION!
!
ATTENTION!
!
ATTENTION!
Vérifier que toutes les dents présentent les longueurs
et angles de tranchant indiqués sur l’illustration.
2. Guide-chaîne
•Retourner le guide-chaîne de temps à autre pour
éviter l’usure inégale.
• Le rail du guide-chaîne doit maintenir la chaîne d’aplomb.
Poser une règle contre le rail et contre l’extérieur
d’une dent. Il doit subsister un interstice entre le
guide-chaîne et la règle. Si ce n’est pas le cas, cela
signifie que le rail est usé. Il faut alors réparer ou remplacer le guide-chaîne.
8. Entretien de la chaîne et du guide-chaîne 15
FR
(1) Gabarit d’affû-
tage
(2) Arrondir l’arête
(3) Voie standard:
(voir le “Tableau
d’entretien de la
chaîne”)
(A) Longueur de tran-
chant
(30°) Angle d’affûtage
(85°) Angle de tran-
chant latéral
(60°) Angle de tran-
chant supérieur
(1) Règle
(2) Interstice
(3) Pas d’interstice
(4) La chaîne est pen-
chée
8. Entretien de la chaîne et du guide-chaîne
Page 33

16MM16
FR
8. Entretien de la chaîne et du guide-chaîne / 9. Guide de dépannage
9. Guide de dépannage
1) Défaut de démar-
rage
AVERTISSEMENT
Veiller à ce que le
système de prévention contre la
congélation ne soit
pas en fonctionnement.
2) Manque de puis-
sance/Accélération
insuffisante/Marche
au ralenti approximative
3) L’huile ne sort pas
– Vérifier s’il y a de l’eau dans le combusti-
ble ou si le mélange n’est pas approprié.
– Vérifier si le moteur est inondé.
– Inspecter l’allumage de la bougie.
– Vérifier si le combustible contient de
l’eau ou présente un mélange non approprié.
– Vérifier si le filtre à air et le filtre à com-
bustible sont bouchés.
– Vérifier si le carburateur présente un
réglage non approprié.
– Vérifier si I’huile est de mauvaise qualité.
– Vérifier si les orifices et passages d’huile
sont bouchés.
– Remplacer par un combustible appro-
prié.
– Enlever et sécher la bougie d’allumage.
– Puis tirer de nouveau le démarreur sans
starter.
– Remplacer par une nouvelle bougie.
– Remplacer par un mélange approprié.
– Nettoyer.
– Régler de nouveau les aiguilles de vitesse.
– Remplacer l’huile.
– Nettoyer.
Si votre machine nécessite un entretien
ultérieur, consultez le Centre de Service
Agréé le plus proche.
PROBLÈME CAUSE SOLUTION
3. Tableau d’entretien de la chaîne
Les données caractéristiques de la chaîne et de la barre homologuées pour
cette machine sont indiquées dans la “Déclaration de conformité CE” qui accompagne cette
machine. Pour des raisons de sécurité, il ne faut jamais utiliser d’autres types de chaînes ou de
barres. Le tableau montre les données d’affûtage de différents types de chaînes, mais cela ne
veut pas dire qu’il soit possible d’utiliser des chaînes différentes de celle qui est homologuée.
!
ATTENTION!
Pas de la chaîne
Niveau de la dent de limitation
(a) Diamètre de la lime (d)
pouces mm pouces mm pouces mm
3/8 Mini 9,32 0,018 0,45 5/32 4,0
0,325 8,25 0,026 0,65 3/16 4,8
3/8 9,32 0,026 0,65 13/64 5,2
0,404 10,26 0,031 0,80 7/32 5,6
a
d
Page 34

Warranty
For this petrol tool, the company provides the end user - independently from the retailer‘s obligations
resulting from the purchasing contract - with the following warranties:
The warranty period is 24 months beginning from the hand-over of the device which has to be proved
by the original purchasing document. For commercial use and use for rent, the warranty period is
reduced to 12 months. Wearing parts and defects caused by the use of not fi tting accessories, repair
with parts that are no original parts of the manufacturer, use of force, strokes and breaking as well as
mischievous overloading of the motor are excluded from this warranty. Warranty replacement does
only include defective parts, not complete devices. Warranty repair shall exclusively be carried out by
authorized service partners or by the company‘s customer service. In the case of any intervention of
not authorized personnel, the warranty will be held void.
All postage or delivery costs as well as any other subsequent expenses will be borne by the customer.
Conditions de garantie
Pour cet appareil, indépendamment des obligations du concessionnaire mentionnées au contrat
devente, nous accordons au consommateur fi nal la garantie suivante :
La période de garantie est de 24 mois et entre en vigueur à la remise de l‘outil qui sera justifi ée par
présentation du bon d‘achat original. En cas d‘utilisation commerciale ou de location, la période de
garantie se limite à 12 mois. Les pièces d‘usure et les dommages dus à l‘utilisation de pièces non
conformes, à des réparations effectuées avec des pièces non originales, à l‘exercice de la force, à
des coups, une destruction ou une surcharge intentionnelle du moteur sont exclus de la garantie. Les
échanges sous garantie ne concernent que les pièces défectueuses et non les appareils complets. Les
réparations sous garantie ne peuvent être effectuées que par des ateliers autorisés ou par le service
après-vente de l‘usine. La garantie s‘éteint en cas d‘intervention étrangère au fournisseur agréé.
Les frais de port, d‘expédition et autres frais annexes sont à la charge du client.
SERVICE
Ikra tools for home & garden inc.
7885 Tranmere Avenue Suite Unit 1
Mississauga Ontario
L5S 1V8
Page 35

Ikra GmbH
Schlesierstraße 36
D-64839 Münster
171501076/0
 Loading...