

Page 1

WATERPROOF MUSIC PLAYER
WITH FM RADIO AND PEDOMETER (MP121)
USER MANUAL
CONTENTS
Contents ....................................................................................................................2
Introduction ...............................................................................................................4
Main Features....................................................................................................... 4
Accessories ..........................................................................................................4
Product Overview......................................................................................................4
Front View............................................................................................................. 4
Back View .............................................................................................................5
LCD Display..........................................................................................................5
Getting Started ..........................................................................................................5
System Requirements........................................................................................... 5
Driver Software Installation For Win98SE............................................................... 6
Windows 98SE......................................................................................................6
Windows ME, 2000, XP ........................................................................................ 6
Macintosh .............................................................................................................6
Connecting to the Computer.................................................................................... 6
Recharging the Battery Through PC or USB Adaptor ........................................... 6
File Transfer.......................................................................................................... 7
Disconnecting from the Computer .......................................................................... 7
Windows 98SE......................................................................................................7
Windows ME, 2000, XP ........................................................................................ 7
Macintosh .............................................................................................................7
Belt Clip .....................................................................................................................7
Using the Earphones ................................................................................................ 8
In Water ................................................................................................................ 8
When Exercising ................................................................................................... 8
Regular Use..........................................................................................................9
Power On / Off ........................................................................................................... 9
Menu Navigation .......................................................................................................9
Music Mode..............................................................................................................10
Play / Stop ..........................................................................................................10
Skip / Fast Forward / Rewind.............................................................................. 10
Volume................................................................................................................ 10
Rotate Display ....................................................................................................10
FM Mode (FM 87.5 MH
Scan Mode (Scan and Preset Channels)............................................................11
Channel mode (Selecting Preset Channels and Auto Preset) ...........................11
Info (Information) ....................................................................................................12
Z ~ 108 MHZ) .......................................................................11
Page 2

Settings....................................................................................................................12
Play Mode...........................................................................................................12
EQ (Equalizer) .................................................................................................... 12
Display ................................................................................................................ 13
Time....................................................................................................................14
Language............................................................................................................15
Default ................................................................................................................15
Deleting Files........................................................................................................... 15
Deleting One....................................................................................................... 15
Deleting All.......................................................................................................... 16
Button Hold..............................................................................................................16
Sport Function.........................................................................................................16
Pedometer ...............................................................................................................16
Start / View .........................................................................................................17
Set Stride ............................................................................................................ 17
Set Target ........................................................................................................... 17
BMI .....................................................................................................................18
Stopwatch................................................................................................................19
Timer................................................................................................................... 19
Count Down ........................................................................................................20
Metronome / Pacer .............................................................................................20
Reset ........................................................................................................................ 21
Upgrading Firmware ............................................................................................... 21
Formatting your Player...........................................................................................21
Copyright .................................................................................................................22
Safety and Care....................................................................................................... 22
General ............................................................................................................... 22
Water .................................................................................................................. 22
Troubleshooting......................................................................................................23
Hardware ............................................................................................................ 23
Software.............................................................................................................. 23
Caution..................................................................................................................... 23
Specifications..........................................................................................................23
About Oregon Scientific ......................................................................................... 24
FCC Statement ........................................................................................................24
Declaration of Conformity ...................................................................................25
EC-Declaration of Conformity................................................................................ 25
Page 3

INTRODUCTION
MAIN FEATURES
Waterproof / shock resistant casing •
•
IPX7 standard (waterproof to a depth of 1 meter for 30 minutes, equivalent to
JIS7 standard)
•
ISO1413 shock resistant standard
•
Built-in 512 MB or 1 GB flash memory (refer to indication on the packing)
•
MP3, WMA and WMA DRM audio playback
•
FM radio with 30 preset channels
•
Multi-lingual menu and ID3 tag / filename support
•
Healthcare function with pedometer, calorie counter, distance calculator and BMI
calculator
•
Chronograph (up to 9 split times)
•
Alarm and clock
•
Workout pacer
•
USB 2.0 file transfer (High speed)
•
USB flash drive
•
Up to 10 hours continuous playback on single battery charge
•
Upgradeable firmware
ACCESSORIES
Waterproof earphones •
•
Stereo earphones
•
Arm belt
•
Rubber ring case
•
Belt clip
•
AC USB adapter
•
USB cable
•
Quick start guide
•
Installation CD-ROM
PRODUCT OVERVIEW
FRONT VIEW
1. LCD
2. + (Volume up; Increase setting values)
3.
4. – (Volume down; Decrease setting
5.
6.
7. (Play / Stop) / Rotate the display
8. (Rewind / Previous / select menu
9. Waterproof earphones
(Power On / Off); (Menu)
values)
(SPORT mode)
(Fast forward / Skip / select menu
options or settings)
options or settings)
Page 4

BACK VIEW
TIP Slide the RESET switch to the “RESET” position when the player has not been
in use for more than a month to protect the unit’s battery from over-discharging.
LCD DISPLAY
1. Sport mode - Pedometer
2. EQ (equalizer)
3. Shuffle
4. Repeat one / Repeat all
5. Music / FM mode
6. Playback status (stop or play)
7. Current track number and total
number of tracks
8. Bitrate of current track, shows VBR
for tracks playing back at variable
bit rates
9. Sport mode - Stopwatch
10. Button lock
11. Battery indicator
12. Real-time clock
13. Alarm
14. Playback time status bar
15. Elapsed time / remaining time
1. Belt clip
2. Chrome screw
3. RESET switch
4. USB port
5. Earphone jack
GETTING STARTED
SYSTEM REQUIREMENTS
Intel® Pentium® 133MHz or faster •
•
CD-ROM drive
•
USB 1.1 or USB 2.0 support
•
10MB free hard disk space
•
Microsoft® Windows® 98SE / ME / 2000 (up to Service Pack 4.0) / XP Service
Pack 1 or 2
•
Mac OS 9.2, 10.1, 10.2, 10.3
Page 5
DRIVER SOFTWARE INSTALLATION FOR WIN98SE
WINDOWS 98SE
1. Installing the MP121 driver software will allow your computer to recognize your
player each time it is connected to the computer.
2. Insert the MP121 CD-ROM into your computer and follow the onscreen
instructions.
3. Restart your computer.
WINDOWS ME, 2000, XP
When you connect your player to your computer, it will appear as a removable drive
(i.e., Removable Disk (E:)).
MACINTOSH
When you connect your player to your Macintosh, it will appear as a drive icon on the
desktop (i.e., Untitled).
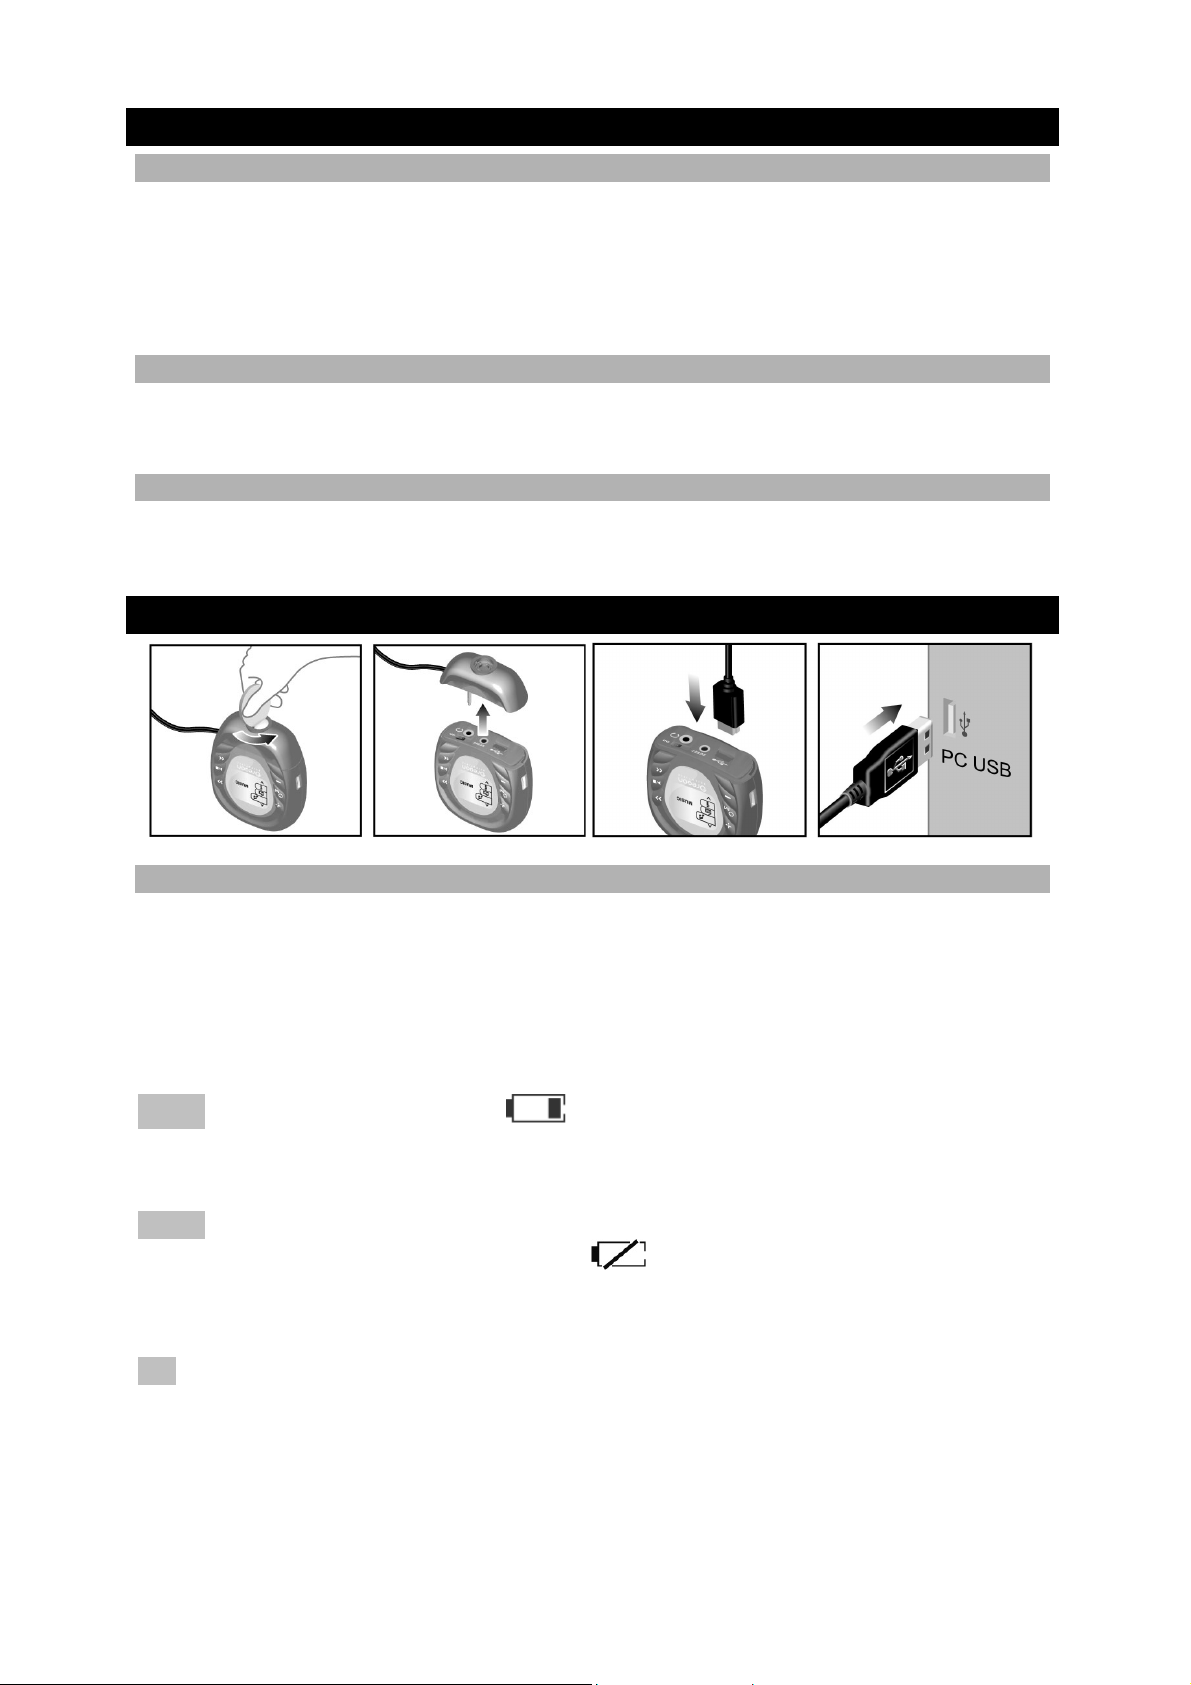
CONNECTING TO THE COMPUTER
RECHARGING THE BATTERY THROUGH PC OR USB ADAPTOR
Make sure the RESET switch is in the ”On” position before powering on or charging
the player.
Once the unit is connected to the computer, its internal rechargeable battery
automatically begins charging. Fully charge the rechargeable battery before first use.
A fully charged battery provides approx. 10 hours of continuous audio playback.
NOTE Recharge the battery when appears on the unit’s LCD. Disconnect the
player when charging is complete Never over-charge the battery as this may damage
the unit.
NOTE Charging time may very depending on the computer's USB usage status. If the
player overheats or cools during charging, appears on the LCD and the unit
stops charging. The player will automatically restart charging after re-adjusting its
internal temperature.
TIP You can charge your player with the supplied USB adapter. AC cable and plugs
differ from region and region. Charging time is approx. 2.5 to 3 hours.
Page 6
FILE TRANSFER
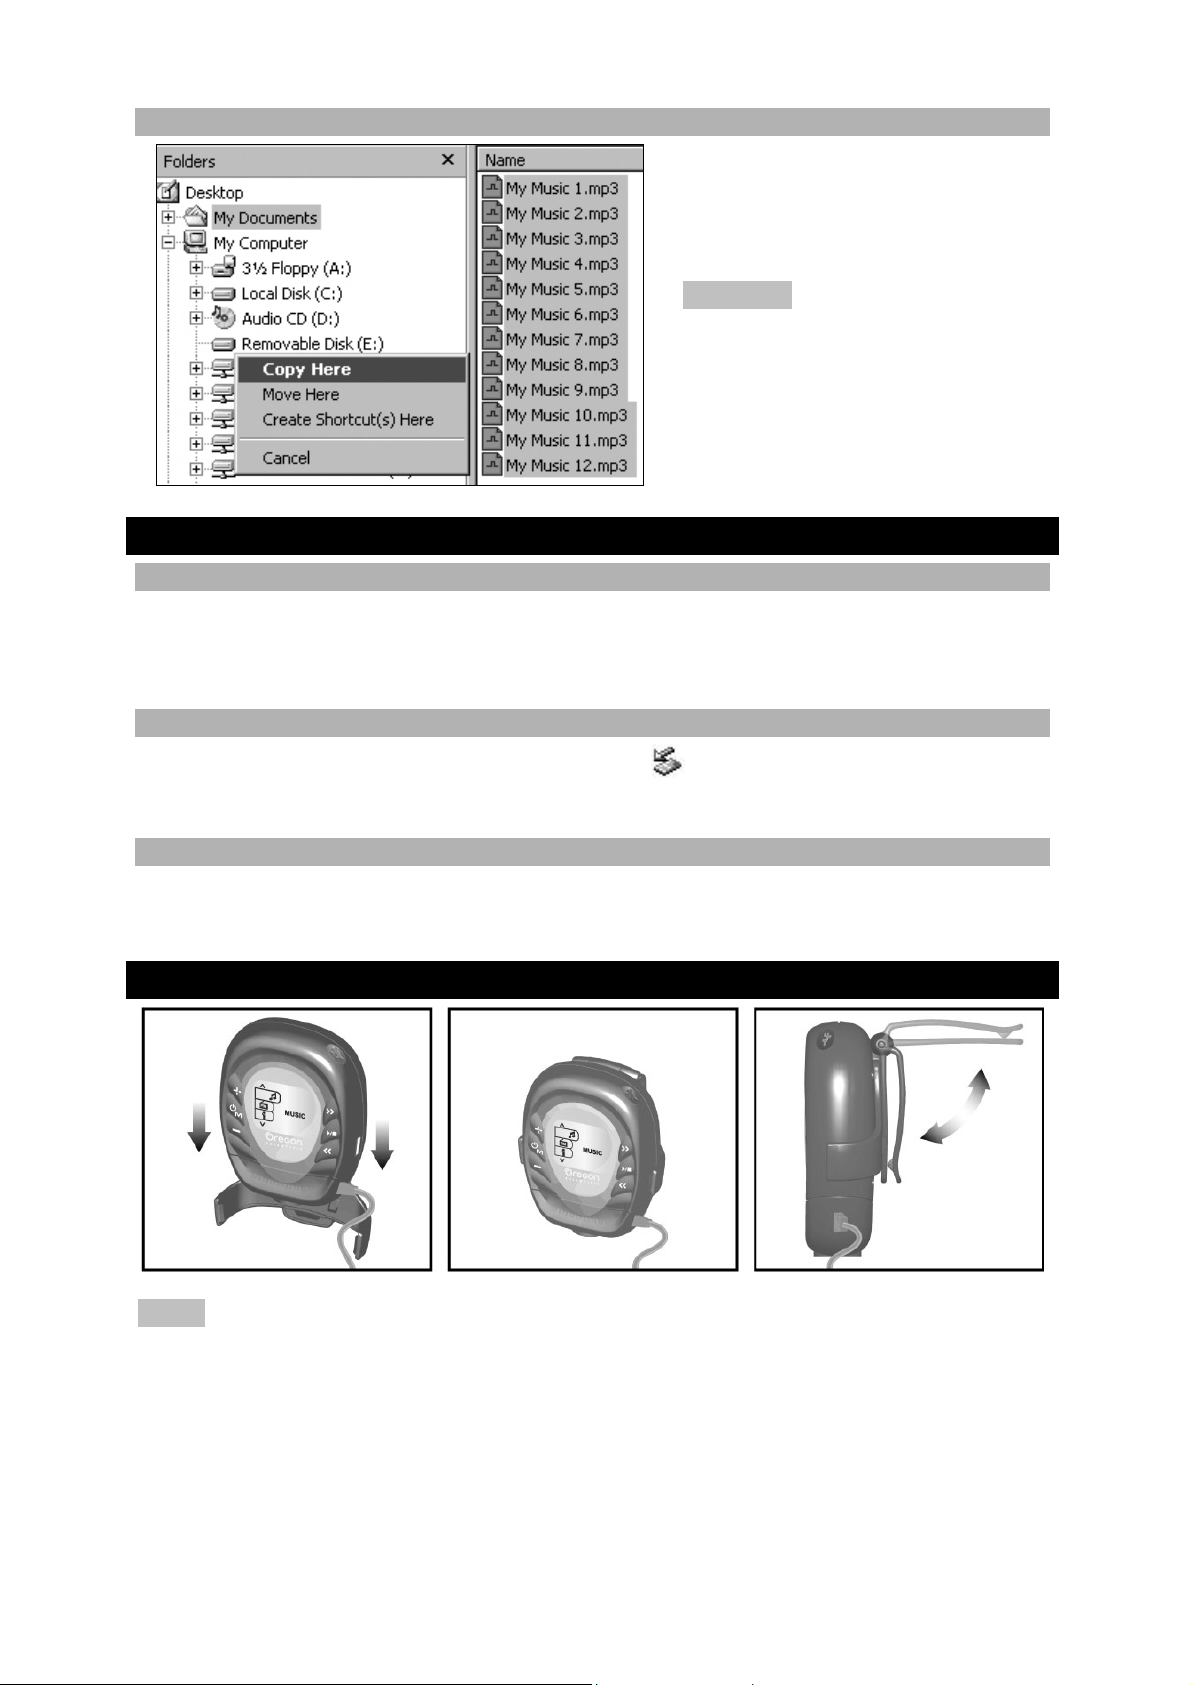
Copy and paste the file(s) from
your computer onto your player
(i.e., Removable Disk (E:)).
CAUTION To prevent data loss,
wait at least 15 seconds to make
sure file transfer is complete
before unplugging your player
from the computer.
DISCONNECTING FROM THE COMPUTER
WINDOWS 98SE
1. Double click the My Computer icon.
2. Right click the removable drive letter your player has been assigned.
3. Click “Eject” from list before disconnecting.
WINDOWS ME, 2000, XP
1. Click the "Stop USB Mass Storage Device" icon on the Windows taskbar.
2. Click your player drive letter to stop the device before disconnecting.
MACINTOSH
Drag and drop the “Untitled” icon from desktop to the “Trash” icon for eject the player
before disconnecting.
BELT CLIP
NOTE The above illustration shows how to attach the belt clip to the unit if you want
to use the device in water.
For regular use, detach the bottom casing of the unit as shown in the“CONNECTING
TO THE COMPUTER” section, then attach to belt clip. For better sound quality, use
the supplied stereo earphones.
Page 7

USING THE EARPHONES
IN WATER
Wear the umbrella-shaped
waterproof earphones and
attach the unit securely
onto the strap of your
swimming goggles or to
your swimming attire.
NOTE Never immerse the unit in water if the bottom protective screw casing is
removed. This can cause electrical shock and damage the unit.
WHEN EXERCISING
ATTACH TO ARM USING BELT CLIP
1. With the bottom casing attached, insert the arm belt through the unit’s belt clip.
2. Strap the arm belt to your arm and fasten securely.
3. Wear the waterproof earphones and use.
ATTACH TO ARM USING RUBBER RING CASE
1. Detach the bottom casing and belt clip from the unit and fit the rubber ring case
around the unit.
2. Insert the arm belt through the unit’s rubber ring case.
3. Plug in the supplied stereo earphones as shown in the diagram.
4. Strap the arm belt to your arm and fasten securely.
Page 8

REGULAR USE
1. Detach the bottom casing and belt clip from the unit and fit the rubber ring case
around the unit.
2. Loop the neckstrap through the rubber ring case’s neckstrap hole and secure.
3. Plug in the supplied stereo earphones as shown in the diagram.
4. Place unit with neckstrap and attached earphones around your neck and begin
operating.
POWER ON / OFF
To turn on or off the unit, press and hold for 2 seconds.
NOTE Unit powers off automatically if left on idle or sleep
time is reached. Power off time and sleep time can be set
from Main Menu > Settings > Time.
NOTE Remember to slide the RESET switch to the “RESET” position if the player
has not been in use for more than a month.
MENU NAVIGATION
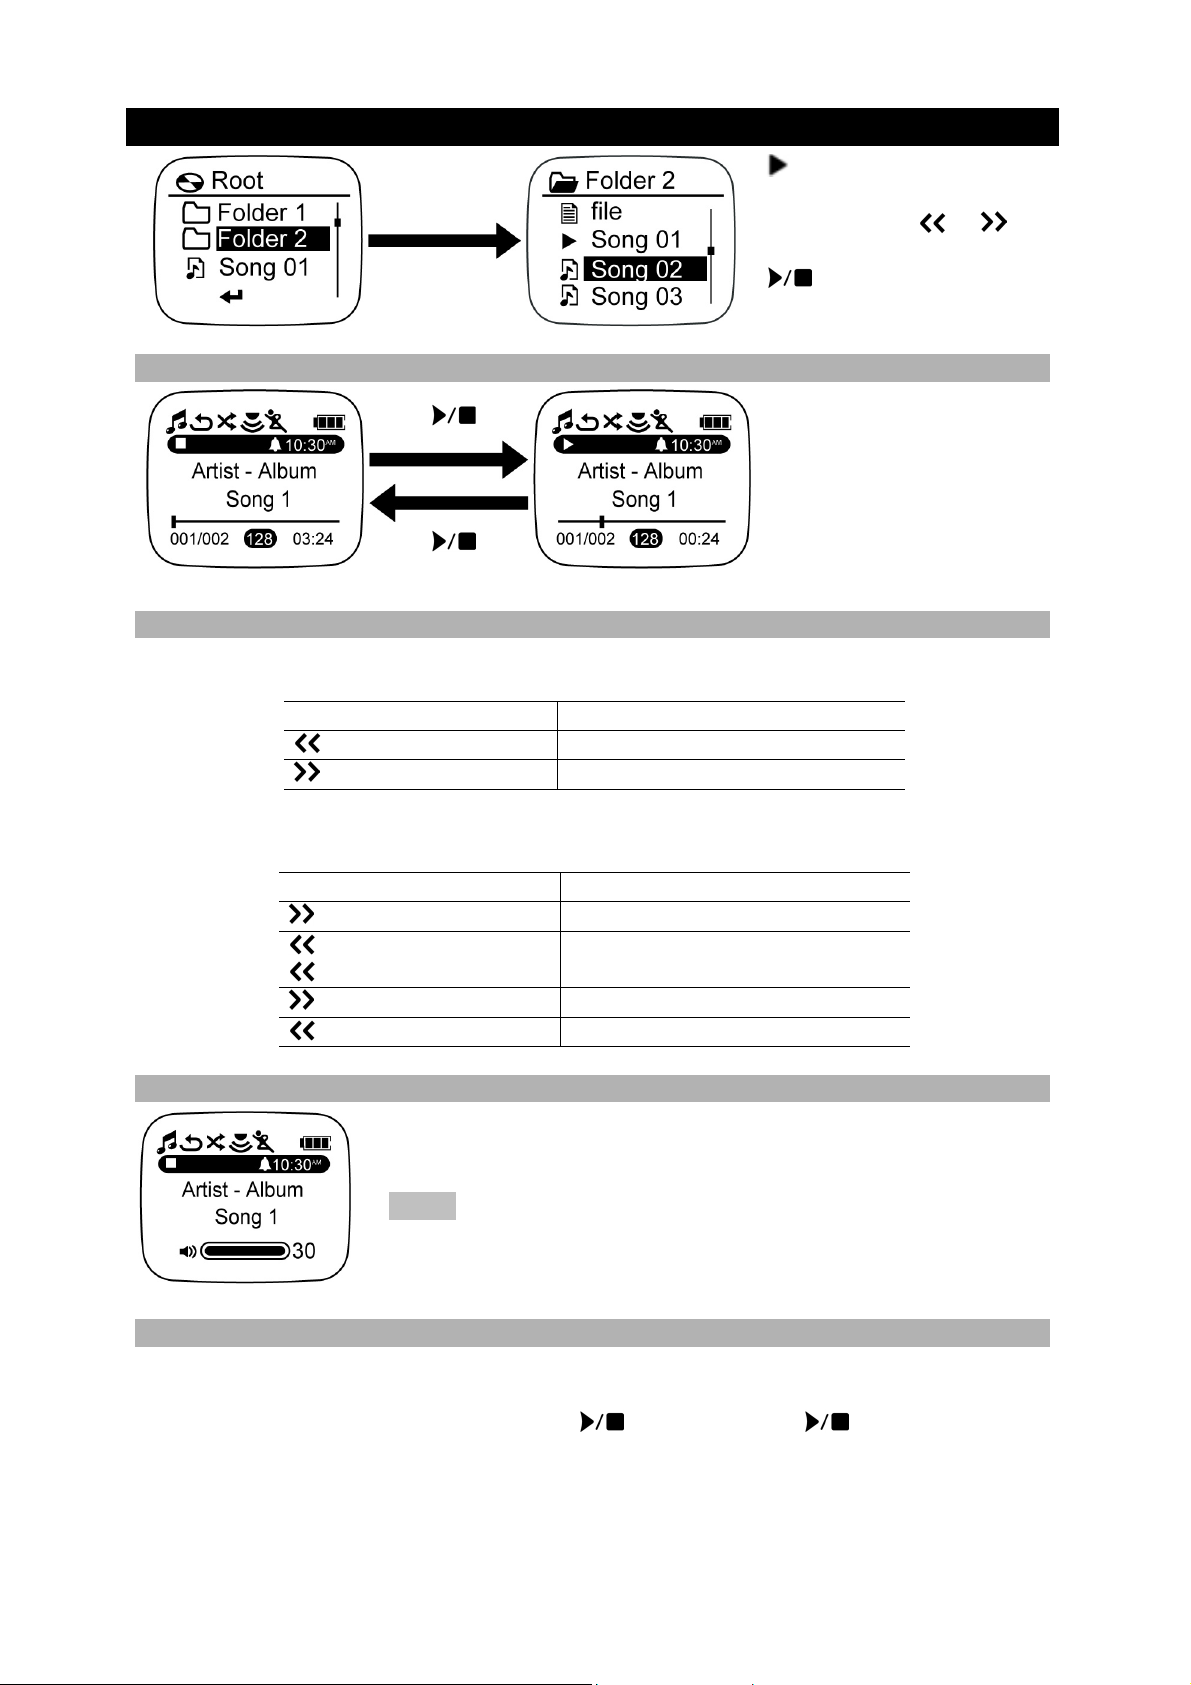
To navigate the main menu and select a menu option:
1. Press
2. Press or to select menu options or settings.
3. Press to confirm and enter desired main menu
ICON MENU
OPTION
Music mode
FM mode
Info
Settings
Hold
4. Repeat steps 2-3 to scroll through and confirm sub-
To exit menu / sub-menu screen:
1. Press
2. Press and hold to go back to the currently selected
once to enter main menu.
option.
menu settings, if available.
once to go back to previous screen.
mode.
Page 9
MUSIC MODE
PLAY / STOP
Press once
SKIP / FAST FORWARD / REWIND
When playback of current track is stopped:
BUTTON PRESS ACTION
once Go back to previous track
once
During playback or pause of current track:
BUTTON PRESS ACTION
once
before 5 seconds /
after first 5 seconds
for 2 seconds
Go to next track
Next track is played
Playback previous track /
Current track is re-played
Fast-forward current track
for 2 seconds Rewind current track
VOLUME
appears beside the
currently track being
played. Press
select track and press
to confirm playback.
or to
1. Press + to increase volume or press – to decrease volume.
2. Press and hold to adjust volume levels more quickly.
NOTE Prolonged listening at full volume may damage your
hearing.
ROTATE DISPLAY
When using the belt clip or arm belt, the player will be positioned where contents
shown on the display will be upside down. To rotate the display 180° so that you can
view the display properly, press and hold
the display and revert to normal viewing.
. Press and hold again to rotate
Page 10
FM MODE (FM 87.5 MHZ ~ 108 MHZ)
y
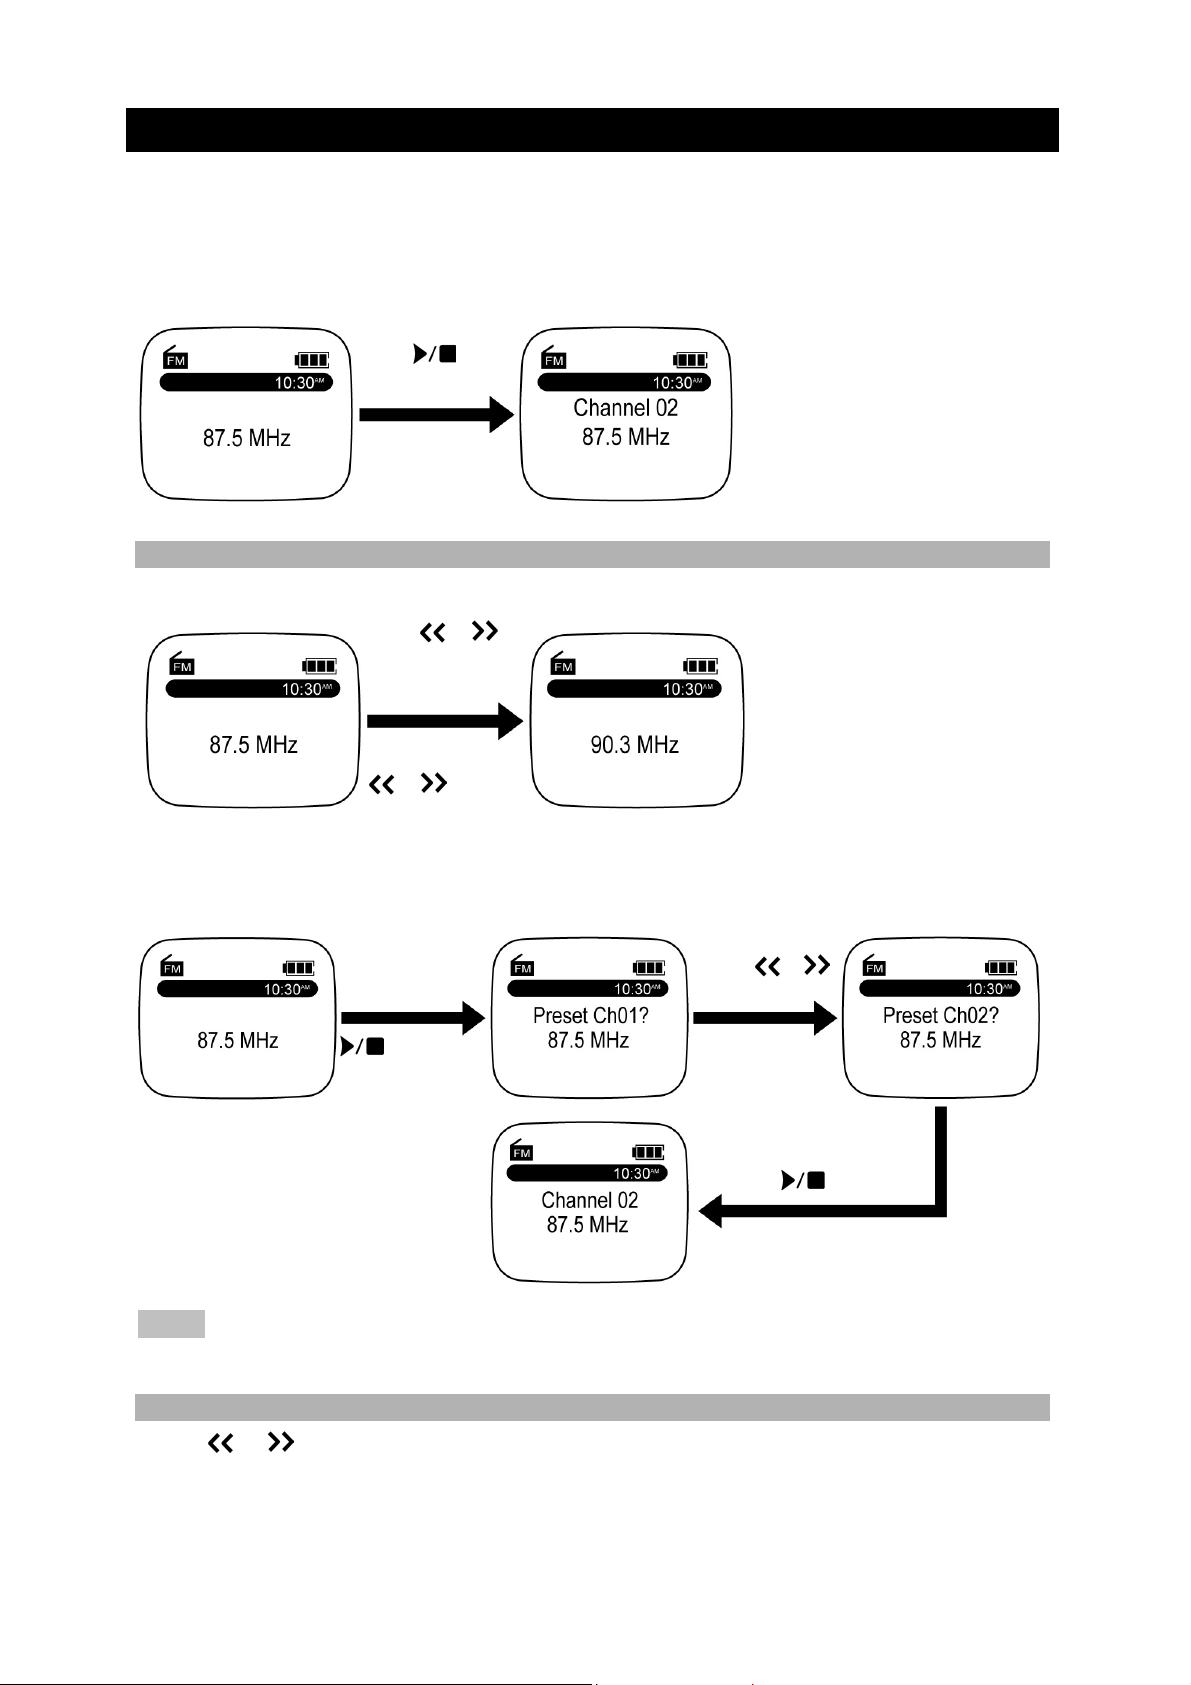
There are 2 operations in FM mode: Scan and Channel.
Scan (scans
channels manuall
or automatically)
Channel (displays
all saved channels
and provides option
to auto-preset)
Press to
toggle between
Scan and Channel
operation
SCAN MODE (SCAN AND PRESET CHANNELS)
SCANNING CHANNELS
Press or
to manually search
for an FM channel.
Press and hold
or to auto-
search.
PRESET CHANNELS
Press and hold
for 2 seconds
The unit stops scanning
and begins broadcasting
when a channel of
sufficient strength is
detected.
Press or
to select desired
channel no.
(01 to 30)
Press to confirm
preset channel
NOTE If you are presetting a channel for the first time, “Preset Ch01?” appears.
Otherwise, the unit starts from the channel that has not yet been preset.
CHANNEL MODE (SELECTING PRESET CHANNELS AND AUTO PRESET)
Press
or once to move to the next or previous preset channels.
Page 11
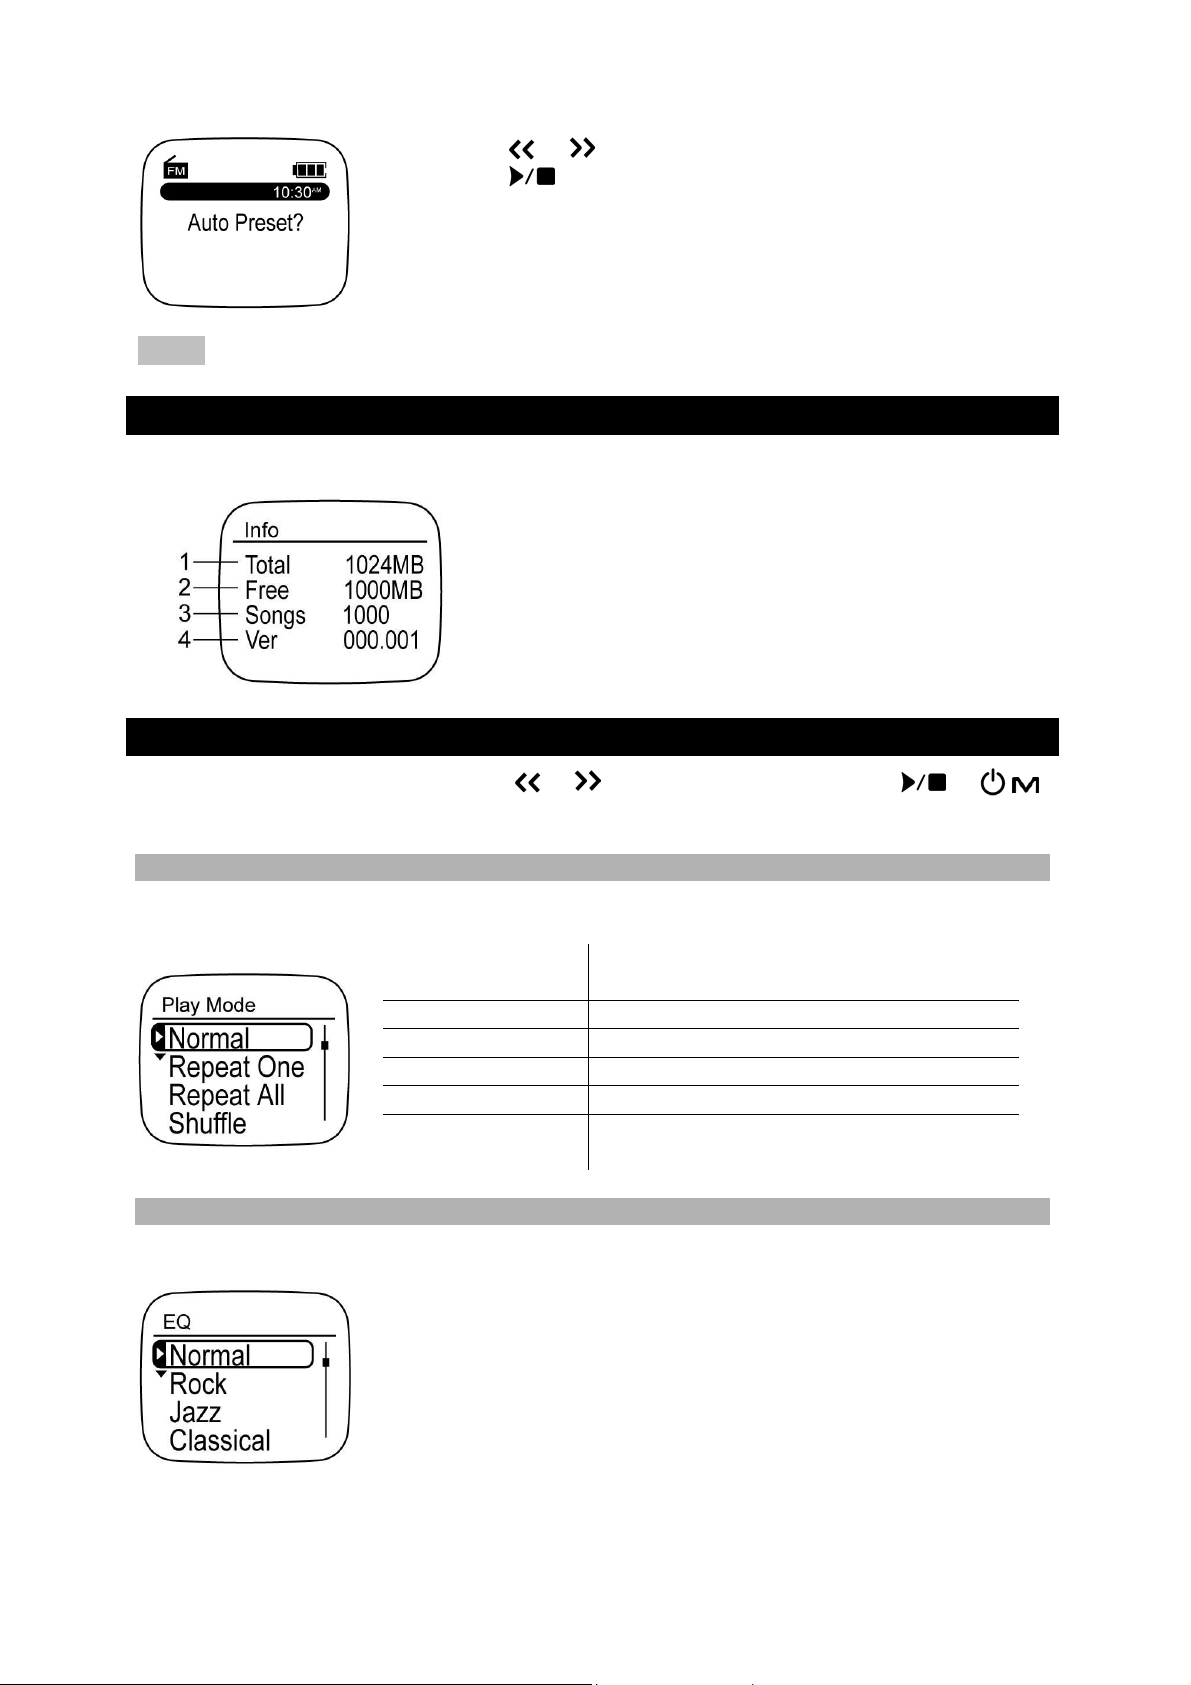
AUTO PRESET
1. Press or to toggle to “Auto Preset?” option.
2. Press
to confirm Auto Preset. Unit scans entire FM
frequency range and presets available channels.
previously saved channels are cleared.
NOTE FM reception varies from region to region.
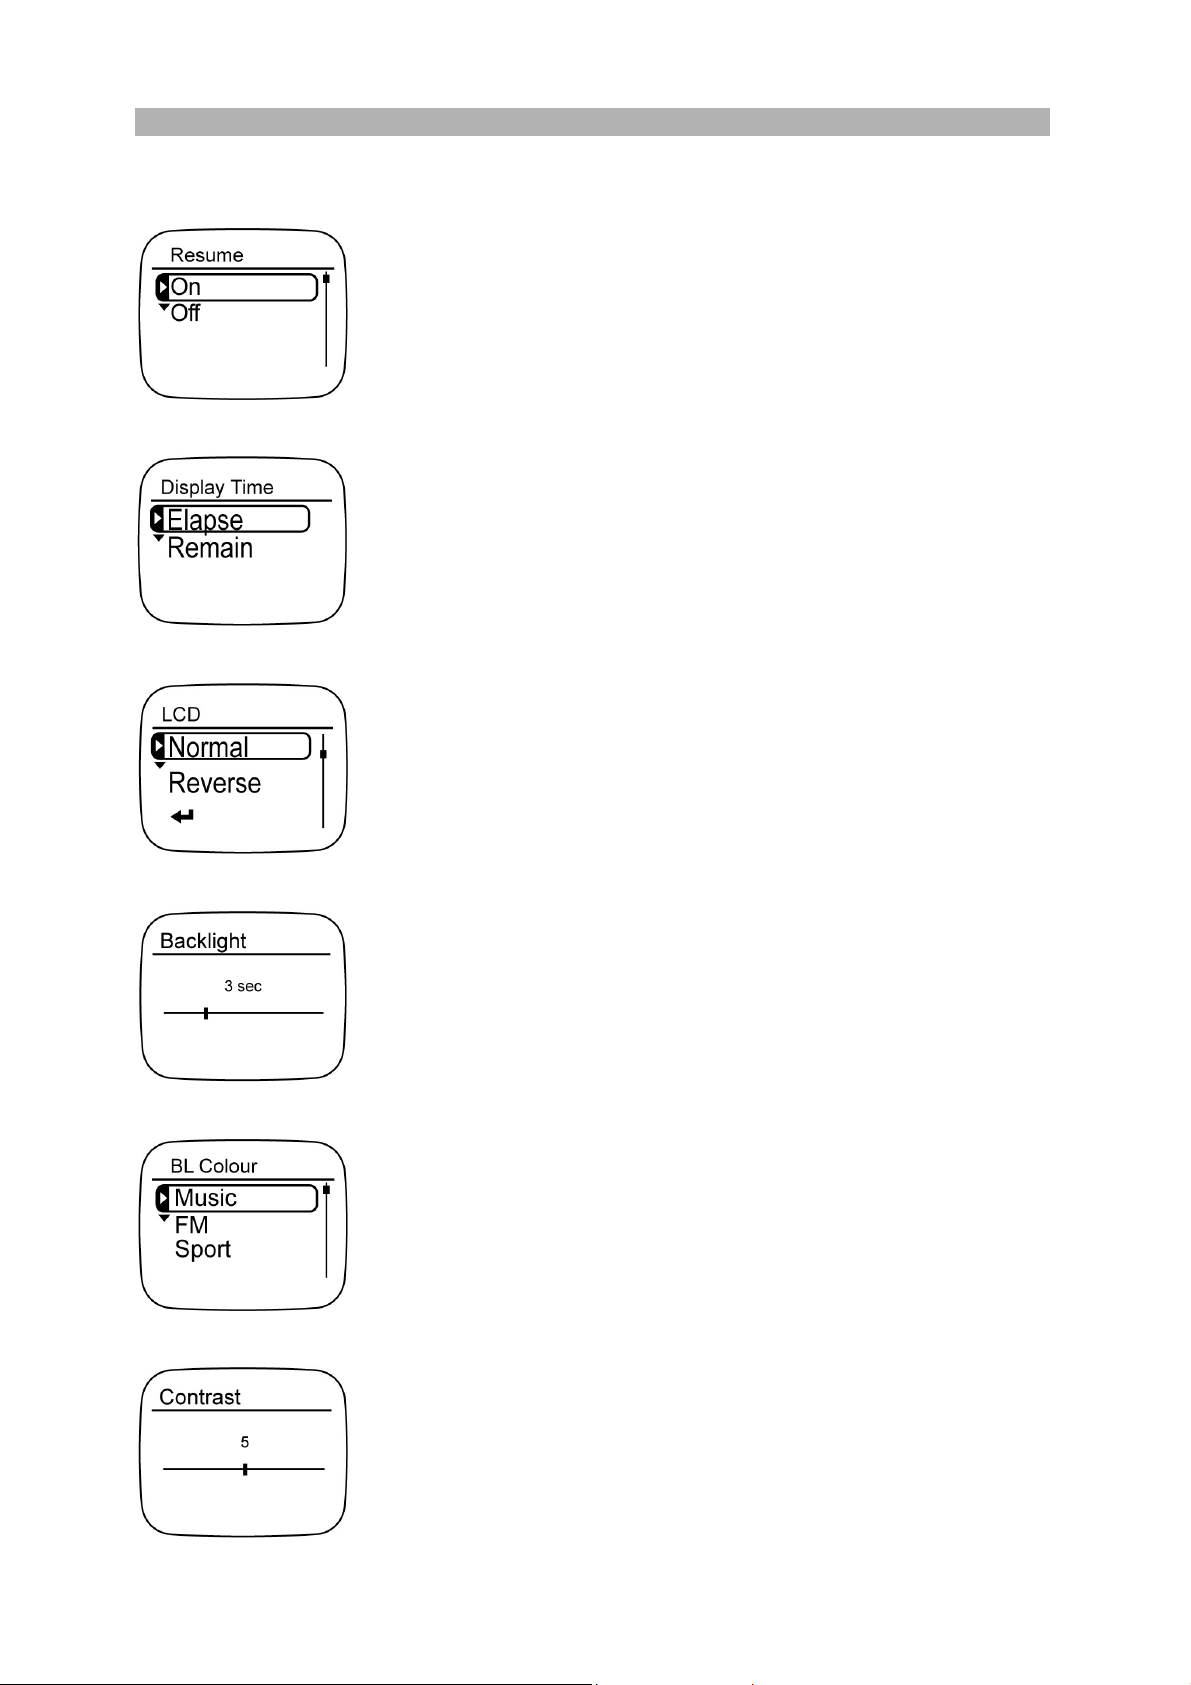
INFO (INFORMATION)
Menu Shortcut: Main Menu > Info
1. Total amount of memory (total memory is
less than indicated as some memory is
reserved for internal system files)
2. Amount of free memory remaining
3. Total number of tracks
4. Firmware version
All
SETTINGS
To adjust the Settings options, use or to select a value and press or
to select / confirm setting and go to the next setting, or exit.
PLAY MODE
Menu Shortcut: Main Menu > Settings > Play Mode
EQ (EQUALIZER)
Menu Shortcut: Main Menu > Settings > EQ
PLAY MODE
DESCRIPTION
PATTERN
Normal Playback all tracks in sequential order
Repeat One Repeats current track
Repeat All Play all tracks once repeatedly
Shuffle All tracks randomly played back once
Shuffle Repeat All tracks randomly played back once
repeatedly
Equalizer settings allow you to adjust sound acoustics based
on the different kinds of music being played back. You may
choose from Normal, Rock, Jazz, Classical or Pop.
Page 12
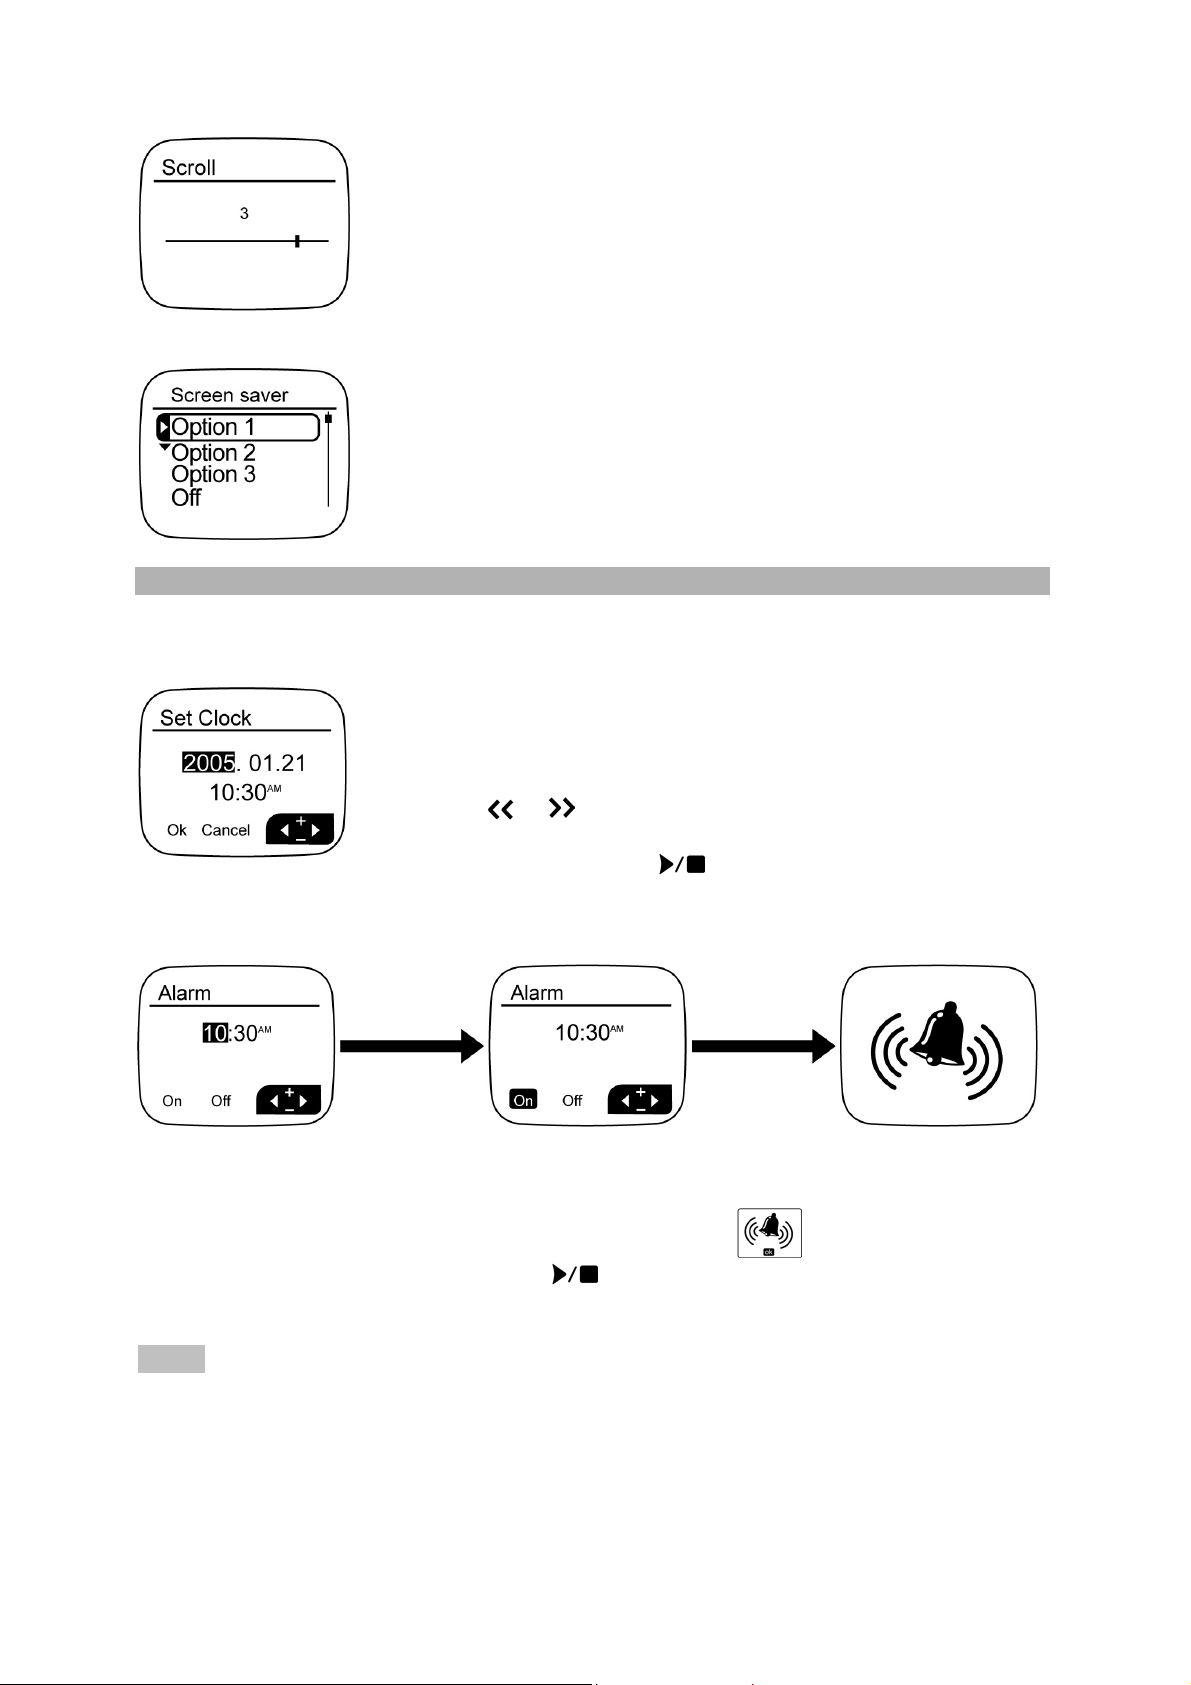
DISPLAY
Menu Shortcut: Main Menu > Settings > Display
RESUME
If “On” is selected, current playback time is stored in memory
and playback starts from last stored playback time.
If “Off” is selected, playback starts from beginning of track.
DISPLAY TIME
Display Time shows track elapsed time or remaining time
during playback.
LCD
Provides option to select normal or reverse display contrast.
BACKLIGHT
BL COLOR
CONTRAST
With the backlight feature activated, the display will light up
for a certain duration each time a button is pressed.
You can choose from 3 backlight color options: Music, FM,
Sport. Within each of these 3 options are 3 colors to select
from: orange, blue, purple.
Adjusting the contrast settings allows you to read the display
more clearly in different lighting conditions.
Page 13
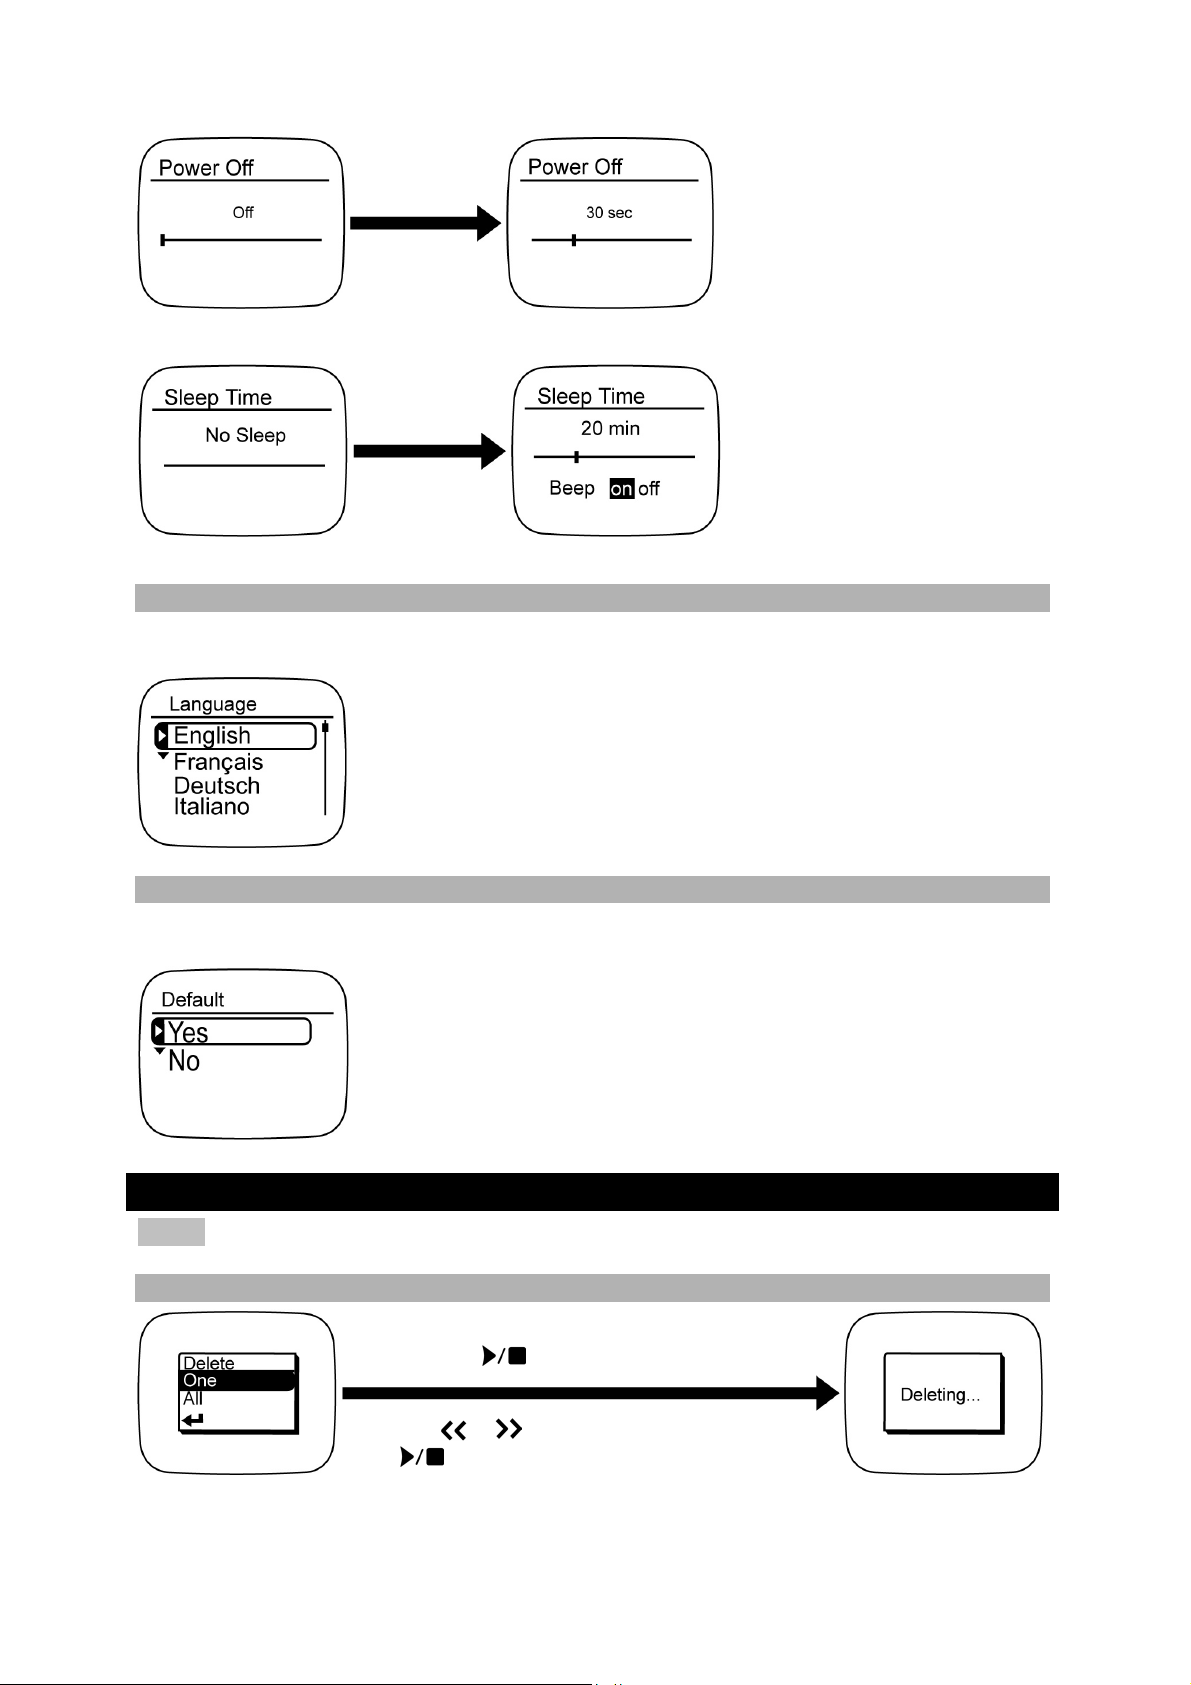
SCROLL
If track information is too long to fit into the display, this
feature allows information to scroll from left to right, set by the
scroll speed selected.
SCN SAVER
When no buttons are pressed after 1 minute, the screensaver
appears. There are 3 screensavers to choose from.
TIME
Menu Shortcut: Main Menu > Settings > Time
SET CLOCK
Clock settings are adjusted in the following order: year,
month, date, hour, minute, AM/PM.
1. To adjust clock values, press – or + to decrease or
increase value.
2. Press
repeat steps 1-2 to until all settings are adjusted.
3. Select “Ok” and press to confirm clock setting, OR
or to move to previous or next value and
select “Cancel” to cancel and go back to previous screen.
ALARM
Alarm settings are adjusted in the following order: hour, minute, and AM/PM.
Procedure for setting the alarm is the same for setting the clock. After the alarm is set,
select “On” to activate. When the alarm time is reached,
and a beep sound is generated. Press
to deactivate alarm and return to current
appears full-screen
operation.
NOTE The alarm, if activated, goes off at the set time only when the player is
powered on.
Page 14
POWER OFF
SLEEP TIME
LANGUAGE
Menu Shortcut: Main Menu > Settings > Language
Select among 8 menu languages: English, S. Chinese, T.
Chinese, French, German, Italian, Spanish, Portuguese.
The player can be set to
power off automatically
when in idle save battery
power.
Sleep Time can be set so
that the unit turns off
automatically after a
specified time. When beep
is set to “On”, the player
will beep the user before
turning off automatically.
DEFAULT
Menu Shortcut: Main Menu > Settings > Default
The unit reverts to its default settings when it is reset,
reformatted, or default setting is selected.
DELETING FILES
NOTE Once files are deleted they cannot be retrieved.
DELETING ONE
When browsing through the tracks, press
and hold
Use
to confirm and delete current file.
to enter Delete option.
or to select “One” and press
Page 15
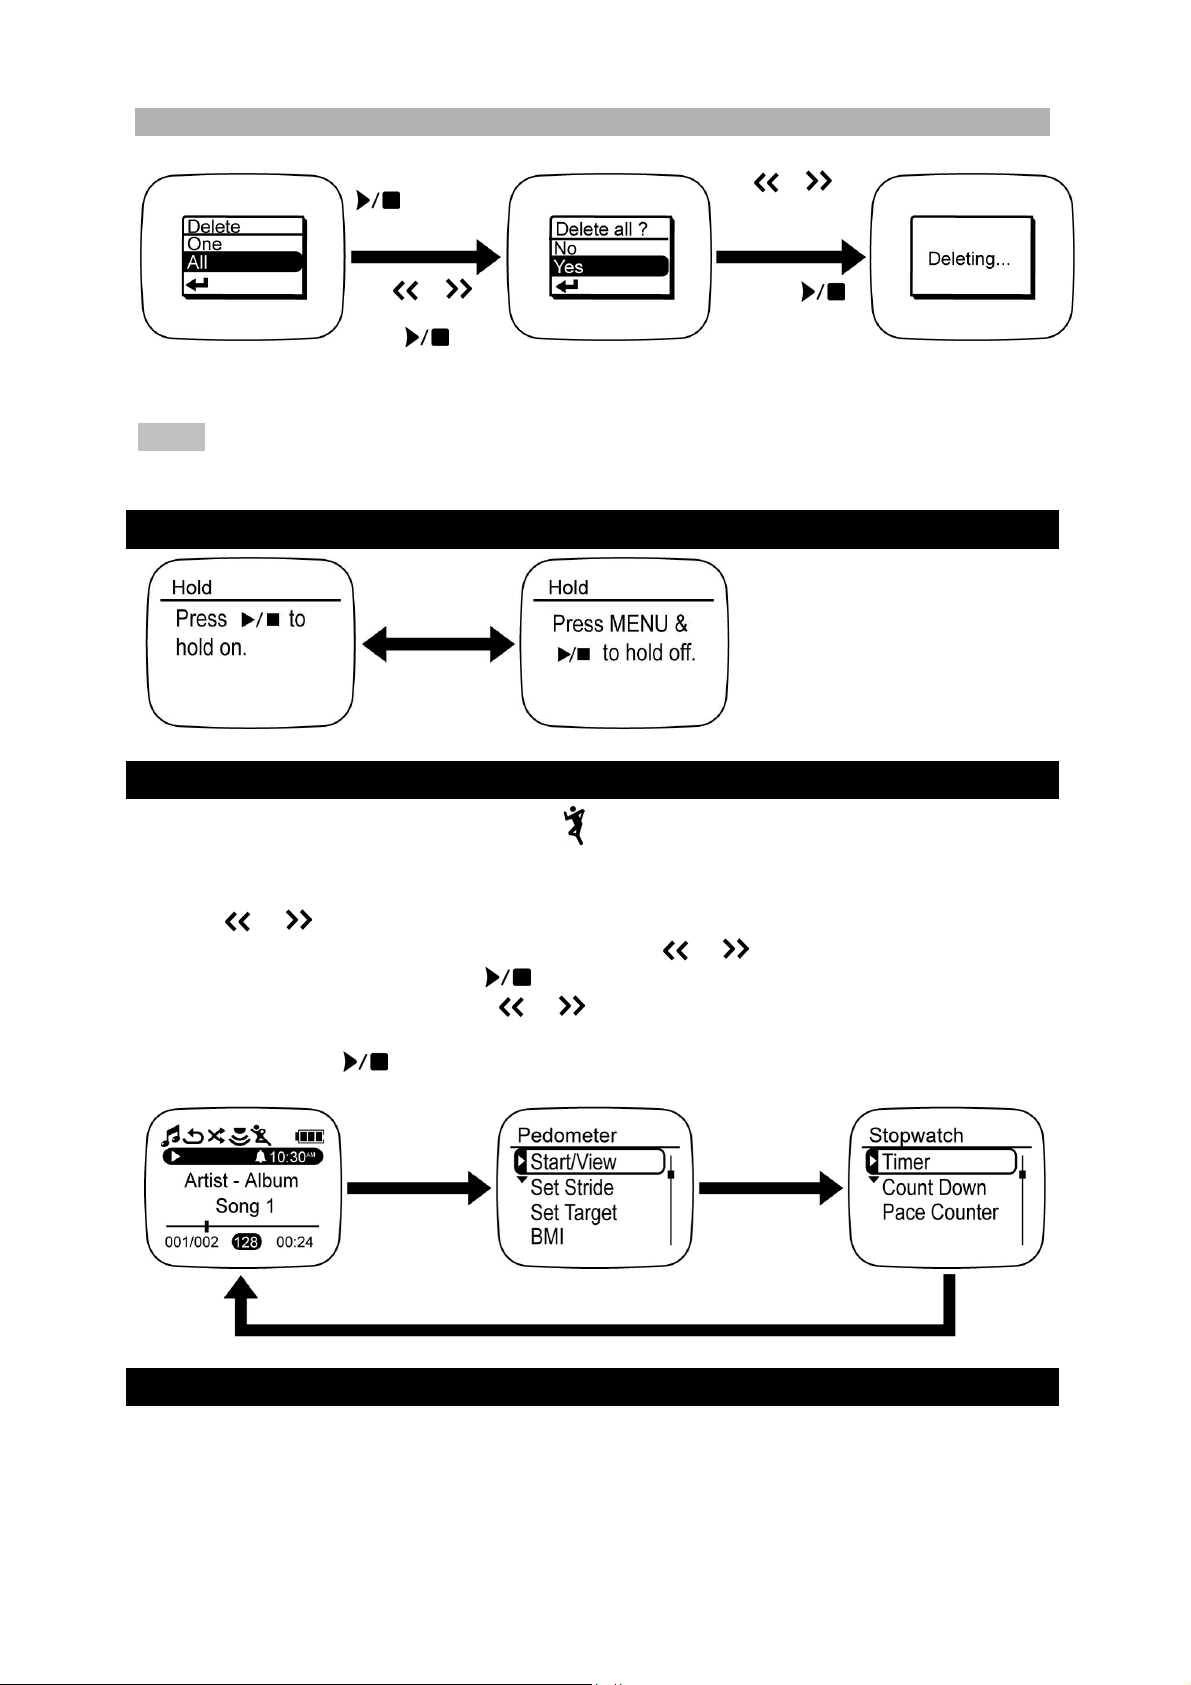
DELETING ALL
Press and hold
to enter
Delete option.
Use
select “All” and
press
or to
.
Use
select “No” or
“Yes”
and press
to confirm deletion
of all files.
or to
NOTE Delete One and Delete All functions work only if playback of current track is
stopped. If unit is playing a music file, the Delete option cannot be accessed.
BUTTON HOLD
The button-hold
function locks all
buttons to prevent
them from being
accidentally pressed.
SPORT FUNCTION
1. In Music / FM mode, press and hold once to enter Pedometer menu, and press
and hold again to enter Stopwatch menu. Press and hold a third time to return to
Music /FM mode.
2. Use
3. In the Pedometer and Stopwatch menus, use
sub-menu options and press to confirm.
4. In each sub-menu option, use
then choose “ok” to confirm or “cancel” to exit without saving.
5. Press and hold to rotate the display 180°.
or to select the respective Pedometer or Stopwatch menu options.
or to select the respective
or to select and – or + to adjust values and
PEDOMETER
The MP121’s Pedometer function measures the approximate distance traveled on
foot by registering the number of steps taken. This allows you to effectively gauge
your walking regimen as part of your exercise routine. You may set specific values for
stride length, steps, distance traveled and calories.
Page 16
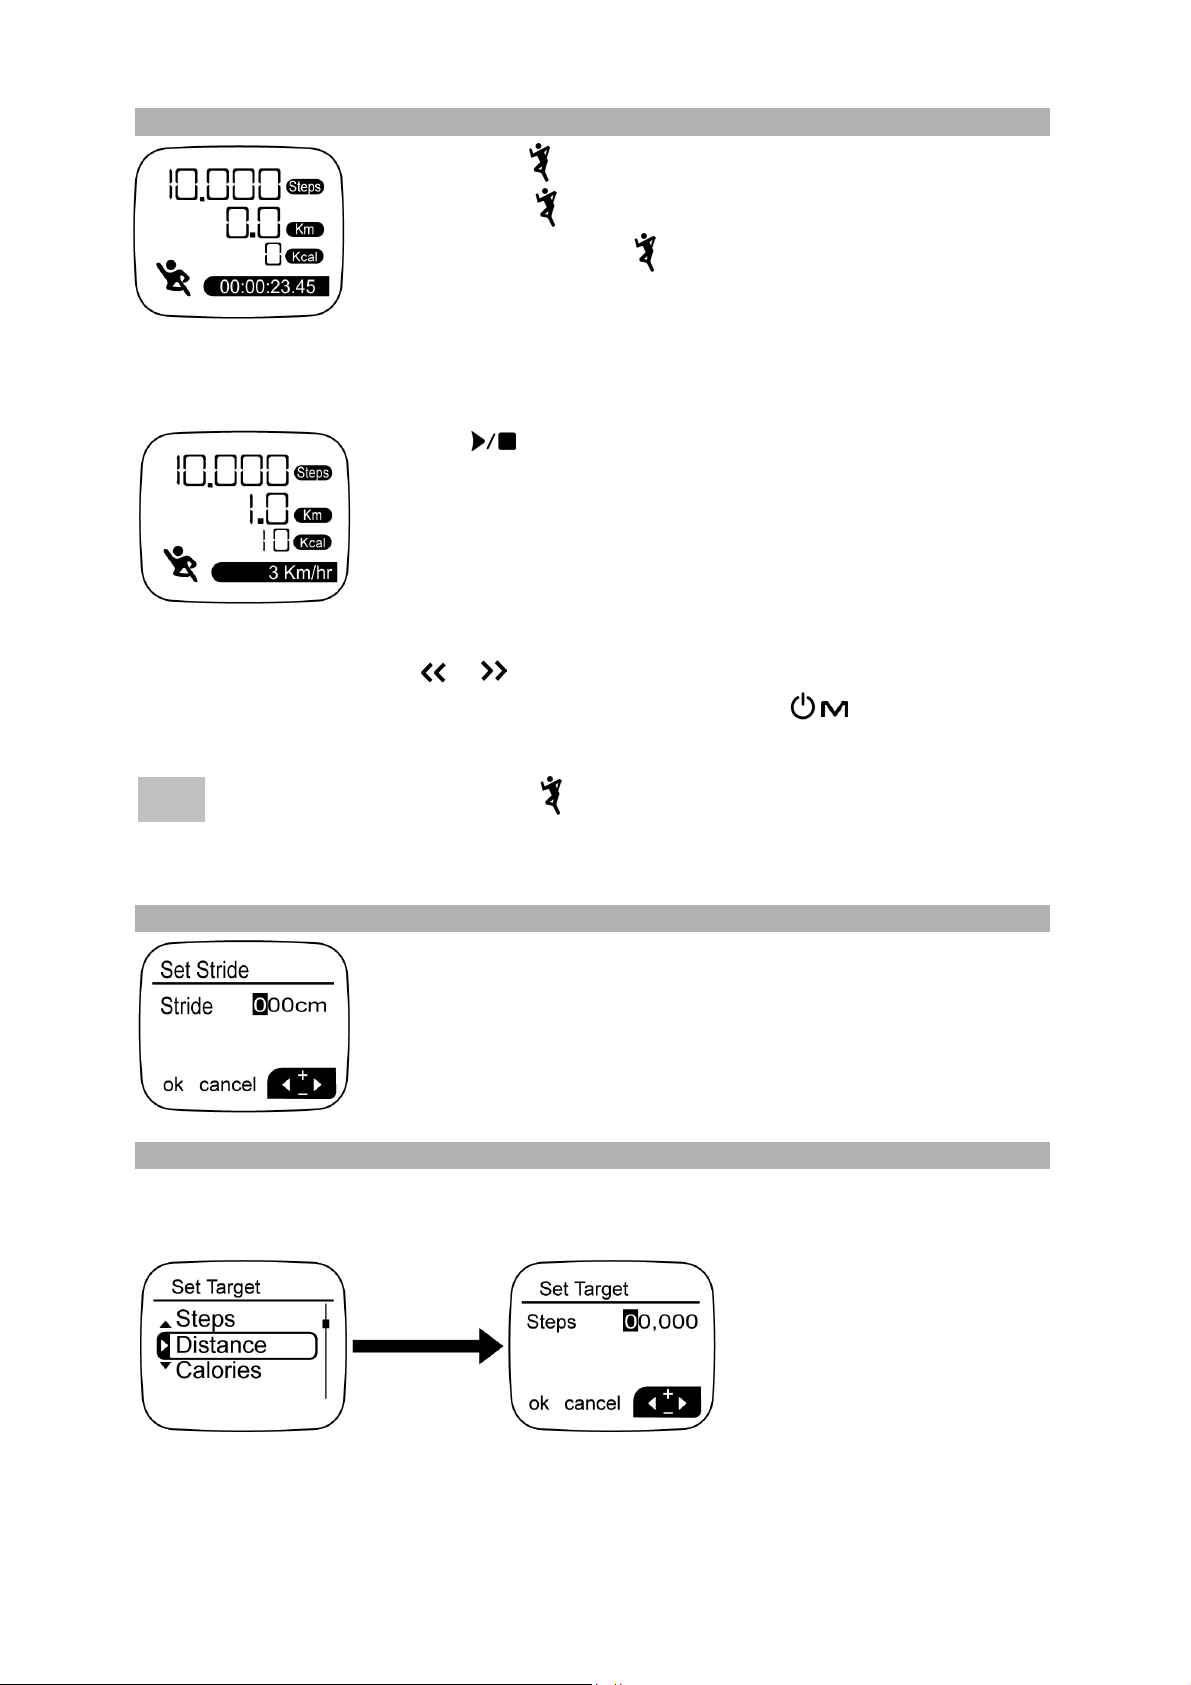
START / VIEW
1. Press to start. The display time begins counting.
2. Press
3. Press and hold
to pause and press again to continue.
to turn off the pedometer. All
values return to 0.
When the pedometer is on, press and hold SPORT to toggle between Sport mode
and current Music / FM status.
Press to display speed. After 5 seconds, it goes back
to Stopwatch time display
If music is playing back / FM radio is on when pedometer is in operation, the
functions of pressing –, +,
display will continue to show the pedometer operating. Press
or is the same as in Music / FM mode but the unit’s
to enter menu
options at anytime.
NOTE While you may press and hold to toggle between Music / FM and the
respective Pedometer and Stopwatch menus, the Pedometer functions do not work if
any of the Stopwatch functions are currently operating.
SET STRIDE
Correctly measuring distance depends on accurately setting
the average length (30cm to 150cm) of an individual stride
(stride length).
SET TARGET
You can set the target steps / distance traveled / calories burned when you are exercising.
Choose between different
Set Target sub-menus:
Steps, Distance and
Calories. Once each of
these values is set, you can
begin the Pedometer
operation.
Page 17
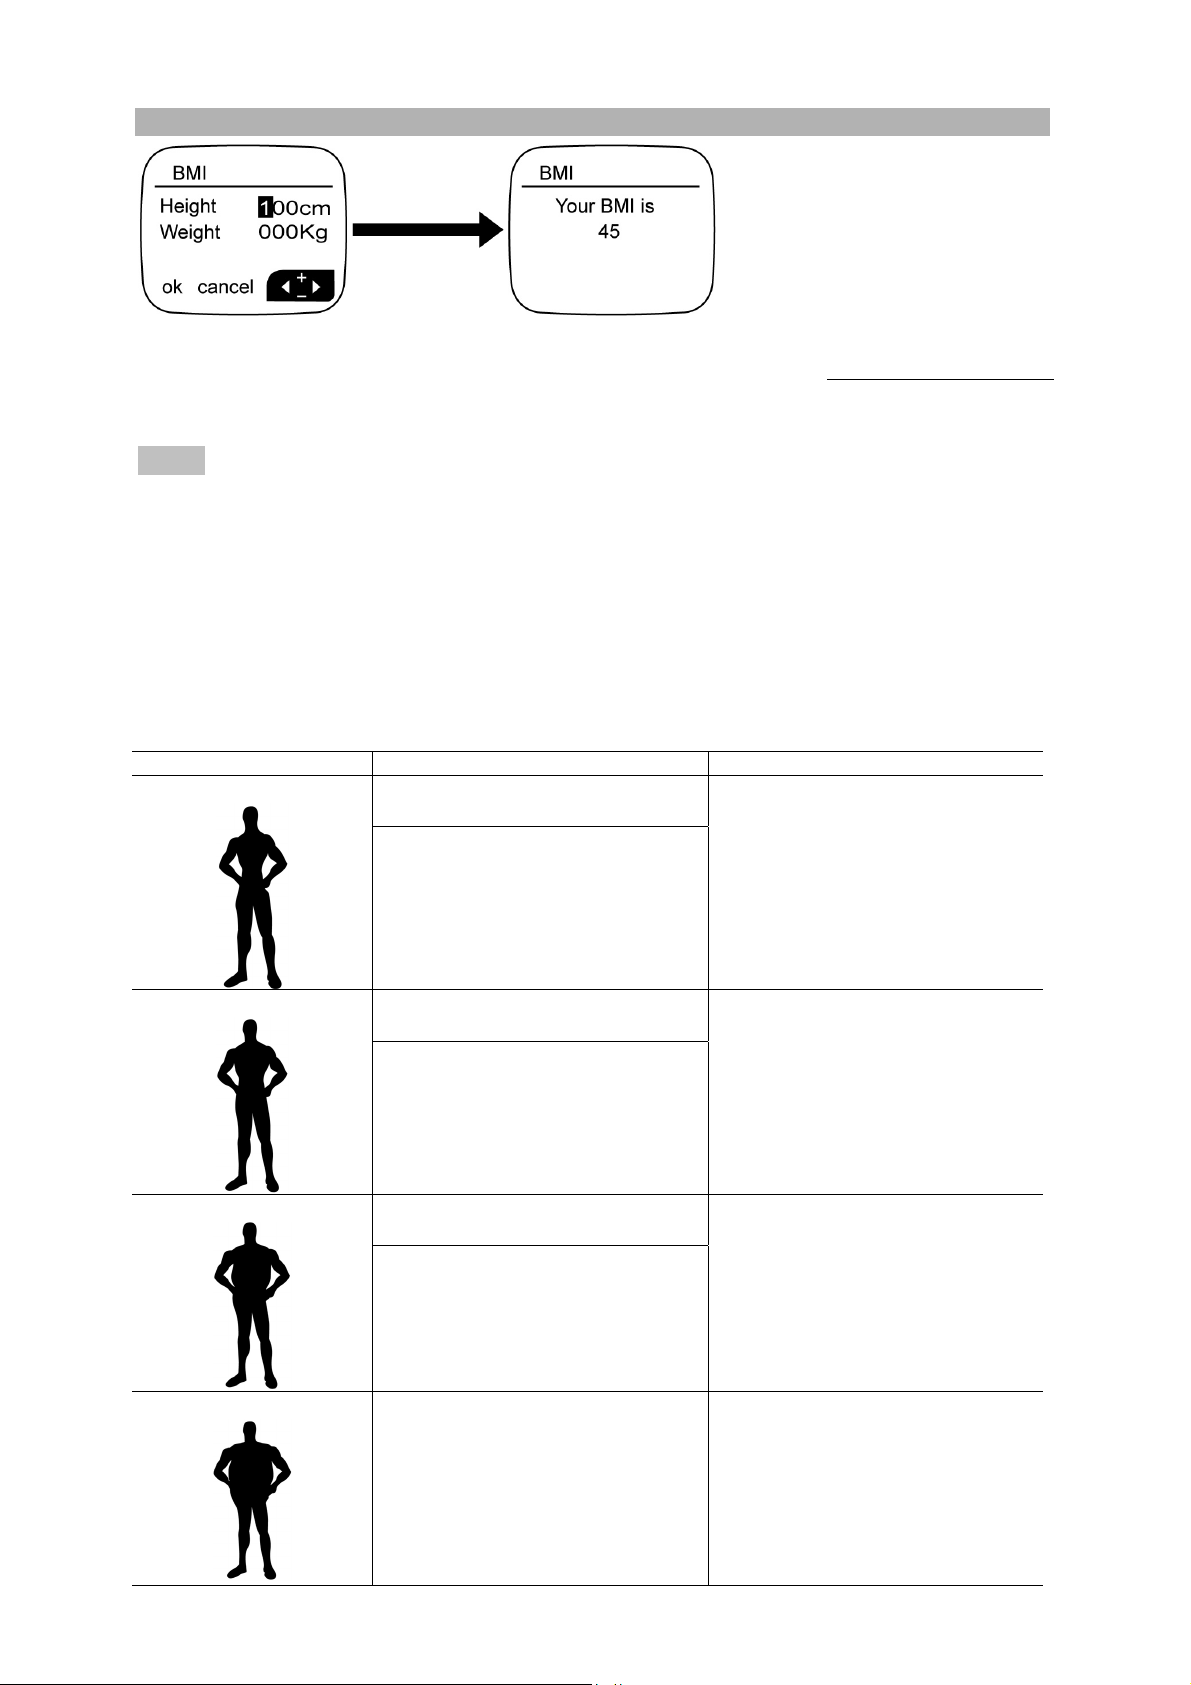
BMI
BMI (body mass index) is a
widely used international
standard that measures
height to weight ratio to
determine obesity. BMI is
expressed as:
BMI =
Body weight (kg)
[Body height (m)]
2
NOTE The BMI index is only a general indicator of overall health. The range may
vary depending on your body type and composition. Consult with your doctor to gain
a full understanding of your health condition.
HOW TO INTERPRET BMI
The result is a value (such as 22) that corresponds to the four BMI ranges:
underweight, recommended, overweight, and obese. The ranges are based on a
comprehensive clinical study of the averages for thousands of people for whom BMI
was calculated. BMI can be used to estimate potential health risks. Based on this
research, it has been shown that the health risk for people with a BMI of 22 is lowest.
HEALTH INDICATION BMI RANGE DESCRIPTION
Underweight
Less than 20.0*
Asian BMI: Less than 18.5
Your body weight is lower
than average.
Work to maintain a healthy,
regular diet and exercise
plan to build up your health.
Recommended
Overweight
Obese
20.0 to 25.0*
Asian BMI: 18.5 to 23.0
25.1 to 29.9*
Asian BMI: 23.0 to 29.9
30.0 or greater*
You are at the recommended
level.
Maintain a balanced diet and
exercise routine to stay at the
present level.
Your body weight may be
above normal.
Exercise more and maintain
a healthy diet to lower your
risk for serious illness.
You may be at risk for heart
disease, high blood pressure,
and other illnesses.
Consult your doctor to create
a proper health and fitness
plan.
Page 18
* Asians have a separate BMI range due to their different body composition.
p
NOTE Consult your physician before you begin a new diet or exercise program.
NOTE BMI should not be used as a health risk indicator for the following groups:
GROUP REASON
Children and teenagers BMI ranges are based on adult heights.
Athletes and body builders BMI does not differentiate between fat and
muscle and can therefore be inaccurate for
people with high muscle density.
Pregnant or nursing women This group may experience elevated fat-
levels as part of the pregnancy.
People over age 65 This group may experience elevated fat
levels as part of the aging process.
REFERENCES
Jequier, E. (1987), Energy, obesity, and body weight standards.
American Journal of Clinical Nutrition, 45, 1035-1047.
The Japan Society for the Study of Obesity
The Weight Loss Research Center
MyDr.com (www.mydr.com.au
)
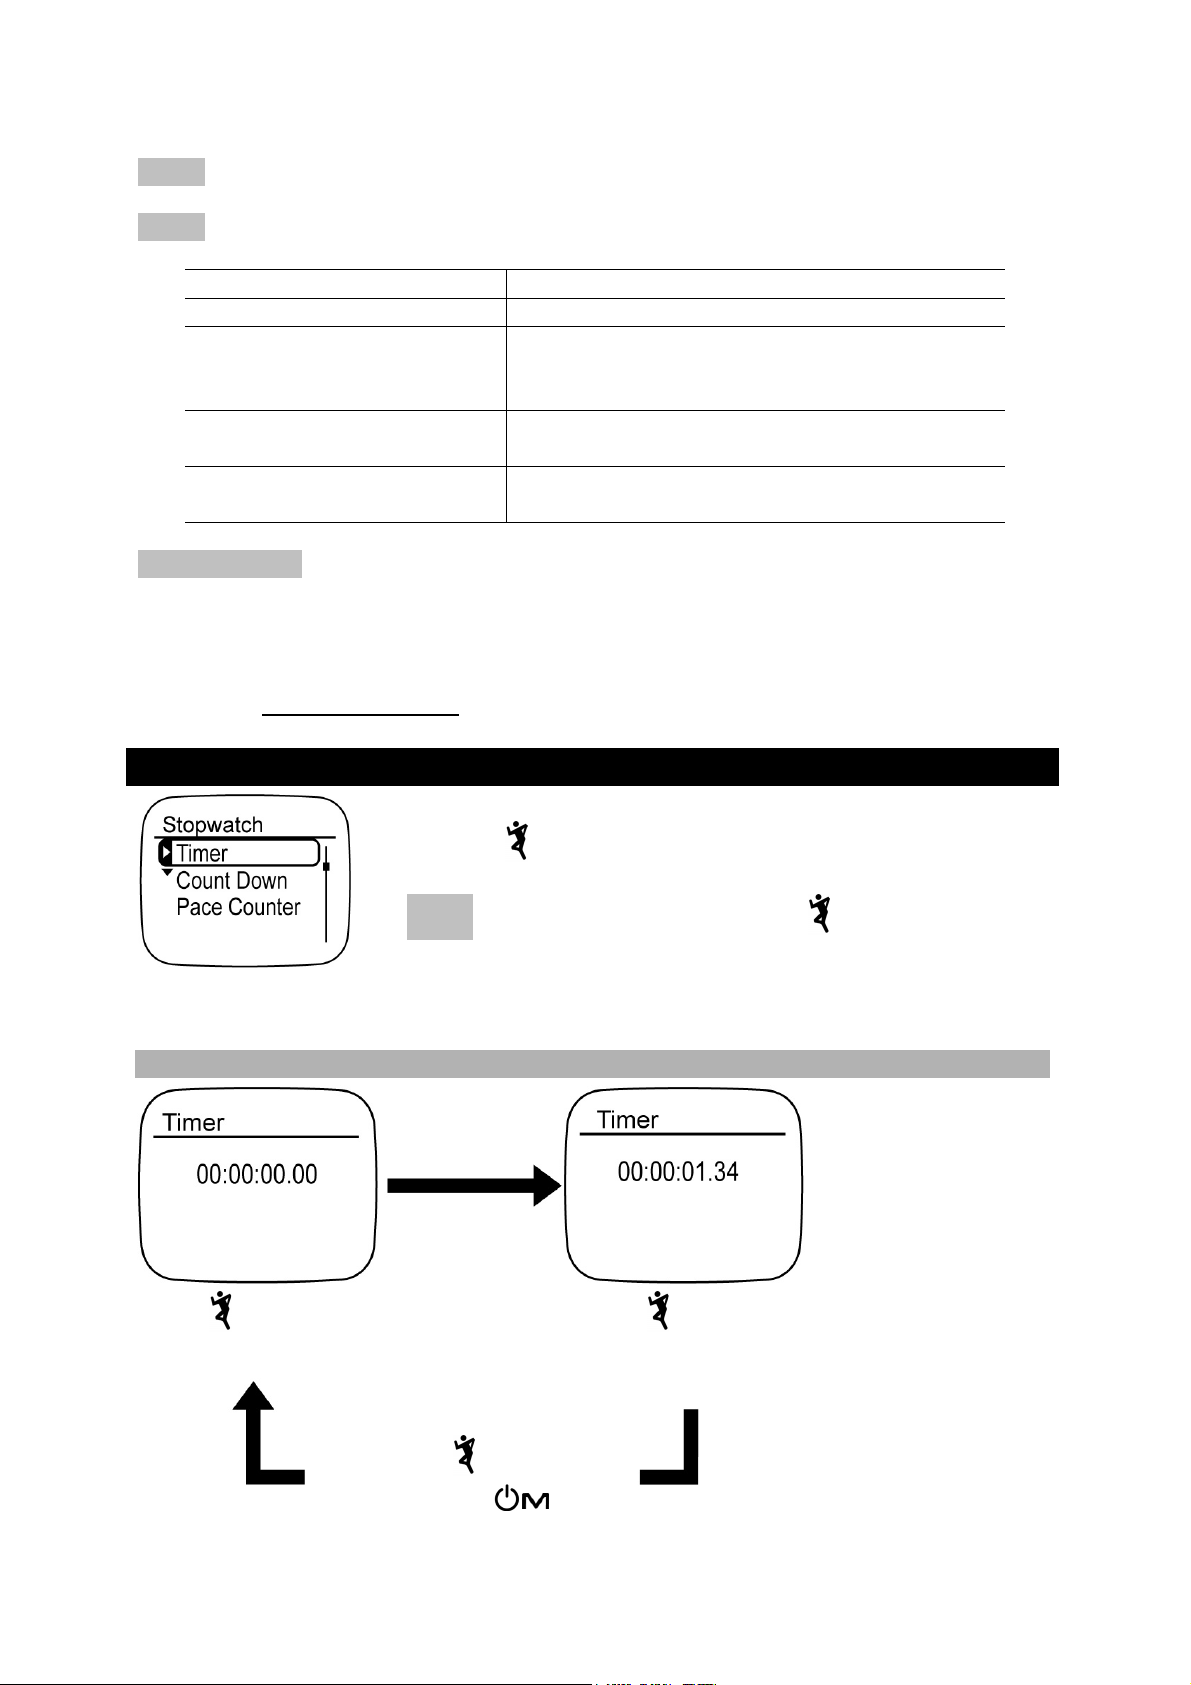
STOPWATCH
TIMER
Press once to start
time measurement
To enter Stopwatch mode from Pedometer mode, press
and hold
.
NOTE While you may press and hold to toggle between
Music / FM and the respective Pedometer and Stopwatch
menus, the Stopwatch functions do not work if any of the
Pedometer functions are currently operating.
Press once to pause
counting and once again
to continue.
Press and hold
and reset OR
to stop counting
ress to exit
Page 19
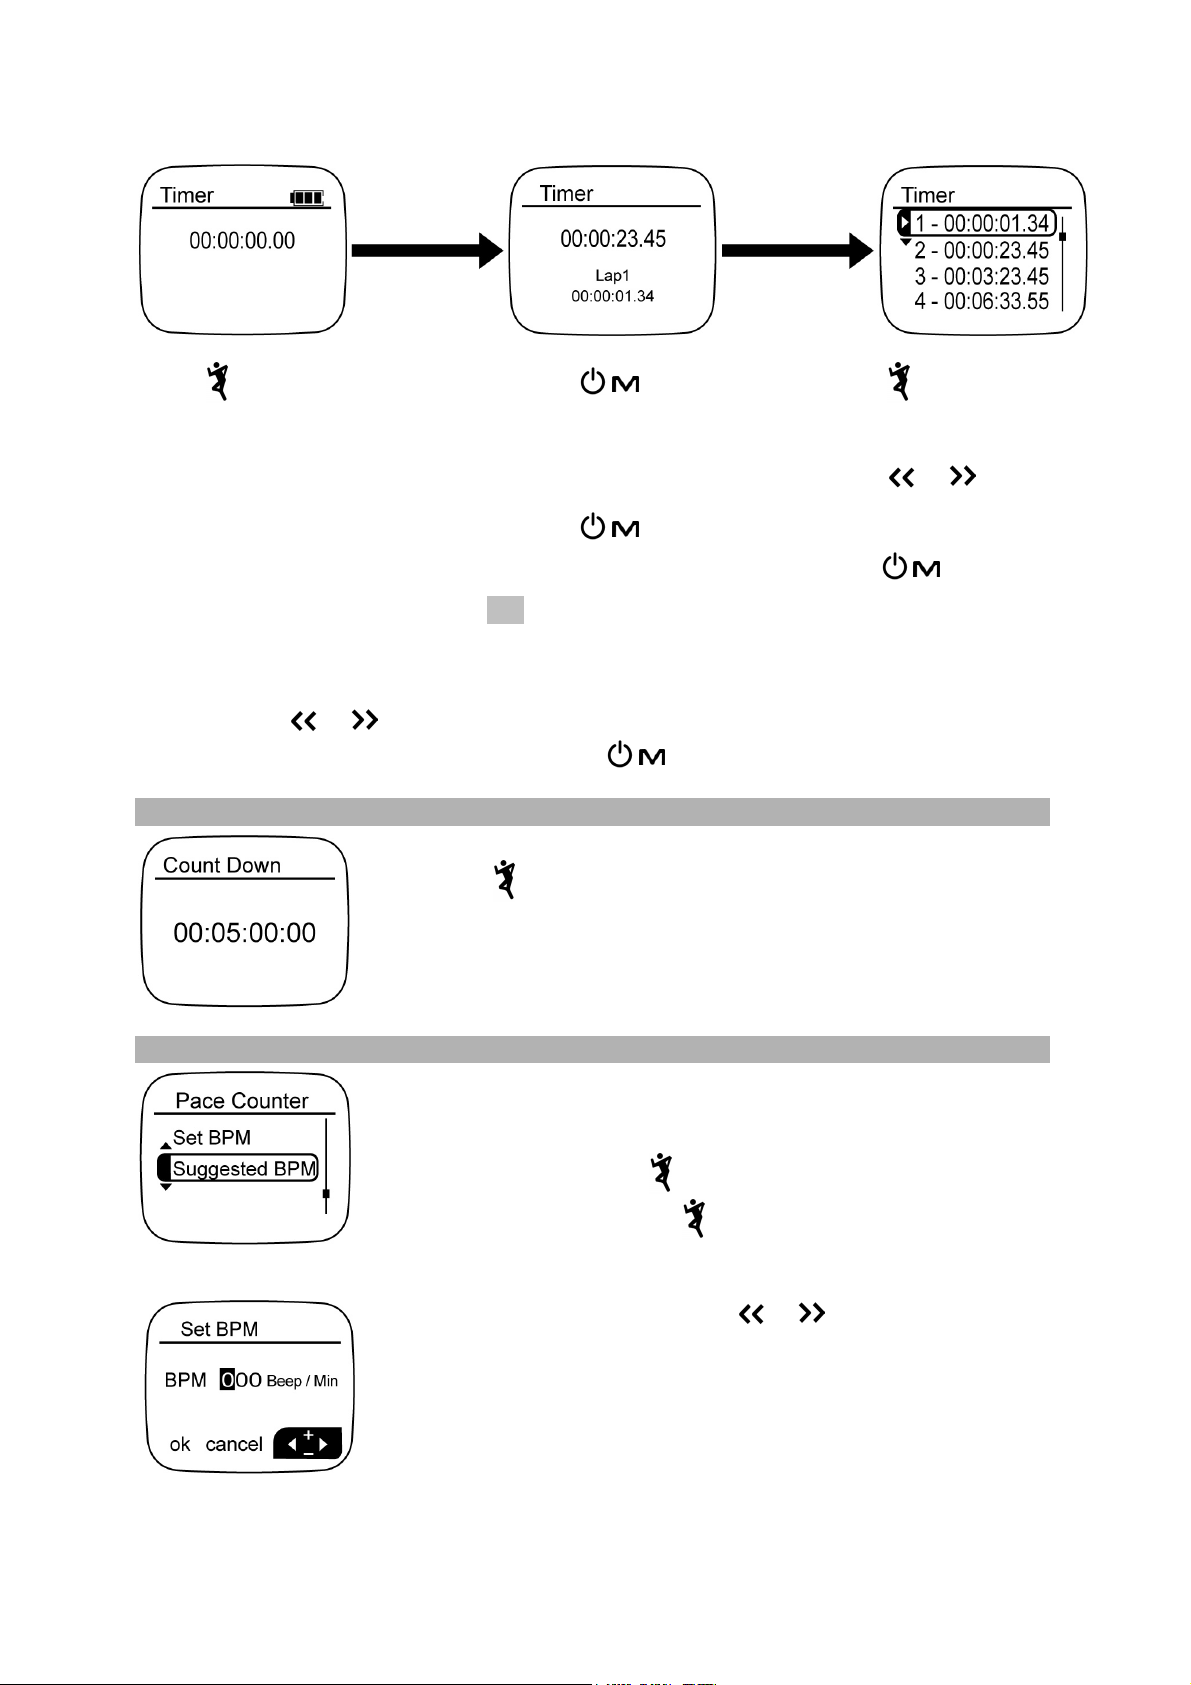
To use the Stopwatch timer as a lap counter:
Press
once to start time
measurement
1. Press once to
store a lap time. First
lap time is displayed
and time count
continues
2. Press to store
other lap times
TIP Up to 9 lap times can
be stored
1. Press once to end
counting. All lap times
and end time are shown
2. Press or to scroll
and view the different
times
3. Press to exit lap
time display
If music is playing back / FM radio is on when timer is in operation, the functions of
pressing –, +,
continue to show the timer operating. Press
or is the same as in Music / FM mode but the unit’s display will
to enter menu options at anytime.
COUNT DOWN
1. Set the time in which unit can count down from.
2. Press
to start count down and press again at anytime to
stop.
METRONOME / PACER
The Pacer provides a beat per minute (BPM) beep rhythm to
help guide you during exercise. Stride length, walking
distance and time can be set to obtain a suggested BPM.
To set the Pacer, press
to previous settings. Press at anytime to end.
SET BPM
1. Select the BPM values using or and – or +.
2. When finished, select "ok" and the pace counter starts
beeping, OR select "cancel" to go back to the Pace
Counter menu.
. The unit starts beeping according
Page 20
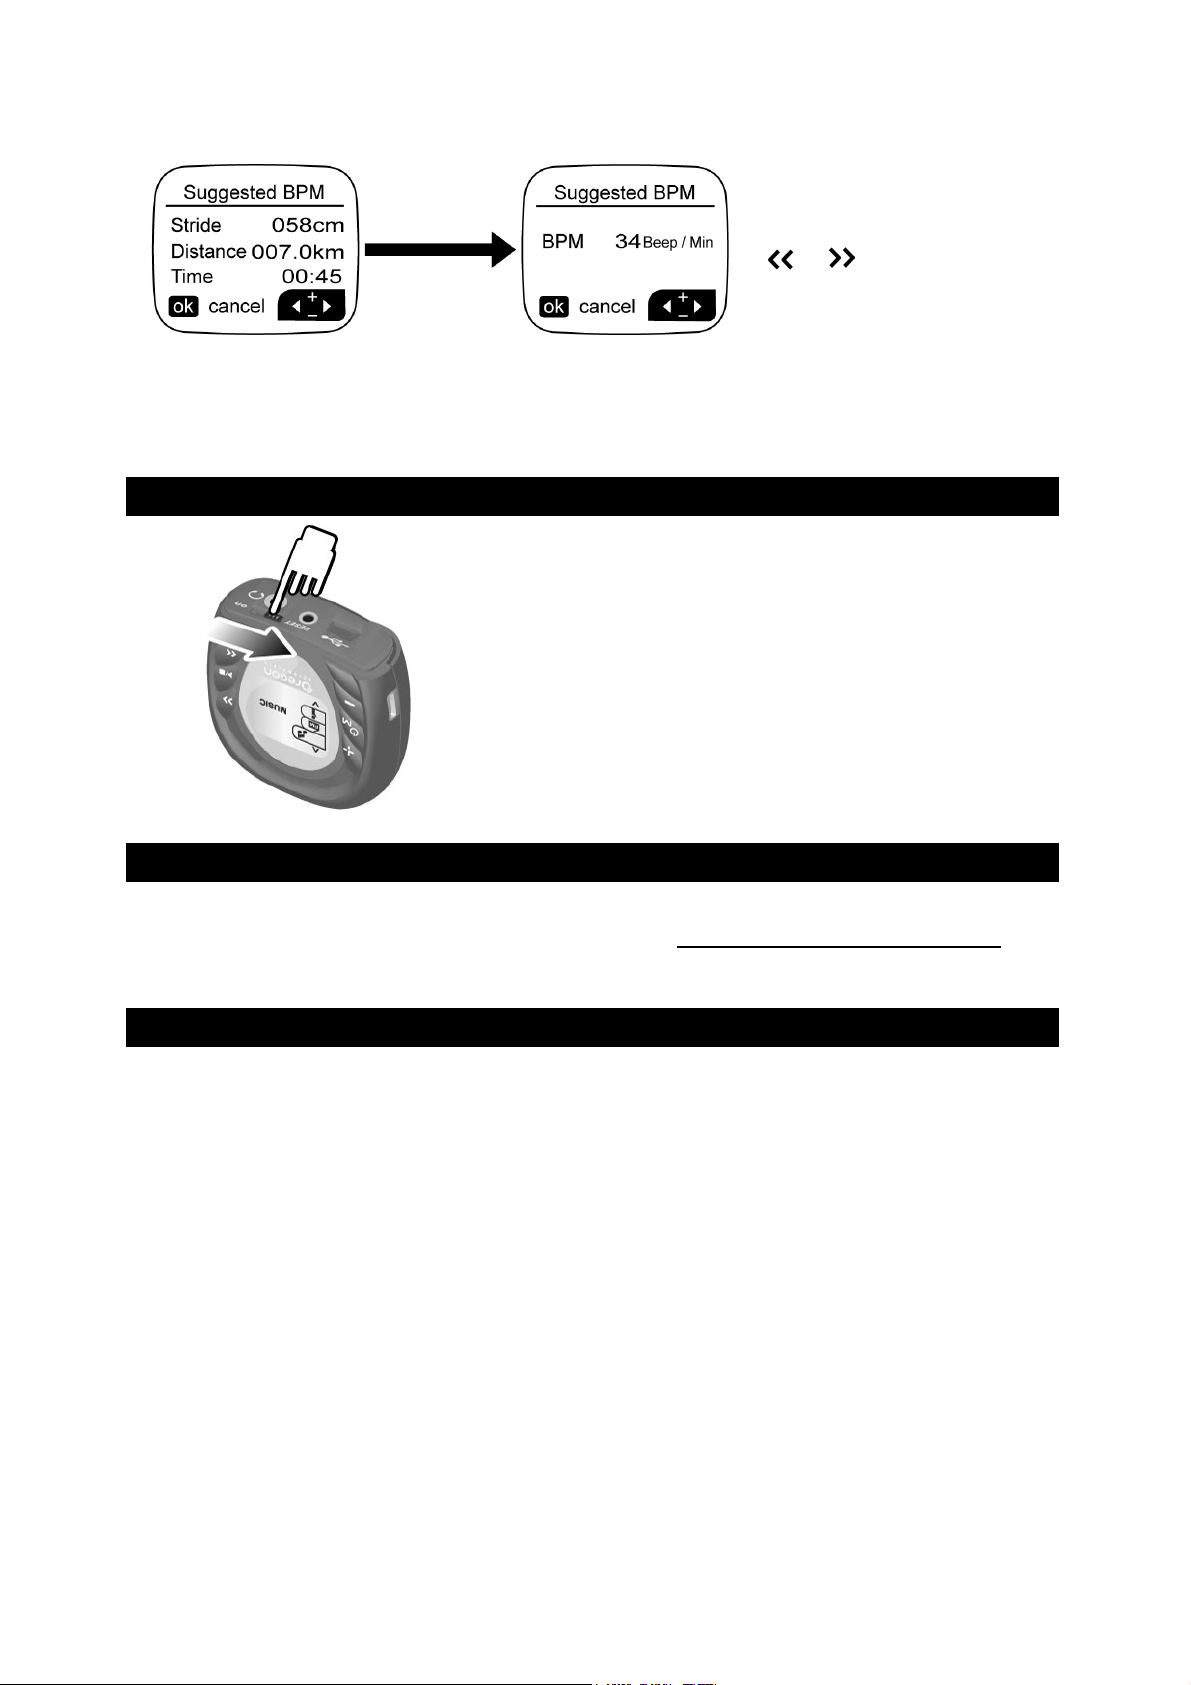
SUGGESTED BPM
Select the respective
values of stride length,
distance, and time using
or and – or +.
When finished, select "ok" and the pace counter starts beeping, OR select "cancel" to
go back to the Pace Counter menu. Music or FM radio playback stops when the pacer
is activated.
RESET
You may occasionally need to reset the unit, for
example, if the player stops responding. All values
will be reset to original factory default settings.
UPGRADING FIRMWARE
Upgrading your MP121 player with the latest firmware ensures optimal playback
performance. Go to the Oregon Scientific website (www.oregonscientific.com) to
download the latest MP121 firmware update (.zip file).
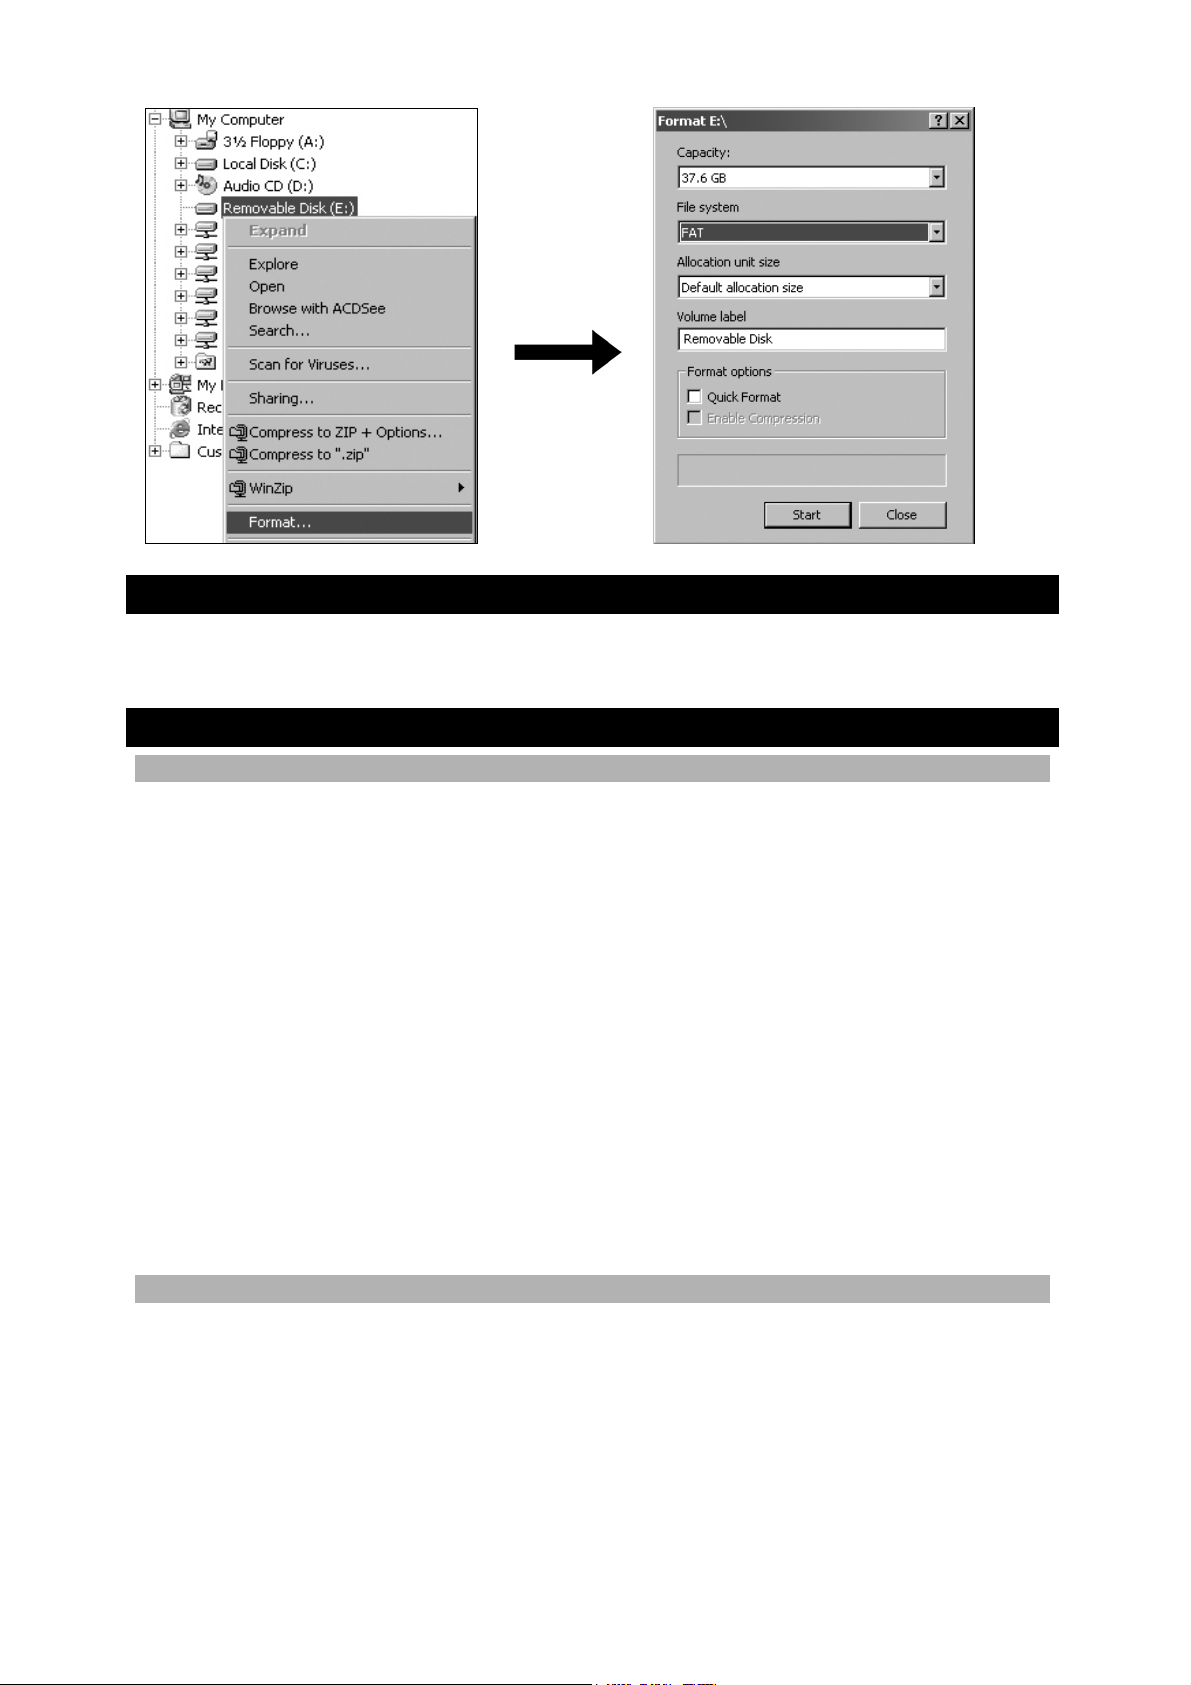
FORMATTING YOUR PLAYER
All stored information will be lost and your settings will return to default values.
1. In Windows Explorer, select the drive letter of your player assigned by the
computer, then right-click your mouse button and select Format.
2. If there is an option to select File system, select FAT then click Start to begin
formatting.
Page 21
COPYRIGHT
The transfer of memory containing data or MP3 files protected under copyright laws
are only permissible within the restrictions imposed.
SAFETY AND CARE
GENERAL
Clean unit with a damp cloth and mild detergent. •
•
Do not subject unit to extreme force, shock, fluctuations in humidity, or immerse
in liquid. This can cause electrical shock and damage the unit.
•
Do not scratch the LCD display.
•
Do not tamper with internal components or make changes or modifications to this
product. Unauthorized changes may void your right to use the product and
invalidate the warranty.
•
Keep unit away from strong magnetic fields, which may erase or damage the
player’s memory.
•
Keep unit away from excessive dust / sand, moisture, rain, direct sunlight or heat.
•
Keep unit in a dry, well-ventilated place to prevent it from molding.
•
Never use headphones while driving, cycling, or operating motorized vehicles.
•
Listening to music at high volume for long periods of time may damage your
hearing. Keep volume at a moderate level.
•
Do not set headphone / earphone volume to high while using unit at pedestrian
crossings or walking.
WATER
After each use, briefly rinse off entire unit with fresh, clean water. Shake out any
•
water blocking earphone's earbud opening.
•
Never immerse unit in water if the bottom protective screw casing is removed.
This can cause electrical shock and damage the unit.
•
Never use electric dryer to dry the earphones or unit.
•
Do not use unit while skin-, scuba- or springboard diving.
•
Do not try and force water into audio tubing of the earphone headset.
•
Do not use unit below 1 meter and for more than 30 minutes at a time.
Page 22

TROUBLESHOOTING
HARDWARE
Music keeps skipping.
Music file may be corrupt or of an unsupported format. Delete and transfer the file
from your computer to player again, making sure file is supported MP3 (MPEG-1,
Audio Layer 3), WMA or WAV format.
Player will not start or shuts off soon after it starts.
Rechargeable battery may have run out of power. If battery level indicator shows low
battery, recharge as soon possible.
Buttons do not work.
Button-hold feature may be on. See section on “BUTTON HOLD”.
Player is not functioning normally.
Player may need to be reset or battery may be low on power. You may also format
the player from your computer and upgrade the firmware. See section on
"UPGRADING FIRMWARE".
Flash memory appears to be corrupted.
Upgrade to the latest firmware to optimise the player's performance. See section on
"UPGRADING FIRMWARE".
No sound is coming out of the headphones.
Check to make sure they are plugged in correctly and volume is turned up.
Your computer does not locate your player.
Check to make sure the USB cable is connected properly. If you are using Win98SE,
make sure the driver software installed. If you are using Win2000, make sure you
have installed the Service Pack version 3.0 or above. Go to Microsoft’s website to
download the latest Windows update.
Cannot store any more files on the player.
Memory may be full. Delete files to make some room.
SOFTWARE
MP121 software does not automatically begin when CD is inserted.
You may need to start the installation process manually.
1. Double click the My Computer icon on the Windows desktop.
2. Double click the drive that contains the CD-ROM.
3. Follow the onscreen instructions to complete the installation process.
CAUTION
In case of electrostatic discharge, the product may not function properly and will
require a manual reset. After resetting the unit, data stored will remain intact.
SPECIFICATIONS
TYPE DESCRIPTION
Immersion resistance: IPX7 / JIS7 standard
Shock resistance: ISO 1413 standard
Page 23
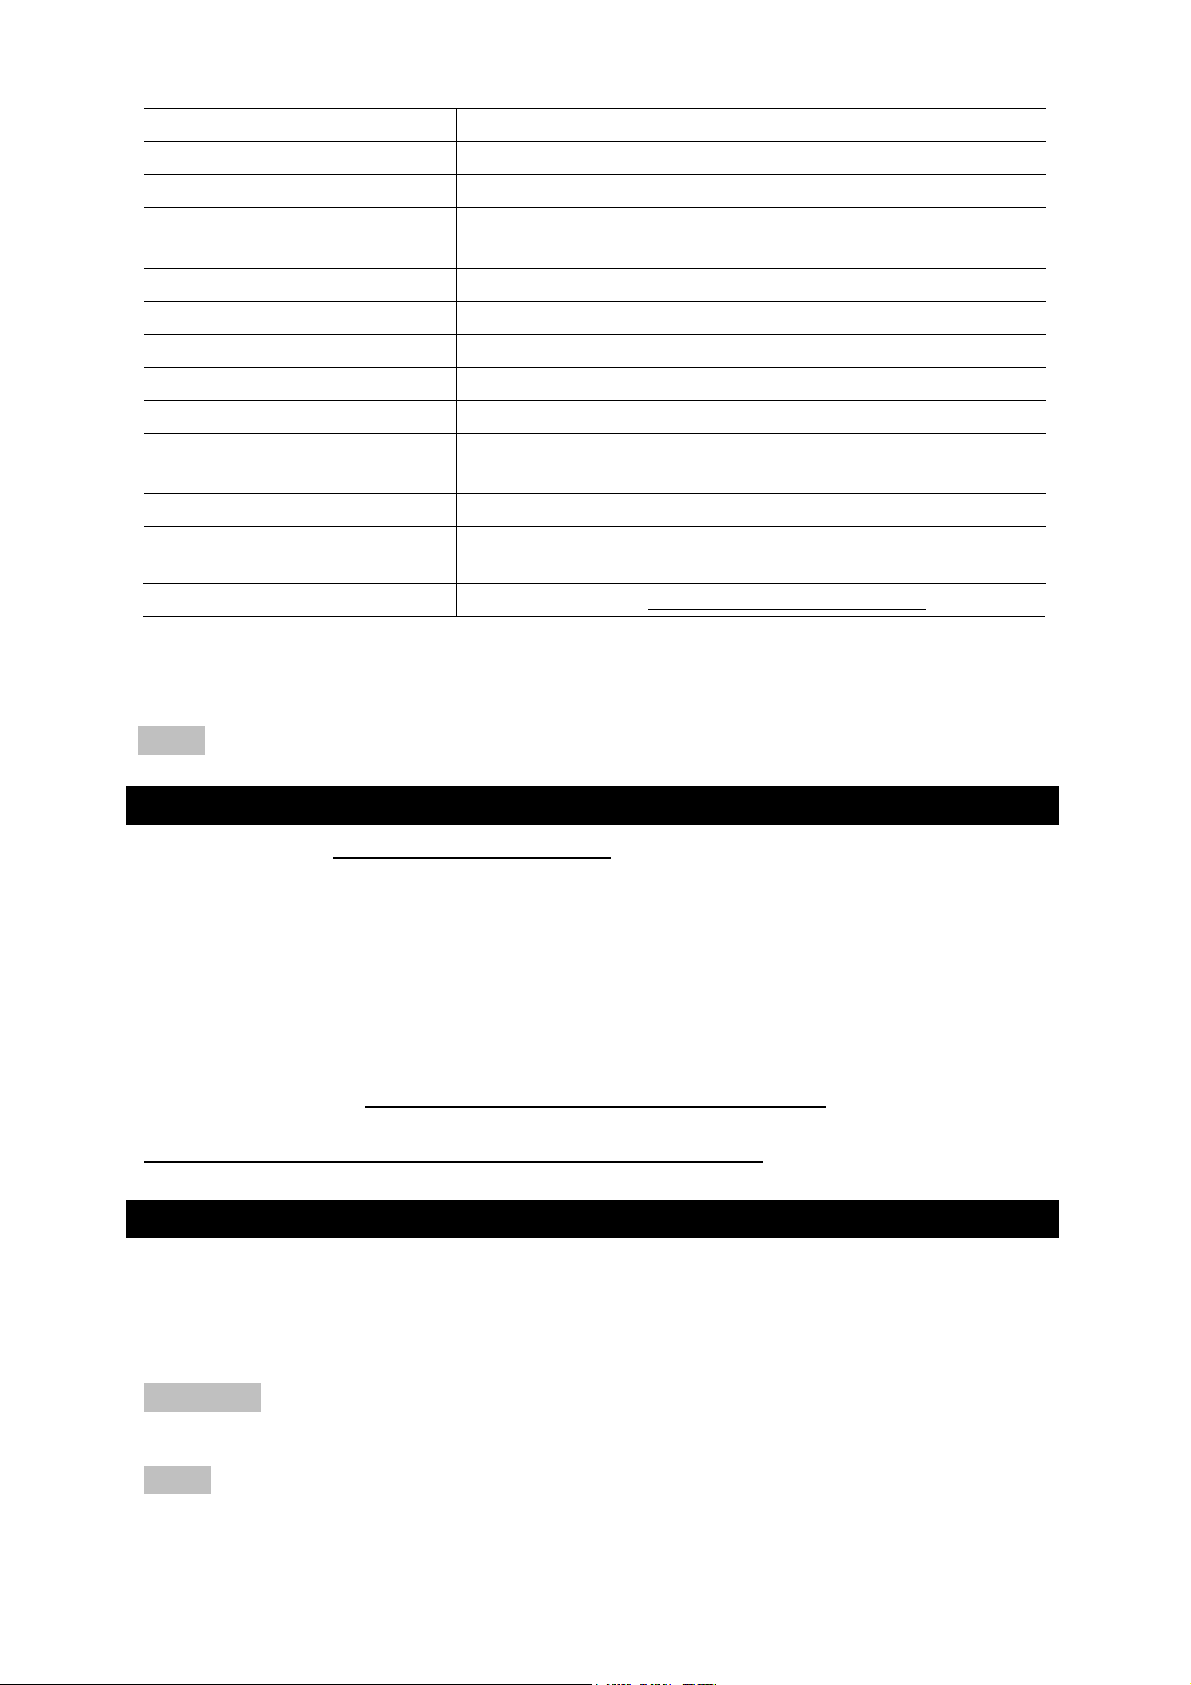
Built-in flash memory: 512 MB or 1 GB (refer to indication on the packing)
Dimensions: 69 (H) x 52.5 (W) x 21 (T) mm (2.7 x 2.1 x 0.83 in)
Weight: 69g (with battery)
LCD dimension: VA: 25 (W) x 20 (H) mm
Full dot matrix: 122 x 96 dots
Backlight: 3-color backlight (orange, blue, purple)
FM radio frequency: 87.5 ~ 108 MHz
Radio preset channels: 30
Volume level: 0-30
Battery: Built-in rechargeable battery
Battery life*: Approx. 10 hours continuous playback (at room
temperature, default volume)
MP3 to PC connection: USB 1.1 or USB 2.0 (Hi-Speed)
Supported playback
formats:
Player firmware: Upgradeable via www.oregonscientific.com
*Data is measured with included battery. Various factors can affect battery life, such
as temperature, battery type or battery capacity.
NOTE Design and specifications are subject to change without notice.
MP3 (up to 320 kbps), variable bit rate
WMA, WMA DRM (up to 192 kbps)
ABOUT OREGON SCIENTIFIC
Visit our website (www.oregonscientific.com) to learn more about Oregon Scientific
products such as digital cameras; MP3 players; children's electronic learning
products and games; projection clocks; health and fitness gear; weather stations;
and digital and conference phones. The website also includes contact information for
our customer care department in case you need to reach us, as well as frequently
asked questions and customer downloads.
We hope you will find all the information you need on our website. However if you're
in the U.S. and would like to contact the Oregon Scientific customer care department
directly, please visit:
8883. For international enquiries, please visit
www2.oregonscientific.com/about/international/default.asp
www2.oregonscientific.com/service/support
.
OR call 1-800-853-
FCC STATEMENT
This device complies with Part 15 of the FCC Rules. Operation is subject to the
following two conditions: (1) This device may not cause harmful interference, and (2)
This device must accept any interference received, including interference that may
cause undesired operation.
WARNING Changes or modifications not expressly approved by the party
responsible for compliance could void the user's authority to operate the equipment.
NOTE This equipment has been tested and found to comply with the limits for a
Class B digital device, pursuant to Part 15 of the FCC Rules. These limits are
designed to provide reasonable protection against harmful interference in a
residential installation.
Page 24

This equipment generates, uses and can radiate radio frequency energy and, if not
installed and used in accordance with the instructions, may cause harmful
interference to radio communications. However, there is no guarantee that
interference will not occur in a particular installation. If this equipment does cause
harmful interference to radio or television reception, which can be determined by
turning the equipment off and on, the user is encouraged to try to correct the
interference by one or more of the following measures:
Reorient or relocate the receiving antenna.
Increase the separation between the equipment and receiver.
Connect the equipment into an outlet on a circuit different from that to which the
receiver is connected.
Consult the dealer or an experienced radio / TV technician for help.
DECLARATION OF CONFORMITY
The following information is not to be used as contact for support or sales. Please
call our customer service number (listed on our website at
www.oregonscientific.com
), or on the warranty card for this product) for all inquiries
instead.
We
Name: Oregon Scientific, Inc.
Address: 19861 SW 95th Ave., Tualatin, Oregon 97062 USA
Telephone No.: 1-800-853-8883
Fax No.: 1-503-684-3332
declare that the product
Product No.: MP121
Product Name: Waterproof Music Player with FM radio and Pedometer
Manufacturer: IDT Technology Limited
Address: Block C, 9/F, Kaiser Estate,
Phase 1,41 Man Yue St.,
Hung Hom, Kowloon,
Hong Kong
is in conformity with Part 15 of the FCC Rules. Operation is subject to the following
two conditions: 1) This device may not cause harmful interference. 2) This device
must accept any interference received, including interference that may cause
undesired operation.
EC-DECLARATION OF CONFORMITY
Hereby, Oregon Scientific, declares that this Waterproof Music Player with FM radio
and Pedometer model MP121 is in compliance with EMC directive 89/336/CE and
LVD directive 73/23/EC. A copy of the signed and dated Declaration of Conformity is
available on request via our Oregon Scientific Customer Service.
© 2005 Oregon Scientific. All rights reserved.
 Loading...