

Page 1
Flat Panel Jumbo LCD
Radio-Controlled Clock
Model: JM200
USER MANUAL
INTRODUCTION
EN
Thank you for selecting the Oregon Scientific™ radio-controlled
clock. Keep this manual handy as you use your new product. It
contains practical step-by-step instructions, as well as technical
specifications and warnings you should know about.
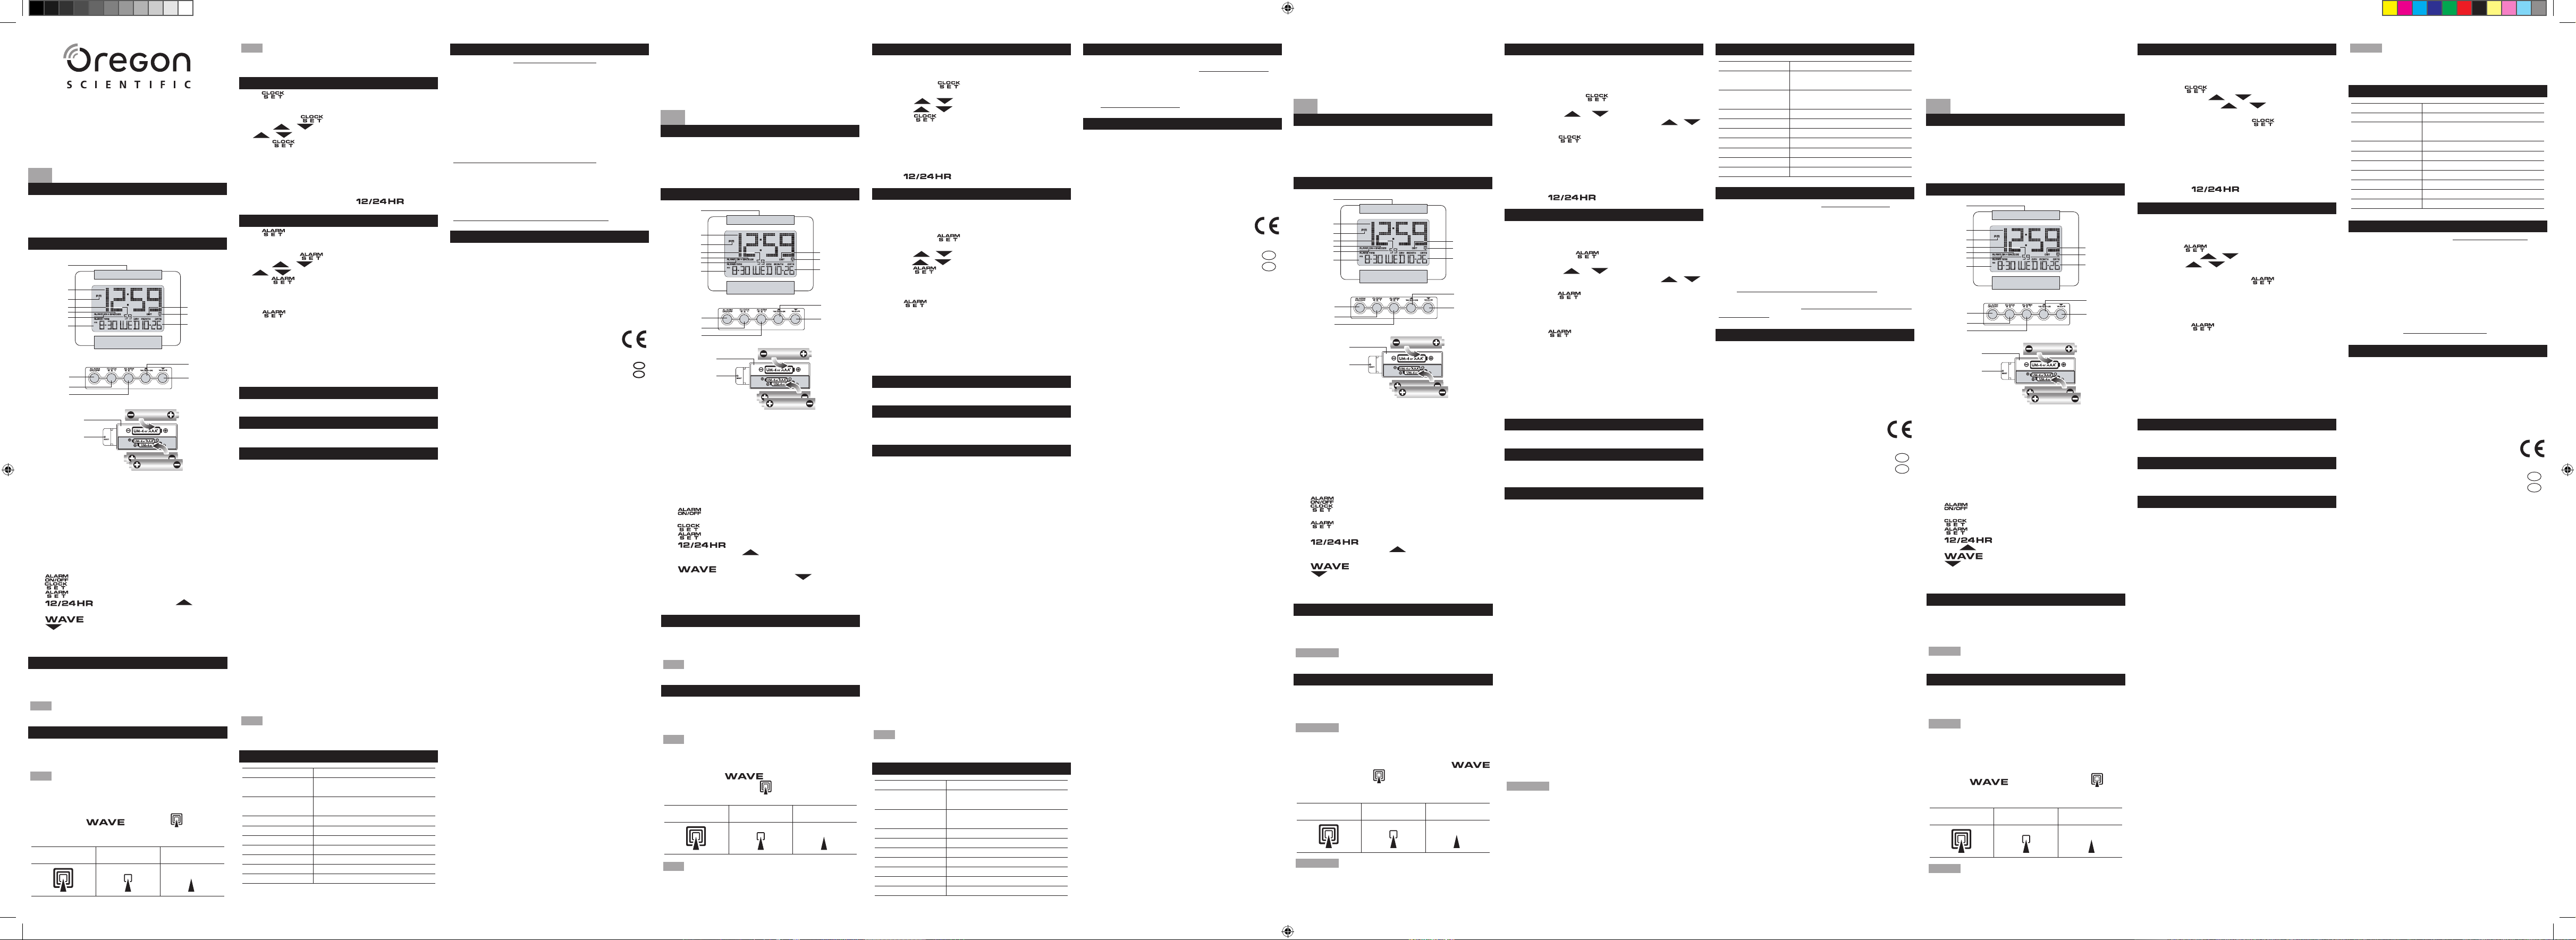
PRODUCT OVERVIEW
1. SNOOZE / LIGHT: Activates 5-minute snooze function or
backlight
2. Clock time
3. 12-hour clock is displayed
4. Seconds
5. Snooze is activated
6. Alarm is activated
7. Alarm time or year is displayed
8. Daylight Saving Time is displayed
9. Radio-controlled signal icon
10. Calendar
11. : Enables / disables alarm and snooze function
12. : Sets clock time
13. : Sets alarm time
14. : Selects 12 / 24 hr clock; increases
setting value
15. : Enables / disables radio-controlled clock;
decreases setting value
16. Battery compartment
17. RESET: Returns unit to default settings
1
2
3
4
5
6
7
8
9
10
12
11
13
14
15
16
17
BATTERIES
Insert batteries matching the polarity (+ and -) as shown in the
Product Overview section. Press RESET after each battery
change.
NOTE It is recommended that you use alkaline batteries with
this product for longer performance.
CLOCK RECEPTION
This product is designed to synchronize its calendar clock
automatically once it is brought within 1500km (932 miles) of a
radio signal (DCF-77 generated from Frankfurt, Germany).
NOTE For best results, place the clock away from metal or
electrical objects, and near a window with a clear view to the
sky.
To turn the clock reception ON / OFF:
• Press and hold for 2 seconds. flashes when
it is searching for a signal. No icon appears when the radio
reception is OFF.
STRONG SIGNAL WEAK SIGNAL NO SIGNAL
CLOCK
Press to change from alarm time to year.
To set the clock (when radio-reception is disabled):
1. Press and hold until the first setting flashes.
2. Press / to change the setting, (press and hold
/ to rapidly change the setting).
3. Press to confirm.
4. The setting sequence is: Hour, minute, second, year, month,
date and time zone hour offset*.
*D-T = Daylight saving time.
*S-T – Normal time.
To toggle 12 / 24 hour clock: Press .
NOTE All keys are disabled when the unit is searching for a
signal. It takes up to 10 minutes to get a valid signal reception.
However, if the radio signal is weak it can take up to 24 hours.
ALARM
Press to change from the year to alarm time.
To set the alarm:
1. Press and hold until the first setting flashes.
2. Press / to change the setting, (press and hold
/ to rapidly change the setting).
3. Press to confirm.
4. The setting sequence is: Hour and minute.
To enable / disable the alarm and snooze:
Press . “ALARM ON + SNOOZE” appear when they
are enabled.
To silence the alarm:
• Press SNOOZE / LIGHT to silence it for 5 minutes.
OR
• Press any key except SNOOZE / LIGHT to mute any alarm
and activate it again in 24 hours.
BACKLIGHT
Press SNOOZE / LIGHT to activate the backlight.
RESET
Press RESET to return unit to default settings.
PRECAUTIONS
This product is designed to give you years of service if handled
properly. Oregon Scientific will not be responsible for any
deviations in the usage of the device from those specified in the
user instructions or any unapproved alterations or repairs of the
product. Observe the following guidelines:
• Do not clean any part of the product with benzene, thinner
or other solvent chemicals – this may cause permanent
damage that is not covered by the guarantee. When
necessary, clean it with a damp cloth.
• Never immerse the product in water. This can cause
electrical shock and damage the product.
• Do not subject the product to extreme force, shock, or
fluctuations in temperature or humidity.
• Do not tamper with the internal components.
• Do not mix new and old batteries or batteries of different
types.
• Do not use rechargeable batteries with this product.
• Remove the batteries if storing this product for a long period
of time.
• Do not scratch the LCD display.
• Placement of this product on wood surfaces with certain
types of finishes, such as clear varnish, may result in
damage to the finish. Consult the furniture manufacturer’s
care instructions for direction as to the types of objects that
may safely be placed on the wood surface. Oregon Scientific
shall not be responsible for any damage to wood surfaces
from contact with this product.
• Do not dispose of this product as unsorted municipal waste.
Collection of such waste separately for special treatment is
necessary.
NOTE The technical specification of this product and contents
of this user manual are subject to change without notice.
Images not drawn to scale.
TYPE DESCRIPTION
156 x 61.3 x 115 mm
(6.1 x 2.4 x 4.5 inches)
L X W X H
470 g (16.6 lbs)Weight (without
battery
DCF-77Frequency
Auto or disabledSynchronization
HH:MM:SSClock
12 / 24 hour formatHour Format
Day-month-dateCalendar
5-minute snoozeAlarm
3 x UM-4 / AAA 1.5V Batteries
PRECAUTIONS
ABOUT OREGON SCIENTIFIC
Visit our website (www.oregonscientific.com) to learn more
about Oregon Scientific products such as digital cameras; MP3
players; children’s electronic learning products and games;
projection clocks; health and fitness gear; weather stations;
and digital and conference phones. The website also includes
contact information for our Customer Care department in case
you need to reach us, as well as frequently asked questions and
customer downloads.
We hope you will find all the information you need on our website,
however if you’re in the US and would like to contact the Oregon
Scientific Customer Care department directly, please visit:
www2.oregonscientific.com/service/default.asp
OR
Call 1-800-853-8883.
For international inquiries, please visit:
www2.oregonscientific.com/about/international.asp
EU-DECLARATION OF CONFORMITY
Hereby, Oregon Scientific, declares that this Flat Panel Jumbo
LCD Radio-Controlled Clock (Model JM200) is in compliance
with the essential requirements and other relevant provisions of
Directive 1999/5/EC.
A copy of the signed and dated Declaration of Conformity
is available on request via our Oregon Scientific Customer
Service.
Orologio radiocontrollato
con schermo ultrapiatto
Modello: JM200
MANUALE PER L’UTENTE
INTRODUZIONE
IT
Grazie per aver scelto l’orologio radiocontrollato
Oregon Scientific™. Si consiglia di tenere questo manuale
a portata di mano durante l’utilizzo del prodotto. Il manuale
contiene pratiche istruzioni dettagliate, dati tecnici e avvertenze
che è necessario conoscere.
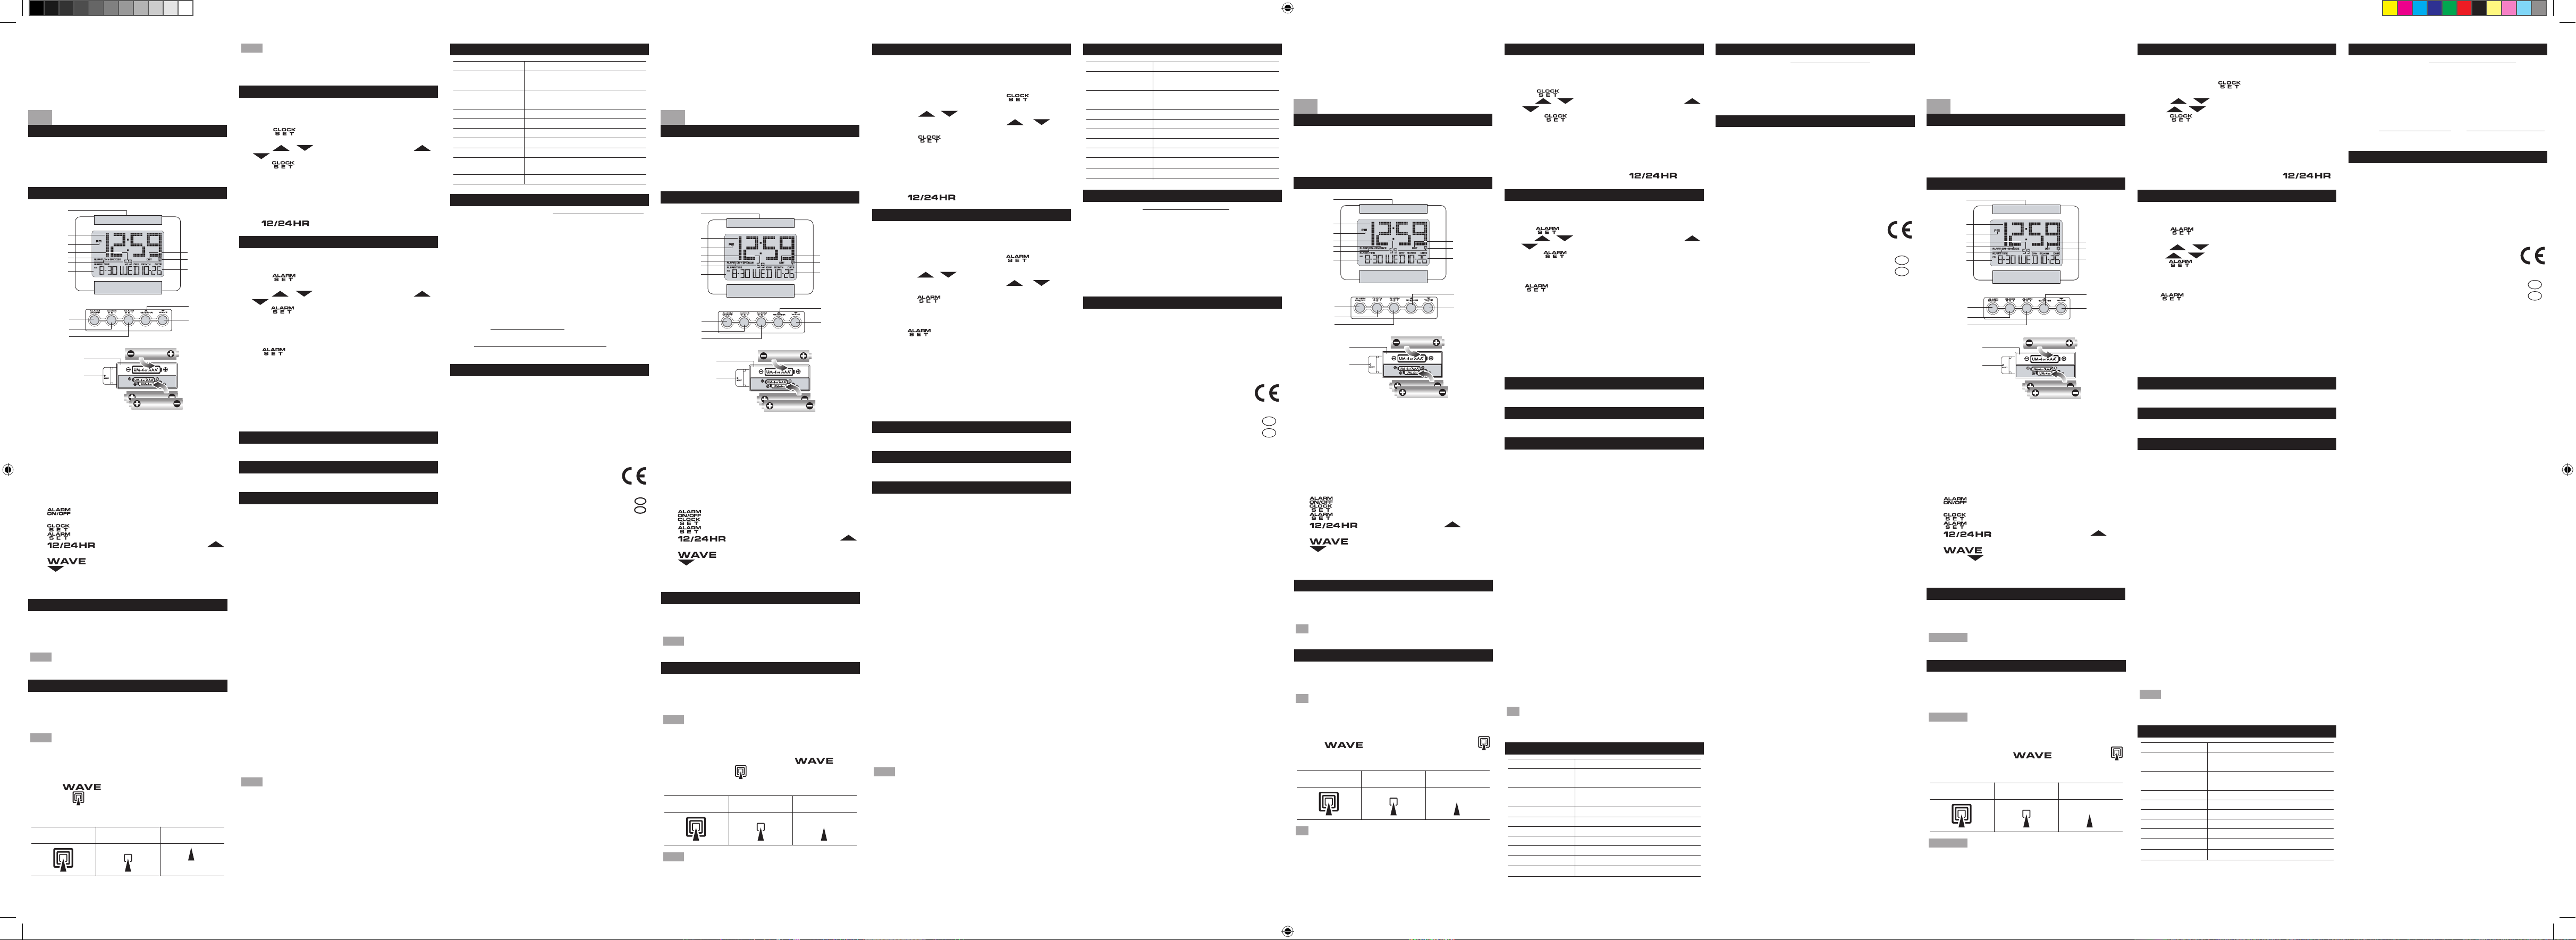
PANORAMICA DEL PRODOTTO
1. SNOOZE / LIGHT: consente di attivare la funzione snooze
di 5 minuti o la retroilluminazione
2. Ora
3. Visualizzazione dell’ora in formato 12 ore
4. Secondi
5. Attivazione della funzione snooze
6. Allarme attivo
7. Visualizzazione dell’ora o dell’anno
8. Visualizzazione dell’ora legale
9. Icona del segnale di radiocontrollo
10. Calendario
11. : consente di attivare / disattivare la sveglia e la
funzione snooze
12. : consente di impostare l’ora
13. : consente di impostare l’ora della sveglia
14. : consente di selezionare l’ora in
formato 12 o 24 ore; consente di aumentare il valore
di un’impostazione
15. : consente di attivare / disattivare la
ricezione radiocontrollata dell’ora; consente di
diminuire il valore di un’impostazione
16. Vano batterie
17. RESET: ripristina i valori predefiniti dell’unità
1
2
3
4
5
6
7
8
9
10
12
11
13
14
15
16
17
BATTERIE
Inserire le batterie, rispettando la polarità (+ e -), come indicato
nel paragrafo “Panoramica del prodotto”. Premere RESET dopo
ogni sostituzione di batteria.
NOTA Con questo prodotto si consiglia di utilizzare batterie
alcaline per prestazioni prolungate.
RICEZIONE DELL’ORA
Questo prodotto è progettato per la sincronizzazione
automatica di orario e calendario quando si trova entro il raggio
di 1.500km (932 miglia) di un segnale radio (DCF-77 generato
da Francoforte, Germania).
NOTA Per ottenere risultati ottimali, posizionare l’orologio
lontano da oggetti metallici o elettrici, e vicino a una finestra con
visuale libera verso il cielo.
Per attivare / disattivare la ricezione radio:
• Tenere premuto per 2 secondi. Quando è in
cerca di un segnale, l’icona lampeggia. Se la ricezione
radio è disattivata, non lampeggia nessuna icona.
SEGNALE SEGNALE NESSUN
FORTE DEBOLE SEGNALE
OROLOGIO
Premere CLOCK SET per passare dall’ora della sveglia all’anno.
Per impostare l’ora (quando la ricezione radio non è attiva):
1. Tenere premuto finché la prima impostazione non
lampeggia.
2. Premere / per modificare l’impostazione (tenere
premuto / per modificarla rapidamente).
3. Premere per confermare.
4. L’ordine delle impostazioni è: ora, minuti, secondi, anno,
mese, data e differenza di fuso orario*.
*D-T = ora legale.
*S-T – ora solare.
Per selezionare il formato 12 o 24 ore:
Premere .
NOTA Quando l’unità è alla ricerca di un segnale, tutti i tasti
sono disattivati. Per ottenere un segnale valido, sono necessari
fino a 10 minuti. Tuttavia, se il segnale radio è debole, possono
essere necessarie fino a 24 ore.
SVEGLIA
Premere ALARM SET per passare dall’anno all’ora della
sveglia.
Per impostare la sveglia:
1. Tenere premuto finché la prima impostazione non
lampeggia.
2. Premere / per modificare l’impostazione (tenere
premuto / per modificarla rapidamente).
3. Premere per confermare.
4. L’ordine delle impostazioni è: Ora e minuti.
Per attivare o disattivare la sveglia e la funzione snooze:
Premere . Quando le due funzioni sono attive, appare
la scritta “ALARM ON + SNOOZE”.
Per arrestare la sveglia:
• Premere SNOOZE / LIGHT per arrestarla per 5 minuti.
OPPURE
• Per arrestarla tutti i tipi di sveglia e per riattivarli dopo 24 ore,
premere un tasto qualsiasi tranne SNOOZE / LIGHT.
RETROILLUMINAZIONE
Premere SNOOZE / LIGHT per attivare la retroilluminazione.
FUNZIONE RESET
Premere RESET per ripristinare le impostazioni predefinite
dell’unità.
PRECAUZIONI
Questo prodotto è progettato per offrire anni di funzionamento
soddisfacente purché venga maneggiato con cura. Oregon
Scientific declina ogni responsabilità per l’utilizzo del dispositivo
in modo diverso rispetto a quanto specificato nel manuale
per l’utente, nonché per eventuali modifiche o riparazioni non
autorizzate del prodotto. Attenersi alle seguenti istruzioni:
• Non pulire nessuna parte del prodotto con benzene,
diluente o con altri solventi chimici, in quanto potrebbero
causare danni permanenti non coperti dalla garanzia.
Quando necessario, pulire con un panno umido.
• Non immergere mai l’unità in acqua. Ciò potrebbe causare
scosse elettriche e danneggiare il prodotto.
• Non sottoporre l’unità a forza eccessiva, urti o oscillazioni di
temperatura o di umidità.
• Non manomettere i componenti interni.
• Non mischiare batterie nuove con batterie vecchie né
batterie di tipi diversi.
• Non utilizzare batterie ricaricabili con questo prodotto.
• Rimuovere le batterie se si prevede di non utilizzare il
prodotto per un lungo periodo di tempo.
• Non graffiare il display LCD.
• Il posizionamento del prodotto su superfici in legno con
determinati tipi di finiture, ad esempio vernici chiare, può
danneggiare queste ultime. Consultare le istruzioni fornite
dal fabbricante per la manutenzione del mobile, per sapere
quali tipi di oggetti possono essere appoggiati su superfici
in legno. Oregon Scientific declina ogni responsabilità per
eventuali danni a superfici in legno dovuti al contatto con
questo prodotto.
• Non smaltire questo prodotto come rifiuto non differenziato.
È necessario che questo rifiuto venga smaltito mediante
raccolta differenziata per essere trattato in modo particolare.
NOTA Le specifiche tecniche del prodotto e il contenuto di
questo manuale possono essere modificati senza preavviso. Le
immagini utilizzate non sono in scala.
TIPO DESCRIZIONE
156 x 61.3 x 115 mm
(6.1 x 2.4 x 4.5 pollici)
base x altezza x
profondità
470 g (16.6 libbre)Peso
batterie escluse
DCF-77Frequenza
Automatica o disattivataSincronizzazione
HH:MM:SSOrologio
Formato 12 / 24 oreFormato ora
Giorno-mese-dataCalendario
Snooze di 5 minutiSveglia
3 batterie di tipo UM-4 / AAA da 1,5VAlimentazione
SPECIFICHE TECNICHE
INFORMAZIONI SU OREGON SCIENTIFIC
Per avere maggiori informazioni sui nuovi prodotti Oregon
Scientific, visita il nostro sito internet www.oregonscientific.it
Sul nostro sito internet potrai trovare tutte le informazioni di cui
hai bisogno, e per ricerche di tipo internazionale puoi visitare il
sito www.oregonscientific.com
DICHIARAZIONE DI CONFORMITA’ UE
Con la presente Oregon Scientific dichiara che questo Orologio
radiocontrollato con schermo ultrapiatto (JM200) è conforme ai
requisiti essenziali ed alle altre disposizioni pertinenti stabilite
dalla direttiva 1999/5/CE.
Una copia firmata e datata della Dichiarazione di Conformità è
disponibile, su richiesta, tramite il servizio clienti della Oregon
Scientific.
Horloge Jumbo radio-pilotée à écran plat
Modèle : JM200
MANUEL DE L’UTILISATEUR
INTRODUZIONE
FR
Nous vous remercions d’avoir sélectionné cette horloge
radio-pilotée de Oregon Scientific™. Conservez ce manuel à
portée de main quand vous utilisez votre nouveau produit. Il
contient toutes les instructions pratiques, les caractéristiques
techniques et les avertissements à prendre en compte.
VUE D’ENSEMBLE DU PRODUIT
1. SNOOZE / LIGHT : Active le rappel d’alarme de 5 minutes
ou le rétro éclairage
2. Heure de l’horloge
3. Le format 12 h est affiché.
4. Secondes
5. Le rappel d’alarme (Snooze) est activé
6. L’alarme est activée
7. L’heure de l’alarme ou l’année est affichée
8. L’heure avancée est affichée
9. Icône du signal radio-piloté
10. Calendrier
11. : Active / désactive l’alarme et le rappel d’alarme
12. : Cette touche vous permet de régler l’heure de
l’horloge
13. : Cette touche vous permet de régler l’heure de
l’alarme.
14. : Cette touche vous permet de sélectionner
le format 12 / 24 heures, augmente les valeurs d’un
réglage.
15. : Active / désactive l’horloge radio-pilotée,
diminue les valeurs d’un réglage.
16. Compartiment des piles
17. RESET : Réinitialise l’appareil aux réglages par défaut
1
2
3
4
5
6
7
8
9
10
12
11
13
14
15
16
17
PILES
Insérez les piles en respectant les polarités (+ et -) comme
indiqué dans la section Vue d’ensemble du produit. Appuyez sur
REINITIALISER (RESET) après chaque changement de piles.
REMARQUE Nous vous recommandons d’utiliser des piles
alcalines pour une meilleure performance.
RECEPTION DE L’HORLOGE
Ce produit est conçu de manière à synchroniser
automatiquement son horloge calendrier une fois placée dans
un rayon de 1500 Km (932 miles) d’un signal radio. (DCF-77
généré depuis Frankfort, Allemagne).
REMARQUE Pour obtenir de meilleurs résultats, éloignez
l’horloge des objets métalliques et électroniques, et placez-la à
proximité d’une fenêtre, directement vers le ciel.
Activer / désactiver la réception de l’horloge :
• Appuyez et maintenez enfoncée la touche
pendant 2 secondes. clignote lorsqu’elle recherche un
signal. Aucune icône ne s’affiche si la réception radio est
DESACTIVEE.
HORLOGE
Appuyez sur CLOCK SET pour passer de l’heure de l’alarme
à l’année.
Pour régler l’horloge (une fois la réception radio
désactivée) :
1. Restez appuyé sur jusqu’à ce que le premier
réglage clignote.
2. Appuyez sur / pour modifier les réglages
(appuyez et maintenez les touches enfoncées /
pour modifier rapidement les réglages).
3. Appuyez sur pour confirmer.
4. L’ordre de réglage est le suivant : Heure, minute, seconde,
année, mois, date et fuseau horaire*.
*D-T = Heure avancée
*S-T – Heure normale
Pour alterner entre le format 12 ou 24 heures :
Appuyez sur .
REMARQUE Toutes les touches sont désactivées lorsque
l’appareil recherche un signal. 10 minutes peuvent s’avérer
nécessaires pour obtenir une réception valide. Cependant si le
signal radio est faible, 24 heures sont nécessaires.
ALARME
Appuyez sur ALARM SET pour passer de l’année à l’heure
de l’alarme.
Pour régler l’alarme :
1. Restez appuyé sur jusqu’à ce que le premier réglage
clignote.
2. Appuyez sur / pour modifier les réglages
(appuyez et maintenez les touches enfoncées /
pour modifier rapidement les réglages).
3. Appuyez sur pour confirmer.
4. L’ordre de réglage est le suivant : Heure et minute.
Pour activer / désactiver l’alarme et le rappel d’alarme
(Snooze) :
Appuyez sur . “ALARM ON + SNOOZE” s’affiche, une
fois désactivés.
Pour couper le son de l’alarme :
• Appuyez sur SNOOZE / LIGHT, pour couper le son pendant
5 minutes.
OU
• Appuyez sur n’importe quelle touche sauf SNOOZE / LIGHT
pour couper le son de n’importe quelle alarme et la réactiver
24 heures plus tard.
RETRO ECLAIRAGE
Appuyez sur SNOOZE / LIGHT pour activer le rétro éclairage.
REINITIALISATION
Appuyez sur RESET pour que l’appareil revienne aux réglages
par défaut.
PRECAUTIONS
Ce produit est conçu pour vous donner entière satisfaction
pendant de nombreuses années si vous le manipulez avec
soin. Oregon Scientific ne peut être tenu responsable de
toutes divergences volontaires d’utilisation de cet appareil non
conformément aux consignes indiquées dans les instructions
utilisateurs ou de toutes modifications ou réparations non
autorisées de ce produit. Veuillez observer les consignes
suivantes :
• Ne pas nettoyer les pièces de ce produit avec du benzène,
du diluant ou autre solvant chimique, il peut en résulter des
dommages permanents non pris en charge par la garantie.
Si nécessaire, nettoyez-le avec un tissue humide.
• Ne jamais l’immerger dans l’eau. Cela peut causer des
décharges électriques et endommager le produit.
• Ne pas soumettre l’appareil à une force extrême, au choc, ou
aux fluctuations de températures ou d’humidité.
• Ne pas trafiquer les composants internes.
• Ne jamais mélanger des piles neuves et usagées, ou de
types différents.
• Ne pas utiliser de piles rechargeables avec ce produit.
• Retirez les piles si vous rangez l’appareil pour un temps
indéterminé.
• Ne pas griffer l’affichage.
• Ne pas placer ce produit sur des surfaces en bois d’un
certain type de finition comme le vernis clair, l’appareil
pourrait abîmer la surface du meuble. Consultez les mises
en gardes du fabriquant du meuble en question pour de plus
amples renseignements sur les types d’objets à placer sur
les surfaces en bois. Oregon Scientific ne sera en aucun cas
responsable des dommages causés aux surfaces de bois.
• Ne pas jeter ce produit dans les containers municipaux
non adaptés Veuillez effectuer le tri de ces ordures pour un
traitement adapté si nécessaire.
REMARQUE Les caractéristiques techniques de ce produit et
le contenu de ce manuel peuvent être soumis à modifications
sans préavis. Les images ne sont pas à l’échelle.
TYPE DESCRIPTION
156 x 61.3 x 115 mm
(6.1 x 2.4 x 4.5 pouces)
L X E x H
470 g (16.6 livres)Poids
(sans piles)
DCF-77Fréquence
Automatique ou désactivée Synchronisation
HH:MM:SSHorloge
Format 12 ou 24 heures Format de l’heure
Jour-mois-dateCalendrier
Rappel d’alarme de 5 minutes Alarme
3 x UM-4 /AAA 1,5VPiles
CARACTERISTIQUES
A PROPOS D’OREGON SCIENTIFIC
En consultant notre site internet (www.oregonscientific.fr), vous
pourrez obtenir des informations sur les produits Oregon Scientific:
photo numérique; lecteurs MP3; produits et jeux électroniques
éducatifs; réveils; sport et bien-être; stations météo; téléphonie.
Le site indique également comment joindre notre service
après-vente.
Nous espérons que vous trouverez toutes les informations dont
vous avez besoin sur notre site, néanmoins, si vous souhaitez
contacter le service client Oregon Scientific directement, allez sur
le site www2.oregonscientific.com/service/default.asp ou appelez
le 949-608-2848 aux US. Pour des demandes internationales,
rendez vous sur le site: www2.oregonscientific.com/about/
international.asp
EUROPE - DÉCLARATION DE CONFORMITÉ
Par la présente Oregon Scientific déclare que l'appareil Horloge
Jumbo radio-pilotée à écran plat (Modèle : JM200) est conforme
aux exigences essentielles et aux autres dispositions pertinentes
de la directive 1999/5/CE.
Une copie signée et datée de la déclaration de conformité est
disponible sur demande auprès de notre Service Client.
SIGNAL
FORT
SIGNAL
FAIBLE
PAS DE
SIGNAL
Flache Jumbo-LCD-Funkuhr
Modell: JM200
BEDIENUNGSANLEITUNG
EINLEITUNG
DE
Wir danken Ihnen, dass Sie sich für die funkgesteuerte Uhr
von Oregon Scientific™ entschieden haben. Halten Sie bitte
diese Anleitung bereit, wenn Sie Ihr neues Produkt in Betrieb
nehmen. Sie enthält praktische Schritt-für-Schritt-Anweisungen
sowie technische Daten und wichtige Hinweise für den Umgang
mit diesem Gerät.
PRODUKTÜBERSICHT
1. SNOOZE / LIGHT: Aktiviert 5-Minuten-Schlummerfunktion
oder Hintergrundbeleuchtung
2. Uhrzeit
3. 12-Stundenuhr wird angezeigt
4. Sekunden
5. Schlummerfunktion ist aktiviert
6. Alarm ist aktiviert
7. Alarmzeit oder Jahr wird angezeigt
8. Sommerzeit (DST) wird angezeigt
9. Symbol für Funksignal
10. Kalender
11. : Aktiviert / deaktiviert Alarm- und
Schlummerfunktion
12. : Stellt Uhrzeit ein
13. : Stellt Alarmzeit ein
14. : cWählt Uhrzeit im 12- / 24-Stundenformat
aus; erhöht Einstellungswert
15. : Aktiviert / deaktiviert funkgesteuerte Uhr;
verringert Einstellungswert
16. Batteriefach
17. RESET: Setzt Gerät auf Standardeinstellungen zurück
1
2
3
4
5
6
7
8
9
10
12
11
13
14
15
16
17
BATTERIEN
Legen Sie die Batterien ein und achten Sie auf die
Übereinstimmung der Polarität (+ und -), wie im Abschnitt
PRODUKTÜBERSICHT dargestellt. Nach jedem
Batteriewechsel auf RESET drücken.
HINWEIS Es wird empfohlen, dass Sie bei diesem Produkt
Alkaline-Batterien für eine längere Betriebsleistung verwenden.
ZEITSIGNALEMPFANG
Dieses Produkt synchronisiert automatisch seine Kalenderuhr,
sobald es sich im Umkreis von 1500 km eines Funksignals
befindet. (DCF-77 wird in Frankfurt, Deutschland, erzeugt).
HINWEIS Stellen Sie die Uhr für optimale Ergebnisse in die
Nähe eines Fensters mit freier Sicht auf den Himmel, aber nicht
unmittelbar neben metallische Gegenstände oder elektrische
Geräte.
So schalten Sie den Empfang des Zeitsignals ein / aus (ON
/ OFF):
• Halten Sie 2 Sekunden lang gedrückt. blinkt,
wenn eine Signalsuche des Geräts erfolgt. Es erscheint
kein Symbol, wenn der Funkempfang deaktiviert ist (OFF).
UHR
Drücken Sie auf CLOCK SET, um von der Alarmzeit auf das
Jahr zu wechseln.
So stellen Sie die Uhr ein (bei deaktiviertem Funkempfang):
1. Halten Sie gedrückt, bis die erste Einstellung blinkt.
2. Drücken Sie auf / , um die Einstellung zu
ändern, (halten Sie / gedrückt, um die
Einstellung rasch zu ändern).
3. Drücken Sie zur Bestätigung auf .
4. Die Reihenfolge der Einstellungen lautet: Stunde, Minute,
Sekunden, Jahr, Monat, Datum und Stunde für
Zeitzonenausgleich*.
*D-T = Sommerzeit.
*S-T – Normalzeit.
So wechseln Sie die Uhrzeit im 12- / 24-Stundenformat:
Drücken Sie auf .
HINWEIS Alle Tasten sind deaktiviert, wenn das Gerät nach
einem Signal sucht. Es nimmt etwa 10 Minuten in Anspruch,
bis ein gültiges Signal empfangen wird. Wenn das Funksignal
schwach ist, kann dies bis zu 24 Stunden dauern.
ALARM
Drücken Sie auf ALARM SET, um das Jahr auf die Alarmzeit
zu ändern.
So stellen Sie den Alarm ein:
1. Halten Sie gedrückt, bis die erste Einstellung blinkt.
2. Drücken Sie auf / , um die Einstellung zu ändern,
(halten Sie / gedrückt, um die Einstellung rasch
zu ändern).
3. Drücken Sie zur Bestätigung auf .
4. Die Reihenfolge der Einstellungen lautet: Stunde und
Minute.
So aktivieren / deaktivieren Sie Alarm- und Schlummerfunktion:
Drücken Sie auf . “ALARM ON + SNOOZE” erscheint,
wenn diese aktiviert sind.
So schalten Sie den Alarm stumm:
• Drücken Sie auf SNOOZE / LIGHT, um den Alarm 5 Minuten
lang stummzuschalten.
ODER
• Drücken Sie eine beliebige Taste, mit Ausnahme
von SNOOZE / LIGHT, um einen beliebigen Alarm
stummzuschalten und ihn nach 24 Stunden erneut zu
aktivieren.
HINTERGRUNDBELEUCHTUNG
Drücken Sie auf SNOOZE / LIGHT, um die
Hintergrundbeleuchtung zu aktivieren.
RESET
Drücken Sie auf RESET, um das Gerät auf die
Standardeinstellungen zurückzusetzen.
VORSICHTSMASSNAHMEN
Dieses Produkt wurde entworfen, um Ihnen bei sorgfältiger
Handhabung jahrelang Freude zu bereiten. Oregon Scientific
übernimmt keinerlei Haftung für eine Benutzung des Geräts,
die von den Angaben in der Bedienungsanleitung abweicht,
oder für nicht zugelassene Änderungen oder Reparaturen des
Produkts. Beachten Sie daher die folgenden Richtlinien:
• Reinigen Sie keinen Teil des Produkts mit Benzol,
Lösungsmitteln oder anderen flüssigen Chemikalien – dies
kann dauerhafte Schäden verursachen, die nicht von der
Garantie gedeckt werden. Reinigen Sie das Gerät ggf. mit
einem feuchten Tuch.
• Tauchen Sie das Gerät niemals in Wasser. Dies kann
zu einem elektrischen Schlag führen und das Produkt
beschädigen.
• Setzen Sie das Produkt keiner extremen Gewalteinwirkung
und keinen Stößen aus, und halten Sie es von
Schwankungen der Temperatur oder Luftfeuchtigkeit fern.
• Machen Sie sich nicht an den internen Komponenten des
Geräts zu schaffen.
• Verwenden Sie keinesfalls neue und alte Batterien oder
Batterien eines unterschiedlichen Typs gemeinsam.
• Verwenden Sie keine wiederaufladbaren Batterien.
• Entfernen Sie die Batterien, wenn Sie das Produkt über
einen längeren Zeitraum lagern.
• Zerkratzen Sie nicht die LCD-Anzeige.
• Wenn dieses Produkt auf Holzflächen mit bestimmen
Oberflächenausführungen, wie Klarlack, gestellt wird,
kann die Oberfläche beschädigt werden. Entsprechende
Hinweise zu Gegenständen, die sicher auf Holzflächen
gestellt werden können, entnehmen Sie bitte der
Pflegeanleitung Ihres Möbelherstellers. Oregon Scientific ist
nicht haftbar für Beschädigungen von Holzflächen, die durch
die Berührung mit diesem Produkt verursacht werden.
• Verbrauchte Batterien gehören nicht in den Hausmüll. Bitte
geben Sie sie bei einer Sammelstelle für Altbatterien bzw.
Sondermüll ab.
• Bitte beachten Sie, dass mache Geräte mit einem
Batterieunterbrechungsstreifen bestückt sind. Vor dem ersten
Gebrauch müssen Sie den Streifen aus dem Batteriefach
ziehen.
• Entsorgen Sie das Produkt nicht im allgemeinen Hausmüll,
sondern ausschließlich in den dafür vorgesehenen,
kommunalen Sammelstellen, die Sie bei Ihrer Gemeinde
erfragen können.
TYP BESCHREIBUNG
156 x 61.3 x 115 mm
L X B X H
470 gGewicht (ohne Bat-
terie)
DCF-77Frequenz
Autom. oder deaktiviertSynchronisierung
HH:MM:SSUhr
12- / 24-StundenformatStundenformat
Tag-Monat-DatumKalender
5-Minuten-SchlummerfunktionAlarm
3 x UM-4 / AAA 1,5V Batterien
TECHNISCHE DATEN
ÜBER OREGON SCIENTIFIC
Besuchen Sie unsere Website (www.oregonscientific.de) und
erfahren Sie mehr über unsere Oregon Scientific-Produkte wie
zum Beispiel Wetterstationen, Projektions-Funkuhren, Produkte
für Gesundheit und Fitness, Digitalkameras , MP3-Player,
DECT-/Konferenztelefone und elektronische Lernprodukte für
Kinder. Auf der Website finden Sie auch Informationen, wie
Sie im Bedarfsfall unseren Kundendienst erreichen und Daten
herunterladen können.
Wir hoffen, dass Sie alle wichtigen Informationen auf unserer
Website finden. Für internationale Anfragen besuchen Sie bitte
unsere Website: www2.oregonscientific.com
EU-KONFORMITÄTSERKLÄRUNG
Hiermit erklärt Oregon Scientific, dass die flache Jumbo-LCDFunkuhr (Modell: JM200) mit den grundlegenden Anforderungen
und anderen relevanten Vorschriften der Richtlinie 1999/5/EG
übereinstimmt.
Eine Kopie der unterschriebenen und mit Datum versehenen
Konformitätserklärung erhalten Sie auf Anfrage über unseren
Oregon Scientific Kundendienst.
STARKES
SIGNAL
SCHWACHES
SIGNAL
KEIN
SIGNAL
N
CH
COUNTRIES RTTE APPROVED COMPLIED
All EU countries, Switzerland
and Norway
PAESI CONFORMI ALLA DIRETTIVA R&TTE
Tutti I Paesi Ue, Svizzera CH
E Norvegia N
PAYS CONCERNÉS RTT&E
Tous les pays Européens, la Suisse CH
et la Norvège N
KONFORM IN FOLGENDEN LÄNDERN
Alle Länder der EU, Schweiz CH
und Norwegen N
HINWEIS Die technischen Daten für dieses Produkt
und der Inhalt der Bedienungsanleitung können ohne
Benachrichtigung geändert werden. Die Abbildungen sind nicht
maßstabsgerecht.
JM200_IM_EU_OP.indd 1 2006.9.7 12:38:57 PM
Page 2
Reloj Jumbo radiocontrolado
con LCD de panel plano
Modelo: JM200
MANUAL DE USUARIO
INTRODUCCIÓN
ES
Gracias por elegir el reloj radiocontrolado de Oregon ScientificTM
Tenga este manual a mano cuando use el nuevo producto. Contiene prácticas instrucciones explicadas paso a paso, así como
especificaciones técnicas y advertencias que debe conocer.
PANORÁMICA GENERAL DEL PRODUCTO
1. REPETICIÓN DE ALARMA / LUZ: Activa una función de
repetición de alarma a los 5 minutos o la luz de la pantalla
2. Hora del reloj
3. Se muestra cunado el formato del reloj está en 12 horas
4. Segundos
5. Función de repetición activada
6. Alarma activada
7. Se muestran la hora de alarma o el año
8. Muestra el horario de verano
9. Icono de la señal radiocontrolada
10. Calendario
11. : Activa / desactiva la alarma y la función de
repetición de alarma
12. : Ajuste de reloj
13. : Ajuste de la hora de alarma
14. : Selecciona reloj de 12 / 24;
incrementa el valor del ajuste
15. : Activa / desactiva el reloj radiocontrolado;
disminuye el valor del ajuste
16. Compartimiento para las pilas
17. RESET: La unidad vuelve a los ajustes predeterminados
1
2
3
4
5
6
7
8
9
10
12
11
13
14
15
16
17
PILAS
Introduzca las pilas hacienda coincidir la polaridad (+ y -) de
las mismas con las indicaciones que aparecen en la sección
de Panorámica del producto. Pulse REINICIO cada vez que
cambie las pilas.
NOTA Recomendamos utilizar pilas alcalinas con este producto
para que funcione durante más tiempo.
RECEPCIÓN DEL RELOJ
Este producto está diseñado para sincronizar su calendario y
reloj automáticamente en cuanto está en el área de cobertura
de una señal de radio (1.500km / 932 millas) : (Señal de radio
DCF-77 de Frankfurt, Alemania).
NOTA Para conseguir una mejor recepción, coloque el reloj
alejado de objetos de metal y aparatos eléctricos, y cerca de
una ventana con una vista clara hacia el cielo.
Para encender / apagar la recepción de la señal
radiocontroladadel reloj:
• Pulse y manténgalo pulsado durante 2
segundos. parpadea mientras busca una señal. Cuando
la recepción de la señal radiocontrolada del reloj está
DESACTIVADA no aparece ningún icono.
RELOJ
Pulse CLOCK SET para pasar de hora de alarma al año.
Para ajustar el reloj (cuando la recepción de la señal radiocontrolada del reloj está DESACTIVADA):
1. Pulse y manténgalo pulsado hasta que el primer
ajuste parpadee.
2. Pulse / , para cambiar el ajuste (pulse /
y manténgalo pulsado para cambiar el ajuste).
3. Pulse para confirmar.
4. La secuencia de configuración es: Hora, minuto, segundo,
año, mes, fecha y zona horaria*.
*D-T = Horario de verano.
*S-T – Horario normal.
Para alternar entre reloj de 12 / 24 horas:
Pulse .
NOTA Cuando la unidad está buscando una señal. La
unidad suele tardar unos 10 minutos en obtener una señal de
recepción radiocontrolada válida. Sin embargo, si la señal
radiocontrolada es débil, puede tardarse hasta 24 horas.
ALARMA
Pulse ALARM SET para pasar del año a la hora de alarma.
Para configurar la alarma:
1. Pulse y manténgalo pulsado hasta que el primer
ajuste parpadee.
2. Pulse / , para cambiar el ajuste (pulse /
y manténgalo pulsado para cambiar el ajuste).
3. Pulse para confirmar.
4. La secuencia de configuración es: Hora y minuto.
Para activar o desactivar la alarma y la función de
repetición de alarma:
Pulse . “ALARM ON + SNOOZE” aparecen cuando
están activados.
Para apagar la alarma:
• Pulse SNOOZE/LIGHT para apagarla durante 5 minutos.
O bien
• Pulse cualquier tecla excepto SNOOZE / LIGHT para
apagar la alarma y que se active de nuevo pasadas 24
horas.
ILUMINACIÓN DE LA PANTALLA
Pulse SNOOZE / LIGHT para activar la iluminación.
REINICIO
Pulse RESET para volver a la configuración predeterminada.
PRECAUCIÓN
Este producto está diseñado para funcionar durante muchos
años, si se usa correctamente. Oregon Scientific no será
responsable de ningún incumplimiento de la utilización de este
dispositivo de modo distinto al indicado en las instrucciones
de uso, ni de ninguna alteración o reparación no autorizada
del producto. Tenga en cuenta las instrucciones de seguridad
siguientes.
• No limpie ningún componente del producto con benceno,
disolvente u otros productos químicos, ya que podría
causar daños permanentes no cubiertos por la garantía.
Puede limpiarlo con un paño húmedo si es necesario.
• Nunca sumerja el dispositivo en agua. hacerlo podría
causar descargas eléctrica u otros daños al producto.
• No exponga el producto a fuerza extrema, descargas o
fluctuaciones de temperatura o humedad.
• No manipule los componentes internos.
• No mezcle distintos tipos de pilas, ni pilas nuevas con pilas
viejas.
• No use pilas recargables en este producto.
• Retire las pilas si va a guardar el producto por un largo
periodo de tiempo.
• No raye la superficie de la pantalla LCD.
• La colocación de este producto en superficies de madera
con cierto tipo de acabados, como por ejemplo barniz claro,
puede provocar que este acabado sufra daños. Consulte las
instrucciones del fabricante del mueble para saber qué tipo
de objetos se pueden colocar sobre la superficie de madera.
Oregon Scientific no asume ninguna responsabilidad en
caso de daños en superficies de madera como resultado del
contacto con este producto.
• No elimine este producto con la basura normal. Es
necesario desecharlo separadamente para poder tratarlo.
NOTA La ficha técnica de este producto y los contenidos de
este manual de usuario pueden cambiarse sin aviso. Las
imágenes no están dibujadas a escala.
TIPO DESCRIPCIÓN
156 x 61.3 x 115 mm
(6.1 x 2.4 x 4.5 pulgadas)
L X A X A
470 g (16.6 lbs)Peso
(sin pila)
DCF-77Frecuencia
Automática o desactivada Sincronización
HH:MM:SSReloj
Formato de 12 ó 24 horasFormato de la hora
Día-mes-fechaCalendario
Repetición de alarma al cabo de 5
minutos
Alarma
3 pilas UM-4 (AAA) 1,5VPilas
FICHA TÉCNICA
SOBRE OREGON SCIENTIFIC
Visi te nues tr a pág in a web (ww w. or ego ns cie ntifi c.com )
para conocer más sobre los productos de Oregon Scientific tales
como: Reproductores MP3, juegos y productos de aprendizaje
electrónico para niños, relojes de proyección, productos para
la salud y el deporte, estaciones meteorológicas y teléfonos
digitales y de conferencia. La página web también incluye
información de contacto de nuestro departamento de Atención
al Cliente, en caso de que necesite contactar con nosotros, a la
vez que Preguntas Frecuentes y Descargas de los programas y
controladores necesarios para nuestros productos.
Esperamos que encuentre toda la información que necesite en
nuestra página web. En cualquier caso, si necesita contactar
con el departamento de Atención al Cliente directamente, por
favor visite www.oregonscientific.es la sección “Contáctenos”
o llame al 902 338 368. Los residentes en EEUU pueden
visitar www2.oregonscientific.com/service/support o llamar al
949-608-2848.
EU-DECLARACIÓN DE CONFORMIDAD
Por medio de la presente Oregon Scientific declara que el
Reloj Jumbo radiocontrolado con LCD de panel plano (Modelo
JM200) cumple con los requisitos esenciales y cualesquiera otras
disposiciones aplicables o exigibles de la Directiva 1999/5/CE.
Tiene a su disposición una copia firmada y sellada de la
Declaración de Conformidad, solicítela al Departamento de
Atención al Cliente de Oregon Scientific.
Relógio Rádio-Controlado com Tela Plana
LCD Tamanho Jumbo
Modelo: JM200
MANUAL DO USUÁRIO
INTRODUÇÃO
POR
Agradecemos por selecionar este relógio rádio-controlado
da Oregon Scientific™. Mantenha este manual à mão ao
utilizar seu novo produto. Ele contém práticas instruções
passo-a-passo, bem como especificações técnicas e
avisos que devem ser do seu conhecimento.
VISÃO GERAL DO PRODUTO
1. SNOOZE / LIGHT: Ativa a função Snooze de 5 minutos ou
a luz de fundo
2. Hora do relógio
3. Formato 12 horas em uso
4. Segundos
5. Snooze ativado
6. Alarme ativado
7. Hora do alarme ou ano
8. Horário de verão em vigor
9. Ícone do sinal de rádio-controle
10. Calendário
11. : Ativa / desativa o alarme e a função Snooze
12. : Ajusta a hora do relógio
13. : Ajusta a hora do alarme
14. : Seleciona formato 12 / 24 h;
aumenta o valor do ajuste
15. : Ativa / desativa o sinal de rádio-controle;
diminui o valor do ajuste
16. Compartimento de pilha
17. RESET: Retorna o aparelho ao ajuste padrão
1
2
3
4
5
6
7
8
9
10
12
11
13
14
15
16
17
PILHAS
Insira as pilhas observando a polaridade (+ e -) conforme
indicado na seção “Visão Geral do Produto”. Pressione RESET
após cada troca de pilhas.
NOTA Recomenda-se o uso de pilhas alcalinas neste produto
para um desempenho prolongado.
RECEPÇÃO DO RELÓGIO
Este produto foi concebido para sincronizar automaticamente
seu calendário e relógio ao ser colocado no alcance (1500
Km ou 932 milhas) de um sinal de rádio (DCF-77 gerado de
Frankfurt, Alemanha).
NOTA Para obter melhores resultados, coloque o relógio
distante de objetos metálicos ou elétricos e perto de uma janela
com vista para o céu.
Para ligar / desligar a recepção do relógio:
• Pressione e mantenha pressionado por 2
segundos. O ícone Nenhum ícone aparece quando a
recepção rádio está DESLIGADA.
RELÓGIO
Pressione CLOCK SET a fim de passar da hora do alarme
para ano.
Para ajustar o relógio (quando a rádio-recepção está
desativada):
1. Pressione e mantenha pressionado até que o
primeiro ajuste pisque.
2. Pressione / , para alterar o ajuste.
(Pressione e mantenha pressionado / para
rapidamente alterar o ajuste).
3. Pressione para confirmar.
4. A sequência do ajuste é: Hora, minuto, segundo, ano, mês,
data e diferença do fuso horário*.
*D-T = Horário de Verão
*S-T = Hora Normal
Para alternar entre o formato 12 / 24 horas:
Pressione .
NOTA Todas as teclas são desativadas durante a busca pelo
sinal. É possível levar até 10 minutos para se obter uma
recepção de sinal válida. No entanto, se o sinal de rádio estiver
fraco, é possível levar até 24 horas.
ALARME
Pressione ALARM SET a fim de passar do ano para a hora
do alarme.
Para ajustar o alarme:
1. Pressione e mantenha pressionado até que o
primeiro ajuste pisque.
2. Pressione / , para alterar o ajuste.
(Pressione e mantenha pressionado / para
rapidamente alterar o ajuste).
3. Pressione para confirmar.
4. A sequência do ajuste é: Hora e minuto.
Para ativar / desativar o alarme e Snooze:
Pressione . “ALARM ON + SNOOZE” aparece quando
ativados.
Para silenciar o alarme:
• Pressione SNOOZE / LIGHT para interrompê-lo por 5
minutos.
OU
• Pressione qualquer tecla com a exceção de SNOOZE /
LIGHT para silenciar qualquer alarme e ativá-lo novamente
em 24 horas.
LUZ DE FUNDO
Pressione SNOOZE / LIGHT para ativar a luz de fundo.
RESET
Pressione RESET para retornar ao ajuste padrão.
PRECAUÇÕES
Este produto foi concebido para oferecer muitos anos de
funcionamento, desde que manuseado adequadamente. A
Oregon Scientific não se responsabilizará por quaisquer
desvios na utilização do aparelho além do especificado nas
instruções, nem por quaisquer alterações ou reparos não
aprovados no produto. Observe as seguintes orientações:
• Não limpe nenhuma parte do aparelho com benzeno,
tíner ou outros solventes químicos, pois isso pode causar
danos permanentes não cobertos pela garantia. Quando
necessário, limpe a unidade com um pano úmido.
• Nunca mergulhe o produto na água. Isso pode causar
choques elétricos e danificar o aparelho.
• Não submeta o aparelho a forças, choques, nem variações
extremas de temperatura e umidade.
• Não interfira inadequadamente nos componentes internos.
• Não misture pilhas novas e usadas, nem tipos diferentes de
pilhas no mesmo compartimento.
• Não utilize pilhas recarregáveis neste produto.
• Retire as pilhas do aparelho, caso tencione guardá-lo por
um longo período de tempo.
• Não arranhe a tela LCD.
• Ao colocar este aparelho em superfícies de madeira
com certos tipos de acabamento, tais como verniz, pode
ocorrer danos no acabamento. Consulte as instruções para
cuidados prescritas pelo fabricante de móveis, para
orientações quanto aos tipos de objetos que podem ser
seguramente colocados na superfície de madeira. A Oregon
Scientific não se responsabiliza por quaisquer danos em
superfícies de madeira devido ao contato com este produto.
• Não disponha deste produto no lixo comum caseiro. O
produto deve ser recolhido separadamente para receber
tratamento especial.
NOTA As especificações técnicas deste produto e o conteúdo
do manual do usuário estão sujeitos a alterações sem aviso
prévio. As imagens estão fora de escala.
ESPECIFICAÇÕES
SOBRE A OREGON SCIENTIFIC
Visite nosso site (www.oregonscientific.com.br) para aprender
mais sobre nossos outros produtos, tais como Câmeras Digitais;
Produtos de Aprendizagem; Relógios de Projeção; Equipamentos
de Esporte e Saúde; Estações Meteorológicas. O nosso site
possui também dados para contato com nosso SAC, assim como
perguntas e respostas mais recentes e downloads.
Esperamos que você encontre todas as informações que
necessitar, entretanto se você quiser entrar em contato direto
com nosso SAC, ligue para 55 11 2182-8608.
CE - DECLARAÇÃO DE CONFORMIDADE
A Oregon Scientific declara que este Relógio de Relógio
Rádio-Controlado com Tela Plana LCD Tamanho Jumbo (Modelo:
JM200) está conforme com os requisitos essenciais e outras
provisões da Diretriz EMC 1999/5/CE.
Uma cópia assinada e datada da Declaração de Conformidade
está disponível para requisições através do nosso SAC.
Jumbo radiogestuurde LCD Klok
met Plat LCD-Scherm
Model: JM200
HANDLEIDING
INTRODUCTIE
NL
Dank u dat u voor de Oregon Scientific™ radiogestuurde klok
gekozen hebt. Houd deze handleiding bij de hand terwijl u uw
nieuwe product gebruikt. Deze bevat praktische stap-voor-stap
instructies, evenals de technische specificaties en belangrijke
waarschuwingen.
PRODUCT OVERZICHT
1. SNOOZE / LICHT: Activeert 5-minuten snoozefunctie of
schermverlichting
2. Kloktijd
3. weergave 12-uurs klok
4. Seconden
5. Snooze is geactiveerd
6. Alarm is geactiveerd
7. Alarmtijd of jaar wordt weergegeven
8. Zomertijd wordt weergegeven
9. Ontvangst icoon radiosignaal
10. Kalender
11. : Activeert / deactiveert alarm en snoozefunctie
12. : Stelt kloktijd in
13. : Stelt alarmtijd in
14. : Kiest 12 uur / 24 uur klok; verhoogt
waarde
15. : Activeert / deactiveert radiogestuurde klok;
verlaagt waarde
16. Batterijvak
17. RESET: Zet het apparaat terug in standaardinstellingen
1
2
3
4
5
6
7
8
9
10
12
11
13
14
15
16
17
BATTERIJEN
Plaats batterijen volgens de polariteit (+ en -) als weergegeven
in de sectie Product Overzicht. Druk altijd op RESET wanneer
u de batterijen vervangen heeft.
NB U wordt aangeraden alkalinebatterijen in dit product te
gebruiken voor langere prestaties.
KLOKONTVANGST
Dit product is ontworpen om zijn kalenderklok automatisch te
synchroniseren zodra hij binnen 1500km (932 mijl) van een
radiosignaal is (DCF-77 verzonden vanuit Frankfurt, Duitsland).
NB Voor de beste resultaten plaatst u de klok uit de buurt van
metalen of elektrische voorwerpen en in de buurt van een raam
met een goed zicht op de lucht.
Om de klokontvangst AAN / UIT te zetten:
• Houd ingedrukt gedurende 2 seconden.
knippert tijdens het zoeken naar een signaal. Dit icoon
verschijnt niet als radio-ontvangst UIT staat.
KLOK
Druk op CLOCK SET om schakelen van alarmtijd naar jaar.
Om de klok in te stellen (wanneer radio-ontvangst
uitgeschakeld is):
1. Houd ingedrukt totdat de eerste instelling knippert.
2. Druk / , om de instelling te wijzigen, (houd
/ ingedrukt om instelling sneller te wijzigen).
3. Druk op om te bevestigen.
4. De volgorde van instellingen is: Uren, minuten, seconden,
jaar, maand, datum en tijdzone*.
*D-T = Zomertijd
*S-T – Normale tijd.
Om 12 / 24-uurs klok te kiezen: Druk .
NB Alle knoppen van het apparaat zijn uitgeschakeld
tijdens het zoeken naar een signaal. Het kan tot 10 minuten
duren voordat een geschikt signaal ontvangen wordt. Maar
als het radiosignaal zwak is, kan het tot 24 uur duren.
ALARM
Druk op ALARM SET om schakelen van jaar naar alarmtijd.
Om het alarm in te stellen:
1. Houd ingedrukt totdat de eerste instelling knippert.
2. Druk / , om de instelling te wijzigen, (houd
/ ingedrukt om instelling sneller te wijzigen).
3. Druk op om te bevestigen.
4. De volgorde van instellingen is: Uur en minuut.
Om het alarm en snooze te activeren / deactiveren:
Druk . “ALARM ON + SNOOZE” verschijnt wanneer
ze geactiveerd zijn.
Om het alarm uit te zetten:
• Druk SNOOZE / LICHT om het alarm 5 minuten uit te
zetten.
OF
• Druk elke knop behalve SNOOZE/LICHT om het alarm
helemaal uit te zetten, waarna het pas na 24 uur weer zal
afgaan.
SCHERMVERLICHTING
Druk SNOOZE / LIGHT om de schermverlichting te activeren.
RESET
Druk RESET om de standaardinstellingen te gebruiken.
WAARSCHUWINGEN
Dit product is ontworpen om u vele jaren plezier te geven, mits
goed behandeld. Oregon Scientific is niet verantwoordelijk voor
enigerlei afwijking in het gebruik van wat in de handleiding
beschreven staat of voor enige ongeautoriseerde aanpassingen
of reparaties aan het product. Houd de volgende regels in acht:
• Reinig de onderdelen van dit product niet met wasbenzine,
verfverdunner of andere oplosmiddelen – dit kan permanente
schade veroorzaken die niet door de garantie wordt gedekt.
Indien nodig, reinig het product dan met een licht vochtige
doek.
• Dompel het product nooit onder in water. Dit kan elektrische
schokken veroorzaken en het product beschadigen.
• Stel het product niet bloot aan extreme klappen, schokken of
schommelingen in temperatuur of vochtigheid.
• Laat de interne componenten met rust.
• Gebruik nooit verschillende types of oude en nieuwe
batterijen door elkaar.
• Gebruik geen oplaadbare batterijen in dit product.
• Verwijder de batterijen als u het product voor langere tijd
wegbergt.
• Maak geen krassen op het LCD-scherm.
• Als u dit product op een houten oppervlak plaatst met
bepaalde afwerking zoals blanke lak, kan deze afwerking
beschadigen. Raadpleeg de zorgvoorschriften van uw
meubel voor aanwijzingen over welk soort voorwerpen veilig
op het houten oppervlak geplaatst kunnen worden. Oregon
Scientific is niet verantwoordelijk voor enigerlei schade aan
houten oppervlakken door contact met dit product.
• Gooi dit product niet bij het gewone huisvuil. Dit soort afval
wordt apart opgehaald om te kunnen worden verwerkt.
NB De technische specificaties van dit product en de inhoud
van de handleiding zijn zonder voorafgaande waarschuwing
aan veranderingen onderhevig. Plaatjes zijn niet op schaal
SPECIFICATIES
OVER OREGON SCIENTIFIC
Bezoek onze website (www.oregonscientific.com) om meer te
weten over uw nieuwe product en andere Oregon Scientific
producten zoals digi ta le fototoeste ll en , gezondheids-en
fitnessuitrusting en weerstations. Op deze website vindt u
tevens de informatie over onze klantendienst, voor het geval u
ons wenst te contacteren.
EU CONFORMITEITS VERKLARING
Bi j deze ve rkl aar t Oreg on Sc ien t ifi c dat dez e Jumb o
radiogestuurde LCD Klok met Plat LCD-Scherm (Model: JM200)
voldoet aan de essentiële eisen en aan de overige relevante
bepalingen van richtlijn 1995/5/CE.
Een kopie van de getekende en gedateerde Conformiteits
verklaring is op verzoek beschikbaar via onze Oregon Scientific
klanten service.
Platt Jumbo radiokontrollerad LCD-klocka
Modell: JM200
BRUKSANVISNING
INTRODUKTION
SWE
Tack för att du valt en radiokontrollerad klocka från
Oregon ScientificTM Ha denna manual till hands när du
använder din nya produkt. Den innehåller en praktisk
steg-för-steg instruktion, samt teknisk specifikation och
varningsmeddelanden som du bör känna till.
PRODUKTÖVERSIKT
1. SNOOZE / LIGHT: Aktiverar 5-minuters snooze eller
bakgrundsbelysning
2. Klocktid
3. 12 timmars klocka visas
4. Sekunder
5. Snooze är aktiverad
6. Alarm aktiverat
7. Alarmtid eller år visas
8. Sommartid visas
9. Radiokontrollerad signalikon
10. Datum
11. : Aktiverar / inaktiverar alarm och
snoozefunktionen
12. : Ställer klockan
13. : Ställer alarmtid
14. : väljer 12 / 24 timmars klocka; ökar
inställningsvärdet
15. : Aktiverar / inaktiverar radiokontrollerad
klocka; minskar inställningsvärdet
16. Batterifack
17. RESET: Återgå till grundinställning
1
2
3
4
5
6
7
8
9
10
12
11
13
14
15
16
17
BATTERIER
Se till att batterierna sätts in enligt figuren i batterifacket som
visas i produktöversiktsavsnittet. Tryck RESET efter varje
batteribyte.
NOTERING Det rekommenderas att använda Alkaline batterier
till denna produkt för maximal drifttid.
KLOCKMOTTAGNING
Denna produkt är konstruerad för att automatiskt synkronisera
kalenderklockan så snart den är inom radiomottagningsradien
(1 500km / 932 miles) för en radiosignal. DCF-77 radiosignal
från Frankfurt, Tyskland
NOTERING För bästa resultat, placera enheten skild från metall
eller elektroniska föremål och nära ett fönster med fri sikt.
Att slå på / av klockmottagningen:
• Tryck och håll inne i 2 sekunder.
blinkar när den söker efter en signal. Ingen ikon visas när
radiomottagningen är bortkopplad.
KLOCKA
Tryck CLOCK SET för att skifta från alarmtid till år.
Att ställa klockan (när radiomottagningen är inaktiverad):
1. Tryck och håll inne tills den första inställningen
blinkar.
2. Tryck / , för att ändra inställning, (tryck och håll
inne / för att snabbmata inställningen).
3. Tryck för att bekräfta.
4. Inställningsföljden för klockan är: Timme, minut, sekund, år,
månad, datum och offset för tidszon*.
*D-T = Sommartid.
*S-T – Normaltid.
Att växla mellan 12 / 24 timmarsklocka: Tryck .
NOTERING Alla knappar är ur funktion när enheten söker
efter en signal. Normalt sett tar det ca 10 minuter innan en
radiosignal kan mottagas. Hursomhelst, om signalen är svag
kan det ta upp till 24 timmar för enheten att få kontakt med
signalen.
ALARM
Tryck ALARM SET för att skifta från år till alarmtid.
Att ställa alarmet:
1. Tryck och håll inne tills den första inställningen
blinkar.
2. Tryck / , för att ändra inställning, (tryck och håll
inne / för att snabbmata inställningen).
3. Tryck för att bekräfta.
4. Inställningsföljden för klockan är: Timme och minut.
Att aktivera / inaktivera alarmet och snoozen:
Tryck . “ALARM ON + SNOOZE” visas när de är
aktiverade.
För att stänga av alarmet:
• Tryck SNOOZE / LIGHT för att stänga av alarmet i 5
minuter.
eller
• Tryck på valfri knapp förutom SNOOZE / LIGHT för att
stänga av larmet och aktivera det igen om 24 timmar.
BAKGRUNDSBELYSNING
Tryck SNOOZE / LIGHT för att slå på bakgrundsbelysningen.
RESET (ÅTERSTÄLLNING)
Tryck RESET för att återställa produkten till grundinställning.
FÖRSIKTIGHETSÅTGÄRDER
Denna produkt är designad för att ge dig många års glädje
om den hanteras på ett korrekt sätt. Oregon Scientific är
inte ansvariga om några avsteg från instruktionsmanualen
gällande användningen av produkten görs eller om icke godkända
förändringar eller reparationer utförs. Se följande anvisningar:
• Rengör aldrig produkten med rengöringsmedel som
innehåller bensen, thinner eller andra lösningsmedel – detta
kan orsaka bestående skador som inte täcks av garantin.
Rengör produkten med en fuktig trasa vid behov.
• Lägg aldrig ner produkten i vatten. Detta kan orsaka en
elektrisk stöt som förstör produkten.
• Utsätt inte produkten för extrema krafter, stötar eller
variationer i temperatur eller luftfuktighet.
• Mixtra inte med interna komponenter.
• Blanda inte gamla och nya batterier eller batterier av olika
fabrikat.
• Använd inte laddningsbara batterier till denna produkt.
• Plocka ur batterierna om produkten skall förvaras under en
längre period.
• Repa inte LCD displayen.
• Om denna produkt placeras på ytor med speciell finish
såsom lackat trä etc. kan dessa ytor skadas. Ta kontakt med
din möbeltillverkare för att få mer information om huruvida
det går bra att placera föremål på ytan. Oregon Scientific kan
inte hållas ansvariga för skador på träytor som uppkommit på
grund av kontakt med denna produkt.
• Släng inte förbrukad produkt som vanligt restavfall. Den bör
slängas som elektronikskrot på en återvinningsstation.
NOTE De tekniska specifikationerna och innehållet i denna
manual kan komma att ändras utan vidare
upplysning. Bilderna är inte ritade i skala.
SPECIFIKATIONER
OM OREGON SCIENTIFIC
Be sök vår hem sid a (w ww.or egon scie nti fic .se ) fö r at t
se mer av vår a pro du kte r sås om digi tal kamer or; MP3
spelare; projektionsklockor; hälsoprodukter; väderstationer;
DECT-telefoner och konferenstelefoner. Hemsidan innehåller
också information för våra kunder i de fall ni behöver ta kontakt
med oss eller behöver ladda ner information. Vi hoppas du hittar
all information du behöver på vår hemsida och om du vill komma i
kontakt med Oregon Scientific kundkontakt besöker du vår lokala
hemsida www.oregonscientific.se eller www.oregonscientific.com
för att finna telefonnummer till respektive supportavdelning.
EU-FÖRSÄKRAN OM ÖVERENSSTÄMMELSE
Härmed intygar Oregon Scientific att denna Platt Jumbo
ra d iok ont roll erad LCD -kl ocka (Mo d ell : JM200 ) st år i
överenstämmer med de väsentliga egenskapskrav och övriga
relevanta bestämmelser som framgår av direktiv 1999/5/EG.
En signerad kopia av “Declaration of Conformity” kan erhållas vid
hänvändelse till Oregon Scientific servicecenter.
SEÑAL
FUERTE
SEÑAL
DÉBIL
NO SE RECIBE
SEÑAL
SINAL
FORTE
SINAL
FRACO
SEM
SINAL
TIPO DESCRIÇÃO
156 x 61.3 x 115 mm
(6.1 x 2.4 x 4.5 polegadas)
C X L X A
470 g (16.6 lbs)Peso
(sem pilha)
DCF-77Frequência
Auto ou desativadaSincronização
HH:MM:SSRelógio
12 / 24 horasFormato da hora
Dia-mês-dataCalendário
Função Snooze de 5 minutosAlarme
3 x UM-4 / AAA de 1,5V Pilhas
STERK
SIGNAAL
ZWAK
SIGNAAL
GEEN
SIGNAAL
TYPE BESCHRIJVING
156 x 61.3 x 115 mm
(6.1 x 2.4 x 4.5 inch)
L x B x H
470 g (16.6 lbs)Gewicht (zonder
batterij)
DCF-77Frequentie
Auto of uitgeschakeldSynchronisatie
UU:MM:SS Klok
12 / 24-uurs formaat Uur Formaat
Dag-maand-datum Kalender
5-minuten snoozeAlarm
3 x UM-4 / AAA 1,5VBatterijen
STARK
SIGNAL
SVAG
SIGNAL
INGEN
SIGNAL
TYP BESKRIVNING
156 x 61.3 x 115 mm
(6.1 x 2.4 x 4.5 tum)
L x B x H
470 g (16.6 lbs)Vikt
(utan batteri)
DCF-77Frekvens
Auto eller inaktiveradSynkronisering
TT:MM:SSKlocka
12 / 24 timmarsformatTimformat
Dag-månad-datumDatum
5 minuters snoozeAlarm
3 x UM-4 AAA 1.5V Batterier
© 2006 Oregon Scientific. All rights reserved.
P/N.: 086L004688-015
N
CH
PAÍSES BAJO LA DIRECTIVA RTTE
Todos los países de la UE, Suiza
y Noruega
PAISES SUJEITOS A NORMA R&TTE
Todos os paises da União Européia, Suíça CH
e Noruega N
LANDEN DIE ZIJN ONDERWORPEN AAN RTT&E
Alle EU landen, Zwitserland CH
en Noorwegen N
LÄNDER SOM OMFATTAS AV RTTE-DIREKTIVET
Alla länder inom EU, Schweiz CH
och Norge N
JM200_IM_EU_OP.indd 2 2006.9.7 12:39:06 PM
 Loading...