

Page 1

6
S N O O Z E / L I G H T
5
C/ F
8
9
RESET
Remot e The rmo Cloc k
5
6
7
6
Alarm /
Temperat ure
Alar m/Snoo ze
Alarm an d Snooze ON
Tempera ture Alarm ON
C8257-PD08423M Size: A4
MAX .t emp era tur e r eco rd
MIN .t emp era tur e re co rd
WIRELESS THERMO CLOCK
MODEL IWA-80055
USER’S INSTRUCTIONS
Thank you for your purchase of this wireless
thermo clock. The utmost care has gone into the design
and man ufact ur e of your clock. Pleas e read the
instructions carefully and keep the manual for future
reference.
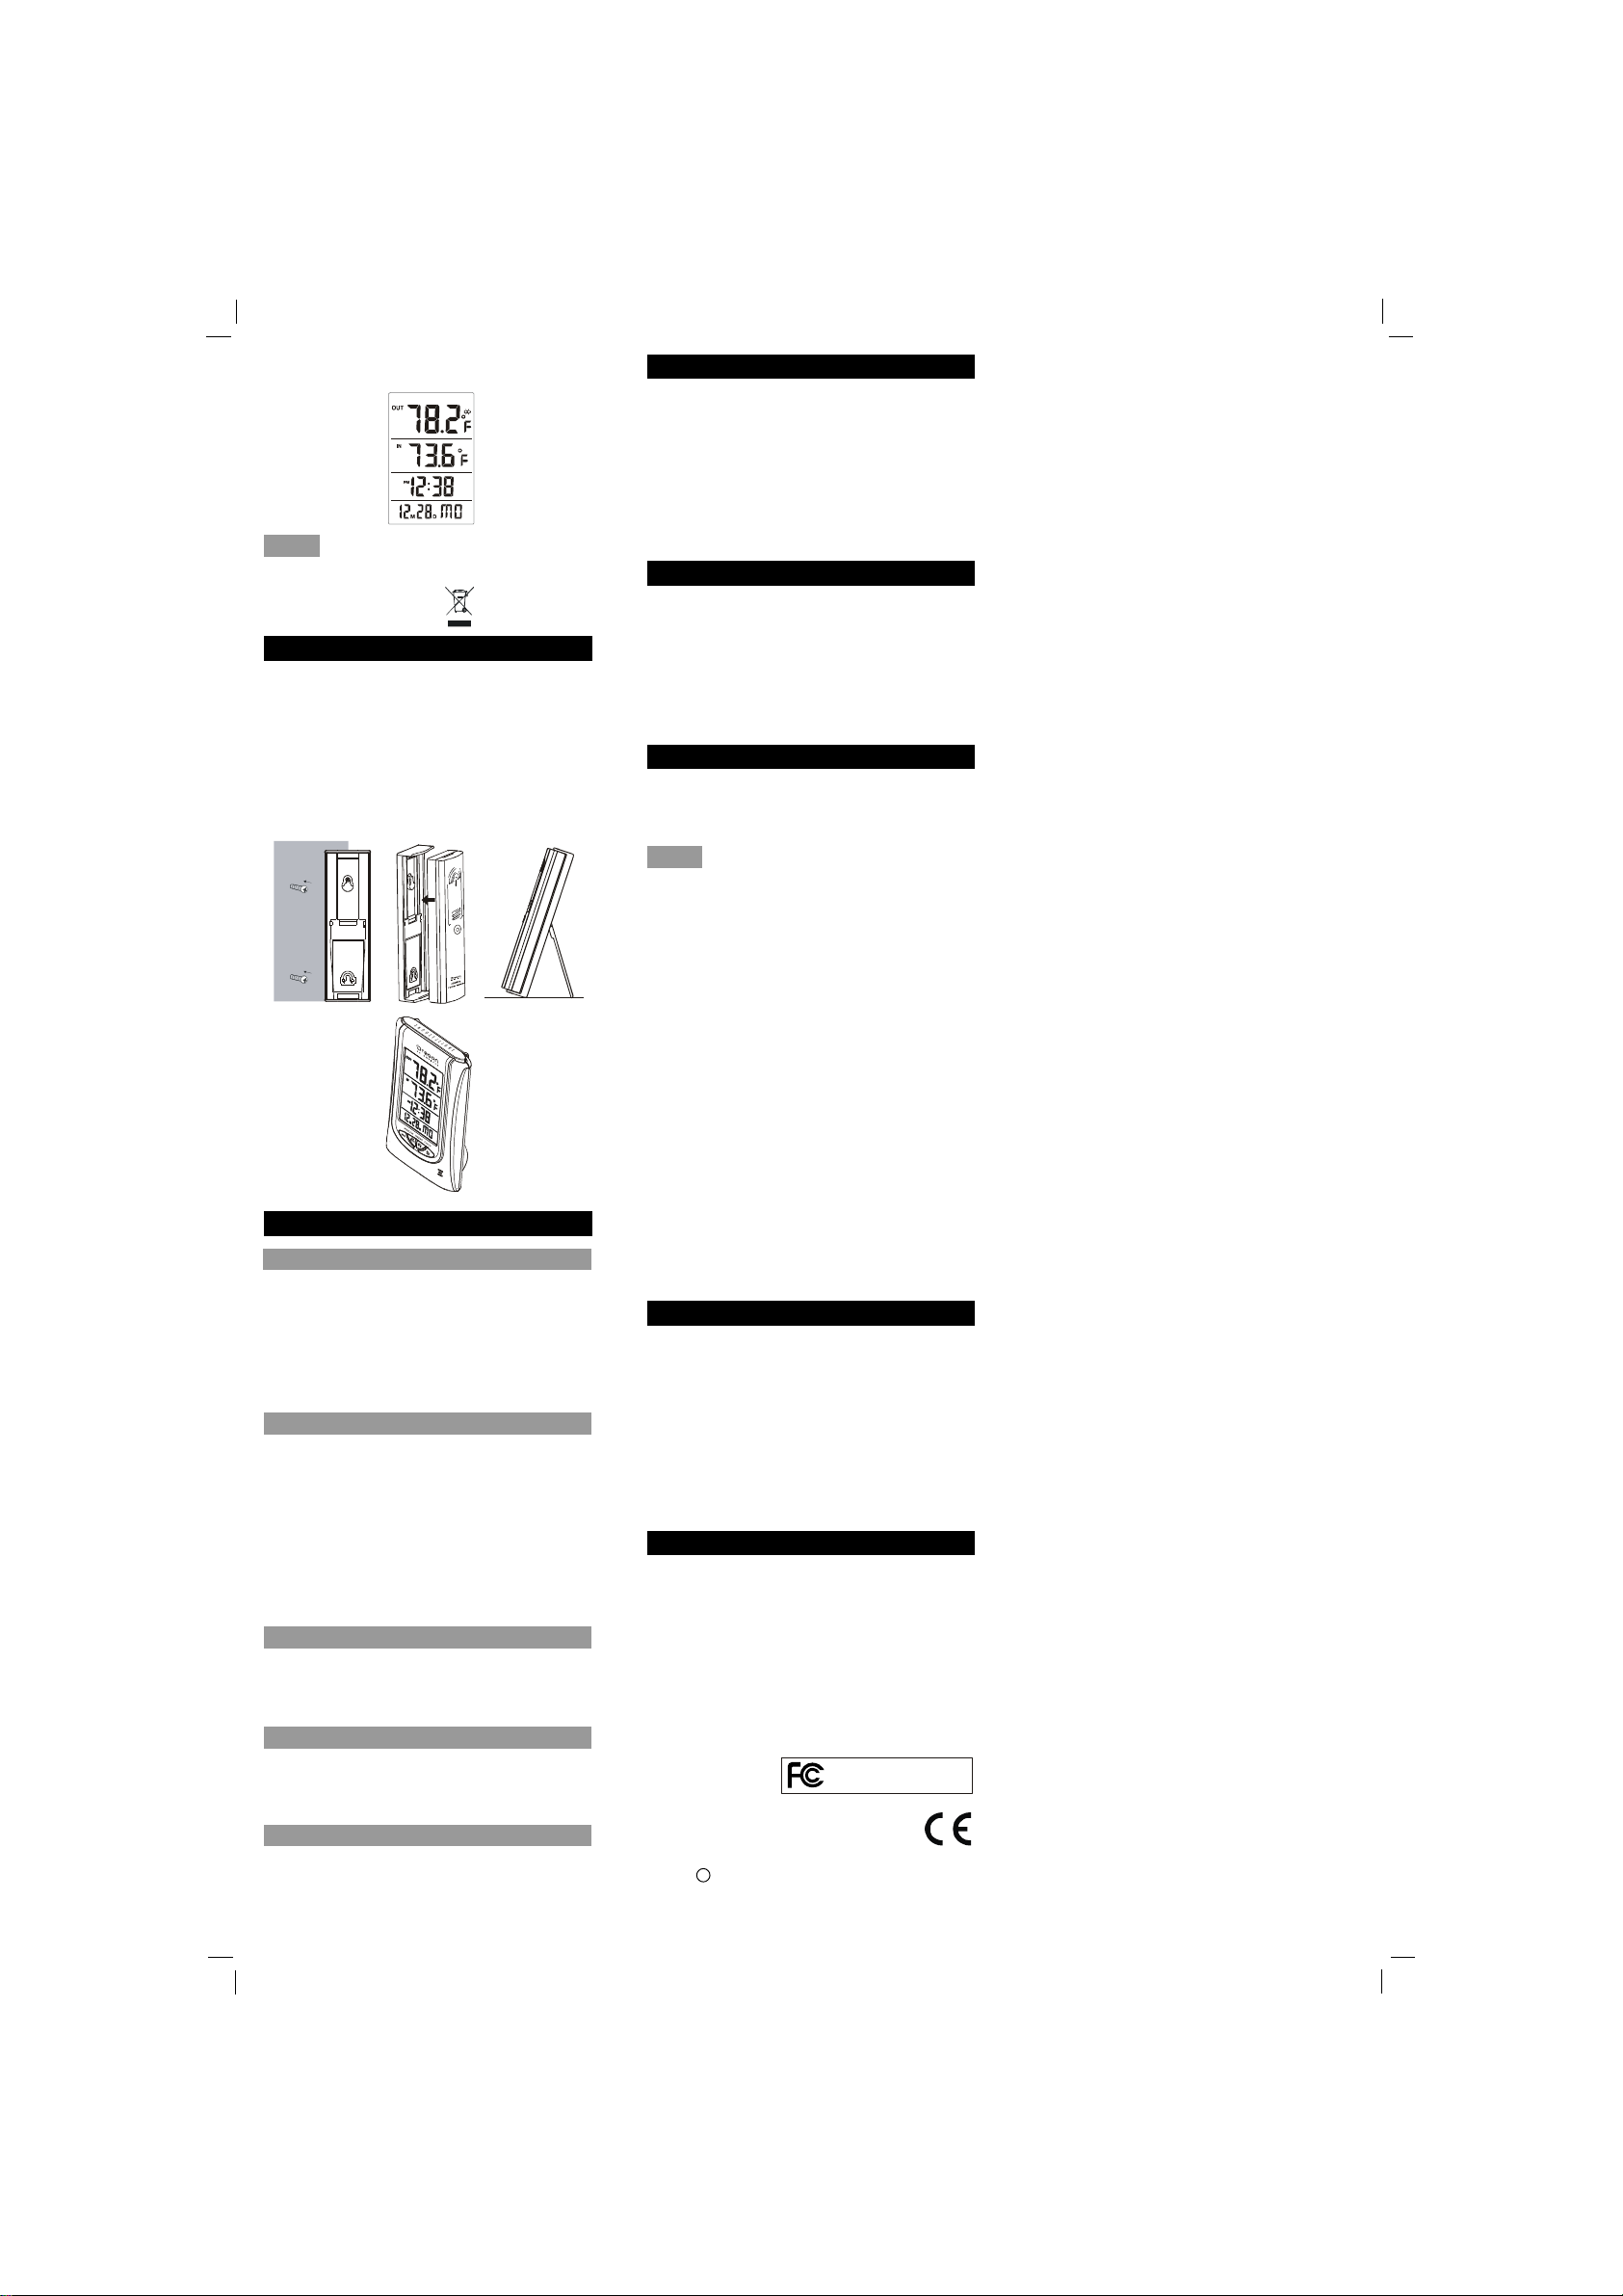
The receiver unit has a clear, easy-to-read display that
shows the indoor/outdoor temperature, time, date, month
and day of the week . It is able to receive and display
readings from the remote sensor.
The 433 MHz technology means no wire installation is
required and you can place the sensor anywhere you
like.
MAIN FEATURES:
1
IWA-80 055
MODEL N O: IW A-80 055
MADE IN CHIN A
2
3
4
1. SNOOZE / LIGHT:
- Press it to turn on the backlight for 5 seconds.
- Press it to stop the curren t alarm wh en it is
sounding.
2. LCD display:
- Displays the time, date, month, day of the week,
indoor/outdoor current temperature as well as the
ma xim um an d mini mu m indo or /ou td oor
temperature.
3. ALM ON/OFF:
- Press it once to turn on the Alarm and Snooze;
press it twice to turn on the Temperature Alarm;
press it again to turn off all of them.
- Press it to stop the curren t alarm wh en it is
sounding.
4. MODE:
- Press it to switch between normal time mode and
alarm time mode.
- Press and hold it for 2 seconds to enter the time
setting mode.
- In setting mode, press it to step the setting items.
5. ADJ · °C/°F:
- Press it to switch between Celsius and Fahrenheit.
- In setting mode, press it to change the setting
val ues.
6. MAX / MIN:
- Press it to check the minimum and maximum
temperature records.
- Press and hold it for 3 seconds to delete the
maximum and minimum temperature records.
7. RESET:
- Press it to reset all values to default values.
- In case of malfunction, the unit may be required
to reset.
8. BATTERY COMPARTMENT:
- Accommodates 3 AA size batteries.
9. FIXED TABLE STAND:
- Use it to stand the clock on the desktop.
7
TRANSMITTER:
2
1
3
4
1. LED indicator:
- Flashes when the remote unit transmits a reading.
2. CHANNEL SLIDE SWITCH:
- Assign the transmitter to Channel 1, 2 or 3.
(NOTE: The default and only effective channel
for receiver is Channel 1.)
3. RESET:
- Press it to restart the transmitter.
4. BATTERY COMPARTMENT:
- Requires 2 AA size batteries (not included).
5. BATTERY DOOR:
6. WALL-MOUNTING HOLDER:
- Supports the transmitter in the wall mounting.
7. TABLE STAND:
- Use it to support the the sensor on a flat surface.
BEFORE USING THE TRANSMITTER
1. Rem ove the trans mit ter from the stand and
open the battery door.
2. In sert 2 AA siz e batte ri es into the batter y
compartment. Make sure you insert them the
right way according to the polarity information
marked on the battery compartment.
3. Replace the battery door.
4. “Channel 1” must be selected for this model.
NOTE:
Avoid placing the transmitter in direct sunlight, rain or
snow.
WEATHER STATION
1. Remove the battery door and insert 3 AA size
batteries into the battery compartment. Make
sure you insert them the right way according to
the polarity information marked on the battery
compartment.
2. Replace the battery door.
3. Press “RESET” key to restart the clock and it
wi ll sy nch ro niz e wit h the tran sm itt er
automatical ly.
NOTE:
1. The building material and the position of receiver
and transmitter affect the effective range. So
try various locations to obtain the best result.
2. Place the unit away fro m metal objects and
electrical appliances to minimize the interference.
Position the receiver and transmitter within the
effective transmission range: 100 feet in usual
circumstances.
TIME AND CALENDAR SETTING
1. In normal time mode, press and hold “MODE”
key for 2 seconds until the HOUR digit flashes.
2. Press “ADJ · °C/°F” key to change its value.
3. Repeat the above operations to set time and
calendar in this order: Hour > Minute > Second >
12/24 Hr > Year > Month > Date.
4. Press “MODE” key to save and exit the setting
mode, or let it exit automatically 30 seconds
later without pressing any key.
ALARM TIME SETTING
1. In norm al time mode, press “MODE” key to
enter the alarm time mode.
2. Press and hold “MODE” key for 2 seconds to
ent er the al arm ti me set tin g mode un til th e
HOUR digit flashes.
3. Press “ADJ · °C/°F” key to change its value.
4. Repeat the above operations to set the alarm
Minute.
5. Press “MODE” key to save and exit the setting
mode, or let it exit automatically 30 seconds
later without pressing any key.
NOTE:
The alarm will be automatically turned on when you set
the alarm time.
USING ALARM & TEMPERATURE ALARM
FUNCTIONS
1. Set the alarm time as described in the previous
section.
2. Press “ALM ON/OFF” key once to turn on the
alarm and snooze with the bell icon “ ” and
snooze icon “Zz” displayed on the LCD.
3. Press it twice to turn on the temperature alarm with
the icon “ ” displayed.
4. Press it again to turn off all of them until the
icons disappear.
NOTE:
1. To activat e the temp erature alarm function,
ALARM must be on.
2. The temperature alarm can be turn ed on 30
minutes earlier than the alarm only when the
transmitter’s temperature is below -3°C (26°F).
3. Once the snooze function is turned on, the 4step crescendo alarm will sound 7 times in 5minute interval. The alarm duration is 60 seconds.
4. Enter the snooze mode; press the “ALM ON/OFF”
key to stop the alarm completely and exit the snooze
mode.”
OFF
HOW TO READ INDOOR AND OUTDOOR
TEMPERATURE RECORDS
Change the temperature unit to °C for Celsius or °F
for Fahrenheit by pressing the “ADJ · °C/°F” key.
NOTE:
1. If no signals are received or the transmission is
interfered, “---” will appear on the LCD.
2. Relocate the clock or the transmitter in other
positions and make sure the transmission is within
the effective range of 100 feet approx.
3. After several unsuccessful attempts to receive the
temperature signal, please remove the batteries
from the sensor and main display unit and start
the setup procedure again and decrease the
distance between the sensor and main display unit.”
CHECKING AND DELETING MAX. /MIN.
TEMPERATURE RECORDS
1. Pr ess “MAX /M IN” key on ce to ch ec k the
maximum temperature records. Press it twice
to check the minimum records. Press it again to
exit.
2. Press and hold “MAX/MIN” key for 3 seconds to
delete the maximum and minimum temperature
records.
LOW BATTERY INDICATOR
Whe n the LCD be com es di m, re place wi th 3 AA size
batteries at once; while if the l ow battery indicator
“ ” appe ars on the LCD, it indicates th at the
battery power of the transmi tter i s n ot eno ugh, a nd
you shou ld replace th e bat teries a t once.
Page 2
Trans mitt er’s low ba tter y ind icat or
(shows on the main unit)
Re mo te T h er m o C lo c
NOTE:
Attention! Please dispose of used unit or batteries in
an ecologically safe manner.
PLACING THE TRANSMITTER OUTSIDE
The transmitter should be located in an area protected
from direct sunlight and rain. Place the sensor under a
covered location like a roof overhand or under the eaves.
This will ensure accurate temperature readings. The
transmitter comes with a wall mounting/desktop holder.
When mounting on a wall, screw in place the holder
using the top and bottom holes. Then secure the transmitter
in the holder. The holder is also equipped with a table
stand. With the transmitter secured on the holder, retract
the leg on the rear of the holder and place on a flat surface.
SPECIFICATIONS
MAIN UNIT
Recommended operating range: 0 °C to 45 °C
32 °F to 113 °F
Resolution: 0.1°C (above -10°C )
1°C (below -10°C)
0.1°F (-9.9°F ~ 99.9°F)
1°F (above 100°F & below -10°F)
REMOTE SENSOR
Recommended operating range: -20 °C to 55 °C
-4 °F to 131 °F
RF transmission frequency: 433 MHz
No. of remote unit: 1 unit
RF transmission range: maximum 100 feet
Temperature sensing cycle: around 60 ~ 64 seconds
Power
Main unit: 4.5V, use 3 x AA 1.5V alkaline battery
Remote sensor: 3 V, use 2 x AA 1.5V alkaline battery
Weight
Main unit: 8.57 oz
Remote sensor: 3.74 oz
ABOUT OREGON SCIENTIFIC
Visit our website (www.oregonscientific.com) to learn
more about Oregon Scientific products.
If you're in the US and would like to contact our
Customer Care department directly, please visit:
www2.oregonscientific.com/service/support.asp
OR
For international inquiries, please visit:
www2.oregonscientific.com/about/international.asp.
FCC STATEMENT
This device complies with Part 15 of the FCC Rules.
Operation is subject to the following two conditions:
(1) This device may not cause harmful interference,
and
(2) T hi s de vi ce mus t ac ce pt any int er fe re nc e
received, including interference that may cause
undesired operation.
WARNING:
Changes or modifications to this unit not expressly
approved by the party responsible for compliance could
void the user’s authority to operate the equipment.
NOTE:
This equipment has been tested and found to comply
with the limits for a Class B digital device, pursuant to
Part 15 of the FCC Rules. These limits are designed to
pr ovi de re aso na ble pr ote ct ion ag ai nst ha rm f ul
interference in a residential installation.
This equipment generates, uses and can radiate radio
freq uenc y energy and, if not installed and used in
accordance with the instructions, may cause harmful
interference to radio communications. However, there
is no guarantee that interference will not occur in a
particular installation. If this equipment does cause
harmful interference to radio or television reception,
which can be determined by turning the equipment off
and on, the user is encouraged to try to correct the
interference by one or more of the following measures:
• Reorient or relocate the receiving antenna.
• Increase the separation between the equipment
and receiver.
• Connect the equipment into an outlet on a circuit
diffe rent fro m tha t to whi ch the rece iver is
connected.
• Consult the dealer or an experienced radio / TV
technician for help.
DECLARATION OF CONFORMITY
The following information is not to be used as contact
for support or sales. Please call our customer service
nu mbe r (l ist ed on o ur we bs i te at
www.oregonscientific.com or on the warranty card for
this product) for all inquiries instead.
We
Name: Oregon Scientific, Inc.
Address: 19861 SW 95th Place, Tualatin,
Oregon 97062 USA
DECLARE THAT THE PRODUCT
Product No.: IWA-80055
Product Name: Remote Thermo Clock
is in con fo rm ity wit h Part 15 of th e FCC Rul es .
Operation is subject to the following two conditions:
1) This device may not cause harmful interference.
2) Thi s devi ce mus t acce pt any inter fe re nc e
received, including interference that may cause
undesired operation.
IW A- 80 05 5
k
Dimension
Main unit: 3.78(W) x 5.71(H) x 2.20(D) inch
Remote sensor: 1.57(W) x 1.26(H) x 0.94(D) inch
C 2008 Oregon Scientific. All rights reserved
 Loading...