

Page 1

1
EN
Mini Wireless Energy Manager
Model: ESM100 / ESM100U
USER MANUAL
CONTENTS
Introduction .............................................................. 2
Overview ................................................................... 2
Main unit – Front view .......................................... 2
Main unit – Back view .......................................... 3
Remote transmitter ............................................... 3
Sensor clamp ........................................................ 4
Household power cables and phase ..................... 4
Getting started ........................................................ 4
Locate live outgoing supply cable ......................... 4
Sensor set up. ....................................................... 5
Transmitter set up ................................................ 6
Main unit set up .................................................... 7
Sensor data transmission ..................................... 7
Understanding electricity ....................................... 7
Display modes ......................................................... 8
Cost rate ................................................................... 8
Power save ............................................................... 8
Clear records ........................................................... 9
Reset ......................................................................... 9
Troubleshooting ...................................................... 9
Specifications ......................................................... 9
Precautions ............................................................ 10
About Oregon Scientific ........................................11
EU-Declaration of conformity ...............................11
Page 2

2
EN
INTRODUCTION
Thank you for selecting the Oregon Scientific™ Mini
Wireless Energy Manager (ESM100 / ESM100U).
The Mini Wireless Energy Manager embodies our
commitment to environmental concerns. Aware of
threats facing the world we live in, Oregon Scientific
™
has combined technological know-how, practicality
and style to create this line of products that can help
you reduce your carbon footprint.
With this measurement category II product, you can
view your consumption in real time. By being made
aware of your consumption, you can take practical
steps to reduce it. Your continued effort will be reflected
by the monitor in meaningful terms - estimated costs /
consumption go down over time.
Our aim is to make products that provide practical
solutions while enabling you and us to fulfill our
environmental responsibility. Together we can improve
the world we live in.
Please observe the following warning and safety
precaution guidelines when setting up and using this
product.
NOTE Please keep this manual handy as you use
your new product. It contains practical step-by-step
instructions, as well as technical specifications and
warnings you should know about.
If the equipment is used in a manner not specified in
this manual, the protection provided by the equipment
may be impaired.
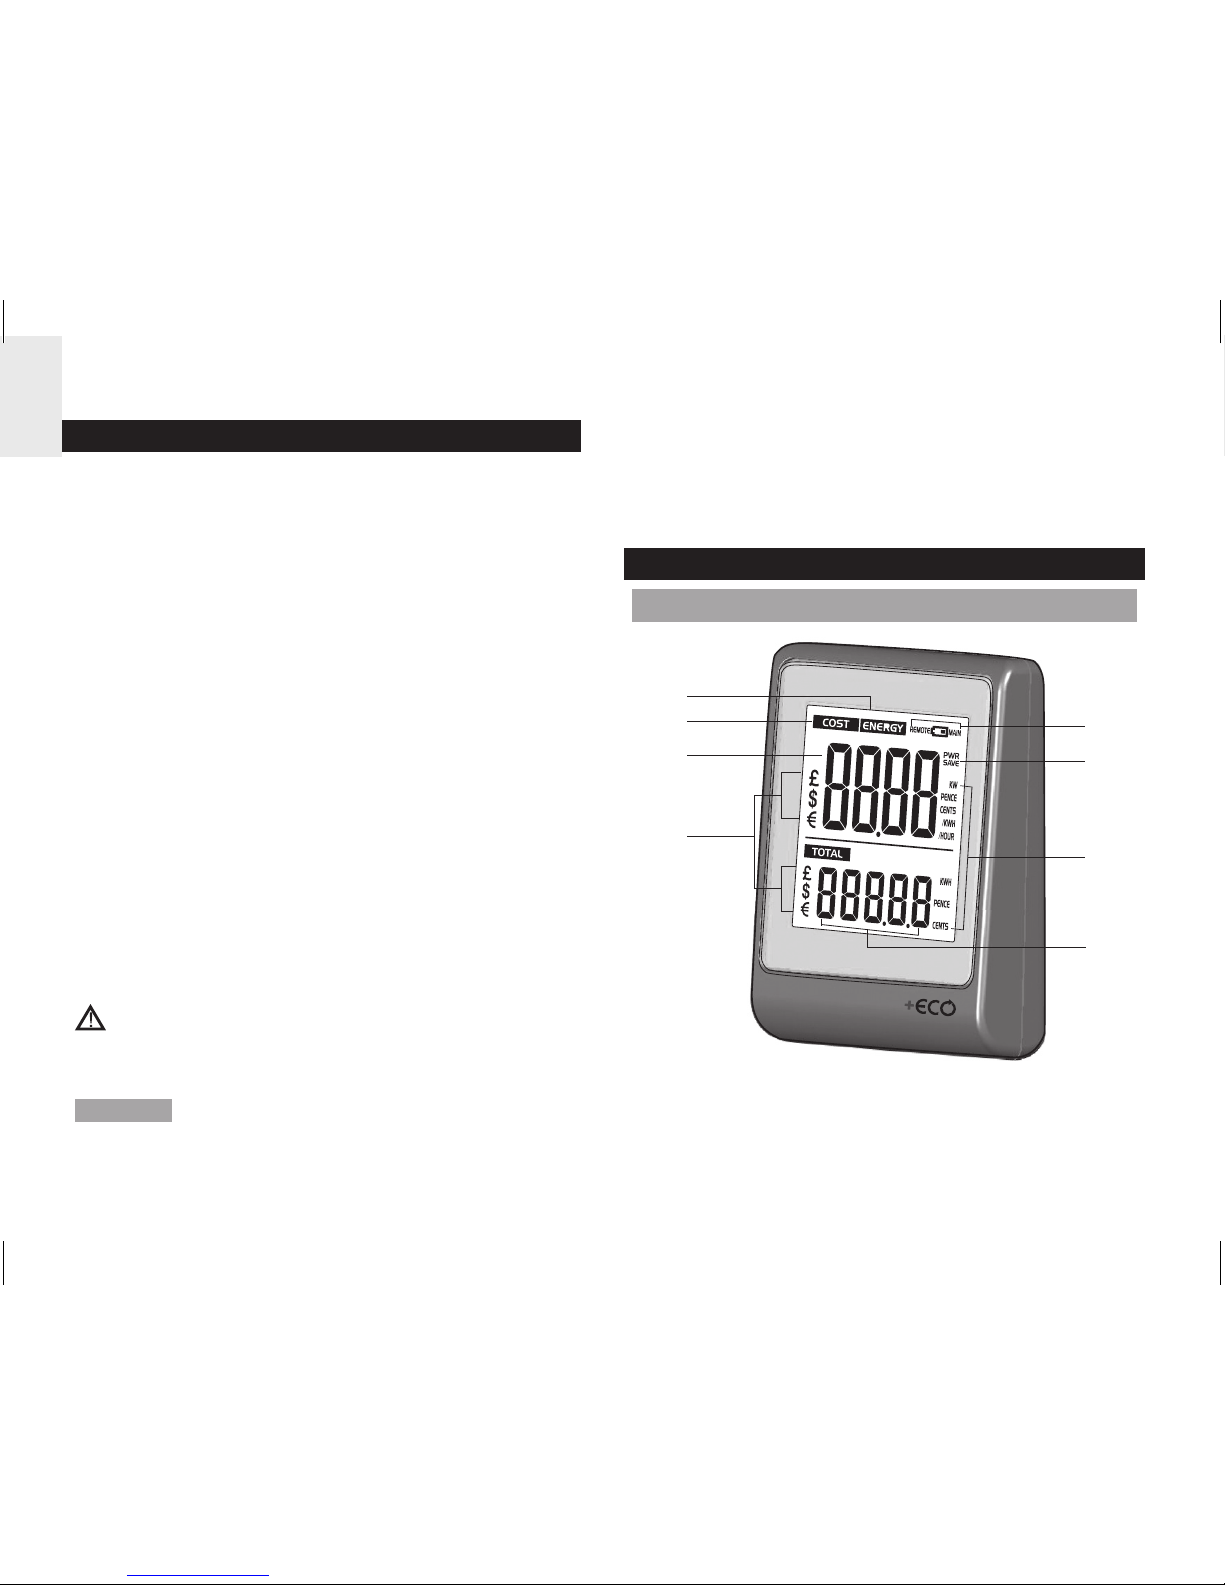
OVERVIEW
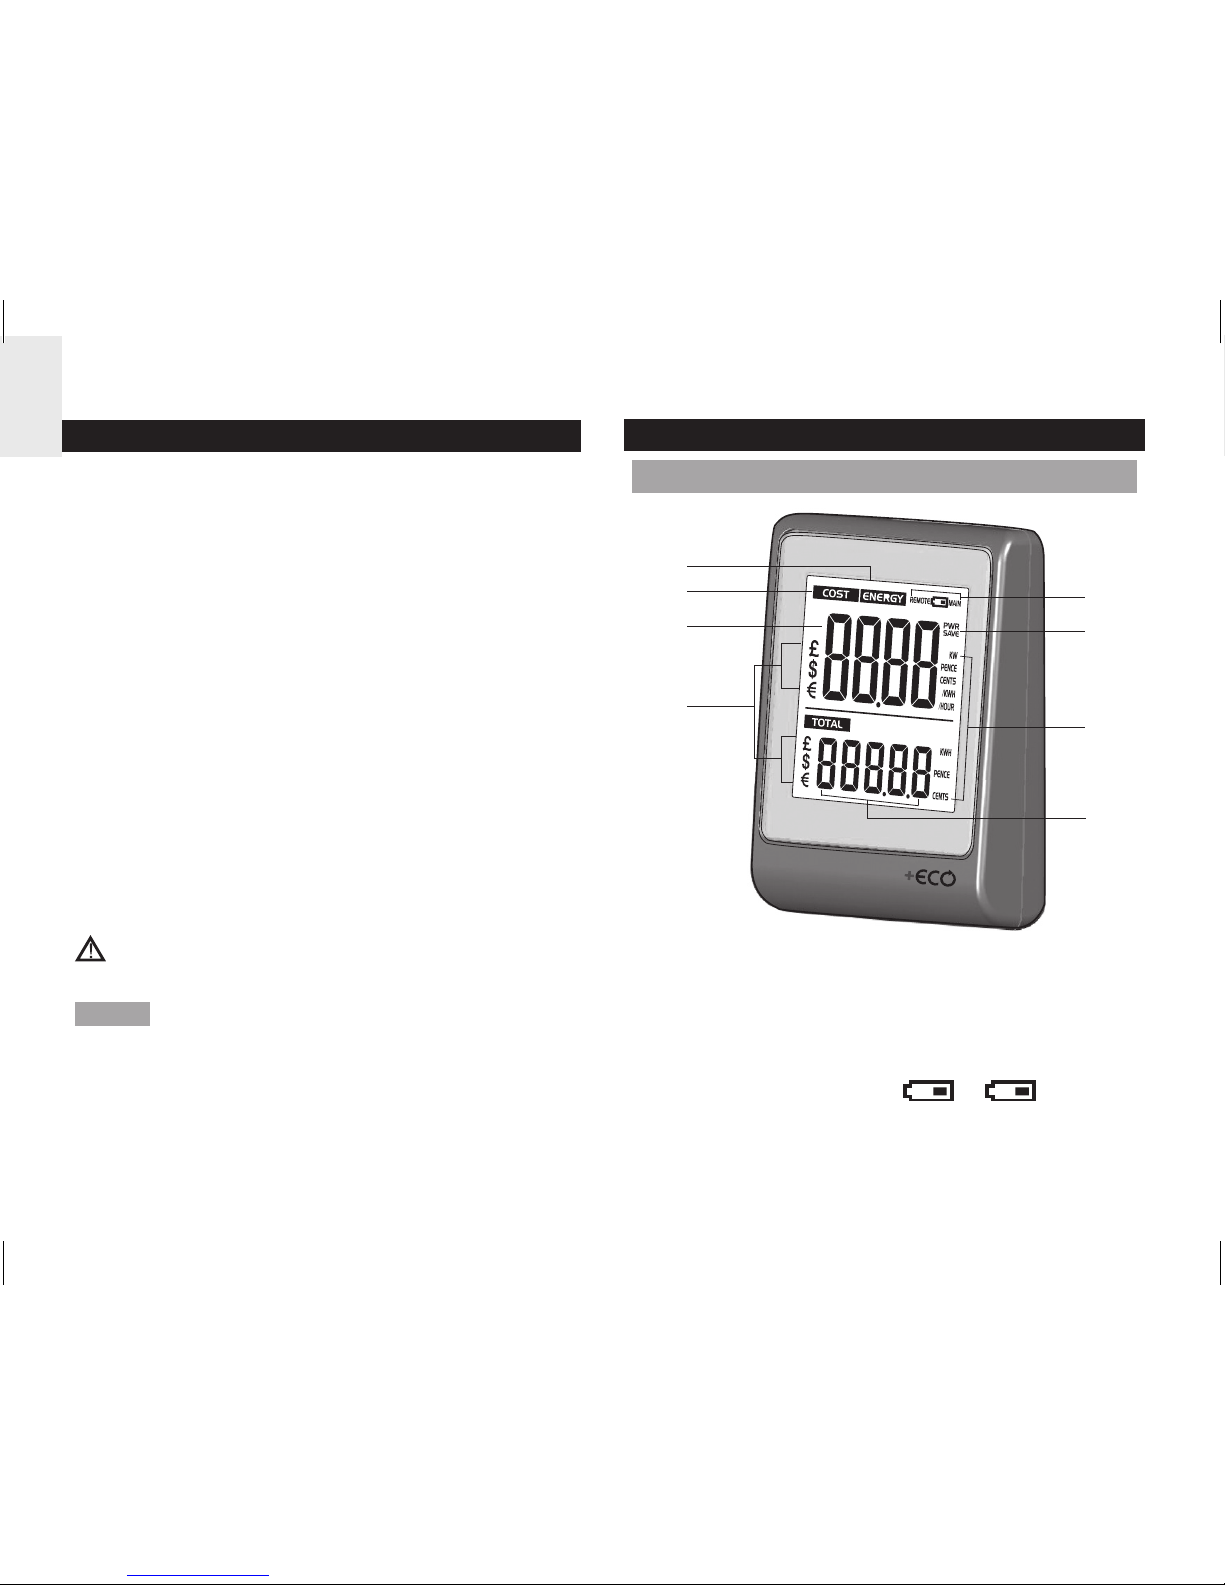
MAIN UNIT – FRONT VIEW
1
2
3
4
5
6
7
8
1. ENERGY: indicates energy consumption is
displayed
2. COST: indicates cost of energy consumed is
displayed
3. Real time cost / energy consumption
4. Currency unit
5. REMOTE
/ MAIN: remote transmitter
batteries low / main unit batteries low
Page 3
3
EN
6. PWR SAVE: power save function is activated
7. Cost / energy consumption measurement units
(KW, PENCE / CENTS per HOUR, PENCE/CENTS
per KWH, KWH, PENCE, CENTS)
8. Accumulated cost / energy consumption (since last
reset)
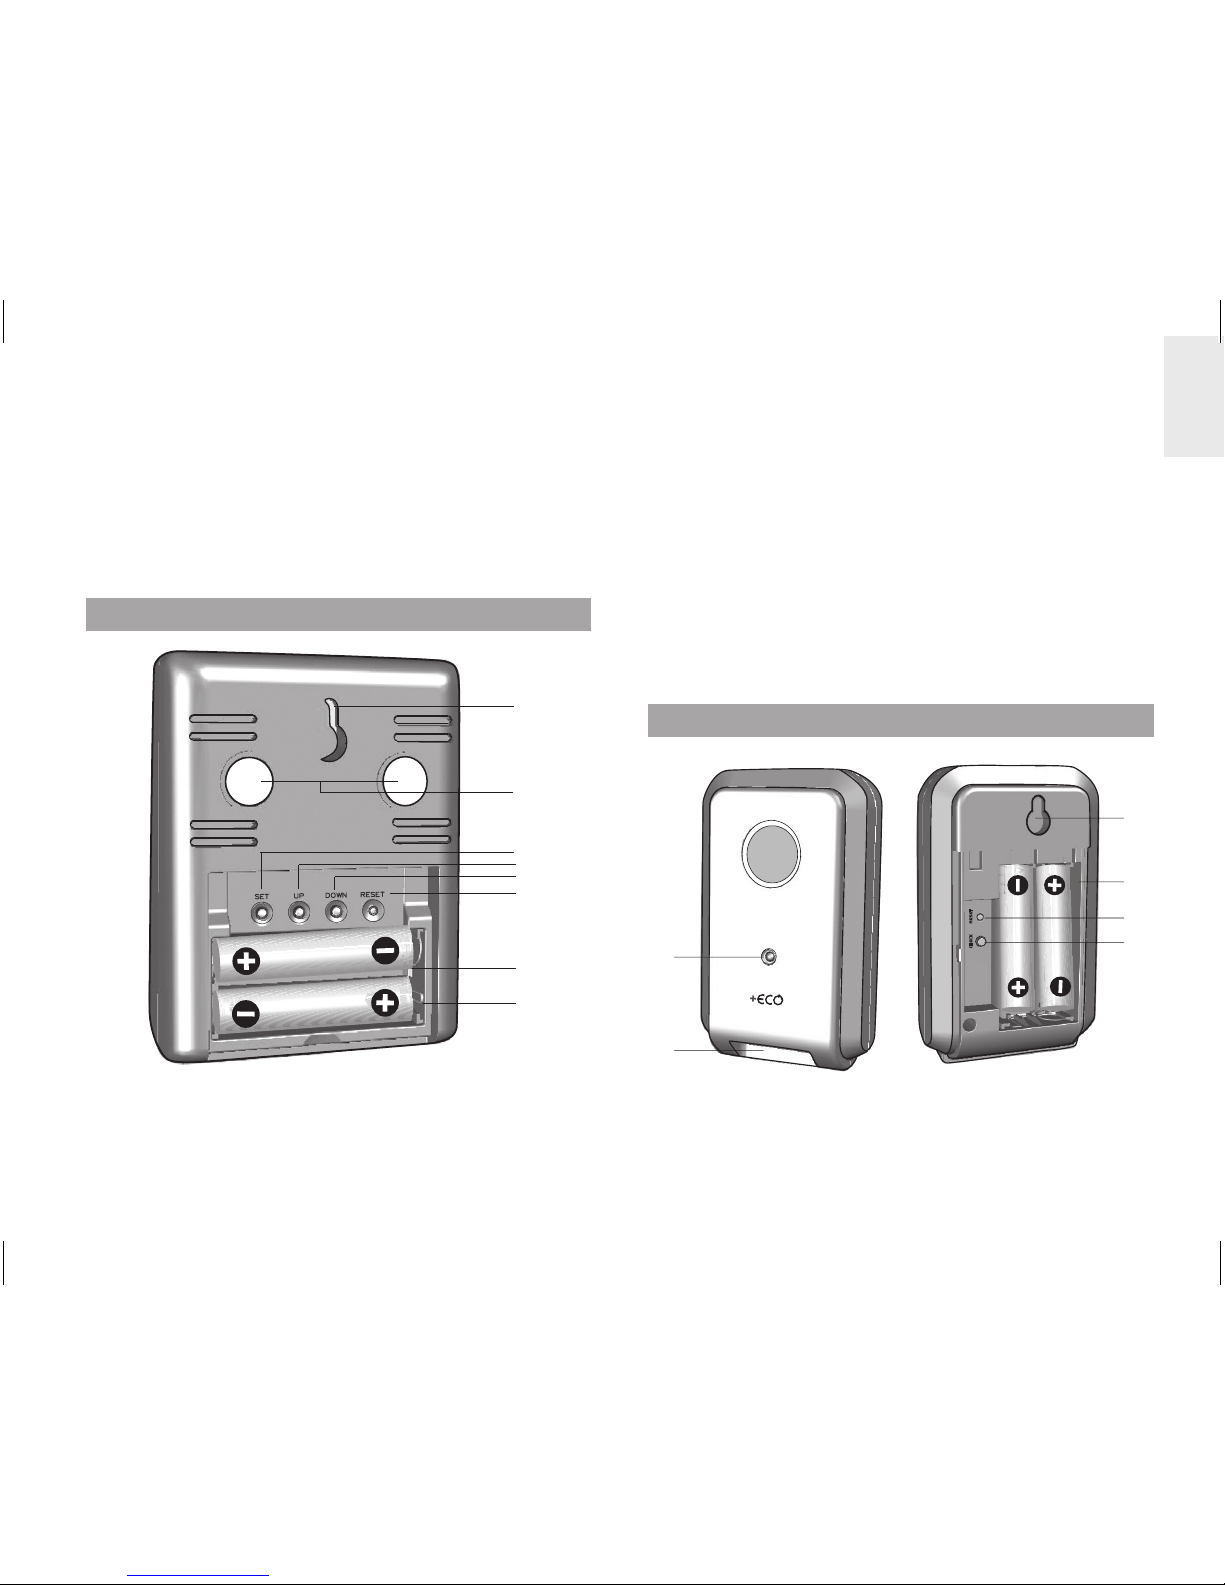
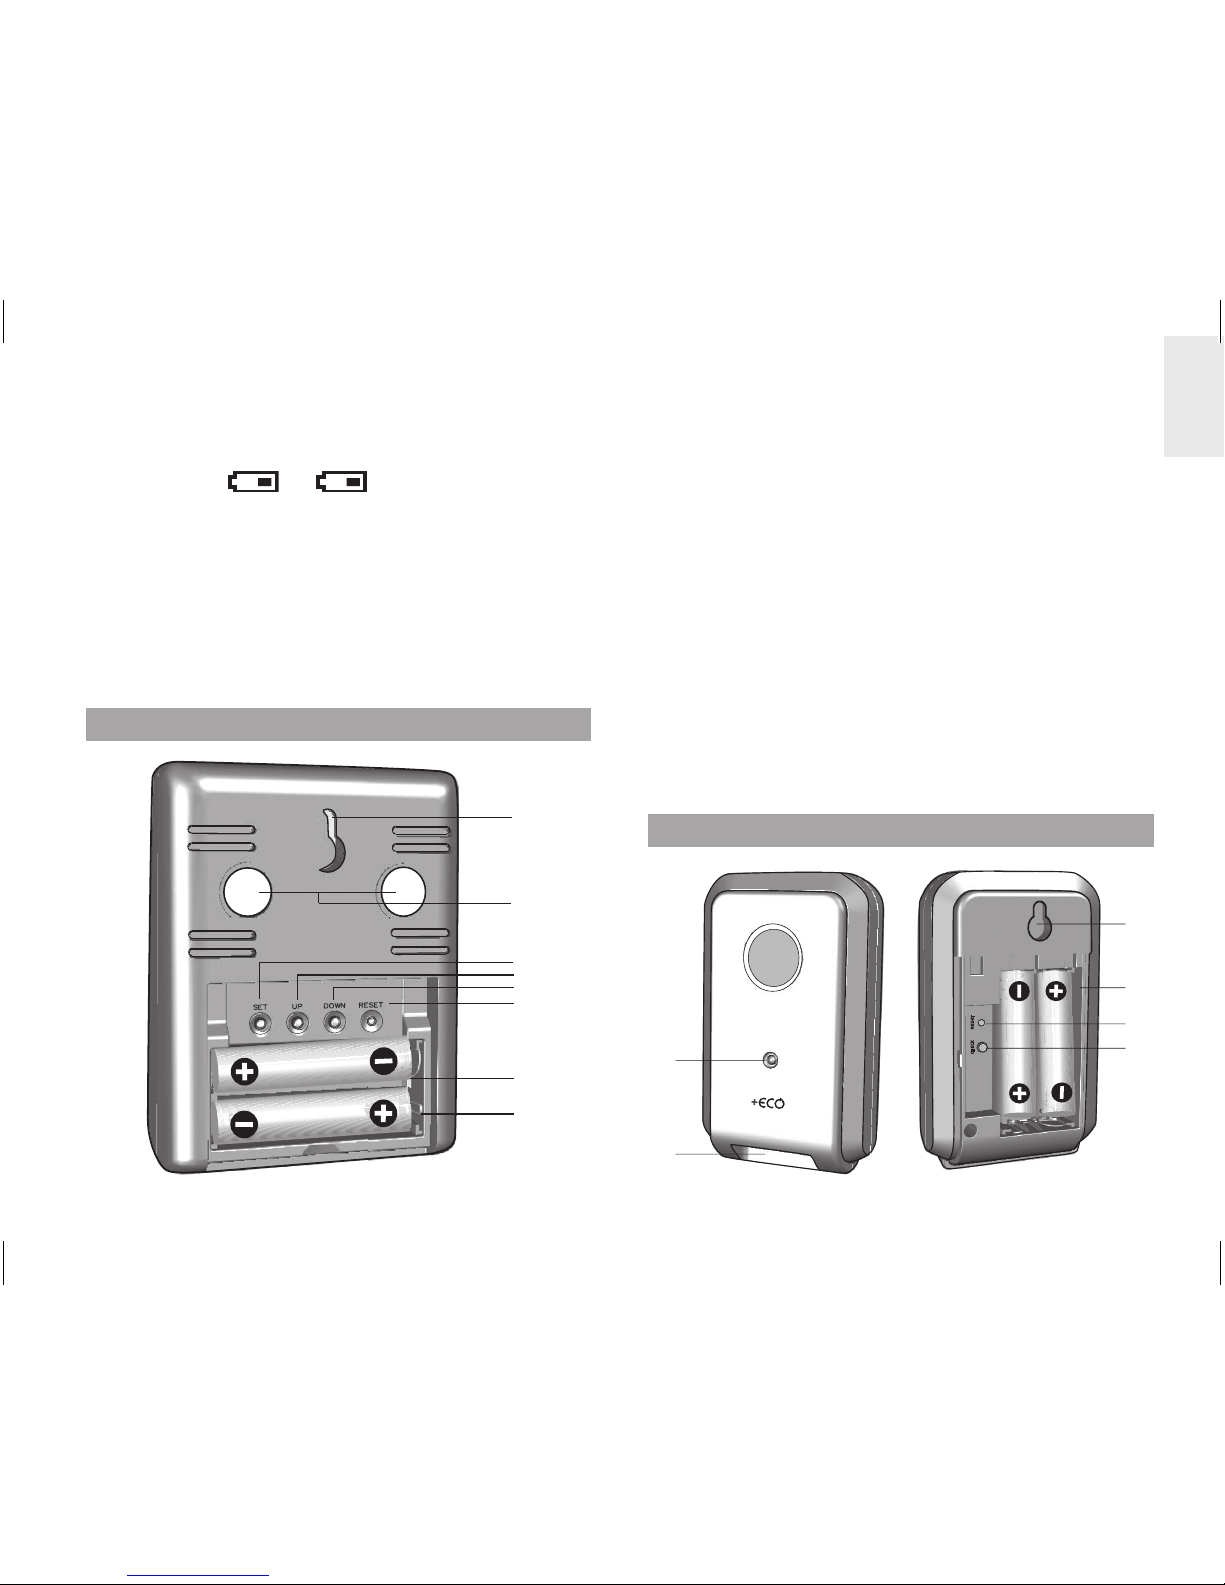
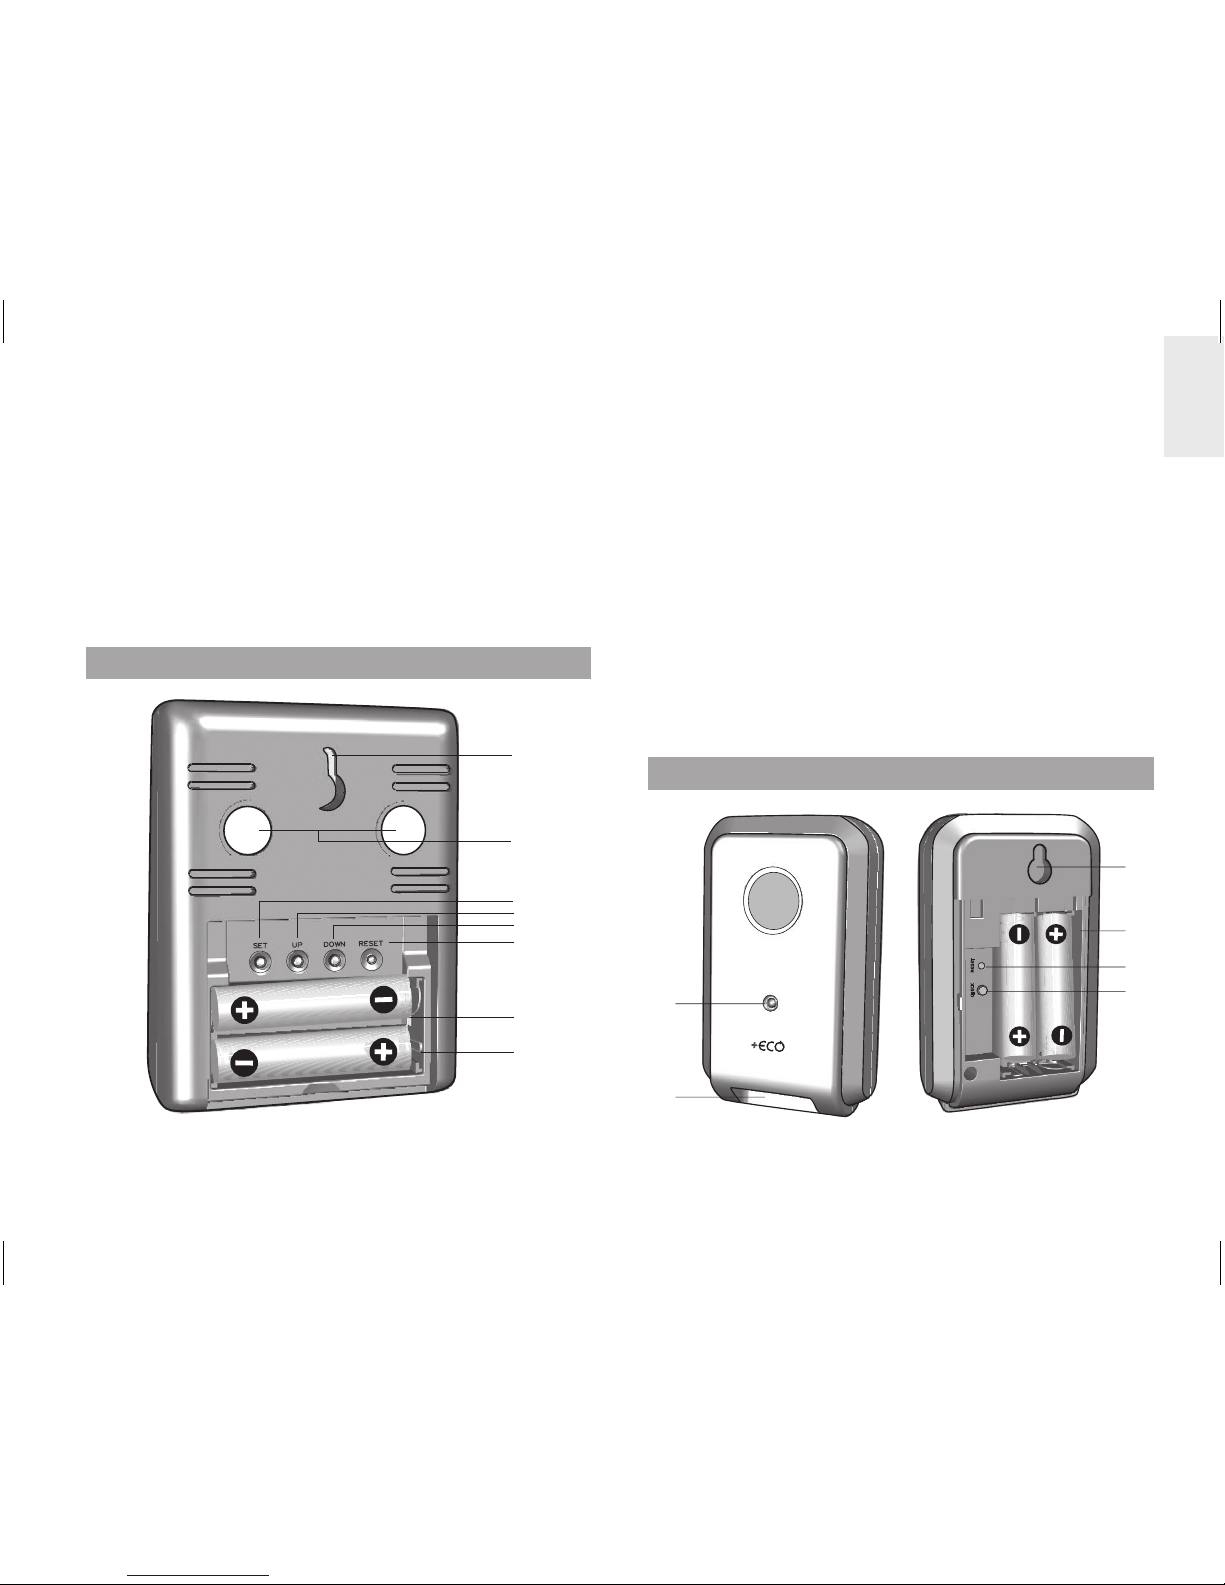
MAIN UNIT - BACK VIEW
1
2
3
4
5
6
7
8
1. Wall mount hole
2. Magnets for mounting
3. SET: enter cost rate setting mode; confirm settings
4. UP: toggle between displays (Cost / Energy);
initiate remote transmitter search; increase cost
rate value
5. DOWN: toggle between displays (Cost / Energy);
activate / deactivate power save function; decrease
cost rate value
6. RESET: resets the unit and clears accumulated
memory; initiate remote transmitter search
7. Battery compartment
8. Collapsible table stand
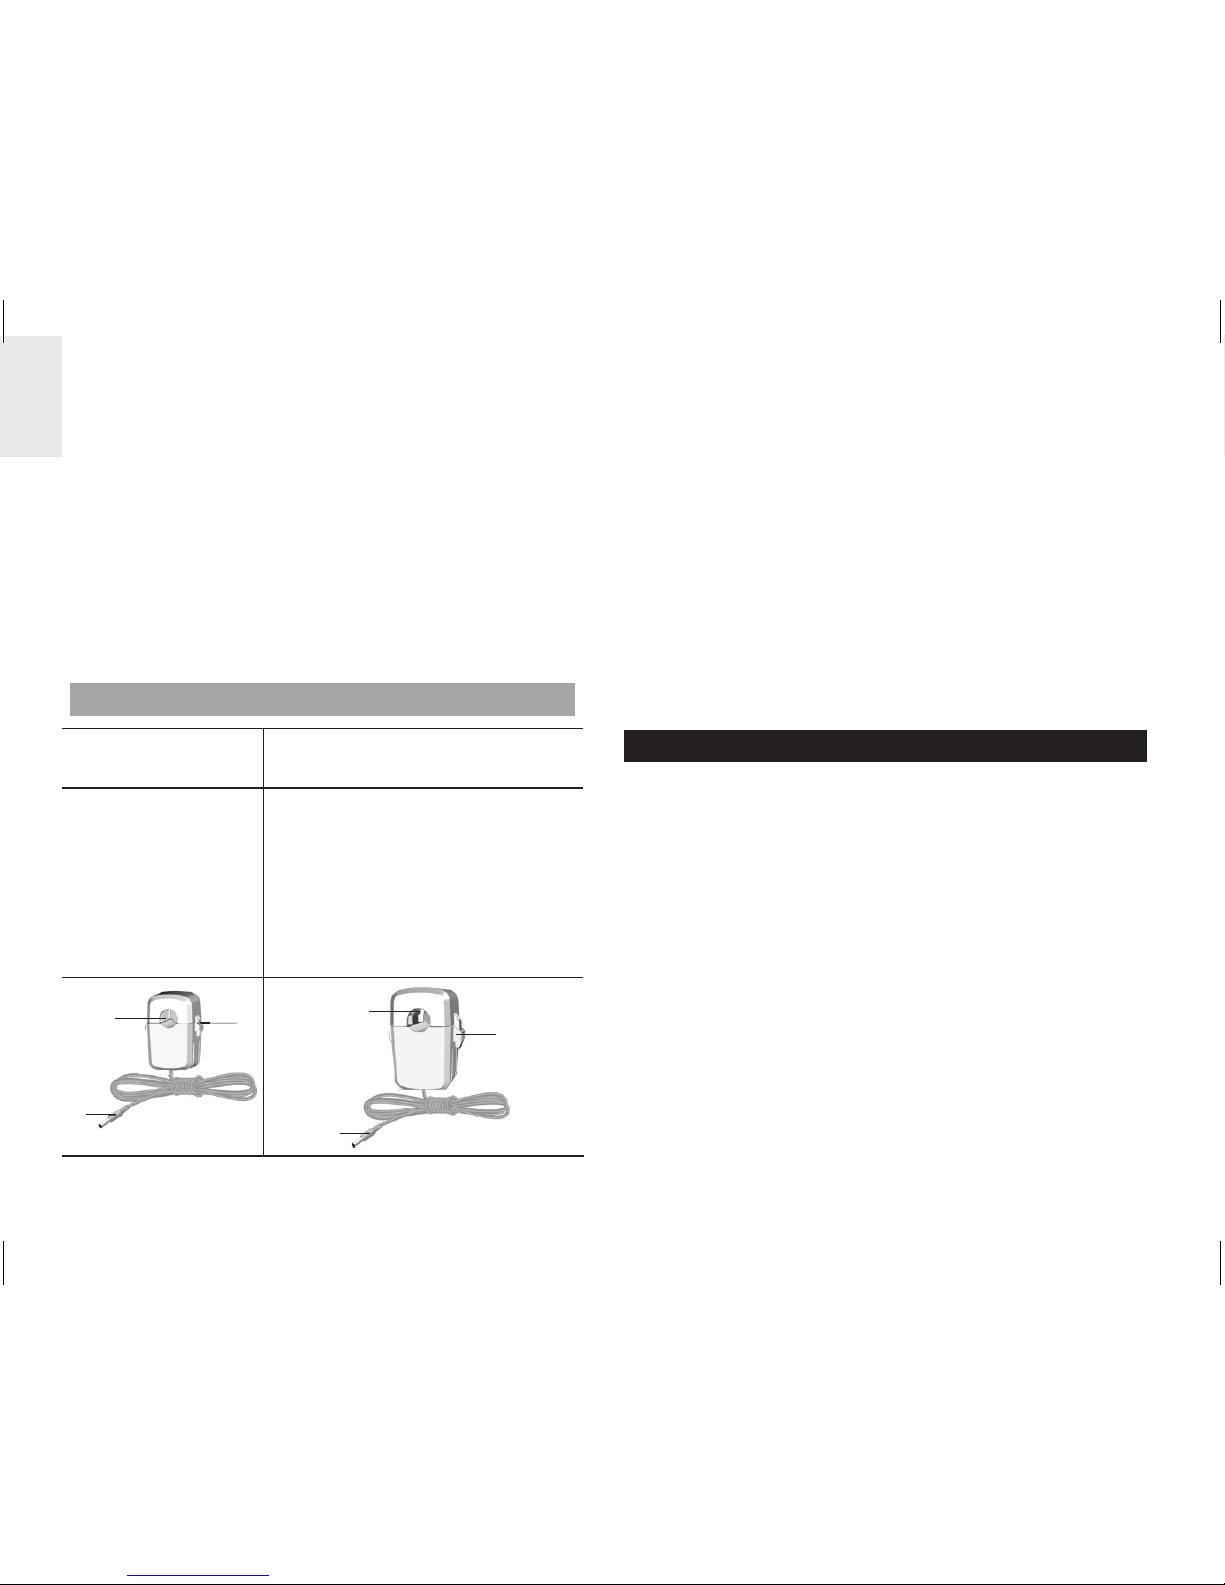
REMOTE TRANSMITTER
1
2
3
4
5
6
1. LED status indicator: flashes when searching
2. Sensor cable sockets
3. Wall mount hole
Page 4
4
EN
4. Battery compartment
5. RESET: resets the unit to default settings
6. CHECK: forces transmission every 2 seconds (for
a period of 30 seconds) to attempt link with main
unit
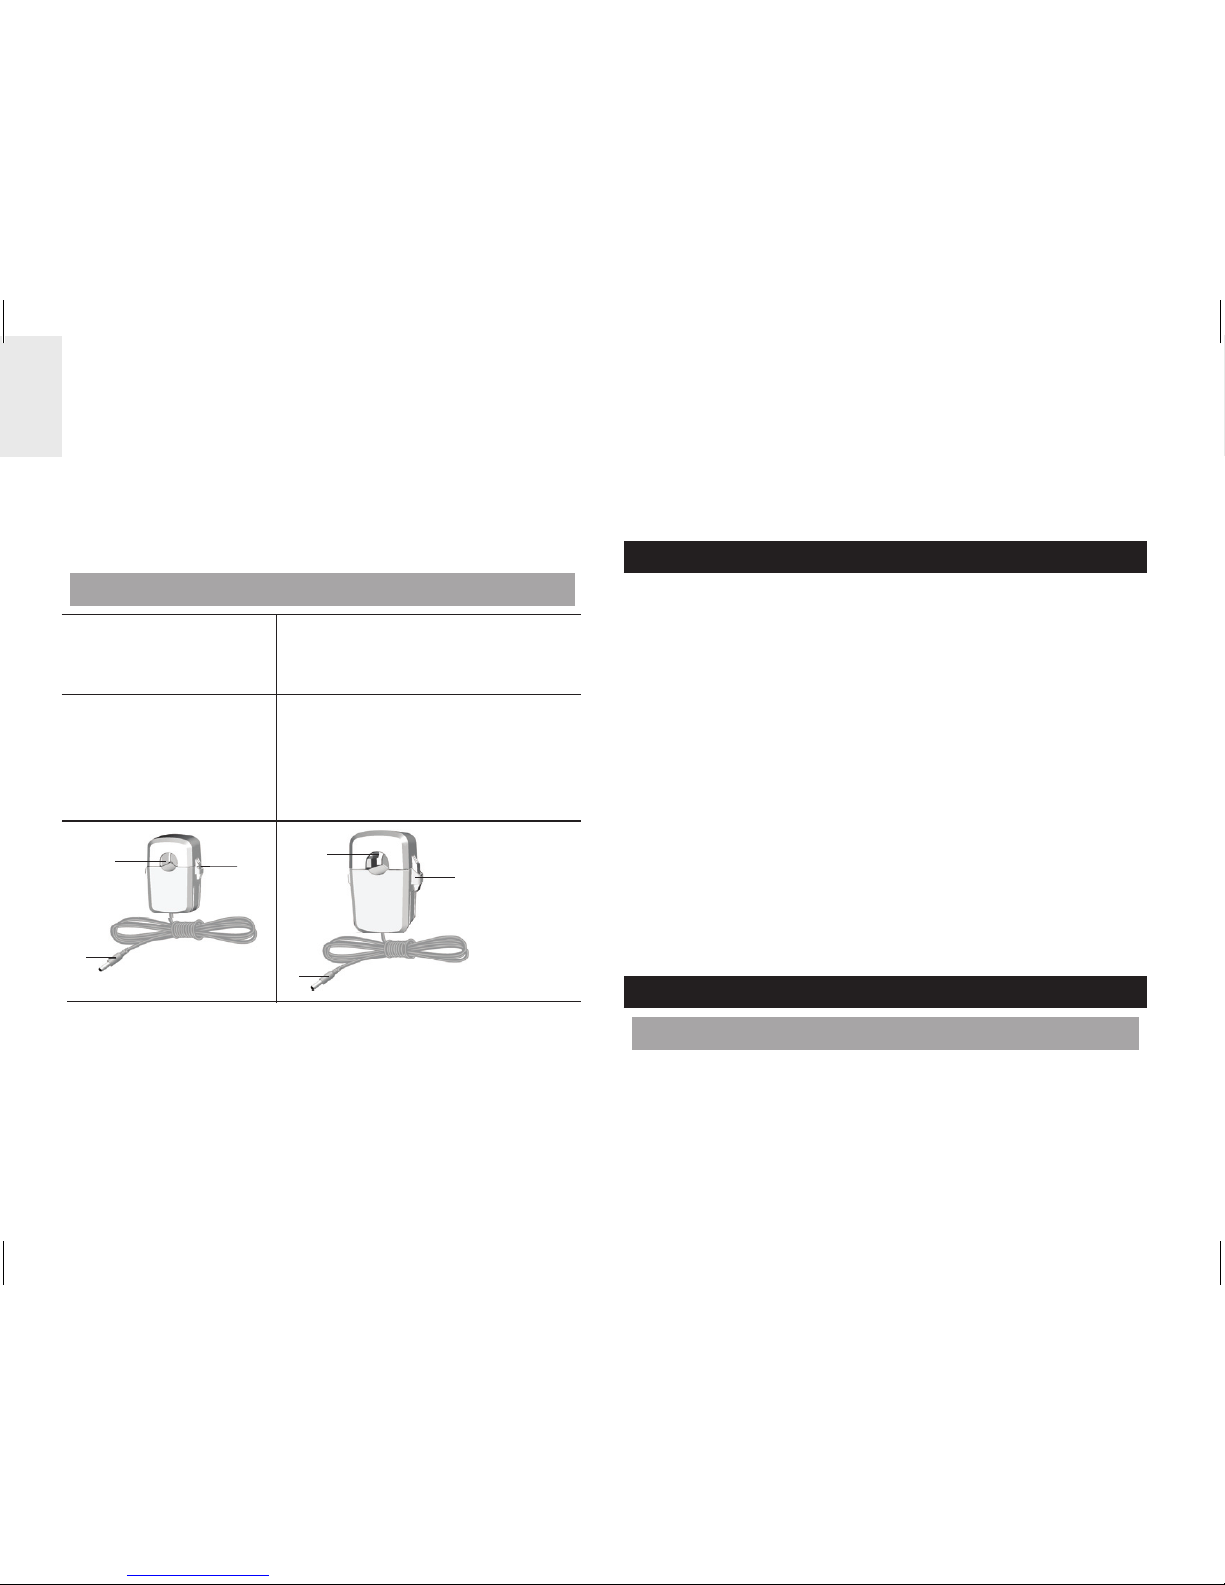
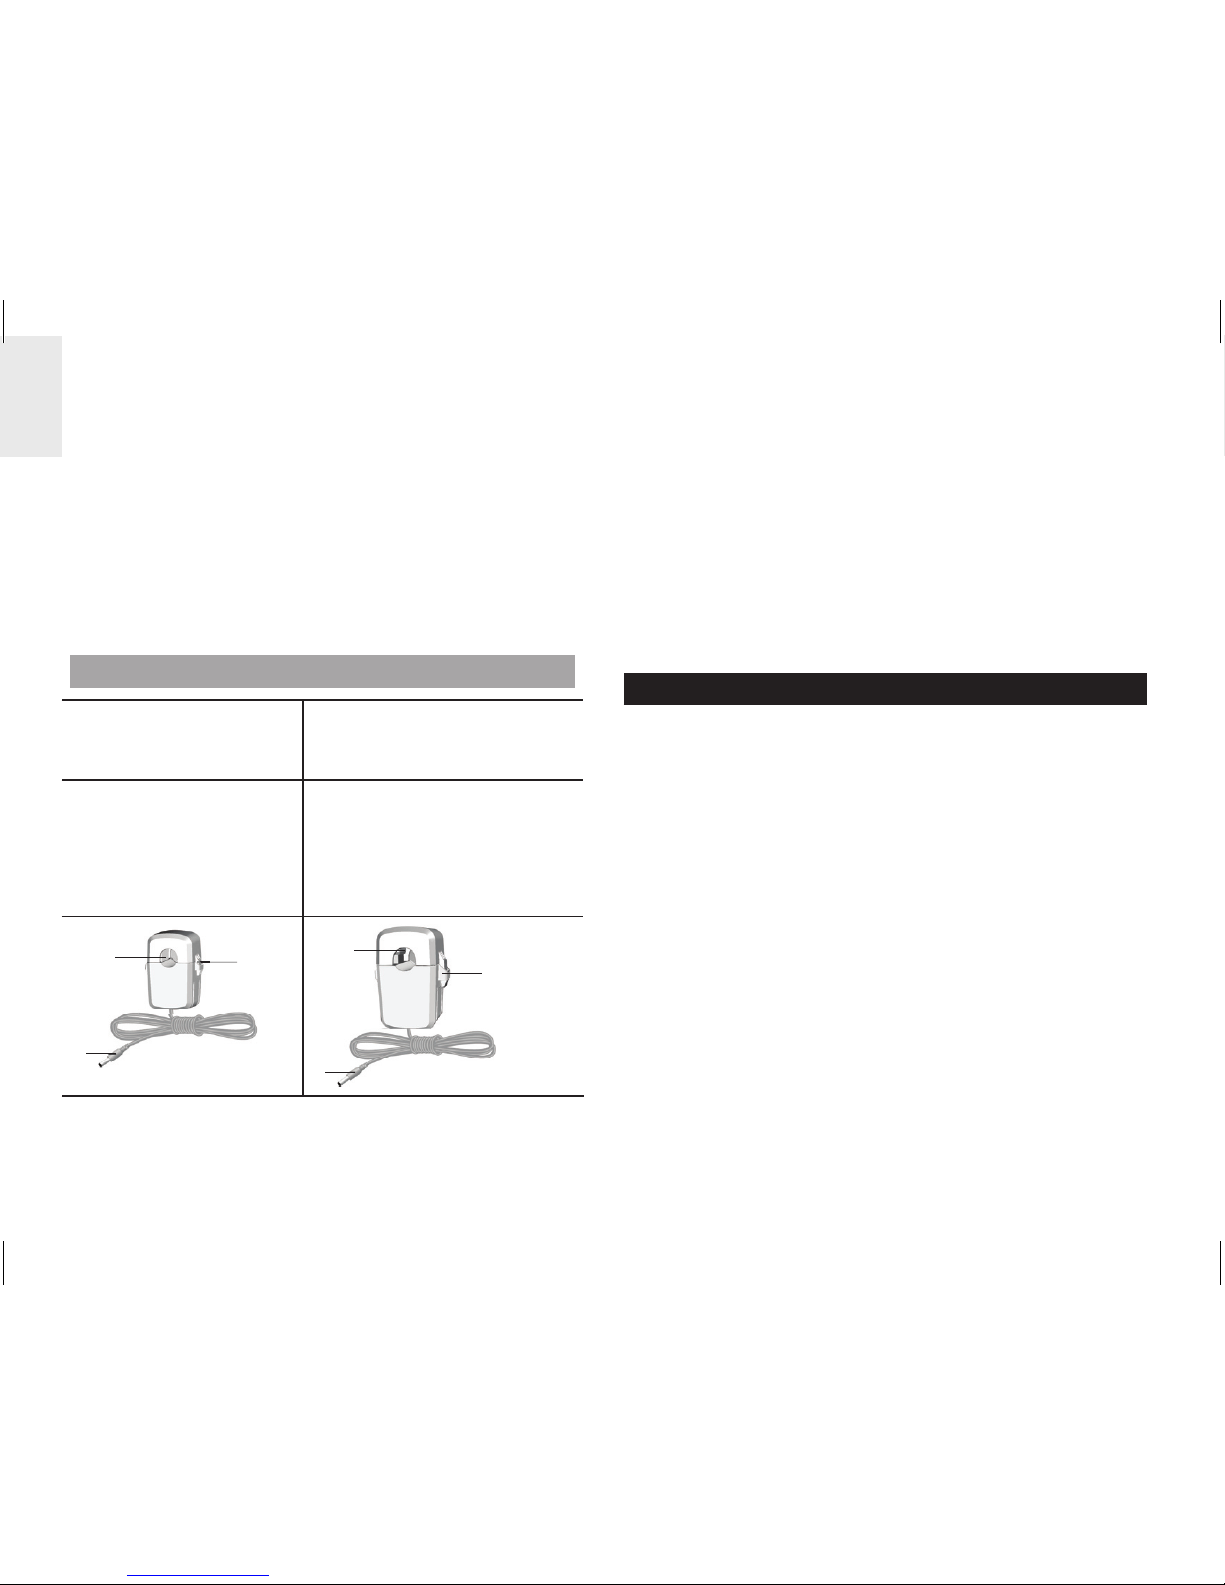
SENSOR CLAMP
Model CT100
(Europe / UK)
Model CT110
(USA, Canada & other
countries)
Sensor for :
• 220V to 250V AC
• cable size up to
10mm dia &/or 70
amps RMS)
Sensor for:
• 120V AC + Industry
• cable size up to 16mm dia
&/ or 200 amps RMS)
2
3
1
1
2
3
1. Electrical wire hole
2. Plastic tabs
3. Sensor transmitter cable
Optional sensor clamps such as those listed below can
be purchased separately. For more information, please
contact your local retailer.*
• Model CT100
• Model CT110
* Features and accessories will not be available in all
countries.
HOUSEHOLD POWER CABLES AND PHASE
Electricity is generally supplied using single-phase and
three-phase systems.
UK: Most homes in the UK use single-phase supplies.
In single-phase supplies, the current flows to and from
your household appliances using a neutral and live
wire. The neutral wire has a voltage close to zero while
the live wire carries a voltage from 120 to 240 volts.
The difference between these two wires makes the
current flow through your appliances.
Europe: Most homes in Europe use three-phase
supplies.In three-phase supplies, current flows to and
from a device through a group of three wires, each one
carrying a fluctuating phase. The three wires, therefore,
each need an individual current sensor which can be
purchased separately.
GETTING STARTED
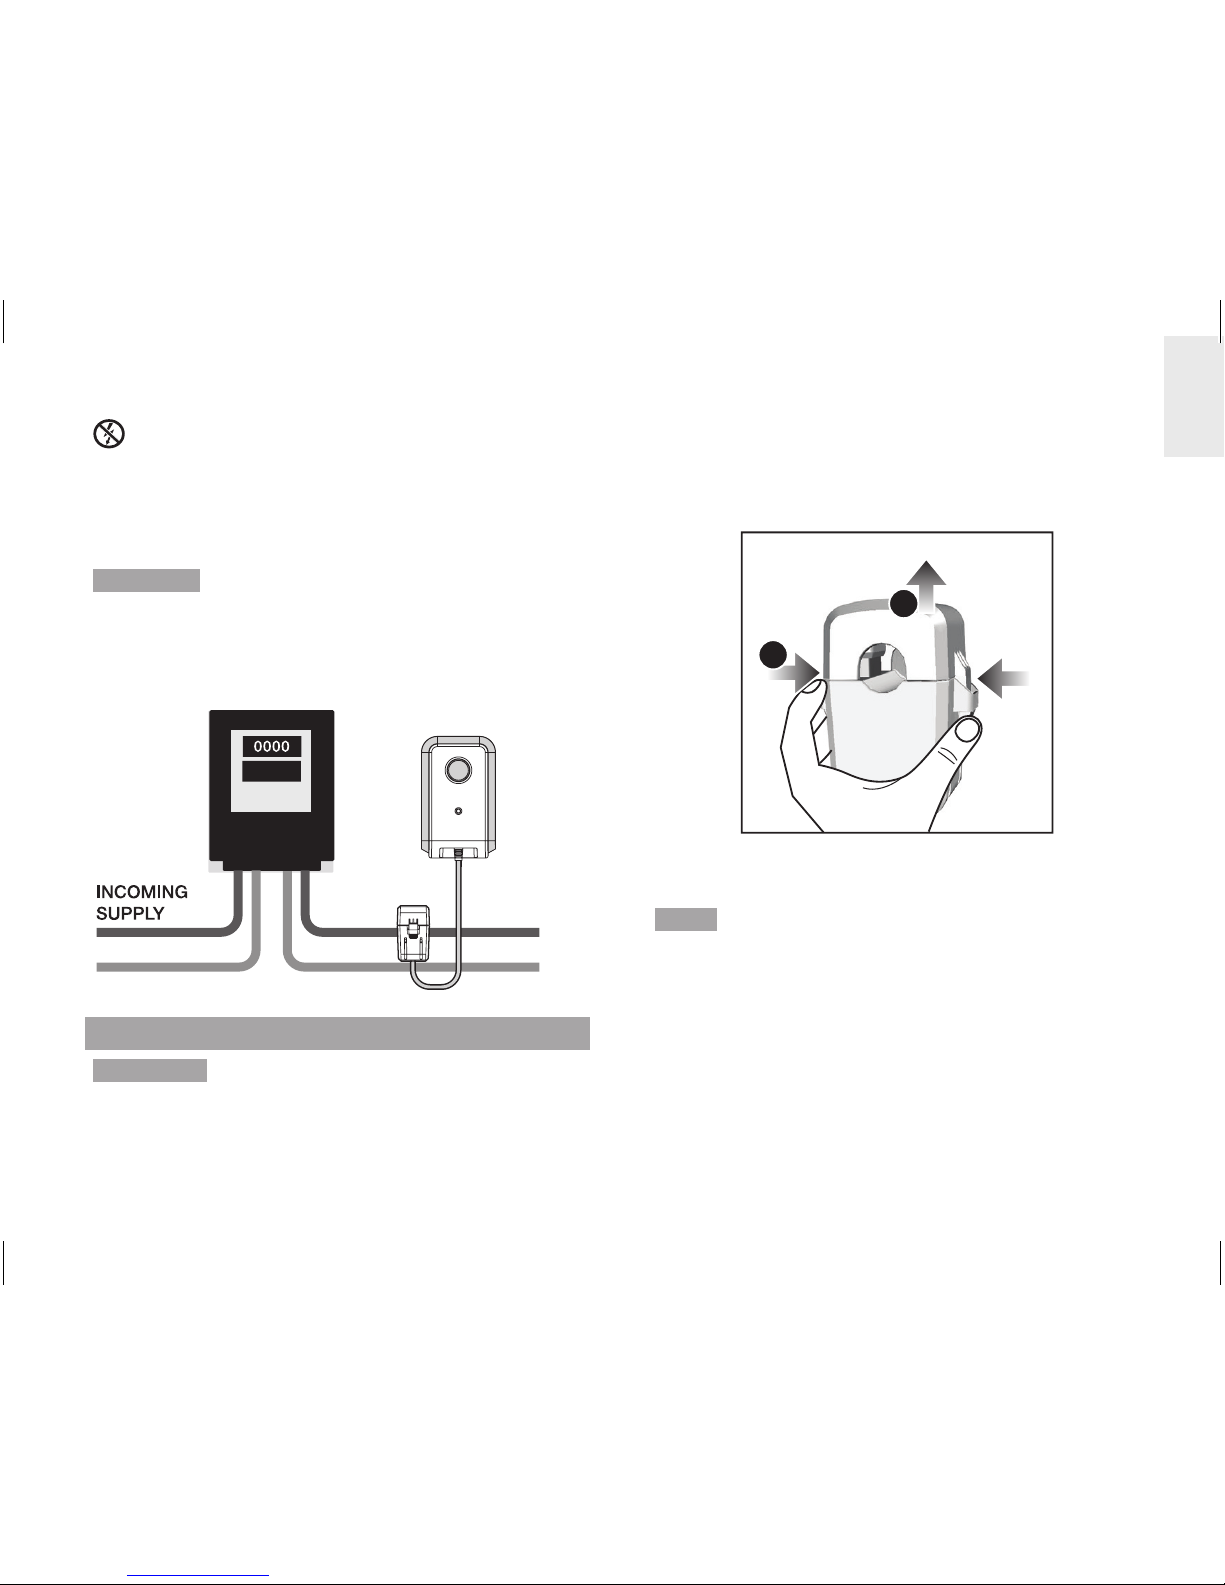
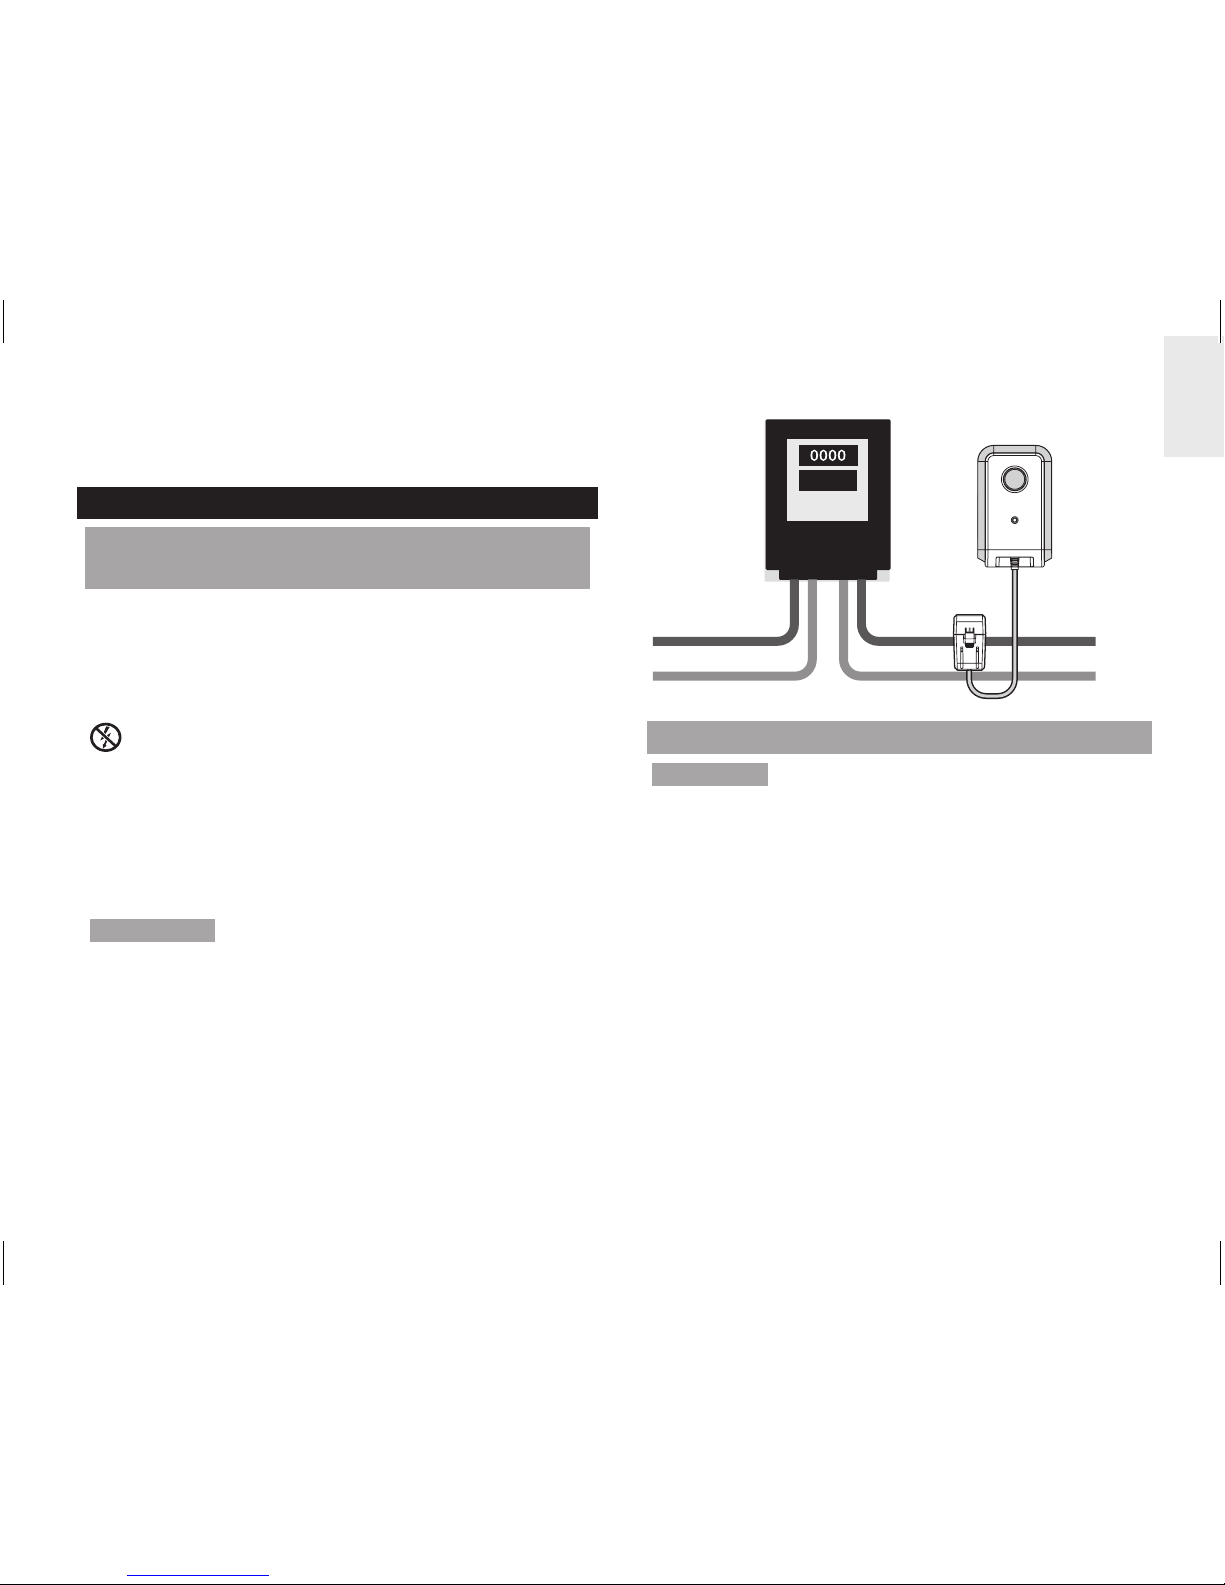
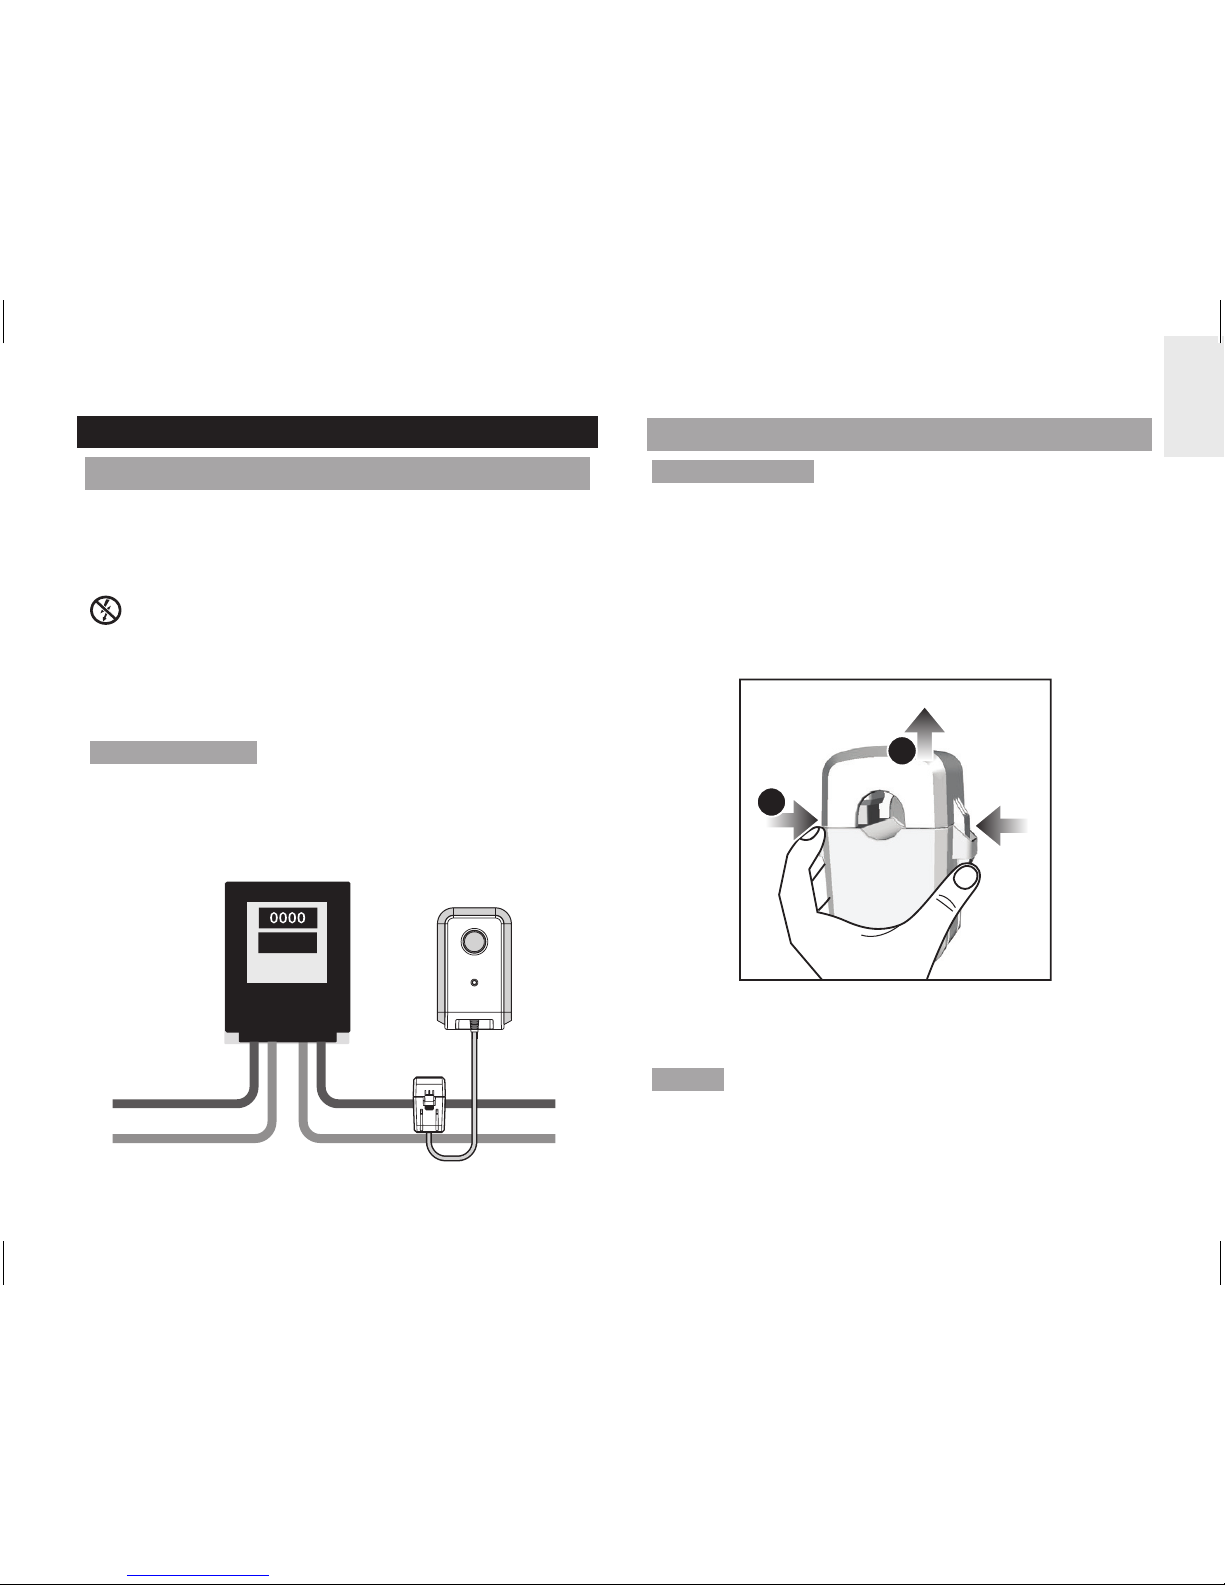
LOCATE LIVE OUTGOING SUPPLY CABLE
The sensor clamp should be fitted over the insulated
live wire. It is recommended that you fit it over the
(outgoing) wire which comes out of the electricity meter
located in the meter box.
Page 5
5
EN
This product uses Type C current sensor, do not
apply around or remove from HAZARDOUS LIVE
conductors.
Under no circumstances should any force or undue
pressure be applied to any wiring or connections.
WARNING Care must be taken at all times to avoid
touching or coming into contact with any un-insulated
wires or contacts.
If any difficulty with installation is experienced at all, the
advice of a licensed electrician should be sought.
OUTGOING
SUPPLY
SENSOR SET UP
WARNING It is recommended for current sensor
clamp(s) to be installed by a licensed electrician.
Switch off power from the mains before attaching and
detaching sensor(s).
1. Using thumb and finger, press inwards on plastic
tabs located on either side of the sensor clamp to
release top part.
2. Lift the top of the sensor away.
2
1
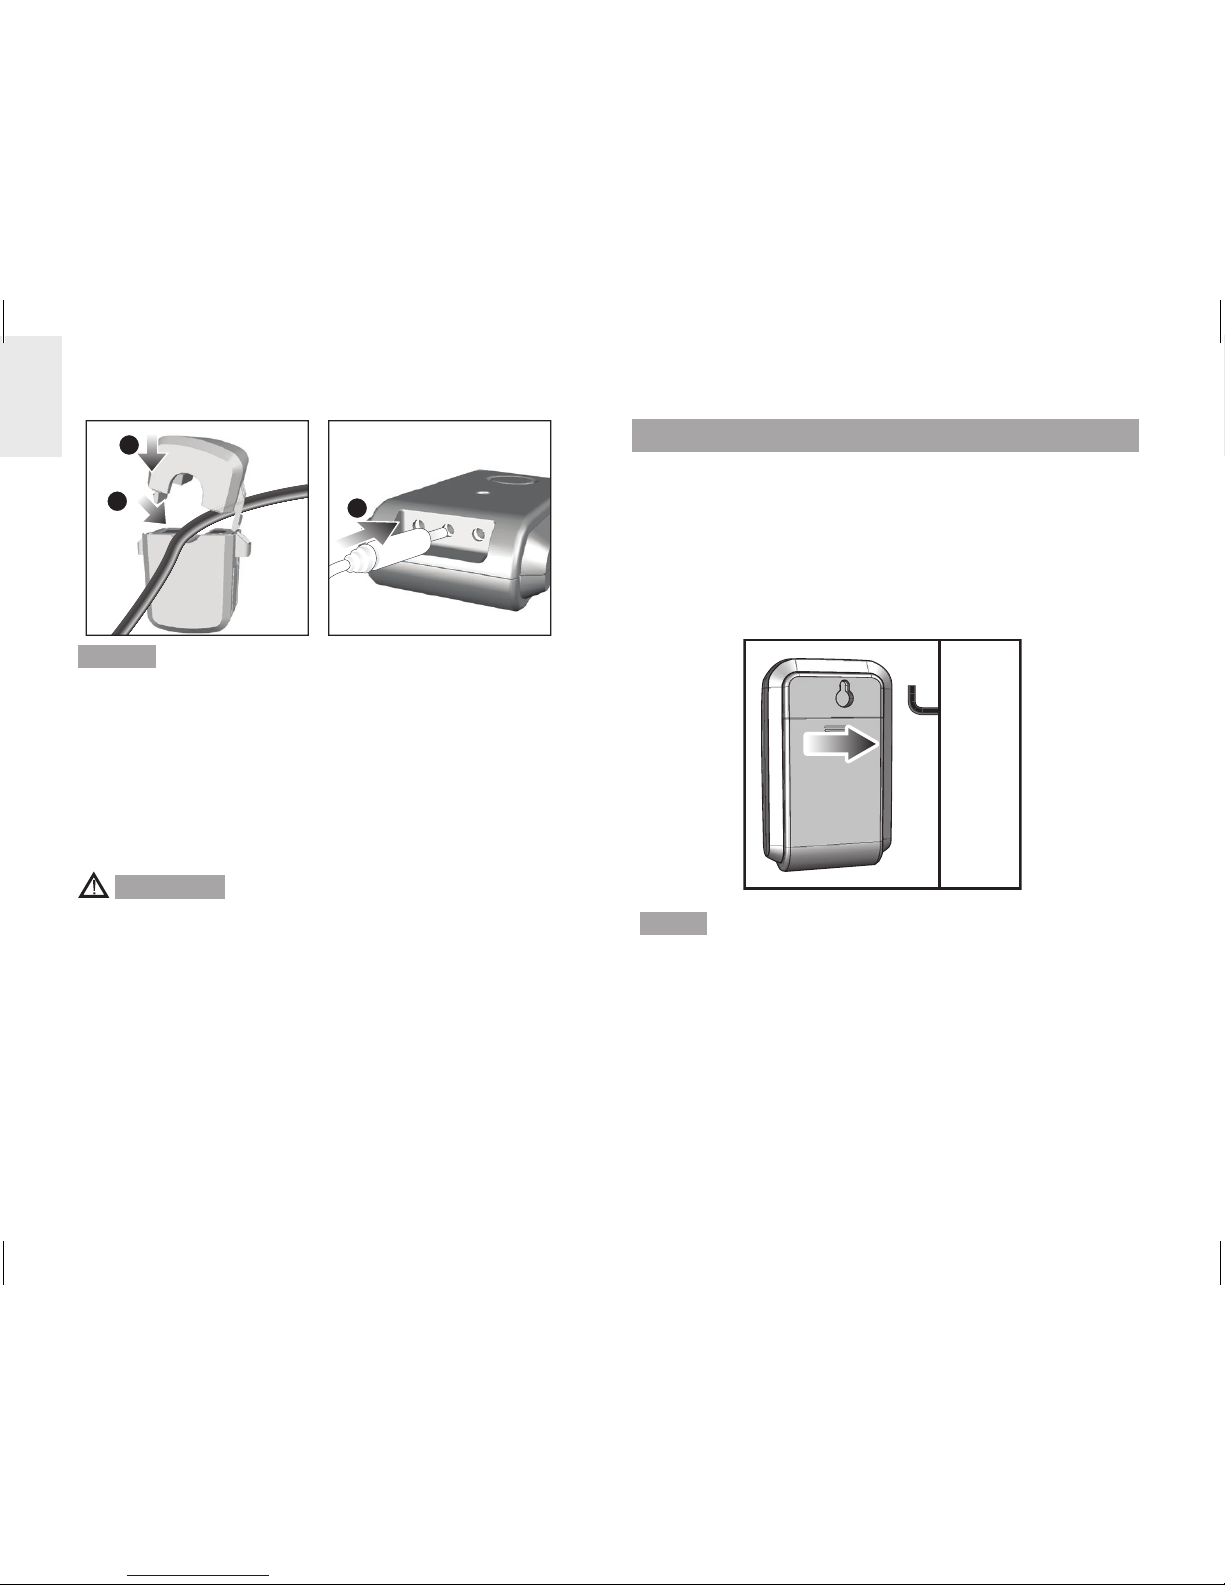
3. Place the main household active or live wire
(outgoing) into the electrical wire hole.
NOTE Do not pull or bend the wires. Ease the wire into
position so you can close the sensor clamp securely
around the wire.
4. Replace the top of the sensor clamp and push
down to secure.
5. Plug the sensor transmitter cable into any of the
cable sockets.
Page 6
6
EN
4
3
5
NOTE For three-phase system, attach a sensor
clamp to each live wire.
• When attaching the sensor clamp, ensure each
sensor clamp is attached to a different wire
otherwise an incorrect reading may result.
• Then plug all sensor clamp cables into the remote
transmitter. Up to three sensor clamps can be
plugged into the remote transmitter.
WARNING
• The signal wiring (approx. 1 volt, 1 milliamp) on
the sensor clamp is double insulated, suitable for
installation in domestic power supply meter box.
When passing through an enclosure opening, the
wiring should be protected from sharp edges by
fixed bushes.
• Do not use the unit if it is damaged or its safety is
impaired.
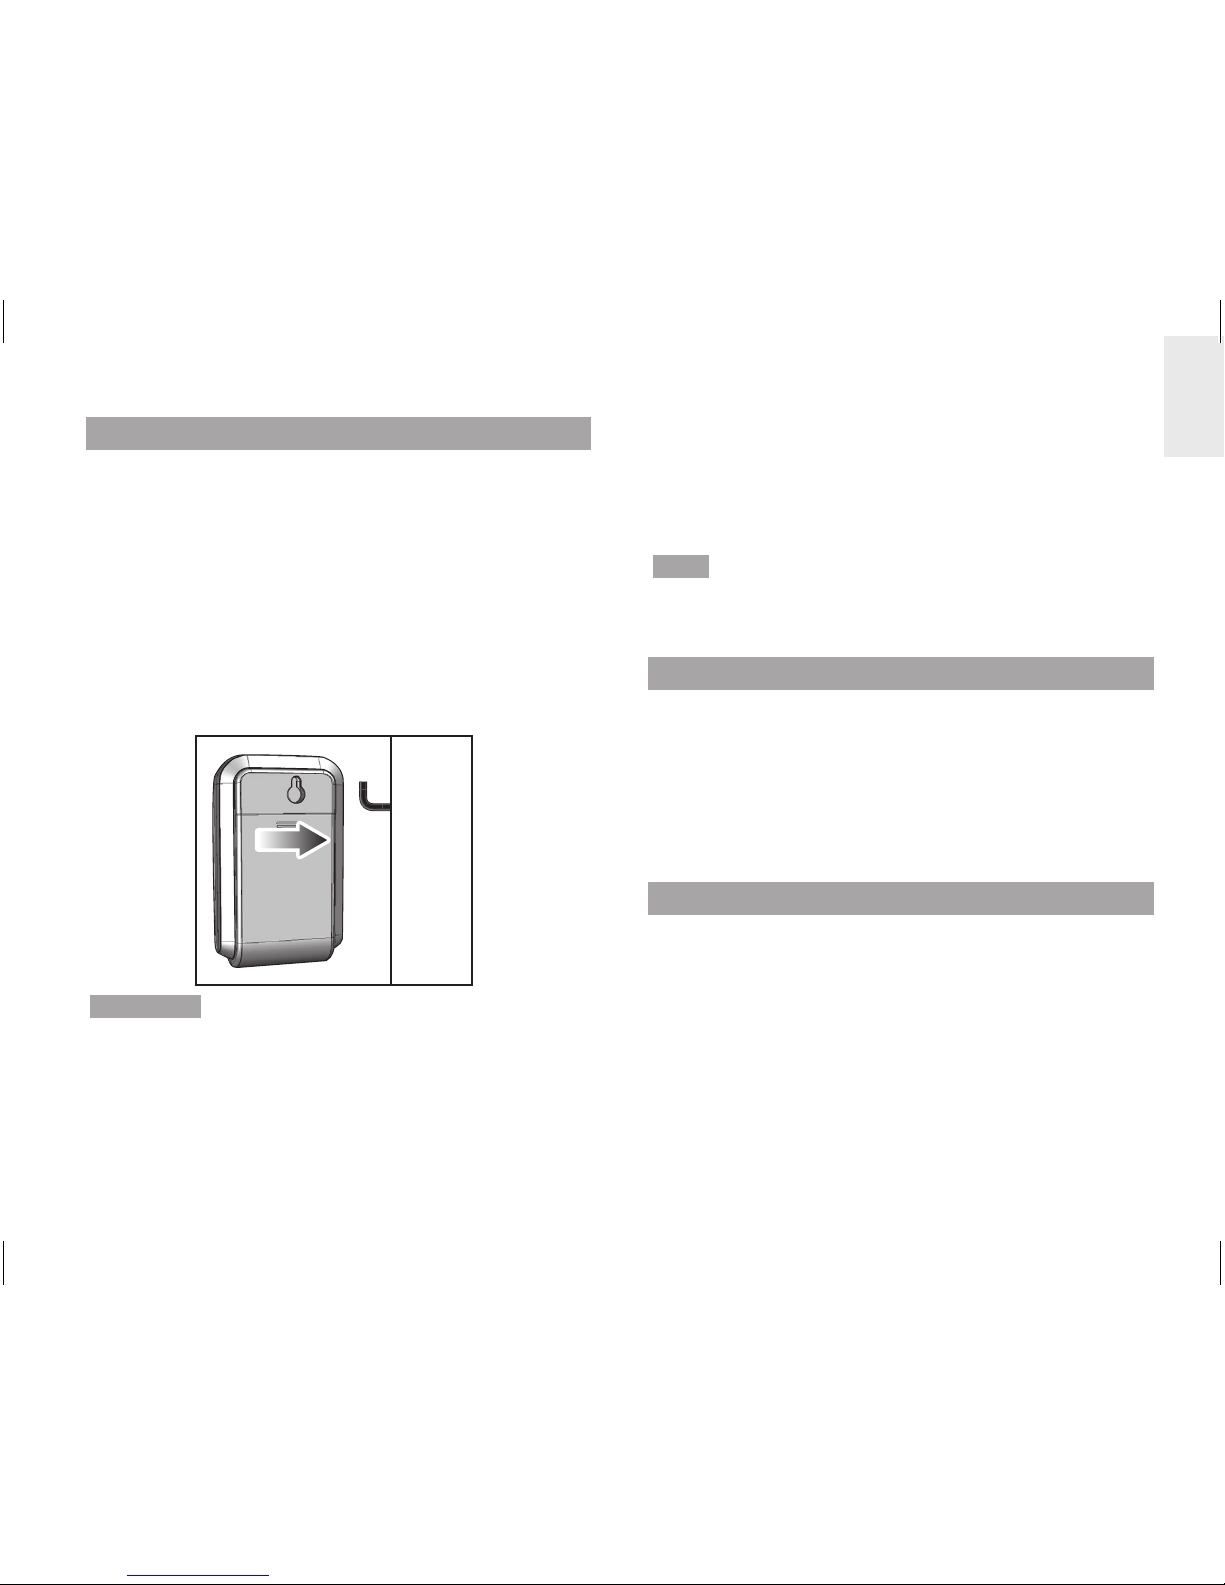
TRANSMITTER SET UP
1. Slide open the battery compartment cover.
2. Insert the batteries, matching the polarities (+ / -).
3. Press
RESET after each battery change.
4. Press and hold
CHECK until LED light flashes.
5. Close the battery door.
6. Mount the transmitter onto an affixed screw.
NOTE Install battery in the transmitter before the main
unit.
For best results:
• Place the sensor within 30 m (100 ft) of the main
unit.
• Place the sensor out of direct sunlight and
moisture.
• Position the sensor so that it faces the main (indoor)
unit, minimizing obstructions such as doors, walls
and furniture.
Page 7

7
EN
TIP The transmission range may vary depending on
many factors. You may need to experiment with various
locations to get the best results.
MAIN UNIT SET UP
1. Slide open the battery compartment cover.
2. Insert the batteries, matching the polarities (+ / -).
3. Press RESET after each battery change.
4. Close the battery door.
SENSOR DATA TRANSMISSION
If main unit does not display data or after each
transmitter battery change:
1. Press and hold
CHECK (located in the transmitter)
until LED light flashes. Transmitter will check for
and transmit data to the main unit every 2 seconds
for 30 seconds.
2. Press and hold
UP on the main unit to search for
signal from transmitter.
UNDERSTANDING ELECTRICITY
Voltage
(volts)
Electrical potential. Fixed at 220V250V or 120V depending on region.
X
Current
(amps)
Amount of electricity flowing through,
e.g., a wire. (The sensor measures this
to determine watt)
=
Power
(watts)
Amount of energy being transferred.
(KW = 1000W). This type of data is
displayed on the top line of Energy
mode.
KWh is a measure of consumption. Kilowatt hour
represents the use of 1000W of electricity for 1 whole
hour, which is equivalent to ten x 100W light bulbs
operating at the same time for 1 hour.
Once cost rate of electricity has been inputted, the
monitor can arrive at an estimated cost.
NOTE This product is for educational purposes only.
Its aim is to aid understanding of the cost of operating
electrical appliances in the home. It does
not replace
your accurate electricity revenue meter.
Page 8
8
EN
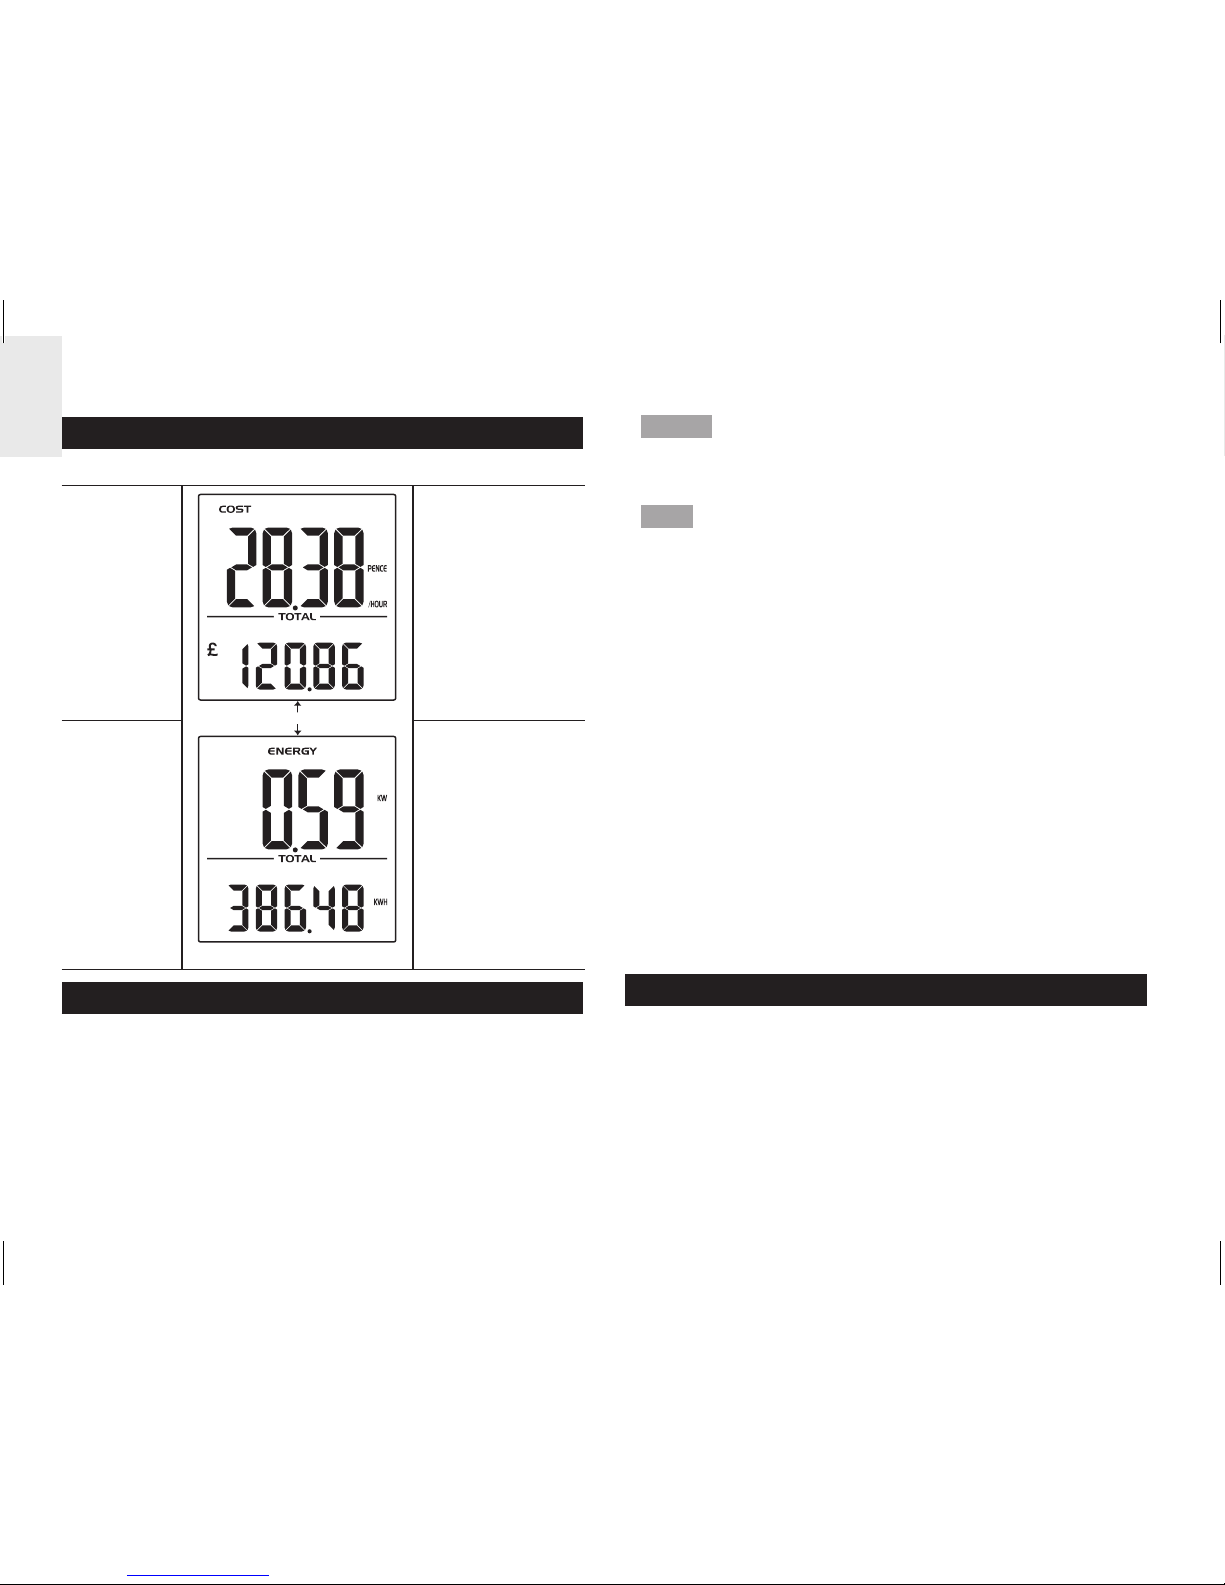
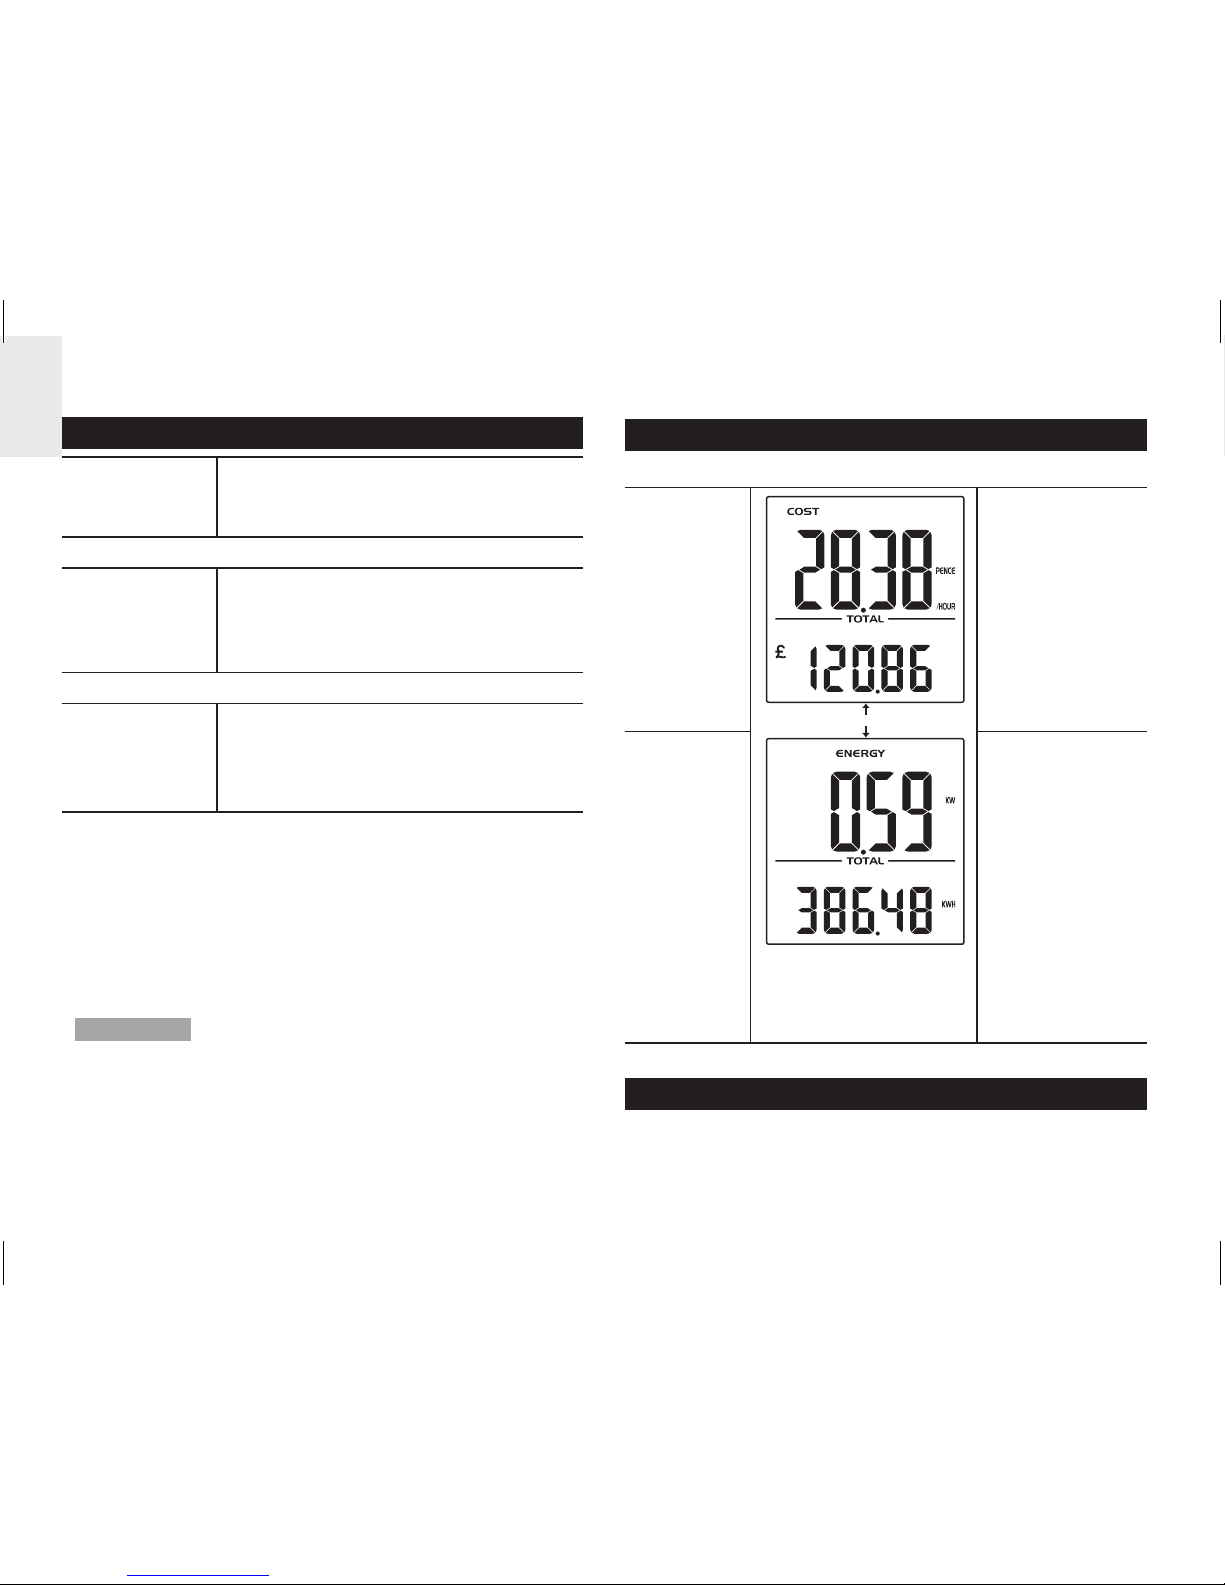
DISPLAY MODES
There are 2 display modes to choose from:
COST
UP / DOWN
Real time cost
of electricity
per hour
Accumulated
cost since last
reset
ENERGY
Real time
power (KW)
Accumulated
energy (KWh)
consumed
since last reset
COST RATE
To determine the approximate cost of electricity
consumption, input the cost per KWh.
To set cost rate:
1. Press and hold
SET.
2. Press
UP / DOWN to change values of the setting.
3. Press
SET to confirm and move to the next digit.
NOTE Each utility company sets a different tariff for
electricity consumption. This rate can usually be found
on the electricity bill.
TIP Certain utility companies use a tiered cost of
electricity, whereby the rate increases after consumption
exceeds a specified amount. It is recommended that
an average value is entered as the cost rate.
I.e., Total usage is 1000KWh (500 + 500) which can
be separated as:
500 KWh at 15p = £75
500 KWh at 10p = £50
Then, £125 / 1000KWh = 12.5p
Similarly, some utility companies use different tariffs for
usage at different times of the day. It is recommended
that an average value is entered as the cost rate.
I.e., Total usage is 3000KWh (1000KWh for day rate +
2000 for night rate) which can be separated as:
1000 KWh at 15p = £150
2000 KWh at 5p = £100
Then, £250 / 3000 KWh = 8.3p
POWER SAVE
By decreasing the frequency data is received from
every 6 seconds to every 60 seconds, battery life is
extended.
To activate power save function:
• Press and hold
DOWN.
PWR SAVE indicates power save function is activated.
Page 9

9
EN
CLEAR RECORDS
NOTE When total cost reaches 999.99 or total
energy reaches 999.99KWh, digits will flash to indicate
maximum has been reached and the need to clear
records.
To clear records of TOTAL data (Cost / Energy):
• Press and hold
UP and DOWN simultaneously.
RESET
Press RESET to return to the default settings.
TROUBLESHOOTING
PROBLEM SYMPTOM REMEDY
Strange
readings
Strange
readings
Set cost rate setting.
Check appliances are
not malfunctioning
(turned off by itself) as
this could be shown
as a sudden drop in
electricity usage.
High
readings
Check appliances
have been switched
off if not in use.
“- - - -“
displayed
Not
synchronised
Press and hold
CHECK on remote
transmitter.
Then, press and hold
UP on the main unit.
If still unsuccessful,
press RESET on
transmitter and main
unit.
“0.00”
displayed
Problem with
the sensor
Check sensor clamp
has been properly
fitted and closed.
Possible damage in
the sensor clamp.
Replace clamp with
new one.
SPECIFICATIONS
MAIN UNIT
Dimensions
(L x W x H)
66 x 27 x 85 mm
(2.6 x 1.1 x 3.3 inches)
Weight 80 g ( 2.8 oz) without battery
Signal frequency 433 MHz
Transmission
range
30 meters (100 feet)
unobstructed
Information update Approximately every 6 seconds
(EU) / 12 seconds (US / Canada)
Page 10

10
EN
Power 2 x UM-4 (AAA) 1.5V batteries
REMOTE TRANSMITTER
Dimensions
(L x W x H)
59 x 28 x 97 mm
(2.3 x 1.1 x 3.8 inches)
Weight 60 g (2.1 oz) without battery
Power 2 x UM-3 (AA) 1.5V batteries
SENSOR CLAMP
CT100
Dimensions
(L x W x H)
40 x 30 x 54 mm
(1.6 x 1.2 x 2.1 inches)
Weight 62 g (2.2 oz)
CT110
Dimensions
(L x W x H)
53 x 40 x 76 mm
(2.1 x 1.6 x 3.0 inches)
Weight 186 g (6.6 oz)
PRECAUTIONS
• Do not subject the unit to excessive force, shock,
dust, temperature or humidity.
• Do not cover the ventilation holes with any items
such as newspapers, curtains etc.
• Do not immerse the unit in water. If you spill liquid
over it, dry it immediately with a soft, lint-free cloth.
• Do not clean the unit with abrasive or corrosive
materials.
• Do not tamper with the unit ’s internal components.
This invalidates the warranty.
• Only use fresh batteries. Do not mix new and old
batteries.
• Images shown in this manual may differ from the
actual display.
• When disposing of this product, ensure it is
collected separately for special treatment and not
as normal household waste.
• Placement of this product on certain types of
wood may result in damage to its finish for which
Oregon Scientific will not be responsible. Consult
the furniture manufacturer's care instructions for
information.
• The contents of this manual may not be reproduced
without the permission of the manufacturer.
• Do not dispose old batteries as unsorted municipal
waste. Collection of such waste separately for
special treatment is necessary.
• Please note that some units are equipped with a
battery safety strip. Remove the strip from the
battery compartment before first use.
NOTE The technical specifications for this product
and the contents of the user manual are subject to
change without notice.
NOTE Features and accessories will not be available
in all countries. For more information, please contact
your local retailer.
Page 11
11
EN
ABOUT OREGON SCIENTIFIC
Visit our website (www.oregonscientific.com) to learn
more about Oregon Scientific products.
If you’re in the US and would like to contact our
Customer Care department directly, please visit:
www2.oregonscientific.com/service/support.asp
For international inquiries, please visit:
www2.oregonscientific.com/about/international.asp
EU-DECLARATION OF CONFORMITY
Hereby, Oregon Scientific, declares that this
Mini Wireless Energy Manager (model: ESM100
/ ESM100U) is in compliance with the essential
requirements and other relevant provisions of Directive
1999/5/EC. A copy of the signed and dated Declaration
of Conformity is available on request via our Oregon
Scientific Customer Service.
COUNTRIES RTTE APPROVAL COMPLIED
All EU countries, Switzerland CH
and Norway N
Page 12

TROUBLESHOOTING GUIDE
EMS100 / RMS300 / RMS600
Issues relating to Computer:
Q. Which computers are compatible with the OS Weather software?
A. Personal computer or laptops which run Microsoft Windows XP SP2 or Vista. Apple Mac
computers are not compatible with the software.
The system operating requirements are:
• Processor: Pentium 4 or above
• RAM: Min. 512MB
• Hard disk free space: Min. 512MB
• Screen area: 1024 x 768 pixels (recommended)
Q. Can the program work and transmit information during Sleep Mode?
A. No. When the PC enters Sleep mode, the computer effectively disables all working
functions, including the USB port. Thus, it is not possible for information to be transmitted
via the USB port. For this reason, the user manual clearly instructs users to disable sleep
mode function on their computer. Please refer to User Manual or Installation Guide for
instructions.
Q. Can data from the Main Unit and / or Communications Hub be transferred to the
PC when PC is switched off?
A. No. In all circumstances, to transfer weather data (whether upload or download), the
PC must be switched on.
i. For Multi-day Weather Stations (I300, I600, I900) which download weather
information to be displayed on a unit, it is recommended to connect USB
Communications Hub to USB port of PC continuously to allow seamless weather
information download.
ii. For Weather Stations (RMS300, RMS600, EMS100, WMR100N, WMR200,
WMRS200) which upload information collected via sensors to the PC, the PC must be
switched on only when user wishes to upload the information. The unit can continuously
work and display the collected information on the main unit.
Q. How long does data transfer normally take?
A. The amount of time required to transfer the data varies from model to model.
i. For Multi-day Weather Stations that download collected weather data and transfer
it from PC to Main Unit, approximately 30 minutes daily connection to computer is
sufficient to receive current weather data.
ii. For Weather Stations that can only upload information to PC, approximately 1 minute
connection to computer is sufficient to receive current weather data.
iii. For WMR200, the time required depends on the amount of weather data stored in memory.
Q. How can computer run better with the OS Weather Program?
A. By doing Windows update, your system will be updated with new Windows features,
device drivers, and system updates available from Microsoft.
It is generally recommended
to this on a regular basis. To do so:
a. Click on ˇ Start.
b. In context menu, scroll to
All Programs and select Windows Update.
Issues relating to OS Weather Software:
Q. Where can I get the latest software to install and system support documentation from?
A. Once the program has been installed, the computer will automatically alert you of
new updates to the program. Follow the steps as per Installation Guide.
If the program is no longer installed on the PC, you can download the latest version
from:http://download.os-weather.com. A screen will appear with a link to the latest
software (Download) and Installation Guide. Please read thoroughly the Installation
Guide and follow instructions to download the software. For further help, there is also a
link to this Troubleshooting Guide and Quick Start Guide and User Manual.
Q. What should I do if I receive a request to “Repair C++ Redistributable to its
original state”?
A. Please refer to instructions outlined in latest Installation Guide – accessible via
http://download.os-weather.com.
Q. The following error messages pop up:
o “CLOCK/TH/BARO.tmp contains an incorrect path”
o “Weather OS\DATA\TH\sensors.temp”
o “Encountering a sharing violation while accessing C:\ProgramFiles\
OregonScientific\Weather\OS\DATA\TH\sensors[#-#day].temp”
What should I do?
A. If you have Windows Vista, first determine the status of User Account Control. If User
Account Control is turned ON, either click on tick box to deselect it and turn it off, or if you
choose to keep it ON, uninstall and reinstall the program. When you reinstall the program,
you should save the program in C:\Users\admin and create a new folder and name it OS
Weather. For detailed instructions, please refer to Installation Guide.
Q. The SENSORS box on OS Web home page shows dashed lines where data
should be. What should I do?
A. i. For EMS100: Reset the unit.
ii. For RMS300 / RMS600: Press and hold
+ MODE.
Issues relating to Server:
Q. An error message “server is not currently available” pops up. What does that
mean?
A. There may be temporary suspension of service from the server at times; please try again later.
Q. An error message “The parameter is incorrect” pops up. What should I do?
A. The operations of OS Weather program will not be affected and can continue running.
Issues relating to Main Unit display:
Q. What data will be uploaded to the OS Weather Software?
A. i. For EMS100: Real-time indoor/outdoor temperature
ii. For RMS300 / RMS600: Real-time indoor/outdoor temperature and humidity
Q. What does mean?
A. It means the main unit is successfully connected with PC and the real-time temperature
and/or humidity data are being uploaded. If disconnected from PC (indicated by
), data will not be uploaded.
Q. I have set the temperature range in the alert feature of the OS Weather Software,
but the Ice Alert feature on the main unit does not respond accordingly. Why?
A. The main unit is programmed to only respond to the default temperature range of 3°C to
-2°C (37°F to 28°F) received from outdoor sensor (channel 1). It has no connection with
any settings you make on the software’s alert features.
Q. Does the main unit have memory for data-logging the temperature and/or humidity data?
A. No.
GUIDA ALLA RISOLUZIONE
DEI PROBLEMI
EMS100 / RMS300 / RMS600
Problemi relativi al computer:
D. Quali computer sono compatibili con il software OS Weather?
R. Personal computer o portatili che eseguono Microsoft Windows XP SP2 o Vista. I
computer Apple Mac non sono compatibili con il software. I requisiti del sistema operativo sono:
• Processore: Pentium 4 o versione successiva
• RAM: min. 512 MB
• Spazio libero su disco rigido: min. 512 MB
• Area dello schermo: 1024 x 768 pixel (consigliata)
D. Il pr
ogramma può funzionare e trasmettere informazioni durante la modalità
sospensione?
R. No. Quando viene attivata la modalità sospensione sul PC, il computer di fatto disabilita
tutte le funzioni attive, inclusa la porta USB. Pertanto, non è possibile trasmettere informazioni
tramite la porta USB. Per questo motivo, nel manuale dell’utente sono contenute semplici
istruzioni per disabilitare la funzione della modalità sospensione sul computer. Per le istruzioni,
fare riferimento al manuale dell’utente o alla Guida all’installazione.
D. È possibile tr
asferire i dati dall’unità principale e/o dall’hub comunicazioni al
PC quando il PC è spento?
R.
No. In qualsiasi caso, per trasferire i dati meteo (sia per caricarli che per scaricarli), il
PC deve essere acceso.
i. Per le stazioni meteorologiche a pi
ù giorni (I300, I600, I900) che scaricano le
informazioni meteorologiche per visualizzarle su un’unità, è consigliabile connettere
ininterrottamente l’hub comunicazioni USB alla porta USB del PC per consentire il
download continuo delle informazioni meteorologiche.
ii. Per le stazioni meteorologiche (RMS300, RMS600, EMS100, WMR100N, WMR200,
WMRS200) che caricano sul PC le informazioni raccolte tramite i sensori, il PC deve
essere acceso solo quando l’utente desidera caricare le informazioni. L’unità può
continuare a funzionare e a visualizzare le informazioni raccolte sull’unità principale.
D. Quanto tempo rich
iede in genere il trasferimento dei dati?
R.
Il periodo di tempo necessario per trasferire i dati dipende dal modello.
i. Per le stazioni meteorologiche a pi
ù giorni che scaricano i dati meteorologici raccolti e
li trasferiscono dal PC all’unità principale, circa 30 minuti al giorno di connessione al
computer sono sufficienti per ricevere i dati meteorologici correnti.
ii. Per le stazioni meteorologiche che possono solo caricare le informazioni sul PC, circa 1
minuto di connessione al computer è sufficiente per ricevere i dati meteorologici correnti.
iii. Per WMR200, il tempo necessario dipende dalla quantit
à di dati meteorologici
archiviati in memoria.
D. Come si può far funzionare meglio il computer con il programma OS Weather?
R.
Eseguendo Windows Update, il sistema verrà aggiornato con le nuove funzionalità
Windows, driver di dispositivo e aggiornamenti per il sistema disponibili da Microsoft. È in
genere consigliabile eseguire periodicamente questa operazione. A questo scopo:
a. Fare clic su
ˇ
Start.
b. Sceglie
re Tutti i programmi dal menu di scelta rapida, quindi Windows Update.
Problemi relativi al software OS Weather:
D. Da dove è possibile ottenere il software più recente da installare e la
documentazione sul supporto di sistema?
R. Dopo avere installato il programma, si verrà automaticamente avvisati della
disponibilità di nuovi aggiornamenti per il programma. Seguire la procedura riportata nella
Guida all’installazione.
Se il programma non
è più installato nel PC, è possibile scaricare la versione più
recente da: http://download.os-weather.com. Verrà visualizzata una schermata con un
collegamento al software più recente (Download) e alla Guida all’installazione. Leggere
con attenzione la Guida all’installazione e seguire le istruzioni per scaricare il software.
Per ulteriore assistenza, è disponibile anche un collegamento alla presente Guida alla
risoluzione dei problemi, alla Guida introduttiva e al manuale dell’utente.
D. Come si d
eve procedere se si riceve una richiesta di ripristinare lo stato
originale di C++ ridistribuibile?
R. Fare riferimento alle istruzioni riportate nella Guida all’installazione più recente, a cui
è possibile accedere da http://download.os-weather.com.
D. Vengono visualizzati messaggi di errore analoghi ai seguenti:
o “CLOCK/TH/BARO.tmp contiene un percorso non corretto”
o “Weather OS\DATA\TH\sensors.temp”
o “Rilevamento di una violazione di condivisione durante l’accesso a C:\
Programmi\OregonScientific\Weather\OS\DATA\TH\sensors[#-#day].temp”
Come si deve procedere?
R. Se si dispone di Windows Vista, determinare innanzitutto lo stato di Controllo
dell’account utente. Se Controllo dell’account utente
è ATTIVATO, fare clic sulla casella
di controllo per deselezionarlo e disattivarlo oppure, se si sceglie di lasciarlo ATTIVATO,
disinstallare e reinstallare il programma. Quando si reinstalla il programma, è consigliabile
salvare il programma in C:\utenti\admin e creare una nuova cartella denominata OS
Weather. Per istruzioni dettagliate, fare riferimento alla Guida all’installazione.
D. Nella casella SEN
SORI nella home page Web OS vengono visualizzate linee
tratteggiate invece dei dati. Come di deve procedere?
R. i. Per il modello EMS100: Premere
RESET.
ii. Per il modello RMS300 / RMS600: Tenere premuto + MODE.
Problemi relativi al server:
D. Viene visualizzato un messaggio di errore analogo a “Server attualmente non
disponibile”. Che cosa significa?
R. A volte può verificarsi una sospensione temporanea del servizio dal server.
Riprovare in seguito.
D. Viene visualizz
ato un messaggio di errore analogo a “Parametro non
corretto”. Come si deve procedere?
R. Le operazioni del programma OS Weather non subiranno alcuna modifica e sarà
possibile continuare l’esecuzione del programma.
Problemi relativi alla visualizzazione sull’unità principale:
D. Quali dati verranno caricati sul software OS Weather?
R. a) Per il modello EMS100: temperatura interna/esterna in tempo reale
b) Per il modello RMS300 / RMS600: temperatura e umidità interna/esterna in tempo reale
D. Che cosa significa il simbolo ?
R. Significa che il collegamento tra l’unità principale e il computer è avvenuto correttamente
e che i dati di temperatura e/o umidità vengono caricati in tempo reale. Se l’unità è
scollegata dal computer (caso indicato dal simbolo ), i dati non
verranno caricati.
D. Ho impostato la fascia della temperatura nella funzione di allerta del software OS
Weather, ma questa non risponde correttamente. Perché?
R. L’unità principale è programmata unicamente per rispondere alla fascia di temperatura predefinita
di 3°C a -2°C (da 37°F a 28°F) ricevuta dal sensore esterno (canale 1). Non c’è possibilità di
collegamento con eventuali impostazioni inserite nelle funzioni di allerta del software.
D. L’unità principale è dotata di memoria per la registrazione dei dati di temperatura
e/o umidità?
R. No.
EN
I T
Page 13

1
DE
Kabelloser Mini-Energie-Manager
Modell: ESM100 / ESM100U
BEDIENUNGSANLEITUNG
INHALT
Einleitung ................................................................. 2
Übersicht .................................................................. 2
Basiseinheit - Vorderansicht ................................ 2
Basiseinheit - Rückansicht .................................... 3
Funksender .......................................................... 3
Sensorklemme ...................................................... 4
Leitungskabel und Phase im Haushalt .................. 4
Erste Schritte ........................................................... 5
Ausgehendes stromführendes Kabel finden ......... 5
Einrichtung des Sensors ....................................... 5
Einrichtung des Senders ...................................... 7
Einrichtung des Basiseinheit ................................ 7
Datenübertragung der Sendeeinheit .................... 7
Elektrizität verstehen .............................................. 8
Anzeigemodi ............................................................ 8
Kostensatz ............................................................... 8
Stromsparfunktion .................................................. 9
Datensätze löschen ................................................. 9
Reset ......................................................................... 9
Fehlersuche und Abhilfe ....................................... 10
Technische Daten .................................................. 10
Vorsichtsmaßnahmen ............................................11
Über Oregon Scientific ..........................................
12
EU-Konformitätserklärung .................................... 12
Page 14
2
DE
EINLEITUNG
Wir danken Ihnen, dass Sie sich für den kabellosen
Mini-Energie-Manager von Oregon Scientific™
(ESM100 / ESM100U) entschieden haben.
Der kabellose Mini-Energie-Manager verkörpert unser
Engagement für ökologische Belange. Angesichts
der Bedrohungen, mit denen unsere heutige Welt
konfrontiert ist, hat Oregon Scientific™ technologisches
Know-How, Praxisnähe und Stil vereint, um diese
Produktreihe zu schaffen, die dabei hilft, Ihre
persönliche CO2-Bilanz zu verringern.
Mit diesem Produkt der Messkategorie II können Sie
Ihren Stromverbrauch in Echtzeit anzeigen. Durch
die Kenntnis Ihres Verbrauchs können Sie geeignete
Schritte unternehmen, um diesen zu verringern.
Ihre kontinuierlichen Bemühungen werden vom
Messgerät mit aussagekräftigen Werten reflektiert – die
voraussichtlichen Kosten / der Verbrauch verringern
sich mit der Zeit.
Unser Anliegen ist es, Produkte zu schaffen, die
praxisnahe Lösungen bieten und es uns ermöglichen,
unserer Verantwortung für die Umwelt nachzukommen
.
Gemeinsam können wir unsere Welt verbessern.
Beachten Sie die bitte nachfolgenden Warnhinweise
und Sicherheitsvorkehrungen bei der Einrichtung und
Verwendung dieses Produkts.
HINWEIS Halten Sie bitte diese Anleitung bereit, wenn
Sie Ihr neues Produkt verwenden. Es enthält praktische
Schritt-für-Schritt-Anweisungen sowie technische Daten
und wichtige Hinweise für den Umgang mit diesem Gerät.
Wenn das Gerät in einer Weise benutzt wird, die in
dieser Anleitung nicht beschrieben ist, kann der vom
Gerät vorgesehene Schutz beeinträchtigt werden.
ÜBERSICHT
BASISEINHEIT - VORDERANSICHT
1
2
3
4
5
6
7
8
1. ENERGY: gibt an, dass der Energieverbrauch
angezeigt wird
2. COST: gibt an, dass die Kosten des
Energieverbrauchs angezeigt werden
Page 15
3
DE
3. Kosten / Energieverbrauch in Echtzeit
4. Währungseinheit
5. REMOTE
/ MAIN: Batterien des
Funksenders / der Basiseinheit sind schwach
6. PWR SAVE: Stromsparfunktion ist aktiviert
7. Maßeinheiten für Kosten / Energieverbrauch (KW,
PENCE / CENT pro STUNDE, PENCE/CENT pro
KWH, KWH, PENCE, CENT)
8. Kumulierte Kosten / Energieverbrauch (seit der
letzten Zurücksetzung)
BASISEINHEIT - RÜCKANSICHT
1
2
3
4
5
6
7
8
1. Öffnung für Wandmontage
2. Magnete für Montage
3. SET: Einstellungsmodus für Kostensatz aufrufen;
Einstellungen bestätigen
4. UP: Zwischen Anzeigearten wechseln (Kosten /
Energie); Suche des Funksenders veranlassen;
Wert des Kostensatzes erhöhen
5. DOWN: zwischen Anzeigearten wechseln
(Kosten / Energie); Stromsparfunktion aktivieren /
deaktivieren; Wert des Kostensatzes verringern
6. RESET: Gerät zurücksetzen und kumulierten Speicher
löschen; Suche des Funksenders veranlassen
7. Batteriefach
8. Ausklappbarer Tischaufsteller
FUNKSENDER
1
2
3
4
5
6
Page 16
4
DE
1. LED-Statusanzeige: blinkt bei Suchvorgang
2. Buchsen für Sensorkabel
3. Öffnung für Wandmontage
4. Batteriefach
5. RESET: Gerät auf Standardeinstellungen
zurücksetzen
6. CHECK: veranlasst Übertragung für alle 2 Sekunden
(für einen Zeitraum von 30 Sekunden), zur Herstellung
einer Verbindung mit der Basiseinheit
SENSORKLEMME
Modell CT100
(Europa / UK)
Modell CT110
(USA, Kanada & andere Länder)
Sensor für:
• 220 V bis 250 V
WS
• Kabelgröße
bis zu 10 mm
Durchmesser
und/oder 70
Ampere RMS)
Sensor für:
• mit 120 V WS + Industrie
• Kabelgröße bis zu 16 mm
Durchmesser und/oder 200
Ampere RMS)
2
3
1
1
2
3
1. Öffnung für Elektrokabel
2. Kunststofflaschen
3. Sensor-Übertragungskabel
Optionale Sensorklemmen, wie die nachstehend
angeführten, können gesondert erworben werden. Für
weitere Informationen wenden Sie sich bitte an Ihren
Händler vor Ort.*
• Modell CT100
• Modell CT110
* Eigenschaften und Zubeh
örteile sind nicht in allen
Ländern verfügbar.
LEITUNGSKABEL UND PHASE IM HAUSHALT
Strom wird gewöhnlich mit Ein- und Drei-PhasenSystemen bereitgestellt.
UK: Die meisten Haushalte in Großbritannien
verwenden Netzanschlüsse mit einer Phase. Bei
solchen Netzanschlüssen fließt der Strom von und
zu Ihrem Haushaltsgerät durch einen Nullleiter und
einen stromführenden Leiter. Der Nullleiter weist
eine Spannung von nahezu 0 auf, während der
stromführende Leiter eine Spannung von 120 bis 240
Volt trägt. Der Unterschied zwischen diesen beiden
Leitern bewirkt den Stromfluss durch Ihre Geräte.
Europa: Die meisten Haushalte in Europa verwenden
Netzanschlüsse mit drei Phasen. Bei solchen
Anschlüssen fließt der Strom von und zu Ihrem Gerät
durch eine Gruppe von drei Leitern – jeder davon trägt
eine veränderliche Phase. Die drei Leiter benötigen
Page 17
5
DE
daher jeweils einen eigenen Stromsensor, der
gesondert erworben werden kann.
ERSTE SCHRITTE
AUSGEHENDES STROMFÜHRENDES
KABEL FINDEN
Die Sensorklemme sollte um den isolierten,
stromführenden Leiter herum angebracht werden.
Es wird empfohlen, dass Sie die Klemme um den
(ausgehenden) Leiter herum anbringen, der aus dem
Elektrizitätszähler im Zählerkasten herausführt.
Dieses Produkt verwendet einen Stromsensor des
Typs C; sie dürfen diesen nicht bei GEFÄHRLICHEN
STROMFÜHRENDEN Leitern anbringen oder
entfernen.
Unter keinen Umständen dürfen Sie zuviel Kraft oder
übermäßigen Druck auf die Kabel oder Anschlüsse
ausüben.
ACHTUNG Es ist unbedingt zu vermeiden, nicht
isolierte Kabel oder Kontaktelemente zu berühren.
Falls irgendwelche Probleme bei der Installation
auftreten, sollten Sie einen zugelassenen
Elektrotechniker zu Rate ziehen.
Eingehende
Stromversorgun
g
Ausgehende
Stromversorgung
EINRICHTUNG DES SENSORS
ACHTUNG
Es wird empfohlen, dass die Klemme(n)
des Stromsensors von einem zugelassenen
Elektrotechniker installiert werden. Schalten Sie Ihr
Stromnetz vollständig ab, bevor Sie die Sensoren
anbringen oder entfernen.
1. Drücken Sie mit Daumen und Zeigefinger nach
innen auf die Kunststofflaschen, die an beiden
Seiten der Sensorklemme angebracht sind, um
den oberen Teil zu lösen.
2. Entfernen Sie den oberen Teil vom Sensor.
Page 18

6
DE
2
1
3. Führen Sie das aktive Leitungskabel oder
stromführende Kabel (ausgehend) durch die
Öffnung für das Elektrokabel.
HINWEIS Sie dürfen nicht an den Kabeln ziehen oder
diese verbiegen. Legen Sie das Kabel vorsichtig in die
entsprechende Vertiefung, damit Sie die Sensorklemme
fest um das Kabel schließen können.
4. Bringen Sie den oberen Teil der Sensorklemme
wieder an und drücken Sie ihn nach unten, bis er
festsitzt.
5. Stecken Sie das Sensor-Übertragungskabel in eine
der Kabelbuchsen.
4
3
5
HINWEIS Bei Drei-Phasen-Systemen befestigen Sie
je eine Sensorklemme an jeden stromführenden Leiter.
• Stellen Sie beim Befestigen der Sensorklemme
sicher, dass jede Sensorklemme an einen eigenen
Leiter befestigt wird, da es ansonsten zu einer
falschen Ablesung kommt.
• Stecken Sie anschließend alle Kabel der
Sensorklemmen in den Funksender. Es können
bis zu drei Sensorklemmen am Funksender
angeschlossen werden.
ACHTUNG
• Die Signalverkabelung (etwa 1 Volt, 1 Milliampere)
am Sensorklemme ist zweifach isoliert und eignet sich
für Installationen in häuslichen Stromzählerkästen.
Wenn die Verkabelung durch die Gehäuseöffnung
geführt wird, sollte diese durch einen Knickschutz
vor scharfen Kanten geschützt werden.
• Sie dürfen das Gerät keinesfalls in Betrieb nehmen,
wenn es beschädigt oder dessen Sicherheit nicht
gewährleistet ist.
Page 19
7
DE
EINRICHTUNG DES SENDERS
1. Öffnen Sie die Abdeckung des Batteriefachs.
2. Legen Sie die Batterien ein und achten Sie auf die
Übereinstimmung der Polaritäten (+ / -).
3. Drücken Sie nach jedem Batteriewechsel auf
RESET.
4. Halten Sie
CHECK gedrückt, bis die LED-Leuchte
zu blinken beginnt.
5. Schließen Sie die Abdeckung des Batteriefachs.
6. Montieren Sie den Sender an einer im Mauerwerk
befestigten Schraube.
HINWEIS Installieren Sie die Batterien zuerst im
Sender und anschließend in der Basiseinheit.
Für optimale Ergebnisse:
• Platzieren Sie die Sendeeinheit innerhalb von 30 m
von der Basiseinheit entfernt.
• Platzieren Sie die Sendeeinheit außerhalb von
direkter Sonnenbestrahlung und Feuchtigkeit.
• Positionieren Sie die Sendeeinheit so, dass sie
auf die Basiseinheit (im Haus) gerichtet ist, und
vermeiden Sie Hindernisse, wie Türen, Wände und
Möbel.
TIPP Die Übertragungsreichweite kann von mehreren
Faktoren abhängen. Sie müssen eventuell mehrere
Standorte testen, um optimale Ergebnisse zu erzielen.
EINRICHTUNG DES BASISEINHEIT
1. Öffnen Sie die Abdeckung des Batteriefachs.
2. Legen Sie die Batterien ein und achten Sie auf die
Übereinstimmung der Polaritäten (+ / -).
3. Drücken Sie nach jedem Batteriewechel auf
RESET.
4. Schließen Sie die Batterieabdeckung.
DATENÜBERTRAGUNG DER SENDEEINHEIT
Falls die Basiseinheit keine Daten anzeigt oder Sie
die Batterie des Senders auswechseln:
1. Halten Sie
CHECK (innerhalb des Senders)
gedrückt, bis die LED-Leuchte zu blinken beginnt.
Der Sender prüft und überträgt die Daten alle 2
Sekunden an die Basiseinheit (30 Sekunden lang).
2. Halten Sie
UP auf der Basiseinheit gedrückt, um
nach dem Signal des Senders zu suchen.
Page 20
8
DE
ELEKTRIZITÄT VERSTEHEN
Spannung
(Volt)
Elektrisches Potential. Mit 220V250V oder 120V festgelegt, je nach
Region.
X
Stromstärke
(Ampere)
Die Strommenge, die z.B. durch
einen Draht fließt (Der Sensor misst
diesen Wert, um die Wattzahl zu
ermitteln)
=
Leistung
(Watt)
Die übertragene Energiemenge.
(KW = 1000 W). Dieser Datentyp
wird in der obersten Zeile des
Energiemodus angezeigt.
kWh ist eine Maßeinheit für den Verbrauch. Ein Kilowatt
pro Stunde bezeichnet die Nutzung von 1000 W Strom
für eine volle Stunde; dies entspricht 10 Glühbirnen mit
je 100 Watt, die 1 Stunde lang brennen.
Wenn der Kostensatz des Stromes eingegeben wurde,
kann das Messgerät einen Schätzwert der Kosten
festlegen.
HINWEIS Dieses Produkt ist ausschließlich für
informative Zwecke bestimmt. Es dient dazu,
das Verständnis der Kosten für den Betrieb von
Elektrogeräten im Haushalt zu fördern. Es kann die
präzisen Messwerte Ihres Elektrizitätszählers
nicht
ersetzen.
ANZEIGEMODI
Es stehen 2 Anzeigemodi zur Auswahl:
KOSTEN
UP / DOWN
Echtzeitkosten
der Elektrizität
pro Stunde
Kumulierte
Kosten seit
der letzten
Zurücksetzung
ENERGIE
Energie in
Echtzeit (KW)
Kumulierte
Energie(kWh),
die seit
der letzten
Zurücksetzung
verbraucht
wurde
KOSTENSATZ
Um die ungefähren Kosten des Stromverbrauchs zu
bestimmen, müssen sie die Kosten pro kWh eingeben.
Page 21

9
DE
So stellen Sie den Kostensatz ein:
1. Halten Sie
SET gedrückt.
2. Drücken Sie auf
UP / DOWN, um die
Einstellungswerte zu ändern.
3. Drücken Sie auf
SET, um die Einstellung zu
bestätigen und zur nächsten Ziffer überzugehen.
HINWEIS Jeder Energiedienstleister legt einen
eigenen Tarifsatz für den Stromverbrauch fest.
Diesen
Tarif finden Sie gewöhnlich auf Ihrer Stromrechnung.
TIPP Manche Energiedienstleister verwenden
gestaffelte Stromkosten, bei denen sich der Tarif
erhöht, wenn der Verbrauch einen bestimmten Wert
übersteigt. Es wird daher empfohlen, einen Mittelwert
als Kostensatz einzugeben.
Z.B., der Gesamtverbrauch beträgt 1000 kWh (500 +
500), der wie folgt aufgeteilt wird:
500 kWh zu 15 p = £ 75
500 kWh zu 10 p = £ 50
Folglich ergibt £ 125 / 1000 kWh = 12,5 p
In ähnlicher Weise verwenden einige
Energiedienstleister unterschiedliche Tarifsätze für
den Verbrauch zu unterschiedlichen Tageszeiten. Es
wird daher empfohlen, auch hier einen Mittelwert als
Kostensatz einzugeben.
Z.B., der Gesamtverbrauch beträgt 3000 kWh (1000
kWh für Tagestarif + 2000 für Nachttarif), der wie folgt
aufgeteilt wird:
1000 kWh zu 15 p = £ 150
2000 kWh zu 5 p = £ 100
Folglich ergibt £ 250 / 3000 kWh = 8,3 p
STROMSPARFUNKTION
Durch Verringerung der Häufigkeit des Datenempfangs
von 6 Sekunden auf 60 Sekunden wird die Lebensdauer
der Batterie verlängert.
So aktivieren Sie die Stromsparfunktion:
• Halten Sie DOWN gedrückt.
PWR SAVE gibt an, dass die Stromsparfunktion
aktiviert ist.
DATENSÄTZE LÖSCHEN
HINWEIS Wenn die Gesamtkosten den Wert 999,99
oder der Gesamtenergieverbrauch den Wert 999,99
kWh erreicht, blinken die Ziffern, um zu signalisieren,
dass der Maximalwert erreicht wurde und die
Datensätze gelöscht werden müssen.
So l
öschen Sie die Datensätze der GESAMTEN
Daten (Kosten / Energieverbrauch):
• Halten Sie UP und DOWN gleichzeitig gedrückt.
RESET
Drücken Sie auf RESET, um das Gerät auf die
Standardeinstellungen zurückzusetzen.
Page 22

10
DE
FEHLERSUCHE UND ABHILFE
PROBLEM MERKMAL ABHILFE
Ungewöhnliche
Messwerte
Ungewöhnliche
Messwerte
Stellen Sie den
Kostensatz ein.
Überprüfen Sie,
ob die Geräte eine
Fehlfunktion aufweisen
(sich von selbst
abschalten), da dies als
plötzlicher Rückgang
der Stromnutzung
angezeigt werden
kann.
Hohe
Messwerte
Überprüfen Sie,
ob die Geräte
bei Nichtnutzung
abgeschaltet wurden.
“- - - -“ wird
angezeigt
Keine
Synchronisierung
Halten Sie CHECK
auf dem Funksender
gedrückt. Halten Sie
anschließend UP
auf der Basiseinheit
gedrückt. Wenn
der Versuch nicht
erfolgreich ist, drücken
Sie RESET auf dem
Funksender und der
Basiseinheit.
“0.00” wird
angezeigt
Problem mit
dem Sensor
Überprüfen Sie, ob
die Sensorklemme
ordnungsgemäß
befestigt und
geschlossen wurde.
Mögliche
Beschädigung der
Sensorklemme.
Ersetzen Sie diese
durch eine neue
Klemme.
TECHNISCHE DATEN
BASISEINHEIT
Abmessungen
(L x B x H)
66 x 27 x 85 mm
Gewicht 80 g (ohne Batterie)
Signalfrequenz 433 MHz
Übertragungs-
reichweite
30 m (ohne Hindernisse)
Aktualisierung der
Daten
Etwa alle 6 Sekunden (EU) / 12
Sekunden (USA / Kanada)
Stromversorgung 2 Batterien UM-4 (AAA) 1,5V
FUNKSENDER
Abmessungen
(L x B x H)
59 x 28 x 97 mm
Page 23

11
DE
Gewicht 60 g (ohne Batterie)
Stromversorgung 2 Batterien UM-3 (AA) 1,5V
SENSORKLEMME
CT100
Abmessungen
(L x B x H)
40 x 30 x 54 mm
Gewicht 62 g
CT110
Abmessungen
(L x B x H)
53 x 40 x 76 mm
Gewicht 186 g
VORSICHTSMASSNAHMEN
• Setzen Sie das Gerät keiner extremen
Gewalteinwirkung und keinen Stößen aus, und
halten Sie es von übermäßigem Staub, Hitze oder
Feuchtigkeit fern.
• Sie dürfen die Belüftungsöffnungen nicht mit
Gegenständen abdecken, wie z.B. Zeitungen,
Vorhänge, usw.
• Tauchen Sie das Gerät niemals in Wasser. Falls
Sie eine Flüssigkeit über das Gerät verschütten,
trocknen Sie es sofort mit einem weichen,
faserfreien Tuch.
• Reinigen Sie das Gerät keinesfalls mit scheuernden
oder ätzenden Mitteln.
• Machen Sie sich nicht an den internen Komponenten
des Geräts zu schaffen, da dies zu einem Verlust
der Garantie führen kann.
• Verwenden Sie nur neue Batterien. Verwenden Sie
keinesfalls neue und alte Batterien gemeinsam.
• Die in dieser Anleitung dargestellten Abbildungen
können sich vom Original unterscheiden.
• Entsorgen Sie das Produkt nicht im allgemeinen
Hausmüll, sondern ausschließlich in den dafür
vorgesehenen, kommunalen Sammelstellen, die
Sie bei Ihrer Gemeinde erfragen können.
• Wenn dieses Produkt auf bestimmte Holzflächen
gestellt wird, kann die Oberfläche beschädigt
werden. Oregon Scientific ist nicht haftbar für
solche Beschädigungen. Entsprechende Hinweise
entnehmen Sie bitte der Pflegeanleitung Ihres
Möbelherstellers.
• Der Inhalt dieser Anleitung darf ohne Genehmigung
des Herstellers nicht vervielfältigt werden.
• Verbrauchte Batterien gehören nicht in den
Hausmüll. Bitte geben Sie sie bei einer Sammelstelle
für Altbatterien bzw. Sondermüll ab.
• Bitte beachten Sie, dass manche Geräte mit einem
Batterieunterbrechungsstreifen bestückt sind. Vor
dem ersten Gebrauch müssen Sie den Streifen aus
dem Batteriefach ziehen.
HINWEIS Die technischen Daten für dieses Produkt
und der Inhalt der Bedienungsanleitung können ohne
Benachrichtigung geändert werden.
Page 24
12
DE
HINWEIS Eigenschaften und Zubehör nicht in allen
Ländern verfügbar. Weitere Informationen erhalten Sie
von Ihrem Fachhändler vor Ort.
ÜBER OREGON SCIENTIFIC
Besuchen Sie unsere Website www.oregonscientific.
de und erfahren Sie mehr über unsere Oregon
Scientific-Produkte. Auf der Website finden Sie
auch Informationen, wie Sie im Bedarfsfall unseren
Kundendienst erreichen und Daten herunterladen
können.
Für internationale Anfragen besuchen Sie bitte
unsere Website: www2.oregonscientific.com/about/
international.asp.
EU-KONFORMITÄTSERKLÄRUNG
Hiermit erklärt Oregon Scientific, dass die Kabelloser
Mini-Energie-Manager (Modell: ESM100 / ESM100U)
mit den grundlegenden Anforderungen und anderen
relevanten Vorschriften der Richtlinie 1999/5/EG
übereinstimmt. Eine Kopie der unterschriebenen und
mit Datum versehenen Konformitätserklärung erhalten
Sie auf Anfrage über unseren Oregon Scientific
Kundendienst.
KONFORM IN FOLGENDEN LÄNDERN
Alle Länder der EU, Schweiz CH
und Norwegen N
Page 25

érieur
ésactive effectivement toutes les
ésactiver le mode veille de leur ordinateur. Veuillez
érer des données météo (pour
élécharger l’information. L’unité peut travailler
ées sur l’Unité Principale.
ées prend normalement ?
ées météo courantes.
épend de la quantité de données météo stockées
+ MODE.
« Le paramètre est
?
TROUBLESHOOTING GUIDE
EMS100 / RMS300 / RMS600
Bei Problemen mit Ihrem PC:
F. Welche Computer sind mit der OS Weather software kompatibel?
A. PC’s oder Laptops mit den Betriebssystemen Microsoft Windows XP SP2 oder Vista.
Die Software ist nicht kompatibel auf Apple Mac. Die minimalen Systemvoraussetzungen
für die Verwendung der Software lauten wie folgt:
• Prozessor: Pentium 4 oder höher
• RAM: Min. 512 MB
• Fesplattenspeicher: Min 512 MB
• Auflösung: 1024 x 768 Pixel (empfohlen)
F. Kann das Programm auch im Ruhezustand arbeiten und Informationen übertragen?
A. Nein. Wenn der Ruhezustand des PC’s eingetreten ist können keine Informationen
übertragen werden. Aus diesem Grund empfehlen wir Ihnen den Ruhezustand auf Ihem
Computer auszuschalten. Weitere Informationen finden Sie in der Bedienungs- und
Installationsanleitung.
F. Können Daten übetragen werden wenn der PC ausgeschaltet ist?
A. Nein. Um Wetterdaten zu übertragen muss der PC eingeschaltet sein.
i. Für Multiday-Wetterstationen (I300, I600, I900) die die Informationen auf das Display
anzeigen, empfehlen wir die stetige Verbindung von USB-Stecker und PC, um eine
nahtlose Übertragung der Wetterinformationen zu gewährleisten.
ii. Für Wetterstationen (RMS300, RMS600, EMS100, WMR100N, WMR 200, WMRS200)
die durch Sensoren Informationen sammeln, muss der PC nur angeschaltet werden
wenn Sie ein Upload der Informationen wünschcen.
F Wie lange dauert die Datenübertragung?
A. Die Länge der Datenübertragung variiert von Model zu Model.
i. Für Multiday- Wetterstationen dauert der Download der gesammelten Informationen
täglich ca. 30 Minuten.
ii. Bei Wetterstationen die nur ein Update vom PC abrufen wollen, dauert es ca. 1Minute
iii. Bei der WMR200 hängt dei Dauer davon ab, wieviel Wetterdaten im Speicher abgelegt
sind.
F. Wie kann mein Computer schneller laufen ohne das OS Weather Program zu
löschen?
A. Bei einem Windows Update, wird Ihr Computer mit neuen Features, Drivern und
zusätzlichem Updates versorgt. Wir empfehlen Ihnen dies zur regulären Basis. Um ein
Windows Update auszuführen, beachten Sie folgende Schritte:
a. Klicken Sie auf Start
ˇ
.
b. Suchen Sie in
Programme nach einem Windows Update und führen SIe es aus.
Probleme bei der OS Weather software:
F. Wo bekomme ich die aktuelle Software zum installieren?
A. Ist einmal das Programm installiert, wird die Software Sie automatisch auf den
neuere Updates informieren.
Ist das Programm nicht mehr auf Ihrem PC installiert, dann können Sie die aktuelle
Version auf http://download.os-weather.com runterladen. Zudem ist unter dem Link auch
die Ausführung der Installation, der Troubleshhoting Guide bei Problemen, ein Quick Start
Guide und die Bedienunganleitung hinterlegt.
F. Was sollte ich machen ich folgendes empfange “Repair C++ Redistrubutable
to its original site”?
A. Bitte schauen Sie in die Einleitung für die Installation - abrufbar auf http://download.
os-weather.com.
F. Folgende Error-Meldung wird angezeigt:
o “CLOCK/TH/BARO.tmp contains an incorrect path”
o “Weather OS\DATA\TH\sensors.temp”
o “Encountering a sharing violation while accessing C:\ProgramFiles\
OregonScientific\Weather\OS\DATA\TH\sensors[#-#day].temp”
Was sollte ich tun?
A. Wenn Sie Windows Vista benutzen, deaktikivieren Sie bitte
Ihre Benutzerkontensteuerung (Häkchen entfernen). Falls Sie die
Benutzerkontensteuerung nicht deaktivieren, deintallieren Sie das Programm und starten
Sie erneut eine Installation. Wenn Sie das Programm wieder installieren speichern sie
es unter C:\Users\admin und erstellen Sie einen neuen Orddner mit den Namen OS
Weather. Detaillierte Ausführung im Installation Guide - Installation.
F. Die Sensoren zeigen gestrichelte Linien anstatt den Daten. Wass soll ich tun?
A. i. Für EMS100: Setzen Sie das Gerät zurück.
ii. Für RMS300 / RMS600: Halten Sie
+ MODE gedrückt.
Probleme mit dem Server:
F. Die Error-Meldung “Server is not currently available” taucht auf. Was heißt das?
A. Hin und wieder kann es vorkommen, dass keine Verbindung zum Server ensteht.
Versuchen Sie es später noch einmal.
F. Die Error-Meldung “The parameter is incorrect” taucht auf. Was heißt das?
A. Das OS Weather Programm ist davon nicht betroffen und kann weiterhin ausgeführt
werden.
Probleme am Gerät:
Q. Welche Daten werden auf die OS-Wetter-Software hochgeladen?
A. i. Für EMS100: Innen-/Außentemperatur in Echtzeit
ii. Für RMS300 / RMS600: Innen-/Außentemperatur und Luftfeuchtigkeit in Echtzeit
Q. Was bedeutet das Symbol ?
A. Es bedeutet, dass die Basiseinheit erfolgreich mit dem PC verbunden ist und die
Temperatur- und/oder Luftfeuchtigkeitsdaten in Echtzeit hochgeladen werden. Wenn
die Verbindung zum PC unterbrochen wurde (durch angezeigt),
werden die Daten nicht hochgeladen.
Q. Ich hab den Temperaturbereich in der Alarmfunktion der OS-Wetter-Software
eingestellt, die Funktion der Frostwarnung auf der Basiseinheit zeigt jedoch keine
entsprechende Reaktion. Warum?
A. Die Basiseinheit ist nur darauf programmiert, auf den vorgegebenen
Temperaturbereich von 3°C bis -2°C (37°F bis 28°F) zu reagieren, der vom Außensensor
(Kanal 1) empfangen wird. Er steht in keiner Verbindung zu den Einstellungen, die Sie in
den Alarmfunktionen der Software vornehmen.
Q. Verfügt die Basiseinheit über einen Speicher zur Aufzeichnung der Temperatur-
und/oder Luftfeuchtigkeitsdaten?
A. Nein.
DE
Page 26

1
ES
Minicontrolador de energía
inalámbrico
Modelo: ESM100 / ESM100U
MANUAL DE USUARIO
ÍNDICE
Introducción ............................................................. 2
Resumen .................................................................. 2
Vista frontal de la unidad principal ........................ 2
Vista trasera de la unidad principal ....................... 3
Transmisor remoto ............................................... 3
Pinza sensora ....................................................... 4
Cables de electricidad doméstica y fase ............... 4
Cómo empezar ......................................................... 5
Localice el cable vivo de salida ............................. 5
Instalación del sensor ........................................... 5
Configuración del transmisor ................................ 6
Instalación de la unidad principal ......................... 7
Transmisión de datos del sensor ......................... 7
Comprender la electricidad .................................... 7
Modos de pantalla ................................................... 8
Coste ......................................................................... 8
Ahorro de energía .................................................... 8
Borrar récords ......................................................... 9
Restablecer .............................................................. 9
Solución de problemas ........................................... 9
Especificaciones ...................................................
10
Precaución ............................................................. 10
Sobre Oregon Scientific .........................................
11
EU – Declaración de conformidad ........................11
Page 27
2
ES
INTRODUCCIÓN
Gracias por elegir el minicontrolador de energía de
Oregon Scientific™ (ESM100 / ESM100U).
El minicontrolador de energía inalámbrico representa
nuestro compromiso con el medio ambiente.
Consciente de las amenazas a que se enfrenta
nuestro mundo, Oregon Scientific™ ha combinado
conocimientos tecnológicos, funcionalidad y diseño
para crear esta línea de productos que le permiten
reducir sus emisiones de carbono.
Con este medidor de categoría II podrá conocer su
consumo en tiempo real. Conocer su consumo le
permitirá actuar para reducirlo. Su esfuerzo continuado
se reflejará útilmente en el monitor: los costes
estimados y el consumo se reducirán a medida que
pase el tiempo.
Nuestro objetivo es fabricar productos que ofrezcan
soluciones prácticas y al mismo tiempo nos permiten
cumplir con nuestra responsabilidad medioambiental.
Juntos podemos mejorar el mundo en que vivimos.
Tenga en cuenta las siguientes instrucciones de
seguridad siguientes al configurar y utilizar este producto.
NOTA Tenga este manual a mano cuando use su
nuevo producto. Contiene prácticas instrucciones
explicadas paso a paso, así como especificaciones
técnicas y advertencias que debe conocer.
Si el dispositivo se utiliza de un modo distinto al que
especifica este manual, la protección de que dispone
el dispositivo puede resultar dañada.
RESUMEN
VISTA FRONTAL DE LA UNIDAD PRINCIPAL
1
2
3
4
5
6
7
8
1. ENERGÍA: indica que se muestra el consumo de
energía
2. COSTE: indica el coste de la energía que se muestra
3. Coste / consumo de energía a tiempo real
4. Divisa
5. MANDO A DISTANCIA
/ UNIDAD
PRINCIPAL: las pilas del transmisor remoto están
casi agotadas / las pilas de la unidad principal
están casi agotadas
Page 28
3
ES
6. AHORRO DE CORRIENTE: la función de ahorro
de corriente está activada
7. Unidades de medición de coste / consumo de
energía (KW, PENIQUES / CÉNTIMOS por
HORA, PENIQUES/CÉNTIMOS por KWH, KWH,
PENIQUES, CÉNTIMOS)
8. Coste / consumo de energía acumulados (desde el
último reinicio)
VISTA TRASERA DE LA UNIDAD PRINCIPAL
1
2
3
4
5
6
7
8
1. Orificio para montaje en pared
2. Imanes para el montaje
3. CONF: Acceder al modo de configuración de coste;
confirmar ajustes
4. ARRIBA: alternar entre pantallas (Coste / Energía);
iniciar búsqueda de transmisor remoto; incrementar
valor del coste
5. ABAJO: alternar entre pantallas (Coste / Energía);
activar / desactivar función de ahorro de energía;
reducir valor del coste
6. RESET: reiniciar la unidad y borra la memoria
acumulada; iniciar búsqueda de transmisor remoto
7. Compartimento para las pilas
8. Soporte de mesa plegable
TRANSMISOR REMOTO
1
2
3
4
5
6
1. Indicador LED de estado: parpadea durante la
búsqueda
Page 29
4
ES
2. Tomas del cable del sensor
3. Orificio para montaje en pared
4. Compartimento para las pilas
5. RESET: La unidad vuelve a los ajustes
predeterminados
6. COMPROBAR: fuerza transmisión cada 2
segundos (durante un periodo de 30 segundos)
para intentar conectar con la unidad principal
PINZA SENSORA
Modelo CT100
(Europa / Reino Unido)
Modelo CT110
(EEUU, Canadá y otros
países)
Sensor para:
• 220 V a 250 V CA
• diámetro del cable:
hasta 10 mm, o
RMS 70 amps
Sensor para:
• CA 120 V + Industria
• diámetro del cable:
hasta 16mm, o RMS
200 amps
2
3
1
1
2
3
1. Orificio para el cable eléctrico
2. Pestañas de plástico
3. Cable del sensor transmisor
Se pueden comprar por separado fijaciones para
sensores como los que aparecen a continuación.
Póngase en contacto con su distribuidor local si desea
más información.*
• Modelo CT100
• Modelo CT110
* No todas las funciones y accesorios estarán
disponibles en todos los países.
CABLES DE ELECTRICIDAD DOMÉSTICA Y FASE
La electricidad se suele suministrar utilizando sistemas
monofásico y trifásico.
Reino Unido: En la mayoría de hogares se utiliza
suministro monofásico. Con este sistema, el flujo de
corriente de entrada y salida de su hogar se produce
utilizando un cable neutro y vivo. El cable neutral tiene
un voltaje cercano a cero, mientras que el cable de
alimentación tiene un voltaje de entre 120 y 240 V.
La diferencia entre ambos es lo que crea el flujo de
corriente que alimenta sus electrodomésticos.
Europa: En la mayoría de hogares europeos se utiliza
suministro trifásico. En el sistema de suministro trifásico,
la corriente fluye a un dispositivo y de vuelta al circuito
a través de un grupo de tres cables con fluctuación de
fase. Por tanto, cada uno de los tres cables requiere
un sensor de corriente individual que se puede adquirir
separadamente.
Page 30
5
ES
CÓMO EMPEZAR
LOCALICE EL CABLE VIVO DE SALIDA
La pinza sensora se debería fijar en el cable vivo
aislado. Se recomienda fijarlo en el cable (de salida)
que sale del contador de electricidad que hay dentro
de la caja.
Este producto utiliza un sensor de corriente de Tipo
C; no lo fije a conductores EN VIVO PELIGROSOS, ni
lo retire de los mismos.
No aplique fuerza ni presión indebida a ningún cable o
conexión en ningún momento.
ADVERTENCIA Tenga cuidado en todo momento
de no tocar ni entrar en contacto con ningún cable o
enchufe sin aislamiento.
Si tiene algún problema con la instalación, consulte a
un electricista calificado.
corriente de
entrada
corriente de
salida
INSTALACIÓN DEL SENSOR
ADVERTENCIA
Recomendamos que un electricista
calificado se ocupe de la instalación de las pinzas
sensoras actuales. Desconecte la corriente antes de
conectar y desconectar el/los sensor/es.
1. Apriete con el pulgar y el dedo índice las pestañas
de plástico que hay a los lados de la pinza sensora
para soltar la parte superior.
2. Levante la parte superior del sensor.
2
1
3. Coloque el cable activo o vivo (de salida) principal
de la casa en el orificio para el cable.
NOTA No tire de los cables ni los doble. Introduzca
el cable en la posición adecuada sin forzarlo hasta que
pueda cerrar la pinza sensora alrededor del cable.
Page 31

6
ES
4. Vuelva a colocar la parte superior de la pinza
sensora y apriete para fijarla.
5. Conecte el cable de transmisión del sensor en una
de las tomas.
4
3
5
NOTA Si el sistema es trifásico, conecte una pinza
sensora a cada cable vivo.
• Al conectar las pinzas sensoras, asegúrese de
que cada pinza esté conectada a un cable distinto,
ya que de lo contrario podría obtener lecturas
erróneas.
• A continuación conecte todos los cables de la pinza
sensora al transmisor remoto. Se pueden conectar
hasta tres pinzas sensoras en el transmisor
remoto.
ADVERTENCIA
• El cableado de la señal (aprox. 1 voltio, 1 miliamp)
de la pinza sensora tiene un aislamiento doble que
permite instalarlo en cajas de contadores de luz
domésticas. Sujete el cableado con abrazaderas
cuando esté al descubierto de modo que no pueda
estropearse rozando con cantos afilados.
• No utilice la unidad si presenta daños o problemas
de seguridad.
CONFIGURACIÓN DEL TRANSMISOR
1. Abra la tapa del compartimento para pilas.
2. Introduzca las pilas haciendo coincidir la polaridad
(+ y -).
3. Pulse
RESET cada vez que cambie la pila.
4. Pulse
CHECK hasta que el piloto LED parpadee.
5. Cierre el compartimento de las pilas.
6. Monte el transmisor en un tornillo fijo.
NOTA Instale la pila en el transmisor antes de la
unidad principal.
Cómo conseguir los mejores resultados:
• Coloque el transmisor en un radio de 30 m (100
pies) de la unidad principal.
Page 32

7
ES
• Coloque el sensor en un lugar en el que no esté
expuesto a la luz directa del sol ni a la humedad.
• Coloque el sensor de tal modo que quede de
cara a la unidad principal (interior), minimizando
obstrucciones como puertas, paredes y muebles.
CONSEJO El alcance de transmisión puede variar
debido a muchos factores. Es posible que tenga que
probar varias ubicaciones para obtener los mejores
resultados.
INSTALACIÓN DE LA UNIDAD PRINCIPAL
1. Abra la tapa del compartimento para pilas.
2. Introduzca las pilas haciendo coincidir la polaridad
(+ y -).
3. Pulse
RESET cada vez que cambie la pila.
4. Cierre el compartimento de las pilas.
TRANSMISIÓN DE DATOS DEL SENSOR
Si la unidad principal no muestra datos, o después
de un cambio de pilas en el transmisor:
1. Pulse
CHECK (en el transmisor) hasta que el piloto
LED parpadea. El transmisor comprobará que
recibe datos y los transmitirá a la unidad principal
cada 2 segundos durante 30 segundos.
2. Pulse
ARRIBA en la unidad principal y manténgalo
pulsado para iniciar una búsqueda de señal del
transmisor.
COMPRENDER LA ELECTRICIDAD
Voltaje
(voltios)
Potencial eléctrico. Fijado en 220V250V o 120V, según la región.
X
Corriente
(amps)
Cantidad de electricidad que fluye a
través de, por ejemplo, un cable.
(El sensor la mide para determinar los
vatios)
=
Potencia
(vatios)
Cantidad de energía que se transfiere.
(KW = 1.000 W). Este tipo de datos se
muestra en la línea superior del modo
de energía.
KWh es una medida de consumo. Los kilovatios por
hora representan el uso de 1.000 vatios de electricidad
durante 1 hora, lo cual es equivalente a diez bombillas
de 100 vatios funcionando al mismo tiempo durante 1
hora.
En cuanto se haya introducido el coste de la electricidad,
el monitor calculará un coste estimado.
NOTA Este producto solamente tiene un fin educativo.
Su objetivo es ayudar a entender el coste de tener
aparatos eléctricos funcionando en casa, pero no
reemplaza su preciso contador de la luz.
Page 33

8
ES
MODOS DE PANTALLA
Puede elegir entre 2 modos de pantalla:
COSTE
UP / DOWN
Coste de la
electricidad
por hora a
tiempo real
Coste
acumulado
desde el
último reinicio
ENERGÍA Potencia a
tiempo real
(kW)
Total de
energía (KWh)
consumida
desde el
último reinicio
COSTE
Para determinar el coste aproximado de la electricidad
que consume, introduzca el coste por KWh.
Cómo introducir el coste:
1. Pulse
SET y manténgalo pulsado.
2. Pulse
ARRIBA / ABAJO para modificar los valores
del ajuste.
3. Pulse SET para confirmar y pasar al siguiente
dígito.
NOTA Cada compañía proveedora de electricidad
cobra la electricidad a un precio distinto. Normalmente
la tarifa se indica en las facturas de electricidad.
CONSEJO Algunas compañías eléctricas utilizan
un sistema tarifario exponencial, en el cual el precio
aumenta si se supera un consumo determinado. En tal
caso recomendamos introducir un valor medio como
coste.
Por ejemplo, si el consumo total es de 1.000 KWh (500
+ 500), que se puede dividir en:
500 KWh a 15 céntimos = 75 €
500 KWh a 10 céntimos = 50 €
Eso significa que 125 € / 1.000 KWh = 12,5 céntimos
Asimismo, algunas proveedoras de electricidad aplican
distintas tarifas según la hora del día. En tal caso
recomendamos introducir un valor medio como coste.
Por ejemplo, si el consumo total es de 3.000 KWh
(1.000 KWh en tarifa diurna + 2000 en tarifa nocturna),
que se puede dividir en:
1.000 KWh a 15 céntimos = 150 €
2.000 KWh a 5 céntimos = 100 €
Eso significa que 250 € / 3.000 KWh = 8,3 céntimos
AHORRO DE ENERGÍA
Si reduce la frecuencia de recepción de datos, de cada
6 segundos a cada 60 segundos, la pila durará más.
Page 34

9
ES
Cómo activar la función de ahorro de energía:
• Pulse DOWN y manténgalo pulsado.
Aparecerá el texto PWR SAVE para indicar que la
función de ahorro de energía está activada.
BORRAR RÉCORDS
NOTA
Cuando el coste total llegue a 999,99 o la
energía total consumida llegue a 999,99KWh, los
dígitos parpadearán para indicar que se ha llegado al
máximo y hay que borrar los registros.
Cómo borrar los registros de datos TOTALES
(Coste / Energía):
• Pulse ARRIBA y ABAJO simultáneamente y
manténgalos pulsados.
RESTABLECER
Pulse RESET para volver a la configuración
predeterminada.
SOLUCIÓN DE PROBLEMAS
PROBLEMA SÍNTOMA SOLUCIÓN
Lecturas
extrañas
Lecturas
extrañas
Ajuste el coste.
Compruebe que los
electrodomésticos
funcionen
correctamente (que no
se hayan apagado por
sí solos), ya que esto
podría aparecer como
una caída repentina
del consumo de
electricidad.
Lecturas
altas
Compruebe que
los aparatos estén
desactivados si no se
están utilizando.
La pantalla
muestra
“- - - -“
Problema
de
sincronización
Pulse CHECK en el
transmisor remoto y
manténgalo pulsado.
A continuación, pulse
ARRIBA en la unidad
principal.
Si sigue sin funcionar,
pulse RESET en el
transmisor y en la
unidad principal.
Page 35

10
ES
La pantalla
muestra
“0.00”
Problema
con el
sensor
Compruebe que
la pinza sensora
esté correctamente
colocada y cerrada.
Es posible que la
pinza sensora haya
sufrido algún daño.
Reemplácela por otra
nueva.
ESPECIFICACIONES
UNIDAD PRINCIPAL
Dimensiones
(L X A X A)
66 x 27 x 85 mm
(2,6 x 1,1 x 3,3 pulgadas)
Peso 80 g (79,38 g) sin pila
Frecuencia de la
señal
433 MHz
Cobertura de
transmisión
30 metros (100 pies) sin
obstáculos
Actualización de
información
Aproximadamente cada 6
segundos (EU) / 12 segundos
(EEUU / Canadá)
Potencia 2 pilas UM-4 (AAA) de 1,5V
TRANSMISOR REMOTO
Dimensiones
(L X A X A)
59 x 28 x 97 mm
(2,3 x 1,1 x 3,8 pulgadas)
Peso 60 g (2,1 oz) sin pila
Potencia 2 pilas UM-3 (AA) de 1,5V
PINZA SENSORA
CT100
Dimensiones
(L X A X A)
40 x 30 x 54 mm
(1,6 x 1,2 x 2,1 pulgadas)
Peso 62 g (2,2 oz)
CT110
Dimensiones
(L X A X A)
53 x 40 x 76 mm
(2,1 x 1,6 x 3,0 pulgadas)
Peso 186 g (6,6 oz)
PRECAUCIÓN
• No exponga el producto a fuerza extrema,
descargas, polvo, fluctuaciones de temperatura o
humedad.
• No cubra los orificios de ventilación con objetos
como periódicos, cortinas, etc.
• No sumerja el dispositivo en agua. Si se vertiera
líquido en la unidad, límpiela con un paño suave y
sin electricidad estática.
• No limpie la unidad con materiales abrasivos o
corrosivos.
• No manipule los componentes internos. De hacerlo
se invalidaría la garantía.
• Use siempre pilas nuevas. No mezcle pilas viejas
Page 36

11
ES
con pilas nuevas.
• Las imágenes de esta guía para el usuario pueden
ser distintas al producto en sí.
• Cuando elimine este producto, asegúrese de
que no vaya a parar a la basura general, sino
separadamente para recibir un tratamiento
especial.
• La colocación de este producto encima de ciertos
tipos de madera puede provocar daños a sus
acabados. Oregon Scientific no se responsabilizará
de dichos daños. Consulte las instrucciones
de cuidado del fabricante para obtener más
información.
• Los contenidos de este manual no pueden
reproducirse sin permiso del fabricante.
• No elimine las pilas gastadas con la basura normal.
Es necesario desecharlas separadamente para
poder tratarlas.
• Tenga en cuenta que algunas unidades disponen
de una cinta de seguridad para las pilas. Retire la
cinta de compartimento para pilas antes de usarlo
por primera vez.
NOTA La ficha técnica de este producto y los
contenidos de este manual de usuario pueden
experimentar cambios sin previo aviso.
NOTA No todas las funciones y accesorios estarán
disponibles en todos los países. Sírvase ponerse
en contacto con su distribuidor local si desea más
información.
SOBRE OREGON SCIENTIFIC
Visite nuestra página web (www.oregonscientific.com)
para conocer más sobre los productos de Oregon
Scientific.
Si está en EE.UU y quiere contactar directamente con
nuestro Departamento de Atención al Cliente, por favor
visite www2.oregonscientific.com/service/support.asp
Si está en España y quiere contactar directamente con
nuestro Departamento de Atención al Cliente, por favor
visite www.oregonscientific.es o llame al 902 338 368.
Para consultas internacionales, por favor visite
www2.
oregonscientific.com/about/international.asp
EU – DECLARACIÓN DE CONFORMIDAD
Por medio de la presente Oregon Scientific declara
que el Minicontrolador de energía inalámbrico (modelo:
ESM100 / ESM100U) cumple con los requisitos
esenciales y cualesquiera otras disposiciones
aplicables o exigibles de la Directiva 1999/5/CE. Tiene
a su disposición una copia firmada y sellada de la
Declaración de Conformidad, solicítela al Departamento
de Atención al Cliente de Oregon Scientific.
PAÍSES BAJO LA DIRECTIVA RTTE
Todos los países de la UE, Suiza CH
y Noruega N
Page 37

ES
POR
RESOLUCIÓN DE PROBLEMAS
EMS100 / RMS300 / RMS600
Cuestiones relacionadas con el equipo:
P: ¿Qué ordenadores son compatibles con el Software OS Weather?
R: Los PCs y portátiles que utilicen Microsoft Windows XP, SP2 o Vista. Los ordenadores
Apple Mac no son compatibles con este software. Los requisitos del sistema operativo son:
• Procesador: Pentium 4 o superior
• RAM: Mín. 512 MB
• Espacio en disco duro: Mín: 512 MB
• Superficie de pa
ntalla. 1024 x 768 pixels (recomendado)
P: ¿Puede el programa funcionar y transmitir información en modo Inactividad?
R: No. Cuando el PC entra en modo Inactividad, el ordenador deshabilita efectivamente todas
las funciones de operación, incluidos los puertos USB. Por tanto, no es posible transmitir
información a través de los puertos USB. Por esta razón, el manual de uso avisa a los
usuarios para que deshabiliten la función de hibernación del ordenador. Por favor, consulte
el Manual de Uso o la Guía de Instalación para recibir instrucciones al respecto.
P: ¿Pueden transferirse datos desde la unidad principal y/o el Hub de comunicaciones
al PC cuando el PC está apagado?
R: No. En cualquier circunstancia, para transferir datos meteorológicos (tanto para cargarlos
como para descargarlos) el PC debe estar encendido.
i) Para Estaciones Meteorológicas Multi-Días (I300, I600, I900), que descargan
información meteorológica que se muestra en una unidad, se recomienda conectar
el Hub de Comunicaciones USB a un puerto USB del ordenador continuamente para
permitir la descarga de datos meteorológicos de forma inalámbrica y continua.
ii) Para Estaciones Meteorológicas (RMS300, RMS600, EMS100, WMR100N, WMRS200),
que cargan información recogida a través de los sensores al PC, el PC debe estar
encendido sólo cuando el usuario desee cargar información. La unidad puede funcionar
continuamente y mostrar la información recogida en la unidad principal.
P: ¿Cuánto dura normalmente la transmisión de datos?
R: La cantidad de tiempo que se necesita para transferir los datos varía según el modelo.
i) Para Estaciones Meteorológicas Multi-Día que descargan los datos meteorológicos
recogidos y los transfieren del PC a la Unidad Principal, suele ser suficiente
una conexión de aproximadamente 30 minutos al día para obtener los datos
meteorológicos actualizados.
ii) Para Estaciones Meteorológicas que sólo cargan información al PC, suele ser
suficiente una conexión de un minuto para obtener los datos meteoroló
gicos
actualizados.
iii) Para la WMR200, el tiempo requerido depende de
la cantidad de datos
meteorológicos almacenados en la memoria.
P: ¿Cómo puede
mejorar el rendimiento de mi PC el programa OS Weather?
R: Al actualizar Windows, su sistema se actualiza con las nuevas características de
Windows, Drivers para dispositivos y actualizaciones del sistema que Microsoft pone a su
disposición. Generalmente se recomienda que lo haga de forma regular. Para ello:
i) Haga clic en el botó
n de arranque de Windows.
ii) EN el menú, acceda a
Todos los Programas y seleccione Actualización de
Windows (Windows Update).
Cuestiones relacionadas con el Software OS Weather:
P: ¿Cómo puedo conseguir el último software para instalar y la documentación de
soporte del sistema?
R: Una vez el programa ha sido instalado, el ordenador le avisará automáticamente de las
actualizaciones del programa. Siga los pasos de la Guía de Instalación. Si el programa
ya no está instalado en el PC, puede descargar la última versión de: http:\\ download.osweather.com. Aparecerá una pantalla con un vínculo para descargar el último software
y la Guía de Instalación. Por favor, lea detenidamente la Guía de Instalación y siga sus
instrucciones para descargar el software. Para más información, también hay un vínculo
a la Guía de Solución de Problemas, la Guía de Inicio Rápido y el Manual de Uso.
P: ¿Qué debo hacer si recibo el mensaje “Reparar C++ Redistribuible a su estado
original?
R: Por favor, consulte las instrucciones de la última Guía de Instalación, accesible en http://
download.os-weather.com.
P: Aparecen los siguientes mensajes de error:
“CLOCK/TH/BARO.tmp contiene una ruta incorrecta”
“Weather OS/DATA/TH/sensors.temp”
“Se ha detectado violación de compartición en C:\Archivos de programa\
OregonScientific\WeatherOS\DATA\THsensors[#-#day].temp
”
¿Qué debo hacer?
R: SI tiene Windows Vista, primero determine el estado del Control de Cuentas de Usuario.
Si el Control de Cuentas de Usuario está activado, puede bien hacer clic sobre la casilla
para deseleccionarla y desactivarlo, o bien, si desea mantenerlo activado, desinstalar el
programa y volver a instalarlo. Cuando reinstale el programa, deberá guardar el programa
en C:\user\admin y crear una nueva carpeta, llamándola OS Weather. Para obtener
instrucciones detalladas, pro favor, consulte la Guía de Instalación.
P: La ventana de los sensores en la Web de OS, muestra lineas en lugar de datos,
¿que tengo que hacer?
R: i. Para EMS100: Reiniciar la unidad.
ii. Para RMS300 / RMS600: Pulse
y MODE y manténgalos pulsados.
Cuestiones relacionadas con el servidor:
P: Aparece un mensaje de error: “el servidor no está disponible actualmente” ¿Qué
debo hacer?
R: Puede que exista una suspensión temporal del servicio desde el servidor de forma
temporal. Por favor, inténtelo de nuevo más adelante.
P: Aparece un mensaje de error: “el parámetro es incorrecto” ¿Qué debo hacer?
R: Las operaciones del programa OS Weather no se verán afectadas y puede continuar
ejecutándose.
Cuestiones relacionadas con la pantalla de la unidad principal:
P. ¿Qué datos se subirán al software meteorológico del SO?
R. i. Para EMS100: Temperatura actual interior y exterior
ii. Para RMS300 / RMS600: Temperatura y humedad interior y exterior actuales
P. ¿Qué significa
?
R. Significa que la unidad principal está correctamente contectada con el PC y que se están
transmitiendo los datos actuales de temperatura y/o humedad. Si se desconecta del PC
(aparecerá el icono ), no se subirán los datos.
P. He configurado la gama de temperatura de la función de alerta del software
meteorológico del SO, pero la función de alerta de hielo de la unidad principal no
actúa en consecuencia. ¿Por qué?
R. La unidad principal está programada para responder solamente a la gama de temperatura
predeterminada de 3°C a -2°C (37°F a 28°F) recibida del sensor exterior (canal 1). No tiene
relación con la configuración que aplique a las funciones de alerta del software.
P. ¿Dispone la unidad de memoria para almacenar datos de temperatura y/o humedad?
R. No.
GUIA DE SOLUÇÃO DE
PROBLEMAS
EMS100 / RMS300 / RMS600
Problemas relacionados ao computador:
P: Quais computadores são compatíveis com o software OS Weather?
R: Computadores pessoais ou laptops com o Microsoft Windows XP SP2 ou Vista.
Computadores Mac da Apple não são compatíveis com o software. Os requisitos de
sistema operacional são:
• Processador:
Pentium 4 ou posterior
• RAM:
mín. de 512 MB
• Espa
ço livre em disco: mín. de 512 MB
•
Área da tela: 1024 x 768 pixels (recomendável)
P: O programa pode funcionar e transmitir informações durante o modo Dormir?
R: Não. Quando o PC entra no modo Dormir, o computador desativa efetivamente
todas as funções de trabalho, incluindo a porta USB. Portanto, não é possível transmitir
informações pela porta USB. Por esse motivo, o manual do usuário instrui claramente os
usuários que desativem o modo Dormir no computador. Consulte o Manual do usuário
ou o Guia de instalação para obter instruções.
P: Os dados da unidade principal e / ou do hub de comunicação podem ser
transferidos para o PC quando ele estiver desligado?
R: Não. Em todas as circunstâncias, para transferir os dados meteorológicos (tanto por
upload ou download), o PC deve estar ligado.
i. Em Esta
ções meteorológicas de vários dias (I300, I600, I900) que transferem por
download as informações meteorológicas que serão exibidas em uma unidade,
é recomendável conectar o hub de comunicação USB à porta USB do PC
continuamente para permitir o download ininterrupto das informações meteorológicas.
ii. Em Esta
ções meteorológicas (RMS300, RMS600, EMS100, WMR100N, WMR200,
WMRS200) que transferem por upload as informações coletadas via sensores ao PC,
o PC deverá ser ligado apenas quando o usuário desejar carregar as informações. A
unidade pode trabalhar e exibir continuamente as informações coletadas na unidade
principal.
P: Quanto tempo normalmente dura uma transferência de dados?
R: O tempo necessário para transferir os dados varia de modelo para modelo.
i. Em Esta
ções meteorológicas de vários dias que transferem por download os
dados meteorológicos coletados e os enviam do PC para a unidade principal,
aproximadamente 30 minutos diários de conexão com o computador são suficientes
para receber os dados meteorológicos atuais.
ii. Em Esta
ções meteorológicas que podem apenas transferir por upload as informações
para o PC, uma conexão de aproximadamente 1 minuto com o computador é
suficiente para receber os dados meteorol
ógicos atuais.
iii. Em WMR200, o tempo necess
ário depende da quantidade de dados meteorológicos
armazenados na memória.
P: Como o computador pode ser melhor executado com o programa OS Weather?
R: Ao executar a atualização do Windows, seu sistema será atualizado com novos
recursos do Windows, drivers de dispositivo e atualizações de sistema disponíveis na
Microsoft. Em geral, é recomendável fazer isso regularmente. Para isso:
a. Clique em
ˇ
Iniciar.
b. No menu de contexto, vá até Todos os programas e selecione Windows Update.
Problemas relacionados ao software OS Weather:
P: Em que local posso obter o software para instalação e a documentação de
suporte do sistema mais recentes?
R: Uma vez que o programa é instalado, o computador o alertará automaticamente sobre novas
atualizações. Siga as etapas de acordo com o Guia de instalação.
Se o programa não estiver mais instalado no PC, faça o download da última versão
em:
http://download.os-weather.com. Uma tela será exibida com um link para o software
(download) e Guia de instalação mais recentes.
Leia o Guia de instalação por completo e siga
as instruções para fazer download do software.
Para obter mais ajuda, também há um link
para este Guia de solução de problemas, o Guia de in
ício rápido e o Manual do usuário.
P: O que devo fazer se eu receber uma solicitação para “Reparar o C++
Redistributable ao seu estado original.”?
R: Consulte as instruções descritas no último Guia de instalação – acessível via http://
download.os-weather.com.
P: A seguinte mensagem de erro é exibida:
o “CLOCK/TH/BARO.tmp contém um caminho incorreto”
o “Weather OS\DATA\TH\sensors.temp”
o “Está ocorrendo uma violação de compartilhamento ao acessar C:\
ProgramFiles\OregonScientific\Weather\OS\DATA\TH\sensors[#-#day].temp”
O que devo fazer?
R: Se você tiver o Windows Vista, determine primeiro o status de Controle de Conta
de Usuário. Se o Controle de Conta de Usuário estiver ativado, clique na caixa de
seleção para desmarcá-lo e desativá-lo ou se você escolher mantê-lo ativo, desisnstale e
reinstale o programa. Ao reinstalar o programa, salve-o em C:\Users\admin e crie uma
nova pasta e dê a ela o nome OS Weather. Para obter instruções detalhadas, consulte o
Guia de instalação.
P: A caixa SENSORS na página inicial do OS mostra as linhas pontilhadas onde
devem estar os dados. O que devo fazer?
R: i. Para EMS100: Reinicialize a unidade.
ii. Para RMS300 / RMS600: Pressione e segure
+ MODE.
Problemas relacionados ao servidor:
P: Uma mensagem de erro “o servidor não está disponível no momento” é
exibida. O que isso significa?
R: Às vezes, pode ocorrer uma suspensão temporária do serviço no servidor; tente
novamente mais tarde.
P: Uma mensagem de erro “O parâmetro está incorreto” é exibida. O que devo fazer?
R: As operações do programa OS Weather não serão afetadas e podem continuar
funcionando.
Problemas relacionados ao display da unidade principal:
P. Quais dados serão carregados no software OS Weather?
R. i. Para EMS100: Temperatura atual dos ambientes interno/externo
ii. Para RMS300 / RMS600: Temperatura e umidade atuais dos ambientes interno/
externo
P. O que significa?
R. Significa que a unidade principal foi conectada com sucesso ao PC e que os dados de
temperatura e ou umidade atuais estão sendo carregados. Se for desconectada do PC
(indicado por ), os dados não serão carregados.
P. Defini a faixa de temperatura no recurso de alerta do Software OS Weather, mas o
recurso de Alerta de gelo na unidade principal não responde de acordo. Por quê?
R. A unidade principal foi programada para responder apenas à faixa de temperatura padrão
de 3°C a -2°C (37°F a 28°F) recebida do sensor externo (canal 1). Não tem relação com
os ajustes feitos nos recursos de alerta do software.
P. A unidade principal tem memória para registro de dados de temperatura e/ou umidade?
R. Não.
Page 38

1
FR
Mini-gestionnaire d’énergie sans fil
Modèle : ESM100 / ESM100U
MANUEL DE L’UTILISATEUR
INDEX
Introduction .............................................................. 2
Vue d’ensemble ....................................................... 2
Appareil principal – face avant ............................. 2
Appareil principal – vue arrière ............................. 3
Emetteur à distance ............................................. 4
Pince-capteur ........................................................ 4
Phase et câbles d’alimentation domestique ......... 5
Au commencement ................................................ 5
Localiser le câble de courant sortant .................... 5
Installation du capteur ........................................... 5
Installation de l’emeteur ....................................... 7
Installation de l’appareil principal ......................... 7
Transmission des données du capteur ................ 7
Comprendre l’électricité ......................................... 8
Modes d’affichage ...................................................
8
Cout .......................................................................... 8
Economie d’énergie ................................................ 9
Effacer la mémoire .................................................. 9
Réinitialisation ......................................................... 9
Dépannage ............................................................. 10
Caractéristiques ................................................... 10
Précautions .............................................................11
À propos d’Oregon Scientific ...............................
12
Europe – Déclaration de conformité .................... 12
Page 39

2
FR
INTRODUCTION
Merci d’avoir choisi ce Mini-gestionnaire d’énergie sans
fil (ESM100 / ESM100U) de Oregon Scientific
TM
.
Ce produit est un parfait exemple de notre engagement
pour l’environnement. Conscients des menaces
pesant sur le monde dans lequel nous vivons, Oregon
Scientific™ a combiné savoir-faire technologique,
fonctionnalité et style, pour créer sa gamme de produits
permettant de réduire votre empreinte carbone.
A l’aide de cet appareil de mesure de catégorie II, vous
pourrez visualiser votre consommation en temps réel.
En prenant conscience de votre consommation, vous
pourrez ainsi prendre des mesures concrètes pour
la réduire. Vous pourrez prendre connaissance des
efforts entrepris directement sur le moniteur, comme
par exemple : coût estimé / réduction dans le temps de
la consommation.
Notre objectif est de fabriquer des produits alliant
solutions pratiques et respect de notre et votre
engagement pour l’environnement. Ensemble,
améliorons le monde dans lequel nous vivons.
Veuillez observer les consignes et avertissements
de sécurité suivants lors de l’installation et de l’utilisation
de ce produit.
REMARQUE Veuillez conserver ce manuel pour
toutes références ultérieures. Il contient toutes les
instructions pratiques, les caractéristiques techniques
et les avertissements à prendre en compte.
Si l’équipement est utilisé d’une manière non spécifiée
dans le manuel, la protection fournie peut en être
affectée.
VUE D’ENSEMBLE
APPAREIL PRINCIPAL – FACE AVANT
1
2
3
4
5
6
7
8
1. ENERGY: Indique que la consommation d’énergie
est affichée
2. COST : Indique que le coût de l’énergie est affiché
3. Consommation d’énergie / coût en temps réel
4. Devise
5. REMOTE
/ MAIN: Les piles de
Page 40

3
FR
l’émetteur à distance / appareil principal sont
faibles
6. PWR SAVE: La fonction économie d’énergie
(power save) est activée
7. Unités de mesure de la consommation d’énergie
Coût / énergie (KW, PENCE / CENTS par HEURE,
PENCE/CENTS par KWH, KWH, PENCE,
CENTS)
8. Coût / Consommation d’énergie cumulés (depuis la
dernière réinitialisation)
APPAREIL PRINCIPAL – VUE ARRIÈRE
1
2
3
4
5
6
7
8
1. Trou de fixation murale
2. Aimant de montage
3. SET : Permet d’entrer dans le mode réglage du
coût ou de confirmer les réglages
4. UP : permet d’alterner entre les différents affichages
(coûts / énergie) ; initie la recherche d’émetteur à
distance ; augmente la valeur d’un coût
5. DOWN: permet d’alterner entre les différents
affichages (coûts / énergie) ; d’activer / désactiver
la fonction économie d’énergie ; diminue la valeur
d’un coût
6. RESET (REINITIALISER) : réinitialise l’appareil et
efface les relevés en mémoire, initie une recherche
d’émetteur à distance
7. Compartiment des piles
8. Support de table pliant
Page 41

4
FR
EMETTEUR À DISTANCE
1
2
3
4
5
6
1. Indicateur de statut LED : clignote lors de la
recherche
2. Prises du câble de l’émetteur
3. Trou de fixation murale
4. Compartiment des piles
5. RESET (REINITIALISER) : réinitialise l’appareil
aux réglages par défaut
6. CHECK: initie une transmission toutes les 2
secondes (pendant 30 secondes) pour se connecter
à l’appareil principal
PINCE-CAPTEUR
Modèle CT100
(Europe / UK)
Modèle CT110
(USA, Canada et autres pays)
Recherche :
• 220 V à 250 V CA
• Taille du câble : 10
mm de diamètre
maxi &/ou 70
ampères RMS
Recherche :
• Adaptateur 120 V CA +
Industrie
• Taille de 16mm de
diamètre maxi &/ou 200
ampères RMS
2
3
1
1
2
3
1. Trou du fil électrique
2. Languettes de plastique
3. Capteur de l’émetteur à distance
Des pinces-capteurs supplémentaires comme
celles indiquées ci-dessous peuvent être achetées
séparément. Pour plus d’informations, contacter votre
revendeur local*
• Modèle CT100
• Modèle CT110
*Les fonctionnalit
és et les accessoires ne seront pas
disponibles dans tous les pays.
Page 42

5
FR
PHASE ET CÂBLES D’ALIMENTATION
DOMESTIQUE
L’électricité est généralement fournie par des systèmes
triphasés et monophasés.
Royaume-Uni : la plupart des habitations britanniques
disposent de systèmes d’alimentation monophasés.
Pour les systèmes d’alimentation monophasés, le
courant circule dans vos appareils domestiques à
l’aide de fils neutres et sous tension. Le fil neutre a une
tension proche de zéro alors que le fil alimenté a une
tension comprise entre 120 et 240 volts. La différence
entre ces deux fils produit le courant circulant dans vos
appareils.
Europe continentale: la plupart des habitations
européennes disposent de systèmes d’alimentation
triphasés. Dans les alimentations triphasées, le courant
circule dans les appareils par le biais de trois câbles,
chacun ayant une phase fluctuante. Ces trois fils
nécessitent une pince-capteur individuelle qui peut être
achetée séparément.
AU COMMENCEMENT
LOCALISER LE CÂBLE DE COURANT SORTANT
La pince-capteur doit être fixée au fil isolé sous tension.
Nous vous recommandons de la fixer sur le fil sortant
du compteur électrique.
Ce produit utilise un capteur de courant de type C,
à ne pas appliquer ou retirer des conducteurs SOUS
TENSION DANGEUREUX.
N’appliquer en aucune circonstance une force ni
une pression excessive sur les câblages ou les
connexions.
ATTENTION Soyez extrêmement vigilant et évitez de
toucher ou d’entrer en contact avec des terminaux ou
fils non isolés.
Si vous rencontrez des difficultés avec cette installation,
faites intervenir un électricien qualifié.
Courant entrant
Courant sortant
INSTALLATION DU CAPTEUR
ATTENTION
Nous vous recommandons de faire appel
à un électricien qualifié pour installer le(s) capteur(s).
Couper l’alimentation électrique avant d’installer ou de
désinstaller la/les pince(s).
1. Avec votre pouce ou un doigt, appuyez sur les
languettes de plastique situées de chaque côté de
la pince-capteur pour libérer la partie supérieure.
Page 43

6
FR
2. Retirez la partie supérieure.
2
1
3. Insérez le câble sous tension ou d‘alimentation
principale actif domestique (sortant) dans le trou
du câble.
REMARQUE Ne pas tirer ou plier les câbles.
Positionnez le câble de manière à pouvoir fermer le
capteur en toute sécurité autour du câble.
4. Remettez la partie supérieure du capteur en place
en la poussant pour la sécuriser.
5. Branchez le câble de l’émetteur du capteur dans
n’importe quelles prises de câble.
4
3
5
REMARQUE Pour les systèmes triphasés, fixez un
capteur à tous les câbles sous tension.
• En fixant les pinces-capteur, assurez-vous que
chacune est fixée à un câble spécifique, dans le
cas contraire des résultats incorrectes peuvent en
résulter.
• Branchez tous les câbles du capteur dans l’émetteur
à distance. Vous pouvez brancher trois capteurs
maximum dans l’émetteur à distance.
MISE EN GARDE
• Le câblage du signal (approximativement 1 volt, 1
milliampère) sur la pince-capteur est doublement
isolé, et adapté à tout les compteurs électriques
domestiques. Pour protéger les fils des cosses
pointues, utilisez des entrées de conducteurs.
• N’utilisez pas l’appareil s’il est endommagé ou si la
sécurité n’est plus assurée.
Page 44

7
FR
INSTALLATION DE L’EMETEUR
1. Ouvrez le compartiment des piles.
2. Insérez les piles, en respectant les polarités (+/-).
3. Appuyez sur RESET (REINITIALISER)
après
chaque changement de piles.
4. Appuyez et maintenez
CHECK jusqu’à ce que le
voyant LED clignote.
5. Fermez le couvercle du compartiment des piles.
6. Montez l’émetteur à l’aide d’une vis.
REMARQUE Insérez les piles dans l’émetteur avant
celles de l’appareil principal.
Pour obtenir de meilleurs résultats :
• Positionnez l’émetteur à 30 m maximum (100
pieds) de l’appareil principal.
• Ne placez pas l’émetteur directement face aux
rayons du soleil ou en contact avec des matières
humides.
• Positionnez l’émetteur pour qu’il soit face à
l’appareil principal (intérieur), en minimisant les
obstacles tels que porte, murs et meubles.
ASTUCE La gamme de transmission peut varier en
fonction de plusieurs facteurs. Vous pouvez essayer
plusieurs emplacements, afin d’obtenir les meilleurs
résultats possibles.
INSTALLATION DE L’APPAREIL PRINCIPAL
1. Ouvrez le compartiment des piles.
2. Insérez les piles, en respectant les polarités (+/-).
3. Appuyez sur RESET (REINITIALISER)
après
chaque changement de piles.
4. Fermez le couvercle du compartiment des piles.
TRANSMISSION DES DONNÉES DU CAPTEUR
Si l’appareil principal n’affiche pas les données ou
suite à chaque changement de piles de l’émetteur :
1. Appuyez et maintenez
CHECK (situé sur
l’émetteur) jusqu’à ce que le voyant LED clignote.
L’émetteur détectera et transmettra les données à
l’appareil principal toutes les 2 secondes pendant
30 secondes.
2. Appuyez et maintenez
UP sur l’appareil principal
pour initier la recherche à partir de l’émetteur.
Page 45

8
FR
COMPRENDRE L’ÉLECTRICITÉ
Tension
(Volts)
Potentiel électrique. Fixée entre 220
– 250 V ou 120 V selon les régions.
X
Courant
(Ampères)
Le montant de l’électricité circulant
dans un fil par exemple. (Le capteur
mesure le courant pour déterminer
les watts).
=
Puissance
(watts)
Montant de l’énergie en cours de
transfert. (KW = 1000 W). Ce type
de données est indiqué sur la ligne
supérieure du mode Energie.
Le KWh est une mesure indiquant la consommation.
Le Kilowatt heure représente l’utilisation de 1000 W
d’électricité pour une heure entière, équivalant à dix
ampoules de 1000 W fonctionnant en même temps
pendant une heure.
Une fois le coût de l’électricité entré, le moniteur peut
déduire une estimation.
REMARQUE Ce produit a un objectif pédagogique
uniquement. Il vous permet de comprendre le coût de
l’exploitation électrique de vos appareils domestiques. Il
ne peut remplacer les relevés précis de votre compteur
de consommation d’électricité.
MODES D’AFFICHAGE
Il existe 2 modes d’affichage :
COUT
UP / DOWN
Coût de
l’électricité par
heure et en
temps réel.
Coût cumulé
depuis la
dernière
réinitialisation
ENERGIE
Puissance en
temps réel (KW)
Energie
cumulée (KWh)
consommée
depuis la
dernière
réinitialisation
COUT
Pour déterminer le coût approximatif de la consommation
électrique, entrez le coût du KWh.
Pour entrer un coût :
1. Appuyez et maintenez la touche
SET.
2. Appuyez sur
UP ou DOWN pour changer les
réglages.
Page 46

9
FR
3. Appuyez sur SET pour confirmer le réglage et
passer au suivant.
REMARQUE Chaque prestataire définit un tarif
différent de la consommation électrique. Vous le
trouverez généralement sur votre facture d’électricité.
ASTUCE Certaines sociétés appliquent des tarifs
progressifs en matière d’électricité par lequel le tarif
augmente si votre consommation dépasse un certain
seuil. Nous vous recommandons d’entrer une valeur
moyenne pour le coût de l’électricité.
Par exemple, l’utilisation totale est 1000 KWh (500 +
500) peut être séparée comme suit :
500 KWh x 15p = £75
500 KWh x 10p = £50
Ainsi, £125 / 1000KWh = 12,5p.
De même, certaines sociétés appliquent des tarifs
différents selon les heures de la journée. Nous vous
recommandons d’entrer une valeur moyenne pour le
coût de l’électricité.
Par exemple, l’utilisation totale est 3000 KWh (1000
KWh pour le tarif de jour et 2000 en tarif de nuit) peut
être séparée comme suit :
1000 KWh x 15p = £150
2000 KWh x 5p = £100
Ainsi, £250 / 3000 KWh = 8,3p
ECONOMIE D’ÉNERGIE
En diminuant la fréquence de réception des données
de toutes les 6 à 60 secondes, vous augmenterez la
durée de vie des piles.
Pour activer la fonction Economie d’énergie :
• Appuyez et maintenez la touche SET.
PWR SAVE indique que la fonction économie d’énergie
est activée.
EFFACER LA MÉMOIRE
REMARQUE
Si le coût total atteint 999,999 ou
l’énergie totale 999,999 KWh, les chiffres clignoteront
pour indiquer que les valeurs maximum ont été
atteintes, vous devez donc effacer les relevés.
Pour effacer les relev
és des données TOTALES
(Coût / Energie) :
• Appuyez et maintenez les touches UP / DOWN.
RÉINITIALISATION
Appuyez sur RESET pour que l’appareil revienne aux
réglages par défaut.
Page 47

10
FR
DÉPANNAGE
PROBLEME SYMPTOME SOLUTION
Relevés
bizarres
Relevés
bizarres
Réglez les paramètres
du coût.
Vérifiez si les
appareils fonctionnent
correctement (ne
se sont pas éteints)
puisque ce peut
indiquer une baisse
soudaine de la
consommation
électrique.
Relevés
supérieurs
Vérifiez si les appareils
ont été éteints s’ils
ne sont pas en cours
d’utilisation.
“- - - -“ affiché Aucune
synchronisation
Appuyez et maintenez
CHECK sur l’émetteur
à distance.
Puis appuyez et
maintenez UP de
l’appareil principal.
Si rien n’y fait,
appuyez sur RESET
de l’émetteur et de
l’appareil principal.
“0.00” affiché Problème
avec le
capteur.
Vérifiez si la pincecapteur a été fixée et
fermée correctement.
La pince-capteur
est peut-être
endommagée.
Remplacez-la.
CARACTÉRISTIQUES
APPAREIL PRINCIPAL
Dimensions
(L X l x H)
66 x 27 x 85 mm
(2,6 x 1,1 x 3,3 pouces)
Poids 80 g (2,8 oz) sans les piles
Fréquence du
signal
433 MHz
Champ de
transmission
30 mètres (100 pieds) sans
obstruction
Mise à jour des
données
Environ toutes les 6 secondes
(UE) / 12 secondes (USA /
Canada)
Alimentation 2 piles UM-4 (AAA) 1,5V
EMETTEUR À DISTANCE
Dimensions
(L X l x H)
59 x 28 x 97 mm
(2,3 x 1,1 x 3,8 pouces)
Poids 60 g (2,1 onces) sans piles
Alimentation 2 piles UM-3 (AA) 1,5 V
Page 48

11
FR
PINCE-CAPTEUR
CT100
Dimensions
(L X l x H)
40 x 30 x 54 mm
(1,6 x 1,2 x 2,1 pouces)
Poids 62 g (2,2 onces)
CT110
Dimensions
(L X l x H)
53 x 40 x 76 mm
(2,1 x 1,6 x 3 pouces)
Poids 186 g (6 onces)
PRÉCAUTIONS
• Ne pas soumettre le produit à une force excessive,
au choc, à la poussière, aux changements de
température ou à l’humidité.
• Ne pas couvrir les trous de ventilation avec des
journaux, rideaux etc.
• Ne pas immerger le produit dans l’eau. Si vous
renversez du liquide sur l’appareil, séchez-le
immédiatement avec un tissu doux.
• Ne pas nettoyer l’appareil avec des matériaux
corrosifs ou abrasifs.
• Ne pas trafiquer les composants internes. Cela
invalidera votre garantie.
• N’utilisez que des piles neuves. Ne pas mélanger
des piles neuves et usagées.
• Les images de ce manuel peuvent différer de
l’aspect réel du produit.
• Lorsque vous désirez vous débarrasser de ce
produit, assurez-vous qu’il soit collecté séparément
pour un traitement adapté.
• Le poser sur certaines surfaces en bois peut
endommager la finition du meuble, et Oregon
Scientific ne peut en être tenu responsable.
Consultez les mises en garde du fabricant du
meuble pour de plus amples informations.
• Le contenu du présent manuel ne peut être
reproduit sans la permission du fabriquant.
• Ne pas jeter les piles usagées dans les containers
municipaux non adaptés. Veuillez effectuer le
tri de ces ordures pour un traitement adapté si
nécessaire.
• Veuillez remarquer que certains appareils sont
équipés d’une bande de sécurité. Retirez la bande
du compartiment des piles avant la première
utilisation.
REMARQUE Les caractéristiques techniques de ce
produit et le contenu de ce manuel peuvent être soumis
à modifications sans préavis.
REMARQUE Caractéristiques et accessoires ne
seront pas valables pour tous les pays. Pour plus
d’information, contacter le détaillant le plus proche.
Page 49

12
FR
À PROPOS D’OREGON SCIENTIFIC
Pour plus d‘informations sur les produits Oregon
Scientific France, rendez-vous sur notre site
www.
oregonscientific.fr
Si vous êtes aux Etats-Unis, vous pouvez contacter
notre support consommateur directement : sur le
site www2.oregonscientific.com/service/support.asp
Pour des renseignements internationaux, rendez
vous sur le site: www2.oregonscientific.com/about/
international.asp
EUROPE – DÉCLARATION DE CONFORMITÉ
Par la présente Oregon Scientific déclare que l’appareil
Mini-gestionnaire d’énergie sans fil (modèle: ESM100
/ ESM100U) est conforme aux exigences essentielles
et aux autres dispositions pertinentes de la directive
1999/5/CE. Une copie signée et datée de la déclaration
de conformité est disponible sur demande auprès de
notre Service Client.
PAYS CONCERNÉS RTT&E
Tous les pays Européens, la Suisse CH
et la Norvège N
Page 50

GUIDE DE DÉPANNAGE
EMS100 / RMS300 / RMS600
Problèmes liés à l’ordinateur :
Q. Quels sont les ordinateurs compatibles avec le logiciel OS Weather?
R.
Les ordinateurs personnels ou portables qui utilisent Microsoft Windows XP SP2
ou Vista. Les ordinateurs Apple Mac ne sont pas compatibles avec le logiciel. Les
configurations
requises sont :
• Processeur: Pentium 4 ou sup
érieur
• RAM: Min. 512MO
• Espace libre sur disque dur: Min. 512MO
• Résolution: 1024 x 768 pixels (recommandé)
Q. Est-ce que le programme peut fonctionner et transmettre des informations en
Mode Veille ?
R. Non. Quand l’ordinateur entre en Mode Veille, il d
ésactive effectivement toutes les
fonctionnalit
és, y compris les connecteurs USB. Donc, il n’est pas possible que l’information
soit transmise par le connecteur USB. Pour cette raison, le manuel d’utilisation donne aux
utilisateurs de claires instructions pour d
ésactiver le mode veille de leur ordinateur. Veuillez
vous r
éférer au Manuel d’Utilisation ou au Guide d’Installation pour avoir des instructions.
Q. Est-ce que les donn
ées de l’unité principale et/ou du pivot de Communications
peuvent être transférées à l’ordinateur quand celui-ci est éteint.
R. Non. Dans toutes les circonstances, pour transf
érer des données météo (pour
télécharger dans un sens ou dans l’autre), l’ordinateur doit être allumé.
i. Pour les Stations M
étéo à jours multiples (I300, I600, I900) qui téléchargent
l’information météo à afficher sur une unité, il est recommandé de connecter le Pivot
USB de Communications au pivot USB de l’ordinateur continuellement permettre le
téléchargement sans heurts de l’information météo.
ii. Pour les Stations M
étéo (RMS300, RMS600, EMS100, WMR100N, WMR200, WMRS200)
qui t
éléchargent l’information collectée par les capteurs de l’ordinateur, celui-ci doit être en
marche seulement quand l’utilisateur veut t
élécharger l’information. L’unité peut travailler
en continu et afficher les informations collect
ées sur l’Unité Principale.
Q. Combien de temps est-ce qu’un transfert de donn
ées prend normalement ?
R.
La durée requise pour faire un transfert de données varie d’un modèle à l’autre.
a. Pour les Stations M
étéo à jours multiples qui téléchargent les données météo collectées
et les transf
èrent de l’ordinateur à l’unité principale, environ 30 minutes de connexion
quotidienne à l’ordinateur suffisent pour recevoir les donn
ées météo courantes.
b. Pour les Stations M
étéo qui peuvent seulement télécharger l’information vers
l’ordinateur, environ 1 minute de connexion à l’ordinateur suffit pour recevoir les
données météo courantes.
c. Pour le WMR200, le temps requis d
épend de la quantité de données météo stockées
en mémoire.
Q. Comment l’ordinateur peut-il fonctionner mieux avec le programme OS Weather?
R. En faisant les mises à jour de Windows, votre système sera mis à jour avec de
nouveaux accessoires Windows, pilotes d’accessoires et mises à jour du systèmes
disponible de chez Microsoft. Il est généralement recommandé de faire ceci
régulièrement. Pour le faire :
a. Cliquer sur
ˇ
démarrer.
b. Dans le menu contextuel, d
éfiler jusqu’à Tous les Programmes et sélectionner
Windows Update.
Questions liées au logiciel OS Weather :
Q. Où puis-je obtenir le logiciel le plus récent à installer et la documentation
d’aide pour le système ?
R. Une fois que le programme a
été installé, l’ordinateur vous avertira automatiquement
des nouvelles mises à jour du programme. Suivre les étapes comme dans le Guide
d’Installation.
Si le programme n’est plus install
é dans l’ordinateur, vous pouvez télécharger la version
la plus récente depuis : http://download.os-weather.com. Un écran apparaîtra avec
un lien vers le logiciel le plus récent (Télécharger) et un Guide d’Installation. Veuillez
lire soigneusement le Guide d’Installation et suivre les instructions pour télécharger le
logiciel. Pour une aide supplémentaire, il y a aussi un lien vers ce Guide de Dépannage,
le Guide de Démarrage Rapide et le Manuel de l’utilisateur.
Q. Que dois-je faire si je re
çois une demande de “Repair C++ Redistributable to
its original state.” (Réparer le Redistribuable C++ dans son état original) ?
R. Veuillez vous r
éférer aux instructions indiquées dans le Guide d’Installation le plus
récent– accessible par http://download.os-weather.com
Q. Les messages d’erreur suivants apparaissent:
o “CLOCK/TH/BARO.tmp contains an incorrect path”
o “Weather OS\DATA\TH\sensors.temp”
o “Encountering a sharing violation while accessing C:\ProgramFiles\
OregonScientific\Weather\OS\DATA\TH\sensors[#-#day].temp”
Que devrais-je faire
?
R.
Si vous avez Windows Vista, tout d’abord déterminer le statut du Contrôle de
Compte d’Utilisateur (UAC). Si l’UAC est activé, soit vous cliquez dans la boîte à cocher
pour le désélectionner et l’éteindre, ou si vous choisissez de le garder activé, désinstallez
et réinstallez le programme. Quand vous réinstallez le programme, vous devriez
l’enregistrer dans C:\Users\admin et créer un nouveau dossier et l’appeler OS Weather.
Pour des instructions détaillées, veuillez vous référer au Guide d’Installation.
Q. La bo
îte CAPTEURS dans la page d’ouverture Web OS affiche des lignes
pointillées là où il devrait y avoir des données. Que devrais-je faire ?
R.
i. Pour le modèle EMS100: Réinitialisez l’appareil.
ii. Pour les modèles RMS300 / RMS600: Appuyez et maintenez la touche
+ MODE.
Questions liées au Serveur :
Q. Un message d’erreur “server is not currently available” / « le serveur n’est pas
disponible à l’instant » apparaît. Qu’est-ce que cela veut dire ?
R. Il peut parfois y avoir des arrêts temporaires de service du serveur ; veuillez essayer
encore plus tard.
Q. Un message d’erreur “The parameter is incorrect” /
« Le paramètre est
incorrect » apparaît. Que devrais-je faire ?
R.
Les activités du programme OS Weather ne seront pas affectées et peuvent
continuer à fonctionner.
Questions liées à l’affichage de l’Unité Principale :
Q. Quelles données puis-je télécharger sur le logiciel de prévisions météo OS?
R. i. Pour le modèle EMS100 : Les relevés de températures intérieures et extérieures en
temps réel
ii. Pour les modèles RMS300 / RMS600 : Les relevés de températures et d’humidités
intérieures et extérieures en temps réel
Q. Que signifie l’icône
?
R. L’appareil principal est correctement connecté au PC et les données de température
et/ou d’humidité sont en cours de chargement. Si le câble est déconnecté du PC (indiqué
par l’icône ), les données ne seront plus chargées.
Q. J’ai réglé la gamme de température dans la fonction alerte du logiciel de prévisions
météo, mais la fonction Alerte du niveau de gel de l’appareil principal ne répond
pas. Pourquoi?
R. L’appareil principal est programmé uniquement pour répondre à la gamme de température par
défaut de 3°C à -2°C (37°F à 28°F) reçue à partir du capteur de température extérieure (canal
1). Cela n’a aucun rapport avec les réglages effectués sur les fonctions alerte du logiciel.
Q. L’appareil principal est-il équipé d’une mémoire pour l’enregistrement des
données de températures et/ou d’humidités?
R. Non.
TROUBLESHOOTING GUIDE
EMS100 / RMS300 / RMS600
Bei Problemen mit Ihrem PC:
F. Welche Computer sind mit der OS Weather software kompatibel?
A. PC’s oder Laptops mit den Betriebssystemen Microsoft Windows XP SP2 oder Vista.
Die Software ist nicht kompatibel auf Apple Mac. Die minimalen Systemvoraussetzungen
für die Verwendung der Software lauten wie folgt:
• Prozessor: Pentium 4 oder höher
• RAM: Min. 512 MB
• Fesplattenspeicher: Min 512 MB
• Auflösung: 1024 x 768 Pixel (empfohlen)
F. Kann das Programm auch im Ruhezustand arbeiten und Informationen übertragen?
A. Nein. Wenn der Ruhezustand des PC’s eingetreten ist können keine Informationen
übertragen werden. Aus diesem Grund empfehlen wir Ihnen den Ruhezustand auf Ihem
Computer auszuschalten. Weitere Informationen finden Sie in der Bedienungs- und
Installationsanleitung.
F. Können Daten übetragen werden wenn der PC ausgeschaltet ist?
A. Nein. Um Wetterdaten zu übertragen muss der PC eingeschaltet sein.
i. Für Multiday-Wetterstationen (I300, I600, I900) die die Informationen auf das Display
anzeigen, empfehlen wir die stetige Verbindung von USB-Stecker und PC, um eine
nahtlose Übertragung der Wetterinformationen zu gewährleisten.
ii. Für Wetterstationen (RMS300, RMS600, EMS100, WMR100N, WMR 200, WMRS200)
die durch Sensoren Informationen sammeln, muss der PC nur angeschaltet werden
wenn Sie ein Upload der Informationen wünschcen.
F Wie lange dauert die Datenübertragung?
A. Die Länge der Datenübertragung variiert von Model zu Model.
i. Für Multiday- Wetterstationen dauert der Download der gesammelten Informationen
täglich ca. 30 Minuten.
ii. Bei Wetterstationen die nur ein Update vom PC abrufen wollen, dauert es ca. 1Minute
iii. Bei der WMR200 hängt dei Dauer davon ab, wieviel Wetterdaten im Speicher abgelegt
sind.
F. Wie kann mein Computer schneller laufen ohne das OS Weather Program zu
löschen?
A. Bei einem Windows Update, wird Ihr Computer mit neuen Features, Drivern und
zusätzlichem Updates versorgt. Wir empfehlen Ihnen dies zur regulären Basis. Um ein
Windows Update auszuführen, beachten Sie folgende Schritte:
a. Klicken Sie auf Start
ˇ
.
b. Suchen Sie in
Programme nach einem Windows Update und führen SIe es aus.
Probleme bei der OS Weather software:
F. Wo bekomme ich die aktuelle Software zum installieren?
A. Ist einmal das Programm installiert, wird die Software Sie automatisch auf den
neuere Updates informieren.
Ist das Programm nicht mehr auf Ihrem PC installiert, dann können Sie die aktuelle
Version auf http://download.os-weather.com runterladen. Zudem ist unter dem Link auch
die Ausführung der Installation, der Troubleshhoting Guide bei Problemen, ein Quick Start
Guide und die Bedienunganleitung hinterlegt.
F. Was sollte ich machen ich folgendes empfange “Repair C++ Redistrubutable
to its original site”?
A. Bitte schauen Sie in die Einleitung für die Installation - abrufbar auf http://download.
os-weather.com.
F. Folgende Error-Meldung wird angezeigt:
o “CLOCK/TH/BARO.tmp contains an incorrect path”
o “Weather OS\DATA\TH\sensors.temp”
o “Encountering a sharing violation while accessing C:\ProgramFiles\
OregonScientific\Weather\OS\DATA\TH\sensors[#-#day].temp”
Was sollte ich tun?
A. Wenn Sie Windows Vista benutzen, deaktikivieren Sie bitte
Ihre Benutzerkontensteuerung (Häkchen entfernen). Falls Sie die
Benutzerkontensteuerung nicht deaktivieren, deintallieren Sie das Programm und starten
Sie erneut eine Installation. Wenn Sie das Programm wieder installieren speichern sie
es unter C:\Users\admin und erstellen Sie einen neuen Orddner mit den Namen OS
Weather. Detaillierte Ausführung im Installation Guide - Installation.
F. Die Sensoren zeigen gestrichelte Linien anstatt den Daten. Wass soll ich tun?
A. i. Für EMS100: Setzen Sie das Gerät zurück.
ii. Für RMS300 / RMS600: Halten Sie
+ MODE gedrückt.
Probleme mit dem Server:
F. Die Error-Meldung “Server is not currently available” taucht auf. Was heißt das?
A. Hin und wieder kann es vorkommen, dass keine Verbindung zum Server ensteht.
Versuchen Sie es später noch einmal.
F. Die Error-Meldung “The parameter is incorrect” taucht auf. Was heißt das?
A. Das OS Weather Programm ist davon nicht betroffen und kann weiterhin ausgeführt
werden.
Probleme am Gerät:
Q. Welche Daten werden auf die OS-Wetter-Software hochgeladen?
A. i. Für EMS100: Innen-/Außentemperatur in Echtzeit
ii. Für RMS300 / RMS600: Innen-/Außentemperatur und Luftfeuchtigkeit in Echtzeit
Q. Was bedeutet das Symbol ?
A. Es bedeutet, dass die Basiseinheit erfolgreich mit dem PC verbunden ist und die
Temperatur- und/oder Luftfeuchtigkeitsdaten in Echtzeit hochgeladen werden. Wenn
die Verbindung zum PC unterbrochen wurde (durch angezeigt),
werden die Daten nicht hochgeladen.
Q. Ich hab den Temperaturbereich in der Alarmfunktion der OS-Wetter-Software
eingestellt, die Funktion der Frostwarnung auf der Basiseinheit zeigt jedoch keine
entsprechende Reaktion. Warum?
A. Die Basiseinheit ist nur darauf programmiert, auf den vorgegebenen
Temperaturbereich von 3°C bis -2°C (37°F bis 28°F) zu reagieren, der vom Außensensor
(Kanal 1) empfangen wird. Er steht in keiner Verbindung zu den Einstellungen, die Sie in
den Alarmfunktionen der Software vornehmen.
Q. Verfügt die Basiseinheit über einen Speicher zur Aufzeichnung der Temperatur-
und/oder Luftfeuchtigkeitsdaten?
A. Nein.
FR
DE
Page 51

1
IT
Mini calcolatore wireless del
consumo energetico
Modello: ESM100 / ESM100U
MANUALE PER L’UTENTE
INDICE
Introduzione ............................................................. 2
Panoramica .............................................................. 2
Unità principale – vista anteriore .......................... 2
Unità principale – vista posteriore ......................... 3
Trasmettitore remoto ............................................ 4
Morsetto sensore .................................................. 4
Cavi di alimentazione domestica e fase ................ 5
Operazioni preliminari ............................................ 5
Individuazione del cavo fase in uscita ................... 5
Impostazione del sensore ..................................... 5
Impostazione del trasmettitore ............................. 6
Impostazione dell’unità principale ........................ 7
Trasmissione dei dati del sensore ........................ 7
Nozioni di elettricità ................................................ 8
Modalità di visualizzazione ..................................... 8
Tariffa ........................................................................ 8
Risparmio energetico .............................................. 9
Cancellazione delle rilevazioni ............................... 9
Reset ......................................................................... 9
Risoluzione dei problemi ...................................... 10
Specifiche tecniche
.............................................. 10
Precauzioni ............................................................11
Informazioni su Oregon Scientific ....................... 12
Dichiarazione di conformitá UE ........................... 12
Page 52

2
IT
INTRODUZIONE
Grazie per aver scelto il Mini calcolatore wireless del
consumo energetico (ESM100 / ESM100U) di Oregon
Scientific™.
Il Mini calcolatore wireless del consumo energetico
riflette il nostro impegno per le questioni ambientali.
Consapevole delle minacce per il mondo in cui viviamo,
Oregon Scientific™ ha unito know-how tecnologico,
praticità e stile per creare questa linea di prodotti che
possono contribuire a ridurre l’impronta emissiva.
Grazie a questo strumento di misurazione di categoria
2, è possibile visualizzare il proprio consumo in tempo
reale. Conoscendo il consumo, si possono adottare
misure efficaci per ridurlo. Questo sforzo costante potr
à
avere un riscontro significativo nel misuratore: i costi
stimati / i consumi si ridurranno nel corso del tempo.
Il nostro scopo è fabbricare prodotti che costituiscono
pratiche soluzioni che consentono al contempo all’utente
e a noi stessi di adempiere alle nostre responsabilità
ambientali. Insieme, possiamo migliorare il mondo in
cui viviamo.
Attenersi ai seguenti avvisi e linee guida di
sicurezza al momento dell’impostazione e dell’utilizzo
di questo prodotto.
NOTA Si consiglia di tenere questo manuale a portata
di mano durante l’utilizzo del prodotto. Il manuale
contiene pratiche istruzioni dettagliate, dati tecnici e
avvertenze che è necessario conoscere.
Se il prodotto viene usato in modo diverso da quanto
specificato nel presente manuale, la protezione che
esso offre può venire compromessa.
PANORAMICA
UNITÀ PRINCIPALE – VISTA ANTERIORE
1
2
3
4
5
6
7
8
1. ENERGY: indica che è visualizzato il consumo
energetico
2. COST: indica che è visualizzato il costo dell’energia
consumata
3. Costo / consumo energetico in tempo reale
4. Valuta
Page 53

3
IT
5. REMOTE / MAIN: batterie del
trasmettitore in esaurimento / batterie dell’unità
principale in esaurimento
6. PWR SAVE: è attiva la funzione di risparmio
energetico
7. Costo / unità di misura del consumo energetico
(KW, PENCE / CENT all’ORA, PENCE/CENT per
KWH, KWH, PENCE, CENT)
8. Costo cumulativo / consumo energetico (dall’ultimo
azzeramento)
UNITÀ PRINCIPALE – VISTA POSTERIORE
1
2
3
4
5
6
7
8
1. Foro per fissaggio a parete
2. Magneti per il montaggio
3. SET: consente di accedere alla modalità di
impostazione delle tariffe e di confermare le
impostazioni
4. UP: consente di alternare le visualizzazioni (Costo
/ Energia), di avviare la ricerca del trasmettitore
remoto e di aumentare il valore della tariffa
5. DOWN: consente di alternare le visualizzazioni
(Costo / Energia), di attivare / disattivare la funzione
di risparmio energetico e di diminuire il valore della
tariffa
6. RESET: consente di azzerare l’unità e cancellare
la memoria cumulativa e di avviare la ricerca del
trasmettitore remoto
7. Vano batterie
8. Supporto da tavolo pieghevole
Page 54

4
IT
TRASMETTITORE REMOTO
1
2
3
4
5
6
1. Indicatore LED di stato: lampeggia quando è in
corso la ricerca
2. Ingressi per i cavi del sensore
3. Foro per fissaggio a parete
4. Vano batterie
5. RESET: consente di ripristinare i valori predefiniti
dell’unità
6. CHECK: forza la trasmissione ogni 2 secondi (per
un periodo di 30 secondi) per tentare il collegamento
con l’unità principale
MORSETTO SENSORE
MODELLO CT100
(Europa / Regno Unito)
MODELLO CT110
(USA, Canada e altri
paesi)
Sensore per:
• da 220V a 250V AC
• dimensioni massime
del cavo diam. 10
mm e/o 70 ampere
RMS
Sensore per:
• con 120V AC +
industriale
• dimensioni massime
del cavo diam. 16 mm
e/o 200 ampere RMS
2
3
1
1
2
3
1. Foro per il cavo elettrico
2. Placchette di plastica
3. Cavo trasmettitore del sensore
È possibile acquistare separatamente morsetti sensore
aggiuntivi come quelli sottoelencati. Per ulteriori
informazioni, rivolgersi al proprio rivenditore.*
• Modello CT100
• Modello CT110
* Caratteristiche e accessori non disponibili in tutti i
paesi.
Page 55

5
IT
CAVI DI ALIMENTAZIONE DOMESTICA E FASE
L’elettricità viene generalmente fornita con sistemi
monofase e trifase.
Regno Unito: la maggior parte delle case del Regno
Unito utilizza il sistema monofase. In questo caso, la
corrente viene trasmessa a e dagli elettrodomestici
mediante un neutro e una fase. Il neutro ha un voltaggio
prossimo allo zero, mentre la fase ha un voltaggio che
va dai 120 ai 240 volt. La differenza tra questi due
cavi rende possibile la trasmissione di corrente negli
elettrodomestici.
Europa: la maggior parte delle case europee utilizza
invece il sistema trifase. Nei sistemi trifase, la corrente
viene trasmessa a e da un dispositivo attraverso un
gruppo di tre cavi, ciascuno con una fase traslata.
Pertanto, ciascuno dei tre cavi necessita di un sensore
individuale di corrente che può essere acquistato
separatamente.
OPERAZIONI PRELIMINARI
INDIVIDUAZIONE DEL CAVO FASE IN USCITA
Il morsetto sensore deve essere collocato sulla fase
isolata. Si consiglia di installarlo sul cavo (in uscita) che
esce dal contatore elettrico che si trova nella scatola.
Questo prodotto utilizza un sensore di corrente di
Tipo C, non applicarlo ai né rimuoverlo dai conduttori che
riportano l’avviso di pericolo di SHOCK ELETTRICO.
Non deve mai essere esercitata forza o pressione
eccessiva sui cablaggi o sui collegamenti.
ATTENZIONE Deve essere sempre usata molta
cautela per evitare di toccare o di entrare in contatto
con cavi o contatti non isolati.
In caso di difficoltà durante l’installazione, si consiglia di
rivolgersi ad un elettricista.
corrente in
entrata
corrente in
uscita
IMPOSTAZIONE DEL SENSORE
ATTENZIONE
Si consiglia di far installare il/i morsetto/
i sensore di corrente da un elettricista professionista.
Scollegare la corrente prima di installare o rimuovere
il/i sensore/i.
1. Con pollice e indice, premere verso l’interno le
placchette di plastica poste su ciascun lato del
morsetto sensore per sbloccare la parte superiore.
2. Sollevare la parte superiore del sensore e
rimuoverla.
Page 56

6
IT
2
1
3. Collocare la fase (in uscita) nel foro per il cavo
elettrico.
NOTA Non tirare o piegare i cavi. Sistemare il cavo in
posizione tale da poter assicurare il morsetto sensore
intorno ad esso.
4. Riposizionare la parte superiore del morsetto
sensore e premere verso il basso per fissarla.
5. Inserire il cavo trasmettitore del sensore in uno
qualsiasi degli ingressi per il cavo.
4
3
5
NOTA Nel caso di sistemi trifase, collegare un morsetto
sensore a ciascuna fase.
• Al momento di collegare il morsetto sensore,
verificare che ciascun morsetto sia collegato a un
cavo diverso, altrimenti la lettura che ne risulta
potrebbe essere erronea.
• Successivamente, inserire tutti i cavi dei morsetti
sensore nel trasmettitore remoto. È possibile
collegare al trasmettitore remoto un numero
massimo di tre morsetti sensore.
AVVISO
• Il cablaggio del segnale (circa 1 volt, 1 milliampere)
sul morsetto sensore della corrente è a doppio
isolamento, adatto quindi all’installazione in
contatori elettrici per forniture domestiche.
Quando
viene fatto passare attraverso l’apertura del
rivestimento, il cablaggio deve essere protetto da
angoli appuntiti mediante boccole fisse.
• Non utilizzare l’unità se è danneggiata o se la
sicurezza è compromessa.
IMPOSTAZIONE DEL TRASMETTITORE
1. Aprire la copertura del vano batterie facendola
scorrere.
2. Inserire le batterie, rispettando le polarità indicate
(+ / -).
3. Premere RESET dopo ogni sostituzione di batteria.
4. Tenere premuto CHECK finché il LED non
lampeggia.
Page 57

7
IT
5. Chiudere il vano batterie.
6. Appendere il trasmettitore ad un gancetto fissato a
parete.
NOTA Inserire prima la batteria del trasmettitore e
successivamente quella dell’unità principale.
Per ottenere i risultati migliori:
• Posizionare il sensore entro 30 m
dall’unità principale.
• Posizionare il sensore lontano da luce solare diretta
e umidità.
• Posizionare il sensore in modo che si trovi di fronte
all’unità interna principale, riducendo al minimo le
ostruzioni causate da porte, pareti e mobili.
SUGGERIMENTO Il campo di trasmissione può
variare in base a molti fattori. È possibile dover provare
diverse posizioni prima di ottenere i risultati migliori.
IMPOSTAZIONE DELL’UNITÀ PRINCIPALE
1. Aprire la copertura del vano batterie facendola
scorrere.
2. Inserire le batterie, rispettando le polarità indicate
(+ / -).
3. Premere RESET dopo ogni sostituzione di batteria.
4. Chiudere il vano batterie.
TRASMISSIONE DEI DATI DEL SENSORE
Se l’unità principale non visualizza i dati e dopo
ogni sostituzione di batteria del trasmettitore:
1. Tenere premuto
CHECK (all’interno del
trasmettitore) finché il LED non lampeggia.
Il
trasmettitore controlla la presenza di dati e li
trasmette all’unità principale ogni 2 secondi per 30
secondi.
2. Tenere premuto
UP sull’unità principale per avviare
la ricerca di segnale del trasmettitore.
Page 58

8
IT
NOZIONI DI ELETTRICITÀ
Voltaggio
(volt)
Potenziale elettrico. Fissato a 220V250V o 120V a seconda della zona.
X
Corrente
(ampere)
Quantità di elettricità che scorre, ad
es., attraverso un cavo.
(Il sensore la misura per determinare
i watt)
=
Potenza
(watt)
Quantità di energia che viene trasferita
(KW = 1000W). Questo tipo di dati
viene visualizzato sulla prima riga della
modalità Energia.
Il KWh è una misura di consumo.
Il kilowattora
rappresenta l’utilizzo di 1000W di elettricità per un’ora
intera, l’equivalente di dieci lampadine da 100W
funzionanti contemporaneamente per un’ora.
Dopo aver inserito la tariffa dell’elettricità, il calcolatore
può dare un costo stimato.
NOTA Questo prodotto ha unicamente scopo
informativo. La sua finalità è agevolare la comprensione
dei costi connessi al funzionamento dei propri
elettrodomestici. Non ha lo scopo di sostituire un
contatore elettrico di elevata precisione.
MODALITÀ DI VISUALIZZAZIONE
È possibile scegliere tra due modalità di visualizzazione:
COSTO
UP / DOWN
Costo in
tempo reale
dell’elettricità
per ora
Costo
cumulativo
dall’ultimo
azzeramento
ENERGIA Energia in
tempo reale
(KW)
Energia
cumulativa
(KWh)
consumata
dall’ultimo
azzeramento
TARIFFA
Per determinare il costo approssimato del consumo
energetico, inserire la tariffa per KWh.
Impostazione della tariffa:
1. Tenere premuto
SET.
2. Premere
UP / DOWN per cambiare i valori
dell’impostazione.
Page 59

9
IT
3. Premere SET per confermare e passare alla cifra
successiva.
NOTA Ogni società di servizi stabilisce una tariffa
diversa per il consumo elettrico. La tariffa solitamente
è indicata sulla bolletta.
SUGGERIMENTO Alcune società di servizi applicano
fasce tariffarie in base alle quali la tariffa aumenta se il
consumo supera una quantità specificata. Si consiglia
di inserire come tariffa un valore medio,
vale a dire: se l’utilizzo totale è 1000KWh (500 + 500),
esso può essere diviso come segue:
500 KWh a 15 penny = 75 sterline
500 KWh a 10 penny = 50 sterline
Quindi 125 sterline / 1000KWh = 12,5 penny
Allo stesso modo, alcune società di servizi applicano
tariffe diverse per l’utilizzo nelle diverse ore del giorno.
Si consiglia di inserire come tariffa un valore medio,
vale a dire: se l’utilizzo totale è 3000KWh (1000KWh a
tariffa giornaliera + 2000 a tariffa notturna), esso può
essere diviso come segue:
1000 KWh a 15 penny = 150 sterline
2000 KWh a 5 penny = 100 sterline
Quindi 250 sterline / 3000KWh = 8,3 penny
RISPARMIO ENERGETICO
Portando la frequenza con cui vengono ricevuti i dati da
un intervallo di sei secondi a un intervallo di 60 secondi,
la durata della batteria verrà aumentata.
Attivazione della funzione di risparmio energetico:
• Tenere premuto DOWN.
La scritta PWR SAVE indica che è attiva la funzione di
risparmio energetico.
CANCELLAZIONE DELLE RILEVAZIONI
NOTA Quando il costo totale arriva a 999,99 o l’energia
totale raggiunge i 999,99 KWh, le cifre lampeggiano ad
indicare che le rilevazioni hanno raggiunto il massimo
ed è quindi necessario cancellarle.
Cancellazione delle rilevazioni dei dati TOTALI
(Costo / Energia)
• Tenere premuto UP e DOWN
contemporaneamente.
RESET
Premere RESET per ripristinare le impostazioni
predefinite.
Page 60

10
IT
RISOLUZIONE DEI PROBLEMI
PROBLEMA CAUSA SOLUZIONE
Rilevazioni
strane
Rilevazioni
strane
Impostare la tariffa.
Verificare che gli
elettrodomestici non
siano malfunzionanti
(che non si spengano
da soli), dal momento
che questo potrebbe
far registrare un calo
improvviso nell’utilizzo
di elettricità.
Rilevazioni
elevate
Verificare che gli
elettrodomestici siano
stati spenti se non
vengono utilizzati.
è visualizzato
“- - - -“
Non
sincronizzato
Tenere premuto
CHECK sul
trasmettitore remoto.
Quindi, tenere
premuto UP sull’unità
principale.
Se ancora non si
ottengono risultati,
premere RESET
sul trasmettitore e
sull’unità principale.
Viene
visualizzato
“0.00”
Problema
col
sensore
Verificare che il
morsetto sensore
sia stato installato e
chiuso correttamente.
Possibili danni al
morsetto sensore.
Sostituire il morsetto.
SPECIFICHE TECNICHE
UNITÀ PRINCIPALE
Dimensioni
(L x P x H)
66 x 27 x 85 mm
Peso 80 g senza batteria
Frequenza segnale 433 MHz
Campo di
trasmissione
30 metri senza ostruzioni
Aggiornamento
informazioni
Ogni 6 secondi circa (EU)
Ogni 12 secondi circa (USA
/ Canada)
Alimentazione 2 batterie UM-4 (AAA) da
1,5V
TRASMETTITORE REMOTO
Dimensioni 59 x 28 x 97 mm
(L x P x H)
Peso 60 g senza batteria
Page 61

11
IT
Alimentazione 2 batterie UM-3 (AA) da
1,5V
MORSETTO SENSORE
CT100
Dimensioni
(L x P x H)
40 x 30 x 54 mm
Peso 62 g
CT110
Dimensioni
(L x P x H)
53 x 40 x 76 mm
Peso 186 g
PRECAUZIONI
• Non sottoporre il prodotto a forza eccessiva, urti,
polvere, sbalzi eccessivi di temperatura o umidità.
• Non otturare i fori di aerazione con oggetti come
giornali, tende, etc.
• Non immergere l’unità in acqua. Se si versa del
liquido sul prodotto, asciugarlo immediatamente
con un panno morbido e liscio.
• Non pulire l’unità con materiali abrasivi o corrosivi.
• Non manomettere i componenti interni. In questo
modo si invalida la garanzia.
• Oregon Scientific declina ogni responsabilità
per eventuali danni alle finiture causati dal
posizionamento del prodotto su determinati tipi di
legno. Consultare le istruzioni fornite dal fabbricante
del mobile per ulteriori informazioni.
• Le immagini del manuale possono differire dalla
realtà.
• Il contenuto di questo manuale non può essere
ristampato senza l’autorizzazione del fabbricante.
• Utilizzare solo batterie nuove. Non mescolare
batterie nuove con batterie vecchie.
• Al momento dello smaltimento del prodotto,
attenersi alla nota relativa in allegato.
• Non smaltire le batterie vecchie come rifiuto
indifferenziato. È necessario che questo rifiuto
venga smaltito mediante raccolta differenziata per
essere trattato in modo idoneo.
• Alcune unità sono dotate di una striscia di sicurezza
per le batterie. Rimuovere la striscia dal vano
batterie prima del primo utilizzo.
NOTA Le specifiche tecniche del prodotto e il
contenuto del manuale per l’utente possono essere
modificati senza preavviso.
NOTA Caratteristiche e accessori non disponibili
in tutti i paesi. Per ulteriori informazioni, rivolgersi al
proprio rivenditore.
Page 62

12
IT
INFORMAZIONI SU OREGON SCIENTIFIC
Per avere maggiori informazioni sui nuovi prodotti
Oregon Scientific visita il nostro sito internet
www.
oregonscientific.it, dove potrai trovare tutte le
informazioni di cui hai bisogno.
DICHIARAZIONE DI CONFORMITÁ UE
Con la presente Oregon Scientific dichiara che questo
prodotto (
modello: ESM100 / ESM100U) è conforme ai
requisiti essenziali e
d alle altre disposizioni pertinenti
stabilite dalla direttiva 1999/5/CE. Una copia firmata e
datata della Dichiarazione di Conformità è disponibile,
su richiesta, tramite il servizio clienti della Oregon
Scientific.
PAESI CONFORMI ALLA DIRETTIVA R&TTE
Tutti I Paesi UE, Svizzera CH
e Norvegia N
Page 63

The system operating requirements are:
It is generally recommended
+ MODE.
GUIDA ALLA RISOLUZIONE
DEI PROBLEMI
EMS100 / RMS300 / RMS600
Problemi relativi al computer:
D. Quali computer sono compatibili con il software OS Weather?
R. Personal computer o portatili che eseguono Microsoft Windows XP SP2 o Vista. I
computer Apple Mac non sono compatibili con il software. I requisiti del sistema operativo sono:
• Processore: Pentium 4 o versione successiva
• RAM: min. 512 MB
• Spazio libero su disco rigido: min. 512 MB
• Area dello schermo: 1024 x 768 pixel (consigliata)
D. Il pr
ogramma può funzionare e trasmettere informazioni durante la modalità
sospensione?
R. No. Quando viene attivata la modalità sospensione sul PC, il computer di fatto disabilita
tutte le funzioni attive, inclusa la porta USB. Pertanto, non è possibile trasmettere informazioni
tramite la porta USB. Per questo motivo, nel manuale dell’utente sono contenute semplici
istruzioni per disabilitare la funzione della modalità sospensione sul computer. Per le istruzioni,
fare riferimento al manuale dell’utente o alla Guida all’installazione.
D. È possibile tr
asferire i dati dall’unità principale e/o dall’hub comunicazioni al
PC quando il PC è spento?
R.
No. In qualsiasi caso, per trasferire i dati meteo (sia per caricarli che per scaricarli), il
PC deve essere acceso.
i. Per le stazioni meteorologiche a pi
ù giorni (I300, I600, I900) che scaricano le
informazioni meteorologiche per visualizzarle su un’unità, è consigliabile connettere
ininterrottamente l’hub comunicazioni USB alla porta USB del PC per consentire il
download continuo delle informazioni meteorologiche.
ii. Per le stazioni meteorologiche (RMS300, RMS600, EMS100, WMR100N, WMR200,
WMRS200) che caricano sul PC le informazioni raccolte tramite i sensori, il PC deve
essere acceso solo quando l’utente desidera caricare le informazioni. L’unità può
continuare a funzionare e a visualizzare le informazioni raccolte sull’unità principale.
D. Quanto tempo rich
iede in genere il trasferimento dei dati?
R.
Il periodo di tempo necessario per trasferire i dati dipende dal modello.
i. Per le stazioni meteorologiche a pi
ù giorni che scaricano i dati meteorologici raccolti e
li trasferiscono dal PC all’unità principale, circa 30 minuti al giorno di connessione al
computer sono sufficienti per ricevere i dati meteorologici correnti.
ii. Per le stazioni meteorologiche che possono solo caricare le informazioni sul PC, circa 1
minuto di connessione al computer è sufficiente per ricevere i dati meteorologici correnti.
iii. Per WMR200, il tempo necessario dipende dalla quantit
à di dati meteorologici
archiviati in memoria.
D. Come si può far funzionare meglio il computer con il programma OS Weather?
R.
Eseguendo Windows Update, il sistema verrà aggiornato con le nuove funzionalità
Windows, driver di dispositivo e aggiornamenti per il sistema disponibili da Microsoft. È in
genere consigliabile eseguire periodicamente questa operazione. A questo scopo:
a. Fare clic su
ˇ
Start.
b. Sceglie
re Tutti i programmi dal menu di scelta rapida, quindi Windows Update.
Problemi relativi al software OS Weather:
D. Da dove è possibile ottenere il software più recente da installare e la
documentazione sul supporto di sistema?
R. Dopo avere installato il programma, si verrà automaticamente avvisati della
disponibilità di nuovi aggiornamenti per il programma. Seguire la procedura riportata nella
Guida all’installazione.
Se il programma non
è più installato nel PC, è possibile scaricare la versione più
recente da: http://download.os-weather.com. Verrà visualizzata una schermata con un
collegamento al software più recente (Download) e alla Guida all’installazione. Leggere
con attenzione la Guida all’installazione e seguire le istruzioni per scaricare il software.
Per ulteriore assistenza, è disponibile anche un collegamento alla presente Guida alla
risoluzione dei problemi, alla Guida introduttiva e al manuale dell’utente.
D. Come si d
eve procedere se si riceve una richiesta di ripristinare lo stato
originale di C++ ridistribuibile?
R. Fare riferimento alle istruzioni riportate nella Guida all’installazione più recente, a cui
è possibile accedere da http://download.os-weather.com.
D. Vengono visualizzati messaggi di errore analoghi ai seguenti:
o “CLOCK/TH/BARO.tmp contiene un percorso non corretto”
o “Weather OS\DATA\TH\sensors.temp”
o “Rilevamento di una violazione di condivisione durante l’accesso a C:\
Programmi\OregonScientific\Weather\OS\DATA\TH\sensors[#-#day].temp”
Come si deve procedere?
R. Se si dispone di Windows Vista, determinare innanzitutto lo stato di Controllo
dell’account utente. Se Controllo dell’account utente
è ATTIVATO, fare clic sulla casella
di controllo per deselezionarlo e disattivarlo oppure, se si sceglie di lasciarlo ATTIVATO,
disinstallare e reinstallare il programma. Quando si reinstalla il programma, è consigliabile
salvare il programma in C:\utenti\admin e creare una nuova cartella denominata OS
Weather. Per istruzioni dettagliate, fare riferimento alla Guida all’installazione.
D. Nella casella SEN
SORI nella home page Web OS vengono visualizzate linee
tratteggiate invece dei dati. Come di deve procedere?
R. i. Per il modello EMS100: Premere
RESET.
ii. Per il modello RMS300 / RMS600: Tenere premuto + MODE.
Problemi relativi al server:
D. Viene visualizzato un messaggio di errore analogo a “Server attualmente non
disponibile”. Che cosa significa?
R. A volte può verificarsi una sospensione temporanea del servizio dal server.
Riprovare in seguito.
D. Viene visualizz
ato un messaggio di errore analogo a “Parametro non
corretto”. Come si deve procedere?
R. Le operazioni del programma OS Weather non subiranno alcuna modifica e sarà
possibile continuare l’esecuzione del programma.
Problemi relativi alla visualizzazione sull’unità principale:
D. Quali dati verranno caricati sul software OS Weather?
R. a) Per il modello EMS100: temperatura interna/esterna in tempo reale
b) Per il modello RMS300 / RMS600: temperatura e umidità interna/esterna in tempo reale
D. Che cosa significa il simbolo ?
R. Significa che il collegamento tra l’unità principale e il computer è avvenuto correttamente
e che i dati di temperatura e/o umidità vengono caricati in tempo reale. Se l’unità è
scollegata dal computer (caso indicato dal simbolo ), i dati non
verranno caricati.
D. Ho impostato la fascia della temperatura nella funzione di allerta del software OS
Weather, ma questa non risponde correttamente. Perché?
R. L’unità principale è programmata unicamente per rispondere alla fascia di temperatura predefinita
di 3°C a -2°C (da 37°F a 28°F) ricevuta dal sensore esterno (canale 1). Non c’è possibilità di
collegamento con eventuali impostazioni inserite nelle funzioni di allerta del software.
D. L’unità principale è dotata di memoria per la registrazione dei dati di temperatura
e/o umidità?
R. No.
I T
Page 64

1
NL
Mini Draadloze Energiemanager
Model: ESM100 / ESM100U
HANDLEIDING
INDEX
Introductie ................................................................ 2
Overzicht .................................................................. 2
Apparaat - voorkant ............................................... 2
Apparaat - achterkant ........................................... 3
Zender ................................................................... 3
Sensorklem ........................................................... 4
Huishoudelijk stroomdraden en -fase ................... 4
Starten ...................................................................... 5
De uitgaande fasedraad identificeren ................... 5
Sensor instellen ..................................................... 5
Zender instellen ..................................................... 6
Installen basisstation ............................................ 7
Gegevensverzending sensor ................................ 7
Hoe werkt elektriciteit ............................................. 7
Weergavemodi ......................................................... 8
Kosten per uur ......................................................... 8
Energiebesparing .................................................... 9
Geheugenitems wissen .......................................... 9
Resetten ................................................................... 9
Foutopsporing ......................................................... 9
Specificaties ...........................................................
10
Waarschuwingen ................................................... 10
Over Oregon Scientific ...........................................
11
EU – conformiteits verklaring ................................11
Page 65

2
NL
INTRODUCTIE
Dank u dat u voor het Oregon Scientific™ Mini
Draadloze Energiemanager (ESM100 / ESM100U)
gekozen hebt.
De Mini Draadloze Energiemanager is het resultaat
van onze inspanningen om het milieu te sparen.
Ook Oregon Scientific™ maakt zich zorgen over de
wereld waarin we leven, en heeft technologische
kennis, gebruiksgemak en stijl gecombineerd om
deze lijn producten te creëren die u kunnen helpen uw
stroomverbruik te verminderen.
Met dit categorie II meetproduct kunt u uw stroomverbruik
in een oogopslag bijhouden. Doordat u zich bewust
bent van uw stroomverbruik, kunt u praktische stappen
ondernemen om het te verminderen. Uw inspanning
op dat gebied wordt door de monitor tot uitdrukking
gebracht - geschatte kosten/ verbruik gaan omlaag
met de tijd.
Ons doel is producten te ontwikkelen die praktische
oplossingen bieden en tegelijkertijd een verantwoorde
keuze zijn als het om het milieu gaat. Samen kunnen
we de wereld waarin we leven verbeteren.
Houd de volgende richtlijnen en veiligheidswaarschuwingen in acht bij het instellen en gebruiken van
dit product.
NB Houd deze handleiding bij de hand terwijl u
uw nieuwe product gebruikt. Deze bevat praktische
stap-voor-stap instructies, evenals de technische
specificaties en belangrijke waarschuwingen.
Als de apparatuur op andere wijze wordt gebruikt dan
staat aangegeven in deze handleiding, dan kan de
bescherming die de apparatuur biedt verloren gaan.
OVERZICHT
APPARAAT - VOORKANT
1
2
3
4
5
6
7
8
1. ENERGIE: geeft aan dat het energieverbruik wordt
weergegeven
2. KOSTEN: geeft aan dat de energiekosten worden
weergegeven
3. Actuele kosten / energieverbruik
Page 66

3
NL
4. Munteenheid
5. REMOTE
/ MAIN: batterijen zender
raken leeg / batterijen apparaat raken leeg
6. PWR SAVE: Stroombesparingsstand is
ingeschakeld
7. Meeteenheden kosten / energieverbruik (KW,
PENCE / CENT per UUR, PENCE/CENT per KWU,
KWU, PENCE, CENT)
8. Totale kosten / energieverbruik (sinds laatste
reset)
APPARAAT - ACHTERKANT
1
2
3
4
5
6
7
8
1. Muurbevestigingsgat
2. Bevestigingsmagneten
3. SET: instellingsmodus kosten openen; instelling
bevestigen
4. OMHOOG: schakelen tussen weergaven (kosten /
energie); zenders zoeken; instellingswaarde kosten
verhogen
5. OMLAAG: schakelen tussen weergaven (kosten /
energie); zenders zoeken; instellingswaarde kosten
verhogen
6. RESET: het apparaat resetten en het
totalengeheugen wissen; zenders zoeken
7. Batterijvak
8. Inklapbare tafelstandaard
ZENDER
1
2
3
4
5
6
Page 67

4
NL
1. Statusindicator-LED: knippert tijdens zoeken
2. Aansluitingen sensorkabels
3. Muurbevestigingsgat
4. Batterijvak
5. RESET: het apparaat terug zetten op de
standaardinstellingen
6. CHECK: forceert signaalverzending elke 2
seconden (voor een periode van 30 seconden) om
verbinding te krijgen met het apparaat
SENSORKLEM
Model CT100
(Europa / VK)
Model CT110
(VS, Canada en andere
landen)
Sensor voor:
• 220V tot 250V
wisselstroom
• kabelformaat tot
10mm dia en/of
70 amps RMS)
Sensor voor:
• met 120V wisselstroom
+ industrie
• kabelformaat tot 16mm
dia en/of 200 amps RMS)
2
3
1
1
2
3
1. Gat voor elektriciteitsdraad
2. Plastic lipjes
3. Sensorzenderkabel
Optionele sensorklemmen, zoals de hier onder
genoemden, zijn apart verkrijgbaar. Neem contact op
met uw plaatselijke verkooppunt voor meer informatie.*
• Model CT100
• Model CT110
* Functies en accessoires ze zijn niet in alle landen
beschikbaar.
HUISHOUDELIJK STROOMDRADEN EN -FASE
Elektriciteit wordt over het algemeen geleverd door
middel van een één-fase en drie-fasen systeem.
NL: Woningen in Nederland en België krijgen over
het algemeen een-fasestroom aangeboden. Bij een
een-fase systeem stroom de stroom van en naar uw
huishoudelijke apparaten via een nuldraad en een
fasedraad. De nuldraad heeft een voltage in de buurt
van de nul, terwijl de fasedraad een voltage heeft van
120 tot 240 volt. Het verschil tussen de twee draden
zorgt dat de stroom door uw apparaten stroomt.
Europa: De meeste woningen in Europa krijgen driefasenstroom aangeboden. Met drie-fasenstroom
stroomt de stroom van een naar een apparaat door een
groep van drie draden - elk met een fluctuerende fase.
De drie draden moeten daarom elk een eigen sensor
hebben, die apart verkrijgbaar zijn.
Page 68

5
NL
STARTEN
DE UITGAANDE FASEDRAAD IDENTIFICEREN
De sensorklem moet over de geïsoleerde fasedraad
bevestigd worden. Het is raadzaam om deze te
bevestigen over de (uitgaande) draad die uit de
elektriciteitsmeter in de meterkast komt.
Dit product gebruikt een type-C stroomsensor,
niet plaatsen op of verwijderen van als er stroom op
de draden staat.
Zet bij het bevestigen nooit kracht op de draden of de
verbindingen.
WAARSCHUWING Vermijd te allen tijde contact met
niet-geïsoleerde draden of contacten.
Als u problemen ondervindt bij de installatie, neem dan
contact op met een gecertificeerd elektricien.
binnenkomende
stroom
uitgaande
stroom
SENSOR INSTELLEN
WAARSCHUWING
We raden u aan de sensorklemmen
te laten installeren door een elektricien. Schakel de
hoofdschakelaar van de stroom uit voor het bevestigen
en verwijderen van sensoren.
1. Druk met uw duim en wijsvinger de plastic lipjes aan
weerzijden van de sensorklem om de bovenkant te
ontgrendelen.
2. Neem de bovenkant van de sensor af.
2
1
3. Plaats de hoofdstroomdraad (uitgaand) in het
kabelgat.
NB Trek of buig de draden niet. Leg de draad
voorzichtig op zijn plaats zodat u de sensorklem stevig
om de draad kunt sluiten.
4. Plaats de bovenkant van de sensorklem terug en
druk deze naar beneden om te vergrendelen.
Page 69

6
NL
5. Steek de sensorzenderkabel in een van de
aansluitingen.
4
3
5
NB Bij een drie-fasensysteem dient u aan elke
fasedraad een sensor te bevestigen.
• Zorg bij het bevestigen van een sensorklem dat
elke sensor aan een andere draad is bevestigd,
anders zullen de meetresultaten incorrect zijn.
• Sluit vervolgens alle sensoren aan op de zender.
Per zender kunnen drie sensoren worden
aangesloten.
WAARSCHUWING
• De signaalbedrading (ongeveer 1 volt, 1 milliamp)
op de sensorklem is dubbel geïsoleerd en dus
geschikt voor installatie in de meterkast van uw
woning. Wanneer deze door een opening nauwe
loopt, moet de bedrading beschermd worden tegen
scherpe randen door middel van een vaste huls.
• Gebruik dit apparaat niet als het beschadigd is of
anderszins onveilig lijkt.
ZENDER INSTELLEN
1. Schuif het batterijvak open.
2. Plaats batterijen volgens de polariteit (+ / -).
3. Druk altijd op RESET wanneer u de batterijen
vervangen heeft.
4. Houd
CHECK ingedrukt totdat de LED begint te
knipperen.
5. Sluit het batterijvak.
6. Hang de zender aan een stevige schroef.
NB Plaats de batterij eerst in de zender en daarna in
het apparaat.
Voor de beste resultaten:
• Plaats de sensor binnen 30m (100 ft) van het
apparaat.
• Plaats de sensor niet in direct zonlicht en uit de
buurt van vochtigheid.
• Plaats de sensor in de richting van het apparaat,
Page 70

7
NL
met zo min mogelijk obstructies zoals deuren,
muren of meubels.
TIP Het zendbereik kan variëren, afhankelijk van
allerlei factoren. U kunt het best verschillende plekken
uitproberen om de beste voor uw sensor te vinden.
INSTALLEN BASISSTATION
1. Schuif het batterijvak open.
2. Plaats batterijen volgens de polariteit (+ / -).
3. Druk altijd op RESET wanneer u de batterijen
vervangen heeft.
4. Sluit het batterijvak.
GEGEVENSVERZENDING SENSOR
Als het apparaat geen meetgegevens weergeeft of
na elke keer dat u de batterijen vervangt:
1. Houd
CHECK (in de zender) ingedrukt totdat
de LED begint te knipperen. De zender zal 30
seconden lang om de twee seconden gegevens
naar het apparaat verzenden.
2. Houd
OMHOOG ingedrukt op het apparaat om
het zoeken naar een signaal van de zender te
beginnen.
HOE WERKT ELEKTRICITEIT
Voltage
(volt)
Elektrische spanning. Afhankelijk van
de regio vastgesteld op 220V-250V of
120V.
X
Stroom
(ampère)
De hoeveelheid elektriciteit die door
bijvoorbeeld een draad stroomt.
(De sensor meet dit om het wattage te
bepalen)
=
Vermogen
(watt)
De hoeveelheid energie die wordt
overgedragen. (KW = 1000W).
Dit type gegevens wordt op de
bovenste regel weergegeven in
Energiemodus.
KWu is een meeteenheid van verbruik. Kilowattuur staat
voor het gebruik van 1000W elektriciteit gedurende een
heel uur, wat overeen komt met tien 100W peertjes die
gedurende een uur aanstaan.
Zodra u de prijs van uw elektriciteit heeft ingevoerd, zal
de het apparaat u een geschat kostenplaatje geven.
NB Dit product is alleen bedoeld als educatief
hulpmiddel. Het is bedoeld om u een inzicht te geven
in de kosten van het gebruik van uw huishoudelijke
apparaten. Het is niet bedoeld ter vervanging van
accurate elektriciteitsmeters.
Page 71

8
NL
WEERGAVEMODI
U kunt kiezen uit twee weergavemodi:
KOSTEN
UP / DOWN
Actuele
weergave van
de kosten van
elektriciteit per
uur
Totale kosten
sinds laatste
reset
ENERGIE Actueel
stroomverbruik
(KW)
Totale
verbruikte
energie (KWu)
sinds laatste
reset
KOSTEN PER UUR
Om te bepalen wat de geschatte kosten van het
energieverbruik zijn, moet u de prijs per KWu
invoeren.
Om de kosten per uur in te stellen:
1. Houd
SET ingedrukt.
2. Druk op OMHOOG / OMLAAG om de instellingen
te wijzigen.
3. Druk op
SET om te bevestigen en het volgende
cijfer in te stellen.
NB Elke energiebedrijf hanteert zijn eigen tarief
voor energieverbruik. Dit tarief kunt u vinden op uw
elektriciteitsrekening.
TIP Bepaalde energiebedrijven gebruiken een
verbruiksafhankelijk tarief, waarbij het tarief omhoog
gaat als het verbruik een bepaalde niveau overstijgt.
We raden u aan in dit geval een gemiddeld tarief in te
voeren.
Bijvoorbeeld: het totale verbruik is 1000KWh (500 +
500), wat als volgt onderverdeeld is:
500 KWh voor 15 cent = €75
500 KWh voor 10 cent = €50
Dan: €125 / 1000KWh = 12,5 cent
Sommige bedrijven rekenen voor verschillende
dagdelen verschillende tarieven. We raden u aan in dit
geval een gemiddeld tarief in te voeren.
Bijvoorbeeld: het totale verbruik is 3000KWh (1000
op dagtarief + 2000 op nachttarief), wat als volgt
onderverdeeld is:
1000 KWh voor 15 cent = €150
2000 KWh voor 5 cent = €100
Dan: €250 / 3000 KWh = 8,3 cent
Page 72

9
NL
ENERGIEBESPARING
Door signaalontvangst in te stellen op elke 60 seconden
in plaats van elke 6 seconden kunt u de levensduur van
de batterij vergroten.
Om de besparingsstand in te schakelen:
• Houd OMLAAG ingedrukt.
PWR SAVE geeft aan dat de stroombesparingsstand
is ingeschakeld.
GEHEUGENITEMS WISSEN
NB Wanneer de totale kosten 999,99 bereiken of het
totale energieverbruik 999,99KWh bereikt, gaan de
cijfers knipperen om aan te geven dat het maximum
bereikt is en dat de geheugens gewist moeten worden.
Om het TOTALE geheugen te wissen (Kosten /
Energie):
• Houd OMHOOG en OMLAAG tegelijk ingedrukt.
RESETTEN
Druk op RESET om de standaardinstellingen te
gebruiken.
FOUTOPSPORING
PROBLEEM SYMPTOOM REMEDIE
Vreemde
metingen
Vreemde
metingen
Kosten per uur
instellen.
Controleer of er
geen apparaten
kapot zijn (vanzelf
uit zijn gegaan),
want dit kan worden
weergegeven als
een plotselinge
daling in
energieverbruik.
Hoge
metingen
Controleer of
apparaten die
u niet gebruikt
uitgeschakeld zijn.
“- - - -“ wordt
weergegeven
Niet
gesynchroniseerd
Houd CHECK
ingedrukt op de
zender.
Houd vervolgens
OMHOOG
ingedrukt op het
apparaat.
Als dit niet lukt, druk
dan op RESET op
zowel de zender als
het apparaat.
Page 73

10
NL
“0.00” wordt
weergegeven
Probleem
met de
sensor
Controleer of de
sensorklem correct
is bevestigd en
goed gesloten is.
Mogelijke schade
aan de sensorklem.
Vervang de klem
door een nieuwe.
SPECIFICATIES
BASISSTATION
Afmetingen
(L x B x H)
66 x 27 x 85 mm
(2,6 x 1,1 x 8,38 cm)
Gewicht 80 g (79,38 g) zonder batterij
Signaalfrequentie 433 MHz
Zendbereik 30 meter (100 voet) zonder
obstructies
Informatie-update Ongeveer elke 6 seconden
(EU)
/ 12 seconden (VS / Canada)
Voeding 2 x UM-4 (AAA) 1,5V batterijen
ZENDER
Afmetingen
(L x B x H)
59 x 28 x 97 mm
(2,3 x 1,1 x 3,8 inch)
Gewicht 60 g (2,1 oz) zonder batterij
Voeding 2 x UM-3 (AA) 1,5V batterijen
SENSORKLEM
CT100
Afmetingen
(L x B x H)
40 x 30 x 54 mm
(1,6 x 1,2 x 2,1 inch)
Gewicht 62 g (2,2 oz)
CT110
Afmetingen
(L x B x H)
53 x 40 x 76 mm
(2,1 x 1,6 x 3,0 inch)
Gewicht 186 g (6,6 oz)
WAARSCHUWINGEN
• Stel het apparaat niet bloot aan extreme klappen,
schokken, stof, temperatuur of vochtigheid.
• Dek de ventilatiegaten niet af met kranten, gordijnen
etc.
• Dompel het product nooit onder in water. Als u
water over het apparaat morst, droog het dan
onmiddellijk af met een zachte stofvrije doek.
• Reinig het apparaat niet met krassende of bijtende
materialen.
• Laat de interne componenten met rust. Anders kan
dit de garantie beïnvloeden.
• Gebruik alleen nieuwe batterijen. Gebruik nooit
oude en nieuwe batterijen door elkaar.
• De in deze handleiding weergegeven plaatjes
Page 74

11
NL
kunnen afwijken van de werkelijkheid.
• Wanneer u dit product weg gooit, zorg dan dat
het opgehaald wordt door de daarvoor bestemde
afvaldienst.
• Dit product kan eventueel schade veroorzaken
aan de laklaag van bepaalde houtsoorten. Oregon
Scientific is hiervoor niet aansprakelijk. Lees de
instructies van de fabrikant van het meubel voor
meer informatie.
• De inhoud van deze handleiding mag niet worden
vermenigvuldigd zonder toestemming van de
fabrikant.
• Gooi lege batterijen niet bij het huisvuil. Dergelijk
afval moet gescheiden verwerkt worden.
• Let op, sommige apparaten zijn voorzien van een
batterijstrip. Verwijder deze strip uit het batterijvak
alvorens het apparaat te gebruiken.
NB De technische specificaties van dit product en de
inhoud van de handleiding zijn zonder voorafgaande
waarschuwing aan veranderingen onderhevig.
NB Functies en accessoires ze zijn niet in alle landen
beschikbaar. Neem contact op met uw plaatselijke
verkooppunt voor meer informatie.
OVER OREGON SCIENTIFIC
Bezoek onze website (www.oregonscientific.com) om
meer te weten over uw nieuwe product en andere
Oregon Scientific producten zoals digitale fototoestellen,
gezondheids- en fitnessuitrusting en weerstations.
Op deze website vindt u tevens de informatie over
onze klantendienst, voor het geval u ons wenst te
contacteren.
EU – CONFORMITEITS VERKLARING
Bij deze verklaart Oregon Scientific dat deze Mini
Draadloze Energiemanager (model: ESM100 /
ESM100U) voldoet aan de essentiële eisen en aan
de overige relevante bepalingen van Richtlijn 1999/5/
EC. Een kopie van de getekende en gedateerde
Conformiteits verklaring is op verzoek beschikbaar via
onze Oregon Scientific klanten service.
LANDEN DIE ZIJN ONDERWORPEN AAN RTT&E
Alle EU landen, Zwitserland CH
en Noorwegen N
Page 75

PROBLEMEN OPLOSSEN
EMS100 / RMS300 / RMS600
Problemen met de computer:
Q. Welke computers zijn geschikt voor de OS Weather software?
A.
Computers of laptops met Microsoft Windows XP SP2 of Vista. Apple Mac
computers worden niet ondersteund door de software. De systeemeisen zijn:
• Processor: Pentium 4 of hoger
• RAM: Min. 512MB
• Vrije ruimte op harde schijf: Min. 512MB
• Schermresolutie: 1024 x 768 pixels (aanbevolen)
Q. Kan het programma werken en informatie verzenden in de slaapstand?
A. Nee. Wanneer de PC in de slaapstand gaat, schakelt de computer alle werkende
functies uit, inclusief de USB-poort. Het is dan niet mogelijk om informatie te verzenden via
de USB-poort. Daarom staan in de handleiding duidelijke instructies voor het uitschakelen
van de slaapstandfunctie. Zie de Handleiding of installatiegids voor instructies.
Q. Kunnen gegevens van het basisstation / communicatiehub naar de PC worden
verzonden wanneer de PC uit staat?
A.
Nee. De PC moet sowieso aan staan voor verzending van weergegevens (zowel
up- als download).
i. Voor meerdaagse weerstations (I300, I600, I900) die weergegevens downloaden voor
weergave op het apparaat, is het raadzaam om de USB-communicatiehub continu
aangesloten te hebben op uw PC, zodat de weergegevens probleemloos kunnen
worden gedownload.
ii. Voor weerstations (RMS300, RMS600, EMS100, WMR100N, WMR200, WMRS200)
die door sensoren verzamelde gegevens uploaden naar de PC, hoeft de PC alleen
aan te staan wanneer de gebruiker gegevens wil uploaden. Het apparaat kan continu
werken en de verzamelde gegevens weergeven op het basisstation.
Q. Hoe lang duurt gegevensverzending normaal gesproken?
A. De benodigde tijd voor gegevensverzending varieert van model tot model.
i. Voor
meerdaagse weerstations die weergegevens downloaden en doorsturen van de
PC naar het basisstation, is ongeveer 30 minuten per dag verbinding met de computer
voldoende om de actuele weergegevens te ontvangen.
ii. Voor weerstations die alleen gegevens kunnen uploaden naar de PC, is ongeveer 1
minuten per dag verbinding met de computer voldoende om de actuele weergegevens
te versturen.
iii. Voor de WMR2
00 is de benodigde tijd afhankelijk van de hoeveelheid in het geheugen
opgeslagen weergegevens.
Q. Hoe kan de computer beter werken met het OS Weather programma?
A. Door Windows update te starten, zal uw systeem worden geüpdate met nieuwe
Windows functies, apparaatstuurprogramma’s, en systeemupdates die bij Microsoft
beschikbaar zijn. Het is raadzaam om dit regelmatig te doen. Om dit te doen:
a. Klik op
ˇ
Start.
b. In het contextmenu bladert u naar
Alle programma’s en kiest Windows Update.
Problemen met de OS Weather Software:
Q. Waar kan ik de nieuwste documentatie en software om te installeren vinden?
A. Zodra het programma geïnstalleerd is, zal de computer u automatisch waarschuwen
wanneer er nieuwe updates beschikbaar zijn. Volg de stappen die vermeld staan in de
Installatiegids.
Als het programma niet (meer) op uw PC geïnstalleerd is, kunt u de nieuwste versie
downloaden van: http://download.os-weather.com. Er verschijnt een scherm met een link
naar de nieuwste software (download) en installatiegids. Lees de installatiegids zorgvuldig
door en volg de instructie om de software te downloaden. Voor meer hulp is er ook een link
naar deze gids Problemen oplossen, de Snelle handleiding en de Handleiding.
Q. Wat moet ik doen als ik de vraag “C++ Redistributable herstellen naar zijn
oorspronkelijke staat.” krijg?
A. Zie hiervoor de instructies die vermeld staan in de nieuwste Installatiegids – toegankelijk
via http://download.os-weather.com.
Q. Ik krijg de volgende foutmelding:
o “CLOCK/TH/BARO.tmp contains an incorrect path”
o “Weather OS\DATA\TH\sensors.temp”
o “Encountering a sharing violation while accessing C:\ProgramFiles\
OregonScientific\Weather\OS\DATA\TH\sensors[#-#day].temp”
Wat moet ik doen?
A. Als u Windows Vista hebt, controleer dan eerst de status van User Account
Control. Als User Account Control
AAN staat, maak dan het aangevinkte vakje leeg om
het uit te schakelen, of als u het liever AAN hebt, moet u de installatie ongedaan maken en
het programma opnieuw installeren. Wanneer u het programma opnieuw installeert, moet
u het programma opslaan in C:\Users\admin en een nieuwe map aanmaken met de naam
OS Weather. Voor gedetailleerde instructies zie de Installatiegids.
Q. Het SENSOREN vak op de OS Web homepage heeft stippellijnen waar
gegevens zouden moeten staan. Wat moet ik doen?
A. i. Voor EMS100: Reset het apparaat.
ii. Voor RMS300 / RMS600: Houd + MODE ingedrukt.
Problemen met de server:
Q. Ik krijg de foutmelding “server is momenteel niet bereikbaar”. Wat betekent dat?
A. Zo nu en dan doet zich een tijdelijke afsluiting van de service van de server voor;
probeer het later nog eens.
Q. Ik krijg de foutmelding “De parameter is incorrect”. Wat moet ik doen?
A. Het functioneren van OS Weather wordt niet beïnvloed en het programma kan
blijven draaien.
Problemen met het scherm van het Basisstation:
V. Welke gegevens worden ge-upload naar de OS Weather Software?
A. i. Voor EMS100: Huidige binnen-/buitentemperatuur
ii. Voor RMS300 / RMS600: Huidige binnen-/buitentemperatuur en -vochtigheid
V. Wat betekent
?
A. Het betekent dat het basisstation met succes verbonden is met de pc, en dat de
gegevens over de huidige temperatuur en/of vochtigheid worden ge-upload. Als de verbinding
met de pc verbroken wordt (aangegeven met
), dan worden geen
gegevens ge-upload.
V. Ik heb een temperatuurbereik ingesteld in de waarschuwingsfunctie van de OS Weather
Software, maar het IJsalarm op het basisstation komt er niet mee overeen. Waarom?
A. Het basisstation is geprogrammeerd om alleen te reageren op het standaard
temperatuurbereik van 3°C tot -2°C (37°F tot 28°F) dat wordt ontvangen van de
buitensensor (kanaal 1). Dit heeft verder niets te maken met instellingen die je maakt in
de waarschuwingsfuncties van de software.
V. Heeft het basisstation een geheugen om temperatuur- en/of vochtigheidsgegevens
in op te slaan?
A. Nee.
FELSÖKNINGSGUIDE
EMS100 / RMS300 / RMS600
Datorrelaterade problem:
Q. Vilka datorer är kompatibla med OS Vädermjukvara?
A. Persondator eller laptop som kör Microsoft Windows XP SP2 eller Vista. Apple Mac
datorer är ej kompatibla med mjukvaran. Systemkraven är:
• Processor: Pentium 4 eller bättre
• RAM: Min. 512MB
• Fritt hårddiskutrymme: Min. 512MB
• Skärmupplösning: 1024 x 768 pixlar (rekommenderas)
Q. Fungerar programmet och kan det behandla information i Sleep Mode?
A. Nej. När PC:n går ner i Sleep mode, inaktiverar datorn alla arbetsfunktioner,
inklusive USB-porten. Därför är det ej möjligt att kommunicera via USB-porten. Av denna
anledning, står det klart i bruksanvisningen hur man avaktiverar sleep mode funktionen
på datorn. Se bruksanvisningen eller installationsguiden för information.
Q. Kan data från huvudenheten och / eller huben överföras till PC:n när denna är
frånkopplad?
A. Nej. Under alla omständigheter måste PC:n vara igång när man överför väderdata
(uppladdning eller nerladdning).
i. För flerdagars väderstationer (I300, I600, I900), som laddar ner väderinformation som
visas på en display, rekommenderas att USB-huben alltid är ansluten till USB-porten i
PC:n för att ingen information skall gå förlorad.
ii. För väderstationer (RMS300, RMS600, EMS100, WMR100N, WMR200, WMRS200)
som hämtar information från sensorer och laddar upp till PC, behöver PC:n endast
vara igång vid uppladdningen. Stationen kan arbeta kontinuerligt och visa den
inhämtade informationen på huvudenheten.
Q. Hur lång tid tar normalt en dataöverföring?
A. Tiden varierar mellan olika modeller.
i. För flerdagars väderstationer är ca 30 minuter dagligen tillräckligt för att få aktuell
väderinformation.
ii. För väderstationer som endast kan ladda upp information till PC:n är ca 1 minuts
daglig anslutning till datorn tillräckligt för att ta emot aktuell väderdata.
iii. För WMR200 är tiden beroende på hur mycket väderinformation som lagrats i minnet.
Q. Hur kan datorn jobba snabbare med OS Vädermjukvara?
A. Genom att köra Windows update, kommer systemet att uppdateras med nya
windowsfunktioner, drivrutiner och systemuppdateringar. Det är en god idé att göra detta
regelbundet. För att göra detta:
a. Klicka på
ˇ
Start.
b. I menyn, scrolla till
All programs och välj Windows Update.
Vädermjukvarurelaterade problem:
Q. Var kan jag hitta senaste programvara och systemsupport information?
A. Så snart programmet installerats, kommer datorn automatiskt att påminna dig om
nya programuppdateringar. Följ stegen som i installationsguiden.
Om programmet inte är installerat på din PC, kan du ladda ner senaste
versionen från: http://download.os-weather.com. En ruta uppträder med en länk till
den senaste mjukvaran (Download) samt en installationsguide. Läs noggrant igenom
installationsguiden och följ instruktionerna för att ladda ner mjukvaran. För ytterligare
hjälp finns det också en länk till denna Felsökningsguide, Komma igång snabbt guide och
Bruksanvisning.
Q. Vad skall jag göra om jag får meddelandet “Repair C++ Redistributable to its
original state”?
A. Se instruktioner i senaste Installationsguiden – som kan hämtas via
http://download.
os-weather.com.
Q. Följande felmeddelande kommer upp:
o “CLOCK/TH/BARO.tmp contains an incorrect path”
o “Weather OS\DATA\TH\sensors.temp”
o “Encountering a sharing violation while accessing C:\ProgramFiles\
OregonScientific\Weather\OS\DATA\TH\sensors[#-#day].temp”
Vad skall jag göra?
A. Om du har Windows Vista, kolla först statusen på User Account Control (UAC).
Om User Account Control är påslagen, klicka antingen för att avmarkera och slå av
den, eller om du beslutar att behålla den PÅ, avinstallera och återinstallera programmet.
När du återinstallerar programmet, skall du spara programmet i C:\Users\admin
och skapa en ny mapp och kalla den OS Väder. För mer detaljerad information, se
Installationsguiden.
Q. SENSOR fältet på OS hemsidan visar streckade linjer där det skall finnas
information. Vad skall jag göra?
A. i. För EMS100: Återställ enheten.
ii. För RMS300 / RMS600: Tryck och håll inne + MODE.
Serverrelaterade problem:
Q. Ett felmeddelande “server is not currently available” kommer upp. Vad menas
med detta?
A. Något problem med serverkommunikationen har uppstått; försök igen senare.
Q. Ett felmeddelande “The parameter is incorrect” kommer upp.
Vad skall jag göra?
A. Funktionen av OS väderprogram påverkas inte och kan fortsätta att köras.
Problem relaterade till Huvudenhet Display:
Q. Vilka data laddas upp till väderprogramvaran?
A. i. För EMS100: Realtids-inomhus-/utomhustemperatur
ii. För RMS300 / RMS600: Realtids-inomhus-/utomhustemperatur och luftfuktighet
Q. Vad betyder ?
A. Det betyder att huvudenheten är ansluten till PC:n och att realtidstemperaturen och/
eller luftfuktighetsdata laddas upp. Om enheten kopplas från PC:n (indikeras med
), kommer data inte att laddas upp.
Q. Jag har ställt in temperaturområdet i varningsfunktionen i mjukvaran men
isvarningsfunktionen på huvudenheten svarar inte som den ska. Varför?
A. Huvudenheten är programmerad att bara svara på standardtemperaturområdet på 3°C till
-2°C (37°F till 28°F) som mottas från utomhussensorn (kanal 1). Den har ingen koppling
med några inställningar som du gör i mjukvarans varningsfunktioner.
Q. Har huvudenheten något minne för dagaloggning av temperatur- och/eller
luftfuktighetsdata?
A. Nej.
NL
SWE
Page 76

1
POR
Mini gerenciador de energia sem fio
Modelo: ESM100 / ESM100U
MANUAL DO USUÁRIO
ÍNDICE
Introdução ................................................................ 2
Visão geral ............................................................... 2
Unidade principal – vista frontal ............................ 2
Unidade principal – vista traseira .......................... 3
Transmissor remoto .............................................. 3
Braçadeiras do sensor .......................................... 4
Cabos e fase da alimentação residencial .............. 4
Primeiros passos ..................................................... 5
Localizar cabos de fornecimento de saída ativos . 5
Ajuste do sensor ................................................... 5
Ajuste do transmissor ............................................ 7
Ajuste da unidade principal .................................. 7
Transmissão de dados do sensor ......................... 7
Entendendo a eletricidade ...................................... 8
Modos de exibição .................................................. 8
Taxa de custos ......................................................... 8
Economia de energia .............................................. 9
Limpar registros ...................................................... 9
Reinicializar .............................................................. 9
Solução de problemas .......................................... 10
Especificações .......................................................
10
Precauções .............................................................11
Sobre a Oregon Scientific .....................................
12
CE – Declaração de conformidade ...................... 12
Page 77

2
POR
INTRODUÇÃO
Agradecemos por selecionar o mini gerenciador de energia
sem fio da Oregon Scientific™ (ESM100 / ESM100U).
O mini gerenciador de energia sem fio incorpora o
nosso compromisso com as preocupações ambientais.
Consciente das ameaças que o mundo em que vivemos
está enfrentando, a Oregon Scientific™ combinou o
conhecimento tecnológico, a praticidade e o estilo para
criar esta linha de produtos que pode ajudá-lo a reduzir
as emissões de carbono.
Com este produto da categoria de medida II, você
pode visualizar seu consumo em tempo real. Ao se
conscientizar de seu consumo, você pode adotar
etapas práticas para reduzi-lo. Seu esforço contínuo
será refletido pelo monitor em termos significativos custos estimados / baixa no consumo com o tempo.
Nosso objetivo é criar produtos que forneçam soluções
práticas e que nos permitam ao mesmo tempo cumprir
com nossa responsabilidade ambiental. Juntos
podemos melhorar o mundo em que vivemos.
Observe as seguintes instruções de precaução de
segurança e aviso ao configurar e usar este produto.
NOTA Mantenha este manual acessível enquanto
usa seu novo produto. Ele contém instruções práticas
e detalhadas, bem como especificações técnicas e
avisos dos quais você deveria estar ciente.
Se o equipamento for usado de uma maneira não
especificada neste manual, a proteção fornecida pelo
equipamento pode ser prejudicada.
VISÃO GERAL
UNIDADE PRINCIPAL – VISTA FRONTAL
1
2
3
4
5
6
7
8
1. ENERGY: indica que o consumo de energia é
exibido
2. COST: indica que o custo da energia consumida é
exibido
3. Consumo de energia / custo em tempo real
4. Unidade da moeda
5. REMOTE
/ MAIN: pilhas fracas do
transmissor remoto / pilhas fracas da unidade
principal
Page 78

3
POR
6. PWR SAVE: a função de economia de energia é
ativada
7. Unidades de medida de consumo de energia /
custo (KW, PENCE / CENTS per HOUR, PENCE/
CENTS per KWH, KWH, PENCE, CENTS)
8. Consumo de energia / custo acumulado (desde a
última reinicialização)
UNIDADE PRINCIPAL – VISTA TRASEIRA
1
2
3
4
5
6
7
8
1. Orifício para montagem em parede
2. Ímãs para montagem
3. SET: entra no modo de configuração da taxa de
custos; confirma as configurações
4. UP: alterna entre as exibições (custo / energia);
inicia a busca do transmissor remoto; aumenta o
valor da taxa de custo
5. DOWN: alterna entre as exibições (custo / energia);
ativa / desativa a função de economia de energia;
diminui o valor da taxa de custos
6. RESET: redefine a unidade e limpa a memória
acumulada; inicia a busca do transmissor remoto
7. Compartimento de pilhas
8. Base de mesa retrátil
TRANSMISSOR REMOTO
1
2
3
4
5
6
1. Indicador LED de status: pisca durante a procura
2. Soquetes de cabo do sensor
Page 79

4
POR
3. Orifício para montagem em parede
4. Compartimento de pilhas
5. RESET: retorna a unidade aos valores de ajuste
padrão
6. CHECK: força a transmissão a cada 2 segundos
(para um período de 30 segundos) para tentar o
link com a unidade principal
BRAÇADEIRAS DO SENSOR
Modelo CT100
(Europa / Reino
Unido)
Modelo CT110
(EUA, Canadá e outros
países)
Sensor para:
• 220V a 250V CA
• tamanho do
cabo de até
10mm dia e/ou
70 amps RMS)
Sensor para:
• com 120V CA + segmento
• tamanho do cabo de até
16mm dia e/ou 200 amps
RMS)
2
3
1
1
2
3
1. Orifício do cabo elétrico
2. Lingüetas plásticas
3. Cabo do transmissor do sensor
Braçadeiras do sensor opcional, como aquelas da lista
abaixo, podem ser adquiridas separadamente. Para
obter mais informações, entre em contato com o seu
distribuidor local.*
• Modelo CT100
• Modelo CT110
* Recursos e acess
órios não estão disponíveis para
todos os países.
CABOS E FASE DA ALIMENTAÇÃO RESIDENCIAL
A eletricidade geralmente é fornecida usando sistemas
monofásicos e trifásicos.
Reino Unido: a maioria das casas no Reino Unido
usa fornecimentos monofásicos. Em fornecimentos
monofásicos, a corrente flui de e para aparelhos
residenciais usando uma fiação neutra e ativa. A fiação
neutra possui uma voltagem perto de zero enquanto a
fiação ativa carrega uma voltagem de 120 a 240 volts.
A diferença entre essas duas fiações faz com que a
corrente flua através dos aparelhos.
Europa: a maioria das casas na Europa usa
fornecimentos trifásicos. Em fornecimentos trifásicos,
a corrente flui de e para um dispositivo através de um
grupo de três fiações – cada uma transportando uma
fase flutuante. Portanto, cada uma das três fiações
precisa de um sensor de corrente individual que pode
ser comprado separadamente.
Page 80

5
POR
PRIMEIROS PASSOS
LOCALIZAR CABOS DE FORNECIMENTO DE
SAÍDA ATIVOS
A braçadeira do sensor deve ser encaixada sobre
a fiação ativa isolada. Recomenda-se que você a
encaixe sobre a fiação (saída) proveniente do medidor
de eletricidade localizado na caixa do medidor.
Este produto usa o sensor de corrente do Tipo C,
não aplique ao redor ou remova dos condutores com
RISCO DE VIDA.
Sob nenhuma circunstância qualquer força ou pressão
indevida deve ser aplicada em qualquer fiação ou
conexão.
AVISO Deve-se tomar cuidado a todo o momento
evitando encostar ou entrar em contato com qualquer
fiação ou contato não-isolado.
Se houver qualquer dificuldade na instalação, o aviso
de um eletricista licenciado deve ser acionado.
fonte de alimentação
de entrada
fonte de alimentação
de saída
AJUSTE DO SENSOR
AVISO
Recomenda-se que a(s) braçadeira(s)
do sensor de corrente seja(m) instalada(s) por um
eletricista licenciado. Desligue a energia dos cabos
elétricos antes de conectar e desconectar o(s)
sensor(es).
1. Com o polegar e o dedo, pressione para dentro as
lingüetas plásticas localizadas em ambos os lados
da braçadeira do sensor para soltar a parte de
cima.
2. Levante a parte de cima do sensor para fora.
Page 81

6
POR
2
1
3. Coloque o cabo elétrico ativo ou a fiação ativa
(saída) no orifício de fiação elétrica.
NOTA Não puxe ou dobre os fios. Libere o fio na
posição para que você possa fechar a braçadeira do
sensor com segurança ao redor do fio.
4. Recoloque a parte superior da braçadeira do
sensor e abaixe para prender.
5. Conecte o cabo do transmissor do sensor em
qualquer soquete do cabo.
4
3
5
NOTA Para o sistema trifásico, conecte uma
braçadeira do sensor em cada fiação ativa.
• Ao conectar a braçadeira do sensor, assegure-se
de que cada braçadeira do sensor esteja conectada
a uma fiação diferente, caso contrário, o resultado
pode ser uma leitura incorreta.
• Conecte todos os cabos da braçadeira do sensor
no transmissor remoto. Até três braçadeiras do
sensor podem ser conectadas no transmissor
remoto.
AVISO
• A fiação do sinal (aproximadamente 1 volt, 1
milliamp) na braçadeira do sensor é duplamente
isolada, adequada para instalação na caixa do
medidor de fonte de alimentação domésticas. Ao
passar por uma abertura da caixa, a fiação deve
estar protegida de pontas afiadas por tufos fixos.
• Não use a unidade se estiver danificada ou se sua
segurança estiver debilitada.
Page 82

7
POR
AJUSTE DO TRANSMISSOR
1. Deslize a tampa do compartimento de pilhas para
abri-la.
2. Insira as pilhas, fazendo a correspondência das
polaridades (+ / -).
3. Pressione
RESET após a troca das pilhas.
4. Mantenha pressionado
CHECK até que a luz do
LED pisque.
5. Feche a tampa do compartimento de pilhas.
6. Monte o transmissor em um parafuso afixado.
NOTA Instale a pilha no transmissor antes da unidade
principal.
Para obter os melhores resultados:
• Coloque o sensor dentro de 30 m (100 pés) da
unidade principal.
• Coloque o sensor fora da incidência direta do sol e
da umidade.
• Posicione o sensor de modo que fique voltado
para a unidade principal (interna), minimizando
obstruções, como portas, paredes e mobílias.
DICA A faixa de transmissão pode variar dependendo
de muitos fatores. Talvez seja necessário testar em
vários locais para obter os melhores resultados.
AJUSTE DA UNIDADE PRINCIPAL
1. Deslize a tampa do compartimento de pilhas para
abri-la.
2. Insira as pilhas, fazendo a correspondência das
polaridades (+ / -).
3. Pressione
RESET após a troca das pilhas.
4. Feche a tampa do compartimento de pilhas.
TRANSMISSÃO DE DADOS DO SENSOR
Se a unidade principal não exibir os dados ou após
cada troca de pilhas do transmissor:
1. Mantenha pressionado
CHECK (localizado no
transmissor) até que a luz do LED pisque. O
transmissor vai procurar e transmitir os dados
para a unidade principal a cada 2 segundos por 30
segundos.
2. Mantenha o botão
UP pressionado na unidade
principal para procurar pelo sinal do transmissor.
Page 83

8
POR
ENTENDENDO A ELETRICIDADE
Voltagem
(volts)
Potencial elétrico. Fixo em 220V a
250V ou 120V, dependendo da região.
X
Corrente
(amps)
Quantidade de eletricidade que flui
através, por exemplo, de um fio. (Isso
é medido pelo sensor para determinar
os Watts)
=
Potência
(watts)
Quantidade de energia sendo
transferida. (KW = 1000W). Este tipo
de dados é exibido na linha superior do
modo de energia.
KWh é uma medida de consumo. Kilowatt hora
representa o uso de 1000W de eletricidade para 1
hora inteira, que é equivalente a dez x 100W lâmpadas
operando ao mesmo tempo por 1 hora.
Assim que a taxa de custos de eletricidade for inserida,
o monitor poderá chegar a um custo estimado.
NOTA Este produto é apenas para fins educacionais.
Seu objetivo é ajudar no entendimento do custo de
aparelhos elétricos operacionais na casa. Ele não
substitui o medidor de receita de eletricidade preciso.
MODOS DE EXIBIÇÃO
Existem 2 modos de exibição dos quais escolher:
COST
UP / DOWN
Custo em
tempo real da
eletricidade por
hora
Custo
acumulado
desde a última
reinicialização
ENERGY
Energia em
tempo real (KW)
Energia
acumulada
(KWh)
consumida
desde a última
reinicialização
TAXA DE CUSTOS
Para determinar o custo aproximado do consumo de
eletricidade, insira o custo por KWh.
Para definir a taxa de custo:
1. Pressione e segure
SET.
2. Pressione UP / DOWN para alterar os valores da
Page 84

9
POR
configuração.
3. Pressione
SET para confirmar e mover para o
próximo dígito.
NOTA Cada empresa de utilidade pública define uma
tarifa diferente para o consumo de eletricidade. Esta
taxa geralmente pode ser encontrada na conta de
energia elétrica.
DICA Certas empresas de utilidade pública usam
um custo acumulado de eletricidade, segundo o qual
a taxa aumenta depois que o consumo excede uma
quantidade específica. Recomenda-se que seja
inserido um valor médio como taxa de custos.
Ou seja, o uso total é 1000KWh (500 + 500) que pode
ser separado como:
500 KWh em 15p = £75
500 KWh em 10p = £50
Em seguida, £125 / 1000KWh = 12.5p
De maneira semelhante, algumas empresas de serviços
utilitários utilizam diferentes tarifas para diferentes
horas do dia. Recomenda-se que seja inserido um
valor médio como taxa de custos.
Ou seja, o uso total é 3000KWh (1000KWh para a
taxa do dia + 2000 para a taxa noturna) que pode ser
separada como:
1000 KWh em 15p = £150
2000 KWh em 5p = £100
Em seguida, £250 / 3000 KWh = 8.3p
ECONOMIA DE ENERGIA
Ao diminuir a freqüência em que os dados são
recebidos de cada 6 segundos para cada 60 segundos,
a vida útil da pilha é estendida.
Para ativar a função de economia de energia:
• Pressione e segure DOWN.
PWR SAVE indica que a função de economia de
energia está ativada.
LIMPAR REGISTROS
NOTA Quando o custo total atinge 999,99 ou a
energia total atinge 999,99 KWh, os dígitos piscarão
para indicar que o máximo foi atingido e é preciso
limpar os registros.
Para limpar os registros de dados TOTAIS (Custo /
Energia):
• Pressione e segure UP e DOWN
simultaneamente.
REINICIALIZAR
Pressione RESET para retornar aos ajustes padrão.
Page 85

10
POR
SOLUÇÃO DE PROBLEMAS
PROBLEMA SINTOMA SOLUÇÃO
Leituras
estranhas
Leituras
estranhas
Defina a configuração
da taxa de custos.
Verifique se os
aparelhos não
apresentam defeitos
de funcionamento
(desligam sozinhos)
porque isso poderia
ser mostrado como
uma queda repentina
no uso da eletricidade.
Altas
leituras
Verifique se os
aparelhos foram
desligados, caso não
estejam em uso.
“- - - -“ exibido
Não
sincronizado
Pressione e
segure CHECK no
transmissor remoto.
Em seguida, pressione
e segure UP na
unidade principal.
Se ainda não for bemsucedido, pressione
RESET no transmissor
e na unidade principal.
“0.00” exibido Problema
com o
sensor
Verifique se a
braçadeira do sensor
foi corretamente
ajustada e fechada.
Possíveis danos na
braçadeira do sensor.
Substitua a braçadeira
pela nova.
ESPECIFICAÇÕES
UNIDADE PRINCIPAL
Dimensões
(C x L x A)
66 x 27 x 85 mm
(2,6 x 1,1 x 3,3 pol.)
Peso 80 g ( 2,8 onças) sem pilha
Freqüência do sinal 433 MHz
Faixa de
transmissão
30 metros (100 pés) sem
obstrução
Atualização das
informações
A cada 6 segundos,
aproximadamente (EU) / 12
segundos (EUA / Canadá)
Energia 2 pilhas UM-4 (AAA) de 1,5 V
TRANSMISSOR REMOTO
Dimensões
(C x L x A)
59 x 28 x 97 mm
(2,3 x 1,1 x 3,8 pol.)
Peso 60 g (2.1 onças) sem pilhas
Page 86

11
POR
Energia 2 pilhas UM-3 (AA) 1,5V
BRAÇADEIRAS DO SENSOR
CT100
Dimensões
(C x L x A)
40 x 30 x 54 mm
(1,6 x 1,2 x 2,1 pol.)
Peso 62 g (2,2 onças)
CT110
Dimensões
(C x L x A)
53 x 40 x 76 mm
(2,1 x 1,6 x 3,0 pol)
Peso 186 g (6,6 onças)
PRECAUÇÕES
• Não submeta a unidade a forças excessivas,
impactos, poeiras, oscilações de temperatura ou
umidade.
• Não obstrua as aberturas de ventilação com itens
como jornais, cortinas, etc.
• Não mergulhe a unidade na água. Se respingar
líquido nela, seque-a imediatamente com um pano
macio e que não solte fiapos.
• Não limpe a unidade com material abrasivo ou
corrosivo.
• Não altere os componentes internos da unidade.
Isso invalidará sua garantia.
• Utilize apenas pilhas novas. Não misture pilhas
novas e usadas. Retire as pilhas caso pretenda
guardar o produto.
• As imagens mostradas neste manual podem diferir
da imagem real.
• Os materiais utilizados nos produtos Oregon podem
ser reutilizados e reciclados após o fim de sua vida
útil. Encaminhe os produtos a serem descartados
aos locais de coleta apropriados, atentando para
as legislações locais.
• A colocação deste produto sobre certos tipos
de madeira pode resultar em danos ao seu
acabamento, pelos quais a Oregon Scientific
não se responsabilizará. Consulte as instruções
de cuidados do fabricante do móvel para obter
informações.
• O conteúdo deste manual não pode ser reproduzido
sem a permissão do fabricante.
• Não descarte baterias usadas em locais não
apropriados. É necessária a coleta do lixo em questão
de maneira separada para tratamento especial.
• Observe que algumas unidades estão equipadas
com uma tira de segurança da bateria. Remova a
tira do compartimento de bateria antes do primeiro
uso.
OBSERVAÇÃO As especificações técnicas deste
produto e o conteúdo do manual do usuário estão
sujeitos a alterações sem aviso prévio.
NOTA Recursos e acessórios não estão disponíveis
para todos os países. Para obter mais informações,
entre em contato com o seu distribuidor local.
Page 87

12
POR
SOBRE A OREGON SCIENTIFIC
Visite nosso site (www.oregonscientific.com.br) para
saber mais sobre os produtos Oregon Scientific.
Caso você necessite de mais informações ou tenha
dúvidas, entre em contato com o nosso Serviço de
Atendimento ao Consumidor através do telefone (11)
5095-2329 ou e-mail sac@oregonscientific.com.br.
CE – DECLARAÇÃO DE CONFORMIDADE
Oregon Scientific declara que este(a) Mini gerenciador
de energia sem fio (modelo: ESM100 / ESM100U
)
está conforme com os requisitos essenciais e outras
provisões da Diretriz 1999/5/CE. Uma cópia assinada e
datada da Declaração de Conformidade está disponível
para requisições através do nosso SAC.
PAISES SUJEITOS A NORMA R&TTE
Todos os paises da União Européia, Suíça CH
e Noruega N
Page 88

POR
gicos
la cantidad de datos
”
y MODE y manténgalos pulsados.
?
GUIA DE SOLUÇÃO DE
PROBLEMAS
EMS100 / RMS300 / RMS600
Problemas relacionados ao computador:
P: Quais computadores são compatíveis com o software OS Weather?
R: Computadores pessoais ou laptops com o Microsoft Windows XP SP2 ou Vista.
Computadores Mac da Apple não são compatíveis com o software. Os requisitos de
sistema operacional são:
• Processador:
Pentium 4 ou posterior
• RAM:
mín. de 512 MB
• Espa
ço livre em disco: mín. de 512 MB
•
Área da tela: 1024 x 768 pixels (recomendável)
P: O programa pode funcionar e transmitir informações durante o modo Dormir?
R: Não. Quando o PC entra no modo Dormir, o computador desativa efetivamente
todas as funções de trabalho, incluindo a porta USB. Portanto, não é possível transmitir
informações pela porta USB. Por esse motivo, o manual do usuário instrui claramente os
usuários que desativem o modo Dormir no computador. Consulte o Manual do usuário
ou o Guia de instalação para obter instruções.
P: Os dados da unidade principal e / ou do hub de comunicação podem ser
transferidos para o PC quando ele estiver desligado?
R: Não. Em todas as circunstâncias, para transferir os dados meteorológicos (tanto por
upload ou download), o PC deve estar ligado.
i. Em Esta
ções meteorológicas de vários dias (I300, I600, I900) que transferem por
download as informações meteorológicas que serão exibidas em uma unidade,
é recomendável conectar o hub de comunicação USB à porta USB do PC
continuamente para permitir o download ininterrupto das informações meteorológicas.
ii. Em Esta
ções meteorológicas (RMS300, RMS600, EMS100, WMR100N, WMR200,
WMRS200) que transferem por upload as informações coletadas via sensores ao PC,
o PC deverá ser ligado apenas quando o usuário desejar carregar as informações. A
unidade pode trabalhar e exibir continuamente as informações coletadas na unidade
principal.
P: Quanto tempo normalmente dura uma transferência de dados?
R: O tempo necessário para transferir os dados varia de modelo para modelo.
i. Em Esta
ções meteorológicas de vários dias que transferem por download os
dados meteorológicos coletados e os enviam do PC para a unidade principal,
aproximadamente 30 minutos diários de conexão com o computador são suficientes
para receber os dados meteorológicos atuais.
ii. Em Esta
ções meteorológicas que podem apenas transferir por upload as informações
para o PC, uma conexão de aproximadamente 1 minuto com o computador é
suficiente para receber os dados meteorol
ógicos atuais.
iii. Em WMR200, o tempo necess
ário depende da quantidade de dados meteorológicos
armazenados na memória.
P: Como o computador pode ser melhor executado com o programa OS Weather?
R: Ao executar a atualização do Windows, seu sistema será atualizado com novos
recursos do Windows, drivers de dispositivo e atualizações de sistema disponíveis na
Microsoft. Em geral, é recomendável fazer isso regularmente. Para isso:
a. Clique em
ˇ
Iniciar.
b. No menu de contexto, vá até Todos os programas e selecione Windows Update.
Problemas relacionados ao software OS Weather:
P: Em que local posso obter o software para instalação e a documentação de
suporte do sistema mais recentes?
R: Uma vez que o programa é instalado, o computador o alertará automaticamente sobre novas
atualizações. Siga as etapas de acordo com o Guia de instalação.
Se o programa não estiver mais instalado no PC, faça o download da última versão
em:
http://download.os-weather.com. Uma tela será exibida com um link para o software
(download) e Guia de instalação mais recentes.
Leia o Guia de instalação por completo e siga
as instruções para fazer download do software.
Para obter mais ajuda, também há um link
para este Guia de solução de problemas, o Guia de in
ício rápido e o Manual do usuário.
P: O que devo fazer se eu receber uma solicitação para “Reparar o C++
Redistributable ao seu estado original.”?
R: Consulte as instruções descritas no último Guia de instalação – acessível via http://
download.os-weather.com.
P: A seguinte mensagem de erro é exibida:
o “CLOCK/TH/BARO.tmp contém um caminho incorreto”
o “Weather OS\DATA\TH\sensors.temp”
o “Está ocorrendo uma violação de compartilhamento ao acessar C:\
ProgramFiles\OregonScientific\Weather\OS\DATA\TH\sensors[#-#day].temp”
O que devo fazer?
R: Se você tiver o Windows Vista, determine primeiro o status de Controle de Conta
de Usuário. Se o Controle de Conta de Usuário estiver ativado, clique na caixa de
seleção para desmarcá-lo e desativá-lo ou se você escolher mantê-lo ativo, desisnstale e
reinstale o programa. Ao reinstalar o programa, salve-o em C:\Users\admin e crie uma
nova pasta e dê a ela o nome OS Weather. Para obter instruções detalhadas, consulte o
Guia de instalação.
P: A caixa SENSORS na página inicial do OS mostra as linhas pontilhadas onde
devem estar os dados. O que devo fazer?
R: i. Para EMS100: Reinicialize a unidade.
ii. Para RMS300 / RMS600: Pressione e segure
+ MODE.
Problemas relacionados ao servidor:
P: Uma mensagem de erro “o servidor não está disponível no momento” é
exibida. O que isso significa?
R: Às vezes, pode ocorrer uma suspensão temporária do serviço no servidor; tente
novamente mais tarde.
P: Uma mensagem de erro “O parâmetro está incorreto” é exibida. O que devo fazer?
R: As operações do programa OS Weather não serão afetadas e podem continuar
funcionando.
Problemas relacionados ao display da unidade principal:
P. Quais dados serão carregados no software OS Weather?
R. i. Para EMS100: Temperatura atual dos ambientes interno/externo
ii. Para RMS300 / RMS600: Temperatura e umidade atuais dos ambientes interno/
externo
P. O que significa?
R. Significa que a unidade principal foi conectada com sucesso ao PC e que os dados de
temperatura e ou umidade atuais estão sendo carregados. Se for desconectada do PC
(indicado por ), os dados não serão carregados.
P. Defini a faixa de temperatura no recurso de alerta do Software OS Weather, mas o
recurso de Alerta de gelo na unidade principal não responde de acordo. Por quê?
R. A unidade principal foi programada para responder apenas à faixa de temperatura padrão
de 3°C a -2°C (37°F a 28°F) recebida do sensor externo (canal 1). Não tem relação com
os ajustes feitos nos recursos de alerta do software.
P. A unidade principal tem memória para registro de dados de temperatura e/ou umidade?
R. Não.
Page 89

1
SWE
Liten trådlös Energimätare
Modell: ESM100 / ESM100U
BRUKSANVISNING
INNEHÅLL
Introduktion .............................................................. 2
Produktöversikt ....................................................... 2
Huvudenhet - vy framsida ..................................... 2
Huvudenhet - vy bakifrån ..................................... 3
Fjärrsändare .......................................................... 3
Sensorklämma ...................................................... 4
Nätkablar och faser i hushållet .............................. 4
Att komma igång ..................................................... 4
Lokalisera utgående fasledare ............................. 4
Sensorinställning ................................................... 5
Sändarinställning .................................................. 6
Huvudenhet .......................................................... 7
Sensordataöverföring ............................................ 7
Förstå elektricitet ..................................................... 7
Displaylägen ............................................................ 8
Pris ............................................................................ 8
Energisparläge ......................................................... 8
Radera data ............................................................. 9
Återställning ............................................................. 9
Felsökning ................................................................ 9
Specifikationer .......................................................
10
Försiktighetsåtgärder ............................................ 10
Om Oregon Scientific .............................................
11
EU-Försäkran om överensstämmelse ..................11
Page 90

2
SWE
INTRODUKTION
Tack för ditt val av en Oregon ScientificTM Liten trådlös
energimätare (ESM100 / ESM100U).
Den trådlösa lilla energimätaren visar vårt engagemang
för omgivningen. Med uppmärksamhet på de hot som
finns i vår värld, har Oregon Scientific™ kombinerat
tekniken, både praktiskt och estetiskt i denna ”line” av
omgivningsvänliga produkter.
Med detta kategori II mätinstrument, kan du se
din elkonsumtion i realtid. Genom att bevaka din
konsumtion kan du åtgärda problem för att sänka den.
Dina förbättringar ser du kontinuerligt på monitorn –
förväntad förbrukning / konsumtion kommer att sjunka.
Dessa produkter erbjuder praktiska lösningar samtidigt
som de fullföljer vårt ansvar mot omgivningen.
Tillsammans kan vi förbättra den värld vi lever i.
Var vänlig beakta följande säkerhetsaspekter vid
uppackning och användning av produkten.
NOTERING Ha denna manual tillhands när du
använder din nya produkt. Den innehåller en praktisk
steg-för-steg instruktion, samt teknisk specifikation och
varningsmeddelanden som du bör känna till.
Om produkten används på ett sätt som inte specificeras
i denna bruksanvisning, kan utrustningens inbyggda
skydd försämras.
PRODUKTÖVERSIKT
HUVUDENHET - VY FRAMSIDA
1
2
3
4
5
6
7
8
1. ENERGY: indikerar att energiförbrukning visas
2. COST: indikerar att kostnaden för
energiförbrukningen visas
3. Kostnad / energiförbrukning i realtid
4. Kostnadsenhet
5. REMOTE
/ MAIN: fjärrkontrollbatterier
svaga / huvudenhetbatterier svaga
6. PWR SAVE: energispar-funktionen är aktiverad
Page 91

3
SWE
7. Kostnad / energiförbrukning mätenheter (KW,
PENCE / CENTS per TIMME, PENCE/CENTS per
KWH, KWH, PENCE, CENTS)
8. Ackumulerad kostnad / energiförbrukning (sedan
senaste nollställning)
HUVUDENHET - VY BAKIFRÅN
1
2
3
4
5
6
7
8
1. Väggmonteringshål
2. Magneter för montering
3. SET: Gå in i inställningsläge för pris; bekräfta
inställning
4. UP: växla mellan visning av (kostnad / Energi);
starta fjärrkontrollsökning; öka prisvärde
5. DOWN: växla mellan visning av (kostnad / Energi);
aktivera / inaktivera energisparfunktion; minska
prisvärde
6. RESET: nollställer enheten och tömmer minnet;
sätter igång fjärrkontrollsökning
7. Batterifack
8. Hopfällbart bordsstativ
FJÄRRSÄNDARE
1
2
3
4
5
6
1. LED statusindikator: blinkar under sökning
2. Uttag för sensorkabel
3. Väggmonteringshål
4. Batterifack
Page 92

4
SWE
5. RESET: återställer enheten till fabriksinställning
6. CHECK: sänder varje 2s (under 30s) för att få
kontakt med huvudenheten
SENSORKLÄMMA
Modell CT100
(Europa / UK)
Modell CT110
(USA, Canada & andra
länder)
Sensor för:
• 220V till 250V AC
• kabeldimension upp
till 10mm i diameter
&/eller 70A RMS
Sensor för:
• med 120V AC + industri
• kabeldimension upp till
16mm i diameter &/eller
200A RMS
2
3
1
1
2
3
1. Hål för elektrisk kabel
2. Plasttapparna
3. Sensoranslutningskabel
Extra givarklämmor såsom de som anges nedan kan
köpas separat. För mer information, kontakta ditt lokala
inköpsställe.
• Modell CT100
• Modell CT110
* Egenskaper och tillbeh
ör kan skilja mellan olika
länder.
NÄTKABLAR OCH FASER I HUSHÅLLET
El distribueras vanligen som 1-fas och 3-fas system.
UK: De flesta hus i UK använder 1-fassystem. I
1-fas system, flyter strömmen till och från dina
hushållsmaskiner genom fasledare och nolledare.
Nolledaren har en spänning nära 0V medan fasledaren
har en spänning mellan 120 och 240V. Skillnaden
mellan dessa två ledare gör att strömmen flyter genom
dina hushållsmaskiner.
Europa: De flesta hus i Europa (utom UK) använder
3-fassystem. I 3-fassystem flyter strömmen i dina
maskiner genom en grupp av tre ledningar – var och
en med en pulserande fas. Eftersom det finns 3 ledare
behöver varje en individuell givare, som kan köpas
separat.
ATT KOMMA IGÅNG
LOKALISERA UTGÅENDE FASLEDARE
Sensorklämman skall klämmas över den isolerade
fasledaren. Det rekommenderas att du klämmer
den över den utgående ledaren som kommer ut från
mätaren som finns i mätarskåpet.
Denna produkt använder Typ C strömsensor,
anslut inte direkt eller koppla loss från LIVSFARLIGA
anslutningar.
Page 93

5
SWE
Våld eller onaturliga påfrestningar får under inga
omständigheter förekomma på ledningar eller
anslutningar.
VARNING Var hela tiden försiktig så att du inte rör
vid eller kommer i kontakt med oisolerade ledare eller
anslutningar.
Om du har minsta svårighet med anslutning eller
installation, skall en behörig elektriker tillkallas.
INKOMMANDE
LEDNING
UTGÅENDE
LEDNIN
G
SENSORINSTÄLLNING
VARNING
Det rekommenderas att de aktuella
sensorklämmorna installeras av en behörig elektriker.
Slå av huvudströmbrytaren innan anslutning eller
bortkoppling av sensorklämmorna utföres.
1. Använd tummen och pekfingret, tryck inåt på
plasttapparna som finns på vardera sidan av
sensorn för att öppna överdelen.
2. Ta bort överdelen av sensorn.
2
1
3. Placera den aktiva faskabeln (utgående) i
kabelhålet.
NOTERA Dra eller böj inte kablarna. Lägg kabeln
i position så att du kan stänga sensorklämman säkert
runt kabeln.
4. Återmontera överdelen på sensorklämman och
tryck ner för låsning.
5. Anslut sensorkabeln i något av
kabelanslutningshålen.
Page 94

6
SWE
4
3
5
NOTERA För 3-fassystem, anslut en givarklämma för
varje fasledare.
• Vid anslutning av sensorgivaren, se till att varje
sensorgivare är ansluten till olika faser annars blir
mätresultatet felaktigt.
• Anslut sedan alla sensorkablarna till fjärrsändaren.
Upp till 3 sensorklämmor kan anslutas till en
fjärrsändare.
VARNING
• Signalledaren (ca 1V, 1mA) på sensorgivaren är
dubbelisolerad, avsedd för installation i mätarskåp
för vanliga hushåll. Ledningarna skall skyddas från
skarpa kanter med genomföringar när de passerar
en skyddande vägg.
• Använd inte enheten om den är skadad eller om
dess skydd blivit sämre.
SÄNDARINSTÄLLNING
1. Ta bort batteriluckan.
2. Se till att batterierna sätts in med rätt polaritet (+ / -).
3. Tryck
RESET efter varje batteribyte.
4. Tryck och håll inne
CHECK tills LED:n blinkar.
5. Stäng batteriluckan.
6. Montera sändaren på en skruv.
NOTERA Installera batteri i sändaren före
huvudenheten.
För bästa resultat:
• Placera sensorn inom 30m från huvudenheten.
• Undvik att placera enheten så att den utsätts för
direkt solljus eller fukt.
• Placera fjärrenheten så att den är riktad mot
huvudenheten, minimera hinder såsom dörrar,
väggar och möbler.
TIPS Sändningsräckvidden kan variera beroende på
många faktorer. Du kan behöva experimentera med
olika platser för att erhålla det bästa resultatet.
Page 95

7
SWE
HUVUDENHET
1. Ta bort batteriluckan.
2. Se till att batterierna sätts in med rätt polaritet (+ / -).
3. Tryck
RESET efter varje batteribyte.
4. Stäng batteriluckan.
SENSORDATAÖVERFÖRING
Om huvudenheten inte visar data eller efter varje
batteribyte i sändaren:
1. Tryck och håll inne
CHECK (finns i sändaren)
tills LED:n blinkar. Sändaren sänder data till
huvudenheten varje 2s i 30s.
2. Tryck och håll inne
UP på huvudenheten för att leta
efter signal från sändaren.
FÖRSTÅ ELEKTRICITET
Spänning
(volt)
Elektrisk potential. Fastställd till 220V250V eller 120V beroende på plats.
X
Ström
(ampere)
Mängd ström som flyter genom t.ex.
en kabel.
(Sensorn mäter denna för att beräkna
watt)
=
Effekt
(watt)
Mängd energi som förbrukats.
(KW = 1000W). Denna typ av
information visas på översta raden i
Energy mode.
KWh är ett mått på energikonsumtion. Kilowattimme
(KWh) representerar användning av 1000W i 1 hel
timme, vilket är detsamma som 10 x 100W glödlampor
som lyser samtidigt i 1 timme.
Så snart elpriset har knappats in, kan monitorn visa en
förväntad kostnad.
NOTERA Denna product är endast för vägledande och
utbildande användning. Dess syfte är att ge förstående
för kostnader och elförbrukning för utrustningar i
hemmet. Den ersätter inte din exakta elmätare i
hemmet.
Page 96

8
SWE
DISPLAYLÄGEN
Där finns 2 olika displaylägen att välja på:
COST
UP / DOWN
Verklig
elkostnad per
timme
Ackumulerad
kostnad sedan
senaste
nollställning
ENERGY
Verklig
förbrukning i
realtid
Ackumulerad
energiförbrukning
(KWh) sedan
senaste
nollställning
PRIS
För att kalkylera den ungefärliga förbrukningskostnaden,
slå in pris per KWh.
Att slå in pris:
1. Tryck och håll inne
SET.
2. Tryck UP / DOWN för att ändra inställning.
3. Tryck
SET för att verkställa och gå till nästa siffra.
NOTERA Varje elleverantör har sitt eget elpris. Detta
pris finns på elfakturan.
TIPS Vissa leverantörer har en stafflad prislista där
priset ändras när förbrukningen överskrider en viss
gräns. Det rekommenderas att ett medelvärde används
som pris.
t.ex. Total förbrukning är 1000KWh (500+500) som kan
delas upp som:
500 KWh för 15p = £75
500 KWh för 10p = £50
Sedan, £125 / 1000KWh = 12.5p
På liknande sätt använder vissa leverantörer olika
tariffer för olika tider under dygnet. Det rekommenderas
att ett medelvärde används som pris.
t.ex. Total förbrukning är 3000KWh (1000KWh på
dagen + 2000 på natten) som kan delas upp som:
1000 KWh för 15p = £150
2000 KWh för 5p = £100
Sedan, £250 / 3000KWh = 8.3p
ENERGISPARLÄGE
Genom att minska frekvensen för datainsamling från
varje 6s till varje 60s, kommer batterilivslängden att
förlängas.
Page 97

9
SWE
Att aktivera energisparlägesfunktionen:
• Tryck och håll inne DOWN.
PWR SAVE indikerar att energisparfunktionen är
aktiverad
RADERA DATA
NOTERA
När den totala kostnaden når 999.99 eller
total energi når 999.99KWh, kommer siffrorna att blinka
för att visa att maximum uppnåtts och att data måste
raderas.
Att radera TOTAL data (kostnad / energi):
• Tryck och håll inne UP och DOWN samtidigt.
ÅTERSTÄLLNING
Tryck RESET för att återställa produkten till
grundinställning.
FELSÖKNING
PROBLEM SYMTOM ÅTGÄRD
Konstig
avläsning
Konstig
avläsning
Slå in pris.
Kontrollera att
utrustningen inte
slagit av sig själv
eftersom detta kan
uppfattas som en
plötslig störning i
systemet.
Höga
avläsningsvärden
Kontrollera att
utrustningen
slagits av när den
inte används.
“- - - -“
visas
Ej synkroniserad
Tryck och håll
inne CHECK på
sändaren.
Därefter, tryck och
håll inne UP på
huvudenheten.
Om det fortfarande
krånglar, tryck
RESET på
sändare och
huvudenhet.
Page 98

10
SWE
“0.00” visas Problem med
sensorn
Kontrollera att
sensorklämman
sitter på rätt sätt
och är stängd.
Sensorklämman
kan vara
skadad. Byt ut
sensorklämman
mot ny.
SPECIFIKATIONER
HUVUDENHET
Dimensioner
(L x B x H)
66 x 27 x 85 mm
(2,6 x 1,1 x 3,3 tum)
Vikt 80 g utan batteri
Sändningsfrekvens 433 MHz
Överföringsavstånd Maximalt 30 meter vid fri sikt
Informationsupp-
datering
Ungefär var 6:e sekund (EU)
/ 12 sekund (US / Canada)
Drift 2 x UM-4 (AAA) 1.5V batterier
FJÄRRSÄNDARE
Dimensioner
(L x B x H)
59 x 28 x 97 mm
(2,3 x 1,1 x 3,8 tum)
Vikt 60 g utan batteri
Drift 2 x UM-3 (AA) 1.5V batterier
SENSORKLÄMMA
CT100
Dimensioner
(L x B x H)
40 x 30 x 54 mm
(1,6 x 1,2 x 2,1 tum)
Vikt 62 g
CT110
Dimensioner
(L x B x H)
53 x 40 x 76 mm
(2,1 x 1,6 x 3,0 tum)
Vikt 186 g
FÖRSIKTIGHETSÅTGÄRDER
• Utsätt inte apparaten för kraftigt våld, stötar, damm,
extrema temperaturer eller fukt.
• Täck inte för ventilationshålen. Försäkra dig om
att närliggande föremål såsom tidningar, dukar,
gardiner m.m. inte täcker för ventilationshålen.
• Utsätt inte produkten för vatten. Om du spiller
vätska över den, torka omedelbart med en mjuk,
luddfri trasa.
• Rengör inte apparaten med frätande eller slipande
material.
• Mixtra inte med enhetens interna komponenter då
detta kan påverka garantin.
• Använd enbart nya batterier. Blanda inte nya och
gamla batterier.
• Av trycktekniska skäl, kan displaybilderna i denna
manual skilja sig från dem i verkligheten.
Page 99

11
SWE
• Förbrukad produkt måste sorteras som specialavfall
på avsedd miljöstation och får inte slängas som
vanligt restavfall.
• Om denna produkt placeras på ytor med speciell
finish såsom lackat trä etc. kan dessa ytor skadas.
Ta kontakt med din möbeltillverkare för att få mer
information om huruvida det går bra att placera
föremål på ytan. Oregon Scientific kan inte hållas
ansvariga för skador på träytor som uppkommit på
grund av kontakt med denna produkt.
• Innehållet i denna manual får ej kopieras utan
tillverkarens medgivande.
• Kassera inte gamla batterier som osorterade
sopor. Insamling av kasserade batterier måste ske
separat.
• Notera att vissa enheter är utrustade med en
batterisäkerhetsstrip. Ta bort denna strip från
batteriutrymmet innan produkten används första
gången.
NOTERING De tekniska specifikationerna för denna
produkt och innehållet I användarmanualen kan komma
att ändras utan vidare upplysning.
NOTERING Egenskaper och tillbehör kan skilja mellan
olika länder. För mer information, kontakta ditt lokala
inköpsställe.
OM OREGON SCIENTIFIC
Besök vår hemsida (www.oregonscientific.se) för
att se mer av våra produkter såsom digitalkameror;
MP3 spelare; projektionsklockor; hälsoprodukter;
väderstationer; DECT-telefoner och konferenstelefoner.
Hemsidan innehåller också information för våra kunder
i de fall ni behöver ta kontakt med oss eller behöver
ladda ner information.
Vi hoppas du hittar all information du behöver på vår
hemsida och om du vill komma i kontakt med Oregon
Scientific kundkontakt besöker du vår lokala hemsida
www.oregonscientific.se eller www.oregonscientific.
com för att finna telefonnummer till respektive
supportavdelning.
EU-FÖRSÄKRAN OM ÖVERENSSTÄMMELSE
Härmed intygar Oregon Scientific att denna Liten
trådlös Energimätare (modell: ESM100 / ESM100U)
står i överensstämmelse med de väsentliga
egenskapskrav och övriga relevanta bestämmelser som
framgår av direktiv 1999/5/EG. En signerad kopia av
“DECLARATION OF CONFORMITY” kan erhållas vid
hänvändelse till OREGON SCIENTIFIC servicecenter.
LÄNDER SOM OMFATTAS AV RTTE-DIREKTIVET
Alla länder inom EU, Schweiz CH
och Norge N
Page 100

Alle programma’s en kiest Windows Update.
AAN staat, maak dan het aangevinkte vakje leeg om
?
), dan worden geen
FELSÖKNINGSGUIDE
EMS100 / RMS300 / RMS600
Datorrelaterade problem:
Q. Vilka datorer är kompatibla med OS Vädermjukvara?
A. Persondator eller laptop som kör Microsoft Windows XP SP2 eller Vista. Apple Mac
datorer är ej kompatibla med mjukvaran. Systemkraven är:
• Processor: Pentium 4 eller bättre
• RAM: Min. 512MB
• Fritt hårddiskutrymme: Min. 512MB
• Skärmupplösning: 1024 x 768 pixlar (rekommenderas)
Q. Fungerar programmet och kan det behandla information i Sleep Mode?
A. Nej. När PC:n går ner i Sleep mode, inaktiverar datorn alla arbetsfunktioner,
inklusive USB-porten. Därför är det ej möjligt att kommunicera via USB-porten. Av denna
anledning, står det klart i bruksanvisningen hur man avaktiverar sleep mode funktionen
på datorn. Se bruksanvisningen eller installationsguiden för information.
Q. Kan data från huvudenheten och / eller huben överföras till PC:n när denna är
frånkopplad?
A. Nej. Under alla omständigheter måste PC:n vara igång när man överför väderdata
(uppladdning eller nerladdning).
i. För flerdagars väderstationer (I300, I600, I900), som laddar ner väderinformation som
visas på en display, rekommenderas att USB-huben alltid är ansluten till USB-porten i
PC:n för att ingen information skall gå förlorad.
ii. För väderstationer (RMS300, RMS600, EMS100, WMR100N, WMR200, WMRS200)
som hämtar information från sensorer och laddar upp till PC, behöver PC:n endast
vara igång vid uppladdningen. Stationen kan arbeta kontinuerligt och visa den
inhämtade informationen på huvudenheten.
Q. Hur lång tid tar normalt en dataöverföring?
A. Tiden varierar mellan olika modeller.
i. För flerdagars väderstationer är ca 30 minuter dagligen tillräckligt för att få aktuell
väderinformation.
ii. För väderstationer som endast kan ladda upp information till PC:n är ca 1 minuts
daglig anslutning till datorn tillräckligt för att ta emot aktuell väderdata.
iii. För WMR200 är tiden beroende på hur mycket väderinformation som lagrats i minnet.
Q. Hur kan datorn jobba snabbare med OS Vädermjukvara?
A. Genom att köra Windows update, kommer systemet att uppdateras med nya
windowsfunktioner, drivrutiner och systemuppdateringar. Det är en god idé att göra detta
regelbundet. För att göra detta:
a. Klicka på
ˇ
Start.
b. I menyn, scrolla till
All programs och välj Windows Update.
Vädermjukvarurelaterade problem:
Q. Var kan jag hitta senaste programvara och systemsupport information?
A. Så snart programmet installerats, kommer datorn automatiskt att påminna dig om
nya programuppdateringar. Följ stegen som i installationsguiden.
Om programmet inte är installerat på din PC, kan du ladda ner senaste
versionen från: http://download.os-weather.com. En ruta uppträder med en länk till
den senaste mjukvaran (Download) samt en installationsguide. Läs noggrant igenom
installationsguiden och följ instruktionerna för att ladda ner mjukvaran. För ytterligare
hjälp finns det också en länk till denna Felsökningsguide, Komma igång snabbt guide och
Bruksanvisning.
Q. Vad skall jag göra om jag får meddelandet “Repair C++ Redistributable to its
original state”?
A. Se instruktioner i senaste Installationsguiden – som kan hämtas via
http://download.
os-weather.com.
Q. Följande felmeddelande kommer upp:
o “CLOCK/TH/BARO.tmp contains an incorrect path”
o “Weather OS\DATA\TH\sensors.temp”
o “Encountering a sharing violation while accessing C:\ProgramFiles\
OregonScientific\Weather\OS\DATA\TH\sensors[#-#day].temp”
Vad skall jag göra?
A. Om du har Windows Vista, kolla först statusen på User Account Control (UAC).
Om User Account Control är påslagen, klicka antingen för att avmarkera och slå av
den, eller om du beslutar att behålla den PÅ, avinstallera och återinstallera programmet.
När du återinstallerar programmet, skall du spara programmet i C:\Users\admin
och skapa en ny mapp och kalla den OS Väder. För mer detaljerad information, se
Installationsguiden.
Q. SENSOR fältet på OS hemsidan visar streckade linjer där det skall finnas
information. Vad skall jag göra?
A. i. För EMS100: Återställ enheten.
ii. För RMS300 / RMS600: Tryck och håll inne + MODE.
Serverrelaterade problem:
Q. Ett felmeddelande “server is not currently available” kommer upp. Vad menas
med detta?
A. Något problem med serverkommunikationen har uppstått; försök igen senare.
Q. Ett felmeddelande “The parameter is incorrect” kommer upp.
Vad skall jag göra?
A. Funktionen av OS väderprogram påverkas inte och kan fortsätta att köras.
Problem relaterade till Huvudenhet Display:
Q. Vilka data laddas upp till väderprogramvaran?
A. i. För EMS100: Realtids-inomhus-/utomhustemperatur
ii. För RMS300 / RMS600: Realtids-inomhus-/utomhustemperatur och luftfuktighet
Q. Vad betyder ?
A. Det betyder att huvudenheten är ansluten till PC:n och att realtidstemperaturen och/
eller luftfuktighetsdata laddas upp. Om enheten kopplas från PC:n (indikeras med
), kommer data inte att laddas upp.
Q. Jag har ställt in temperaturområdet i varningsfunktionen i mjukvaran men
isvarningsfunktionen på huvudenheten svarar inte som den ska. Varför?
A. Huvudenheten är programmerad att bara svara på standardtemperaturområdet på 3°C till
-2°C (37°F till 28°F) som mottas från utomhussensorn (kanal 1). Den har ingen koppling
med några inställningar som du gör i mjukvarans varningsfunktioner.
Q. Har huvudenheten något minne för dagaloggning av temperatur- och/eller
luftfuktighetsdata?
A. Nej.
SWE
 Loading...