

Page 1
Weather@Home
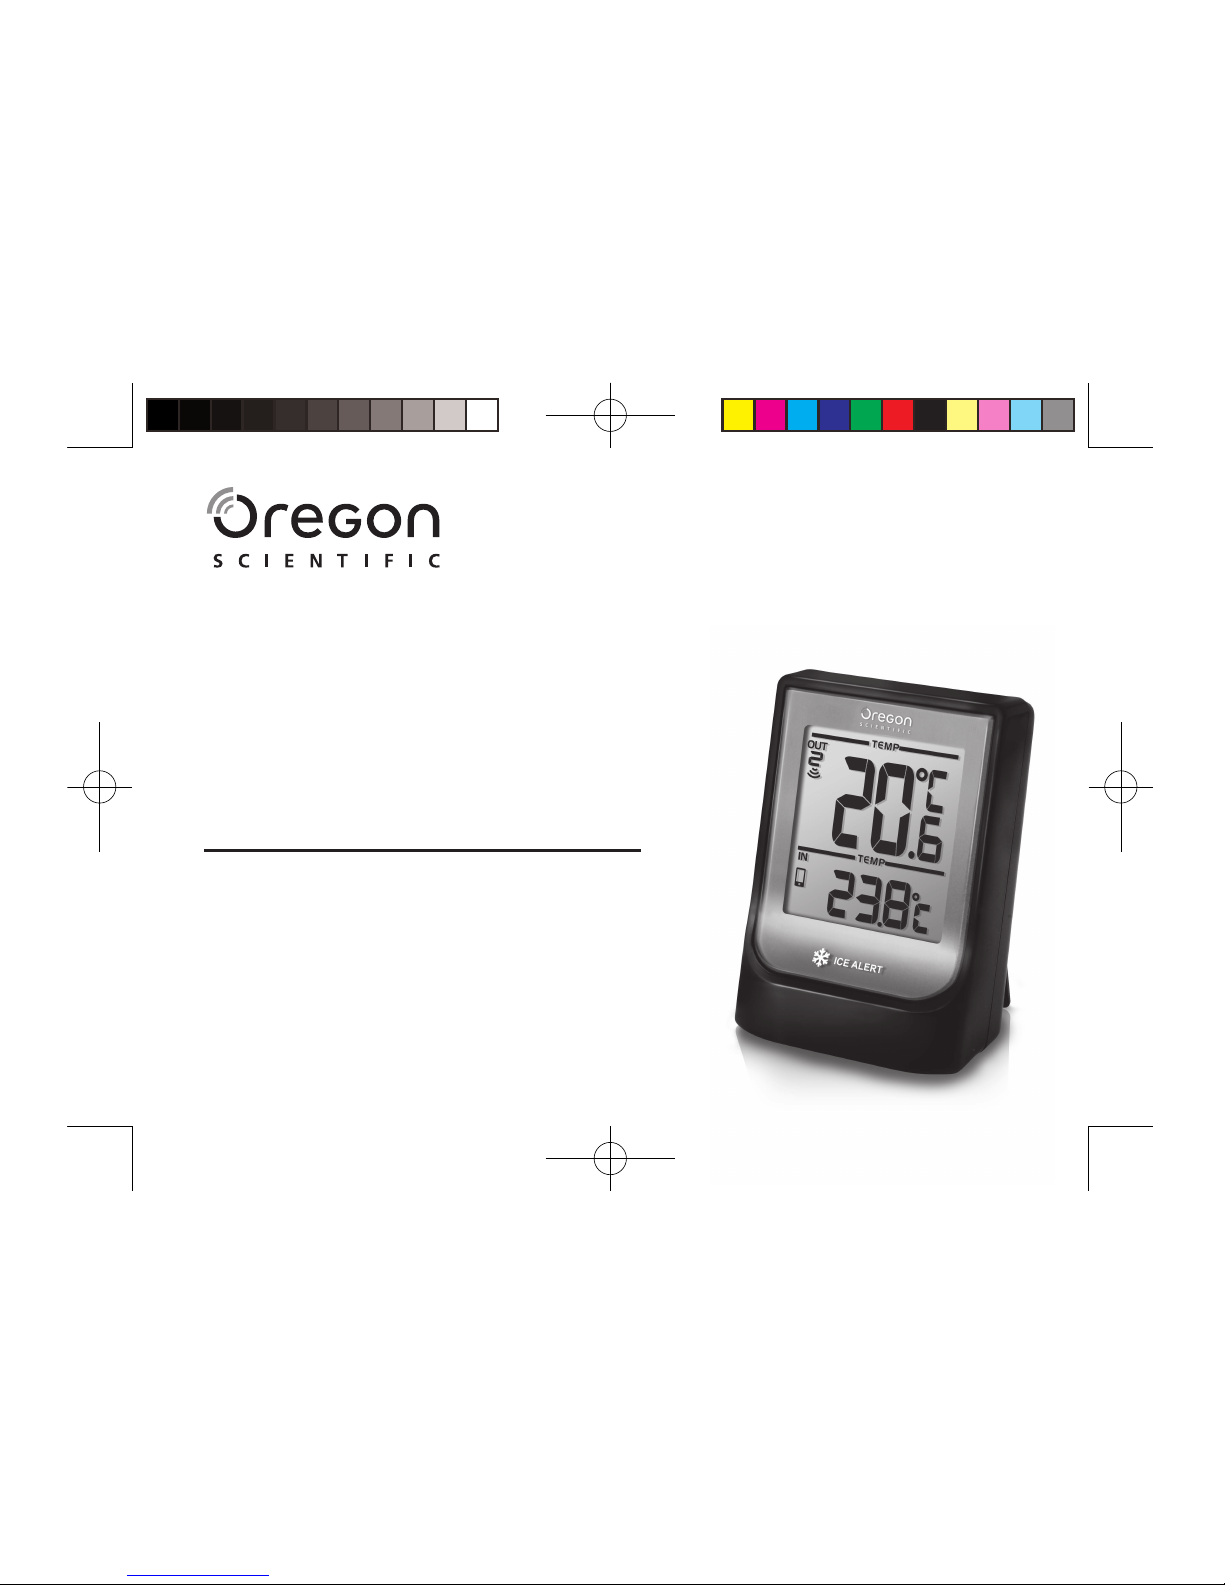
Thermo Bluetooth-enabled
Thermometer
USER MANUAL
EMR211X
BAR218HG-18-UM-EN-R1.indd 1 2018/4/13 下午12:14
Page 2

EN
1
Weather@Home Thermo
Bluetooth-enabled Thermometer
Model: EMR211X
USER MANUAL
CONTENTS
Introduction .............................................................. 2
Overview ................................................................... 2
Front view .............................................................. 2
Rear view ............................................................... 2
Remote Sensor (THN132N) ................................... 3
Getting started .......................................................... 3
Insert batteries ....................................................... 3
Remote sensor...... .................................................... 3
Sensor data transmission ...................................... 4
Temperature .............................................................. 4
Ice warning ............................................................. 4
Reset .......................................................................... 4
Connect with your mobile device ........................... 5
Paring your Thermometer ...................................... 5
Settings .................................................................. 6
View current readings ............................................ 7
View history readings .............................................. 7
Optional sensor for additional information ........... 7
Precautions ............................................................... 8
Specifications ........................................................... 8
About oregon scientific ........................................... 9
Eu-Declaration of Conformity ................................. 9
Disposal Information for Users ............................... 9
FCC statement ........................................................ 10
EMR211X_M_EU_EN_R7.indd 1 2018/8/15 下午4:29
Page 3
EN
2
INTRODUCTION
Thank you for selecting our Oregon ScientificTM
Weather@Home Bluetooth-enabled Thermometer,
which has changeable display on indoor and outdoor
temperature.
NOTE Please keep this manual handy as you use
your new product. It contains practical step-by-step
instructions, as well as technical specifications and
warnings you should know about.
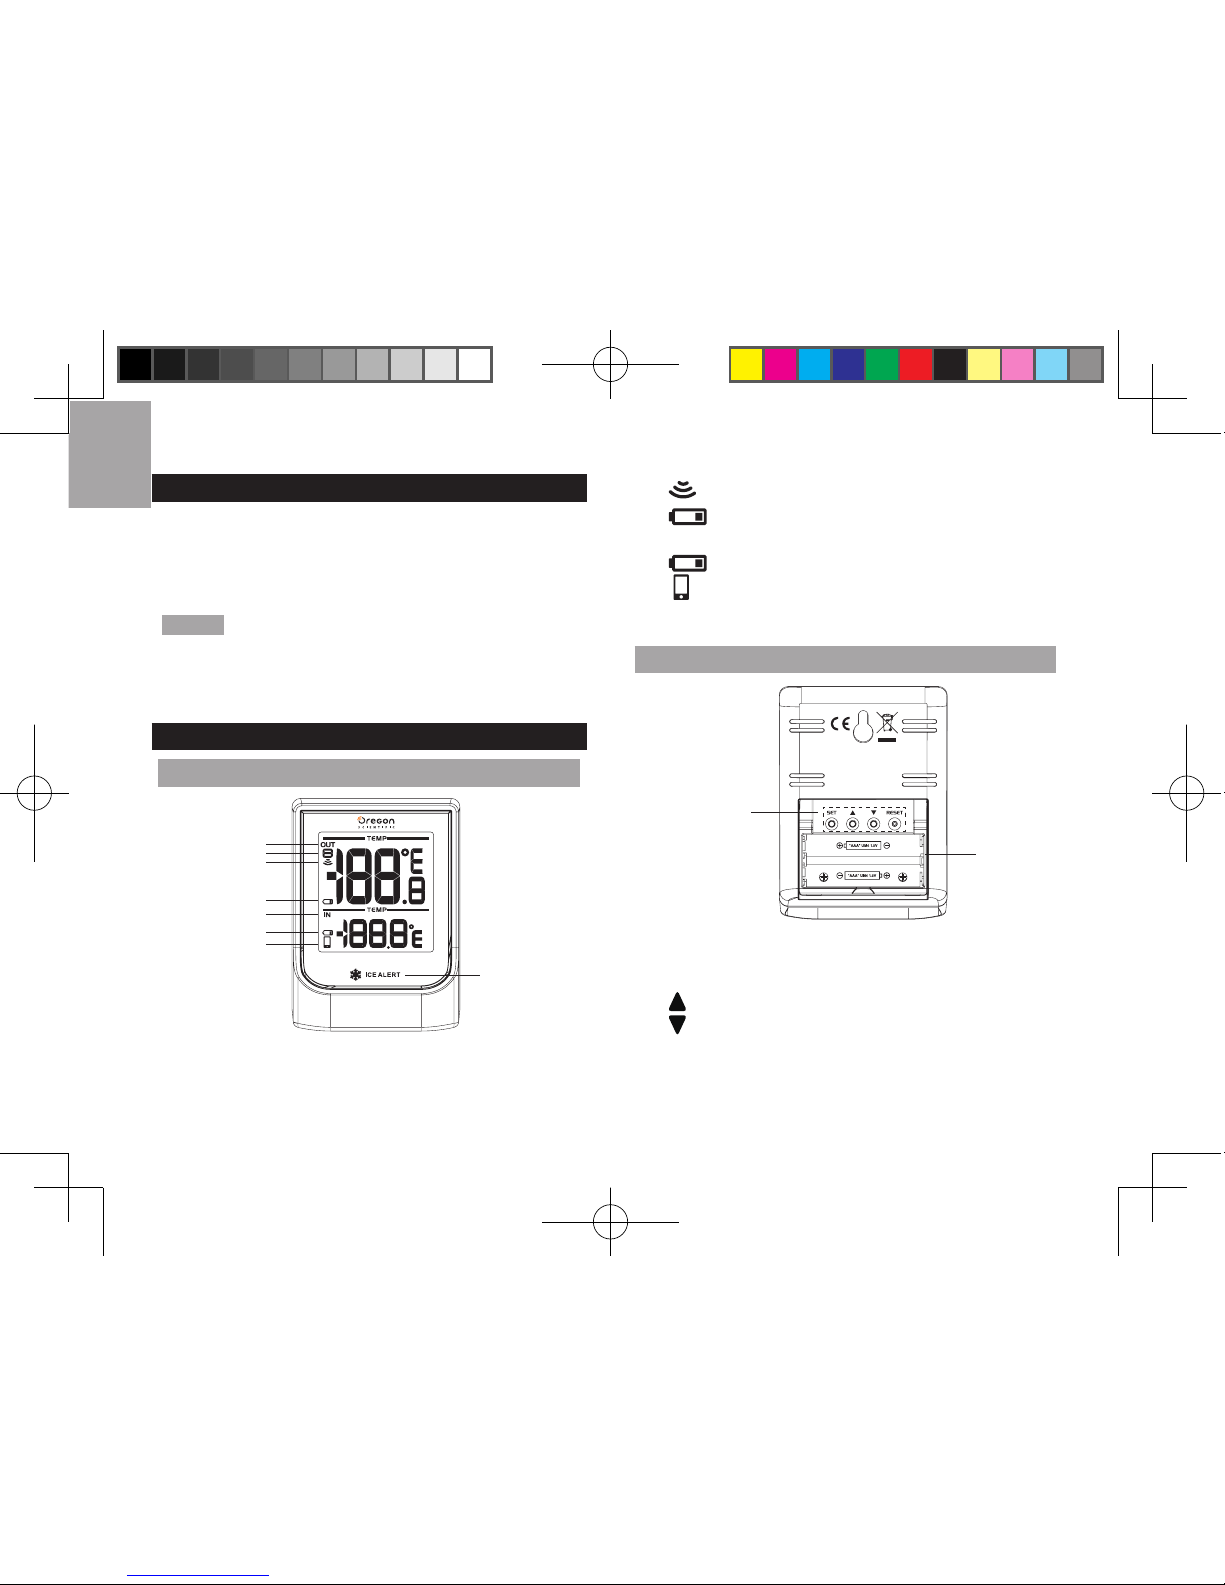
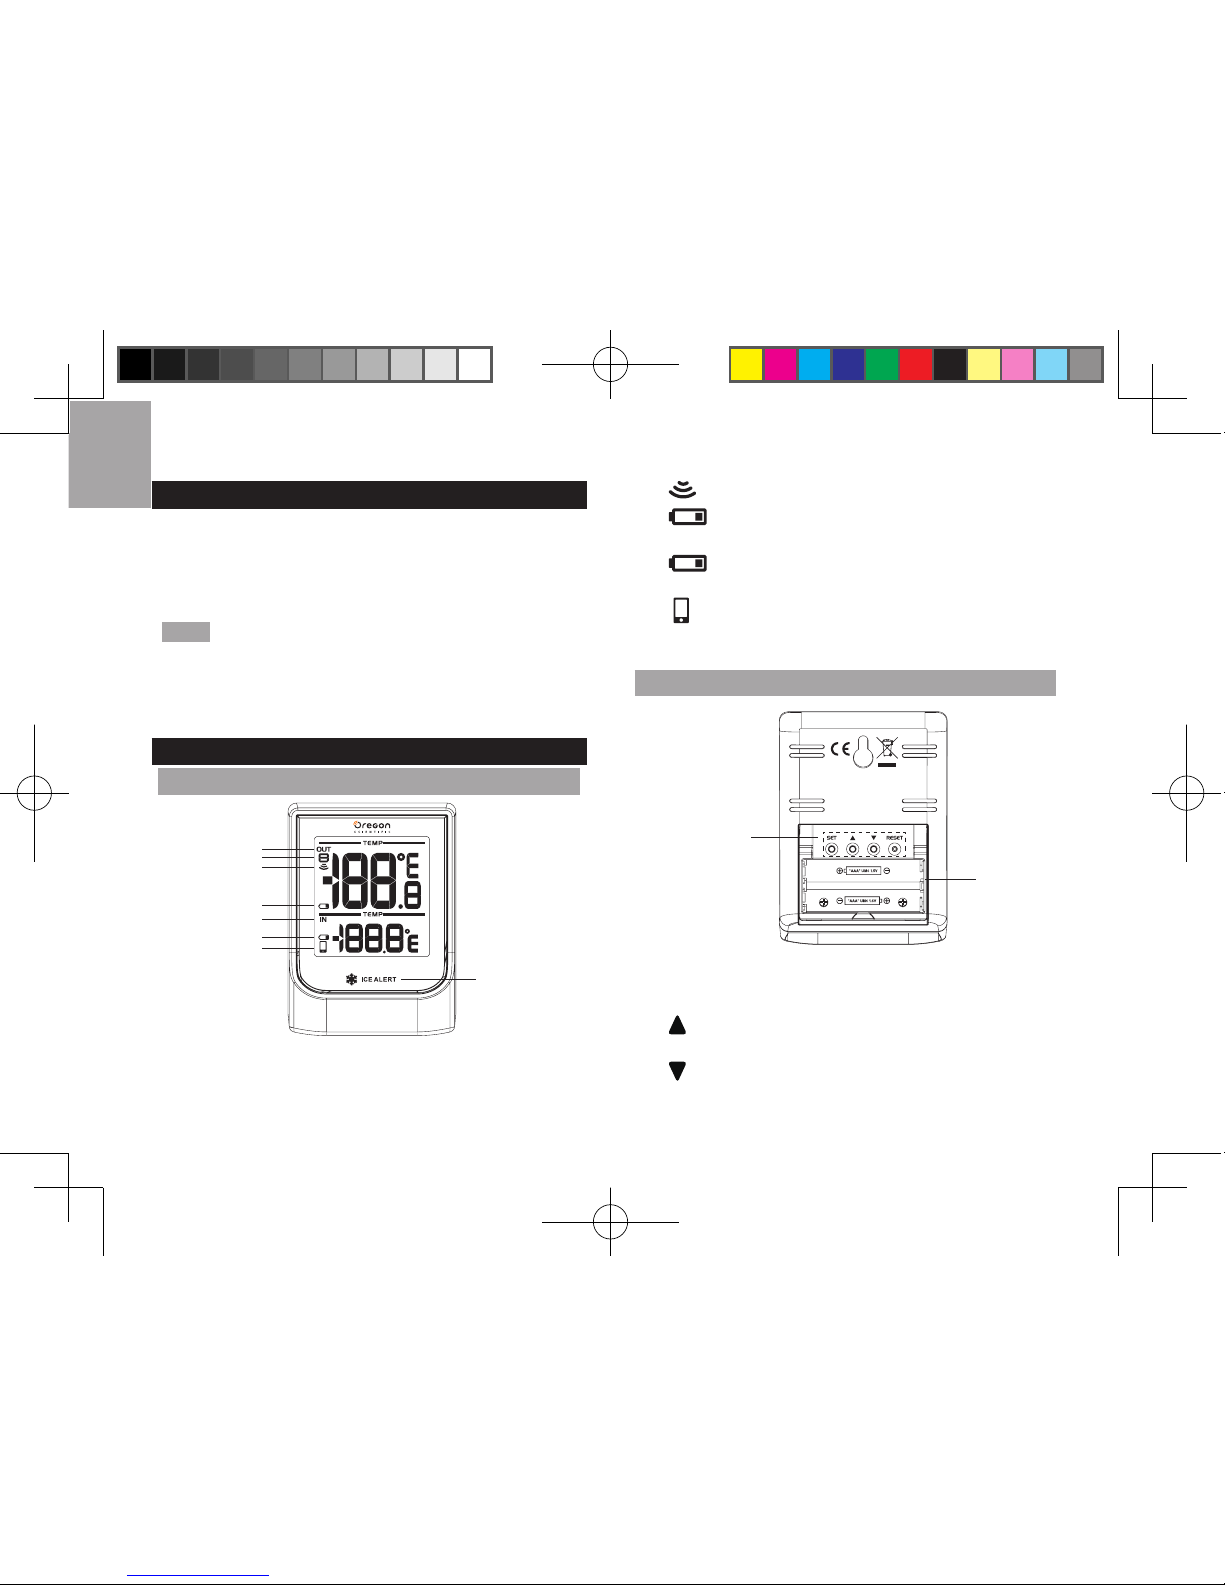
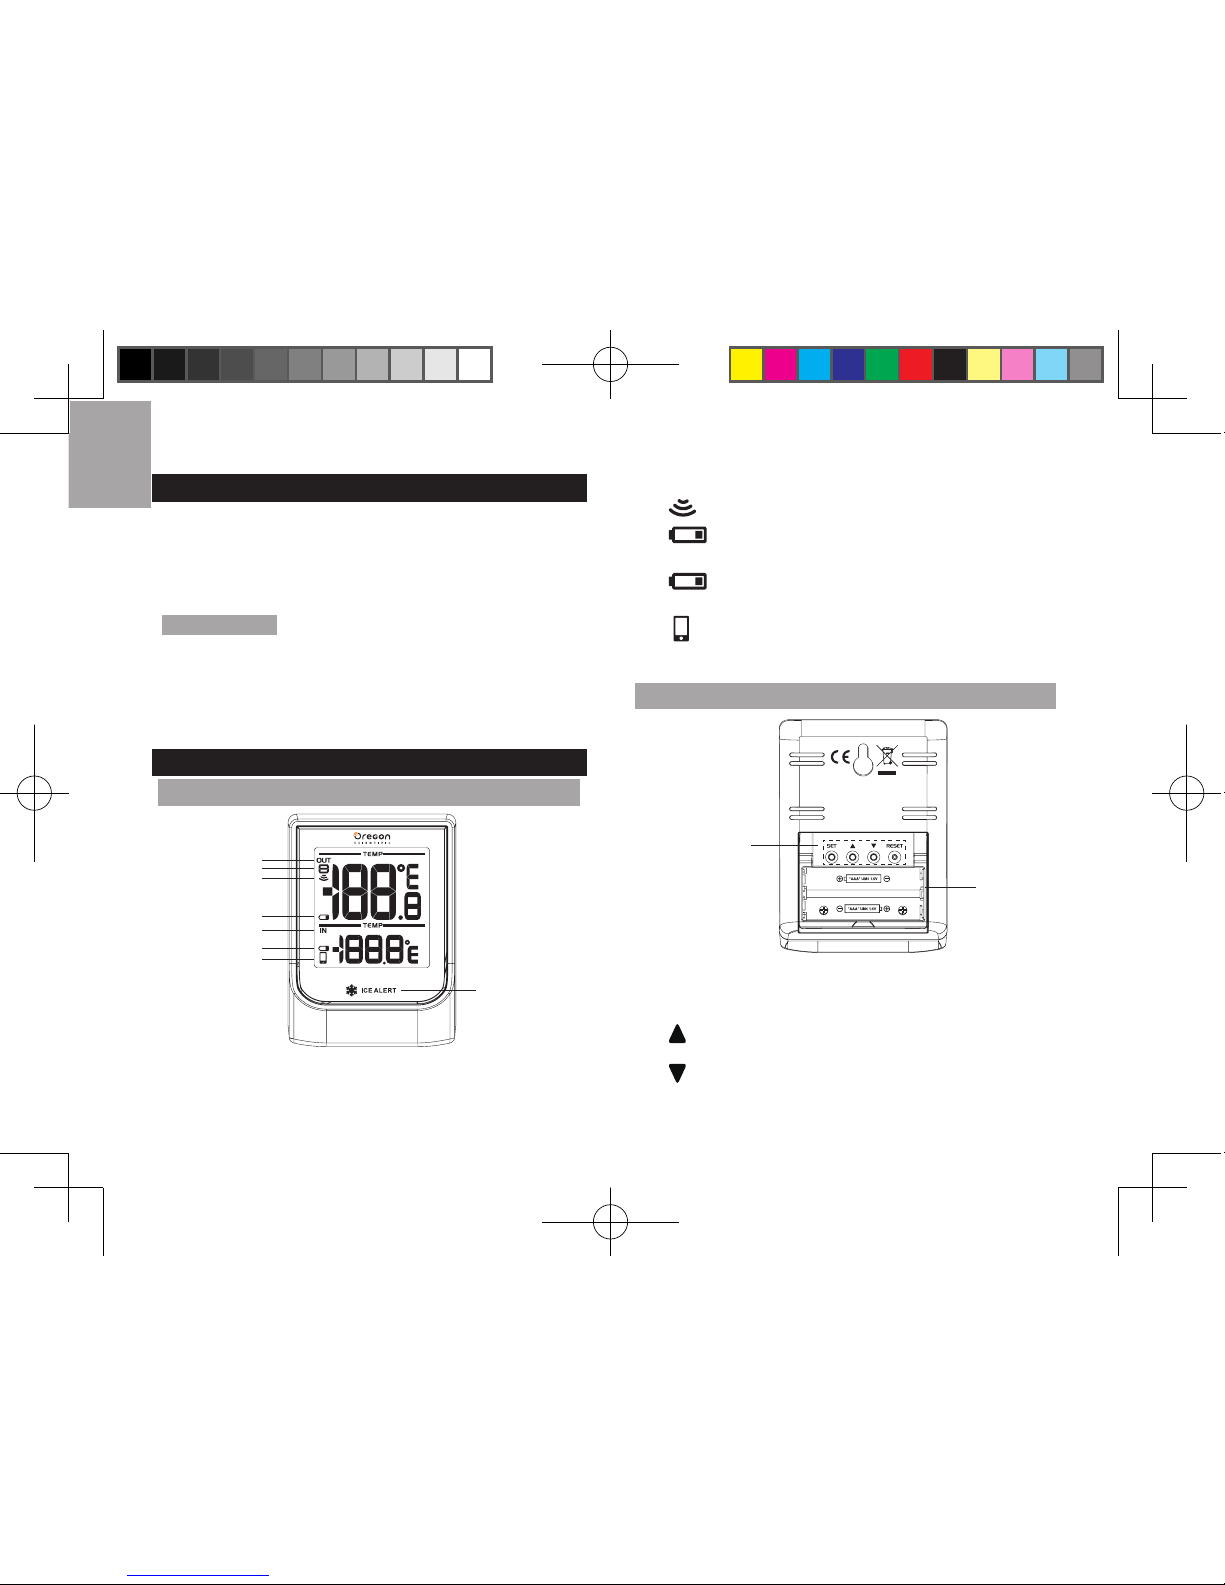
OVERVIEW
FRONT VIEW
1
2
3
4
5
6
7
8
1. Outdoor temperature reading (°C/°F)
2. Sensor channel indicator
3. : Sensor reception indicator
4. : outdoor remote sensor battery low
5. Indoor temperature reading (°C/°F)
6. : indoor remote sensor / main unit battery low
7. : BLE connection indicator
8. Ice alert LED indicator
REAR VIEW
1. 2. 3.
4
5
1. SET: select temperature unit (°C/°F); pair up
Bluetooth function
2. : select outdoor channels (1-5); search remote sensor
3. : select outdoor channels (1-5); auto-scan among sensors
4. RESET: reset the unit to default settings
5. Battery compartment
EMR211X_M_EU_EN_R7.indd 2 2018/8/15 下午4:29
Page 4
EN
3
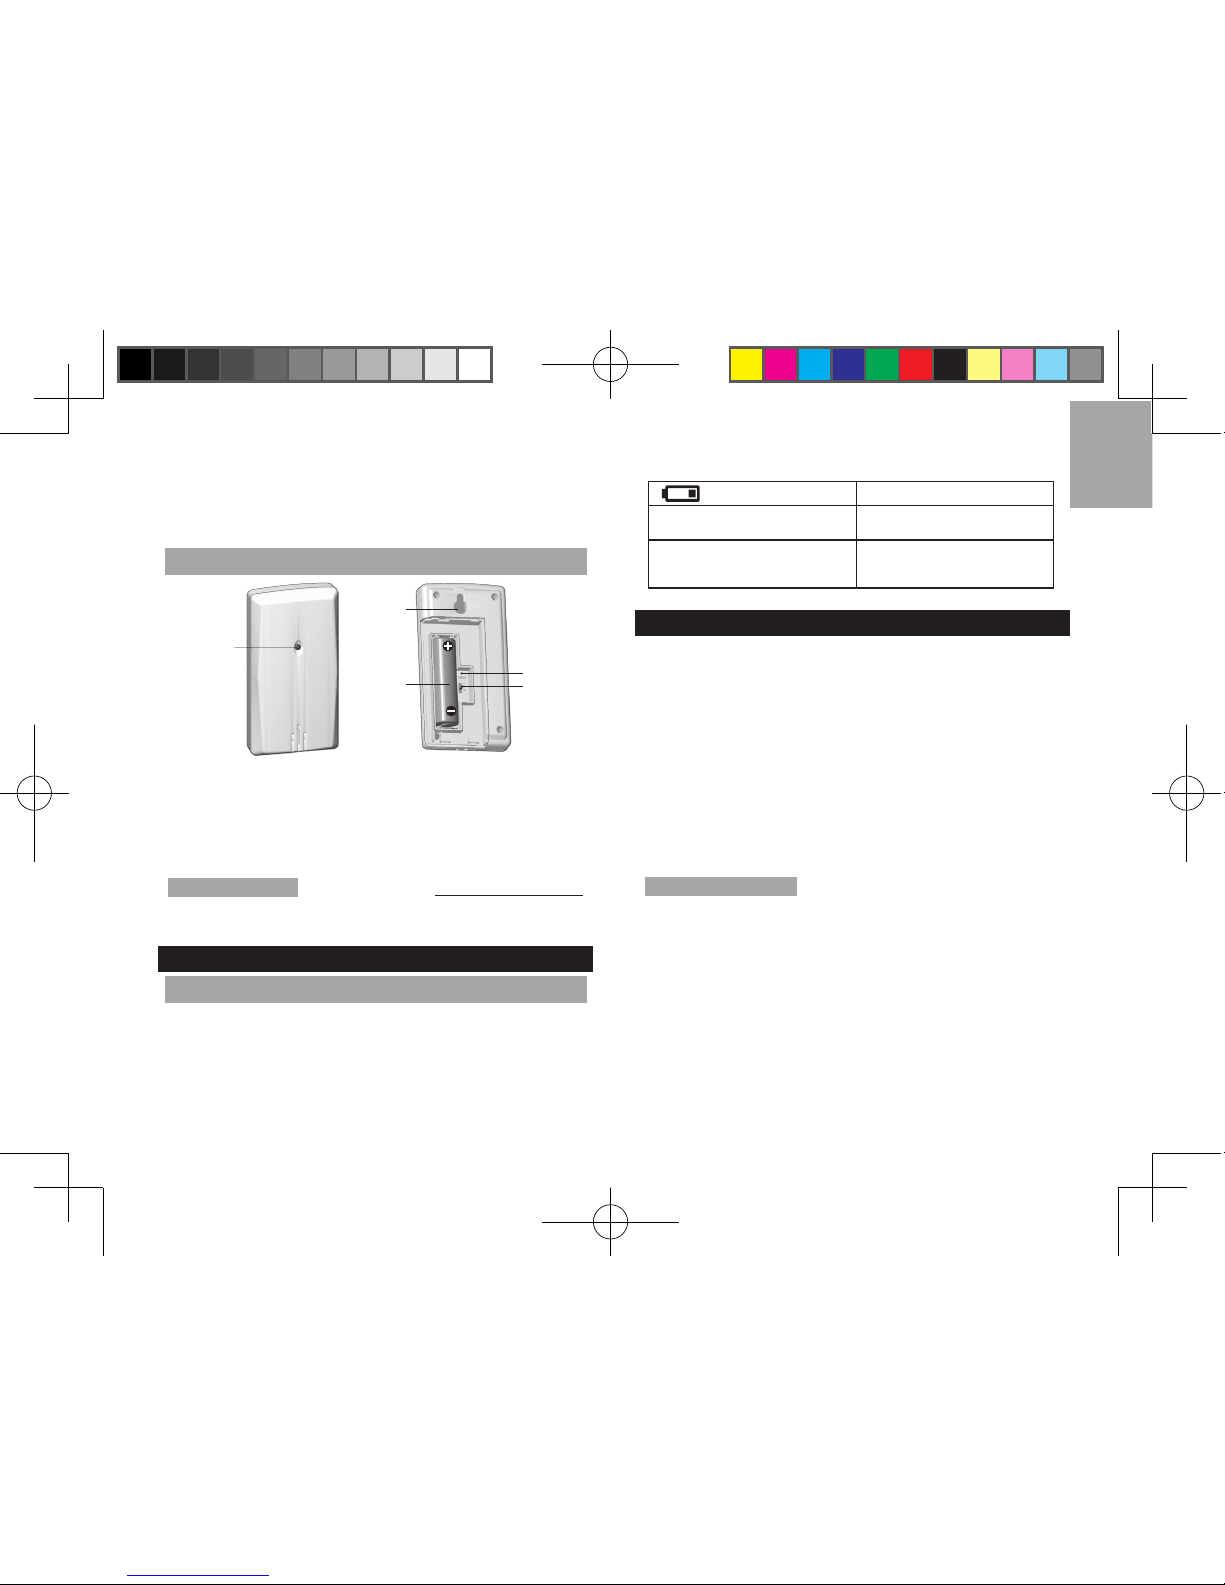
REMOTE SENSOR (THN132N)
1
2
3
4
5
1. LED status indicator
2. Wall mount hole
3. Battery compartment
4. RESET hole
5. CHANNEL switch
REFERENCE Visit our website www.oregonscientific.com
to learn more about the compatible sensors.
GETTING STARTED
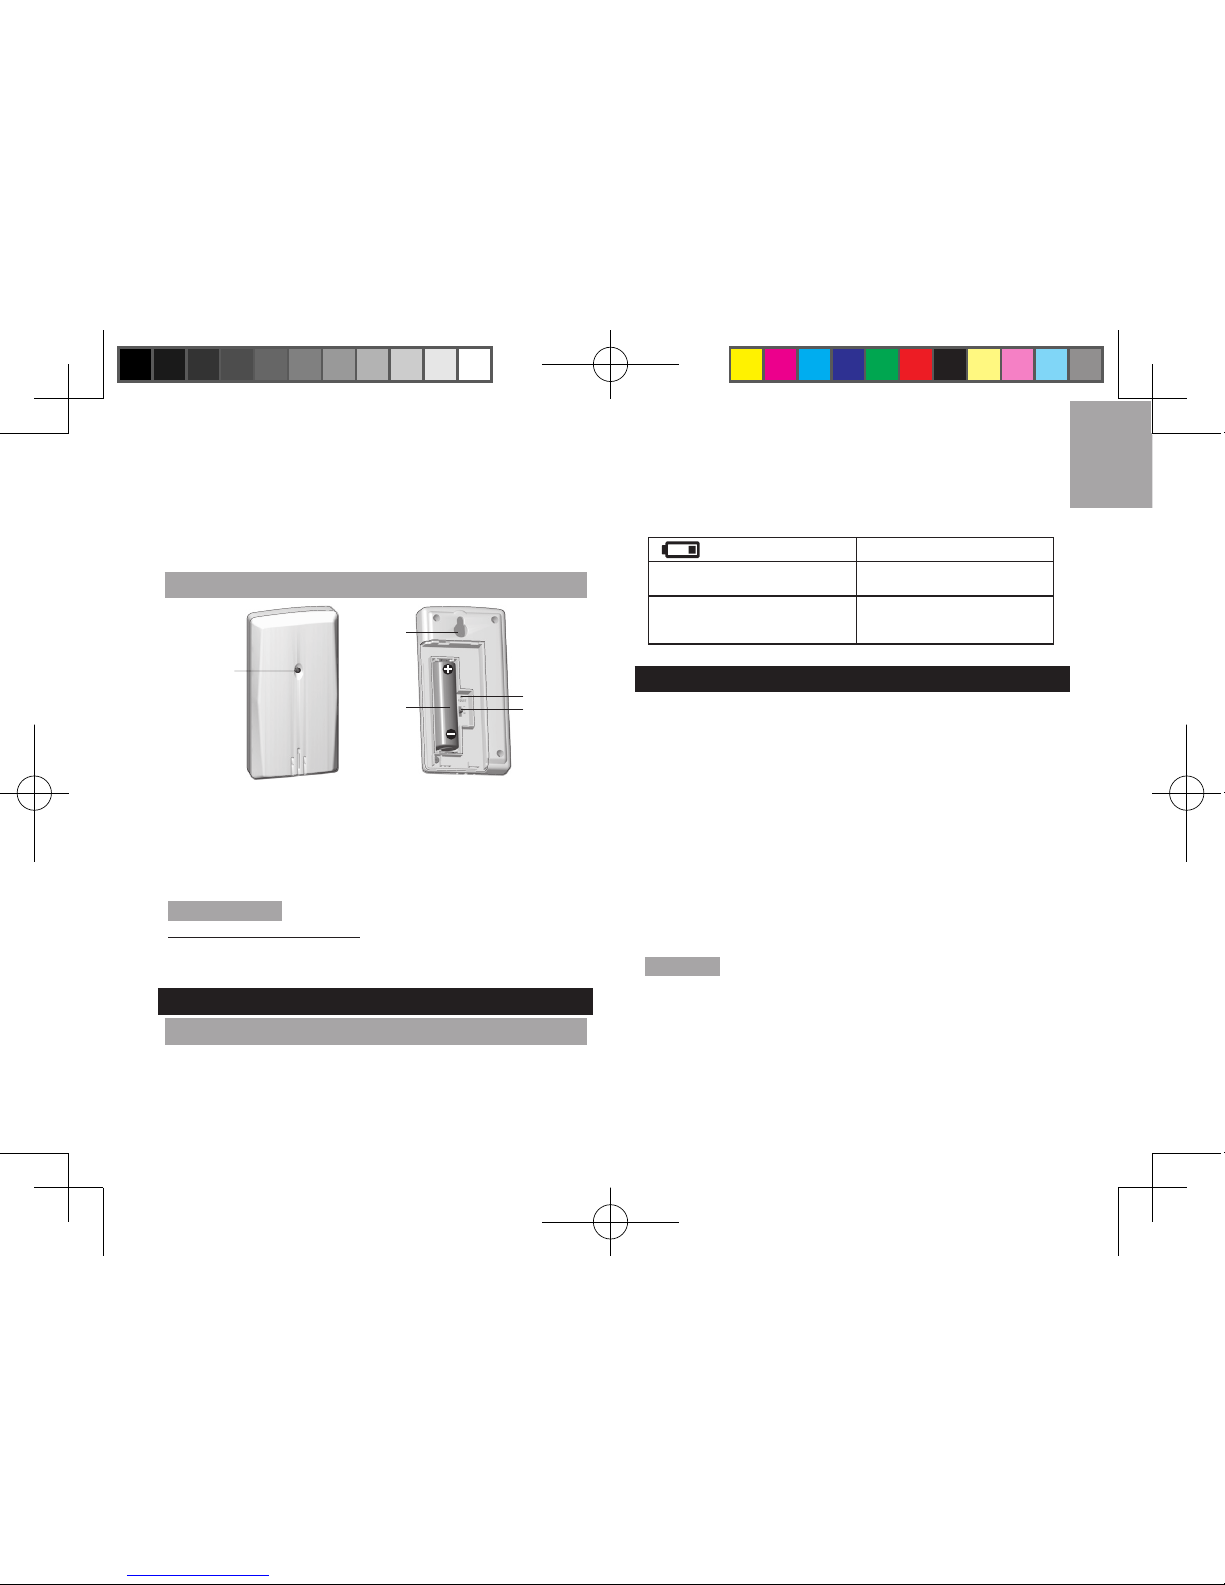
INSERT BATTERIES
1. Remove the battery compartment.
2. Insert the batteries, matching the polarities (+/-).
3. Press RESET after each battery change.
LOCATION
MEANING
Outdoor temperature area Outdoor sensor batteries low
Indoor temperature area
Indoor sensor batteries
low / main unit batteries low
REMOTE SENSOR
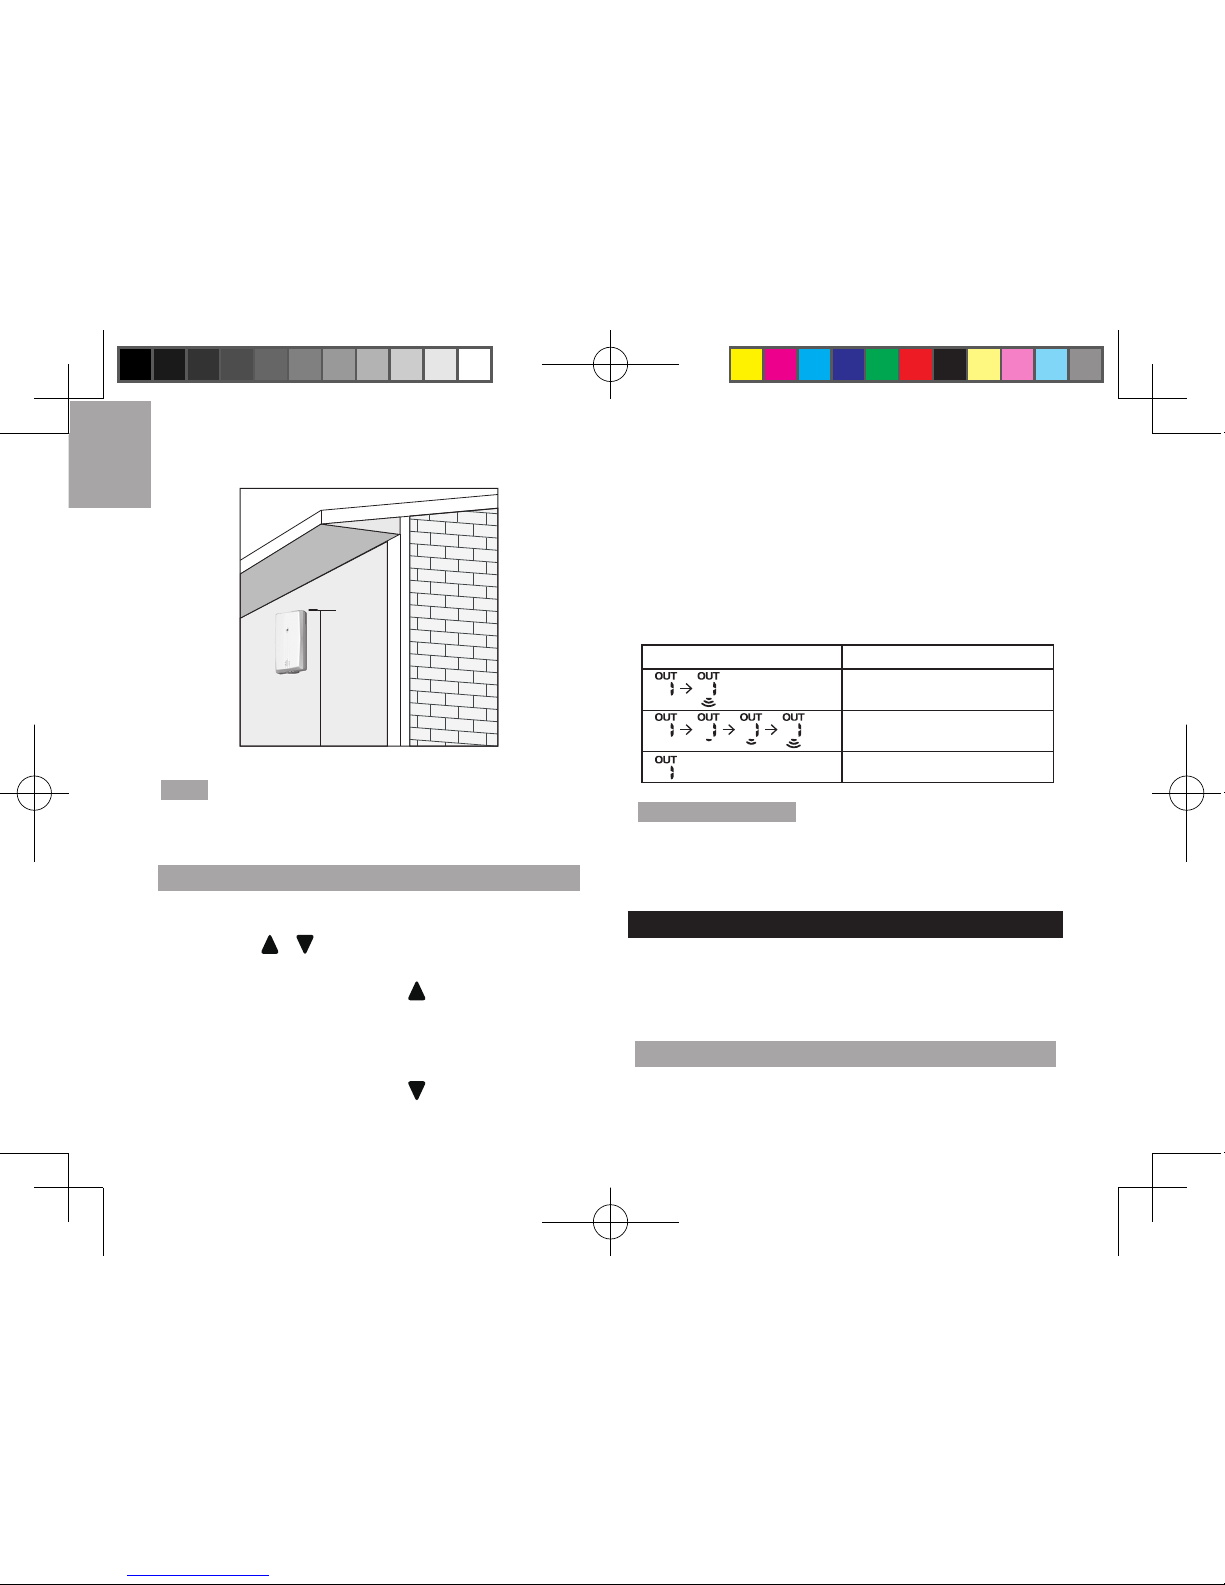
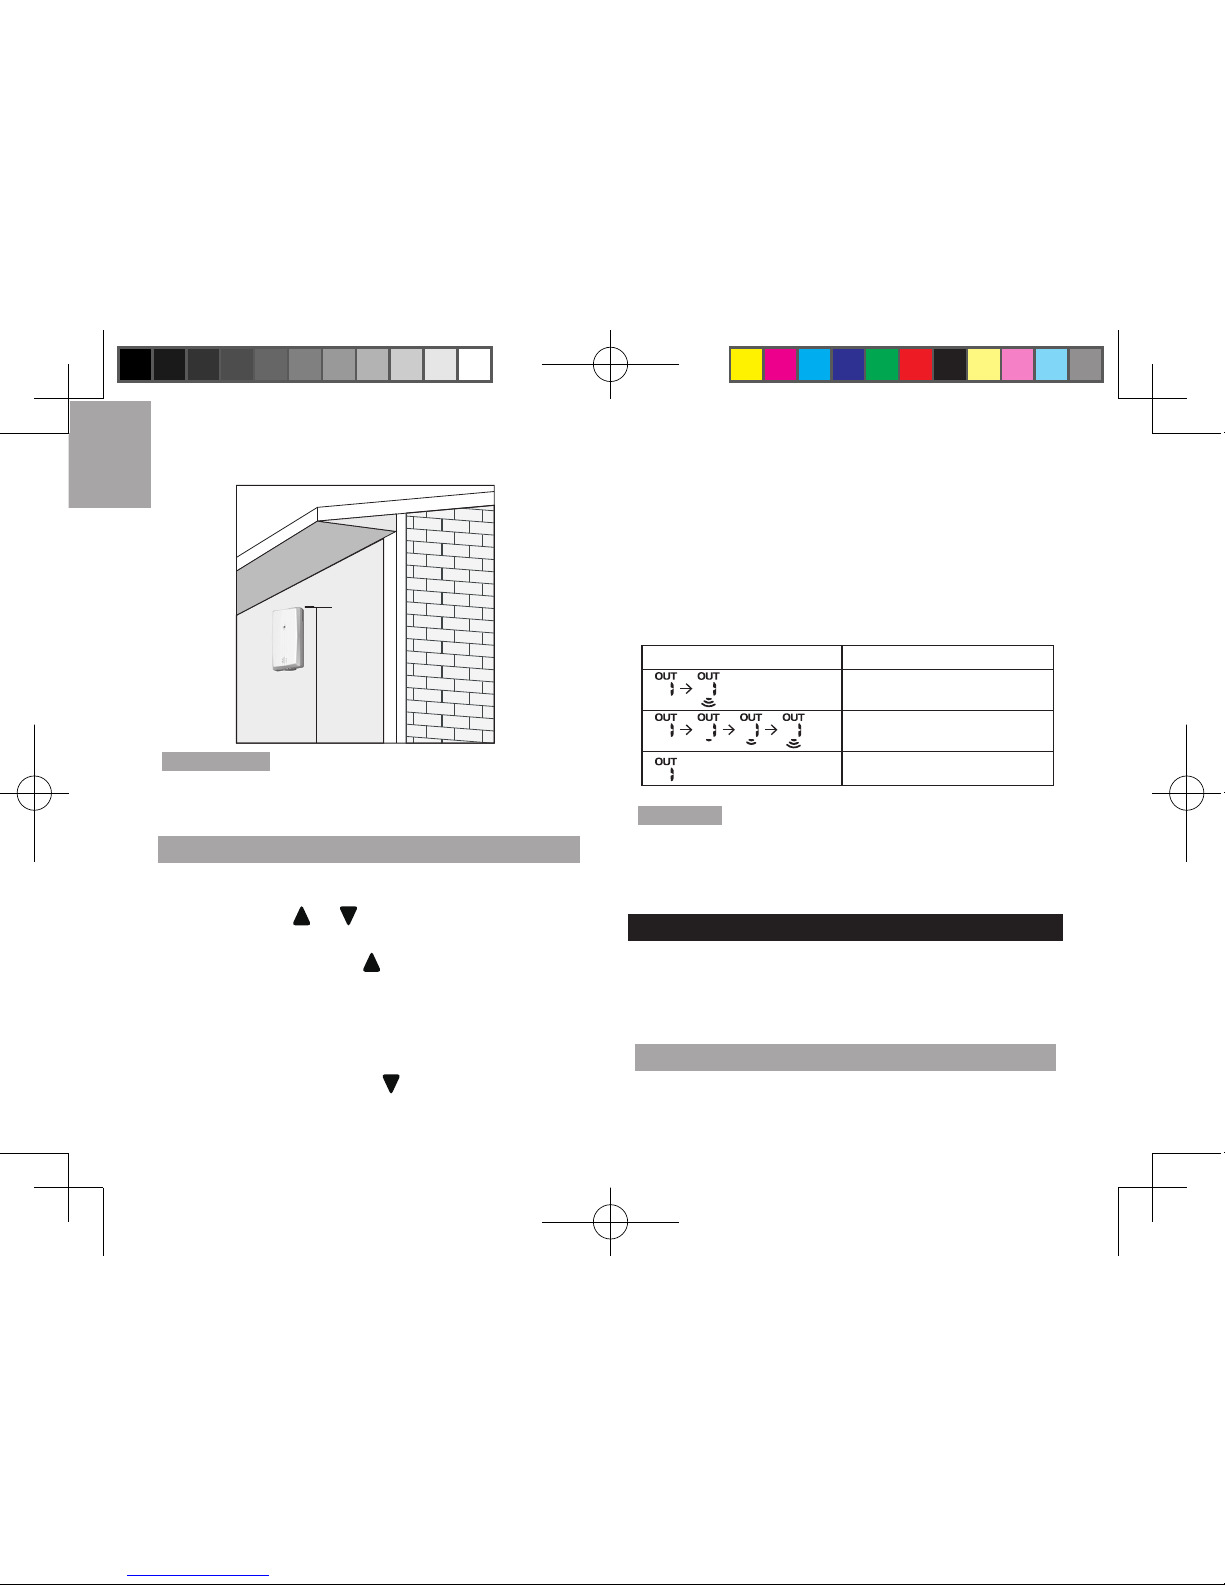
The main unit can collect data from up to 5 sensors.
To set up the sensor:
1. Open the battery compartment.
2. Select a channel then press RESET.
3. Close the battery door.
4. Place the sensor within 98 ft (30 m) of the main unit
using the table stand or wall mount.
TIP
Ideal placements for the sensor would be in any
location on the exterior of the home at a height of not
more than 5 ft (1.5 m); and can shield it from direct
sunlight or wet conditions for an accurate reading.
1.5 m (5 ft)
EMR211X_M_EU_EN_R7.indd 3 2018/8/15 下午4:29
Page 5
EN
4
NOTE Use alkaline batteries for longer usage and consumer
grade lithium batteries in temperatures below freezing.
SENSOR DATA TRANSMISSION
To search for a sensor:
1. Press or to select among 5 different outdoor
channels of remote sensors.
2. Press and hold for 2 seconds to enforce
researching for the selected sensor.
To auto-scan among sensors:
• Press and hold for 2 seconds to enable auto-scan
function for all 5 channels. The temperatures will be
displayed automatically in sequential order (Channel
1,2,3,4,5)
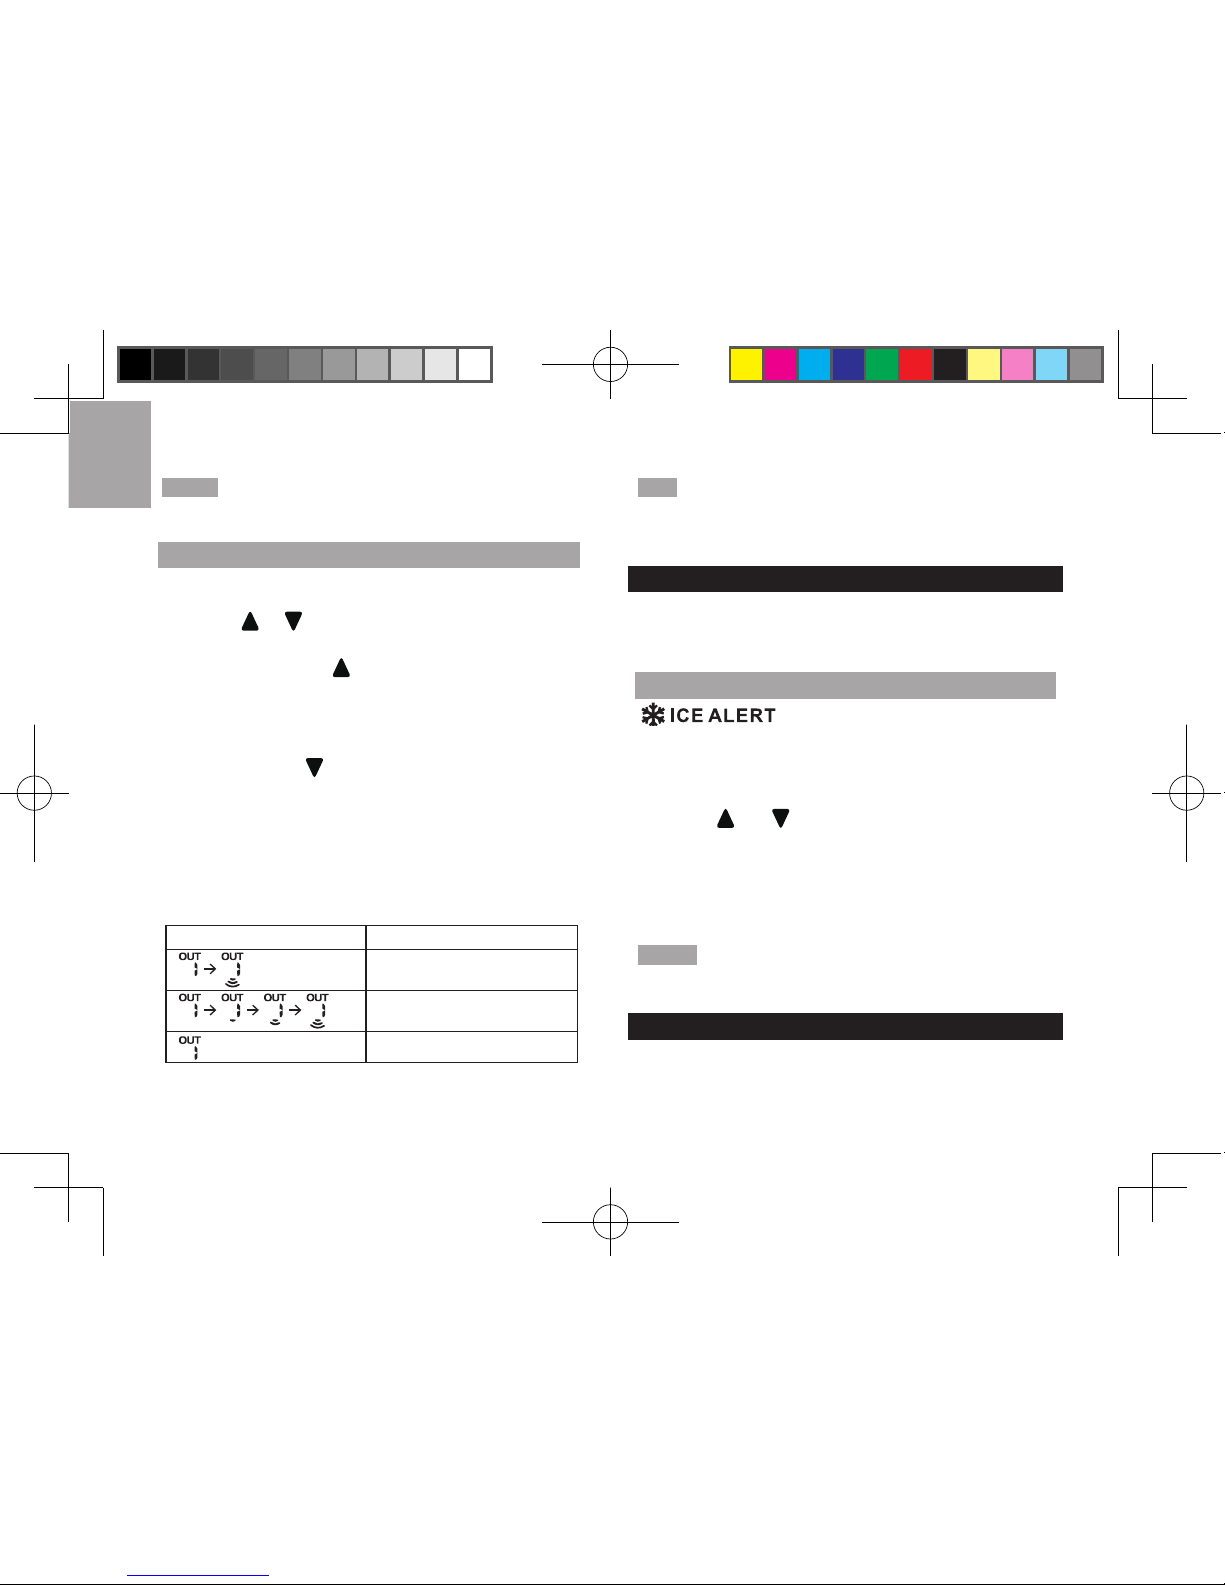
The sensor reception icon at the front of the main
unit shows the status:
ICON DESCRIPTION
Main unit is searching for
sensor(s).
A channel has been found.
The sensor cannot be found.
TIP The transmission range may vary depending on
many factors. You may need to place the sensor(s) in
different locations to get the best result(s).
TEMPERATURE
To select temperature unit:
• Press SET to select °C or °F for temperature readings.
ICE WARNING
If the channel 1 sensor falls from 37°F
to 28°F (3°C to -2°C), LED indicator in the front of the
main unit will ash continuously, and will stop ashing
once the temperature is out of this range.
• Press and at the same time to deactivate the
ice alert warning.
• The ice alert warning will be disable/enable again
when the temperature falls again from 37°F to 28°F
(3°C to -2°C).
NOTE As ice alert is only applicable to channel 1, to
prevent flashing of LED, select channel 2-5 on outdoor sensor.
RESET
Press RESET at the rear of the main unit to return to
the default settings.
EMR211X_M_EU_EN_R7.indd 4 2018/8/15 下午4:29
Page 6
EN
5
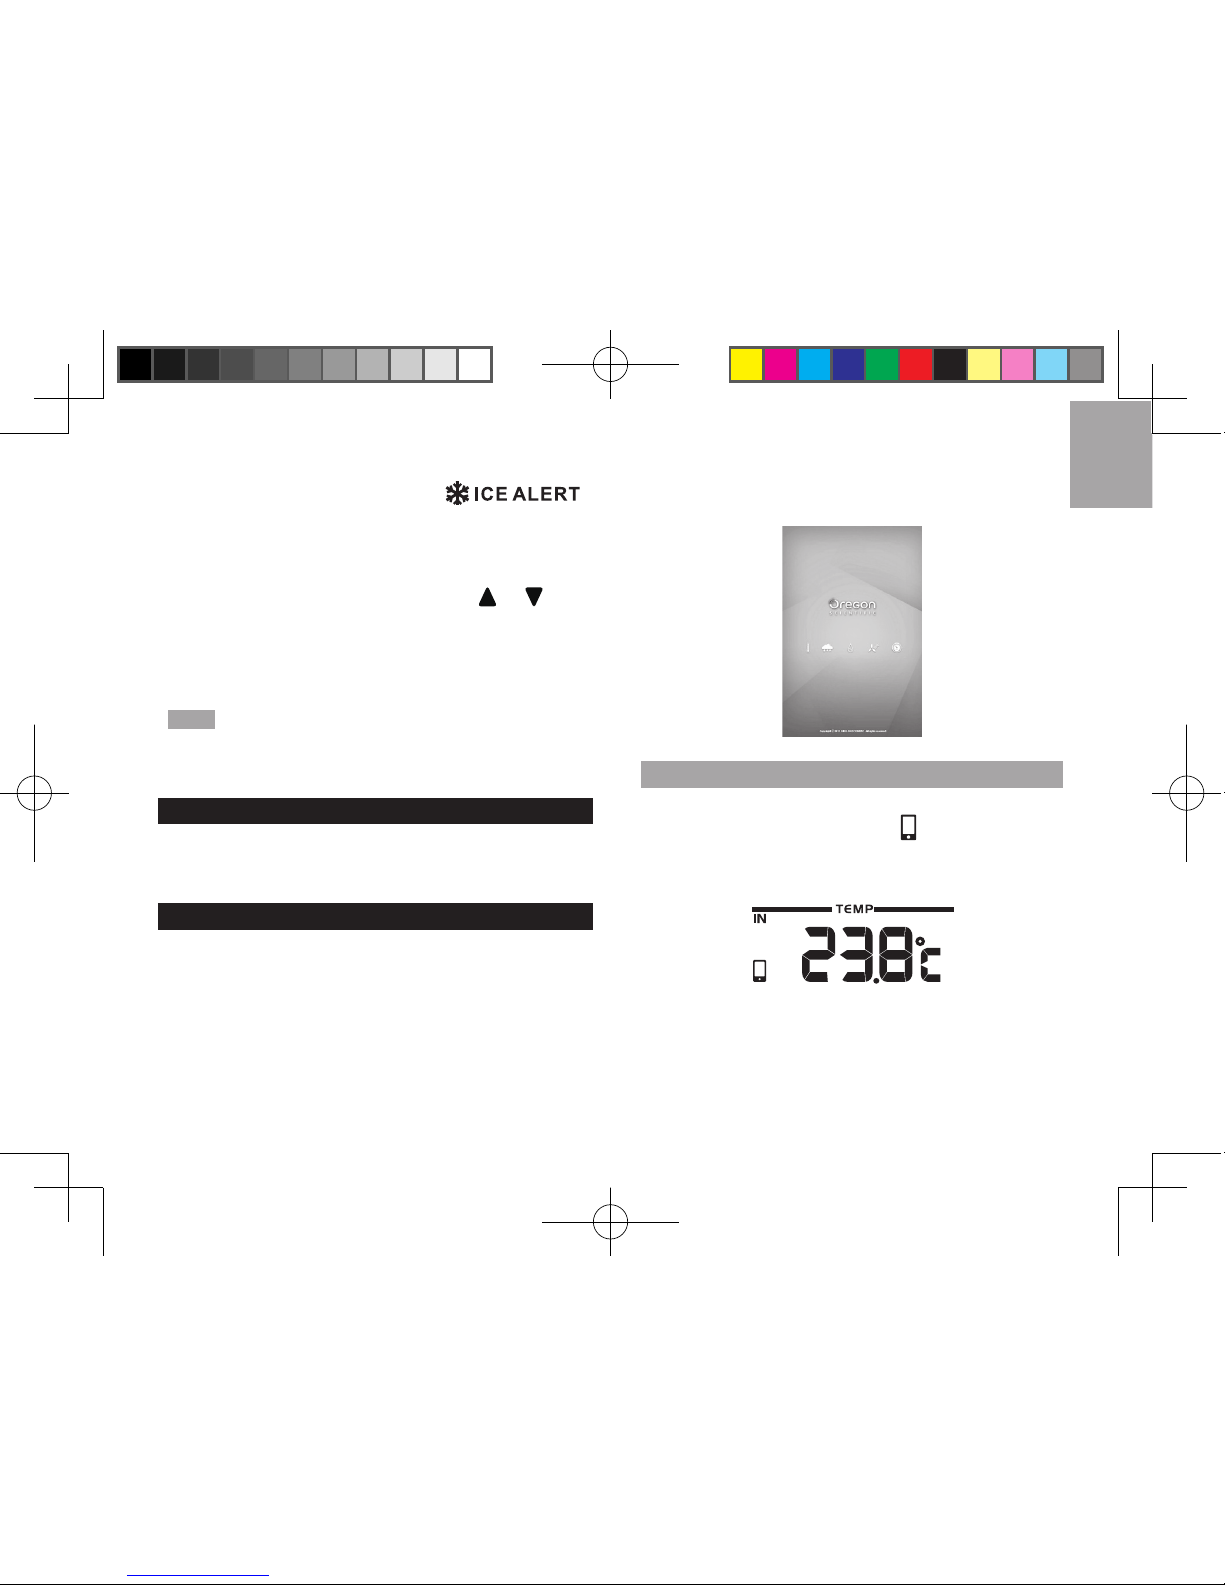
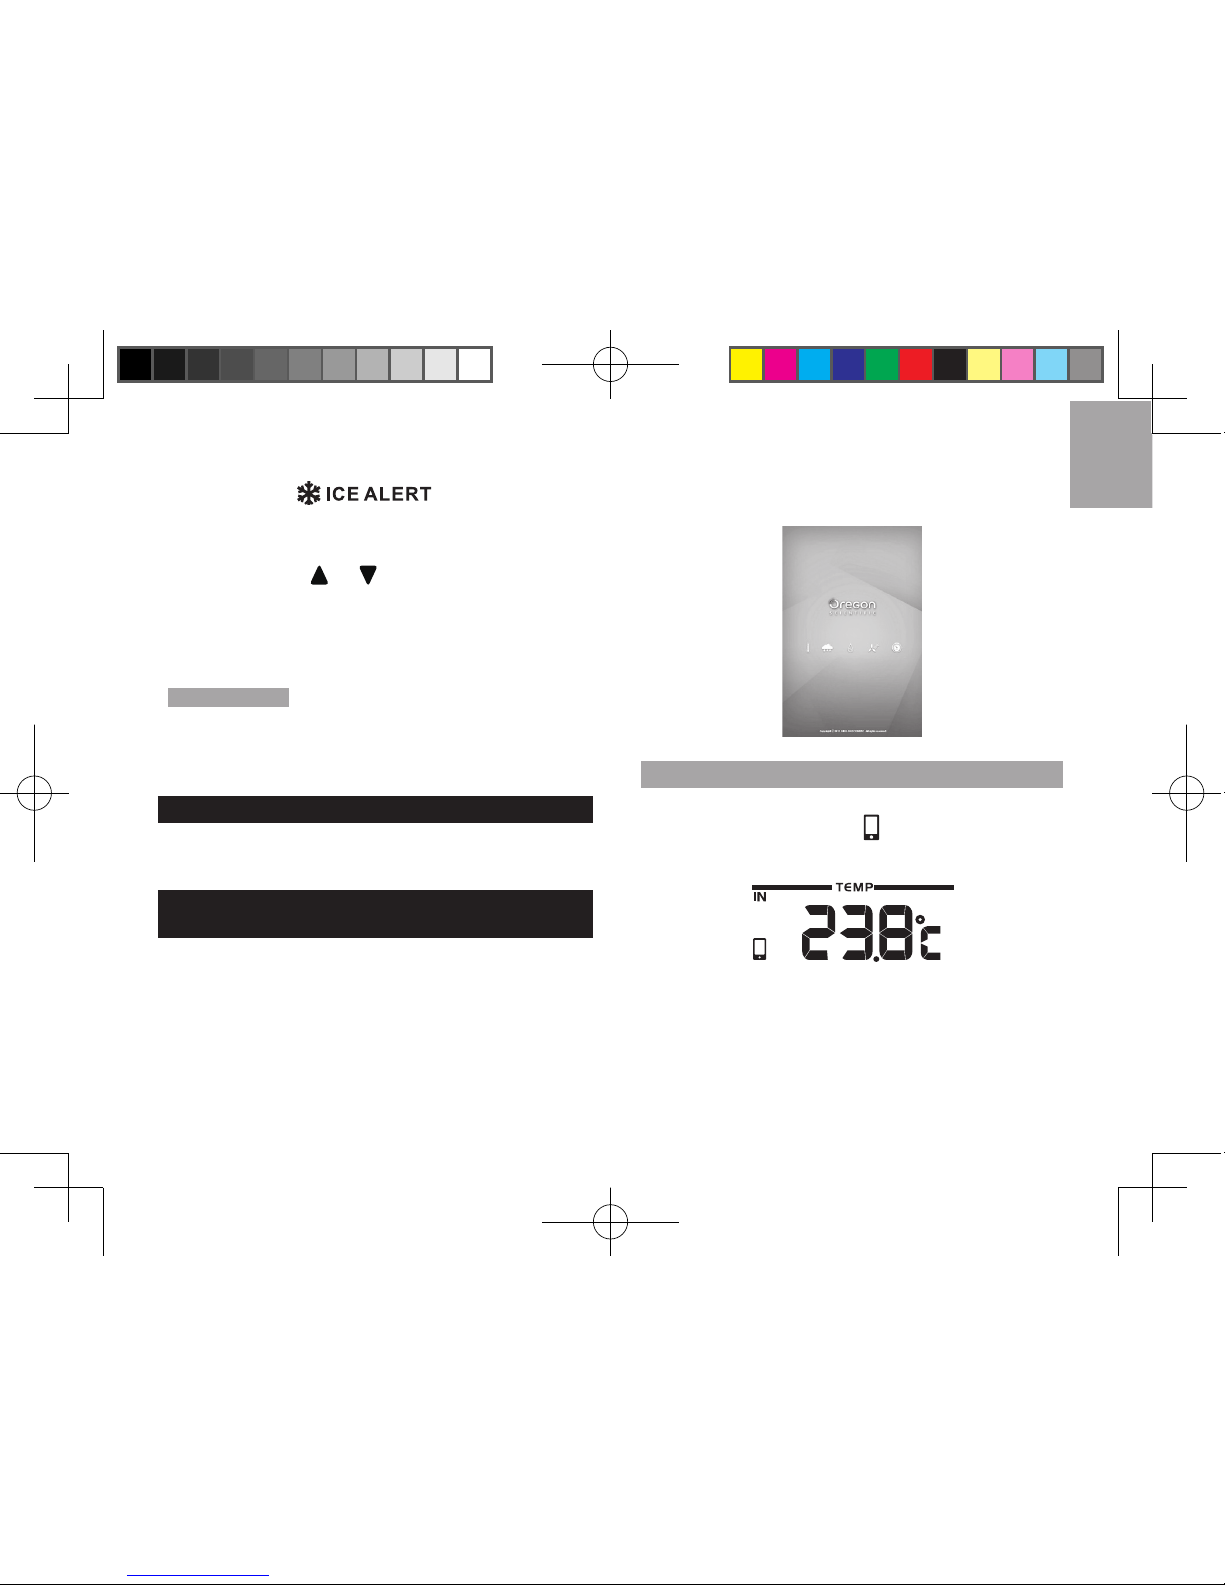
CONNECT WITH YOUR MOBILE DEVICE
You can remotely set the thermometer and read the
weather information through Bluetooth®4.0 using your
mobile device with the downloaded application from
the Apple Store. To quickly find the application, type
‘Weather@Home’ as keyword in the search engine.
Ensure your mobile device is compatible with iOS 5 or
Android 4.3 with Bluetooth®v4.0.
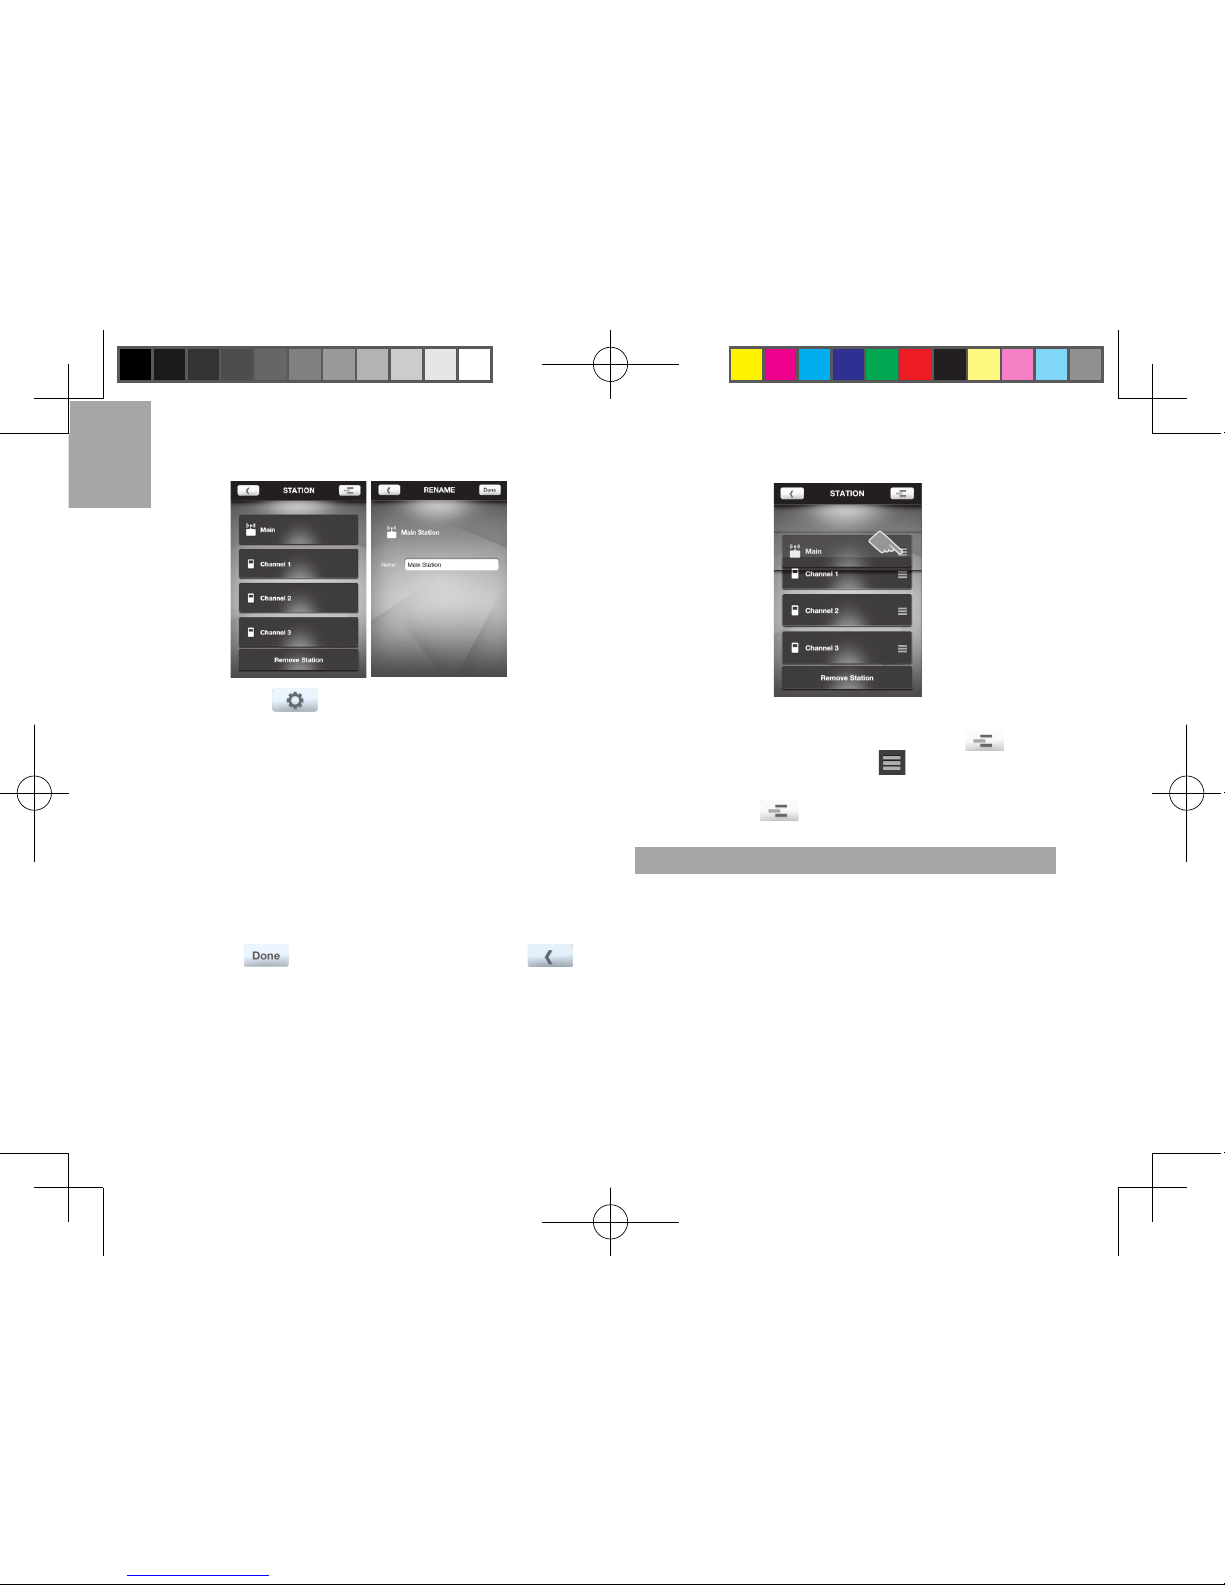
PAIRING YOUR THERMOMETER
First of all, you need to pair your thermometer with your
mobile device. will ash on the screen of the weather
station while pairing and be on after successful pairing.
To pair up a sensor:
At the rear of the main unit, press and hold SET for
2 seconds to enable a pair-up for the main unit.
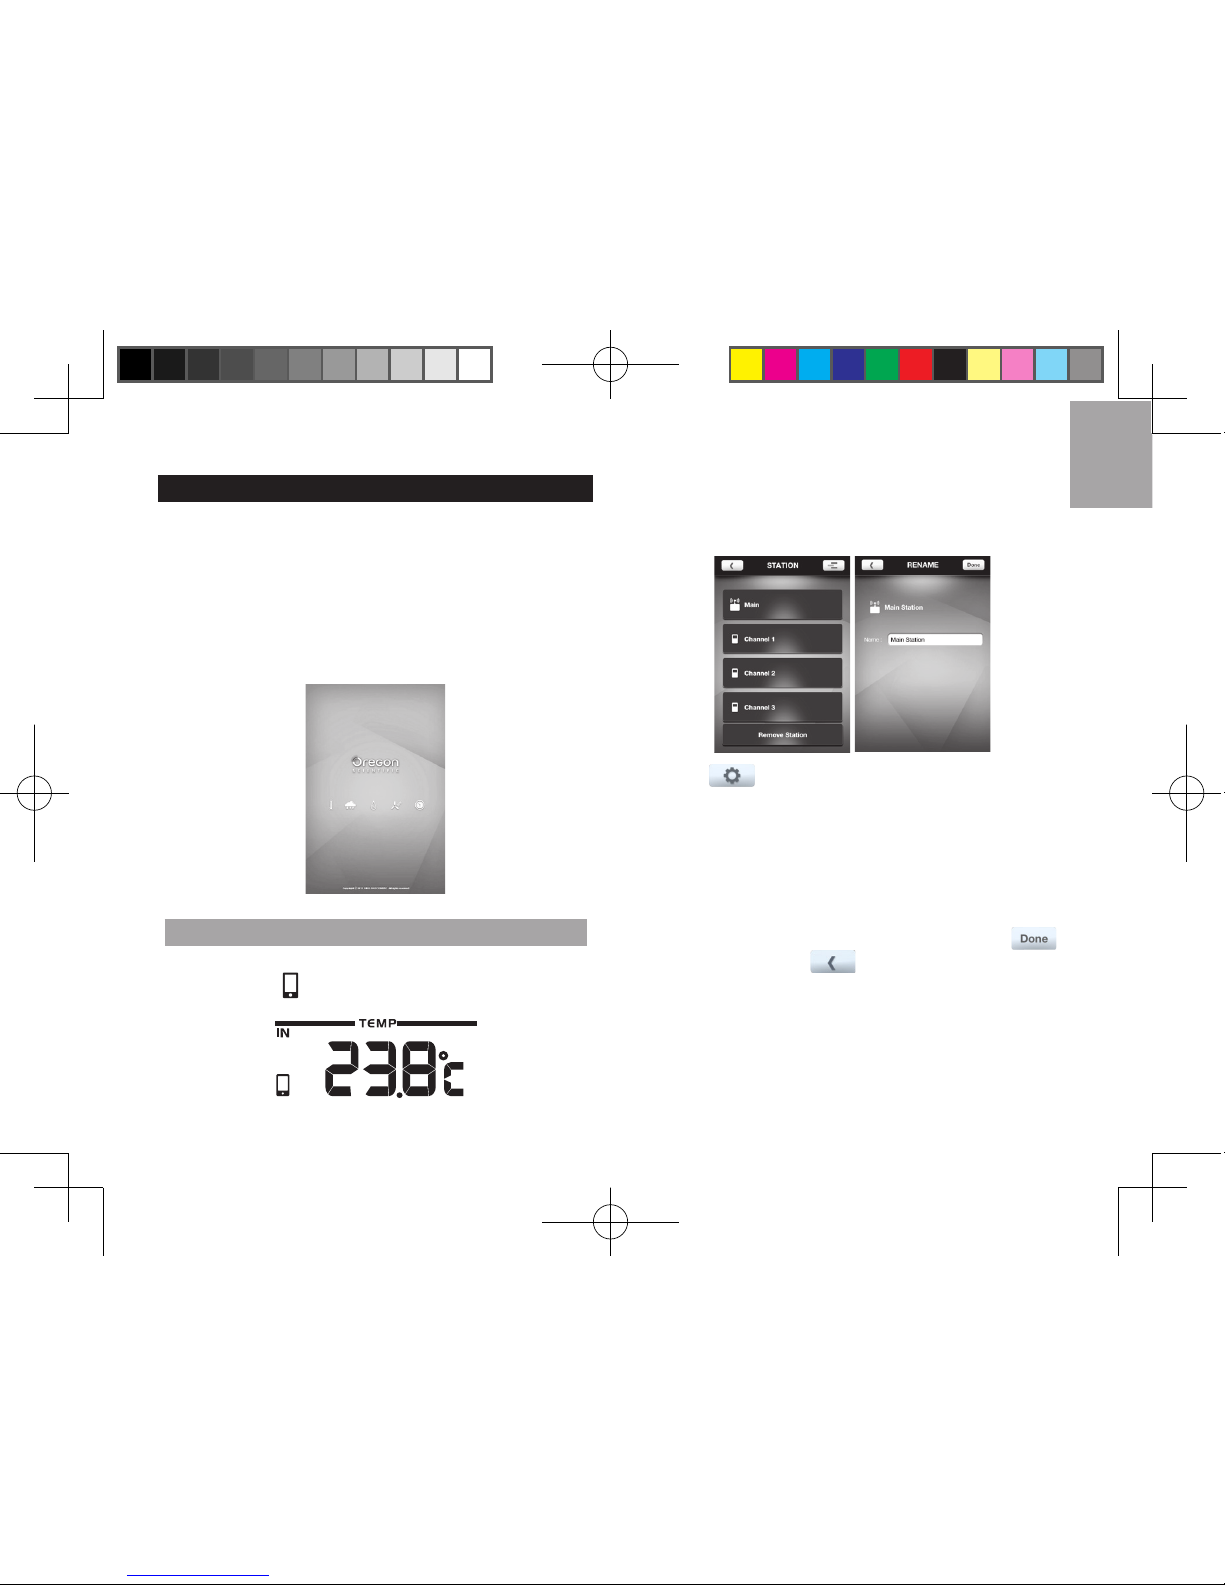
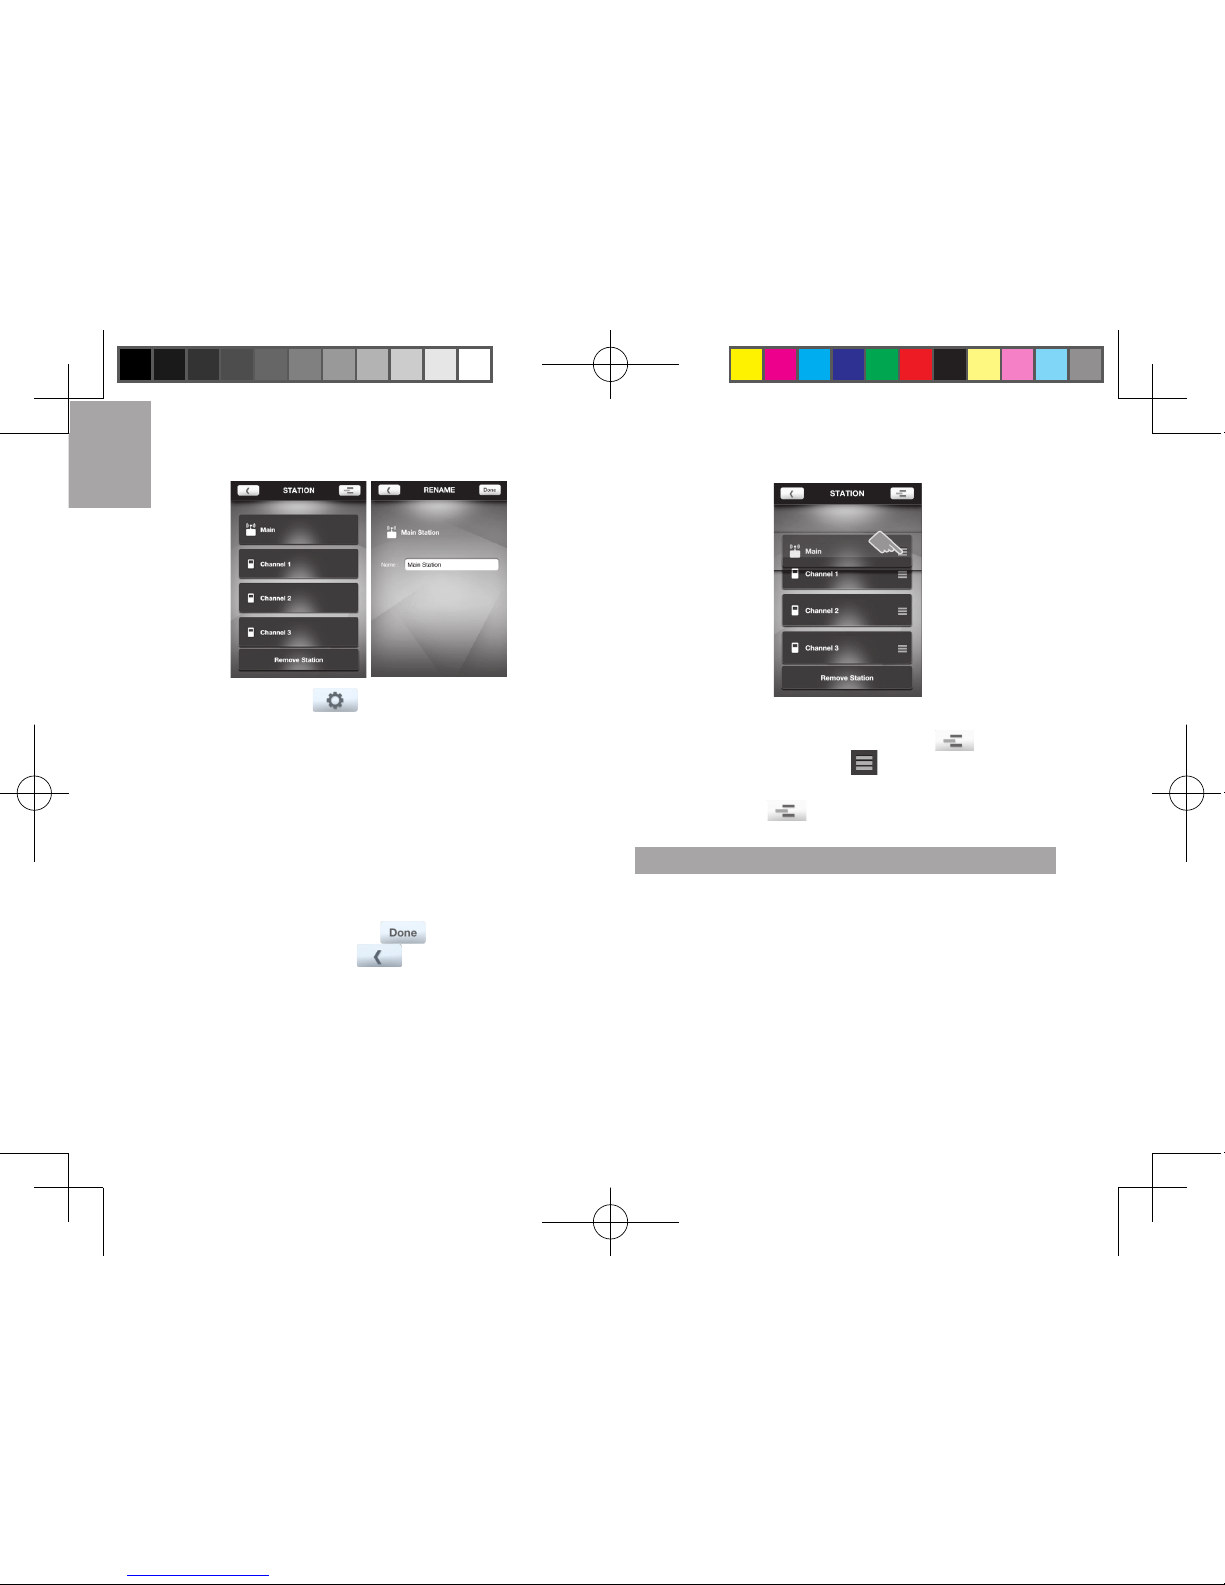
1. Tap to enter SETTINGS screen.
2. Tap on STATION area.
3. Tap Pair Up. Searching… displays. If you want to
cancel the pairing, tap Cancel.
4. Once the pairing is successful, it will return to
STATION screen.
5. Tap on each channel to rename it. (Up to 20
characters including space are allowed). Tap
if completed. Tap to exit.
To remove sensor:
To remove any sensor from the weather station, Tap
Remove station on STATION screen, all the sensors
will be removed at the same time.
EMR211X_M_EU_EN_R7.indd 5 2018/8/15 下午4:29
Page 7
EN
6
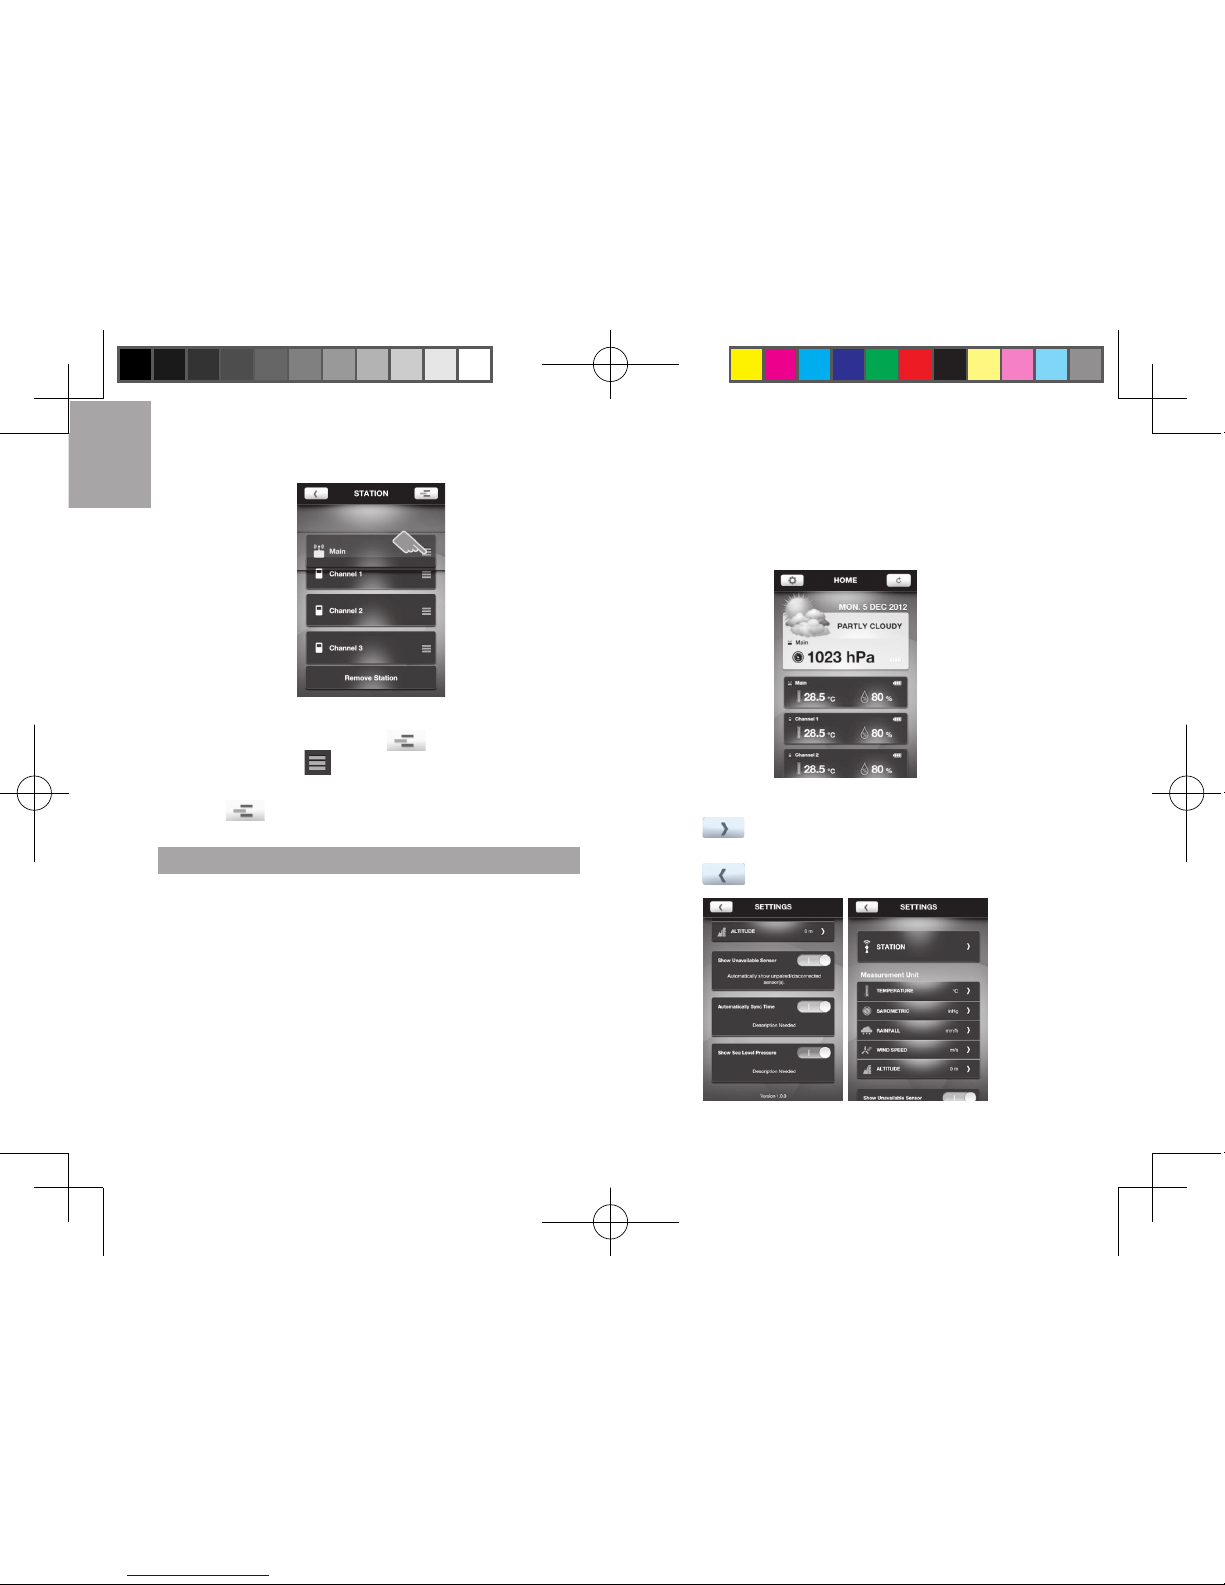
To reposition the sensors on screen:
1. On STATION screen, tap .
2. Press and hold at the right side of a sensor. Drag
it to your desired position.
3. Tap to conrm.
SETTINGS
You can set your weather station through the application,
such as measurement units.
The settings are as follows:
• Temperature
• Barometric (not available in EMR211X)
• Rainfall (not available in EMR211X)
• Wind speed (not available in EMR211X)
• Altitude (not available in EMR211X)
• Show unavailable sensor
• Automatically sync time
• Show Sea Level Pressure (not available in EMR211X)
To select the measurement unit:
1. Tap to view the measurement unit options.
2. Tap on your desired unit.
3. Tap to go back to the previous screen.
EMR211X_M_EU_EN_R7.indd 6 2018/8/15 下午4:29
Page 8
EN
7
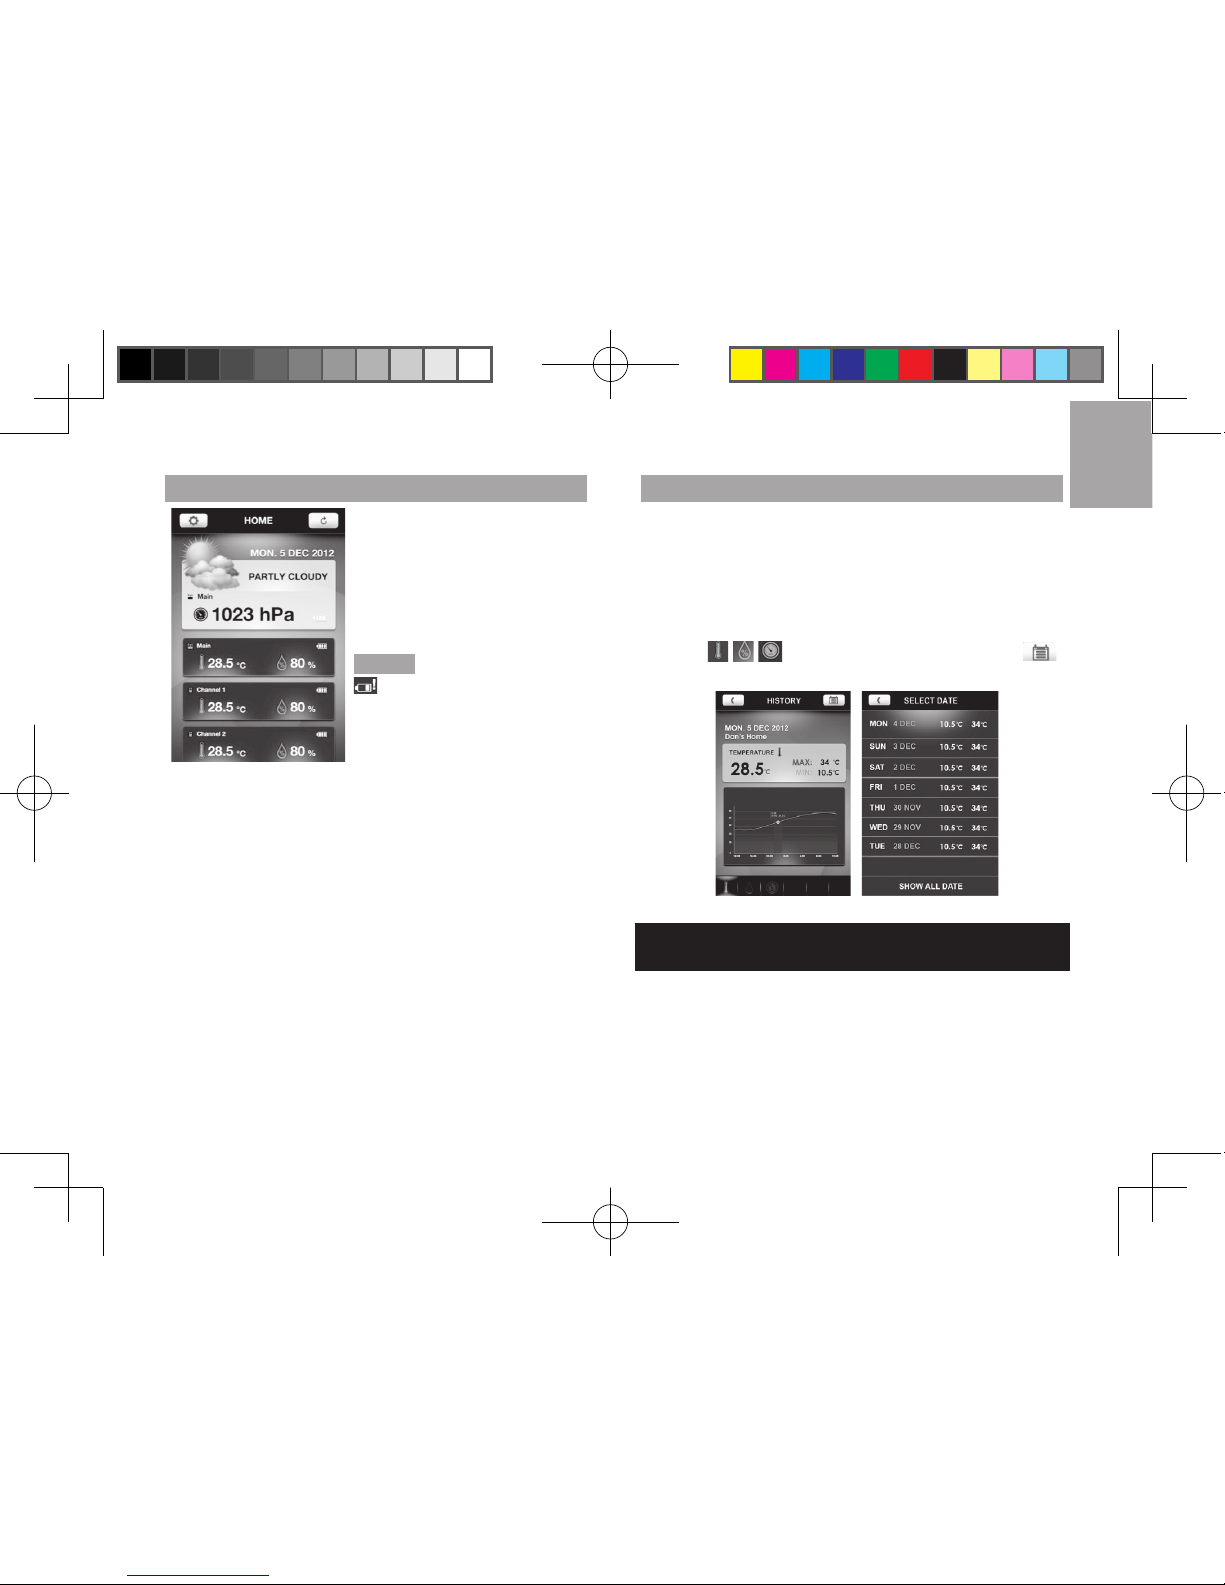
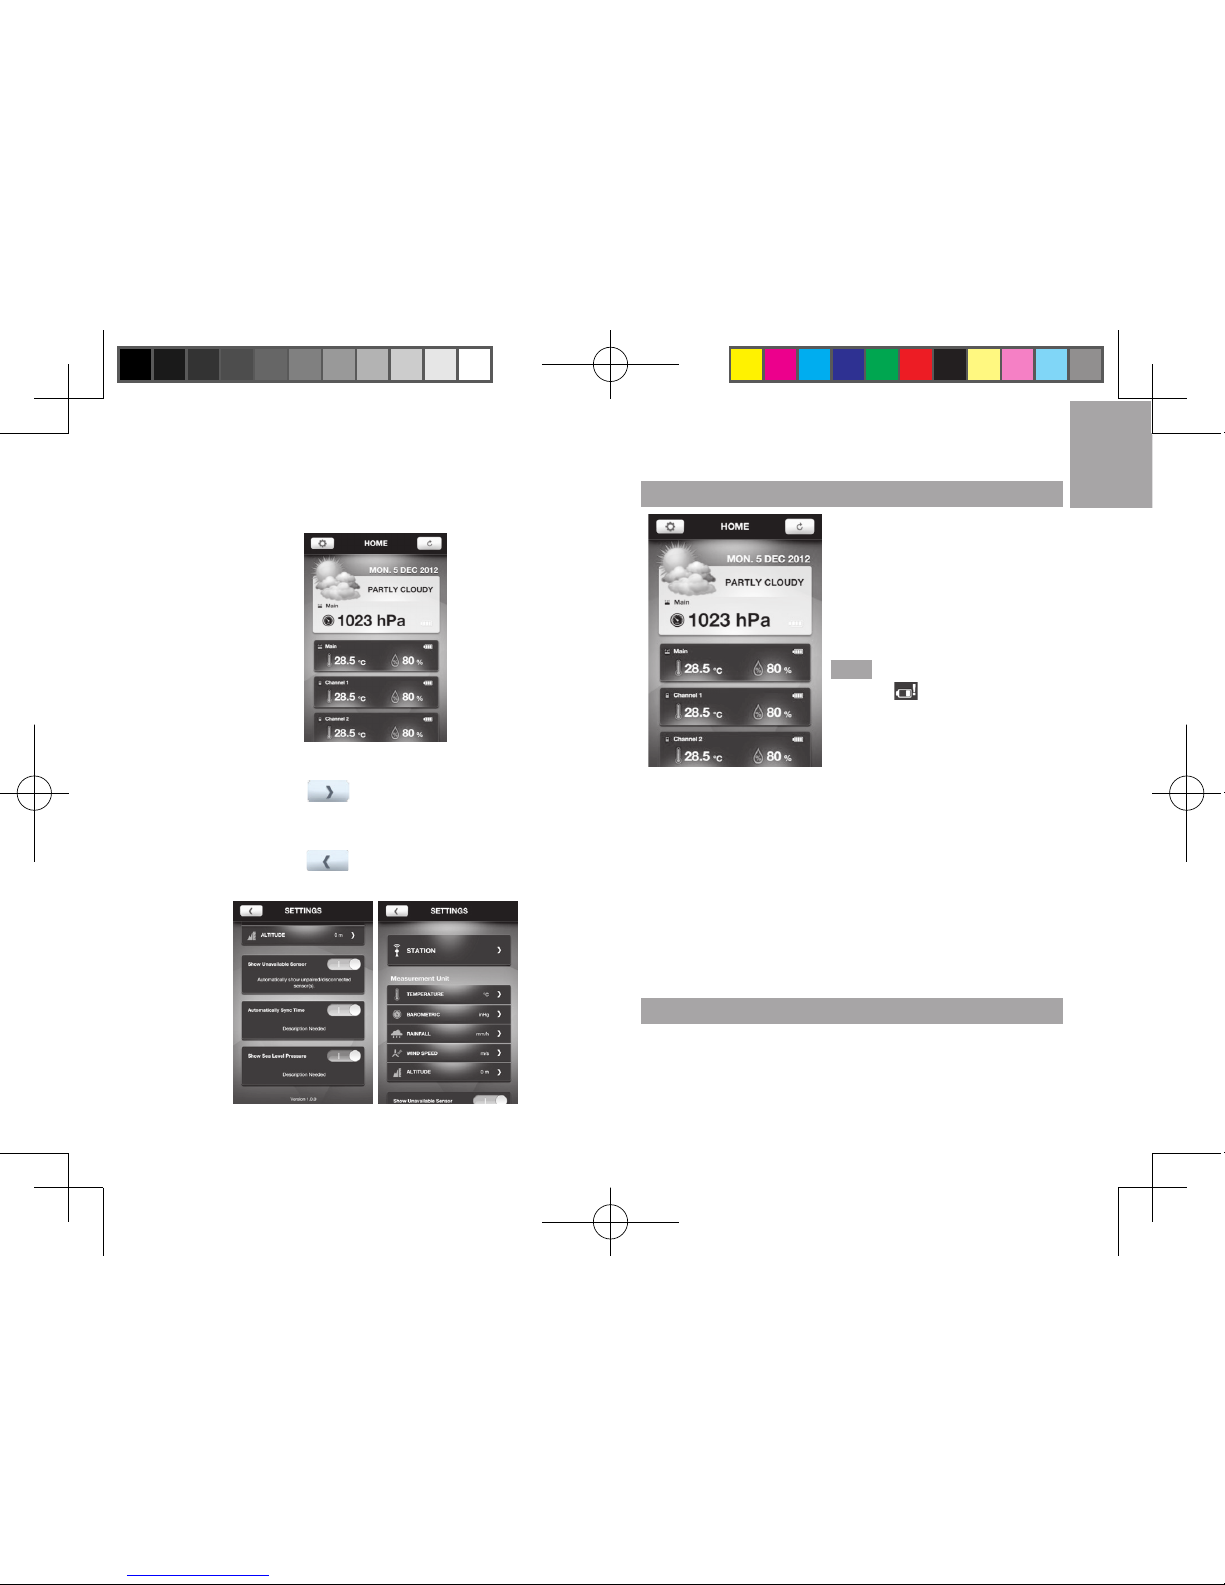
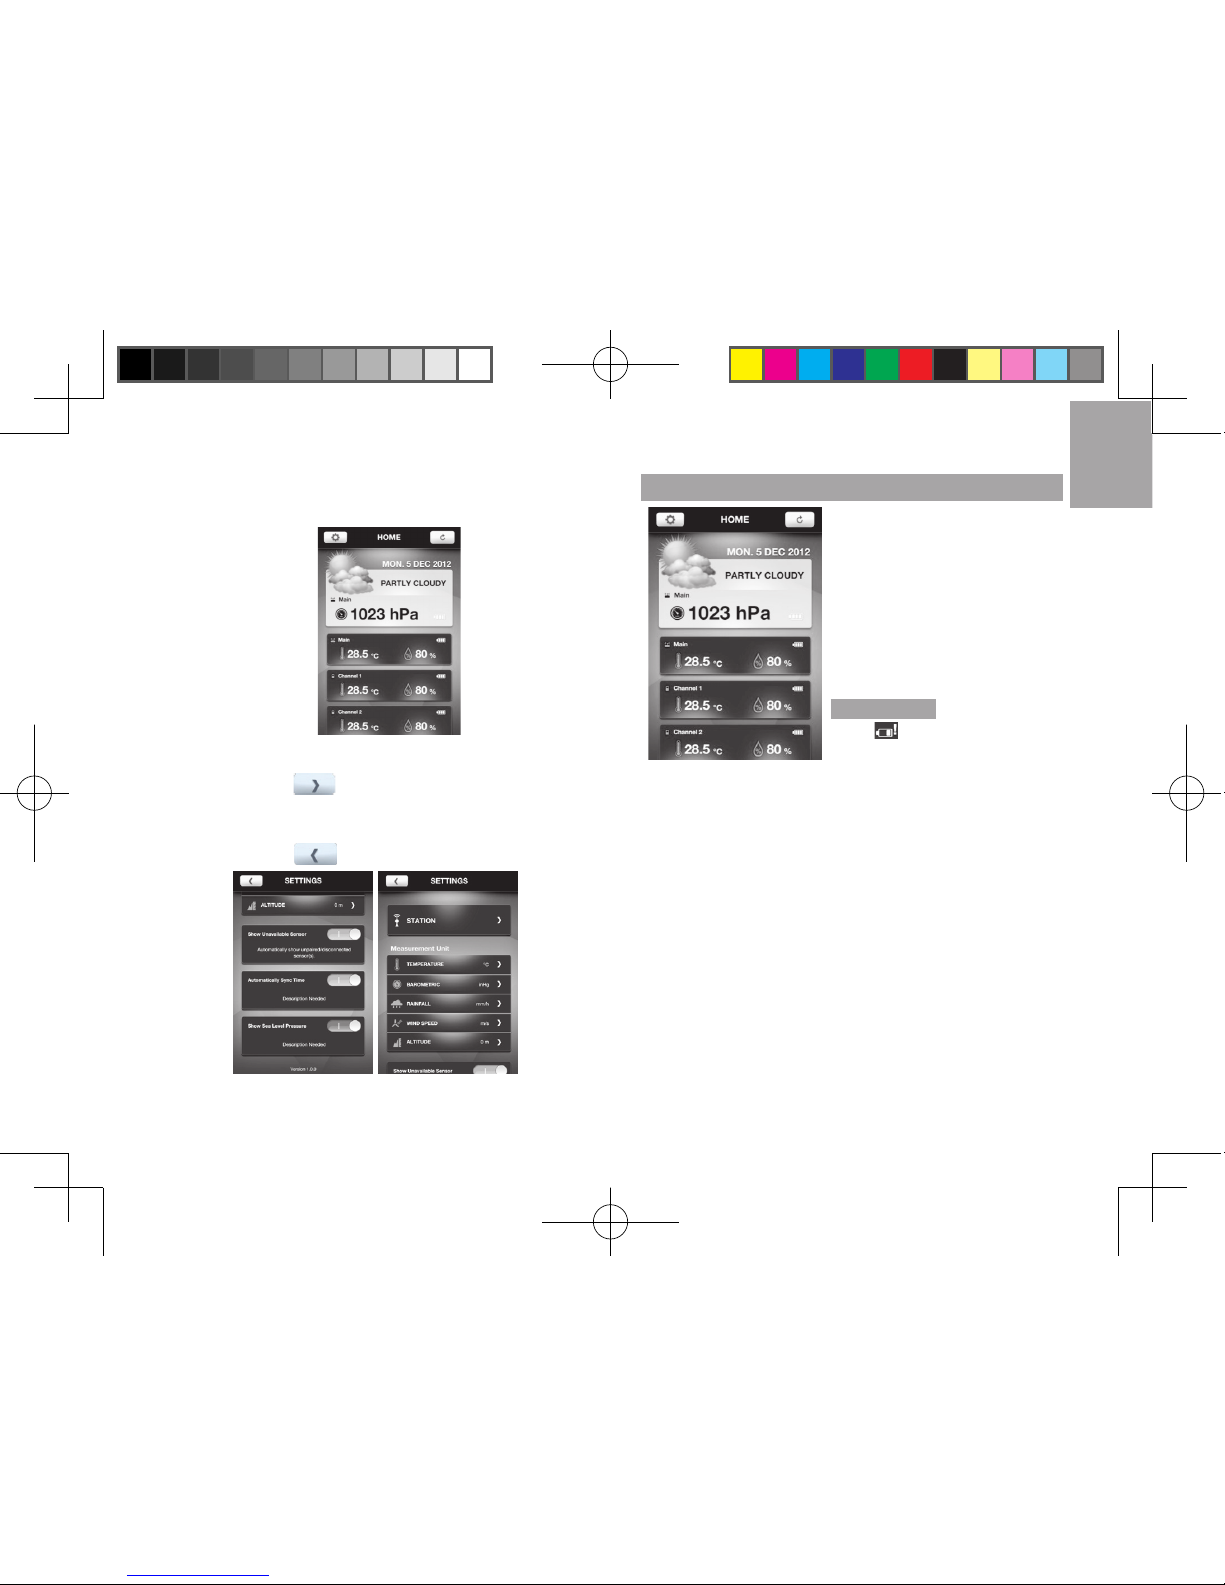
VIEW CURRENT READINGS
You can directly view all the
temperature readings from
different sensors through the
application at a time. The
readings are on the HOME
screen.
NOTE If low battery icon
displays on the screen,
please replace the batteries for
the corresponding device.
To show unavailable sensor:
If the sensor is out of range, the readings are interrupted
and - - (dash mode) displays on the screen. If you do
not want to show the unavailable sensor:
• On SETTINGS screen, touch and slide the button to
right to turn on the function, or sliding to left to turn it off.
To automatically synchronize time:
Time and date on your weather station could be
automatically synchronized by your mobile device.
• On SETTINGS screen, touch and slide the button to
right to turn on the function, or sliding to left to turn it off.
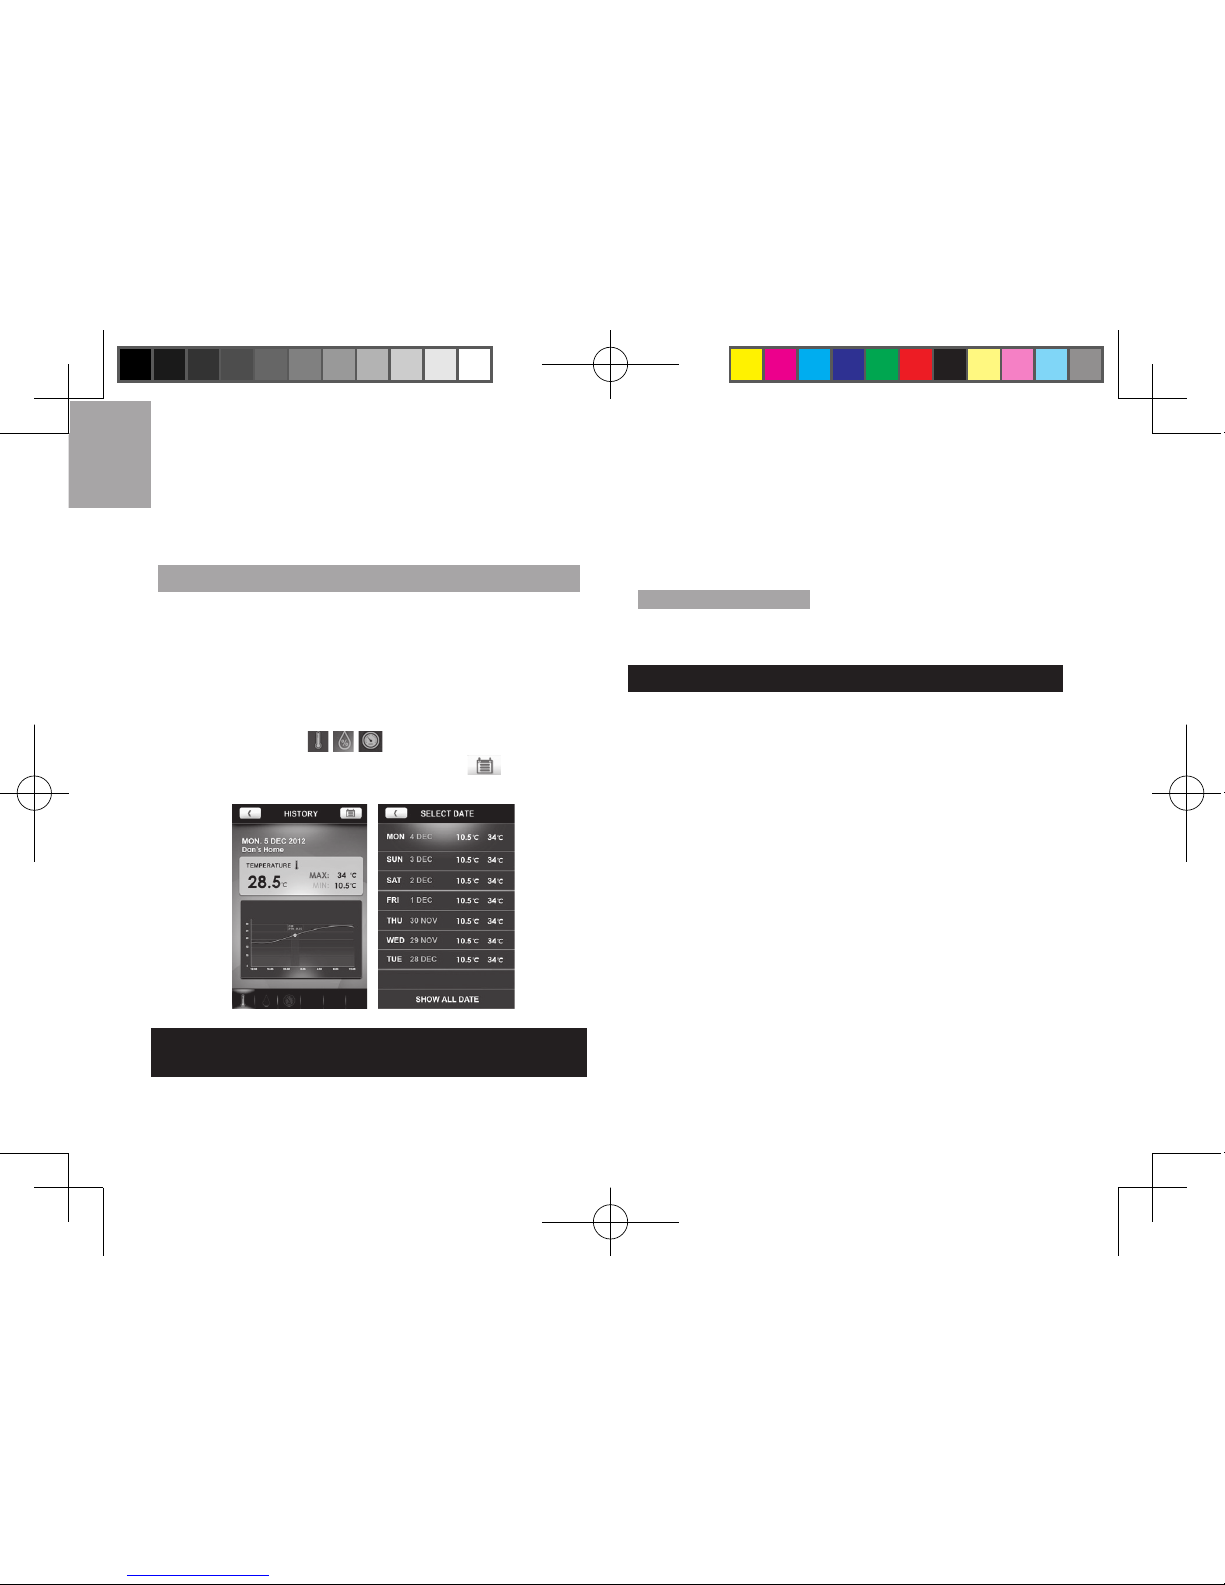
VIEW HISTORY READINGS
You can view history through the application. The history
could also be presented in graphs (past 24 hours or
past 7 days).
To view the history:
1. Tap on your desired sensor area on the screen.
2. Tap to select your desired data or tap
to sort the data by date.
OPTIONAL SENSOR FOR ADDITIONAL
INFORMATION
By applying the sensor (Model: BTH Sensor) at the same
time, you can also view the following information using
your mobile device.
• Weather Forecast
• Air Pressure
• Outdoor Humidity
EMR211X_M_EU_EN_R7.indd 7 2018/8/15 下午4:29
Page 9

EN
8
USEFUL REFERENCE The optional sensor (Model:
BTH Sensor) can be purchased from Oregon Scientific.
PRECAUTIONS
• Do not subject the unit to excessive force, shock,
dust, temperature or humidity.
• Do not cover the ventilation holes with any items
such as newspapers, curtains etc.
• Do not immerse the unit in water. If you spill liquid
over it, dry it immediately with a soft, lint-free cloth.
• Do not clean the unit with abrasive or corrosive materials.
• Do not tamper with the unit’s internal components.
This invalidates the warranty.
• Only use fresh batteries. Do not mix new and old batteries.
• Images shown in this manual may differ from the
actual display.
• When disposing of this product, ensure it is
collected separately for special treatment and not
as household waste.
• Placement of this product on certain types of wood
may result in damage to its nish for which Oregon
Scientific will not be responsible. Co nsult the
furniture manufacturer’s care instructions
for information.
• The contents of this manual may not be reproduced
without the permission of the manufacturer.
• Do not dispose old batteries as unsorted municipal waste.
Collection of such waste separately for special treatment
is necessary.
• Please note that some units are equipped with a
battery safety strip. Remove the strip from the battery
compartment before rst use.
NOTE The technical specifications for this product and
the contents of the user manual are subject to change
without notice.
NOTE Features and accessories will not be available
in all countries. For more information, please contact
your local retailer.
SPECIFICATIONS
TYPE DESCRIPTION
MAIN UNIT
L x W x H
93 x 68 x 30 mm
(3.66 x 2.68 x 1.18 in)
Weight 96g (3.39 ounces) include battery
Temperature range -5°C to 50°C (23°F to 122°F)
Signal frequency 433 MHz
Power 2 x AAA batteries
EMR211X_M_EU_EN_R7.indd 8 2018/8/15 下午4:29
Page 10
EN
9
Temperature range
for ice alert
3°C to -2°C
REMOTE THERMO SENSOR (THN132N)
L x W x H
96 x 50 x 22 mm
(3.78 x 1.97 x 0.87 in)
Weight 62g (2.22 ounces)
Transmission range 30 m (98 ft) unobstructed
Temperature range -20°C to 60°C (-4°F to 140°F)
Power 1 x UM-3 (AA) 1.5V batteries
ABOUT OREGON SCIENTIFIC
Visit our website www.oregonscientific.com to learn more about
Oregon Scientific products.
For any inquiry, please contact our Customer Services at
info@oregonscientific.com.
Oregon Scientific Global Distribution Limited reserves the right to
interpret and construe any contents, terms and provisions in this
user manual and to amend it, at its sole discretion, at any time
without prior notice. To the extent that there is any inconsistency
between the English version and any other language versions,
the English version shall prevail.
EU-DECLARATION OF CONFORMITY
Hereby the manufacturer, Oregon Scientic Global Distribution
Limited, declares that the radio equipment type Weather@Home
Thermo Bluetooth-enabled Thermometer (Model: EMR211X) is
in compliance with 2014/53/EU Directive. The full text of the EU
Declaration of Conformity is available at the following internet address:
http://global.oregonscientific.com/customerSupport.php
COUNTRIES RED APPROVED COMPLIED
All EU countries, Switzerland CH
and Norway N
DISPOSAL INFORMATION FOR USERS
Pursuant to and in accordance with Article 14 of the
Directive 2012/19/EU of the European Parliament on
waste electrical and electronic equipment (WEEE),
and pursuant to and in accordance with Article 20 of
the Directive 2013/56/EU of the European Parliament
on batteries and accumulators and waste batteries.
The barred symbol of the rubbish bin shown on the equipment
indicates that, at the end of its useful life, the product must be
collected separately from other waste.
Please note that the batteries/rechargeable batteries must be
removed from the equipment before it is given as waste. To
remove the batteries/accumulators refer to the specifications in
the user manual. Therefore, any products that have reached the
end of their useful life must be given to waste disposal centers
EMR211X_M_EU_EN_R7.indd 9 2018/8/15 下午4:29
Page 11
EN
10
specializing in separate collection of waste electrical and electronic
equipment, or given back to the dealer when purchasing a
new WEEE, pursuant to and in accordance with Article 14 as
implemented in the country.
The adequate separate collection for the subsequent start-up of
the equipment sent to be recycled, treated and disposal of in an
environmentally compatible way contributes to preventing possible
negative effects on the environment and health and optimizes the
recycling and reuse of components making up the apparatus.
Abusive disposal of the product by the user involves application
of the administrative sanctions according to the laws in force.
FCC STATEMENT
This device complies with Part 15 of the FCC Rules. Operation
is subject to the following two conditions: (1) This device may
not cause harmful interference, and (2) This device must accept
any interference received, including interference that may cause
undesired operation.
WARNING Changes or modifications to this unit not expressly
approved by the party responsible for compliance could void the
user’s authority to operate the equipment.
NOTE This equipment has been tested and found to comply with
the limits for a Class B digital device, pursuant to Part 15 of the FCC
Rules. These limits are designed to provide reasonable protection
against harmful interference in a residential installation.
This equipment generates, uses and can radiate radio frequency
energy and, if not installed and used in accordance with the
instructions, may cause harmful interference to radio communications.
However, there is no guarantee that interference will not occur
in a particular installation. If this equipment does cause harmful
interference to radio or television reception,which can be determined
by turning the equipment off and on, the user is encouraged to try to
correct the interference by one or more of the following measures:
• Reorient or relocate the receiving antenna.
• Increase the separation between the equipment and receiver.
• Connect the equipment into an outlet on a circuit different
from that to which the receiver is connected.
• Consult the dealer or an experienced radio / TV technician for help.
DECLARATION OF CONFORMITY
The following information is not to be used as contact for support
or sales. Please call our customer service number (listed on our
website at www.oregonscientific.com), or on the warranty card
for this product) for all inquiries instead.
We
Name: Oregon Scientic Inc.
Address: Brea Corporate Park
3020 Saturn St. Suite 200
Brea, CA 92821
Telephone No.:
1 (888) 950-8889
declare that the product
Product No.:
EMR211X
Product Name:
Weather@Home Thermo
Bluetooth-enabled Thermometer
Manufacturer:
Oregon Scientic
Global Distribution Limited
Address:
Block C, 9/F, Kaiser Estate,
Phase 1, 41 Man Yue St.,
Hung Hom, Kowloon,
Hong Kong
is in conformity with Part 15 of the FCC Rules. Operation is subject
to the following two conditions: 1) This device may not cause
harmful interference. 2) This device must accept any interference
received, including interference that may cause undesired operation.
EMR211X_M_EU_EN_R7.indd 10 2018/8/15 下午4:29
Page 12
IT
1
Termometro con connessione
Bluetooth Weather@Home
Model: EMR211X
MANUALE UTENTE
INDICE
Introduzione .............................................................. 2
Panoramica ............................................................... 2
Vista anteriore ........................................................ 2
Vista posteriore ...................................................... 2
Sensore remoto (THN132N) .................................. 3
Per iniziare ................................................................ 3
Inserire le batterie .................................................. 3
Sensore remoto...... .................................................. 3
Trasmissione dati sensore ..................................... 4
Temperatura .............................................................. 4
Avviso ghiaccio ...................................................... 4
Reset .......................................................................... 5
Connessione con il dispositivo mobile .................. 5
Abbinamento del termometro ................................. 5
Impostazioni ........................................................... 6
Visualizza dati correnti ........................................... 7
visualizza dati della cronologia .............................. 7
Sensore opzionale per informazioni aggiuntive .... 8
Precauzioni ............................................................... 8
Specifiche ................................................................. 9
Informazioni su Oregon Scientific .......................... 9
Dichiarazione di Conformita’ue ............................ 10
Informazione Agli Utenti ........................................ 10
EMR211X_M_EU_IT_R10.indd 1 2018/8/15 下午4:24
Page 13
IT
2
INTRODUZIONE
Grazie per aver scelto il termometro Oregon ScientificTM
Weather@Home con tecnologia Bluetooth, che permette
di visualizzare i dati di temperatura interna ed esterna
sull’unità principale o sul tuo dispositivo mobile.
N.B. Tenere questo manuale a disposizione mentre
si usa il nuovo prodotto. Contiene le indicazioni per il
corretto funzionamento, oltre che specifiche tecniche e
avvisi che occorre conoscere.
PANORAMICA
VISTA ANTERIORE
1
2
3
4
5
6
7
8
1. Visualizzazione temperatura esterna (°C/°F)
2. Indicatore canale sensore
3. : indicatore ricezione sensore
4. : batteria sensore remoto esterno quasi esaurita
5. Visualizzazione temperatura interna (°C/°F)
6. : sensore remoto interno/batteria unità
principale quasi esaurita
7. : Indicatore connessione BLE
8. Indicatore LED avviso ghiaccio
VISTA POSTERIORE
1. 2. 3.
4
5
1. SET: selezionare l’unità di temperatura (°C/°F);
abbinare la funzione Bluetooth
2. : selezionare i canali esterni (1-5); ricercare un
sensore remoto
3. : selezionare i canali esterni (1-5); eseguire la
scansione automatica tra i sensori
EMR211X_M_EU_IT_R10.indd 2 2018/8/15 下午4:24
Page 14
IT
3
4. RESET: ripristinare le impostazioni predenite dell’unità
5. Vano batterie
SENSORE REMOTO (THN132N)
1
2
3
4
5
1. Indicatore stato LED
2. Foro per il montaggio a muro
3. Vano batterie
4. foro RESET
5. interruttore CHANNEL
INFORMAZIONI Visita il nostro sito www.oregonscientific.it
per conoscere i modelli dei sensori compatibili.
PER INIZIARE
INSERIRE LE BATTERIE
1. Rimuovere il vano batterie.
2. Inserire le batterie rispettando le polarità (+/-).
3. Premere RESET dopo ogni sostituzione delle batterie.
UBICAZIONE
SIGNIFICATO
Area temperatura esterna
Batterie sensore esterno
quasi esaurite
Area temperatura interna
Batterie sensore interno
quasi esaurite/batterie unità
principale quasi esaurite
SENSORE REMOTO
E' possibile sincronizzare all'unità principale no a 5
sensori remoti.
Per impostare il sensore:
1. Aprire il vano batterie.
2. Selezionare un canale quindi premere RESET.
3. Chiudere il vano batterie.
4. Posizionare il sensore entro 30 m (98 piedi) dall’unità
principale usando il supporto per il tavolo o il
montaggio a muro.
SUGGERIMENTO L’ubicazione ideale del sensore è
all’esterno dell’abitazione a un’altezza non superiore a
1,5 m (5 piedi); per garantire una lettura accurata, il luogo
deve proteggere il sensore dalla luce diretta del sole o
le condizioni umide.
EMR211X_M_EU_IT_R10.indd 3 2018/8/15 下午4:24
Page 15
IT
4
1.5 m (5 ft)
N.B. Usare batterie alcaline per garantire un utilizzo
più lungo e batterie al litio di grande consumo nelle
temperature sotto lo zero.
TRASMISSIONE DATI SENSORE
Per cercare un sensore:
1. Premere o per selezionare tra 5 diversi canali
esterni dei sensori remoti.
2. Premere e tenere premuto per 2 secondi per
forzare la ricerca del sensore selezionato.
Per eseguire la scansione automatica dei sensori:
• Premere e tenere premuto per 2 secondi per
attivare la funzione di scansione automatica per tutti
e 5 i canali. Le temperature saranno visualizzate
automaticamente in ordine sequenziale (canale 1,
2, 3, 4, 5)
L'icona di ricezione del sensore sul lato anteriore
dell'unità principale mostra lo stato:
ICONA DESCRIZIONE
L’unità principale sta ricercando
il sensore/i sensori.
È stato individuato un canale.
Impossibile trovare il sensore.
SUGGERIMENTO L’intervallo di trasmissione può
variare a seconda di numerosi fattori. Può essere
necessario posizionare il sensore/i sensori in vari punti
per ottenere i risultati migliori.
TEMPERATURA
Per selezionare l'unità di temperatura:
• Premere SET per selezionare °C o °F per le letture
della temperatura.
AVVISO GHIACCIO
Se la temperatura rilevata dal canale 1 è tra i 3°C e i - 2
EMR211X_M_EU_IT_R10.indd 4 2018/8/15 下午4:24
Page 16
IT
5
°C (da 37°F a 28°F), l'indicatore LED
sul lato anteriore dell'unità principale lampeggerà
continuamente, e smetterà di lampeggiare una volta che
la temperatura è al di fuori di tale intervallo.
• Premere contemporaneamente e per
disattivare l’avviso ghiaccio.
• L’avviso ghiaccio sarà disattivato/attivato nuovamente
quando la temperatura cala nuovamente da 3°C a
- 2°C (da 37°F a 28°F).
N.B. Un avviso ghiaccio è applicabile solo al canale
1; per evitare il lampeggiamento del LED selezionare il
canale 2-5 nel sensore esterno.
RESET
Premere RESET sul lato posteriore dell'unità principale
per ripristinare le impostazioni predenite.
CONNESSIONE CON IL DISPOSITIVO MOBILE
È possibile impostare in remoto il termometro e leggere
le informazioni atmosferiche attraverso Bluetooth®v4.0
utilizzando il dispositivo mobile con l'applicazione
scaricata dall'Apple Store o da Google Play Store. Per
trovare rapidamente l'applicazione, digitare "Weather@
Home" quale parola chiave nel motore di ricerca.
Accertarsi che il dispositivo mobile sia compatibile con
iOS 5 o Android 4.3 con Bluetooth®v4.0.
SINCRONIZZAZIONE DEL TERMOMETRO
Prima di tutto, occorre sincronizzare il termometro
al dispositivo mobile. Il simbolo lampeggerà sullo
schermo della stazione meteorologica durante la
sincronizzazione e sarà acceso una volta eseguito
l'abbinamento.
Per sincronizzare un sensore:
Sul retro dell'unità principale, premere SET e tenere
premuto per 2 secondi per attivare la connessione con
l'unità principale.
EMR211X_M_EU_IT_R10.indd 5 2018/8/15 下午4:24
Page 17
IT
6
1. Premere per accedere alla schermata
SETTINGS.
2. Fare clic sull’area STATION.
3. Fare clic su Pair Up; sullo schermo apparirà la scritta
Searching... per indicare che la connessione è in
corso. Se si desidera annullare la sincronizzazione,
fare clic su Cancel.
4. Una volta eseguito l’abbinamento, tornerà alla
schermata STATION.
5. Fare clic su ogni canale per rinominarlo (sono
consentiti no a 20 caratteri compresi gli spazi). Fare
clic su se si ha terminato. Fare clic su
per uscire.
Per rimuovere un sensore:
Per rimuovere un sensore dalla stazione meteorologica,
fare clic su Remove station nella schermata STATION;
tutti i sensori saranno rimossi contemporaneamente.
Per riposizionare i sensori nello schermo:
1. Nella schermata STATION, fare clic su .
2. Premere e tenere premuto sul lato destro del
sensore. Trascinarlo nella posizione desiderata.
3. Fare clic su per confermare.
IMPOSTAZIONI
È possibile impostare la stazione meteo attraverso
l'applicazione, come le unità di misurazione.
Le impostazioni sono le seguenti:
• Temperatura
• Barometro (non disponibile in EMR211X)
• Precipitazioni (non disponibile in EMR211X)
• Velocità del vento (non disponibile in EMR211X)
• Altitudine (non disponibile in EMR211X)
• Mostra sensore non disponibile
• Sincronizza automaticamente l’ora
EMR211X_M_EU_IT_R10.indd 6 2018/8/15 下午4:24
Page 18
IT
7
• Mostra la pressione a livello del mare (non
disponibile in EMR211X)
Per selezionare l'unità di misurazione:
1. Fare clic su per visualizzare le opzioni
dell’unità di misurazione.
2. Fare clic sull’unità desiderata.
3. Fare clic su per tornare alla schermata
precedente.
VISUALIZZA LDATI CORRENTI
E’ possibile visualizzare
contemporaneamente i
dati rilevati dai sensori remoti,
direttamente sull’applicazione.
Le letture sono nella schermata
HOME.
N.B. Se l’icona di batteria quasi
esaurita è visualizzata
sullo schermo, sostituire le
batterie del dispositivo
corrispondente.
Per mostrare un sensore non disponibile:
Se il sensore è fuori intervallo, le letture sono interrotte
e il simbolo - - (modalità trattino) è visualizzato sullo
schermo. Se non si desidera visualizzare il sensore
non disponibile:
• Nella schermata SETTINGS, premere e far scorrere
il pulsante verso destra per attivare la funzione, o
sulla sinistra per disattivarla.
VISUALIZZA DATI DELLA CRONOLOGIA
È possibile visualizzare la cronologia attraverso
l'applicazione. È anche possibile presentare la
cronologia in graci (le ultime 24 ore o gli ultimi 7 giorni).
EMR211X_M_EU_IT_R10.indd 7 2018/8/15 下午4:24
Page 19

IT
8
Per visualizzare la cronologia:
1. Fare clic sull’area desiderata nello schermo.
2. Fare clic su per selezionare i dati
desiderati o su per elencare i dati in base alla
data.
SENSORE OPZIONALE PER INFORMAZIONI
AGGIUNTIVE
Utilizzando il sensore opzionale modello BTH, sarà
possibile visualizzare sull'applicazione le seguenti
informazioni:
• Previsioni meteorologiche
• Pressione dell’aria
• Umidità esterna
RIFERIMENTI UTILI Il sensore opzionale (modello:
sensore BTH) può essere acquistato da Oregon
Scientific.
PRECAUZIONI
• Non sottoporre il prodotto a forza eccessiva, urti,
polvere, temperatura o a umidità.
• Non otturare i fori di aerazione con oggetti come
giornali, tende, etc.
• Non immergere l’unità in acqua. Se si versa del
liquido sul prodotto, asciugarlo immediatamente con
un panno morbido e liscio.
• Non pulire l’unità con materiali abrasivi, corrosivi o alcolici.
• Non grafare il display LCD con oggetti duri in quanto
si potrebbero causare danni.
• Non manomettere i componenti interni dell’unità. In
questo modo si invalida la garanzia.
• Utilizzare solo batterie nuove. Non mescolare
batterie nuove con batterie vecchie.
• Le immagini del manuale possono differire dalla realtà.
• Al momento dello smaltimento del prodotto, conferirlo
ai centri di raccolta specici.
• Decliniamo ogni responsabilità per eventuali
danni causati dal posizionamento del prodotto su
determinati tipi di legno. Consultare le istruzioni fornite
dal fabbricante del mobile per ulteriori informazioni.
• Il contenuto di questo manuale non può essere
riprodotto senza l’autorizzazione del fabbricante.
• Non smaltire le batterie vecchie come riuto non
differenziato. È necessario che questo tipo di riuto
venga smaltito separatamente per essere trattato in
modo specico.
EMR211X_M_EU_IT_R10.indd 8 2018/8/15 下午4:24
Page 20
IT
9
• Alcune unità sono dotate di una striscia protettiva
per le batterie. Rimuoverla dal vano batterie prima
dell’utilizzo.
N.B. Le speciche tecniche del prodotto e il contenuto
del manuale per l’utente possono essere modicati
senza preavviso. Si prega di visitare il sito http://
global.oregonscientic.com/customerSupport.php per
scaricare una versione elettronica del manuale.
SPECIFICHE
TIPO DESCRIZIONE
UNITÀ PRINCIPALE
L x W x H
93 x 68 x 30 mm
(3.66 x 2.68 x 1.18 pollici)
Peso 96 g ( 3,39 once) con la batteria
Intervallo di tem-
peratura
Da -5°C a 50°C (da 23°F a 122°F)
Frequenza segnale 433 MHz
Alimentazione 2 x AAA
Intervallo tem-
peratura per avviso
ghiaccio
Da 3°C a -2°C
TERMOSENSORE REMOTO (THN132N)
L x W x H
96 x 50 x 22 mm
(3.78 x 1.97 x 0.87 pollici)
Peso 62 g (2,22 once)
Intervallo di trasmis-
sione
30 m (98 piedi) senza ostruzione
Intervallo di temperatura
Da -20°C a 60°C
(da -4°F a 140°F)
Alimentazione 1 x batteria UM-3 (AA) 1.5V
INFORMAZIONI SU OREGON SCIENTIFIC
Per richiedere informazioni, contattate il nostro Servizio
Clienti al seguente collegamento:
https://www.nital.it/contatti/index.php.
Oregon Scientific Global Distribution Limited si riserva
il diritto di interpretare e definire eventuali contenuti,
termini e disposizioni contenuti in questo manuale per
l’utente e di modificarli, a sua esclusiva discrezione, in
qualsiasi momento e senza preavviso. Nella misura in
cui risultassero incongruenze tra la versione in inglese
e quelle in altre lingue, farà fede la versione in inglese.
EMR211X_M_EU_IT_R10.indd 9 2018/8/15 下午4:24
Page 21
IT
10
DICHIARAZIONE DI CONFORMITA’UE
Con la presente il fabbricante, Oregon Scientific
Global Distribution Limited, dichiara che questo tipo di
apparecchiatura Termometro con connessione Bluetooth
Weather@Home (Modello: EMR211X) è conforme alla
direttiva 2014/53/UE. Il testo completo della Dichiarazione
di Conformità UE è disponibile al seguente indirizzo
internet:
http://global.oregonscientific.com/customerSupport.php
PAESI CONFORMI ALLA DIRETTIVA RED
Tutti I Paesi UE, Svizzera CH
e Norvegia N
INFORMAZIONE AGLI UTENTI
Ai sensi dell’art.26 del Decreto Legislativo 14
marzo 2014, n. 49 “Attuazione della Direttiva
2012/19/UE sui rifiuti di apparecchiature
elettriche ed elettroniche (RAEE)” ed ai sensi
dell’art.22 del Decreto Legislativo 188 del 20
novembre 2008 “Attuazione della direttiva
2013/56/EU concernente pile, accumulatori e
relativi riuti “.
Il simbolo del cassonetto barrato riportato
sull’apparecchiatura o sulla sua confezione indica
che il prodotto alla fine della propria vita utile deve
essere raccolto separatamente dagli altri rifiuti per
permetterne un adeguato trattamento e riciclo.
Si ricorda che le pile/accumulatori devono essere
rimosse dall’apparecchiatura prima che questa
sia conferita come rifiuto. Per rimuovere le pile/
accumulatori fare riferimento alle speciche indicazioni
riportate nel manuale d’uso.
L’utente dovrà, pertanto, conferire gratuitamente
l’apparecchiatura e la pila giunta a fine vita agli
idonei centri comunali di raccoltadifferenziata dei
rifiuti elettrici ed elettronici, oppure riconsegnarle al
rivenditore secondo le seguenti modalità:
• sia pile portatili sia apparecchiature di piccole
dimensioni, ovvero con almeno un lato esterno non
superiore a 25 cm, è prevista la consegna gratuita
senza obbligo di acquisto presso i negozi con una
EMR211X_M_EU_IT_R10.indd 10 2018/8/15 下午4:24
Page 22
IT
11
supercie di vendita delle apparecchiature elettriche
ed elettroniche superiore ai 400 mq. Per negozi con
dimensioni inferiori, tale modalità è facoltativa.
• per apparecchiature con dimensioni superiori a 25
cm, è prevista la consegna in tutti i punti di vendita in
modalità 1 contro 1, ovvero la consegna al rivenditore
potrà avvenire solo all’atto dell’acquisto di un nuovo
prodotto equivalente, in ragione di uno a uno.
L’adeguata raccolta differenziata per l’avvio successivo
dell’apparecchiatura e delle pile/accumulatori dismessi
al riciclaggio, al trattamento e allo smaltimento
ambientalmente compatibile contribuisce ad evitare
possibili effetti negativi sull’ambiente e sulla salute
e favorisce il reimpiego e/o riciclo dei materiali di cui
essi sono composti.
Lo smaltimento abusivo di apparecchiature, pile
ed accumulatori da parte dell’utente comporta
l’applicazione delle sanzioni di cui alla corrente
normativa di legge.
EMR211X_M_EU_IT_R10.indd 11 2018/8/15 下午4:24
Page 23

FR
1
Weather@Home Bluetooth
Thermomètre compatible Bluetooth
Modèle: EMR211X
GUIDE DE L’UTILISATEUR
TABLE DES MATIÈRES
Introduction .............................................................. 2
Vue d’ensemble ........................................................ 2
Vue de face ............................................................ 2
Vue arrière ............................................................. 2
Capteur à distance (THN132N) ............................. 3
Démarrage ................................................................. 3
Insertion des piles .................................................. 3
Capteur à distance...... ............................................. 3
Transmission des données du capteur .................. 4
Température .............................................................. 4
Avertissement de gel ............................................. 4
Réinitialisation .......................................................... 5
Connexion avec un appareil mobile ....................... 5
Jumelage du thermomètre ..................................... 5
Réglages ................................................................ 6
Affichage des mesures en cours ............................ 7
Affichage de l’historique des mesures ................... 8
Capteur en option pour plus d’informations ......... 8
Précautions ............................................................... 8
Caractéristiques ....................................................... 9
À Propos d’Oregon Scientific ................................. 9
Eu – Déclaration de Conformité ............................ 10
Informations Aux Usagers ..................................... 10
EMR211X_M_EU_FR_R6.indd 1 2018/8/15 下午4:26
Page 24
FR
2
INTRODUCTION
Merci d’avoir choisi notre thermomètre compatible
Bluetooth Weather@Home d’Oregon ScientificTM, qui
a un affichage variable de la température intérieure et
extérieure.
REMARQUE Veuillez conserver le présent manuel
à portée de main lorsque vous utilisez votre nouveau
produit. Il contient des instructions étape par étape, ainsi
que les spécifications techniques et les avertissements
que vous devriez connaître.
VUE D’ENSEMBLE
VUE DE FACE
1
2
3
4
5
6
7
8
1. Afchagedelatempératureextérieure(°C/°F)
2. Indicateur de canal du capteur
3. : Indicateur de réception du capteur
4. : la batterie du capteur extérieur à distance est faible
5. Afchagedelatempératureintérieure(°C/°F)
6. : la batterie du capteur intérieur à distance / de
l’unité principale est faible
7. : Indicateur de connexion BLE
8. Voyant d’avertissement de gel
VUE ARRIÈRE
1. 2. 3.
4
5
1. SET(RÉGLER ): sélectionnez l’unité de température
(°C/°F); jumelage de l’appareil pour la fonction
Bluetooth la fonction Bluetooth
2. : sélectionnez les canaux extérieurs (1-5) ;
recherchez le capteur à distance
3. : sélectionnez les canaux extérieurs (1-5) ; lancez
une recherche automatique parmi les capteurs
EMR211X_M_EU_FR_R6.indd 2 2018/8/15 下午4:26
Page 25
FR
3
4. RESET (RÉINITIALISATION): réinitialisez l’appareil
et retour aux réglages par défaut
5. Compartiment à piles
CAPTEUR À DISTANCE (THN132N)
1
2
3
4
5
1. Voyant d’état
2. Troupourxationmurale
3. Compartiment à piles
4. Bouton de RESET(RÉINITIALISATION)
5. Interrupteur CHANNEL(CANAL)
RÉFÉRENCE Visitez notre site Web
www.oregonscientific.com en savoir plus sur les capteurs
compatibles.
DÉMARRAGE
INSERTION DES PILES
1. Retirez le couvercle du compartiment à piles
2. Insérez les piles en respectant les polarités (+/-).
3. Appuyez sur RESET(RÉINITIALISATION) après
chaque changement de piles.
EMPLACEMENT
SIGNIFICATION
Zoned’afchagedela
température extérieure
Batterie du capteur extérieur faible
Zoned’afchagedela
température intérieure
Batterie du capteur intérieur
faible / batterie de l’unité
principale faible
CAPTEUR À DISTANCE
L'unité principale peut recueillir des données jusqu'à
5 capteurs.
Pour régler le capteur:
1. Ouvrez le compartiment à piles.
2. Sélectionnez un canal puis appuyez sur
RESET(RÉINITIALISATION).
3. Fermez le couvercle du compartiment à piles.
4. Installez le capteur à 98 pieds (30 m) de l’unité
principaleàl’aidedusupportdetableoudelaxation
murale.
ASTUCE L’emplacement idéal pour le capteur se trouve
dans n’importe quel endroit à l’extérieur de la maison à
une hauteur de moins de 5 pieds (1,5 m), protégé de la
lumière directe du soleil et à l’abris de l’humidité pour
une mesure précise.
EMR211X_M_EU_FR_R6.indd 3 2018/8/15 下午4:26
Page 26
FR
4
1.5 m (5 ft)
REMARQUE Utilisez les piles alcalines pour un usage
prolongé et les piles au lithium de qualité grand public à
des températures en dessous de zéro.
TRANSMISSION DES DONNÉES DU CAPTEUR
Pour rechercher un capteur:
1. Appuyez sur ou pour choisir parmi 5 canaux
extérieurs de capteurs à distance.
2. Appuyez et maintenez pendant 2 secondes pour
appliquer la recherche pour le capteur sélectionné.
Pour lancer une recherche automatique parmi les
capteurs:
• Appuyez et maintenez pendant 2 secondes
pour activer la fonction de recherche automatique
pour tous les 5 canaux. Les températures seront
affichées automatiquement en ordre séquentiel
(canal 1,2,3,4,5).
L'icône de réception du capteur à l'avant de l'unité
principale afche l'état:
ICÔNE DESCRIPTION
L’appareil principal
recherche le(s) capteur(s).
Un canal a été trouvé.
Le capteur ne peut pas être
trouvé.
ASTUCE La portée de transmission peut varier en
fonction de nombreux facteurs. Vous pouvez avoir besoin
de placer le(s) capteur(s) à des endroits différents pour
obtenir le(s) meilleur(s) résultat(s).
TEMPÉRATURE
Pour sélectionner l'unité de température:
• Appuyezsur SET(RÉGLER) pour sélectionner °C
ou °F pour les mesures de température.
AVERTISSEMENT DE GEL
Si le capteur du canal 1 passe de 37°F à 28°F (3°C à
EMR211X_M_EU_FR_R6.indd 4 2018/8/15 下午4:26
Page 27
FR
5
- 2°C), le voyant de l'unité principale
clignote en permanence, et s'arrête de clignoter lorsque
la température est en dehors de cette plage.
• Appuyez sur et au même moment pour
désactiver l’avertissement de gel.
• Le voyant d’avertissement de gel se désactivera /
s’activera à nouveau lorsque la température passera
à nouveau de 37°F à 28°F (3°C à - 2°C).
REMARQUE Vu que l’avertissement de gel est
applicable uniquement au canal 1, pour empêcher le
clignotement de la LED, sélectionnez le canal 2-5 sur le
capteur extérieur.
RÉINITIALISATION
Appuyez sur RESET(RÉINITIALISATION) à l'arrière de
l'unité principale pour revenir aux paramètres par défaut.
CONNECTEZ-VOUS AVEC VOTRE
DISPOSITIF MOBILE
Vouspouvez congurer le thermomètre à distance et
lire les informations météorologiques via Bluetooth®
v4.0 à l'aide de votre appareil mobile avec l'application
téléchargée depuis Apple Store. Pour trouver rapidement
l'application, tapez ‘Weather@Home » comme mot-clé
dans le moteur de recherche.
Assurez-vous que votre appareil mobile est compatible
avec iOS 5 ou Android 4.3 et avec Bluetooth® v4.0 .
JUMELAGE DE VOTRE THERMOMÈTRE
Tout d'abord, vous devez jumeler votre thermomètre
avec votre appareil mobile. clignote sur l'écran de
la station météo pendant le jumelage et s'allumera une
fois le jumelage réussi.
Pour jumeler un capteur:
A l'arrière de l'unité principale, appuyez sur
SET(RÉGLER) et maintenez pendant 2 secondes pour
activer un jumelage pour l'unité principale.
EMR211X_M_EU_FR_R6.indd 5 2018/8/15 下午4:26
Page 28
FR
6
1. Appuyez sur pour accéder à l’écran
SETTINGS (RÉGLAGES).
2. Appuyez sur la zone STATION.
3. Appuyez sur Pair Up(umelage). Searching...
(Rechercheencours...)s’afche.Sivoussouhaitez
annuler le jumelage, appuyez sur Cancel(Annuler).
4. Une fois le jumelage réussi, vous serez redirigé vers
l’écran STATION.
5. Appuyez sur chaque canal pour le renommer.
(Jusqu’à 20 caractères y compris les espaces sont
autorisés). Appuyez sur lorsque vous avez
terminé. Appuyez sur pour quitter.
Pour supprimer le capteur:
Pour supprimer un capteur de la station météo, appuyez
sur Remove station (Supprimer la station) sur l'écran
STATION, tous les capteurs seront supprimés en
même temps.
Pour repositionner les capteurs à l'écran:
1. Sur l’écran STATION, appuyez sur .
2. Appuyez et maintenez sur le côté droit d’un
capteur. Faites-le glisser à la position désirée.
3. Appuyez sur pourconrmer.
RÉGLAGES
Vouspouvezcongurer votre stationmétéogrâce à
l'application, maintenez appuyé les unités de mesure.
Les réglages sont les suivants:
• Température
• Barométre (non disponible sur le modèle EMR211X)
• Pluie(nondisponiblesurlemodèleEMR211X)
• Vitesse du vent (non disponible sur le modèle EMR211X)
• Altitude(nondisponiblesurlemodèleEMR211X)
• Afchageducapteurindisponible
• Synchronisationautomatiquedutemps
EMR211X_M_EU_FR_R6.indd 6 2018/8/15 下午4:26
Page 29
FR
7
• Afchagedelapressionatmosphériqueauniveau
de la mer (pas disponible sur le modèle EMR211X)
Pour sélectionner l'unité de mesure:
1. Appuyez sur pourafcherlesoptionsdel’unité
de mesure.
2. Entrez l’unité désirée.
3. Appuyez sur pour revenir à l’écran précédent.
AFFICHER LES MESURES EN COURS
Vouspouvezafcheren
même temps et directement
toutes les mesures de
température à partir des
différents capteursgrâce à
l’application.Les mesures sont
afchées surl’écran HOME
(ACCUEIL).
REMARQUE Si l’icône de pile
faible s’affiche sur l’écran,
remplacez les piles de l’appareil
correspondant.
Pour afcher le capteur indisponible:
Si le capteur est hors de portée, les mesures seront
interrompueset--(modetiret)s'afchesurl'écran.Si
vousnesouhaitezpasafcherlecapteurindisponible:
• Sur l’écran SETTINGS (RÉGLAGES), appuyez et
faites glisser le bouton vers la droite pour activer
la fonction, ou faites glisser vers la gauche pour la
désactiver.
Pour synchroniser automatiquement l'heure et la date:
L'heure et la date sur votre station météo pourraient être
synchronisées automatiquement par votre appareil mobile:
• Surl’écranSETTINGS (RÉGLAGES), appuyez et
EMR211X_M_EU_FR_R6.indd 7 2018/8/15 下午4:26
Page 30
FR
8
faites glisser le bouton vers la droite pour activer
la fonction, ou faites glisser vers la gauche pour la
désactiver.
AFFICHER L’HISTORIQUE DES MESURES
Vouspouvezafcherl'historiqueàtraversl'application.
L'historique peut également être présenté à l'aide de
graphiques (24 dernières heures ou 7 derniers jours).
Pour afcher l'historique:
1. Appuyez votre zone de capteur désiré sur l’écran.
2. Appuyez sur pour sélectionner les
données souhaitées ou appuyez sur pour trier
les données par jour.
CAPTEUR EN OPTION POUR PLUS
D’INFORMATIONS
En utilisant simultanément le capteur (Modèle : Capteur
BTH),vouspouvezégalementafcherlesinformations
suivantes à l'aide de votre appareil mobile.
• Prévisionsmétéo
• Pressiondel’air
• Humiditéextérieure
RÉFÉRENCE UTILE Le capteur en option (Modèle :
Capteur BTH) peut être acheté à partir de Oregon Scientific.
PRÉCAUTIONS
• Nepassoumettreleproduitàuneforceexcessive,
à un choc violent, à la poussière, à de fortes
températures ou à l’humidité.
• Nepas couvrir lestrousde ventilation avecdes
objets tels que des journaux, des rideaux…
• Ne pasplonger l’appareil dansl’eau. Si vous
renversez du liquide sur l’appareil, séchez-le
immédiatement avec un chiffon doux non pelucheux.
• Ne pas nettoyerl’appareilavec des matériaux
corrosifs ou abrasifs.
• Ne pastoucher auxcomposants internes de
l’appareil. Cela annule la garantie.
• N’utilisezquedespilesneuves.Nemélangezpas
les piles neuves et usagées.
• Les images decemanuel peuvent différerde
l’afchageréel.
• Lorsque vousvous débarrassezde ce produit,
assurez-vous qu’il soit collecté séparément pour un
traitement adapté.
EMR211X_M_EU_FR_R6.indd 8 2018/8/15 下午4:26
Page 31

FR
9
• Leplacementdeceproduitsurcertainstypesdebois
peutendommagerlanitiondumeuble,etnousne
seront être tenus pour responsable. Consultez les
instructions de soins du fabricant du meuble pour
plus d’informations.
• Lecontenudecemanuelnepeutêtrereproduitsans
la permission du fabricant.
• Nepas jeter lespiles usagées aveclesdéchets
municipaux non triés. La collection de ce type de
déchets pour un traitement adapté est nécessaire.
• Veuilleznoterquecertainsappareils sontéquipés
d’une bande de sécurité. Retirez la bande du
compartiment des piles avant la première utilisation.
REMARQUE Les caractéristiques techniques de ce
produit et le contenu de ce manuel peuvent ê tre soumis
à modifications sans pré avis. Pour té lé charger une
version électronique de ce mode d’emploi, veuillez visiter
http://global.oregonscientific.com/customerSupport.php.
CARACTÉRISTIQUES
TYPE DESCRIPTION
UNITÉ PRINCIPALE
L x I x H
93 x 68 x 30 mm
(3.66 x 2.68 x 1.18 po)
Poids 96g (3,39 onces) avec piles
Plage de température -5°C à 50°C (-5,00°C à 50,00°C)
Fréquence du signal 433 MHz
Puissance 2 x AAA
Plage de température
pour recevoir un
avertissement de gel
3°C à - 2°C
CAPTEUR À DISTANCE DU THERMOMÈTRE (THN132N)
L x I x H
96 x 50 x 22 mm
(3.78 x 1.97 x 0.87 po)
Poids 62 g (2,22 onces)
Intervalle de transmission
30 m (98 pieds) sans obstruction
Plage de température - 20°C à 60°C (- 4°F à 140°F)
Puissance Piles 1 x UM-3 (AA) 1,5V
À PROPOS D’OREGON SCIENTIFIC
Pour plus d‘informations sur les produits Oregon
ScienticFrance,rendez-voussurnotresite
www.oregonscientic.fr.
Besoin de plus d’informations? Contactez notre service
client expert à info@oregonscientic.fr.
OregonScienticGlobalDistributionLimitedseréserve
le droit d’interpréter tout contenu, termes et provisions
du présent manuel de l’utilisateur et de les amender à sa
seule discrétion, n’importe quand et sans avis préalable.
Dans la mesure où des incohérences sont constatées
entre la version anglaise et les versions traduites en
langues étrangères, la version anglaise prévaudra.
EMR211X_M_EU_FR_R6.indd 9 2018/8/15 下午4:26
Page 32

FR
10
EU – DÉCLARATION DE CONFORMITÉ
Le fabricant, Oregon Scientific Global Distribution
Limited, déclare que le type d’équipement radio
Weather@Home Bluetooth Thermomètre compatible
Bluetooth (modèle: EMR211X) est conforme à la
directive 2014/53/UE. Le texte intégral de la déclaration
de conformité de l’UE est disponible à l’adresse Internet
suivante:
http://global.oregonscientic.com/customerSupport.php
PAYS CONCERNÉS RED
Tous les pays Européens, la Suisse
CH
et la Norvège
N
INFORMATIONS AUX USAGERS
Aux termes des Directives européennes
2011/65/EU et 2012/19/EU, relatives à la
réduction de l’utilisation de substances
dangereuses dans les appareils électriques et
électroniques et à l’élimination des déchets.
Le symbole représentant une poubelle barrée reporté
sur l’appareil indique que le produit doit être collecté
séparémentdesautresdéchetsàlandesaproprevie.
L’usager devra done remettre l’appareil, lorsqu’il ne
l’utilisera plus, à des centres adaptés de collecte sélective
pour les déchets électroniques et électrotechniques, ou
bien il devra le rapporter au revendeur au moment de
l’achat d’un nouvel appareil de type équivalent, en raison
d’un contre un.
La collecte sélective adéquate pour la transmission
successive de l’appareil qui n’est plus utilisé au recyclage,
au traitement ou à l’élimination compatible au niveau
environnemental, contribue à éviter les effets négatifs
possibles sur l’environnement et sur la santé et favorise
le recyclage des matériaux dont l’appareil est composé.
L’élimination illégale du produit par l’usager est passible de
l’application de sanctions selon les lois en vigueur.
EMR211X_M_EU_FR_R6.indd 10 2018/8/15 下午4:26
Page 33

DE
1
Weather@Home Bluetooth-
Thermometer
Modell: EMR211X
BEDIENUNGSANLEITUNG
INHALT
Einführung ................................................................ 2
Übersicht ................................................................... 2
Vorderansicht ......................................................... 2
Rückansicht ........................................................... 2
Sensor (THN132N) ................................................ 3
Inbetriebnahme ......................................................... 3
Batterie einsetzen .................................................. 3
Sensor...... ................................................................. 3
Sensor anlernen ..................................................... 4
Temperatur ................................................................ 4
Frostwarnung ......................................................... 5
Rückstellung ............................................................. 5
Verbindung mit ihrem Mobilgerät ........................... 5
Paarung des Thermometers .................................. 5
Einstellungen ......................................................... 6
Aktuelle Messwerte anzeigen ................................ 7
Messdaten-Verlauf anzeigen ................................. 8
Sensor für zusätzliche Information ........................ 8
Vorsichtsmassnahmen ............................................ 8
Spezifikationen ......................................................... 9
Über Oregon Scientific .......................................... 10
Eu-Konformitätserklärung ..................................... 10
Informationen für die Benutzer ..............................11
EMR211X_M_EU_DE_R6.indd 1 2018/8/15 下午4:10
Page 34

DE
2
EINFÜHRUNG
Danke, dass Sie unser Oregon ScientificTM Weather@
Home Bluetooth-Thermometer gewählt haben, mit seiner
wechselbaren Anzeige für den Innen-und Aussenbereich.
BITTE BEACHTEN Halten Sie diese Anleitung beim
Gebrauch Ihres neuen Produkts griffbereit. Sie enthält
praktische Schritt-für-Schritt Anleitungen wie auch
technische Spezifikationen und Warnungen, über die Sie
Bescheid wissen sollten.
ÜBERSICHT
VORDERANSICHT
1
2
3
4
5
6
7
8
1. Messung der Außentemperatur (°C/°F)
2. Sensor-Kanalanzeige
3. : Sensor-Empfangsanzeige
4. : Sensor Batteriebereitschaftsstatus
5. Innenraum-Temperaturmessung (°C/°F)
6. : Innenraum-Sensor / Batterie der Haupteinheit
fast leer
7. : BLE-Prozess Anschlussanzeige
8. Frostwarnung LED Anzeige
RÜCKANSICHT
1. 2. 3.
4
5
1. SET/Einstellung: Temperatureinheit wählen (°C/°F);
mit Bluetooth-Funktion paaren
2. : Außenkanäle wählen (1-5); Fernfühler suchen
3. : Außenkanäle wählen (1-5); automatisches
Absuchen der Sensoren
4. RESET/Rückstellung: die Einheit auf die
Grundeinstellung bringen
5. Batteriefach
EMR211X_M_EU_DE_R6.indd 2 2018/8/15 下午4:10
Page 35

DE
3
SENSOR (THN132N)
1
2
3
4
5
1. LED Statusanzeige
2. Wandbefestigung
3. Batteriefach
4. RESET: Taste für die RÜCKSTELLUNG
5. CHANNEL: Kanalschalter
HINWEIS Besuchen Sie unsere Website
www.oregonscientific.com um mehr über die kompatiblen
Sensoren zu erfahren.
INBETRIEBNAHME
BATTERIE EINSETZEN
1. Batteriefach entfernen
2. Batterien einsetzen, unter der Beachtung der
Polarität (+/-).
3. Nach jedem Batteriewechsel RESET drücken.
ORT
BEDEUTUNG
Außentemperaturbereich Sensor-Batterien fast leer
Bereich der Innenraumtemperatur
Batterien der Innenraumfühler und Haupteinheit
fast leer
SENSOR
Die Haupteinheit kann Daten von bis zu 5 Sensoren
sammeln.
Zur Einstellung des Sensors:
1. Batteriefach öffnen.
2. Einen Kanal wählen, dann RESET(Rückstellung) drücken.
3. Die Batteriefach schließen.
4. Den Sensor innerhalb von 30 m Entfernung von der
Haupteinheit platzieren, unter Verwendung eines
Ständers oder durch Wandmontage.
TIPP Ideale Platzierung des Fühlers ist jedweder Ort
auf der Außenseite des Hauses, auf einer Höhe von
nicht mehr als 1,5 m; für genaue Messung sodann vor
direktem Sonnenlicht oder vor Regen und ähnlichen
nassen Bedingungen schützen.
EMR211X_M_EU_DE_R6.indd 3 2018/8/15 下午4:10
Page 36

DE
4
1.5 m (5 ft)
HINWEIS Verwenden Sie alkalische Batterien für
längere Lebensdauer und Lithium Batterien der
Konsumentenklasse bei Temperaturen unter dem
Gefrierpunkt.
SENSOR ANLERNEN
Zur Suche eines Sensors:
1. Zur Wahl der 5 verschiedenen Freiluftkanäle der
Sensoren oder drücken.
2. Gleichzeitig 2 Sekunden drücken und halten, um
die Suche des gewählten Fühlers zu aktivieren.
Zur automatischen Suche der Sensoren:
• 2 Sekunden drücken und halten, um die
automatische Suchfunktion für alle 5 Kanäle zu
aktivieren. Die Temperaturen werden in automatischer
Reihenfolge angezeigt (Kanäle 1, 2, 3, 4, 5).
Das Fühlerempfangssymbol auf der Vorderseite der
Haupteinheit zeigt den Stand an:
SYMBOL BESCHREIBUNG
Haupteinheit sucht den/die
Sensor/Sensoren.
Es wurde ein Kanal gefunden.
Der Sensor ist nicht
aufndbar.
TIPP Die Übertragsreichweite kann, abhängig von
vielen Faktoren, sein. Zur Erzielung des besten Resultats
oder der besten Ergebnisse müssen Sie u.U. den oder
die Sensoren an verschiedenen Orten probehalber
platzieren.
TEMPERATUR
Zum Wählen der Temperatureinheit:
• SET(Einstellung) drücken für das Ablesen von °C
(Celsius) oder °F (Fahrenheit).
EMR211X_M_EU_DE_R6.indd 4 2018/8/15 下午4:10
Page 37

DE
5
FROSTWARNUNG
Wenn der Wert des Kanals 1 von
3°C bis -2°C (37°F auf 28°F) aufweist, wird die LED
Anzeige vorne an der Haupteinheit dauernd blinken;
das Blinken endet, wenn die Temperatur außerhalb des
obigen Bereichs ist.
• Zur Deaktivierung der Frostwarnung, gleichzeitig
und drücken.
• Die Frostwarnung wird erneut eingeschaltet, wenn
die Temperatur erneut in den Bereich zwischen 3°C
und -2°C (37°F und 28°F) fällt.
HINWEIS Eine Frostwarnung gilt nur für Kanal 1. Zur
Verhinderung des Blinkens der LED-Anzeige sind Kanäle
2 bis 5 für die Sensoren zu wählen.
RÜCKSTELLUNG
Zur Rückkehr zur Grundeinstellung RESET(Rückstellung)
hinten an der Haupteinheit drücken.
VERBINDUNG MIT IHREM MOBILGERÄT
Das Thermometer kann ferneingestellt und die
Temperaturinformation über Bluetooth®v4.0 gelesen
werden, indem Sie Ihr mobiles Gerät mit der vom Apple
Store heruntergeladenen Anwendung gebrauchen. Zum
raschen Aufnden der Anwendung tippen Sie ‚Weather@
Home’ als Schlüsselwort in die Suchmaschine.
Stellen Sie sicher, dass Ihr Mobilgerät mit iOS5 oder
Android 4.3 mit Bluetooth®v4.0 kompatibel ist.
PAARUNG DES THERMOMETERS
Zuerst ist Ihr Thermometer mit Ihrem Mobilgerät
zu paaren. wird während der Paarung auf der
Anzeige der Wetterstation blinken und bei erfolgreicher
Verbindung dauerhaft sichtbar bleiben.
Zur Paarung der Station:
Hinten an der Haupteinheit SET/für 2 Sekunden drücken und
halten. Die Paarung für die Haupteinheit wird so gestartet.
EMR211X_M_EU_DE_R6.indd 5 2018/8/15 下午4:10
Page 38

DE
6
1. Um die Einstellungs-Anzeige zu starten, antippen.
2. Auf den Bereich STATION tippen.
3. Pair-up(Paarung) wählen. Searching(Suche)
…..zeigt an. Falls Sie die Paarung annullieren
wollen, Cancel(löschen) drücken.
4. Nach erfolgreicher Paarung kehrt die Anzeige auf
STATION zurück.
5. Jeden Kanal wählen, um ihn neu zu benennen
(erlaubt sind bis zu 20 Zeichen,einschließlich
Leerzeichen). Wenn erledigt, auf /tippen. Zur
Beendigung auf drücken.
Zur Entfernung der Sensoren:
Um einen Sensor von der Wetterstation zu entfernen,
Remove station(Station entfernen) auf der Anzeige
STATION drücken.
Alle Sensoren werden gleichzeitig entfernt.
Zur Neupositionierung der Sensoren auf dem
Anzeigefeld:
1. Auf der Anzeige STATION, drücken.
2. Auf der rechten Seite eines Sensors drücken
und halten, dann zur gewünschten Position ziehen.
3. Zur Bestätigung drücken.
SETTINGS/EINSTELLUNG
Sie können die Messwerte Ihre Wetterstation über die
Anwendung einstellen.
Die Einstellungen sind wie folgt:
• Temperatur
• Barometer (nicht verfügbar mit EMR211X)
• Regenmenge (nicht verfügbar mit EMR211X)
• Windgeschwindigkeit (nicht verfügbar mit EMR211X)
• Höhe über Meer (nicht verfügbar mit EMR211X)
• Anzeige nicht verfügbarer Sensoren
EMR211X_M_EU_DE_R6.indd 6 2018/8/15 下午4:10
Page 39

DE
7
• Automatische Synchronzeit
• Anzeige der Luftdrucks auf Meereshöhe (nicht
verfügbar mit EMR211X)
Zur Wahl der Messwerte:
1. wählen, worauf die Messwertauswahl zu
sehen ist.
2. Die gewünschte Wahl bestätigen.
3. Rückkehr zur vorherigen Anzeige durch Drücken auf
.
AKTUELLE MESSWERTE ANSEHEN
Sie können alle
Temperaturmessungen direkt
von verschiedenen Sensoren
sehen, aber jeweils nur
einen Wert im gegebenen
Moment. Die Ergebnisse sind auf
in der HOME-Anzeige ersichtlich.
HINWEIS Wenn das Symbol
der leeren Batterie erscheint,
sind die Batterien des
entsprechenden Geräts zu ersetzen.
Aufzeichnung der nicht verfügbaren Sensoren:
Wenn der Sensor sich außerhalb Reichweite bendet,
setzt die Messung aus und ---- (Strichzeichen)
erscheinen auf der Anzeigetafel. Wenn Sie die nicht
verfügbaren Sensoren nicht zeigen wollen:
• berühren Sie auf der SETTINGS(Einstellungs-
Anzeige) den Knopf und schieben ihn zum Anschalten
der Funktion nach rechts und zum Abschalten der
Funktion nach links.
Zur automatischen Synchronisation der Zeit:
Zeit und Datum an Ihrer Wetterstation lassen sich durch
Ihr Mobilgerät automatisch synchronisieren:
• auf der SETTINGS(Einstellungs-Anzeige) berühren
EMR211X_M_EU_DE_R6.indd 7 2018/8/15 下午4:11
Page 40

DE
8
Sie den Knopf und schieben ihn zum Anschalten der
Funktion nach rechts und zum Abschalten nach links.
MESSDATEN-VERLAUF ANZEIGEN
Der Verlauf ist über die Anwendung lesbar. Sie ist auch
graphisch darstellbar (die letzten 24 Stunden oder die
letzten 7 Tage).
Zur Betrachtung der Entwicklung:
1. Drücken Sie auf der Übersicht den gewünschten
Bereich an.
2. Wählen Sie die gewünschten Daten durch Drücken
von oder tippen Sie auf um die
Ergebnisse nach Datum sortiert zu erhalten.
SENSOR FÜR ZUSÄTZLICHE INFORMATION
Durch Anwendung des wahlweise verfügbaren Sensor
(Modell: BTH Sensor) können Sie bei Benutzung Ihres
Mobilgerätes jeweils auch die folgende Information ersehen.
• Wettervorhersage
• Luftdruck
• Feuchtigkeit im Außenbereich
NÜTZLICHER HINWEIS Der wahlweise verfügbare
Sensor (Modell: BTH Sensor) kann von Oregon Scientific
bezogen werden.
VORSICHTSMASSNAHMEN
• Setzen Sie das Gerät keiner übermäßigen
Gewalteinwirkung und keinen Stößen aus und
halten Sie es von Staub, extremen Temperaturen
und Feuchtigkeit fern.
• Blockieren Sie nicht die Belüftungsöffnungen mit
Gegenständen, wie Zeitungen, Vorhänge, usw.
• Tauchen Sie das Gerät niemals in Wasser. Falls
Sie Flüssigkeiten darauf verschütten, trocknen Sie
es umgehend mit einem weichen faserfreien Tuch.
• Reinigen Sie das Gerät nicht mit scheuernden oder
ätzenden Mitteln.
• Kratzen Sie nicht mit harten Gegenständen am
LCD-Display, da dieses sonst beschädigt wird.
• Nehmen Sie keine Änderungen an den internen
Komponenten des Geräts vor. Dies würde zum
Erlöschen der Garantieansprüche führen.
• Installieren Sie ausschließlich neue Batterien. Verwenden
Sie niemals neue und alte Batterien gemeinsam.
• Die in dieser Anleitung dargestellten Abbildungen
können sich vom Original unterscheiden.
EMR211X_M_EU_DE_R6.indd 8 2018/8/15 下午4:11
Page 41

DE
9
• Achten Sie bei der Entsorgung des Produktes darauf,
dass es speziellen Sammelstellen zur gesonderten
Aufbereitung zugeführt wird.
• Wenn dieses Produkt auf bestimmte Holzächen
gestellt wird, kann die Oberfläche beschädigt
werden. Oregon Scientific ist nicht haftbar für
solche Beschädigungen. Entsprechende Hinweise
entnehmen Sie bitte der Pflegeanleitung Ihres
Möbelherstellers.
• Inhalt dieser Anleitung darf ohne Genehmigung des
Herstellers nicht vervielfältigt werden.
• Entsorgen Sie alte Batterien nicht im allgemeinen
Hausmüll, sondern ausschließlich in den dafür
vorgesehenen, kommunalen Sammelstellen, die Sie
bei Ihrer Gemeinde erfragen können.
• Beachten Sie bitte, dass einige Geräte mit
Batterieschutzstreifen ausgestattet sind. Entfernen
Sie diesen Streifen vor der ersten Inbetriebnahme
aus dem Batteriefach.
HINWEIS Die technischen Daten fü r dieses Produkt
und der Inhalt der Bedienungsanleitung können ohne
Benachrichtigung geändert werden. Bitte besuchen Sie
unsere Internetseite http://global.oregonscientic.com/
customerSupport.php, um eine elektronische Version
dieser Bedienungsanleitung herunter zu laden.
SPEZIFIKATIONEN
AUSFÜHRUNG BESCHREIBUNGN
HAUPTEINHEIT
Länge x Breite x Höhe 93 x 68 x 30 mm
Gewichts 96 g mit Batterie
Temperaturbereich -5°C bis 50°Celsius
Signalfrequenz 433 MHz
Stromversorgung 2 x AAA Batterien
Temperaturbereich
bei Frostwarnung
3o bis -2o Celsius
FERNBEDIENUNGSEINHEIT (THN132N)
Länge x Breite x Höhe 96 x 50 x 22 mm
Gewicht 62 g
Übermittlungsbereich 30 m unbehindert
Temperaturbereich -20o bis 60o Celsius
Stromversorgung 1 x UM-3 (AA) 1.5 V Batterie
EMR211X_M_EU_DE_R6.indd 9 2018/8/15 下午4:11
Page 42

DE
10
ÜBER OREGON SCIENTIFIC
Besuchen Sie unsere Website www.oregonscientic.
de, um mehr über die Produkte von Oregon Scientic
zu erfahren.
Für etwaige Anfragen kontaktieren Sie bitte unseren
Kundendienst unter info@oregonscientic.de.
Oregon Scientic Global Distribution Limited behält
sich das Recht vor, die Inhalte, Bedingungen und
Bestimmungen in dieser Bedienungsanleitung zu
interpretieren und auszulegen, und diese jederzeit
nach eigenem Ermessen ohne vorherige Ankündigung
abzuändern. Soweit es irgendwelche Unterschiede
zwischen der englischen Version und den Versionen
in anderen Sprachen gibt, ist die englische Version
maßgebend.
EU-KONFORMITÄTSERKLÄRUNG
Hiermit erklärt der Hersteller, Oregon Scientic Global
Distribution Limited, dass der Funkausrüstungs-Typ
Weather@Home Bluetooth-Thermometer (Modell:
EMR211X) In Übereinstimmung mit 2014/53/EU ist. Den
vollständigen Wortlaut der EU-Konformitätserklärung
nden Sie unter folgender Internetadresse:
http://global.oregonscientic.com/customerSupport.php
KONFORM IN FOLGENDEN LÄNDERN
Alle Länder der EU, Schweiz CH
und Norwegen N
EMR211X_M_EU_DE_R6.indd 10 2018/8/15 下午4:11
Page 43

DE
11
INFORMATIONEN FÜR DIE BENUTZER
Gemäß den Europäischen Richtlinien
2011/65/EU und 2012/19/EU über die
Reduzierung der Verwendung gefährlicher
Stoffe in elektrischen und elektronischen
Geräten, sowie die Abfallentsorgung.
Das Symbol der durchgestrichenen Mülltonne auf dem
Gerät besagt, dass es am Ende seiner Verwendungszeit
getrennt von anderen Abfällen entsorgt werden muss.
Der Benutzer muss daher das Gerät nach Beendigung
seiner Verwendungsdauer zu geeigneten Sammelstellen
für die getrennte Abfallentsorgung von elektrischen
und elektronischen Geräten bringen oder es dem
Endverkäufer beim Kauf eines neuen Geräts von
ähnlicher Art im Verhältnis eins zu eins übergeben.
Die angemessene Abfalltrennung und die darauf
folgende Verbringung des aufgelassenen Geräts in den
Recyclingkreislauf zur umweltverträglichen Verwertung
und Entsorgung tragen dazu bei, mögliche negative
Auswirkungen auf die Umwelt und die Gesundheit zu
vermeiden und sie begünstigen das Recycling von
Materialien, aus denen das Gerät besteht.
Die rechtswidrige Entsorgung des Produktes veranlässt
die Verwendung der geltenden Verwaltungssanktionen.
EMR211X_M_EU_DE_R6.indd 11 2018/8/15 下午4:11
Page 44

ES
1
Termómetro con Bluetooth
Weather@Home
Modelo: EMR211X
MANUAL DEL USUARIO
CONTENIDO
Introducción .............................................................. 2
Descripción general ................................................. 2
Vista frontal ............................................................ 2
Vista trasera ........................................................... 2
Sensor remoto(THN132N) ..................................... 3
Inicio .......................................................................... 3
Inserte las pilas ...................................................... 3
Sensor remoto...... .................................................... 3
Transmisión de datos del sensor ........................... 4
Temperatura .............................................................. 4
Alerta de hielo ........................................................ 4
Reinicio ..................................................................... 5
Vincular a su dispositivo móvil ... ........................... 5
Vincular el termómetro ........................................... 5
Ajustes ................................................................... 6
Ver las lecturas actuales ........................................ 7
Ver el historial de lecturas ...................................... 8
Sensor opcional para información Adicional ........ 8
Precauciones ... ........................................................ 8
Especificaciones ...................................................... 9
Sobre Oregon Scientific .......................................... 9
EU - Declaración de conformidad ......................... 10
Informaciòn de Suarios ......................................... 10
EMR211X_M_EU_ES_R7.indd 1 2018/8/15 下午4:28
Page 45

ES
2
INTRODUCCIÓN
Gracias por elegir nuestro Termómetro con Bluetooth
Weather@Home DE Oregon ScientificTM, con pantalla
cambiable de temperatura interior a exterior.
NOTA Conserve este manual cuando use el nuevo
producto. Contiene las instrucciones prácticas paso
a paso, así como las especificaciones técnicas y las
advertencias que debe conocer.
DESCRIPCIÓN GENERAL
VISTA FRONTAL
1
2
3
4
5
6
7
8
1. Lectura de la temperatura exterior (°C/°F)
2. Indicador del canal del sensor
3. : Indicador de recepción del sensor
4. : Sensor remoto exterior de batería baja
5. Lectura de la temperatura interior(°C/°F)
6. : Sensor/unidad principal exterior remoto de
batería baja
7. : Indicador de conexión BLE
8. Indicador LED de alerta de hielo
VISTA TRASERA
1. 2. 3.
4
5
1. SET (AJUSTAR): seleccione la unidad de
temperatura (° C / ° F); vincule la función Bluetooth
2. : seleccione los canales exteriores (1-5); busque
un sensor remoto
3. : Seleccione los canales exteriores (1-5); escanee
automáticamente entre los sensores
EMR211X_M_EU_ES_R7.indd 2 2018/8/15 下午4:28
Page 46

ES
3
4. RESET(REINICIO): reinicie la unidad a la
conguración predeterminada
5. Compartimento para las pilas
SENSOR REMOTO (THN132N)
1
2
3
4
5
1. Indicador LED de estado
2. Oricio de montaje en pared
3. Compartimento para las pilas
4. RESET(REINICIO): Oricio de
5. Interruptor del CHANNEL(CANAL)
REFERENCIA
OVisite nuestra web www.oregonscientific.com
para saber más acerca de los sensores compatibles.
INICIO
INSERTE LAS PILAS
1. Retire el compartimiento de las pilas
2. Introduzca las pilas haciendo coincidir la polaridad (+ / -).
3. Pulse RESET (REINICIO) cada vez que cambie las pilas.
UBICACIÓN
SIGNIFICADO
Area de temperatura exterior
Sensor exterior de bacteria baja
Area de temperatura interior
Sensor interior de bacteria
baja / bacteria baja de la
unidad principalnd Haupteinheit fast leer
SENSOR REMOTO
La unidad principal puede recoger datos de hasta 5
sensores.
Para congurar el sensor:
1. Abra el compartimento de las pilas.
2. Seleccione un canal y pulse RESET (REINICIO).
3. Cierre la puerta de las pilas.
4. Coloque el sensor en un radio de 98 pies (30 m)
de la unidad principal utilizando el pie de mesa o
colgándolo en la pared.
TRUCO El lugar ideal para colocar el sensor es el exterior
de la casa a una altura de no más de 5 pies (1,5 m), y que
pueda protegerse de la luz solar directa o de la humedad
para una lectura exacta.
EMR211X_M_EU_ES_R7.indd 3 2018/8/15 下午4:28
Page 47

ES
4
1.5 m (5 ft)
NOTA Utilice pilas alcalinas para un uso de larga
duración y las pilas de litio en temperaturas bajo cero.
TRANSMISIÓN DE DATOS DEL SENSOR
Buscar un sensor:
1. Pulse o para seleccionar entre los diferentes
5 canales exteriores de sensores remotos.
2. Mantenga pulsado durante 2 segundos para
efectuar la búsqueda del sensor seleccionado.
Para escanear automáticamente entre sensores:
• Mantenga pulsado durante 2 segundos para activar
la función de búsqueda automática de los 5 canales.
Las temperaturas se mostrarán automáticamente en
orden secuencial (canal 1,2,3,4,5).
El icono de recepción del sensor en la parte frontal
de la unidad principal muestra el estado:
ICONO DESCRIPCIÓN
La unidad principal está
buscando sensor (es).
Se ha encontrado un canal.
No se encuentra el sensor.
TRUCO El alcance de transmisión puede variar en
función de muchos factores. Puede que tenga que
colocar el sensor (es) en diferentes lugares para
conseguir mejor resultados.
TEMPERATURA
Para seleccionar la unidad de temperatura:
• Pulse SET (AJUSTAR) para seleccionar °C o °F
para la lectura de temperatura.
ALERTA DE HIELO
Si el sensor del canal 1 cae de 37
° F a 28 ° F (3 ° C a -2 ° C), el indicador LED de la
parte delantera de la unidad principal parpadeará de
forma continua, y dejará de parpadear una vez que la
temperatura se encuentre fuera de este rango.
EMR211X_M_EU_ES_R7.indd 4 2018/8/15 下午4:28
Page 48

ES
5
• Pulse y al mismo tiempo para desactivar la
advertencia de alerta de hielo.
• La advertencia de alerta de hielo volverá a desactivarse/
activarse cuando la temperatura descienda de nuevo
a partir de 37 ° F a 28 ° F (3 ° C a -2 ° C).
NOTA Como la alerta de hielo sólo es aplicable al canal
1, para evitar el parpadeo del LED, seleccione el canal
2-5 en el sensor exterior.
REINICIO
Pulse RESET (REINICIO) en la parte trasera de
la unidad principal para volver a la configuración
predeterminada.
VINCULAR A SU DISPOSITIVO MÓVIL
Puede congurar de forma remota el termómetro y leer
la información sobre el clima a través del Bluetooth®
v4.0 utilizando su dispositivo móvil con la aplicación
descargada en Apple Store. Para encontrar rápidamente
la aplicación, escriba 'Previsión meteorológica' como
palabra clave en el motor de búsqueda.
Asegúrese de que su dispositivo móvil es compatible
con iOS 5 o Android 4.3 con Bluetooth® v4.0.
VINCULAR EL TERMÓMETRO
En primer lugar, es necesario vincular el termómetro
con su dispositivo móvil. parpadeará en la pantalla
de la estación meteorológica mientras se conecta y
se encenderá después de que se haya realizado la
vinculación.
Vincular un sensor:
En la parte trasera de la unidad principal, presione SET
(AJUSTAR) y mantenga durante 2 segundos para permitir
que se efectúe la conexión de la unidad principal.
EMR211X_M_EU_ES_R7.indd 5 2018/8/15 下午4:28
Page 49

ES
6
1. Pulse para entrar en la pantalla SETTINGS
(AJUSTES).
2. Pulse el área de la STATION (ESTACIÓN).
3. Pulse Pair Up (Vincular). Aparecerá Searching...
(Buscando...) en pantalla. Si desea cancelar la
conexión, pulse Cancel (Cancelar).
4. Una vez que se haya realizado la conexión, volverá
a la pantalla STATION (ESTACION).
5. ulse en cada canal para cambiar su nombre.
(Están permitidos hasta 20 caracteres incluyendo
espacios). Pulse si se completa. Pulse
para salir.
Eliminar el sensor:
Para eliminar cualquier sensor de la estación
meteorológica, pulse Remove station (Eliminar
estacion) en la pantalla STATION (ESTACIÓN), y todos
los sensores serán eliminados al mismo tiempo.
Para cambiar la posición de los sensores en la pantalla:
1. En la pantalla STATION (ESTACION), pulse .
2. Mantenga pulsado en la parte derecha del
sensor. Arrástrelo a la posición deseada.
3. Pulse para conrmar.
AJUSTES
Puede congurar su estación meteorológica a través de
la aplicación, como las unidades de medida.
Los ajustes son los siguientes:
• Temperatura
• Barómetro (no disponible en EMR211X)
• Lluvia (no disponible en EMR211X)
• La velocidad del viento (no disponible en EMR211X)
• Altitud (no disponible en EMR211X)
• Muestra el sensor disponible
• Sincroniza automáticamente el tiempo
EMR211X_M_EU_ES_R7.indd 6 2018/8/15 下午4:28
Page 50

ES
7
• Muestra la presión a nivel del mar (no disponible en
EMR211X)
Para seleccionar la unidad de medida:
1. Pulse para ver las opciones de unidad de medida.
2. Pulse en la unidad deseada.
3. Pulse para volver a la pantalla anterior.
VER LAS LECTURAS ACTUALES
Puede ver a la vez y directamente
todas las lecturas de
temperatura de los diferentes
sensores a través de la
aplicación. Las lecturas están
en la pantalla HOME (INICIO).
NOTA Si el icono de batería
baja aparece en la pantalla,
reemplace las pilas del
dispositivo correspondiente.
Aparece el sensor no dispoible:
Si el sensor está fuera de rango, las lecturas se
interrumpen y aparece - - (modo de guión) en la
pantalla. Si no desea que aparezca que el sensor no
está disponible:
• En la pantalla SETTINGS (AJUSTES), pulse y
deslice el botón hacia la derecha para activar la
función, o deslícelo a la izquierda para apagarlo.
Sincronizar automáticamente la hora:
La hora y la fecha de su estación meteorológica pueden
sincronizarse automáticamente en el dispositivo móvil.
• En la pantalla SETTINGS (AJUSTES), pulse y
deslice el botón hacia la derecha para activar la
función, o deslícelo a la izquierda para apagarlo.
EMR211X_M_EU_ES_R7.indd 7 2018/8/15 下午4:28
Page 51

ES
8
VER EL HISTORIAL DE LECTURAS
Puede ver el historial a través de la aplicación. El historial
también puede presentarse en los grácos (después de
24 horas o pasados 7 días).
Ver el historial:
1. Pulse el área del sensor deseado en la pantalla.
2. Pulse para seleccionar los datos deseados
o pulse para ordenar los datos por fecha.
SENSOR OPCIONAL PARA INFORMACIÓN
ADICIONAL
Colocando el sensor opcional (modelo: sensor BTH) a la
vez, también podrá ver la siguiente información utilizando
su dispositivo móvil.
• Previsión meteorológica
• Presión de aire
• Humedad exterior
REFERENCIA ÚTIL El sensor opcional (modelo: sensor
BTH) puede adquirirse en Oregon Scientific.
PRECAUCIONES
• No exponga la unidad a fuerza excesiva, descargas,
polvo, temperatura ni humedad.
• No cubra los oricios de ventilación con objetos
como periódicos, cortinas, etc.
• No sumerja el dispositivo en agua. Si se vertiera
líquido en la unidad, límpiela con un paño suave y
sin electricidad estática.
• No limpie la unidad con materiales abrasivos o
corrosivos.
• No ralle la pantalla LCD con objetos duros, porque
podría causar daños.
• No manipule los componentes internos. Hacerlo
invalida la garantía.
• Use siempre pilas nuevas. No mezcle pilas viejas
con pilas nuevas.
• Las imágenes de esta guía para el usuario pueden
ser distintas al producto en sí.
• Cuando elimine este producto, asegúrese de
que no vaya a parar a la basura general, sino
separadamente para recibir un tratamiento especial.
• La colocación de este producto encima de ciertos
tipos de madera puede provocar daños a sus
acabados. Nosotros no nos responsabilizaremos
EMR211X_M_EU_ES_R7.indd 8 2018/8/15 下午4:28
Page 52

ES
9
de dichos daños. Consulte las instrucciones de
cuidado del fabricante del mueble para disponer de
más información.
• Los contenidos de este manual no pueden
reproducirse sin permiso del fabricante.
• No elimine las pilas gastadas con la basura normal.
Es necesario desecharlo separadamente para poder
tratarlo.
• Tenga en cuenta que algunas unidades disponen
de una cinta de seguridad para las pilas. Retire la
cinta de compartimiento para pilas antes de usarlo
por primera vez.
NOTA La ficha té cnica de este producto y los contenidos
de este manual de usuario pueden cambiarse sin aviso.
Por favor, visite http://global.oregonscientific.com/
customerSupport.php para descargar una versión electró
nica del manual de usuario.
ESPECIFICACIONES
TIPO DESCRIPCIÓN
UNIDAD PRINCIPAL
L x P x He
93 x 68 x 30 mm
(3.66 x 2.68 x 1.18 pulgadas)
Peso 96g (3.39 oz) con la batería
Rango de temperatura -5 ° C a 50 ° C (23 ° F a 122 ° F)
Frecuencia de señal 433 MHz
Potencia 2 x AAA
Rango de temperatura
por alerta de hielo
3°C a -2°C
TERMO SENSOR REMOTO (THN132N)
L x P x H
96 x 50 x 22 mm
(3.78 x 1.97 x 0.87 pulgadas)
Peso 62g (2.22 oz)
Rango de transmisión 30 m (98 pies) sin obstáculos
Rango de temperatura -20 ° C a 60 ° C (-4 ° F a 140 ° F)
Potencia 1 x pila de 1.5V (AA) UM-3
SOBRE OREGON SCIENTIFIC
Visite nuestro sitio web www.oregonscientific.com
para obtener más información sobre los productos de
Oregon Scientic.
Si tiene alguna duda, póngase en contacto con nuestros
servicios al cliente en info@oregonscientic.com.
Oregon Scientic Global Distribution Limited se reserva
el derecho de interpretar e inferir cualquier contenido,
términos y provisiones de este manual de usuario y
corregirlo, a su discreción en cualquier momento y
sin aviso previo. Si hubiese alguna divergencia entre
la versión en inglés y las versiones de otros idiomas,
prevalecerá la versión en inglés.
EMR211X_M_EU_ES_R7.indd 9 2018/8/15 下午4:28
Page 53

ES
10
EU - DECLARACIÓN DE CONFORMIDAD
Por la presente el fabricante, Oregon Scientic Global
Distribution Limited, declara que el tipo de radio equipo
Termómetro con Bluetooth Weather@Home (Modelo:
EMR211X) está en el cumplimiento de la Directiva
2014/53/UE. El texto completo de la declaración de
conformidad de la UE está disponible en la siguiente
dirección de Internet:
http://global.oregonscientic.com/customerSupport.php
PAÍSES BAJO LA DIRECTIVA RED
Todos los países de la UE, Suiza CH
y Norue N
INFORMACIÒN DE USUARIOS
Segùn las Directrices Europeas 2011/65/
EU y 2012/19/EU, relativas a la reducción
del uso de sustancias peligrosas en los
aparatos eléctricos y electrónicos, además
del desecho de los residuos.
El símbolo tachado del contenedor que se encuentra
en el aparato indica que el producto, al nal de su vida
útil, deberá depositarse en un lugar separado de los
demás residuos. Por lo tanto, el usuario deberá entregar
el aparato, cuando deje de utilizarse, a los adecuados
centros de recogida diferenciada de residuos electrónicos
y electrotécnicos, o deberá devolverlo al vendedor en
el momento de compra de un nuevo aparato de tipo
equivalente, uno a cambio de otro.
La adecuada recogida diferenciada del aparato inutilizado
para el sucesivo reciclaje, tratamiento y desecho
ambientalmente compatibles, contribuye a evitar posibles
efectos negativos en el medioambiente y en la salud,
y favorece el reciclaje de los materiales de los que se
compone el aparato.
El desecho abusivo del producto por parte del usuario
implica la aplicación de las sanciones previstas por la ley.
EMR211X_M_EU_ES_R7.indd 10 2018/8/15 下午4:28
Page 54

1
POR
Termômetro ativado para Bluetooth
Weather@Home
Modelo: EMR211X
MANUAL DE INSTRUÇÕES
ÍNDICE
Introdução ................................................................. 2
Aspecto geral ............................................................ 2
Vista de frente ........................................................ 2
Vista traseira .......................................................... 2
Sensor remoto (THN132N) .................................... 3
Iniciar ......................................................................... 3
Colocar as pilhas ................................................... 3
Sensor remoto...... .................................................... 3
Transmissão de dados pelo sensor ....................... 4
Temperatura .............................................................. 4
Alerta de gelo ......................................................... 4
Reconfigurar ............................................................. 5
Ligar ao seu dispositivo móvel ............................... 5
Emparelhamento do seu termômetro .................... 5
Configurações ........................................................ 6
Ver leituras atuais .................................................. 7
Ver registos anteriores ........................................... 8
Sensor opcional para informação adicional .......... 8
Precauções ............................................................... 8
Especificações ......................................................... 9
Sobre a Oregon Scientific ....................................... 9
Ce – Declaração de Conformidade ....................... 10
Informações Aos Utentes ...................................... 10
EMR211X_M_EU_POR_R6.indd 1 2018/8/15 下午4:21
Page 55

POR
2
INTRODUÇÃO
Agradecemos a sua preferência pelo Termômetro ativado
para Bluetooth Weather@Home, da Oregon ScientificTM,
com tela regulável para temperatura interior e exterior.
OBS Por favor, tenha o manual à mão quando usar o
novo produto. Contém instruções práticas passo a passo,
bem como especificações e advertências que deve ter
em consideração.
ASPECTO GERAL
VISTA DE FRENTE
1
2
3
4
5
6
7
8
1. Leitura de temperatura exterior (°C/°F)
2. Indicador de canal do sensor
3. : indicador de recepção do sensor
4. : pilha do sensor remoto exterior com pouca carga
5. Leitura de temperatura interior (°C/°F)
6. : pilha do sensor remoto interior / unidade
principal com pouca carga
7. : Indicador de ligação BLE
8. Indicador LED de alerta de gelo
VISTA TRASEIRA
1. 2. 3.
4
5
1. SET: selecionar unidade de temperatura (°C/°F);
função de emparelhamento Bluetooth
2. : selecionar canais exteriores (1-5); procurar
sensor remoto
3. : selecionar canais exteriores (1-5); pesquisa
automática entre sensores
EMR211X_M_EU_POR_R6.indd 2 2018/8/15 下午4:21
Page 56

3
POR
4. RESET: recongurar a unidade para os valores
predenidos
5. Compartimento das pilhas
SENSOR REMOTO (THN132N)
1
2
3
4
5
1. Indicador LED de estado
2. Orifício para suporte na parede
3. Compartimento das pilhas
4. Orifício para RESET
5. Interruptor para CHANNEL
REFERÊNCIAS ÚTEIS Visite nosso site
www.oregonscientific.br para saber mais sobre os
sensores compatíveis.
INICIAR
COLOCAR AS PILHAS
1. Retire o compartimento das pilhas
2. Coloque as pilhas, fazendo corresponder as
polaridades (+/-).
3. Pressione RESET de cada vez que mudar as pilhas.
LOCALIZAÇÃO
SIGNIFICADO
Zona de temperatura
Pilhas do sensor exterior
com pouca carga
Zona de temperatura interior
Pilhas do sensor interior
com pouca carga / pilhas
da unidade principal com
pouca carga
SENSOR REMOTO
A unidade principal pode recolher dados de até 5
sensores.
Congurar o sensor:
1. Abra o compartimento das pilhas.
2. Selecione um canal e prima RESET.
3. Feche a porta do compartimento das pilhas.
4. Coloque o sensor a uma distância de até 98 pés
(30 m) da unidade principal, usando o suporte de
mesa ou o suporte de parede.
DICA Para obter uma leitura correta, a colocação ideal
para o sensor é num espaço exterior, a uma altura não
superior a 5 pés (1,5 m), que seja protegido da luz direta
do sol e da chuva.
EMR211X_M_EU_POR_R6.indd 3 2018/8/15 下午4:21
Page 57

POR
4
1.5 m (5 ft)
OBS Use pilhas alcalinas para maior durabilidade e
pilhas de lítio consumíveis em temperaturas abaixo do
nível de congelamento.
TRANSMISSÃO DE DADOS PELO SENSOR
Procurar um sensor:
1. Prima ou para selecionar entre 5 diferentes
canais exteriores de sensores remotos.
2. Prima continuamente durante 2 segundos para
pesquisar o sensor selecionado.
Fazer uma pesquisa automática entre sensores:
• Prima continuamente durante 2 segundos
para ativar a função de pesquisa automática para
os 5 canais. As temperaturas serão mostradas
automaticamente por ordem sequencial (canal
1,2,3,4,5).
O ícone de recepção do sensor na parte traseira da
unidade principal mostra o estado:
ÍCONE DESCRIÇÃO
A unidade principal está a
procurar o(s) sensor(es).
Foi encontrado um canal.
Não é possível encontrar
o sensor.
DICA A amplitude de transmissão pode variar,
dependendo de vários fatores. Pode ser necessário
colocar o(s) sensor(es) em locais diferentes para obter
melhores resultados.
TEMPERATURA
Selecionar unidade de temperatura:
• Prima SET para selecionar °C ou °F para as leituras
de temperatura.
ALERTA DE GELO
Se o sensor do canal 1 descer de 37°F até 28°F (3°C
a -2°C), o indicador LED na parte da
frente da unidade principal pisca continuamente e só
para quando a temperatura estiver fora deste intervalo.
EMR211X_M_EU_POR_R6.indd 4 2018/8/15 下午4:21
Page 58

5
POR
• Prima e ao mesmo tempo para desativar o
alerta de gelo.
• O alerta de gelo será novamente desativado/ativado
quando a temperatura descer de novo de 37°F até
28°F (3°C até -2°C).
OBS Como o alerta de gelo só se aplica ao canal 1,
para evitar o LED a piscar, selecione os canais 2 a 5
para o sensor exterior.
RECONFIGURAR
Prima RESET na parte traseira da unidade principal
para voltar às congurações.
LIGAR AO SEU DISPOSITIVO MÓVEL
Pode configurar o termômetro à distância e ler a
informação meteorológica através do Bluetooth®v4.0,
usando o seu dispositivo móvel com o aplicativo que
descarregou da Apple Store.ara encontrar o aplicativo
rapidamente, escreva "Weather@Home" no motor de
busca
Certique-se que o seu dispositivo móvel é compatível
com iOS 5 ou Android 4.3 com Bluetooth®v4.0.
EMPARELHAMENTO DO SEU TERMÔMETRO
Em primeiro lugar, tem de fazer o emparelhamento do
termômetro com o seu dispositivo móvel. irá piscar no
tela da estação meteorológica durante o emparelhamento
e cará ativa após cada emparelhamento bem-sucedido.
Emparelhamento de um sensor:
Na parte traseira da unidade principal, prima
continuamente SET durante 2 segundos para ativar um
emparelhamento para a unidade principal.
EMR211X_M_EU_POR_R6.indd 5 2018/8/15 下午4:21
Page 59

POR
6
1. Toque em para abrir o tela SETTINGS.
2. Toque em STATION.
3. Toque em Pair Up. Surge Searching... Se quiser
cancelar o emparelhamento, toque em Cancel.
4. Se o emparelhamento for bem-sucedido, volta ao
tela STATION.
5. Toque em cada um dos canais para mudar o
nome. (São permitidos até 20 carateres, incluindo
espaços.) Toque em se tiver terminado.
Toque em para sair.
Remover sensor:
Para remover os sensores da estação meteorológica,
toque em Remove station no tela STATION, todos os
sensores serão removidos ao mesmo tempo.
Reposicionamento dos sensores no tela:
1. No tela STATION, toque em .
2. Prima continuamente no lado direito de um
sensor. Arraste-o para a posição pretendida.
3. Toque em para conrmar.
CONFIGURAÇÕES
Pode congurar a estação meteorológica através do
aplicativo, como por exemplo as unidades de medição.
As congurações são as seguintes:
• Temperatura
• Pressão barométrica (não disponível para o
EMR211X)
• Precipitação (não disponível para o EMR211X)
• Velocidade do vento (não disponível para o EMR211X)
• Altitude (não disponível para o EMR211X)
• Mostrar sensor indisponível
EMR211X_M_EU_POR_R6.indd 6 2018/8/15 下午4:21
Page 60

7
POR
• Sincronizar hora automaticamente
• Mostrar pressão ao nível do mar (não disponível
para o EMR211X)
Selecionar a unidade de medição:
1. Toque em para ver as opções de unidades de
medição.
2. Toque na unidade pretendida.
3. Toque em para voltar ao tela anterior.
VER LEITURAS ATUAIS
Pode ver, diretamente e em
simultâneo, todas as leituras
de temperatura dos diferentes
sensores, através do aplicativo.
As leituras encontram-se no
tela HOME.
OBS Se o ícone de pilha com
pouca carga surgir no tela,
troque as pilhas do dispositivo
correspondente.
Mostrar sensor indisponível:
Se o sensor estiver fora de alcance, as leituras são
interrompidas e surge - - (sinal tracejado) no tela. Se
não quiser mostrar o sensor indisponível:
• No tela SETTINGS, toque e faça deslizar o botão
para a direita para ativar a função ou para a
esquerda para desativar.
Sincronizar a hora automaticamente:
Pode sincronizar automaticamente hora e data na sua
estação meteorológica a partir do seu dispositivo móvel.
• No tela SETTINGS, toque e faça deslizar o botão
para a direita para ativar a função ou para a
esquerda para desativar.
EMR211X_M_EU_POR_R6.indd 7 2018/8/15 下午4:21
Page 61

POR
8
VER REGISTROS ANTERIORES
Pode ver os registos anteriores através do aplicativo.
Os registos anteriores também podem ser apresentados
em grácos (últimas 24 horas ou os últimos 7 dias).
Ver registos anteriores:
1. Toque na zona do sensor pretendido no tela.
2. Toque em para selecionar os dados
pretendidos ou toque em para ordenar os dados
por data.
SENSOR OPCIONAL PARA INFORMAÇÃO
ADICIONAL
Ao usar o sensor (Modelo: Sensor BTH) uma vez,
também pode ver a seguinte informação através do
seu dispositivo móvel.
• Previsão Meteorológica
• Pressão Atmosférica
• Humidade Exterior
REFERÊNCIAS ÚTEIS O sensor opcional (Modelo:
Sensor BTH) pode ser adquirido na Oregon Scientific.
PRECAUÇÕES
• Não sujeite a unidade a força, choque, pó,
temperatura ou humidade em excesso.
• Não tape os orifícios de ventilação com quaisquer
artigos tais como jornais, cortinas, etc.
• Não mergulhe a unidade em água. Se verter líquido
sobre a unidade, seque-a imediatamente com um
pano macio sem pêlos.
• Não limpe a unidade com materiais abrasivos ou corrosivos.
• Não esfregue objetos duros contra o visor LCD uma
vez que pode provocar danos.
• Não mexa nos componentes internos da unidade.
Tal, invalida a garantia.
• Use apenas baterias novas. Não misture baterias
novas e antigas.
• As imagens apresentadas neste manual podem
diferir da imagem real.
• Quando eliminar este produto, certique-se de que é
recolhido separadamente para tratamento especial.
• A colocação deste produto sobre certos tipos de
madeira pode resultar em danos no seu acabamento
pelos quais não nos responsabilizaremos. Consulte as
instruções de cuidados do fabricante para informação.
EMR211X_M_EU_POR_R6.indd 8 2018/8/15 下午4:21
Page 62

9
POR
• O conteúdo deste manual não pode ser reproduzido
sem a autorização do fabricante.
• Não elimine baterias usadas como lixo comum. É
necessária a recolha selectiva de tais resíduos para
tratamento especial.
• Por favor, note que algumas unidades estão
equipadas com uma tira de segurança da bateria.
Retire a tira do compartimento da bateria antes da
primeira utilização.
NOTA As especicações técnicas deste produto e o
conteúdo do manual do usuário estão sujeitos a alteraçõ
es sem aviso prévio. Para descarregar uma versão
eletrônica do manual de utilizador, por favor visite
http://global.oregonscientic.com/customerSupport.php.
ESPECIFICAÇÕES
TIPO DESCRIÇÃON
UNIDADE PRINCIPAL
C x L x A
93 x 68 x 30 mm
(3.66 x 2.68 x 1.18 pol)
Peso 96g (3.39 onças) com pilhas
Amplitude térmica -5°C até 50°C (23°F até 122°F)
Frequência de Sinal 433 MHz
Energia 2 pilhas AAA
Amplitude térmica
para alerta de gelo
3°C a -2°C
SENSOR TÉRMICO REMOTO (THN132N)
C x L x A
96 x 50 x 22 mm
(3.78 x 1.97 x 0.87 pol)
Peso 62g (2.22 onças)
Amplitude de trans-
missão
30 m (98pés) desimpedido
Amplitude térmica -20°C até 60°C (-4°F até 140°F)
Energia 1 pilha UM-3(AA) de 1.5V
SOBRE A OREGON SCIENTIFIC
Visite o nosso website www.oregonscientic.com.br
para saber mais sobre os produtos da Oregon Scientic.
Para colocar qualquer tipo de questão, contacte o nosso
Serviço de Apoio ao Cliente através do endereço
sac@oregonscientic.com.br.
Para maiores informações, contatar o SAC - Serviço
de Atendimento a Cliente - (11) 3523-1934 ou email:
sac@oregonscientic.com.br.
A Oregon Scientic Global Distribution Limited reserva
o direito de interpretar e denir quaisquer conteúdos,
termos e disposições neste manual do usuário, e
de o modicar a seu exclusivo critério, em qualquer
altura e sem aviso prévio. No caso de existir alguma
EMR211X_M_EU_POR_R6.indd 9 2018/8/15 下午4:21
Page 63

POR
10
inconsistência entre a versão em inglês e as outras
versões noutras línguas, a versão em inglês prevalecerá.
CE – DECLARAÇÃO DE CONFORMIDADE
Com isso o fabricante, Oregon Scientific Global
Distribution Limited, declara que o tipo de rádio
equipmment Termômetro ativado para Bluetooth
Weather@Home (Modelo: EMR211X)
está em conformidade com a Directiva 2014/53/UE. O
texto integral da Declaração de Conformidade da UE
está disponível no endereço Internet seguinte:
http://global.oregonscientic.com/customerSupport.php
PAISES SUJEITOS A NORMA RED
Todos os paises da União Européia, Suíça CH
e Noruega N
INFORMAÇÕES AOS UTENTES
Nos termos das Diretivas Europeias 2011/65/
EU e 2012/19/EU, relativas à redução do uso
de substãncias perigosas nos aparelhos
elétricos e eletrônicos, além da eliminação
de resíduos sólidos.
O símbolo da lata de lixo traçada indicada no aparelho
signica que o produto ao m de sua vida útil, deverá
ser eliminado separadamente de outros resíduos
sólidos.
O consumidor deverá, portanto, entregar o aparelho
após o término de sua vida útil, aos centros
encarregados pela coleta diferenciada de resíduos
eletrônicos e eletrotécnicos, ou mesmo, entregá-lo de
volta ao revendedor no momento da compra de um
novo aparelho de tipo equivalente, na proporção de
um para um.
A coleta diferenciada adequada para a eliminação
sucessiva do aparelho fora de uso a ser reciclado,
para o tratamento do lixo em modo compatível com
o ambiente, contribui para evitar possíveis efeitos
negativos ao meio ambiente e à saúde e facilita a
reciclagem dos materiais dos quais o aparelho é
constituído.
A eliminação do produto sem respeitar as normas por
parte do consumidor implica na aplicação das sanções
de acordo com as leis vigentes.
EMR211X_M_EU_POR_R6.indd 10 2018/8/15 下午4:21
Page 64

1
NL
Weather@Home Thermometer met
Bluetooth
Model: EMR211X
Gebruiksaanwijzing
INDICE
Introductie ................................................................. 2
Overzicht ................................................................... 2
Vooraanzicht .......................................................... 2
Achteraanzicht ....................................................... 2
Sensor op afstand (THN132N) .............................. 3
Om te beginnen ........................................................ 3
Plaats de batterijen ................................................ 3
Sensor op afstand...... .............................................. 3
Transmissie sensorgegevens ................................ 4
Temperatuur .............................................................. 4
Ijswaarschuwing ..................................................... 4
Reset .......................................................................... 5
Connector met uw mobiele apparaat ..................... 5
Koppelen van uw thermometer .............................. 5
Instellingen ............................................................. 6
Bekijk actuele meetwaarden .................................. 7
Bekijk historische meetwaarden ............................ 8
Optionele sensor voor additionele informatie ....... 8
Precautions ............................................................... 8
Specificaties ............................................................. 9
Over Oregon Scientific ............................................ 9
EU conformiteits verklaring .................................. 10
Informatie Voor de Gebruikers .............................. 10
EMR211X_M_EU_NL_R6.indd 1 2018/8/15 下午4:22
Page 65

NL
2
INTRODUCTIE
Wij danken u voor de keuze van onze Oregon
ScientificTM Weather@Home Bluetooth thermometer,
die een aanpasbaar display voor zowel binnen- als
buitentemperatuur heeft.
OPMERKING Houd deze handleiding bij de hand terwijl
u uw nieuwe product gebruikt. Het bevat praktische
stap-voor-stap aanwijzingen, zowel als technische
specificaties en waarschuwingen waarover u moet weten.
OVERZICHT
VOORAANZICHT
1
2
3
4
5
6
7
8
1. Aezingbuitentemperatuur(°C/°F)
2. Sensor kanaalindicator
3. : Sensor ontvangstindicator
4. : Batterij Sensor op afstand leeg
5. Aezingbinnentemperatuur(°C/°F)
6. : Batterij binnensensor / batterij hoofdapparaat leeg
7. : Indicator voor BLE-aansluiting
8. LED-indicator ijswaarschuwing
ACHTERAANZICHT
1. 2. 3.
4
5
1. SET: selecteer temperatuureenheid (°C/°F); koppel
Bluetoothfunctie
2. : selecteer buitenkanalen (1-5); zoek sensor op
afstand
3. : selecteer buitenkanalen (1-5); Auto-scan tussen
sensoren
EMR211X_M_EU_NL_R6.indd 2 2018/8/15 下午4:22
Page 66

3
NL
4. RESET: reset de eenheid naar default instellingen
5. Batterijvak
SENSOR OP AFSTAND (THN132N)
1
2
3
4
5
1. LED statusindicator
2. Gat voor wandmontage
3. Batterij vak
4. RESET gat
5. CHANNEL (KANAAL) schakelaar
NUTTIGE VERWIJZINGEN Bezoek onze website
www.oregonscientific.com om meer te leren over de
compatibele sensoren.
OM TE BEGINNEN
PLAATS DE BATTERIJEN
1. Open het batterijvak.
2. Plaats de batterijen, OPMERKING de polariteit (+/-).
3. Druk op RESET na elke wissel van batterijen.
PLAATS
BETEKENIS
Gebied buitentemperatuur
Batterijen sensor op
afstand leeg
Gebied binnentemperatuur
Batterijen binnensensor
leeg/ batterijen hoofdapparaat leeg
SENSOR OP AFSTAND
Het hoofdapparaat kan gegevens van tot 5 sensoren
verzamelen.
Om de sensor in te stellen:
1. Open het batterijvak.
2. Selecteer een kanaal en druk dan op RESET.
3. Sluit het batterijvak.
4. Plaats de sensor binnen 98 voet (30 m) van het
hoofdapparaat met behulp van de tafelstandaard of
wandmontage.
TIP De ideale plek voor de sensor zou zijn op elke
locatie op de buitenkant van het huis op een hoogte van
niet meer dan 5 voet (1,5 m); en die tegen direct zonlicht
of natte omstandigheden kan worden beschermd voor
een goede aflezing.
EMR211X_M_EU_NL_R6.indd 3 2018/8/15 下午4:22
Page 67

NL
4
1.5 m (5 ft)
OPMERKING Gebruik alkalinebatterijen voor langdurig
gebruik en lithium batterijen bij temperaturen onder het
vriespunt.
TRANSMISSIE SENSORGEGEVENS
Zoeken naar een sensor:
1. Druk op of om te selecteren tussen 5
verschillende kanalen van sensoren op afstand.
2. Druk op en houd ingedrukt gedurende 2 seconden
om herzoeken naar de geselecteerde sensor te
forceren.
Auto-scan tussen sensoren:
• Drukenhoud gedurende 2 seconden ingedrukt
om de Auto-Scan functie voor alle 5 kanalen in
te stellen. De temperaturen worden automatisch
achtereenvolgens (kanaal 1,2,3,4,5) getoond.
Het sensorontvangsticoon het van het hoofdapparaat
toont de status:
ICON OMSCHRIJVING
Hoofdapparaat zoekt naar
sensor(en).
Een kanaal is gevonden.
De sensor kan niet worden
gevonden.
TIP Het zendbereik kan variëren afhankelijk van veel
factoren. Mogelijk moet u de sensor(en) op andere
locaties plaatsen om het beste resultaat te krijgen.
TEMPERATUUR
Om de temperatuureenheid te selecteren:
• Druk opSET om °C of °F voor temperatuur te
selecteren.
IJSWAARSCHUWING
Indien de sensor van kanaal 1 van 37°F tot 28°F (3°C
tot -2°C) daalt, zal de LED-indi van
het hoofdapparaat continu knipperen, en zal ophouden
te knipperen zodra de temperatuur buiten dit gebied ligt.
EMR211X_M_EU_NL_R6.indd 4 2018/8/15 下午4:22
Page 68

5
NL
• Druktegelijkertijdop en om de ijswaarschuwing
te deactiveren.
• deijswaarschuwingzalweerwordenge(de)activeerd
wanneer de temperatuur weer van 37 °F naar 28 °F
(3 °C naar -2 °C) daalt.
OPMERKING Omdat de ijswaarschuwing alleen van
toepassing is op kanaal 1, kies, om knipperen van LED
te voorkomen, kanaal 2-5 op de buitensensor.
RESET
Druk op RESET aan de achterzijde van het apparaat om
terug te keren naar de standaardinstellingen.
CONNECTOR MET UW MOBIELE APPARAAT
U kunt de thermometer op afstand instellen en de
weersinformatie lezen via Bluetooth®v4.0 met uw
mobiele apparaat met de gedownloade applicatie uit
de Apple Store. Typ, om snel de toepassing te vinden,
‘Weather@Home’ als zoekwoord in de zoekmachine.
Verzeker u ervan dat uw mobiele apparaat compatibel is
met iOS 5 of Android 4.3 met Bluetooth®v4.0.
KOPPELEN VAN UW THERMOMETER
Allereerst moet u uw thermometer koppelen met uw
mobiele apparaat. knippert op het scherm van het
weerstation tijdens het koppelen en blijft aan na een
succesvolle koppeling.
Om een sensor aan te koppelen:
Druk aan de achterzijde van het apparaat op SET en houd
2 seconden vast om koppeling voor het hoofdtoestel in
te schakelen.
EMR211X_M_EU_NL_R6.indd 5 2018/8/15 下午4:22
Page 69

NL
6
1. Tik op om het scherm SETTINGS
(INSTELLINGEN) te benaderen.
2. Tik op het vlak STATION.
3. Tik op Pair Up (koppelen). Searching… (Automatische
afstemming) wordt getoond. Als u de koppeling wilt
annuleren, tikt u op Cancel (annuleren).
4. Zodra de koppeling is geslaagd, zal het STATION
scherm terugkeren.
5. Tik op elk kanaal om het te hernoemen. (Tot 20
karakters met inbegrip van spaties zijn toegestaan).
Tik op indien ingevuld. Tik op om de
instelling te verlaten.
Om een sensor te verwijderen:
Tik, om een sensor van het weerstation te verwijderen,
op Remove station (Verwijder station) op het scherm
STATION; alle sensoren worden tegelijk verwijderd.
Om de sensoren op het scherm te verplaatsen:
1. Op het scherm STATION , tik op .
2. Druk en houd ingedrukt aan de rechterkant van
een sensor. Sleep hem naar uw gewenste plaats.
3. Tik op om te bevestigen.
INSTELLINGEN
U kunt uw weerstation instellen via de app, zoals
meeteenheden.
De instellingen gaan als volgt:
• Temperatuur
• Luchtdruk(nietbeschikbaarinEMR211X)
• Regen(nietbeschikbaarinEMR211X)
• Windsnelheid(nietbeschikbaarinEMR211X)
• Hoogte(nietbeschikbaarinEMR211X)
• Toonnietbeschikbaresensor
EMR211X_M_EU_NL_R6.indd 6 2018/8/15 下午4:22
Page 70

7
NL
• Synchroniseerautomatischtijd
• Toonluchtdrukop zeeniveau (niet beschikbaar in
EMR211X)
Om de meeteenheid te selecteren:
1. Tik op om de opties voor de meeteenheid te
bekijken.
2. Tik op uw gewenste eenheid.
3. Tik op om terug te gaan naar het vorige scherm.
BEKIJK ACTUELE MEETWAARDEN
U kunt direct alle
temperatuurmetingen uit
verschillende sensoren bekijken.
Deaezingenzijntevindenin
het HOME-scherm.
OPMERKING Als het icoon
batterij leeg op het scherm
wordt getoond, vervang dan de
batterijen van het
corresponderende apparaat.
Niet beschikbare sensor tonen:
Als de sensor buiten bereik is, worden de uitlezingen
onderbroken en - (streep-modus) verschijnt op het
scherm. Als u de niet beschikbare sensor niet wilt zien:
• RaakophetschermSETTINGS ( INSTELLINGEN)
de toets aan en schuif hem naar rechts om de
functie in te schakelen of schuif naar links om uit te
schakelen.
Om automatisch de tijd te synchroniseren:
Tijd en datum op uw weerstation worden automatisch
door uw mobiele apparaat gesynchroniseerd.
• RaakophetschermSETTINGS ( INSTELLINGEN) de
toets aan en schuif hem naar rechts om de functie in
te schakelen of schuif naar links om uit te schakelen.
EMR211X_M_EU_NL_R6.indd 7 2018/8/15 下午4:22
Page 71

NL
8
BEKIJK HISTORISCHE MEETWAARDEN
U kunt de geschiedenis via de toepassing bekijken. De
geschiedeniskanookingraekenwordengepresenteerd
(24 uren of laatste 7 dagen).
Om de geschiedenis te bekijken:
1. Tik op het gebied van uw gewenste sensor op het
scherm.
2. Tik op om de gewenste gegevens te
selecteren of tik op om de gegevens volgens
datum te sorteren.
OPTIONELE SENSOR VOOR ADDITIONELE
INFORMATIE
Bij gebruik van de sensor (Model: BTH Sensor) kunt u
ook de volgende informatie met behulp van uw mobiele
apparaat bekijken.
• Weersverwachting
• Luchtdruk
• Vochtigheidbuiten
NUTTIGE VERWIJZINGEN De optionele sensor (Model:
BTH Sensor) kan worden aangeschaft bij Oregon Scientific.
PRECAUTIONS
• Stelhetapparaatniet bloot aan extremeklappen,
schokken, stof, temperatuur of vochtigheid.
• Dekdeventilatiegatennietafmetkranten,gordijnenetc.
• Dompelhetproductnooitonderinwater.Alsuwater
over het product morst, droog het dan onmiddellijk
af met een zachte stofvrije doek.
• Reinighetapparaatnietmetkrassendeofbijtende
materialen.
• Kras nietmet harde voorwerpenlangshet LCD
scherm, want het kan beschadigd raken.
• Laatdeinternecomponentenmetrust.Hierdoorkan
de garantie komen te vervallen.
• Gebruikalleennieuwebatterijen.Gebruiknooitoude
en nieuwe batterijen door elkaar.
• Deindezehandleidingweergegevenafbeeldingen
kunnen afwijken van de werkelijkheid.
• Wanneer udit product weggooit,zorg dan dat
het opgehaald wordt door de daarvoor bestemde
afvaldienst.
• Dit product kaneventueel schade veroorzaken
aan de laklaag van bepaalde houtsoorten. Wij zijn
EMR211X_M_EU_NL_R6.indd 8 2018/8/15 下午4:22
Page 72

9
NL
hiervoor niet aansprakelijk. Lees de instructies van
de fabrikant van het meubel voor meer informatie.
• De inhoud vandeze handleiding magnietworden
vermenigvuldigd zonder toestemming van de fabrikant.
• Doeoude batterijen nietbijhet gewone huisvuil.
Dit soort afval wordt apart opgehaald om te kunnen
worden verwerkt.
• Letop:sommigeapparaten zijn voorzien vaneen
batterijstrip. Verwijder de strip uit het batterijvak voor
het eerste gebruik.
NB Detechnischespecicatiesvanditproductende
inhoud van de handleiding zijn zonder voorafgaande
waarschuwing aan veranderingen onderhevig. U
kunt een elektronische versie van deze handleiding
downloaden op http://global.oregonscientific.com/
customerSupport.php.
SPECIFICATIES
TYPE OMSCHRIJVING
HOOFDAPPARAAT
LxBxH
93x68x30mm
(3.66x2.68x1.18in)
Gewicht 96 g met batterij
Temperatuurbereik -5°C tot 50°C (23°F tot 122°F)
Signaalfrequentie 433 MHz
Voeding 2xAAA
Temperatuurbereik
voor IJswaarschuwing
3°C tot -2°C
THERMISCHE BUITENSENSOR (THN132N)
LxBxH
96x50x22mm
(3.78x1.97x0.87in)
Gewicht 62g
Zendbereik 30 m onbelemmerd
Temperatuurbereik -20 °C tot 60 °C (-4 °F tot 140 °F)
Voeding 1xUM-3(AA)1.5Vbatterijen
OVER OREGON SCIENTIFIC
Bezoek onze website www.oregonscientic.com voor
meerinformatieoverdeproductenvanOregonScientic.
Mocht u vragen hebben, neem dan contact op met onze
klantenservice op info@oregonscientic.com.
OregonScienticGlobalDistributionLimitedbehoudtzich
het recht voor enige inhoud, bepalingen en voorwaarden
in deze gebruikershandleiding te interpreteren en deze
te allen tijde naar eigen inzicht en zonder voorafgaande
kennisgeving te wijzigen. Met dien verstande dat, indien
er enige inconsistentie bestaat tussen de Engelstalige
versie en een versie in enige andere taal, de Engelse
versie bindend is.
EMR211X_M_EU_NL_R6.indd 9 2018/8/15 下午4:22
Page 73

NL
10
EU CONFORMITEITS VERKLARING
Hierbijdefabrikant,OregonScienticGlobalDistribution
Limited, verklaart dat de radio equipmment soort
Weather@Home Thermometer met Bluetooth (Model:
EMR211X)in overeenstemmingis met 2014/53/
EU-richtlijn. De volledige tekst van de verklaring van
overeenstemming EU is beschikbaar op het volgende
internetadres:
http://global.oregonscientic.com/customerSupport.php
LANDEN DIE ZIJN ONDERWORPEN AAN RED
Alle EU landen, Zwitserland CH
en Noorwegen N
INFORMATIE VOOR DE GEBRUIKERS
Krachtens de EG-richtlijnen 2011/65/EU en
2012/19/EU met betrekking tot de beperking
van het gebruik van bepaalde gevaarlijke
stoffen in elektrische en elektronische
apparatuur en de afdanking van deze
apparatuur.
Het symbool van de doorstreepte vuilnisbak aangebracht
op de apparatuur geeft aan dat het product op het einde
van zijn levensduur afzonderlijk van het ander afval
afgedankt moet worden.
De gebruiker dient de apparatuur op het einde van zijn
levensduur dus toe te vertrouwen aan een geschikt
centrum voor de gscheden verwerking van elektronisch
en elektrotechnisch afval, of aan de verkoper te
bezorgen bij de aankoop van een nieuwe apparatuur
van gelijkaardig type, in de verhouding één tot één.
De correcte gescheiden omhaling voor de latere
recyclage, verwerking en milieuvriendelijke vernietiging
van de apparatuur draagt bij tot het voorkomen van
mogelijke negatieve invloeden op het milieu en de
gezondheid en bevordert de recyclage van de materialen
waarvan de apparatuur samengesteld is.
De abusievelijk afdanking van het product vanwege
de gebruiker geeft aanleiding tot de toepassing van
administra-tieve boetes volgens de wetgeving.
EMR211X_M_EU_NL_R6.indd 10 2018/8/15 下午4:22
Page 74

1
SWE
Weather@Home Bluetooth-aktiverad
termometer
Modell: EMR211X
Användarmanual
INNEHÅLL
Inledning ................................................................... 2
Översikt ..................................................................... 2
Vy framifrån ............................................................ 2
Vy bakifrån ............................................................. 2
Fjärrsensor (THN132N) ......................................... 3
Komma igång ............................................................ 3
Sätt i batterierna ..................................................... 3
Fjärrsensor...... .......................................................... 3
Överföring av sensordata ....................................... 4
Temperatur ................................................................ 4
Isvarning ................................................................ 4
Återställning ............................................................. 5
Anslut med din mobila enhet .................................. 5
Länka din termometer ............................................ 5
Inställningar ............................................................ 6
VISA aktuella värden .............................................. 7
VISA historikvärden ................................................ 8
Valfri sensor för ytterligare information ................. 8
Försiktighetsåtgärder .............................................. 8
Specifikationer .......................................................... 9
Om Oregon Scientific ............................................... 9
EU-försäkran om överensstämmelse ..................... 9
Information till alla Användare .............................. 10
EMR211X_M_EU_SWE_R7.indd 1 2018/8/15 下午4:18
Page 75

SWE
2
INLEDNING
Tack för att du väljer vår Bluetooth-aktiverade termometer
Weather@Home från Oregon ScientificTM. Denna
termometer har ändringsbar visning av inomhus-och
utomhustemperatur.
OBS! Ha den här manualen till hands medan du
använder din nya produkt. Manualen innehåller praktiska
anvisningar steg för steg liksom tekniska specifikationer
och varningar som du bör känna till.
ÖVERSIKT
VY FRAMIFRÅN
1
2
3
4
5
6
7
8
1. Utomhustemperatur (°C/°F)
2. Indikator för sensorkanal
3. : Indikator för sensormottagning
4. : låg batterinivå hos fjärrsensor utomhus
5. Inomhustemperatur (°C/°F)
6. : fjärrsensor inomhus / låg batterinivå hos huvudenhet
7. : Indikator för BLE-anslutning
8. LED-indikator för isvarning
VY BAKIFRÅN
1. 2. 3.
4
5
1. SET (ANGE): välj temperaturenhet (°C/°F); länka
Bluetooth-funktion
2. : välj utomhuskanaler (1–5); sök efter fjärrsensor
3. : välj utomhuskanaler (1–5); utför automatisk
sökning bland sensorer
4. RESET (ÅTERSTÄLL): återställ enheten till
standardinställningar
5. Batterifack
EMR211X_M_EU_SWE_R7.indd 2 2018/8/15 下午4:18
Page 76

3
SWE
FJÄRRSENSOR (THN132N)
1
2
3
4
5
1. LED statusindicator
2. Monteringshål för väggmontering
3. Batterifack
4. Hål för återställning (RESET)
5. Väljare av kanal (CHANNEL)
REFERENS Besök vår hemsida www.oregonscientific.se
för att lära sig mer om kompatibla sensorer..
KOMMA IGÅNG
SÄTT I BATTERIERNA
1. Öppna batterifacket.
2. Sätt i batterierna så att polerna stämmer med
pollägena (+/-).
3. Tryck på RESET (ÅTERSTÄLL) efter varje batteribyte.
PLATS
BETYDELSE
Utomhustemperaturområde
Låg batterinivå hos utomhussensor
Inomhustemperaturområde
Låg batterinivå hos inomhussensor / låg batterinivå
hos huvudenhet
FJÄRRSENSOR
Huvudenheten kan samla in data från upp till 5 sensorer.
För att sätta upp sensorn:
1. Öppna batterifacket.
2. Välj en kanal och tryck sedan på RESET (ÅTERSTÄLL).
3. Stäng batterilocket.
4. Placera sensorn inom 30 meter (98 fot) från huvudenheten
med hjälp av stödet eller väggmonteringen.
TIPS Idealiska placeringar för sensorn är alla platser på
utsidan av hemmet med en maximal höjd av 1,5 meter
(5 fot) och som kan skydda sensorn mot direkt solljus
eller fukt så att korrekta värden erhålls.
EMR211X_M_EU_SWE_R7.indd 3 2018/8/15 下午4:18
Page 77

SWE
4
1.5 m (5 ft)
OBS! Använd alkaliska batterier för längre användning
och vanliga litiumbatterier i temperaturer under noll grader.
ÖVERFÖRING AV SENSORDATA
För att söka efter en sensor:
1. Tryck på eller för att välja bland 5 olika
utomhuskanaler för fjärrsensorer.
2. Tryck och håll in i 2 sekunder för att utföra sökning
efter den valda sensorn.
För att utföra en automatisk sökning bland sensorer:
• Tryck och håll in i 2 sekunder för att aktivera
automatisk sökning för alla 5 kanalerna.
Temperaturerna visas automatiskt i sekventiell
ordning (kanal 1, 2, 3, 4, 5).
Ikonen för sensormottagning på huvudenhetens
framsida visar statusen:
IKON BESKRIVNING
Huvudenheten söker efter
sensor(er).
En kanal har hittats.
Sensorn kan inte hittas.
TIPS Överföringsavståndet kan variera beroende på
många faktorer. Du måste kanske placera sensorn eller
sensorerna på olika platser för att uppnå bäst resultat.
TEMPERATUR
För att välja temperaturenhet:
• Tryck på SET (ANGE) för att välja °C eller °F för
avlästa temperaturvärden.
ISVARNING
Om sensorn i kanal 1 faller från 3 °C till -2 °C (37°F till 28
°F) kommer LED- på huvudenhetens
framsida att blinka kontinuerligt. Den slutar att blinka när
temperaturen kommer utanför detta område.
• Tryck på och på samma gång för att inaktivera
isvarningen.
EMR211X_M_EU_SWE_R7.indd 4 2018/8/15 下午4:18
Page 78

5
SWE
• Isvarningen inaktiveras/aktiveras på nytt om
temperaturen återigen faller från 3 °C till -2 °C (37 °F
till 28 °F).
OBS! Eftersom isvarning endast är tillämpligt på kanal
1 ska du välja kanal 2–5 på utomhussensorn för att
förhindra att LED-indikatorn blinkar.
ÅTERSTÄLLNING
Tryck på RESET (ÅTERSTÄLL) på huvudenhetens
baksida för att återvända till standardinställningarna.
ANSLUT MED DIN MOBILA ENHET
Du kan sätta termometern och läsa väderinformationen
på avstånd via Bluetooth®v4.0 med din mobila enhet,
med hjälp av applikationen, som hämtas från Apple
Store. För att hitta applikationen snabbt skriver du
”Weather@Home” som nyckelord i sökmotorn.
Säkerställ att din mobila enhet är kompatibel med iOS
5 eller Android 4.3 med Bluetooth®v4.0.
LÄNKA DIN TERMOMETER
Först av allt måste du länka din termometer till din
mobila enhet. kommer att blinka på skärmen på
väderstationen medan länkning pågår och vara påslagen
efter lyckad länkning.
För att länka en sensor:
Tryck och håll in SET (ANGE) i 2 sekunder på
huvudenhetens baksida för att aktivera en länkning för
huvudenheten.
EMR211X_M_EU_SWE_R7.indd 5 2018/8/15 下午4:18
Page 79

SWE
6
1. Tryck på för att komma till skärmen SETTINGS
(INSTÄLLNINGAR).
2. Tryck på området STATION.
3. Tryck på Pair Up (Länka). Texten Searching…
(Söker...) visas. Om du vill avbryta länkningen ska du
trycka på Cancel (Avbryt).
4. När länkningen är klar visas skärmen STATION på nytt.
5. Tryck på varje kanal för att ändra kanalens namn.
(Upp till 20 tecken, inklusive mellanslag, tillåts.) Tryck
på om du är klar. Tryck på för att lämna
skärmen.
För att ta bort en sensor:
För att ta bort en sensor från väderstationen ska du
trycka på Remove station (Ta bort stationen) på skärmen
STATION. Alla sensorerna tas bort på samma gång.
För att sätta tillbaka sensorerna på skärmen:
1. På skärmen STATION ska du trycka på .
2. Tryck och håll in på högra sidan av en sensor.
Dra den till önskad position.
3. Tryck på för att bekräfta.
INSTÄLLNINGAR
Du kan kongurera din väderstation genom applikationen,
t.ex. måttenheter.
Inställningarna är som följer:
• Temperatur
• Barometrik (ej tillgängligt i EMR211X)
• Nederbörd (ej tillgängligt i EMR211X)
• Vindhastighet (ej tillgängligt i EMR211X)
• Höjd (ej tillgängligt i EMR211X)
• Visa en otillgänglig sensor
EMR211X_M_EU_SWE_R7.indd 6 2018/8/15 下午4:18
Page 80

7
SWE
• Automatiskt synkronisera tid
• Visa lufttryck vid havsnivå (ej tillgängligt i EMR211X)
För att välja måttenhet:
1. Tryck på för att visa tillgängliga måttenheter.
2. Tryck på önskad enhet.
3. Tryck på för att gå tillbaka till föregående skärm.
VISA AKTUELLA VÄRDEN
Med hjälp av applikationen
kan du visa alla temperaturvärden
direkt från olika sensorer på
samma gång. Värdena visas
på skärmen HOME (HEM).
OBS! Om ikonen för låg
batterinivå, , visas på
skärmen ska du byta batterierna
för motsvarande enhet.
För att visa en otillgänglig sensor:
Om sensorn är utanför räckvidden avbryts avläsningarna
och - - (streckläge) visas på skärmen. Om du inte vill
visa den otillgängliga sensorn:
• På skärmen SETTINGS (INSTÄLLNINGAR) ska
du vidröra och föra knappen åt höger för att slå på
funktionen eller åt vänster för att stänga av den.
För att automatiskt synkronisera tiden:
Väderstationens tid och datum kan synkroniseras
automatiskt av din mobila enhet.
• På skärmen SETTINGS (INSTÄLLNINGAR) ska
du vidröra och föra knappen åt höger för att slå på
funktionen eller åt vänster för att stänga av den.
EMR211X_M_EU_SWE_R7.indd 7 2018/8/15 下午4:18
Page 81

SWE
8
VISA HISTORIKVÄRDEN
Du kan visa historiken genom applikationen. Historiken
kan även presenteras i diagram (senaste 24 timmarna
eller senaste 7 dagarna).
För att visa historiken:
1. Tryck på önskat sensorområde på skärmen.
2. Tryck på för att välja önskad data eller
tryck på för att sortera datan efter datum.
VALFRI SENSOR FÖR YTTERLIGARE
INFORMATION
Genom att tillämpa sensorn (modell: BTH Sensor) vid
en tidpunkt kan du även visa följande information med
din mobila enhet.
• Väderprognos
• Lufttryck
• Utomhusfuktighet
PRAKTISK REFERENS Den valfria sensorn (modell:
BTH Sensor) kan köpas från Oregon Scientific.
FÖRSIKTIGHETSÅTGÄRDER
• Utsätt inte produkten för onödigt våld, stötar, damm,
extrema temperaturer eller fukt.
• Täck inte över ventilationshålen med något såsom
tidningar, gardiner etc.
• Doppa inte enheten i vatten. Om du spiller vätska på
den, torka omedelbart av med en mjuk, luddfri trasa.
• Rengör inte enheten med frätande eller repande
material.
• Skrapa inga hårda objekt mot LCD-displayen då
detta kan orsaka skador.
• Mixtra inte med enhetens interna komponenter. Detta
gör garantin ogiltig.
• Använd bara nya batterier. Blanda inte nya och
gamla batterier.
• Bilder som visas i den här manualen kan skilja sig
från det verkliga utseendet.
• När produkten kasseras ska den sorteras separat.
• Om den här produkten placeras på vissa typer
av träunderlag kan detta resultera i att ytan
skadas, vilket vi inte tar något ansvar för. Se
möbeltillverkarens underhållsinstruktioner för mer
information.
EMR211X_M_EU_SWE_R7.indd 8 2018/8/15 下午4:18
Page 82

9
SWE
• Innehållet i den här manualen får inte mångfaldigas
utan tillstånd från tillverkaren.
• Kasta inte gamla batterier i hushållsavfallet. Lämna
dem i stället i batteriinsamlingen.
• Observera att vissa enheter är utrustade med en
batterisäkerhetsremsa. Avlägsna remsan från
batteriet före första användning.
NOTERA De tekniska specikationerna för denna
produkt och innehå llet I användarmanualen kan komma
att ändras utan vidare upplysning. För att ladda ner en
elektronisk version av manualen, vänligen besök
http://global.oregonscientic.com/customerSupport.php.
SPECIFIKATIONER
TYP BESKRIVNING
HUVUDENHET
L x B x H
93 x 68 x 30 mm
(3.66 x 2.68 x 1.18 tum)
Vikt 96 g (3,39 uns) med batteri
Temperaturområde -5 °C till 50 °C (23 °F till 122 °F)
Signalfrekvens 433 MHz
Ström 2 st AAA
Temperaturområde för
isvarning
3°C till -2°C
FJÄRRTERMOSENSOR (THN132N)
L x B x H
96 x 50 x 22 mm
(3.78 x 1.97 x 0.87 tum)
Vikt 62 g (2,22 uns)
Överföringsavstånd 30 m (98 fot) utan hinder
Temperaturområde -20 °C till 60 °C (-4 °F till 140 °F)
Ström 1 st UM-3 (AA) 1,5 V-batteri
OM OREGON SCIENTIFIC
Besök vår webbsajt www.oregonscientic.se för att ta
reda på mer om Oregon Scientics produkter.
Om du har några frågor är du välkommen att kontakta
vår Kundtjänst på info@oregonscientic.se.
Oregon Scientic Global Distribution Limited reserverar
sig rätten att redigera och uttolka innehåll, terminologi
och föreskrifter i denna manual samt att göra tillägg när
som helst utan föregående meddelande. Om skillnader
finns mellan den engelska versionen och andra
språkversioner, gäller den engelska.
EMR211X_M_EU_SWE_R7.indd 9 2018/8/15 下午4:18
Page 83

SWE
10
EU-FÖRSÄKRAN OM ÖVERENSSTÄMMELSE
Härmed deklarerar tillverkaren Oregon Scientific
Global Distribution Limited att radioutrustning typ
Weather@Home Bluetooth-aktiverad termometer
(Modell: EMR211X) Står i överensstämmelse med
2014/53/EU-direktiv. Den fullständiga texten av EUförsäkran om överensstämmelse finns tillgänglig på
följande Internetadress:
http://global.oregonscientic.com/customerSupport.php
LÄNDER SOM OMFATTAS AV RED-DIREKTIVET
Alla länder inom EU, Schweiz CH
och Norge N
INFORMATION TILL ALLA ANVÄNDARE
I enlighet med de europeiska direktiven
2011/65/ EU och 2012/19/EU, som hänsyftar till
användning av farliga substanser i elektrisk och
elektronisk apparatur liksom avyttring av avfall.
Symbolen med den överkryssade soptunnan som
nns på apparaten, anger att produkten måste samlas
upp och avyttras separat i förhållande till annat avfall
när den fullgjort sin livstid.
Användaren mäste därför överlämna den utslitna
apparaturen till lämpliga uppsamlingsställen för
sorterat elektroniskt och elektrotekniskt avfall eller
lämna tillbaka den till återförsäljaren på samma gång
som han/hon köper en ny likvärdig apparat, enligt
principen en gammal produkt i utbyte mot en ny.
Lämplig sortering av den nedskrotade apparaturens
olika delar för därpå följande återvinning, behandling
och miljövänlig sanering bidrar till att undvika
förorening av miljön och negativa effekter på hälsan,
liksom att det gynnar återanvändning av de material
som apparaturen är gjord av.
Om användaren nedskrotar produkten felaktigt medför
det att sanktioner enligt gällande lagstiftning kommer
att tillämpas.
EMR211X_M_EU_SWE_R7.indd 10 2018/8/15 下午4:18
Page 84

1
繁中
Weather@Home
藍牙功能溫度計
型號: EMR211X
用戶手册
目录
簡介 ............................................................................ 2
概述 ............................................................................ 2
正面圖 .................................................................... 2
背面圖 .................................................................... 2
遠程感應器 (THN132N) .......................................... 3
準備開始 ..................................................................... 3
装裝入電池 ............................................................ 3
遠程感應器...... ........................................................... 3
感應器數據傳輸 ...................................................... 4
溫度 ............................................................................ 4
冰點警報 ................................................................. 4
重設 ............................................................................ 5
連接您的流動設備 ....................................................... 5
配對您的溫度計 ...................................................... 5
設定 ........................................................................ 6
查看當時讀數 ......................................................... 7
查看過往讀數 ......................................................... 7
利用可選感應器獲取額外信息 ..................................... 7
注意事項 ..................................................................... 8
規格 ............................................................................ 8
關於歐西亞 ................................................................. 8
EMR211X_M_EU_TC_R6.indd 1 2018/8/15 下午4:15
Page 85

繁中
2
簡介
感謝您選擇本公司生産的Oregon Scientific TM Weather@
Home 藍牙功能溫度計,該溫度計可爲您切換顯示室內、
外溫度。
注 使用新産品時,請將此手册存放於方便取閱的地方。
手册內容包括實用步驟說明、技術規格,以及使用須知。
概述
正面圖
1
2
3
4
5
6
7
8
1. 室外溫度讀數 (°C/°F)
2. 感應器頻道指示圖
3. : 感應器接收指示圖
4. : 室外遠程感應器電量低
5. 室內溫度讀數 (°C/°F)
6. : 室內遠程感應器 / 主要組件電量低
7. : 低耗量藍牙連接指示圖
8. 冰點提示 LED 指示圖
背面圖
1. 2. 3.
4
5
1. SET : 選擇溫度單位(°C/°F);藍牙配對功能
2. : 選擇室外頻道 (1-5);搜索遠程感應器
3. : 選擇室外頻道 (1-5);自動掃描感應器
4. RESET : 重設該組件至預先設定
5. 電池盒
EMR211X_M_EU_TC_R6.indd 2 2018/8/15 下午4:15
Page 86

3
繁中
遠程感應器 (THN132N)
1
2
3
4
5
1. LED 狀態指示燈
2. 牆壁固定孔
3. 電池盒
4. RESET 重設孔
5. CHANNEL 頻道開關
參考 請訪問我們的網站 www.oregonscientic.com了解
更多可兼容的傳感器。
準備開始
裝入電池
1. 取下電池盒。
2. 裝入電池,注意配合正負極(+/-)。
3. 每次更換電池後,按 RESET 鍵。
位置
含義
室外溫區 室外感應器電量低
室內溫區
室內感應器電量低 / 主
要組件電量低
遠程感應器
主要組件可收集多達5個感應器之數據。
設定感應器:
1. 打開電池盒。
2. 選擇一個頻道,然後按 RESET.
3. 合上電池盒蓋。
4. 利用桌架將感應器放置或掛於牆上,距離主要組件98英
尺(30米)以內。
贴士 感應器可在室外任何位置安放,但高度不應超過5英
尺(1.5米),同時應避免陽光直射或潮濕環境,以免影響
精確讀數。
EMR211X_M_EU_TC_R6.indd 3 2018/8/15 下午4:15
Page 87

繁中
4
1.5 m (5 ft)
注 使用鹼性電池可延長使用壽命, 零度以下可使用消費
級鋰電池。
感應器數據傳輸
搜索感應器:
1. 按住 或 可選擇室外5個不同遠程感應器。
2. 持續按住 2秒,加强搜索所選感應器。
自動掃描感應器:
• 持續按住 并保持2秒,启动全部5个频道自动搜索功
能。各传感器温度将依次自动显示(频道1,2,3,4,5)。
主要組件感應器接收圖標顯示狀態如下:
圖標 描述
主要組件正在搜索感應器。
已搜索到一個頻道。
無法找到感應器。
贴士 傳輸範圍可能取決於多種因素。您可嘗試將感應器安
放在不同地點,以便獲得最佳效果。
溫度
選擇溫度組件:
• 按住 SET選擇°C 或°F 溫度讀數。
冰點警報
倘若頻道1感應器溫度從37°F 降至 28°F(3°C 至-2°C),
主要組件前面板上的LED 指示圖將持續
閃爍,一旦溫度高於該範圍,閃爍將停止。
• 同時按住 和 可解除冰點提示警報。
• 當溫度再次從37°F 降至 28°F(3°C 至-2°C)時,冰點
提示警報將不可用或再次啟動。
注 由于冰點提示僅 適用于頻道1,爲避免LED閃爍,請
將室外感應器選擇頻道2-5。
EMR211X_M_EU_TC_R6.indd 4 2018/8/15 下午4:15
Page 88

5
繁中
重設
按住主要組件背後RESET鍵,可返回預先設定。
连接您的移动设备
利用您的流動設備從Apple Store下載應用程式,然後透過
藍牙®v4.0遠程設定此溫度計,並獲取天氣消息。如需迅速
找到該應用程式,請在搜索器內輸入‘Weather@Home’
即可找到。
確保您的流動設備可透過Bluetooth®v4.0兼容iOS 5系統或
安卓4.3 系統。
配對您的溫度計
首先,您需要將流動設備與溫度計配對。配對過程中,氣
象站上的 圖標將閃爍,配對完成之後,該圖標處于開
啓狀態。
配對感應器
在主要組件後面,持續按住SET2秒,爲主要組件啟動配
對功能。
1. 輕觸 進入 SETTINGS 屏幕。
2. 輕觸 STATION 區域。
3. 輕觸 Pair Up。顯示 Searching…。倘若你希望取消配
對,輕觸 Cancel 即可。
4. 一旦配對成功,將返回 STATION 屏幕。
5. 輕觸各頻道可爲其重新命名(包括空格在內,可多達20個
字符)。輕觸 完成。輕觸 退出。
EMR211X_M_EU_TC_R6.indd 5 2018/8/15 下午4:15
Page 89

繁中
6
移除感應器:
如需從氣象站上移除感應器,輕觸STATION屏幕上的
Remove Station可同時移除所有感應器。
恢復屏幕上的感應器:
1. 在STATION 屏幕上輕觸 。
2. 持續按住感應器右側的 將其拖至您需要的位置。
3. 輕觸 確定。
設定
您可以透過應用程式設定您的氣象站,例如量度組件。
設定內容如下:
• 溫度
• 氣壓(EMR211X中不可用)
• 降雨量(EMR211X中不可用)
• 風速(EMR211X中不可用)
• 海拔(EMR211X中不可用)
• 顯示不可用感應器
• 自動同步時間
• 顯示海平面氣壓 (EMR211X中不可用)
選擇量度組件
1. 輕觸 量度組件選項。
2. 輕觸打開您需要的組件。
3. 輕觸 返回上一屏幕。
EMR211X_M_EU_TC_R6.indd 6 2018/8/15 下午4:15
Page 90

7
繁中
查看當時讀數
您可以透過應用程式同時直接查
看不同感應器的所有溫度讀數。
讀數顯示在 HOME 屏幕上。
㉏倘若屏幕上出現低電量圖標
,請爲相應設備更換電池。
顯示不可用感應器:
倘若感應器超出範圍,讀數將中斷,屏幕顯示--(短綫模
式)。
倘若您不希望顯示不可用感應器:
• 進入SETTINGS屏幕,輕觸並向右滑動按鈕即可打開該功
能,或者向左滑動將其關閉。
自動同步時間:
您的流動設備可以自動同步氣象站上的時間和日期。
• 進入SETTINGS屏幕,輕觸並向右滑動按鈕即可打開該功
能,或者向左滑動將其關閉。
查看過往讀數
您可以透過應用程式查看過往讀數。也可以圖形方式顯示過
往記錄(過去24小時或過去7天)。
查看過往讀數:
1. 輕觸打開屏幕上您需要的感應器區域。
2. 輕觸 選擇您需要的數據,或輕觸 按日期分類
數據。
利用可選感應器獲取額外信息
當你應用該感應器(型號:BTH感應器)之後,您還可以利
用流動設備查看下列信息:
• 天氣預報
• 氣壓
• 室外濕度
␓䗨
可從Oregon Scientific公司購買可選感應器
(型 號:BTH感應器)。
EMR211X_M_EU_TC_R6.indd 7 2018/8/15 下午4:15
Page 91

繁中
8
注意事項
• 不得對機體猛力施壓、撞擊、或放在温差大或過於濕度
的地方。
•
不得利用類似報紙、窗廉等物品蓋住產品的通風口。
• 請勿將機體浸水若不慎將機體沾水,立即使用柔軟、不
含麻的布將之擦拭。
• 不得使用磨損或腐蝕性的物質清潔機體。
• 不得以硬物刮液晶體顯示屏,此舉可能導致顯示屏的損壞。
• 不要干擾機體的內部零件。此舉將使保證失效。
• 必須使用新電池。請勿混合使用新舊電池。
• 本指南所示圖像也許與實物不同。
• 棄置本產品時,確認已個別將之回收。
• 把產品放在某些木材表面可能會損壞其塗層。我們對此
等損壞概不負責。請諮詢傢具製造商,了解保養傢具的
資訊。
• 未經製造商的許可,不可複製手冊中的任何內容。
• 丟棄舊電池時,不得視之為不必分類的都市廢棄物。必
須以特別方式另行處理此等廢棄物。
• 請注意,部份機體配備電池安全繫帶。首次使用前,請
將之從電池格中拆下。
注 我們有權更改本產品的技術規格和本使用指南之內容,
而無需另行通知。
規格
類型 描述
主要組件
長*寬*高
93 x 68 x 30 毫米
(3.66 x 2.68 x 1.18 英寸)
重量 96克 (3.39 盎司) 包括電池
溫度範圍 -5°C 至 50°C (23°F 至122°F)
信號頻率
433 MHz
電源
2 x AAA
冰點提示溫度範圍 3°C 至 -2°C
遠程溫度感應器(THN132N)
長*寬*高
96 x 50 x 22 毫米
(3.78 x 1.97 x 0.87 英寸)
重量 62克 (2.22 盎司)
傳輸範圍 30 米 (98 英尺)无遮挡
溫度範圍
-20 °C 至 60 °C
(-4 °F 至 140 °F)
電源 1 x UM-3(AA) 1.5V 電池
關於歐西亞
瀏覽我們的網站 www.oregonscientic.com 瞭解更多關於
歐西亞的產品。
如有任何疑問,請聯絡我們的客戶服務
info@oregonscientic.com.
EMR211X_M_EU_TC_R6.indd 8 2018/8/15 下午4:15
Page 92

9
繁中
Oregon Scientic Global Distribution Limited。保留權利,隨時
行使獨立裁決權,於未事前通知情況下詮釋和解釋本用戶手冊
之任何內容、條款與條件並修改之。若英語版本與任何其他語
言版本有任何不一致處,將以英語版本為準。
EMR211X_M_EU_TC_R6.indd 9 2018/8/15 下午4:15
Page 93

1
简中
Weather@Home
蓝牙功能温度计
型号: EMR211X
用户手册
目录
简介 ............................................................................ 2
概述 ............................................................................ 2
前视图 .................................................................... 2
后视图 .................................................................... 2
远程传感器 (THN132N) .......................................... 3
准备开始 ..................................................................... 3
装装入电池 ............................................................ 3
远程传感器...... ........................................................... 3
传感器数据传输 ...................................................... 4
温度 ............................................................................ 4
冰点警报 ................................................................. 4
重置 ............................................................................ 5
连接您的移动设备 ....................................................... 5
配对您的温度计 ...................................................... 5
设置 ........................................................................ 6
查看当前读数 ......................................................... 7
查看过往读数 ......................................................... 7
利用可选传感器获取额外信息 ..................................... 7
注意事项 ..................................................................... 8
规格 ............................................................................ 8
关于欧西亚 ................................................................. 9
EMR211X_M_EU_SC_R6.indd 1 2018/8/15 下午4:19
Page 94

简中
2
简介
感谢您选择我公司生产的 Oregon Scientic TM Weather@Home 蓝
牙功能温度计,该温度计可为您切换显示室内、外温度。
㉏
使用新产品时,请将此手册保存便于取阅处。手册内容
包括实用分步说明、技术规格,以及使用须知。
概述
前视图
1
2
3
4
5
6
7
8
1. 室外温度读数 (°C/°F)
2. 传感器频道指示符
3. : 传感器接收指示符
4. : 室外远程传感器低电量显示
5. 室内温度读数 (°C/°F)
6. : 室内远程传感器 / 主要组件低电量显示
7. : 低功耗蓝牙连接指示符
8. 冰点提醒 LED 指示符
后视图
1. 2. 3.
4
5
1. SET : 选择温度组件(°C/°F);蓝牙配对功能
2. : 选择室外频道 (1-5);搜索远程传感器
3. : 选择室外频道 (1-5);自动扫描传感器
4. RESET : 重置该组件至默认设置
5. 电池盒
EMR211X_M_EU_SC_R6.indd 2 2018/8/15 下午4:19
Page 95

3
简中
远程传感器 (THN132N)
1
2
3
4
5
1. LED 状态指示灯
2. 墙壁固定孔
3. 电池盒
4. RESET 重置孔
5. CHANNEL 频道开关
ঝ净
请浏览我们的网站 www.oregonscientific.com.cn
了解更多可兼容的传感器。
准备开始
装入电池
1. 取下电池盒.
2. 装入电池,注意匹配极性(+/-)。
3. 每次更换电池后,按 RESET 键。
位置
含义
室外温区 室外传感器电量低
室内温区
室内传感器电量低 /
主要组件电量低
远程传感器
主要组件可收集源自多达5个传感器之数据。
设置传感器:
1. 打开电池盒。
2. 选择一个频道,然后按 RESET。
3. 合上电池盒盖。
4. 将传感器桌面摆放或挂墙上,距主要组件98英尺
(30米)以内。
␓䗨
传感器可在室外任何位置安放,但高度不应超过5英
尺(1.5米),同时应避免阳光直射或潮湿环境,以免影响
精确读数。
EMR211X_M_EU_SC_R6.indd 3 2018/8/15 下午4:20
Page 96

简中
4
1.5 m (5 ft)
㉏
使用碱性电池可延长使用寿命, 零度以下可使用消费
级锂电池。
传感器数据传输
搜索传感器:
1. 按住 或 可选择室外5个不同远程传感器。
2. 按住 并保持2秒,加强搜索所选传感器。
自动扫描传感器:
• 按住 并保持2秒,启动全部5个频道自动搜索功能。
各传感器温度将依次自动显示(频道1,2,3,4,5)。
主要组件传感器接收图标显示状态如下:
图标 描述
主要组件正在搜索传感器。
已搜索到一个频道。
无法找到传感器。
␓䗨
传输范围可能取决于多种影响因素。您可尝试将传感
器安放在不同地点,以便获得最佳效果。
温度
选择温度组件:
• 按住 SET选择°C 或°F 温度读数。
冰点警报
倘若频道1传感器温度从37°F 降至 28°F(3°C 至-2°C),
主要组件前面板上的LED 指示符将持续
闪烁,一旦温度高于该范围,闪烁将终止。
• 同时按住 和 可解除冰点提醒警报。
• 当温度再次从37°F 降至 28°F(3°C 至-2°C)时,冰点
提醒警报将不可用或再次启动。
㉏
由于冰点提醒仅 适用于频道1,为避免LED闪烁,请为
室外传感器选择频道2-5。
EMR211X_M_EU_SC_R6.indd 4 2018/8/15 下午4:20
Page 97

5
简中
重置
按住主要组件背后 RESET 键,可返回默认设置。
连接您的移动设备
利用您的移动设备从Apple Store下载应用程序,然后通过
蓝牙®v4.0远程设置此温度计,并获取天气信息。如需迅
速找到该应用程序,请在搜索引擎框内输入‘Weather@
Home’ 即可找到。
确保您的移动设备可通过Bluetooth®v4.0兼容iOS 5系统或
安卓4.3 系统。
配对您的温度计
首先,您需要将移动设备与温度计配对。配对过程中,气
象站上的 图标将闪烁,配对完成之后,该图标处于开
启状态。
配对传感器
在主要组件后面,按住 SET 并保持2秒,为主要组件启动
配对功能。
1. 轻触 进入 SETTINGS 屏幕。
2. 轻触 STATION 区域。
3. 轻触 Pair Up。显示 Searching…。倘若你希望取消配
对,轻触Cancel即可。
4. 一旦配对成功,将返回 STATION 屏幕。
EMR211X_M_EU_SC_R6.indd 5 2018/8/15 下午4:20
Page 98

简中
6
5. 轻触各频道可为其重新命名(包括空格在内,可多达20个
字符)。轻触 完成。 退出。
移除传感器:
如需从气象站上移除传感器,轻触 STATION 屏幕上的
Remove Station 可同时移除所有传感器。
恢复屏幕上的传感器:
1. 在 STATION 屏幕上轻触 。
2. 按住传感器右侧的 并保持。将其拖至您需要的位置。
3. 轻触 确定。
设置
您可以通过应用程序设置您的气象站,例如测量组件。
设置内容如下:
• 温度
• 气压(EMR211X中不可用)
• 降雨量(EMR211X中不可用)
• 风速(EMR211X中不可用)
• 海拔(EMR211X中不可用)
• 显示不可用传感器
• 自动同步时间
• 显示海平面气压 (EMR211X中不可用)
选择测量组件
1. 轻触 测量组件选项。
2. 轻触打开您需要的组件。
3. 轻触 返回上一屏幕。
EMR211X_M_EU_SC_R6.indd 6 2018/8/15 下午4:20
Page 99

7
简中
查看当前读数
您可以通过应用程序同时直接
查看不同传感器的所有温度读
数。读数显示在HOME屏幕上。
㉏
倘若屏幕上出现低电量图
标 ,请为相应设备更换电池。
显示不可用传感器:
倘若传感器超出范围,读数将中断,屏幕显示-(短线模式)。
倘若您不希望显示不可用传感器:
• 进入SETTINGS屏幕,轻触并向右滑动按钮即可打开该
功能,或者向左滑动将其关闭。
自动同步时间:
您的移动设备可以自动同步气象站上的时间和日期。
• 进入SETTINGS屏幕,轻触并向右滑动按钮即可打开该
功能,或者向左滑动将其关闭。
查看过往读数
您可以通过应用程序查看过往读数。也可以图形方式显示过
往记录信息(过去24小时或过去7天)。
查看过往读数:
1. 轻触打开屏幕上您需要的传感器区域。
2. 轻触 选择您需要的数据,或轻触 按日期分类
数据。
利用可选传感器获取额外信息
当你应用该传感器(型号:BTH传感器)之后,您还可以利
用移动设备查看下列信息:
• 天气预报
• 气压
• 室外湿度
␓䗨
可从Oregon Scientific公司购买可选传感器
(型号:BTH传感器)。
EMR211X_M_EU_SC_R6.indd 7 2018/8/15 下午4:20
Page 100

简中
8
注意事项
• 不得对机体猛力施压、撞击、或放在温差过大或过于潮
湿的地方。
• 不得用报纸、窗帘等物品盖住产品的通风口。
• 请勿将机体浸水。若机体不慎沾水,请立即使用无绒软
布擦拭干净。
• 不得使用磨损或腐蚀性物质清洁机体。
• 请勿使用硬物刮擦液晶显示屏,以免损坏显示屏。
• 不要干扰机体内部零件,以免使保修失效。
• 必须使用新电池。请勿混合使用新旧电池。
• 本手册所示图像可能与实物有所不同。
• 弃置本产品时,确保妥当回收以备处置。
• 把产品放在某些木材表面可能会损坏其涂层,对此类损
坏我们恕不负责。请咨询家具制造商,了解有关家具保
养的详细信息。
• 未经制造商许可,不可复制本手册中的任何内容。
• 丢弃旧电池时,不得将其视为不可分类废弃物,而必须
以特别方式另行处理。
• 请注意,部份机体配备电池安全系带。首次使用前,请
将其从电池格中拆下。
㉏
我们保留权限随时变更本产品的技术规格和本使
用手册内容,恕不另行通知。请访问 http://global.
oregonscientic.com/customerSupport.php下载电子版
的用户手册。
规格
类型 描述
主要组件
长*宽*高
93 x 68 x 30 毫米
(3.66 x 2.68 x 1.18 英寸)
重量 96克(3.39 盎司)含电池
温度范围
-5°C 至 50°C (23°F 至122°F)
信号频率
433 MHz
电源
2 x AAA
冰点提醒温度范围
3°C 至 -2°C
远程温度传感器(THN132N)
长*宽*高
96 x 50 x 22 毫米
(3.78 x 1.97 x 0.87 英寸)
重量 62克(2.22 盎司)
传输范围 30米(98 英尺)无遮挡
温度范围
-20 °C 至 60 °C
(-4 °F 至 140 °F)
电源
1 x UM-3 (AA) 1.5 V 电池
EMR211X_M_EU_SC_R6.indd 8 2018/8/15 下午4:20
 Loading...