

Page 1
®
User’s
Guide
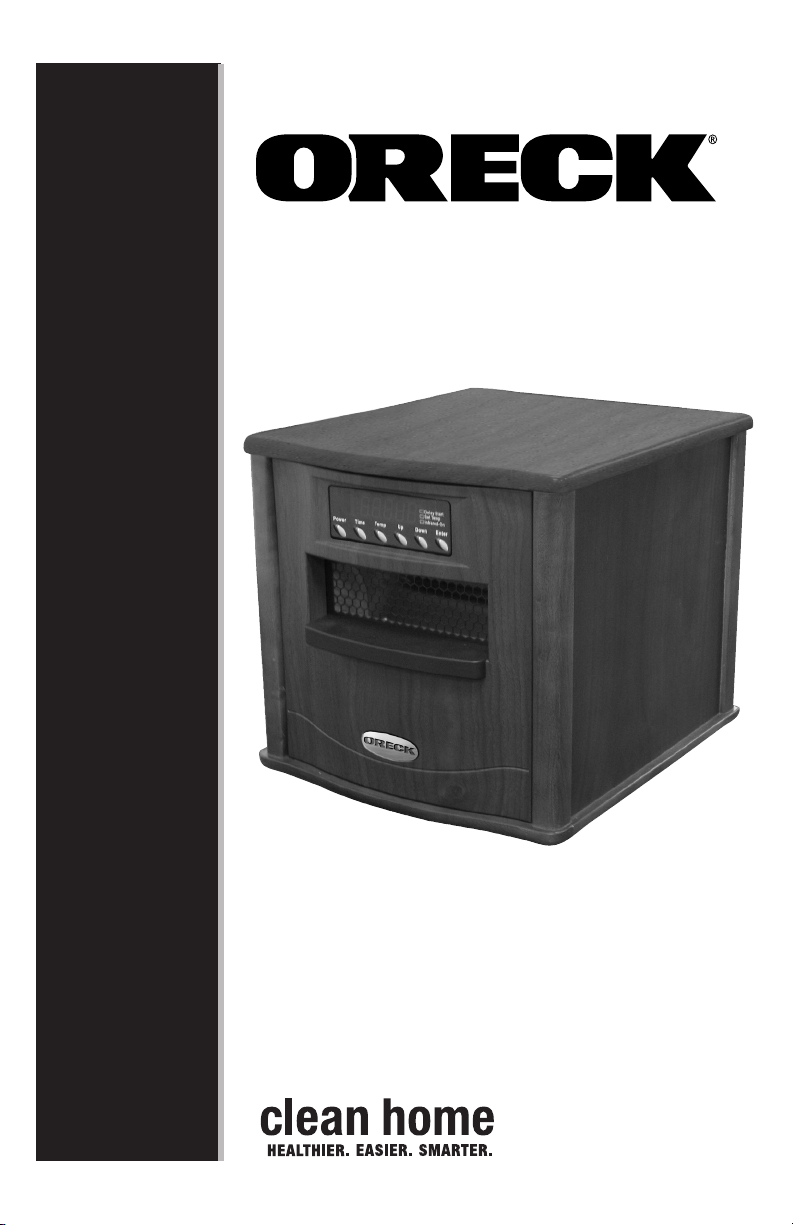
Heatwise™ Heater
Important!
Read this manual
carefully, and
keep for future
reference.
MODELS:
Heatwise™ HW1500W
Heatwise™ HW1500P
Heatwise™ HW1000P
Page 2
Enjoy
Call
Congratulations on your purchase of the Oreck Heatwise™
Infrared Heater.
The infrared heating technology utilized in the heater warms the
objects in the room, from top to bottom. The heat in the room
will never hover uselessly near the ceiling again!
In addition to helping you keep money in your pocket,
the Oreck Heatwise™ Infrared Heater goes a step beyond to also enhance the quality of comfort you experi-
ence in the heated room. The infrared heating system will
not burn, dry out, or otherwise pollute the air with impurities. This protects the natural humidity level and produces a soft
ion-balanced heat. Using soft infrared heat is the better, comfortable and more healthy way to heat a room.
Welcome to our Call. Click. Visit. customer service program.
To speak with an Oreck representative call:
USA: 1•800•989•3535
Canada: 1•888•676•7325
Click
Visit
On the web, point and click at: www.oreck.com
or visit www.oreck.com and click locate a store on
the top right.
Visit Oreck in person at one of over 450 store
locations. To nd the nearest store, please call
888•oreck store (1•888•673•2578).
Page 3

Contents
Safety . . . . . . . . . . . . . . . . . . . . . . . . . . . . . . . . . . . 1
General Warnings . . . . . . . . . . . . . . . . . . . . . . . 1
Features . . . . . . . . . . . . . . . . . . . . . . . . . . . . . . . . . 3
Operation. . . . . . . . . . . . . . . . . . . . . . . . . . . . . . . . . 4
Power On/Off . . . . . . . . . . . . . . . . . . . . . . . . . 4
Setting Temperature . . . . . . . . . . . . . . . . . . . . . 4
Setting Timer . . . . . . . . . . . . . . . . . . . . . . . . . . 4
Fahrenheit/Celsius . . . . . . . . . . . . . . . . . . . . . . 5
Performance Suggestions . . . . . . . . . . . . . . . . . 5
Maintenance . . . . . . . . . . . . . . . . . . . . . . . . . . . . . . 7
Cleaning the Electrostatic Filter . . . . . . . . . . . . 7
Troubleshooting . . . . . . . . . . . . . . . . . . . . . . . . . . . . 9
Warranty . . . . . . . . . . . . . . . . . . . . . . . . . . . . . . . . 10
Page 4
Safety
!
General Warnings
IMPORTANT SAFETY
INSTRUCTIONS
READ ALL INSTRUCTIONS BEFORE USING THE
HEATER
• DO NOT plug heater into any other cord connected device
such as a power strip, surge protector, multiple outlet
adapter, grounding adapter, outlet-type air fresheners or
extension cords. Plug into a 3-prong 124V 15 amp or higher
grounded circuit receptacle only.
• DO NOT plug the heater into a loose tting or broken
receptacle.
• DO NOT alter the heater’s design or you will void the
warranty.
• DO NOT block the front or rear of the heater.
• DO NOT place anything directly in front of the heater.
• DO NOT cover the unit as this may block airow and cause
the heater to malfunction.
• DO NOT use the heater outdoors or for heating construction
sites.
• This heater is not intended for use in bathrooms, laundry
areas and similar indoor locations. Never locate heater
where it may fall into a bathtub or other water container.
• DO NOT force the lter to dry using any alternative
methods when performing lter maintenance; doing so
could damage the lter.
• DO NOT run cord under carpeting.
• DO NOT cover cord with throw rugs, runners or similar
coverings. Arrange cord away from trafc area and where it
will not be tripped over.
• DO NOT insert or allow foreign objects to enter any
ventilation or exhaust opening as this may cause an electric
shock or re or damage to the heater.
• Heater has hot and arcing or sparking parts inside. DO NOT
use it in areas where gasoline, paint or ammable liquids
are used or stored.
1
Page 5

• Heater is hot when in use. To avoid burns, DO NOT let
bare skin touch hot surfaces. If provided, use handle when
moving this heater.
• DO NOT operate any heater with a damaged cord or plug or
after the heater malfunctions, has been dropped or damaged
in any manner.
• To disconnect heater, turn controls to OFF then remove plug
from outlet.
• Connect to properly grounded outlets only.
• To prevent a possible re, DO NOT block air intakes or
exhaust in any manner. DO NOT use on soft surfaces, like a
bed, where openings may become blocked.
• Use this heater only as described in this manual. Any other
use not recommended by the manufacturer may cause re,
electrical shock or injury to persons.
• Avoid the use of an extension cord because the extension
cord may overheat and cause a risk of re.
• This heater is for use on 120 volts. The adapter should not
be used if a three-slot grounded receptacle is available.
• Heater must not be located immediately below a socket-
outlet.
• DO NOT use this heater in or around a bath, a shower or a
swimming pool.
SAVE THESE
INSTRUCTIONS
2
Page 6

Features
1
2
3
5
4
8
9
7
4
1. LED Display: Large display showing desired temp and
delay start function.
2. Control Panel: Easy-to-push buttons control: power,
time, and temp.
3. Cabinet: Wood: 3/4 ply - Tuscan walnut nish.
Plastic: ABS 94-VO re retardant plastic
4. Caster Wheels: Free oating for easy relocation.
5. Handle: Easy transport.
6. Power Cord: Plug into the outlet to begin use.
7. Cord Wrap: Convenient cord wrap for transport and storage.
8. Electrostatic Filter: Removable lifetime electrostatic pre-lter.
9. Remote: Credit card size with large buttons.
3
6
Page 7

Operation
DELAY START
SET TEMP
INFRARED-ON
Turning Power On
1. Press the Power button on the left side of the Control Panel.
The heater’s quartz heating elements will light up inside the
heater.
2. After a few minutes, once the air within the heater is warm,
the heater fan (some models have 2) will begin to operate.
Turning Power Off
1. Press the Power button located on the left side of the Control
Panel.
2. The sound of the heater fan will continue until the heat
has been completely vented, thus protecting the unit and
preventing waste by cycling the remaining heat into the
room. (DO NOT unplug the heater until the sound of the fan
has stopped. Doing so may cause damage to the unit.)
Setting the Temperature
This feature allows you to set the temperature measured by the
units thermostat.
1. Press the Temperature (TEMP) Button on the Control Panel;
the Set Temp Indicator will illuminate and the temperature
display will ash.
2. Use the Up and Down buttons to select the temperature and
press Enter.
3. The Set Temp light will turn off and the temperature is now set.
Setting the Timer
This feature allows you to set a future time for the heater to
turn itself ON. For example, if you set the time for 1 hour, the
heater will turn ON in 1 hour.
1. Turn the Power OFF (heater must be powered OFF to use
4
the timer feature).
Page 8

Operation
DELAY START
SET TEMP
INFRARED-ON
DELAY START
SET TEMP
INFRARED-ON
2. Press the Time button of the Control Panel - the two zeros to
the right will ash (:00), indicating 0 minutes have been set
and the DELAY START indicator will illuminate.
3. Press the UP or DOWN button to select desired number of
minutes (up to 59 minutes) that you would like the heater to
wait to turn itself on.
4. Press the ENTER button - the two zero button to the left
will ash (00:), indicating 0 hours have been set.
5. Press the UP or DOWN button to the desired number of
hours (up to 24 hours) and then press the ENTER button.
6. DELAY START indicator will ash until the unit comes on
after waiting the period of time you have set.
7. To cancel the timer, press the power button and the timer
will stop.
Switching between Fahrenheit & Celsius
Press the DOWN & ENTER buttons simultaneously and hold
for about 3 seconds. The display will update automatically.
Suggestions for Best Performance
To assure maximum performance of your Oreck Heatwise™
Infrared Heater, please review the following recommendations:
• Do not locate the heater in an area with a high air exchange
• Try placing the heater near a warmer inside wall and direct
• Placing the heater next to a cord air return will draw the heat
5
rate in and out of the room. Heat produced should be
contained in the room.
the output toward a cooler outside wall. The cooler outside
wall will tend to draw the generated heat towards it, which
will allow for more efcient heating.
away from the area to be heated. Try closing or covering the
Page 9

Operation
cold air return. This will alow for more efcient heating.
Experiment with the placement of the heater to see what
works best for you.
• To ensure maximum efciency, a 30% minimum relative
humidity should be maintained in the heated environment.
• The heater is designed to operate for maximum efciency
in the 68-74 degree range. Due to the soft heat concept,
temperatures at 68 degrees F feel as though it were
72 degrees F. This is due to the heat mixing with humidity
evenly for head-to-toe comfort.
• When the heater is placed in an isolated area, i.e. basement
or recreation area, any existing HVAC heating system vents
should be closed in that area, if possible. This allows the
heater to maintain the isolated area more efciently.
• If placing the heater a few feet above the oor, such in
rooms with large areas of bare concrete, make sure the
heater is secure and won’t fall. This will allow for more
efcient heating since concrete acts as a heat sink and will
tend to draw the heat in its direction. Optimally, concrete
oors should be covered to provide some insulation factor
from the concrete.
• For zone heating: set your central heating system to a lower
temperature. Place the heater in the area you spend the most
of your time. Now set the heater to your comfort level.
• When heating larger areas, place the heater in a central
location.
• If the heater is used in an extremely dirty area, the lter
must be cleaned more frequently to maintain heater
performance.
6
Page 10

Maintenance
The only maintenance that is required for the heater is the
periodic cleaning of the heater’s electrostatic lter (located at
the back of the unit). This cleaning should be performed at least
once a month, or earlier as dust becomes visible on the lter, to
ensure efcient operation of the heater.
Cleaning the Electrostatic Filter
Clean the lter often to provide for maximum performance.
When necessary, wipe the cabinet clean with a soft damp cloth
and/or furniture polish.
Removing Filter
1. Power the heater off by pressing the Power Button, located
on the left side of the Control Panel. (Note: The sound of the
heater’s fans will continue until the heat has been completely
vented, thus protecting the unit and preventing waste by
cycling the remaining heat into the room. DO NOT unplug
the heater until the sound of the fan has stopped. Doing so
may cause damage to the unit.)
2. When the heater’s fans have stopped (the heater will become
completely silent) unplug the heater.
3. Release the Electrostatic Filter by pushing the lter up from
below.
4. Remove the Electrostatic Filter by pulling the lter down
and out.
5. Clean the lter by vacuuming the lter until clear.
6. Replace the lter by sliding the top upwards into the spring-
loaded slot on the back of the heater, then gently press the
bottom of the lter into place.
7
Replacing Filter
Page 11

Maintenance
Storage
When the heater is not being used for an extended period of
time, observe the following steps to preserve the life and performance of the unit:
• Unplug heater (Do not unplug heater while heater is running).
• Gently wrap the power cord into the cord storage compartment
in the back of your heater. This will help prevent undue wear
and tear on the cord.
• Cover the heater to prevent dust from accumulating on or
in heater.
• Store heater in a dry, low dust environment.
NOTE: Before resuming use of heater, ensure the lter and
front grille are clean and free of all dust and dirt. Also check
the entire length of the power cord to ensure no damage has
compromised the integrity of the cord.
8
Page 12

Trouble-
Service problems that appear to be major can often be solved
easily. You can be your own troubleshooter by reviewing this guide.
shooting
All other servicing should be done by an Oreck authorized
service center.
Problem Solution
The heater’s airow has been
reduced
The heater stays ON after I
push the Power Button to turn
it off
The heater’s display is showing a line of dots
Heater thermostat temperature does not match wall
thermostat temperature
The heater will not turn on. • Test the outlet to make sure there is power
• Make sure the electrostatic lter is clean.
• Check front grill and look behind rear air intake
for any objects that could obstruct air-ow.
• If the heater’s airow is still diminished or has
stopped, please contact Customer Service.
• This is a normal function of the heater. DO
NOT unplug the heater until you no longer hear
the fan running. During this time, the heater is
cooling down.
• This is part of the heater’s normal operation.
After a period of inactivity, the heater will enter
into a “screen saver” mode to conserve opwer.
This will not affect the heater’s operation. When
any function key is pressed, the heater’s display
will reappear.
• Contact Customer Service to obtain
programming instructions for matching your
Heatwise thermostat settings with your existing
wall thermostat.
available and then check the heater display for
the ashing Time Delay Light. Press the Power
Button to turn off the timer and resume normal
operation of the heater.
Until still does not operate
properly.
9
• Contact Oreck for service.
Page 13

Warranty
ORECK MANUFACTURING COMPANY: (Oreck Manufacturing Company gives you the following limited warranty for this
product only if it was originally purchased for residential use, not
for resale, from Oreck or an Oreck Authorized Retail Dealer.)
Oreck will repair or replace, free of charge, to the original purchaser, any part that is found to be defective in material or workmanship within three (3) years following the date of purchase for
all residential models. NOTE: If the unit is used commercially, a
one (1) year overall warranty applies.
This limited warranty does not cover the replacement of expend-
able or consumable parts such as lters, cartridges, and other
parts subject to normal wear unless they are defective in material
or workmanship.
This limited warranty does not apply to any part subjected to accident, abuse, commercial use, alteration, misuse, damage caused
by act of God, the use of voltages other than on the data plate of
this product or service of this product by other than Oreck or a
participating Factory Authorized Service Center.
Oreck does not authorize any person or representative to assume or grant any other warranty obligation with the sale of this
product.
Oreck’s limited warranty is valid only if you retain proof of purchase from Oreck or an Oreck Authorized Retail Dealer for this
product. If you purchase this product from any other source, your
purchase is “AS IS,” which means Oreck grants you no warranty,
and that you, not Oreck, assume the entire risk of the quality
and performance of this product, including the entire cost of any
necessary servicing or repairs of any defects.
Oreck’s liability for damages to you for any costs whatsoever arising out of this statement of limited warranty shall be limited to
the amount paid for this product at the time of original purchase,
and Oreck shall not be liable for any direct, indirect, consequential or incidental damages arising out of the use or inability to use
this product. Some states do not allow the exclusion or limitation
of incidental or consequential damages, so the above limitation or
exclusion may not apply to you.
ALL EXPRESS AND IMPLIED WARRANTIES OTHER
THAN THE LIMITED WARRANTY SET FORTH ABOVE,
FOR THIS PRODUCT, INCLUDING IMPLIED WARRANTIES OF MERCHANTABILITY AND FITNESS FOR A
PARTICULAR PURPOSE ARE EXPRESSLY DENIED.
This warranty gives you specic legal rights, and you may also
have other rights which vary from state to state.
10
Page 14

111213
Page 15

Page 16

© 2009 Oreck Holdings, LLC.
All rights reserved. All marks, text, logo’s, product congurations and registered trademarks are owned and used under the
authority of Oreck Holdings, LLC
21085-01 REV A 07/09 ECN # R-9474
 Loading...