


WTM000684 57096-24 rF.qxd 3/6/06 11:00 AM Page 1
User’s Manual
Sprinkler Timers by Orbit ®
Manual para el Usuario
Reguladores para aspersores de riego de Orbit ®
Manuel de l’utilisateur
Programmateurs pour systemes d’arrosage par Orbit®
How to Program
Orbit® SuperStar and WaterMaster®
Dual Program Sprinkler Timers
With Built-In Wireless Remote Control
Cómo programar
Reguladores para aspersores de doble programación Orbit ® SuperStar y WaterMaster®
con control remoto inalámbrico integrado
Comment Programmer
Les systemes d’arrosage Orbit® SuperStar et WaterMaster® Programmateurs à double programmation
avec télécommande incorporée
Model 57096, 57586, 57592, 91006

WTM000684 57096-24 rF.qxd 3/6/06 11:00 AM Page 2
ENGLISH
TABLE OF CONTENTS
ENGLISH
Section One: Introduction . . . . . . . . . . . . . . . . . . . . . . . . . . . . . . . . . . . . . . . . . . . . . . . . . . . . . . . . . . . . . . . . . . . . . . . . . . . . . .1
Section Two: Getting Started . . . . . . . . . . . . . . . . . . . . . . . . . . . . . . . . . . . . . . . . . . . . . . . . . . . . . . . . . . . . . . . . . . . . . . . . . . . .2
Section Three: Programming . . . . . . . . . . . . . . . . . . . . . . . . . . . . . . . . . . . . . . . . . . . . . . . . . . . . . . . . . . . . . . . . . . . . . . . . . . . .4
Section Four: Manual Operation . . . . . . . . . . . . . . . . . . . . . . . . . . . . . . . . . . . . . . . . . . . . . . . . . . . . . . . . . . . . . . . . . . . . . . . . .7
Section Five: Wireless Remote Features . . . . . . . . . . . . . . . . . . . . . . . . . . . . . . . . . . . . . . . . . . . . . . . . . . . . . . . . . . . . . . . . .9
Section Six: Installation . . . . . . . . . . . . . . . . . . . . . . . . . . . . . . . . . . . . . . . . . . . . . . . . . . . . . . . . . . . . . . . . . . . . . . . . . . . . . . .12
Trouble-Shooting . . . . . . . . . . . . . . . . . . . . . . . . . . . . . . . . . . . . . . . . . . . . . . . . . . . . . . . . . . . . . . . . . . . . . . . . . . . . . . . . . . . . .14
Other Quality Products and Accessories . . . . . . . . . . . . . . . . . . . . . . . . . . . . . . . . . . . . . . . . . . . . . . . . . . . . . . . . . . . . . . . .15
The information in this manual is primarily intended for the user who will establish a watering schedule and enter that schedule into the Controller. This product is intended to be used as an automatic timer controller for activating 24 VAC irrigation valves, as described in this manual.
Help: Before returning this timer to the store, contact Orbit® Technical Service at: Orbit® Technical Service: 1-800-488-6156 or 801-299-5555 Trademark Notice: WaterMaster® is a registered trademark of Orbit® Irrigation Products, Inc.
ESPAÑOL |
|
Sección uno: Introducción . . . . . . . . . . . . . . . . . . . . . . . . . . . . . . . . . . . . . . . . . . . . . . . . . . . . . . . . . . . . . . . . . . . . . . . . . . . . |
.16 |
Sección dos: Para comenzar . . . . . . . . . . . . . . . . . . . . . . . . . . . . . . . . . . . . . . . . . . . . . . . . . . . . . . . . . . . . . . . . . . . . . . . . . . . |
18 |
Sección tres: Programación . . . . . . . . . . . . . . . . . . . . . . . . . . . . . . . . . . . . . . . . . . . . . . . . . . . . . . . . . . . . . . . . . . . . . . . . . . . |
19 |
Sección cuatro: Operación manual . . . . . . . . . . . . . . . . . . . . . . . . . . . . . . . . . . . . . . . . . . . . . . . . . . . . . . . . . . . . . . . . . . . . |
22 |

WTM000684 57096-24 rF.qxd 3/6/06 11:00 AM Page 3
Sección cinco: Características del control remoto inalámbrico . . . . . . . . . . . . . . . . . . . . . . . . . . . . . . . . . . . . . . . . . . . . |
25 |
Sección seis: Instalación . . . . . . . . . . . . . . . . . . . . . . . . . . . . . . . . . . . . . . . . . . . . . . . . . . . . . . . . . . . . . . . . . . . . . . . . . . . . . . |
27 |
Solución de problemas . . . . . . . . . . . . . . . . . . . . . . . . . . . . . . . . . . . . . . . . . . . . . . . . . . . . . . . . . . . . . . . . . . . . . . . . . . . . . . . |
30 |
Otros productos y accesorios de calidad . . . . . . . . . . . . . . . . . . . . . . . . . . . . . . . . . . . . . . . . . . . . . . . . . . . . . . . . . . . . . . . |
31 |
La información de este manual se ha preparado primordialmente para el usuario que vaya a establecer un programa de riego y lo adapte al Regulador. Este producto se ha preparado para usarse como controlador automático de regulador para activar válvulas de irrigación de 24 VCA, según se describe en este manual.
Sugerencia: Antes de devolver este Regulador al almacén, sírvase ponerse en contacto con la sección de servicio técnico de Orbit®, llamando a: Servicio técnico:: 1-800-488-6156 or 801-299-5555
Aviso de marca registrada: WaterMaster® es marca registradas de la compañía Orbit® Irrigation Products, Inc.
FRANCAIS
Section un: Introduction . . . . . . . . . . . . . . . . . . . . . . . . . . . . . . . . . . . . . . . . . . . . . . . . . . . . . . . . . . . . . . . . . . . . . . . . . . . . . . .32 Section deux: Pour commencer . . . . . . . . . . . . . . . . . . . . . . . . . . . . . . . . . . . . . . . . . . . . . . . . . . . . . . . . . . . . . . . . . . . . . . . .34 Section trois: Programmation . . . . . . . . . . . . . . . . . . . . . . . . . . . . . . . . . . . . . . . . . . . . . . . . . . . . . . . . . . . . . . . . . . . . . . . . . .35 Section quatre: Manuel d'utilisation . . . . . . . . . . . . . . . . . . . . . . . . . . . . . . . . . . . . . . . . . . . . . . . . . . . . . . . . . . . . . . . . . . . .38 Section cinq: Fonctions de contrôle à distance . . . . . . . . . . . . . . . . . . . . . . . . . . . . . . . . . . . . . . . . . . . . . . . . . . . . . . . . . .41 Section six: Installation . . . . . . . . . . . . . . . . . . . . . . . . . . . . . . . . . . . . . . . . . . . . . . . . . . . . . . . . . . . . . . . . . . . . . . . . . . . . . . .43 Dépannage . . . . . . . . . . . . . . . . . . . . . . . . . . . . . . . . . . . . . . . . . . . . . . . . . . . . . . . . . . . . . . . . . . . . . . . . . . . . . . . . . . . . . . . . . .46 Autres accessoires et produits de qualité . . . . . . . . . . . . . . . . . . . . . . . . . . . . . . . . . . . . . . . . . . . . . . . . . . . . . . . . . . . . . . .47
L'information contenue dans ce manuel a été rédigée principalement pour l'utilisateur qui veut établir un programme d'arrosage et introduire ce programme sur le programmateur. Ce produit est conçu de manière à être utilisé comme programmateur automatique pour l'activation de vannes d'irriga-

WTM000684 57096-24 rF.qxd 3/6/06 11:00 AM Page 4
tions de 24 VCA, comme décrit dans ce manuel.
Aide: Avant de retourner ce programmateur au détaillant, contactez le service technique d'Orbit® au numéro suivant: Service technique d'Orbit®: 1-800- 488-6156 or 801-299-5555
Avis de marque enregistrée: WaterMaster® est des marques enregistrées de la compagnie Orbit® Irrigation Products, Inc.
S
I
T h o a fl w th P th
A
B in
W
W o Y o a p v
F
T m

WTM000684 57096-24 rF.qxd 3/6/06 11:00 AM Page 5
SECTION ONE
Introduction
® |
® |
Thank you for selecting an Orbit Sprinkler Controller. Orbit designers have combined the simplicity of mechanical switches with the accuracy
of digital electronics to give you a Controller that is both easy to program
®
and extremely versatile. The Orbit Controller provides convenience and flexibility, letting you run a fully automatic, semi-automatic, or a manual watering program for all your watering needs. This Controller also adds the convenience and flexibility of, wireless remote control.
Please read this manual completely before you begin to program and use the Controller. A few of the most notable design features include:
Arm Chair Programmable
By inserting two AA alkaline batteries you may program the timer prior to installing it in its permanent location.
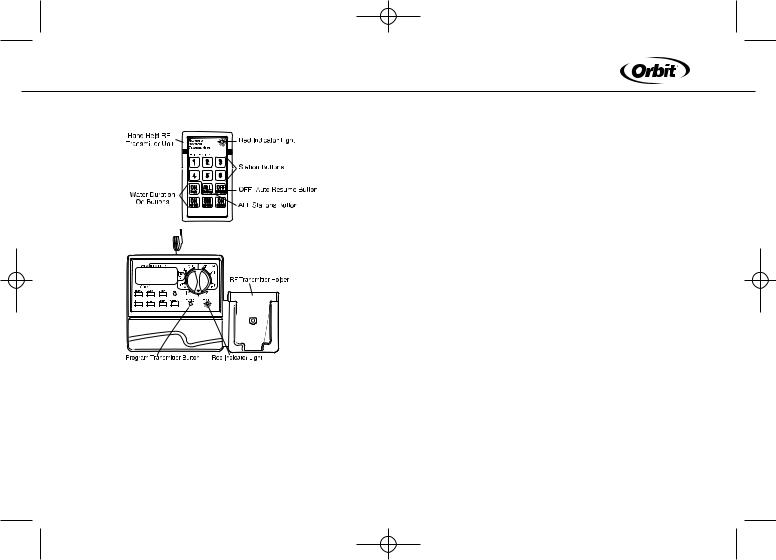
Wireless Remote Control
With the use of the wireless remote transmitter, the Controller can be operated via wireless remote control, up to 200 feet from the controller. You may initiate a manual watering cycle of 2, 10, 30 or 60 minutes for all or any individual station. This feature is useful for maintenance, repairs and system start-up and shut-down. The Controller allows up to 6 independent transmitters. The convenient LED light on the Controller face verifies wireless transmission.
Fuse
The 0.75 amp slow-blow fuse provides circuit protection. For replacement, use WaterMaster® 0.75 amp fuse or equivalent.
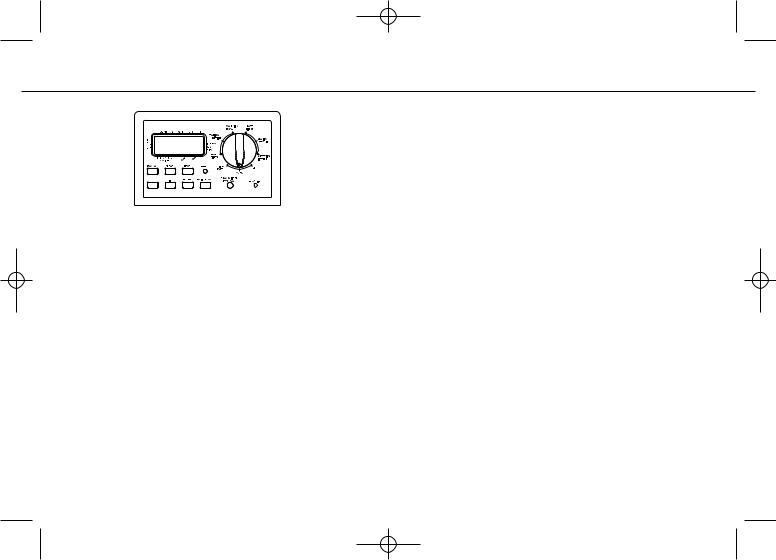
Features of the Timer
1. Reset Button
The reset button clears the time and date but does not remove the factory installed fail-safe program. To prevent an accidental reset, the button is recessed into the panel and must be pressed with a small pointed object such as a pen or pencil tip.
2. Digital Display
A large LCD (Liquid Crystal Display) shows the time of day and indicates many of the programming settings. The display is completely interactive with all other controls.
3. Programming Keys
The Timer has seven push button keys for setup and program entry. Working in conjunction with the rotary dial, the keys are used to set the time of day, watering time, watering days, start times, and other functions.
4. Rotary Dial
The heart of the Timer is the rotary dial. This makes it easy to see which function is currently selected and/or in which mode the Timer is set to operate.
1
WTM000684 57096-24 rF.qxd 3/6/06 11:00 AM Page 6
ENGLISH
|
Start-Time Stacking |
|
The Timer has the intelligence to “stack” start times that overlap. If you |
|
enter two or more start times that overlap (in the same or in different pro- |
|
grams), the Timer will not activate two stations at the same time. Instead, |
|
the Timer activates the first station and then activates the next station(s) |
|
in sequence after the first station finishes its preset watering duration. |
|
The Timer will NOT stack to the next calendar day. This prevents the |
|
Timer from violating an odd or even day watering schedule. |
Figure 1: Location of Controls on the Timer |
Manual and Semi-Automatic Modes |
Notable Programming Features
Two Watering Programs
The Timer gives you the option of using any or all of these independent programs: Note that each station can independently be set to either A or B or both A and B programs.
Program A—Days
This program lets you schedule selected stations to water on specific days of the week or to water every 2nd day. Program-A repeats itself continuously in successive weeks.
Program B—Interval, Odd, Even
Provides two options: One for odd or even day watering or one for intervals ranging from everyday to every 28th day. This feature is designed to meet the growing needs and restrictions imposed by local governments and to conserve water. The Timer automatically calculates odd and even days (by date) for each month and makes adjustments for leap years to provide true odd and even watering through the year 2100.
The Timer gives you a number of manual and semi-automatic modes for flexibility in watering. You can override the Timer’s automatic programming in a variety of ways.
SECTION TWO
Getting Started
Programming the Timer can be accomplished in just a few basic steps. Before you begin programming, it is important to install the battery, set the time of day and date, and establish a watering plan.
Install the Batteries
The Timer requires two AA batteries to maintain the time and date in case of AC power loss. In a typical installation, fully charged batteries should provide sufficient power for approximately one year of operation.
• To access the battery compartment sliding lower front cover down.
N to
W a te m
S
If th th
D r
T
2
WTM000684 57096-24 rF.qxd 3/6/06 11:00 AM Page 7
•Insert two AA alkaline batteries into the battery compartment.
•Return the battery cover to its closed position.
-
,
NOTE: if you have the model 57586 remove the lower shroud by pulling toward you and then remove cover as instructed above.
Weak or missing batteries can cause the time and date to be erased after a power failure. If this happens, you will need to install fully charged batteries and re-enter the time and date. All other program settings will be maintained in non-volatile memory.
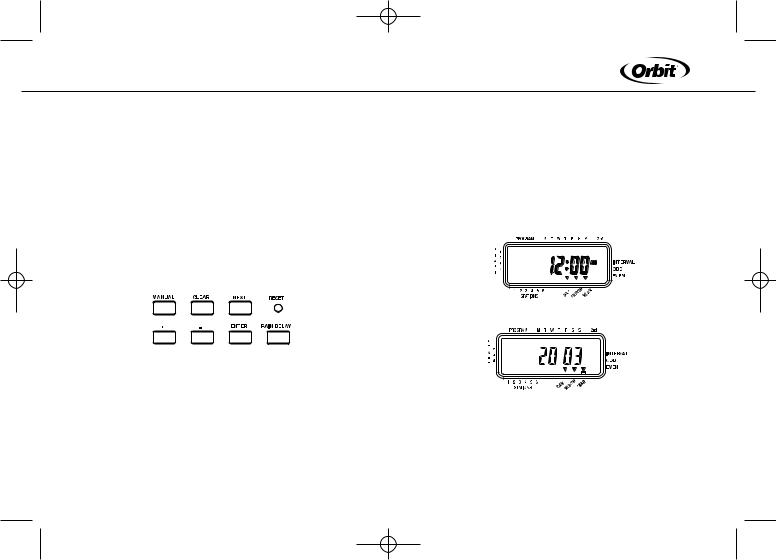
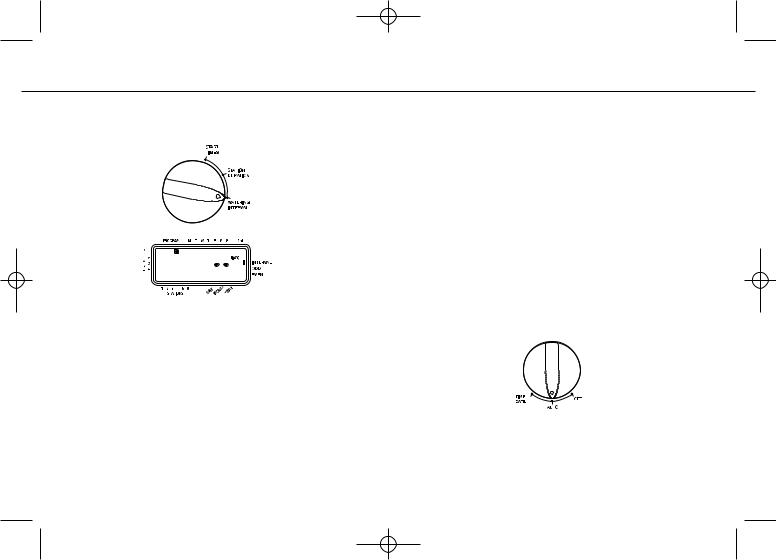
Set the Time of Day and Date
If this is the first time the Timer has been programmed, you should press the small recessed button labeled RESET. Pressing RESET does not affect
the factory installed fail-safe program [See Figure 2].
Figure 2: Programming Keys
Do not press the reset button again unless you want to completely remove all your programming.
•Turn the rotary dial to the Time/Date position.
•12:00 AM will appear in the display with three arrows pointing to the
e |
year (Y), month (M), and day (D) [See Figure 3]. |
• |
Press and hold the + key to advance the clock to the correct time of |
|
day. Use the – key to go in reverse. When the correct time of day |
|
is reached, press the enter key to lock in the time. |
To increase or decrease more rapidly, hold down either the + or – keys
until the display goes into rapid advance mode.
•A blinking cursor will appear above the arrow for the year (Y), month (M), or date (D) when programming [See Figure 4].
•Use the + and – buttons to set the correct year, then press ENTER.
•Use the + and – buttons to set the correct month, then press ENTER.
•Use the + and – buttons to set the correct day of the week, then press
ENTER.
Figure 3: LCD Display with Surrounding Information
Figure 4
CAUTION: If a watering schedule is not entered into the Timer, the factory installed fail-safe program will turn on each station every day for 10 minutes. To avoid accidental valve activation, either:
1)turn the rotary dial to OFF
2)enter a watering schedule
Establish a Watering Plan
3
WTM000684 57096-24 rF.qxd 3/6/06 11:00 AM Page 8
ENGLISH
To help you visualize how best to program the Timer, it might be helpful to make a watering plan on paper. This will help you establish which days and times you want to water.
SECTION THREE
or – keys, then press the ENTER key. The display will advance to START 2. For additional start times, simply repeat this procedure by using the + and – keys to enter the time, then press ENTER.
Remember, Each start time will activate all stations that are programmed to operate. There are not separate start times for each station. Start times do not correspond to specific stations.
Programming
The Timer has two programs you can setup to control a variety of watering plans. Depending on your needs, you can use either or both programs.
Enter the Watering Schedule in Any Order
You have the option of entering your watering schedule in whatever order you like. This feature makes it very easy to review and change your watering schedule. Your settings can be changed at any time—while you’re setting up the initial schedule, or after years of operation.
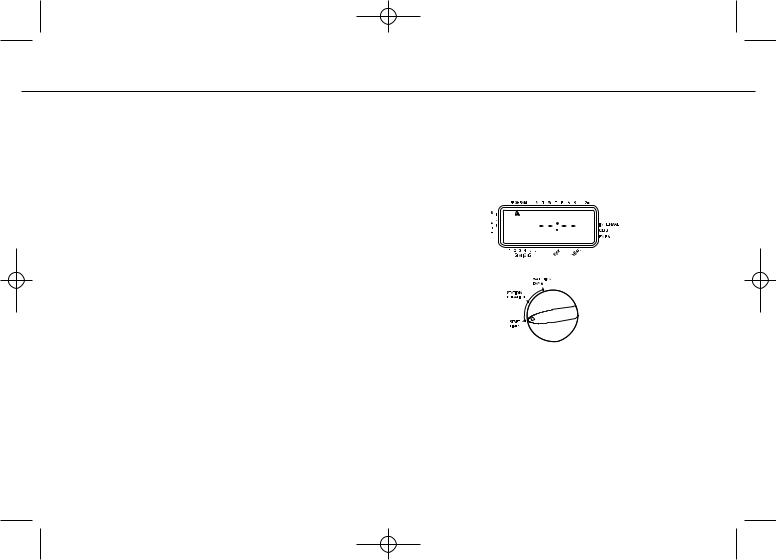
Start Times for Program A or B
Note: A start time is the time of day that the program begins watering the first station, and all other stations will then follow in sequence. There are not separate start times for each station. Start times do not correspond to specific stations. If you enter more than one start time, all stations programmed to operate will water again (in sequence).
•The way you set the start time is the same for both programs.Turn the rotary dial to the Start Times position in the program that you want to set up. The display will show an A or B depending on which program you have selected.
The display will show – – :– –, and a blinking cursor in START 1 location [See Figure 5].
• Set the time you want to begin watering for start time 1 using the +
Figure 5: LCD
Display with Start Time |
|
Watering Durations for Program A or B |
|
Note: Both programs require watering durations to be programmed. |
|
• Turn the rotary dial to the Station Duration position in either the A or |
A |
B program. The display will show which program you have select- |
|
ed with an “A” or “B” and the - - MINS and the cursor blinking at |
|
station “1” [See Figure 6]. |
|
4
WTM000684 57096-24 rF.qxd 3/6/06 11:00 AM Page 9
s
Figure 6: Station Duration for Program A |
Figure 7: LCD Display with Watering Days |
•You can set the watering duration from 1 to 99 minutes. Press and hold the + key to advance the number of minutes, or use the - key to go in reverse, then press enter. When the minutes are set, a solid “A” or “B” will appear over station 1 and the cursor will advance to station 2 and continue blinking
•Simply repeat these steps to set watering durations for stations 2 through 6 (or 2 - 12).
•To skip a station, press the Next key.
•To erase previously programmed watering durations, press the Clear key.
rAssigning Watering Days for Program A
•Turn the rotary dial to Watering Days in program A. The display will show an "A" and the cursor will blink under the days of week M, T, W, T, F, S, S Monday, Tuesday, etc [See Figure 7 ].
•Press enter to activate watering on Monday. An arrow appears under M and the cursor will advance to Tuesday (“T”), press enter to activate watering on this day. Repeat these steps for all days of the week.
•To skip a day, press next.
•To delete a previously entered day, press clear.
•If you want to water every second day, press the next key to advance the cursor to “2nd”, then press
Note: If you choose to water every 2nd day, you cannot set specific days of the week for watering.
Assigning Watering Intervals for Program B
Program B is used to water at specific intervals between days (1 to 28), or on odd or even calender dates. The Timer has a leap-year compensator and will ensure conformance to the odd and even schedule through the year 2100.
5
WTM000684 57096-24 rF.qxd 3/6/06 11:00 AM Page 10
ENGLISH
•Turn the rotary dial to Watering Interval. The cursor will blink to the left of the word Interval [See Figure 8].
Figure 8: LCD Display with Watering Interval
•Press and hold the + or - keys to select the number of days between watering. Example: If you want to water once every 10 days, set the interval at 10.
•To activate the watering interval, press enter.
Note: If an interval of “3” is entered today, the Timer will water for the first time today, and then again every “3” days.
•To select odd or even day watering, press next. The cursor will move to either the odd or even setting, then press enter.
•To erase a schedule, press clear. To enter a new schedule, press next.
Reviewing and Changing Your Program
The Orbit® Timer lets you easily review a complete watering plan.
For example, to review Program-A watering start times, simply turn the rotary dial to the Start Times position in Program-A and check the times that have been entered. Using the next key, you can advance through the schedule without fear of disturbing any programming.
If you want to change the start times, watering days, or interval, simply follow the directions for that program.
After reviewing or changing a watering schedule, remember to turn the rotary dial back to auto if you want the Timer to automatically follow your program.
Ready for Automatic Operation
After programming is complete, turn the rotary dial to auto [See Figure 9].
The Timer is now fully programmed and ready to use in the automatic mode. In automatic mode, each program will operate sequentially, starting with Program-A.
Figure 9: Ready for Automatic Operation.
S
T d U A
A
N th
6
WTM000684 57096-24 rF.qxd 3/6/06 11:00 AM Page 11
SECTION FOUR
Semi-Automatic and Manual
Operation
The Orbit® Timer has the ability to override the automatic program without disturbing the preset program.
rUsing the Semi-Automatic Mode (All stations cycle once both A & B programs)
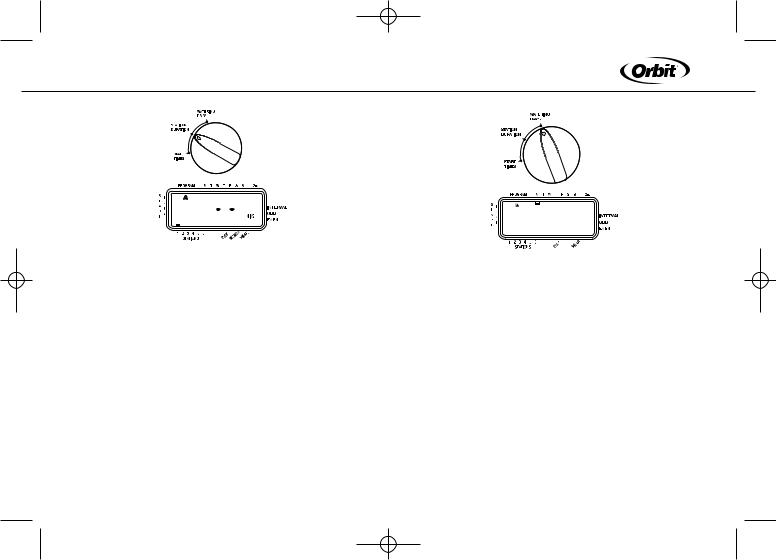
•Turn the rotary dial to auto, then press the manual key. The display will show “AB”, “MANUAL”, and “ALL” will be blinking [See Figure 10]. This indicates all six (or twelve) stations in the A and B programs will semi-automatically water for their assigned durations in sequence.
Figure 10: Semi-Automatic Watering for Stations
Assigned to A and B Programs
•To activate the assigned water durations in the A and B programs for each station, press enter.
Assigned to A and B Programs
Note: Water durations assigned to station 1 in program A will water first, then move to station 1 in program B before advancing to the second sta-
tion and will continue alternating. Only those stations assigned a watering duration will water when using the manual or semi-automatic mode [See Figure 11].
Figure 11: Semi-Automatic Watering Entered for A and B Programs, All Stations
All Stations (All stations cycle once, A program only)
•To activate each stations assigned watering durations for the A program only, press the manual key, followed by the next key. This will activate stations with assigned watering durations in the A program only. To initiate this semi-automatic watering, press enter [See Figure 12].
(All stations cycle once, B program only)
•To activate each stations assigned watering durations for the B program only, press the manual key, followed by pressing the next key two distinct times. This will activate only those stations with assigned watering durations in the B program only. To initiate this semi-automatic watering, press enter.
7

WTM000684 57096-24 rF.qxd 3/6/06 11:00 AM Page 12
ENGLISH
Figure 12: Manual Watering in Either the A or B Program Only
Using Manual Operation
The manual operation mode allows you to set durations in any of the six stations from 1 to 99 minutes.
•Turn the rotary dial to auto.
•Press the manual key. Then press next three times. The display will show a blinking cursor on station 1 along with - - MINS [See Figure 13].
Figure 13
•To set the number of minutes for watering duration, press and hold the + key to advance to desired number of watering minutes. Use the - key to go in reverse. Press enter to begin watering.
•To skip a station, press next until the cursor is blinking over the station number you wish to program. Example: To set station 3 for five minutes, press the manual key; then press the next key five times to select the manual operation mode and advance to watering for station 3; using the + or - key, set the manual watering duration to five minutes; then press enter [See Figure 14].
Figure 14: Manual Watering Station 3 for Five Minutes
Note: After the manual key has been pushed, if a selection is not made within 60 seconds the display returns to the time of day.
Interrupting or Halting Timer Output
The Timer has several built-in features that allow the user to momentarily interrupt or halt the electrical output to the station valves.
U
T m
8

WTM000684 57096-24 rF.qxd 3/6/06 11:00 AM Page 13
e• To momentarily interrupt the electrical output to the stations, press the off/auto resume button on the hand held wireless transmitter.
This is useful for making a quick repair or pattern adjustment in the sprinkler system. To restart the electrical output, simply press the
n off/auto resume button once again. NOTE: The program will return where it would have, had the interruption not occurred. For instance, the Timer does not try to recapture any automatic watering which is
nlost due to the interruption.
•To halt or discontinue semi-automatic or manual watering, press the clear key once. The Timer will revert to your original automatic watering plan.
Using the User Selectable Rain Delay Mode
To stop automatic watering for 24, 48, or 72 hours, use the rain delay mode key.
•With the rotary dial set to auto, press the rain delay key once. The Timer will force a 24-hour interruption of all scheduled watering. After 24 hours, the Timer will automatically return to its initial watering schedule.
•To increase the rain delay to 48 or 72 hours simply press the rain delay key again until the desired delay time is displayed.
•To cancel the rain delay mode, press clear [See Figure 15].
•Note: While in rain delay mode, the timer will display the remaining hours (counting down) to the end of the accepted delay alternating with the current time and date. No other key besides clear is accepted while the Timer is in the rain delay mode. (Wireless operation is still possible)
y
Figure 15: Display Showing Rain Delay Complete System Shut Down
To shut the system down, turn the rotary dial to the off position. The Timer remains programmed but will not water.
SECTION FIVE
Using Remote
Features
Setting up the Wireless Features
The Wireless Remote features of the Timer allow you to operate the Timer from up to 200 feet away using the hand held Wireless Transmitter. You can turn on all stations or a specific station, for a number of minutes. This feature is especially helpful in troubleshooting, making adjustments and repairs, performing additional watering, and for start-up and shut-down of the sprinkler system.
•First, install a 9-volt alkaline battery into the hand held Transmitter [see Figure 16]. To test the battery, press the off/auto resume button on the Transmitter. The red light on the Transmitter will light up for two seconds, and three audible beeps will be heard. After sustained
9
WTM000684 57096-24 rF.qxd 3/6/06 11:00 AM Page 14
ENGLISH
use (approx. one year) the battery will weaken, and the red light will dim. Replace the battery when the light begins to dim or if the operating distance begins to lessen.
Figure 16: Installing Transmitter Battery
•To test the wireless system, hold the Transmitter near the Timer (the Timer must have the transformer installed) and press the off/auto resume button on the Transmitter. If powered correctly, the red light on the face of the Timer (labeled RF Active) will flash several times, as will the red light on the Transmitter. NOTE: If the Transmitter and Timer do not respond accordingly, check power sources. It may also be necessary to program the Transmitter to the Timer (see Programming the Transmitter).
Operating the Timer Using the Wireless Features
The wireless feature allows you to perform semi-automatic timed watering cycles. The normal automatic program of the Timer and the wireless feature operates independently. However, the wireless operation has priority over any other Timer program.
(To turn on one station for a specific watering duration using the wireless Transmitter)
•Press the desired station button on the Transmitter (number 1, 2, 3, etc.). The Transmitter will beep once, and the red light will turn on [See Figure 17].
•Press the desired watering duration on button (choose 2, 10, 30, or 60
minute durations). The Transmitter will beep three times to confirm the command. The Timer’s red light will flash several times to acknowledge receipt of the wireless signal [See Figure 17]. During wireless watering, the Timer display will show the active station being watered (an “A” above the station number), show remote, and count down the number of minutes remaining for that station.
•Note that the on button must be pressed within 10 seconds of the desired station button (while the red indicator light is still lit) or you will need to repeat the steps.
•NOTE: The wireless watering has priority over any other Timer function (including automatic, semi-automatic, or manual). If the wireless feature interrupts a functioning automatic program, the wireless watering will occur, and afterwards the Timer will revert back to the automatic program. However, any time occurring during the wireless watering will be lost. The wireless feature will also override the rain delay, or Timer off modes.
•To stop wireless watering , simply press the off/auto resume button on the Transmitter.
(To turn on all stations for a specific watering duration using the wireless Transmitter)
•Press the all button on the Transmitter. The Transmitter will beep once, and the red light will turn on [See Figure 17].
•Press the desired watering duration on button (choose 2, 10, 30, or 60 minute durations). The Transmitter will beep three times to confirm the command. The Timer’s red light will flash several times to acknowledge receipt of the wireless signal [See Figure 17]. During
wireless watering, the Timer display will show the active station
being watered (an “A” above the station number), show remote, and ( count down the number of minutes remaining for each station. Note
that each station will be activated, regardless of the programming in the Timer.
•To stop wireless watering, simply press the off button on the Transmitter.
10
WTM000684 57096-24 rF.qxd 3/6/06 11:00 AM Page 15
s
0
Figure 17: Watering Using Wireless Remote Features
(Notes About Using the Wireless Remote Features)
•Remember that the wireless features have priority over normal Timer operations. Although the Timer will return to the automatic program, the time spent during an wireless cycle will be lost. For this reason, interrupting a currently running automatic (or semi-automatic or manual) program may cause some stations of the currently running
automatic program not to water at this time.
•The wireless watering features do not “Stack” as do the Timer programs. A new wireless command will cancel the currently running wireless command.
•After sustained use (approx. one year) the hand held Transmitter battery will weaken, and the red light will dim. Replace the battery when the light begins to dim or if the operating distance begins to lessen.
If the Transmitter and Timer do not respond appropriately, check power sources. It may also be necessary to program the Transmitter to the Timer (see Programming the Transmitter below).
•The normal distance your Transmitter will operate is 200 feet line of sight. The range is reduced when transmitting through walls, shrubbery, metal siding, etc. For best results hold the Transmitter above your head or immediately in front of you.
Programming the Transmitter
It may not be necessary to use this procedure for models sold with a Transmitter included, since the Transmitter and Timer have already been programmed to work together. However, if you replace your Transmitter you must code the Transmitter to the Timer.
To program the Transmitter:
•While holding the Transmitter in one hand, press and release the transmitter program button found to the right of the RAIN DELAY button. The red indicator light on the Timer will turn on. Press the off button on the Transmitter. The Transmitter will beep three times and the red indicator light on the Timer will blink, indicating the program coding is complete.
11
WTM000684 57096-24 rF.qxd 3/6/06 11:00 AM Page 16
ENGLISH
SECTION SIX
Installation
Timer Location
•Select a location near a standard electrical outlet. Avoid using an outlet controlled by an On/Off switch.
•The timer should not be exposed to the weather or operated at temperatures below 32° or above 113° Fahrenheit. (0° c + 45° c)
•Installation works best inside a garage or protected area. The Timer should not be mounted outdoors.
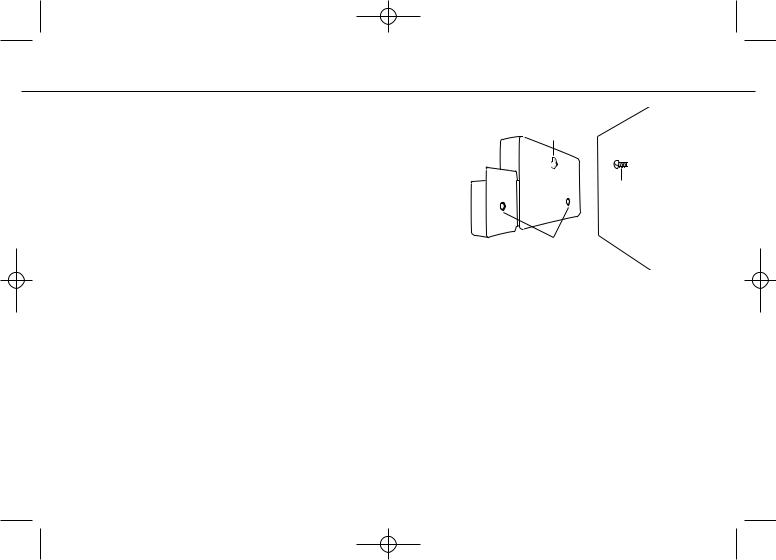
Keyhole
No. 8 Screw
Screwholes |
Wall |
Note: The distance that the Transmitter and Timer will operate at is approximately 200 feet line of sight. This distance can be affected by obstacles such as walls, automobiles, metal siding, etc. To achieve the maximum amount of range, mount the Timer as high on the wall as is convenient for operation and service.
Mounting the Timer
•Screw a No. 8 screw at eye level leaving the screw head extended out from the wall about 1/8 inch. Use expanding anchors in plaster or masonry if necessary.
•Slip the keyhole in the back of the timer over the extended screw.
•Screw a No. 8 screw through each of the two holes at the bottom of the timer box into the wall [See Figure 18].
•Install two AA batteries, and re-enter the time and date as required.
Figure 18: Mounting the Timer
Wiring the Electric Valves
•If the distance between the timer and valves is under 700 feet, use WaterMaster® sprinkler wire or 20 gauge plastic jacketed thermostat wire to connect the timer to the valves. If the distance is over 700 feet, use 16 gauge wire. The wire can be buried in the ground; however, for more protection wires can be pulled through PVC pipe and buried underground. Be careful to avoid burying the wires in locations where they could be damaged by digging or trenching in the future.
12
 Loading...