


94075

4-Button Digital Hose Faucet Timer
■
Installation and user’s guide
Minuterie Orbit®numérique à 4 boutons pour
adaptateur de tuyau
■
Guide d'installation et d'utilisation
Programador digital de grifo de 4 botones
conectado a la llave de agua
■
Guía del usuario y de instalación
Timer digitale per attacco diretto a manichetta
Orbit®a 4 pulsanti
■
Installazione e Guida dell'utente
Orbit®Digitales zeitgesteuertes
Schlauchhahnventil mit vier Ausgängen
■
Installationsanleitung und Benutzerhandbuch Inhalt
Models: 94075, 62075
WTM221395 62075-24 rB.qxd 11/1/2002 10:09 AM

2
Table of Contents
Introduction . . . . . . . . . . . . . . . 3
Key Pad and Display . . . . . . . . 5
Installation . . . . . . . . . . . . . . . . 6
Timer Programming . . . . . . . . . 8
Other Features . . . . . . . . . . . . 20
Trouble Shooting . . . . . . . . . . 21
Table des matières
Introduction . . . . . . . . . . . . . . 22
Cadran et affichage . . . . . . . . 24
Installation . . . . . . . . . . . . . . . 25
Programmation de le
minuterie . . . . . . . . . . . . . . . . . 26
Autres caractéristiques. . . . . 42
Dépannage . . . . . . . . . . . . . . . 43
Índice
Introducción . . . . . . . . . . . . . . 44
Teclado numérico
y pantalla . . . . . . . . . . . . . . . 46
Instalación . . . . . . . . . . . . . . . 47
Configuración del
programador . . . . . . . . . . . . . 49
Otras funciones . . . . . . . . . . . 65
Resolución de problemas . . . 67
Índice
Introduzione . . . . . . . . . . . . . . 68
Tastierino e display . . . . . . . . 70
Installazione . . . . . . . . . . . . . . 71
Programmazione
del timer . . . . . . . . . . . . . . . . . 73
Altre caratteristiche . . . . . . . 88
Risoluzione dei problemi . . . . 90
Inhalt
Einführung. . . . . . . . . . . . . . . . 91
Tastenbereich und
Anzeige . . . . . . . . . . . . . . . . . . 93
Installation . . . . . . . . . . . . . . . 94
Programmieren der
Zeitschaltuhr. . . . . . . . . . . . . . 96
Sonstige Funktionen . . . . . . 112
Fehlerbehebung . . . . . . . . . . 114
INT
Thank y
many y
care is
The Orb
home o
ting yo
automa
The Orb
ing per
the Use
set up a
comple
Note: Us
WTM221395 62075-24 rB.qxd 11/1/2002 10:09 AM

3
. . . . . . 49
. . . . . . 65
. . . . . . 68
. . . . . . 70
. . . . . . 71
. . . . . . 73
. . . . . . 88
. . . . . . 91
. . . . . . 93
. . . . . . 94
. . . . . . 96
. . . . . 112
. . . . . 114
INTRODUCTION
Thank you for selecting a quality Orbit®timer. You will enjoy
many years of satisfactory service if proper installation and
care is observed.
The Orbittimer keeps your yard beautiful whether you are at
home or away. Orbit gives you convenience and flexibility, letting you use an automatic watering program or override the
automatic program for special watering needs.
The Orbit Timer provides up to 3 start times per day with watering periods from 1 to 99 minutes per start time. For ease of use,
the User’s Guide has step-by-step instructions for installation,
set up and operation. Please read the guide
completely before installing, programming and operating.
Note: Use only with three 1.5 –volt (AA) alkaline batteries.
WTM221395 62075-24 rB.qxd 11/1/2002 10:09 AM
4
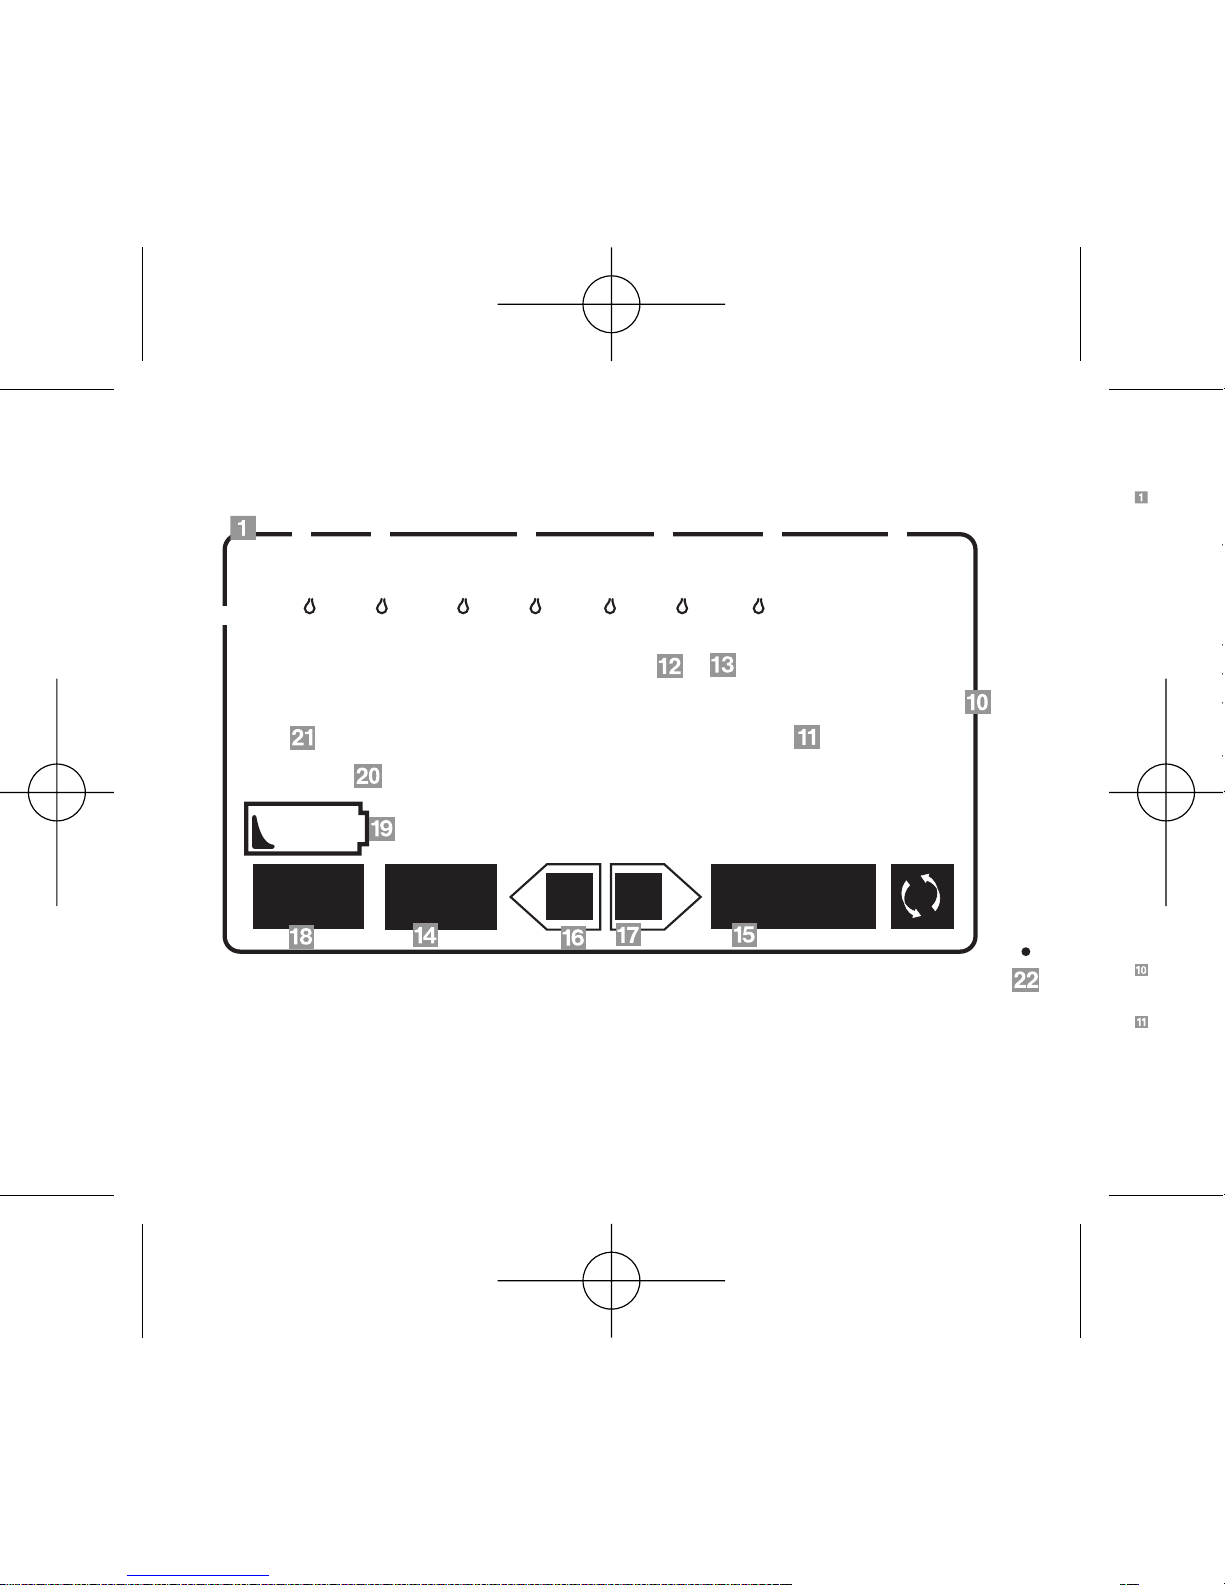
SET AUTO MANUAL OFF DELAY LEFT
START
MODE
–
+
CONFIRM
88:88
Mo Tu We Th Fr Sa Su 2nd 3rd
NEXT
AM
PM
CLOCK
CYCLESTN
1 2 3 4
ABC
MINS
TO
RUN
KEY P
Indica
progra
Select
clock
water
start t
Select
Select
Select
all sta
Select
hours
Indica
ing on
Indica
the se
Indica
water
Indica
will w
Indica
start t
FIGURE 1
WTM221395 62075-24 rB.qxd 11/1/2002 10:09 AM

5
KEY PAD AND DISPLAY
Indicates different mode settings for
programming.
Select to set day of the week, to set
clock time, to set watering day(s), to set
watering station and duration and to set
start times.
Select to use automatic watering mode.
Select to enable watering manually.
Select to suspend watering and turn off
all stations.
Select to postpone watering for up to 24
hours.
Indicates the number of hours remain-
ing on the Delay.
Indicates current day of the week and
the set days for watering.
Indicates which days are selected for
watering.
Indicates the duration that each station
will water.
Indicates A.M. or P.M. for clock and
start time.
Indicates the time to begin watering.
Indicates clock, start time and watering
duration.
Push to select or unselect a setting.
Push to confirm a new setting and
advance to the next setting.
Push to increase numeric setting or
advance a setting.
Push to decrease numeric setting or
retract a setting.
Push to cycle through the different
mode settings.
Indicates low battery, or that batteries
need to be replaced.
Indicates that the setting of the clock
and day of the week is in process.
Indicates which watering cycle is active
or being set.
One pinhole "Reset" button: Push to
reset all programs and settings.
WTM221395 62075-24 rB.qxd 11/1/2002 10:09 AM

In
m
Ch
ba
Ba
ter
If o
co
Re
6
INSTALLATION
GENERAL INFORMATION
1. Location:
Choose a spot where water drains away from house and
window wells.
Warning: For outdoor use in cold water only.
2. Plumbing Codes:
Follow all watering and back-flow (anti-siphon)
prevention codes.
3. Specifications:
Water pressure: Min. 10 psi/Max. 80 psi working pressure
Working Temperature: Min. 32º F/Max. 167º F
Storage Temperature: Min. -22º F/Max. 185º F
Electrical: Three AA 1.5-volt alkaline batteries
4. Installing the Batteries:
Remove timer cover and slide battery compartment cover off
in the direction of arrow.
WTM221395 62075-24 rB.qxd 11/1/2002 10:09 AM

7
Install three AA 1.5-volt alkaline batteries. Slide compart-
ment cover back into place.
Check the timer periodically for low voltage. When the
battery power drops below the safety zone, the "Low
Battery" indicator appears on the display. Replace the batteries with new fully-charged batteries when this appears.
If old batteries are not replaced before they run out, all
controls will be disabled.
Replace the timer cover.
WTM221395 62075-24 rB.qxd 11/1/2002 10:09 AM
 Loading...