

Orbit 57880, 57881, 27780, 27781, 27782 User Manual
...
PN 57880-24 Rev D
MODELS / MODÈLES / MODELOS:
57880, 57881, 57882, 57883, 27780, 27781, 27782, 27783,
91880, 91881, 91882, 91883, 94880, 94881, 94882, 94883,
96880, 96881, 96882, 96883
Users ManUal
ManUel de l’UtilisateUr
ManUal del UsUario
www.orbitonline.com
?
1
-
8
0
0
-
4
8
8
-
6
1
5
6
1
2nd
PROGRAM
INTERVAL
ODD
EVEN
2
3
4
MANUAL
CLEAR
NEXT ENTER
STATIONS
CYCLE S TART TIM ES
DAY
MONTH
YEAR
ACTIVE/BYPASS
B
u
d
g
e
t
O
f
f
D
a
t
e
T
i
m
e
/
T
i
m
e
s
S
t
a
r
t
S
t
a
t
i
o
n
D
a
y
s
o
f
S
t
a
r
t
T
i
m
e
s
S
t
a
t
i
o
n
W
e
e
k
D
u
r
a
t
i
o
n
D
u
r
a
t
i
o
n
A
u
t
o
W
a
t
e
r
i
n
g
I
n
t
e
r
v
a
l
1234

Section 1: Introduction
Thank you for selecting an Orbit® sprinkler timer. Orbit® designers
have combined the simplicity and accuracy of digital electronics to
give you a timer that is both easy to program and extremely versatile.
The Orbit® timer provides convenience and flexibility, letting you
run a fully automatic, a semi-automatic, or a manual watering program for all your watering needs.
Please read the manual completely before you install or use this
sprinkler timer.
To assist you, we have included some notable features to
this manual.
1. Glossary of the most common terms (see page 17)
2. Blue Text relates to the buttons used for programming
3. Blue Underlined Text relates to stop positions for both
rotary dial and slide switches.
Programming Features
Dual Programs
This Timer has two programs (“Program A” and “Program B”)
that allow you to set up separate watering schedules for your Lawn,
Gardens or Shrubs.
Fail-Safe Program
If the timer loses AC power, the existing program, date and time will
not be lost. After the AC power returns, the timer will recall the last
program into memory. If both the AC power is lost and the battery
is dead or missing, the user will have to reprogram the timer.
Water Budgeting
This feature is ideal when adjusting to seasonal watering demands.
Instead of reprogramming your timer, the “Water Budget Mode” will
enable easy adjustments to watering duration by ten percent increments from 10%-200%. For example, a budget percentage set at
70% will alter a 10-minute preset watering duration to 7 minutes.
Start-Time Stacking
When a start time is set before the previous program has completed,
that start time will be “stacked” or delayed, and will start upon
completion of the previous program.
Section 2: Getting Started
Programming the timer can be accomplished in just a few basic
steps. Before you begin programming, it is important to install the
battery, set the time of day and date, and establish a watering plan.
To activate battery, pull the narrow black plastic strip out, this
is protruding out the top panel.
Replacing the Battery
The timer requires one CR2032 Lithium battery to keep the program
in memory in case of AC power loss. In a typical installation, the
battery should provide sufficient power for approximately one year
of protection. Therefore, we recommend changing the battery every
year.
• Remove the battery cover by sliding it upward.
• Insert one CR2032 battery into the battery compartment.
• Return the battery cover to its closed position.
A weak or missing battery can cause the time, date, and program
to be erased after a power failure. If this happens, you will need to
install a fully charged battery and reprogram the timer.
Note: A battery alone will not operate the valves in your sprinkling
system. The sprinkler timer has a build-in transformer that must be connected to an AC line voltage source.
Resetting the Sprinkler Timer
If this is the first time the sprinkler timer has been programmed, you
should press the small recessed button labeled RESET. Do not press
ENGLISH
• Introduction.........................................3
• Getting Started .......................................3
• Programming ........................................6
• Automatic Operation and Commonly Used Features..........9
• Manual Watering . . . . . . . . . . . . . . . . . . . . . . . . . . . . . . . . . . . . 11
• Sprinkler Timer Installation . ...........................12
• Appendix A . .......................................16
• Glossary of Terms . ..................................17
• Troubleshooting.....................................18
Help:
Before returning this timer to the store, contact Orbit
®
Technical Service at:
Orbit® Technical Service: 1-800-488-6156 or 801-299-5555
Table des matières
FRANÇAIS
• Introduction........................................20
• Pour commencer ....................................20
• Programmation .....................................23
• Fonctionnement automatique et fonctions
fréquemment utilisées ................................27
• Arrosage manuel . ...................................28
• Installation de la minuterie d’arrosage . ...................29
• Annexe A . .........................................34
• Glossaire des termes ..................................35
• Dépannage .........................................36
Assistance:
Avant de ramener cette minuterie chez le détaillant, veuillez
contacter
le service technique d’Orbit® au:
Service technique d’Orbit®: 1 800 488 6156 ou 801 299 5555
Índice
ESPAÑOL
• Presentación........................................38
• Primeros pasos ......................................38
• Programación .......................................41
• Funcionamiento automático y características
utilizadas comúnmente ...............................45
• Riego manual . .....................................46
• Instalación del temporizador de aspersor . ................48
• Apéndice A . .......................................52
• Glosario de términos . ................................53
• Localización y solución de problemas ....................54
Sugerencia:
Antes de devolver este temporizador a la tienda, póngase en contacto
con el Departamento de servicios técnicos de Orbit® al 1-800-
488-6156 ó 801-299-5555
2
Table of Contents
ENGLISH
3
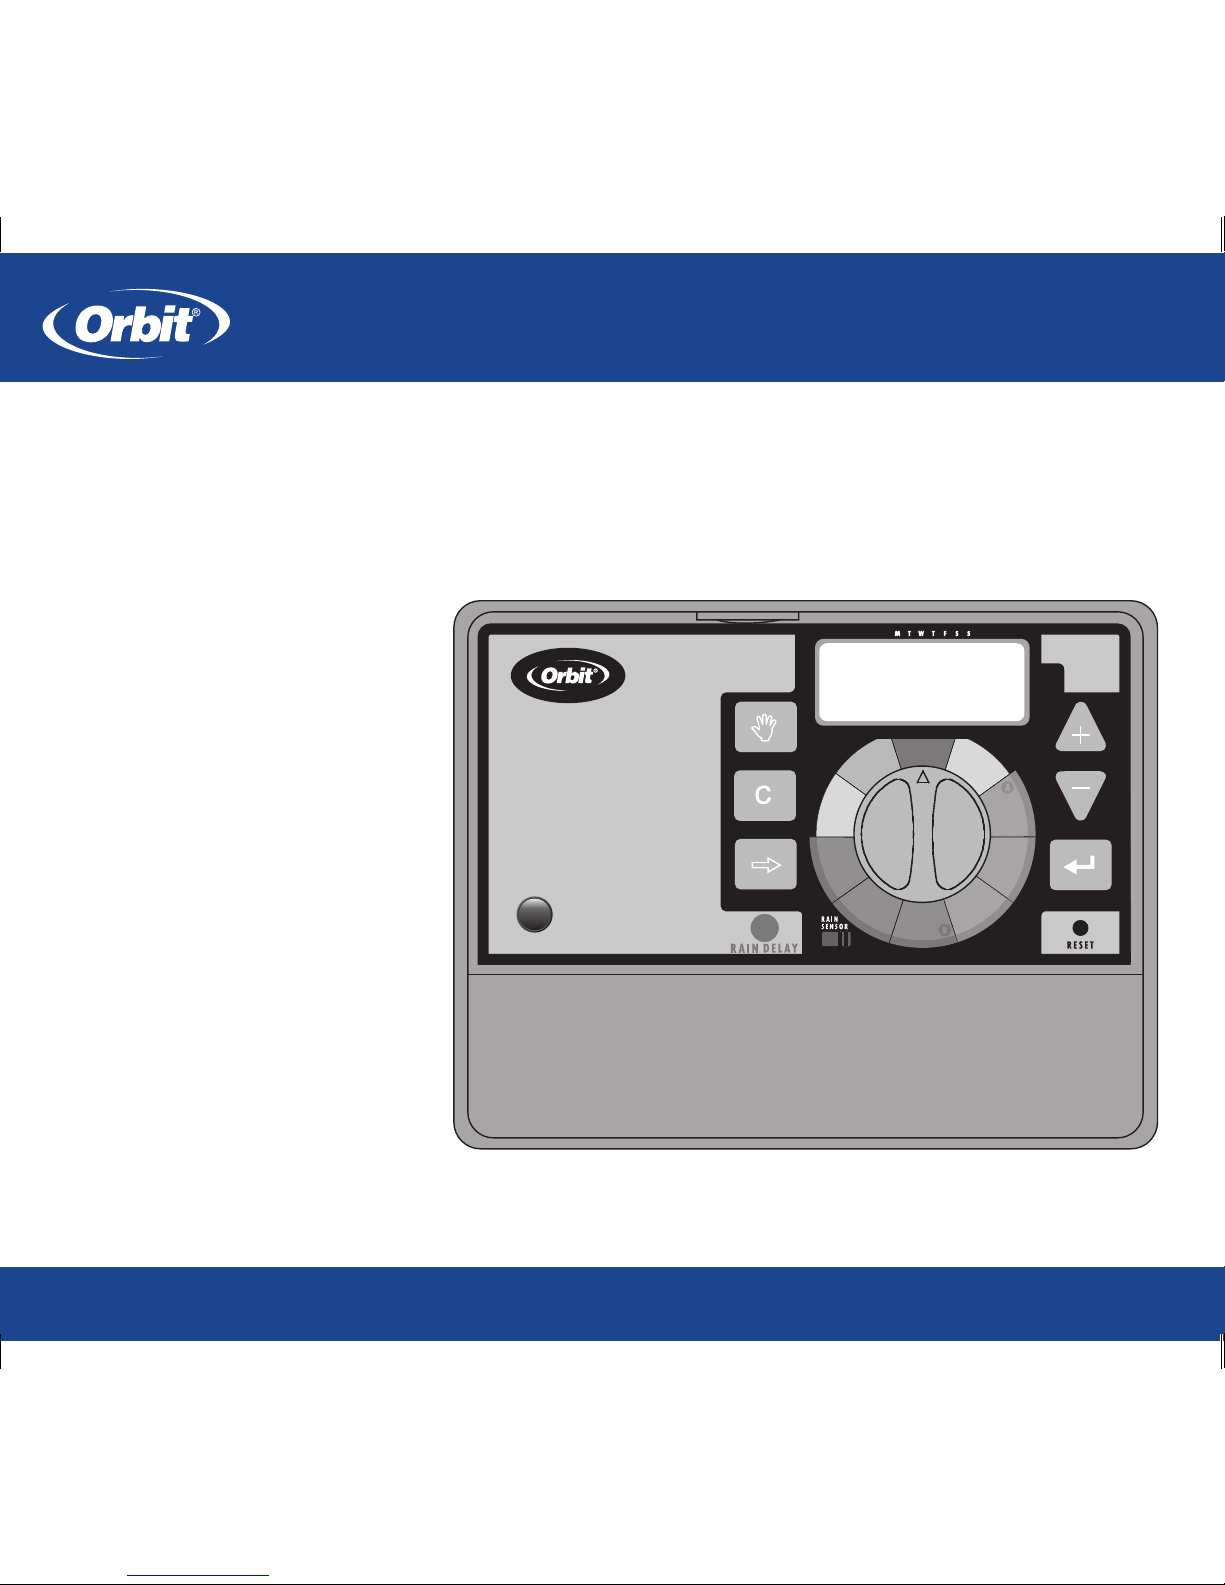
FRONT VIEW REAR VIEW
Battery Compartment
the RESET button again unless you want to completely remove all
your programming.
Set the Time of Day and Date
• Turn the rotary dial to the TIME/DATE position.
• 12:00 PM will appear in the display with three arrows
pointing to the year, month, and day. [See Figure 1]
• Press and hold the button to advance the clock to the cor-
rect time of day. Use the button to go in reverse. When the
correct time of day is reached, press the ENTER button to
lock in the time. To increase or decrease more rapidly, hold
down either the or buttons until the display goes into
rapid advance mode.
• A blinking cursor will appear below the arrow for the year,
month, and date when programming.
• Use the and buttons to set the correct year, then press
ENTER.
• Use the and buttons to set the correct month, then press
ENTER.
• Use the and buttons to set the correct date, then press
ENTER. The display will show the correct time and date.
Note: If a watering schedule is not entered into the timer, the factory
installed fail-safe program will turn on each station every day for 10 minutes. To avoid accidental station activation, either turn the rotary switch
to off or enter a watering schedule.
Determine a Watering Plan
To help you visualize how best to program the sprinkler timer, it
might be helpful to make a watering plan on paper. This will help
you establish which days and times you want to water. [See Figure 2]
1. For each station (or valve) write down the watering location,
the type of sprinkler head and the plants to be watered.
2. Using this list, determine the recommended watering dura-
tion (for each type of sprinkler head and the vegetation
to be watered) and frequency for each station.
Important: Identify any imposed watering restrictions through
your local water district.
3. Determine, based on step 2, the ideal watering option for each
station.
• Program A allows you to select specific days of the week to
water (e.g. Monday, Wednesday and and Saturday) as well
as every second day (every other day).
• Program B allows you to specify 2 options:
- Interval Watering - Interval watering is used to water at
an interval from 1 to 28 days. An interval of 1 will water
every day; an interval of 2 will water every other day, etc.
- Odd or Even Days - The sprinkler timer can be selected
to only water on Odd days or Even days. The odd/even
schedule is based on the date.
ENGLISH
5 4
A
A
A
A
B
B
Program
Days of Week
Days of Week
Days of Week
Days of Week
Interval
Interval
Watering
Option
1
2
3
4
5
6
Station
M, W, Sat
M, W, Sat
M, W, Sat
M, W, Sat
Every 5 days
Every 5 days
Days
5:00 AM
9:00 AM
Start
Time
15 min
15 min
30 min
30 min
30 min
30 min
Duration
Minutes
Front Strip
Front
Back, South
Back, North
Back
Front
Location
Spray Heads
Spray Heads
Gear Drive
Gear Drive
Shrub Head
Shrub Head
Sprinkler
Grass
Grass
Grass
Grass
Shrubs and Flowers
Shrubs and Flowers
Plants
Figure 2: Creating a Watering Plan
Figure 1: LCD Display with Surrounding Information
User Controls
Section 3: Programming
Using your watering plan, determine which program you will need to
use (A, B or both A and B) and go to the appropriate section (below) for
programming help.
Program A - Day(s) of Week
STEP 1. SET THE “START TIME(s)”
Note: The cycle start time is the time the program begins watering the
first station. Cycle start times do not correspond to specific stations.
• Turn the dial to the CYCLE START TIMES position in
“Program A”. The display will show an “A” and a blinking
cursor should be next to “Cycle Start Time 1” (on the left side
of the LCD). If not, push the NEXT key until the curser is
next to “Cycle Start Time 1”. [See Figure 3]
• Set the time you want to begin watering for start time 1 using
the or keys, then press the ENTER key. The curser
should now be at “Cycle Start Time 2” and begin blinking.
IMPORTANT: Entering additional start times (2 through 4) will
repeat the watering program for the same designated watering day.
Generally, only one cycle start time is required for “Program A”.
For more information on “Multiple Start Times” go to the
“Automatic Operation and Commonly used Features” section on
page 10.
STEP 2: WATERING DURATIONS
To set the duration for each station/zone assigned to “Program A”
do the following:
• Turn the rotary dial to the STATION DURATION position in
“Program A”. The display will show an “A” and MINS. [See
Figure 4]
• Press the NEXT key until the cursor blinks over the station
first station assigned to “Program A”. Using the “Watering Plan”
as our example, this would be station 1. [See Figure 2]
• Press and hold the or key to enter the watering duration
and press the ENTER key. You should see an “A” over the
Station just programmed. [See Figure 4]
• Following the steps above, set the watering duration for each
remaining station assigned to “Program A” (15 min for station
2 and 30 min for both Stations 3 and 4 in our example).
• To skip a station, press the NEXT key.
• To erase previously programmed watering durations, press the
CLEAR key.
STEP 3: ASSIGNING WATERING DAYS
• Turn the rotary dial to DAYS OF WEEK in “Program A”. The
display will show an “A” and the cursor will blink under the
days of week M, T, W, T, F, S, S Monday, Tuesday, etc. [See
Figure 5]
• Press ENTER to activate watering on Monday. An arrow
appears under “M” and the cursor will advance to Tuesday
(“T”), press ENTER to activate watering on Tuesday or NEXT
to skip to the next day. [See Figure 5] Repeat these steps for all
days of the week.
• To delete a previously entered day, press CLEAR.
• If you want to water every second day, press the NEXT key to
advance the cursor to “2nd”, then press ENTER. If you choose
to water every 2nd day, you cannot set specific days of the
week for watering.
Please proceed to the “Automatic Operation” section if a Program
B is not required.
Program B - Interval Watering & Odd and
Even Days
STEP 1. SET THE “START TIME(s)”
Note: The cycle start time is the time the program begins watering the
first station. Cycle start times do not correspond to specific stations.
• Turn the dial to the CYCLE START TIMES position in
“Program B”. The display will show a “B” and a blinking
cursor should be next to “Cycle Start Time 1” (on the left side
of the LCD). If not, push the NEXT key until the curser is
next to “Cycle Start Time 1”.
• Set the time you want to begin watering for start time 1 using
the or keys, then press the ENTER key. The curser
should now be at “Cycle Start Time 2” and begin blinking.
IMPORTANT: Entering additional start times (2 through 4) will
repeat the watering program for the same designated watering day.
Generally, only one cycle start time is required for “Program B”.
For more information on “Multiple Start Times” go to the
“Commonly used Features” section on page 10.
ENGLISH
7 6 6
Figure 3: LCD Display with Start Time
A
Figure 4: Entering Duration for “Program A”
NO DURATIONS ENTERED
ENTERING DURATIONS
8
Reviewing and Changing Your Program
The Orbit timer lets you easily review a complete watering schedule.
To review Program A watering start times, simply turn the rotary dial
to the START TIMES position in Program A and check the times
that have been entered. Using the NEXT key, you may advance
through the schedule without fear of disturbing any programming.
If you want to change the start times, watering days, or interval, simply follow the directions for that program. After reviewing or changing a watering schedule, remember to turn the rotary dial back to
AUTO if you want the timer to automatically follow the program.
Section 4: Automatic Operation and
Commonly Used Features
Caution: This appliance is not intended for use by young children or
infirm persons without supervision. Young children should be supervised to
ensure that they do not play with the appliance.
Ready for Automatic Operation
After programming is complete, turn the rotary selector to AUTO.
The sprinkler timer is now fully programmed and ready to use in
the automatic mode. In automatic mode, each station will operate
sequentially, starting with “Program A”.
STEP 2: WATERING DURATIONS
To set the duration for each station/zone assigned to “Program B”
please do the following:
• Turn the rotary dial to the STATION DURATION position
in “Program B”. The display will show a “B” and MINS. [See
Figure 6]
• Press the NEXT key until the cursor blinks over the first sta-
tion assigned to “Program B”. Using the “Watering Plan” as
our example, this would be station 5. [See Figure 2]
• Press and hold the or key to enter the watering duration
and press the ENTER key. You should see a “B” over the
Station just programmed. [See Figure 6]
• Following the steps above to set the watering duration for each
remaining station assigned to “Program B” (30 min for station
5 and 30 min for Station 6 our example).
• To skip a station, press the NEXT key.
• To erase previously programmed watering durations, press the
CLEAR key.
STEP 3: ASSIGNING WATERING INTERVALS
• Turn the rotary dial to WATERING INTERVAL. The cursor
will blink to the left of the word Interval. [See Figure 7]
• Press and hold the or keys to select the number of days
between watering. Example: If you want to water once every 10
days, set the interval at 10.
• To activate the watering interval, press ENTER. Example: If
an interval of “3” is entered today, the timer will water for the first
time today, and then again every “3” days.
• To select odd or even day watering, press NEXT. The cur-
sor will move to either the odd or even setting, then press
ENTER.
• To erase a schedule, press CLEAR. To enter a new schedule,
press NEXT.
ENGLISH
9
Figure 5: LCD Display with Watering Days
NO DAYS ASSIGNED
ENTERING WATERING DAYS
B
Figure 6: Entering Duration for “Program B”
NO DURATIONS ENTERED
ENTERING DURATIONS
Figure 7: LCD Display with Watering Interval
Section 5: Manual Watering
The Orbit® timer has the ability to override the automatic program
without disturbing the preset program.
Manually Running Both A and B Programs
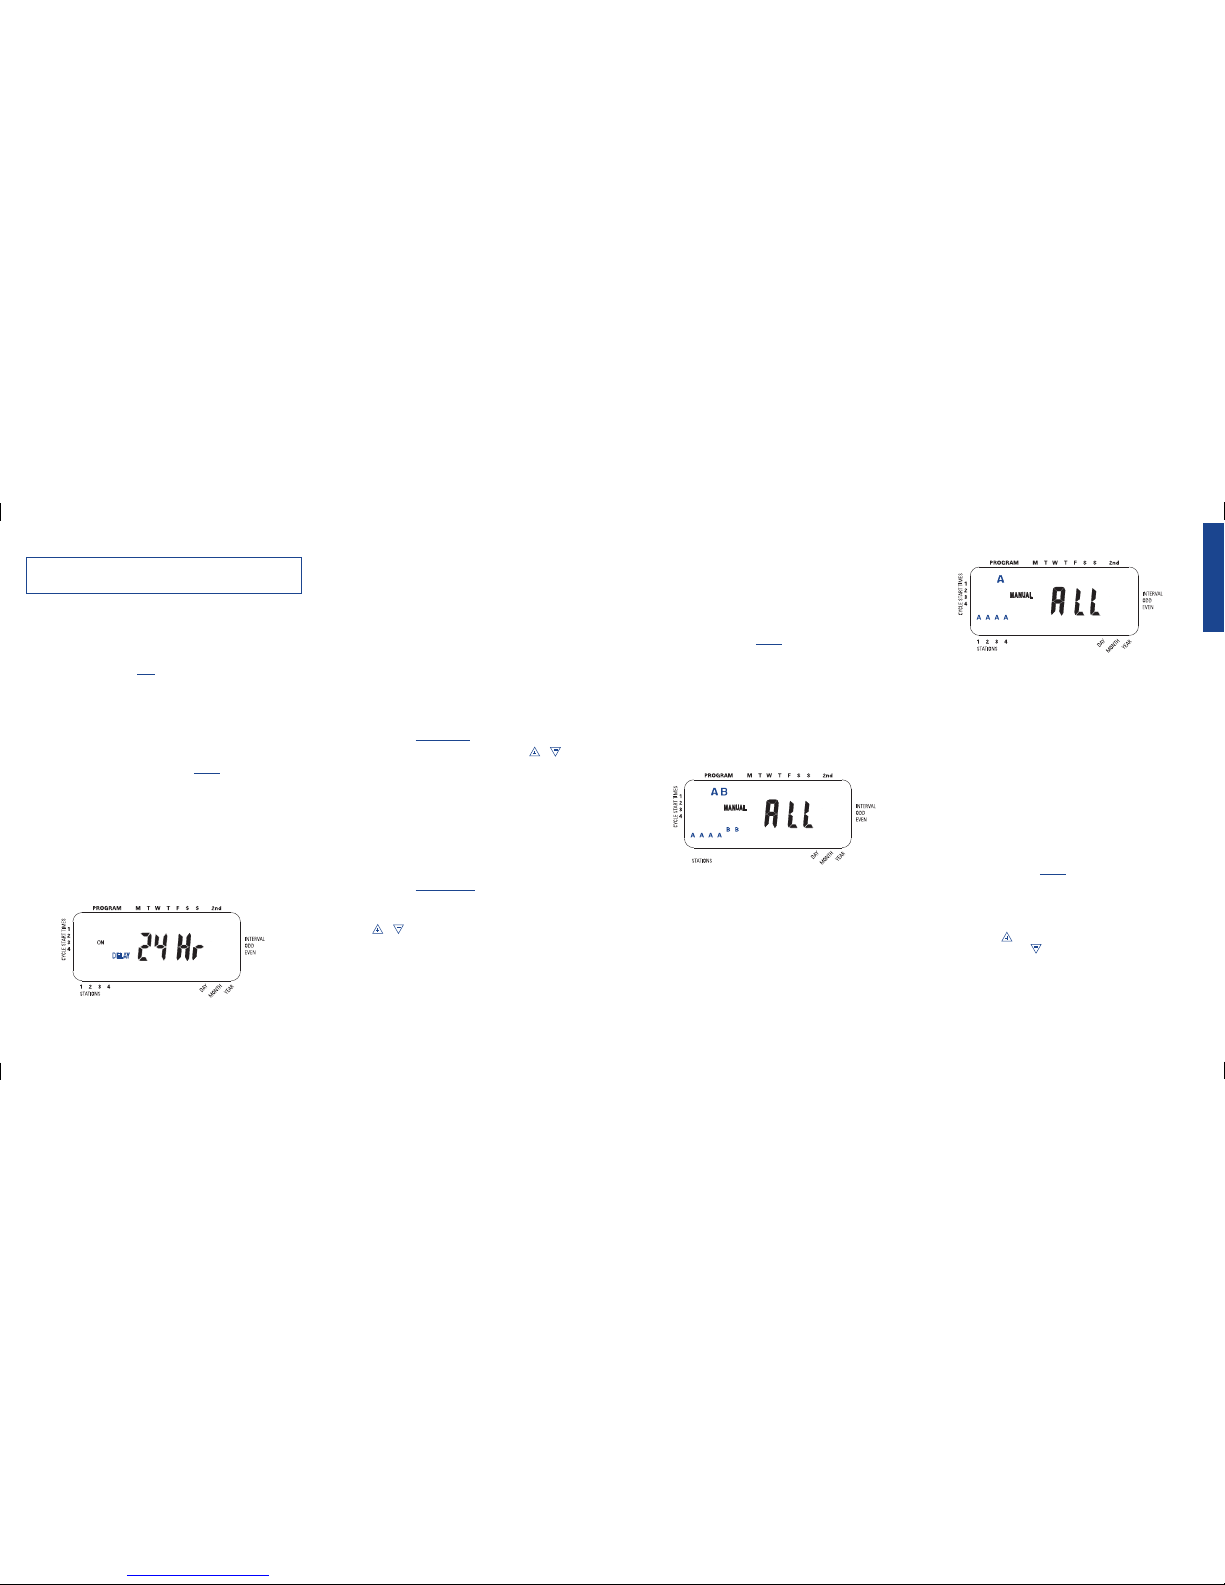
• Turn the rotary dial to AUTO, then press the MANUAL key.
The display will show “AB” and “ALL” blinking. [See Figure
9] This indicates all stations in the “A” and “B” programs will
water for their assigned durations in sequence.
• To activate the assigned water durations in the “A” and “B”
programs for each station, press ENTER.
Water durations assigned to station 1 in “Program A” will water
first, then move to station 1 in “Program B” before advancing to
the second station and will continue alternating. Only those stations
assigned a watering duration will water.
Manually Running “Program A” or “Program B”
PROGRAM A
To activate each station’s assigned watering durations for the “A”
program only, press the MANUAL key, followed by the NEXT key.
This will activate stations with assigned watering durations in the
“A” program. To initiate watering, press ENTER. (All stations cycle
once). [See Figure 10]
PROGRAM B
To activate each station’s assigned watering durations for the “B”
program only, press the MANUAL key, followed by the NEXT
key two distinct times. This will activate only those stations with
assigned watering durations in the “B” program. To initiate watering,
press ENTER.
• To halt or discontinue manual watering, press the CLEAR key
once. The timer will revert to your original automatic watering
schedule.
Manually Running One or More Stations
The manual operation mode allows you to set durations in any of the
stations from 1 to 99 minutes.
• Turn the rotary dial to AUTO.
• Press the MANUAL key. Then press NEXT three times. The
display will show a blinking cursor on station 1 along with - MINS. [See Figure 11]
• To set the number of minutes for watering duration, press
and hold the key to advance to desired number of watering minutes. Use the key to go in reverse. Press ENTER to
begin watering.
• To skip a station, press NEXT until the cursor is blinking over
the station number you wish to program. (Example: To set
station 3 for five minutes, press the manual key; then press the
NEXT key five times to select the manual operation mode and
IMPORTANT: This timer contains a Rain Sensor Bypass Switch.
If the rain sensor switch is in the “on” position and no sensor is
connected the sprinkler timer will not operate.
Station Advance
When the sprinkler timer is operating, press NEXT to end watering
at the current station and move on to the next station.
Timer Off
Turn the Rotary Dial to the OFF position. This prevents the sprinkler timer from watering in Automatic and Manual modes.
Rain Delay
Rain delay allows you to delay your sprinkler timer from watering
for a set period of time. Delay settings are 24, 48, and 72 hours.
ACTIVATE THE “RAIN DELAY” FUNCTION:
1. Ensure the rotary selector is on the AUTO position.
2. Press the RAIN DELAY button to automatically delay watering for 24 hours. [See Figure 8]
3. If a longer Rain Delay is desired, press and release the RAIN
DELAY button to increase or decrease the setting.
4. Press ENTER or wait 10 seconds and the selected Rain Delay
will begin.
5. The CLEAR button stops the Rain Delay and scheduled
watering will resume.
At the end of the selected Rain Delay amount of time, automatic
watering resumes.
While in rain delay mode, the sprinkler timer will display the
remaining hours. No other buttons, besides CLEAR, will be accepted while the sprinkler timer is in the rain delay mode.
Water Budgeting
Water Budgeting is a simple way to adjust your watering duration to
match seasonal watering needs. Water Budgeting works by increasing or decreasing watering duration for all stations in all programs.
Adjustment range is from 10% to 200% by increments of 10%. The
default value is 100%.
TO SET BUDGETING:
1. Turn rotary dial to BUDGETING position.
2. To increase or decrease the percentage, press the or
button.
3. Press ENTER to save setting.
Multiple Start Times
Multiple Start times allow “Program A” and/or “B” to cycle through
each Station/zone and repeat the program again (up to four times)
on the days programmed. This is useful for preventing damage to
newly seeded lawns and to prevent water waste from run-off on
sloped areas. To Set Multiple Start Times
1. Turn rotary dial to START TIMES position for “Program A”
or “B”.
2. Press NEXT until the curser blinks at “Cycle Start Time 2”.
3. Use the or key to enter the time you want the program
to begin watering again and press ENTER.
4. Repeat step 3 to program a third and fourth start time if
needed.
5. To delete a start time press NEXT until the curser blinks by
the start time and press CLEAR.
ENGLISH
11
Figure 8: LCD Display with Rain Delay
1 2 3 4 5 6
Figure 9: Manually running both programs A and B
Figure 10: Manual Watering Program A Only
10
12
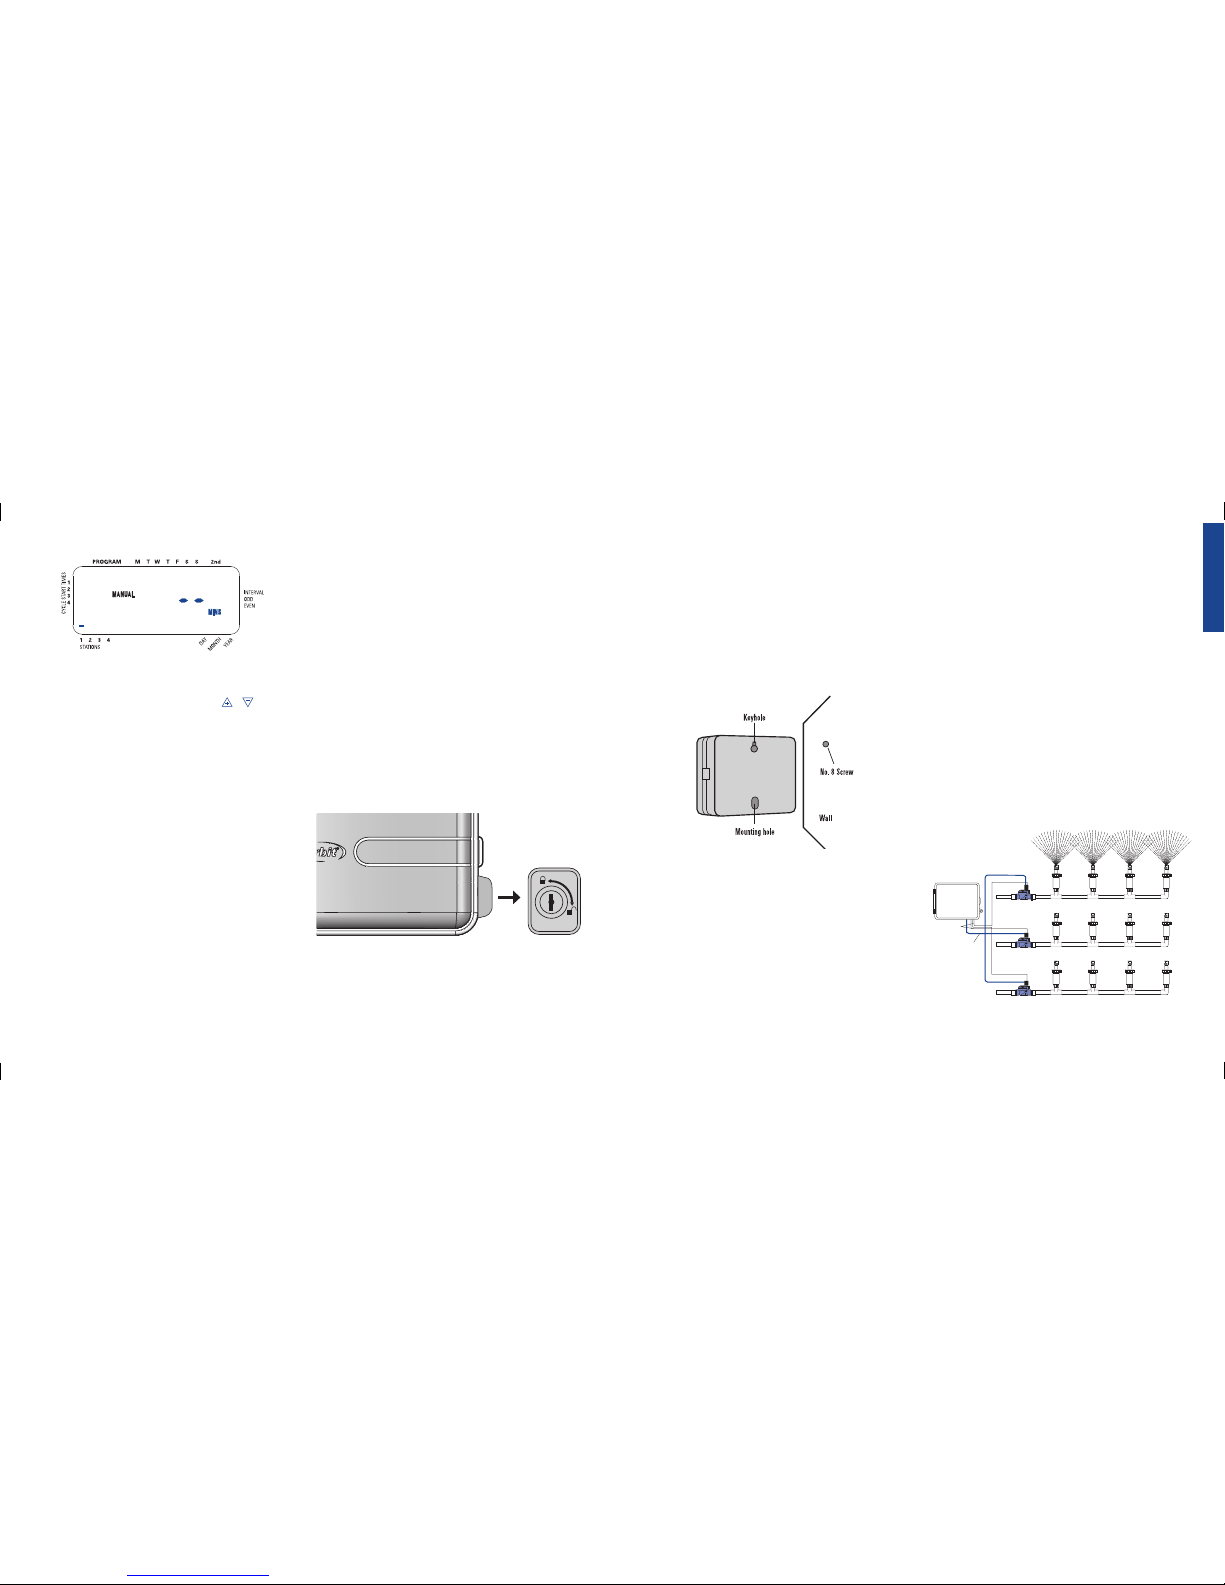
2. Mounting the Sprinkler Timer
• Use the mounting template (included) to mark the screw
locations on the wall.
• Insert a No. 8 screw (included) in the upper mark, leaving
the screw head about 1/8” (3mm) out from the wall. (Use the
expanding anchors in plaster or masonry if necessary.)
• Slip the keyhole slot in the back of the sprinkler timer over the
extended screw. [See Figure 12b]
• Screw a No. 8 screw through the hole located behind the wire
shroud cover.
3. Install the Batteries
One Lithium battery (CR2032) is required to retain the program in
memory during power loss. Annual replacement is recommended.
• See page 3 for battery replacement
Note: The battery alone will not operate the valves in your sprinkling
system. The sprinkler timer has a build-in transformer that must be connected to an AC line voltage source.
4. Wiring the Electric Valves
Note: If the distance between the sprinkler timer and valves is under 700’
(210 m), use Orbit
®
sprinkler wire or 20 gauge (AWG) plastic jacketed
thermostat wire to connect the sprinkler timer to the valves. If the distance
is over 700’ (210 m), use 16 gauge (AWG) wire.
• Taking the sprinkler wire, strip 1/2” (12 mm) of the plastic
insulation off the end of each individual wire.
• Connect one wire from each valve (it doesn’t matter which
wire) to a single “Common” sprinkler wire (usually white)
[See Figure 13]
Important: All wires should be joined together using wire nuts, solder,
and/or vinyl tape. For additional protection to waterproof connections,
an Orbit® grease cap can be used.
• Next connect the remaining wire from each valve to a separate
colored sprinkler wire.
• To avoid electrical hazards, only one valve should be connected
to each station.
Important: The wire can be buried in the ground; however, for more
protection wires can be pulled through PVC pipe and buried underground.
Be careful to avoid burying the wires in locations where they could be
damaged by digging or trenching in the future.
Figure 13: Connecting Sprinkler Wires to Valves
Station 1
Sprinklers
Station 2
Station 3
Remote Control
Valves
Common Wire
Zone Wires
Timer
advance to watering for station 3; using the or key, set
the manual watering duration to five minutes; press ENTER).
Note: After the MANUAL key has been pushed, if a selection is not made
within 60 seconds the display returns to the time of day.
• To halt or discontinue manual watering, press the CLEAR key
once. The timer will revert to your original automatic watering
schedule.
Section 6: Sprinkler Timer Installation
Before installation please have the following items and tools.
• Phillips Screwdriver
• Wire Strippers
Installing the sprinkler timer in 5 easy steps
1. Selecting a Location
2. Mounting the Sprinkler Timer
3. Activating the Battery
4. Connecting Valve Wires to Sprinkler Timer
5. Connecting Electrical Power
1. Selecting a Location
Select a location with the following criteria:
• Near a power source (if hard wiring) or electrical outlet (applicable only to U.S. retail timers)
• A location, where operating temperatures are not below 32° or
above 158° Fahrenheit (0 degrees or above 70 degrees Celsius
• A location, with at least 9” of space to the left of the sprinkler
timer box for the door to swing open after installation
Note: Sprinkler timers are weather-resistant to UL-50 and ETL®
Listings, but should not be placed in areas where continuous water
could cause damage.
• A location without direct sunlight
• Access to sprinkler wire (from valves)
Caution: Do not open the Sprinkler Timer when it is raining.
If mounted in an outdoor location, shut the compartment door to
keep the timer safe from weather damage. To lock: insert the key
and turn counterclockwise to the locked position.
Figure 11: Manually Running Individual Stations
ENGLISH
Figure 12b: Mounting the Sprinkler Timer
13
Figure 12a
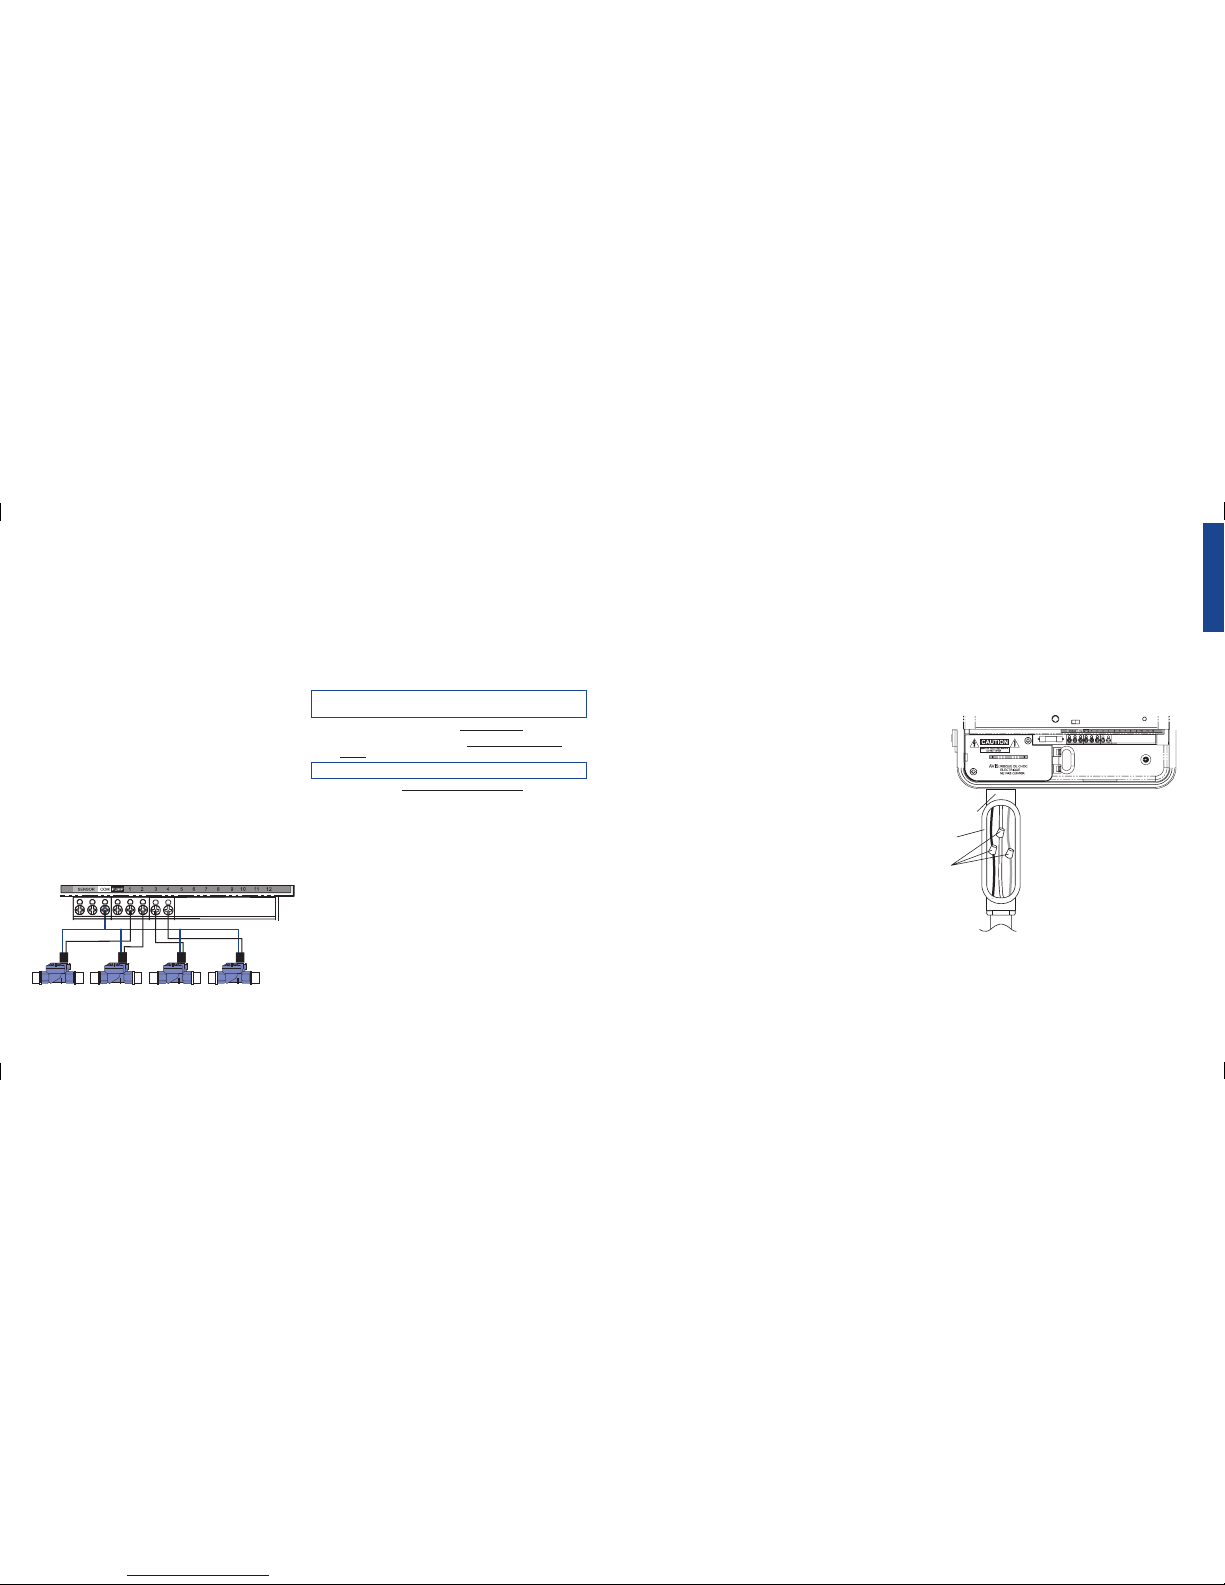
Connecting Valve Wires to the Sprinkler Timer
• Remove the terminal compartment cover.
• Strip 1/4” (6 mm) of the plastic insulation off the end of
each wire.
• Determine which valve you want to connect to which station.
• Connect each sprinkler wire (excluding the “Common” wire)
to a separate station terminal (numbered above each terminal
screw) by inserting the bare wire fully into the hole under each
terminal screw. [See Figure 14]
• It may be necessary to open the terminal to allow for wire
insertion or removal. To do this, you’ll need to use a small
Phillips screwdriver.
Note: it isn’t necessary to fully remove the screw
• Connect the common wire to the terminal (white in color)
labeled “COMMON”.
Note: For installation instructions for Pump Start, Master Valve and Rain
Sensors see Appendix A.
5. Connecting Electrical Power
Note: For outdoor installation it is recommended that a qualified electrician completes wiring in accordance with electrical codes and regulation.
This sprinkler timer is intended for use with a Ground Fault Interrupter
(GFI) protected circuit when used outdoors.
Check the model number of your sprinkler timer: various models
are configured differently to meet national requirements. The model
number can be found on the back of the door, together with other
useful information.
FIND YOUR MODEL BELOW AND GO TO THE APPROPRIATE
SECTION:
Models 57880, 57881, 57882, 57883, 27780, 27781, 27782, 27783,
91880, 91881, 91882, 91883
• For Indoor mounting go to the Fitted Line Cord section below.
• For Outdoor mounting go to the Preparing for Permanent
Wiring section below
Models 94880, 94881, 94882, 94883
• Please go to the Preparing for Permanent Wiring section
below.
FITTED LINE CORD INSTALLATION
Replacement of the supply Cord: If the supply cord is damaged it
must be replaced by a service agent or similarly qualified person in
order to avoid a hazard
• Indoor Locations - Insert the line cord into Ground Fault
Interrupter (GFI) outlet.
• Outdoor Locations - Insert the line cord into a power Ground
Fault Interrupter (GFI) outlet connected to a GFI circuit.
PREPARING FOR PERMANENT WIRING
The following three “Pigtail” wires extend out of the bottom of the
box:
• Black “pigtail” wire – Hot
• White “pigtail” wire – Neutral
• Green “pigtail” wire –Ground
ENGLISH
INSTALLATION USING PERMANENT WIRING
Important: The sprinkler timer has a built-in transformer that must
be connected to an AC line voltage source. Check the back of the
sprinkler timer box for power requirements. Local building and electrical codes usually require that an approved electrical conduit and
electrical fittings be used to connect exterior wall-mounted equipment
to AC power. Please check local codes. Any permanent connection
should be made by a licensed electrical contractor in accordance with
the requirements of the National Electrical Code and other state and
local codes.
Caution: Do not connect the sprinkler timer to one phase of a three phase
power system used by a pump or other electrical equipment.
Important: This sprinkler timer has a ¾” knock-out. Use a ¾” (13mm)
waterproof connector to connect the sprinkler timer to a standard electrical junction box. Both connector and junction box must be UL Listed or
equivalent or comply with IEC or EN standards or equivalent.
• Turn off the AC power at the AC circuit breaker and apply
an appropriate safety lockout. Verify that the power has been
turned off to the installation site using an AC voltmeter set for
the correct measurement range.
• Use power feed wire of 14 gauge (AWG) minimum with a
temperature rating of 155 degrees Fahrenheit (68 degrees
Celsius) or higher.
• Install the conduit and associated fittings. Connect the AC
electrical power wiring to the source by following all the right
codes and local standards.
• Connect the junction box and 3/4” Connector to the Timer
(Junction box and Connector not included). [See Figure 15]
• Connect the source power conduit to the entrance of the junction box, following all the appropriate codes.
• Take the cord (running from the timer to the junction box)
from the junction box and cut it to length. Remove the outer
insulation (from cord) to expose the three wires.
• Connect the source wires to the wires extending from the
sprinkler timer.
• Take care to follow the correct color code. For USA: connect
the Green for Ground, Black for Live, and White for Neutral.
Often the source ground may be bare copper conductor rather
than green wire. For Europe: Live is Brown and Neutral is
Blue, there is no ground connection required. Be sure that all
wires are connected to the proper source wire.
• Make sure all connections are made with code-approved insulated connectors.
• Be sure to place a weatherproof gasket and lid on the junction
box.
• Turn AC power on at the AC circuit breaker.
Figure 14: Connecting Sprinkler Wire
Station Valves
Common Wire
14 15
1/2" Connector
Junction
Box
3 Wire
Connectors
Figure 15: Using a Junction Box
16
ENGLISH
17
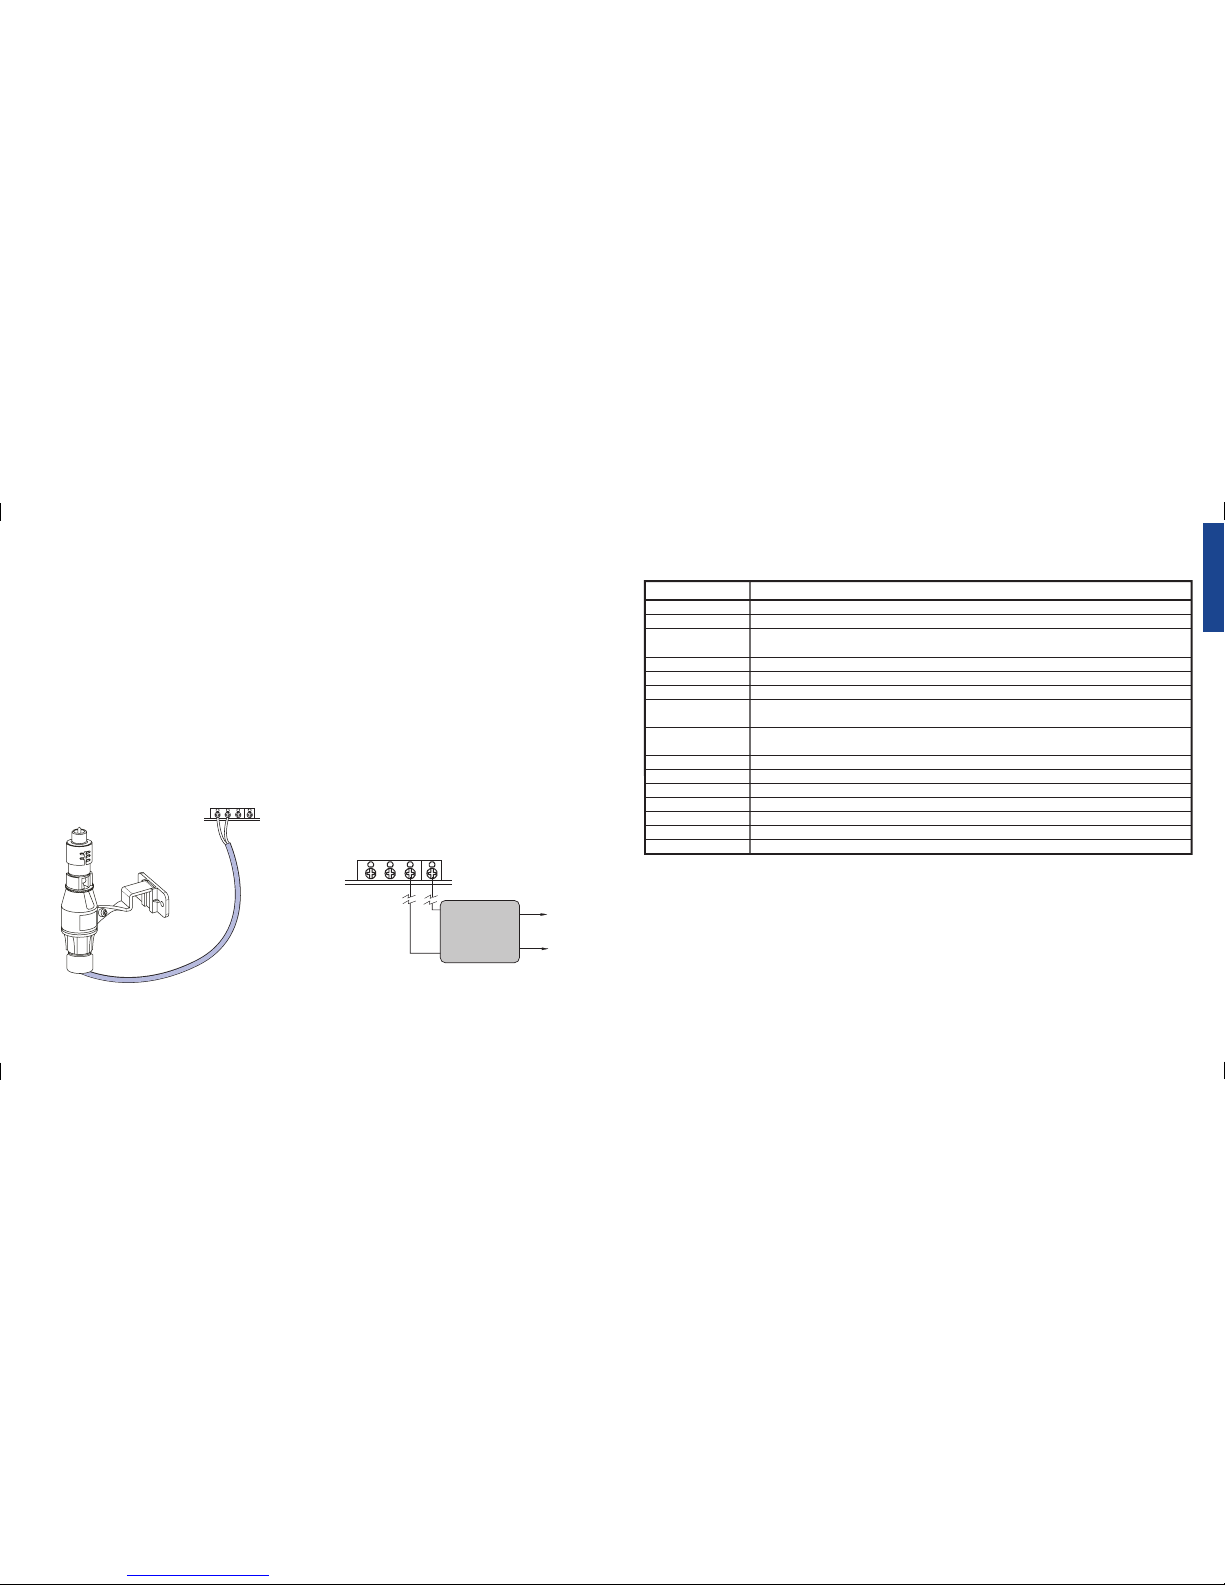
Appendix A: Connecting to a Rain Sensor,
Pump Start or Master Valve
Rain Sensor and the Rain Sensor Bypass
Switch (sensor sold separately)
A rain sensor or other type of micro-switch weather sensor may be
connected to the sprinkler timer. The purpose of the sensor is to
stop watering when precipitation is sufficient.
CONNECTING A RAIN SENSOR
• Connect the rain sensor wires to the wiring terminal ports
(beige in color) labeled “Sensor” [See Figure A1]
Note: Refer to your rain sensor manual for specific wiring instruc-
tions.
• Place the sensor on/off switch to the “on” position to begin
operation.
RAIN SENSOR BYPASS
This sprinkler timer is equipped with a sensor override “on/off”
switch. This switch is for use during maintenance and repairs, so the
sprinkler timer can be operated even if the rain sensor is in active
mode.
IMPORTANT: If the rain sensor switch is in the “on” position and no sen-
sor is connected, the sprinkler timer will not operate. To resume sprinkler
timer operation place the switch in the off position
PUMP START & MASTER VALVE
This sprinkler timer allows a master valve or pump start relay to
operate whenever a station is on.
Note: If you are activating a pump from this timer, you must purchase a
Pump Start Relay.
From the pump start relay (or master valve); connect one wire to the
“Pump” terminal and the other wire to the “Common” terminal. [See
Figure A2]
TIMER
P
U
MP START RELAY
To Pump
To Power
24v
Coil
COMSENSOR
PUMP
Figure A2: Connecting Pump Start or Master Valve
TIMER
COMSENSOR
PUMP
Figure A1: Connecting a Rain Sensor
Glossary of Terms
Controller
Cycle Start Time
Irrigation Valve,
Automatic
Master Valve
Multiple Start Times
Overlapping Programs
Program (A, or B)
Rain Delay
Solenoid
Sprinkler Timer
Station
Valve
Watering Option
Watering Program
Zones
TERM DEFINITION
See sprinkler timer
The time the program begins watering the first station
Used in conjunction with sprinkler timers and are a convenient way of delivering water to lawns,
plants and gardens
A valve that prohibits water from reaching "Station Valves"
A feature that allows a program to be operated multiple times on the same day
When a "Start Time" is set before the previous program has completed
Consists of 1 or more "Start Time(s)," a "Watering Option" (Days of Week, Interval or Odd/Even Days)
and which stations will water
A feature that prevents the sprinkler timer from running its scheduled watering program for a
specific duration
The electrical part on an irrigation valve that opens and closes the valve
A device that is responsible for turning an automatic irrigation system on and off
An area where the irrigation is all controlled by a single control valve
See irrigation valve
Consists of Days of Week, Interval or Odd/Even Days use in programming
See program
See station
FUSE
The 0.75 amp slow-blow fuse provides circuit protection. For replacement, use a 0.75 amp fuse.
 Loading...