

Page 1
Product Features
6. O nce the start-up se quence is complet e; create your timer
program.
7. Turn dial to AUTO
8. Slide time r onto a valve mountin g bracket.
9. Turn o n hose faucet.
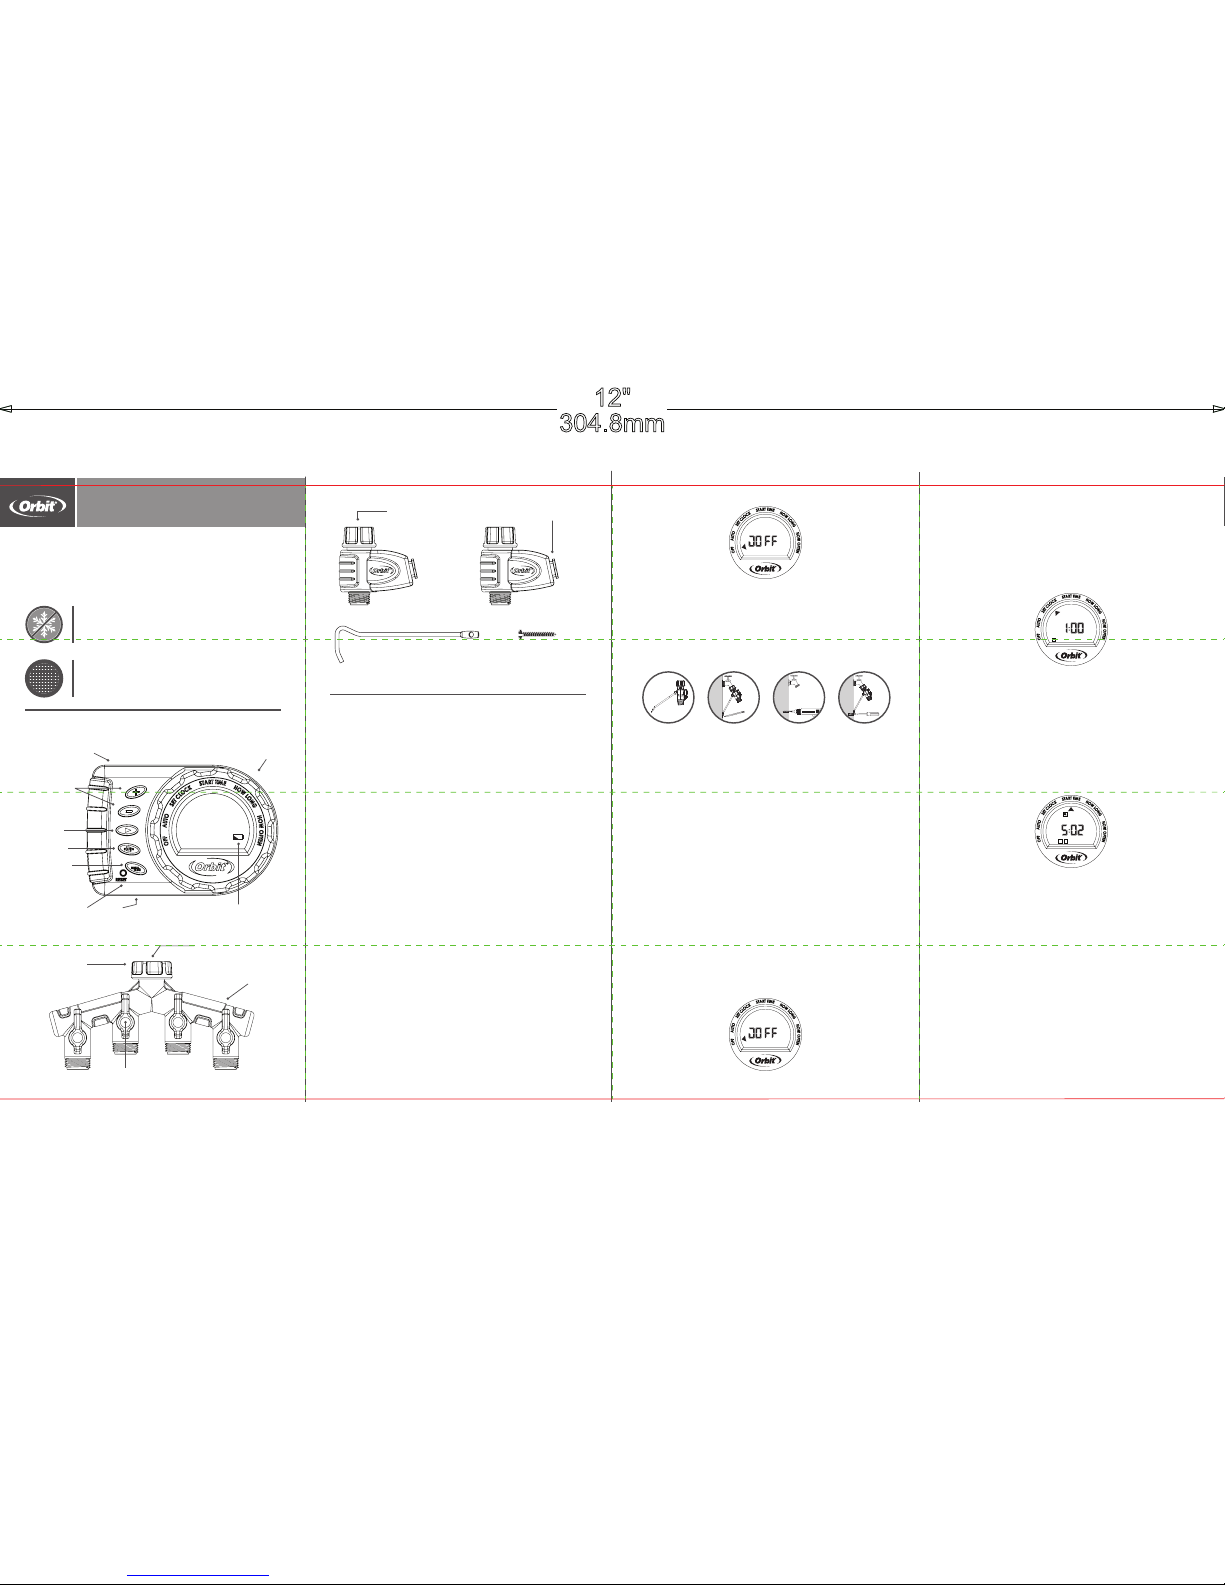
Installation and Programming Instructions
Mounting the Manifold
1. Att ach support rod to m anifold by inser ting it into the two
mounting h oles on the back of the m anifold.
2. Mark where sup port rod touche s the wall.
3. Drill a pilot ho le using a ¼-in. dril l bit.
4. At tach the suppor t rod using the scr ew provided.
Installing the Batteries
1. Att ach up to 4 valves to the ma nifold outlets (the v alves are
electron ically operate d and must be attach ed to the timer
for proper o peration). Ope n fully each of the shu tos with
a valve attac hed.
2. Remove the plug a nd connect the wir e from a valve to
one of the num bered ports on t he back of the timer. The
numbers 1 th rough 4 are the “S TATIONS” used while
programm ing your timer. Attac h up to 4 valves.
3. Remove the tray on t he side of the timer by s liding or
pulling it o ut.
4. In sert two AA (1 .5V) alkali ne batteries (not in cluded) and
replace th e tray.
Note: Firmly re place the batter y tray to ensure wate r
resistan ce and increase ba ttery life. You will k now the battery
tray is fully in serted if it does n ot pull out easily. Us ed up or
dead batte ries must be remove d from the timer an d disposed
of properly. Re place batterie s when low battery i con appears
on display. Do n ot dispose of batte ries in fire. Batte ries may
explode or leak.
For Rain Delay Press + in Auto
MANIFOLD
MANUAL/
CLEAR
BATTERY TRAY DIAL
RESET LOW BAT TERY I NDIC ATOR
Timer
When expec ting freezing temp eratures,
timers sho uld be removed from t he
hose faucet a nd stored indoor s to avoid
potential f reeze damage.
Filter traps d irt particles, p rolonging
life of timer. Cle an filter regular ly and
replace if w orn.
Important, please read!
+/
BUTTONS
ARROW
5. Please ensu re that the valves are a ttached to the tim er
before ins talling batteri es. Once the batte ries are install ed
the timer wil l immediately be gin a start-up sequ ence noted
on the scree n by a circling icon.
6. O nce the start-up se quence is complet e you may begin
programming.
Programming the Timer
Set Clock and D ay
1. Turn dial to S ET CLOCK.
2. Using the +/- buttons , set the time of day, incl uding AM
and PM. Tim er advances faste r if button is held do wn.
3. Press the ARROW b utton to set current d ay.
4. Pr ess the +/- buttons to move b etween and sele ct the
current day of t he week. Press th e ARROW button to toggl e
back to the tim e of day.
5. Turn dial to save chan ges.
Start Time
A start tim e is the time of day that th e timer will begin to
water. This time r features three s tart times.
1. Turn dial to S TART TIME.
2. Press the ARROW b utton to move through a nd select a
start tim e; A, B, or C.
3. Using the +/- button s, set your first sta rt time, includ ing
AM and PM. Ti mer advances fa ster if button is hel d down.
A box is place d around each pro grammed start t ime.
4. Pr ess the STATION button to m ove through and sel ect
stations; 1- 4. Only stations w ith connected va lves are
shown. Pre ss the + / - buttons to togg le a station on/o.
A box is place d around each sele cted station.
Note: To remove a sta rt time press CLE AR.
5. Repeat steps 2- 4 to program additi onal start time s.
Note: Only on e start time is req uired.
6. Turn di al to save changes .
Expandable
Watering Timer
STATIO N
SHUTOFF LEVER
FILT ER
HOSE TAP
CONNECTION
FILT ER
1 #14 ROUND
HEAD SCREW
1 7 ¼-in.
SUPPORT ROD
TIMER MOUNTING BRACKET
DIAL—Rotate th e dial to customize yo ur watering sched ule
+/- Buttons—Use these buttons to a djust time and pro gram.
While in AUTO pr ess + to activate Rain D elay.
ARROW—Moves curs or around the scre en during
programming.
STATIO N—Moves b etween Station 1 - St ation 4
MANUAL/CLEAR—Press to water ma nually
or to clear pro gramming
RES ET—Pres s to reset back to fact ory settings
OFF—Turn o all watering
AUTO—Timer water s according to your cu stomized schedu le
SET CLOCK—Set the time of day
START TIME—Select what time y ou would like
to start wate ring
HOW LONG—Determine ho w long to water
HOW OFTEN— Choose how often y ou will water
Quick Start G uide
1. Att ach manifold to an ou tdoor hose faucet .
2. Secure manif old to wall using the m ounting hardwa re and
instructions provided.
3. Attach up to 4 valve s to the manifold ou tlets. Open full y
each of the sh utos with a valve atta ched.
4. Co nnect the wire fro m each valve to one of the n umbered
ports on th e back of the timer.
5. Install two A A alkaline batte ries into the batte ry tray
(Remove the tr ay on the side of the tim er by sliding or
pulling it o ut.)
Note: Please e nsure that the valv es are attached to th e timer
before ins talling batteri es. Once the batte ries are install ed
the timer wil l immediately be gin a start-up sequ ence noted
on the scree n by a circling icon.
1. 2. 3. 4.
S M T W T F S
PM
B C
1 2
4 PLUGS
(behind timer)
Page 2
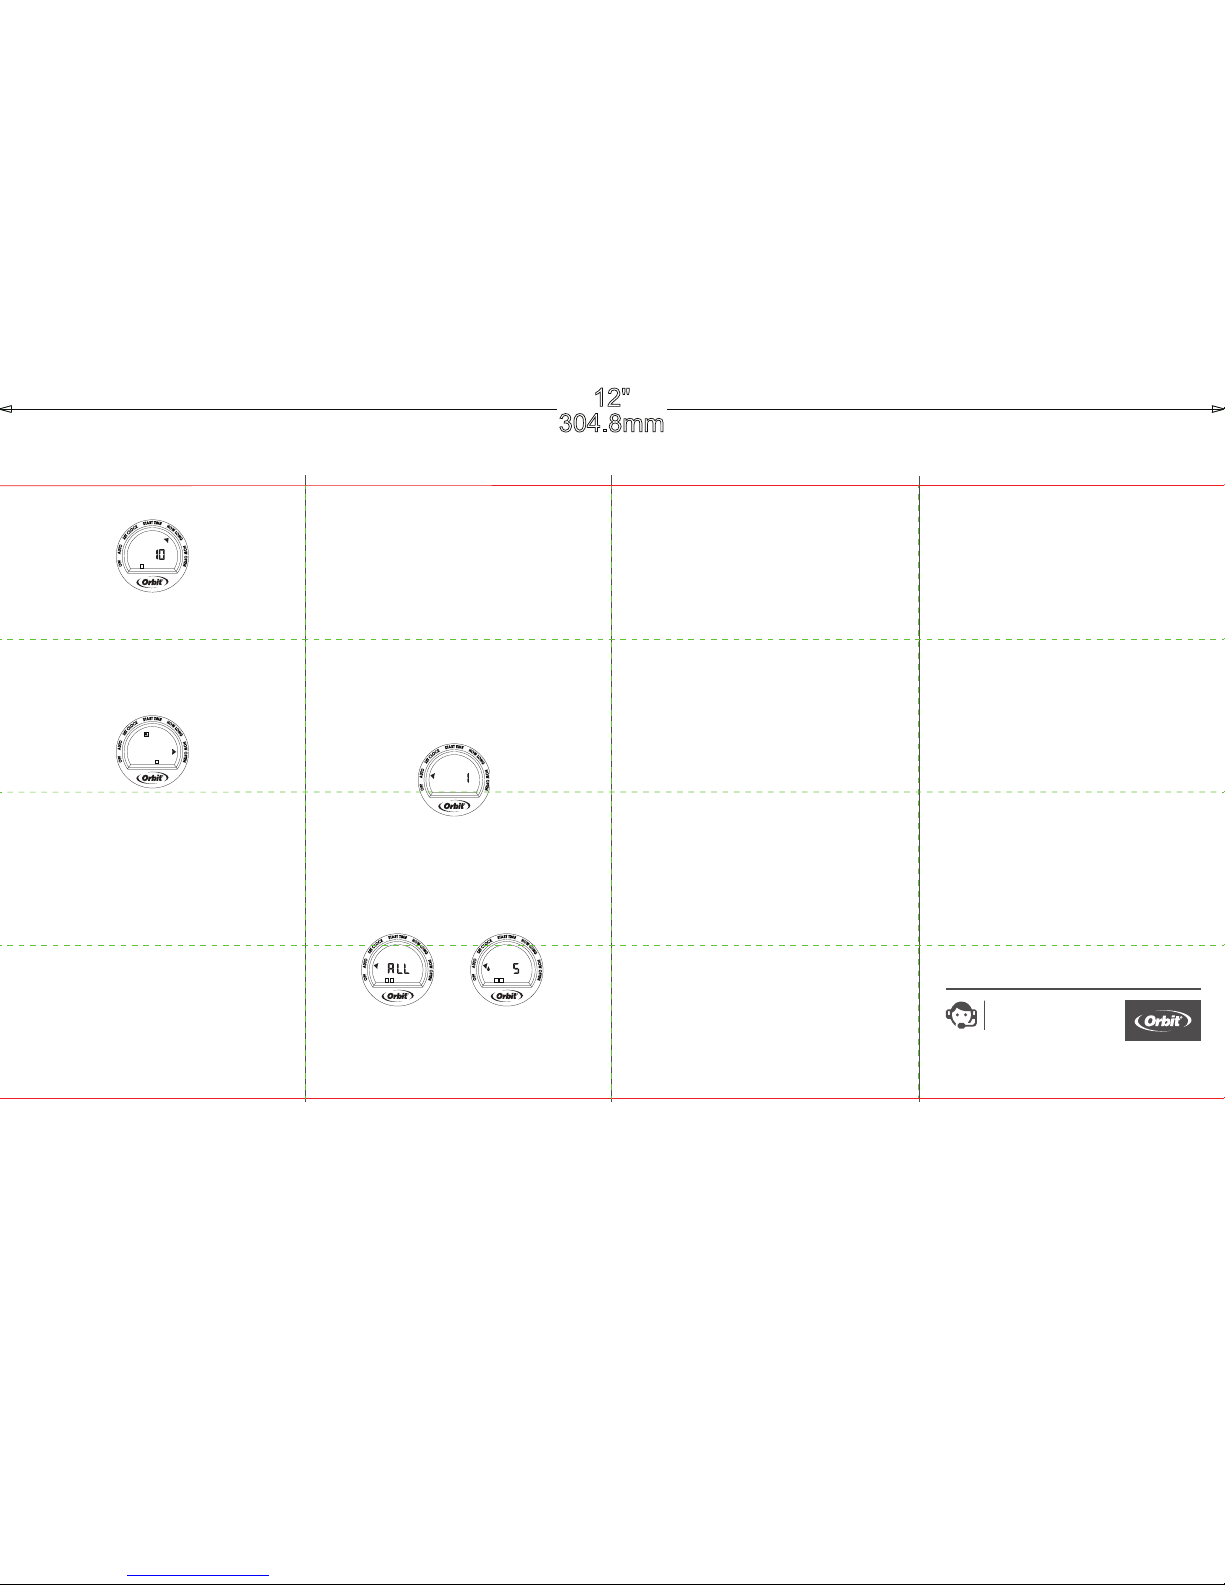
To manual water all s tations as progr ammed:
• With th e dial on AUTO, press t he MANUAL button .
• ALL wi ll be displayed an d the timer will water a ll stations as
programmed.
To manual water specific stations or durations:
• With th e dial on AUTO, press t he MANUAL button .
• Pres s the STATION button to sel ect desired stat ion.
• Usin g the +/- buttons, selec t watering duratio n from 1 to
360 minutes.
Note: There m ay be a slight delay b etween the time th e
manual but ton is pressed an d when watering beg ins.
2. Screen will fl ash between cloc k and time remaini ng before
automatic programming resumes.
3. To stop manual water ing, turn the dial to OF F.
4. Turn th e dial back to AUTO to res ume your programm ed
watering schedule.
Troubleshooting
Water does not c ome on at desired t ime.
Check if:
• Man ifold shutos are f ully open where va lves are attached .
• Cloc k is set to correct time , including AM an d PM.
• Dia l is set to “Auto”
• Start time i s set to desired time , including AM an d PM.
• Rain D elay is on.
Timer does not water.
Check if:
• Manifold s hutos are fully op en where valves ar e attached.
• Timer is set to A UTO.
• Hose faucet i s on.
• Batteries a re low.
• Clock is set to co rrect time, incl uding AM and PM.
• Rain Delay i s on.
Water won’t tur n o.
Check if:
• HOW LONG is set to d esired time.
• HOW OFTEN i s set to desired inter val hour or day.
• Valve was just a dded without sta rt-up sequence.
Working water pressure:
• Minimum: 10 p si
• Maximum: 10 0 psi
Working temperature:
• Maximum: Do n ot exceed 120°F
• Minimum: Ke ep from freezing
Warnings:
For outdoor u se with cold water onl y.
Not for use wit h appliances.
Operates u p to 100 psi.
Add or Repla ce Valves
1. Turn o hose fau cet.
2. Slide timer o o f valve mounting br acket.
3. Attach up to 4 valve s to the manifold ou tlets (the valves are
electron ically operate d and must be attach ed to the timer
for proper o peration). Ope n fully each of the shu tos with
a valve attac hed.
4. Re move the plug and con nect the wire from a v alve to
one of the num bered ports on t he back of the timer. The
numbers 1 th rough 4 are the “S TATIONS” used while
programm ing your timer. Attac h up to 4 valves.
5. Turn the timer di al to OFF. Once the timer is O FF the timer
will begin a s tart-up sequence n oted on the screen b y a
circling icon.
6. Once the st art-up sequence i s complete you may be gin
programming the new valve(s).
7. When progr amming is comple te turn the dial to AUTO to
allow your tim er to water accordin g to programmed tim e,
station, duration, and frequency.
8. S lide timer onto a va lve mounting bracke t.
9. Turn o n hose faucet.
Additional Features
Rain Delay
Rain delay a llows you to postpon e watering for a set pe riod of
time. To access th e rain delay, follow th e steps below.
1. With the di al on AUTO, press the + bu tton to select a del ay
of 1 to 7 days.
2. Screen will fl ash between cloc k and hours remai ning
before programmed cycle resumes.
3. To remove rain delay, tu rn dial to OFF and then b ack to
AUTO.
Manual/Hand Watering
This featur e allows you to manual w ater without interr upting
your set sche dule. To access this fea ture, follow the ste ps
below.
1. There ar e two ways to manual wate r: all stations as
programmed or selected stations.
How Long
1. Turn dial to HOW LON G.
2. Press the STATION bu tton to move through an d select
a station; 1-4 . Only stations wi th connected valve s are
shown. A box is p laced around ea ch selected stat ion.
3. Using the +/- button s, select waterin g duration from 1
to 360 minutes f or each desired s tation. Timer a dvances
faster if but ton is held down.
Note: To remove a water ing duration pres s CLEAR.
4. Turn dial to save ch anges.
How Often
1. Turn dial to HOW OF TEN.
2. Press the ARROW b utton to move through a nd select a
start tim e A, B, and/or C.
3. Press + or – butto n to move the cursor dow n to select Days
of the Week or Int erval watering fr equency.
4. T here are two ways to set yo ur watering frequ ency for
each star t time; Days of the Week o r Interval.
Days of the week–S elect specific d ays you want to water:
• Using the ARR OW button move to the de sired day.
• Press the + / - bu ttons to toggle the day o f the week on/o.
• Select any co mbination of days .
Interval–S elect an interv al period you want to w ater:
• Using the ARR OW button move to INT.
• Press the + / - bu ttons to cycle throu gh each interval .
You may choose to in terval water 1 to 7 days .
5. Repeat steps 2 a nd 4 to program wateri ng frequency fo r
additional start times.
6. Turn di al to AUTO.
7. Slide time r onto a valve mountin g bracket.
8. Turn on h ose faucet.
Congratulations!
Your timer is now p rogrammed. Turn the di al to AUTO to allow
your timer to wa ter according to pro grammed time, s tation,
duration, and frequency.
© 2015 Orbit Irr igation Product s, Inc.
All rights res erved. All trad e names are register ed
trademarks of respective manufacturers listed.
Orbit® Irrigation Products, Inc.
North Salt L ake, UT 84054
PN 24723-24 rB
Customer Service
1-800-488-6156
orbitonline.com
S M T W T F S INT
B C
DAYS DELAY
MINS
MAN
1 2
MINS
1 2
MAN
1 2
 Loading...