

Page 1
snt manual 1.0c 3001001R02_NP_Lo
Businesspark Monrepos
D-71634 Ludwigsburg
Telephone +49-7141-2266-0
Telefax +49-71412266-7
Internet www.dialog4.com
®
SOUNTAINER
Manual V1.0c
Page 2
Technical Data
Graphical display: 100 x 64 dots
Memory sizes: 16 - 256 MB, two separate slots
Recording on: MMC (MultimediaCard)
Current algorithm: MPEG Layer III „mp3“
Audio engine: 100 MHz Motorola DSP
Recording capacity: approx. 4 hours*
Playback: approx. 8 hours*
*when using 1.600 mAh NiMH
rechargeable batteries
PC connection: USB interface
Scope of delivery: CD-ROM with driver software for
Win98/2000 and mp3 samples
1 x 32 MB MMC
Stereo connection cable
USB connection cable
2 x 1.5V batteries (Mignon/AA)
Audio interfaces: 3.5 mm jack socket for:
Line input, stereo
Microphone input, stereo
Line/Earphones output, stereo
Dimensions (BxLxH): 62 x 110 x 24 mm
Weight (incl. batteries): approx. 140 g
2
23
Page 3

For your information
Table of Contents
This manual is for the use of the owners and their staff only. The
information in the manual, including all texts and drawings, are to be
treated as confidential, and are not to be reproduced, translated or
published. The original documentation, its contents or parts of it are
not to be passed on to third parties or copied in any form. Hereby
the right to registered utility models or patent application is reserved
explicitly. In the case of violation or non-compliance resulting in
consequent losses, DIALOG4 may be entitled to claim damages according
to the German BGB, HGB as well as the competition law and Patents
Act.
Due to the further development and product improvement of the
present unit and alterations of certain industrial parts, it cannot be
avoided that some parts may not be fully compatible.
All technical alternations may be subject to change without notice.
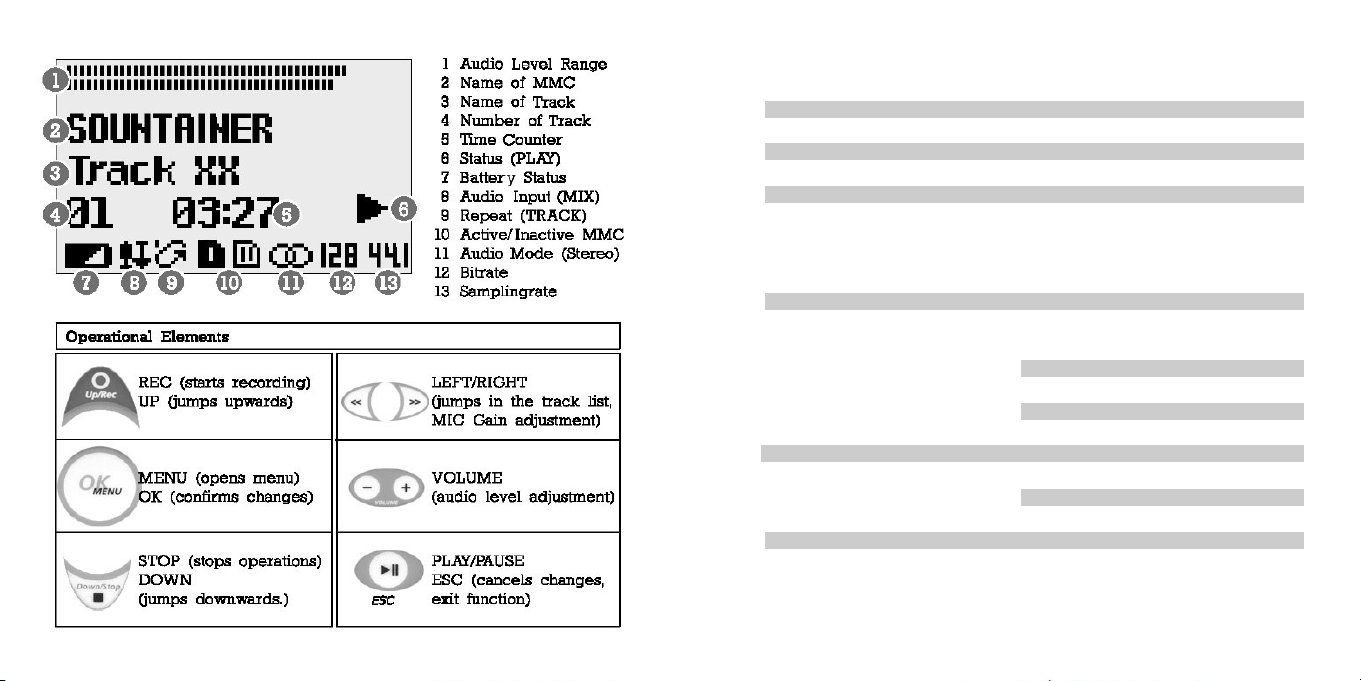
Display Symbols/Keypad 2
The MPEG Technology 4
Getting Started 5
Menu Structure/Navigation 6
Menus in Standby/Stop Mode
MMC
Activate MMC, CardInfo,
Format MMC 7
Tone Control
Volume, Bass, Treble 8
System
Info, Set Defaults,
SW Update (MMC),
Backlight
Del: Track 9
Playback Mode 10
Menus in Playback Mode
Time, Tone Control,
Repeat 11
Record Mode/ Menus
Time 12
MP3 Config
Input Select 13
MIC Setup
MIC Power, AutoGain,
MIC Gain 14
Start Recording 15
Important Information 16
Settings 17
SOUNTAINER PC Software 18
Functions
MMC1/MMC2, Play List 19
Get from Sountainer
Send to Sountainer 20
Update 21
For your information 22
Technical Data 23
22 3
Page 4

The MPEG Technology
Update
The ISO/MPEG technology (Layer II and III) developed by the
“Institut für Rundfunktechnik” and the Fraunhofer Institute allows music
signals (also in larger quantities) to be recorded by means of data
reduction without any considerable loss of quality.
The principle of audio data reduction is based on the frequency
This feature ensures that your MP3 player always offers you the latest
in technology. Almost all functional components are stored in the
Flash EPROMS. Further software updates, manuals and technical
information can be called up at all times over the Internet at:
http://wwwhttp://www
http://www
http://wwwhttp://www
.dialog4.com.dialog4.com
.dialog4.com
.dialog4.com.dialog4.com
dependent sensitivity of the human ear. The objective auditory properties and subjective habits of the ear means that the ear ignores
certain sounds and concentrates on the most essential: The message.
This contrasts with purely electronic techniques which hear every-
Before starting an upload / download ensure that your SOUNTAINER
is in the STOP mode. Confirm the safety query with OK and follow
the instructions on your PC screen.
thing, even the non-essential.
The MPEG audio technology utilises the difference between ear and
electronic measuring equipment when reducing data. By masking all
superfluous noise, a reduction ratio is achieved which is necessary in
order to store large amounts of real time data in recording components. The data is compressed and subjected to A/B comparison and
then the ear hears only what is should.
No more and no less.
Interruption of the connection or switching off the computer will result
Some examples of data compression rates achieved with ISO/MPEG:
1:1:
44
1:
4 at Layer I with 384 kbps, stereo
1:1:
44
1:1:
6...6...
1:1:
1:
1:1:
1:1:
1:
1:1:
88
6...
1:
8 at Layer II with 192…256 kbps, stereo
6...6...
1:1:
88
10...10...
1:1:
1212
10...
1:
12 at Layer III with 112…128 kbps, stereo.
10...10...
1:1:
1212
in an unsuccessful update and the update procedure will then have to
be repeated. It may happen you are not able to switch the
SOUNTAINER
®
off after an update. In such case, please remove the
batteries.
4 21
®
Page 5

Get from SOUNTAINER
This feature enables the MP3 recordings to be copied onto your PC
and then processed or renamed using the existing program.
The ID3 tag, containing detailed information on the title name, artist,
recording date, comments and more, can also be edited with certain
of these programs.
Send to SOUNTAINER
The MP3 data files are transferred to the
SOUNTAINER
®
using this feature. A short
message (see illustration right) will inform
you when the recording capacity of the activated MMC has been exceeded. The
SOUNTAINER
®
will also display the message “MMC full!”.
Getting Started
Place two 1,5 V batteries or
rechargeables (Mignon/AA) into
the battery compartment.
Insert the MultimediaCards.
Use only MMCs from SanDisk.
Connection possibilities for
microphone, hi-fi system
and earphones.
520
Page 6

Menu Structure
Functions
After switching on the unit, the SOUNTAINER® is found in the
STANDBY/STOP mode (see icon # 6).
6
10
Navigation
All menus are called up using the menu button. Menu items followed
by three dots (
Use the UP/DOWN buttons to select a menu item. The active line
is displayed inverted (negative).
Confirm your selection with the OK button. Press the ESC/Exit
button to abort.
!!!) contain sub-menus.
6
You will recognise that the operating screen of the program is
clearly layed out and constructed
similarly to that of the SOUN-
TAINER
The following features are found
in the software version:
MMC1/MMC2
The inserted MultimediaCards are
activated / deactivated by marking the radio buttons (icon # 10a).
As previously mentioned (please
see page 5), only one MMC can
be activated at any given time.
Play-List
Here a pop-up window, opened
with a click, displays the entire
content of the active MMC.
This enables you to easily trace
a certain track which can immediately be played back.
®
10a
19
Page 7

SOUNTAINER
®
PC Software
The following menu items are contained in the
STST
ANDBY/STOPANDBY/STOP
ST
ANDBY/STOP mode:
STST
ANDBY/STOPANDBY/STOP
The SOUNTAINER® will soon become the link between your hi-fi
system and Internet.
First install the control software and
the USB driver onto your PC. The
connection between PC and
SOUNTAINER
®
is possible using
the special USB cable included in
the scope of delivery.
Switch off the SOUNTAINER® and use only fully charged batteries,
ensure that the USB cable has been properly and securely inserted.
Place the reference CD-ROM into the CD-ROM drive of your PC.
After switching on the
SOUNTAINER
®
again, the Microsoft Windows
system will recognise the new “Plug’n Play” hardware and will search
for the suitable driver. This data is also included on the reference
CD-ROM. Enter the position of the CD-ROM driver. Do not remove
the power supply plug once the connection has been established and
once the data transmission has been initiated.
After the software has been successfully installed, open the SOUNTAINER
(.exe) program with a double click (reference CD-ROM).
18
MMC...
with options to:
Activate MMC
Here the MMCs found in slot 1 / slot 2 are activated/deactivated.
Confirm the changes you have made with the OK button. Only one
MMC can be activated and this is shown inverted on the display (see
icon # 10).
CardInfo MMC
An overview of the name and recording capacity of the activated
MMC, the number of titles saved as well the remaining recording
space is displayed here. To exit this menu press the ESC/Exit button.
Format MMC
You here have the possibility to format the activated MMC. Press the
OK button after the safety query to confirm that you want to delete all
recordings from the MMC.
Please note:Please note:
Please note: The entire content of the MMC is deleted with this
Please note:Please note:
function.
This operation is not reverseable!This operation is not reverseable!
This operation is not reverseable!
This operation is not reverseable!This operation is not reverseable!
The MMCs may only be formatted inside the SOUNTAINER®.
7
Page 8

Tone Control...
Settings
Here the volume, bass and trebles are altered to your personal taste.
The level control display (see icon # 1) is represented on a dB scale.
The values are changed using the VOLUME button. The volume is
altered accordingly.
Volume 50% (ex-factory)
Setting the volume output.
When operating the volume button in the playback or recording
mode, the set value is displayed for two (2) seconds. The level meter
is only visible during recording or playback and displays the levels
of the left and right channels.
Bass 00 dB (ex-factory)
Adjusting the bass values.
Treble 00 dB (ex-factory)
Adjusting the treble values.
All of these values can be changed during recording or playback
without having to interrupt operation.
To exit this menu item please press the OK button.
Settings made with the different menu functions are automatically
taken over after being marked with the cursor and upon exiting the
menu item (ESC/Exit button). The following settings exist even after
the unit has been switched off:
Activated MMC,
MP3 Configuration,
Recording Source (Input Select),
Volume / Bass / Trebles,
Display Backlight,
Time Setting (Time),
Microphone Input Power,
Microphone Level Control (MIC Level)
and Amplification (MIC (Auto) Gain).
Return to the original settings ex-factory using the menu item
SYSTEM / Set Defaults.
Active: MMC 1
MP3 Config: CD Quality
Volume: 50%
Bass: 0 dB
Trebles: 0 dB
Repeat: OFF
Input Select: Line
MIC Power: OFF
Auto Gain: OFF
MIC Gain: 27 dB
Backlight: AUTO
8 17
Page 9

Important Information
System... with the following options:
Before undertaking an up/download set the unit to the STOP mode.
Should the SOUNTAINER® not be automatically switched off after a
software update, remove the batteries and insert once again.
During data transfer, the display on the PC monitor is not updated
continously. This only takes place after the download has been successfully completed.
We recommend using only rechargeable batteries as these have a
larger capacity than alkali batteries. The playback time is largely
dependent on the type of battery:
REC with modern alkali batteries approx. 1 hour
PLAY with modern alkali batteries approx. 8 hours
REC with NiMH 1600 mAh rechargeables approx. 3 – 4 hours
PLAY with NiMH 1600 mAh rechargeables approx. 6 – 8 hours
Use only MMCs from SanDisk! The length of recording/play time is
dependent on the bitrate:
64 MB REC Capacity = 65 min. CD Quality
88 min. FM Quality
130 min. Long Play
260 min. Voice Recording
The maximum number of recordings per MMC is 255 tracks.
Info
Here the current software version and the battery power supply is
interrogated. Leave this menu item with the ESC/Exit button.
Set Defaults
After confirming the safety query with the OK button, all of the
settings which you have made are replaced by the original values exfactory.
SW Update (MMC)
Here the software update from a MMC is started.
Please note: Do not switch the unit off during the update procedure!Please note: Do not switch the unit off during the update procedure!
Please note: Do not switch the unit off during the update procedure!
Please note: Do not switch the unit off during the update procedure!Please note: Do not switch the unit off during the update procedure!
An unsuccessful update is displayed with the message “BOOT ERROR”. A renewed update is only possible using the PC software
(please see page 21).
Backlight AUTO (setting ex-factory)
Here you have the possibility to set the display backlight to either
ON, OFF or AUTO, using the volume buttons. When set to AUTO, the
backlight is switched on for 20 seconds after any button has been
pressed. Confirm your selection with the OK button.
Del: <Track Name>
Selecte a track to be deleted and confirm with the OK button.
916
Page 10

Playback Mode
To begin the playback of a track (see icon # 6) press the PLAY
button. The name, position number, play duration and the audio
parameters (icons # 11, 12, 13) of the selected title are automatically
displayed.
1
Start Recording by pressing the REC button.
Begin the recording of a new track by pressing this button once
again. The new track recording will begin immediately, without
interruption.
During the recording, changes to both the output volume (VOLUME
button) and the microphone amplification (LEFT/RIGHT buttons) are
possible.
5
9
In this operating mode the volume is changed using the VOLUME
button. The level is shown in the upper area of the display.
The playback of a track is interrupted with the PAUSE button. Press
the PAUSE button once again to continue with the playback or end
this function by using the STOP button.
11 12
6
13
Interrupt the recording temporarily by briefly pressing the PLAY/
PAUSE button. Pressing the STOP button will end the recording.
A standard name and a position number (03) is automatically allocated
to the new track (for e.g. TAKE-00X). The renaming and sorting of
tracks can then take place via PC.
10 15
Page 11

Mic Setup...
with the menu items:
Mic Power OFF
Phantom power (3,3V) for electret condensor microphones. The setting is changed by using the VOLUME button.
AutoGain OFF
This setting is for the automatic regulation of the microphone
amplification. Alterations to the setting are made using the VOLUME
button.
MicGain 27 dB
This is for the manual regulation of the microphone amplification.
Changes to the setting are also made using the VOLUME button.
Please note:Please note:
Please note:
Please note:Please note:
Should AutoGain be activated then the settings under MicGain are
ignored.
Confirm the settings with the ESC/Exit button. You then automatically
exit this menu item.
(ex-factory)
(ex-factory)
(ex-factory)
Use the LEFT/RIGHT buttons to select another track. The playback of
the following title is automatically started without interruption.
Menus in the Playback Mode
You have the possibility to also select the following features as menu
items in the PLAY/PAUSE mode:
Time
Here you will find information on the played or remaining (see icon
# 6) time of each title.
Tone Control...
The volume, bass and trebles are set by using the VOLUME button,
in the same way as in the STANDBY/STOP mode (pls. see page 8).
Repeat...
When the repeat function has been activated a new icon (see # 9) is
found on the display. Exit this menu item using the ESC/Exit button.
REPEAT TRACK The title you have selected for playback
is continuously repeated.
REPEAT ALL All titles are repeated continuously.
REPEAT OFF All titles are played only once.
1114
Page 12

Recording Mode
MP3 Config...
To prepare the unit for recording, press the RECORD button. The unit
will switch to pause mode (icon # 6). The LED flashes continuously.
Icons of the
recording sources
Microphone
Line IN
6
Mic + Line IN
(MIX)
8
Menus in the Recording Mode
In the REC/Recording Pause mode (icon # 6) the following options
are selectable:
Time
Here you can select between the current time display of the recording or the remaining recording space (time) on the MMC. The
recording capacity of the MMC is dependent on the set MP3 configuration and the MB size of the card.
This menu item is only selectable in the REC/Pause mode and serves
to set the audio quality. The selectable options are:
CD QualityCD Quality
CD Quality 128 kbps, 44.1 kHz, stereo,
CD QualityCD Quality
FM QualityFM Quality
FM Quality 96 kbps, 32 kHz, stereo,
FM QualityFM Quality
a a
nd sounds goodnd sounds good
a
nd sounds good
a a
nd sounds goodnd sounds good
Long PlayLong Play
Long Play 64 kbps, 22.05 kHz, stereo,
Long PlayLong Play
VV
oice Recorderoice Recorder
V
oice Recorder 32 kbps, 16 kHz, mono.
VV
oice Recorderoice Recorder
Leave this menu with the OK button.
))
)
))
(sounds the best) (sounds the best)
(sounds the best)
(sounds the best) (sounds the best)
((
saves recording spacesaves recording space
(
saves recording space
((
saves recording spacesaves recording space
(good voice quality)(good voice quality)
(good voice quality)
(good voice quality)(good voice quality)
((
as dictating unitas dictating unit
(
as dictating unit
((
as dictating unitas dictating unit
))
)
))
Input Select...
Here you can select the audio inputs from microphone, line input or
Mic+Line (MIX). Depending on the recording source you have selected, the respective icon (8) is present on the display (please see
page 12).
The MIC amplification is set using the VOLUME button. The level
setting of the stereo channels during MIC recordings can be set to
take place either automatically or manually. An automatic setting
means that the amplification is monitored and adapted during the
entire duration of the recording. This guarantees a good recording
even under difficult conditions.
The start of a peak overload is shown with a red colouring of the
LED.
12 13
 Loading...