


DLP® Projector
User manual

TABLE OF CONTENTS
SAFETY ............................................................................................... 4
Important Safety Instruction....................................................................................................... 4
Laser Radiation Safety Information ........................................................................................... 6
Product Safety Labels and Location .......................................................................................... 7
3D Safety Information ................................................................................................................ 8
Cleaning the Lens...................................................................................................................... 8
Copyright ................................................................................................................................... 9
Disclaimer .................................................................................................................................. 9
Trademark Recognition ............................................................................................................. 9
FCC ........................................................................................................................................... 9
Declaration of Conformity for EU countries .............................................................................. 10
WEEE ....................................................................................................................................... 10
INTRODUCTION ............................................................................... 11
Package Overview.................................................................................................................... 11
Standard Accessories ............................................................................................................... 11
Product Overview ..................................................................................................................... 12
Connections.............................................................................................................................. 13
Keypad ..................................................................................................................................... 14
Remote control ......................................................................................................................... 15
SETUP AND INSTALLATION ........................................................... 17
Connecting Sources to the Projector ........................................................................................ 17
Adjusting the Projector Image .................................................................................................. 18
Adjusting the Projection Image Shift......................................................................................... 19
Adjusting the Projector’s Zoom and Focus ............................................................................... 22
Adjusting the Projector Position................................................................................................ 23
Remote Setup........................................................................................................................... 24
USING THE PROJECTOR ............................................................... 26
Powering On / O the Projector ................................................................................................ 26
Menu navigation and features .................................................................................................. 28
OSD menu tree......................................................................................................................... 29
Image menu.............................................................................................................................. 39
Display menu ............................................................................................................................ 44
Device Setup menu .................................................................................................................. 47
Input Settings menu.................................................................................................................. 52
Audio menu .............................................................................................................................. 53
Communication menu............................................................................................................... 54
Information menu...................................................................................................................... 59
2
English

ADDITIONAL INFORMATION .......................................................... 62
Compatible Resolutions............................................................................................................ 62
RS232 Port Setting and Signals Connection ............................................................................ 64
Image Size and Projection Distance......................................................................................... 65
Ceiling Mount Installation ......................................................................................................... 66
IR remote codes ....................................................................................................................... 67
Troubleshooting ........................................................................................................................ 69
LED Indicators and Lightning Messages .................................................................................. 70
Specications ........................................................................................................................... 71
RS232 protocol function list ...................................................................................................... 73
Optoma global oces ............................................................................................................... 81
English
3

SAFETY
The lightning ash with arrow head within an equilateral triangle is
intended to alert the user to the presence of uninsulated “dangerous
voltage” within the product’s enclosure that may be of sucient magnitude
to constitute a risk of electric shock to persons.
The exclamation point within an equilateral triangle is intended to alert the
user to the presence of important operating and maintenance (servicing)
instructions in the literature accompanying the appliance.
Please follow all warnings, precautions and maintenance as recommended in this user manual.
Important Safety Instruction
• Do not stare into the beam, RG2.
As with any bright source, do not stare into the direct beam, RG2 IEC 62471-5:2015.
• Do not block any ventilation openings. To ensure reliable operation of the projector and to protect from
overheating, it is recommended to install the projector in a location that does not block ventilation.
As an example, do not place the projector on a crowded surface. Do not put the projector in an
enclosure such as a book case or a cabinet that restricts air ow.
• To reduce the risk of re and/or electric shock, do not expose the projector to rain or moisture.
Do not install near heat sources such as radiators, heaters, stoves or any other apparatus such as
ampliers that emits heat.
• Do not let objects or liquids enter the projector. They may touch dangerous voltage points and short
out parts that could result in re or electric shock.
• Do not use under the following conditions:
± In extremely hot, cold or humid environments.
(i) Ensure that the ambient room temperature is within 5°C ~ 40°C (41°F ~ 104°F)
(ii) Relative humidity is 10% ~ 85%
± In areas susceptible to excessive dust and dirt.
± Near any appliance generating a strong magnetic eld.
± In direct sunlight.
• Do not use the unit if it has been physically damaged or abused. Physical damage/abuse would be
(but not limited to):
± Unit has been dropped.
± Power supply cord or plug has been damaged.
± Liquid has been spilled on to the projector.
± Projector has been exposed to rain or moisture.
± Something has fallen in the projector or something is loose inside.
4
• Do not place the projector on an unstable surface. The projector may fall over resulting in injury or the
projector may become damaged.
• Do not block the light coming out of the projector lens when in operation. The light will heat the object
and could melt, cause burns or start a re.
• Please do not open or disassemble the projector as this may cause electric shock.
• Do not attempt to service the unit yourself. Opening or removing covers may expose you to dangerous
voltages or other hazards. Please call Optoma before you send the unit for repair.
• See projector enclosure for safety related markings.
English

• The unit should only be repaired by appropriate service personnel.
• Only use attachments/accessories specied by the manufacturer.
• Do not look straight into the projector lens during operation. The bright light may harm your eyes.
• When switching the projector o, please ensure the cooling cycle has been completed before
disconnecting power. Allow 90 seconds for the projector to cool down.
• Turn o and unplug the power plug from the AC outlet before cleaning the product.
• Use a soft dry cloth with mild detergent to clean the display housing. Do not use abrasive cleaners,
waxes or solvents to clean the unit.
• Disconnect the power plug from the AC outlet if the product will not be used for a long period of time.
• Do not setup the projector in places where it might be subjected to vibration or shock.
• Do not touch the lens with bare hands.
• Remove battery/batteries from remote control before storage. If the battery/batteries are left in the
remote for long periods, they may leak.
• Do not use or store the projector in places where smoke from oil or cigarettes may be present, as it
can adversely aect the quality of the projector performance.
• Please follow the correct projector orientation installation as non standard installation may aect the
projector performance.
• Use a power strip and/or surge protector. As power outages and brown-outs can KILL devices.
Warning: Do not remove the earthing pin on the mains plugs. This apparatus is equipped with
a three prong earthing type mains plug. This plug will only t an earthing-type mains
socket. This is a safety feature. If you are unable to insert the plug into the mains
socket, contact an electrician. Do not defeat the purpose of the earthing plug.
CAUTION: This equipment is equipped with a three-pin grounding-type power
plug. Do not remove the grounding pin on the power plug. This plug
will only t a grounding-type power outlet. This is a safety feature.
If you are unable to insert the plug into the outlet, contact an
electrician. Do not defeat the purpose of the grounding plug.
Do not remove
• These requirements apply to consumer products containing button batteries or coin cells batteries.
They do not apply to products that by virtue of their dedicated purpose and instructions are not
intended to be used in locations where they may be accessed by children, such as products for
dedicated professional use or commercial use in locations where children are not normally or typically
present.
• Ground the power cord:
± This device is designed to be used with the power cord grounded. Failure to ground the power
cord may result in electric shock. Ensure the power cord is properly grounded and directly
connected to a wall outlet.
± Do not use a 2-pin adapter.
• Disclaimer: Operating this equipment in residential areas may cause radio interference.
English
5

Laser Radiation Safety Information
To ensure safe operation, read all laser safety precautions before installing and operating the projector.
• This projector is class 1 laser product of IEC/EN 60825-1:2014 and risk group 2 with the requirements of
IEC 62471-5:2015.
• Complies with 21 CFR 1040.10 and 1040.11 except for conformance as a Risk Group 2 LIP as dened in
IEC 62471-5:Ed.1.0. For more information see Laser Notice No. 57, dated May 8, 2019.
• IEC 60825-1:2014/EN 60825-1:2014+A11:2021/EN 50689:2021 class 1 consumer laser product, IEC
62741-5:2015 risk group 2.
• This product must not be used in residential areas.
• This product may cause interference if used in residential areas. Such use must be avoided unless the
user takes special measures to reduce electromagnetic emissions to prevent interference to the reception
of radio and television broadcasts.
• Possibly hazardous optical radiation emitted from this product.
• This projector has built-in Class 4 laser module. Disassembly or modication is very dangerous and should
never be attempted.
• Any operation or adjustment not specically instructed in the user manual creates the risk of hazardous
laser radiation exposure.
• Do not open or disassemble the projector as this may cause damage by the exposure of laser radiation.
• Do not stare into beam when the projector is on. The bright light may result in permanent eye damage.
• When turning on the projector, make sure no one within projection range is looking at the lens.
• Without following the control, adjustment or operation procedure may cause damage by the exposure of
laser radiation.
• Adequate instructions for assembly, operation, and maintenance, including clear warnings concerning
precautions to avoid possible exposure to laser and collateral radiation in excess of the accessible
emission limits in Class 2.
• The Class A digital apparatus meets all requirements of the Canadian Interference-Causing Equipment
Regulation.
• We recommend you install this projector above the reach of children.
• Notice is given to supervise children and to never allow them to stare into the projector beam at any
distance from the projector.
• Notice is given to use caution when using the remote control for starting the projector while in front of the
projection lens.
• Notice is given to the user to avoid the use of optical aids such as binoculars or telescopes inside the beam.
CAUTION: Use of controls, adjustments, or performance of procedures other than those specied
herein may result in hazardous radiation exposure.
6
English

Product Safety Labels and Location
Light Beam Related Safety Labels and Location
Label Name Label Image Label Location
Specication Label
Note: Spec label varies by region
(for reference only).
Warning Label
Warning Label
English
7

3D Safety Information
Please follow all warnings and precautions as recommended before you or your child use the 3D function.
Warning
• Children and teenagers may be more susceptible to health issues associated with viewing in 3D and
should be closely supervised when viewing these images.
Photosensitive Seizure Warning and Other Health Risks
• Some viewers may experience an epileptic seizure or stroke when exposed to certain ashing images
or lights contained in certain Projector pictures or video games. If you suer from, or have a family
history of epilepsy or strokes, please consult with a medical specialist before using the 3D function.
• Even those without a personal or family history of epilepsy or stroke may have an undiagnosed
condition that can cause photosensitive epileptic seizures.
• Pregnant women, the elderly, suerers of serious medical conditions, those who are sleep deprived or
under the inuence of alcohol should avoid utilizing the unit’s 3D functionality.
• If you experience any of the following symptoms, stop viewing 3D pictures immediately and consult
a medical specialist: (1) altered vision; (2) lightheadedness; (3) dizziness; (4) involuntary movements
such as eye or muscle twitching; (5) confusion; (6) nausea; (7) loss of awareness; (8) convulsions;
(9) cramps; and/ or (10) disorientation. Children and teenagers may be more likely than adults
to experience these symptoms. Parents should monitor their children and ask whether they are
experiencing these symptoms.
• Watching 3D projection may also cause motion sickness, perceptual after eects, disorientation, eye
strain and decreased postural stability. It is recommended that users take frequent breaks to lessen
the potential of these eects. If your eyes show signs of fatigue or dryness or if you have any of the
above symptoms, immediately discontinue use of this device and do not resume using it for at least
thirty minutes after the symptoms have subsided.
• Watching 3D projection while sitting too close to the screen for an extended period of time may
damage your eyesight. The ideal viewing distance should be at least three times the screen height. It
is recommended that the viewer’s eyes are level with the screen.
• Watching 3D projection while wearing 3D glasses for an extended period of time may cause a
headache or fatigue. If you experience a headache, fatigue or dizziness, stop viewing the 3D
projection and rest.
• Do not use the 3D glasses for any other purpose than for watching 3D projection.
• Wearing the 3D glasses for any other purpose (as general spectacles, sunglasses, protective goggles,
etc.) may be physically harmful to you and may weaken your eyesight.
• Viewing in 3D projection may cause disorientation for some viewers. Accordingly, DO NOT place your
3D PROJECTOR near open stairwells, cables, balconies, or other objects that can be tripped over, run
into, knocked down, broken or fallen over.
Cleaning the Lens
• Before cleaning the lens, be sure to turn o the projector and unplug the power cord to allow it to
completely cool down.
8
• Use a compressed air tank to remove the dust.
• Use a special cloth for cleaning lens and gently wipe the lens. Do not touch the lens with your ngers.
• Do not use alkaline/acid detergents or volatile solvents such as alcohol for cleaning lens. If the lens is
damaged due to the cleaning process, it is not covered by the warranty.
Warning
• Do not use a spray containing ammable gases to remove dust or dirt from the lens. This may cause a
re due to excessive heat inside the projector.
• Do not clean the lens if the projector is warming up as this may cause the lens’ surface lm to peel o.
• Do not wipe or tap the lens with a hard object.
English

Copyright
This publication, including all photographs, illustrations and software, is protected under international copyright
laws, with all rights reserved. Neither this manual, nor any of the material contained herein, may be reproduced
without written consent of the author.
© Copyright 2024
Disclaimer
The information in this document is subject to change without notice. The manufacturer makes no representations
or warranties with respect to the contents hereof and specically disclaims any implied warranties of
merchantability or tness for any particular purpose. The manufacturer reserves the right to revise this publication
and to make changes from time to time in the content hereof without obligation of the manufacturer to notify any
person of such revision or changes.
Trademark Recognition
Kensington is a U.S. registered trademark of ACCO Brand Corporation with issued registrations and pending
applications in other countries throughout the world.
HDMI, the HDMI Logo, and High-Denition Multimedia Interface are trademarks or registered trademarks of HDMI
Licensing LLC in the United States and other countries.
®
, DLP Link and the DLP logo are registered trademarks of Texas Instruments and BrilliantColorTM is a trademark
DLP
of Texas Instruments.
HDBaseT™ and the HDBaseT Alliance logo are trademarks of the HDBaseT Alliance.
All other product names used in this manual are the properties of their respective owners and are Acknowledged.
FCC
This Equipment has been tested and found to comply with the limits for a Class A digital device, pursuant to part 15
of the FCC Rules. These limits are designed to provide reasonable protection against harmful interference when
the equipment is operated in a commercial environment. This equipment generates, uses, and can radiate radio
frequency energy and, if not installed and used in accordance with the instruction manual, may cause harmful
interference to radio communications.
However, there is no guarantee that interference will not occur in a particular installation. If this device does cause
harmful interference to radio or television reception, which can be determined by turning the device o and on is
encouraged to try to correct the interference by one or more of the following measures:
• Reorient or relocate the receiving antenna.
• Increase the separation between the device and receiver.
• Connect the device into an outlet on a circuit dierent from that to which the receiver is connected.
• Consult the dealer or an experienced radio/television technician for help.
English
9

Notice: Shielded cables
All connections to other computing devices must be made using shielded cables to maintain compliance with FCC
regulations.
Caution
Changes or modications not expressly approved by the manufacturer could void the user’s authority, which is
granted by the Federal Communications Commission, to operate this projector.
Operation Conditions
This device complies with Part 15 of the FCC Rules. Operation is subject to the following two conditions:
1. This device may not cause harmful interference and
2. This device must accept any interference received, including interference that may cause undesired operation.
Notice: Canadian users
This Class A digital apparatus complies with Canadian ICES-003.
Remarque à l’intention des utilisateurs canadiens
Cet appareil numerique de la classe A est conforme a la norme NMB-003 du Canada.
Declaration of Conformity for EU countries
• EMC Directive 2014/30/EU (including amendments)
• Low Voltage Directive 2014/35/EU
• Radio Equipment Directive 2014/53/EU (if product has RF function)
• RoHS Directive 2011/65/EU
WEEE
Disposal instructions
Do not throw this electronic device into the trash when discarding. To minimize pollution and ensure
utmost protection of the global environment, please recycle it.
10
English

INTRODUCTION
Package Overview
Carefully unpack and verify that you have the items listed below under standard accessories. Some of the items
under optional accessories may not be available depending on the model, specication and your region of
purchase. Please check with your place of purchase. Some accessories may vary from region to region.
The warranty card is only supplied in some specic regions. Please consult your dealer for detailed information.
Standard Accessories
Warranty Card(**)
Quick Start User Manual
Projector Remote control(*)
Note:
• (*)The remote control requires two AAA batteries. See “Install / Replacing Remote Control Batteries”
on page 24 for more information.
• (**) For European warranty Information, please visit www.optoma.com.
Please scan the OPAM warranty QR code or visit the following URL:
www.optomausa.com/OPAM/warranty
Please scan the Asia-Pacic QR code or visit the following URL:
https://www.optoma.com/support/download
AC power cord
Documentation
English
11

INTRODUCTION
Product Overview
2
3
4
5
1
Minimum
500mm (19.69”)
8
9
5
72 6 2
5 5
Minimum
500mm (19.69”)
10
11
Minimum
500mm (19.69”)
12
Note:
• Do not block projector intake and exhaust vents.
• When operating the projector in an enclosed space, allow at least 500mm (19.69”) clearance around
the intake and exhaust vents.
No. Item No. Item
1. IR Receivers 7. Projection Lens
2. Ventilation (Inlet) 8. Input / Output
3. LED Indicators 9. Kensington™ Lock Port
4. Deco Ring (1.6x lens model) 10. Control Panel
5. Tilt-Adjustment Foot 11. Power Socket / Power Switch
6. Ventilation (Outlet) 12. Speakers
12
English

INTRODUCTION
Connections
1 2 4 5 6 7 8
15
3
No. Item Cable Example Connections
9
10
11
12
13
14
1
1. 12V Out Connector 12V Trigger Cable Motorized screen, Curtain, etc
2. Remote In Connector Wired Remote Control Cable or
RCU
IR Receiver Cable (3.5mm TRS
2
type
)
3. USB Connector USB (A to B) Cable Computer
4. HDBaseT Connector RJ-45 Cable Media Play
5. LAN Connector RJ-45 Cable Local or Company Network
6. HDMI 2 Connector HDMI Cable Computer, Game, Console, Media
Play
7. HDMI 1 Connector HDMI Cable Computer, Game, Console, Media
Play
8. HDMI Out Connector HDMI Cable Screen
9. 3D Sync In Connector 3D Sync Cable Computer
10. 3D Sync Out Connector 3D Emitter Cable 3D Emitter
11. USB Connector (Power 5V
1.5A)3USB (A to A) Cable USB 5V Out
12. Audio Out Connector Audio Out Cable Speaker, Media Play
13. RS-232C Connector RS232 Cable Computer
14. Power Socket / Power Switch Power Cord Projector
15. Kensington™ Lock Port Protection Cable Projector
Note:
1. These are just a few examples of what you can connect. There may be more options available for each port.
2. 3.5mm TRS type.
5V Output
SIG.
GND
3. Not recommended for charging a cell phone.
English
13

INTRODUCTION
Keypad
1
9
8
7
32
4
5
6
No. Button Function
1. Power Button Turns the projector on or o.
2. Lens Shift Adjust the lens vertical / horizontal position.
3. Enter Conrm the settings.
4. Four Directional Select Keys Navigation keys.
5. Focus Adjust the image focus.
6. Keystone Correction Adjust the keystone correction.
7. Zoom Adjust the image size.
8. Exit Returns to previous menu or exit menu if at top level.
9. Menu Shows the main menu on screen.
14
English

INTRODUCTION
Remote control
1
2
3
4
5
6
7
8
9
10
11
16
17
18
19
20
21
22
12
13
14
15
No. Button Function
1. Power On Turn the projector on.
Number Keys Input numbers (0-9).
2.
3. Info Display information on the screen image.
4. Auto Automatically synchronize the projector to an input source.
5. Enter Press to conrm the selection.
6. Arrow Keys Use arrow keys to navigate through the menu or select the appropriate settings.
7. Menu Show the main menu on the screen.
8. Mode Press to select the preset display mode.
9. Brightness Set the brightness of the image.
23
24
English
15

INTRODUCTION
No. Button Function
10. Lens Shift (Horizontal) Adjust the image position horizontally.
11. Lens Shift (Vertical) Adjust the image position vertically.
12. Keystone (Horizontal) Adjust a horizontally keystone image.
13. Keystone (Vertical) Adjust a vertically keystone image.
14. Shutter Momentarily turn o/on the screen (AV Mute).
15. User 1 Press to assign custom functions. See user guide for more info.
16. Standby Turn the projector o.
17. ID Set the projector address.
18. Input Select an input source manually.
19. Exit Back to previous menu.
20. Pattern Display test pattern.
21. Contrast Set the contrast of the image.
22. Focus Adjust the image focus.
23. Zoom Adjust the image size.
24. User 2 Press to assign custom functions. See user guide for more info.
Note: Some keys may have no function for models that do not support these features.
16
English

SETUP AND INSTALLATION
Connecting Sources to the Projector
2
OR
2
1
3
4
5
7
6
8
1011121314
9
No. Item No. Item No. Item
1. 12V DC Jack 6. 3D Sync Cable 11. HDMI Cable
2. Wired Remote Control Cable
7. 3D Emitter Cable 12. RJ-45 Cable
or IR Receiver Cable
(3.5mm TRS type)
3. HDMI Cable 8. Audio Out Cable 13. RJ-45 Cable
4.
HDMI Dongle
9. Power Cord 14. USB (A to B) Cable
5. USB (A to A) Cable 10. RS232 Cable
English
17

SETUP AND INSTALLATION
Adjusting the Projector Image
Adjusting the Projector’s Height
The projector is equipped with elevator feet for adjusting the image height.
1. Locate the adjustable foot you wish to adjust on the underside of the projector.
2. Rotate the adjustable foot clockwise or counterclockwise to raise or lower the projector.
Tilt-Adjustment Feet
Tilt-Adjustment Ring
18
English

SETUP AND INSTALLATION
Adjusting the Projection Image Shift
The projection lens can be moved up, down, right, and left with the motor-driven lens shift function. This function
makes the positioning of images easy on the screen. Lens shift is generally expressed as a percentage of the
image height or width, see below illustration.
Vertical / Horizontal Lens Shift
When the lens is shifted to top:
1.6x/1.15x lens models:
594 pixels of
shift above lens
center.
Lens center
The display position can be shifted upwards
up to 55% elevation of the display.
When the lens is shifted to bottom:
594 pixels of
shift below lens
center.
1.6x/1.15x lens models:
The display position can be shifted
downwards up to 55% elevation of the display.
Lens center
English
19

SETUP AND INSTALLATION
When the lens is shifted to the leftmost:
-480 pixels 1920 pixels
Lens center
1.6x/1.15x lens models:
The display position can
be shifted to the left in up
to 25% of the width of the
display.
When the lens is shifted to the rightmost:
+480 pixels1920 pixels
Lens center
20
1.6x/1.15x lens models:
The display position can be
shifted to the right in up to 25%
of the width of the display.
English

SETUP AND INSTALLATION
Lens Shift Range
Lens Type
1.6x/1.15x lens models 50% 110% 10% 30%
ΔH ΔV ΔHo ΔVo
Lens Shift Range (1/2 image)
Note:
a) ΔH: The lens shift range in horizontal direction when the lens is at the center.
b) ΔV: The lens shift range in vertical direction when the lens is at the center.
c) ΔHo:The lens shift range without vignetting in horizontal direction when the lens is at the top center or the
bottom center.
d) ΔVo:The lens shift range without vignetting in vertical direction when the lens is at the middle right or the
middle left.
e) V: Height of the projected image.
f) H: Width of the projected image.
g)
h)
Projected image.
When the lens is shifted beyond the described range of operation, screen edges may become darker or
image may become out of focus.
English
21

SETUP AND INSTALLATION
Adjusting the Projector’s Zoom and Focus
Use the remote control or projector keypad to adjust the zoom and focus of the projected image.
• To adjust the image focus, press Focus and the pq buttons until the image is sharp and legible.
• To adjust the image size, press Zoom and the buttons on the remote control or on the
keypad to get the required image size.
B
A
B
A
22
English

SETUP AND INSTALLATION
Adjusting the Projector Position
When you select a position for the projector, consider the size and shape of your screen, the location of your power
outlets, and the distance between the projector and the rest of your equipment.
Follow these general guidelines:
• Position the projector on a at surface at a right angle to the screen. The 1.6x/1.5x lens models
projector (with the standard lens) must be at least 50 inch (1.6x: 1.33m/1.15x: 0.69m) from the
projection screen.
• Position the projector to the desired distance from the screen. The distance from the lens of the
projector to the screen, the zoom setting, and the video format determine the size of the projected
image.
• Lens throw ratio:
• 1.6x lens model: 1.25 ~ 2.0
• 1.15x lens model: 0.65 ~ 0.75
• 360 degrees free orientation operation.
• When installing multiple projectors, keep at least 1000mm (39.4”) space between the adjacent
projectors.
• For ceiling/wall mount installations, make sure to leave 15 mm (0.6”) between the ceiling mount and
the bottom intake vents of the projector.
English
23

SETUP AND INSTALLATION
Remote Setup
Install / Replacing Remote Control Batteries
Two AAA size batteries are supplied for the remote control.
1. Remove the battery cover on the back of the remote control.
2. Insert AAA batteries in the battery compartment as illustrated.
3. Replace back cover on remote control.
Note: Replace only with the same or equivalent type batteries.
CAUTION
Improper use of batteries can result in chemical leakage or explosion. Be sure to follow the instructions below.
• Do not mix batteries of dierent types. Dierent types of batteries have dierent characteristics.
• Do not mix old and new batteries. Mixing old and new batteries can shorten the life of new batteries or
cause chemical leakage in old batteries.
• Remove batteries as soon as the are depleted. Chemicals that leak from batteries that come in contact
with skin can cause a rash. If you nd any chemical leakage, wipe thoroughly with a cloth.
• The batteries supplied with this product may have a shorter life expectancy due to storage conditions.
• If you will not be using the remote control for an extended period of time, remove the batteries.
• When you dispose of the batteries, you must obey the law in the relative area or country.
24
English

SETUP AND INSTALLATION
Remote Control Eective Range
Infra-Red (IR) remote control sensor is located on the top and front of the projector. Ensure to hold the remote
control at an angle within 30 degrees perpendicular to the projector’s IR remote control sensor to function correctly.
The distance between the remote control and the sensor should not be longer than 12 meters (39.4 feet) when
holding not longer than 15 meters (49.2 feet) when aiming the sensor at 0°.
• Make sure that there are no obstacles between the remote control and the IR sensor on the projector
that might obstruct the infra-red beam.
• Make sure the IR transmitter of the projector/remote control is not being shined by sunlight or
uorescent lamps directly.
• Please keep the remote controller away from uorescent lamps for over 2 m or the remote controller
might become malfunction.
• If the remote control is close to Inverter-Type uorescent lamps, it might become ineective from time
to time.
• If the remote control and the projector are within a very short distance, the remote control might
become ineective.
• When you aim at the screen, the eective distance is less than 5 m from the remote control to the
screen and reecting the IR beams back to the projector. However, the eective range might change
according to screens.
Approx. ±30°
Approx. ±30°
English
25

USING THE PROJECTOR
Powering On / O the Projector
Powering On
1. Securely connect the power lead and signal/source cable. When connected, the power LED will turn red.
2. Set the power switch to the “
solid red.
” (On) position and wait until the “ ” button on the projector keypad is
3. Turn on the projector by pressing the “ ” button on the projector keypad or the “ ” on the remote
control.
During startup the power LED is ashing red and during normal operation, the power LED is solid
green.
or
26
English

USING THE PROJECTOR
Powering O
1. Turn o the projector by pressing the “ ” button on the projector keypad or remote control. The
following message will be displayed:
Power O
Press power key again.
2. Press the
you press the
3. During the cooling cycle, the power LED is ashing green. When the power LED turns solid red,
this indicates the projector has entered standby mode. If you wish to turn the projector back on, you
must wait until the cooling cycle has nished and the projector has entered standby mode. When the
projector is in standby mode, simply press the “
remote control again to turn on the projector.
4. Disconnect the power cord from the electrical outlet and the projector.
Note:
• It is not recommended that the projector is turned on immediately, right after a power o procedure.
• By default, the projector turns o automatically after 20 minutes of inactivity. You can modify the idle
time length in “Auto Power o (min.)” menu in “Device Setup
projector to enter standby mode instead, disable auto power o and set the sleep time interval in
“Device Setup Power Settings Sleep Timer (min.)”.
button again to conrm, otherwise the message will disappear after 15 seconds. When
button for the second time, the projector will shut down.
” button on the projector keypad or the “ ” on the
Power Settings”. If you want the
English
27

USING THE PROJECTOR
Menu navigation and features
The projector has multilingual on-screen display (OSD) menus that allow you to make image adjustments and
change a variety of settings.
1. To open the OSD menu, press the Menu key on the remote control or projector keypad.
2. To select a main menu or sub menu, use the pq buttons to highlight it. Then, press the Enter button
to enter the sub menu.
3. Press the Exit button to return to the previous menu or exit the OSD menu if at top level.
4. Setting methods to adjust the function value or selection an option.
• To adjust the slide bar values, highlight the function, and use the buttons to change value.
• To check or uncheck a checkbox, highlight the function, and press Enter.
• To input a number or symbol, highlight the number or symbol, and use the p q buttons to
make a selection. You can also use the number keys on the remote control or keypad.
• To select a function option, use the pq buttons to make the selection. If no Enter icon
shows at the navigation bar, the highlighted option is automatically applied. If there is an Enter
icon at the navigation bar, press Enter to conrm your selection.
Submenus SettingsMain menus
1
2
Picture Mode
Dynamic Range
3
4
5
6
7
Brightness
Contrast
Sharpness
Gamma
Dynamic Contrast
Extreme Black
Color Settings
Wall Color
Image
Bright
0
0
0
2.2
O
28
No Item No Item
1. Image menu 5. Audio menu
2. Display menu 6. Communication menu
3. Device setup menu 7. Information menu
4. Input settings menu
English

USING THE PROJECTOR
OSD menu tree
Main Menu Sub Menu 2 Sub Menu 3 Sub Menu 4 Sub Menu 5 Sub Menu 6 Values
Image Picture Mode Vivid
HDR
HLG
Cinema
sRGB
Bright
DICOM SIM.
Blending
3D
High Frame Rate
User
Dynamic Range HDR O
Auto [default]
HDR Picture Mode 0 ~ 10
Brightness 0 ~ 100
Contrast 0 ~ 100
Sharpness 1 ~ 15
Gamma Film
Graphics
1.8
2.0
2.2
2.4
2.6
Vivid
3D
Blackboard
DICOM SIM.
Dynamic
Contrast
Color Settings Color 0 ~ 100
Dynamic Black O [default]
On
Speed 1 ~ 160 [default: 160]
Strength 0 ~ 3 [default: 3]
Level 50% ~ 100% [default:
100%]
Extreme Black O [default]
On
AV Mute Timer 0.0s ~ 10.0s [default: 0.0s]
Black Signal Level 0 ~ 5 [default: 0]
Tint 0 ~ 100
BrilliantColor™ 0 ~ 10
Color Temperature Warm
Standard
Cool
Cold
English
29

USING THE PROJECTOR
Main Menu Sub Menu 2 Sub Menu 3 Sub Menu 4 Sub Menu 5 Sub Menu 6 Values
Image Color Settings Color Matching Red Hue 0 ~ 254
Saturation 0 ~ 254
Luminance 0 ~ 254
Reset Yes
Cancel [default]
Green Hue 0 ~ 254
Saturation 0 ~ 254
Luminance 0 ~ 254
Reset Yes
Cancel [default]
Blue Hue 0 ~ 254
Saturation 0 ~ 254
Luminance 0 ~ 254
Reset Yes
Cancel [default]
Cyan Hue 0 ~ 254
Saturation 0 ~ 254
Luminance 0 ~ 254
Reset Yes
Cancel [default]
Magenta Hue 0 ~ 254
Saturation 0 ~ 254
Luminance 0 ~ 254
Reset Yes
Cancel [default]
Yellow Hue 0 ~ 254
Saturation 0 ~ 254
Luminance 0 ~ 254
Reset Yes
Cancel [default]
White Red 0 ~ 254
Green 0 ~ 254
Blue 0 ~ 254
Reset Yes
Cancel [default]
White Balance Red Gain 0 ~ 100 [default: 50]
Green Gain 0 ~ 100 [default: 50]
Blue Gain 0 ~ 100 [default: 50]
Red Oset 0 ~ 100 [default: 50]
Green Oset 0 ~ 100 [default: 50]
Blue Oset 0 ~ 100 [default: 50]
Color Space (HDMI Input) Auto [default]
RGB (0 ~ 255)
RGB (16 ~ 235)
YUV
30
English

USING THE PROJECTOR
Main Menu Sub Menu 2 Sub Menu 3 Sub Menu 4 Sub Menu 5 Sub Menu 6 Values
Image Wall Color O [default]
Blackboard
Light Yellow
Light Green
Light Blue
Pink
Gray
3D Setup 3D Mode O [default]
Auto
3D Sync Type DLP-link [default]
3D Sync
3D Format Auto
Frame Packing
Side by Side
Top and Bottom
Frame Sequential
3D Sync Invert O [default]
On
3D Sync Out To Emitter [default]
To Next Projector
Reset Yes
Cancel [default]
Reset Yes
Cancel [default]
Display Light Source
Settings
Gaming Mode
Aspect Ratio 4:3
Digital Zoom 80 ~ 180 [default: 100]
Image Shift Horizontal 0 ~ 100 [default: 50]
Geometric
Correction
Light Source Mode Normal [default]
Eco Mode
Constant Luminance
Constant Power
Brightness Level 10% ~ 100% [default:
100%]
O [default]
On
16:9
21:9
LBX
Auto [default]
Native
Vertical 0 ~ 100 [default: 50]
V Keystone 0 ~ 40 [default: 20]
H Keystone 0 ~ 40 [default: 20]
English
31

USING THE PROJECTOR
Main Menu Sub Menu 2 Sub Menu 3 Sub Menu 4 Sub Menu 5 Sub Menu 6 Values
Display Geometric
Correction
Edge Mask 0 ~ 10 [default: 0]
Reset Yes
Device Setup Test Pattern O [default]
Projection
Orientation
Language English [default]
4-Corner Top Left
Top Right
Bottom Left
Bottom Right
Warping O [default]
On
Warping Adjustment (Adjust Pattern)
Grid Color Green [default]
Magenta
Red
Cyan
Reset Yes
Cancel [default]
Cancel [default]
Green Grid
Magenta Grid
White Grid
White
Black
Red
Green
Blue
Yellow
Magenta
Cyan
ANSI Contrast 4x4
Color bar
4K Full screen
Ceiling Auto [default]
On
O
Rear O [default]
On
Deutsch
Français
Italiano
Español
Português
Polski
Nederlands
Norsk
繁體中文
32
English

USING THE PROJECTOR
Main Menu Sub Menu 2 Sub Menu 3 Sub Menu 4 Sub Menu 5 Sub Menu 6 Values
Device Setup Language
Menu Settings Menu Location Top Left
Menu Timer O
Information Hide O [default]
High Altitude O [default]
Lens Settings Focus [Focus for adjust]
Zoom [Zoom for adjust]
Lens Function Lock
Lens Shift [Pattern for adjust]
Lens Calibration Yes
Lens Shift Memory Save Memory Memory 1 ~ Memory 5
Apply Memory Memory 1 ~ Memory 5
Clear Memory Yes
Reset Yes
Power Settings Direct Power On O [default]
Signal Power On O [default]
Auto Power O
(min.)
Sleep Timer (min.) 0 ~ 960 [default: 0]
Power Mode
(Standby)
12V Trigger O [default]
Reset Yes
简体中文
日本語
한국어
Русский
Magyar
ไทย
Top Right
Center [default]
Bottom Left
Bottom Right
5s
10s [default]
20s
30s
60s
On
On
Unlock [default]
Cancel [default]
Cancel [default]
Cancel [default]
On
On
0, 2 ~ 180 [default: 20]
Eco
Active
Communication [default]
On
Cancel [default]
English
33

USING THE PROJECTOR
Main Menu Sub Menu 2 Sub Menu 3 Sub Menu 4 Sub Menu 5 Sub Menu 6 Values
Device Setup OMS [Pop-up Binding Dialog box]
[Display binding information]
Shutter Startup Shutter O [default]
Shutter On
Security Security O [default]
On
Security Timer Month 0 ~ 35 [default: 0]
Day 0 ~ 29 [default: 0]
Hour 0 ~ 23 [default: 0]
Change Password
Keypad Lock O [default]
On
Keypad LED
Settings
Startup Logo Change Logo Default
Background
Color
User Data Save All Settings Memory 1 ~ Memory 5
Load All Settings Memory 1 ~ Memory 5
System Update Auto O [default]
Auto Download O
Update Yes
Device Reset Reset OSD Ye s
Reset All Settings Yes
Reset Selective Image Yes
Display Yes
O
On [default]
Neutral
None
Blue
Red
Green
Grey
White
Logo
[default: Memory 1]
[default: Memory 1]
On
On [default]
Cancel [default]
Cancel [default]
Cancel [default]
Cancel [default]
Cancel [default]
34
English

USING THE PROJECTOR
Main Menu Sub Menu 2 Sub Menu 3 Sub Menu 4 Sub Menu 5 Sub Menu 6 Values
Device Setup Device Reset Reset Selective Setup Yes
Cancel [default]
Input Yes
Cancel [default]
Audio Yes
Cancel [default]
Communication Ye s
Cancel [default]
Input Settings Auto Source O
On [default]
Quick Resync O
On [default]
Active Inputs HDMI 1 [default]
HDMI 2
HDBaseT
EDID Settings HDMI 1 EDID 1.4
2.0 [default]
HDMI 2 EDID 1.4
2.0 [default]
HDBaseT EDID 1.4
2.0 [default]
HDMI Out HDMI 1 [default]
HDMI 2
Reset Yes
Cancel [default]
Audio Volume 0 ~ 10 [default: 5]
Mute O [default]
On
Audio Output Auto [default]
Internal Speaker
Line Out
Reset Yes
Cancel [default]
Communication Device ID 0 ~ 99 [default: 0]
IR Function Front O
On [default]
Top O
On [default]
HDBaseT O [default]
On
English
35

USING THE PROJECTOR
Main Menu Sub Menu 2 Sub Menu 3 Sub Menu 4 Sub Menu 5 Sub Menu 6 Values
Communication Remote
Settings
Remote
Settings
LAN LAN Interface RJ-45 [default]
Control Crestron O
Remote Code 0 ~ 99 [default: 0]
Quick Switch Code O [default]
1 ~ 9
User1 HDMI 1
HDMI 2
Color Matching
Color Temperature
Projection Orientation
Light Source Mode
Freeze Screen
Network setup
Reset Selective
User2 HDMI 1
HDMI 2
Color Matching
Color Temperature
Projection Orientation
Light Source Mode
Freeze Screen
Network setup
Reset Selective
HDBaseT
Network Status Connected [read only]
Disconnected [read only]
MAC Address [read only]
DHCP O [default]
On
IP Address ---.---.---.---
[default: 192.168.0.100]
Subnet Mask ---.---.---.---
[default: 255.255.255.0]
Gateway ---.---.---.---
[default: 192.168.0.51]
DNS 1 ---.---.---.---
[default: 0.0.0.0]
DNS 2 ---.---.---.--- [default: 0.0.0.0]
Apply Yes
Cancel [default]
Reset Yes
Cancel [default]
On [default]
IP Address ---.---.---.---
[default: 192.168.0.2]
IP ID 2 ~ 255 [default: 5]
Port 0 ~ 65535 [default: 41794]
36
English

USING THE PROJECTOR
Main Menu Sub Menu 2 Sub Menu 3 Sub Menu 4 Sub Menu 5 Sub Menu 6 Values
Communication Control Crestron Setup
Apply
PJ Link O
Extron O
AMX O
Telnet O
HTTP O
Baud Rate 9600
Reset Yes
Information Regulatory
Serial Number
Source Info. Source
Resolution
Signal Format
Pixel Clock
Refresh Rate
Color Bit Depth
Color Gamut
Color Space
Picture Mode
Light Source
Mode
Device ID
Remote Code
System Status Standby Mode
Projection Hours
Total Hours
Normal
Eco Mode
Custom Power
Ambient Temp.
Yes
Cancel [default]
On [default]
On [default]
On [default]
On [default]
On [default]
19200
38400
57600
115200 [default]
Cancel [default]
English
37

USING THE PROJECTOR
Main Menu Sub Menu 2 Sub Menu 3 Sub Menu 4 Sub Menu 5 Sub Menu 6 Values
Information System Status System Temp.
Control Crestron
Extron
PJ Link
AMX
Telnet
HTTP
LAN LAN Interface
MAC Address
Network Status
DHCP
IP Address
Subnet Mask
Gateway
DNS 1
DNS 2
FW Version Main Version
F-MCU Version
A-MCU Version
LAN Version
Formatter Version
HDBaseT Version
38
English

USING THE PROJECTOR
Image menu
Learn how to congure image settings.
Submenus
• Picture Mode
• Dynamic Range
• Brightness
• Contrast
• Sharpness
• Gamma
• Dynamic Contrast
• Color Settings
• Wall Color
• 3D Setup
Picture Mode
There are several predened display modes that you can choose from to suit your viewing preference. Each mode
has been ne-tuned by our expert colour team to ensure superior colour performance for wide range of content.
Vivid
In this mode, the color saturation and brightness are well-balanced. Choose this mode for playing games.
HDR / HLG
Decodes and displays High Dynamic Range (HDR) / Hybrid Log Gamma (HLG) content for the deepest
blacks, brightest whites, and vivid cinematic color using REC.2020 color gamut. This mode will be
automatically enabled if HDR/HLG is set to Auto (and HDR/HLG Content is sent to projector – 4K UHD
Blu-ray, 1080p/4K UHD HDR/HLG Games, 4K UHD Streaming Video). While HDR/HLG mode is active,
other display modes (Cinema, Reference, etc.) cannot be selected as HDR/HLG delivers color that is highly
accurate, exceeding the color performance of the other display modes.
Cinema
Provides the best balance of detail and colors for watching movies.
sRGB
Standardized accurate color.
Bright
This mode is suitable for environments where extra-high brightness is required, such as using the projector in
well-lit rooms.
DICOM SIM.
This mode has been created for viewing greyscale images, perfect for viewing X-rays and scans during
medical training.
Blending
When using multiple projectors, this mode can eliminate the visible banding and create a single bright, high
resolution image across the screen.
3D
Optimized settings for watching 3D contentd.
Note: To experience the 3D eect, you will need to have compatible DLP Link 3D glasses. See 3D section for
more information.
English
39

USING THE PROJECTOR
High Frame Rate
High Frame Rate (HFR) refers to higher frame rates than typical prior practice.
Note:
• The High Frame Rate mode only supports input resolutions of 1080P at 120/240Hz, with an output
refresh rate of 240Hz.
• The system will automatically detect the input signal and switch to this mode. It is generally not available
for manual use.
User
Based on Vivid, users can adjust color settings and save them.
Note:
• When 3D mode is selected, the Vivid, HDR, HLG, Cinema, sRGB, Bright, DICOM SIM., Blending, High
Frame Rate, and User mode will be unavailable.
• When Blending mode is selected, the HDR, HLG, 3D, and High Frame Rate mode will be unavailable.
HDR
Best for playing HDR videos.
Dynamic Range
Congure the HDR (High Dynamic Range) setting and its eect when displaying video from 4K Blu-ray players and
streaming devices.
HDR
• O: Turn o HDR Processing. When set to O, the projector will NOT decode HDR content.
• Auto: Auto detect HDR signal.
HDR Brightness
Adjust the brightness of the HDR.
Brightness
Adjust the luminous brightness of the projected image to adapt to dierent ambient light.
Contrast
Adjust the contrast ratio of the projected image. The contrast controls the degree of dierence between the lightest
and darkest parts of the image.
Sharpness
Adjust the clarity of details in the projected image to make the image clearer and sharper.
Gamma
Select an appropriate gamma value to optimize the image conformance to dierent input sources.
40
Film
Best for home theater setting.
Graphics
Best for projecting photos from PC input.
1.8 / 2.0 / 2.2 / 2.4 / 2.6
Select a preset gamma value to adjust the image performance. In general, the smaller the value, the brighter
the dark areas of the image will become. The standard gamma value is 2.2.
English

USING THE PROJECTOR
Vivid
Best for playing games. In this mode, color saturation and brightness are well-balanced.
3D
Best for playing 3D videos.
Blackboard
Best for projecting on to a blackboard.
DICOM SIM.
Best for projecting monochrome medical images, such as X-ray diagram.
Note: When Blending mode is selected, only gamma 2.2 is supported.
HDR
Best for playing HDR videos.
Dynamic Contrast
Set up the Dynamic Contrast to maximize the contrast for dark content.
Dynamic Black
Enable this function to automatically adjust the contrast ratio for video sources. It improves the black level in
dark scenes by reducing the light output.
Speed
Adjust the speed of the light source correction. The value ranges from 1 to 160. A lower value makes the
correction slower and less aggressive while a higher value results in the faster correction.
Strength
Set the strength of the dynamic contrast adjustment. The value ranges from 0 to 3, the higher the value the
stronger the correction.
Level
Adjust the light source when the brightness level of the current content gets lower than the set value. The
value ranges from 50% to 100%. The higher the value, the larger the range to adjust the light source.
Extreme Black
Enable this function to automatically increase the contrast ratio by turning o the laser light when black image
is detected.
AV Mute Timer
Set a timer for the laser light to turn o after detecting black content. The set value ranges from 0s to 10s.
Black Signal Level
Set a black level value as the threshold for the Real Black function. The value can be adjusted from 0% to 5%,
with 0 being the darkest black and 5 being the brightest.
Note:
• When Dynamic Black is turned on, the Extreme Black will be unavailable.
• When Extreme Black is turned on, the Dynamic Black will be unavailable.
English
41

USING THE PROJECTOR
Color Settings
Congure the color settings of the projected image to improve the color performance.
Color
Adjust the saturation of the selected color. The value indicates the color shifts from or towards the white in the
center of the chromaticity diagram.
Tint
Adjust the color balance of red and green in video images.
BrilliantColor™
This adjustable item utilizes a new color-processing algorithm and enhancements to enable higher brightness
while providing true, more vibrant colors in picture.
Color Temperature
Adjust the color temperature of the projected image. The available options are Warm, Standard, Cool, or Cold.
Color Matching
Change the color of a projected image by adjusting each color component in the image. The adjustable color
includes Red, Green, Blue, Cyan, Yellow, and Magenta (R / G / B / C / Y / M).
• Red / Green / Blue / Cyan / Magenta / Yellow: Select a color for further adjustment.
± Hue: Adjust the hue of the selected color. The value reects the number of degrees of
rotation around the chromaticity diagram from the original color. Increasing value indicates
counterclockwise rotation, and decreasing value, clockwise rotation.
± Saturation: Adjust the saturation of the selected color. The value indicates the color shifts from
or towards the white in the center of the chromaticity diagram.
± Luminance: Adjust the luminance of the selected color. Increase the value to brighten the
image (add white to a color) or decrease the value to darken the image (add black to a color).
± Reset: Reset the Red, Green, Blue, Cyan, Magenta, or Yellow color to factory default values.
• White: Adjust the white color performance via setting the Red, Green, and Blue values.
± Red / Green / Blue: Adjust the red, green, and blue colors to optimize the white color
performance.
White Balance
Adjust the white balance of the projected image via gain and oset. Gain and oset are individual controls for
each RGB channels used to set greyscale. The Gains calibrate the color of the dark parts and Bias calibrate
the white parts.
• Red / Green / Blue Gain: Adjust the color of the image’s bright areas.
• Red / Green / Blue Oset: Adjust the color of the image’s dark areas.
Color Space
Select a color space that has been specically tuned for the input signal. The available options are Auto
(default), RGB (0 ~ 255), RGB (16 ~ 235), and YUV.
Note: When 3D, High Frame Rate, or Blending mode is selected, the Color Temperature will be unavailable.
Wall Color
Set the wall color of the projector to achieve best color performance for a specic wall. The available options are
O, Blackboard, Light Yellow, Light Green, Light Blue, Pink, and Gray.
3D Setup
3D video le combines two slightly dierent images (frames) of the same scene representing the dierent views
that the left and right eyes see. When these frames are displayed fast enough and viewed with 3D glasses
synchronized with the left and right frames, the viewer’s brain then assemble the separate images into a single 3D
image. 3D Menu provides options to set up the 3D functions to correctly display 3D videos.
42
English

USING THE PROJECTOR
3D Mode
• O: Select “O” to turn o 3D mode.
• Auto: Select “Auto” to turn on 3D mode.
3D Sync Type
Select a proper 3D technology according to how the 3D sync signal is processed.
• DLP-Link: Select DLP-Link when the 3D sync signal is generated by the DLP Link technology built
into the projector. DLP Link works only with the glasses that are compatible with DLP 3D technology
and the 3D function is enabled.
• 3D Sync: Select 3D Sync when the 3D sync out signal is sent to an emitter or another projector
through the 3D sync out port.
Note: 3D Sync out does not support 3D frame delay.
3D Format
Use this option to select the appropriate 3D format content.
• Auto: When a 3D identication signal is detected, the 3D format is selected automatically.
• Frame Packing: Display 3D signal in “Frame Packing” format.
• Side by Side: Display 3D signal in “Side-by-Side” format.
• Top and Bottom: Display 3D signal in “Top and Bottom” format.
• Frame Sequential: Display 3D signal in “Frame Sequential” format.
3D Sync Invert
Use this option to enable/disable the 3D sync invert function.
3D Sync Out
Set up the transmission of the 3D sync output signal.
• To Emitter: Send the 3D sync signal to the emitter connected to the 3D sync out port.
• To Next Projector: Send the 3D sync signal to next projector when using multiple projectors.
Reset
Reset the function settings to factory default values.
Note:
• When Blending mode is selected, the 3D Sync Type, 3D Sync Invert, and 3D Sync Out will be unavailable.
• This projector is a 3D ready projector with DLP-Link 3D solution.
• Please ensure that 3D glasses are in use for DLP-Link 3D content before enjoying your video.
• This projector supports frame sequential (page-ip) 3D via HDMI1/HDMI2 ports.
• To enable 3D mode, the input frame rate should be set to 60Hz only, lower or higher frame rate is not
supported.
• To reach the best performance, resolution 1920x1080 is recommended, please note that 4K
(3840x2160) resolution is not supported in 3D mode.
Reset
Reset all the image settings to factory default values.
English
43

USING THE PROJECTOR
Display menu
Learn how to congure the settings to properly project images according to your installation circumstances.
Submenus
• Light Source Settings
• Gaming Mode
• Aspect Ratio
• Digital Zoom
• Image Shift
• Geometric Correction
• Edge Mask
Light Source Settings
Set up the light source to control the projector brightness.
Light Source Mode
Select a light source mode depending on the installation requirements. The available options are Normal, Eco
Mode, Constant Luminance, and Constant Power.
Brightness Level
Adjust the brightness level from 10% to 100%.
Note:
• Normal: Brightness Level is xed at 100% and cannot be adjusted.
• Eco Mode: Brightness Level is xed at 50% and cannot be adjusted.
• Constant Luminance: Brightness Level can only be adjusted from 50% to 80%.
• Constant Power: Brightness Level can be adjusted from 10% to 100%.
Gaming Mode
Enable this feature to reduce response times (input latency) during gaming to 4.5 ms (1080p120Hz). All geometric
correction settings (example: Keystone, Four Corners) will be disabled when Gaming Mode is enabled. For more
information is below.
Note:
• The input lag by signals is described in the following table:
• The values in the table can vary slightly.
Source Timing Gaming Mode Output Resolution Input Lag Frame
1080p60 On 2160p 16.9 ms ~1 frame
1080p120 On 2160p 8.9 ms ~0.5 frame
1080p240 On 2160p 4.5 ms ~0.25 frame
4K60 On 2160p 16.8 ms ~1 frame
1080p60 O 2160p 25.22 ms ~1.5 frame
1080p120 O 2160p 12.8 ms ~0.8 frame
1080p240 O 2160p 6.4 ms ~0.4 frame
4K60 O 2160p 50.2 ms ~3 frame
44
English

USING THE PROJECTOR
Aspect Ratio
Set the aspect ratio of the projected image. The available options are 4:3, 16:9, 21:9, LBX, Auto, or Native. Select
Auto to display the detected image size.
• 4:3: This format is for 4:3 input sources.
• 16:9: This format is for 16:9 input sources, like HDTV and DVD enhanced for Wide screen TV.
• 21:9: This format is for 21:9 input source, like HDTV and DVD enhanced for Wide screen TV.
• LBX: This format is for non-16x9, letterbox source and if you use external 16x9 lens to display 2.35:1
aspect ratio in full resolution.
• Auto: Automatically selects the appropriate display format.
• Native: This format displays the original image without any scaling.
Note: Native setting is not available when the input resolution is lower than 1080p.
Digital Zoom
Use to reduce or magnify an image on the projection screen. Digital Zoom is not the same as optical zoom and can
result in degradation of image quality.
Note: Zoom settings are retained on power cycle of the projector.
Image Shift
Adjust the projected image position.
Horizontal
Use the and buttons to adjust the projected image position horizontally.
Vertical
Use the p and q buttons to adjust the projected image position vertically.
Note: When 3D mode is selected, the Image Shift will be unavailable.
Geometric Correction
Congure the geometric settings to reshape the image for dierent projection surfaces.
V Keystone
Adjust image distortion vertically and make a squarer image. Vertical keystone is used to correct a keystoned
image shape in which the top and bottom are slanted to one of the sides. This is intended when for use with
vertically on-axis applications.
H Keystone
Adjust image distortion horizontally and make a squarer image. Horizontal keystone is used to correct a
keystoned image shape in which the left and right borders of the image are unequal in length. This is intended
for use with vertically on-axis applications.
English
45

USING THE PROJECTOR
4-Corner
Reshape the image by moving the 4 corners of the image to have it t a specic projection surface.
Warping
Enable or disable the warping function.
Warping Adjustment
Use warping to adjust the image to align with the border of the projection surface (screen) or to eliminate
image distortion (caused by an uneven surface).
Note: Warping adjustment only supports 5x3 grid points.
Grid Color
Select a grid color for warp and blend pattern between Green, Magenta, Red, and Cyan.
Reset
Reset geometric correction settings to factory default values.
Edge Mask
The edge blending function allows you to hide one or multiple edges of the projected image. You can use this
function to remove the video encoding noise on the edges of the video images.
Note: When 3D mode is turned on, the Edge Mask will be unavailable.
Reset
Reset all the display settings to factory default values.
46
English

USING THE PROJECTOR
Device Setup menu
Learn how to congure the system settings for the projector.
Submenus
• Test Pattern
• Projection Orientation
• Language
• Menu Settings
• High Altitude
• Lens Settings
• Power Settings
• OMS
• Shutter
• Security
• Keypad Lock
• Keypad LED Settings
• Startup Logo
• Background Color
• User Data
• System Update
Test Pattern
Select a test pattern. The available options are O, Green Grid, Magenta Grid, White Grid, White, Black, Red,
Green, Blue, Yellow, Magenta, Cyan, ANSI Contrast 4x4, Color bar, and 4K Full screen.
Projection Orientation
Change the image direction by selecting a proper projection mode.
Ceiling
Enable the function for ceiling mount installation.
Rear
Check the function for rear projection.
Language
Select a language for the OSD menu. The available languages are English, German, French, Italian, Spanish,
Portuguese, Polish, Dutch, Norwegian, Traditional Chinese, Simplied Chinese, Japanese, Korean, Russian,
Hungarian, and Thai.
Menu Settings
Menu Location
Select the menu location from Top Left, Top Right, Center, Bottom Left, and Bottom Right.
Note: Due to the limitation of hardware, the update of Bottom Left & Right OSD will become slower.
Menu Timer
Set the length of time the menu displays on the screen.
Information Hide
Enable or disable the corner information messages, such as input source, IP address, and so on.
English
47

USING THE PROJECTOR
High Altitude
Select On to increase the fan speed. To ensure the image quality and prevent damage to the projector, enable High
Altitude mode in high temperature, high humidity, or high altitude environment.
Lens Settings
Congure the lens settings to adjust the image quality and position.
Focus
Use the p and q buttons to adjust the focus of the projected image.
Zoom
Use the
Lens Function
Lock the lens to prevent the lens motors from moving, which disables all lens functions.
Note: When Lens Function is turned on, the Focus, Zoom, Lens Shift, Lens Calibration, and Lens Shift
Lens Shift
Use the p, q, , right buttons to adjust the lens position to shift the projected area.
Note: 1.15x lens model oating ring
• For better optical performance, manually adjust the oating ring before adjusting Zoom & Focus.
• Floating ring’s label scale shows the projection distance.
• The projection distance is from the projector lens to the screen. For example, if the distance
and buttons to adjust the size of the projected image.
Memory will be unavailable.
between the screen and the projector lens is 1.4 m, adjust the oating ring scale to “1.40” for better
performance.
48
Lens Calibration
Calibrate the lens position to return it to the center.
English

USING THE PROJECTOR
Lens Shift Memory
This projector can save up to ve lens settings, which records the lens position.
• Save Memory: Select a record from 1 to 5 to save the current lens settings.
• Apply Memory: Select a record from 1 to 5 to apply the lens settings.
• Clear Memory: Clear the saved lens records.
Note:
• Process the lens calibration before setup lens shift memory.
• Performing a lens calibration will clear the saved lens records.
• When the lens calibration is not completed, the lens shift memory will be unavailable.
Reset
Reset the lens settings to factory default values.
Power Settings
Congure the projector’s power settings.
Direct Power On
Choose “On” to activate Direct Power mode. The projector will automatically power on when AC power is
supplied, without pressing the “Power” key on the projector keypad or on the remote control.
Signal Power On
Turn on this function to have the projector automatically turning on when connected to HDMI input sources. It
only applies to the standby projector set to Communication mode.
Auto Power O (min.)
Set an interval timer for the projector to automatically turn o if no signal is detected within the specied time
period. Press the and buttons to add or reduce time, 1 minutes for each press.
Sleep Timer (min.)
Set an interval timer for the projector to automatically turn o after operating for the specied amount of time.
Power Mode (Standby)
Setup the projector’s standby mode.
• Eco: Minimum power consumption (0.5 Watt) which does not allow network control.
• Active: Low power consumption (< 2 Watt) which allows the LAN module to enter sleep mode and
supports to be woken by Wake on LAN (WoL). When the LAN module is woken by WoL, the projector
is ready to receive commands over the network.
• Communication: More power consumption that allows controlling the projector over the network.
12V Trigger
Use this function to enable or disable the trigger.
Note: 3.5mm TS type mini jack that outputs 12V 200mA (max.) for relay system control.
Reset
Reset the power settings to factory default values.
12V Trigger Output
GND
English
49

USING THE PROJECTOR
OMS (Optoma Management Suite)
Control the projector with OMS. For more information, please visit https://onlinemanual.optoma.com/.
Shutter
Set up the shutter behavior.
Startup
Select the shutter behavior when turning on the projector.
• Shutter O: Projector projects images normally after being powered on.
• Shutter On: Projector automatically turns on shutter after being powered on
Security
Set up security verication to protect the projector.
Security
Select On to protect the projector with a password.
Note:
• For the rst time use security function, please enter a password when security function turned on.
• Non rst time use security function, please enter previous password to verify when security function
turned on again.
Security Timer
Specify the length of time the projector can be used without the password. Once the timer counts to 0, the user
must enter a password to use the projector. The timer restarts every time the projector is turned on.
Change Password
Change the projector password.
Note: In the last minute before reaching a specied timer, including Auto Power O, Sleep Timer, and Security
Timer, an on-screen message will pop up warning that the projector shuts down in 60 seconds. Press
any button on the remote control or projector keypad to reset the timer and the projector remains on.
Keypad Lock
When the keypad lock function is “On”, the Keypad will be locked. However, the projector can be operated by the
remote control. By selecting “O”, you will be able to reuse the Keypad.
50
English

USING THE PROJECTOR
Keypad LED Settings
Enable or disable the keypad LED.
Startup Logo
Set up the logo for the startup screen.
Change Logo
Change the logo for the startup screen. Apart from the Default logo, user can select from Default and Neutral.
• Default: The projector default logo.
• Neutral: The logo is not displayed on the startup screen.
Background Color
Set a background color to display when no input signal is detected. The available options are None, Blue, Red,
Green, Grey, White, and Logo.
User Data
User can save the projector settings as user data and reload the settings later.
Save All Settings
Save all of the projector settings as user data. User can save up to 5 records.
Load All Settings
Load the previously saved user data.
System Update
Update the system automatically or manually.
Auto
System checks for new updates automatically every time it is connected to the Internet.
Auto Download
When both “Auto” and “Auto Download” are On, new updates will be downloaded automatically when the
projector is restarted.
Note:
1. When new updates are automatically downloaded, there will be no prompts.
2. When the Power O button is pressed, if the download is complete, a prompt to update will pop up
3. Select the Update option to start the update.
Update
Manually update the system rmware.
Device Reset
Reset the settings to factory default values.
Reset OSD
Reset OSD settings to default values.
Reset All Settings
Reset all projector settings to default values.
Reset Selective
Reset the settings of one of the main menus. User can choose from Image, Display, Setup, Input, Audio, and
Communication.
English
51

USING THE PROJECTOR
Input Settings menu
Learn how to congure the projector input settings.
Submenus
• Auto Source
• Quick Resync
• Active Inputs
• EDID Settings
• HDMI Out
Auto Source
When Auto Source is enabled, the projector automatically detects and selects the input signal. Once an input
source is selected, press the Input button on the remote control or keypad to switch to other available sources.
When the function is disabled, pressing Input will bring up the Active Inputs submenu.
Quick Resync
Set the quick resync feature.
Active Inputs
Select an input signal from the source list. The available input sources are HDMI1, HDMI2, and HDBaseT.
EDID Settings
Set the EDID compatibility.
HDMI 1 EDID / HDMI 2 EDID
When receiving a HDMI signal, set the projector’s EDID compatibility to display the signal correctly. Select 1.4
for the input devices with HDMI 1.4, or 2.0 for HDMI 2.0 devices.
HDBaseT EDID
When receiving a HDMI signal via HDBaseT, set the projector’s EDID compatibility to display the signal
correctly. Select 1.4 for the input devices with HDMI 1.4, or 2.0 for HDMI 2.0 devices.
HDMI Out
Set the HDMI 1 or HDMI 2 port to output the signal.
Reset
Reset all the input settings to factory default values.
52
English

USING THE PROJECTOR
Audio menu
Learn how to congure audio settings.
Submenus
• Volume
• Mute
• Audio Output
Volume
Adjust the volume level.
Mute
Turn o or turn on the projector sound.
Audio Output
Select the audio output between Internal Speaker and Line Out.
Reset
Reset all the audio settings to factory default values.
English
53

USING THE PROJECTOR
Communication menu
Communication menu is used to congure the settings that allow the projector to communicate with other projectors
or control devices.
Submenus
• Device ID
• IR Function
• Remote Settings
• LAN
• HDBaseT Control
• Control
• Baud Rate
Device ID
Assign an ID code for the projector from 00 to 99. Use this code as the projector ID when controlling the projector
by RS232, Telnet or other control methods.
IR Function
Set the remote receiver for the projector to control the communication between the projector and the IR remote.
Front
Enable or disable the front remote receiver.
Top
Enable or disable the top remote receiver.
HDBaseT
Select On to set the HDBaseT terminal as the remote receiver.
Remote Settings
Congure the settings of the Infra-Red (IR) remote control.
Remote Code
Press and hold the remote control ID key. When all the key lights turn on, press the number key 00-99 to assign a
number. When all key lights ash rapidly twice, the remote control code has been changed. At this time, release the
remote control ID key.
Quick Switch Code
The IR receiving function of the projector can be temporarily deactivated by hot key (0 ~ 9) to avoid the IR
interference between projectors. The remote ID needs to be set to All.
User 1 / User 2
Assign a function to the User 1 and User 2 buttons on the remote control. It allows you to use the function
easily without going through the OSD menus. The available functions are HDMI 1, HDMI 2, Color Matching,
Color Temperature, Projection Orientation, Light Source Mode, Freeze Screen, Network, and Reset Selective.
LAN
Congure the projector’s network settings.
LAN Interface
To avoid clash, specify the LAN interface to RJ-45 or HDBaseT.
Network Status
Display the network connection status. (Read only)
MAC Address
Display the MAC address. (Read only)
English
54

USING THE PROJECTOR
DHCP
Turn on DHCP to automatically acquire IP address, subnet mask, gateway, and DNS.
IP Address
Assign the projector’s IP address.
Subnet Mask
Assign the projector’s subnet mask.
Gateway
Assign the projector’s gateway.
DNS 1/DNS 2
Assign the projector’s DNS 1/DNS 2.
Apply
Apply the wired network settings.
Note: If you have adjusted the settings for DHCP, IP Address, Subnet Mask, Gateway, DNS1/2, please be
sure to execute “Apply” so that the system will apply any changes to the network settings.
Reset
Reset the network settings to default factory values.
Control
This projector can be controlled remotely by a computer or other external devices through wired network
connection. It allows the user to control one or more projectors from a remote control center, such as powering the
projector on or o, and adjusting the image brightness or contrast.
Use the Control submenu to select a control device for the projector.
Crestron
Control the projector with Crestron controller and related software (Port: 41794).
For more information, please visit http://www.crestron.com.
• Crestron Setup: Setup the Crestron IP Address, IPID, and Port. Then select Crestron Setup Apply to
save the modications.
Note: Crestron settings on the OSD only support Crestron V1 functions. If you want to congure Crestron V2
functions or more detailed settings, you need to go to the web page to set them.
PJ Link
Control the projector with PJLink Class2 commands (Port: 4352).
For more information, please visit http://pjlink.jbmia.or.jp/english.
Extron
Control the projector with Extron devices (Port: 2023).
For more information, please visit http://www.extron.com.
AMX
Control the projector with AMX devices (Port: 9131).
For more information, please visit http://www.amx.com.
Note: Only supports AMX Discovery function.
Telnet
Control the projector using RS232 commands though Telnet connection (Port: 23).
For more information, refer to “Using RS232 command by Telnet” on page 58.
English
55

USING THE PROJECTOR
HTTP
Control the projector with web browser (Port: 80).
For more information, refer to “Overview of the web control panel” on page 57.
Note:
• Crestron is a registered trademark of Crestron Electronics, Inc. of the United States.
• Extron is a registered trademark of Extron Electronics, Inc. of the United States.
• AMX is a registered trademark of AMX LLC of the United States.
• PJLink applied for trademark and logo registration in Japan, the United States of America, and other
countries by JBMIA.
• For more information about the various types of external devices which can be connected to the LAN
/ RJ45 port and remotely control the projector, as well as the supported commands for these external
devices, please contact the Support-Service directly.
• Support OMSC and OMSL. For more information, please contact the Support-Service directly.
Setup Network Control
LAN_RJ45 function
For simplicity and ease of operation, the projector provides diverse networking and remote management
features.
The LAN / RJ45 function of the projector through a network, such as remotely manage: Power On / O,
brightness, and contrast settings.
Projector
(Ethernet)
Wired LAN terminal functionalities
This projector can be controlled by using a PC (laptop) or other external device via LAN / RJ45 port and
compatible with Crestron / Extron / AMX (Device -Discovery) / PJLink.
The projector is supported by the specied commands of the Crestron Electronics controller and related
software, for example RoomView
Using the web control panel
The web control panel allows the user to congure various projector settings using a web browser from any
personal computer or mobile devices.
®
.
56
System Requirements
To use the web control panel, make sure your devices and software meet the minimum system requirements
• RJ45 cable (CAT-5e)
• PC, laptop, mobile phone, or tablet installed with a web browser
English

USING THE PROJECTOR
• Compatible web browsers
± Microsoft Edge 40 or higher version
± Firefox 57 or higher version
± Chrome 63 or higher version
Overview of the web control panel
Congure the projector settings using web browser.
Menu Description
HOME View the projector information and rmware version details.
IMAGE To congure image settings.
DISPLAY To congure the settings to properly project images according to your installation
circumstances.
INPUT SETTINGS To congure the projector input settings.
DEVICE SETUP To congure the system settings for the projector.
COMMUNICATION Communication menu is used to congure the settings that allow the projector to
communicate with other projectors or control devices.
INFORMATION View the projector information about its status and settings. The projector
information is read only.
English
57
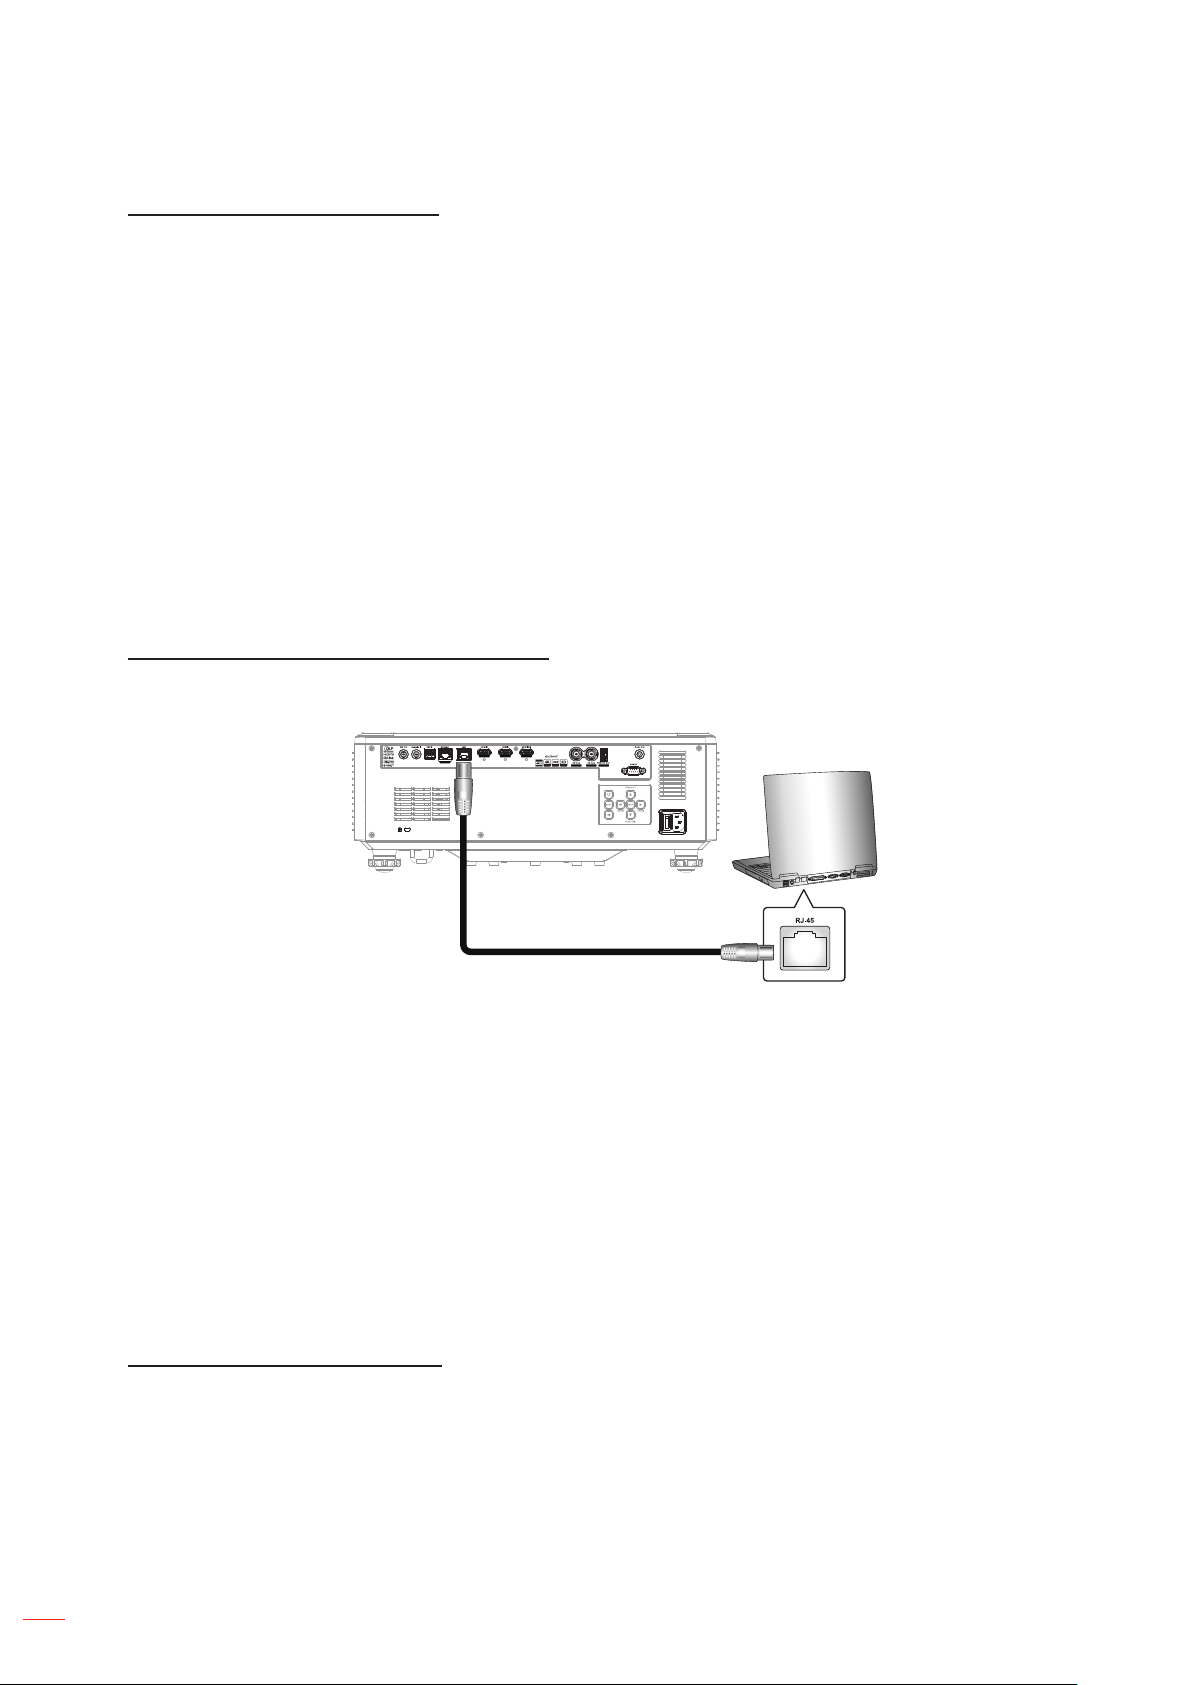
USING THE PROJECTOR
Accessing the web control panel
When network is available, connect the projector and the computer to the same network. Use the projector
address as the web URL to open the web control panel in a browser.
1. Check the projector address using the OSD menu.
• Setup: Control → LAN → IP Address.
Note: Make sure DHCP is enabled.
2. Open a web browser and type the projector address in the address bar.
3. The web page redirects to the web control panel.
4. In the Username eld, type the username: admin (rst time login).
Note:
• When logging in for the rst time, you don't need to enter a password.
• It is needed to change the username and password once you have logged in. It is also advised
to use a strong password.
When network is not available, refer to “Directly connect the projector to a computer” on page 58.
Directly connect the projector to a computer
When network is not available, connect the projector to the computer directly using a RJ-45 cable, and
congure the network settings manually.
RJ-45 Cable
1. Assign IP address to the projector
• From the OSD menu, select LAN > DHCP.
• Turn o DHCP, and manually set the projector’s IP Address, Subnet Mask, and Gateway.
• Press Enter to conrm the settings.
2. Assign IP address to the computer
• Set the Default Gateway and Subnet Mask of the computer to match the projector.
• Set the IP address of the computer to match the rst three numbers of the projector.
For example, if the projector IP address is 192.168.0.100, set the computer IP address to
192.168.0.xxx, where xxx is not 100.
3. Open a web browser and type the projector address in the address bar.
4. The web page redirects to the web control panel.
Using RS232 command by Telnet
This projector supports using RS232 commands through Telnet connection.
1. Set up a direct connection between the projector and computer. Refer to Directly connect the projector
to a computer on page 58.
2. Disable the rewall on the computer.
3. Open the command dialogue on the computer. For Windows 7 operating system, select Start > All
Programs > Accessories > Command Prompt.
4. Input the command “telnet ttt.xxx.yyy.zzz 23”.
Replace “ttt.xxx.yyy.zzz” with the projector IP address.
58
5. Press Enter on the computer keyboard.
English

USING THE PROJECTOR
Specication for RS232 by Telnet
• Telnet: TCP
• Telnet port: 23 (contact service team for more details)
• Telnet utility: Windows “TELNET.exe” (console mode).
• Disconnection for RS232-by-Telnet control normally: Close
• Below are the limitations for using Windows Telnet utility directly after TELNET connection is ready:
± There is less than 50 bytes for successive network payload for Telnet-Control application.
± There is less than 26 bytes for one complete RS232 command for Telnet-Control.
± Minimum delay for next RS232 command must be more than 200 (ms).Information menu.
Baud Rate
Set the baud rate for Serial Port In and Serial Port Out. The available options are 9600, 19200, 38400, 57600, and
115200 (default).
Reset
Reset all control settings to default factory values.
Information menu
View the projector information about its status and settings. The projector information is read only.
Submenus
• Regulatory
• Serial Number
• Source Info.
• Light Source Mode
• Device ID
• Remote Code
• System Status
• Control
• LAN
• FW Version
Regulatory
Display the projector model name.
Serial Number
Display the projector serial number.
Source Info.
Source
Display the current input signal of the projector.
• Resolution: Display the resolution of the current input signal source of the projector.
• Signal Format: Display the format of the current input signal source of the projector.
• Pixel Clock: Display the pixel clock of the projector’s current input signal source.
• Refresh Rate: Display the horizontal and vertical refresh frequency of the projector’s current input
signal source.
• Color Bit Depth: Displays the color depth of the current input signal.
• Color Gamut: Displays the Color Gamut of the current input signal.
• Color Space: Display the color space of the projector’s current input signal source.
• Picture Mode: Displays the Picture mode used by the projector’s current input signal.
English
59

USING THE PROJECTOR
Light Source Mode
Display the current Light Source Mode setting of the projector.
Device ID
Display the current Device ID setting of the projector.
Remote Code
Display the current remote code setting of the projector.
System Status
Display the projector system status information.
Standby Mode
Display the current standby mode setting of the projector.
Projection Hours
Display the total projector usage hours.
Total Hours
Displays the total laser usage time of the projector in Normal, Eco and Custom Power modes.
Normal
Displays the total laser usage time of the projector in Normal mode.
Eco Mode
Displays the total laser usage time of the projector in Eco mode.
Custom Power
Displays the total laser usage time of the projector in Custom Power mode.
Ambient Temp.
Display the current ambient temperature of the projector.
System Temp.
Display the current system temperature of the projector.
Control
Display projector control setting information.
Crestron
Display the current Crestron on or o setting of the projector.
Extron
Display the current Extron on or o setting of the projector.
PJLink
Display the current PJLink on or o setting of the projector.
60
AMX
Display the current AMX on or o setting of the projector.
Telnet
Display the current Telnet on or o setting of the projector.
HTTP
Display the current HTTP on or o setting of the projector.
English

LAN
Display the projector network setting information.
LAN Interface
Display the current LAN interface settings of the projector.
MAC Address
Display the projector MAC address information.
Network Status
Display the projector network connection status.
DHCP
Display the projector DHCP settings.
IP Address
Display the current IP address of the projector.
Subnet Mask
Display the current Subnet Mask of the projector.
Gateway
Display the current Gateway of the projector.
DNS 1/ DNS 2
Display the current DNS1 and DNS2 address of the projector.
FW Version
Display the projector Main, F-MCU, A-MCU, LAN, Formatter, HDBaseT rmware version information.
English
61

ADDITIONAL INFORMATION
Compatible Resolutions
Digital
HDMI 2.0 / HDBaseT
Established Timing Standard Timing Detail Timing Supported Video Timing
1024x768 @60Hz 1024x768 @120Hz 3840x2160 @60Hz (Native) 1280x720 @50Hz
1024x768 @70Hz 1280x800 @75Hz 1920x1080 @60Hz 1280x720 @60Hz
1024x768 @75Hz 1280x1024 @60Hz 2560x1080 @60Hz 1280x720 @120Hz
1152x870 @75Hz 1360x765 @60Hz 1920x1080 @240Hz 1920x1080 @24Hz
1280x1024 @75Hz 1400x1050 @60Hz 1920x1080 @25Hz
1600x1200 @60Hz 1920x1080 @50Hz
1680x1050 @60Hz 1920x1080 @60Hz
1920x1200 @60Hz 1920x1080i @50Hz
1920x1080i @60Hz
1920x1080 @120Hz
2560x1080 @24Hz
2560x1080 @25Hz
2560x1080 @30Hz
2560x1080 @50Hz
2560x1080 @60Hz
3840x2160 @24Hz
3840x2160 @25Hz
3840x2160 @30Hz
3840x2160 @50Hz
3840x2160 @60Hz
4096x2160 @24Hz
4096x2160 @25Hz
4096x2160 @30Hz
4096x2160 @50Hz
62
English

ADDITIONAL INFORMATION
HDMI 1.4 / HDBaseT
Established Timing Standard Timing Detail Timing Supported Video Timing
1024x768 @60Hz 1024x768 @120Hz 720x480 @59Hz 1280x720 @50Hz
1024x768 @70Hz 1280x800 @75Hz 1366x768 @59Hz 1280x720 @60Hz
1024x768 @75Hz 1280x1024 @60Hz 1920x540 @60Hz 1280x720 @120Hz
1152x870 @75Hz 1360x765 @60Hz 1920x1080 @60Hz (Native) 1920x1080i @50Hz
1280x1024 @75Hz 1400x1050 @60Hz 1920x1200 @59Hz 1920x1080i @60Hz
1600x1200 @60Hz 2560x1080 @60Hz 1920x1080 @24Hz
1680x1050 @60Hz 1920x1080 @25Hz
1920x1200 @60Hz 1920x1080 @50Hz
1920x1080 @60Hz
1920x1080 @120Hz
2560x1080 @24Hz
2560x1080 @25Hz
2560x1080 @30Hz
2560x1080 @50Hz
2560x1080 @60Hz
3840x2160 @24Hz
3840x2160 @25Hz
3840x2160 @30Hz
4096x2160 @24Hz
4096x2160 @25Hz
4096x2160 @30Hz
True 3D video compatibility
Input timing
1280 x 720P @ 50Hz Top and Bottom
1280 x 720P @ 60Hz Top and Bottom
1280 x 720P @ 50Hz Frame Packing
1280 x 720P @ 60Hz Frame Packing
1920 x 1080P @ 24Hz Top and Bottom
1920 x 1080P @ 24Hz Frame Packing
1920 x 1080i @ 50Hz Side by Side
Input Resolutions HDMI 1.4a 3D Input
Note: If 3D input is 1080p@24Hz, the DMD should replay with integral multiple with 3D mode.
1920 x 1080i @ 60Hz Side by Side
800 x 600 @ 120Hz Frame Sequential
1024 x 768 @ 120Hz Frame Sequential
1280 x 720 @ 120Hz Frame Sequential
1280 x 800 @ 120Hz Frame Sequential
1920 x 1080P @ 60Hz Frame Sequential
1920 x 1080P @ 120Hz Frame Sequential
1920 x 1200 @ 60Hz Frame Sequential
English
63

ADDITIONAL INFORMATION
RS232 Port Setting and Signals Connection
RS232 Port Setting
Items Method
Communication Method Asynchronous Communication
Baud Rate
Data Bits
Parity None
Stop Bits 1
Flow Control None
RS232 Signals Connection
115200
8 bits
Computer COM Port
(D-Sub 9-pin connector)
Note: RS232 shell is grounded.
Projector COM Port
(D-Sub 9-pin connector)
64
English

ADDITIONAL INFORMATION
Image Size and Projection Distance
1.6x lens model
The size of pojected images is 50 ~ 300 inches (1.36 ~ 13.35 m)
Screen Size 16:9 (W x H) Projector Distance
Diagonal Length of
Image
inch m inch m inch m inch m inch m
50 1.27 43.6 1.11 24.5 0.62 53.5 1.36 85.8 2.18
60 1.52 52.3 1.33 29.4 0.75 64.6 1.64 103.5 2.63
70 1.78 61.0 1.55 34.3 0.87 75.7 1.92 121.3 3.08
80 2.03 69.7 1.77 39.2 1.00 86.8 2.20 138.6 3.52
90 2.29 78.4 1.99 44.1 1.12 97.9 2.49 156.3 3.97
100 2.54 87.1 2.21 49.0 1.25 109.0 2.77 174.0 4.42
120 3.05 104.6 2.66 58.8 1.49 131.2 3.33 209.1 5.31
150 3.81 130.7 3.32 73.5 1.87 164.5 4.18 261.8 6.65
180 4.57 156.8 3.98 88.2 2.24 198.0 5.03 314.6 7.99
200 5.08 174.3 4.43 98.0 2.49 219.9 5.59 349.6 8.88
250 6.35 217.8 5.53 122.5 3.11 275.4 7.00 437.8 11.12
300 7.62 261.4 6.64 147.1 3.74 330.9 8.41 525.6 13.35
Width Height Wide Tele
1.15x lens model
The size of pojected images is 50 ~ 1000 inches (0.70 ~ 17.04 m)
Screen Size 16:9 (W x H) Projector Distance
Diagonal Length of
Image
inch m inch m inch m inch m inch m
50 1.27 43.6 1.11 24.5 0.62 27.6 0.70 32.1 0.81
60 1.52 52.3 1.33 29.4 0.75 33.4 0.85 38.8 0.99
70 1.78 61.0 1.55 34.3 0.87 39.2 1.00 45.5 1.16
80 2.03 69.7 1.77 39.2 1.00 45.0 1.14 52.3 1.33
90 2.29 78.4 1.99 44.1 1.12 50.9 1.29 59.0 1.50
100 2.54 87.2 2.21 49.0 1.25 56.7 1.44 65.7 1.67
120 3.05 104.6 2.66 58.8 1.49 68.3 1.74 79.2 2.01
150 3.81 130.7 3.32 73.5 1.87 85.8 2.18 99.3 2.52
180 4.57 156.9 3.98 88.2 2.24 103.3 2.62 119.5 3.04
200 5.08 174.3 4.43 98.1 2.49 114.9 2.92 133.0 3.38
250 6.35 217.9 5.53 122.6 3.11 144.0 3.66 166.6 4.23
300 7.62 261.5 6.64 147.1 3.74 173.1 4.40 200.2 5.09
500 12.70 435.8 11.07 245.1 6.23 289.6 7.35 334.7 8.50
600 15.24 522.9 13.28 294.2 7.47 347.8 8.83 402.0 10.21
700 17.78 610.1 15.50 343.2 8.72 406.0 10.31 469.3 11.92
800 20.32 697.3 17.71 392.2 9.96 464.2 11.79 536.5 13.63
900 22.86 784.4 19.92 441.2 11.21 522.5 13.27 603.8 15.34
1000 25.40 871.6 22.14 490.3 12.45 580.7 14.75 671.0 17.04
Width Height Wide Tele
English
65

ADDITIONAL INFORMATION
Ceiling Mount Installation
1. To prevent damage to your projector, please use the Optoma ceiling mount.
2. If you wish to use a third party ceiling mount kit, please ensure the screws used to attach a mount to
the projector meet the following specications:
• Screw type: M4*4
• Minimum screw length: 8 mm
Lens
185.38
154.50
240.00
233.00
140.00
1
85.00
170.00
Unit: mm
66
Note:
1. Mounting holes for ceiling mount.
2. Please note that damage resulting from incorrect installation will void the warranty.
English

ADDITIONAL INFORMATION
IR remote codes
Key Legend
ON (
OFF (
1 3 F1 32 CD 72 8D Use as numeric keypad number “1”.
2 4 F1 32 CD 73 8C Use as numeric keypad number “2”.
3 5 F1 32 CD 74 8B Use as numeric keypad number “3”.
4 6 F1 32 CD 75 8A Use as numeric keypad number “4”.
5 7 F1 32 CD 77 88 Use as numeric keypad number “5”.
6 8 F1 32 CD 78 87 Use as numeric keypad number “6”.
Key
Position
)
)
Repeat
Format
1 F1 32 CD 2 FD Press to turn on the projector.
2 F1 32 CD 2E D1 Press to turn o the projector.
Address Data
Byte 1 Byte 2 Byte 3 Byte 4
Description
English
67

ADDITIONAL INFORMATION
Address Data
Byte 1 Byte 2 Byte 3 Byte 4
Description
Press to automatically synchronize the projector to
the input source.
Press to select items or make adjustments to our
selection.
Press to select items or make adjustments to our
selection.
Press to select items or make adjustments to our
selection.
Press to select items or make adjustments to our
selection.
Press to display the on-screen display menus for
projector.
Press to return to previous level or exit menus if at
top level.
Press to adjust the position of the image horizontally.
Press to adjust focus to improve image clarity as
desired.
Press to adjust focus to improve image clarity as
desired.
Press to adjust zoom to achieve a desired image
size.
Press to assign user functions. Please refer to
“Remote Setup” on page 24.
Press to assign user functions. Please refer to
“Remote Setup” on page 24.
)
Key
Position
12 F1 32 CD 82 7D Press to display source image information.
34 F1 32 CD 87 78 Press to adjust the horizontal keystone.
35 F1 32 CD 51 AE Press to adjust the horizontal keystone.
36 F1 32 CD 52 AD
37 F1 32 CD 53 AC Press to adjust the vertical keystone.
38 F1 32 CD 54 AB Press to adjust the vertical keystone.
39 F1 32 CD 55 AA Press to adjust zoom to achieve a desired image size.
40 F1 32 CD 56 A9 Press to hide/unhide the screen picture.
Key Legend
7 9 F1 32 CD 79 86 Use as numeric keypad number “7”.
8 10 F1 32 CD 80 7F Use as numeric keypad number “8”.
9 11 F1 32 CD 81 7E Use as numeric keypad number “9”.
Info (
0 13 F1 32 CD 25 DA Use as numeric keypad number “0”.
ID 14 F1 32 CD A7 58 Press to set remote ID.
Auto 15 F1 32 CD 4 FB
Input 16 F1 32 CD 18 E7 Press to select an input signal.
UP (▲) 17 F1 32 CD 0F F0
LEFT (◄) 18 F1 32 CD 11 EE
Enter 19 F1 32 CD 14 EB Press to conrm your item selection.
RIGHT (►) 20 F1 32 CD 10 EF
DOWN (▼) 21 F1 32 CD 12 ED
Menu 22 F1 32 CD 0E F1
Exit 23 F1 32 CD 2A D5
Mode 24 F1 32 CD 5 FA Press to select the preset display mode.
Bright. 25 F1 32 CD 28 D7 Press to adjust amount of light in the image.
Contr. 26 F1 32 CD 29 D6 Press to adjust dierence between dark and light.
Pattern 27 F1 32 CD 58 A7 Press to display a test pattern.
Lens Shift◄ 28 F1 32 CD 41 BE
Lens Shift ► 29 F1 32 CD 42 BD
Focus ▲ 30 F1 32 CD 86 79
Lens Shift ▲ 31 F1 32 CD 34 CB Press to adjust the position of the image vertically.
Lens Shift ▼ 32 F1 32 CD 32 CD Press to adjust the position of the image vertically.
Focus ▼ 33 F1 32 CD 26 D9
Keystone
Keystone
Zoom
Keystone
Keystone
Zoom
Shutter
(AV Mute)
User 1 41 F1 32 CD 57 A8
User 2 42 F1 32 CD 27 D8
Repeat
Format
68
English

ADDITIONAL INFORMATION
Troubleshooting
If you experience a problem with your projector, please refer to the following information. If a problem persists,
please contact your local reseller or service center.
Image problems
No image appears on-screen
• Ensure all the cables and power connections are correctly and securely connected as described in the
Setup and Installation section.
• Ensure the pins of connectors are not crooked or broken.
• Ensure that the Shutter (AV Mute) feature is not turned on.
Image is out of focus
• Press the Focus ▲ or Focus ▼ button on the remote control or projector keypad to adjust the focus
until the image is sharp and legible.
• Make sure the projection screen is between the required distance from the projector. (Please refer to
Image size and projection distance page 65).
The image is stretched when displaying 16:10 DVD title
• When you play anamorphic DVD or 16:10 DVD, the projector will show the best image in 16:10 format
on projector side.
• If you play 4:3 format DVD title, please change the format as 4:3 in projector OSD.
• Please setup the display format as 16:10 (wide) aspect ratio type on your DVD player.
Image is too small or too large
• Press the Zoom
projected image size.
• Move the projector closer to or further from the screen.
• From the OSD menu, select Display > Aspect Ratio to change the aspect ratio.
Image has slanted sides:
• If possible, reposition the projector so that it is centered on the screen and below the bottom of the screen.
• Press the Keystone
Image is reversed
• From the OSD menu, select Device Setup > Projection Orientation > Rear to reverse the image so
you can project from behind a translucent screen.
Other problems
The projector stops responding to all controls
• If possible, turn o the projector, then unplug the power cord and wait at least 20 seconds before
reconnecting power.
Remote control problems
If the remote control does not work
• Check that the operating angle of the remote control is pointed within ±30° to the IR receivers on the
projector.
• Make sure there are not any obstructions between the remote control and the projector. Move to within
6 meters (19.7 feet) of the projector.
• Make sure batteries are inserted correctly.
• Replace batteries if they are exhausted.
or Zoom button on the remote control or projector keypad to adjust the
/ / / buttons on the remote control to adjust the screen shape.
English
69

ADDITIONAL INFORMATION
LED Indicators and Lightning Messages
1 2 3
No. Item
1. Light LED
2. Power LED
3. Temp LED
Status
Standby N/A Steady light N/A N/A
Power On N/A N/A Steady light N/A
Warning Up Start N/A
Cooling Down Start N/A N/A
AV Mute
Error (Power Failure) Steady light N/A N/A Steady light
Error (Fan Failure) N/A N/A N/A
Error (DIM Power) N/A N/A N/A
Error (Over Temp) N/A N/A N/A Steady light
Error (LD Over Temp) N/A N/A N/A Steady light
OPFU Mode Steady light Steady light Steady light Steady light
Light LED Power LED Temp LED
Red Red Green Red
Flashing
(1 sec o / 1 sec on)
Flashing
(1 sec o / 1 sec on)
(0.5 sec o / 0.5 sec
N/A Steady light N/A
N/A N/A
Flashing
on)
(3 sec on / 3 sec o)
(0.5 sec o / 0.5 sec
N/A
Flashing
Flashing
on)
Note: The light o for 10min when projector into upgrade process and All LED Flashing (3 sec o/ 3 sec on)
70
English

ADDITIONAL INFORMATION
Specications
Optical Description
Display resolution 4K UHD 3840 x 2160
Maximum resolution 3840 x 2160 @ 60Hz for HDMI
Throw ratio
• 1.6x lens model: 1.25 ~ 2.0
• 1.15x lens model: 0.65 ~ 0.75
F-stop
Lens
Oset 0
Image size
Projection distance
Input Interface
Output Interface
Control Interface
Colour 1073.4 Million color
Scan rate
Speaker 10W x 2
Power consumption
Power requirement AC 100 ~ 240V ±10%, 50/60Hz
Input current 6.5A
Installation orientations Front, Rear, Ceiling, Rear-top
• 1.6x lens model: 2.0 ~ 2.4
• 1.15x lens model: 2.0 ~ 2.1
Focal length
• 1.6x lens model: 18.72 ~ 29.59
• 1.15x lens model: 9.69 ~ 11.19
• 1.6x lens model: 50” ~ 300” (mechanical travel) (optimized@120”)
• 1.15x lens model: 50” ~ 1000” (mechanical travel) (optimized@100”)
• 1.6x lens model: 1.33m ~ 13.06m (mechanical travel)
• 1.15x lens model: 0.7m ~ 16.6m (mechanical travel)
• HDMI in 2.0 x 2
• HDBaseT x 1
• 3D Sync in x 1
• HDMI out 2.0 x 1
• USB type-A x 1 for power USB 5V/1.5A
• 3D Sync out x 1
• Audio out x 1
• USB type-B x 1 for service
• LAN x 1
• 12V Trigger x 1
• Wired Remote x 1
• RS232 control x 1
• Horizontal scan rate: 15.375 ~ 91.146 KHz
• Vertical scan rate: 24 ~ 85 Hz (120Hz for 3D feature)
Normal mode (typical)
• 530W ± 15% @ 110Vac
• 520W ± 15% @ 220Vac
ECO mode (typical)
• 285W ± 15% @ 110Vac
• 280W ± 15% @ 220Vac
English
71

ADDITIONAL INFORMATION
Optical Description
1.6x lens model:
• Without feet: 486 x 432.5 x 176 mm (19.1 x 17.0 x 6.9 inches)
Dimensions
(W x D x H)
Weight
Environmental Operating in 5 ~ 40°C, 10% to 85% humidity (non-condensing)
Note: All specications are subject to change without notice.
• With feet: 486 x 432.5 x 185.5 mm (19.1 x 17.0 x 7.3 inches)
1.15x lens model:
• Without feet: 486 x 427.5 x 176 mm (19.1 x 16.8 x 6.9 inches)
• With feet: 486 x 427.5 x 185.5 mm (19.1 x 16.8 x 7.3 inches)
• 1.6x lens model: 13.5 Kg ± 0.3 Kg (29.76 lbs ± 0.66 lbs)
• 1.15x lens model: 13.2 Kg ± 0.3 Kg (29.10 lbs ± 0.66 lbs)
72
English

ADDITIONAL INFORMATION
~XXXXX nCR
~XXXXX nCR
RS232 protocol function list
Baud Rate : 115200
Data Bits: 8
Parity: None
Stop Bits: 1
Flow Control : None
UART16550 FIFO: Disable
Write Command
Lead Code space variable carriage return
Prefix 0~9999 suffix
Pass: P
Fail: F
Read Command
Lead Code space variable carriage return
Prefix
Response Format
Pass: O k n Fail: F
System Automatically Send
Projector ID Command
00~99
(Default: 00)
Projector ID Command
00~99
(Default: 00)
Variable
I NFOn
000~999
000~999
Variable
0~9999 suffix
Note: There is a <CR> after all ASCII commands. 0D is the HEX code for <CR> in ASCII code.
English
73

ADDITIONAL INFORMATION
Level 1 Level 2 Level 3 Level 4 Level 5 n value
Picture Mode
Dynamic Range
Brightness 0 ~ 100 ~XX21 0~100 ~XX125 1 O k 0~100
Contrast 0 ~ 100 ~XX22 0~100 ~XX126 1 O k 0~100
Sharpness 1 ~ 15 ~XX23 1~15
Gamma
Dynamic Contrast
Image
Color Settings
[None] ~XX123 1 O k 0
Vivid ~XX20 16 ~XX123 1 O k 16
HDR ~XX20 21 ~XX123 1 O k 21
HLG ~XX20 25 ~XX12 3 1 O k 25
Cinema ~XX20 3 ~XX123 1 O k 3
sRGB ~XX20 4 ~XX123 1 O k 4
Bright ~XX20 2 ~XX123 1 O k 2
DICOM SIM. ~XX20 13 ~XX123 1 O k 10
Blending ~XX20 19 ~XX123 1 O k 19
3D ~XX20 9 ~XX123 1 O k 9
High Frame Rate ~XX20 18 ~XX123 1 O k 18
User ~XX20 5 ~XX123 1 O k 5
HDR
HDR Birghtness 0 ~ 10 ~XX288 0~10
Film ~XX35 1
Graphics ~XX35 3
1.8 ~XX35 5
2.0 ~XX35 6
2.2 ~XX35 7
2.4 ~XX35 12
2.6 ~XX35 8
Vivid ~XX35 21
3D ~XX35 9
Blackboard ~XX35 10
DICOM SIM. ~XX35 11
HDR
Dynamic Black
Speed 1 ~ 160 ~XX253 1~160
Strength 0 ~ 3 ~XX254 0~3
Level 50% ~ 100% ~XX255 50~100
Extreme Black
AV Mute Timer 0.0s ~ 10.0s ~XX256 0~20
Black Signal Level 0 ~ 5 ~XX257 0~5
Color 0 ~ 100 ~XX45 0~100 ~XX292 1 O k 0~100
Tint 0 ~ 100 ~XX44 0~100 ~XX293 1 O k 0~100
BrilliantColor™ 0 ~ 10 ~XX34 1~10 ~XX294 1 O k 0~10
Color Temperature
Color Matching
Off ~XX565 0 ~XX291 1 O k 0
Auto ~XX565 1 ~XX291 1 O k 1
Off ~XX191 0
On ~XX191 1
Off ~XX218 0
On ~XX218 1
Warm ~XX36 4 ~XX128 1 O k 3
Standard ~XX36 1 ~XX128 1 O k 0
Cool ~XX36 2 ~XX128 1 O k 1
Cold ~XX36 3 ~XX128 1 O k 2
Red
Green
Blue
Cyan
Magenta
Yellow
White
Hue 0 ~ 254 ~XX327 0~254 ~XX491 1 O k 0~254
Saturation 0 ~ 254 ~XX333 0~254 ~XX491 2 O k 0~254
Luminance 0 ~ 254 ~XX339 0~254 ~XX491 3 O k 0~254
Reset
Hue 0 ~ 254 ~XX328 0~254 ~XX492 1 O k 0~254
Saturation 0 ~ 254 ~XX334 0~254 ~XX492 2 O k 0~254
Luminance 0 ~ 254 ~XX340 0~254 ~XX492 3 O k 0~254
Reset
Hue 0 ~ 254 ~XX329 0~254 ~XX493 1 O k 0~254
Saturation 0 ~ 254 ~XX335 0~254 ~XX493 2 O k 0~254
Luminance 0 ~ 254 ~XX341 0~254 ~XX493 3 O k 0~254
Reset
Hue 0 ~ 254 ~XX330 0~254 ~XX494 1 O k 0~254
Saturation 0 ~ 254 ~XX336 0~254 ~XX494 2 O k 0~254
Luminance 0 ~ 254 ~XX342 0~254 ~XX494 3 O k 0~254
Reset
Hue 0 ~ 254 ~XX332 0~254 ~XX495 1 O k 0~254
Saturation 0 ~ 254 ~XX338 0~254 ~XX495 2 O k 0~254
Luminance 0 ~ 254 ~XX344 0~254 ~XX495 3 O k 0~254
Reset
Hue 0 ~ 254 ~XX331 0~254 ~XX496 1 O k 0~254
Saturation 0 ~ 254 ~XX337 0~254 ~XX496 2 O k 0~254
Luminance 0 ~ 254 ~XX343 0~254 ~XX496 3 O k 0~254
Reset
Red 0 ~ 254 ~XX345 0~254 ~XX497 1 O k 0~254
Green 0 ~ 254 ~XX346 0~254 ~XX497 2 O k 0~254
Blue 0 ~ 254 ~XX347 0~254 ~XX497 3 O k 0~254
Reset
Write Command
Command Command
Set
Para.
space
CMD
Read Command
CMD ValueCMD
Pass
Note: Some commands are not supported, it depends on models.
74
English

ADDITIONAL INFORMATION
Level 1 Level 2 Level 3 Level 4 Level 5 n value
Image
Display
Color Settings
Wall Color
3D Setup
Reset ~XX509 1
Light Source Settings
Gaming Mode
Aspect Ratio
Digital Zoom 80 ~ 180 ~XX15 80~180 ~XX543 9 O k 80~180
Image Shift
Geometric Correction
White Balance
Color Space (HDMI Input)
Off ~XX506 0 ~XX296 1 O k 0
BlackBoard ~XX506 1 ~XX296 1 O k 1
Light Yellow ~XX506 7 ~XX296 1 O k 7
Light Green ~XX506 3 ~XX296 1 O k 3
Light Blue ~XX506 4 ~XX296 1 O k 4
Pink ~XX506 5 ~XX296 1 O k 5
Gray ~XX506 6 ~XX296 1 O k 6
3D Mode
3D Sync Type
3D Format
3D Sync Invert
3D Sync Out
Reset ~XX234 1
Light Source Mode
Brightness Level 10%-100% ~XX326 10~100 ~XX381 1 O k 10~100
Off ~XX220 0 ~XX133 1 O k 0
On ~XX220 1 ~XX133 1 O k 1
4:3 ~XX60 1 ~XX127 1 O k 1
16:9 ~XX60 2 ~XX127 1 O k 2
21:9 ~XX60 16 ~XX127 1 O k 16
LBX ~XX60 5 ~XX127 1 O k 5
Auto ~XX60 7 ~XX127 1 O k 7
Native ~XX60 6 ~XX127 1 O k 6
Horizontal 0 ~ 100 ~XX63 0~100 ~XX543 1 O k 0~100
Vertical 0 ~ 100 ~XX64 0~100 ~XX543 2 O k 0~100
V Keystone 0 ~ 40 ~XX66 0~40 ~XX543 3 O k 0~40
H Keystone 0 ~ 40 ~XX65 0~40 ~XX543 4 O k 0~40
4-Corner
Warping
Warping Adjustment (Adjust Pattern)
Grid Color
Reset ~XX561 1
Reset All (CLI Only) ~XX215 1
Red Gain 0 ~ 100 ~XX24 0~100 ~XX498 1 O k 0~100
Green Gain 0 ~ 100 ~XX25 0~100 ~XX498 2 O k 0~100
Blue Gain 0 ~ 100 ~XX26 0~100 ~XX498 3 O k 0~100
Red Offset 0 ~ 100 ~XX27 0~100 ~XX499 1 O k 0~100
Green Offset 0 ~ 100 ~XX28 0~100 ~XX499 2 O k 0~100
Blue Offset 0 ~ 100 ~XX29 0~100 ~XX499 3 O k 0~100
Auto ~XX37 1 ~XX295 1 O k 1
RGB (0-255) ~XX37 2 ~XX295 1 O k 2
RGB (16-235) ~XX37 4 ~XX295 1 O k 4
YUV ~XX37 3 ~XX295 1 O k 3
Off ~XX230 0 ~XX297 1 O k 0
Auto ~XX230 4 ~XX297 1 O k 4
DLP-Link ~XX230 1 ~XX298 1 O k 1
3D Sync ~XX230 3 ~XX298 1 O k 3
Auto ~XX405 0
Frame Packing ~XX405 7
SBS ~XX405 1
Top and Bottom ~XX405 2
Frame Sequential ~XX405 3
Off ~XX231 1
On ~XX231 0
To Emitter ~XX232 0
To Next Projector ~XX232 1
Normal ~XX110 1 ~XX241 1 O k 1
Eco Mode ~XX110 2 ~XX241 1 O k 2
Constant Luminance ~XX110 6 ~XX241 1 O k 5
Constant Power ~XX110 7 ~XX241 1 O k 6
right (0 ~ 1152) 0 ~XX59 1 ~XX58 1 O k 0~1152
Top Left
Top Right
Bottom Left
Bottom Right
Off ~XX142 0 ~XX380 1 O k 0
On ~XX142 3 ~XX380 1 O k 3
Green ~XX143 1 ~XX379 1 O k 1
Magenta ~XX143 2 ~XX379 1 O k 2
Red
Cyan ~XX143 4 ~XX379 1 O k 4
left (0 ~ 1152) 0 ~XX59 2 ~XX58 1 O k 0~1152
up (0 ~ 648) 0 ~XX59 3 ~XX58 2 O k 0~648
down (0 ~ 648) 0 ~XX59 4 ~XX58 2 O k 0~648
right (2688 ~ 3839) 3839 ~XX59 5 ~XX58 3 O k 2688~3839
left (2688 ~ 3839) 3839 ~XX59 6 ~XX58 3 O k 2688~3839
up (0 ~ 648) 0 ~XX59 7 ~XX58 4 O k 0~648
down (0 ~ 648) 0 ~XX59 8 ~XX58 4 O k 0~648
right (0 ~ 1152) 0 ~XX59 9 ~XX58 5 O k 0~1152
left (0 ~ 1152) 0 ~XX59 10 ~XX58 5 O k 0~1152
up (1512 ~ 2159) 2159 ~XX59 11 ~XX58 6 O k 1512~2159
down (1512 ~ 2159) 2159 ~XX59 12 ~XX58 6 O k 1512~2159
right (2688 ~ 3839) 3839 ~XX59 13 ~XX58 7 O k 2688~3839
left (2688 ~ 3839) 3839 ~XX59 14 ~XX58 7 O k 2688~3839
up (1512 ~ 2159) 2159 ~XX59 15 ~XX58 8 O k 1512~2159
down (1512 ~ 2159) 2159 ~XX59 16 ~XX58 8 O k 1512~2159
Write Command
Command Command
Set
Para.
space
~XX143 3 ~XX379 1 O k 3
CMD
Read Command
CMD ValueCMD
Pass
Note: Some commands are not supported, it depends on models.
English
75

ADDITIONAL INFORMATION
Level 1 Level 2 Level 3 Level 4 Level 5 n value
Read Command
Command Command
Pass
CMD
CMD ValueCMD
Write Command
space
Set
Para.
d=1=Monday
d=2=Tuesday
On ~XX284 1 ~XX244 1 O K 1
Level 1 Level 2 Level 3 Level 4 Level 5 n value
Device Setup
Edge Mask 0 ~ 10 ~XX61 0~10 ~XX378 1 O k 0~10
Freeze Screen (CLI Only)
Reset ~XX173 1
Test Pattern
Projection Orientation
Language
Menu Settings
High Altitude
Lens Settings
Schedule (CLI Only)
Power Settings
OMS ~XX247 1 O k
Shutter
Security
Unfreeze ~XX04 0 ~XX377 1 O k 0
Freeze ~XX04 1 ~XX377 1 O k 1
Off ~XX1 95 0
Green Grid ~XX195 3
Magenta Grid ~XX195 4
White Grid ~XX195 1
White ~XX195 2
Black ~XX195 11
Red ~XX1 95 5
Green ~XX195 6
Blue ~XX19 5 7
Yellow ~XX195 8
Magenta ~XX195 9
Cyan ~XX195 10
ANSI Contrast 4x4 ~XX195 14
Color bar ~XX195 13
4K Full screen ~XX195 16
Ceiling
Rear
English ~XX70 1 ~XX299 1 O k 1
Deutsch ~XX7 0 2 ~XX299 1 O k 2
Français ~XX70 3 ~XX299 1 O k 3
Italiano ~XX70 4 ~XX299 1 O k 4
Español ~XX70 5 ~XX299 1 O k 5
Português ~XX70 6 ~XX299 1 O k 6
Polski ~XX70 7 ~XX299 1 O k 7
Nederlands ~XX70 8 ~XX299 1 O k 8
Norsk ~XX70 10 ~XX29 9 1 O k 10
繁體中文 ~XX70 1 3 ~XX299 1 O k 13
简体中文 ~XX70 14 ~XX299 1 O k 14
日本語 ~XX70 1 5 ~XX299 1 O k 15
한국어 ~XX70 16 ~XX299 1 O k 16
Русский ~XX70 1 7 ~XX299 1 O k 17
Magyar ~XX70 18 ~XX2 99 1 O k 18
ไทย ~XX70 21 ~XX299 1 O k 21
Menu Location
Menu Timer
Information Hide
Off ~XX1 01 0 ~XX150 22 O k 0
On ~XX101 1 ~XX150 22 O k 1
Focus
Zoom
Lens Function
Lens Shift
Lens Calibration ~XX525 1
Lens Shift Memory
Reset ~XX175 1
Date and Time ~XX243 1 O K YYYYMMDDhhmm (202107051750)
Schedule Mode
View Today
Reset Schedule ~XX284 9
Direct Power On
Signal Power On
Auto Power Off (min.) 0, 2 ~ 180 ~XX106 0~180 ~XX387 1 O k 0~180
Sleep Timer (min.) 0 ~ 960 ~XX107 0~960 ~XX388 1 O k 0~960
Power Mode (Standby)
12V Trigger
Reset ~XX177 1
Startup
Security
Security Timer
Change Password ~XX406 nnnn~nnnn
Auto ~XX523 3 ~XX370 1 O k 3
On ~XX523 1 ~XX370 1 O k 1
Off ~XX523 0 ~XX370 1 O k 0
Off ~XX524 0 ~XX371 1 O k 0
On ~XX524 1 ~XX371 1 O k 1
Top Left ~XX72 1
Top Right ~XX72 2
Center ~XX72 3
Bottom Left ~XX72 4
Bottom Right ~XX72 5
Off ~XX515 0 ~XX382 1 O k 0
5s ~XX515 1 ~XX382 1 O k 1
10s ~XX515 3 ~XX382 1 O k 3
20s ~XX515 7 ~XX382 1 O k 7
30s ~XX515 5 ~XX382 1 O k 5
60s
Off ~XX102 0 ~XX383 1 O k 0
On ~XX102 1 ~XX383 1 O k 1
+ ~XX308 1
- ~XX308 2
+ ~XX307 1
- ~XX307 2
Lock ~XX349 1 ~XX545 4 O k 0
Unlock ~XX349 2 ~XX545 4 O k 1
Up ~XX84 3
Down ~XX84 4
Left ~XX84 5
Right ~XX84 6
Save Memory Memory 1 ~ Memory 5 ~XX360 1~5
Apply Memory Memory 1 ~ Memory 5 ~XX359 1~5 ~XX384 1 O k 1~5
Clear Memory ~XX361 1
Off ~XX284 0 ~XX244 1 O K 0
Monday / Tuesday / Wednesday /
Thursday / Friday / Saturday /
Sunday
Off ~XX105 0 ~XX385 1 O k 0
On ~XX105 1 ~XX385 1 O k 1
Off ~XX113 0 ~XX385 2 O k 0
On ~XX113 1 ~XX385 2 O k 1
Eco ~XX114 0 ~XX150 1 6 O k 0
Active ~XX114 1 ~XX150 16 O k 1
Communication ~XX114 3 ~XX150 16 O k 3
Off ~XX192 0 ~XX389 1 O k 0
On ~XX192 1 ~XX389 1 O k 1
Shutter Off ~XX269 0 ~XX390 1 O k 0
Shutter On ~XX269 1 ~XX390 1 O k 1
Off ~XX78 0~nnnn ~XX391 1 O k 0
On ~XX78 1~nnnn ~XX391 1 O k 1
Month 0 ~ 35 ~XX537 00~35 ~XX544 1 O k 00~35
Day 0 ~ 29 ~XX538 00~29 ~XX544 2 O k 00~29
Hour 0 ~ 23 ~XX539 00~23 ~XX544 3 O k 00~23
Write Command
Command Command
Set
Para.
space
~XX515 6 ~XX382 1 O k 6
~XX77 ~MMDDHH
CMD
~XX243 2 O K
Read Command
CMD ValueCMD
Pass
d=3=Wednesday
d=4=Thursday
d=5=Friday
d=6=Saturday
=
=
a=0 without bind
a=1 Binded
Note: Some commands are not supported, it depends on models.
English
76

ADDITIONAL INFORMATION
Level 1 Level 2 Level 3 Level 4 Level 5 n value
Device Setup
Input Setup
Audio
Communication
Keypad Lock
Keypad LED Settings
Background Color
User Data
System Update
Device Reset
Auto Source
Quick Resync
Active Inputs
EDID Settings
HDMI Out
Reset ~XX178 1
Volume 0 ~ 10 ~XX81 0~10 ~XX12 0 1 O k 0~10
Mute
Audio Output
Reset ~XX180 1
Device ID 0 ~ 99 ~XX79 00~99 ~XX558 1 O k 00~99
IR Function
Remote Settings
Off ~XX1 03 0 ~XX392 1 O k0
On ~XX103 1 ~XX392 1 O k1
Off ~XX3 62 0 ~XX393 1 O k0
On ~XX362 1 ~XX393 1 O k1
Change LogoStartup Logo
None ~XX104 0 ~XX396 1 O k0
Blue ~XX10 4 1 ~XX396 1 O k1
Red ~XX1 04 3 ~XX396 1 O k3
Green ~XX104 4 ~XX396 1 O k4
Grey ~XX104 6 ~XX396 1 O k6
White ~XX104 5 ~XX396 1 O k5
Logo ~XX104 7 ~XX396 1 O k7
Save all settings Memory 1 ~ Memory 5 ~XX258 1~5
Load all settings Memory 1 ~ Memory 5 ~XX259 1 ~5 ~XX397 1 O k 1~5
Auto
Auto Download
Update ~XX168 9
Reset OSD ~XX546 1
Reset All Settings ~XX112 1
Reset Selective
Off ~XX5 63 0 ~XX372 1 O k0
On ~XX563 1 ~XX372 1 O k1
Off ~XX3 15 0 ~XX373 1 O k0
On ~XX315 1 ~XX373 1 O k1
[None] ~XX121 1 O k0
HDMI 1 ~XX1 2 1 ~XX121 1 O k7
HDMI 2 ~XX1 2 15 ~XX121 1 O k8
HDBaseT ~XX12 21 ~XX121 1 O k 16
HDMI 1 EDID
HDMI 2 EDID
HDBaseT EDID
HDMI 1 ~XX3 09 5
HDMI 2 ~XX3 09 6
Off ~XX0 3 0 ~XX356 1 O k0
On ~XX03 1 ~XX356 1 O k1
Auto ~XX510 3 ~XX399 1 O k3
Internal Speaker ~XX510 4 ~XX399 1 O k4
Line Out
Front
Top
HDBaseT
Remote Code 0 ~ 99 ~XX350 00~99 ~XX138 1 O k 0~99
Quick Switch Code
Default ~XX82 1 ~XX395 1 O k1
Neutral ~XX82 3 ~XX395 1 O k3
Off ~XX168 0 ~XX158 1 O k0
On ~XX168 1 ~XX158 1 O k1
Off ~XX168 3 ~XX398 1 O k0
On ~XX168 4 ~XX398 1 O k1
Image ~XX509 1
Display ~XX173 1
Setup ~XX179 1
Input ~XX178 1
Audio ~XX180 1
Communication ~XX181 1
1.4 ~XX236 1 ~XX374 1 O k1
2 ~XX236 2 ~XX374 1 O k2
1.4 ~XX237 1 ~XX375 1 O k1
2 ~XX237 2 ~XX375 1 O k2
1.4 ~XX238 1 ~XX376 1 O k1
2 ~XX238 2 ~XX376 1 O k2
Off ~XX11 4 ~XX542 1 O k0
On ~XX11 5 ~XX542 1 O k1
Off ~XX11 6 ~XX542 2 O k0
On ~XX11 7 ~XX542 2 O k1
Off ~XX11 10 ~XX542 3 O k0
On ~XX11 9 ~XX542 3 O k1
Off ~XX314 0 ~XX138 3 O k0
1 ~ 9 ~XX314 1~9 ~XX138 3 O k 1~9
Write Command
Command Command
Set
Para.
space
~XX510 5 ~XX399 1 O k5
CMD
Read Command
CMD ValueCMD
Pass
Note: Some commands are not supported, it depends on models.
English
77

ADDITIONAL INFORMATION
Level 1 Level 2 Level 3 Level 4 Level 5 n value
Read Command
Command Command
Pass
CMD
CMD ValueCMD
Write Command
space
Set
Para.
Pixel Clock ~XX150 6 O k nnn..nn
a
None
Level 1 Level 2 Level 3 Level 4 Level 5 n value
User 1
Remote Settings
User 2
LAN Interface
Network Status
Communication
Information
LAN
Control
Baud Rate
Reset ~XX181 1
Regulatory ~XX151 3 O k nnnnnnnn
Serial Number ~XX353 1 O k nnnnnnnnnnnnnnnn
Source Info.
Light Source Mode
Device ID ~XX79 00~99 ~XX558 1 O k 00~99
Remote Code ~XX350 00~99 ~XX138 1 O k 00~99
System Status
Control
LAN
FW Version
MAC Address (read only) ~XX555 1 O k nn:nn:nn:nn:nn:nn
DHCP
IP Address - - - . - - - . - - - . - - - ~XX87 3 O k nnn.nnn.nnn.nnn
Subnet Mask - - - . - - - . - - - . - - - ~XX87 4 O k nnn.nnn.nnn.nnn
Gateway - - - . - - - . - - - . - - - ~XX87 5 O k nnn.nnn.nnn.nnn
DNS 1 - - - . - - - . - - - . - - - ~XX87 6 O k nnn.nnn.nnn.nnn
DNS 2 - - - . - - - . - - - . - - - ~XX87 7 O k nnn.nnn.nnn.nnn
Apply ~XX462 9
Reset ~XX462 1
Crestron
IP Address - - - . - - - . - - - . - - - ~XX465 1 ~nnn.nnn.nnn.nnn ~XX441 2 O k nnn.nnn.nnn.nnn
IPID 2-255 ~XX466 1 ~nnn ~XX441 3 O k 2-255
Port 0~65535 ~XX467 1 ~nnnnn ~XX441 4 O k 0~65535
Crestron Setup Apply ~XX454 9
PJ Link
Extron
AMX
Telnet
HTTP
9600 ~XX153 1 O k 9600
19200 ~XX153 1 O k 19200
38400
57600 ~XX153 1 O k 57600
115200 ~XX153 1 O k 115200
Source ~XX150 3 O k nnn..nn (e.g. OkHDMI)
Resolution ~XX150 4 O k nnn ..nn (e.g.Ok1920x1080)
Signal Format ~XX150 5 O k a=nnnnnnnnnnnn (eg. BT.2020 HDR)
Refresh Rate ~XX150 19 O k nnn..nn
Color Bit Depth ~XX156 1 O k a=nbit nnn (e.g. 8bit RGB)
Color Gamut ~XX156 3 O k a=string (e.g. BT.2020 HDR)
Color Space ~XX295 1 O k
Picture Mode ~XX123 1 O k
Standby Mode ~XX150 16 O k
Projection Hours ~XX150 21 O k nnnnn (nnnnn= hour digits)
Total Hours ~XX108 1 O k nnnnn (nnnnn= hour digits)
Normal ~XX108 3 O k nnnnn (nnnnn= hour digits)
Eco Mode ~XX108 4 O k nnnnn (nnnnn= hour digits)
Custom Power ~XX108 7 O k nnnnn (nnnnn= hour digits)
Ambient Temp. ~XX150 18 O k nnn..nn (e.g. Ok48)
System Temp. ~XX352 1 O k nnn..nn (e.g. Ok 48)
Crestron ~XX441 1 O k a=0 off ; a=1 On
Extron ~XX442 1 O k a=0 off ; a=1 On
PJ Link ~XX440 2 O k a=0 off ; a=1 On
AMX ~XX444 1 O k a=0 off ; a=1 On
Telnet ~XX445 1 O k a =0 off ; a=1 On
HTTP ~XX446 1 O k a=0 off ; a=1 On
LAN Interface ~XX386 1 O k a=1 RJ45 ; a=2 HDBaseT
MAC Address ~XX555 1 O k nn:nn:nn:nn:nn:nn
Network Status ~XX87 1 O k
DHCP ~XX150 17 O k 0=off, 1=on
IP Address ~XX87 3 O k nn:nn:nn:nn:nn:nn
Subnet Mask ~XX87 4 O k nnn.nnn.nnn.nnn
Gateway ~XX87 5 O k nnn.nnn.nnn.nnn
DNS 1 ~XX87 6 O k nnn.nnn.nnn.nnn
DNS 2 ~XX87 7 O k nnn.nnn.nnn.nnn
Main Version ~XX122 1 O k Pnn.nn.nn
F-MCU Version
A-MCU Version
LAN Version
Formatter Version
HDBaseT Version
HDMI 1 ~XX117 8 ~XX394 1 O k 8
HDMI 2 ~XX117 9 ~XX394 1 O k 9
Color Matching ~XX11 7 13 ~XX394 1 O k 13
Color Temperature ~XX117 4 ~XX394 1 O k 4
Projection Orientation ~XX117 14 ~XX394 1 O k 14
Light Source Mode ~XX117 15 ~XX394 1 O k 15
Freeze Screen ~XX117 17 ~XX394 1 O k 17
Network setup ~XX117 20 ~XX394 1 O k 20
Reset Selective ~XX117 21 ~XX394 1 O k 21
HDMI 1 ~XX118 8 ~XX394 2 O k 8
HDMI 2 ~XX118 9 ~XX394 2 O k 9
Color Matching ~XX11 8 13 ~XX394 2 O k 13
Color Temperature ~XX118 4 ~XX394 2 O k 4
Projection Orientation ~XX118 14 ~XX394 2 O k 14
Light Source Mode ~XX118 15 ~XX394 2 O k 15
Freeze Screen ~XX118 17 ~XX394 2 O k 17
Network setup ~XX118 20 ~XX394 2 O k 20
Reset Selective ~XX118 21 ~XX394 2 O k 21
RJ-45 ~XX460 1 ~XX386 1 O k 1
HDBaseT ~XX460 2 ~XX386 1 O k 2
(read only) Connected ~XX87 1 O k 1
(read only) Disconnected ~XX87 1 O k 0
Off ~XX461 0 ~XX150 17 O k 0
On ~XX461 1 ~XX150 17 O k 1
Off ~XX454 0 ~XX441 1 O k 0
On ~XX454 1 ~XX441 1 O k 1
Off ~XX456 0 ~XX440 2 O k 0
On ~XX456 1 ~XX440 2 O k 1
Off ~XX455 0 ~XX442 1 O k 0
On ~XX455 1 ~XX442 1 O k 1
Off ~XX457 0 ~XX444 1 O k 0
On ~XX457 1 ~XX444 1 O k 1
Off ~XX458 0 ~XX445 1 O k 0
On ~XX458 1 ~XX445 1 O k 1
Off ~XX459 0 ~XX446 1 O k 0
On ~XX459 1 ~XX446 1 O k 1
Write Command
Command Command
Set
Para.
space
CMD ValueCMD
CMD
~XX153 1 O k 38400
Read Command
Pass
a=1 Auto
a=2 RGB \ RGB (0-255)*
a=3 YUV
a=4 RGB(16 - 235)*
a=5 Rec709
a=6 Rec601
= 0
a = 1 Presentation
a = 2 Bright
a = 3 Cinema
a = 4 sRGB(Reference/Standa rd)
a = 5 User 1
a = 6 User 2 / 3D User
a = 9 3D
a = 10 DICOM SIM.
a = 14 Vivid (Photo)
a= 19 Blending
a= 21 HDR
a=1 Active
a=0 Eco.
a=3 Communication
a=0 Disconnected
a=1 Connected
Note: Some commands are not supported, it depends on models.
English
78

ADDITIONAL INFORMATION
Level 1 Level 2 Level 3 Level 4 Level 5 n value
Read Command
Command Command
Pass
CMD
CMD ValueCMD
Write Command
space
Set
Para.
Info String ~XX150 1 O k abbbbbccddddee (Note*1)
Level 1 Level 2 Level 3 Level 4 Level 5 n value
When projector in standby, RS232 have to support
Power Off ~XX00 0 ~XX124 1 O k 0
Power On ~XX00 1 ~XX124 1 O k 1
Power On with password ~XX00 1 ~nnnn
Information In fo String ~XX150 1 O k abbbbbccddddee (Note*1)
Light Source Hours ~XX108 1 O k nnnnn (nnnnn= hour digits)
Other Items
Power Off ~XX00 0 ~XX124 1 O k 0
Power On ~XX00 1 ~XX124 1 O k 1
Power On with password ~XX00 1 ~nnnn
Re-Sync ~XX01 1
AV Mute
Mute
Freeze
3D Sync Out
Output 3D state
System Auto Send
System Temperature Level
Fan Status Level
Device Type Projector ~XX149 1 O k 1
Model Name Optoma UHD ~XX151 1 O k 6
OSD Lock
Regulatory Model ~XX151 3 O k
Software Version ~XX122 1 O k nnnnnnn (Software Version)
LAN FW version ~XX357 1 O k nnnnnnn (LAN FW version)
Fan Speed
System Temperature ~XX352 1 O k 0000~9999
Information
Source Lock
Display message on the OSD ~XX210 nn…n (50 charactors)
Filter Wheel Index ~XX528 0000~9999 ~XX530 1 O k 0000~9999
Phosphor Wheel Index ~XX529 0000~9999 ~XX531 1 O k 0000~9999
Remote Control Simulation
Power ~XX140 1
Power Off ~XX140 2
Up ~XX140 10
Left ~XX140 11
Enter (for projection MENU) ~XX140 12
Right ~XX140 13
Down ~XX140 14
V Keystone + ~XX140 15
V Keystone - ~XX140 16
Brightness ~XX140 19
Menu ~XX140 20
AV Mute ~XX140 24
Contrast ~XX140 28
Zoom + ~XX140 32
Zoom - ~XX140 33
Focus + ~XX140 34
Focus - ~XX140 35
Mode ~XX140 36
info ~XX140 40
Re-sync ~XX140 41
HDMI 1 ~XX140 42
HDMI 2 ~XX140 43
Source ~XX140 47
1 ~XX140 51
2 ~XX140 52
3 ~XX140 53
4 ~XX140 54
5 ~XX140 55
6 ~XX140 56
7 ~XX140 57
8 ~XX140 58
9 ~XX140 59
0 ~XX140 60
Gamma ~XX140 61
Lens H(left) ~XX140 64
Lens H(Right) ~XX140 65
Lens V(left) ~XX140 66
Lens V(Right) ~XX140 67
H Keystone + ~XX140 68
H Keystone - ~XX140 69
Hot Key (user1)(F1) ~XX140 70
Hot Key (user2)(F2) ~XX140 71
Pattern ~XX140 73
Exit ~XX140 74
Mute ~XX140 77
Return ~XX140 82
Off ~XX02 0 ~XX355 1 O k 0
On ~XX02 1 ~XX355 1 O k 1
Off ~XX03 0 ~XX356 1 O k 0
On ~XX03 1 ~XX356 1 O k 1
Unfreeze ~XX04 0 ~XX357 1 O k 0
Freeze ~XX04 1 ~XX357 1 O k 1
To Emitter ~XX232 0
To Next Projector ~XX232 1
2D ~XX130 1 O k 0
3D ~XX130 1 O k 1
Standby Mode I N F O0
Warming up I N F O1
Cooling Down I N F O2
Out of Range I N F O3
Over Temperature I N F O7
Cover Open I N F O9
Color Wheel Unexpected Stop I N F O 12
FAN 1 Lock I N F O 14
FAN 2 Lock I N F O 15
FAN 3 Lock I N F O 16
FAN 4 Lock I N F O 17
FAN 5 Lock I N F O 18
LD NTC (1) Over Temperature I N F O 21
LD NTC (2) Over Temperature I N F O 22
High Ambient Temperature I N F O 23
System Ready I N F O 24
FAN 6 Lock I N F O 26
FAN 7 Lock I N F O 27
FAN 8 Lock I N F O 28
Green/Normal ~XX1 55 1 O k 1
Orange/Notice ~XX155 1 O k 2
Red/Warning. About to trigger shutdown ~XX155 1 O k 3
Green/Normal ~XX1 59 1 O k 1
Orange/Notice ~XX159 1 O k 2
Red/Warning. About to trigger shutdown ~XX159 1 O k 3
On ~XX239 1 ~nnnn ~XX229 1 O k 1
Off ~XX239 2 ~nnnn ~XX229 1 O k 0
Fan 1 Speed 0000~9999 ~XX351 0 O k 0000~9999
Fan 2 Speed 0000~9999 ~XX351 1 O k 0000~9999
Fan 3 Speed 0000~9999 ~XX351 2 O k 0000~9999
Fan 4 Speed 0000~9999
Fan 5 Speed 0000~9999 ~XX351 4 O k 0000~9999
Fan 6 Speed 0000~9999 ~XX351 5 O k 0000~9999
Fan 7 Speed 0000~9999 ~XX351 6 O k 0000~9999
Fan 8 Speed 0000~9999 ~XX351 7 O k 0000~9999
Native Resolution ~XX150 2 O k nn n..nn (e.g. Ok1920x1080)
Main Source ~XX150 3 O k nnn..nn (e.g. OkHDMI)
- Resolution ~XX150 4 O k nnn ..nn (e.g.Ok1920x1080)
- Signal Format ~XX150 5 O k nnn..nn
- Pixel Clock ~XX150 6 O k nnn..nn
- Horz Refresh ~XX150 7 O k nnn..nn
- Vert Refresh ~XX150 8 O k nnn..nn
Light Source Mode ~XX150 15 O k nnn..nn
Standby Power Mode
DHCP
System Temperature ~XX150 18 O k nnn..nn (e.g. Ok48)
Refresh rate ~XX150 19 O k nnn..nn (e.g. Ok60Hz)
On ~XX100 0
Off ~XX100 1
Active ~XX150 16 O k 1
Eco. ~XX150 16 O k 0
Communication ~XX150 16 O k 3
Off ~XX150 17 O k 0
On ~XX150 17 O k 1
Write Command
Command Command
Set
Para.
space
Read Command
CMD ValueCMD
CMD
~XX351 3 O k 0000~9999
DAZKBGZT
DAZKBGZTST
Pass
Note: Some commands are not supported, it depends on models.
English
79

ADDITIONAL INFORMATION
Light Source Life Input Source Firmware Version
a=0 Power Off Light Source Life = nnnn cc=00 None ####ee=00 None
a=1 Power On Calucalte by each mode formula cc =01 DVI ee=01 Presentation (Old: Cinema)
cc=02 VGA1 ee=02 Bright
cc=03 VGA2 ee=03 Cinema (Old: Movie/Photo)
cc=04 S-Video ee=04 sRGB\Reference\Standard
cc=05 Video ee=05 User(1)
cc=06 BNC ee=06 User2
cc=07 HDMI 1 ee=07 Blackboard
cc=08 HDMI 2 ee=08 Classroom
cc=09 Wireless ee=09 3D
cc=10 Compnent ee=10 DICOM SIM.
cc=11 Flash drive ee=11 Film
cc=12 Network Display(Presenter) ee=12 Game
cc=13 USB Display ee=13 Cinema
cc=14 HDMI 3 ee=14 Vivid
cc=15 DisplayPort ee=15 ISF Day
cc=16 HDBaseT ee=16 ISF Night
cc=17 Multimedia ee=17 ISF 3D
cc=18 Android ee=18 Blending
cc=19 Slot in PC ee=21 HDR
cc=20 HDMI Front ee=22 HDR SIM.
cc=21 USB Type C1 ee=23 Super Bright
cc=22 3G-SDI ee=24 (Alexa auto check 2D/3D User)
cc=23 3G-SDI 2 ee=25 HLG
cc=24 HDMI 4
cc=25 USB Type C2
dddd e e
Display Mode
80
English

ADDITIONAL INFORMATION
Optoma global oces
For service or support, please contact your local oce.
Japan
USA
Optoma Technology, Inc. 888-289-6786
47697 Westinghouse Drive.
Fremont, Ca 94539 services@optoma.com
510-996-4794
https://jp.optoma.com/
Taiwan
https://www.optoma.com/tw/
Canada
Optoma Technology, Inc. 888-289-6786
47697 Westinghouse Drive. 510-996-4794
Fremont, Ca 94539 services@optoma.com
Latin America
Optoma Technology, Inc. 888-289-6786
47697 Westinghouse Drive. 510-996-4794
Fremont, Ca 94539 services@optoma.com
Europe
1 Bourne End Mills
Hemel Hempstead
Hertfordshire +44 (0) 1923 691 800
HP1 2UJ +44 (0) 1923 691 888
United Kingdom service@tsc-europe.com
www.optoma.eu
Service Tel : +44 (0)1923 691865
Benelux BV
Optoma Benelux BV +31 (0) 36 8200 250
Europalaan 770 D +31 (0) 36 548 9052
1363BM Almere
The Netherlands
www.optoma.nl
China
Room 2001, 20F, Building 4, +86-21-62947376
No.1398 Kaixuan Road, +86-21-62947375
Changning District www.optoma.com.cn
Shanghai, 200052, China
Australia
https://www.optoma.com/au/
France
Bâtiment E +33 1 41 46 12 20
81-83 avenue Edouard Vaillant +33 1 41 46 94 35
92100 Boulogne Billancourt, France savoptoma@optoma.fr
Spain
C/ José Hierro, 36 Of. 1C 28529 Rivas +34 91 499 06 06
VaciaMadrid, Spain +34 91 670 08 32
Deutschland
Optoma Deutschland GmbH +49 (0) 2161 68643 0
Am Nordpark 3 +49 (0) 2161 68643 99
41069 Mönchengladbach info@optoma.de
Deutschland
Scandinavia
Postboks 9515 Åskollen +47 32 98 89 90
Kniveveien 29
Drammen
3036
Norway
+47 32 98 89 99
info@optoma.no
Korea
https://www.optoma.com/kr/
English
81

www.optoma.com
 Loading...