

Page 1
Mo b i l e leD Pr o j e c t o r
Us e r ’s Ma n U a l
Page 2
2
1. Do not block any ventilation openings.
To ensure reliable operation of the
projector and to protect from over
heating, it is recommended to install
the projector in a location that does not
block ventilation. As an example, do not
place the projector on a crowded coffee
table, sofa, bed, etc. Do not put the
projector in an enclosure such as a book
case or a cabinet that restricts air ow.
2. Do not use the projector near water or
moisture. To reduce the risk of re and/
or electric shock, do not expose the
projector to rain or moisture.
3. Do not install near heat sources such as
radiators, heaters, stoves or any other
apparatus such as ampliers that emits
heat.
4. Do not use the projector in direct
sunlight.
5. Do not use near any appliance
generating a strong magnetic eld.
6. Do not use the projector in areas
susceptible to excessive dust and dirt.
7. Turn off the product before cleaning.
8. Disconnect the power cord if the
product is not being used for a long
period of time.
9. Ensure that the ambient room
temperature is within 5- 35°C.
10. Relative Humidity is 5 - 35°C, 80%
(Max.), non-condensing.
11. Do not drop, throw or try to bend your
product.
12. May explode if disposed of in re.
13. Clean only with dry cloth.
14. Only use attachments/accessories
specied by the manufacturer.
15. Do not use the unit if it has been
physically damaged or abused. Physical
damage/abuse would be (but not
limited to):
▀■ Unit has been dropped.
▀■ Charger or plug has been damaged.
▀■ Liquid has been spilled on to the
projector.
▀■ Projector has been exposed to rain or
moisture.
▀■ Something has fallen in the projector
or something is loose inside.
Do not attempt to service the unit
yourself. Opening or removing covers
may expose you to dangerous voltages
or other hazards. Please contact your
local reseller or service center before you
send the unit for repair.
16. Do not let objects or liquids enter the
projector. They may touch dangerous
voltage points and short out parts that
could result in re or electric shock.
17. See projector enclosure for safety related
markings.
18. The unit should only be repaired by
appropriate service personnel.
19. Do not touch the projector for a long
time while the projector is used.
Im p o r t a n t Sa f e t y In S t r u c t I o n
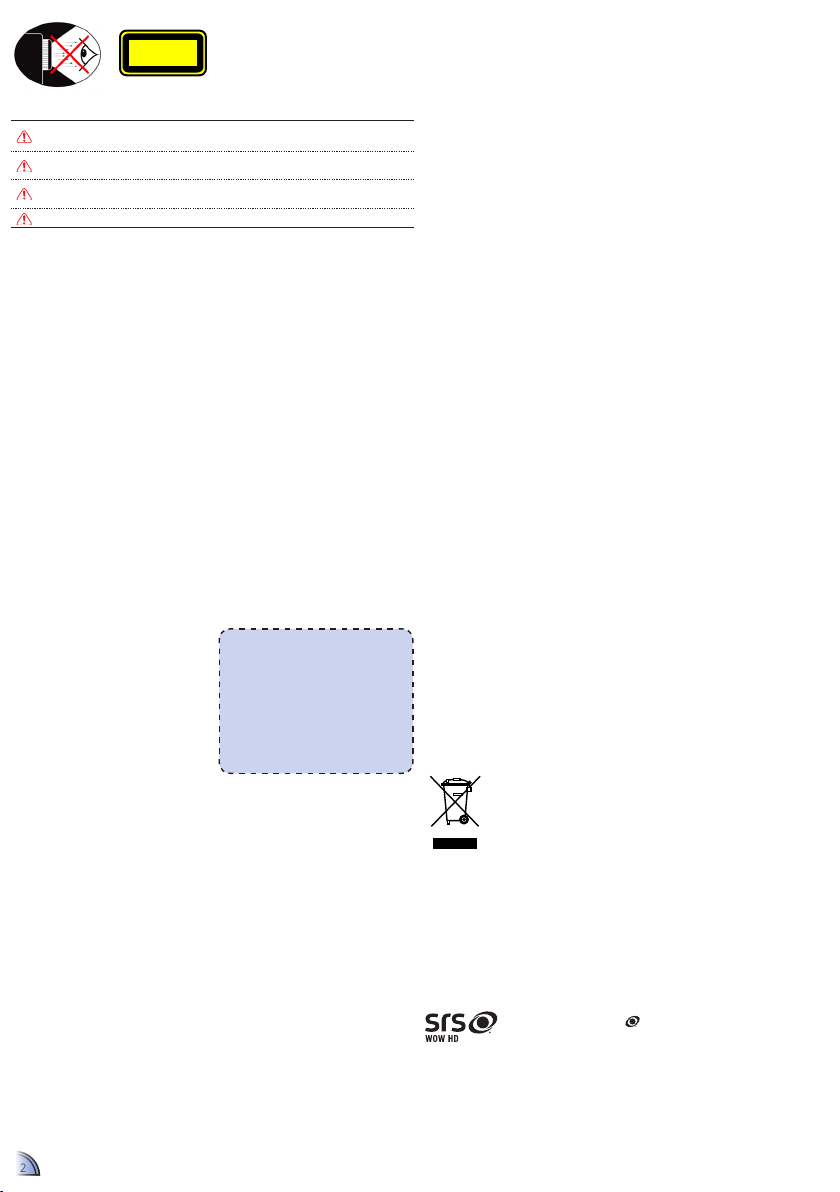
ey e Sa f e t y Wa r n I n g S
Avoid staring/facing directly into the projector beam at all times. Keep your back
to the beam as much as possible.
A stick or laser pointer is recommended to avoid the need for the user to enter
the beam.
When projector is used in a classroom, adequately supervise students when they
are asked to point out something on the screen.
In order to minimize power, use room blinds to reduce ambient light levels.
CLASS 1 LED PRODUCT
This appendix lists the general notices of
your Projector.
FCC notice
This device has been tested and found to
comply with the limits for a Class B digital
device pursuant to Part 15 of the FCC
rules. These limits are designed to provide
reasonable protection against harmful
interference in a residential installation.
This device generates, uses, and can radiate
radio frequency energy and, if not installed
and used in accordance with the instructions, may cause harmful interference to
radio communications.
However, there is no guarantee that interference will not occur in a particular installation. If this device does cause harmful
interference to radio or television reception,
which can be determined by turning the
device off and on, the user is encouraged
to try to correct the interference by one or
more of the following measures:
• Reorient or relocate the receiving
antenna.
• Increase the separation between the
device and receiver.
• Connect the device into an outlet on
a circuit different from that to which
the receiver is connected.
• Consult the dealer or an experienced
radio/television technician for help.
Notice: Shielded cables
All connections to other computing
devices must be made using shielded
cables to maintain compliance with
FCC regulations.
Caution
Changes or modications not
expressly approved by the manufacturer could void the user’s authority,
which is granted by the Federal
Communications Commission, to
operate this device.
Operation conditions
This device complies with Part 15 of the
FCC Rules. Operation is subject to the following two conditions:
1. this device may not cause harmful
interference, and
2. this device must accept any interference received, including interference
that may cause undesired operation.
Notice: Canadian users
This Class B digital apparatus complies with Canadian
ICES-003.
Remarque à l’intention des utilisateurs canadiens
Cet appareil numerique de la classe B est conforme a la
norme NMB-003 du Canada.
Declaration of Conformity for EU countries
• EMC Directive 2004/108/EC (including
amendments)
• Low Voltage Directive 2006/95/EC
• R & TTE Directive 1999/5/EC (if product has
RF function)
re g u l a t I o n & S a f e t y n o t I c e S
DI S p o S a l o f o l D el e c t r I c a l & el e c t r o n I c
eq u I p m e n t
(Applicable throughout the European Union and other European countries with
separate collection programs)
This symbol found on your product or on its packaging, indicates that this product should
not be treated as household waste when you wish to dispose of it. Instead, it should be
handed over to an applicable collection point for the recycling of electrical and electronic
equipment. By ensuring this product is disposed of correctly, you will help prevent
potential negative consequences to the environment and human health, which could
otherwise be caused by inappropriate disposal of this product. The recycling of materials
will help to conserve natural resources.
This symbol is only valid in the European Union.
If you wish to discard this product, please contact your local authorities or
dealer and ask for the correct method of disposal.
The requirements for the gloss of housing apply to peripheral devices used
at the visual display workplace according to BildscharbV. Peripheral devices
intended for use outside the visual display workplace can receive a GS-Mark
if the scope is indicated in the User’s Manual as well as the certicate.
That means the following wording is possible in situations where the use
within the eld of view is not intended and where sufcient hints are given
in the User’s Manual for the avoidance of such situations to ensure that
display work is not affected.
Wording in the certicate: “This device is not intended for use in the direct
eld of view at visual display workplaces. To avoid incommoding reexions
at visual display workplaces this device must not be placed in the direct
eld of view.”
a.2.9.31 gl o S S o f h o u S I n g o f p e r I p h e r a l
D e v I c e S (15
t h
/ 22 m e e t I n g ag1 eK1):
tr a D e m a r K S
• WOW HD, SRS and the symbol are trademarks of SRS Labs,
Inc. WOW HD technology is incorporated under license from SRS
Labs, Inc.
• WOW HD™ signicantly improves the playback quality of audio,
delivering a dynamic 3D entertainment experience with deep, rich
bass and high frequency clarity for crisp detail.
2
Page 3
3
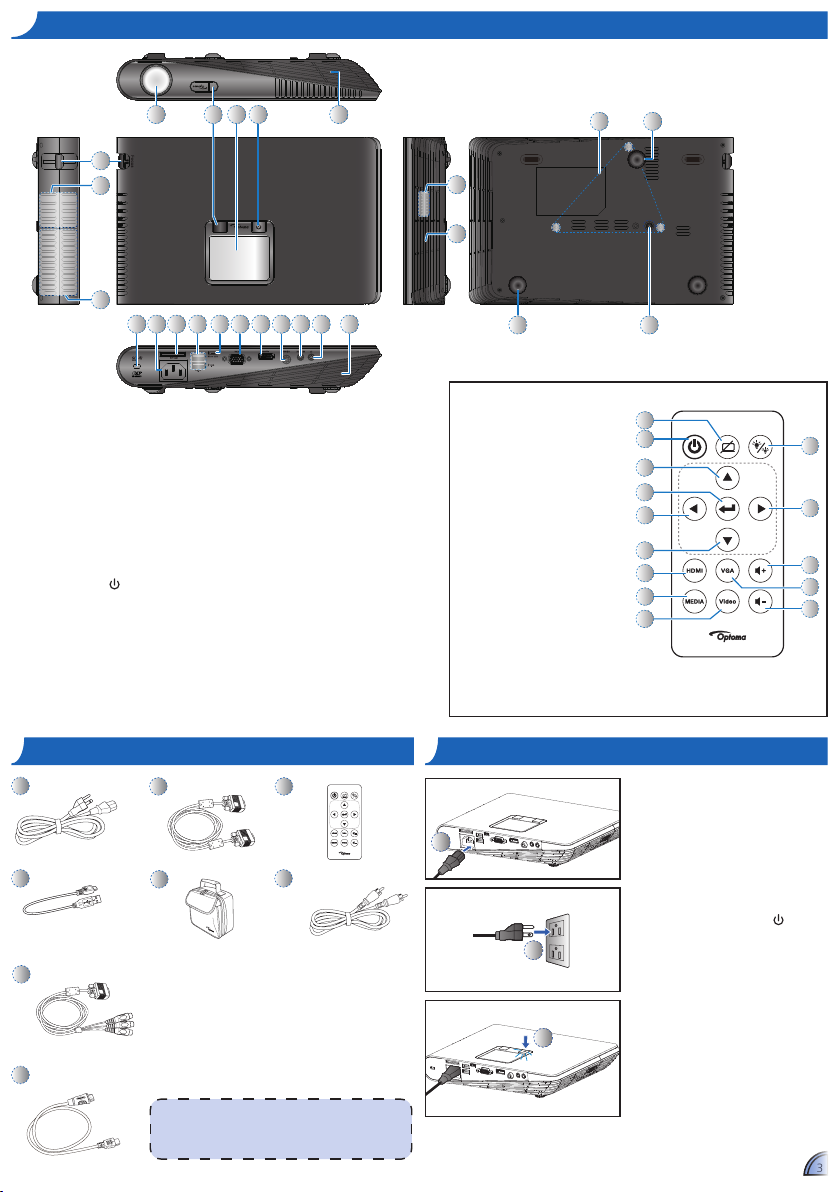
pr o D u c t ov e r v I e W
3
8 9 18171510 13 14 16
2
3
7654
19
1
3
11 12
2
18
20
20 21
pr o D u c t ov e r v I e W
Focus Dial1.
Speaker2.
Ventilation (outlet)3.
Lens4.
IR Receiver5.
Touch Panel6.
Power Button (7. )
Kensington Lock8.
AC Input9.
SD Card Slot10.
USB Type A Port (Memory 11.
Stick/WiFi/HDD)
Micro USB Port12.
VGA Connector13.
HDMI Connector14.
Video In15.
Audio / AV In16.
Headphones Connector17.
Ventilation (inlet)18.
Ceiling Mount Holes19.
Elevator Foot20.
Screw Hole for Tripod21.
2
5
7
8
10
11
12
13
14
1
3
4
6
9
Remote Control
Hide Button1.
Power Button2.
Up Button3.
OK Button4.
Left Button5.
Down Button6.
HDMI Button7.
Media Button8.
Video Button9.
LED Mode Button10.
Right Button11.
Volume Up Button12.
VGA Button13.
Volume Down Button14.
po W e r on / of f
1
1. Connect the power cord to the AC
IN input jack on the rear of the
projector. ()
2. Insert the plug at the other end of
the power cord into a power outlet.
()
The LED lights red in standby
mode.
3. Press the Power button ( ) to turn
the projector on or off. ()
The LED turns green when the
projector is turned on.
3
2
Standard Accessory
Power cord1.
VGA cable2.
Remote control3.
<Note>
The standard accessories may vary in each region due •
to different applications.
The inclusive power cord varies per region.•
pa c K a g e ov e r v I e Wpa c K a g e ov e r v I e W
1
5
6
2
8
3
4
Optional Accessory
Micro USB to USB 4.
Type-A cable
Carrying case5.
Video cable6.
VGA to Component 7.
cable
HDMI cable8.
7
Page 4
44
212
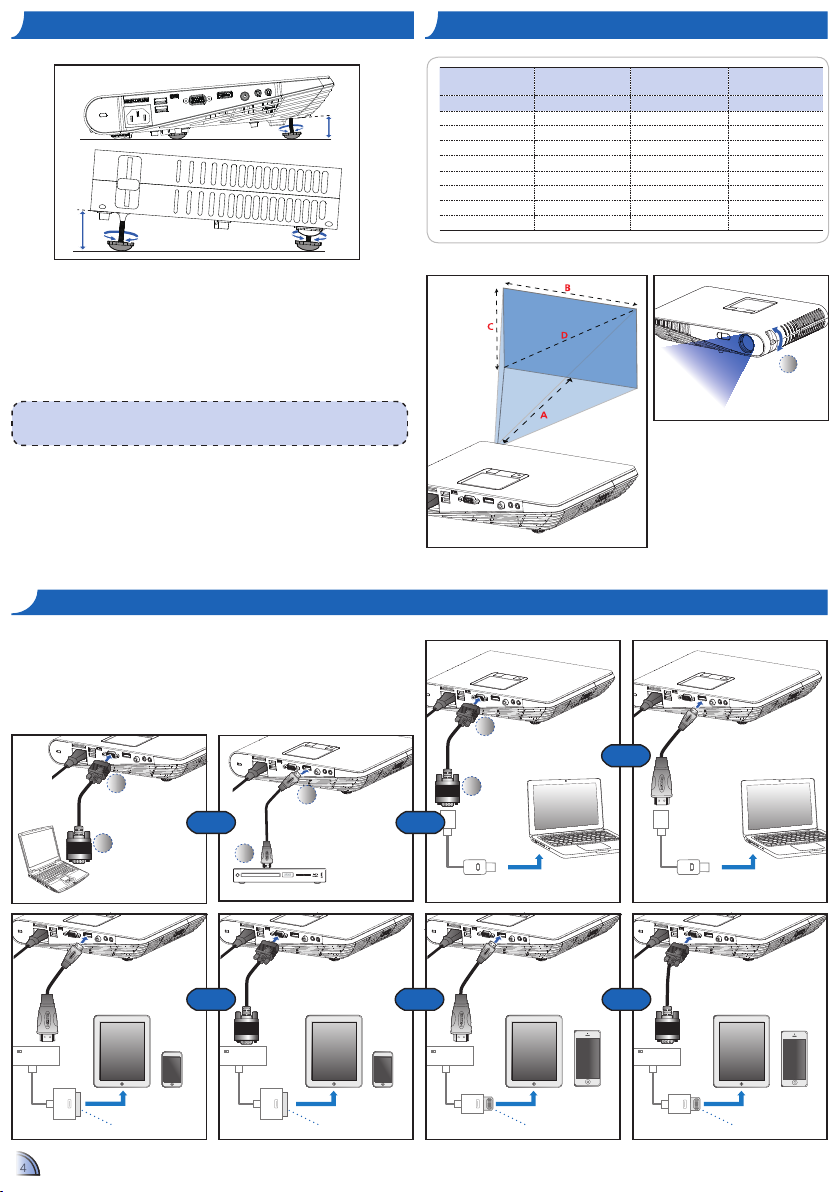
1. Connect a VGA / HDMI device using the appropriate cable. (
~
)
2. After powering on the projector, press direct source button on the remote or
swipe left or right on the touch panel.
1
2
TM
aD j u S t pr o j e c t e D Im a g e he I g h t aD j u S t t h e pr o j e c t e D Im a g e
The projector is equipped with an elevator foot for adjusting the projected
image height.
To adjust the height:
Turn the elevator foot to adjust the projected image position to the desired
height.
Projection Distance
(A)
Screen Size - Width
(B)
Screen Size - Height
(C)
Screen Diagonal
(D)
Meter feet (mm) (inch) (mm) (inch) (mm) (inch)
0.50 1.64 360.0 14.2 220.0 8.7 422 16.6
0.90 2.95 640.0 25.2 400.0 15.7 757 29.8
1.50 4.92 1070.0 42.1 670.0 26.4 1262 49.7
1.80 5.91 1290.0 50.8 800.0 31.5 1516 59.7
2.40 7.87 1710.0 67.3 1070.0 42.1 2022 79.6
3.00 9.84 2140.0 84.3 1340.0 52.8 2527 99.5
3.60 11.81 2570.0 101.2 1610.0 63.4 3033 119.4
4.50 14.76 3210.0 126.4 2010.0 79.1 3790 149.2
1
Adjust the focus () until the
image is clear.
co n n e c t In p u t So u r c e - vga / hDmI
<Note>
After a few seconds, if there is no changes, the projector will automatically adjust the image
display via Auto Keystone function.
or
HDMI
VGA
HDMI
VGA
212
VGA
HDMI
Apple Digital AV
Adapter
Apple Digital AV
Adapter
Apple Lightning
Adapter
Apple Lightning
Adapter
iPad
iPad iPad 4 iPad 4
iPhone 4/4S
iPhone 4/4S
iPhone 5 iPhone 5
or
MacBook
MacBook
Mini Displayport
to HDMI
Mini Displayport
to VGA
or
or or or
Page 5
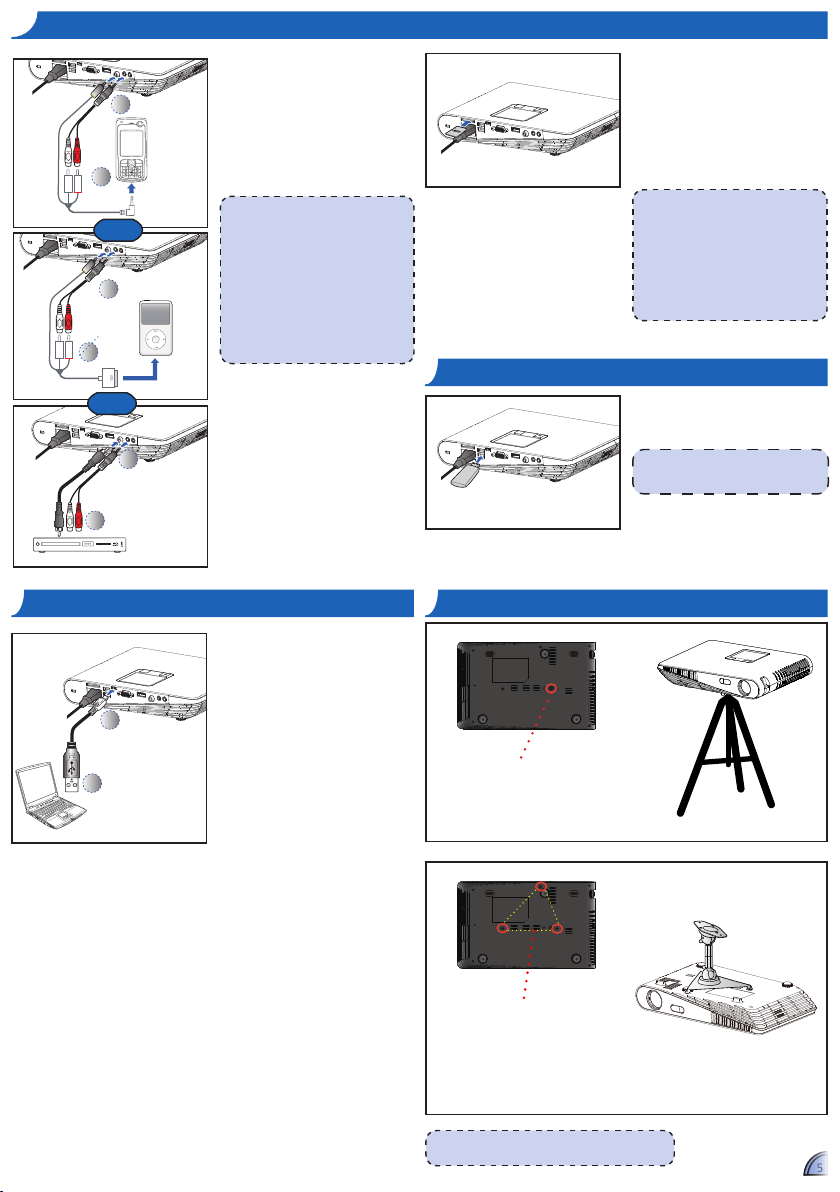
55
mo u n t t h e pr o j e c t o r
<Note>
The tripod and ceiling mount are optional accessories.
In S e r t SD ca r D
In S e r t uSB fl a S h Dr I v e
LOCK
Insert an SD card into the slot with the
gold contacts facing down.
<Note>
To remove the SD card, push the card to •
eject it from the slot.
Do not remove the SD card while the •
projector is projecting image from
the card. This can cause data loss or
damage the card.
Supports SD card size up to 32GB.•
The SD card is not included in the •
package.
Plug a USB ash drive into the USB
Type A port at the back of projector.
<Note>
Support USB ash drive with FAT32 format.
co n n e c t co m p u t e r f o r
uS e r ma n u a l
2
1
1 Connect a laptop or PC using the
Micro USB to USB Type-A cable.
2. Turn on the projector.
3. CD-ROM icon will appear on the
laptop/PC screen.
4. Click CD-ROM icon and open
User Manual.
1. Connect the AV input source.
(
~
)
2. After powering on the projector,
press direct source button on the
remote or swipe left or right on the
touch panel.
<Note>
1. All other brand and product names are
trademarks or registered trademarks of
their respective companies.
2. The cables connecting the video output
devices are not supplied, please contact
the device vendor or Optoma.
3. iPod nano/iPod touch/iPhone/iPod classic
(version 5 and above)
4. Designed for iPod/iPhone/Mobile phone/
PMP with TV out functions. Using with
devices with audio signal voltage >
0.3Vrms is not recommended.
1
2
1
2
or
For video and
audio input
Screw a standard tripod into the screw
hole on the projector.
Screw hole for tripod
*Standard Tripod
1. Place the projector upside down on a at surface.
2. Line up the three mounting holes and use the three ceiling mount
screws to secure the mount to the projector.
Screw holes (M3x10) for ceiling mount
*Ceiling Mount
co n n e c t In p u t So u r c e - co m p o S I t e av I n
TM
2
1
or
Page 6
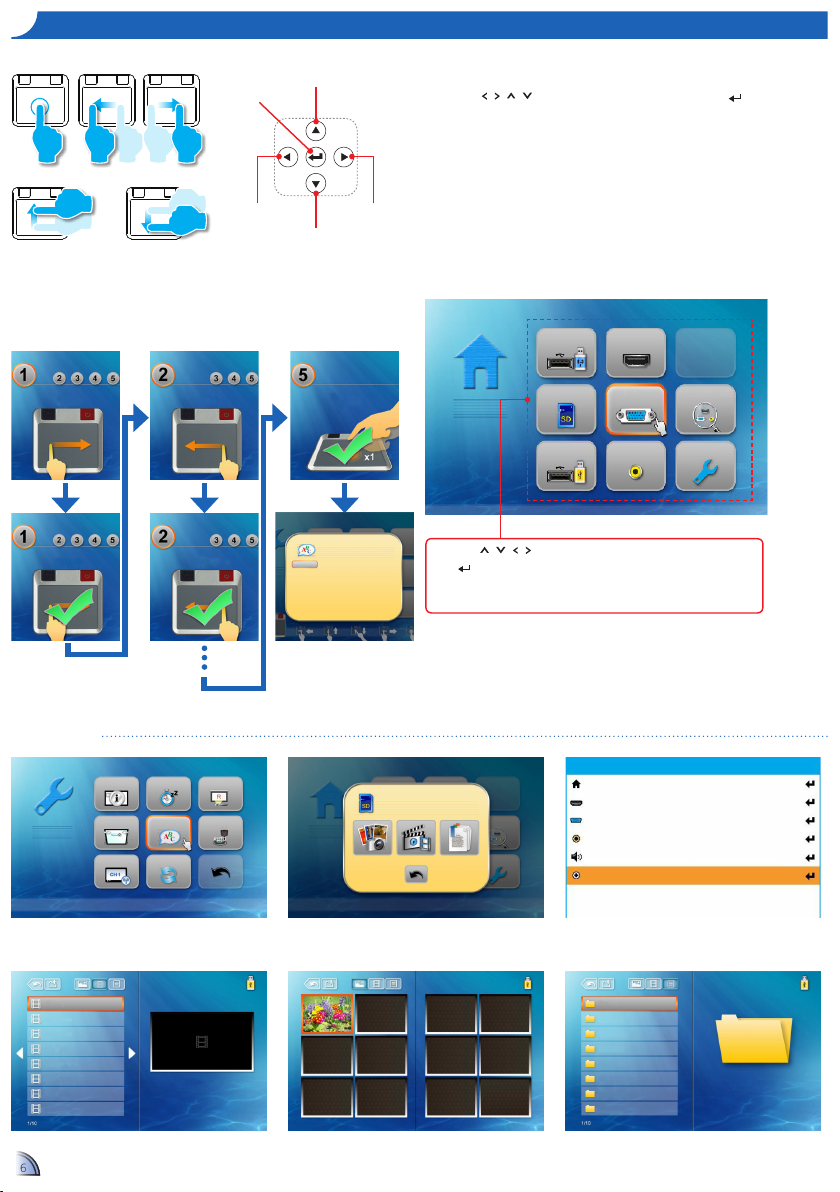
66
Submenu Items
ho W t o uS e t h e me n u
RC: Use•
/ / /
to highlight the desired option and press to conrm the
selection.
TP: Swipe
Left/Right/Up/Down
to highlight the desired option and Tap / One Click to
conrm the selection.
Buttons functionality varies depending on the current mode.•
Down Button
Right Button
RC: Press
/ / /
to select the menu item that you want to access and
press to enter the menu screen.
TP: Swipe Up/Down/Left/Right to select the menu item that you want to access
and Tap / One Click to enter the menu screen.
Photo menuVideo menu Ofce Viewer menu
Setup menu
(HDMI, VGA, Video modes)
Home menu
Touch Panel (TP) Remote Control (RC)
Up Button
Left Button
OK Button
Tap it
Swipe Down
Swipe Left Swipe Right
Swipe Up
Setup menu
Touch Pad Practice Guide
These screens will appear the first time for using
the projector or Reset projector.
SD Card/USB menu
WiFi Display HDMI
SD Card VGA Auto Searching
USB Video Setup
Information Sleep Timer Projection
Keystone Language Direct Power On
WiFi Channel Reset
Menu
Home
HDMI
VGA
Video
Volume
Advanced
File name
File name
File name
File name
File name
File name
File name
File name
File name
RIGHT
RIGHT
LEFT
LEFT
ENTER
File name
File name
File name
File name
File name
File name
File name
File name
File name
English Français Español Italiano
Português Deutsch Nederlands Polski
Русский Svenska Ελληνικά Türkçe
繁體中文
简体中文
한국어
日本語
Page 7
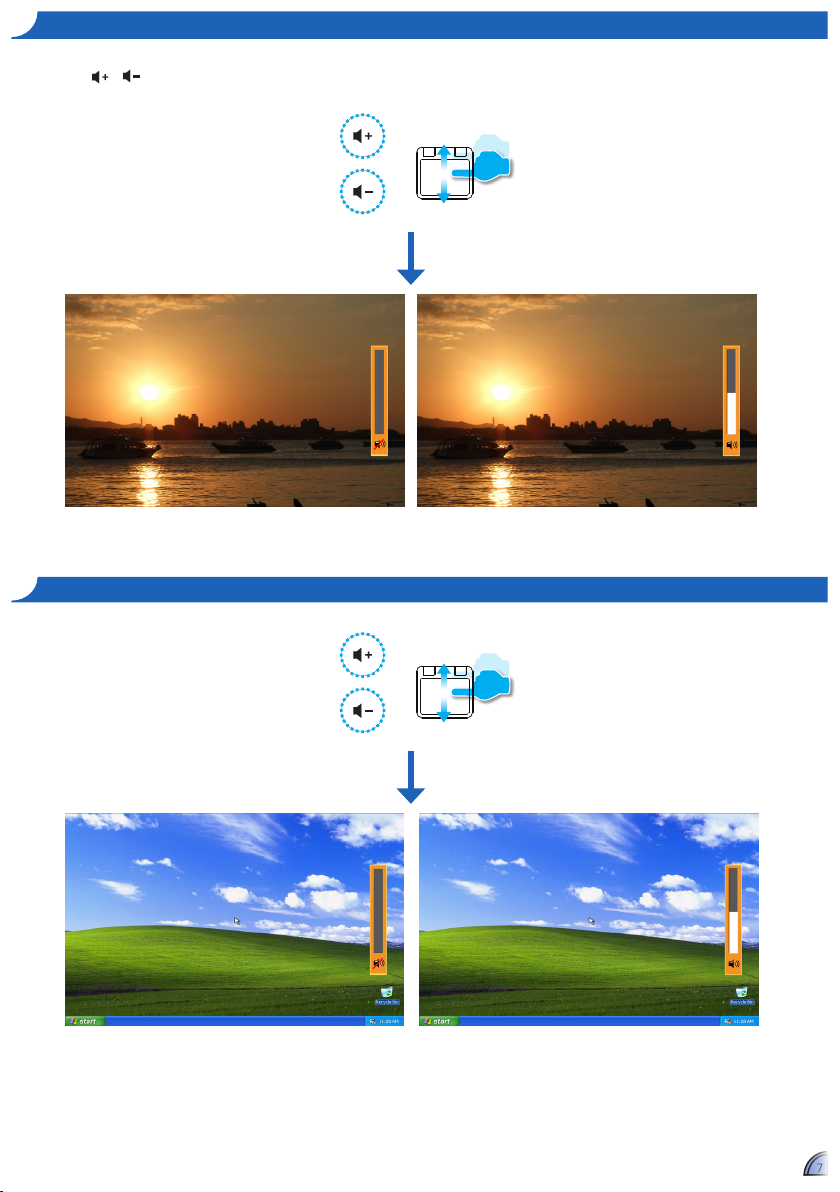
77
ho W t o aD j u S t vo l u m e - So u r c e : SD ca r D / uSB fl a S h Dr I v e
ho W t o aD j u S t vo l u m e - So u r c e : vga / vI D e o / hDmI
Press • / on the remote control or swipe Up/Down on the touch pad to adjust volume.
Page 8
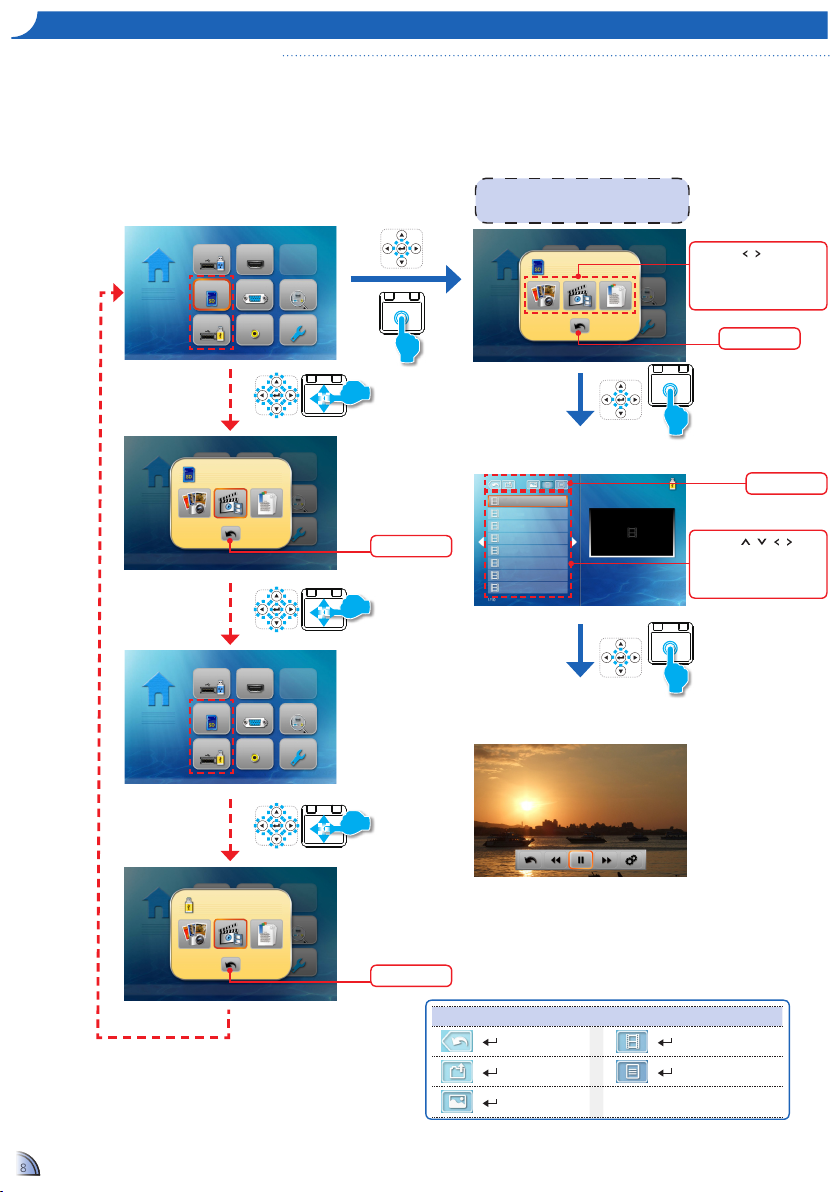
88
File name
File name
File name
File name
File name
File name
File name
File name
File name
Show folder List
Playing Videos from the SD Card, or USB Flash Drive
ho W t o pl a y vI D e o S - So u r c e : SD ca r D / uSB fl a S h Dr I v e
<Note>
The displayed screen may vary depending on
the selected data source on the previous step.
Video Playback mode (see page 8)
Start playback
Change data
source
2.
Select Video Menu
4.
Playback File
The screen, the source icon on the button guide,
and the sequence in which screens appear vary
depending on the available data source.
1.
Select Data Source
Back icon
RC: Press
/
to select the
menu item.
TP: Swipe Left/Right to select
the menu item.
RC: Press
/ / /
to
select the le list.
TP: Swipe Up/Down/Left/Right
to select the le list.
3.
Select Video File
Menu bar
Menu Bar Control
+
Back
+
Video menu
+
To parent
directory
+
Document menu
+
Photo menu
Change data
source
Back icon
Change data
source
Back icon
WiFi Display HDMI
SD Card VGA Auto Searching
USB Video Setup
WiFi Display HDMI
SD Card VGA Auto Searching
USB Video Setup
Page 9
99
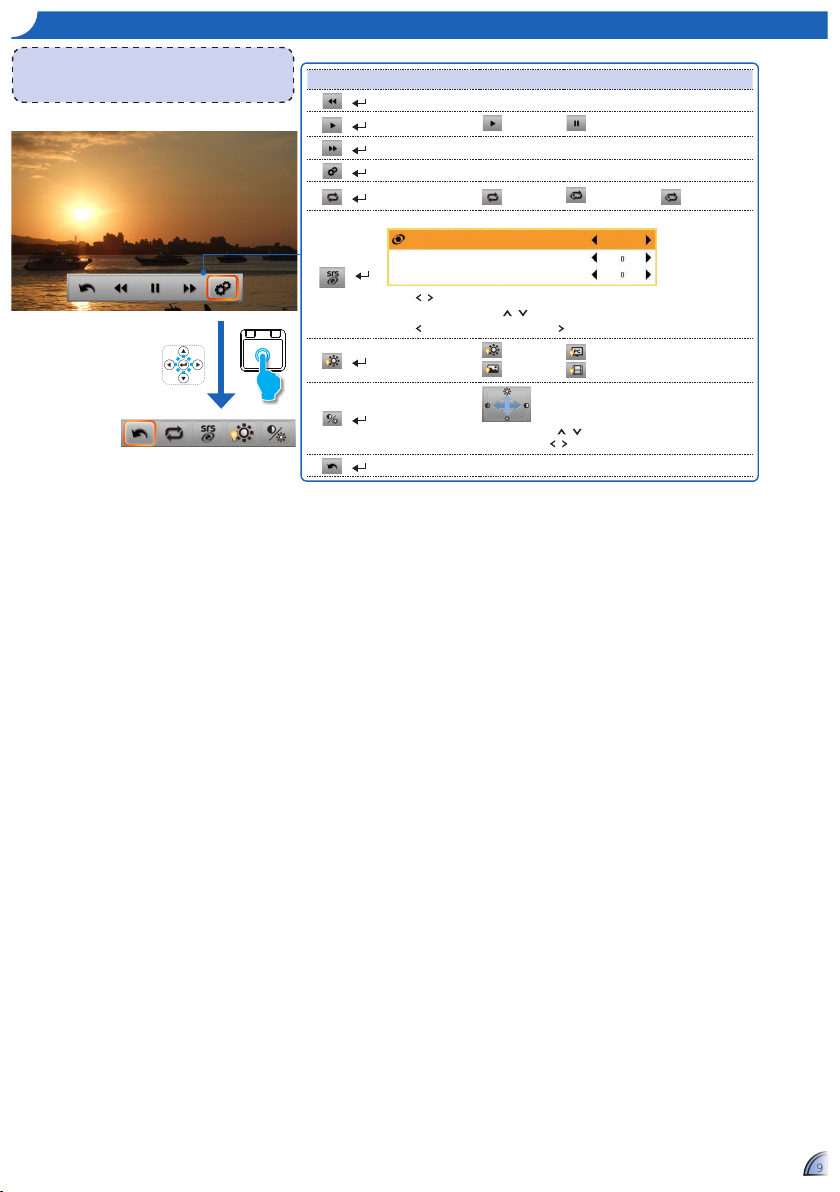
ho W t o pl a y vI D e o S - vI D e o pl a y B a c K mo D e
<Note>
The button guide disappears when the keypad is not used for 5
seconds.
To display the button guide, press Enter key.
Media Playback Control
+
Rewind 2x, 4x, 8x, 16x, and 32x
+
Play
Play Pause
+
Fast forward 2x, 4x, 8x, 16x, and 32x
+
Setting Advanced setting
+
Repeat
Repeat all Repeat one Repeat disabled
+
SRS
SRS
Treble
Bass
Off
Press / key to switch On / Off SRS.
When switch off SRS, press / key to select Treble and Bass.
Press to decrease the value and press to increase the value.
+
Display mode
Brigt mode
Photo mode
PC mode
Cinema mode
+
Contrast and
Brightness
Brightness: Press / key to increase/decrease the brightness.
Contrast: Press / to decrease/increase the contrast.
+
Back Back to parent menu
Setting Menu
Page 10
1010
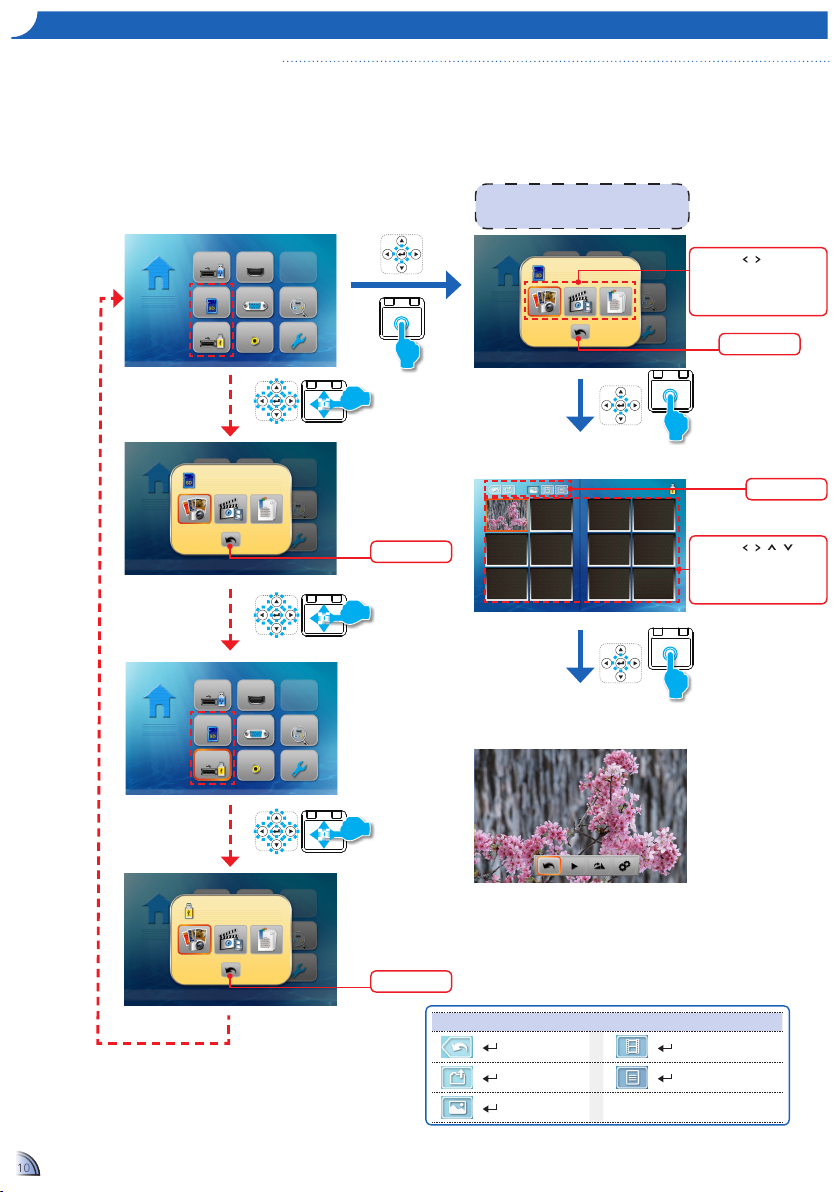
Viewing Photos from the SD Card, or USB Flash Drive
ho W t o vI e W ph o t o S - So u r c e : SD ca r D / uSB fl a S h Dr I v e
<Note>
The displayed screen may vary depending on
the selected data source on the previous step.
Photo Review mode (see page 10)
Start playback
2.
Select Photo Menu
4.
Preview File
RC: Press
/ / /
to
select the le list.
TP: Swipe Left/Right/Up/Down
to select the le list.
3.
Browse Thumbnails
Menu bar
Change data
source
The screen, the source icon on the button guide,
and the sequence in which screens appear vary
depending on the available data source.
1.
Select Data Source
Change data
source
Back icon
Change data
source
Back icon
Show folder List
Back icon
RC: Press
/
to select the
menu item.
TP: Swipe Left/Right to select
the menu item.
Menu Bar Control
+
Back
+
Video menu
+
To parent
directory
+
Document menu
+
Photo menu
WiFi Display HDMI
SD Card VGA Auto Searching
USB Video Setup
WiFi Display HDMI
SD Card VGA Auto Searching
USB Video Setup
Page 11
1111
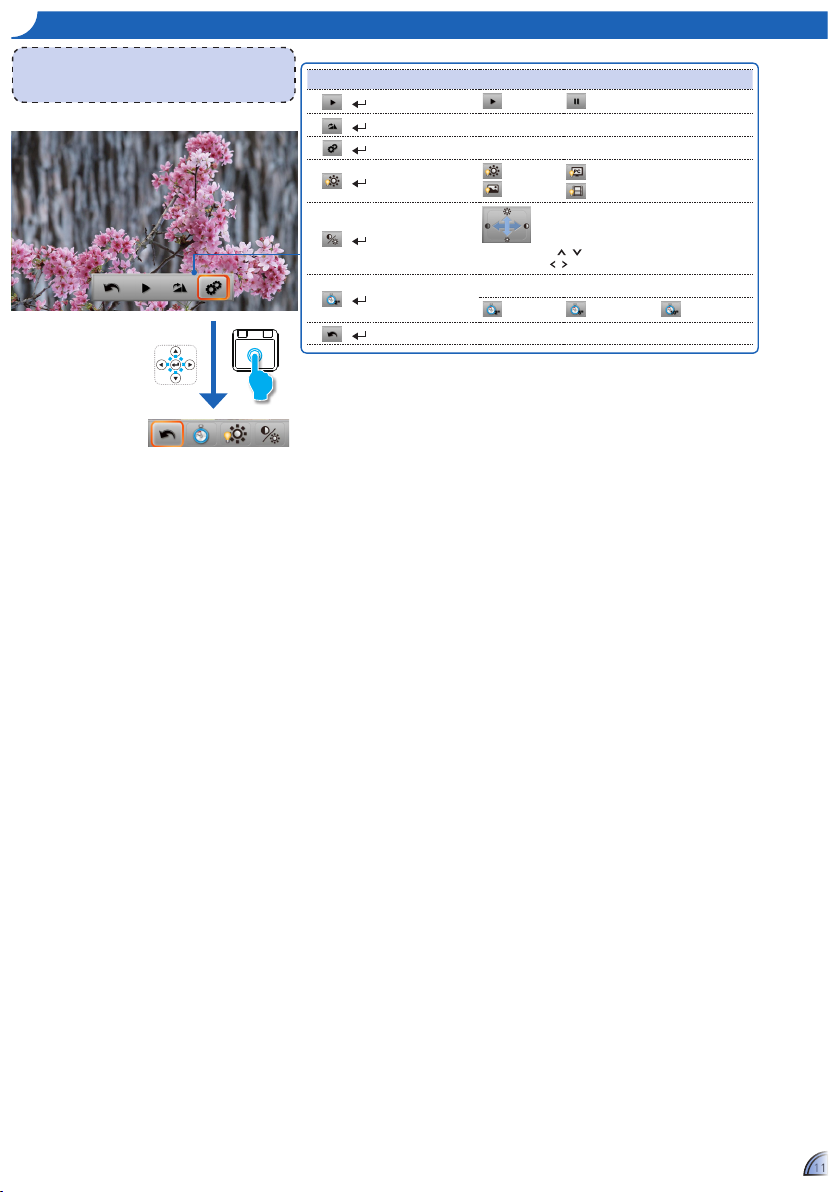
ho W t o vI e W ph o t o S - mo D e : ph o t o pr e v I e W mo D e
<Note>
The button guide disappears when the keypad is not used for 5
seconds.
To display the button guide, press Enter key.
Media Playback Control
+
Slideshow
Slideshow on Slideshow off
+
Rotate Clockwise 90 degree
+
Setting Advanced setting
+
Display mode
Brigt mode
Photo mode
PC mode
Cinema mode
+
Contrast and
Brightness
Brightness: Press / key to increase/decrease the brightness.
Contrast: Press / to decrease/increase the contrast.
+
Slideshow period
Time period of each photo by slideshow mode
2 sec. 5 sec. 10 sec.
+
Back Back to parent menu
Setting Menu
Page 12
1212
File name
File name
File name
File name
File name
File name
File name
File name
File name
Back icon
RC: Press
/
to select the
menu item.
TP: Swipe Left/Right to select
the menu item.
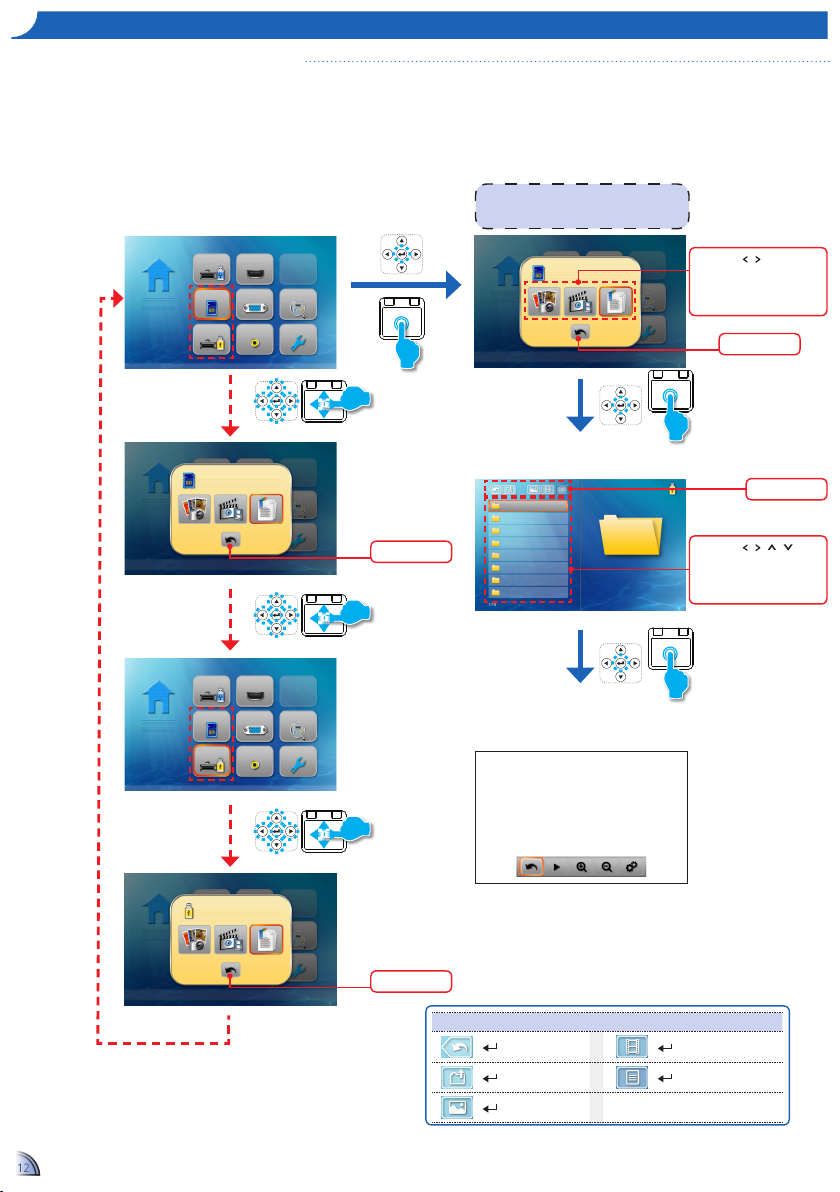
Viewing Documents from the SD Card, or USB Flash Drive
ho W t o vI e W Do c u m e n t S - So u r c e : SD ca r D / uSB fl a S h Dr I v e
Show folder List
<Note>
The displayed screen may vary depending on
the selected data source on the previous step.
View mode (see page 12)
Open document
2.
Select Document Menu
4.
View File
The screen, the source icon on the button guide,
and the sequence in which screens appear vary
depending on the available data source.
1.
Select Data Source
RC: Press
/ / /
to
select the le list.
TP: Swipe Left/Right/Up/Down
to select the le list.
3.
Select Document File
Menu bar
Change data
source
Change data
source
Back icon
Change data
source
Back icon
Menu Bar Control
+
Back
+
Video menu
+
To parent
directory
+
Document menu
+
Photo menu
WiFi Display HDMI
SD Card VGA Auto Searching
USB Video Setup
WiFi Display HDMI
SD Card VGA Auto Searching
USB Video Setup
Page 13
13
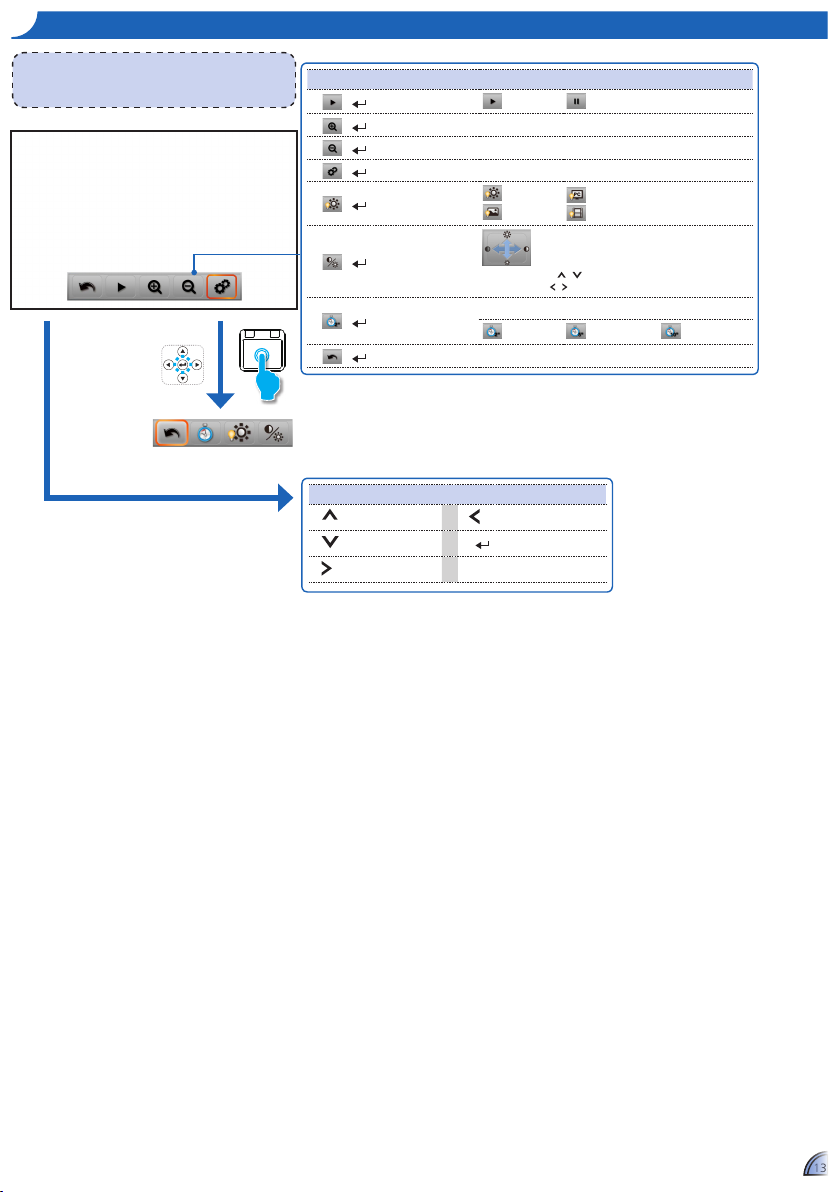
Advanced Menu Control (RC / TP)
Page up Move to the left
Page down Back
Move to the right
13
ho W t o vI e W Do c u m e n t S - vI e W mo D e
<Note>
The button guide disappears when the keypad is not used for 5
seconds.
To display the button guide, press Enter key.
Media Playback Control
+
Slideshow
Slideshow on Slideshow off
+
Zoom in Zoom in the page
+
Zoom out Zoom out the page
+
Setting Advanced setting
+
Display mode
Brigt mode
Photo mode
PC mode
Cinema mode
+
Contrast and
Brightness
Brightness: Press / key to increase/decrease the brightness.
Contrast: Press / to decrease/increase the contrast.
+
Slideshow period
Time period of each photo by slideshow mode
2 sec. 5 sec. 10 sec.
+
Back Back to parent menu
Setting Menu
Page 14
1414
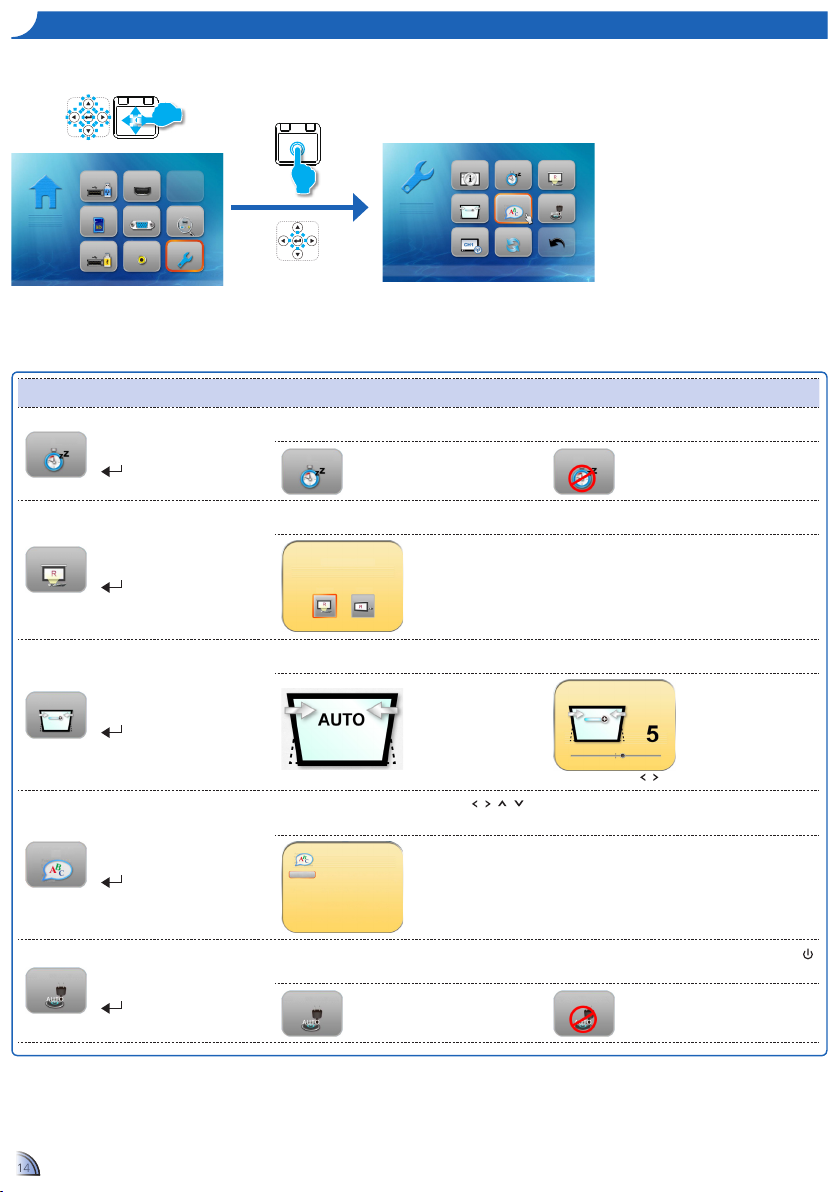
ho W t o aD j u S t t h e Se t t I n g S
1.
Select "Setup" menu
2.
Enter "Setup" Menu
Setting Menu Control
Sleep Timer
+
Sleep Timer
Automatically turn off the projector at a preset time.
Sleep Timer
On
Sleep Timer
Off
Projection
+
Projection
Switch to front projection or rear projection.
Projection
Front Rear
Keystone
+
Keystone
Press “Enter” to switch Auto keystone / Manual keystone.
Auto keystone
Manual keystone:
In
Manual mode, press / to adjust keystone.
Language
+
Language
Setting system language. Press / / / to move highlight bar, then press “Enter” to
select language.
English Français Español Italiano
Português Deutsch Nederlands Polski
Русский Svenska Ελληνικά Türkçe
繁體中文
简体中文
한국어
日本語
Direct Power On
+
Direct Power On
The projector will automatically power on when AC power is supplied, without pressing the “
” key on the projector control panel or on the remote control.
Direct Power On
On
Direct Power On
Off
Information Sleep Timer Projection
Keystone Language Direct Power On
WiFi Channel
Reset
WiFi Display HDMI
SD Card VGA Auto Searching
USB Video Setup
Page 15
1515
ho W t o aD j u S t t h e Se t t I n g
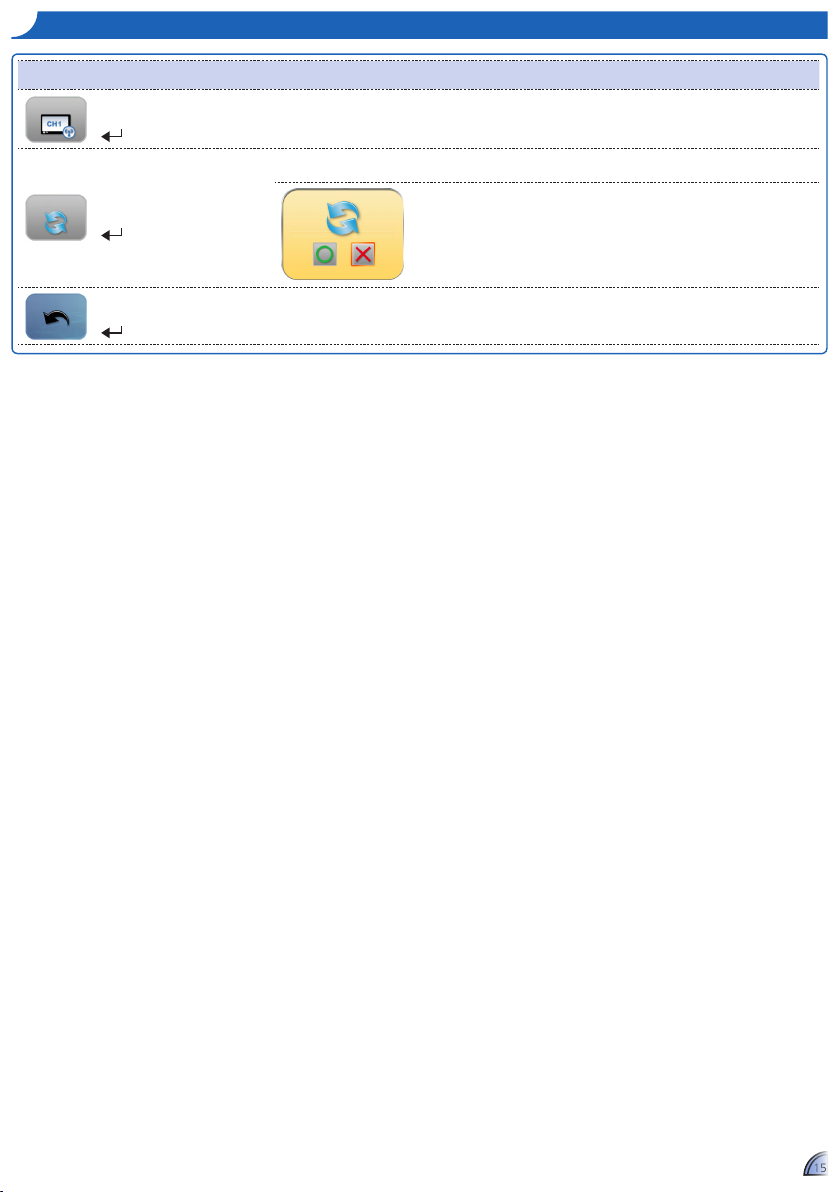
Setting Menu Control
WiFi Channel
+
WiFi Channel Press “Enter” to Switch Wi channel (from 1 to 11)
Reset
+
Reset
Press “Enter” to return the display parameters on all menus to the factory default settings.
+
Back Back to parent menu.
Page 16
1616
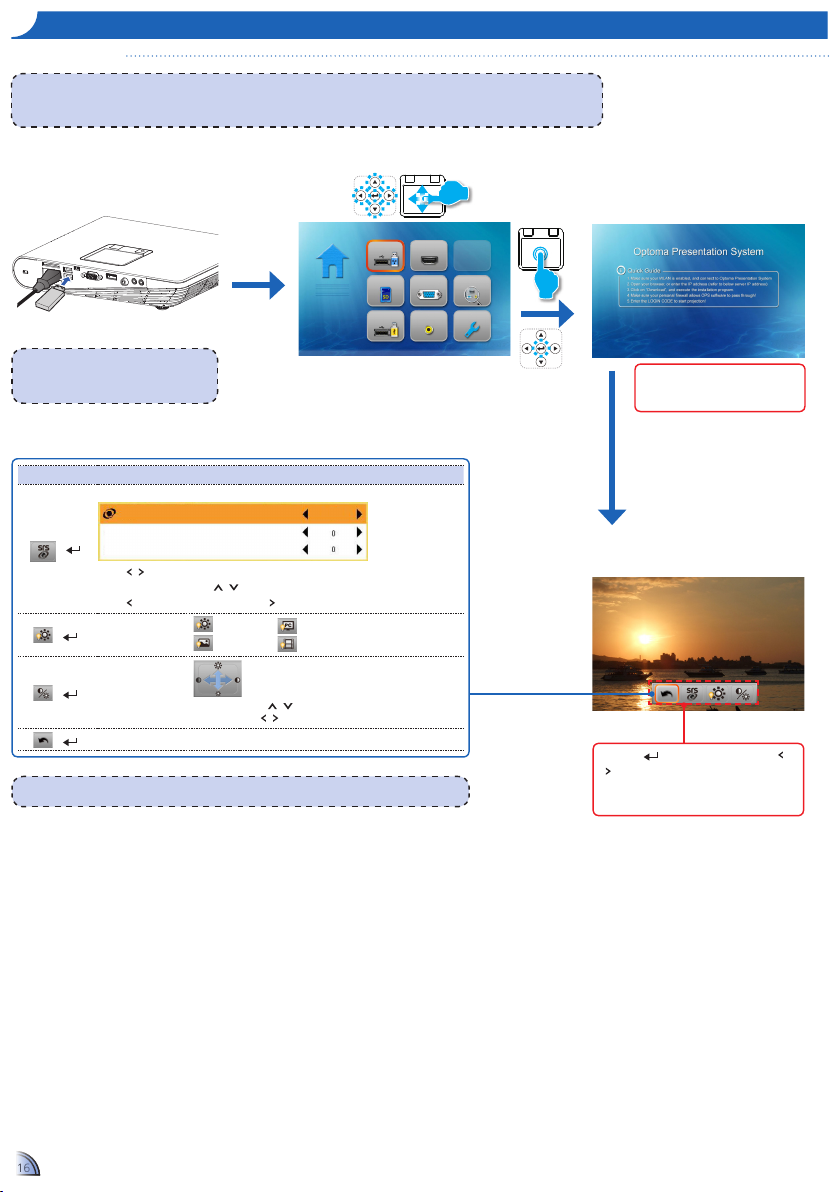
WIfI DI S p l a y mo D e
WiFi Display Mode
Home menu
2.
Select "WiFi" menu
3.
View
WiFi Display
Information.
1.
Plug in the WiFi Dongle
<Note>
When using WiFi Display function for the rst time, install "MirrorOp Lite" software into your PC:
1. From the Windows desktop, double-click "setupMirrorOpSender.exe". Follow the on-screen instructions to complete the software installation.
2. See the WiFi Dongle User Manual for more details.
<Note> See the WiFi Dongle User Manual for more instructions.
<Note>
The projector is only compatible with "Optoma
Wireless Dongle". Contact Optoma Service for
details.
Connect to Laptop/PC according to
Quick Guide on screen, and Sync
screen with Laptop/PC.
Waiting for connection
from PC/Laptop client
4.
Disply the screen.
RC: Press to open menu list and press
/
to select the menu item.
TP: Tap / One Click to open menu list and swipe
Left/Right to select the menu item.
Media Playback Control
+
SRS
SRS
Treble
Bass
Off
Press / key to switch On / Off SRS.
When switch off SRS, press / key to select Treble and Bass.
Press to decrease the value and press to increase the value.
+
Display mode
Brigt mode
Photo mode
PC mode
Cinema mode
+
Contrast and
Brightness
Brightness: Press / key to increase/decrease the brightness.
Contrast: Press / t to decrease/increase the contrast.
+
Back Back to parent menu
WiFi Display HDMI
SD Card VGA Auto Searching
USB Video Setup
Page 17
1717
WiFi Display HDMI
SD Card VGA Auto Searching
USB Video Setup
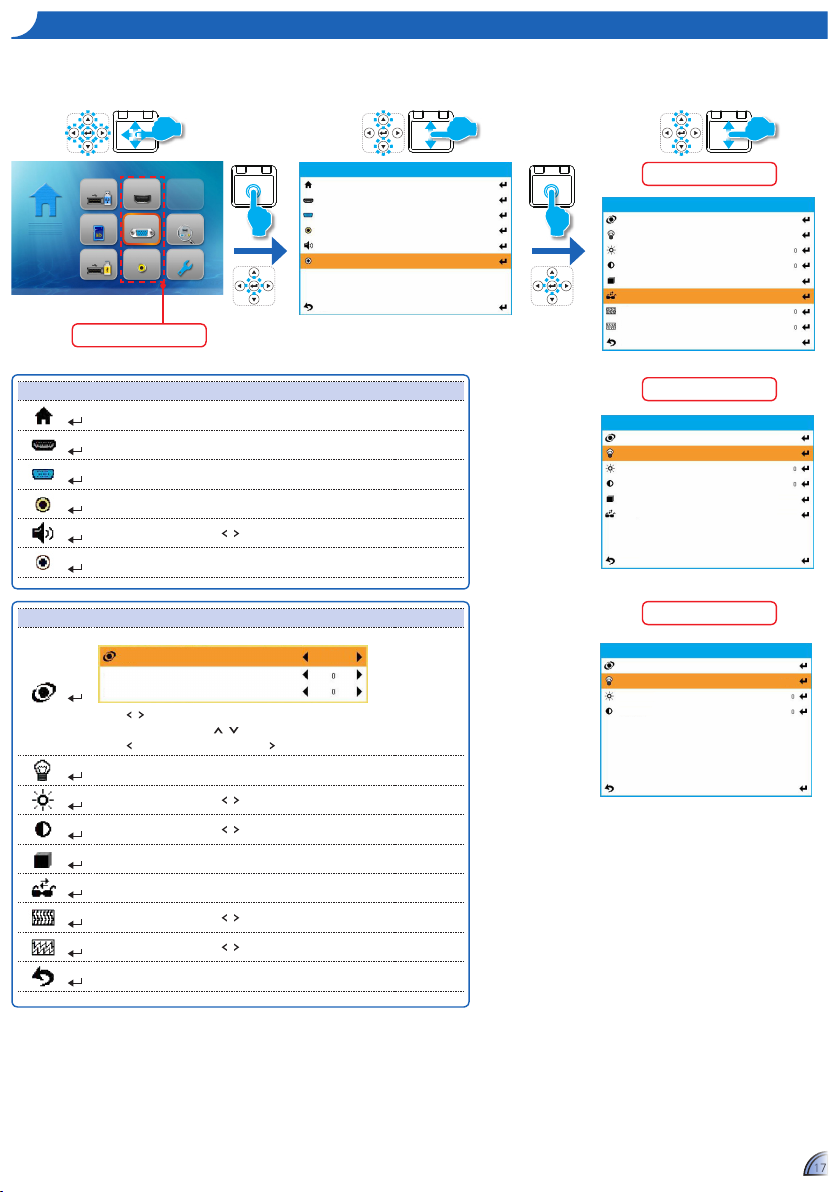
vga mo D e / vI D e o mo D e / hDmI mo D e
1.
Select "VGA" / "HDMI" / "Video"
menu
2.
Display the submenu
Home menu
3.
Select the item
Submenu Control
+
Home Go to Home menu.
+
HDMI Change to HDMI source.
+
VGA Change to VGA source.
+
Video Change to Video source.
+
Volume
Press / to decrease/increase the volume.
+
Advanced The option is different according to the source.
Select External Source
Item Control (Only for Advaned submenu)
+
SRS
SRS
Treble
Bass
Off
Press / key to switch On / Off SRS.
When switch off SRS, press / key to select Treble and Bass.
Press to decrease the value and press
to increase the value.
+
LED Mode Brigt mode / Photo mode / PC mode / Cinema mode
+
Brightness
Press / key to increase/decrease the brightness.
+
Contrast
Press / t to decrease/increase the contrast.
+
3D Mode On / Off
+
3D Sync On / Off
+
Phase
Press / key to decrease/increase the value.
+
Clock
Press / key to decrease/increase the value.
+
Exit Exit this menu and back to previous menu.
VGA Submenu Item
HDMI Submenu Item
Video Submenu Item
Menu
Home
HDMI
VGA
Video
Volume
Advanced
Exit
Advanced
SRS On
Bright
Off
No
LED Mode
Brightness
Contrast
3D Mode
Phase
3D Sync
Clock
Exit
SRS On
Bright
Off
No
LED Mode
Brightness
Contrast
3D Mode
3D Sync
Exit
Advanced
SRS On
Bright
LED Mode
Brightness
Contrast
Exit
Advanced
Page 18

1818
up g r a D e fI r m W a r e
Software updates can be obtained from the Computer.
1. On your computer, create a folder named "upgrade".
2. Download the latest rmware from www.optoma.com and save it in the "upgrade" folder.
3. Copy the "upgrade" folder to the root folder of the SD card.
4. Insert the SD card into the SD card slot of the projector and then press the Power button.
5. Follow the steps below.
1.
Wait to Complete
2.
Upgrade may take a
while to complete
Page 19
1919
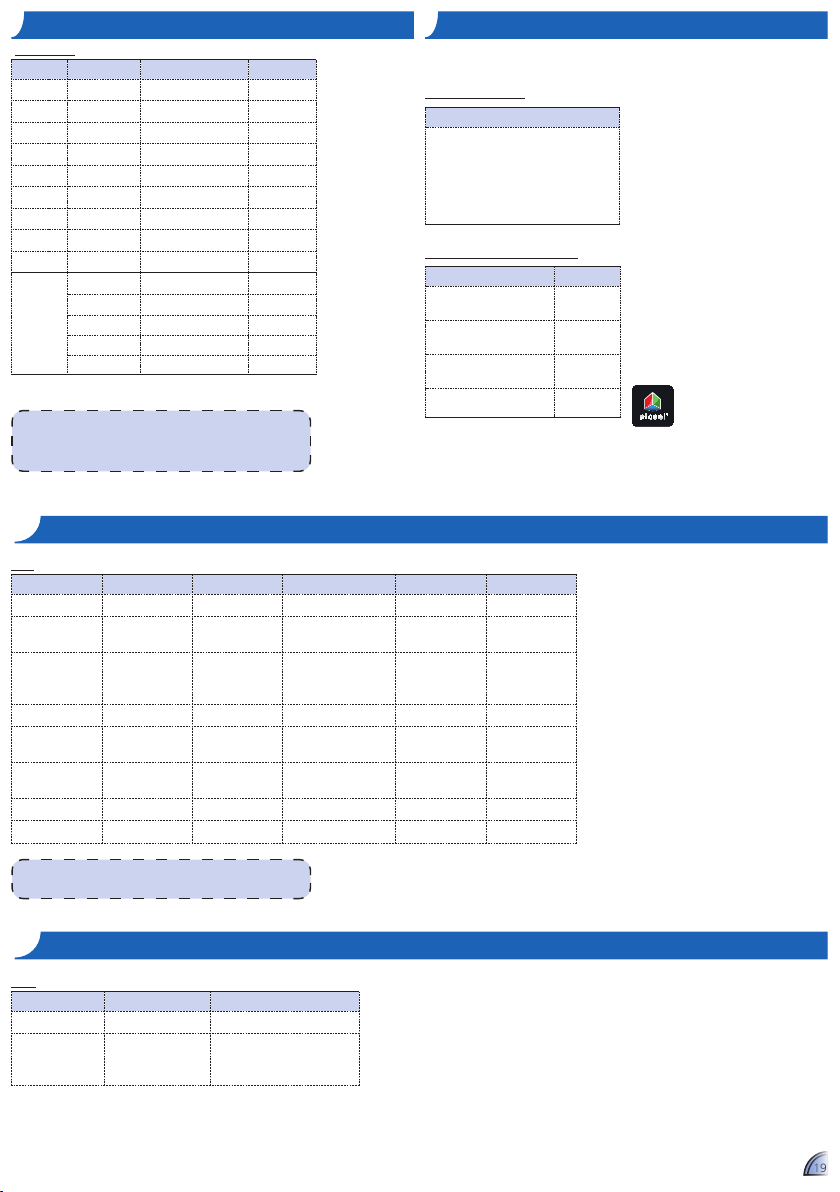
co m p a t I B l e vga / vI D e o mo D e
Timing Table
Mode Resolution V-Sync (Hz) Mac
VGA
640 x 480 60 / 72 / 75 / 85
(*1)
60 / 72 / 85
SVGA
800 x 600 56 / 60 / 72 / 75 / 85 / 120
(*3)
60 / 72 / 85
XGA
1024 x 768 60 / 70 / 75 / 85 / 120
(*3)
60 / 70 / 75 / 85
HDTV (720p)
1280 x 720 50 / 60 60
WXGA
1280 x 768 60 / 75 / 85 60
(*1)
/ 75 / 85
(*1)
WXGA
1280 x 800 60
WXGA
1366 x 768 60 60
SXGA+
1400 x 1050 60 60
WSXGA+
1680 x 1050 60 60
YPbPr,
HDMI
480i / 480P 60
576i / 576P 50
720P 50 / 60
1080i 50 / 60
1080P 24 / 50 / 60 60
(*2)
<Note>
(*1) Not supported input signal for HDMI.
(*2) Not supported input signal for Computer analog RGB.
(*3) Support 3D timing.
co m p a t I B I l I t y : Do c u m e n t
me D I a fI l e Su p p o r t lI S t : vI D e o
Video
File format Video Format Audio Format Decode max res. Prole Level
MPG,MPEG
MPEG1 MPEG1 L1-3 1920x1080 30fps 19Mbps
AVI,MOV,MP4
H.263
MPEG1 L1-3
HE-ACC v1
1920x1080 30fps 19Mbps P3 70
AVI,MOV,MP4,MKV
H.264
MPEG1 L1-3
HE-ACC v1
AC3
1920x1080 30fps 19Mbps BP/MP/HP L4.1
AVI,MOV,MP4,WMV
MPEG4 HE-ACC v1 1920x1080 30fps 19Mbps SP/ASP
L5
AVI,MOV,MP4
Xivd
MPEG1 L1-3
HE-ACC v1
1920x1080 30fps 19Mbps HD
AVI,MOV
MJPEG
MPEG1 L1-3
HE-ACC v1
1920x1080 30fps 19Mbps Baseline YUV444
WMV
VC-1 WMA8/9 (v1/v2) 1920x1080 30fps 19Mbps SP/MP/AP L3
FLV
Sorenson Spark MPEG1 L1-3 1920x1080 30fps 19Mbps Spark
The projector uses Picsel File Viewer to open and view Microsoft® ofce les
and Adobe® PDF les.
Supported Versions
Ofce Version
Microsoft® Ofce 95
Microsoft® Ofce 97
Microsoft® Ofce 2000
Microsoft® Ofce 2003
Microsoft® Ofce 2007
Microsoft® Ofce 2010
Compatible Document Format
Microsoft® Ofce Application File Extension
Word
.doc
.docx
Power Point
.ppt
.pptx
Excel
.xls
.xlsx
Adobe PDF .pdf
me D I a fI l e Su p p o r t lI S t : Im a g e
Image
File format File extension Max resolution
BMP
*.bmp 3000x3000=9,000,000
JPG, JPEG
*.jpg, *jpeg
Progressive:2048x2048=4,194,304
Baseline: 3254x2448=7,965,792
support YUV 420, YUV422
<Note>
Video format does not support content with B-Frame function
Page 20

2020
ap p e n D I x
Copyright © Optoma Company Limited.
All rights reserved.
Optoma reserves the right to make technical changes. Optoma assumes no
liability for damages incurred directly or indirectly from errors, omissions, or
discrepancies between the device and this documentation.
Other brands or logos are trademarks or registered trademarks of their
respective companies.
This device is not intended for use in the direct eld of view at visual display
workplaces.
Clause for Ofce / Document Viewer
The copyright is owned by Picsel to avoid rights violated by end customer and
third parties.
1. All IPR, including but not limited to copyright, in the Picsel Products is owned
by Piscel or its supplier.
2. The End User may not:
make copies of the Picsel Products or make them available for use by third •
parties.
reverse engineer, disassemble, reverse translate, or in any way decode the •
Picsel Products or any copy or part of it in order to derive any source code. Save
only as is permitted by any applicable law.
3. Picsel makes no representations or warranties whether express or implied
(by statute or otherwise) relating to the performance, quality, merchantability,
or tness for a particular purpose of the Picsel Products or otherwise and all
such representations or warranties are specically disclaimed and excluded.
4. Picsel agrees and acknowledges that Picsel and the Picsel Products will not
be specically mentioned in the end user license agreement.
co p y r I g h t / tr a D e m a r K
If you experience a problem with your projector, please refer to the following
information. If a problem persists, please contact your local retailer or service center.
Image Problems
No image appears on-screen
• Ensure the power cord is correctly and securely connected.
• Ensure the pins of connectors are not crooked or broken.
• Make sure the projector is switched on.
Image is out of focus
• Adjust the Focus Dial.
• Make sure the projection screen is between the required distance 19.69 to
177.17 inches (0.5 to 4.5 meters) from the projector. See page 4.
Image is too small or too large
• Move the projector closer to or further from the screen.
Audio Problems
No sound
• During music playback, press or .
tr o u B l e S h o o t I n g
<Note>
When the projector temperature reaches 85°C, the projector automatically shuts down due to
the built-in temperature protection. This is not a malfunction. Let the projector cool down before
switching it on again.
Page 21
2121
For service or support please contact your local ofce.
USA
3178 Laurelview Ct.
888-289-6786
Fremont, CA 94538, USA
510-897-8601
www.optomausa.com
Canada
2420 Meadowpine Blvd., Suite #105
888-289-6786
Mississauga, ON, L5N 6S2, Canada
510-897-8601
www.optoma.ca
Latin America
3178 Laurelview Ct.
888-289-6786
Fremont, CA 94538, USA
510-897-8601
www.optomausa.com
Europe
42 Caxton Way, The Watford Business +44 (0) 1923 691 800
Park Watford, Hertfordshire,
+44 (0) 1923 691 888
WD18 8QZ, UK
www.optoma.eu
Service Tel: +44 (0)1923 691865
Benelux BV
Randstad 22-123
+31 (0) 36 820 0253
1316 BW Almere
+31 (0) 36 548 9052
The Netherlands
www.optoma.nl
France
Bâtiment E
+33 1 41 46 12 20
81-83 avenue Edouard Vaillant
+33 1 41 46 94 35
92100 Boulogne Billancourt, France
Spain
C/ José Hierro,36 Of. 1C 28522
+34 91 499 06 06
Rivas VaciaMadrid,
+34 91 670 08 32
Spain
Deutschland
Wiesenstrasse 21 W
+49 (0) 211 506 6670
D40549 Düsseldorf,
+49 (0) 211 506 66799
Germany
Scandinavia
Lerpeveien 25
+47 32 98 89 90
3040 Drammen
+47 32 98 89 99
Norway
PO.BOX 9515
3038 Drammen
Norway
Korea
WOOMI TECH.CO.,LTD.
+82+2+34430004
4F, Minu Bldg. 33-14, Kangnam-Ku,
+82+2+34430005
Seoul,135-815, KOREA
Japan
東京都足立区綾瀬
3-25-18
株式会社オーエスエム
www.os-worldwide.com
ポートセンター
: 0120-46-5040
Taiwan
12F., No.215,Sec. 3, Beixin Rd.,
+886-2-8911-8600
Xindian Dist., New Taipei City 231,
+886-2-8911-6550
Taiwan, R.O.C.
www.optoma.com.tw asia.optoma.com
Hong Kong
Unit A, 27/F Dragon Centre
+852-2396-8968
79 Wing Hong Street,
+852-2370-1222
Cheung Sha Wan, www.optoma.com.hk
Kowloon, Hong Kong
China
5F, No. 1205, Kaixuan Rd.,
+86-21-62947376
Changning District
+86-21-62947375
Shanghai, 200052, China www.optoma.com.cn
op t o m a gl o B a l of f I c e S
 Loading...