

Page 1

Contents
Important Information .............................................. 3
Cleaning the TV...................................................................................... 3
Using the Remote Control....................................... 4
How to Use the Remote Control ............................................................ 4
Cautions.................................................................................................. 4
Installing the Remote Control Batteries................................................. 4
The Front and Rear Panel........................................ 5
Connecting the TV
Connecting the Antenna or the Cable Converter Box............................ 6
Connecting the VCR to Video Input ...................................................... 7
Connecting the DVD and the VCR ......................................................... 7
Connecting the DVD with Component Video and the VCR................... 8
Connecting the Camcorder or the Game Device .................................... 8
Connecting the Computer VGA Input.................................................... 9
Connecting the Audio System................................................................ 9
Connecting the VCR to Video Output ................................................... 10
Connecting Two VCRs to V ideo Output................................................ 10
The Remote Control Functions............................... 11
Basic Operation
Standby/On ............................................................................................. 12
Power Off ............................................................................................... 12
Selecting Channel................................................................................... 12
Volume Adjustment ................................................................................ 12
Muting the Sound................................................................................... 12
Freezing the Screen ................................................................................ 12
Switching between Two Channels .......................................................... 12
Selecting Video Input Source ................................................................. 12
On-Screen Display.................................................................................. 12
1
English
Page 2

Contents
Advanced Operation
Setting OFF-Timer (Sleep)..................................................................... 13
Setting Stereo, Mono or SAP Broadcast ................................................ 13
Setting X-BASS System......................................................................... 13
Using the Surround Sound Feature ........................................................ 13
Watching Picture-In-Picture ................................................................... 13
Switching the Main and Second Picture................................................. 14
Menu.......................................................................... 15
Menu Options......................................................................................... 15
How to Program the Menus.................................................................... 16
Channel................................................................................................... 17
Picture Video .......................................................................................... 17
Enhanced................................................................................................. 17
Picture Data ............................................................................................ 17
Audio ...................................................................................................... 18
PIP .......................................................................................................... 18
Language................................................................................................. 19
Misc ........................................................................................................ 19
Troubleshooting ....................................................... 21
Specifications........................................................... 22
Compatible Frequency Table .................................. 24
Accessories .............................................................. 25
English
2
Page 3

Important Information
Caution: To reduce the risk of
electric shock, refer servicing to
qualified service personnel. Do
NOT attempt to remove parts on
your own.
Warning: To reduce the risk of
electric shock and fire, DO NOT
expose this appliance to rain or
moisture.
l Place the TV on the floor or on a sturdy platform. The mounting surface should be flat and secure to
prevent the TV from damage.
l Place the TV at a proper distance from the wall to allow ventilation and prevent the TV from overheating.
Avoid dusty places as well.
l Do not put any heavy object on top of the TV.
l Do not stand or climb on the TV.
l For your safety, do not remove the back cover of the TV.
l Avoid exposing the TV to direct sunlight or the direct radiation of other heat sources. Putting the TV
directly under sunlight will produce glare.
l If any foreign material or liquid leaks into the TV, unplug the AC cord and contact your dealer.
l Do not plug too many appliances into one outlet or leave the cords tangled up, rolled over by heavy objects
or subjected to heat.
l Remove the power plug when the TV is left unused for a long period of time.
l If the TV emits smoke, unusual noise or strange odor, turn it off immediately and conta ct your dealer. It is
dangerous to leave the TV on under such circumstances.
l For safety purpose, when you see the warning message as below, contact your dealer referred servicing to
qualified service personnel to change the lamp as soon as possible.
“ Lamp is running out of standard lifetime. Be sure to replace the lamp as soon as possible.”
Cleaning the TV
Make sure the TV is turned off before you clean it. Do not spray on the screen or the cabinet of TV directly.
vCleaning the screen
j Wipe clean the screen with a clean, soft and unfuzzed cloth to remove dusts and other fine particles
k Wipe the screen with a clean lint free cloth to remove dust. To remove smears or stubborn marks use alcohol
free glass cleaner.
vCleaning the cabinet
j Use a soft dry cloth to wipe clean the cabinet.
k If the cabinet is not clean, add some alcohol-free, neutral, non-corrosive detergent to the cloth.
3
English
Page 4

Using the Remote Control
How to Use the Remote Control
j Point the front of the remote control to the “remote control rece iving” window at the lower margin
of the TV and press the button desired.
k The remote control works within 7M ( 20 feet) from the TV.
Precautions
l Do not pour liquid on the remote control.
l Do not drop the remote control.
l Leave the remote control in a dry place at room temperature.
l When the remote control becomes less sensitive after a long ti me of use, replace the batteries.
l If you do not intend to use the remote control for more than one month, remove the batteries to prevent acid leak
that will damage the remote control.
l If there is acid leak, clean it off and then install new batteries.
l Do not mix use new and used batterie s or batteries of different types.
Installing the Batteries
j Slide the battery cover off the back of remote control.
k Install two “AAA” size alkaline batteries. Match the “ + ” and “ - ” signs on the batteries to those on
the battery compartment.
l Slide the battery cover back onto the remote control until the lock sna ps.
English
4
Page 5
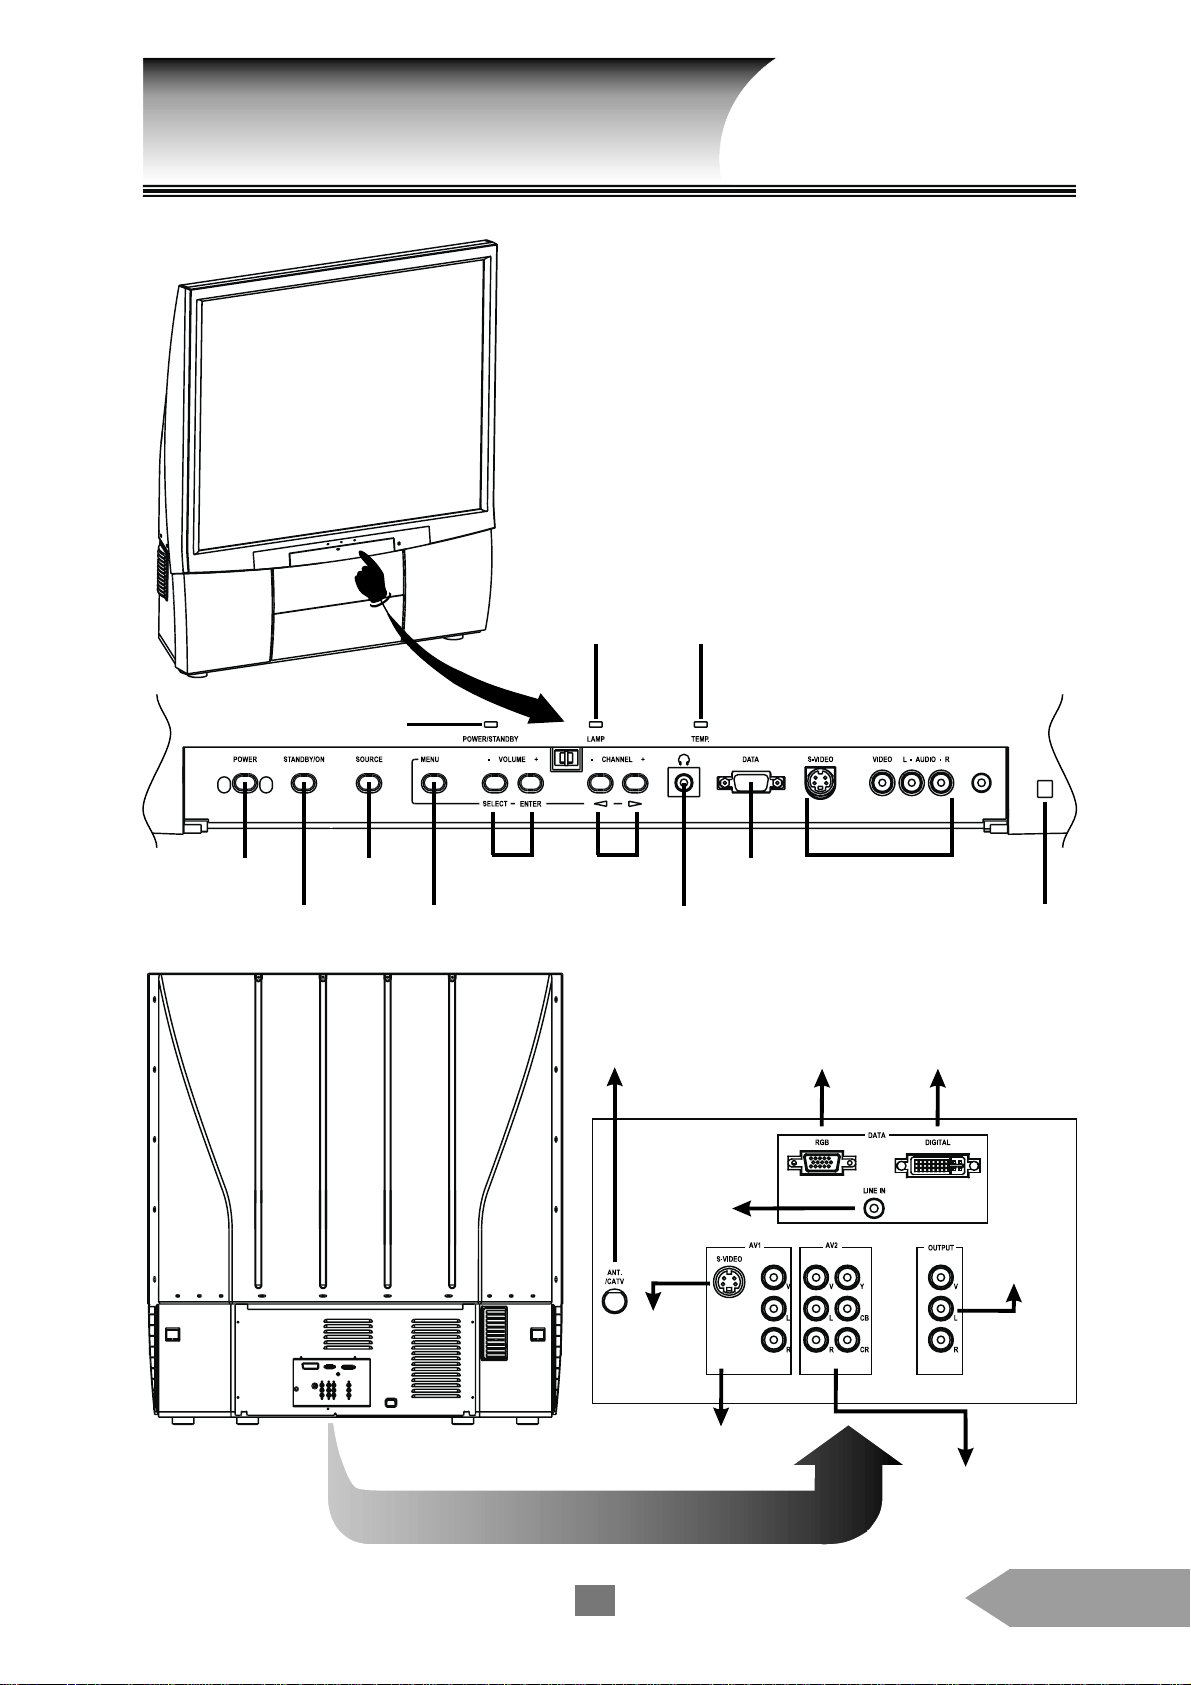
The Front and Rear Panel
Power
ON/OFF
Sta ndby/ON
Power/Standby
indicator
Source
selection
Menu button
Volume
control
Lamp
indicator
Channel
selection
Antenna/Cable TV
indicator
Earphone
Temp
Computer
RGB2 input
Video/Audio
inputs (3)
Computer
RGB1 input
Remote control
receiving window
Computer
DVI input
S-Video
5
Computer
Audio input
Video/Audio
outputs
Video/Audio
inputs (1)
Component Video
(DVD)/Audio
inputs (2)
English
Page 6
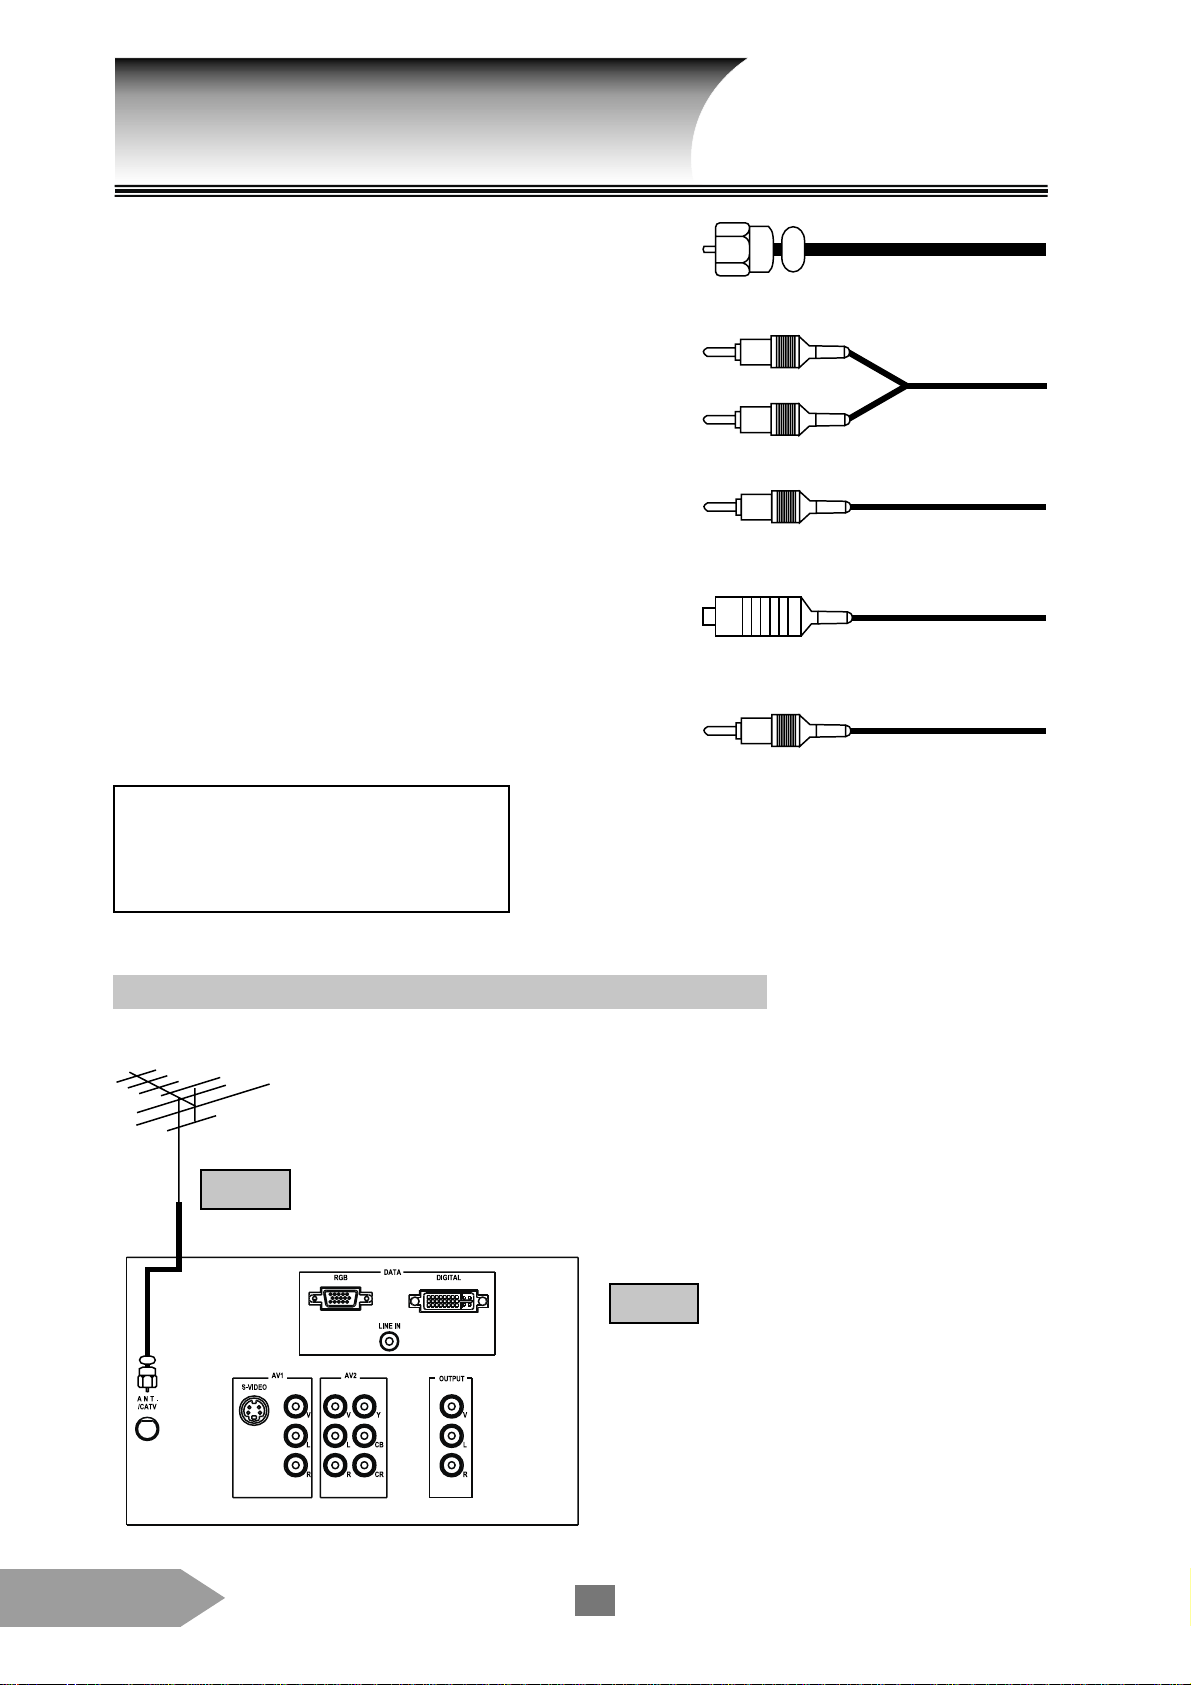
Connecting the TV
l This product uses coaxial cable for signal
transmission, which comes in from your antenna or
cable converter box. Coaxi al cables use “F”
connectors.
l Audio and Composite video cables are usually color
coded according to use: yellow for video, red f or
audio and stereo right channel, and white for audio
and stereo (or mono) left channel. If you check the
rear panel of the TV, you will see that the jacks are
color coded in the same manner as the cables.
l S-video cables can only be used with S-video
compatible components.
l Component video cable comes in a set of three and
provides excellent picture performance. Component
video cable can only be used with compatible
components.
Caution:
Do not plug in the TV until you have
finished all the connections.
Coaxial Ca ble
Audio Cable
Composite Video Cable
S-Video Cable
Component Video Ca ble
Connecting the Antenna or the Cable Converter Box
This connection allows you to watch local and cable channels.
ANT
TV
English
6
Page 7
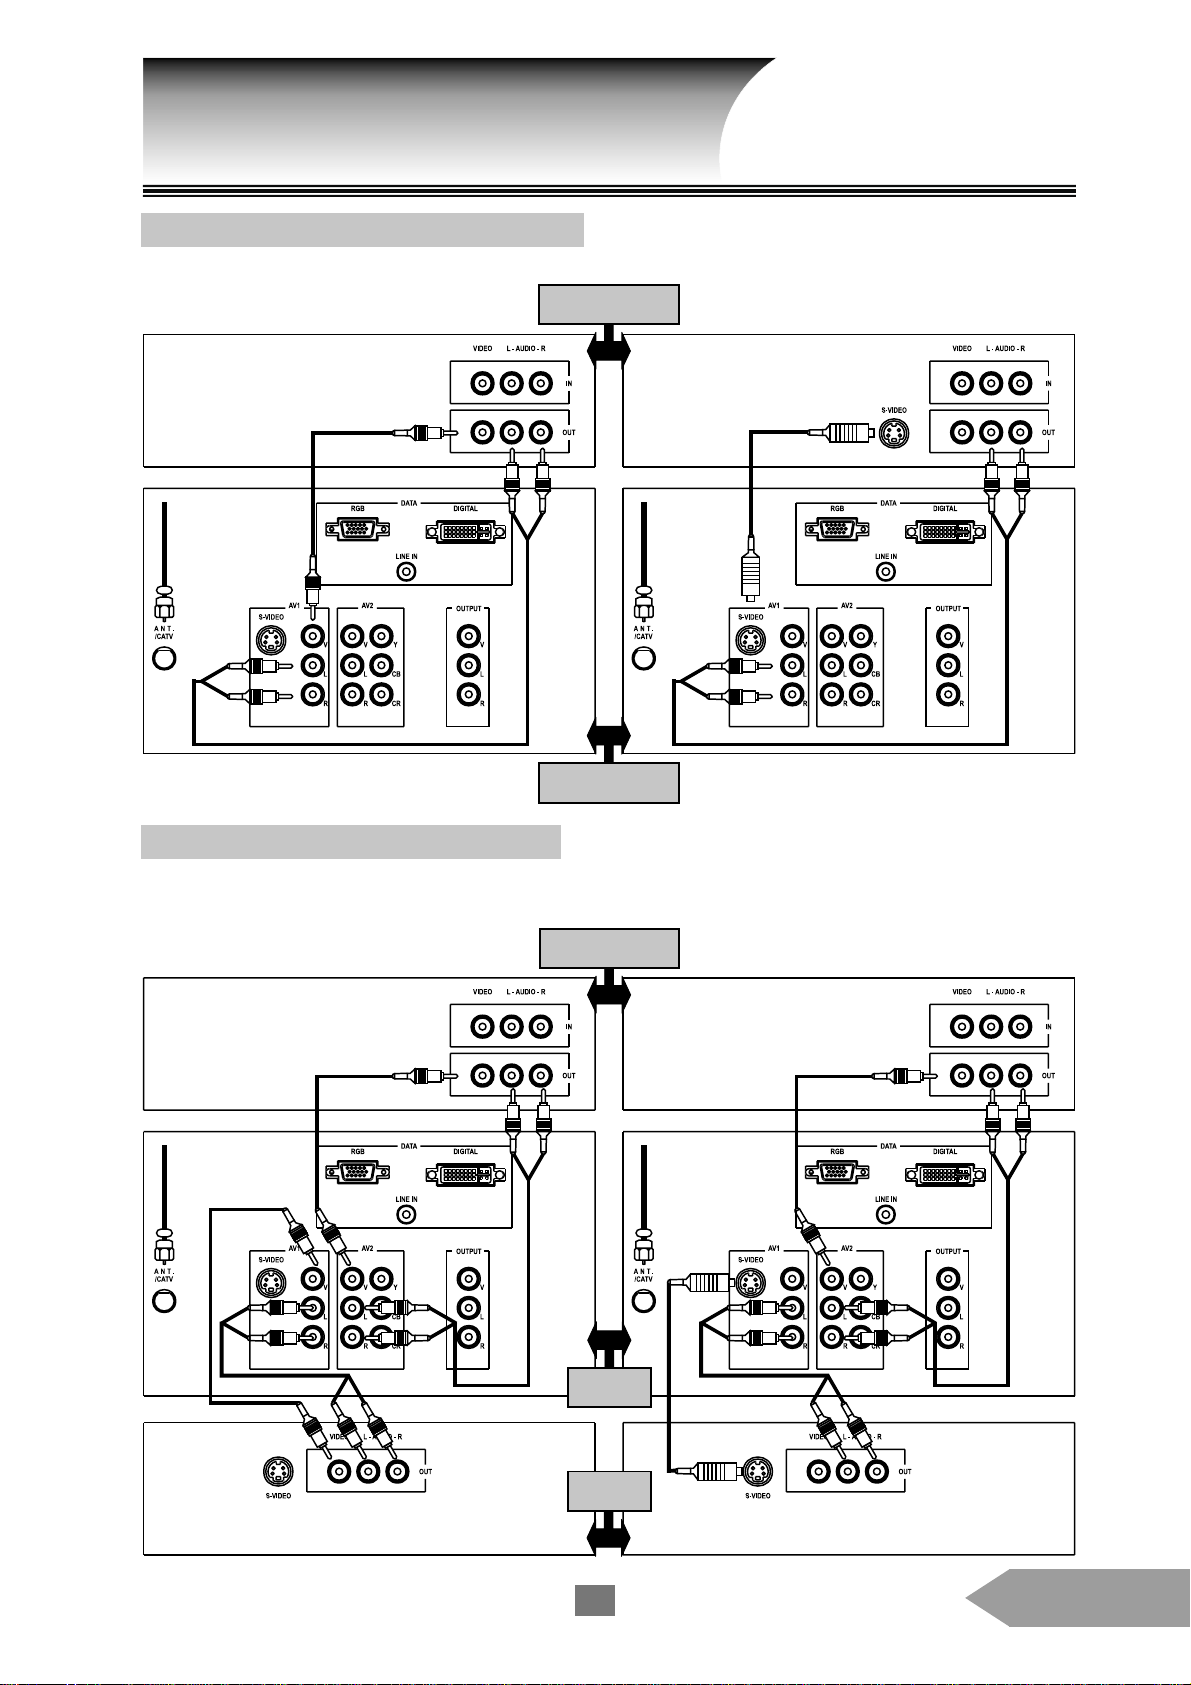
Connecting the TV
Connecting the VCR to Video Input
This connection allows you to watch local a nd cable channels and video programs played on VCR.
(1) Regular video input (2) S-Video input
Stereo VCR
TV
Connecting the DVD and the VCR
This connection allows you to watch DV D, video or TV programs. You may record from one channel while
watching a program from another channel.
(1) Regular video input (2) S-Video input
Stereo VCR
TV
DVD
7
English
Page 8
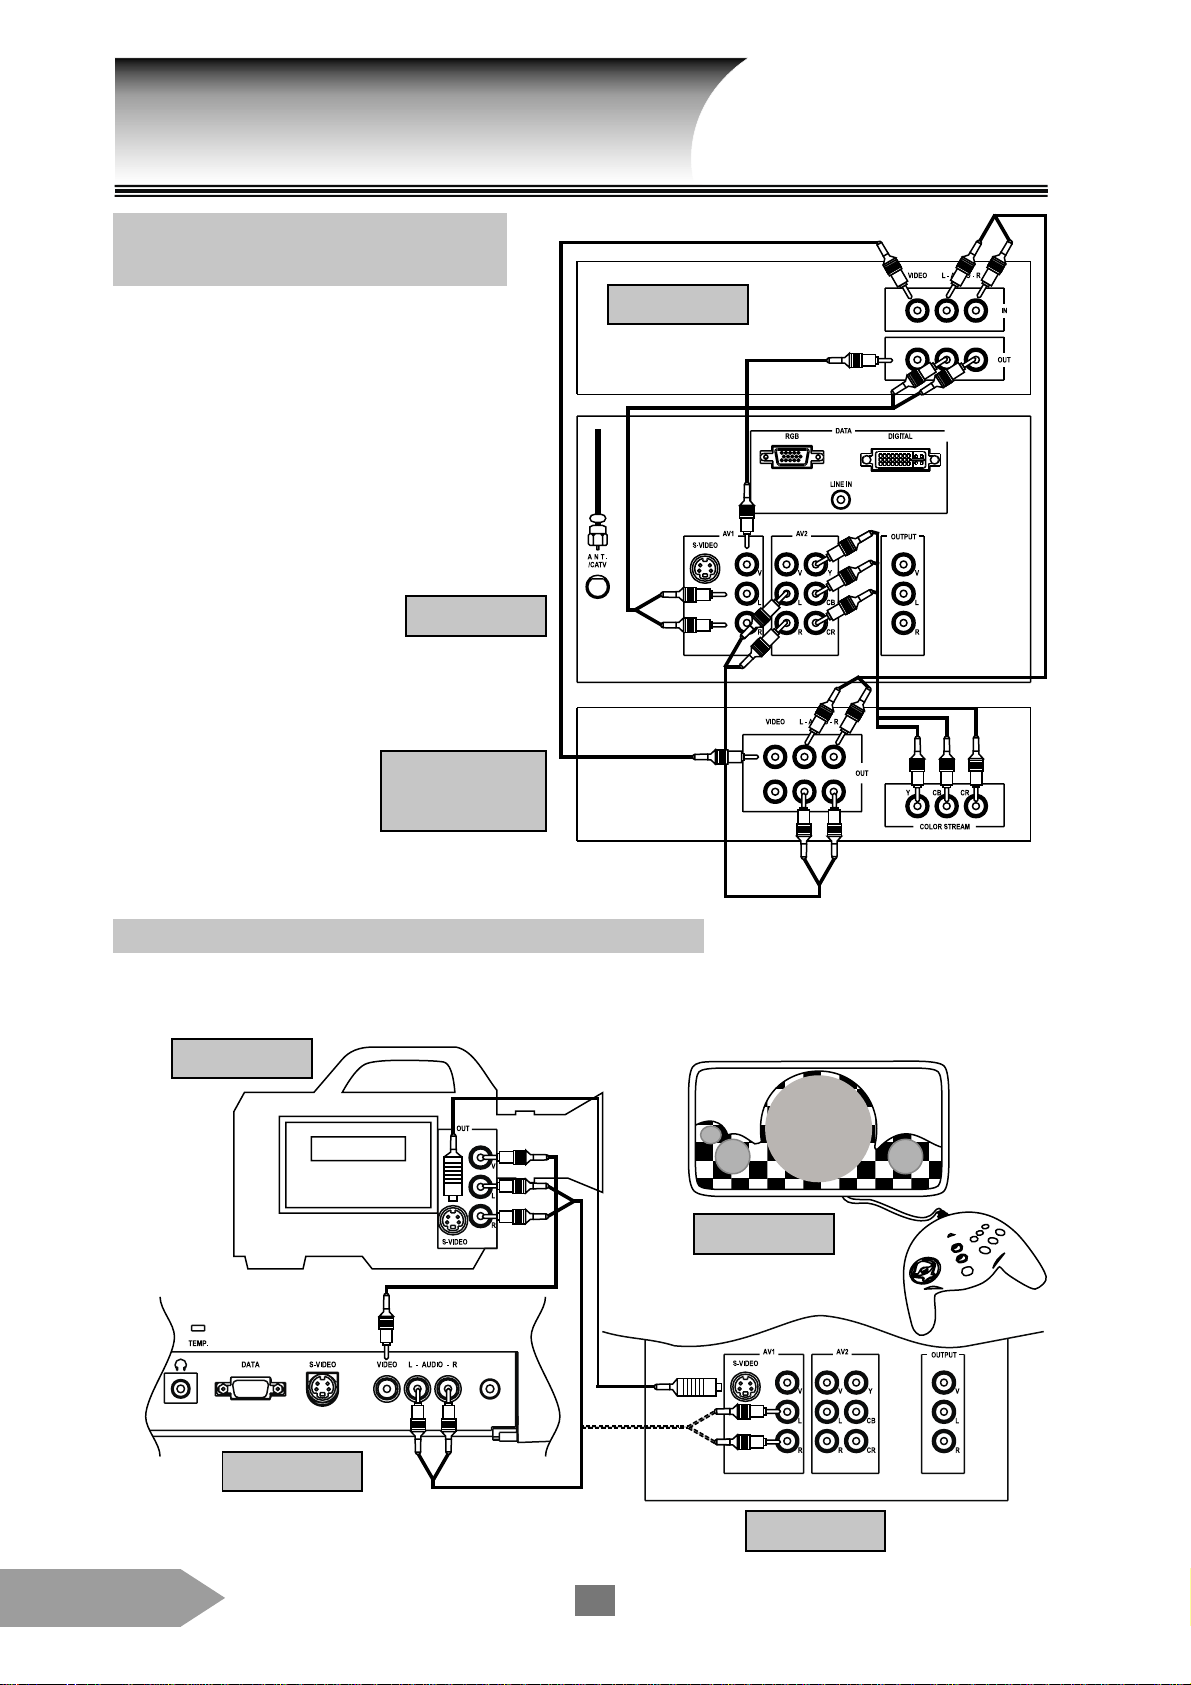
Connecting the TV
Connecting the DVD with
Component Video and the VCR
This connection allows you to watch DVD,
video or TV programs and to record DVD or TV
programs. You can record from one channel while
watching program from another channel. Your TV
can use Component cable. Connecting your TV to
the DVD with Component V ideo f eature can
greatly enha nce picture quality and performance.
TV
DVD with
Component Video
VCR
Connecting the Camcorder or the Game Device
This connection allows you to watch video materials recorded on the camcorder or pictures from the game
device.
Camcorder
or
Game Device
Front Panel
or
English
Rear Pa nel
8
Page 9

Connecting the TV
Connecting the Computer VGA Input
You can use the TV as a computer monitor. The computer can be connected to RGB1 input at the front and
RGB2 and DVI inputs at the rear simultaneously .
Computer B
Computer A
Rear Pa nel
Front Panel
Connecting the Audio System
This connection allows you to use the audio
amplifier to adjust the audio level.
TV
Amplifier
9
English
Page 10

Connecting the TV
Connecting the VCR to Video Output
This connection allows the output of the source that is currently on the screen to a VCR.
TV
VCR
Connecting T wo VCRs to V ideo Output
This connection allows you to record from one VCR to another VCR while watching a video program.
VCR 1
TV
Caution:
Do not connect one VCR to the output and input
jacks on the T V at the same ti me.
To monitor the reproduction, VCR 2 for recording must select Line IN, and the TV must select
AV1-C source.
English
VCR 2
10
Page 11

The Remote Control Functions
[ POWER ] turns the TV on and off.
[ TV ] selects video input source.
[ VIDEO ] selects any mode of A V1-S, AV1-C, A V2-YCrCb,
A V2-C, AV3-S and AV3-C.
[ DATA ] selects any mode of RGB1, RGB2, and DVI.
[ DISPLAY ] displays on-screen message.
[ MUTE ] mutes the sound.
[ SLEEP ] sets the OFF timer (slee p).
[ MTS ] selects stereo, mono or language broadcast.
[ FREEZE ] freezes the screen.
[ CH RTN ] returns to the last viewed channel.
[ CH+ / CH- ]
Press “CH-” to select channel in reverse order, press “CH+” to
select cha nnel in numerical order.
[ VOL+ / VOL- ]
Press “VOL+” to turn up the volume, press “VOL-” to turn
down the volume.
[ MENU ] allows menu editing.
[ PIP ] operates picture in picture.
[ PIP SOURCE ] selects the source of PIP.
[ SWAP ] switches main and second pictures.
[ CH / CH ] selects channel in second picture only.
Press “CH ” to select channel in reverse order, and
“CH ” in numerical order.
[ LINE OUT ] selects output source.
[ SURROUND ] adjusts surround sound effect.
[ X-BASS ] receives super-base sound effect.
[ AUTO SCAN ]
Make sure this function is executed when your TV connects the
a ntenna or a cable converter box. It will activate auto scan and
return to normal settings after the sca n is done.
11
English
Page 12

Basic Operation
Feature Operation
Standby/On Press [ POWER ] or STANDBY/ON on the TV. At this time, the
POWER/ST ANDBY indicator will flash green a nd stop in green after 30
seconds.
Power OFF Press POWER to turn off the power.
Selecting channel Press [ CH+ / CH- ] to select the desired channel or press the channel
number directly. You may also use CHANNEL - / + on the TV to select
cha nnel.
Volume adjustment Press [ VOL+ / VOL- ] or VOLUME - / + on TV to adjust volume.
Muting the sound Press [ MUTE ] to mute the sound.
Freezing the screen Press [ FREEZE ] to freeze the screen.
Switching between two channels Press [ CH R TN ] to return the last viewed channel.
Selecting video input source 1. Press [ TV ] to watch a local program or cable TV program.
2. Press [ VIDEO ] to select video program from AV1-S, AV1-C,
A V2-YCrCb, AV2-C, A V3-S or AV3-C.
3. Press [ DATA ] to view computer data from RGB1, RGB2, or DVI.
4. You may also press SOURCE at the front panel to select any of the
three video input sources.
Displaying on-screen message Press [ DISPLAY ] to display on-screen message.
English
12
Page 13

Advanced Operation
Setting OFF-Timer (Sleep)
Press [ SLEEP ] until the duration you desire appears on the screen. The change of time is as follows each time
you press [ SLEEP ] :
15 M mea ns the TV goes into sleep mode in 15 minutes, and so on for other durations set. But when you pick 0 M, it
mea ns the OFF-timer is off.
Setting Sereo, Mono or SAP Broadcast
Press [ MTS ] until you the menu you desire appears.
Selection Function
STEREO You can listen to stereo sound when the TV receives stereo broadcast
SAP You can listen to a second language when selecting SAP.
( second audio program ) The sound will be muted if it is not a SAP program.
MONO You can receive mono sound (or use MONO to reduce the noise of stereo broadcast).
Setting X-BASS System
Press the [ X-BASS ] button will enhance the
bass effect (even when the volume is very low). T o
turn off the X-Bass feature, press [ X-BASS ] again.
1M 15M 30M 60M 90M 120M 0M
OFF-Timer
button
Sterto, Mono
or SAP
button
Using the Surround Sound Feature
Press the [ SURROUND ] button changes the
stereo mode of TV or video output to surroundsound. To turn off the surround-sound feature, press
[ SURROUND ] again.
Surround
sound
PIP button
Super-bass
button
Watching Picture-In-Picture
Press [ PIP ] allows you to watch two pictures at the same time. The second picture can be a TV broa dcast or
come from an external source, such as a VCR. To display a TV broa dcast as a second picture: ( [ DATA ] doesn’t
provide this function ).
Steps
1. Turn on the TV and select the program you want to watch.
2. Press [ PIP ] once to display a second picture. Use [ MENU ] to select the size of second picture (P.19).
3. Press [ CH ] or [ CH ] to choose the TV program you want to be displayed as a small picture.
4. Press [ PIP SOURCE ] or [ MENU ] , then select the PIP main menu. Under SOURCE, choose the input source
from TV, AV1-S, AV1-C, AV2-YCrCb, AV2-C, AV3-S and AV3-C as a second picture (see P.18).
5. To turn PIP off, press [ PIP ] again.
Notes:
Main picture and second picture can not be TV program in the sam time.
I
f you desire to have both main a nd second pictures a s TV signals, contact your dealer for dual-tuner option upgrade.
13
English
Page 14

Advanced Operation
Switching the Main and Second Picture
Press [ SWAP ] while you are using the PIP feature to switch the main and second pictures. The main and
second pictures are switched each time you press [ SWAP ] .
English
14
Page 15

MENU
Menu Options
Below are all the menu options.
Cha nnel Setting
Picture Video Setting
Data Picture Setting
Enhanced Picture Setting
Audio Setting
PIP Setting
La nguage Setting
15
Miscellaneous Setting
English
Page 16

MENU
How to Program the Menus
You can use the buttons on the TV panel or remote control to program and save the menus.
Up/Dn, Lt/Rt a nd
Enter buttons to select
a nd set menu items.
Menu
button
Steps
1. Press [ MENU ] to display the menus.
2. Press [ SELECT ] on TV panel to highlight the item desired, then press [ ENTER ] to set the selected
menu.
3. Press [ SELECT ] on TV panel to highlight the item desired, then press [ ENTER ] or to select or
adjust a setting.
4. To exit the menu mode, press [ MENU ] again.
Menu
button
Select a nd
set menu
left and right
button (to cha nge
the setting)
Notices:
l When a n item on the menu is selected by pressing [ ENTER ] , the color of the item will change.
l The menu display will disappear automatically if no selection is made in approximately 5 seconds.
English
16
Page 17

MENU
CHANNEL
Item Function a nd Operation
AUTO SCAN When the TV connects the antenna or cable converter box, it will activate auto
sca n and return to normal settings after the scan is done.
Press [ ENTER ] to make selection.
PICTURE VIDEO
Item Function a nd Operation
CONTRAST Controls the scale between brightest and darkest tune. Adjusting Contrast
ca n change the amount of black and white in the picture.
Press to adjust the setting.
BRIGHT Adjusts the image luminance.
Press to adjust the setting.
COLOR Adjusts the video image from B/W to color saturation.
Press to adjust the setting.
TINT Adjusts the hue equilibrium of red a nd green in video image.
Press to adjust the setting.
ENHANCED
Item Function a nd Operation
SHARPNESS Adjusts the sharpness of picture.
Press to adjust the setting.
SCREEN Adjusts the screen to original type.
Adjusts the screen to magnified 16 : 9.
Adjusts the screen to full screen.
Press to adjust the setting.
Item
CONTRAST
BRIGHT
COLOR
Low
Dark
Light
Press Item
High TINT
Bright SHARPNESS
Dark COLOR TEMP Yellowish(6500)
Red
Weak
Press
Bluish(11000)
Green
Strong
PICTURE DAT A
Item Function a nd Operation
CONTRAST Controls the scale between brightest and darkest tune. Adjusting Contrast can
cha nge the amount of black and white in the picture.
Press to adjust the setting.
17
English
Page 18

MENU
Item Function a nd Operation
BRIGHT Adjusts the brightness of picture.
Press to adjust the setting.
FREQUENCY Adjusts the data display frequency to keep in line with the setting of display
card. Use this function to make adjustment when the picture shows vertical
flickering lines.
Press to adjust the setting.
TRACKING Synchronizes the picture display signals a nd display card. When the picture
becomes unstea dy or flickers, use this function to make adjustment.
Press to adjust the setting.
H POSITION Moves the picture to left or right .
Press to adjust the setting.
V POSITION Moves the picture to up or down.
Press to adjust the setting.
EXPAND Expands the picture to the entire TV screen.
Press to select ON or OFF.
AUDIO
Item Function a nd Operation
TREBLE Adjusts the treble in the sound source.
Press to adjust the setting.
BASS Adjusts the bass in the sound source.
Press to adjust the setting.
BALANCE Controls the output volume ratio from left and right speakers.
Press to adjust the setting.
STEREO MONO SAP See P.13 for details.
Press to make selection.
PIP
Item Function and Operation
PIP Turns on and off picture-in-picture.
Press to select ON or OFF.
SOURCE The input source includes: TV, AV1-S ( S-video ), AV1-C, AV2-YCrCb, AV2-C,
AV3-S ( S-video ) and AV3-C.
Press to select source.
SWAP Switches the main and second pictures.
Press to make selection.
English
18
Page 19

MENU
Item Function and Operation
POSITION ( position of second picture ) Selects the position of second picture which will be
cha nged by the order shown on the left.
Use to adjust the position.
SIZE ( size of the second picture ) Selects the size of small pictures as 1/2, 1/4, 1/9 or 1/16
according to your preference.
Press to adjust the size.
LANGUAGE
Item Function and Operation
ENGLISH Selecting this item means menus and messages will be displayed in English.
Press [ ENTER ] to make selection.
CHINESE Selecting this item means menus and messages will be displayed in Chinese.
Press [ ENTER ] to make selection.
MISC
Item Function and Operation
LINEOUT Output sources include TV, AV1-S (S-video), A V1-C, 5AV2-YCrCb, A V2-C,
AV3-S (S-video) and AV3-C.
Press to select video source.
SLEEP Setting sleep time of 1,15, 30, 60, 90, 120 and 0 minutes.
Press to make selection.
19
English
Page 20

MENU
Item Function and Operation
DISPLAY Displays the on-screen messages, such as channel and source.
Press to select ON or OFF.
COLOR TEMP Adjusts the color temperature from 6500K to 11000K. The default value is
6500K.
Press to adjust the setting.
RESET ALL Returns the display parameters of the current mode to its factory default settings.
Press [ ENTER ] to make selection.
LAMPTIME This tells the user the remaining life of lamp. Estimated life time of a new lamp is
8000 hours. The TV will detect the lamp life itself. It will show you a warning
message “Lamp is running out of standard lifetime. Be sure to replace the la mp as
soon as possible.” When you see this message, contact your dealer referred
servicing to qualified service personnel to cha nge the lamp as soon as possible.
English
20
Page 21

Troubleshooting
If you have problem with your TV, refer to the following table for possible causes.
If you can’t solve the problem, please contact your local dealer or our service center.
Problem Solution
TV will not turn on Make sure the power cord is plugged in, then press [ POWER ].
The remote control batteries may be dead. Replace the batteries.
No picture, no sound Check all cables and antenna are accurately connected.
Check if power plug or outlet is working.
No sound, picture OK The sound may be muted. Press [ VOL ].
The station may have broadcast difficulty. Try another channel.
Check if [ MUTE ] button is inadvertently pre ssed.
Poor sound, picture OK The station may have broadcast difficulty. Try another channel.
Poor picture, sound OK Check the antenna connection.
broadcast difficulty. Try another channel.
Adjust PICTURE menu.
Poor picture and noise Check the antenna connection.
TV signals might be too weak.
Possible interference from appli ance, neon lights or high voltage lines.
Is there interference of high voltage line or neon lights?
Multiple/shadow images, sound OK The station may have broadcast difficulty. Try another channel.
Poor color or no color The station may have broadcast difficulty. T ry another channel.
Adjust TINT and COLOR in Picture menu.
No stereo or SAP sound from a
known MTS broadcast Make sure the MTS feature is set properly.
LAMP indicator in red for a long time Lamp ignition fail. Contact the dealer.
TEMP indicator in red The fan is stuck. Contact the dealer.
It indicates the screen has led to overheat of the TV and the screen will
shut off automatically. After the TEMP indicator turns green again, press
[ POWER ] or STANDBY/ON on the panel.
The remote control does not operate Make sure [ VIDEO ] and [ DATA] are accurately set.
The remote control batteries may be dead. Replace the batteries.
When Connecting Computer Sources
Picture unsteady or flickering Use TRACKING menu to make adjustment.
Cha nge display color setting in your computer.
Picture having vertical flickering stripes Use FREQUENCY menu to make adjustment.
Check and reset the display mode of your display card to make it
consistent with this product.
21
English
Page 22

Specification s
TV Screen - 52" ( diagonal )
LCD Technology - 6.4" single LCD technology
- Amorphous silicon T F T color liquid crystal
Lamp - 100W User Replacable UHP lamp
Number of Pixels - 2400 ( 800 x 3 ) pixels ( H ) x 600 lines ( V )
Displayable Color - 16.7M colors
Contrast Ratio - 150 : 1 ANSI Contrast
Luminance - 500 Nits
Aspect Ratio - 4 : 3
H. Frequency - 15~60 kHz
V. frequency - 50~85 Hz
Video Compatibility - NTSC/PAL/SECAM
Computer Compatibility - IBM VGA 640 x 350, 70Hz
640 x 480, 60Hz
720 x 400, 70Hz
- VESA VGA 640 x 480, 60/72/75Hz
- VESA SVGA 800 x 600, 56/60/72/75/85Hz
- VESA XGA 1024 x 768, 60/70/75Hz
- MAC LC 13" 640 x 480, 66.66Hz
- MAC II 13" 640 x 480, 66.68 Hz
- MAC 16" 832 x 624, 74.55 Hz
- MAC 19" 1024 x 768, 75 Hz
- PC 98 640 x 400, 56.42 Hz
640 x 480, 60/70 Hz
Multimedia Audio - MTS Stereo / SAP ( applied to NTSC only )
- Simulated surround sound feature
- Built-in 2 x 15W speakers
Front input connectors - One S-Video input
- One composite video RCA input
- One 15-pin D-sub computer input
Front output connectors - One phone jack earphone
English
22
Page 23

Specification s
Rear input connectors - One AC power cord input socket
- One DVI digital data computer input
- One 15-pin D-sub computer input
- One Component video ( Y, Cr, Cb ) RCA input
- One S-Video input
- Two composite video RCA inputs (used in USA and Asia)
- One composite video RCA input & one SCART adapter (used in Europe)
- One phone jack for computer audio input
Rear output connectors - One composite video RCA output
- One set of audio output
Power Supply - Automatic switch
- 100~120/200~240V, 50~60Hz AC
Power consumption - Normal operation : 180W
- Standby / On : 5W
Dimensions (W x H x D) - 45.5 x 48.9 x 19.6inches
- 1156 x 1244 x 497 mm
Weight - 114.53 lbs / 52 kgs
Operating Environment - Operating temp : 5°C~40°C / 41°F~104°F
- Operating humidity : 80% maximum
- Storage temp : -20°C~60°C / -4°F~140°F
- Storage humidity : 80% maximum
Safety Regulation - FCC-B, CE-B, BCIQ, UL, CUL, TÜV/GS
23
English
Page 24

Compatible Frequency Table
Model Resolution
Vertical Scan
Frequency (Hz)
Horizontal Sca n
Frequency (kHz)
English
“ * ” means optional connector is required.
24
Page 25

Accessories
Make sure all the accessories listed below come with the TV. Contact your dealer if any of the
accessories is missing or broken.
TV Display
Component Video Ca ble
User’s Manual
Power Cord
Remote Control
Warranty Card
Computer V GA Cable
Battery
25
English
 Loading...