

Page 1

Table of Contents
Usage Notice
Precautions .......................................................................................... 2
Introduction
About the Product................................................................................. 3
Package Overview ............................................................................... 4
1
English
Installation
Product Overview ................................................................................. 5
Start Your Installation............................................................................ 7
Powering On/Off the Projection Display................................................ 9
Adjusting the Image Size ...................................................................... 10
User Controls
User Control Overview ......................................................................... 11
Function Descriptions........................................................................... 13
Appendices
T rouble shooting .................................................................................... 16
Maintena nce ......................................................................................... 17
Specifications ....................................................................................... 20
Page 2
2
English
Usage Notice
Warning- Do not look into the lens. The bright light may hurt your eyes.
Warning- To reduce the risk of fire or electric shock, do not expose this
product to rain or moisture.
Warning- Please do not open or disassemble the product as this may cause
electric shock.
Warning- When cha nging the lamp, please allow unit to cool down and follow
all cha nging instruction.
Warning- This product will detect the life of the lamp itself. Please be sure to
change the lamp when it shows warning messages.
Warning- After cha nging a new lamp, please reset the lamp life timer from
OSD menu.
Warning- Before switching off the product, please keep the cooling fan
running for a few minutes.
Precautions
Follow all warnings, precautions and maintenance as recommended in this
user’s manual to maximize the life of your unit.
Do:
q Turn off the product bef ore clea ning.
q Use a soft cloth moistened with mild detergent to clean the display housing.
q Disconnect the power plug from AC outlet if the product is not being used f or a
long period of time.
Don’t:
q Block the slots and openings on the unit provided f or ventilation.
q Use abra sive clea ners, waxe s or solvents for your cle a ning.
q Use under the following conditions:
- Extremely hot, cold or humid environment.
- In area s susce ptible to excessive dust and dirt.
- Near any applia nce generating a strong magnetic field.
- Pla ce in dire ct sunlight.
Page 3

Introduction
About the Product
This video projection display, designed with a high-powered metal halide lamp, has
its outstanding features as follows:
q 10.34lbs (4.7 kg) lightweight compact design
q 330-watt user replaceable metal-halide lamp
q Single panel 6.4” TFT LCD projection system
q 800 x 600 addressable pixels
q 16.7M (24-bit) displayable colors
q NTSC/ NTSC 4.43/ PAL/ SECAM composite video & S-Video
q Large keystone correction range up to 20 degree
3
English
q Automatically saves adjustments
q Fan automatic stop after 5 minutes of standby mode
q Multilingual OSD menu adjustments
Page 4
4
English
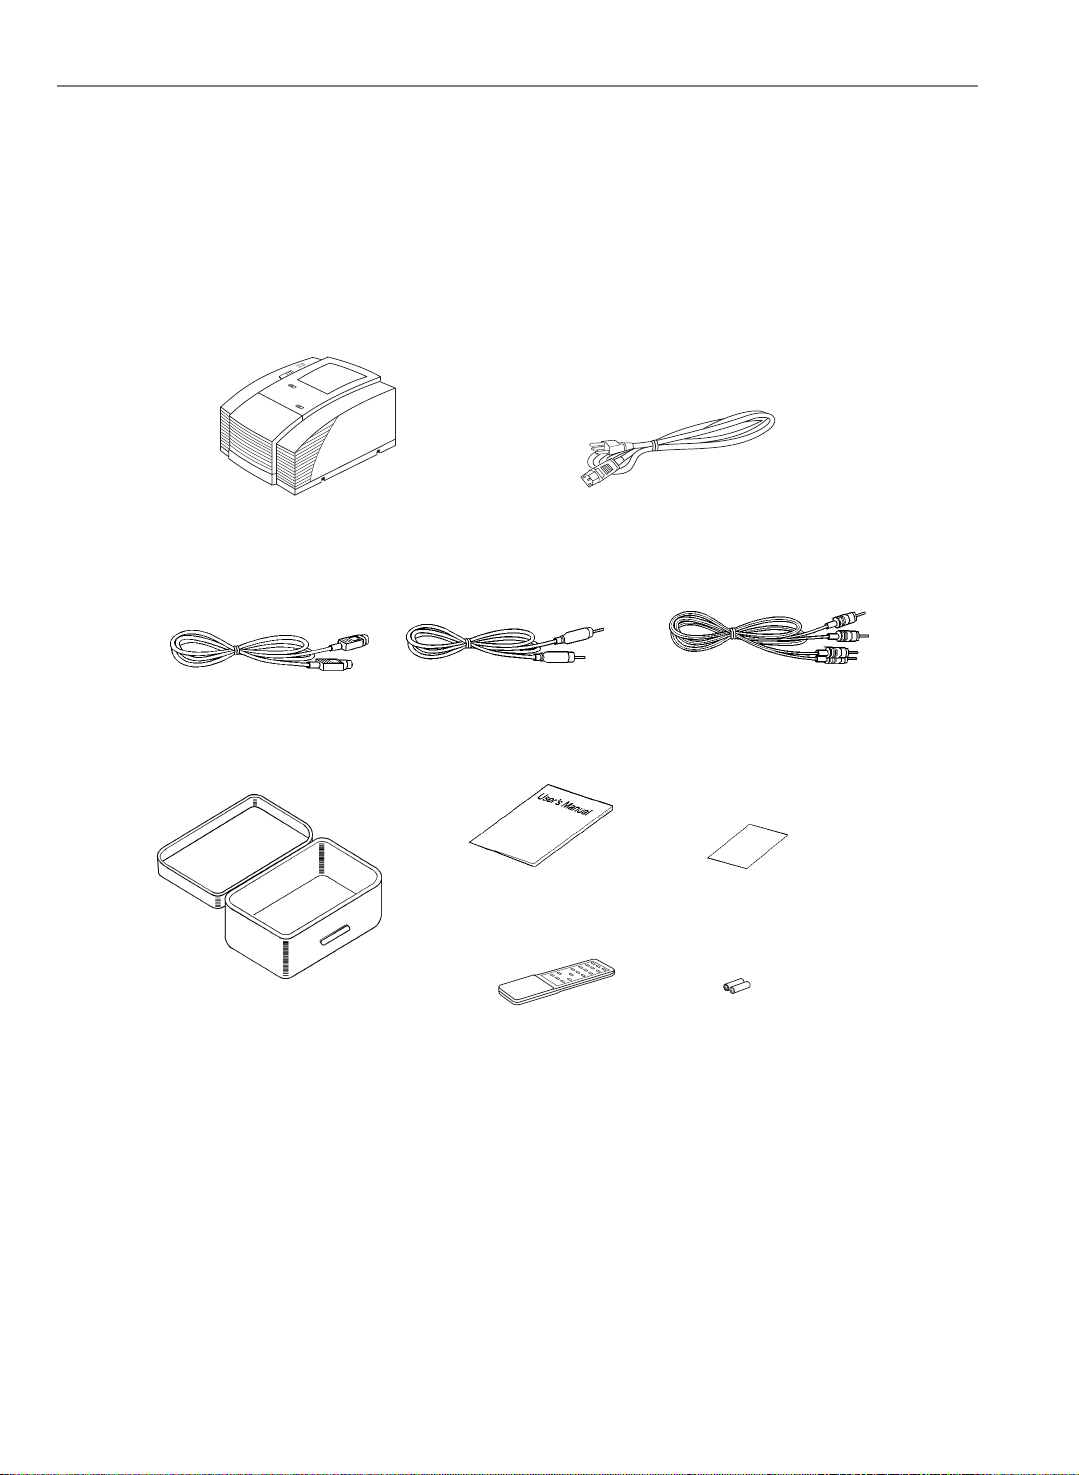
Package Overview
This projection display comes with all the items shown below. Check to make
sure your unit is complete. Contact your dealer immediately if anything is
missing.
LCD Projection Display
S-Video Cable
Carrying Case
(Optional)
Composite Video Cable
User’s Manual
Power Cord
Audio-in Cable
Warranty Card
Battery x 2Remote Control
Page 5
Installation
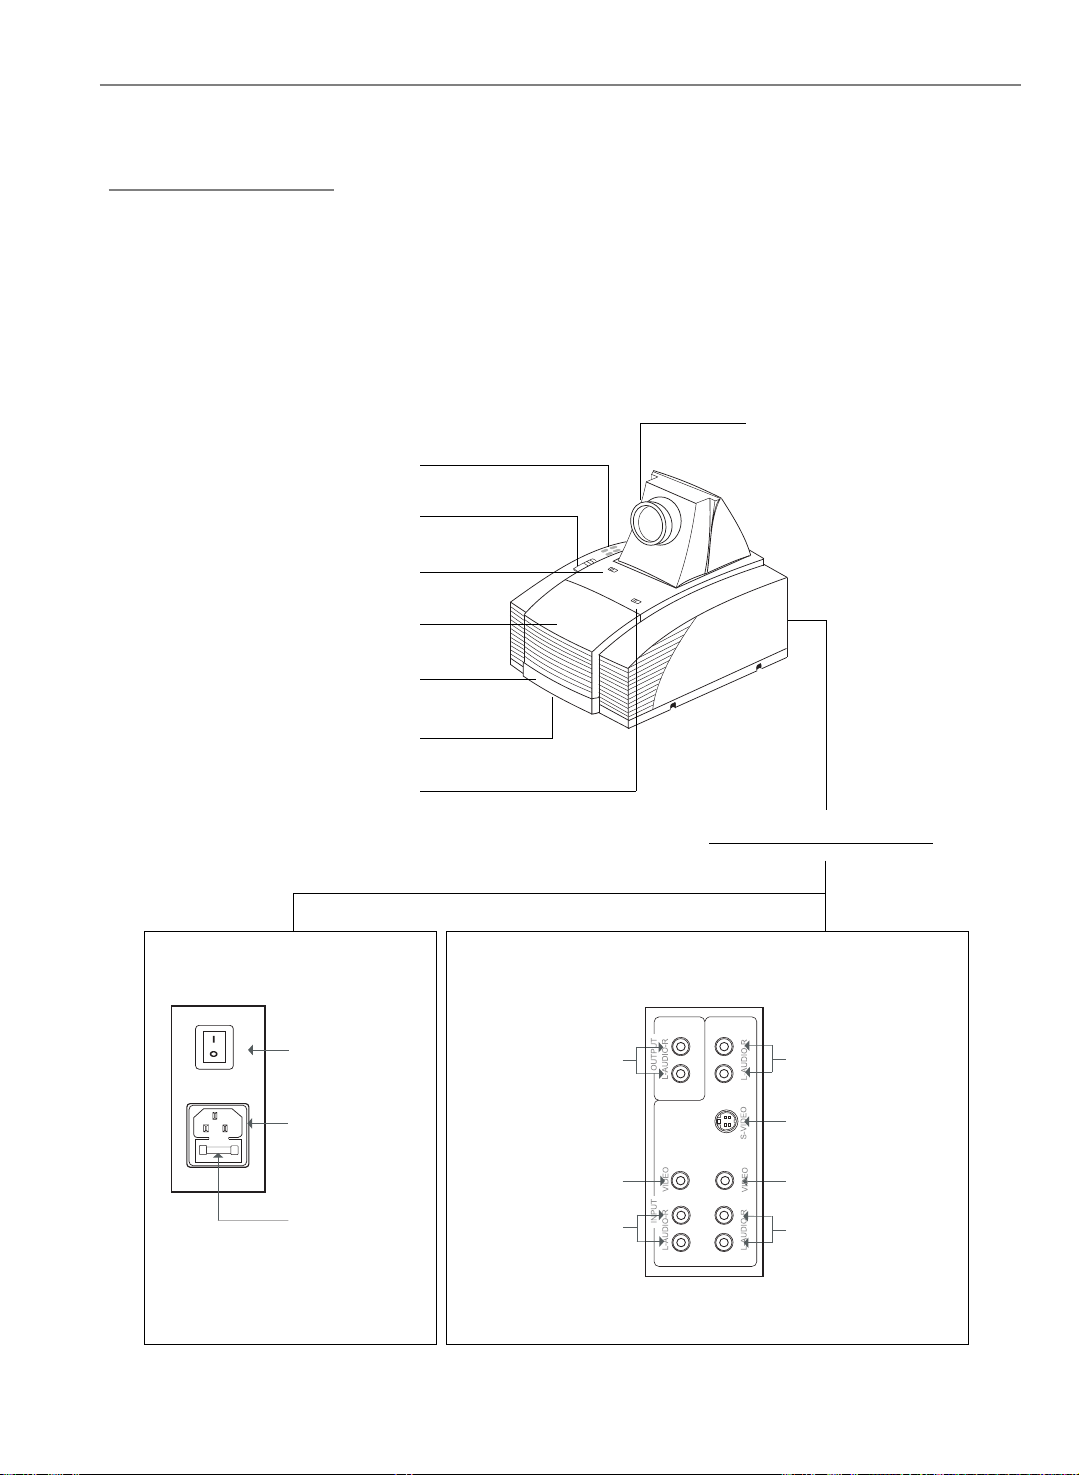
Product Overview
w Main Unit
Panel Control Buttons
Keystone Correction
5
English
Lens
Lens Latch
La mp Door
Carrying Handle
Elevator Foot
Lamp Latch
Power Switch
Power
Connector
Fuse
Audio Outputs
Composite Video
Connector
Audio Inputs
Rear Connection Ports
Audio Inputs
S-Video Connector
Composite Video
Connector
Audio Inputs
Page 6
6
English
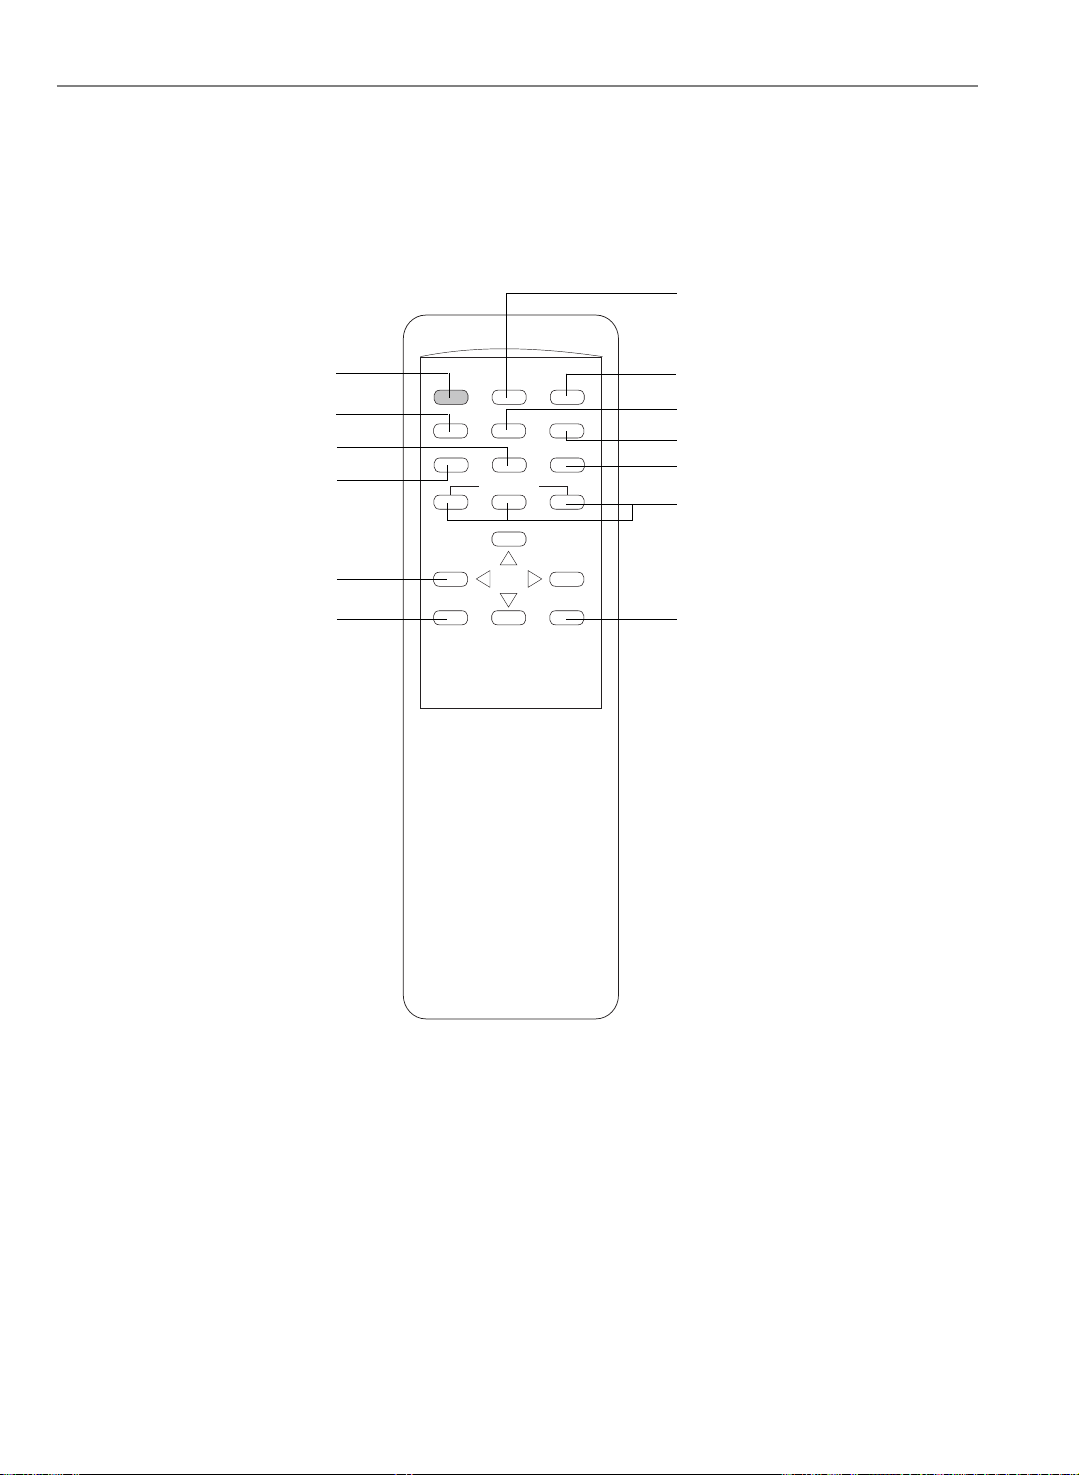
w Remote Control
Reset All
Power on/Standby
Color
Brightness
Contrast
Directional select keys
On-Screen menus
POWER ON
STANDBY
CONTRAST
_
MENU
RESET All
SHARPNESSCOLOR
BRIGHTNESS
VOLUME
+
FREEZE
TINT
SOURCE
MUTE
ENTER
Freeze
Sharpness
Tint
Source selection
Volume
Enter
* For more detailed information, please refer to “Function Descriptions”
on page 13.
Page 7

Start Y our Installation
w Connecting the Projection Display
Refer to the installation figure shown below.
Power Cord
7
English
Audio Cable
S-Video Cable
Composite Video
Cable
Audio Cable
Page 8

8
English
Powering On/Off the Projection Display
uu
u Powering On the Projection Display .
uu
Switch on the power; then turn on the lamp by pressing “STANDBY”
44
4
44
button.
Press the “ I ” side of the power switch to turn on the projection display. After a
few seconds, press the “Power on/Standby” button to power on the projection
lamp. At this time, the “Power on/Standby” indicator (the Green Light, see followin g figure) will be illuminated.
* If you wish to turn off the projection display for a short period of time, press
the “Power on/Standby” button. The Amber Light will illumin ate. This indi cates the projection lamp is powered off and is cooling down.
* If you want to turn on the projection lamp again, you must wait at least 1
minute until the Amber Light is OFF. Be sure the Amber Light is in OFF status
so that you can press the “Power on/Standby” button to turn on the projection
lamp.
Green Light
Amber Light
uu
u Powering Off the Projection Display
uu
44
4 Turn off lamp power first for three minute and then switch off the power.
44
Power Switch
Press “Power On/Standby” button to make the display in Standby mode first and
wait for three minutes, then you can switch off the power.
* After pressing the “Power on/Standby” button , you will see a message-
“Power off the lamp?”. Press the “Power on/Standby” button again to turn
off the lamp. Otherwise the message will disappear itself 5 seconds later.
* The projection display will automatically shut down when the lamp is powered
o f f and is not turned back on within 5 minutes. Please switch off the
power if this occurs.
* Always remember to turn off the projection lamp first and allow it to cool for a
few minutes before switching off the power.
Page 9

Adjusting the Image Size
q Positioning the projection display
9
English
Projection
Dista nce
Image Size
(diagonal)
q Slide the lens latch and pop up the projection lens. Switch on the power and
5 ft.
(1.5 m)
40"
(1.01m)
(min.)
(projection distance and image size)
6.5 ft.
(2 m)
60"
(1.52m)
9.5 ft.
(3 m)
80"
(2.03m)
(4 m)
(2.79m)
13 ft.
110"
20 ft.
(6 m)
160"
(4.06m)
(max.)
press the “Power on/Standby” button. See “Powering On/Off the Projection
Display” on page 8 for more information.
Power on/
Standby Buttons
Lens Latch
Power Switch
q Adjusting the screen image.
1. Rotate the projection lens to focus the image.
2. Slide the keystone correction button to adjust image shape.
3. Adjust the elevation:
(1) Pull out the carrying handle.
(2) Lift the projection display to the desired angle.
(3) Press down on the elevator node to loosen the elevator foot.
Keystone Correction
Carrying Handle
Lens
Elevator Node
Page 10

10
English
User Controls
User Control Overview
There are two ways for you to control the functions: pa nel control a nd remote control.
w Panel Control
POWER ON
STANDBY
MENU ENTER
4 Directional Keys
w Remote Control
RESET
ALL
Reset All
Power on/Standby
Color
Brightness
Contra st
Directional select keys
On-Screen menus
POWER ON
STANDBY
COLOR
CONTRAST
_
MENU
RESET ALL FREEZE
SHARPNESS
BRIGHTNESS
SOURCE
VOLUME
MUTE
+
ENTER
TINT
Freeze
Sharpness
Tint
Source selection
Volume
Enter
Page 11

w OSD Menus
The OSD (On-Screen Display) menus will allow you to ea sily adjust the display
functions. Refer to the following ta ble to find out the location of your adjusting
items.
Main Menu Sub Menu
Language English
French
German
Spanish
Italian
Source Video 1, Video 2, S-Video
Picture Brightness
Contrast
Color
Tint
Sharpness
Ceiling Projection
Rear Projectiotion
Audio Volume
Balance
Treble
Bass
Mode
La mp Lamp W arning
Lamp Re set
Reset All Reset, Cancel
11
English
Page 12

12
English
w The way to open the OSD menus will be as f ollows:
Main Menu:
4
Press “MENU” button to pop up the OSD Main Menu. There will be six submenus of “La nguage”, “Source”, “Picture”, “Audio”, “Lamp” and “Reset All” for
you to easily adjust the screen images.
Main Menu
Language
Source
Picture
Audio
Lamp
Reset All
Sub-menus:
4
After entering the Main Menu, use 5or6 button to select the main item you require.
Then press “ENTER” button to go into its sub-menu. Such as:
Picture
Brightness
Contrast
Color
Tint
Sharpness
Ceiling Projection
Rear Projection
Adjusting Items:
4
Choose the adjusting item by 5or6 button, and then press “ENTER” button for
confirmation. At this time, use 3or4 button to a djust your projected i mage.
Such as:
Contrast
IIIIIIIIIIIII
3
Press “MENU” button to exit from the OSD menus.
4
lllllllllllllll
4
Page 13

Function Descriptions
w Basic Function s:
13
English
Power On/Standby
4
Menu
4
Enter
4
Four Directional
4
Select Keys
Freeze
4
Mute
4
Language
4
Press the “Power On/Standby” button to turn on the
projection lamp.
Press “Menu” button to pop up the OSD menu.
“Enter” is used for confirming your selection.
Use 5or6 button to select items. Use 3or4 to make
adjustments for your selection.
Press the “Freeze” button to still the screen image.
Use this function to shut off the sound.
Choose “La nguage” item to select your choice of English,
French, German, Spanish or Italian.
Source
4
Reset All
4
w Picture Functions
Brightness
4
Choose “ Source” function to select between video 1 ,
video 2, and S-Video source.
Choose “Reset All” function to return the display parameters of the current mode to its factory default settings.
T o adjust the brightness of the image, select “Brightness”
from OSD menus or the remote control.
Page 14

14
English
Contrast
4
Color
4
Tint
4
Sharpness
4
Ceiling Projection
4
Rear Projection
4
To adjust the contrast of the image, select “Contrast” from
OSD menus or the remote control.
To adjust the color of the i mage, select “Color” from OSD
menus or the remote control.
T o adjust the tint of the image, select “Tint” from OSD
menus or the remote control.
To adjust the sharpness of the image, select “Sharpness”
from OSD menus or the remote control.
Choose this funtion from OSD menus for a ceiling
mounted projection.
Choose this function from OSD menus for a rear
projection.
w Audio Functions
Volume
4
Balance
4
Choose this function from OSD menus or the remote
control to adjust volume.
Choose this function from OSD menus to balance the
sound of left & right cha nnel.
Page 15

15
English
Treble
4
Bass
4
Mode
4
w Lamp Functions
Lamp W arning
4
Lamp Reset
4
Use this function to control the treble level.
Use this function to control the bass level.
There are four modes for your choices: Spatial Stereo,
Pseudo Stereo, Linear Stereo, and Forced Mono.
Choose this function to show or hide the warning
message.
After changing a new lamp, reset the lamp lif e timer from
OSD menus.
Page 16

16
English
Appendices
Trouble shooting
If you are experiencing trouble with the projection display, refer to the follows. If the
problem persists, please contact your local dealer or our service center.
Problem: No image appears on screen.
Press “Power on/Standby” button.
4
Ensure all the cables and power connections are correctly and securely connected
4
as described in the “Installation” section.
Ensure the pins of connectors are not crooked or broken.
4
Check if the projection lamp has securely installed. Please refer to the “Changing
4
the lamp” section.
Ensure the cooling fan is on. If not, you may need to change the fuse. Please refer
4
to the “Changing the fuse” section.
Problem: Unclear image or incorrectly displayed the image.
Ensure the displayed video source is good.
4
Adjust the items of picture from OSD menus to obtain an optimum image.
4
Problem: Sound does not come out from the speakers.
Adjust volume from OSD menus.
4
Make sure all audio cables are correctly connected as described in the “Installa-
4
tion” section.
Page 17

Maintenance
w Changing the La mp
The projection display will detect the lamp life itself. It will show you a warning
message when the lamp is used over working hours. When you see this message,
change the lamp as soon as possible.
Make sure the projection display has cooled for at least 30 minutes before
cha nge the lamp.
Warning: Lamp compartment is hot! Allow it to cool before changing
lamps!
* We suggest you a Professional Engineer or to contact our local dealer for
changing the projection lamp module.
17
English
Lamp Changing Directions:
1. Use a cross screwdriver to remove the screw of the lamp latch.
Open the lamp door.
Lamp Door
Lamp Latch Screw
2. Remove the screws on the metal protection cover and then open this metal cover.
Lamp Metal Cover
Metal Cover
Screws
Page 18

18
English
3. Unscrew the two screws on the bottom of the lamp module.
Then release the head screw of the lamp module.
Bottom Screws
Head Screw
4. Take out the used lamp from the usage position. Take out the head of the lamp first
and then the bottom. Be careful of the hot lamp.
Bottom Lamp
Head La mp
5. Replace a new lamp.
Hold the new lamp by its base (we suggest you to put gloves on) and then push it
firmly into the usage position. Remember to push the bottom of the lamp back to its
position first and then the head. Tighten the screws.
Lamp Base
Lamp
Lamp Base
Warning: Never touch the glass or white powder of the lamp as finger
oil, dust or water will damage the lamp.
6. Close the metal cover and then tighten the screws.
Close the lamp door and then tighten the screw beside the lamp latch.
Page 19

w Changing the Fuse
19
English
Fuse Holder
Fuse Changing Procedure:
4
1. Switch off the power and unplug the power cord.
2. Pull out the fuse holder.
3. Remove the blown fuse and then insert a new fuse.
4. Put the fuse holder back in position.
the Blown Fuse
Page 20

20
English
Specifications
LCD Pa n el - active matrix TFT color LCD
- 6.4” panel x 1
- tr=30ms, tf=50ms response time
- 200:1 contrast ratio
Lamp - 330-watt metal halide
Display Resolution - 800 pixels(H) x 600 lines(V)
Displayable Color - 16.7M colors
Image Size - 40” to 160” diagonal
Projection Distance - 5 ft. to 20 ft./ 1.5 m to 6 m
Video Compatibility - NTSC/ NTSC 4.43/ P AL/ SECAM compatible
- composite video & S-Video capa bility
Multimedia Audio - two internal speakers with 3 watt output
- built-in amplifier with 3 watt x 2 output
Power Supply - auto switch
- AC input 100~120V/ 200~240V, 50/60Hz
I/O Connectors - power: AC power input socket
- video input: composite video RCA ja ck x 2/ S-V ideo jack x 1
- audio input: 3 pairs of L/R RCA ja ck s
- audio output: 1 pair of L/R RCA ja c ks
W e ight - 10.34 lbs/ 4.7 kg
Dimensions (W x H x D) -10.2 x 6.4 x 12.5”/ 259 x 162 x 317 mm
Environmental -operating temperature: 10o~35oC/ 50o~95oF
humidity: 80% maximum
storage temperature: -20o~60oC/ -40o~140oF
humidity: 80% maximum
Safety Regulation - FCC class A, CE Mark, VCCI-I, UL, CUL, T?V
 Loading...