

Page 1

OPR-3101
Quick Start Guide
Introduction
• Read this quick start guide carefully before installing and/or using this product.
• Keep this quick start guide for future reference and store in a safe place.
Notice
• This quick start guide may be revised or withdrawn at any time without prior notice.
• This quick start guide may not, in whole or in part, be copied, photocopied, reproduced, translated or converted to any
electronic or machine readable form without prior written consent of Opticon.
• Trademarks used are property of their respective owners.
• Under no circumstances shall Opticon be held responsible for any special, incidental, consequential or indirect damages
howsoever caused.
Caution and Warning
1. Laser Safety
Do not stare into the laser beam. This product meets the following regulatory requirements:
- JIS C6802:2005: Laser class 2
- IEC IEC60825-1+A2:2001 Class 2
- FDA CDRH Laser class II. Complies with 21 CFR 1040.10 and 1040.11 except for deviations pursuant to laser notice No. 50
dated June 24, 2007.
2. Use of the Product
Radio frequency energy from wireless devices may affect some sensitive electronic medical equipment. In order to avoid
interference with the operation of this equipment, wireless devices should be switched off when requested in hospitals,
clinics, or health care facilities.
3. Handling Instructions
OPR-3101
【
• Do not attempt to disassemble, modify or update this device.
• Operating the scanner while operating machinery or a vehicle can be distracting.
• Do not drop this product or put heavy items on this product.
• Do not insert foreign substances into the device.
• Do not use this product in the following areas:
- In areas exposed to direct sunlight for long periods of time.
- In dusty environments.
- Near water or other liquids, as well as in extremely high humidity.
- Near heat sources, such as radiators, heat registers, stoves, or other types of devices that produce heat.
- Near microwaves, medical devices, or low-power radio stations.
• When cleaning this product, rub gently with either a soft dry cloth or a damp cloth with mild detergent.
Battery Pack
【
• Do not attempt to disassemble this battery.
• Do not expose the battery pack to liquids or allow the battery contacts to get wet.
• Do not expose the battery pack to heat sources including other devices that produce heat.
• Do not short the power leads on the battery pack. If the (+) and (-) terminals come in contact with metals (such as a necklace
or hairpin), a short-circuit will occur.
• Do not load the battery pack with its (+) and (-) terminals reversed.
• Check the local regulations for proper battery disposal.
4. Radio Equipment
• Do not peel off the certification label.
5. Bluetooth
• Bluetooth® is a registered trademark owned by Bluetooth SIG, Inc., U.S.A. and is used by OPTICON under license.
• This product supports Bluetooth wireless communication with other Bluetooth devices that have the same profile.
• This product complies with Bluetooth version 2.0; however, its communication performance with equipment other than
cradles or devices stated in this manual is not guaranteed.
• Bluetooth devices use the 2.4 GHz frequency band. Scientific, medical, and industrial devices, including radio stations,
microwave ovens, wireless security (camera) systems and WLAN use the same frequency band as this product. Interference
from other devices may affect the communication speed or communication range of this scanner or vice versa.
】
】
(Please refer to the specification manual and instruction guide for details.)
Copyright© 2007, Opticon All rig hts reserved.
Page 2
Before Getting Started
■
What's in the Box
No. Item Product No. Function
1
Scanner
2
Lithium-ion Battery Pack
3
Quick Start Guide
OPR-31 01 Wirele ss barcode scanner.
1UR185 00F-OEL Designate d battery p ack for OPR-3101.
5J0082 Provid es product informatio n and instr uction gui de.
Overview
■
Basic Specifications
Parameter Specications
Size (W) 68 ×(D) 155×( H) 165 mm M ax
Physical
Features
Weight 250g Max (excluding battery)
10 to 60
Durability
Operating Temp.
and Humidity
Storage Temp.
and Humidity
Ambient Light
Immunity
Dust and Drip Proof
Shock
Static Electricity
Speci cations Bluetoot h Ver. 2.0
Wireless
Section
Supported Protocol
Output Level Class 2 (4dBm or less)
Communication
Operation Mode
Comm. Distance
Security
Light Source Red las er diode
Optical
Section
Wavelength 650 ±1 0 nm
Light Output
Scan Method Bi-dir ectional s canning
Scan Rate 100 ±2 0 scan / sec
Supported
Symbologies
Main Power Supply
Power
Supply
Battery Capacity 1620mA / hr
Section
Charging Temp. 0 to 4 0
Operating Time
−
5 to 9 5% (non- condensing )
20 to 60
−
5 to 9 5% (non- condensing )
Fluore scent: up to 4,000 lx
Sunlig ht: up to 80,000 lx
IP54
Dropped 18 times onto concrete from
a height of 2m with no defects found.
15kV ( no destruc tion)
SPP
1 OPR- 3101 : 1 B T device (c radle)
OPR-31 01: Master mode
BT dev ice (cradl e): Slave m ode
10 m (depends on the environment)
Au th ent ic ati on a nd e ncr yp tio n
available.
1.0 mW
≦
EAN, JAN, UP C, Industrial 2of5, IATA ,
Int erlea ved 2of5 , N W-7(C odaba r),
C od e 3 9, Co de 93 , Co de 12 8,
MS I/P les se y, IS BN (1 3-d igit J AN
+ 5-d igi t a dd on ), RSS -14F ami ly,
MicroPDF417 etc…
Lithiu m-ion seco ndary batte ry
25 hou rs (scan o nce every 5 sec.)
℃
℃
℃
■
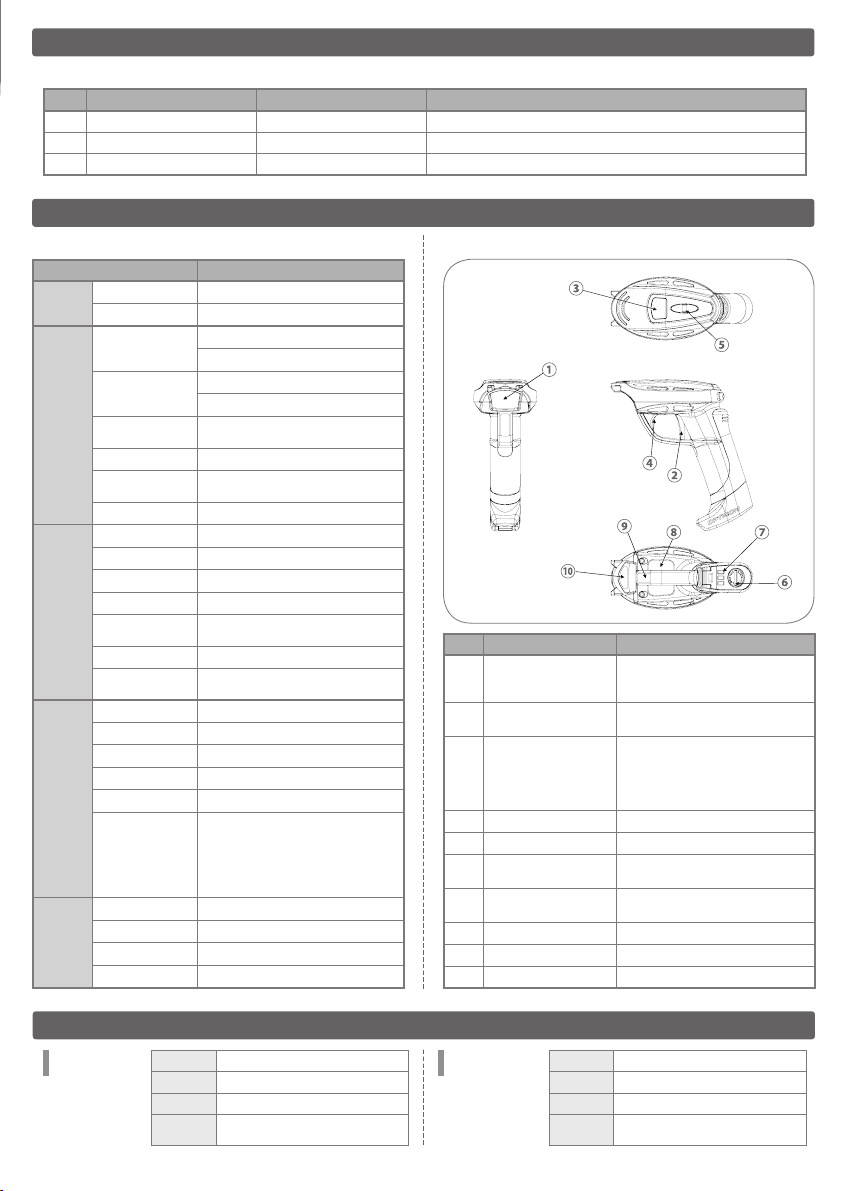
Detailed View
No. Part Function
Optical Window
①
Trigger Switch
②
Status LED
③
Buzzer Hole
④
Strap Hook
⑤
Battery Cover
⑥
Charging Terminals
⑦
Model Name Label
⑧
Laser Caution Label
⑨
Serial No. Label
⑩
The scanner emits a laser beam
through the optical window while
scanning a barcode.
To scan and decode a bar code, you
need to press the trigger switch.
The Status LED is use d to alert
user s to the stat us of the scan ning
ope ration, wirele ss conn ectivi ty,
data stora ge, re mainin g batt ery
leve l and rec harging time.
Buzzer sounds through the buzzer hole.
Designated battery pack is contained
under the battery cover.
Charging terminals ar e used to supply
power to the scanner from the cradle.
Designated Cradles (Optional)*
Charging
Cradle
CHG-3101
*Please refer to the specification manual or the instruction guide for details of designated cradles.
Size (H) 115 × (W) 100 × (D) 185 mm Max
Weight 250g M ax
Color Light Gray
Chargi ng
Time
5 hour s (using an AC Adapte r)
Communications &
Charging Cradle
CRD-3101
Size (H) 115 × (W) 100 × (D) 185 mm Max
Weight 250g M ax
Color Light Gray
Chargi ng
Time
5 hour s (using an AC Adapte r)
10 hou rs (using U SB bus pow er)
Page 3

Brief Setup
(Please refer to the instruction guide for details of default settings etc... )
Connect to the Host via
Opticon Communication Cradle
OPTION 1: Connect via RS-232C Interface
Connect the AC adapter and the RS-232C interface cable
①
to the cradle.
Confirm that the cradle status LEDs light up correctly.
②
Connect the cable to the host and open the COM port in
③
the host application.
Scan Menu Barcode Set A from the top to the bottom to
④
connect to cradle (RS-232C).
is set to RS-232C in default.)
Carry out one of the following to connect to the cradle.
⑤
1. Scan 12-digit address label attached to the cradle. or
2.
Scan Menu Barcode Set B to connect.
to Connect" is enabled, hold down the trigger switch for the set time.)
The Status LED flashes BLUE when making a connection.
⑥
The Status LED turns solid BLUE and the good read buzzer sounds
⑦
when a successful connection is made. (The Status LED flashes RED
and the buzzer sounds when the connection is not successful.)
Confirm if barcodes can be read correctly.
⑧
The Status LED turns solid RED when the COM port is
⑨
closed while this product is still connected to the host.
Scan Menu Barcode Set C to disconnect.
⑩
Trigger Switch Time to Disconnect" is enabled, hold down
the trigger switch for the set time.)
When this product is disconnected, the Status LED turns
⑪
solid RED and the buzzer sounds.
(You can skip this procedure if it
(If the "Press Trigger Switch Time
(If the "Press
OPTION 2: Connect via USB Interface
Connect the USB interface cable to the cradle.
①
Confirm that the status LEDs light up correctly.
②
Scan Menu Barcode Set D from the top to the bottom to
③
connect to cradle (USB-HID) .
is set to USB in default.)
Carry out Procedure ⑤ to ⑧ and ⑩ to ⑪ of "OPTION 1".
④
(You can skip this procedure if it
Connect to the Host via
3rd party Bluetooth Device
OPTION 3: Connect without Authentication
Scan Menu Barcode Set E from the top to the bottom to
①
connect to PC.
Scan the numbers and characters of the Bluetooth
②
device address from Menu Barcode Set F.
Scan Menu Barcode Set B to connect.
③
(If the "Press Trigger Switch Time to Connect" is ena bled,
hold down the trigger switch for the set time.)
The Status LED flashes BLUE when making a connection.
④
The Status LED turns solid BLUE and the good read buzzer sounds
⑤
when a successful connection is made. (The Status LED flashes RED
and the buzzer sounds when the connection is not successful.)
Confirm if barcodes can be read correctly.
⑥
Scan Menu Barcode Set C to disconnect.
⑦
(If the "Press Trigger Switch Time to Disconnect" is enabled,
hold down the trigger switch for the set time.)
When this product is disconnected, the Status LED turns
⑧
solid RED and the buzzer sounds.
OPTION 4: Connect with Authentication
Carry out Procedure ① and ② of "OPTION 3".
①
Scan Menu Barcode Set G from the top to the bottom to configure
②
the Bluetooth security to "Authentication if not paired".
*Please refer to the Universal Menu Book or the instruction
guide for other Bluetooth security configurations.
Scan numbers of the PIN code from the Menu Barcode Set H.
③
Scan Menu Barcode Set I from the top to the bottom to
④
configure the Bluetooth security to "Enable encryption".
Scan Menu Barcode Set B to connect.
⑤
to Connect" is enabled, hold down the trigger switch for the set time.)
The Status LED flashes BLUE when making a connection.
⑥
Input the same PIN code to the Bluetooth device.
⑦
Carry out Procedure ⑤ to ⑧ of "OPTION 3".
⑧
(If the "Press Trigger Switch Time
Trouble Shooting
*If you cannot connect this product to the PC, please
confirm the following:
- Did you input the correct bluetooth address?
- Did you set the cradle DIP switch correctly?
Trouble
Shooting
Menu Barcodes for the Conguration
■
Menu Barcode Set A
SET
Bluetooth
address
■
Manually
connect
■
Manually
disconnect
Connect to
cradle
(RS-232C)
END
Menu Barcode Set B
Menu Barcode Set C
+-CONN-+
+-DISC-+
ZZ
CNCR
ZZ
Trouble Shooting
*If you cannot connect this product to the PC, please
confirm the following:
- Did you input the correct bluetooth address?
- Did you confirm the Bluetooth Security options?
■
Menu Barcode Set D
SET
Bluetooth
address
■
Bluetooth
address
Connect to
cradle
(USB-HID)
END
Menu Barcode Set E
SET
Connect
to PC
END
Trouble
Shooting
ZZ
CNC2
ZZ
ZZ
CNPC
ZZ
Page 4

■
Menu Barcode Set F
SET
ZZ
■
Menu Barcode Set H
SET
ZZ
Set bluetooth
address label
0
1
2
3
4
5
6
7
8
End bluetooth
address label
END
■
Menu Barcode Set G
SET
Bluetooth
security
*Authentication
if not paired
END
BDAS
9
A
B
C
D
E
F
Note: If you make mistake in
reading the menu barcodes, you
must restart the procedure again
from Set bluetooth address label.
BDAE
ZZ
ZZ
AUTO
ZZ
Set pin-
code label
PINS
0
1
2
3
4
PIN code
5
6
7
8
9
End pin-
code label
END
■
Menu Barcode Set I
SET
Bluetooth
security
END
* Please refer to the instruction guide on how to change the
batter y pack.
* Please refer to the Universal Menu Book for details about the
other configuration .
Enable
encryption
PINE
ZZ
ZZ
ENCE
ZZ
Contact
Please contact OPTICON or your local dealer.
The Netherlands
U.S.A.
France
Germany
Italy
Spain
More product details, additional support, and configuration options (from the Universal Menu Book) are available at www.opticon.com.
Opticon Sensors Europe B.V.
tel: +31 (0)23-5692700
Opticon Inc.
tel: 800-636-0090
Opticon S.A.S.
tel: +33 (0)1-41461260
Opticon Sensoren GmbH
tel: +49 (0)6074-91890-0
Opticon s.r.l.
tel: +39 (0)051-6321800
Opticon Sensores S.L.
tel: +34 (0)902-747469
email: sales@opticon.com
/
email: opticon@opticonUSA.com
/
email: opticon@opticon.fr
/
email: sales.de@opticon.com
/
email: opticon@opticonitalia.it
/
email: info@opticon.es
/
Sweden
United Kingdom
Taiwan
China
Australia
Brazil
Opticon Sensors Nordic AB
tel: +46 (0)8-58548560
Opticon Limited
tel: +44 (0)1582-635100
Opticon Far Eastern Ltd.
tel: +886 2-27597444 / email: taiwan@opticon.com
Opticon Sensors Europe B.V., Shanghai Representative Oce
tel: +86 21-64480881
Opticon Sensors Pty. Ltd.
tel: +61 (0)2-43402666
Opticon Sensors Europe B.V., Latin American Oce
tel: +55 11-5081 2088
email: henrik@opticon-sensors.se
/
email: sales@opticon.co.uk
/
email: china@opticon.com
/
email: sales@opticon.com.au
/
email: sales.la@opticon.com
/
5J008 2A
 Loading...