

Page 1
M-5
①
⑦
②
③
⑥
⑤
④
Quick Start Guide
Introduction
• Read this quick start guide carefully before installing and/or using this product.
• Keep this quick start guide for future reference and store it in a safe place.
Notice
• This quick start guide may be revised or withdrawn at any time without prior notice.
• This quick start guide may not, in whole or in part, be copied, photocopied, reproduced, translated or converted to any
electronic or machine readable form without prior written consent of Opticon.
• Trademarks used are property of their respective owners.
• Under no circu mstances s hall Opticon be held r esponsible for any spec ial, inci dental, consequential or indirect
damages howsoever caused.
Precautions for Use
1. LED Safety
Do not stare into the LEDʼs.
2. Handling Instructions
【
】
M-5
• Do not attempt to disassemble, modify or update this device.
• Do not use the scanner while operating machinery.
• Do not drop or put heavy items on this product or its cable.
• Do not pinch or forcibly bend the cable, especially at very low temperature.
• Do not insert foreign substances into the device.
• Do not use/leave this device:
- In areas exposed to direct sunlight for long periods of time
- In dusty environments
- In risk for an exposure to chemicals
- Near water or other liquids, as well as in extremely high humidity
- Near heat sources such as radiators, heat registers, stoves, or other types of devices that produce heat
- Near microwaves, medical devices, or RF-emitting devices
- In the reach of blinking lights such as CRT
• Do not use this product during a lightning storm.
【
AC/DC Adapter
• Use only the supplied AC adapter with the enclosed region specific plugs for connection to the wall socket.
• This product may produce heat when in use, but it does not affect its performance.
• Do not pull on the cord when unplugging the power cord from a power outlet. Grasp the plug to remove it.
• Do not plug in or out this product with wet hands.
• Unplug this product when it is not in use or when it is being cleaned.
】
Before Getting Started
■
What's in the Box
Confirm that you have the following items before getting started. Please note that the contents may differ
depending on interface specifications. Please contact the nearest dealer if items are damaged or missing.
No. Item Function Notes
1 Scanner
2 Interface cable A cable for connecting the scanner Different for each int erface spec.
3 Wedge branch cable
4 Connector cover
5
Instruction of connector cover
6 AC adapter
7 Interchangeable plugs Plugs for different regions
8 Quick start guide
An omnidirectional imaging scanner
Y-cable: The cable that can be used to connect a keyboard
and the scanner's straight cable to a host computer.
A cover use d to fix the c onn ection bet wee n the
Y-cable and the stra ight cable.
An instruction manua l for the connector cover
AC adapter with inte rchangeable plugs
This manual provides the basic product specification
and setup instructio ns.
Copyright© 2009, Opticon All right s reserved.
−−−−−−−−−−−
Only for Wedge interface.
Only for M-5-WEDGE+PS package.
Only for M-5-WEDGE+P S package.
Only for RS-232C and
Only for RS-232C and
Wedge
Wedge
−−−−−−−−−−−
interface.
interface.
Page 2
■
①
⑦
②
③
⑥
⑤
④
M-5 Basic Specifications
Parame ter
Size (H)140.0
Physical
Features
Weight Approx .295g (excluding th e cable)
Scan Confirmation
Operation
Section
Keys 2 keys ( Trigger Switch/Mode Sw itch)
RS-232C 9600bp s
Interfaces
USB
Wedge
ASIC
Control
Section
SDRAM 128Mbi ts(1M
Buzze r and 3 colors LED(Green/Blue/Orange)
Full-Speed 12Mbps(HID/VCP)
Hi-Power Bus-powered
PS/2 Keyb oard (Connect or dis connect the keyboard.)
OEY-0603 CPU:ARM -1026EJ-S Core:160MHz
Flash ROM 16Mbit s(1M
Light Source
Scanning
Wavelength
Section
Scann ing Method
Supported
Symbologies
(1D)
Supported
Symbologies
(2D)
Operating voltage
Power
Supply
Section
Current
consumption
Operating Temp.
Durability
Storage Temp.
Operating Humidity
Storage Humidity
Ambient
Light
Immunity
Dust-and-Drip Proof
Static Electricity
Shock
Endurance
(*1)Except “Mobile phone scanning mode” in each condition. Please note that scanning while the
LCD screen is exposed to direct sunlight may have a negative effect on the reading performance.
■
Basic Specifications for Universal AC adapter
8-Alln GaP Red LEDs(Omnisc an Mode)/625nm
4-Alln GaP red LEDs (Mobile Mode)/633nm
WVGA(752 x 48 0 pixels) CMOS area sens or
UPC-A,UPC-E, UPC-E1, UPC-A Add-on, UPC-E Add-on, EAN-13,
EAN-8, EAN-13 Add-on/EAN-8 Add-on, JAN-8 , JAN-13, Code
39,Tri-Optic, NW-7, Industrial 2 of 5, Interleaved 2 of 5, Code 93,
Code 128, GS1-128, S-Code, MSI/Plessey, UK/Plessey, TELEPEN,
Matrix 2 of 5, C hinese Post Matri x 2 of 5, IATA,Code 11,
Korean Pos tal Authority co de , GS1 DataBar, Postal Cod e
PDF4 17,Micr oPDF417, QR Code,Mi croQR Code, Data
Matrix (ECC 000-140/ECC 200),MaxiCode (Modes 2 to 5),
Aztec Code, EAN.UCC Composite bar code, Codablock F
4.5 to 6.6V
Peak
(when scanning and decoding)
Averag e
(when scanning and decoding)
Stand-by
0 to 40 deg. C
−
5 to 95% (non-condensing)
5 to 95% (non-condensing)
Fluore scent:10,000 lx or less
Incand escent lamp:10,000 lx or less
Sunlight:50,000lx or less
IP52
15kV (no destruction)
Dropped once from each of 5 angles onto
concrete floor from a height of 150cm with
no defects found. (Total 5 times)
Specif ications
×
(W)92.0 × (D) 95.5 mm
〜
115.2k bps
×
×
40 to 70 deg. C
4Banks×32Bits )
16Bits ) Flash Memory
USB
420mA 400mA
(typ)
280mA
(typ)
140mA
1)
(*
Parame ter Specif ications
Physical
Features
Input
Output
Environmental
Specification
Size
Cable Length 1.8m
Colour
Power Voltage
Supply Current
Power Voltage
Maximu m Current
Operating Temp.
Operating Humidity
Storage Temp.
Storage Humidity
(H)75 x (W)47.5 x (D)28mm (excluding boss)
Black
AC 90V to 265V
500mA Max
5.7V to 6.3V
2A Max
0 to 4 0 deg. C
25 to 85% (non-condensing)
−20 to 60 deg. C
20 to 90% (non-condensing)
Overview
RS-232C, Wedge
(typ)
210mA
(typ)
130mA
■
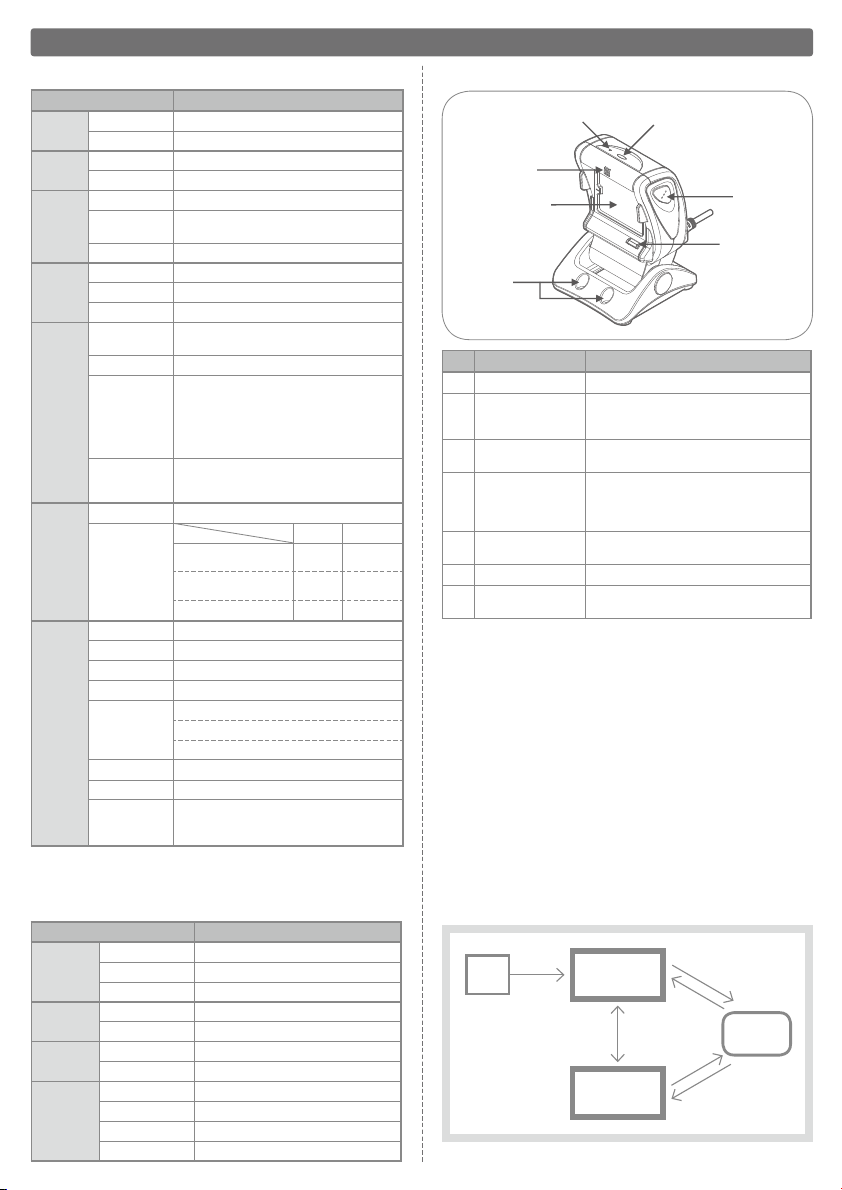
Detailed View
No. Part Function
Optical Window
①
Trigger Switch
②
Mode Switch
③
Indicator LED
④
Indicator LED While Mobile
⑤
phone scanning Mode
Buzzer Holes
⑥
Screw Holes
⑦
■
Various Scanning Modes
−−−−−−−−−−−
The trigger switch is used for the manual
scanning operation. A single aiming guide
will be activated in this mode.
The mode switch toggles between Mobile phone
scanni ng mode and Normal scannin g mode.
Gre en LED lig ht show s t he scan ning
operation has been successful.
Blue LED light shows when the scanner is
ready to scan.
Orange LED light shows when the scanner
is ready for mobile code scanning.
−−−−−−−−−−−
Used to mount the scanner onto a base plate,
wall etc. using D4 (diameter: 4mm) screws.
The following modes are available for different uses:
□
Normal scanning mode
A mode in which the scanner is configured optimally for general barcode
reading. The device automatically starts scanning when a label is
held in front of it. The trigger key activates the single line scanning.
□
Mobile phone scanning mode
A special mode ― in which the lighting conditions are optimized for
reading barcodes,― displayed on mobile devices such as a phone.
The device automatically starts scanning when a label is held in front
of it. The trigger key activates the single line scanning.
□
Single line scanning
While the trigger switch is pressed, the illumination LEDs turn on
and only one code can be read. The single line can read one target
code out of multiple printed codes in this mode.
or Time-Out
Trigger
Switch
Trigger
Switch
Single line
scanning
Finished Scanning
or Time-Out
Power
ON
Figure 1. Scanning mode diagram
Normal scanning
Mode Switch
Mobile phone
scanning mode
mode
Finished Scanning
Page 3

①
⑦
②
③
⑥
⑤
④
Setting Menu Codes
The M-5 can be configured by reading the menu codes below. Read more about configuration options
(by Opticonfigure) on www.opticon.com.
: Default
Default Setting
■
Enable QR Code
(* Use this only when “Disable QR Code” is set in advance.)
Start / END: ZZ
Enable QR Code: BCD
Stop / END: ZZ
■
Back to default
Serial command : U2, C01, SU, UB
Read Time Setting
You can set the time that the scanner will try to read a code
after it is detected by the auto trigger. This can be set for “Normal scanning mode” and “Mobile phone scanning mode”.
For single line scanning, it can be set as the LED aiming time.
■
Normal scanning mode
Serial command : Y0 (0.5s) Serial command : Y2 (2.0s)
Serial command : Y1 (1.0s) Serial command : Y3 (3.0s)
■
Mobile phone scanning mode
Serial command : E91 (1s) Serial command : E93 (3s)
Scanning Mode Setting
"Normal scanning mode" or "Mobile phone scanning mode"
can be selected as primary mode when the scanner starts up.
■
Normal scanning mode
Serial command : E8Y
■
Mobile phone scanning mode
Serial command : E8Z
Serial command : E92 (2s) Serial command : E94 (4s)
■
Single line scanning
Serial command : E8V (1s) Serial command : E8X (5s)
Serial command : E8W (3s)
Page 4

①
⑦
②
③
⑥
⑤
④
Setting Menu Codes
Multiple read reset time Setting
The time that a code will not be read after it is read successful
once can be set. This can prevent the double read of a code.
■
Multiple read reset time
Serial command :
Serial command : AK (300ms)
Serial command :
Serial command :
AJ (200ms)
AL (400ms)
AM (500ms)
Serial command :
E9H (700ms)
Serial command : E9I (800ms)
Serial command :
Serial command :
E9J (900ms)
E8T (1s)
Auto Trigger Setting
Auto trigger ON / OFF can be set. When it is set to OFF, only
the trigger switch can be used to activate the scanner.
■
Auto Trigger ON
Serial command : +I
■
Auto Trigger OFF
Serial command : +F
Serial command :
AN (600ms)
Serial command :
AG (Infinity)
Contact
Please contact OPTICON or your local dealer.
The Netherlands
U.S.A.
France
Germany
Italy
Spain
More product details, additional support, and configuration options (from the Universal Menu Book) are available at www.opticon.com.
Opticon Sensors Europe B.V.
tel: +31 (0)23-5692700
Opticon Inc.
tel: 800-636-0090
Opticon S.A.S.
tel: +33 (0)1-41461260
Opticon Sensoren GmbH
tel: +49 (0)6074-91890-0
Opticon s.r.l.
tel: +39 (0)051-6321800
Opticon Sensores S.L.
tel: +34 (0)902-747469
email: sales@opticon.com
/
email: opticon@opticonUSA.com
/
email: opticon@opticon.fr
/
email: sales.de@opticon.com
/
email: opticon@opticonitalia.it
/
email: info@opticon.es
/
Sweden
United Kingdom
Taiwan
China
Australia
Brazil
Opticon Sensors Nordic AB
tel: +46 (0)8-58548560
Opticon Limited
tel: +44 (0)1582-635100
Opticon Far Eastern Ltd.
tel: +886 2-27597444 / email: taiwan@opticon.com
Opticon Sensors Europe B.V., Shanghai Representative Oce
tel: +86 21-64480881
Opticon Sensors Pty. Ltd.
tel: +61 (0)2-43402666
Opticon Sensors Europe B.V., Latin American Oce
tel: +55 11-5081 2088
email: henrik@opticon-sensors.se
/
email: sales@opticon.co.uk
/
email: china@opticon.com
/
email: sales@opticon.com.au
/
email: sales.la@opticon.com
/
M-50 0009062- 0-00
 Loading...