

Page 1
Page 2
2
3
Contents
Chapter 1. Knowing Your Device 09
1.1 Introduction 10
1.2 Accessories 14
1.3 Install SIM Card and Battery 15
1.4 Battery Information 16
1.5 Mini-SD Cards 18
Chapter 2. Basic Operations 19
2.1 Getting Started 20
2.2 Input Methods 23
2.3 Today Screen Components 28
2.4 The Start Menu 30
2.5 Settings 32
2.6 Using Calendar 34
2.7 Using Notes 41
2.8 Using Tasks 49
Charter 3. Phone Features 55
3.1 Using the Phone 56
3.2 Making a Call 58
3.3 In-Call options 63
3.4 SIM Manager 67
Chapter 4. Synchronizing Information 69
4.1 Installing and setting up ActiveSync 70
4.2 Synchronizing Information 71
4.3 Changing Settings for an Information Type 73
4.4 Synchronizing with Exchange Server 73
4.5 Synchronizing via Bluetooth 74
Chapter 5. Bluetooth Connections 77
5.1 Overview of Bluetooth 78
5.2 Bluetooth Partnership (Bonding) 81
5.3 Beaming Information (Bluetooth) 84
Chapter 6. Transferring Files To and From Your Device 87
6.1 Using ActiveSync 88
6.2 Transferring from Memory Cards 89
6.3 Using Bluetooth 90
6.4 Transferring to a PC or Other Devices 90
Chapter 7. Connecting to the Internet 91
7.1 Setting up Internet connections 92
7.2 Using Internet Explorer Mobile 97
7.3 Using Wireless Manager 101
7.4 Using Wi-Fi Connection 103
Page 3

4
5
Chapter 8. Messaging & Contacts 105
8.1 Text Messaging 106
8.2 E-mail 108
8.3 Changing Messaging Account Options 112
8.4 Using Contacts 112
CAUTION: This information is subject to change without prior notice.
Copyright © 2007 Opticon. All Rights Reserved.
This manual may not, in whole or in part, be copied, photocopied, reproduced, translated or
converted to any electronic or machine readable form without prior written consent of Opticon.
Chapter 9. Using Barcode Reader 117
9.1 Setting Barcode Reader 118
9.2 Scanning and Reading Barcode labels 129
Chapter 10. Other Applications 131
10.1 Word Mobile 132
10.2 Excel Mobile 134
10.3 PowerPoint Mobile 136
10.4 Pocket MSN Messenger 137
10.5 Backup/Recover 140
10.6 Managing Memory 143
Appendix 145
A.1 Regulatory Notices 146
A.2 PC Requirement to Run ActiveSync 4.5 151
A.3 Specifications 152
Warranty
Unless otherwise agreed in a written contract, all Opticon products are warranted against defects in
materials and workmanship for two years after purchase. Opticon will repair or, at its option, replace
products that are defective in materials or workmanship with proper use during the warranty period.
Opticon is not liable for damages caused by modifications made by a customer. In such cases,
standard repair charges will apply. If a product is returned under warranty and no defect is found,
standard repair charges will apply. Opticon assumes no liability for any direct, indirect, consequential
or incidental damages arising out of use or inability to use both the hardware and software, even if
Opticon has been informed about the possibility of such damages.
Packaging
The packing materials are recyclable. We recommend that you save all packing material to use if you
need to transport your scanner or send it for service. Damage caused by improper packaging during
shipment is not covered by the warranty.
IMPORTANT SAFETY INFORMATION
Please read the following information carefully before you start using this Opticon device to avoid any
damages caused by improper usage:
Page 4
6
7
•The device is not charged when you take it out of the box. The battery should
be charged for at least 8 hours before first use. Do not remove the battery while
charging.
•Do not use batteries, which have not been specified by the manufacturer, as this may
cause leakage or rupture.
•Do not charge the battery with an unspecified AC Adapter, as this may cause damage
to both the device and the battery.
•When discarding the batteries, dispose of them in a proper manner, according to the
battery manufacturer’s instructions and your local laws.
•Power off the device and remove the battery before inserting SIM card. Make sure the
SIM card snaps correctly into the SIM socket.
• Do not open the device housing or tamper with the device, as it will void your
warranty.
•Do not apply excessive force on this product, as it may cause damage to the screen
or the internal component.
•Do not use the device at gas or refueling stations, chemical plants, and places
containing explosives or flammable materials. Observe local guidelines.
•Use only manufacturer specified stylus. Do not scratch the screen with sharp objects.
•Do not clean the screen with chemical detergents. Only use cloths, specifically
designed for cleaning liquid displays, or a soft cloth moisturized with water drops, to
wipe the device screen.
•Do not expose the devic e to direct s unlight, or leave the devic e in a humid
environment, for extended periods of time, as this may cause damage to the device
and battery.
•Do not immerse the device in water.
•The device may interfere with the navigation and/or communication systems on
aircraft. The use of the device on aircraft is prohibited by laws in most countries.
Observe local guidelines.
•This product may cause medical equipment to malfunction. The use of this device is
forbidden in most hospitals and medical clinics. Observe local guidelines.
•Use hands-free devices, if you need to use the telephony services, while driving a
vehicle. Observe local guidelines.
Safety of Laser Products
International Standards (Japan/EU/USA) Laser Class 1
Precautions about the Laser Device
This product using laser complies with JIS C6802: 2005 Class 1, IEC60825-1+A2: 2001 Class 1
and 21CFR 1040.10 and 1040.11 except for deviations pursuant to Laser Notice No.50, dated July
26, 2001.
Class 1 Laser devices are not considered to be hazardous when used for their intended purpose.
Use of controls, adjustment of procedures other than those specified herein may result in hazardous
laser light exposure.
The user should not view directly into the light beam with optical instruments, it may pose an eye
hazard.
Page 5

Information for the User
• Legible reproductions (colour optional) of all required labels and hazard warnings to
be affixed to the laser product or provided with the laser product.
• The corresponding position of each label affixed to the product.
• A clear indication in the manual of all location of laser apertures.
• Labels for panels (If it is applicable).
• Labels for safety interlocked panels (If it is applicable).
Chapter 1.
Knowing Your Device
Trademarks
Trademarks used are the property of their respective owners.
Opticon is a registered trademark. Microsoft, MS -DOS, Windows, Windows NT, Windows Server,
Windows Mobile, ActiveSync, Excel, Internet Explorer, MSN, Outlook, PowerPoint, and Word are
either registered trademarks or trademarks of Microsoft Corporation in the United States and/or other
countries.
8
1.1 Introduction
1.2 Accessories
1.3 Install SIM Card and Battery
1.4 Battery Information
1.5 Mini-SD Cards
Page 6
10
Chapter 1. Knowing Your Device
11
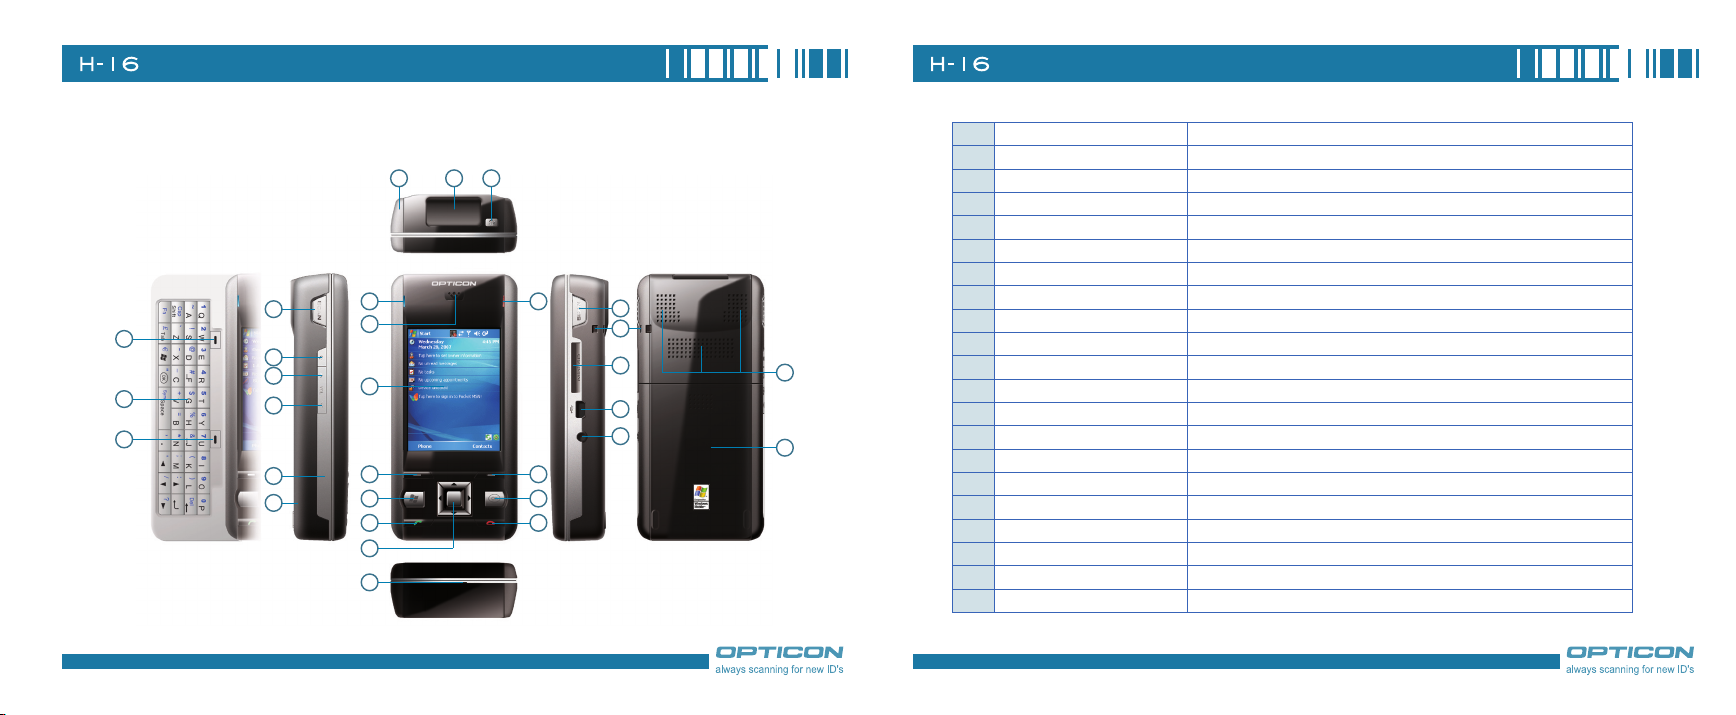
1.1 Introduction
Views of the Device
1
2
3
1 Soft key 1
2 QWERTY keyboard
10
12
11
3 Soft key 2
4 Scan key (Left)
5 Record key
6 Volume up
7 Volume down
4
5
6
7
8
9
13 15
14
16
17
19
21
22
24
18
20
23
25
26
27
28
29
30
31
8 RESET button
9 Eyelet for wrist strap(Left)
10 Stylus
11 Scanner
12 Power button
13 Wi-Fi/Bluetooth LED
14 Telephone receiver
15 GSM/Battery LED
16 Display
17 Soft key 3
18 Soft key 4
19 Start key
20 OK key
21 Talk key
Performs the command shown in the label above the button
A hardware keyboard similar to a standard one on your PC
Performs the command shown in the label above the button
Press the key to scan and decode bar code/2D code
Press and hold this key to record a voice note
Press the Volume up button to turn up the PDA receiver volume
Press the Volume down button to turn down the PDA receiver volume
Press the RESET button with stylus to soft-reset your device
Fix a wrist strap here
Write, draw, or make selection on the touch screen
Point the reading window of the scanner in the direction of bar code/ 2D code
Power on or off the device
Indicates Wi-Fi/Bluetooth Status
Listen to a phone call here
Indicates GSM/Battery LED
2.8-inch TFT LCD with touch screen
Performs the command shown in the label above the button
Performs the command shown in the label above the button
Pull down the Start menu
Press OK key to make a selection
Press this key to dial or answer a call
Page 7

12
Chapter 1. Knowing Your Device
13
22 5-way navigation key
23 End key
24 Microphone
25 Scan key(Right)
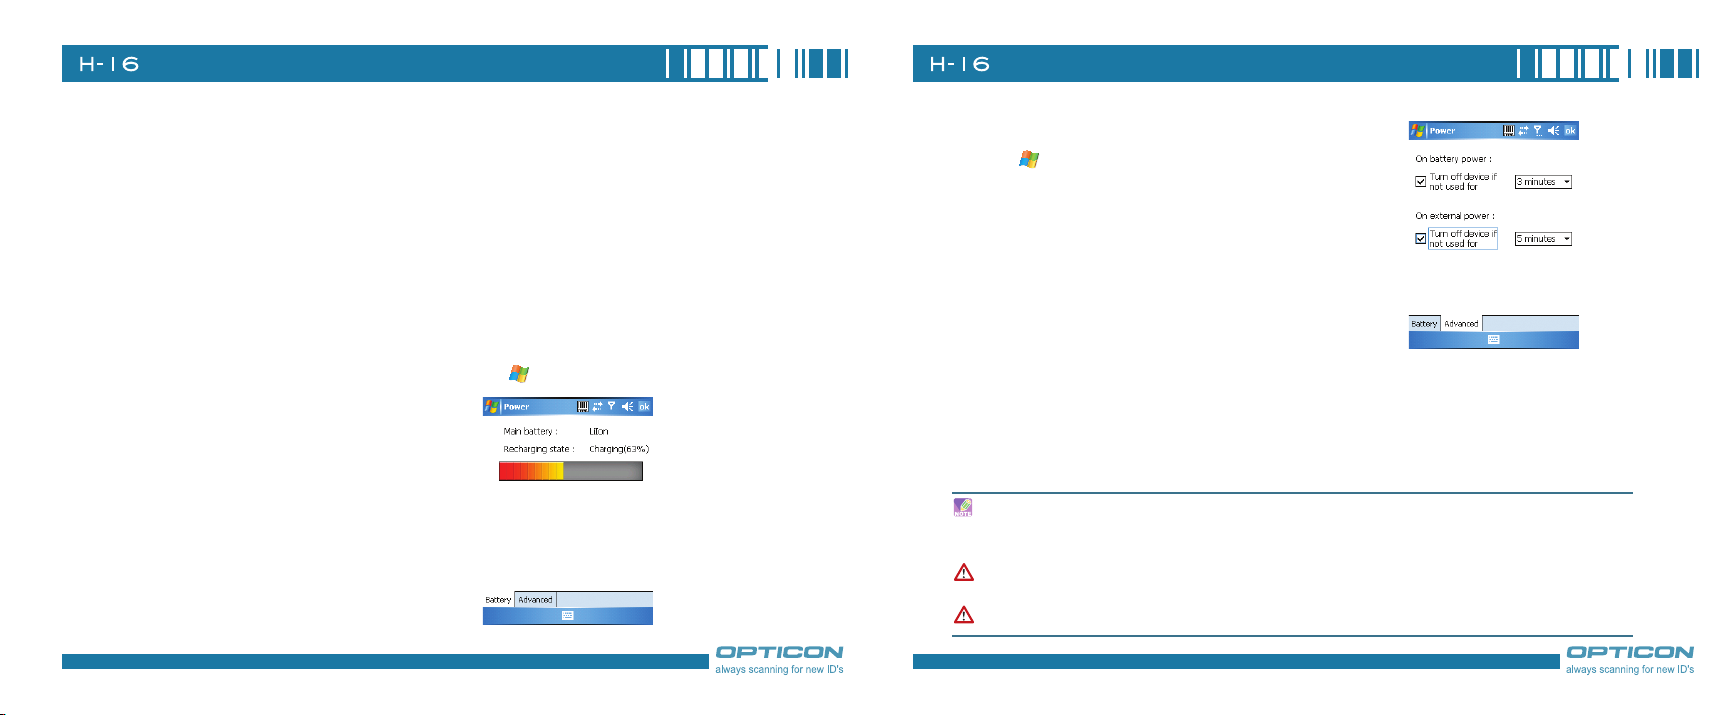
26 Eyelet for wrist strap(Right)
27 Mini-SD card slot
28 Mini USB connector
29 Earphone Jack
30 Speaker
31 Battery pack
Be sure to save all data in your device and then press the POWER button to switch your device off
before resetting the device or replacing the battery.
Press and hold the POWER button longer than 10 seconds immediately after pressing the RESET
button, this will implement factory reset and clean up all contents on DiskOnChip as well.
Press this button up, down, left, or right to move through menus; carry out the selec-
tion by pressing the center button
End a call or close phone application
Speak into the microphone when talking on the phone or recording a voice note
Press the key to scan and decode bar code/ 2D code
Fix a wrist strap here
Insert a mini-SD card to expand device memory
Mini USB connector for PC sync and battery charging
Connect a 2.5 mm Earphone
Listen to audio media or listen to a phone call hands-free
Remove to place battery and SIM card
The Stylus
•Use the stylus to tap a selection, to drag-and-drop an item, to write, or to draw on the touch
screen.
•Tap and hold the stylus on the screen, icon is displayed and then a pop-up submenu is
displayed.
Notification LEDs
The device has 2 notification LEDs: the left is Wi-Fi/Bluetooth LED and the right is GSM/Battery LED.
Bluetooth/Wi-Fi LED tells you about the device’s Bluetooth/Wi-Fi status:
Color Bluetooth on Wi-Fi on
Green Off Blink
Blue Blink Off
Green and blue blink alternately while both Bluetooth and Wi-Fi are on.
GSM/Battery LED lets you know that you have unanswered calls or tells you about the device’s
GSM/battery status:
Color
Missed Call/
Low Power
GSM on
(battery full)
GSM on
(battery low)
Charging
Red Blink Off Blink Off
Orange Off Off Off Constantly on
Green Off Blink Off Off
Page 8
14
Chapter 1. Knowing Your Device
15
Quick GuideQuick Guide
ManualManual
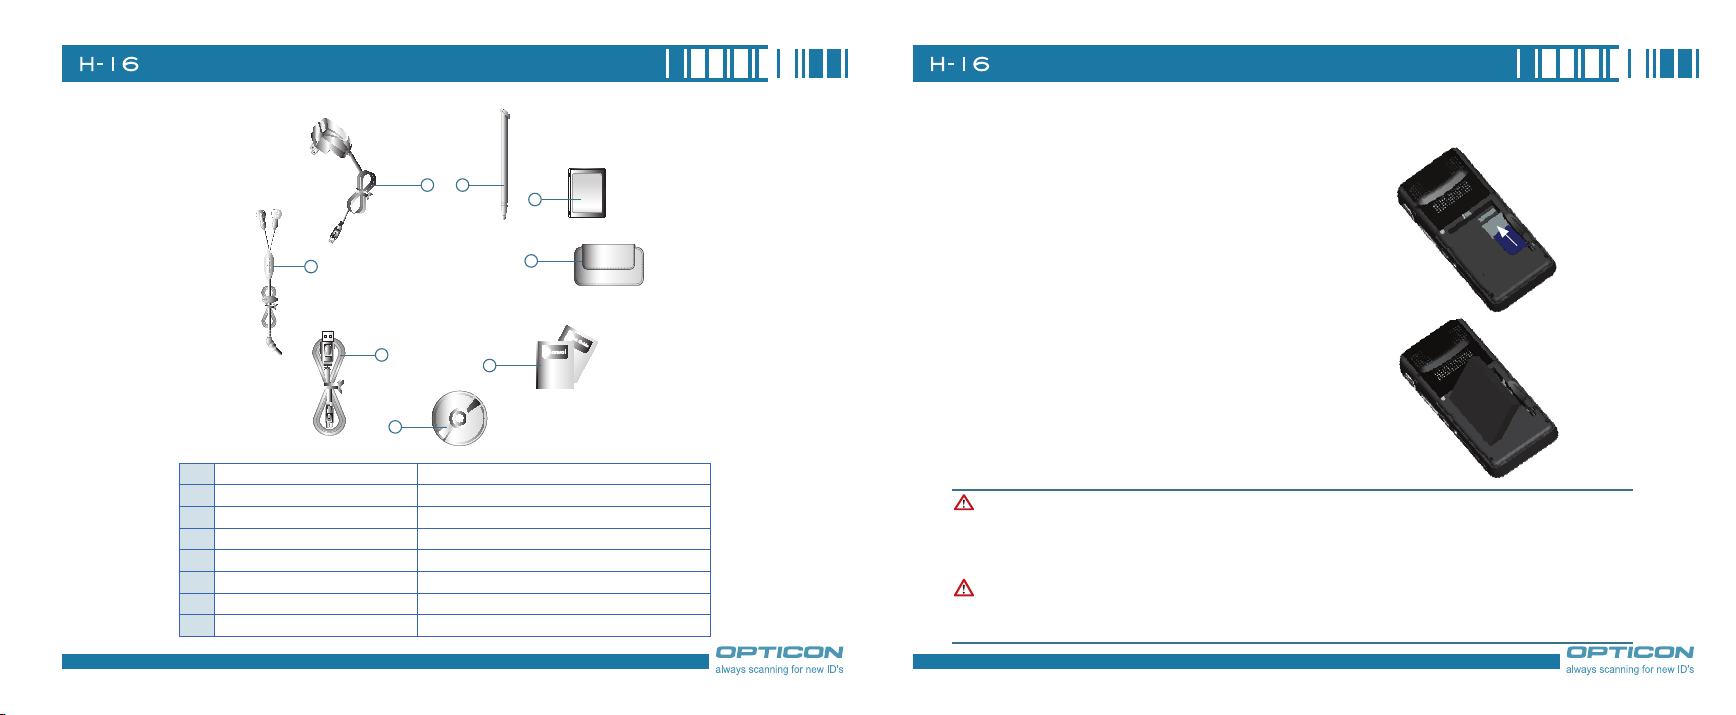
1.2 Accessories
a AC Adapter
b Stereo Headset
c USB Cable
d Getting Started CD
e User Manual/Quick Guide
f Pouch
g Battery
h Stylus
1.3 Install SIM Card and Battery
Installing the SIM Card
a
h
b
c
d
Recharge the device battery
Listen to a phone conversation hands-free
Connect the device to a PC
Windows Mobile
Provide instructions of device functions
Protect the device
Rechargeable Li-ion polymer battery
Write, draw, or make selection on the touch screen
g
f
e
TM
Getting Started Disc
If you want to use phone features, you must install
a GSM SIM card.
•Push the back cover down and slide it open.
•Place the SIM card in the SIM card slot with the
gold contacts facing down. The SIM card’s cutoff corner should match the cut-off corner in the
SIM card slot.
Installing the Battery
•Place the battery in position by pressing it’s
protrusions on the side of the battery against the
sockets inside the battery slot.
•Press the battery down into the battery slot and
close the back cover.
The device contains a rechargeable Li-ion polymer battery completely discharged and should be
charged for at least 8 hours before first use. Use only manufacturer-specified original batteries.
Damages caused by using batteries not specified by manufacturer are not covered under warranty.
Please follow normal power off procedure to remove the battery or reboot the device, otherwise
unsaved data may be lost. For information of power off procedures, see “Chapter 2.1 Powering
On/Off the Device”.
Page 9
16
Chapter 1. Knowing Your Device
17
1.4 Battery Information
Battery performance depends on many factors, including your wireless service provider’s network
configuration, signal strength, the temperature of the environment in which you operate your phone,
the features and/or settings you select and use, items attached to your phone’s connecting ports, and
your voice, data, and other program usage patterns.
Battery life estimates (approximations):
•Talk time: 4 hours
•Standby time: 150-200 hours
Reducing Risk of Fire or Burns
•Do not attempt to open, disassemble, or
service the battery pack.
•Do not crush, puncture, short the external
contacts, or dispose of in fire or water.
•Do not expose to temperatures above 60˚C
(140˚F).
•Replace only with the battery pack designated
for this product.
•R e c y c l e or dispose of used batter y as
stipulated by local regulation.
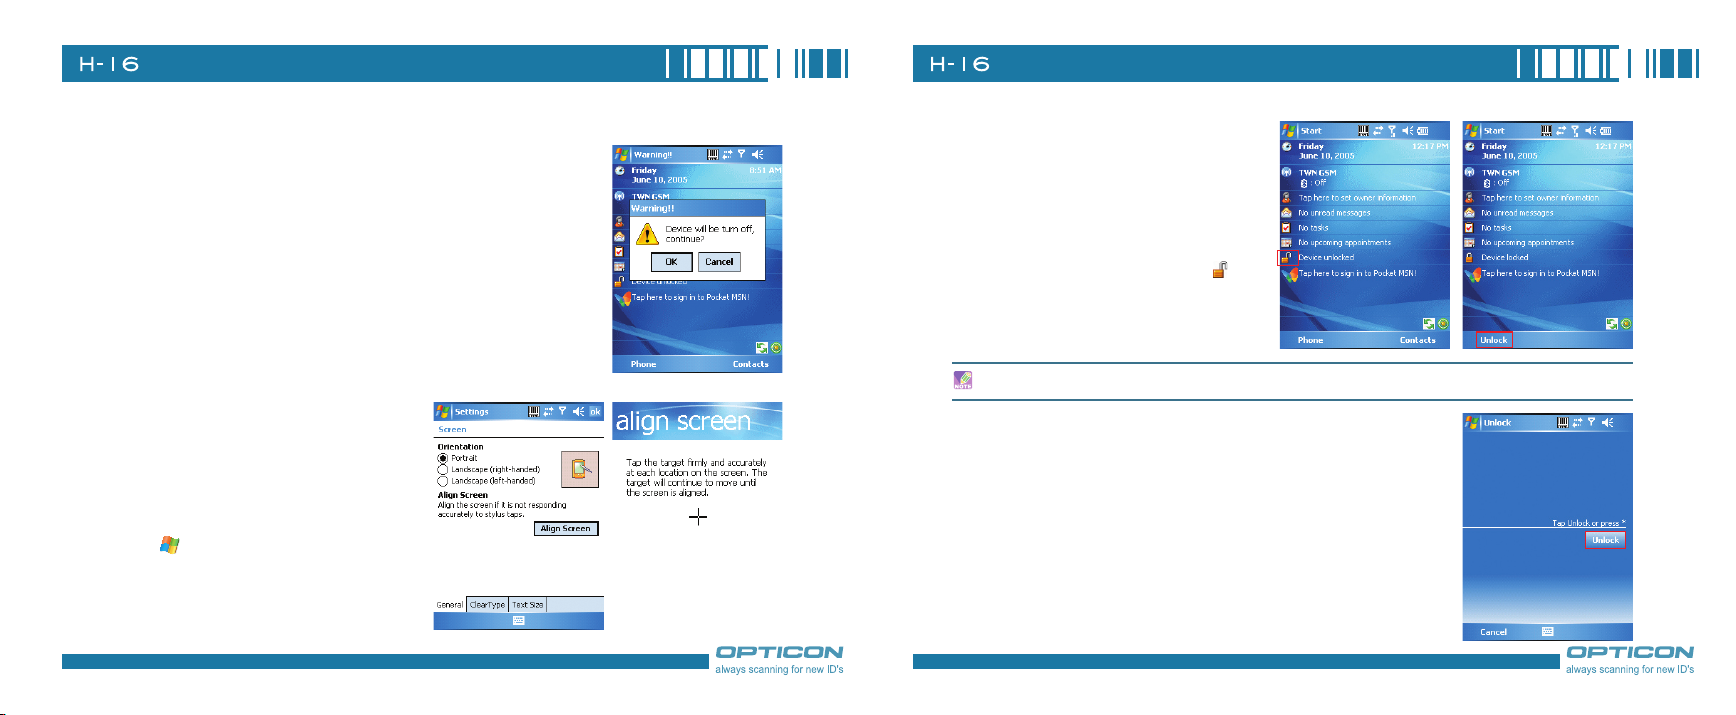
Checking the Battery Power
•Tap > Settings > System tab > Power.
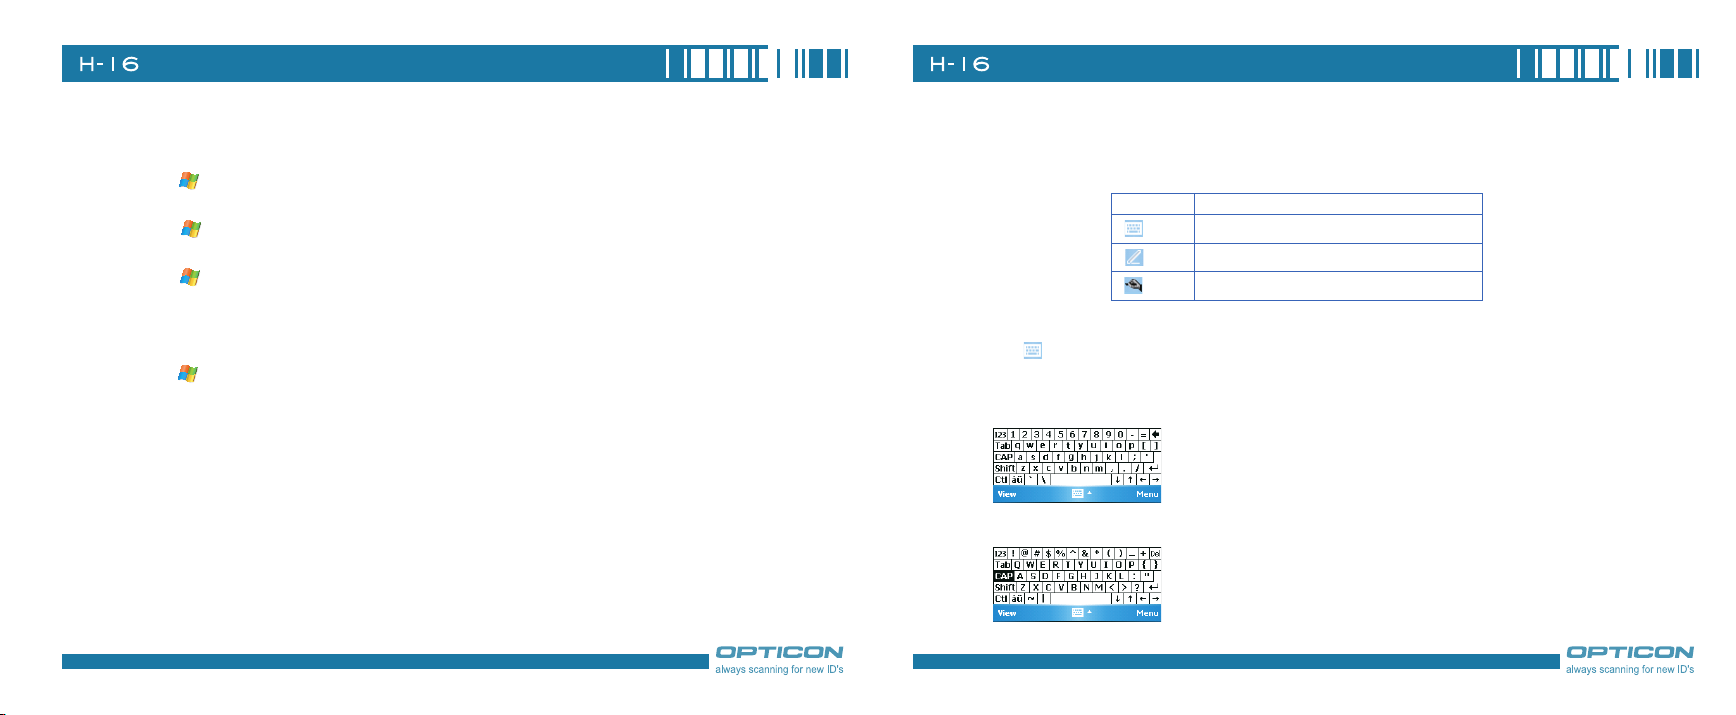
Optimizing the Power Performance
•Tap > Settings > System tab > Power > Advanced,
and adjust the time for turning off the device if it is not in use.
Managing a Low Battery
When the low-battery warning appears, do the following:
1. Immediately save your current data.
2. Start charging the battery or turn off your phone.
Charging the Battery
1. To charge the battery, place the battery into the battery slot correctly. See previous section for
how to install the battery.
2. Do one of the following:
•Connect the device with the AC adapter and plug the AC adapter into a power outlet.
•Connect the device to a PC with the USB cable.
To charge the device with the USB cable, you must connect the device to a functioning USB port
on a PC that is powered on.
Do not operate your device to temperatures above 40˚C (72˚F) while charging the battery.
Do not leave the battery in a place above 60˚C (140˚F).
Page 10

18
Chapter 1. Knowing Your Device
1.5 Mini-SD Cards
Mini-SD is one of the most popular formats for mobile devices. Your device contains a mini-SD card
slot in which you can expand the device’s memory up to 2GB. Mini-SD provides functions such as
built-in security for copyrighted content along with great performance for storing music, video, and
photographs. Please note that mini HCSD (High Capacity SD) is not supported by this device.
Inserting a Mini-SD Card into the Device
Insert the mini SD card with the logo side down and push into place until it clicks down and is
held in place.
Mini-SD cards can only be inserted in one direction. Inserting the card in the wrong direction by
force can cause damage to the card and the card slot.
Removing a Mini-SD Card from the Device
1. Gently press the mini-SD card inward (you may feel some resistance) and the card will eject
itself.
2. Take out the mini-SD card from the card slot by hand.
Chapter 2.
Basic Operations
2.1 Getting Started
2.2 Input Methods
2.3 Today Screen Components
2.4 The Start Menu
2.5 Settings
2.6 Using Calendar
2.7 Using Notes
2.8 Using Tasks
Page 11
20
Chapter 2. Basic Operations
21
2.1 Getting Started
Powering On/Off the Device
Press the POWER button to turn on the device. The POWER button
is located on the top side of the device. When you power on the
device for the first time, you are asked to calibrate the device.
Please refer to the “Calibrating your device” section in this chapter
for calibration steps. Press the POWER button again to switch
the device to sleep mode. You can still receive phone calls and
messages when the device is operating on sleep mode. To power
off the device completely, press and hold the POWER button for 3
seconds and the system will prompt you to power off the device.
Calibrating Your Device
Calibrating the device ensures the tapped
item is activated. To calibrate your device,
tap the center of the cross with the stylus
as the cross moves around the screen. If
you would like to re-calibrate the device,
follow the steps below:
1. Tap > Setti ngs > S yste m ta b >
Screen.
2. Tap the
Align Screen button and follow the
on-screen instructions.
Locking/Unlocking the Device
Locking the device turns off keyboard and
touch screen functionality. This is a helpful
feature if, for example, the device is turned
on and in your pocket, and you want to
prevent accidental key presses.
•To lock the device, tap on the icon
on the Today Screen. Once the device is
locked, the left soft key label changes to
Unlock.
You can still receive calls and make emergency calls when the keypad is locked.
To unlock the device, tap the Unlock button on the Today screen first,
a screen as below will show. Press the “Fn” key and * to unlock the
device, or just tap the Unlock button on the screen.
Page 12
22
Chapter 2. Basic Operations
23
Setting Buttons
To change functions for specific buttons in your device, do either of the following:
1. Tap > Settings > Buttons > Program Buttons tab. Select a button (Record, Start or OK
key) and assign a new program to replace the default one.
2. Tap
3. Tap
Changing the Backlight Settings
1. Tap > Settings > System tab > Backlight.
2. You can customize the following settings:
> Settings > Buttons > Up/Down Control tab. Drag the slider on the screen to
customize the way your Up/Down control repeats.
> Settings > Buttons > Buttons Lock tab. Choose to lock all buttons or not when
your device is in sleep mode.
•Backlight settings while your device is using battery power.
•Backlight settings while your device is using external power.
•Brightness of backlight.
2.2 Input Methods
The device contains 4 different input methods: Keyboard, Letter Recognizer, Block Recognizer, and
Transcriber.
Icon Input Method
Keyboard
Letter/Block Recognizer
Transcriber
Keyboard
•Tap to launch the on-screen keyboard. If on-screen Keyboard is not the selected input
method, tap the input method selector arrow (the upward arrow next to the input method icon)
and select Keyboard.
•To enter text, tap the keys on the on-screen keyboard.
•Tap the CAP key on the on-screen keyboard to enter capital letters and/or symbols.
Page 13
24
Chapter 2. Basic Operations
25
Letter Recognizer
Letter Recognizer recognizes one letter, number, or symbol at a time.
•To launch Letter Recognizer, tap the input method selector arrow (the upward arrow next to the
input method icon) and select Letter Recognizer.
•Write uppercase letters in the left recognition area (the ABC box).
•Write lowercase letters in the middle recognition area (the abc box).
•Write numbers and symbols in the right recognition area (the 123 box).
Block Recognizer
Block Recognizer recognizes letters written in one stroke.
•To launch Block Recognizer, tap the input method selector arrow (the upward arrow next to the
input method icon) and select Block Recognizer.
•Write lowercase letters in the text recognition area (the abc box).
•Write numbers and symbols in the numeric recognition area (the 123 box).
•To input symbols, tap any recognition area, text or numeric, once and write symbols.
Tap in Letter or Block Recognizer to see a demo on how to write recognizable characters.
Transcriber
Transcriber recognizes handwritings in cursive and/or print. It uses the full screen as its recognition
area. It interprets the movement of the stylus on the screen as you write.
•To launch Transcriber, tap the input method selector arrow (the upward arrow next to the input
method icon) and select Transcriber.
•Write anywhere on the screen.
The Transcriber comes with a detailed help. Tap if you need further assistance.
Hardware Keyboard
Besides the on-screen keyboard, this device is equipped with a QWERTY keyboard. Please slide
the main screen to the right to reveal it.
Page 14
26
Chapter 2. Basic Operations
27
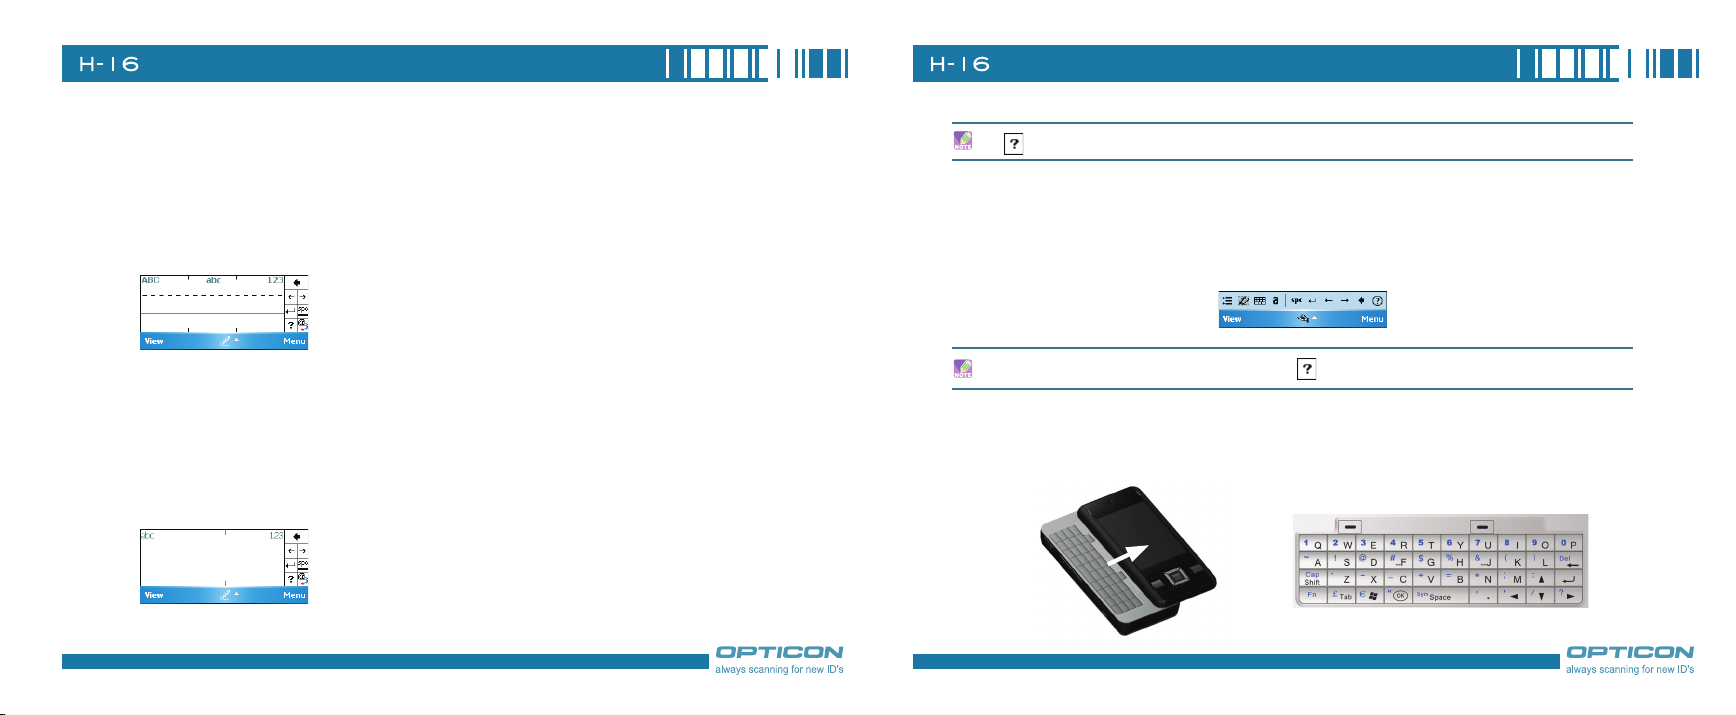
To enter capital letters/numbers, or to delete/back by using the hardware keyboard:
The “Fn” key is used to access the symbols in blue on the keypad. Press this key once and the icon ap-
pears; the next character you enter will be a symbol or number (for example: @abc). Press the “Fn” key twice
can enter numbers and symbols constantly (for example: $25). You can also hold down the “Fn” key and press
another key at the same time to enter its corresponding symbol.
Press this key once, the next character you enter will be a capital letter (for example: Abc). Hold down this key
and press another key at the same time to enter capital letters constantly. Alternatively, you can press the “Fn”
key once and then press this key ( appears) to enter capital letters constantly. For returning to enter lower-
case letters, press the “Fn” key and then the “Cap” key.
Press this key to erase the letter in the left side of the cursor. Press the “Fn” key once ( appears) then press
this key to delete the first letter in the right side of the cursor. To disable the “Fn” key, press it again ( will
disappear).
You can press this key to enter symbols or special characters such as accented letters (e.g. à, é…etc.). After
pressing a character, press the “Fn” key and then the “Sym” key once to show an accent type of this character.
To show another accent type, repeat the same steps until the desired type is displayed.
Corresponding symbols for each character/key
a
à á â ä å æ ã ą ă
A
À Á Â Ä Å Æ Ã Ą Ă
c
ç ć ĉ ©
C
Ç Ć Ĉ ©
d
ð
D
Đ
e
è é ê ë ę
E
È É Ê Ë Ę
i
ì í î ï ĩ ij
I
Ì Í Î Ï Ĩ IJ
l
ł
L
Ł
n
ñ
N
Ñ
o
ò ó ô õ ö ő ø œ
O
Ò Ó Ô Õ Ö Ő Ø Œ
p
þ ¶
P
Þ ¶
r
®
R
®
s
ß ş š
S
ß Ş Š
t
ţ
T
Ţ
u
U
y
Y
z
Z
0
1
2
3
4
8
$
/
”
(
)
+
!
.
@
%
=
ù ú û ü ű ũµ
Ù Ú Û Ü Ű Ũµ
ý
Ý
ź ż
Ź Ż
º
¹
² ½
³
¼ ¾
⅛ ⅜ ⅝ ⅞
€ £ ¥ ¢ ¤
\ |
‘ ’
[ { < ≤ «
] } > ≥ »
± & - _
¡ ? ¿
• ÷
~
^ ° ‰ §
≠ ≈
Page 15
28
Chapter 2. Basic Operations
29
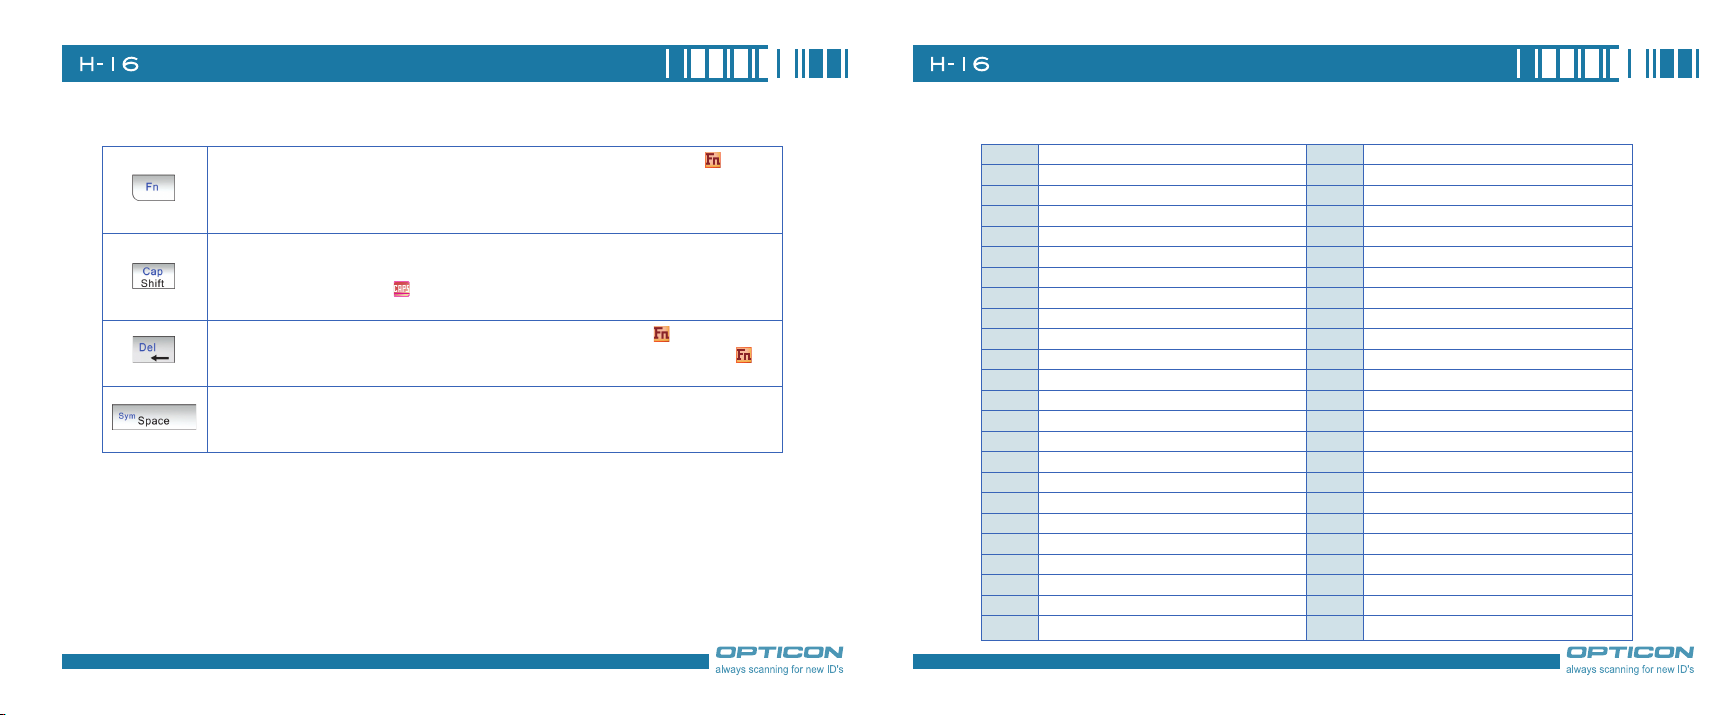
2.3 Today Screen Components
Today Screen
The Today Screen is usually the first screen
that appears when you turn on the device for
the first time each day. It displays a summary
of information for the day, shows you the
system status and contains a list of shortcuts
to programs. The Today screen looks like this:
1
2
3
4
5
6
7
8
You can also access the Today screen by selecting Today from the Start menu.
To change the items showed in the Today screen, tap > Settings > Today > Items tab.
Date and time
Wireless status (GSM, Wi-Fi, and Bluetooth)
Owner information
Unread messages including text messages, MMS messages, and e-mails
Active tasks
Upcoming appointments
Device lock status
Sign in to Pocket MSN
Tap here to rotate the
screen
Tap here to trigger the
Wireless Manager
Icon Indicators
Status indicators appear at the top of the screen and on the Today screen. The following table lists
common status indicators and their meanings
New e-mail or text message (SMS) Connection is not active
New voice mail Synchronization in progress
New instant message Ringer on
Voice call Ringer off
Voice call in progress Roaming
Data call in progress No Voice mail
Calls are forwarded Voice mail Lines 1
Call on hold Call Forwarding Lines 1
Missed call Alarm
Battery level 1 GPRS available
Battery level 2 GRPS in use
Low battery No SIM card installed
Extremely low battery Wi-Fi connection in progress
Battery charging Ringer in vibration mode
Signal strength Function key on
Bluetooth bonding in progress Synchronization error
No signal Barcode reader off
Flight mode Barcode reader on
No service PC Connection is active
Page 16
30
Chapter 2. Basic Operations
31
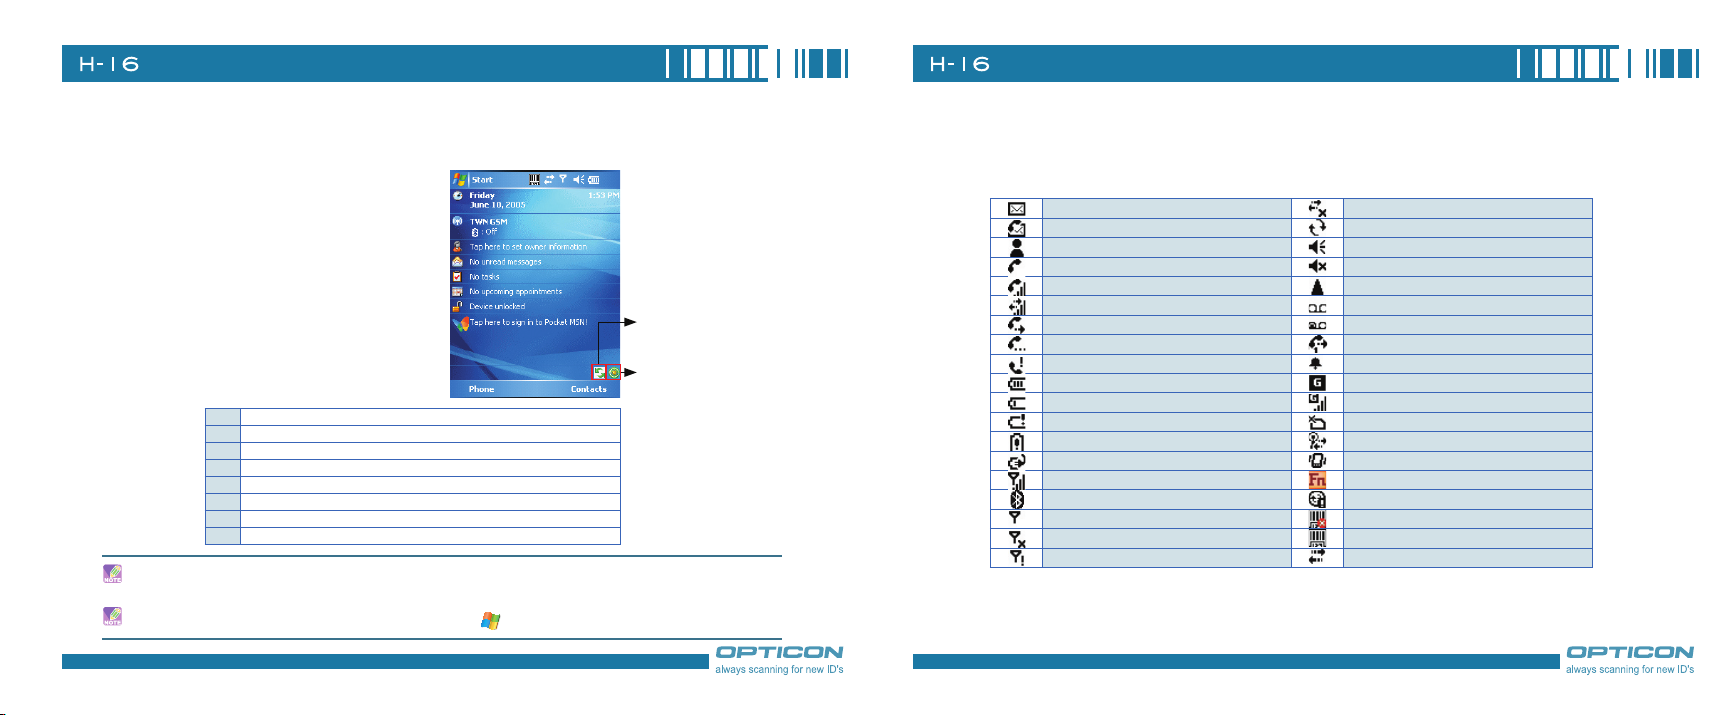
2.4 The Start Menu
The Start menu is divided into 3 groups as described in the following:
1
2
3
Commonly used items
1
Recently accessed applications
2
List of all programs, device settings, and system help
3
List of All Programs
The following table lists icons of programs that are already installed on your device.
Windows Mobile comes with 2 games: Bubble Breaker and Solitaire.
Synchronizes information between your device and a PC. See “Chapter 4. Synchronizing
Information” for details.
Games
ActiveSync
Backup Manager
Calculator
Download Agent
Excel Mobile
File Explorer
Internet Sharing
Notes
Pictures & Video
Pocket MSN
PowerPoint Mobile
Search
SIM Manager
Tasks
Te rm in al Se rv ic es
Client
Word Mobile
Lets you backup and recover your date. See “10.5 Backup/Recover” for details.
Performs basic arithmetic and calculations such as addition, subtraction, multiplication,
and division.
Lets you download Windows Mobile updates.
See “10.2 Excel Mobile” for details.
Lets you organize and manage the files on your device.
Lets you use your device as an external modem for a PC, connecting through an USB
port and Bluetooth.
See “2.7 Notes” for details.
Collects, organizes, and sorts picture and video files in the My Pictures folder on your
device or on a storage card.
Lets you send and receive instant messages with your MSN Messenger contacts.
See “10.3 PowerPoint Mobile” for details.
Searches the data stored in your device.
Lets you manager your SIM card. See “3.4 SIM Manager” for details.
Keeps track of your tasks. See “2.8 Using Tasks” for details.
Allows you to log on to a PC running Terminal Services or Remote Desktop.
See “10.1 Word Mobile” for details.
Page 17
32
Chapter 2. Basic Operations
33
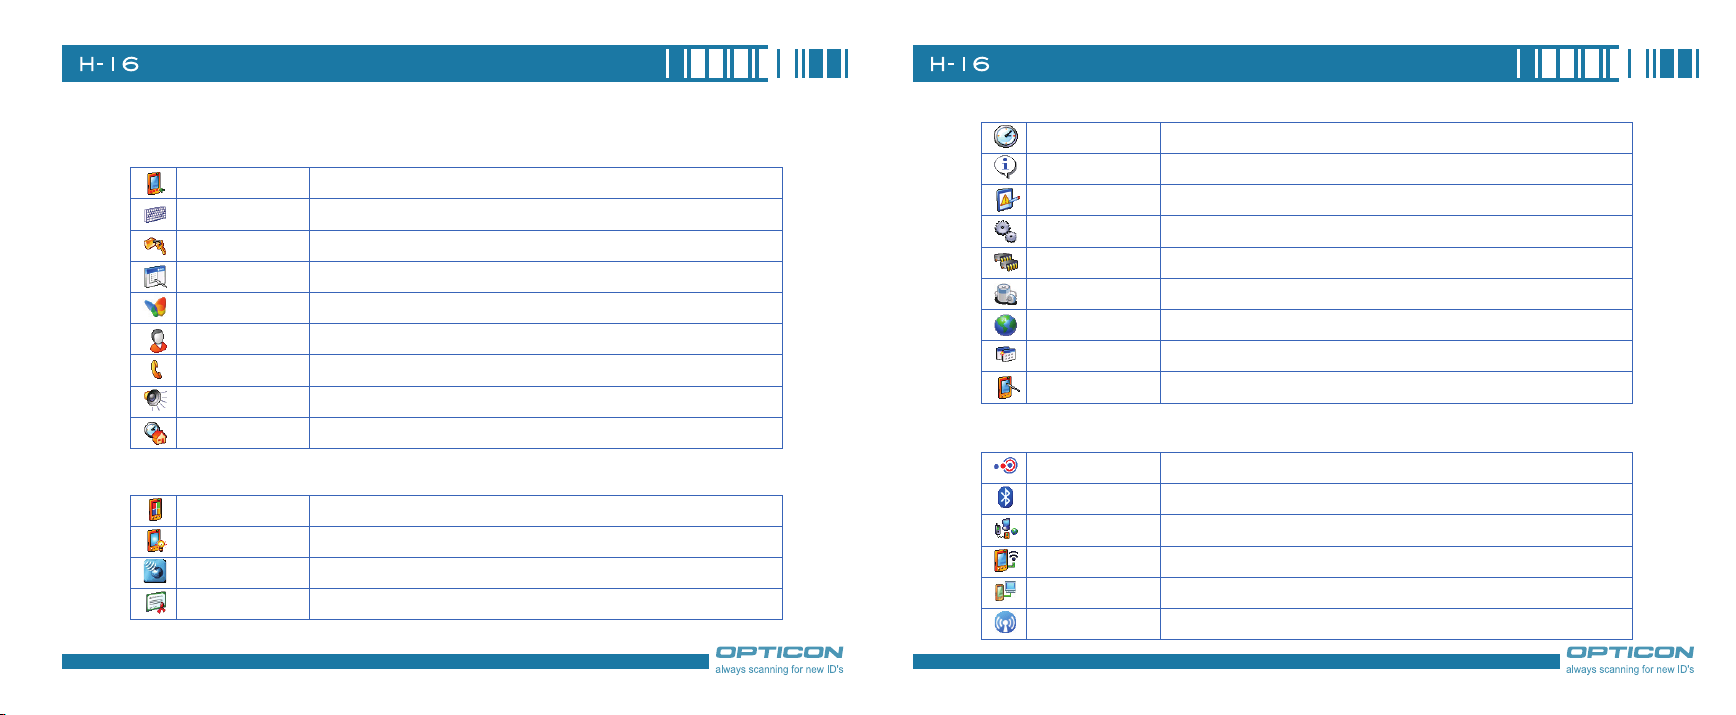
2.5 Settings
Personal
System
Buttons Configures the device’s buttons.
Input
Lock Set a password to unlock the device.
Menus Configure the Start menu.
MSN Options Configure MSN services.
Owner Information Enter information about the owner of the device.
Phone Configure the Phone features. See “Chapter 3 Phone Features” for details.
Sounds &
Notifications
Today Configure the Today screen items and theme.
About Windows Mobile information and device name.
Backlight Configures the display backlight.
Barcode Settings Change settings of barcode scanner.
Certificates Manages personal and root certificates.
Input method configurations.
Configure program and event sounds.
Clock & Alarms Sets time and alarms.
Device Info Display the device software and hardware version.
Error Reporting Enable or disable Microsoft product error reporting.
Factory Reset Lets you reset all settings to manufacturer default.
Memory Memory and process management.
Power Power management settings.
Regional Settings Configure the device’s locale.
Remove Programs Remove an installed application.
Screen Lets you align the screen. See “Calibrating Your Device” of Chapter 2 for details.
Connections
Beam Turn on/off the beam feature.
Bluetooth Configure Bluetooth settings. See “Chapter 5 Bluetooth Connections” for detail.
Connections Configure the device’s connections.
Network Cards Configure Network adapter.
USB to PC Enable/Disable advanced network functionality.
Wireless Manager Turn on/off wireless and phone features with the Wireless Manager.
Page 18
34
Chapter 2. Basic Operations
35
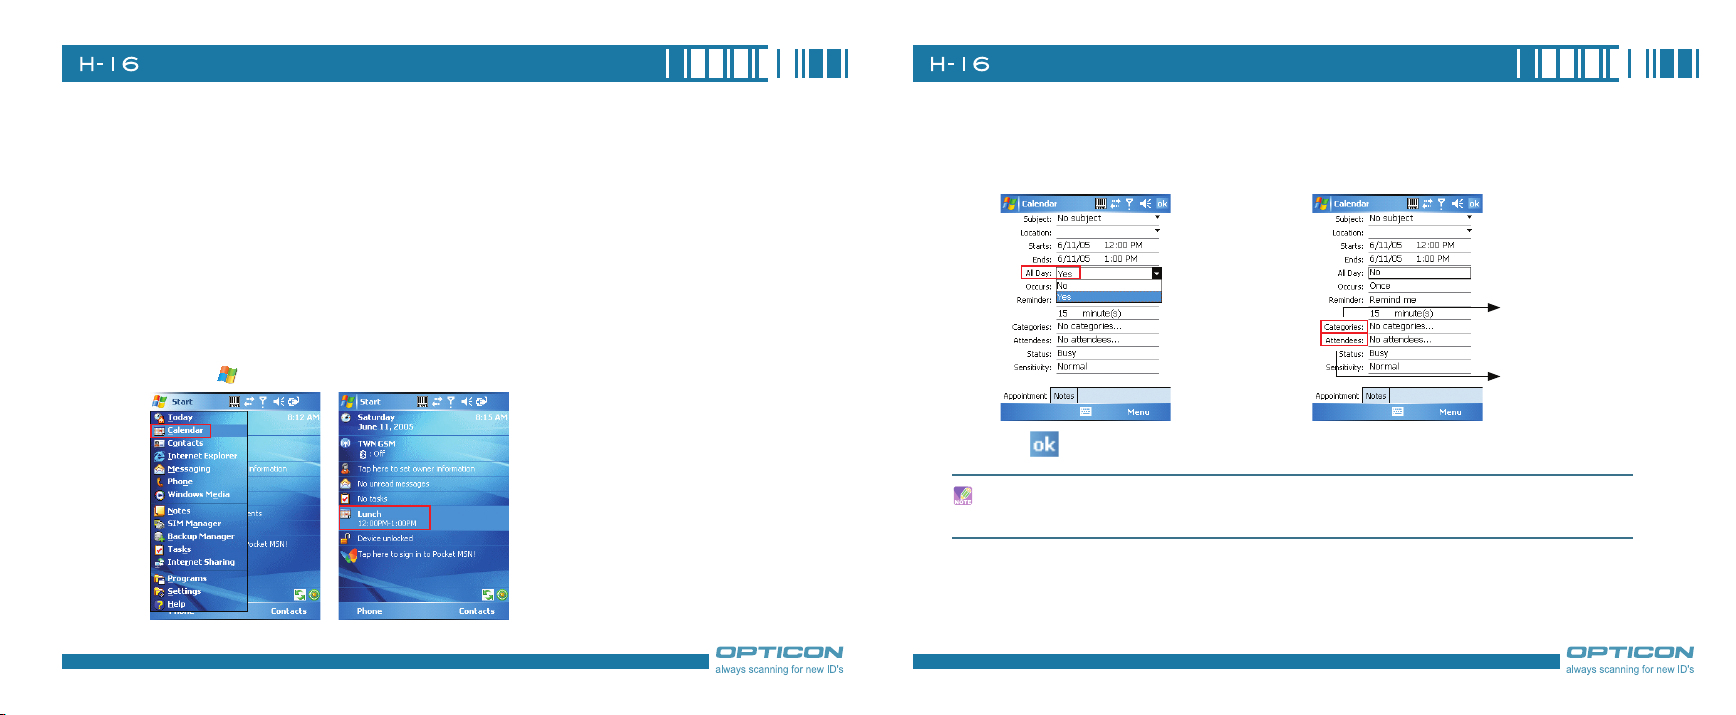
2.6 Using Calendar
Use Calendar to schedule appointments, including meetings and other events. Your appointments for
the day can be displayed on the Today screen. If you use Outlook on your PC, you can synchronize
appointments between your device and PC. You can also set Calendar to remind you of appointments
with a sound or flashing light, for example.
You can look at your appointments in several different views (Day, Week, Month, Year and Agenda).
To see detailed appointment information in any view, tap the appointment. For information about
changing the Calendar view, see Change views in Calendar.
Scheduling an Appointment
1. Either tap >Calendar or tap the appointment reminder on the Today Screen.
2. Tap Menu > New Appointment. 3. Enter information about the appointment.
4. To schedule an all-day event, 5. Select categories and attendees.
under All Day, select Yes.
Categories:
Business,Holiday,
Personal, Seasonal.
Add attendees
to the meeting.
6. Tap
.
All-day events do not occupy blocks of time in Calendar; instead, they appear in banners at the
top of the calendar.
Page 19
36
Chapter 2. Basic Operations
37
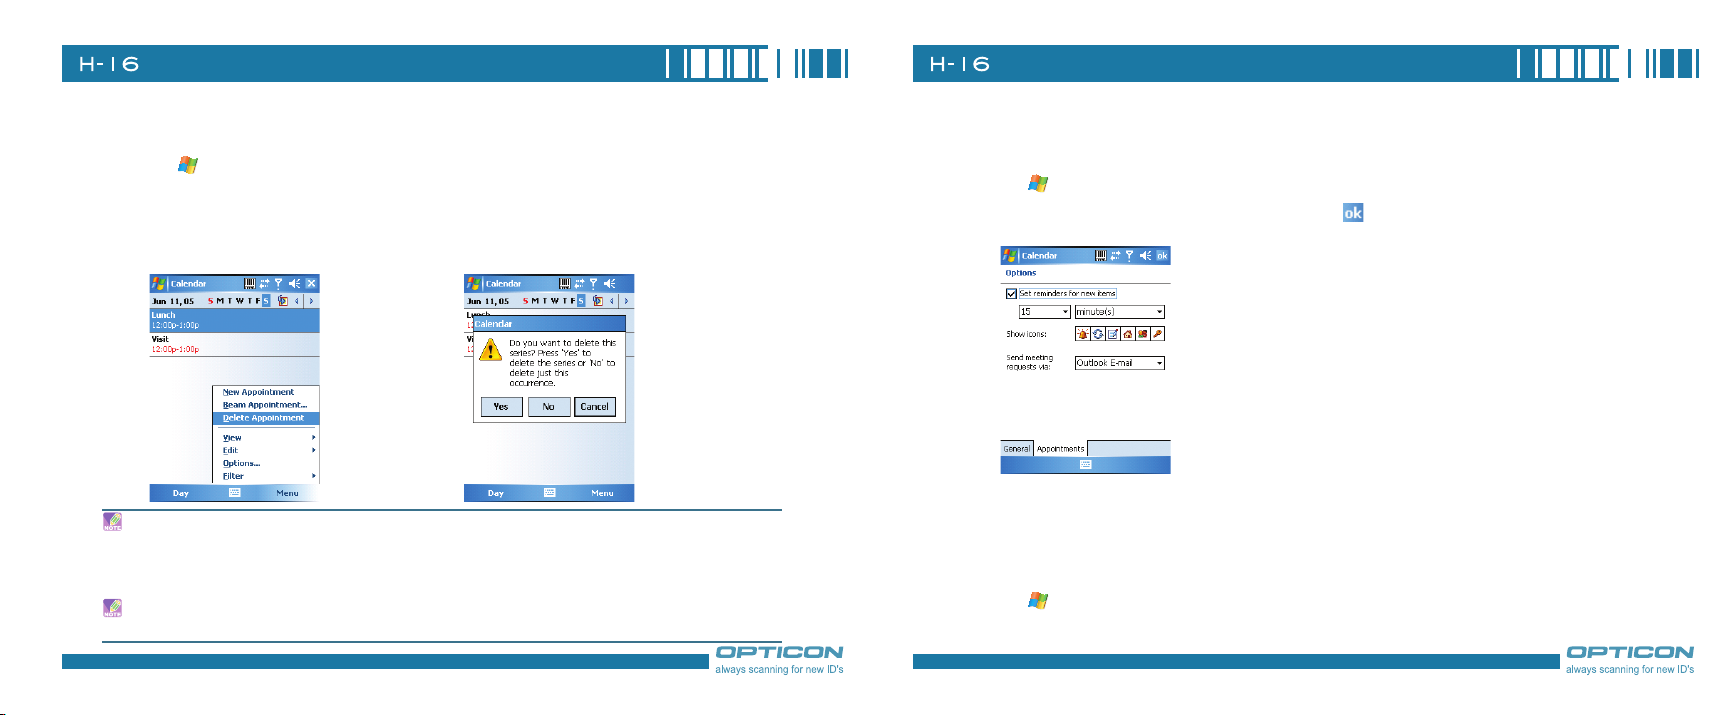
Deleting an Appointment
1. Tap >Calendar.
2. In Agenda view, select the appointment to
delete.
3. Tap Menu > Delete Appointment.
4. If the appointment is recurring, tap Yes to delete
the series, or tap No to delete only the current
occurrence.
When you delete an appointment in Calendar on your phone, it is also deleted on your PC the
next time you synchronize. If the appointment has not been synchronized with a PC, it will be
deleted only form the phone.
Calendar items can be deleted only from Agenda view or from an open calendar appointment. To
delete from other views, open the appointment, and Tap Menu > Delete.
Changing the Reminder Time
By default, the reminder time is set 15 minutes prior to an appointment.
1. Tap >Calendar. 2. Tap Menu > Options.
3. Tap
Appointment tab and change 4. Tap .
the time.
Changing Calendar Views
You can look at your appointments in Agenda, Day, Week, or Month view. To see detailed
appointment information in any view, tap the appointment. To see a list of available actions for an
appointment, tap and hold the appointment.
1. Tap > Calendar.
2. Tap
Menu > View and select the view you want.
Page 20
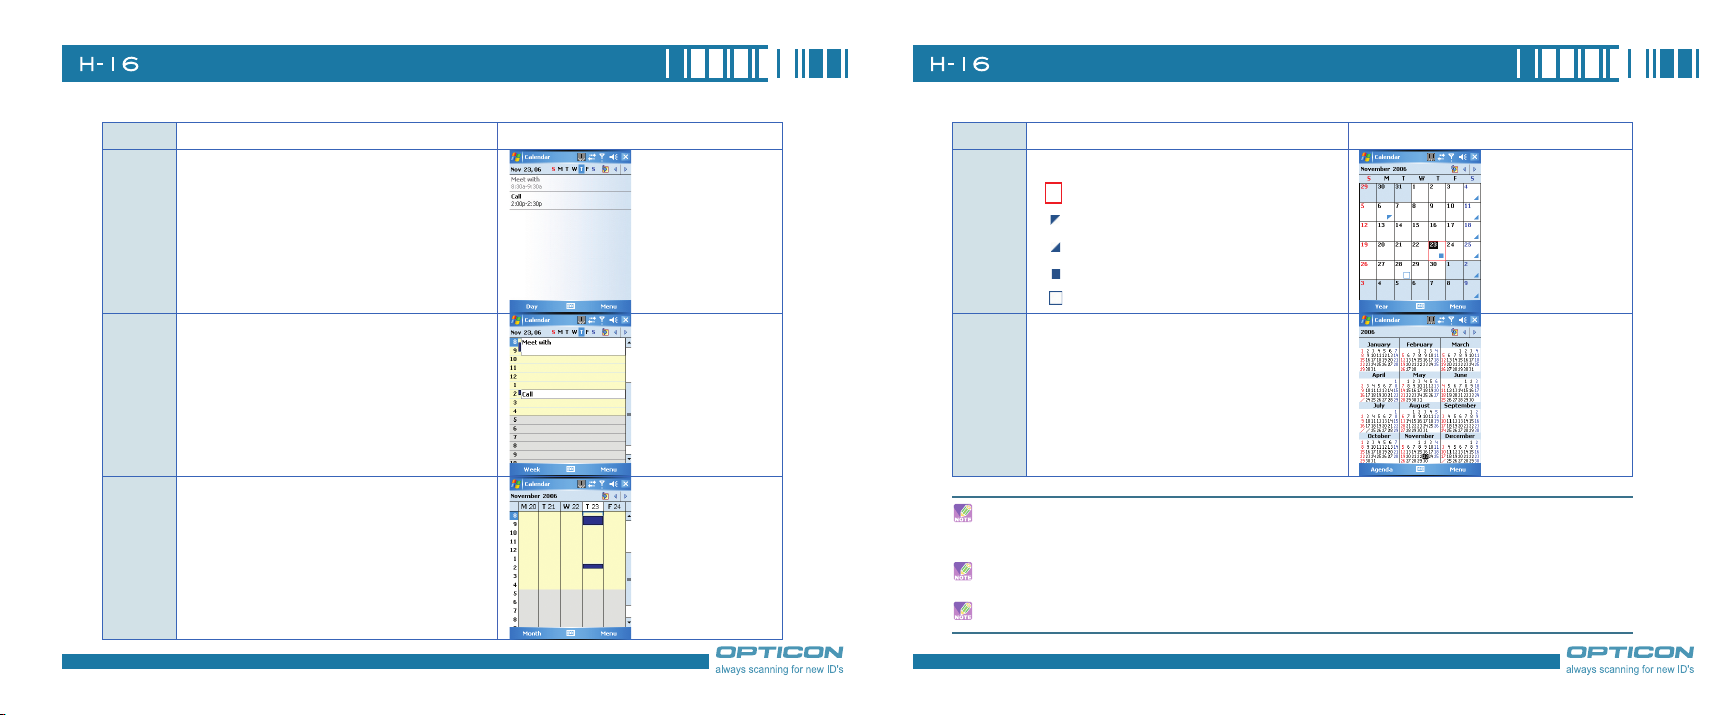
38
Chapter 2. Basic Operations
39
View See Screen
Agenda Your current day's activities a t a glanc e.
Upcoming appointments are bold; past appointments are dimmed.
Day Your schedule for a single day in a day-
planner layout. Free and busy times in time
slots of 1/2 hour or 1 hour.
Week Your schedule for the whole week.
View See Screen
Month Your free and booked days for a month:
: Current day
: morning appointment
: afternoon appointment
: morning and afternoon appointments
: all-day event with time not marked free
Year A calendar for the entire year.
In Month view, a date will appear in red when the Holiday category is assigned to any
appointment for that day.
You can also change the view by tapping Agenda, Day, Week, Month, or Year on the menu bar.
To quickly see your appointments for the current day, tap Start > Today.
Page 21
40
Chapter 2. Basic Operations
41
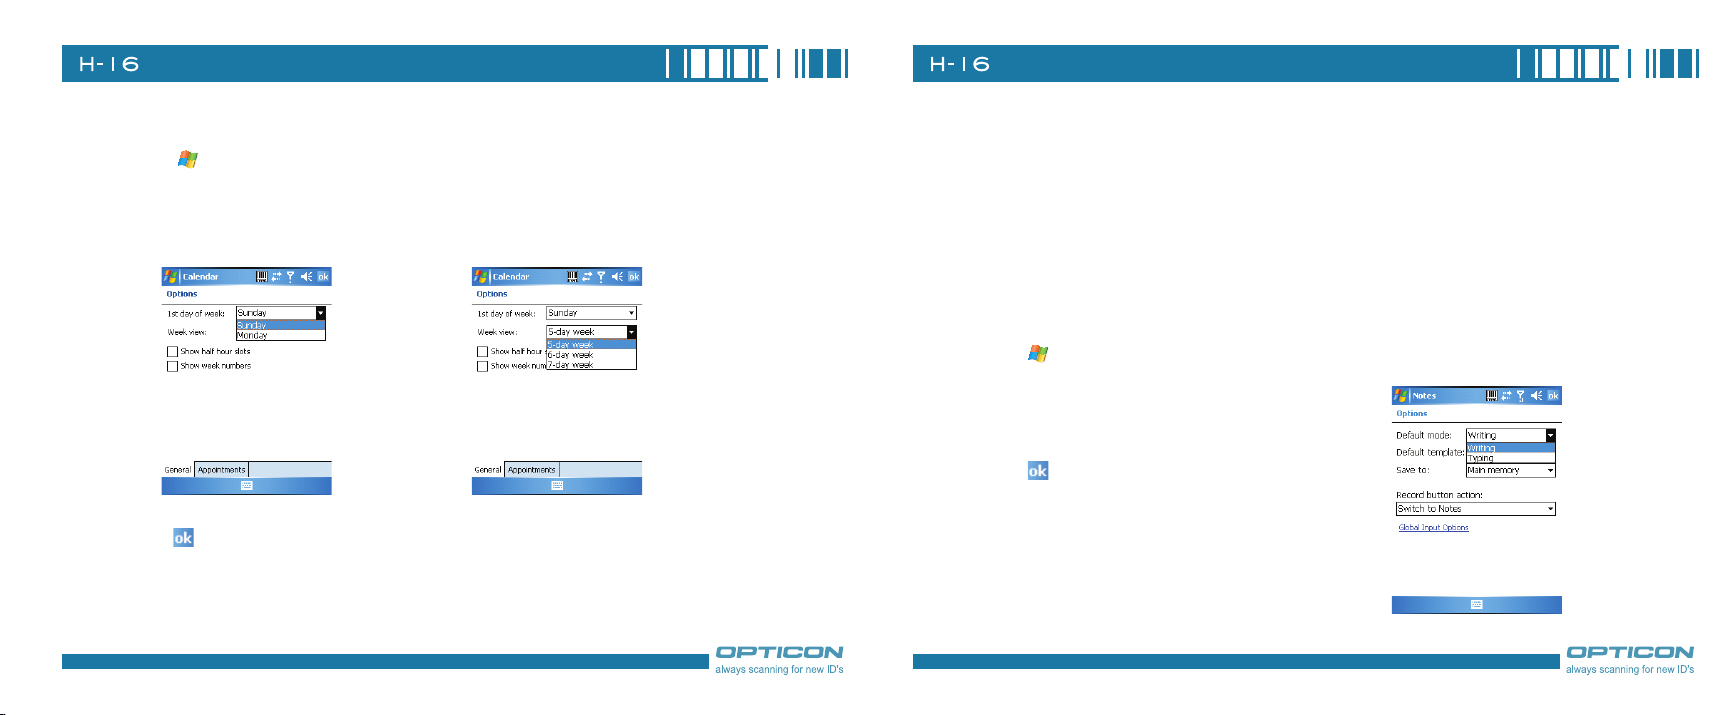
Changing the Display of the Work Week
1. Tap > Calendar.
Menu > Options and do one of the flowing:
2. Tap
•To specify the first day of the week, •To specify the number of days you want to
in 1st day of week, tap Sunday or appear in a week, in Week view, tap 5-day
Monday.
3. Tap
.
week, 6-day week, or 7-day week.
2.7 Using Notes
Notes helps you to quickly capture thoughts, questions, reminders, to-do lists, and meeting notes. You
can create handwritten and typed notes, record voice notes, convert handwritten notes to text for easy
readability, and send notes to others.
Your notes and recordings are displayed in the note list. If you have a long list, tap the sort list (labeled
Name by default), and select the option you want. To open a note or play a recording, tap it. To see a
list of available actions for a note or recording, tap and hold the note or recording.
Setting the Default Input Mode
1. Tap > Programs > Notes.
Menu > Options.
2. Tap
3. Select one of the following modes in Default mode:
•Select Writing if you prefer your notes to be handwritten.
•Select Typing if you would like your notes to be typed.
4. Tap
.
Page 22
42
Chapter 2. Basic Operations
43
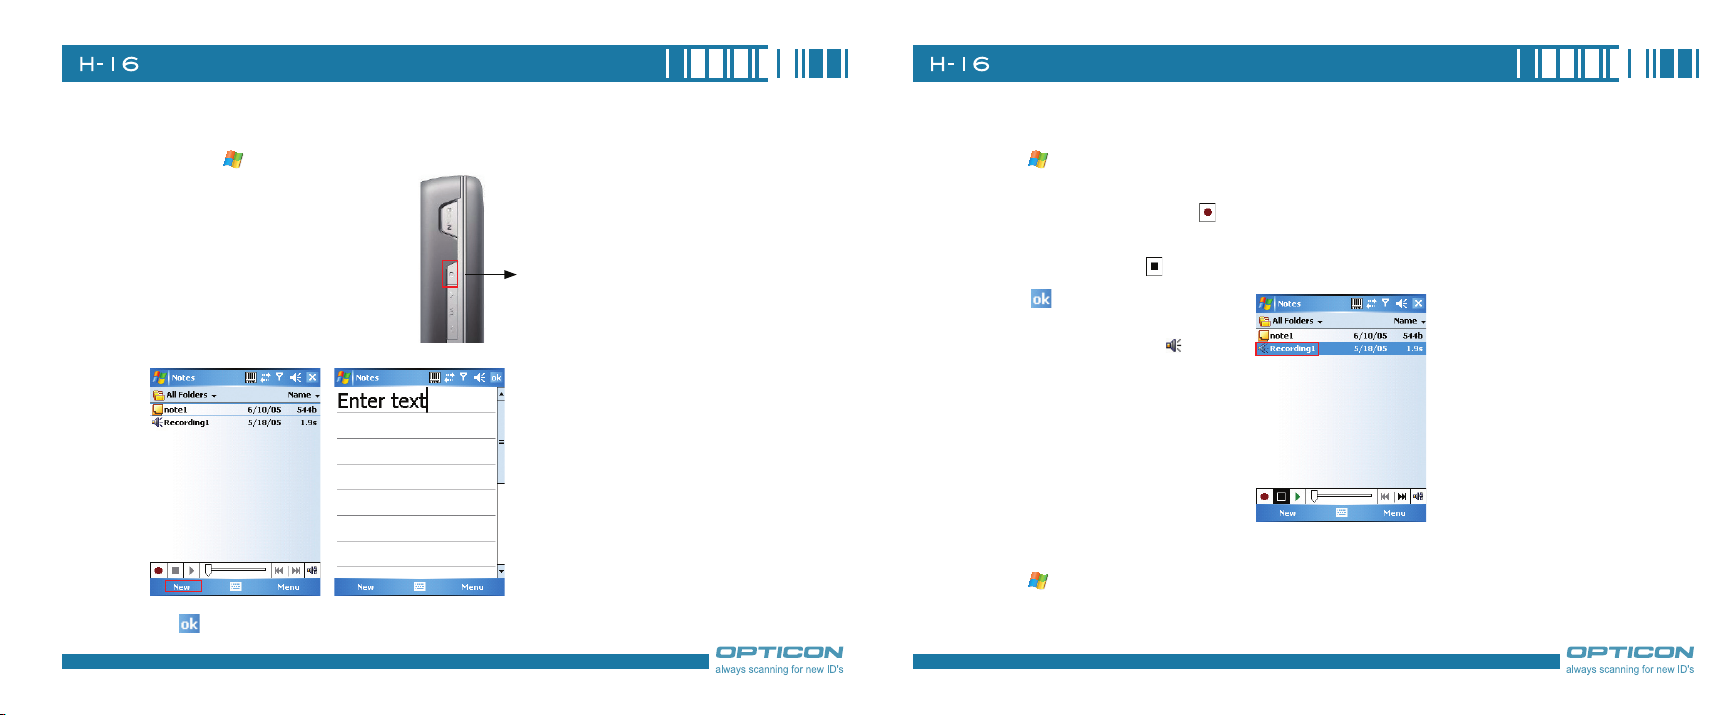
Creating a Note
1. Either tap > Programs > Notes or press the Voice Record button on the left side of the
device.
Press the Voice Record button on the
left side to launch Notes.
New and enter text.
2. Tap
3. Tap
to save your note.
Creating a Stand-alone Voice Recording
1. Tap > Programs > Notes.
2. If the recording toolbar is not shown, tap
Menu > View Recording Toolbar.
3. Tap the RECORD but ton on the t ap recording toolbar a nd speak to the dev ic e’s
microphone to record your voice in the notes list.
4. Tap the STOP button on the recording toolbar when finished.
5. Tap
to return to the notes list.
In the noteslist a stand-alone voice
recording is listed witha icon.
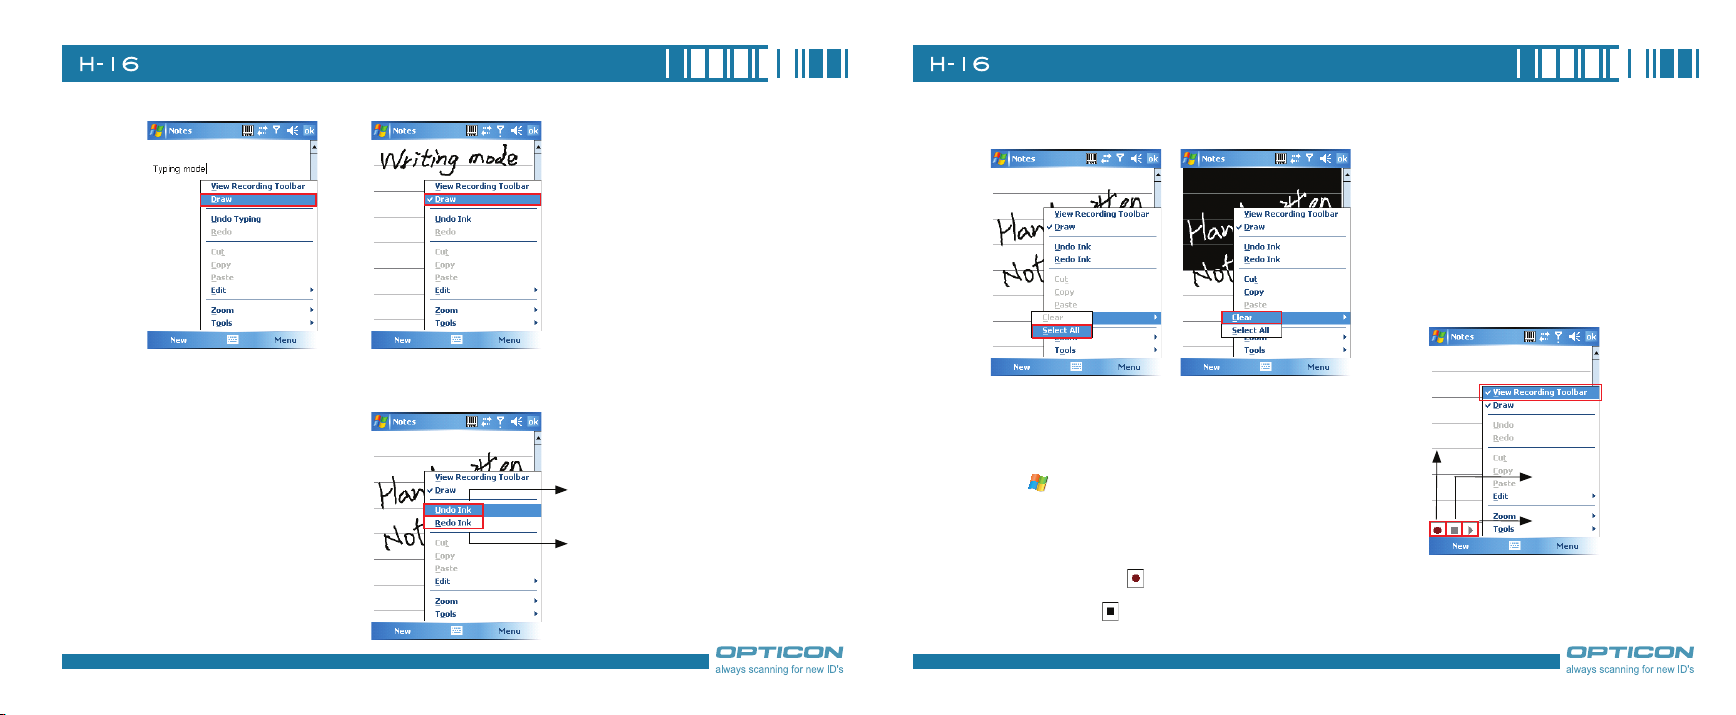
Switching between Typing/Writing Modes
1. Tap > Programs > Notes.
2. Create a new note or open an existing note from the notes list.
3. Tap Menu > Draw to switch to a different mode.
Page 23
44
Chapter 2. Basic Operations
45
•Select All/Clear
While in typing mode, tap
Draw to switch to writing mode.
Editing a Handwritten Note
•Undo/Redo Ink
While in writing mode, tap
Draw to switch to typing mode.
Tap Un d o In k to ca n ce l o r
reverse an action.
Re-execute an undone action
by tapping Redo Ink.
Tap Select All to select
all handwriting
Adding a Voice Recording to a Note
1. Tap > Programs > Notes.
Tap Clear to clear selected
handwriting
Record
Stop
2. Create a new note or open an existing note from the notes list.
3. If the recording toolbar is not shown, tap
Menu > View
Play
Recording Toolbar.
4. Tap the RECORD button on the recording toolbar and speak to the device’s microphone.
5. Tap the
STOP button on the recording toolbar when finished.
Page 24
46
Chapter 2. Basic Operations
47
6. Tap to return to the notes list if you
are adding a voice recording to a note.
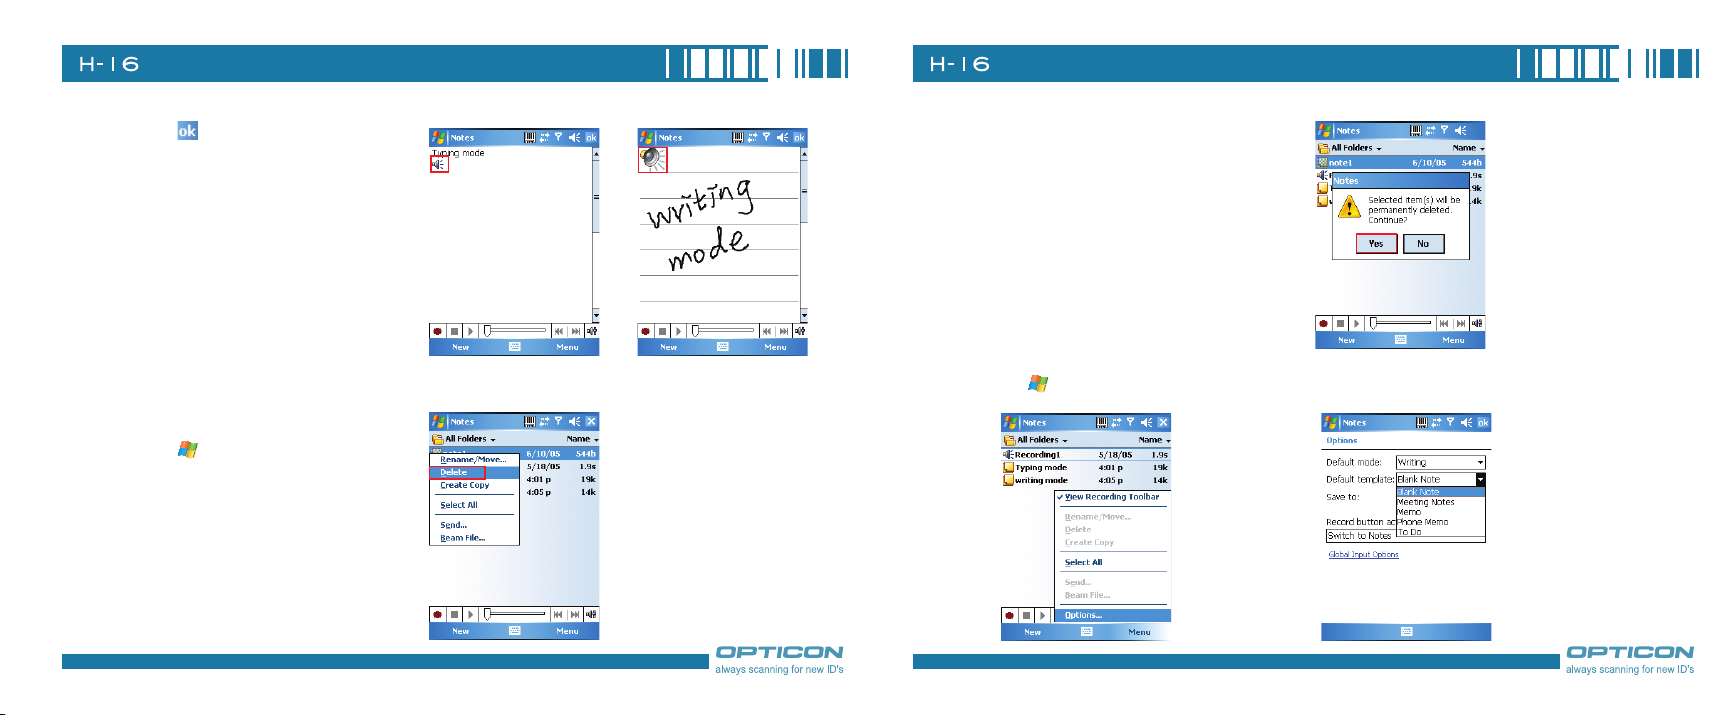
Deleting a Note
1. Tap > Programs > Notes.
2. Tap and hold the note and tap
Delete.
Add a voice recording to
a note in typing mode
Add a voice recording to
a note in writing mode
3. Tap the Yes button to delete the selected note.
Creating a Default Template
1. Tap > Programs > Notes.
Menu > Options. 3. Select a template from Default template.
2. Tap
Page 25

48
Chapter 2. Basic Operations
49
Template Screen Template Screen
Blank Phone Memo
Meeting Notes To Do
Memo
2.8 Using Tasks
Use Tasks to keep track of things you need to do. A task can occur once or repeatedly (recurring). You
can set reminders for your tasks and you can organize them by using categories.
Your tasks are displayed in a task list. Overdue tasks are displayed in red.
If you use Outlook on your PC, you can synchronize tasks between your device and PC so that tasks
you create or update on your PC will also be updated on your device and vice versa.
To quickly see the number of active tasks you have, tap Start > Today.
Creating a Task
1. Tap > Programs > Tasks.
2. Do one of the following:
•In the Tap here to add a new task box enter the task
name and press the ENTER key.
•Tap Menu > New Task and enter details about the new
task.
Page 26

50
Chapter 2. Basic Operations
51
1. Enter or select a subject. 2. Select a completion status.
3. Pick the start and due time.
4. Set a reminder date/time and pick a task category.
Multi-selection
Set reminder date
and time.
5. Select task sensitivity.
Page 27

52
Chapter 2. Basic Operations
53
You can synchronize information on your phone with your PC to keep your task list up to date in
both locations.
If you create a new task with a reminder on your PC and then synchronize tasks with your phone,
the reminder will play at the time it was set on your PC.
Deleting a Task
1. Tap > Programs > Tasks.
2. Select the task, and tap
Menu > Delete Task.
Changing Task Priority
1. Tap > Programs > Tasks.
2. Select an existing task, and tap
Edit.
3. In the Priority box, select a priority.
Sorting/Filtering Your Tasks
1. Tap > Programs > Tasks.
2. Do one of the following:
•To sort the tasks, tap Menu >
So r t by and se l ect a sorti n g
option.
•To f ilter t he tasks by cat egory,
tap Menu > Filter and select a
category to display.
Page 28

54
Chapter 2. Basic Operations
Setting Tasks Options
1. Tap > Programs > Tasks.
Menu > Options, there are 3
2. Tap
options you can set:
•Set reminders for new items
•Show start and due dates
•Show Tasks entry bar
Viewing Task Details
1. Tap > Programs > Tasks.
2. Tap twice on a task to view the details.
Chapter 3.
Phone Features
3.1 Using the Phone
3.2 Making a Call
3.3 In-Call options
3.4 SIM Manager
Page 29

56
Chapter 3. Phone Features
57
3.1 Using the Phone
You can use your phone to make, receive, and keep track of calls, and send text messages (SMS,
Short Message Service) and MMS (Multimedia Messaging Service) messages. You can also dial a
phone number directly from Contacts, and easily copy SIM contacts to Contacts on the phone.
The Phone Screen
From the Phone screen, you can open, call, or find a contact, and even save a new number in
Contacts. To access the Phone screen, do any of the following:
•Press the Talk key ( ).
•Tap > Phone.
Activating PIN Security
Most Subscriber Identity Module (SIM) cards are preset with a personal identification number (PIN)
that is provided by your wireless service provider. When PIN Security is activated, you need to
enter the PIN whenever you use your phone.
1. Tap > Settings > Phone > Select Require PIN when phone is used.
2. Enter the preset PIN provided by your wireless service provider.
Enter.
3. Tap
If your PIN is entered incorrectly three times, the SIM card will be blocked. If this happens, you
can unblock it with the PIN Unblocking Key (PUK) obtained from your wireless service provider.
Setting Ring Tones
You can choose how to be notified for incoming calls, reminders, new messages, alarms, and
more.
To set a ring tone for incoming calls:
1. Tap > Settings > Phone.
2. In the Ring tone list, select a ring tone.
3. Tap
.
To adjust the earpiece volume during a call, press the VOLUME control on the phone side panel.
Adjusting the volume at any other time can affect the ring and notification and MP3 sound levels.
Page 30

58
Chapter 3. Phone Features
59
3.2 Making a Call
Making a Call by Entering a Phone Number
1. On the Pho ne screen, begin
entering the phone number.
2. Do one of the following after
entering the phone number:
•If you se e th e numb e r or
contact name to call, select
it, then tap on the screen or
press TALK ( ).
•If you do not see the number
o r c o n t a ct na me , fi n i sh
entering the number, then tap
or press TALK ( ).
TALK Key END Key
Tap the Backspace button once to erase one single number; tap and hold the Backspace
button to erase a whole string of numbers.
Making a Call from Call History
Call History displays calls you have made, received, and missed.
1. On the Phone screen, tap the Call History button on the Phone keypad.
Call History
1.Calls you received
2.Calls you made
3.Calls you missed
2. Select the name or phone number to call.
3. Tap Call or press the TALK key.
Making a Call from Contacts
1. On the Phone screen, tap Contacts.
2. Tap the desired contact and tap Call or press the TALK Key to dial.
You can tap on the desired contact in the list and tap on the number you want to dial.
You can also tap and hold the desired contact in the list and select Call Work, Call Home, or
Call Mobile from the pop-up submenu.
Page 31

60
Chapter 3. Phone Features
61
Making a Call from Speed Dial
You can create speed dial entries for frequently-called numbers or frequently-accessed items so
you can dial a number by pressing a single key. For example, if you assign location 2 to a contact
in Speed Dial, you can simply press and hold 2 on the Phone keypad to dial the contact’s number.
Speed dials can be created only for numbers that are stored in Contacts.
To create a speed dial entry for a contact
1. On the Phone screen, tap Contacts.
2. Tap the contact for whom to create a speed dial.
3. Select the phone number for which to create a speed dial.
4. Tap Menu > Add to Speed Dial. 5. In Location, select the speed dial
number to use.
6. Tap when finished.
Tap the Speed Dial button on the phone screen to check the success of creating a Speed Dial
entry.
The first speed dial location is generally reserved for your voicemail. Speed Dial uses the next
available location by default. If you want to place a number in a location that is already used,
the new number replaces the existing number.
To delete a speed dial entry
•In the Speed Dial list, tap Menu > Delete.
Receiving/Rejecting a Call
When you receive a phone call, you have the option to answer it or ignore it.
To receive a call
•Tap Answer or press the TALK ( ) key to accept an incoming call.
To end a call
•Tap Ignore or press END ( ) to hang up a call.
To block incoming or outgoing calls
You will not be able to receive or make calls according to the options you choose.
1. Tap > Settings > Personal tab > Phone > Services tab.
Page 32

62
Chapter 3. Phone Features
63
2. Tap Call Barring > Get Settings. 3. Choose the calls you want to block, and tap
.
•Block incoming calls: All calls, When roaming,
Off.
•Block outgoing calls: All calls, International,
International except to home country, Off.
3.3 In-Call options
Your phone provides various options for managing multiple calls at the
same time. You are notified when you have another incoming call, and
you have the choice of ignoring or accepting the call. If you are already
on a call and accept the new call, you can choose to switch between the
two callers, or set up a conference call between all three parties.
Conference Call
1. Either put a call on hold and dial a second number; or accept a
second incoming call when you have one in progress.
To dial a second numb er, tap
the Hold button first then tap
Keypad to enter phone numbers.
To accept a second inco min g
call, tap Answer.
In-Call Options.
Page 33

64
Chapter 3. Phone Features
65
2. Tap Menu and select Conference.
If the conference connection is successful, the word “Conference” will appear at the top of the
screen. To add additional persons to your conference call, tap Hold, enter the phone number,
and then tap Swap to return and continue.
Not all service providers support conference calling. Contact your service provider for details.
Call waiting
To turn call waiting notifications on and off
When you are in another call, you will be notified of an incoming call if this option is selected.
1. Tap > Settings > Phone >Services 2. Select Notify me or Do not notify
tab > Call Waiting > Get Settings. me , and tap .
To answer another call
1. Click Answer to take the second call and put the first call on hold.
2. To end the second call and return to the first call, press END ( ).
To switch between calls
•To switch between two calls, click Swap.
Page 34

66
Chapter 3. Phone Features
67
Turning On/Off the Speakerphone
Talk hands-free or let others hear your conversation with the built-in speakerphone in your device.
•Tap Speaker On during a call to turn the speaker on.
•Tap Speaker Off to turn the speaker off.
To avoid damage to your hea ring, do not hol d your phone against your ear when the
Speakerphone is turned on.
3.4 SIM Manager
The SIM Manager helps you to manage the phonebook in your SIM
card. Using the SIM Manager, you can easily transfer phonebook entries
from your SIM card to Contacts.
Adding a Phonebook Entry to SIM Card
1. Tap > Programs > SIM Manager.
2. Tap Option > Add Entry and enter the name and phone number you want to add.
Muting the microphone
The device’s microphone can be turned off during a call. If you turn off the microphone the caller
cannot hear you. However, you can still hear the caller.
•Tap Mute during a call to turn the microphone off.
• Tap Unmute to turn the microphone on.
3. Tap the
OK button.
Deleting Phonebook Entries from SIM Card
1. Tap > Programs > SIM Manager.
Page 35

68
Chapter 3. Phone Features
2. Select the entries you want to delete by checking the checkboxes in front.
3. Tap
Option > Delete Selected.
Saving Phonebook Entries to Contacts
1. Tap > Programs > SIM Manager.
2. Select the entries you want to save to Contacts by checking the checkboxes in front.
3. Tap
Option > Add to Contacts..
to close the notification dialog box.
4. Tap
Chapter 4.
Synchronizing
Information
4.1 Installing and setting up ActiveSync
4.2 Synchronizing Information
4.3 Changing Settings for an Information Type
4.4 Synchronizing with Exchange Server
4.5 Synchronizing via Bluetooth
Page 36

70
Chapter 4. Synchronizing Information
71
ActiveSync synchronizes information on your phone with information on your PC such as Outlook
content. ActiveSync can also synchronize over a wireless or cellular network with Exchange Server, if
your company or service provider is running Exchange Server with Exchange ActiveSync.
Specifically, you can use ActiveSync to:
•Synchronize information such as Outlook e-mail, contacts, calendar, or tasks information on your
phone with your PC, as well as pictures, video, and music.
•Synchronize Outlook e-mail, contacts, calendar appointments, and tasks on your phone directly with
Exchange Server so that you can stay up to date even when your PC is turned off.
•Copy files between your phone and your PC without synchronizing.
•Select w hich types of informa tion are syn chron ized and specify how much inform ation is
synchronized. For example, you can choose how many weeks of past calendar appointments to
synchronize.
4.1 Installing and setting up ActiveSync
1. Install ActiveSync on your PC, as described on the Windows Mobile™ Getting Started Disc. After
Setup completes, the Synchronization Setup Wizard automatically starts when you connect your
device to the PC.
2. Follow the instructions on the screen to complete the wizard. In the Sync Setup Wizard, you can:
•Create a synchronization relationship between your PC and the device.
•Configure an Exchange Server connection to synchronize directly with Exchange Server. To
synchronize your device with Exchange Server, obtain the name of the Exchange Server, your user
name, password, and domain name from your administrator before completing the wizard.
•Choose information types to synchronize.
When you finish the wizard , Active Sync synchroniz es your phon e a utoma tically. Once
synchronization completes, you can disconnect your phone from your PC.
4.2 Synchronizing Information
To synchronize using ActiveSync, you must install ActiveSync on your PC before connecting your device
to the PC.
Starting and Stopping Synchronization Manually
1. Turn on the device.
2. Connect your device to your PC using a USB cable or Blu etooth. Fo r more detaile d
information, see "Connecting a mobile device to a PC" in ActiveSync Help on your PC.
3. Tap > Programs > ActiveSync.
4. To start synchronizing, tap
5. To stop synchronizing, tap
You can start and stop synchronization only if your device already has a sync relationship with a
PC or Exchange Server.
Some Anti-Virus software may conflict with ActiveSync.
ActiveSync synchronizes a limited amount of information by default to save storage space on your
phone. You can change the amount of information that is synchronized by performing the following
steps.
Sync.
Stop.
Page 37

72
Chapter 4. Synchronizing Information
73
Changing Which Information is Synchronized
You can change this setting only if your device already has a sync relationship with a PC.
Please disconnect your device from your PC before changing this setting.
1. Tap > Programs > ActiveSync.
2. Tap Menu > Options.
3. Do one or more of the following:
•Select the check box for the items you want to synchronize. If you cannot select a check box,
you might have to clear the check box for the same information type elsewhere in the list.
•Clear the check box for any items you want to exclude.
•To customize synchronization of a computer, select the computer name then click Settings.
•To customize synchronization of particular information, select the information type then click
Settings.
•To stop synchronizing with one computer completely, select the computer name and click
Delete.
Outlook e-mail can be synchronized with only one computer.
4.3 Changing Settings for an Information Type
Before changing settings for an information type on the device, disconnect it from your PC.
1. Tap > Programs > ActiveSync > Menu > Options.
2. Select one of the information types.
3. Do one of the following:
•To view or change settings for an information type (when available), tap Settings.
•To view or change settings for a computer or Exchange Server, tap Settings.
4. Change the amount of information to be synchronized or other settings.
5. Tap
(or Finish in the Exchange Server settings wizard).
4.4 Synchronizing with Exchange Server
To set up your device to synchronize directly with Exchange Server, you will need to get the name of
the server and the server domain name from your service provider or system administrator. You must
also know your Exchange user name and password.
Before changing synchronization settings on the device, disconnect it from your PC.
Page 38

74
Chapter 4. Synchronizing Information
75
1. On your device screen, tap > Programs > ActiveSync > Menu > Configure Server. If
you have not yet set up sync with Exchange Server, this will say Add Server Source.
2. In
Server address, enter the name of the server running Exchange Server, and tap Next.
3. Enter your user name, password, and domain name, and tap
4. If you want the device to save your password so that you will not need to enter it again when
connecting, select the Save password check box.
5. Select the check boxes for the types of information items that you want to synchronize with
Exchange Server.
6. To change available synchronization settings, select the type of information, and tap
7. To change the rules for resolving synchronization conflicts, tap
8. Tap
Finish.
You can also use the Sync Setup Wizard to set up the phone to synchronize remotely with the
Exchange Server. This wizard is started when you connect your phone to your PC after installing
ActiveSync on the PC.
4.5 Synchronizing via Bluetooth
Connecting to a PC Using Bluetooth
1. Follow the instructions in ActiveSync Help on the PC for configuring Bluetooth on your PC to
support ActiveSync.
2. Tap > Programs > ActiveSync.
3. Tap Menu > Connect via Bluetooth. Ensure that the device and PC are within close range.
Next.
Advanced.
Settings.
4. If this is the first time you have connected to this PC via Bluetooth, you must complete
the Bluetooth wizard on the phone and set up a Bluetooth partnership with the PC before
synchronizing.
5. Tap
Sync.
6. When finished, tap
Menu > Disconnect Bluetooth.
To preserve battery power, turn off Bluetooth.
Page 39

76
Chapter 4. Synchronizing Information
Chapter 5.
Bluetooth Connections
5.1 Overview of Bluetooth
5.2 Bluetooth Partnership (Bonding)
5.3 Beaming Information (Bluetooth)
Page 40

78
Chapter 5. Bluetooth Connections
79
5.1 Overview of Bluetooth
Bluetooth is a short-range wireless communications technology. Devices with Bluetooth capabilities
can exchange information over a distance of about 10 meters without requiring a physical connection.
You can even beam information to a device in a different room, as long as it is within range.
The software included with your phone allows you to use Bluetooth in the following ways:
•Beam information, such as files, appointments, tasks, and contact cards, between devices that have
Bluetooth capabilities.
•Create a connection between your device and a Bluetooth phone to use the phone as a modem.
Bluetooth Modes
Bluetooth on your phone operates in three different modes:
1.
On. Bluetooth is turned on and you can use Bluetooth features.
2.
Off. Bluetooth is turned off. In this mode, you can neither send nor receive information using
Bluetooth. You might want to turn off the radio at times to conserve battery power, or in
situations where radio use is prohibited, such as onboard an aircraft and in hospitals.
3.
Visible. Bluetooth is turned on, and all other Bluetooth-enabled devices within a range of 10
meters can detect your phone.
By default, Bluetooth is turned off. If you turn it on, and then turn off your phone, Bluetooth also
turns off. When you turn on your phone again, Bluetooth automatically turns on.
Turning Bluetooth On or Off
1. Tap > Settings > Connections
2. Check or uncheck the checkbox in front of
tab> Bluetooth. Turn on Bluetooth to turn on or off Bluetooth.
Making Your Device Visible
To receive beamed information, beaming devices
or computers must be able to detect your device.
1. Tap > Settings > Connections tab>
Bluetooth.
2. S elect
Mak e this d evice visibl e to oth er
devices, and tap .
Page 41

80
Chapter 5. Bluetooth Connections
81
Other Bluetooth-enabled devices can now detect your phone and attempt to beam information to
it, establish a Bluetooth partnership, or use a Bluetooth service.
Selecting Visible also turns on Bluetooth.
Turning off Bluetooth will make your device not visible, and it will also prevent you from sending
a Bluetooth beam.
5.2 Bluetooth Partnership (Bonding)
A Bluetooth partnership is a relationship that you create between your phone and another Bluetoothenabled device in order to exchange information in a secure manner. Creating a partnership between
two devices involves entering the same personal identification number (PIN) on both devices, and this
is a one-time process. Once a partnership is created, the devices can recognize the partnership and
exchange information without entering a PIN again. Make sure the two devices are within a range of
10 meters, and Bluetooth is turned on and in discoverable mode.
Creating a Bluetooth Partnership
1. Tap > Settings > Connections tab > BluetooDevice > Device tab.
2. Tap
Add new device. Your device searches for other Bluetooth-enabled devices and displays
them in the list.
Page 42

82
Chapter 5. Bluetooth Connections
83
3. Select the device with which you want to a Bluetooth partnership, and tap Next.
Tap the Refresh button if the device
you want to connect is not listed.
4. In Passcode, if you want to use a passcode
(recommended for enhanced security), enter
alphanumeric passcode between 1 and 16
characters, and tap Next. Otherwise, leave the
passcode blank.
5. Enter the same passcode on the other device.
6. Select the service to use from the device, and tap
Finish.
Once you create a partnership, the Bluetooth-enabled devices don't need to be visible to beam
information between them; Bluetooth needs only to be turned on.
Page 43

84
Chapter 5. Bluetooth Connections
85
5.3 Beaming Information (Bluetooth)
Receiving Beamed Information
1. Tap > Settings > Connections tab> 2.Select Receive all incoming beams.
Beam.
3. To receive beams by using Bluetooth, ensure Bluetooth is turned on and that your phone is
discoverable and within close range.
4. Tap
.
Once you select Receive incoming beams, your phone automatically receives beams until you
clear this check box.
Your phone can receive all types of beamed files, but you may not be able to view all types of
files on the phone. You may need to copy some files to a PC for viewing.
Beaming an Item
In the Calendar, Contacts, Notes, Tasks, and Pictures programs, you can beam files and
information to other devices using Bluetooth.
1. From the program, select the item you want to beam, such as an appointment in Calendar,
a task in Tasks, a contact card in Contacts, a picture in Pictures, a file in File Explorer. In
Calendar, for example, first open the appointment in Agenda view.
2. Tap
Menu > Beam.
3. Your device will search and show visible devices, select the device to which you want to send
the item.
When using Bluetooth, if the device that you want to beam to doesn't appear in the list, ensure
that the device is turned on, visible, and within close range of your phone. Also, ensure that
Bluetooth is turned on.
You can obtain the Bluetooth BD Address of your device. Tap > Settings > System tab >
Device Info > Identity tab.
Page 44

86
Chapter 5. Bluetooth Connections
Chapter 6.
Transferring Files To and
From Your Device
6.1 Using ActiveSync
6.2 Transferring from Memory Cards
6.3 Using Bluetooth
6.4 Transferring to a PC or Other Devices
Page 45

88
Chapter 6. Transferring Files To and From Your Device
89
You may need to transfer application data such as Word documents, Excel spreadsheets, PowerPoint
slides, and/or media files from your PC to your device. This section describes different methods to
transfer files from a PC to your device.
6.1 Using ActiveSync
To transfer files from PC to your device with ActiveSync, you must install Microsoft ActiveSync on
the PC first. Please refer to "Chapter 4. Synchronizing Information" for detail on how to install and
set up ActiveSync.
1. Connect your device to the PC with the USB cable. Microsoft ActiveSync should be
automatically launched on the PC if it is set up correctly.
2. Select an information type under Synchronization Options in the Synchronization Setup Wizard
by checking the checkbox in front of it.
3. Click the Settings button and add the files you want
to transfer. Click the OK button when you finish.
4. Click Next, and then click Finish to start the
synchronization process.
> Programs > File
5. On your device, tap
Explorer. The files should be saved to My
Documents. Check to see if the files have been
transferred to your device successfully.
6.2 Transferring from Memory Cards
1. Insert your memory card into the device’s mini-SD card slot. (See “1.5 Mini-SD cards” for details.)
2. Tap
4. File Explore should display all the files stored in your
5. From the Show list in File Explorer, go to
6. Tap
> Programs > File Explorer. 3. In the Show list, select Storage Card.
memory card. Tap and hold the file you want to
transfer, and select Copy.
destination folder. (For example, My Device > My
Documents.)
Menu > Edit > Paste.
Page 46

90
Chapter 6. Transferring Files To and From Your Device
6.3 Using Bluetooth
Before receiving files, you must turn Bluetooth on and establish a Bluetooth partnership between
your PC and your device. (See “Chapter 5. Bluetooth Connections” for details.)
1. On your PC, locate the file you want to send using Bluetooth with Windows Explorer.
2. Right-click the file and select the device you want to transfer the file to under “to Bluetooth.”
3. Tap Yes when your device prompts about receiving a file.
4. After the transmission process is finished, the file should be saved in your device under My
Documents in the File Explorer.
6.4 Transferring to a PC or Other Devices
Please refer to Section 5.3 “Beaming Information (Bluetooth)” for details.
Chapter 7.
Connecting to the
Internet
7.1 Setting up Internet connections
7.2 Using Internet Explorer Mobile
7.3 Using Wireless Manager
7.4 Using Wi-Fi Connection
Page 47

92
Chapter 7. Connecting to the Internet
93
7.1 Setting up Internet connections
Your device’s powerful networking capabilities allow you to access the Internet or your corporate
network at work through wireless and conventional connections. Specifically, you can configure your
device to establish a connection via GPRS or Proxy.
With an active connection on your device, you can browse the Web, download e-mails, or use
Windows Live Messenger. Check with your service provider to see if a connection has already been set
up for you, and if over-the-air configuration is supported.
If you need to manually set up a connection, it is important that you obtain the following information
from your Internet Service Provider (ISP) or the company whose intranet you are trying to access:
•User name
•Password
•Access point name (required for GPRS connection)
•Domain name (required for accessing a corporate network or an intranet)
Creating a GPRS Connection
Every network connection is different. You should gather all of the relevant information or network
settings you need before starting this process.
1. Tap > Settings > Connections tab > 2. Tap Add a new modem connection.
Connections.
3. Enter the following information (you may or
may not need to ent er all of t he follow ing
information), and tap Finish.
•Enter a name for the connection.
•In Select a modem, select Cellular (GPRS).
Page 48

94
Chapter 7. Connecting to the Internet
95
•In Access point name, enter the access Line point name.
•In User name, enter your user name for the GPRS network, if required.
•In Password, enter your password, if required.
•Tap Advanced > Servers tab. In DNS, enter the primary
Domain Name System (DNS) address, if required.
•In Alt DNS, enter the secondary DNS address, if required.
•Tap TCP/IP tab. In Use specific IP address, enter the
Internet Protocol (IP) address for the device, if required.
The phone uses this connection when you open a program that connects to the Internet.
Creating a Proxy Connection
Every network connection is different. You should gather all of the relevant information or network
settings you need before starting this process.
1. Tap > Settings > Connections tab > Connections.
Edit my proxy server.
2. Tap
Page 49

96
Chapter 7. Connecting to the Internet
97
3. Check the checkbox in front of This network connects to the Internet.
4. Check the checkbox in front of This network uses a proxy server to connect to the
Internet.
5. Under Proxy server, enter the proxy server name.
6. If the proxy server uses a different port or requires a username and password tap Advanced,
select the proxy type to change its settings, then enter username, password and/or port number
in the proper fields.
7. T
ap .
Deleting a Connection
1. Tap > Settings > Connections tab > connections.
Manage existing connections.
2. Tap
3. Tap and hold on the connection you want to delete and
select Delete.
The device can not connect to a PC through ActiveSync while connecting to the Internet using
GPRS.
7.2 Using Internet Explorer Mobile
Internet Explorer Mobile is a full-featured Web browser, optimized for use on your phone. You can use
Internet Explorer Mobile to browse the Internet once you have set up your Internet connection (if you
haven’t done so, please read the previous chapter before continuing).
Browsing the Internet
1. To browse the Internet you must have a valid connection established.
2. Tap
3. Do either of the following:
> Internet Explorer.
•Enter the address in the address bar, and tap .
•Tap Favorites then select a Web Page.
Page 50

98
Chapter 7. Connecting to the Internet
99
Adding a Web Page to the Favorite List
1. Tap > Internet Explorer.
2. To go to the page you want to add, tap
Menu > Add to Favorites.
3. Confirm or change the name and Web page address.
4. In Create in, select a folder for this favorite.
5. Tap Add.
A quick way to add favorites to your phone is to synchronize with your PC using ActiveSync. For
more information, see ActiveSync Help on your PC.
Deleting a Favorite
1. Tap > Internet Explorer.
2. Tap Favorites.
3. Tap
Add / Delete tab.
4. Select the favorite to delete.
5. Tap the
6. Tap
Delete button.
Yes to confirm the deletion.
Changing the Size of Text on Web Pages
1. Tap > Internet Explorer.
2. Tap Menu > Zoom and select the size you want.
There are five zoom options you can select: Largest / Larger / Medium / Smaller / Smallest.
Showing or Hiding Pictures on Web Pages
1. Tap > Internet Explorer.
Menu > View > Show Pictures.
2. Tap
A check mark next to Show Pictures indicates that pictures will be displayed.
Changing Web Page Display Options
1. Tap > Internet Explorer.
2. Tap Menu > View.
3. Select one of the following:
•One Column. Arranges the content into one column that is as wide as
the screen. This means that you will rarely have to scroll horizontally.
•Default. Maintains a layout similar to what you see on a desktop
computer, but makes items smaller and arranges the content so that you
can see most of it without having to scroll horizontally.
•Desktop. Keeps the same layout and size as on a desktop computer,
which will require both horizontal and vertical scrolling.
Clearing History, Cookies, or Temporary Files
1. Tap > Internet Explorer.
2. Tap Menu > Tools > Options.
3. Tap
Memory tab.
4. Select the type of memory to clear.
Page 51

100
Chapter 7. Connecting to the Internet
101
5. Tap Clear History or Delete Files, then tap .
Viewing a Page in Full Screen Mode
1. Tap > Internet Explorer.
Menu > View > Full Screen
2. Tap
To exit full screen mode, press either SOFT KEY, and then tap Menu > View > Full Screen to
cancel the selection.
7.3 Using Wireless Manager
Wireless Manager is a program that allows you to conveniently turn on or off the various wireless
connections on the Windows Mobile-based device, including cellular phone, Bluetooth and Wi-Fi.
Opening Wireless Manager
To open the Wireless Manager, do one of the following:
•Tap the signal strength icon ( ) at •Tap > Settings > Connections tab
the top of the screen, and tap Wireless > Wireless Manager.
Manager.
Page 52

102
Chapter 7. Connecting to the Internet
103
Enabling and Disabling a Feature
There are three buttons in the Wireless Manager; each of them represents a certain feature. You
can simply tap a button to activate its corresponding feature.
•Tap the first button to toggle between enabling or disabling the phone.
•Tap the second button to toggle between turning on or off Bluetooth.
•Tap the third button to toggle between turning on or off Wi-Fi.
7.4 Using Wi-Fi Connection
Wi-Fi is an enabling technology that allows you to quickly access e-mail, the internet, and broadband
multimedia content. When your device encounters a hotspot (a place where you can access Wi-Fi
networks), it can then connect to that network wirelessly. While some hotspots are free, the most robust
public Wi-Fi networks are provided by private internet service providers (ISPs) that charge a fee for
users to connect to the internet.
Connecting to a Wi-Fi Network
1. Tap > Settings > Connections tab > Wireless Manager.
2. Tap the third button to turn on Wi-Fi
connection. and showed on a pop-up window. Select
the desired wireless network and tap OK.
3. Available wireless networks will be detected
Page 53

104
Chapter 7. Connecting to the Internet
4. Select The Internet if the wireless network 5. Enter a network key if required. Then tap
connects your device to the Internet; select Connect.
Work if the wireless network connects to a
private network. Then tap Connect.
6. When Wi-Fi connection is activated, the
You may need to consult your ISP before you try to run this utility.
You can obtain the Wi-Fi address of your device. Tap > Settings > System tab > Device
Info > Identity tab and refer to WirelessLAN MAC Address.
icon shows on the title bar.
Chapter 8.
Messaging & Contacts
8.1 Text Messaging
8.2 E-mail
8.3 Changing Messaging Account Options
8.4 Using Contacts
Page 54

106
Chapter 8. Messaging & Contacts
107
Messaging is the unified point of access for all message types within your device. With Messaging, you
can send and receive text messages, e-mails, and MMS messages.
Contacts helps you to manage your contact information. Using Contacts you can quickly communicate
with people.
This section describes the procedure on sending and receiving different kinds of messages, and using
Contacts to manage addresses and phone numbers.
8.1 Text Messaging
Creating a Text Message
1. Tap > Messaging.
2. In the message list, tap
3. Tap
New.
4. Enter the recipient ’s text message number in the
multiple text message numbers.
5. Enter your message and tap
You can quickly enter text message numbers from your contact cards. In To, press ENTER and
select a recipient from the list. Then, select the recipient’s phone number.
Menu > Go To > Text Messages.
To field. Insert a semicolon (;) between
Send. Text messages are sent immediately.
Using Preset Text Messages
You can quickly insert preset or frequently used messages into your text message. While
composing a message, tap Menu > My Text and select a preset message to insert.
To edit a preset message:
1. While composing a message, tap
Menu > My Text > Edit My Text Messages.
2. Select a message and edit.
3. T
ap .
Reading a Text Message
1. Tap > Messaging.
2. Tap
Inbox and select Inbox under Text Messages.
3. In the message list, tap the text message you want to read.
Changing Message Options
1. Tap > Messaging, and select Text Messages account.
New.
2. Tap
Menu > Message Options.
3. Tap
4. Select this check box to request a message delivery notification.
.
5. Tap
Page 55

108
Chapter 8. Messaging & Contacts
109
8.2 E-mail
Setting Up an Internet E-mail Account Manually
Before you set up your Internet e-mail account, please ensure that you have the necessary
information.
Setting Description
User name Usually the first part of your e-mail address, which appears be-
fore the “at” sign (@).
Password Choose a strong password. You will have the option to save
your password, so that you do not need to enter it each time
you connect to your e-mail server.
Domain The domain name. This may be required.
Server type The type of e-mail server that hosts your mailbox (POP3 or
IMAP4).
Account name A name for this account. You must use a different name for
each account that you set up.
Network The type of network your e-mail server connects to.
Incoming mail server The name of your e-mail server (POP3 or IMAP4).
Require SSL connection Select this to ensure you always receive e-mail for this account
using an SSL connection. This enables you to receive personal
information more securely. Please note that if you select this and
your ISP does not support an SSL connection, you will not be
able to connect to receive e-mail.
Outgoing mail server The name of your outgoing e-mail server (SMTP).
Outgoing server requires authentication
Your outgoing e-mail server (SMTP) may require authentication.
Note: Your user name and password from above will be used.
Outgoing server settings Your outgoing e-mail server may require different authentication
settings than your incoming e-mail server.
Use d iff ere nt user n ame fo r
outgoing server
A check box that lets you enter separate settings for your outgoing e-mail server.
User name Your user name for the outgoing e-mail server.
Password Your password for the outgoing e-mail server.
Domain The domain name of the outgoing e-mail server.
Require SSL connection (Outgoing mail server only)
A connection that enables you to send personal information
more securely. Note that if you select this and your ISP does not
support an SSL connection, you will not be able to send e-mail.
Page 56

110
Chapter 8. Messaging & Contacts
111
Now you are ready to set up your account:
1. Tap
2. Tap
3. Select your e-mail provider then tap
4. Enter your e-mail address and tap
5. On the
> Messaging.
Menu > Tools > New Account.
Next.
Next.
Auto configuration setup page, tap Next. Auto configuration attempts to obtain
necessary e-mail server settings from your service provider.
6. If auto configuration was successful, the
Your name and User name are automatically filled
out for you. Tap Next and then tap Finish to complete the account setup. If auto configuration
was not successful, enter information above appropriate until setup is complete.
Enter a name that you want to display when you send e-mail in the Your name field.
If you save your password and then lose your phone, someone finding your phone might be able
to gain access to your e-mail.
Composing an E-mail Message
1. Tap
> Messaging.
2. Select an e-mail account.
New.
3. Tap
To, Cc and/or Bcc, enter recipient e-mail addresses. Insert a semicolon (;) between multiple
4. In
addresses.
5. In Subject, enter a subject.
6. Enter a message.
7. Tap
Send. E-mail messages are stored in Outbox and are sent to recipients the next time you
synchronize or connect to your e-mail server and send and receive mail.
You can quickly enter e-mail addresses from your contact cards. In To, press ENTER and select a
recipient from the list. Then, select the recipient’s e-mail address.
Reading an E-mail Message
1. Tap > Messaging.
Inbox and select Inbox under Text Messages.
2. Tap
3. In the message list, tap the text message you want to read.
Message Options
1. Tap > Messaging, and select an e-mail account.
New.
2. Tap
Menu > Message Options.
3. Tap
4. Select the type of options to change.
5. Tap
.
Page 57

112
Chapter 8. Messaging & Contacts
113
8.3 Changing Messaging Account Options
1. Tap > Messaging, and select the Messaging account you want to change options for.
Menu > Tools > Options.
2. Tap
4. Select the type of options to change.
5. Tap
.
8.4 Using Contacts
Contacts is your a ddress book and infor mation storage for the people and bus inesses y ou
communicate with. It stores phone numbers, e-mail addresses, home addresses, and any other
information that relates to a contact, such as a birthday or an anniversary date. You can also add a
picture or assign a ring tone to a contact.
From the contact list, you can quickly communicate with people. Click a contact in the list for a
summary of contact information. From there, you can call or send a message.
If you use Outlook on your PC, you can synchronize contacts between your phone and PC.
Creating a New Contact
1. Tap > Contacts > New.
2. Enter information for the new contact.
.
5. Tap
If someone who isn't in your list of contacts calls you or sends you a message, you can create a
contact from Call History or from the message by tapping Menu > Save to Contacts.
To save an existing contact to your SIM, open the contact and tap Menu > Save to SIM.
Viewing and Editing Contact Information
1. Tap > Contacts.
2. Tap the contact whose information you want to view.
3. To edit the information, tap
4. When finished making changes, tap
Adding a Picture to a Contact
1. Tap > Contacts.
2. Tap the contact you want to add a picture to.
Menu > Edit.
3. Tap
Picture.
4. Tap
5. Tap the picture you want to add.
Menu > Edit.
.
Page 58

114
Chapter 8. Messaging & Contacts
115
Assigning a Ring Tone to a Contact
To easily identify who is calling you by the ring tone, you can assign a custom ring tone to each
contact.
1. Tap > Contacts.
2. Tap the contact you want to assign a ring tone to.
Menu > Edit.
3. Tap
Ring tone and select the ring tone you want.
4. Tap
5. Tap
.
Finding a Contact
1. Tap > Contacts.
2. Begin entering the name or phone number of the contact until the contact is displayed.
Sending an E-mail to a Contact
1. Tap > Contacts.
2. Tap the contact you want to send an e-mail to.
3. Tap the e-mail address.
4. Select the e-mail account to use.
5. Enter a subject, compose your message, and then tap
Send.
Sending a Text Message to a Contact
1. Tap > Contacts.
2. Tap the contact you want to send a text message to, and tap
3. Compose your message, and tap
Send.
Menu > Send Text Message.
Creating a SIM Contact
Contacts can be created and stored on a subscriber identity module (SIM.) If you move the SIM to
another phone, your SIM contacts are moved as well.
1. Tap > Contacts.
Menu > New SIM Contact.
2. Tap
3. Enter the name and phone number of the contact and tap
.
SIM contacts appear at the bottom of the contacts listed in alphabetical order.
Page 59

116
Chapter 8. Messaging & Contacts
Chapter 9.
Using Barcode Reader
9.1 Setting Barcode Reader
9.2 Scanning and Reading Barcode labels
Page 60

118
Chapter 9. Using Barcode Reader
119
In the top of your device, a reader for barcode/2D code reading and decoding is built in, with which
various types of barcode/2D code labels are decoded into readable information such as letters and
numbers. Settings of barcode/2D code reader can be changed to fit your specific requests.
9.1 Setting Barcode Reader
Changing Options in Barcode Reader
Barcode reader is set to be disabled by default, please
remember to activate it before scanning.
1. Tap
Keyboard hook can convert received characters to keyboard messages; therefore, you can read
barcode in applications such as Notes, Tasks, Excel Mobile and Word Mobile as long as you
enable the keyboard hook.
> Settings > System tab > Barcode
Settings > Options tab. Check the check box of
Barcode reader or/and Keyboard hook.
When Keyboard hook is enabled, data is received
as key message; when Keyboard hook is disabled,
data is stored in the memory buffer temporarily. To
retrieve the data, use specific software development
kit (SDK) and com pa tible Windows application
program interfaces (APIs). You can download the
SDK from www.opticon.com.
2. In Read Mode, tap the upward/downward
arrow to t oggle between Multiple and
Si n g l e . Multiple re a d mo de enab l e s
constantly scanning while single read mode
needs the reader to be triggered again to
read another label.
Bu z z e r, ch e c k t h e ch ec k b o x of
3. I n
Goodread sound. It enables the function
of playing a sound effect after a barcode
has been decoded successfully. You can
change the sound effect by tapping the
upward/downward arrow and playback
the sound effect you choose by tapping the
Sound button on the screen.
4. In
Additional trigger key, tap the upward/downward arrow to choose another access key for
the reader. Otherwise you can set the additional trigger key to be none.
Page 61

120
Chapter 9. Using Barcode Reader
121
Choosing Barcode Types
Your device is capable of scanning and decoding various
barcode types; to check what kind of barcode is readable and
to assign specific barcode types to scan for, do as follows:
1. Tap
> Settings > System tab > Barcode Settings >
Barcodes tab.
2. Select specific barcode types or select all of them.
3. Tap
.
Advanced Setting
You can set specific configuration to your barcode reader by editing a list of codes in the menu
codes file. The codes you input will be stored in the menu code file and replace default settings.
For descriptions of menu codes, refer to Universal Menu Book (you can download it from www.
opticon.com). Please note that supported menu codes depend on the module type or the firmware
version of your device.
Inputting Menu Codes from a File
You can input menu codes automatically from a file, please do as follow to access the file and
configure the barcode reader.
1. Tap
2. Tap
> Settings > System tab > Barcode Settings > Menu codes tab.
to view available files in your device.
Tap Cancel if you want
to stop the procedure.
Page 62

122
Chapter 9. Using Barcode Reader
123
3. Tap after you select a file.
4. Tap
to continue. 5.Tap .
Editing Existent Menu Codes
You can input characters directly to edit an existent
menu codes file.
1. Tap
> Settings > System tab > Barcode
settings > Menu codes tab.
2. Tap
.
3. Input or delete menu codes.
4. Tap
.
Returning to Defaults
You can cancel all personalized settings in the barcode
reader.
1. Tap
> Settings > Sy stem tab > Barco de
settings > Menu codes tab.
2. Tap
.
Page 63

124
Chapter 9. Using Barcode Reader
125
3. Tap to continue. 4. Tap .
Firmware Update
How to update the firmware of your device
You can update the firmware of barcode reader from an adapted file on your device or a MiniSD card inserted to your device. Please connect your device with the AC adaptor before updating
firmware.
1. Tap
> Settings > System tab > Barcode setting > Firmware Update tab.
2. Tap to view available files and select one of them.
Tap Cancel if you want
to stop the procedure.
3. Tap the file you want to update the firmware from. The selected file will be showed on the
screen then.
Page 64

126
Chapter 9. Using Barcode Reader
127
4. Input the default password “1234567890AB” and tap . You can then see current
completed percentage of the update to be displayed on the screen.
5. Tap
to complete the operation.
Change Password
You can change the default password of firmware update to another one.
1. Tap
2. Tap
> Settings > System tab > Barcode setting > Firmware Update tab.
. 3. Input old password first. In Password
Information, input your new password
in both of the boxes in sequence for
double confirmation. Then tap .
Page 65

128
Chapter 9. Using Barcode Reader
129
4. Tap to complete the procedure.
You can see more information about the barcode reader such as scanner version, please tap
> Settings > System tab > Barcode Settings > About tab.
9.2 Scanning and Reading Barcode labels
Your device can scan and decode barcode labels depending on the scanner equipped with your
device. If you prefer to read a barcode on your device right after scanning, open an application in
which letters and numbers can be displayed before you activate the barcode reader.
1. Open an application, e.g. Notes, Tasks and Contacts, in which you want to display converted
barcode information after scanning.
2. Do one of the following to enable barcode reader and keyboard hook:
• Tap > Settings > System tab > Barcode Settings > Options tab. Then check the
checkboxes of Barcode reader and Keyboard hook.
• Tap icon on the screen and tap in the dialog box to active barcode reader and
keyboard hook directly.
Page 66

130
Chapter 9. Using Barcode Reader
3. Point the barcode reader to a barcode label and press the scan key (left scan key, right scan key or
the assigned trigger key).
4. Adjust the distance between your device and the label, and make sure the light emitted from the
scanner exceeds the width of the label.
5. A Goodread Sound plays and the content of the barcode shows when the label is decoded
successfully.
Chapter 10.
Other Applications
10.1 Word Mobile
10.2 Excel Mobile
10.3 PowerPoint Mobile
10.4 Pocket MSN Messenger
10.5 Backup/Recover
10.6 Managing Memory
Page 67

132
Chapter 10. Other Applications
133
Your device comes with a variety of useful companion applications. This chapter describes the
procedure on how to utilize these applications.
10.1 Word Mobile
With Word Mobile, you can create and edit Microsoft Word documents and templates, plain text files,
and/or rich text format files.
Unlike Microsoft Word, you can only have one document open at a time in Word Mobile.
Creating a Document
1. Do one of the following:
• Tap > Programs > Word Mobile .
• Tap on the Word Mobile icon in the program shortcut of the Today screen.
2. Tap
New, if a new document is not opened by itself.
3. Enter text as desired.
4. Tap
Menu > File > Save As.
5. Enter a name for the document and tap the
You can also tap Ok to save a document after you finish entering text. This way, the first few
words of the document is being used as the filename.
Save button.
Word Mobile Formatting Toolbar
The Formatting toolbar in Word Mobile provides a quick way to apply common formatting such
as bold type, bulleted or numbered lists, and paragraph indentation to your text.
•In a Word Mobile document, tap View > Toolbar.
A check mark appears next to Toolbar when the toolbar is visible.
Tap To
Make the selected text bold
Make the selected text italic
Underline the selected text
Align text to the left
Center the text
Align text to the right
Add or remove a numbered list in the selected text
Add or remove bullets in the selected text
Increase the indent of numbered or bulleted list text one tab stop to the right
Decrease the indent of numbered or bulleted list text one tab stop to the left
Page 68

134
Chapter 10. Other Applications
135
10.2 Excel Mobile
With Excel Mobile, you can create and view spreadsheet on you device.
Unlike Microsoft Excel, you can only have one document open at a time in Excel Word Mobile.
Creating a New Spreadsheet
1. Do one of the following:
•Tap > Programs > Excel Mobile .
•Tap on the Excel Mobile icon in the program shortcut of the Today screen.
2. Enter text, numbers, and formulas as desired.
3. Tap
Menu > File > Save As.
4. Enter a name for the document and tap the
You can also tap Ok to save a spreadsheet and Excel Mobile gives it a name automatically.
Excel Mobile Formatting Toolbar
The formatting toolbar in Excel Mobile provides a quick way to apply common functions such as
create a chart or align text to the left.
•In an Excel Mobile workbook, tap View > Toolbar.
A check mark appears next to Toolbar when the toolbar is visible.
Tap To
Create a chart from the selected cells
Align text to the left
Center the selected text
Align text to the right
Add all contiguous numbers in a column or row
Add a currency symbol
Add the default thousands separator
Add a decimal point
Increase and decrease the magnification
Save button.
Page 69

136
Chapter 10. Other Applications
137
10.3 PowerPoint Mobile
With PowerPoint Mobile, you can view PowerPoint slides on you device.
PowerPoint Mobile only supports slides in .ppt and .pps formats.
Starting a PowerPoint Presentation
1. Do one of the following:
•Tap > Programs > PowerPoint Mobile.
•Tap on the PowerPoint Mobile icon in the program shortcut of the Today screen.
2. Tap the slide show you want to view in the presentation list.
3. Tap the current slide to advance to the next slide if slides don’t advance automatically.
4. Tap
Menu > Rename/Move .
5. Enter a name for the document and tap
Stopping a PowerPoint Presentation
•In a slide show, tap > End Show.
Navigating Between Slides
•Tap > Next to go to the next slide.
•Tap > Previous to go back to the previous slide.
•To jump to any slide in the slide show, tap > Go to Slide and tap on the slide you want
to view.
10.4 Pocket MSN Messenger
You can send instant messages with MSN Messenger.
Your device must be connected to the Internet before you can start using MSN Messenger.
Signing In/Out MSN Messenger
With MSN Messenger, you can send and receive instant messages from other MSN Messenger
users.
You must have a valid Microsoft .NET Passport or Hotmail account before you can sign in to
MSN Messenger.
.
To sign in MSN Messenger
1. Tap > Programs > Pocket MSN.
MSN Messenger.
2. Tap
3. Tap
Sign In, anywhere on the MSN Messenger screen, or Menu > Sign In to sign in MSN
Messenger.
4. Enter your e-mail and password and tap
To sign out MSN Messenger
•Tap Menu > Sign out.
Sign In.
Page 70

138
Chapter 10. Other Applications
139
Adding/Deleting a MSN Messenger Contact
1. Sign in MSN Messenger.
2. Do any of the following:
•To add a contact, tap Menu > Add a Contact, and follow the on-screen instructions.
•To delete a contact, tap and hold the contact name in the MSN contact list, then tap Delete
Contact.
Sending an Instant Message
1. Sign in MSN Messenger.
2. Tap the contact’s name to whom you want to send a message to.
3. Enter a message and tap Send.
To add a preset message, tap Menu > My Text and select a preset message.
Changing MSN Messenger Display Name
1. Sign in MSN Messenger.
2. Tap
Menu > Options > Messenger tab.
3. Enter a new display name and tap
.
Blocking/Unblocking a Contact
•To block a contact from seeing you on-line, tap and hold the contact’s name and select Block.
•To unblock a contact, tap and hold the contact’s name and select Unblock.
Changing MSN Messenger Settings
1. Sign in MSN Messenger.
2. Tap
Menu > Options.
3. Select the type of options to change.
4. Ta
p .
Page 71

140
Chapter 10. Other Applications
141
10.5 Backup/Recover
It is advisable to take backups of your device data regularly in case important data is accidentally lost
or damaged. You can recover your data from those backup copies as needed. Device data can be
backed up to or be recovered from DiskOnChip of your device or a compatible memory card.
DiskOnChip is flash memory device (essentially a hard disk on a chip) which locates in an
independent area of OS. DiskOnChip keeps the data even after a factory reset.
Backup data
1. Tap > Programs > Backup Manager.
2. Tap the
you want to backup.
Backup button. 3. Select the check box(es) of the item(s) that
4. Input a file name for the backup copy. To 5. Select a destination for storing the backup
name it automatically, tap . copy: Storage Card or DiskOnChip.
6. Tap the
Backup Button. 7. Tap .
Page 72

142
Chapter 10. Other Applications
143
Recover data
1. Tap > Programs > Backup Manager.
2. Tap the
Recover button. 3. Do one of the following to select a file:
•Tap > File Explorer > Backup File folder and
select a file.
•Tap on the screen to view available files. You can
then select one of them.
4. Tap the
5. T
Recover Button.
ap .
Only items that have already been backed up can be recovered from their backup copies.
10.6 Managing Memory
Checking Available Storage
1. Tap > Settings > System tab > Memory.
Main tab, you can see how much storage is
2. In
available on the main memory of your device.
3. To see how much storage is available on your
storage cards, tap Storage Card tab.
4. Us e th e dro p - d own menu to sele c t yo ur
available storage cards and view their
available memory.
Page 73

144
Chapter 10. Other Applications
Closing a Running Program
1. Tap > Settings > System tab > Memory > Running Programs tab.
Running Program List, select a program. You can tap Stop on the screen to close the
2. In
program or tap Stop All to close all programs.
Appendix
Page 74

146
Appendix
147
A.1 Regulatory Notices
European Union Notice
Product with CE marking comply with the R&TTE Directive (99/5/EC), the EMC Directive (89/336/
EEC), and the Low Voltage Directive (73/23/EEC) issued by the Commission of the European
Community.
Compliance with these directives implies conformity to the following European Norms (in parentheses
are the equivalent international standards).
•ETSI EN 301 481-1
Electromagnetic compatibility and Radio spectrum Matters (ERM); ElectroMagnetic Compatibility (EMC)
standard for radio equipment and services; Part 1: Common technical requirements.
•ETSI EN 300 328
Electromagnetic compatibility and Radio spectrum Matters (ERM); Wideband Transmission systems;
data transmission equipment operating in the 2.4 GHz ISM band and using spread spectrum
modulation techniques.
•EN 50360:2001
Product standard to demonstrate the compliance of mobile phones with the basic restrictions related
to human exposure to electromagnetic fields (300MHz – 3GHz)
•ETSI EN 301 489-7
Eletromagnetic compatibility and Radio spectrum matters (ERM); ElectroMagnetic Compatibility (EMC)
standard for radio equipment and services; Part 7: Specific conditions for mobile and portable radio
and ancillary equipment of digital cellular radio telecommunications systems (GSM and DCS).
•ETSI EN 301 489-17
Electromagnetic compatibility and Radio spectrum Matters (ERM); ElectroMagnetic Compatibility
(EMC) standard for radio equipment and services; Part 17: Specific conditions for 2.4 GHz wideband
transmission systems and 5 GHz high performance RLAN equipment.
•EN 60950-1 (IEC 60950-1)
Safety of information Technology Equipment.
•ETSI EN 301 511
Global system for mobile communications (GSM); Harmonized EN for mobile stations in the GSM
900 and GSM 1800 bands, covering essential requirements of article 3.2 of the R&TT directive
(1995/5/EC).
Page 75

148
Appendix
149
Federal Communications Commission Notice
This device complies with part 15 of the FCC Rules. Operation is subject to the following two
conditions: (1) This device may not cause harmful interference, and (2) this device must accept any
interference received, including interference that may cause undesired operation. This equipment has
been tested and found to comply with the limits for a Class B digital device, pursuant to Part 15 of the
FCC Rules. These limits are designed to provide reasonable protection against harmful interference
in a residential installation. This equipment generates, uses, and can radiate radio frequency energy
and, if not installed and used in accordance with the instructions, may cause harmful interference to
radio communications. However, there is no guarantee does cause harmful interference to radio or TV
reception, which can be determined by turning the equipment on and off, the user is encourage to try
to correct the interference by one or more of the following measures:
•Reorient or relocate the receiving antenna.
•Increase the separation between the equipment and receiver.
•Connect the equipment into an outlet on a circuit different from that to which the receiver is
connected.
•Consult the dealer or an experienced radio or television technician for help.
RF Exposure Information (SAR)
This device meets the government’s requirements for exposure to radio waves. This device is designed
and manufactured not to exceed the emission limits for exposure to radio frequency (RF) energy set by
the Federal Communications Commission of the U.S. Government.
The exposure standard for wireless devices employs a unit of measurement known as the Specific
Absorption Rate, or SAR. The SAR limit set by the FCC is 1.6W/kg. *Tests for SAR are conducted using
standard operating positions accepted by the FCC with the device transmitting at its highest certified
power level in all tested frequency bands. Although the SAR is determined at the highest certified
power level, the actual SAR level of the device while operating can be well below the maximum value.
This is because the device is designed to operate at multiple power levels so as to use only the poser
required to reach the network. In general, the closer you are to a wireless base station antenna, the
lower the power output.
While there may be differences between the SAR levels of various devices and at various positions,
they all meet the government requirement.
The FCC has granted an Equipment Authorization for this device with all reported SAR levels evaluated
as in compliance with the FCC RF exposure guidelines. SAR information on this device is on file
with the FCC and can be found under the Display Grant section of http://www.fcc.gov/oet/ea after
searching on FCC ID: DGIBC0129AAA190.
For body worn operation, this device has been tested and meets the FCC RF exposure guidelines for
use with an accessory that contains no metal and the positions the handset a minimum of 1.5 cm from
the body. Use of other enhancements may not ensure compliance with FCC RF exposure guidelines. If
you do no t use a body-worn accessory and are not holding the device at the ear, position the handset
a minimum of 1.5 cm from your body when the device is switched on.
Page 76

150
Appendix
151
SAR Information
•0.605W/Kg @1g FCC (head)
•0.863W/Kg @1g FCC (body)
•0.2W/Kg @10g (CE)
Exposure to Radio Frequency (RF) Signals
Your wireless phone is a radio transmitter and receiver. It is designed and manufactured not to exceed
the emission limits for exposure to radio frequency (RF) energy set by the Federal Communications
Commission of the U.S. Government. These limits are part of comprehensive guidelines and establish
permitted levels of RF energy for the general population. The guidelines are based on the safety
standards previously set by both U.S. and international standards bodies:
•American National Standards Institute (ANSI) IEEE. C95.1-1992
•National Council on Radiation Protection and Measurement (NCRP). Report 86. 1986
•International Commission on Non-Ionizing Radiation Protection (ICNIRP) 1996
•Ministry of Health (Canada), Safety Code 6. The standards include a substantial safety margin
designed to assure the safety of all persons, regardless of age and health.
In the U.S. and Canada, the SAR limit for mobile phones used by the public is 1.6 Watts/kg (W/kg)
averaged over one gram of tissue. The standard incorporates a substantial margin of safety to give
additional protection for the public and to account for any variations in usage. Normal conditions
only ensure the radiative performance and safety of the interference. As with other mobile radio
transmitting equipment, users are advised that for satisfactory operation of the equipment and for the
safety of personnel, it is recommended that no part of the human body be allowed to come too close
antenna during operation of the equipment.
Warning!
DANGER OF EXPLOSION IF BATTERY IS INCORRECTLY REPLACED. TO REDUCE RISK OF FIRE OR
BURNS, DO NOT DISASSEMBLE, CRUSH, PUNCTURE, SHORT EXTERNAL CONTACTS, EXPOSE TO
TEMPERATURE ABOVE 60.C (140.F), OR DISPOSE OF IN FIRE OR WATER. REPLACE ONLY WITH
SPECIFIED BATTERIES. RECYCLE OR DISPOSE OF USED BATTERIES ACCORDING TO THE LOCAL
REGULATIONS OR REFERENCE GUIDE SUPPLIED WITH YOUR PRODUCT.
A.2 PC Requirement to Run ActiveSync 4.5
To connect your device to the PC, you must have Microsoft® ActiveSync® program installed on your
PC. ActiveSync 4.5 is included in the Installation CD, which is compatible with the following operating
systems and applications:
•Microsoft® Windows® 2000 Service Pack 4
•Microsoft® Windows® Server 2003 Service Pack 1
•Microsoft® Windows® Server 2003 IA64 Edition Service Pack 1
•Microsoft® Windows® Server 2003 x64 Edition Service Pack 1
•Microsoft® Windows® XP Professional Service Packs 1 and 2
•Microsoft® Windows® XP Home Service Packs 1 and 2
•Microsoft® Windows® XP Tablet PC Edition 2005
•Microsoft® Windows® XP Media Center Edition 2005
•Microsoft® Windows® XP Professional x64 Edition
Page 77

152
Appendix
153
•Microsoft® Outlook® XP and Microsoft® Outlook® 2003 messaging and collaboration clients
•Microsoft® Office XP
•Microsoft® Office 2003
•Microsoft® Internet Explorer 6.0 or later (required)
•Microsoft® Systems Management Server 2.0
A.3 Specifications
System Information
CPU Samsung S3C2440A, 400MHz
Operating System Windows Mobile 5.0 for Pocket PC, Phone Edition
Memory 64 MB RAM
128 MB ROM
Dimension and Weight
Dimension 126.7 x 60 x 25.8(27.4) mm
H-16A〉169g
〈
H-16B〉171 g
〈
(excluded Main Battery)
Weight
Key and Indication
Key •5-way navigation with action input
•2 Scan key
•Volume up and down
•Power button
•Talk key and End key
•Warm reset button
•Record key
•2 Soft key
•Start and OK key
•41 key QWERTY keyboard
Indication •Vibrate
•Audible
•Visual message
•LED 1: Wi-Fi (Green)/Bluetooth(Blue)
•LED 2: Low Power/Missed Call(Red)/Charging(Orange)/GSM on(Green)
Page 78

154
Appendix
155
Display
Type Transflective TFT LCD with touch panel and backlight
Size/Resolution/Color 2.8", 240x320, 65,536 colors
Scanner/Barcode Reader
<H-16A> 1D Model Red laser diode
Supported Symbologies
1D : EAN, JAN, UPC-A, UPC-E, Industrial 2 of 5, IATA, Interleaved 2 of 5,
NW-7 (CODABAR), CODE-39, CODE-93, CODE-128, and so on
<H-16B> 1D/2D Model
CMOS Area Sensor
Supported Symbologies
1D : EAN, JAN, UPC-A, UPC-E, Industrial 2 of 5, IATA, Interleaved 2 of 5,
NW-7 (CODABAR), CODE-39, CODE-93, CODE-128, and so on
2D : PDF417, Micro PDF417, QR Code, Data Matrix, Maxi Code, and
so on
Connectivity
Bluetooth Bluetooth 1.2 compliant
Wi-Fi IEEE802.11 b/g compliant
Telecom GSM/GPRS/EDGE 850/900/1800/1900,
GPRS class 12, EDGE class 10
USB mini USB (ver.1.1 client)
External Memory Card
Card Slot Mini-SD card slot (ver.1.0)
Battery and Power
Main Battery Li-Ion Polymer 4.2V 1440mAh
Talk Time 4 hours
Standby Time 150 hours
Battery Charing Time 4 Hours
Page 79

156
Appendix
WEEE Notice
The Waste Electrical and Electronic Equipment (WEEE) Directive is designed to encourage and
regulate the collection, reuse, recycling and recovery of waste electrical and electronic equipment,
which entered into force as European law on 13th February 2003. The Directive aims to improve the
level of recycling of electrical and electronic equipment (EEE) and encourages designers to develop
products with recycling efficiency in mind; it also aims to improve our environment, reduce risks to
human health through the proper treatment of discarded goods.
The WEEE logo ( ) on the product and its accessories or on its box indicates that this product
must be disposed of or dumped with your other household wastes. You are liable to dispose of all
your electronic or electrical waste equipment by relocating over to the specified collection point for
recycling of such hazardous waste. Isolated collection and proper recovery of your electronic and
electrical waste equipment at the time of disposal will allow us to help conserving natural resources.
Moreover, proper recycling of the electronic and electrical waste equipment will ensure safety of
human health and environment.
For more information about electronic and electrical waste equipment disposal, recovery and
collection point, please contact your local city centre, household waste disposal service, shop from
where you purchased the equipment, or manufacturer of the equipment.
RoHS Compliance
This product is in compliance with Directive 2002/95/EC of the European Parliament and of the
Council of 27 January 2003, on the restriction of the use of certain hazardous substances in electrical
and electronic equipment (RoHS) and its amendment.
 Loading...