

Page 1
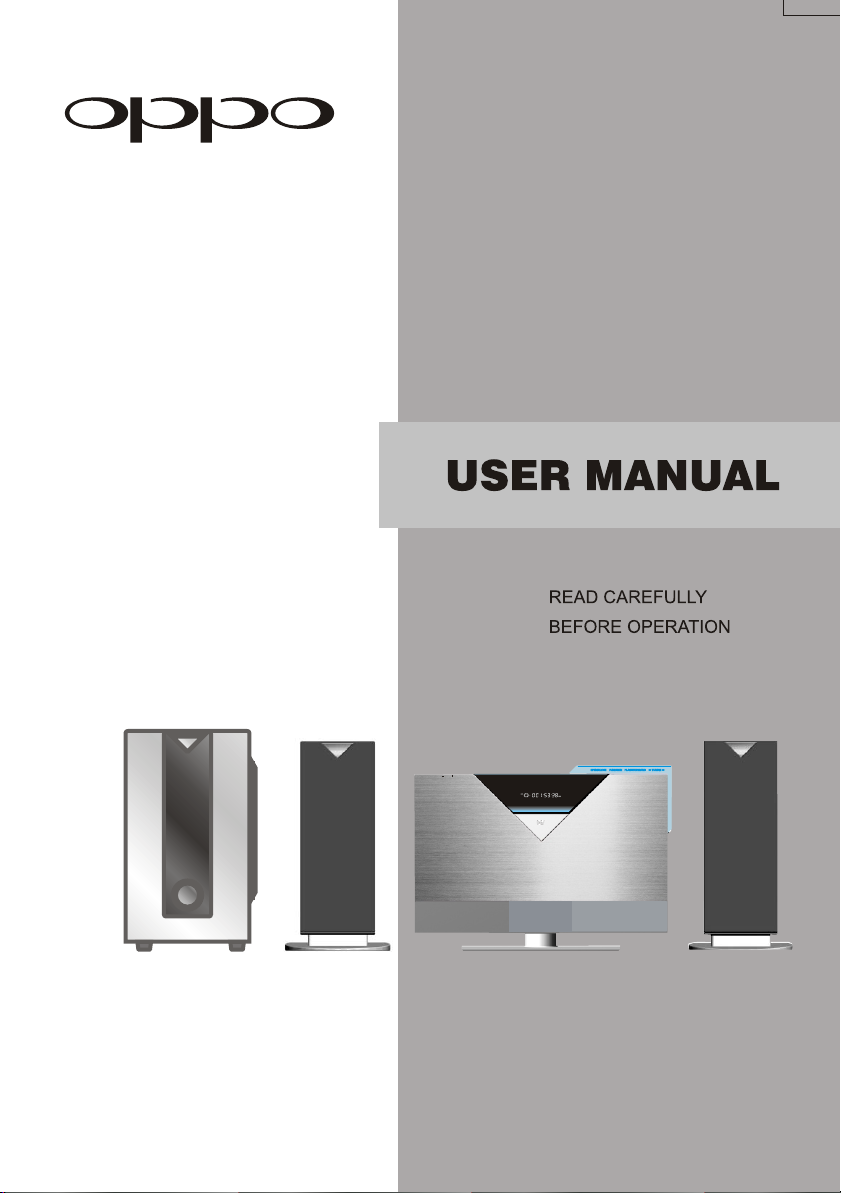
DVD MINI COMBO
CH-SW
VOLUME
POWER
VS1000
POWER
CH-SW
VOLUME
Page 2
Danger Symbol
Reminding the user of the dangerous voltage!
Warning Symbol
Reminding the user of the important instructions for operation and maintenance.
WARNING:
To prevent the risk of fire or electric shock, do not expose this unit to rain or moisture.
High voltage components in it so do not attempt to open the enclosure. Only qualified personnel
are allowed for maintenance.
CAUTION:
This DVD player contains laser system.
Read this manual carefully and get familiar with the instructions before operating.
After reading this manual, please keep it for future reference. Please contact your local dealer or
our technical service center for maintenance.
To prevent direct laser radiation, do not attempt to open the enclosure. Visible laser beam will radiate
when the enclosure is opened or when the interlock device is released. Do not stare at the laser-beam.
Never place other things or articles upon the player, otherwise it may cause improper playback.
Safety Instructions
is a trademark of DVD Format/Logo Licensing Corporation, registered in the U.S.,
Japan and other countries.
This product incorporates copyright protection technology that is protected by method
claims of certain U.S. patents and other intellectual property rights owned by Macrovision
Corporation and other rights owners. Use of this copyright protection technology must be
authorized by Macrovision Corporation, and is intended for home and other limited viewing
uses only unless otherwise authorized by Macrovision Corporation. Reverse engineering
or disassembly is prohibited.
All images in this manual are sketch illustrations for reference only. The actual displays
are contingent upon discs.
Page 3
Contents
Brief introduction to DVD
PREFACE
Cautions
Features
Compatible disc types
Control Button Locations and Explanations
Front Panel Illustration
Connected to This Player
CONNECTIONS
Connected to FM/AM Tuning
SYSTEM
Connected to AUX IN 1
Connected to AUX IN 2
Connected to Amplifier with DOLBY DIGITAL/DTS Decoder
Connected to Progressive Scanning TV set
Connected to TV set
Playback
Progressive/Interlacing Output Mode
OPERATION
TV System selection
BASIC
Pause/step Playback
OSD
Channel Volume Control
DVD menu playback
PBC Playback
Direct selection playback function
by number button
Rear Panel Illustration
Side panel illustration
Dot matrix VFD
Subwoofer rear panel illustration
Remote Control Illustration
How to use the Remote Control
Accessories
Language/audio channel selection
Mute
Function switch
Tuning
Save radio station
AUX IN Amplifying
Sleep power -off time setup
Real-time clock display
Timing Power-on setup
Usage of USB equipment and 3-IN-1 card reader
Fast Playback
OPERATION
Repeat playback
PLAY
Repeat the selected section
Quick-play Playback
Subtitle selection
Angle selection
FUNCTION
Function Setup
SETUP
General Settings
Audio Setup
OTHERS
Useful notes
Troubleshooting
Specifications
Playback from the desired point
Zooming the Displayed Frame
Disc info
MPEG4,MP3 and JPEG File Playing
Headphone enjoying
Video Setup
Initial Setup
Specifications for sound system
Terms
Language Code List
Page 4
PREFACE
Brief Introduction to DVD
DVD is well known for its extraordinarily large capacity and outstanding audio-video effects. Its capacity is as high
as 4.7 -17GB (approximately 7-26 times the CD capacity).With 500-line horizontal resolution of picture and Dolby
GB
Digital 5.1 Channel surround sound, it brings a new era to the household AV products.
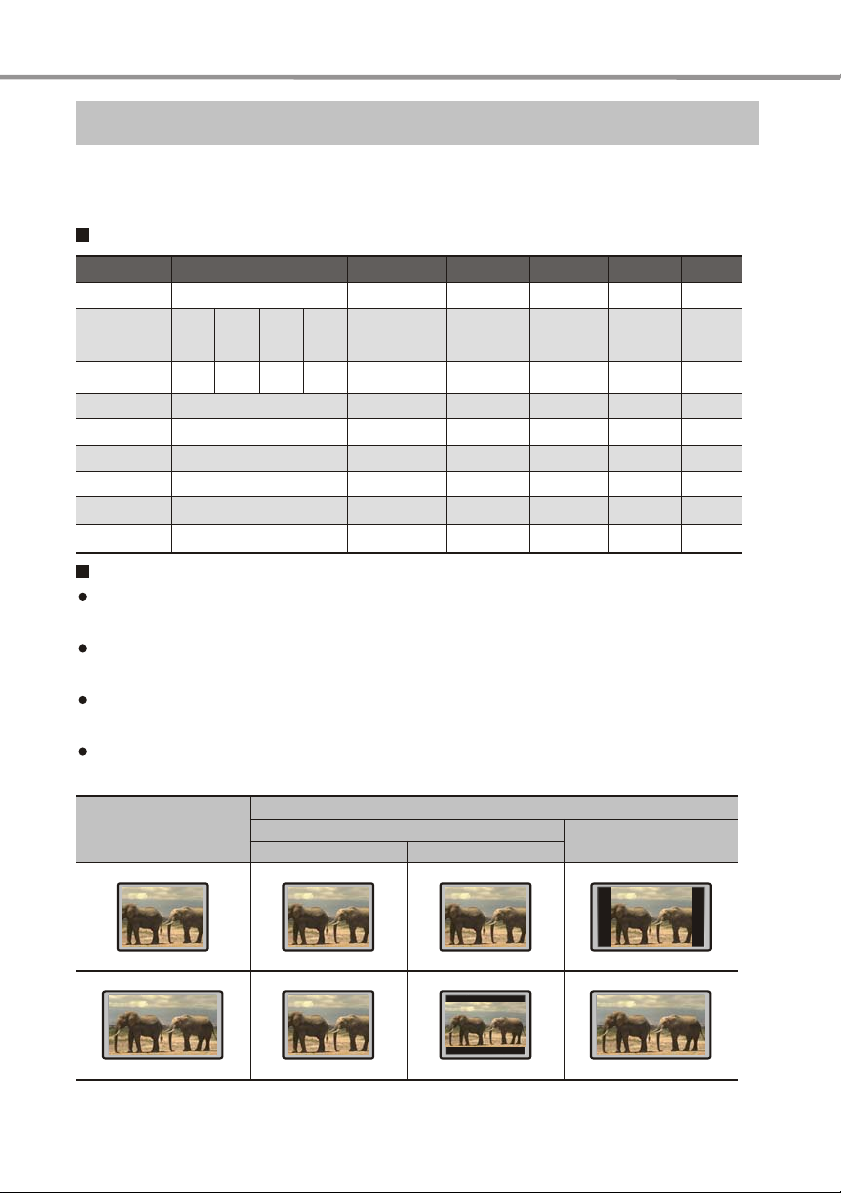
Comparison Between DVD and Other Discs
VCD
Digital/MPEG1
650MB
74min.
12cm/8cm
250 lines or more
44.1kHz
650MB
74min.
12cm/8cm
Linear PCM
44.1kHz/16bit
Recording Method
Capacity
Playback time
Disc Diameter
Horizontal
Resolution
Aspect Ratio
Subtitle
Audio
Sound Quality
DVD
Digital/MPEG2
Singlesided
1layer
4.7G
133min.
Dolby Digital/Linear PCM
48kHz,96kHz/16,20,24bit
Double-
Single-
sided
sided
1layer
2layers
9.4G
8.5G
242min. 266min. 484min.
12cm/8cm
500 lines or more
Multiple
32 types
Doublesided
2layers
17G
LD
Analog
1 side 60min.
2 sides 120min.
30cm/20cm
430 lines or more
One
Max. 16 types
Linear PCM
FM modulation
44.1kHz/16bit
Super VCD
Digital/MPEG2
650MB
45min.
12cm/8cm
350 lines or more
Function Introduction
Multiple languages and subtitles
DVD disc can support as many as 8 dubbing languages and 32 subtitle languages.
Multiple angles
DVD disc may support as many as 9 camera angles.
Multiple story plots
User can select to play the desired plots (the beginning, development or ending) of the same disc.
Multiple aspect ratios
Multiple aspect ratios support various TV screens.
TV Screen
Disc Pictures
Pan-Scan Letterbox
4:3
4:3
CDROM
CD
Digital Digital
650MB
12cm/8cm
16:9
16:9
1
Page 5
PREFACE
Cautions
Please remove the power plug from the socket when you are not going to use the player for a long time.
Ensure that all wires and the power supply are properly connected befor turning the Power on.
The player uses the switching power supply .The range of the power supply: AC 110V~250V, 50/60Hz.
Before turning on the power of the player, please adjust the volume level knob of audio system speakers and amplifiers to minimum. Adjust the volume as necessary only after starting normal playback to avoid damage to your
amplifiers or speakers.
Do not put your player near any high power speaker or put both on the same table-board so as to avoid any
influence on its nomal operation due to vibration.
Please put the player at a dry and ventilated area. Do not put it near heat source, or expose it to direct sunlight, mechanical vibration, humidity or dust-rich environment ,and also do not put it over heat releasing substances.
When moving the player from a cold place to a warm one, or vice versa, the laser head may have condensation.
Then the player will not work properly. In such a case, please turn the power on for 1-2 hours(without disc) before playing.
It is allowed to use a small amount of neutral detergent to clean the player. Never use sandpaper or organic solvent
such as alcohol or gasoline for cleaning.
Do not place objects full of liquid such as vase on the player.
MAINS plug is used as the disconnect device, so mains plug shall always remain readily operable.
Features
This player has employed the new generation DV decode chip with built-in Dolby Digital decoder which will
bring you to a brand-new AV ententainment world. The 2-laser super error-correction mechanism supports CD-R.
Brand-new AV Effects
Compatible with DivX, MPEG4 discs to produce wonderful pictures.
108MHz/12bit video DAC, with more vivid and brilliant pictures.
Compatible with three fashion storage cards such as MMC/SD/MS (Memory stick) Capable of reading the audio/video data
in the storage cards through card reader.
Compatible with USB equipment, capable of reading the audio/video data in the USB through USB port.
Progressive-scan video outputs to eliminate the flickers hardly overcome by interlacing scan and therefore your
eyesight will be well-protected. At the same time, the pictures definition is sharply enhanced and the pictures will
be finer, smoother and stabler.
DVD-Audio decoding output to reproduce original and realistic sound effects.
Brightness, chroma and contrast adjustment functions to render your eyes more comfortable.
Composite Video, S-Video and Component Video outputs.
8
9
Dolby output for 2channel(DOWNMIX)
10
Hi-Fi stereo headphone output.
11
2-way separate audio input function.
12
FM/AM digital tuning function, capable of storing (memorizing) 20 FM or AM radio stations.
13
High/low tone control, 2-channel separate volume fining function.
14
Real time clock (year, month, date, hour, minute, second) display, timing power on/off function.
15
Power amplifier employs high-performance and large-power IC, with complete protection and perfect sound quality.
16
Subwoofer employs large diameter bass unit matched with large-capacity speaker body to produce deep and dynamic effect.
17
Main speaker is dual-magnetic and magnetic shielded design for environmental protection, with clear and sweet sound quality.
18
More personalized mini I-Link connection, simple and convenient.
High Quality Digital Audio
Optical and coaxial outputs for Digital audio.
Dobly Digital, PCM Digital audio outputs to satisfy the Fans’ acoustic requirements.
Many Convenient Features
Screen saver protects your TV set carefully.
The novel Mp3 playback window GUI provides you a new way to appreciate Mp3 music.
Multi-angle playback function makes it possible for you to view a scene from different camera angles.
It’s possible to select the desired beginning, development and ending of a story.
Direct entry into desired scenes(title/chapter/time/track search).
Zooming function to zoom up any playing picture.
Capable of playing PAL/NTSC discs.
Multiple aspect ratios to fit TV sets of various screen ratios.
Parental lock function to prevent children from watching unsuitable discs.
Multiple dubbing languages and subtitle languages bring you the best entertainment status all the time.
Super Compatibility with super VCD, VCD, CD , CD-R , MP3,HDCD,KODAK PICTURE CD etc.
NOTE: DivX version is still upgrading continuously and the latest version of this unit is DivX 5.1. Some discs
labelled with MPEG4 on the market actually are*.rm/*.ram/*.rmm and others which are imcompatible.
Please take care when buying discs.
2
Page 6

Compatible Dise Types
PREFACE
Types
MPEG4
Sizes
12cm or 8cm
12cm or 8cm
12cm or 8cm
12cm
12cm or 8cm
12cm or 8cm
12cm
DVD: Compressed digital audio + compressed digital video(dynamic picture)
DVD: Compressed digital audio + compressed digital video(still picture)
Super VCD: Compressed digital audio + compressed digital video(dynamic picture)
MPEG4: Compressed digital audio + compressed digital video(dynamic picture)
VIDEO CD: Compressed digital audio + compressed digital video(dynamic picture)
CD-DA: Digital audio
Mp3: Compressed digital audio
Recorded Contents
NOTES
When the button is invalid, on TV screen display:
1
Press the effective button again.
2
Issues related to
DVD
MPEG4
Super VCD
CDVCD
MP3
These icons on the top banner indicate the disc types that the function described in this section applies to.
DVD
MPEG4
Super VCD
Applies to DVD disc
Applies to Super MPEG4 disc
Applies to Super VCD disc
VCD
Applies to VCD disc
CD
MP3
Applies to CD disc
Applies to MP3 disc
Control Button Locations and Explanations
Front panel illustration
3
1
4
2
POWER
CH-SW VOLUME
5
6
7 8
9 10
11 12
3
1
POWER button
2
Channel Switch Button
3
VOL- button
4
VOL+ button
Display window
5
6
IR sensor
7
OPEN/CLOSE button
8
FUNCTION button
9
PLAY/STOP button
BAND button
10
PREV button
TUNING<< button
11
NEXT button
TUNING>> button
12
Glass
Page 7

PREFACE
-
DT
M
2
-
SD/MMC/MS
AUDIOIN1
Control Button Locations and Explanations
Rear panel illustration
VIDEO
S-VIDEO
2
1 43 7
1
Video out terminal
2
S-video
3
Optical out terminal for
4
5
6
digital audio
Side panel illustration
FRONT
AUDIOIN 2
AUDIOOUT
Cb/Pb
Cr/Pr
Y
5
LRL
R
6
8
OPTICAL
VIDEOOUT
AUDIOOUT
DIGITAL
COAXIAL
Coaxial out terminal for digital audio
Component video/Y Pb Pr out terminal
Front amplifying audio out terminal
1
FM
SD/MMC/MS
AM
AUDIOIN1
-DTM2-
2
3
4
5
6
POWER
I-LINK
9
7
External audio in terminal 2
8
SCART Outjack
9
I-LINK out terminal
FM antenna input terminal
2
Card reader port
3
AM antenna input terminal
4
USB port
4
5
Headphone jack
6
External audio input terminal 1
Page 8
PREFACE
Control Button Locations and Explanations
Dot matrix VFD
3
4 5
15
8 9
1
DVD disc
2
CD,VCD, SVCD discs
3
MP3 disc
4
DOLBY DIGITAL
5
DTS
6
External input indicator
1
DVD
10
2
V CDS
111213 14
7
Stereo indicator
FM tuning indicator
8
9
AM tuning indicator
10
Bass adjustment indicator
Treble adjustment indicator
11
12
Playback information
Subwoofer rear panel illustration
1
16 17
6 7
18 19
13
Play
14
Pause
15
Repeat
16
Stop
17
Radio station pre-memory indicator
18
Sound field, EQ indicator
20
21
19
20
21
Tuning indicator
KHZ
MHZ
1
Phase inverter pipe
2
I-LINK input
2
3
4
3
Speaker output
4
Power switch
5
Power cord
5
5
Page 9
PREFACE
Control Button Locations and Explanations
Remote Control illustration
2
3
4
5
6
7
8
9
10
11
12
13
14
15
16
17
18
26
P/N Button
Switch the TV system between PAL,NTSC and
AUTO.
27
MENU Button
Display DVD menu or open/close PBC.
28
TITLE Button
DVD titles.
29
TIME Button
Show/edit current real time.
30
SLEEP Button
Auto sleep/wake up setting.
2731
Q-PLAY Button
Skip the advertisement /warning and play DVD directly.
2732
OSD Button
Display or hide disc information.
33
27
NUMBER Buttons
34
SUBTITLE Button
Change subtitle language/Switch JPEG
display modes.
35
EJECT Button
Open or close the disc tray.
INFO
35
34
33
32
Q-PLAY
31
30
29
28
27
26
25
24
23
22
21
20
19
6
STANDBY Button
Press once to standby, Press twice to play.
2
AUDIO Button
Change the audio language or audio channel.
3
GOTO button
Play from the desired location.
4
ZOOM Button
Zoom in the displayed frame.
5
ANGLE Button
Change camera angles.
6
MUTE button
Press once to mute, twice to unmute.
7
FUNCTION button
Switch DVD mode. Receiver mode and Aux in mode
8
CURSOR Buttons
9
SELECT Button
10
SETUP Button
Function setup.
11
PLAY Button
Normal playback.
12
STOP Button
Stop playback.
13
REV Button
Fast backward play.
TUNNING - Button
Tunning - with one step.
14
FWD Button
Fast forward play.
TUNNING + Button
Tunning + with one step.
15
REPEAT button
Repeat play.
SEARCH PREV button
15
Search prev station.
16
A-B button
Repeat the select.
SEARCH NEXT button
Search next station.
17
INTERLACE/PROGRESSIVE Button
Switch video output to the Interlace /Progressive
YPbPr / mode.
BAND button
FM/AM switching.
CHANNEL SWITCH Button
18
Select the speaker channel to be adjusted.
19
VOLUME-
20
VOLUME+
21
INFO Button
Switch new user interface.
AUTO Button
Auto tuning.
22
CARD READER Button
Switch in DVD ,USB and card reader.
SAVE button
Save radio station.
23
PREV Button
Skip backward.
PRESET - Button
Select the prev preset station.
24
NEXT Button
Skip forward.
PRESET + Button
Select the next preset station.
25
PAUSE/STEP Button
Pause or play frame by frame.
Page 10
PREFACE
Control Button Locations and Explanations
How to use remote control
Battery Installation
Cr2025
1
Step 1: press toward left
as illustration 1;
Cr2025
2
Step 2: take out outwards
as illustration 2.
Using remote control
POWER
When using remote control, the
front window of remote control
should be pointed to the infrared
sensor on the front panel within
an angle of 30 and a range
of 8 metres.
Cautions
Never drop remote control or expose it to moisture.
Never expose the infrared remote sensor on the front panel to direct sunlight or strong beams.
When the batteries become low, replace them in time.
CH-SW VOLUME
30
30
Within about 8 m
Accessories
Audio/video cord 1suit
AM screen-shielded antenna bracket
A
ntenna
FM
Main speaker cord 2pcs
MINI I-LINK CORD 1pc
Remote control 1pc
Power adaptor 1pc
3V button battery
AV Cord 1pc
User manual 1pc
7
1pc
1pc
1pc
Page 11
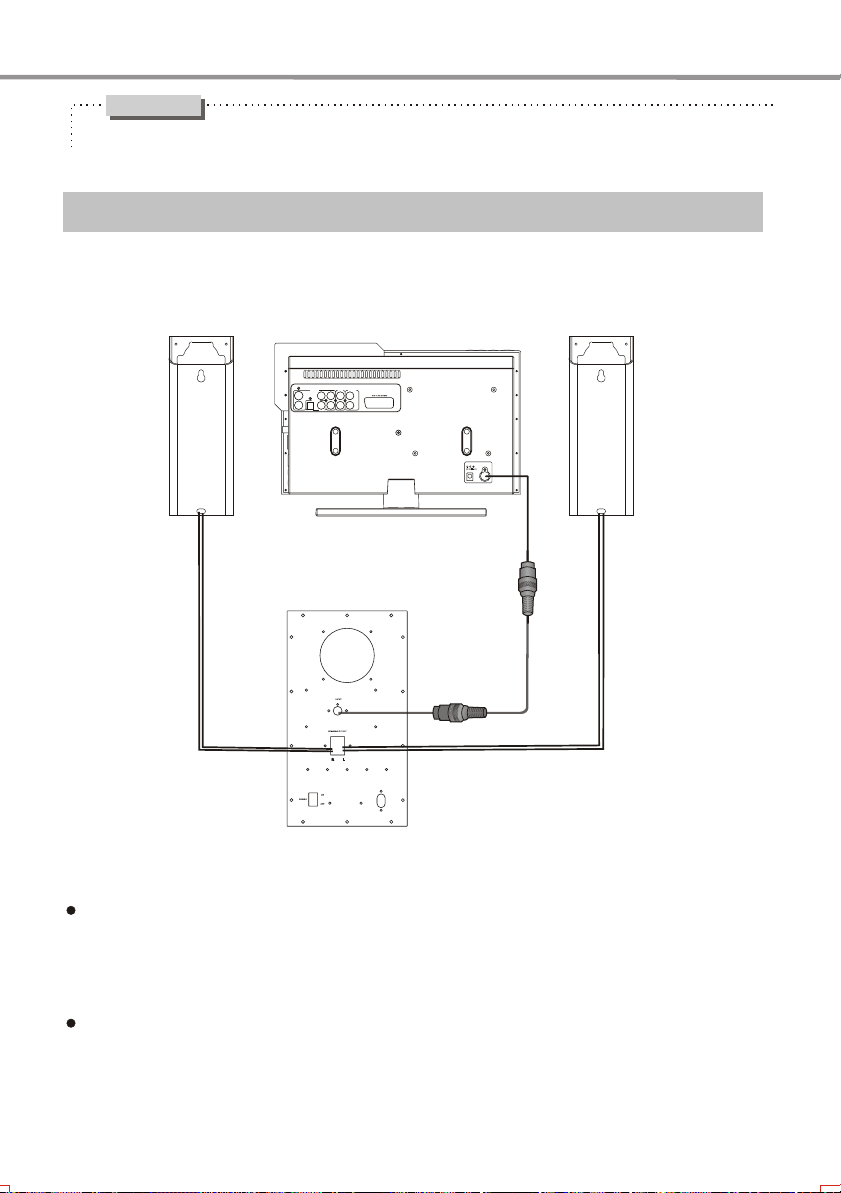
SYSTEM CONNECTIONS
Caution
Before system connecting, make sure that this player and other equipments are unplugged.
Connected to This Player
Rear panel
Main Speaker
VIDEOOUT
VIDEO
DIGITAL
S-VIDEO
AUDIOOUT
OPTICAL
FRONT
AUDIO IN 2
AUDIOOUT
Cb/Pb
Cr/Pr
L
RLR
Y
COAXIAL
Subwoofer
POWER
I-LINK
Main Speaker
Mini I-link Cord
Connect one end of main speaker cord to the connecting card in the bottom of the main
speaker, and the square head of the cord is anode. Connect the other end to the power
output connecting card in the rear panel of subwoofer speaker. The speaker placed on
the left is connected to L socket, and that on the right is connected to R socket.
Connect one end of mini I-link cord to the mini I-link jack of DVD player, and the other
end to that on the rear panel of subwoofer speaker.
8
Page 12

SYSTEM CONNECTIONS
-
D
TM
2
-
Connected to FM/AM Tuning
FM
AM
AUDIOIN 1
Side Panel
Main Speaker
SD/MMC/MS
-DTM2-
AM antenna
Subwoofer
FM antenna
Rear Panel
FRONT
AUDIO IN 2
AUDIO OUT
VIDEOOUT
Cb/Pb
Cr/Pr
VIDEO
L
DIGITAL
S-VIDEO
OPTICAL
RLR
Y
AUDIOOUT
COAXIAL
POWER
I-LINK
Min I-link Cord
Main Speaker
If you want to enjoy radio station program, please connect according to the above connections of FM/AM
tuning. Meanwhile press FUNCTION button to switch this player to tuning mode. Please refer to page 18
for details.
Note: When connecting to AM antenna, the ground wire of AM antenna should be connected to (ground
wire) port, and connect the signal wire of AM antenna to the signal wire port.
9
Page 13

SYSTEM CONNECTIONS
-DTM2-
Connected to AUX IN 1
Audio Out
CD-PLAYER
FM
SD/MMC/MS
AM
AUDIOIN 1
-DTM2-
Rear Panel
FRONT
AUDIO IN 2
AUDIO OUT
VIDEOOUT
Cb/Pb
Cr/Pr
VIDEO
L
DIGITAL
S-VIDEO
OPTICAL
RLR
Y
AUDIOOUT
COAXIAL
POWER
I-LINK
Side Panel
Subwoofer
Min I-Link Cord
Main Speaker
Main Speaker
If you want to enjoy music from external equipments, please connect according to the above
connection of external audio input. Meanwhile, press FUNCTION button to switch this player
to AUX IN1 mode. Please refer to page 18 for details.
10
Page 14

SYSTEM CONNECTIONS
Connected to AUX IN 2
L Audio R
Out
FRONT
AUDIO IN 2
AUDIO OUT
VIDEOOUT
Cb/Pb
Cr/Pr
VIDEO
L
DIGITAL
S-VIDEO
Y
AUDIOOUT
OPTICAL
COAXIAL
Rear Panel
RLR
POWER
I-LINK
Subwoofer
Mini I-Link Cord
Main Speaker
Main Speaker
If you want to enjoy music from external equipments, please connect according to the above
connection of external audio input. Meanwhile, press FUNCTION button to switch this player
to AUX IN 2 mode. Please refer to page 18 for details.
11
Page 15

SYSTEM CONNECTIONS
Connected to Amplifier with DOLBY DIGITAL/DTS Decoder
Video In
Video Cord
Rear Panel
VIDEOOUT
VIDEO
DIGITAL
AUDIOOUT
S-VIDEO
OPTICAL
SOURCE
MENU
CH
VOL
FRONT
AUDIOIN 2
AUDIOOUT
Cb/Pb
Cr/Pr
Y
COAXIAL
LRL
R
(Connect either of the cords)
Optical In
Coaxial In
Optical Cord
75 Coaxial Cord
Amplifier with DOLBY DIGITAL/DTS Decoder
Centre Speaker
Front Left Speaker Front Right Speaker
Subwoofer
Surround Left Speaker Surround Right Speaker
Manufactured under license from Dolby Laboratories. "Dolby" and the double-D symbol
are trademarks of Dolby Laboratories.
"DTS" and "DTS Digital Out" are the trademarks of Digital The ater Systems, Inc.
12
Page 16

SYSTEM CONNECTIONS
Connected to Progressive Scanning TV set
Component In (Y)
Component In (Pb)
Component In (Pr)
Rear Panel
VIDEOOUT
VIDEO
DIGITAL
AUDIOOUT
SOURCE
MENU
CH
VOL
S-VIDEO
OPTICAL
Progressive Scanning TV set
FRONT
AUDIOOUT
AUDIOIN2
Cb/Pb
Cr/Pr
Y
COAXIAL
LRL
R
Audio In
Audio Cord
13
Page 17

SYSTEM CONNECTIONS
Connected to TV set
Component In (Y)
Component In (Cb)
Component In (Cr)
Rear Panel
VIDEOOUT
VIDEO
DIGITAL
AUDIOOUT
SOURCE
MENU
CH
VOL
S-VIDEO
OPTICAL
FRONT
AUDIOOUT
AUDIOIN 2
Cb/Pb
Cr/Pr
Y
COAXIAL
LRL
R
or
S-Video
Video In
S-Video
Audio In
If you want to enjoy interlacing video, press IS/PS button to switch the video of this player to
interlacing output mode. In interlacing output mode, progressive output cannot be used.
If TV set has S-Video input, you may connect the player to TV set with S-Video cord.
If TV set has component video input, you may use the component video output of this player.
If the audio output of this player is also connected to TV set, please connect L and R channel
output of "Front Audio Out" to the audio input terminals the same group with the video input of
TV set.
Video Cord
S-Video Cord
Audio Cord
14
Page 18

BASIC OPERATION
Playback
MP3
MPEG4
1. Connect the DC output socket of the power adaptor
with the power input jack of the player to turn on
working power supply
2.
Press POWER button on the front panel, and the
player begins working.
Place disc into the door vertically (with disc label
side facing forward), and this player will draw in
the disc automatically.
The player begins to read the disc information.
STANDBY
3. Press PLAY button and playback automatically
begins.
4. Press STOP button to stop playback.
Press STOP button for the first time and the player
enters pre-stop status. Now if you press PLAY
button, the player continues to play from the stopped
point; press STOP button again and the player enter
the stop status.
When playing MP3 discs, press STOP button to
enter stop mode directly.
5. Press STANDBY button to enter standby mode
when finish playing. Please pull out the power
adaptor plug from the power source outlet if you
do not intend to use this player for an extended
period of time.
CDVCDSVCDDVD
NOTES
Please change your TV settings accordingly and
connect the cords according to the instructions in
pages 13&14.
When there are no audio and video outputs if you
switched on this player or pressed the above two
buttons and the VFD works normally, please check
whether this player's progressive-scan or
interlacing-scan mode corresponds to that of the
TV set.
To help you to recognize more clearly in which
output mode this player is, character appears on
the VFD when opening the disc tray or reading a
disc. I indicates the interlacing-scan mode, while
P indicates the progressive-scan mode.
This player's interlacing-scan mode does not
support the old-style 100Hz color TV set.
TV System Selection
MP3
CDVCDSVCDDVD MPEG4
Set the system of this player according to the connected
TV set system in order to match to the TV set.
1. Press P/N button to select PAL system if the system of
TV set is PAL. The TV screen displays:
PAL
2. Press P/N button to select NTSC system if the system
of TV set is NTSC. The TV screen displays:
NTSC
NOTES
Please turn off power supply when you are not
going to use the player for a long time.
Press STOP button twice when playing DVD
disc so switch into stop status.
Progressive/Interlacing OutputMode
You can adjust this player's video output mode
according to TV settings.
IS/PS
Press the IS/PS button.
Press IS/PS to switch the video to the interlacing
scan output mode/switch the video to the Y Pb Pr
mode.
3. Press P/N button to set automatic system when using
multi-system TV set. The TV screen displays:
AUTO
P/N
NOTES
The system cannot be switched when playing a
disc in the interlacing scan mode. The system can
be switched in the stop mode or no disc inside.
Some functions of certain discs can not be
performed very well when not in the very system
status.
It is recommended that you set the system of both
the TV set and this player to be AUTO.
15
Page 19

BASIC OPERATION
Pause/Step Playback
MP3
CDVCDSVCDDVD MPEG4
1. Press PAUSE/STEP button in playback status.
Press PAUSE/STEP button once to pause
playback. The TV screen displays:
2. Press PAUSE button in pause mode to realize
step playback function. Each press moves
one frame forward. The TV screen displays:
PLAY
No step playback function available when
playing CD or MP3 discs.
3. Press PLAY button to restore playback.
NOTES
When you set the screen saver mode to ON (See
Page 25 for details), the display on TV screen
turns to screen saver status after the picture on
TV screen keep still for about 2 minutes ( in mode
such as pause mode, stop mode, menu select, set
up menu, no disc mode and so on).
OSD
CDVCDSVCDDVD
1. Press OSD button.
Disc information and operation function
hint will display on TV screen when in
operation.
Press OSD button to display the following
function:
OSD
DVD disc:
TITLE ELAPSED
TT / CH / : :
DISPLAY OFF
CHAPTER REMAIN
::
SINGLE REMAIN
:
DISPLAY OFF
SVCD, VCD, CD discs:
SINGLE ELAPSED
TRACK / :
TOTAL REMAIN
:
PAUSE/STEP
TITLE REMAIN
::
CHAPTER ELAPSED
::
TOTAL ELAPSED
:
Channel Volume control
3
MP
MPEG4
1. Press CH-SW button to select bass, treble, main volume or
left/right channel.
2. Press volume button on the remote control of this player.
Press VOL+ button to increase volume.
Press VOL- button to decrease volume.
The volume adjustment range of main volume is 0 to 30;
of bass/treble is -6 to +6; of left/right channel is -6 to 0.
DVD Menu Playback
DVD
Some DVD discs are made with title menu
or chapter menu function.
1. Press MENU button to display menu on
TV screen for selection. Operate according
to the hint of menu and press number
buttons to select.
ROOT MENU
2. Press CURSOR button to select the track
you desired, and then press PLAY or SELECT
button.
CURSOR
PLAY
NOTES
Press TITLE button the first time to return to
title menu.
Press MENU button the first time to return to
initial menu.
The return location varies with discs.
PBC Playback
VCDSVCD
You can enjoy the menu playback alternate function when
playing SVCD, VCD 2.0 discs with menu playback
function. In the setup menu, you can set the menu playback
mode and select menu playback or sequence playback.
Please refer to page 26 for details.
For example: Play VCD2.0 disc.
1. Main menu displays on TV screen.
Press number buttons to select. For example:
press number button 1 to select main menu 1.
16
CDVCDSVCDDVD
VOL+
VOL-
CH-SW
1.
2.
3.
NUMBER
SELECT
TITLE
MENU
1.
2.
1.
2.
Page 20

BASIC OPERATIONS
2. Submenu displays on TV screen after
entering into main menu 1.
1.
2.
3.
4.
5.
3. Press NEXT or PREV button to turn to
adjacent page.
4. Press NUMBER buttons to select in submenu.
For instance, press number 5 and the player
begins to
play the fifth track.
1.
2.
3.
4.
5.
5. Press TITLE button to return main menu
when in menu playback.
6. Press MENU button to realize sequence
playback function when in menu playback;
press MENU button to realize menu
playback function when in sequence
playback.
7.Press RETURN button to submenu.Press
again to return to main menu.
NUMBER
MENU
PLAY
PREV
NEXT
Direct Selection Playback Function
by Number Button
MPEG4
CDVCDSVCDDVD
1. Input disc, after the player begins
reading, press number buttons to select
track for playback.
Press the number buttons 1-9 directly
to select the according track if the track
number is below 10.
For example, select the track 7:
7
Press the +10 button and then the number
buttons 0-9 to select the according track if
the track number is above 10 (including 10).
For example, select the track 16:
10 + 6
+10
6
Press the +10 button twice and then press
the number buttons 0-9 to select the
according track if the
track number is
above 20 (including 20). The rest can be
performed by analogy.
NUMBER
Language/Audio Channel Selection
CDVCDSVCDDVD
1. Press AUDIO button.
You may select the language you desire when
playing multi-language DVD, SVCD discs.
DVD disc:
AUDIO 1/2:
SVCD disc:
AUDIO 1
AUDIO 4
You may select audio output from left or right
channel or stereo audio output when playing
multi-channel CD or VCD discs.
For example: to VCD disc, dubbing is recorded
in left audio channel and singing in right
audio channel, you can select left channel for
.
dubbing
VCD, CD discs:
LEFT MONO
AUDIO
NOTES
Language kinds varies with different disc
recording.
To dual-language VCD disc, you may press
AUDIO button to select your desired language.
When playing some DVD discs, pressing
AUDIO button may result in playing the track
from its beginning.
MUTE
When playing discs, mute function can be
used to switch off audio output.
1. MUTE
* Press MUTE button and the word MUTE
displays on TV screen.
MUTE
2. Resume audio output.
* Press MUTE button again to unmute.
MUTE OFF
MUTE
NOTE
Press MUTE button when the player has
not audio output.
AUDIO 3
STEREO
AUDIO 2/2:
AUDIO 2
RIGHT MONO
CDVCDSVCDDVD MPEG4
MP3
17
Page 21
BASIC OPERATION
Function Switch
1. Press FUNCTION button and you may switch in
3 modes of DVD, TUNING and AUX IN. The
sequence of mode switch is:
DVD
AUX IN 2
Tuning
Before tuning, please connect AM and FM antenna
to "AM antenna input" port or "FM antenna input"
port according to system connections of page 9.
1. Press FUNCTION button to switch in tuning mode,
and press BAND button to select FM or AM.
2. Manual tuning: press TUNING+/- button and the
tuner searches radio stations upwards or downwards
by increasing or decreasing a frequency.
STANDBY
FUNCTION
TUNING +, -
SEARCH PREV/NEXT
BAND
3. Auto tuning: press SEARCH PREV/NEXT button
on the front panel or remote control, and the tuner
automatically searches radio stations upwards or
downwards. When radio station is searched, the
player stops searching. In FM band, search a
certain radio station shown in the following figure.
If you need listen to the next radio station, please
repeat the above operation.
4. All auto tuning: press AUTO button, the tuner
automatically searches radio stations and saves
those searched in sequence.
NOTE
When selecting all auto tuning, the tuner
automatically searches radio stations and saves
those searched in sequence, and the previously
saved radio stations will be covered.
AUX IN 1
Frequency
TUNING
PRESET+/-
SAVE
AUTO
Stereo
Save Radio Station
This player may pre-save 20 FM and 20 AM radio stations.
Pre-save radio station:
1. According to the above tuning operation, if you
have searched a favourite radio station in AM band (as
the following figure):
2. Press SAVE button to save it. When the radio station
number flashes, press PRESET +/- button and
the number increases or decrease to the position that
you want to save, such as "08", press SAVE button again
and you may save this radio station in "08" position.
3. If you want to save more radio stations, please repeat
the above operations.
Frequency
Number
NOTE
If the radio station has been saved, VFD screen
displays "MEM" as in the following figure.
MEM
4. Listen to the saved radio station:
If you want to listen to the saved radio station, press
PRESET +/button to select.
button or directly press NUMBER
Frequency
AUX IN Amplifying
1. According to the system connection figure, connect
the audio output terminal of external signal sources (such
as digital recorder, video tape recorder, CD player and
Mp3 player) to the corresponding audio input terminal
of this player.
2. According to audio input connections, press FUNCTION
button on the front panel or remote control to switch in
AUX IN 1 or AUX IN 2 mode, and now the VFD screen
displays as the following figure:
3. When external signal sources works normally and the
signals are correctly sent to this player, the AUX IN signals
can be amplified and volume can be adjusted through
remote control.
18
Page 22

BASIC OPERATION
Sleep Power-off Time Setup
You may set sleep power-off when reading disc.
Before the sleep power-off time that you set comes,
the player will enter standby mode automatically.
1. Press SLEEP button.
DVD mode:
Press SLEEP button each time and the player
switches to a sleep power-off state. TV screen
displays:
05min 10min 15min 30min
SLEEP OFF
TUNING mode and AUX IN mode:
Press SLEEP button each time and the player
switches to a sleep power-off state.
VFD screen displays:
05 10 15
SLEEP OFF
SLEEP
60min90min
30
6090
Real-time Clock Display
When the player is in standby mode, VFD screen
will display the information of hour and minute,
shown as follows:
:
Now press TIME button and you may change
real-time clock.
1. Press TIME button to enter time change state.
The number flashes on VFD screen indicates that
this position can be changed. Press number buttons
and cursor button to change. After changing, press
SELECT button to exit real-time clock change state.
H M
TIME
If the player is in playback mode:
1. Press TIME button and TV screen displays
the real time:
2005-01-01 00-00-00
NOW TIME
If the player is in disc out state:
1. Press TIME button and TV screen displays:
TIME SET ------------
--
2. Press number buttons to input year, month, date,
hour, minute and second in turn.
TIME SETUP 05 01 01 00 00 00
3. Press SELECT button to exit clock setup.
Timing Power-on Setup
You may set timing power-on in standby mode. When the
timing power-on time that you set comes, the player will
start up automatically.
1. When in standby mode, press SLEEP button to enter
timing power-on setup state and VFD screen display as
follows:
:
H M
2. Now press SLEEP button and you may set to open or
close timing power-on function. If you set in open, the
number flashes on VFD screen indicated that this position
can be changed and please press number buttons and
cursor button to change.
3. After changing, press SELECT button to exit timing
power-on setup.
NOTE
If you do not need timing power-on function, please
turn off this function according to the above operation.
19
Page 23

USAGE OF USB EQUIPMENT
AND 3-IN-1 CARD READER
USB refers to Universal Serial Bus. It is a kind of Bus
conformation used for data communication with features
of simple usage and convenient connecting, capable of
inserting and then using instantly, such as FLASH disc.
The 3-in-1 card reader of this player can read SD Card
(Secure Digital Card), MMC Card (Multi Media Card)
and MS Card (Memory Stick Card).
USB refers to Universal Serial Bus. Most of USB
devices on the market are USB1.1 or USB2.0.There are
some types USB 1.1 devices:
Monitors Communication devices Audio
Human input Mass storage.most FLASH MEMORY,
Mp3 PLayer ,USB HDD ect. belong to MASS storage
Class . Mass storage
Class include 2 transport manners:
USB 1.1 Mass Storage Class Control/Bulk/Interrupt
(CBI) Transport
USB 1.1 Mass Storage Class Bulk-Only Transport
1. Play USB Equipment:
Please insert USB equipment into the USB port of this
unit firstly, press DVD/READER button and a selection
menu appears on screen. You may press DVD/READER
button or up/down direction button to select. If the cursor
stops in "USB" item, you may press SELECT or PLAY
button to confirm. After correctly reading USB
equipment data, the screen will display an operation
menu. Please refer to the part of "MPEG4, MP3 and
JPEG FILE PLAYBACK" in page 23 for details.
AUDIO IN 1
Cover Cover
DVD
USB
CARD READER
2. Play 3-in-1 CARD READER
Please insert the FLASH card supported by this
player into the port of card reader, press DVD/
READER button and a selection menu appears
on screen. You may press DVD/READER button
or up/down direction button to select. If the cursor
CARD READER
BASIC OPERATION
stops in "CARD READER" item, you may press
SELECT or PLAY button to confirm. After correctly
reading card reader equipment data, the screen
will display an operation menu. Please refer to
the part of "MPEG4, MP3 and JPEG FILE
PLAYBACK" in page 23 for details.
After pressing DVD/READER button to display
the selection menu, if you do not want to switch
equipment, please move cursor to the original
one, and then press SELECT or PLAY button, or
wait until the menu disappears automatically.
If you want to use DVD function, please select
"DVD"through the above-mentioned operation
steps to exit USB and card reader functions.
NOTE
This player can play USB equipment; MPEG4,
Mp3 and JPEG files in SD, MMC and MS cards.
When reading MPEG flies with large rate in USB
equipment and FLASH card, pause may appear.
If USB equipment and FLASH card have no files,
the screen appears "Empty Device", and does not
display operation menu. If USB equipment and
FLASH card have troubles, or the operation is
improper, the screen appears "Device Error .
Please check USB equipment and FLASH card,
or insert and unplug them again.
If USB equipment and FLASH card unsupported
by this player have been used, this player probably
cannot work normally. Please switch off power,
take out USB equipment and FLASH card, and
then restart to switch on the power.
This unit support USB 1.1 Mass Storage Class BulkOnly Transport, we are not sure that other USB
devices can be supported !So please find out about
the features of USB equipments before buy.
When use USB 1.1 Mass Storage Class Bulk-Only
Transport devices, please notice the file operation
system support Windows FAT ,not support FAT32
and NTFS ect. file system.
This player probably cannot read some
FLASH disc and MP3 player.
NOTE
1. When the button is invalid, the TV screen
displays:
Press the effective button again.
"
20
Page 24

PLAY OPERATION
Fast Playback
MPEG4
You can select forward or reward playback to
search the point you desire when playing discs.
1. Press Forward button and the player starts
forward playback.
Each press of FWD button switches the
playback speed of DVD, SVCD, VCD and CD
discs in the following sequence circularly:
2X
2. Press REV button and the player starts
reward playback.
Each press of REV button switches the
playback speed of DVD, SVCD, VCD and CD
discs in the following sequence circularly.
2X
WD
F
REV
CDVCDSVCDDVD
4X
4X
8X
16X32X
8X
16X32X
Repeat Playback
MP3
CDVCDSVCDDVD MPEG4
The repeat function enables a title/chapter/
track/disc repeated.
1. Each press of REPEAT button performs
different repeat functions.
DVD disc:
TITLECHAPTER ALL
SVCD, VCD and CD discs:
The repeat playback can be performed to
SVCD or VCD2.0 only when the PBC is off
and to VCD1.1 or CD whether the PBC is on
or off.
TRACK
REPEAT OFF
ALL
REPEATOFF
Repeat the Selected Section
MP3
CDVCDSVCDDVD MPEG4
When playing discs, you may press A-B button
to repeat playback of certain section you desire.
1. Under normal playback, press A-B button at the
desired point (point A) to set the beginning.
TV screen displays:
A
2. Under normal playback, press A-B button at the
desired point (point B) to set the ending.
TV screen displays:
The player returns to point A automatically to
repeat the selected section (A-B).
AB
3. Press A-B button for the third time.
Normal playback resumes.
A-B
NOTE
The A-B repeat function may be not available
for some discs.
Sections can only be selected in the same track
in PBC mode.
Quick-play Playback
1. Press the Q-play button and the unit plays the
disc directly.
When playing story discs, the advertisement
and warning can be skipped and the disc can be
played directly.
NOTE
The Q-play function may be invalid to some
discs due to different disc qualities and reco
rding conditions.
The repeat function is not available for SVCD
and VCD2.0 discs when the PBC is on.
MP3 disc:
SINGLE
REPEATONE
REPEAT
REPEAT
FOLDER
FOLDER
21
Page 25

PLAY OPERATION
Subtitle Selection
DVD
1. Press SUBTITLE button.
When playing the DVD disc recorded with
subtitles of different languages, it is possible
to select different subtitle languages.
Each press of SUBTITLE button switches
one subtitle language and the TV screen
displays:
SUBTITLE 01/03 SUBTITLE 02/03
SUBTITLE OFF
SUBTITLE 03/03
The number of the switchable subtitle
languages varies with discs. DVD disc has
32 selected subtitle language at the most.
SUBTITLE
Angle Selection
DVD
1. Press ANGLE button and the TV screen
displays:
1/4
2. Press number buttons to select your
desired playback angle.
2/4
3/4
4/4
3. Press ANGLE button to select the default
angle to resume normal playback.
ANGLE
NOTE
The number of angles varies with different
DVD discs. You can change as many as
they have.
This function only applies to the discs
recorded with different angles.
Playback from the Desired Point
CDVCDSVCDDVD MPEG4
Playing DVD disc
Input the time, title or chapter directly, the
content can be found quickly and played from
the selected point.
1. Title, Chapter search. For example: search
Chapter 2, Title 6:
Press GOTO button and the TV screen displays:
TITLE 03/30 CHAPTER /02
Press CURSOR button to lighten the title number,
as shown in the figure:
Press number button 6 to select Title 6, as shown
in the figure:
And then press number button 2 to select
Chapter 2, as shown in the figure:
2. Title time search
Press GOTO button until the TV screen displays
the following picture. Then press number buttons
to input
hour, minute and second.
3. Chapter time search
Press GOTO button until the TV screen
displays the following picture. Then press
number buttons to input
second.
Playing SVCD, VCD and CD discs
1. Disc time search
Press GOTO button until the Tv screen displays
the following picture. Then press number buttons
to input
hour, minute and second.
2. Track time search
Press GOTO button until the TV screen
displays the following picture. Then press
number buttons to input hour, minute and
second.
3. Select a track
Press GOTO button until the TV screen displays
the following picture. Then press number
buttons to input
the track number.
GOTO
CURSOR
22
TITLE /30 CHAPTER 01/02
TITLE 06 /30 CHAPTER /02
TITLE 06 /30 CHAPTER 02/02
TITLE 06/30 TIME : :
hour, minute and
CHAPTER 01/04 TIME : :
DISC GOTO --:--
TRACK GOTO --:--
SELECT TRACK --/15
NUMBER
SELECT
Page 26

PLAY OPERATION
Zooming the Displayed Frame
MPEG4
Capable of zooming in/out a certain
dynamic or still frame.
1. Press ZOOM button when playing discs
and the TV screen displays:
The frame is magnified.
2. Press ZOOM button again and the TV
screen displays:
The frame is magnified the second time.
3. Press ZOOM button once again and the
TV screen displays:
The frame is magnified the third time.
4. Press ZOOM the fourth time and the TV
screen displays:
The frame is minified.
5. Press ZOOM button the fifth time and the
TV screen displays:
The frame is minified again.
6. Press ZOOM button the sixth time and the
TV screen displays:
VCDSVCDDVD
2
3
4
1/2
1/3
Disc INFO
The brand-new interface Disc INFO enables you
to conveniently perform DVD disc functions of title,
chapter, sound, subtitle, angle, title time, chapter time,
repeat play and time display; or SVCD, VCD disc
functions of track, disc time, track time, repeat play
and time display.
For example: Playing DVD:
1. Press INFO button under normal playback and the
TV screen displays as follows:
MENU
Disc Format D5 DISC
Video Type NTSC
Video Scale 4:3
Title 01/01
BITRATE 85
2. Press UP/BOWN arrows to select the desired time
and press ENTRE button to confirm.
For example: press UP/DOWN arrows to select the
desired chapter and press ENTRE button to confirm.
The TV screen displays as follows:
BITRATE 85
3. Press number buttons or UP/DOWN arrows to
select the desired chapter.
For example: press number button 0 and then 4, this
player starts playing from the fourth chapter. The TV
screen displays as follows:
TITLE ELAPSED: 0:01:25
MENU
Video Type NTSC
Video Scale 4:3
Title 01/01
Chapter _0/05
TITLE ELAPSED: 0:01:25
1/4
The frame is minified the third time.
7. When the frame is magnified, press
CURSOR button to move the frame.
You can enjiy any desired part of the frame.
8. Press ZOOM button again and the frame
restores normal size.
ZOOM
CURSOR
SELECT
MENU
Video Type NTSC
Video Scale 4:3
Title 01/01
Chapter 04/05
BITRATE 85
The input number should be within the optional
numbers.
TITLE ELAPSED: 0:01:25
4. Press INFO button to exit the browser interface.
MPEG4,MP3 and JPEG File Playing
MPEG4 is the audio standard publicized by MPEG (Moving
Picture Experts Group) in November,1998.As the discrepant
parts between frames of picture are only processed and the
same parts are deleted,
23
Page 27

PLAY OPERATION
the data number are greatly decreased. The most distinct
feature of MPEG4 is the high compression and clear imaging.
Furthermore, MPEG4 provides elastic specifications to adjust
the stream according to the used requirements. The larger
stream can be used when collecting private films; and the
small stream can be used in network transferring, which
make MPEG4 use widely.
MP3 utilizes the third layer audio compression mode of the
international standard MPEG with the compression ration as
12:1. Employing MP3, one disc can record 600-minute music
or 170 songs And the sound quality is the same as CD.
JPEG (Joint Photographic Experts Group) is the most widely
used picture compression and storage format today. Utilizing
the high efficiency compression algorithm, JPEG compresses
the original picture 15 to 20 times with very excellent picture
quality. JPEG is featuring small size data, convenient
application and supported by most picture processing software,
so it is very fit to store photos.
The strong decoding capability of this player can
decode and play the files with the above two formats.
During the course of playing, an operation menu will
display and the details are as follows:
00:00 00:00
004/369
\PIC\
..
Du000
Du001
Du002
1
Status Window
Display the current
status information.
3
File Window
Display the file in the
current path.
5
Information Window
Display The Information
Of The Current Operation.
2
Directory Window
Display the current path.
4
Scroll bar Window
Indicate the position
of the current file.
6
Information window.
Displays the current
operating prompts.
1
2
3
4
5
6
The displayed status information on the status window:
1
00:57
002/073
1
Playback time of the current MP3
2
Total time of the current Mp3
3
The audio bit rate of the current MP3
5
2
03:31 128
4
3
6 7
(Generally the bit rate is 128Kbps, and
sometimes it is VBR)
4
Current playback mode indicator
5
Track indicator
6
Volume indicator
7
Dynamic frequency spectrum indicator
1. File playback way
When playing MPEG4, MP3 and JPEG format discs,
the player will search disc information, enter file
playback way and display operation menu shown
as the following figure (display content varies with
disc).
00:00 00:00
001/369
A/V
MP000
A/V
MP001
A/V
MP002
A/V
MP003
In the figure, press up/down cursor to select your
desired MPEG4, MP3 and JPEG format file, and
press SELECT button to confirm.
NOTE
If your disc includes MP3 file, after recognizing disc,
operation menu of this player will only include MP3
file, and play these files in sequence automatically.
If you want to enjoy other files in disc, please press
ANGLE button in stop status to switch into directory
playback way.
2. Directory playback way
00:00 00:00
A:
001/004
\
Du000
Du001
Du002
Du003
00:00 00:00
B:
001/369
\Du000\
..
A/V
MP000
A/V
MP001
A/V
MP002
Press up/down cursor to select your desired directory,
and press SELECT button to confirm. Take figure A for
instance, select directory Du000, press SELECT button,
and TV screen displays as figure B. When you select
[ ] in the first line, or press left cursor, it returns to the
previous directory.
In figure B, press up/down cursor to select your desired
MPEG4 format disc, press SELECT button to confirm
and this player begins playing MPEG4 format movie.
2.1 Play JPEG file
Operation steps are the same with those of MP3 file. The
difference in operation menu is that when selecting JPEG
file, preview window will display the preview image of this
file to facilitate you to select. When you select your desired
JPEG file, after pressing SELECT button to confirm, the
image displays in full screen.
2.2 Play MP3+JPEG file
00:00 00:00
004/369
\PIC\
..
Du000
Du001
Du002
Resolution 640 480
24
Page 28

If disc includes both MP3 and JPEG file, you may enjoy MP3
songs and JPEG file at the same time. You may play MP3
songs in above-mentioned way, then enter directory with
JPEG file and enjoy JPEG picture in above-mentioned way.
Other basic operations
1. In stop status, pressing ANGLE button may switch in modes
of file playback and directory playback.
2. Press NEXT and PREV button to turn pages upward or
downward.
Other functions of JPEG file
1. When playing JPEG file, pressing SUBTITLE button may
switch different JPEG display modes. There are 16 modes
for selection.
2. When playing JPEG file, pressing ZOOM button may turn
it on, and pressing this button again may turn it off.
3. When turning it on, press FWD button to zoom in picture,
twice over the original one in maximum; press REV button to
zoom out picture, half of the original one in minimum.
4. When playing JPEG file, pressing STOP button may realize
preview playback function. This player displays JPEG file of
disc on TV screen at the same time. Each screen may display
12 pictures at most, and the rest displays on next screen.
Press NEXT button to enter the next screen, and press PREV
button to enter the previous screen. You may press NUMBER
button or CURSOR button to select your desired picture, and
then press SELECT button to confirm.
5. When in preview playback, pressing MENU button may
exit from preview playback function.
6. When playing JPEG file, pressing CURSOR buttons may
realize picture rotation function.
ZOOM
ANGLE
FWD
REV
SUBTITLE
NUMBER
SELECT
CURSOR
MENU
PREV
NEXT
Headphone Enjoying
SVCDDVD VCD
1. If you want to use headphone to enjoy all by
yourself, adjust the master volume to the minimum
firstly, then insert the headphone plug into the
headphone jack of this player and adjust the master
volume until suitable.
MPEG4 Mp3
Earphone
NOTE
1. When the button is invalid, the TV screen
displays:
FUNCTION SETUP
Function Setup
1. Press SETUP button, and the TV set screen
displays:
General Setup Page
TV Display
OSD Lang
Screen Saver
SCART
Spectrum
2. Press LEFT/RIGHT arrow to select the desired
channel to be changed.
For example, if you want to set this player's video,
please press LEFT/RIGHT arrows to select VIDEO
SETUP PAGE. Press SELECT for verification. The
video setup page displays on the screen.
3. Press UP/DOWN arrow to select the desired
item and press SELECT.
For example, press UP/DOWN arrows to select
SHARPNESS and press SELECT. The sharpness
appears on the screen.
Video Setup Page
Sharpness
Brightness
Contrast
Hue
Saturation
Gamma
4. Press UP/DOWN arrow to select the desired
value. Press SELECT to confirm it.
For example: Press UP/DOWN arrow to select
"Medium", then press SELECT and the TV screen
display:
Video Setup Page
5. Press SETUP to exit the setup menu.
Video Setup Page
Sharpness
Brightness
Contrast
Hue
Saturation
Gamma Off
Sharpness
Brightness
Contrast
Hue
Saturation
Gamma Off
Normal/LB
English
On
YCb Cr
Off
Low
00
00
00
00
High
Medium
Low
Medium
00
00
00
00
Press the effective button again.
25
Page 29

FUNCTION SETUP
General Settings
General Setup Page
TV Display
OSD Lang
Screen Saver
SCART
Spectrum
1. TV Display: To set the aspect ratio of this
player's output image.
Optional settings: NORMAL/PS, NORMAL/LB,
WIDE.
Default: NORMAL/LB.
NOTES
The playing effects are contingent upon the disc's
recording aspect ratio. Some discs may not be
played according to your selected aspect ratio.
WIDE is only applicable to the WIDE TV.
Please select the aspect ration in accordance with
that of your TV.
2. OSD Lang.: This item is used to set the prompts
language on the screen.
Optional settings: English,Danish,Swedish,Bokmal,
Nynorsk,Finnish.
Default: English.
3. Screen Saver: Open or close the screen saver
function.
Optional settings: OFF, ON.
Default: ON.
4. SCART:To set the types of the SCART out
connector.
Optional settings: Y Cb Cr,RGB.
Default:Y Cb Cr.
When using RGB outputs from the SCART interface,
Please select RGB.Otherwise,please select YCbCr.
5. Spectrum:This item is used to set whether
the Dynamic Spetrum is allowed.
Selectable value:ON,OFF.
Default:OFF
Dynamic Spectrum display is invalid in MPEG4 playback.
Normal/LB
English
On
YCb Cr
Off
1. EQ type: To set EQ modes.
Optional settings: None, Rock, Pop, Live,
Dance, Techno, Classic, Soft.
Default: None.
2. Sound Field: To set different sound field
effects.
Optional settings: Off, Concert, Living Room,
Hall, Bathroom, Cave, Arena, Church.
Default: Off.
Sound Field is void when playing DVD
AUDIO discs.
3.
4.
192K
5. Tone control: to set the tone level to match your
diapason when you're singing
Method to adjust tone control:
A. Press Up or Down cursor buttons to select "tone"
item in Audio Setting page, and then press Select
button to enter Adjustment Menu.
B. Press Left or Right cursor button to adjust
setting value.
C. Press Select button to return to Audio Setting
page after adjustments are done.
6
A.
EQ Type
Sound Field
TONE 00
None
Off
26
Page 30

FUNCTION SETUP
English, French, German, Spanish, Danish,
Swedish, Norwegian, Chinese, Others,Off.
English, French, German, Spanish, Danish,
Swedish, Norwegian, Chinese, Others.
English.
English.
PAL
English
English
English
27
Page 31

OTHERS
Useful notes
In order to prolong the service life of your player, it is recommended to wait at least 30 seconds
before you turn it on again after switching it off.
Turn off power after operation.
Only use the power supply of the nominal voltage, otherwise the player will not be operational or
even be damaged.
Some functions of the player may not be applicable to some discs.
In case of occasional player halt, please turn it off and turn it on again.
This player cannot play some Super VCD discs with the CVD format.
Troubleshooting
Please check for causes of problems in accordance with the following chart
before contacting any maintenance personnel.
Symptom
No disc reading
Sound distortion
No sound
No picture
No color
No disc reading
Remote control
failure
Temporary
function failure
Picture rolling
No subtitle
Cause Correction
Condensation on laser head
Disc reversely loaded
Disc not compatible
Volume of the connected device too high Adjust volume of the device.
Signal not properly connected.
Disc warped or dirty.
Player in mute status.
Signal not properly connected.
TV not set for proper system.
TV system not right.
TV set color not properly adjusted.
No disc in the player.
Disc not properly loaded.
Condensation on the laser head.
Remote control not pointing to the sensor
window.
Remote control's operating distance more
than 8 meters away from your TV set.
Batteries low.
Mal-fabricated disc used.
Wrong buttons pressed.
Static leakage into the player from outside.
TV set system not properly adjusted. Readjust system of your TV set.
No subtitle made in disc
Subtitle of player turned off
TV clears subtitles
Power on and wait for 1-2 hours.
Make sure label side facing forward.
Make sure this player compatible with the loaded disc.
Connect signal securely.
Clean your disc.
Press MUTE button again.
Connect signal securely.
Reset the AV/TV status ofyour TV set.
Press P/N button on the remote control to set the system.
Readjust color of your TV set.
Load a disc.
Reload a disc, with the label side facing up.
Turn on the player, unload the disc and leave it on for about one hour.
Use the remote control properly.
Replace both batteries.
Wait 5~10 seconds and the player will automatically return to normal.
Operate once more.
Turn off the player for 1 to 2 minutes, then turn it on again.
Disc problem
Press SUBTITLE button to select it
Adjust TV to make it display subtitles
28
Page 32
OTHERS
Specifications
Disc Types
Input
Output
Video
Characteristics
FM tuning
AM tuning
DVD VIDEO,DVD AUDIO
DivX*, MPEG4*
Super VCD
VCD1.0, 1.1, 2.0
CD-DA
Mp3
2-group AUX IN
FM antenna in, AM antenna in
Analog audio output stereo output
Digital Audio Output Coaxial Output, Optical Out jack
Video Output
Progressive Scan Output Y Pb Pr
S-Video Output Y, C
Component Video Output Y Cb Cr
Stereo headphone
SCART Output
Video Amplitude 1.0Vp-p(75 )
S-Video Output Amplitude Y:1.0Vp-p(75 ), C:0.286Vp-p(75 )
Component Video OutputAmplitude Y:1.0Vp-p(75 ), Cb/Cr: 0.7Vp-p(75 )
Frequency range
Separability
Frequency range
87.5MHz 108MHz
35dB
522kHz 1710kHz
Audio
Characteristics
General
Specifications
Operating
Temperature
Operating
Humidity
DivX version is still upgrading continuously and the latest version of this unit is DivX 5.1.
*
Some discs labelled with MPEG4 on the market actually are *.rm/*.ram/*.rmm and others which are
*
imcompatible. Pleases take care when buying discs.
The design and explanation of this product are subject to change and renovate without notice.
We cannot ensure all the discs are fluently read because of the disc quality, disc make quality
and format difference.
As for the special make of some discs, some functions can not be realized when playing, which is not the
malfunction of the unit.
Frequency 20Hz~20kHz( 1dB)
Signal-to-noise Ratio >90dB
Total harmonic distortion <0.01%
Power Supply 110V 250V AC,50/60Hz
Power Consumption 15W
Dimensions 360 105 253.5
Mass 2.4kg
535
15 75% (no condensation)%
mm mm mm
29
Page 33

Specifications for Sound System
OTHERS
Rated power
(total harmonic
distortion for
amplifier )
Rated load
impedance
System frequency
range (normal
working condition)
Input sensitivity
(rated condition)
Total harmonic
distortion plus
noise (normal
working condition)
General
specifications
1%
SNR
VS1000 (subwoofer)
Vs1000 (L/R)
VS1000 (subwoofer)
VS1000 (L/R)
VS1000 (subwoofer)
VS1000 (L/R)
700mV
71dB
1%
Power supply
Max power consumption
Dimensions for subwoofer speaker
Dimensions for main speaker
Weight
35W (6 ,50Hz)
15W (8 ,1kHz)
6
8
50Hz ~ 210Hz (+1/-3dB)
190Hz ~ 20kHz (+1/-3dB)
~230V, 50Hz
150W
200 350 385mm mm mm
91 285 85mm mm mm
11.3kg
Technique and specifications are changed without further notice.
30
Page 34

OTHERS
31
Page 35

OTHERS
32
Page 36

5194135
V 2.0
 Loading...