

Page 1
HEADPHONE AMPLIFIER HA-1
USER
MANUAL
USB
Made for
Page 2

Page 3

Table of Contents
Important Information ........................................................................................................................................................ 1
Precautions ................................................................................................................................................................... 2
CE mark ........................................................................................................................................................................ 2
C-Tick mark .................................................................................................................................................................. 2
WEEE symbol ............................................................................................................................................................... 2
Legal Notice .................................................................................................................................................................. 2
Compatible iPod/iPhone/iPad Models .......................................................................................................................... 2
Introduction ........................................................................................................................................................................ 3
Accessories .................................................................................................................................................................. 3
Installation ......................................................................................................................................................................... 4
Front Panel Controls ..................................................................................................................................................... 4
Back Panel Connectors ................................................................................................................................................ 4
Remote Control ............................................................................................................................................................ 5
Remote Control Buttons .......................................................................................................................................... 5
Battery Installation ................................................................................................................................................... 5
Using the Remote Control ....................................................................................................................................... 6
Remote Control App for Smartphones .................................................................................................................... 6
Headphone Output Connection .................................................................................................................................... 7
Balanced Headphone Jack Pin-out ......................................................................................................................... 7
Using the HA-1 as a Pre-Amplifier or DAC ................................................................................................................... 7
RCA Stereo Audio Outputs ...................................................................................................................................... 8
XLR Balanced Audio Outputs .................................................................................................................................. 8
Triggers ................................................................................................................................................................... 8
Input Signal Connections .............................................................................................................................................. 9
RCA Stereo Audio Inputs ........................................................................................................................................ 9
XLR Balanced Audio Inputs ..................................................................................................................................... 9
Coaxial Digital Audio Input ...................................................................................................................................... 9
Optical Digital Audio Input ..................................................................................................................................... 10
AES / EBU Digital Audio Input ............................................................................................................................... 10
USB (Type B) Audio Input ..................................................................................................................................... 10
Mobile USB Audio Input ........................................................................................................................................ 11
Bluetooth Audio Connection .................................................................................................................................. 11
Bluetooth Setup ..................................................................................................................................................... 12
Using the OPPO HA-1 ..................................................................................................................................................... 13
Basic Operations ........................................................................................................................................................ 13
i
Page 4

Power On / Off ........................................................................................................................................................ 13
The Front Panel Display ......................................................................................................................................... 13
Source Selection .................................................................................................................................................... 13
Volume Control ....................................................................................................................................................... 14
Mute ....................................................................................................................................................................... 14
Playback Controls .................................................................................................................................................. 15
Advanced Operations .................................................................................................................................................. 15
Home Screen Selection .......................................................................................................................................... 16
Screen Dimmer Setting .......................................................................................................................................... 16
Mute Operation ....................................................................................................................................................... 16
Headphone Gain Selection .................................................................................................................................... 17
Home Theater Bypass Mode.................................................................................................................................. 18
Reset Factory Default Settings............................................................................................................................... 20
Reference ......................................................................................................................................................................... 21
Usage Notes................................................................................................................................................................ 21
Troubleshooting........................................................................................................................................................... 21
User Manual Updates.................................................................................................................................................. 21
Specifications .............................................................................................................................................................. 22
ii
Page 5
Important Information
CAUTION
RISK OF ELECTRIC SHOCK.
DO NOT OPEN.
CAUTION: TO REDUCE THE RISK OF ELECTRIC
SHOCK, DO NOT REMOVE COVER (OR BACK).
NO USER-SERVICEABLE PARTS INSIDE.
REFER SERVICING TO QUALIFIED SERVICE
PERSONNEL.
The lightning flash with arrowhead symbol,
within an equilateral triangle, is intended to
alert the user to the presence of uninsulated
“dangerous voltage” within the product's enclosure that
may be of sufficient magnitude to constitute a risk of
electric shock to persons.
The exclamation point within an equilateral
triangle is intended to alert the user to the
presence of important operation and
maintenance (servicing) instruction in the literature
accompanying the appliance.
WARNING: TO REDUCE THE RISK OF FIRE OR
ELECTRIC SHOCK, DO NOT EXPOSE THIS
APPLIANCE TO RAIN OR MOISTURE. DANGEROUS
HIGH VOLTAGES ARE PRESENT INSIDE THE
ENCLOSURE. DO NOT OPEN THE CABINET. REFER
SERVICING TO QUALIFIED PERSONNEL ONLY. THE
APPARATUS SHALL NOT BE EXPOSED TO
DRIPPING OR SPLASHING AND THAT NO OBJECTS
FILLED WITH LIQUIDS, SUCH AS VASES SHALL BE
PLACED ON THE APPARATUS.
1. Read these instructions.
2. Keep these instructions.
3. Heed all warnings.
4. Follow all instructions.
5. Do not use this device near water.
6. Clean only with a dry cloth.
7. Do not block any ventilation openings. Install in
accordance with the manufacturer’s instructions.
8. Do not install near any heat sources such as
radiators, heat registers, stoves, or other
apparatuses (including amplifiers) that produce heat.
9. Do not defeat the safety purpose of the polarized or
grounding-type plug. A polarized plug has two blades
with one wider than the other. A grounding-type plug
has two blades and a third grounding prong. The
wide blade or the third prong is provided for your
safety. If the provided plug does not fit into your
outlet, consult an electrician for replacement of the
obsolete outlet.
10. Protect the power cord from being walked on or
pinched, particularly at plug, receptacle, and the
point where it exits from the apparatus.
11. Only use attachments and accessories specified by
the manufacturer.
12. Unplug this apparatus during lightning storms or
when unused for long periods of time.
13. Refer all servicing to qualified service personnel.
Servicing is required when the apparatus has been
damaged in any way, such as when the power
supply cord or plug is damaged, liquid has been
spilled or objects have fallen into the apparatus, the
apparatus has been exposed to rain or moisture,
does not operate normally, or has been dropped.
WARNING:
The remote control supplied with this product contains a coin/button cell battery. If the coin/ button cell battery is
swallowed, it can cause severe internal burns in just 2 hours and can lead to death. Keep new and used batteries away
from children. If the battery compartment does not close securely, stop using the product and keep it away from
children. If you think batteries might have been swallowed or placed inside any part of the body, seek immediate
medical attention.
DO NOT INGEST BATTERY, CHEMICAL BURN HAZARD.
CAUTION: Danger of explosion if battery is incorrectly replaced. Replace only with the same or equivalent type.
Batteries shall not be exposed to excessive heat such as sunshine, fire or the like.
WARNING: The mains plug is used as disconnect device. The disconnect device shall remain readily operable.
1
Page 6

Precautions
Before connecting the AC power cord to the
appliance, make sure the voltage designation of
the appliance corresponds to the local electrical
supply. If you are unsure of your power supply,
contact your local power company. The
acceptable power input range is AC 110 V - 120 V
~ / 220 V - 240 V ~, 50 / 60 Hz.
The appliance with CLASS I construction should
be connected to a mains socket with a protective
earth connection.
The device receives power from the AC power
source as long as it is connected to the wall outlet,
even if the device itself has been turned off.
CE mark
This product compiles with European Low
Voltage (2006/95/CE), Electromagnetic
Compatibility (2004/108/EC) and Environmentally-
friendly design of Energy-related Products
(2009/125/EC) Directives when used and installed
according to this instruction manual.
C-Tick mark
This product complies with Australian C-Tick
electromagnetic compatibility (EMC)
emission requirements, according to the requirements
of the Radio communications Labelling
(Electromagnetic Compatibility) Notice 2008.
Unplug the power cord if you are not going to use
the product for an extended period of time.
Hold the power plug when unplugging. Do not pull
on the cord.
To ensure proper ventilation around this product, do
not place this product on a sofa, bed, or rug. When
installing this product on a wall or bookshelf, make
sure to provide appropriate space. We recommend
leaving 4 in (10 cm) of free space at the top, the
sides, and the rear.
High temperature will lead to abnormal operation of
this unit. Do not expose this unit to direct sunlight
or near other heat sources.
WEEE symbol
Correct Disposal of This Product. (Waste
Electrical & Electronic Equipment) Applicable
in the European Union and other European
countries with separate collection systems.
This marking on the product, accessories or literature
indicates that the product and its electronic accessories
(e.g. remote handset) should not be disposed of with
other household waste at the end of their working life.
To prevent possible harm to the environment or human
health from uncontrolled waste disposal, please
separate these items from other types of household
waste and recycle them responsibly to promote the
sustainable reuse of material resources.
Legal Notice
“Made for iPod”, “Made for iPhone”, and “Made for iPad” mean that an electronic accessory has been designed to
connect specifically to iPod, iPhone, or iPad, respectively, and has been certified by the developer to meet Apple
performance standards. Apple is not responsible for the operation of this device or its compliance with safety and
regulatory standards. Please note that the use of this accessory with iPod, iPhone, or iPad may affect wireless
performance.
iPad, iPhone, iPod and iPod touch are trademarks of Apple Inc., registered in the U.S. and other countries.
Compatible iPod/iPhone/iPad Models
USB works with iPhone 5S, iPhone 5C, iPhone 5, iPhone 4S, iPad (4th generation), iPad mini, iPod touch (5th
generation).
Bluetooth technology works with iPhone 5S, iPhone 5C, iPhone 5, iPhone 4S, iPad (4th generation), iPad mini,
and iPod touch (5th generation).
2
Page 7

Introduction
The HA-1 Headphone Amplifier draws upon the proven circuit design of the BDP-95 and BDP-105 Blu-ray Disc players.
We designed the HA-1 headphone amplifier using the same universal approach we take with our Blu-ray players, so
apart from being a high performance headphone amplifier, the HA-1 functions as an asynchronous USB DAC, stereo
pre-amplifier, digital audio dock for mobile devices, and a Bluetooth audio transport.
The HA-1’s analog audio section is a fully balanced, differential design with a Class A power amplifier circuit that is
capable of driving the most difficult of headphones. Throughout the design process, our emphasis was in keeping the
audio signal in the analog domain once it leaves the DAC. The HA-1 is anchored by a robust toroidal power
transformer with linear power regulators and filters with custom made capacitors to ensure the headphone amplifier has
a clean power source with plenty or energy reserves. Users have the choice between using a 4-pin balanced XLR or
traditional quarter-inch (6.35 mm) headphone connection.
The power amplification section uses hand-picked and paired discrete components to ensure symmetry. The volume
control knob is motor-driven and can be adjusted either by hand or via remote control while keeping the audio in the
analog domain. Line level RCA and balanced XLR analog inputs and outputs are available, and built-in monitoring and
protection circuitry guards against short-circuiting, overloading, and DC offset.
The HA-1 is ideally suited for high-resolution digital audio. It includes coaxial, optical, balanced AES/EBU digital inputs
as well as an asynchronous USB DAC controlled by a 16-core XMOS chipset that supports both PCM and DSD
formats. The same ESS 9018 Sabre
ensures high resolution performance with extremely low noise and distortion. You can easily connect the HA-1 to a
computer via USB and enjoy jitter-free music using your preferred playback software. For added convenience,
Bluetooth connectivity with the high quality aptX codec is also available.
32
Reference DAC and output driving state used in our audiophile Blu-ray players
Aesthetically, the HA-1 features a classic design with contemporary elements. It is housed in a thick aluminum chassis,
and its familiar volume and source selection knobs are complemented by a high-quality TFT LCD display providing
convenient access to the HA-1’s intuitive user interface. Depending on your preferences or the mood of the music
being played, you can choose between a classic VU meter, a modern spectrum display, or a simple informational
summary to be displayed on the screen. A supplied IR remote and smartphone application via Bluetooth provide
additional control and convenience.
The OPPO HA-1 Headphone Amplifier allows you to fully realize the potential of your high-end headphones. The HA-1
is a perfect match for OPPO Planar Magnetic headphones, and its power and versatility allow it to meet the demands
of the most discerning music lover.
Accessories
Ensure that the following accessories have been included with your OPPO HA-1 Headphone Amplifier:
User Manual
Remote Control with Battery
3.5 mm to 6.35 mm Headphone Adapter
Power Cable , about 4.5 feet
Bluetooth Antenna
3
Page 8
110-1 20V~ / 22 0-240 V~
Ster eo Audio O ut
XLR Ba lance d Audio Ou t
HA-1 H EADPH ONE AMPL IFIER
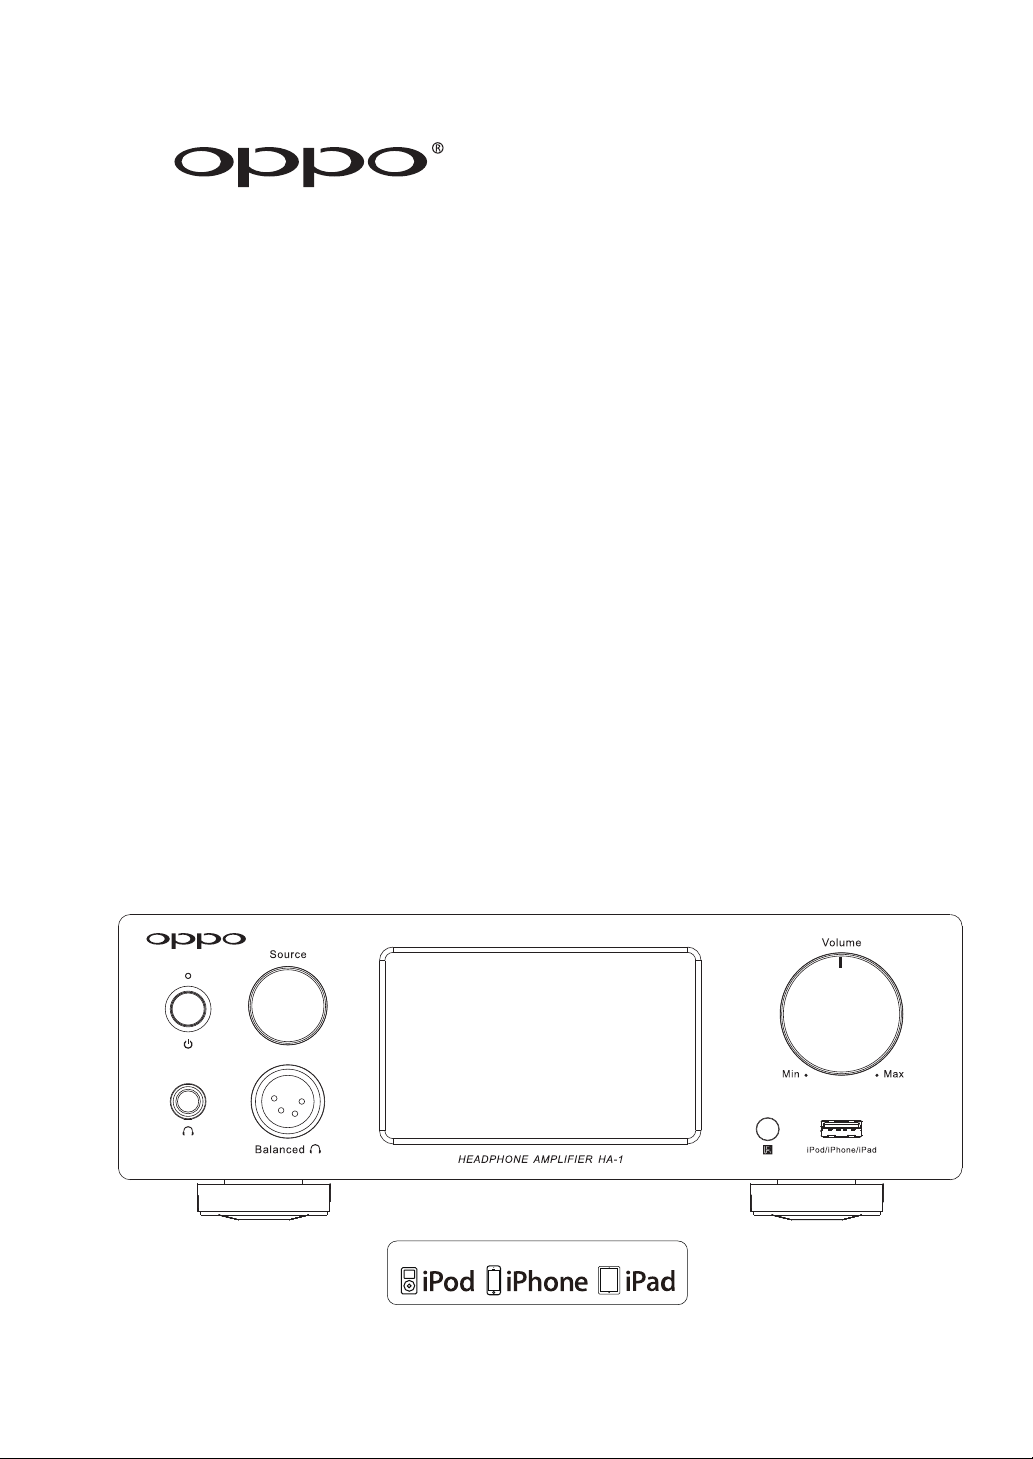
Installation
Front Panel Controls
1 2
3
Source
5
4
1. Power Button
2. Power Status Indicator
3. 6.35 mm Headphone Jack
Back Panel Connectors
6
HEADPHONE AMPLIFIER HA-1
4. Source Selector Knob
5. Balanced Headphone Jack
6. Front Panel Display Window
7
8 9
Volume
USB
7. IR Sensor Window
8. Volume Knob
9. Mobile USB Audio Input
1 2
R
R
3
ANALOG INPUT
R
SStteerreeoo AAuuddiioo IInn
RR BBaallaanncceedd AAuudd
XXLLiioo IInn
PRE O UT
1. XLR Balanced Audio Input
2. Pre-Amplifier Output (XLR)
3. RCA Stereo Audio Input
4. Pre-Amplifier Output (RCA)
4
4
L
L
LR
L
5
5. Bluetooth Antenna
6. Trigger Input
7. AES / EBU Digital Audio Input
8. Trigger Output
6
AES/EBU
TRIGGER
Out
In
7
89 10
DIGITAL INPUT
Coaxial
9. Coaxial Digital Audio Input
10. Optical Digital Audio Input
11. USB (Type B) Audio Input
12. AC Inlet
Optical
11
USB DAC
AC IN
12
Page 9
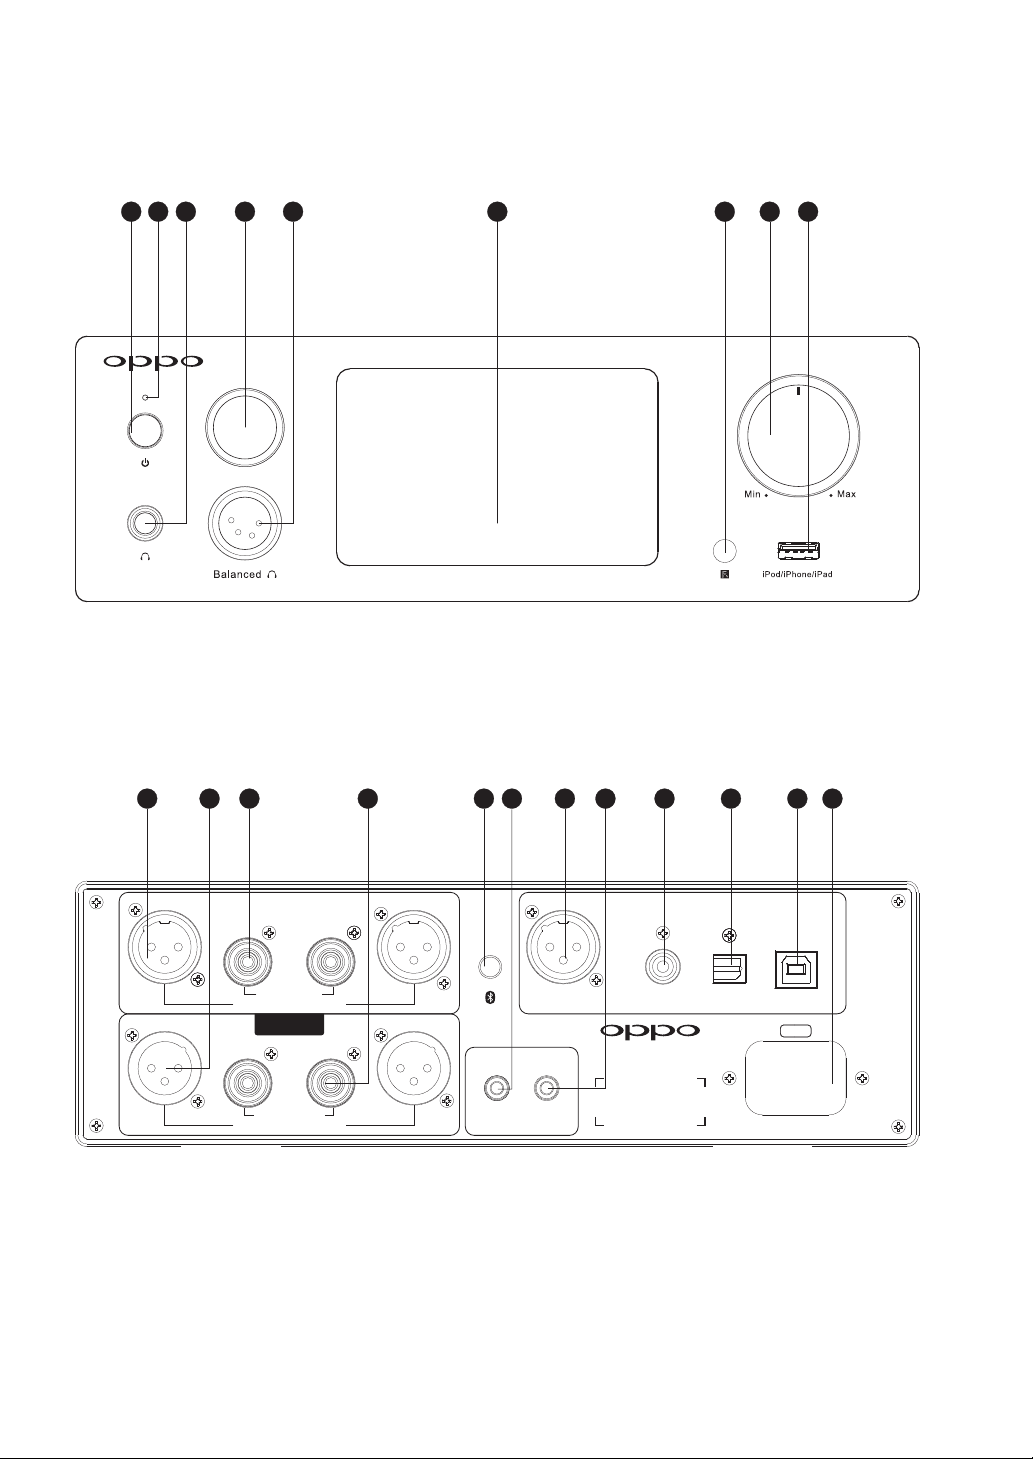
Remote Control
Remote Control Buttons
POWER: Toggle between STANDBY and ON
MUTE: Mute audio output
VOLUME +/-: Increase and decrease volume
PREV: Skip to previous track
PLAY / PAUSE: Start or Pause playback
NEXT: Skip to next track
COAX: Switch to Coaxial Digital Audio Input
OPTI: Switch to Optical Digital Audio Input
AES/EBU: Switch to AES/EBU Digital Audio Input
USB: Switch to USB (Type B) Audio Input
BT: Switch to Bluetooth Audio Input
MOBILE: Switch to Mobile USB Audio Input
RCA: Switch to RCA Stereo Audio Input
XLR: Switch to XLR Balanced Audio Input
DIMMER: Dim the front panel display
Battery Installation
The remote control comes with the battery pre-installed. When the original battery runs out, replace it with a new
CR2032 button battery. To replace the battery, insert a straightened paper clip into the battery tray release hole at the
5
Page 10

end of the remote control and push. The battery tray will pop slightly open. Pull out the battery tray with the remote
control buttons facing down. Pay attention to the battery orientation while taking out the old battery. Place a new battery
into the tray following the correct orientation by matching the polarity marks on the battery and the tray. The battery’s
positive side (the flat end that has a + sign on it) should face down and sink into the tray, while its negative side (the
rounded end) should face up. Slide the battery tray back into the remote until it clicks. Test the remote to make sure it
works well after the battery replacement. Dispose of the used battery immediately and responsibly.
Using the Remote Control
Source
Balanced
HEADPHONE AMPLIFIER HA-1
Volume
USB
iPod/iPhone/iPad
Within about 26 ft
When using the remote control, the IR Emitter on the front of the remote should be pointed towards the IR Sensor
Window on the HA-1 within a ±30° angle and a range of about 26 ft (8 meters).
Remote Control App for Smartphones
A free remote control app is available for iPhone and Android-based smartphones. Please download from the app store
of your smartphone. The app operates over Bluetooth and has the same functions as the physical remote control.
6
Page 11

Headphone Output Connection
You can connect your headphones to the OPPO HA-1 using either a standard 6.35 mm connector or a 4-pin XLR
balanced connector. If your headphones terminate with a 3.5 mm connector, you can use the supplied 3.5 mm to 6.35
mm Headphone Adapter to connect the headphones to the HA-1.
For optimal sound quality, you can adjust the Headphone Gain between the Normal and High settings in order to
properly drive headphones that are very sensitive or require additional power. Please refer to the Headphone Gain
Selection section in the Advanced Operations chapter of this manual for details.
6.35 mm or 4-pin XLR
Notes:
The 6.35 mm Headphone Jack and Balanced Headphone Jack cannot be used simultaneously. When a 6.35
mm connector is plugged in, the Balanced Headphone Jack is muted.
When plugging and unplugging the 6.35 mm connector, please completely insert or pull out the connector in a
quick motion. Due to the physical shape of the 6.35 mm connector, keeping the connector plugged in half way
causes a short circuit between the left and right output channels, and may trigger the short-circuit protection
feature of the HA-1.
Balanced Headphone Jack Pin-out
The 4-pin XLR socket for the Balanced Headphone Jack uses the following pin-out assignment:
4: R 3: R+
Notes:
Pin 2 (L-) and pin 4 (R-) are individual signal pins and cannot be tied together as the ground pin for a single-ended
headphone. Never use any adapter to connect the Balanced Headphone Jack to a single-ended headphone.
1: L+
2: L -
Using the HA-1 as a Pre-Amplifier or DAC
The OPPO HA-1 can be used as a pre-amplifier or a Digital-to-Analog Converter (DAC) by connecting its Pre-amplifier
Output (PRE OUT) to a power amplifier or a pair of active speakers. The HA-1 offers both RCA and XLR Balanced
7
Page 12

110-120V~ / 2 20-24 0V~
Stereo Audi o Out
XLR Balanc ed Audio O ut
HA-1 HEADPH ONE AMPL IFIER
110-120V ~ / 220-2 40V~
Stereo Aud io Out
XLR Balan ced Audi o Out
HA-1 HEADP HONE AMP LIFIE R
jacks. The output level is controlled by the Volume Knob or remote. The output is not muted when a pair of
headphones is plugged in. It is muted when the remote MUTE button is pressed.
RCA Stereo Audio Outputs
You can connect the HA-1 to a power amplifier or a pair of active speakers with RCA analog inputs using RCA audio
interconnect cables.
ANALOG INPUT
R
L
SStteerreeoo AAuuddiioo IInn
RR BBaallaanncceedd AAuudd
XXLLiioo IInn
PRE OUT
L
LR
TRIGGER
L
In
R
R
DIGITAL INPUT
Coaxial
Optical
USB DAC
AC IN
AES/EBU
Out
Audio Interconnect Cables
LR
AUDIO IN
AUDIO/VIDEO MULTI-CHANNEL
RECEIVER
XLR Balanced Audio Outputs
You can connect the HA-1 to a power amplifier or a pair of active speakers with XLR balanced inputs using XLR cables.
AES/EBU
Out
DIGITAL INPUT
Coaxial
Optical
USB DAC
AC IN
AUDIO/VIDEO MULTI-CHANNEL
RECEIVER
ANALOG INPUT
R
L
R
XXLLiioo IInn
R
SStteerreeoo AAuuddiioo IInn
RR BBaallaanncceedd AAuudd
PRE OUT
L
LR
TRIGGER
L
In
L
R
AUDIO IN
XLR Cables
Triggers
When used as pre-amplifier, the Trigger Output of the HA-1 can be connected to the trigger input of a stereo power
amplifier using a 3.5 mm mono-to-mono mini-jack cable. When the HA-1 is turned on, the Trigger Output will supply a
+12 V voltage signal so the connected power amplifier can be turned on automatically. The Trigger Output can supply
up to 100 mA current.
The Trigger Input of the HA-1 can be connected to the trigger output of a source device or surround sound processor.
This allows the HA-1 to be turned on and off together with the connected device.
The use of Trigger Output or Trigger Input is not required. You can always manually turn on or off the HA-1 using the
POWER button on the front panel or remote control.
8
Page 13

110-120V ~ / 220-2 40V~
Stereo Aud io Out
XLR Balan ced Audi o Out
HA-1 HEADP HONE AMP LIFIE R
110-120V ~ / 220-2 40V~
Stereo Aud io Out
XLR Balan ced Audi o Out
HA-1 HEADP HONE AMP LIFIE R
110-120V ~ / 220-2 40V~
Stereo Aud io Out
XLR Balan ced Audi o Out
HA-1 HEADP HONE AMP LIFIE R
Input Signal Connections
The OPPO HA-1 supports multiple analog and digital input connections. Depending on your intended usage, please
connect one or more input sources to the HA-1.
RCA Stereo Audio Inputs
You can connect an audio device with RCA analog outputs into the HA-1 using a pair of RCA cables. The analog signal
will be amplified and sent to the headphone and line level outputs. This input source is labeled RCA on both the
Source Selection screen and the remote control.
Audio Interconnect Cables
L
R
AUDIO Out
ANALOG INPUT
R
L
R
XXLLiioo IInn
R
SStteerreeoo AAuuddiioo IInn
RR BBaallaanncceedd AAuudd
PRE OUT
L
LR
TRIGGER
L
In
XLR Balanced Audio Inputs
You can connect an audio device with XLR balanced outputs into the HA-1 using XLR balanced cables. The analog
signal will be amplified and sent to the headphone and line level outputs. This input source is labeled XLR on both the
Source Selection screen and the remote control.
AES/EBU
Out
DIGITAL INPUT
Coaxial
Optical
USB DAC
AC IN
XLR Cables
L
R
AUDIO OUT
ANALOG INPUT
L
R
R
XXLLiioo IInn
R
SStteerreeoo AAuuddiioo IInn
RR BBaallaanncceedd AAuudd
PRE OUT
L
LR
TRIGGER
L
In
AES/EBU
Out
DIGITAL INPUT
Coaxial
Optical
USB DAC
AC IN
Coaxial Digital Audio Input
You can connect a device with a coaxial digital output into the Coaxial Digital Audio Input of the HA-1 using a coaxial
digital (75 ohm) cable. The digital signal will be converted by the internal DAC and sent to the headphone and line level
outputs. This input source is labeled COAXIAL on the Source Selection screen and COAX on the remote control.
Coaxial Digital Cable
Coaxial Out
ANALOG INPUT
R
L
R
XXLLiioo IInn
R
SStteerreeoo AAuuddiioo IInn
RR BBaallaanncceedd AAuudd
PRE OUT
LR
L
L
TRIGGER
In
AES/EBU
Out
DIGITAL INPUT
Coaxial
Optical
USB DAC
AC IN
9
Page 14

110-120V ~ / 220-2 40V~
Stereo Aud io Out
XLR Balan ced Audi o Out
HA-1 HEADP HONE AMP LIFIE R
110-120V ~ / 220-2 40V~
Stereo Aud io Out
XLR Balan ced Audi o Out
HA-1 HEADP HONE AMP LIFIE R
Optical Digital Audio Input
You can connect a device with an optical digital output into the Optical Digital Audio Input of the HA-1 using an
optical cable (also known as a TOSLINK cable). The digital signal will be converted by the internal DAC and sent to the
headphone and line level outputs. This input source is labeled OPTICAL on the Source Selection screen and OPTI on
the remote control.
Optical (TOSLINK) Cable
Optical Out
ANALOG INPUT
R
L
R
R
XXLLiioo IInn
SStteerreeoo AAuuddiioo IInn
RR BBaallaanncceedd AAuudd
PRE OUT
L
LR
TRIGGER
L
In
AES/EBU
Out
DIGITAL INPUT
Coaxial
Optical
USB DAC
AC IN
AES / EBU Digital Audio Input
You can connect a device with an AES / EBU digital output into the AES / EBU Digital Audio Input of the HA-1 using
an XLR-3 (110 ohm) digital cable. The digital signal will be converted by the internal DAC and sent to the headphone
and line level outputs. This input source is labeled AES / EBU on both the Source Selection screen and the remote
control.
XLR-3 Digital Cable
AES/EBU
Out
DIGITAL INPUT
Coaxial
Optical
USB DAC
AC IN
ANALOG INPUT
R
L
Digital Out
R
R
XXLLiioo IInn
SStteerreeoo AAuuddiioo IInn
RR BBaallaanncceedd AAuudd
PRE OUT
L
LR
TRIGGER
L
In
Note:
The Coaxial, Optical and AES/EBU Digital Audio Inputs accept stereo PCM signals only. Compressed audio
signals such as Dolby Digital or DTS are not supported.
USB (Type B) Audio Input
You can connect your computer directly to the HA-1 using a USB-A to USB-B cable. This will allow your computer to
function as the digital source, and you will be able to use whatever playback software you prefer to output audio
through the HA-1. The digital signal will be converted by the internal DAC and sent to the headphone and line level
outputs. This input source is labeled USB DAC on the Source Selection screen and USB on the remote control.
10
Page 15

110-120 V~ / 220- 240V~
Stereo Au dio Out
XLR Bala nced Aud io Out
HA-1 HEAD PHONE AM PLIFI ER
(Type A Male)
USB 2.0 Cable
(Type B Male)
USB Port
ANALOG INPUT
R
L
R
R
SStteerreeoo AAuuddiioo IInn
RR BBaallaanncceedd AAuudd
XXLLiioo IInn
PRE OU T
L
LR
L
TRIGGER
In
AES/EBU
Out
DIGITAL INPUT
Coaxial
Optical
USB DAC
AC IN
Note:
Depending on the operating system and playback software used, driver software, specific software settings and
configurations may be required in order to enable the computer to play audio into the HA-1. Please visit the HA-1
Support page on the OPPO official website for driver download and additional help guides.
Mobile USB Audio Input
You can connect a compatible iPod, iPhone, or iPad into the Mobile USB Audio Input port on the front panel of the
HA-1. A 30-pin dock connector to USB cable or a Lightning™ to USB cable that comes with your Apple product is
required for this connection. The digital audio signal from your Apple product will be converted by the internal DAC and
sent to the headphone and line level outputs. This input source is labeled MOBILE on both the Source Selection
screen and the remote control.
Source
Volume
USB
HEADPHONE AM PLIFIER HA-1
Note:
USB works with iPhone 5S, iPhone 5C, iPhone 5, iPhone 4S, iPad (4th generation), iPad mini, iPod touch (5th
generation).
Bluetooth Audio Connection
You can connect a Bluetooth-capable mobile device such as a smartphone or digital audio player by enabling
Bluetooth on your mobile device and searching for and connecting to the OPPO HA-1. Once successfully paired and
connected, the Bluetooth digital audio signal will be converted by the internal DAC and sent to the headphone and line
level outputs. This input source is labeled BLUETOOTH on the Source Selection screen and BT on the remote
control.
11
Page 16

Source
Balanced
HEADPHONE AMPLIFIER HA-1
Volume
USB
Notes:
Bluetooth technology works with iPhone 5S, iPhone 5C, iPhone 5, iPhone 4S, iPad (4th generation), iPad mini,
and iPod touch (5th generation).
Bluetooth technology also works with any mobile device or computer that supports the Bluetooth A2DP profile.
Bluetooth Setup
When the BLUETOOTH input source is selected, the front panel screen displays the Bluetooth connection status. If a
device has not yet been paired, or a previously paired device is not in range, the screen will display Not Connected. If
this is the case, you will need to enable Bluetooth on your mobile device, search for the OPPO HA-1, and attempt to
pair with it. After pairing successfully, the HA-1 will display that it is Connected.
Once you have paired a Bluetooth device, the HA-1 will attempt to reconnect to it when the device is in range and the
BLUETOOTH input has been selected on the HA-1. If a new device needs to be paired, but the HA-1 is already
connected to a device, you will need to disconnect that device in order to pair the new device. This can be done by un-
pairing the HA-1 from the existing device’s Bluetooth menu or by temporarily turning off Bluetooth on the existing
device.
If the pairing process fails, the HA-1’s Bluetooth status will continue to show Not Connected. If that is the case, you
will need to attempt the pairing process again.
12
Page 17

Using the OPPO HA-1
Basic Operations
Power On / Off
When the HA-1 is initially connected to AC power, it stays in standby mode. Pressing the Power Button on the HA-1
will result in the Power Status Indicator turning blue, indicating the HA-1 has powered on. When the unit is powering
on, the OPPO logo will appear on the screen. When it is fully ready, one of the pre-selected Home Screens (Status,
Spectrum or VU Meter) will appear.
Once the HA-1 has powered on, pressing the Power Button again will turn the unit off, at which time the Power
Status Indicator will turn off, indicating that it is in standby mode.
Remote:
Source
Balanced
HEADPHONE AMPLIFIER HA-1
Volum e
USB
iPod/iPhone/iPad
The POWER button on the remote control functions in the same way as the Power Button on the front panel of the
HA-1.
The Front Panel Display
When the HA-1 is in its normal operational mode, it shows one of the pre-selected Status, Spectrum or VU Meter
screen on its Front Panel Display. This is called the Home Screen Selection.
When there is any user operation, the Front Panel Display changes accordingly. Please use it as the visual aid for all
operations.
Source Selection
The active input source can be selected by rotating the Source Selector Knob. The Front Panel Display will show a
Source Selection screen, with the active input source highlighted. When the Source Selector Knob is rotated in
either direction, a new input source is highlighted. Once you settle down on an input source by leaving the highlight
cursor on it or by pressing the Source Selector Knob, the new input source becomes active and the Front Panel
Display returns to the Home Screen.
13
Page 18

Remote:
Source
Volum e
Balanced
HEADPHONE AMPLIFIER HA-1
iPod/iPhone/iPad
You can also switch input sources by directly pressing the appropriate source button on the remote.
Volume Control
Rotating the Volume Knob clockwise or counter-clockwise will increase or decrease the volume level. The Volume
screen will appear to provide a visual reference for the volume level. The HA-1 implements its volume control with a
pure analog signal path. The numeric dB value displayed on the screen is based on the measurement of the Volume
Knob position. It indicates the approximate gain or attenuation level of the Pre-amplifier Output relative to the input
signal. It is normal for the display value to vary a few dB when the Volume Knob moves in the very low range due to
the logarithmic nature of the volume control curve. The actual headphone volume depends on the headphones’
sensitivity, the input signal level, and the Headphone Gain setting.
Remote:
You can also adjust the volume level by using the Volume +/- button on the remote control. The Front Panel Display
will show the Volume screen and the Volume Knob will also rotate accordingly.
Note:
It is possible that the Volume Knob may be inadvertently rotated when the HA-1 is off. In order to protect the
output device, there is a protection mechanism built-in to the HA-1’s volume control. When the device is powered
on, if the Volume Knob position is higher than the previously used volume level before the unit was powered off,
the Volume Knob will automatically return to the previous volume level. If the Volume Knob position is less than
the volume level before it was powered off, the HA-1 will keep the new volume level.
Mute
Pressing the MUTE button on the remote control will disable audio output for the HA-1, and the Front Panel Display
will show the Mute icon. You can cancel Mute by rotating the Volume Knob, pressing the VOLUME +/- button on the
remote control, or by pressing the MUTE button again.
14
Page 19

Remote:
Source
Balanced
HEADPHONE AMPLIFIER HA-1
Vol um e
USB
iPod/iPhone/iPad
For those who use the HA-1 as both a headphone amplifier and a pre-amplifier, it is possible to assign the MUTE
button to the Pre-amplifier Output only. This way the user can mute the large speakers with the MUTE button while
still being able to listen to the headphones. Please refer to the Mute Operation section in the Advanced Operations
chapter of this manual for details.
Playback Controls
When the active input source is the USB DAC Audio Input, Mobile USB Audio Input, or Bluetooth Audio Input, the
PLAY / PAUSE, PREV, and NEXT buttons on the remote control are passed on to the computer or mobile device. This
function allows you to control playback by starting, stopping, and skipping to the next or previous track. Not all software
or devices support this function. This function does not control devices connected via the Coaxial, Optical, AES/EBU,
RCA Stereo, or XLR Balanced Audio Inputs.
Advanced Operations
Advanced configuration of the OPPO HA-1 can be accessed by pressing and rotating the Source Selector Knob. The
basic operations are:
Press the Source Selector Knob to access advanced configuration screens.
If the Source Selector Knob is pressed again immediately without any other operations occurring on the current
configuration screen, the next configuration screen is shown. Repeatedly pressing the Source Selector Knob will
eventually return you to the Home Screen after looping through all available configuration screens.
In any configuration screen, the current selection is highlighted. Rotate the Source Selector Knob to move the
selection cursor. The highlighted selection becomes active if you leave the selection cursor on it or press the
Source Selector Knob to confirm your selection. The Front Panel Display returns to the Home Screen after a
selection is made.
Source
HEADPHONE AMPLIFIER HA-1
Volum e
USB
15
Page 20

The following configuration screens are available:
Home Screen Selection
You can choose one of three screens to be the Home Screen for your HA-1. The Home Screen is displayed when the
HA-1 is in its normal operation mode.
Status (default text-based display) – Status information about the current source and audio stream.
Spectrum – A dynamic spectrum display corresponding to the audio signal.
VU Meter – A pair of traditional VU meters indicating the audio signal level.
Screen Dimmer Setting
You can adjust the brightness of the Front Panel Display. The following selections are available:
Normal (default) – The Front Panel Display will operate at full brightness.
Dim – The Front Panel Display brightness will be dimmed.
Off – The Front Panel Display will be turned off. Any user interaction will turn on the display temporarily to
provide you with visual aid. The display turns off again when the HA-1 returns to its normal operation mode.
Remote:
You can also quickly adjust the Screen Dimmer setting by pressing the DIMMER button on the remote control. Each
press of the button moves to the next Screen Dimmer selection.
Mute Operation
When using the HA-1 as both a headphone amplifier and a pre-amplifier, it may be desirable to mute the Pre-amplifier
Output while listening to headphones. For example, if the HA-1 is connected to a pair of active speakers, it may be
easier to mute the Pre-Amplifier Output than to turn off both speakers when you want to listen with headphones. The
Mute Operation setting is designed for this type of usage. It controls how the MUTE button on the remote control
functions. The following selections are available:
16
Page 21

Mute All (default) – Both the Headphone Jack and Pre-amplifier Output are muted when the MUTE button
is pressed. This condition is indicated by a Mute icon on the Front Panel Display. Mute is cancelled if the
MUTE button is pressed again, or if the Volume Knob is turned.
Mute Pre Out – Only the Pre-amplifier Output is muted when the MUTE button is pressed. This is indicated
by the word “MUTE” displayed next to the volume level on the Front Panel Display. Mute is cancelled if the
MUTE button is pressed again. Adjusting the Volume Knob does not cancel mute so that headphone
volume can still be adjusted while the Pre-amplifier Output is muted. Please note that when mute is
cancelled, the Pre-amplifier Output level is determined by the current Volume Knob position. Use caution if
you listen to the headphones and speakers at significantly different volume levels.
Remote:
Headphone Gain Selection
For optimal sound quality, you can select the Headphone Gain setting between High and Normal in order to properly
match the sensitivity and impedance of the headphones in use. The following selections are available:
High (default) – The headphone amplification circuit of the HA-1 applies the high gain level, which is about
18dB higher than Normal. This setting is recommended for headphones with low sensitivity or high
impedance.
Normal – The headphone amplification circuit of the HA-1 applies the normal gain level. This setting is
recommended for headphones with high sensitivity or low impedance.
The rule of thumb for selecting the proper gain level is to find a comfortable listening volume that utilizes the upper
range of the Volume Knob. It is generally better to have the Volume Knob set to a high volume level when using the
Normal gain setting rather than having the Volume Knob set to a low volume level when using the High gain setting.
Note:
In order to prevent a sudden loud sound from damaging your headphones and hearing, please turn down the
volume before changing the Headphone Gain setting.
17
Page 22

110-120V~ / 22 0-240 V~
Stereo Audi o Out
XLR Balanc ed Audio O ut
HA-1 HEADPH ONE AMPL IFIER
Home Theater Bypass Mode
Each of the HA-1’s input sources can be individually configured to operate in a Home Theater Bypass mode. If an
input source is in this mode, the HA-1’s volume control is bypassed for the Pre-Amplifier Output. The Pre-Amplifier
Output level will be exactly the same as the input signal level (unity gain). This feature helps when integrating the HA-1
as a high performance stereo pre-amplifier into a multi-channel home theater sound system. The following diagram
shows the typical connection for such a system:
Surround Sound Processor
REC
EIVE
R
AUD
IO/VIDEO MULTI-
CHANN
EL
FL FR
RCA
Stereo Power
Amplifier
CD Player
RL
XLR
TRIGGER
AES/EBU
Out
DIGITAL INPUT
Coaxial
ANALOG INPUT
L
R
R
R
RL
SStteerreeoo AAuuddiioo IInn
RR BBaallaanncceedd AAuudd
XXLLiioo IInn
PRE OUT
XLR
L
LR
L
In
HA-1
Optical
USB DAC
AC IN
Multi-channel
Front Left/Right Speakers
Power Amplifier
...
Surround Speakers
Subwoofer
In the above system, when listening to stereo sources (such as the CD player), only the stereo power amplifier, the HA-
1 and the source component need to be turned on. Volume is controlled by the HA-1. When listening to multi-channel
sources, all components are turned on, and the volume is controlled by the surround sound processor. The HA-1’s
input source that is connected to the surround sound processor (RCA Stereo Audio Input in this example) is
configured in Home Theater Bypass mode. The HA-1’s Pre-Amplifier Output level will be exactly the same as the
output level of the surround sound processor’s front left and right channel output levels because the volume control of
the HA-1 is bypassed.
18
Page 23

It is important to configure an input source in Home Theater Bypass mode only if the connected device has its own
volume control. Do not connect a source device (such as a CD player or DVD player) without volume control to an input
source in Home Theater Bypass mode, since the high output level may cause damage to downstream amplifiers and
speakers.
Although digital input sources can be configured to Home Theater Bypass mode, it is not recommended. This is
because most digital source components do not offer volume control. However, if you intend to use the HA-1 as a pure
DAC device connected to another pre-amplifier with proper volume control, you should configure the digital input
source to Home Theater Bypass mode. This will ensure that the DAC output bypasses the HA-1’s volume control.
Home Theater Bypass mode only affects the Pre-Amplifier Output. The Headphone Jack output volume is still
controlled by the Volume Knob for sources in Home Theater Bypass mode.
The Home Theater Bypass setting applies to the current input source. Unlike the other settings, this setting is per
input, not global. If you need to configure Home Theater Bypass mode for multiple input sources, please select each
input source and then change the setting. The following selections are available:
Standard (Variable Volume) (default) – The current input source is in standard mode. The Pre-Amplifier
Output level is controlled by the Volume Knob.
Bypass (Fixed Level) – The current input source is in Home Theater Bypass mode. The Pre-Amplifier
Output level is fixed at the same level as the input signal, and the Volume Knob does not affect the Pre-
Amplifier Output.
When the Bypass (Fixed Level) option is selected, you will be asked to confirm again due to the danger of sending a
high signal level to the Pre-Amplifier Output. Please make your selection and push the Source Selector Knob to
confirm.
19
Page 24

The input sources that are in Home Theater Bypass mode are indicated with a “BYPASS” banner in the Source
Selection screen.
Reset Factory Default Settings
If you need to reset the HA-1 to its factory default settings, please hold down the Source Selector Knob on the front
panel while at the same time press the MUTE button on the remote control. All custom settings will be erased and the
factory default settings will be loaded. The Volume Knob will automatically return to the minimum volume position. The
HA-1 will automatically turn off after resetting to factory default settings.
Source
Balanced
HEADPHONE AMPLIFIER HA-1
Vol um e
USB
iPod/iPhone/iPad
20
Page 25

Reference
Usage Notes
In order to prolong the life of your headphone amplifier, it is recommended that you wait at least 30 seconds
before you power it on after powering it off.
In the case of a malfunction, please power the unit off, wait for 30 seconds, and then power it back on. If the
issue persists, please consult the Troubleshooting table or contact an OPPO service center.
Power the unit off after operation.
Troubleshooting
Use this chart to resolve general operational problems. If there are any problems that you cannot resolve, please
contact your OPPO service center.
Symptom Possible Cause Solution Reference Page
Mute is activated. The
Front Panel Display
shows the Mute icon.
Press the MUTE button or rotate the
Volume Knob to unmute.
14
Press the Volume +/- button or rotate the
Volume Knob to increase the volume.
Rotate the Source Selector Knob or
press a source button on the remote to
select an active input source.
Check audio cable. Reconnect if
necessary.
Use the remote control within the effective
range.
Turn off the unit. Wait for 30 seconds, and
then try again.
Identify interference by turning off other
devices, and then relocate or replace the
offending device.
14
13
7 , 8
6
13
2
No sound
Remote control
failure
Te mp o r ar y
malfunction
Volume is too low.
The input source is not
connected or is not actively
playing audio.
Audio cable is not properly
connected.
Remote control is out of
range.
Low battery. Replace the batteries. 5
The protection mechanism
is triggered.
Interference from other
devices.
User Manual Updates
An updated version of the User Manual may be available online at the OPPO official website. To read or download the
latest version of the User Manual, click on the HA-1 from the Product list, and navigate to the Support tab.
Occasional updates are needed to reflect new features added to the device since the User Manual was printed. As
future firmware updates provide new features and functions, the online version of the User Manual will be updated
accordingly.
21
Page 26

Specifications
Designs and specifications are subject to change without notice.
General
Dimensions (W x H x D) 10.0 x 3.1 x 13.1 inches, 254 x 80 x 333 mm
Mass 13.0 lbs, 5.9 kg
Power Supply AC 110-120 V~ / 220-240 V~, 50/60 Hz auto-sensing
Power Consumption 70 W (operation), 0.5 W (standby)
Trigger Input 3.5 V – 15 V, 10 mA minimum
Trigger Output 12 V, 100 mA maximum
Operating Temperature 41 F - 95 F, 5 C - 35 C
Operating Humidity 15% - 75% No condensation
Recommended Headphone Impedance 32 ohm – 600 ohm
Balanced Headphone Jack Output (XLR-4) Pin order 1: L+, 2: L-, 3: R+, 4: R-, Shell: GND
6.35 mm Headphone Jack Output Pin order Tip: L, Ring: R, Sleeve: GND
XLR Balanced Audio Input
Input Impedance 15k ohm
Maximum Input Level 18 Vrms, +27.3 dBu (0 dBu = 0.775 Vrms)
RCA Stereo Audio Input
Input Impedance 10k ohm
Maximum Input Level 9 Vrms, +21.3 dBu (0 dBu = 0.775 Vrms)
Coaxial, Optical, AES/EBU Digital Inputs
Input Format Stereo PCM
Sampling Frequencies
Word Length 16-bit, 24-bit
USB DAC Audio Input (USB B Type)
Input Format Stereo PCM, Stereo DSD (DoP v1.1 or native)
PCM Sampling Frequencies
PCM Word Length 16-bit, 24-bit, 32-bit
DSD Sampling Frequencies
Profile USB 2.0, USB Audio 2.0
Mobile USB Audio Input (USB A Type)
Input Format Stereo PCM
PCM Sampling Frequencies 44.1 kHz, 48 kHz
Profile USB 2.0, USB Audio 2.0
VBUS Power Output +5 V, 2.1 A
Bluetooth Audio Input
Standard Bluetooth 2.1+EDR
Profile iAP, SPP, AVRCP, A2DP
Audio Transmission Format SBC, aptX
44.1 kHz, 48 kHz, 88.2 kHz, 96 kHz,
176.4 kHz, 192 kHz
44.1 kHz, 48 kHz, 88.2 kHz, 96 kHz,
176.4 kHz, 192 kHz, 352.8 kHz, 384 kHz
2.8224 MHz (DSD64), 5.6448 MHz (DSD128),
11.2896 MHz (DSD256, native mode only)
22
Page 27

DAC Performance Specifications
Specification XLR Output RCA Output
Output Level 4.6 ± 0.3 Vrms 2.3 ± 0.3 Vrms
Frequency Response
(Tested with -10 dBFS / 384 kHz)
THD+N at 1 kHz (A Weight, 20 Hz – 20 kHz) < 0.00056% (< -105 dB) < 0.00056% (< -105 dB)
Channel Separation > 105 dB > 105 dB
Signal-to-Noise Ratio
(A Weight, 20 Hz – 20 kHz)
Dynamic Range
(1 kHz -60 dBFS, A Weight, 20 Hz – 20 kHz)
(Test condition: USB DAC input in Home Theater Bypass mode and the volume knob at Max position.)
Pre-amplifier Performance Specifications
Specification XLR Input – XLR Output RCA Input – RCA Output
Rated Output Level 4.6 Vrms 2.3 Vrms
Frequency Response
THD+N at 1 kHz (A Weight, 20 Hz – 20 kHz) < 0.00056% (< -105 dB) < 0.00071% (< -103 dB)
Channel Separation > 120 dB > 110 dB
Signal-to-Noise Ratio
(A Weight, 20 Hz – 20 kHz)
Dynamic Range
(1 kHz -60 dB, A Weight, 20 Hz – 20 kHz)
Maximum Gain (100 mVrms input) 6 dB 6 dB
(Test condition: Volume knob at Max position and an input signal to drive the output to the rated output level.)
10 Hz – 170 kHz (+0/-3 dB)
20 Hz – 20 kHz (+0/-0.07 dB)
> 115 dB > 113 dB
> 115 dB > 113 dB
10 Hz – 200 kHz (+0/-2 dB)
20 Hz – 20 kHz (+0/-0.04 dB)
> 110 dB > 105 dB
> 120 dB > 115 dB
10 Hz – 170 kHz (+0/-3 dB)
20 Hz – 20 kHz (+0/-0.07 dB)
10 Hz – 200 kHz (+0/-2 dB)
20 Hz – 20 kHz (+0/-0.04 dB)
Headphone Power Amplifier Specifications
Specification Condition XLR Input - Balanced Output RCA Input - 6.35 mm Output
Maximum Output Power
(Per Channel)
Rated Output Power
(Per Channel)
Frequency Response at Rated Power
THD+N at 1 kHz
(A Weight, 20 Hz – 20 kHz)
Channel Separation > 120 dB > 90 dB
Signal-to-Noise Ratio
(A Weight, 20 Hz – 20 kHz)
Dynamic Range
(1 kHz -60 dB, A Weight, 20 Hz – 20 kHz)
Output Impedance 0.5 Ohm 0.7 Ohm
(Test condition: Volume knob at Max position and an input signal to drive the output with 600 Ohm loads to the rated
output power, unless otherwise noted.)
Into 600 Ohm 2400 mW 600 mW
Into 32 Ohm 3000 mW 3500 mW
Into 600 Ohm 800 mW 200 mW
Into 32 Ohm 2000 mW 500 mW
10 Hz – 200 kHz (+0/-1 dB)
20 Hz – 20 kHz (+0/-0.04 dB)
Rated Power < 0.0018% (< -95 dB) < 0.0056% (< -85 dB)
50 mW < 0.001% (< -100 dB) < 0.0022% (< -93dB)
> 111 dB > 111 dB
> 120 dB > 115 dB
10 Hz – 200 kHz (+0/-1 dB)
20 Hz – 20 kHz (+0/-0.04 dB)
23
Page 28

© 2014 OPPO
51979368 V 1.1
Page 29

 Loading...